how to create a health eshop requisition financials 9.2 upgrade ... eprocurement manage...
TRANSCRIPT

How to Create a
Health eShop
RequisitionPeopleSoft Financials 9.2 Upgrade
Candyse Edwards
Health eShop Administrator

Upon logging into PeopleSoft, click on the
Navigation/Compass Symbol and then
Navigator.
***Note***
You will log into PeopleSoft using your
Novell ID and Password. You must have
access to PeopleSoft Financials prior to
using the system. Access to PeopleSoft
requires the completion of a security form.
It can be found on the following website:
http://www.augusta.edu/finance/peoplesoft/
Nav. Symbol

Click on…..
eProcurement
Requisition.

On Requisition Settings, you will complete the following items:
1. Requisition Name
2. Supplier
3. Ship To
4. Due Date
5. Attention
6. Location
7. Account, Fund, Dept., Program, Class, Project
8. Default/Override
1
2
8
3, 4, 5
6, 7

In the Line Defaults you will search for the supplier by clicking the magnifying glass . Then, you will
type the name of the supplier that you want to buy from in the name section.

For the Shipping Defaults, select a due date and completed the attention to fields. When
completing the attention field, you must use the following format: BUILDING CODE
AND ROOM NUMBER/NAME e.g. PL1001/CAEDWARDS
*** NOTE: The attention to format is mandatory and the system will give an error
message if blank or not entered correctly.

Enter CFC (Account String) in the Accounting Defaults section. Confirm accuracy of information, then, click
“OK” to move on.

Select the Default Override Options when updating your ship to and location fields to an alternate building
and room number (Please click this option after ALL
CHANGES have been made)
Select the Default Override Options when updating your ship to and location fields to an alternate building
and room number (Please click this option after ALL
CHANGES have been made)

On this screen, click the “Health eShop”
hyperlink

Now you have reached Health
eShop’s home page. Click on
the supplier’s icon that you are
wanting to purchase from.

Search for the item(s) you are in need of and
add them to your cart. When you are done
select checkout.

Select “Submit Order”. On the following screen
you can change the cart name and then click
“Proceed to Checkout”.

When finished shopping select “Proceed to
Checkout.” On the following screen,
review your cart and then select “Return
Cart.”

At this point you are back
in PeopleSoft, where line
items can be edited and/or
comments can be entered.
Ensure account codes are correct!!!
Add general comment for
the requisition here. Include Specs from
the supplier.

Select “Check Budget.” When Valid budget
check appears; click “Save and Submit”.

Requisition successfully submitted for the
approval process.

How to Create a
Special Requisition

In the Line Defaults section, search for the supplier by clicking
the magnifying glass. Then, type the name of the supplier to
buy from in the name section.

Enter CFC (Account String) and in the “Accounting Defaults”
section. Confirmed everything is correct, click “OK” to move on.

On this screen, click “Special Request”
hyperlink.

On this screen, enter information for a item or service. Enter the description of the item or service, price,
quantity, category, unit of measure, and the supplier part or catalog number.
***NOTE: When entering a special item requisition quotes are required from the supplier. The quote will
have all detailed information needed to complete this screen. Quotes must be attach to the requisition
(shown later in this presentation).

After entering all line items, click the checkout button.
***NOTE: When entering a special item requisition, quotes are required from the supplier. The quote will
have all of the detailed information you need to fill out this screen. Quotes must be attach to the requisition
(shown later in this presentation).

Click the “Comments” bubble, click
“add attachments.” Find the saved
quote and click upload and “OK.”
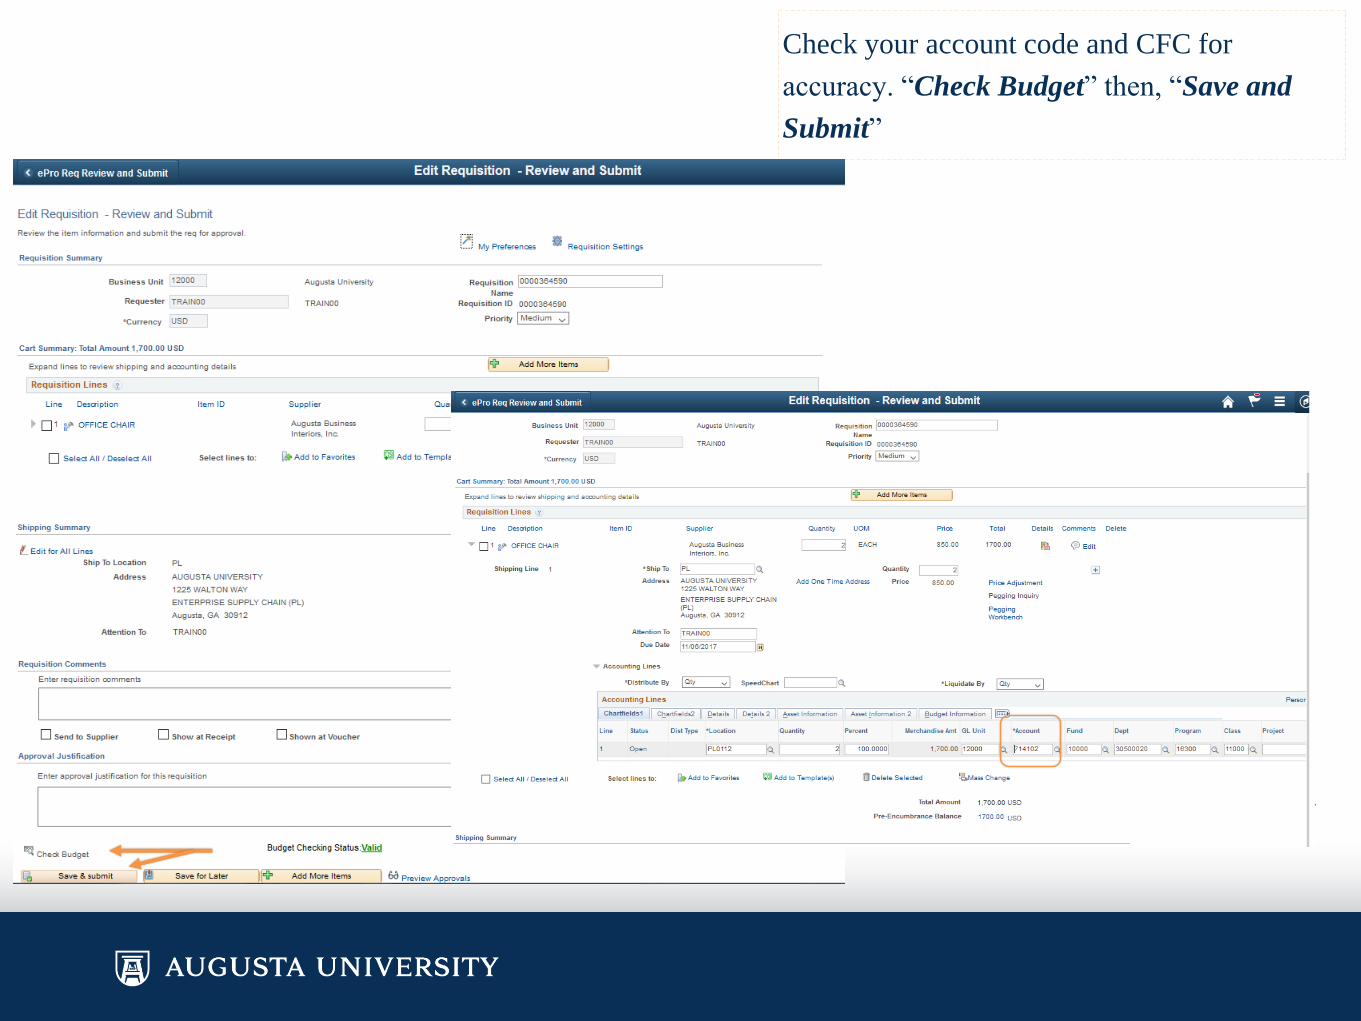
Check your account code and CFC for
accuracy. “Check Budget” then, “Save and
Submit”

Manage Requisition

Click on the following:
Navigation/Compass Symbol
Navigator

Click on…..
eProcurement
Manage Requisitions
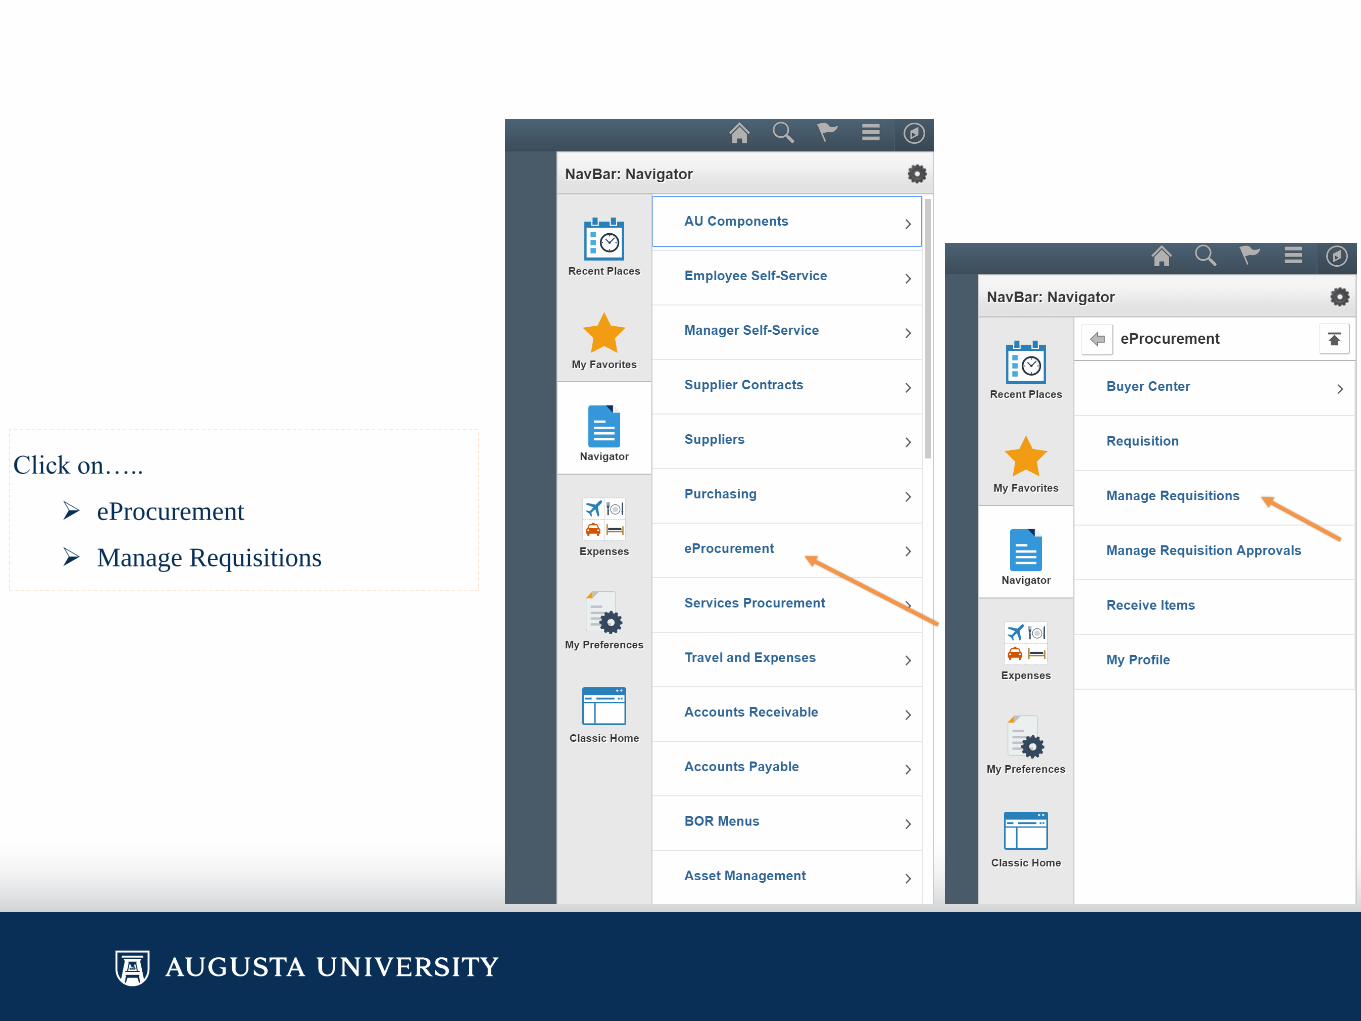
Click on…..
eProcurement
Manage Requisitions

In this module items are received on orders that are delivered directly to your office or lab. It is
recommended that you desktop received your items at least once a week to ensure prompt payment. If
items are delivered to different departments, set up a process to receive the packing slips to confirm
receipt.

To receive in your order, select the “Action
Drop Down”, select “Receive” and click
“Go” to proceed.

Check the item(s) that are physically received in the
department; select “Receive Selected”.

Please ensure that only physically received items are
received in the system that you have physically received.

Receiving confirmation.

Print Requisition

Click on the following:
Navigation/Compass Symbol
Navigator

Click on…..
eProcurement
Manage Requisitions

Select the action drop down and select “View Print” and click
“Go”

The requisition report will populate on
another tab or window, depending on the
internet browser that is used.