how to create the complete rain harvesting system...your rain harvesting system how to create the...
TRANSCRIPT

suitable for vertical and horizontal
(rear outlet) pipes.
FITS 4" ROUND DOWNSPOUTS
Consider local council requirements and have a plumber complete installation where required. © Rain Harvesting Pty Ltd.
Next generation technology for advanced debris shedding.3 Directs leaves & debris away from the flow of water
3 Improves tank water quality
3 Single screen for easy installation
3 Self cleaning – low maintenance
3 1/32" aperture stainless steel mozzie screen
3 Superior flow rate – collect more rainwater
Rain Harvesting Pty Ltd1005 N Common DriveAurora Illinois 60504Toll Free: +1 866 506 3047Ph: +1 (630) 405 0579Fax: +1 (630) 851 [email protected] in China
Bam
boo
RA
H33
34 /
P00
88
High Performance Downspout Filter• Advanced debris shedding
technology• High flow rate performance• No more blocked gutters
or flooded eaves
• No more vermin or mosquitoes in the water system
• Self cleaning• Low maintenance
Prevent leaves and debris from entering your Rain Harvesting System
How to create the complete Rain Harvesting System
• Improve Water Quality• Increases Catchment Efficiency• Protects Pumps and Household Appliances• Reduces Tank/Cistern Maintenance
1. Check ROOF SURFACE is suitable for collecting quality rainwater.
2. Install GUTTER MESH to prevent leaves and debris from blocking gutters.
3. Fit GUTTER OUTLETS from the underside of the gutter to prevent obstruction of water flow.
4. Fit Leaf Eater® or Leaf Beater® RAIN HEADS to downspouts to prevent block-ing. Rain Heads deflect leaves and debris and keep mosquitoes out of pipes that hold water.
5. Install FIRST FLUSH WATER DIVERTER/S (sometimes called 'roof washers') to prevent the first flush of most contaminated rainwater from entering the tank. Fit to each downspout that supplies water to the water tank, cistern or rain barrel, or install a large diverter that can handle multiple downspouts, beside the water tank or in-ground.
6. Ensure the TANK/CISTERN SCREEN is installed at tank/cistern entry point to keep mosquitoes and pests out.
7. Choose a WATER TANK, CISTERN or RAIN BARREL. Consider annual rainfall, roof catchment area and water usage when determining its size.
8. Fit INSECT PROOF SCREENS or FLAP VALVES to the end of all pipes to the tank screen and to TANK/CISTERN OVERFLOW OUTLETS to keep mosqui-toes and pests out and ensure tank/cistern is vented properly.
9. Utilize a TANK/CISTERN ‘TOP UP’ system (if required) to automatically ‘top up’ the tank/cistern with mains water when water levels fall to a designated minimum level.
10. Select a PUMP SYSTEM (if required) to distribute water for use inside or outside the home.
11. Fit a purpose designed RAINWATER FILTER after the pump to help reduce residual sediment, color and odour.
12. WATER LEVEL MONITOR. Install a level indicator to help monitor your water us-age. Wireless systems are most convenient and display a reading inside the home.
FOLD FOLD
PAINTINGRemove the Clean Shield™ screen when painting. It is not recommended to paint the frame of the Clean Shield™ screen.
HA
ND
Y
HIN
TS
CLEANINGThe Clean Shield™ screen is mostly self cleaning. If cleaning is required simply lift the Clean Shield™ screen out by taking hold of the quick release tabs and pull the Clean Shield™ screen upwards and outwards, then hose or brush off.
PROTECTING THE HOMEGeneral stormwater application
Rain Heads help ensure downspout do not block up with leaves and debris.
INSTALLATION INSTRUCTIONS
Preferable Rainwater Harvesting SystemsTo deliver optimum results, it is advisable to install a rainwater harvesting system that incorporates rain heads and a gutter mesh system to deflect leaves and debris and keep gutters dry, as well as a first flush water diverter and insect proof screens.
‘Dry’ SystemsWhen pipes run direct from the gutter into the tank (not underground) they will drain and dry out. ‘Dry’ systems are preferable to ‘wet’ systems. Wherever possible, and especially with multi-level buildings, install ‘dry’ systems and fit a standard tank screen with 1/32" aperture at the downspout entry to the tank.
‘Wet’ SystemsWhen pipes go underground and then up to the tank, they will inevitably hold water after it rains. Legislation broadly says that when pipes hold water in this way, they must be screened with a non-corrosive screen of a maximum 1/32" aperture, to prevent the entry of mosquitoes and vermin. Mosquitoes are known to be responsible for many diseases including Dengue Fever and Ross River Fever. ‘Wet’ systems can be converted to ‘dry’ systems by installing an in-ground water diverter that not only diverts the first flush of contaminated water from the roof, but also drains water from the underground pipe system on a sloping site.
(For more information, visit www.rainharvesting.com).
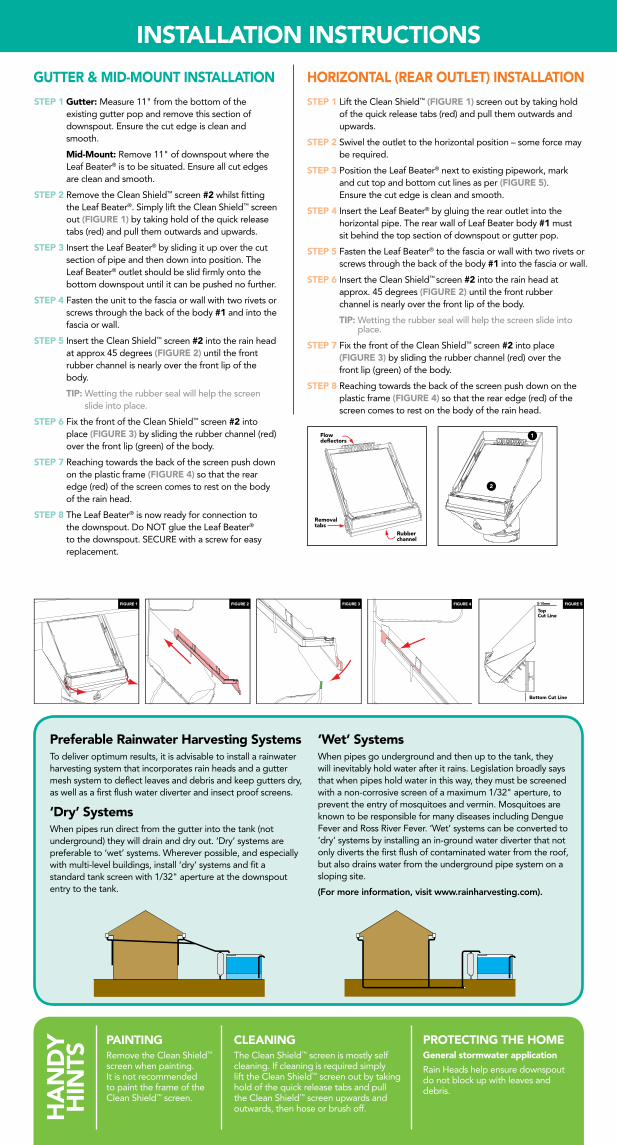
STEP 1 Lift the Clean Shield™ (FIGURE 1) screen out by taking hold of the quick release tabs (red) and pull them outwards and upwards.
STEP 2 Swivel the outlet to the horizontal position – some force may be required.
STEP 3 Position the Leaf Beater® next to existing pipework, mark and cut top and bottom cut lines as per (FIGURE 5). Ensure the cut edge is clean and smooth.
STEP 4 Insert the Leaf Beater® by gluing the rear outlet into the horizontal pipe. The rear wall of Leaf Beater body #1 must sit behind the top section of downspout or gutter pop.
STEP 5 Fasten the Leaf Beater® to the fascia or wall with two rivets or screws through the back of the body #1 into the fascia or wall.
STEP 6 Insert the Clean Shield™ screen #2 into the rain head at approx. 45 degrees (FIGURE 2) until the front rubber channel is nearly over the front lip of the body.
TIP: Wetting the rubber seal will help the screen slide into place.
STEP 7 Fix the front of the Clean Shield™ screen #2 into place (FIGURE 3) by sliding the rubber channel (red) over the front lip (green) of the body.
STEP 8 Reaching towards the back of the screen push down on the plastic frame (FIGURE 4) so that the rear edge (red) of the screen comes to rest on the body of the rain head.
STEP 1 Gutter: Measure 11" from the bottom of the existing gutter pop and remove this section of downspout. Ensure the cut edge is clean and smooth.
Mid-Mount: Remove 11" of downspout where the Leaf Beater® is to be situated. Ensure all cut edges are clean and smooth.
STEP 2 Remove the Clean Shield™ screen #2 whilst fitting the Leaf Beater®. Simply lift the Clean Shield™ screen out (FIGURE 1) by taking hold of the quick release tabs (red) and pull them outwards and upwards.
STEP 3 Insert the Leaf Beater® by sliding it up over the cut section of pipe and then down into position. The Leaf Beater® outlet should be slid firmly onto the bottom downspout until it can be pushed no further.
STEP 4 Fasten the unit to the fascia or wall with two rivets or screws through the back of the body #1 and into the fascia or wall.
STEP 5 Insert the Clean Shield™ screen #2 into the rain head at approx 45 degrees (FIGURE 2) until the front rubber channel is nearly over the front lip of the body.
TIP: Wetting the rubber seal will help the screen slide into place.
STEP 6 Fix the front of the Clean Shield™ screen #2 into place (FIGURE 3) by sliding the rubber channel (red) over the front lip (green) of the body.
STEP 7 Reaching towards the back of the screen push down on the plastic frame (FIGURE 4) so that the rear edge (red) of the screen comes to rest on the body of the rain head.
STEP 8 The Leaf Beater® is now ready for connection to the downspout. Do NOT glue the Leaf Beater® to the downspout. SECURE with a screw for easy replacement.
HORIZONTAL (REAR OUTLET) INSTALLATIONGUTTER & MID-MOUNT INSTALLATION
FIGURE 1 FIGURE 2 FIGURE 3 FIGURE 4 FIGURE 5
TopCut Line
5-10mm
Bottom Cut Line
Removaltabs
Rubberchannel
Flow deflectors
2
1
FOLD FOLD