how to create your own create the good do-it-yourself...
TRANSCRIPT

How To Create your own Create the Good Do-It-Yourself
Project Guide
All the information you need to create and submit your do-it-yourself service project
www.CreateTheGood.org
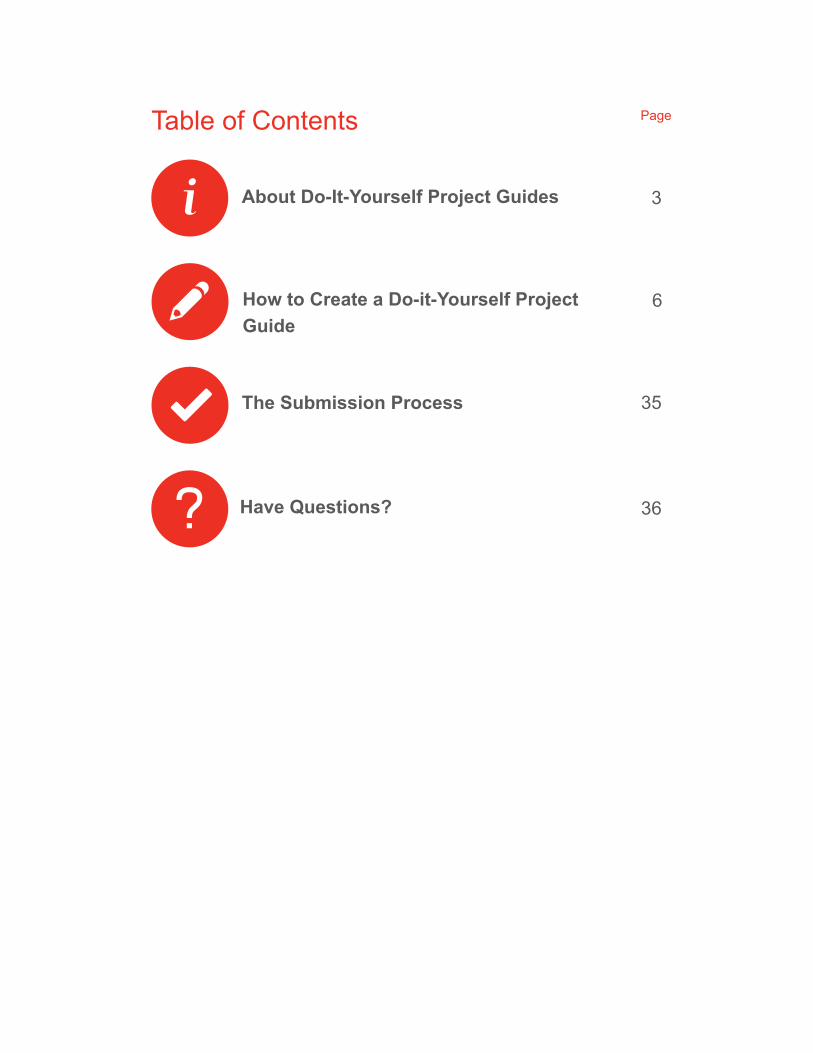
About Do-It-Yourself Project Guides
How to Create a Do-it-Yourself Project Guide
The Submission Process
Have Questions?
3
6
35
36
Table of Contents Page
3Create the Good
A Do-It-Yourself (“DIY”) Project Guide provides simple, step-by-step instructions for planning and implementing a successful community project. Guides currently featured on Create the Good cover everything from holding a food or school supplies drive to stating a walking group to caring or a caregiver. To see all current DIY Project guides, visit http://createthegood.org/how-to-guides.
Many people want to give back to their community but struggle to find volunteer opportunities that match their schedule and interests. Do-It-Yourself Project Guides enable individuals to engage in community projects they care about in the time they have, creating more meaningful ways for Create the Good members to get involved.
DIY Project Guides are a great way to introduce members of the Create the Good community to your cause or organization and educate them about how their efforts can make an impact on your mission.
Create the Good offers free and easy to use tools to create a project guide and the Create the Good team is available every step of the way.
A little bit about the Create the Good community
What is a Do-It-Yourself Project Guide?
How do DIY Projects help Create the Good members?
How do DIY Projects help authors?
About Do-It-Yourself Project Guides
Help a cause you care about in a time and manner that works best for you.
• Approximately 450,000 members turn to Create the Good for tools
and inspiration
• CreateTheGood.org attracts 50,000 - 70,000 visitors per month
• Community members have contributed thousands of volunteer
opportunities to the site - 10,000+ of which have been vetted and
approved by the Create the Good team and made available on the
Create the Good site and other volunteer listings
4Create the Good
Create the Good’s goal in offering these free tools is to gather a diverse collection of service projects that provide meaningful opportunities for individuals with a wide range of causes, time commitments, and skill sets. The Create the Good team reviews and approves all guides prior to publication, so you can be sure your project will be in good company.
While the focus and the time commitment required for the DIY Projects vary dramatically, the projects themselves generally fall into one of the following categories.
What makes for a good DIY project?
Create the Good enforces just a few ground rules:
1. The success of the project cannot depend on you or your organization’s involvement or availability. Put another way, Create the Good users must be able to plan and execute your project according to their schedule and availability.
2. The project does not involve fundraising or ask participants to collect donations for your organization.
3. The project does not involve political advocacy for a particular candidate or political campaign.
1. Awareness / Education - providing people with information that can help improve their lives or those of their family and neighbors. For example, the Operation Energy Save project guide shows readers how they can walk through a friend or neighbors home and inform them of ways they can save energy.
2. Crafts / Creating - producing physical objects to benefit someone else. For example, the Create Toddler “Busy Bags” project guide highlights how to assemble bags to be used by families with sick children who spend a lot of time in waiting rooms.
5Create the Good
I work for a nonprofit. Can I create a guide on its behalf? Absolutely, we love to help nonprofits reach the Create the Good community.
Do I have to be associated with a nonprofit to author a guide? Not at all. If you are a passionate individual with a great idea for supporting a cause you love, this is the perfect project for you.
My idea is really short, is that appropriate for a project? Yes! Such projects are particularly helpful for our members with limited time.
My organization has an existing document that outlines the steps of our project. Still, we would love a way to get the project in front of the Create the Good audience, how can we participate? When creating a project guide you can upload any related documents and materials you think will be helpful in completing the project successfully. In these circumstances, we suggest uploading your existing document and referring to it within the project instructions. For example, “Get started by reviewing the XYZ.PDF file in the supplemental materials section’.
Frequently Asked Questions
1. Social / Event - hosting a one-time event where guests will learn about a given issue and do some good for themselves and/or the community. For example, the Organize a Shredding Event project guide describes how to host an event where you inform guests about ways to avoid identity theft and encourage them to bring ‘shredables’ to be destroyed safely by a professional shredding company.
2. Starting Something - initiate an activity that lives past a single event and continues to do good for the community and its participants. For example, the Start a Walking Group project guide provides instructions for gathering friends, family or co-workers for regular exercise.
6Create the Good
How to Create a Do-It-Yourself Project Guide
Only Create the Good community members may create Do-It-Yourself project guides and submit them for publication on the Create the Good site. But fear not, registration is free and AARP does not share your information with anyone. Follow the steps below to register for free.
Already registered with Create the Good? Wonderful! You can skip ahead to page X to learn how to create and submit a project guide.
Step 1: Sign in or Join Create the Good
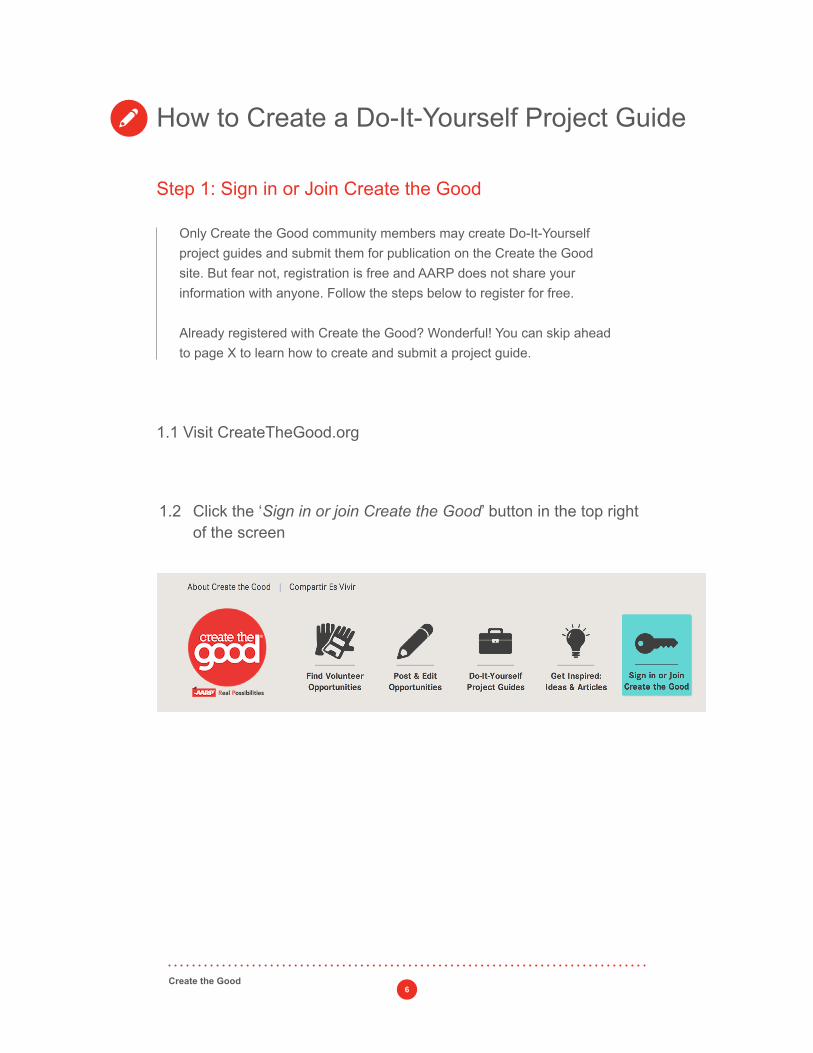
1.1 Visit CreateTheGood.org
1.2 Click the ‘Sign in or join Create the Good’ button in the top right of the screen

7Create the Good
1.4
1.5
Log in if you have already registered with AARP.org or Create the Good
Register using the site
A green circle with a check mark appears if you’ve entered acceptable information.
Click the green ‘Register’ button and enter the information requested in the AARP.org registration form
If you have registered previously for AARP.org or Create the Good, enter your email address and password, click Log In and continue to step 2.
To create a new account, you can either register through this site by clicking the ‘Register’ button, or use your social media account by clicking the social account icon you prefer to log in with. You can simply log in if you have previously registered with AARP.org or Create the Good.
1.3 Choose to Log In, Register or Connect with Facebook
8Create the Good
1.5.1
1.5.2
1.5.3
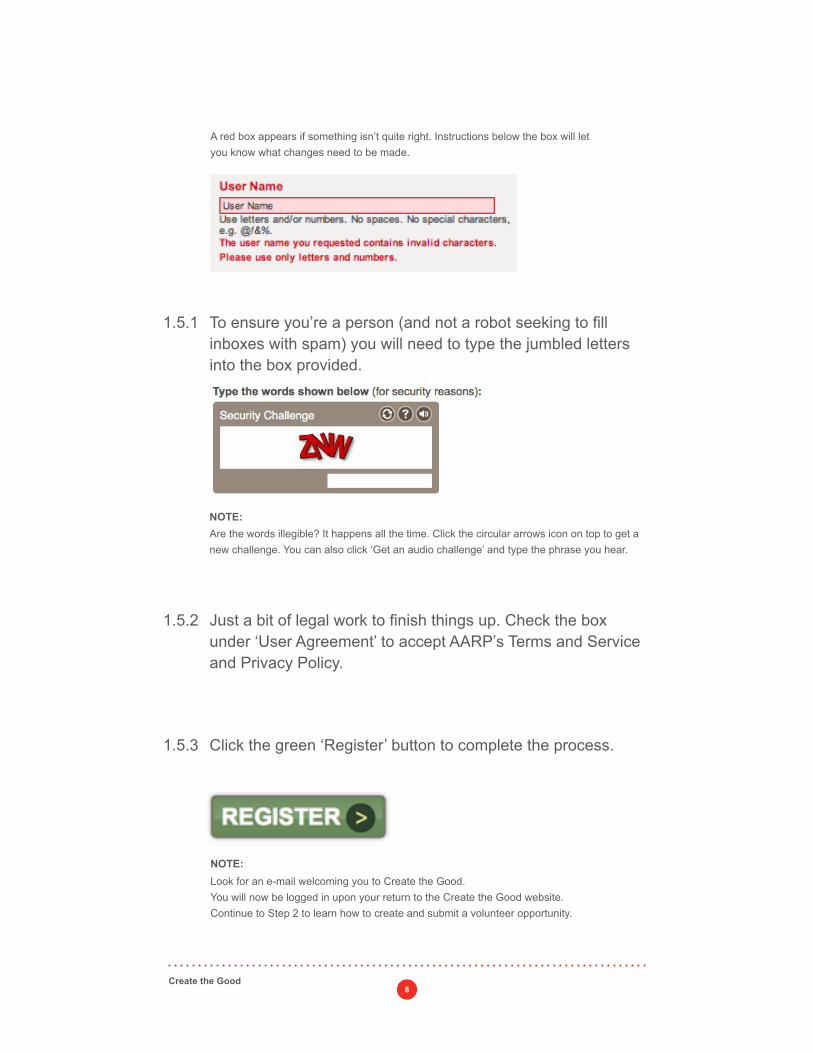
To ensure you’re a person (and not a robot seeking to fill inboxes with spam) you will need to type the jumbled letters into the box provided.
Just a bit of legal work to finish things up. Check the box under ‘User Agreement’ to accept AARP’s Terms and Service and Privacy Policy.
Click the green ‘Register’ button to complete the process.
Are the words illegible? It happens all the time. Click the circular arrows icon on top to get a new challenge. You can also click ‘Get an audio challenge’ and type the phrase you hear.
A red box appears if something isn’t quite right. Instructions below the box will let you know what changes need to be made.
NOTE:
NOTE:Look for an e-mail welcoming you to Create the Good. You will now be logged in upon your return to the Create the Good website. Continue to Step 2 to learn how to create and submit a volunteer opportunity.
9Create the Good
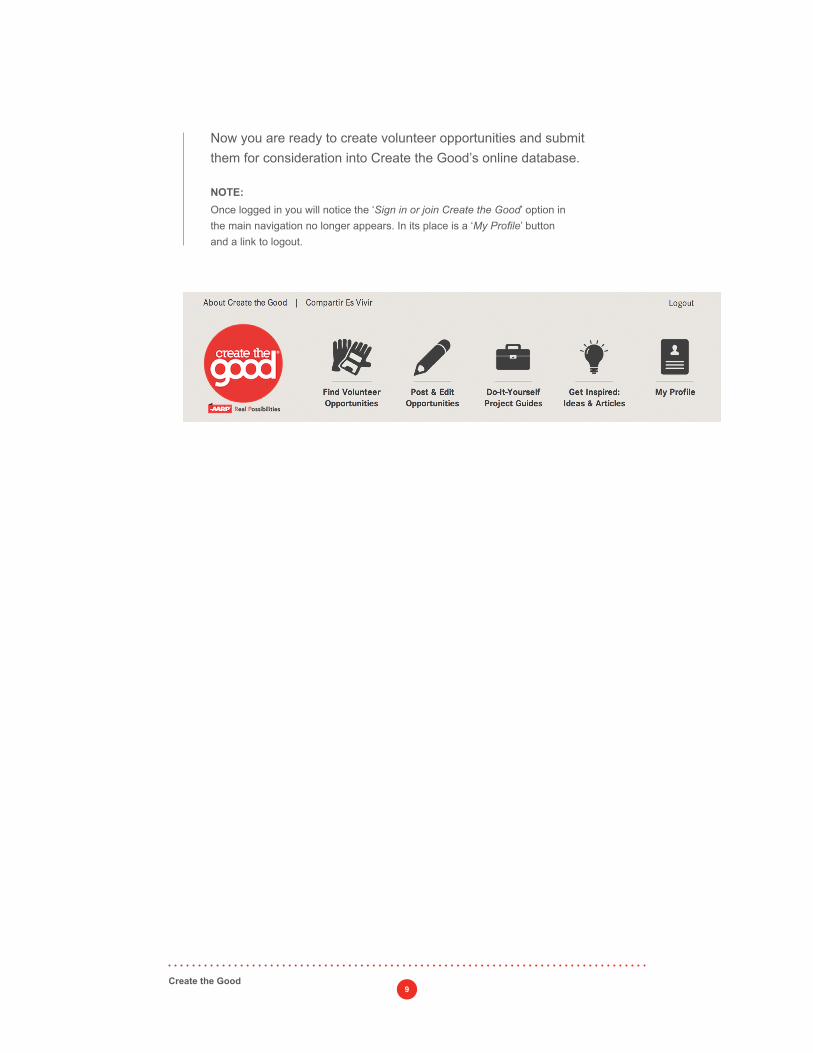
NOTE:Once logged in you will notice the ‘Sign in or join Create the Good’ option in the main navigation no longer appears. In its place is a ‘My Profile’ button and a link to logout.
Now you are ready to create volunteer opportunities and submit them for consideration into Create the Good’s online database.
10Create the Good
Step 2: Access the Project Guide Builder
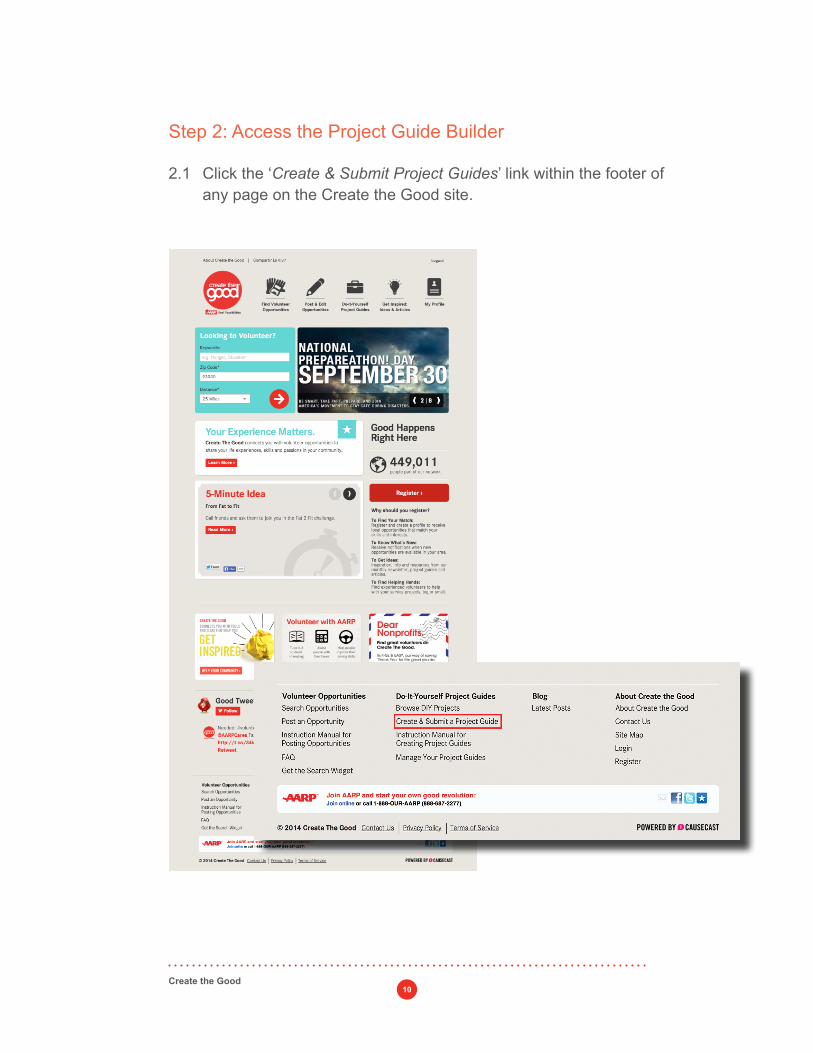
2.1 Click the ‘Create & Submit Project Guides’ link within the footer of any page on the Create the Good site.
11Create the Good
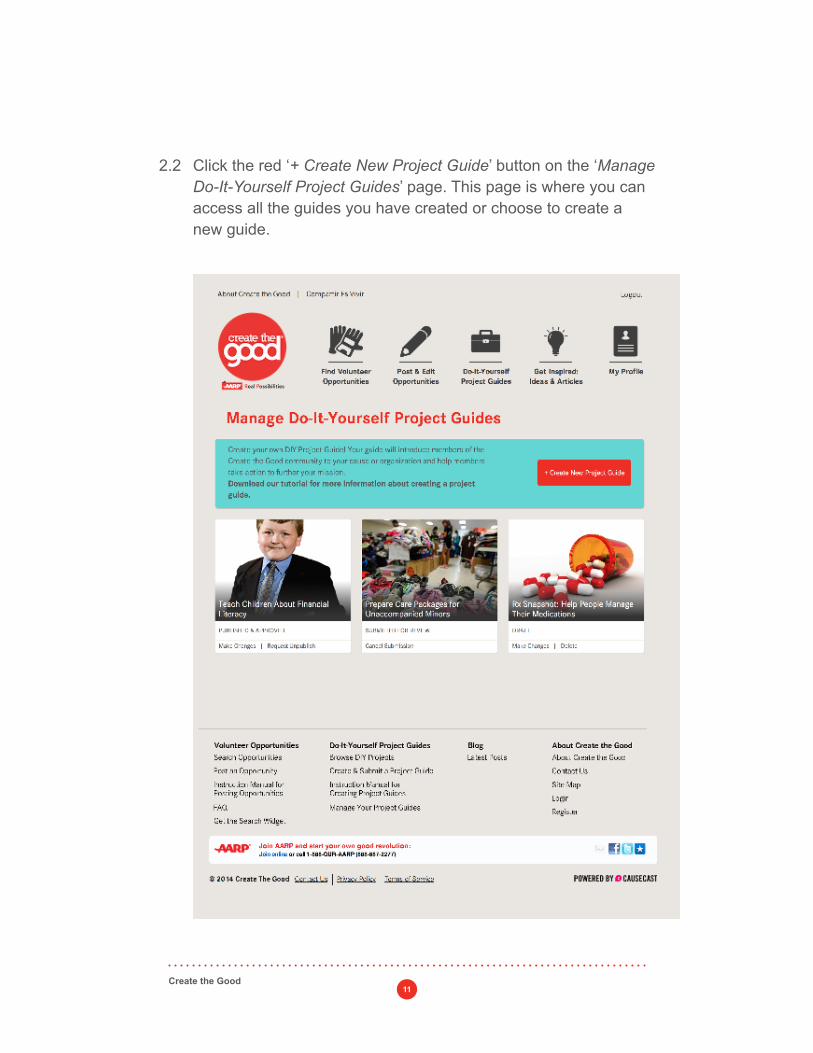
2.2 Click the red ‘+ Create New Project Guide’ button on the ‘Manage Do-It-Yourself Project Guides’ page. This page is where you can access all the guides you have created or choose to create a new guide.
12Create the Good
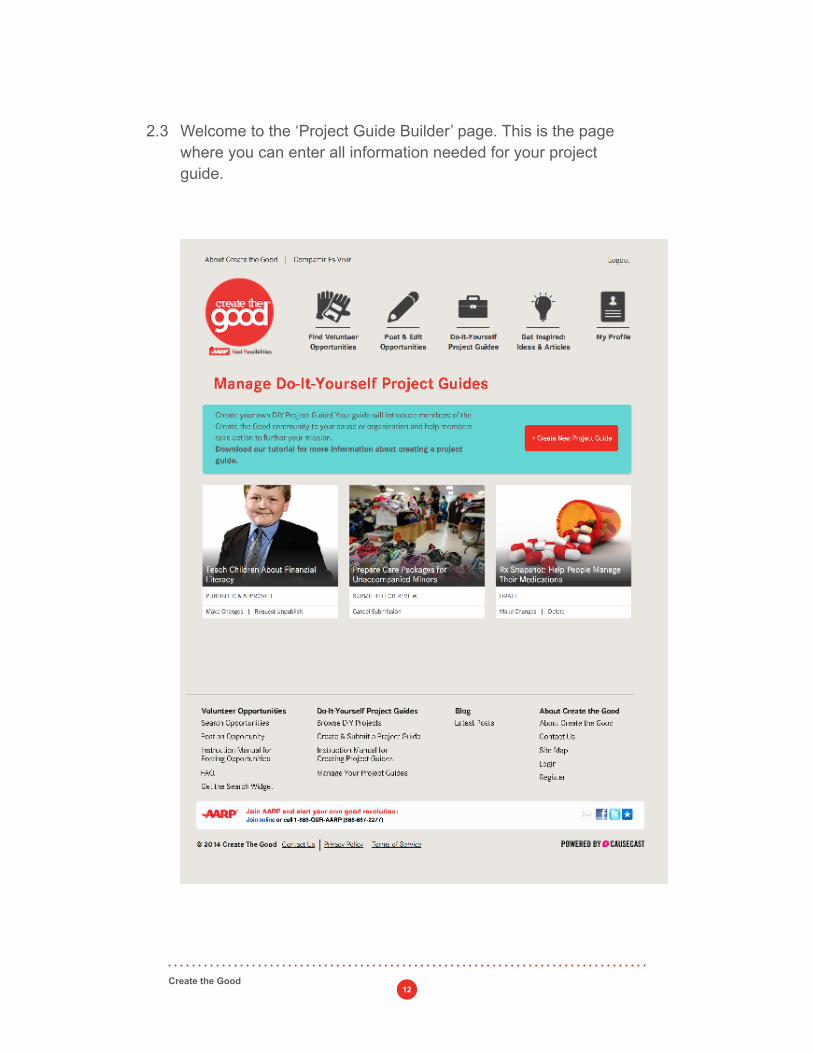
2.3 Welcome to the ‘Project Guide Builder’ page. This is the page where you can enter all information needed for your project guide.
13Create the Good
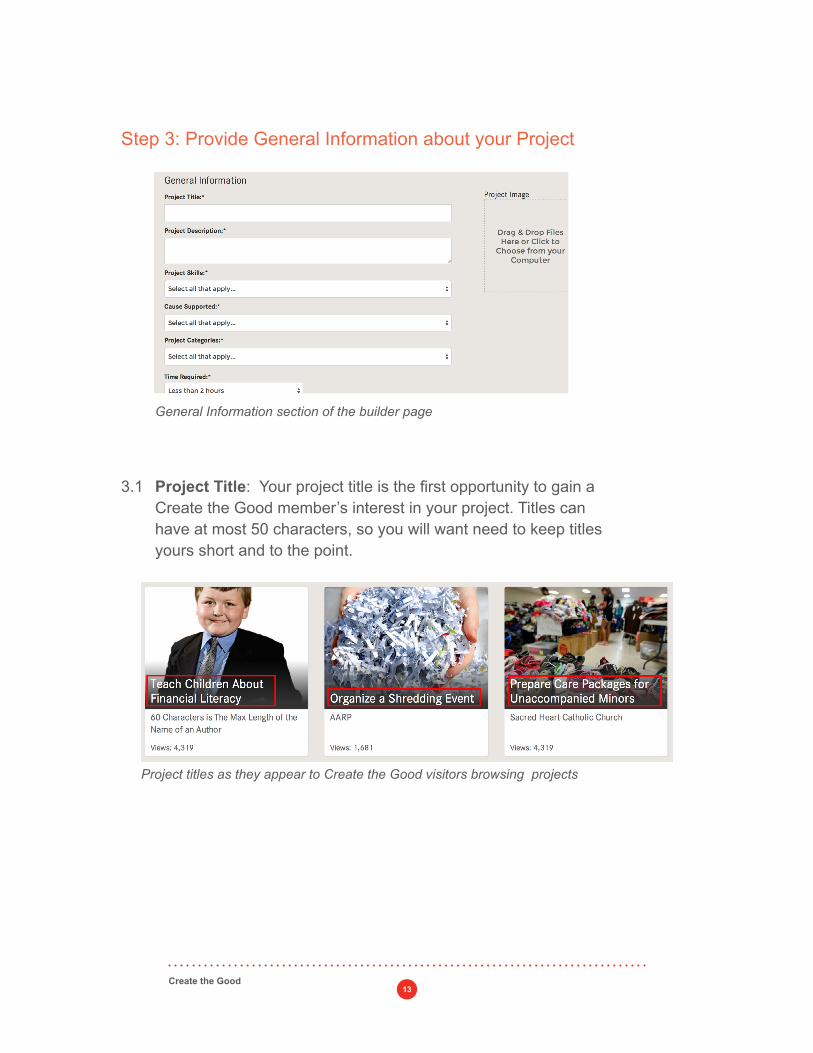
Step 3: Provide General Information about your Project
3.1 Project Title: Your project title is the first opportunity to gain a Create the Good member’s interest in your project. Titles can have at most 50 characters, so you will want need to keep titles yours short and to the point.
Project titles as they appear to Create the Good visitors browsing projects
General Information section of the builder page
14Create the Good
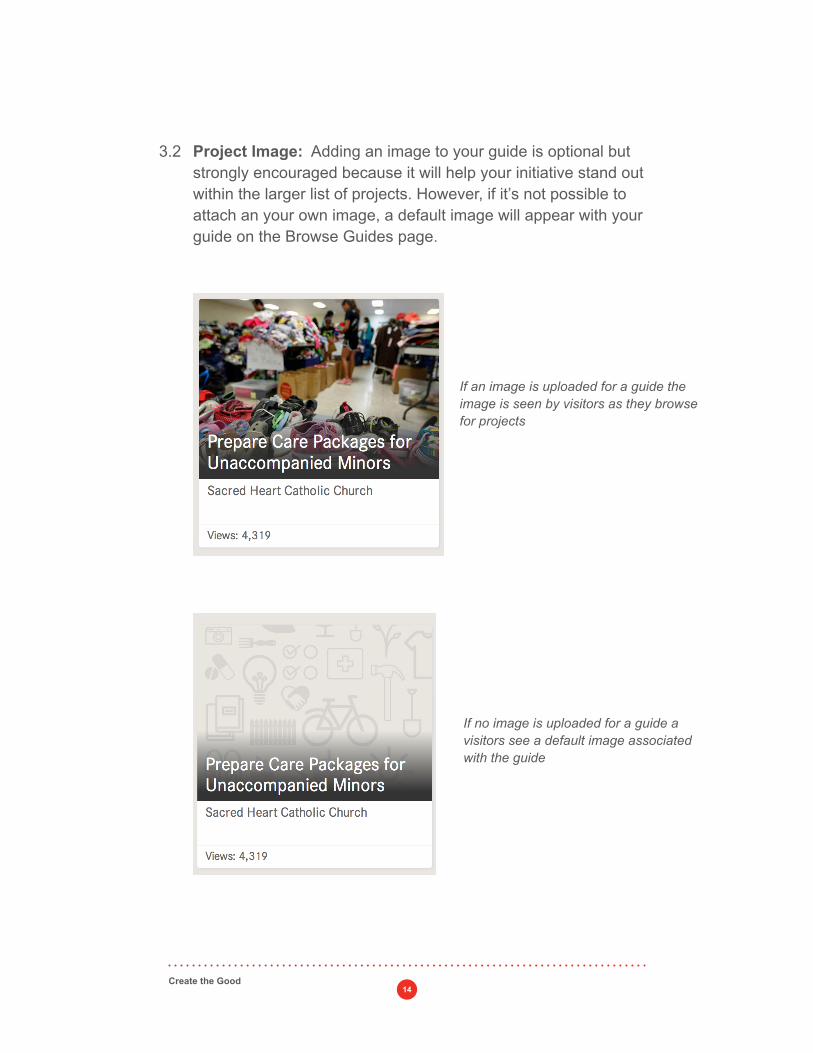
3.2 Project Image: Adding an image to your guide is optional but strongly encouraged because it will help your initiative stand out within the larger list of projects. However, if it’s not possible to attach an your own image, a default image will appear with your guide on the Browse Guides page.
If no image is uploaded for a guide a visitors see a default image associated with the guide
If an image is uploaded for a guide the image is seen by visitors as they browse for projects
15Create the Good
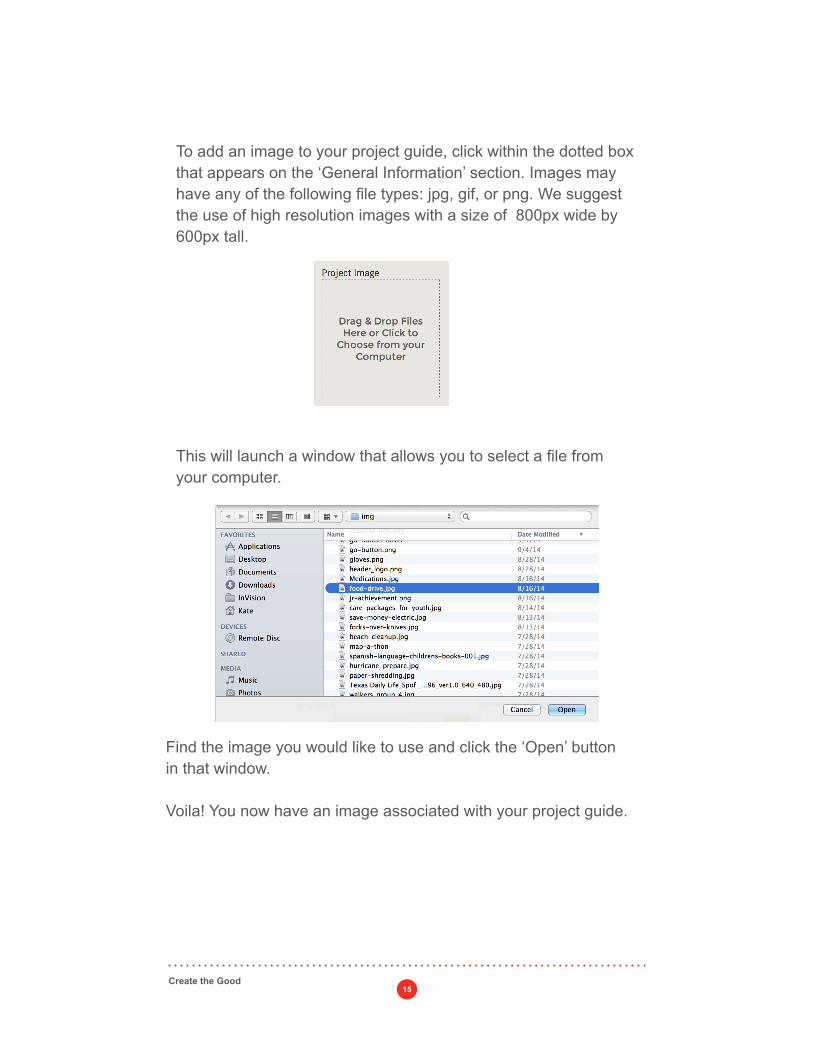
To add an image to your project guide, click within the dotted box that appears on the ‘General Information’ section. Images may have any of the following file types: jpg, gif, or png. We suggest the use of high resolution images with a size of 800px wide by 600px tall.
This will launch a window that allows you to select a file from your computer.
Find the image you would like to use and click the ‘Open’ button in that window.
Voila! You now have an image associated with your project guide.
16Create the Good
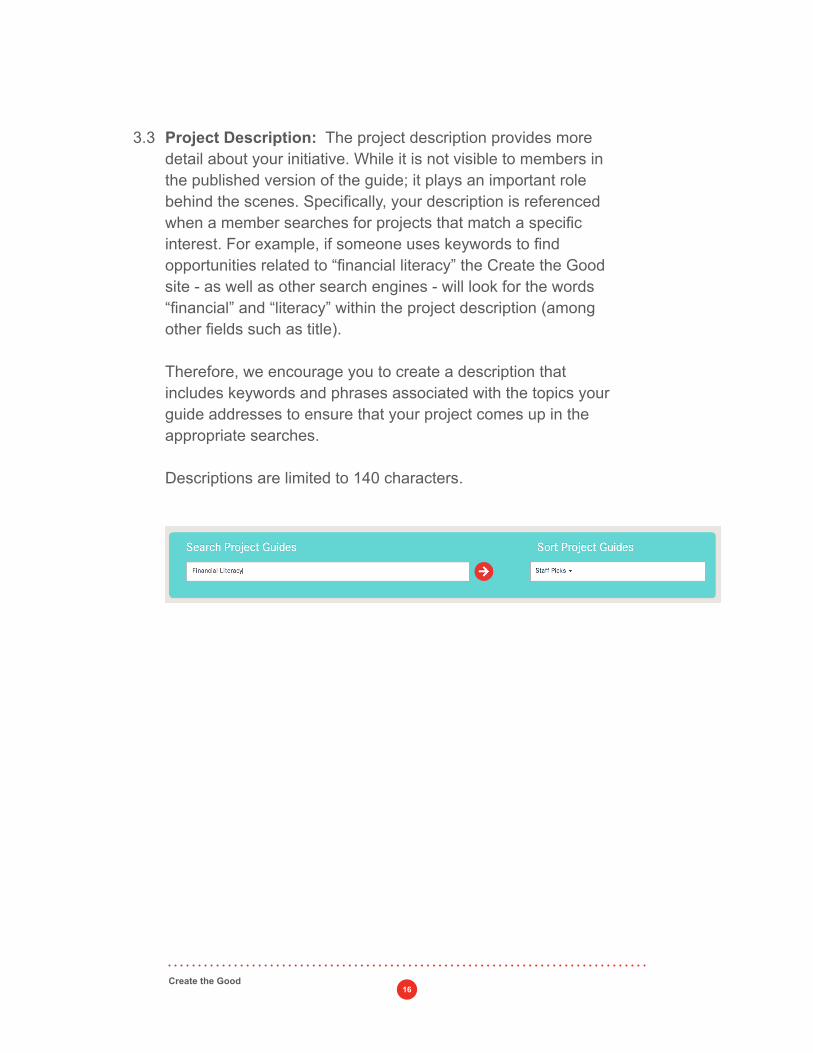
3.3 Project Description: The project description provides more detail about your initiative. While it is not visible to members in the published version of the guide; it plays an important role behind the scenes. Specifically, your description is referenced when a member searches for projects that match a specific interest. For example, if someone uses keywords to find opportunities related to “financial literacy” the Create the Good site - as well as other search engines - will look for the words “financial” and “literacy” within the project description (among other fields such as title).
Therefore, we encourage you to create a description that includes keywords and phrases associated with the topics your guide addresses to ensure that your project comes up in the appropriate searches.
Descriptions are limited to 140 characters.
17Create the Good
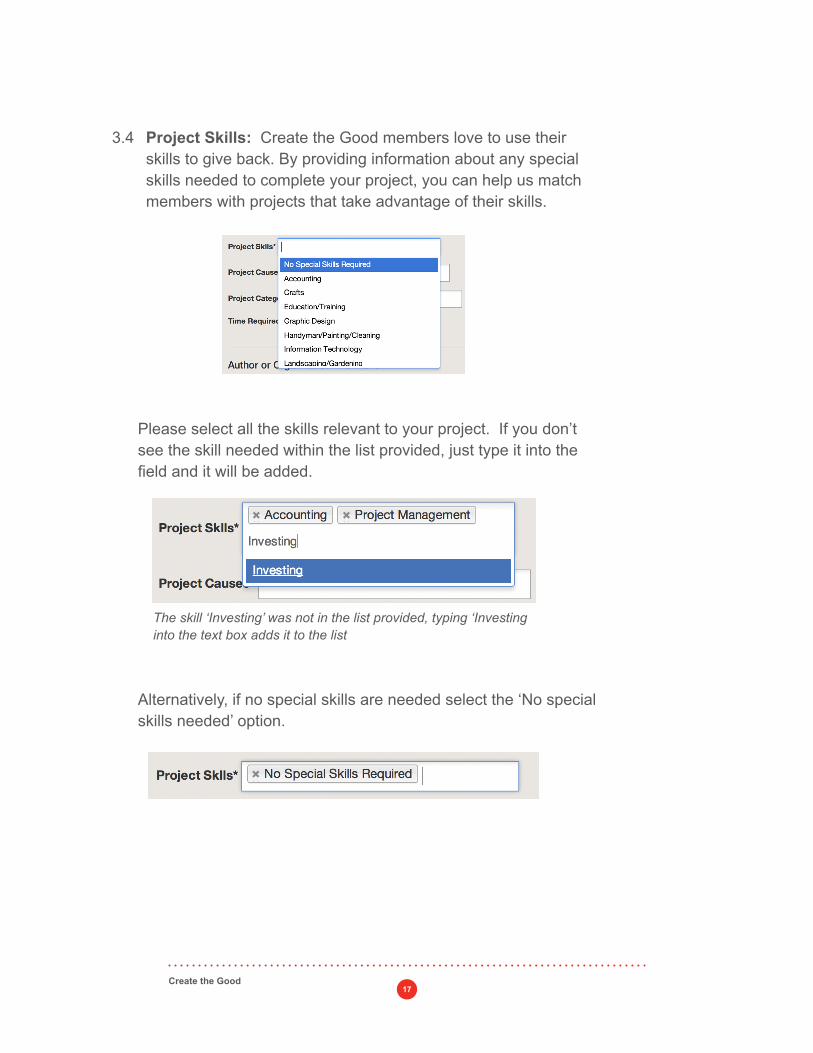
3.4 Project Skills: Create the Good members love to use their skills to give back. By providing information about any special skills needed to complete your project, you can help us match members with projects that take advantage of their skills.
Please select all the skills relevant to your project. If you don’t see the skill needed within the list provided, just type it into the field and it will be added.
Alternatively, if no special skills are needed select the ‘No special skills needed’ option.
The skill ‘Investing’ was not in the list provided, typing ‘Investing into the text box adds it to the list
18Create the Good
3.5
3.6
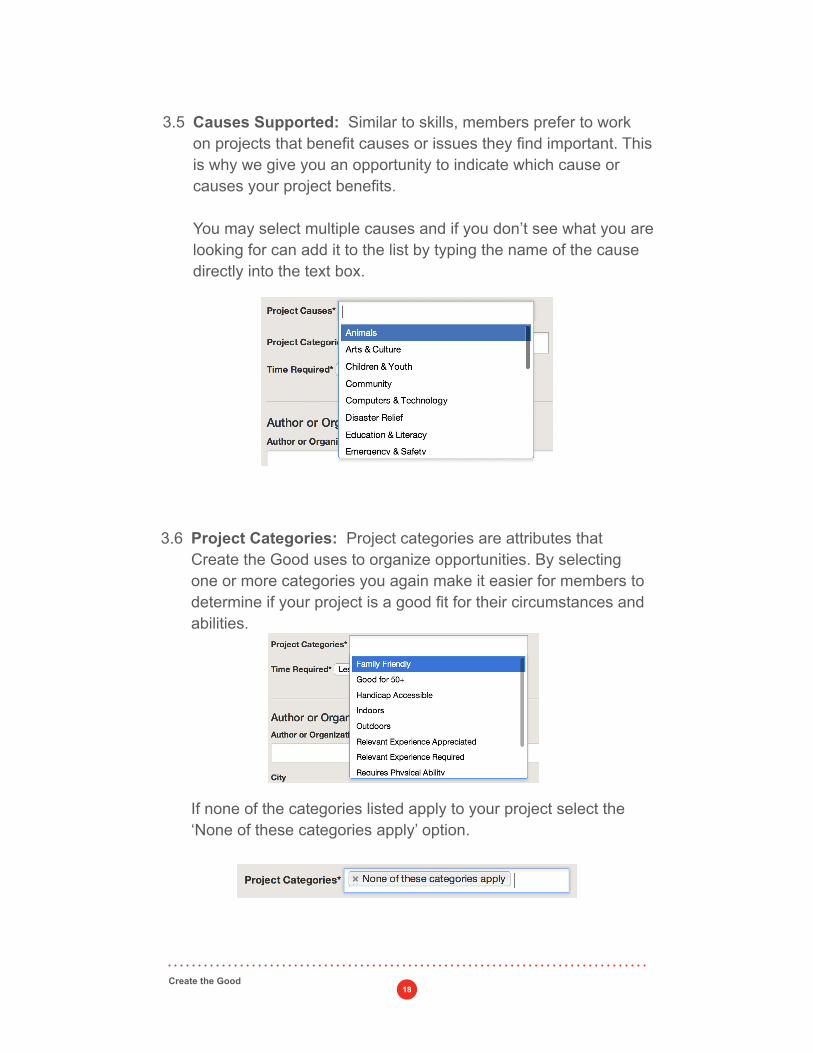
Causes Supported: Similar to skills, members prefer to work on projects that benefit causes or issues they find important. This is why we give you an opportunity to indicate which cause or causes your project benefits.
You may select multiple causes and if you don’t see what you are looking for can add it to the list by typing the name of the cause directly into the text box.
Project Categories: Project categories are attributes that Create the Good uses to organize opportunities. By selecting one or more categories you again make it easier for members to determine if your project is a good fit for their circumstances and abilities.
If none of the categories listed apply to your project select the ‘None of these categories apply’ option.
19Create the Good
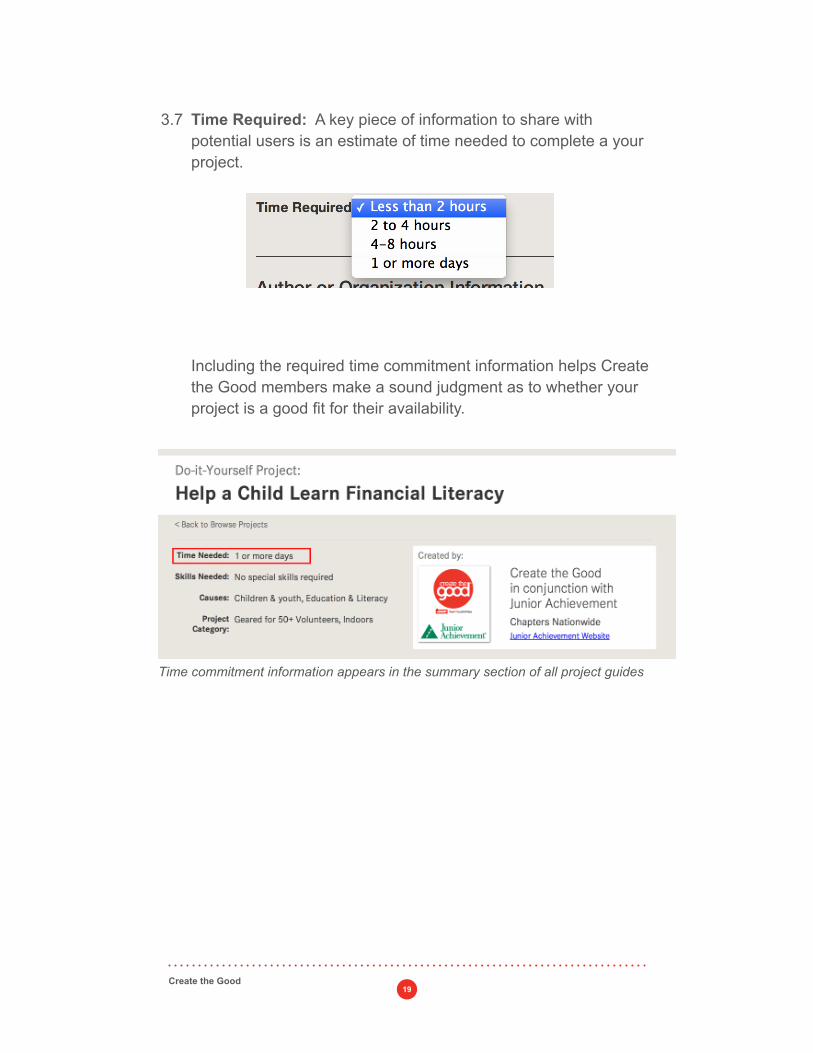
3.7 Time Required: A key piece of information to share with potential users is an estimate of time needed to complete a your project.
Including the required time commitment information helps Create the Good members make a sound judgment as to whether your project is a good fit for their availability.
Time commitment information appears in the summary section of all project guides
20Create the Good
Step 4: Provide Author or Organization Information
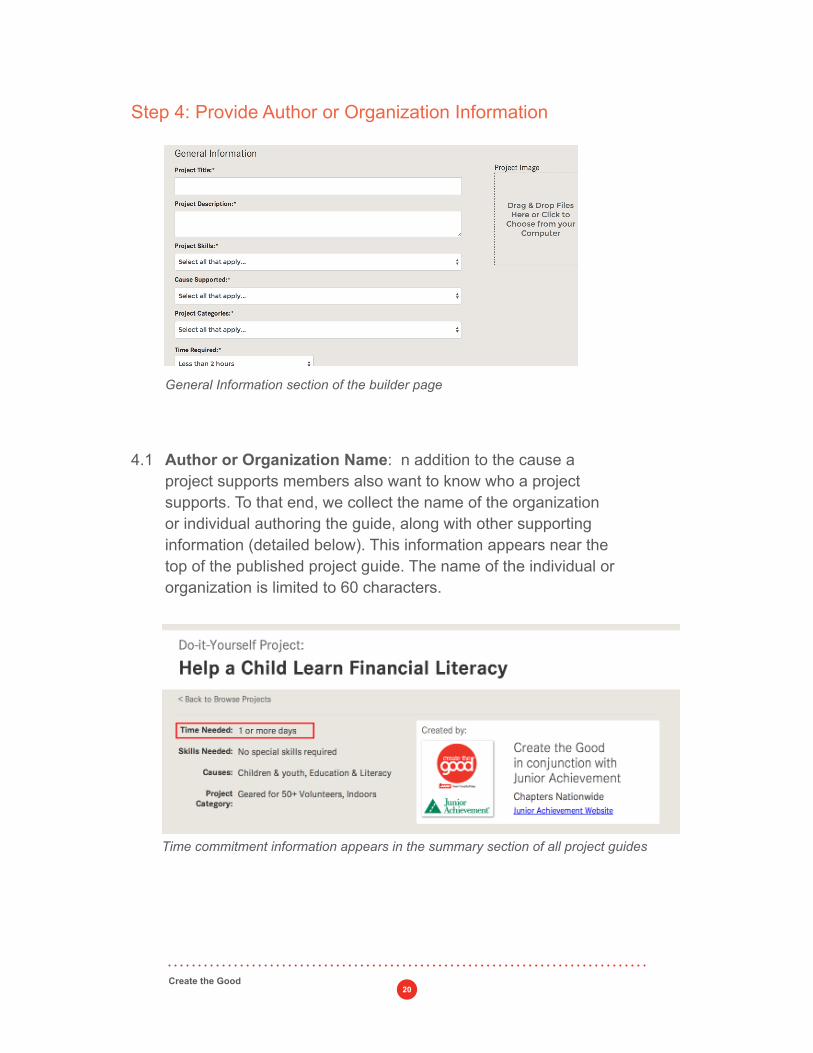
4.1 Author or Organization Name: n addition to the cause a project supports members also want to know who a project supports. To that end, we collect the name of the organization or individual authoring the guide, along with other supporting information (detailed below). This information appears near the top of the published project guide. The name of the individual or organization is limited to 60 characters.
General Information section of the builder page
Time commitment information appears in the summary section of all project guides
21Create the Good
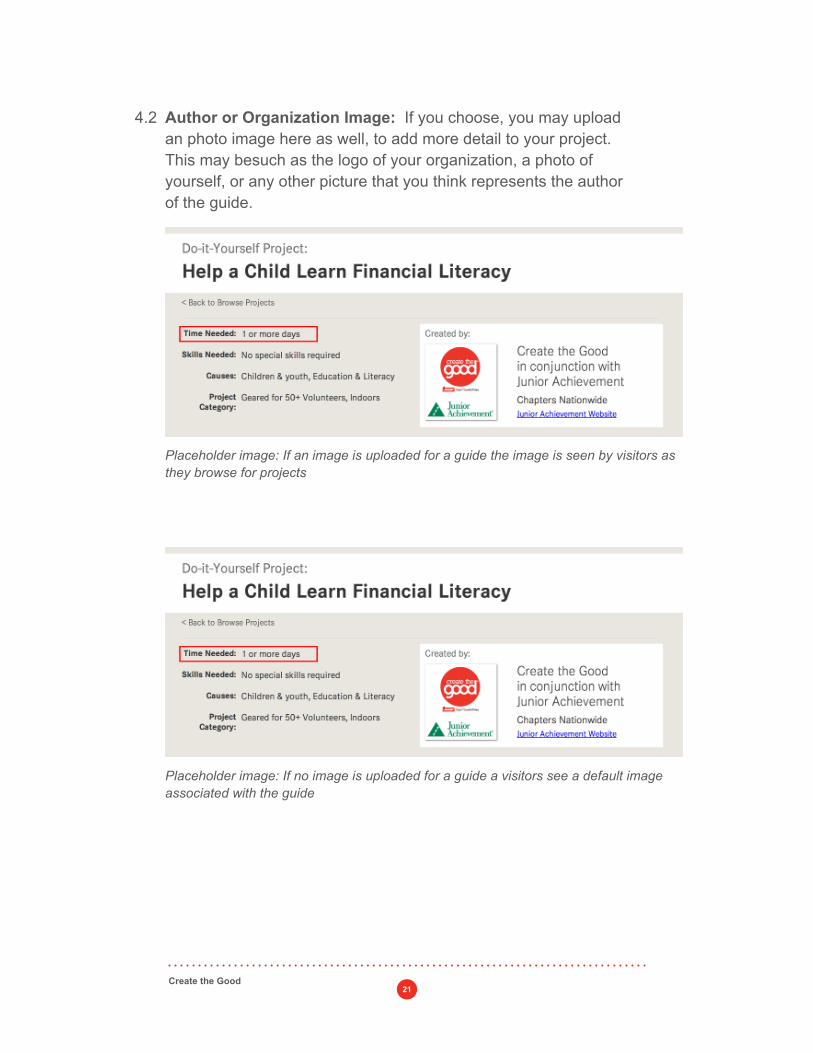
4.2 Author or Organization Image: If you choose, you may upload an photo image here as well, to add more detail to your project. This may besuch as the logo of your organization, a photo of yourself, or any other picture that you think represents the author of the guide.
Placeholder image: If no image is uploaded for a guide a visitors see a default image associated with the guide
Placeholder image: If an image is uploaded for a guide the image is seen by visitors as they browse for projects
22Create the Good
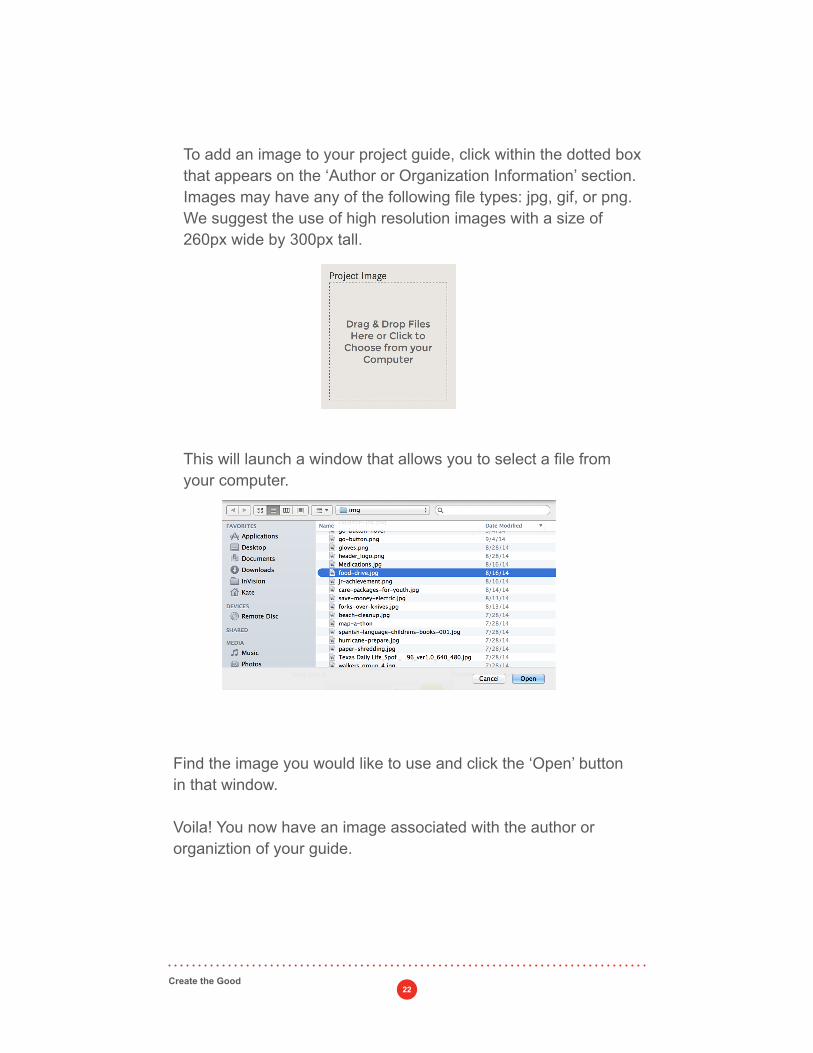
To add an image to your project guide, click within the dotted box that appears on the ‘Author or Organization Information’ section. Images may have any of the following file types: jpg, gif, or png. We suggest the use of high resolution images with a size of 260px wide by 300px tall.
This will launch a window that allows you to select a file from your computer.
Find the image you would like to use and click the ‘Open’ button in that window.
Voila! You now have an image associated with the author or organiztion of your guide.

23Create the Good
4.3
4.5
4.6
Author City & State: The location and state of yourself or the organization you represent.
Author Contact Email Address: Create the Good requires an email address for the individual responsible for creating the guide. This is where Create the Good Administrators will send any questions or notifications about your guide (e.g. “your guide has been published!”). Your email address will not be shared with outside parties or published as part of your project guide.
Author Contact Phone Number: You may also provide a phone number at which you can be reached. This phone number will not be shared or published as part of your project guide. It will only be used by Create the Good administrators in the event they have questions about your guide.
4.4 Author or Organization Website: You can also specify a website where a Create the Good member can learn more about yourself or your organization.
If a website is specified a link to the site appears with other author information. If no website is given, no link appears.
24Create the Good
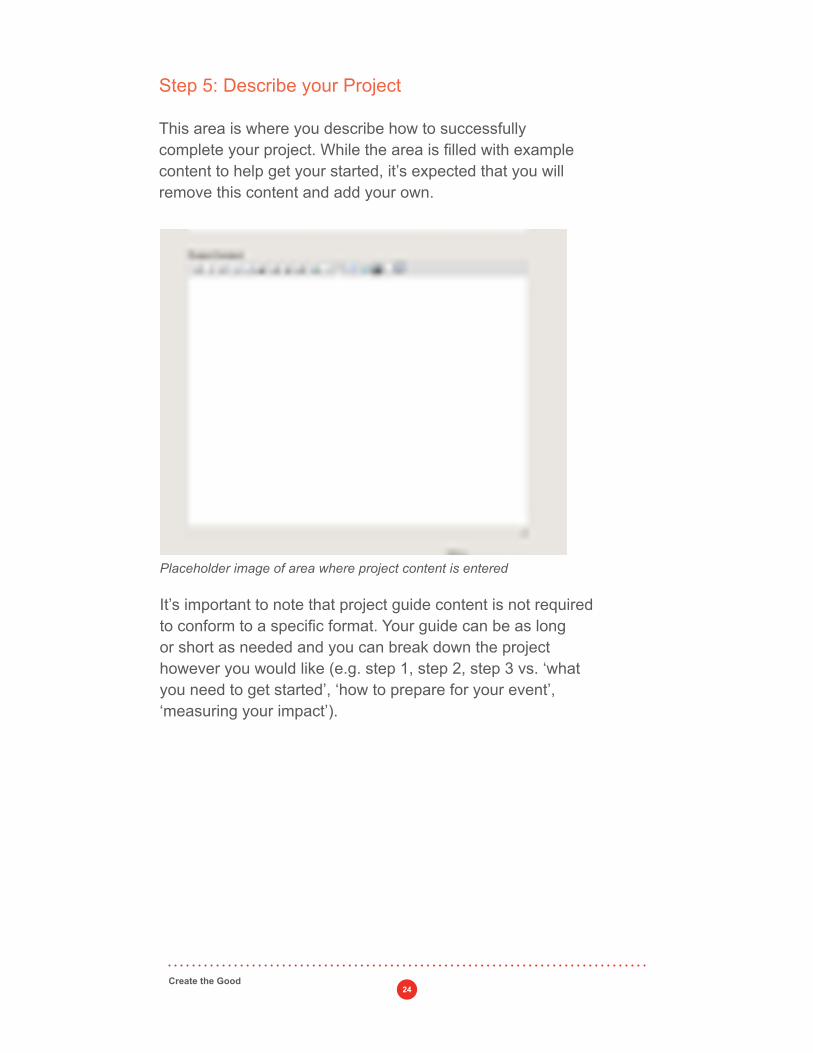
Step 5: Describe your Project
This area is where you describe how to successfully complete your project. While the area is filled with example content to help get your started, it’s expected that you will remove this content and add your own.
It’s important to note that project guide content is not required to conform to a specific format. Your guide can be as long or short as needed and you can break down the project however you would like (e.g. step 1, step 2, step 3 vs. ‘what you need to get started’, ‘how to prepare for your event’, ‘measuring your impact’).
Placeholder image of area where project content is entered
25Create the Good
We’ve provided a number of style and content options to help make your project guide descriptive and engaging.
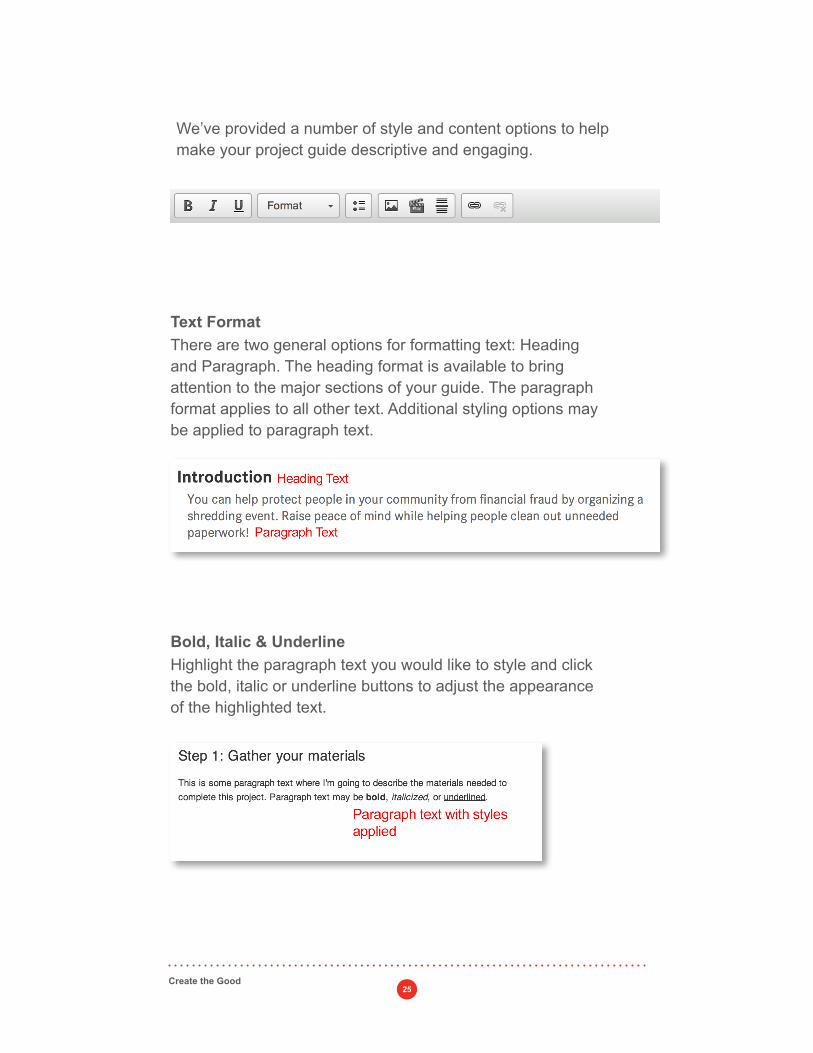
There are two general options for formatting text: Heading and Paragraph. The heading format is available to bring attention to the major sections of your guide. The paragraph format applies to all other text. Additional styling options may be applied to paragraph text.
Highlight the paragraph text you would like to style and click the bold, italic or underline buttons to adjust the appearance of the highlighted text.
Text Format
Bold, Italic & Underline
26Create the Good
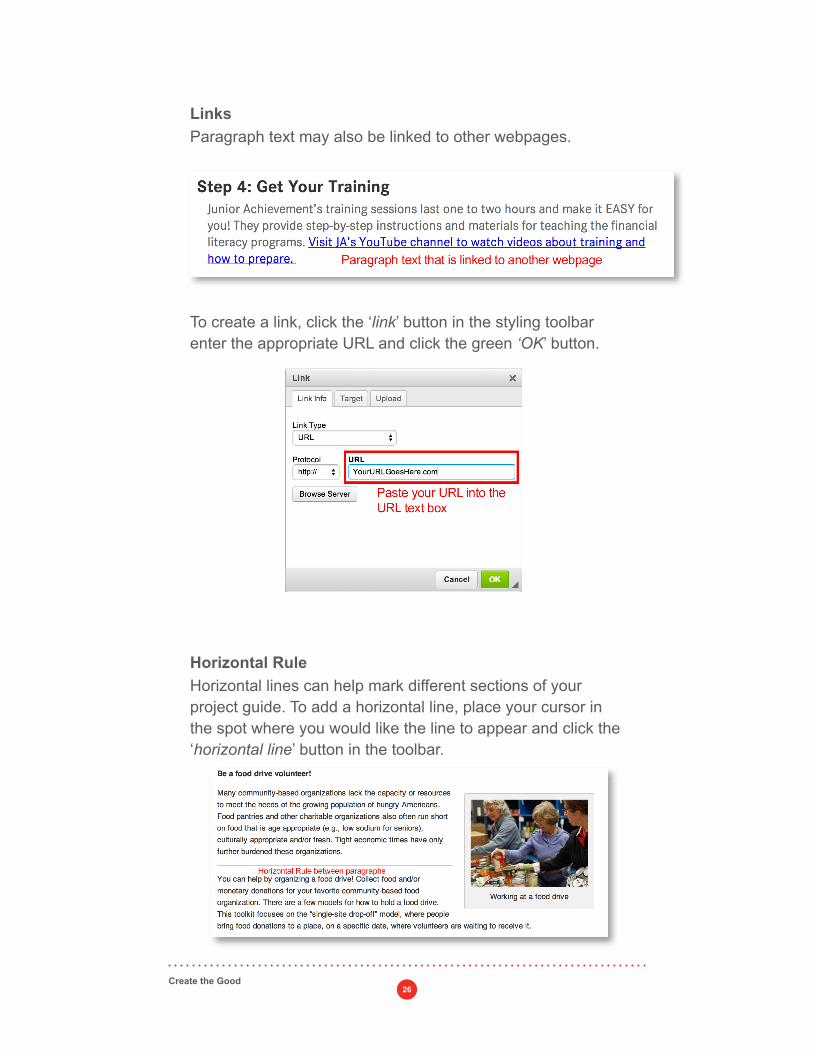
Paragraph text may also be linked to other webpages.
Horizontal lines can help mark different sections of your project guide. To add a horizontal line, place your cursor in the spot where you would like the line to appear and click the ‘horizontal line’ button in the toolbar.
To create a link, click the ‘link’ button in the styling toolbar enter the appropriate URL and click the green ‘OK’ button.
Links
Horizontal Rule
27Create the Good
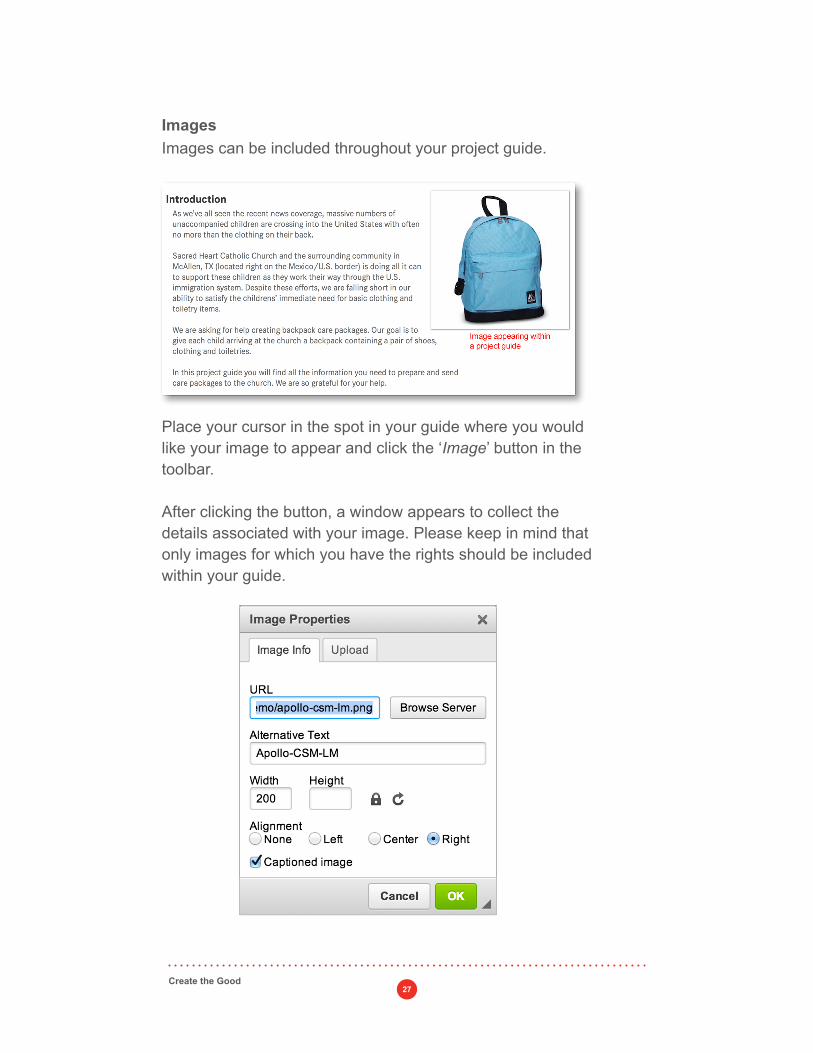
Images can be included throughout your project guide.
Place your cursor in the spot in your guide where you would like your image to appear and click the ‘Image’ button in the toolbar.
After clicking the button, a window appears to collect the details associated with your image. Please keep in mind that only images for which you have the rights should be included within your guide.
Images
28Create the Good
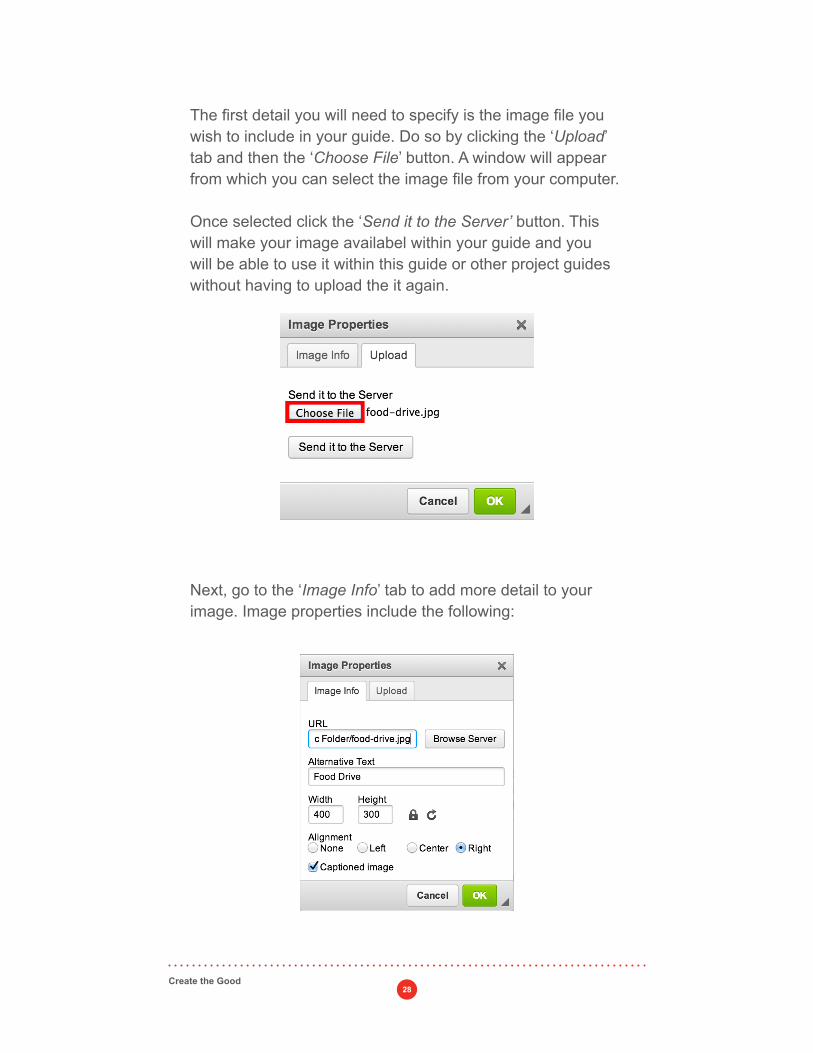
The first detail you will need to specify is the image file you wish to include in your guide. Do so by clicking the ‘Upload’ tab and then the ‘Choose File’ button. A window will appear from which you can select the image file from your computer.
Once selected click the ‘Send it to the Server’ button. This will make your image availabel within your guide and you will be able to use it within this guide or other project guides without having to upload the it again.
Next, go to the ‘Image Info’ tab to add more detail to your image. Image properties include the following:
29Create the Good
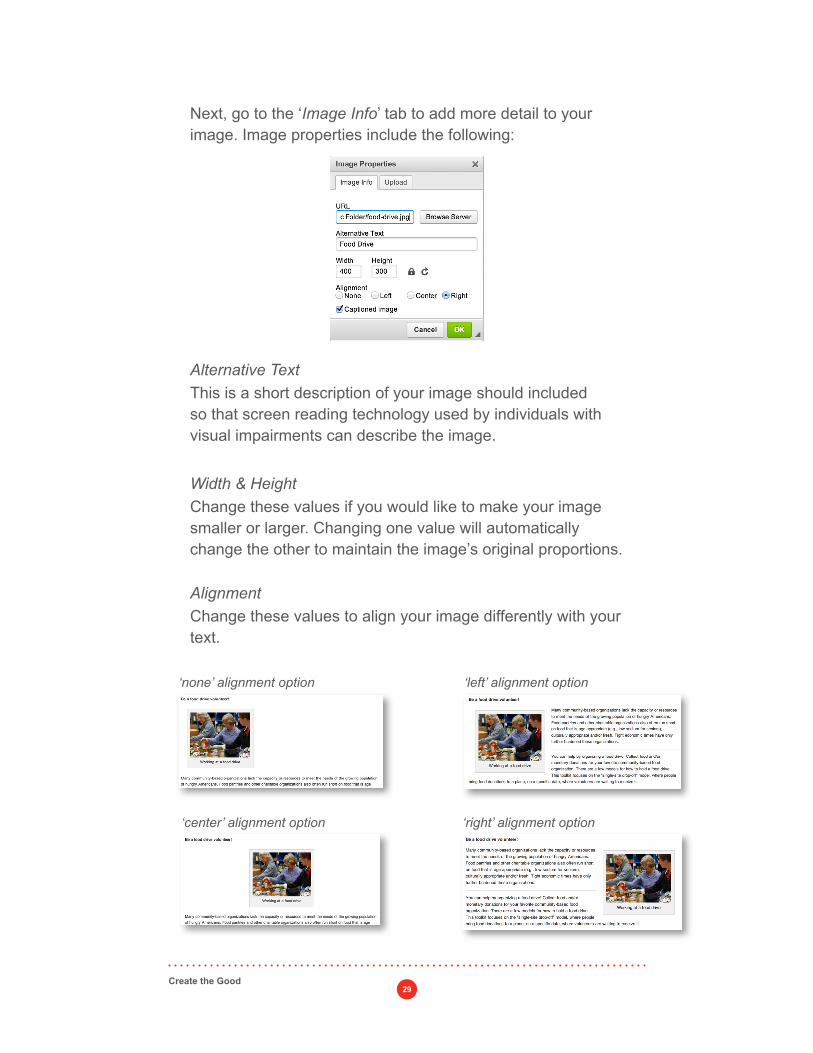
Next, go to the ‘Image Info’ tab to add more detail to your image. Image properties include the following:
This is a short description of your image should included so that screen reading technology used by individuals with visual impairments can describe the image.
Alternative Text
Change these values if you would like to make your image smaller or larger. Changing one value will automatically change the other to maintain the image’s original proportions.
Change these values to align your image differently with your text.
Width & Height
Alignment
‘none’ alignment option
‘center’ alignment option ‘right’ alignment option
‘left’ alignment option
30Create the Good
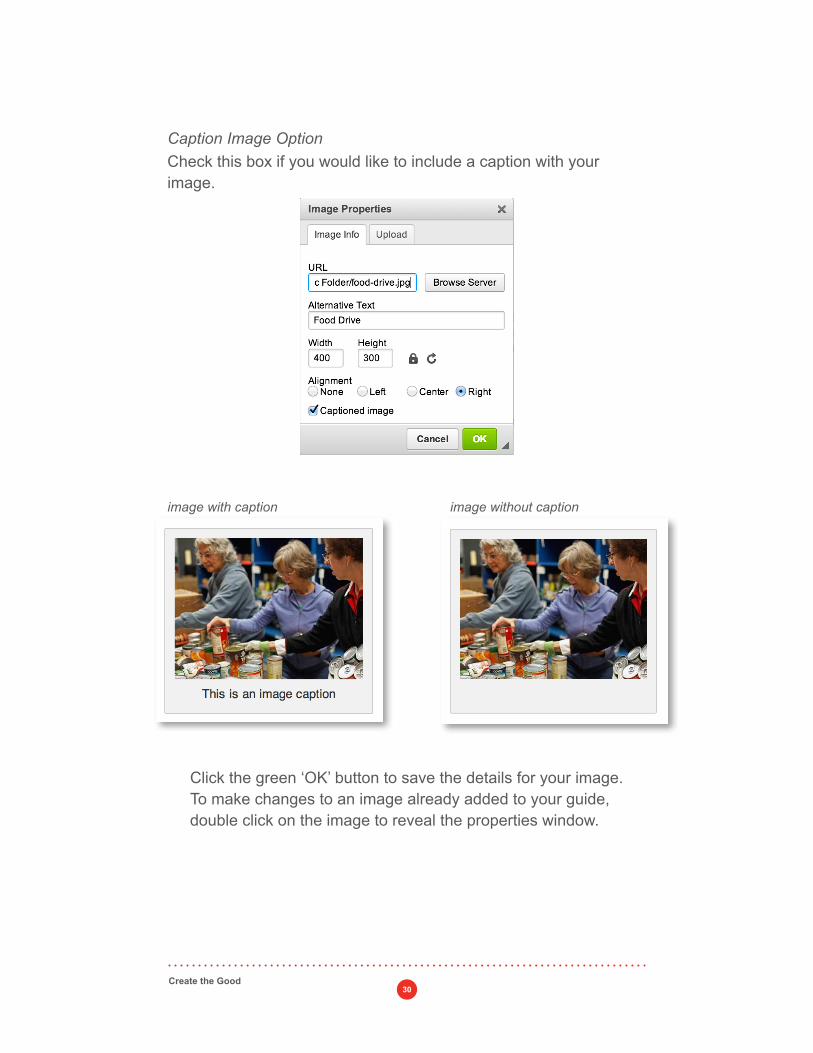
Check this box if you would like to include a caption with your image.
Click the green ‘OK’ button to save the details for your image. To make changes to an image already added to your guide, double click on the image to reveal the properties window.
Caption Image Option
image with caption image without caption
31Create the Good
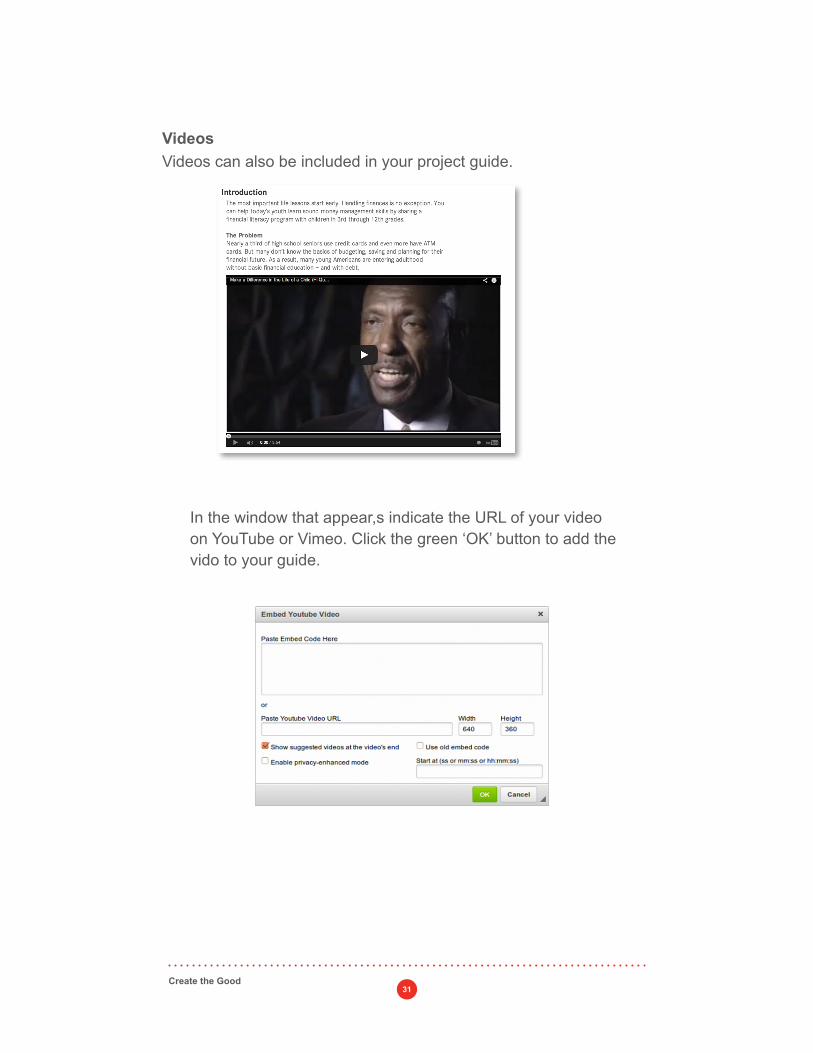
Videos can also be included in your project guide.
In the window that appear,s indicate the URL of your video on YouTube or Vimeo. Click the green ‘OK’ button to add the vido to your guide.
Videos
32Create the Good
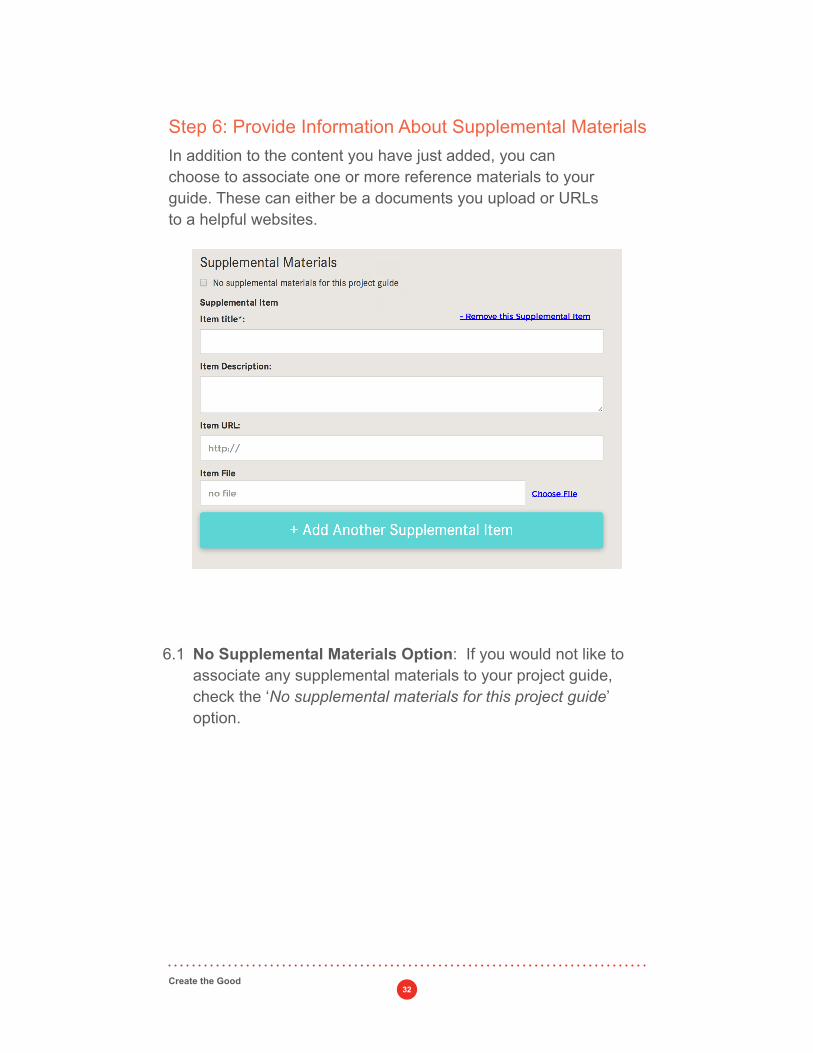
Step 6: Provide Information About Supplemental MaterialsIn addition to the content you have just added, you can choose to associate one or more reference materials to your guide. These can either be a documents you upload or URLs to a helpful websites.
6.1 No Supplemental Materials Option: If you would not like to associate any supplemental materials to your project guide, check the ‘No supplemental materials for this project guide’ option.
33Create the Good
6.2 Add Supplemental Materials: If you would like to add supplemental materials, provide the following for each supplemental item:
The name of the given item.
How the this item will help the project organizer.
The link for a webpage containing useful information about the project.
A document such as a flyer template, example press release or sample sign-in sheet.
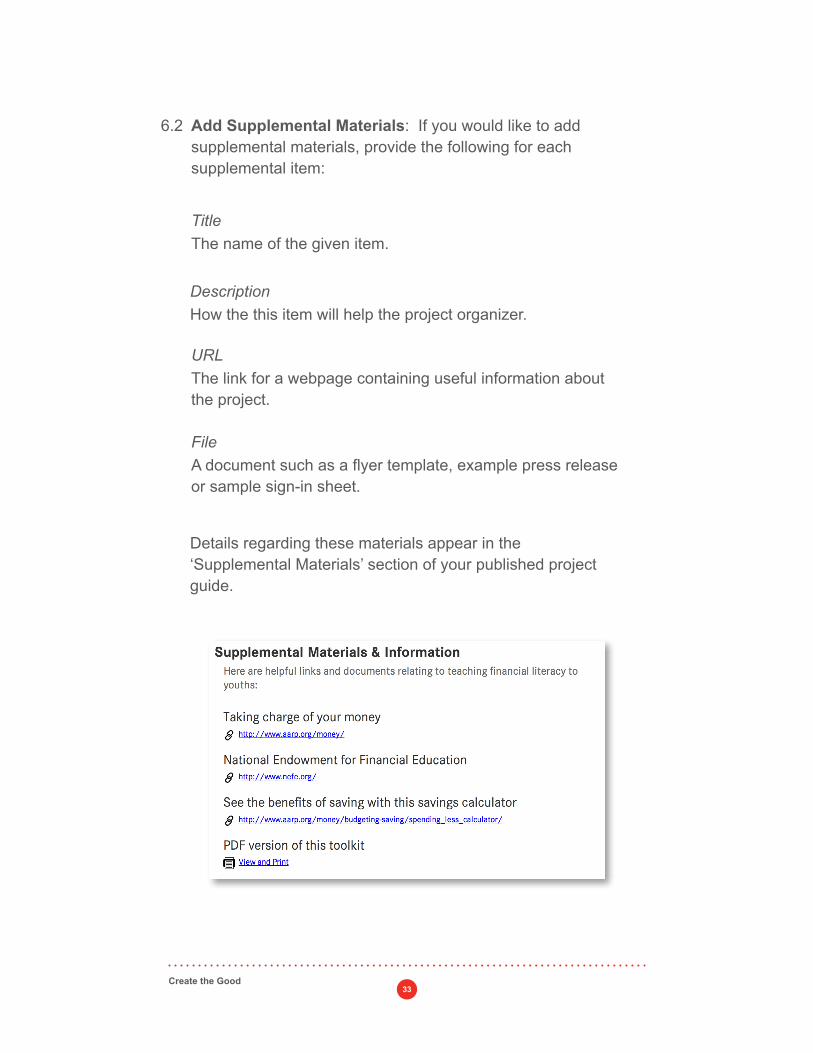
Details regarding these materials appear in the ‘Supplemental Materials’ section of your published project guide.
Title
Description
URL
File
34Create the Good
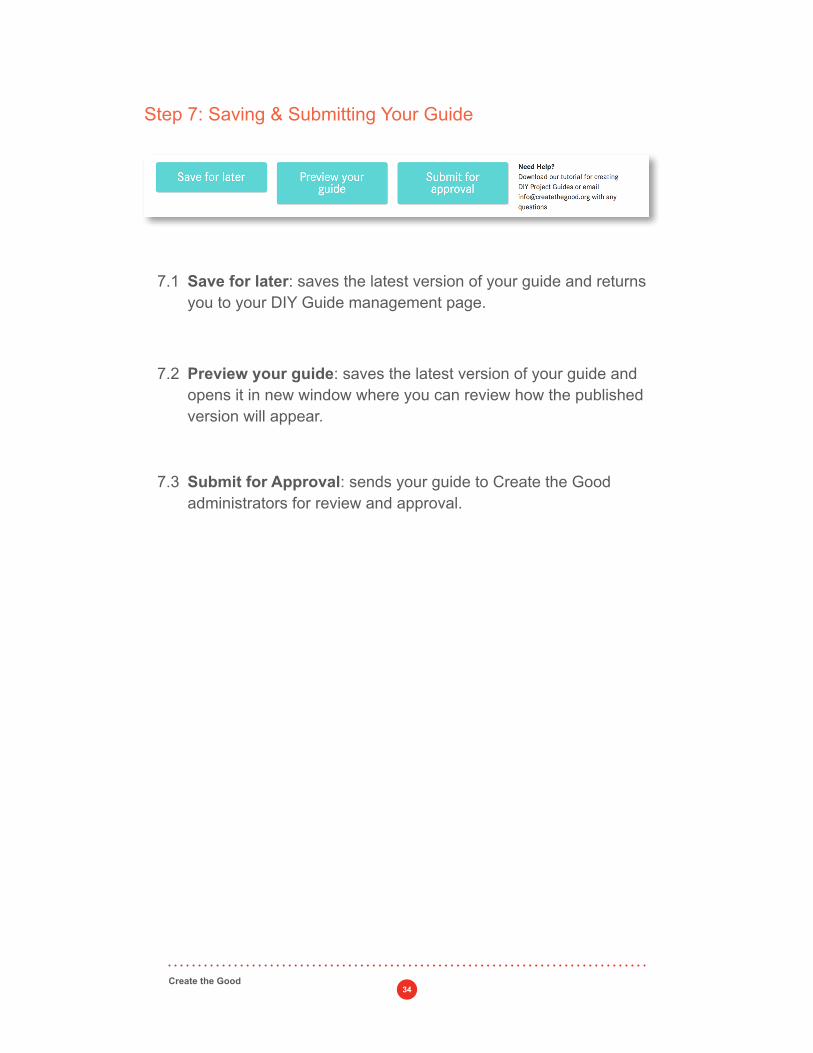
Step 7: Saving & Submitting Your Guide
7.1
7.2
7.3
Save for later: saves the latest version of your guide and returns you to your DIY Guide management page.
Preview your guide: saves the latest version of your guide and opens it in new window where you can review how the published version will appear.
Submit for Approval: sends your guide to Create the Good administrators for review and approval.
35Create the Good
The Submission Process
Once your project guide has been submitted, it will be reviewed within 7 business days by a member of the Create the Good team. You will be notified via the email address you provide (and optionally, the phone number) should Create the Good Administrators have any questions about your guide or need more information.
When the review is complete, you will receive an email indicating whether or not your guide has been approved for publication. During the review process, you are not able to make changes to your submitted guide.
If approved and published, your guide will become available immediately to visitors and members of the Create the Good community. At this point, we encourage authors to promote the guide through social media and/or other means.
Some example tweets and posts:
If your guide is not approved for publication, you can expect an email to let you know, along with a short description of why your guide was not approved. At this point, your guide will return to a ‘Draft’ state where you can make changes and re-submit for approval.
Our Do-it-Yourself project was just published on @CreateTheGood! Try it out and let us know what you think [URL]
Want to add support @nameoforganization at your next family gathering? Learn how with our DIY project on @CreateTheGood [URL]
Want to support @nameoforg but can’t find a way that fits your schedule? Problem solved with our DIY project on @CreateTheGood [URL]
36Create the Good
Please get in touch should you need more information about any of the topics of this guide or about DIY project guides in general. We can be reached as follows.
Email: [email protected] Phone:1-866-740-7719.
Have Questions?