how to give infusion therapy at home with a pump
TRANSCRIPT

EDUCATION
How to Give Infusion Therapy at Home
With a Pump

Phone Numbers
Health care provider’s name: __________________________
Health care provider’s phone number: __________________
Home infusion company: _____________________________
Home care nursing agency: ___________________________
Other numbers: _____________________________________
________________________________________________
________________________________________________

1
Home Infusion Therapy with a Pump
Your health care provider has ordered home infusion therapy for you. Infusion therapy is a treatment that gives medicine through an IV line in your hand, arm or chest area.
Infusion therapy is usually given in the hospital. However, it is possible for some infusion therapy to be given in the comfort of your own home.
The information in this booklet includes information for:
what supplies you will need
how to prepare the tubing and pump
how to flush the catheter using the SASH method and pre-filled syringes
when to call your home care nursing agency
possible problems (complications) and what to do if they occur
activity information.
Important
Wash your hands before preparing your home infusion therapy.

2
What Supplies You Will Need
� infusion therapy bag or cassette with tubing
� pump
� backpack
� alcohol wipes
� 2 pre-filled saline syringes
� 1 pre-filled heparin syringe (if ordered)
� 4 AA batteries or a rechargeable battery pack
Alcohol wipes
Supplies for home infusion therapy
Pump
Rechargable battery pack and cord
Backpack
Saline syringes
Heparin syringes
Batteries
Important
You will only have one type of heparin (yellow or blue cap) syringe.
Tip
You may need to replace the batteries in the pump. Keep a stock of AA batteries on hand in case you need them. You can also use a rechargable battery pack.

3
Preparing the tubing and pump
1. You will have one of the following:
— an infusion therapy bag with tubing connected or
— a cassette with tubing connected.
2. Pull the blue clip from the bottom of the cassette.
Cassette with medicine
Tubing
Tubing
Bag
Blue clip
Blue clip
Cassette
All photos © Allina Health System
Infusion therapy bag with tubing connected
Cassette with tubing connected
4
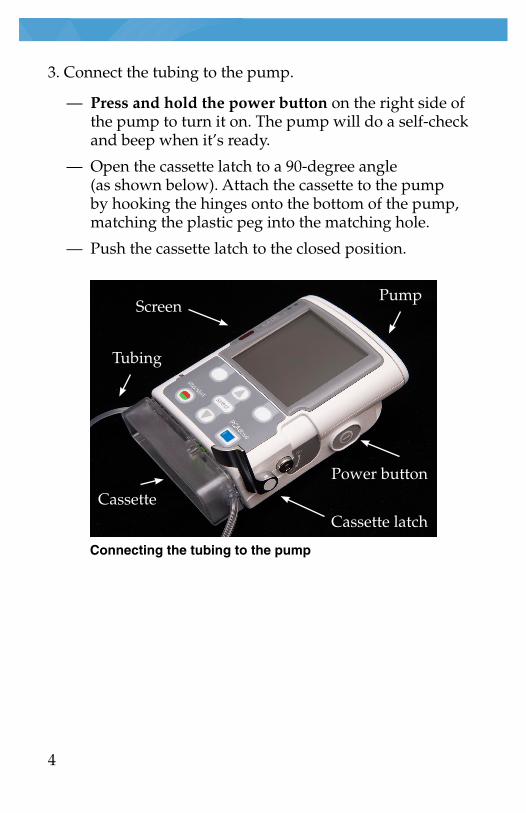
3. Connect the tubing to the pump.
— Press and hold the power button on the right side of the pump to turn it on. The pump will do a self-check and beep when it’s ready.
— Open the cassette latch to a 90-degree angle (as shown below). Attach the cassette to the pump by hooking the hinges onto the bottom of the pump, matching the plastic peg into the matching hole.
— Push the cassette latch to the closed position.
Cassette latch
Power button
Screen
Tubing
Cassette
Connecting the tubing to the pump
Pump

5
4. Reset the reservoir volume.
— You should see Reset reservoir volume to ...? on the screen. (The volume will be specific to your infusion therapy.) Select “Yes.”
5. Prime the tubing.
— You should see Prime tubing? on the screen. Select “Yes.”
— You should see Disconnect tubing from patient, open clamps, then press “prime” on the screen. Select “Prime.”
— When you see liquid at the end of the tubing and no air is left, select “Stop priming.”
— You should see Continue priming? on the screen. Select “No” if you see liquid at the end of the tubing and no air is left.
Important
Make sure the filter on the tubing hangs straight down as it primes.
The buttons you will use to select options on the screen
All photos © Allina Health System
Pump

6
6. Flush the IV catheter. (See instructions below.)
7. Remove the cap from the end of the tubing. Connect the end of the tubing to your IV line.
8. You should see Start pump? on the screen. Select “Yes.” You should see Infusion is starting now on the screen.
Flushing Your IV Catheter
You have had a _________________________________ IV catheter placed under your skin (into your vein). The IV must be flushed at certain times to prevent it from becoming plugged.
Supplies you need
Four alcohol wipes
One or two pre-filled saline (sodium chloride) syringes. If you have been instructed to do a flush with heparin, use one or two heparin syringes. The number of syringes you’ll need will depend on how many ends (lumens) your catheter has.
Flushing your IV catheter
Your health care provider may teach you a technique called the “SASH method” to flush your IV catheter.
SASH stands for:
S: Saline
A: Administer medicine
S: Saline
H: Heparin (if ordered)
Use the guide on the next page to help you use the SASH method.

Un
clamp
cath
eter if yo
ur IV
lin
e has
a clamp
SA
SH
Meth
od
SS
AH
� In
fusio
n p
um
p
Ad
min
ister Med
icine
every ___ ho
urs
over ___ min
utes
Clam
p
catheter
if you
r IV
line h
as a clam
p
Salin
e ___ m
Ls
every ___ ho
urs
Salin
e ___ m
Ls
every ___ ho
urs
Hep
arin (if o
rdered
) ___ m
Ls every ___ h
ou
rs �
10 un
its per m
L
� 100 u
nits p
er mL
Scrub for 15 second
sScrub for
15 seconds
Scrub for 15 second
sScrub for
15 seconds

8
How to flush the catheter with a pre-filled syringe
Clean your work area, gather your supplies and wash your hands before starting.
Remove the pre-filled saline syringe from the package.
Remove the cap or plastic cover from the tip of the syringe.
Hold the syringe so the tip points upward.
Slowly push up on the barrel or plunger of the syringe to remove air bubbles from the syringe.
Hold the syringe between your middle finger and pointer finger (index finger) to keep the tip of the syringe from touching anything.
Pick up an alcohol wipe. Open the alcohol wipe and scrub the end of the cap or the valve on the tip of the catheter for 15 seconds. Allow to dry for 15 seconds.
Screw the syringe firmly into the end cap or valve of the catheter.
If your catheter has a clamp on it, open the clamp.
Push on the plunger or barrel of the syringe in a push-pause motion. Push (or flush) the saline solution into the catheter. The push-pause motion creates motion (turbulence) in the catheter to clean it better.
Cleaning the catheter while holding the syringe in one hand. Be sure the syringe tip does not touch anything.
Screw the syringe into the end of the cap.

9
If you feel resistance while flushing, stop. Do not force it. Resistance could mean the catheter is plugged. Forcing the syringe flush may damage the catheter or break off an internal blood clot in your bloodstream, which could be very dangerous. Make sure if you have a clamp, it is open. If you cannot flush the catheter, call your home care nursing agency or home infusion pharmacy.
If your catheter has a clamp on it, clamp the catheter when you are done with the flush.
After flushing the catheter, unscrew the syringe from the end of the catheter and throw the syringe away.
Repeat the steps to flush the second end if the catheter has two ends.
Straining or heavy lifting may make blood back up into the catheter. If you see blood in the catheter, flush right away using the above steps. Flush again at the routine time.
Notes or questions for your home care nursing agency:
______________________________________________________
_____________________________________________________
______________________________________________________
______________________________________________________
If your catheter has a clamp, be sure to open and close it as you were taught.
All photos © Allina Health System

10
When to Call Your Home Care Nursing Agency
Call your home care nursing agency if:
the catheter breaks or comes out
you have shortness of breath or feeling of discomfort in your chest
you have swelling of your hand, arm, chest, shoulder or neck on the side where the catheter is
you are unable to flush the catheter with normal pressure
the dressing gets wet or becomes loose
you have a burning sensation when flushing the catheter
bleeding at the catheter site after the first couple of days
you have signs of infection, which may include:
— a temperature of 100.4 F or higher
— chills, shaking, body aches or sweating, especially when flushing the IV catheter
— pain at the catheter or along the catheter where it lies under the skin
— increased redness, swelling, drainage or pain where the catheter comes out of the skin.
Problems (Complications)
If the catheter breaks
If there is a clamp, clamp the catheter right away.
If there is not a clamp, bend and pinch the catheter so it is folded.
Keep the fold in place with a rubber band or tape.
Go to your nearest hospital Emergency Department to have the catheter repaired or removed.

11
If the catheter is accidentally pulled out
If the catheter pulls out only a little, call your home care nursing agency.
If the catheter pulls out all the way, apply pressure over the skin area where the catheter was located.
Go to your nearest hospital Emergency Department. (Bring the catheter.)
Call 911 if you have shortness of breath or chest pain.
If the cap at the end of the catheter comes off and blood comes out
If there is a clamp, clamp the catheter.
If there is no clamp, pinch the catheter or fold it to stop the blood flow.
Clean the end of the catheter with an alcohol wipe.
Screw a new cap onto the end of the catheter.
Unfold the catheter.
Flush the catheter in the usual manner.
Call your home care nursing agency.
Other Information
Activity
Work, exercise and sexual activity can be done if allowed by your medical condition or as instructed by your home care nursing agency. Tape the catheter in place and make sure it is not pulled during activity.
Ask your home care nursing agency if you can swim or go in hot tubs. You may not be able to do either if you are at risk for infection. Remember, the dressing and catheter cannot get wet.

12
Catheter site
Call your home care nursing agency right away if the dressing gets wet or becomes loose, or if you have skin irritation.
Look at the skin where the catheter comes out every day. Call your home care nursing agency if there is any new redness, swelling, drainage or pain.
Avoid wearing clothing or fabric that may rub or catch on the catheter.
Tape the catheter to your skin to prevent it from being pulled.
Stitches
In some cases, the stitches (or sutures) are removed 2 to 4 weeks after the IV catheter is inserted. Ask your home care nursing agency if the stitches should be removed.
Identification card
Always carry your card that identifies the type of catheter you have.
Call your home care nursing agency if you have any questions or concerns.

13

allinahealth.org
© 2020 ALLINA HEALTH SYSTEM. TM – A TRADEMARK OF ALLINA HEALTH SYSTEM.OTHER TRADEMARKS USED ARE OWNED BY THEIR RESPECTIVE OWNERS
THIS BOOKLET DOES NOT REPLACE MEDICAL OR PROFESSIONAL ADVICE; IT IS ONLY A GUIDE.
gen-ah-28739 (1/19)