how to install a micro-air easystart on an atwood
TRANSCRIPT
1
How to Install a Micro-Air EasyStart on an Atwood AirCommand AC-1511 and Clean the Evaporator Ray Pesek Orig: June 8, 2021 Rev: These directions should also be applicable to the AC-1361 13,500 BTU unit as well as to the unducted units. They all use the same installation and service manuals from Atwood.
Estimated time, including the evaporator cleaning but without the 30 minutes of “Learning” at the end: 4 hours. Since much of the disassembly and reassembly was solely for the evaporator cleaning, I’d bet the actual EasyStart installation was maybe 2 hours.
Tools needed: I did not buy the Micro-Air $10 installation kit, which includes some of these items. The * items were used solely for the evaporator cleaning portion, which is optional.
#2 Phillips screwdriver
WD-40
Tie wraps
Silicone sealant
Crimping tool
Wire strippers
Yellow butt splices
Needle-nosed pliers
Side cutters
Electrical tape
Method of securing the EasyStart, either four 1/2” to 3/4” length self-tapping screws or bolts and locking nuts.
o If using bolts and locking nuts, a drill and a 1/4" drill bit
* Small brush or toothbrush to clean dirt off the evaporator fan squirrel cage blades
* One or two cans of “no rinse” air conditioner evaporator cleaner a.k.a. “A/C Coil” cleaner. A single 19 ounce can was not quite enough for two units.
* Old towel to keep dirt and dirty water from the evaporator out of the RV interior
* Spray bottle of water
How do you know if your evaporator needs cleaned? It’s actually pretty easy. Remove the panel with the air filter from the ceiling. Take a flashlight and shine it straight up. You’re looking at the evaporator, the large “panel”. If you see a lot of dirt on the evaporator it needs cleaned.

2
The placard showing my “Locked Rotor Amps”, the power requirement that the EasyStart reduces
That 63 amps is what the EasyStart greatly reduces.
ELECTRICAL SAFETY - Turn off all power to the RV Shore power unplugged and batteries disconnected. You will be working with an electronic component known as a “capacitor”. A capacitor stores electricity and can still hold a charge for a while after power has been removed.
Remove the shroud Remove the four Phillips screws and washers securing the shroud to the air conditioner. Lift up on the rear of the shroud and work it back and forth to lift it off. DO NOT FORCE IT OFF. There may be something caught under the cover.
Secure the four rubber washers On top of the unit you’ll see a rubber washer that sits between the shroud and the unit, one under each of the Phillips screws. Mine were just sitting there so I lifted them off and placed them over one of the mounting bolts protruding from underneath to keep from losing a washer.

3
Picture with the exterior shroud removed
The two black horizontal “bars” actually are blocks of foam for the shroud to rest on. That wide metal panel next to the Styrofoam is actually L-shaped. The EasyStart will be mounted to the vertical part, which is not visible in this picture. While you can mount the EasyStart using the double-backed tape and a few self-tapping metal screws without removing that L-shaped frame piece, I removed that frame piece for the evaporator cleaning so I mounted the EasyStart while it was removed.

4
Once the shroud is removed, inspect for “critter” nests inside the unit and on the inside of the removed shroud
Let’s just say the former occupants of that nest were not happy that their house was no longer where they left it…
5
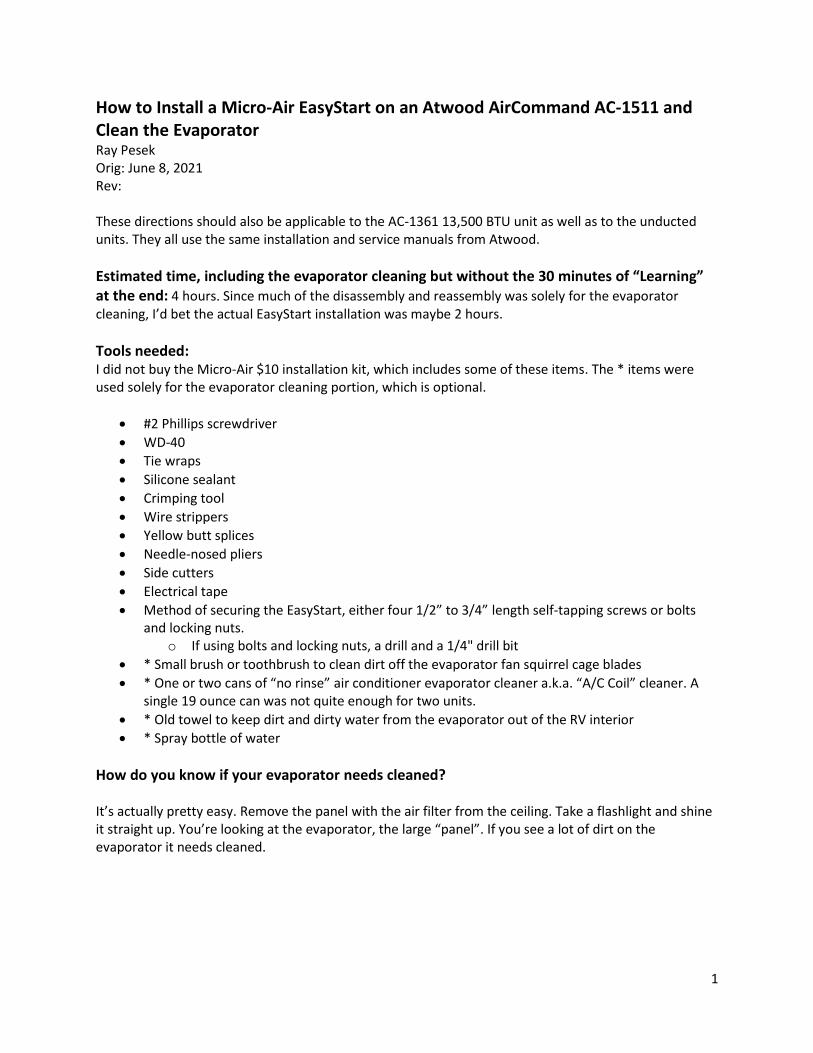
If you’re NOT cleaning the evaporator, skip to page 10
OPTIONAL: Cleaning the evaporator, which should be done once a year Cleaning the evaporator is recommended as it accumulates dirt and that hurts the cooling efficiency. When I installed the EasyStart I also performed the extra steps to clean the evaporator. The evaporator sits inside that Styrofoam cover, which is actually two pieces. Remove the screw and star washer securing the green ground wire, move the wire out of the way, and place the screw and star washer back in the hole to avoid losing them. The Styrofoam cover is held in place by a strap that runs from one side to the other side. That Styrofoam cover also sits partially under some metal pieces. There was some kind of deteriorated wide tape along the bottom which was just sitting there loose and all crinkly on mine so I just threw it away. I think it was used to hold the top of the Styrofoam cover to the bottom piece. There’s a lip between the two Styrofoam pieces so I saw no need for the tape. Remove one of the screws on the strap and insert the screw back into its hole to avoid losing it. Flip the strap over the Styrofoam cover to get it out of the way. On the driver side you’ll see some wires underneath the strap. Note how the wires are run because you’ll want to put them back the same way.
6
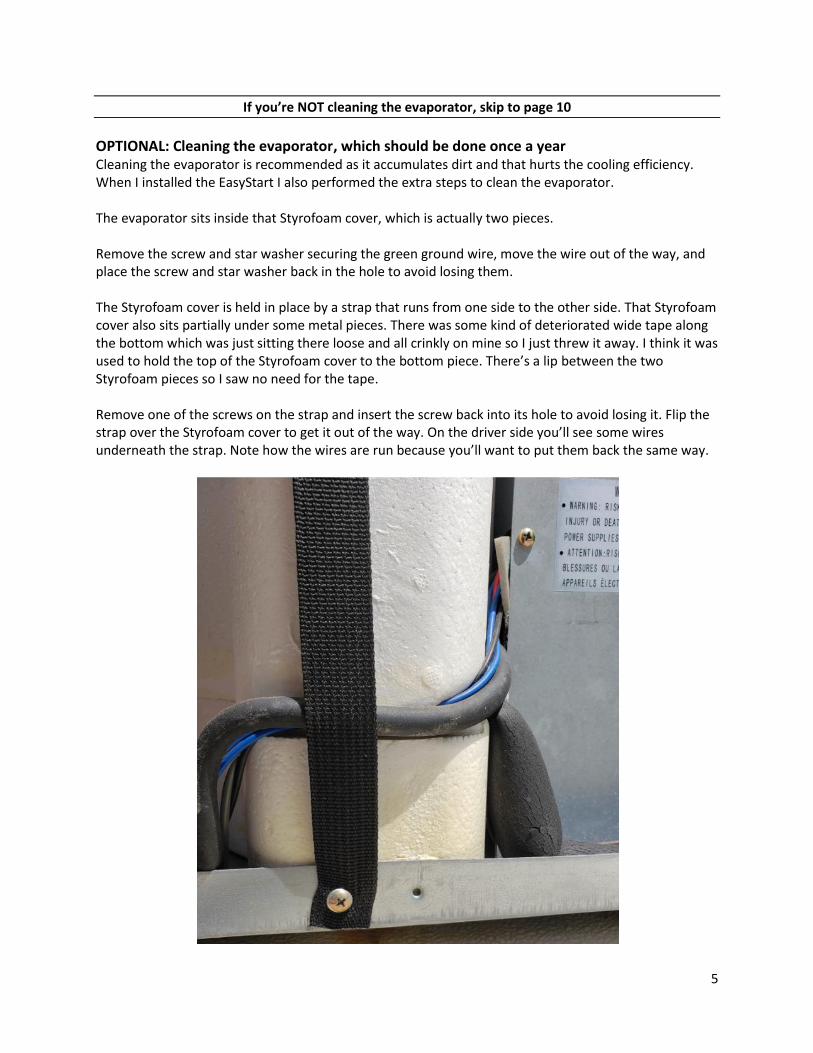
There are three metal braces running across the Styrofoam cover that need removed. Use a Ziplock bag or another method to hold the screws to avoid losing them. I just placed them inside the unit. Remove the screws from each end of the three braces. One screw is underneath each piece of foam so you’ll have to gently rip one end of the foam loose to access that screw. Those braces hold the two fans and the compressor in their proper position so they are under some tension and likely will move once the screws are removed. Remove the screws securing that wide L-shaped metal frame and remove it. The EasyStart will eventually be mounted to this L-shaped frame. Once all three braces and the L-shaped frame piece are removed, while wiggling the top of the Styrofoam cover, lift it off.
Picture after the braces, L-shaped frame and the Styrofoam cover are removed. The evaporator has been cleaned already.
The compressor is the cylinder in the upper right of this picture, underneath the green wire, with the rod sticking up. That is the rod that sticks through a hole in one of the metal braces. The black wire attached to the right front of the evaporator is the room temperature sensor. In this view it’s in the lower right corner.

7
On the front side of the evaporator you’ll notice you can look directly down and through to the inside of the RV. Since we do not want any of the cleaning foam to run inside the RV, place an old towel over the hole. Most of the foam residue will follow the normal condensate draining path and not go inside the RV but why take a chance? Using a “no rinse” evaporator cleaning spray, which is available at hardware or big box stores, shake the can and liberally spray the front of the evaporator to completely cover it. The “no rinse” cleaner literally means that. It’s safe to just let it sit and the condensation from normal usage will rinse any residue away. Dometic sells a “no rinse” cleaner and I bought a 19 ounce can for about $10 from Amazon. One can was not quite enough to do both air conditioners.
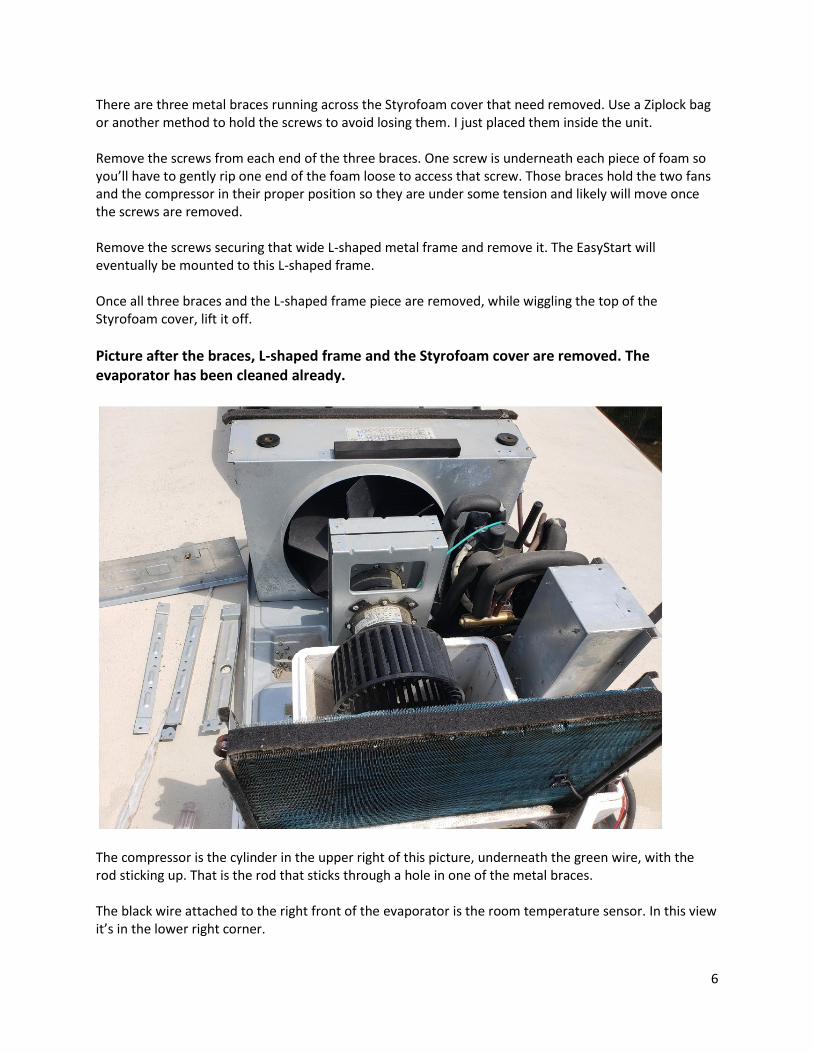
Picture of the dirty evaporator. This one is about two years since new. The other one was dirtier.
8
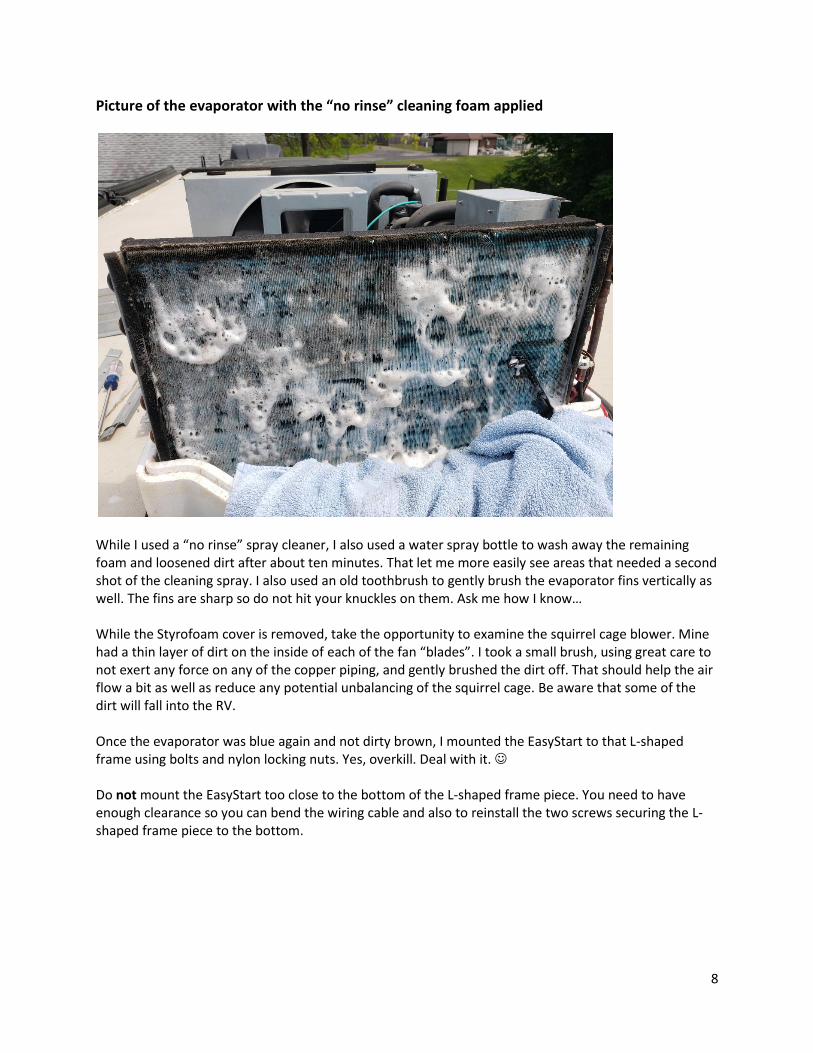
Picture of the evaporator with the “no rinse” cleaning foam applied
While I used a “no rinse” spray cleaner, I also used a water spray bottle to wash away the remaining foam and loosened dirt after about ten minutes. That let me more easily see areas that needed a second shot of the cleaning spray. I also used an old toothbrush to gently brush the evaporator fins vertically as well. The fins are sharp so do not hit your knuckles on them. Ask me how I know… While the Styrofoam cover is removed, take the opportunity to examine the squirrel cage blower. Mine had a thin layer of dirt on the inside of each of the fan “blades”. I took a small brush, using great care to not exert any force on any of the copper piping, and gently brushed the dirt off. That should help the air flow a bit as well as reduce any potential unbalancing of the squirrel cage. Be aware that some of the dirt will fall into the RV. Once the evaporator was blue again and not dirty brown, I mounted the EasyStart to that L-shaped frame using bolts and nylon locking nuts. Yes, overkill. Deal with it. Do not mount the EasyStart too close to the bottom of the L-shaped frame piece. You need to have enough clearance so you can bend the wiring cable and also to reinstall the two screws securing the L-shaped frame piece to the bottom.

9
Picture of the EasyStart mounted to the L-shaped frame
Now that the evaporator is clean and the EasyStart is mounted, place the Styrofoam cover back in place. Replace that strap, taking care to route the driver side wires in that “slot” in the Styrofoam and under the strap. Reattach the L-shaped frame and reattach the three braces. You may need to exert a bit more force than expected to get those two fans lined back up with the holes in the braces and you also may need move the compressor a bit to get its rod stuck back through the hole in the driver side brace.

10
If you chose to NOT clean the evaporator, continue from here
Mount the EasyStart to the L-shaped frame if not cleaning the evaporator If you chose to skip the steps needed to clean the evaporator, go ahead and mount the EasyStart. There is no wiring or plumbing behind where it gets mounted, just the Styrofoam cover. Use appropriately sized self-tapping sheet metal screws and/or the Micro-Air double-sided tape as desired.
While Micro-Air says you can use their double-sided tape only, I also would run a few screws in just in case…
Do not mount the EasyStart too close to the bottom of the L-shaped frame piece. You need to have enough clearance so you can bend the wiring cable and also to reinstall the two screws securing the frame piece.
OK, on to wiring up the EasyStart The EasyStart is on the passenger side of the unit but the compartment it gets connected to is on the driver side. I chose to run the EasyStart cable on the rear side of that L-shaped frame, along the bottom of the Styrofoam cover and over to the driver side.
Why did I not run the cable along the top of the braces, securing them with tie wraps? I could have but along the bottom just looked cleaner to me. Whichever way you decide to route that cable, remember that you will have to remove (or just move) that L-shaped frame for future evaporator cleaning. You can run that cable any way you want. Just be certain the cable can never hit anything unintended if it comes loose and that you can still remove all of the pieces-parts needed to access the evaporator.

11
The capacitor (and the unit’s electronic control board) are located directly opposite the EasyStart. Remove the cover over that area. Take care to note that a thin copper line runs across the bottom “lip” of that cover. Do not place any stress on that copper line while removing or installing the cover. Yes, one of the screws you just reinstalled if you cleaned the evaporator will need to come out.
Now that the cover is removed and the cable is on the driver side, how the heck to we get that EasyStart cable into that little compartment? I really did not want to drill another hole and risk having metal chips or shavings get on the control board and damage it. There already are two holes in the back side of that compartment with cables running through a grommet in each hole. On front air conditioner, it looked like the top grommet had enough room to fit the EasyStart cable through it and it did. But…Atwood had stuffed that grommet full of some kind of tough brownish sealant. Using small side cutters and needle-nosed pliers I carefully worked at removing enough of that sealant to open a hole all the way through the sealant. This had to take ten minutes or more as I could only remove tiny bits of sealant at one time due to the limited working area. Do not rush this step. There is a lot of copper plumbing that you could easily bend and weaken or rupture. I also used a drill bit and turned it by hand to help remove the sealant inside the grommet. Be very careful. You do not want to damage the existing wires or the grommet. Once you have a hole in the sealant, thread each wire of the EasyStart cable through with care. The two wires with the pre-crimped ends will be the most difficult and the needle-nose pliers will help. They should be pushed through first followed by the two wires without terminal ends. Then pull the cable itself through the grommet.

12
Say hello to my little friends! (This picture is from my rear air conditioner)
So how did those little fellows get into a sealed compartment on the rear air conditioner? Because Atwood did not completely fill the bottom grommet with sealant. That actually made it easier than the front unit to get the wires inside the compartment. Unlike the front air conditioner where I had to carefully and slowly remove that brown sealant, enough sealant was missing from the rear air conditioner that I could push the wires through the grommet, the same way the stink bugs went through. I did not cut the EasyStart cable to shorten it at all; I just ran it “down” and then “up” inside the compartment.

13
Identifying the White and Black wires from the compressor On mine it was easy. All of the cables coming through the two grommets were black-jacketed except one. That one cable was white and actually was a braided sleeve over three wires instead of a molded jacket, the three wires from the compressor!
Cut any tie wraps inside the compartment securing that braided sleeve and its three wires so you can isolate the wires coming from the compressor.
14
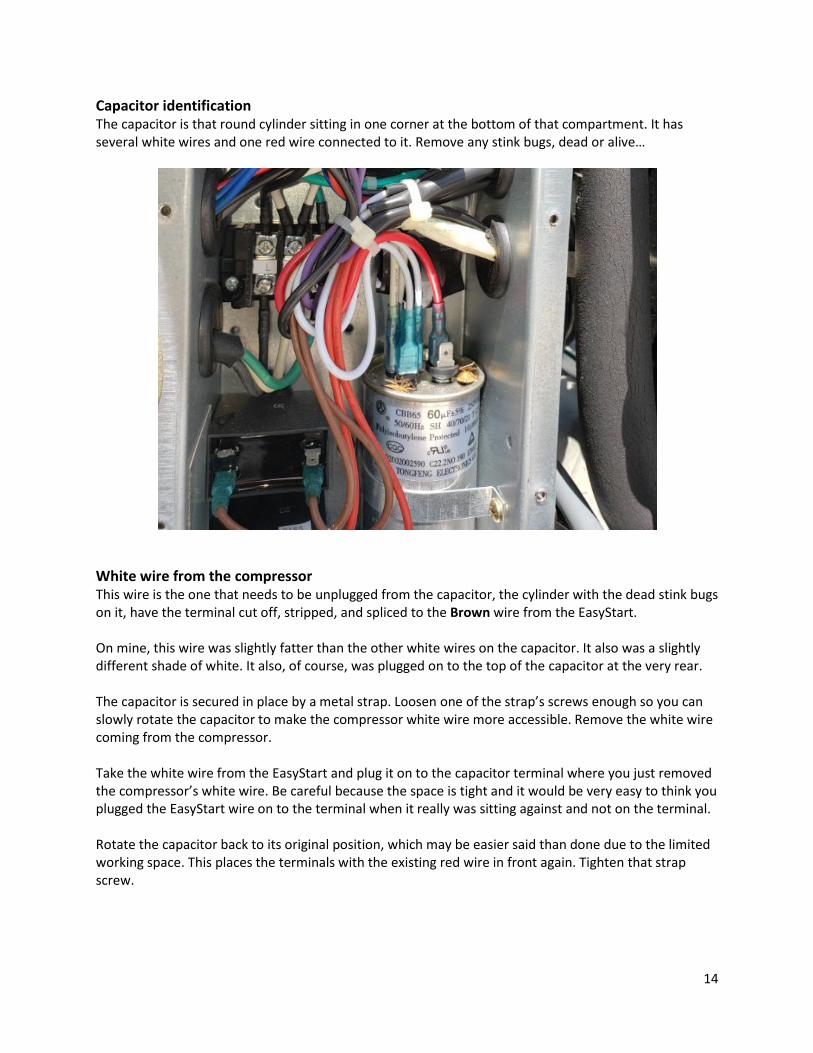
Capacitor identification The capacitor is that round cylinder sitting in one corner at the bottom of that compartment. It has several white wires and one red wire connected to it. Remove any stink bugs, dead or alive…
White wire from the compressor This wire is the one that needs to be unplugged from the capacitor, the cylinder with the dead stink bugs on it, have the terminal cut off, stripped, and spliced to the Brown wire from the EasyStart. On mine, this wire was slightly fatter than the other white wires on the capacitor. It also was a slightly different shade of white. It also, of course, was plugged on to the top of the capacitor at the very rear. The capacitor is secured in place by a metal strap. Loosen one of the strap’s screws enough so you can slowly rotate the capacitor to make the compressor white wire more accessible. Remove the white wire coming from the compressor. Take the white wire from the EasyStart and plug it on to the capacitor terminal where you just removed the compressor’s white wire. Be careful because the space is tight and it would be very easy to think you plugged the EasyStart wire on to the terminal when it really was sitting against and not on the terminal. Rotate the capacitor back to its original position, which may be easier said than done due to the limited working space. This places the terminals with the existing red wire in front again. Tighten that strap screw.

15
Orange wire from the EasyStart This one is the easiest to connect. On the same capacitor you’ll see an existing red wire. There is an empty terminal available to use next to the red wire. Plug the orange wire from the EasyStart on to that unused terminal. Take care again to assure the orange wire terminal is actually on the capacitor terminal and not next to it.
Brown wire from the EasyStart This wire gets spliced to the white wire coming from the compressor, the one you unplugged from the capacitor. Cut the terminal off the white wire, strip some insulation away, and crimp the brown wire to the white wire. I used a yellow butt connector.
Black wire from the EasyStart This wire needs spliced to the black wire coming from the compressor. You need to locate that black wire coming from that white braided sleeve, pick a good place where you have room, and cut that wire. Strip both ends of that black wire an appropriate amount and use a crimp connector to connect all three black wires together. I used a yellow butt splice myself.
Check all crimped connections for security Give each of the black wires a good tug to assure they are crimped solidly in place. Do the same for the brown and white wires that are crimped together. Take some electrical tape and cover each crimp connector and some of the wiring for good measure.
Inspect all wiring for clearance Place the wires within the compartment so there is no chance they can be pinched by the cover or otherwise stressed or stress anything else.
Double-check that the wiring is correct You know, just in case you have orange-white-black-brown color blindness or something.

16
Add sealant to that grommet Take some sealant (I used clear silicone) and liberally apply it to that grommet to assure there is no possibility that water could ever run along the wires and into the compartment with the control board.
Install the compartment cover Be very careful not to crunch or otherwise damage that thin copper line that runs across the bottom lip of that cover. Also be careful that the cover is not pushing on any of the wiring inside the compartment.
Re-check everything you touched Be certain you do not have any leftover screws and that all screws you removed are tight. Assure that the one blower accessible from the outside rotates easily and is not rubbing on anything. Go inside the RV and remove both ceiling covers if you have not already done so. There may be dirt on the floor or on the back of those covers that got brushed off the squirrel cage blower so be certain to protect your eyes. Reach up and assure that the squirrel cage blower rotates easily.
We’re ready to test! The learning process is pretty easy. Plug into shore power and turn the house batteries on. Turn the air conditioner on and set to Cool, set the thermostat to a very low temperature, let the compressor run for 30 seconds and turn the air conditioner off. Pro tip: If you’re doing the EasyStart installation when it’s cold, run the RV furnace to raise the temperature inside. Wait five minutes and do that again. Perform this process a total of five times and the learning process is completed. But… There are two considerations. The first is that the EasyStart starts the fan first and then starts the compressor about five seconds later where both used to start simultaneously. The second is that the EasyStart eliminates that WHUMP or BANG when the compressor starts, even on the first run. It’s no longer easy to tell when the compressor actually kicks in. That’s a Good Thing ™ What I did was turn the air conditioner on, let it run for five seconds, and then let it run 35 more seconds for a total of 40 seconds. I never could tell when the compressor actually started but this worked.
Install the roof shroud If needed, set those four rubber washers back in place. I put some silicone sealant under each one to help hold them in place. Place the shroud back on the unit. Take some WD-40 or equivalent and spray each of the four mounting screw holes to help keep rust away. Install those four screws and their washers. Congratulations!