how to make, use and enjoy - the solar cooking world network
TRANSCRIPT

Solar Cookers Internationalspreading solar cooking to benefit
people and environments
How to make,
use and enjoy10th edition
SOLAR COOKERS How to make, use and enjoy
10th Edition, 2004
This guidebook is a sum of contributions from educators, engineers, long-time solar cooks and promoters, most of who served as volunteers with Solar Cookers International (SCI). Special thanks to Mark Aalfs, Paul Barth, Elinor Benes, Roger Bernard, Rick Blodgett, Barbara Blum, Bev Blum, Georgianna Borgens, Jay Campbell, Don Coan, Sherry Cole, Ramón Coyle, Maria Gonzalez, Gerri de Graaf, Tom Juring, Barbara Kerr, Barbara Knudson, Beth Luna, Dave Maize, Paul Mellersh, Bob Metcalf, John Murphy, Faustine Odaba, Joe On, Margaret Owino, Ed Pejack, Kevin Porter, Mark Rothman, Louise Seeley, Clark and Eleanor Shimeall, Randy Smith and Kim Victorine. This edition received support from the Richard and Rhoda Goldman Fund and the Sacramento Area Earth Day Network. Past editions of this booklet were supported by the American Conservation Association, the Educational Foundation and the W. Alton Jones Foundation.
Solar Cookers International is a 501(c)(3) nonprofit, nongovernmental organization spreading solar cooking to benefit people and environments.
Solar Cookers International
1919 21st Street, Suite 101Sacramento, California 95811-6827
United States of America
Tel: +1 (916) 455-4499Fax: +1 (916) 455-4498
[email protected] | solarcooking.org

CONTENTS
IntroductionWhy solar cook? 3Is solar cooking for you? 4
Solar cooker conceptsTypes of solar cookers 6How solar cookers work 7Frequently asked questions 8
How to make and use solar cookersModel 1: Panel cooker (the CooKit) 12Model 2: Box cooker 18Substitute materials 26
Solar recipes and tipsGrains, Pasta 31Legumes 32Meats 33Vegetables 34Fruit 35Breads, Baked goods 36Other foods 37Quick treats 38
Alternative solar cooker usesSolar pasteurization 40Other uses 42
Ideas for teachersQuickie demo CooKit 44Solar activities 45
A brief history of solar cookingA brief history of solar cooking 52


SECTION 1 INTRODUCTION

�
SOLAR COOKERS How to make, use and enjoy
What exactly is a solar cooker? It is a device that allows you to cook
food using the sun’s energy as fuel. Is it really possible to cook with the sun? Yes, and this booklet will show you how. It will walk you through the process of building a simple solar cooker, using the cooker, and teaching simple solar cooking concepts to others.
From the beginning of time — and still for many today — daily cooking has required fire, fuel gathering and frequent attention to be sure foods cook evenly, don’t burn and don’t stick to the pot.
Depending on where you live and how you cook, solar cooking can save you time, work and fuel. And it’s environmentally benign. All foods can be cooked in some type of solar cooker. This booklet covers low- to medium-temperature solar box cookers and solar panel cookers (“CooKits”) that slowly and gently cook all the foods you boil, roast or bake. Other types of solar cookers reach high temperatures capable of frying.
Slow cooking is different, but the differences are nice. Slow cooking retains flavor, moisture and nutrients, and makes meats tender. Recent studies indicate that foods cooked at moderate temperatures may be healthier.
When solar cooking, add approximately one hour to normal cook times. No need to watch, stir or worry about food. The cook spends just two minutes: one to put food in and one to take food out. For many of us, solar cooking has become our favorite way to cook.
Solar cookers complement traditional cooking methods, which are still used at night and during inclement weather.
This booklet includes solar cooking concepts, solar cooker construction plans and directions for use, recipes, student activities and examples of non-cooking uses of solar cookers
including solar water pasteurization — a basic survival skill.
Solar cooking can make a world of difference if we each use it on sunny days and share this information with others. SCI depends on the support of its members and donors to continue to bring this life-saving knowledge to millions of families in fuel-scarce, sun-rich parts of the world. We invite you to join us in this effort.
Bon appétit!

SOLAR COOKERS INTERNATIONAL
�
WHY SOLAR COOK?
Solar cookers save money and time
Sunshine is free. Solar cooking saves precious fuel for evenings, cloudy days and cold weather.
Foods cook unattended while you do other things.
Pots are easy to clean. Food doesn’t stick on the inside and there’s no soot on the outside.
A solar cooker is easy to make from a variety of materials.
Solar cookers are safe, healthy and convenient
There is no fire to cause burns or blow out of control.
There is no smoke to injure eyes and cause lung problems. People allergic to smoke can now enjoy “solarcues” — barbecues without the smoke.
Most solar cookers cook at 82-121ºC (180-250ºF), ideal for retaining nutrients, moisture and flavor and not burning foods. Wood and gas fire temperatures, by contrast, exceed 260ºC (500ºF).
You can bake, boil and lightly fry foods in their own juices. Meats get very tender.
Solar water pasteurization is a skill everyone should know for emergencies.
When solar cooking, your kitchen stays cool on hot, sunny days.
A CooKit folds for easy storage or carrying for meals away from home.
Solar cookers are versatile and adaptable
The simple technology is easily adapted to a wide variety of construction materials, cooking customs and climates.
Solar cookers are life-saving devices for those in sunny, fuel-scarce regions
Solar cookers help two of the world’s pressing problems — growing shortages of cooking fuels and the scourge of waterborne diseases. Half the world’s population cooks over wood fires. According to the United Nations, about one-third of us — two billion people — now suffer fuel wood shortages. Women, and sometimes children, must carry fuel further distances, and spend more time doing so, than in the past. Some urban families spend 30-50% of their income on
�
SOLAR COOKERS How to make, use and enjoy
cooking fuel or must barter away food for fuel to cook the remainder. Families drop the nutritious foods that require lengthy cooking — such as legumes — from their diet, contributing to malnutrition. Many governments import and subsidize fossil fuels. With solar cookers families often reduce fuel wood needs by half.
Pasteurizing water and milk in solar cookers can help reduce Cholera and other waterborne diseases, which kill 50,000 people every day. The World Health Organization estimates 80% of all illnesses are spread through contaminated water.
Solar cookers save trees and soil
In deforested areas, efforts to protect scarce trees fail when people have no alternatives to wood-fueled cooking. As a government administrator in Zimbabwe said, “When trees are gone, then follows erosion of the soil. ... The farmer is unable to use the land. ... The soil is washed into the river. Water needed for irrigation is no longer there. Then cotton and wheat are more expensive. ... This is a circle without end.”
Each solar cooker in sunny, arid climates can save one ton of wood per year.
Solar cookers help air quality
Burning traditional fuels such as wood and gas pollutes the air and contributes to global warming. Solar cookers provide a pollution-free alternative.
A checklist
Do you have mostly-sunny days several months of the year? (Essential)
Do you have a space outside that is sunny for several hours, sheltered from high wind and safe from theft or tampering?
Are your cooking fuels expensive or scarce?
Does your kitchen sometimes get too hot or your barbecue too smoky?
Do you worry about safety of small children near your kitchen stove or open cooking fire?
Do you want to prepare for emergencies or camping when you may not have safe drinking water?
Would you like carefree, absentee cooking?
If you checked several boxes, you’ll probably like solar cooking!
IS SO
LAR
COOK
ING
FOR
YOU?

SECTION 2 SOLAR COOKER CONCEPTS

�
SOLAR COOKERS How to make, use and enjoy
There are many types of solar cookers — heat-trap boxes, curved concentrators and combinations of both.
Box cookers
Box cookers are the most widely used in households. There are several hundred thousand in India alone.
TYPE
S OF S
OLAR
COO
KERS
Curved concentrator cookers
Curved concentrators (often called parabolic cookers) cook fast at very high temperatures like fire, but require more frequent adjustment and supervision for safe operation. They are not covered in this booklet, but several hundred thousand households in western China use them. They are especially useful for large-scale institutional cooking.
Combination cookers
Combination cookers (often called panel cookers) incorporate elements of box and curved concentrator cookers. SCI’s simple “CooKit” is the most widely used combination cooker.
Compared to curved concentrator cookers:
• it doesn’t need to be moved to track the sun during several hours of unattended cooking
• temperatures are more even
• the flat shiny surfaces are safer for your eyes
Compared to a box cooker:
• it requires no window or insulation
• it cooks just one pot at a time, but several units cost less than one box cooker
Compared to both:
• it is easier and cheaper to produce
• it folds compactly to carry and store
• it requires 10-20 clear, heat-resistant plastic cooking bags per year
SOLAR COOKERS INTERNATIONAL
�
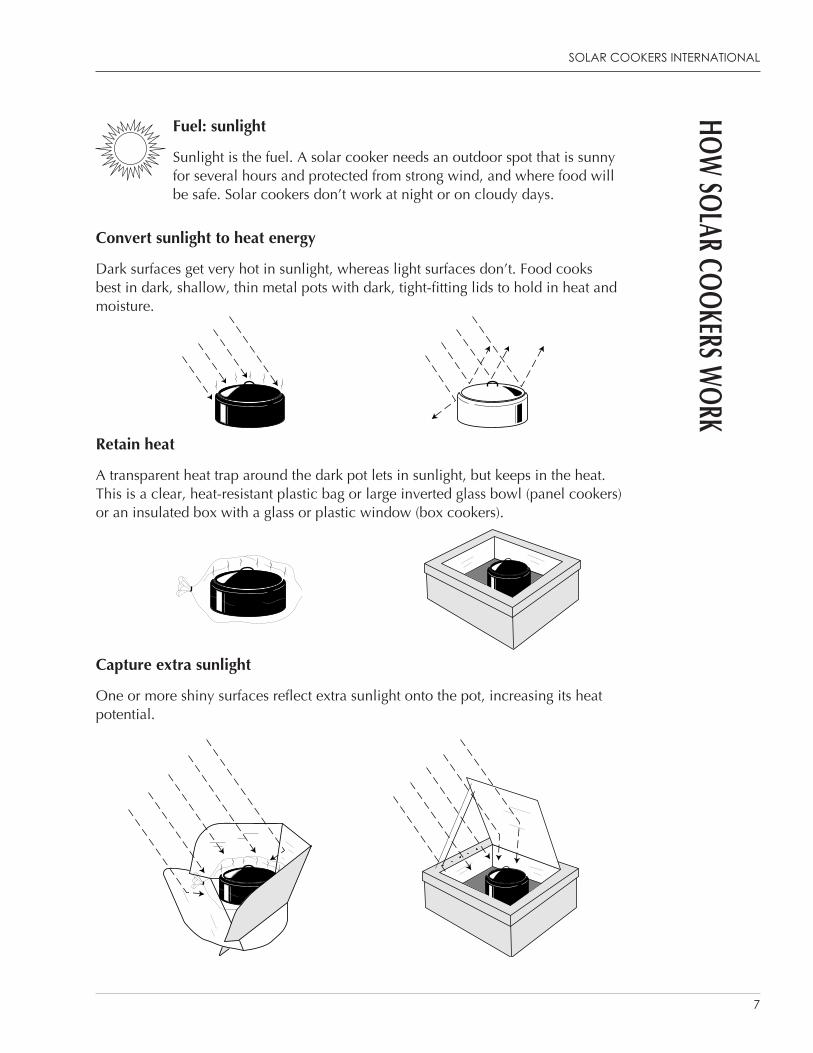
Fuel: sunlight
Sunlight is the fuel. A solar cooker needs an outdoor spot that is sunny for several hours and protected from strong wind, and where food will be safe. Solar cookers don’t work at night or on cloudy days.
Convert sunlight to heat energy
Dark surfaces get very hot in sunlight, whereas light surfaces don’t. Food cooks best in dark, shallow, thin metal pots with dark, tight-fitting lids to hold in heat and moisture.
Retain heat
A transparent heat trap around the dark pot lets in sunlight, but keeps in the heat. This is a clear, heat-resistant plastic bag or large inverted glass bowl (panel cookers) or an insulated box with a glass or plastic window (box cookers).
Capture extra sunlight
One or more shiny surfaces reflect extra sunlight onto the pot, increasing its heat potential.
HOW SOLAR COOKERS W
ORK

�
SOLAR COOKERS How to make, use and enjoy
FREQ
UENT
LY A
SKED
QUE
STIO
NS What can I cook?
Use your solar cooker to cook vegetables, fruits, meats, grains, legumes and most other foods. You can even bake breads and desserts! Simple solar cookers cannot stir-fry or cook flat breads that require high temperatures.
Do I need to add water to foods that will be solar cooked?
Vegetables, fruits and meats cook great without water, which tends to slow cooking and wash away nutrients. For grains and legumes, use the amount of water you use with other cooking methods. If the food comes out too moist or dry, adjust the amount of water next time.
What time of year can I cook?
In general, you can use your cooker when the length of your shadow on the ground is shorter than your height. This is an indicator that the sun is high enough in the sky to cook. In many countries there are a few months each year when simple solar cookers cannot be used. People living in the darker areas on the following map tend to have longer cooking seasons.
What time of day can I cook?
You can typically cook two meals per day — a noontime meal and an evening meal. You cannot cook early in the morning or after sunset. The sun is most intense between 10:00 a.m. and 2:00 p.m., which is when breads, cakes and pastries should be baked if possible.
Faster cooking Slower cooking No cooking

SOLAR COOKERS INTERNATIONAL
�
How long do foods take to cook?
There are many factors that affect the speed with which your food cooks in a solar cooker, including time of year, amount of sun, type of pot and amount of food. The following table summarizes some important factors.
Faster cooking Slower cooking
Time of year and day:
Amount of sun:
Amount of wind:
Thickness of pot:
Amount and size of food:
Amount of water:

10
SOLAR COOKERS How to make, use and enjoy
Simple solar cookers, under normal conditions, will cook at temperatures from 82-121°C (180-250°F) or more. Since food cooks at 82-91ºC (180-195ºF) these temperatures are hot enough to fully cook food, but not so hot as to burn or dry out food or damage healthful nutrients. Also, many foods can cook for several hours without overcooking, which allows food to be placed in the cooker early in the day and left until mealtime without needing to be stirred or monitored. (“Absentee cooking.”)
As with any cooking method, cooked food that is allowed to cool to temperatures between 52-10ºC (125-50ºF) for a period of
time may contain bacteria that can spoil food and lead to food poisoning. Food that stays in this temperature range for more than four hours should be discarded.
Here are some typical cooking times for 4 pounds (2 kilograms) of food on a sunny day:
71°C Food pasteurization65°C Water pasteurization
49°C Most germscan't grow
22°C Room temperature
100°C Water boils
135°C
82°C Food Cooks
275°F
212°F
160°F150°F
180°F
120°F
72°F
Simple Solar Cookers
1-2 hours 5-8 hours3-4 hours

SECTION 3 HOW TO MAKE AND USE SOLAR COOKERS

1�
SOLAR COOKERS How to make, use and enjoy
MOD
EL 1:
PANE
L COO
KER
(COO
KIT)
The CooKit is a simple, portable solar cooker. It can be made in one to two hours and can cook one large pot of food for about six people. For larger families, make a larger CooKit or several this size.
Construction materials
• Corrugated cardboard (carton board) — 0.9x1.2 meters (3x4 feet)
• Aluminum foil — 0.3x3 meters (1x10 feet), cut into strips as needed
• Glue (nontoxic, water-based, diluted 1:1 with water)
• Paintbrush (the foam type work well)
• Utility knife or similar cutting device
• Pencil, pen or other marking device
• Large ruler or other straight edge
• See page 26 for substitute materials
Construction steps
1. Draw cut and fold lines on cardboard as indicated below.
73°
90°
98°99°
61°
12"/30cm12"/30cm
12"/30cm 12"/30cm
12"/
30cm
10"/25cm
11"/28cm
13"/
33cm
13"/
33cm
8"/20cm
11"/
28cm
8"/20cm
5"/1
3cm
24"/61cm36"/91cm
48"/122cm
8"/2
0cm
36"/
91cm
narrow slot, width of cardboard thickness (about ⅛"/0.3cm)
CUT LINES FOLD LINES (optional fold lines for compact storage)
8"/20cm
11"/
28cm

SOLAR COOKERS INTERNATIONAL
1�
2. Cut out the CooKit shape and slots.
Cut out the CooKit shape and the two 60º angled slots in the front panel. Be sure to make the slots narrow so the 73º angled corners from the back panel fit snugly to hold up the front panel. (Refer to step 3, page 14.)
3. Score the fold lines.
With a blunt edge, such as a spoon handle, score the fold lines. Make straight folds by folding against a firm straight edge. Only score the optional fold lines if you intend to fold the CooKit for compact storage. (See page 17.)
4. Glue foil on CooKit.
Using a paintbrush, spread the glue/water mixture on the dull side of aluminum foil and press the glued sheets of aluminum foil tightly and smoothly like wallpaper onto one entire side of the CooKit. A few wrinkles won’t hurt.
5. Leave flat until dry. Trim any excess foil.
Cooking directions
1. Put food in a dark pot with a dark, tight-fitting lid.
2. Enclose pot in a transparent heat trap.
Put the pot in a clear, heat-resistant plastic bag and bind the open end of the bag or simply fold it under the pot in such a way as to prevent air from escaping. The bag should be loose enough that a small, insulating layer of air exists around the pot.

1�
SOLAR COOKERS How to make, use and enjoy
Optional: Cooking efficiency may be marginally improved by placing the pot on a pot “stand” — three or four stones, a couple of twigs, a small wire rack, etc. — located inside the bag. This helps create a thin layer of air under the pot, reducing heat loss to the cooker itself. For optimal performance, Dr. Steven Jones of
Brigham Young University recommends raising the pot 6 centimeters with an open-mesh wire stand located inside the bag (see image below). This allows sunlight to be reflected underneath the pot as well as on the sides and top. For best pot stability make the wire stand slightly wider than the pot, and slightly taller than 6 centimeters, so that the pot can rest inside the stand on two crossed wires at the 6 centimeters height. Again, these steps are optional.
3. Assemble the CooKit.
In a shaded area, lay the CooKit shiny side up so that the wide (back) panel is away from you. Tilt the back panel towards you and carefully slide the ends of its flaps into the slots on the shorter front panel that is nearest to you. (As you do this you will need to also tilt the front panel up.) Clamp the inserted flaps, on the underside of the front panel, using clothespins or similar device.

SOLAR COOKERS INTERNATIONAL
15
4. Choose a cooking location.
Set the cooker on a dry, level surface in direct sunshine away from potential shadows. For best results, solar cooking requires continuous, direct sunshine throughout the cooking period.
5. Orient the CooKit.
Orient the CooKit according to the details below. Once oriented, the CooKit doesn’t need to be moved again during three to four hours of cooking. For longer cooking, or for large quantities of food, reorienting the cooker every couple of hours speeds cooking a little. Food cooks fastest when the shadow created by the cooker is directly behind it.
• TO COOK A NOONTIME MEAL orient the cooker so that the shorter, front panel faces easterly, or approximately where the sun will be mid-morning. In general, it is good to get the food out early and not to worry about it until mealtime. For most dishes you should start cooking by 9:00 or 10:00 a.m.
• TO COOK AN EVENING MEAL orient the cooker so that the shorter, front panel faces westerly, or approximately where the sun will be mid-afternoon. For most dishes, it is best to start cooking by 1:00 or 2:00 p.m.
• FOR ALL-DAY COOKING orient cooker where sun will be at noon or early afternoon and food will be ready and waiting for the evening meal.
6. Adjust front flap.
Raise or lower the front flap so there is a small shadow, no more than half its width, under it. The flap should be angled higher when the sun is high and lower when the sun is low. You want the front flap to reflect the sun, not block it.
Shadow Shadow

1�
SOLAR COOKERS How to make, use and enjoy
7. Set the bag-enclosed pot on the flat part of the CooKit.
Optional: on windy days, large stones or bricks can be placed on each side of the flat part of the CooKit that extends beyond the side reflective panels, as well as under the front panel.
8. Leave food to cook for several hours or until done.
There is no need to stir food while it is cooking.
9. Remove the pot.
Using pot holders, remove the pot from the CooKit. (Pots get VERY hot.) To prevent steam burns, open the bag away from you when removing the pot, and slide pot lid toward you when opening pot.
Enjoy a delicious meal! For less glare from the reflector when putting in or taking out food, stand or squat in front of the CooKit with your back to the sun to make a shadow. Many solar cooks also wear sunglasses.

SOLAR COOKERS INTERNATIONAL
1�
Care and storage
Store the CooKit in a safe place away from moisture and animals, preferably indoors. Periodically wipe reflective surfaces gently with a dry cloth. If the cardboard (carton board) accidentally gets wet, lay it flat — shiny side down — until dry.
Allow plastic bags to air-dry or gently wipe dry with a towel. Heat-resistant bags, handled properly, should last 10 or more uses. Bags gradually become brittle from exposure to sunlight and heat, and will eventually develop small tears. Tape can be applied to the outside of small tears to temporarily extend bag usefulness.
The CooKit is designed to be compact and portable. When not in use it can be simply folded lengthwise into thirds or, if needed, folded flat to about 33 centimeters (13 inches) square.
Fold to backFold to front

1�
SOLAR COOKERS How to make, use and enjoy
MOD
EL 2:
BOX
COO
KER This box cooker takes one to two days to make, plus overnight drying. It cooks two to
three pots of food. If rocks or bricks are heated alongside the pots, the box cooker will maintain heat for a couple of hours after sunset with the lid closed.
Construction materials
• Two large, shallow corrugated cardboard (carton board) boxes, nestable as follows:
An INNER BOX at least 45x55 centimeters (18x22 inches), preferably just a little bit taller than your pots.
An OUTER BOX a little larger in all dimensions so there is at least 3-5 centimeters (1-2 inches) space between the two boxes on all sides when nested. Ideal proportions: one unit tall by two units long (front to back) by three units wide (side to side). Cookers that are too tall create shadows across the pot and increase heat loss through walls.
• Corrugated cardboard (carton board) at least 15 centimeters (6 inches) longer and wider than the outer box to make the lid
• Window glass at least 50x60 centimeters (20x24 inches) and longer and wider than the inner box
• Thin, black metal sheet, sized equal to or slightly smaller than the inner box
• Aluminum foil — 0.3x20 meters (1x60 feet), cut into strips as needed
• Dry plant fibers or about 50 sheets of newspaper, quartered and loosely crumpled
• Glue (nontoxic, water-based)
• Silicone caulk
• Rigid wire (hanger wire, etc.), or a stick and string — 0.7 meters (2 feet) each
• Paintbrush (the foam type work well)
• Utility knife or similar cutting device
• Pencil, pen or other marking device
• Large ruler or other straight edge
• See page 26 for substitute materials
Glass
Lid piece
Metal sheet
Inner box
Outer box
SOLAR COOKERS INTERNATIONAL
1�
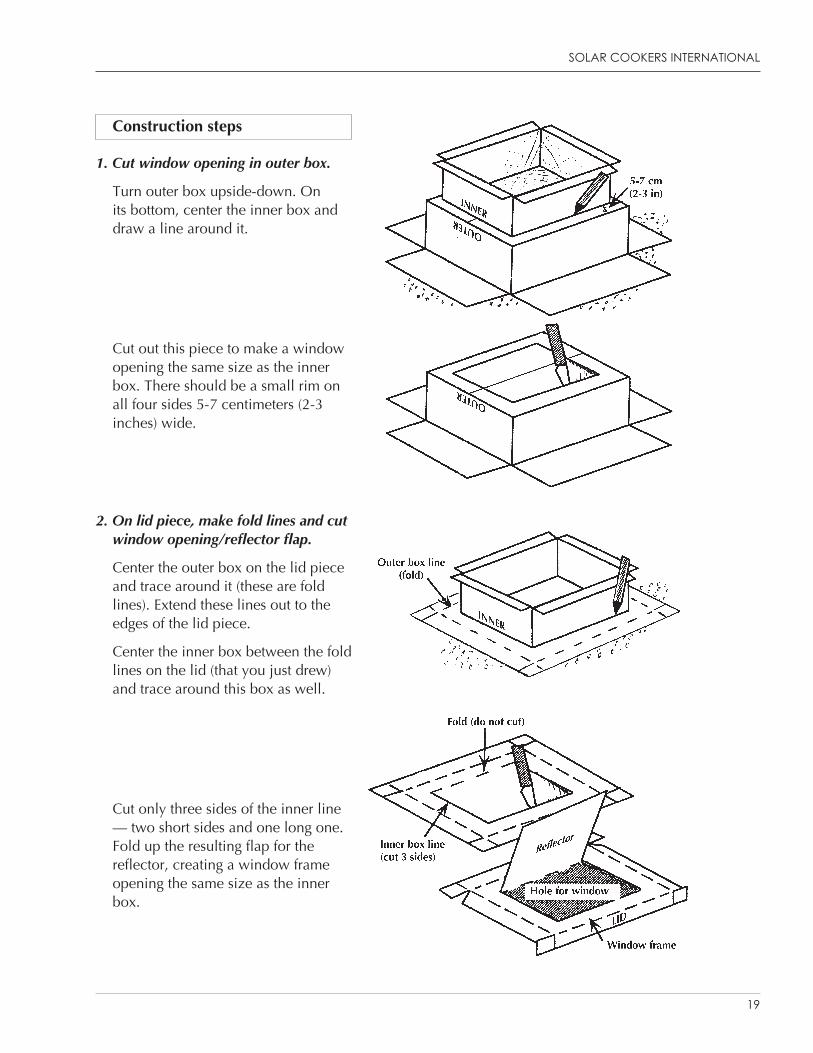
Construction steps
1. Cut window opening in outer box.
Turn outer box upside-down. On its bottom, center the inner box and draw a line around it.
Cut out this piece to make a window opening the same size as the inner box. There should be a small rim on all four sides 5-7 centimeters (2-3 inches) wide.
2. On lid piece, make fold lines and cut window opening/reflector flap.
Center the outer box on the lid piece and trace around it (these are fold lines). Extend these lines out to the edges of the lid piece.
Center the inner box between the fold lines on the lid (that you just drew) and trace around this box as well.
Cut only three sides of the inner line — two short sides and one long one. Fold up the resulting flap for the reflector, creating a window frame opening the same size as the inner box.

�0
SOLAR COOKERS How to make, use and enjoy
3. Adjust height of boxes, if needed.
Set a cooking pot next to both boxes. The inner box needs to be just a little taller than your pots. The outer box needs to be just a little taller than the inner box.
If the boxes are too tall:
ON THE INNER BOX make a mark about 3 centimeters (1 inch) above the top of the pot and draw a fold line straight around the four box walls. Score the fold lines with a blunt edge such as a spoon handle.
ON THE OUTER BOX make a mark about 5 centimeters (2 inches) above the top of the pot and draw a fold line straight around the four box walls. Score the fold lines with a blunt edge such as a spoon handle.
Cut the corners of both boxes down to the fold lines.
Fold sides outwards along the creases.
4. Trim inner box flaps.
When the walls of the inner box are folded down to the right height — or if you didn’t have to adjust your box height — trim off at about 5-7 centimeters (2-3 inches) above the folded crease to make flaps as narrow as the small rim around the window opening on the outer box. (Refer to step 1, page 19.)
SOLAR COOKERS INTERNATIONAL
�1
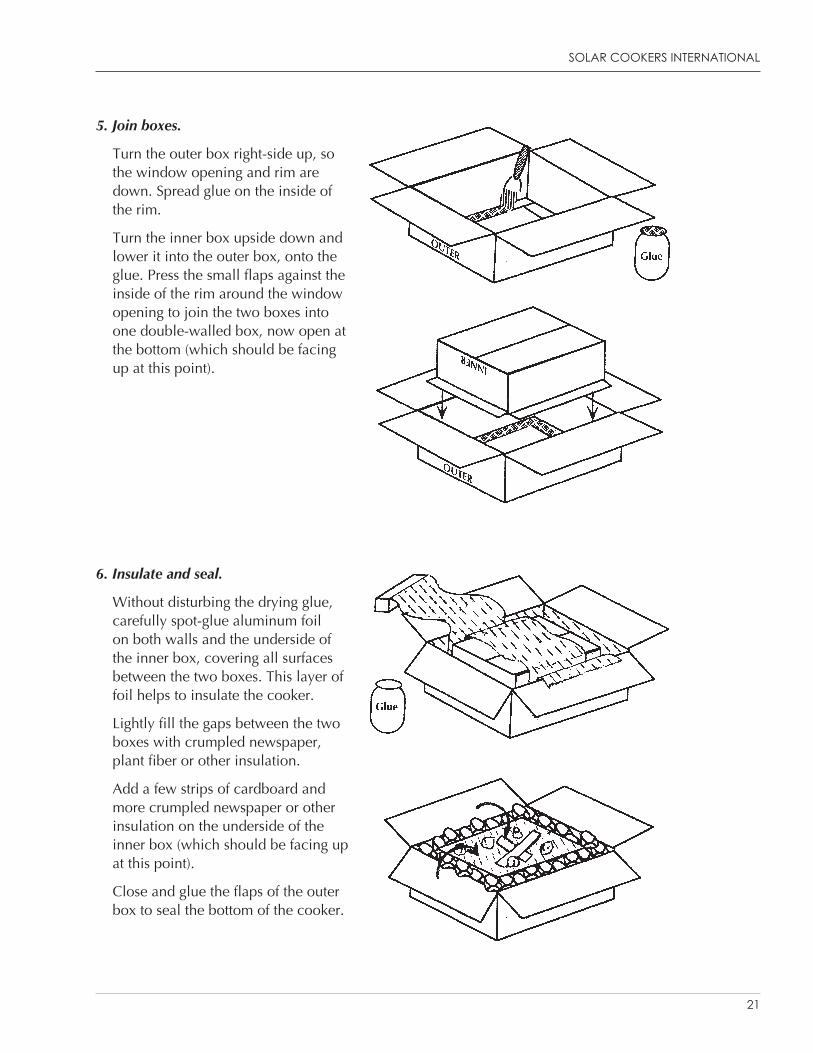
5. Join boxes.
Turn the outer box right-side up, so the window opening and rim are down. Spread glue on the inside of the rim.
Turn the inner box upside down and lower it into the outer box, onto the glue. Press the small flaps against the inside of the rim around the window opening to join the two boxes into one double-walled box, now open at the bottom (which should be facing up at this point).
6. Insulate and seal.
Without disturbing the drying glue, carefully spot-glue aluminum foil on both walls and the underside of the inner box, covering all surfaces between the two boxes. This layer of foil helps to insulate the cooker.
Lightly fill the gaps between the two boxes with crumpled newspaper, plant fiber or other insulation.
Add a few strips of cardboard and more crumpled newspaper or other insulation on the underside of the inner box (which should be facing up at this point).
Close and glue the flaps of the outer box to seal the bottom of the cooker.

��
SOLAR COOKERS How to make, use and enjoy
7. Glue foil inside the box and lid.
Turn box right-side up.
Dilute glue 1:1 with water and, using a paintbrush, spread it thinly on the dull side of sheets of aluminum foil.
Press the glued sheets of aluminum foil tightly and smoothly like wallpaper to the inside and rim of the box. A few wrinkles won’t hurt. Set aside to dry.
Repeating the procedure, glue foil to the underside of the lid flap (the folded up center part only).
8. Cut, fold and glue the corners of the new lid.
With the lid upside down (foil facing up), make one cut at each of the four lid corners, just to the first fold lines. (Cuts should be parallel to the long side of the lid.) Score all fold lines with a blunt edge such as a spoon handle and fold along creases with a straight edge.
Overlap and glue the corners, and hold with clothes pins or clamps until the glue is dry. To make quick clamps, cut cardboard-width slits in a small stack of cardboard pieces.
9. Insert the window.
Spread silicone caulk along the underside edge of the window opening rim (outside the cut edge of the foiled reflector piece), then press the glass in firmly but carefully to make a good seal with the caulk.
Let box and lid dry overnight.

SOLAR COOKERS INTERNATIONAL
��
10. Make an adjustable prop.
Make small holes in a corner of the lid reflector and side of lid as shown. Loop string through the holes.
Make several notches in a stick, and tie the stick at both ends to hold up the reflector and allow angle adjustments.
~ or ~
Bend a sturdy wire at both ends and glue corrugated cardboard (carton board) strips to the lid and reflector as shown. The wire can be inserted into any of the corrugations for angle adjustments.
11. Add the black tray and “cook” the cooker.
Put the black metal sheet inside the box. (The pots will sit on this light-absorbing sheet.) Put on the lid, with the lid reflector propped open, and aim toward the sun for several hours to drive out the last bit of moisture and any paint or glue fumes.

��
SOLAR COOKERS How to make, use and enjoy
Cooking directions
1. Put food in dark pot(s) with dark, tight-fitting lid(s).
2. Choose a cooking location.
Set the cooker on a dry, level surface in direct sunshine away from potential shadows. For best results, solar cooking requires continuous, direct sunshine throughout the cooking period.
3. Put pot(s) in cooker and replace lid.
Put pot(s) in cooker. If cooking multiple dishes, quicker cooking items should be placed towards the front of the cooker (opposite the reflector) and slower cooking items towards the back, where access to sunlight is best. Place lid on cooker.
4. Orient the cooker.
Orient the cooker according to the details below. Once oriented, the cooker doesn’t need to be moved again during three to four hours of cooking. For longer cooking, or for large quantities of food, reorienting the cooker every couple of hours speeds cooking a little. Food cooks fastest when the shadow created by the cooker is directly behind it.
SOLAR COOKERS INTERNATIONAL
�5
• TO COOK A NOONTIME MEAL orient the cooker so that the front side (opposite the reflector) faces easterly, or approximately where the sun will be mid-morning. In general, it is good to get the food out early and not to worry about it until mealtime. For most dishes you should start cooking by 9:00 or 10:00 a.m.
• TO COOK AN EVENING MEAL orient the cooker so that the front side (opposite the reflector) faces westerly, or approximately where the sun will be mid-afternoon. For most dishes, it is best to start cooking by 1:00 or 2:00 p.m.
• FOR ALL-DAY COOKING orient cooker where sun will be at noon or early afternoon and food will be ready and waiting for the evening meal.
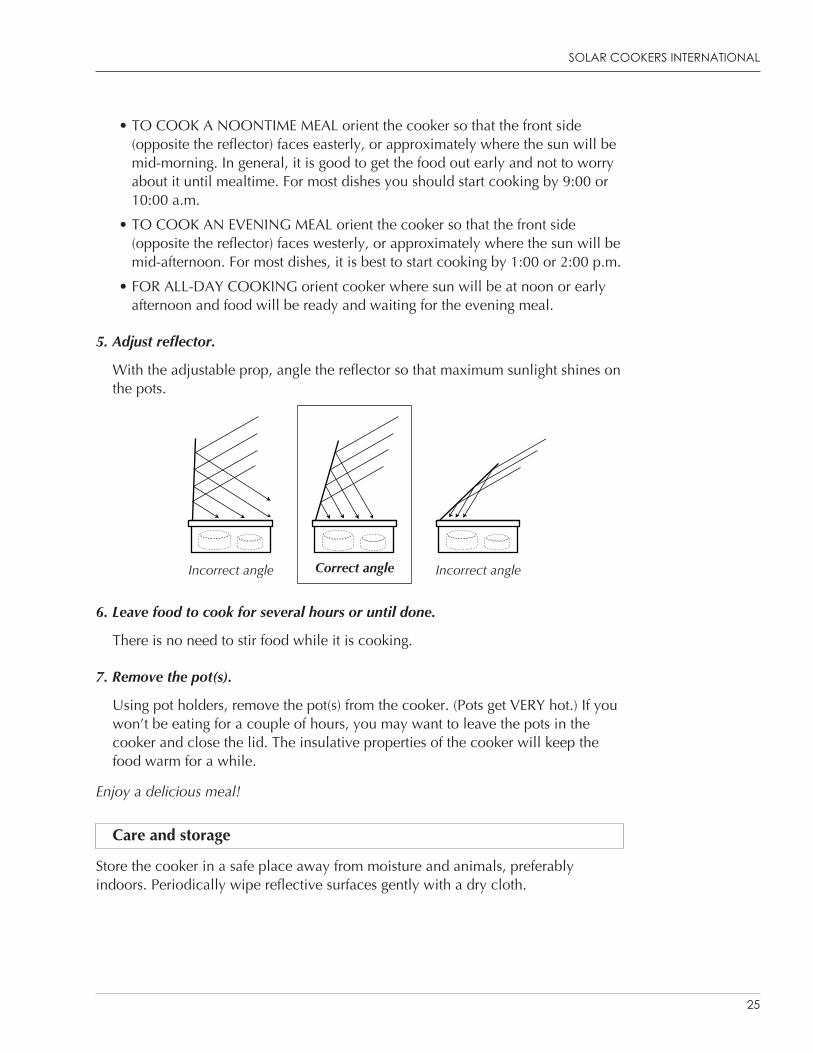
5. Adjust reflector.
With the adjustable prop, angle the reflector so that maximum sunlight shines on the pots.
6. Leave food to cook for several hours or until done.
There is no need to stir food while it is cooking.
7. Remove the pot(s).
Using pot holders, remove the pot(s) from the cooker. (Pots get VERY hot.) If you won’t be eating for a couple of hours, you may want to leave the pots in the cooker and close the lid. The insulative properties of the cooker will keep the food warm for a while.
Enjoy a delicious meal!
Care and storage
Store the cooker in a safe place away from moisture and animals, preferably indoors. Periodically wipe reflective surfaces gently with a dry cloth.
Correct angle Incorrect angleIncorrect angle

��
SOLAR COOKERS How to make, use and enjoy
SUBS
TITU
TE M
ATER
IALS Cooker forms (bodies)
Panel and box cookers are easily and inexpensively built using corrugated cardboard (carton board) as the form. To increase durability, outer, non-reflective surfaces can be painted, oiled or waxed to help protect from moisture.
FORMS FOR PANEL COOKERS should be rigid and durable. A number of materials will work, including:
• Plain or corrugated plastics
• Wood
• Woven mats
FORMS FOR BOX COOKERS (OUTER BOX) should be made of materials that hold insulation and seal well with the lid. A number of materials will work, including:
• Plain or corrugated plastics
• Wood
• Metal
• Masonite
• Bricks or adobe
• Papier-mâché
FORMS FOR BOX COOKERS (INNER BOX) must withstand high temperatures without releasing fumes. The surface that faces the cooking pot should be reflective, lined with reflective material, or black. A number of materials will work, including:
• Wood
• Sheet metal
• Masonite
• Woven baskets or mats
• DON’T USE Styrofoam, vinyl plastics, bricks or adobe
Glues
Water-based polyvinyl acetate glues — such as Elmer’s Glue-All® — can be diluted 1:1 with water. Wheat or rice flower paste, acacia gum, and casein glue are other options. Avoid petroleum- and rubber-based glues. Some cooker materials can be sewn or stapled. Don’t use tape for inner cooker surfaces.
Dark cooking pots
Food is solar cooked in lidded, dark-colored pots or similar vessels. Thin metal pots work best. Tinted glass baking dishes also work, as do heavy metal, ceramic or clay pots, but the mass of these materials absorbs heat resulting in a slower cooking process.

SOLAR COOKERS INTERNATIONAL
��
If you don’t have dark-colored pots and lids, you can paint them black (outer surfaces only). Dull, nontoxic latex or blackboard paints are preferred. If oil-based paint is used, “bake” the pot in the sun for several days to get rid of any odor. Water-based glue mixed with soot or poster paint works also, but is less durable.
Glass jars with lids can be used if painted black. You can place a vertical strip of tape on the jar before painting and then remove the tape, leaving a space to view food while cooking. Canning jars and lids are recommended because they are designed to release excessive steam pressure if needed.
Transparent heat traps
Transparent heat traps let in sunlight and hold in heat. In panel cookers this is typically a heat-resistant plastic bag — able to withstanding temperatures up to 150ºC (300ºF) — surrounding the cooking pot. In box cookers this is a glass or plastic window.
TRANSPARENT HEAT TRAPS FOR PANEL COOKERS:
• Polypropylene bags
• Nylon (polyamide) bags, a common type of “oven bag”
• Polyester bags, a common type of “oven bag”
• High-density polyethylene (HDPE) bags — the crinkly-sounding bags with handles used to carry goods from stores in many countries, often bearing the #2 recycle symbol — are acceptable if mostly clear
• Inverted glass or Pyrex® bowls over the cooking pot, if big enough to rest directly on the cooker to seal the air space around the pot. (Note: over time, moisture released during cooking can damage cardboard solar cookers. If you use an inverted bowl, consider placing the pot and the bowl on a clear glass tray or dish with a slightly raised edge to prevent accumulated moisture from running onto and damaging the cooker.)
TRANSPARENT HEAT TRAPS FOR BOX COOKERS:
• Ordinary window glass or old car windows if un-tinted
• A double layer of heat-resistant plastics, either polypropylene, polyester or polycarbonate, 4-mil thick with 1 centimeter (1/4 inch) air space between. Some thicker plastics work fine with one layer. Don’t use most plastics or fiberglass, which may give off fumes when heated.
• Large “oven bags” may be glued to the window frame with a little air space between two layers

��
SOLAR COOKERS How to make, use and enjoy
Reflective surfaces
Most solar cookers use one or more reflective surfaces to deliver extra sunlight to the cooking pot. Reflectors should be shiny, fairly rigid, and not easily damaged. We recommend aluminum foil mounted on cardboard, which makes for a simple, effective reflector.
Other reflective surfaces:
• Aluminized polyester film (Mylar®), if reflective, can be used for panel cookers and the reflector(s) on top of a box cooker. Don’t use inside a box cooker, however, because it might melt or give off fumes. (This material can be tricky to adhere to rigid backing. It can be sewn on if necessary.)
• Mirrors, though they are heavy and fragile
NOT recommended:
• Sheet metals, including aluminum and steel, aren’t extremely reflective and tend to absorb some radiation, making them less effective. (The exception is certain anodized aluminums.)
• Metallic paints are not reflective enough
Insulation (box cooker only)
Insulation materials must be poor conductors of heat and tolerate high temperatures without melting or giving off fumes. Newspapers — quartered and loosely crumpled — are cheap, readily available and easy to work with.
Other insulation materials:
• An extra layer of foil-covered cardboard (carton board) and empty air spaces in each wall
• Dry plant fibers — rice hulls, straw, walnut or peanut (groundnut) shells, coconut fibers, dried banana leaves
• Feathers
• Wool
• DON’T USE Styrofoam, polyvinyl or other plastics that melt or give off fumes at cooking temperatures

SECTION 4 SOLAR RECIPES AND TIPS

�0
SOLAR COOKERS How to make, use and enjoy
You can cook almost anything in your solar cooker, including vegetables, meats, grains and legumes. You can even bake breads and desserts! However, simple solar cookers cannot stir-fry or cook flat breads that require high temperatures.
Tips:
• Solar cooking is not an exact science. Many factors influence cooking temperatures and times, including time of year, time of day and intensity of sun. Expect cooking times at least double what you are used to. In general, put the food out early and don’t worry about it. Solar cooking is easy!
• Foods cook fastest between 10 a.m. and 2 p.m., when the sun’s energy is most intense.
• Thin, black, metal pots with lids work best. Shallow, wide pots are better than tall, narrow ones. See page 26 for pot options.
• The amount, volume and height of food in the pot influence cooking speed. Small quantities of food, and food cut into small pieces, cook fastest. Food should be no deeper than a hand width.
• When recipes instruct to “add this, cook 10 minutes, then add that,” you can usually just put all the ingredients in at once.
• Many, if not most, of your favorite recipes will work in a solar cooker — often without any adjustments. Slow-cooker recipes work particularly well. Be adventurous!

SOLAR COOKERS INTERNATIONAL
�1
Barley, corn (maize), millet, oats, quinoa, rice, wheat, sorghum: mix with the usual amount of water and cook in a dark, covered pot. No need to stir while cooking. If the texture is too wet or dry, adjust the amount of water next time. Some people heat water and dry grain in two separate pots before combining to get the preferred texture, but this extra step is usually not necessary.
Rice
Combine 1 part rice to 1½-2 parts water. Cook 1-2 hours in a dark, covered pot. Subsequently, adjust water content as necessary.
Variations:
• Prior to cooking, mix in finely-chopped vegetables, such as onions, celery and/or carrots. Reduce amount of water slightly. Cook 2-3 hours.
• Prior to cooking, place raw, chopped chicken pieces on top of the rice/water mixture. Reduce amount of water slightly. Cook 2-3 hours.
Maize meal (ugali, sadza)
Combine 1 part maize meal to 1-1½ parts cold water. Stir well to avoid lumps. Cook 2-3 hours in a dark, covered pot. (Traditionally, maize meal requires constant stirring as the meal is added to boiling water. With this solar cooking method it does not.)
Cooked cereals
You can’t solar cook early in the morning, but you can solar cook your favorite cereal the day before and eat it cold or quickly reheat it over a fire or on a stove.
Pasta
Heat water in a dark, covered pot. (Use less water than you normally would.) Put dry pasta, with a bit of cooking oil, in a second dark, covered pot and set it in the sun to warm. This second pot does NOT need to be in the solar cooker, however. When the water is near boiling add the warm pasta, stir, then cover and solar cook for 10-15 additional minutes.
GRAINS, PASTA

��
SOLAR COOKERS How to make, use and enjoy
Lasagna
• 1 liter (1 quart) pasta sauce
• 1/4 kilogram (1/2 pound) uncooked lasagna noodles
• 1/2 kilogram (1 pound) ricotta cheese
• 1/2 kilogram (1 pound) shredded mozzarella cheese
• Parmesan cheese to taste
• 1/2 kilogram (1 pound) ground beef — optional
Pour 1/3 of the pasta sauce into a dark roaster pan. Coat half of the uncooked noodles with ricotta cheese to make a bottom layer in the pan, and top with half of the shredded mozzarella. Repeat to make a second layer. Top with remaining pasta sauce and the Parmesan cheese. Cover and bake for 3 hours.
For meat lasagna, first brown ground beef — in a dark, covered pot — for 1½ hours in a solar cooker. Drain. Add meat to pasta sauce and prepare as above.
For faster cooking, soak most beans in water overnight. (Pinto beans, lentils and split peas don’t need to pre-soak). Put beans and usual amount of water in a dark, covered pot and cook for 3-5 hours or more depending on bean type. Optional ingredients — including salt, tomatoes and onions — should be added after at least 2 hours of cooking. If desired, rice can be added to cook with beans for the last 1-2 hours.
“Refried” beans
• 1 cup dried pinto beans
• 3 cups water
• 1/2 cup onions, chopped
• 1/2 teaspoon cumin
• 1/2 teaspoon salt
• garlic powder to taste
• pepper to taste
Combine beans, water and onions in a dark, covered pot and cook for 4-6 hours or until beans are soft. Drain (but save) the liquid. Mash the beans, adding reserved liquid to get the consistency you prefer. Add spices and mix well.
LEGU
MES

SOLAR COOKERS INTERNATIONAL
��
Add little or no water; meats cook in their own juices. The longer meats cook, the more tender they become. Smaller pieces cook faster.
Pot roast
Chop and combine potatoes, carrots, onions and other vegetables in a dark pot. Place roast on top and season as desired. Cover and cook for 4+ hours. Remember, this requires no added water; natural juices coming from the meat and vegetables will blend the flavors nicely.
Chili
• 1/2 kilogram (1 pound) ground beef
• 1 onion, chopped
• 1 green pepper, chopped
• 2 garlic cloves, minced
• 2 cups fresh tomatoes, chopped; or 1 cup tomato sauce
• 2 cups cooked kidney or pinto beans
• 1 tablespoon chili powder
• 1/2 teaspoon dried basil, crushed
• Salt and pepper to taste
Brown ground beef — in a dark, covered pot — for 1½ hours in a solar cooker. Drain. Add remaining ingredients, cover and cook for 2+ hours.
Fish
Wash fish steaks or fillets and drain well. Cook in a dark, covered pot for 1-2 hours or more. (Fish may be done sooner, but won’t overcook.) Butter, lemon, etc. may be added at the beginning.
MEATS

��
SOLAR COOKERS How to make, use and enjoy
Add no water. Root vegetables cook beautifully in a solar cooker, usually in 3-4 hours in a dark, covered pot. Smaller pieces cook faster. Above-ground vegetables usually cook in 1-1½ hours. If cooked longer they lose their nice color, but the flavor should be fine. Greens cook quickly and can overcook, so keep an eye on them. They steam nicely atop grains or meats during the last few minutes of cooking.
Corn on the cob
Corn cooks well without water in a dark, covered pot or jar. Alternatively, leave corn in husks and cook in a black sock. Cook 1/2-1 hour.
Stewed tomatoes
• Whole tomatoes
• Bread, cut into small pieces
• Cheese
• Basil or other herbs
• Salt and pepper to taste
Slice tomatoes part way down into quarters and place in a dark muffin tin or cake pan. Top tomatoes with bread, herbs, spices and cheese. Cover and cook 2 hours. (A second dark muffin tin or cake pan can be inverted and used for the lid.)
Baked potatoes
Wash potatoes. Oil the skins if you like them soft. Cook 4+ hours in a dark, covered pot.
Winter squash
Winter squash (butternut, acorn, spaghetti, etc.) cook well in a solar cooker. Wash, peel and coarsely chop squash. Mix in a little butter and brown sugar if desired. Cook 1-2 hours in a dark, covered pot.
Pineapple yams
Peel and dice yams. Mix in pineapple chunks and a bit of juice. Cook 2-3 hours in a dark, covered pot.
vEGE
TABL
ES

SOLAR COOKERS INTERNATIONAL
�5
Applesauce
• 2 kilograms (4 pounds) apples, peeled and sliced
• 1 cup water or cider
• Sugar or honey to taste
Combine apples and water or cider in a dark pan and cook, covered, for 2+ hours until very soft. Process through a food mill or similar device, adding sugar or honey as desired.
Peach meringue
• 5 peaches, halved
• 5 teaspoons brown sugar
• Cinnamon to taste
• 3 egg whites
• 1 teaspoon vanilla
• 3/4 cup granulated sugar
Place peaches cut side up in a dark pie pan or casserole dish. Place 1/2 teaspoon brown sugar in cavity of each peach half and sprinkle with cinnamon. Cover and bake 1½ hours.
Beat egg whites at medium speed until soft peaks form. Add vanilla and gradually add granulated sugar while beating at high speed.
Remove peaches from cooker and top each peach half with meringue, covering completely. Return to solar cooker and bake uncovered for 1 hour.
FRUIT

��
SOLAR COOKERS How to make, use and enjoy
Baking is best done in the middle of the day — between 10 a.m. and 2 p.m. — in dark, covered pans. If your baking pans don’t have lids you can invert a second dark pan as a lid. Bake crusts separate from fillings.
Whole wheat bread
• 1 tablespoon dry yeast
• 2½ cups hot tap water
• 1/2 tablespoon sugar
• 6 cups whole wheat flour (or 3½ cups whole wheat flour and 2½ cups white flour)
• 1 tablespoon salt
• 1/3 cup oil
• 1/3 cup honey or sugar
Sprinkle yeast into 1/4 cup hot tap water. Let stand 15 minutes. Add 1/2 tablespoon sugar. Combine the remaining 2¼ cups hot tap water with 3½ cups whole wheat flour in a large bowl. Add salt, oil and honey or sugar. Continue mixing until well blended. Add 1/2 cup flour to mixture. Add prepared yeast to mixture and blend thoroughly. Add 1½-2 cups more flour. Knead for 10 minutes or until there is a consistency like cookie dough. Divide dough into two parts. Mold into loaves on oiled counter. Place in dark, oiled pans. If desired, oil top of loaves for softer crust. Cover loaves with damp cloth and let rise 1/3 in bulk. Cover and cook for 2½ hours, ideally between 10 a.m. and 2 p.m.
Light bread pans without covers may be used if they are placed inside of dark, covered pots large enough to hold them.
(Adapted from a recipe submitted by Jacqueline Parrish.)
American Indian fancy corn bread
• 1/4 cup butter
• 1/3 cup honey
• 2 eggs
• 1 cup canned pumpkin
• 1/4 cup milk
• 1½ cups blue cornmeal
• 3/4 cup whole wheat flour
• 3 teaspoons baking powder
• 1 teaspoon salt
BREA
DS, B
AKED
GOO
DS

SOLAR COOKERS INTERNATIONAL
��
• 1 cup blueberries
• 1/2 cup nuts, chopped
In a dark pot, beat butter, honey and eggs together until smooth. Stir in pumpkin, milk and cornmeal and beat until smooth. Sift in flour, baking powder and salt until combined. Fold in blueberries and nuts.
Cover and bake 2-3 hours.
(From Solar Cooking Naturally by the late Virginia Heather Gurley.)
Eggs
Leave eggs in shells and cook for 1-2 hours in a dark, covered pot. (Water does not need to be added.) With longer cooking whites tend to “tan” but flavor is fine.
Custard
• 1 egg
• 1 cup of milk
• 2-3 tablespoons of sugar
• 1/4 teaspoon salt
• 1/2 teaspoon vanilla
• Nutmeg to taste
Mix together all ingredients and sprinkle with nutmeg. Bake for 1½ hours in a dark, covered pot. Let cool before serving.
Sauces and gravies (with flour or starch)
Heat juices and flour separately, with a bit of cooking oil in the flour. Then combine and stir. It will be ready quickly.
Roasting nuts
Roast in dark, uncovered pan or tray. Almonds take about 1 hour, peanuts (groundnuts) about 2 hours.
Beverages
Solar cookers easily heat water for warm beverages like tea and cocoa.
OTHER FOODS

��
SOLAR COOKERS How to make, use and enjoy
Nachos
Spread corn chips on a dark metal tray and sprinkle with shredded cheese. When cheese is melted, nachos are ready.
“Solarcued” hot dogs
Place a single layer of hot dogs in a dark pot and heat, covered, until warm. Hot dogs can also be sliced and mixed with barbecue sauce prior to heating.
Solar s’mores
Place marshmallows and pieces of chocolate and/or peanut butter between graham crackers. Heat in a dark, covered pot until marshmallows melt.
Fruit cut-ups
Sprinkle sliced apples with cinnamon and sugar, and cook in a dark, covered pot until done (anywhere from slightly tender to very soft).
QUIC
K TR
EATS

SECTION 5 ALTERNATIvE SOLAR COOKER USES

�0
SOLAR COOKERS How to make, use and enjoy
SOLA
R PA
STEU
RIZA
TION
Disease-causing organisms in water are killed by exposure to heat in a process called pasteurization. Water that has been heated to 65ºC (149ºF) for a short period of time is free from microbes including Escherichia coli, Rotaviruses, Giardia and the Hepatitis A virus. At around 71ºC (160ºF), milk and food are pasteurized. Boiling is not required.
Microbe Killed rapidly at
Worms, Protozoa cysts (Giardia, Cryptosporidium, Entamoeba)
55°C (131°F)
Bacteria (V. cholerae, E. coli, Shigella, Salmonella typhi), Rotavirus
60°C (140°F)
Hepatitis A virus 65°C (149°F)
Why pasteurize?
Worldwide, unsafe water is a major health problem. Over one billion people do not have access to safe water. Preventable waterborne diseases are responsible for approximately 80% of all illnesses and deaths in the developing world. Children are especially susceptible, with nearly two million deaths each year. Diseases spread through contaminated water include Amoebiasis (Amoebic Dysentery), Campylobacteriosis, Cholera, Cryptosporidiosis, Dracunculiasis (Guinea Worm disease), Giardiasis, Hepatitis A, Shigellosis (Bacillary Dysentery) and Typhoid Fever.
How is pasteurization accomplished?
Traditional fuels can be used to pasteurize water, but on sunny days solar energy can be used as well. Simple solar cookers can pasteurize water for a family at a rate of about one liter (one quart) per hour. Solar Cookers International’s reusable Water Pasteurization Indicator (WAPI) can be used to determine when water heated by solar or conventional means has reached appropriate temperatures to make it safe.
Solar pasteurization directions
1. Pour water into a black pot or jar of the type used for cooking.
2. Position WAPI along string.
Slide the WAPI to the end of the string so that the wax end is furthest from the adjacent washer.

SOLAR COOKERS INTERNATIONAL
�1
3. Place WAPI in water.
Place the WAPI, wax end up, in the water with the opposite end of the string draped outside the pot or jar. The WAPI should rest on the bottom of the pot or jar (near the middle) and the wax end should be highest. Replace the lid. If using a glass jar, the lid should have a small hole in it or be loosely screwed on to release steam pressure.
4. Orient the solar cooker as you would for cooking.
In general, face the cooker easterly in the morning and westerly in the afternoon.
5. Set the pot or jar in the cooker.
If using a panel-type solar cooker, such as the CooKit, you can speed pasteurization by placing the pot or jar inside a clear, heat-resistant plastic bag. Though a plastic bag is required for cooking in this type of cooker, it is often not necessary for pasteurizing.
6. Allow water to heat.
Leave the cooker in a sunny place for a number of hours, reorienting if necessary. Allow at least one hour per liter (quart) of water.
7. Determine if pasteurization has occurred.
When the WAPI wax melts and falls to the bottom of the WAPI, the water has been pasteurized. Even if the water has cooled by the time you check it, as long as the wax is at the bottom of the WAPI then pasteurization has occurred. If you do not have a WAPI, you will need to either measure the water temperature using an alternate device or observe the water boiling.
8. Allow the water to cool before drinking.
Keep pasteurized water covered until use to prevent recontamination. Don’t let fingers or unclean objects touch clean water. If you aren’t sure, re-pasteurize water.
Safety Notice: Pasteurization does not remove dangerous chemicals, like arsenic. Pasteurization is not the same as sterilization, a process whereby everything, including heat-resistant spores, is killed. The heat-resistant spores that survive pasteurization are harmless to drink. Where sterilized liquids are needed — in hospitals and in certain food canning processes, for example — high temperatures are achieved using special pressure cookers.
BEFOREpasteurization
AFTERpasteurization
wax
wax
��
SOLAR COOKERS How to make, use and enjoy
OTHE
R US
ES Disinfect dry medical supplies
Disease-causing organisms in dry medical supplies are killed by exposure to heat. When these medical supplies — such as instruments, bandages and other cloth materials — are heated to 149ºC (300ºF) for a short period of time they are free from nearly all organisms. Larger solar cookers reach this temperature and, in difficult field conditions, can help save lives. Disinfection of liquids requires special equipment and cannot be accomplished with ordinary solar cookers.
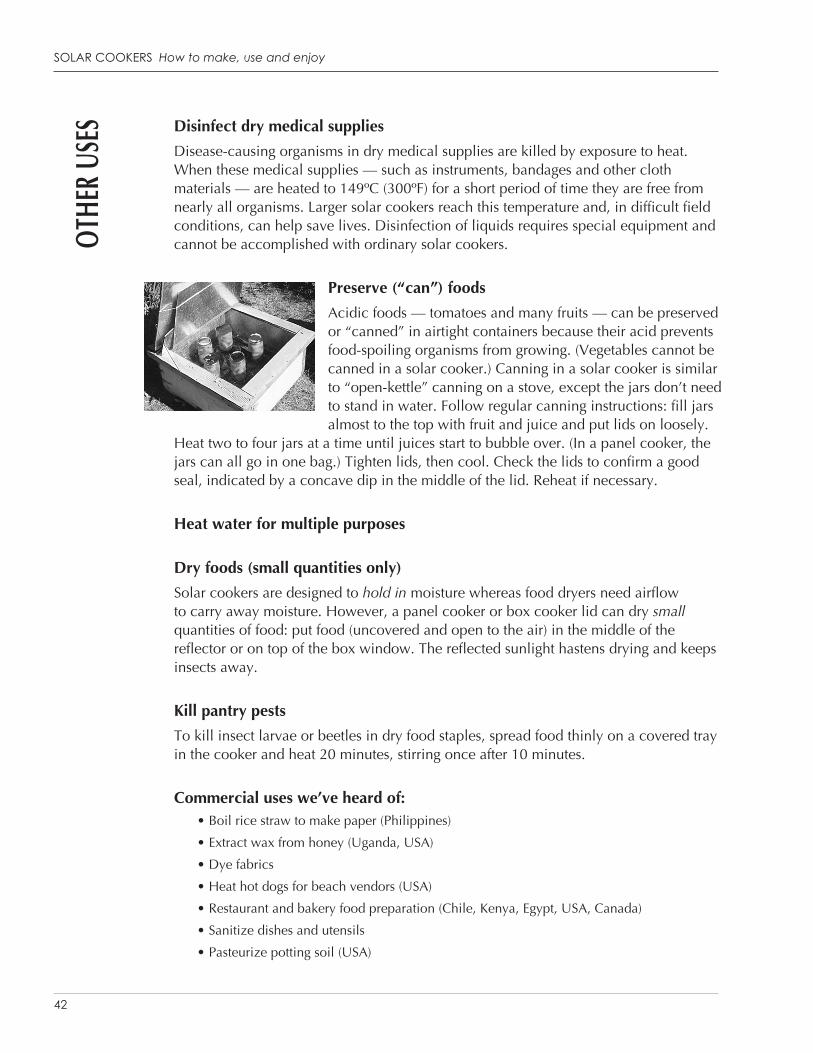
Preserve (“can”) foods
Acidic foods — tomatoes and many fruits — can be preserved or “canned” in airtight containers because their acid prevents food-spoiling organisms from growing. (Vegetables cannot be canned in a solar cooker.) Canning in a solar cooker is similar to “open-kettle” canning on a stove, except the jars don’t need to stand in water. Follow regular canning instructions: fill jars almost to the top with fruit and juice and put lids on loosely.
Heat two to four jars at a time until juices start to bubble over. (In a panel cooker, the jars can all go in one bag.) Tighten lids, then cool. Check the lids to confirm a good seal, indicated by a concave dip in the middle of the lid. Reheat if necessary.
Heat water for multiple purposes
Dry foods (small quantities only)
Solar cookers are designed to hold in moisture whereas food dryers need airflow to carry away moisture. However, a panel cooker or box cooker lid can dry small quantities of food: put food (uncovered and open to the air) in the middle of the reflector or on top of the box window. The reflected sunlight hastens drying and keeps insects away.
Kill pantry pests
To kill insect larvae or beetles in dry food staples, spread food thinly on a covered tray in the cooker and heat 20 minutes, stirring once after 10 minutes.
Commercial uses we’ve heard of:• Boil rice straw to make paper (Philippines)
• Extract wax from honey (Uganda, USA)
• Dye fabrics
• Heat hot dogs for beach vendors (USA)
• Restaurant and bakery food preparation (Chile, Kenya, Egypt, USA, Canada)
• Sanitize dishes and utensils
• Pasteurize potting soil (USA)

SECTION 6 IDEAS FOR TEACHERS

��
SOLAR COOKERS How to make, use and enjoy
QUIC
KIE D
EMO
COOK
IT You can make this “quickie” version of the CooKit on-the-spot for teaching purposes. It only cooks small quantities of food, but it can be used to demonstrate solar cooking concepts by warming foods, melting cheese and chocolate, heating water, etc. It is not intended as a substitute for a standard solar cooker.
Construction materials
• Corrugated cardboard (carton board) box — about 0.6x0.6x0.3 meters (2x2x1 feet)
• Aluminum foil, cut into strips as needed
• Utility knife or similar cutting device
• Tape (or glue and a paintbrush)
• See page 26 for substitute materials
Construction steps
1. Cut box in half diagonally so each half has two walls and a triangular bottom.
2. Tape an extra strip of cardboard to the cut edge of the bottom as an adjustable front panel.
3. Tape foil on demo CooKit.
Tape (or glue) aluminum foil to the inner side of the demo CooKit, including the front panel. Make sure the shiny side faces out.
Cooking directions
Follow the cooking directions for the standard CooKit beginning on page 13. (Some steps are not applicable.) The front flap will need to be propped up with a rock or similar object.

SOLAR COOKERS INTERNATIONAL
�5
SOLAR ACTIvITIESSolar energy has many household uses and will become more important to future generations as fossil fuels and trees are used up. The following learn-by-doing activities explore solar energy, how solar cookers work and how to put solar energy to work in other ways. They can be adapted for all ages.
Light
Sunlight affects materials, and materials affect sunlight in various ways.
• If the material is transparent (like some glass, plastics, water, etc.), light goes right through it almost as though it isn’t there
• If material is shiny, it reflects most light away
• If material is very dark, light seems to soak in and disappear. It is absorbed.
What you need
• A sunny day (early or late, when there are longer shadows)
• A sunny wall
• One or more items that are (1) transparent — clear plastic bag, glass, etc., (2) metallic shiny — metal pot, mirror, etc., (3) black metal, (4) black or dark-colored cloth, and (5) white or light-colored cloth
Activities
1. Have students hold the items near the sunny wall.
Discuss which ones let light through (transparent items) and which block the light and make shadows on the wall.

��
SOLAR COOKERS How to make, use and enjoy
2. Have students hold the items in the sunlight and move the items to try to shine a bright spot somewhere on the ground.
Discuss which materials reflect light (shiny and light-colored) and which ones absorb light (dark materials).
Changing light to heat
When absorbed (not reflected), light seems to disappear. What happens to it?
What you need
• A sunny day (early or late, when there are longer shadows)
• A sunny wall
• One or more items that are (1) transparent — clear plastic bag, glass, etc., (2) metallic shiny — metal pot, mirror, etc., (3) black metal, (4) black or dark-colored cloth, and (5) white or light-colored cloth
Activities
1. Set out all the materials in the sun (to check later).
2. Have a student stand in the sun with eyes closed and both hands outstretched, like a statue. Put white cloth over one hand and black cloth over the other.
Have other students guess which hand will feel hotter. Then ask “statue” — without opening eyes — to tell which hand feels hotter. (The hand with the black cloth should quickly feel warmer.) Let everyone try this.

SOLAR COOKERS INTERNATIONAL
��
3. Have each student stand by the sunny wall to make a shadow on the wall.
Ask them if their front and back feel different. (On their sunny side they are absorbing sunlight and changing some to heat.)
4. Have students feel all of the items which have been sitting in the sunlight and decide which is hottest and which is coolest. See if they all agree.
Ask which types of materials get hotter — those that reflect or those that absorb. (Black items should be hottest, shiny and transparent should be coolest.)
Heat
Heat naturally spreads from warmer places to cooler places. Some materials spread (conduct) heat and others keep it from spreading (insulate).
What you need
• A sunny day
• Solar cooker to heat a liter (quart) of water
• Four identical jars or containers with lids
• Plastic bag
• Crumpled newspaper or a large cloth
• Piece of heavy paper or a hand fan
Activities
1. Early in the day, set water in the solar cooker to heat.
2. When water is quite hot (but not hot enough to cause burns) pour equal amounts into each of the four jars and tighten lids.
• Put jar #1 inside a plastic bag
• Wrap jar #2 in crumpled newspaper or large cloth
• Set jar #3 in the open air
• Set jar #4 in the open air away from the others. Take turns fanning it.
3. After 10 minutes compare how hot the water is in each jar.
4. Discuss what things help heat escape (open air, breezes) and what things insulate (cloth, crumpled newspaper, a small layer of trapped air in a bag).
��
SOLAR COOKERS How to make, use and enjoy
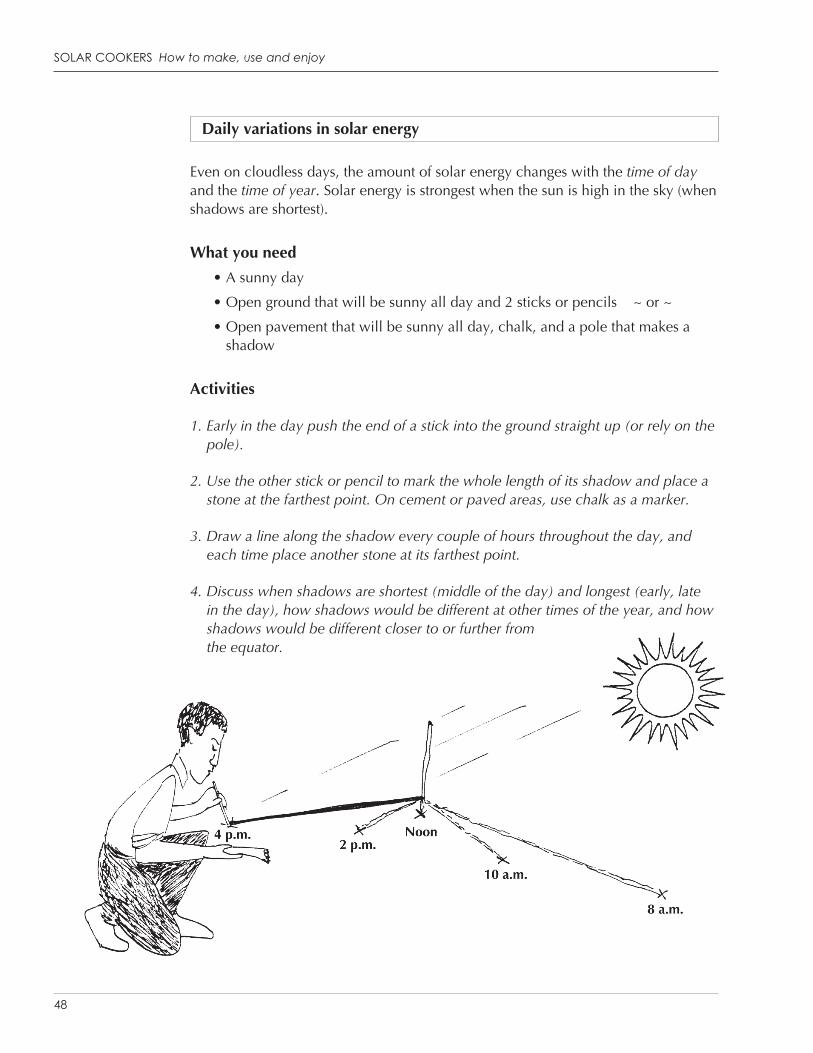
Daily variations in solar energy
Even on cloudless days, the amount of solar energy changes with the time of day and the time of year. Solar energy is strongest when the sun is high in the sky (when shadows are shortest).
What you need
• A sunny day
• Open ground that will be sunny all day and 2 sticks or pencils ~ or ~
• Open pavement that will be sunny all day, chalk, and a pole that makes a shadow
Activities
1. Early in the day push the end of a stick into the ground straight up (or rely on the pole).
2. Use the other stick or pencil to mark the whole length of its shadow and place a stone at the farthest point. On cement or paved areas, use chalk as a marker.
3. Draw a line along the shadow every couple of hours throughout the day, and each time place another stone at its farthest point.
4. Discuss when shadows are shortest (middle of the day) and longest (early, late in the day), how shadows would be different at other times of the year, and how shadows would be different closer to or further from the equator.

SOLAR COOKERS INTERNATIONAL
��
Apply knowledge to solar cooking
What you need
• Solar cooker (students can make)
• Plastic bag
• Dark pot
Activities
1. Have students explain how a solar cooker:
• Uses light
• Changes light to heat
• Transmits, reflects, absorbs, and conducts heat
• Insulates from heat loss
2. Have students relate the concepts above to parts of a solar cooker:
• Reflectors add extra sunlight
• Dark metal absorbs light and changes it to heat
• Window or bag transmits light and holds air which acts as insulation
• Etc.
Ideas for independent study
1. Geography
• Compare the amount of sunlight and rainfall in different parts of the world
• Study types of cooking fuels, where they come from, and their effects on the environment
2. Social studies
• Explore costs of cooking fuels for households, and for governments that must import fuels
• Explore costs of pasteurizing drinking water and of treating diseases caused by unsafe water
• Interview households about cooking fuel costs, time spent cooking and gathering fuel, and the effects of fuel shortages (if any) on family time, health and nutrition

50
SOLAR COOKERS How to make, use and enjoy
3. Science
Explore and describe the following:
• The effects on nutrition if families are unable to cook food
• Diseases that are spread by germs in water
• The health effects of smoky air
• “Greenhouse” gases and global warming
Using a solar cooker:
• The effects on cooking time of different types or quantities of food, different pots, etc.
• Compare/contrast cooking in light and dark pots of equal size
• Compare/contrast cooking with and without a plastic bag (in a panel cooker)
• Using thermometers, measure and graph water temperature in a solar cooker throughout the day
• Measure dimensions of the solar cooker
4. Languages
• Translate information about solar cooking into (or from) another language
5. Vocational skills, business
• Build a solar cooker and use it to bake food for sale

SECTION 7 A BRIEF HISTORY OF SOLAR COOKING

5�
SOLAR COOKERS How to make, use and enjoy
In 1767 French/Swiss Horace de Saussure solar cooked fruit in a glass-covered box made of three glass panes, two pine boxes and wool insulation. British
astronomer John Herschel used a box cooker in South Africa in 1830. The first recorded use in the United States was by Samuel P. Langley while climbing Mt. Whitney in 1881. In the 1860s Mouchot in Algeria first cooked with a curved concentrator. Charles Abbot made a box with curved mirrored frames to focus onto a container of motor oil. This heated to 177ºC (351ºF) and allowed cooking in the evening with stored heat. In the United States, Maria Telkes researched several combination types in the early 1900s. Early solar cookers were expensive and inconvenient.
In the 1970s disappearing trees and growing fuel shortages rekindled worldwide interest. Governments of India and China developed and promoted solar box and curved concentrator cookers. In the USA Barbara Kerr and Sherry Cole developed simple-to-make box cookers, as well as solar food dryers and sterilizers. Bob Metcalf has and continues to research solar water pasteurization and shares the knowledge in many countries.
Kerr, Cole, Metcalf and others founded Solar Cookers International (SCI) in 1987 to spread solar cooking benefits to people and environments worldwide. Today many hundreds of engineers, educators, Peace Corps volunteers, community development workers, retirees, government workers, Rotary clubs, universities, religious groups and refugee programs are sharing solar skills. As just a few examples, SERVE has brought solar cooking to thousands in Pakistan. The University of Chile, with Teresa Guzman, Pedro Serrano et al., brought solar cooking to Villa Seca, a village where most families solar cook and a solar restaurant is a tourist attraction.
Severe droughts in the 1990s prompted SCI to refine the ultra-simple CooKit by Roger Bernard (France) and share it worldwide and with more than 30,000 refugee families in sun-rich eastern Africa. Rotary International and Girl Guides have brought solar cooking to numerous countries.
We can all help spread solar cooking for a better world with a brighter future.
Barbara Kerr and Sherry Cole


SOLAR COOKERS INTERNATIONAL (SCI) is a nonprofit, nongovernmental organization with headquarters in Sacramento,
California, USA and an office in Nairobi, Kenya. Since its founding in 1987 SCI has spread solar cooking skills and technologies where they are needed most. Over 30,000 families have benefited directly from SCI’s field projects and countless others have used SCI’s resources to learn how to make and use solar cookers and teach others to do the same. SCI depends on the support of its members and donors to continue with its vital mission. We invite you to join us in this effort.
Solar Cookers International
1919 21st Street, Suite 101Sacramento, California 95811-6827
United States of America
Tel: +1 (916) 455-4499Fax: +1 (916) 455-4498
[email protected] | solarcooking.org