how to make your own plasma cutter - instructables
TRANSCRIPT

instructables
How to Make Your Own Plasma Cutter....
by Plasanator
Check out new video of the Plasanator on utube.com
This Ebook is designed for Guys and Gals who like tocreate tools and machinery.
I hope my Ebook gives you hope that no matter howhard a project may seem, keep plugging away untilyou finish and you will succeed.
I spent 3 years putting this together and now finally allmy hard work and research has paid off.
I studied diagrams from commercial venders, but tono luck. They tend to leave a lot out – on purpose - soit’s hard to reproduce their design. I’ve see differentattempts at people making their own on You Tubeand other sites, but what a death trap. Messy waterresistors and wiring like a darn Christmas tree.
So I began reading books and articles on theirworkings and took my home schooled-knowledge ofelectronics to build my own plasma cutter. I wasdetermined; failure was not an option.
I started by collecting parts from old microwaves,stoves, water heaters, air conditioners, car parts and
//www.youtube.com/embed/enELHZ7dP2I
more in the hopes of creating a low budget way tocreate a plasma cutter for myself. I mounted it all on asimple piece of scrap wood; well it’s scrap wood now.We, didn’t need that table anyway (shhhhhhh don’ttell the wife).
Then one day it all came together. I hit the powerswitch, placed the head to the metal, started the arc,felt the air kick and then a second hard kick (thecurrent being drawn into play). Then BAM, it wasslicing through quarter inch steel like a hot knifethrough butter.
How sweet it sounded! I felt the amazement ofcompleting a project that I just couldn’t let go of.
So, take your time, enjoy and be safe.
The Plasmaman
P.S.
Like Steam Punk?
Check out my Tesla Levitating Steam Punk LampVideo.
https://www.youtube.com/watch?v=jip8HYd39g0
How to Make Your Own Plasma Cutter....: Page 1
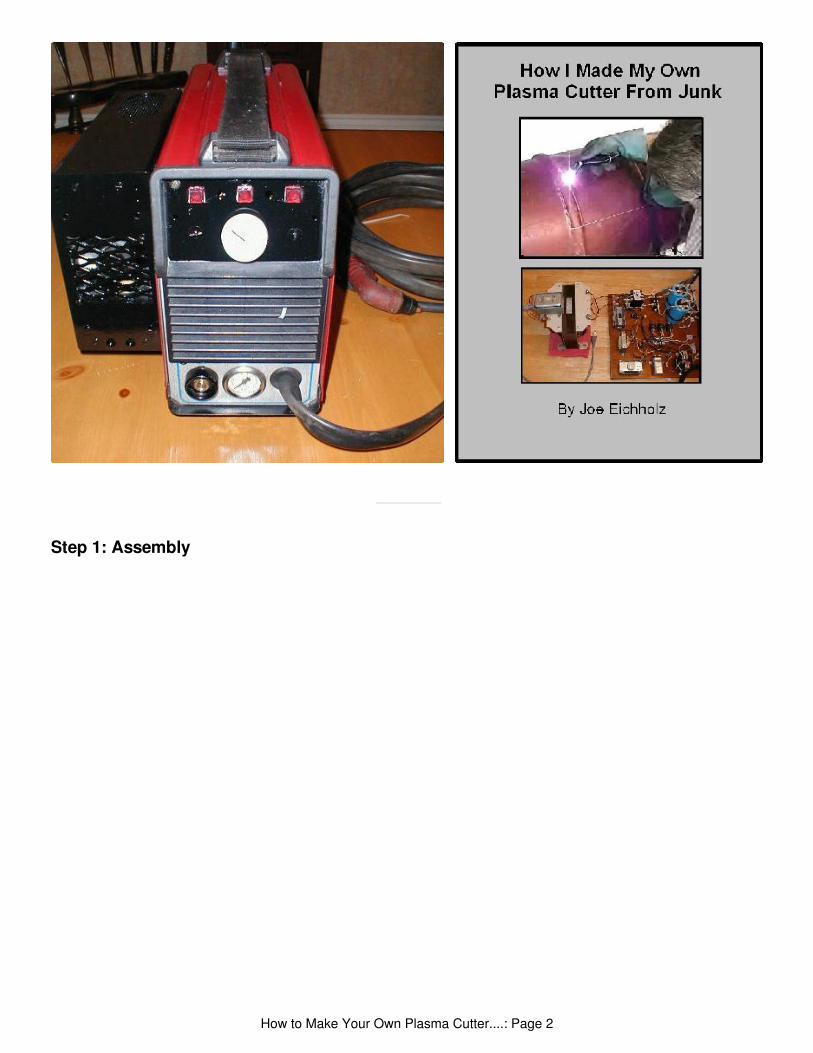
Step 1: Assembly
How to Make Your Own Plasma Cutter....: Page 2

When I started assembling my cutter, I began withtaking a good look at my parts. As shown in Section 5and Section 6, my parts are laid out so I can beginchecking off from my parts list. Once this wasaccomplished, I would study each the parts pictorialto get familiar with each part/component and theywould be placed.
The next step was to study my schematic and createa layout diagram. My board layout diagram is themost valuable piece in the building, repairing, andmodifying process of my cutter.
As I began mounting my parts, I organized my boardinto four sections. Those sections are Power Control,High Current DC, Low Voltage DC and High VoltageArc Start.
Power Control3KVA step down transformer and contactor. Thetransformer is mounted off board because it is big andheavy, as you can see in Section 13. The contactorbecame my first part on the board. I wired it so whenthe head trigger is pressed, it turns the contactor onand allows my DC components to come on line. ThenI began with my next system, High Current DC.
High Current DCBridge RectifierLarge CapacitorsReed Switch (which I used as a current sensor), whatit does is allow the high voltage arc system to fire andas soon as high current starts to travel to the headand cutting starts it shuts down the high voltage arcsystem while cutting since it’s not needed at thispoint.If you lose your fire it restarts the arc and gets yougoing again automatically.My next system was placed on board.
Low Voltage DCThe low voltage DC components are mixed withpower switch and 120 volt terminals.Power Switch120-volt terminal blocks12 volt transformerLow voltage bridge rectifierAuto relaysTerminal strip, 4 position is all I needed but 5 positionwas what I had in my toy box.
High Voltage Arc StartMicrowave capacitor or run capacitor, a household
dimmer switch rated for 15 amps. A Ford or Chevyignition coil. I used the Chevy on this cutter. As youcan see, I have terminals to all parts that get anexternal connection outside of their system so all Ihave to do is run a piece of wire in-between. Nowlook at the pictorial of board mounted parts in Section11. It shows all the wires on the board, but here youcan see all terminals and parts mounted, as I wanted.When wiring all my components, I used my Chevyboard layout diagram to run my wires.
I checked and re checked all wires before mountingexternal parts. If you go to the final wiring section, youwill also find pictures of my rigging of these parts. Icould have done it many different ways, but this iswhat I chose at this time.
It took me about 3 hours of procrastination to finallyassemble it all. You know how it is on a project, onceyou are ready with all your parts, your mind startsgiving you a million ways of doing something. And, at
last you just pick a way and go with it.
Once I got it all together, I connected my air tankhose and put the pressure setting at 28 for a safepoint to start. I fired it up and BAM - that baby didn’tneed any more adjusting. It was cutting!
You can imagine all the relief and pride I felt when thePlasanator started kicking ass. Yea, I said it KickingAss Baby. Oops Wife just told me I need to stop, heehee and for all you creators – ah ah ah ahhhhhh.
I hope you enjoyed riding along with me in myjourney.
Take care and be safe.
The Plasmaman
How to Make Your Own Plasma Cutter....: Page 3
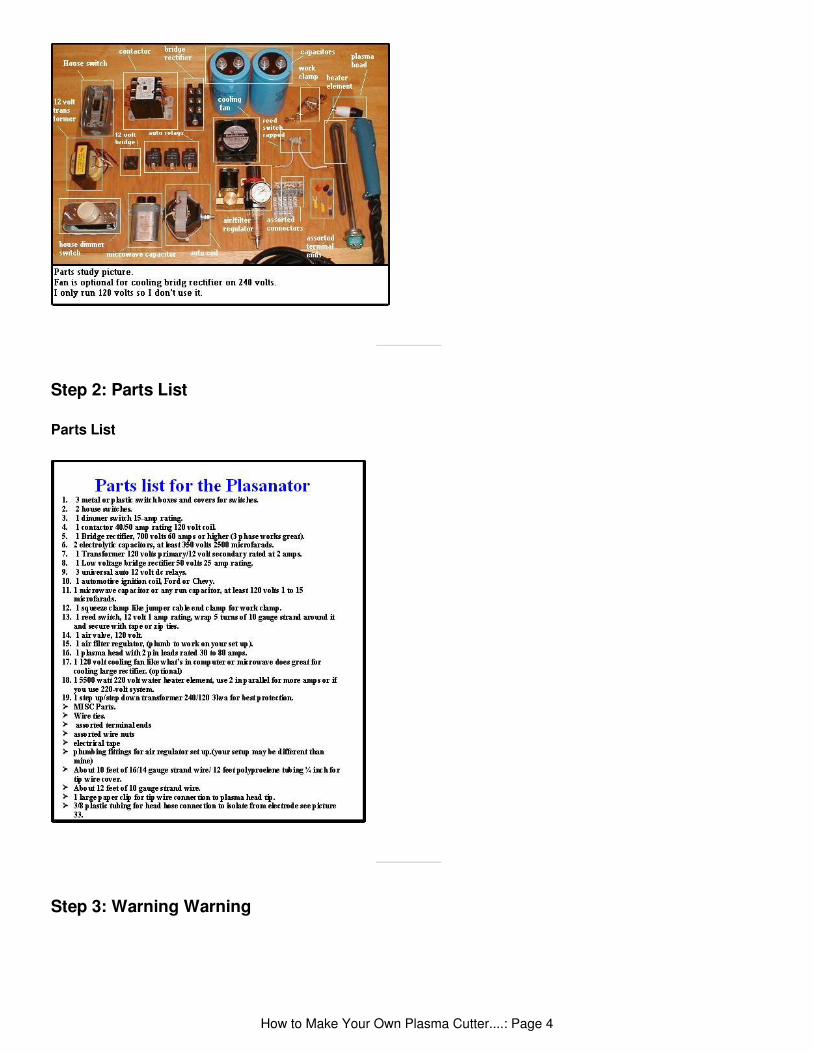
Step 2: Parts List
Parts List
Step 3: Warning Warning
How to Make Your Own Plasma Cutter....: Page 4

Step 4: Schematic
Chevy Pictorial Schematic
How to Make Your Own Plasma Cutter....: Page 5

Step 5: Another View
Step 6: Another Schematic to Looksy At
Step 7: Board Lay Out
Now this is to demenstrate how I set it up before putting it in a case configuration.So dont think you would leave it like this for it would be to dangerous to do so.
How to Make Your Own Plasma Cutter....: Page 6

Step 8: Transformer I Used
Its a control transformer I got off ebay for 50 bucks.It's 220 to 120 3kva 25 amps and works great in power isolation.
Step 9: Transformer Connected to Board Terminals.
How to Make Your Own Plasma Cutter....: Page 7

Step 10: Power to Contactor Terminals
These are the contactor terminal conections on the transformer side and then the contactor to large bridgerectifier connections.Also you will see Bridge rec to Capitor connections and how they are connected.This is your Main Current set up.
How to Make Your Own Plasma Cutter....: Page 8

Step 11: Reed Current Sensor
How to Make Your Own Plasma Cutter....: Page 9

Step 12: Low Voltage Side
How to Make Your Own Plasma Cutter....: Page 10

Step 13: Relay Connections by Color
How to Make Your Own Plasma Cutter....: Page 11

How to Make Your Own Plasma Cutter....: Page 12

Step 14: Chevy HV Transformer Connections
How to Make Your Own Plasma Cutter....: Page 13

Step 15: Arc Tip Assembly to Head
Step 16: Head Air Coupling
here is where you will connect your air line to your head if you dont have a fitting to do so then hook to boardconnections.
How to Make Your Own Plasma Cutter....: Page 14
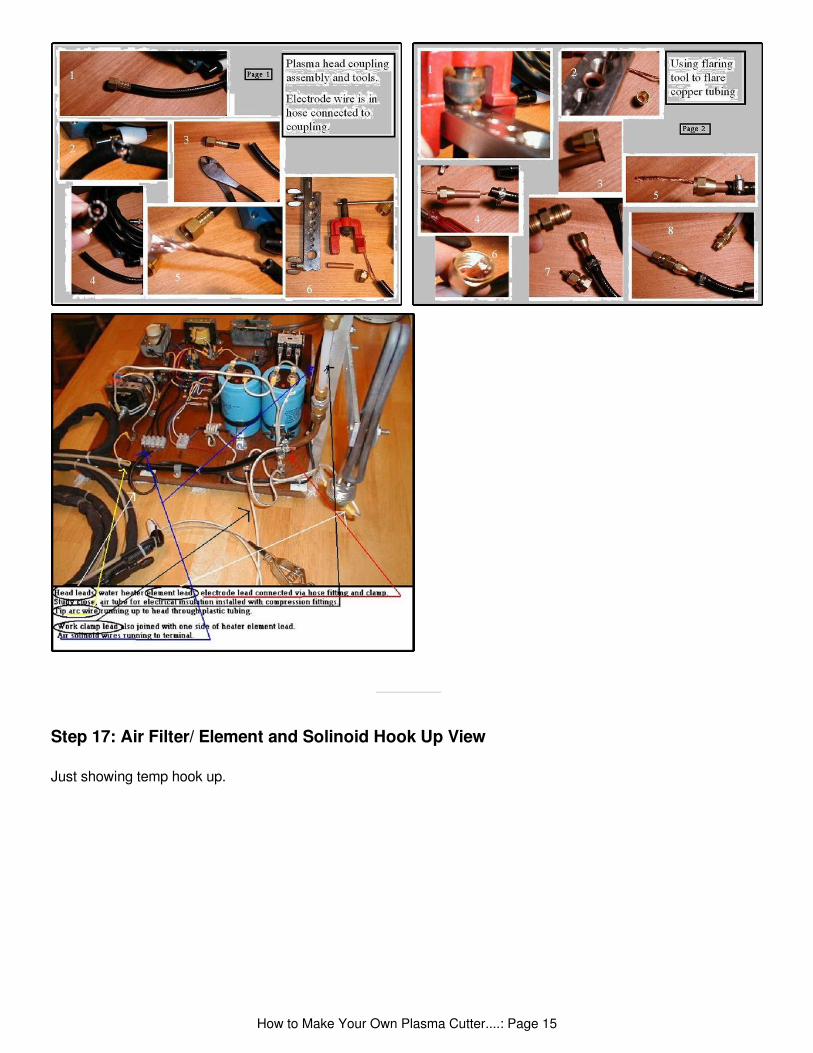
Step 17: Air Filter/ Element and Solinoid Hook Up View
Just showing temp hook up.
How to Make Your Own Plasma Cutter....: Page 15
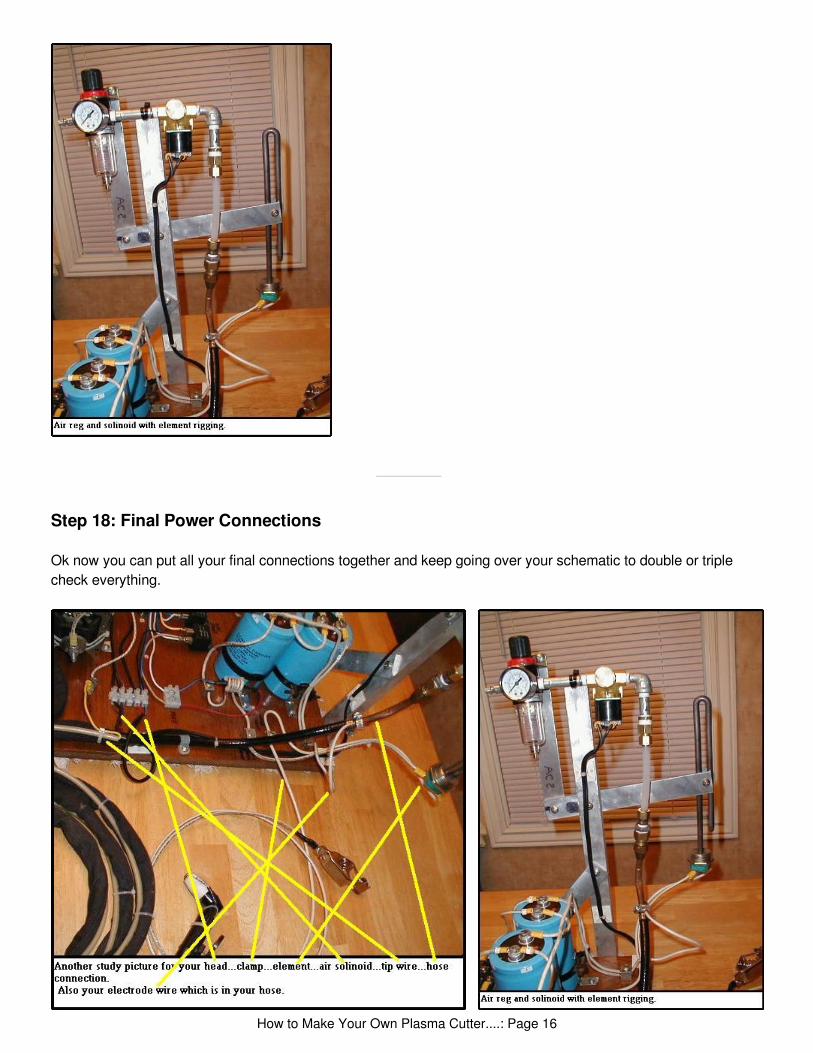
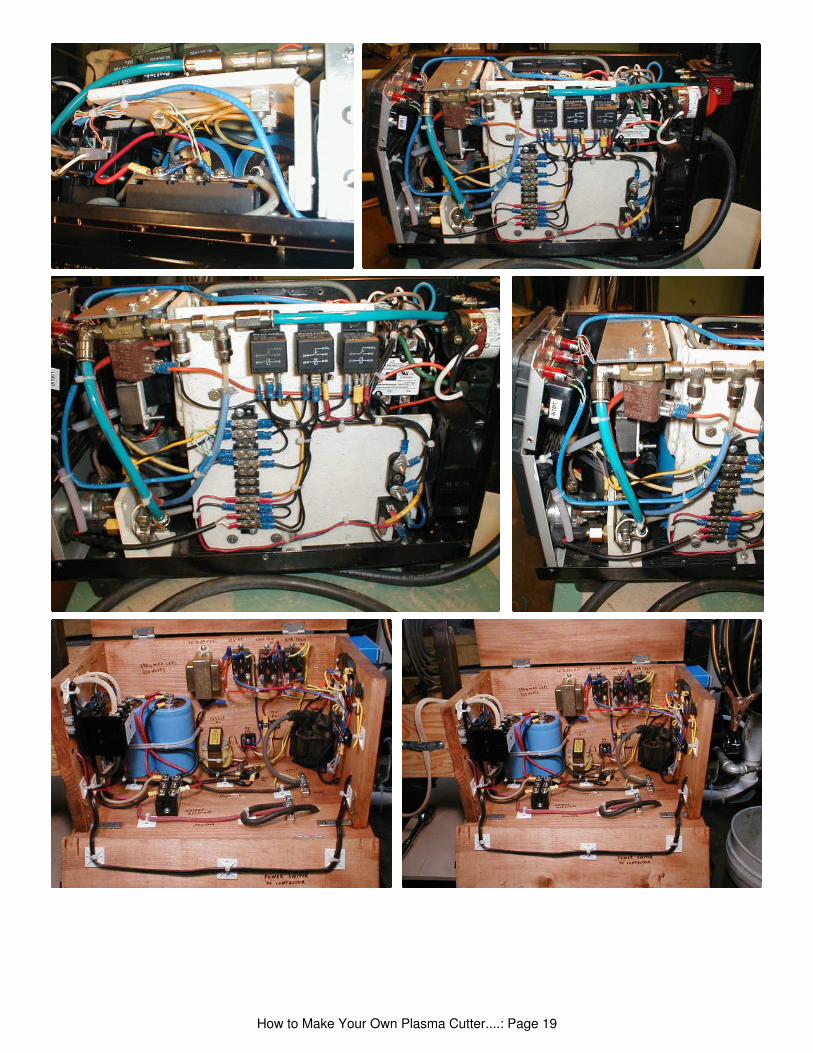
Step 18: Final Power Connections
Ok now you can put all your final connections together and keep going over your schematic to double or triplecheck everything.
How to Make Your Own Plasma Cutter....: Page 16

How to Make Your Own Plasma Cutter....: Page 17

Step 19: Extra Photos of Past Cutter Projects
Here are some photos of past cutter projects for youto enjoy.Now remember that you will need to put in a case forsafty.It can be would metal or plastic just enclose it.My photos are in a testing stage and that is why yousee them exposed.The photos of the red cutter was a china one thatburnt up on my neighbor and I ripped out the guts andreplaced it with my design.
He just loves it.The black box on side is the housing for 2 elementsto draw more current.You will also see here some other designs where Iused a chevy control module as the hv arc start andmy first plasma cutter on test stand using stove coilsas current resistors.Have fun and be safe ya'll. Joe
How to Make Your Own Plasma Cutter....: Page 18
How to Make Your Own Plasma Cutter....: Page 19

How to Make Your Own Plasma Cutter....: Page 20

How to Make Your Own Plasma Cutter....: Page 21

My isolation transformer made of a old welder machine. It will be capable to supply 40A at 220vac.I will try to remove the heater element an include a pwm controller. For HV i designed a couplingcoil to isolate the HV side of the high current side. Soon as i test i will publish here. Wish me luck!
I wish you Best of luck, be safe
Did you ever get your HV start working?
Be nice to see it. good luck God speed
Plasanator, I have a question for you and the rest of the community. Have you figured out how tochange amperage? And a way to rid the design of the wasteful resistors? Like a simple pwm circuitto control amps?
As it stands now I just parallele 2 or 3 elements together for more current cutting power.I am just about done with COMPLETELY NEW PLASMA CUTTER where all you do is turnselector for more power eleminating resistor elements. Stay Tuned Folks.
I wanted to post some info for anyone wanting to use a flyback transformer for the HV start. Aflyback transformer needs some type of driver to conduct voltages. It acts more like a choke withcoupled windings than a true transformer. It needs a pulsed, generally high frequency source toconduct the high voltages. If it doesn't have a collapsing or changing field at a higher than linefrequency (60hz) it will not conduct voltages very well if at all. The driver can be a simple spark gap, a 555 timer circuit, simple mosfet switching circuit, pwmcircuit, a florescent light ballast (even one from a compact cfl). I am unsure if a lc or rc circuit wouldwork. You don't need very much current for the HV (mA is ok), the voltage alone is enough to startthe plasma.
What are the values of the components of your measurements?
I have a parts list that will tell you everything you need.
If anyone would like to have: switch, breaker, allen bradley contactor, relay, din rail, enclosure box,psi meter (manometer), selenoid valve, hose fittings, hp hose, a allanson 120 to 6000v natural gasignition transformer, a 200 amp welder plug like the link under that I can add the big breakeralready fixed to with the enclosure box... and lot of things... for really fair price and the bestindustrial grade quality you would not think possible for the price i will do, just message me back
Step 20: Plasanator 3's First Cut
http://www.youtube.com/watch?v=nA6zWHNn6zU
Goto link and watch it's first cut while listening to the mission impossible song.Thanks for stopping by and God Bless.
How to Make Your Own Plasma Cutter....: Page 22

please.
https://www.reynoldsonline.com/ASSETS/DOCUMENTS/ITEMS/EN/AP204612_Spec.pdf
I’d like to Ernst least some of these parts if you still have.
does this change the wiring or component?
wiring still could change back to get 120 less thickness of cut
so, is this now a 220 unite or is it still a 120 unite?
Sir some problem in plasma cutter every two or three time use then short a rectifier I use rectifier50amp. 600volt x 3 pies
Some of the cheapy rectifiers are junk get you a 90 to 120 amp rect and you should be good to go.
Thanks great work Good explanation There is only something I did not understand
Chevy HV Transformer Connections 14 Thank youIf it's about the hv lead coming off the bolt to capacitors and lead going to torch head ? it's set upthis way to cause arc to electrode when trigger is pressed.
Hi Saraa, if it's the bolt on it and how it's mounted , you can just solder 10 guage wire directly tocoil spot.
Don't need bolt set up at all. this was first time using this kind of coil and later found out the flatspot wasnt aluminum but was able to be soldered to.
I do not understand How much is needed from the current I have coil Bipolar 8 kv Per pole Is itenough and thank you
it will be great should give you about 36 amps and you will want to run at about 25 amps for 1/4inch cuts and if just thin sheet metal 16 to 18 amps will be great.
thanks for your wonderful work�
but there is a QUESTION�
what‘s the heater element for �in this design�
hope anyone could help me with that question� thanks�
sorry � i am not good at electric thing �
It is a load resistor which pulls your current need to cut
it adds resistance to the circuit.
Thank you for sharing your knowlegde. I would like to make my own plasanator but the step downtransformer is very expensive to bought it. I have a transformer rescued from a old stereo. Itsmarked as +63v / -63v out, 120 volt in. I supose 120v in - 120v out . Do you think I can use it? Iwant to cut carbon steel 18 gage with a CNC machine I made. here is a video
Thank you
Abraham Montemayor
Monterrey, MX.
For 18 gauge it will work great. great video
//www.youtube.com/embed/bEs9bxv-p5E
How to Make Your Own Plasma Cutter....: Page 23

hi And it all shuts Abraham I just use mains since I run it on a contactor.Release trigger an all is shut down.I never had one problem.Your t former wont work.
Would like to build this as a 220 volt unit. I understand that I wont need the step down(up) xformer,and will need two heater elements, also a double pole main power switch. Are there any otherchanges that will need to be made to the circuit? also, you don't specify if the reed switch is NO orNC. From your description of the circuit, I'm assuming NC. Correct? Thanks for an interestingproject!
It is nc because you want it on until current flows then it opens to turn off high voltage arc.
That is correct and good luck have fun. Joe
Hello; Anyone needing some of these parts I have alot of those items
hello.am felix in kenya.and yes am interested to have some parts.
Alot of rectifiers, connectors,relays etc
That is so cool to see all the places of the world Ive helped someone with one of there dreams.Aweome
Thank you for sharing all this information. I was able to build my own Plasma cutter. It was fun.Here's link to my video
https://youtu.be/e_Ocq96N5rU
Your very welcome great video.
Where are you from? I think it's great to see people from all over the world enjoy making somethingI made. Congratulations. Plasanator
This project is worth the effort. I am from India.
We, didn’t need that table anyway (shhhhhhh don’t tell the wife). xD
Forgive me if this questions has been asked before, but I am in ths uk and we have 13amp at 230volt, so do i need that 110v 3kva transformer?
no you do not
Works great!
With a higher pressure and a HV capacitor (1,5 nF) in the output of flyback finally my the plasmacutter is working perfectly. I will not publish a picture of my creature because it's only a lot of wireson the floor. Soon as assemble it properly i will post some photos.Thank you Plasanator!
Plasma cutter video!
//www.youtube.com/embed/F1l72neIPyQ
How to Make Your Own Plasma Cutter....: Page 24

Congratulations!!! Super great don't it feel good?
Would you mind if I put your video on my site?
Yes. I'm feeling like a boy with brand new toy.Feel free to use any of my videos on your site.
My plasma cutter (almost) works! Unfortunately the plasma do not start when i press the button. Myarc starter is made of a TV FLYBACK with the positive HV wire is connected in external tip of thetorch and the negative HV connected with the (-) high current in the interior of the torch.I have to scratch the torch several times to iniciate the plasma and finally cut something.Please any help or suggestion will be welcome!I WILL NEVER GIVE UP UNTIL MY PLASMA CUTTER BE WORKING 100%.
Tks All!
make sure electrode has negative and work clamp is positive like dc welder on reverse
adjust air to 70 psi.
Let me know how it goes and what voltage are you using 120 or 220?
Hi Joe Eichholz,Yes the work clamp is positive and the electrode is negative.I will try with 70 psi of pressure i was using 40 psi or less. I have small air compressor!I builded with 120V AC inlet and the voltage doubler. I measured +/- 320V DC.I'm using 6 resistor and 10.000uf capacitors.I need high power hv to start the plasma? The flyback system have only 24W.
Thanks for helping. I will post the results soon.
Hi I wish to work on the modification of the work you have done. So I get the opportunity to work onit. I wish to get the documents or any material regarding the project. If yes I wish to get your e-mail.Thank you
thanks
thanks
very nice,what are the specs of the bridge rectifier the you used
How to Make Your Own Plasma Cutter....: Page 25