how to multi hoop futura - singer sewing co.€¦ · how to multi-hoop on the futura quartet 1 –...
TRANSCRIPT

HOW TO MULTI-HOOP ON THE FUTURA QUARTET 1 – Set up your machine with embroidery unit attached; connect the machine to your computer via the USB cable. Boot up your computer and turn on the sewing machine. Launch the FQ-4 software. Insert a full bobbin & thread machine. 2 – Attach the empty Large Hoop to the embroidery arm. 3 – Choose your Hoop. Select “Tools” from the tool bar; Select “Hoop”; Select “Multiple”.
4 - Choose your Design. Select “Create” from the tool bar; Select “Design Library”; Select “Singer Special
Cameo”. Select pattern SP_011 Right click on screen - Left click on
Flip - Flip Horizontal.
After design flips, right click again and then left click on Apply.
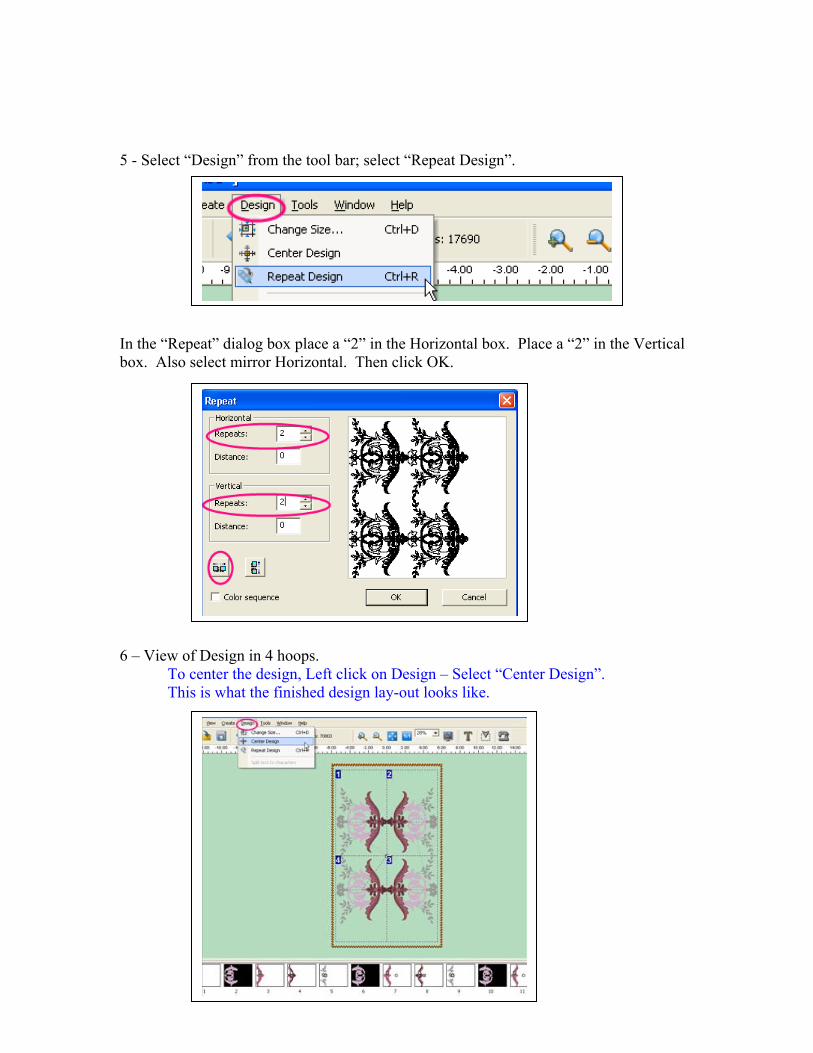
5 - Select “Design” from the tool bar; select “Repeat Design”. In the “Repeat” dialog box place a “2” in the Horizontal box. Place a “2” in the Vertical box. Also select mirror Horizontal. Then click OK. 6 – View of Design in 4 hoops.
To center the design, Left click on Design – Select “Center Design”. This is what the finished design lay-out looks like.

7 – Preparing the Fabric. Mark your fabric with a vertical and horizontal line that will cross at the center. It is critical that these 2 lines cross at a perfect 90° angle. (Use a fine point
water soluble pen or chalk). The finer the line the more accurate your right angle will be. We highly recommend that you invest in an L-Squared, T- Squared or see-through quilter’s ruler for the best results. We used a see- through quilter’s ruler. Vertical Line Horizontal Line
Finished vertical-horizontal cross line.
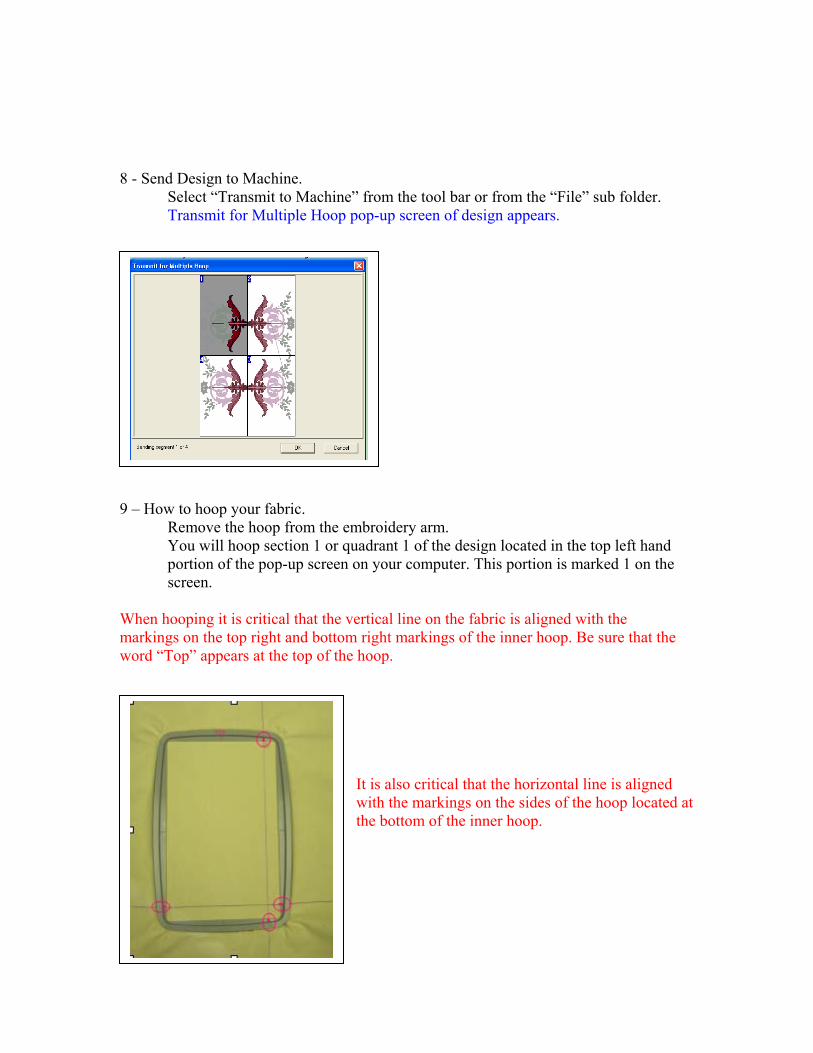
8 - Send Design to Machine. Select “Transmit to Machine” from the tool bar or from the “File” sub folder. Transmit for Multiple Hoop pop-up screen of design appears.
9 – How to hoop your fabric. Remove the hoop from the embroidery arm.
You will hoop section 1 or quadrant 1 of the design located in the top left hand portion of the pop-up screen on your computer. This portion is marked 1 on the screen.
When hooping it is critical that the vertical line on the fabric is aligned with the markings on the top right and bottom right markings of the inner hoop. Be sure that the word “Top” appears at the top of the hoop.
It is also critical that the horizontal line is aligned with the markings on the sides of the hoop located at the bottom of the inner hoop.

10 – Preparing to sew out hoop 1 of your design. Attach the hoop with the hooped fabric to the embroidery unit.
On computer screen click “OK”.
The illuminated lights on the front panel of your machine represent the vertical and horizontal lines on your fabric.
The computer screen now prompts us to input Alignment point A
The directional buttons now become shifting buttons that will allow you to move the hoop, and line up the needle with the vertical or horizontal line.
The first point to line up is point A. This is indicated by the blinking button on the front panel of the machine.

Point A in this case is the top of the vertical line. Use the right and left shift buttons to position the hoop so that the needle is precisely over the vertical line. To verify the position of the needle, turn the handwheel towards you and lightly pierce the fabric with the needle. If the needle is aligned correctly, it will have dropped into the center of the vertical line. Don’t forget to raise your needle before you start to sew otherwise the software will not allow you to proceed.
If needle is precisely on the line, press OK on the front panel of the machine.

The next point to line up is point B. This is indicated by the blinking button on the front panel of the machine. Point B in this case is the bottom of the vertical line. Use the right & left or up & down shift buttons to position the hoop so that the needle is precisely over the vertical line. To verify the position of the needle, turn the handwheel towards you and lightly pierce the fabric with the needle. If the needle is aligned correctly, it will have dropped into the center of the vertical line. Don’t forget to raise your needle before you start to sew otherwise the software will not allow you to proceed. If needle is precisely on the line, press OK on the front panel of the machine.
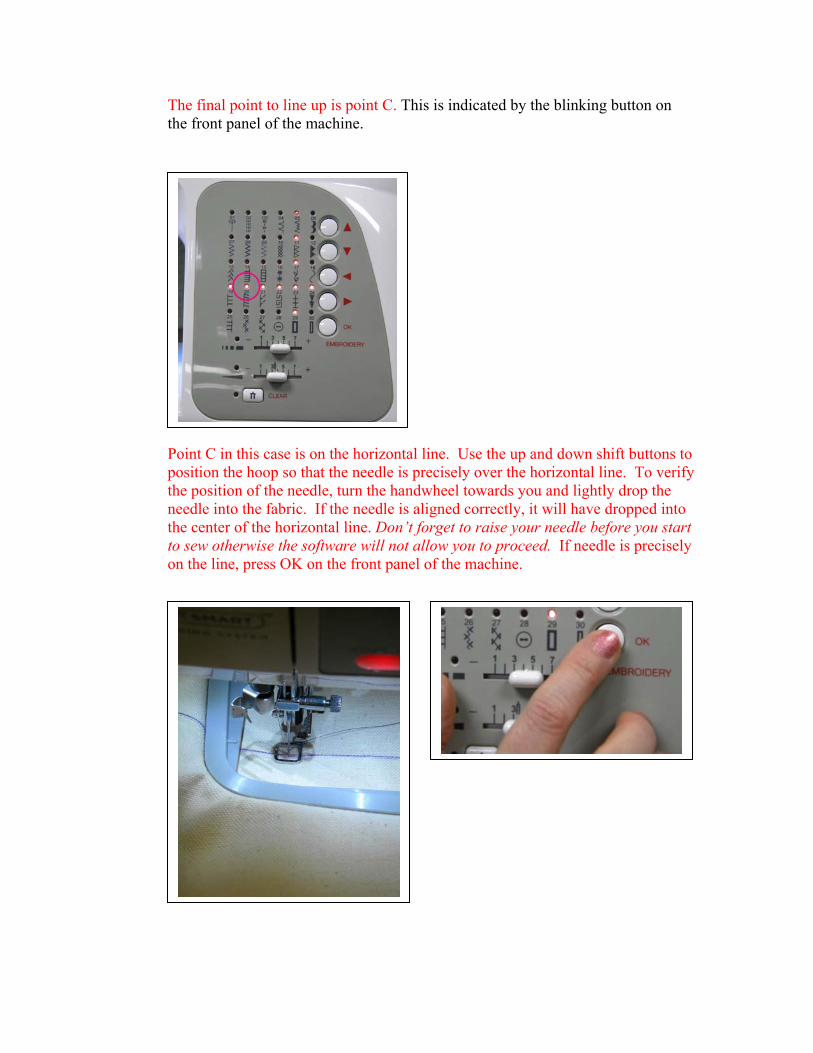
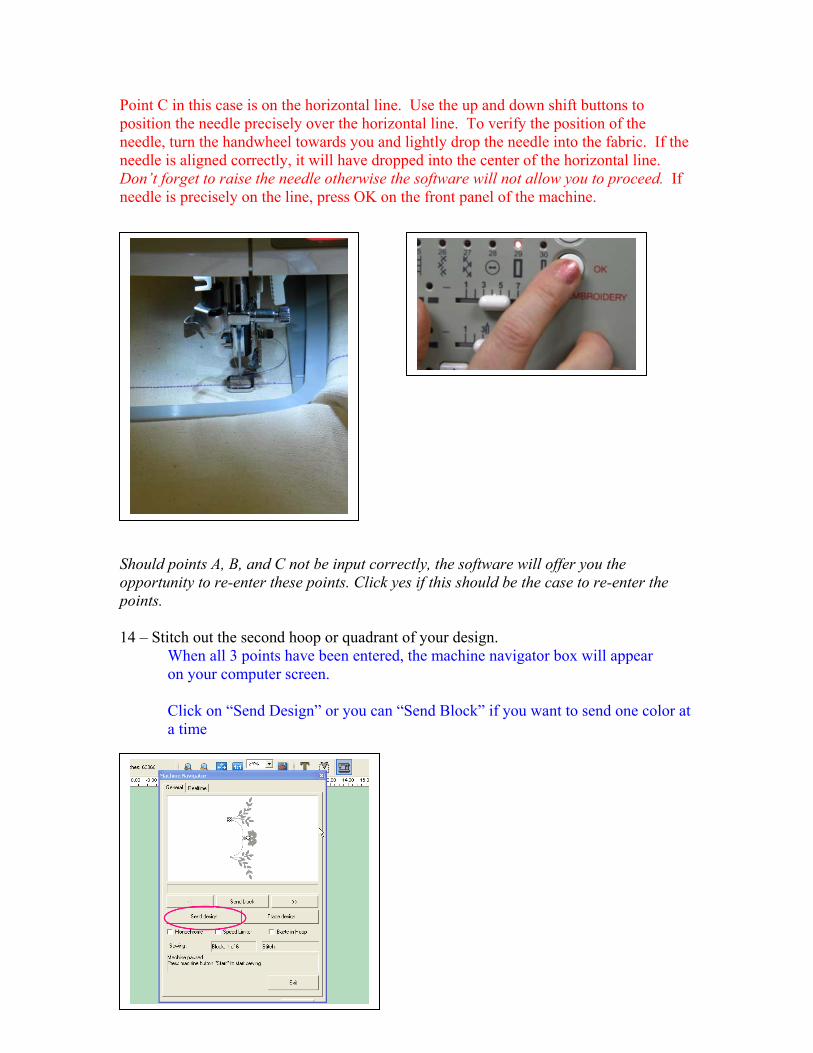
The final point to line up is point C. This is indicated by the blinking button on the front panel of the machine. Point C in this case is on the horizontal line. Use the up and down shift buttons to position the hoop so that the needle is precisely over the horizontal line. To verify the position of the needle, turn the handwheel towards you and lightly drop the needle into the fabric. If the needle is aligned correctly, it will have dropped into the center of the horizontal line. Don’t forget to raise your needle before you start to sew otherwise the software will not allow you to proceed. If needle is precisely on the line, press OK on the front panel of the machine.

Should points A, B, and C not be input correctly, the software will offer you the opportunity to re-enter these points. Click yes if you need to re-enter the points.
11 – Stitch out the first hoop or quadrant of your design.
When all 3 points have been entered, the machine navigator box will appear on your computer screen. Click on “Send Design” or you can “Send Block” if you want to send one color at a time.
When all colors of the design have been completed in hoop 1, the Transmit for Multiple Hooping box will be on screen, hoop 2 will be highlighted. Click OK.

12 – Preparing to stitch out Hoop or Quadrant 2: How to rehoop the fabric. Remove the hoop from the embroidery arm. You will hoop section 2 or quadrant 2 of the design located in the top right hand portion of the pop-up screen on your computer.
When hooping it is critical that the vertical cross line on the fabric is aligned with the markings on the top left and bottom left markings on the inner hoop. Be sure that the word “TOP” appears at the top of the hoop. It is also critical that the horizontal line is aligned with the markings on the bottom sides of the inner hoop.
13 – Preparing to sew out hoop 2 of your design.
Attach the hoop with the hooped fabric to the embroidery unit. On computer screen click “OK”. The computer screen now prompts us to input Alignment point A.

The illuminated lights on the front panel of your machine represent the cross lines of the hooped fabric for section 2 The first point to line up is point A. This is indicated by the blinking button on the front panel of the machine.
Point A in this case is the top of the vertical line. Use the right and left shift buttons to position the hoop so that the needle is precisely over the vertical line. To verify the position of the needle, turn the handwheel towards you and lightly pierce the fabric with the needle. If the needle is aligned correctly, it will have dropped into the center of the vertical line. Don’t forget to raise your needle before you start to sew otherwise the software will not allow you to proceed.

If needle is precisely on the line, press OK on the front panel of the machine.
The next point to line up is B.
Point B is indicated by the blinking button on the front panel of the machine.

Point B in this case is the bottom of the vertical line. Use the right and left shift buttons to position the hoop so that the needle is precisely over the vertical line. To verify the position of the needle, turn the handwheel towards you and lightly pierce the fabric with the needle. If the needle is aligned correctly, it will have dropped into the center of the vertical line. Don’t forget to raise your needle before you start to sew otherwise the software will not allow you to proceed. If needle is precisely on the line, press OK on the front panel of the machine.
The final point to line up is point C. This is indicated by the blinking button on the front panel of the machine.
Point C in this case is on the horizontal line. Use the up and down shift buttons to position the needle precisely over the horizontal line. To verify the position of the needle, turn the handwheel towards you and lightly drop the needle into the fabric. If the needle is aligned correctly, it will have dropped into the center of the horizontal line. Don’t forget to raise the needle otherwise the software will not allow you to proceed. If needle is precisely on the line, press OK on the front panel of the machine. Should points A, B, and C not be input correctly, the software will offer you the opportunity to re-enter these points. Click yes if this should be the case to re-enter the points. 14 – Stitch out the second hoop or quadrant of your design. When all 3 points have been entered, the machine navigator box will appear on your computer screen.
Click on “Send Design” or you can “Send Block” if you want to send one color at a time
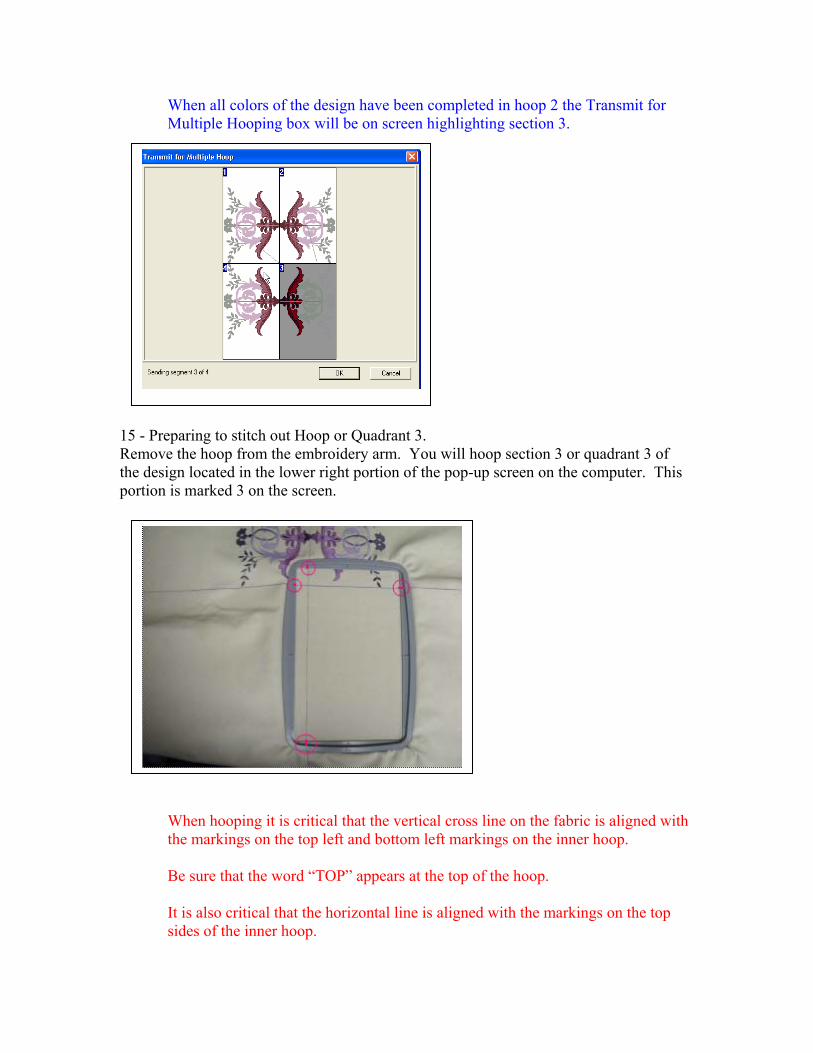
When all colors of the design have been completed in hoop 2 the Transmit for Multiple Hooping box will be on screen highlighting section 3.
15 - Preparing to stitch out Hoop or Quadrant 3. Remove the hoop from the embroidery arm. You will hoop section 3 or quadrant 3 of the design located in the lower right portion of the pop-up screen on the computer. This portion is marked 3 on the screen.
When hooping it is critical that the vertical cross line on the fabric is aligned with the markings on the top left and bottom left markings on the inner hoop. Be sure that the word “TOP” appears at the top of the hoop. It is also critical that the horizontal line is aligned with the markings on the top sides of the inner hoop.

16 – Preparing to sew out hoop 3 of your design. Attach the hoop with the hooped fabric to the embroidery unit
On the computer screen click “OK”
We are now ready to input Alignment point A. The illuminated lights on the front panel of your machine represent the vertical and horizontal cross lines on your fabric. The first point to line up is point A. This is indicated by the blinking button on the front panel of the machine.

Point A in this case is on the bottom of the vertical line. Use the right and left shift buttons to position the hoop so that the needle is precisely over the vertical line. To verify the position of the needle, turn the handwheel towards you and lightly pierce the fabric with the needle. If the needle is aligned correctly, it will have dropped into the center of the vertical line. Don’t forget to raise the needle, otherwise the software will not allow you to proceed. If the needle is precisely on the line, press OK on the front panel of the machine.
The next point to line up is point B. This is indicated by the blinking button on the front panel of the machine.

Point B in this case is the top of the vertical line. Use the right & left or up & down shift buttons to position the hoop so that the needle is precisely over the vertical line and just below the horizontal line. To verify the position of the needle, turn the handwheel towards you and lightly pierce the fabric with the needle. If the needle is aligned correctly, it will have dropped into the center of the crossed line. Don’t forget to raise the needle otherwise the software will not allow you to proceed. If needle is precisely on the line, press OK on the front panel of the machine.
The final point to line up is point C. This is indicated by the blinking button on the front panel of the machine.

Point C in this case is on the horizontal line. Use the up and down shift buttons to position the hoop so that the needle is precisely over the horizontal line. To verify the position of the needle, turn the handwheel towards you to lightly drop the needle into the fabric. If the needle is aligned correctly, it will have dropped into the center of the horizontal line. Don’t forget to raise your needle otherwise the software will not allow you to proceed. If the needle is precisely on the line, press OK on the front panel of the machine.
Should points A, B, and C not be input correctly, the software will offer you the opportunity to re-enter these points. Click yes if this should be the case. Re-enter the points.
17 – Stitch out the third hoop or quadrant of your design.
When all 3 points have been entered, the Machine Navigator box will appear on the computer screen.
Click on “Send Design” or “Send Block” if you want to send one color at a time. When all the colors of the design have been completed in hoop 3, the “Transmit for Multiple Hooping” box will appear. Click OK.

18 – Preparing to stitch out Hoop or Quadrant 4. How to rehoop the fabric.
Remove the hoop from the embroidery arm. You will hoop section 4or quadrant 4 of the design located in the bottom left hand portion of the pop-up screen on your computer. This portion is marked 4 on the computer screen.
When hooping it is critical that the vertical cross line on the fabric is aligned with the markings on the top right and bottom right markings on the inner hoop. Be sure that the word “TOP” appears at the top of the hoop. It is also critical that the horizontal line is aligned with the markings on the top sides of the inner hoop.
19 - Preparing to sew out hoop 4 of your design. Attach the hoop with the hooped fabric to the embroidery unit.
We are now ready to input Alignment point A. The illuminated lights on the front panel of your machine represent the vertical and horizontal cross lines on your fabric.

The first point to line up is point A. This is indicated by the blinking button on the front panel of the machine. Point A in this case is at the bottom of the vertical line. Use the right and left shift buttons to position the hoop so that the needle is precisely over the vertical line. To verify the position of the needle, turn the handwheel towards you and lightly pierce the fabric with the needle. If the needle is aligned correctly, it will have dropped into the center of the vertical line. Don’t forget to raise your needle otherwise the software will not allow you to proceed.
If the needle is precisely on the line, press OK on the front of the machine.
The next point to line up is point B. This is indicated by the blinking button on the front panel of the machine.

Point B in this case is at the center of the cross lines. Use the right & left or up & down shift buttons to position the hoop so that the needle is precisely over the vertical line but just under the horizontal line. To verify the position of the needle, turn the handwheel towards you and lightly pierce the fabric with the needle. If the needle is aligned correctly, it will have dropped into the center of the vertical line. Don’t forget to raise your needle otherwise the software will not allow you to proceed. If the needle is precisely on the line, press OK on the front panel of the machine. The final point to line up is point C. This is indicated by the blinking button on the front panel of the machine.

Point C in this case is on the horizontal line. Use the up and down shift buttons to position the hoop so that the needle is precisely over the horizontal line. To verify the position of the needle, turn the handwheel towards you and lightly drop the needle into the fabric. If the needle is aligned correctly, it will have dropped into the center of the horizontal line. Don’t forget to raise the needle otherwise the software will not allow you to proceed.
If the needle is precisely on the line, press OK on the front panel of the machine.
Should points A, B, and C not input correctly, the software will offer you the opportunity to re-enter these points. Click yes if this should be the case.
20 - Stitch out the fourth hoop or quadrant of your design.
When all 3 points have been entered, the Machine Navigator box will appear on your computer screen.
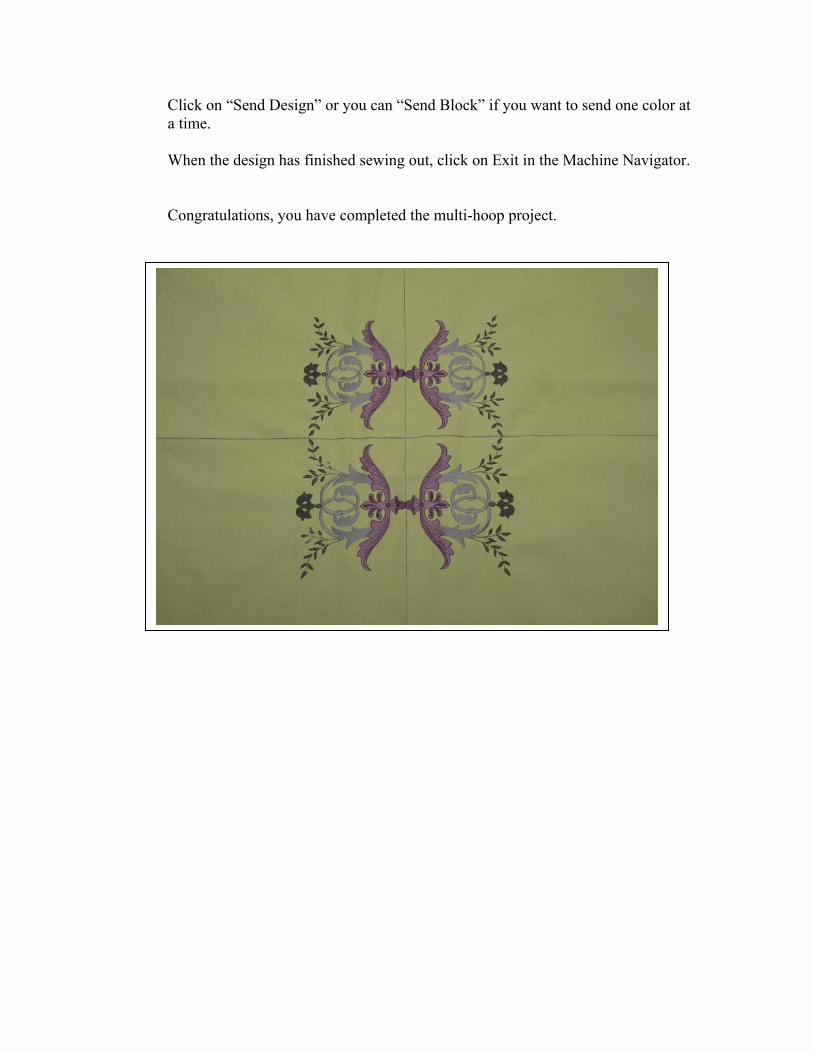
Click on “Send Design” or you can “Send Block” if you want to send one color at a time. When the design has finished sewing out, click on Exit in the Machine Navigator. Congratulations, you have completed the multi-hoop project.