how-to photos making wire - lark · pdf filemaking wire & bead jewelry 123 cascading...
TRANSCRIPT
Janice BerkeBile & Tracy STanley
making Wire &Bead jeWelry· A r t f u l W i r e W o r k t e c h n i q u e s ·
Learn Visually with
500How-To Photos
iT’s easy To creaTe sTylisH Wire and Bead jeWelry THaT looks as Professional as THe ProjecTs in THis Book.
That’s because two top teachers in the industry guide you each step of the way using how-to photos—500 in all—to visually teach you the simple techniques. One look at the projects, however, makes it clear there’s nothing basic about these designs! This is jewelry with texture—wirework that’s rich with layers, ornate and impressive.
Janice Berkebile and Tracy Stanley explain the necessary materials and tools as well as the techniques for making common components like eye pins and jump rings.
The projects are suitable for beginners seeking to make something that looks sophisticated, as well as intermediate jewelers interested in
ISBN 978-1-4547-0287-0
Please connect with Lark Jewelry & Beading on Facebook:facebook.com/ LarkJewelryBeading
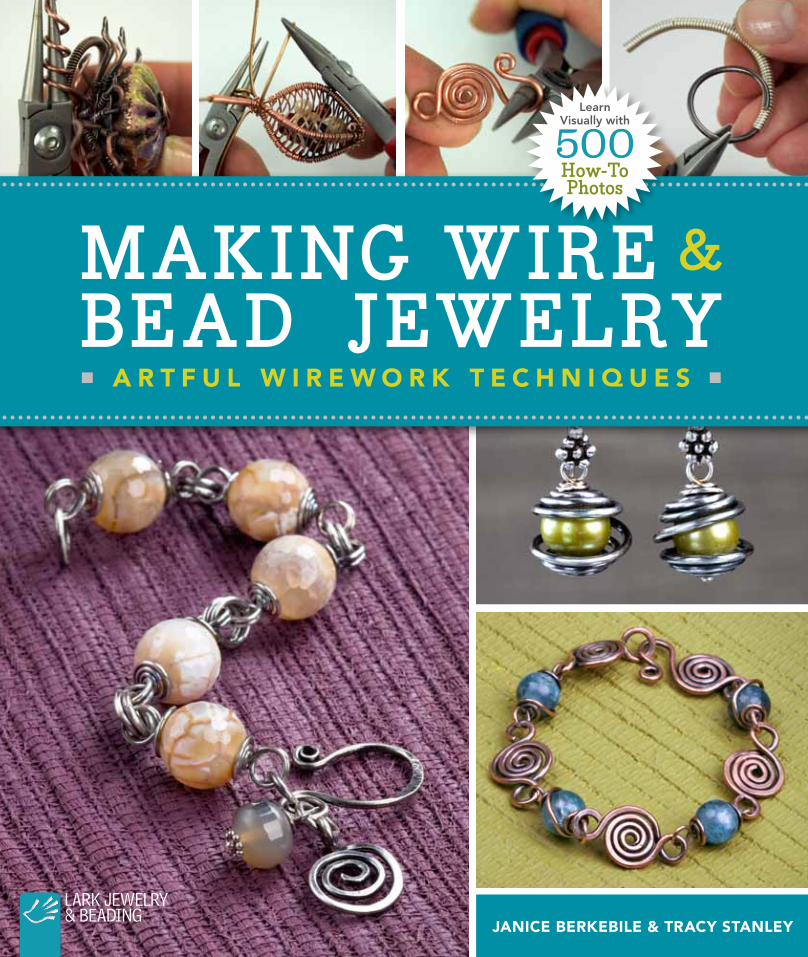
love BeauTiful Wire jeWelry accenTed WiTH Beads?Then this is the book for you! Created by two well-known teachers in the field, it’s brimming with great projects to make, accessible instructions to follow, and 500 how-to photos at every step to ensure professional-looking results. Janice Berkebile and Tracy Stanley start at the very beginning, teaching basic wire-working skills and explaining how to combine wire with beads. From the Spiral Link Bracelet to the Clamshell Earrings, these wearable projects are layered, richly wrought, and stunning. The authors end the book with inspirational photos of their work, as well as pieces by other top wire jewelers.
taking their work to the next level. A focal bead is framed in coiled wire and the chain is embellished with sparkling gemstones to create the dazzling Cascading Waterfall Gems Pendant. Wrapped links are combined with vintage crystal to craft the sparkly Dog Bone Bracelet. Other projects include Beach Pebble Necklace, Chain and Bead Earrings, Gypsy Wire Pendant, Spiral Waves Ring, and Wire- Wrapped Bangle.
These are artful pieces, remarkable for their graceful forms and splendid texture.
JEWELRY | DESIGN $24.95 | CAN. $29.95
continued on back flap
continued from front flap
Asheville
larkcrafts.com
Jan
ice
Be
rk
eB
ile &
Tr
ac
y S
Tan
ley
ma
kin
g W
ire
& Be
ad
jeW
el
ry
LARK JEWELRY & BEADING

Contents
Library of Congress Cataloging-in-Publication Data
Berkebile, Janice, 1959- Making wire & bead jewelry : artful wirework techniques / Janice Berkebile & Tracy Stanley.—1st ed. p. cm. ISBN 978-1-4547-0287-0 (pbk.) 1. Jewelry making. 2. Wire jewelry. 3. Beadwork. I. Stanley, Tracy, 1955- II. Title. III. Title: Making wire and bead jewelry. TT212.B49 2012 739.27—dc23 2011037354
10 9 8 7 6 5 4 3 2 1
First Edition Published by Lark Crafts An Imprint of Sterling Publishing Co., Inc. 387 Park Avenue South, New York, NY 10016
Text © 2012, Janice Berkebile and Tracy Stanley Photography © 2012, Lark Crafts, an Imprint of Sterling Publishing Co., Inc., unless otherwise specified How-to photography © 2012, Janice Berkebile and Tracy Stanley Illustrations © 2012, Lark Crafts, an Imprint of Sterling Publishing Co., Inc., unless otherwise specified
Distributed in Canada by Sterling Publishing, c/o Canadian Manda Group, 165 Dufferin Street, Toronto, Ontario, Canada M6K 3H6
Distributed in the United Kingdom by GMC Distribution Services, Castle Place, 166 High Street, Lewes, East Sussex, England BN7 1XU
Distributed in Australia by Capricorn Link (Australia) Pty Ltd., P.O. Box 704, Windsor, NSW 2756 Australia
The written instructions, photographs, designs, patterns, and projects in this volume are intended for the personal use of the reader and may be reproduced for that purpose only. Any other use, especially commercial use, is forbidden under law without written permission of the copyright holder.
Every effort has been made to ensure that all the information in this book is accurate. However, due to differing conditions, tools, and individual skills, the publisher cannot be responsible for any injuries, losses, and other damages that may result from the use of the information in this book.
Manufactured in China
All rights reserved
ISBN 13: 978-1-4547-0287-0
For information about custom editions, special sales, premium, and corporate purchases, please contact the Sterling Special Sales Department at 800-805-5489 or [email protected].
Submit requests for information about desk and examination copies available to college and university professors to [email protected]. Our complete policy can be found at www.larkcrafts.com.
editorNathalie Mornu
editorial assistanceDawn Dillingham
Hannah Doyle Abby Haffelt
art directorsKathy Holmes
Carol Morse Barnao
project photographerStewart O’Shields
how-to photographersJanice Berkebile
Tracy Stanley
book & cover designerLaura Palese
editorial internVirginia M. Roper
TOOLS AND MATeRiALS 4
WiRe TeCHNiqueS 11
FiNiSHiNg 27
THe PROJeCTS
Dog Bone Earrings 30
Dog Bone Bracelet 34
Go-To Bracelet 37
Chain and Bead Earrings 40
Chain and Bead Necklace 44
Clamshell Earrings 48
Spiral Link Bracelet 50
My Beach Bracelet 54
Beach Pebble Bracelet 59
Wire-Wrapped Pendant 62
Coiled Drop Pendant 66
Wire-Wrapped Bangle 71
Encrusted Earrings 75
Coils and Beads Bracelet 78
All in One Wire-Wrapped Bracelet 82
Cascading Waterfall Gems Pendant 86
Gypsy Wire Pendant 90
Cage It 96
Spiral Waves Ring 102
Rock and Roll by the Sea 107
Acorn Caps 114
Wire Pod 118
Cascading Spirals Bracelet 122
Bloom! 127
gALLeRy 134
ABOuT THe AuTHORS 142
ACKNOWLeDgMeNTS 143
iNDex 144
An Imprint of Sterling Publishing 387 Park Avenue SouthNew York, NY 10016
If you have questions or comments about this book, please visit larkcrafts.com.
30
34
44
4859
66
71
82
102
12254
37
114
50
40
62
75
78
90
96
107
118
86
127

m a k i n g w i r e & b e a d j e w e l ry 123
C a S C a d I N g S P I R a l S B R a C e l e t
by tracy Stanley
Spirals, spirals, and more spirals…here’s a pretty bracelet that will make you a real expert when it comes to forming this shape.
YOU’LL NEED
4 feet (1.2 m) of 18-gauge dead-soft copper wire
41/2 feet (1.4 m) of 14-gauge dead-soft copper wire
15 feet (4.6 m) of 24-gauge dead-soft copper wire
Twenty 14-gauge copper jump rings, 6.5 to 7 mm
One 14-gauge copper jump ring, 9 mm
Beads*
Liver of sulfur
Mandrel, 3.5 mm in diameter
Flush wire cutters
Ruler
Marker
Small round-nose pliers
Flat-nose pliers
Chain-nose pliers
Chasing hammer
Bench block and pad
*See the tip box below
1
2 3
Tip: It’s up to you what beads to use to embellish! Small bicone crystals, pearls, gemstones—even glass seed beads will work. how many you’ll need will depend on their size; I recommend 3-mm beads. You’ll need enough to cover the front side of the coils completely.
linkS1 Coil all the 18-gauge wire around the mandrel. Remove the coil from the mandrel and cut it into 1/2-inch (1.3 cm) sections, trimming each end with the flush wire cutters 1 . Set aside.
Tip: this bracelet can be made out of silver wire instead, or you can even try a combination of both copper and silver!
2 Cut two pieces of 14-gauge wire, each 4 inches (10.2 cm) long. Mark the end of each one 13/4 inches (4.4 cm) from one end.
3 Set one piece of wire aside. Using the round-nose pliers, make a loop on the marked end of the wire 2 . (If the loop is too large for your taste, use flat-nose pliers to squeeze it and make it smaller 3 .)

m a k i n g w i r e & b e a d j e w e l ry 125
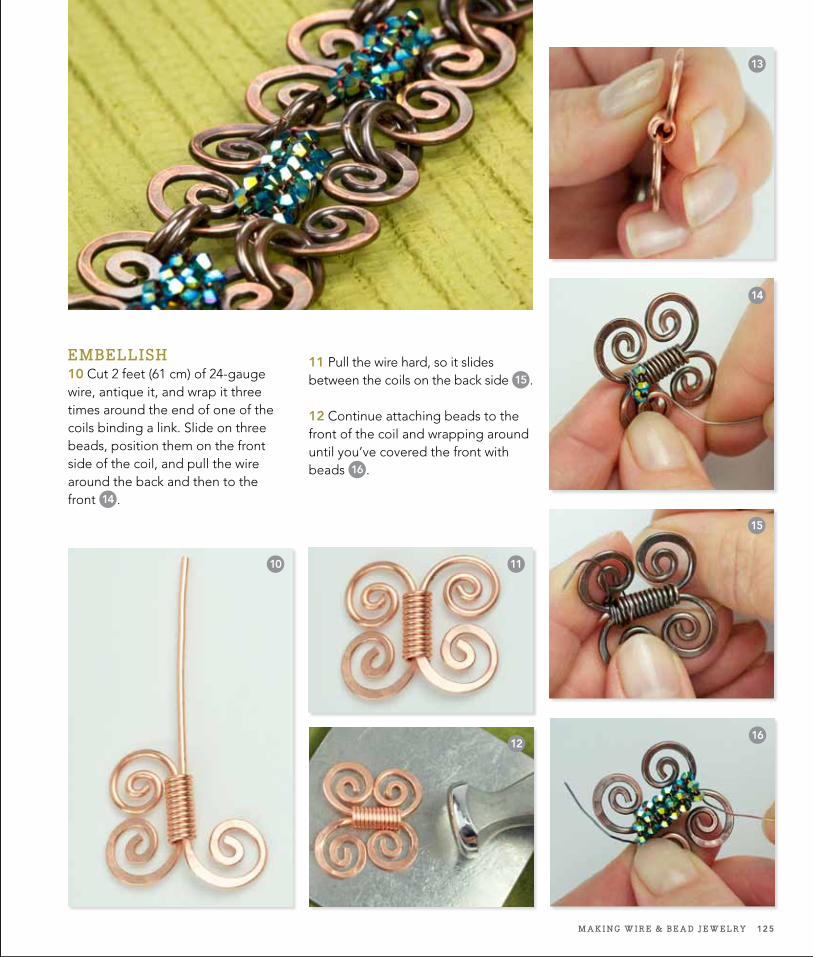
11 Pull the wire hard, so it slides between the coils on the back side 15 .
12 Continue attaching beads to the front of the coil and wrapping around until you’ve covered the front with beads 16 .
124 C a S C a d i n g S p i r a l S b r aC e l e T
6 Insert both of the spiraled wires into any one of the 1/2-inch (1.3 cm) sections of coil 8 . Use round-nose pliers to make a loop on one of the ends of wire 9 . Form the rest of that wire into an open spiral 10 . Repeat on the other wire 11 .
7 Forge the spirals made in step 6, making sure not to hit the coil 12 .
8 Using chain-nose pliers, squeeze down the end of the coil wire to hold both spiraled wires in this link more tightly together 13 . There will still be some movement, but that’s okay.
9 Repeat steps 2 through 8 to make a total of five links. Antique them, as well as the jump rings. Clean them up with polishing pads or tumble them.
4 Hold the inside of the loop with chain-nose pliers, and use your other hand to begin to form an open spiral by pulling the wire around 4 . When you’ve turned as far as you can, re-position the pliers 5 and repeat until you’ve reached the mark you made on the wire 6 .
Tip: the secret to making a nice smooth spiral is keeping the chain-nose pliers in a fully curved section as you form. If you grasp the wire too close to the area you’re forming, it will get unwanted kinks in it. You can decide how much space you want between the turns. all you need is enough room for the tip of the pliers.
5 Repeat steps 3 and 4 with the second piece of wire. Orienting the spirals in opposite directions and using your chasing hammer, flatten each spiral up to the mark 7 .
embelliSh10 Cut 2 feet (61 cm) of 24-gauge wire, antique it, and wrap it three times around the end of one of the coils binding a link. Slide on three beads, position them on the front side of the coil, and pull the wire around the back and then to the front 14 .
4
8
5
9
6
10
7
11
12
13
14
15
16
m a k i n g w i r e & b e a d j e w e l ry 125
11 Pull the wire hard, so it slides between the coils on the back side 15 .
12 Continue attaching beads to the front of the coil and wrapping around until you’ve covered the front with beads 16 .
124 C a S C a d i n g S p i r a l S b r aC e l e T
6 Insert both of the spiraled wires into any one of the 1/2-inch (1.3 cm) sections of coil 8 . Use round-nose pliers to make a loop on one of the ends of wire 9 . Form the rest of that wire into an open spiral 10 . Repeat on the other wire 11 .
7 Forge the spirals made in step 6, making sure not to hit the coil 12 .
8 Using chain-nose pliers, squeeze down the end of the coil wire to hold both spiraled wires in this link more tightly together 13 . There will still be some movement, but that’s okay.
9 Repeat steps 2 through 8 to make a total of five links. Antique them, as well as the jump rings. Clean them up with polishing pads or tumble them.
4 Hold the inside of the loop with chain-nose pliers, and use your other hand to begin to form an open spiral by pulling the wire around 4 . When you’ve turned as far as you can, re-position the pliers 5 and repeat until you’ve reached the mark you made on the wire 6 .
Tip: the secret to making a nice smooth spiral is keeping the chain-nose pliers in a fully curved section as you form. If you grasp the wire too close to the area you’re forming, it will get unwanted kinks in it. You can decide how much space you want between the turns. all you need is enough room for the tip of the pliers.
5 Repeat steps 3 and 4 with the second piece of wire. Orienting the spirals in opposite directions and using your chasing hammer, flatten each spiral up to the mark 7 .
embelliSh10 Cut 2 feet (61 cm) of 24-gauge wire, antique it, and wrap it three times around the end of one of the coils binding a link. Slide on three beads, position them on the front side of the coil, and pull the wire around the back and then to the front 14 .
4
8
5
9
6
10
7
11
12
13
14
15
16

126 C a S C a d i n g S p i r a l S b r aC e l e T
20 21
1917
18
13 Wind this wire three times around where the spiraled wires come out of the coiled section. Trim the wire to approximately 3 inches (7.6 cm). Using chain-nose pliers, insert this wire into the center of the coil 17 . If it’ll go all the way through, pull it tight and trim off; if it won’t go through, trim the wire short and tuck it into the end of the coil. Finish off the other end in the same way (most of the time it won’t fit all the way through).
14 Embellish the other four links in the same way.
ClaSpYou can choose from the many clasps shown in this book. I like the spiral clasp 18 because it has a shape similar to the links. Instructions for this clasp are given in the Coils and Beads Bracelet project (page 80). Don’t forget to antique it.
aSSemble 15 Antique the jump rings. Connect the links sequentially, using pairs of the small jump rings 19 .
16 Use two small jump rings to attach the clasp to one end, as shown in 20 .
17 Attach the 9-mm jump ring to the other end, using two small jump rings 21 .
Tip: You can make the bracelet longer by adding more 9-mm jump rings at the end, linked in a chain with 6.5-mm jump rings.
Now put on this fabulous bracelet. You’ll see it’s not only a showstopper, but so comfortable to wear!
B l O O m ! by Janice Berkebi le
Bend, weave, and coil wire to create a frame for the perfect focal bead. Everyone who sees this dynamic blossom pendant will love it.

m a k i n g w i r e & b e a d j e w e l ry 143142 m a k i n g w i r e & b e a d j e w e l ry
Tracy STanley has taught beading, wire, and metal working techniques for more than 18 years. Because she loves organic elements, she uses them as inspiration in her work. She rarely plans pieces out on paper, preferring to just let things fall together naturally, letting one
thing lead to another, until the finished piece looks balanced and cohesive.
A big believer in quality tools and solid techniques, Tracy thinks learning correct techniques and bringing them into practice will make for pieces that are not only structurally sound, but also beautiful. She really enjoys teaching these skills and passing on her knowledge to students all over the country.
Tracy has lived in the beautiful Northwest her whole life, and the lovely natural surroundings have definitely influ-enced her style of wire and metal work. Over the years she has taught in bead stores all over the United States. She’s been an instructor at workshops on the Oregon Coast, on cruise ships, and even during a trip to Italy. She currently teaches at Fusion Beads and at shows around the country, including Bead Fest, Wire Masters, Bead&Button, and the BABE! show. Her work appears in a number of books, including 500 Beaded Objects (Lark Beading & Jewelry), Make Stamped Metal Jewelry, and 101 Gorgeous Earrings, and she has contributed articles to both Bead&Button and Beadwork magazines. Tracy also has classes available on line at Beaducation.com.
What’s planned for the future? Hopefully more travel, more teaching, and spreading the knowledge she has about wire and metal.
JanIce BerkeBIle has always been attracted to the fanciful rather than the practical. When she discovered beads, it was love. She’s drawn in by the gleam, glint, and glow of their colors. Even trade beads, worn from travel and rich with history, beckon her to touch them and become part of their story. When Janice was introduced to
wire, she thought, “Finally, a thread I can relate to! Strong yet malleable, and no knots!” Wire longs to wrap itself around beads, framing them and making each one special.
Janice finds the forms, textures, and architecture of plants, shells, and pods amazing. They provide her with inspira-tion for movement and patterns. Her focus is wire and metalwork, drawing from nature and incorporating texture and form into her work.
In 2005, Janice won first and second place in the Beaded Inspirations Wirework category at the Puget Sound Bead Festival. Her piece It’s a Mystery took third place in the non-wearables category in the 2006 Bead Dreams competition.
Janice lives in Kirkland, Washington, where she teaches at Fusion Beads. She also teaches at bead stores from Alaska to Florida, and from Hawaii to Rhode Island; at shows including Bead Fest, Bead&Button, and BABE! (Bay Area Bead Extravaganza); at Adorn Me, Art & Soul, and other mixed-media shows; and for bead societies. She has contributed projects to various magazines. Her work has been featured in several books, including Wrap, Stitch, Fold & Rivet (Lark Jewelry & Beading); Stamped Metal Jewelry; and Metal Style. She teaches online classes through Beaducation.com.
I’d like to thank the following people who were such an impor-tant part of my wire-working journey:
Kathy Dannerbeck, for encouraging me to teach and for believing and supporting me in this venture.
NanC Meinhardt, for forcing me to spread my wings and get out and teach at the national level.
Lynne Merchant, for awakening the world to a new-yet-old style of wire working and for setting such a high standard of workmanship, emphasizing quality materials and tools.
My bead-store “family,” for their friendship and support.
Thank you to Carole Tripp and Blanche Costa, two women who have always supported my teaching career and given me great words of encouragement.
A big thank you to all of the students who have taken my classes over the years and allowed me to assist their wire- working experience. They’ve made me a better instructor with every class I teach.
Lark Jewelry & Beading, especially editor Nathalie Mornu, for guiding us through this experience and making our dream of being published come true.
Janice Berkebile, for going on this adventure with me. It’s nice to have someone to share the highs and lows with!
My family, for putting up with the crazy schedule, wire flying, and hammer tapping late at night.
My sweet dog Bogey, for reminding me to take a break and breathe when times get crazy!
And finally, my Dad, who told me over and over that I should write a book. Hey, Dad, I finally did it!
—Tracy
My adventures with wire and beads have been an extraor-dinary journey. Of course, I didn’t travel this road alone. My family and friends have always been there supporting me from the beginning. I appreciate your always being there for me.
While working at the best bead store in the world, I discovered inspiration, a passion for wire, and friends who believed in me even when I didn’t believe in myself. While that shop has since closed, the people I found there will remain family forever. I’ll be forever grateful to Kathy Dannerbeck, who opened the gate and encour-aged me to start teaching.
Radiating from this circle came many mentors and friends from all across the country. I’m truly grateful to each of them for giving me what I needed at just the right moment in time: Lynne Merchant brought wirework in its contemporary form to the United States. I’m grateful to have worked with her. She taught me not only how to relate tools to wire, but to do it with integrity and to work with nothing but the best. NanC Meinhardt was there for me when I was just getting started, and she helped me find my voice. She has taught me more than she knows! These days, Carole Tripp and Blanche Costa keep me on track, providing sound advice and gentle encouragement. To the staff at Lark Crafts, and especially to my editor, Nathalie Mornu, for taking Tracy and me through the process of becoming authors. Without them, this book was all talk.
To Tracy my adopted big sister. Who knew I needed a fourth older sister?! She’s a constant source of support and opinions, all served up with her unique perspective! To all of my fur babies who keep me sane and totally entertained.
And to Jack, who grounds and sustains me, always.—Janice
aCknowledgmenTSabouT The auThorSjanice berkebile and Tracy Stanley met when they worked together at a bead store in bellevue, washington. They partnered to form wired arts, a business that offers wire-working classes and sells tools, in 2006. Check out their website at www.wiredarts.net.
Photo by Tracy Stanley Photo by Tracy Stanley

Janice BerkeBile & Tracy STanley
making Wire &Bead jeWelry· A r t f u l W i r e W o r k t e c h n i q u e s ·
Learn Visually with
500How-To Photos
iT’s easy To creaTe sTylisH Wire and Bead jeWelry THaT looks as Professional as THe ProjecTs in THis Book.
That’s because two top teachers in the industry guide you each step of the way using how-to photos—500 in all—to visually teach you the simple techniques. One look at the projects, however, makes it clear there’s nothing basic about these designs! This is jewelry with texture—wirework that’s rich with layers, ornate and impressive.
Janice Berkebile and Tracy Stanley explain the necessary materials and tools as well as the techniques for making common components like eye pins and jump rings.
The projects are suitable for beginners seeking to make something that looks sophisticated, as well as intermediate jewelers interested in
ISBN 978-1-4547-0287-0
Please connect with Lark Jewelry & Beading on Facebook:facebook.com/ LarkJewelryBeading
love BeauTiful Wire jeWelry accenTed WiTH Beads?Then this is the book for you! Created by two well-known teachers in the field, it’s brimming with great projects to make, accessible instructions to follow, and 500 how-to photos at every step to ensure professional-looking results. Janice Berkebile and Tracy Stanley start at the very beginning, teaching basic wire-working skills and explaining how to combine wire with beads. From the Spiral Link Bracelet to the Clamshell Earrings, these wearable projects are layered, richly wrought, and stunning. The authors end the book with inspirational photos of their work, as well as pieces by other top wire jewelers.
taking their work to the next level. A focal bead is framed in coiled wire and the chain is embellished with sparkling gemstones to create the dazzling Cascading Waterfall Gems Pendant. Wrapped links are combined with vintage crystal to craft the sparkly Dog Bone Bracelet. Other projects include Beach Pebble Necklace, Chain and Bead Earrings, Gypsy Wire Pendant, Spiral Waves Ring, and Wire- Wrapped Bangle.
These are artful pieces, remarkable for their graceful forms and splendid texture.
JEWELRY | DESIGN $24.95 | CAN. $29.95
continued on back flap
continued from front flap
Asheville
larkcrafts.com
Jan
ice
Be
rk
eB
ile &
Tr
ac
y S
Tan
ley
ma
kin
g W
ire
& Be
ad
jeW
el
ry
LARK JEWELRY & BEADING