how to rock with robots for young makers with mblock? (teaching material)
TRANSCRIPT

It’s the most attractive and amazing educational robot so far I have try. —— LIE LENG BOON
You did what I was looking for so many months: the best of two world, graphical and code. —— Cant Sébastien, STEM teacher in France
This little robot has a lot of features to use: leds, IR, buzzer, and so on… I would like to use it more and more. I want two for my daughters �rstly!!! —— Vincent MARECHAL from Lycee Stendhal Milan
mBot in combination with mBlock is probably the best thing you and your team have done. With mBlock you can look at the code, which is very important for us teachers. —— Christian Prim from Switzerland High School Zurich North
mBot is much more than a robot. I wish it were the “key to a great world” in the “small hands of kids”. —— Teddy Donat, physicist MSC, STEM teacher in Spain
Authors Liao Yuqiang Zhao Tongzheng

Hello everyone, welcome to the world of mBot robot!
Therefore, only when mBlock and mCore are connected together, can we control mBot by mBlock. Then, how could we connect mBlock to the robot mBot? First, we connect the USB cable to both the computer and the mCore main board. Open mBlock software and select the appropriate COM port:
We will experience the interaction between the physical world and software through learning the course. The course consists of three parts: mBot robot, mCore main board and mBlock (You could download them with following address: http://mblock.cc/download). mBlock is a software developed on the basis of Scratch 2.0. It could control mCore main board of mBot and achieve the corresponding functions. Here is the main interface of mBlock:
It will display "COMx Connected" after clicking:
COM ports vary in computers. How could we �nd the COM port number of mBot? Open Device Manager and expand Ports (COM and LPT) to view:
If you can't �nd the port number in the Device Manager, please try to install Arduino driver. Then �nd and select the port:
0302
Pre- Learning Preparation

After installation, mBlock is able to communicate with mBot! Come on! Test it! Turn on the small lamp on the robot mBot:
Click this block to set LED color. The little light of mBot will turn red. If all are set to 0, the light will go out.
mBlock is successfully connected to mBot! But they are not able to communicate with each other yet, because communication demands the communication protocol as a basis. Let us install this protocol on the motherboard! First, select the correct main board and then select “Upgrade Firmware”:
What should we improve if we want the car to move on the ground? Yes, the USB cable is the answer. It restricts the travel distance of mBot. We can solve this problem with the Bluetooth module or 2.4G module.
BluetoothFirst, open the computer's Bluetooth switch (or use a Bluetooth adapter) and disconnect the previous COM (just click on COM6). Enter mBlock and select Discovery. Then the Bluetooth list pops up. Then, you select the corresponding Bluetooth:
2.4GIt is even easier for 2.4G. First, insert the 2.4G adapter (receiver) into your PC, pair it with the 2.4 module of mBot according to the user manual. After successful pairing, click “Connect”.
0504
Pre- Learning Preparation

Now, Let’s check what sensors that mBot’s main board contains:
Choose “mBot” from the Extension menu, then you will see various blocks which we will be using to control mBot:
OK! Everything is ready, just save it. Begin your mBot journey!
Option Function
New : create a new project;Load Project: Open an existing project;Save project: Save the current project to local �le. (Note: the �lename extension is “.sb2”)
Undelete: restore the previous deleted script;Small stage layout: Hide the stage, hence to make the editing area of script bigger;Turbo mode: Accelerate the redraw speed of mBlock stage Arduino mode: Convert the block script of mBlock to Adruino program and upload to the Ardui-no main board to realize o�-line operation.
Extension menu is related tomodule. The option you choose in Extension will a�ect the blocks shown in the Robots module. Which means, di�erent option represents di�erent blocks in Robot module.Arduino: including blocks compatible with Arduino platform;Makeblock, mBot: Speci�c main board from Make-block;PicoBoard: Control and testing board from Scratch;Communication: Provides the function of LAN com-munication.
0706
Pre- Learning Preparation
Now let’s see the common-used functions in the menu.

Chapter 1 The Mouse Loves Apples
1.Learn to control LED lights
2.Learn to control the buzzer tone
Mouse, the small mouse, likes to eat apples very much. Today it breaks into the
mBlock world and there is a sweet apple just in front of it. Can you help Mouse eat
that apple? Come on, help Mouse with the mCore baseboard at your hand .
ButtonThe button is an input device. It usual-ly de�nes di�erent functions depend-ing on the application scenario.
BuzzerThe buzzer is an audio device, but also an output device. It can control the di�erent output frequencies so as to give a di�erent tone.
The starting point of event
and triggering ways of the
program. The function of
the script in the left �gure is
to start the program when
you press the green �ag.
Wait one second. The number
can be an integer or a decimal
number.
Before "button is pressed",
always wait. The blue
blocks in the left �gure can
be replaced by other
hexagonal blocks.
Set the color of RGB LED
lights. Each color range is
from 0 to255. If you want
to turn o� the small lights,
set all three colors to zero.
Buzzer can output the tone
from C2 to D8. It needs to
add the stop playing block
in the left �gure to make
the buzzer stop playing.
Instructions ExampleBuilding Blocks
The RGB LED light is a output light source device. It can output light of any color through the tri-color of the red, the green and the blue.
RGRGB LED lights
mBlock小创客玩转机器人
0908
Learning Objectives
Electronic Moduless
Knowledge Points

Programming Structure
,
Example Expansion
,
Programming structure Thinking Process
Begin
Instruction block A
Instruction block B
Instruction block C
End
Sequence structure description:The script begins running from the �rst block, followed by
all the other blocks executing in order. This is the sequential
structure.
The diagram on the right is a standard sequence structure.
After the program starts, it implements three blocks in turn
and �nally ends. The sequential structure is the basis for the
running way of the program.
The value set in the blocks alters the state of the electronic module. For example, when setting the tone as C4, the
buzzer will continue to make a sound and even if you stop the program, the sounding state won't be changed. The
correct usage is to add a stop-playing block with playing time when sound is not required.
Tips
Challenge learning �ow chart and please write
down the �ow order in the left �gure.
1.Start the program (when the green �ag is clicked)
2.Red light is turned on one second
3.Light is turned o� one second
4.
5.
Try it Flow chart
Try it
The mouse loves apple
Mouse sprite
Apple sprite
Mouse continue to move forward. When it
comes to Apple, the mCore makes a sound.
Press the space bar to start the program->let
the mouse move to the initial position-> Play
tone C4->wait0.5 seconds-> Stop Playing
->before pressing button on the mCore,
wait->let the mouse move to the speci�ed
location
Press the space bar to start the program-> Wait
before you hit the mouse-> Play mCore buzzer
tone with C4->wait0.2 seconds-> Change the
tone as F2->wait0.2 seconds-> Stop playing
sound
Let's make the �rst mBlock program now! In this program the mouse wants to eat the apple so it contains two sprites while achiev-
ing interactive control e�ects through mCore baseboard.
When the program starts, mCore utters a sound and wait for you to press the button on the mCore. Once you press the button, the
mouse moves toward th e apple. The mCore sounds again when the mouse hits the apple.
Exercise1.Use the buttons on the mCore to change the color of the small LED lights, hence to create a gorgeous lighting
e�ect. Try to make it emit purple, yellow and white light.
mBlock小创客玩转机器人
1110
Instructions
Let the mouse move towards Apple's position
Make a sound when the mouse eats the apples

Knowledge Points
Chapter 2 Pick ApplesLittle mouse Mice found a fruitful apple tree today . Now is the ripe season. Apples on
the trees constantly fall when blowing in the wind. Mice hopes to �nd a container to
hold these apples. Can you help Mice collect more apples?
1.Learn how to control and apply the ultra sensor
Learning Objectives
Electronic Modules
Category Name Function Instructions
Ultrasonic sensor is an input device for detecting
distance. It has two "eyes", one of which is to emit
ultrasonic waves while the other one is responsible
for receiving the signal bounced back after
detecting an obstacle. Hence, it realizes the goal of
measuring distance.
Detection range: 3cm-400cm; Detection angle: 30 °.
Ultrasonic module is marked with a yellow
label so you need to connect it to the interface
with a yellow logo on the motherboard.
Ultrasonic sensors
Building Block Instructions Example
Repeat encased script for
speci�ed times, and then
continue to perform the
following script.
Repeat until the condition is
satis�ed (the condition is
within the space)
When the condition is not
satis�ed, the wrapped script
will constantly run.
If met, the program will
move on to the following
scripts.
Constantly repeat:The encased script keeps
running and cannot be
terminated.
Ultrasonic sensor block: to
give feedback on the
distance between the
ultrasonic sensor and any
obstacles in front of it.
mBlock小创客玩转机器人
1312

Programming Structure
Programming Structure Thinking Process
Loop structure is the structure which repeats
its contained execution script. As the right
�ow chart shows, instruction block A and B
are called as loop body. If the loop condition
is false, re-execute the loop, otherwise the
loop ends. When you need to repeat the
same script, we often use the loop structure
in programming.
Begin
End
Instruction block b
N
Y
meet the loop condition
Instruction block A
Try it
Scripting Flow Chart
Challenge yourself to learn about �owchart.
Write the �ow order in the left �gure and
indicate which building blocks are the loop
body.
Scripting Flow Chart
Try to execute the script on the
left side and record the changes
of mCore.
Example Expansion
We have learned the loop structure. Can you help Mice catch apples through combining the sequential
structure learned before?
We just need to take advantage of the characteristics of repeating to control the movement of Mice
through ultrasonic information.
Instructions
When the mouse moves
forward and hits the apple,
mCore utters a sound.
Catch the apple
Loop Structure (Cycle Structure):
mBlock小创客玩转机器人
1514

You must use values that are
through constantly repeating
and updating the ultrasonic
sensor to make the position of
the mouse dynamically change.
Wait for the mouse to hit the
apple -> play a tone for 0.5
second -> stop the program after
5 apples are collected.
Keep apples falling
Repeatedly execute its contained
script -> Display Apple -> Specify
the location that the apple
appears -> Repeatedly move the
apple down until it hit the edge
-> After it hits the edge, hide the
apple
Apple sprite
Mouse sprite
Mouse sprite
Exercise1.Try to use loop structure to control RGB light on the baseboard. Let them �ash once every second and indicate which
building blocks are the loop body.
2.Try to make the buzzer sound as C4 in 10 times, E5 in 20 times, B6 in 30 times, and then keep repeating. Can you
distinguish these loop bodies inside it? Try it.
Chapter 3 The Arithmetic ChallengeLittle Monkey randomly displays a number. It required the bat to collect the same
number of points within 30 seconds. Can you help the bat complete the little mon-
key's task?
1.Use of mathematic operation
2.Use variables
Learning Objectives
Category Name mCore Baseboard Instructions
Send information via infrared to the
infrared receiver module. Then process
the received date in the program.
Infrared remote control
Infrared Transceiver Module
The mBot infrared transceiver module
is able to receive and send information.
The transmitted information can be
numbers and text.
Electronic Modules
mBlock小创客玩转机器人
1716
Stop the program after the mouse collect 5 apples
Use mCore together with the ultrasonic sensor to control the moving of the mouse.

Building Block Instructions
The value of the joystick is divided by 10
Wait until the distance that the ultra sensor detects is less than
30cm, then move on to the following building blocks
Comparison of the two variables are done to check whether they
are equal. Wait if they are not equal
Face to a random direction once every 1 second
Sensor data will be saved in the variable
The variable is incremented by 1 once every second
If you press the right key on the infrared remote controller, the sprite
will move towards the right direction
Example
Four operations include
addition, subtraction,
multiplication, division. You
can �ll in the values or
variables.
Comparison operators can
be used to compare the
value with the variable, the
variable with the variable,
the value with the value.
The input of the sensor can
also be used as a variable.
Random number blocks. You
can �ll in the values or
variables.
Variable is a container for
storing data. Its value can be
freely modi�ed according to
the needs.
If <condition> then
If the condition is satis�ed,
the internal script is executed
Knowledge Points
The idea Description Thinking Process
Programming Ideas
Programs Start
Score Ball
Score
Reset to zero
Zero Ball
Touch
Reset the score
Y
N
Add 1 point
Repeat
Add the score
Touch Bat
Little Monkey
Less than 30s
Over 30s
Show item variable
Wait until Point Variable = Item Variable
Save a random number to Item Variable.
Reset the timer
Stop All Programs
(Sensor Value/100)-5
mBlock小创客玩转机器人
1918
Math games. It collects comput-
er-generated points.
Four sprites
1. Score ball, to increase score
2. Bat, operate by infrared
remote controller
3. Small monkeys, compare
scores collected by bats
Zero ball, set score as zero

Scripting
Try to learn the �owchart and write
the process in the left �gure.
Try to run the script on the left side
and record the change of the mCore.
Flow Chart
Try it Example Expansion
Use an infrared remote
controller to operate
the bat
The bat automatically �ies forward
Use If..Then building blocks to change the
direction of �ight
mBlock小创客玩转机器人
2120
The mathematic operation is very important for the program. The chapter will be very helpful for those learners who are not really good at math! Come
and learn together!

The score ball random-
ly appears on the stage
and moves. If it hits the
bat, it will modify the
responding variables.
Compare once every
30 seconds
Randomly-appear ball will make the
game more interesting
Di�erent balls represents di�erent points
The title variable is set to a random
number, and the timer is set to zero
Within 30 seconds, the little monkey will
always say the number of points to be
If the values of the two variables are equal,
the execution number of points is set to
zero and you score 1 point
If the time exceeds 32 seconds, it indicates
that the subject is not the same number
of points. It will stop all programs and the
game is over
The zero ball can set the
point number to zero
and collect points from
the beginning
The point number becomes zero when
the bat hits it
Exercise1.Try to make a small ball that can reduce the number of points.
2.Let zero ball move and it has a function of comparing the number of points.
If the turning mode of the sprite is set as , it will a�ect turning of
the sprite. Test it by yourself.
Tips
。
mBlock小创客玩转机器人
2322

Chapter 4 Guess
1.Learn the branch structure
2.Usage and comparison of variables
The “if .. then block” is a single branch structure. It
needs to be �lled with the hexagon blocks. The
contained script will be executed if the condition is
met. If not, the script will be skipped .
If we judge a number of conditions in the program,
we need to use several “if .. then “blocks.
The “if .. then otherwise block” is a double branch
structure. The upper part will run if the conditions
are met. If not, the lower part will run.
,
Learning Objectives
Knowledge Points
Instructions ExampleBuild Blocks
Typically, the value of the sensor will be saved
into a variable. So the following script will not
misjudge the sensor values by the time
di�erence caused by the sequence structure.We often play game of guessing coin with friends. So how do we use mCore to play
this game? In this chapter, we'll do it .Let’s see who is the best guesser!
mBlock小创客玩转机器人
2524
Because it is often for the programs to repeatedly judge whether the value of the sensor satis�es certain conditions,
branch structure and loop structure are often used together.
The Idea Description
Branch structure
Thinking Process
When button 1 is clicked
Play a melody Play a melody
Set variable "select" to 1
Set variable "camp" to 1
When button 2 is clicked
Set variable "select" to 1
Set variable "camp" to 2
Main program begin
Clear "select"
Play the beep
Wait for "select=1"
LED blinks and beeps
Compare variable "camp"
and "computer"
Branch structure is used for determin-
ing a given condition and controlling
the �ow of the program based on the
judgment result.
Tips
Programming Ideas
Equal Not equal

2726
Challenge yourself to make a
�owchart. Write the �ow chart of
selection structure on the left
graph.
Try to run the script on the left
side. Record change of mCore.
Scripting Flow Chart
Try it Example Expansion
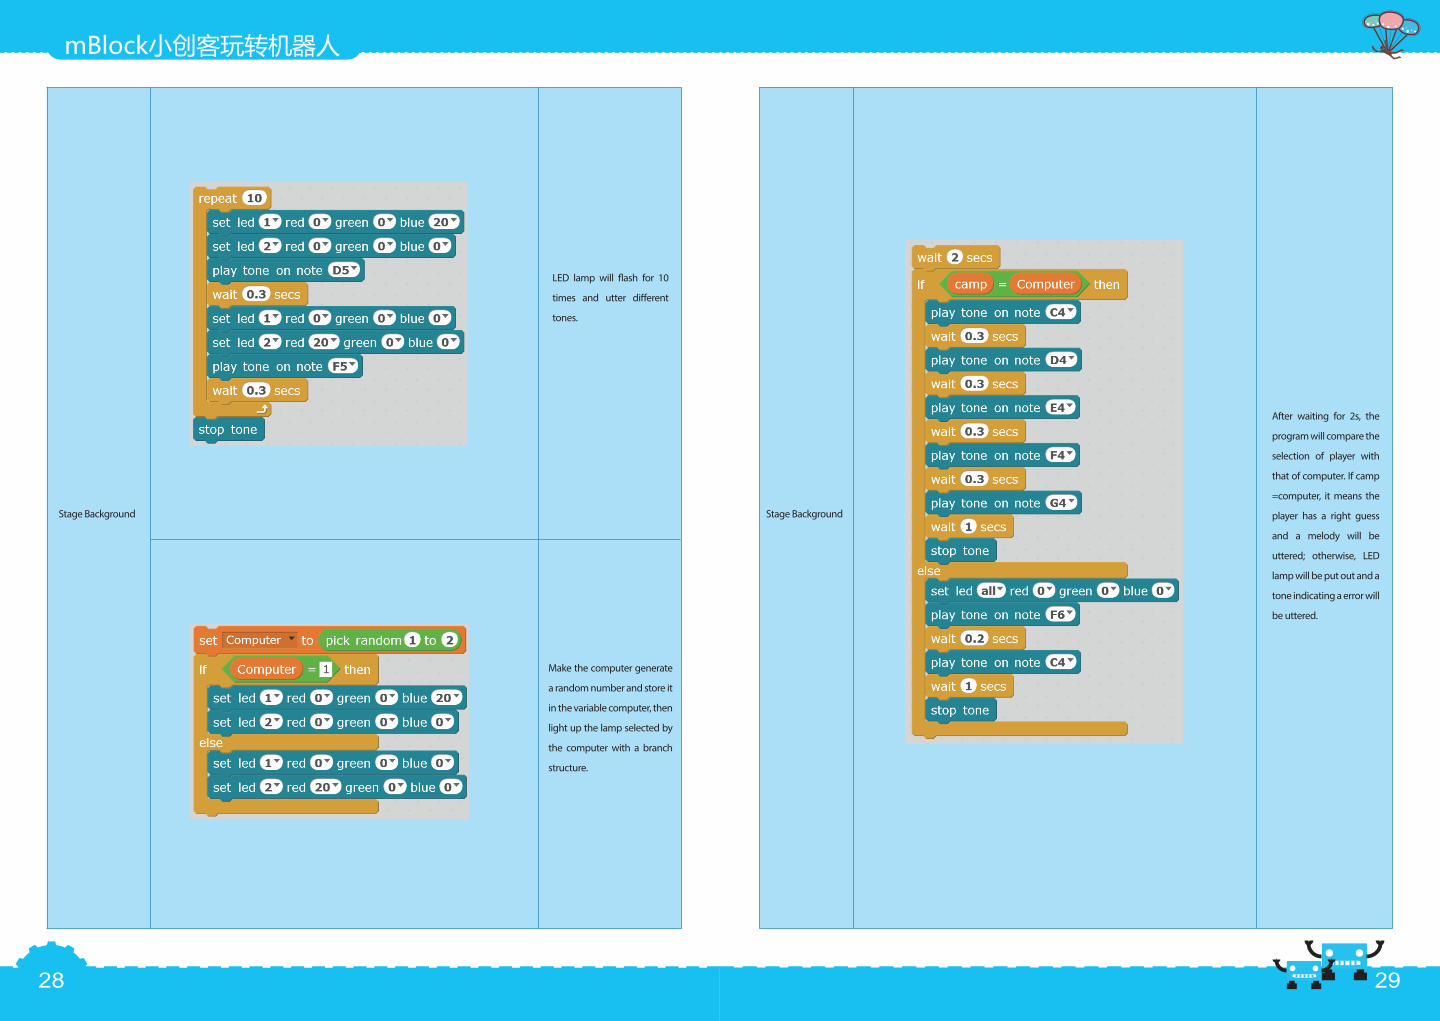
Guess
Stage Background
First, select LED lamp button 1 or 2 on the
screen. After waiting for a while, computer will
compare if the master control board is identical
to the selection of player. If it is identical, it
means the guess is right and a melody will be
uttered; if it is not identical, it means the guess
is false and a short music will be given o�.
If the variable select is set at 0, the player will be
deemed that no selection has been made.
If a tone is uttered, it means that it is ready for
player to select.
It is ready for player to select button 1 or 2 on
the stage. After selection, with the variable
select=1, the block will not obstruct the script
any longer.
mBlock小创客玩转机器人
Operating Instructions
Start the main program
Let's play a game: Click the button on the stage. Two RGB lights on the main board will �icker back and forth. One of them will light in the end. Let's guess
and see who will be the best guesser!
2928
实例拓展
LED lamp will �ash for 10
times and utter di�erent
tones.
Make the computer generate
a random number and store it
in the variable computer, then
light up the lamp selected by
the computer with a branch
structure.
Stage Background
After waiting for 2s, the
program will compare the
selection of player with
that of computer. If camp
=computer, it means the
player has a right guess
and a melody will be
uttered; otherwise, LED
lamp will be put out and a
tone indicating a error will
be uttered.
Stage Background
mBlock小创客玩转机器人

3130
Stage Background
Set the variable "select" to 1 (start the main
program)
Set the variable "camp" to 1 (player's choice)
Set the variable "select" to 1
Set the variable "camp" to 2
实例拓展
TipsIn the button sprite, we use the building blocks of "when the sprite is clicked". It means that no matter whether the green
�ag is started, the script below it will be executed when the sprite is clicked. Sometimes this design is not appropriate. We
can solve this problem later after we learn the logical operator.
Exercise1.Use the branch structure to display the number of pressing the mCore button within 5 seconds on the stage.
2.Use branch structure and values of light sensors on the mCore to switch the di�erent stage background.
mBlock小创客玩转机器人
Script of button 1
Script of button 2
Chapter 5 Defend the Island
The broadcast blocks broadcast a sender‘s
message to all the sprites (including the sprite
itself). Thereby it reminds the recipient to
perform certain actions.
The Figure on the right is the menu displayed
when right- clicking the block. Among them,
"show sender" and "show recipient" can show the
associated sprites. So it allows users to quickly
�nd the corresponding relationship.
Building Blocks Instructions Example
Category Name
Light sensor
Legend Instructions
The treasure left by the head of the pirates is hidden on a small island. When the
pirates get the news, many of them want to snatch the treasure and attack the island.
Great heroes, come to the island to defend it!
Learning Objectives
Electronic Modules
Knowledge Points
1.Learn the broadcast command
2.Learn to use clones
It can generate value by sensing
the brightness of ambient light
and.

mBlock小创客玩转机器人
This building block is the recipient
of the message. It is also the
triggering block of script.
Clones can reproduce sprite that is
exactly same as the original sprite.
Its script is same as the original .This
feature prevents the production of
many sprites with the same script.
After its creation, the clone starts by
this building block. It is di�erent
from starting of the original sprite.
Delete the unnecessary clones.
Excessive clones will lead to the
program delay and a�ect the
execution speed.
The Idea Description Thinking Process
After broadcasting a message, the
message will be sent to all the
sprites (including the sprites
themselves). The sprites use "when
receiving" building blocks to
receive messages. If messages sent
and received match, the "when
receiving" building blocks are
triggered to run.
Cloning Function
Clone can reproduce the sprite
with the same script and attribute
while the program is running. It
can solve the problem that the
number of sprites is undetermined
before the program runs.
Programming Ideas
Background program
The number of point is zero
Wait for light intensity<500
Broadcast Fire
Wait 0.5 seconds
Repeat
Receive �re broadcast
Fort program
Clone fort sprite
Wait 0.3 seconds
Fort program
Turn right 1 degreeTurn left 1 degree
fort faces -45
Press the button
If fort direction<45 If fort direction>45
Y
YY
N
N N
fort faces 45
3332
Broadcast Function

mBlock小创客玩转机器人
The Idea Description
Same as above
Thinking Process
Clone artillery shell program
Move to the position of the fort,
move 30 steps towards the fort
Hit the artillery shell target of the enemy
Touching the edge of
Y
Y
NN
N
Mobile step 10
Delete the clone
The enemy artillery shell program
Set the display position,
face the fort
Hit the artillery shell
Hit the edge
Y
Y
Y
Y
Hit the fort
Move 5 steps
Repeat
The variable "point" plus 1 point, wait 0.3 seconds
全部停止
Challenge yourself with the learning
�owchart. Please write the �ow
sequence stated on the left �gure.
Try to run the script on the left side.
Record change of mBlock.
Example Expansion
Defend the Island
Try it
Scripting Flow Chart
Operating Instructions
3534
Use the buttons on the mCore to control rotation angle
of the fort.
Use the optical sensor on the mCore to control emission
of the artillery shell.
If the fort is hit, the game is over.

mBlock小创客玩转机器人
Use the buttons on the mCore to
adjust the angle of the fort.
Branch structure is used to
control the rotation magnitude
that limits the angle of the fort.
This makes the rotation of the
fort more reasonable.
Fort Sprite
Control emission of the artillery
shells in the background
program.
Broadcast FIRE message when
light gets dimmed.
Stage Background
Upon receiving the FIRE
message, one clone is
made.
The Sprite of
Enemy Targets
Shells Sprite
As the sprite continues to
appear, the program
needs to repeat running.
The program sets that
enemy target randomly
appears in the sky and
�ies facing the fort. There
are two situations before
enemy target hits the
edge, that is, hitting the
fort or being hit by the
artillery shell. We can use
branch structures to
determine: if enemy
target hit the artillery
shells, it will hide itself
and wait 0.03 seconds
after adding one point;
otherwise, if it is hit by the
artillery shells, the game
is over.
,
;
3736

mBlock小创客玩转机器人
Each clone will execute
this script. First, the
artillery shell is moved
near the muzzle and
faces the muzzle in the
direction. Before it hits
the edge, the clones will
be deleted if it hits the
target, or moves 10
steps forward. It hides
itself and deletes the
clone after it hits the
edge.
Shells Sprite
1. The resulting clones will inherit the Hide/Show attributes of the original sprite: if the original sprite hides, the clones
will hide, and vice versa.
2. Broadcast is also an event. Its "receiving the message" blocks start upon receiving a matching message.
Tips:
Exercise1.Try to use cloning feature to make a program with raining e�ect.
2.Use the optical sensor on the mCore to change the stage background.
3.Modify the game and enable 3 to 5 enemy artillery shells to appear simultaneously.
Chapter 6 The Card ReaderEvery commodity in the supermarkets is with a barcode. Every barcode corresponds
to a speci�c commodity. Can you design a machine to read the identity? Come on
and realize it!
1.Understand and learn features and usage of the linked list
Knowledge Points
Building Blocks Instructions Example
New linked lists can generate a set of variable
form. It can store several variables and also
take out a variable within the table.
Learning Objectives
3938
Produce clones

mBlock小创客玩转机器人
Programming Ideas
The Idea Description Thinking Process
Linked list Block De-scription
Main program Stage background program
Repeat
Set the variable "list" to a random number
Stop all
Variable "point"+1
Set "list" to a random nu
Convert the light intense into digits
Y
Y
N
N
The linked list "list"
No. 1
No. 2
No. 3
No. 4
No. 5
No. 6
Move 10 steps
Hit the edge and rebound
y coordinate reduce 5
Sprite 1
y coordinate<-150
light=list
Timer>60
Repeat
Sprite 1
y coordinate>120
4140
You can enter the "thing" in
the blocks in the left �gure
manually. You can also �ll
in the variables. The �lled
data is automatically
generated into the
sequence number. It is the
basis to obtain data in the
linked list.
1.The data are stored at the
end of the linked list
2.Delete data at the
speci�ed position from the
linked list
3.Insert data into the
speci�ed location
Replace data at the
speci�ed position in the
linked list
The functions of the
blocks in the left �gure
are as follows:
1.The building block
takes out of data in the
linked list by position
number
2.Get the number of data
stored in a linked list
Find whether the linked
list contains the data
When the amount of
data needed to be
recorded is more, we
usually use linked list.
The linked list can
store numeric, string
or Chinese text. The
data stored in the
linked list can be
checked and
modi�ed at any time.
The stage background programs

mBlock小创客玩转机器人
Try it
Scripting Flow Chart
Challenge yourself with learning
�owchart. Please write the �ow
sequence stated on the left
�gure.
Try to run the script on the left
side. Record change of
mBlock.
Example Expansion
The linked list is a good helper for recording massive amount of data. With it, you can save data (either digital or text) and
�nd or modify data if necessary. It is a commonly used tool for high-level programming!
Card Reader
Background
Program
Countdown timer of 60 seconds
4342
Operating Instructions
Use the optical sensor to scan
color card
Find the corresponding
commodity through the
linked list
The value of the light sensor is
processed through arithmetic
operation. The value
representing the color
characteristics is left.
Within a given period of time,
the values in the light sensor
and the linked list are
compared to validate
whether they are same.
Wherein the variable "light" is
the value of the light sensor
and the variable "list" is the
value of the linked list.
mBlock小创客玩转机器人
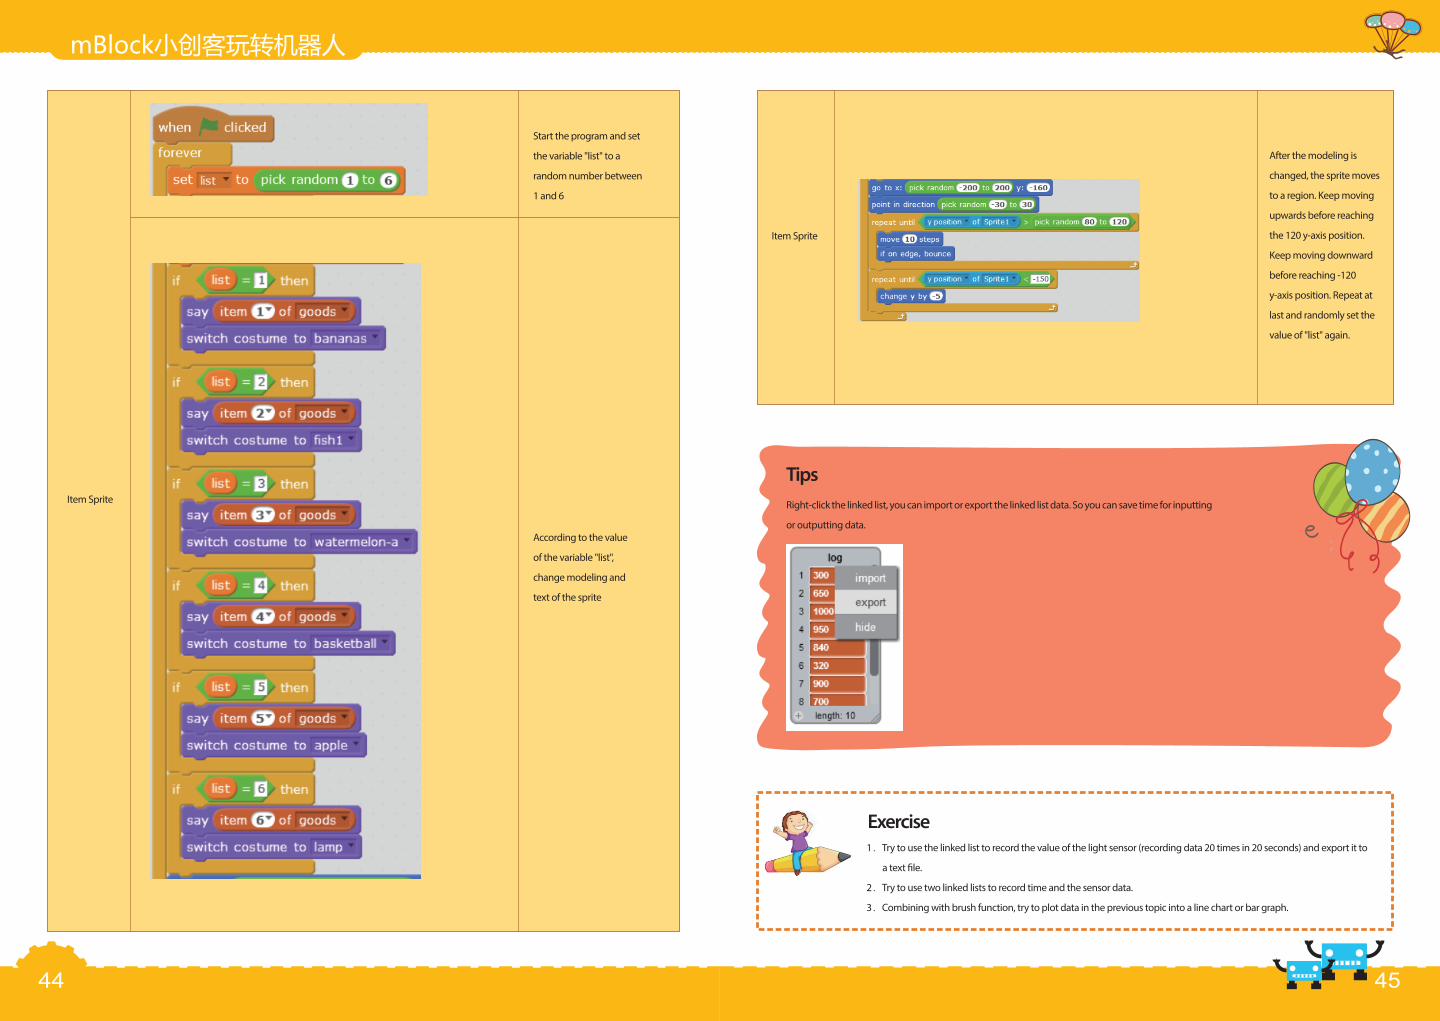
Item Sprite
Start the program and set
the variable "list" to a
random number between
1 and 6
According to the value
of the variable "list",
change modeling and
text of the sprite
Item Sprite
After the modeling is
changed, the sprite moves
to a region. Keep moving
upwards before reaching
the 120 y-axis position.
Keep moving downward
before reaching -120
y-axis position. Repeat at
last and randomly set the
value of "list" again.
Exercise1.Try to use the linked list to record the value of the light sensor (recording data 20 times in 20 seconds) and export it to
a text �le.
2.Try to use two linked lists to record time and the sensor data.
3.Combining with brush function, try to plot data in the previous topic into a line chart or bar graph.
Right-click the linked list, you can import or export the linked list data. So you can save time for inputting
or outputting data.
Tips
4544

mBlock小创客玩转机器人
Chapter 7 Rhythm GameParty time! Happy hour demands music. Let’s play a rhythm game and see who has
better sense of rhythm. This game is focused on Hand-eye coordination!
1.Learn logical operators
Building Blocks Instructions ExampleExample
When both internal
conditions are true,
"and" building block
will be true. Otherwise
it is false.
Learning Objectives
Knowledge Points
The Idea Description Thinking Process
Stage background program
Initiate "time" and "point"
Wait 1 second
The variable
The variable time=0
The program stops
Y
N
Programming Ideas
Programs of each sprite
Face the left
Randomly set the movement speed
Hit the edge and rebound
Repeat
When there are two or
more conditions
needed to be judged,
we usually use logical
operators to combine
conditions. Operation
varies in conditions.
Logical Operators
Building Blocks Instructions Example
When the condition
inside the Block is true,
"not" building block is
false. When the internal
condition is false, the
building block is true.
4746
When either one of
the two internal
condition is true, "or"
building block is true.
Otherwise it is false.

想法说明 思路流程
重复执行
节奏光线程序
显示光线否
否
按下按钮
否
是
否
同上
mBlock小创客玩转机器人
The Idea Description Thinking Process
Repeat
Rhythm light program
Show light
Plus 5 points
The three sprites are hit
Y
N
Plus 1 point
Any sprite is hit
Y
N
Subtract 3 points
Any sprite is not hit
Y
Wait 0.2 seconds and hide
Plus 3 points
Press button
The two sprites are hit
N
Y
N
Same as above
Try it
Scripting Flow Chart
Example Expansion
Challenge yourself
with learning
�owchart. Please write
the �ow sequence
stated on the left
�gure.
Try to run the script
on the left side.
Record change of
mCore.
Which tone will
mCore play if the light
intensity is exactly
equal to 500?
4948
Rhythm game is very simple: When one or more sprites are caught by the middle light beam (light beam is controlled by the button), points are obtained;
If any sprite is not caught, points are reduced. Use "and", "or" and "not" to judge points obtain or deduction. Keep your eyes open and concentrated. Let’s
play this small but tight game!

想法说明 思路流程
Star�sh Sprite
Basketball Sprite
The sprite moves back and
forth on the stage at random
speed
The sprite moves back and
forth on the stage at random
speed
mBlock小创客玩转机器人
The game is only 60 seconds long. Crabs, star�sh and
basketball on the stage move around at di�erent
speeds. The program uses buttons to control the
beam showing or hiding. Points are obtained
according to the sprite captured by the beam.
Come and try! Let’s see how many points you could
get in one minute!
Rhythm Game
Stage Background
Crab Sprite
Operating Instructions
The variable "time" represents total time of the
game. The variable "point" represents the obtained
points. After the timer returns to zero, the game
starts. While the program is in progress, the value of
the variable "time" continuously diminishes. When
it is equal to 0, it indicates that the game is over and
the program stops.
The sprite moves back and forth on the stage at
random speed
5150
Calculate the game time

想法说明 思路流程
Logic judgment of
beam
The script
constantly checks
the contact
between the light
beam and the other
three sprites. Points
obtained vary in
situation.
Exercise
Beam Sprite
1.Use "and" building block to design an e�ect: enlarge the sprite if the condition is met. Otherwise, narrow the sprite.
2.Use "not" building block to design a program that makes LED light blinking .
mBlock小创客玩转机器人
知识要点知识要点
Chapter 8 The Video BallIn this chapter, we will learn how to make an interactive video game. The game
tests your hand-eye coordination. Are you ready?
1.Learn to use the video-related building blocks
2.Learn to use variables
Start the camera
connected to the
computer
Set the transparency of
the video. 0 is opaque and
100 is completely
transparent.
Detect sprite’s movement
in the video.
学习目标
Building Blocks Instructions Example
Learning Objectives
Knowledge Points
5352

The Idea Description Thinking Process
Begin the program
Start the camera
Repeat within 60 seconds
ScoEnd
Randomly determine the ball
target and light on the mCore
Touch the ball in the video
End
N
Use the camera to make an interactive game. The �ow is shown
in the right �gure. The target balls for touching are randomly
generated by the computer. Then the mCore turn on LED lights
with the corresponding color. So players know what color ball
they need to touch.
The program uses the branch structure for scoring. When 60
seconds end, the score is calculated.
Use Video:
Challenge yourself with learning �owchart.
Please write the �ow sequence stated in the left
Scripting Flow Chart
Try it
Try to run the script on the left
side. Record change of mCore.
It is a new feature of Scratch 2.0 that uses the camera as a sensor. The mBlock also inherits this feature. When the video
features are combined with mCore, it can create lively, interesting, funny and interactive games. Let’s experience it now!
Video Ball
When the game starts, LED on the mCore will constantly
change color. Players must touch the ball of the same
color on the stage within certain time. You will obtain
points if you touch the balls within the speci�ed time.
The game time is totally 60 seconds. You need to
connect the camera to your computer.
Example Expansion
Operating Instructions
Programming Ideas
mBlock小创客玩转机器人
5554

Stage Background
You should �rstly start the camera and set the
transparency when the program starts.
The beeper sounds before the game starts.
Initialize variables and timers
Same as above
The game is 60 seconds long.
Program constantly switches the
color of LED (1 is red, 2 green, 3
yellow and 4 blue). Then the status
of "state" is set to 1. It indicates that
the player did not answer.
If the players answer it within two
seconds, "state" will be set to 0 and
the program re-picks the color. And
then the game enters into the next
round; otherwise, if the answer is
not made within two seconds, the
variable "time" is set to the next
time-out point. At same time, the
"state" is set to 0 so that the next
round of color conversion is done.
The timer display returns to zero. The variable POINT
represents player's points.
The variable "state" represents whether players
answer. 0 indicates that they have answered. 1
indicates that they have not answered.
The variable "time" represents the next timeout time
point.
have answered. 1 indicates that they have not
answered.
The variable "time" represents the next timeout time
point.
mBlock小创客玩转机器人
5756

Stage Background
The game is over. Play a beep tone and turn o�
the camera.
The buzzer sounds when point is obtained.
Ball Sprite
Four ball sprites constantly judge
whether they are the same color
as the one displayed by the
mCore and be hit by the video.
When the ball is hit correctly, it
will disappear for 0.2 seconds.
The variable "color" is set in the
stage background, which
represents the color selected by
the game.
Why will the ball disappear for few seconds when it is hit? This is because the continuous display can cause incorrect
scoring for continuous score. So it must disappear for few seconds.
Exercise1.Test relationship between the camera and its transparency.
Record the values obtained through .
2.Compare the di�erence between and .
Tips
mBlock小创客玩转机器人
5958

Chapter 9 Run! RobotWe can apply the mBlock programming knowledge we learned to control mBot
robots. If you play a chasing game with other children, it will be very interesting.
1.Learn how to use mBlock to control traveling of robot
Electronic Modules
Learning Objectives
Knowledge Points
Category Name Legend Instructions
Bluetooth can help us be free from the
data line and enjoy wireless program-
ming
Bluetooth Module
Module Building Blocks InstructionsSet the motor interface and implement
rotation of the motor. The value range
from 255 to -255 .255 represents the
maximum forward rotation value, while
-255 indicates the maximum reverse
rotation value
Programming Ideas
Try it
Legend Instructions
At the side of the main board, there are two orange ports for
connecting the motor.
1.Connect the Motor
The Idea Description Thinking Process
Event of pressing the key
The motor runs
Event of releasing the key
The motor stops
Use mBot Bluetooth to receive mBlock
keyboard commands and control the
movement direction
mBlock小创客玩转机器人
6160

Legend Instructions
2.Power by Battery
Before you use Bluetooth, please
make sure to use the battery to
power and switch on.
Legend Instructions
3.3.Create Bluetooth Connections
Click Discover and wait for the
search results of Bluetooth devices.
Find the Bluetooth connection
named "Makeblock"
When it is successfully connected,
the toolbar will change, as shown on
the left �gure. Finally, make sure to
select MBot in the connection.
4.Write a Script
Achieve the mobile mBotAchieve the mobile mBot
Idea Script Script Description
Press the move-up
key on the
keyboard to move
mBot forward.
Release the
move-up key on
the keyboard to
move mBot
backward
Response only by pressing the move-up key.
Set speed of two motor to 100.
Response by releasing the move-up key.
Set speed of two motors to 0 and the motors stop.
Motor speed of 100 is not a real speed value but a "range value" for easy operation. Within the range, speed varies in
voltage and motor. This "range value" is in the range of 0-255. To be speci�c, 0 indicates the motor stops while 255
indicates the motor reaches the maximum speed at the current voltage.
Tips
mBlock小创客玩转机器人
6362

How will you operate it if you want to steer the mBot ?How will you operate it if you want to steer the mBot ?
If you think mBot turns too slowly, you can also set it as followsIf you think mBot turns too slowly, you can also set it as follows
Script Script Description
If a wheel turns forward
and a wheel turns back,
what happens?
If the left wheel turns back and the
right wheel turns forward, the car
will quickly turn left.
Idea
Idea
Script Script Description
When you press the move-left button,
set the left motor to 0 and the right
motor to rotation speed. Then the car
will turn left. (If your test is opposite to
the above e�ect, it is still correct. You
just need to remember the motor
interface number and corresponding
motor.
If a wheel rotates
forward and a wheel
does not turn, what
happens?
Example Expansion
Install the ultrasonic sensor on the front of the car.
Connect the data cable to the 3rd port
1.Ultrasonic Sensors
Please program by yourself with the knowledge learned above. Then you can control the car with the up , down, left and right keys on the keyboard.Please program by yourself with the knowledge learned above. Then you can control the car with the up , down, left and right keys on the keyboard.
Control the mBot
program with the arrow
keys on the keyboard.
Judge if there is an obstacle ahead in the way.
mBlock小创客玩转机器人
6564

Chapter 10 Dodging MasterThe robot mBot wants to learn walking. But it always hits the obstacle ahead. Look!
mBot hits the children in front of it. It is very frustrating. Let's help it now. In this
chapter, we will learn how to use mBlock programming to enable mBot to avoid
obstacles ahead.
1.Understand the usage of ultrasonic sensors
2.Learn how to use mBlock programming to enable mBot to avoid obstacles
Category Name Legend Instructions
Ultrasonic sensors can detect the
distance from the object aheadUltrasonic Sensor Module
Module Building Blocks Instructions
The distance from the object ahead
detected by the ultrasonic sensor
will be measured in centimeter.
Learning Objectives
Electronic Modules
Knowledge Points
Exercise1.Let us think, is there any problem for the above program? Can we use the spacebar to control the car's alarm?
More interesting games are waiting for your development!
Idea Module Module Description
Click the data and commands. Create
a new module command named
"sound"
is the beginning of the
program de�nition.
If the ultrasonic sensor(con-
nected to the interface 3)
senses that the obstacle ahead
is less than 10 cm from it, the
buzzer will sound for one
second.
When the mBot moves (such
as pressing the up/down key),
the "sound" program runs.
Create a module
command named "sound"
1.De�ne Module Commands
2.Write a Script
Idea Script Script Description
When mBot moves,
the “sound” program
will run. If there is an
obstacle ahead
detected by the
ultrasonic sensors, the
buzzer will alarm.
mBlock小创客玩转机器人
6766

1.1.Install Ultrasonic Sensors
Try it
Legend Instructions
Install the ultrasonic sensor on the front of mBot. Connect the
data line to the No. 2 port on the main board.
Acquire the sensor data Acquire the sensor data
2.Write a Script
Idea Script Script Description
Press the spacebar (do not release) to trigger the
program
Because the ultrasonic data is constantly acquired, it
should use the loop block.
It assigns the variable "dis" to the distance from the
object ahead detected by the ultrasonic sensors .
In this way, when you click the little green �ag, the
current distance detected by the ultrasonic sensor will
be displayed in the upper left corner.
Create a variable
(e.g. dis) to hold
the distance data
detected by the
ultrasonic sensor.
Tips
The Idea Description Thinking Process
Hold down the spacebar and mBot
move forward. If the ultrasonic
sensor detects that it is closed to
the object ahead (such as less than
10 cm), the mBot will turn to avoid
obstacles and move on. If you
release the spacebar, mBot stops.
Press the spacebar
Judge whether the obstacle
is less than10 cm away
Move forward Change direction
N Y
Programming Ideas
Normally the human ear cannot hear sound of 20 kilohertz (kHz) or higher. Such sound wave is called ultrasonic wave. Bats
�ying at night can make such type of ultrasound. Bat is with amblyopic eyes, so its locating and foraging rely on
ultrasound. Bat emits sound waves ranging from 20 and 120 kHz. The sound wave come from bat’s mouth or nose and is
accepted by its ears. Makeblock ultrasonic sensor is also divided into the transmitting end and the receiving end. The end
marked with T is transmitter and the end with R is the receiver.
mBlock小创客玩转机器人
6968
Release the spacebar
Stop

Judge whether the distance value is less than 10.
Two motors rotate in reverse direction and mBot
turns.
Two motors rotate in the same direction and
mBot moves forward.
Add a judgment and enable mBot’s function of avoidanceAdd a judgment and enable mBot’s function of avoidance
Idea Script Script Description
If the "distance value" is
less than 10, the two
motors rotate in the
opposite direction to
make mBot turn.
Otherwise, the two
motors rotate forward
and mBot moves
forward.
It will trigger event by releasing the spacebar.
Firstly, stop other script programs (because the
other program keeps judging whether there are
obstacles ahead).
Set the motor speed to 0 and stop turning.
Set mBot stopping eventSet mBot stopping event
Idea Script Script Description
Set the motor speed to
0 and stop other scripts.
Could you achieve following e�ect? When mBot moves forward, if there is an obstacle ahead (eg 50 cm away), mBot will be alerted and turn on alarm light.
As obstacle is getting closer, alarm and light frequency will gradually accelerate until mBot turn.
All programsAll programs
Example Expansion
mBlock小创客玩转机器人
7170
”
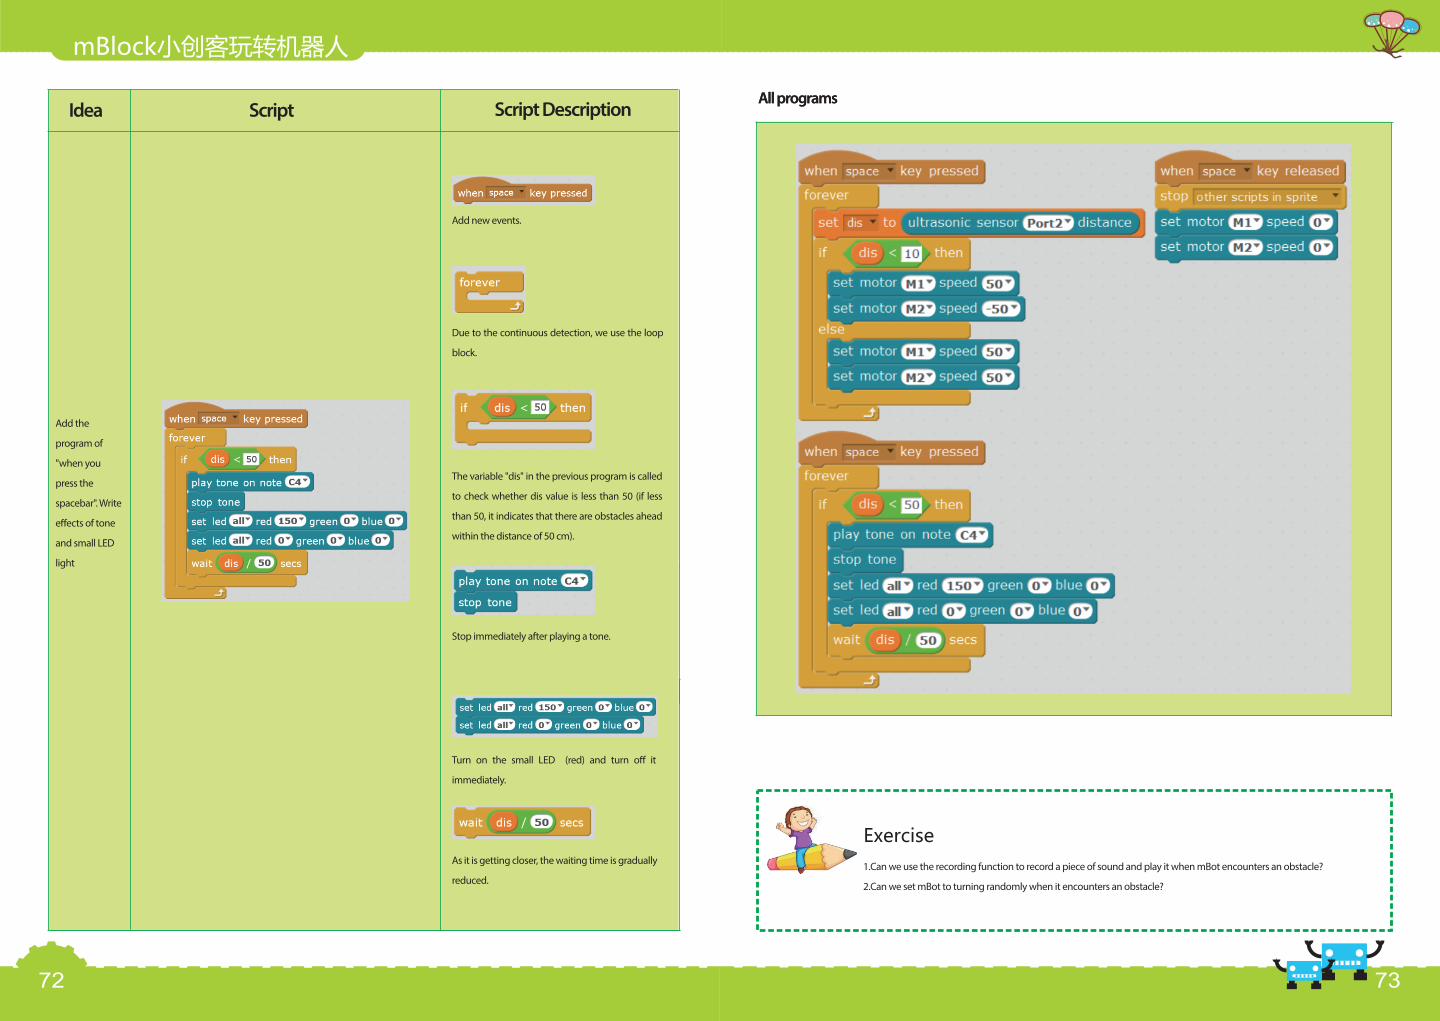
Idea Script Script Description
Add the
program of
"when you
press the
spacebar". Write
e�ects of tone
and small LED
light
Add new events.
Due to the continuous detection, we use the loop
block.
The variable "dis" in the previous program is called
to check whether dis value is less than 50 (if less
than 50, it indicates that there are obstacles ahead
within the distance of 50 cm).
Stop immediately after playing a tone.
Turn on the small LED (red) and turn o� it
immediately.
As it is getting closer, the waiting time is gradually
reduced.
All programsAll programs
Exercise1.Can we use the recording function to record a piece of sound and play it when mBot encounters an obstacle?
2.Can we set mBot to turning randomly when it encounters an obstacle?
mBlock小创客玩转机器人
7372

Chapter 11 The Success RoadThe robot mBot sees the train moves along the track. It hopes it could be with a
train-like track. In this chapter, we will learn the line-patrolling feature of mBot!
Learning Objectives
1.Understand the characteristics of the line-patrolling sensor
2.Learn to patrol line with the line-patrolling sensor.
Electronic Modules
Category Name Legend Instructions
Line-patrolling
Sensor Module
Line-patrolling
Sensor module can help the robot
move along the black line on the
ground. There are two detectors on its
front. Through the re�ected light
projected on the ground by the LED, it
detects the o�set of the module against
the black line.
Module Instructions
Get o�set value of the line-patrolling sensor. They are a total of four
values, namely 0,1,2,3. Among them, 0 represents that the sensor is
completely along the black line and 3 represents that the sensor is
completely o�-track. 1 and 2 illustrate that one side of the sensor is
away from the black line, while the other side is along the black line.
The value is 0
The value is 1
The value is 2
The value is 3
Building Blocks
Knowledge Points
mBlock小创客玩转机器人
7574

Hold down the spacebar and then mBot runs
the program. Judge whether mBot is
completely along the dark line. if it is, it moves
straightly. Otherwise, it continues to judge
whether mBot is on the left (right). If it is, it
turns to the right (left) and make mBot return
to the black line. If mBot is away from the
black line, it will draw back to the black line.
Repeat the cycle as this until you release the
spacebar.
The Idea Description Thinking Process
Programming Ideas
1.Install Line-patrolling sensor
2.Set Custom Module Motor
The line-patrolling sensor is attached to one end
of mBot. Please make sure that two detectors are
downwards. The data cable is connected to the
port 3.
Note: For easy learning, we regard the end with
the line-patrolling sensor as the front. So, if you
want to drive mBot forward, you should set the
motor to turning backward during programming
(example: -50).
Try it
Legend Explanation
In "Data and Blocks" module, click "Make a Block"
Select "Add number input" in the open form(This
parameter can be referred as motor speed) and
rename the module as "left" (It means the custom
function would operate the motor on the left side
of mBot)
Create a custom module "right" for operating the
motor on the right side of mBot
Legend Explanation
In this lesson, we regard the end with the line-patrolling sensor as the front of mBot. For easy learning and operation, we set the motor operation with the
custom module, so as to facilitate the follow-up operation.
Press the spacebar
If mBot is on the back line
If mBot is close to the left
If mBot is close to the right
If mBot is out of the back line
Move straightly
Turn right
Turn left
Move backwards
Release the spacebar
Stop
Y
Y
Y
Y
N
N
N
mBlock小创客玩转机器人
7776

4.Write the Script
Press the spacebar (hold pressing) to trigger the program
Because it will constantly acquire the data of line-patrolling
sensor, it is necessary to use a loop block.
Idea Script Script Description
Set the Line-patrolling function of mBot
When you press the
spacebar (hold
down), mBot begins
to judge the state of
the line patrolling
sensors. The rotation
of the motor
depends on the
o�set, which
facilitate the
direction adjustment
of mBot.
The value detected by the sensor is assigned to the
variable "liner".
If the liner is 0, it indicates that mBot is just along the black line
and rotation speed of left and right motors is consistent with
If the liner is 1, it indicates that mBot is right to the black
line. It should turn left. At that time, the left motor deceler-
ates and the right motor accelerates.
If the liner is 2, it indicates that mBot is left to the black line
and should turn right. At that time, the right motor deceler-
ates and the left motor accelerates.
If the liner is 3, it indicates that mBot has been completely
o�-track the black line .It should immediately be back to
the black line.
mBlock小创客玩转机器人
7978
3.Debug mBot’s movement
The left wheel of mBot corresponds motor 2 and the right wheel corresponds motor 1.
Proceed as follows to set custom modules:
The left wheel of mBot corresponds motor 2 and the right wheel corresponds motor 1.
Proceed as follows to set custom modules:
As shown in the �gure, when we run command "left", commands in the custom module
are called. The value 30 in the "left" command will replace the value number1. In this
example, the rotation speed of motor 2 will be 30.
Does the motor rotate forward or backward?
The value of number1 will be multiplied by -1.
Finally, prepare custom modules "left" and "right":
Legend Explanation
The front of mBot
Motor 1Motor 2

Idea Module Instruction Description
Stop the line-patrolling function of mBot
Release the spacebar to trigger event.
Set the motor speed to 0 and stop rotation.
When you release the
spacebar, mBot stops.Stop other script programs (because the other program
is continuously judging the value of the line-patrolling
sensors).
Tips:
It should make sure that mBot is along the black line when the program starts. If the line –patrolling of mBot doesn’t function
well, for example, often o�-line, you can appropriately increase the width of the black line.
All programs
mBlock小创客玩转机器人
8180

Idea Script Script Description
The buzzer plays
di�erent sound
according to various
values detected by line
–patrolling sensor
If your play tone and immediately stop playing, it will
emit short and rapid voice. That is the e�ect we expect!
As a result, mBot will play melody when it patrol the lines
(you could also try to take di�erent tones).
Example Expansion
The robot mBot learned how to move along the track! It is very happy. It was humming a song and
walking on the "success road". Please write programs for the robot and add songs according to di�er-
ent values detected by line –patrolling sensor
Exercise1.Write a program to control the LED lighting e�ect and make mBot movement more cool.
Chapter 12 The Obedient Robot
mBot is a smart obedient robot. There is an infrared receiver on its body. We
can remotely c control mBot’s movement with this receiver. Is it so cool, ah?
In this lesson, we will learn how to control the robot with the infrared remote
controller.
1.Learn how to control the robot with the infrared remote controller.
Learning Objectives
Electronic Modules
Category Name Legend Instructions
Transmit the coded infrared signal. It is received
and processed by the infrared receiver of mBot
master controller, which realize the related
program action .
Infrared Remote Controller
mBlock小创客玩转机器人
8382

2.编程指令
Module Building Blocks Instructions
Get the button Information for
the infrared remote controller
Programming Ideas
Knowledge Points
The Idea Description Thinking Process
Click the green �ag to start the loop
program. It will constantly judge
whether the received button
information of the infrared remote
controller is consistent with the preset
information (such as the A key). If yes,
corresponding action is executed.
Otherwise, the loop continues.
Click on the small green �ag
Judge whether the key
information is consistent
Perform the corresponding action
N
Y
Tips
2.编程指令Try it
Idea Script Script Description
Click the green �ag
to execute the loop
structure. It will
continuously detect
the received key
information of the
remote controller. If
it receive the arrow,
mBot will move or
turn.
Click the green �ag and execute the program
The loop program is used for continuously detecting data
information
Analyze the key information of the remote controller and
execute the corresponding program.
Use arrow keys to control the traveling mBot
mBlock小创客玩转机器人
8584
You can set the keypad of the remote controller according to your preferences, for example, press A and mBot play a piece of
sound.

We are able to use the arrow keys on the remote controller to control mBot’s movement. However ,I have to remind your
of a problem : mBot moves very hard. When we control it with an infrared remote controller , the signal is �rstly received by
the infrared receiver of the main controller and then fed back to mBlock of the computer through Bluetooth. After the
signal is processed by mBlock, the motor rotation of mBot is controlled by Bluetooth. This process is very complicated, isn't
it? Is there a way to disconnecting mBot from computer? In other words, the program is directly burned into the main
controller. It is de�nitely feasible. Let’s learn this function now.
Example Expansion
Idea Script Script Description
Use "mBot main
program" in the
"robot module" to
replace "when the
green �ag is clicked".
Upload the code to
the main controller.
Allow program code to be uploaded to mBot’s main
controller and make the robot operate o�-line
Then right-click, select "Upload Arduino program", as
shown below
Click the "Upload to arduino" in the opened window
Attention! When you upload Arduino program, please
make sure that your USB cable is connected to mBot’s
main controller and the corresponding port number is
Tips
Exercise1.Upload code to the main controller. It can control mBot’s movement with the remote controller . It can also control the buzzer
sound and LED �ash e�ects and so on.
mBlock小创客玩转机器人
8786
When the program is successfully uploaded, you could control mBot with an infrared remote controller , If you write a very
complicated program (such as using the Scratch brush, recording and other functions), it may not generate the
corresponding code. Reminder page will be prompted and indicate where goes wrong. Therefore, It is recommended that
you should not write the program for complex functions.

Chapter 13 The Versatile RobotmBot is a smart robot. It has learned a lot of skills. For example, it is able to deftly
dodge obstacles ahead. It can also perform line- patrolling and operate the infra-
red remote controller. In this lesson, we will have mBot shown its all skills!
Learning Objectives
The Idea Description Thinking Process
Begin
Execute the subroutine "control"
If "A" key is pressed
The program is burned into the controller.
When it is executed, it will continuously
judge whether button "A" is pressed. If
pressed, the subroutine "control" is
executed.
The subroutine "control" repeatedly
executes the program until the key "Set" is
pressed or the line sensor detectes the
black line. In the
N
Y
Programming Ideas
01
The Idea Description Thinking Process
Subroutine "control"
If "Up" key is pressed
If "Left" key is pressed
If "Right" key is pressed
If "Down" key is pressed
If detect obstacles
The motor
turns forward
The motor di�erential
changes direction
The motor turns
reversely
The motor di�erential
turns left
The motor di�erential
turns right
Y
Y
Y
Y
Y
N
N
N
N
"control" program, it
controls the
movement direction
of mBot with the
button of the remote
controller. However, if
there is any obstacle
ahead (within 10 cm),
mBot will automati-
cally turn.
1.Press "A" key of the remote controller. mBot enters the remote control mode. Use the arrow keys to
control mBot to move forward, backward and turning. However, if there is any obstacle 10 cm ahead,
mBot will automatically turn.
2.If you press "control key" on the remote controller or the line-patrolling sensor hits the black line,
mBlock小创客玩转机器人
Run repeatedly
until "Settings"
button is
pressed or the
line sensor
detects the
back line
The
subroutine is
�nished
8988

Try it
Idea Script Script Description
1.Write a script. Judge whether "A" on the remote controller is pressed
The program can be burned directly into the control-
ler to achieve mBot running without the computer.
The program that is burned into the main control-
ler must be executed in a loop
Judge whether "A" key on the remote controller is pressed
To execute the subroutine "control", you should
create a subroutine in "Data and Blocks" module,
shown as below:
2.Write Subroutine "control"
Execute the subroutine "control".
Set LED light to red color, which indicates that
mBot enters the control mode.
According to di�erent keys of the remote controller,
the movement direction of mBot. varies.
If there are obstacles 10 cm ahead, the LED light is in
green and robot turns. The small light will be o� in
0.5 seconds
Repeatedly execute the program until "Settings"
button on the remote controller is pressed or the
line sensor detects the black line (the value of the
sensor is 0). Then turn o� the small LED lights and
stop rotation of the motor.
Idea Script Script Description
The program runs
repeatedly in the
subroutine "control"
until "Settings"
button on the
remote controller is
pressed or the line
sensor detects the
black line. In the loop,
it will detect the state
of keys of the remote
controller, and judge
whether there are
obstacles 10 cm
ahead.
Exercise1.Apart from making mBot enter the control mode by pressing "A" key of the remote controller, you can also set other
modes. For example, press "B" key and enter the line-patrolling mode, and then mBot travels along the black line, etc.
In the loop body
,mBot’s main
program judge
whether "A" key on
the remote
controller is
pressed. If yes, the
subroutine
"control" will run.
mBlock小创客玩转机器人
,
9190
Chapter 14 The Horse Race TycoonToday, we come to the racetrack. Each contestant brings mBot. They will calibrate
their beloved mBot by themselves, so that it achieves the best results in this
racing game. Before the game starts, players have plenty of time to train the
mBot. Game time, all go to the track please!
1.Upload the control program to mBot in o�ine mode and �nish the racing game
Knowledge Points
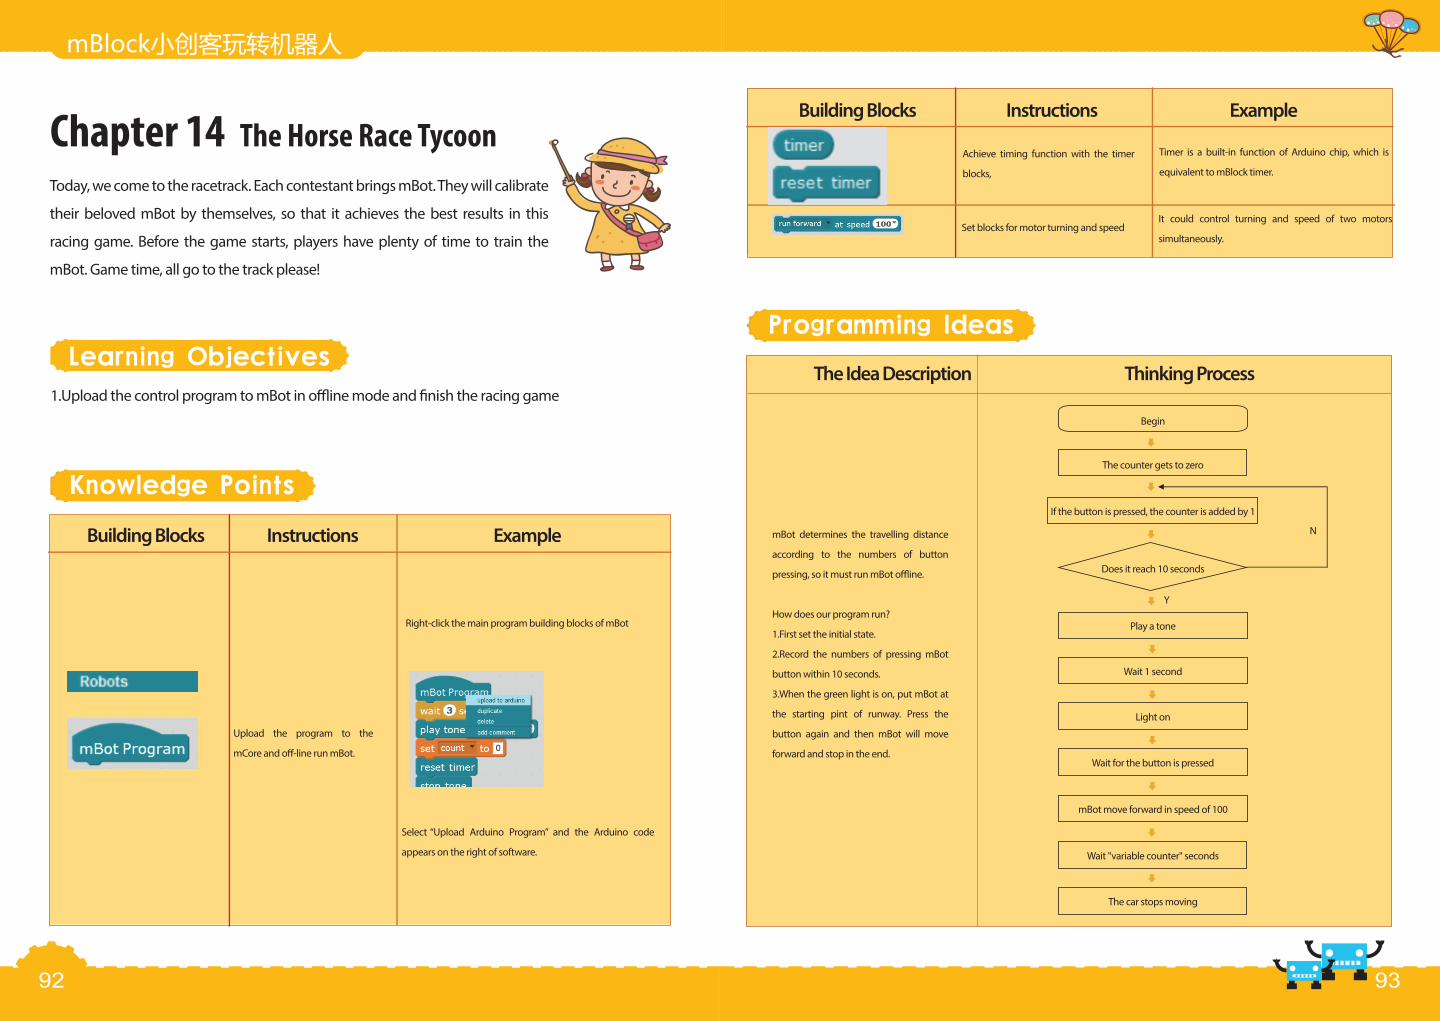
Building Blocks Instructions Example
Upload the program to the
mCore and o�-line run mBot.
Right-click the main program building blocks of mBot
Select “Upload Arduino Program” and the Arduino code
appears on the right of software.
Learning Objectives
Building Blocks Instructions Example
Achieve timing function with the timer
blocks,
Set blocks for motor turning and speed
Timer is a built-in function of Arduino chip, which is
equivalent to mBlock timer.
It could control turning and speed of two motors
simultaneously.
Programming Ideas
The Idea Description Thinking Process
Y
NmBot determines the travelling distance
according to the numbers of button
pressing, so it must run mBot o�ine.
How does our program run?
1.First set the initial state.
2.Record the numbers of pressing mBot
button within 10 seconds.
3.When the green light is on, put mBot at
the starting pint of runway. Press the
button again and then mBot will move
forward and stop in the end.
Begin
The counter gets to zero
If the button is pressed, the counter is added by 1
Does it reach 10 seconds
Play a tone
Wait 1 second
Light on
Wait for the button is pressed
mBot move forward in speed of 100
Wait "variable counter" seconds
The car stops moving
mBlock小创客玩转机器人
9392
Try it
Idea Script Script Description
Initialize the
variable applied to
mBot before it sets
o�
Detect the
number of times
that the button is
pressed within 10
seconds. Emit a
tone in 10
seconds.
The green light
turns on when
time is up.
Players put mBot
to the speci�ed
location. Press
the button again
and mBot starts
moving.
The variable "count" records the numbers of
pressing button. If the numbers does not get to
zero before the program starts, the following
program will add the previous numbers. The
program will run abnormally.
Start recording time again.
The loop ends when it goes beyond 10 seconds.
Record the number of times that the
button is pressed.
Wait for pressing the button.
Forward time is equivalent to the number of times that the
button is pressed by the player.
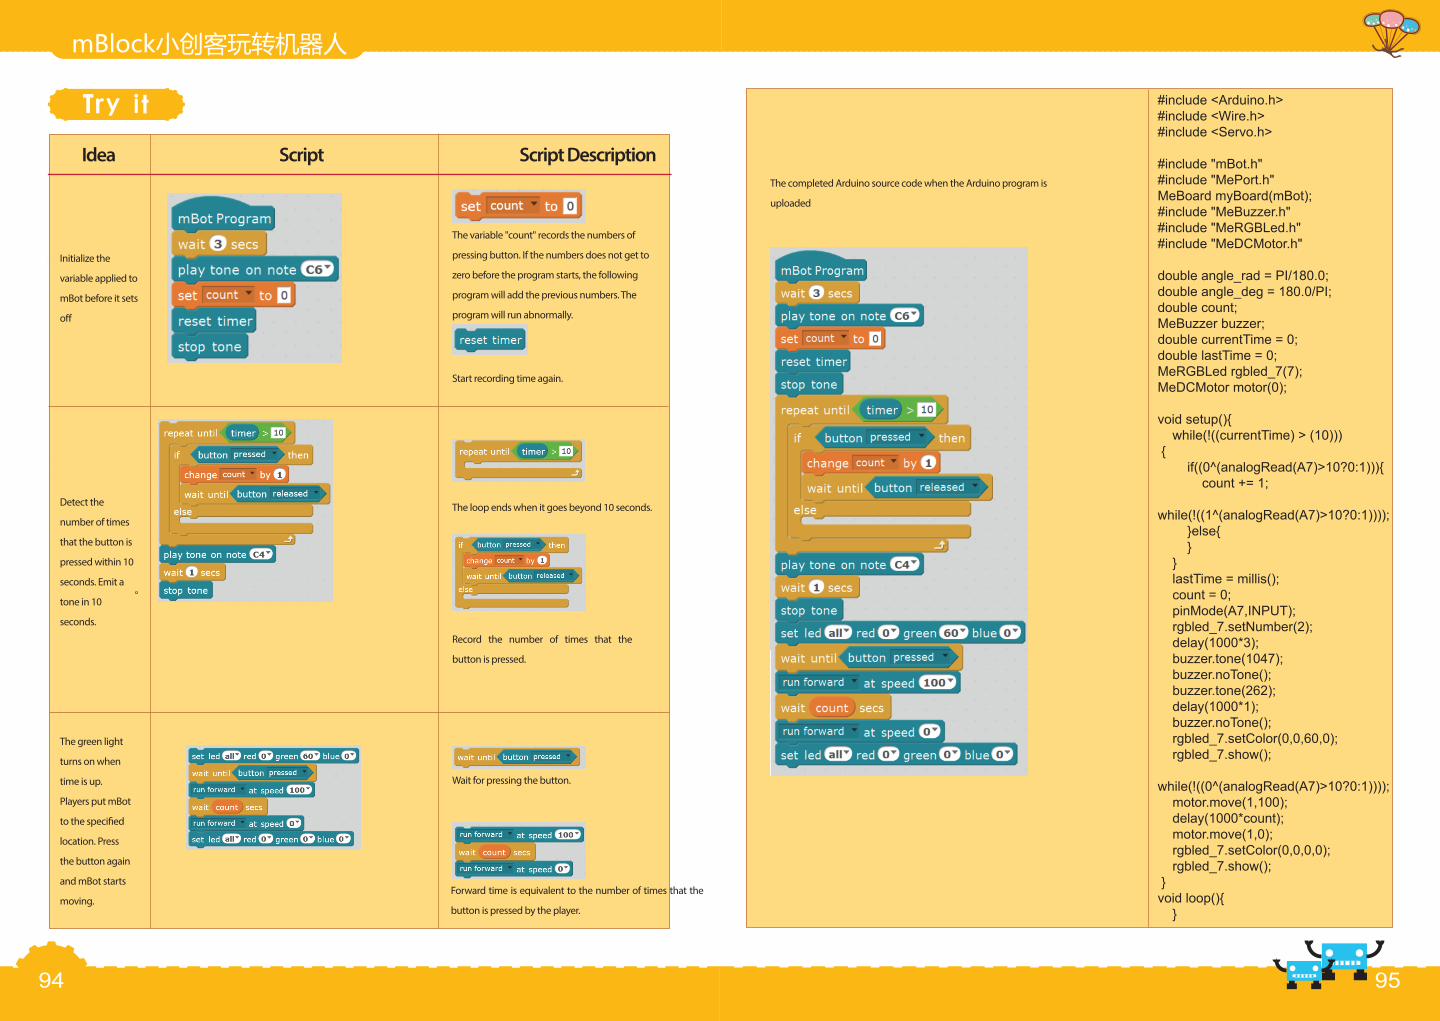
The completed Arduino source code when the Arduino program is
uploaded
#include <Arduino.h>#include <Wire.h>#include <Servo.h>
#include "mBot.h"#include "MePort.h"MeBoard myBoard(mBot);#include "MeBuzzer.h"#include "MeRGBLed.h"#include "MeDCMotor.h"
double angle_rad = PI/180.0;double angle_deg = 180.0/PI;double count;MeBuzzer buzzer;double currentTime = 0;double lastTime = 0;MeRGBLed rgbled_7(7);MeDCMotor motor(0);
void setup(){ while(!((currentTime) > (10))) { if((0^(analogRead(A7)>10?0:1))){ count += 1; while(!((1^(analogRead(A7)>10?0:1)))); }else{ } } lastTime = millis(); count = 0; pinMode(A7,INPUT); rgbled_7.setNumber(2); delay(1000*3); buzzer.tone(1047); buzzer.noTone(); buzzer.tone(262); delay(1000*1); buzzer.noTone(); rgbled_7.setColor(0,0,60,0); rgbled_7.show(); while(!((0^(analogRead(A7)>10?0:1)))); motor.move(1,100); delay(1000*count); motor.move(1,0); rgbled_7.setColor(0,0,0,0); rgbled_7.show(); }void loop(){ }
mBlock小创客玩转机器人
。
9594

Click the "Upload to Arduino" button and upload the programs to the mBot mainboard.
Tips
Idea Script Script Description
Modify the waiting time
in the program
Example Expansion
How could you change the moving distance per second for mBot?
Idea Script Script Description
Modify the motor speed
You can change the moving speed by
modifying this number
If you think mBot moves too fast, how could you set it?
Touchdowns game: Let mBot start from a �xed starting point and move to the speci�ed range with the button.
mBlock小创客玩转机器人
Why is added to if .. then block? Because it is only countered as successful pressing when the button is
pressed and then released. If you do not add this building block, it will be considered as repeated pressing when you hold down it. It is
not the e�ect that we want.
Will there be any di�erence if we use if..then block in the script? Try it. Try again, will mBot react if the time you press the button is more
than 10 seconds?
Extend the waiting time by 20%. Try
and see the di�erence.
9796
It is a good solution that we set motor
at di�erent speed.
Maybe you have better idea ~
Idea Script Script Description
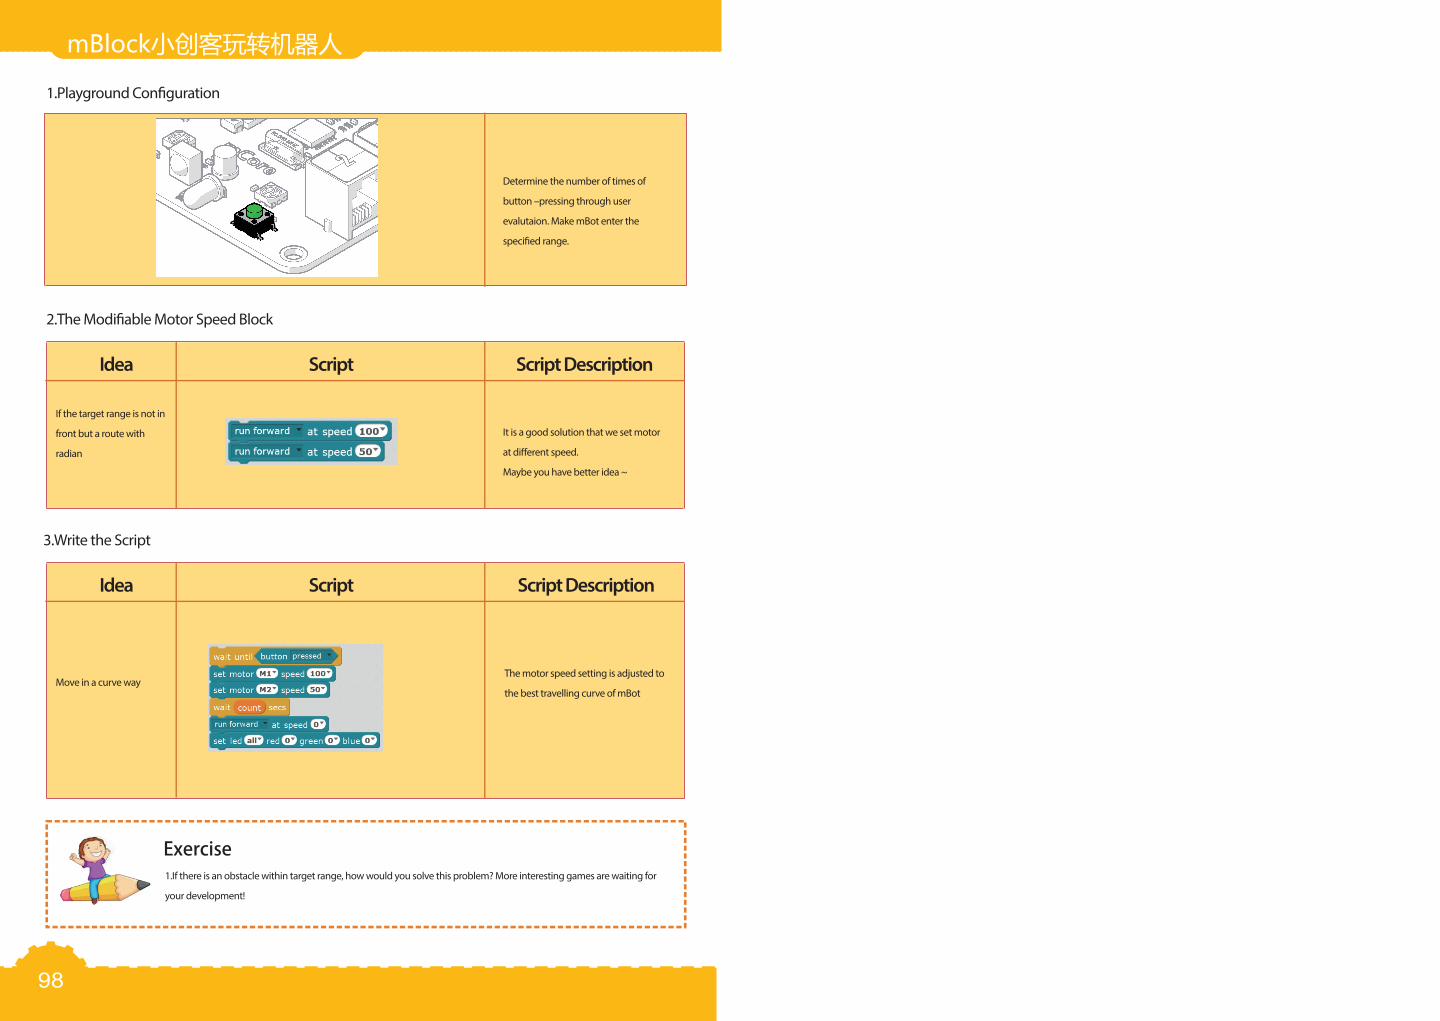
If the target range is not in
front but a route with
radian
2.The Modi�able Motor Speed Block
The motor speed setting is adjusted to
the best travelling curve of mBot
Idea Script Script Description
Move in a curve way
3.Write the Script
Exercise1.If there is an obstacle within target range, how would you solve this problem? More interesting games are waiting for
your development!
mBlock小创客玩转机器人
1.Playground Con�guration
Determine the number of times of
button –pressing through user
evalutaion. Make mBot enter the
speci�ed range.
98