how-to series: pinterest place pins
TRANSCRIPT

Copyright Easy Assist Media 2014
How-to Series: Pinterest Place PinsBy Mieke HartkampEasy Assist Media
Copyright Easy Assist Media 2014
How to create a Pinterest Place Board
11/01/2014
Copyright Easy Assist Media 2014
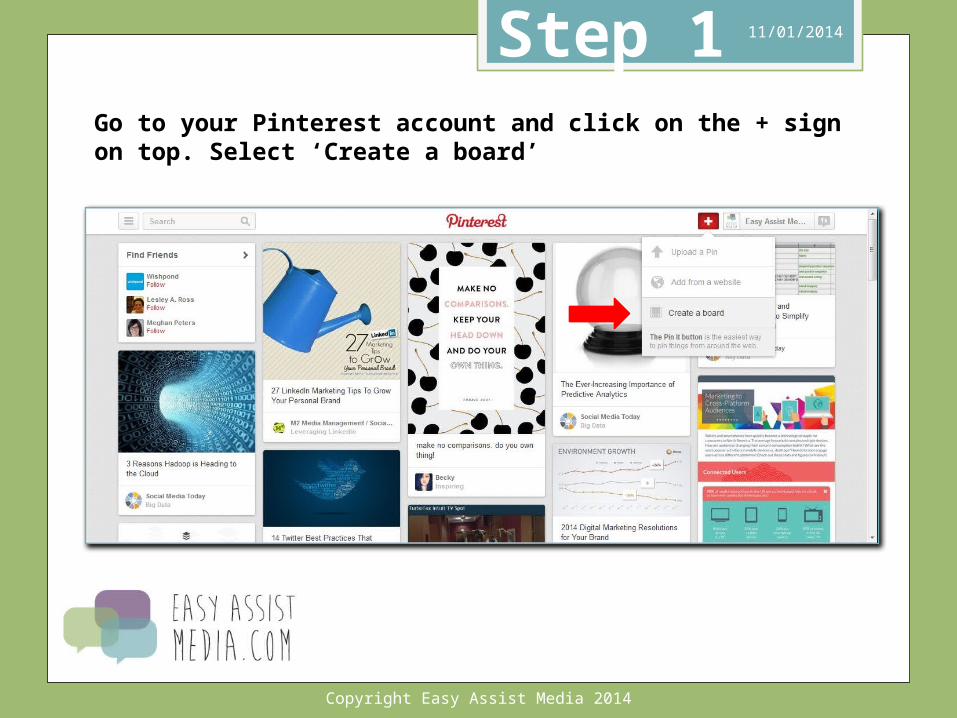
Go to your Pinterest account and click on the + sign on top. Select ‘Create a board’
Step 1 11/01/2014

Copyright Easy Assist Media 2014
Add a title, description (with relevant hashtags) and category. In the ‘Add a map?’ section, click the slider to select ‘yes’.
Step 2 11/01/2014
If you want, you can create a secret board first, so you can add pins and make the board look good before you make it visible to anyone.
When you’re done, click on ‘Create Board’.

Copyright Easy Assist Media 2014
Welcome to your new (but bare) Place Board! You’ll see a couple of pop up screens with more information on how to build your Place Board.
Step 3 11/01/2014
Copyright Easy Assist Media 2014
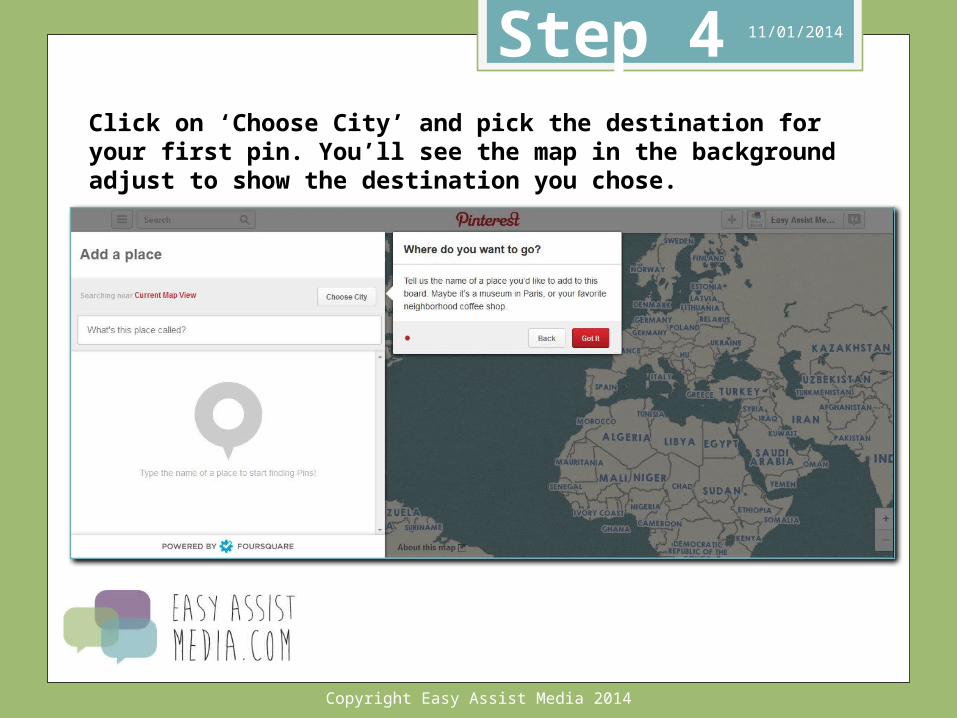
Click on ‘Choose City’ and pick the destination for your first pin. You’ll see the map in the background adjust to show the destination you chose.
Step 4 11/01/2014

Copyright Easy Assist Media 2014
Start typing the name of the place you want to add a pin of and find the correct one from the places that pop up. Click on ‘Map it’.
Step 5 11/01/2014

Copyright Easy Assist Media 2014
Write a short description (don’t forget the hashtags!). Then, upload your own photo or pin one of the other suggested pictures.
Step 6 11/01/2014
Copyright Easy Assist Media 2014
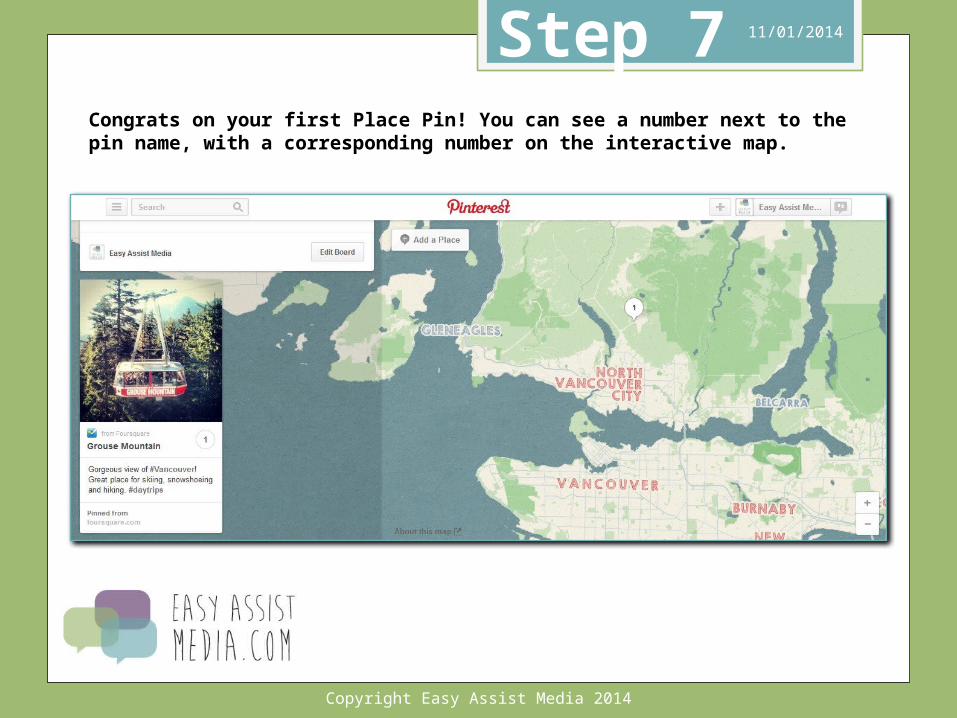
Congrats on your first Place Pin! You can see a number next to the pin name, with a corresponding number on the interactive map.
Step 7 11/01/2014

Copyright Easy Assist Media 2014
When you click on the number on the map, it will show you the pin, address and contact information, and a link to the place’s own website (if available).
Step 8 11/01/2014

Copyright Easy Assist Media 2014
How to add a pin from a website to your
existing Place Board
11/01/2014

Copyright Easy Assist Media 2014
When you find a cool picture on a website that you want to add to your Place Board, just use the Pin It button as usual (Click here to add it to your browser). Choose your board and add or edit the description with relevant hashtags and click ‘Pin It’.
Step 1 11/01/2014

Copyright Easy Assist Media 2014
When you pin a Place Pin, it won’t automatically link it to your map. So when you’re done pinning new pictures to your board, make sure to go back to your Place Board and add the location for these pins.
You can see the pins that haven’t been mapped yet have a + sign instead of a number. To map the pin, click on the +, type the name of the place and click ‘Map it’. The + sign will change to a number and show up on the map.
Step 2 11/01/2014

Copyright Easy Assist Media 2014
Did you know you can change regular pin boards to Place Boards, and the other way around? Just go to Edit Board and click on the ‘Add a map?’ slider.
11/01/2014
Place Board
Regular Board

Copyright Easy Assist Media 2014
Here are 10 ideas for boards you can create using Place Pins:
1. Must-see places in Europe2. Itinerary showcase3. Best hotels in New York4. Family friendly attractions5. Destination photo albums6. Travelers' pics7. Best beaches8. Ideas for a weekend in Paris9. Unique wedding venues10. Festivals around the world
Check out some great examples of how other travel brands are using these new Pins here.
11/01/2014

Copyright Easy Assist Media 2014
Thanks for watching this How-to Series slideshow!
If the information was helpful, please share it with your colleagues and friends.
11/01/2014
Would you like to receive FREE social media tips in your inbox?
Sign up for my weekly email at www.easyassistmedia.com/freetips