how to setup captive portal on apc500? introduction -...
TRANSCRIPT

How to Setup Captive Portal on APC500?
Introduction
APC500 supports user name and password authentication with guest network for Edimax Pro AP series.
While users try to connect to the guest network, they will be requested a user name and password. If the
user name and password are correct, then they will be able to access the internet.
In this document, we will show you below subjects.
1. Add Guest User and Manger Account
2. Configure Guest Portal
3. Add guest SSID and deploy the settings
4. Create account using front desk account
Add Guest User and Manager Account
1. Connect laptop to the same network as APC500 using cable.
2. Open web browser, type the IP address of APC500 on the address bar, and press enter.
3. The default user name and password is admin / 1234.
4. After login web panel, click NMS Settings >> Users, and click Add at Users.

5. Please enter the user name and password, and click Apply.
6. We create 3 users for the demonstration.
7. Click Add at User Group.

8. Please configure as below, and click Apply.
a. Name: Please enter group name here.
b. Role Type:
Guest Portal user: While user connects to guest network, it will prompt the custom guest portal
page. After enter user name and password of guest portal user, then user will able
to have the internet access.
Front Desk Manager: Front Desk Manger is allowed to login front desk panel. It provides another way
to quickly create / manage user account, generate and print tickets.
c. Members: Please select the member of this user group.
9. We create 3 users group for the demonstration.

Configure Guest Portal
1. Click Guest Portal, and click Add.
2. Please configure as below, and click Apply.
a. Name: Please enter the name of guest portal.
b. Guest Portal Type: Please configure Guest Portal Type as Dynamic Users.
c. Front Desk User Group: Please select a Front Desk User Group. Only users of this group are able to
login the front desktop panel to create user account and password.
d. Front Desktop Generation URL: This is URL of front desk login panel. Please mark down, and we will
need it later.
e. Authentication User Group: Please select a user group. Users of this group are able to login guest
portal and have the internet access.

Create Guest Network
1. Click Guest Network, and click Add.
2. Please configure as below.
a. Name/ESSID: Please enter guest network name.
b. Authentication Method: Please configure as WPA-PSK.
c. Pre-Shared Key: Please enter wireless security.
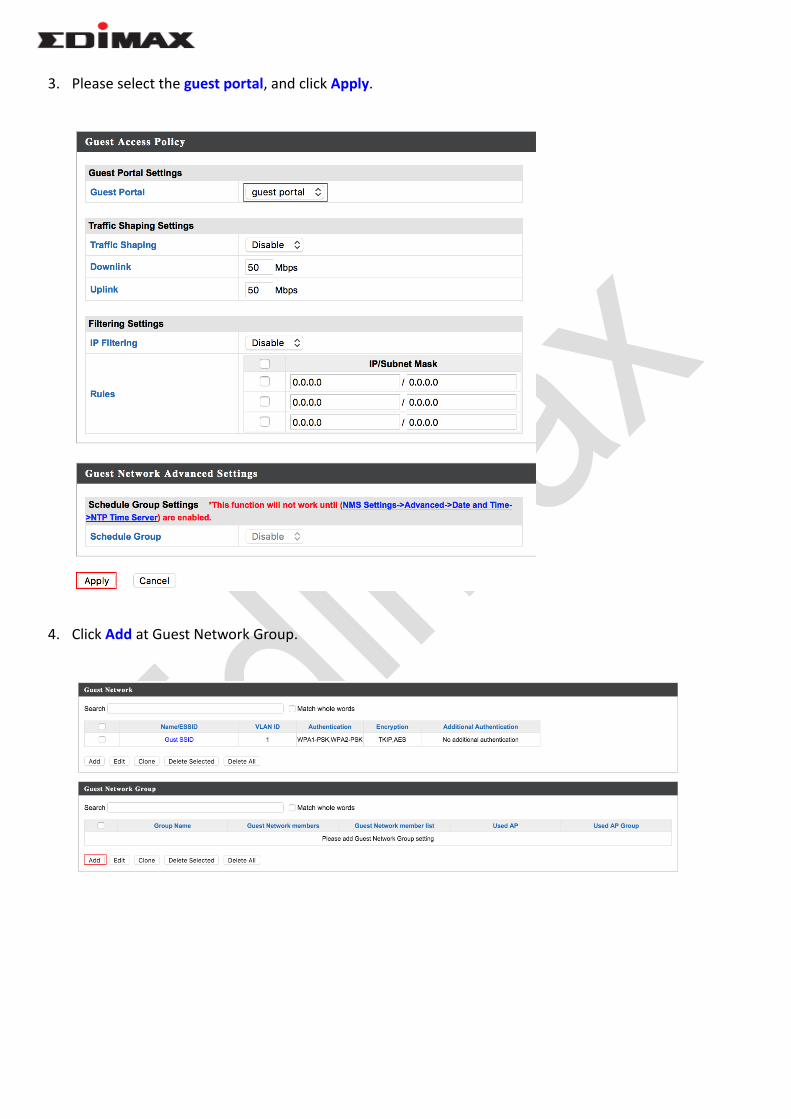
3. Please select the guest portal, and click Apply.
4. Click Add at Guest Network Group.

5. Please enter the name of guest group, select the SSID, and click Apply.
Deploy Configuration to Managed AP
1. Click Access Point, select Managed AP, and click Edit.

2. Check Guest Network Group, select Guest, and click Apply.
Create User account using front desk
In Add Guest User and Manager Account, we have introduced how to create guest portal user account.
Here is another way to create guest portal account. You could type a specific IP address, enter front desk
account to login front desk, and create guest portal account.
1. Type URL on the address bar, enter front desk account and password, and click Login.

2. Select the SSID. There is default Name and Password. User can modify it if necessary.
Click Next.
3. The new account can be generated here, it’s able to be login on the page of guest portal, and has the
internet access.
Front desk manager can easy to click the icon to print out the ticket, including of user name and
password for the guest portal.