how to smart home
TRANSCRIPT


How To Smart Home A Step by Step Guide to Your Personal Internet of Things
A Key Concept Book by Othmar Kyas
4th Edition

How To Smart Home Published by Key Concept Press www.keyconceptpress.com ISBN 978-3-944980-11-9 Fourth Edition July 2016
All rights reserved. No part of this book may be reproduced or transmitted in any form or by any means, electronic or mechanical, including photocopying, recording, or by any information storage and retrieval system, without permission in writing from the publisher. Copyright © 2016 by KEY CONCEPT PRESS

Disclaimer Every effort has been made to make this book as accurate as possible. However, there may be typographical and or content errors. Therefore, this book should serve only as a general guide and not as the ultimate source of subject information. This book contains information that might be dated and is intended only to educate and entertain. The author and publisher shall have no liability or responsibility to any person or entity regarding any loss or damage incurred, or alleged to have incurred, directly or indirectly, by the information contained in this book. References to websites in the book are provided for informational purposes only and do not constitute endorsement of any products or services provided by these websites. Further the provided links are subject to change, expire, or be redirected without any notice.

Bonus Material for Download Bonus material for this book can be downloaded from the book website on http://www.keyconceptpress.com/how-to-smart-home

Notification on Updates and New Releases If you want to be notified when an update to this book or a new release from Key Concept Press becomes available sign up here. Our mailing list is exclusively used to keep you and others informed about Key Concept Press. We do not share or sell your information to any third parties http://www.keyconceptpress.com/newsletter.html.

About the Author Othmar Kyas is an internationally renowned expert in communication technology and strategic marketing. He is author of fourteen books, which have been translated into five languages.

Table of Content Disclaimer
Bonus Material for Download
Notification on Updates and New Releases
About the Author
Table of Content
1 Read Me 1.1 Who is this Book for?
1.2 What You Will NOT Find
1.3 Take no Risks
1.4 Formatting Rules
2 The Big Picture 2.1 Smart Buildings and the Internet of Things (IoT)
2.2 The Potential for Energy Conservation
2.3 Safety Management and Assistive Domotics
2.4 Changing the World (a bit) to the Better
2.5 Bibliography
3 Key Concepts 3.1 Devices under Control
3.2 Sensors and Actuators
3.3 Control Networks
3.3.1 Power Line Communication
3.3.2 Wireless Communication
3.3.3 Wire Line Building Automation
3.3.4 Control Networks: Summary
3.4 Controller
3.5 Remote Control Devices
3.6 Market Trends
3.7. Smart Homes for the Masses: Google, Apple, Samsung and more …
3.8 A Future Proof Smart Home Architecture
3.9 Where do we go from here?
3.10 Bibliography
4 The Project 4.1 Overview
4.2 Equipment and Prerequisites
5 The Home Control Centre: Open Remote 5.1 OpenRemote Overview
5.2 OpenRemote Controller Installation
5.3 Java Installation and Configuration under Mac OS X
5.4 Java Installation and Configuration under Windows
5.5 First Synchronization between Designer and Controller[…]”
5.6 OpenRemote Professional Designer
5.7 The “Hello World” App
6 A Pretty Smart Sensor: Internet Weather 6.1 OpenRemote Control via HTTP: Retrieving Internet Weather Data
6.2 Designing the App Layout
6.3 Bibliography
7 Integration of Multimedia: iTunes Remote 7.1 Scripting Basics: Shell what?
7.2 Testing it Right - Best Practice for Script Writing
7.3 Script Based iTunes Control in OS X
7.4 Script Based MediaPlayer Control (Windows 10)
7.5 Script Based iTunes Control (Windows 10)
7.6 Smartphone Remote for iTunes
7.7 Talk to Me
8 A Little AI: Drools Rules 8.1 Wake me up Early if it Rains: iAlarm
8.2 Maintaining State Information
9 More iDevices 9.1 Denon / Marantz Audio System Control
9.2 Device Control Using Z-Wave ”

9.3 Bibliography
10 Smartphone Based Presence Detection 10.1 Building a DHCP – MAC Address Monitor Function
10.2 Creating a Shell Script for Presence Detection
10.3 The Presence Detection Script under OS X / Linux
10.4 The Presence Detection Script under Windows 7/8 and 10
10.5 Controlling Presence Detection via Smartphone
11 Industry Grade Home Infrastructure Control: KNX 11.1 What is KNX?
11.2 How does KNX Work?
11.3 The KNX Software Infrastructure: ETS
11.4 Which Operating Systems does ETS Support?
11.5 ETS on a Mac
11.6 Other KNX.org Software Tools
11.7 ETS5 Installation
11.8 Importing Vendor Catalogs
11.9 ETS5 Infrastructure Configuration
11.10 ETS5: Adding the Building Infrastructure
11.11 ETS5: Configuring the KNX Elements
11.12 ETS5: Connecting Infrastructure to Controls
11.13 Notes on Configuring KNX Devices
12 KNX Control via OpenRemote Designer 12.1 Background Pictures for the Smartphone and Tablet App
12.2 Configuring KNX Based Heating Mode Control
12.3 Smartphone Based Heating Control
12.4 Drools Based Heating Automation
13 Remote Smarthome Control 14 Cold Start: Launch Automation
14.1 Windows 10 Task Scheduler
14.2 OS X launchd

15 Troubleshooting and Testing 16 We proudly Present: Reporting 16.1 A Drools Reporting Rule
17 Bibliography

1 Read Me 15 .....................................................................................1.1 Who is this Book for? 15 .................................................................................................1.2 What You Will NOT Find 16 .........................................................................................1.3 Take no Risks 16 .............................................................................................................1.4 Formatting Rules 16 ......................................................................................................
2 The Big Picture 17 ...........................................................................2.1 Smart Buildings and the Internet of Things (IoT) 17 ....................................................2.2 The Potential for Energy Conservation 18 ....................................................................2.3 Safety Management and Assistive Domotics 23 ..........................................................2.4 Changing the World (a bit) to the Better 23 .................................................................2.5 Bibliography 24 ..............................................................................................................
3 Key Concepts 25 .............................................................................3.1 Devices under Control 25 ..............................................................................................3.2 Sensors and Actuators 25 .............................................................................................3.3 Control Networks 25 .....................................................................................................3.3.1 Power Line Communication 25 .................................................................................3.3.2 Wireless Communication 26 .....................................................................................3.3.3 Wire Line Building Automation 27 ...........................................................................3.3.4 Control Networks: Summary 28 ...............................................................................3.4 Controller 28 .................................................................................................................3.5 Remote Control Devices 29 ..........................................................................................3.6 Market Trends 29 .........................................................................................................3.7. Smart Homes for the Masses: Google, Apple, Samsung and more … 29 ....................3.8 A Future Proof Smart Home Architecture 31 ...............................................................3.9 Where do we go from here? 33 ......................................................................................3.10 Bibliography 35 ............................................................................................................
4 The Project 36 .................................................................................4.1 Overview 36 ....................................................................................................................4.2 Equipment and Prerequisites 42 ..................................................................................
5 The Home Control Centre: Open Remote 43 ..................................5.1 OpenRemote Overview 43 ............................................................................................5.2 OpenRemote Controller Installation 45 ........................................................................5.3 Java Installation and Configuration under Mac OS X 47 .............................................5.4 Java Installation and Configuration under Windows 52 ..............................................5.5 First Synchronization between Designer and Controller 52 .........................................

5.6 OpenRemote Professional Designer 54 ........................................................................5.7 The “Hello World” App 55............................................................................................

1 Read Me 1.1 Who is this Book for? This book shows how to take smart home automation to the next level. It is based on using state of the art Internet of Things (IoT) technologies such as tablets, smartphones, sensor equipped devices and the Internet in conjunction with the latest wireline and wireless building automation standards. Expecting no specific know-how upfront, it is suited for both the technology loving hobbyist as well as the professional consultant. Technologies and platforms which are used in the projects described in the book are:
• Wi-Fi / WLAN
• Telnet, HTTP, TCP/IP
• Z-Wave, a smart home communication standard
• ZigBee, a smart home communication standard
• KNX, a smart home communication standard
• Drools, an open source object oriented rule engine
• OpenRemote, an open source Internet of Things software platform
• Mac OS X / Linux / Windows
Parts of the projects integrate consumer electronics devices, such as audio equipment from Denon and Marantz. However, projects and instructions are designed so that that they can easily be adapted to other manufacturers. Be aware, however, that equipment which is more than four or five years old probably will lack the required interfaces for smart home integration at the level which is being covered in this book, such as built in WLAN, Bluetooth, web server components, or "Wake-on-LAN" functionality.
After explaining the big picture and the key concepts of state of the art smart home automation, the book will walk you in a step-by-step manner through the implementation of several essential home automation and control projects. At the end of each project phase you should have a real, working solution on your desk, which can be further customized and expanded as desired. No programming skills are required as prerequisite. Scripts are explained line by line, configuration settings step by step. Of course, if you have never written a short automation script or configured a DSL router, at some point your learning curve will be steeper than that of others. However, everything you learn will be based on open standard technologies, which you will be able to utilize in many other IT related projects.
1.2 What You Will NOT Find This book is not about legacy technology based home automation such as routing infrared signals around the house and controlling light switches and power outlets using outdated technologies like X10. It is also not a cookbook for plug and play type of home automation solution, which various vendors and utilities are offering based on closed and proprietary solutions with limited functionality. While popular solutions like Apple HomeKit, Google Nest or Samsung SmartThing are being discussed, they are not the focus of this book. At this point their capabilities to integrate existing building infrastructure and to build a customized smart home solution are still very limited.
1.3 Take no Risks Be careful when following the step-by-step instructions. No two PC systems, consumer electronic devices, or other electronic gear are alike. If something goes wrong, you might need to reinstall the operating systems on your PC and you could lose all your data. So set up a dedicated user for testing or experimentation or even better use a spare computer system, unless you are absolutely sure what you are doing. I cannot take any liability for any undesired outcome of the given instructions.
1.4 Formatting Rules For better readability, the following formatting rules are used throughout the book:
• Monospace Computer output, code, commands
• LARGE CAPS Communication Protocols (DHCP, IP, etc.)
• Italic – medium blue sequence of GUI commands separated by en dash (–)
• Medium blue underlined Web address (URL)
For the projects in this book I have created the user account smarthome under OS X and Windows. The prompts in terminal window screenshots as well as in terminal print-outs read accordingly.

2 The Big Picture Home automation, at the intersection of rapidly developing technologies such as Internet, mobile communication, and renewable energies, has changed considerably over the course of the past years. The developments relate to all major aspects of a smart home, such as
• the capabilities of home infrastructure and controlled device
• the usability of mobile and stationary user interfaces
• the motivation for investing in automation and control technologies
Up to recently, home automation was mainly focused on installing controllable power-outlets or light switches and wiring infrared (IR) controls around the house. Technologies developed in the early seventies of the past century, which from today’s perspective are slow, unreliable, and insecure, were at the heart of building control.
The rapid developments in mobile communications have introduced a technological leap forward in home automation since. Wireless networks (3G, LTE, Wi-Fi, LoRa) and smart devices, with wireless communication interfaces (Bluetooth, ZigBee, Wi-Fi), are omnipresent, and allow the user to take home control and building automation to the next level. Instead of simply switching power outlets on and off, specific and meaningful functions of consumer electronics, household devices, or infrastructure components can be stirred. As a result, instead of rudimentary functionality, home automation today can deliver capabilities that have a real impact on comfort, security, and energy conservation of residential and industrial buildings.
Of similar significance as the new possibilities of home automation have been its advances in the user interface. The smartphone and tablet revolution has finally brought the personal, universal remote control device to the home. Proprietary, stationary panels and control devices are phasing out, being replaced by apps, which are easy to operate, to maintain, and to upgrade. With smart phone voice assistants becoming ready for usage by the masses, Star Trek style, reliable voice control for smart homes has finally arrived.
2.1 Smart Buildings and the Internet of Things (IoT) With improved usability and new capabilities, the motivations for installing smart home technologies have become broader as well. The vision of green buildings, capable of significantly reducing energy and water consumption, is finally becoming real. Other use cases are safety management, home automation for the elderly and disabled (assistive domotics) and remote building control. Beyond providing powerful point solutions, smart buildings in addition have become a central component of larger Internet of Things concepts such as smart cities, smart industry and smart grids.

2.2 The Potential for Energy Conservation Looking at the distribution of total energy consumption, the share of the private sector is significant. In the 28 European Union countries (EU-28), in 2014, 25% of the total energy was consumed by the residential sector, in the US 22%. (Figures 2.1 and 2.2). Thus, energy conservation in homes does move the needle even from a global perspective. And the savings potential for all energy forms used in the private sector is large. Space heating and cooling takes the largest share with between 50% and 70% of the total residential energy usage. Water heating takes second place, followed by electric appliances and lighting.
In US households over the past 20 years the share of energy used for space heating has steadily declined, while the share for space cooling has increased. Main factors for this trend are increased adoption of more efficient equipment, better insulation, more efficient windows, and population shifts to warmer climates. (Figures 2.3 and 2.4).
!
Figure 2.1 2014 EU-28 energy consumption per sector
Services13 %
Agriculture2 %
Residential25 %
Transport33 %
Industry26 %

!
Figure 2.2 2014 US energy consumption per sector.
!
Figure 2.3 2014 Residential end-use energy split EU-27
Services18 %
Residential22 %
Transport28 %
Industry32 %
Lighting2 %
Cooking 6 %
Electrical Appliances11 %
Water Heating13 %
Space Heating68 %

!
Figure 2.4 2014 Residential end-use energy split US
Still the potential for energy conservation in the industrialized world is enormous. There are four main approaches for reducing residential energy consumption, all of which should be noted:
• building insulation
• usage of state of the art appliances
• installation of efficient water heating and space heating systems
• installation of smart building automation and control
With the advances in home automation as described above, the last one in the list, building automation, has become an increasingly attractive choice, providing the opportunity for significant savings with relatively low upfront investment. Smart appliances coordinate their operation with smart meters (home gateways), reducing overall energy consumption and avoiding load peaks. Monitoring current and past power consumption and identifying load profiles provide the basis for intelligent power management with capabilities such as:
• Intelligent heating control by automatically managing room temperature based on time, outside temperature, and presence
• Smart lighting system, managing illumination based on presence detection, sunrise, or sunset timing and room function
Lighting7 %
Cooking3 %
Electrical Appliances20 %
Water Heating12 %
Space Cooling9 %
Space Heating49 %

• Intelligent, proactive blinds, keeping the interior of the building cool or warm
• Monitoring and management of electricity consumption
• Reducing water consumption through sensor faucets and intelligent plant watering management
2.2.1 Calculating Actual Building Automation Energy Savings Studies report electricity savings of up to 30% using automated lighting as well as heating energy savings of 15%-20% using automated heating in residential buildings. But how much is it that you can really conserve by implementing a smart home? Answering this question was the task of a major standardization effort in Europe, which has come up with a comprehensive specification on how to measure and calculate building automation based energy savings: The European standard EN15232:“Energy performance of buildings - Impact of Building Automation, Control and Building Management”. For the first time, EN15232 specifies standardized methods to assess the impact of Building Automation and Control Systems (BACS) on the energy performance of these different building types:
offices
lecture halls
education
hospitals
hotels
restaurants
wholesale & retail
residential
The performance of building automation is categorized in four classes (A-D), A representing the highest performance building automation, D the lowest.
For each building type and each BACS Class, so called BACS Factors are given, with which the thermal and electrical energy savings can be calculated. Table 2.2 shows the description of the four BACS classes and the BACS factors for the different building types. Table 2.1 displays the percentage of thermal savings by installing building automation of efficiency classes A and B in reference to the standard class C.

Table 2.1 Thermal and electrical savings for various building types using BACS classifications
Table 2.2 BACS class definition
2.2.2 Smart Grids need Smart Buildings Smart homes also allow for integration with smart power grids, which are in build out around the world, driven by renewable energy generation on the rise. Smart meters and smart gateways can only work, if a home control and automation infrastructure is in place. This infrastructure then can interact with the supply and demand driven electricity cost in smart power grids. Wind and sun based renewable energy generation introduces significant energy level fluctuations in the utilities’ power grids. Thus, for example, it can make sense to cool down the freezer two or three degrees below normal operation during times of high wind, so it can stay off longer in times of the day with lower energy supply.
By being able to continuously monitor energy levels and prices in a smart power grid, and by scheduling (delay or early start) high energy processes such as
• heating up the hot water tank
Thermal Energy Electrical Energy
BACS Class D C B A D C B A
Offices 1,51 1,00 0,80 0,70 1,10 1,00 0,93 0,87
Lecture hall 1,24 1,00 0,75 0,50 1,06 1,00 0,94 0,89
Education 1,20 1,00 0,88 0,80 1,07 1,00 0,93 0,86
Hospitals 1,31 1,00 0,91 0,86 1,05 1,00 0,98 0,96
Hotels 1,31 1,00 0,85 0,68 1,07 1,00 0,95 0,90
Restaurants 1,23 1,00 0,77 0,68 1,04 1,00 0,96 0,92
Wholesale&Retail 1,56 1,00 0,73 0,60 1,08 1,00 0,95 0,91
Residential 1,10 1,00 0,88 0,81 1,08 1,00 0,93 0,92
Class A High performance BACS Networked room automation with automatic demand control Scheduled maintenance Energy monitoring Sustainable energy optimization
Class B Advanced BACS Networked room automation without automatic demand control Energy monitoring
Class C Corresponds to standard BACS Networked building automation of primary plants No electronic room automation,thermostatic valves for radiators No energy monitoring
Class D Non energy efficient BACS Without networked building automation functions No electronic room automation No energy monitoring

• operating the dish washer and washing machine
• cooling the freezer and refrigerator
smart meters can contribute significant energy savings without impacting the comfort level of residents.
2.3 Safety Management and Assistive Domotics Another application for state of the art home automation is remote building control and safety management with features such as
• controlling the vacant home (temperature, energy, gas, water, smoke, wind)
• feeding and watching pets
• watering plants indoors and outdoors
• presence simulation to keep out intruders
• assistive living systems (assistive domotics), allowing elderly and handicapped people to stay home safe through reminder systems, medication dispensing, blood pressure and pulse monitoring as well as emergency notification
2.4 Changing the World (a bit) to the Better Home automation standardization based on open Internet technologies, omnipresent smartphones and sensor equipped devices have been the catalyst for manufacturers to start integrating control functionality in their products as a default. The broad wave of Internet of Things technologies has embraced smart homes and smart buildings, making it an integral part of its concepts. This has further accelerated the acceptance and deployment of smart home technologies, which have arrived in the mainstream. So (finally) everything is there, that is needed for a truly intelligent home. Following the instructions in this book, you will be able to test this claim by translating the described concepts into real world solutions for your home.
Smart home technologies have come a long way. Technological advances, climate change and demographic transitions have redefined what they are and why they are being deployed. Rather than being a futuristic niche for geeks and luxury home owners, smart homes have become an integral part of the life of millions. Capable of helping to solve pressing problems such as global warming or demographic transitions, they are changing the world (a bit) to the better.

2.5 Bibliography US Department of Energy. (2016): Total Energy Interactive Table Browser. www.eia.gov/beta/MER/index.cfm?tbl=T02.01#/?f=A&start=2013&end=2014&charted=3-6-9-12
Eurostat European Commission (2016): Final energy consumption, by sector. ec.europa.eu/eurostat/data/database?node_code=tsdpc320
Enerdata. (2015) Energy Efficiency Trends in Residential in the EU. www.odyssee-mure.eu/publications/efficiency-by-sector/household/
US Department of Energy. (2016) Annual Energy Outlook 2015. https://www.eia.gov/beta/aeo/#/?id=4-AEO2015&cases=ref2015&sourcekey=0
Baggini, Angelo and Lyn Meany. (2012) Application Note Building Automation and Energy Efficiency: The EN 15232 Standard. http://www.leonardo-energy.org/sites/leonardo-energy/files/Cu0163_AN_Building%20automation_v1_bis.pdf
3 Key Concepts From a technical perspective, home automation consists of five building blocks:
• devices under control (DUC)
• sensors and actuators
• the control network
• the controller
• remote control devices.
3.1 Devices under Control Devices under control are all components, such as home appliances, consumer electronics, lighting, or window blinds, which are connected to and controlled by the home automation system. An increasing number of things come with this functionality built in through integrated web-servers, WLAN-, Bluetooth- or Z-Wave-interfaces. Components without such built in control capabilities can often be equipped with adapters in order to integrate them with the smart home infrastructure.
3.2 Sensors and Actuators Sensors are the eyes and ears of the home network. There are sensors for a wide range of applications such as measuring temperature, humidity, light, liquid, gas, detecting movement or noise.
Actuators are the hands of the home network. They are the means of how the smart network can actually do things in the real world. Depending on the type of interaction required, there are mechanical actuators such as pumps and electrical motors or electronic actuators such as electric switches and dimmers.
3.3 Control Networks The control network provides the connectivity between devices under control, sensors, and actuators on the one hand and the controller along with remote control devices on the other hand. There are three technology options for home and building automation control networks:
• powerline communication
• wireless communication
• wireline communication
3.3.1 Power Line Communication The power line communication principle uses existing electric power lines in buildings to transmit carrier wave signals in the frequency range of 20 kHz to 100 MHz. The long dominant, decades

old, low speed power line standard X.10, while still widely installed, has been finally replaced by HomePlug, which became the IEEE 1901 standard in 2010. AV2, the latest version of HomePlug, is able to achieve transmission speeds of up to 500 MBit/s. The main advantage of power line communication is the low price for its components and that fact, that no additional wiring is required. The downside is that power line distribution units can significantly impact transmission speeds. In some cases the design of the electric wiring can even prohibit the coverage of parts of the electric power line infrastructure in a building.
3.3.2 Wireless Communication Today, there are a large number of wireless communication technologies available for building and home automation. Transmission speeds and distance depend on transmission frequency and modulation of the very technology and range from 20 kBit/s to 250 kBit/s and 60 ft (20 m) to 3000 ft (1000 m) respectively. Other important considerations are power consumption and location accuracy. Technological advances have significantly improved all performance aspects of wireless transmission technologies over the past 10 years. The main drivers for wireless technologies gaining popularity in home automation are:
• proprietary home automation systems migrating towards Internet technologies
• the main building automation systems becoming open, international standards
• new standards releases increasing throughput and reducing power consumption
• cost and size of components coming down
• integration with wireline based building automation standards through gateways
While wireless building control for years has been plan B for lower end, post-construction projects, the adoption of new, reliable low power technologies has changed the industry. Today, Z-Wave, ZigBee, BLE (Bluetooth low energy), and RFID interfaces are available fully integrated in controllable power-outlets, light switches, and household appliances. Many audio and video consumer electronic devices come with WLAN (Wi-Fi), ready to stream content from the Internet, and ready to be fully controlled via smartphones. In 2016 the Wi-Fi Alliance announced 802.11ah (HaLow), a new standard optimized for Home Automation and Internet of Things (IoT) applications. It features a number of benefits compared to current Wi-Fi technologies. Using the 900 MHz band (other than conventional Wi-Fi networks operating in the 2.4 GHz and 5 GHz bands) it allows wireless signals to reach almost twice as far as current Wi-Fi radios while using less power to broadcast. This will impact not just Wi-Fi routers, which will become far more efficient at killing dead spots, but also mobile phones and IoT devices that will be able to communicate over greater distances while conserving battery life.
A new generation of energy harvesting technology based devices such as EnOcean are even capable of operating wireless control links exclusively with energy retrieved from the environment through temperature changes, light changes or the mechanical energy when pressing a switch. Table 3.1 lists the main open standards used for wireless building automation today.

Table 3.1 Wireless building automation standards
* LR-WPAN (Low Rate Wireless Personal Area Networks)
** Strongly depends on topology, frequency and distortion of the sensor
3.3.3 Wire Line Building Automation The main open standards for wire line based building automation are KNX, G.hn, LON and HomePNA. KNX is a European (EN50090, 2003) and international (ISO/IEC 14543-3, 2006) standard for home and building automation. The abbreviation KNX stands for Konnex, and replaces the older European standards EIB (European Installation Bus), Batibus (primarily used in France), and EHS (European Home Systems). Today in Europe, more than 75% of industrial building automation solutions as well as upscale residential smart homes are realized using KNX.
First Released
Range (indoor/outdoor)
Speed Frequency Modulation Standard Location Accuracy
Z-Wave 1999 30m 250 kBit/s 908.42 MHz
GFSK IEEE 802.15.4*
10 m **
ZigBee 668/669 30m - 500m 250 kBit/s 2.4 GHz, 915 MHz (US), 868 MHz (EU)
QPSK ITU-G.9959
10 m**
Wireless Hart
2004 50m / 250m 250 kBit/s 2.4 GHz DSSS, Q-PSK
IEEE 802.15.4*, IEC 62591
10 m**
MiWi 2003 20m / 50m 20 kBit/s, 40 kBit/s, 250 kBit/s
868 MHz, 915 MHz, 2.4 GHz
O-QPSK IEEE 802.15.4*
10 m**
EnOcean 2001 30m - 300m 125 kBit/s 902 MHz (US), 868 MHz (EU), 315 MHz (Int.)
ASK ISO/IEC 14543-3-10
N/A
DASH7 (active RFID)
2004 1000m 200 kBi/s 433 MHz GFSK ISO/IEC 18000-7
1 m
THREAD 2015 30-500m 250 kBit/s 2.4 GHz QPSK IEEE 802.15.4 *
10 m **
HAP 2014 10m 1 MBit/s 2.4 GHz GFSK BLE 1 m
HaLow 2016 up to 1000m 100 kBit/s - 8 MBit/s
900 MHz BPSK, QPSK, QAM
IEEE 802.11ah
N/A

Over the past years, KNX has started to be adopted in many regions of the world outside of Europe as well.
LON (Local Operating Network), originally introduced in 1990 by Echolon Corporation and an ISO/IEC 14908 standard since 2008, is the building automation solution of choice for large scale automation projects such as airports, stadiums, or street lightning. Contrary to the hierarchical KNX architecture, it uses a decentralized approach. In large installations, local information can be processed locally, without being sent to a central control node. This allows for the scalability and redundancy needed in public installations with high availability requirements.
Another wireline transmission standard for the networked home, which has been primarily deployed in North America, is HomePNA. Specified by the Home Phoneline Networking Alliance its first release was published in 1990. For almost twenty years it was mainly used to transmit IPTV services over telephone wires, since 2006 also over coaxial cables. In an effort to put an end to the multitude of non-interoperable home networking technologies, the ITU-T working group G developed a single transmission standard for home networks, which can be used over any type of wire (telephone, coax, power line and fiber): G.hn (hn - home network). The initial release of G.hn was published in 2010. The industry alliance behind the standard is the HomeGrid Forum (HGF). In 2013 the Home Phoneline Networking Alliance merged with the Home Grid Forum. G.hn provides data transmission rates of between 250 MBit/s and 2 Gbit/s, depending on the physical medium.
3.3.4 Control Networks: Summary All three control network technology categories– power line, wireless, and wire line - have significantly improved in transmission speed, reliability and interoperability through standardization efforts over the past ten years. In general, control networks based on power line communication and wireless transmission are dominant in residential home automation due to lower component prices and installation cost. Wire line based control networks, on the other hand, are found in the premium residential segment and in control applications for industrial buildings. Wireless technologies are used for partial or point solutions involving components which are not mission critical for building operation.
3.4 Controller The controller is the computer system which acts as the brain of the building automation system. It collects information through sensors and receives commands through remote control devices. It acts based on commands or a set of predefined rules using actuators or means of communication such as loud speaker, email, or telephone. For residential home automation, the controller typically is an always-on standalone or embedded Linux / Windows / OS-X computer, running the control application for the house. Higher end residential and industrial buildings use dedicated high availability, redundant controller systems with uninterruptible power supplies (UPS). In the consumer segment for residential homes some vendors also offer controllers in form of cloud applications, which connect to the building through the Internet.

3.5 Remote Control Devices One of the main reasons for the increased acceptance of home automation systems in the residential segment is, that with the omnipresence of smart phones and tablets, the need for dedicated automation control devices has vanished. Within a few years, literally all home automation systems on the market have introduced smartphone and tablet based control applications. In addition, advances in voice recognition have finally brought voice based control to smart homes as well. The remote control devices act by connecting to the home automation application, which reside on the home controller. They do this by either connecting to the controller through the building control network itself, or through any other interface the controller provides, such as WLAN, the Internet, or the telephone network. As a side affect of using smartphones as remote control, building control from outside of the house via the mobile telephony network or the public Internet comes as a standard feature set.
3.6 Market Trends The traditional differentiation between expensive, proprietary industrial building control systems and residential smart homes automation is blurring. Over the past ten years these two market segments have changed drastically and are increasingly overlapping. Expensive proprietary solutions have become more open standards based and less expensive. Low end solutions for residential customers have become more sophisticated and are using the same technologies as industrial systems. A development similar to what happened when the markets for professional and home PCs blended a few decades ago. While the requirements for reliability, redundancy and robustness of professional building control systems have led to the development of many proprietary standards, now the pace of the digital evolution has caught up with these requirements. In addition, new requirements for smart building control are arriving at speeds, which proprietary standards cannot match anymore. Recent examples are
• integration of smart grid and smart meters
• integration of web/IP enabled home appliances
• integration of web/IP enabled consumer electronics
• integration of Internet based information and services such as supply demand based energy prices or weather, traffic and location information.
3.7. Smart Homes for the Masses: Google, Apple, Samsung and more … While the smart home market has experienced double digit growth rates in recent years, it was the year 2014, by when it truly became mainstream. It was the year when three of the largest consumer product and service companies made bold entries into the smart home market. Apple introduced it’s HomeKit architecture, Samsung spent more than 200 million US$ for home automation startup SmartThings and Google acquired learning thermostat maker Nest Labs for 3.2 billion US$.

3.7.1 Google’s Nest Labs Nest Labs was founded in 2010 by two former Apple engineers with the focus on self learning thermostats. The key innovation of Nest Labs centered around the fact that most people do not program their thermostats because it is too complicated. Nest thermostats automatically create a heating or cooling schedule based on the daily routines of the residents. Initially the residents frequently set the target room temperature by turning the Nest thermostat wheel several times a day. Storing these settings the thermostat is capable of building a temperature schedule. Nest thermostats have to be connected to the Internet to receive software updates. Since part of their functionality requires location information determined by postal zip-codes, international deployment outside of the US has been slow. At the end of 2014 Nest acquired streaming video camera maker Dropcam and has since integrated its products with Dropcam’s surveillance capabilities. Dropcam recordings can now be triggered by Nest smoke detector alarms and Dropcam motion alerts are turned on when Nest thermostats are being set to „away“.
Nest devices communicate using Nest Lab’s Thread protocol (http://www.threadgroup.org), which is based on the 6LoWPAN standard (IPv6 over IEEE 802.15.4 LR-WPAN). With that it uses the same transport protocol as ZigBee and WirelessHART. With that Existing 802.15.4 products could be upgraded to the Thread protocol via software update.
3.7.2 One More Thing … Apple HomeKit With its HomeKit framework Apple has made a strategic move to enter the smart home market. The large installed base of smartphones and tablets with the powerful voice assistant Siri provide the platform for a basic, easy to use, plug and play type smart home solution. The core of Apples HomeKit consists of the three components
• home configuration database
• HAP HomeKit Accessory Protocol
• API for HomeKit Apps
As transport protocol Apple has specified IP (LAN, WiFi) and BLE (Low Energy Bluetooth). Using the HomeKit API third party developers can build iOS applications, which discover HomeKit compliant accessories and add them to the home configuration database, access the database and communicate with configured accessories and services. In addition to iOS applications Apples voice assistant Siri has also access to HomeKit, allowing for voice based smart home control.
Accessories which are not HomeKit compliant can connect to the HomeKit infrastructure through bridging devices (HomeKit Bridges). However this approach is limited to accessories which
• offer no user control
• have no physical access (such as door locks)
• and which use non competing transport layer technologies such as ZigBee or Z-Wave
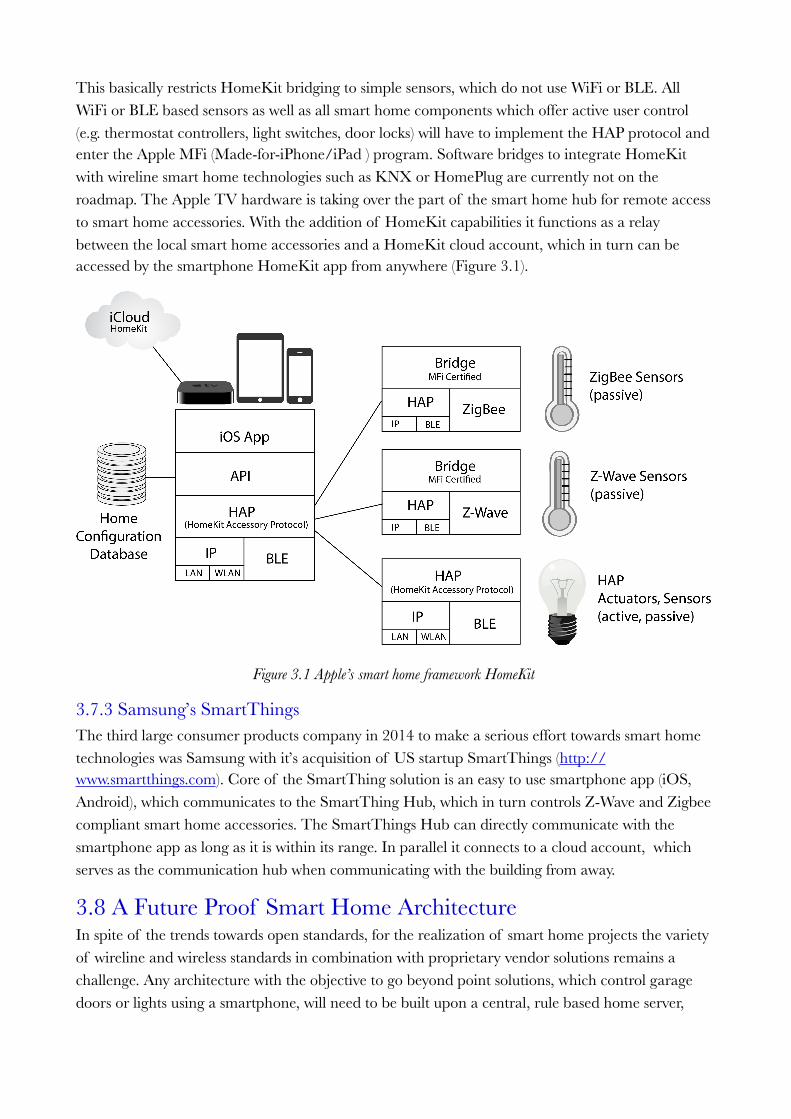
This basically restricts HomeKit bridging to simple sensors, which do not use WiFi or BLE. All WiFi or BLE based sensors as well as all smart home components which offer active user control (e.g. thermostat controllers, light switches, door locks) will have to implement the HAP protocol and enter the Apple MFi (Made-for-iPhone/iPad ) program. Software bridges to integrate HomeKit with wireline smart home technologies such as KNX or HomePlug are currently not on the roadmap. The Apple TV hardware is taking over the part of the smart home hub for remote access to smart home accessories. With the addition of HomeKit capabilities it functions as a relay between the local smart home accessories and a HomeKit cloud account, which in turn can be accessed by the smartphone HomeKit app from anywhere (Figure 3.1).
!
Figure 3.1 Apple’s smart home framework HomeKit
3.7.3 Samsung’s SmartThings The third large consumer products company in 2014 to make a serious effort towards smart home technologies was Samsung with it’s acquisition of US startup SmartThings (http://www.smartthings.com). Core of the SmartThing solution is an easy to use smartphone app (iOS, Android), which communicates to the SmartThing Hub, which in turn controls Z-Wave and Zigbee compliant smart home accessories. The SmartThings Hub can directly communicate with the smartphone app as long as it is within its range. In parallel it connects to a cloud account, which serves as the communication hub when communicating with the building from away.
3.8 A Future Proof Smart Home Architecture In spite of the trends towards open standards, for the realization of smart home projects the variety of wireline and wireless standards in combination with proprietary vendor solutions remains a challenge. Any architecture with the objective to go beyond point solutions, which control garage doors or lights using a smartphone, will need to be built upon a central, rule based home server,

capable of connecting to devices via multiple technologies. In most homes at least part of the control infrastructure will be based on WLAN (WiFi) and wireline technologies for the foreseeable future. Examples are the latest generation of consumer electronic devices such as audio equipment, TV sets and appliances (ovens, refrigerators, dish washers, washing machines) which are all equipped with WLAN interfaces ready to be integrated in smart home infrastructures. The full line of WiFi connected appliances from General Electric (http://www.geappliances.com/connected-home-smart-appliances/), Samsung’s series of SmartTV sets, or the Denon and Marantz music systems are just a few representatives for this market reality. In newly built residential homes as well as in commercial and public buildings for security and reliability reasons wireline technologies will continue to serve as the backbone for the control of key building infrastructure elements such as power outlets, lighting and HVAC (heating, ventilation and air conditioning). The smart home solutions of new market entrants such as Nest, Apple or the many new smart home startups typically provide point solutions for specific needs. They are capable of providing a quick and inexpensive initial step towards home automation with restricted functionality and limited customization capabilities. Most of these solutions can be at least partially integrated in server based scalable multi technology solutions such as OpenRemote. However, their reliance on wireless technology and cloud based control limits their use from a security and reliability perspective. An example is the attenuation of the popular 2.4 GHz frequency band through rain and plants. The 900 MHz band on the other hand suffers from low data rates. And last but not least, any wireless technology is prone to denial of service attacks through signal jammers, which anybody can buy on the Internet for a few dollars.
Equally critical from a security and privacy perspective is the usage of cloud accounts for smart home control and communication. A prominent example is Nest Labs, which officially passes user data stored on the thermostats of its customers to its parent company Google. And even independent of the wide spread practice of selling customer data and profiles, cloud based solutions represent a significant risk from a security and reliability perspective. It is a fact that cloud based services frequently suffer from outages caused by technical problems or hacker attacks. Just take a look at InfoWorld’s annual listing of the top ten cloud service outages.
To summarize, a reliable and secure architecture needs to be based on a local smart home controller with wireline control links to the key home infrastructure components such as power outlets, lighting, HVAC, surveillance and door locks. Since most consumer electronics and appliances with integrated power supply will continue to offer connectivity using WiFi, WLAN integration is mandatory. In addition a new generation of mobile, battery powered devices are coming to the market, which provide connectivity through low power technologies such as BLE or EnOcean. Some of these devices are based on proprietary vendor implementations such as Apple’s HomeKit or Nest’s Thread protocol. The degree to which they can or should be integrated in an overall smart home architecture needs to be looked at on a case per case basis. Perhaps the biggest downside of these proprietary plug and play solutions is their lack of customization capabilities. The price for being easy to install and for using proprietary technology is, that they cannot be used to build an integrated rule base, which delivers meaningful interaction between residents, environment and building infrastructure. And without that, the fact that the garage door can now

be opened using smart phone based voice control, cannot conceal that such a smart home solution is a mere remote control. Figure 3.2 shows how an integrated smart home architecture as discussed above could look like.
3.9 Where do we go from here? With the above trends and developments, the slow moving market of building automation has changed radically. New players and start-ups are taking on the opportunities, which the intersection of new technologies and new demands are offering in home automation. It looks like that finally the vision of an Internet of Things, seamlessly integrating with our life, handling daily routines, while saving energy, is becoming reality.
!
Figure 3.2 An integrated smart home architecture
(1) 24/7 Home controller with rule database interfacing actuators and sensors via multiple technologies
(2) WiFi (WLAN) network interfacing to power supply based devices (consumer electronics, home appliances)
(3) 2nd generation wireless technologies (z-wave, ZigBee) interfacing to small devices and sensors
(4) Local smartphone / tablet based home control app connected to controllable devices through the home server
(5) Proprietary smart home components (e.g. Apple’s HomeKit) connected to select devices and integrated to the home network using bridges
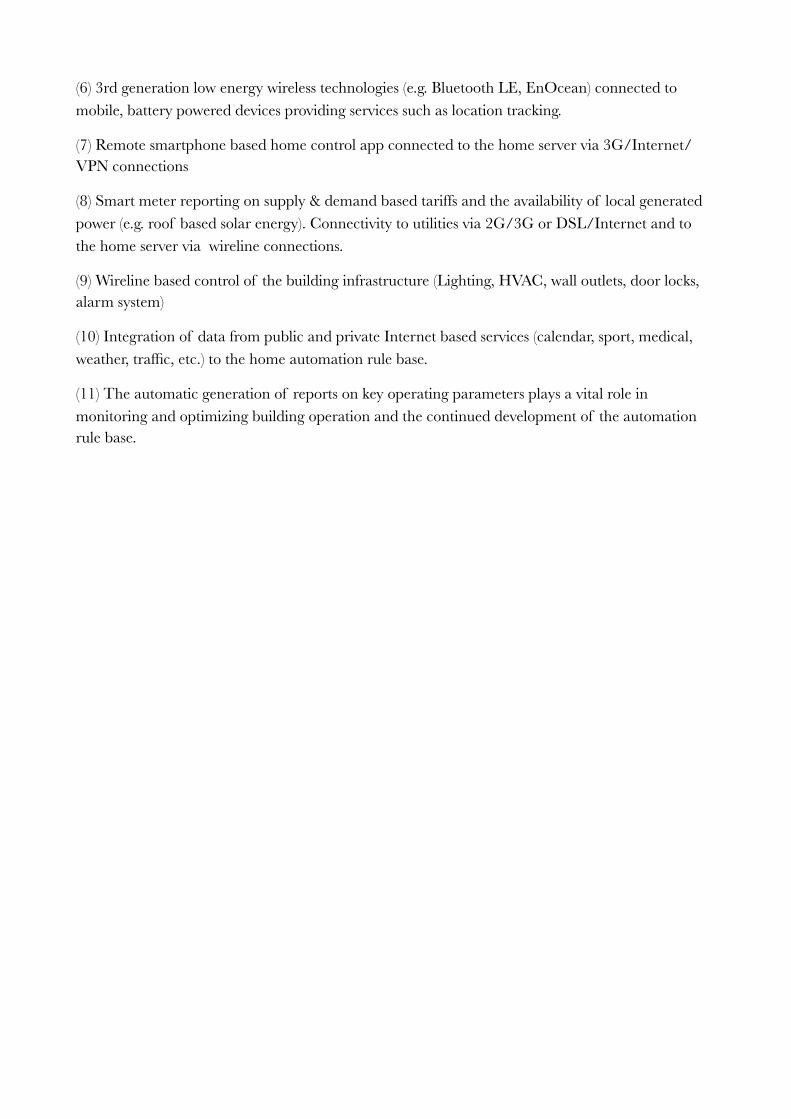
(6) 3rd generation low energy wireless technologies (e.g. Bluetooth LE, EnOcean) connected to mobile, battery powered devices providing services such as location tracking.
(7) Remote smartphone based home control app connected to the home server via 3G/Internet/VPN connections
(8) Smart meter reporting on supply & demand based tariffs and the availability of local generated power (e.g. roof based solar energy). Connectivity to utilities via 2G/3G or DSL/Internet and to the home server via wireline connections.
(9) Wireline based control of the building infrastructure (Lighting, HVAC, wall outlets, door locks, alarm system)
(10) Integration of data from public and private Internet based services (calendar, sport, medical, weather, traffic, etc.) to the home automation rule base.
(11) The automatic generation of reports on key operating parameters plays a vital role in monitoring and optimizing building operation and the continued development of the automation rule base.

3.10 Bibliography Weiping Sun, Munhwan Choi and Sunghyun Choi (2013): 802.ah - A long range 802.11 WLAN. IEEE 802.ah: A long range 802.11 WLAN
Home Grid Forum (2013): Converging Technologies. Converging Technologies - Moving from HomePNA to G.hn.
IEEE Computer Society (2011): IEEE Standard for Local and metropolitan area networks Part 15.4: Low-Rate Wireless Personal Area Networks (LR-WPANs). http://standards.ieee.org/getieee802/download/802.15.4-2011.pdf
International Telecommunication Union (2012): Recommendation ITU-T G.9959 Short range narrow-band digital radio communication transceivers – PHY and MAC layer specifications. https://www.itu.int/rec/T-REC-G.9959
Enocean Alliance (2013): EnOcean Wireless Standard ISO/IEC 14543-3-10. http://www.enocean-alliance.org/en/home/

4 The Project 4.1 Overview Complex functionality in information technology can be explained best using an incremental approach, starting from simple “hello-world” type of functionality to sophisticated features in sequential steps, each of which can be tested and demonstrated individually. In software engineering terms, this approach is called a development sprint. Sprints are relatively small coding modules, which need to be designed in such a way, that they can be demonstrated independent of other development elements, once their implementation is finished. In engineering projects such sprint demonstrations are formal project milestones, which are conducted in front of the entire engineering team. The advantage of the sprint approach is the continuous validation of functionality. Problems are recognized early and remain manageable. The permanent monitoring of increasing functionality avoids surprises and keeps the fun factor high. In following this philosophy, most design phases of our project are independent from each other and work stand alone. However, some of the initial components build upon each other, so it does make sense to follow the sequence up to chapter 8.
In chapter five we start with installing and configuring the open source smart building and Internet of Things (IoT) platform OpenRemote. This will allow us to build a customized smartphone and tablet control app in less than one hour with no programming skills required. Later, the OpenRemote controller will also be used to run the automation rules, which we will build during the course of the project.

!
Figure 4.1 Chapter 5: Building a custom smartphone app with OpenRemote
In chapter six we configure our first sensor and connect it to the smart home application. Specifically, we will be polling weather condition and temperature for a specific location from the popular Weather Underground Internet service, displaying it with our smartphone app (Figure 4.2).

!
Figure 4.2 Chapter 6: Retrieving and displaying weather information (top of the screen)
In chapter seven we integrate multimedia control functionality to our smart home project. We will set up our OpenRemote smartphone app to function as a remote control for Apple's multimedia suite iTunes (on both Macs and PCs) and Microsofts MediaPlayer under Windows 10 (Figure 4.3).
In chapter eight we introduce the rule based automation capabilities of OpenRemote. We will use the components, we have built so far, to put together the intelligent wake up scenario: “Wake me up early in case it rains or snows”. The idea is to start a morning wake up scenario 45 minutes earlier than normal in case of nightly rain or snowfall, to avoid the potential traffic jam. For that, we will use our Internet weather sensor to poll the weather conditions during the night, and, once a wake up condition is met, our scenario will start playing music. Another scenario will be "Welcome Home", which uses the smartphone triggered presence detection to start playing the iTunes playlist of choice for the person returning home. We will even give our smart home a voice and have it read reminders and appointments for the day to us via its Hi-Fi stereo.

!
Figure 4.3 Chapters 7,8,10: Adding controls for iTunes and a Hi Fi stereo system
Up to this phase all you need for following and implementing the project is a Mac or PC, a Wi-Fi network and an Internet capable smartphone. From here on, you need the components of the technology you have chosen for your smart home, such as Z-Wave or KNX sensors and actuators.
In chapter nine, we add wireless light and power outlet control to our project, using the popular Z-Wave standard. In addition, we accomplish the integration of consumer electronics hardware using a Denon audio video receiver (AVR 3313), as an example (Figure 4.4).

!
Figure 4.4 Chapter 9: Controlling lights and power outlets
Chapter ten adds presence control. We will configure our WiFi home network to detect the registration of a particular smartphone, which we will use to trigger a welcome home scenario (Figure 4.3).
In chapters eleven and twelve we integrate KNX based infrastructure components for heating and lighting. In a step-by-step fashion, we explore how to download, install and configure ETS, the official KNX association control software. Then, we fully integrate the KNX controls with our OpenRemote project (Figure 4.5).

!
Figure 4.5 Chapters 11,12: Adding KNX control
In the last part of the book we extend our project with functionality, which enables it to reliably function in a real environment and in daily operation. In chapter 13 we add the capabilities to access all control functions from remote via the Internet, in chapter 14 to automatically restore operation after a restart of the controller.
With that done, our smart home control system will be capable of:
• smartphone / tablet based display of weather and temperature
• smartphone / tablet based control of lights, heating, power-outlets, consumer electronics
• smartphone / tablet based scenario control for scenarios such as Good Morning, Welcome, Good Night, Leaving Home
• operation of an audio reminder system with text-to-voice conversion of calendar items
• rule based scenario execution triggered by time, date, weather condition or temperature
• WiFi network and smartphone based presence detection
• Remote control via the Internet
• Automated restoration of operation after power outages or planned downtime
Sensoring approaches such as presence detection based on smartphones or weather condition information retrieved from the Internet provide just a glimpse of what state of the art home automation based on open standards is capable of delivering. Using the functionality of our project as a start, a vast variety of variations and add-ons can easily be implemented.
4.2 Equipment and Prerequisites In general you will find that in order to implement smart home controls with functions beyond switching power outlets and lights, as we demonstrate it, you need relatively new equipment. This is true for your WLAN (Wi-Fi) router, for the appliances and consumer electronic devices you want to control as well for the mobile clients (smartphones and tablets) you plan to use. Fortunately, prices for all of the above have gone down over the past years. Thus, in many cases, you might rather want to upgrade the equipment you have to the latest generation than compromising and spending a lot of effort to integrate legacy equipment. Of course, there are always also good reasons not to upgrade. Everyone will have to make that decision on an individual base.
In order to be able to follow the project in this book, you will need the following, obviously depending on which functionality you plan to implement:
• a home network with Internet access and a WiFi/DSL router
• an iOS or Android powered smartphone or tablet
• a Mac OS X or a Windows PC (While the functionality of the projects in this book can also be realized with older operating system variants, the step by step descriptions are based on OS X 10.11 (El Capitan) and Windows 7/8 and Windows 10.)
• Z-Wave components (power-outlets, lighting, etc.) in case you plan to use the Z-Wave protocol
• KNX components (power-outlets, lighting, etc.) in case you plan to use the KNX protocol
• consumer electronic devices with LAN / WiFi capability built in
Alternative to Z-Wave or KNX, the usage of other building control standards for the projects described in the book is also possible, although not described in detail. The smart building and Internet of Things platform OpenRemote, which we use throughout this book, supports literally all major building control standards. (Table 4.1).
In addition to the above equipment, some familiarity with computer and network technology is recommended. You do not have to be able to actually write code. However, if you have never heard from IP, Telnet or HTTP, and if you have never edited a batch file (.bat) or a shell script (.sh), you will probably have to go through a steeper learning curve than others. On the other hand, with the thousands of good Internet tutorials just a mouse click away, there is nothing you cannot learn within a few hours. ;-)

5 The Home Control Centre: Open Remote We will start our project with the installation and configuration of OpenRemote. OpenRemote is a state of the art open source software platform for building automation and device control. It has been used for smart building and Internet of Things (IoT) projects around the world, and is supported by a large and active user community. Setting up and configuring the software is a bit more complex than clicking a few buttons, however you do not need programming skills. Still, the platform will allow you to build a fully custom, professional building control system, including a smartphone app, which will serve as the mobile control centre. The OpenRemote controller, which is supported on OS X, Linux, Windows and other platforms, will run the “always on” automation rules for our project.
All OpenRemote components with their full functionality are available free for private use, educational purposes and trials. Commercial users pay a one time fee of 150 US$. A former differentiation between a free and a pay for version was removed in early 2016. Since then, all users - private, educational and commercial - use the identical software.
5.1 OpenRemote Overview The OpenRemote platform consists of three software components:
• The OpenRemote Controller, an always-on (24/7) Linux, Windows or OS X server application, which connects the mobile control devices (smartphones, tablets) to building automation systems and devices under control. Control devices can be building infrastructure (light switches, power outlets etc.), consumer electronic devices, or home appliances. The OpenRemote Controller can also run scripts, which are called rules. These rules are automation sequences, which are implemented based on the open Drools event processing language.
• The second component consists of the OpenRemote mobile clients for iOS or Android. Graphical user interface and functionality of the OpenRemote App can be fully customized using the third component of OpenRemote, the OpenRemote Professional Designer.
• OpenRemote Professional Designer is an online, cloud based application, providing a graphical user interface for crafting the mobile client interface and the related commands, sensors, and switches. Once user interface and control functions are designed, the Professional Designer configuration files are synchronized with the local controller installation. The smartphone client application is updated automatically, when connecting to the controller, immediately reflecting changes or updates made within the online Professional Designer project.
OpenRemote supports a large variety of building automation protocol standards. In addition, it provides API’s for the customization and extension of its capabilities. The current software release OpenRemote Controller 2.6 supports the following control protocols (Table 5.1).

1-Wire Protocol Low data rate communication bus for Maxim Integrated Products. www.maximintegrated.com
AMX Controller AMX Inc. proprietary device control protocol.
DateTime Protocol Display of date and time, including sunrise/sunset calculation.
Denon Serial AVR Protocol Protocol to control Denon / Marantz audio / video/ devices.
Domintell Protocol for Domintell building control infrastructure.
DSC IT-100 Serial Protocol Protocol for DSC (Digital Security Controls) systems.
EnOcean Energy harvesting wireless technology for device control ISO/IEC 14543-3-10. www.enocean.com
GlobalCache Infrared control devices by specialist GlobalCache. www.globalcache.com
HSC Z-WAVE IP Gateway Honeywell Z-Wave Gateway.HTTP Hypertext Transfer ProtocolHTTP/MJEPEG Motion JPEG Video StreamingHTTP/REST Representational State Transfer.
Usage of HTTP for stateless client-server communication
Insteon Home automation system based on power line and radio frequency (RF). www.smartlabsinc.com
Integrated Control Technology (ICT)
Protocol for the Protege Suite, an enterprise level building automation system
ISY-99 Control protocol for Universal Devices home automation solution.
Keene IR Anywhere Protocol Proprietary protocol to transmit Infrared (IR) Control Commands over IP or RS232
KNX International standard for industry grade wireline home automation. www.knx.org
Lutron HomeWorks Protocol for Lutron building control infrastructure.
Open Webnet Remote control protocol for Legrand My Home systems
panStamp Lagarto Open source protocol for PanStamp wireless modules. www.panstamp.com

Table 5.1 Communication protocols and automation standards supported by OpenRemote Controller 2.6
With its intuitive user interface, OpenRemote allows for designing a fully customizable building and home control solution without the need to actually write code. This is not to say that home automation is becoming as easy as an off the shelf software installation. With components from different vendors having to play together, there will often be the need for iterations of testing, troubleshooting, and fine-tuning. However, with OpenRemote, we have a powerful platform at hand, which allows for professional results and comprehensive functionality. In addition, the large and helpful OpenRemote user community of building automation professionals and home automation hobbyists provide help and support.
5.2 OpenRemote Controller Installation Getting OpenRemote downloaded, installed, and running should take less than one hour. First we need to register for an OpenRemote account. Open https://designer.openremote.com/login.jsp and select Don't have an account?, then Order Now. Fill out the fields for email and address. If you are a private or educational user, or if you want to trial the software as a company, on the right hand side of the window, under Order Summary, select Add Coupon and enter PRIVUNIV. Then select APPLY , which reduces your order total to 0 US$, then select SUBMIT YOUR ORDER (Figure 5.1).
Philips Hue Protocol HTTP/REST API to communicate with Philips Hue bridge devices
Russound RNET Protocol Protocol for distributed audio and video solutions from Russound.
Samsung TV Remote Protocol Protocol used to control Samsung TV systems.
Shell execution protocol Execution of shell scripts.Shell execution protocol Execution of shell scripts.TCP/IP Transmission Control ProtocolTelnet Telnet ProtocolUDP User Datagram ProtocolVelbus Protocol for Velbus home
automation products www.velbus.eu
Wake-On-Lan Protocol Protocol activating networked systems in power save mode.
X10 Legacy standard for power line based home automation.
XBMC Open source media player platform. xbmc.org
xPL,IRTrans, VLC, FreeBox, MythTV
Commercial and OpenSource home automation solutions.
Z-Wave Wireless communication protocol optimized for home automation. www.z-wavealliance.org

!
Figure 5.1 Setting up a free account for OpenRemote Professional Designer
With the user name and password, which you will receive in an email after registration, you login to your new account at https://designer.openremote.com/login.jsp. A window with the OpenRemote Professional Designer GUI will open. Now you can install OpenRemote Controller. Select the Download Resources button at the upper right corner of the user interface, and a GitHub window with the latest binary and source code files for OpenRemote Controller will open (Figure 5.2). In the section of the most recent release (at the time of this writing 2.6) you go to Downloads and select the file OpenRemote_Controller.zip.

!
Figure 5.2 The OpenRemote Professional Designer GUI with the Download Resources button
After downloading the compressed file, which has a size of around 30 Mbytes, move it to a local project directory (e.g. shproject) under your home directory and extract it. You will now see the directory tree of the software with the startup files openremote.sh (OS X, Linux) and openremote.bat (MS Windows) in the /bin directory (Figure 5.3).
Under Windows, as as well as under OS X, the home directory is the one you are in when opening a terminal window. To make moving around directories from a terminal window easier, you should rename the top level OpenRemote directory, which is called something like OpenRemote-Controller-2.6.0 to something simpler such as ORC260.
!
Figure 5.3 The OpenRemote Professional Designer directory tree
Since OpenRemote Controller is a Java application, before you are actually able to start it, you need to install Java on your computer. I will cover this in separate sections for OS X and Windows. If you are working under Windows move on to section 5.4 now.
5.3 Java Installation and Configuration under Mac OS X On a Mac you start by opening an OS X Terminal window selecting Applications – Utilities. If you have not worked with the terminal application before, there are a few commands you need to know in order to survive at the beginning:

Table 5.1 Basic OS X Terminal commands
First you need to verify if you have Java installed. To do this use the command
java -version
On a new Mac, you will not find Java installed, because since version 10.8 it is no more part of OS X. In response to the above command OS X will alert you that you need to download Java in order to execute this command. If you select more information in the alert window, you will be taken to to the Oracle Java website. There you select JDK Download, and after accepting the Oracle License Agreement you can download and install the JDK version for Mac OS X. While you will not conduct Java development work, just installing the Java Runtime Environment (JRE) is not sufficient for the instructions to follow and for the integrated rules environment Drools. So do install the JDK (Java Development Kit) package and not the JRE (Java Runtime Environment) software.
When you now open System Preferences on your Mac, you will see a Java icon, the Java Control Panel. If you select General and About the Java version you have installed is being displayed (Figure 5.4).
ls -l display listing with the option - l (l for long), displays the content of the current directory, including hidden files and permissions
ls -a display listing with the option -a also shows hidden files (e.g. all files starting with a period such as .bash profile are hidden)
pwd print working directory - displays the path of the current directory
cd .. change directory followed by a space and two dots - gets us one directory hierarchy up
cd just typing cd gets us back to our home directory
cd /target changes to the specified directorymkdir name create (make) directoryman mdc show the manual entry for a command

!
Figure 5.4 The Java Control Panel on Mac OS X
If you are using Safari as your browser, make sure to also enable Java by selecting Preferences and Security. Then open Plug-in Setttings… and add Java to the list of approved Plug-ins. You will now be able to verify your installed Java version with Safari using the link https://www.java.com/en/download/installed.jsp.
Apple also offers a legacy Java version (Java 1.6 http://support.apple.com/kb/DL1572) for download from its support website, which was the last Java version, officially supported by Apple. There are still some older OS X applications out, which do require this legacy version, however in most cases going with the latest Java version from Oracle is the best choice, which today is also being recommended by Apple on its Java support page. Since controller version 2.6 and higher Open Remote includes the latest Drools version (6.4) and is fully compatible with the latest Java release, which at the time of this writing is 1.8.
After the successful installation of the JDK you can verify the installed version using the java -version command. The JDK will report the version number of its integrated JRE environment:
java version "1.8.0_25"
Java(TM) SE Runtime Environment (build 1.8.0_25-b17)

Java HotSpot(TM) 64-Bit Server VM (build 25.25-b02, mixed mode)
5.3.1 Setting $JAVA_HOME on a Mac There is one more thing we need to do before we can start the OpenRemote controller, which is setting the $JAVA_HOME variable. $JAVA_HOME is used by Java programs to find the path of the Java files and needs to contain the full path to the Java installation.
Under OS X and Linux, the list of locations or paths, which a program uses to search for executables, is stored in the $PATH variable. There is a system wide and a user specific $PATH definition. We will just use the user specific $PATH variable at this point. The user specific $PATH definitions under OS X are contained in the file .bash_profile file in the user home directory. The (hidden) file .bash_profile might not exist yet in your home directory, which is why you probably will need to create it. To list the hidden files in your home directory use the command ls -a. Then enter the following two commands in the terminal window:
touch ~/.bash_profile
open ~/.bash_profile
You can enter the tilde character (~) by typing alt N. The command touch along with a filename creates an empty file and the command open plus a filename opens the specified file in the default text editor, which on a Mac is TextEdit. Now you need to add the line that sets $JAVA_HOME to contain the directory of your JDK installation. The best way to do this is to use the command java_home, which automatically returns a path suitable for the $JAVA_HOME environment variable. The command can be found in the directory /usr/libexec/. If you open a Terminal window, move to /usr/libexec/ and enter the command ./java_home, you will get something like:
/Library/Java/JavaVirtualMachines/jdk1.8.0_25.jdk/Contents/Home
With that the entry for the file .bash_profile using java_home looks like the following:
export JAVA_HOME=$(/usr/libexec/java_home)
You enter the above line and save .bash_profile in TextEdit, close the terminal window and open it up again (which forces the system to process the new $PATH definition), and test your work by entering echo $PATH and echo $JAVA_HOME.
$JAVA_HOME
-bash: /Library/Java/JavaVirtualMachines/jdk1.8.0_25.jdk/Contents/Home: is a directory
5.3.2 Starting OpenRemote Controller for the First Time The OS X start script for OpenRemote Controller is openremote.sh in /shProject/ORC260/bin/. When we do a long listing (ls -l) of the files in the ORC260/bin/ directory we can see that we do not have the execution right for the file yet. In case you are new to file permissions: File permissions in OS X and Linux are set in three groups (owner, group, everyone) with three symbols for each group receiving permissions. The symbols can contain:

Table 5.2 File permissions under OS X
The first letter of the file listing is not a permission, but shows whether the line entry references a file (-) or a directory (d). So the permissions start actually at the second letter of the below listing:
ls -l ./shProject/ORC260/bin
total 48
-rw-r--r--@ 9854 10 Mar 2016 openremote.bat
-rw-r--r--@ 12039 10 Mar 2016 openremote.sh
We see that we have only read and write rights for openremote.sh. With the command chmod +x we can set the execution rights:
chmod +x ./shProject/ORC260/bin/openremote.sh
and can now start the OpenRemote controller by entering:
./openremote.sh run
The dot slash sequence references to the current directory in Unix type systems. For security reasons it is not part of the $PATH definition. So for commands to be executed in the current directory you always have to start with dot slash (./).
In the terminal window, you will now see a lot of text running by, which eventually will stop, displaying something like
INFO: Server startup in 3159 ms
Your OpenRemote Controller is now up and running for the first time.
5.3.3 Curly or straight, this is the question! Finally, before you get started with scripting or entering terminal commands, an important hint. Quotation marks in scripts and terminal commands have an important function. However, the quotes used need to be the straight quotation marks, rather than the curly quotation marks, which are used by word processor software. It can happen, that when you copy a command line from a text document or when you edit a shell script or an AppleScript using TextEdit or another word processor, that the straight quotes are converted to curly quotes resulting in runtime errors, which at first sight are hard to detect. So always take a close look at the quotation marks. I will repeat this hint several more times throughout the book, since it is a common problem for people not so close to software development, working along a book. Mac users can now move on to section 5.5.
- no permission
r read permission
w write permission
x execute permission
5.4 Java Installation and Configuration under Windows Also under MS Windows (XP/7/8/10) at first you need to make sure you have a Java Development Kit (JDK) package installed. To find out if you have an installation on your computer, select Start – Control Panel – Add or Remove Programs. If you do not have Java installed, you need to download the JDK package from the Oracle Java website. After installing the JDK determine the exact directory path of your Java installation. It should be something like
C:\Program Files\Java\jdk1.8.0_45\
Next go to the Windows menu for environment variables. Open System in Control Panel. (or simply type advanced system in the search bar). Open the Advanced tab, select Environment Variables. Select New to add a new variable name and value. Enter JAVA_HOME as variable name and the path to your Java directory. Be very careful to make no mistakes when setting the environment variable. The controller will not start up if the environment variable does not point to the correct directory. With the command set from a terminal window you can validate the settings of your environment variable:
set
JAVA_HOME=C:\Program Files\Java\jdk1.8.0_45
To open a terminal window under Windows 10 simply type command in the search bar. Now you can start up the controller for the first time. In the terminal window change to the directory /shProject/ORC260/bin/ and enter openremote.bat run
You will now see a lot of text running by, which eventually will stop displaying something like:
INFO: Server startup in 3159 ms
Your OpenRemote controller is now up and running for the first time.
5.5 First Synchronization between Designer and Controller Now you need to validate your installation and synchronize the local controller installation with your online Designer account for the first time. First access the controller web interface by opening the URL http://controller-machine-IP:8688/controller in an Internet browser window. For the part of this URL, which says controller-machine-IP, you insert the IP address of the hardware, your controller is running on. If you run the controller on your local machine, the IP address you need to use is simply 127.0.0.1 or localhost, in which case you open the URL http://localhost:8688/controller.

!
Figure 5.5 The OpenRemote Professional Designer controller synchronization window
Now the OpenRemote Professional Designer controller synchronization window will open, showing the MAC address of your controller hardware in the upper half of the window. Ignore the message Use Controller management in OpenRemote designer to create link. Controller management will be activated in a later release of OpenRemote Controller and provide auto detection of the controller IP address. For now directly proceed by entering your Professional Designer login details, and select the button Sync with Online Designer (Figure 5.5). A few seconds later the synchronization window will show the message Sync complete (Figure 5.6).

!
Figure 5.6 Successful synchronization between an OpenRemote Professional Designer Account and a local controller
5.5.4 The Importance of Systematic Directory and File Management A last advice before we move on. I recommend to place all custom scripts and files, which you develop throughout this project, in the root directory of your project (in our case the directory shProject), rather than in the OpenRemote directory (in our case ORC260). Otherwise you will have to manually move your custom scripts and files from your old to your new OpenRemote installation in case of a software upgrade, which then might become a source of problems.
5.6 OpenRemote Professional Designer We now will take a closer look at our OpenRemote Professional Designer account. We open https://designer.openremote.com/login.jsp and log into our Designer account. The Designer GUI consists of two main elements. The Building Modeler and the UI Designer. The Building Modeler (Figure 5.7) is used for defining commands, sensors, switches and sliders, and for selecting and configuring the associated protocols. In the UI Designer, we create the graphical user interface for our smartphone or tablet control app, linking its functional elements to the commands in the Building Modeler. (Figure 5.8).
!
Figure 5.7 Selecting the Building Modeler

!
Fig. 5.8 Selecting the UI Designer
5.7 The “Hello World” App As a first step and in order to understand the workflow of OpenRemote we want to display “Hello World” on our smartphone or tablet. For that in the UI designer window we click on New –New Panel, select our mobile device (Android, iPhone, iPad) and enter our project name (e.g. shome), as the name under panel property on the right hand menu bar. The default name for the screen, which is Starting Screen, we rename to Remote. Next, from the right hand menu, we drag an abc label element onto the smartphone panel and enter Hello World in its text field on the right hand side of the GUI. As the last step, we click on the save button in the upper left corner. Our OpenRemote UI Designer screen should now look similar to the one in Figure 5.9.

!
Figure 5.9 First steps with OpenRemote Professional Designer

!
Figure 5.10 Downloading the OpenRemote client app for iOS
Now we download the mobile client app, the OpenRemote Panel, onto our tablet or smartphone. Do not get confused by multiple OpenRemote client versions. You need the one which is described as: “Universal version of the OpenRemote 2 console” (Figure 5.10). When you start the OpenRemote app for the first time, it opens with a configuration screen. Later, access to the configuration screen is gained by shaking the phone (Figure 5.11). For the time being leave Auto Discovery mode deactivated and manually set the IP address of your computer hosting the controller. To find your Mac’s IP address under OS X it is easiest to open the Network Utility application. To find it, simply enter the term Network Utility in the Mac Spotlight search.
Under Windows you open a terminal window and type
ipconfig /all

To configure the controller IP address you now enter the IP address of your computer followed by 8688/controller in the configuration screen of your OpenRemote app. The entry should look similar to http://192.168.178.41:8688/controller.
!
Figure 5.11 The OpenRemote app’s configuration screen (shake phone for access)
Next, at the bottom of the configuration screen, select the Panel Identity of your Designer layout, which in our case is shome. The app now automatically connects to your local Open Remote Controller and retrieves the application you just designed on your OpenRemote Professional Designer account. Make sure to synchronize your local controller with your OpenRemote Professional Designer account after every change of your Designer project. You should now see the “Hello World” message on your smartphone or tablet app.

In case you see an error message from the client app or the OpenRemote controller such as controller.xml not found or panel.xml not found, don’t panic. These files (controller.xml, panel.xml) are only downloaded to your local controller and your smartphone client after the first synchronization with your OpenRemote Professional Designer account. You probably have not synchronized Designer and Controller yet. Make sure to synchronize Designer and Controller again by opening up
http://localhost:8688/controller
and clicking on Sync with Online Designer. The controller will then connect to your online OpenRemote Professional Designer account and synchronize with the latest changes to your project. The local copy of your design will be updated in the file panel.xml in the directory ../shProject/ORC260/webapps/controller/. After a restart of your smartphone app, you should finally see “Hello World” on the screen of your smartphone.
Congratulations!
Since you now have successfully installed and configured the home automation control platform for our project, we can get started with the implementation of our first feature.

!
Enjoyed the preview? Buy the book on Apple iBooks
!
on Amazon Kindle
!
or go to the book website howtosmarthome.com.