hp 3600 3800 reman eng - uninethp color laserjet 3600 • 3800 toner cartridge remanufacturing...
TRANSCRIPT
HP® COLOR LASERJET 3600 • 3800TONER CARTRIDGE REMANUFACTURING INSTRUCTIONS
HP® COLOR LASERJET 3800 TONER CARTRIDGE
© 2010 UniNet Imaging Inc. All trademark names and artwork are property of their respective owners. Product brand names mentioned are intended to show compatibility only.UniNet Imaging does not warrant downloaded information. Unauthorized sale, reproduction or distribution of this article is prohibited. For additional support, please contact [email protected]
www.uninetimaging.com
HP COLOR LASERJET 3600 • 3800 TONER CARTRIDGE REMANUFACTURING INSTRUCTIONS
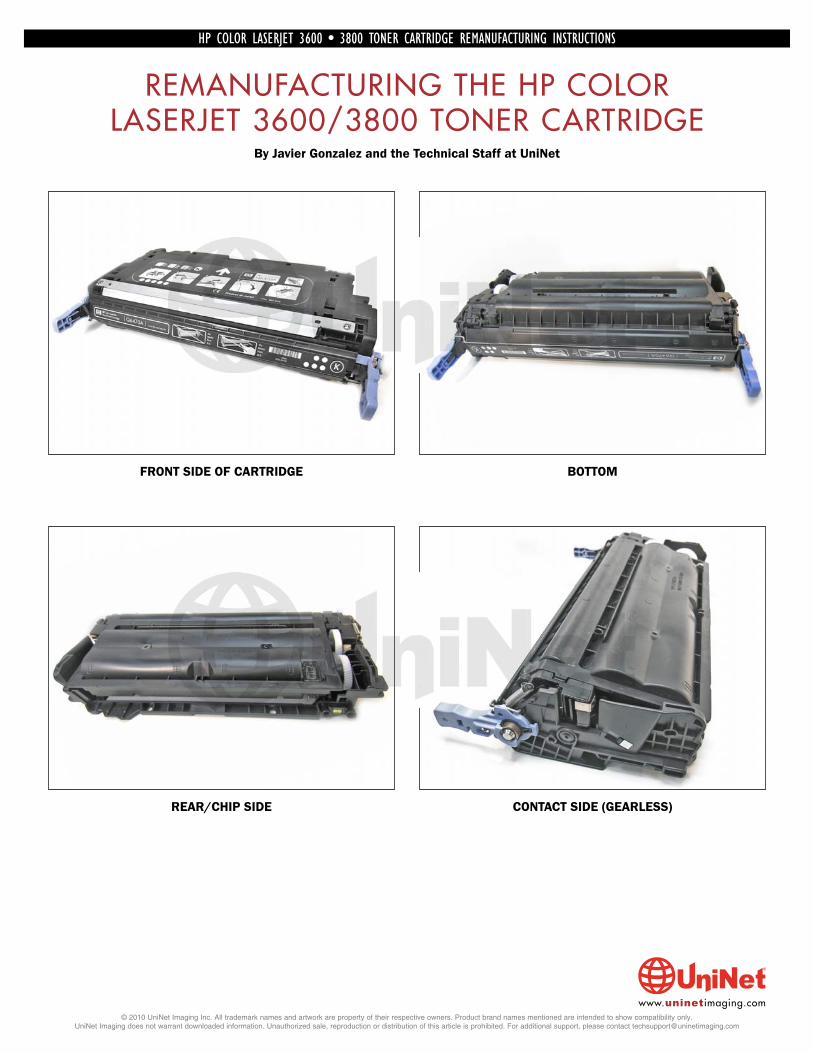
REMANUFACTURING THE HP COLORLASERJET 3600/3800 TONER CARTRIDGE
By Javier Gonzalez and the Technical Staff at UniNet
© 2010 UniNet Imaging Inc. All trademark names and artwork are property of their respective owners. Product brand names mentioned are intended to show compatibility only.UniNet Imaging does not warrant downloaded information. Unauthorized sale, reproduction or distribution of this article is prohibited. For additional support, please contact [email protected]
www.uninetimaging.com
FRONT SIDE OF CARTRIDGE BOTTOM
REAR/CHIP SIDE CONTACT SIDE (GEARLESS)
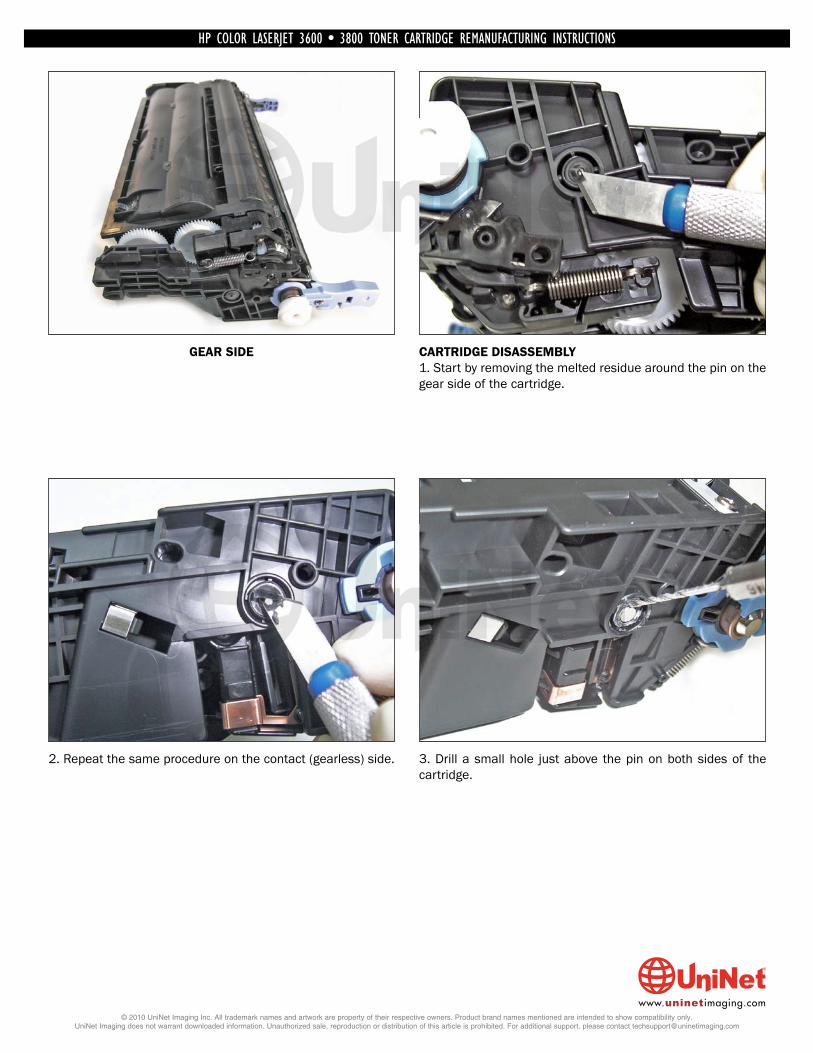
GEAR SIDE CARTRIDGE DISASSEMBLY1. Start by removing the melted residue around the pin on thegear side of the cartridge.
2. Repeat the same procedure on the contact (gearless) side. 3. Drill a small hole just above the pin on both sides of thecartridge.
HP COLOR LASERJET 3600 • 3800 TONER CARTRIDGE REMANUFACTURING INSTRUCTIONS
© 2010 UniNet Imaging Inc. All trademark names and artwork are property of their respective owners. Product brand names mentioned are intended to show compatibility only.UniNet Imaging does not warrant downloaded information. Unauthorized sale, reproduction or distribution of this article is prohibited. For additional support, please contact [email protected]
www.uninetimaging.com
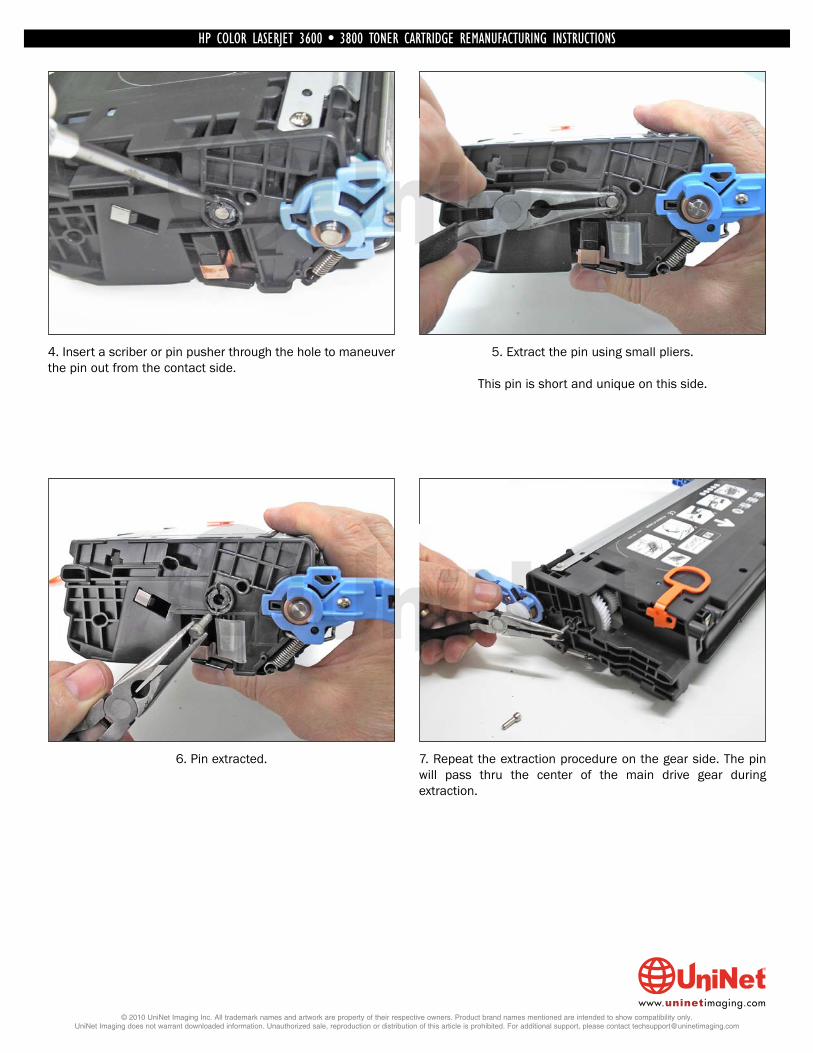
4. Insert a scriber or pin pusher through the hole to maneuverthe pin out from the contact side.
5. Extract the pin using small pliers.
This pin is short and unique on this side.
6. Pin extracted. 7. Repeat the extraction procedure on the gear side. The pinwill pass thru the center of the main drive gear duringextraction.
HP COLOR LASERJET 3600 • 3800 TONER CARTRIDGE REMANUFACTURING INSTRUCTIONS
© 2010 UniNet Imaging Inc. All trademark names and artwork are property of their respective owners. Product brand names mentioned are intended to show compatibility only.UniNet Imaging does not warrant downloaded information. Unauthorized sale, reproduction or distribution of this article is prohibited. For additional support, please contact [email protected]
www.uninetimaging.com
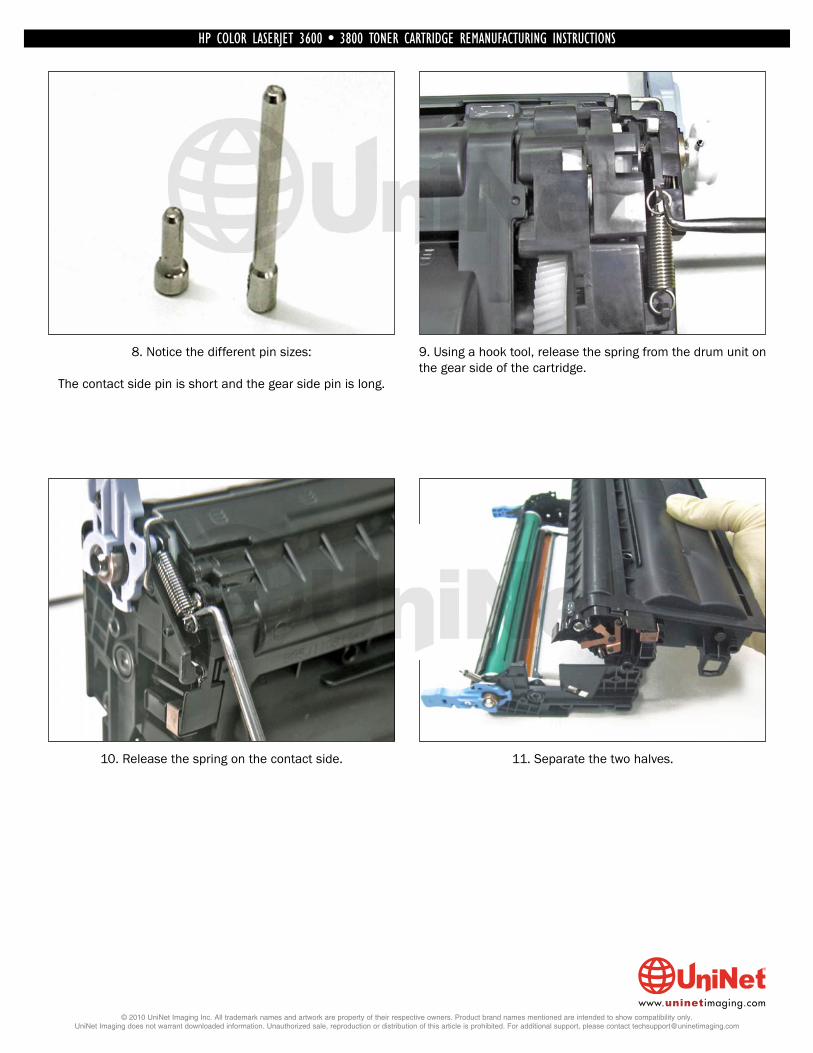
8. Notice the different pin sizes:
The contact side pin is short and the gear side pin is long.
9. Using a hook tool, release the spring from the drum unit onthe gear side of the cartridge.
10. Release the spring on the contact side. 11. Separate the two halves.
HP COLOR LASERJET 3600 • 3800 TONER CARTRIDGE REMANUFACTURING INSTRUCTIONS
© 2010 UniNet Imaging Inc. All trademark names and artwork are property of their respective owners. Product brand names mentioned are intended to show compatibility only.UniNet Imaging does not warrant downloaded information. Unauthorized sale, reproduction or distribution of this article is prohibited. For additional support, please contact [email protected]
www.uninetimaging.com
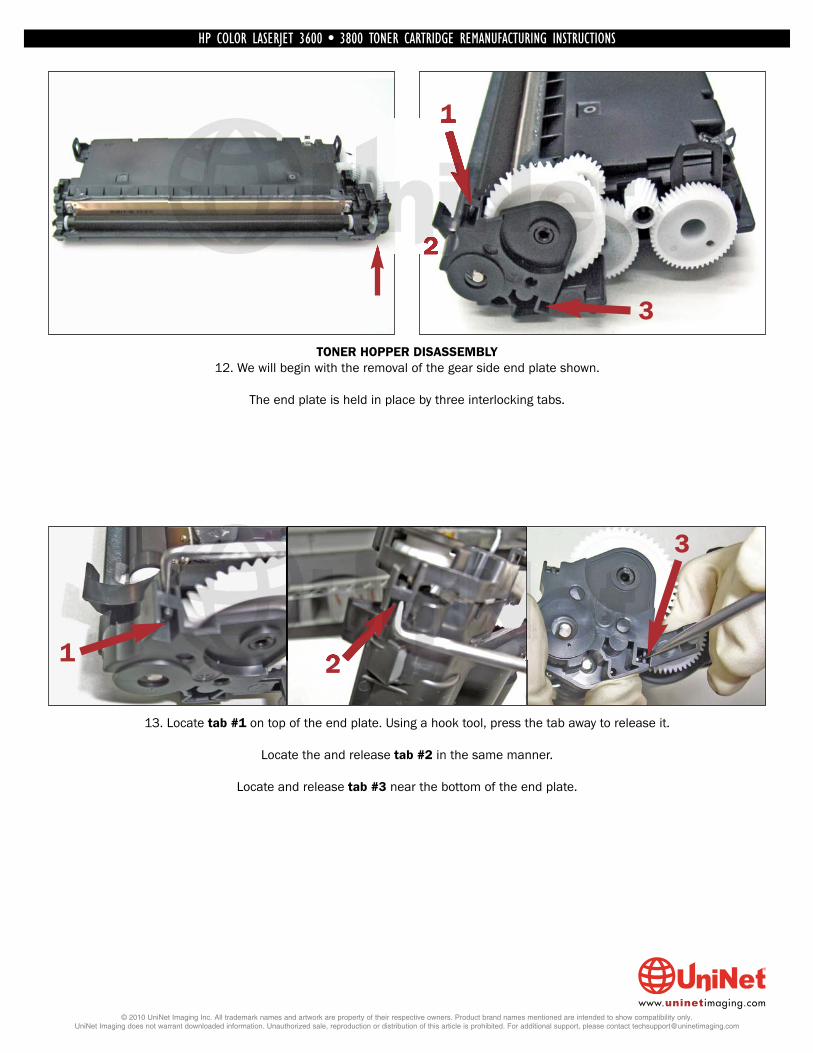
13. Locate tab #1 on top of the end plate. Using a hook tool, press the tab away to release it.
Locate the and release tab #2 in the same manner.
Locate and release tab #3 near the bottom of the end plate.
TONER HOPPER DISASSEMBLY12. We will begin with the removal of the gear side end plate shown.
The end plate is held in place by three interlocking tabs.
HP COLOR LASERJET 3600 • 3800 TONER CARTRIDGE REMANUFACTURING INSTRUCTIONS
© 2010 UniNet Imaging Inc. All trademark names and artwork are property of their respective owners. Product brand names mentioned are intended to show compatibility only.UniNet Imaging does not warrant downloaded information. Unauthorized sale, reproduction or distribution of this article is prohibited. For additional support, please contact [email protected]
www.uninetimaging.com
1
1
2
2
3
3
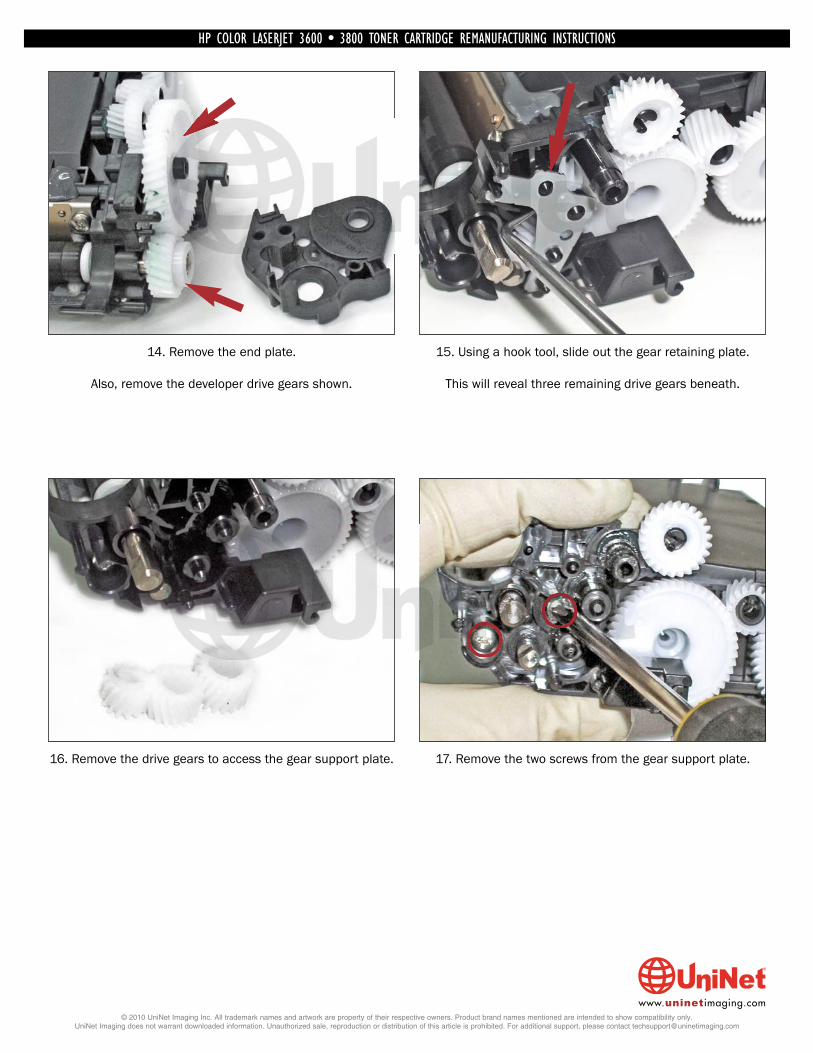
14. Remove the end plate.
Also, remove the developer drive gears shown.
15. Using a hook tool, slide out the gear retaining plate.
This will reveal three remaining drive gears beneath.
16. Remove the drive gears to access the gear support plate. 17. Remove the two screws from the gear support plate.
HP COLOR LASERJET 3600 • 3800 TONER CARTRIDGE REMANUFACTURING INSTRUCTIONS
© 2010 UniNet Imaging Inc. All trademark names and artwork are property of their respective owners. Product brand names mentioned are intended to show compatibility only.UniNet Imaging does not warrant downloaded information. Unauthorized sale, reproduction or distribution of this article is prohibited. For additional support, please contact [email protected]
www.uninetimaging.com
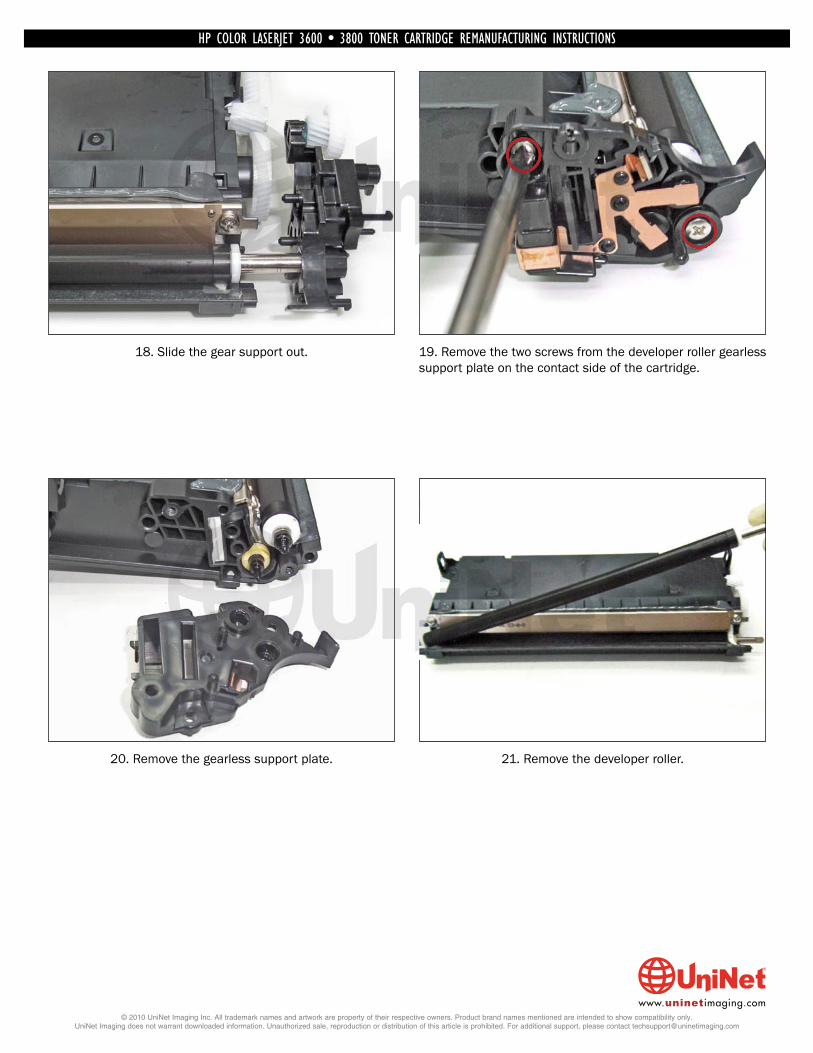
18. Slide the gear support out. 19. Remove the two screws from the developer roller gearlesssupport plate on the contact side of the cartridge.
20. Remove the gearless support plate. 21. Remove the developer roller.
HP COLOR LASERJET 3600 • 3800 TONER CARTRIDGE REMANUFACTURING INSTRUCTIONS
© 2010 UniNet Imaging Inc. All trademark names and artwork are property of their respective owners. Product brand names mentioned are intended to show compatibility only.UniNet Imaging does not warrant downloaded information. Unauthorized sale, reproduction or distribution of this article is prohibited. For additional support, please contact [email protected]
www.uninetimaging.com
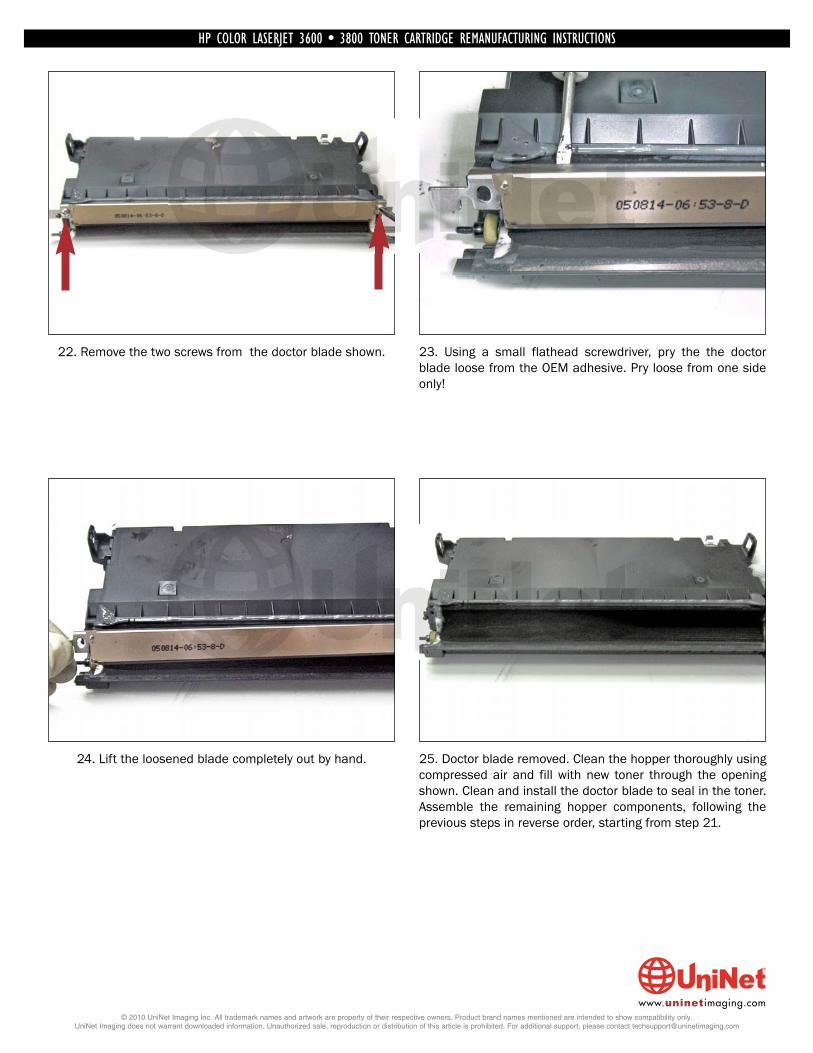
22. Remove the two screws from the doctor blade shown. 23. Using a small flathead screwdriver, pry the the doctorblade loose from the OEM adhesive. Pry loose from one sideonly!
24. Lift the loosened blade completely out by hand. 25. Doctor blade removed. Clean the hopper thoroughly usingcompressed air and fill with new toner through the openingshown. Clean and install the doctor blade to seal in the toner.Assemble the remaining hopper components, following theprevious steps in reverse order, starting from step 21.
HP COLOR LASERJET 3600 • 3800 TONER CARTRIDGE REMANUFACTURING INSTRUCTIONS
© 2010 UniNet Imaging Inc. All trademark names and artwork are property of their respective owners. Product brand names mentioned are intended to show compatibility only.UniNet Imaging does not warrant downloaded information. Unauthorized sale, reproduction or distribution of this article is prohibited. For additional support, please contact [email protected]
www.uninetimaging.com
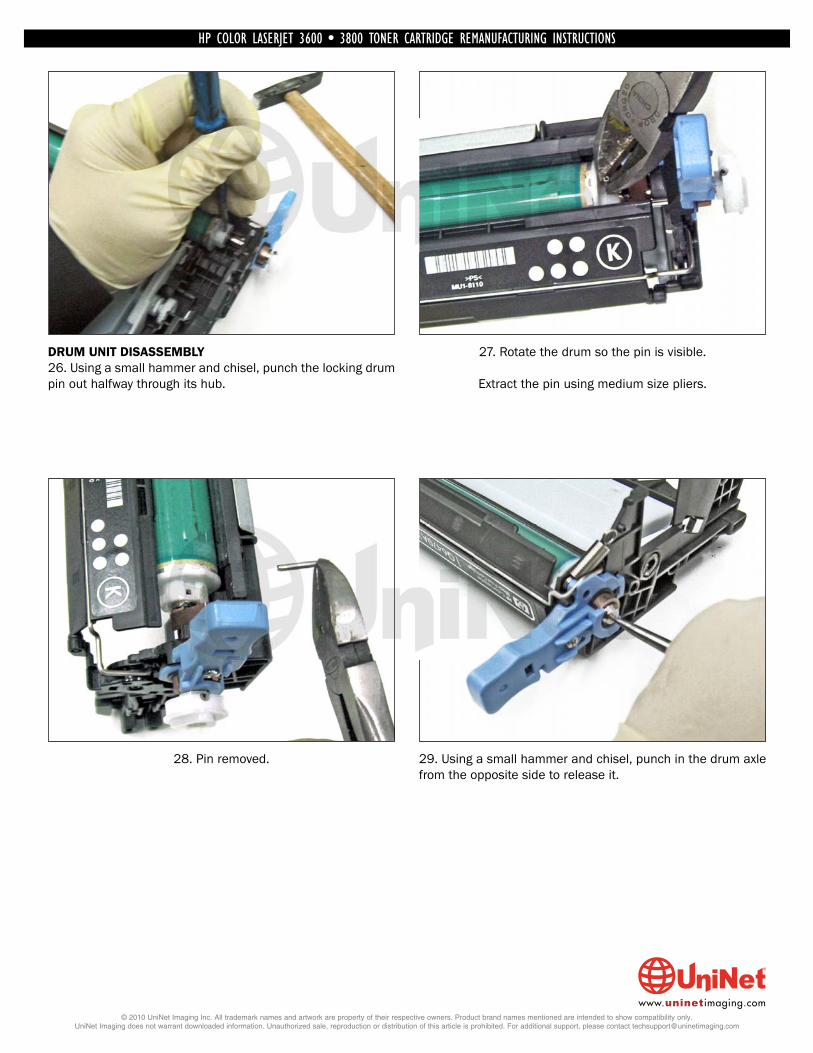
DRUM UNIT DISASSEMBLY26. Using a small hammer and chisel, punch the locking drumpin out halfway through its hub.
27. Rotate the drum so the pin is visible.
Extract the pin using medium size pliers.
28. Pin removed. 29. Using a small hammer and chisel, punch in the drum axlefrom the opposite side to release it.
HP COLOR LASERJET 3600 • 3800 TONER CARTRIDGE REMANUFACTURING INSTRUCTIONS
© 2010 UniNet Imaging Inc. All trademark names and artwork are property of their respective owners. Product brand names mentioned are intended to show compatibility only.UniNet Imaging does not warrant downloaded information. Unauthorized sale, reproduction or distribution of this article is prohibited. For additional support, please contact [email protected]
www.uninetimaging.com
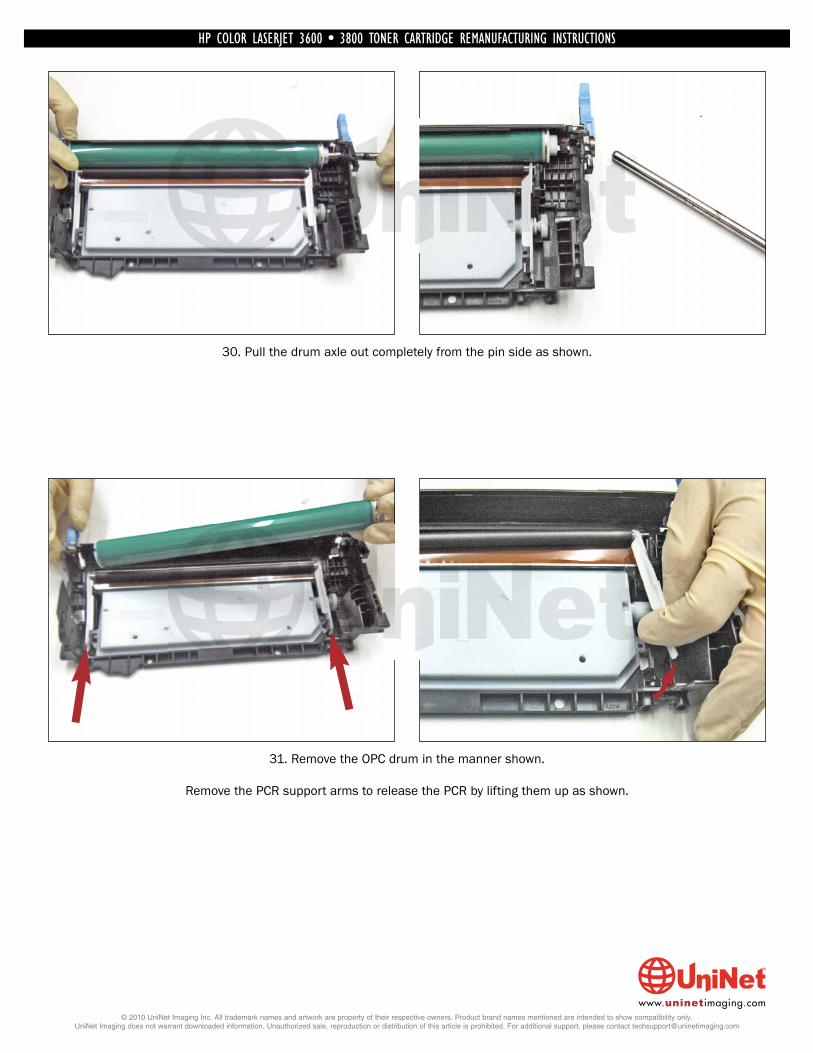
30. Pull the drum axle out completely from the pin side as shown.
31. Remove the OPC drum in the manner shown.
Remove the PCR support arms to release the PCR by lifting them up as shown.
HP COLOR LASERJET 3600 • 3800 TONER CARTRIDGE REMANUFACTURING INSTRUCTIONS
© 2010 UniNet Imaging Inc. All trademark names and artwork are property of their respective owners. Product brand names mentioned are intended to show compatibility only.UniNet Imaging does not warrant downloaded information. Unauthorized sale, reproduction or distribution of this article is prohibited. For additional support, please contact [email protected]
www.uninetimaging.com
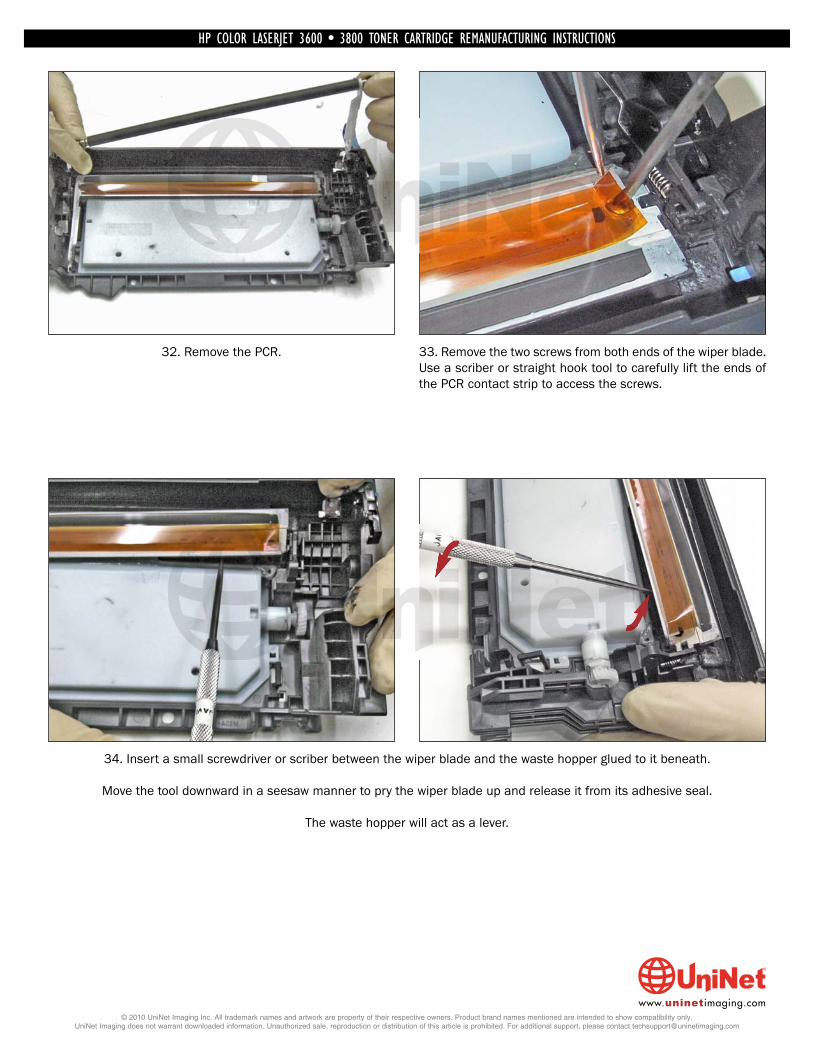
32. Remove the PCR. 33. Remove the two screws from both ends of the wiper blade.Use a scriber or straight hook tool to carefully lift the ends ofthe PCR contact strip to access the screws.
34. Insert a small screwdriver or scriber between the wiper blade and the waste hopper glued to it beneath.
Move the tool downward in a seesaw manner to pry the wiper blade up and release it from its adhesive seal.
The waste hopper will act as a lever.
HP COLOR LASERJET 3600 • 3800 TONER CARTRIDGE REMANUFACTURING INSTRUCTIONS
© 2010 UniNet Imaging Inc. All trademark names and artwork are property of their respective owners. Product brand names mentioned are intended to show compatibility only.UniNet Imaging does not warrant downloaded information. Unauthorized sale, reproduction or distribution of this article is prohibited. For additional support, please contact [email protected]
www.uninetimaging.com
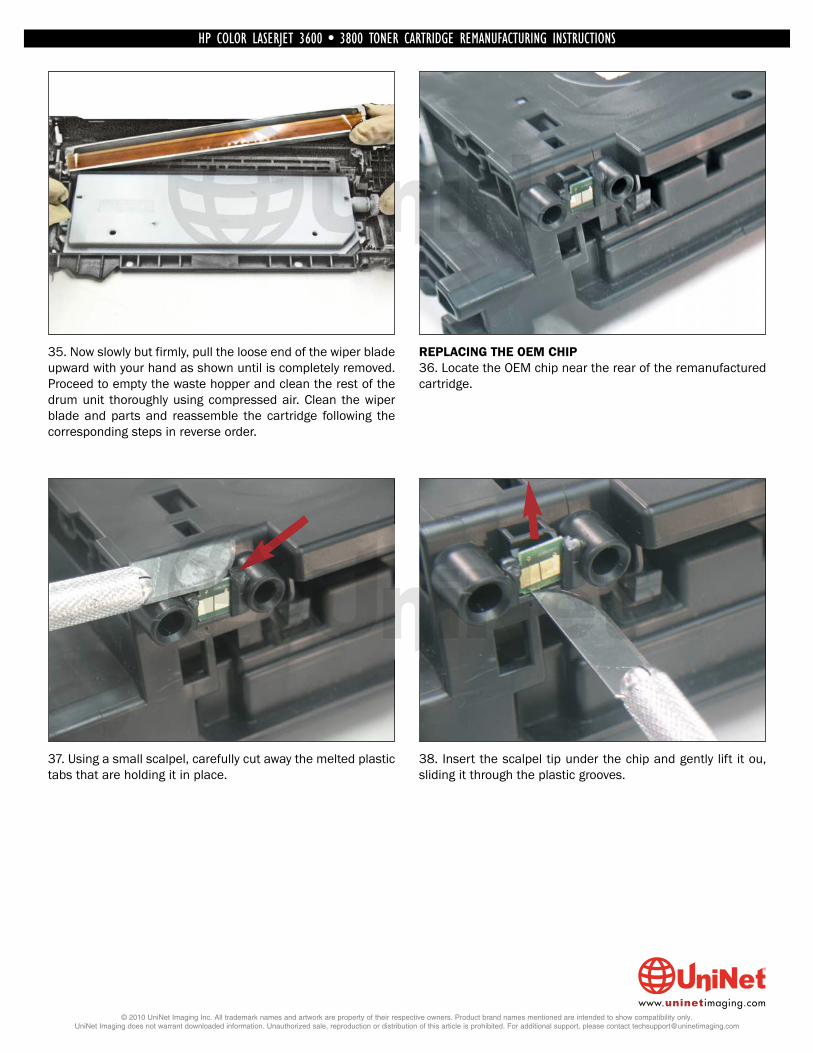
35. Now slowly but firmly, pull the loose end of the wiper bladeupward with your hand as shown until is completely removed.Proceed to empty the waste hopper and clean the rest of thedrum unit thoroughly using compressed air. Clean the wiperblade and parts and reassemble the cartridge following thecorresponding steps in reverse order.
REPLACING THE OEM CHIP36. Locate the OEM chip near the rear of the remanufacturedcartridge.
37. Using a small scalpel, carefully cut away the melted plastictabs that are holding it in place.
38. Insert the scalpel tip under the chip and gently lift it ou,sliding it through the plastic grooves.
HP COLOR LASERJET 3600 • 3800 TONER CARTRIDGE REMANUFACTURING INSTRUCTIONS
© 2010 UniNet Imaging Inc. All trademark names and artwork are property of their respective owners. Product brand names mentioned are intended to show compatibility only.UniNet Imaging does not warrant downloaded information. Unauthorized sale, reproduction or distribution of this article is prohibited. For additional support, please contact [email protected]
www.uninetimaging.com
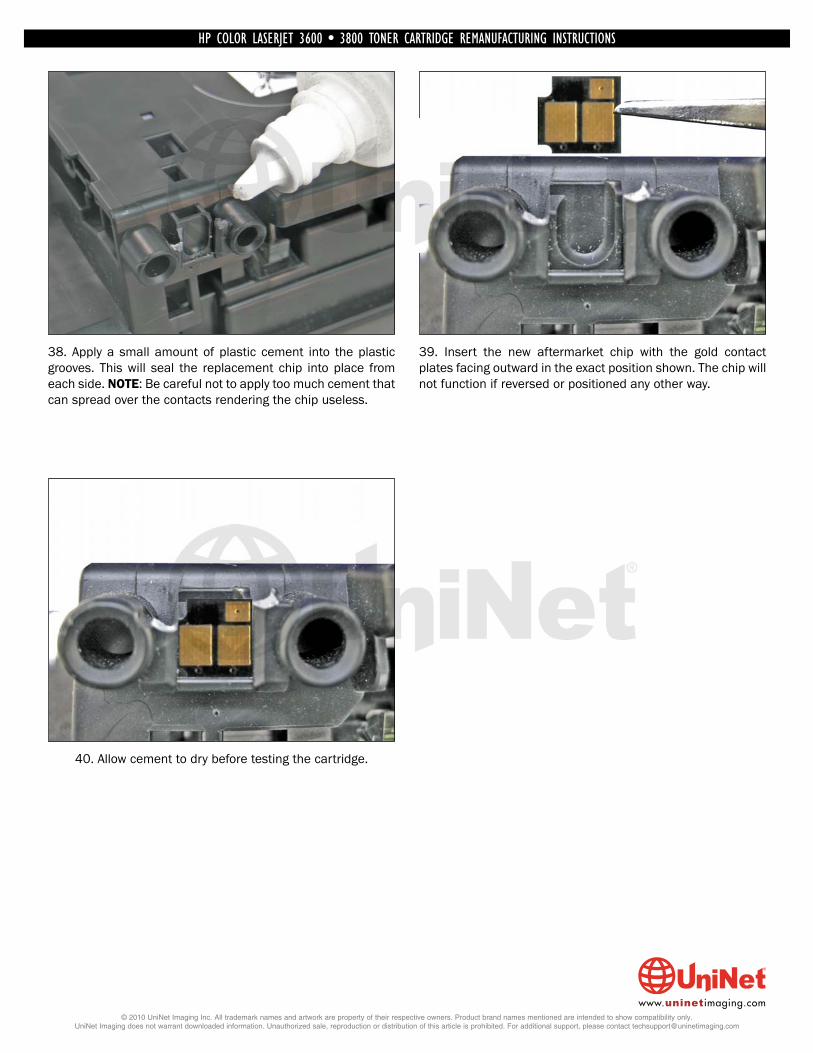
38. Apply a small amount of plastic cement into the plasticgrooves. This will seal the replacement chip into place fromeach side. NOTE: Be careful not to apply too much cement thatcan spread over the contacts rendering the chip useless.
39. Insert the new aftermarket chip with the gold contactplates facing outward in the exact position shown. The chip willnot function if reversed or positioned any other way.
40. Allow cement to dry before testing the cartridge.
HP COLOR LASERJET 3600 • 3800 TONER CARTRIDGE REMANUFACTURING INSTRUCTIONS
© 2010 UniNet Imaging Inc. All trademark names and artwork are property of their respective owners. Product brand names mentioned are intended to show compatibility only.UniNet Imaging does not warrant downloaded information. Unauthorized sale, reproduction or distribution of this article is prohibited. For additional support, please contact [email protected]
www.uninetimaging.com