hp designjet 5100 printer - hewlett packardh10032. · hp designjet online ... hp designjet 5100...
TRANSCRIPT
HP Designjet 5100 printerCustomer Reference Guide
HP Designjet 5100 printer Customer Reference Guide
More Information
You can find more about the following topics on the Using Your Printer CD:Printing materials and their characteristicsAnimations of loading materials and installing ink suppliesMore about solving problemsPage formattingPrinter configuration and maintenanceFunctional specificationsA glossary of terms and a comprehensive index
There is also more information available from the following sources:The WebAccess tool, for information about your printer status, technical support, on-line documentation, etc.HP Designjet Online (http://www.designjet.hp.com) for the latest product information, including on-line documentation and application notes for leading GIS softwareThe setup instructions that came with your printer

HP Designjet 5100 printer Customer Reference Guide
Table of Contents
1. Use the front panel
2. Load and unload material
3. Maintain the ink system
4. Manage the prints
5. Front-panel messages
6. Troubleshooting image quality
7. Troubleshooting the ink supply
8. Troubleshooting print material jams
9. Legal and service information
HP Designjet 5100 printer Customer Reference Guide
1-1HP Designjet 5100 printer Customer Reference Guide
Use the front panel 1
Functional areas 1-2The navigation keys 1-2Display screens 1-3Action keys 1-4Status lights 1-4Sleep mode key 1-5
Print mode selection 1-5Selecting production mode 1-6
Internal prints 1-7Print the configuration 1-7Menu print 1-7
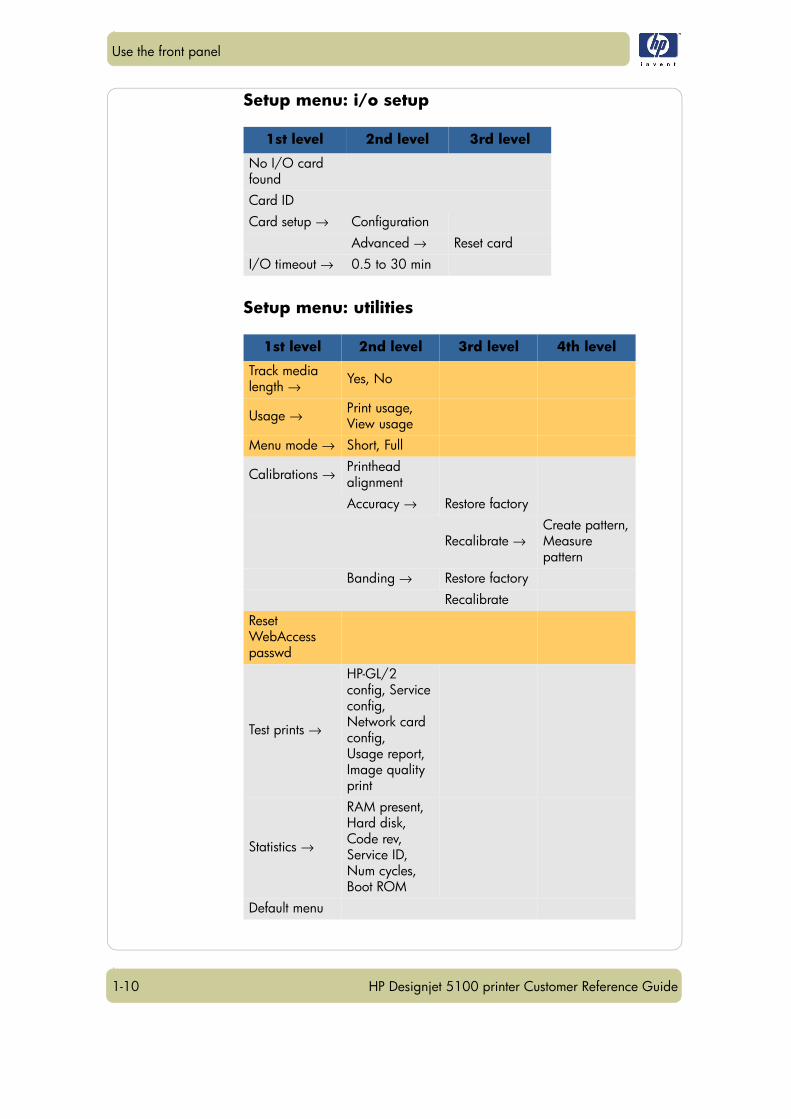
Front-panel menus 1-9Setup menu: device setup 1-9Setup menu: internal rip settings 1-12Setup menu: queuing and nesting 1-12Setup menu: page format 1-13Setup menu: demos 1-14Media menu 1-14Ink cartridge menu 1-15Printhead menu 1-15
Navigation 1-15Using the navigation keys 1-15Entering the setup menu 1-16
Navigation examples 1-17Changing menu mode 1-17Changing the page size 1-17Changing the drying time 1-18Restoring the default menu 1-19
1
1-2
Use the front panel
HP Designjet 5100 printer Customer Reference Guide
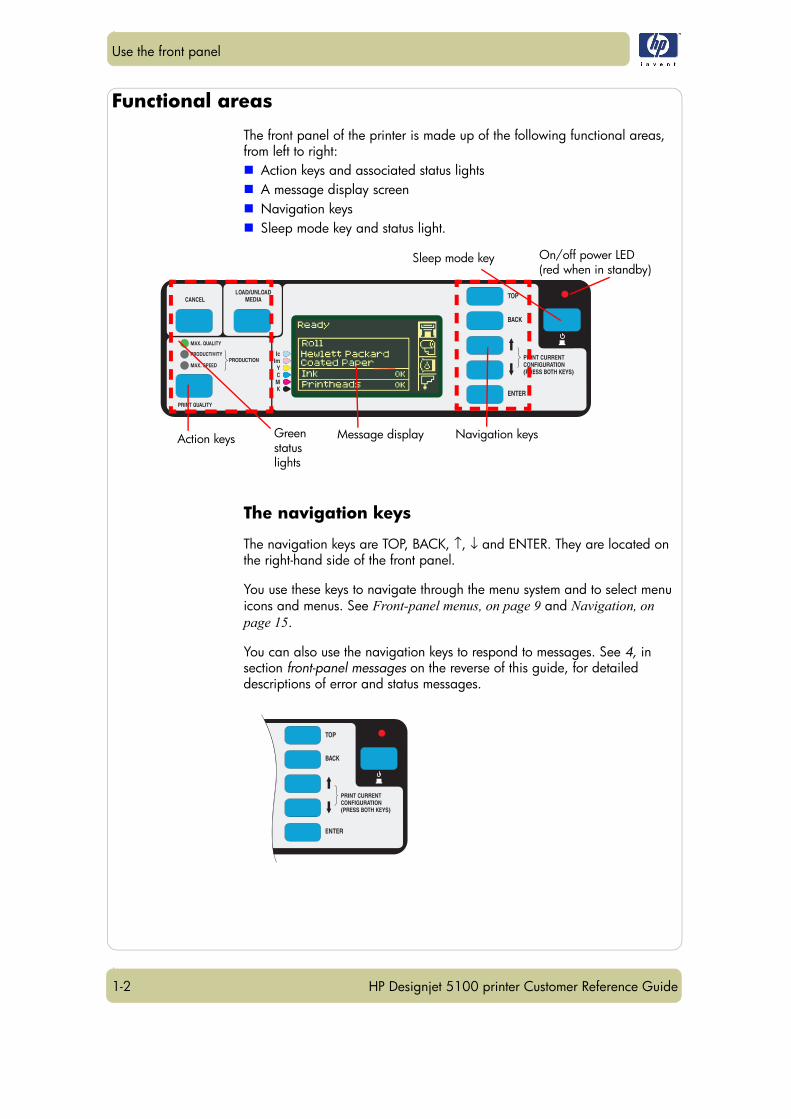
Functional areas
The front panel of the printer is made up of the following functional areas, from left to right:
Action keys and associated status lightsA message display screenNavigation keysSleep mode key and status light.
The navigation keys
The navigation keys are TOP, BACK, ↑, ↓ and ENTER. They are located on the right-hand side of the front panel.
You use these keys to navigate through the menu system and to select menu icons and menus. See Front-panel menus, on page 9 and Navigation, on page 15.
You can also use the navigation keys to respond to messages. See 4, in section front-panel messages on the reverse of this guide, for detailed descriptions of error and status messages.
On/off power LED(red when in standby)
Sleep mode key
Message displayAction keys Navigation keysGreen status lights
1-3
Use the front panel
HP Designjet 5100 printer Customer Reference Guide
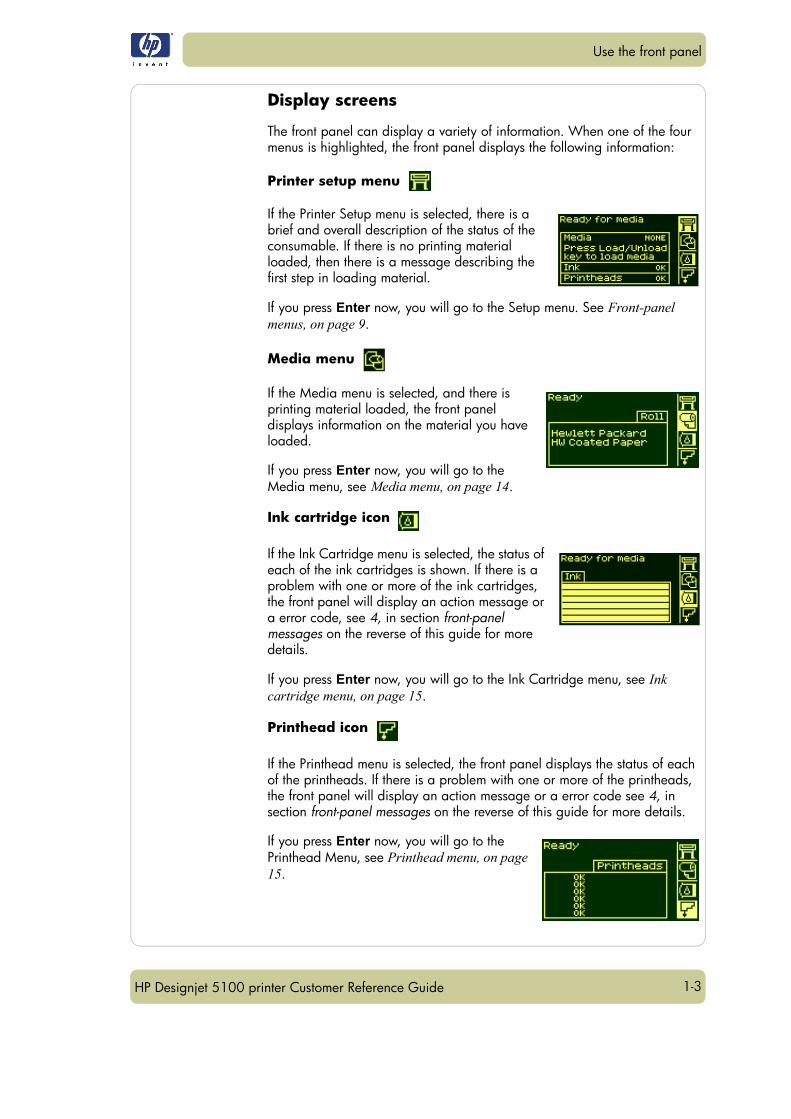
Display screens
The front panel can display a variety of information. When one of the four menus is highlighted, the front panel displays the following information:
Printer setup menu
If the Printer Setup menu is selected, there is a brief and overall description of the status of the consumable. If there is no printing material loaded, then there is a message describing the first step in loading material.
If you press Enter now, you will go to the Setup menu. See Front-panel menus, on page 9.
Media menu
If the Media menu is selected, and there is printing material loaded, the front panel displays information on the material you have loaded.
If you press Enter now, you will go to the Media menu, see Media menu, on page 14.
Ink cartridge icon
If the Ink Cartridge menu is selected, the status of each of the ink cartridges is shown. If there is a problem with one or more of the ink cartridges, the front panel will display an action message or a error code, see 4, in section front-panel messages on the reverse of this guide for more details.
If you press Enter now, you will go to the Ink Cartridge menu, see Ink cartridge menu, on page 15.
Printhead icon
If the Printhead menu is selected, the front panel displays the status of each of the printheads. If there is a problem with one or more of the printheads, the front panel will display an action message or a error code see 4, in section front-panel messages on the reverse of this guide for more details.
If you press Enter now, you will go to the Printhead Menu, see Printhead menu, on page 15.
1-4
Use the front panel
HP Designjet 5100 printer Customer Reference Guide
Menus
To configure the printer, use the menus to select and change the settings. Use the ↑ and ↓ keys to navigate and press the Enter key to select the options.
Procedure information
The front-panel display can help you through the various procedures you have to perform, such as loading printing material.
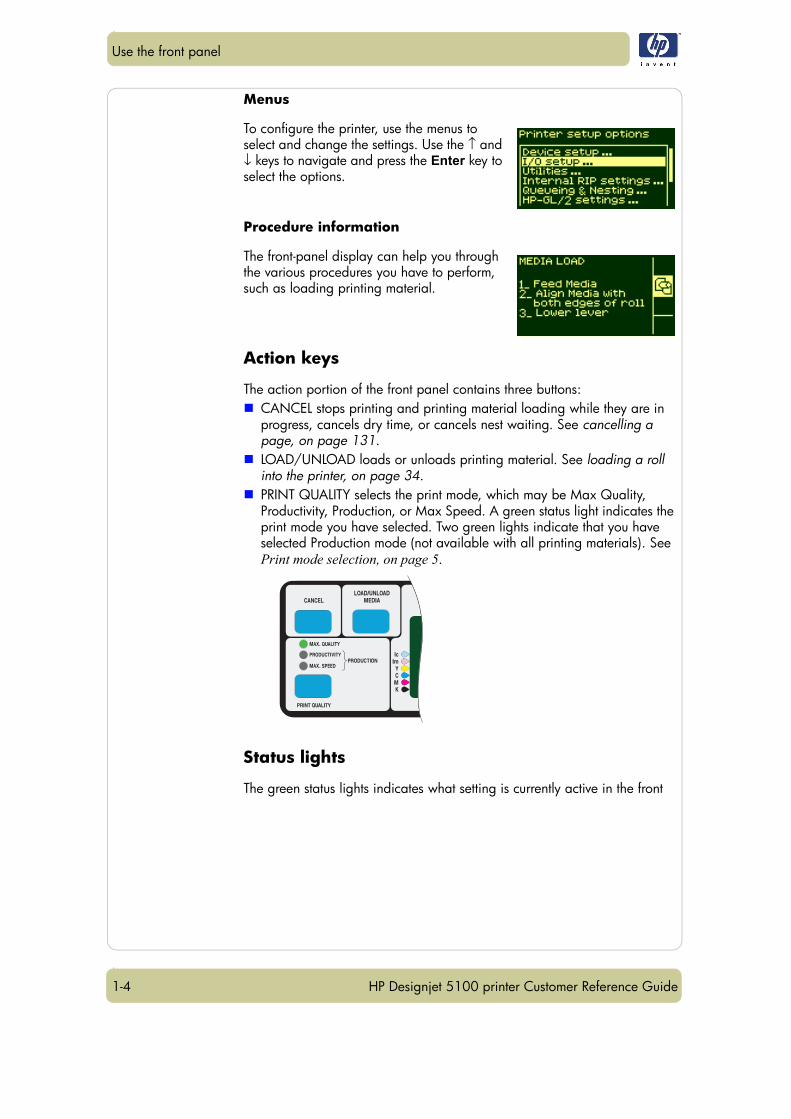
Action keys
The action portion of the front panel contains three buttons:CANCEL stops printing and printing material loading while they are in progress, cancels dry time, or cancels nest waiting. See cancelling a page, on page 131.LOAD/UNLOAD loads or unloads printing material. See loading a roll into the printer, on page 34.PRINT QUALITY selects the print mode, which may be Max Quality, Productivity, Production, or Max Speed. A green status light indicates the print mode you have selected. Two green lights indicate that you have selected Production mode (not available with all printing materials). See Print mode selection, on page 5.
Status lights
The green status lights indicates what setting is currently active in the front
1-5
Use the front panel
HP Designjet 5100 printer Customer Reference Guide
panel.
NOTE: In most cases, settings in your application software or printer driver will override the settings you make on the front panel of the printer.
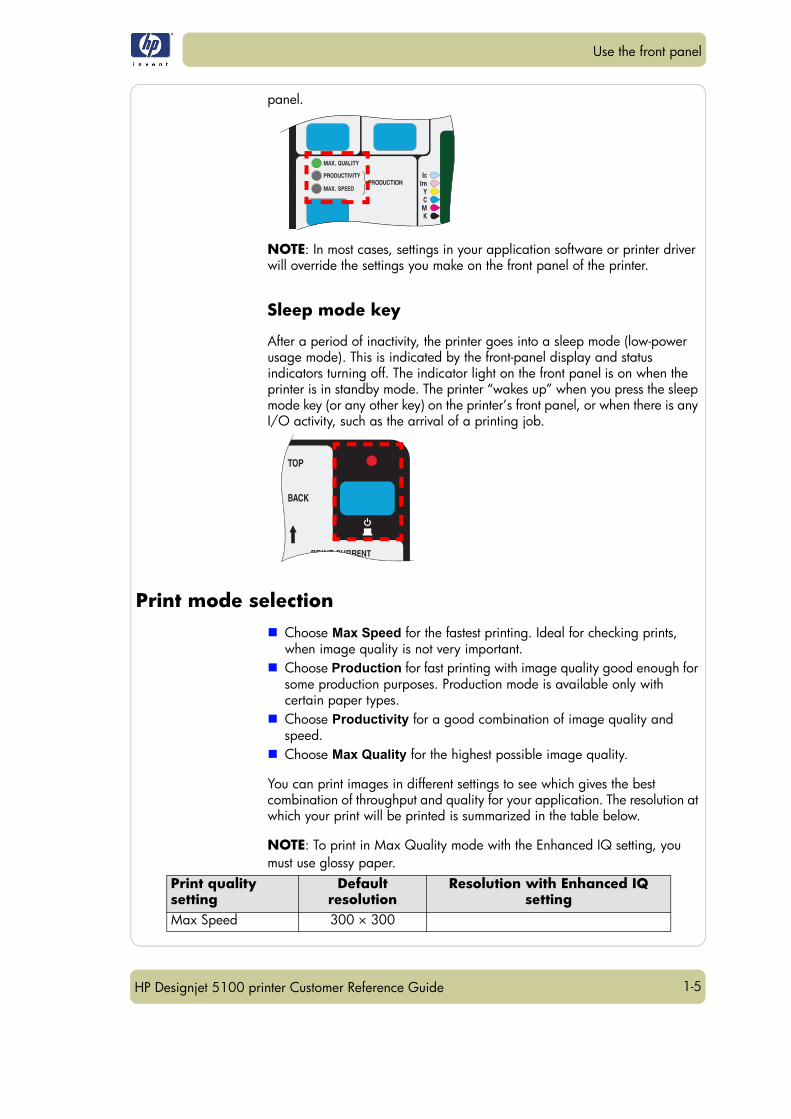
Sleep mode key
After a period of inactivity, the printer goes into a sleep mode (low-power usage mode). This is indicated by the front-panel display and status indicators turning off. The indicator light on the front panel is on when the printer is in standby mode. The printer “wakes up” when you press the sleep mode key (or any other key) on the printer’s front panel, or when there is any I/O activity, such as the arrival of a printing job.
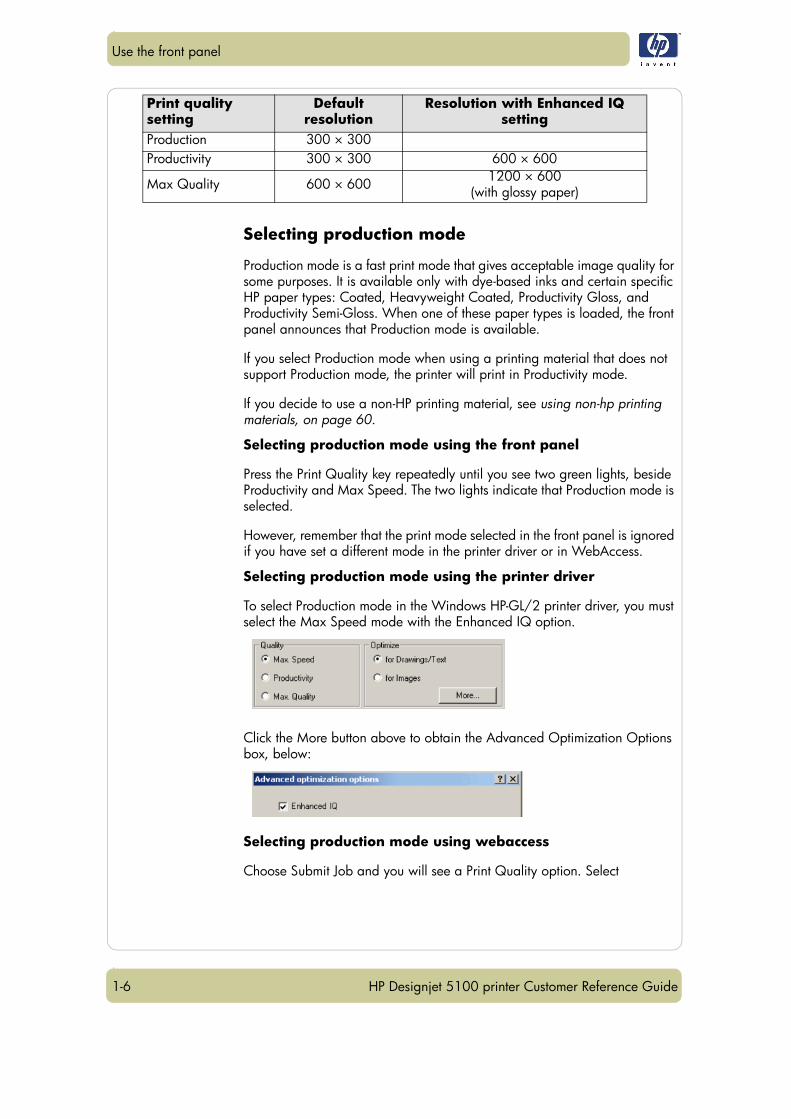
Print mode selectionChoose Max Speed for the fastest printing. Ideal for checking prints, when image quality is not very important.Choose Production for fast printing with image quality good enough for some production purposes. Production mode is available only with certain paper types.Choose Productivity for a good combination of image quality and speed.Choose Max Quality for the highest possible image quality.
You can print images in different settings to see which gives the best combination of throughput and quality for your application. The resolution at which your print will be printed is summarized in the table below.
NOTE: To print in Max Quality mode with the Enhanced IQ setting, you must use glossy paper.
Print quality setting
Default resolution
Resolution with Enhanced IQ setting
Max Speed 300 × 300
1-6
Use the front panel
HP Designjet 5100 printer Customer Reference Guide
Selecting production mode
Production mode is a fast print mode that gives acceptable image quality for some purposes. It is available only with dye-based inks and certain specific HP paper types: Coated, Heavyweight Coated, Productivity Gloss, and Productivity Semi-Gloss. When one of these paper types is loaded, the front panel announces that Production mode is available.
If you select Production mode when using a printing material that does not support Production mode, the printer will print in Productivity mode.
If you decide to use a non-HP printing material, see using non-hp printing materials, on page 60.
Selecting production mode using the front panel
Press the Print Quality key repeatedly until you see two green lights, beside Productivity and Max Speed. The two lights indicate that Production mode is selected.
However, remember that the print mode selected in the front panel is ignored if you have set a different mode in the printer driver or in WebAccess.
Selecting production mode using the printer driver
To select Production mode in the Windows HP-GL/2 printer driver, you must select the Max Speed mode with the Enhanced IQ option.
Click the More button above to obtain the Advanced Optimization Options box, below:
Selecting production mode using webaccess
Choose Submit Job and you will see a Print Quality option. Select
Production 300 × 300Productivity 300 × 300 600 × 600
Max Quality 600 × 600 1200 × 600(with glossy paper)
Print quality setting
Default resolution
Resolution with Enhanced IQ setting
1-7
Use the front panel
HP Designjet 5100 printer Customer Reference Guide
Production.
Internal prints
Print the configuration
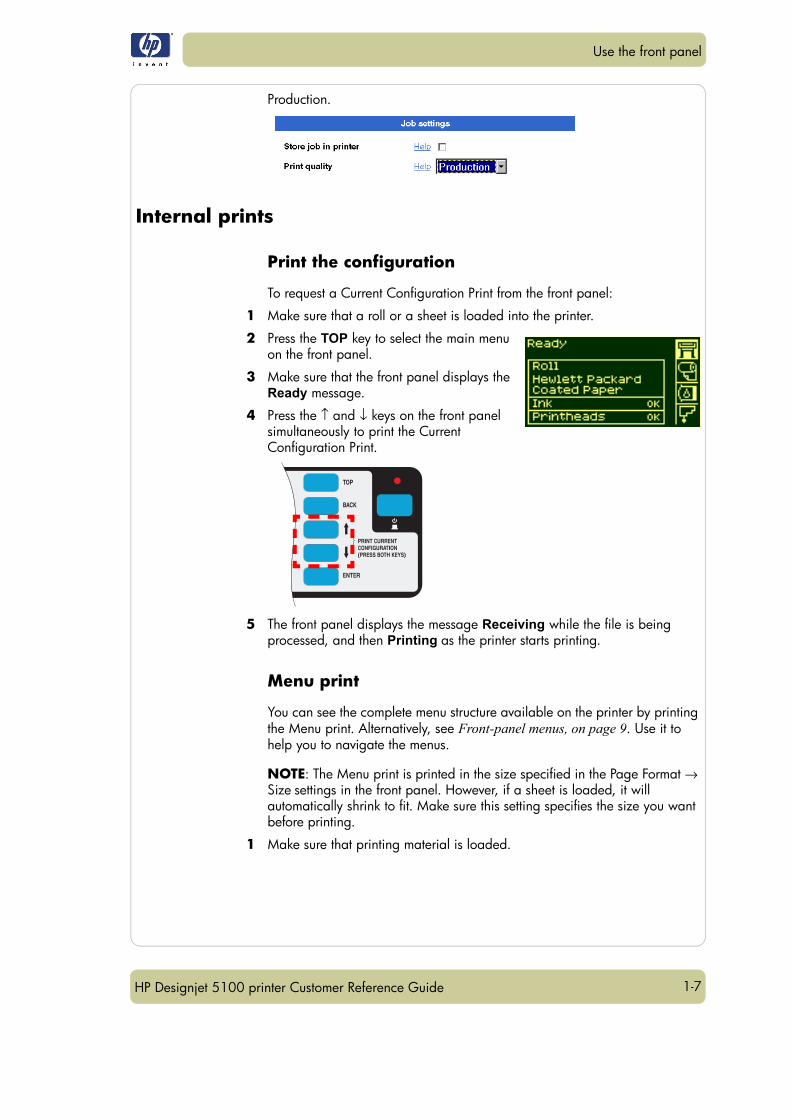
To request a Current Configuration Print from the front panel:
1 Make sure that a roll or a sheet is loaded into the printer.
2 Press the TOP key to select the main menu on the front panel.
3 Make sure that the front panel displays the Ready message.
4 Press the ↑ and ↓ keys on the front panel simultaneously to print the Current Configuration Print.
5 The front panel displays the message Receiving while the file is being processed, and then Printing as the printer starts printing.
Menu print
You can see the complete menu structure available on the printer by printing the Menu print. Alternatively, see Front-panel menus, on page 9. Use it to help you to navigate the menus.
NOTE: The Menu print is printed in the size specified in the Page Format → Size settings in the front panel. However, if a sheet is loaded, it will automatically shrink to fit. Make sure this setting specifies the size you want before printing.
1 Make sure that printing material is loaded.
1-8
Use the front panel
HP Designjet 5100 printer Customer Reference Guide
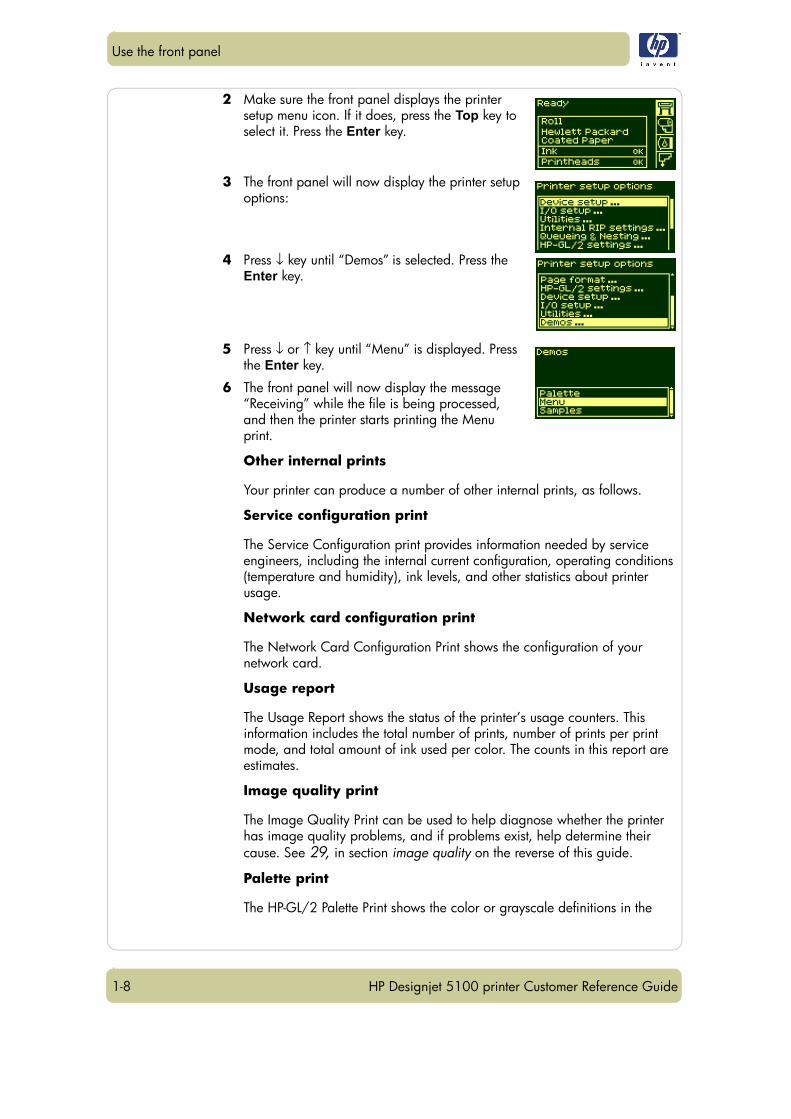
2 Make sure the front panel displays the printer setup menu icon. If it does, press the Top key to select it. Press the Enter key.
3 The front panel will now display the printer setup options:
4 Press ↓ key until “Demos” is selected. Press the Enter key.
5 Press ↓ or ↑ key until “Menu” is displayed. Press the Enter key.
6 The front panel will now display the message “Receiving” while the file is being processed, and then the printer starts printing the Menu print.
Other internal prints
Your printer can produce a number of other internal prints, as follows.
Service configuration print
The Service Configuration print provides information needed by service engineers, including the internal current configuration, operating conditions (temperature and humidity), ink levels, and other statistics about printer usage.
Network card configuration print
The Network Card Configuration Print shows the configuration of your network card.
Usage report
The Usage Report shows the status of the printer’s usage counters. This information includes the total number of prints, number of prints per print mode, and total amount of ink used per color. The counts in this report are estimates.
Image quality print
The Image Quality Print can be used to help diagnose whether the printer has image quality problems, and if problems exist, help determine their cause. See 29, in section image quality on the reverse of this guide.
Palette print
The HP-GL/2 Palette Print shows the color or grayscale definitions in the
1-9
Use the front panel
HP Designjet 5100 printer Customer Reference Guide
currently-selected color palette. See the ‘Using Your Printer CD’.
Samples
These are prints showing the capabilities of the printer.
Front-panel menus
Key:1 The items on a yellow background always appear on the Front Panel.
2 The items on a gray background appear in the front panel only when Utilities > Menu mode is set to Full. Full is the default.
3 The items on a blue background appear in the front panel only when the TUR is installed and loaded with a roll.
4 The items on a green background appear in the front panel only when the TUR is installed and not loaded with a roll, or when the TUR is not installed.
Setup menu: device setup
1st level 2nd level 3rd level
Accessories → TUR installed → Yes, NoOther accessories → Yes, No
Cutter → On, OffReduced margins → On, Off
Lang → CALS/G4, HP-GL/2, TIFF, JPEG, Automatic
Drying time → AutomaticNoneManual → 1 to 255 min
Pen check → Optimized
Manual → every 1 to 255 plots
Next plotHeater → Automatic
NoneManual → 10 to 100%
Sleep mode → 30, 60, 120, 150, 180, 210, 240 min
1-10
Use the front panel
HP Designjet 5100 printer Customer Reference Guide
Setup menu: i/o setup
Setup menu: utilities
1st level 2nd level 3rd level
No I/O card foundCard IDCard setup → Configuration
Advanced → Reset cardI/O timeout → 0.5 to 30 min
1st level 2nd level 3rd level 4th level
Track media length → Yes, No
Usage → Print usage,View usage
Menu mode → Short, Full
Calibrations → Printhead alignmentAccuracy → Restore factory
Recalibrate →Create pattern,Measure pattern
Banding → Restore factoryRecalibrate
Reset WebAccess passwd
Test prints →
HP-GL/2 config, Service config, Network card config,Usage report, Image quality print
Statistics →
RAM present, Hard disk,Code rev, Service ID,Num cycles,Boot ROM
Default menu
1-11
Use the front panel
HP Designjet 5100 printer Customer Reference Guide
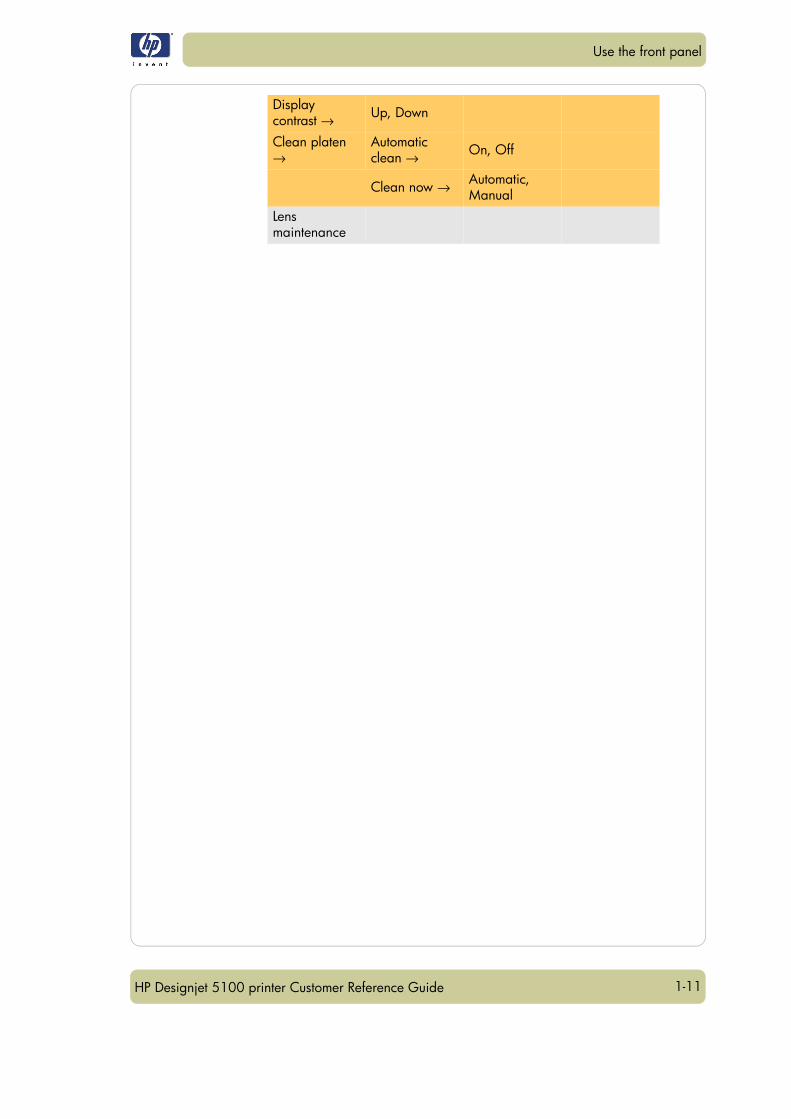
Display contrast → Up, Down
Clean platen →
Automatic clean → On, Off
Clean now → Automatic, Manual
Lens maintenance
1-12
Use the front panel
HP Designjet 5100 printer Customer Reference Guide
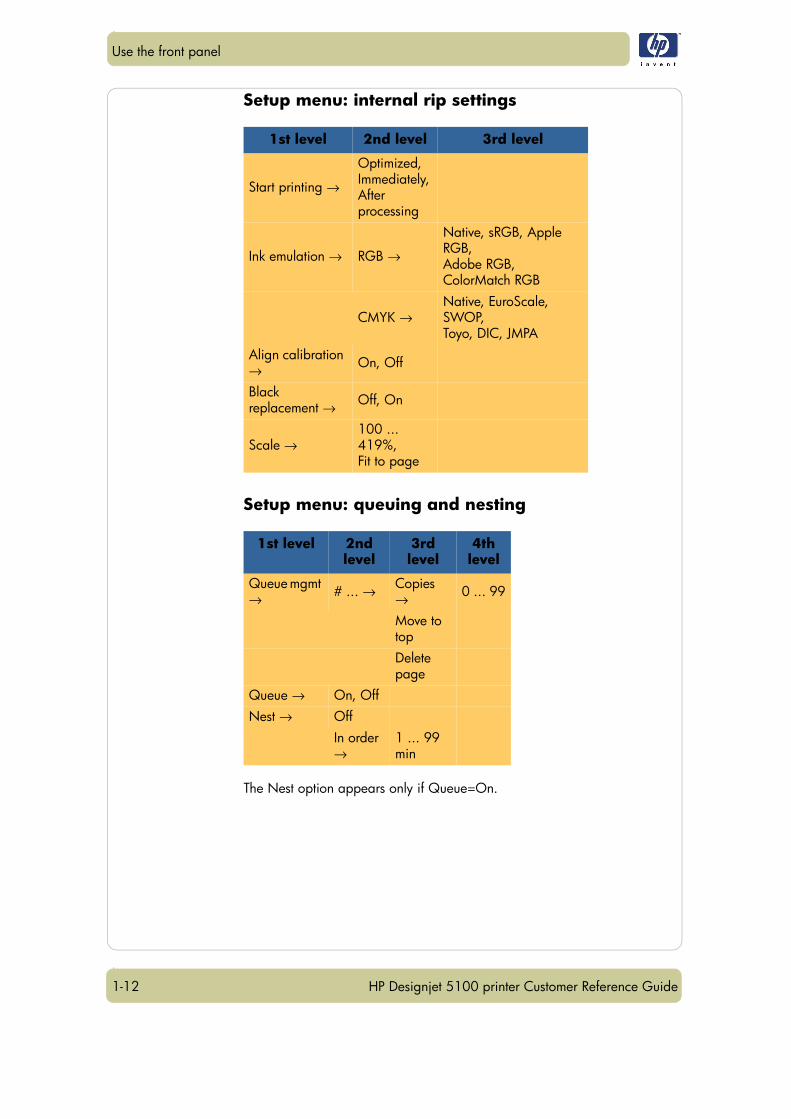
Setup menu: internal rip settings
Setup menu: queuing and nesting
The Nest option appears only if Queue=On.
1st level 2nd level 3rd level
Start printing →
Optimized,Immediately,After processing
Ink emulation → RGB →
Native, sRGB, Apple RGB,Adobe RGB, ColorMatch RGB
CMYK →Native, EuroScale, SWOP,Toyo, DIC, JMPA
Align calibration → On, Off
Black replacement → Off, On
Scale →100 ... 419%,Fit to page
1st level 2nd level
3rd level
4th level
Queue mgmt → # ... → Copies
→ 0 ... 99
Move to topDelete page
Queue → On, OffNest → Off
In order →
1 ... 99 min
1-13
Use the front panel
HP Designjet 5100 printer Customer Reference Guide
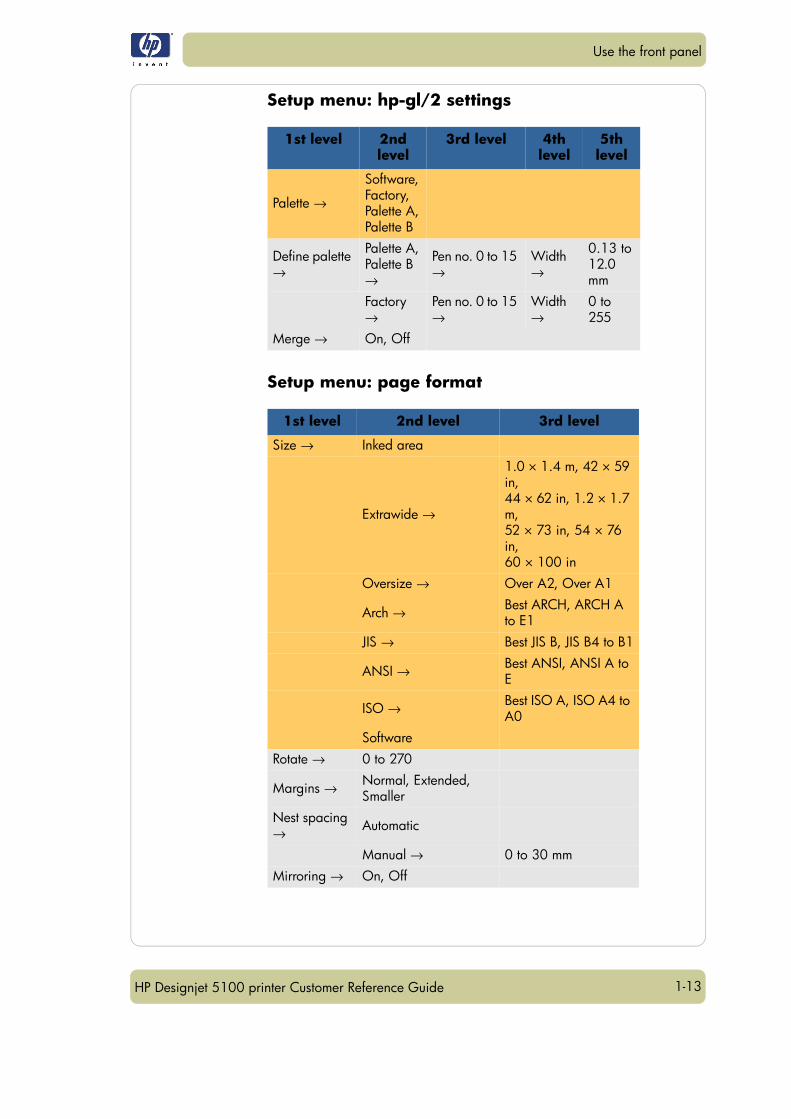
Setup menu: hp-gl/2 settings
Setup menu: page format
1st level 2nd level
3rd level 4th level
5th level
Palette →
Software,Factory,Palette A,Palette B
Define palette →
Palette A,Palette B →
Pen no. 0 to 15 →
Width →
0.13 to12.0 mm
Factory →
Pen no. 0 to 15 →
Width →
0 to 255
Merge → On, Off
1st level 2nd level 3rd level
Size → Inked area
Extrawide →
1.0 × 1.4 m, 42 × 59 in,44 × 62 in, 1.2 × 1.7 m,52 × 73 in, 54 × 76 in,60 × 100 in
Oversize → Over A2, Over A1
Arch → Best ARCH, ARCH A to E1
JIS → Best JIS B, JIS B4 to B1
ANSI → Best ANSI, ANSI A to E
ISO → Best ISO A, ISO A4 to A0
SoftwareRotate → 0 to 270
Margins → Normal, Extended, Smaller
Nest spacing → Automatic
Manual → 0 to 30 mmMirroring → On, Off

1-14
Use the front panel
HP Designjet 5100 printer Customer Reference Guide
Setup menu: demos
Media menu
1st level
SamplesPaletteMenu
1st level 2nd level 3rd level 4th level
Roll/sheet info →
Vendor name, Type of media, Width, Length, Max XY, Profile revision
Media selection → HP →
HW Coated, Coated Paper, Photo Imaging Gloss,Colorfast Vinyl, HP Adhesive-Backed Polypropylene, Paper Semi-Gloss, Poster Paper,Studio Canvas,More...
Others →
Coated, →HW Coated,Photo,Fine Arts,Vinyl/Film,Backlit,Textile,Colored,CAD,More...
Choose profile,Print sample
Delete media →
(list of downloaded media profiles; media profiles provided with the printer cannot be deleted)
Move mediaTUR loaded → Yes, NoForm feed & cut → Yes, No
1-15
Use the front panel
HP Designjet 5100 printer Customer Reference Guide
The front panel shows only a selection of the available printing materials.
The Using Your Printer CD has a more complete list.
See also using non-hp printing materials, on page 60.
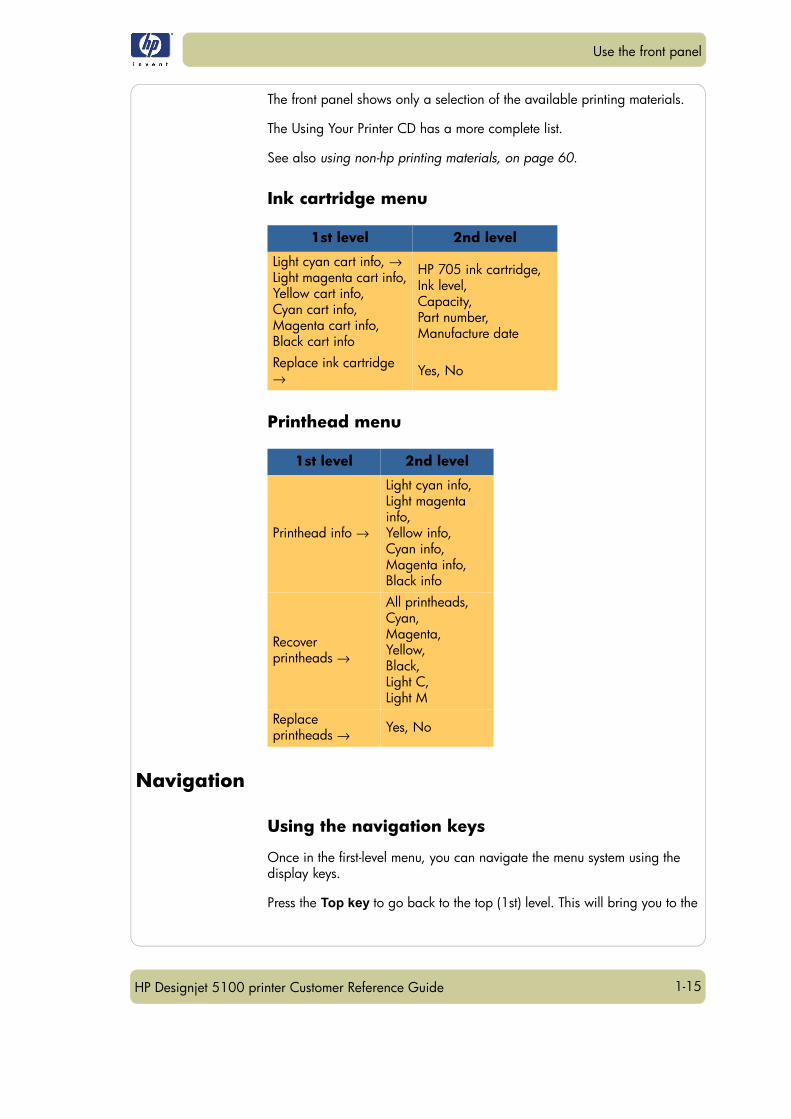
Ink cartridge menu
Printhead menu
Navigation
Using the navigation keys
Once in the first-level menu, you can navigate the menu system using the display keys.
Press the Top key to go back to the top (1st) level. This will bring you to the
1st level 2nd level
Light cyan cart info, →Light magenta cart info,Yellow cart info,Cyan cart info,Magenta cart info,Black cart info
HP 705 ink cartridge,Ink level,Capacity,Part number,Manufacture date
Replace ink cartridge → Yes, No
1st level 2nd level
Printhead info →
Light cyan info,Light magenta info,Yellow info,Cyan info,Magenta info,Black info
Recover printheads →
All printheads,Cyan,Magenta,Yellow,Black,Light C,Light M
Replace printheads → Yes, No
1-16
Use the front panel
HP Designjet 5100 printer Customer Reference Guide
setup menu icon See Entering the setup menu, on page 16.
Press the Back key to display the previous menu level, without changing any menu selections
Press ↑ to scroll up, or ↓ to scroll down though the menus.
Press the Enter key to:
a Select a menu and move to the next menu level, when in the menu system
b Change the printer’s configuration to the highlighted menu item indicated with a √ symbol.
The … characters in a menu box indicate that another level of menu is available.
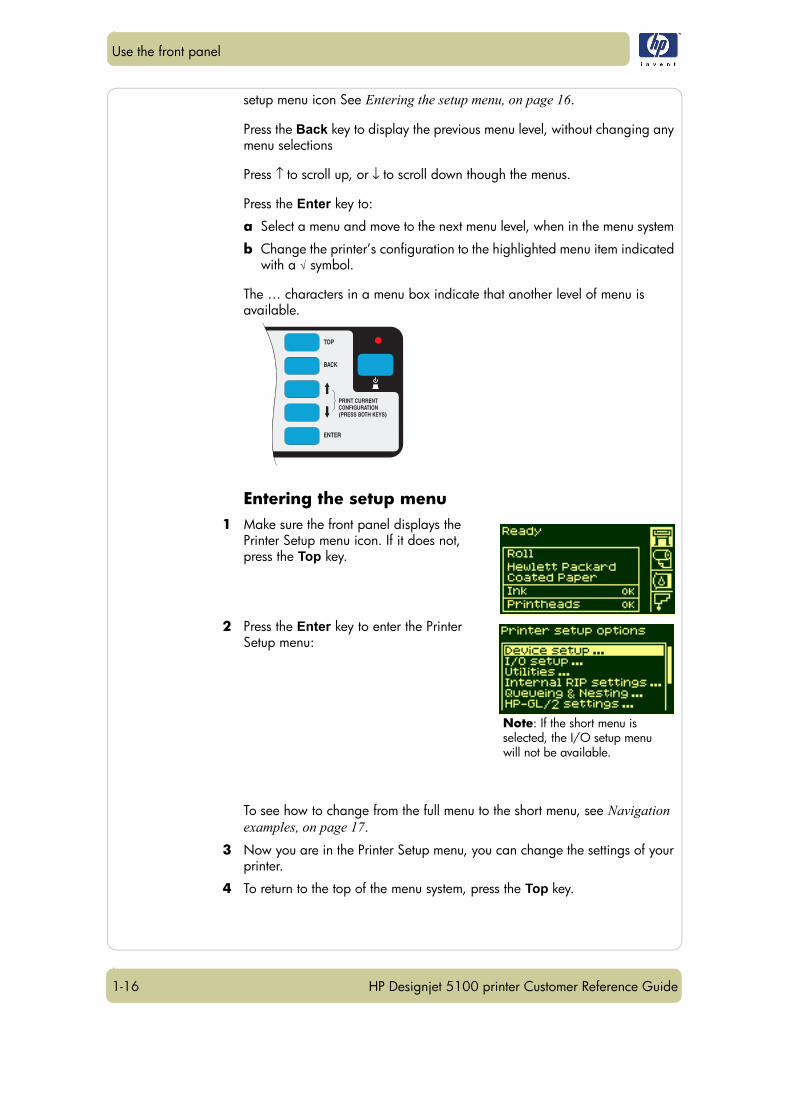
Entering the setup menu 1 Make sure the front panel displays the
Printer Setup menu icon. If it does not, press the Top key.
2 Press the Enter key to enter the Printer Setup menu:
To see how to change from the full menu to the short menu, see Navigation examples, on page 17.
3 Now you are in the Printer Setup menu, you can change the settings of your printer.
4 To return to the top of the menu system, press the Top key.
Note: If the short menu is selected, the I/O setup menu will not be available.
1-17
Use the front panel
HP Designjet 5100 printer Customer Reference Guide
Navigation examples
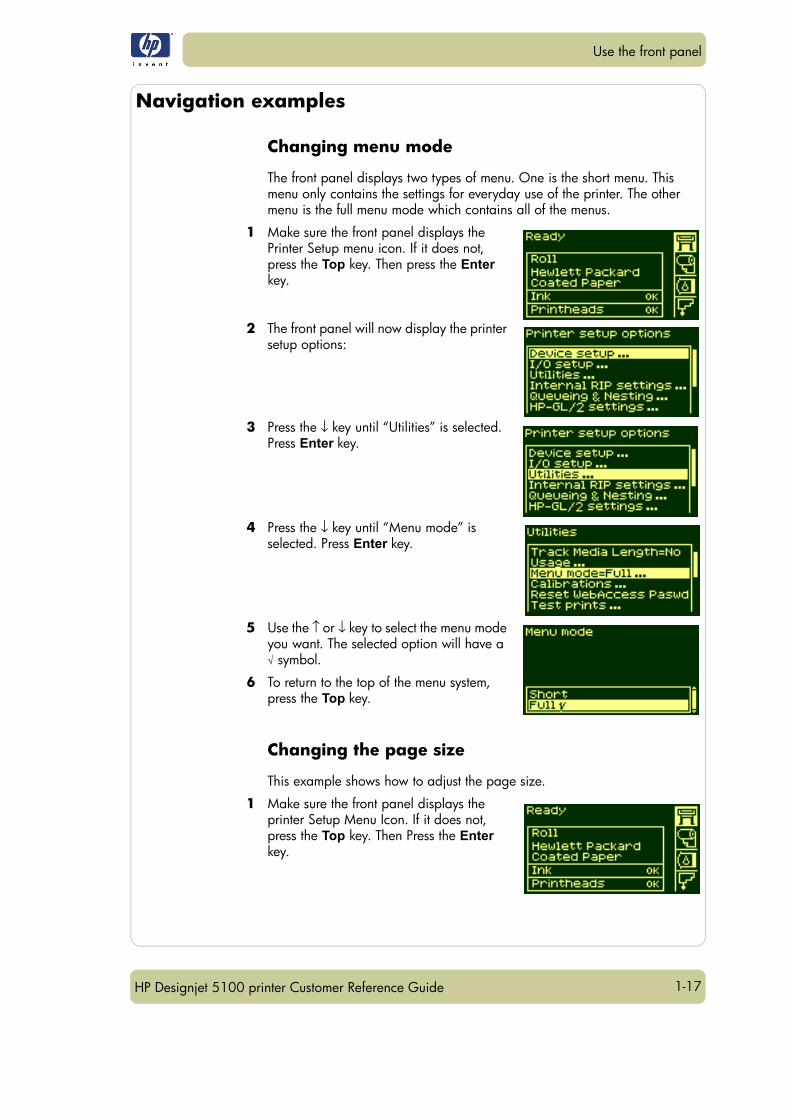
Changing menu mode
The front panel displays two types of menu. One is the short menu. This menu only contains the settings for everyday use of the printer. The other menu is the full menu mode which contains all of the menus.
1 Make sure the front panel displays the Printer Setup menu icon. If it does not, press the Top key. Then press the Enter key.
2 The front panel will now display the printer setup options:
3 Press the ↓ key until “Utilities” is selected. Press Enter key.
4 Press the ↓ key until “Menu mode” is selected. Press Enter key.
5 Use the ↑ or ↓ key to select the menu mode you want. The selected option will have a √ symbol.
6 To return to the top of the menu system, press the Top key.
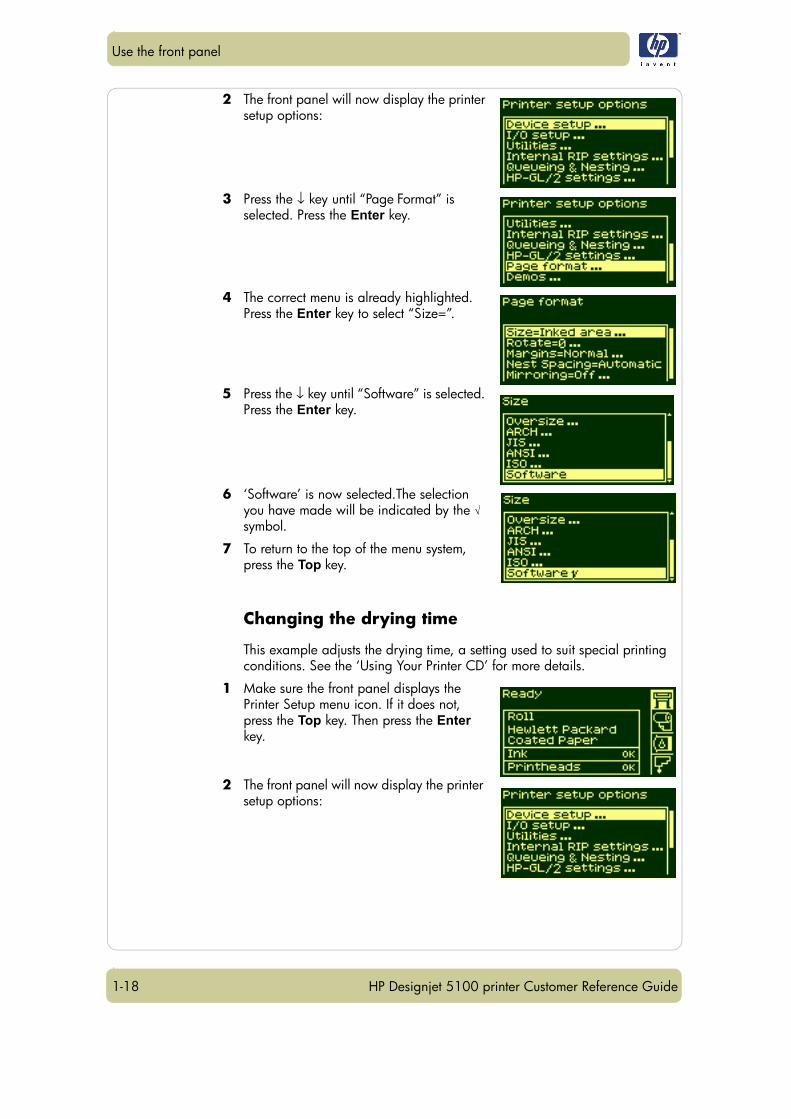
Changing the page size
This example shows how to adjust the page size.
1 Make sure the front panel displays the printer Setup Menu Icon. If it does not, press the Top key. Then Press the Enter key.
1-18
Use the front panel
HP Designjet 5100 printer Customer Reference Guide
2 The front panel will now display the printer setup options:
3 Press the ↓ key until “Page Format” is selected. Press the Enter key.
4 The correct menu is already highlighted. Press the Enter key to select “Size=”.
5 Press the ↓ key until “Software” is selected. Press the Enter key.
6 ‘Software’ is now selected.The selection you have made will be indicated by the √ symbol.
7 To return to the top of the menu system, press the Top key.
Changing the drying time
This example adjusts the drying time, a setting used to suit special printing conditions. See the ‘Using Your Printer CD’ for more details.
1 Make sure the front panel displays the Printer Setup menu icon. If it does not, press the Top key. Then press the Enter key.
2 The front panel will now display the printer setup options:
1-19
Use the front panel
HP Designjet 5100 printer Customer Reference Guide
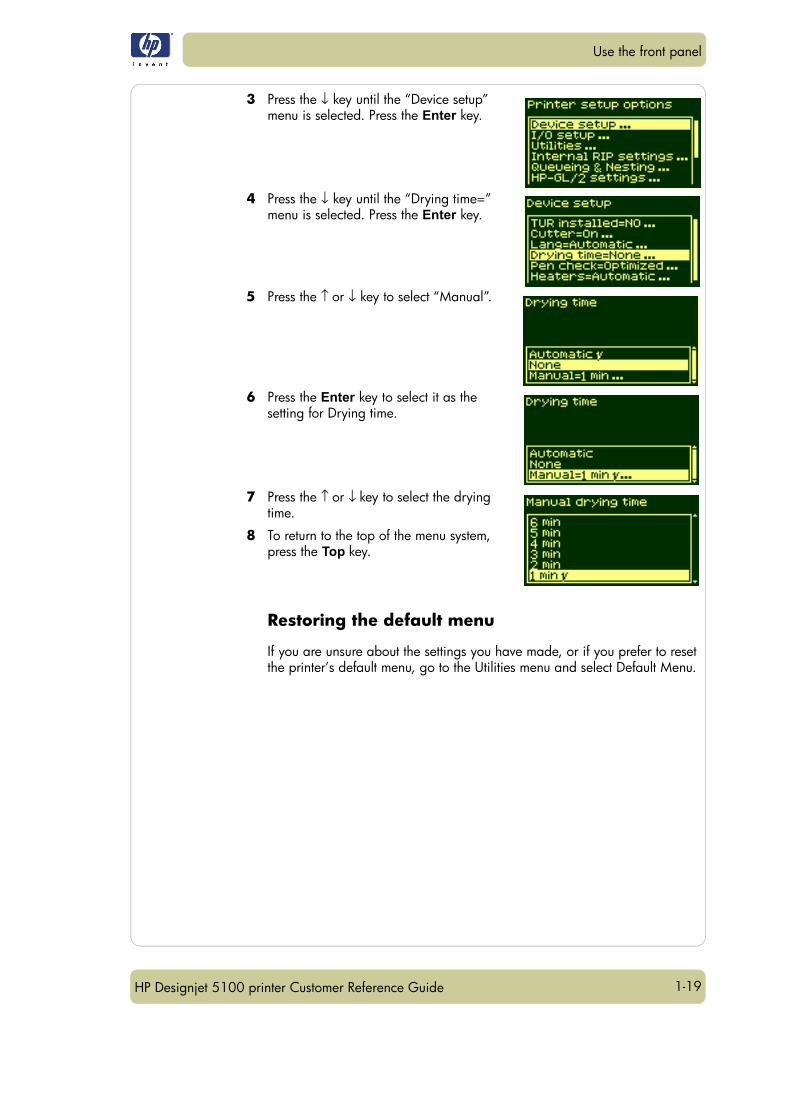
3 Press the ↓ key until the “Device setup” menu is selected. Press the Enter key.
4 Press the ↓ key until the “Drying time=” menu is selected. Press the Enter key.
5 Press the ↑ or ↓ key to select “Manual”.
6 Press the Enter key to select it as the setting for Drying time.
7 Press the ↑ or ↓ key to select the drying time.
8 To return to the top of the menu system, press the Top key.
Restoring the default menu
If you are unsure about the settings you have made, or if you prefer to reset the printer’s default menu, go to the Utilities menu and select Default Menu.
1-20
Use the front panel
HP Designjet 5100 printer Customer Reference Guide
2-1HP Designjet 5100 printer Customer Reference Guide
Load and unload material 2
Loading roll guidelines 2-2Loading a roll into the printer 2-2Using pre-loaded spindles 2-2Attaching printing material to the take-up reel 2-2Help with loading 2-3
Loading a roll onto the spindle 2-3Loading a roll into the printer 2-5Attaching the roll to the take-up reel 2-9Unloading the roll from the take-up reel 2-12Removing the roll from the printer 2-15Loading sheets 2-16Unloading sheets 2-18Using non-hp printing materials 2-18Media length tracking 2-19
2
2-2
Load and unload material
HP Designjet 5100 printer Customer Reference Guide
Loading roll guidelines
There are three steps to loading a roll into the printer.
1 Load the roll onto the spindle and install the loaded spindle into the printer.
2 Insert the roll into the printer and set the media type in the front panel.
3 Attach the roll to the take-up reel (if you have one).
CAUTION Long rolls are heavy. You may need two people to loadthem.
Loading a roll into the printer
In the initial stages of loading a roll you may want to open the window, but this is optional. If you are an experienced user for example, you can leave the window closed, thus saving time.
NOTE: Always start the procedure through the front panel.
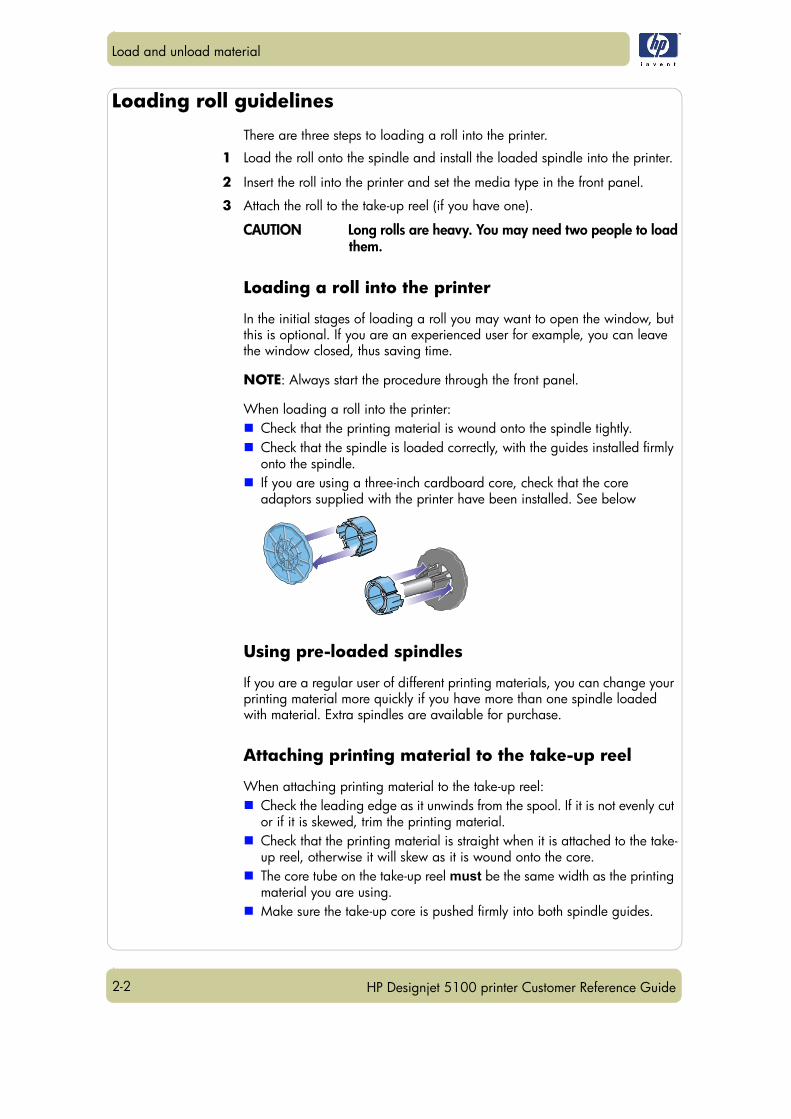
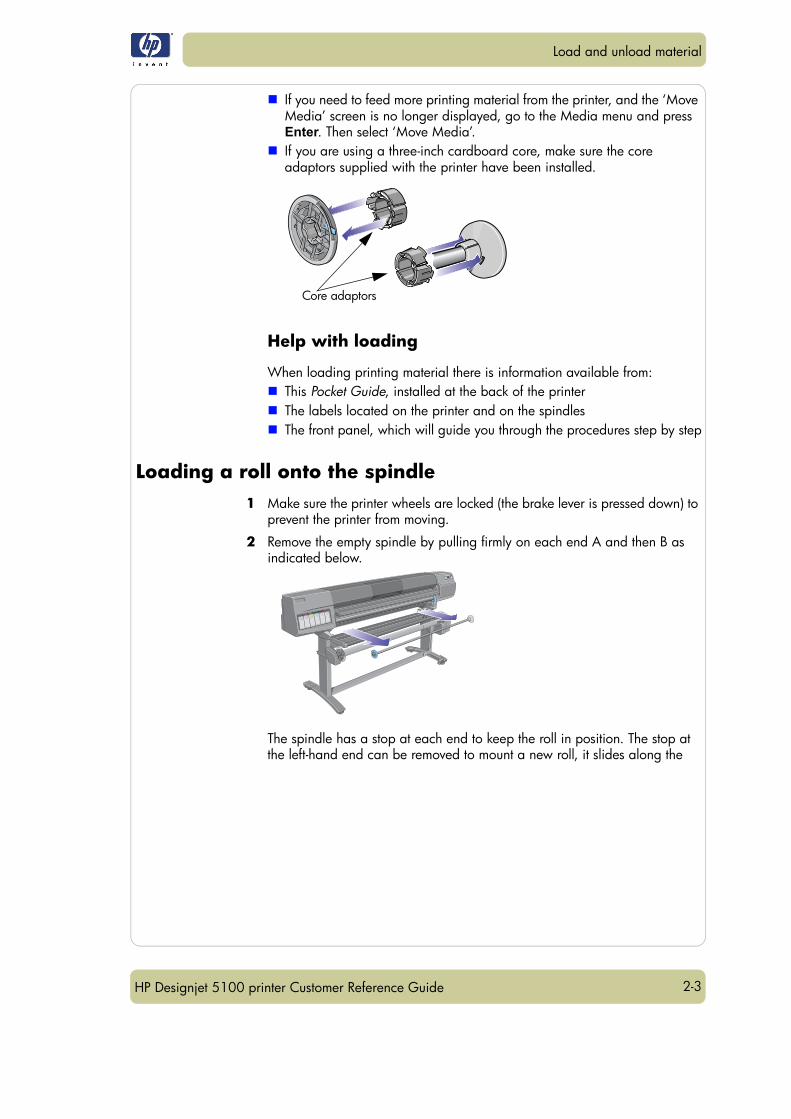
When loading a roll into the printer:Check that the printing material is wound onto the spindle tightly.Check that the spindle is loaded correctly, with the guides installed firmly onto the spindle.If you are using a three-inch cardboard core, check that the core adaptors supplied with the printer have been installed. See below
Using pre-loaded spindles
If you are a regular user of different printing materials, you can change your printing material more quickly if you have more than one spindle loaded with material. Extra spindles are available for purchase.
Attaching printing material to the take-up reel
When attaching printing material to the take-up reel:Check the leading edge as it unwinds from the spool. If it is not evenly cut or if it is skewed, trim the printing material.Check that the printing material is straight when it is attached to the take-up reel, otherwise it will skew as it is wound onto the core.The core tube on the take-up reel must be the same width as the printing material you are using. Make sure the take-up core is pushed firmly into both spindle guides.
2-3
Load and unload material
HP Designjet 5100 printer Customer Reference Guide
If you need to feed more printing material from the printer, and the ‘Move Media’ screen is no longer displayed, go to the Media menu and press Enter. Then select ‘Move Media’.If you are using a three-inch cardboard core, make sure the core adaptors supplied with the printer have been installed.
Help with loading
When loading printing material there is information available from:This Pocket Guide, installed at the back of the printerThe labels located on the printer and on the spindlesThe front panel, which will guide you through the procedures step by step
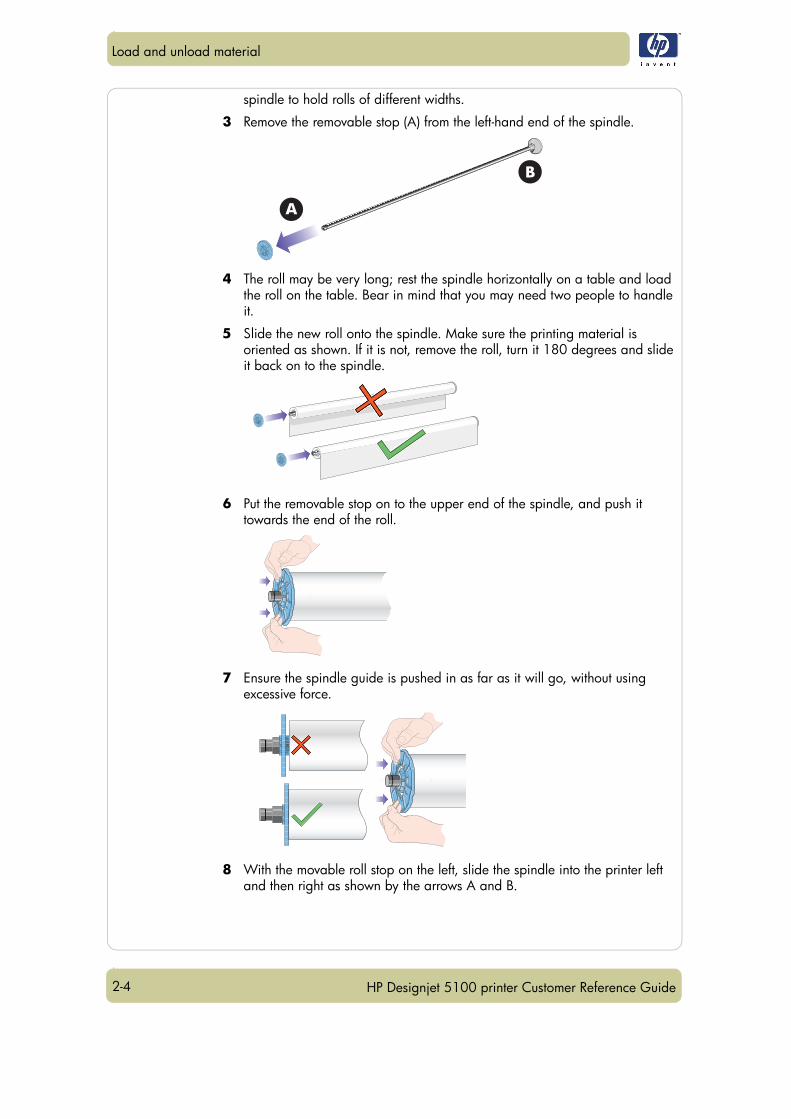
Loading a roll onto the spindle1 Make sure the printer wheels are locked (the brake lever is pressed down) to
prevent the printer from moving.
2 Remove the empty spindle by pulling firmly on each end A and then B as indicated below.
The spindle has a stop at each end to keep the roll in position. The stop at the left-hand end can be removed to mount a new roll, it slides along the
Core adaptors
2-4
Load and unload material
HP Designjet 5100 printer Customer Reference Guide
spindle to hold rolls of different widths.
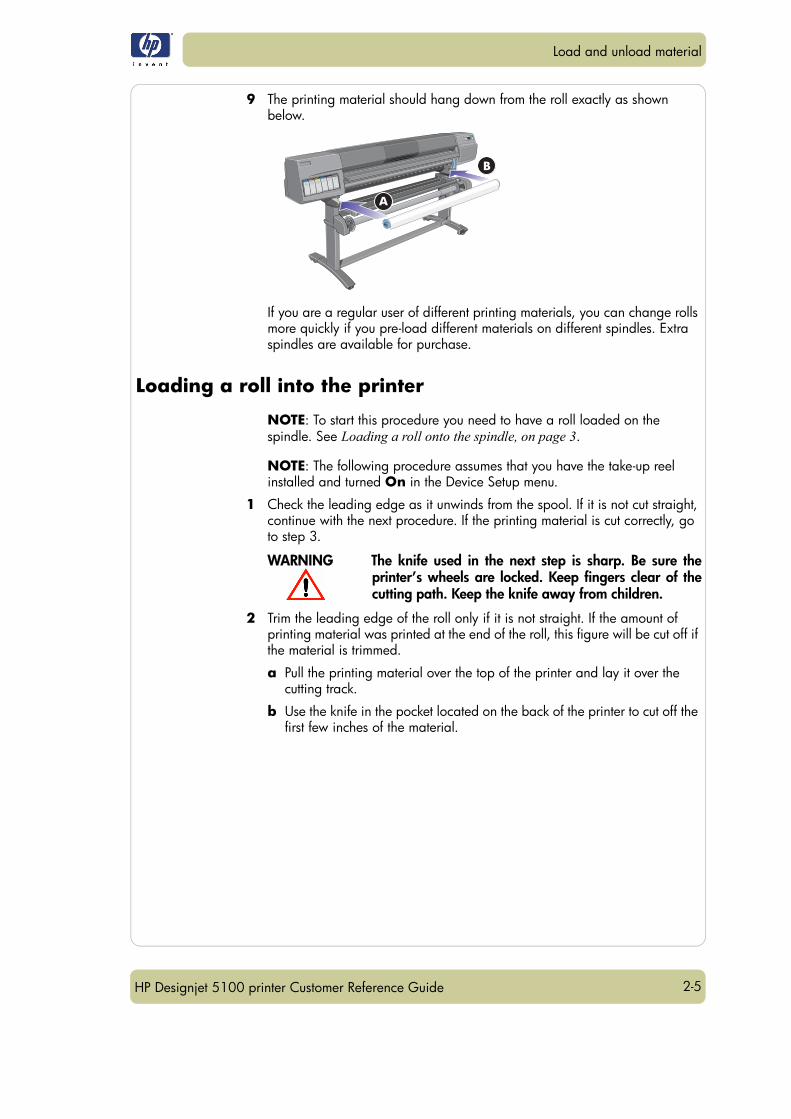
3 Remove the removable stop (A) from the left-hand end of the spindle.
4 The roll may be very long; rest the spindle horizontally on a table and load the roll on the table. Bear in mind that you may need two people to handle it.
5 Slide the new roll onto the spindle. Make sure the printing material is oriented as shown. If it is not, remove the roll, turn it 180 degrees and slide it back on to the spindle.
6 Put the removable stop on to the upper end of the spindle, and push it towards the end of the roll.
7 Ensure the spindle guide is pushed in as far as it will go, without using excessive force.
8 With the movable roll stop on the left, slide the spindle into the printer left and then right as shown by the arrows A and B.
2-5
Load and unload material
HP Designjet 5100 printer Customer Reference Guide
9 The printing material should hang down from the roll exactly as shown below.
If you are a regular user of different printing materials, you can change rolls more quickly if you pre-load different materials on different spindles. Extra spindles are available for purchase.
Loading a roll into the printer
NOTE: To start this procedure you need to have a roll loaded on the spindle. See Loading a roll onto the spindle, on page 3.
NOTE: The following procedure assumes that you have the take-up reel installed and turned On in the Device Setup menu.
1 Check the leading edge as it unwinds from the spool. If it is not cut straight, continue with the next procedure. If the printing material is cut correctly, go to step 3.
WARNING The knife used in the next step is sharp. Be sure theprinter’s wheels are locked. Keep fingers clear of thecutting path. Keep the knife away from children.
2 Trim the leading edge of the roll only if it is not straight. If the amount of printing material was printed at the end of the roll, this figure will be cut off if the material is trimmed.
a Pull the printing material over the top of the printer and lay it over the cutting track.
b Use the knife in the pocket located on the back of the printer to cut off the first few inches of the material.
2-6
Load and unload material
HP Designjet 5100 printer Customer Reference Guide
c Retract the blade and return the knife to its pocket.
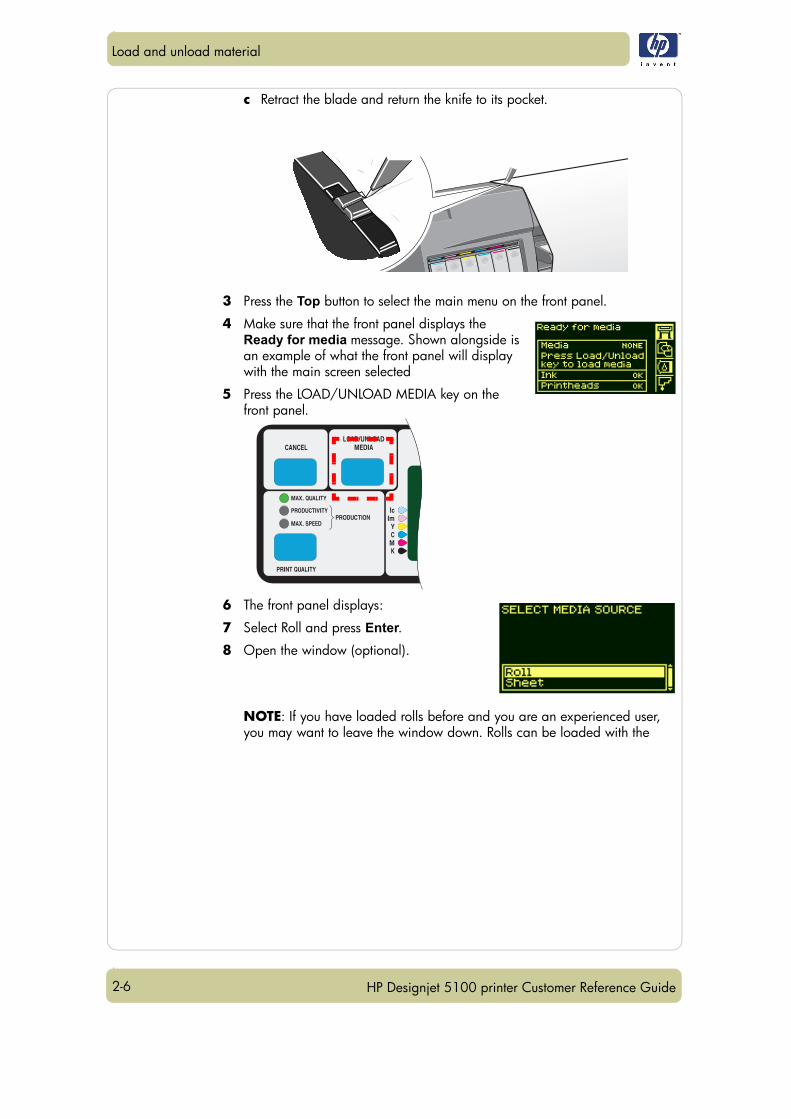
3 Press the Top button to select the main menu on the front panel.
4 Make sure that the front panel displays the Ready for media message. Shown alongside is an example of what the front panel will display with the main screen selected
5 Press the LOAD/UNLOAD MEDIA key on the front panel.
6 The front panel displays:
7 Select Roll and press Enter.8 Open the window (optional).
NOTE: If you have loaded rolls before and you are an experienced user, you may want to leave the window down. Rolls can be loaded with the
2-7
Load and unload material
HP Designjet 5100 printer Customer Reference Guide
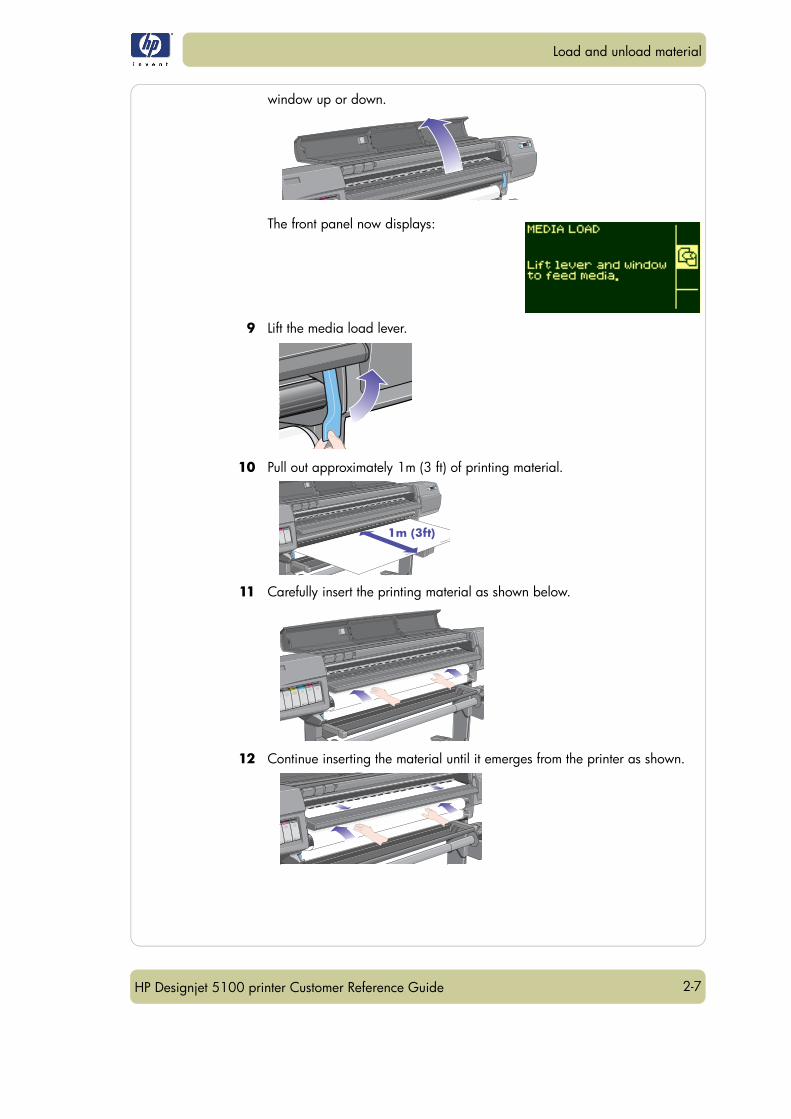
window up or down.
The front panel now displays:
9 Lift the media load lever.
10 Pull out approximately 1m (3 ft) of printing material.
11 Carefully insert the printing material as shown below.
12 Continue inserting the material until it emerges from the printer as shown.
2-8
Load and unload material
HP Designjet 5100 printer Customer Reference Guide
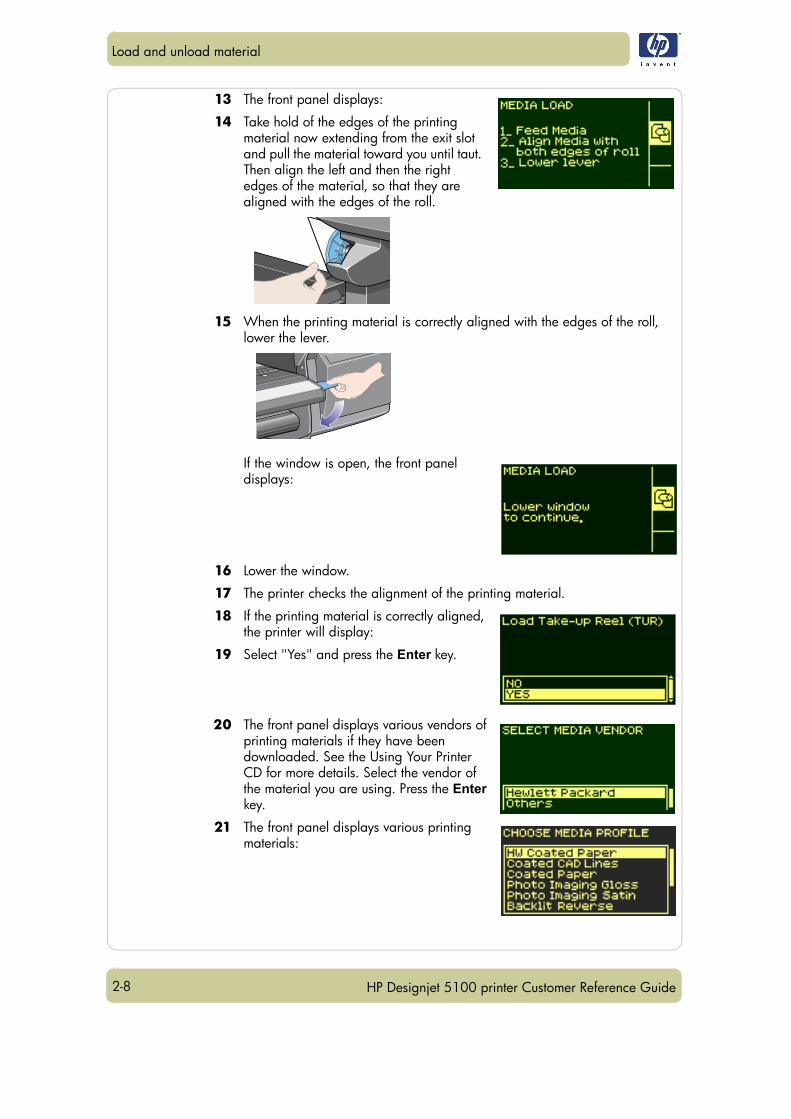
13 The front panel displays:
14 Take hold of the edges of the printing material now extending from the exit slot and pull the material toward you until taut. Then align the left and then the right edges of the material, so that they are aligned with the edges of the roll.
15 When the printing material is correctly aligned with the edges of the roll, lower the lever.
If the window is open, the front panel displays:
16 Lower the window.
17 The printer checks the alignment of the printing material.
18 If the printing material is correctly aligned, the printer will display:
19 Select "Yes" and press the Enter key.
20 The front panel displays various vendors of printing materials if they have been downloaded. See the Using Your Printer CD for more details. Select the vendor of the material you are using. Press the Enter key.
21 The front panel displays various printing materials:

2-9
Load and unload material
HP Designjet 5100 printer Customer Reference Guide
This list includes only a selection of the available printing materials. The Using Your Printer CD has a more complete list.
22 Select the printing material you are using and press the Enter key.
23 The front panel displays various lengths of material.
If you have been using the roll previously, it is unlikely to be a standard length of roll. The remaining length should be printed on the end of the roll (if you have not trimmed it). In this case select Custom Media.
24 Change the screen using the ↑ and ↓ keys to the amount printed on the end of the roll. Press the Enter key.
NOTE: To turn on and off the media length tracking function see Media length tracking, on page 19.
The printer is ready. You can now load the roll onto the take-up reel. Follow the procedure in the next section.
Attaching the roll to the take-up reel
The first part of attaching a roll to the take-up reel is attaching the end of the roll (by tape) to the core tube supplied with the take-up reel. You can also use an empty cardboard tube to replace the plastic core tube. Both types of
The following procedure is applicable to your printer only if you have a take-up reel. If you do not have one, you can order it as an optional accessory; see the ‘Using Your Printer CD’.
2-10
Load and unload material
HP Designjet 5100 printer Customer Reference Guide
core must be the same length as the roll you are using.
Plastic tube core
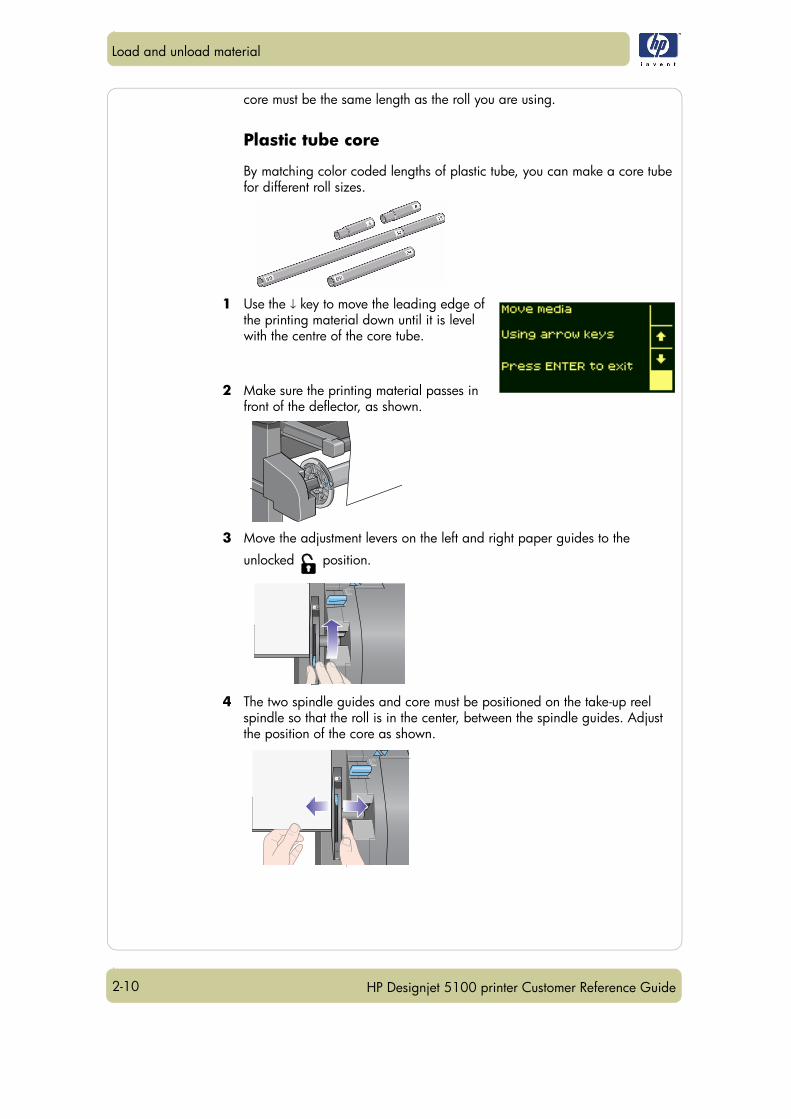
By matching color coded lengths of plastic tube, you can make a core tube for different roll sizes.
1 Use the ↓ key to move the leading edge of the printing material down until it is level with the centre of the core tube.
2 Make sure the printing material passes in front of the deflector, as shown.
3 Move the adjustment levers on the left and right paper guides to the
unlocked position.
4 The two spindle guides and core must be positioned on the take-up reel spindle so that the roll is in the center, between the spindle guides. Adjust the position of the core as shown.
2-11
Load and unload material
HP Designjet 5100 printer Customer Reference Guide
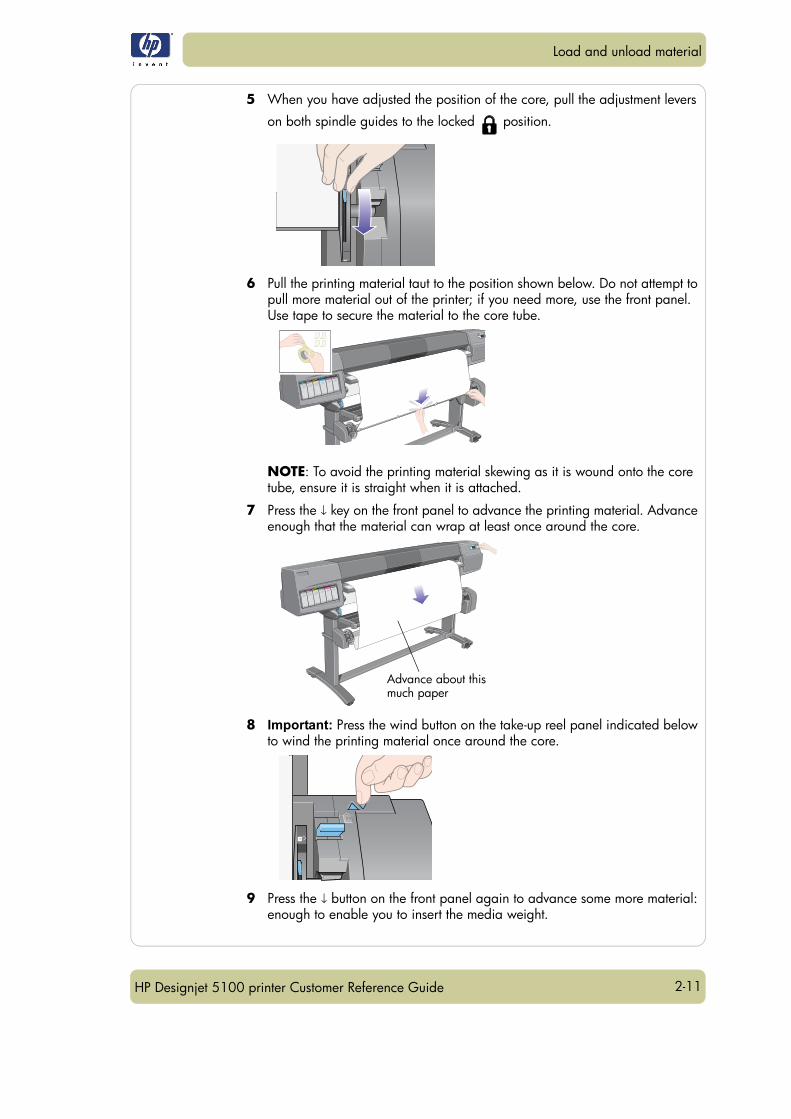
5 When you have adjusted the position of the core, pull the adjustment levers
on both spindle guides to the locked position.
6 Pull the printing material taut to the position shown below. Do not attempt to pull more material out of the printer; if you need more, use the front panel. Use tape to secure the material to the core tube.
NOTE: To avoid the printing material skewing as it is wound onto the core tube, ensure it is straight when it is attached.
7 Press the ↓ key on the front panel to advance the printing material. Advance enough that the material can wrap at least once around the core.
8 Important: Press the wind button on the take-up reel panel indicated below to wind the printing material once around the core.
9 Press the ↓ button on the front panel again to advance some more material: enough to enable you to insert the media weight.
Advance about this much paper
2-12
Load and unload material
HP Designjet 5100 printer Customer Reference Guide
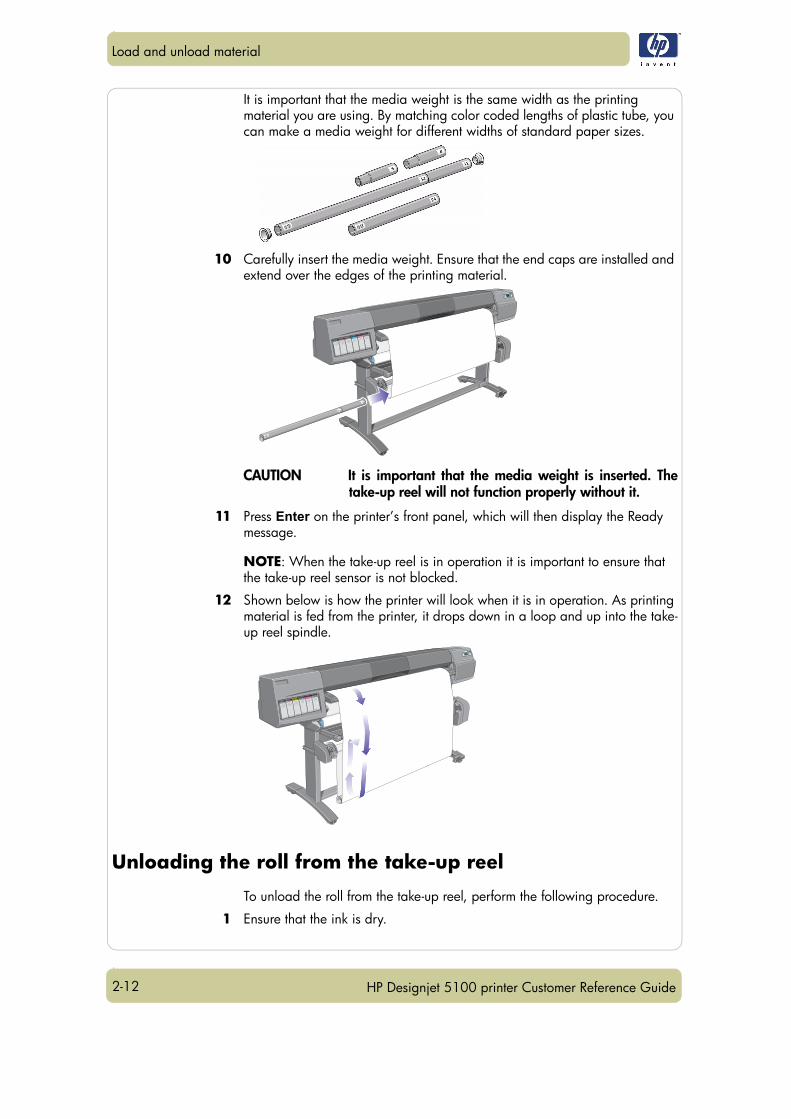
It is important that the media weight is the same width as the printing material you are using. By matching color coded lengths of plastic tube, you can make a media weight for different widths of standard paper sizes.
10 Carefully insert the media weight. Ensure that the end caps are installed and extend over the edges of the printing material.
CAUTION It is important that the media weight is inserted. Thetake-up reel will not function properly without it.
11 Press Enter on the printer’s front panel, which will then display the Ready message.
NOTE: When the take-up reel is in operation it is important to ensure that the take-up reel sensor is not blocked.
12 Shown below is how the printer will look when it is in operation. As printing material is fed from the printer, it drops down in a loop and up into the take-up reel spindle.
Unloading the roll from the take-up reel
To unload the roll from the take-up reel, perform the following procedure.
1 Ensure that the ink is dry.
42
12
2-13
Load and unload material
HP Designjet 5100 printer Customer Reference Guide
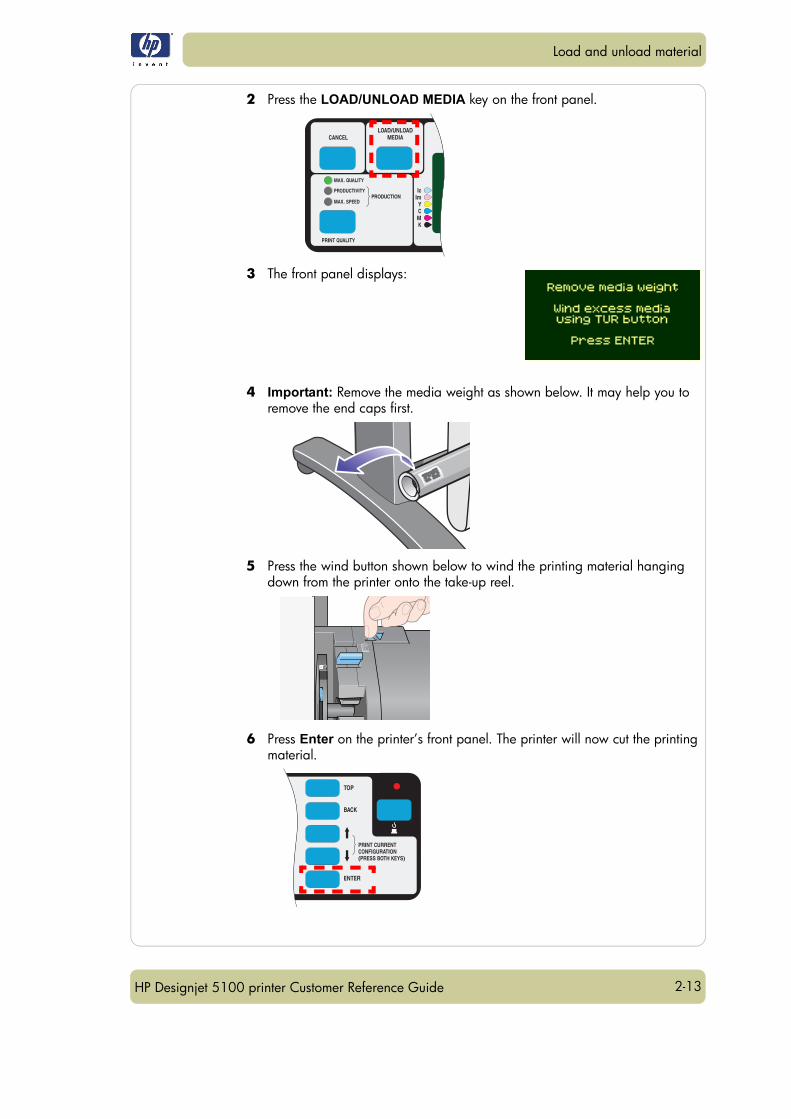
2 Press the LOAD/UNLOAD MEDIA key on the front panel.
3 The front panel displays:
4 Important: Remove the media weight as shown below. It may help you to remove the end caps first.
5 Press the wind button shown below to wind the printing material hanging down from the printer onto the take-up reel.
6 Press Enter on the printer’s front panel. The printer will now cut the printing material.
2-14
Load and unload material
HP Designjet 5100 printer Customer Reference Guide
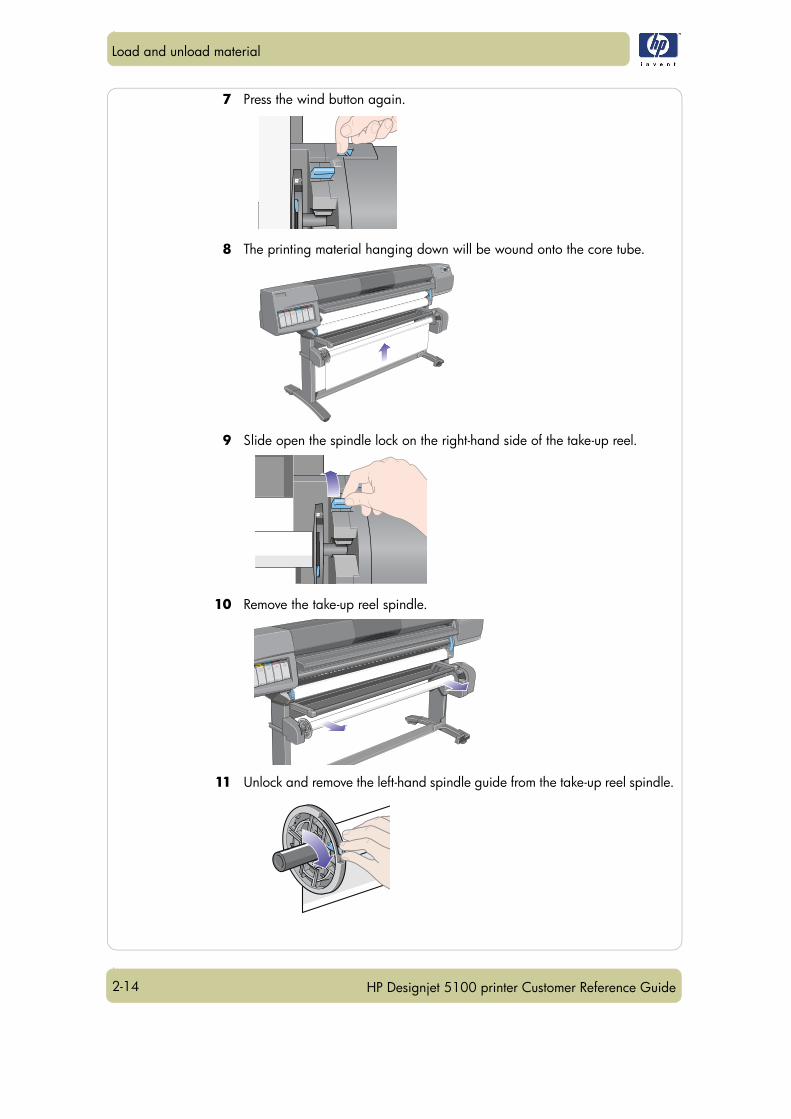
7 Press the wind button again.
8 The printing material hanging down will be wound onto the core tube.
9 Slide open the spindle lock on the right-hand side of the take-up reel.
10 Remove the take-up reel spindle.
11 Unlock and remove the left-hand spindle guide from the take-up reel spindle.
2-15
Load and unload material
HP Designjet 5100 printer Customer Reference Guide
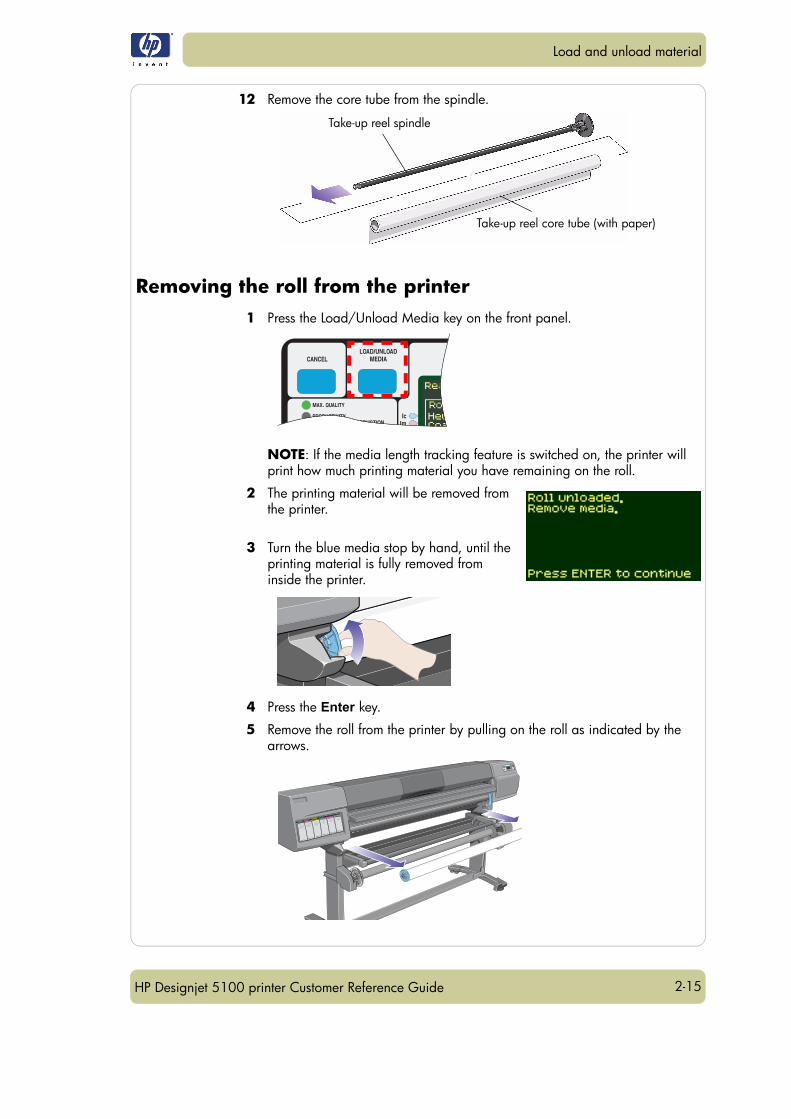
12 Remove the core tube from the spindle.
Removing the roll from the printer1 Press the Load/Unload Media key on the front panel.
NOTE: If the media length tracking feature is switched on, the printer will print how much printing material you have remaining on the roll.
2 The printing material will be removed from the printer.
3 Turn the blue media stop by hand, until the printing material is fully removed from inside the printer.
4 Press the Enter key.
5 Remove the roll from the printer by pulling on the roll as indicated by the arrows.
Take-up reel core tube (with paper)
Take-up reel spindle
2-16
Load and unload material
HP Designjet 5100 printer Customer Reference Guide
Loading sheets
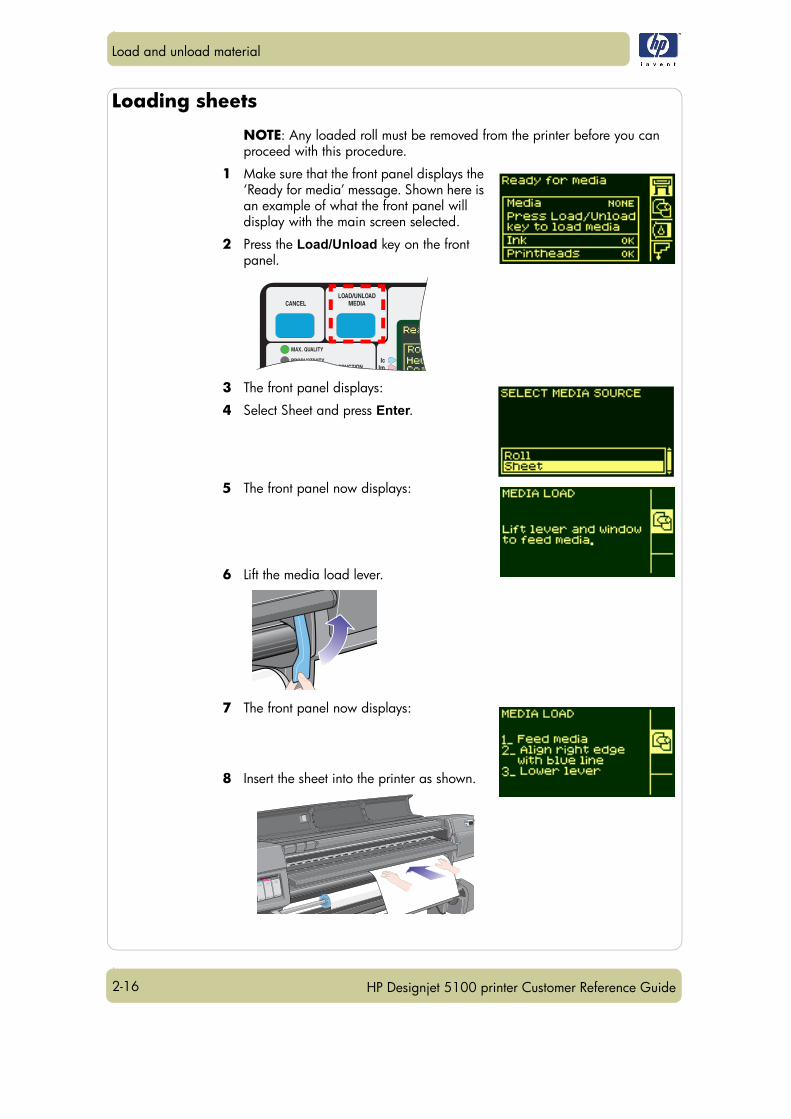
NOTE: Any loaded roll must be removed from the printer before you can proceed with this procedure.
1 Make sure that the front panel displays the ‘Ready for media’ message. Shown here is an example of what the front panel will display with the main screen selected.
2 Press the Load/Unload key on the front panel.
3 The front panel displays:
4 Select Sheet and press Enter.
5 The front panel now displays:
6 Lift the media load lever.
7 The front panel now displays:
8 Insert the sheet into the printer as shown.
2-17
Load and unload material
HP Designjet 5100 printer Customer Reference Guide
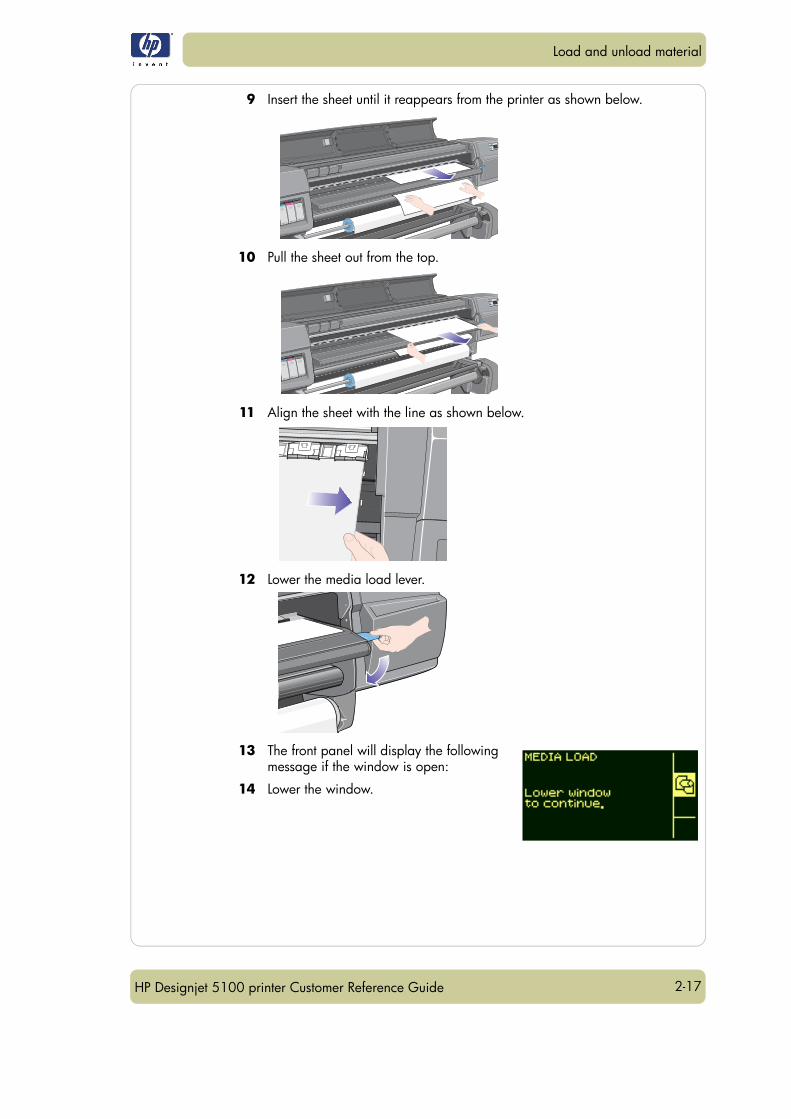
9 Insert the sheet until it reappears from the printer as shown below.
10 Pull the sheet out from the top.
11 Align the sheet with the line as shown below.
12 Lower the media load lever.
13 The front panel will display the following message if the window is open:
14 Lower the window.
2-18
Load and unload material
HP Designjet 5100 printer Customer Reference Guide
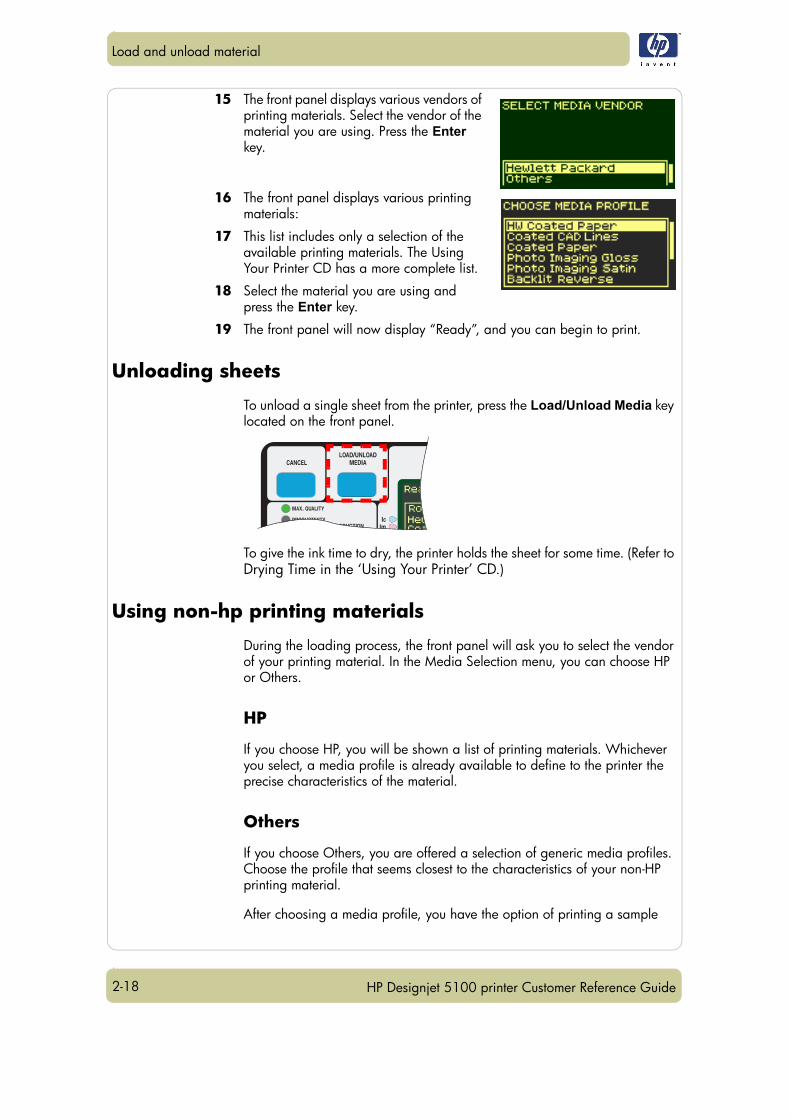
15 The front panel displays various vendors of printing materials. Select the vendor of the material you are using. Press the Enter key.
16 The front panel displays various printing materials:
17 This list includes only a selection of the available printing materials. The Using Your Printer CD has a more complete list.
18 Select the material you are using and press the Enter key.
19 The front panel will now display “Ready”, and you can begin to print.
Unloading sheets
To unload a single sheet from the printer, press the Load/Unload Media key located on the front panel.
To give the ink time to dry, the printer holds the sheet for some time. (Refer to Drying Time in the ‘Using Your Printer’ CD.)
Using non-hp printing materials
During the loading process, the front panel will ask you to select the vendor of your printing material. In the Media Selection menu, you can choose HP or Others.
HP
If you choose HP, you will be shown a list of printing materials. Whichever you select, a media profile is already available to define to the printer the precise characteristics of the material.
Others
If you choose Others, you are offered a selection of generic media profiles. Choose the profile that seems closest to the characteristics of your non-HP printing material.
After choosing a media profile, you have the option of printing a sample
2-19
Load and unload material
HP Designjet 5100 printer Customer Reference Guide
using that profile. It takes about nine minutes to print a sample, depending on the print mode and the printing material.
RGB sample
CMYK sample
If you are unsure which profile to choose, you can print samples using several different profiles and decide for yourself which gives the best print quality.
Many of our customers prefer high-grammage printing materials (about 170 g/m²), and there is a generic media profile best suited to such materials. Choose Heavyweight Coated, and then HW Coated 2. This profile is designed to give particularly good quality, especially in Production mode.
In some cases it may be possible to select Production mode although the non-HP printing material is not compatible with Production mode. In such cases the printer will print in Productivity mode.
Media length tracking
The media length tracking function enables the printer to register through the front panel how much printing material is left on the roll you are using.
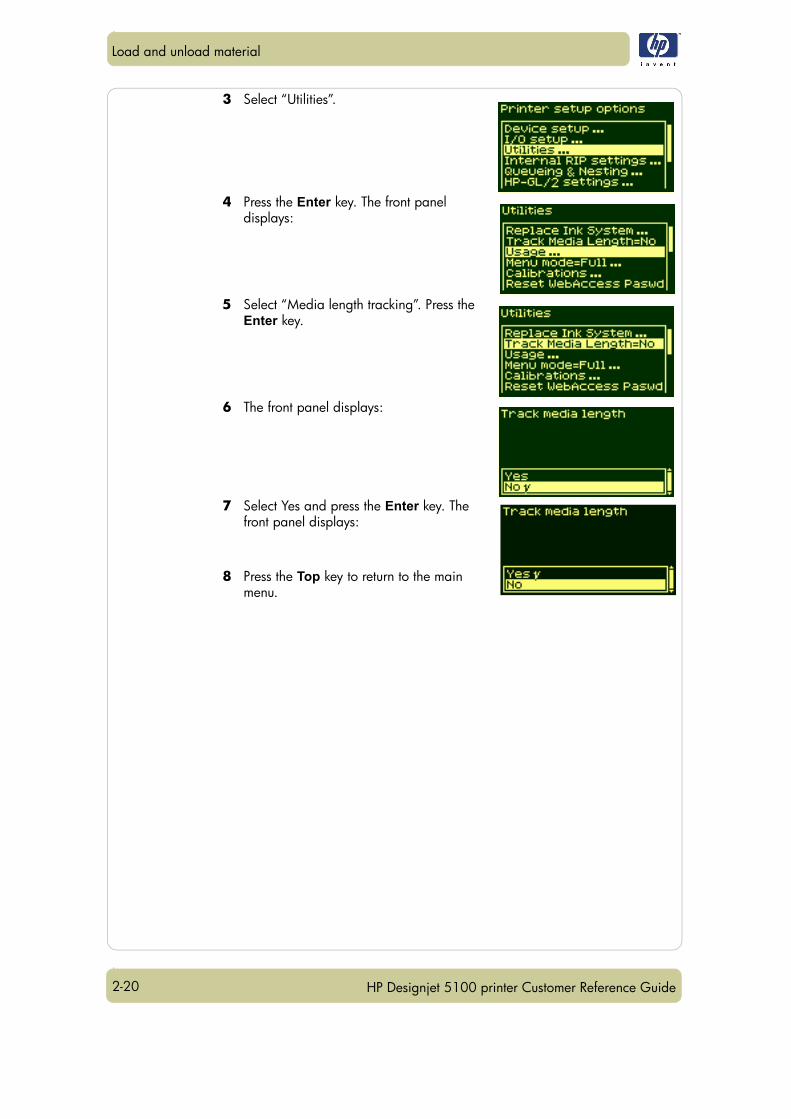
To turn on the function1 Go to the Printer Setup menu and press
Enter:
2 The front panel displays:
2-20
Load and unload material
HP Designjet 5100 printer Customer Reference Guide
3 Select “Utilities”.
4 Press the Enter key. The front panel displays:
5 Select “Media length tracking”. Press the Enter key.
6 The front panel displays:
7 Select Yes and press the Enter key. The front panel displays:
8 Press the Top key to return to the main menu.
3-1HP Designjet 5100 printer Customer Reference Guide
Maintain the ink system 3
Ink cartridge statistics 3-2Ink cartridge removal 3-2Ink cartridge installation 3-3Printhead statistics 3-4Printhead removal 3-5Printhead installation 3-8Printhead cleaner removal 3-9Printhead cleaner installation 3-11After replacing a printhead and printhead cleaner 3-12
3

3-2
Maintain the ink system
HP Designjet 5100 printer Customer Reference Guide
Ink cartridge statistics
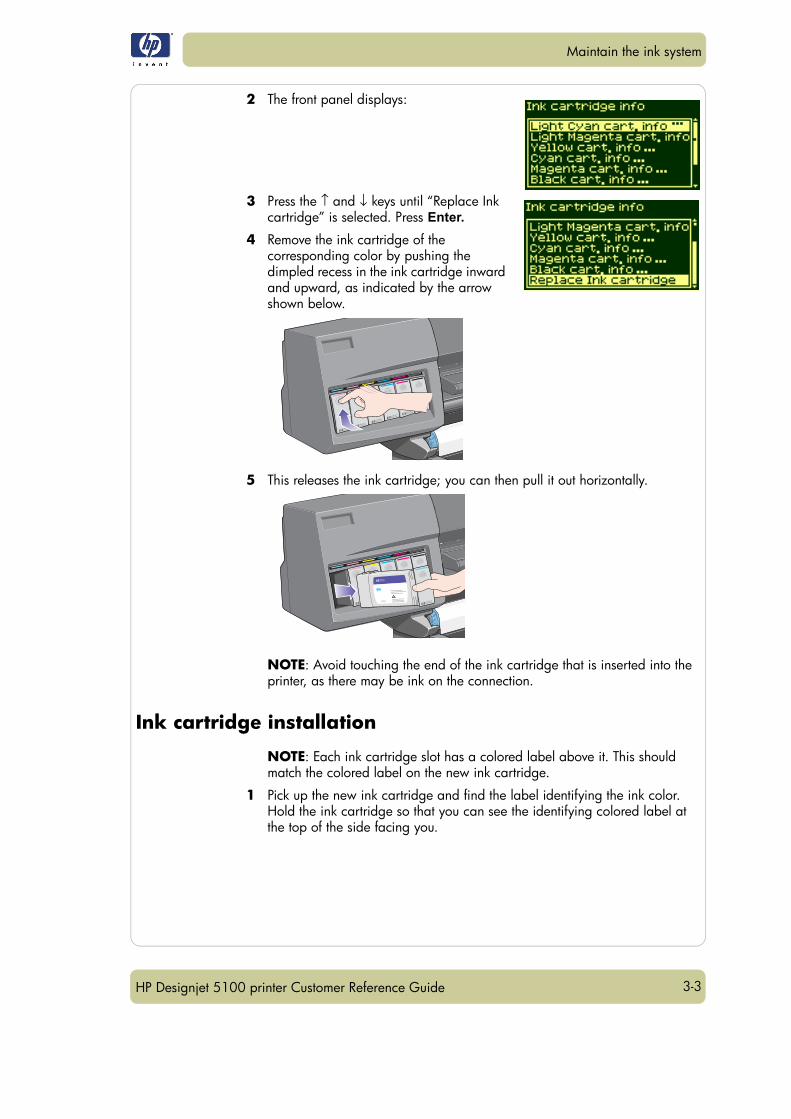
Use the following procedure to get ink cartridge information:
1 Select the Ink Cartridge menu icon. Press the Enter key.
2 The front panel displays “Ink information”. Press the Enter key.
3 The front panel displays:
The information supplied is:The make of the ink cartridge (HP 705 is recommended)The percentage of ink remaining in the cartridgeThe original capacity of the ink cartridge in millilitersThe re-order part number of the ink cartridgeThe month and year that the ink cartridge was manufactured
Ink cartridge removalCAUTION Remove an ink cartridge only if you are replacing it.
WARNING Make sure the printer wheels are locked (the brakelever is pressed down) to prevent the printer frommoving.
There are two types of ink cartridge removal. The ink cartridge is very low and you want to replace the ink cartridge with a full one for unattended printing, with the view to replacing it again and using until empty. The ink cartridge is empty and the front panel tells you to replace the ink cartridge.
1 Select the Ink Cartridges menu and press Enter.
3-3
Maintain the ink system
HP Designjet 5100 printer Customer Reference Guide
2 The front panel displays:
3 Press the ↑ and ↓ keys until “Replace Ink cartridge” is selected. Press Enter.
4 Remove the ink cartridge of the corresponding color by pushing the dimpled recess in the ink cartridge inward and upward, as indicated by the arrow shown below.
5 This releases the ink cartridge; you can then pull it out horizontally.
NOTE: Avoid touching the end of the ink cartridge that is inserted into the printer, as there may be ink on the connection.
Ink cartridge installation
NOTE: Each ink cartridge slot has a colored label above it. This should match the colored label on the new ink cartridge.
1 Pick up the new ink cartridge and find the label identifying the ink color. Hold the ink cartridge so that you can see the identifying colored label at the top of the side facing you.
3-4
Maintain the ink system
HP Designjet 5100 printer Customer Reference Guide
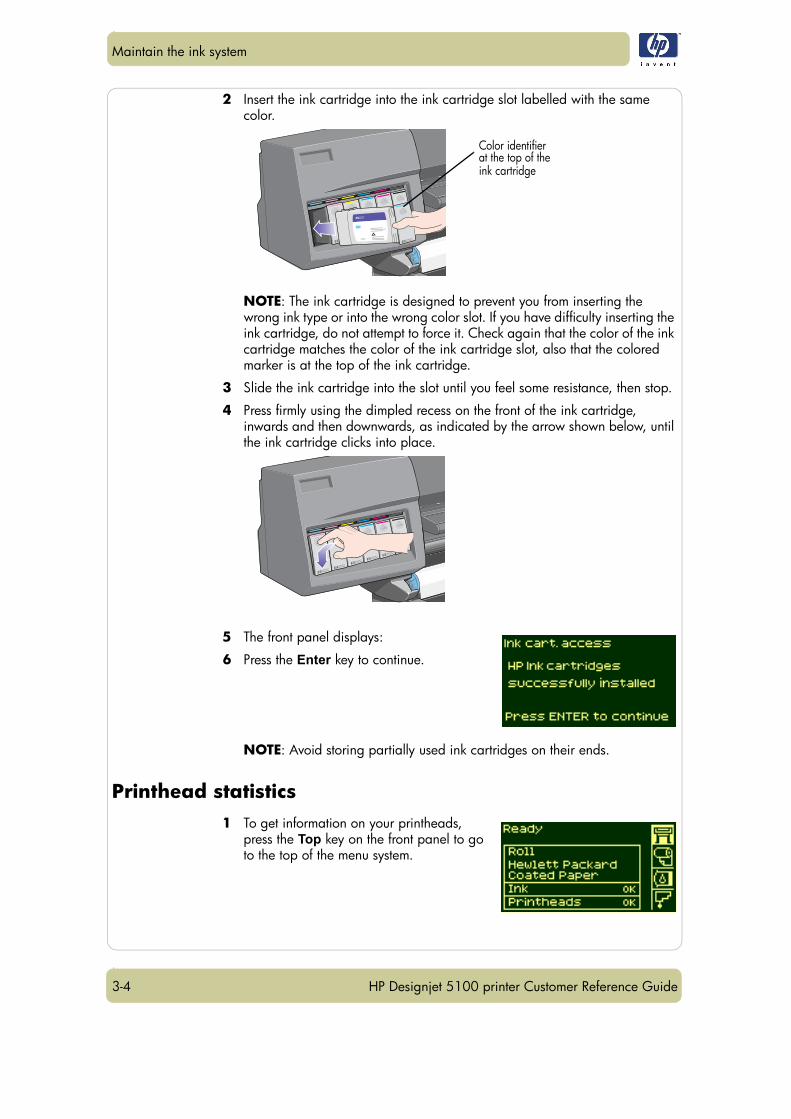
2 Insert the ink cartridge into the ink cartridge slot labelled with the same color.
NOTE: The ink cartridge is designed to prevent you from inserting the wrong ink type or into the wrong color slot. If you have difficulty inserting the ink cartridge, do not attempt to force it. Check again that the color of the ink cartridge matches the color of the ink cartridge slot, also that the colored marker is at the top of the ink cartridge.
3 Slide the ink cartridge into the slot until you feel some resistance, then stop.
4 Press firmly using the dimpled recess on the front of the ink cartridge, inwards and then downwards, as indicated by the arrow shown below, until the ink cartridge clicks into place.
5 The front panel displays:
6 Press the Enter key to continue.
NOTE: Avoid storing partially used ink cartridges on their ends.
Printhead statistics1 To get information on your printheads,
press the Top key on the front panel to go to the top of the menu system.
Color identifierat the top of theink cartridge

3-5
Maintain the ink system
HP Designjet 5100 printer Customer Reference Guide
2 Press the ↑ or ↓ key until the front panel displays the printhead menu icon. Press the Enter key.
3 Press the ↑ or ↓ key until the front panel highlights ‘Printhead info …’. Press the Enter key.
4 Press the ↑ or ↓ key until the front panel highlights the color that you want to see information on. Press the Enter key.
5 The front panel displays information on the selected printhead.
The information supplied is:The status of the printhead warrantyThe make of the printheads (HP 705 is recommended)The current status of the printheadThe re-order part number of the printheadThe time that the printhead has been operating in the printerHow much ink has been consumed by the printheadThe year and the month that the printhead was manufactured
Printhead removalWARNING Make sure the printer wheels are locked (the brake
lever is pressed down) to prevent the printer frommoving.
Printhead replacement must be performed with the printer switched on at the power isolation switch.
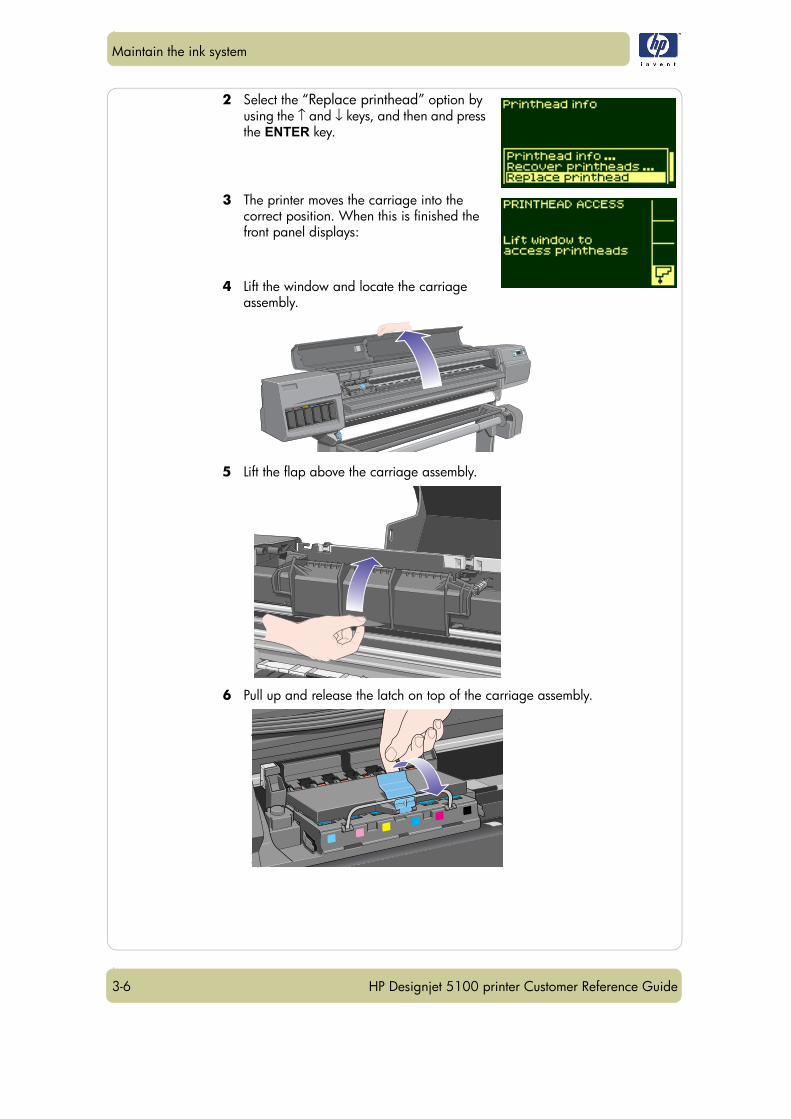
1 Select the Printhead menu on the front panel by using the ↑ and ↓ keys, and then press the ENTER key.
3-6
Maintain the ink system
HP Designjet 5100 printer Customer Reference Guide
2 Select the “Replace printhead” option by using the ↑ and ↓ keys, and then and press the ENTER key.
3 The printer moves the carriage into the correct position. When this is finished the front panel displays:
4 Lift the window and locate the carriage assembly.
5 Lift the flap above the carriage assembly.
6 Pull up and release the latch on top of the carriage assembly.
3-7
Maintain the ink system
HP Designjet 5100 printer Customer Reference Guide
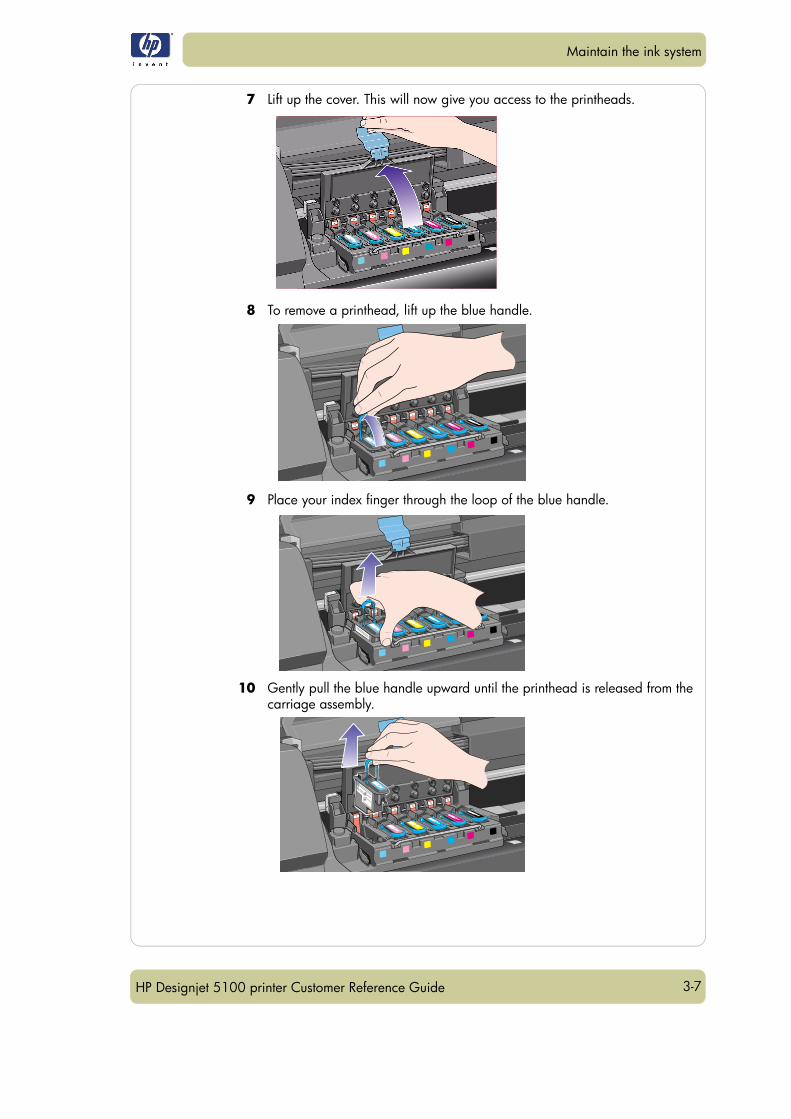
7 Lift up the cover. This will now give you access to the printheads.
8 To remove a printhead, lift up the blue handle.
9 Place your index finger through the loop of the blue handle.
10 Gently pull the blue handle upward until the printhead is released from the carriage assembly.
3-8
Maintain the ink system
HP Designjet 5100 printer Customer Reference Guide
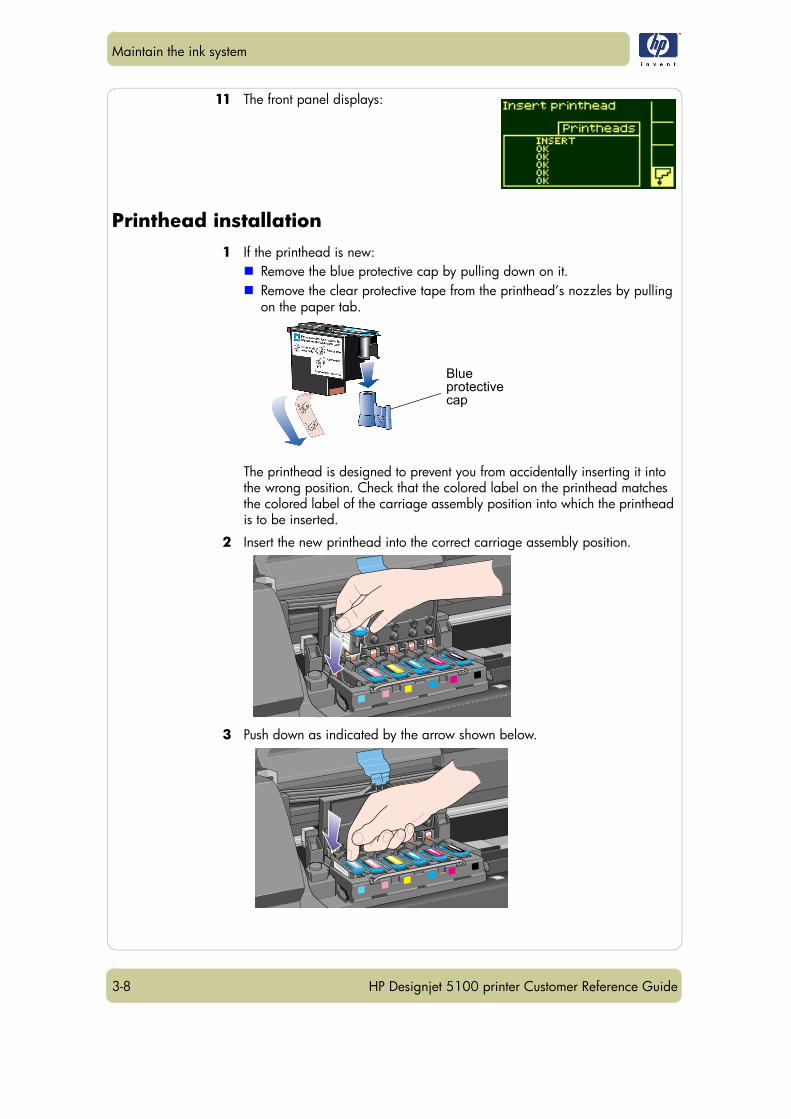
11 The front panel displays:
Printhead installation1 If the printhead is new:
Remove the blue protective cap by pulling down on it.Remove the clear protective tape from the printhead’s nozzles by pulling on the paper tab.
The printhead is designed to prevent you from accidentally inserting it into the wrong position. Check that the colored label on the printhead matches the colored label of the carriage assembly position into which the printhead is to be inserted.
2 Insert the new printhead into the correct carriage assembly position.
3 Push down as indicated by the arrow shown below.
Blue protective cap
3-9
Maintain the ink system
HP Designjet 5100 printer Customer Reference Guide
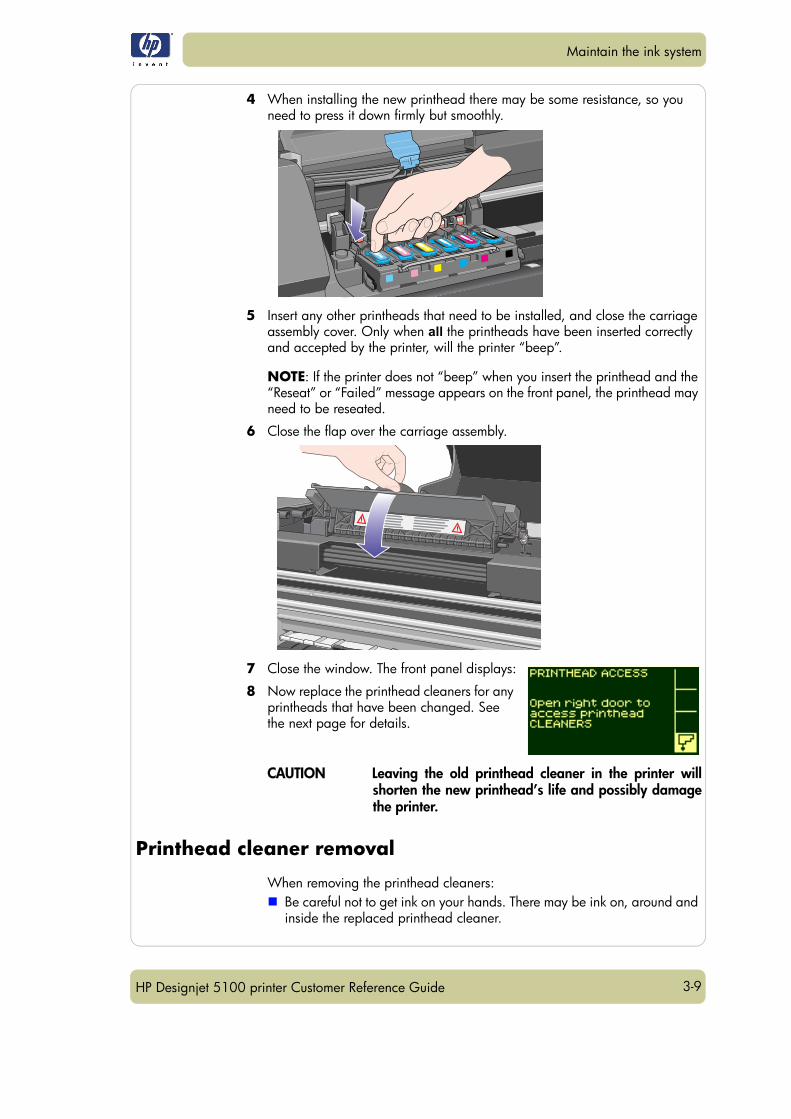
4 When installing the new printhead there may be some resistance, so you need to press it down firmly but smoothly.
5 Insert any other printheads that need to be installed, and close the carriage assembly cover. Only when all the printheads have been inserted correctly and accepted by the printer, will the printer “beep”.
NOTE: If the printer does not “beep” when you insert the printhead and the “Reseat” or “Failed” message appears on the front panel, the printhead may need to be reseated.
6 Close the flap over the carriage assembly.
7 Close the window. The front panel displays:
8 Now replace the printhead cleaners for any printheads that have been changed. See the next page for details.
CAUTION Leaving the old printhead cleaner in the printer willshorten the new printhead’s life and possibly damagethe printer.
Printhead cleaner removal
When removing the printhead cleaners:Be careful not to get ink on your hands. There may be ink on, around and inside the replaced printhead cleaner.
3-10
Maintain the ink system
HP Designjet 5100 printer Customer Reference Guide
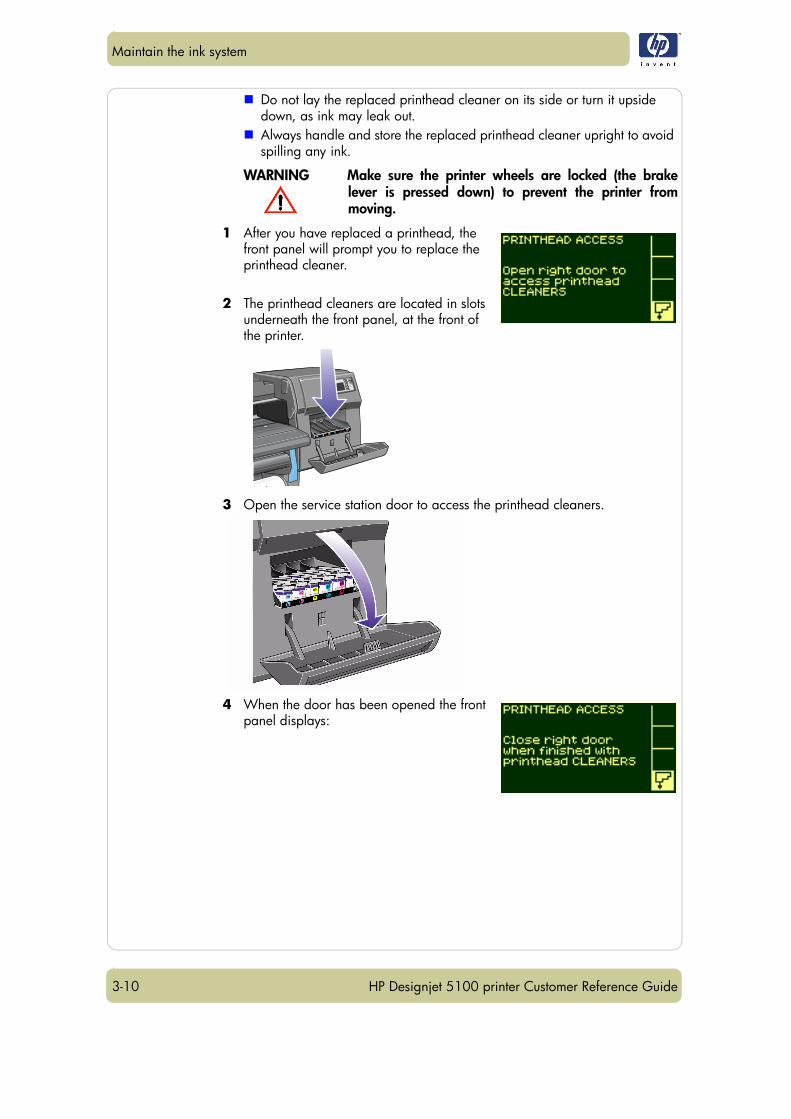
Do not lay the replaced printhead cleaner on its side or turn it upside down, as ink may leak out.Always handle and store the replaced printhead cleaner upright to avoid spilling any ink.
WARNING Make sure the printer wheels are locked (the brakelever is pressed down) to prevent the printer frommoving.
1 After you have replaced a printhead, the front panel will prompt you to replace the printhead cleaner.
2 The printhead cleaners are located in slots underneath the front panel, at the front of the printer.
3 Open the service station door to access the printhead cleaners.
4 When the door has been opened the front panel displays:
3-11
Maintain the ink system
HP Designjet 5100 printer Customer Reference Guide
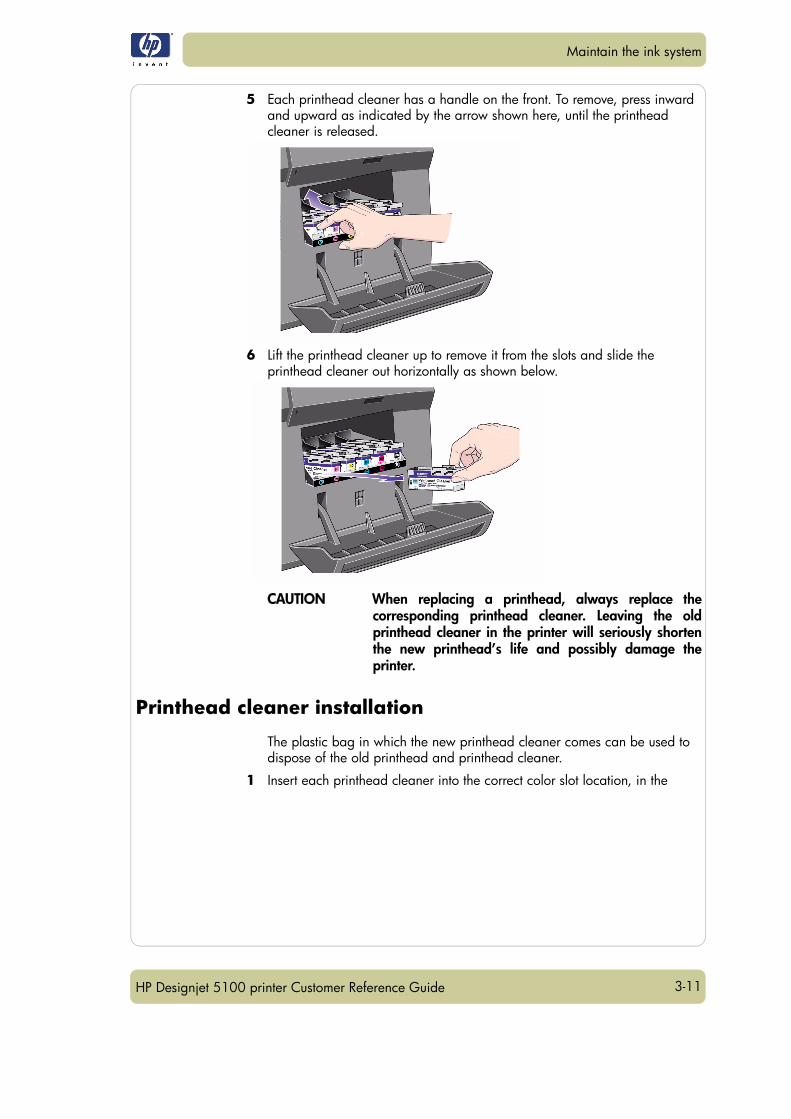
5 Each printhead cleaner has a handle on the front. To remove, press inward and upward as indicated by the arrow shown here, until the printhead cleaner is released.
6 Lift the printhead cleaner up to remove it from the slots and slide the printhead cleaner out horizontally as shown below.
CAUTION When replacing a printhead, always replace thecorresponding printhead cleaner. Leaving the oldprinthead cleaner in the printer will seriously shortenthe new printhead’s life and possibly damage theprinter.
Printhead cleaner installation
The plastic bag in which the new printhead cleaner comes can be used to dispose of the old printhead and printhead cleaner.
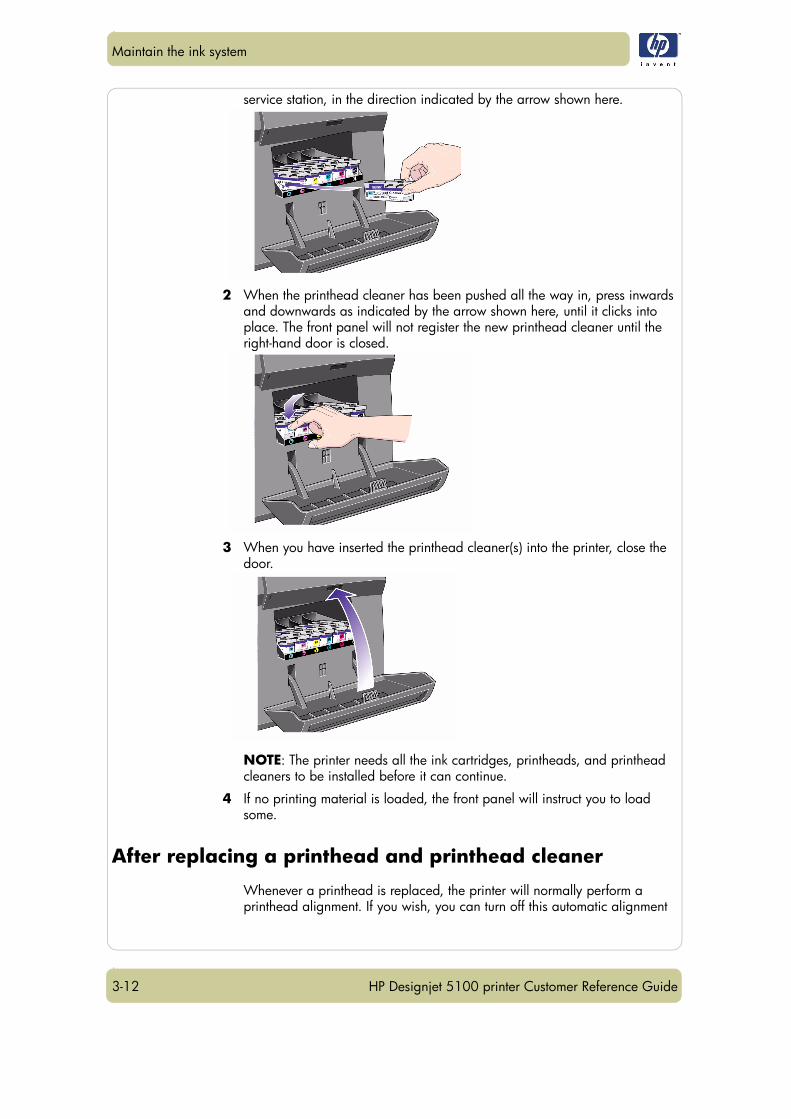
1 Insert each printhead cleaner into the correct color slot location, in the
3-12
Maintain the ink system
HP Designjet 5100 printer Customer Reference Guide
service station, in the direction indicated by the arrow shown here.
2 When the printhead cleaner has been pushed all the way in, press inwards and downwards as indicated by the arrow shown here, until it clicks into place. The front panel will not register the new printhead cleaner until the right-hand door is closed.
3 When you have inserted the printhead cleaner(s) into the printer, close the door.
NOTE: The printer needs all the ink cartridges, printheads, and printhead cleaners to be installed before it can continue.
4 If no printing material is loaded, the front panel will instruct you to load some.
After replacing a printhead and printhead cleaner
Whenever a printhead is replaced, the printer will normally perform a printhead alignment. If you wish, you can turn off this automatic alignment

3-13
Maintain the ink system
HP Designjet 5100 printer Customer Reference Guide
from the front panel: select Internal RIP Settings > Align Calibration > Off.
The printhead alignment procedure requires an A1 or D-size paper size.
When the front panel displays Ready, you are ready to print.
NOTE: Make sure the printer window and the right-hand door are closed after you replace the supplies. The printer will not print while these are open.

3-14
Maintain the ink system
HP Designjet 5100 printer Customer Reference Guide

4-1HP Designjet 5100 printer Customer Reference Guide
Manage the prints 4
WebAccess 4-2Starting WebAccess 4-2Using WebAccess 4-3
Pages printing or drying 4-5Cancelling a page 4-5Cancelling the drying time 4-5
Managing the queue 4-5Jobs and pages 4-5What is the queue? 4-5The ‘start printing’ options 4-6Starting to print a file that is waiting for a time-out 4-6Identifying a job in the queue 4-6Viewing the size of a page in the queue 4-7Prioritizing a job in the queue 4-7Deleting a job from the queue 4-7Making copies of a job in the queue 4-8
Nesting pages 4-9What is nesting? 4-9When does the printer try to nest pages? 4-9Which pages qualify for nesting? 4-9How long does the printer wait for another file? 4-9
4

4-2
Manage the prints
HP Designjet 5100 printer Customer Reference Guide
WebAccess
WebAccess is the control centre for remote management of your printer. From any computer, you can use an ordinary Web browser to contact your printer’s internal Web server, which gives you the following facilities:
Detailed reports on the status and history of your printer and your printing jobsCancel or hold printing jobsSend files directly to the printerStore jobs permanently in the printer for repeated printingDownload firmware upgrades and media profilesRequest e-mail alerts whenever an error condition occursAccess HP Instant Support to troubleshoot any problem you may have
For more details about WebAccess, refer to the ‘Using Your Printer CD’ or see the information available within WebAccess.
Starting WebAccess
Start your Web browser and give the address of your printer, as follows: http://IPaddress/ where IPaddress is the IP address of the printer. You can find out the IP address of the printer from the front panel, as follows:
1 From the Printer Setup menu, select IO setup.
2 From IO setup, select Card ID.
3 Under Card ID, find the line starting with IP=. The remainder of that line is the IP address of the printer.
As an alternative to the IP address, you may give the DNS name of the printer. However, you will not be able to find the DNS name in the front panel; ask your network administrator if you would like to use it.
Each status display is static: it does not automatically update itself as time goes by. To update it, click on the Update icon.
4-3
Manage the prints
HP Designjet 5100 printer Customer Reference Guide
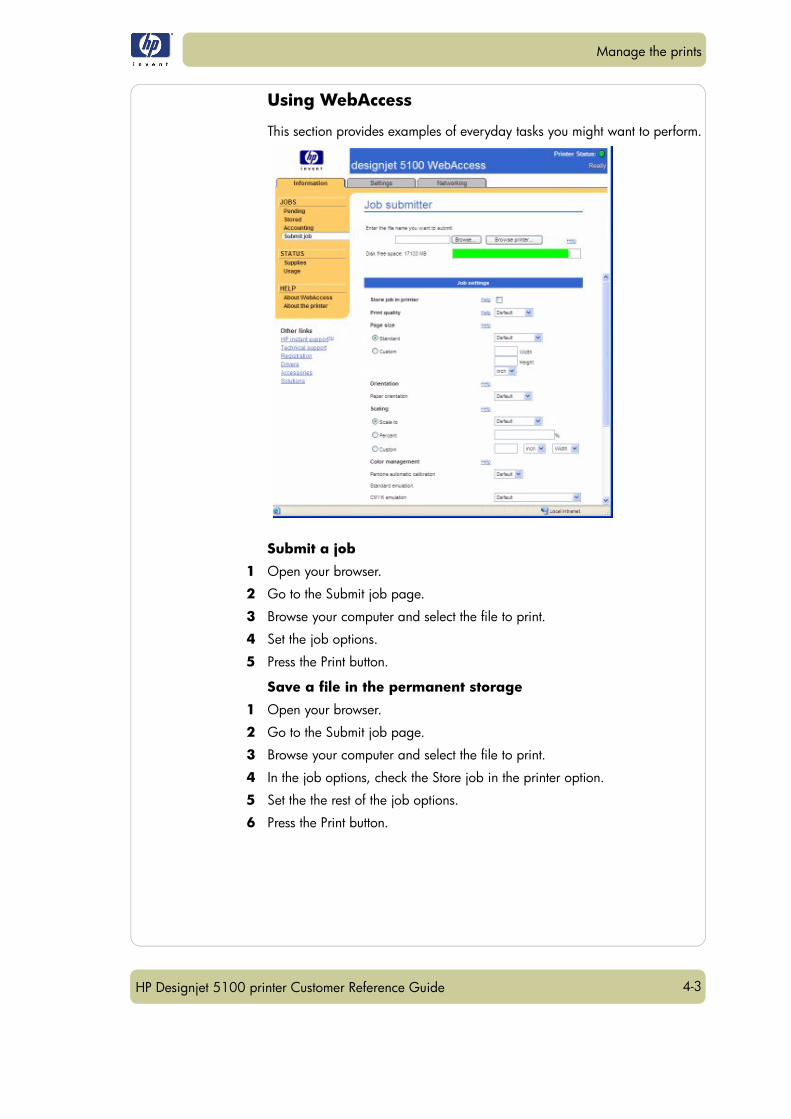
Using WebAccess
This section provides examples of everyday tasks you might want to perform.
Submit a job
1 Open your browser.
2 Go to the Submit job page.
3 Browse your computer and select the file to print.
4 Set the job options.
5 Press the Print button.
Save a file in the permanent storage
1 Open your browser.
2 Go to the Submit job page.
3 Browse your computer and select the file to print.
4 In the job options, check the Store job in the printer option.
5 Set the the rest of the job options.
6 Press the Print button.

4-4
Manage the prints
HP Designjet 5100 printer Customer Reference Guide
Print a file from the permanent storage
1 Open your browser.
2 Go to the Submit job page.
3 Press Browse printer and select the file to print.
4 Press the Print button in the Browse printer toolbar.
5 Set the the rest of the job options.
6 Press the Print button.
Check the ink and printing material usage for a job
1 Open your browser.
2 Go to the Accounting page.
The Accounting page shows you all the information regarding the jobs printed by the printer.
Check the status of the printer’s supplies
1 Open your browser.
2 Go to the Supplies page.
The Supplies page shows you all the information regarding loaded printing material and ink levels.
Periodically track the usage of the printer
1 Open your browser.
2 Go to the Usage page.
3 Go to the Historical tab to see the accumulated usage of the printer since the first day.
4 Go to the Snapshot tab to save a record of the accumulated usage since the last snapshot, and reset the counters to zero.
5 Go to the Accumulated tab to view the accumulated usage since the last snapshot.
4-5
Manage the prints
HP Designjet 5100 printer Customer Reference Guide
Pages printing or drying
RTL and HP-GL/2 jobs are single-page jobs. Where we talk about the print paper, the term page means a single output page.
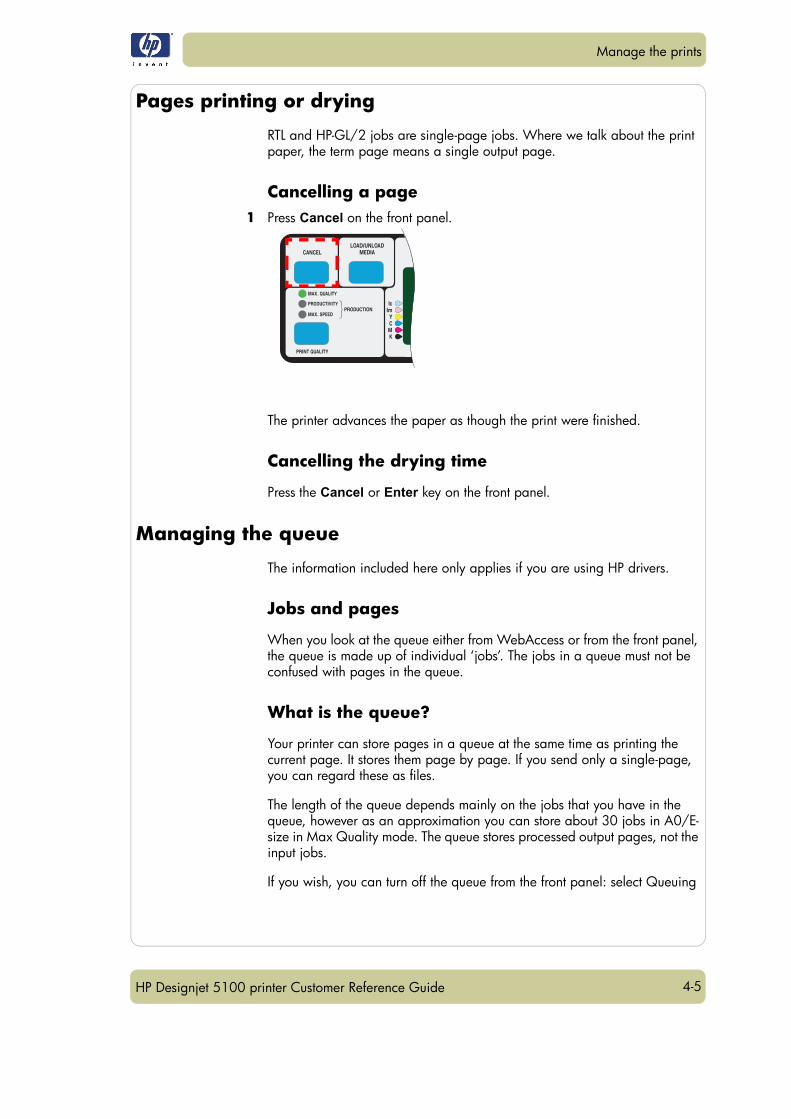
Cancelling a page1 Press Cancel on the front panel.
The printer advances the paper as though the print were finished.
Cancelling the drying time
Press the Cancel or Enter key on the front panel.
Managing the queue
The information included here only applies if you are using HP drivers.
Jobs and pages
When you look at the queue either from WebAccess or from the front panel, the queue is made up of individual ‘jobs’. The jobs in a queue must not be confused with pages in the queue.
What is the queue?
Your printer can store pages in a queue at the same time as printing the current page. It stores them page by page. If you send only a single-page, you can regard these as files.
The length of the queue depends mainly on the jobs that you have in the queue, however as an approximation you can store about 30 jobs in A0/E-size in Max Quality mode. The queue stores processed output pages, not the input jobs.
If you wish, you can turn off the queue from the front panel: select Queuing
4-6
Manage the prints
HP Designjet 5100 printer Customer Reference Guide
& Nesting > Queue > Off.
The ‘start printing’ options
You can select at what point you want to print the file you have in the printer’s queue. Go to Internal RIP Settings > Start printing. There are three options you can select:
After processing
When this is selected the printer waits until the whole file has been processed and then it starts to print. This is the slowest setting but you can achieve the best image quality.
Immediately
This selection prints the file as it is processed. This is the quickest setting, however the printer may stop halfway through a print to process data. This setting is not recommended for complex images with dense color.
Optimized (default)
This setting calculates the best time to begin printing the file. It is the best mix between the After Processing and Immediately settings.
Starting to print a file that is waiting for a time-out
If all is in order (paper loaded, all ink components installed, and no file errors), there are still reasons why a file you have sent from your computer may not start printing when expected:
The print file may lack a proper file terminator and the printer is therefore waiting for the specified I/O time-out period before assuming it is complete. See the Using Your Printer CD for more details.Nesting may be on and the printer is waiting for the specified nest wait time-out period before calculating the appropriate nests. In this case, the printer display shows the remaining time for the nesting time-out. See How long does the printer wait for another file?, on page 9.You may have “wait for preview” selected in your printer driver. This is a function you can use to check that the image is the one you want. You can check the preview in the WebAccess tool, then select “Start print”.
Identifying a job in the queue
In Queueing & Nesting, you can scroll through the pages in the queue.
Each has an identifier, comprising:
<position in queue>: <image name>
4-7
Manage the prints
HP Designjet 5100 printer Customer Reference Guide
Position in queue
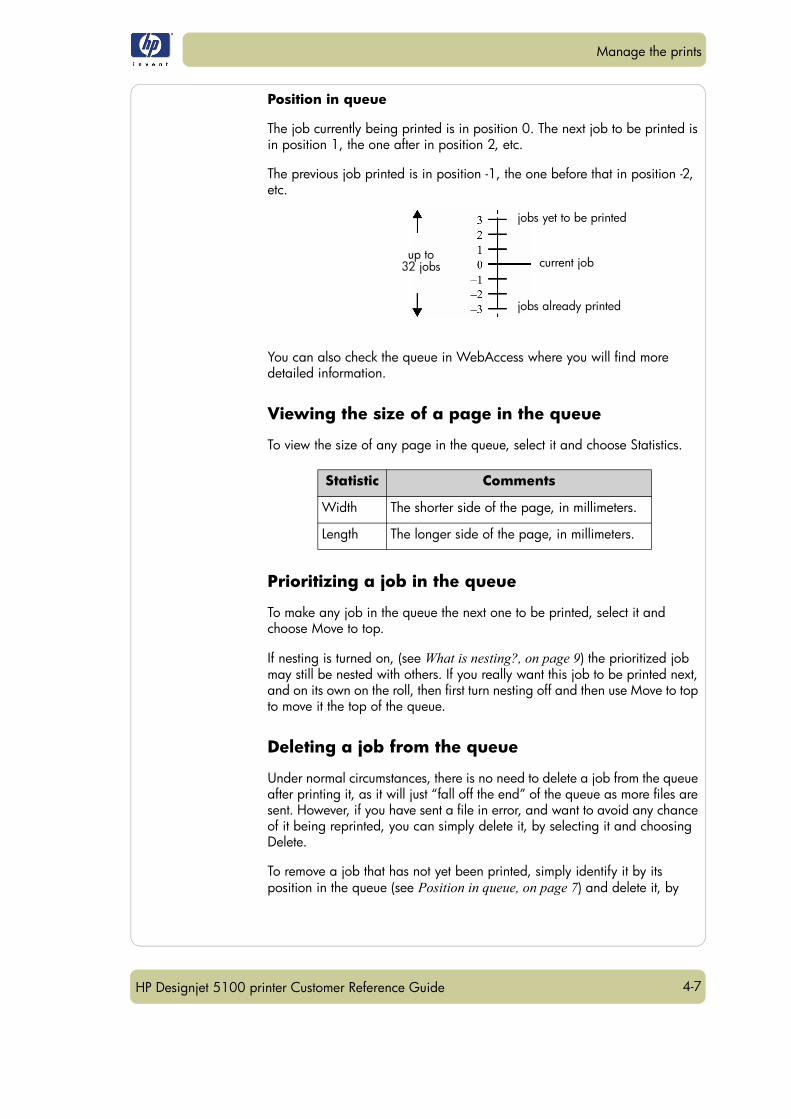
The job currently being printed is in position 0. The next job to be printed is in position 1, the one after in position 2, etc.
The previous job printed is in position -1, the one before that in position -2, etc.
You can also check the queue in WebAccess where you will find more detailed information.
Viewing the size of a page in the queue
To view the size of any page in the queue, select it and choose Statistics.
Prioritizing a job in the queue
To make any job in the queue the next one to be printed, select it and choose Move to top.
If nesting is turned on, (see What is nesting?, on page 9) the prioritized job may still be nested with others. If you really want this job to be printed next, and on its own on the roll, then first turn nesting off and then use Move to top to move it the top of the queue.
Deleting a job from the queue
Under normal circumstances, there is no need to delete a job from the queue after printing it, as it will just “fall off the end” of the queue as more files are sent. However, if you have sent a file in error, and want to avoid any chance of it being reprinted, you can simply delete it, by selecting it and choosing Delete.
To remove a job that has not yet been printed, simply identify it by its position in the queue (see Position in queue, on page 7) and delete it, by
Statistic Comments
Width The shorter side of the page, in millimeters.
Length The longer side of the page, in millimeters.
up to32 jobs current job
jobs yet to be printed
jobs already printed
4-8
Manage the prints
HP Designjet 5100 printer Customer Reference Guide
choosing Delete.
If the job is currently being printed (its queue position is 0), and you want both to cancel the job and to delete it, first press the Cancel key and then delete it from the queue.
Making copies of a job in the queue
In all cases, the job must be still in the queue.
Having selected the job and chosen Copies, use the scrolling keys to specify the number of copies required, and press Enter. The number you enter is the actual number of pages to be printed; for example, choosing 2 for a page not yet printed means you will get the one original and one copy. The maximum is 99.
The setting you specify in this option overrides any value set by your software.
NOTE: If ‘Rotate’ was On when you sent the file, every copy will be rotated. See the ‘Using Your Printer CD’ for details on rotation.
Has the job already been
printed?
Do you want one copy or
several? What to do
Yes One Use Move to top (see Prioritizing a job in the queue, on page 7).
Several Use Copies (see below) and then use Move to top (see Prioritizing a job in the queue, on page 7).
No One Use Copies (see below).
Several Use Copies (see below)
4-9
Manage the prints
HP Designjet 5100 printer Customer Reference Guide
Nesting pages
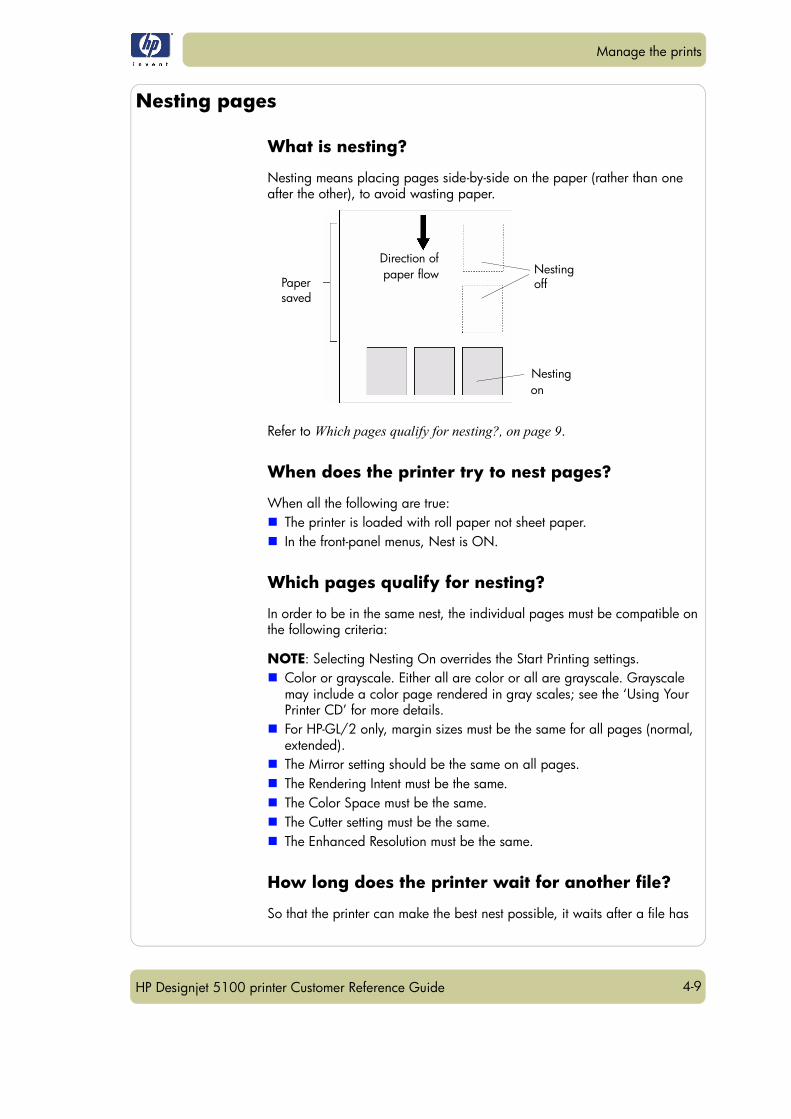
What is nesting?
Nesting means placing pages side-by-side on the paper (rather than one after the other), to avoid wasting paper.
Refer to Which pages qualify for nesting?, on page 9.
When does the printer try to nest pages?
When all the following are true:The printer is loaded with roll paper not sheet paper.In the front-panel menus, Nest is ON.
Which pages qualify for nesting?
In order to be in the same nest, the individual pages must be compatible on the following criteria:
NOTE: Selecting Nesting On overrides the Start Printing settings.Color or grayscale. Either all are color or all are grayscale. Grayscale may include a color page rendered in gray scales; see the ‘Using Your Printer CD’ for more details.For HP-GL/2 only, margin sizes must be the same for all pages (normal, extended).The Mirror setting should be the same on all pages.The Rendering Intent must be the same.The Color Space must be the same.The Cutter setting must be the same.The Enhanced Resolution must be the same.
How long does the printer wait for another file?
So that the printer can make the best nest possible, it waits after a file has
PaperNesting
Nesting
Direction ofpaper flow
off
on
saved
4-10
Manage the prints
HP Designjet 5100 printer Customer Reference Guide
been received to check whether a subsequent page will nest with it or with pages already in the queue. This waiting period is the nest wait time; the factory default nest wait time is two minutes. This means that the printer waits for up to two minutes after the last file is received before printing the final nest. You can change this waiting time using the front panel: Queuing & Nesting > Nest > In Order. The available range is 1 to 99 minutes.
While the printer is waiting for nesting to time out, it displays the remaining time in the front-panel display. You can print the nest (cancel the nest wait) by pressing the Cancel key.
5-1HP Designjet 5100 printer Customer Reference Guide
Front-panel messages 5
Status code interpretation 5-2Consumable in warranty 5-2Status codes 5-2
Front-panel messages 5-3Printhead status messages 5-10Ink cartridge error messages 5-12Printhead cleaner error messages 5-13System error messages 5-13
5
5-2
Front-panel messages
HP Designjet 5100 printer Customer Reference Guide
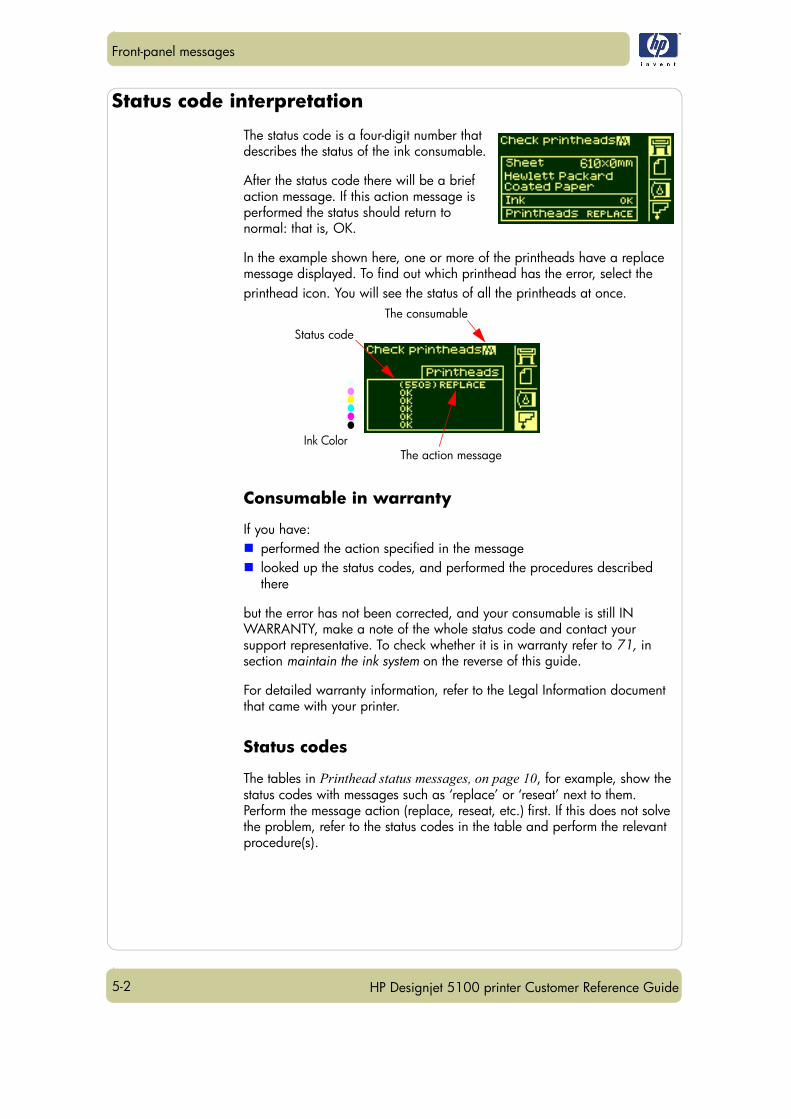
Status code interpretation
The status code is a four-digit number that describes the status of the ink consumable.
After the status code there will be a brief action message. If this action message is performed the status should return to normal: that is, OK.
In the example shown here, one or more of the printheads have a replace message displayed. To find out which printhead has the error, select the printhead icon. You will see the status of all the printheads at once.
Consumable in warranty
If you have:performed the action specified in the messagelooked up the status codes, and performed the procedures described there
but the error has not been corrected, and your consumable is still IN WARRANTY, make a note of the whole status code and contact your support representative. To check whether it is in warranty refer to 71, in section maintain the ink system on the reverse of this guide.
For detailed warranty information, refer to the Legal Information document that came with your printer.
Status codes
The tables in Printhead status messages, on page 10, for example, show the status codes with messages such as ‘replace’ or ‘reseat’ next to them. Perform the message action (replace, reseat, etc.) first. If this does not solve the problem, refer to the status codes in the table and perform the relevant procedure(s).
The consumable
Status code
Ink ColorThe action message
5-3
Front-panel messages
HP Designjet 5100 printer Customer Reference Guide
Front-panel messages
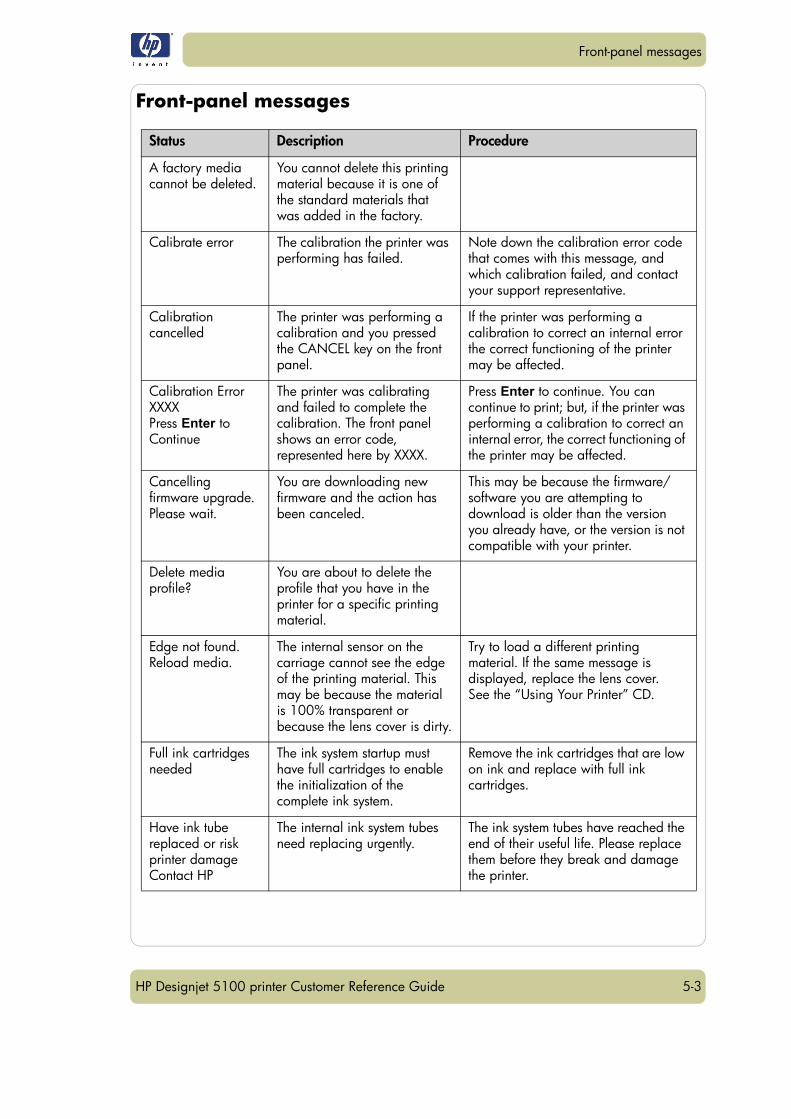
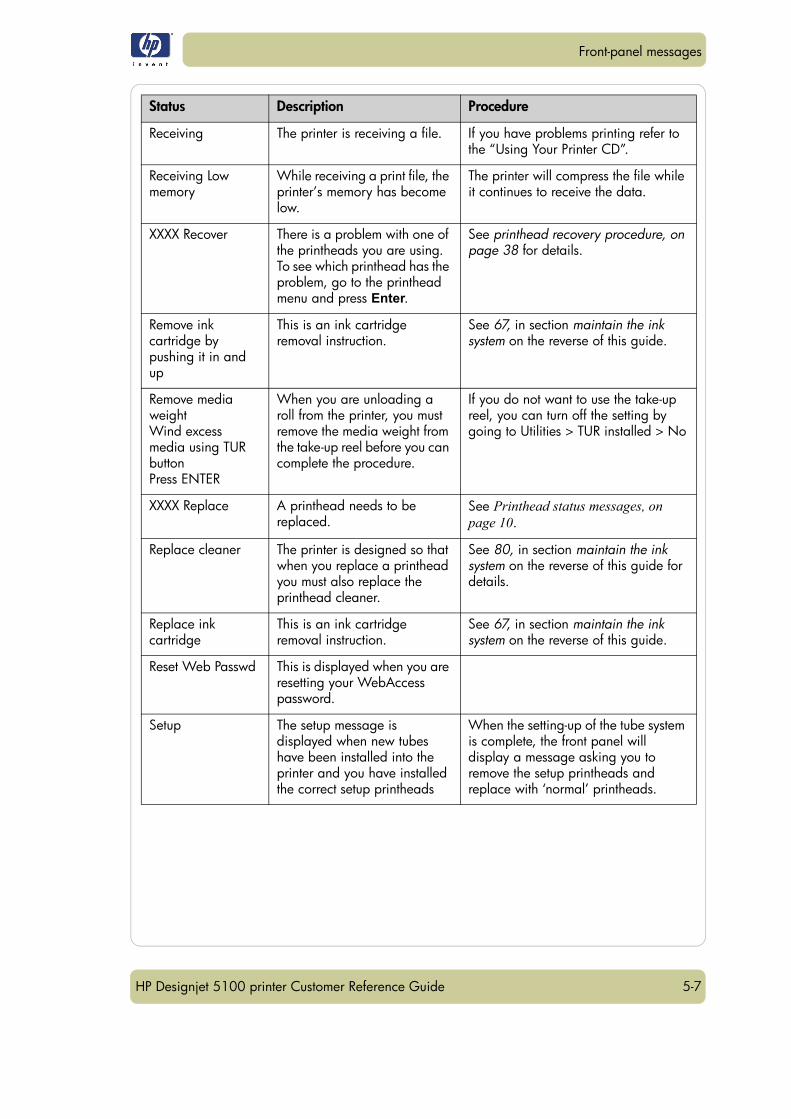
Status Description Procedure
A factory media cannot be deleted.
You cannot delete this printing material because it is one of the standard materials that was added in the factory.
Calibrate error The calibration the printer was performing has failed.
Note down the calibration error code that comes with this message, and which calibration failed, and contact your support representative.
Calibration cancelled
The printer was performing a calibration and you pressed the CANCEL key on the front panel.
If the printer was performing a calibration to correct an internal error the correct functioning of the printer may be affected.
Calibration ErrorXXXXPress Enter to Continue
The printer was calibrating and failed to complete the calibration. The front panel shows an error code, represented here by XXXX.
Press Enter to continue. You can continue to print; but, if the printer was performing a calibration to correct an internal error, the correct functioning of the printer may be affected.
Cancelling firmware upgrade. Please wait.
You are downloading new firmware and the action has been canceled.
This may be because the firmware/software you are attempting to download is older than the version you already have, or the version is not compatible with your printer.
Delete media profile?
You are about to delete the profile that you have in the printer for a specific printing material.
Edge not found. Reload media.
The internal sensor on the carriage cannot see the edge of the printing material. This may be because the material is 100% transparent or because the lens cover is dirty.
Try to load a different printing material. If the same message is displayed, replace the lens cover.See the “Using Your Printer” CD.
Full ink cartridges needed
The ink system startup must have full cartridges to enable the initialization of the complete ink system.
Remove the ink cartridges that are low on ink and replace with full ink cartridges.
Have ink tube replaced or risk printer damage Contact HP
The internal ink system tubes need replacing urgently.
The ink system tubes have reached the end of their useful life. Please replace them before they break and damage the printer.
5-4
Front-panel messages
HP Designjet 5100 printer Customer Reference Guide
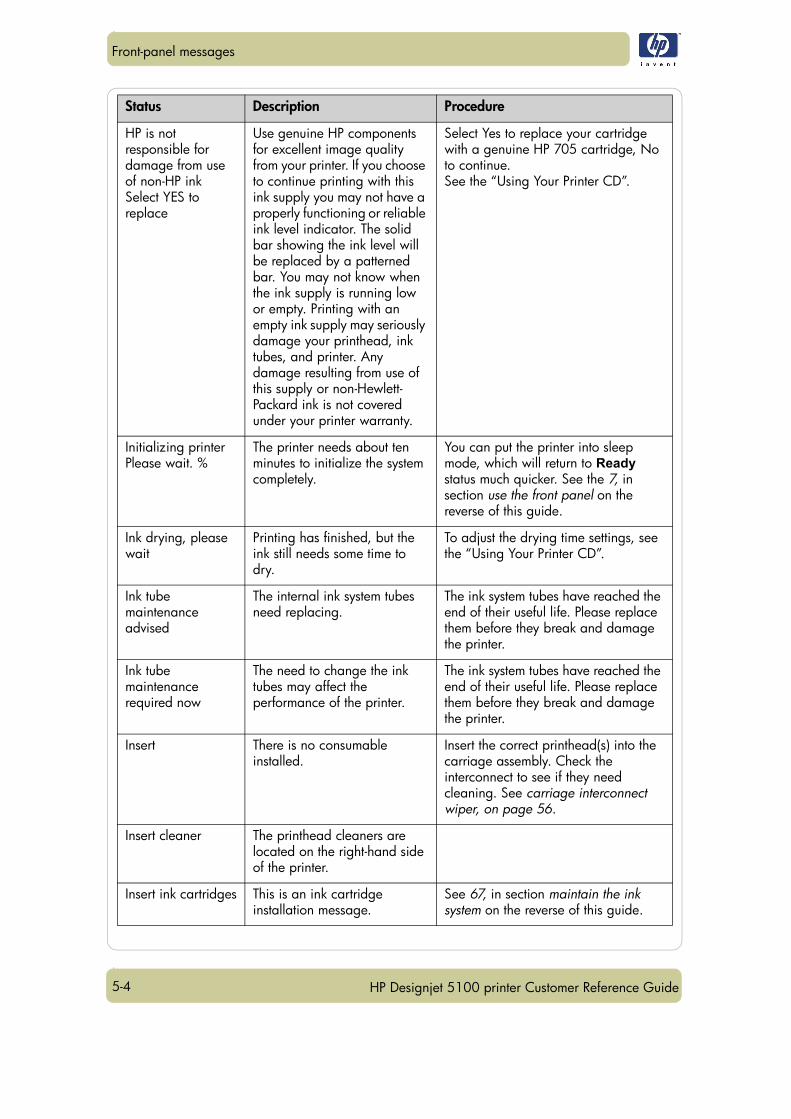
HP is not responsible for damage from use of non-HP inkSelect YES to replace
Use genuine HP components for excellent image quality from your printer. If you choose to continue printing with this ink supply you may not have a properly functioning or reliable ink level indicator. The solid bar showing the ink level will be replaced by a patterned bar. You may not know when the ink supply is running low or empty. Printing with an empty ink supply may seriously damage your printhead, ink tubes, and printer. Any damage resulting from use of this supply or non-Hewlett-Packard ink is not covered under your printer warranty.
Select Yes to replace your cartridge with a genuine HP 705 cartridge, No to continue.See the “Using Your Printer CD”.
Initializing printerPlease wait. %
The printer needs about ten minutes to initialize the system completely.
You can put the printer into sleep mode, which will return to Ready status much quicker. See the 7, in section use the front panel on the reverse of this guide.
Ink drying, please wait
Printing has finished, but the ink still needs some time to dry.
To adjust the drying time settings, see the “Using Your Printer CD”.
Ink tube maintenance advised
The internal ink system tubes need replacing.
The ink system tubes have reached the end of their useful life. Please replace them before they break and damage the printer.
Ink tube maintenance required now
The need to change the ink tubes may affect the performance of the printer.
The ink system tubes have reached the end of their useful life. Please replace them before they break and damage the printer.
Insert There is no consumable installed.
Insert the correct printhead(s) into the carriage assembly. Check the interconnect to see if they need cleaning. See carriage interconnect wiper, on page 56.
Insert cleaner The printhead cleaners are located on the right-hand side of the printer.
Insert ink cartridges This is an ink cartridge installation message.
See 67, in section maintain the ink system on the reverse of this guide.
Status Description Procedure
5-5
Front-panel messages
HP Designjet 5100 printer Customer Reference Guide
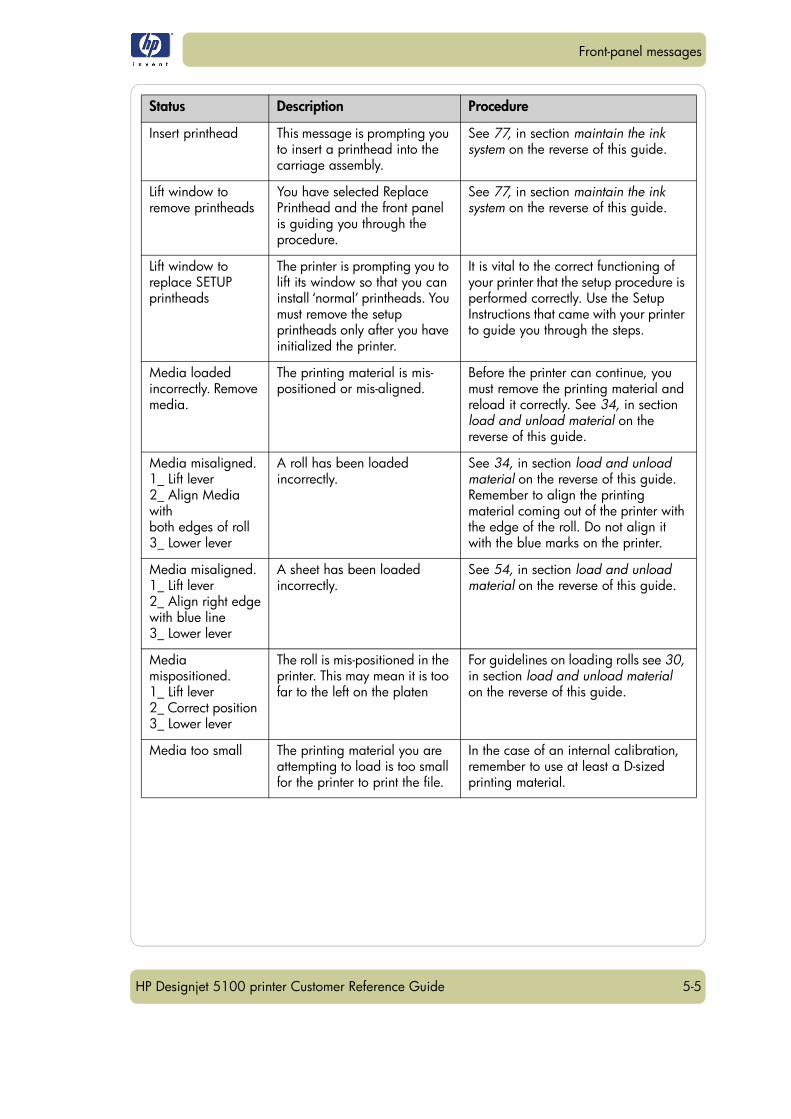
Insert printhead This message is prompting you to insert a printhead into the carriage assembly.
See 77, in section maintain the ink system on the reverse of this guide.
Lift window to remove printheads
You have selected Replace Printhead and the front panel is guiding you through the procedure.
See 77, in section maintain the ink system on the reverse of this guide.
Lift window to replace SETUP printheads
The printer is prompting you to lift its window so that you can install ‘normal’ printheads. You must remove the setup printheads only after you have initialized the printer.
It is vital to the correct functioning of your printer that the setup procedure is performed correctly. Use the Setup Instructions that came with your printer to guide you through the steps.
Media loaded incorrectly. Remove media.
The printing material is mis-positioned or mis-aligned.
Before the printer can continue, you must remove the printing material and reload it correctly. See 34, in section load and unload material on the reverse of this guide.
Media misaligned. 1_ Lift lever 2_ Align Media withboth edges of roll 3_ Lower lever
A roll has been loaded incorrectly.
See 34, in section load and unload material on the reverse of this guide. Remember to align the printing material coming out of the printer with the edge of the roll. Do not align it with the blue marks on the printer.
Media misaligned. 1_ Lift lever 2_ Align right edgewith blue line 3_ Lower lever
A sheet has been loaded incorrectly.
See 54, in section load and unload material on the reverse of this guide.
Media mispositioned. 1_ Lift lever 2_ Correct position 3_ Lower lever
The roll is mis-positioned in the printer. This may mean it is too far to the left on the platen
For guidelines on loading rolls see 30, in section load and unload material on the reverse of this guide.
Media too small The printing material you are attempting to load is too small for the printer to print the file.
In the case of an internal calibration, remember to use at least a D-sized printing material.
Status Description Procedure
5-6
Front-panel messages
HP Designjet 5100 printer Customer Reference Guide
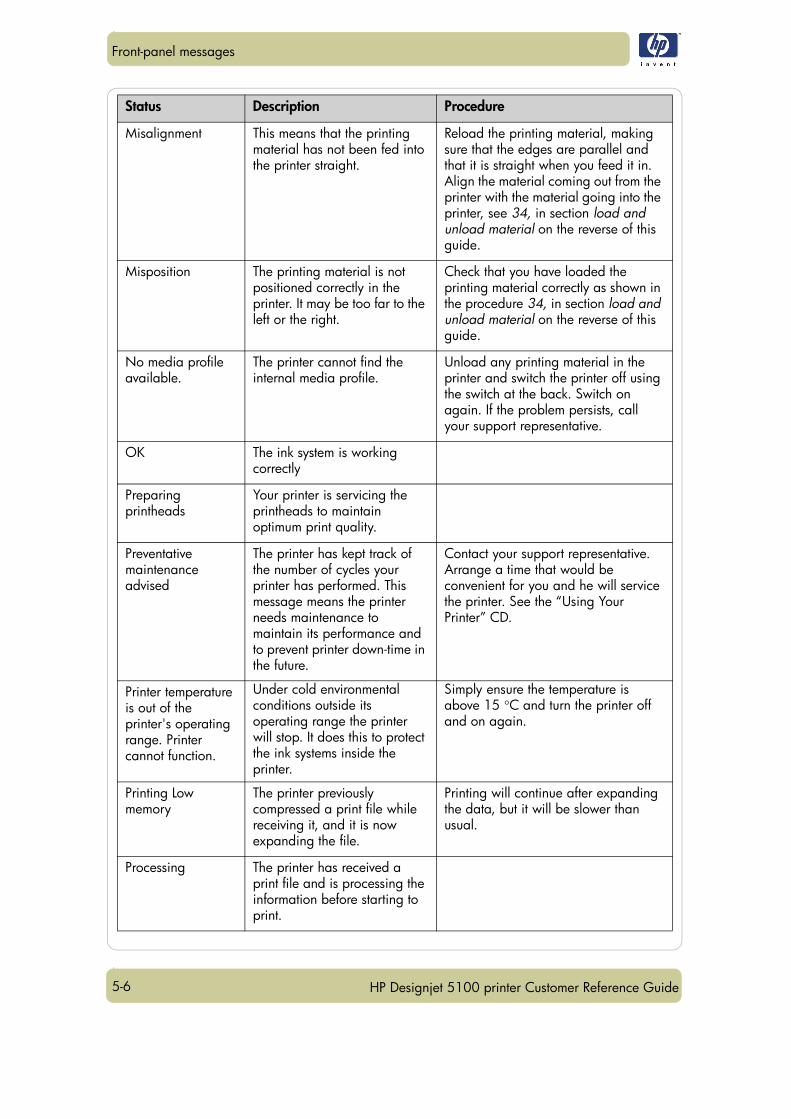
Misalignment This means that the printing material has not been fed into the printer straight.
Reload the printing material, making sure that the edges are parallel and that it is straight when you feed it in. Align the material coming out from the printer with the material going into the printer, see 34, in section load and unload material on the reverse of this guide.
Misposition The printing material is not positioned correctly in the printer. It may be too far to the left or the right.
Check that you have loaded the printing material correctly as shown in the procedure 34, in section load and unload material on the reverse of this guide.
No media profile available.
The printer cannot find the internal media profile.
Unload any printing material in the printer and switch the printer off using the switch at the back. Switch on again. If the problem persists, call your support representative.
OK The ink system is working correctly
Preparing printheads
Your printer is servicing the printheads to maintain optimum print quality.
Preventative maintenance advised
The printer has kept track of the number of cycles your printer has performed. This message means the printer needs maintenance to maintain its performance and to prevent printer down-time in the future.
Contact your support representative. Arrange a time that would be convenient for you and he will service the printer. See the “Using Your Printer” CD.
Printer temperature is out of the printer's operating range. Printer cannot function.
Under cold environmental conditions outside its operating range the printer will stop. It does this to protect the ink systems inside the printer.
Simply ensure the temperature is above 15 °C and turn the printer off and on again.
Printing Low memory
The printer previously compressed a print file while receiving it, and it is now expanding the file.
Printing will continue after expanding the data, but it will be slower than usual.
Processing The printer has received a print file and is processing the information before starting to print.
Status Description Procedure
5-7
Front-panel messages
HP Designjet 5100 printer Customer Reference Guide
Receiving The printer is receiving a file. If you have problems printing refer to the “Using Your Printer CD”.
Receiving Low memory
While receiving a print file, the printer’s memory has become low.
The printer will compress the file while it continues to receive the data.
XXXX Recover There is a problem with one of the printheads you are using. To see which printhead has the problem, go to the printhead menu and press Enter.
See printhead recovery procedure, on page 38 for details.
Remove ink cartridge by pushing it in and up
This is an ink cartridge removal instruction.
See 67, in section maintain the ink system on the reverse of this guide.
Remove media weightWind excess media using TUR buttonPress ENTER
When you are unloading a roll from the printer, you must remove the media weight from the take-up reel before you can complete the procedure.
If you do not want to use the take-up reel, you can turn off the setting by going to Utilities > TUR installed > No
XXXX Replace A printhead needs to be replaced.
See Printhead status messages, on page 10.
Replace cleaner The printer is designed so that when you replace a printhead you must also replace the printhead cleaner.
See 80, in section maintain the ink system on the reverse of this guide for details.
Replace ink cartridge
This is an ink cartridge removal instruction.
See 67, in section maintain the ink system on the reverse of this guide.
Reset Web Passwd This is displayed when you are resetting your WebAccess password.
Setup The setup message is displayed when new tubes have been installed into the printer and you have installed the correct setup printheads
When the setting-up of the tube system is complete, the front panel will display a message asking you to remove the setup printheads and replace with ‘normal’ printheads.
Status Description Procedure
5-8
Front-panel messages
HP Designjet 5100 printer Customer Reference Guide
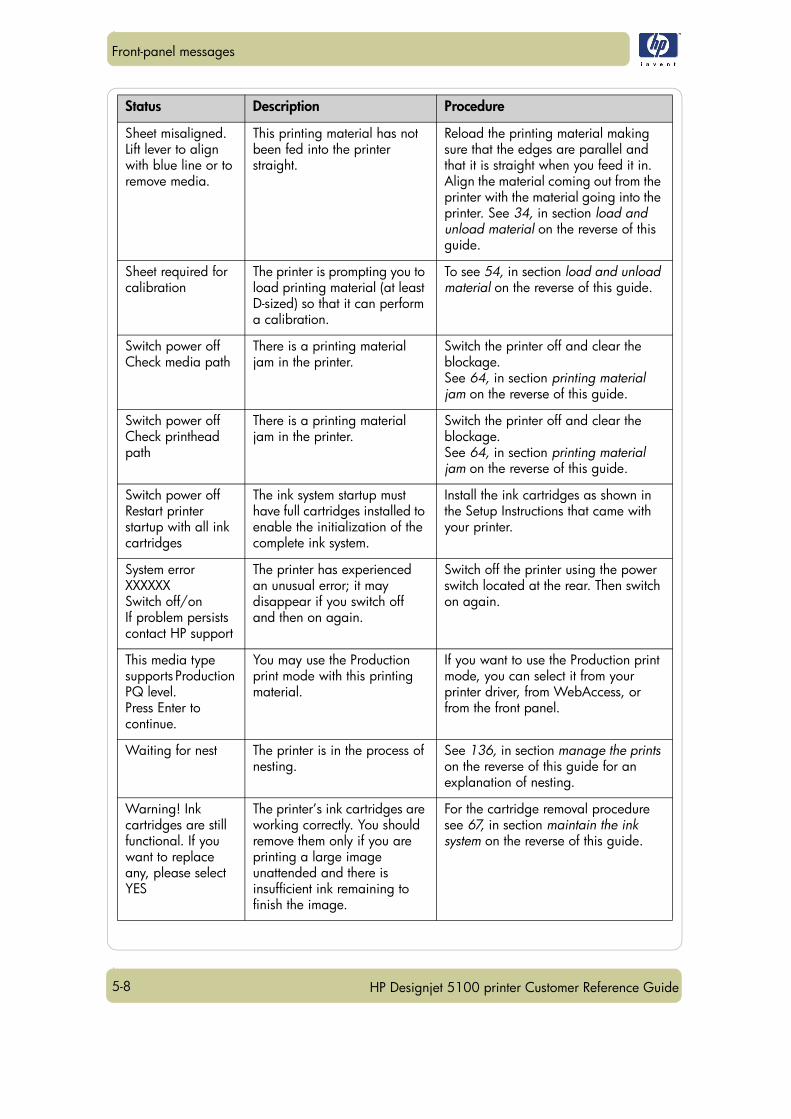
Sheet misaligned. Lift lever to align with blue line or to remove media.
This printing material has not been fed into the printer straight.
Reload the printing material making sure that the edges are parallel and that it is straight when you feed it in. Align the material coming out from the printer with the material going into the printer. See 34, in section load and unload material on the reverse of this guide.
Sheet required for calibration
The printer is prompting you to load printing material (at least D-sized) so that it can perform a calibration.
To see 54, in section load and unload material on the reverse of this guide.
Switch power offCheck media path
There is a printing material jam in the printer.
Switch the printer off and clear the blockage.See 64, in section printing material jam on the reverse of this guide.
Switch power offCheck printhead path
There is a printing material jam in the printer.
Switch the printer off and clear the blockage.See 64, in section printing material jam on the reverse of this guide.
Switch power offRestart printer startup with all ink cartridges
The ink system startup must have full cartridges installed to enable the initialization of the complete ink system.
Install the ink cartridges as shown in the Setup Instructions that came with your printer.
System errorXXXXXXSwitch off/onIf problem persistscontact HP support
The printer has experienced an unusual error; it may disappear if you switch off and then on again.
Switch off the printer using the power switch located at the rear. Then switch on again.
This media type supports Production PQ level.Press Enter to continue.
You may use the Production print mode with this printing material.
If you want to use the Production print mode, you can select it from your printer driver, from WebAccess, or from the front panel.
Waiting for nest The printer is in the process of nesting.
See 136, in section manage the prints on the reverse of this guide for an explanation of nesting.
Warning! Ink cartridges are still functional. If you want to replace any, please select YES
The printer’s ink cartridges are working correctly. You should remove them only if you are printing a large image unattended and there is insufficient ink remaining to finish the image.
For the cartridge removal procedure see 67, in section maintain the ink system on the reverse of this guide.
Status Description Procedure

5-9
Front-panel messages
HP Designjet 5100 printer Customer Reference Guide
Warning … supply ink level? (Error code 8x09) See user manual.
If you choose to continue printing with this ink supply you will not have an ink level indicator. You may not know when the ink supply is running low or empty. Printing with an empty ink supply may seriously damage your printhead, ink tubes, and printer. See below for a complete listing of features that will not be available with continued use of this ink supply. Any damage resulting from use of this supply or non-HP ink is not covered under your printer warranty.The following features will not be available as a result of using this supply.In the Ink Cartridge menu:
Ink level indicatorPercentage of ink remaining
In WebAccess:Ink Cartridges status & Ink Level
Select Yes to replace it with a genuine HP 705 cartridge, No to continue.
Warning! Tubes System has reached its END OF LIFE. Contact HP Representative. Replace Tubes System.
The internal ink system inside your printer has reached the end of its life.
The ink system tubes have reached the end of their useful life. Please replace them before they break and damage the printer.
WARNING!!! You are going to reset the WebAccess Passwd.
You have a security setting for WebAccess. This is an optional setting. If you continue with the procedure, the password to gain access to WebAccess will be reset.
This setting is because you have forgotten, or do not know the password for entry into WebAccess. See the “Using Your Printer” CD for more details.
You need to cut this media manually
You have printing material loaded that is too thick or strong for the cutter to cut.
Use a knife or scissors to cut the printing material.
Status Description Procedure
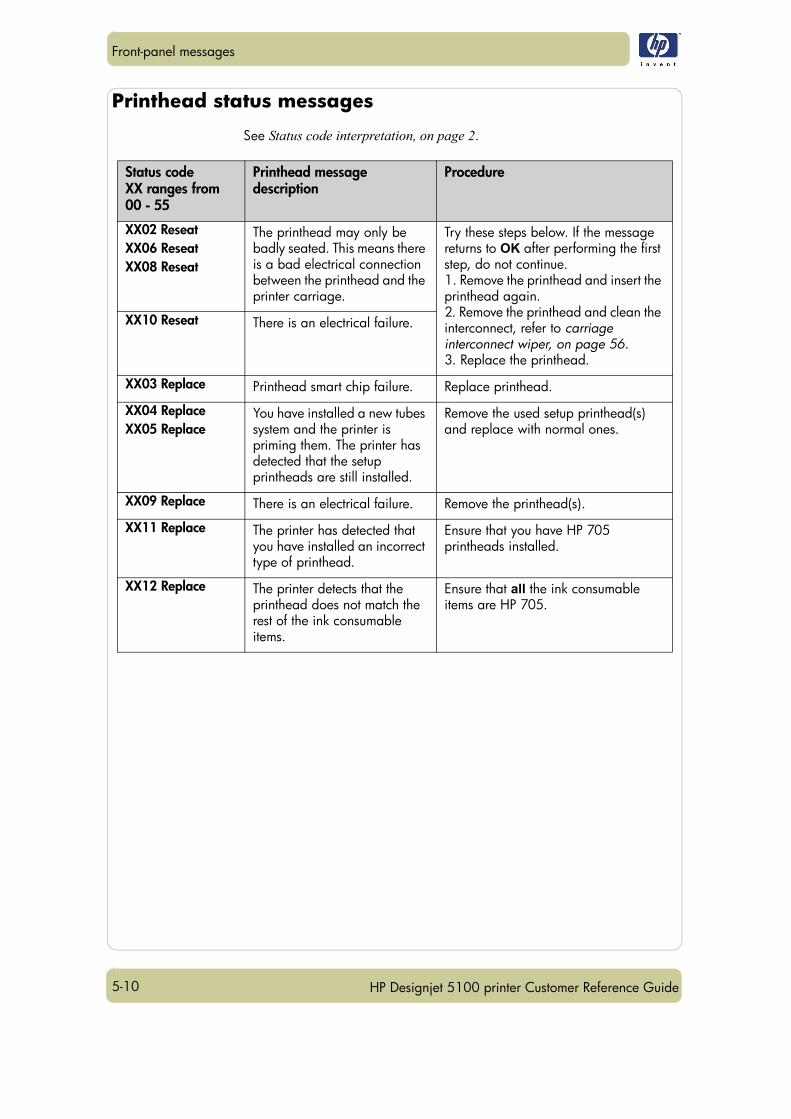
5-10
Front-panel messages
HP Designjet 5100 printer Customer Reference Guide
Printhead status messages
See Status code interpretation, on page 2.
Status codeXX ranges from 00 - 55
Printhead message description
Procedure
XX02 ReseatXX06 ReseatXX08 Reseat
The printhead may only be badly seated. This means there is a bad electrical connection between the printhead and the printer carriage.
Try these steps below. If the message returns to OK after performing the first step, do not continue.1. Remove the printhead and insert the printhead again.2. Remove the printhead and clean the interconnect, refer to carriage interconnect wiper, on page 56.3. Replace the printhead.
XX10 Reseat There is an electrical failure.
XX03 Replace Printhead smart chip failure. Replace printhead.
XX04 ReplaceXX05 Replace
You have installed a new tubes system and the printer is priming them. The printer has detected that the setup printheads are still installed.
Remove the used setup printhead(s) and replace with normal ones.
XX09 Replace There is an electrical failure. Remove the printhead(s).
XX11 Replace The printer has detected that you have installed an incorrect type of printhead.
Ensure that you have HP 705 printheads installed.
XX12 Replace The printer detects that the printhead does not match the rest of the ink consumable items.
Ensure that all the ink consumable items are HP 705.
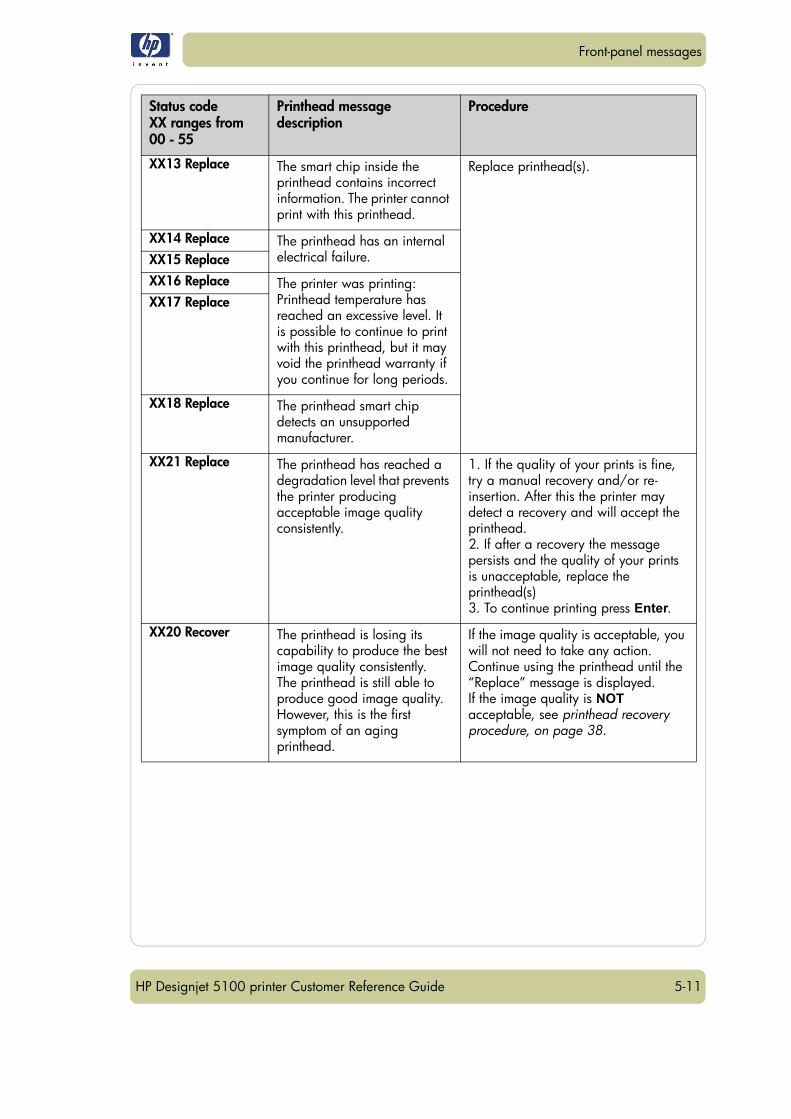
5-11
Front-panel messages
HP Designjet 5100 printer Customer Reference Guide
XX13 Replace The smart chip inside the printhead contains incorrect information. The printer cannot print with this printhead.
Replace printhead(s).
XX14 Replace The printhead has an internal electrical failure.XX15 Replace
XX16 Replace The printer was printing:Printhead temperature has reached an excessive level. It is possible to continue to print with this printhead, but it may void the printhead warranty if you continue for long periods.
XX17 Replace
XX18 Replace The printhead smart chip detects an unsupported manufacturer.
XX21 Replace The printhead has reached a degradation level that prevents the printer producing acceptable image quality consistently.
1. If the quality of your prints is fine, try a manual recovery and/or re-insertion. After this the printer may detect a recovery and will accept the printhead.2. If after a recovery the message persists and the quality of your prints is unacceptable, replace the printhead(s)3. To continue printing press Enter.
XX20 Recover The printhead is losing its capability to produce the best image quality consistently.The printhead is still able to produce good image quality. However, this is the first symptom of an aging printhead.
If the image quality is acceptable, you will not need to take any action. Continue using the printhead until the “Replace” message is displayed.If the image quality is NOT acceptable, see printhead recovery procedure, on page 38.
Status codeXX ranges from 00 - 55
Printhead message description
Procedure
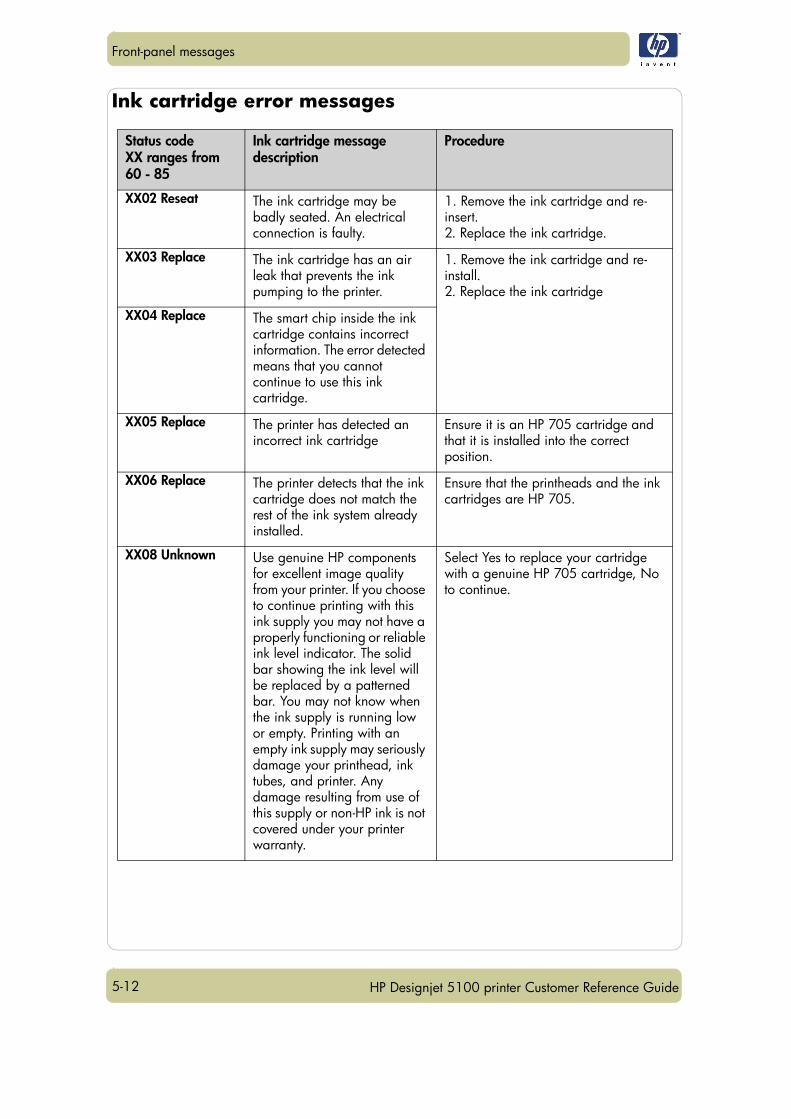
5-12
Front-panel messages
HP Designjet 5100 printer Customer Reference Guide
Ink cartridge error messages
Status codeXX ranges from 60 - 85
Ink cartridge message description
Procedure
XX02 Reseat The ink cartridge may be badly seated. An electrical connection is faulty.
1. Remove the ink cartridge and re-insert.2. Replace the ink cartridge.
XX03 Replace The ink cartridge has an air leak that prevents the ink pumping to the printer.
1. Remove the ink cartridge and re-install.2. Replace the ink cartridge
XX04 Replace The smart chip inside the ink cartridge contains incorrect information. The error detected means that you cannot continue to use this ink cartridge.
XX05 Replace The printer has detected an incorrect ink cartridge
Ensure it is an HP 705 cartridge and that it is installed into the correct position.
XX06 Replace The printer detects that the ink cartridge does not match the rest of the ink system already installed.
Ensure that the printheads and the ink cartridges are HP 705.
XX08 Unknown Use genuine HP components for excellent image quality from your printer. If you choose to continue printing with this ink supply you may not have a properly functioning or reliable ink level indicator. The solid bar showing the ink level will be replaced by a patterned bar. You may not know when the ink supply is running low or empty. Printing with an empty ink supply may seriously damage your printhead, ink tubes, and printer. Any damage resulting from use of this supply or non-HP ink is not covered under your printer warranty.
Select Yes to replace your cartridge with a genuine HP 705 cartridge, No to continue.
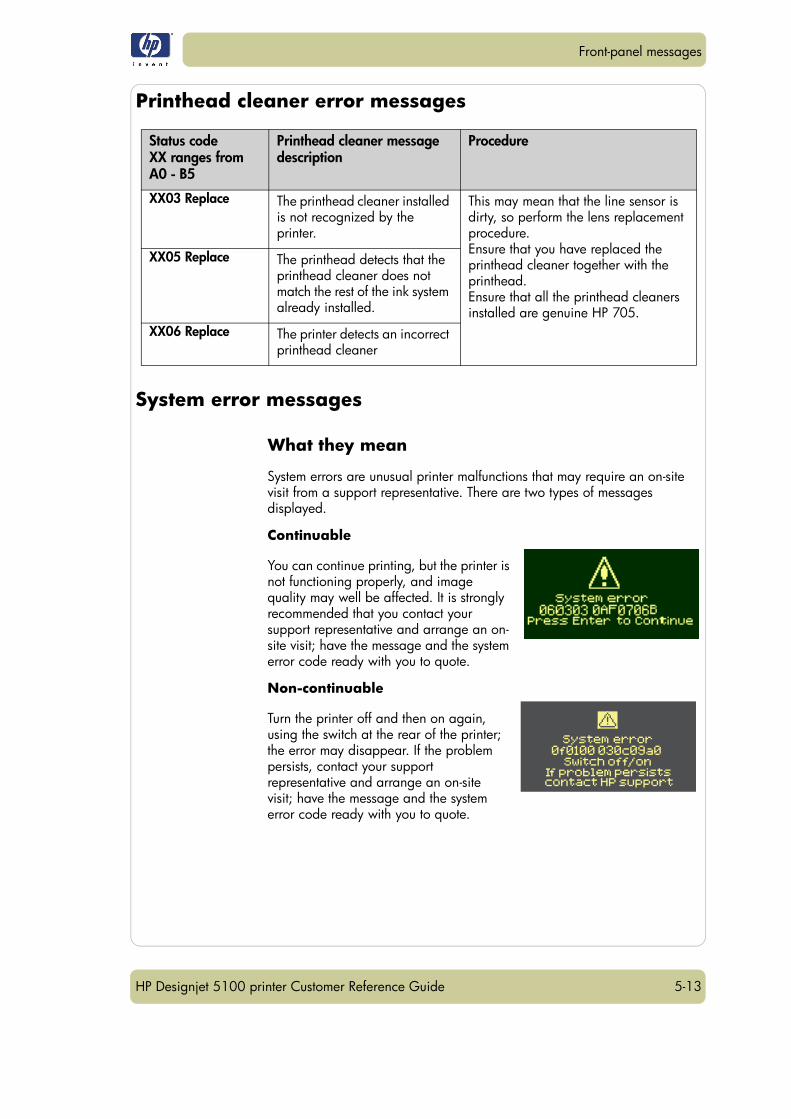
5-13
Front-panel messages
HP Designjet 5100 printer Customer Reference Guide
Printhead cleaner error messages
System error messages
What they mean
System errors are unusual printer malfunctions that may require an on-site visit from a support representative. There are two types of messages displayed.
Continuable
You can continue printing, but the printer is not functioning properly, and image quality may well be affected. It is strongly recommended that you contact your support representative and arrange an on-site visit; have the message and the system error code ready with you to quote.
Non-continuable
Turn the printer off and then on again, using the switch at the rear of the printer; the error may disappear. If the problem persists, contact your support representative and arrange an on-site visit; have the message and the system error code ready with you to quote.
Status codeXX ranges from A0 - B5
Printhead cleaner message description
Procedure
XX03 Replace The printhead cleaner installed is not recognized by the printer.
This may mean that the line sensor is dirty, so perform the lens replacement procedure.Ensure that you have replaced the printhead cleaner together with the printhead. Ensure that all the printhead cleaners installed are genuine HP 705.
XX05 Replace The printhead detects that the printhead cleaner does not match the rest of the ink system already installed.
XX06 Replace The printer detects an incorrect printhead cleaner

5-14
Front-panel messages
HP Designjet 5100 printer Customer Reference Guide

6-1HP Designjet 5100 printer Customer Reference Guide
Troubleshooting image quality 6
Correcting the configuration 6-2Using the image quality print 6-2
Printhead status check 6-2Replacing 6-2How to print the image quality print 6-3How to use the image quality print 6-3Analyzing the image quality print 6-3No defects found in the image quality print 6-6
Color accuracy 6-6Configuration 6-6Color consistency problems 6-7Color accuracy configuration 6-7
Printhead recovery procedure 6-8Accuracy calibration 6-8
To restore the factory’s calibration 6-9Aligning the printheads 6-9Ink marks on the printing material 6-9
Warped lines 6-9Blurred lines (ink bleeds from lines) 6-10Marks and/or scratches on glossy paper 6-10Smears or scratching on the image 6-10Marks on the reverse of the printing material 6-10Automatic 6-11Manual 6-11The printing material cannot be loaded successfully 6-12
Other sources of information 6-13
6
6-2
Troubleshooting image quality
HP Designjet 5100 printer Customer Reference Guide
Correcting the configuration1 To achieve the best performance from your printer, only use genuine HP
accessories and supplies, whose reliability and performance have been thoroughly tested to give trouble-free performance and best-quality prints. For details of HP printing materials, see the Using Your Printer CD. You can also look at the Web page http://www.designjet.hp.com/ for the most up-to-date information.
2 Make sure that the type of media selected in the front panel is the same as the printing material loaded into the printer. To check this go to the Roll or Sheet menu in the front panel and press Enter.
3 Make sure that the print mode (Max Quality, Productivity, Production, Max Speed) is correct. Check that this is defined in the front panel and in the driver selection.
4 Select Max Quality print mode for maximum print quality.
5 For Non-HP drivers, set media settings to match the printing material loaded in the printer. See the documentation that came with your software for information.
6 If your image quality problem is related to color accuracy, go to Color accuracy configuration, on page 7 for further configuration help.
Using the image quality print
The image quality print helps you determine whether you have an image quality problem, and if you do, what the cause of the problem is and how to resolve it. The print contains patterns designed to highlight any image quality problems.
Before printing and analyzing the Image Quality Print, it is recommended that you check the following:
Printhead status check
Check the printhead status in the front panel. Using the up and down keys, select the printhead icon; the front panel will then display the printhead status.
Replacing
If the printhead needs replacing, go to 73, in section maintain the ink system on the reverse of this guide and replace the printhead.
Recovering
If the printhead needs recovering, go to Printhead recovery procedure, on

6-3
Troubleshooting image quality
HP Designjet 5100 printer Customer Reference Guide
page 8.
How to print the image quality print
Before you print the Image Quality Print you must ensure that you have A2- or C-size printing material (or larger) loaded into the printer.
To print the Image Quality Print use the front panel. Go to Utilities > Test Prints > Image Quality, select which of the four prints you want (see the following pages), and press the Enter key.
How to use the image quality print1 Use the same printing material and image quality setting as you were using
when you discovered the image quality problem.
2 Study each of the test patterns in the order that they are shown: 1 through 4.
Shown here is what the image quality print looks like:
Analyzing the image quality printPlot 1: primary colors
The purpose of the particular part of the image Quality Print is to test the overall quality of the document with regard to dense colors.
The colored stripes are in the same order as they appear on the printer as if you are facing it: light cyan first and black last.
Each pair of colors is printed by only one printhead. So it’s easy to find the root cause of the image quality problem.
This array of colored stripes is designed to check for certain defects in the
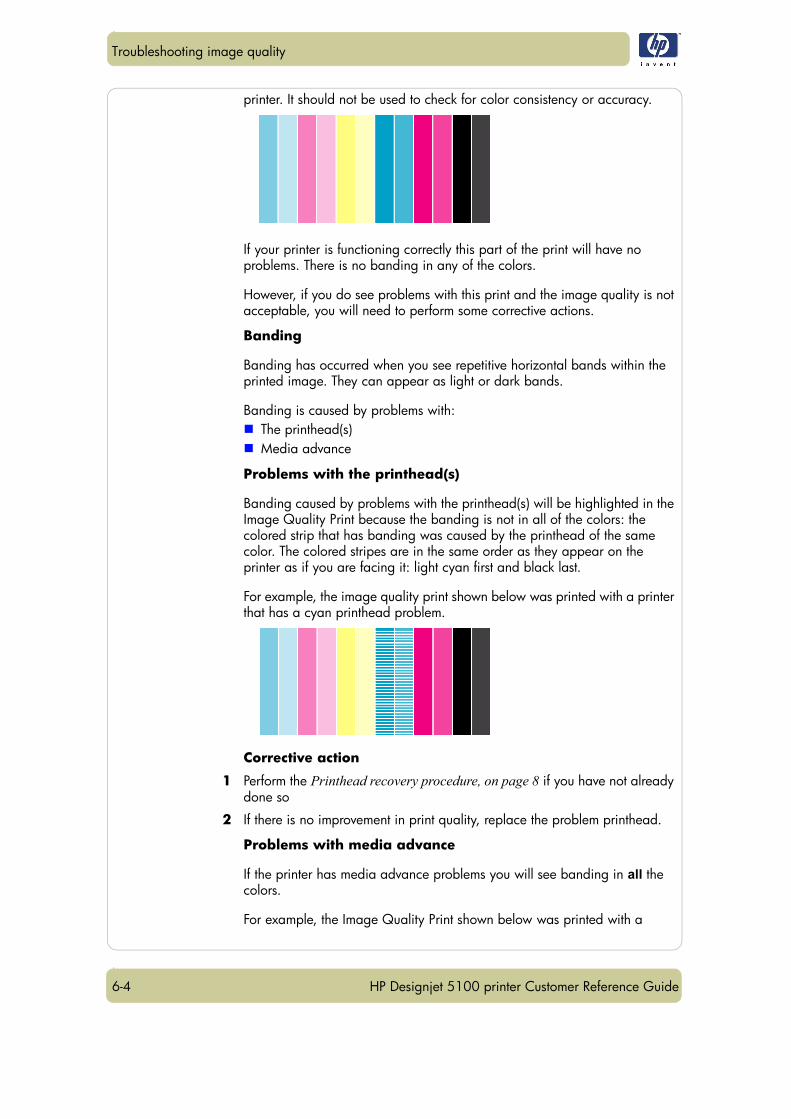
6-4
Troubleshooting image quality
HP Designjet 5100 printer Customer Reference Guide
printer. It should not be used to check for color consistency or accuracy.
If your printer is functioning correctly this part of the print will have no problems. There is no banding in any of the colors.
However, if you do see problems with this print and the image quality is not acceptable, you will need to perform some corrective actions.
Banding
Banding has occurred when you see repetitive horizontal bands within the printed image. They can appear as light or dark bands.
Banding is caused by problems with:The printhead(s)Media advance
Problems with the printhead(s)
Banding caused by problems with the printhead(s) will be highlighted in the Image Quality Print because the banding is not in all of the colors: the colored strip that has banding was caused by the printhead of the same color. The colored stripes are in the same order as they appear on the printer as if you are facing it: light cyan first and black last.
For example, the image quality print shown below was printed with a printer that has a cyan printhead problem.
Corrective action
1 Perform the Printhead recovery procedure, on page 8 if you have not already done so
2 If there is no improvement in print quality, replace the problem printhead.
Problems with media advance
If the printer has media advance problems you will see banding in all the colors.
For example, the Image Quality Print shown below was printed with a
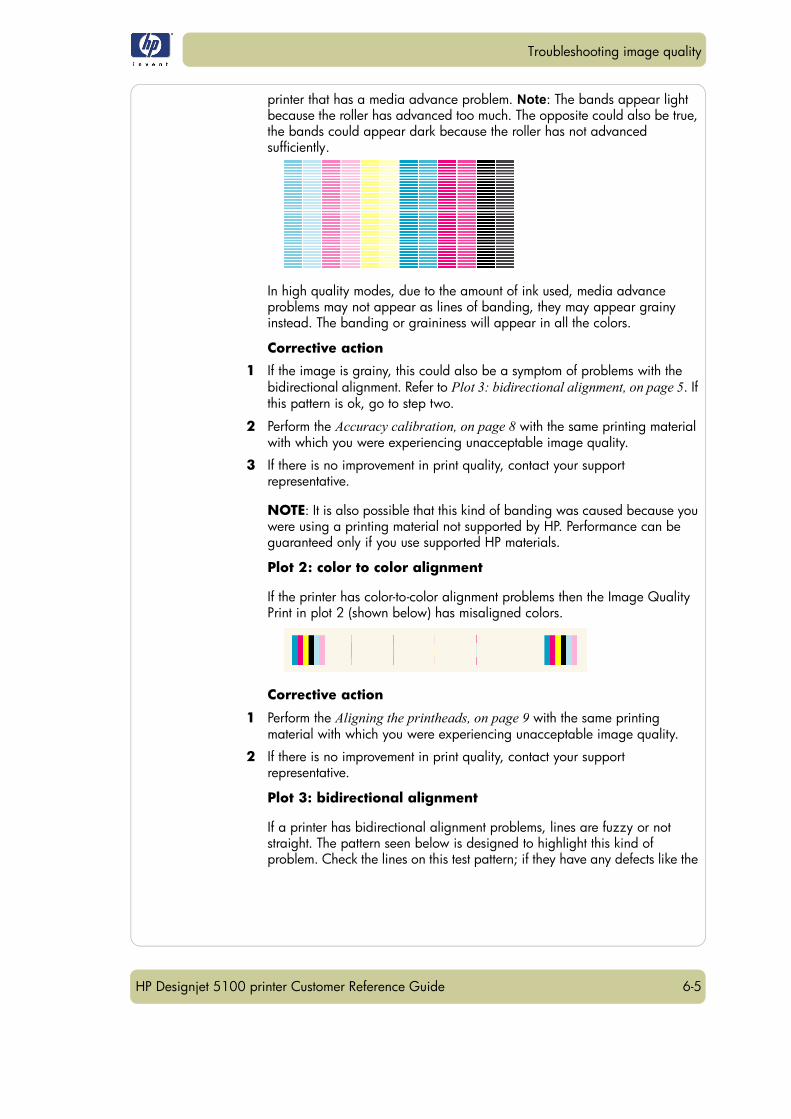
6-5
Troubleshooting image quality
HP Designjet 5100 printer Customer Reference Guide
printer that has a media advance problem. Note: The bands appear light because the roller has advanced too much. The opposite could also be true, the bands could appear dark because the roller has not advanced sufficiently.
In high quality modes, due to the amount of ink used, media advance problems may not appear as lines of banding, they may appear grainy instead. The banding or graininess will appear in all the colors.
Corrective action
1 If the image is grainy, this could also be a symptom of problems with the bidirectional alignment. Refer to Plot 3: bidirectional alignment, on page 5. If this pattern is ok, go to step two.
2 Perform the Accuracy calibration, on page 8 with the same printing material with which you were experiencing unacceptable image quality.
3 If there is no improvement in print quality, contact your support representative.
NOTE: It is also possible that this kind of banding was caused because you were using a printing material not supported by HP. Performance can be guaranteed only if you use supported HP materials.
Plot 2: color to color alignment
If the printer has color-to-color alignment problems then the Image Quality Print in plot 2 (shown below) has misaligned colors.
Corrective action
1 Perform the Aligning the printheads, on page 9 with the same printing material with which you were experiencing unacceptable image quality.
2 If there is no improvement in print quality, contact your support representative.
Plot 3: bidirectional alignment
If a printer has bidirectional alignment problems, lines are fuzzy or not straight. The pattern seen below is designed to highlight this kind of problem. Check the lines on this test pattern; if they have any defects like the
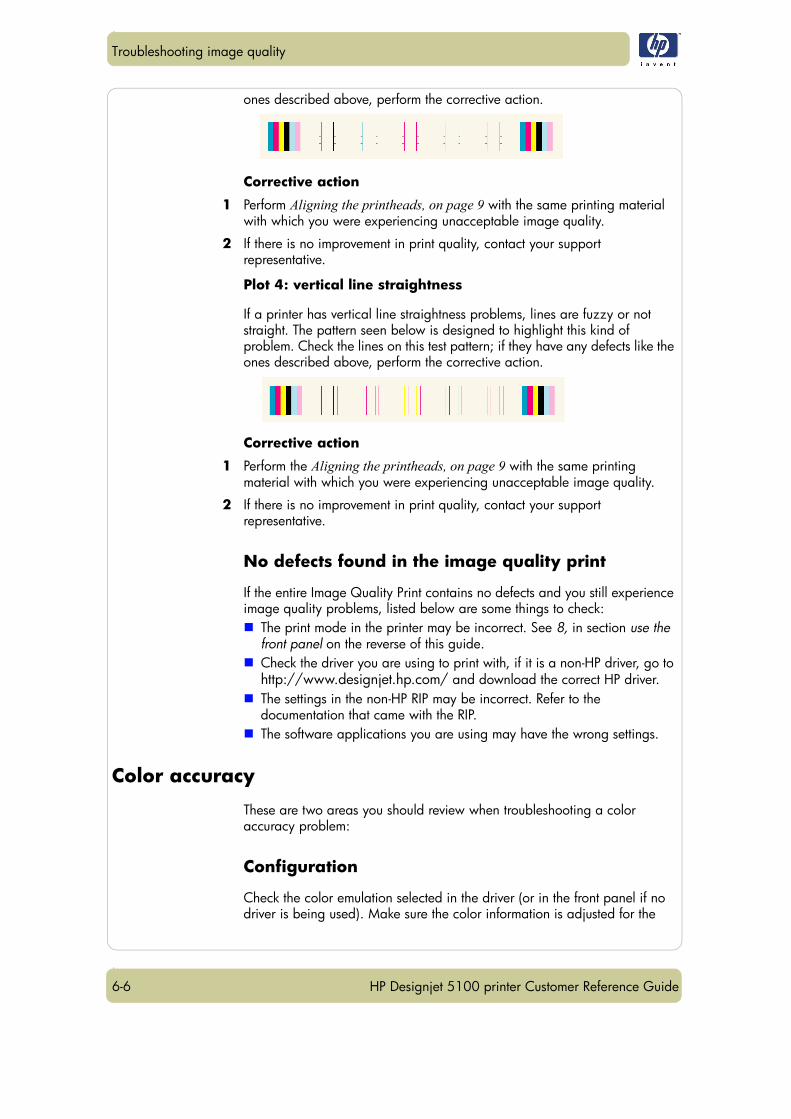
6-6
Troubleshooting image quality
HP Designjet 5100 printer Customer Reference Guide
ones described above, perform the corrective action.
Corrective action
1 Perform Aligning the printheads, on page 9 with the same printing material with which you were experiencing unacceptable image quality.
2 If there is no improvement in print quality, contact your support representative.
Plot 4: vertical line straightness
If a printer has vertical line straightness problems, lines are fuzzy or not straight. The pattern seen below is designed to highlight this kind of problem. Check the lines on this test pattern; if they have any defects like the ones described above, perform the corrective action.
Corrective action
1 Perform the Aligning the printheads, on page 9 with the same printing material with which you were experiencing unacceptable image quality.
2 If there is no improvement in print quality, contact your support representative.
No defects found in the image quality print
If the entire Image Quality Print contains no defects and you still experience image quality problems, listed below are some things to check:
The print mode in the printer may be incorrect. See 8, in section use the front panel on the reverse of this guide.Check the driver you are using to print with, if it is a non-HP driver, go to http://www.designjet.hp.com/ and download the correct HP driver.The settings in the non-HP RIP may be incorrect. Refer to the documentation that came with the RIP.The software applications you are using may have the wrong settings.
Color accuracy
These are two areas you should review when troubleshooting a color accuracy problem:
Configuration
Check the color emulation selected in the driver (or in the front panel if no driver is being used). Make sure the color information is adjusted for the
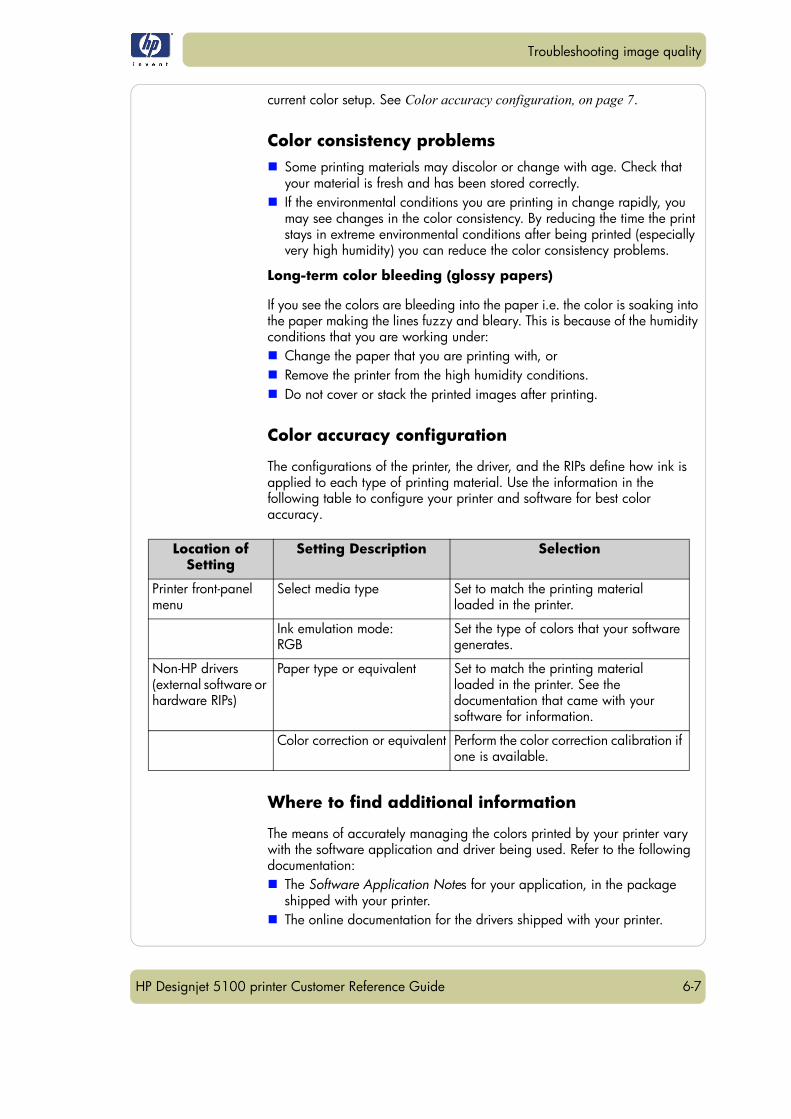
6-7
Troubleshooting image quality
HP Designjet 5100 printer Customer Reference Guide
current color setup. See Color accuracy configuration, on page 7.
Color consistency problemsSome printing materials may discolor or change with age. Check that your material is fresh and has been stored correctly.If the environmental conditions you are printing in change rapidly, you may see changes in the color consistency. By reducing the time the print stays in extreme environmental conditions after being printed (especially very high humidity) you can reduce the color consistency problems.
Long-term color bleeding (glossy papers)
If you see the colors are bleeding into the paper i.e. the color is soaking into the paper making the lines fuzzy and bleary. This is because of the humidity conditions that you are working under:
Change the paper that you are printing with, or Remove the printer from the high humidity conditions.Do not cover or stack the printed images after printing.
Color accuracy configuration
The configurations of the printer, the driver, and the RIPs define how ink is applied to each type of printing material. Use the information in the following table to configure your printer and software for best color accuracy.
Where to find additional information
The means of accurately managing the colors printed by your printer vary with the software application and driver being used. Refer to the following documentation:
The Software Application Notes for your application, in the package shipped with your printer.The online documentation for the drivers shipped with your printer.
Location of Setting
Setting Description Selection
Printer front-panel menu
Select media type Set to match the printing material loaded in the printer.
Ink emulation mode:RGB
Set the type of colors that your software generates.
Non-HP drivers(external software or hardware RIPs)
Paper type or equivalent Set to match the printing material loaded in the printer. See the documentation that came with your software for information.
Color correction or equivalent Perform the color correction calibration if one is available.
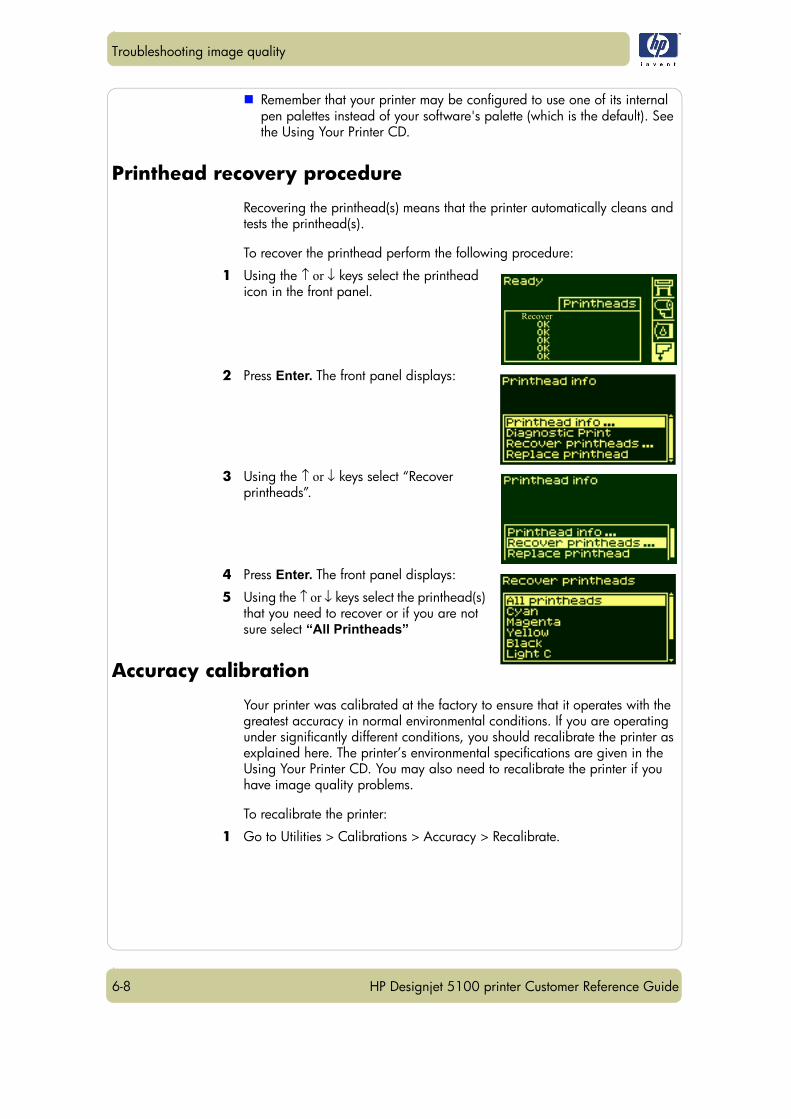
6-8
Troubleshooting image quality
HP Designjet 5100 printer Customer Reference Guide
Remember that your printer may be configured to use one of its internal pen palettes instead of your software's palette (which is the default). See the Using Your Printer CD.
Printhead recovery procedure
Recovering the printhead(s) means that the printer automatically cleans and tests the printhead(s).
To recover the printhead perform the following procedure:
1 Using the ↑ or ↓ keys select the printhead icon in the front panel.
2 Press Enter. The front panel displays:
3 Using the ↑ or ↓ keys select “Recover printheads”.
4 Press Enter. The front panel displays:
5 Using the ↑ or ↓ keys select the printhead(s) that you need to recover or if you are not sure select “All Printheads”
Accuracy calibration
Your printer was calibrated at the factory to ensure that it operates with the greatest accuracy in normal environmental conditions. If you are operating under significantly different conditions, you should recalibrate the printer as explained here. The printer’s environmental specifications are given in the Using Your Printer CD. You may also need to recalibrate the printer if you have image quality problems.
To recalibrate the printer:
1 Go to Utilities > Calibrations > Accuracy > Recalibrate.
Recover
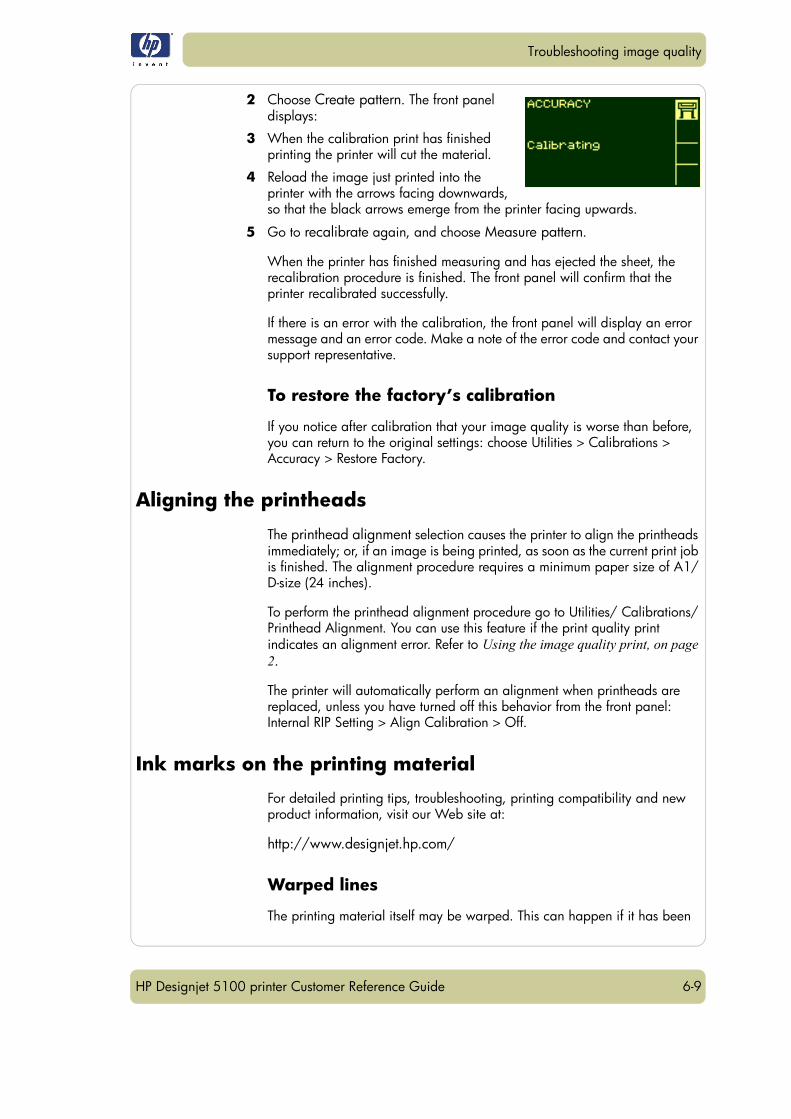
6-9
Troubleshooting image quality
HP Designjet 5100 printer Customer Reference Guide
2 Choose Create pattern. The front panel displays:
3 When the calibration print has finished printing the printer will cut the material.
4 Reload the image just printed into the printer with the arrows facing downwards, so that the black arrows emerge from the printer facing upwards.
5 Go to recalibrate again, and choose Measure pattern.
When the printer has finished measuring and has ejected the sheet, the recalibration procedure is finished. The front panel will confirm that the printer recalibrated successfully.
If there is an error with the calibration, the front panel will display an error message and an error code. Make a note of the error code and contact your support representative.
To restore the factory’s calibration
If you notice after calibration that your image quality is worse than before, you can return to the original settings: choose Utilities > Calibrations > Accuracy > Restore Factory.
Aligning the printheads
The printhead alignment selection causes the printer to align the printheads immediately; or, if an image is being printed, as soon as the current print job is finished. The alignment procedure requires a minimum paper size of A1/D-size (24 inches).
To perform the printhead alignment procedure go to Utilities/ Calibrations/Printhead Alignment. You can use this feature if the print quality print indicates an alignment error. Refer to Using the image quality print, on page 2.
The printer will automatically perform an alignment when printheads are replaced, unless you have turned off this behavior from the front panel: Internal RIP Setting > Align Calibration > Off.
Ink marks on the printing material
For detailed printing tips, troubleshooting, printing compatibility and new product information, visit our Web site at:
http://www.designjet.hp.com/
Warped lines
The printing material itself may be warped. This can happen if it has been
6-10
Troubleshooting image quality
HP Designjet 5100 printer Customer Reference Guide
used or stored in an extreme environment. For all environmental specifications, see Environmental Specifications in the Using Your Printer CD.
Blurred lines (ink bleeds from lines)
Perhaps you have adjusted the drying time in the front-panel menu to speed up the printer output. Set “Drying time” to “Automatic”.
For details of drying time adjustments, see the Using Your Printer CD.
Marks and/or scratches on glossy paper
Glossy paper may be extremely sensitive to the bin or anything with which it comes into contact directly after printing. This will depend on the amount of ink printed and the environmental conditions that are present at the time of printing. Avoid any contact with the paper and handle the print with care until some time has elapsed.
Smears or scratching on the image
This problem can appear on coated paper if a lot of ink was printed. The paper absorbs the ink quickly and expands. As the printheads move over the paper, the printheads and the paper come into contact with each other and the printed image is smeared.
1 Press the Cancel key on the front panel; if you continue to print, the paper may damage the printheads.
2 Cancel the print job from your computer application.
In order to obtain better results, try the following suggestions:Use HP-recommended paper. If the image you are printing has intense color, try using HP Heavyweight Coated Paper through the front panel.Use extended margins (see the Using Your Printer CD), or try to increase the print margins by relocating the image in the page from your software application.If you are using ‘Media Saving Options’ from the advanced section of the HP- GL/2 driver, try disabling one or both of the options ‘auto rotate’ and ‘inked area’.Use the take-up reel if you have one installed.
If these suggestions fail to solve the problem of smears and scratching, consider changing to a non-paper-based material such as glossy film.
Marks on the reverse of the printing material
Marks underneath or at the edges of the printing material can be caused by accumulated ink deposits on the platen transferring to the printing material. The ink deposits can be seen mostly in the areas where the edge of your material rests on the platen. The printer routinely removes these ink deposits

6-11
Troubleshooting image quality
HP Designjet 5100 printer Customer Reference Guide
every time you load a roll. However, depending on your printer usage, this is sometimes not sufficient. There are two procedures for cleaning the platen, Automatic and Manual.
Automatic
This setting enables you to remove the ink deposits from the platen using the printing material you have loaded. The printer moves a portion of the material backwards and forwards over the platen. To manually trigger the automatic cleaning process go to Utilities > Clean Platen > Automatic.
Manual
This section explains the manual platen cleaning process.
NOTE: Ensure that you have unloaded all printing material before performing these procedures.
1 Open the window.
2 With a dry brush, remove the ink deposits from the cutter groove.
3 With the same dry brush, remove the ink deposits from the platen surface.
4 Use a clean, slightly damp, absorbent lint-free cloth to wipe off the loosened ink deposits from the platen. However, do not wipe the platen wheels with this cloth.

6-12
Troubleshooting image quality
HP Designjet 5100 printer Customer Reference Guide
CAUTION Do not use commercial cleaners or abrasive cleaners.Do not wet the platen directly because you will leavetoo much moisture behind.
NOTE: Use isopropyl alcohol to dampen the cloth.
5 Clean the cutter ramp as shown below with the damp cloth.
6 Clean the exposed part of the wheels as shown below with a slightly-damp absorbent lint-free cloth. It is important that the cloth is not too damp, otherwise you will leave too much moisture behind and the wheels will not work well.
To turn the platen wheels and clean the whole circumference:
7 Close the printer’s window.
8 Select the Printer Setup menu in the front panel.
9 Select Utilities > Clean Platen > Clean Now > Manual.
10 Open the printer window.
11 Use the ↓ & ↑ keys to move the wheels through a fifth of a turn.
WARNING Do not touch the rotating wheels directly with yourhands.
12 Clean the exposed part of the wheels.
13 Repeat steps 11 and 12 three more times to clean the whole circumference of the wheels.
14 Close window to exit.
The printing material cannot be loaded successfullyRolls
The roll may be loaded the wrong way. The paper should load over the roll toward you.
6-13
Troubleshooting image quality
HP Designjet 5100 printer Customer Reference Guide
The roll may be crumpled or warped or may have irregular edges.The paper may be loaded at an angle. The right-hand edge must be aligned with the edges of the roll.Ensure that the paper is wound tightly on the roll.Check that the paper is correctly loaded onto the spindle.
SheetsIt must be loaded with the right-hand edge against the blue perforated line on the printer.Align the sheet against the trailing edge coming out of the printer.The sheet may be crumpled or warped or may have irregular edges.If you are using a hand-cut sheet, the edges may not form a right angle or they may be rough. Do not use hand-cut sheets; use only purchased sheets.Refer to 30, in section load and unload material on the reverse of this guide.
Prints do not stack properly in the binThe printer may be too close to the end of the roll. The natural curl near the end of the roll can cause stacking problems. Load a new roll or remove prints manually as they are completed.If you are mixing prints or nesting sets of several different sizes, you may have stacking problems because of the different sizes of printing material in the bin.
Other sources of information
If you don’t find the solution to the problem here, other sources of help are:The documentation supplied with the driver that you are using to manage the output from your software application to the printer. For example, the online and printed documentation included in the HP-GL/2 drivers (for Windows NT 4.0/2000/XP) supplied with your printer.The HP-GL/2 driver documentation supplied with your application software.There is also documentation on the WebAccess tool. Refer to 128, in section manage the prints on the reverse of this guide.
6-14
Troubleshooting image quality
HP Designjet 5100 printer Customer Reference Guide
7-1HP Designjet 5100 printer Customer Reference Guide
Troubleshooting the ink supply 7
Ink system error/status messages 7-2(error code) Replace 7-2(error code) Reseat 7-2(error code) Recover 7-3
Recovery procedure 7-3Solving ink supply problems 7-4
Problems re-seating the printhead 7-4You cannot insert the ink cartridge into the printer 7-4You cannot insert the printhead into the printer 7-4Problems inserting the printhead cleaner 7-4Carriage interconnect wiper 7-5
7
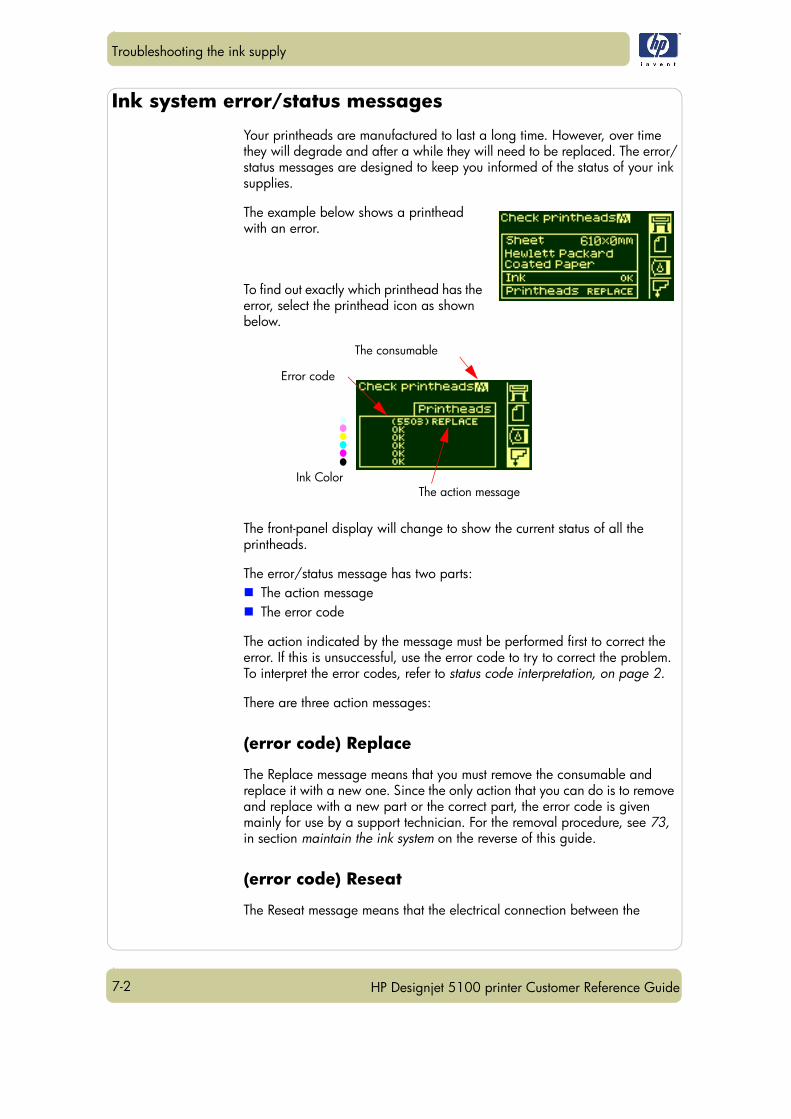
7-2
Troubleshooting the ink supply
HP Designjet 5100 printer Customer Reference Guide
Ink system error/status messages
Your printheads are manufactured to last a long time. However, over time they will degrade and after a while they will need to be replaced. The error/status messages are designed to keep you informed of the status of your ink supplies.
The example below shows a printhead with an error.
To find out exactly which printhead has the error, select the printhead icon as shown below.
The front-panel display will change to show the current status of all the printheads.
The error/status message has two parts: The action messageThe error code
The action indicated by the message must be performed first to correct the error. If this is unsuccessful, use the error code to try to correct the problem. To interpret the error codes, refer to status code interpretation, on page 2.
There are three action messages:
(error code) Replace
The Replace message means that you must remove the consumable and replace it with a new one. Since the only action that you can do is to remove and replace with a new part or the correct part, the error code is given mainly for use by a support technician. For the removal procedure, see 73, in section maintain the ink system on the reverse of this guide.
(error code) Reseat
The Reseat message means that the electrical connection between the
The consumable
Error code
Ink ColorThe action message
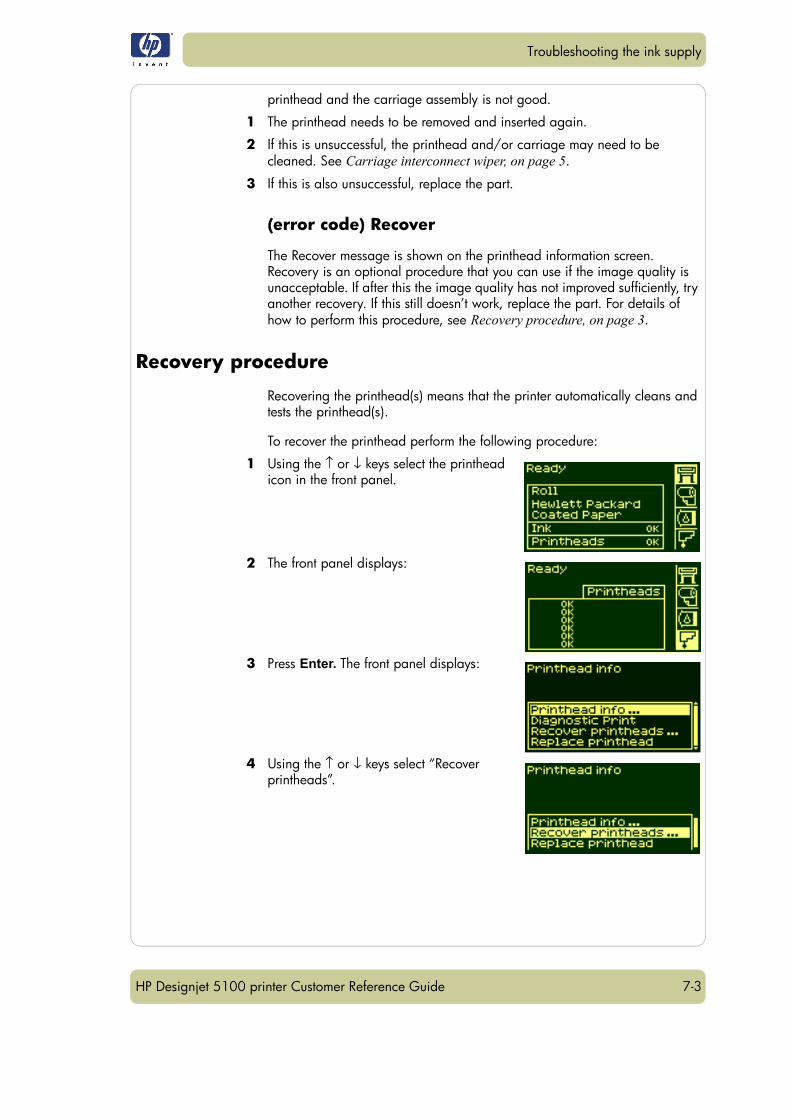
7-3
Troubleshooting the ink supply
HP Designjet 5100 printer Customer Reference Guide
printhead and the carriage assembly is not good.
1 The printhead needs to be removed and inserted again.
2 If this is unsuccessful, the printhead and/or carriage may need to be cleaned. See Carriage interconnect wiper, on page 5.
3 If this is also unsuccessful, replace the part.
(error code) Recover
The Recover message is shown on the printhead information screen. Recovery is an optional procedure that you can use if the image quality is unacceptable. If after this the image quality has not improved sufficiently, try another recovery. If this still doesn’t work, replace the part. For details of how to perform this procedure, see Recovery procedure, on page 3.
Recovery procedure
Recovering the printhead(s) means that the printer automatically cleans and tests the printhead(s).
To recover the printhead perform the following procedure:
1 Using the ↑ or ↓ keys select the printhead icon in the front panel.
2 The front panel displays:
3 Press Enter. The front panel displays:
4 Using the ↑ or ↓ keys select “Recover printheads”.
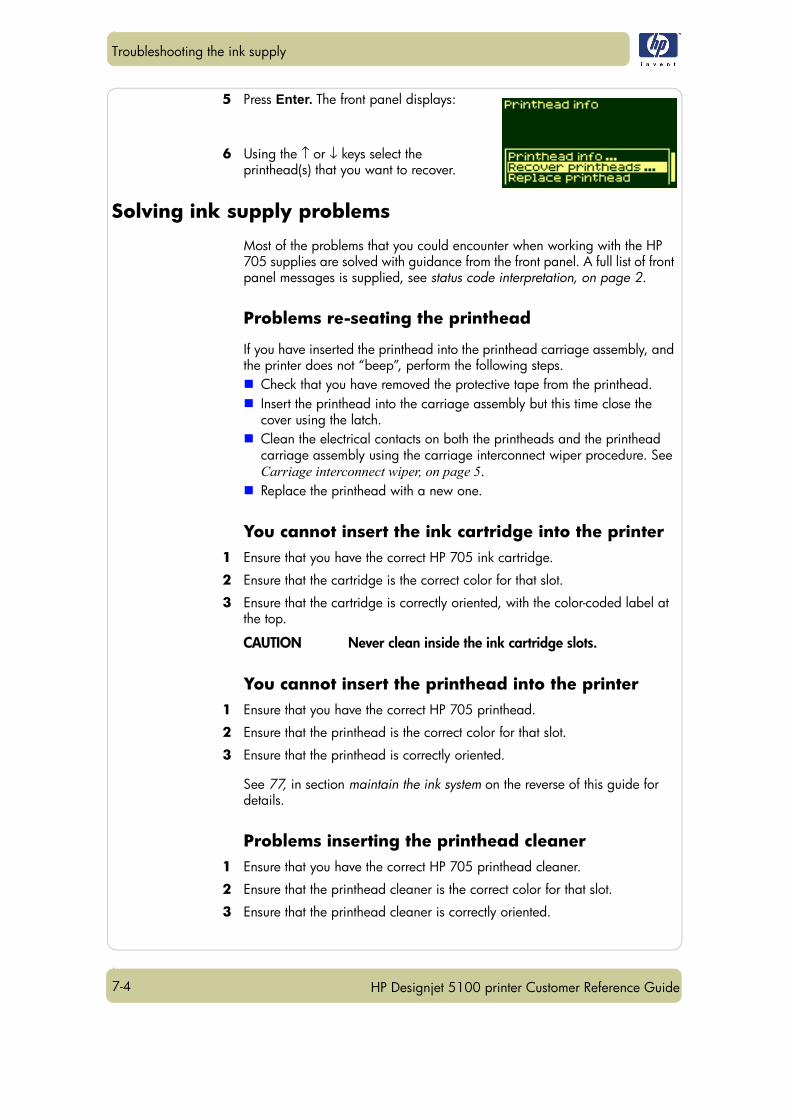
7-4
Troubleshooting the ink supply
HP Designjet 5100 printer Customer Reference Guide
5 Press Enter. The front panel displays:
6 Using the ↑ or ↓ keys select the printhead(s) that you want to recover.
Solving ink supply problems
Most of the problems that you could encounter when working with the HP 705 supplies are solved with guidance from the front panel. A full list of front panel messages is supplied, see status code interpretation, on page 2.
Problems re-seating the printhead
If you have inserted the printhead into the printhead carriage assembly, and the printer does not “beep”, perform the following steps.
Check that you have removed the protective tape from the printhead.Insert the printhead into the carriage assembly but this time close the cover using the latch.Clean the electrical contacts on both the printheads and the printhead carriage assembly using the carriage interconnect wiper procedure. See Carriage interconnect wiper, on page 5.Replace the printhead with a new one.
You cannot insert the ink cartridge into the printer1 Ensure that you have the correct HP 705 ink cartridge.
2 Ensure that the cartridge is the correct color for that slot.
3 Ensure that the cartridge is correctly oriented, with the color-coded label at the top.
CAUTION Never clean inside the ink cartridge slots.
You cannot insert the printhead into the printer1 Ensure that you have the correct HP 705 printhead.
2 Ensure that the printhead is the correct color for that slot.
3 Ensure that the printhead is correctly oriented.
See 77, in section maintain the ink system on the reverse of this guide for details.
Problems inserting the printhead cleaner1 Ensure that you have the correct HP 705 printhead cleaner.
2 Ensure that the printhead cleaner is the correct color for that slot.
3 Ensure that the printhead cleaner is correctly oriented.
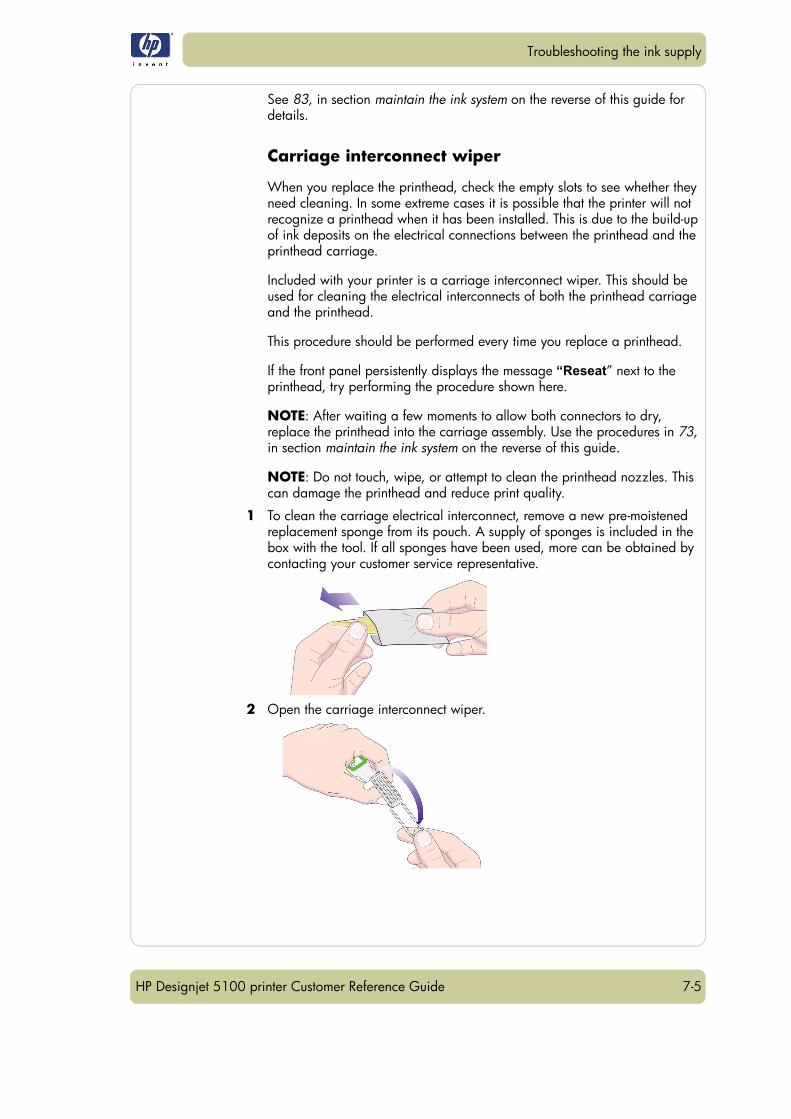
7-5
Troubleshooting the ink supply
HP Designjet 5100 printer Customer Reference Guide
See 83, in section maintain the ink system on the reverse of this guide for details.
Carriage interconnect wiper
When you replace the printhead, check the empty slots to see whether they need cleaning. In some extreme cases it is possible that the printer will not recognize a printhead when it has been installed. This is due to the build-up of ink deposits on the electrical connections between the printhead and the printhead carriage.
Included with your printer is a carriage interconnect wiper. This should be used for cleaning the electrical interconnects of both the printhead carriage and the printhead.
This procedure should be performed every time you replace a printhead.
If the front panel persistently displays the message “Reseat” next to the printhead, try performing the procedure shown here.
NOTE: After waiting a few moments to allow both connectors to dry, replace the printhead into the carriage assembly. Use the procedures in 73, in section maintain the ink system on the reverse of this guide.
NOTE: Do not touch, wipe, or attempt to clean the printhead nozzles. This can damage the printhead and reduce print quality.
1 To clean the carriage electrical interconnect, remove a new pre-moistened replacement sponge from its pouch. A supply of sponges is included in the box with the tool. If all sponges have been used, more can be obtained by contacting your customer service representative.
2 Open the carriage interconnect wiper.

7-6
Troubleshooting the ink supply
HP Designjet 5100 printer Customer Reference Guide
3 Load the sponge into the carriage interconnect wiper by positioning the sponge on the face of the carriage interconnect wiper with the shorter tab in the locating slot.
4 Close the carriage interconnect wiper trapping the sponge in place.
5 Open the printhead carriage latch and extract the printhead that has the problem, as indicated on the front panel. Use the procedures in 73, in section maintain the ink system on the reverse of this guide.
6 Insert the carriage interconnect wiper into the printhead slot at the back. Wipe the electrical contacts by inserting the tool between the electrical connections at the back of the slot and the steel spring with the sponge facing away from you, towards the electrical contacts.
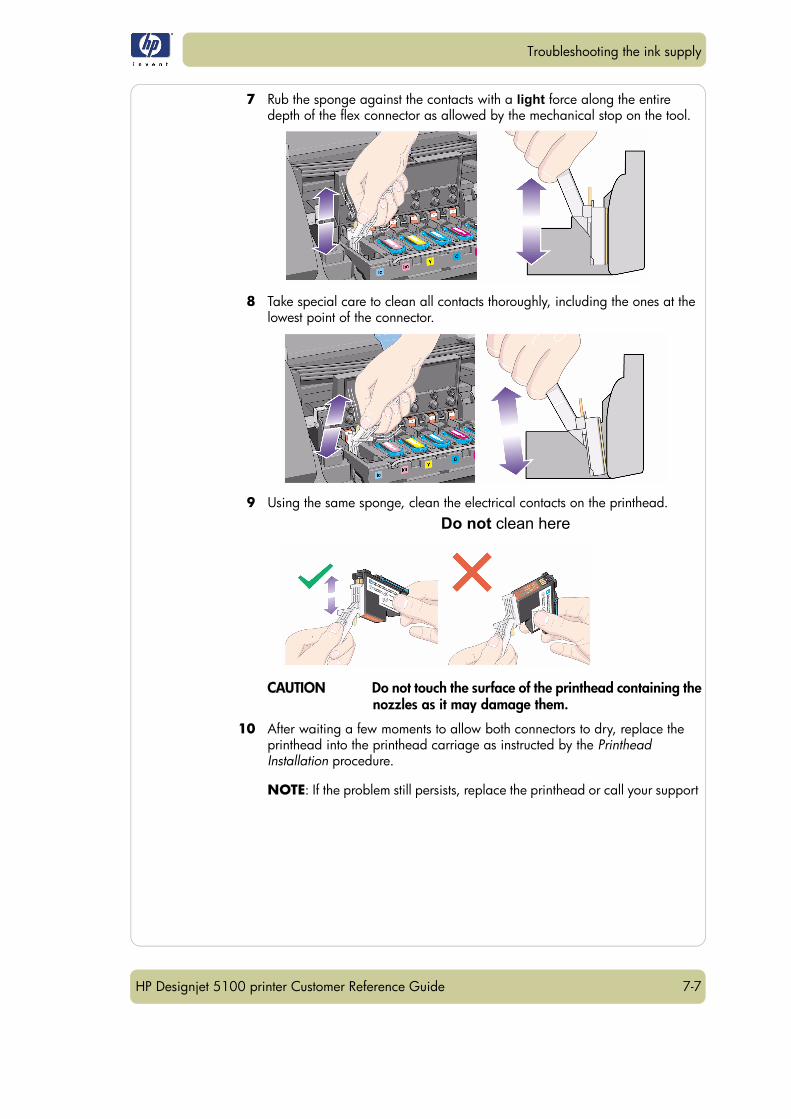
7-7
Troubleshooting the ink supply
HP Designjet 5100 printer Customer Reference Guide
7 Rub the sponge against the contacts with a light force along the entire depth of the flex connector as allowed by the mechanical stop on the tool.
8 Take special care to clean all contacts thoroughly, including the ones at the lowest point of the connector.
9 Using the same sponge, clean the electrical contacts on the printhead.
CAUTION Do not touch the surface of the printhead containing thenozzles as it may damage them.
10 After waiting a few moments to allow both connectors to dry, replace the printhead into the printhead carriage as instructed by the Printhead Installation procedure.
NOTE: If the problem still persists, replace the printhead or call your support
Do not clean here
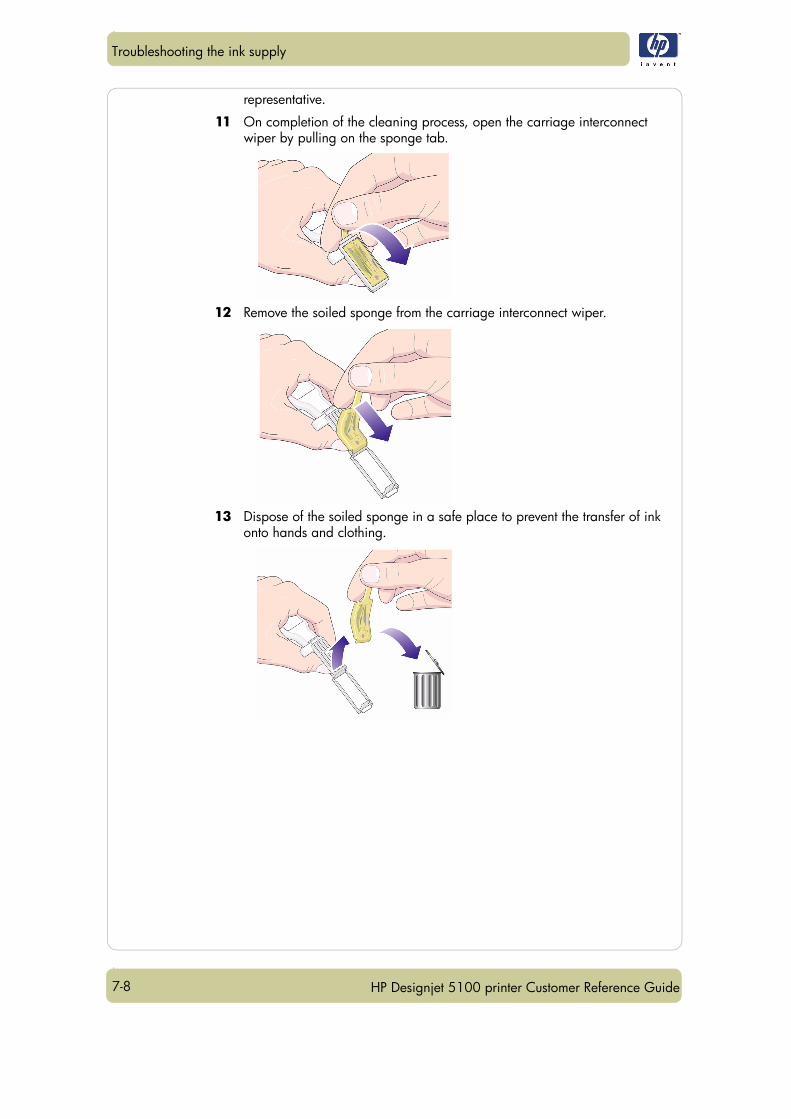
7-8
Troubleshooting the ink supply
HP Designjet 5100 printer Customer Reference Guide
representative.
11 On completion of the cleaning process, open the carriage interconnect wiper by pulling on the sponge tab.
12 Remove the soiled sponge from the carriage interconnect wiper.
13 Dispose of the soiled sponge in a safe place to prevent the transfer of ink onto hands and clothing.
8-1HP Designjet 5100 printer Customer Reference Guide
Troubleshooting print material jams 8
Clearing a printing material jam 8-2Check printhead path 8-2Check media path 8-3
8

8-2
Troubleshooting print material jams
HP Designjet 5100 printer Customer Reference Guide
Clearing a printing material jam
The “Switch Power Off” message is usually shown when there is a printing material jam.
The printer must be cleared before the printer can operate again. There are two types of printing material jams:
A jam that prevents the carriage from moving from one side of the printer to the other. This is called Printhead Path jam. See Check printhead path, on page 2.A jam that prevents the material advancing into the printer correctly. This is called a Media Path jam. See Check media path, on page 3.
Check printhead path1 Switch the printer off at the rear of the printer and open the window.
2 Look in the area where the printer was printing at the time of the jam, this is where the printing material is most likely to be jammed.
3 Lift the media load lever.
4 Carefully remove any of the jammed printing material that you can lift up and out from the top of the printer.
5 Carefully pull the rest of the roll or sheet down and out of the printer.
6 If you are using a roll, trim the printing material with a knife as shown in 34, in section load and unload material on the reverse of this guide.
7 Reload the roll; see 34, in section load and unload material on the reverse of this guide.
Internal error code
Switch Power offCheck printhead path
(x)
Switch power offCheck media path
(x)
8-3
Troubleshooting print material jams
HP Designjet 5100 printer Customer Reference Guide
8 Switch the printer on.
9 If there is some printing material left behind in the media path, loading paper can become difficult. This can be cleared by loading a rigid paper type through the printer media path.
10 If you have image quality problems after a paper jam, this could indicate that the printheads have been moved from their correct position in the carriage. To correct this, perform aligning the printheads, on page 41.
Check media path1 Switch the printer off at the rear of the printer.
2 Check that the roll has not almost finished and is stuck to the empty cardboard core.
3 Load a new roll
Contact your support representative
If after performing all of these procedures the front panel displays the “Switch Power Off” message again, make a note of the message with the error code and contact your support representative.

8-4
Troubleshooting print material jams
HP Designjet 5100 printer Customer Reference Guide
9-1HP Designjet 5100 printer Customer Reference Guide
Legal and service information 9
Customer Service Guide 9-2Hewlett-Packard limited warranty statement 9-5Regulatory Notices 9-7Sound 9-10Address 9-10Declaration of conformity 9-11Energy Star information 9-13
9
9-2
Legal and service information
HP Designjet 5100 printer Customer Reference Guide
Customer Service Guide
Enjoy a world of dedicated services and resources to ensure you always get the best performance from your HP Designjet products and solutions.
Serving your business round the clock
HP Designjet Online, your large format printing community at www.hp.com/go/designjet, gives:
downloadstechnical supportforumswarranty trackingnews servicestechnical documentationproduct informationink and media information
... and all customizable for the product you have purchased and your business.
HP Designjet Online is available in English, German, French, Italian, Spanish, Portuguese, Japanese, Traditional Chinese, Simplified Chinese and Korean.
HP Warranty Services - peace of mind
Your HP Designjet 12-month warranty gives you:24-hour online Web support at HP Designjet Onlineprofessional telephone support (see back cover for your country phone number)repair services: next business day, at the customer site, or exchange, depending on the product and the country.
NOTE: The level of warranty service may vary according to local standards. Refer to your warranty statement document for the terms and conditions applicable. Please check the availability of these HP Designjet services in your country through the Support Options of HP Designjet Online, or contact your HP reseller or call HP directly.
The best option for printing support - HP Care Pack Services
HP Care Pack Services offer upgraded service levels to extend and expand your standard product warranty with easy-to-buy, easy-to-use support packages that help you make the most of your investments. You can choose the support levels that meet your business requirements, from installation to warranty coverage extension or 4-hour response. These services are
9-3
Legal and service information
HP Designjet 5100 printer Customer Reference Guide
available by contacting your HP sales representative or HP reseller.
Register and win!
Register your product, and by giving HP some extra information, you will be able to participate in HP programs and receive great gifts. Register your product at:
www.register.designjet.hp.com
Customer care centers
You can contact HP directly by calling the HP Customer Care Center in your country. For the most current phone numbers, please go to http://welcome.hp.com/country/us/eng/wwcontact.html.
Response time for our services may vary depending on local distance of your site from the nearest HP support office. Business day = Monday - Friday, excluding HP holidays.
The only warranties for HP products and services are set forth in the express warranty statements accompanying such products and services. Nothing herein should be construed as constituting an additional warranty. To the extent allowed by local law, HP shall not be liable for technical or editorial errors or omissions contained herein.
Algeria: 213 17 63 80Argentina: 0 800 777 HP INVENT, local 5411 4778 8380Australia: 13 10 47Austria: 0810 00 10 00Bahrain: 800 171Belgium: (0) 78 600 600Bolivia: 0 800 1110, local 54 11 4708 1600Brazil: 0800 157 751, local 55 11 3747 7799Canada: 1 800 HP INVENTCaribbean: 1 800 711 2884Central America: 1 800 711 2884Chile: 800 HP INVENT, 123 800 360 999China: 800 810 59 59, 10 6564 59 59Colombia: 01 8000 51 HP INVENT, local 571 606 9191Czech Rep: 420 261 307 310Denmark: 70 11 77 00Ecuador: 999 119, 1 800 225 528Egypt: 202 532 5222Finland: 0203 53232France: 08 26 10 49 49Germany: 0180 52 58 143Greece: 210 6073603, 801 11 22 55 47Guadalupe: 0800 99 00 11, 877 219 8791Guatemala: 1 800 999 5105, 1 800 711 2884Hong Kong: 852 3002 8555Hungary: 06 1 382 1111India: 1 600 112 267Indonesia: 350 3408
9-4
Legal and service information
HP Designjet 5100 printer Customer Reference Guide
Ireland: 1 890 946500Israel: 09 830 4848Italy: 02 3859 1212Jamaica: 0 800 711 2884Japan: Software 0120 014121, Hardware 0120 742594Korea: 82 1588 3003Luxemburg: 27 303 303Malaysia: 1 800 80 5405Martinica: 0 800 99 00, 877 219 8671Mexico: 01 800 472 6684, local 5258 9922Middel East: 4 366 2020Morocco: 2240 4747Netherlands: 0900 1170 000New Zealand: 09 365 9805Norway: 800 62 800Paraguay: 00 811 800, 800 711 2884Panama: 001 800 711 2884Peru: 0 800 10111Philippines: 632 888 6100Poland: 22 566 6000Portugal: 213 164 164Puerto Rico: 1 800 652 6672RSA: 27 11 258 9301, local 086 000 1030Romania: 40 21 315 4442Russia: 095 797 3520, 812 3467 997Saudi Arabia: 6272 5300Slovakia: 2 50222444South Africa: 0800 001 030Spain: 902 010 333Sweden: 077 130 30 00Switzerland: 0848 80 20 20Taiwan: 886 2 872 28000Thailand: 0 2353 9000Tunisia: 71 89 12 22Turkey: 216 444 71 71UAE: 800 4520, 04 366 2020Ukraine: 44 4903520United Kingdom: 0870 842 2339United States: 1 800 HP INVENTUruguay: 54 11 4708 1600Venezuela: 0 800 HP INVENT, local 58 212 278 8000Vietnam: 84 8 823 45 30West Africa (French): 351 213 17 63 80
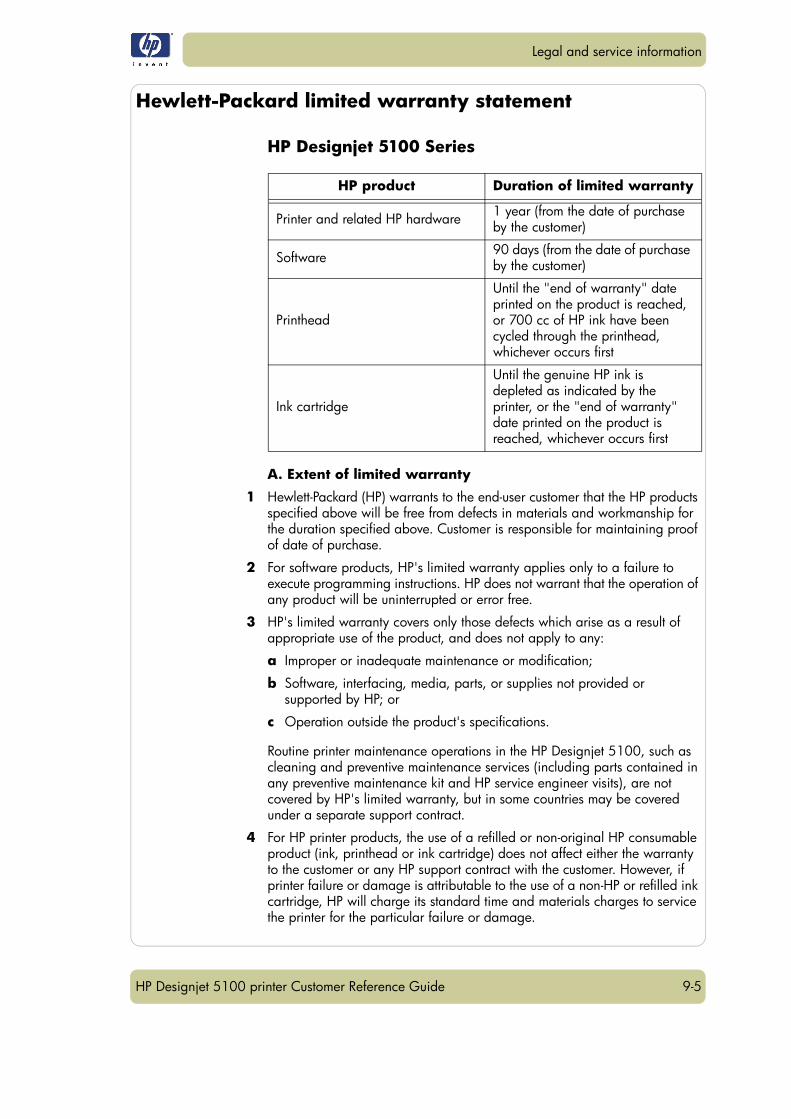
9-5
Legal and service information
HP Designjet 5100 printer Customer Reference Guide
Hewlett-Packard limited warranty statement
HP Designjet 5100 Series
A. Extent of limited warranty
1 Hewlett-Packard (HP) warrants to the end-user customer that the HP products specified above will be free from defects in materials and workmanship for the duration specified above. Customer is responsible for maintaining proof of date of purchase.
2 For software products, HP's limited warranty applies only to a failure to execute programming instructions. HP does not warrant that the operation of any product will be uninterrupted or error free.
3 HP's limited warranty covers only those defects which arise as a result of appropriate use of the product, and does not apply to any:
a Improper or inadequate maintenance or modification;
b Software, interfacing, media, parts, or supplies not provided or supported by HP; or
c Operation outside the product's specifications.
Routine printer maintenance operations in the HP Designjet 5100, such as cleaning and preventive maintenance services (including parts contained in any preventive maintenance kit and HP service engineer visits), are not covered by HP's limited warranty, but in some countries may be covered under a separate support contract.
4 For HP printer products, the use of a refilled or non-original HP consumable product (ink, printhead or ink cartridge) does not affect either the warranty to the customer or any HP support contract with the customer. However, if printer failure or damage is attributable to the use of a non-HP or refilled ink cartridge, HP will charge its standard time and materials charges to service the printer for the particular failure or damage.
HP product Duration of limited warranty
Printer and related HP hardware 1 year (from the date of purchase by the customer)
Software 90 days (from the date of purchase by the customer)
Printhead
Until the "end of warranty" date printed on the product is reached, or 700 cc of HP ink have been cycled through the printhead, whichever occurs first
Ink cartridge
Until the genuine HP ink is depleted as indicated by the printer, or the "end of warranty" date printed on the product is reached, whichever occurs first
9-6
Legal and service information
HP Designjet 5100 printer Customer Reference Guide
5 If HP receives, during the applicable warranty period, notice of a defect in any software, media, or consumable product which is covered by HP's warranty, HP shall deliver another product to customer to replace the defective one. If HP receives, during the applicable warranty period, notice of a defect in any hardware product which is covered by HP's warranty, HP shall either repair or replace the defective product, at HP's option. A replacement part, in return for a defective one and remote part installation assistance, if needed, may be provided to the customer, at HP's option. HP may, at its option, waive the requirement for the customer to return the defective part.
6 If HP is unable to repair or replace, as applicable, a defective product which is covered by HP's warranty, HP shall, within a reasonable time after being notified of the defect, refund the purchase price for the product.
7 HP shall have no obligation to repair, replace, or refund until the customer returns the defective product to HP.
8 Any replacement product may be either new or like-new, provided that it has functionality at least equal to that of the product being replaced.
9 HP products may contain remanufactured parts or components equivalent to new in performance or may have been subject to incidental use.
10 HP's limited warranty is valid in any country or locality where HP has a support presence for this product and where HP has marketed this product. The level of warranty service you receive may vary according to local standards. HP will not alter form, fit or function of the product to make it operate in a country for which it was never intended to function for legal or regulatory reasons.
Contracts for additional services may be available for any authorized HP service facility where the listed HP product is distributed by HP or an authorized importer.
B. Limitations of warranty
1 TO THE EXTENT ALLOWED BY LOCAL LAW, NEITHER HP NOR ITS THIRD PARTY SUPPLIERS MAKE ANY OTHER WARRANTY OR CONDITION OF ANY KIND, WHETHER EXPRESS OR IMPLIED, WITH RESPECT TO THE HP PRODUCTS, AND SPECIFICALLY DISCLAIM THE IMPLIED WARRANTIES OR CONDITIONS OF MERCHANTABILITY, SATISFACTORY QUALITY, AND FITNESS FOR A PARTICULAR PURPOSE.
C. Limitations of liability
1 To the extent allowed by local law, the remedies provided in this Warranty Statement are the customer's sole and exclusive remedies.
2 TO THE EXTENT ALLOWED BY LOCAL LAW, EXCEPT FOR THE OBLIGATIONS SPECIFICALLY SET FORTH IN THIS WARRANTY STATEMENT, IN NO EVENT SHALL HP OR ITS THIRD PARTY SUPPLIERS BE LIABLE FOR DIRECT, INDIRECT, SPECIAL, INCIDENTAL, OR CONSEQUENTIAL DAMAGES, WHETHER BASED ON CONTRACT, TORT, OR ANY OTHER LEGAL THEORY AND WHETHER ADVISED OF THE POSSIBILITY OF SUCH DAMAGES.
9-7
Legal and service information
HP Designjet 5100 printer Customer Reference Guide
D. Local law
1 This Warranty Statement gives the customer specific legal rights. The customer may also have other rights which vary from state to state in the United States, from province to province in Canada, and from country to country elsewhere in the world.
2 To the extent that this Warranty Statement is inconsistent with local law, this Warranty Statement shall be deemed modified to be consistent with such local law. Under such local law, certain disclaimers and limitations of this Warranty Statement may not apply to the customer. For example, some states in the United States, as well as some governments outside the United States (including provinces in Canada), may:
a Preclude the disclaimers and limitations in this Warranty Statement from limiting the statutory rights of a consumer (e.g. the United Kingdom);
b Otherwise restrict the ability of a manufacturer to enforce such disclaimers or limitations; or
c Grant the customer additional warranty rights, specify the duration of implied warranties which the manufacturer cannot disclaim, or not allow limitations on the duration of implied warranties.
3 FOR CONSUMER TRANSACTIONS IN AUSTRALIA AND NEW ZEALAND, THE TERMS IN THIS WARRANTY STATEMENT, EXCEPT TO THE EXTENT LAWFULLY PERMITTED, DO NOT EXCLUDE, RESTRICT, OR MODIFY, AND ARE IN ADDITION TO, THE MANDATORY STATUTORY RIGHTS APPLICABLE TO THE SALE OF HP PRODUCTS TO SUCH CUSTOMERS.
Revision: September 1st, 2002
Regulatory Notices
You can obtain current Material Safety Data Sheets for the ink systems used in the printer by mailing a request to this address: Hewlett-Packard Customer Information Center, 19310 Pruneridge Avenue, Dept. MSDS, Cupertino, CA 95014, U.S.A. There is also a Web page:
http://www.hp.com/hpinfo/community/environment/productinfo/psis_inkjet.htm
Regulatory Model Number
For regulatory identification purposes, your product is assigned a Regulatory Model Number. The Regulatory Model Number for your product is BCLAA-0604. This regulatory number should not be confused with the marketing name (such as HP Designjet printer) or product numbers (such as Z####X
9-8
Legal and service information
HP Designjet 5100 printer Customer Reference Guide
where Z and X are any single letter and # is any number).
Regulatory statements
Electro-Magnetic Compatibility (EMC)FCC statements (U.S.A.)
The U.S. Federal Communications Commission (in 47 cfr15.105) has specified that the following notices be brought to the attention of users of this product.
This device complies with part 15 of the FCC rules. Operation is subject to the following two conditions: (1) this device may not cause harmful interference, and (2) this device must accept any interference received, including interference that may cause undesired operation.
Shielded cables
Use of shielded data cables is required to comply with the Class B limits of Part 15 of the FCC Rules.
Caution: Pursuant to Part 15.21 of the FCC Rules, any changes or modifications to this equipment not expressly approved by the Hewlett-Packard Company may cause harmful interference and void the FCC authorization to operate this equipment.
Note: This equipment has been tested and found to comply with the limits for a Class B digital device, pursuant to part 15 of the FCC Rules. These limits are designed to provide reasonable protection against harmful interference in a residential installation. This equipment generates, uses and can radiate radio frequency energy and, if not installed and used in accordance with the instructions, may cause harmful interference to radio communications. However, there is no guarantee that interference will not occur in a particular installation. If this equipment does cause harmful interference to radio or television reception, which can be determined by turning the equipment off and on, the user is encouraged to try to correct the interference by one or more of the following measures:
Reorient the receiving antenna.Increase the separation between the equipment and the receiver.Connect the equipment into an outlet on a circuit different from that to which the receiver is connected.Consult your dealer or an experienced radio/TV technician.
You may find useful the following booklet prepared by the FCC: “How to Identify and Resolve Radio-TV Interference Problems”. This booklet is available from the US Government Printing Office, Washington, DC 20402, Stock No. 004-000-00345-4.
9-9
Legal and service information
HP Designjet 5100 printer Customer Reference Guide
When connected to LAN cables using print server accessories:
This equipment has been tested and found to comply with the limits for a Class A digital device, pursuant to part 15 of the FCC Rules. These limits are designed to provide reasonable protection against harmful interference in a commercial environment. This equipment generates, uses, and can radiate radio frequency energy and, if not installed and used in accordance with the instructions, may cause harmful interference to radio communications. Operation of this equipment in a residential area is likely to cause harmful interference, in which case t he user will be required to correct the interference at their own expense.
Normes de sécurité (Canada)
Le présent appareil numérique n’émet pas de bruits radioélectriques dépassant les limites applicables aux appareils numériques de Classe B prescrites dans le réglement sur le brouillage radioélectrique édicté par le Ministére des Communications du Canada.
Connecté à un réseau par des accessoires de serveur, l'appareil n'émet pas de bruits radioélectriques dépassant les limites applicables aux appareils numériques de Classe A prescrites dans le réglement sur le brouillage radioélectrique édicté par le Ministère des Communications du Canada.
DOC statement (Canada)
This digital apparatus does not exceed the Class B limits for radio noise emissions from digital apparatus set out in the Radio Interference Regulations of the Canadian Department of Communications.
When connected to LAN cables using print server accessories, this digital apparatus does not exceed the Class A limits for radio noise emissions from digital apparatus set out in the Radio Interference Regulations of the Ca nadian Department of Communications.
9-10
Legal and service information
HP Designjet 5100 printer Customer Reference Guide
VCCI Class A and B (Japan)
Safety power cord warning
Chinese EMI statement
Class B
9-11
Legal and service information
HP Designjet 5100 printer Customer Reference Guide
Class A for LAN cables connection using print server accessory
Korean EMI statement
Taiwanese EMI statement
Sound
Geräuschemission (Germany)
LpA < 70 dB, am Arbeitsplatz, im Normalbetrieb, nach DIN 45635 T. 19.
AddressHewlett-Packard CompanyManager of Corporate Product Regulations3000 Hanover StreetPalo Alto, CA 94304650/857-1501
9-12
Legal and service information
HP Designjet 5100 printer Customer Reference Guide
Declaration of conformity
According to ISO/IEC Guide 22 and EN 45014
Manufacturer’s name: Hewlett-Packard Española S.A.Supplier’s address: Inkjet Commercial Division
Avenida Graells, 50108174 Sant Cugat del VallèsBarcelona, Spain
declares that the productRegulatory Model Number4): BCLAA-0604Product Family: HP Designjet 5100 Series Inkjet Printers
HP Designjet 5500 Series Inkjet PrintersProduct accessories: All
conforms to the following product specifications
Safety: IEC 60950-1:2001 / EN 60950-1:2001
EMC: CISPR 22:2005 / EN 55022:2006 Class B1) 3)
EN 55024:1998 +A1:2001 +A2:2003
EN 61000-3-2:2000+A2:2005/ IEC 61000-3-2:2000+A2:2004
EN 61000-3-3:1995+A1:2001/ IEC 61000-3-3/A1:200
FCC Title 47 CFR, Part 15 Class B2)
Additional information
The product herewith complies with the requirements of the Low Voltage Directive 2006/95/EC and the EMC Directive 2004/108/EC and carries the CE-marking accordingly. In addition it complies with the WEEE Directive 2002/96/EC and RoHS Directive 2002/95/EC.
1 The product was tested in a typical configuration with HP Personal Computer Systems and peripherals
2 This Device complies with Part 15 of the FCC Rules. Operation is subject to the following two Conditions: (1) this device may not cause harmful interference, and (2) this device must accept any interference received, including interference that my cause undesired operation.
3 The product exhibits class A operation when connected to LAN cables using print server accessories.
4 This product is assigned a Regulatory Model Number which stays with the regulatory aspects of the design. The Regulatory Model Number is the main product identifier in the regulatory documentation and test reports, this number should not be confused with the marketing name or the product numbers.
9-13
Legal and service information
HP Designjet 5100 printer Customer Reference Guide
Vicenç LlorensProduct Regulations ManagerSant Cugat del Vallès (Barcelona),January 30th, 2008
Local contact for regulatory topics only
EMEA Contact: Hewlett-Packard GmbH, HQ-TRE, Herrenberger Strasse
140, 71034 Boeblingen, Germany
USA Contact: Hewlett-Packard Company, Corporate Product Regulations
Manager, 3000 Hanover St, Palo Alto, CA 94304, USA . Phone: (650) 857
1501.
Australia Contact: Hewlett-Packard Australia Ltd, Product regulations
Manger, 31-41 Joseph Street, Blackburn, Victoria,3130, Australia
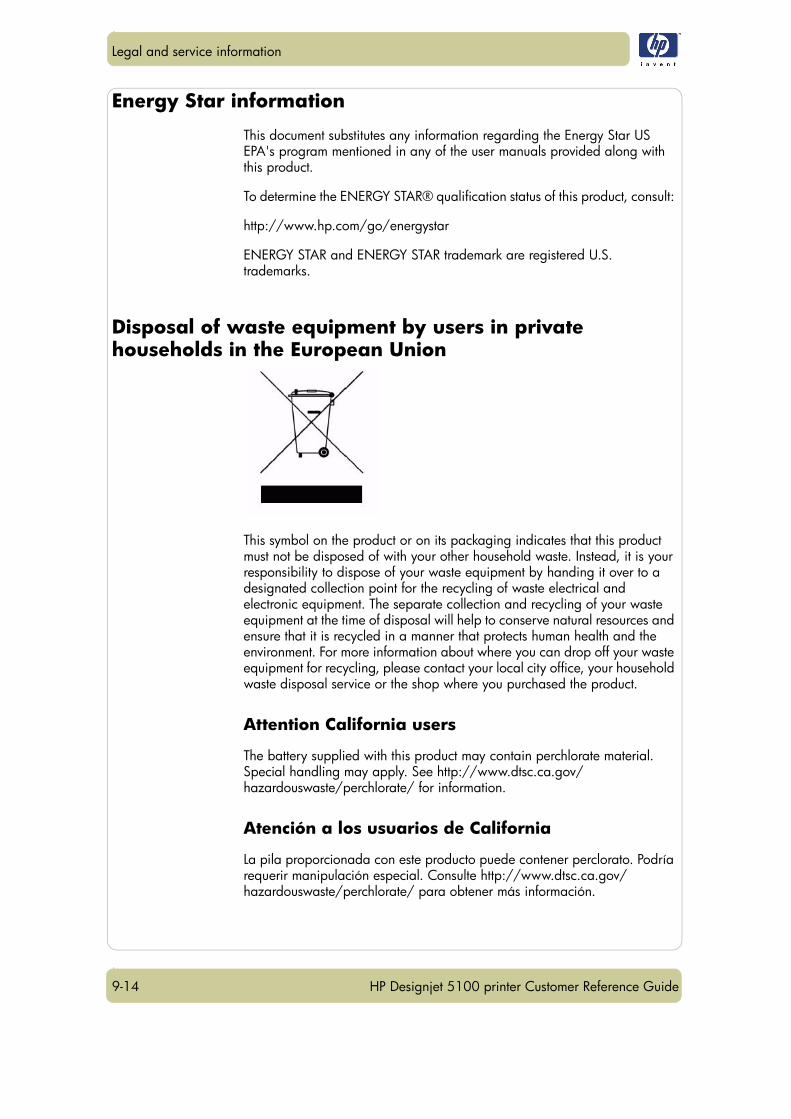
9-14
Legal and service information
HP Designjet 5100 printer Customer Reference Guide
Energy Star information
This document substitutes any information regarding the Energy Star US EPA's program mentioned in any of the user manuals provided along with this product.
To determine the ENERGY STAR® qualification status of this product, consult:
http://www.hp.com/go/energystar
ENERGY STAR and ENERGY STAR trademark are registered U.S. trademarks.
Disposal of waste equipment by users in private households in the European Union
This symbol on the product or on its packaging indicates that this product must not be disposed of with your other household waste. Instead, it is your responsibility to dispose of your waste equipment by handing it over to a designated collection point for the recycling of waste electrical and electronic equipment. The separate collection and recycling of your waste equipment at the time of disposal will help to conserve natural resources and ensure that it is recycled in a manner that protects human health and the environment. For more information about where you can drop off your waste equipment for recycling, please contact your local city office, your household waste disposal service or the shop where you purchased the product.
Attention California users
The battery supplied with this product may contain perchlorate material. Special handling may apply. See http://www.dtsc.ca.gov/hazardouswaste/perchlorate/ for information.
Atención a los usuarios de California
La pila proporcionada con este producto puede contener perclorato. Podría requerir manipulación especial. Consulte http://www.dtsc.ca.gov/hazardouswaste/perchlorate/ para obtener más información.

© 2007 Hewlett-Packard Development Company L.P.
Printed in Germany - Imprimé en Allemagne - Stampato in Germania
www.hp.com