hp designjet 8000s printer series - hp® official siteh10032. designjet 8000s printer series...
TRANSCRIPT

HP Designjet 8000s Printer series
User's Guide

Legal notices
The information contained in this documentis subject to change without notice.
Hewlett-Packard makes no warranty of anykind with regard to this material, including,but not limited to, the implied warranties ofmerchantability and fitness for a particularpurpose.
Hewlett-Packard shall not be liable for errorscontained herein or for incidental orconsequential damages in connection withthe furnishing, performance, or use of thismaterial.
No part of this document may be photocopiedor translated to another language without theprior written consent of Hewlett-PackardCompany.
Table of contents
1 IntroductionUsing this guide .................................................................................................................................. 2
Introduction ................................................................................................................. 2How do I … ................................................................................................................. 2The problem is … ....................................................................................................... 2Tell me about … ......................................................................................................... 2Index ........................................................................................................................... 2
The printer's main components .......................................................................................................... 2Front view ................................................................................................................... 3Rear view .................................................................................................................... 4The heaters ................................................................................................................ 4
The printer's front panel ..................................................................................................................... 5Safety precautions ............................................................................................................................. 7
General warnings ....................................................................................................... 7General cautions ........................................................................................................ 8
Handling precautions ......................................................................................................................... 9Power supply .............................................................................................................. 9Printer ......................................................................................................................... 9Regular inspection and maintenance ......................................................................... 9Consumables .............................................................................................................. 9
2 How do I… (basic operation topics)?Connect to a computer ..................................................................................................................... 11
System configuration (connection example) ............................................................. 11Connection procedure .............................................................................................. 11
Turn the power on/off ....................................................................................................................... 14Turn on the printer .................................................................................................... 15How do I turn the power off ...................................................................................... 16
........................................................................................................... 16Check the firmware version .............................................................................................................. 18
3 How do I load/unload mediaInstall a media roll in the printer ....................................................................................................... 20Remove a media roll from the printer ............................................................................................... 33Replace a jammed media roll ........................................................................................................... 35Load a cut sheet ............................................................................................................................... 35Use the media edge guards ............................................................................................................. 41Use the media cutter ........................................................................................................................ 42Use the take-up reel ......................................................................................................................... 45
ENWW iii
Set the take-up reel winding direction ...................................................................... 46Define the take-up reel winding mode ...................................................................... 47Load media on to the take-up reel ............................................................................ 48Take-up reel horizontal alignment ............................................................................ 54
4 How do I… (printing topics)Perform a manual form feed/rewind ................................................................................................. 57Use manual nesting ......................................................................................................................... 58Increase/reduce pressure on media ................................................................................................. 59
5 How do I… (ink topics)Replace an ink cartridge .................................................................................................................. 61Change the printhead height ............................................................................................................ 62
6 How do I maintain the printerRegular maintenance guide ............................................................................................................. 67Daily maintenance ............................................................................................................................ 69
Capping unit cleaning ............................................................................................... 70Wiper liquid bottle replacement ........................................................................................................ 76Wiper sponge replacement .............................................................................................................. 82Wiper blade replacement ................................................................................................................. 88When returning to the printer after being switched off for an extended period (less than twoweeks) .............................................................................................................................................. 94
Clean ink system ...................................................................................................... 94Prepare for extended power down (two to four weeks) .................................................................... 95
Ink system storage ................................................................................................... 96Charge the ink system ..................................................................................................................... 97Clean the exterior of the printer ........................................................................................................ 98Clean the carriage base ................................................................................................................... 98Clean the front cover and media feed ............................................................................................ 100Clean the platen ............................................................................................................................. 101Waste ink bottle replacement ......................................................................................................... 103Normal printhead recovery ............................................................................................................. 106Print the nozzle print pattern .......................................................................................................... 108
7 How do I get the best image qualityTest the image quality .................................................................................................................... 112Interpreting the print quality ............................................................................................................ 113Manage media types ...................................................................................................................... 114
Copy a media type to create a new one ................................................................. 114Create a new media type ........................................................................................ 115Modify media type settings ..................................................................................... 116Delete a media type ................................................................................................ 117
How do I calibrate my printer ......................................................................................................... 118Calibrate media advance ........................................................................................ 118Printhead position adjustment ................................................................................ 121Printhead nozzle position adjustment ..................................................................... 124Line sensor position adjustment ............................................................................. 125Back feed adjustment print ..................................................................................... 125
iv ENWW
Adjust heater and print mode settings ............................................................................................ 127
8 The problem is… (troubleshooting topics)The problem is… (checklist) ........................................................................................................... 132A printhead crash ........................................................................................................................... 134Ink cartridge is not installed ............................................................................................................ 136Ink cartridge is not detected ........................................................................................................... 136Ink cartridge is near expiration date ............................................................................................... 136Ink cartridge has passed its expiration date ................................................................................... 136An error message ........................................................................................................................... 137
Service errors ......................................................................................................... 137System error messages .................................................................. 137Printhead error messages ............................................................... 137Service error messages .................................................................. 138
Operator error messages ....................................................................................... 138Ink cartridge .................................................................................... 138
The ink LED flashes ................................................ 138Waste ink bottle is not installed ....................................................... 139Waste ink bottle is full ..................................................................... 139Media crash .................................................................................... 139Media .............................................................................................. 139
Error LED is flashing ............................................... 140Other messages .............................................................................. 140
The problem is an abnormal sound ................................................................................................ 141
9 The problem is print quality
10 Tell me about… (basic knowledge topics)Tell me about operating conditions ................................................................................................ 146
Installation space .................................................................................................... 146Environmental conditions ....................................................................................... 146
Operating temperature and humidity levels .................................... 146Places where the printer must not be installed ............................... 147
Tell me about the power supply ..................................................................................................... 147Power .................................................................................................................... 147The HP Designjet High Speed Dryer ..................................................................... 148Exhaust attachment ................................................................................................ 148
Tell me about front panel messages and printer state ................................................................... 148Messages on the front panel .................................................................................. 148
Initialization display ......................................................................... 148Online state (idle mode) display ...................................................... 148Online state (print mode) display .................................................... 149Online state (print pause mode) display ......................................... 149
Print stop and resume ............................................. 149Print cancel (end) .................................................... 149
Online state (print information mode) display ................................. 149Offline (menu mode) display ........................................................... 150Shutdown state display ................................................................... 151
ENWW v
11 Tell me about mediaStoring media ................................................................................................................................. 153Disposing of media ......................................................................................................................... 153Using media ................................................................................................................................... 154Handling prints ............................................................................................................................... 154Other precautions ........................................................................................................................... 154
12 Tell me about the ink systemInk Cartridges ................................................................................................................................. 155Replacing an ink cartridge .............................................................................................................. 157Ink cartridge storage and disposal ................................................................................................. 157HP 780 Waste Ink Bottle ................................................................................................................ 157
Precautions for handling the waste ink bottle ......................................................... 158HP Cap Cleaning Kit with Roller .................................................................................................... 158HP 780 Wiper Cleaning Liquid ....................................................................................................... 158HP Cleaning Swabs ....................................................................................................................... 158HP Ink System Storage Kit ............................................................................................................. 159HP Ink System Cleaning Kit ........................................................................................................... 159
13 Tell me about waste managementDisposing of waste ......................................................................................................................... 161General recommendations ............................................................................................................. 163
14 Tell me about… (menus)Menu operations ............................................................................................................................ 166
Menu structure ........................................................................................................ 166Making front panel selections and settings ..................................... 166
To define a setting ................................................... 166To define a value ..................................................... 167Character list ........................................................... 168
The INK menu & messages ........................................................................................................... 169Replacing an empty ink cartridge ........................................................................... 169
The MEDIA menu ........................................................................................................................... 169The MEDIA REG menu .................................................................................................................. 170
Selecting a media type number (SELECT MEDIA) ................................................ 171Setting a media type name (RENAME MEDIA) ...................................................... 171Media advance value (MEDIA ADV VALUE) .......................................................... 171Dry time value (DRY TIME VALUE) ....................................................................... 172Print mode setting (PRINT MODE) ......................................................................... 172Print direction setting (PRINT DIRECTION) ........................................................... 172Flatten time (FLATTEN TIME) ............................................................................... 173Use media edge guard (USE EDGE GUARD) ....................................................... 173Media advance mode (MEDIA ADV MODE) .......................................................... 174Take-up reel mode (TUR MODE) ........................................................................... 174Leading edge mode (LEADING EDGE) ................................................................. 175Vacuum level setting (VACUUM LEVEL) ............................................................... 175Initial temperature setting for the front heater (FRONT HEATER T) ...................... 175Initial temperature setting for the print heater (PRINT HEATER T) ........................ 176Initial temperature setting for the rear heater (REAR HEATER T) ......................... 176
vi ENWW
Color stripe setting (COLOR STRIPE) ................................................................... 177Printhead height setting (PH HEIGHT VAL) ........................................................... 177Bidirectional print position adjustment (BIDIR DEF VALUE) .................................. 177Bidirectional print position fine adjustment (BIDIR FINE VALUE) .......................... 178Printhead cleaning mode (PH CLEANING) ............................................................ 178Media back feed adjustment (BACK ADJUST VAL) ............................................... 179Media advance preference (ADVANCE PREF) ...................................................... 179Print mode preference (PRINT MODE PREF) ....................................................... 180Heater preference (HEATER PREF) ...................................................................... 180Printhead rest period (PH REST PERIOD) ............................................................ 180Set remaining media (SET REMAINING MEDIA) .................................................. 181Printhead temperature rest (PH TEMP REST) ....................................................... 181Delete a media type (DELETE MEDIA) .................................................................. 181Copy a media type (COPY MEDIA) ........................................................................ 181Paste a media type (PASTE MEDIA) ..................................................................... 181Default values for media types ............................................................................... 182
Media advance calibration ............................................................................................................. 182Media advance calibration print .............................................................................. 183Back feed adjustment print ..................................................................................... 183Media back feed adjustment value ......................................................................... 184
The PH. MAIN menu ...................................................................................................................... 184Ink system optimization (INK SYS OPT) ................................................................ 184Cap cleaning (CAP CLEANING) ............................................................................ 184Replace wiper blade (REPLACE WIPER BLADE) ................................................. 185Replace wiper cleaning liquid (REPLACE WIPE LIQUID) ...................................... 185Replace wiper sponge (REPLACE WIPE SPONGE) ............................................. 185Washing the printheads (WASH PRINTHEADS) ................................................... 185Printhead height (PH HEIGHT ADJ) ....................................................................... 186Replace Printhead (REPLACE PRINTHEAD) ........................................................ 186Reseat Printhead (RESEAT PRINTHEAD) ............................................................ 186
The PH. REC menu ....................................................................................................................... 186The FEED option ............................................................................................................................ 187The REWIND option ....................................................................................................................... 187The PRINTER menu ...................................................................................................................... 187
Configuration print (CONFIG PRINT) ..................................................................... 187Error log information print (ERROR LOG PRINT) .................................................. 188History print (HISTORY PRINT) ............................................................................. 188
The ADJUST menu ........................................................................................................................ 188Adjustment pattern prints (TEST PRINTS) ............................................................. 188Printhead position adjustment (#PH TO PH VAL) .................................................. 189Bidirectional print position adjustment (BIDIR DEF) ............................................... 189Bidirectional print position fine adjustment (BIDIR FINE) ....................................... 189Nozzle position (NOZZLE POS VAL) ..................................................................... 190Line sensor top position (LS ADJ TOP VAL) .......................................................... 190Line sensor side position (LS ADJ SIDE VAL) ....................................................... 190
The SETUP menu .......................................................................................................................... 190Language for front panel (LANGUAGE) ................................................................. 191Time Zone (TIME ZONE GMT+) ............................................................................ 191Units of measure (LENGTH UNITS) ....................................................................... 191Temperature units (TEMPERATURE UNITS) ........................................................ 191
ENWW vii
Acoustic warning (BEEP) ....................................................................................... 191BOOT version display (BOOT VERSION) .............................................................. 191Firmware version display (PRINTER FW VER) ...................................................... 192Main PCA version display (MAIN PCA VER) ......................................................... 192ICB board version display (CARRIAGE PCA) ........................................................ 192ASIC version display (ASIC VER) .......................................................................... 192USB address (USB ADDRESS) ............................................................................. 192USB speed (USB SPEED) ..................................................................................... 193Factory default setting (FACTORY DEFAULT) ...................................................... 193Printer firmware upgrade (PRINTER FW UPGRADE) ........................................... 193
The HEATER menu ....................................................................................................................... 193Heater delay time (HEATER DELAY TIME) ........................................................... 193Heater standby time (HEATER STANDBY TIME) .................................................. 194
15 Tell me about… (heater topics)The heaters .................................................................................................................................... 195Heater temperature settings ........................................................................................................... 196
Heater preset temperature by medium ................................................................... 196Flow of heater temperature setting ......................................................................... 197Temperature control ............................................................................................... 198
Maintaining the preset temperature ................................................ 198Maintaining the standby temperature .............................................. 198Turning off the heaters .................................................................... 198
Heater error messages .................................................................................................................. 199
16 Tell me about… (printer specifications topics)Specifications ................................................................................................................................. 202Ecological specifications ................................................................................................................ 203
17 Tell me about… (ordering supplies and accessories topics)Ordering supplies ........................................................................................................................... 206Ordering media .............................................................................................................................. 206Ordering accessories ..................................................................................................................... 207
18 Tell me about… (getting help topics)HP Customer Care ......................................................................................................................... 209HP Designjet Online ....................................................................................................................... 210
19 Legal informationWorldwide Limited Warranty—HP Designjet 8000s Printer series ................................................. 211
A. Extent of HP Limited Warranty ........................................................................... 211B. Limitations of liability .......................................................................................... 213C. Local law ............................................................................................................ 213
Regulatory notices ......................................................................................................................... 213Regulatory Model Number ...................................................................................... 213ELECTROMAGNETIC COMPATIBILITY (EMC) .................................................... 214FCC statements (U.S.A.) ........................................................................................ 214Shielded cables ...................................................................................................... 214
viii ENWW

Normes de sécurité (Canada) ................................................................................ 214DOC statement (Canada) ....................................................................................... 214Korean EMI statement ............................................................................................ 215Taiwanese EMI statement ...................................................................................... 215Chinese EMI statement .......................................................................................... 215Sound ..................................................................................................................... 215
DECLARATION OF CONFORMITY .............................................................................................. 216declares that the product ........................................................................................ 216conforms to the following product specifications .................................................... 216Additional information ............................................................................................. 216Local contacts for regulatory topics only ................................................................ 217
Index ...................................................................................................................................................................... 219
ENWW ix

x ENWW
1 Introduction
● Using this guide
● The printer's main components
● The printer's front panel
● Safety precautions
● Handling precautions
ENWW 1
Intr
oduc
tion
Using this guideThis guide is organized into the following chapters.
IntroductionThis chapter provides a brief introduction to the printer and its documentation for new users.
How do I …These chapters help you to carry out various procedures such as loading media or changing an inkcartridge. Many of these procedures are illustrated with drawings.
The problem is …These chapters help you to solve problems that may occur while printing.
Tell me about …These chapters contain reference information, including the specifications of the printer, and the partnumbers of media types, ink supplies, and other accessories.
IndexIn addition to the table of contents, there is an alphabetical index to help you to find topics quickly.
The printer's main componentsThe following front and rear views of the printer illustrate the main components.
2 Chapter 1 Introduction ENWW
Introduction
Front view
1. Printer front panel.
2. Media lever.
3. Carriage height lever.
4. Media cutter.
5. Front cover.
6. Ink service station.
7. Carriage maintenance station.
8. Cleaning kit drawer.
9. Wheel lock.
10. Waste ink bottle.
11. The HP Designjet 8000s Take-Up Reel Kit (Q6681A) is an optional accessory that can be orderedseparately.
ENWW The printer's main components 3
Intr
oduc
tion
Rear view
1. Roll holder.
2. Ink cartridge station.
3. Media lever.
4. Documentation holder.
5. Printer power socket.
6. Printer power on/off switch.
7. 100 V / 200 V alternation switch.
8. USB port.
9. Exhaust attachments.
The heatersThe printer includes three heaters for fixing and stabilizing the printed image on the media. Each heater iscontrolled separately.
4 Chapter 1 Introduction ENWW
Introduction
1. Media roll.
2. Pressure roller.
3. Rear heater (preheats the media).
4. Grid roller.
5. Carriage.
6. Front cover.
7. Print heater (dries the ink and stabilizes the printed image).
8. Front heater (fixes the ink on to the media).
WARNING! Do not touch heater surfaces in the media path. This may cause burns.
The printer's front panelYour printer's front panel is located on the front of the printer, on the right-hand side. It has the followingimportant functions:
● It must be used to perform certain operations, such as loading and unloading media.
● It can display up-to-date information about the status of the printer, the ink cartridges, the printheads,the media, etc.
● It can provide guidance in using the printer.
● It displays warning and error messages when appropriate.
● It can be used to change the values of printer settings, changing the operation of the printer.
ENWW The printer's front panel 5
Intr
oduc
tion
The front panel has the following components:
1. The Data light is off when the printer is not receiving data, and flashing when data is being received.
2. The Error light is off when there is no printer error, flashing to warn of an error condition that requiresoperator intervention, and on when there is a serious internal error.
3. The Ink Cartridge light is on when all ink cartridges are present and there is sufficient ink, flashingwhen an ink cartridge is low on ink, and off if an ink cartridge must be replaced.
4. The Media light indicates the status of media in the printer. When it is on, media is loaded in the printerand off indicates that the media is not loaded.
5. The display area where information and menus are displayed.
6. The Up key selects a menu group or moves to the previous item in a list, or increases a numericalvalue. This key can also be used to rewind the media through the media path (only when the frontpanel displays “Printer Ready”).
7. The Back key selects a menu group or goes back to the previous menu. If you press it repeatedly,or hold it down, you will soon return to the main menu.
8. The Forward key selects a menu group or moves to the next digit when you are setting parameters.
9. The Down key selects a menu group or moves to the next item in a list, or decreases a numericalvalue. This key can also be used to feed the media through the media path (only when the front paneldisplays “Printer Ready”).
10. The OK key selects an item that is currently highlighted or enters a parameter.
11. The SHIFT key is used to switch between the menu groups.
12. The Power light is off when the printer is off; green when the printer is on; flashing when the printer isin transition between off and on.
13. The CANCEL key cancels the current operation. It is often used to stop printing the current print job.
14. The HEATER key is used to set the temperature of the front, print and rear heaters.
6 Chapter 1 Introduction ENWW
Introduction
15. The ONLINE key switches the printer online or offline, and provides access to menu groups.
16. The Power key turns the printer on or off.
Safety precautionsThe following symbols are used in this manual to ensure the proper use of the printer and to prevent theprinter from being damaged. Follow the instructions marked with these symbols.
WARNING! Failure to follow the guidelines marked with this symbol could result in seriouspersonal injury or death.
CAUTION Failure to follow the guidelines marked with this symbol could result in minor personalinjury or damage to the product.
General warnings● Use the power supply voltage specified on the nameplate. Avoid overloading the printer’s electrical
outlet with multiple devices.
● Be sure the printer is well grounded. Failure to ground the printer may result in electrical shock, fire,and susceptibility to electromagnetic interference.
● Do not disassemble or repair the printer yourself. Do not reinstall the printer in a new location. Callyour local HP Service Representative for service.
● Use only the electrical cable supplied by HP with the printer. Do not damage, cut, or repair the powercable. A damaged power cable has risk of fire and electric shock. Replace a damaged power cablewith an HP-approved power cable.
● Do not allow metal or liquids (except those used in HP Cleaning Kits) to touch the internal parts of theprinter. Doing so may cause fire, electric shock, or other serious hazards.
● Power OFF the printer and unplug the power cable from the power outlet in any of the following cases:
● When placing your hands inside the printer.
● If there is smoke or an unusual smell coming from the printer.
● If the printer is making an unusual noise not heard during normal operation.
● A piece of metal or a liquid (not part of cleaning and maintenance routines) touches internal partsof the printer.
● During an electrical (thunder/lightning) storm.
● During a power failure.
● Inks used in the printer and liquids in the HP Cleaning kits contain an organic solvent (ethylene glycolmonobutyl ether acetate, CAS No. 112-07-2). Observe all local, state, and federal regulations relatedto the handling, use, storage, and disposal of organic solvents.
● Ink and fluids used in the Cleaning Kits are combustible. Do not use or store within 8 meters (25 feet)of open flames, sparks, or other sources of ignition.
ENWW Safety precautions 7
Intr
oduc
tion
● Do not operate printer within 8 meters (25 feet) of open flames, sparks, or other sources of ignition.Do not smoke within 8 meters (25 feet) of the printer.
● Install and operate the printer in a well-ventilated area.
● The printer installation must meet all applicable regulations on the emissions of volatile organiccompounds in the workplace. HP recommends that installations use an ink vapor extraction andexhaust system or an HP Air Purification System. Before installing a system exhausting ink vapors tothe outside atmosphere, consult with your local air quality control authorities.
● Avoid contact between ink and skin, eyes, and clothing.
● Immediately wash skin with soapy water.
● Remove clothing soaked with ink from contact with skin.
● Use an approved eye wash station if ink is splashed into eyes and consult a doctor if necessary.
If an approved eye wash station is unavailable, flush eyes with cold water and consult a doctorif necessary.
● Do not swallow ink. If swallowed, do not induce vomiting and seek immediate medical attention.
● Keep ink cartridges, cleaning kits, and waste ink bottles out of the reach of children.
● Be sure all operators are trained in the use of emergency equipment such as eye wash stations andfire extinguishers and know where they are located.
General cautions● Handle media rolls with care. They can be heavy and difficult to move in confined spaces. In some
cases, two people should move and install media rolls. Dropping a media roll could cause personalinjury or damage to the printer.
● Allow and maintain adequate space around printer for immediate access to safety equipment suchas eye wash stations, fire extinguishers, glove and safety glass dispensers, and fireproof wastestorage containers.
● Treat any media, used cleaning and maintenance supplies, and wipes soaked with ink as combustiblematerials. Handle and dispose of properly.
● If an Air Purifier System is installed, allow adequate space for exhaust hoses from the printer. Locatethese hoses and the Air Purifier System so that they do not pose a trip hazard or interfere with theoperation of the printer such as loading and unloading media, replacing Ink Cartridges, inspecting andreplacing the waste ink bottle.
● Always hold the power cable by the plug when connecting and disconnecting from the power outlet.Never pull on the cable because this may damage it and create risk of fire and electric shock.
● Do not touch heater surfaces in the media path. This may cause burns.
In order to ensure the safe operation of the printer, heed all of the cautions and warnings containedthroughout this manual.
8 Chapter 1 Introduction ENWW
Introduction
Handling precautionsThese precautions are recommended to avoid damage to your printer and its components.
Power supply● Use the power supply voltage specified on the nameplate.
● Check the printer electrical outlet for proper polarity and grounding before connecting printer. Failureto do so may result in fire and electric shock hazards.
● Be sure the printer is well-grounded. Failure to ground the printer may result in electrical shock, fire,and susceptibility to electromagnetic interference.
● Avoid overloading the printer’s electrical outlet with multiple devices.
● Use only the electrical cable supplied by HP with the printer.
Printer● Wipe the printer clean with a soft cloth. A cloth moistened with a neutral detergent may be used. Do
not allow liquid to enter the printer. This may create risk of fire and electrical shock and cause amalfunction. Do not clean the printer with benzene or paint thinner. This may damage the paint.
● Never touch the printhead nozzles. They can be easily damaged or clogged.
Regular inspection and maintenance● Make sure you observe the appropriate maintenance guideline. See How do I maintain the printer.
● Clean the capping unit every day.
● Never switch off the printer without following the correct procedures. Even with the storage liquidinstalled, never leave the printer off for more than 4 weeks. Leaving your printer off for more than 4weeks can cause permanent damage that cannot be repaired. In all other cases make sure youobserve the appropriate maintenance guidelines.
Consumables● Ink inside the ink cartridge is combustible. Do not expose or store near open flames, sparks, or other
sources of ignition.
● HP Ink Cartridges should be installed before the “Install By” date printed on the cartridge. Use of theInk Cartridge 3 months beyond the “Install By” date may cause deterioration in print quality or a printermalfunction.
● Do not disassemble the ink cartridges. Ink cartridges are intended for single use only.
● Avoid contact between ink and skin, eyes, and clothing.
● Immediately wash skin with soapy water.
● Remove clothing soaked with ink from contact with skin.
● Use an approved eye wash station if ink is splashed into eyes and consult a doctor if necessary.
If an approved eye wash station is unavailable, flush eyes with cold water and consult a doctorif necessary.
ENWW Handling precautions 9
Intr
oduc
tion

● Use only an HP Waste Ink Bottle. The bottle must be installed according to instructions or waste inkmay overflow.
An HP Waste Ink Bottle must always be installed before turning the printer ON. Automatic and manualservice cycles produce waste ink that must be contained in an HP Waste Ink Bottle.
Do not remove the cap from its tether to the HP Waste Ink Bottle. The cap is needed to properly sealthe HP Waste Ink Bottle for disposal.
Keep the HP Waste Ink Bottle upright. Do not place on tables or shelves where it could fall.
Waste ink is combustible. Keep an HP Waste Ink Bottle containing waste ink away from open flames,sparks, or other sources of ignition.
The level in the HP Waste Ink Bottle must be checked by visual inspection to prevent overflow. If thewaste ink level is above the indication line, the bottle must be replaced with an empty HP Waste InkBottle.
● Place a sheet of paper under the HP Waste Ink Bottle on the floor when removing a bottle containingwaste ink. This will help clean up any ink spills. If soaked with ink, treat the paper as a combustiblematerial and dispose of properly.
● Do not store HP Ink Cartridges in direct sunlight. Store HP Ink Cartridges in a cool, dry place. Thisprevents deterioration of the ink during storage.
10 Chapter 1 Introduction ENWW
Introduction
2 How do I… (basic operation topics)?
● Connect to a computer
● Turn the power on/off
● Check the firmware version
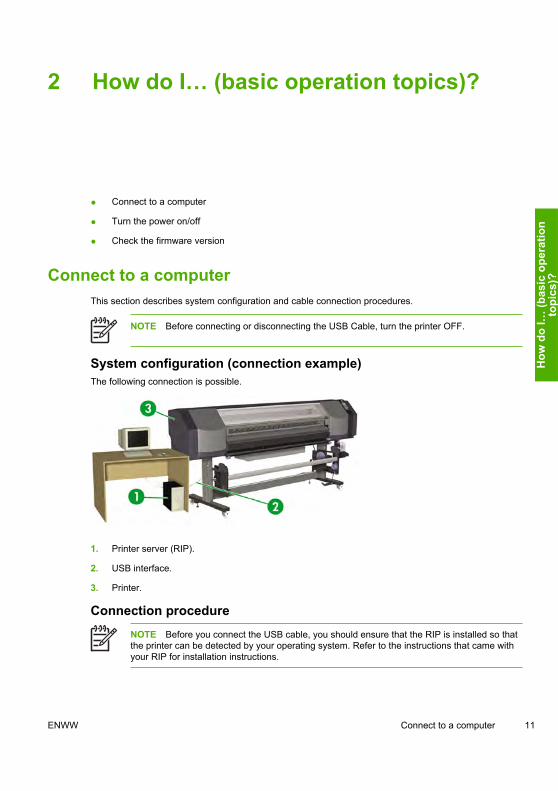
Connect to a computerThis section describes system configuration and cable connection procedures.
NOTE Before connecting or disconnecting the USB Cable, turn the printer OFF.
System configuration (connection example)The following connection is possible.
1. Printer server (RIP).
2. USB interface.
3. Printer.
Connection procedureNOTE Before you connect the USB cable, you should ensure that the RIP is installed so thatthe printer can be detected by your operating system. Refer to the instructions that came withyour RIP for installation instructions.
ENWW Connect to a computer 11
How
do
I… (b
asic
ope
ratio
nto
pics
)?
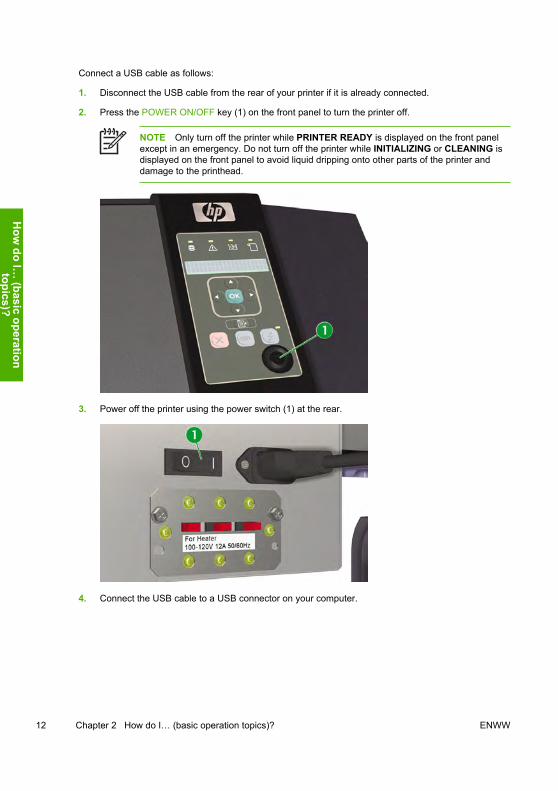
Connect a USB cable as follows:
1. Disconnect the USB cable from the rear of your printer if it is already connected.
2. Press the POWER ON/OFF key (1) on the front panel to turn the printer off.
NOTE Only turn off the printer while PRINTER READY is displayed on the front panelexcept in an emergency. Do not turn off the printer while INITIALIZING or CLEANING isdisplayed on the front panel to avoid liquid dripping onto other parts of the printer anddamage to the printhead.
3. Power off the printer using the power switch (1) at the rear.
4. Connect the USB cable to a USB connector on your computer.
12 Chapter 2 How do I… (basic operation topics)? ENWW
How
do I… (basic operation
topics)?
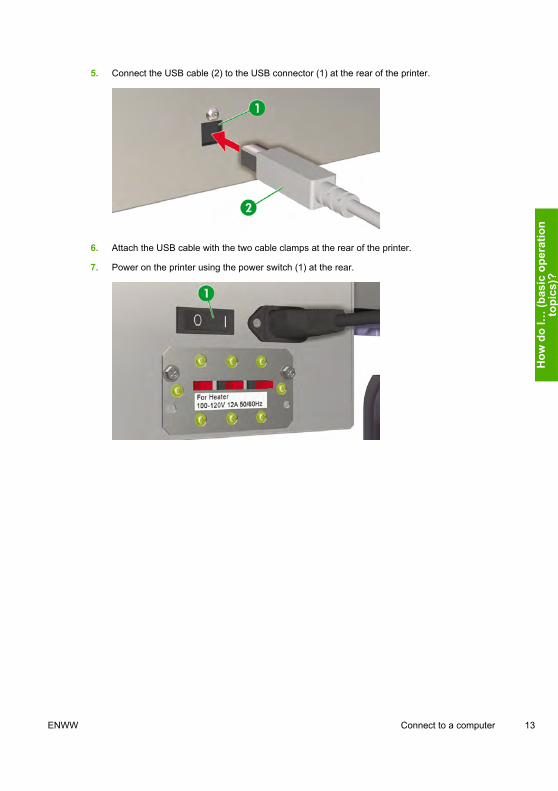
5. Connect the USB cable (2) to the USB connector (1) at the rear of the printer.
6. Attach the USB cable with the two cable clamps at the rear of the printer.
7. Power on the printer using the power switch (1) at the rear.
ENWW Connect to a computer 13
How
do
I… (b
asic
ope
ratio
nto
pics
)?
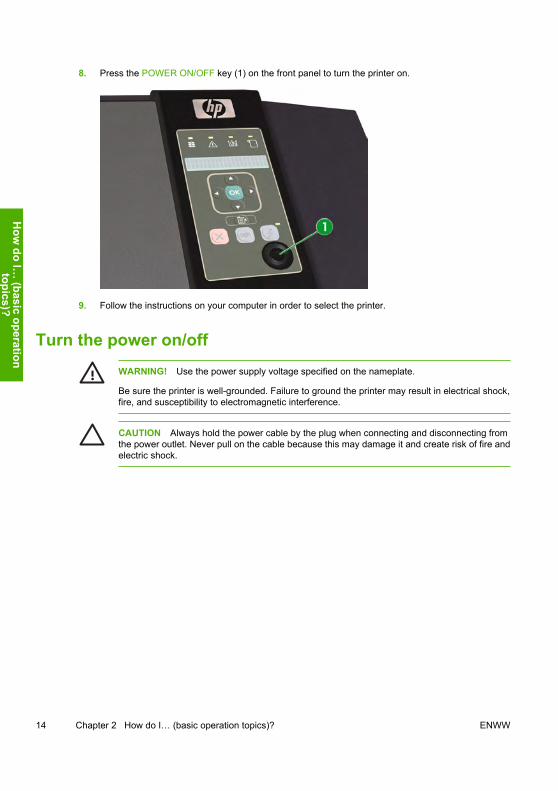
8. Press the POWER ON/OFF key (1) on the front panel to turn the printer on.
9. Follow the instructions on your computer in order to select the printer.
Turn the power on/offWARNING! Use the power supply voltage specified on the nameplate.
Be sure the printer is well-grounded. Failure to ground the printer may result in electrical shock,fire, and susceptibility to electromagnetic interference.
CAUTION Always hold the power cable by the plug when connecting and disconnecting fromthe power outlet. Never pull on the cable because this may damage it and create risk of fire andelectric shock.
14 Chapter 2 How do I… (basic operation topics)? ENWW
How
do I… (basic operation
topics)?
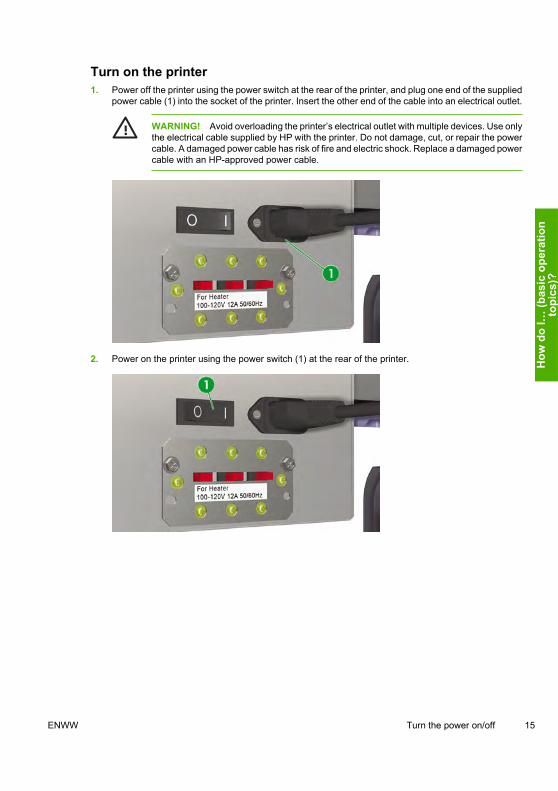
Turn on the printer1. Power off the printer using the power switch at the rear of the printer, and plug one end of the supplied
power cable (1) into the socket of the printer. Insert the other end of the cable into an electrical outlet.
WARNING! Avoid overloading the printer’s electrical outlet with multiple devices. Use onlythe electrical cable supplied by HP with the printer. Do not damage, cut, or repair the powercable. A damaged power cable has risk of fire and electric shock. Replace a damaged powercable with an HP-approved power cable.
2. Power on the printer using the power switch (1) at the rear of the printer.
ENWW Turn the power on/off 15
How
do
I… (b
asic
ope
ratio
nto
pics
)?
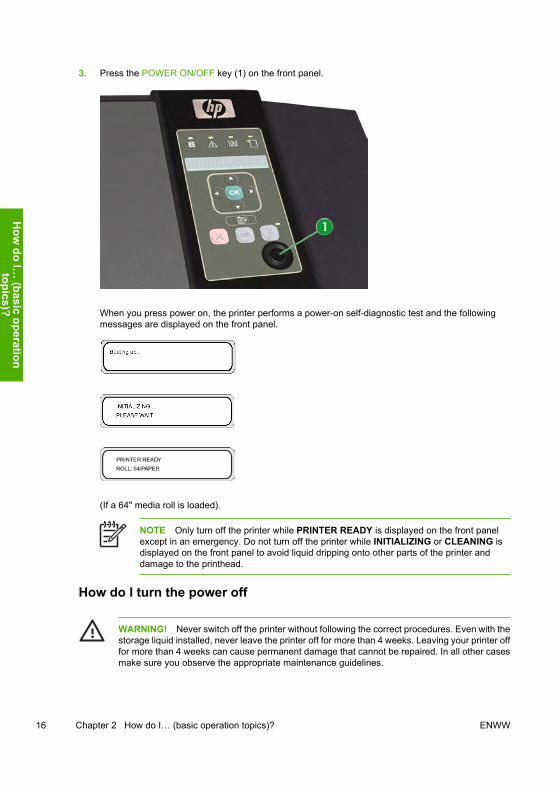
3. Press the POWER ON/OFF key (1) on the front panel.
When you press power on, the printer performs a power-on self-diagnostic test and the followingmessages are displayed on the front panel.
(If a 64" media roll is loaded).
NOTE Only turn off the printer while PRINTER READY is displayed on the front panelexcept in an emergency. Do not turn off the printer while INITIALIZING or CLEANING isdisplayed on the front panel to avoid liquid dripping onto other parts of the printer anddamage to the printhead.
How do I turn the power off
WARNING! Never switch off the printer without following the correct procedures. Even with thestorage liquid installed, never leave the printer off for more than 4 weeks. Leaving your printer offfor more than 4 weeks can cause permanent damage that cannot be repaired. In all other casesmake sure you observe the appropriate maintenance guidelines.
16 Chapter 2 How do I… (basic operation topics)? ENWW
How
do I… (basic operation
topics)?
WARNING! The printer has an internal clock which allows it to automatically wash theprintheads, flushing some ink through the printheads, which keeps the printheads in goodcondition. The printer automatically washes the printheads regularly after the last printingprocess. If the printer is switched Off for a long period, this process does not happen. If the inkdoes not flow through the printheads from time to time, the ink will dry inside the nozzles, reachinga point where it is impossible to recover them and the printheads will fail. This will mean anexpensive printhead replacement.
Automatic maintenance and cleaning will not be performed if you turn off the printer on the frontpanel or leave it without media loaded. The printer power switch on the rear of the printer shouldonly be used when the printer is turned off to move it, to connect it to a computer, or to install ormaintain printer parts.
WARNING! Turn the printer OFF and unplug the power cable from the power outlet in any ofthe following cases;
— when placing your hands inside the printer;
— if there is smoke or an unusual smell coming from the printer;
— if the printer is making an unusual noise not heard during normal operation;
— a piece of metal or a liquid (not part of cleaning and maintenance routines) touches internalparts of the printer;
— during an electrical (thunder/lightning) storm;
— during a power failure.
CAUTION Always hold the power cable by the plug when connecting and disconnecting fromthe power outlet. Never pull on the cable because this may damage it and create risk of fire andelectric shock.
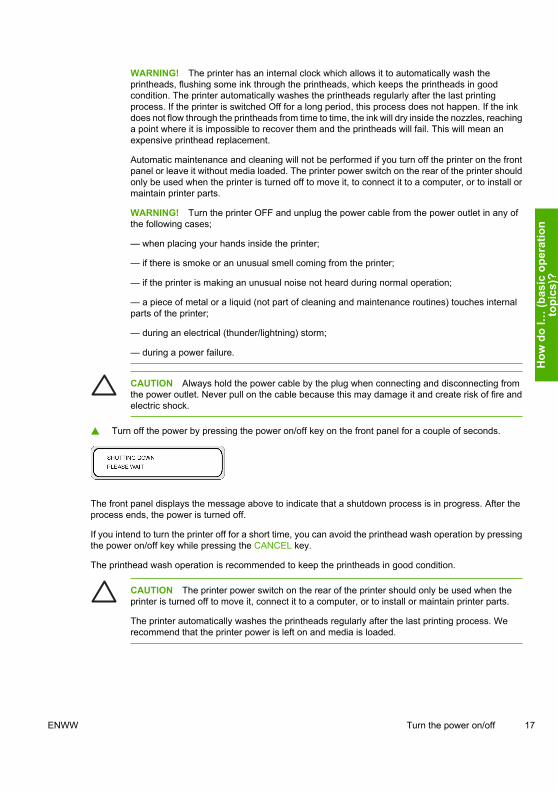
▲ Turn off the power by pressing the power on/off key on the front panel for a couple of seconds.
The front panel displays the message above to indicate that a shutdown process is in progress. After theprocess ends, the power is turned off.
If you intend to turn the printer off for a short time, you can avoid the printhead wash operation by pressingthe power on/off key while pressing the CANCEL key.
The printhead wash operation is recommended to keep the printheads in good condition.
CAUTION The printer power switch on the rear of the printer should only be used when theprinter is turned off to move it, connect it to a computer, or to install or maintain printer parts.
The printer automatically washes the printheads regularly after the last printing process. Werecommend that the printer power is left on and media is loaded.
ENWW Turn the power on/off 17
How
do
I… (b
asic
ope
ratio
nto
pics
)?
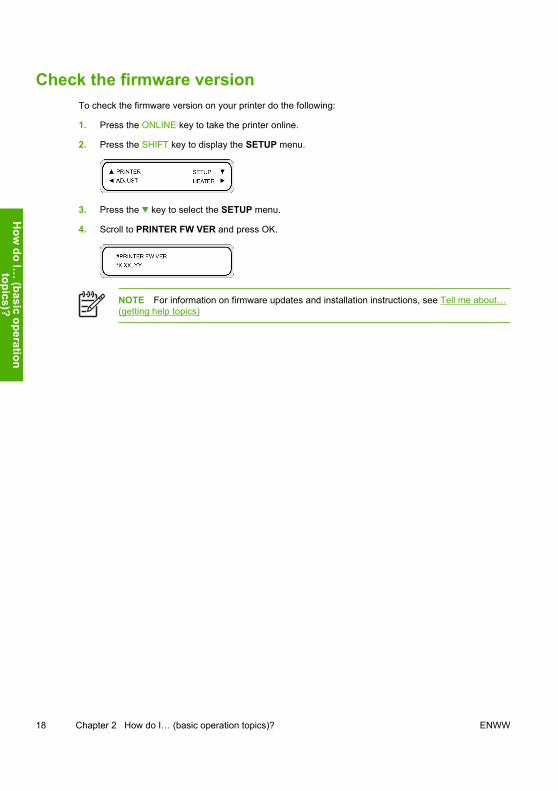
Check the firmware versionTo check the firmware version on your printer do the following:
1. Press the ONLINE key to take the printer online.
2. Press the SHIFT key to display the SETUP menu.
3. Press the key to select the SETUP menu.
4. Scroll to PRINTER FW VER and press OK.
NOTE For information on firmware updates and installation instructions, see Tell me about…(getting help topics)
18 Chapter 2 How do I… (basic operation topics)? ENWW
How
do I… (basic operation
topics)?
3 How do I load/unload media
This section describes how to load and remove media in the printer.
● Install a media roll in the printer
● Remove a media roll from the printer
● Replace a jammed media roll
● Load a cut sheet
● Use the media edge guards
● Use the media cutter
● Use the take-up reel
ENWW 19
How
do
I loa
d/un
load
med
ia
Install a media roll in the printerCAUTION Do not touch heater surfaces in the media path. This may cause burns.
Handle media rolls with care. They can be heavy and difficult to move in confined spaces. In somecases, two people should move and install media rolls. Dropping a media roll could causepersonal injury or damage to the printer.
NOTE You can increase or reduce the printhead height depending on the thickness of the mediayou are using. See How do I… Change the printhead height
.
NOTE The HP Designjet 8000s Take-Up Reel Kit (Q6681A) is an optional accessory. See Tellme about… Ordering accessories
.
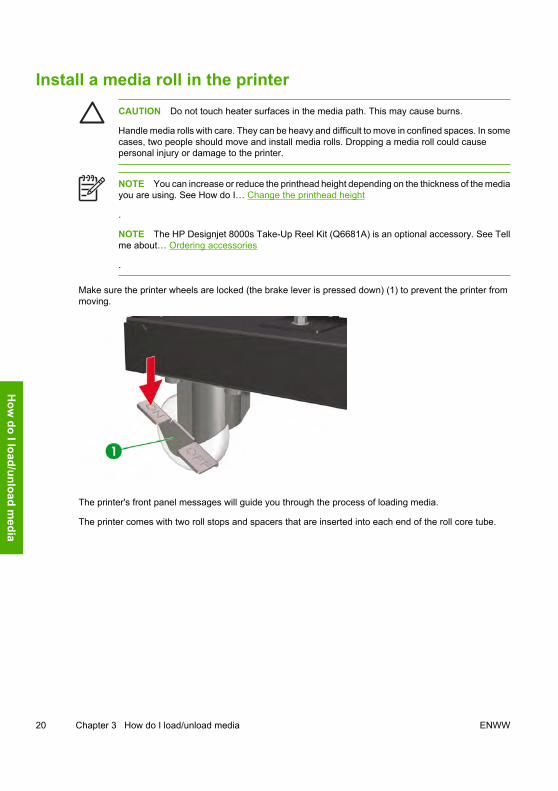
Make sure the printer wheels are locked (the brake lever is pressed down) (1) to prevent the printer frommoving.
The printer's front panel messages will guide you through the process of loading media.
The printer comes with two roll stops and spacers that are inserted into each end of the roll core tube.
20 Chapter 3 How do I load/unload media ENWW
How
do I load/unload media
To install a media roll:
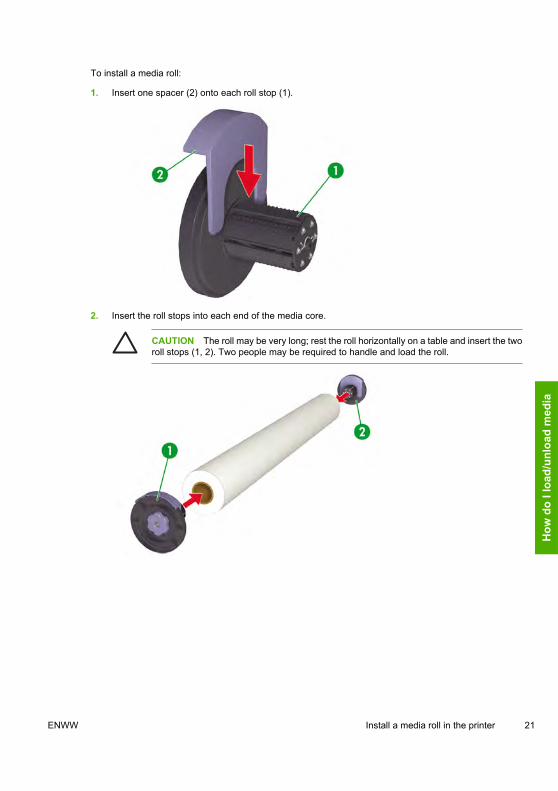
1. Insert one spacer (2) onto each roll stop (1).
2. Insert the roll stops into each end of the media core.
CAUTION The roll may be very long; rest the roll horizontally on a table and insert the tworoll stops (1, 2). Two people may be required to handle and load the roll.
ENWW Install a media roll in the printer 21
How
do
I loa
d/un
load
med
ia
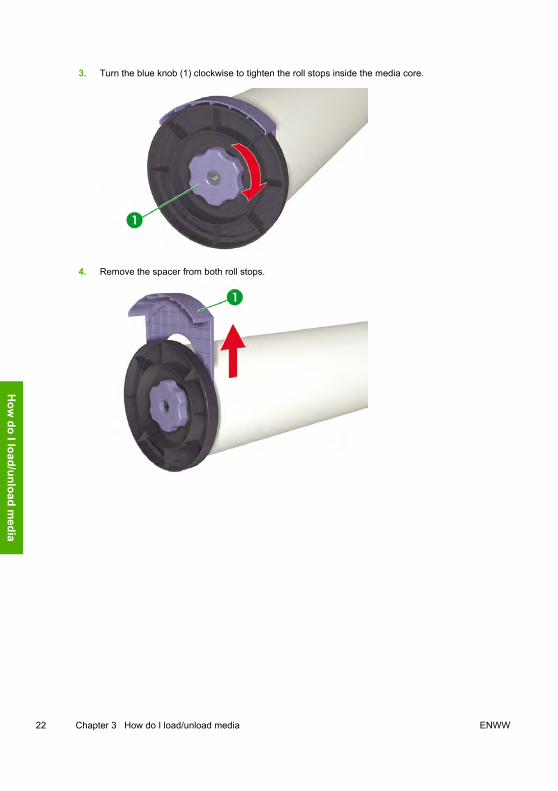
3. Turn the blue knob (1) clockwise to tighten the roll stops inside the media core.
4. Remove the spacer from both roll stops.
22 Chapter 3 How do I load/unload media ENWW
How
do I load/unload media

5. At the rear of the printer, loosen the stop screw (1) and position the left (3) and right (2) media rollholders so that the roll stops on each end of the roll can be placed on the holders.
NOTE Before lifting the roll of media onto the media roll holders, decide if you want to printon the media face up or face down. Media can be fed through the media path from over theroll (face up) (1) or from under the roll (face down) (2).
6. Lift the roll of media (1) onto the media roll holders.
ENWW Install a media roll in the printer 23
How
do
I loa
d/un
load
med
ia
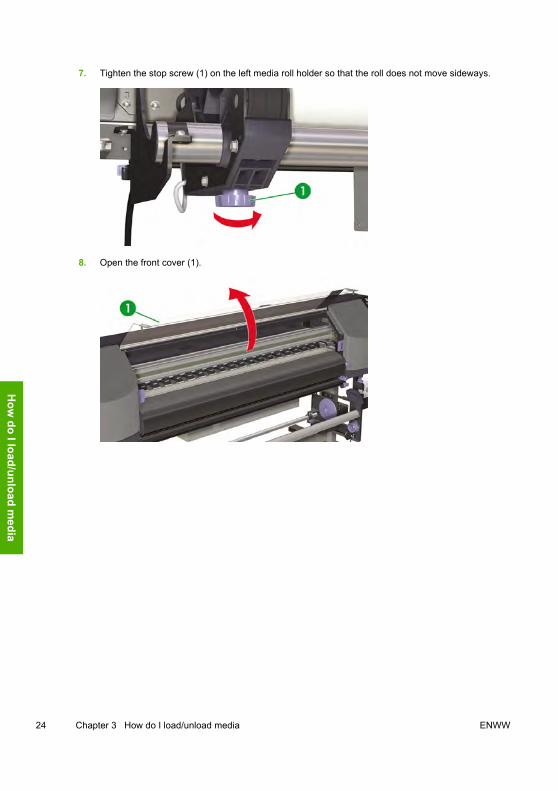
7. Tighten the stop screw (1) on the left media roll holder so that the roll does not move sideways.
8. Open the front cover (1).
24 Chapter 3 How do I load/unload media ENWW
How
do I load/unload media
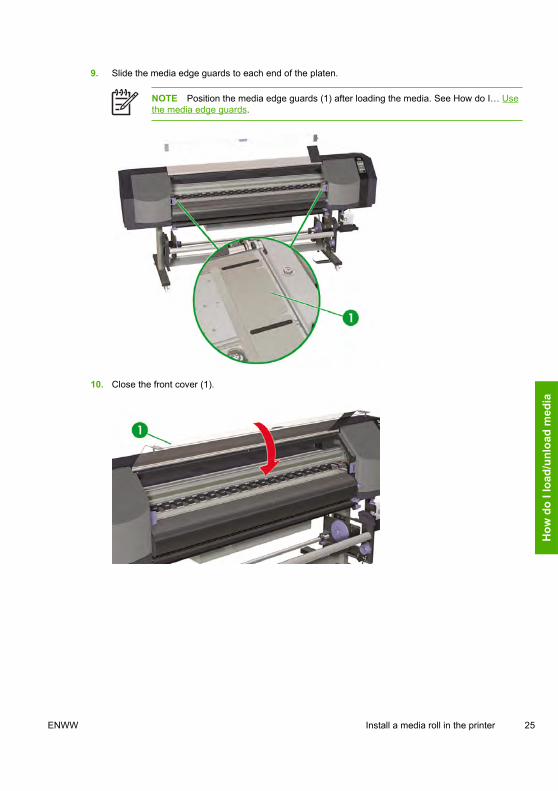
9. Slide the media edge guards to each end of the platen.
NOTE Position the media edge guards (1) after loading the media. See How do I… Usethe media edge guards.
10. Close the front cover (1).
ENWW Install a media roll in the printer 25
How
do
I loa
d/un
load
med
ia
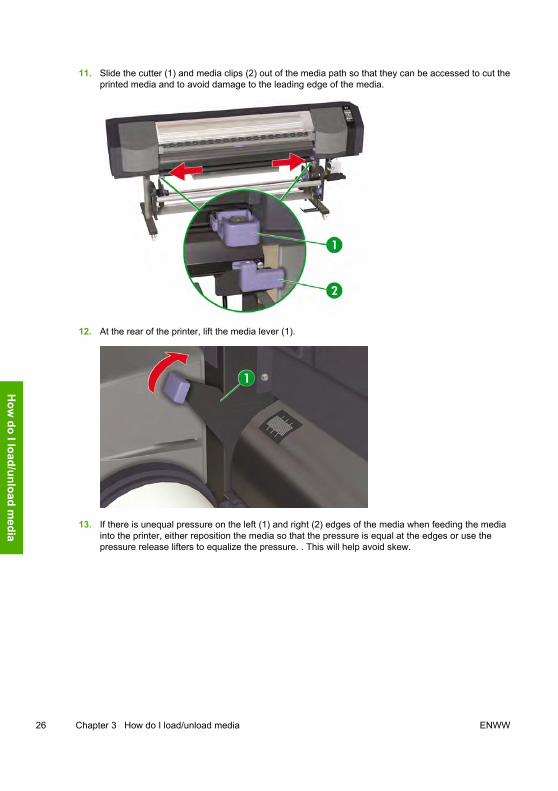
11. Slide the cutter (1) and media clips (2) out of the media path so that they can be accessed to cut theprinted media and to avoid damage to the leading edge of the media.
12. At the rear of the printer, lift the media lever (1).
13. If there is unequal pressure on the left (1) and right (2) edges of the media when feeding the mediainto the printer, either reposition the media so that the pressure is equal at the edges or use thepressure release lifters to equalize the pressure. . This will help avoid skew.
26 Chapter 3 How do I load/unload media ENWW
How
do I load/unload media
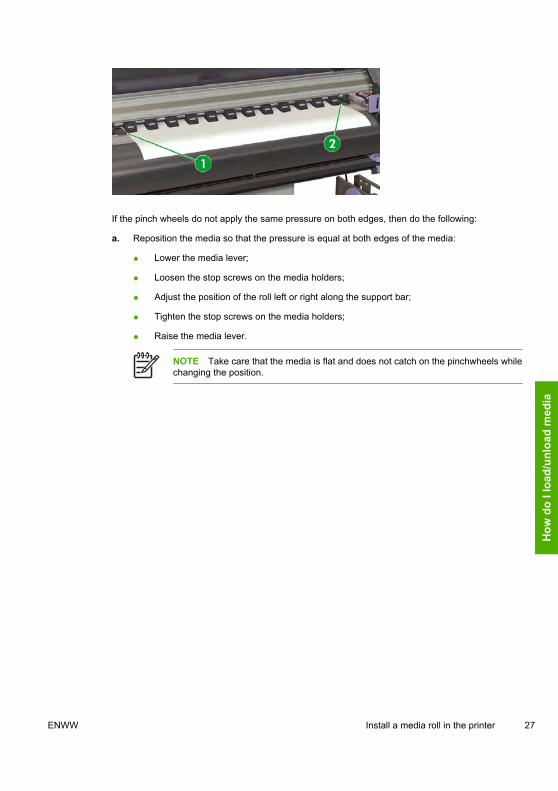
If the pinch wheels do not apply the same pressure on both edges, then do the following:
a. Reposition the media so that the pressure is equal at both edges of the media:
● Lower the media lever;
● Loosen the stop screws on the media holders;
● Adjust the position of the roll left or right along the support bar;
● Tighten the stop screws on the media holders;
● Raise the media lever.
NOTE Take care that the media is flat and does not catch on the pinchwheels whilechanging the position.
ENWW Install a media roll in the printer 27
How
do
I loa
d/un
load
med
ia
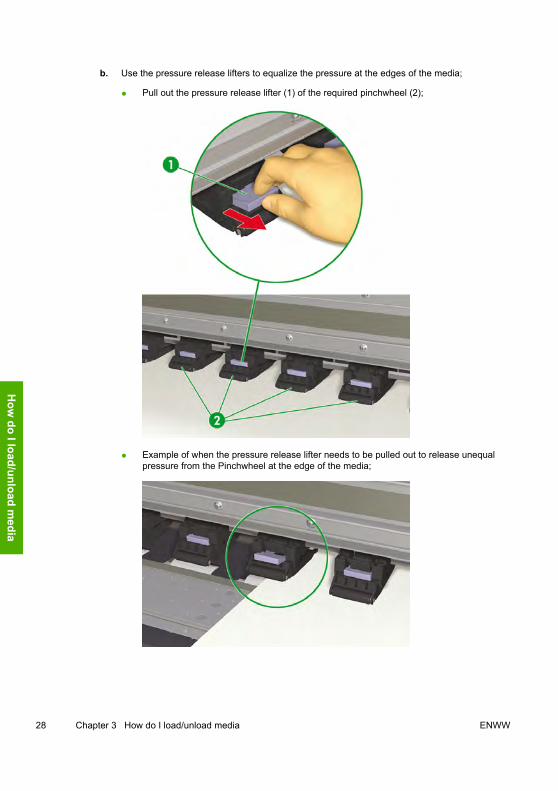
b. Use the pressure release lifters to equalize the pressure at the edges of the media;
● Pull out the pressure release lifter (1) of the required pinchwheel (2);
● Example of when the pressure release lifter needs to be pulled out to release unequalpressure from the Pinchwheel at the edge of the media;
28 Chapter 3 How do I load/unload media ENWW
How
do I load/unload media

● Example of when the pressure release lifter does not need to be pulled out to releaseunequal pressure from the Pinchwheel at the edge of the media;
14. Feed the media until a beep sounds from the media feeder (about 200 mm).
NOTE It is a good practice to feed the media through the media path until it almost touchesthe floor because when you rewind the excess media again this will ensure an even tensionacross width of the media and avoid skew.
NOTE If you have problems loading media, feed the media into the printer by holding bothedges of the media.
Take care that the media does not curl inside the front cover and that the media edge guardsare not obstructing the media path.
ENWW Install a media roll in the printer 29
How
do
I loa
d/un
load
med
ia
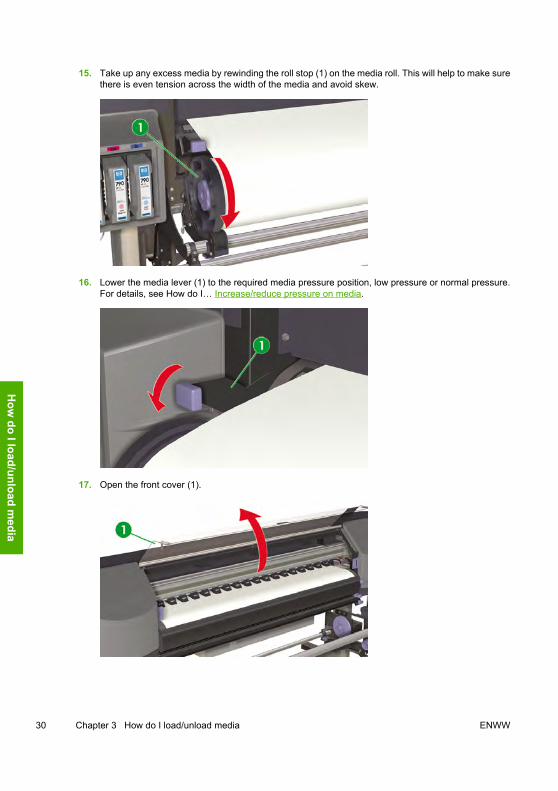
15. Take up any excess media by rewinding the roll stop (1) on the media roll. This will help to make surethere is even tension across the width of the media and avoid skew.
16. Lower the media lever (1) to the required media pressure position, low pressure or normal pressure.For details, see How do I… Increase/reduce pressure on media.
17. Open the front cover (1).
30 Chapter 3 How do I load/unload media ENWW
How
do I load/unload media
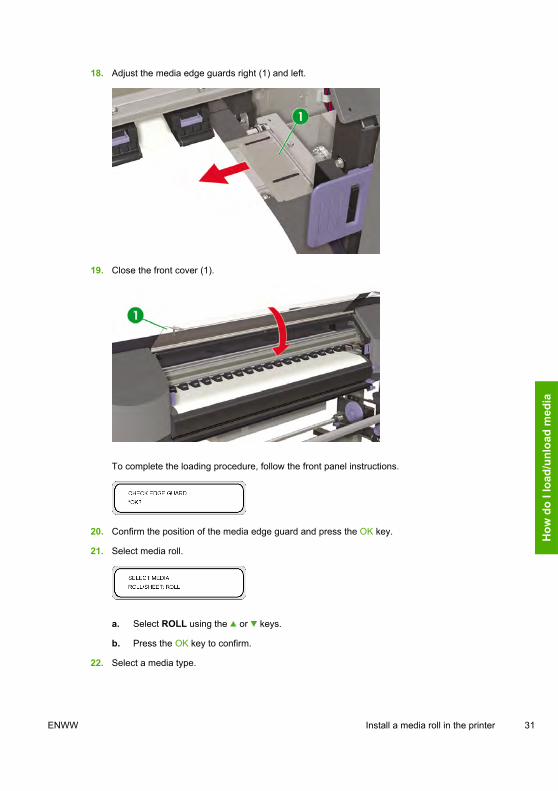
18. Adjust the media edge guards right (1) and left.
19. Close the front cover (1).
To complete the loading procedure, follow the front panel instructions.
20. Confirm the position of the media edge guard and press the OK key.
21. Select media roll.
a. Select ROLL using the or keys.
b. Press the OK key to confirm.
22. Select a media type.
ENWW Install a media roll in the printer 31
How
do
I loa
d/un
load
med
ia
a. Select the media type with the or key.
The following preset media types are available to choose from:
● PAPER
● Glossy
● Matte
● Banner
● BLT_B (Backlit)
b. Press the OK key to confirm.
NOTE If you wish to select a media type that is currently not available, then you willneed to create a new media type.
c. Select the NEW MEDIA ENTRY option using the or key and press the OK key. For details,see How do I… Manage media types.
Press the CANCEL key to return to the SELECT MEDIA menu.
23. Set the length of the media that you have loaded using the or key and press OK.
24. The media will be loaded automatically.
25. When you have completed the process, the following message is displayed.
The message describes the status of the printer, the media you have loaded, the media width and themedia type.
32 Chapter 3 How do I load/unload media ENWW
How
do I load/unload media
Remove a media roll from the printerCAUTION Do not leave the printer for long periods without media loaded because the automaticPrinthead.washing procedure will not operate if no media is loaded and could lead to expensivePrinthead replacement.
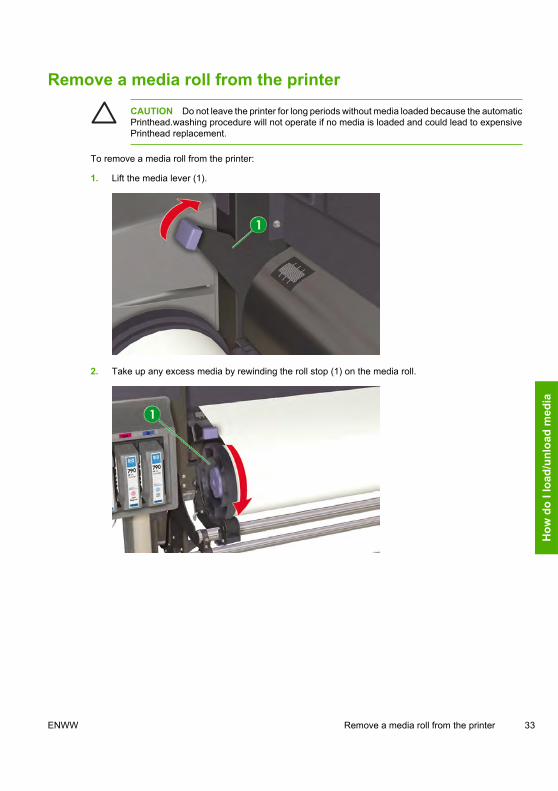
To remove a media roll from the printer:
1. Lift the media lever (1).
2. Take up any excess media by rewinding the roll stop (1) on the media roll.
ENWW Remove a media roll from the printer 33
How
do
I loa
d/un
load
med
ia
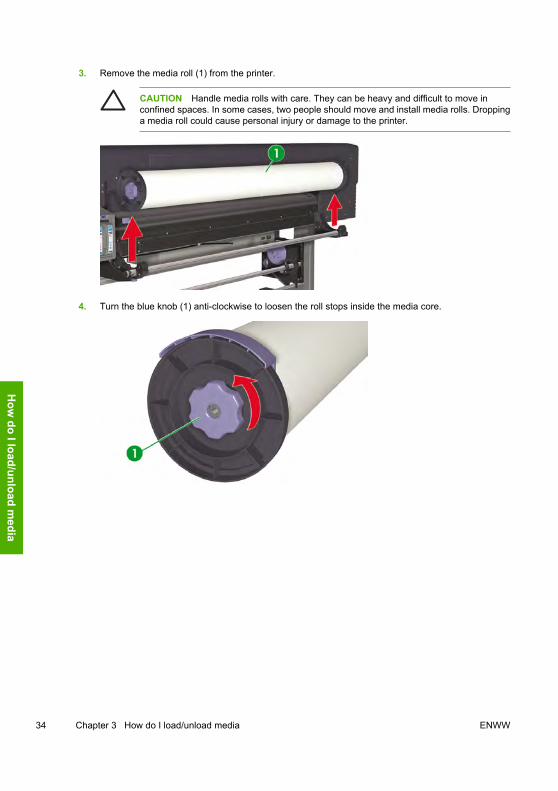
3. Remove the media roll (1) from the printer.
CAUTION Handle media rolls with care. They can be heavy and difficult to move inconfined spaces. In some cases, two people should move and install media rolls. Droppinga media roll could cause personal injury or damage to the printer.
4. Turn the blue knob (1) anti-clockwise to loosen the roll stops inside the media core.
34 Chapter 3 How do I load/unload media ENWW
How
do I load/unload media
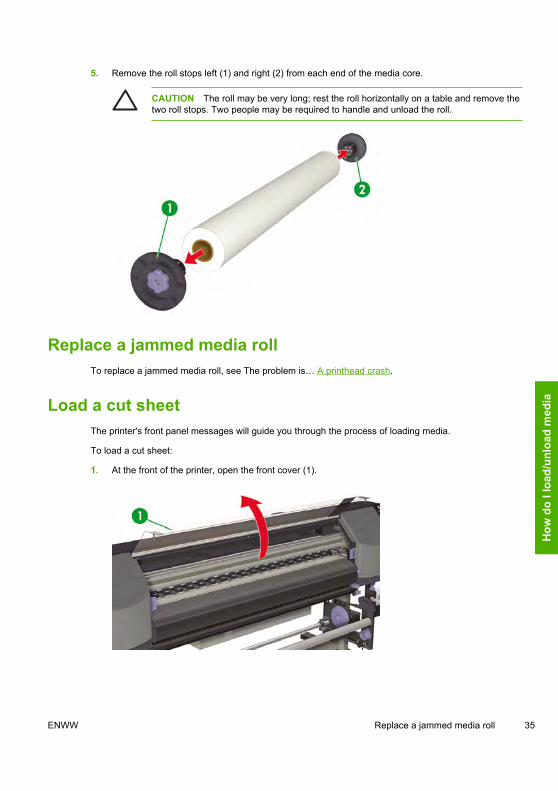
5. Remove the roll stops left (1) and right (2) from each end of the media core.
CAUTION The roll may be very long; rest the roll horizontally on a table and remove thetwo roll stops. Two people may be required to handle and unload the roll.
Replace a jammed media rollTo replace a jammed media roll, see The problem is… A printhead crash.
Load a cut sheetThe printer's front panel messages will guide you through the process of loading media.
To load a cut sheet:
1. At the front of the printer, open the front cover (1).
ENWW Replace a jammed media roll 35
How
do
I loa
d/un
load
med
ia
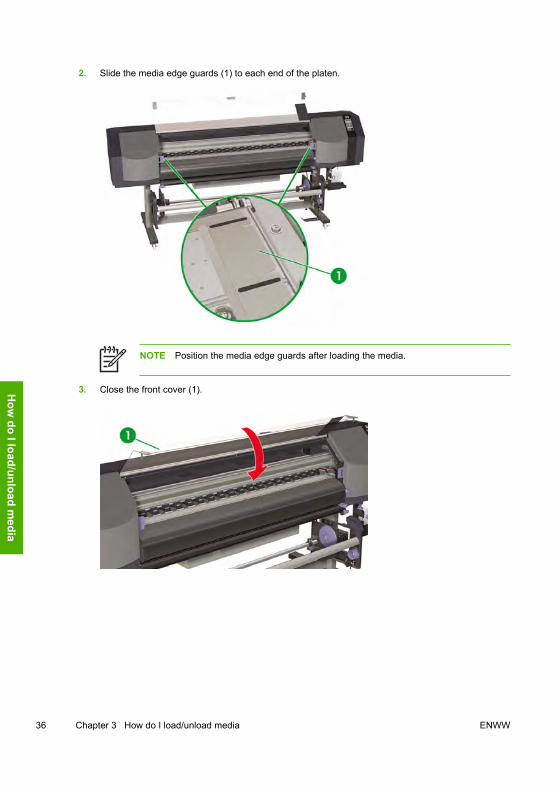
2. Slide the media edge guards (1) to each end of the platen.
NOTE Position the media edge guards after loading the media.
3. Close the front cover (1).
36 Chapter 3 How do I load/unload media ENWW
How
do I load/unload media

4. Slide the cutter (1) and media clips (2) out of the media path so that they can be accessed to cut theprinted media and to avoid damage to the leading edge of the media.
5. At the rear of the printer, lift the media lever (1).
ENWW Load a cut sheet 37
How
do
I loa
d/un
load
med
ia
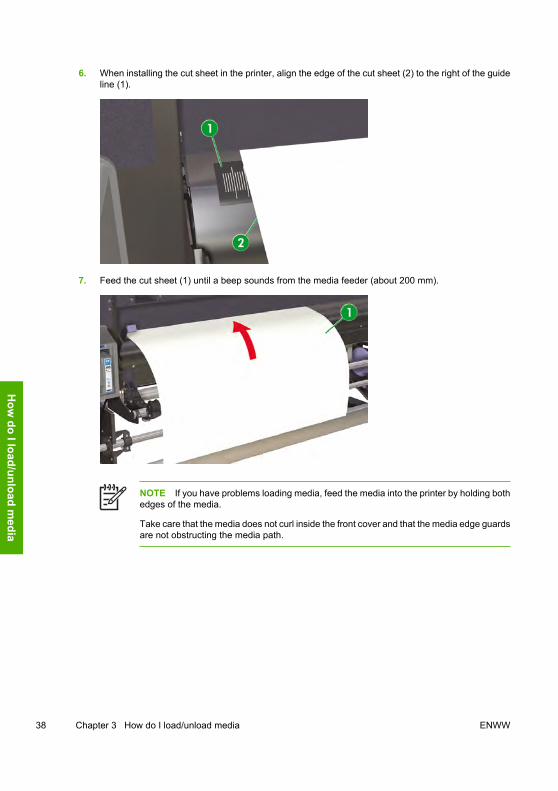
6. When installing the cut sheet in the printer, align the edge of the cut sheet (2) to the right of the guideline (1).
7. Feed the cut sheet (1) until a beep sounds from the media feeder (about 200 mm).
NOTE If you have problems loading media, feed the media into the printer by holding bothedges of the media.
Take care that the media does not curl inside the front cover and that the media edge guardsare not obstructing the media path.
38 Chapter 3 How do I load/unload media ENWW
How
do I load/unload media
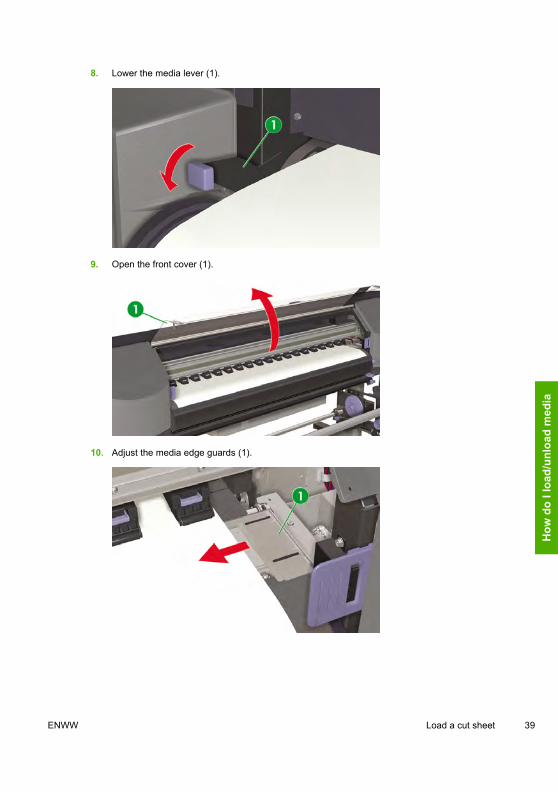
8. Lower the media lever (1).
9. Open the front cover (1).
10. Adjust the media edge guards (1).
ENWW Load a cut sheet 39
How
do
I loa
d/un
load
med
ia

11. Close the front cover (1).
To complete the loading procedure, follow the front panel instructions.
12. Confirm the position of the media edge guard and press the OK key.
13. Select cut sheet.
a. Select SHEET using the or keys.
b. Press the OK key to confirm.
14. Select a media type.
a. Select the media type with the or key.
The following preset media types are available to choose from:
● PAPER
● Glossy
● Matte
● Banner
● BLT_B (Backlit)
40 Chapter 3 How do I load/unload media ENWW
How
do I load/unload media
b. Press the OK key to confirm.
NOTE If you wish to select a media type that is currently not available, then you willneed to create a new media type.
c. Select the NEW MEDIA ENTRY option using the or key and press OK. See How do I…Manage media types.
Press the CANCEL key to return to the SELECT MEDIA menu.
15. Set the length of the media that you have loaded using the or key and press OK.
If an error message is displayed, remove the media and repeat the task.
16. The media will be loaded automatically.
If an error message is displayed, remove the media and repeat the task.
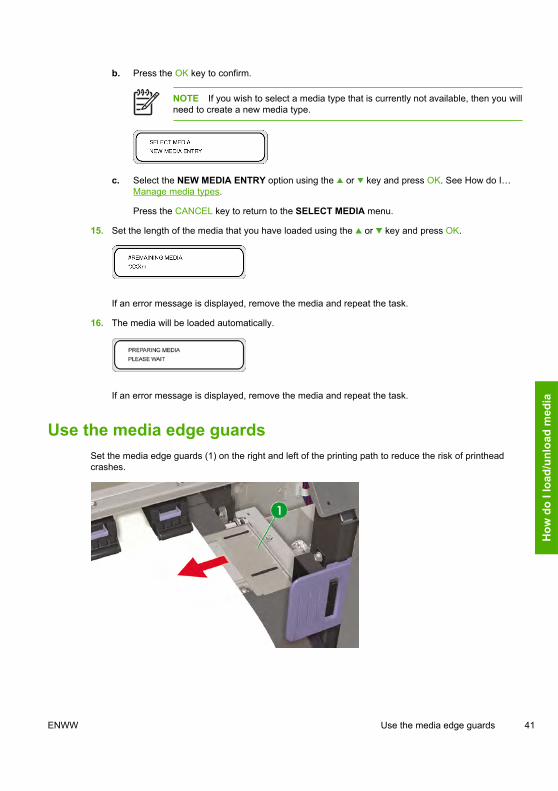
Use the media edge guardsSet the media edge guards (1) on the right and left of the printing path to reduce the risk of printheadcrashes.
ENWW Use the media edge guards 41
How
do
I loa
d/un
load
med
ia
NOTE When using the media edge guards, the right and left margins increase from 5 mm to 10mm.
You need to activate or deactivate use of the media edge guards on the front panel.
To access the MEDIA REG menu:
1. Press the ONLINE key.
2. Press the key to see MEDIA REG menu options.
3. Select the media that you want to use or not use the media edge guards with and press the OK key.
This setting will only apply to the selected media.
4. Scroll to USE EDGE GUARD using the or keys and press the OK key.
5. Select YES or NO and press OK to confirm.
Use the media cutterNOTE The cutter is a consumable that can be replaced if the blade deteriorates and does notcut your media cleanly. See Tell me about … Ordering supplies
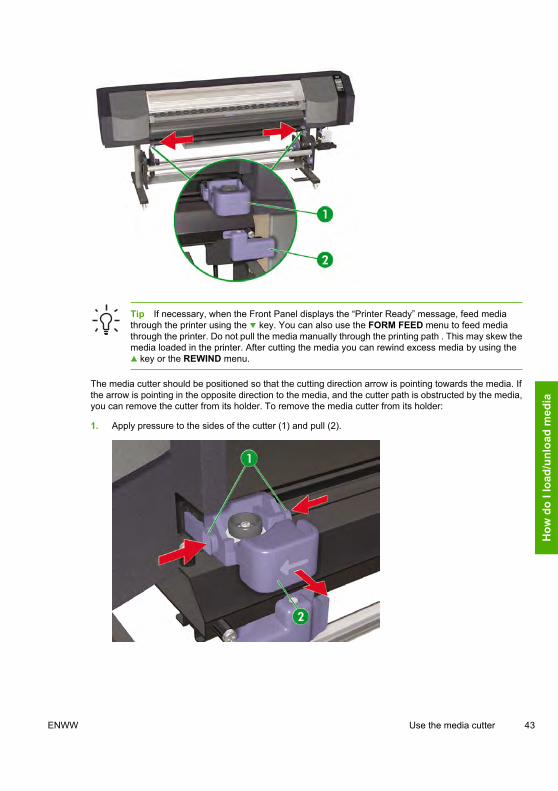
The printer comes with a removable cutter (1) and two media clips (2) installed in the printer.
42 Chapter 3 How do I load/unload media ENWW
How
do I load/unload media
Tip If necessary, when the Front Panel displays the “Printer Ready” message, feed mediathrough the printer using the key. You can also use the FORM FEED menu to feed mediathrough the printer. Do not pull the media manually through the printing path . This may skew themedia loaded in the printer. After cutting the media you can rewind excess media by using the
key or the REWIND menu.
The media cutter should be positioned so that the cutting direction arrow is pointing towards the media. Ifthe arrow is pointing in the opposite direction to the media, and the cutter path is obstructed by the media,you can remove the cutter from its holder. To remove the media cutter from its holder:
1. Apply pressure to the sides of the cutter (1) and pull (2).
ENWW Use the media cutter 43
How
do
I loa
d/un
load
med
ia
2. Rotate the cutter (1) so that the arrow is pointing in the direction of the media that you want to cut.
3. Insert the cutter (1) with the arrow pointing towards the media.
44 Chapter 3 How do I load/unload media ENWW
How
do I load/unload media
4. Secure both edges of the media using the media clips (1) on the left and right side, making sure thatthe media is not hanging loosely.
5. Slide the cutter (1) across the media. The media will be held securely by the media clips (2).
Tip After cutting the media you can rewind excess media by using the REWIND option the key or the REWIND menu.
Use the take-up reelNOTE The HP Designjet 8000s Take-Up Reel Kit (Q6681A) is an optional accessory.
ENWW Use the take-up reel 45
How
do
I loa
d/un
load
med
ia

There are four tasks required to complete loading of media on the take-up reel: The first part of attachinga roll to the take-up reel is attaching the end of the roll (by tape) to the core tube supplied with the take-upreel. You can also use an empty cardboard tube. Both types of core must be the same length as the rollyou are using.
● Set the take-up reel for clockwise or anti-clockwise winding.
● Define the winding mode.
● Load media onto the take-up reel.
● Calibrate media advance.
Set the take-up reel winding directionWinding for printing on the outside of the roll (3) or the inside of the roll (2) can be selected. When the take-up reel is not used, set the take-up reel switch to off (1).
NOTE For LOOSE winding mode, make sure that the media passes inside the take-up reelsensor (1).
If the take-up reel is not used, turn the take-up reel switch off.
Make sure that you change the media roll on the take-up reel before the roll size exceeds thediameter of the take-up reel media hub. Replace the core tube with a new one to avoid windingerrors.
46 Chapter 3 How do I load/unload media ENWW
How
do I load/unload media
NOTE When printing without using the take-up reel, make sure the media or printing surface isnot damaged or folded by the take-up reel sensor.
Define the take-up reel winding modeThe take-up reel supports two winding modes; tension winding and loose winding.
NOTE Normally the LOOSE winding mode is recommended.
NOTE Use the TENSION winding mode when there are problems with skew.
1. Press the ONLINE key to view the MEDIA REG menu.
2. Press to select MEDIA REG.
3. Press to scroll to the TUR MODE option and press OK to select.
4. Select LOOSE or TENSION and press OK to confirm.
ENWW Use the take-up reel 47
How
do
I loa
d/un
load
med
ia
Load media on to the take-up reelIf you are using a two-inch cardboard core, make sure you remove the core adaptors installed on the take-up reel hubs as follows:
1. Remove the adaptor ring (1) from the take-up reel right end plate.
2. Insert the adaptor ring into the core adaptors on each take-up reel hub and turn anti-clockwise torelease.
48 Chapter 3 How do I load/unload media ENWW
How
do I load/unload media

3. Pull to release the core adaptors (1).
4. Insert the core adaptors into the take-up reel right and left end plates and turn clockwise to secure.
When attaching printing material to the take-up reel:
● Check the leading edge of your media. If it is not evenly cut or if it is skewed, trim the printing material.
● Check that the media is straight when it is attached to the take-up reel, otherwise it will skew as it iswound onto the core.
NOTE The core tube on the take-up reel must be the same width as the printing materialyou are using.
ENWW Use the take-up reel 49
How
do
I loa
d/un
load
med
ia
● Make sure the take-up core is pushed firmly into both media hubs.
● If you need to feed more printing material from the printer, press the ONLINE key and then theSHIFT key to display the FORM FEED option. Hold down the key to feed media.
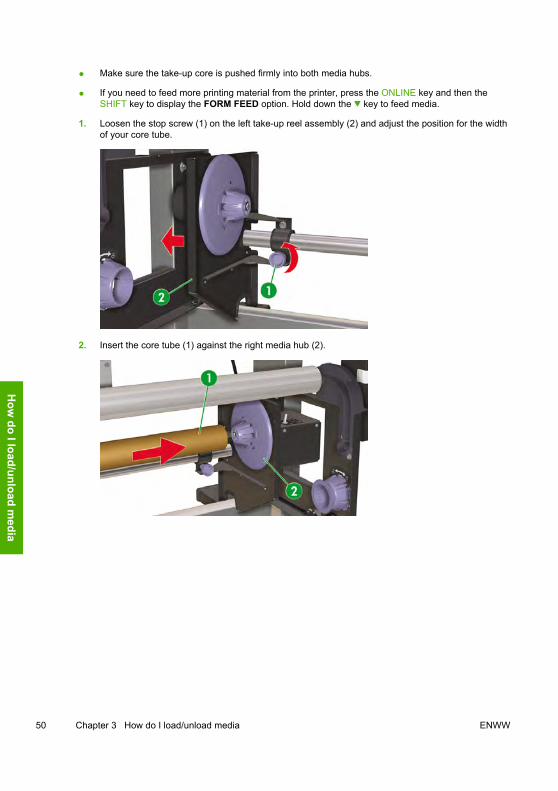
1. Loosen the stop screw (1) on the left take-up reel assembly (2) and adjust the position for the widthof your core tube.
2. Insert the core tube (1) against the right media hub (2).
50 Chapter 3 How do I load/unload media ENWW
How
do I load/unload media
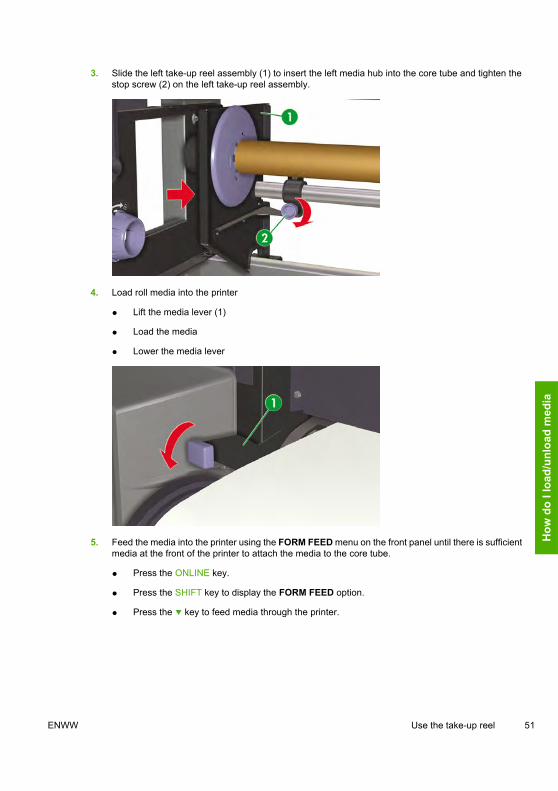
3. Slide the left take-up reel assembly (1) to insert the left media hub into the core tube and tighten thestop screw (2) on the left take-up reel assembly.
4. Load roll media into the printer
● Lift the media lever (1)
● Load the media
● Lower the media lever
5. Feed the media into the printer using the FORM FEED menu on the front panel until there is sufficientmedia at the front of the printer to attach the media to the core tube.
● Press the ONLINE key.
● Press the SHIFT key to display the FORM FEED option.
● Press the key to feed media through the printer.
ENWW Use the take-up reel 51
How
do
I loa
d/un
load
med
ia
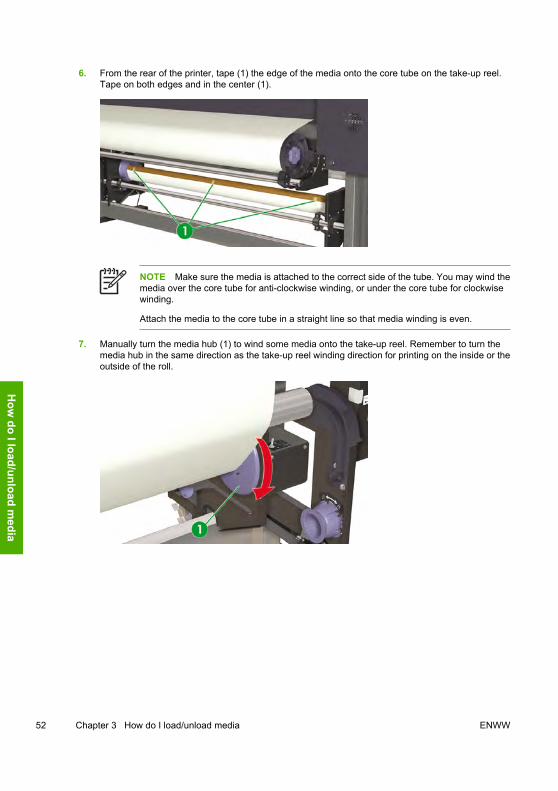
6. From the rear of the printer, tape (1) the edge of the media onto the core tube on the take-up reel.Tape on both edges and in the center (1).
NOTE Make sure the media is attached to the correct side of the tube. You may wind themedia over the core tube for anti-clockwise winding, or under the core tube for clockwisewinding.
Attach the media to the core tube in a straight line so that media winding is even.
7. Manually turn the media hub (1) to wind some media onto the take-up reel. Remember to turn themedia hub in the same direction as the take-up reel winding direction for printing on the inside or theoutside of the roll.
52 Chapter 3 How do I load/unload media ENWW
How
do I load/unload media
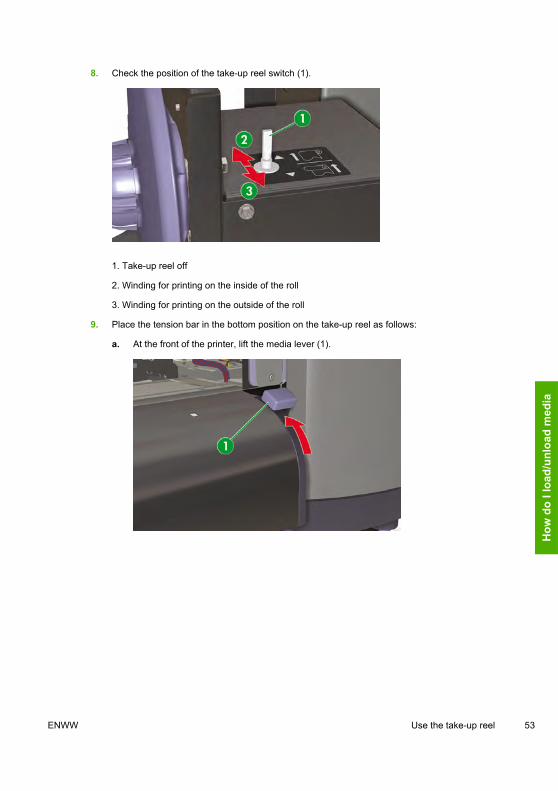
8. Check the position of the take-up reel switch (1).
1. Take-up reel off
2. Winding for printing on the inside of the roll
3. Winding for printing on the outside of the roll
9. Place the tension bar in the bottom position on the take-up reel as follows:
a. At the front of the printer, lift the media lever (1).
ENWW Use the take-up reel 53
How
do
I loa
d/un
load
med
ia

b. Lower the tension bar (1) to the bottom position.
As you lower the tension bar, it will pull the extra media needed for the bottom position throughthe media path.
c. At the front of the printer, lower the media lever (1).
You now need to perform media advance calibration. See How do I calibrate my printer
Take-up reel horizontal alignmentThe height of the take-up reel may require adjustment as it must be horizontally aligned to the media outputfrom the printer. If you notice that the media is not winding on to the take-up reel correctly, and there isskew, check that the media is loaded in the printer correctly and that the take-up reel is aligned. To verifyalignment of the take-up reel height you need to print the take-up reel test print.
The printer will print a line across the width of the media. Use this line to check the alignment of the rightside of the take-up reel with the left side. Use the take-up reel tension bar as the horizontal reference foralignment.
Print the take-up reel pattern on roll media to ensure that there is sufficient length to feed the media to thetension bar on the take-up reel.
54 Chapter 3 How do I load/unload media ENWW
How
do I load/unload media
Print the take-up reel print as follows:
1. When the "Printer Ready" message appears on the Front Panel, press the ONLINE key to take thePrinter offline.
2. Press the SHIFT key twice and select the ADJUST menu using the key.
3. In the ADJUST submenu, scroll to TEST PRINTS and press the ENTER key.
4. In the TEST PRINTS menu scroll to the TUR ADJ PRINToption and press the ENTER key.
5. Press the ENTER key to start printing the pattern.
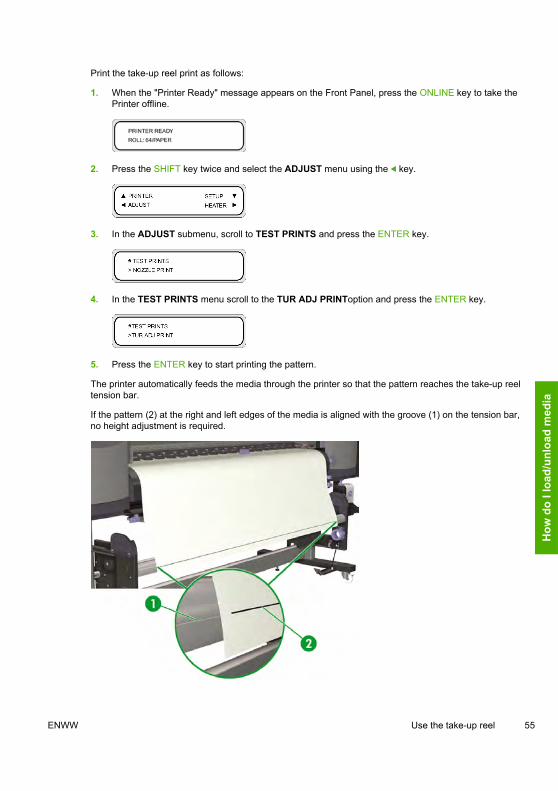
The printer automatically feeds the media through the printer so that the pattern reaches the take-up reeltension bar.
If the pattern (2) at the right and left edges of the media is aligned with the groove (1) on the tension bar,no height adjustment is required.
ENWW Use the take-up reel 55
How
do
I loa
d/un
load
med
ia
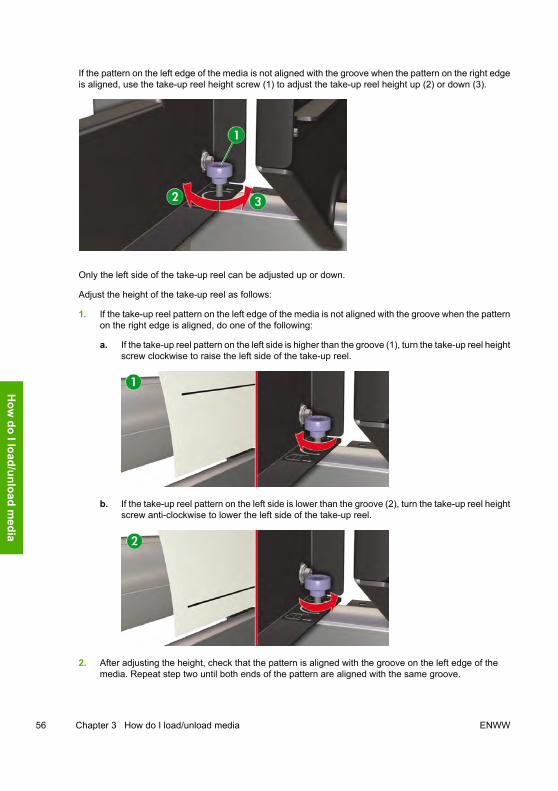
If the pattern on the left edge of the media is not aligned with the groove when the pattern on the right edgeis aligned, use the take-up reel height screw (1) to adjust the take-up reel height up (2) or down (3).
Only the left side of the take-up reel can be adjusted up or down.
Adjust the height of the take-up reel as follows:
1. If the take-up reel pattern on the left edge of the media is not aligned with the groove when the patternon the right edge is aligned, do one of the following:
a. If the take-up reel pattern on the left side is higher than the groove (1), turn the take-up reel heightscrew clockwise to raise the left side of the take-up reel.
b. If the take-up reel pattern on the left side is lower than the groove (2), turn the take-up reel heightscrew anti-clockwise to lower the left side of the take-up reel.
2. After adjusting the height, check that the pattern is aligned with the groove on the left edge of themedia. Repeat step two until both ends of the pattern are aligned with the same groove.
56 Chapter 3 How do I load/unload media ENWW
How
do I load/unload media

4 How do I… (printing topics)
● Perform a manual form feed/rewind
● Use manual nesting
● Increase/reduce pressure on media
Perform a manual form feed/rewindThis section describes how to manually feed or rewind media through the printing path, for example beforeand after cutting media. By using these automatic features, you reduce the risk of skew when you performthis task manually.
1. Press the ONLINE key.
2. Press the SHIFT key to display the FORM FEED and REWIND options.
3. To rewind or feed media, do one of the following:
a. Hold down the key to feed media forwards through the printing path.
While the key is pressed, the roll media advances. If cut sheet is loaded, it is discharged.
b. Hold down the key to rewind the media.
While the key is pressed, the roll media rewinds.
4. When the or key is released, media feeding or rewinding stops and the menu group is displayed.
ENWW Perform a manual form feed/rewind 57
How
do
I… (p
rintin
g to
pics
)
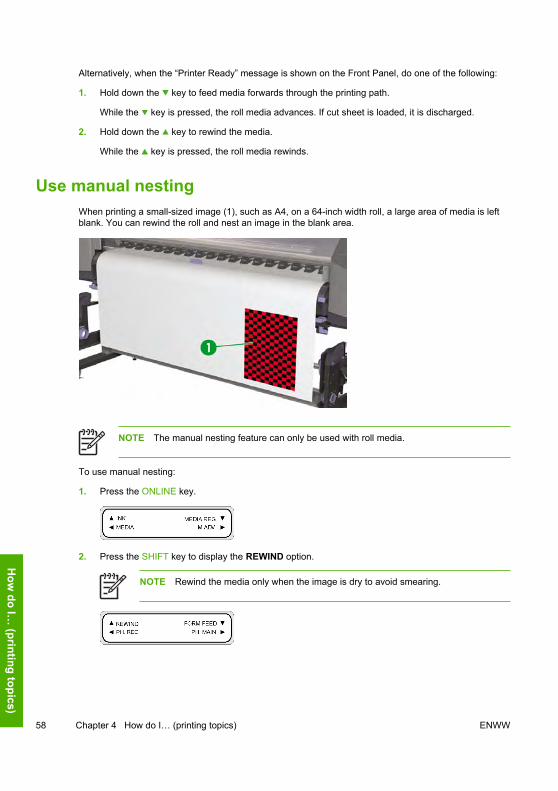
Alternatively, when the “Printer Ready” message is shown on the Front Panel, do one of the following:
1. Hold down the key to feed media forwards through the printing path.
While the key is pressed, the roll media advances. If cut sheet is loaded, it is discharged.
2. Hold down the key to rewind the media.
While the key is pressed, the roll media rewinds.
Use manual nestingWhen printing a small-sized image (1), such as A4, on a 64-inch width roll, a large area of media is leftblank. You can rewind the roll and nest an image in the blank area.
NOTE The manual nesting feature can only be used with roll media.
To use manual nesting:
1. Press the ONLINE key.
2. Press the SHIFT key to display the REWIND option.
NOTE Rewind the media only when the image is dry to avoid smearing.
58 Chapter 4 How do I… (printing topics) ENWW
How
do I… (printing topics)

3. Hold down the key to rewind the media.
While the key is pressed, the roll media rewinds.
Now you need to position the printhead carriage so that printing starts in the blank area beyond theimage that was printed previously.
NOTE When moving the printhead carriage, make sure that you leave a sufficient marginbetween the image that was previously printed and the position where you would like yournext image to be printed.
To position the printhead carriage:
4. Press the key for more than one second.
5. Use the and keys to move the printhead carriage to the desired position.
6. Release the or key when the printhead carriage has reached the desired position.
7. If the position of the carriage is correct, confirm the position by pressing the OK key.
If the position of the carriage is incorrect when you release the key, repeat step 5.
Increase/reduce pressure on mediaThe media lever allows you to change the pressure on the media exerted by the media transmission roller.This can be used to solve skew with certain types of media.
ENWW Increase/reduce pressure on media 59
How
do
I… (p
rintin
g to
pics
)
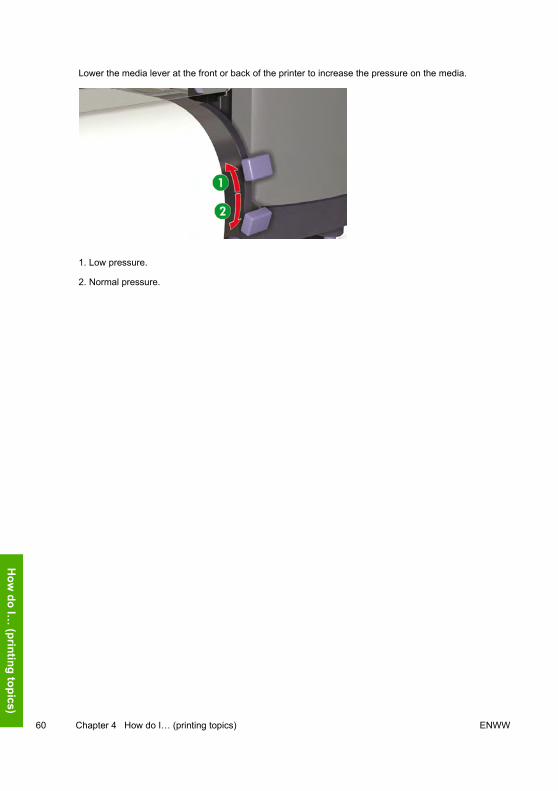
Lower the media lever at the front or back of the printer to increase the pressure on the media.
1. Low pressure.
2. Normal pressure.
60 Chapter 4 How do I… (printing topics) ENWW
How
do I… (printing topics)
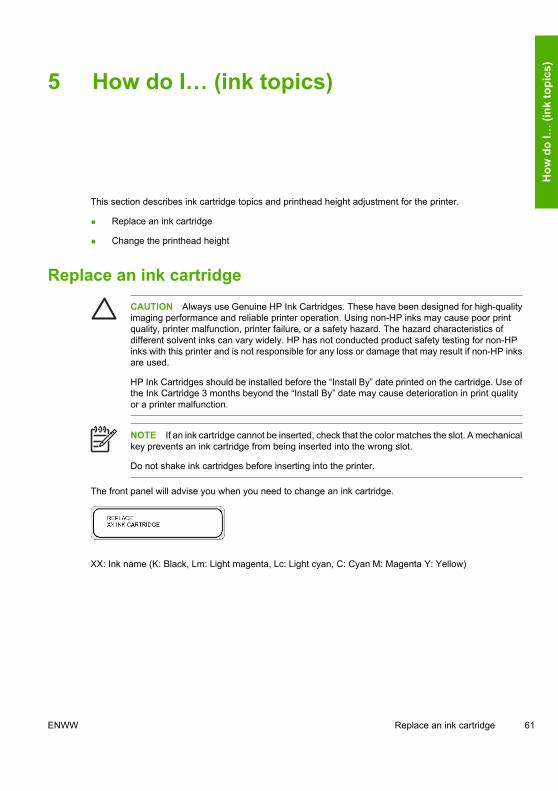
5 How do I… (ink topics)
This section describes ink cartridge topics and printhead height adjustment for the printer.
● Replace an ink cartridge
● Change the printhead height
Replace an ink cartridgeCAUTION Always use Genuine HP Ink Cartridges. These have been designed for high-qualityimaging performance and reliable printer operation. Using non-HP inks may cause poor printquality, printer malfunction, printer failure, or a safety hazard. The hazard characteristics ofdifferent solvent inks can vary widely. HP has not conducted product safety testing for non-HPinks with this printer and is not responsible for any loss or damage that may result if non-HP inksare used.
HP Ink Cartridges should be installed before the “Install By” date printed on the cartridge. Use ofthe Ink Cartridge 3 months beyond the “Install By” date may cause deterioration in print qualityor a printer malfunction.
NOTE If an ink cartridge cannot be inserted, check that the color matches the slot. A mechanicalkey prevents an ink cartridge from being inserted into the wrong slot.
Do not shake ink cartridges before inserting into the printer.
The front panel will advise you when you need to change an ink cartridge.
XX: Ink name (K: Black, Lm: Light magenta, Lc: Light cyan, C: Cyan M: Magenta Y: Yellow)
ENWW Replace an ink cartridge 61
How
do
I… (i
nk to
pics
)
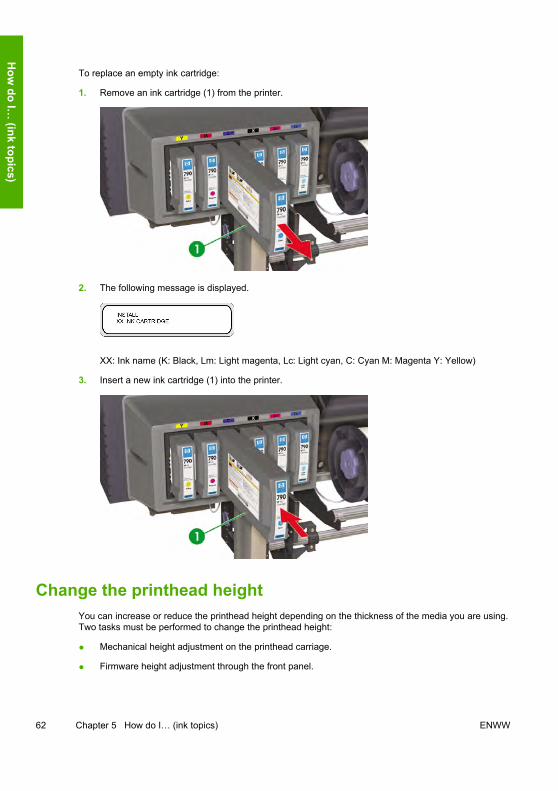
To replace an empty ink cartridge:
1. Remove an ink cartridge (1) from the printer.
2. The following message is displayed.
XX: Ink name (K: Black, Lm: Light magenta, Lc: Light cyan, C: Cyan M: Magenta Y: Yellow)
3. Insert a new ink cartridge (1) into the printer.
Change the printhead heightYou can increase or reduce the printhead height depending on the thickness of the media you are using.Two tasks must be performed to change the printhead height:
● Mechanical height adjustment on the printhead carriage.
● Firmware height adjustment through the front panel.
62 Chapter 5 How do I… (ink topics) ENWW
How
do I… (ink topics)
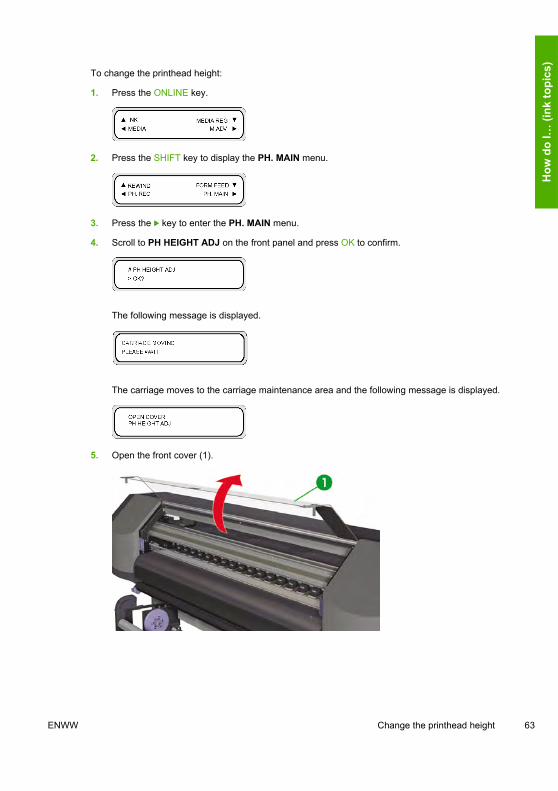
To change the printhead height:
1. Press the ONLINE key.
2. Press the SHIFT key to display the PH. MAIN menu.
3. Press the key to enter the PH. MAIN menu.
4. Scroll to PH HEIGHT ADJ on the front panel and press OK to confirm.
The following message is displayed.
The carriage moves to the carriage maintenance area and the following message is displayed.
5. Open the front cover (1).
ENWW Change the printhead height 63
How
do
I… (i
nk to
pics
)
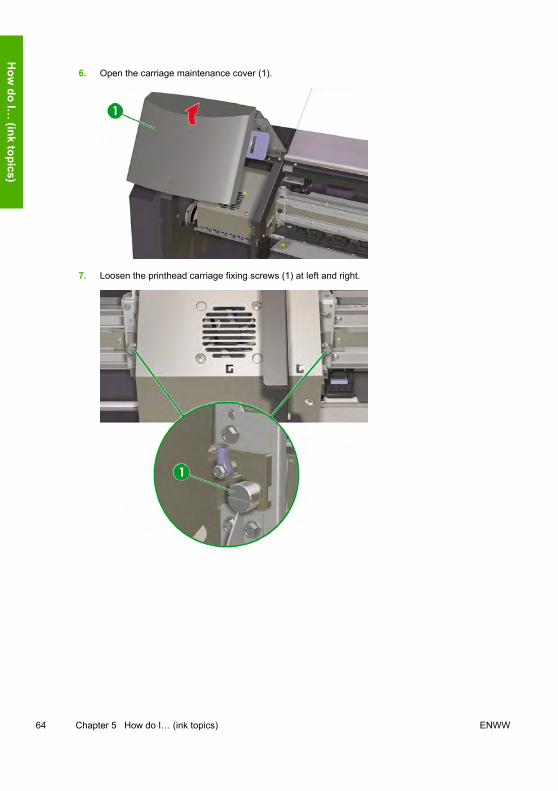
6. Open the carriage maintenance cover (1).
7. Loosen the printhead carriage fixing screws (1) at left and right.
64 Chapter 5 How do I… (ink topics) ENWW
How
do I… (ink topics)
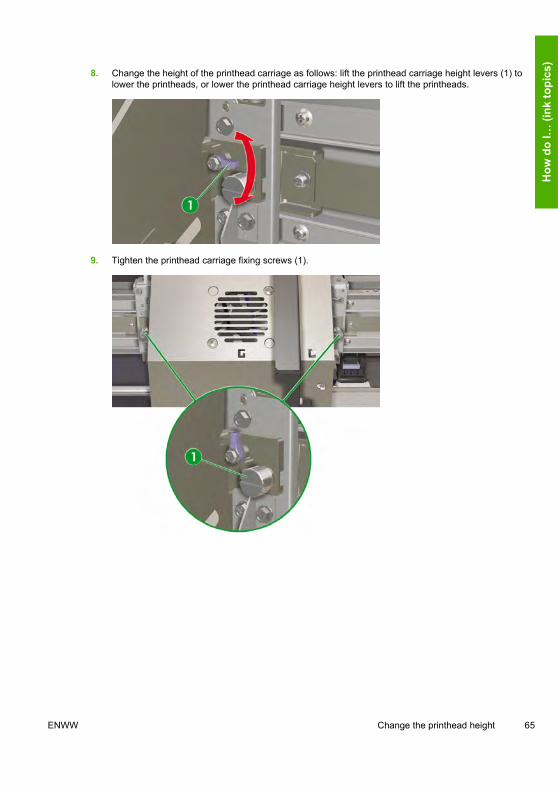
8. Change the height of the printhead carriage as follows: lift the printhead carriage height levers (1) tolower the printheads, or lower the printhead carriage height levers to lift the printheads.
9. Tighten the printhead carriage fixing screws (1).
ENWW Change the printhead height 65
How
do
I… (i
nk to
pics
)
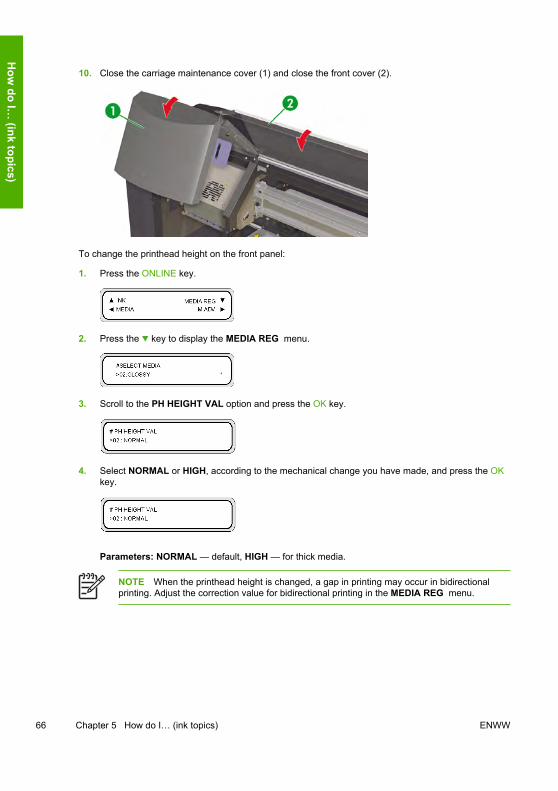
10. Close the carriage maintenance cover (1) and close the front cover (2).
To change the printhead height on the front panel:
1. Press the ONLINE key.
2. Press the key to display the MEDIA REG menu.
3. Scroll to the PH HEIGHT VAL option and press the OK key.
4. Select NORMAL or HIGH, according to the mechanical change you have made, and press the OKkey.
Parameters: NORMAL — default, HIGH — for thick media.
NOTE When the printhead height is changed, a gap in printing may occur in bidirectionalprinting. Adjust the correction value for bidirectional printing in the MEDIA REG menu.
66 Chapter 5 How do I… (ink topics) ENWW
How
do I… (ink topics)
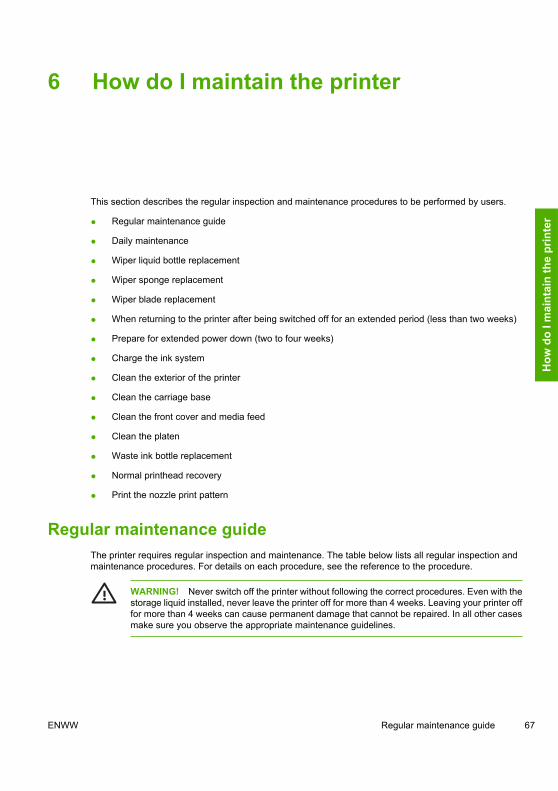
6 How do I maintain the printer
This section describes the regular inspection and maintenance procedures to be performed by users.
● Regular maintenance guide
● Daily maintenance
● Wiper liquid bottle replacement
● Wiper sponge replacement
● Wiper blade replacement
● When returning to the printer after being switched off for an extended period (less than two weeks)
● Prepare for extended power down (two to four weeks)
● Charge the ink system
● Clean the exterior of the printer
● Clean the carriage base
● Clean the front cover and media feed
● Clean the platen
● Waste ink bottle replacement
● Normal printhead recovery
● Print the nozzle print pattern
Regular maintenance guideThe printer requires regular inspection and maintenance. The table below lists all regular inspection andmaintenance procedures. For details on each procedure, see the reference to the procedure.
WARNING! Never switch off the printer without following the correct procedures. Even with thestorage liquid installed, never leave the printer off for more than 4 weeks. Leaving your printer offfor more than 4 weeks can cause permanent damage that cannot be repaired. In all other casesmake sure you observe the appropriate maintenance guidelines.
ENWW Regular maintenance guide 67
How
do
I mai
ntai
n th
e pr
inte
r
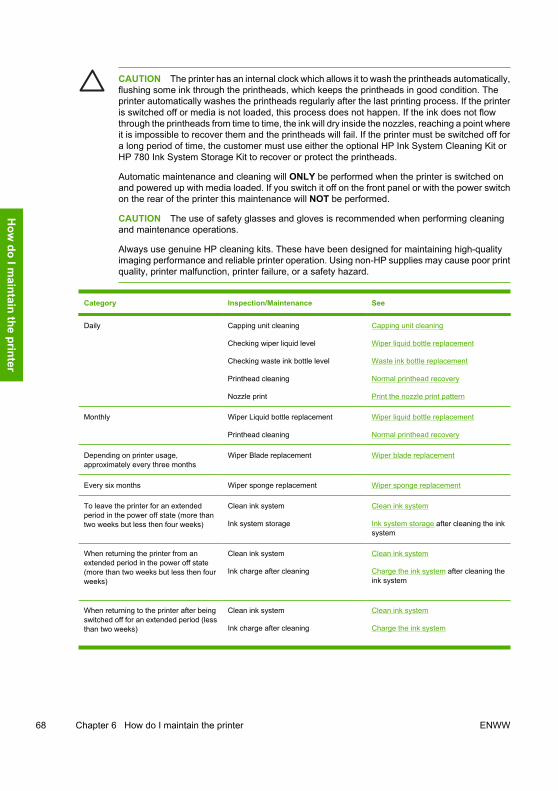
CAUTION The printer has an internal clock which allows it to wash the printheads automatically,flushing some ink through the printheads, which keeps the printheads in good condition. Theprinter automatically washes the printheads regularly after the last printing process. If the printeris switched off or media is not loaded, this process does not happen. If the ink does not flowthrough the printheads from time to time, the ink will dry inside the nozzles, reaching a point whereit is impossible to recover them and the printheads will fail. If the printer must be switched off fora long period of time, the customer must use either the optional HP Ink System Cleaning Kit orHP 780 Ink System Storage Kit to recover or protect the printheads.
Automatic maintenance and cleaning will ONLY be performed when the printer is switched onand powered up with media loaded. If you switch it off on the front panel or with the power switchon the rear of the printer this maintenance will NOT be performed.
CAUTION The use of safety glasses and gloves is recommended when performing cleaningand maintenance operations.
Always use genuine HP cleaning kits. These have been designed for maintaining high-qualityimaging performance and reliable printer operation. Using non-HP supplies may cause poor printquality, printer malfunction, printer failure, or a safety hazard.
Category Inspection/Maintenance See
Daily Capping unit cleaning
Checking wiper liquid level
Checking waste ink bottle level
Printhead cleaning
Nozzle print
Capping unit cleaning
Wiper liquid bottle replacement
Waste ink bottle replacement
Normal printhead recovery
Print the nozzle print pattern
Monthly Wiper Liquid bottle replacement
Printhead cleaning
Wiper liquid bottle replacement
Normal printhead recovery
Depending on printer usage,approximately every three months
Wiper Blade replacement Wiper blade replacement
Every six months Wiper sponge replacement Wiper sponge replacement
To leave the printer for an extendedperiod in the power off state (more thantwo weeks but less then four weeks)
Clean ink system
Ink system storage
Clean ink system
Ink system storage after cleaning the inksystem
When returning the printer from anextended period in the power off state(more than two weeks but less then fourweeks)
Clean ink system
Ink charge after cleaning
Clean ink system
Charge the ink system after cleaning theink system
When returning to the printer after beingswitched off for an extended period (lessthan two weeks)
Clean ink system
Ink charge after cleaning
Clean ink system
Charge the ink system
68 Chapter 6 How do I maintain the printer ENWW
How
do I maintain the printer
Category Inspection/Maintenance See
To leave the printer in or return it from apower off state of more than four weeks
Contact HP Support.
Other A service call error message will bedisplayed on the front panel. Contact HPSupport.
Daily maintenanceWARNING! Failure to perform daily maintenance procedures may result in damage to yourprintheads and will invalidate your warranty.
CAUTION If you need to leave the printer unattended for any reason, ensure that the printeris on, the ink cartridges are full, the waste ink bottle is empty, and media is loaded so thatautomatic maintenance (performed regularly after the last printing process) can be completedsuccessfully for the time you are not present. If needed, install new ink cartridges. The inkcartridges that you replace can be reused when you return to your printer, if they still contain ink.The ink cartridges must be stored properly and should not be used again if 3 months passed theinstall by date (on the product label).
Daily printhead maintenance will ensure optimal print quality and the life of your printheads. The ink in yourHP Designjet 8000s Printer dries very quickly, so maintenance procedures ensure that the ink does not dryin the capping unit, the wiper blades, the ink tubes and printheads.
When the following message is displayed, immediately perform daily maintenance procedures:
● Clean the capping unit.
● Check the wiper liquid level.
● Check the waste ink bottle level
● Perform Normal printhead cleaning
● Print the NOZZLE PRINT pattern
NOTE Perform the above every day before printing.
Always use the specified cleaning liquid and cleaning equipment.
ENWW Daily maintenance 69
How
do
I mai
ntai
n th
e pr
inte
r

Capping unit cleaningThis cleaning procedure will remove any dried ink and particles from the capping unit.
1. Open the cleaning kit drawer (1).
2. Remove the HP 780 Cap Cleaning Kit from the drawer.
NOTE The HP 790 Cap Cleaning Kit can also be used. The HP 790 Cap Cleaning Kitcomes with swabs only (no rollers).
1. Cap cleaning liquid.
2. Cap cleaning handle.
3. Cap cleaning roller.
4. Cleaning swab.
5. Disposable latex or Nitrile(R) safety gloves.
70 Chapter 6 How do I maintain the printer ENWW
How
do I maintain the printer
3. Put on disposable latex or Nitrile(R) safety gloves.
4. Clip a new cap cleaning roller onto the cap cleaning handle.
5. Dip the cap cleaning roller (1) into the cap cleaning liquid (2).
CAUTION Make sure that you use the cap cleaning liquid and not the wiper cleaning liquidto clean the capping unit, otherwise you could cause damage to the printheads.
6. Press the ONLINE key to set the printer offline.
7. Press the SHIFT key to display the PH. MAIN menu.
8. Press the key to select the PH. MAIN menu.
9. Scroll to the CAP CLEANING option using the key and press OK to select.
10. Press OK again to confirm your selection.
The carriage will automatically move to the left side of the printer so that the capping unit can easilybe accessed. The front panel displays CARRIAGE MOVING — PLEASE WAIT .
ENWW Daily maintenance 71
How
do
I mai
ntai
n th
e pr
inte
r
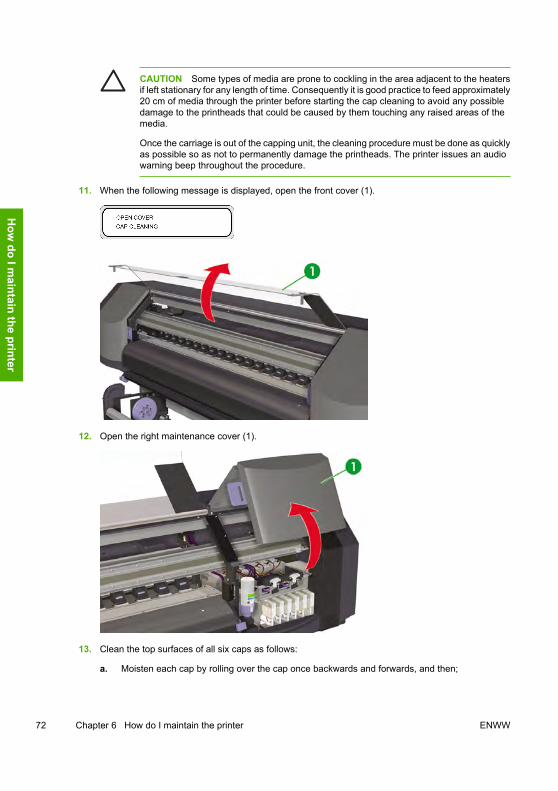
CAUTION Some types of media are prone to cockling in the area adjacent to the heatersif left stationary for any length of time. Consequently it is good practice to feed approximately20 cm of media through the printer before starting the cap cleaning to avoid any possibledamage to the printheads that could be caused by them touching any raised areas of themedia.
Once the carriage is out of the capping unit, the cleaning procedure must be done as quicklyas possible so as not to permanently damage the printheads. The printer issues an audiowarning beep throughout the procedure.
11. When the following message is displayed, open the front cover (1).
12. Open the right maintenance cover (1).
13. Clean the top surfaces of all six caps as follows:
a. Moisten each cap by rolling over the cap once backwards and forwards, and then;
72 Chapter 6 How do I maintain the printer ENWW
How
do I maintain the printer
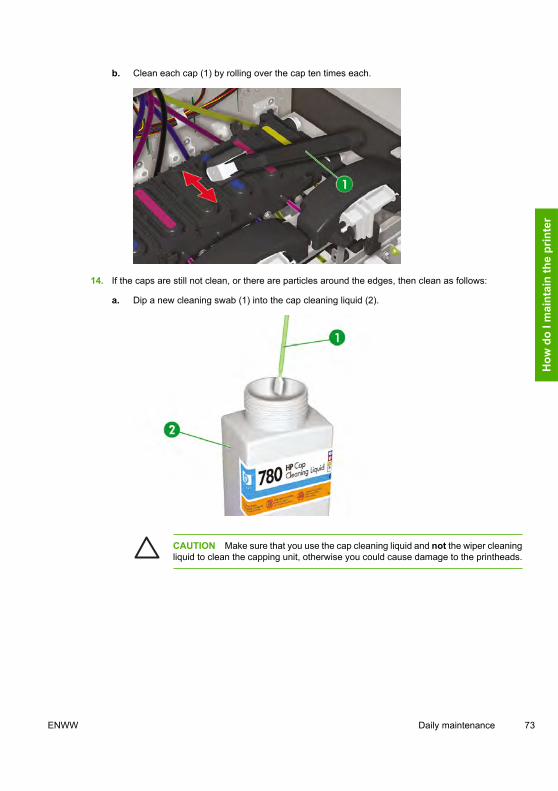
b. Clean each cap (1) by rolling over the cap ten times each.
14. If the caps are still not clean, or there are particles around the edges, then clean as follows:
a. Dip a new cleaning swab (1) into the cap cleaning liquid (2).
CAUTION Make sure that you use the cap cleaning liquid and not the wiper cleaningliquid to clean the capping unit, otherwise you could cause damage to the printheads.
ENWW Daily maintenance 73
How
do
I mai
ntai
n th
e pr
inte
r
b. Clean the top outside edges and the upper surfaces of all six caps.
15. Close the right maintenance cover (1).
16. Close the front cover (1).
The printhead carriage will return to the right maintenance area (home position) automatically.
74 Chapter 6 How do I maintain the printer ENWW
How
do I maintain the printer
NOTE Use the NOZZLE PRINT to check that there are no printhead nozzles out after capcleaning.
ENWW Daily maintenance 75
How
do
I mai
ntai
n th
e pr
inte
r
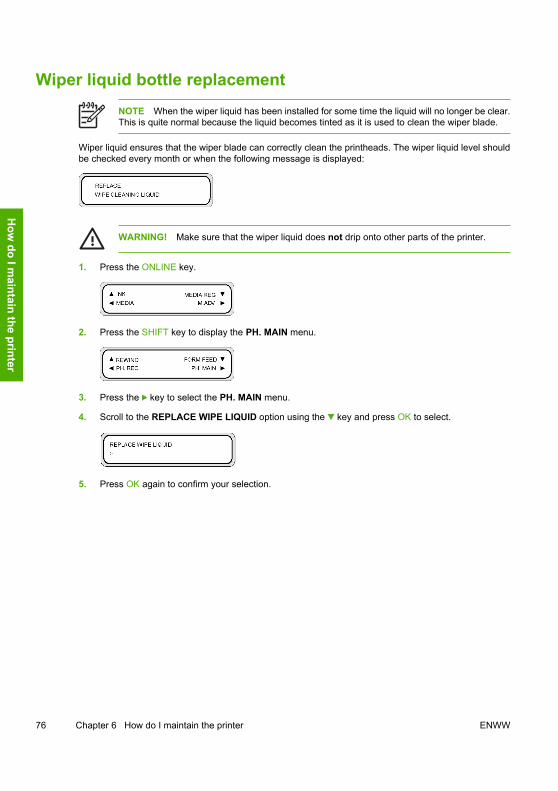
Wiper liquid bottle replacementNOTE When the wiper liquid has been installed for some time the liquid will no longer be clear.This is quite normal because the liquid becomes tinted as it is used to clean the wiper blade.
Wiper liquid ensures that the wiper blade can correctly clean the printheads. The wiper liquid level shouldbe checked every month or when the following message is displayed:
WARNING! Make sure that the wiper liquid does not drip onto other parts of the printer.
1. Press the ONLINE key.
2. Press the SHIFT key to display the PH. MAIN menu.
3. Press the key to select the PH. MAIN menu.
4. Scroll to the REPLACE WIPE LIQUID option using the key and press OK to select.
5. Press OK again to confirm your selection.
76 Chapter 6 How do I maintain the printer ENWW
How
do I maintain the printer
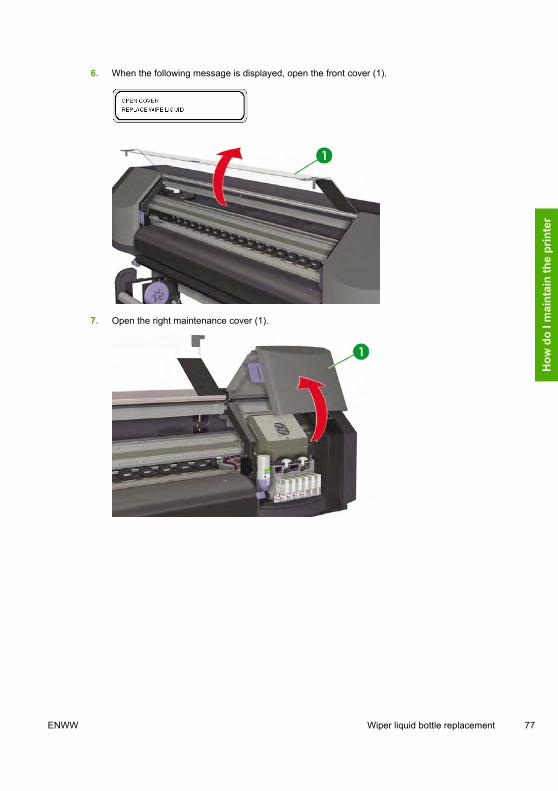
6. When the following message is displayed, open the front cover (1).
7. Open the right maintenance cover (1).
ENWW Wiper liquid bottle replacement 77
How
do
I mai
ntai
n th
e pr
inte
r
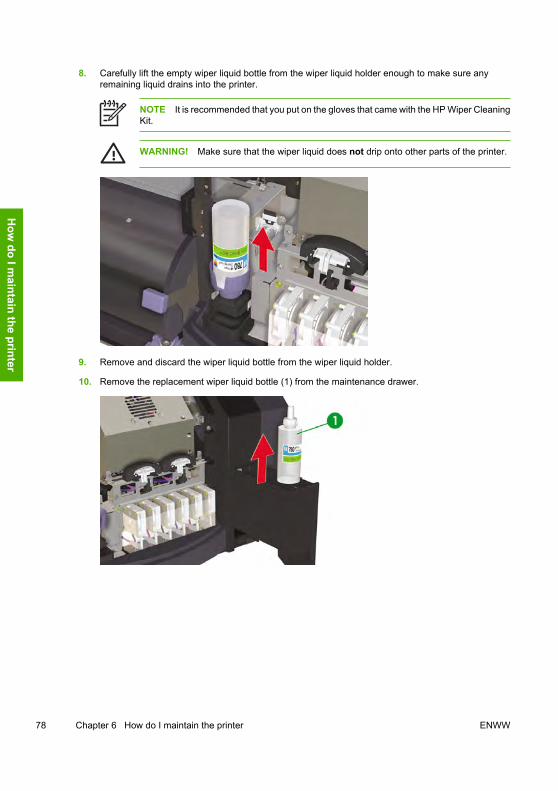
8. Carefully lift the empty wiper liquid bottle from the wiper liquid holder enough to make sure anyremaining liquid drains into the printer.
NOTE It is recommended that you put on the gloves that came with the HP Wiper CleaningKit.
WARNING! Make sure that the wiper liquid does not drip onto other parts of the printer.
9. Remove and discard the wiper liquid bottle from the wiper liquid holder.
10. Remove the replacement wiper liquid bottle (1) from the maintenance drawer.
78 Chapter 6 How do I maintain the printer ENWW
How
do I maintain the printer

11. Remove the wiper liquid bottle cap (1).
12. Make sure that the plastic seal (1) is well positioned in the hole of the wiper liquid dispenser cap.
13. Insert the wiper liquid dispenser cap (1).
ENWW Wiper liquid bottle replacement 79
How
do
I mai
ntai
n th
e pr
inte
r
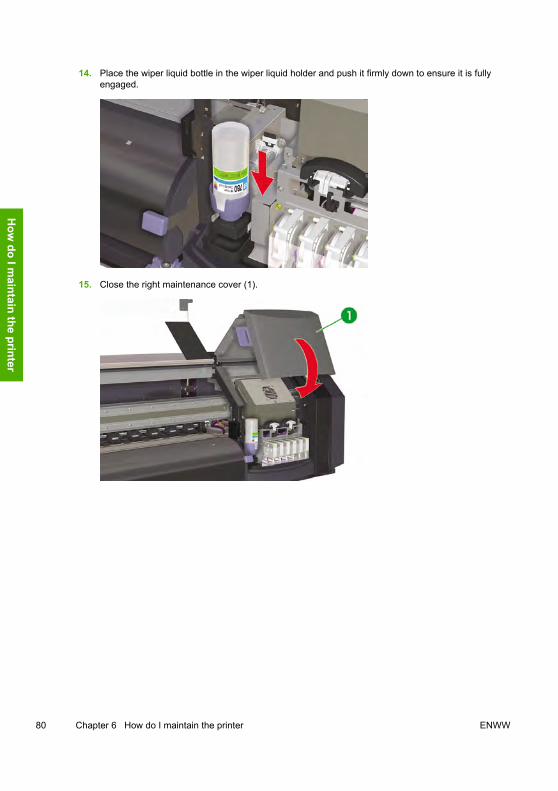
14. Place the wiper liquid bottle in the wiper liquid holder and push it firmly down to ensure it is fullyengaged.
15. Close the right maintenance cover (1).
80 Chapter 6 How do I maintain the printer ENWW
How
do I maintain the printer
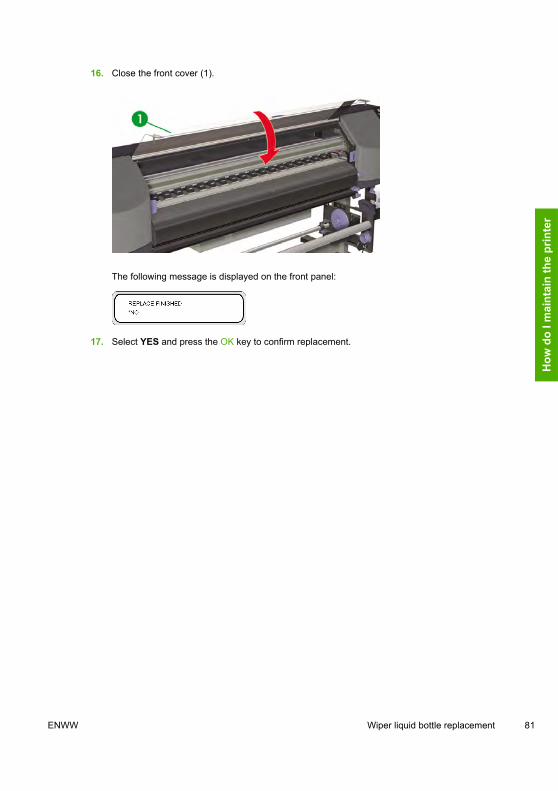
16. Close the front cover (1).
The following message is displayed on the front panel:
17. Select YES and press the OK key to confirm replacement.
ENWW Wiper liquid bottle replacement 81
How
do
I mai
ntai
n th
e pr
inte
r
Wiper sponge replacementThe wiper sponge ensures that the wiper blade can correctly clean the printheads. The wiper sponge shouldbe replaced approximately every six months or when the following message is displayed:
NOTE Please contact HP Support to obtain the Wiper Sponge Replacement Kit containing thenew wiper sponge and wiper liquid bottle.
CAUTION The use of safety glasses and gloves is recommended when performing cleaningand maintenance operations.
Always use genuine HP cleaning kits. These have been designed for maintaining high-qualityimaging performance and reliable printer operation. Using non-HP supplies may cause poor printquality, printer malfunction, printer failure, or a safety hazard.
1. Press the ONLINE key.
2. Press the SHIFT key to display the PH. MAIN menu.
3. Press the key to select the PH. MAIN menu.
4. Scroll to the REPLACE WIPE SPONGE option using the key and press OK to select.
5. Press OK again to confirm your selection.
82 Chapter 6 How do I maintain the printer ENWW
How
do I maintain the printer
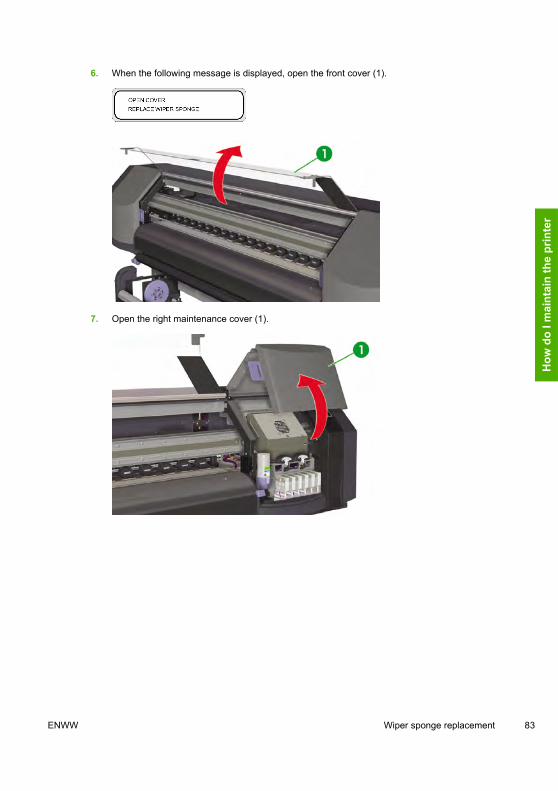
6. When the following message is displayed, open the front cover (1).
7. Open the right maintenance cover (1).
ENWW Wiper sponge replacement 83
How
do
I mai
ntai
n th
e pr
inte
r
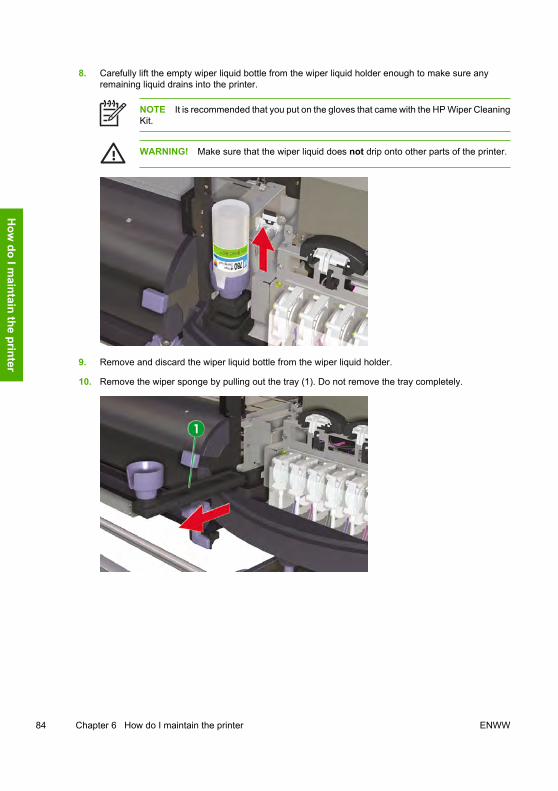
8. Carefully lift the empty wiper liquid bottle from the wiper liquid holder enough to make sure anyremaining liquid drains into the printer.
NOTE It is recommended that you put on the gloves that came with the HP Wiper CleaningKit.
WARNING! Make sure that the wiper liquid does not drip onto other parts of the printer.
9. Remove and discard the wiper liquid bottle from the wiper liquid holder.
10. Remove the wiper sponge by pulling out the tray (1). Do not remove the tray completely.
84 Chapter 6 How do I maintain the printer ENWW
How
do I maintain the printer
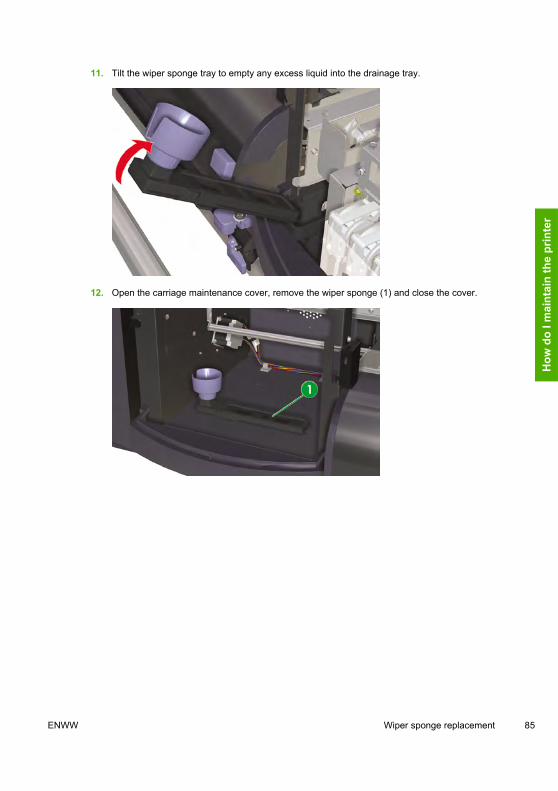
11. Tilt the wiper sponge tray to empty any excess liquid into the drainage tray.
12. Open the carriage maintenance cover, remove the wiper sponge (1) and close the cover.
ENWW Wiper sponge replacement 85
How
do
I mai
ntai
n th
e pr
inte
r
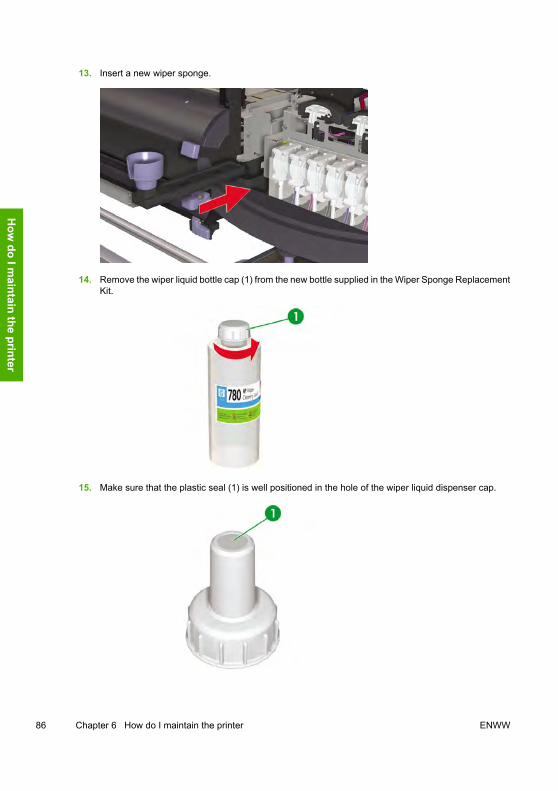
13. Insert a new wiper sponge.
14. Remove the wiper liquid bottle cap (1) from the new bottle supplied in the Wiper Sponge ReplacementKit.
15. Make sure that the plastic seal (1) is well positioned in the hole of the wiper liquid dispenser cap.
86 Chapter 6 How do I maintain the printer ENWW
How
do I maintain the printer

16. Insert the wiper liquid dispenser cap (1).
17. Place the wiper liquid bottle in the wiper liquid holder and push it firmly down to ensure it is fullyengaged.
ENWW Wiper sponge replacement 87
How
do
I mai
ntai
n th
e pr
inte
r
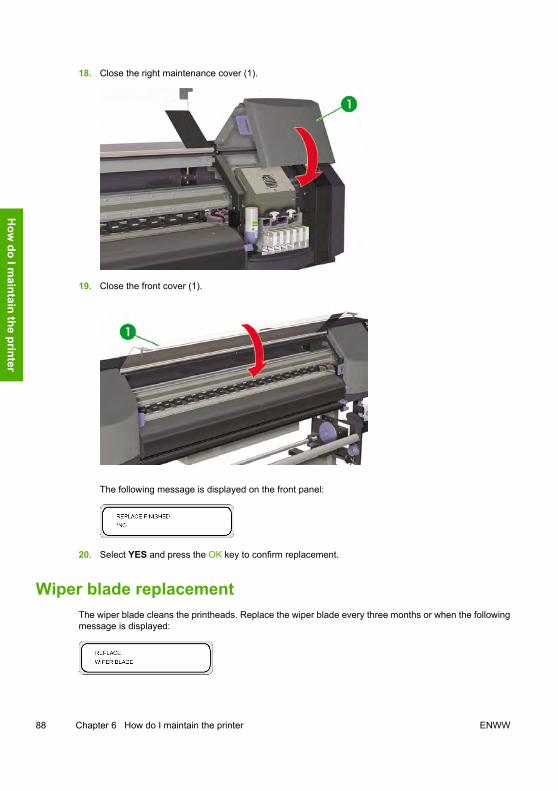
18. Close the right maintenance cover (1).
19. Close the front cover (1).
The following message is displayed on the front panel:
20. Select YES and press the OK key to confirm replacement.
Wiper blade replacementThe wiper blade cleans the printheads. Replace the wiper blade every three months or when the followingmessage is displayed:
88 Chapter 6 How do I maintain the printer ENWW
How
do I maintain the printer
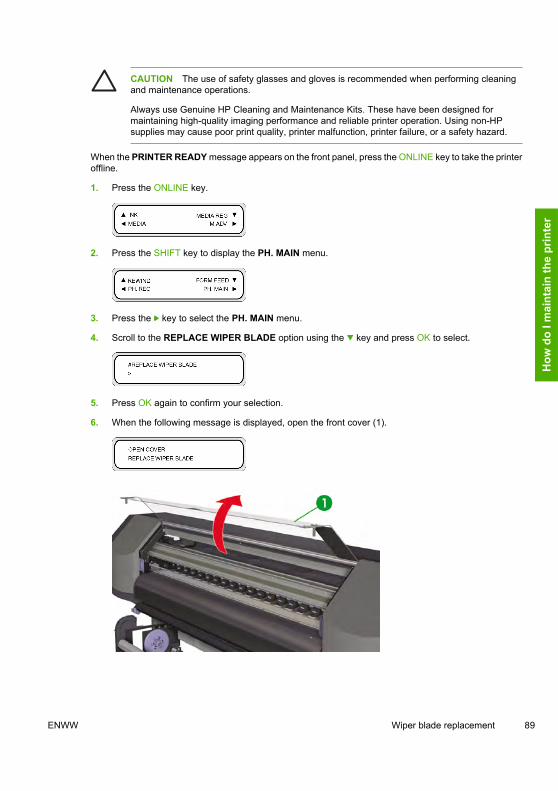
CAUTION The use of safety glasses and gloves is recommended when performing cleaningand maintenance operations.
Always use Genuine HP Cleaning and Maintenance Kits. These have been designed formaintaining high-quality imaging performance and reliable printer operation. Using non-HPsupplies may cause poor print quality, printer malfunction, printer failure, or a safety hazard.
When the PRINTER READY message appears on the front panel, press the ONLINE key to take the printeroffline.
1. Press the ONLINE key.
2. Press the SHIFT key to display the PH. MAIN menu.
3. Press the key to select the PH. MAIN menu.
4. Scroll to the REPLACE WIPER BLADE option using the key and press OK to select.
5. Press OK again to confirm your selection.
6. When the following message is displayed, open the front cover (1).
ENWW Wiper blade replacement 89
How
do
I mai
ntai
n th
e pr
inte
r

7. Open the right maintenance cover (1).
8. The wiper blade (1) is located on the left in the maintenance area.
90 Chapter 6 How do I maintain the printer ENWW
How
do I maintain the printer
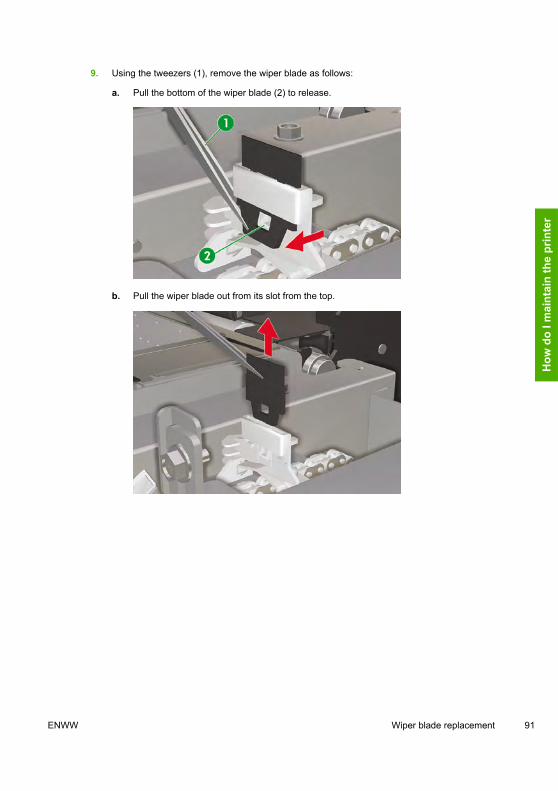
9. Using the tweezers (1), remove the wiper blade as follows:
a. Pull the bottom of the wiper blade (2) to release.
b. Pull the wiper blade out from its slot from the top.
ENWW Wiper blade replacement 91
How
do
I mai
ntai
n th
e pr
inte
r
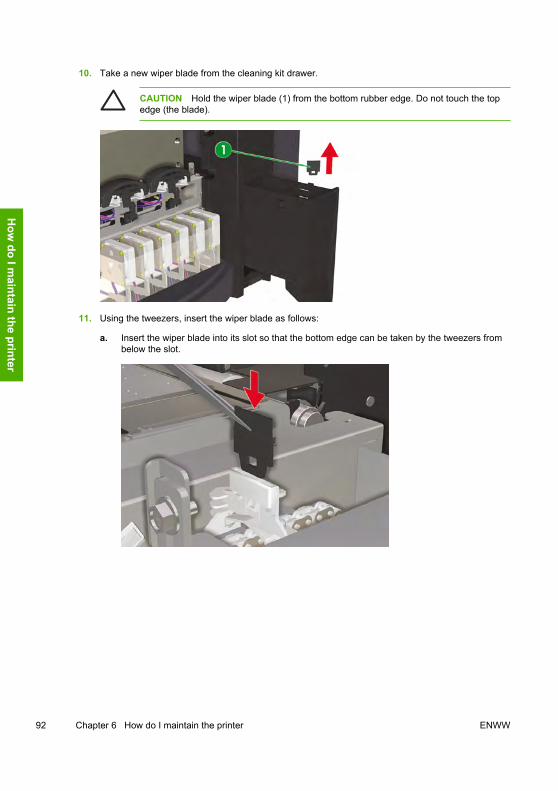
10. Take a new wiper blade from the cleaning kit drawer.
CAUTION Hold the wiper blade (1) from the bottom rubber edge. Do not touch the topedge (the blade).
11. Using the tweezers, insert the wiper blade as follows:
a. Insert the wiper blade into its slot so that the bottom edge can be taken by the tweezers frombelow the slot.
92 Chapter 6 How do I maintain the printer ENWW
How
do I maintain the printer
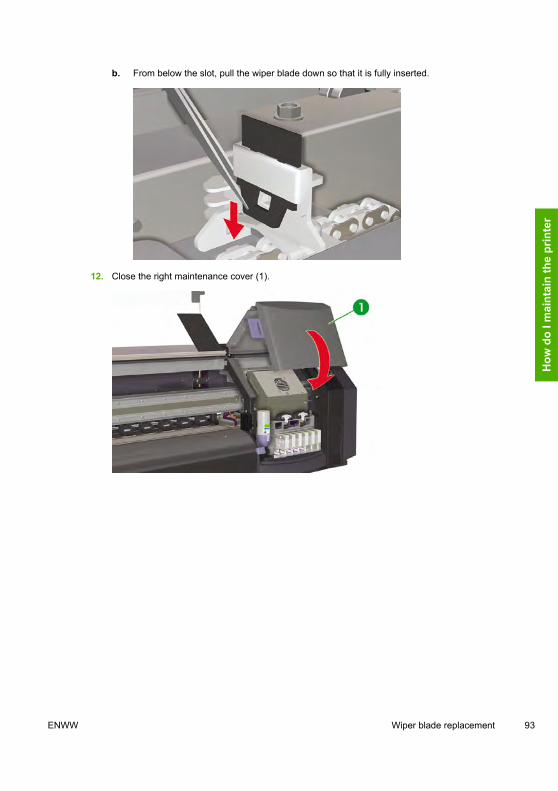
b. From below the slot, pull the wiper blade down so that it is fully inserted.
12. Close the right maintenance cover (1).
ENWW Wiper blade replacement 93
How
do
I mai
ntai
n th
e pr
inte
r

13. Close the front cover (1).
The following message is displayed on the front panel:
14. Select YES and press the OK key to confirm replacement.
When returning to the printer after being switched off for anextended period (less than two weeks)
WARNING! Never switch off the printer without following the correct procedures. Even with thestorage liquid installed, never leave the printer off for more than 4 weeks. Leaving your printer offfor more than 4 weeks can cause permanent damage that cannot be repaired. In all other casesmake sure you observe the appropriate maintenance guidelines.
CAUTION If you need to leave the printer unattended for any reason, ensure that the printeris on, the ink cartridges are full, media is loaded and the waste ink bottle is empty, so thatautomatic maintenance can be completed successfully for the time you are not present. If needed,install new ink cartridges. The ink cartridges that you replace can be reused when you return toyour printer, if they still contain ink.
To clean the ink system, you will need the HP 780 Ink System Cleaning Kit (part number CB303A).
Clean ink systemThis option allows you to clean dry ink from the ink system with cleaning liquid after the printer is poweredon after being stored for less than two weeks.
94 Chapter 6 How do I maintain the printer ENWW
How
do I maintain the printer
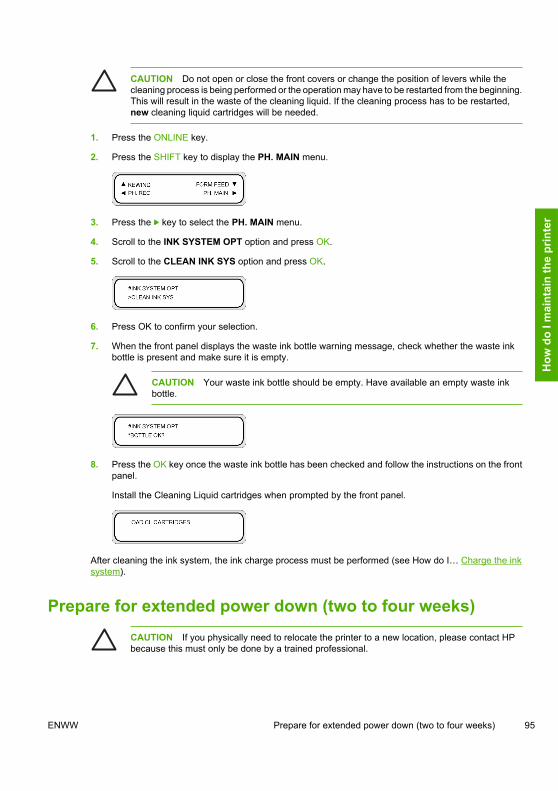
CAUTION Do not open or close the front covers or change the position of levers while thecleaning process is being performed or the operation may have to be restarted from the beginning.This will result in the waste of the cleaning liquid. If the cleaning process has to be restarted,new cleaning liquid cartridges will be needed.
1. Press the ONLINE key.
2. Press the SHIFT key to display the PH. MAIN menu.
3. Press the key to select the PH. MAIN menu.
4. Scroll to the INK SYSTEM OPT option and press OK.
5. Scroll to the CLEAN INK SYS option and press OK.
6. Press OK to confirm your selection.
7. When the front panel displays the waste ink bottle warning message, check whether the waste inkbottle is present and make sure it is empty.
CAUTION Your waste ink bottle should be empty. Have available an empty waste inkbottle.
8. Press the OK key once the waste ink bottle has been checked and follow the instructions on the frontpanel.
Install the Cleaning Liquid cartridges when prompted by the front panel.
After cleaning the ink system, the ink charge process must be performed (see How do I… Charge the inksystem).
Prepare for extended power down (two to four weeks)CAUTION If you physically need to relocate the printer to a new location, please contact HPbecause this must only be done by a trained professional.
ENWW Prepare for extended power down (two to four weeks) 95
How
do
I mai
ntai
n th
e pr
inte
r
CAUTION Never switch off the printer without following the correct procedures. Even with thestorage liquid installed, never leave the printer off for more than 4 weeks. Leaving your printer offfor more than 4 weeks can cause permanent damage that cannot be repaired. In all other casesmake sure you observe the appropriate maintenance guidelines.
CAUTION The printer has an internal clock which allows it to automatically wash the printheadsand flush some ink through the printheads, which keeps the printheads in good condition. Theprinter automatically washes the printheads regularly after the last printing process. If the printeris switched off for a long period, this process does not happen. If the ink does not flow throughthe printheads from time to time, the ink will dry inside the nozzles reaching a point where it isimpossible to recover them and the printheads will fail. If the printer must be switched off for along period of time, the customer must use either the optional HP Ink System Storage or CleaningKit to recover or protect the printheads.
Automatic maintenance and cleaning will not be performed if you turn off the printer on the frontpanel. The printer power switch on the rear of the printer should only be used when the printer isturned off to move it, to connect it to a computer, or to install or maintain printer parts.
Before starting the ink system storage procedure, make sure you have available the HP 780 Ink SystemStorage Kit and an empty waste ink bottle.
Ink system storageThis procedure allows you to empty the ink system of ink and fills it with storage liquid that will preservethe ink system if you do not intend to use the printer for a period of time (between two weeks and a month).
CAUTION Do not open or close the covers or change the position of levers while the ink systemstorage process is being performed or the operation may have to be restarted from the beginning.This will result in the waste of the storage liquid. If ink system storage has to be restarted, newstorage liquid cartridges will be needed.
1. Clean the ink system (see How do I… Clean ink system).
2. Press the ONLINE key.
3. Press the SHIFT key to display the PH. MAIN menu.
4. Press the key to select the PH. MAIN menu and press OK.
5. Scroll to the INK SYSTEM OPT option and press OK.
6. Scroll to the STORE INK SYS option and press OK.
7. Press OK to confirm your selection.
96 Chapter 6 How do I maintain the printer ENWW
How
do I maintain the printer
8. When the front panel displays the waste ink bottle warning message, check whether the waste inkbottle is present and make sure it is empty.
CAUTION Your waste ink bottle should be empty. Have available an empty waste inkbottle.
9. Press the OK key once the waste ink bottle has been checked and follow the instructions on the frontpanel.
Install the Storage Liquid cartridges when prompted by the front panel.
When you turn on the printer again, you will have to clean the ink system (see How do I… Clean inksystem).
Charge the ink systemAfter the ink system has been cleaned, then you will need to charge the ink system with ink. You will needink cartridges with more than 100 cc of ink available.
If any of the ink cartridges contain less than 100 cc of ink, a warning message is displayed on the frontpanel. Install a correct ink cartridge that contains more than 100 cc of ink in the indicated slot in order tocontinue.
To charge the ink system:
1. Press the ONLINE key.
2. Press the SHIFT key to display the PH. MAIN menu.
3. Press the key to select the PH. MAIN menu.
4. Scroll to the INK SYSTEM OPT option and press OK.
5. Scroll to the CHARGE INK SYS option and press OK.
6. Press OK to confirm your selection.
ENWW Charge the ink system 97
How
do
I mai
ntai
n th
e pr
inte
r
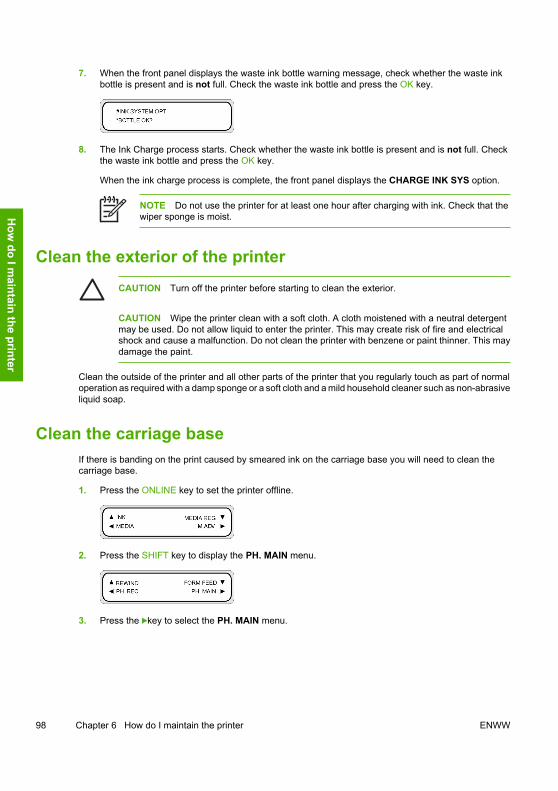
7. When the front panel displays the waste ink bottle warning message, check whether the waste inkbottle is present and is not full. Check the waste ink bottle and press the OK key.
8. The Ink Charge process starts. Check whether the waste ink bottle is present and is not full. Checkthe waste ink bottle and press the OK key.
When the ink charge process is complete, the front panel displays the CHARGE INK SYS option.
NOTE Do not use the printer for at least one hour after charging with ink. Check that thewiper sponge is moist.
Clean the exterior of the printerCAUTION Turn off the printer before starting to clean the exterior.
CAUTION Wipe the printer clean with a soft cloth. A cloth moistened with a neutral detergentmay be used. Do not allow liquid to enter the printer. This may create risk of fire and electricalshock and cause a malfunction. Do not clean the printer with benzene or paint thinner. This maydamage the paint.
Clean the outside of the printer and all other parts of the printer that you regularly touch as part of normaloperation as required with a damp sponge or a soft cloth and a mild household cleaner such as non-abrasiveliquid soap.
Clean the carriage baseIf there is banding on the print caused by smeared ink on the carriage base you will need to clean thecarriage base.
1. Press the ONLINE key to set the printer offline.
2. Press the SHIFT key to display the PH. MAIN menu.
3. Press the key to select the PH. MAIN menu.
98 Chapter 6 How do I maintain the printer ENWW
How
do I maintain the printer
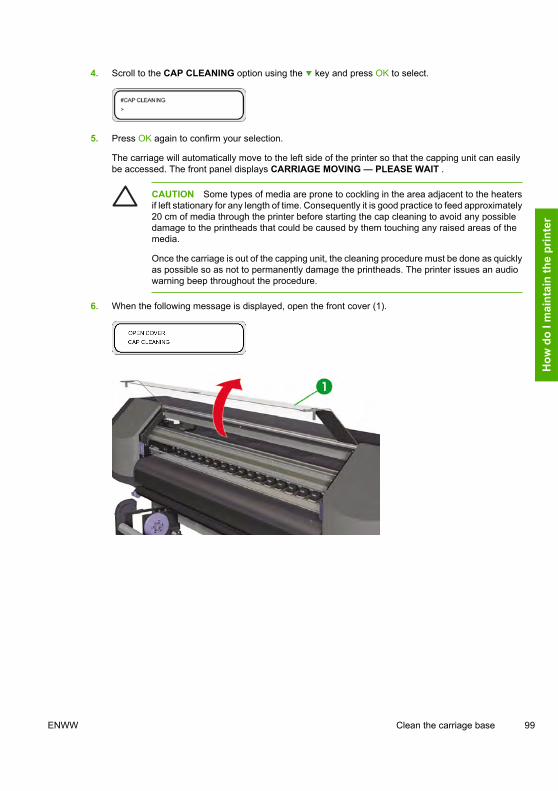
4. Scroll to the CAP CLEANING option using the key and press OK to select.
5. Press OK again to confirm your selection.
The carriage will automatically move to the left side of the printer so that the capping unit can easilybe accessed. The front panel displays CARRIAGE MOVING — PLEASE WAIT .
CAUTION Some types of media are prone to cockling in the area adjacent to the heatersif left stationary for any length of time. Consequently it is good practice to feed approximately20 cm of media through the printer before starting the cap cleaning to avoid any possibledamage to the printheads that could be caused by them touching any raised areas of themedia.
Once the carriage is out of the capping unit, the cleaning procedure must be done as quicklyas possible so as not to permanently damage the printheads. The printer issues an audiowarning beep throughout the procedure.
6. When the following message is displayed, open the front cover (1).
ENWW Clean the carriage base 99
How
do
I mai
ntai
n th
e pr
inte
r
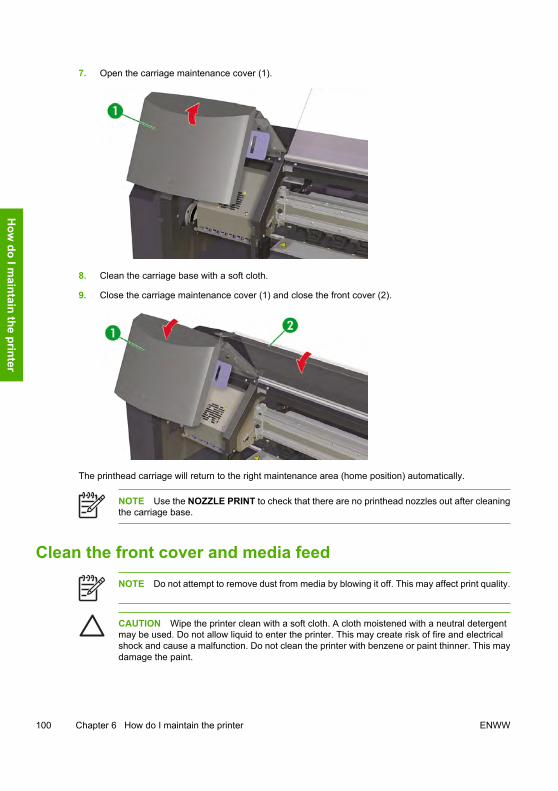
7. Open the carriage maintenance cover (1).
8. Clean the carriage base with a soft cloth.
9. Close the carriage maintenance cover (1) and close the front cover (2).
The printhead carriage will return to the right maintenance area (home position) automatically.
NOTE Use the NOZZLE PRINT to check that there are no printhead nozzles out after cleaningthe carriage base.
Clean the front cover and media feedNOTE Do not attempt to remove dust from media by blowing it off. This may affect print quality.
CAUTION Wipe the printer clean with a soft cloth. A cloth moistened with a neutral detergentmay be used. Do not allow liquid to enter the printer. This may create risk of fire and electricalshock and cause a malfunction. Do not clean the printer with benzene or paint thinner. This maydamage the paint.
100 Chapter 6 How do I maintain the printer ENWW
How
do I maintain the printer
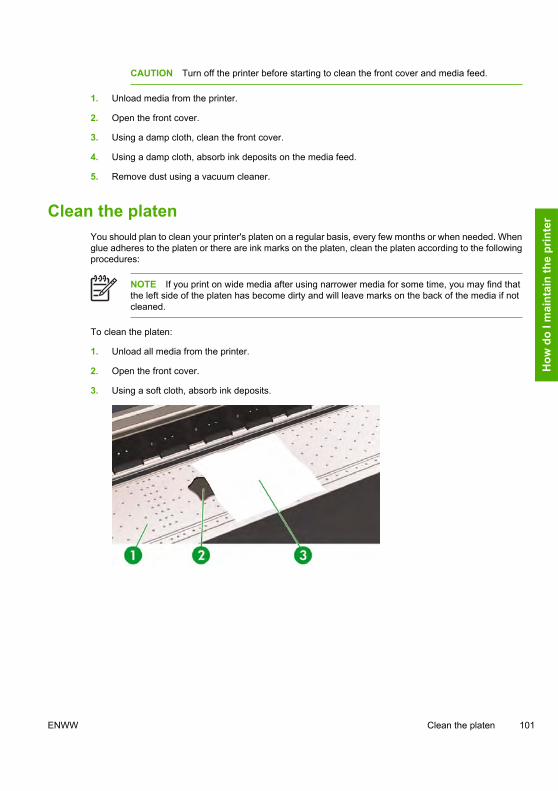
CAUTION Turn off the printer before starting to clean the front cover and media feed.
1. Unload media from the printer.
2. Open the front cover.
3. Using a damp cloth, clean the front cover.
4. Using a damp cloth, absorb ink deposits on the media feed.
5. Remove dust using a vacuum cleaner.
Clean the platenYou should plan to clean your printer's platen on a regular basis, every few months or when needed. Whenglue adheres to the platen or there are ink marks on the platen, clean the platen according to the followingprocedures:
NOTE If you print on wide media after using narrower media for some time, you may find thatthe left side of the platen has become dirty and will leave marks on the back of the media if notcleaned.
To clean the platen:
1. Unload all media from the printer.
2. Open the front cover.
3. Using a soft cloth, absorb ink deposits.
ENWW Clean the platen 101
How
do
I mai
ntai
n th
e pr
inte
r
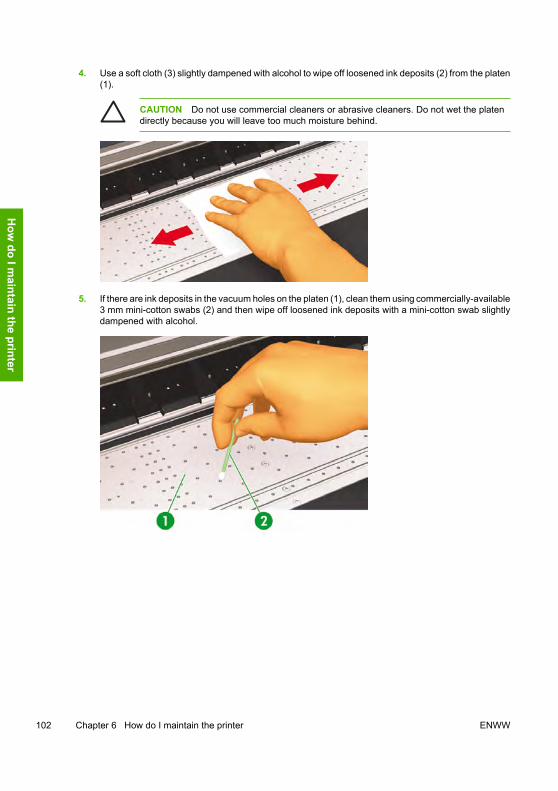
4. Use a soft cloth (3) slightly dampened with alcohol to wipe off loosened ink deposits (2) from the platen(1).
CAUTION Do not use commercial cleaners or abrasive cleaners. Do not wet the platendirectly because you will leave too much moisture behind.
5. If there are ink deposits in the vacuum holes on the platen (1), clean them using commercially-available3 mm mini-cotton swabs (2) and then wipe off loosened ink deposits with a mini-cotton swab slightlydampened with alcohol.
102 Chapter 6 How do I maintain the printer ENWW
How
do I maintain the printer
Waste ink bottle replacementWARNING! The HP Waste Ink Bottle has been specifically designed to contain waste ink fromthe printer. It is designed to work with the printer’s waste ink quantity tracking system to alert theuser when the bottle is full. It provides safe handling and disposal of waste ink when sealed withits attached cap.
Use only an HP Waste Ink Bottle. The bottle must be installed according to instructions or wasteink may overflow.
An HP Waste Ink Bottle must always be installed before turning the printer ON. Automatic andmanual service cycles produce waste ink that must be contained in an HP Waste Ink Bottle.
CAUTION Do not remove the cap from its tether to the HP Waste Ink Bottle. The cap is neededto properly seal the HP Waste Ink Bottle for disposal.
WARNING! Always use both hands to remove and carry an HP Waste Ink Bottle.
Keep the HP Waste Ink Bottle upright. Do not place on tables or shelves where it could fall.
Waste ink is combustible. Keep an HP Waste Ink Bottle containing waste ink away from openflames, sparks, or other sources of ignition.
Never store waste ink in a glass container.
Never pour waste ink into a container filled with other chemicals.
CAUTION The level in the HP Waste Ink Bottle must be checked by visual inspection to preventoverflow. If the waste ink level is above the indication line, the bottle must be replaced with anempty HP Waste Ink Bottle.
NOTE Place a sheet of media under the HP Waste Ink Bottle on the floor when removing abottle containing waste ink. This will help clean up any ink spills. If soaked with ink, treat the mediaas a combustible material and dispose of properly.
HP recommends that you always keep a spare empty HP Waste Ink Bottle available. Somemaintenance procedures require installation of an empty HP Waste Ink Bottle to prevent inkoverflow.
The HP Waste Ink Bottle contains organic solvents and must be disposed of in compliance withall local, state, and federal regulations. Always securely replace the cap on a full or partially-fullHP Waste Ink Bottle after removing it from the printer to prevent ink spills.
Be sure all operators are trained in the use of emergency equipment such as eye wash stationsand fire extinguishers and know where they are located.
NOTE Do not replace the waste ink bottle during printing.
The waste ink bottle must be checked on a daily basis to make sure that it is not full.
ENWW Waste ink bottle replacement 103
How
do
I mai
ntai
n th
e pr
inte
r
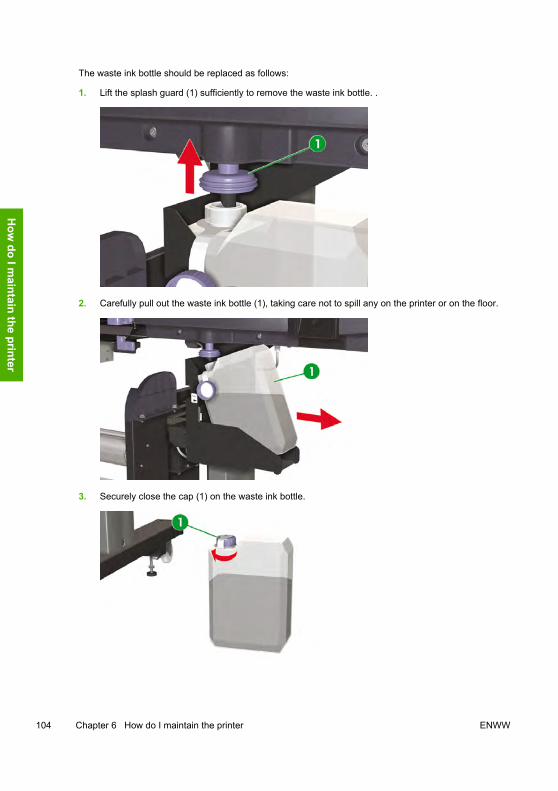
The waste ink bottle should be replaced as follows:
1. Lift the splash guard (1) sufficiently to remove the waste ink bottle. .
2. Carefully pull out the waste ink bottle (1), taking care not to spill any on the printer or on the floor.
3. Securely close the cap (1) on the waste ink bottle.
104 Chapter 6 How do I maintain the printer ENWW
How
do I maintain the printer
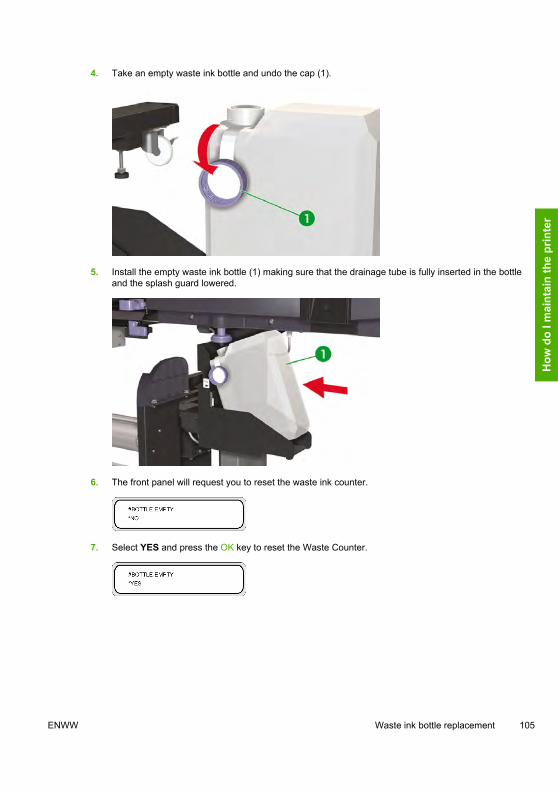
4. Take an empty waste ink bottle and undo the cap (1).
5. Install the empty waste ink bottle (1) making sure that the drainage tube is fully inserted in the bottleand the splash guard lowered.
6. The front panel will request you to reset the waste ink counter.
7. Select YES and press the OK key to reset the Waste Counter.
ENWW Waste ink bottle replacement 105
How
do
I mai
ntai
n th
e pr
inte
r
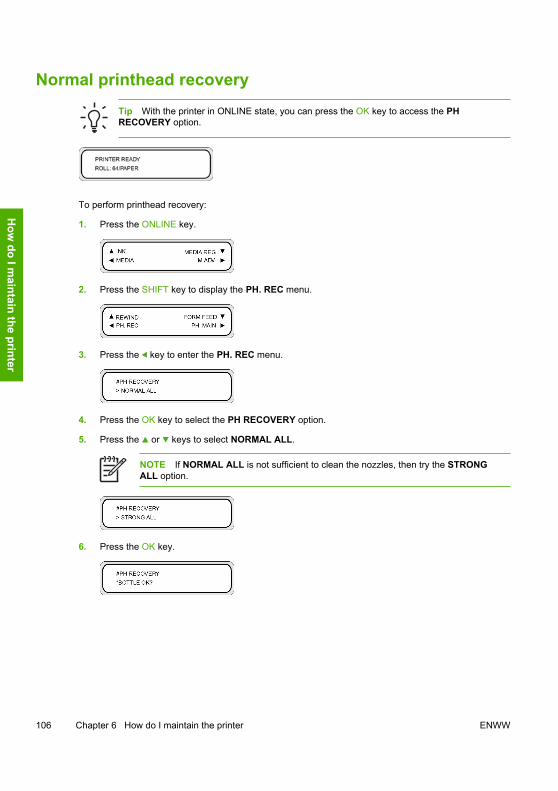
Normal printhead recoveryTip With the printer in ONLINE state, you can press the OK key to access the PHRECOVERY option.
To perform printhead recovery:
1. Press the ONLINE key.
2. Press the SHIFT key to display the PH. REC menu.
3. Press the key to enter the PH. REC menu.
4. Press the OK key to select the PH RECOVERY option.
5. Press the or keys to select NORMAL ALL.
NOTE If NORMAL ALL is not sufficient to clean the nozzles, then try the STRONGALL option.
6. Press the OK key.
106 Chapter 6 How do I maintain the printer ENWW
How
do I maintain the printer

7. Make sure that the waste ink bottle is not full, and then press the OK key again.
NOTE Cleaning may take several minutes.
8. When cleaning is completed, the PH RECOVERY option is displayed.
9. Press the key to return to the offline mode.
ENWW Normal printhead recovery 107
How
do
I mai
ntai
n th
e pr
inte
r

Print the nozzle print patternUse the nozzle print pattern to check that all printhead nozzles are working correctly. Perform the NOZZLEPRINT every day before using your printer.
NOTE Use the nozzle print pattern to check that all printhead nozzles are working correctly aftercap cleaning or any major servicing task.
To print the nozzle print:
1. Press the ONLINE key and press the SHIFT key twice.
2. Select the ADJUST menu using the key.
3. In the ADJUST submenu, scroll to TEST PRINTS and press the OK key.
4. In the TEST PRINTS menu scroll to the NOZZLE PRINToption and press the OK key.
NOTE If you have already verified that printhead nozzles are not printing correctly, thenselect the NOZZLE PRINT/RECOVER option. The printer will print three sets of printheadnozzle patterns, performing a printhead recovery between each pattern so that you canverify if the problem has been solved and the printhead nozzles are printing correctly.
5. Press the OK key to start printing.
108 Chapter 6 How do I maintain the printer ENWW
How
do I maintain the printer
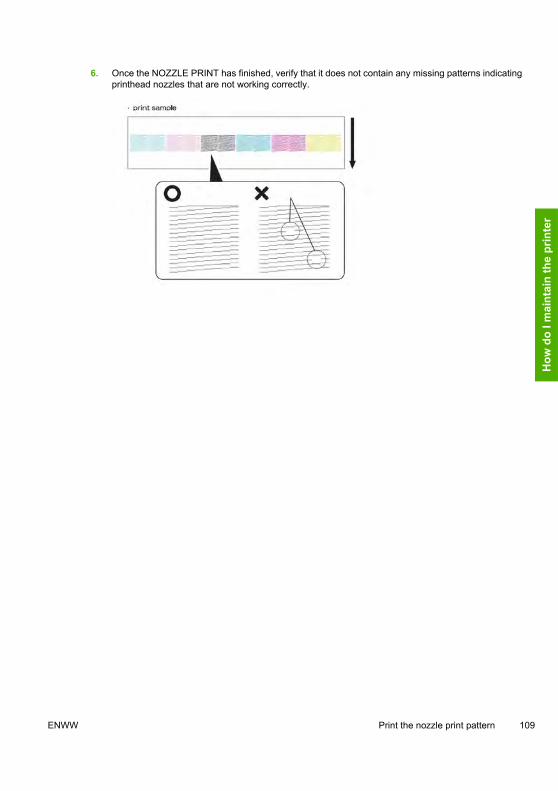
6. Once the NOZZLE PRINT has finished, verify that it does not contain any missing patterns indicatingprinthead nozzles that are not working correctly.
ENWW Print the nozzle print pattern 109
How
do
I mai
ntai
n th
e pr
inte
r

110 Chapter 6 How do I maintain the printer ENWW
How
do I maintain the printer
7 How do I get the best image quality
● Test the image quality
● Interpreting the print quality
● Manage media types
● How do I calibrate my printer
● Adjust heater and print mode settings
Different types of media may give better image quality based on specific mechanical and electrical settingsin your printer. To optimize image quality you can perform a series of test prints for the media type that youare using. Based on the results you can then adjust the printer settings for the media type.
To adjust the printer settings for a media type, you can modify existing media types or create new ones.Before creating or modifying a media type for the media you intend to use, check the image quality usingthe preset values to determine the overall quality that you get with one of the existing preset media types.Some media types may require no printer setting adjustments.
● Load your new media and select a media type that is similar to the media you are loading. See Howdo I… Install a media roll in the printer.
● Print an image that you have already successfully printed on other media types. See How do I… Testthe image quality.
If the image quality is satisfactory you can use the preset media type for printing.
If the image quality is not satisfactory, create a new media type or modify the one selected. See Howdo I… Manage media types.
● Calibrate the printer for the media type. See How do I calibrate my printer.
● Change the media type settings. See How do I… Manage media types.
● Print your test image again to check the overall image quality with the new settings.
If you are still not satisfied with the image quality, you may need to make more adjustments to printersettings, such as the print mode or the heater temperature. For a description of image quality problemsthat you may see and the recommended solution, refer to The problem is print quality.
ENWW 111
How
do
I get
the
best
imag
equ
ality
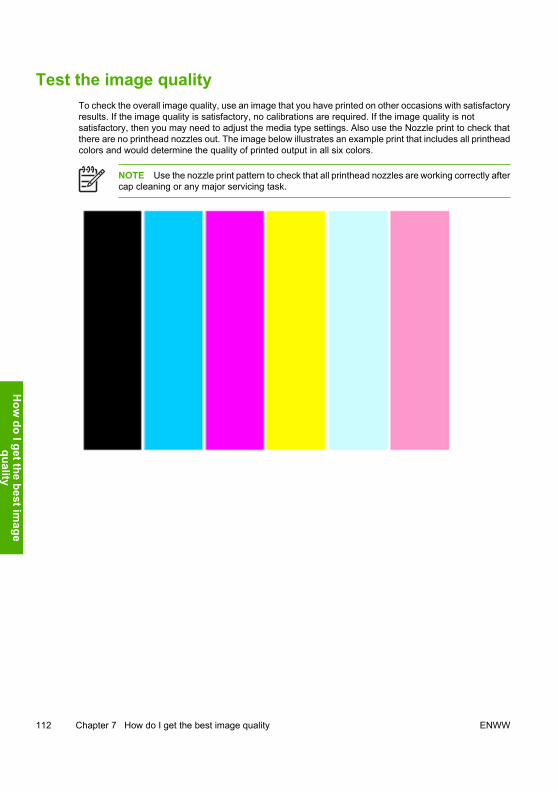
Test the image qualityTo check the overall image quality, use an image that you have printed on other occasions with satisfactoryresults. If the image quality is satisfactory, no calibrations are required. If the image quality is notsatisfactory, then you may need to adjust the media type settings. Also use the Nozzle print to check thatthere are no printhead nozzles out. The image below illustrates an example print that includes all printheadcolors and would determine the quality of printed output in all six colors.
NOTE Use the nozzle print pattern to check that all printhead nozzles are working correctly aftercap cleaning or any major servicing task.
112 Chapter 7 How do I get the best image quality ENWW
How
do I get the best image
quality

Interpreting the print qualityBelow are examples of the print results you may see in your test print and the recommended action.
If the print quality is satisfactory, you can print on the media without changing printer or heater settings.
If you see banding in one color (in the black color in the image above), then there are printhead nozzlesout. Print the NOZZLE PRINT/RECOVER pattern and then print your image again to check that theprinthead is printing correctly. See How do I… Print the nozzle print pattern.
If you see banding in all colors then you need to calibrate the printer for the media you have loaded. If youhave selected a preset media type, we recommend that you create a new media type before modifying thesettings (See How do I…Manage media types) and then calibrate the printer. See How do I calibrate my
ENWW Interpreting the print quality 113
How
do
I get
the
best
imag
equ
ality
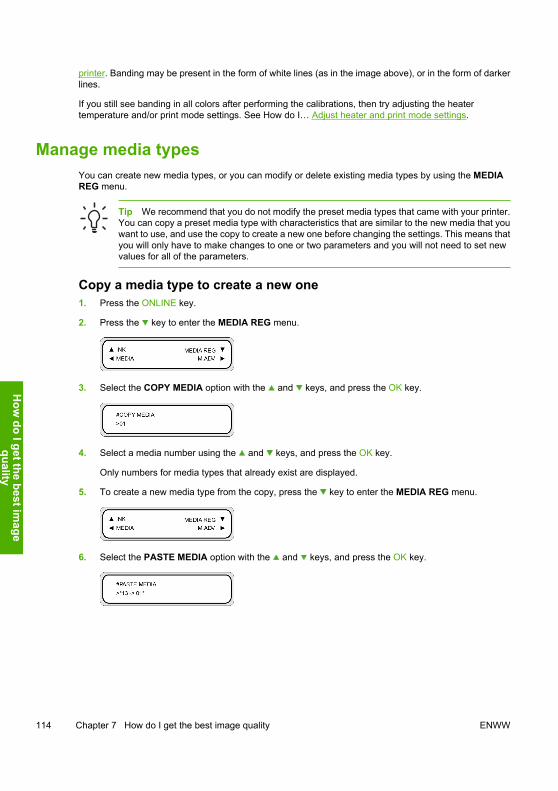
printer. Banding may be present in the form of white lines (as in the image above), or in the form of darkerlines.
If you still see banding in all colors after performing the calibrations, then try adjusting the heatertemperature and/or print mode settings. See How do I… Adjust heater and print mode settings.
Manage media typesYou can create new media types, or you can modify or delete existing media types by using the MEDIAREG menu.
Tip We recommend that you do not modify the preset media types that came with your printer.You can copy a preset media type with characteristics that are similar to the new media that youwant to use, and use the copy to create a new one before changing the settings. This means thatyou will only have to make changes to one or two parameters and you will not need to set newvalues for all of the parameters.
Copy a media type to create a new one1. Press the ONLINE key.
2. Press the key to enter the MEDIA REG menu.
3. Select the COPY MEDIA option with the and keys, and press the OK key.
4. Select a media number using the and keys, and press the OK key.
Only numbers for media types that already exist are displayed.
5. To create a new media type from the copy, press the key to enter the MEDIA REG menu.
6. Select the PASTE MEDIA option with the and keys, and press the OK key.
114 Chapter 7 How do I get the best image quality ENWW
How
do I get the best image
quality
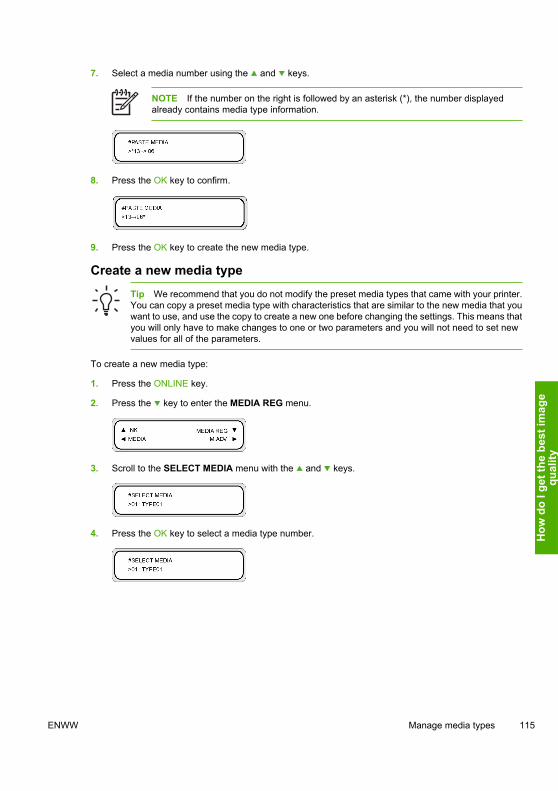
7. Select a media number using the and keys.
NOTE If the number on the right is followed by an asterisk (*), the number displayedalready contains media type information.
8. Press the OK key to confirm.
9. Press the OK key to create the new media type.
Create a new media typeTip We recommend that you do not modify the preset media types that came with your printer.You can copy a preset media type with characteristics that are similar to the new media that youwant to use, and use the copy to create a new one before changing the settings. This means thatyou will only have to make changes to one or two parameters and you will not need to set newvalues for all of the parameters.
To create a new media type:
1. Press the ONLINE key.
2. Press the key to enter the MEDIA REG menu.
3. Scroll to the SELECT MEDIA menu with the and keys.
4. Press the OK key to select a media type number.
ENWW Manage media types 115
How
do
I get
the
best
imag
equ
ality
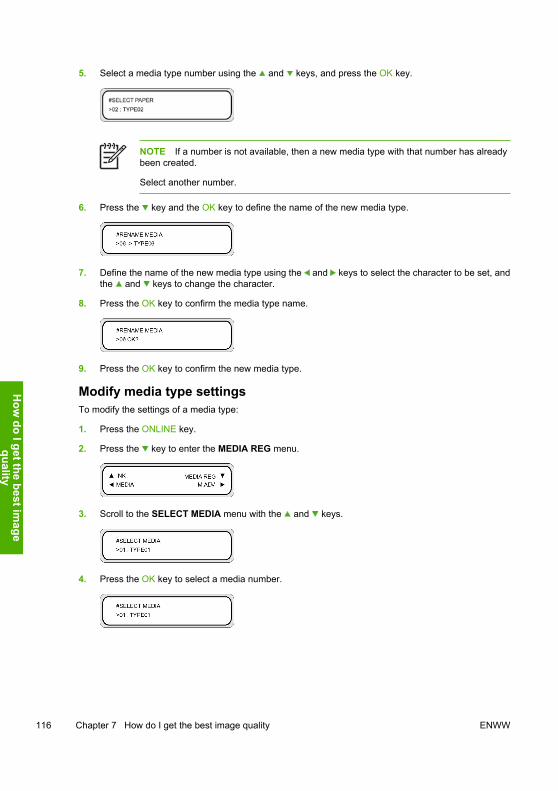
5. Select a media type number using the and keys, and press the OK key.
NOTE If a number is not available, then a new media type with that number has alreadybeen created.
Select another number.
6. Press the key and the OK key to define the name of the new media type.
7. Define the name of the new media type using the and keys to select the character to be set, andthe and keys to change the character.
8. Press the OK key to confirm the media type name.
9. Press the OK key to confirm the new media type.
Modify media type settingsTo modify the settings of a media type:
1. Press the ONLINE key.
2. Press the key to enter the MEDIA REG menu.
3. Scroll to the SELECT MEDIA menu with the and keys.
4. Press the OK key to select a media number.
116 Chapter 7 How do I get the best image quality ENWW
How
do I get the best image
quality
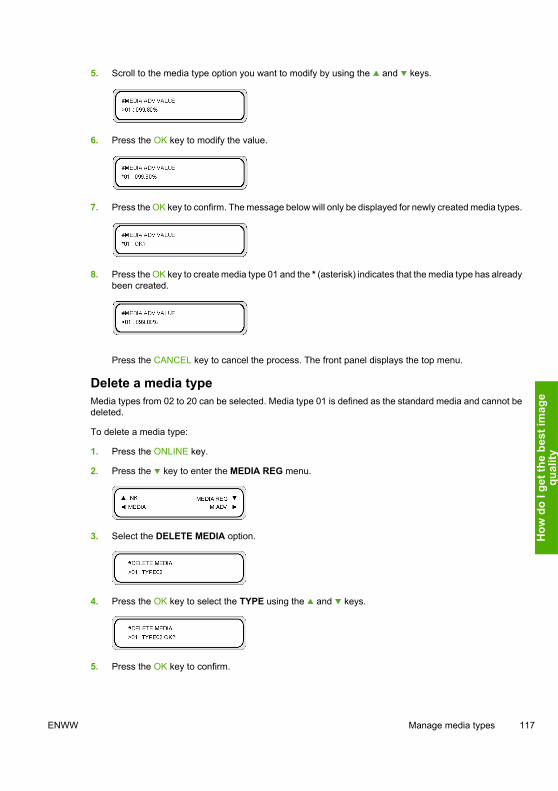
5. Scroll to the media type option you want to modify by using the and keys.
6. Press the OK key to modify the value.
7. Press the OK key to confirm. The message below will only be displayed for newly created media types.
8. Press the OK key to create media type 01 and the * (asterisk) indicates that the media type has alreadybeen created.
Press the CANCEL key to cancel the process. The front panel displays the top menu.
Delete a media typeMedia types from 02 to 20 can be selected. Media type 01 is defined as the standard media and cannot bedeleted.
To delete a media type:
1. Press the ONLINE key.
2. Press the key to enter the MEDIA REG menu.
3. Select the DELETE MEDIA option.
4. Press the OK key to select the TYPE using the and keys.
5. Press the OK key to confirm.
ENWW Manage media types 117
How
do
I get
the
best
imag
equ
ality
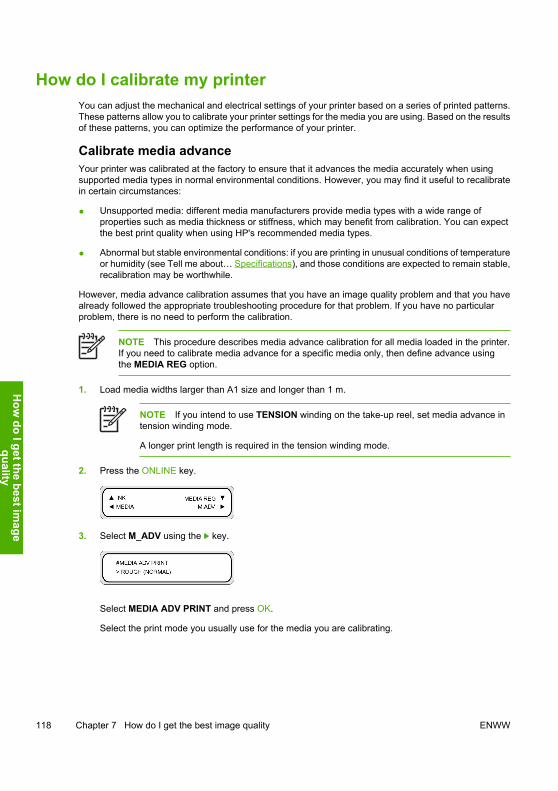
How do I calibrate my printerYou can adjust the mechanical and electrical settings of your printer based on a series of printed patterns.These patterns allow you to calibrate your printer settings for the media you are using. Based on the resultsof these patterns, you can optimize the performance of your printer.
Calibrate media advanceYour printer was calibrated at the factory to ensure that it advances the media accurately when usingsupported media types in normal environmental conditions. However, you may find it useful to recalibratein certain circumstances:
● Unsupported media: different media manufacturers provide media types with a wide range ofproperties such as media thickness or stiffness, which may benefit from calibration. You can expectthe best print quality when using HP's recommended media types.
● Abnormal but stable environmental conditions: if you are printing in unusual conditions of temperatureor humidity (see Tell me about… Specifications), and those conditions are expected to remain stable,recalibration may be worthwhile.
However, media advance calibration assumes that you have an image quality problem and that you havealready followed the appropriate troubleshooting procedure for that problem. If you have no particularproblem, there is no need to perform the calibration.
NOTE This procedure describes media advance calibration for all media loaded in the printer.If you need to calibrate media advance for a specific media only, then define advance usingthe MEDIA REG option.
1. Load media widths larger than A1 size and longer than 1 m.
NOTE If you intend to use TENSION winding on the take-up reel, set media advance intension winding mode.
A longer print length is required in the tension winding mode.
2. Press the ONLINE key.
3. Select M_ADV using the key.
Select MEDIA ADV PRINT and press OK.
Select the print mode you usually use for the media you are calibrating.
118 Chapter 7 How do I get the best image quality ENWW
How
do I get the best image
quality
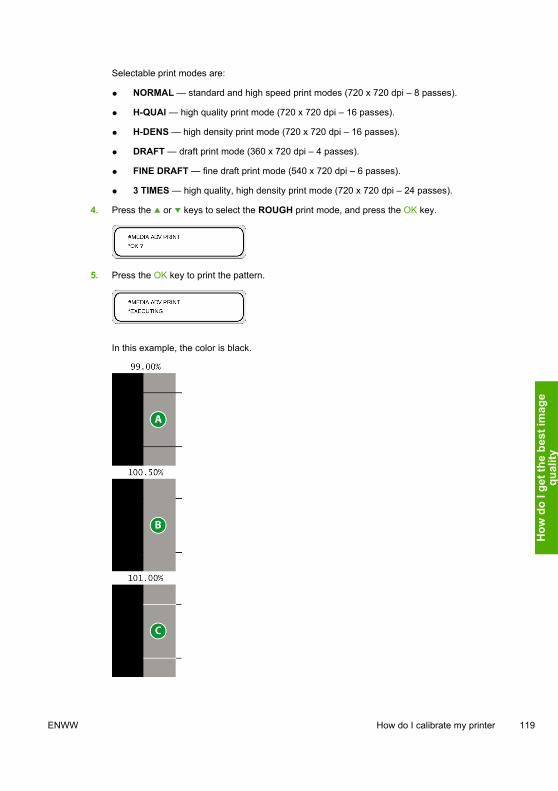
Selectable print modes are:
● NORMAL — standard and high speed print modes (720 x 720 dpi – 8 passes).
● H-QUAl — high quality print mode (720 x 720 dpi – 16 passes).
● H-DENS — high density print mode (720 x 720 dpi – 16 passes).
● DRAFT — draft print mode (360 x 720 dpi – 4 passes).
● FINE DRAFT — fine draft print mode (540 x 720 dpi – 6 passes).
● 3 TIMES — high quality, high density print mode (720 x 720 dpi – 24 passes).
4. Press the or keys to select the ROUGH print mode, and press the OK key.
5. Press the OK key to print the pattern.
In this example, the color is black.
ENWW How do I calibrate my printer 119
How
do
I get
the
best
imag
equ
ality
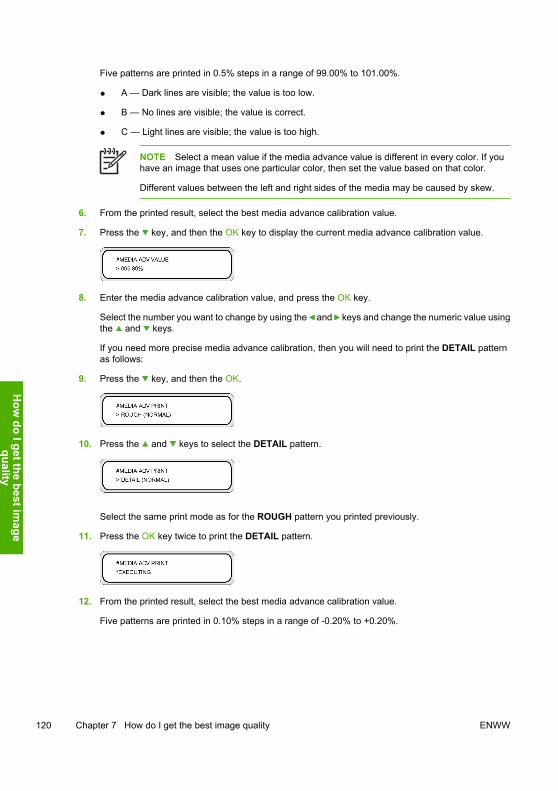
Five patterns are printed in 0.5% steps in a range of 99.00% to 101.00%.
● A — Dark lines are visible; the value is too low.
● B — No lines are visible; the value is correct.
● C — Light lines are visible; the value is too high.
NOTE Select a mean value if the media advance value is different in every color. If youhave an image that uses one particular color, then set the value based on that color.
Different values between the left and right sides of the media may be caused by skew.
6. From the printed result, select the best media advance calibration value.
7. Press the key, and then the OK key to display the current media advance calibration value.
8. Enter the media advance calibration value, and press the OK key.
Select the number you want to change by using the and keys and change the numeric value usingthe and keys.
If you need more precise media advance calibration, then you will need to print the DETAIL patternas follows:
9. Press the key, and then the OK.
10. Press the and keys to select the DETAIL pattern.
Select the same print mode as for the ROUGH pattern you printed previously.
11. Press the OK key twice to print the DETAIL pattern.
12. From the printed result, select the best media advance calibration value.
Five patterns are printed in 0.10% steps in a range of -0.20% to +0.20%.
120 Chapter 7 How do I get the best image quality ENWW
How
do I get the best image
quality
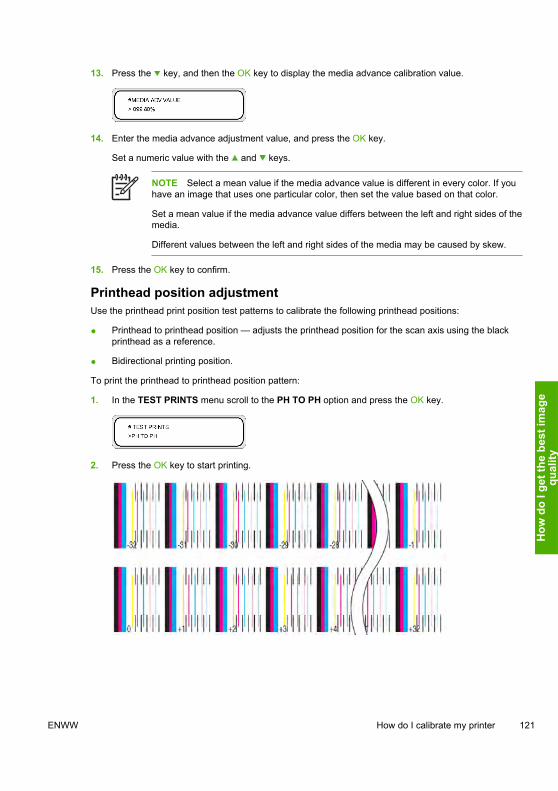
13. Press the key, and then the OK key to display the media advance calibration value.
14. Enter the media advance adjustment value, and press the OK key.
Set a numeric value with the and keys.
NOTE Select a mean value if the media advance value is different in every color. If youhave an image that uses one particular color, then set the value based on that color.
Set a mean value if the media advance value differs between the left and right sides of themedia.
Different values between the left and right sides of the media may be caused by skew.
15. Press the OK key to confirm.
Printhead position adjustmentUse the printhead print position test patterns to calibrate the following printhead positions:
● Printhead to printhead position — adjusts the printhead position for the scan axis using the blackprinthead as a reference.
● Bidirectional printing position.
To print the printhead to printhead position pattern:
1. In the TEST PRINTS menu scroll to the PH TO PH option and press the OK key.
2. Press the OK key to start printing.
ENWW How do I calibrate my printer 121
How
do
I get
the
best
imag
equ
ality
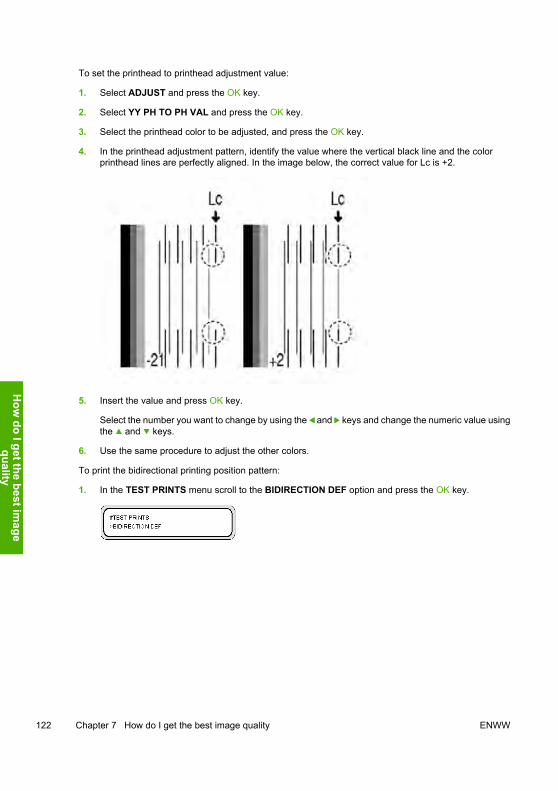
To set the printhead to printhead adjustment value:
1. Select ADJUST and press the OK key.
2. Select YY PH TO PH VAL and press the OK key.
3. Select the printhead color to be adjusted, and press the OK key.
4. In the printhead adjustment pattern, identify the value where the vertical black line and the colorprinthead lines are perfectly aligned. In the image below, the correct value for Lc is +2.
5. Insert the value and press OK key.
Select the number you want to change by using the and keys and change the numeric value usingthe and keys.
6. Use the same procedure to adjust the other colors.
To print the bidirectional printing position pattern:
1. In the TEST PRINTS menu scroll to the BIDIRECTION DEF option and press the OK key.
122 Chapter 7 How do I get the best image quality ENWW
How
do I get the best image
quality

2. Press the OK key to start printing.
To set the bidirectional printing adjustment:
1. Select ADJUST and press the OK key.
2. Select BIDIRECTION DEF and press the OK key.
3. Select the printhead color to be adjusted, and press the OK key.
4. In the printhead adjustment pattern, identify the value where two vertical lines for the same printheadare aligned. In the image below, the correct value for M is –8.
5. Insert the value and press OK key.
ENWW How do I calibrate my printer 123
How
do
I get
the
best
imag
equ
ality
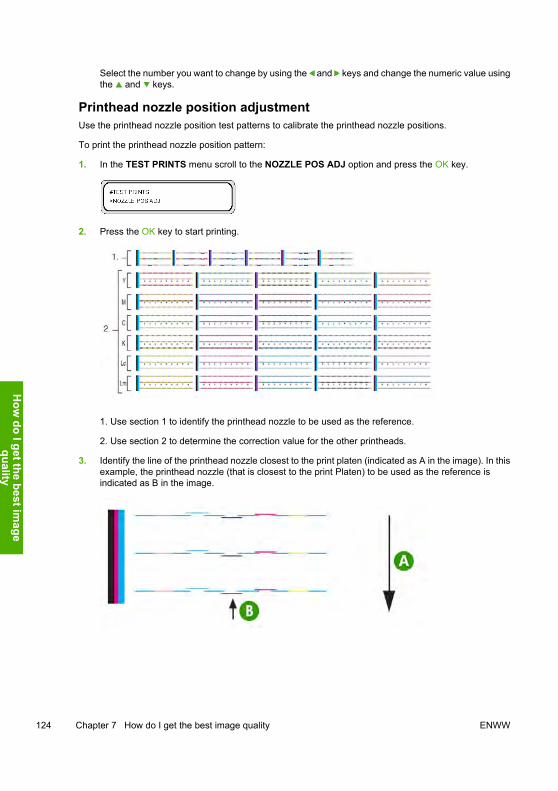
Select the number you want to change by using the and keys and change the numeric value usingthe and keys.
Printhead nozzle position adjustmentUse the printhead nozzle position test patterns to calibrate the printhead nozzle positions.
To print the printhead nozzle position pattern:
1. In the TEST PRINTS menu scroll to the NOZZLE POS ADJ option and press the OK key.
2. Press the OK key to start printing.
1. Use section 1 to identify the printhead nozzle to be used as the reference.
2. Use section 2 to determine the correction value for the other printheads.
3. Identify the line of the printhead nozzle closest to the print platen (indicated as A in the image). In thisexample, the printhead nozzle (that is closest to the print Platen) to be used as the reference isindicated as B in the image.
124 Chapter 7 How do I get the best image quality ENWW
How
do I get the best image
quality
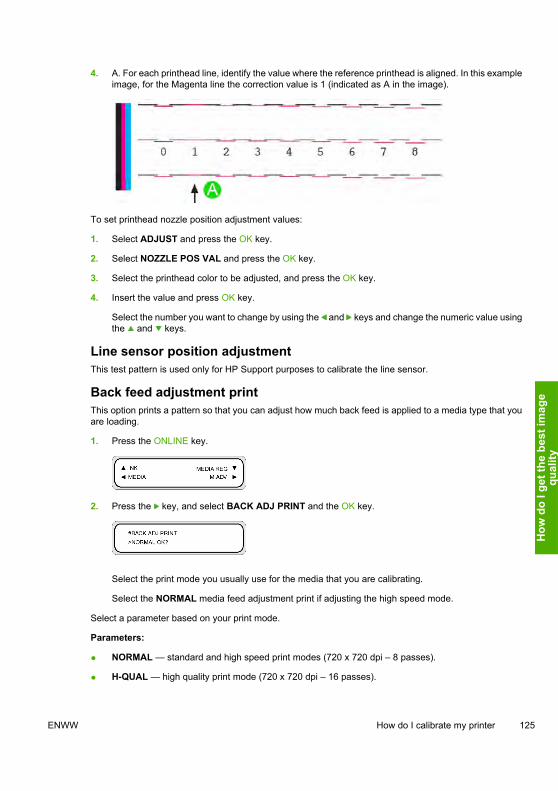
4. A. For each printhead line, identify the value where the reference printhead is aligned. In this exampleimage, for the Magenta line the correction value is 1 (indicated as A in the image).
To set printhead nozzle position adjustment values:
1. Select ADJUST and press the OK key.
2. Select NOZZLE POS VAL and press the OK key.
3. Select the printhead color to be adjusted, and press the OK key.
4. Insert the value and press OK key.
Select the number you want to change by using the and keys and change the numeric value usingthe and keys.
Line sensor position adjustmentThis test pattern is used only for HP Support purposes to calibrate the line sensor.
Back feed adjustment printThis option prints a pattern so that you can adjust how much back feed is applied to a media type that youare loading.
1. Press the ONLINE key.
2. Press the key, and select BACK ADJ PRINT and the OK key.
Select the print mode you usually use for the media that you are calibrating.
Select the NORMAL media feed adjustment print if adjusting the high speed mode.
Select a parameter based on your print mode.
Parameters:
● NORMAL — standard and high speed print modes (720 x 720 dpi – 8 passes).
● H-QUAL — high quality print mode (720 x 720 dpi – 16 passes).
ENWW How do I calibrate my printer 125
How
do
I get
the
best
imag
equ
ality

● H-DENS — high density print mode (720 x 720 dpi – 16 passes).
● DRAFT — draft print mode (360 x 720 dpi – 4 passes).
● FINE DRAFT — fine draft print mode (540 x 720 dpi – 6 passes).
● 3 TIMES — high quality, high density print mode (720 x 720 dpi – 24 passes).
126 Chapter 7 How do I get the best image quality ENWW
How
do I get the best image
quality
Adjust heater and print mode settingsIf you see banding in all colors and you have already performed media advance calibration, then you cantry adjusting the heater temperature and print mode settings.
Banding in all colors may be caused by the following factors:
● Small print dot size: heat will cause a smaller dot size. The higher you set the heater temperature, thesmaller the dot size is which results in light banding.
● Ink absorption by the media: if the media you are using is not capable of absorbing the ink as it isplaced, then this can result in dark banding.
To improve ink placement and absorption try the following:
● Set a lower print heater temperature for light banding or a higher temperature for dark banding.
● Change the print mode to reduce the quantity of ink placed on the media for dark banding.
● Change the print mode from bidirectional printing to unidirectional printing for dark banding.
After each change to a setting, try printing the nozzle print pattern to check the image quality.
To change the heater temperature and print mode settings:
1. Press the ONLINE key and select the MEDIA REG menu with the key.
2. Select PRINT HEATER T in the MEDIA REG menu with the and keys.
Parameters: 15 °C to 55 °C, or ** to turn the heater off.
NOTE This value will only be applied if the HEATER PREF option is set to HEATPANEL.
3. Select the number you want to change by using the and keys and change the numeric value usingthe and keys.
4. Press the OK key to confirm the parameter.
Print the nozzle print pattern to check the image quality.
5. To change the Print mode:
Select PRINT MODE. in the MEDIA REG menu with the and keys.
ENWW Adjust heater and print mode settings 127
How
do
I get
the
best
imag
equ
ality
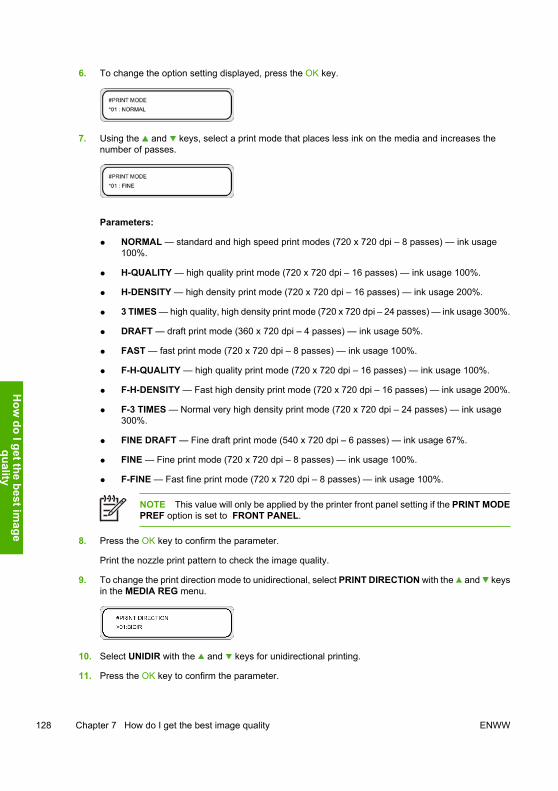
6. To change the option setting displayed, press the OK key.
7. Using the and keys, select a print mode that places less ink on the media and increases thenumber of passes.
Parameters:
● NORMAL — standard and high speed print modes (720 x 720 dpi – 8 passes) — ink usage100%.
● H-QUALITY — high quality print mode (720 x 720 dpi – 16 passes) — ink usage 100%.
● H-DENSITY — high density print mode (720 x 720 dpi – 16 passes) — ink usage 200%.
● 3 TIMES — high quality, high density print mode (720 x 720 dpi – 24 passes) — ink usage 300%.
● DRAFT — draft print mode (360 x 720 dpi – 4 passes) — ink usage 50%.
● FAST — fast print mode (720 x 720 dpi – 8 passes) — ink usage 100%.
● F-H-QUALITY — high quality print mode (720 x 720 dpi – 16 passes) — ink usage 100%.
● F-H-DENSITY — Fast high density print mode (720 x 720 dpi – 16 passes) — ink usage 200%.
● F-3 TIMES — Normal very high density print mode (720 x 720 dpi – 24 passes) — ink usage300%.
● FINE DRAFT — Fine draft print mode (540 x 720 dpi – 6 passes) — ink usage 67%.
● FINE — Fine print mode (720 x 720 dpi – 8 passes) — ink usage 100%.
● F-FINE — Fast fine print mode (720 x 720 dpi – 8 passes) — ink usage 100%.
NOTE This value will only be applied by the printer front panel setting if the PRINT MODEPREF option is set to FRONT PANEL.
8. Press the OK key to confirm the parameter.
Print the nozzle print pattern to check the image quality.
9. To change the print direction mode to unidirectional, select PRINT DIRECTION with the and keysin the MEDIA REG menu.
10. Select UNIDIR with the and keys for unidirectional printing.
11. Press the OK key to confirm the parameter.
128 Chapter 7 How do I get the best image quality ENWW
How
do I get the best image
quality

If the image quality still does not improve, we recommend that you change the media.
ENWW Adjust heater and print mode settings 129
How
do
I get
the
best
imag
equ
ality

130 Chapter 7 How do I get the best image quality ENWW
How
do I get the best image
quality

8 The problem is… (troubleshootingtopics)
This section describes troubleshooting for the printer. If the problem cannot be solved, contact your dealeror our service center.
● The problem is… (checklist)
● A printhead crash
● Ink cartridge is not installed
● Ink cartridge is not detected
● Ink cartridge is near expiration date
● Ink cartridge has passed its expiration date
● An error message
● The problem is an abnormal sound
ENWW 131
The
prob
lem
is…
(trou
bles
hoot
ing
topi
cs)
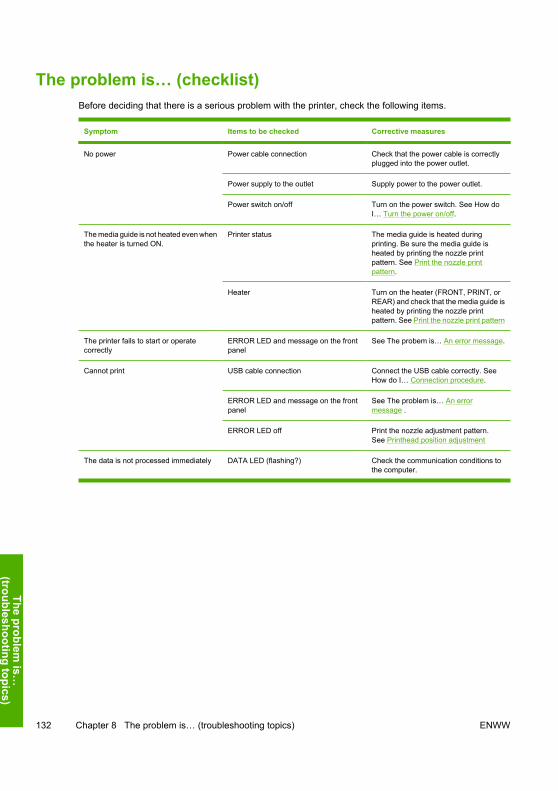
The problem is… (checklist)Before deciding that there is a serious problem with the printer, check the following items.
Symptom Items to be checked Corrective measures
No power Power cable connection Check that the power cable is correctlyplugged into the power outlet.
Power supply to the outlet Supply power to the power outlet.
Power switch on/off Turn on the power switch. See How doI… Turn the power on/off.
The media guide is not heated even whenthe heater is turned ON.
Printer status The media guide is heated duringprinting. Be sure the media guide isheated by printing the nozzle printpattern. See Print the nozzle printpattern.
Heater Turn on the heater (FRONT, PRINT, orREAR) and check that the media guide isheated by printing the nozzle printpattern. See Print the nozzle print pattern
The printer fails to start or operatecorrectly
ERROR LED and message on the frontpanel
See The probem is… An error message.
Cannot print USB cable connection Connect the USB cable correctly. SeeHow do I… Connection procedure.
ERROR LED and message on the frontpanel
See The problem is… An errormessage .
ERROR LED off Print the nozzle adjustment pattern.See Printhead position adjustment
The data is not processed immediately DATA LED (flashing?) Check the communication conditions tothe computer.
132 Chapter 8 The problem is… (troubleshooting topics) ENWW
The problem is…
(troubleshooting topics)
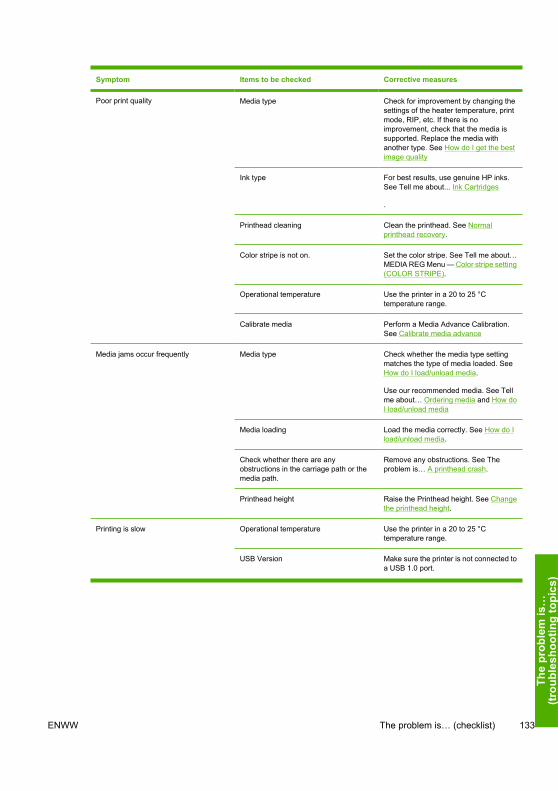
Symptom Items to be checked Corrective measures
Poor print quality Media type Check for improvement by changing thesettings of the heater temperature, printmode, RIP, etc. If there is noimprovement, check that the media issupported. Replace the media withanother type. See How do I get the bestimage quality
Ink type For best results, use genuine HP inks.See Tell me about... Ink Cartridges
.
Printhead cleaning Clean the printhead. See Normalprinthead recovery.
Color stripe is not on. Set the color stripe. See Tell me about…MEDIA REG Menu — Color stripe setting(COLOR STRIPE).
Operational temperature Use the printer in a 20 to 25 °Ctemperature range.
Calibrate media Perform a Media Advance Calibration.See Calibrate media advance
Media jams occur frequently Media type Check whether the media type settingmatches the type of media loaded. SeeHow do I load/unload media.
Use our recommended media. See Tellme about… Ordering media and How doI load/unload media
Media loading Load the media correctly. See How do Iload/unload media.
Check whether there are anyobstructions in the carriage path or themedia path.
Remove any obstructions. See Theproblem is… A printhead crash.
Printhead height Raise the Printhead height. See Changethe printhead height.
Printing is slow Operational temperature Use the printer in a 20 to 25 °Ctemperature range.
USB Version Make sure the printer is not connected toa USB 1.0 port.
ENWW The problem is… (checklist) 133
The
prob
lem
is…
(trou
bles
hoot
ing
topi
cs)
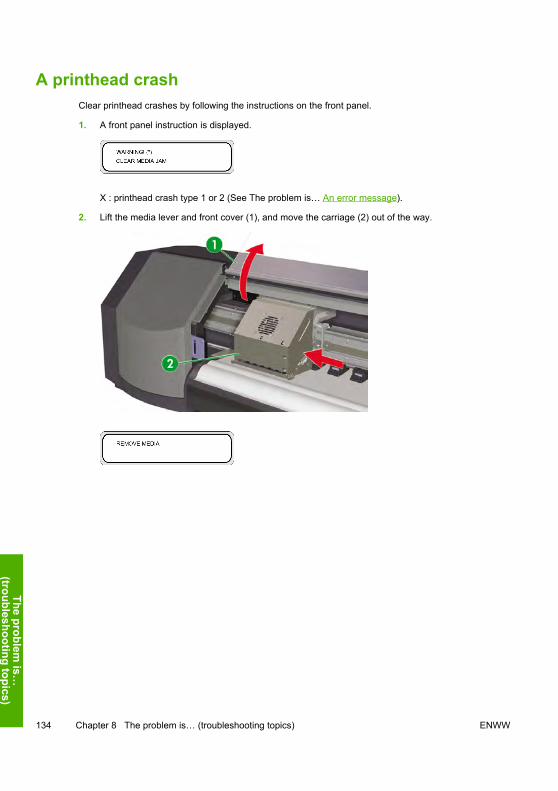
A printhead crashClear printhead crashes by following the instructions on the front panel.
1. A front panel instruction is displayed.
X : printhead crash type 1 or 2 (See The problem is… An error message).
2. Lift the media lever and front cover (1), and move the carriage (2) out of the way.
134 Chapter 8 The problem is… (troubleshooting topics) ENWW
The problem is…
(troubleshooting topics)
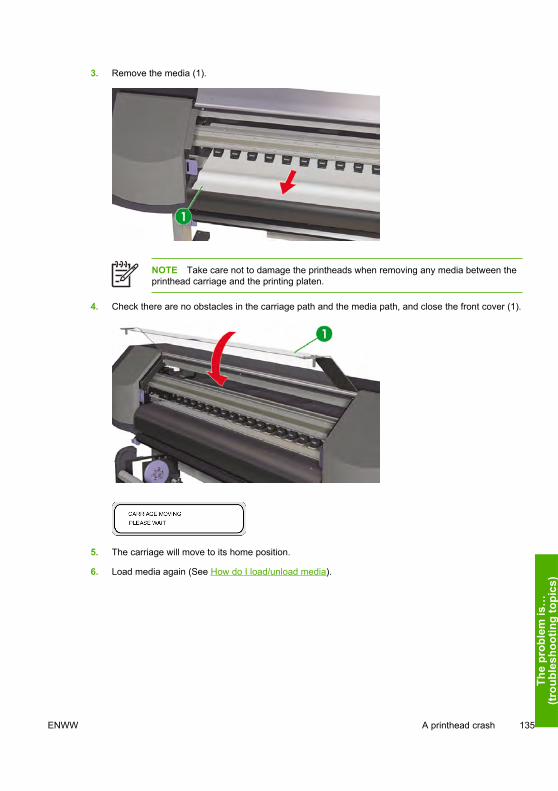
3. Remove the media (1).
NOTE Take care not to damage the printheads when removing any media between theprinthead carriage and the printing platen.
4. Check there are no obstacles in the carriage path and the media path, and close the front cover (1).
5. The carriage will move to its home position.
6. Load media again (See How do I load/unload media).
ENWW A printhead crash 135
The
prob
lem
is…
(trou
bles
hoot
ing
topi
cs)
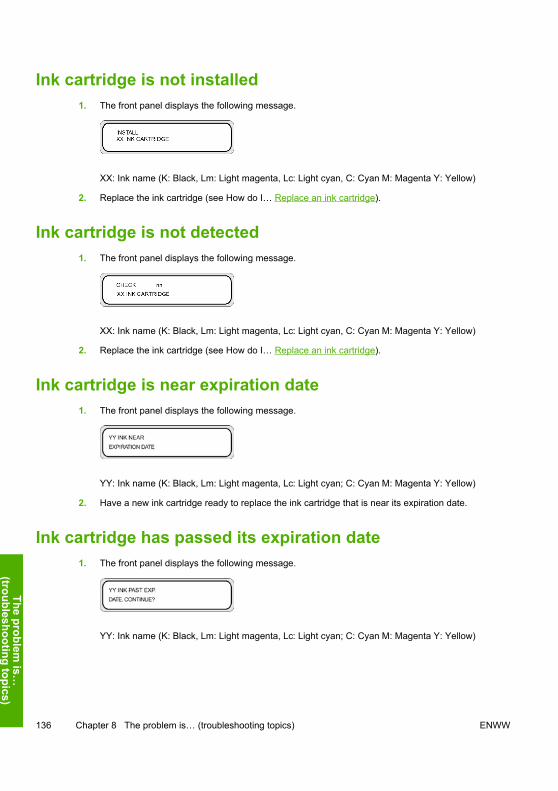
Ink cartridge is not installed1. The front panel displays the following message.
XX: Ink name (K: Black, Lm: Light magenta, Lc: Light cyan, C: Cyan M: Magenta Y: Yellow)
2. Replace the ink cartridge (see How do I… Replace an ink cartridge).
Ink cartridge is not detected1. The front panel displays the following message.
XX: Ink name (K: Black, Lm: Light magenta, Lc: Light cyan, C: Cyan M: Magenta Y: Yellow)
2. Replace the ink cartridge (see How do I… Replace an ink cartridge).
Ink cartridge is near expiration date1. The front panel displays the following message.
YY: Ink name (K: Black, Lm: Light magenta, Lc: Light cyan; C: Cyan M: Magenta Y: Yellow)
2. Have a new ink cartridge ready to replace the ink cartridge that is near its expiration date.
Ink cartridge has passed its expiration date1. The front panel displays the following message.
YY: Ink name (K: Black, Lm: Light magenta, Lc: Light cyan; C: Cyan M: Magenta Y: Yellow)
136 Chapter 8 The problem is… (troubleshooting topics) ENWW
The problem is…
(troubleshooting topics)
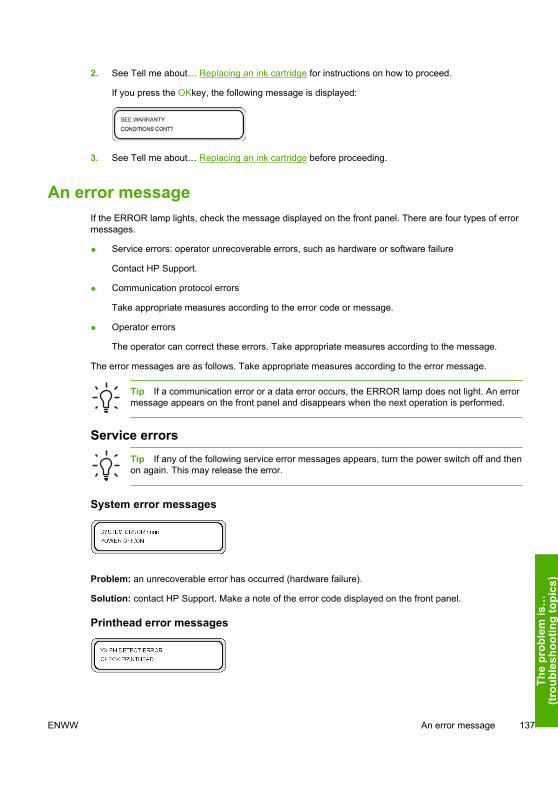
2. See Tell me about… Replacing an ink cartridge for instructions on how to proceed.
If you press the OKkey, the following message is displayed:
3. See Tell me about… Replacing an ink cartridge before proceeding.
An error messageIf the ERROR lamp lights, check the message displayed on the front panel. There are four types of errormessages.
● Service errors: operator unrecoverable errors, such as hardware or software failure
Contact HP Support.
● Communication protocol errors
Take appropriate measures according to the error code or message.
● Operator errors
The operator can correct these errors. Take appropriate measures according to the message.
The error messages are as follows. Take appropriate measures according to the error message.
Tip If a communication error or a data error occurs, the ERROR lamp does not light. An errormessage appears on the front panel and disappears when the next operation is performed.
Service errorsTip If any of the following service error messages appears, turn the power switch off and thenon again. This may release the error.
System error messages
Problem: an unrecoverable error has occurred (hardware failure).
Solution: contact HP Support. Make a note of the error code displayed on the front panel.
Printhead error messages
ENWW An error message 137
The
prob
lem
is…
(trou
bles
hoot
ing
topi
cs)
Problem: an unrecoverable error has occurred in the printhead.
Solution: contact HP Support. Make a note of the error message displayed on the front panel.
Service error messages
Problem: an error has occurred that requires printer maintenance.
Solution: contact HP Support. Make a note of the error message displayed on the front panel.
Operator error messagesThe following errors can be corrected by the operator.
Ink cartridge
YY: Y, M, C, K, Lm, Lc
Problem: the ink cartridge has passed its expiration date.
Solution: press OK and follow the instructions on the front panel. See How do I… Replace an inkcartridge.
The ink LED flashes
Problem: ink is running out (warning).
Solution: prepare a new ink cartridge.
138 Chapter 8 The problem is… (troubleshooting topics) ENWW
The problem is…
(troubleshooting topics)
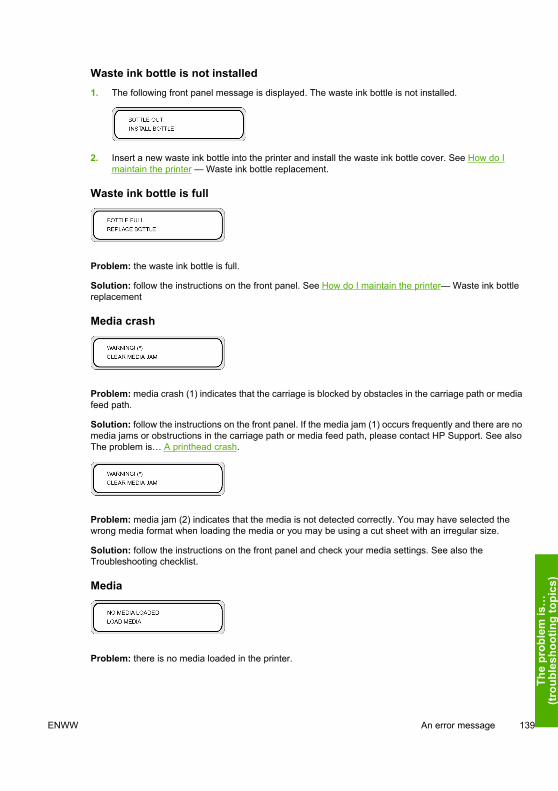
Waste ink bottle is not installed1. The following front panel message is displayed. The waste ink bottle is not installed.
2. Insert a new waste ink bottle into the printer and install the waste ink bottle cover. See How do Imaintain the printer — Waste ink bottle replacement.
Waste ink bottle is full
Problem: the waste ink bottle is full.
Solution: follow the instructions on the front panel. See How do I maintain the printer— Waste ink bottlereplacement
Media crash
Problem: media crash (1) indicates that the carriage is blocked by obstacles in the carriage path or mediafeed path.
Solution: follow the instructions on the front panel. If the media jam (1) occurs frequently and there are nomedia jams or obstructions in the carriage path or media feed path, please contact HP Support. See alsoThe problem is… A printhead crash.
Problem: media jam (2) indicates that the media is not detected correctly. You may have selected thewrong media format when loading the media or you may be using a cut sheet with an irregular size.
Solution: follow the instructions on the front panel and check your media settings. See also theTroubleshooting checklist.
Media
Problem: there is no media loaded in the printer.
ENWW An error message 139
The
prob
lem
is…
(trou
bles
hoot
ing
topi
cs)
Solution: load media. See How do I load/unload media.
Problem: you have set an invalid media size (less than 297 mm wide or 64 inch wide or more).
Solution: set the correct size. See How do I load/unload media.
Problem: there is media skew.
Solution: reload the media (see How do I load/unload media). Skew may be caused by ink deposits onthe platen. Check the platen for ink deposits and clean any ink. See How do I maintain the printer.
Problem: the media lever has not been lowered.
Solution: lower the media lever.
Error LED is flashing
Problem: the take-up reel is not winding the media correctly.
Solution: check that the media is correctly detected by the take-up reel sensor. Check that the media isloaded correctly. See How do I… Use the take-up reel.
Other messages
Problem: the cover is open.
Solution: close the cover.
Problem: the temperature of the printheads exceeds the operating temperature range.
Solution: allow the printheads to cool by not using the printer until the printhead temperature returns tothe operating temperature range.
140 Chapter 8 The problem is… (troubleshooting topics) ENWW
The problem is…
(troubleshooting topics)
Problem: the environment temperature is not within the operating temperature range for the printer.
Solution: use the printer within its operating temperature range (15 °C to 30 °C).
The problem is an abnormal soundIf your printer makes an unusual sound, contact HP Support.
ENWW The problem is an abnormal sound 141
The
prob
lem
is…
(trou
bles
hoot
ing
topi
cs)

142 Chapter 8 The problem is… (troubleshooting topics) ENWW
The problem is…
(troubleshooting topics)
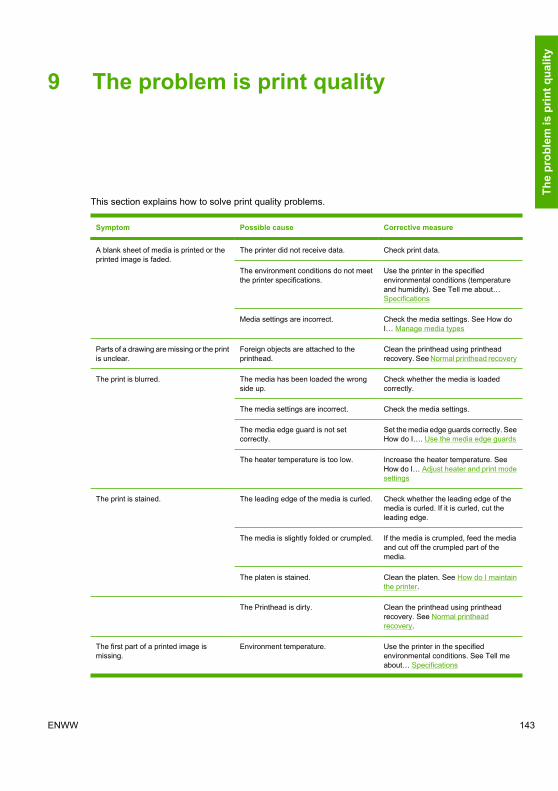
9 The problem is print quality
This section explains how to solve print quality problems.
Symptom Possible cause Corrective measure
A blank sheet of media is printed or theprinted image is faded.
The printer did not receive data. Check print data.
The environment conditions do not meetthe printer specifications.
Use the printer in the specifiedenvironmental conditions (temperatureand humidity). See Tell me about…Specifications
Media settings are incorrect. Check the media settings. See How doI… Manage media types
Parts of a drawing are missing or the printis unclear.
Foreign objects are attached to theprinthead.
Clean the printhead using printheadrecovery. See Normal printhead recovery
The print is blurred. The media has been loaded the wrongside up.
Check whether the media is loadedcorrectly.
The media settings are incorrect. Check the media settings.
The media edge guard is not setcorrectly.
Set the media edge guards correctly. SeeHow do I…. Use the media edge guards
The heater temperature is too low. Increase the heater temperature. SeeHow do I… Adjust heater and print modesettings
The print is stained. The leading edge of the media is curled. Check whether the leading edge of themedia is curled. If it is curled, cut theleading edge.
The media is slightly folded or crumpled. If the media is crumpled, feed the mediaand cut off the crumpled part of themedia.
The platen is stained. Clean the platen. See How do I maintainthe printer.
The Printhead is dirty. Clean the printhead using printheadrecovery. See Normal printheadrecovery.
The first part of a printed image ismissing.
Environment temperature. Use the printer in the specifiedenvironmental conditions. See Tell meabout… Specifications
ENWW 143
The
prob
lem
is p
rint q
ualit
y
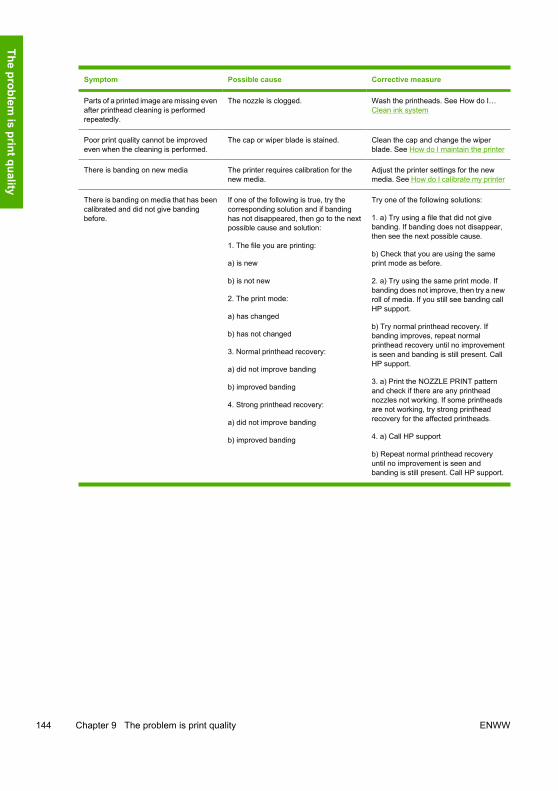
Symptom Possible cause Corrective measure
Parts of a printed image are missing evenafter printhead cleaning is performedrepeatedly.
The nozzle is clogged. Wash the printheads. See How do I…Clean ink system
Poor print quality cannot be improvedeven when the cleaning is performed.
The cap or wiper blade is stained. Clean the cap and change the wiperblade. See How do I maintain the printer
There is banding on new media The printer requires calibration for thenew media.
Adjust the printer settings for the newmedia. See How do I calibrate my printer
There is banding on media that has beencalibrated and did not give bandingbefore.
If one of the following is true, try thecorresponding solution and if bandinghas not disappeared, then go to the nextpossible cause and solution:
1. The file you are printing:
a) is new
b) is not new
2. The print mode:
a) has changed
b) has not changed
3. Normal printhead recovery:
a) did not improve banding
b) improved banding
4. Strong printhead recovery:
a) did not improve banding
b) improved banding
Try one of the following solutions:
1. a) Try using a file that did not givebanding. If banding does not disappear,then see the next possible cause.
b) Check that you are using the sameprint mode as before.
2. a) Try using the same print mode. Ifbanding does not improve, then try a newroll of media. If you still see banding callHP support.
b) Try normal printhead recovery. Ifbanding improves, repeat normalprinthead recovery until no improvementis seen and banding is still present. CallHP support.
3. a) Print the NOZZLE PRINT patternand check if there are any printheadnozzles not working. If some printheadsare not working, try strong printheadrecovery for the affected printheads.
4. a) Call HP support
b) Repeat normal printhead recoveryuntil no improvement is seen andbanding is still present. Call HP support.
144 Chapter 9 The problem is print quality ENWW
The problem is print quality
10 Tell me about… (basic knowledge topics)
This chapter provides necessary information to operate the printer. Familiarize yourself with the basics ofthe printer before reading the rest of this Guide.
● Tell me about operating conditions
● Tell me about the power supply
● Tell me about front panel messages and printer state
ENWW 145
Tell
me
abou
t… (b
asic
know
led g
e to
pics
)
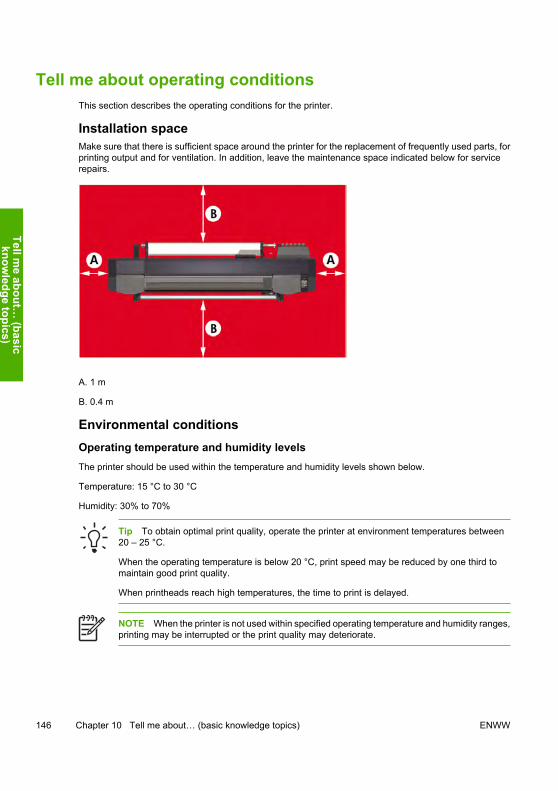
Tell me about operating conditionsThis section describes the operating conditions for the printer.
Installation spaceMake sure that there is sufficient space around the printer for the replacement of frequently used parts, forprinting output and for ventilation. In addition, leave the maintenance space indicated below for servicerepairs.
A. 1 m
B. 0.4 m
Environmental conditionsOperating temperature and humidity levelsThe printer should be used within the temperature and humidity levels shown below.
Temperature: 15 °C to 30 °C
Humidity: 30% to 70%
Tip To obtain optimal print quality, operate the printer at environment temperatures between20 – 25 °C.
When the operating temperature is below 20 °C, print speed may be reduced by one third tomaintain good print quality.
When printheads reach high temperatures, the time to print is delayed.
NOTE When the printer is not used within specified operating temperature and humidity ranges,printing may be interrupted or the print quality may deteriorate.
146 Chapter 10 Tell me about… (basic knowledge topics) ENWW
Tell me about…
(basicknow
ledge topics)
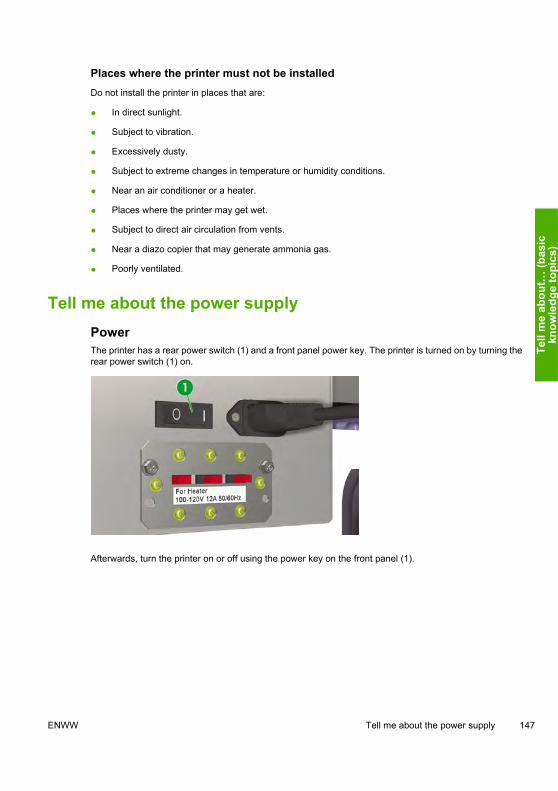
Places where the printer must not be installedDo not install the printer in places that are:
● In direct sunlight.
● Subject to vibration.
● Excessively dusty.
● Subject to extreme changes in temperature or humidity conditions.
● Near an air conditioner or a heater.
● Places where the printer may get wet.
● Subject to direct air circulation from vents.
● Near a diazo copier that may generate ammonia gas.
● Poorly ventilated.
Tell me about the power supplyPowerThe printer has a rear power switch (1) and a front panel power key. The printer is turned on by turning therear power switch (1) on.
Afterwards, turn the printer on or off using the power key on the front panel (1).
ENWW Tell me about the power supply 147
Tell
me
abou
t… (b
asic
know
led g
e to
pics
)
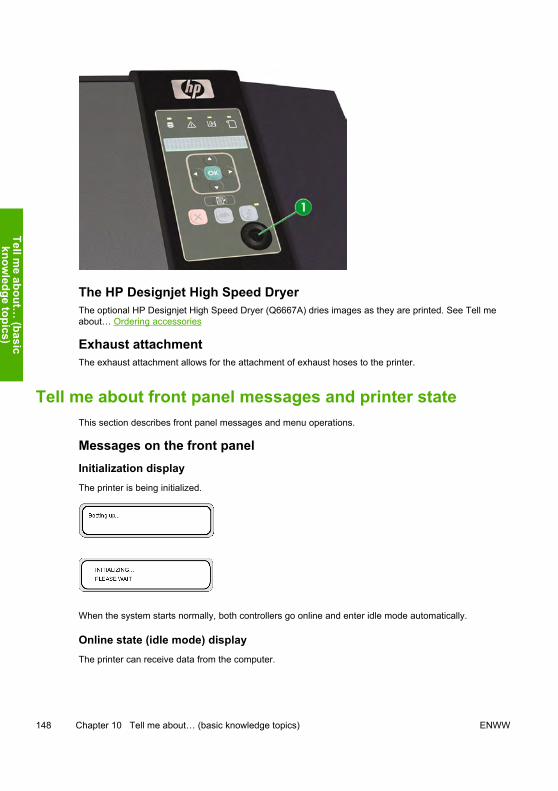
The HP Designjet High Speed DryerThe optional HP Designjet High Speed Dryer (Q6667A) dries images as they are printed. See Tell meabout… Ordering accessories
Exhaust attachmentThe exhaust attachment allows for the attachment of exhaust hoses to the printer.
Tell me about front panel messages and printer stateThis section describes front panel messages and menu operations.
Messages on the front panelInitialization displayThe printer is being initialized.
When the system starts normally, both controllers go online and enter idle mode automatically.
Online state (idle mode) displayThe printer can receive data from the computer.
148 Chapter 10 Tell me about… (basic knowledge topics) ENWW
Tell me about…
(basicknow
ledge topics)
When the OK key is pressed in the online mode, the printhead recovery menu is displayed.
Online state (print mode) displayThe printer is printing.
Online state (print pause mode) displayThe printer is paused.
Print stop and resume
ONLINE
The Online LED flashes
Press the OK key in the print pause mode to start the printhead cleaning.
Print cancel (end)
The Online LED flashes
CANCEL
Online state (print information mode) displayThe amount of media used and the ink cartridge levels are displayed.
ENWW Tell me about front panel messages and printer state 149
Tell
me
abou
t… (b
asic
know
led g
e to
pics
)

SHIFT
SHIFT
Three-second intervals or SHIFT
Three-second intervals or SHIFT
Then the printer returns to online idle mode.
Offline (menu mode) displayMenus can be operated in offline mode.
SHIFT
SHIFT
150 Chapter 10 Tell me about… (basic knowledge topics) ENWW
Tell me about…
(basicknow
ledge topics)
The arrow keys give access to menus.
When the OK key is pressed in the menu mode, the CLEANING menu appears.
Shutdown state displayThe printer is shutting down.
ENWW Tell me about front panel messages and printer state 151
Tell
me
abou
t… (b
asic
know
led g
e to
pics
)

152 Chapter 10 Tell me about… (basic knowledge topics) ENWW
Tell me about…
(basicknow
ledge topics)
11 Tell me about media
● Storing media
● Disposing of media
● Using media
● Handling prints
● Other precautions
Choosing the correct media type for your needs is an essential step in ensuring good print quality. For bestprinting results, use only recommended media, whose reliability and performance have been developedand thoroughly tested. All printing components (printer, ink system, and media) have been designed towork together to give trouble-free performance and optimal print quality.
The HP Designjet 8000s Printer supports the following media types:
● Glossy vinyl chloride
● Matte vinyl chloride
● Banner
Storing media● Always keep unused rolls wrapped in the plastic wrap to prevent discoloration. Rewrap partially used
rolls if they are not being used.
● Avoid rapid changes in temperature and humidity conditions and store media in condensation-freeenvironments.
● Do not stand a roll on its end.
● Do not stack rolls.
Disposing of mediaDispose of media according to local regulations and guidelines, where applicable.
ENWW Storing media 153
Tell
me
abou
t med
ia
Using media● Avoid changes to room conditions and allow media to adapt to room conditions out of the packaging
for 3 hours or more before printing.
● Low humidity may cause curling of media and high humidity may cause wrinkling.
Use media in the recommended temperature and humidity conditions (about 23 °C and 50% R.H.).
● Do not use scratched, crumpled, curled, or dusty media.
Take care not to damage the edges of roll media as this may affect media feeding.
Do not drop or wet the media.
● Handle media by the edges. Skin oils can be transferred to the printing material, leaving fingerprintmarks.
● Keep the media tightly wound on the roll throughout the loading and unloading procedures.
Handling prints● Do not touch the printed surface before the ink dries.
Handle media by the edges.
When handling media take special care in the first 24 hours after printing.
● Rubbing the printed surface may cause color fading or color transfer.
To prevent color transfer do not stack printed images.
● Do not stack your prints together with photocopies or laser prints. The ink or toner may cause imagesto stick together.
● Do not rub, scratch, or hold media as this may cause the ink to peal off.
Other precautions● The printing characteristics of media may change over a long period of time and colors may fade or
print quality may deteriorate.
Use media in good condition.
● Media particles caused by cutting of the media may harm the media coating.
● When using adhesive-backed media, adhesive may stick to the platen.
Adhesive matter on the platen may cause the media to jam.
Clean adhesive matter from the platen. See How do I… How do I maintain the printer.
154 Chapter 11 Tell me about media ENWW
Tell me about m
edia
12 Tell me about the ink system
● Ink Cartridges
● Replacing an ink cartridge
● Ink cartridge storage and disposal
● HP 780 Waste Ink Bottle
● HP Cap Cleaning Kit with Roller
● HP 780 Wiper Cleaning Liquid
● HP Cleaning Swabs
● HP Ink System Storage Kit
● HP Ink System Cleaning Kit
Ink CartridgesThe printer's six ink cartridges provide yellow, magenta, black, cyan, light cyan and light magenta ink tothe printheads. Ink cartridges require no maintenance or cleaning. As long as each ink cartridge is insertedcorrectly into its slot, the ink will flow to the printheads.
NOTE Using non-HP inks may cause poor print quality, printer malfunction, printer failure, or asafety hazard.
The valid period of ink is 3 months from the install by date.
Do not shake ink cartridges before use.
All six color cartridges must be installed. If one of the cartridges is removed, a new one must beinstalled.
Ink cartridges must be installed in all six slots. The positions of ink cartridges are specified by color. Seethe figure below.
ENWW Ink Cartridges 155
Tell
me
abou
t the
ink
syst
em

1. Yellow
2. Magenta
3. Cyan
4. Black
5. Light magenta
6. Light cyan
WARNING! Ink inside the ink cartridge is combustible. Do not expose or store near open flames,sparks, or other sources of ignition.
WARNING! Do not swallow ink. If swallowed, do not induce vomiting and seek immediatemedical attention.
156 Chapter 12 Tell me about the ink system ENWW
Tell me about the ink system
Replacing an ink cartridgeYou can check the ink level at any time by accessing the INK menu and pressing the key. Informationon each ink cartridge is displayed at three-second intervals.
The front panel warns you when a cartridge's ink level is low or when a cartridge is empty.
You are recommended to replace the empty cartridge with a new HP ink cartridge: see How do I …Replacean ink cartridge.
Although it is possible to use refilled or non-HP ink cartridges, either choice has several seriousdisadvantages:
● There is some risk of damaging the printer. In this case the printer warranty will not be valid for anyprinter repairs that are related to the cartridge, nor for any problems due to ink contamination.
● You will invalidate the warranty of all printheads of the same color used in the printer subsequently,unless and until the whole ink system (including ink tubes) is replaced.
● Print quality may be impaired.
● The printer will be unable to estimate the ink level in the cartridge, and will report it as empty.
Ink cartridge storage and disposalCAUTION Securely put a used ink cartridge into a plastic bag and dispose of it as industrialwaste. Observe any regulations for disposal of ink cartridges.
NOTE HP Ink Cartridges should be installed before the “Install By” date printed on the cartridge.Use of the Ink Cartridge 3 months beyond the “Install By” date may cause deterioration in printquality or a printer malfunction.
Store ink cartridges in a dry, cool and dark place.
Always use the recommended consumables (media, ink, etc.). Failure to follow this instructionmay cause poor print quality, printer malfunction, printer failure, or a safety hazard.
HP 780 Waste Ink BottleThe HP 780 Waste Ink Bottle is used for collecting waste ink that is discharged from the printer duringcleaning processes. Only use the recommended HP 780 Waste Ink Bottle.
WARNING! Waste ink is combustible. Keep an HP Waste Ink Bottle containing waste ink awayfrom open flames, sparks, or other sources of ignition.
ENWW Replacing an ink cartridge 157
Tell
me
abou
t the
ink
syst
em
WARNING! Avoid contact between ink and skin, eyes, and clothing.
Immediately wash skin with soapy water.
Remove clothing soaked with ink from contact with skin.
Use an approved eye wash station if ink is splashed into eyes and consult a doctor if necessary.
If an approved eye wash station is unavailable, flush eyes with cold water and consult a doctor ifnecessary.
Do not swallow ink. If swallowed, do not induce vomiting and seek immediate medical attention.
WARNING! Use only an HP Waste Ink Bottle. The bottle must be installed according toinstructions or waste ink may overflow.
An HP Waste Ink Bottle must always be installed before turning the printer ON. Automatic andmanual service cycles produce waste ink that must be contained in an HP Waste Ink Bottle.
Precautions for handling the waste ink bottleWARNING! Always securely replace the cap on a full or partially-full HP Waste Ink Bottle afterremoving it from the printer to prevent ink spills.
The HP Waste Ink Bottle contains organic solvents and must be disposed of in compliance withall local, state, and federal regulations.
WARNING! Always use both hands to remove and carry an HP Waste Ink Bottle.
Keep the HP Waste Ink Bottle upright. Do not place on tables or shelves where it could fall.
HP Cap Cleaning Kit with RollerThe HP Cap Cleaning Kit is used to clean and maintain the capping unit. The HP Cap Cleaning Liquidcomes packs of six bottles of cleaning liquid.
HP 780 Wiper Cleaning LiquidThe HP 780 Wiper Cleaning Liquid is used to clean and maintain the wiper blades.
HP Cleaning SwabsHP Cleaning Swabs are used for cleaning your printer parts. They are specifically designed to avoiddamage to your printer. They are designed not to leave particles or fibers on your printer when you performcleaning procedures.
158 Chapter 12 Tell me about the ink system ENWW
Tell me about the ink system

HP Ink System Storage KitThe HP 780 Ink System Storage Kit is used to protect the ink tubes and printheads when the printer isswitched off for less than 4 weeks. The HP 780 Ink System Storage Kit contains six ink system storageliquid cartridges.
HP Ink System Cleaning KitThe HP 780 Ink System Cleaning Kit is used to try to recover the printheads and clean the ink tubes whenthe printer has been switched off for less than two weeks. The HP 780 Ink System Cleaning Kit containssix cleaning liquid cartridges.
ENWW HP Ink System Storage Kit 159
Tell
me
abou
t the
ink
syst
em

160 Chapter 12 Tell me about the ink system ENWW
Tell me about the ink system

13 Tell me about waste management
Disposing of wasteIt is the printer owner’s responsibility to ensure that waste is disposed of in accordance with all local, stateand federal regulations.
There are registered waste management companies that have been authorized by local authorities tomanage waste collection and disposal and that will manage waste management and disposal on yourbehalf.
We recommend that you contact your local authorities for a list of authorized companies, or you can searchfor the nearest authorized waste disposal company on the Worldwide Web.
Make sure that any waste disposal company you engage for this task is able to provide you with thenecessary documentation proving their authority to legally manage and dispose of waste.
You will be legally responsible for failing to dispose of waste according to local, state and federal legislation.
When you have established an authorized waste management company, they will need to know the typeof chemical that requires disposal and you will need to determine the type of agreement that best meetsyour requirements.
They will need to know the common name or chemical CAS number of the main solvent found in thesupplies. This information can be obtained on the Material Safety Data Sheets (MSDS) available for allsupplies at http://www.hp.com/hpinfo/globalcitizenship/environment/productdata/index.html
ENWW Disposing of waste 161
Tell
me
abou
t was
tem
ana g
emen
t
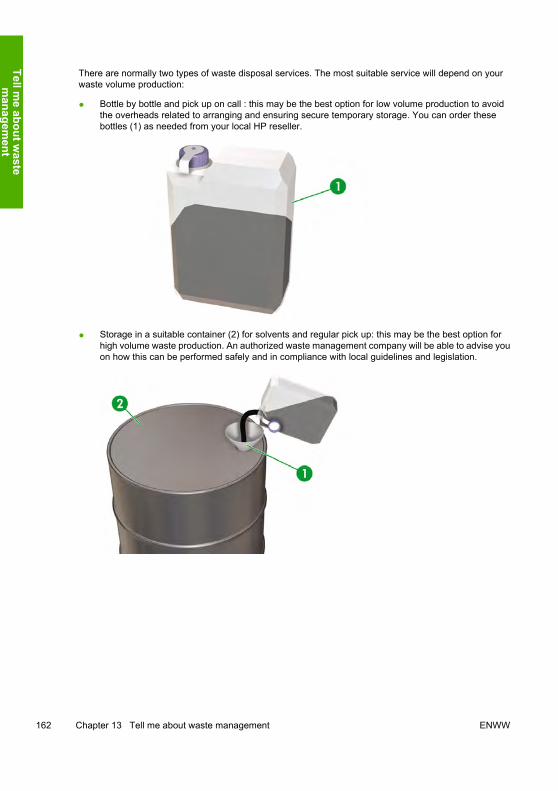
There are normally two types of waste disposal services. The most suitable service will depend on yourwaste volume production:
● Bottle by bottle and pick up on call : this may be the best option for low volume production to avoidthe overheads related to arranging and ensuring secure temporary storage. You can order thesebottles (1) as needed from your local HP reseller.
● Storage in a suitable container (2) for solvents and regular pick up: this may be the best option forhigh volume waste production. An authorized waste management company will be able to advise youon how this can be performed safely and in compliance with local guidelines and legislation.
162 Chapter 13 Tell me about waste management ENWW
Tell me about w
astem
anagement
General recommendations● The HP 780 Waste Ink Bottle is specifically designed to resist chemical interaction with waste ink. Do
not use any other kind of container or bottle to collect the liquid. Consult your waste managementcompany to ensure you are following correct and safe procedures.
● Do not dispose of materials via the sanitary sewer or drains. Hazardous waste disposal is regulatedby local, state and federal regulations.
● Store the full bottle in an area that has been prepared for this purpose until it is emptied or removedby a waste management company for disposal. Consult your local authorities about requirements orfor advice on storing hazardous waste.
● The bottle is provided with an undetachable cap to close the bottle safely and securely to avoid spillagewhen it is handled or transported.
● Use disposable latex or Nitrile(R) safety gloves to handle or transport the bottle once full.
● If you are emptying the HP supplied bottle into a larger container, use the container for this chemicalexclusively. Never mix this chemical with other chemicals in the same container. This represents aserious safety hazard.
ENWW General recommendations 163
Tell
me
abou
t was
tem
ana g
emen
t

164 Chapter 13 Tell me about waste management ENWW
Tell me about w
astem
anagement
14 Tell me about… (menus)
This chapter outlines the user menu structure and operations.
● Menu operations
● The INK menu & messages
● The MEDIA menu
● The MEDIA REG menu
● Media advance calibration
● The PH. MAIN menu
● The PH. REC menu
● The FEED option
● The REWIND option
● The PRINTER menu
● The ADJUST menu
● The SETUP menu
● The HEATER menu
ENWW 165
Tell
me
abou
t… (m
enus
)
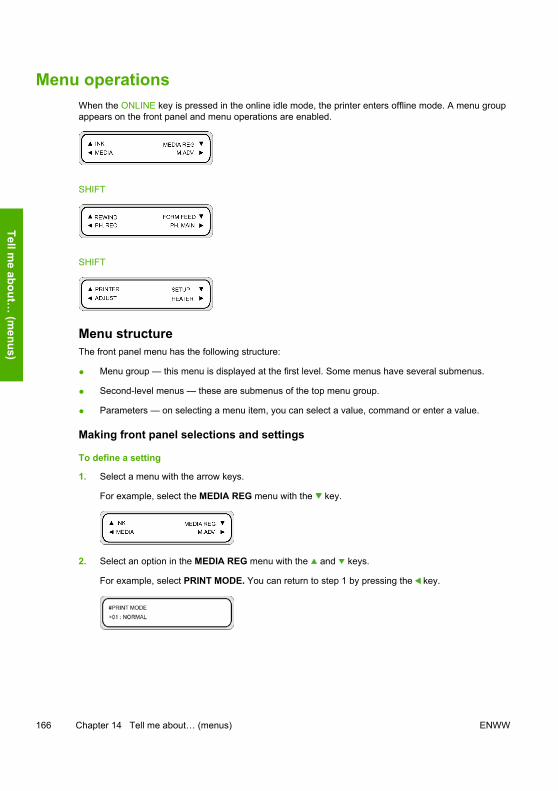
Menu operationsWhen the ONLINE key is pressed in the online idle mode, the printer enters offline mode. A menu groupappears on the front panel and menu operations are enabled.
SHIFT
SHIFT
Menu structureThe front panel menu has the following structure:
● Menu group — this menu is displayed at the first level. Some menus have several submenus.
● Second-level menus — these are submenus of the top menu group.
● Parameters — on selecting a menu item, you can select a value, command or enter a value.
Making front panel selections and settings
To define a setting
1. Select a menu with the arrow keys.
For example, select the MEDIA REG menu with the key.
2. Select an option in the MEDIA REG menu with the and keys.
For example, select PRINT MODE. You can return to step 1 by pressing the key.
166 Chapter 14 Tell me about… (menus) ENWW
Tell me about…
(menus)
3. To change the option setting displayed, press the OK key.
4. Select a setting with the and keys.
Select 01 : FINE.
5. Press OK key to confirm the parameter and return to step 2.
To define a value
The following example describes the MEDIA ADV. VALUE in the ADJUST menu.
1. Select a menu with the arrow keys.
Select the ADJUST menu with the key.
2. Select a menu option with the and keys.
Select the MEDIA ADV. VALUE option. You can return to step 1 by pressing the key.
3. Press the OK key.
4. Select the digit to be modified using the and keys.
ENWW Menu operations 167
Tell
me
abou
t… (m
enus
)
5. Change the value using the and keys.
NOTE To see the full list of characters available, refer to the list of characters below.
6. Press the OK key to confirm the value and return to step 2.
Character list
Character code group
SHIFT , SHIFT
Character
,
Symbols space, !, “,#,$,%,&,',*,+,-,.,/,:,;,<,=,>,?,@,[,],^,_,{,|,}
Numerals 0 to 9
Upper-case letters A to Z
Lower-case letters a to z
Special characters
168 Chapter 14 Tell me about… (menus) ENWW
Tell me about…
(menus)
The INK menu & messagesThis INK menu is used to display ink information or replace the ink. When the key is pressed, informationon each ink cartridge is displayed at three-second intervals.
XX: Color name — K, Lm, Lc, Y, M, and C.
YYY: Amount of ink remaining.
ZZ/ZZ/ZZ: Manufacturing date of the ink cartridge
NOTE If the following message is displayed, the ink cartridge is not a genuine HP Ink Cartridge.
Press the SHIFT key to see information on the next color ink cartridge without waiting for three seconds.
Press the CANCEL or key to return to the previous menu.
Press the ONLINE key to end menu display and take the printer online.
Press the OK key to replace an ink cartridge. See also Tell me about… Replacing an ink cartridge.
Replacing an empty ink cartridge1. The following front panel message is displayed.
XX: Ink name (K: Black, Lm: Light magenta, Lc: Light cyan, C: Cyan M: Magenta Y: Yellow)
2. Replace the ink cartridge. See How do I… Replace an ink cartridge.
The MEDIA menuThis menu is used to display media information or replace the media. When you press the key, informationon media is displayed at three-second intervals.
ENWW The INK menu & messages 169
Tell
me
abou
t… (m
enus
)
To access the MEDIA menu:
1. Press the ONLINE key.
2. Press the key to see media information.
Media roll:
Cut sheet:
Nest:
XXXXXX: media type
YYY: media width
ZZZ: media length
Press the CANCEL and keys to display the main menu in offline state.
Press the ONLINE key to take the printer online.
Press the OK key to change media settings.
The MEDIA REG menuUse the MEDIA REG menu to register or modify media type parameters or create new media types in theprinter. See How do I…. Manage media types. For a list of the default parameters, see Default values formedia types in this section.
To access the MEDIA REG menu:
1. Press the ONLINE key.
170 Chapter 14 Tell me about… (menus) ENWW
Tell me about…
(menus)
2. Press the key to see MEDIA REG menu options.
Selecting a media type number (SELECT MEDIA)Select the media type number you intend to modify or create. You can choose from 01 to 20.
Parameters: media type number (01 to 20).
NOTE All changes to settings in the MEDIA REG menu will apply to the media that you selector create in the SELECT MEDIA option.
Setting a media type name (RENAME MEDIA)Rename a media type you want to modify or create.
Name the media type using up to six characters.
Parameters: a six-digit name.
Media advance value (MEDIA ADV VALUE)Use this option to set the media advance value for the selected media type. This value is obtained from theMedia Advance print. See How do I… Calibrate media advance for the step by step procedure.
NOTE This value will only be applied by the printer front panel setting if the ADVANCE PREFoption is set to FRONT PANEL.
Parameters: XXX.XX% (97.00 to 103.00%)
ENWW The MEDIA REG menu 171
Tell
me
abou
t… (m
enus
)
Dry time value (DRY TIME VALUE)Use this option to define the amount of time the printhead carriage pauses between printing passes for theselected media type.
Parameters: three-digit time in seconds.
The front panel display asks the user to wait while a countdown readout shows how much drying timeremains.
Print mode setting (PRINT MODE)Use this option to set the default print quality for the selected media type.
NOTE This value will only be applied by the printer front panel setting if the PRINT MODEPREF option is set to FRONT PANEL.
Parameters:
● NORMAL — standard and high speed print modes (720 x 720 dpi – 8 passes).
● H-QUALITY — high quality print mode (720 x 720 dpi – 16 passes).
● H-DENSITY — high density print mode (720 x 720 dpi – 16 passes).
● DRAFT — draft print mode (360 x 720 dpi – 4 passes).
● FAST — fast print mode (720 x 720 dpi – 8 passes).
● FINE DRAFT — fine draft print mode (540 x 720 dpi – 6 passes).
● 3 TIMES — high quality, high density print mode (720 x 720 dpi – 24 passes).
● F-H-QUALITY — high quality print mode (720 x 720 dpi – 16 passes).
● F-H-DENSITY — Fast high density print mode (720 x 720 dpi – 16 passes).
● F-3 TIMES — Normal very high density print mode (720 x 720 dpi – 24 passes).
● FINE — Fine print mode (720 x 720 dpi – 8 passes).
● F-FINE — Fast fine print modes (720 x 720 dpi – 8 passes).
Print direction setting (PRINT DIRECTION)For the selected media type, use this option to set bidirectional printing so that the print carriage places inkon the media at every pass, or unidirectional printing so that the print carriage places ink on the media onceevery two passes.
172 Chapter 14 Tell me about… (menus) ENWW
Tell me about…
(menus)
Parameters:
● BIDIR — Bidirectional printing gives higher printing speeds with slightly lower image quality.
● UNIDIR — Unidirectional printing gives lower printing speeds but higher image quality.
Flatten time (FLATTEN TIME)The printing conditions may affect the media when the printer has not printed for some time, and print qualitymay be affected by wrinkles or smudges on the edge of the media due to humidity and dust. For example,if you print using a higher heater temperature, this may cause wrinkling, so you can set a lower time tomaintain the media in optimal condition. The FLATTEN MEDIA option automatically feeds and rewinds themedia before printing starts.
If no data is received and the set time limit is reached, then the edge of the media roll is fed through themedia path to the rear cover automatically. If the leading edge of the media roll is already present at therear cover, the procedure is not performed.
The printer performs the procedure automatically when it is turned off; the edge of the media roll is fedthrough the media path to the rear cover. When using the take-up reel, the printer turns off without feedingthe media through the media path.
Parameters:
● NONE — Select this parameter when you use your printer continuously and the type of media doesnot wrinkle.
● 30 min — Media is passed through the media path if there is no printing for more than 30 minutes. Ifthe printer starts printing before the 30 minute interval, the media is passed through the media pathat the start of printing. Select this parameter when the printer prints in a high humidity environmentfrequently and the media is extremely wrinkled.
● 1 hour — Media is passed through the media path if there is no printing for more than 1 hour. Selectthis parameter when the print interval is more than 1 hour and the media is extremely wrinkled.
● 2 hours — Media is passed through the media path if there is no printing for more than 2 hours. Selectthis parameter when the print interval is more than 2 hours and the media is extremely wrinkled.
● 4 hours — Media is passed through the media path if there is no printing for more than 4 hours. Selectthis parameter when the print interval is more than 4 hours and the media is extremely wrinkled.
Use media edge guard (USE EDGE GUARD)Use this option to activate or deactivate the media edge guards for the selected media type. The right andleft print margins are 10 mm when the media edge guards are used, and 5 mm when they are not used.See How do I… Use the media edge guards.
ENWW The MEDIA REG menu 173
Tell
me
abou
t… (m
enus
)
Parameters:
● YES — the edge guard is used.
● NO — the edge guard is not used.
Media advance mode (MEDIA ADV MODE)Use this option to set a media advance mode for the selected media type.
Parameters:
● FWD ONLY — Media is fed through the printer in the standard way.
● BACK & FWD — This setting checks that the media moves freely through the media path by feedingthe media backwards and forwards before starting to print. This can be useful for media with adhesivecoating that, in combination with the heat, may stick to the platen.
NOTE BACK & FWD can cause image banding.
Take-up reel mode (TUR MODE)Use this option to set the take-up reel winding mode for the selected media type. You must set the take-up reel winding switch to the same setting as this option. See How do I… Use the take-up reel.
Parameters:
● LOOSE — Media hangs loosely after printing and is then gathered on to the take-up reel.
● TENSION — Media is gathered on to the take-up reel while printing is going on.
Tip TENSION is the recommended take-up reel mode particularly when printing on longroll media. This helps to reduce the risk of media skew.
NOTE If you see banding, perform the Media Advance calibration in the mode that youare using. See How do I calibrate my printer.
174 Chapter 14 Tell me about… (menus) ENWW
Tell me about…
(menus)
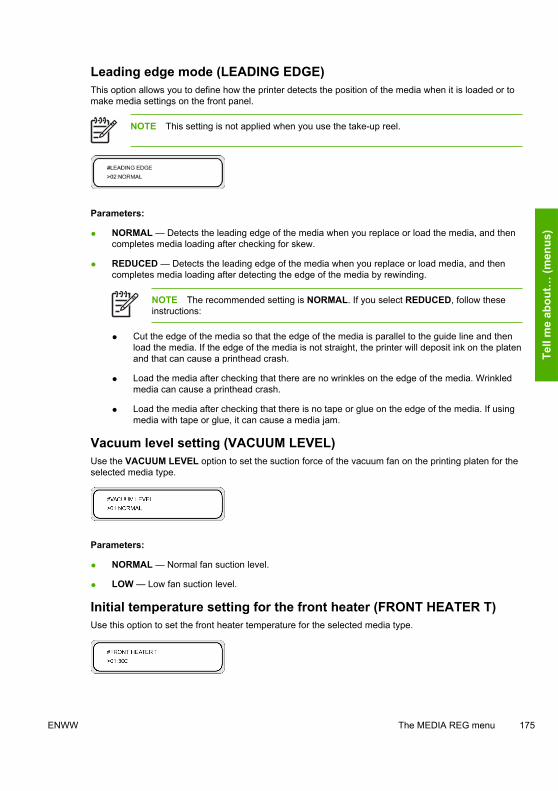
Leading edge mode (LEADING EDGE)This option allows you to define how the printer detects the position of the media when it is loaded or tomake media settings on the front panel.
NOTE This setting is not applied when you use the take-up reel.
Parameters:
● NORMAL — Detects the leading edge of the media when you replace or load the media, and thencompletes media loading after checking for skew.
● REDUCED — Detects the leading edge of the media when you replace or load media, and thencompletes media loading after detecting the edge of the media by rewinding.
NOTE The recommended setting is NORMAL. If you select REDUCED, follow theseinstructions:
● Cut the edge of the media so that the edge of the media is parallel to the guide line and thenload the media. If the edge of the media is not straight, the printer will deposit ink on the platenand that can cause a printhead crash.
● Load the media after checking that there are no wrinkles on the edge of the media. Wrinkledmedia can cause a printhead crash.
● Load the media after checking that there is no tape or glue on the edge of the media. If usingmedia with tape or glue, it can cause a media jam.
Vacuum level setting (VACUUM LEVEL)Use the VACUUM LEVEL option to set the suction force of the vacuum fan on the printing platen for theselected media type.
Parameters:
● NORMAL — Normal fan suction level.
● LOW — Low fan suction level.
Initial temperature setting for the front heater (FRONT HEATER T)Use this option to set the front heater temperature for the selected media type.
ENWW The MEDIA REG menu 175
Tell
me
abou
t… (m
enus
)
Parameters: 15 °C to 55 °C, or ** to turn the heater off.
NOTE For Celsius/Fahrenheit conversions:
F = (9 × C / 5) + 32
C = 5 × (F - 32) / 9
NOTE This value will only be applied if the HEATER PREF option is set to HEAT PANEL.
Initial temperature setting for the print heater (PRINT HEATER T)Use this option to set the printer platen heater temperature for the selected media type.
Parameters: 15 °C to 55 °C, or ** to turn the heater off.
NOTE For Celsius/Fahrenheit conversions:
F = (9 × C / 5) + 32
C = 5 × (F - 32) / 9
NOTE This value will only be applied if the HEATER PREF option is set to HEAT PANEL.
Initial temperature setting for the rear heater (REAR HEATER T)Use this option to set the rear heater temperature for the selected media type.
Parameters: 15 °C to 55 °C, or ** to turn the heater off.
176 Chapter 14 Tell me about… (menus) ENWW
Tell me about…
(menus)
NOTE For Celsius/Fahrenheit conversions:
F = (9 × C / 5) + 32
C = 5 × (F - 32) / 9
NOTE This value will only be applied if the HEATER PREF option is set to HEAT PANEL.
Color stripe setting (COLOR STRIPE)A color stripe is printed on all plots. This ensures that all printhead nozzles are used in all prints, even ifthe printed image does not include certain colors. The color stripe avoids drying of nozzles even if they arenot used for a long time because they are not needed within your printed images. This option activates ordeactivates printing of the color stripe for the selected media type.
Parameters:
● OFF — Does not print the color stripe.
● ON — Prints the color stripe.
NOTE Use of the color stripe will add 40 mm (1.57 in) to your print margin.
NOTE We recommend that you set COLOR STRIPE to ON if possible. If the color stripe is notprinted, this can affect printhead nozzle performance.
The color stripe is printed on the test print even if this option is set to OFF.
Printhead height setting (PH HEIGHT VAL)Use this option to set the printhead height for the selected media type. Change this setting when you changethe printing carriage height (see How do I… Change the printhead height).
Parameters:
● NORMAL — Default.
● HIGH — Set for thick media.
Bidirectional print position adjustment (BIDIR DEF VALUE)For the selected media type, use this option to adjust the position of all the printheads when usingbidirectional printing for all print modes except FINE and F-FINE.
Enter an adjustment value based on the printhead adjustment pattern print. See How do I calibrate myprinter.
ENWW The MEDIA REG menu 177
Tell
me
abou
t… (m
enus
)
YY: Ink color
XXXXXX: Media type
Display order: K -> Lm -> Lc -> Y -> M -> C
Parameters: sign (+/-), value (-32 to +31)
Bidirectional print position fine adjustment (BIDIR FINE VALUE)For the selected media type, use this option to fine adjust the position of all the printheads when usingbidirectional printing in FINE print mode.
Enter an adjustment value based on the printhead fine adjustment pattern print. See How do I calibrate myprinter.
YY: Ink color
XXXXXX: Media type
Display order: K -> Lm -> Lc -> Y -> M -> C
Parameters: sign (+/-), value (-32 to +31)
Printhead cleaning mode (PH CLEANING)Use this option to select an automatic printhead cleaning mode for the selected media type.
Parameters:
● START & END — Performs cleaning at the start or end of the print based on the print history record.
● DURING PRINT — Performs cleaning after a certain period of time even if the printer interrupts itscurrent print job. This option is recommended only for Glossy media.
● DURING PRINT2 — Performs cleaning after a certain period of time even if the printer interrupts itscurrent print job.
NOTE When the TENSION winding or BACK & FWD (MEDIA ADV MODE mode) is selected,the printer will only use START & END even if you have selected DURING PRINT.
When DURING PRINT is selected, separator lines are generated on the print because cleaning isperformed during printing. However, cleaning is performed after completing the image around the separator
178 Chapter 14 Tell me about… (menus) ENWW
Tell me about…
(menus)
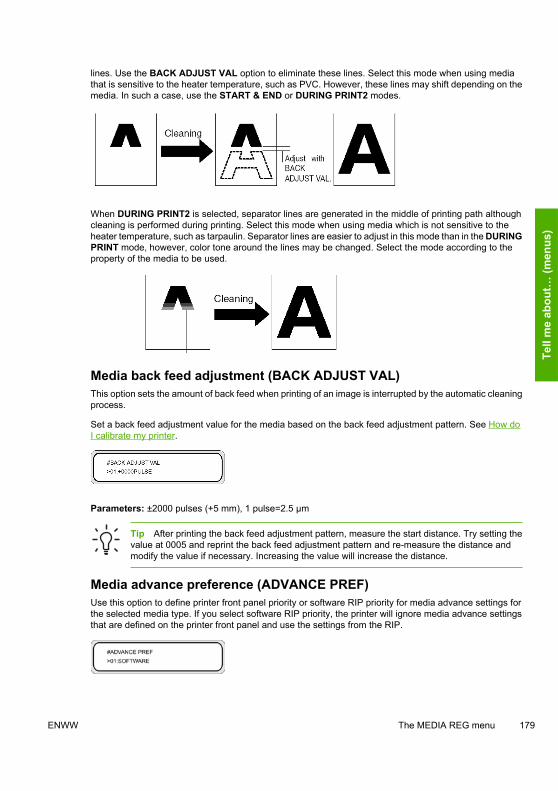
lines. Use the BACK ADJUST VAL option to eliminate these lines. Select this mode when using mediathat is sensitive to the heater temperature, such as PVC. However, these lines may shift depending on themedia. In such a case, use the START & END or DURING PRINT2 modes.
When DURING PRINT2 is selected, separator lines are generated in the middle of printing path althoughcleaning is performed during printing. Select this mode when using media which is not sensitive to theheater temperature, such as tarpaulin. Separator lines are easier to adjust in this mode than in the DURINGPRINT mode, however, color tone around the lines may be changed. Select the mode according to theproperty of the media to be used.
Media back feed adjustment (BACK ADJUST VAL)This option sets the amount of back feed when printing of an image is interrupted by the automatic cleaningprocess.
Set a back feed adjustment value for the media based on the back feed adjustment pattern. See How doI calibrate my printer.
Parameters: ±2000 pulses (+5 mm), 1 pulse=2.5 µm
Tip After printing the back feed adjustment pattern, measure the start distance. Try setting thevalue at 0005 and reprint the back feed adjustment pattern and re-measure the distance andmodify the value if necessary. Increasing the value will increase the distance.
Media advance preference (ADVANCE PREF)Use this option to define printer front panel priority or software RIP priority for media advance settings forthe selected media type. If you select software RIP priority, the printer will ignore media advance settingsthat are defined on the printer front panel and use the settings from the RIP.
ENWW The MEDIA REG menu 179
Tell
me
abou
t… (m
enus
)
Parameters:
● SOFTWARE — Settings in the RIP take priority.
● FRONT PANEL — Settings in the printer front panel take priority.
Print mode preference (PRINT MODE PREF)Use this option to define printer front panel priority or software RIP priority for print mode settings for theselected media type. If you select software RIP priority, the printer will ignore print mode settings that aredefined on the printer front panel and use the settings from the RIP.
Parameters:
● SOFTWARE — Settings in the RIP take priority.
● FRONT PANEL — Settings in the printer front panel take priority.
Heater preference (HEATER PREF)Use this option to define printer front panel priority or software RIP priority for heater settings for the selectedmedia type. If you select software RIP priority, the printer will ignore heater settings that are defined on theprinter and heater front panels and use the settings from the RIP.
Parameters:
● SOFTWARE — Settings in the RIP take priority.
● HEAT PANEL — Settings in the printer front panel take priority.
Printhead rest period (PH REST PERIOD)Use this option to define the number of passes the printhead carriage performs before it pauses for theselected media type.
Parameters:
● CYCLES — Number of passes.
The front panel display asks the user to wait while a countdown readout shows how much rest time remains.
180 Chapter 14 Tell me about… (menus) ENWW
Tell me about…
(menus)
Set remaining media (SET REMAINING MEDIA)Use this option to set the amount of media left for the media type you are loading. Use this option if youare using a roll of media that is of a different length to the roll (of the same media type) that was previouslyloaded.
Parameters:
● YYY — Length in meters or feet.
Printhead temperature rest (PH TEMP REST)Use this option if you want printing to pause if there is a ttoo great a difference between the temperatureset for the media print heater and the actual printhead temperature.
Parameters:
● ON — Pauses printing.
● OFF — Printing continues.
Delete a media type (DELETE MEDIA)Use this option to delete a registered media type. See How do I… Manage media types.
Media types from 02 to 20 can be selected. Media type 01 is defined as the standard media and cannot bedeleted.
Copy a media type (COPY MEDIA)Use this option to copy a registered media type. See How do I… Manage media types.
Paste a media type (PASTE MEDIA)Use this option to paste a media that you have previously copied, over a media type that already exists.See How do I… Manage media types.
ENWW The MEDIA REG menu 181
Tell
me
abou
t… (m
enus
)
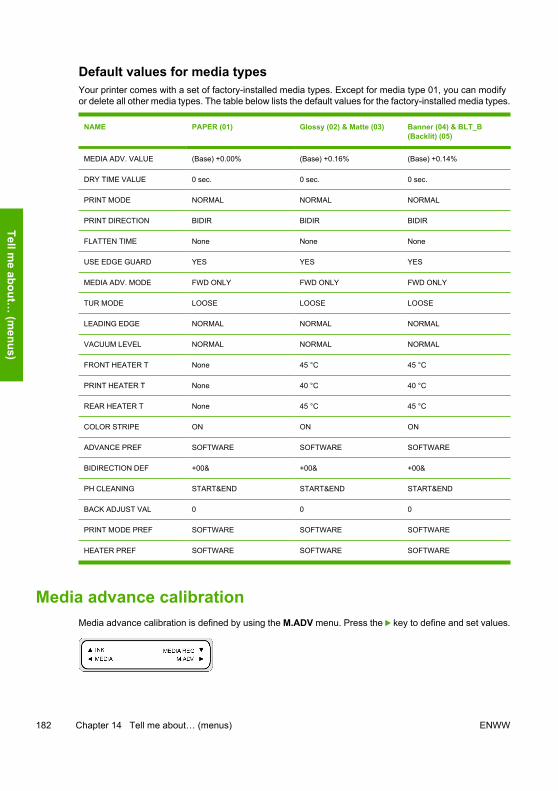
Default values for media typesYour printer comes with a set of factory-installed media types. Except for media type 01, you can modifyor delete all other media types. The table below lists the default values for the factory-installed media types.
NAME PAPER (01) Glossy (02) & Matte (03) Banner (04) & BLT_B(Backlit) (05)
MEDIA ADV. VALUE (Base) +0.00% (Base) +0.16% (Base) +0.14%
DRY TIME VALUE 0 sec. 0 sec. 0 sec.
PRINT MODE NORMAL NORMAL NORMAL
PRINT DIRECTION BIDIR BIDIR BIDIR
FLATTEN TIME None None None
USE EDGE GUARD YES YES YES
MEDIA ADV. MODE FWD ONLY FWD ONLY FWD ONLY
TUR MODE LOOSE LOOSE LOOSE
LEADING EDGE NORMAL NORMAL NORMAL
VACUUM LEVEL NORMAL NORMAL NORMAL
FRONT HEATER T None 45 °C 45 °C
PRINT HEATER T None 40 °C 40 °C
REAR HEATER T None 45 °C 45 °C
COLOR STRIPE ON ON ON
ADVANCE PREF SOFTWARE SOFTWARE SOFTWARE
BIDIRECTION DEF +00& +00& +00&
PH CLEANING START&END START&END START&END
BACK ADJUST VAL 0 0 0
PRINT MODE PREF SOFTWARE SOFTWARE SOFTWARE
HEATER PREF SOFTWARE SOFTWARE SOFTWARE
Media advance calibrationMedia advance calibration is defined by using the M.ADV menu. Press the key to define and set values.
182 Chapter 14 Tell me about… (menus) ENWW
Tell me about…
(menus)
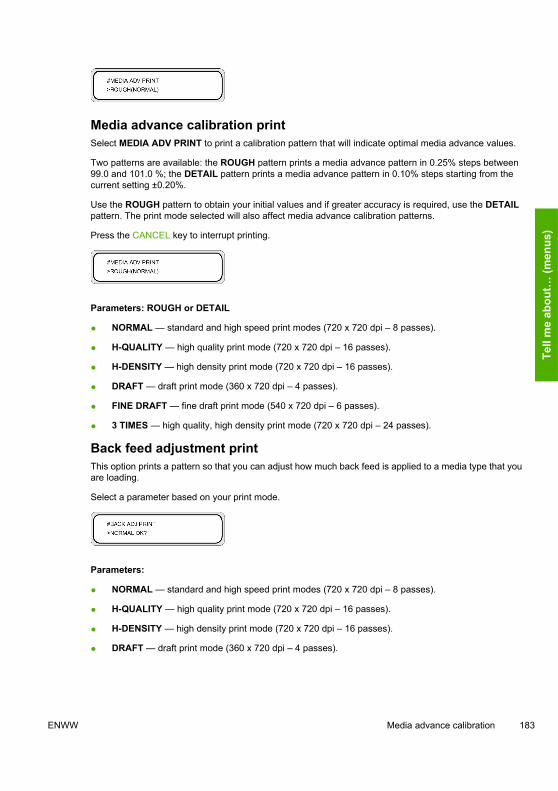
Media advance calibration printSelect MEDIA ADV PRINT to print a calibration pattern that will indicate optimal media advance values.
Two patterns are available: the ROUGH pattern prints a media advance pattern in 0.25% steps between99.0 and 101.0 %; the DETAIL pattern prints a media advance pattern in 0.10% steps starting from thecurrent setting ±0.20%.
Use the ROUGH pattern to obtain your initial values and if greater accuracy is required, use the DETAILpattern. The print mode selected will also affect media advance calibration patterns.
Press the CANCEL key to interrupt printing.
Parameters: ROUGH or DETAIL
● NORMAL — standard and high speed print modes (720 x 720 dpi – 8 passes).
● H-QUALITY — high quality print mode (720 x 720 dpi – 16 passes).
● H-DENSITY — high density print mode (720 x 720 dpi – 16 passes).
● DRAFT — draft print mode (360 x 720 dpi – 4 passes).
● FINE DRAFT — fine draft print mode (540 x 720 dpi – 6 passes).
● 3 TIMES — high quality, high density print mode (720 x 720 dpi – 24 passes).
Back feed adjustment printThis option prints a pattern so that you can adjust how much back feed is applied to a media type that youare loading.
Select a parameter based on your print mode.
Parameters:
● NORMAL — standard and high speed print modes (720 x 720 dpi – 8 passes).
● H-QUALITY — high quality print mode (720 x 720 dpi – 16 passes).
● H-DENSITY — high density print mode (720 x 720 dpi – 16 passes).
● DRAFT — draft print mode (360 x 720 dpi – 4 passes).
ENWW Media advance calibration 183
Tell
me
abou
t… (m
enus
)
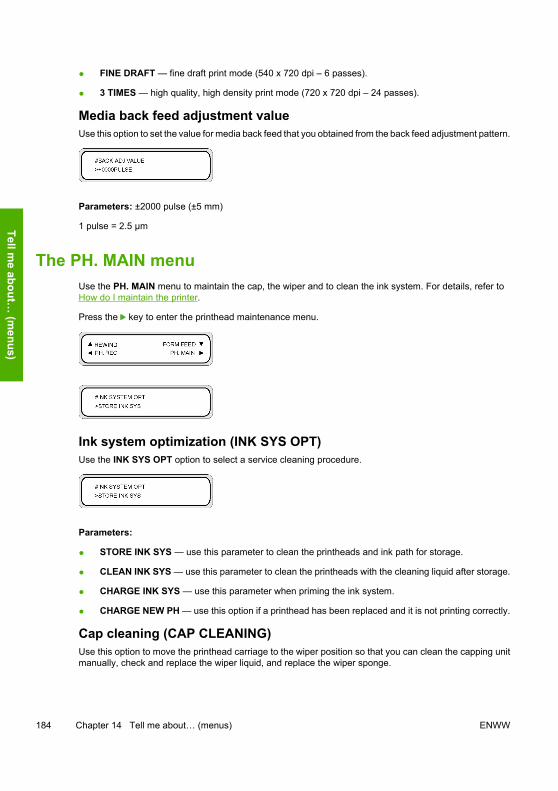
● FINE DRAFT — fine draft print mode (540 x 720 dpi – 6 passes).
● 3 TIMES — high quality, high density print mode (720 x 720 dpi – 24 passes).
Media back feed adjustment valueUse this option to set the value for media back feed that you obtained from the back feed adjustment pattern.
Parameters: ±2000 pulse (±5 mm)
1 pulse = 2.5 µm
The PH. MAIN menuUse the PH. MAIN menu to maintain the cap, the wiper and to clean the ink system. For details, refer toHow do I maintain the printer.
Press the key to enter the printhead maintenance menu.
Ink system optimization (INK SYS OPT)Use the INK SYS OPT option to select a service cleaning procedure.
Parameters:
● STORE INK SYS — use this parameter to clean the printheads and ink path for storage.
● CLEAN INK SYS — use this parameter to clean the printheads with the cleaning liquid after storage.
● CHARGE INK SYS — use this parameter when priming the ink system.
● CHARGE NEW PH — use this option if a printhead has been replaced and it is not printing correctly.
Cap cleaning (CAP CLEANING)Use this option to move the printhead carriage to the wiper position so that you can clean the capping unitmanually, check and replace the wiper liquid, and replace the wiper sponge.
184 Chapter 14 Tell me about… (menus) ENWW
Tell me about…
(menus)
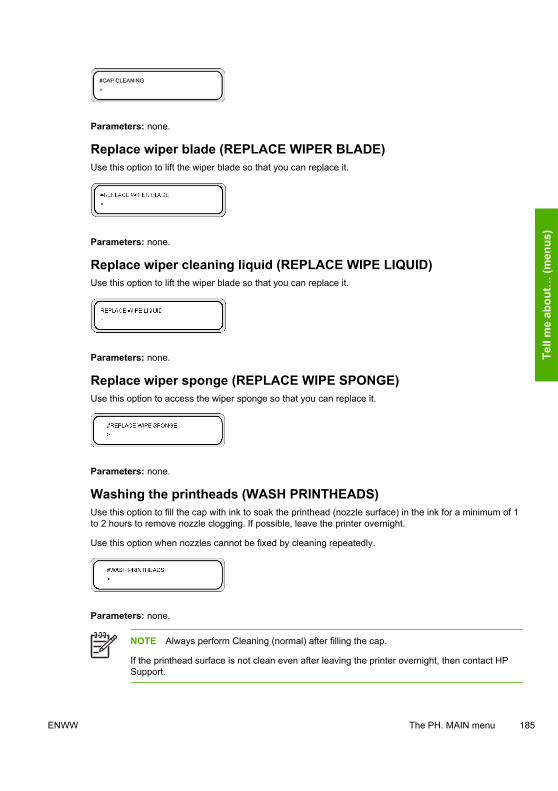
Parameters: none.
Replace wiper blade (REPLACE WIPER BLADE)Use this option to lift the wiper blade so that you can replace it.
Parameters: none.
Replace wiper cleaning liquid (REPLACE WIPE LIQUID)Use this option to lift the wiper blade so that you can replace it.
Parameters: none.
Replace wiper sponge (REPLACE WIPE SPONGE)Use this option to access the wiper sponge so that you can replace it.
Parameters: none.
Washing the printheads (WASH PRINTHEADS)Use this option to fill the cap with ink to soak the printhead (nozzle surface) in the ink for a minimum of 1to 2 hours to remove nozzle clogging. If possible, leave the printer overnight.
Use this option when nozzles cannot be fixed by cleaning repeatedly.
Parameters: none.
NOTE Always perform Cleaning (normal) after filling the cap.
If the printhead surface is not clean even after leaving the printer overnight, then contact HPSupport.
ENWW The PH. MAIN menu 185
Tell
me
abou
t… (m
enus
)
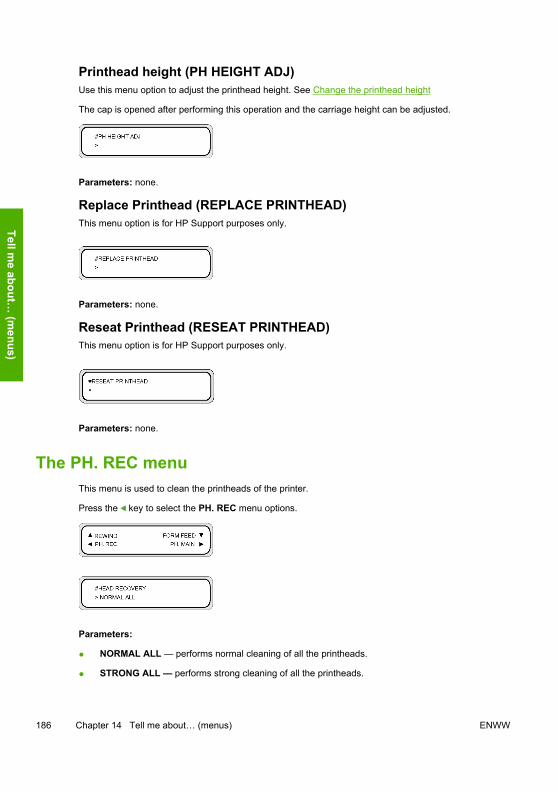
Printhead height (PH HEIGHT ADJ)Use this menu option to adjust the printhead height. See Change the printhead height
The cap is opened after performing this operation and the carriage height can be adjusted.
Parameters: none.
Replace Printhead (REPLACE PRINTHEAD)This menu option is for HP Support purposes only.
Parameters: none.
Reseat Printhead (RESEAT PRINTHEAD)This menu option is for HP Support purposes only.
Parameters: none.
The PH. REC menuThis menu is used to clean the printheads of the printer.
Press the key to select the PH. REC menu options.
Parameters:
● NORMAL ALL — performs normal cleaning of all the printheads.
● STRONG ALL — performs strong cleaning of all the printheads.
186 Chapter 14 Tell me about… (menus) ENWW
Tell me about…
(menus)
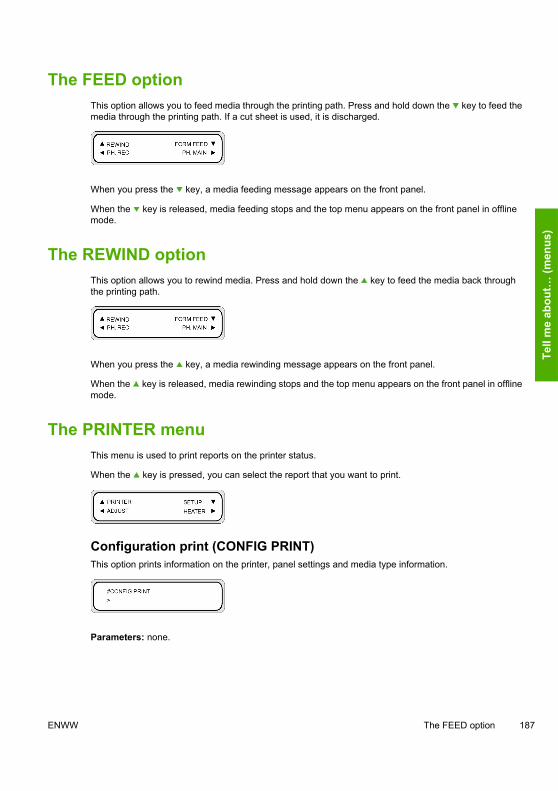
The FEED optionThis option allows you to feed media through the printing path. Press and hold down the key to feed themedia through the printing path. If a cut sheet is used, it is discharged.
When you press the key, a media feeding message appears on the front panel.
When the key is released, media feeding stops and the top menu appears on the front panel in offlinemode.
The REWIND optionThis option allows you to rewind media. Press and hold down the key to feed the media back throughthe printing path.
When you press the key, a media rewinding message appears on the front panel.
When the key is released, media rewinding stops and the top menu appears on the front panel in offlinemode.
The PRINTER menuThis menu is used to print reports on the printer status.
When the key is pressed, you can select the report that you want to print.
Configuration print (CONFIG PRINT)This option prints information on the printer, panel settings and media type information.
Parameters: none.
ENWW The FEED option 187
Tell
me
abou
t… (m
enus
)
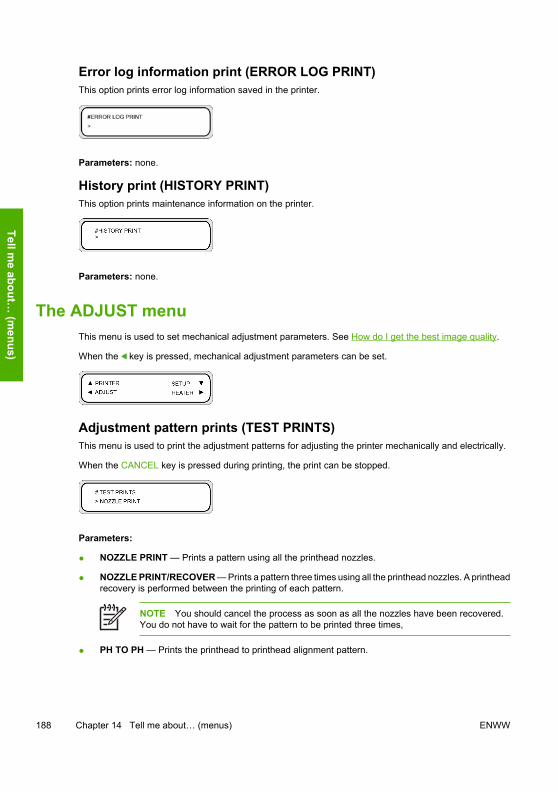
Error log information print (ERROR LOG PRINT)This option prints error log information saved in the printer.
Parameters: none.
History print (HISTORY PRINT)This option prints maintenance information on the printer.
Parameters: none.
The ADJUST menuThis menu is used to set mechanical adjustment parameters. See How do I get the best image quality.
When the key is pressed, mechanical adjustment parameters can be set.
Adjustment pattern prints (TEST PRINTS)This menu is used to print the adjustment patterns for adjusting the printer mechanically and electrically.
When the CANCEL key is pressed during printing, the print can be stopped.
Parameters:
● NOZZLE PRINT — Prints a pattern using all the printhead nozzles.
● NOZZLE PRINT/RECOVER — Prints a pattern three times using all the printhead nozzles. A printheadrecovery is performed between the printing of each pattern.
NOTE You should cancel the process as soon as all the nozzles have been recovered.You do not have to wait for the pattern to be printed three times,
● PH TO PH — Prints the printhead to printhead alignment pattern.
188 Chapter 14 Tell me about… (menus) ENWW
Tell me about…
(menus)
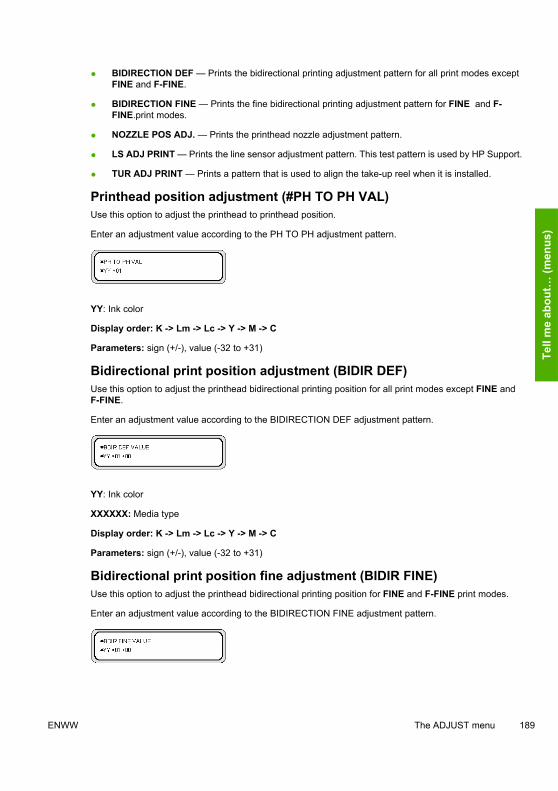
● BIDIRECTION DEF — Prints the bidirectional printing adjustment pattern for all print modes exceptFINE and F-FINE.
● BIDIRECTION FINE — Prints the fine bidirectional printing adjustment pattern for FINE and F-FINE.print modes.
● NOZZLE POS ADJ. — Prints the printhead nozzle adjustment pattern.
● LS ADJ PRINT — Prints the line sensor adjustment pattern. This test pattern is used by HP Support.
● TUR ADJ PRINT — Prints a pattern that is used to align the take-up reel when it is installed.
Printhead position adjustment (#PH TO PH VAL)Use this option to adjust the printhead to printhead position.
Enter an adjustment value according to the PH TO PH adjustment pattern.
YY: Ink color
Display order: K -> Lm -> Lc -> Y -> M -> C
Parameters: sign (+/-), value (-32 to +31)
Bidirectional print position adjustment (BIDIR DEF)Use this option to adjust the printhead bidirectional printing position for all print modes except FINE andF-FINE.
Enter an adjustment value according to the BIDIRECTION DEF adjustment pattern.
YY: Ink color
XXXXXX: Media type
Display order: K -> Lm -> Lc -> Y -> M -> C
Parameters: sign (+/-), value (-32 to +31)
Bidirectional print position fine adjustment (BIDIR FINE)Use this option to adjust the printhead bidirectional printing position for FINE and F-FINE print modes.
Enter an adjustment value according to the BIDIRECTION FINE adjustment pattern.
ENWW The ADJUST menu 189
Tell
me
abou
t… (m
enus
)
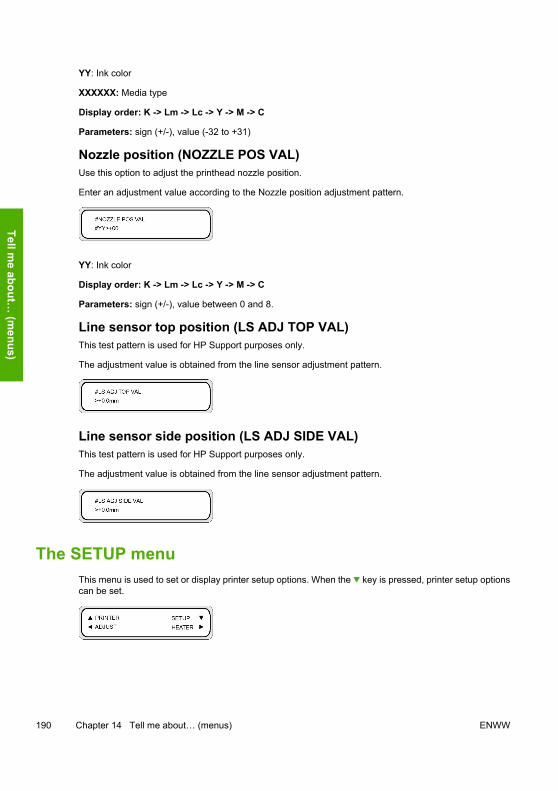
YY: Ink color
XXXXXX: Media type
Display order: K -> Lm -> Lc -> Y -> M -> C
Parameters: sign (+/-), value (-32 to +31)
Nozzle position (NOZZLE POS VAL)Use this option to adjust the printhead nozzle position.
Enter an adjustment value according to the Nozzle position adjustment pattern.
YY: Ink color
Display order: K -> Lm -> Lc -> Y -> M -> C
Parameters: sign (+/-), value between 0 and 8.
Line sensor top position (LS ADJ TOP VAL)This test pattern is used for HP Support purposes only.
The adjustment value is obtained from the line sensor adjustment pattern.
Line sensor side position (LS ADJ SIDE VAL)This test pattern is used for HP Support purposes only.
The adjustment value is obtained from the line sensor adjustment pattern.
The SETUP menuThis menu is used to set or display printer setup options. When the key is pressed, printer setup optionscan be set.
190 Chapter 14 Tell me about… (menus) ENWW
Tell me about…
(menus)
Language for front panel (LANGUAGE)This option sets the language for messages displayed on the front panel. The initial value is English.
Parameters: ENGLISH, JAPANESE, FRENCH, ITALIAN, GERMAN, SPANISH, PORTUGUESE
Time Zone (TIME ZONE GMT+)This option sets the year, month and day and the local time in hours and minutes.
Parameters: YY/MM/DD HH:MM +00
Units of measure (LENGTH UNITS)This option sets the units of measure.
Parameters: MILLIMETERS, INCH
Temperature units (TEMPERATURE UNITS)This option sets the temperature units.
Parameters: FAHRENHEIT, CENTIGRADE
Acoustic warning (BEEP)This option sets the acoustic warning on or off.
Parameters: ON, OFF
BOOT version display (BOOT VERSION)This option displays the BOOT version.
ENWW The SETUP menu 191
Tell
me
abou
t… (m
enus
)
Parameters: none.
Firmware version display (PRINTER FW VER)This option displays the printer firmware version.
Parameters: none.
Main PCA version display (MAIN PCA VER)This option displays the version number of the main PCA.
Parameters: none.
ICB board version display (CARRIAGE PCA)This option displays the version number of the printer carriage PCA.
Parameters: none.
ASIC version display (ASIC VER)This option displays the ASIC version.
Parameters: none.
USB address (USB ADDRESS)This option displays the printer USB address.
192 Chapter 14 Tell me about… (menus) ENWW
Tell me about…
(menus)
Parameters:none.
USB speed (USB SPEED)This option sets the USB port speed.
Parameters: HIGH, FULL
Factory default setting (FACTORY DEFAULT)This option sets all parameter values to default factory settings.
Parameters: none.
Printer firmware upgrade (PRINTER FW UPGRADE)This option upgrades the printer firmware.
Parameters: none.
The HEATER menuThis menu is used to modify heater settings. Press the key to access heater options.
Heater delay time (HEATER DELAY TIME)Use this option to turn the heater off after the selected amount of time.
Parameters: NONE, 30 min, 60 min, 90 min, 120 min, ENDLESS.
ENWW The HEATER menu 193
Tell
me
abou
t… (m
enus
)

Heater standby time (HEATER STANDBY TIME)Use this option to set the heater to standby temperature after the selected amount of time
Parameters: NONE, 30 min, 60 min, 90 min, 120 min, ENDLESS.
194 Chapter 14 Tell me about… (menus) ENWW
Tell me about…
(menus)
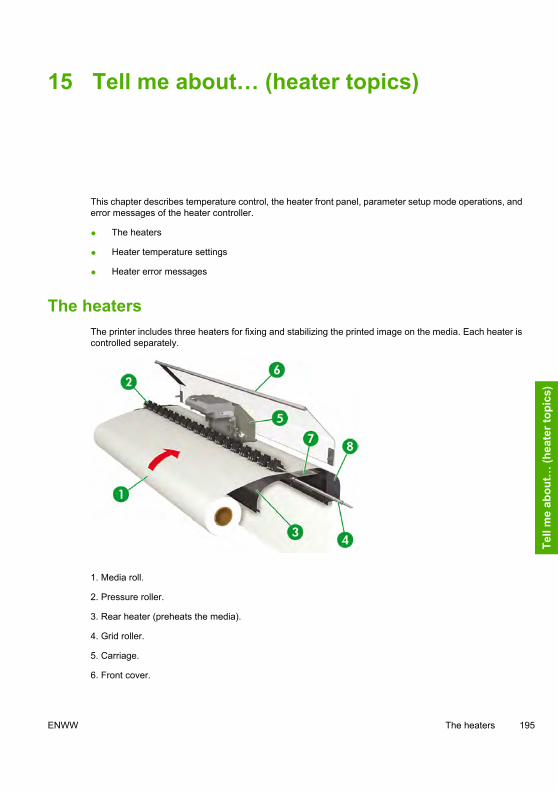
15 Tell me about… (heater topics)
This chapter describes temperature control, the heater front panel, parameter setup mode operations, anderror messages of the heater controller.
● The heaters
● Heater temperature settings
● Heater error messages
The heatersThe printer includes three heaters for fixing and stabilizing the printed image on the media. Each heater iscontrolled separately.
1. Media roll.
2. Pressure roller.
3. Rear heater (preheats the media).
4. Grid roller.
5. Carriage.
6. Front cover.
ENWW The heaters 195
Tell
me
abou
t… (h
eate
r top
ics)

7. Print heater (fixes the ink on to the media).
8. Front heater (dries the ink and stabilizes the printed image).
WARNING! Do not touch heater surfaces in the media path. This may cause burns.
Heater temperature settings
Heater temperatures are preset automatically for the media type that is selected during media loading.Under normal operating conditions you do not need to set the temperature.
Use the printer front panel only when you need to make fine adjustments to the heater temperature.
● On/off setting: use theSHIFTkey when the heater is selected.
● Heater selection: use the left key or right key to select the front (F), print (P) or Rear (R) heater.
● Temperature setting: use the up key or down key to set the temperature for the selected heater.
● You can turn the heater ON while the printer is not printing by pressing and holding the<keyboard>OK</keyboard>key for 2 seconds.
● You can turn the heater OFF while the printer is not printing by pressing and holding the CANCEL keyfor 2 seconds.
● Front panel display (when the heater is turned on):
● Upper line: preset temperature for each heater
● Lower line: current temperature for each heater
● Front panel display (when the heater is turned off):
● Upper line: OFF for each heater
● Lower line: current temperature for each heater
A “+” sign indicates that the heater is warming up. The default temperature range is set between 15 °C and55 °C.
Heater preset temperature by mediumThe heater preset temperature for each media type is listed below. Preset the heater temperature accordingto the media you use.
Medium Media type Front Print Rear Print mode
Glossy vinylchloride
Glossy 45°C 40°C 45°C 8 pass bi-directional
196 Chapter 15 Tell me about… (heater topics) ENWW
Tell me about…
(heater topics)
Medium Media type Front Print Rear Print mode
Matte vinylchloride
Matte 45°C 40°C 45°C 8 pass bi-directional
Banner Banner 45°C 40°C 45°C 8 pass bi-directional
We recommend that the front heater, the print heater and the rear heater be set to lower than 50 °C, 45 °C and 50 °C, respectively.
NOTE When the print heater temperature is set to high, fixing of the ink on the media isimproved, but media wrinkle or mat print may be caused. Adjust heater temperature accordingto the media type and environmental temperature.
When the print heater temperature is set to high, the printer may print at low speed to ensurestable print quality.
Set the front/rear heater temperature 5 °C higher than the print heater temperature. Badtemperature balance between the front/rear heater and print heater may cause the media towrinkle.
Flow of heater temperature setting1. If you select the media type when loading the media, the temperature value applies as follows:
● If the initial temperature value has been set, the heater turns on but heating does not start.
● If the initial temperature value is set to **, the heater turns off.
2. If the printing job data are sent from the host (PC), either of the following operations is performedbefore the print starts:
a. If the HEATER PREF set for the media is SOFTWARE:
● The temperature set in the RIP (print data, job) overwrites the temperature set in the printer,and the heating starts. Heating does not start if the temperature value is set to OFF.
● If the temperature is not set in the RIP (print data, job), heating starts with the temperatureset in the printer.
b. If the HEATER PREF set for the media is HEAT PANEL:
● The temperature set in the RIP is ignored and heating starts with the temperature set in theprinter.
3. Printing starts when the current temperatures of the front, print, and rear heaters all reach the valueexceeding set temperature -2 °C.
If the current temperature is higher than the set temperature, printing starts without waiting for thetemperature to drop. Even after printing has started, the temperature control makes sure that theheaters maintain the set temperature.
4. During printing, the temperature can be adjusted by using the HEATER key, and then selecting therear, front or print heater, and using the or keys to change the temperature.
ENWW Heater temperature settings 197
Tell
me
abou
t… (h
eate
r top
ics)
Even after printing has finished, the changed temperature is applied as the set temperature.
5. The print job returns to step (2).
To set the initial temperature value of front, print, and rear heaters, and the HEAT PREFsetting (heater),see the MEDIA REG menu.
Temperature controlThe following tables describe how heater temperature is controlled.
Maintaining the preset temperature
Function: To heat the media to reduce the ink drying time, improve fixing of ink to media, and to protectmedia from wrinkling.
Status: Status of maintaining each heater temperature at the preset temperature.
Conditions: 1. If the heater ON/OFF setting is set to ON and a print command is received.
2. Under condition (1) above, and the time specified by the delay time after the print endcommand was received.
Maintaining the standby temperature
Function: To shorten the time needed to reach the preset temperature to start printing.
Status: Status of maintaining the heater temperature at the specified standby temperature (35 °C) for allheaters.
When the preset temperature is lower than the specified standby temperature (35 °C), the printermaintains the preset temperature.
Conditions: If the standby time has been set, after reaching the preset temperature.
Turning off the heaters
Function: To prevent excessive current consumption, to protect the media from damage by the heat fromthe heaters, and to protect the user from getting burned from touching the heaters when printingis not performed.
Status: Status of reaching the environmental temperature slowly.
Conditions: In all cases except when maintaining the preset temperature or the standby temperature.
Start of heating: The print start command is received and heating starts. Printing does not start until the heatershave reached the preset temperature.
Start of print: The heaters reach the preset temperature and printing starts.
End of print: The print end command is received and printing finishes.
198 Chapter 15 Tell me about… (heater topics) ENWW
Tell me about…
(heater topics)
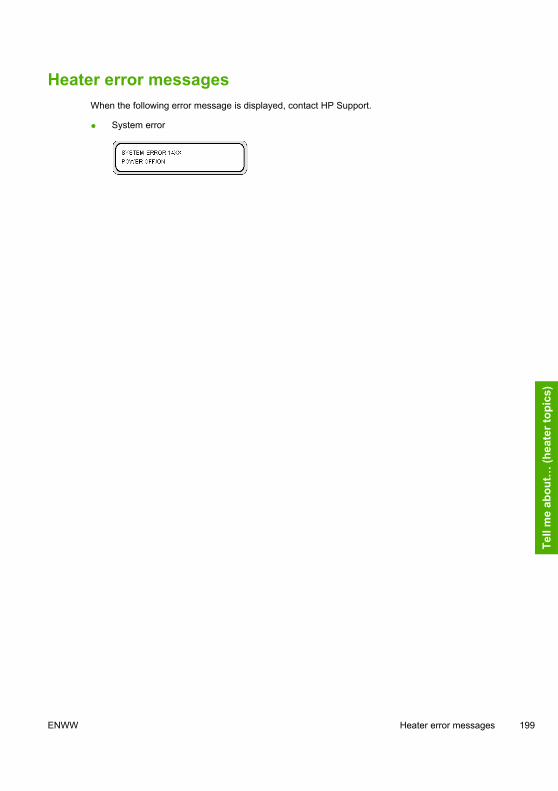
Heater error messagesWhen the following error message is displayed, contact HP Support.
● System error
ENWW Heater error messages 199
Tell
me
abou
t… (h
eate
r top
ics)

200 Chapter 15 Tell me about… (heater topics) ENWW
Tell me about…
(heater topics)
16 Tell me about… (printer specificationstopics)
● Specifications
● Ecological specifications
ENWW 201
Tell
me
abou
t… (p
rinte
rs p
ecifi
catio
ns to
pics
)
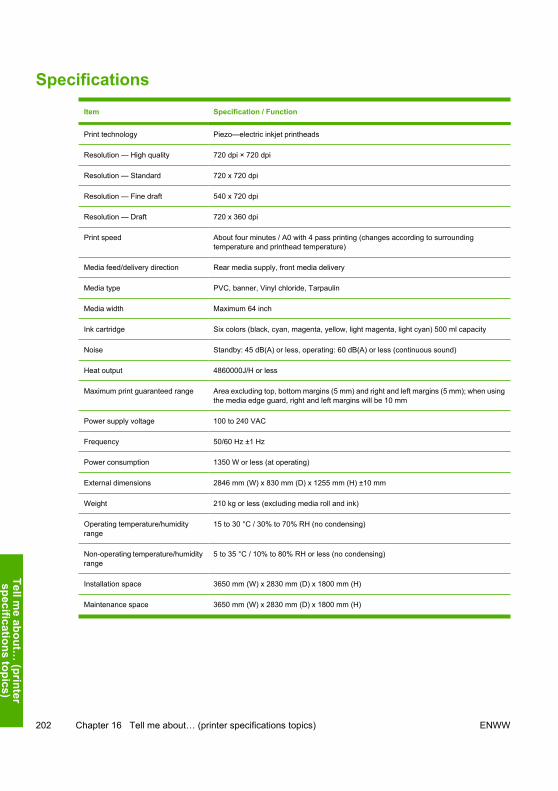
SpecificationsItem Specification / Function
Print technology Piezo—electric inkjet printheads
Resolution — High quality 720 dpi × 720 dpi
Resolution — Standard 720 x 720 dpi
Resolution — Fine draft 540 x 720 dpi
Resolution — Draft 720 x 360 dpi
Print speed About four minutes / A0 with 4 pass printing (changes according to surroundingtemperature and printhead temperature)
Media feed/delivery direction Rear media supply, front media delivery
Media type PVC, banner, Vinyl chloride, Tarpaulin
Media width Maximum 64 inch
Ink cartridge Six colors (black, cyan, magenta, yellow, light magenta, light cyan) 500 ml capacity
Noise Standby: 45 dB(A) or less, operating: 60 dB(A) or less (continuous sound)
Heat output 4860000J/H or less
Maximum print guaranteed range Area excluding top, bottom margins (5 mm) and right and left margins (5 mm); when usingthe media edge guard, right and left margins will be 10 mm
Power supply voltage 100 to 240 VAC
Frequency 50/60 Hz ±1 Hz
Power consumption 1350 W or less (at operating)
External dimensions 2846 mm (W) x 830 mm (D) x 1255 mm (H) ±10 mm
Weight 210 kg or less (excluding media roll and ink)
Operating temperature/humidityrange
15 to 30 °C / 30% to 70% RH (no condensing)
Non-operating temperature/humidityrange
5 to 35 °C / 10% to 80% RH or less (no condensing)
Installation space 3650 mm (W) x 2830 mm (D) x 1800 mm (H)
Maintenance space 3650 mm (W) x 2830 mm (D) x 1800 mm (H)
202 Chapter 16 Tell me about… (printer specifications topics) ENWW
Tell me about…
(printerspecifications topics)

Ecological specificationsFor the up-to-date ecological specifications of your printer, please go to http://www.hp.com/ and search for“ecological specifications”.
ENWW Ecological specifications 203
Tell
me
abou
t… (p
rinte
rs p
ecifi
catio
ns to
pics
)

204 Chapter 16 Tell me about… (printer specifications topics) ENWW
Tell me about…
(printerspecifications topics)

17 Tell me about… (ordering supplies andaccessories topics)
● Ordering supplies
● Ordering media
● Ordering accessories
ENWW 205
Tell
me
abou
t… (o
rder
ing
supp
lies
and
acce
ssor
ies
topi
cs)
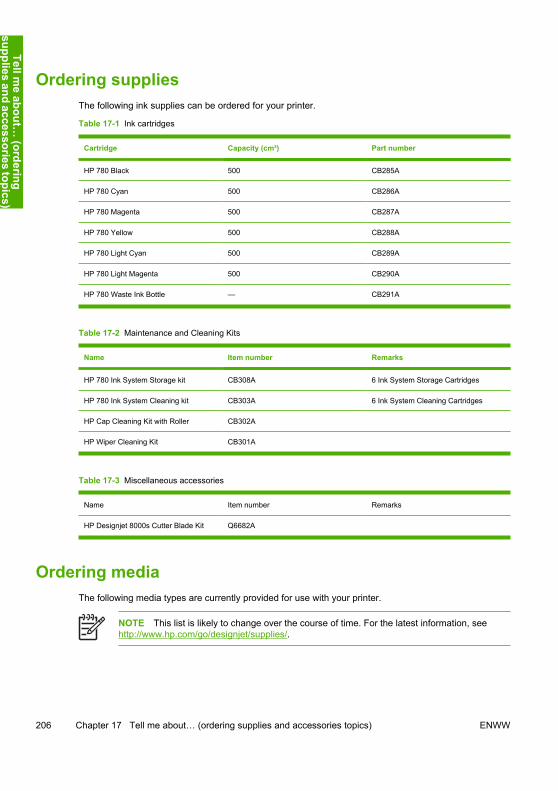
Ordering suppliesThe following ink supplies can be ordered for your printer.
Table 17-1 Ink cartridges
Cartridge Capacity (cm³) Part number
HP 780 Black 500 CB285A
HP 780 Cyan 500 CB286A
HP 780 Magenta 500 CB287A
HP 780 Yellow 500 CB288A
HP 780 Light Cyan 500 CB289A
HP 780 Light Magenta 500 CB290A
HP 780 Waste Ink Bottle — CB291A
Table 17-2 Maintenance and Cleaning Kits
Name Item number Remarks
HP 780 Ink System Storage kit CB308A 6 Ink System Storage Cartridges
HP 780 Ink System Cleaning kit CB303A 6 Ink System Cleaning Cartridges
HP Cap Cleaning Kit with Roller CB302A
HP Wiper Cleaning Kit CB301A
Table 17-3 Miscellaneous accessories
Name Item number Remarks
HP Designjet 8000s Cutter Blade Kit Q6682A
Ordering mediaThe following media types are currently provided for use with your printer.
NOTE This list is likely to change over the course of time. For the latest information, seehttp://www.hp.com/go/designjet/supplies/.
206 Chapter 17 Tell me about… (ordering supplies and accessories topics) ENWW
Tell me about…
(orderingsupplies and accessories topics)
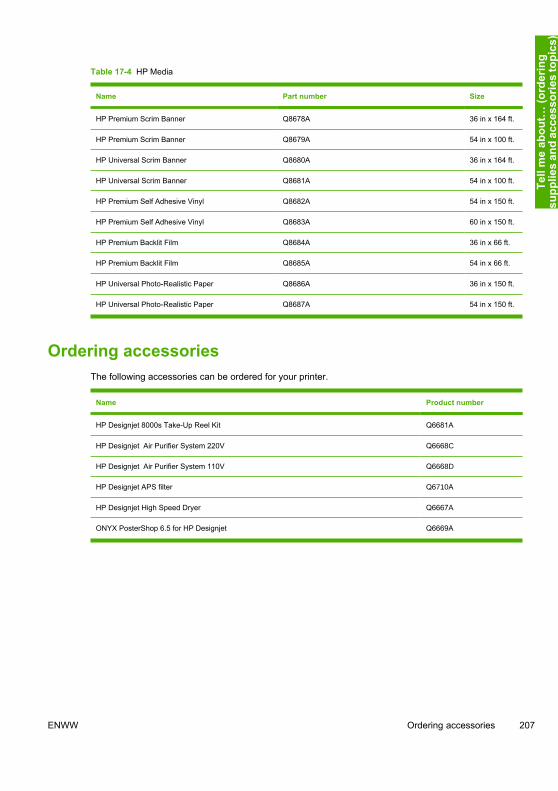
Table 17-4 HP Media
Name Part number Size
HP Premium Scrim Banner Q8678A 36 in x 164 ft.
HP Premium Scrim Banner Q8679A 54 in x 100 ft.
HP Universal Scrim Banner Q8680A 36 in x 164 ft.
HP Universal Scrim Banner Q8681A 54 in x 100 ft.
HP Premium Self Adhesive Vinyl Q8682A 54 in x 150 ft.
HP Premium Self Adhesive Vinyl Q8683A 60 in x 150 ft.
HP Premium Backlit Film Q8684A 36 in x 66 ft.
HP Premium Backlit Film Q8685A 54 in x 66 ft.
HP Universal Photo-Realistic Paper Q8686A 36 in x 150 ft.
HP Universal Photo-Realistic Paper Q8687A 54 in x 150 ft.
Ordering accessoriesThe following accessories can be ordered for your printer.
Name Product number
HP Designjet 8000s Take-Up Reel Kit Q6681A
HP Designjet Air Purifier System 220V Q6668C
HP Designjet Air Purifier System 110V Q6668D
HP Designjet APS filter Q6710A
HP Designjet High Speed Dryer Q6667A
ONYX PosterShop 6.5 for HP Designjet Q6669A
ENWW Ordering accessories 207
Tell
me
abou
t… (o
rder
ing
supp
lies
and
acce
ssor
ies
topi
cs)

208 Chapter 17 Tell me about… (ordering supplies and accessories topics) ENWW
Tell me about…
(orderingsupplies and accessories topics)
18 Tell me about… (getting help topics)
● HP Customer Care
● HP Designjet Online
HP Customer CareAs your strategic support partner, we make it our business to help keep your business running smoothly.HP Customer Care offers award-winning support to ensure you get the most from your HP Designjet.
HP Customer Care provides comprehensive, proven support expertise and leverages new technologies togive customers unique end-to-end support. Services include setup and installation, troubleshooting tools,warranty upgrades, repair and exchange services, phone and Web support, software updates, and self-maintenance services. To find out more about HP Customer Care, please visit us at:
http://www.hp.com/go/designjet/
or call the phone number in the Customer Service Guide provided with your printer.
What to do before you call:
● Review the “The problem is” troubleshooting suggestions in this guide.
● Review the relevant driver documentation supplied with this printer (for users sending PostScript filesor those using Microsoft Windows).
● If you have installed third-party software drivers and RIPs, refer to their documentation.
● If the problem appears to be related to your software application, first contact your software vendor.
● If you still have difficulty, refer to the HP Support Services booklet provided with your printer. Thisdocument contains a comprehensive list of various support services available to help solve printerproblems.
● If you call one of the Hewlett-Packard offices, please have the following information available to helpus answer your questions more quickly:
● The printer you are using (the product number and the serial number, found on the label at theback of the printer)
● If there is an error code on the front panel, note it down; see “Status codes and error messages”
● The computer you are using
● Any special equipment or software you are using (for example, spoolers, networks, switch-boxes,modems, or special software drivers)
ENWW HP Customer Care 209
Tell
me
abou
t… (g
ettin
g he
lpto
pics
)
● The cable you are using (by part number) and where you purchased it
● The type of interface used on your printer (FireWire, USB, or network)
● The software name and version you are currently using
● If the problem is a system error it will have an error number; record the error number and haveit ready
HP Designjet OnlineEnjoy a world of dedicated services and resources to ensure you always get the best performance fromyour HP Designjet products and solutions.
Register at HP Designjet Online, your large-format printing community at http://www.hp.com/go/designjet/ for unrestricted access to:
● Downloads — the latest printer firmware, drivers, software, media profiles, etc.
● Technical support — online troubleshooting, customer care contacts, and more
● Forums for direct contact with the experts, both HP and your colleagues
● Warranty tracking online, for your peace of mind
● Technical documentation and training videos
● Latest product information — printers, supplies, accessories, software, etc.
● Supplies Center for all you need to know about ink and media
By customizing your registration for the products you have purchased and your type of business, and bysetting your communication preferences: you decide the information you need.
Register at HP Designjet Online for the best performance.
HP Designjet Online is available in English, German, French, Italian, Spanish, Portuguese, Japanese,Korean, Simplified Chinese, and Traditional Chinese.
210 Chapter 18 Tell me about… (getting help topics) ENWW
Tell me about…
(getting helptopics)
19 Legal information
● Worldwide Limited Warranty—HP Designjet 8000s Printer series
● Regulatory notices
● DECLARATION OF CONFORMITY
Worldwide Limited Warranty—HP Designjet 8000s Printerseries
HP product Limited Warranty Period
Printer 1 year (from the date of printer’s purchase by the customer)
Software 90 days (from the date of purchase by the customer)
Printhead 1 year (from the date of printer’s purchase by the customer)
Ink cartridge 3 months from the “Install by” date printed on the product, oruntil the genuine HP ink is depleted as indicated by the printer,whichever occurs first
Wiper Cleaning kit, Cap Cleaning kit, Ink System cleaning kit,Ink System Storage kit
Until the “Use by” date printed on the product, or until thegenuine HP liquids are depleted as indicated by the printer,whichever occurs first
A. Extent of HP Limited Warranty1. This Hewlett-Packard (HP) Limited Warranty gives you, the end-customer, express limited warranty
rights from HP. In addition, you may also have other legal rights under the applicable local law orspecial written agreement with HP.
2. HP warrants to you that the HP products specified above will be free from defects in materials andworkmanship during the Limited Warranty Period specified above. The Limited Warranty Period startson the date of purchase. Your dated sales or delivery receipt, showing the date of purchase of theproduct, is your proof of purchase date. You may be required to provide proof of purchase as acondition of receiving warranty service. You are entitled to warranty service according to the termsand conditions of this document if a repair or replacement of your HP Products is required within theLimited Warranty Period.
3. For software products, HP’s Limited Warranty applies only to a failure to execute programminginstructions. HP does not warrant that the operation of any product will be uninterrupted or error free.
ENWW Worldwide Limited Warranty—HP Designjet 8000s Printer series 211
Lega
l inf
orm
atio
n
4. HP’s limited warranty covers only those defects which arise as a result of use of the HP products asdefined in the user’s guide, and does not apply to any:
a. Improper, inadequate or lack of daily maintenance following the instructions defined in thePrinter’s User’s Guide in Chapter 6;
b. Media crashes due to use of incorrect printhead height for a given media type as described inthe Printer’s User Guide in Chapter 5;
c. Long time power off without following the proper preparation as described in the Printer’s User’sGuide in Chapter 6;
d. Software, interfacing or parts not provided or supported by HP; or
e. Operation outside the product’s specifications.
Routine printer maintenance operations in the HP Designjet 8000s Printer series, such as cleaningand preventive maintenance services (including parts contained in any preventive maintenance kitand HP service engineer visits), are not covered by HP’s Limited Warranty, but in some countries maybe covered under a separate support contract.
5. For HP printer products, the use of a refilled or non-original HP consumable product (ink, printhead,ink cartridge or media) does not affect either HP’s Limited Warranty to you or any HP support contractwith you. However, if printer failure or damage is attributable to the use of a non-original HPconsumable or refilled ink cartridge, HP will charge its standard time and materials charges to servicethe printer for the particular failure or damage.
6. Your exclusive remedies for defective HP products are the following:
a. During the Limited Warranty Period, HP will replace any defective HP software, media, orconsumable product which is covered by this Limited Warranty, and deliver another product toyou to replace the defective one.
b. During the Limited Warranty Period, HP, at its sole discretion, shall either repair on site or replaceany defective hardware product or component part. If HP elects to replace any component part,HP will provide to you (i) a replacement part, in return for the defective one, and (ii) remote partinstallation assistance, if needed.
c. In the unlikely event that HP is unable to repair or replace, as applicable, a defective productwhich is covered by this Limited Warranty, HP shall, within a reasonable time after being notifiedof the defect, refund the purchase price for the product.
7. HP shall have no obligation to replace or refund until you return the defective media, consumable,hardware product or component part to HP. All components, parts, consumables, media or hardwareproducts, removed under this Limited Warranty become the property of HP. Notwithstanding the abovementioned, HP may waive the requirement for you to return the defective part.
8. Unless otherwise stated, and to the extent permitted by local law, HP products may be manufacturedusing new materials or new and used materials equivalent to new in performance and reliability. HPmay repair or replace products (i) with equivalent products to the products being repaired or replacedbut which may have been subject to prior use; or (ii) with equivalent product to an original product thathas been discontinued.
9. THIS LIMITED WARRANTY IS APPLICABLE IN ALL COUNTRIES AND MAY BE ENFORCED INANY COUNTRY WHERE HP OR ITS AUTHORIZED SERVICE PROVIDERS OFFER WARRANTYSERVICE AND HP HAS MARKETED THIS PRODUCT, SUBJECT TO THE TERMS ANDCONDITIONS SET FORTH IN THIS LIMITED WARRANTY. HOWEVER, WARRANTY SERVICEAVAILABILITY AND RESPONSE TIME MAY VARY FROM COUNTRY TO COUNTRY. HP WILL NOT
212 Chapter 19 Legal information ENWW
Legal information
ALTER FORM, FIT OR FUNCTION OF THE PRODUCT TO MAKE IT OPERATE IN A COUNTRYFOR WHICH IT WAS NEVER INTENDED TO FUNCTION FOR LEGAL OR REGULATORYREASONS.
10. Contracts for additional services may be available for any authorized HP service facility where thelisted HP product is distributed by HP or an authorized importer.
11. TO THE EXTENT ALLOWED BY LOCAL LAW, EXCEPT AS EXPRESSLY SET FORTH IN THISLIMITED WARRANTY NEITHER HP NOR ITS THIRD PARTY SUPPLIERS MAKE ANY OTHERWARRANTY OR CONDITION OF ANY KIND, WHETHER EXPRESS OR IMPLIED, WITH RESPECTTO THE HP PRODUCTS, AND SPECIFICALLY DISCLAIM THE IMPLIED WARRANTIES ORCONDITIONS OF MERCHANTABILITY, SATISFACTORY QUALITY, AND FITNESS FOR APARTICULAR PURPOSE.
B. Limitations of liability1. TO THE EXTENT ALLOWED BY LOCAL LAW, EXCEPT FOR THE OBLIGATIONS SPECIFICALLYSET FORTH IN THIS LIMITED WARRANTY, IN NO EVENT SHALL HP OR ITS THIRD PARTYSUPPLIERS BE LIABLE FOR DIRECT, INDIRECT, SPECIAL, INCIDENTAL, OR CONSEQUENTIALDAMAGES (INCLUDING ANY LOSS OF PROFITS OR SAVINGS), WHETHER BASED ON CONTRACT,TORT, OR ANY OTHER LEGAL THEORY AND WHETHER ADVISED OF THE POSSIBILITY OF SUCHDAMAGES.
C. Local law1. This Limited Warranty gives you specific legal rights. You may also have other rights which vary from
state to state in the United States, from province to province in Canada, and from country to countryelsewhere in the world. You are advised to consult applicable state, province or country laws for fulldetermination of your rights.
2. To the extent that this Warranty Statement is inconsistent with local law, this Warranty Statement shallbe deemed modified to be consistent with such local law. THE WARRANTY TERMS CONTAINED INTHIS LIMITED WARRANTY, EXCEPT TO THE EXTENT LAWFULLY PERMITTED, DO NOTEXCLUDE, RESTRICT OR MODIFY AND ARE IN ADDITION TO THE MANDATORY STATUTORYRIGHTS APPLICABLE TO THE SALE OF THIS PRODUCT TO YOU.
Revision: December 5th, 2005
Regulatory noticesYou can obtain current Material Safety Data Sheets for the ink systems used in the printer by mailing arequest to this address: Hewlett-Packard Customer Information Center, 19310 Pruneridge Avenue, Dept.MSDS, Cupertino, CA 95014, U.S.A.
There is also a Web page: http://www.hp.com/hpinfo/community/environment/productinfo/psis_inkjet.htm
Regulatory Model NumberFor regulatory identification purposes, your product is assigned a Regulatory Model Number. TheRegulatory Model Number for your product is BCLAA-0502.
ENWW Regulatory notices 213
Lega
l inf
orm
atio
n
RMN Product family
BCLAA-0502 HP Designjet 8000 Printer series
BCLAA-0602 HP Designjet 8000s Take-up Reel Kit
The Regulatory Model Number (RMN) should not be confused with the marketing name (HP Designjet8000s Printer series or HP Designjet 8000s Take-up Reel Kit) or product number.
ELECTROMAGNETIC COMPATIBILITY (EMC)WARNING! This is a class A product. In a domestic environment this product may cause radiointerference, in which case the user may be required to take adequate measures.
FCC statements (U.S.A.)The U.S. Federal Communications Commission (in 47 cfr15.105) has specified that the following noticesbe brought to the attention of users of this product.
Shielded cablesUse of shielded data cables is required to comply with the Class A limits of Part 15 of the FCC Rules.
CAUTION Pursuant to Part 15.21 of the FCC Rules, any changes or modifications to thisequipment not expressly approved by the Hewlett-Packard Company may cause harmfulinterference and void the FCC authorization to operate this equipment.
This equipment has been tested and found to comply with the limits for a Class A digital device, pursuantto part 15 of the FCC Rules. These limits are designed to provide reasonable protection against harmfulinterference in a commercial environment. This equipment generates, uses, and can radiate radiofrequency energy and, if not installed and used in accordance with the instructions, may cause harmfulinterference to radio communications. Operation of this equipment in a residential area is likely to causeharmful interference, in which case users will be required to correct the interference at their own expense.
Normes de sécurité (Canada)Le présent appareil numérique n'émet pas de bruits radioélectriques dépassant les limites applicables auxappareils numériques de Classe A prescrites dans le réglement sur le brouillage radioélectrique édicté parle Ministére des Communications du Canada.
DOC statement (Canada)This digital apparatus does not exceed the Class A limits for radio noise emissions from digital apparatusset out in the Radio Interference Regulations of the Canadian Department of Communications.
214 Chapter 19 Legal information ENWW
Legal information
Korean EMI statement
Taiwanese EMI statement
Chinese EMI statement
SoundGeräuschemission (Germany) LpA < 70 dB, am Arbeitsplatz, im Normalbetrieb, nach DIN45635 T. 19.
ENWW Regulatory notices 215
Lega
l inf
orm
atio
n
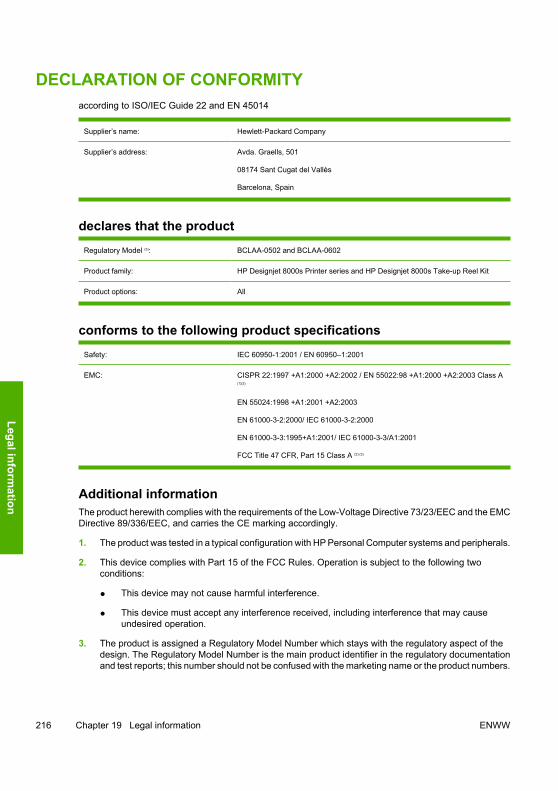
DECLARATION OF CONFORMITYaccording to ISO/IEC Guide 22 and EN 45014
Supplier’s name: Hewlett-Packard Company
Supplier’s address: Avda. Graells, 501
08174 Sant Cugat del Vallès
Barcelona, Spain
declares that the productRegulatory Model (3): BCLAA-0502 and BCLAA-0602
Product family: HP Designjet 8000s Printer series and HP Designjet 8000s Take-up Reel Kit
Product options: All
conforms to the following product specificationsSafety: IEC 60950-1:2001 / EN 60950–1:2001
EMC: CISPR 22:1997 +A1:2000 +A2:2002 / EN 55022:98 +A1:2000 +A2:2003 Class A(1)(3)
EN 55024:1998 +A1:2001 +A2:2003
EN 61000-3-2:2000/ IEC 61000-3-2:2000
EN 61000-3-3:1995+A1:2001/ IEC 61000-3-3/A1:2001
FCC Title 47 CFR, Part 15 Class A (2) (3)
Additional informationThe product herewith complies with the requirements of the Low-Voltage Directive 73/23/EEC and the EMCDirective 89/336/EEC, and carries the CE marking accordingly.
1. The product was tested in a typical configuration with HP Personal Computer systems and peripherals.
2. This device complies with Part 15 of the FCC Rules. Operation is subject to the following twoconditions:
● This device may not cause harmful interference.
● This device must accept any interference received, including interference that may causeundesired operation.
3. The product is assigned a Regulatory Model Number which stays with the regulatory aspect of thedesign. The Regulatory Model Number is the main product identifier in the regulatory documentationand test reports; this number should not be confused with the marketing name or the product numbers.
216 Chapter 19 Legal information ENWW
Legal information

Josep-Maria Pujol
Hardware Quality Manager
Sant Cugat del Vallès (Barcelona)
November 25th, 2005
Local contacts for regulatory topics onlyEuropean contact: Hewlett-Packard GmbH, HQ-TRE, Herrenberger Strasse 140, D-71034 Böblingen,Germany.
United States contact: Hewlett-Packard Company, HPCC, 20555 S.H. 249 Houston, Texas, 77070.
Australian contact: Hewlett-Packard Australia Ltd, Product Regulations Manager, 31–41 Joseph Street,Blackburn, Victoria, 3130, Australia.
ENWW DECLARATION OF CONFORMITY 217
Lega
l inf
orm
atio
n

218 Chapter 19 Legal information ENWW
Legal information

Index
Aaccessories
ordering 207ADJUST menu 188adjustment patterns 112, 118adjustment patterns; printhead
position 121
Ccleaning and maintenance
consumablesordering 206
cleaning kitsordering 206
components of printer [8000s] 2connections 11Customer Care 209
DDeclaration of Conformity 216Designjet Online 210
Eecological specifications 203error messages, operator 138error messages, service 138
Fform feed 57front panel, printer 5
Gguarantee 211
Hhandling precautions 9heater control 196heater menu 193
heaters, info 195HP Customer Care 209HP Designjet Online 210
Iink cartridge
ordering 206ink cartridge expiration 136ink cartridge replacement 61ink cartridges 155INK menu 169ink system 155install media 20
Lload sheet media 35
MM.ADV menu 182maintenance
ordering consumables 206media
install 20loading sheet 35loading, take-up reel 48take-up reel, core
adaptors 48unloading 33
media advance calibrationcalibration; media
advance 118MEDIA menu 169MEDIA REG menu 170media types
ordering 206weights 206widths 206
media types, default values 182
menuADJUST 188INK 169M.ADV 182MEDIA 169MEDIA REG 170PH. MAIN 184PH. REC 186PRINTER 187SETUP 190
Nnozzle print 112
Oordering
accessories 207ink cartridges 206maintenance and cleaning
consumables 206media 206
PPH. MAIN menu 184PH. REC menu 186power on/off 14PRINTER Menu 187printer's main components
[8000s] 2printhead crash 134printhead position
adjustment 121
Rregulatory notices 213
Ssafety precautions 7
ENWW Index 219

service errors 137SETUP printer menu 190specifications
ecological 203specifications, printer 202support services
HP Customer Care 209HP Designjet Online 210
Ttake-up reel
core adaptors 48loading media 48using 45winding direction, setting 46winding mode, setting 47
troubleshooting checklist 132
Uunload media 33using this guide 2
Wwarranty statement 211waste management 161
220 Index ENWW