hp deskjet 2640 series – enww · os x v10.6: click the blue disclosure triangle next to the...
TRANSCRIPT

HP Deskjet 2640 series


Table of contents
1 HP Deskjet 2640 series Help ........................................................................................................................... 1
2 Get to know the HP Deskjet 2640 series ........................................................................................................... 3
Printer parts ........................................................................................................................................................... 4Control panel and status lights ............................................................................................................................. 6
3 Print ............................................................................................................................................................. 7
Print documents .................................................................................................................................................... 8Print photos ......................................................................................................................................................... 11Print envelopes .................................................................................................................................................... 13Print Quick Forms ................................................................................................................................................ 15Print using the maximum dpi .............................................................................................................................. 16Tips for print success ........................................................................................................................................... 17
4 Paper basics ................................................................................................................................................ 21
Recommended papers for printing ..................................................................................................................... 22Load media .......................................................................................................................................................... 24Load original ........................................................................................................................................................ 28Order HP paper supplies ...................................................................................................................................... 30
5 Copy and scan .............................................................................................................................................. 31
Copy documents .................................................................................................................................................. 32Scan to a computer .............................................................................................................................................. 34Tips for copy success ........................................................................................................................................... 36Tips for scan success ........................................................................................................................................... 37
6 Fax ............................................................................................................................................................. 39
Send a fax ............................................................................................................................................................ 40Receive a fax ........................................................................................................................................................ 45Set up speed-dial entries .................................................................................................................................... 49Change fax settings ............................................................................................................................................. 51
ENWW iii

Fax and digital phone services ............................................................................................................................ 55Fax on Voice over Internet Protocol .................................................................................................................... 56Use reports .......................................................................................................................................................... 57Tips for fax success .............................................................................................................................................. 60
7 Work with ink cartridges .............................................................................................................................. 61
Check estimated ink levels .................................................................................................................................. 62Order ink supplies ................................................................................................................................................ 63Choose right ink cartridges ................................................................................................................................. 64Replace ink cartridges ......................................................................................................................................... 65Use single-cartridge mode .................................................................................................................................. 67Cartridge warranty information .......................................................................................................................... 68Tips for working with ink cartridges .................................................................................................................... 69
8 Connectivity ................................................................................................................................................ 71
Connect a new printer .......................................................................................................................................... 72USB connection .................................................................................................................................................... 73
9 Solve a problem ........................................................................................................................................... 75
Clear paper jam .................................................................................................................................................... 76Improve print quality ........................................................................................................................................... 80Unable to print ..................................................................................................................................................... 85Resolve copy and scan issues .............................................................................................................................. 89Resolve fax issues ................................................................................................................................................ 90HP support ........................................................................................................................................................... 91
Appendix A Technical information ................................................................................................................... 99
Hewlett-Packard Company notices ................................................................................................................... 100Specifications ..................................................................................................................................................... 101Environmental product stewardship program .................................................................................................. 105Regulatory notices ............................................................................................................................................. 109
Appendix B Additional fax setup .................................................................................................................... 117
Set up faxing (parallel phone systems) ............................................................................................................ 118Test fax setup .................................................................................................................................................... 140
Index ........................................................................................................................................................... 141
iv ENWW

1 HP Deskjet 2640 series Help
Learn how to use your HP Deskjet 2640 series
● Printer parts on page 4
● Control panel and status lights on page 6
● Load media on page 24
● Print on page 7
● Copy documents on page 32
● Scan to a computer on page 34
● Check estimated ink levels on page 62
● Replace ink cartridges on page 65
● Clear paper jam on page 76
ENWW 1

2 Chapter 1 HP Deskjet 2640 series Help ENWW

2 Get to know the HP Deskjet 2640 series
● Printer parts
● Control panel and status lights
ENWW 3

Printer parts● Front view
1 Automatic Document Feeder (ADF)
2 Paper-width guide for the input tray
3 Input tray
4 Input tray shield
5 Lid
6 Lid-backing
7 Scanner glass
8 Printer display
9 Control panel
10 Ink cartridges
11 Output tray extender (also referred to as the tray extender)
12 Cartridge access door
13 Output tray
4 Chapter 2 Get to know the HP Deskjet 2640 series ENWW

● Rear view
14 USB port
15 Power connection
16 Fax port (1-LINE)
17 Fax port (2-EXT)
ENWW Printer parts 5

Control panel and status lightsFigure 2-1 Control panel features
Label Description
1 On button: Turns the printer on or off.
2 Home button: Returns to the Home screen, the screen that is displayed when you first turn on the printer.
3 Up button: Use this button to navigate menus and select number of copies.
4 Down button: Use this button to navigate menus and select number of copies.
5 Keypad : Use the keypad to enter numbers and text.
6 Back button: Returns to the previous screen.
7 Selection button : The function of this button changes depending on what is displayed on the printer display.
8 OK button: Confirms the current selection.
9 Help button: On the Home screen, shows all Help topics. On another screen, shows information or animation on the display to assist in the current operation.
Figure 2-2 On button light
Light behavior Description
Off The printer is powered off.
Dimmed Indicates the printer is in Sleep mode. The printer automatically enters Sleep mode after 5 minutes of inactivity.
Fast blinking Error has occurred. Refer to the messages on the printer display.
Pulsing Indicates that the printer is initializing or is being shut down.
On The printer is printing, scanning, copying, or is on and ready to print.
6 Chapter 2 Get to know the HP Deskjet 2640 series ENWW

3 Print
● Print documents
● Print photos
● Print envelopes
● Print Quick Forms
● Print using the maximum dpi
● Tips for print success
ENWW 7

Print documentsTo load paper
1. Make sure the output tray is open.
2. Make sure you have paper loaded in the input tray.
To print a document
1. On the File menu in your software, click Print.
2. Make sure your printer is selected.
3. Click the button that opens the Properties dialog box.
Depending on your software application, this button might be called Properties, Options, Printer Setup, Printer Properties, Printer, or Preferences.
4. Select the appropriate options.
● On the Layout tab, select Portrait or Landscape orientation.
● On the Paper/Quality tab, select the appropriate paper type and print quality from the Media drop-down list.
● Click the Advanced button, in the Paper/Output area, select the appropriate plain paper size from the Paper Size drop-down list.
For more printing options, see Tips for print success on page 17.
5. Click OK to close the Properties dialog box.
6. Click Print or OK to begin printing.
To print from software
1. From the File menu in your software, choose Print.
2. Make sure the HP Deskjet 2640 series is the selected printer.
8 Chapter 3 Print ENWW

3. Specify the page properties.
Do the following if you do not see options on the Print dialog.
● OS X v10.6: Click the blue disclosure triangle next to the Printer selection to access the print options.
● OS X Lion and Mountain Lion: Click Show Details to access the print options.
NOTE: The following options are available for your printer. Locations for the options can vary from one application to another.
● Choose the paper size.
● Select the orientation.
● Enter the scaling percentage.
4. Click Print.
To print on both sides of the page
1. From your software, click the Print button.
2. Make sure your printer is selected.
3. Click the button that opens the Properties dialog box.
Depending on your software application, this button might be called Properties, Options, Printer Setup, Printer Properties, Printer, or Preferences.
4. Select the appropriate options.
● On the Layout tab, select Portrait or Landscape orientation.
● On the Paper/Quality tab, select the appropriate paper type and print quality from the Media drop-down list.
● Click the Advanced button, in the Paper/Output area, select the appropriate paper size from the Paper Size drop-down list.
For more printing options, see Tips for print success on page 17.
5. On the Layout tab, select Flip on Long Edge or Flip on Short Edge from the Print on Both Sides Manually drop-down list.
6. Click OK to print.
7. After the even numbered pages of the document have been printed, remove the document from the output tray.
8. Follow the on-screen instructions to reload the paper in the input tray with the blank side up and top of page down, and then click Continue.
To print on both sides of the page
1. From the File menu in your software, choose Print.
2. In the Print dialog, choose Paper Handling from the pop-up menu and set Page Order to Normal.
ENWW Print documents 9

3. Set Pages to Print to Odd only.
4. Click Print.
5. After all of the odd numbered pages have printed, remove the document from the output tray.
6. Reload the document so that the end that came out of the printer is now going into the printer and the blank side of the document is facing toward the front of the printer.
7. In the Print dialog, return to the Paper Handling pop-up menu and set the page order to Normal and the pages to print to Even Only.
8. Click Print.
10 Chapter 3 Print ENWW

Print photosTo load photo paper
1. Make sure the output tray is open.
2. Remove all paper from the input tray, and then load the photo paper with side to be printed on facing up.
To print a photo on photo paper
1. On the File menu in your software, click Print.
2. Make sure your printer is selected.
3. Click the button that opens the Properties dialog box.
Depending on your software application, this button might be called Properties, Options, Printer Setup, Printer Properties, Printer, or Preferences.
4. Select the appropriate options.
● On the Layout tab, select Portrait or Landscape orientation.
● On the Paper/Quality tab, select the appropriate paper type and print quality from the Media drop-down list.
● Click Advanced to select the appropriate photo paper size from the Paper Size drop-down list.
For more printing options, see Tips for print success on page 17.
NOTE: For the maximum dpi resolution, see Print using the maximum dpi on page 16.
5. Click OK to return to the Properties dialog box.
6. Click OK, and then click Print or OK in the Print dialog box.
NOTE: After the printing is finished, remove unused photo paper from the input tray. Store the photo paper so it does not start to curl, which could reduce the quality of your printout.
ENWW Print photos 11

To print a photo from the computer
1. From the File menu in your software, choose Print.
2. Make sure the HP Deskjet 2640 series is the selected printer.
3. Set the print options.
Do the following if you do not see options on the Print dialog.
● OS X v10.6: Click the blue disclosure triangle next to the Printer selection to access the print options.
● OS X Lion and Mountain Lion: Click Show Details to access the print options.
NOTE: The following options are available for your printer. Locations for the options can vary from one application to another.
a. Choose the appropriate paper size in the Paper Size pop-up menu.
b. Select an Orientation.
c. From the pop-up menu, choose Paper Type/Quality, and then choose the following settings:
● Paper Type: The appropriate photo paper type
● Quality: Best or Maximum dpi
● Click the Color Options disclosure triangle, and then choose the appropriate Photo Fix option.
— Off: applies no changes to the image.
— Basic: automatically focuses the image; moderately adjusts image sharpness.
4. Select any other print settings you want, and then click Print.
12 Chapter 3 Print ENWW

Print envelopesYou can load one or more envelopes into the input tray of the HP Deskjet 2640 series. Do not use shiny or embossed envelopes, or envelopes that have clasps or windows.
NOTE: For details on how to format the text to be printed on envelopes, see the help files in your word application. For best results, consider using a label for the return address on envelopes.
To load envelopes
1. Make sure the output tray is open.
2. Lift the input tray shield and slide the paper-width guide all the way to the left.
3. Place the envelopes in the right side of the input tray. The side to be printed on should face up.
4. Push the envelopes into the printer until they stop.
5. Lift the input tray shield and slide the paper-width guide firmly against the edge of the envelopes.
To print an envelope
1. On the File menu in your software, click Print.
2. Make sure your printer is selected.
3. Click the button that opens the Properties dialog box.
Depending on your software application, this button might be called Properties, Options, Printer Setup, Printer Properties, Printer, or Preferences.
4. Select the appropriate options.
● On the Layout tab, select Portrait or Landscape orientation.
● On the Paper/Quality tab, select the appropriate paper type and print quality from the Media drop-down list.
● Click Advanced to select the appropriate envelope paper size from the Paper Size drop-down list.
For more printing options, see Tips for print success on page 17.
5. Click OK, and then click Print or OK in the Print dialog box.
ENWW Print envelopes 13

To print envelopes
1. From the File menu in your software, choose Print.
2. Make sure the HP Deskjet 2640 series is the selected printer.
3. Set the print options.
Do the following if you do not see options on the Print dialog.
● OS X v10.6: Click the blue disclosure triangle next to the Printer selection to access the print options.
● OS X Lion and Mountain Lion: Click Show Details to access the print options.
NOTE: The following options are available for your printer. Locations for the options can vary from one application to another.
a. Select the appropriate envelope size from the Paper Size pop-up menu.
b. From the pop-up menu, choose Paper Type/Quality, and verify the paper type setting is set to Plain Paper.
4. Click Print.
14 Chapter 3 Print ENWW

Print Quick FormsUse Quick Forms to print calendars, check lists, games, notebook paper, graph paper, music paper, and games.
To print Quick Forms
1. From the Home screen on the printer display, press the Up and Down buttons to select Quick Forms, and then press OK .
TIP: If the Quick Forms option does not appear on the printer display, press the Home button, and then press the Up and Down buttons until you see Quick Forms .
2. Press the Up and Down buttons to select one of the Quick Forms options, and then press OK.
3. Select the number of copies, and then press OK.
ENWW Print Quick Forms 15

Print using the maximum dpiUse maximum dots per inch (dpi) mode to print high-quality, sharp images on photo paper.
Printing in maximum dpi takes longer than printing with other settings and requires a large amount of memory.
To print in maximum dpi mode
1. From your software, select Print.
2. Make sure your printer is selected.
3. Click the button that opens the Properties dialog box.
Depending on your software application, this button might be called Properties, Options, Printer Setup, Printer Properties, Printer, or Preferences.
4. Click the Paper/Quality tab.
5. From the Media drop-down list, must select Photo Paper, Best Quality to enable printing in maximum dpi.
6. Click the Advanced button.
7. In the Printer Features area, select Yes from the Print in Max DPI drop-down list.
8. Select the appropriate paper size from the Paper Size drop-down list.
9. Click OK to close the advanced options.
10. Confirm Orientation on the Layout tab, and then click OK to print.
To print using maximum dpi
1. From the File menu in your software, choose Print.
2. Make sure the HP Deskjet 2640 series is the selected printer.
3. Set the print options.
Do the following if you do not see options on the Print dialog.
● OS X v10.6: Click the blue disclosure triangle next to the Printer selection to access the print options.
● OS X Lion and Mountain Lion: Click Show Details to access the print options.
NOTE: The following options are available for your printer. Locations for the options can vary from one application to another.
a. Choose the appropriate paper size in the Paper Size pop-up menu.
b. From the pop-up menu, choose Paper Type/Quality, and then choose the following settings:
● Paper Type: The appropriate photo paper type
● Quality: Best or Maximum dpi
4. Select any other print settings that you want, and then click Print.
16 Chapter 3 Print ENWW

Tips for print successTo print successfully, the HP cartridges should be functioning properly with sufficient ink, the paper should be loaded correctly, and the printer should have the appropriate settings. Print settings do not apply to copying or scanning.
Ink tips
● Use Original HP ink cartridges.
● Install both the black and tri-color cartridges correctly.
For more information, see Replace ink cartridges on page 65.
● Check the estimated ink levels in the ink cartridges to make sure there is sufficient ink.
For more information, see Check estimated ink levels on page 62.
● If the print quality is not acceptable, see Improve print quality on page 80 for more information.
Paper loading tips
● Load a stack of paper (not just one page). All of the paper in the stack should be the same size and type to avoid a paper jam.
● Load paper with side to be printed on facing up.
● Ensure that paper loaded in the input tray lays flat, and the edges are not bent or torn.
● Adjust the paper-width guide in the input tray to fit snugly against all paper. Make sure the paper-width guide does not bend the paper in the input tray.
For more information, see Load media on page 24.
Printer settings tips
● To change default print settings, click Print, Scan & Fax , and then click Set Preferences in the printer software.
Depending on your operating system, do one of the following to open the printer software:
— Windows 8: On the Start screen, right-click an empty area on the screen, click All Apps on the app bar, and then click the icon with the printer's name.
— Windows 7, Windows Vista, and Windows XP: From the computer desktop, click Start, select All Programs, click HP, click HP Deskjet 2640 series , and then click HP Deskjet 2640 series .
● To select the number of pages to print per sheet, on the Layout tab, select the appropriate option from the Pages per Sheet drop-down list.
● To set the paper type and print quality, on the Paper/Quality tab, select the appropriate option from the Media drop-down list.
● To view more printing settings, on the Layout or Paper/Quality tab, click the Advanced button to open the Advanced Options dialog box.
ENWW Tips for print success 17

— Print in Grayscale: Allows you to print a black and white document using the black ink only. Select Black Ink Only, and then click OK .
— HP Real Life Technologies: This feature smooths and sharpens images and graphics for improved print quality.
— Booklet: Allows you to print a multiple-page document as a booklet. It places two pages on each side of a sheet that can then be folded into a booklet in half size of the paper. Select a binding method from the drop-down list, and then click OK.
○ Booklet-LeftBinding: The binding side after folded into a booklet appears at the left side. Select the option if your reading habit is from left to right.
○ Booklet-RightBinding: The binding side after folded into a booklet appears at the right side. Select the option if your reading habit is from right to left.
NOTE: The preview on the Layout tab cannot reflect what you select from the Booklet drop-down list.
— Pages per Sheet Layout: Helps you specify the order of the pages if you print the document with more than two pages per sheet.
NOTE: The preview on the Layout tab cannot reflect what you select from the Pages per Sheet Layout drop-down list.
— Page Borders: Allows you to add the borders to the pages if you print the document with two or more pages per sheet.
NOTE: The preview on the Layout tab cannot reflect what you select from the Page Borders drop-down list.
Printer settings tips
● On the Print dialog, use the Paper Size pop-up menu to select the size of paper loaded in the printer.
● On the Print dialog, choose the Paper Type/Quality pop-up menu and select the appropriate paper type and quality.
● To print a black and white document using only black ink, choose the Paper Type/Quality from the pop-up menu and choose Grayscale from the Color pop-up menu.
Notes
● Original HP ink cartridges are designed and tested with HP printers and papers to help you easily produce great results, time after time.
NOTE: HP cannot guarantee the quality or reliability of non-HP supplies. Product service or repairs required as a result of using a non-HP supply will not be covered under warranty.
If you believe you purchased Original HP ink cartridges, go to www.hp.com/go/anticounterfeit.
● Ink level warnings and indicators provide estimates for planning purposes only.
NOTE: When you receive a low-ink warning message, consider having a replacement cartridge available to avoid possible printing delays. You do not need to replace the cartridges until print quality becomes unacceptable.
18 Chapter 3 Print ENWW

● Software settings selected in the print driver only apply to printing, they do not apply to copying or scanning.
● You can print your document on both sides of the paper.
ENWW Tips for print success 19

20 Chapter 3 Print ENWW

4 Paper basics
You can load many different types and sizes of paper in the HP Printer.
This section contains the following topics:
● Recommended papers for printing
● Load media
● Load original
● Order HP paper supplies
ENWW 21

Recommended papers for printingIf you want the best print quality, HP recommends using HP papers that are specifically designed for the type of project you are printing.
Depending on your country/region, some of these papers might not be available.
ColorLok
● HP recommends plain papers with the ColorLok logo for printing and copying of everyday documents. All papers with the ColorLok logo are independently tested to meet high standards of reliability and print quality, and produce documents with crisp, vivid color, bolder blacks, and dry faster than ordinary plain papers. Look for papers with the ColorLok logo in a variety of weights and sizes from major paper manufacturers.
Photo printing
● HP Premium Plus Photo Paper
HP Premium Plus Photo Paper is HP’s highest-quality photo paper for your best photos. With HP Premium Plus Photo Paper, you can print beautiful photos that are instant-dry so you can share them right off the printer. It is available in several sizes, including A4, 8.5 x 11 inch, 4 x 6 inch (10 x 15 cm), 5 x 7 inch (13 x 18 cm), and 11 x 17 inch (A3), and in two finishes - glossy or soft gloss (semi-gloss). Ideal for framing, displaying, or gifting your best photos and special photo projects. HP Premium Plus Photo Paper delivers exceptional results with professional quality and durability.
● HP Advanced Photo Paper
This thick photo paper features an instant-dry finish for easy handling without smudging. It resists water, smears, fingerprints, and humidity. Your prints have a look and feel comparable to a store-processed photo. It is available in several sizes, including A4, 8.5 x 11 inch, 10 x 15 cm (4 x 6 inch), 13 x 18 cm (5 x 7 inch). It is acid-free for longer lasting documents.
● HP Everyday Photo Paper
Print colorful, everyday snapshots at a low cost, using paper designed for casual photo printing. This affordable photo paper dries quickly for easy handling. Get sharp, crisp images when you use this paper with any inkjet printer. It is available in glossy finish in several sizes, including A4, 8.5 x 11 inch, and 10 x 15 cm (4 x 6 inch). For longer-lasting photos, it is acid-free.
Business documents
● HP Premium Presentation Paper or HP Professional Paper 120
These papers are heavy two-sided matte papers perfect for presentation, proposals, reports, and newsletters. They are heavyweight for an impressive look and feel.
● HP Brochure Paper or HP Professional Paper 180
22 Chapter 4 Paper basics ENWW

These papers are glossy-coated or matte-coated on both sides for two-sided use. They are the perfect choice for near-photographic reproductions and business graphics for report covers, special presentations, brochures, mailers, and calendars.
Everyday printing
● HP Bright White Inkjet Paper
HP Bright White Inkjet Paper delivers high-contrast colors and sharp text. It is opaque enough for two-sided color usage with no show-through, which makes it ideal for newsletters, reports, and flyers. It features ColorLok Technology for less smearing, bolder blacks, and vivid colors.
● HP Printing Paper
HP Printing Paper is a high-quality multifunction paper. It produces documents that look and feel more substantial than documents printed on standard multipurpose or copy paper. It features ColorLok Technology for less smearing, bolder blacks, and vivid colors. It is acid-free for longer lasting documents.
● HP Office Paper
HP Office Paper is a high-quality multifunction paper. It is suitable for copies, drafts, memos, and other everyday documents. It features ColorLok Technology for less smearing, bolder blacks, and vivid colors. It is acid-free for longer lasting documents.
● HP Office Recycled Paper
HP Office Recycled Paper is a high-quality multifunction paper made with 30% recycled fiber. It features ColorLok Technology for less smearing, bolder blacks and vivid colors.
Special projects
● HP Iron-On Transfers
HP Iron-on Transfers (for light or white fabrics) are the ideal solution for creating custom T-shirts from your digital photos.
ENWW Recommended papers for printing 23

Load mediaSelect a paper size to continue.
To load full-size paper
1. Raise the input tray.
2. Lower the output tray and pull out the output tray extender.
3. Lift the input tray shield and slide the paper-width guide to the left.
24 Chapter 4 Paper basics ENWW

4. Insert a stack of paper into the input tray with the short edge down and the print side up, and slide the stack of paper down until it stops.
5. Slide the paper-width guide to the right until it stops at the edge of paper.
To load small-size paper
1. Raise the input tray.
2. Lower the output tray and pull out the output tray extender.
ENWW Load media 25
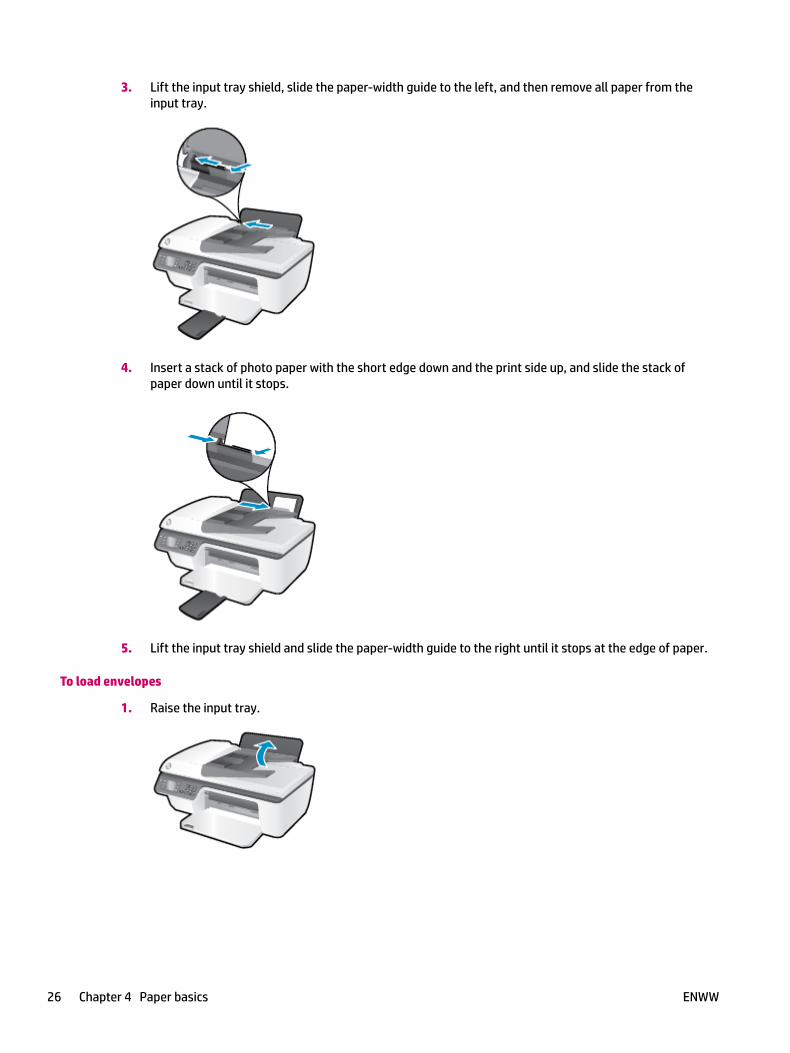
3. Lift the input tray shield, slide the paper-width guide to the left, and then remove all paper from the input tray.
4. Insert a stack of photo paper with the short edge down and the print side up, and slide the stack of paper down until it stops.
5. Lift the input tray shield and slide the paper-width guide to the right until it stops at the edge of paper.
To load envelopes
1. Raise the input tray.
26 Chapter 4 Paper basics ENWW

2. Lower the output tray and pull out the output tray extender.
3. Lift the input tray shield, slide the paper-width guide to the left, and then remove all paper from the input tray.
4. Insert one or more envelopes into far-right side of the input tray and slide the stack of envelopes down until it stops.
The side to be printed on should face up. The flap should be on the left side and facing down.
5. Lift the input tray shield and slide the paper-width guide to the right against the stack of envelopes until it stops.
ENWW Load media 27
Load originalYou can load your original print-side up in the Automatic Document Feeder (ADF) or print-side down on the right front corner of the scanner glass.
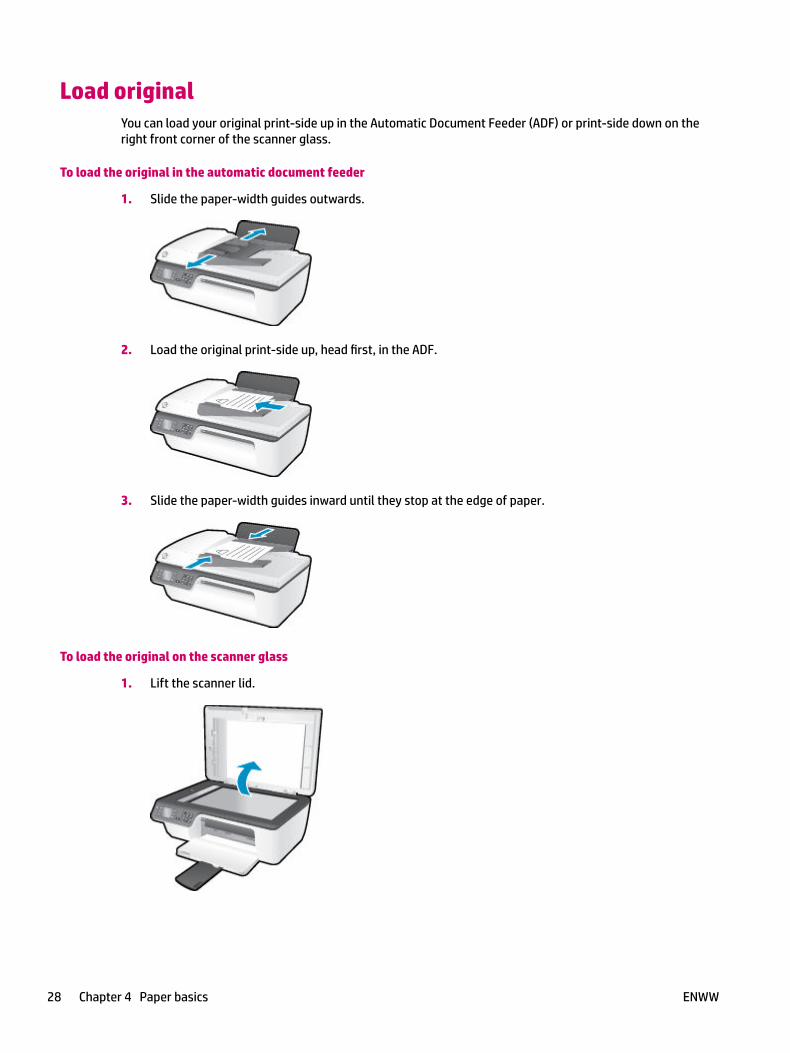
To load the original in the automatic document feeder
1. Slide the paper-width guides outwards.
2. Load the original print-side up, head first, in the ADF.
3. Slide the paper-width guides inward until they stop at the edge of paper.
To load the original on the scanner glass
1. Lift the scanner lid.
28 Chapter 4 Paper basics ENWW
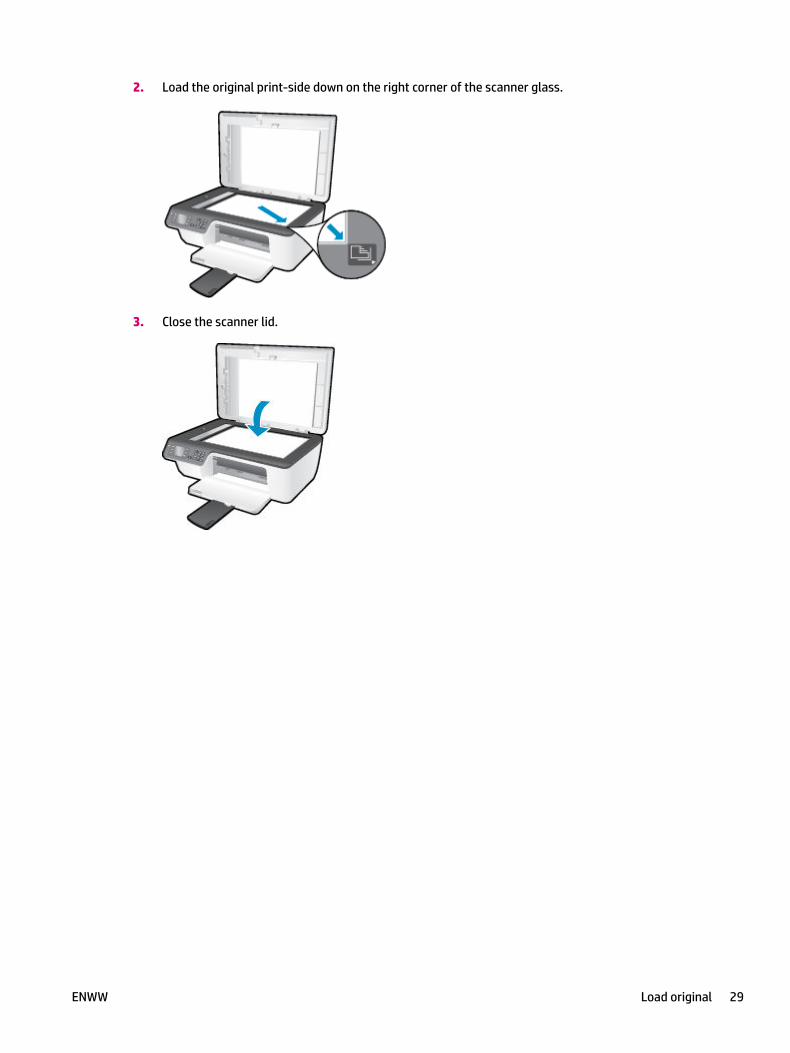
2. Load the original print-side down on the right corner of the scanner glass.
3. Close the scanner lid.
ENWW Load original 29

Order HP paper suppliesThe printer is designed to work well with most types of office media. Use HP media for optimum print quality. Visit the HP website at www.hp.com for more information about HP media.
HP recommends plain papers with the ColorLok logo for printing and copying of everyday documents. All papers with the ColorLok logo are independently tested to meet high standards of reliability and print quality, and produce documents with crisp, vivid color, bolder blacks and dry faster than ordinary plain papers. Look for papers with the ColorLok logo in a variety of weights and sizes from major paper manufacturers.
To purchase HP papers, go to Shop for Products and Services and select ink, toner and paper.
30 Chapter 4 Paper basics ENWW

5 Copy and scan
● Copy documents
● Scan to a computer
● Tips for copy success
● Tips for scan success
ENWW 31

Copy documentsThe Copy menu on the printer display allows you to easily start a black or color copy and select number of copies. You can also easily change the copy settings, such as changing the paper type and size, adjusting the darkness of the copy, and resizing the copy.
To make black or color copy
1. Load paper in the input tray.
2. Load the original print-side up in the ADF or print-side down on the right front corner of the scanner glass.
For more information about loading the original, see Load original on page 28.
3. Select Copy from the Home screen on the printer display, and then press OK to access the Copy menu.
If you do not see Copy on the printer display, press the Home button, and then press the Up and Down buttons until you see Copy .
4. From the Copy menu, select Copies to increase or decrease the number of copies, and then press OK to confirm.
5. Select Start Black Copy or Start Color Copy, and then press OK to make a black or color copy.
More copy features
While in the Copy menu, press the Up and Down buttons to select among settings.
● Paper Type: Selects paper size and paper type. A plain paper setting will print in plain paper normal print quality. A photo paper setting will print in photo paper best quality.
● Resize: Controls the size of the image or document to be copied.
— Actual Size: Makes a copy that is the same as the size of the original, but the margins of the copied image may be clipped.
— Fit to Page: Makes a copy that is centered with a white border around the edges. The resized image is either enlarged or reduced to fit the size of the selected output paper.
NOTE: The scanner glass must be clean to make sure the Fit to Page feature works properly.
— Custom Size: Allows you to increase the size of the image by selecting values greater than 100% or reduce the image size by selecting values less than 100%.
32 Chapter 5 Copy and scan ENWW

● ID Card Copy: Allows you to copy both sides of ID card.
● Lighter / Darker: Adjusts the copy settings to make copies lighter or darker.
NOTE: After two minutes of inactivity, the copy options will automatically return to the default settings of plain paper A4 or 8.5 x 11 inches (depending on region).
ENWW Copy documents 33

Scan to a computerTo scan to a computer, the printer and computer must be connected and turned on. You can scan from the control panel of the printer or from your computer. Scan from the control panel if you want to quickly scan one page to an image file. Scan from your computer if you want to scan multiple pages into one file, define the file format of the scan, or make adjustments to the scanned image.
To prepare the scan
1. Load the original print-side up in the ADF or print-side down on the right front corner of the scanner glass.
For more information about loading the original, see Load original on page 28.
2. Start the scan.
To scan from the printer control panel
1. Select Scan from the Home screen on the printer display. If you do not see Scan on the printer display, press the Home button, and then press the Up and Down buttons until you see Scan .
2. Select Scan to Computer.
3. Select the computer that you want to scan to from the printer display.
If you do not see your computer listed on the printer display make sure that your computer is connected to the printer through a USB cable.
To scan from your computer
1. Depending on your operating system, do one of the following to open the printer software.
● Windows 8: On the Start screen, right-click an empty area on the screen, click All Apps on the app bar, and then click the icon with the printer's name.
● Windows 7, Windows Vista, and Windows XP: From the computer desktop, click Start, select All Programs, click HP, click HP Deskjet 2640 series , and then click HP Deskjet 2640 series .
2. In the printer software, click the Print, Scan & Fax icon, and then select Scan a Document or Photo.
3. Select the type of scan that you want from the shortcut menu and then click Scan.
NOTE: If Show Scan Preview is selected, you will be able to make adjustments to the scanned image in the preview screen.
4. Select Save if you want to keep the application open for another scan, or select Done to exit the application.
5. After the scan is saved, a Windows Explorer window will open in the directory where the scan was saved.
NOTE: There is a limited number of computers that can have the scan function activated at the same time. Select Scan on the printer display and you will see the computers that are currently available for scanning.
34 Chapter 5 Copy and scan ENWW

Scan from your computer
1. Open HP Scan.
HP Scan is located in the Applications/Hewlett-Packard folder at the top level of the hard disk.
2. Choose the type of scan profile you want and follow the on-screen instructions.
ENWW Scan to a computer 35

Tips for copy success● Clean the scanner glass and make sure that there are no foreign materials adhering to it.
● To increase or decrease the contrast of your printed output, select Copy from the printer display and then select Lighter/Darker to adjust the contrast.
● To select the paper size and paper type of the printed output, select Copy from the printer display. From the Copy menu, select Paper Type to choose plain or photo paper and photo paper size.
● To resize the image, select Copy from the printer display, and then select Resize.
36 Chapter 5 Copy and scan ENWW

Tips for scan success● Clean the scanner glass and make sure that there are no foreign materials adhering to it.
● After you select Scan from the printer display, choose the computer that you want to scan to from the list of printers on the printer display.
● If you want to scan a document with several pages into one file instead of multiple files, start the scan with the printer software instead of selecting Scan from the printer display.
ENWW Tips for scan success 37

38 Chapter 5 Copy and scan ENWW

6 Fax
You can use the printer to send and receive faxes, including color faxes. You can schedule faxes to be sent at a later time and set up speed-dials to send faxes quickly and easily to frequently used numbers. From the printer control panel, you can also set a number of fax options, such as resolution and the contrast between lightness and darkness on the faxes you send.
NOTE: Before you begin faxing, make sure you have set up the printer correctly for faxing. You might have already done this as part of the initial setup, by using either the control panel or the HP software provided with the printer. You can verify the fax is set up correctly by running the fax setup test from the control panel. For more information on the fax test, see Test fax setup on page 140.
● Send a fax
● Receive a fax
● Set up speed-dial entries
● Change fax settings
● Fax and digital phone services
● Fax on Voice over Internet Protocol
● Use reports
● Tips for fax success
ENWW 39

Send a faxYou can send a fax in a variety of ways. Using the printer control panel, you can send a black and white fax or a color fax. You can also send a fax manually from an attached phone. This allows you to speak with the recipient before sending the fax.
This section contains the following topics:
● Send a standard fax
● Send a standard fax from the computer
● Send a fax manually from a phone
● Send a fax using monitor dialing
● Schedule a fax to send later
● Send a fax in Error Correction Mode
Send a standard faxYou can easily send a single- or multiple-page black-and-white or color fax by using the printer control panel.
NOTE: If you need to print confirmation that your faxes were successfully sent, fax confirmation must be enabled.
TIP: You can also send a fax manually from a phone or by using monitor dialing. These features allow you to control the pace of your dialing. They are also useful when you want to use a calling card to charge the call and you have to respond to tone prompts while dialing.
To send a standard fax from the printer control panel
1. Load the original print-side up in the ADF or print-side down on the right front corner of the scanner glass.
For more information about loading the original, see Load original on page 28.
2. From the Home screen on the printer display, press the Up and Down buttons to select Fax , and then press OK .
3. Select Black Fax or Color Fax.
If an original is loaded in the ADF, the document is sent to the number you entered. If no original is detected in the ADF, a message appears that promts you to make a selection.
TIP: If the recipient reports issues with the quality of the fax you sent, you can try changing the resolution or contrast of your fax.
4. Enter the fax number by using the keypad, and then press OK .
TIP: To add a pause in the fax number you are entering, press * repeatedly, until a dash (-) appears on the display.
Send a standard fax from the computerYou can send a document on your computer as a fax, without printing a copy and faxing it from the printer.
40 Chapter 6 Fax ENWW

NOTE: Faxes sent from your computer by this method use the printer's fax connection, not the Internet connection or computer modem. Therefore, make sure the printer is connected to a working telephone line and that the fax function is set up and functioning correctly.
To use this feature, you must install the printer software using the HP software CD provided with the printer.
To send a standard fax from the computer
1. Open the document on your computer that you want to fax.
2. On the File menu in your software application, click Print.
3. From the Name list, select the printer that has “fax” in the name.
4. To change settings (such as selecting to send the document as a black fax or a color fax), click the button that opens the Properties dialog box. Depending on your software application, this button might be called Properties, Options, Printer Setup, Printer, or Preferences.
5. After you have changed any settings, click OK.
6. Click Print or OK.
7. Enter the fax number and other information for the recipient, change any further settings for the fax, and then click Send Fax. The printer begins dialing the fax number and faxing the document.
Send a standard fax from the computer
1. Open the document on your computer that you want to fax.
2. From the File menu in your software, click Print.
3. Select the printer that has “(Fax)” in the name.
4. Select Fax Recipients from the pop-up menu below the Orientation setting.
NOTE: If you cannot find the pop-up menu, try clicking the disclosure triangle next to the Printer selection.
5. Enter the fax number and other information in the boxes provided, and then click Add to Recipients.
6. Select the Fax Mode and any other fax options you want, and then click Send Fax Now to begin dialing the fax number and faxing the document.
Send a fax manually from a phoneSending a fax manually allows you to make a phone call and talk with the recipient before you send the fax. This is useful if you want to inform the recipient that you are going to send them a fax before sending it. When you send a fax manually, you can hear the dial tones, telephone prompts, or other sounds through the handset on your telephone. This makes it easy for you to use a calling card to send your fax.
Depending on how the recipient has their fax machine set up, the recipient might answer the phone, or the fax machine might take the call. If a person answers the phone, you can speak with the recipient before sending the fax. If a fax machine answers the call, you can send the fax directly to the fax machine when you hear the fax tones from the receiving fax machine.
ENWW Send a fax 41

To send a fax manually from an extension phone
1. Load the original print-side up in the ADF or print-side down on the right front corner of the scanner glass.
For more information about loading the original, see Load original on page 28.
2. From the Home screen on the printer display, press the Up and Down buttons to select Fax , and then press OK .
3. Dial the number by using the keypad on the phone that is connected to the printer.
NOTE: Do not use the keypad on the control panel of the printer when manually sending a fax. You must use the keypad on your phone to dial the recipient's number.
4. If the recipient answers the telephone, you can engage in a conversation before sending your fax.
NOTE: If a fax machine answers the call, you will hear fax tones from the receiving fax machine. Proceed to the next step to transmit the fax.
5. When you are ready to send the fax, press OK, select Send New Fax, and then select Black or Color.
If you were speaking with the recipient before sending the fax, inform the recipient that they should press Receive Fax Manually on their fax machine after they hear fax tones.
The telephone line is silent while the fax is transmitting. At this point, you can hang up the telephone. If you want to continue speaking with the recipient, remain on the line until the fax transmission is complete.
Send a fax using monitor dialingMonitor dialing allows you to dial a number from the printer control panel as you would dial a regular telephone. When you send a fax using monitor dialing, you can hear the dial tones, telephone prompts, or other sounds through the speakers on the printer. This enables you to respond to prompts while dialing, as well as control the pace of your dialing.
TIP: If you are using a calling card and do not enter your PIN fast enough, the printer might start sending fax tones too soon and cause your PIN not to be recognized by the calling card service. If this is the case, you can create a speed dial entry to store the PIN for your calling card. For more information, see Set up speed-dial entries on page 49.
NOTE: Make sure the volume is turned on to hear a dial tone.
To send a fax using monitor dialing from the printer control panel
1. Load the original print-side up in the ADF or print-side down on the right front corner of the scanner glass.
For more information about loading the original, see Load original on page 28.
2. From the Home screen on the printer display, press the Up and Down buttons to select Fax , and then press OK .
3. Select Black Fax or Color Fax.
● If the printer detects an original loaded in the ADF, you can hear a dial tone.
● If the original is loaded on the scanner glass, select Fax from Glass.
42 Chapter 6 Fax ENWW

4. When you hear the dial tone, enter the number by using the keypad on the printer control panel.
5. Follow any prompts that might occur.
Your fax is sent when the receiving fax machine answers.
Schedule a fax to send laterYou can schedule a black and white fax to be sent within the next 24 hours. This enables you to send a black and white fax late in the evening, when phone lines are not as busy or phone rates are lower. The printer automatically sends your fax at the specified time.
You can only schedule one fax to be sent at a time. You can continue to send faxes normally, while a fax is scheduled.
NOTE: You can only send a black and white fax from memory.
To schedule a fax from the printer control panel
1. Load your original print-side up in the ADF.
For more information about loading the original, see Load original on page 28.
2. From the Home screen on the printer display, press the Up and Down buttons to select Fax , and then press OK .
3. Select Settings, and then select Schedule a Fax.
4. Enter the fax delay time by pressing the Up and Down buttons, and then press OK to confirm.
5. When you hear the dial tone, enter the number by using the keypad on the printer control panel.
6. Select Scan, select Start, and then press OK .
The printer scans all pages and sends the fax at the scheduled time.
To cancel a scheduled fax
1. From the Home screen on the printer display, press the Up and Down buttons to select Fax , and then press OK .
2. Select Settings, and then select Schedule a Fax.
3. Select the scheduled fax that you want to delete, select Delete, and then press OK .
Send a fax in Error Correction ModeError Correction Mode (ECM) prevents loss of data due to poor phone lines by detecting errors that occur during transmission and automatically requesting retransmission of the erroneous portion. Phone charges are unaffected, or might even be reduced, on good phone lines. On poor phone lines, ECM increases sending time and phone charges, but sends the data much more reliably. The default setting is On . Turn ECM off only if it increases phone charges substantially, and if you can accept poorer quality in exchange for reduced charges.
Before turning the ECM setting off, consider the following. If you turn ECM off:
ENWW Send a fax 43

● The quality and transmission speed of faxes you send and receive are affected.
● The Fax Speed is automatically set to Medium .
● You can no longer send or receive faxes in color.
To change the ECM setting from the control panel
1. From the Home screen on the printer display, press the Up and Down buttons to select Fax , and then press OK .
2. Select Settings, and then select Advanced Settings.
3. Select Error Correction.
4. Select On or Off, and then press OK .
44 Chapter 6 Fax ENWW

Receive a faxYou can receive faxes automatically or manually. If you turn off the Auto Answer option, you must receive faxes manually. If you turn on the Auto Answer option (the default setting), the printer automatically answers incoming calls and receives faxes after the number of rings that are specified by the Rings to Answer setting. (The default Rings to Answer setting is five rings.)
If you receive a Legal-size (216 mm x 279 mm) or larger fax and the printer is not currently set to use Legal-size paper, the printer reduces the fax so that it fits on the paper that is loaded.
NOTE: If you are copying a document when a fax arrives, the fax is stored in the printer memory until the copying finishes. This can reduce the number of fax pages stored in memory.
● Receive a fax manually
● Reprint received faxes from memory
● Forward faxes to another number
● Set the paper size for received faxes
● Block unwanted fax numbers
Receive a fax manuallyWhen you are on the phone, the person you are speaking with can send you a fax while you are still connected. This is referred to as manual faxing. Use the instructions in this section to receive a manual fax.
NOTE: You can pick up the handset to talk or listen for fax tones.
You can receive faxes manually from a phone that is:
● Directly connected to the printer (on the 2-EXT port).
● On the same phone line, but not directly connected to the printer.
To receive a fax manually
1. Make sure the printer is turned on and you have paper loaded in the input tray.
2. Remove any originals from the ADF.
3. Set the Rings to Answer setting to a high number to allow you to answer the incoming call before the printer answers. Or turn off the Auto Answer setting so that the printer does not automatically answer incoming calls.
4. If you are currently on the phone with the sender, instruct the sender to press Send New Fax on the fax machine.
5. When you hear fax tones from a sending fax machine, do the following:
a. From the Home screen on the printer display, press the Up and Down buttons to select Fax , press OK, and then select Receive Fax Manually.
b. After the printer begins to receive the fax, you can hang up the phone or remain on the line. The phone line is silent during fax transmission.
ENWW Receive a fax 45

Reprint received faxes from memoryThe received faxes, which are not printed out, are stored in memory.
NOTE: After the memory becomes full, the printer cannot receive the new fax until you print or delete the faxes from memory. You might also want to delete the faxes in memory for security or privacy purposes.
Depending on the sizes of the faxes in memory, you can reprint up to eight of the most recently printed faxes, if they are still in memory. For example, you might need to reprint your faxes if you lost the copy of your last printout.
To reprint faxes in memory from the printer control panel
1. Make sure you have paper loaded in the input tray. For more information, see Load media on page 24.
2. From the Home screen on the printer display, press the Up and Down buttons to select Fax , and then press OK .
3. Select Settings, and then select Reprint Missed Faxes.
The faxes are displayed in the reverse order from which they were received with the most recently received fax first.
4. Select the fax you want to print, and then select Print.
5. If you want to stop reprinting the fax, select Cancel, and then press OK .
Forward faxes to another numberYou can set up the printer to forward your faxes to another fax number. A received color fax is forwarded in black and white.
HP recommends that you verify the number you are forwarding to is a working fax line. Send a test fax to make sure the fax machine is able to receive your forwarded faxes.
To forward faxes from the printer control panel
1. From the Home screen on the printer display, press the Up and Down buttons to select Fax , and then press OK .
2. Select Settings, and then select Advanced Settings.
3. Select Fax Forwarding, and then select Fax Forward.
4. Select On with Print to print and forward the fax, or select On to forward the fax.
NOTE: If the printer is not able to forward the fax to the designated fax machine (for example, if it is not turned on), the printer prints the fax. If you set up the printer to print error reports for received faxes, it also prints an error report.
5. At the prompt, enter the number of the fax machine intended to receive the forwarded faxes, and then select Done. Enter the required information for each of the following prompts: start date, start time, end date, and end time.
6. Fax forwarding is activated. Select OK to confirm.
If the printer loses power when fax forwarding is set up, it saves the fax forwarding setting and phone number. When the power is restored to the printer, the fax forwarding setting is still On.
46 Chapter 6 Fax ENWW

NOTE: You can cancel fax forwarding by selecting Off from the Fax Forwarding menu.
Set the paper size for received faxesYou can select the paper size for received faxes. The paper size you select should match what is loaded in your input tray. Faxes can be printed on Letter, A4, or Legal paper only.
NOTE: If an incorrect paper size is loaded in the input tray when you receive a fax, the fax does not print and an error message appears on the display. Load Letter, A4, or Legal paper, and then press OK to print the fax.
To set the paper size for received faxes from the printer control panel
1. From the Home screen on the printer display, press the Up and Down buttons to select Fax , and then press OK .
2. Select Settings.
3. Select Fax Paper Size, and then select an option.
Block unwanted fax numbersIf you subscribe to a caller ID service through your phone provider, you can block specific fax numbers so the printer does not print faxes received from those numbers. When an incoming fax call is received, the printer compares the number to the list of junk fax numbers to determine if the call should be blocked. If the number matches a number in the blocked fax numbers list, the fax is not printed. (The maximum number of fax numbers you can block varies by model.)
NOTE: This feature is not supported in all countries/regions. If it is not supported in your country/region, Junk Fax Blocker does not appear in the Fax Options or Fax Settings menu.
NOTE: If no phone numbers are added in the Caller ID list, it is assumed that you are not subscribed to a Caller ID service.
● Add numbers to the junk fax list
● Remove numbers from the junk fax list
Add numbers to the junk fax list
You can block specific numbers by adding them to the junk fax list.
To add a number to the junk fax list
1. From the Home screen on the printer display, press the Up and Down buttons to select Fax , and then press OK .
2. Select Settings, and then select Junk Fax.
3. A message appears stating that Caller ID is required to block junk faxes. Select OK to continue.
4. Select Add a Number.
5. To select a fax number to block from the caller ID list, select From Call History.
- or -
ENWW Receive a fax 47

To manually enter a fax number to block, select Enter New Number.
6. After entering a fax number to block, select Done.
NOTE: Make sure you enter the fax number as it appears on the control panel display, and not the fax number that appears on the fax header of the received fax, as these numbers can be different.
Remove numbers from the junk fax list
If you no longer want to block a fax number, you can remove a number from your junk fax list.
To remove numbers from the list of junk fax numbers
1. From the Home screen on the printer display, press the Up and Down buttons to select Fax , and then press OK .
2. Select Settings, and then select Junk Fax.
3. Select the number you want to remove, and then select Remove a Number.
4. Press OK to confirm the deletion.
48 Chapter 6 Fax ENWW

Set up speed-dial entriesYou can set up frequently used fax numbers as speed-dial entries. This allows you to dial those numbers quickly by using the printer control panel.
TIP: In addition to creating and managing speed-dial entries from the printer control panel, you can also use tools available on your computer, such as the HP software included with the printer.
This section contains the following topics:
● Set up and change speed-dial entries
● Delete speed-dial entries
Set up and change speed-dial entriesYou can store fax numbers as speed-dial entries.
To set up speed-dial entries
1. From the Home screen on the printer display, press the Up and Down buttons to select Fax , and then press OK .
2. Select Settings, and then select Phone Book.
3. Select Add Contact.
4. Type the name of the entry, and then select Next.
5. Type the fax number, and then select Done.
NOTE: Be sure to include any pauses or other required numbers, such as an area code, an access code for numbers outside a PBX system (usually a 9 or 0), or a long-distance prefix.
To change speed-dial entries
1. From the Home screen on the printer display, press the Up and Down buttons to select Fax , and then press OK .
2. Select Settings, and then select Phone Book.
3. Select the entry you want to change, and then press OK.
4. Select Edit, and then make your changes in the fax name, and then select Next.
5. Make your changes in the fax number, and then select Done.
NOTE: Be sure to include any pauses or other required numbers, such as an area code, an access code for numbers outside a PBX system (usually a 9 or 0), or a long-distance prefix.
ENWW Set up speed-dial entries 49

Delete speed-dial entries
To delete speed-dial entries
1. From the Home screen on the printer display, press the Up and Down buttons to select Fax , and then press OK .
2. Select Settings, and then select Phone Book.
3. Select the entry you want to delete, and then select Delete to confirm.
50 Chapter 6 Fax ENWW

Change fax settingsUse the following steps to change the initial settings or to configure other options for faxing.
● Configure the fax header
● Set the answer mode (Auto answer)
● Set the number of rings before answering
● Change the answer ring pattern for distinctive ring
● Set the dial type
● Set the redial options
● Set the fax speed
● Set the fax sound volume
Configure the fax headerThe fax header prints your name and fax number on the top of every fax you send. HP recommends that you set up the fax header by using the HP software provided with the printer. You can also set up the fax header from the printer control panel, as described here.
NOTE: In some countries/regions, the fax header information is a legal requirement.
To set or change the fax header
1. From the Home screen on the printer display, press the Up and Down buttons to select Fax , and then press OK .
2. Select Settings, and then select Fax Header.
3. Enter your personal or company name and fax number, and then select Done.
Set the answer mode (Auto answer)The answer mode determines whether the printer answers incoming calls.
● Turn on the Auto Answer setting if you want the printer to answer faxes automatically. The printer answers all incoming calls and faxes.
● Turn off the Auto Answer setting if you want to receive faxes manually. You must be available to respond in person to the incoming fax call or else the printer does not receive faxes.
To set the answer mode
1. From the Home screen on the printer display, press the Up and Down buttons to select Fax , and then press OK .
2. Select Settings.
3. Select Auto Answer, select On or Off, and then press OK .
ENWW Change fax settings 51

Set the number of rings before answeringIf you turn on the Auto Answer setting, you can specify how many rings occur before incoming calls are automatically answered.
The Rings to Answer setting is important if you have an answering machine on the same phone line as the printer, because you want the answering machine to answer the phone before the printer does. The number of rings to answer for the printer should be greater than the number of rings to answer for the answering machine.
For example, set your answering machine to a low number of rings and the printer to answer in the maximum number of rings. (The maximum number of rings varies by country/region.) In this setup, the answering machine answers the call and the printer monitors the line. If the printer detects fax tones, it receives the fax. If the call is a voice call, the answering machine records the incoming message.
To set the number of rings before answering
1. From the Home screen on the printer display, press the Up and Down buttons to select Fax , and then press OK .
2. Select Settings, and then select Advanced Settings.
3. Select Ring Settings, and then select Rings to Answer.
4. Select up and down arrows to change the number of rings.
5. Select OK to accept the setting.
Change the answer ring pattern for distinctive ringMany phone companies offer a distinctive ring feature that allows you to have several phone numbers on one phone line. When you subscribe to this service, each number is assigned a different ring pattern. You can set up the printer to answer incoming calls that have a specific ring pattern.
If you connect the printer to a line with distinctive ring, have your telephone company assign one ring pattern to voice calls and another ring pattern to fax calls. HP recommends that you request double or triple rings for a fax number. When the printer detects the specified ring pattern, it answers the call and receives the fax.
TIP: You can also use the Ring Pattern Detection feature in the printer control panel to set distinctive ring. With this feature, the printer recognizes and records the ring pattern of an incoming call and, based on this call, automatically determines the distinctive ring pattern assigned by your telephone company to fax calls.
If you do not have a distinctive ring service, use the default ring pattern, which is All Rings .
NOTE: The printer cannot receive faxes when the main phone number is off the hook.
To change the answer ring pattern for distinctive ring
1. Verify that the printer is set to answer fax calls automatically.
2. From the Home screen on the printer display, press the Up and Down buttons to select Fax , and then press OK .
3. Select Settings, and then select Advanced Settings.
4. Select Ring Settings, and then select Distinctive Ring.
52 Chapter 6 Fax ENWW

5. A message appears stating that this setting should not be changed unless you have multiple numbers on the same telephone line. Select Yes to continue.
6. Do one of the following:
● Select the ring pattern assigned by your telephone company to fax calls.
- Or -
● Select Auto Detect, and then follow the instructions on the printer control panel.
NOTE: If the Ring Pattern Detection feature cannot detect the ring pattern or if you cancel the feature before it finishes, the ring pattern is automatically set to the default, which is All Rings.
NOTE: If you are using a PBX phone system that has different ring patterns for internal and external calls, you must call the fax number from an external number.
Set the dial typeUse this procedure to set tone-dialing or pulse-dialing mode. The factory-set default is Tone. Do not change the setting unless you know that your phone line cannot use tone dialing.
NOTE: The pulse-dialing option is not available in all countries/regions.
To set the dial type
1. From the Home screen on the printer display, press the Up and Down buttons to select Fax , and then press OK .
2. Select Settings, and then select Advanced Settings.
3. Select Dial Type, select Tone Dialing or Pulse Dialing, and then press OK .
Set the redial optionsIf the printer was unable to send a fax because the receiving fax machine did not answer or was busy, the printer attempts to redial based on the settings for the busy-redial and no-answer-redial options. Use the following procedure to turn the options on or off.
● When Busy: If this option is turned on, the printer redials automatically if it receives a busy signal. The factory-set default for this option is Redial.
● When No answer: If this option is turned on, the printer redials automatically if the receiving fax machine does not answer. The factory-set default for this option is No Redial.
To set the redial options
1. From the Home screen on the printer display, press the Up and Down buttons to select Fax , and then press OK .
2. Select Settings, and then select Auto Redial.
3. Select the appropriate option, and then press OK.
ENWW Change fax settings 53

Set the fax speedYou can set the fax speed used to communicate between your printer and other fax machines when sending and receiving faxes.
If you use one of the following, setting the fax speed to a slower speed might be required:
● An Internet phone service
● A PBX system
● Fax on Voice over Internet Protocol (VoIP)
● An integrated services digital network (ISDN) service
If you experience problems sending and receiving faxes, try using a lower Fax Speed. The following table provides the available fax speed settings.
Fax speed setting Fax speed
Fast v.34 (33600 bps)
Medium v.17 (14400 bps)
Slow v.29 (9600 bps)
To set the fax speed
1. From the Home screen on the printer display, press the Up and Down buttons to select Fax , and then press OK .
2. Select Settings, and then select Advanced Settings.
3. Select Fax Speed.
4. Select an option, and then press OK.
Set the fax sound volumeUse this procedure to increase or decrease the volume of the fax sounds.
To set the fax sound volume
1. From the Home screen on the printer display, press the Up and Down buttons to select Fax , and then press OK .
2. Select Settings, and then select Advanced Settings.
3. Select Ring Settings, and then select Fax Sound Volume.
4. Select Soft, Loud, or Off, and then press OK .
54 Chapter 6 Fax ENWW

Fax and digital phone servicesMany telephone companies provide their customers with digital phone services, such as the following:
● DSL: A Digital subscriber line (DSL) service through your telephone company. (DSL might be called ADSL in your country/region.)
● PBX: A private branch exchange (PBX) phone system.
● ISDN: An integrated services digital network (ISDN) system.
● VoIP: A low-cost phone service that allows you to send and receive faxes with your printer by using the Internet. This method is called Fax on Voice over Internet Protocol (VoIP).
For more information, see Fax on Voice over Internet Protocol on page 56.
HP printers are designed specifically for use with traditional analog phone services. If you are in a digital phone environment (such as DSL/ADSL, PBX, or ISDN), you might need to use digital-to-analog filters or converters when setting up the printer for faxing.
NOTE: HP does not guarantee that the printer will be compatible with all digital service lines or providers, in all digital environments, or with all digital-to-analog converters. It is always recommended that you discuss with the telephone company directly for the correct setup options based on their line services provided.
ENWW Fax and digital phone services 55

Fax on Voice over Internet ProtocolYou might be able to subscribe to a low cost phone service that allows you to send and receive faxes with your printer by using the Internet. This method is called Fax on Voice over Internet Protocol (VoIP).
The following are indications you probably use a VoIP service.
● Dial a special access code along with the fax number.
● Have an IP converter box that connects to the Internet and provides analog phone ports for the fax connection.
NOTE: You can only send and receive faxes by connecting a phone cord to the port labeled "1-LINE" on the printer. This means that your connection to the Internet must be done either through a converter box (which supplies regular analog phone jacks for fax connections) or your telephone company.
TIP: Support for traditional fax transmission over any Internet protocol telephone systems are often limited. If you experience problems faxing, try using a slower fax speed or disabling the fax error-correction mode (ECM). However, if you turn off ECM, you cannot send and receive color faxes.
For more information about changing the fax speed, see Set the fax speed on page 54. For more information about using ECM, see Send a fax in Error Correction Mode on page 43.
If you have questions about Internet faxing, contact your Internet faxing services support department or your local service provider for further assistance.
56 Chapter 6 Fax ENWW

Use reportsYou can set up the printer to print error reports and confirmation reports automatically for each fax you send and receive. You can also manually print system reports as required; these reports provide useful system information about the printer.
By default, the printer is set to print a report only if there is a problem sending or receiving a fax. A confirmation message that indicates whether a fax was successfully sent appears briefly on the control panel display after each transaction.
NOTE: If the reports are not legible, you can check the estimated ink levels from the control panel or the HP software.
NOTE: Ink level alerts and indicators provide estimates for planning purposes only. When you receive a low-ink alert, consider having a replacement cartridge available to avoid possible printing delays. You do not need to replace the ink cartridges until prompted to do so.
NOTE: Ensure that the printheads and ink cartridges are in good conditions and installed properly. For more information, see Work with ink cartridges on page 61.
This section contains the following topics:
● Print fax confirmation reports
● Print and view the fax log
● Print the details of the last fax transaction
● Print a Caller ID report
● View the Call History
Print fax confirmation reportsIf you require printed confirmation that your faxes were successfully sent, follow these instructions to enable fax confirmation before sending any faxes.
The default fax confirmation setting is Error Only.
To enable fax confirmation
1. From the Home screen on the printer display, press the Up and Down buttons to select Fax , and then press OK .
2. Select Settings, select Advanced Settings, and then select Fax Confirmation.
3. Select one of the following options, and then press OK .
Off Does not print a fax confirmation report when you send and receive faxes successfully.
After Send Fax Prints a fax confirmation report for every fax you send.
After Receive Fax Prints a fax confirmation report for every fax you receive.
ENWW Use reports 57

On Always Prints a fax confirmation report for every fax you send and receive.
Error Only Prints a fax confirmation report for every fax error. This is the default setting.
Print and view the fax logYou can print a log of faxes that have been received and sent by the printer.
To print the fax log from the printer control panel
1. From the Home screen on the printer display, press the Up and Down buttons to select Fax , and then press OK .
2. Select Settings, select Advanced Settings, and then select Fax Reports.
3. Select Fax Log, and then press OK .
Print the details of the last fax transactionThe Last Fax Transaction report prints the details of the last fax transaction to occur. Details include the fax number, number of pages, and the fax status.
To print the Last Fax Transaction report
1. From the Home screen on the printer display, press the Up and Down buttons to select Fax , and then press OK .
2. Select Settings, select Advanced Settings, and then select Fax Reports.
3. Select Last Transaction Report, and then press OK .
Print a Caller ID reportUse the following procedure to print a list of Caller ID fax numbers.
To print a Caller ID History report
1. From the Home screen on the printer display, press the Up and Down buttons to select Fax , and then press OK .
2. Select Settings, select Advanced Settings, and then select Fax Reports.
3. Select Caller ID Report, and then press OK .
View the Call HistoryUse the following procedure to print a list of all the calls placed from the printer.
58 Chapter 6 Fax ENWW

To view the Call History
1. From the Home screen on the printer display, press the Up and Down buttons to select Fax , and then press OK .
2. Select Settings, and then select Junk Fax.
3. Select Add a Number, select From Call History, and then press OK .
ENWW Use reports 59

Tips for fax success● Load the original print-side up in the ADF or print-side down on the right front corner of the scanner
glass.
For more information about loading the original, see Load original on page 28.
● Clean the scanner glass and make sure that there are no foreign materials adhering to it.
● Turn on Error Correction Mode (ECM) to send color faxes.
For more information about turning on ECM, see Send a fax in Error Correction Mode on page 43.
● After the fax memory becomes full, the printer does not receive any faxes until you print or delete the faxes from memory.
For more information about reprinting the faxes in the memory, see Reprint received faxes from memory on page 46.
● You can set up the printer to answer incoming calls with a specific ring pattern. Use this feature only when you have subscribed to the service, which allows several phone numbers on one phone line from your phone service provider.
60 Chapter 6 Fax ENWW

7 Work with ink cartridges
This section contains the following topics:
● Check estimated ink levels
● Order ink supplies
● Choose right ink cartridges
● Replace ink cartridges
● Use single-cartridge mode
● Cartridge warranty information
● Tips for working with ink cartridges
ENWW 61

Check estimated ink levelsYou can easily check the ink supply level to determine how soon you might need to replace an ink cartridge. The ink supply level shows an estimate of the amount of ink remaining in the ink cartridges.
To check the ink levels from the printer control panel
● From the Home screen on the printer display, select Ink Levels. Then the printer displays the current ink levels.
NOTE: If you do not see the Home screen, press the Home button.
To check the ink levels from the printer software
1. Depending on your operating system, do one of the following to open the printer software:
● Windows 8: On the Start screen, right-click an empty area on the screen, click All Apps on the app bar, and then click the icon with the printer's name.
● Windows 7, Windows Vista, and Windows XP: From the computer desktop, click Start, select All Programs, click HP, click HP Deskjet 2640 series, and then click HP Deskjet 2640 series.
2. In the printer software, click Estimated Ink Levels.
To check the ink levels from HP Utility
1. Open HP Utility.
HP Utility is located in the Hewlett-Packard folder in the Applications folder at the top level of the hard disk.
2. Select the HP Deskjet 2640 series from the list of devices at the left of the window.
3. Click Supplies Status.
The estimated ink levels appear.
4. Click All Settings to return to the Information and Support pane.
NOTE: If you have installed a refilled or remanufactured ink cartridge, or an ink cartridge that has been used in another printer, the ink level indicator might be inaccurate or unavailable.
NOTE: Ink level warnings and indicators provide estimates for planning purposes only. When you receive a low-ink warning message, consider having a replacement ink cartridge available to avoid possible printing delays. You do not have to replace the ink cartridges until the print quality is unacceptable.
NOTE: Ink from the ink cartridges is used in the printing process in a number of different ways, including in the initialization process, which prepares the printer and cartridges for printing, and in printhead servicing, which keeps print nozzles clear and ink flowing smoothly. In addition, some residual ink is left in the ink cartridge after it is used. For more information, see www.hp.com/go/inkusage.
62 Chapter 7 Work with ink cartridges ENWW

Order ink suppliesBefore ordering cartridges, locate the correct cartridge number.
Locate the cartridge number on the printer
● The cartridge number is located inside the cartridge access door.
Locate the cartridge number from the printer software
1. Depending on your operating system, do one of the following to open the printer software:
● Windows 8: On the Start screen, right-click an empty area on the screen, click All Apps on the app bar, and then click the icon with the printer's name.
● Windows 7, Windows Vista, and Windows XP: From the computer desktop, click Start, select All Programs, click HP, click HP Deskjet 2640 series, and then click HP Deskjet 2640 series.
2. In the printer software, click Shop, click Shop For Supplies Online, and then follow the on-screen instructions.
To find the print cartridge reorder numbers
1. Open HP Utility.
NOTE: HP Utility is located in the Hewlett-Packard folder in the Applications folder at the top level of the hard disk.
2. Click Supplies Info.
The print cartridge ordering numbers appear.
3. Click All Settings to return to the Information and Support pane.
To order original HP supplies for the HP Deskjet 2640 series, go to www.hp.com/buy/supplies . If prompted, choose your country/region, follow the prompts to select your product, and then click one of the shopping links on the page.
NOTE: Ordering ink cartridges online is not supported in all countries/regions. If it is not available in your country/region, you may still view supplies information and print a list for reference when shopping at a local HP reseller.
ENWW Order ink supplies 63

Choose right ink cartridgesHP recommends that you use Original HP ink cartridges. Original HP ink cartridges are designed and tested with HP printers to help you easily produce great results, time after time.
64 Chapter 7 Work with ink cartridges ENWW

Replace ink cartridgesTo replace the ink cartridges
1. Check that power is on.
2. Load paper.
3. Remove the ink cartridge.
a. Open the cartridge access door and wait for the print carriage to move to the center of the pinter.
b. Press down to release the ink cartridge, and then remove it from the slot.
4. Insert new ink cartridge.
a. Remove the ink cartridge from the packaging.
ENWW Replace ink cartridges 65
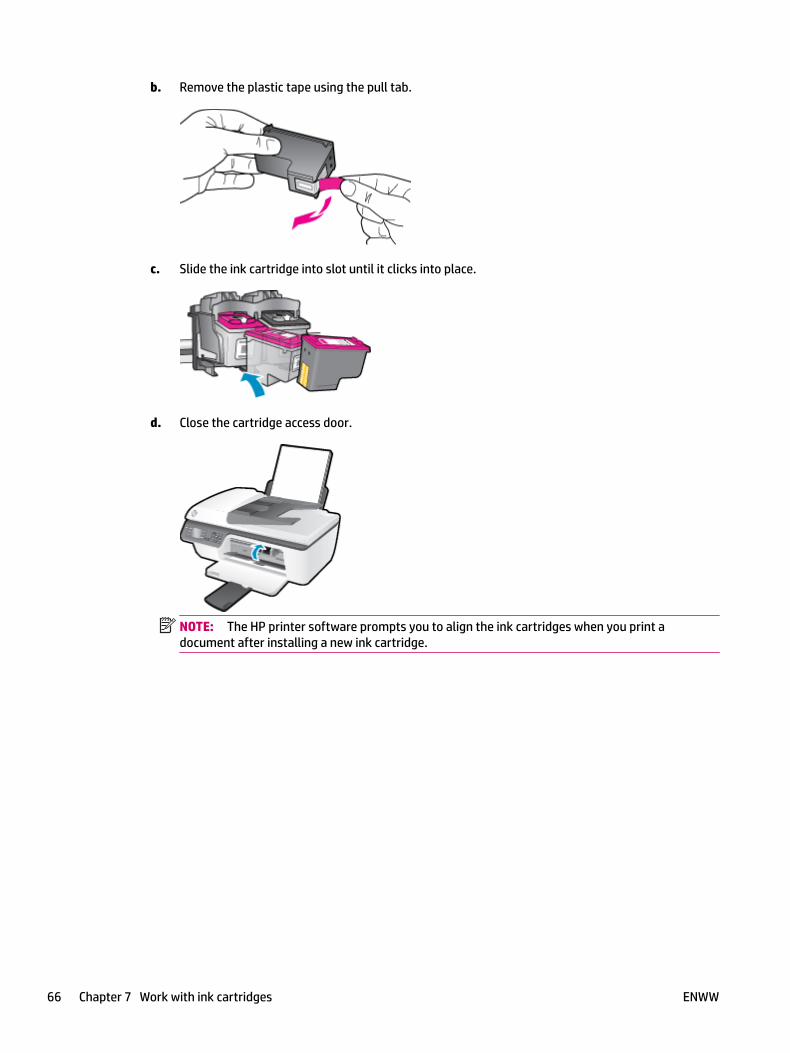
b. Remove the plastic tape using the pull tab.
c. Slide the ink cartridge into slot until it clicks into place.
d. Close the cartridge access door.
NOTE: The HP printer software prompts you to align the ink cartridges when you print a document after installing a new ink cartridge.
66 Chapter 7 Work with ink cartridges ENWW

Use single-cartridge modeUse the single-cartridge mode to operate the HP Deskjet 2640 series with only one ink cartridge. The single-cartridge mode is initiated when an ink cartridge is removed from the ink cartridge carriage.
NOTE: When the HP Deskjet 2640 series operates in single-cartridge mode, a message is displayed on screen. If the message is displayed and two ink cartridges are installed in the printer, verify that the protective piece of plastic tape has been removed from each ink cartridge. When plastic tape covers the ink cartridge contacts, the printer cannot detect that the ink cartridge is installed.
To exit single-cartridge mode
● Install both the black and tri-color cartridges in the HP Deskjet 2640 series to exit single-cartridge mode.
ENWW Use single-cartridge mode 67

Cartridge warranty informationThe HP cartridge warranty is applicable when the cartridge is used in its designated HP printing device. This warranty does not cover HP ink cartridges that have been refilled, remanufactured, refurbished, misused, or tampered with.
During the warranty period the cartridge is covered as long as the HP ink is not depleted and the end of warranty date has not been reached. The end of warranty date, in YYYY/MM/DD format, may be found on the cartridge as indicated:
For a copy of the HP Limited Warranty Statement, see the printed documentation that came with the printer.
68 Chapter 7 Work with ink cartridges ENWW

Tips for working with ink cartridgesUse the following tips to work with ink cartridges:
● To protect the ink cartridges from drying out, always turn the printer off using the On button, and wait until the On button light goes out.
● Do not open or untape ink cartridges until you are ready to install them. Leaving tape on the ink cartridges reduces ink evaporation.
● Insert the ink cartridges into the correct slots. Match the color and icon of each ink cartridge to the color and icon for each slot. Make sure the ink cartridges snap into place.
● After you insert new ink cartridges, align the printer for best print quality. See Improve print quality on page 80 for more information.
● When the Estimated Ink Levels in the printer software shows one or both ink cartridges in a low state, consider getting replacement cartridges to avoid possible printing delays. You do not need to replace the ink cartridges until print quality becomes unacceptable. See Replace ink cartridges on page 65 for more information.
● If you remove an ink cartridge from the printer for any reason, try to replace it again as soon as possible. Outside of the printer, if unprotected, ink cartridges begin to dry out.
ENWW Tips for working with ink cartridges 69

70 Chapter 7 Work with ink cartridges ENWW

8 Connectivity
This section contains the following topics:
● Connect a new printer
● USB connection
ENWW 71

Connect a new printerIf you have not connected the printer to your computer, or you want to connect another new printer of the same model to your computer, you can use the Connect a new printer function to set up the connection.
NOTE: Use this method if you have already installed the printer software.
1. Depending on your operating system, do one of the following:
● Windows 8: On the Start screen, right-click an empty area on the screen, and then click All Apps on the app bar.
● Windows 7, Windows Vista, and Windows XP: From the computer desktop, click Start, select All Programs, click HP, and then click HP Deskjet 2640 series .
2. Select Printer Setup & Software.
3. Select Connect a new printer. Follow the on-screen instructions.
Connect a new printer
1. In System Preferences, select Print & Fax.
2. Click + below the printer list on the left.
3. Select the new printer from the list.
72 Chapter 8 Connectivity ENWW

USB connectionThe HP Deskjet 2640 series supports a rear USB 2.0 High Speed port for connection to a computer.
To connect the printer with the USB cable
1. Insert the printer software CD in the computer CD-ROM drive.
2. Follow the on-screen instructions. When you are prompted, connect the printer to the computer by selecting USB on the Connection Options screen.
NOTE: Do not connect the USB cable to the printer until you are prompted to do so.
3. Follow the on-screen instructions.
If the printer software has been installed, the printer will operate as a plug-and-play device. If the software has not been installed, insert the CD that came with the printer and follow the on-screen instructions.
ENWW USB connection 73

74 Chapter 8 Connectivity ENWW

9 Solve a problem
This section contains the following topics:
● Clear paper jam
● Improve print quality
● Unable to print
● Resolve copy and scan issues
● Resolve fax issues
● HP support
ENWW 75

Clear paper jamUse the following steps to clear a paper jam.
To clear a paper jam from the input tray
1. Pull the paper gently out of the input tray.
2. Press the OK button on the control panel to continue the current job.
To clear a paper jam from the output tray
1. Pull the paper gently out of the output tray.
2. Press the OK button on the control panel to continue the current job.
To clear a paper jam from the cartridge access area
1. Open the cartridge access door and slide the print carriage to the right to access the paper jam.
2. Press the OK button on the control panel to continue the current job.
To clear a paper jam inside of the printer
1. Open the cleanout door located on the bottom of the printer. Press tabs on both sides of the cleanout door.
76 Chapter 9 Solve a problem ENWW

2. Remove the jammed paper.
3. Close the cleanout door. Gently push the door towards the printer until both latches snap into place.
4. Press the OK button on the control panel to continue the current job.
To clear a jam in the automatic document feeder
1. Lift the cover of the ADF.
2. Lift the tab located on the front edge of the ADF.
ENWW Clear paper jam 77

3. Gently pull the paper out of the rollers.
CAUTION: If the paper tears when you are removing it from the rollers, check the rollers and wheels for torn pieces of paper that might remain inside the printer. If you do not remove all the pieces of paper from the printer, more paper jams are likely to occur.
4. Close the cover of the ADF, pressing down firmly until it snaps into place.
5. Press the OK button on the control panel to continue the current job.
If the above solutions do not resolve the problem, click here for more online troubleshooting.
Prevent paper jams
● Do not overfill the input tray.
● Remove printed papers from the output tray frequently.
● Ensure that paper loaded in the input tray lays flat, and the edges are not bent or torn.
● Do not combine different paper types and paper sizes in the input tray; the entire stack of paper in the input tray must be the same size and type.
● Adjust the paper-width guide in the input tray to fit snugly against all paper. Make sure the paper-width guide does not bend the paper in the input tray.
● Do not force paper too far forward in the input tray.
● Do not add paper while the printer is printing. If the printer is about to run out of paper, wait until the out of paper message appears before adding paper.
If the above solutions do not resolve the problem, click here for more online troubleshooting.
78 Chapter 9 Solve a problem ENWW

Clear print carriageRemove any objects, such as paper, that are blocking the print carriage.
See Clear paper jam on page 76 for more information.
NOTE: Do not use any tools or other devices to remove jammed paper. Always use caution when removing jammed paper from inside the printer.
Click here to go online for more information.
ENWW Clear print carriage 79

Improve print qualityNOTE: To protect the ink cartridges from drying out, always turn the printer off using the On button, and wait until the On button light goes out.
1. Make sure you are using Original HP ink cartridges and HP recommended papers.
2. Check the printer software to make sure you have selected the appropriate paper type from the Media drop-down list and print quality in the Quality Settings area.
In the printer software, click Print, Scan & Fax and then click Set Preferences to access the print properties.
3. Check the estimated ink levels to determine if the ink cartridges are low on ink.
For more information, see Check estimated ink levels on page 62. If the ink cartridges are low on ink consider replacing them.
4. Align the ink cartridges.
To align the cartridges from the printer software
a. Load letter or A4 unused plain white paper into the input tray.
b. Depending on your operating system, do one of the following to open the printer software:
● Windows 8: On the Start screen, right-click an empty area on the screen, click All Apps on the app bar, and then click the icon with the printer's name.
● Windows 7, Windows Vista, and Windows XP: From the computer desktop, click Start, select All Programs, click HP, click HP Deskjet 2640 series, and then click HP Deskjet 2640 series.
c. In the printer software, click Print, Scan & Fax , and then click Maintain Your Printer to access the printer toolbox.
The printer toolbox appears.
d. Click Align Ink Cartridges on the Device Services tab.
The printer prints an alignment sheet.
e. Load the cartridge alignment sheet print side down on the right front corner of the scanner glass.
f. Follow the instructions on the printer display to align the cartridges. Recycle or discard the cartridge alignment sheet.
80 Chapter 9 Solve a problem ENWW

To align the cartridges from the printer display
a. From the Home screen on the printer display, press the Up and Down buttons to select Tools , and then press OK .
NOTE: If you do not see the Home screen, press the Home button.
b. From the Tools menu on the printer display, select Align Printer. Follow the on-screen instructions.
5. Print a diagnostics page if the ink cartridges are not low on ink.
To print a diagnostics page from the printer software
a. Load letter or A4 unused plain white paper into the input tray.
b. Depending on your operating system, do one of the following to open the printer software:
● Windows 8: On the Start screen, right-click an empty area on the screen, click All Apps on the app bar, and then click the icon with the printer's name.
● Windows 7, Windows Vista, and Windows XP: From the computer desktop, click Start, select All Programs, click HP, click HP Deskjet 2640 series, and then click HP Deskjet 2640 series.
c. In the printer software, click Print, Scan & Fax , and then click Maintain Your Printer to access the printer toolbox.
ENWW Improve print quality 81

d. Click Print Diagnostic Information on the Device Reports tab to print a diagnostics page. Review the blue, magenta, yellow, and black boxes on the diagnostics page.
To print a diagnostics page from the printer display
a. From the Home screen on the printer display, press the Up and Down buttons to select Tools , and then press OK .
NOTE: If you do not see the Home screen, press the Home button.
b. From the Tools menu on the printer display, select Print Quality Report. Follow the on-screen instructions.
6. Do one of the following to clean the ink cartridges, if the diagnostic page shows steaks or missing portions of the color and black boxes.
To clean the cartridges from the printer software
a. Load letter or A4 unused plain white paper into the input tray.
b. Depending on your operating system, do one of the following to open the printer software:
82 Chapter 9 Solve a problem ENWW

● Windows 8: On the Start screen, right-click an empty area on the screen, click All Apps on the app bar, and then click the icon with the printer's name.
● Windows 7, Windows Vista, and Windows XP: From the computer desktop, click Start, select All Programs, click HP, click HP Deskjet 2640 series, and then click HP Deskjet 2640 series.
c. In the printer software, click Print, Scan & Fax , and then click Maintain Your Printer to access the Printer Toolbox.
d. Click Clean Ink Cartridges on the Device Services tab. Follow the on-screen instructions.
To clean the cartridges from the printer display
a. From the Home screen on the printer display, press the Up and Down buttons to select Tools , and then press OK .
NOTE: If you do not see the Home screen, press the Home button.
b. From the Tools menu on the printer display, select Clean Printhead. Follow the on-screen instructions.
To improve print quality
1. Make sure you are using original HP cartridges.
2. Make sure you have selected the appropriate paper type and print quality in the Print dialog.
3. Check the estimated ink levels to determine if the cartridges are low on ink.
Consider replacing the print cartridges if they are low on ink.
4. Align the printer cartridges
To align print cartridges from the software
a. Load Letter or A4 plain, white paper in the paper tray.
b. Open HP Utility.
NOTE: HP Utility is located in the Hewlett-Packard folder in the Applications folder at the top level of the hard disk.
c. Select the HP Deskjet 2640 series from the list of devices at the left of the window.
d. Click Align.
e. Click Align and follow the on-screen instructions.
f. Click All Settings to return to the Information and Support pane.
5. Print a test page.
ENWW Improve print quality 83

To print a test page
a. Load Letter or A4 plain, white paper in the paper tray.
b. Open HP Utility.
NOTE: HP Utility is located in the Hewlett-Packard folder in the Applications folder at the top level of the hard disk.
c. Select the HP Deskjet 2640 series from the list of devices at the left of the window.
d. Click Test Page.
e. Click the Print Test Page button, and follow the on-screen instructions.
Check the test page for jagged lines in the text or streaks in the text and colored boxes. If you are seeing jagged lines, or streaks, or no ink in portions of the boxes, then automatically clean the cartridges.
6. If the diagnostic page shows steaks or missing portions of the text or colored boxes, clean the print cartridges automatically.
To automatically clean the print head
a. Load Letter or A4 plain, white paper in the paper tray.
b. Open HP Utility.
NOTE: HP Utility is located in the Hewlett-Packard folder in the Applications folder at the top level of the hard disk.
c. Select the HP Deskjet 2640 series from the list of devices at the left of the window.
d. Click Clean Printheads.
e. Click Clean, and follow the on-screen instructions.
CAUTION: Clean the print head only when necessary. Unnecessary cleaning wastes ink and shortens the life of the print head.
NOTE: If print quality still seems poor after you complete cleaning, try aligning the printer. If print quality problems persist after cleaning and aligning, contact HP support.
f. Click All Settings to return to the Information and Support pane.
If the above solutions do not resolve the problem, click here for more online troubleshooting.
84 Chapter 9 Solve a problem ENWW

Unable to printIf you are having trouble printing, you can download the HP Print and Scan Doctor, which can troubleshoot this issue for you automatically. To get the utility, click the appropriate link:
Take me to the HP Print and Scan Doctor download page.
NOTE: The HP Print and Scan Doctor may not be available in all languages.
To resolve print issues
Make sure that the printer is turned on and that there is paper in the input tray. If you are still unable to print, try the following in order:
1. Check for error messages from the printer display and resolve them by following the on-screen instructions.
2. Disconnect and reconnect the USB cable.
3. Verify that the printer is not paused or offline.
To verify that the printer is not paused or offline
a. Depending on your operating system, do one of the following:
● Windows 8: Point to or tap the upper-right corner of the screen to open the Charms bar, click the Settings icon, click or tap Control Panel, and then click or tap View devices and printers.
● Windows 7: From the Windows Start menu, click Devices and Printers.
● Windows Vista: From the Windows Start menu, click Control Panel, and then click Printers.
● Windows XP: From the Windows Start menu, click Control Panel, and then click Printers and Faxes.
b. Either double-click the icon for your printer, or right-click the icon for your printer and select See what’s printing to open the print queue.
c. On the Printer menu, make sure there are no check marks next to Pause Printing or Use Printer Offline.
d. If you make any changes, try to print again.
4. Verify that the printer is set as the default printer.
To verify that the printer is set as the default printer
a. Depending on your operating system, do one of the following:
● Windows 8: Point to or tap the upper-right corner of the screen to open the Charms bar, click the Settings icon, click or tap Control Panel, and then click or tap View devices and printers.
● Windows 7: From the Windows Start menu, click Devices and Printers.
ENWW Unable to print 85
● Windows Vista: From the Windows Start menu, click Control Panel, and then click Printers.
● Windows XP: From the Windows Start menu, click Control Panel, and then click Printers and Faxes.
b. Make sure the correct printer is set as the default printer.
The default printer has a check mark in a black or green circle next to it.
c. If the wrong printer is set as the default printer, right-click the correct printer and select Set as Default Printer.
d. Try using your printer again.
5. Restart the print spooler.
To restart the print spooler
a. Depending on your operating system, do one of the following:
Windows 8
i. Point to or tap the upper-right corner of the screen to open the Charms bar, and then click the Settings icon.
ii. Click or tap Control Panel, and then click or tap System and Security.
iii. Click or tap Administrative Tools, and then double-click or double-tap Services.
iv. Right-click or touch and hold Print Spooler, and then click Properties.
v. On the General tab, next to Startup type, make sure that Automatic is selected.
vi. If the service is not already running, under Service status, click or tap Start, and then click or tap OK.
Windows 7
i. From the Windows Start menu, click Control Panel, System and Security, and then Administrative Tools.
ii. Double-click Services.
iii. Right-click the Print Spooler, and then click Properties.
iv. On the General tab, next to Startup type, make sure that Automatic is selected.
v. If the service is not already running, under Service status, click Start, and then click OK.
Windows Vista
i. From the Windows Start menu, click Control Panel, System and Maintenance, Administrative Tools.
ii. Double-click Services.
iii. Right-click the Print Spooler service, and then click Properties.
86 Chapter 9 Solve a problem ENWW

iv. On the General tab, next to Startup type, make sure that Automatic is selected.
v. If the service is not already running, under Service status, click Start, and then click OK.
Windows XP
i. From the Windows Start menu, right click My Computer.
ii. Click Manage, and then click Services and Applications.
iii. Double-click Services, and then select Print Spooler.
iv. Right-click Print Spooler, and click Restart to restart the service.
b. Make sure the correct printer is set as the default printer.
The default printer has a check mark in a black or green circle next to it.
c. If the wrong printer is set as the default printer, right-click the correct printer and select Set as Default Printer.
d. Try using your printer again.
6. Restart the computer.
7. Clear the print queue.
To clear the print queue
a. Depending on your operating system, do one of the following:
● Windows 8: Point to or tap the upper-right corner of the screen to open the Charms bar, click the Settings icon, click or tap Control Panel, and then click or tap View devices and printers.
● Windows 7: From the Windows Start menu, click Devices and Printers.
● Windows Vista: From the Windows Start menu, click Control Panel, and then click Printers.
● Windows XP: From the Windows Start menu, click Control Panel, and then click Printers and Faxes.
b. Double-click the icon for your printer to open the print queue.
c. On the Printer menu, click Cancel all documents or Purge Print Document, and then click Yes to confirm.
d. If there are still documents in the queue, restart the computer and try printing again after the computer has restarted.
e. Check the print queue again to make sure it is clear, and then try to print again.
Resolve print issues
1. Check for error messages and resolve.
2. Disconnect and reconnect the USB cable.
3. Verify that the product is not paused or offline.
ENWW Unable to print 87

To verify that the product is not paused or offline
a. In System Preferences, click Print & Fax.
b. Click the Open Print Queue button.
c. Click a print job to select it.
Use the following buttons to manage the print job:
● Delete: Cancel the selected print job.
● Hold: Pause the selected print job.
● Resume: Continue a paused print job.
● Pause Printer: Pause all print jobs in the print queue.
d. If you made any changes, try to print again.
4. Restart the computer.
If the above solutions do not resolve the problem, click here for more online troubleshooting.
88 Chapter 9 Solve a problem ENWW

Resolve copy and scan issuesHP provides an HP Print and Scan Doctor (Windows only) that can help solve many common “Unable to scan” issues.
NOTE: The HP Print and Scan Doctor may not be available in all languages.
Take me to the HP Print and Scan Doctor download page.
Learn more about how to solve scan issues. Click here to go online for more information.
Learn how to solve copy issues. Click here to go online for more information.
ENWW Resolve copy and scan issues 89

Resolve fax issuesIf you are having faxing problems, you can print a fax test report to check the status of the printer. The test fails if the printer is not set up correctly for faxing. Perform this test after you have completed setting up the printer for faxing. For more information, see Test fax setup on page 140.
Learn more about how to solve fax issues. Click here to go online for more information.
For further assistance, visit the HP online support website: www.hp.com/support .
90 Chapter 9 Solve a problem ENWW

HP support● Register printer
● Support process
● HP support by phone
● Additional warranty options
Register printerBy taking just a few quick minutes to register, you can enjoy quicker service, more efficient support, and product support alerts. If you did not register your printer while installing the software, you can register now at http://www.register.hp.com.
Support processIf you have a problem, follow these steps:
1. Check the documentation that came with the printer.
2. Visit the HP online support website at www.hp.com/support .
HP online support is available to all HP customers. It is the fastest source for up-to-date product information and expert assistance, and includes the following features:
● Fast access to qualified online support specialists
● Software and driver updates for the printer
● Valuable troubleshooting information for common problems
● Proactive printer updates, support alerts, and HP newsgrams that are available when you register the printer
3. Call HP support.
Support options and availability vary by printer, country/region, and language.
HP support by phonePhone support options and availability vary by printer, country/region, and language.
This section contains the following topics:
● Phone support period
● Placing a call
● Support phone numbers
● After the phone support period
ENWW HP support 91

Phone support period
One year of phone support is available in North America, Asia Pacific, and Latin America (including Mexico). To determine the duration of phone support in Europe, the Middle East, and Africa, go to www.hp.com/support . Standard phone company charges apply.
Placing a call
Call HP support while you are in front of the computer and the printer. Be prepared to provide the following information:
● Product name (Located on the printer, such as HP Deskjet Ink Advantage 2645)
● Product number (located inside the cartridge access door)
● Serial number (located on the back or bottom of the printer)
● Messages that appear when the situation occurs
● Answers to these questions:
— Has this situation happened before?
— Can you recreate it?
— Did you add any new hardware or software to your computer at about the time that this situation began?
— Did anything else occur prior to this situation (such as a thunderstorm, the printer was moved, etc.)?
Support phone numbers
For the most current HP list of telephone support numbers and call costs information, see www.hp.com/support .
After the phone support period
After the phone support period, help is available from HP at an additional cost. Help may also be available at the HP online support website: www.hp.com/support . Contact your HP dealer or call the support phone number for your country/region to learn more about support options.
Additional warranty optionsExtended service plans are available for the HP Deskjet 2640 series at additional costs. Go to www.hp.com/support , select your country/region and language, then explore the services and warranty area for information about the extended service plans.
92 Chapter 9 Solve a problem ENWW

Prepare traysOpen output tray
▲ Output tray must be open to begin printing.
Close cartridge access door
▲ Cartridge door must be closed to begin printing.
Click here to go online for more information.
ENWW Prepare trays 93

Printer failureResolve printer failure.
▲ Turn the printer off, then on. If that does not resolve the problem, contact HP.
Please contact HP support for help .
94 Chapter 9 Solve a problem ENWW

Ink cartridge problemFirst try removing and reinserting the ink cartridges. If this does not work, clean the cartridge contacts. If your problem is still not resolved, replace the ink cartridges. For more information, see Replace ink cartridges on page 65.
Clean the ink cartridge contacts
CAUTION: The cleaning procedure should take only a few minutes. Make sure that the ink cartridges are reinstalled in the printer as soon as possible. It is not recommended to leave the ink cartridges outside of the printer longer than 30 minutes. This could result in damage to the printhead or the ink cartridges.
1. Check that power is on.
2. Open the cartridge access door and wait for the print carriage to move to the center of the printer.
3. Remove the ink cartridge indicated by the flashing cartridge light on the control panel.
4. Hold the ink cartridge by its sides with the bottom pointing up and locate the electrical contacts on the ink cartridge.
The electrical contacts are the small gold-colored dots on the ink cartridge.
5. Wipe only the contacts with a dry swab or lint-free cloth.
CAUTION: Be careful to wipe only the contacts, and do not smear any of the ink or other debris elsewhere on the ink cartridge.
ENWW Ink cartridge problem 95

6. On the inside of the printer, locate the contacts for the cartridge.
The printer contacts are the set of gold-colored bumps positioned to meet the contacts on the ink cartridge.
7. Use a dry swab or lint-free cloth to wipe the contacts.
8. Reinstall the ink cartridge.
9. Close the cartridge access door, and check if the error message has gone away.
10. If you still receive the error message, turn the printer off, and then on again.
NOTE: If one ink cartridge is causing problems, you can remove it and use the single-cartridge mode to operate the HP Deskjet 2640 series with only one ink cartridge.
Click here to go online for more information.
96 Chapter 9 Solve a problem ENWW

Older generation cartridgesYou will need to use a newer version of this cartridge. In most cases you can identify a newer version of the cartridge by looking at the exterior of the cartridge package and finding the Warranty Ends date.
If it says ‘v1’ several spaces to the right of the date, then the cartridge is the updated newer version. If it is an older generation cartridge, contact HP support for help or a replacement.
Click here to go online for more information.
ENWW Older generation cartridges 97

98 Chapter 9 Solve a problem ENWW
A Technical information
The technical specifications and international regulatory information for the HP Deskjet 2640 series are provided in this section.
For additional specifications, see the printed documentation that came with the HP Deskjet 2640 series.
This section contains the following topics:
● Hewlett-Packard Company notices
● Specifications
● Environmental product stewardship program
● Regulatory notices
ENWW 99

Hewlett-Packard Company noticesThe information contained herein is subject to change without notice.
All rights reserved. Reproduction, adaptation, or translation of this material is prohibited without prior written permission of Hewlett-Packard, except as allowed under the copyright laws. The only warranties for HP products and services are set forth in the express warranty statements accompanying such products and services. Nothing herein should be construed as constituting an additional warranty. HP shall not be liable for technical or editorial errors or omissions contained herein.
© 2013 Hewlett-Packard Development Company, L.P.
Microsoft®, Windows ®, Windows® XP, Windows Vista®, Windows® 7 and Windows® 8 are U.S. registered trademarks of Microsoft Corporation.
100 Appendix A Technical information ENWW

SpecificationsTechnical specifications for the HP Deskjet 2640 series are provided in this section. For more product specifications, see the Product Data Sheet at www.hp.com/support .
● System requirements
● Environmental specifications
● Input tray capacity
● Output tray capacity
● Paper size
● Paper weights
● Print specifications
● Copy specifications
● Scan specifications
● Fax specifications
● Print resolution
● Power safety
● Cartridge yield
● Acoustic information
System requirementsSoftware and system requirements are located in the Readme file.
For information about future operating system releases and support, visit the HP online support website at www.hp.com/support .
Environmental specifications● Recommended operating temperature range: 15ºC to 32ºC (59ºF to 90ºF)
● Allowable operating temperature range: 5ºC to 40ºC (41ºF to 104ºF)
● Humidity: 15% to 80% RH non-condensing; 28ºC maximum dewpoint
● Nonoperating (storage) temperature range: –40ºC to 60ºC (–40ºF to 140ºF)
● In the presence of high electromagnetic fields, it is possible the output from the HP Deskjet 2640 series may be slightly distorted
● HP recommends using a USB cable less than or equal to 3 m (10 feet) in length to minimize injected noise due to potential high electromagnetic fields
Input tray capacityPlain paper sheets (80 g/m2 [20lb]): Up to 50
ENWW Specifications 101

Envelopes: Up to 5
Index cards: Up to 20
Photo paper sheets: Up to 20
Output tray capacityPlain paper sheets (80 g/m2 [20lb]): Up to 30
Envelopes: Up to 5
Index cards: Up to 10
Photo paper sheets: Up to 10
Paper sizeFor a complete list of supported media sizes, see the printer software.
Paper weightsPlain Paper: 64 to 90 g/m² (16 to 24 lb)
Envelopes: 75 to 90 g/m² (20 to 24 lb)
Cards: Up to 200 g/m² (110-lb index maximum)
Photo Paper: Up to 280 g/m² (75 lb)
Print specifications● Print speeds vary according to the complexity of the document
● Method: drop-on-demand thermal inkjet
● Language: PCL3 GUI
Copy specifications● Digital image processing
● Copy speeds vary according to the complexity of the document and model
Scan specifications● Resolution: up to 1200 x 1200 dpi
For more information about dpi resolution, see the scanner software.
● Color: 24-bit color, 8-bit grayscale (256 levels of gray)
● Maximum scan size from glass: 21.6 x 29.7 cm (8.5 x 11.7 inches)
102 Appendix A Technical information ENWW

Fax specifications● Send/Receive black and white faxes or color faxes.
● Up to 99 speed dials.
● Up to 99-page memory (based on ITU-T Test Image #1 at standard resolution). More complicated pages or higher resolution faxes take longer and use more memory.
● Manual fax send and receive.
● Automatic busy redial up to five times (varies by model).
● Automatic no-answer redial one time or two times (varies by model).
● Confirmation and activity reports.
● CCITT/ITU Group 3 fax with Error Correction Mode.
● 33.6 Kbps transmission.
● 4 seconds per page speed at 33.6 Kbps (based on ITU-T Test Image #1 at standard resolution). More complicated pages or higher resolution faxes take longer and use more memory.
● Ring detect with automatic fax/answering machine switching.
Fine (dpi) Standard (dpi)
Black 208 x 196 208 x 98
Color 208 x 200 208 x 200
Print resolution
Draft mode
● Color Input/Black Render: 300x300dpi
● Output (Black/Color): Automatic
Normal mode
● Color Input/Black Render: 600x300dpi
● Output (Black/Color): Automatic
Plain-Best mode
● Color Input/Black Render: 600x600dpi
● Output (Black/Color): Automatic
Photo-Best mode
● Color Input/Black Render: 600x600dpi
● Output (Black/Color): Automatic
ENWW Specifications 103

Max DPI mode
● Color Input/Black Render: 1200x1200dpi
● Output: Automatic (Black), 4800x1200 optimized dpi (Color)
Power safety
NOTE: Use only with the power cord and power adapter supplied by HP.
Cartridge yieldVisit www.hp.com/go/learnaboutsupplies for more information on estimated cartridge yields.
Acoustic informationIf you have Internet access, you can get acoustic information from the HP website. Go to: www.hp.com/support.
104 Appendix A Technical information ENWW

Environmental product stewardship programHewlett-Packard is committed to providing quality products in an environmentally sound manner. Design for recycling has been incorporated into this product. The number of materials has been kept to a minimum while ensuring proper functionality and reliability. Dissimilar materials have been designed to separate easily. Fasteners and other connections are easy to locate, access, and remove using common tools. High priority parts have been designed to access quickly for efficient disassembly and repair.
For more information, visit HP’s Commitment to the Environment website at:
www.hp.com/hpinfo/globalcitizenship/environment/index.html
● Eco-Tips
● Paper use
● Plastics
● Material safety data sheets
● Recycling program
● HP inkjet supplies recycling program
● Power consumption
● Sleep mode
● Disposal of waste equipment by users
● Chemical substances
● Toxic and hazardous substance table (China)
● Restriction of hazardous substance (Ukraine)
● Restriction of hazardous substance (India)
● Battery disposal in the Netherlands
● Battery disposal in the Taiwan
● California Perchlorate Material Notice
Eco-TipsHP is committed to helping customers reduce their environmental footprint. Please visit the HP Environmental Programs and Initiatives website for more information on HP’s environmental initiatives.
www.hp.com/hpinfo/globalcitizenship/environment/
Paper useThis product is suited for the use of recycled paper according to DIN 19309 and EN 12281:2002.
PlasticsPlastic parts over 25 grams are marked according to international standards that enhance the ability to identify plastics for recycling purposes at the end of product life.
ENWW Environmental product stewardship program 105

Material safety data sheetsMaterial safety data sheets (MSDS) can be obtained from the HP website at:
www.hp.com/go/msds
Recycling programHP offers an increasing number of product return and recycling programs in many countries/regions, and partners with some of the largest electronic recycling centers throughout the world. HP conserves resources by reselling some of its most popular products. For more information regarding recycling of HP products, please visit:
www.hp.com/hpinfo/globalcitizenship/environment/recycle/
HP inkjet supplies recycling programHP is committed to protecting the environment. The HP Inkjet Supplies Recycling Program is available in many countries/regions, and lets you recycle used print cartridges and ink cartridges free of charge. For more information, go to the following website:
www.hp.com/hpinfo/globalcitizenship/environment/recycle/
Power consumptionHewlett-Packard printing and imaging equipment marked with the ENERGY STAR® logo is qualified to the U.S. Environmental Protection Agency’s ENERGY STAR specifications for imaging equipment. The following mark will appear on ENERGY STAR qualified imaging products:
Additional ENERGY STAR qualified imaging product model information is listed at: www.hp.com/go/energystar
Sleep modePower usage is reduced while in Sleep mode.
After initial setup of printer, the printer will enter Sleep mode after 5 minutes of inactivity.
To change the time to Sleep mode
1. From the Home screen on the printer display, press the Up and Down buttons to select Preferences , and then press OK .
2. Select Sleep, and then select the desired option.
106 Appendix A Technical information ENWW

Disposal of waste equipment by users
This symbol means do not dispose of your product with your other household waste. Instead, you should protect human health and the environment by handing over your waste equipment to a designated collection point for the recycling of waste electrical and electronic equipment. For more information, please contact your household waste disposal service, or go to http://www.hp.com/recycle.
Chemical substancesHP is committed to providing our customers with information about the chemical substances in our products as needed to comply with legal requirements such as REACH (Regulation EC No 1907/2006 of the European Parliament and the Council). A chemical information report for this product can be found at: www.hp.com/go/reach.
Toxic and hazardous substance table (China)
Restriction of hazardous substance (Ukraine)
ENWW Environmental product stewardship program 107

Restriction of hazardous substance (India)
Battery disposal in the Netherlands
Battery disposal in the Taiwan
California Perchlorate Material Notice
108 Appendix A Technical information ENWW

Regulatory noticesThe HP Deskjet 2640 series meets product requirements from regulatory agencies in your country/region.
This section contains the following topics:
● Regulatory model identification number
● FCC statement
● Notice to users in Korea
● VCCI (Class B) compliance statement for users in Japan
● Notice to users in Japan about the power cord
● Noise emission statement for Germany
● European Union Regulatory Notice
● Visual display workplaces statement for Germany
● Declaration of conformity
● Notice to users of the U.S. telephone network: FCC requirements
● Notice to users of the Canadian telephone network
● Notice to users in the European Economic Area
● Notice to users of the German telephone network
● Australia wired fax statement
Regulatory model identification numberFor regulatory identification purposes, your product is assigned a Regulatory Model Number. The Regulatory Model Number for your product is SNPRH-1203. This regulatory number should not be confused with the marketing name (HP Deskjet Ink Advantage 2645 All-in-One, etc.) or product numbers (D4H22A, D4H22B, D4H22C, etc.).
ENWW Regulatory notices 109

FCC statement
Notice to users in Korea
VCCI (Class B) compliance statement for users in Japan
Notice to users in Japan about the power cord
110 Appendix A Technical information ENWW

Noise emission statement for Germany
European Union Regulatory NoticeProducts bearing the CE marking comply with the following EU Directives:
● Low Voltage Directive 2006/95/EC
● EMC Directive 2004/108/EC
● Ecodesign Directive 2009/125/EC, where applicable
CE compliance of this product is valid only if powered with the correct CE-marked AC adapter provided by HP.
If this product has wired and/or wireless telecommunications functionality, it also complies with the essential requirements of the following EU Directive:
● R&TTE Directive 1999/5/EC
Compliance with these directives implies conformity to applicable harmonized European standards (European Norms) that are listed in the EU Declaration of Conformity issued by HP for this product or product family and available (in English only) either within the product documentation or at the following website: www.hp.com/go/certificates (type the product number in the search field).
The compliance is indicated by one of the following conformity markings placed on the product:
For non-telecommunications products and for EU harmonized telecommunications products, such as Bluetooth® within power class below 10mW.
For EU non-harmonized telecommunications products (If applicable, a 4-digit notified body number is placed next to CE mark).
Please refer to the regulatory label provided on the product.
The telecommunications functionality of this product may be used in the following EU and EFTA countries: Austria, Belgium, Bulgaria, Cyprus, Czech Republic, Denmark, Estonia, Finland, France, Germany, Greece, Hungary, Iceland, Ireland, Italy, Latvia, Liechtenstein, Lithuania, Luxembourg, Malta, Netherlands, Norway, Poland, Portugal, Romania, Slovak Republic, Slovenia, Spain, Sweden, Switzerland, and United Kingdom.
ENWW Regulatory notices 111

The telephone connector (not available for all products) is intended for connection to analogue telephone networks.
Products with wireless LAN devices
● Some countries may have specific obligations or special requirements about the operation of Wireless LAN networks such as indoor use only or restrictions of the channels available. Please make sure that the country settings of the wireless network are correct.
France
● For 2.4-GHz Wireless LAN operation of this product, certain restrictions apply: This product may be used indoors for the entire 2400-MHz to 2483.5-MHz frequency band (channels 1 to 13). For outdoor use, only the 2400-MHz to 2454-MHz frequency band (channels 1 to 7) may be used. For the latest requirements, see www.arcep.fr.
The point of contact for regulatory matters is:
Hewlett-Packard GmbH, Dept./MS: HQ-TRE, Herrenberger Strasse 140, 71034 Boeblingen, GERMANY
Visual display workplaces statement for Germany
112 Appendix A Technical information ENWW

Declaration of conformity
ENWW Regulatory notices 113

Notice to users of the U.S. telephone network: FCC requirements
114 Appendix A Technical information ENWW

Notice to users of the Canadian telephone network
Notice to users in the European Economic Area
ENWW Regulatory notices 115

Notice to users of the German telephone network
Australia wired fax statement
116 Appendix A Technical information ENWW

B Additional fax setup
In this section, you learn how to set up the printer so that faxing works successfully with equipment and services you might already have on the same phone line.
TIP: You can also use the Fax Setup Wizard (Windows) or HP Setup Assistant (Mac OS X) to help you quickly set up some important fax settings such as the answer mode and fax header information. You can access these tools through the HP software you installed with the printer. After you run these tools, follow the procedures in this section to complete your fax setup.
This section contains the following topics:
● Set up faxing (parallel phone systems)
● Test fax setup
ENWW 117

Set up faxing (parallel phone systems)Before you begin setting up the printer for faxing, determine which kind of phone system your country/region uses. The instructions for fax setup differ depending on whether you have a serial- or parallel-type phone system.
Table B-1 Countries/regions with a parallel-type phone system
Argentina Australia Brazil
Canada Chile China
Colombia Greece India
Indonesia Ireland Japan
Korea Latin America Malaysia
Mexico Philippines Poland
Portugal Russia Saudi Arabia
Singapore Spain Taiwan
Thailand USA Venezuela
Vietnam
● If you do not see your country/region listed, you probably have a serial-type phone system. In a serial-type phone system, the connector type on your shared telephone equipment (modems, phones, and answering machines) does not allow a physical connection to the "2-EXT" port on the printer. Instead, all equipment must be connected at the telephone wall jack.
NOTE: In some countries/regions that use serial-type phone systems, the phone cord that came with the printer might have an additional wall plug attached to it. This enables you to connect other telecom devices to the wall jack where you plug in the printer.
You might need to connect the supplied phone cord to the adapter provided for your country/region.
● If your country/region is listed, you probably have a parallel-type telephone system. In a parallel-type phone system, you are able to connect shared telephone equipment to the phone line by using the "2-EXT" port on the back of the printer.
NOTE: If you have a parallel-type phone system, HP recommends you use the 2-wire phone cord supplied with the printer to connect it to the telephone wall jack.
If you are unsure which kind of telephone system you have (serial or parallel), check with your telephone company.
This section contains the following topics:
● Select the correct fax setup for your home or office
● Case A: Separate fax line (no voice calls received)
● Case B: Set up the printer with DSL
● Case C: Set up the printer with a PBX phone system or an ISDN line
● Case D: Fax with a distinctive ring service on the same line
118 Appendix B Additional fax setup ENWW

● Case E: Shared voice/fax line
● Case F: Shared voice/fax line with voice mail
● Case G: Fax line shared with computer modem (no voice calls received)
● Case H: Shared voice/fax line with computer modem
● Case I: Shared voice/fax line with answering machine
● Case J: Shared voice/fax line with computer modem and answering machine
● Case K: Shared voice/fax line with computer dial-up modem and voice mail
Select the correct fax setup for your home or officeTo fax successfully, you need to know what types of equipment and services (if any) share the same phone line with the printer. This is important because you might need to connect some of your existing office equipment directly to the printer, and you might also need to change some fax settings before you can fax successfully.
1. Determine if your telephone system is serial or parallel. See Set up faxing (parallel phone systems) on page 118.
2. Select the combination of equipment and services sharing your fax line.
● DSL: A Digital subscriber line (DSL) service through your telephone company. (DSL might be called ADSL in your country/region.)
● PBX: A private branch exchange (PBX) phone system or an integrated services digital network (ISDN) system.
● Distinctive ring service: A distinctive ring service through your telephone company provides multiple telephone numbers with different ring patterns.
● Voice calls: Voice calls are received at the same phone number you use for fax calls on the printer.
● Computer dial-up modem: A computer dial-up modem is on the same phone line as the printer. If you answer Yes to any of the following questions, you are using a computer dial-up modem:
— Do you send and receive faxes directly to and from your computer software applications through a dial-up connection?
— Do you send and receive email messages on your computer through a dial-up connection?
— Do you access the Internet from your computer through a dial-up connection?
● Answering machine: An answering machine that answers voice calls at the same phone number you use for fax calls on the printer.
● Voice mail service: A voice mail subscription through your telephone company at the same number you use for fax calls on the printer.
3. From the following table, select the combination of equipment and services applicable to your home or office setting. Then look up the recommended fax setup. Step-by-step instructions are included for each case in the sections that follow.
ENWW Set up faxing (parallel phone systems) 119

NOTE: If your home or office setup is not described in this section, set up the printer as you would a regular analog phone. Make sure you use the phone cord supplied in the box to connect one end to your telephone wall jack and the other end to the port labeled 1-LINE on the back of the printer. If you use another phone cord, you might experience problems sending and receiving faxes.
You might need to connect the supplied phone cord to the adapter provided for your country/region.
Other equipment or services sharing your fax line Recommended fax setup
DSL PBX Distinctive ring service
Voice calls
Computer dail-up modem
Answering machine
Voice mail service
Case A: Separate fax line (no voice calls received) on page 120
Case B: Set up the printer with DSL on page 121
Case C: Set up the printer with a PBX phone system or an ISDN line on page 122
Case D: Fax with a distinctive ring service on the same line on page 123
Case E: Shared voice/fax line on page 124
Case F: Shared voice/fax line with voice mail on page 125
Case G: Fax line shared with computer modem (no voice calls received) on page 126
Case H: Shared voice/fax line with computer modem on page 129
Case I: Shared voice/fax line with answering machine on page 132
Case J: Shared voice/fax line with computer modem and answering machine on page 134
Case K: Shared voice/fax line with computer dial-up modem and voice mail on page 138
Case A: Separate fax line (no voice calls received)If you have a separate phone line on which you receive no voice calls, and you have no other equipment connected on this phone line, set up the printer as described in this section.
120 Appendix B Additional fax setup ENWW

Figure B-1 Back view of the printer
1 Telephone wall jack
2 Use the phone cord supplied in the box with the printer to connect to the 1-LINE port.
You might need to connect the supplied phone cord to the adapter provided for your country/region.
To set up the printer with a separate fax line
1. Using the phone cord supplied in the box with the printer, connect one end to your telephone wall jack, then connect the other end to the port labeled 1-LINE on the back of the printer.
NOTE: You might need to connect the supplied phone cord to the adapter provided for your country/region.
If you do not use the supplied cord to connect from the telephone wall jack to the printer, you might not be able to fax successfully. This special phone cord is different from the phone cords you might already have in your home or office.
2. Turn on the Auto Answer setting.
3. (Optional) Change the Rings to Answer setting to the lowest setting (two rings).
4. Run a fax test.
When the phone rings, the printer answers automatically after the number of rings you set in the Rings to Answer setting. The printer begins emitting fax reception tones to the sending fax machine and receives the fax.
Case B: Set up the printer with DSLIf you have a DSL service through your telephone company, and do not connect any equipment to the printer, use the instructions in this section to connect a DSL filter between the telephone wall jack and the printer. The DSL filter removes the digital signal that can interfere with the printer, so the printer can communicate correctly with the phone line. (DSL might be called ADSL in your country/region.)
NOTE: If you have a DSL line and you do not connect the DSL filter, you cannot send and receive faxes with the printer.
ENWW Set up faxing (parallel phone systems) 121

Figure B-2 Back view of the printer
1 Telephone wall jack
2 DSL (or ADSL) filter and cord supplied by your DSL provider
3 Use the phone cord supplied in the box with the printer to connect to the 1-LINE port.
You might need to connect the supplied phone cord to the adapter provided for your country/region.
To set up the printer with DSL
1. Obtain a DSL filter from your DSL provider.
2. Using the phone cord supplied in the box with the printer, connect one end to the open port on the DSL filter, and then connect the other end to the port labeled 1-LINE on the back of the printer.
NOTE: You might need to connect the supplied phone cord to the adapter provided for your country/region.
If you do not use the supplied cord to connect from the DSL filter to the printer, you might not be able to fax successfully. This special phone cord is different from the phone cords you might already have in your home or office.
As only one phone cord is supplied, you might need to obtain additional phone cords for this setup.
3. Connect an additional phone cord from the DSL filter to the telephone wall jack.
4. Run a fax test.
If you encounter problems setting up the printer with optional equipment, contact your local service provider or vendor for further assistance.
Case C: Set up the printer with a PBX phone system or an ISDN lineIf you are using either a PBX phone system or an ISDN converter/terminal adapter, make sure you do the following:
● If you are using either a PBX or an ISDN converter/terminal adaptor, connect the printer to the port that is designated for fax and phone use. Also, make sure that the terminal adapter is set to the correct switch type for your country/region, if possible.
122 Appendix B Additional fax setup ENWW

NOTE: Some ISDN systems allow you to configure the ports for specific phone equipment. For example, you might have assigned one port for telephone and Group 3 fax and another port for multiple purposes. If you have problems when connected to the fax/phone port of your ISDN converter, try using the port designated for multiple purposes; it might be labeled "multi-combi" or something similar.
● If you are using a PBX phone system, set the call waiting tone to "off."
NOTE: Many digital PBX systems include a call-waiting tone that is set to "on" by default. The call-waiting tone interferes with any fax transmission, and you cannot send or receive faxes with the printer. Refer to the documentation that came with your PBX phone system for instructions on how to turn off the call-waiting tone.
● If you are using a PBX phone system, dial the number for an outside line before dialing the fax number.
● Make sure you use the supplied cord to connect from the telephone wall jack to the printer. If you do not, you might not be able to fax successfully. This special phone cord is different from the phone cords you might already have in your home or office. If the supplied phone cord is too short, you can purchase a coupler from your local electronics store and extend it.
You might need to connect the supplied phone cord to the adapter provided for your country/region.
If you encounter problems setting up the printer with optional equipment, contact your local service provider or vendor for further assistance.
Case D: Fax with a distinctive ring service on the same lineIf you subscribe to a distinctive ring service (through your telephone company) that allows you to have multiple phone numbers on one phone line, each with a different ring pattern, set up the printer as described in this section.
Figure B-3 Back view of the printer
1 Telephone wall jack
2 Use the phone cord supplied in the box with the printer to connect to the 1-LINE port.
You might need to connect the supplied phone cord to the adapter provided for your country/region.
To set up the printer with a distinctive ring service
1. Using the phone cord supplied in the box with the printer, connect one end to your telephone wall jack, then connect the other end to the port labeled 1-LINE on the back of the printer.
ENWW Set up faxing (parallel phone systems) 123

NOTE: You might need to connect the supplied phone cord to the adapter provided for your country/region.
If you do not use the supplied cord to connect from the telephone wall jack to the printer, you might not be able to fax successfully. This special phone cord is different from the phone cords you might already have in your home or office.
2. Turn on the Auto Answer setting.
3. Change the Distinctive Ring setting to match the pattern that the telephone company assigned to your fax number.
NOTE: By default, the printer is set to answer all ring patterns. If you do not set the Distinctive Ring to match the ring pattern assigned to your fax number, the printer might answer both voice calls and fax calls, or it might not answer at all.
TIP: You can also use the Ring Pattern Detection feature in the printer control panel to set distinctive ring. With this feature, the printer recognizes and records the ring pattern of an incoming call and, based on this call, automatically determines the distinctive ring pattern assigned by your telephone company to fax calls. For more information, see Set the dial type on page 53.
4. (Optional) Change the Rings to Answer setting to the lowest setting (two rings).
5. Run a fax test.
The printer automatically answers incoming calls that have the ring pattern you selected ( Distinctive Ring setting) after the number of rings you selected ( Rings to Answer setting). The printer begins emitting fax reception tones to the sending fax machine and receives the fax.
If you encounter problems setting up the printer with optional equipment, contact your local service provider or vendor for further assistance.
Case E: Shared voice/fax lineIf you receive both voice calls and fax calls at the same phone number, and you have no other office equipment (or voice mail) on this phone line, set up the printer as described in this section.
Figure B-4 Back view of the printer
1 Telephone wall jack
124 Appendix B Additional fax setup ENWW

2 Use the phone cord supplied in the box with the printer to connect to the 1-LINE port.
You might need to connect the supplied phone cord to the adapter provided for your country/region.
3 Telephone (optional)
To set up the printer with a shared voice/fax line
1. Using the phone cord supplied in the box with the printer, connect one end to your telephone wall jack, then connect the other end to the port labeled 1-LINE on the back of the printer.
NOTE: You might need to connect the supplied phone cord to the adapter provided for your country/region.
If you do not use the supplied cord to connect from the telephone wall jack to the printer, you might not be able to fax successfully. This special phone cord is different from the phone cords you might already have in your home or office.
2. Do one of the following:
● If you have a parallel-type phone system, remove the white plug from the port labeled 2-EXT on the back of the printer, and then connect a phone to this port.
● If you have a serial-type phone system, you might plug your phone directly on top of the printer cable which has a wall plug attached to it.
3. Now you need to decide how you want the printer to answer calls, automatically or manually:
● If you set up the printer to answer calls automatically, it answers all incoming calls and receives faxes. The printer cannot distinguish between fax and voice calls in this case; if you suspect the call is a voice call, you need to answer it before the printer answers the call. To set up the printer to answer calls automatically, turn on the Auto Answer setting.
● If you set up the printer to answer faxes manually, you must be available to respond in person to incoming fax calls or the printer cannot receive faxes. To set up the printer to answer calls manually, turn off the Auto Answer setting.
4. Run a fax test.
If you pick up the phone before the printer answers the call and hear fax tones from a sending fax machine, you need to answer the fax call manually.
If you encounter problems setting up the printer with optional equipment, contact your local service provider or vendor for further assistance.
Case F: Shared voice/fax line with voice mailIf you receive both voice calls and fax calls at the same phone number, and you also subscribe to a voice mail service through your telephone company, set up the printer as described in this section.
NOTE: You cannot receive faxes automatically if you have a voice mail service at the same phone number you use for fax calls. You must receive faxes manually; this means you must be available to respond in person to incoming fax calls. If you want to receive faxes automatically instead, contact your telephone company to subscribe to a distinctive ring service, or to obtain a separate phone line for faxing.
ENWW Set up faxing (parallel phone systems) 125

Figure B-5 Back view of the printer
1 Telephone wall jack
2 Use the phone cord supplied in the box with the printer to connect to the 1-LINE port.
You might need to connect the supplied phone cord to the adapter provided for your country/region.
To set up the printer with voice mail
1. Using the phone cord supplied in the box with the printer, connect one end to your telephone wall jack, then connect the other end to the port labeled 1-LINE on the back of the printer.
You might need to connect the supplied phone cord to the adapter provided for your country/region.
NOTE: You might need to connect the supplied phone cord to the adapter provided for your country/region.
If you do not use the supplied cord to connect from the telephone wall jack to the printer, you might not be able to fax successfully. This special phone cord is different from the phone cords you might already have in your home or office.
2. Turn off the Auto Answer setting.
3. Run a fax test.
You must be available to respond in person to incoming fax calls, or the printer cannot receive faxes. You must initiate the manual fax before voicemail picks up the line.
If you encounter problems setting up the printer with optional equipment, contact your local service provider or vendor for further assistance.
Case G: Fax line shared with computer modem (no voice calls received)If you have a fax line on which you receive no voice calls, and you also have a computer modem connected on this line, set up the printer as described in this section.
NOTE: If you have a computer dial-up modem, your computer dial-up modem shares the phone line with the printer. You cannot use both your modem and the printer simultaneously. For example, you cannot use the printer for faxing while you are using your computer dial-up modem to send an email or access the Internet.
● Set up the printer with a computer dial-up modem
● Set up the printer with a computer DSL/ADSL modem
126 Appendix B Additional fax setup ENWW

Set up the printer with a computer dial-up modem
If you are using the same phone line for sending faxes and for a computer dial-up modem, follow these directions for setting up the printer.
Figure B-6 Back view of the printer
1 Telephone wall jack
2 Use the phone cord supplied in the box with the printer to connect to the 1-LINE port.
You might need to connect the supplied phone cord to the adapter provided for your country/region.
3 Computer with modem
To set up the printer with a computer dial-up modem
1. Remove the white plug from the port labeled 2-EXT on the back of the printer.
2. Find the phone cord that connects from the back of your computer (your computer dial-up modem) to a telephone wall jack. Disconnect the cord from the telephone wall jack and plug it into the port labeled 2-EXT on the back of the printer.
3. Using the phone cord supplied in the box with the printer, connect one end to your telephone wall jack, then connect the other end to the port labeled 1-LINE on the back of the printer.
NOTE: You might need to connect the supplied phone cord to the adapter provided for your country/region.
If you do not use the supplied cord to connect from the telephone wall jack to the printer, you might not be able to fax successfully. This special phone cord is different from the phone cords you might already have in your home or office.
4. If your modem software is set to receive faxes to your computer automatically, turn off that setting.
NOTE: If you do not turn off the automatic fax reception setting in your modem software, the printer cannot receive faxes.
5. Turn on the Auto Answer setting.
6. (Optional) Change the Rings to Answer setting to the lowest setting (two rings).
7. Run a fax test.
ENWW Set up faxing (parallel phone systems) 127

When the phone rings, the printer automatically answers after the number of rings you set in the Rings to Answer setting. The printer begins emitting fax reception tones to the sending fax machine and receives the fax.
If you encounter problems setting up the printer with optional equipment, contact your local service provider or vendor for further assistance.
Set up the printer with a computer DSL/ADSL modem
If you have a DSL line and use that phone line to send faxes, follow these instructions to set up your fax.
1 Telephone wall jack
2 Parallel splitter
3 DSL/ADSL filter
Connect one end of the phone jack that was supplied with the printer to connect to the 1-LINE port on the back of the printer. Connect the other end of the cord to the DSL/ADSL filter.
You might need to connect the supplied phone cord to the adapter provided for your country/region.
4 Computer DSL/ADSL modem
5 Computer
NOTE: You need to purchase a parallel splitter. A parallel splitter has one RJ-11 port on the front and two RJ-11 ports on the back. Do not use a 2–line phone splitter, a serial splitter, or a parallel splitter which has two RJ-11 ports on the front and a plug on the back.
Figure B-7 Example of a parallel splitter
128 Appendix B Additional fax setup ENWW

To set up the printer with a computer DSL/ADSL modem
1. Obtain a DSL filter from your DSL provider.
2. Using the phone cord provided in the box with the printer, connect one end to the DSL filter, and then connect the other end to the port labeled 1-LINE on the back of the printer.
NOTE: You might need to connect the supplied phone cord to the adapter provided for your country/region.
If you do not use the supplied cord to connect from the DSL filter to the back of the printer, you might not be able to fax successfully. This special phone cord is different from the phone cords you might already have in your home or office.
3. Connect the DSL filter to the parallel splitter.
4. Connect the DSL modem to the parallel splitter.
5. Connect the parallel splitter to the wall jack.
6. Run a fax test.
When the phone rings, the printer automatically answers after the number of rings you set in the Rings to Answer setting. The printer begins emitting fax reception tones to the sending fax machine and receives the fax.
If you encounter problems setting up the printer with optional equipment, contact your local service provider or vendor for further assistance.
Case H: Shared voice/fax line with computer modemThere are two different ways to set up the printer with your computer based on the number of phone ports on your computer. Before you begin, check your computer to see if it has one or two phone ports.
NOTE: If your computer has only one phone port, you need to purchase a parallel splitter (also called a coupler), as shown in the illustration. (A parallel splitter has one RJ-11 port on the front and two RJ-11 ports on the back. Do not use a two-line phone splitter, a serial splitter, or a parallel splitter which has two RJ-11 ports on the front and a plug on the back.)
● Shared voice/fax with computer dial-up modem
● Shared voice/fax with computer DSL/ADSL modem
Shared voice/fax with computer dial-up modem
If you use your phone line for both fax and telephone calls, use these instructions to set up your fax.
There are two different ways to set up the printer with your computer based on the number of phone ports on your computer. Before you begin, check your computer to see if it has one or two phone ports.
NOTE: If your computer has only one phone port, you need to purchase a parallel splitter (also called a coupler), as shown in the illustration. (A parallel splitter has one RJ-11 port on the front and two RJ-11 ports on the back. Do not use a two-line phone splitter, a serial splitter, or a parallel splitter which has two RJ-11 ports on the front and a plug on the back.)
ENWW Set up faxing (parallel phone systems) 129

Figure B-8 Example of a parallel splitter
Figure B-9 Back view of the printer
1 Telephone wall jack
2 Parallel splitter
3 Use the phone cord supplied in the box with the printer to connect to the 1-LINE port.
4 Computer with modem
5 Telephone
To set up the printer on the same phone line as a computer with two phone ports
1. Remove the white plug from the port labeled 2-EXT on the back of the printer.
2. Find the phone cord that connects from the back of your computer (your computer dial-up modem) to a telephone wall jack. Disconnect the cord from the telephone wall jack and plug it into the port labeled 2-EXT on the back of the printer.
3. Connect a phone to the "OUT" port on the back of your computer dial-up modem.
4. Using the phone cord supplied in the box with the printer, connect one end to your telephone wall jack, then connect the other end to the port labeled 1-LINE on the back of the printer.
NOTE: You might need to connect the supplied phone cord to the adapter provided for your country/region.
If you do not use the supplied cord to connect from the telephone wall jack to the printer, you might not be able to fax successfully. This special phone cord is different from the phone cords you might already have in your home or office.
5. If your modem software is set to receive faxes to your computer automatically, turn off that setting.
NOTE: If you do not turn off the automatic fax reception setting in your modem software, the printer cannot receive faxes.
130 Appendix B Additional fax setup ENWW

6. Now you need to decide how you want the printer to answer calls, automatically or manually:
● If you set up the printer to answer calls automatically, it answers all incoming calls and receives faxes. The printer cannot distinguish between fax and voice calls in this case; if you suspect the call is a voice call, you need to answer it before the printer answers the call. To set up the printer to answer calls automatically, turn on the Auto Answer setting.
● If you set up the printer to answer faxes manually, you must be available to respond in person to incoming fax calls or the printer cannot receive faxes. To set up the printer to answer calls manually, turn off the Auto Answer setting.
7. Run a fax test.
If you pick up the phone before the printer answers the call and hear fax tones from a sending fax machine, you need to answer the fax call manually.
If you use your phone line for voice, fax, and your computer dial-up modem, follow these directions to set up your fax.
If you encounter problems setting up the printer with optional equipment, contact your local service provider or vendor for further assistance.
Shared voice/fax with computer DSL/ADSL modem
Use these instructions if your computer has a DSL/ADSL modem
Figure B-10 Back view of the printer
1 Telephone wall jack
2 Parallel splitter
3 DSL/ADSL filter
4 Telephone
5 Computer DSL/ADSL modem
6 Computer
7 Use the phone cord provided to connect to the 1-LINE port on the back of the printer.
You might need to connect the supplied phone cord to the adapter provided for your country/region.
ENWW Set up faxing (parallel phone systems) 131

NOTE: You need to purchase a parallel splitter. A parallel splitter has one RJ-11 port on the front and two RJ-11 ports on the back. Do not use a 2–line phone splitter, a serial splitter, or a parallel splitter which has two RJ-11 ports on the front and a plug on the back.
Figure B-11 Example of a parallel splitter
To set up the printer with a computer DSL/ADSL modem
1. Obtain a DSL filter from your DSL provider.
NOTE: Phones in other parts of the home/office sharing the same phone number with DSL service need to be connected to additional DSL filters to avoid noise when making voice calls.
2. Using the phone cord supplied in the box with the printers, connect one end to the DSL filter, then connect the other end to the port labeled 1-LINE on the back of the printer.
NOTE: You might need to connect the supplied phone cord to the adapter provided for your country/region.
If you do not use the supplied cord to connect from the DSL filter to the back of the printer, you might not be able to fax successfully. This special phone cord is different from the phone cords you might already have in your home or office.
3. If you have a parallel-type phone system, remove the white plug from the port labeled 2-EXT on the back of the printer, and then connect a phone to this port.
4. Connect the DSL filter to the parallel splitter.
5. Connect the DSL modem to the parallel splitter.
6. Connect the parallel splitter to the wall jack.
7. Run a fax test.
When the phone rings, the printer automatically answers after the number of rings you set in the Rings to Answer setting. The printer begins emitting fax reception tones to the sending fax machine and receives the fax.
If you encounter problems setting up the printer with optional equipment, contact your local service provider or vendor for further assistance.
Case I: Shared voice/fax line with answering machineIf you receive both voice calls and fax calls at the same phone number, and you also have an answering machine that answers voice calls at this phone number, set up the printer as described in this section.
132 Appendix B Additional fax setup ENWW

Figure B-12 Back view of the printer
1 Telephone wall jack
2 Use the phone cord provided to connect to the 1-LINE port on the back of the printer.
You might need to connect the supplied phone cord to the adapter provided for your country/region.
3 Answering machine
4 Telephone (optional)
To set up the printer with a shared voice/fax line with answering machine
1. Remove the white plug from the port labeled 2-EXT on the back of the printer.
2. Unplug your answering machine from the telephone wall jack, and connect it to the port labeled 2-EXT on the back of the printer.
NOTE: If you do not connect your answering machine directly to the printer, fax tones from a sending fax machine might be recorded on your answering machine, and you might not receive faxes with the printer.
3. Using the phone cord supplied in the box with the printer, connect one end to your telephone wall jack, then connect the other end to the port labeled 1-LINE on the back of the printer.
NOTE: You might need to connect the supplied phone cord to the adapter provided for your country/region.
If you do not use the supplied cord to connect from the telephone wall jack to the printer, you might not be able to fax successfully. This special phone cord is different from the phone cords you might already have in your home or office.
4. (Optional) If your answering machine does not have a built-in phone, for convenience you might want to connect a phone to the back of your answering machine at the "OUT" port.
NOTE: If your answering machine does not let you connect an external phone, you can purchase and use a parallel splitter (also known as a coupler) to connect both the answering machine and telephone to the printer. You can use standard phone cords for these connections.
5. Turn on the Auto Answer setting.
6. Set your answering machine to answer after a low number of rings.
ENWW Set up faxing (parallel phone systems) 133

7. Change the Rings to Answer setting on the printer to the maximum number of rings supported by your printer. (The maximum number of rings varies by country/region.)
8. Run a fax test.
When the phone rings, your answering machine answers after the number of rings you have set, and then plays your recorded greeting. The printer monitors the call during this time, "listening" for fax tones. If incoming fax tones are detected, the printer emits fax reception tones and receives the fax; if there are no fax tones, the printer stops monitoring the line and your answering machine can record a voice message.
If you encounter problems setting up the printer with optional equipment, contact your local service provider or vendor for further assistance.
Case J: Shared voice/fax line with computer modem and answering machineIf you receive both voice calls and fax calls at the same phone number, and you also have a computer modem and answering machine connected on this phone line, set up the printer as described in this section.
NOTE: Since your computer dial-up modem shares the phone line with the printer, you cannot use both your modem and the printer simultaneously. For example, you cannot use the printer for faxing while you are using your computer dial-up modem to send an email or access the Internet.
● Shared voice/fax line with computer dial-up modem and answering machine
● Shared voice/fax line with computer DSL/ADSL modem and answering machine
Shared voice/fax line with computer dial-up modem and answering machine
There are two different ways to set up the printer with your computer based on the number of phone ports on your computer. Before you begin, check your computer to see if it has one or two phone ports.
NOTE: If your computer has only one phone port, you need to purchase a parallel splitter (also called a coupler), as shown in the illustration. (A parallel splitter has one RJ-11 port on the front and two RJ-11 ports on the back. Do not use a two-line phone splitter, a serial splitter, or a parallel splitter which has two RJ-11 ports on the front and a plug on the back.)
Figure B-13 Example of a parallel splitter
134 Appendix B Additional fax setup ENWW

Figure B-14 Back view of the printer
1 Telephone wall jack
2 "IN" phone port on your computer
3 "OUT" phone port on your computer
4 Use the phone cord supplied in the box with the printer to connect to the 1-LINE port.
You might need to connect the supplied phone cord to the adapter provided for your country/region.
5 Computer with modem
6 Answering machine
7 Telephone (optional)
To set up the printer on the same phone line as a computer with two phone ports
1. Remove the white plug from the port labeled 2-EXT on the back of the printer.
2. Find the phone cord that connects from the back of your computer (your computer dial-up modem) to a telephone wall jack. Disconnect the cord from the telephone wall jack and plug it into the port labeled 2-EXT on the back of the printer.
3. Unplug your answering machine from the telephone wall jack, and connect it to the port labeled "OUT" on the back of the computer (the computer dial-up modem).
4. Using the phone cord supplied in the box with the printer, connect one end to your telephone wall jack, then connect the other end to the port labeled 1-LINE on the back of the printer.
NOTE: You might need to connect the supplied phone cord to the adapter provided for your country/region.
If you do not use the supplied cord to connect from the telephone wall jack to the printer, you might not be able to fax successfully. This special phone cord is different from the phone cords you might already have in your home or office.
5. (Optional) If your answering machine does not have a built-in phone, for convenience you might want to connect a phone to the back of your answering machine at the "OUT" port.
ENWW Set up faxing (parallel phone systems) 135

NOTE: If your answering machine does not let you connect an external phone, you can purchase and use a parallel splitter (also known as a coupler) to connect both the answering machine and telephone to the printer. You can use standard phone cords for these connections.
6. If your modem software is set to receive faxes to your computer automatically, turn off that setting.
NOTE: If you do not turn off the automatic fax reception setting in your modem software, the printer cannot receive faxes.
7. Turn on the Auto Answer setting.
8. Set your answering machine to answer after a low number of rings.
9. Change the Rings to Answer setting on the printer to the maximum number of rings supported by the product. (The maximum number of rings varies by country/region.)
10. Run a fax test.
When the phone rings, your answering machine answers after the number of rings you have set, and then plays your recorded greeting. The printer monitors the call during this time, "listening" for fax tones. If incoming fax tones are detected, the printer emits fax reception tones and receives the fax; if there are no fax tones, the printer stops monitoring the line and your answering machine can record a voice message.
If you encounter problems setting up the printer with optional equipment, contact your local service provider or vendor for further assistance.
Shared voice/fax line with computer DSL/ADSL modem and answering machine
Figure B-15 Back view of the printer
1 Telephone wall jack
2 Parallel splitter
3 DSL/ADSL filter
4 Answering machine
5 Telephone (optional)
6 DSL/ADSL modem
136 Appendix B Additional fax setup ENWW

7 Computer
8 Phone cord provided with the printer connected to the 1-LINE port on the back of the printer
You might need to connect the supplied phone cord to the adapter provided for your country/region.
NOTE: You need to purchase a parallel splitter. A parallel splitter has one RJ-11 port on the front and two RJ-11 ports on the back. Do not use a 2–line phone splitter, a serial splitter, or a parallel splitter which has two RJ-11 ports on the front and a plug on the back.
Figure B-16 Example of a parallel splitter
To set up the printer with a computer DSL/ADSL modem
1. Obtain a DSL/ADSL filter from your DSL/ADSL provider.
NOTE: Phones in other parts of the home/office sharing the same phone number with DSL/ADSL service need to be connected to additional DSL/ADSL filters, to avoid noise when making voice calls.
2. Using the phone cord supplied in the box with the printer, connect one end to the DSL/ADSL filter, then connect the other end to the port labeled 1-LINE on the back of the printer.
NOTE: You might need to connect the supplied phone cord to the adapter provided for your country/region.
If you do not use the supplied cord to connect from the DSL/ADSL filter to the printer, you might not be able to fax successfully. This special phone cord is different from the phone cords you might already have in your home or office.
3. Connect the DSL/ADSL filter to the splitter.
4. Unplug the answering machine from the telephone wall jack, and connect it to the port labeled 2-EXT on the back of the printer.
NOTE: If you do not connect your answering machine directly to the printer, fax tones from a sending fax machine might be recorded on your answering machine, and you might not receive faxes with the printer.
5. Connect the DSL modem to the parallel splitter.
6. Connect the parallel splitter to the wall jack.
7. Set your answering machine to answer after a low number of rings.
8. Change your Rings to Answer setting on the printer to the maximum number of rings supported by the printer.
NOTE: The maximum number of rings varies by country/region.
9. Run a fax test.
When the phone rings, your answering machine answers after the number of rings you have set, and then play your recorded greeting. The printer monitors the call during this time, “listening” for fax tones. If
ENWW Set up faxing (parallel phone systems) 137

incoming fax tones are detected, the printer emits fax reception tones and receive the fax; if there are no fax tones, the printer stops monitoring the line and your answering machine can record a voice message.
If you use the same phone line for telephone, fax, and have a computer DSL modem, follow these instructions to set up your fax.
If you encounter problems setting up the printer with optional equipment, contact your local service provider or vendor for further assistance.
Case K: Shared voice/fax line with computer dial-up modem and voice mailIf you receive both voice calls and fax calls at the same phone number, use a computer dial-up modem on the same phone line, and subscribe to a voice mail service through your telephone company, set up the printer as described in this section.
NOTE: You cannot receive faxes automatically if you have a voice mail service at the same phone number you use for fax calls. You must receive faxes manually; this means you must be available to respond in person to incoming fax calls. If you want to receive faxes automatically instead, contact your telephone company to subscribe to a distinctive ring service, or to obtain a separate phone line for faxing.
Since your computer dial-up modem shares the phone line with the printer, you cannot use both your modem and the printer simultaneously. For example, you cannot use the printer for faxing if you are using your computer dial-up modem to send an email or access the Internet.
There are two different ways to set up the printer with your computer based on the number of phone ports on your computer. Before you begin, check your computer to see if it has one or two phone ports.
● If your computer has only one phone port, you need to purchase a parallel splitter (also called a coupler), as shown in the illustration. (A parallel splitter has one RJ-11 port on the front and two RJ-11 ports on the back. Do not use a two-line phone splitter, a serial splitter, or a parallel splitter which has two RJ-11 ports on the front and a plug on the back.)
Figure B-17 Example of a parallel splitter
● If your country/region is listed in the table, you probably have a parallel-type telephone system. In a parallel-type phone system, you are able to connect shared telephone equipment to the phone line by using the "2-EXT" port on the back of the printer.
Figure B-18 Back view of the printer
138 Appendix B Additional fax setup ENWW

1 Telephone wall jack
2 Use the phone cord supplied in the box with the printer to connect to the 1-LINE port.
You might need to connect the supplied phone cord to the adapter provided for your country/region.
3 Computer with modem
4 Telephone
To set up the printer on the same phone line as a computer with two phone ports
1. Remove the white plug from the port labeled 2-EXT on the back of the printer.
2. Find the phone cord that connects from the back of your computer (your computer dial-up modem) to a telephone wall jack. Disconnect the cord from the telephone wall jack and plug it into the port labeled 2-EXT on the back of the printer.
3. Connect a phone to the "OUT" port on the back of your computer dial-up modem.
4. Using the phone cord supplied in the box with the printer, connect one end to your telephone wall jack, then connect the other end to the port labeled 1-LINE on the back of the printer.
NOTE: You might need to connect the supplied phone cord to the adapter provided for your country/region.
If you do not use the supplied cord to connect from the telephone wall jack to the printer, you might not be able to fax successfully. This special phone cord is different from the phone cords you might already have in your home or office.
5. If your modem software is set to receive faxes to your computer automatically, turn off that setting.
NOTE: If you do not turn off the automatic fax reception setting in your modem software, the printer cannot receive faxes.
6. Turn off the Auto Answer setting.
7. Run a fax test.
You must be available to respond in person to incoming fax calls, or the printer cannot receive faxes.
If you encounter problems setting up the printer with optional equipment, contact your local service provider or vendor for further assistance.
ENWW Set up faxing (parallel phone systems) 139

Test fax setupYou can test your fax setup to check the status of the printer and to make sure it is set up correctly for faxing. Perform this test after you have completed setting up the printer for faxing. The test does the following:
● Tests the fax hardware
● Verifies the correct type of phone cord is connected to the printer
● Checks that the phone cord is plugged into the correct port
● Checks for a dial tone
● Tests the status of your phone line connection
● Checks for an active phone line
The printer prints a report with the results of the test. If the test fails, review the report for information on how to fix the problem and rerun the test.
To test fax setup via the printer control panel
1. Set up the printer for faxing according to your particular home or office setup instructions.
2. Make sure the ink cartridges are installed, and that full-size paper is loaded in the input tray before starting the test.
3. From the Home screen on the printer display, press the Up and Down buttons to select Fax , and then press OK .
4. Select Settings, select Advanced Settings, select Fax Setup Wizard, and then follow on-screen instructions.
The printer displays the status of the test on the display and prints a report.
5. Review the report.
● If the test passes and you are still having problems faxing, check the fax settings listed in the report to verify the settings are correct. A blank or incorrect fax setting can cause problems faxing.
● If the test fails, review the report for more information on how to fix any problems found.
140 Appendix B Additional fax setup ENWW

Index
AADSL, fax setup with
parallel phone systems 121after the support period 92answer ring pattern
parallel phone systems 123answering machine
set up with fax (parallel phone systems) 132
set up with fax and modem 134
Bbuttons, control panel 6
Ccomputer modem
shared with fax (parallel phone systems) 126
shared with fax and answering machine (parallel phone systems) 134
shared with fax and voice line (parallel phone systems) 129
shared with fax and voice mail (parallel phone systems) 138
control panelbuttons 6features 6
copyspecifications 102
customer supportwarranty 92
Ddial-up modem
shared with fax (parallel phone systems) 126
shared with fax and answering machine (parallel phone systems) 134
shared with fax and voice line (parallel phone systems) 129
shared with fax and voice mail (parallel phone systems) 138
distinctive ringingparallel phone systems 123
DSL, fax setup withparallel phone systems 121
Eenvironment
Environmental product stewardship program 105
environmental specifications101
Ffax
answering machine and modem, shared with (parallel phone systems) 134
answering machine, set up (parallel phone systems) 132
distinctive ringing setup (parallel phone systems) 123
DSL, set up (parallel phone systems) 121
fax specifications 103Internet Protocol, over 56ISDN line, set up (parallel phone
systems) 122modem and answering machine,
shared with (parallel phone systems) 134
modem and voice line, shared with (parallel phone systems)129
modem and voice mail, shared with (parallel phone systems)138
modem, shared with (parallel phone systems) 126
PBX system, set up (parallel phone systems) 122
separate line setup (parallel phone systems) 120
shared phone line setup (parallel phone systems) 124
test setup 140voice mail, set up (parallel phone
systems) 125
IInternet Protocol
fax, using 56ISDN line, set up with fax
parallel phone systems 122
Mmodem
shared with fax (parallel phone systems) 126
shared with fax and answering machine (parallel phone systems) 134
shared with fax and voice line (parallel phone systems) 129
shared with fax and voice mail (parallel phone systems) 138
Ppaper
recommended types 22
ENWW Index 141

parallel phone systemsanswering machine setup 132distinctive ringing setup 123DSL setup 121ISDN setup 122modem and answering machine
setup 134modem and voice mail setup
138modem setup 126modem shared with voice line
setup 129PBX setup 122separate line setup 120shared line setup 124
PBX system, set up with faxparallel phone systems 122
phone support 91phone support period
period for support 92print
specifications 102
Rrecycle
ink cartridges 106regulatory notices 109
regulatory model identification number 109
Sscan
scan specifications 102setup
answering machine (parallel phone systems) 132
answering machine and modem (parallel phone systems) 134
computer modem (parallel phone systems) 126
computer modem and answering machine (parallel phone systems) 134
computer modem and voice line (parallel phone systems) 129
computer modem and voice mail (parallel phone systems) 138
distinctive ringing (parallel phone systems) 123
DSL (parallel phone systems)121
ISDN line (parallel phone systems) 122
PBX system (parallel phone systems) 122
separate fax line (parallel phone systems) 120
shared phone line (parallel phone systems) 124
test fax 140voice mail (parallel phone
systems) 125voice mail and computer modem
(parallel phone systems) 138support process 91system requirements 101
Ttechnical information
copy specifications 102environmental specifications
101fax specifications 103print specifications 102scan specifications 102system requirements 101
tests, faxsetup 140
Vvoice mail
set up with fax (parallel phone systems) 125
set up with fax and computer modem (parallel phone systems) 138
VoIP 56
Wwarranty 92
142 Index ENWW