hp notebook - ftp directory listing - hewlett-packard
TRANSCRIPT

HP NotebookReference Guide

© Copyright 2011 Hewlett-PackardDevelopment Company, L.P.
Bluetooth is a trademark owned by itsproprietor and used by Hewlett-PackardCompany under license. Intel is atrademark of Intel Corporation in the U.S.and other countries. Microsoft and Windowsare U.S. registered trademarks of MicrosoftCorporation. Java is a U.S. trademark ofSun Microsystems, Inc.
The information contained herein is subjectto change without notice. The onlywarranties for HP products and services areset forth in the express warranty statementsaccompanying such products and services.Nothing herein should be construed asconstituting an additional warranty. HP shallnot be liable for technical or editorial errorsor omissions contained herein.
Third Edition: January 2011
First Edition: April 2010
Document Part Number: 607194-003
Product notice
This reference guide describes featuresthat are common to most models. Somefeatures may not be available on yourcomputer.

Safety warning noticeWARNING! To reduce the possibility of heat-related injuries or of overheating the computer, do notplace the computer directly on your lap or obstruct the computer air vents. Use the computer only ona hard, flat surface. Do not allow another hard surface, such as an adjoining optional printer, or a softsurface, such as pillows or rugs or clothing, to block airflow. Also, do not allow the AC adapter tocome into contact with the skin or a soft surface, such as pillows or rugs or clothing, during operation.The computer and the AC adapter comply with the user-accessible surface temperature limits definedby the International Standard for Safety of Information Technology Equipment (IEC 60950).
iii

iv Safety warning notice

Table of contents
1 Introduction ..................................................................................................................................................... 1Finding more information about your new computer ............................................................................ 1
2 Networking (select models only) ................................................................................................................... 2Creating a wireless connection ............................................................................................................ 2
Identifying wireless and network status icons ...................................................................... 2Turning wireless devices on or off ....................................................................................... 3
Using the wireless button .................................................................................... 3Using HP Wireless Assistant (select models only) to turn wireless deviceson or off ............................................................................................................... 4
Using HP Connection Manager (select models only) .......................................................... 4Using operating system controls .......................................................................................... 5
Using a WLAN ...................................................................................................................................... 5Connecting to an existing WLAN ......................................................................................... 5Setting up a new WLAN ....................................................................................................... 6Protecting your WLAN ......................................................................................................... 7Roaming to another network ................................................................................................ 7
Using HP Mobile Broadband (select models only) ............................................................................... 7Inserting a SIM ..................................................................................................................... 8Removing a SIM .................................................................................................................. 8
Using Bluetooth wireless devices ......................................................................................................... 9Bluetooth and Internet Connection Sharing (ICS) ............................................................... 9
Using GPS (select models only) ........................................................................................................... 9Connecting to a wired network ............................................................................................................. 9
Using a modem (select models only) ................................................................................... 9Connecting a modem cable .............................................................................. 10Connecting a country- or region-specific modem cable adapter ....................... 10Selecting a location setting ............................................................................... 11
Viewing the current location selection .............................................. 11Adding new locations when traveling ............................................... 11
Connecting to a local area network (LAN) (select models only) ........................................ 13
v

3 Multimedia ..................................................................................................................................................... 15Using the media activity controls ........................................................................................................ 15Audio .................................................................................................................................................. 15
Adjusting the volume ......................................................................................................... 16Checking audio functions on the computer ........................................................................ 16
Webcam (select models only) ............................................................................................................ 17Using SkyRoom (select models only) ................................................................................ 17
Video .................................................................................................................................................. 17VGA ................................................................................................................................... 17DisplayPort ........................................................................................................................ 18HDMI .................................................................................................................................. 18
Configuring audio for HDMI ............................................................................... 19Intel Wireless Display (select models only) ....................................................... 19
Using HP MediaSmart (select models only) ....................................................................................... 20
4 Power management ...................................................................................................................................... 21Shutting down the computer ............................................................................................................... 21Setting power options ......................................................................................................................... 22
Using power-saving states ................................................................................................. 22Initiating and exiting Sleep ................................................................................ 22Initiating and exiting Hibernation ....................................................................... 23
Using the power meter ....................................................................................................... 23Using power plans ............................................................................................................. 23
Viewing the current power plan ......................................................................... 23Selecting a different power plan ........................................................................ 24Customizing power plans .................................................................................. 24
Setting password protection on wakeup ............................................................................ 24Using battery power ........................................................................................................................... 25
Finding battery information in Help and Support in Windows 7 ......................................... 25Using Battery Check in Windows 7 .................................................................................... 26Displaying the remaining battery charge ........................................................................... 26Maximizing battery discharge time .................................................................................... 26Managing low battery levels .............................................................................................. 26
Identifying low battery levels ............................................................................. 26Resolving a low battery level ............................................................................. 27
Resolving a low battery level when external power is available ....... 27Resolving a low battery level when a charged battery is available ... 27Resolving a low battery level when no power source is available .... 27Resolving a low battery level when the computer cannot exitHibernation ....................................................................................... 27
Conserving battery power .................................................................................................. 27
vi
Storing a battery ................................................................................................................ 28Disposing of a used battery ............................................................................................... 28Replacing the battery ......................................................................................................... 28
Using external AC power .................................................................................................................... 29Testing an AC adapter ....................................................................................................... 30
5 External cards and devices .......................................................................................................................... 31Using Digital Media Slot cards (select models only) .......................................................................... 31
Inserting a digital card ........................................................................................................ 31Removing a digital card ..................................................................................................... 32
Using PC Cards (select models only) ................................................................................................. 32Configuring a PC Card ....................................................................................................... 33Inserting a PC Card ........................................................................................................... 33Removing a PC Card ......................................................................................................... 34
Using ExpressCards (select models only) .......................................................................................... 35Configuring an ExpressCard .............................................................................................. 35Inserting an ExpressCard .................................................................................................. 36Removing an ExpressCard ................................................................................................ 37
Using smart cards (select models only) ............................................................................................. 37Inserting a smart card ........................................................................................................ 38Removing a smart card ...................................................................................................... 38
Using a USB device ........................................................................................................................... 38Connecting a USB device .................................................................................................. 38Removing a USB device .................................................................................................... 39
Using 1394 devices (select models only) ........................................................................................... 39Connecting a 1394 device ................................................................................................. 40Removing a 1394 device ................................................................................................... 40
Using an eSATA device (select models only) .................................................................................... 40Connecting an eSATA device ............................................................................................ 41Removing an eSATA device .............................................................................................. 41
Using optional external devices .......................................................................................................... 42Using optional external drives ............................................................................................ 42Using the expansion port (select models only) .................................................................. 42Using the docking connector (select models only) ............................................................ 43
6 Drives ............................................................................................................................................................. 44Handling drives ................................................................................................................................... 44Using hard drives ............................................................................................................................... 45
Improving hard drive performance ..................................................................................... 45Using Disk Defragmenter .................................................................................. 45Using Disk Cleanup ........................................................................................... 45
vii

Using HP ProtectSmart Hard Drive Protection in Windows 7 (select models only) ........... 46Identifying HP ProtectSmart Hard Drive Protection status ................................ 46Managing power with a parked hard drive ........................................................ 46Using HP ProtectSmart Hard Drive Protection software ................................... 47
Using optical drives (select models only) ........................................................................................... 47Identifying the installed optical drive .................................................................................. 47Inserting an optical disc ..................................................................................................... 48
Tray load ........................................................................................................... 48Slot load ............................................................................................................ 48
Removing an optical disc ................................................................................................... 49Tray load ........................................................................................................... 49
When the disc tray opens normally .................................................. 49When the disc tray fails to open ....................................................... 49
Slot load ............................................................................................................ 50Sharing optical drives ........................................................................................................ 51
Using RAID (select models only) ........................................................................................................ 51
7 Security .......................................................................................................................................................... 52Protecting the computer ..................................................................................................................... 52Using passwords ................................................................................................................................ 52
Setting passwords in Windows .......................................................................................... 53Setting passwords in Setup Utility ..................................................................................... 53
Managing an administrator password ............................................................... 54Entering an administrator password .................................................................. 54Managing a power-on password ....................................................................... 55Entering a power-on password ......................................................................... 55
Using antivirus software ..................................................................................................................... 55Using firewall software ....................................................................................................................... 55Installing critical security updates ....................................................................................................... 56Installing an optional security cable .................................................................................................... 56Using the fingerprint reader (select models only) ............................................................................... 57
Locating the fingerprint reader ........................................................................................... 57
8 Maintenance .................................................................................................................................................. 58Cleaning your computer ..................................................................................................................... 58
Cleaning the display .......................................................................................................... 58Cleaning the TouchPad and keyboard .............................................................................. 58
Updating programs and drivers .......................................................................................................... 58Using SoftPaq Download Manager .................................................................................................... 59
viii

9 Setup Utility (BIOS) and System Diagnostics ............................................................................................ 60Using Setup Utility .............................................................................................................................. 60
Starting Setup Utility .......................................................................................................... 60Changing the language of Setup Utility ............................................................................. 60Navigating and selecting in Setup Utility ............................................................................ 61Displaying system information ........................................................................................... 61Restoring factory settings in Setup Utility .......................................................................... 62Exiting Setup Utility ............................................................................................................ 62Updating the BIOS ............................................................................................................. 62
Determining the BIOS version ........................................................................... 62Downloading a BIOS update ............................................................................. 63
Using System Diagnostics .................................................................................................................. 64
Appendix A Traveling with the computer ...................................................................................................... 65
Appendix B Troubleshooting resources ....................................................................................................... 67
Appendix C Electrostatic Discharge .............................................................................................................. 68
Index ................................................................................................................................................................... 69
ix

x
1 Introduction
This guide contains general information about HP and Compaq notebook computers, includingconnecting to a wireless network, multimedia, power management, security, and so on.
NOTE: Some of the features described in this guide may not be available on your computer.
Finding more information about your new computerThe following user guides and reference material are provided with your computer, either in print, onthe computer hard drive, or on an optical disc or SD Card:
● Quick Setup poster—Guides you through setting up your computer and turning it on. The posteris located in the computer box.
NOTE: Refer to the poster for the location of your user guides and reference material.
● Getting Started—Contains information about your computer, including product-specific features,backup and recovery, maintenance, and specifications.
● Help and Support—Contains information about the operating system, drivers, troubleshootingtools, and technical support. To access Help and Support, select Start > Help and Support. Forcountry- or region-specific support, go to http://www.hp.com/support, select your country orregion, and follow the on-screen instructions.
● Safety & Comfort Guide—Describes proper workstation setup and proper posture, health, andwork habits for computer users. It also provides important electrical and mechanical safetyinformation. To access this guide, select Start > Help and Support > User Guides. This guideis also available on the Web at http://www.hp.com/ergo.
● Regulatory, Safety, and Environmental Notices—Contains safety and regulatory information, andbattery disposal information. To access the notices, select Start > Help and Support > UserGuides.
Finding more information about your new computer 1

2 Networking (select models only)
Your computer supports 2 types of Internet access:
● Wireless—Refer to Creating a wireless connection on page 2.
● Wired—Refer to Connecting to a wired network on page 9.
NOTE: You must set up Internet service before you can connect to the Internet.
Creating a wireless connectionYour computer may be equipped with one or more of the following wireless devices:
● Wireless local area network (WLAN) device
● HP Mobile Broadband Module (wireless wide area network (WWAN)
● Bluetooth® device
For more information on wireless technology, refer to the information and Web site links provided inHelp and Support.
Identifying wireless and network status iconsWindows 7
Icon Name Description
Wireless (connected) Indicates that one or more wireless devices are on.
Wireless (disconnected) Indicates that all wireless devices are off.
HP Connection Manager Opens HP Connection Manager, which enables you to create aconnection with an HP Mobile Broadband Module (select models only).
Wired network (connected) Indicates that one or more network devices are connected to the network.
2 Chapter 2 Networking (select models only)

Network (disabled/disconnected)
Indicates that all network devices are disabled in Windows Control Panel.
Network (connected) Indicates that one or more network devices are connected to a network.
Network (disconnected) Indicates that network devices are not connected to a network.
Network (disabled/disconnected)
Indicates that no wireless connections are available.
Windows XP
Icon Name Description
HP Connection Manager Opens HP Connection Manager, which enables you tocreate a connection with an HP Mobile Broadband Module(select models only).
Wireless (connected) Indicates that one or more wireless devices are on.
Wireless (disconnected) Indicates that all wireless devices are off.
Wireless network connection (connected) Indicates that one or more WLAN devices are connected toa network.
Wireless network connection (disconnected) Indicates that one or more WLAN devices are notconnected to a network.
Network status (connected) Connected to the wired network.
Network status (disconnected) Not connected to the wired network.
Turning wireless devices on or off
Using the wireless buttonNOTE: A computer may have a wireless button, a wireless switch, or a wireless action key on thekeyboard. The term wireless button is used throughout this guide to refer to all types of wirelesscontrols. Refer to the Getting Started guide for information on identifying the location of the wirelessbutton on your computer.
Creating a wireless connection 3
You can use the wireless button to simultaneously turn on or turn off the wireless network controllerand Bluetooth device. These devices can be controlled through Wireless Assistant (select modelsonly).
Using HP Wireless Assistant (select models only) to turn wireless devices on or offA wireless device can be turned on or off using Wireless Assistant. If a wireless device is disabled inSetup Utility, it must be reenabled in Setup Utility before it can be turned on or off using WirelessAssistant.
NOTE: Enabling and turning on a wireless device does not automatically connect the computer to anetwork or a Bluetooth-enabled device.
To view the state of the wireless devices, click the Show hidden icons icon, the arrow at the left ofthe notification area, and position the mouse pointer over the wireless icon.
▲ To open Wireless Assistant, double-click the wireless icon in the notification area.
If the wireless icon is not displayed in the notification area, complete the following steps:
Windows 7
1. Select Start > Control Panel > Hardware and Sound > Windows Mobility Center.
2. Click the wireless icon in the Wireless Assistant tile, which is located in the bottom row ofWindows® Mobility Center.
3. Click Properties.
4. Select the check box next to HP Wireless Assistant icon in notification area.
5. Click Apply.
6. Click Close.
For more information, refer to the Wireless Assistant software Help:
1. Open Wireless Assistant by clicking the wireless icon in Windows Mobility Center.
2. Click the Help button.
Windows XP
1. Select Start > Control Panel > Network and Internet Connections > HP Wireless Assistant.
2. Click Properties.
3. Select the check box next to Wireless Assistant icon in notification area.
4. Click Apply.
Using HP Connection Manager (select models only)You can use HP Connection Manager to connect to WWANs using the HP Mobile Broadband Modulein your computer (select models only).
▲ To start Connection Manager, click the HP Connection Manager icon in the notification area, atthe far right of the taskbar.
– or –
4 Chapter 2 Networking (select models only)

Select Start > All Programs > HP Connection Manager > HP Connection Manager.
For more details about using Connection Manager, refer to the Connection Manager software Help.
Using operating system controlsThe Network and Sharing Center allows you to set up a connection or network, connect to a network,manage wireless networks, and diagnose and repair network problems.
Windows 7
▲ Select Start > Control Panel > Network and Internet > Network and Sharing Center.
Windows XP
▲ Select Start > Control Panel > Network and Internet Connections > Network Connections.
For more information, select Start > Help and Support.
Using a WLANA wireless connection connects the computer to Wi-Fi networks, or WLANs. A WLAN is composed ofother computers and accessories that are linked by a wireless router or a wireless access point.
Connecting to an existing WLANWindows 7
1. Be sure that the WLAN device is on. (Refer to Turning wireless devices on or off on page 3.)
2. Click the network icon in the notification area, at the far right of the taskbar.
3. Select your WLAN from the list.
4. Click Connect.
If the network is a security-enabled WLAN, you are prompted to enter a network security code.Type the code, and then click OK to complete the connection.
NOTE: If no WLANs are listed, you are out of range of a wireless router or access point.
NOTE: If you do not see the network you want to connect to, click Open Network andSharing Center, and then click Set up a new connection or network. A list of options isdisplayed. You can choose to manually search for and connect to a network or to create a newnetwork connection.
Using a WLAN 5
Windows XP
1. Be sure that the WLAN device is on. (Refer to Turning wireless devices on or off on page 3.)
2. Select Start > Connect to.
3. Select your WLAN from the list.
● If the network is unsecured, a warning is displayed. Click Connect Anyway to accept thewarning and complete the connection.
● If the network is a security-enabled WLAN, you are prompted to enter a network securitycode. Type the code, and then click Connect to complete the connection.
NOTE: If no WLANs are listed, you are out of range of a wireless router or access point.
NOTE: If you do not see the network you want to connect to, click Set up a connectionor network. A list of options is displayed. You can choose to manually search for andconnect to a network or to create a new network connection.
After the connection is made, you can place the mouse pointer over the network icon in thenotification area, at the far right of the taskbar, to verify the name and status of the connection.
NOTE: The functional range (how far your wireless signals travel) depends on WLANimplementation, router manufacturer, and interference from other electronic devices or structuralbarriers such as walls and floors.
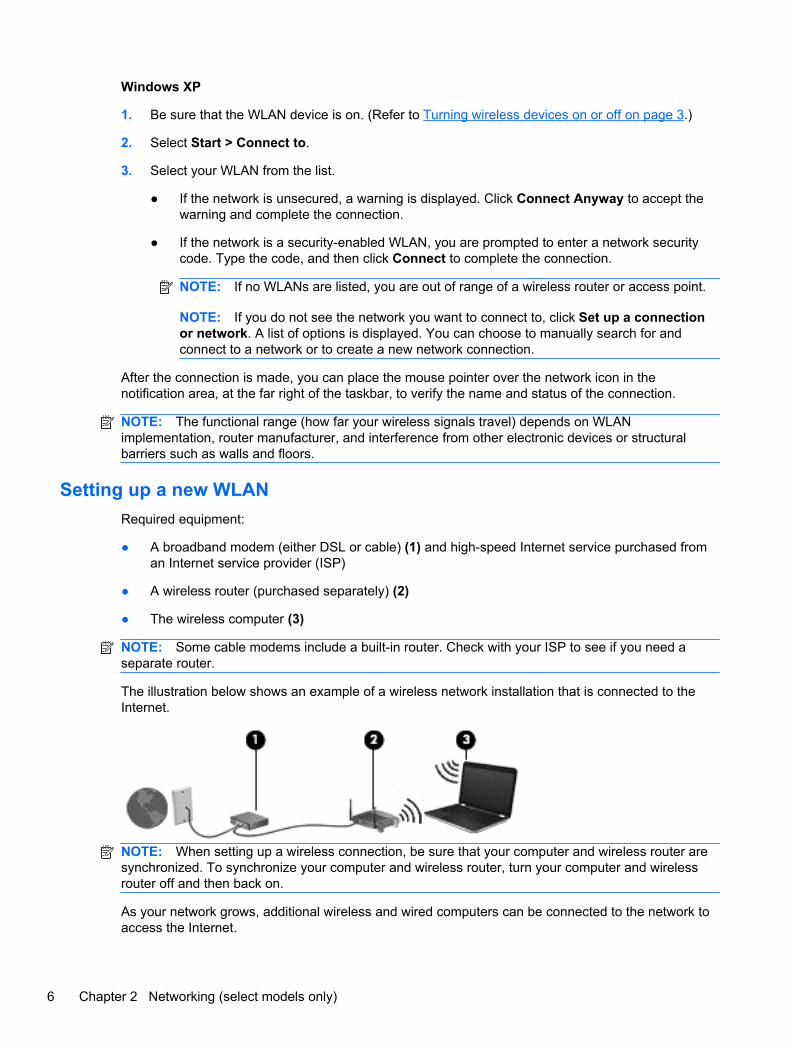
Setting up a new WLANRequired equipment:
● A broadband modem (either DSL or cable) (1) and high-speed Internet service purchased froman Internet service provider (ISP)
● A wireless router (purchased separately) (2)
● The wireless computer (3)
NOTE: Some cable modems include a built-in router. Check with your ISP to see if you need aseparate router.
The illustration below shows an example of a wireless network installation that is connected to theInternet.
NOTE: When setting up a wireless connection, be sure that your computer and wireless router aresynchronized. To synchronize your computer and wireless router, turn your computer and wirelessrouter off and then back on.
As your network grows, additional wireless and wired computers can be connected to the network toaccess the Internet.
6 Chapter 2 Networking (select models only)

For help in setting up your WLAN, refer to the information provided by your router manufacturer oryour ISP.
Protecting your WLANWhen you set up a WLAN or access an existing WLAN, always enable security features to protectyour network from unauthorized access. WLANs in public areas (hotspots) like coffee shops andairports may not provide any security. If you are concerned about the security of your computer in ahotspot, limit your network activities to e-mail that is not confidential and basic Internet surfing.
Wireless radio signals travel outside the network, so other WLAN devices can pick up unprotectedsignals. You can take the following precautions to protect your WLAN:
● Firewall—Checks both data and requests for data that are sent to your network, and discardsany suspicious items. Firewalls are available in both software and hardware. Some networks usea combination of both types.
● Wireless encryption—Wi-Fi Protected Access (WPA) uses security settings to encrypt anddecrypt data transmitted over the network. WPA uses Temporal Key Integrity Protocol (TKIP) todynamically generate a new key for every packet. It also generates different sets of keys foreach computer on the network.
Roaming to another networkWhen you move your computer within range of another WLAN, Windows attempts to connect to thatnetwork. If the attempt is successful, your computer is automatically connected to the new network. IfWindows does not recognize the new network, follow the same procedure you used initially toconnect to your WLAN.
Using HP Mobile Broadband (select models only)HP Mobile Broadband enables your computer to use wireless wide area networks (WWANs) toaccess the Internet from more places and over larger areas than it can by using WLANs. Using HPMobile Broadband requires a network service provider, which in most cases is a mobile phonenetwork provider.
When used with mobile network provider service, HP Mobile Broadband gives you the freedom tostay connected to the Internet, send e-mail, or connect to your corporate network whether you are onthe road or outside the range of Wi-Fi hotspots.
NOTE: You may need the HP Mobile Broadband Module serial number to activate mobilebroadband service. Refer to the Getting Started guide for the location of the serial number.
Some mobile network service providers require the use of a subscriber identity module (SIM). A SIMcontains basic information about you, such as a personal identification number (PIN), as well asnetwork information. Some computers include a preinstalled SIM. If the SIM is not preinstalled, it maybe included with the HP Mobile Broadband information provided with your computer, or it may beprovided separately by the mobile network service provider.
For information on inserting and removing the SIM, refer to Inserting a SIM on page 8 andRemoving a SIM on page 8.
For information on HP Mobile Broadband and how to activate service with a preferred mobile networkservice provider, refer to the HP Mobile Broadband information included with your computer. Foradditional information, see the HP Web site at http://www.hp.com/go/mobilebroadband (U.S. only).
Using HP Mobile Broadband (select models only) 7
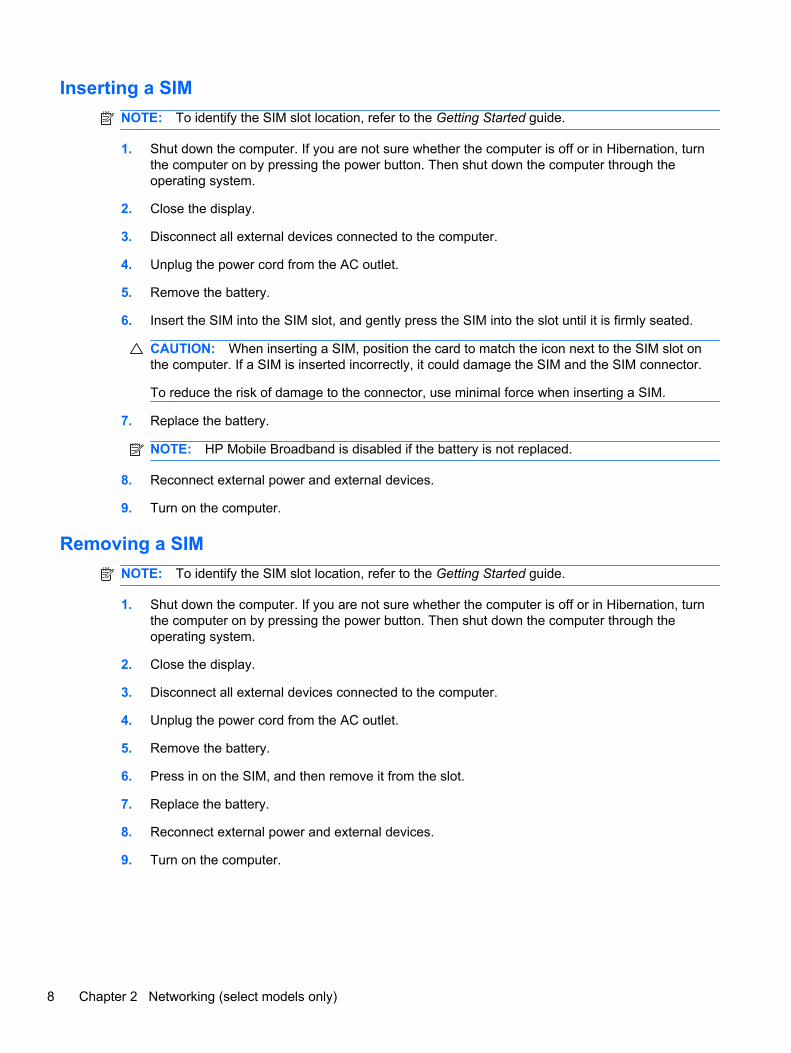
Inserting a SIMNOTE: To identify the SIM slot location, refer to the Getting Started guide.
1. Shut down the computer. If you are not sure whether the computer is off or in Hibernation, turnthe computer on by pressing the power button. Then shut down the computer through theoperating system.
2. Close the display.
3. Disconnect all external devices connected to the computer.
4. Unplug the power cord from the AC outlet.
5. Remove the battery.
6. Insert the SIM into the SIM slot, and gently press the SIM into the slot until it is firmly seated.
CAUTION: When inserting a SIM, position the card to match the icon next to the SIM slot onthe computer. If a SIM is inserted incorrectly, it could damage the SIM and the SIM connector.
To reduce the risk of damage to the connector, use minimal force when inserting a SIM.
7. Replace the battery.
NOTE: HP Mobile Broadband is disabled if the battery is not replaced.
8. Reconnect external power and external devices.
9. Turn on the computer.
Removing a SIMNOTE: To identify the SIM slot location, refer to the Getting Started guide.
1. Shut down the computer. If you are not sure whether the computer is off or in Hibernation, turnthe computer on by pressing the power button. Then shut down the computer through theoperating system.
2. Close the display.
3. Disconnect all external devices connected to the computer.
4. Unplug the power cord from the AC outlet.
5. Remove the battery.
6. Press in on the SIM, and then remove it from the slot.
7. Replace the battery.
8. Reconnect external power and external devices.
9. Turn on the computer.
8 Chapter 2 Networking (select models only)
Using Bluetooth wireless devicesA Bluetooth device provides short-range wireless communications that replace the physical cableconnections that traditionally link electronic devices such as the following:
● Computers
● Phones
● Imaging devices (cameras and printers)
● Audio devices
Bluetooth devices provide peer-to-peer capability that allows you to set up a personal area network(PAN) of Bluetooth devices. For information on configuring and using Bluetooth devices, refer to theBluetooth software Help.
Bluetooth and Internet Connection Sharing (ICS)HP does not recommend setting up one computer with Bluetooth as a host and using it as a gatewaythrough which other computers may connect to the Internet. When two or more computers areconnected using Bluetooth, and Internet Connection Sharing (ICS) is enabled on one of thecomputers, the other computers may not be able to connect to the Internet using the Bluetoothnetwork.
The strength of Bluetooth is in synchronizing information transfers between your computer andwireless devices including cellular phones, printers, cameras, and PDAs. The inability to consistentlyconnect two or more computers to share the Internet through Bluetooth is a limitation of Bluetoothand the Windows operating system.
Using GPS (select models only)Your computer may be equipped with a Global Positioning System (GPS). GPS satellites deliverlocation, speed, and direction information to GPS-equipped systems.
For more information, refer to the HP Connection Manager software Help.
Connecting to a wired networkUsing a modem (select models only)
A modem must be connected to an analog telephone line using a 6-pin, RJ-11 modem cable(purchased separately). In some countries or regions, a specific modem cable adapter is alsorequired. Jacks for digital PBX systems may resemble analog telephone jacks, but they are notcompatible with the modem.
WARNING! To reduce the risk of electric shock, fire, or damage to the equipment, do not plug amodem or telephone cable into the RJ-45 (network) jack.
If the modem cable contains noise suppression circuitry (1), which prevents interference from TV andradio reception, orient the circuitry end of the cable (2) toward the computer.
Using Bluetooth wireless devices 9
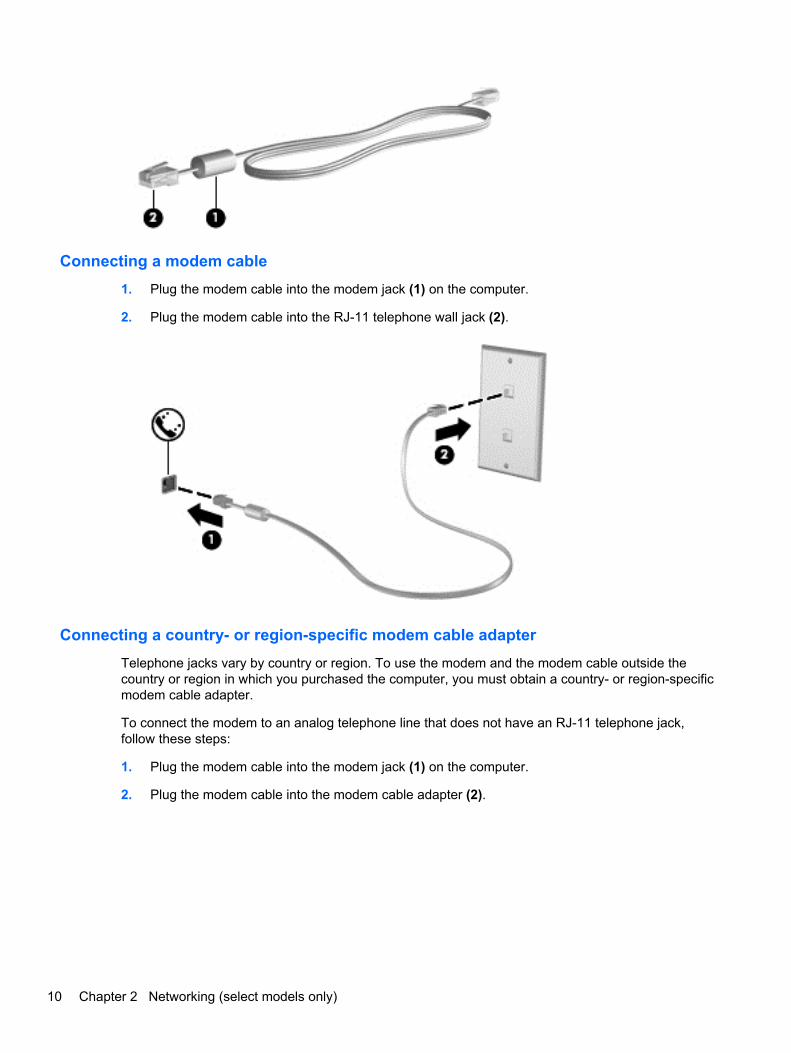
Connecting a modem cable1. Plug the modem cable into the modem jack (1) on the computer.
2. Plug the modem cable into the RJ-11 telephone wall jack (2).
Connecting a country- or region-specific modem cable adapterTelephone jacks vary by country or region. To use the modem and the modem cable outside thecountry or region in which you purchased the computer, you must obtain a country- or region-specificmodem cable adapter.
To connect the modem to an analog telephone line that does not have an RJ-11 telephone jack,follow these steps:
1. Plug the modem cable into the modem jack (1) on the computer.
2. Plug the modem cable into the modem cable adapter (2).
10 Chapter 2 Networking (select models only)
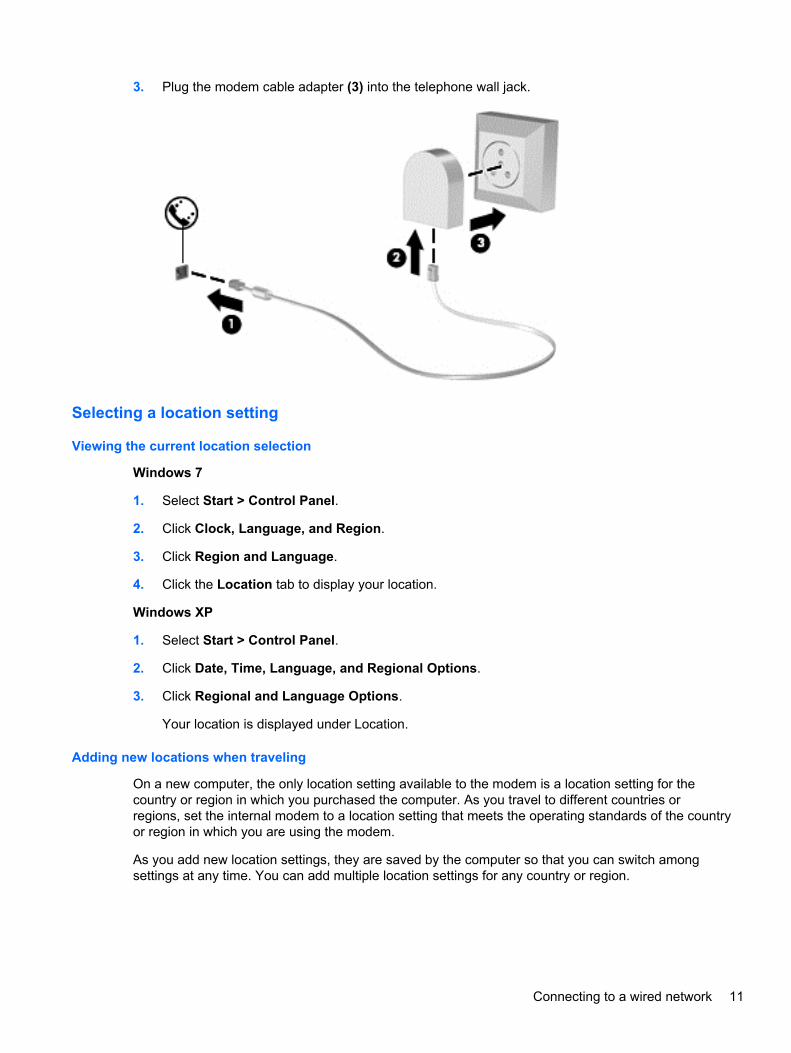
3. Plug the modem cable adapter (3) into the telephone wall jack.
Selecting a location setting
Viewing the current location selection
Windows 7
1. Select Start > Control Panel.
2. Click Clock, Language, and Region.
3. Click Region and Language.
4. Click the Location tab to display your location.
Windows XP
1. Select Start > Control Panel.
2. Click Date, Time, Language, and Regional Options.
3. Click Regional and Language Options.
Your location is displayed under Location.
Adding new locations when traveling
On a new computer, the only location setting available to the modem is a location setting for thecountry or region in which you purchased the computer. As you travel to different countries orregions, set the internal modem to a location setting that meets the operating standards of the countryor region in which you are using the modem.
As you add new location settings, they are saved by the computer so that you can switch amongsettings at any time. You can add multiple location settings for any country or region.
Connecting to a wired network 11
CAUTION: To reduce the risk of losing your home country or region settings, do not delete yourcurrent modem country or region settings. To enable modem use in other countries or regions whilepreserving your home country or region configuration, add a new configuration for each location inwhich you will use the modem.
CAUTION: To reduce the risk of configuring the modem in a way that violates thetelecommunications regulations and laws of the country or region you are visiting, select the countryor region in which the computer is located. The modem may not function properly if the correctcountry or region selection is not made.
Windows 7
1. Select Start > Devices and Printers.
2. Right-click the device that represents your computer, and click Modem settings.
NOTE: You must set up an initial (current) location area code before you can view the DialingRules tab. If you do not have a location already set up, you are prompted to enter the locationwhen you click Modem settings.
3. Click the Dialing Rules tab.
4. Click New. The New Location window opens.
5. In the Location name box, type a name (such as home or work) for the new location setting.
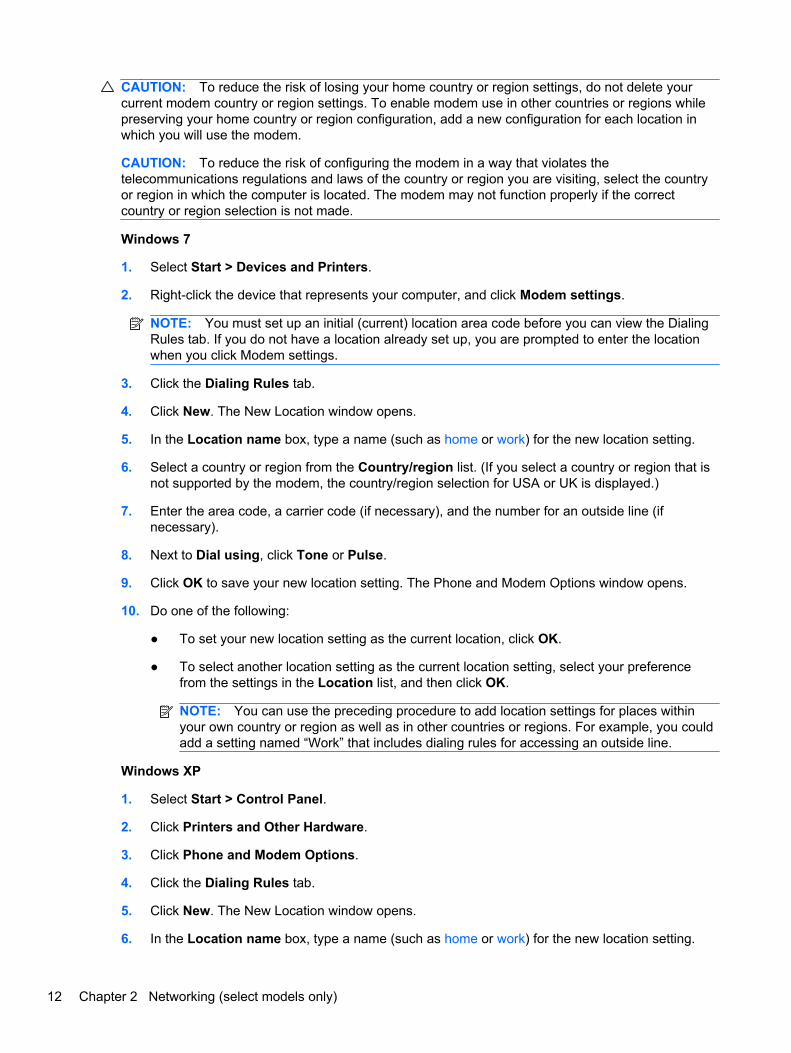
6. Select a country or region from the Country/region list. (If you select a country or region that isnot supported by the modem, the country/region selection for USA or UK is displayed.)
7. Enter the area code, a carrier code (if necessary), and the number for an outside line (ifnecessary).
8. Next to Dial using, click Tone or Pulse.
9. Click OK to save your new location setting. The Phone and Modem Options window opens.
10. Do one of the following:
● To set your new location setting as the current location, click OK.
● To select another location setting as the current location setting, select your preferencefrom the settings in the Location list, and then click OK.
NOTE: You can use the preceding procedure to add location settings for places withinyour own country or region as well as in other countries or regions. For example, you couldadd a setting named “Work” that includes dialing rules for accessing an outside line.
Windows XP
1. Select Start > Control Panel.
2. Click Printers and Other Hardware.
3. Click Phone and Modem Options.
4. Click the Dialing Rules tab.
5. Click New. The New Location window opens.
6. In the Location name box, type a name (such as home or work) for the new location setting.
12 Chapter 2 Networking (select models only)

7. Select a country or region from the Country/region list. (If you select a country or region that isnot supported by the modem, the country/region selection for USA or UK is displayed.)
8. Enter the area code, a carrier code (if necessary), and the number for an outside line (ifnecessary).
9. Next to Dial using, click Tone or Pulse.
10. Click OK to save your new location setting. The Phone and Modem Options window opens.
11. Do one of the following:
● To set your new location setting as the current location, click OK.
● To select another location setting as the current location setting, select your preferencefrom the settings in the Location list, and then click OK.
NOTE: You can use the preceding procedure to add location settings for places within yourown country or region as well as in other countries or regions. For example, you could add asetting named “Work” that includes dialing rules for accessing an outside line.
Connecting to a local area network (LAN) (select models only)Connecting to a local area network (LAN) requires an 8-pin, RJ-45 network cable (purchasedseparately). If the network cable contains noise suppression circuitry (1), which prevents interferencefrom TV and radio reception, orient the circuitry end of the cable (2) toward the computer.
To connect the network cable:
1. Plug the network cable into the network jack (1) on the computer.
Connecting to a wired network 13

2. Plug the other end of the network cable into a network wall jack (2).
WARNING! To reduce the risk of electric shock, fire, or damage to the equipment, do not plug amodem cable or telephone cable into an RJ-45 (network) jack.
14 Chapter 2 Networking (select models only)

3 Multimedia
Your computer may include the following:
● One or two integrated speakers
● One or two integrated microphones
● Integrated webcam
● Preinstalled multimedia software
● Multimedia buttons or keys
Using the media activity controlsDepending on your computer model, you may have the following media activity controls that allowyou to play, pause, fast forward, or rewind a media file:
● Media buttons
● Media hotkeys (specific keys pressed in combination with the fn key)
● Media action keys
Refer to the Getting Started guide for information about your computer's media activity controls.
AudioYour computer provides a variety of audio-related opportunities:
● Play music.
● Record sound.
● Download music from the Internet.
● Create multimedia presentations.
● Transmit sound and images with instant messaging programs.
● Stream radio programs.
● Create (burn) audio CDs using the installed optical drive (select models only) or on an optionalexternal optical drive (purchased separately).
Using the media activity controls 15
Adjusting the volumeDepending on your computer model, you can adjust the volume using the following:
● Volume buttons
● Volume hotkeys
● Volume keys
WARNING! To reduce the risk of personal injury, adjust the volume before putting on headphones,earbuds, or a headset. For additional safety information, refer to the Regulatory, Safety, andEnvironmental Notices.
NOTE: Volume can also be controlled through the operating system and some programs.
NOTE: Refer to the Getting Started guide for information on what type of volume controls yourcomputer has.
Checking audio functions on the computerWindows 7
To check the audio functions on your computer, follow these steps:
1. Select Start > Control Panel > Hardware and Sound > Sound.
2. When the Sound window opens, click the Sounds tab. Under Program Events, select anysound event, such as a beep or alarm, and click the Test button.
You should hear sound through the speakers or through connected headphones.
To check the recording functions on your computer, follow these steps:
1. Select Start > All Programs > Accessories > Sound Recorder.
2. Click Start Recording and speak into the microphone. Save the file to your desktop.
3. Open a multimedia program and play back the sound.
NOTE: For best results when recording, speak directly into the microphone and record sound in asetting free of background noise.
To confirm or change the audio settings on your computer, select Start > Control Panel > Hardwareand Sound > Sound.
Windows XP
To check the audio functions on your computer, follow these steps:
1. Select Start > Control Panel > Sounds, Speech, and Audio Devices > Sounds and AudioDevices.
2. When the Sound and Audio Device Properties window opens, click the Sounds tab. UnderProgram events, select any sound event, such as a beep or alarm, and click the arrow button tocheck the sound.
You should hear sound through the speakers or through connected headphones.
16 Chapter 3 Multimedia

To check the recording functions on your computer, follow these steps:
1. Select Start > All Programs > Accessories > Entertainment > Sound Recorder.
2. Click the recording button and speak into the microphone. Save the file to your desktop.
3. Open a multimedia program and play back the sound.
NOTE: For best results when recording, speak directly into the microphone and record sound in asetting free of background noise.
To confirm or change the audio settings on your computer, right-click the Volume icon on the taskbar,or select Start > Control Panel > Sounds, Speech, and Audio Devices > Sounds and AudioDevices.
Webcam (select models only)Some computers include an integrated webcam, located at the top of the display. With thepreinstalled software, you can use the webcam to take a photo or record a video. You can previewand save the photo or video recording.
The webcam software enables you to experiment with the following features:
● Capturing and sharing video
● Streaming video with instant message software
● Taking still photos
For information on how to access the webcam, refer to the Getting Started guide. For information onusing the webcam, select Start > Help and Support.
Using SkyRoom (select models only)HP SkyRoom is a video tool that allows video conferencing and desktop sharing so that participantsacross the world can collaborate in real time.
You can utilize your existing Microsoft Office Communicator or Jabber contact lists or you can createyour own list and add contacts manually. For more information, refer to the SkyRoom software Help.
VideoYour computer may have one or more of the following external video ports:
● VGA
● DisplayPort
● HDMI
VGAThe external monitor port, or VGA port, is an analog display interface that connects an external VGAdisplay device such as an external VGA monitor or a VGA projector to the computer.
Webcam (select models only) 17
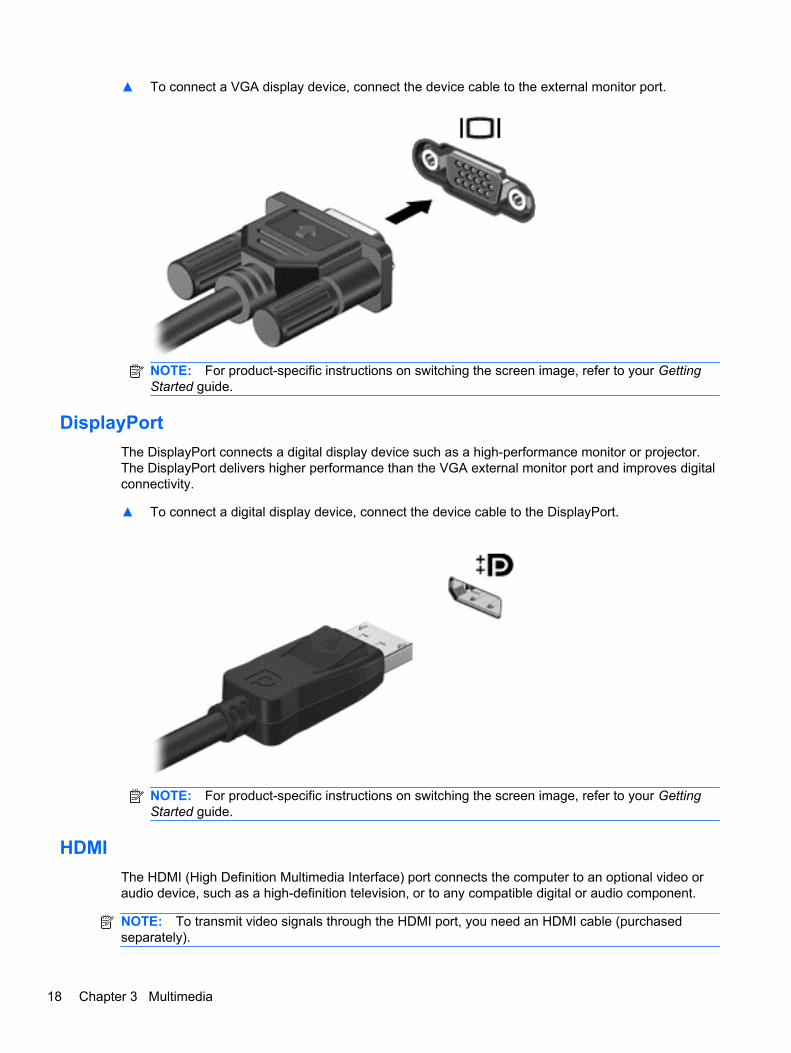
▲ To connect a VGA display device, connect the device cable to the external monitor port.
NOTE: For product-specific instructions on switching the screen image, refer to your GettingStarted guide.
DisplayPortThe DisplayPort connects a digital display device such as a high-performance monitor or projector.The DisplayPort delivers higher performance than the VGA external monitor port and improves digitalconnectivity.
▲ To connect a digital display device, connect the device cable to the DisplayPort.
NOTE: For product-specific instructions on switching the screen image, refer to your GettingStarted guide.
HDMIThe HDMI (High Definition Multimedia Interface) port connects the computer to an optional video oraudio device, such as a high-definition television, or to any compatible digital or audio component.
NOTE: To transmit video signals through the HDMI port, you need an HDMI cable (purchasedseparately).
18 Chapter 3 Multimedia
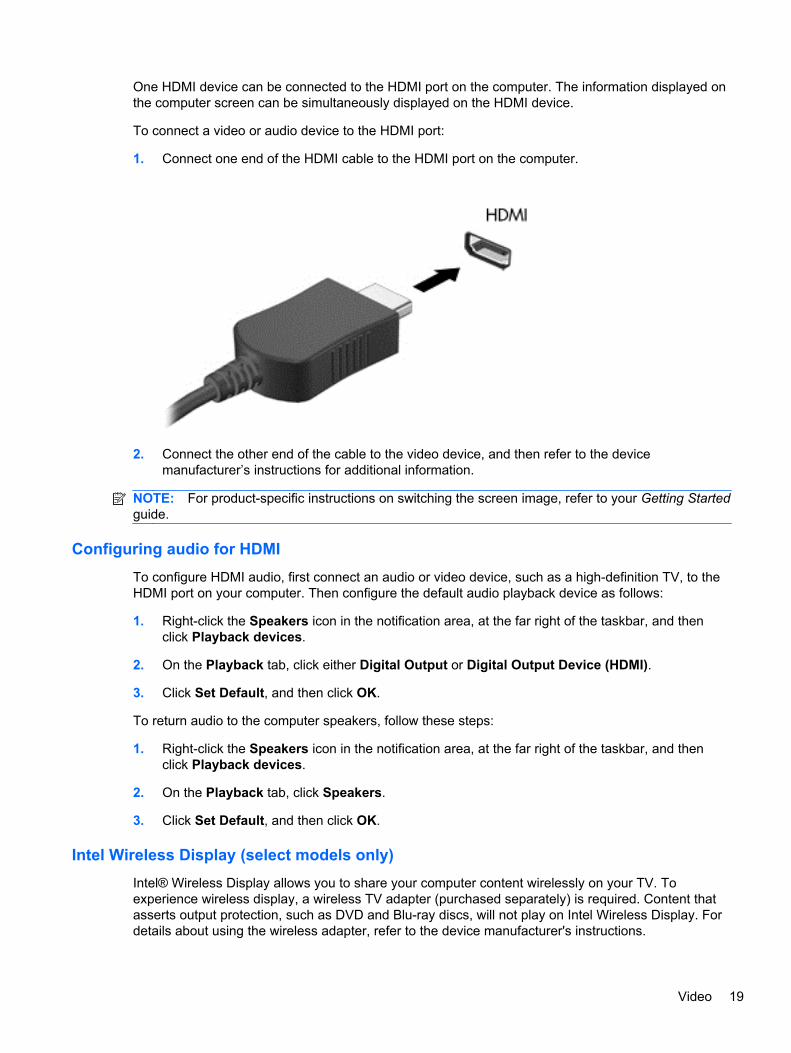
One HDMI device can be connected to the HDMI port on the computer. The information displayed onthe computer screen can be simultaneously displayed on the HDMI device.
To connect a video or audio device to the HDMI port:
1. Connect one end of the HDMI cable to the HDMI port on the computer.
2. Connect the other end of the cable to the video device, and then refer to the devicemanufacturer’s instructions for additional information.
NOTE: For product-specific instructions on switching the screen image, refer to your Getting Startedguide.
Configuring audio for HDMITo configure HDMI audio, first connect an audio or video device, such as a high-definition TV, to theHDMI port on your computer. Then configure the default audio playback device as follows:
1. Right-click the Speakers icon in the notification area, at the far right of the taskbar, and thenclick Playback devices.
2. On the Playback tab, click either Digital Output or Digital Output Device (HDMI).
3. Click Set Default, and then click OK.
To return audio to the computer speakers, follow these steps:
1. Right-click the Speakers icon in the notification area, at the far right of the taskbar, and thenclick Playback devices.
2. On the Playback tab, click Speakers.
3. Click Set Default, and then click OK.
Intel Wireless Display (select models only)Intel® Wireless Display allows you to share your computer content wirelessly on your TV. Toexperience wireless display, a wireless TV adapter (purchased separately) is required. Content thatasserts output protection, such as DVD and Blu-ray discs, will not play on Intel Wireless Display. Fordetails about using the wireless adapter, refer to the device manufacturer's instructions.
Video 19
NOTE: Be sure that wireless is enabled on your computer before using the wireless display.
Using HP MediaSmart (select models only)HP MediaSmart turns your computer into a mobile entertainment center. With MediaSmart, you canenjoy music CDs and DVD and Blu-ray Disc (BD) movies. You can also manage and edit your photocollections. MediaSmart includes the following features:
● Playlist upload support:
◦ Upload your MediaSmart photo playlists to Internet photo albums.
◦ Upload your MediaSmart video playlists to YouTube.
◦ Export your MediaSmart playlist to the CyberLink DVD Suite.
● Pandora Internet radio (North America only)—Listen to music selected just for you, streamedfrom the Internet.
▲ To start MediaSmart, select Start > All Programs > HP > HP MediaSmart.
For more information on using MediaSmart, select Start > Help and Support.
20 Chapter 3 Multimedia

4 Power management
NOTE: A computer may have a power button or a power switch. The term power button is usedthroughout this guide to refer to both types of power controls.
NOTE: Windows 7 uses Sleep and Windows XP uses Standby. The term Sleep is used throughoutthis guide to refer to both. Differences between the operating systems that affect any of theprocedures are noted.
Shutting down the computerCAUTION: Unsaved information is lost when the computer shuts down.
The Shut down command closes all open programs, including the operating system, and then turnsoff the display and computer.
Shut down the computer under any of the following conditions:
● When you need to replace the battery or access components inside the computer
● When you are connecting an external hardware device that does not connect to a USB port
● When the computer will be unused and disconnected from external power for an extendedperiod
Although you can shut down the computer with the power button, the recommended procedure is touse the Windows Shut down command:
NOTE: If the computer is in the Sleep state or in Hibernation, you must first exit Sleep orHibernation before shutdown is possible.
1. Save your work and close all open programs.
2. Windows 7—Select Start > Shut down.
Windows XP—Select Start > Turn Off Computer > Turn Off.
NOTE: If you have been registered to a network domain, the button you click is called ShutDown instead of Turn Off Computer.
Shutting down the computer 21
If the computer is unresponsive and you are unable to use the preceding shutdown procedures, trythe following emergency procedures in the sequence provided:
● Windows 7—Press ctrl+alt+delete, and then click the Power button.
Windows XP—Press ctrl+alt+delete. Click Shut Down, and then click Turn Off.
● Press and hold the power button for at least 5 seconds.
● Disconnect the computer from external power and remove the battery.
Setting power optionsUsing power-saving states
The computer has two power-saving states that are enabled at the factory: Sleep and Hibernation.
When Sleep is initiated, the power lights blink and the screen clears. Your work is saved to memory,letting you exit Sleep faster than exiting Hibernation. If the computer is in the Sleep state for anextended period or if the battery reaches a critical battery level while in the Sleep state, the computerinitiates Hibernation.
When Hibernation is initiated, your work is saved to a hibernation file on the hard drive and thecomputer turns off.
CAUTION: To reduce the risk of possible audio and video degradation, loss of audio or videoplayback functionality, or loss of information, do not initiate Sleep or Hibernation while reading from orwriting to a disc or an external media card.
NOTE: You cannot initiate any type of networking connection or perform any computer functionswhile the computer is in the Sleep state or in Hibernation.
Initiating and exiting SleepThe system is set at the factory to initiate Sleep after a period of inactivity when running on batterypower or on external power.
Power settings and timeouts can be changed using Power Options in Windows® Control Panel.
With the computer on, you can initiate Sleep in any of the following ways:
● Briefly press the power button.
● Close the display.
● Windows 7—Select Start, click the arrow next to the Shut down button, and then click Sleep.
Windows XP—Select Start > Turn Off Computer > Stand By.
To exit Sleep:
● Briefly press the power button.
● If the display is closed, open the display.
● Press a key on the keyboard.
● Tap or swipe the TouchPad.
22 Chapter 4 Power management

When the computer exits Sleep, the power lights turn on and your work returns to the screen whereyou stopped working.
NOTE: If you have set a password to be required on wakeup, you must enter your Windowspassword before your work will return to the screen.
Initiating and exiting HibernationThe system is set at the factory to initiate Hibernation after a period of inactivity when running onbattery power or on external power, or when the battery reaches a critical battery level.
Power settings and timeouts can be changed in Windows Control Panel.
To initiate Hibernation:
▲ Windows 7—Select Start, click the arrow next to the Shut down button, and then clickHibernate.
Windows XP—Select Start > Turn Off Computer, and then hold down the shift key and selectHibernate.
To exit Hibernation:
▲ Briefly press the power button.
The power lights turn on and your work returns to the screen where you stopped working.
NOTE: If you have set a password to be required on wakeup, you must enter your Windowspassword before your work will return to the screen.
Using the power meterThe power meter is located in the notification area, at the far right of the taskbar. The power meterallows you to quickly access power settings and view the remaining battery charge.
● To display the percentage of remaining battery charge and the current power plan (or powerscheme in Windows XP), move the pointer over the power meter icon.
● To access Power Options, or to change the power plan, click the power meter icon and select anitem from the list.
Different power meter icons indicate whether the computer is running on battery or external power.The icon also displays a message if the battery has reached a low or critical battery level.
Using power plansA power plan (or power scheme in Windows XP) is a collection of system settings that manages howthe computer uses power. Power plans can help you conserve power or maximize performance.
Viewing the current power planUse any of the following methods:
● Click the power meter icon in the notification area, at the far right of the taskbar.
● Windows 7—Select Start > Control Panel > System and Security > Power Options.
Setting power options 23

Windows XP—Select Start > Control Panel > Performance and Maintenance > PowerOptions.
Selecting a different power planUse any of the following methods:
● Click the power meter icon in the notification area, and then select a power plan from the list.
● Windows 7—Select Start > Control Panel > System and Security > Power Options, andthen select an item from the list.
Windows XP—Select Start > Control Panel > Performance and Maintenance > PowerOptions, and then select an item from the list.
Customizing power plansWindows 7
1. Click the power meter icon in the notification area, and then click More power options.
– or –
Select Start > Control Panel > System and Security > Power Options.
2. Select a power plan, and then click Change plan settings.
3. Change the settings as needed.
4. To change additional settings, click Change advanced power settings and make yourchanges.
Windows XP
1. Select Start > Control Panel > Performance and Maintenance > Power Options.
2. Select a power scheme from the Power schemes list.
3. Modify the Plugged in and Running on batteries settings as needed.
4. Click OK.
Setting password protection on wakeupWindows 7
To set the computer to prompt for a password when the computer exits Sleep or Hibernation, followthese steps:
1. Select Start > Control Panel > System and Security > Power Options.
2. In the left pane, click Require a password on wakeup.
3. Click Change Settings that are currently unavailable.
4. Click Require a password (recommended).
24 Chapter 4 Power management

NOTE: If you need to create a user account password or change your current user accountpassword, click Create or change your user account password, and then follow the on-screen instructions. If you do not need to create or change a user account password, go to step5.
5. Click Save changes.
Windows XP
1. Right-click the Power Meter icon in the notification area, and then click Adjust PowerProperties.
2. Click the Advanced tab.
3. Select the Prompt for password when computer resumes from Standby check box.
4. Click Apply.
Using battery powerWhen a charged battery is in the computer and the computer is not plugged into external power, thecomputer runs on battery power. When the computer is plugged into external AC power, thecomputer runs on AC power.
If the computer contains a charged battery and is running on external AC power, the computerswitches to battery power if the AC adapter is disconnected from the computer.
NOTE: When you disconnect AC power, the display brightness is automatically decreased to savebattery life. For information on increasing or decreasing display brightness, refer to the GettingStarted guide.
You can keep a battery in the computer or in storage, depending on how you work. Keeping thebattery in the computer whenever the computer is plugged into AC power charges the battery andalso protects your work in case of a power outage. However, a battery in the computer slowlydischarges when the computer is off and unplugged from external power.
WARNING! To reduce potential safety issues, use only the battery provided with the computer, areplacement battery provided by HP, or a compatible battery purchased from HP.
Computer battery life varies, depending on power management settings, programs running on thecomputer, display brightness, external devices connected to the computer, and other factors.
Finding battery information in Help and Support in Windows 7Help and Support provides the following tools and information about the battery:
● Battery Check tool to test battery performance
● Information on calibration, power management, and proper care and storage to maximize batterylife
● Information on battery types, specifications, life cycles, and capacity
To access battery information:
▲ Select Start > Help and Support > Learn > Power Plans: Frequently Asked Questions.
Using battery power 25
Using Battery Check in Windows 7Battery Check in Help and Support provides information on the status of the battery installed in thecomputer.
To run Battery Check:
1. Connect the AC adapter to the computer.
NOTE: The computer must be connected to external power for Battery Check to work properly.
2. Select Start > Help and Support > Troubleshoot > Power, Thermal and Mechanical.
3. Click the Power tab, and then click Battery Check.
Battery Check examines the battery and its cells to see if they are functioning properly, and thenreports the results of the examination.
Displaying the remaining battery charge▲ Move the pointer over the power meter icon in the notification area, at the far right of the taskbar.
Maximizing battery discharge timeBattery discharge time varies depending on the features you use while on battery power. Maximumdischarge time gradually decreases as the battery storage capacity naturally degrades.
Tips for maximizing battery discharge time:
● Lower the brightness on the display.
● Remove the battery from the computer when it is not being used or charged.
● Store the battery in a cool, dry location.
● Windows 7—Select the Power saver setting in Power Options.
Managing low battery levelsThe information in this section describes the alerts and system responses set at the factory. Somelow-battery alerts and system responses can be changed using Power Options in Windows ControlPanel. Preferences set using Power Options do not affect lights.
Identifying low battery levelsWhen a battery that is the sole power source for the computer reaches a low or critical battery level,the following behavior occurs:
● The battery light (select models only) indicates a low or critical battery level.
NOTE: For additional information about the battery light, refer to the Getting Started guide.
– or –
● The power meter icon in the notification area shows a low or critical battery notification.
NOTE: For additional information about the power meter, refer to Using the power meteron page 23.
26 Chapter 4 Power management
The computer takes the following actions for a critical battery level:
● If Hibernation is enabled and the computer is on or in the Sleep state, the computer initiatesHibernation.
● If Hibernation is disabled and the computer is on or in the Sleep state, the computer remainsbriefly in the Sleep state, and then shuts down and loses any unsaved information.
Resolving a low battery level
Resolving a low battery level when external power is available
▲ Connect one of the following devices:
● AC adapter
● Optional docking or expansion device
● Optional power adapter purchased as an accessory from HP
Resolving a low battery level when a charged battery is available
1. Turn off the computer or initiate Hibernation.
2. Replace the discharged battery with a charged battery.
3. Turn on the computer.
Resolving a low battery level when no power source is available
● Initiate Hibernation.
● Save your work and shut down the computer.
Resolving a low battery level when the computer cannot exit Hibernation
When the computer lacks sufficient power to exit Hibernation, follow these steps:
1. Replace the discharged battery with a charged battery, or connect the AC adapter to thecomputer and to external power.
2. Exit Hibernation by pressing the power button.
Conserving battery power● Select low power-use settings through Power Options in Windows Control Panel.
● Turn off wireless and local area network (LAN) connections and exit modem applications whenyou are not using them.
● Disconnect unused external devices that are not plugged into an external power source.
● Stop, disable, or remove any external media cards that you are not using.
● Decrease screen brightness.
● Before you leave your work, initiate Sleep or Hibernation, or shut down the computer.
Using battery power 27

Storing a batteryCAUTION: To reduce the risk of damage to a battery, do not expose it to high temperatures forextended periods of time.
If a computer will be unused and unplugged from external power for more than 2 weeks, remove thebattery and store it separately.
To prolong the charge of a stored battery, place it in a cool, dry place.
NOTE: A stored battery should be checked every 6 months. If the capacity is less than 50 percent,recharge the battery before returning it to storage.
Calibrate a battery before using it if it has been stored for one month or more.
Disposing of a used batteryWARNING! To reduce the risk of fire or burns, do not disassemble, crush, or puncture; do not shortexternal contacts; do not dispose of in fire or water.
Refer to the Regulatory, Safety, and Environmental Notices for proper battery disposal.
Replacing the batteryIn Windows 7, Battery Check in Help and Support notifies you to replace the battery when an internalcell is not charging properly or when the battery storage capacity has reached a weak condition. If thebattery is possibly covered by an HP warranty, instructions include a warranty ID. A message refersyou to the HP Web site for more information about ordering a replacement battery.
28 Chapter 4 Power management
Using external AC powerNOTE: For information on connecting to AC power, refer to the Quick Setup poster provided in thecomputer box.
External AC power is supplied through an approved AC adapter or an optional docking or expansiondevice.
WARNING! To reduce potential safety issues, use only the AC adapter provided with the computer,a replacement AC adapter provided by HP, or a compatible AC adapter purchased from HP.
Connect the computer to external AC power under any of the following conditions:
WARNING! Do not charge the computer battery while you are onboard aircraft.
● When charging or calibrating a battery
● When installing or modifying system software
● When writing information to a CD, a DVD, or a BD (select models only)
● When running Disk Defragmenter
● When performing a backup or recovery
When you connect the computer to external AC power, the following events occur:
● The battery begins to charge.
● If the computer is turned on, the power meter icon in the notification area changes appearance.
When you disconnect external AC power, the following events occur:
● The computer switches to battery power.
● The display brightness is automatically decreased to save battery life.
Using external AC power 29

Testing an AC adapterTest the AC adapter if the computer exhibits any of the following symptoms when it is connected toAC power:
● The computer does not turn on.
● The display does not turn on.
● The power lights are off.
To test the AC adapter:
1. Shut down the computer.
2. Remove the battery from the computer.
3. Connect the AC adapter to the computer, and then plug it into an AC outlet.
4. Turn on the computer.
● If the power lights turn on, the AC adapter is working properly.
● If the power lights remain off, the AC adapter is not functioning and should be replaced.
Contact technical support for information on obtaining a replacement AC power adapter.
30 Chapter 4 Power management

5 External cards and devices
Using Digital Media Slot cards (select models only)Optional digital cards provide secure data storage and convenient data sharing. These cards areoften used with digital media–equipped cameras and PDAs as well as with other computers.
To determine the digital card formats that are supported on your computer, refer to the GettingStarted guide.
Inserting a digital cardCAUTION: To reduce the risk of damage to the digital card connectors, use minimal force to inserta digital card.
1. Hold the card label-side up, with the connectors facing the computer.
2. Insert the card into the Digital Media Slot, and then press in on the card until it is firmly seated.
You will hear a sound when the device has been detected, and a menu of options may bedisplayed.
Using Digital Media Slot cards (select models only) 31

Removing a digital cardCAUTION: To reduce the risk of loss of data or an unresponsive system, use the followingprocedure to safely remove the digital card.
1. Save your information and close all programs associated with the digital card.
2. Click the remove hardware icon in the notification area, at the far right of the taskbar. Thenfollow the on-screen instructions.
3. Either press in on the card (1), and then remove it from the slot (2).
– or –
Pull the card out of the slot.
Using PC Cards (select models only)A PC Card is a credit card–sized accessory designed to conform to the standard specifications of thePersonal Computer Memory Card International Association (PCMCIA). The PC Card slot supports thefollowing types of PC Cards:
● 32-bit (CardBus) and 16-bit PC Cards
● Type I and Type II PC Cards
NOTE: Zoomed video PC Cards and 12-V PC Cards are not supported.
32 Chapter 5 External cards and devices

Configuring a PC CardTo reduce the risk of loss of support for other PC Cards during configuration, install only the softwarerequired for the device. If you are instructed by the PC Card manufacturer to install device drivers:
● Install only the device drivers for your operating system.
● Do not install other software, such as card services, socket services, or enablers, supplied bythe PC Card manufacturer.
Inserting a PC CardCAUTION: To prevent damage to the computer and external media cards, do not insert anExpressCard into a PC Card slot.
CAUTION: To reduce the risk of damage to the connectors:
Use minimal force when inserting a PC Card.
Do not move or transport the computer when a PC Card is in use.
The PC Card slot may contain a protective insert. The insert must be removed before you can insert aPC Card:
1. Press the PC Card eject button (1).
This action extends the button into position for releasing the insert.
2. Press the PC Card eject button again to release the insert.
3. Pull the insert out of the slot (2).
To insert a PC Card:
1. Hold the card label-side up, with the connectors facing the computer.
Using PC Cards (select models only) 33

2. Insert the card into the PC Card slot, and then press in on the card until it is firmly seated.
You will hear a sound when the card has been detected, and a menu of available options maybe displayed.
NOTE: The first time you connect a PC Card, a message in the notification area lets you knowthat the device is recognized by the computer.
NOTE: To conserve power, stop or remove a PC Card when it is not in use.
Removing a PC CardCAUTION: To reduce the risk of loss of data or an unresponsive system, stop a PC Card beforeremoving it.
1. Save your information and close all programs associated with the PC Card.
2. Click the remove hardware icon in the notification area, at the far right of the taskbar, and thenfollow the on-screen instructions.
3. Release and remove the PC Card:
a. Press the PC Card eject button (1).
This action extends the button into position for releasing the PC Card.
b. Press the PC Card eject button again to release the PC Card.
c. Pull the PC Card (2) out of the slot.
34 Chapter 5 External cards and devices

Using ExpressCards (select models only)An ExpressCard is a high-performance PC Card that is inserted into the ExpressCard slot.
Like standard PC Cards, ExpressCards are designed to conform to the standard specifications of thePersonal Computer Memory Card International Association (PCMCIA).
Configuring an ExpressCardInstall only the software required for the card. If you are instructed by the ExpressCard manufacturerto install device drivers:
● Install only the device drivers for your operating system.
● Do not install additional software, such as card services, socket services, or enablers, that aresupplied by the ExpressCard manufacturer.
Using ExpressCards (select models only) 35

Inserting an ExpressCardCAUTION: To prevent damage to the computer and external media cards, do not insert a PC Cardinto an ExpressCard slot.
CAUTION: To reduce the risk of damage to the connectors:
Use minimal force when inserting an ExpressCard.
Do not move or transport the computer when an ExpressCard is in use.
The ExpressCard slot may contain a protective insert. To remove the insert:
1. Press in on the insert (1) to unlock it.
2. Pull the insert out of the slot (2).
To insert an ExpressCard:
1. Hold the card label-side up, with the connectors facing the computer.
2. Insert the card into the ExpressCard slot, and then press in on the card until it is firmly seated.
You will hear a sound when the card has been detected, and a menu of options may bedisplayed.
NOTE: The first time you connect an ExpressCard, a message in the notification area lets youknow that the card is recognized by the computer.
NOTE: To conserve power, stop or remove an ExpressCard when it is not in use.
36 Chapter 5 External cards and devices

Removing an ExpressCardCAUTION: To reduce the risk of loss of data or an unresponsive system, use the followingprocedure to safely remove the ExpressCard.
1. Save your information and close all programs associated with the ExpressCard.
2. Click the remove hardware icon in the notification area, at the far right of the taskbar, and thenfollow the on-screen instructions.
3. Release and remove the ExpressCard:
a. Gently press in on the ExpressCard (1) to unlock it.
b. Pull the ExpressCard out of the slot (2).
Using smart cards (select models only)NOTE: The term smart card is used throughout this chapter to refer to both smart cards and Java™Cards.
A smart card is a credit card–sized accessory that carries a microchip containing memory and amicroprocessor. Like personal computers, smart cards have an operating system to manage inputand output, and they include security features to protect against tampering. Industry-standard smartcards are used with the smart card reader (select models only).
A personal identification number (PIN) is needed to gain access to the contents of the microchip. Formore information about smart card security features, refer to Help and Support.
Using smart cards (select models only) 37

Inserting a smart card1. Hold the card label-side up, and gently slide the card into the smart card reader until the card is
seated.
2. Follow the on-screen instructions for logging on to the computer using the smart card PIN.
Removing a smart card▲ Grasp the edge of the smart card, and then pull it out of the smart card reader.
Using a USB deviceUniversal Serial Bus (USB) is a hardware interface that can be used to connect an optional externaldevice, such as a USB keyboard, mouse, drive, printer, scanner, or hub.
Some USB devices may require additional support software, which is usually included with thedevice. For more information about device-specific software, refer to the manufacturer's instructions.These instructions may be provided with the software, on disc, or on the manufacturer’s Web site.
The computer has at least 1 USB port that supports USB 1.0, 1.1, 2.0, or 3.0 devices. Your computermay also have a powered USB port that provides power to an external device if it is used with apowered USB cable. An optional docking device or USB hub provides additional USB ports that canbe used with the computer.
Connecting a USB deviceCAUTION: To reduce the risk of damage to a USB connector, use minimal force to connect thedevice.
38 Chapter 5 External cards and devices

▲ Connect the USB cable for the device to the USB port.
You will hear a sound when the device has been detected.
NOTE: The first time you connect a USB device, a message in the notification area lets you knowthat the device is recognized by the computer.
Removing a USB deviceCAUTION: To reduce the risk of damage to a USB connector, do not pull on the cable to removethe USB device.
CAUTION: To reduce the risk of loss of information or an unresponsive system, use the followingprocedure to safely remove the USB device.
1. To remove a USB device, save your information and close all programs associated with thedevice.
2. Click the remove hardware icon in the notification area, at the far right of the taskbar, and thenfollow the on-screen instructions.
3. Remove the device.
Using 1394 devices (select models only)IEEE 1394 is a hardware interface that connects a high-speed multimedia or data storage device tothe computer. Scanners, digital cameras, and digital camcorders often require a 1394 connection.
Some 1394 devices may require additional support software, which is usually included with thedevice. For more information about device-specific software, refer to the manufacturer's instructions.
The 1394 port also supports IEEE 1394a devices.
Using 1394 devices (select models only) 39

Connecting a 1394 deviceCAUTION: To reduce the risk of damage to a 1394 port connector, use minimal force to connect thedevice.
▲ To connect a 1394 device to the computer, connect the 1394 cable for the device to the 1394port.
You will hear a sound when the device has been detected.
Removing a 1394 deviceCAUTION: To reduce the risk of loss of information or an unresponsive system, stop the 1394device before removing it.
CAUTION: To reduce the risk of damage to a 1394 connector, do not pull on the cable to removethe 1394 device.
1. To remove a 1394 device, save your information and close all programs associated with thedevice.
2. Click the remove hardware icon in the notification area, at the far right of the taskbar, and thenfollow the on-screen instructions.
3. Remove the device.
Using an eSATA device (select models only)An eSATA port connects an optional high-performance eSATA component, such as an eSATAexternal hard drive.
Some eSATA devices may require additional support software, which is usually included with thedevice. For more information about device-specific software, refer to the manufacturer's instructions.
NOTE: The eSATA port also supports an optional USB device.
40 Chapter 5 External cards and devices

Connecting an eSATA deviceCAUTION: To reduce the risk of damage to an eSATA port connector, use minimal force to connectthe device.
▲ To connect an eSATA device to the computer, connect the eSATA cable for the device to theeSATA port.
You will hear a sound when the device has been detected.
Removing an eSATA deviceCAUTION: To reduce the risk of damage to an eSATA connector, do not pull on the cable toremove the eSATA device.
CAUTION: To reduce the risk of loss of information or an unresponsive system, use the followingprocedure to safely remove the device.
1. To remove an eSATA device, save your information and close all programs associated with thedevice.
2. Click the remove hardware icon in the notification area, at the far right of the taskbar, and thenfollow the on-screen instructions.
3. Remove the device.
Using an eSATA device (select models only) 41

Using optional external devicesNOTE: For more information about required software and drivers, or to learn which computer port touse, refer to the manufacturer's instructions.
To connect an external device to the computer:
CAUTION: To reduce the risk of damage to the equipment when connecting a powered device, besure that the device is turned off and the AC power cord is unplugged.
1. Connect the device to the computer.
2. If you are connecting a powered device, plug the device power cord into a grounded AC outlet.
3. Turn on the device.
To disconnect an unpowered external device, turn off the device, and then disconnect it from thecomputer. To disconnect a powered external device, turn off the device, disconnect it from thecomputer, and then unplug the AC power cord.
Using optional external drivesRemovable external drives expand your options for storing and accessing information. A USB drivecan be added by connecting the drive to a USB port on the computer.
NOTE: HP external USB optical drives should be connected to the powered USB port on thecomputer.
USB drives include the following types:
● 1.44-megabyte diskette drive
● Hard drive module (a hard drive with an adapter attached)
● External optical drive (CD, DVD, and Blu-ray)
● MultiBay device
Using the expansion port (select models only)The expansion port connects the computer to an optional docking or expansion device, so thatadditional ports and connectors can be used with the computer.
NOTE: The computer has only one expansion port. The term expansion port 3 describes the type ofexpansion port.
42 Chapter 5 External cards and devices
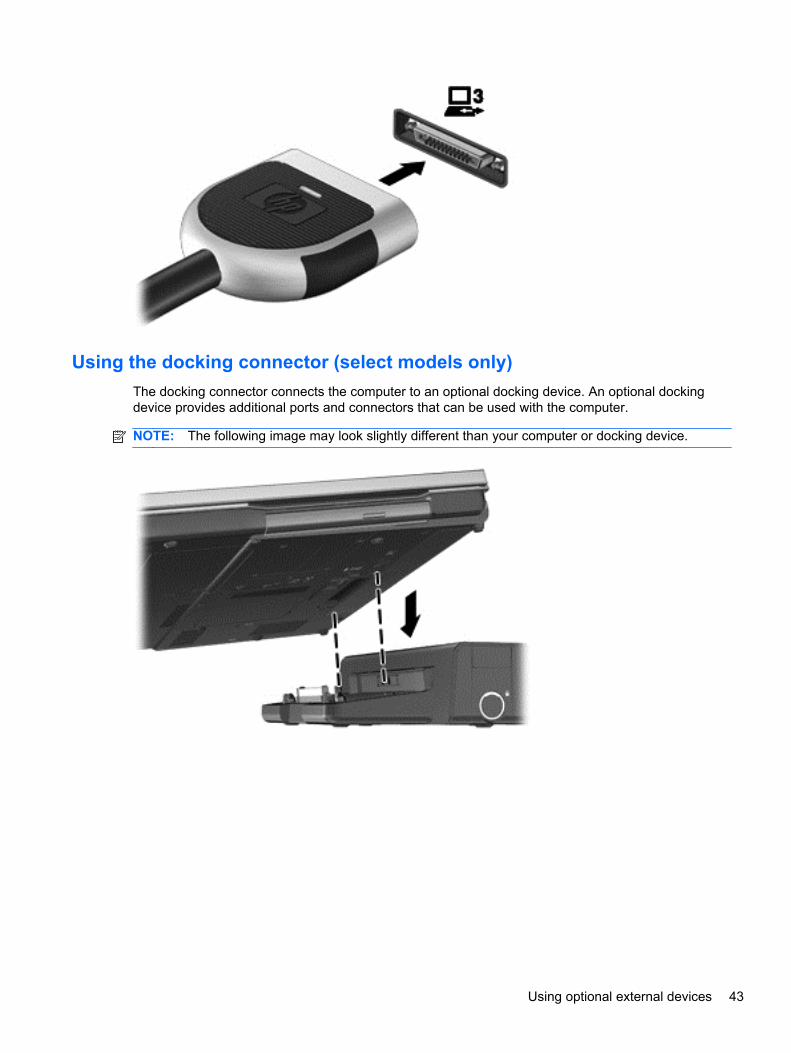
Using the docking connector (select models only)The docking connector connects the computer to an optional docking device. An optional dockingdevice provides additional ports and connectors that can be used with the computer.
NOTE: The following image may look slightly different than your computer or docking device.
Using optional external devices 43

6 Drives
Handling drivesDrives are fragile computer components that must be handled with care. Refer to the followingcautions before handling drives. Additional cautions are included with the procedures to which theyapply.
Observe these precautions:
● Before you move a computer that is connected to an external hard drive, initiate Sleep and allowthe screen to clear, or properly disconnect the external hard drive.
● Before handling a drive, discharge static electricity by touching the unpainted metal surface ofthe drive.
● Do not touch the connector pins on a removable drive or on the computer.
● Handle a drive carefully; do not drop a drive or place items on it.
● Before removing or inserting a drive, shut down the computer. If you are unsure whether thecomputer is off, in the Sleep state, or in Hibernation, turn the computer on, and then shut it downthrough the operating system.
● Do not use excessive force when inserting a drive into a drive bay.
● Do not type on the keyboard or move the computer while an optical drive is writing to a disc. Thewrite process is sensitive to vibration.
● When the battery is the only source of power, be sure that the battery is sufficiently chargedbefore writing to media.
● Avoid exposing a drive to temperature or humidity extremes.
● Avoid exposing a drive to liquids. Do not spray the drive with cleaning products.
● Remove media from a drive before removing the drive from the drive bay, or traveling with,shipping, or storing a drive.
● If a drive must be mailed, place the drive in a bubble-pack mailer or other suitable protectivepackaging and label the package “FRAGILE.”
● Avoid exposing a drive to magnetic fields. Security devices with magnetic fields include airportwalk-through devices and security wands. Airport conveyer belts and similar security devicesthat check carry-on baggage use X-rays instead of magnetism and do not damage drives.
44 Chapter 6 Drives

Using hard drivesImproving hard drive performance
Using Disk DefragmenterAs you use the computer, files on the hard drive become fragmented. Disk Defragmenterconsolidates the fragmented files and folders on the hard drive so that the system can run moreefficiently.
NOTE: It is not necessary to run Disk Defragmenter on solid-state drives.
After you start Disk Defragmenter, it works without supervision. Depending on the size of your harddrive and the number of fragmented files, Disk Defragmenter may take more than an hour tocomplete. You may want to set it to run during the night or at another time when you do not needaccess to your computer.
HP recommends defragmenting your hard drive at least once a month. You may set DiskDefragmenter to run on a monthly schedule, but you can defragment your computer manually at anytime.
To run Disk Defragmenter:
1. Connect the computer to AC power.
2. Select Start > All Programs > Accessories > System Tools > Disk Defragmenter.
3. Windows 7—Click Defragment disk.
NOTE: Windows includes the User Account Control feature to improve the security of yourcomputer. You may be prompted for your permission or password for tasks such as installingsoftware, running utilities, or changing Windows settings. Refer to Help and Support for moreinformation.
Windows XP— Under Volume, click the listing for the hard drive, usually listed as (C:), and thenclick Defragment.
For additional information, access the Disk Defragmenter software Help.
Using Disk CleanupDisk Cleanup searches the hard drive for unnecessary files that you can safely delete to free up diskspace and help the computer to run more efficiently.
To run Disk Cleanup:
1. Select Start > All Programs > Accessories > System Tools > Disk Cleanup.
2. Follow the on-screen instructions.
Using hard drives 45
Using HP ProtectSmart Hard Drive Protection in Windows 7 (selectmodels only)
HP ProtectSmart Hard Drive Protection protects a hard drive by parking the drive and halting datarequests under either of the following conditions:
● You drop the computer.
● You move the computer with the display closed while the computer is running on battery power.
A short time after the end of one of these events, HP ProtectSmart Hard Drive Protection returns thehard drive to normal operation.
NOTE: Because solid-state drives (SSD) lack moving parts, HP ProtectSmart Hard Drive Protectionis unnecessary.
NOTE: Hard drives in the primary hard drive bay or in the secondary hard drive bay are protectedby HP ProtectSmart Hard Drive Protection. Hard drives connected to USB ports are not covered byHP ProtectSmart Hard Drive Protection.
For more information, refer to the HP ProtectSmart Hard Drive Protection software Help.
Identifying HP ProtectSmart Hard Drive Protection statusThe drive light on the computer changes color to show that a drive in the primary hard drive bay or adrive in the secondary hard drive bay (select models only) is parked. To determine whether drives arecurrently protected or whether a drive is parked, select Start > Control Panel > Hardware andSound > Windows Mobility Center:
● If HP ProtectSmart Hard Drive Protection is enabled, a green check mark is superimposed overthe hard drive icon.
● If HP ProtectSmart Hard Drive Protection is disabled, a red X is superimposed over the harddrive icon.
● If the drives are parked, a yellow moon is superimposed over the hard drive icon.
The icon in the Mobility Center may not show the most up-to-date status for the drive. For immediateupdates after a change in status, you need to enable the notification area icon.
To enable the notification area icon:
1. Select Start > Control Panel > Hardware and Sound > HP ProtectSmart Hard DriveProtection.
NOTE: If prompted by User Account Control, click Yes.
2. On the Icon in System Tray row, click Show.
3. Click OK.
Managing power with a parked hard driveIf HP ProtectSmart Hard Drive Protection has parked the drive, the computer behaves in the followingways:
● The computer will not shut down.
● The computer will not initiate Sleep or Hibernation, except as described in the following Note.
46 Chapter 6 Drives

NOTE: If the computer is running on battery power and reaches a critical battery level, HPProtectSmart Hard Drive Protection allows the computer to initiate Hibernation.
Before you move the computer, HP recommends that you either shut it down or initiate Sleep orHibernation.
Using HP ProtectSmart Hard Drive Protection softwareThe HP ProtectSmart Hard Drive Protection software can be enabled or disabled by an Administrator.
NOTE: Depending on your user privileges, you may be unable to enable or disable HPProtectSmart Hard Drive Protection. Privileges for non-Administrator users can be changed bymembers of an Administrator group.
To open the software and change settings, follow these steps:
1. In Mobility Center, click the hard drive icon to open the HP ProtectSmart Hard Drive Protectionwindow.
– or –
Select Start > Control Panel > Hardware and Sound > HP ProtectSmart Hard DriveProtection.
NOTE: If prompted by User Account Control, click Yes.
2. Click the appropriate button to change settings.
3. Click OK.
Using optical drives (select models only)Optical drives include the following:
● CD
● DVD
● Blu-ray (BD)
Identifying the installed optical drive
▲ Windows 7—Select Start > Computer.
Windows XP—Select Start > My Computer.
A list of all the devices installed in your computer, including your optical drive, is displayed.
Using optical drives (select models only) 47
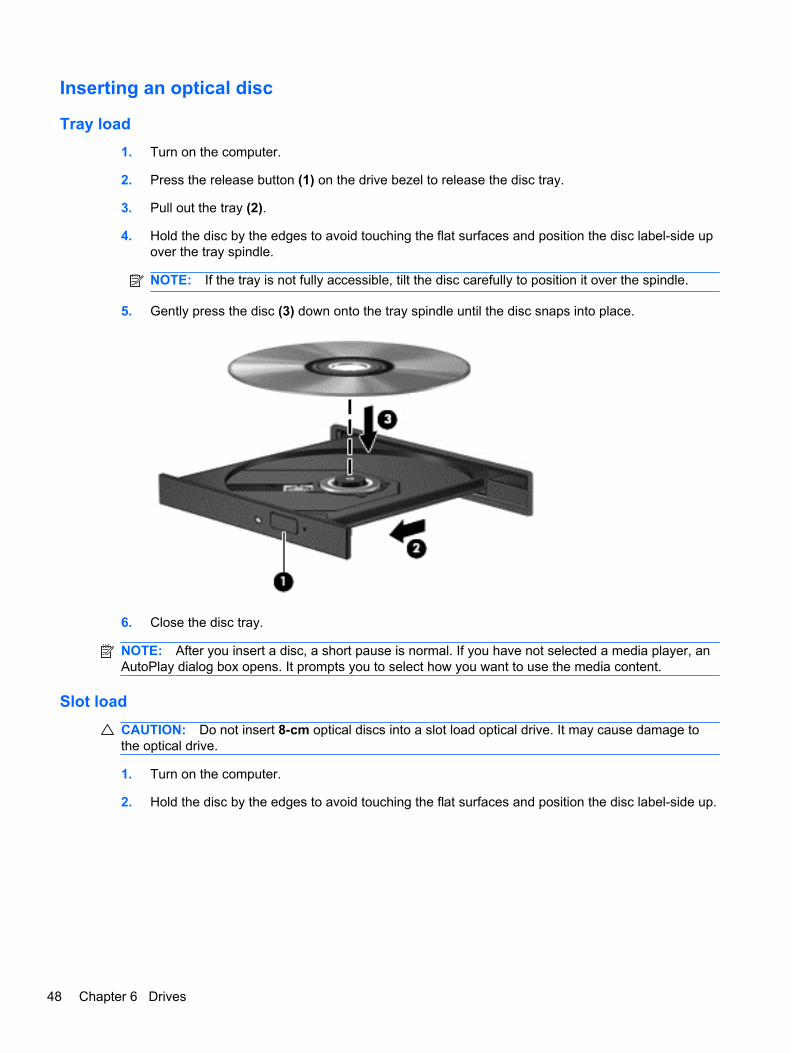
Inserting an optical disc
Tray load1. Turn on the computer.
2. Press the release button (1) on the drive bezel to release the disc tray.
3. Pull out the tray (2).
4. Hold the disc by the edges to avoid touching the flat surfaces and position the disc label-side upover the tray spindle.
NOTE: If the tray is not fully accessible, tilt the disc carefully to position it over the spindle.
5. Gently press the disc (3) down onto the tray spindle until the disc snaps into place.
6. Close the disc tray.
NOTE: After you insert a disc, a short pause is normal. If you have not selected a media player, anAutoPlay dialog box opens. It prompts you to select how you want to use the media content.
Slot loadCAUTION: Do not insert 8-cm optical discs into a slot load optical drive. It may cause damage tothe optical drive.
1. Turn on the computer.
2. Hold the disc by the edges to avoid touching the flat surfaces and position the disc label-side up.
48 Chapter 6 Drives
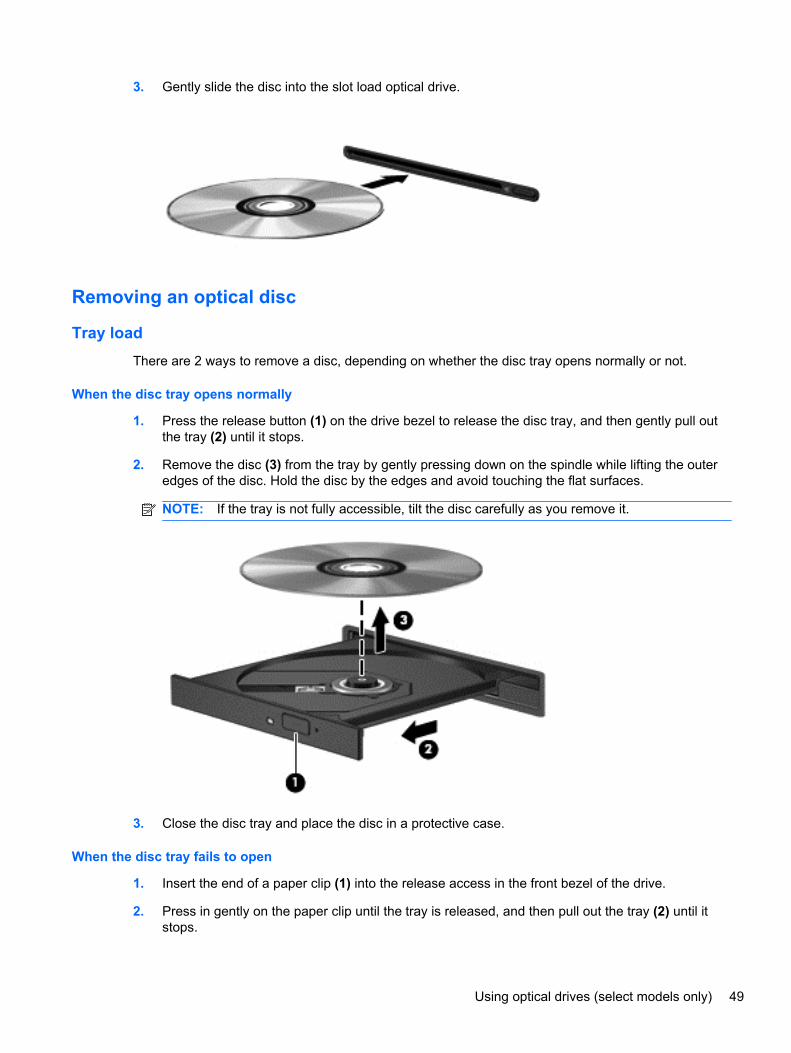
3. Gently slide the disc into the slot load optical drive.
Removing an optical disc
Tray loadThere are 2 ways to remove a disc, depending on whether the disc tray opens normally or not.
When the disc tray opens normally
1. Press the release button (1) on the drive bezel to release the disc tray, and then gently pull outthe tray (2) until it stops.
2. Remove the disc (3) from the tray by gently pressing down on the spindle while lifting the outeredges of the disc. Hold the disc by the edges and avoid touching the flat surfaces.
NOTE: If the tray is not fully accessible, tilt the disc carefully as you remove it.
3. Close the disc tray and place the disc in a protective case.
When the disc tray fails to open
1. Insert the end of a paper clip (1) into the release access in the front bezel of the drive.
2. Press in gently on the paper clip until the tray is released, and then pull out the tray (2) until itstops.
Using optical drives (select models only) 49

3. Remove the disc (3) from the tray by gently pressing down on the spindle while lifting the outeredges of the disc. Hold the disc by the edges and avoid touching the flat surfaces.
NOTE: If the tray is not fully accessible, tilt the disc carefully as you remove it.
4. Close the disc tray and place the disc in a protective case.
Slot load1. Press the release button (1) next to the drive.
2. Remove the disc (2) by holding it by the edges and avoid touching the flat surfaces.
3. Place the disc in a protective case.
50 Chapter 6 Drives
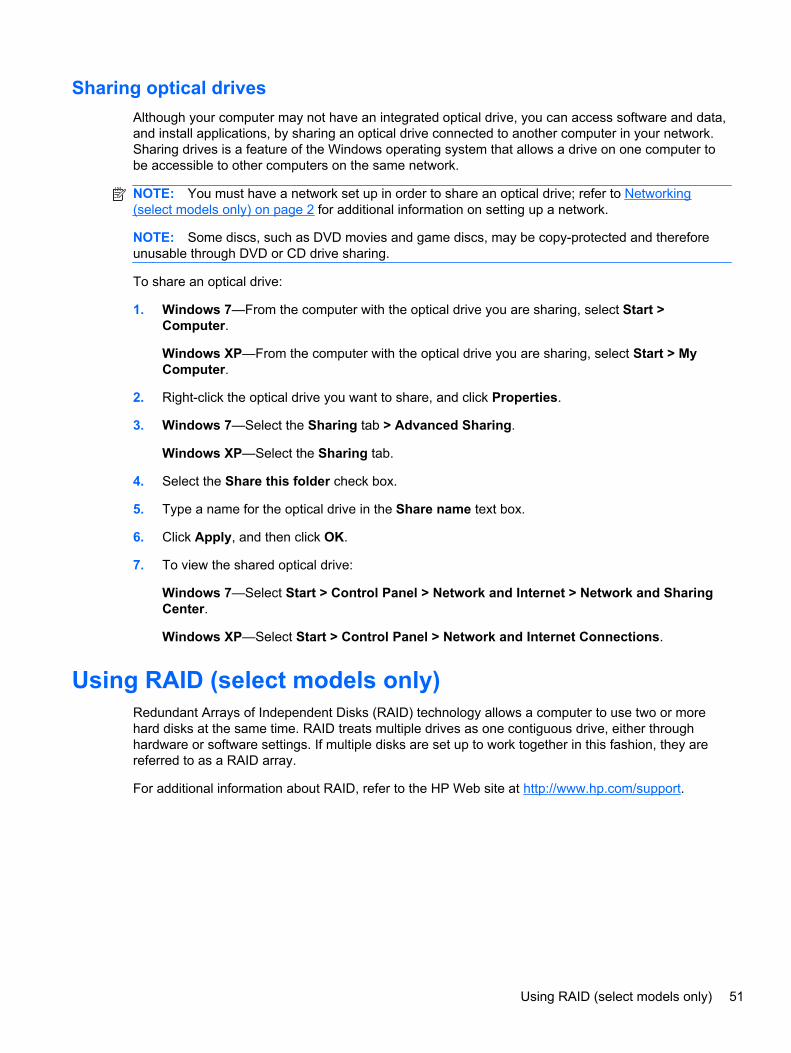
Sharing optical drivesAlthough your computer may not have an integrated optical drive, you can access software and data,and install applications, by sharing an optical drive connected to another computer in your network.Sharing drives is a feature of the Windows operating system that allows a drive on one computer tobe accessible to other computers on the same network.
NOTE: You must have a network set up in order to share an optical drive; refer to Networking(select models only) on page 2 for additional information on setting up a network.
NOTE: Some discs, such as DVD movies and game discs, may be copy-protected and thereforeunusable through DVD or CD drive sharing.
To share an optical drive:
1. Windows 7—From the computer with the optical drive you are sharing, select Start >Computer.
Windows XP—From the computer with the optical drive you are sharing, select Start > MyComputer.
2. Right-click the optical drive you want to share, and click Properties.
3. Windows 7—Select the Sharing tab > Advanced Sharing.
Windows XP—Select the Sharing tab.
4. Select the Share this folder check box.
5. Type a name for the optical drive in the Share name text box.
6. Click Apply, and then click OK.
7. To view the shared optical drive:
Windows 7—Select Start > Control Panel > Network and Internet > Network and SharingCenter.
Windows XP—Select Start > Control Panel > Network and Internet Connections.
Using RAID (select models only)Redundant Arrays of Independent Disks (RAID) technology allows a computer to use two or morehard disks at the same time. RAID treats multiple drives as one contiguous drive, either throughhardware or software settings. If multiple disks are set up to work together in this fashion, they arereferred to as a RAID array.
For additional information about RAID, refer to the HP Web site at http://www.hp.com/support.
Using RAID (select models only) 51
7 Security
Protecting the computerStandard security features provided by the Windows® operating system and the non-Windows SetupUtility can protect your personal settings and data from a variety of risks.
NOTE: Security solutions are designed to act as deterrents, but they may not deter software attacksor prevent the computer from being mishandled or stolen.
NOTE: Before you send your computer for service, back up and delete confidential files, andremove all password settings.
NOTE: Some features listed in this chapter may not be available on your computer.
Computer risk Security feature
Unauthorized use of the computer ● QuickLock (select models only)
● Power-on password
● Fingerprint reader
Computer viruses Antivirus software
Unauthorized access to data ● Firewall software
● Windows updates
● File encryption
Unauthorized access to Setup Utility, BIOS settings, andother system identification information
Administrator password
Ongoing or future threats to the computer Critical security updates from Microsoft
Unauthorized access to a Windows user account User password
Unauthorized removal of the computer Security cable slot (used with an optional security cable)
Using passwordsA password is a group of characters that you choose to secure your computer information. Severaltypes of passwords can be set, depending on how you want to control access to your information.Passwords can be set in Windows or in the non-Windows Setup Utility that is preinstalled on thecomputer.
52 Chapter 7 Security
NOTE: To reduce the risk of being locked out of the computer, record each password and store it ina secure place.
You can use the same password for a Setup Utility feature and for a Windows security feature. Youcan also use the same password for more than one Setup Utility feature.
For additional information about Windows passwords, such as screen-saver passwords, select Start> Help and Support.
Setting passwords in Windows
Password Function
Administrator password Protects administrator-level access to computer contents.
NOTE: This password cannot be used to access SetupUtility contents.
User password Protects access to a Windows user account. It also protectsaccess to the computer contents and must be entered whenyou exit Sleep or Hibernation.
QuickLock (select models only) Protects your information by displaying the operating systemLog On window. While the Log On window is displayed, thecomputer cannot be accessed until a Windows userpassword or a Windows administrator password is entered.After you set a user or administrator password, follow thesesteps:
1. Initiate QuickLock.
2. Exit QuickLock by entering your Windows user oradministrator password.
Setting passwords in Setup Utility
Password Function
Administrator password* ● Protects access to Setup Utility.
● After this password is set, it must be entered each timeyou access Setup Utility.
CAUTION: If you forget your administrator password, youcannot access Setup Utility.
NOTE: The administrator password can be used in place ofthe power-on password.
NOTE: Your administrator password is not interchangeablewith an administrator password set in Windows, nor is itdisplayed as it is set, entered, changed, or deleted.
NOTE: If you enter the power-on password at the firstpassword check before the “Press the ESC key for StartupMenu” message is displayed, you must enter theadministrator password to access Setup Utility.
Using passwords 53

Password Function
Power-on password* ● Protects access to the computer contents.
● After this password is set, it must be entered each timeyou turn on or restart the computer, or exit Hibernation.
CAUTION: If you forget your power-on password, youcannot turn on or restart the computer, or exit Hibernation.
NOTE: The administrator password can be used in place ofthe power-on password.
NOTE: A power-on password is not displayed as it is set,entered, changed, or deleted.
*For details about each of these passwords, refer to the following topics.
Managing an administrator passwordTo set, change, or delete this password, follow these steps:
1. Open Setup Utility by turning on or restarting the computer. While the “Press the ESC key forStartup Menu” message is displayed in the lower-left corner of the screen, press esc. When theStartup Menu is displayed, press f10.
2. Use the arrow keys to select Security > Set Administrator Password, and then press enter.
● To set an administrator password, type your password in the Enter New Password andConfirm New Password fields, and then press enter.
● To change an administrator password, type your current password in the Enter CurrentPassword field, type a new password in the Enter New Password and Confirm NewPassword fields, and then press enter.
● To delete an administrator password, type your current password in the Enter Passwordfield, and then press enter 4 times.
3. To save your changes and exit Setup Utility, use the arrow keys to select Exit > Exit SavingChanges.
Your changes take effect when the computer restarts.
Entering an administrator passwordAt the Enter Password prompt, type your administrator password, and then press enter. After 3unsuccessful attempts to enter the administrator password, you must restart the computer and tryagain.
54 Chapter 7 Security

Managing a power-on passwordTo set, change, or delete this password, follow these steps:
1. Open Setup Utility by turning on or restarting the computer. While the “Press the ESC key forStartup Menu” message is displayed in the lower-left corner of the screen, press esc. When theStartup Menu is displayed, press f10.
2. Use the arrow keys to select Security > Set Power-On Password, and then press enter.
● To set a power-on password, type your password in the Enter New Password andConfirm New Password fields, and then press enter.
● To change a power-on password, type your current password in the Enter CurrentPassword field, type a new password in the Enter New Password and Confirm NewPassword fields, and then press enter.
● To delete a power-on password, type your current password in the Enter CurrentPassword field, and then press enter 4 times.
3. To save your changes and exit Setup Utility, use the arrow keys to select Exit > Exit SavingChanges.
Your changes take effect when the computer restarts.
Entering a power-on passwordAt the Enter Password prompt, type your password, and then press enter. After 3 unsuccessfulattempts to enter the password, you must restart the computer and try again.
Using antivirus softwareWhen you use the computer to access e-mail, a network, or the Internet, you potentially expose it tocomputer viruses. Computer viruses can disable the operating system, programs, or utilities, or causethem to function abnormally.
Antivirus software can detect most viruses, destroy them, and, in most cases, repair any damage theyhave caused. To provide ongoing protection against newly discovered viruses, antivirus softwaremust be kept up to date.
An antivirus program may be preinstalled on your computer and may include a trial offer. It is stronglyrecommended that you upgrade the trial offer or purchase the antivirus program of your choice inorder to fully protect your computer.
For more information about computer viruses, type viruses in the Search box in Help and Support.
Using firewall softwareFirewalls are designed to prevent unauthorized access to a system or network. A firewall can be asoftware program you install on your computer and/or network, or it can be a solution made up ofboth hardware and software.
Using antivirus software 55

There are two types of firewalls to consider:
● Host-based firewalls—Software that protects only the computer it is installed on.
● Network-based firewalls—Installed between your DSL or cable modem and your home networkto protect all the computers on the network.
When a firewall is installed on a system, all data sent to and from the system is monitored andcompared with a set of user-defined security criteria. Any data that does not meet those criteria isblocked.
Your computer or networking equipment may already have a firewall installed. If not, firewall softwaresolutions are available.
NOTE: Under some circumstances a firewall can block access to Internet games, interfere withprinter or file sharing on a network, or block authorized e-mail attachments. To temporarily resolve theproblem, disable the firewall, perform the task that you want to perform, and then reenable thefirewall. To permanently resolve the problem, reconfigure the firewall.
Installing critical security updatesCAUTION: Microsoft sends out alerts regarding critical updates. To protect the computer fromsecurity breaches and computer viruses, install all critical updates from Microsoft as soon as youreceive an alert.
Updates to the operating system and other software may have become available after the computerleft the factory. To be sure that all available updates are installed on the computer, observe theseguidelines:
● Run Windows Update as soon as possible after you set up your computer. Use the update linkat Start > All Programs > Windows Update.
● Run Windows Update monthly thereafter.
● Obtain updates to Windows and other Microsoft® programs, as they are released, from theMicrosoft Web site and through the updates link in Help and Support.
Installing an optional security cableNOTE: A security cable is designed to act as a deterrent, but it may not prevent the computer frombeing mishandled or stolen.
NOTE: The security cable slot on your computer may look slightly different from the illustration inthis section. Refer to the Getting Started guide for the location of the security cable slot on yourcomputer.
1. Loop the security cable around a secured object.
2. Insert the key (1) into the cable lock (2).
56 Chapter 7 Security
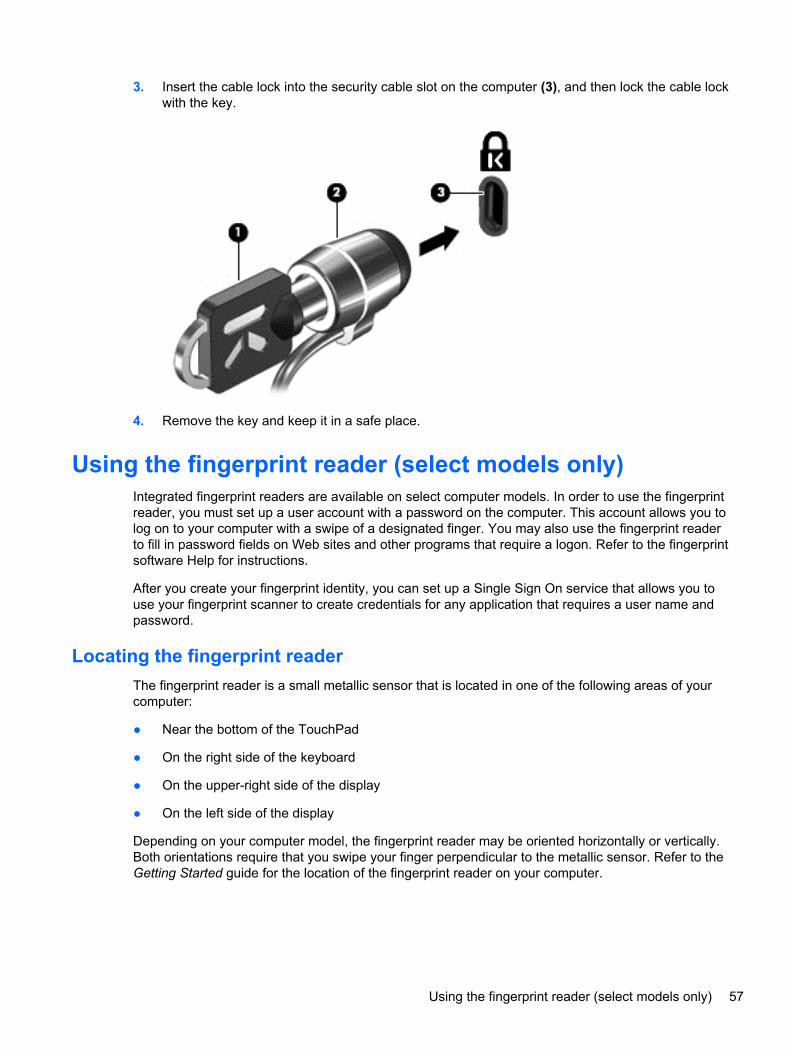
3. Insert the cable lock into the security cable slot on the computer (3), and then lock the cable lockwith the key.
4. Remove the key and keep it in a safe place.
Using the fingerprint reader (select models only)Integrated fingerprint readers are available on select computer models. In order to use the fingerprintreader, you must set up a user account with a password on the computer. This account allows you tolog on to your computer with a swipe of a designated finger. You may also use the fingerprint readerto fill in password fields on Web sites and other programs that require a logon. Refer to the fingerprintsoftware Help for instructions.
After you create your fingerprint identity, you can set up a Single Sign On service that allows you touse your fingerprint scanner to create credentials for any application that requires a user name andpassword.
Locating the fingerprint readerThe fingerprint reader is a small metallic sensor that is located in one of the following areas of yourcomputer:
● Near the bottom of the TouchPad
● On the right side of the keyboard
● On the upper-right side of the display
● On the left side of the display
Depending on your computer model, the fingerprint reader may be oriented horizontally or vertically.Both orientations require that you swipe your finger perpendicular to the metallic sensor. Refer to theGetting Started guide for the location of the fingerprint reader on your computer.
Using the fingerprint reader (select models only) 57

8 Maintenance
Cleaning your computerCleaning the display
CAUTION: To prevent permanent damage to the computer, never spray water, cleaning fluids, orchemicals on the display.
To remove smudges and lint, frequently clean the display with a soft damp, lint-free cloth. If thescreen requires additional cleaning, use premoistened antistatic wipes or an antistatic screen cleaner.
Cleaning the TouchPad and keyboardDirt and grease on the TouchPad can cause the pointer to jump around on the screen. To avoid this,clean the TouchPad with a damp cloth, and wash your hands frequently when using the computer.
WARNING! To reduce the risk of electric shock or damage to internal components, do not use avacuum cleaner attachment to clean the keyboard. A vacuum cleaner can deposit household debrison the keyboard surface.
Clean the keyboard regularly to prevent keys from sticking, and to remove dust, lint, and particles thatcan become trapped beneath the keys. A can of compressed air with a straw extension can be usedto blow air around and under the keys to loosen and remove debris.
Updating programs and driversHP recommends that you update your programs and drivers on a regular basis with the latestversions. Go to http://www.hp.com/support to download the latest versions. You can also register toreceive automatic update notifications when they become available.
58 Chapter 8 Maintenance
Using SoftPaq Download ManagerHP SoftPaq Download Manager (SDM) is a tool that provides quick access to SoftPaq information forHP business computers without requiring the SoftPaq number. Using this tool, you can easily searchfor SoftPaqs, and then download and unpack them.
SoftPaq Download Manager works by reading and downloading, from the HP FTP site, a publisheddatabase file containing computer model and SoftPaq information. SoftPaq Download Managerallows you to specify one or more computer models to determine which SoftPaqs are available fordownload.
SoftPaq Download Manager checks the HP FTP site for updates to the database and software. Ifupdates are found, they are downloaded and applied automatically.
SoftPaq Download Manager is available on the HP Web site. To use SoftPaq Download Manager todownload SoftPaqs, you must first download and install the program. Go to the HP Web site athttp://www.hp.com/go/sdm, and follow the instructions to download and install SoftPaq DownloadManager.
To download SoftPaqs:
1. Select Start > All Programs > HP Software Setup > HP SoftPaq Download Manager.
2. When SoftPaq Download Manager opens for the first time, a window is displayed asking if youwant to show only software for the computer you are using or to show the software for allsupported models. Select Show software for all supported models. If you have used HPSoftPaq Download Manager previously, go to Step 3.
a. Select your operating system and language filters in the Configuration Options window. Thefilters limit the number of options that are listed in the Product Catalog pane. For example, ifonly Windows 7 Professional is selected in the operating system filter, the only operatingsystem that is displayed in the Product Catalog is Windows 7 Professional.
b. To add other operating systems, change the filter settings in the Configuration Optionswindow. Refer to the HP SoftPaq Download Manager software Help for more information.
3. In the left pane, click the plus sign (+) to expand the model list, and then select the model ormodels of the products you want to update.
4. Click Find Available SoftPaqs to download a list of available SoftPaqs for the selectedcomputer.
5. Select from the list of available SoftPaqs, and then click Download Only if you have manySoftPaqs to download, because the SoftPaq selection and Internet connection speed determinehow long the download process will take.
If you want to download only one or two SoftPaqs and have a high-speed Internet connection,click Download & Unpack.
6. Right-click Install SoftPaq in the SoftPaq Download Manager software to install the selectedSoftPaqs on the computer.
Using SoftPaq Download Manager 59

9 Setup Utility (BIOS) and SystemDiagnostics
Using Setup UtilitySetup Utility, or Basic Input/Output System (BIOS), controls communication between all the input andoutput devices on the system (such as disk drives, display, keyboard, mouse, and printer). SetupUtility includes settings for the types of peripherals installed, the startup sequence of the computer,and the amount of system and extended memory.
NOTE: Use extreme care when making changes in Setup Utility. Errors can prevent the computerfrom operating properly.
Starting Setup UtilityNOTE: An external keyboard or mouse connected to a USB port can be used with Setup Utility onlyif USB legacy support is enabled.
To start Setup Utility, follow these steps:
1. Turn on or restart the computer, and then press esc while the “Press the ESC key for StartupMenu” message is displayed at the bottom of the screen.
2. Press f10 to enter Setup Utility.
Changing the language of Setup Utility1. Start Setup Utility.
2. Use the arrow keys to select System Configuration > Language, and then press enter.
3. Use the arrow keys to select a language, and then press enter.
4. When a confirmation prompt with your language selected is displayed, press enter.
5. To save your change and exit Setup Utility, use the arrow keys to select Exit > Exit SavingChanges, and then press enter.
Your change takes effect immediately.
60 Chapter 9 Setup Utility (BIOS) and System Diagnostics
Navigating and selecting in Setup UtilityTo navigate and select in Setup Utility, follow these steps:
1. Turn on or restart the computer, and then press esc while the “Press the ESC key for StartupMenu” message is displayed at the bottom of the screen.
● To select a menu or a menu item, use the tab key and the keyboard arrow keys and thenpress enter, or use a pointing device to click the item.
● To scroll up and down, click the up arrow or the down arrow in the upper-right corner of thescreen, or use the up arrow key or the down arrow key.
● To close open dialog boxes and return to the main Setup Utility screen, press esc, and thenfollow the on-screen instructions.
NOTE: You can use either a pointing device (TouchPad, pointing stick, or USB mouse) or thekeyboard to navigate and make selections in Setup Utility.
2. Press f10 to enter Setup Utility.
To exit Setup Utility menus, choose one of the following methods:
● To exit Setup Utility menus without saving your changes, click the Exit icon in the lower-leftcorner of the screen, and then follow the on-screen instructions.
– or –
Use the tab key and the arrow keys to select File > Ignore Changes and Exit, and then pressenter.
– or –
● To save your changes and exit Setup Utility menus, click the Save icon in the lower-left corner ofthe screen, and then follow the on-screen instructions.
– or –
Use the tab key and the arrow keys to select File > Save Changes and Exit, and then pressenter.
Your changes go into effect when the computer restarts.
Displaying system information1. Start Setup Utility.
2. Select the Main menu. System information such as the system time and date, and identificationinformation about the computer is displayed.
3. To exit Setup Utility without changing any settings, use the arrow keys to select Exit > ExitDiscarding Changes, and then press enter.
Using Setup Utility 61
Restoring factory settings in Setup UtilityNOTE: Restoring defaults will not change the hard drive mode.
To return all settings in Setup Utility to the values that were set at the factory, follow these steps:
1. Turn on or restart the computer, and then press esc while the “Press the ESC key for StartupMenu” message is displayed at the bottom of the screen.
2. Press f10 to enter Setup Utility.
3. Use a pointing device or the arrow keys to select File > Restore Defaults.
4. Follow the on-screen instructions.
5. To save your changes and exit, click the Save icon in the lower-left corner of the screen, andthen follow the on-screen instructions.
– or –
Use the arrow keys to select File > Save Changes and Exit, and then press enter.
Your changes go into effect when the computer restarts.
NOTE: Your password settings and security settings are not changed when you restore the factorysettings.
Exiting Setup Utility● To exit Setup Utility and save your changes from the current session:
If the Setup Utility menus are not visible, press esc to return to the menu display. Then use thearrow keys to select Exit > Exit Saving Changes, and then press enter.
● To exit Setup Utility without saving your changes from the current session:
If the Setup Utility menus are not visible, press esc to return to the menu display. Then use thearrow keys to select Exit > Exit Discarding Changes, and then press enter.
Updating the BIOSUpdated versions of the BIOS may be available on the HP Web site.
Most BIOS updates on the HP Web site are packaged in compressed files called SoftPaqs.
Some download packages contain a file named Readme.txt, which contains information regardinginstalling and troubleshooting the file.
Determining the BIOS versionTo determine whether available BIOS updates contain later BIOS versions than those currentlyinstalled on the computer, you need to know the version of the system BIOS currently installed.
62 Chapter 9 Setup Utility (BIOS) and System Diagnostics
BIOS version information (also known as ROM date and System BIOS) can be displayed by pressingfn+esc (if you are already in Windows) or by using Setup Utility.
1. Start Setup Utility.
2. Use a pointing device or the arrow keys to select File > System Information.
3. To exit Setup Utility without saving your changes, click the Exit icon in the lower-left corner ofthe screen, and then follow the on-screen instructions.
– or –
Use the tab key and the arrow keys to select File > Ignore Changes and Exit, and then pressenter.
Downloading a BIOS updateCAUTION: To reduce the risk of damage to the computer or an unsuccessful installation, downloadand install a BIOS update only when the computer is connected to reliable external power using theAC adapter. Do not download or install a BIOS update while the computer is running on batterypower, docked in an optional docking device, or connected to an optional power source. During thedownload and installation, follow these instructions:
Do not disconnect power from the computer by unplugging the power cord from the AC outlet.
Do not shut down the computer or initiate Sleep or Hibernation.
Do not insert, remove, connect, or disconnect any device, cable, or cord.
1. Windows 7—Select Start > Help and Support > Maintain.
Windows XP—Select Start > Help and Support, and then select the software and driversupdate.
2. Follow the on-screen instructions to identify your computer and access the BIOS update youwant to download.
3. At the download area, follow these steps:
a. Identify the BIOS update that is later than the BIOS version currently installed on yourcomputer. Make a note of the date, name, or other identifier. You may need this informationto locate the update later, after it has been downloaded to your hard drive.
b. Follow the on-screen instructions to download your selection to the hard drive.
Make a note of the path to the location on your hard drive where the BIOS update isdownloaded. You will need to access this path when you are ready to install the update.
NOTE: If you connect your computer to a network, consult the network administrator beforeinstalling any software updates, especially system BIOS updates.
BIOS installation procedures vary. Follow any instructions that are displayed on the screen after thedownload is complete. If no instructions are displayed, follow these steps:
1. Windows 7—Open Windows Explorer by selecting Start > Computer.
Windows XP—Open Windows Explorer by selecting Start > My Computer.
2. Double-click your hard drive designation. The hard drive designation is typically Local Disk (C:).
Using Setup Utility 63
3. Using the hard drive path you recorded earlier, open the folder on your hard drive that containsthe update.
4. Double-click the file that has an .exe extension (for example, filename.exe).
The BIOS installation begins.
5. Complete the installation by following the on-screen instructions.
NOTE: After a message on the screen reports a successful installation, you can delete thedownloaded file from your hard drive.
Using System DiagnosticsSystem Diagnostics allows you to run diagnostic tests to determine if the computer hardware isfunctioning properly. The following diagnostic tests are available in System Diagnostics:
● Start-up test—This test analyzes the main computer components that are required to start thecomputer.
● Run-in test—This test repeats the start-up test and checks for intermittent problems that thestart-up test does not detect.
● Hard disk test—This test analyzes the physical condition of the hard drive, and then checks alldata in every sector of the hard drive. If the test detects a damaged sector, it attempts to movethe data to a good sector.
● Memory test—This test analyzes the physical condition of the memory modules. If it reports anerror, replace the memory modules immediately.
● Battery test—This test analyzes the condition of the battery. If the battery fails the test, contactHP support to report the issue and purchase a replacement battery.
You can also view system information and error logs in the System Diagnostics window.
To start System Diagnostics:
1. Turn on or restart the computer. While the “Press the ESC key for Startup Menu” message isdisplayed in the lower-left corner of the screen, press esc. When the Startup Menu is displayed,press f2.
2. Click the diagnostic test you want to run, and then follow the on-screen instructions.
NOTE: If you need to stop a diagnostics test while it is running, press esc.
64 Chapter 9 Setup Utility (BIOS) and System Diagnostics

A Traveling with the computer
For best results, follow these traveling and shipping tips:
● Prepare the computer for traveling or shipping:
◦ Back up your information.
◦ Remove all discs and all external media cards, such as digital cards.
CAUTION: To reduce the risk of damage to the computer, damage to a drive, or loss ofinformation, remove the media from a drive before removing the drive from a drive bay andbefore shipping, storing, or traveling with a drive.
◦ Turn off and then disconnect all external devices.
◦ Shut down the computer.
● Take along a backup of your information. Keep the backup separate from the computer.
● When traveling by air, carry the computer as hand luggage; do not check it in with the rest ofyour bags.
CAUTION: Avoid exposing a drive to magnetic fields. Security devices with magnetic fieldsinclude airport walk-through devices and security wands. Airport conveyer belts and similarsecurity devices that check carry-on baggage use X-rays instead of magnetism and do notdamage drives.
● In-flight computer use is at the discretion of the airline. If you plan to use the computer during aflight, check with the airline in advance.
● If the computer will be unused and disconnected from external power for more than 2 weeks,remove the battery and store it separately.
● If you are shipping the computer or a drive, use suitable protective packaging and label thepackage “FRAGILE.”
● If the computer has a wireless device or an HP Mobile Broadband Module installed, such as an802.11b/g device, a Global System for Mobile Communications (GSM) device, or a GeneralPacket Radio Service (GPRS) device, the use of these devices may be restricted in someenvironments. Such restrictions may apply onboard aircraft, in hospitals, near explosives, and in
65

hazardous locations. If you are uncertain of the policy that applies to the use of a particulardevice, ask for authorization to use it before you turn it on.
● If you are traveling internationally, follow these suggestions:
◦ Check the computer-related customs regulations for each country or region on youritinerary.
◦ Check the power cord and adapter requirements for each location in which you plan to usethe computer. Voltage, frequency, and plug configurations vary.
WARNING! To reduce the risk of electric shock, fire, or damage to the equipment, do notattempt to power the computer with a voltage converter kit sold for appliances.
66 Appendix A Traveling with the computer
B Troubleshooting resources
● Access Web site links and additional information about the computer through Help and Support.Select Start > Help and Support.
NOTE: Some checkup and repair tools require an Internet connection. HP also providesadditional tools that do not require an Internet connection.
● Contact HP Customer Support at http://www.hp.com/go/contactHP.
NOTE: For worldwide support, click Contact HP worldwide on the left side of the page, or goto http://welcome.hp.com/country/us/en/wwcontact_us.html.
Choose from the following types of support:
◦ Chat online with an HP technician.
NOTE: When chat is not available in a particular language, it is available in English.
◦ E-mail HP Customer Support.
◦ Find HP Customer Support worldwide telephone numbers.
◦ Locate an HP service center.
67

C Electrostatic Discharge
Electrostatic discharge is the release of static electricity when two objects come into contact—forexample, the shock you receive when you walk across the carpet and touch a metal door knob.
A discharge of static electricity from fingers or other electrostatic conductors may damage electroniccomponents. To prevent damage to the computer, damage to a drive, or loss of information, observethese precautions:
● If removal or installation instructions direct you to unplug the computer, unplug it after beingproperly grounded and before removing a cover.
● Keep components in their electrostatic-safe containers until you are ready to install them.
● Avoid touching pins, leads, and circuitry. Handle electronic components as little as possible.
● Use nonmagnetic tools.
● Before handling components, discharge static electricity by touching an unpainted metal surfaceof the component.
● If you remove a component, place it in an electrostatic-safe container.
If you need more information about static electricity or assistance with component removal orinstallation, contact Customer Support.
68 Appendix C Electrostatic Discharge

Index
Symbols/Numerics1394 cable, connecting 401394 devices
connecting 40defined 39removing 40
16-bit PC Cards 3232-bit PC Cards 32
AAC adapter, testing 30action keys
media 15volume 16
administrator passwordcreating 54entering 54managing 54
airport security devices 44antivirus software, using 55audio functions, checking 16
Bbattery
conserving power 27discharging 26displaying remaining charge
26disposing 28low battery levels 26replacing 28storing 28
Battery Check 26battery information, finding 25battery power 25battery temperature 28BIOS
determining version 62
downloading an update 63updating 62
Bluetooth device 2, 9buttons
media 15power 21volume 16wireless 3
Ccables
1394 40eSATA 41USB 39
CardBus PC Cards 32checking audio functions 16computer, traveling 28, 65configuring audio for HDMI 19configuring ExpressCards 35configuring PC Cards 33connecting to a wired network 9connecting to an existing wireless
network 5Connection Manager 4connector, docking 43conservation, power 27creating a wireless connection 2critical battery level 22, 27critical security updates,
installing 56
Ddigital card
inserting 31removing 32supported formats 31
Disk Cleanup software 45Disk Defragmenter software 45DisplayPort, connecting 18
docking connector 43drive light 46drive media 22drivers 33drives
external 42handling 44hard 42optical 42using 45
Eelectrostatic discharge 68entering a power-on password
55entering an administrator
password 54eSATA cable, connecting 41eSATA devices
connecting 41defined 40removing 41
existing wireless network,connecting to 5
expansion port 42ExpressCard
configuring 35defined 35inserting 36removing 37removing insert 36
external AC power, using 29external devices 42external drive 42external monitor port 17
Ffinding more information 1
Index 69

fingerprint readerlocating 57using 57
firewall software 7, 55
GGPS 9
Hhard drive
external 42HP ProtectSmart Hard Drive
Protection 46HDMI
configuring audio 19HDMI port, connecting 18Hibernation
exiting 23initiated during critical battery
level 27initiating 23
high-definition devices,connecting 18, 19
HP Connection Manager 4HP MediaSmart 20HP Mobile Broadband Module 7,
8HP ProtectSmart Hard Drive
Protection 46HP SkyRoom 17HP USB Ethernet Adapter,
connecting 13HP Wireless Assistant 4hubs 38
Iicons
network 2wireless 2
installingcritical security updates 56optional security cable 56
Intel Wireless Display 19Internet connection setup 6
JJava Card
defined 37inserting 38removing 38
Kkeys
media 15volume 16
Llegacy support, USB 60lights, drive 46local area network (LAN)
cable required 13connecting cable 13
low battery level 26
Mmaintenance
Disk Cleanup 45Disk Defragmenter 45
managing a power-on password55
managing an administratorpassword 54
media action keys 15media activity controls 15media hotkeys 15MediaSmart 20modems
connecting a modem cable 10connecting a modem cable
adapter 10selecting a location setting 11
Nnetwork cable, connecting 13network icon 2
Ooperating system controls 5optical disc
inserting 48removing 49
optical drive 42optional external devices, using
42
Ppasswords
set in Setup Utility 53set in Windows 53
PC Cardsconfiguring 33description 32
inserting 33removing 34removing insert 33software and drivers 33supported types 32
portsDisplayPort 18expansion 42external monitor 17HDMI 18Intel Wireless Display 19VGA 17
powerbattery 25conserving 27options 22
power button 21power meter 23power plans
customizing 24selecting 24viewing current 23
power switch 21power-on password
creating 55entering 55managing 55
power-saving states 22protecting the computer 52protecting your wireless network
7
QQuickLock 52, 53
RRAID 51readable media 22roaming to another network 7
Ssecurity cable, installing 56security, wireless 7setting password protection on
wakeup 24setting power options 22setup of WLAN 6Setup Utility
changing the language 60displaying system information
61
70 Index

exiting 62navigating and selecting 61passwords set in 53restoring factory settings 62
setup utilitynavigating and selecting 61restoring factory settings 62
sharing optical drives 51shutdown 21SIM
inserting 8removing 8
SkyRoom 17Sleep
exiting 22initiating 22
slot-load optical drive 48smart card
defined 37inserting 38removing 38
SoftPaqs, downloading 59software
Disk Cleanup 45Disk Defragmenter 45HP Connection Manager 4HP MediaSmart 20HP ProtectSmart Hard Drive
Protection 47HP SkyRoom 17HP Wireless Assistant 4
Standby 21storing a battery 28switch, power 21system information, displaying 61
Ttemperature 28testing an AC adapter 30traveling with the computer 28,
65tray-load optical drive 48troubleshooting resources 67turning off the computer 21turning wireless devices on or off
3
Uunresponsive system 21USB cable, connecting 39
USB devicesconnecting 38description 38removing 39
USB hubs 38USB legacy support 60using a modem 9using external AC power 29using passwords 52using power plans 23using power-saving states 22using the power meter 23
VVGA port, connecting 17video 17volume
adjusting 16buttons 16keys 16
Wwebcam 17Windows, passwords set in 53wireless
action key 3button 3icons 2protecting 7set up 6switch 3
Wireless Assistant software 4wireless connection, creating 2wireless devices, turning on or
off 3wireless encryption 7wireless network (WLAN)
connecting to existing 5equipment needed 6security 7
writable media 22WWAN device 7
Zzoomed video PC Cards 32
Index 71
