hp officejet 7500a (e910) all-in-one series user guidewelcome.hp-ww.com/ctg/manual/c02497735.pdf ·...
TRANSCRIPT

Getting Started Guide
OFFICEJET 7500A
E910

2
Copyright Information© 2010 Copyright Hewlett-Packard Development Company, L.P.Edition 1, 3/2010Reproduction, adaptation or translation without prior written permission is prohibited, except as allowed under the copyright laws.The information contained herein is subject to change without notice.The only warranties for HP products and services are set forth in the express warranty statements accompanying such products and services. Nothing herein should be construed as constituting an additional warranty. HP shall not be liable for technical or editorial errors or omissions contained herein.Trademark creditsMicrosoft® and Windows® are U.S. registered trademarks of Microsoft Corporation.

Contents 1
Engl
ish
Contents
Use the printer ........................................................................................................ 2HP Digital Solutions ............................................................................................ 3Internet features ................................................................................................. 4
Set up and use fax .................................................................................................. 6Set up fax ......................................................................................................... 6Use fax ............................................................................................................12Fax and digital phone services ...........................................................................17
Set up wireless (802.11) communication (some models only) .........................................18Solve setup problems ..............................................................................................22
Problems setting up the printer ............................................................................22Problems installing the software ..........................................................................22Problems setting up fax ......................................................................................23Wireless (802.11) setup problems ........................................................................26
Use the Embedded Web server (EWS) ......................................................................28Hewlett-Packard limited warranty statement ................................................................29
Safety InformationAlways follow basic safety precautions when using this printer to reduce risk of injury from fire or electric shock.1. Read and understand all instructions in the
documentation that comes with the printer.2. Observe all warnings and instructions
marked on the printer.3. Unplug this printer from wall outlets before
cleaning.4. Do not install or use this printer near water,
or when you are wet.5. Install the printer securely on a stable
surface.6. Install the printer in a protected location
where no one can step on or trip over the line cord, and the line cord cannot be damaged.
7. If the printer does not operate normally, see the user guide (which is available on your computer after you install the software).
8. There are no user-serviceable parts inside. Refer servicing to qualified service personnel.
9. Use only the external power adapter provided with the printer.
Note: Ink from the cartridges is used in the printing process in a number of different ways, including in the initialization process, which prepares the printer and cartridges for printing, and in printhead servicing, which keeps print nozzles clear and ink flowing smoothly. In addition, some residual ink is left in the cartridge after it is used. For more information see www.hp.com/go/inkusage.

Use the printer2
Where’s the user guide?The user guide for this printer (also called “Help”) is not provided in printed format. Instead, it is placed on your computer while the installation program is installing the HP software.
This guide provides information on the following topics:
• Troubleshooting information
• Important safety notices and regulatory information
• Information about supported printing supplies
• Detailed user instructions
You can open this guide either from the HP print software (Windows) or from the Help menu (Mac OS X):
• Windows: Click Start, select Programs or All Programs, select HP, select the folder for your HP printer, and then select Help.
• Mac OS X: From the Finder, click Help > Mac Help. In the Help Viewer window, choose your printer from the Mac Help pop-up menu.
Also, an Adobe Acrobat version of this guide is available on HP’s support Web site (www.hp.com/support).
1. Use the printerThank you for purchasing this printer. With this printer, you can print documents and photos, scan documents to a connected computer, make copies, and send and receive faxes.
To scan, copy, and send faxes, you can use the printer’s control panel. You can also use the control panel to change settings, print reports, or get help for the printer.
Tip: If the printer is connected to a computer, you can also change the printer settings using software tools available on your computer, such as the printer software or the embedded Web server (EWS). For more information about these tools, see the user guide (which is available on your computer after you install the software).

Use the printer 3
Engl
ish
Engl
ish
Scan to ComputerUsing the printer, you can simply walk up to the printer, touch a button on the printer’s control panel, and either scan documents directly to a computer or quickly share them with business partners as e-mail attachments.
Note: If you are using a computer running Microsoft® Windows® and if your computer does not appear in the list of destinations on the printer’s control-panel display, you will need
HP Digital Fax (Fax to PC and Fax to Mac)Never lose important faxes misplaced within a stack of paper pages again!
Use Fax to PC and Fax to Mac to automatically receive faxes and save faxes directly to your computer. With Fax to PC and Fax to Mac, you can store digital copies of your faxes easily and also eliminate the hassle of dealing with bulky paper files.
HP Digital Solutions
The printer includes a collection of digital solutions that can help you simplify and streamline your work.
to restart your HP software’s scan function on the destination computer. To restart the scan function, click the Start on your computer desktop, select Programs or All Programs, select HP, select the folder for your HP printer, and then select your HP printer. In the window that appears, click the Activate Scan to Computer option.
In addition, you can turn off fax printing altogether — saving money on paper and ink, as well as helping reduce paper consumption and waste.
Learn more!For more information about setting up and using these digital solutions, see the user guide. (The user guide is available on your computer after you install the software.)

Use the printer4
Internet features
The printer offers innovative, Web-enabled solutions that can help you quickly access the Internet, obtain documents, and print them faster and with less hassle—and all without using a computer. In addition, you can use a Web service (Marketsplash by HP) to create and print professional-quality marketing materials.
Note: To use these Web features, the printer must be connected to the Internet (either using an Ethernet cable or wireless connection). You cannot use these Web features if the printer is connected using a USB cable.
Note: In addition to these solutions, you can send print jobs to the printer remotely from mobile devices. With this service, called HP ePrint, you can print from e-mail connected mobile phones, netbooks, or other mobile devices—anywhere, anytime.
HP Apps
HP Apps provide a quick and easy way to access, store, and print business information without a computer. Using HP Apps, you can gain access to content stored on the Web, such as business forms, news, archiving, and more—right from the printer’s control-panel display.
To use HP Apps, the printer needs to be connected to the Internet (either using an Ethernet cable or wireless connection). Follow the instructions on the printer’s control panel to enable and set up this service.
New Apps are periodically added and you can select and download to the printer’s control panel for use. For more information, visit www.hp.com/go/ePrintCenter.
Note: For a list of system requirements for this Web site, see the user guide (which is available on your computer after you install the software).

Use the printer 5
Engl
ish
Marketsplash by HP
Grow your business using online HP tools and services to create and print professional marketing materials. With Marketsplash, you can do the following:
• Quickly and easily create amazing, professional-quality brochures, flyers, business cards, and more. Choose from thousands of customizable templates created by award-winning business graphic designers.
• A variety of print options allow you to get exactly what you need, when you need it. For immediate, high-quality results, print on your printer. Other options are available online from HP and our partners. Achieve the professional quality you expect, while minimizing printing costs.
HP ePrint
With HP ePrint, you can print from e-mail connected mobile phones, netbooks, or other mobile devices—anywhere, anytime. Using your mobile device service and the printer’s Web Services, you can print documents to a printer that could be sitting next to you or sitting thousands of miles away.
• Keep all of your marketing materials organized and readily accessible in your Marketsplash account, available from any computer and directly from the printer’s control-panel display (on select models only).
To get started, select Marketsplash by HP in the HP printer software that came with your printer. Or for more information, visit marketsplash.com.
Note: For a list of system requirements for this Web site, see HP Web site specifications, in the user guide (which is available on your computer after you install the software).
Note: Not all Marketsplash tools and services are available in all countries, regions and languages. Visit marketsplash.com for the most current information.
To use the HP ePrint service, you need to have the following components:
• An HP ePrint-enabled printer that is connected to the Internet (either using an Ethernet cable or wireless connection)
• A device that has a functioning e-mail capability
Follow the instructions on the printer’s control panel to enable and set up the printer’s Web Services. For more information, see www.hp.com/go/ePrintCenter

Set up and use fax6
Finding fax setup information
If you are in one of the following countries/regions, visit the appropriate Web site for information about setting up fax.
AustriaBelgium Dutch FrenchDenmarkFinlandFranceGermanyIrelandItalyNorwayNetherlandsPortugalSpainSwedenSwitzerland French GermanUnited Kingdom
www.hp.com/at/faxconfig
www.hp.be/nl/faxconfigwww.hp.be/fr/faxconfigwww.hp.dk/faxconfigwww.hp.fi/faxconfigwww.hp.com/fr/faxconfigwww.hp.com/de/faxconfigwww.hp.com/ie/faxconfigwww.hp.com/it/faxconfigwww.hp.no/faxconfigwww.hp.nl/faxconfigwww.hp.pt/faxconfigwww.hp.es/faxconfigwww.hp.se/faxconfig
www.hp.com/ch/fr/faxconfigwww.hp.com/ch/de/faxconfigwww.hp.com/uk/faxconfig
2. Set up and use fax This printer allows you to send and receive black-and-white and color faxes.
Set up faxBefore using the fax feature, follow these steps to connect your printer successfully.
Tip: You can use the Fax Setup Wizard (Windows) or HP Utility (Mac OS X) to set up the fax.
For more information about fax features available with the printer, see the user guide (which is available on your computer after you install the software).
IMPORTANT: Check the “Finding fax setup information” box for your country/region. If your country/region is included in the list, visit the Web site for setup information. If your country/region is not listed, follow the instructions provided in this guide.

Set up and use fax 7
Engl
ish
Step 1: Connect the printer to the phone line
Before you begin…Before beginning, be sure you have done the following:
• Installed ink cartridges
• Loaded A4- or Letter-size paper in the tray
• Have the telephone cord and adapter (if provided with the printer) ready.
For more information, see the setup poster included in the box with the printer.
To connect the printer and any other telephone equipment or devices, complete the following steps:
1. Using the phone cord provided in the box with the printer, connect one end to your telephone wall jack, then connect the other end to the port labeled 1-LINE on the back of the printer.
Note: You might need to connect the provided phone cord to the adapter provided for your country/region.
Note: If the phone cord that came with the printer is not long enough, you can use a coupler to extend the length. You can purchase a coupler at an electronics store that carries phone accessories. You also need another phone cord, which can be a standard phone cord that you might already have in your home or office. For more information, see the user guide (which is available on your computer after you install the software).
CAUTION: If you use a phone cord other than the one provided with the printer, you might not be able to fax successfully. Because phone cords that you might be using in your home or office can be different from the one provided with the printer, HP recommends that you use the phone cord that is provided with the printer.
2. Connect any other telephone equipment. For more information about connecting and setting up additional devices or services with the printer, see the boxes in this section or see the user guide.
Note: If you encounter problems setting up the printer with other equipment or services, contact the company that provided the equipment or service.
1
2
1 Telephone wall jack2 1-LINE port on printer

Set up and use fax8
Connecting to a DSL/ADSL lineIf you subscribe to a DSL/ADSL service, follow these steps to connect the fax.
1
32
1. Connect the DSL/ADSL filter and telephone cord provided by your DSL/ADSL service provider between the telephone wall jack and the DSL/ADSL filter.
2. Connect the telephone cord provided with the printer between the DSL/ADSL filter and the 1-Line port on the printer.
1 Telephone wall jack2 DSL/ADSL filter and telephone cord (provided by your DSL/ADSL service provider)3 Telephone cord provided in the box with the printer, connected to the 1-LINE port on the printer
What is a distinctive ring service?Many phone companies offer a distinctive ring feature that allows you to have several phone numbers on one phone line. When you subscribe to this service, each number is assigned a different ring pattern. You can set up the printer to answer incoming calls that have a specific ring pattern.
If you connect the printer to a line with distinctive ring, have your telephone company assign one ring pattern to voice calls and another ring pattern to fax calls. HP recommends that you request double or triple rings for a fax number. When the printer detects the specified ring pattern, it answers the call and receives the fax.
For information about setting up distinctive ring, see ”Step 3: Configure fax settings” on page 10.
Tip: If you subscribe to a voicemail service on the same phone line that you will use for faxing, you cannot receive faxes automatically. Because you must be available to respond in person to incoming fax calls, be sure to turn off the Auto Answer feature.
If you want to receive faxes automatically instead, contact your telephone company to subscribe to a distinctive ring service or to obtain a separate telephone line for faxing.
3. After you have connected the printer and any other telephone equipment, go to ”Step 2: Test fax setup” on page 9.

Set up and use fax 9
Engl
ish
Connecting additional equipmentRemove the white plug from the port labeled 2-EXT on the back of the printer, and then connect a phone to this port.
If you are connecting additional equipment, such as a dial-up computer modem or a telephone, you will need to purchase a parallel splitter. A parallel splitter has one RJ-11 port on the front and two RJ-11 ports on the back. Do not use a 2–line phone splitter, a serial splitter, or a parallel splitter which has two RJ-11 ports on the front and a plug on the back.
Note: If you subscribe to a DSL/ADSL service, connect to the DSL/ADSL filter to the parallel splitter, and then use the HP-provided telephone cord to connect the other end of the filter to the 1-Line port on the printer. Remove the white plug from the port labeled 2-EXT on the back of the printer, and then connect a telephone set or telephone answering machine to the 2-EXT port. Next, connect the second port of the parallel splitter to the DSL/ADSL modem which is connecting to the computer.
1
5
4
2
7
3
6
1 Telephone wall jack2 Parallel Splitter3 DSL/ADSL filter (available from your DSL/ADSL service
provider)4 Phone cord provided with printer5 DSL/ADSL Modem6 Computer7 Telephone
Step 2: Test fax setupTest your fax setup to check the status of the printer and make sure it is set up properly for faxing.
The fax test does the following:
• Tests the fax hardware
• Verifies the correct type of phone cord is connected to the printer
• Checks that the phone cord is plugged into the correct port
• Checks for a dial tone
• Checks for an active phone line
• Tests the status of your phone line connection
1. From the printer control panel, touch and then touch Setup.
2. Touch Tools, and then touch Run Fax Test. The printer displays the status of the test on the display and prints a report. After the test is finished, the printer prints a report with the results of the test. If the test fails, review the report for information on how to fix the problem and rerun the test. For additional troubleshooting information, see ”Problems setting up the printer” on page 22.
3. Once the fax test has run successfully, go to ”Step 3: Configure fax settings” on page 10.

Set up and use fax10
Step 3: Configure fax settingsChange the printer’s fax settings to meet your needs after you have connected the printer to a phone line.
Note: To use the same fax resolution and lighter/darker settings for all faxes sent from the printer, configure the settings as you wish, and then touch Set as New Defaults.
If you want to configure this setting… …do this:Auto AnswerSet the answer mode to On if you want the printer to automatically answer incoming calls and receive faxes. The printer will answer these incoming calls after the number of rings that has been specified in the Rings to Answer setting.
1. Touch right arrow and then touch Setup.
2. Touch Fax Setup, and then touch Basic Fax Setup.
3. Touch Auto Answer, and then touch ON.
Rings to Answer (Optional)Set the number of rings to answer
Note: The number of rings to answer for the printer should be greater than the number of rings to answer for the answering machine.
1. Touch right arrow and then touch Setup.
2. Touch Fax Setup, and then touch Basic Fax Setup.
3. Touch Rings to Answer.4. Touch up arrow or to change the
number of rings.5. Touch Done, to accept the setting.
Where can I change fax settings?
You can configure fax settings using the following tools:
Printer’s control panelTouch the Setup button on the printer’s control panel, touch Fax Settings, and then touch the setting you want to configure.
HP softwareIf you have installed the HP software on your computer, you can configure fax settings using the software that was installed on your computer.
For more information about using these tools or settings, see the user guide.

Set up and use fax 11
Engl
ish
If you want to configure this setting… …do this:Distinctive RingChange the answer ring pattern for distinctive ring
Note: If you are using a distinctive ring service, you can use more than one telephone number on the same telephone line. You can change this setting to enable the printer to determine automatically which ring pattern it should use for fax calls only.
Tip: You can also use the Ring Pattern Detection feature in the printer’s control panel to set distinctive ring. With this feature, the printer recognizes and records the ring pattern of an incoming call and, based on this call, automatically determines the distinctive ring pattern assigned by your telephone company to fax calls.
1. Touch right arrow and then touch Setup.
2. Touch Fax Setup, and then touch Advanced Fax Setup.
3. Touch Distinctive Ring.4. A message appears stating that this
setting should not be changed unless you have multiple phone numbers on the same telephone line. Touch Yes to continue.
5. Do one of the following:• Touch the ring pattern assigned by your telephone company to fax calls. Or • Touch Ring Pattern Detection, and then follow the instructions on the printer’s control panel.
Note: If you are using either a PBX phone system that has different ring patterns for internal and external calls, you must call the fax number from an external number.
Fax SpeedSet the fax speed used to communicate between the printer and other fax machines when sending and receiving faxes.
Note: If you experience problems sending and receiving faxes, try using a lower fax speed.
1. Touch right arrow and then touch Setup.
2. Touch Fax Setup, and then touch Advanced Fax Setup.
3. Touch down arrow , and then touch Fax Speed.
4. Touch to touch Fast, Medium, or Slow.Fax Error Correction ModeIf the printer detects an error signal during the transmission and the error-correction setting is turned on, the printer can request that a portion of the fax be resent.
Note: If you have problems sending and receiving faxes, turn off error correction. Also, turning off this setting might be useful when you are trying to send a fax to another country/region or receive a fax from another country/region or if you are using a satellite phone connection.
1. Touch right arrow and then touch Setup.
2. Touch Fax Setup, and then touch Advanced Fax Setup.
3. Touch down arrow , and then touch Error Correction Mode.
4. Select On or Off.

Set up and use fax12
Send a faxYou can send faxes in a variety of ways. Using the printer’s control panel, you can send black-and-white or color faxes. You can also send faxes manually from an attached phone, which allows you to speak with the recipient before sending the fax.
You can also send documents on your computer as faxes, without printing them first.
Use fax
In this section, you will learn how to send and receive faxes.
If you want to configure this setting… …do this:VolumeChange the volume of the printer sounds, including the fax tones.
1. Touch right arrow and then touch Setup.
2. Touch Fax Setup, and then touch Basic Fax Setup.
3. Touch down arrow , and then touch Fax Sound Volume.
4. Touch to touch Soft, Loud, or Off.
Learn more!See the user guide for more information about the following topics:
• Send a fax using monitor dialing
• Send a fax from a computer
• Send a fax from memory
• Schedule a fax to send later
• Send a fax to multiple recipients
• Send a fax in Error Correction Mode
The user guide is available on your computer after you install the software.

Set up and use fax 13
Engl
ish
Send a fax from an extension phone
1. Load the document you want to fax in the printer.
You can fax either from the automatic document feeder (ADF) or from the scanner glass.
2. Touch Fax.
3. Dial the number by using the keypad on the phone that is connected to the printer.
Note: Do not use the keypad on the control panel of the printer when manually sending a fax. You must use the keypad on your phone to dial the recipient’s number.
4. If the recipient answers the telephone, you can engage in a conversation before sending the fax. When you’re ready to send the fax.
Note: If a fax machine answers the call, you will hear fax tones from the receiving fax machine. Proceed to the next step to transmit the fax
5. When you are ready to send the fax, touch Start Black or Start Color.
Note: If prompted, select Send Fax.
If you were speaking with the recipient before sending the fax, inform the recipient that they should press Start on their fax machine after they hear fax tones. The telephone line is silent while the fax is transmitting. At this point, you can hang up the telephone. If you want to continue speaking with the recipient, remain on the line until the fax transmission is complete.
Send a standard fax
1. Load the document you want to fax in the printer.
You can fax either from the automatic document feeder (ADF) or from the scanner glass.
2. Touch Fax.
3. Enter the fax number by using the keypad.
Tip: To add a pause in the fax number you are entering, touch *@ repeatedly, until a dash (-) appears on the display.
4. Touch Start Black or Start Color.
Tip: If the recipient reports issues with the quality of the fax you sent, you can try changing the resolution or contrast or your fax.

Set up and use fax14
Learn more!See the user guide for more information about the following topics:
• Reprint received faxes from memory
• Poll to receive a fax
• Forward faxes to another number
• Set the paper size for received faxes
• Set automatic reduction for incoming faxes
• Block junk fax numbers
The user guide is available on your computer after you install the software.
Faxes and your voice mail service
If you subscribe to a voicemail service on the same phone line that you will use for faxing, you cannot receive faxes automatically. Instead, you must receive make sure the Auto Answer setting is turned off so that you can receive faxes manually. Be sure you initiate the manual fax before the voicemail picks up the line.
If you want to receive faxes automatically instead, contact your telephone company to subscribe to a distinctive ring service or to obtain a separate phone line for faxing.
Receive a fax automatically
If you turn on the Auto Answer option (the default setting) from the printer’s control panel, the printer automatically answers incoming calls and receives faxes after the number of rings specified by the Rings to Answer setting. For information about configuring this setting, see ”Step 3: Configure fax settings” on page 10.
Receive faxesYou can receive faxes automatically or manually.
Note: If you receive a legal-size or larger fax and the printer is not currently set to use legal-size paper, the printer reduces the fax so that it fits on the paper that is loaded. If you have disabled the Automatic Reduction feature, the printer prints the fax on two pages.
If you are copying a document when a fax arrives, the fax is stored in the printer’s memory until the copying finishes. As a result, the number of fax pages that can be stored in memory might be reduced.

Set up and use fax 15
Engl
ish
Reprint received faxes from memory
If you turn on the Backup fax Reception, received faxes are stored in memory, whether the printer has an error condition or not.
Note: All faxes stored in memory are deleted from memory when you turn off the power. For more information about using this feature, see the user guide (which is available on your computer after you install the software).
Receive a fax manually
When you are on the phone, the person you are speaking with can send you a fax while you are still connected (called “manual faxing”).
You can receive faxes manually from a phone that is connected to the printer (through the 2-EXT port) or a phone that is on the same phone line (but not directly connected to the printer).
1. Make sure the printer is turned on and you have paper loaded in the main tray.
2. Remove any originals from the document feeder tray.
3. Set the Rings to Answer setting to a high number to allow you to answer the incoming call before the printer answers. Or turn off the Auto Answer setting so that the printer does not automatically answer incoming calls.
4. If you are currently on the phone with the sender, instruct the sender to press Start on their fax machine.
5. When you hear fax tones from a sending fax machine, do the following:
a. Touch Fax, and then select Start Black or Start Color.
b. After the printer begins to receive the fax, you can hang up the phone or remain on the line. The phone line is silent during fax transmission.
1. Make sure you have paper loaded in the main tray.
2. Touch right arrow and then touch Setup.
3. Touch Tools, and then touch Reprint Faxes in Memory. The faxes are printed in the reverse order from which they were received with the most recently received fax printed first, and so on.
4. If you want to stop reprinting the faxes in memory, touch (Cancel).

Set up and use fax16
Working with reports and logsYou can print sevral different types of fax reports:
• Fax Confirmation page
• Fax Log
• Image on Fax Send Report
• Other reports
These reports provide useful system information about the printer.
Note: You can also view the call history on the printer’s control panel display. To view the call history, touch Fax, and then touch (Call History). However, this list cannot be printed.
To clear the fax log
Note: Clearing the fax log also deletes all faxes stored in memory.
1. Touch right arrow , and then touch Setup.
To print a report
1. Touch right arrow , and then touch Setup.
2. Touch Fax Setup, touch down arrow , and then touch Fax Reports.
2. Touch Tools.
3. Touch down arrow , and then touch Clear Fax Log.
3. Select the fax report you want to print, and then touch OK.

Set up and use fax 17
Engl
ish
Fax and digital phone services
Many telephone companies provide their customers with digital phone services, such as the following:
• DSL: A Digital subscriber line (DSL) service through your telephone company. (DSL might be called ADSL in your country/region.)
• PBX: A private branch exchange (PBX) phone system
• ISDN: An integrated services digital network (ISDN) system.
• FoIP: A low-cost phone service that allows you to send and receive faxes with your printer by using the Internet. This method is called Fax over Internet Protocol (FoIP). For more information, see the user guide.
HP printers are designed specifically for use with traditional analog phone services. If you are in a digital phone environment (such as DSL/ADSL, PBX, or ISDN), you might need to use digital-to-analog filters or converters when setting up the printer for faxing.
Note: HP does not guarantee that the printer will be compatible with all digital service lines or providers, in all digital environments, or with all digital-to-analog converters. It is always recommended that you discuss with the telephone company directly for the correct setup options based on their line services provided.

Set up wireless (802.11) communication (some models only)18
While you are installing the software, you will be prompted to enter the network name (also called an “SSID”) and a security passkey:
• The network name is the name of your wireless network.
• The security passkey prevents other people from connecting to your wireless network without your permission. Depending on the level of security required, your wireless network might use either a WPA key or WEP passphrase.
If you have not changed the network name or the security passkey since setting up your wireless network, you can sometimes find them on the back or side of the wireless router.
In addition, if you are using a computer running Windows, HP provides a web-based tool called the Wireless Network Assistant that can help retrieve this information for some systems. To use this tool, go to www.hp.com/go/networksetup. (This tool is currently available in English only.)
If you cannot find the network name or the security passkey or cannot remember this information, see the documentation available with your computer or with the wireless router. If you still cannot find this information, contact your network administrator or the person who set up the wireless network.
For more information about the network connections types, the network name, and the WEP key/WPA Passphrase, see the user guide.
What is my network name and passkey?
3. Set up wireless (802.11) communication (some models only)
If the printer supports wireless (802.11) communication, you can connect it wireless to an existing wireless network.
To connect the printer, complete the following steps in the order listed.
Note: Before you set up wireless communication, make sure the printer hardware is set up. For more information, see the setup poster that came with the printer.

Set up wireless (802.11) communication (some models only) 19
Engl
ish
Windows
1. Save any open documents. Close any applications that are running on your computer.
2. Place the HP software CD into the computer.
Step 2: Install software for your printerFollow the instructions for your operating system.
3. On the CD menu, click Install Network/Wireless Device and then follow the onscreen instructions.
Note: If the firewall software on your computer displays any messages during the installation, select the “always permit/allow” option in the messages. Selecting this option allows the software to install successfully on your computer.
Step 1: Connect the printer to your wireless network1. On the printer control panel, touch the
right arrow, and then select Network.
2. Touch Wireless, touch Wireless Setup Wizard, and then touch OK.
3. Follow the display instructions to complete the setup.
Note: If you encounter problems while running the Wireless Setup Wizard, see ”Wireless (802.11) setup problems” on page 26.
Connecting without a wireless routerIf you do not have a wireless router (such as a Linksys wireless router or Apple AirPort Base Station), you can still connect the printer to your computer using a wireless connection (known as a “computer-to-computer” or an “ad hoc“ wireless connection).
For more information, see the user guide.

Set up wireless (802.11) communication (some models only)20
Step 3: Test the wireless connectionPrint the wireless test page for information about the printer’s wireless connection. The wireless test page provides information about the printer’s status, MAC address, and IP address. If the printer is connected to a network, the test page displays details about the network settings.
Mac OS
1. Place the HP software CD into the computer.
2. Double-click the HP Installer icon on the software CD, and then follow the onscreen instructions.
1. Touch right arrow , and then touch Network.
2. Touch Wireless, and then touch Wireless Network Test.

Set up wireless (802.11) communication (some models only) 21
Engl
ish
Change the connection methodIf you have installed the HP software and connected your printer using a USB, Ethernet, or wireless connection, you can change to a different connection any time you want.
Note: If you are changing to a wireless connection, make sure that an Ethernet cable has not been connected to the printer. Connecting an Ethernet cable turns off the printer’s wireless capabilities.
Follow the instructions for your operating system.
Windows
1. On the computer desktop, click Start, select Programs or All Programs, click HP, select your printer name, and then click Connect a New Printer.
2. Follow the onscreen instructions.
Mac OS X
1. Click the HP Utility icon in the Dock.
Note: If the icon does not appear in the Dock, click the Spotlight icon on the right side of the menu bar, type HP Utility in the box, and then click the HP Utility entry.
2. Click the Application icon on the toolbar.
3. Double-click HP Setup Assistant, and then follow the onscreen instructions.

Solve setup problems22
Problems installing the software• Before installing software, make sure
that all other programs are closed.
• If the computer does not recognize the path to the CD drive that you type, make sure that you are specifying the correct drive letter.
• If the computer cannot recognize the HP software CD in the CD drive, inspect the HP software CD for damage. You can
Problems setting up the printer
• Make sure that all packing tape and material have been removed from outside and inside the printer.
• Make sure that the printer is loaded with plain, white, unused A4- or Letter-size (8.5x11 inch) paper.
• Make sure that any cords and cables that you are using (such as a USB cable or Ethernet cable) are in good working order.
• Make sure the (Power) light is on and not blinking. When the printer is first turned on, it takes approximately 45 seconds to warm up.
4. Solve setup problems The following sections provide help with problems you might have while setting up the printer.
If you need more help, see the user guide (which is available on your computer after you install the software).
• Make sure the printer is displaying the home screen and that no other lights on the printer’s control panel are lit or blinking.
• Make sure that the power cord and power adapter are securely connected and that the power source is working properly.
• Make sure paper is loaded correctly in the tray and is not jammed in the printer.
• Make sure that all latches and covers are closed properly.
also download the HP software from the HP Web site (www.hp.com/support).
• If you are using a computer running Windows and are connecting using a USB cable, make sure that the USB drivers have not been disabled in the Windows Device Manager.

Solve setup problems 23
Engl
ish
The printer is having problems sending and receiving faxes• Make sure you use the phone cord or
adapter that came with the printer. (If you do not use this phone cord or adapter, the display might always show Phone Off Hook.)
• Other equipment that uses the same phone line as the printer might be in use. Make sure extension phones (phones on the same phone line, but
not connected to the printer) or other equipment is not in use or off the hook. For example, you cannot use the printer for faxing if an extension phone is off the hook or if you are using a computer dial-up modem to send e-mail or access the Internet.
• If you are using a phone splitter, the splitter could cause faxing problems.
Step 2: Check the list of possible problemsIf you have run the fax text but are still having problems setting up fax, check the following list of possible problems and solutions:
Step 1: Run the fax testTest your fax setup to check the status of the printer and to make sure it is set up properly for faxing. For more information, see ”Set up and use fax” on page 6.
Tip: If you receive a fax communication error that includes an error code, you can find an explanation of the error
Problems setting up fax
This section contains information about solving problems you might have when setting up fax for the printer.
Note: If the printer is not set up properly for faxing, you might experience problems when sending faxes, receiving faxes, or both.
If you are having faxing problems, you can print a fax test report to check the status of the printer. The test will fail if the printer is not set up properly for faxing. Perform this test after you have completed setting up the printer for faxing. For more information, see “Step 2: Test fax setup” on page 9.
code at HP’s support Web site (www.hp.com/support). If prompted, choose your country/region, and then type “fax error codes” in the Search box.
If you are unable to solve the problems using the suggestions provided in the fax test, go to Step 2.

Solve setup problems24
The printer can send faxes but cannot receive faxes• If you are not using a distinctive ring
service, check to make sure that the Distinctive Ring feature on the printer is set to All Rings.
• If Auto Answer is set to Off, or if you subscribe to a voicemail service on the same phone line that you will use for faxing, you can only receive faxes manually.
• If you have a computer dial-up modem on the same phone line with the printer, check to make sure that the software that came with your modem is not set to receive faxes automatically.
• If you have an answering machine on the same phone line with the printer:
- Check that the answering machine is working properly.
- Make sure the printer is set to receive faxes automatically.
- Make sure the Rings to Answer setting is set to a greater number of rings than the answering machine.
- Disconnect the answering machine and then try receiving a fax.
- Record a message that is approximately 10 seconds in duration.
Try connecting the printer directly to the telephone wall jack.
• Make sure that one end of the phone cord is connected to the telephone wall jack, while the other end to port labeled “1-LINE” on the back of the printer.
• Try connecting a working phone directly to the telephone wall jack and check for a dial tone. If you do not hear a dial tone, contact your telephone company to check the line.
• Make sure you connect the printer to an analog phone line, or you cannot send or receive faxes. To check if your phone line is digital, connect a regular analog phone to the line and listen for a dial tone. If you do not hear a normal-sounding dial tone, it might be a phone line set up for digital phones. Connect the printer to an analog phone line and try sending or receiving a fax.
• The phone line connection might be noisy. Phone lines with poor sound quality (noise) can cause faxing problems. Check the sound quality of the phone line by plugging a phone into the telephone wall jack and listening for static or other noise. If you hear noise, turn Error Correction Mode (ECM) off and try faxing again.
• If you are using a DSL/ADSL service, make sure that you have a DSL/ADSL filter connected. Without the filter, you cannot fax successfully.
• If you are using either a private branch exchange (PBX) or an integrated services digital network (ISDN) converter/terminal adapter, make sure the printer is connected to the correct port and the terminal adapter is set to the correct switch type for your country/region.
• You are using a Fax over IP service. Try to use a slower connection speed. If this does not work, contact your Fax over IP service’s support department.

Solve setup problems 25
Engl
ish
The printer cannot send faxes but can receive faxes• The printer might be dialing too fast or
too soon. For example, if you need to access an outside line by dialing “9,” try inserting pauses as follows: 9-XXX-XXXX (where XXX-XXXX is the fax number you are sending to). To enter a pause, touch *@ and select a dash (-).If you are having problems sending a fax manually from a phone that is connected directly to the printer the printer—and if you are in the following countries/regions—you must use the keypad on the telephone to send the fax:
Argentina AustraliaBrazil CanadaChile ChinaColombia GreeceIndia IndonesiaIreland JapanKorea Latin AmericaMalaysia MexicoPhilippines PolandPortugal RussiaSaudi Arabia SingaporeSpain TaiwanThailand USAVenezuela Vietnam
Speak slowly and at a low volume when recording your message. Leave at least 5 seconds of silence at the end of the voice message.
• Other equipment that uses the same phone line might be causing the fax test to fail. You can disconnect all the other devices and run the test again. If the Dial Tone Detection Test passes,
then one or more of the other equipment is causing problems. Try adding them back one at a time and rerunning the test each time until you identify which piece of equipment is causing the problem.

Solve setup problems26
After resolving the problems…After you resolve any problems and have connected the printer to your wireless network, complete the following steps for your operating system:
WindowsPlace the HP software CD into the computer and run the software installation program again. Select either Install Network/Wireless Device or Add a Device when prompted.
Mac OSOpen the HP Utility, located in the Dock. (HP Utility is also located in the Hewlett-Packard folder in the Applications folder on your computer.) Click the Application icon on the toolbar, double-click HP Setup Assistant, and then follow the onscreen instructions.
Step 1: Make sure the wireless (802.11) light is turned onIf the blue light near the printer’s control panel is not lit, wireless capabilities might not have been turned on.
To turn on wireless, press the (Wireless) button once to turn on wireless capabilities.
Or touch Setup on the printer’s control panel, touch Wireless Menu, touch Wireless ON/OFF, and then touch On.
Wireless (802.11) setup problemsThis section provides information about solving problems you might encounter when connecting the printer to your wireless network.
Follow these suggestions in the order listed.
Note: If you are still encountering problems, see the problem-solving information in the user guide (which is available on your computer after you install the software).

Solve setup problems 27
Engl
ish
Reducing interferenceThe following tips might help reduce the chances for interference in a wireless network:
• Keep the wireless devices away from large metal objects, such as filing cabinets, and other electromagnetic devices, such as microwaves and cordless telephones, as these objects can disrupt radio signals.
• Keep the wireless devices away from large masonry structures and other building structures as these objects can absorb radio waves and lower signal strength.
Step 4. Run the Wireless Network TestFor wireless networking issues, run the Wireless Test from the printer’s control panel:
1. Touch right arrow , and then touch Network.
2. Touch Wireless, and then touch Wireless Network Test.
If a problem is detected, the printed test report will include recommendations that might help solve the problem.
Step 3. Restart components of the wireless networkTurn off the router and the printer, and then turn them back on in this order: router first, and then the printer.
If you still are unable to connect, turn off the router, printer, and your computer, and then
turn them back on in this order: router first, then the printer, and finally the computer.
Sometimes, turning off the power and then turning it back on will recover a network communication issue.
Step 2. Check the wireless signal strengthIf the strength of the signal for your wireless network or computer is weak or if there is interference on the wireless network, the printer might not be able to detect the signal.
To determine the strength of the wireless signal, run the Wireless Network Test from the printer’s control panel. (For more information, see “Step 4. Run the Wireless Network Test” on page 27).
If the Wireless Network Test indicates the signal is weak, try moving the printer closer to the wireless router.

Use the Embedded Web server (EWS)28
To open the EWS
1. Obtain the IP address for the printer. The IP address is shown on the Network Configuration Page.
a. Load paper in the tray.
b. Touch the right arrow , touch Setup, touch Network, and then touch Print Network Settings.
2. In a supported Web browser on your computer, type the IP address or hostname that has been assigned to the device.
For example, if the IP address is 123.123.123.123, type the following address into the Web browser:
http://123.123.123.123
Tip: After opening the EWS, you can bookmark it so that you can return to it quickly.
5. Use the Embedded Web server (EWS)
When the printer is connected to a network, you can use the “embedded Web server” (“EWS”) to view status information and configure network settings from your computer web browser. No special software needs to be installed or configured on your computer.
Note: You can open and use the EWS without being connected to the Internet, though some features will not be available.
For more information about the EWS, see the user guide (which is available on your computer after you install the software).

Hewlett-Packard limited warranty statement 29
Engl
ish
A. Extent of limited warranty 1. Hewlett-Packard (HP) warrants to the end-user customer that the HP products specified above will be free from defects
in materials and workmanship for the duration specified above, which duration begins on the date of purchase by the customer.
2. For software products, HP’s limited warranty applies only to a failure to execute programming instructions. HP does not warrant that the operation of any product will be interrupted or error free.
3. HP's limited warranty covers only those defects that arise as a result of normal use of the product, and does not cover any other problems, including those that arise as a result of:
a. Improper maintenance or modification; b. Software, media, parts, or supplies not provided or supported by HP; c. Operation outside the product's specifications; d. Unauthorized modification or misuse. 4. For HP printer products, the use of a non-HP cartridge or a refilled cartridge does not affect either the warranty to the
customer or any HP support contract with the customer. However, if printer failure or damage is attributable to the use of a non-HP or refilled cartridge or an expired ink cartridge, HP will charge its standard time and materials charges to service the printer for the particular failure or damage.
5. If HP receives, during the applicable warranty period, notice of a defect in any product which is covered by HP's warranty, HP shall either repair or replace the product, at HP's option.
6. If HP is unable to repair or replace, as applicable, a defective product which is covered by HP's warranty, HP shall, within a reasonable time after being notified of the defect, refund the purchase price for the product.
7. HP shall have no obligation to repair, replace, or refund until the customer returns the defective product to HP. 8. Any replacement product may be either new or like-new, provided that it has functionality at least equal to that of the
product being replaced. 9. HP products may contain remanufactured parts, components, or materials equivalent to new in performance. 10. HP's Limited Warranty Statement is valid in any country where the covered HP product is distributed by HP. Contracts
for additional warranty services, such as on-site service, may be available from any authorized HP service facility in countries where the product is distributed by HP or by an authorized importer.
B. Limitations of warrantyTO THE EXTENT ALLOWED BY LOCAL LAW, NEITHER HP NOR ITS THIRD PARTY SUPPLIERS MAKES ANY OTHER WARRANTY OR CONDITION OF ANY KIND, WHETHER EXPRESS OR IMPLIED WARRANTIES OR CONDITIONS OF MERCHANTABILITY, SATISFACTORY QUALITY, AND FITNESS FOR A PARTICULAR PURPOSE.
C. Limitations of liability 1. To the extent allowed by local law, the remedies provided in this Warranty Statement are the customer's sole and
exclusive remedies. 2. TO THE EXTENT ALLOWED BY LOCAL LAW, EXCEPT FOR THE OBLIGATIONS SPECIFICALLY SET FORTH IN
THIS WARRANTY STATEMENT, IN NO EVENT SHALL HP OR ITS THIRD PARTY SUPPLIERS BE LIABLE FOR DIRECT, INDIRECT, SPECIAL, INCIDENTAL, OR CONSEQUENTIAL DAMAGES, WHETHER BASED ON CONTRACT, TORT, OR ANY OTHER LEGAL THEORY AND WHETHER ADVISED OF THE POSSIBILITY OF SUCH DAMAGES.
D. Local law 1. This Warranty Statement gives the customer specific legal rights. The customer may also have other rights which vary
from state to state in the United States, from province to province in Canada, and from country to country elsewhere in the world.
2. To the extent that this Warranty Statement is inconsistent with local law, this Warranty Statement shall be deemed modified to be consistent with such local law. Under such local law, certain disclaimers and limitations of this Warranty Statement may not apply to the customer. For example, some states in the United States, as well as some governments outside the United States (including provinces in Canada), may:
a. Preclude the disclaimers and limitations in this Warranty Statement from limiting the statutory rights of a consumer (e.g., the United Kingdom);
b. Otherwise restrict the ability of a manufacturer to enforce such disclaimers or limitations; or c. Grant the customer additional warranty rights, specify the duration of implied warranties which the manufacturer
cannot disclaim, or allow limitations on the duration of implied warranties. 3. THE TERMS IN THIS WARRANTY STATEMENT, EXCEPT TO THE EXTENT LAWFULLY PERMITTED, DO NOT
EXCLUDE, RESTRICT, OR MODIFY, AND ARE IN ADDITION TO, THE MANDATORY STATUTORY RIGHTS APPLICABLE TO THE SALE OF THE HP PRODUCTS TO SUCH CUSTOMERS.
HP Limited WarrantyDear Customer,You will find below the name and address of the HP entity responsible for the performance of the HP Limited Warranty in your country. You may have additional statutory rights against the seller based on your purchase agreement. Those rights are not in any way affected by this HP Limited Warranty.Ireland: Hewlett-Packard Ireland Limited, 63-74 Sir John Rogerson's Quay, Dublin 2 United Kingdom: Hewlett-Packard Ltd, Cain Road, Bracknell, GB-Berks RG12 1HN Malta: Hewlett Packard International Trade BV, Branch 48, Sqaq Nru 2, Triq ix-Xatt, Pieta MSD08, MaltaSouth Africa: Hewlett-Packard South Africa Ltd, 12 Autumn Street, Rivonia, Sandton, 2128, Republic of South Africa
HP product Duration of limited warrantySoftware Media 90 daysPrinter 1 yearPrint or Ink cartridges Until the HP ink is depleted or the “end of warranty” date printed
on the cartridge has been reached, whichever occurs first. This warranty does not cover HP ink products that have been refilled, remanufactured, refurbished, misused, or tampered with.
Printheads (only applies to products with customer 1 year replaceable printheads)Accessories 1 year unless otherwise stated
Hewlett-Packard limited warranty statement


1المحتويات
بيعر
فهرس
..........................................................................................................................2 استخدمالطابعةSolutionsDigitalHP)حلولHPالرقمية(.............................................................................3.................................................................................................................4 مميزاتاإلنترنت................................................................................................................6 إعدادواستخدامالفاكس......................................................................................................................6 إعدادالفاكساستخدامالفاكس..................................................................................................................12...............................................................................................17 الفاكسوخدماتالهاتفالرقمية.......................................................................18 إعداداتصال)802.11(الالسلكي)بعضالموديالتفقط(....................................................................................................................22 حلمشاكلاإلعدادمشكالتإعدادالطابعة..........................................................................................................22........................................................................................................22 مشكالتتثبيتالبرنامجمشكالتإعدادالفاكس..........................................................................................................23مشكالتاإلعدادالالسلكية)802.11(........................................................................................26استخدامملقمالويبالمضمن)EWS(..............................................................................................28.............................................................................29 Hewlett-Packardبيانالضمانالمحدودلشركة
معلومات األماناحرصدوًماعلىإتباعاحتياطاتاألماناألساسيةعنداستخدامهذهالطابعةتقلياًللمخاطراإلصابةنتيجةنشوبحريقأوحدوثصدمة
كهربية.اقرأواستوعبكافةاإلرشاداتالموجودةفيالوثائقالتي 1.
تأتيمعالطابعة.اتبعكلالتحذيراتواإلرشاداتالموجودةعلىالطابعة. 2.افصلهذهالطابعةمنمآخذالتيارالكهربيبالحائطقبل 3.
التنظيف.التقمبتركيبهذهالطابعةأوتستخدمهابالقربمنالماءأو 4.
عندماتكونيداكمبتلة.قمبتركيبالطابعةبإحكامعلىسطحثابت. 5.
قمبتركيبالطابعةفيموقعآمنحيثاليمكنألحدالمرور 6.فوقسلكالتيار،تفادًيالتلفالسلك.
إذالمتعملالطابعةبشكلطبيعي،أنظردليلالمستخدم 7.)ذلكالمتاحعلىجهازالكمبيوتربعدماتقومبتثبيت
البرنامج(.
التوجدأجزاءداخلالجهازيمكنللمستخدمصيانتها. 8.فاتركعملياتالصيانةلفنييالصيانةالمؤهلين.
استخدمفقطمهايئالتيارالخارجيالمرفقمعالطابعة. 9.
مالحظة: يتماستخدامحبرمنالخرطوشاتفيإجراء الطباعةبالعديدمنالطرقالمختلفة،بمافيذلكفي
إجراءالتهيئة،الذييقومبتجهيزالطابعةوالخرطوشاتللطباعةوفيصيانةرؤوسالطباعة،التيتقومبالحفاظ
علىفتحاتالطباعةنظيفةوانسيابالحبرعلىمايرام.باإلضافةإلىذلك،تبقىبعضبقاياللحبرفي
الخرطوشةبعداستخدامها.للمزيدمنالمعلوماتراجع.www.hp.com/go/inkusage

استخدمالطابعة 2
بيعر
أين دليل المستخدم؟
اليتوافردليلالمستخدملهذهالطابعة)يسمىأيضًا"Help"(علىهيئةمطبوعة.بداًلمنذلك،يتموضعهاعلىالكمبيوترأثناءتثبيتبرنامجHPبواسطةبرنامجالتثبيت.
يقدمهذاالدليلمعلوماتحولالموضوعاتالتالية:
معلوماتحولحلالمشكالت
مالحظاتأمانهامةومعلوماتتنظيمية
معلوماتحولمستلزماتالطباعةالمدعومة
تعليماتتفصيليةللمستخدم:)MacOSX(أومنقائمةالمساعدة)نظامWindows)نظامHPيمكنكفتحهذاالدليلمنبرنامجطباعة
Windows:أنقرStart )ابدأ(،وحددPrograms )البرامج(أوAll Programs)كافةالبرامج(ثمحددHP،وبعدذلكحددمجلدطابعةHP،ثمحددHelp )مساعدة(.
نظام Mac OS X:منFinder،أنقرMac Help<Help.فينافذةViewerHelp،اخترالطابعةمنقائمةHelpMacالمنبثقة.
وأيضًا،يتوفرإصداربتنسيقAcrobatAdobeمندليلالمستخدمهذاعلىموقعدعمHP.)www.hp.com/support(
استخدمالطابعة1.شكًرالشرائكهذهالطابعة.معهذهالطابعة،يمكنكطباعةالمستنداتوالصور،مسحالمستنداتضوئيًاإلىجهاز
كمبيوترمتصل،عملُنسخ،وإرسالواستقبالالفاكسات.
للمسحالضوئي،النسخ،وإرسالالفاكسات،يمكنكاستخداملوحةالتحكمالخاصةبالطابعة.كمايمكنكأيضًااستخداملوحةتحكمالطابعةلتغييراإلعدادات،طباعةالتقارير،أوالحصول
علىالمساعدةفيمايتعلقبالطابعة.
تلميح: إذاكانتالطابعةمتصلةبجهازكمبيوتر، يمكنكأيضًاتغييرإعداداتالطابعةباستخدامأدواتالبرامجالمتاحةعلىالكمبيوتر،مثلبرنامجالطابعة،أوخادمالويبالمضمن)EWS(.للحصولعلى
مزيدمنالمعلوماتحولهذهاألدوات،انظردليلالمستخدم)ذلكالمتاحعلىالكمبيوتربعد
تثبيتالبرنامج(.

3استخدمالطابعة
المسح الضوئي للكمبيوترباستخدامالطابعة،يمكنكببساطةالذهابإلىالطابعة،لمس
زرماعلىلوحةتحكمالطابعة،وإمامسحالمستنداتضوئيًابشكلمباشرإلىالكمبيوترأومشاركتهابسرعةمعشركاء
العملكمرفقبريدإلكتروني.
مالحظة:إذاكنتتستخدمجهازكمبيوتريعملبنظام ®Windows®Microsoftوإذالميظهر
جهازالكمبيوترالخاصبكفيقائمةالوجهاتعلىشاشةلوحةتحكمالطابعة،فستحتاجإلىإعادةتشغيلوظيفةالمسحالضوئيعلىجهازالكمبيوترالوجهة.
)Mac إلى Fax و PC إلى Fax خاصية( HP Digital Faxلنتفقدبعداآلنرسائلالفاكسالهامةالتيتوضعبطريق
الخطأبينمجموعاتالورق.
استخدمميزةPCtoFax)فاكسإلىكمبيوتر(وMactoFax)فاكسإلىماكنتوش(الستالمالفاكسات
وحفظالفاكساتمباشرةإلىالكمبيوتر.باستخدامميزةPCtoFax)فاكسإلىكمبيوتر(وMactoFax)فاكسإلىماكنتوش(،يمكنكحفظالُنسخالرقميةمن
الفاكساتبسهولةكماتقضيأيًضاعلىصعوبةالتعاملمعالملفاتالورقيةالُمكدسة.
SolutionsDigitalHP)حلولHPالرقمية(
تتضمنالطابعةمجموعةمنالحلولالرقميةالتييمكنأنتساعدفيتبسيطاألعمالوتنظيمها.
إلعادةتشغيلوظيفةالمسحالضوئي،أنقرStartعلىسطحمكتبجهازالكمبيوترالخاصبك،واخترProgramsأوAll Programs،اخترHPثماخترمجلدطابعةHP،واخترطابعةHPالخاصةبك.فيالنافذةالتيتظهر،
أنقرخيارActivate Scan to Computer)تنشيطالمسحللكمبيوتر(.
عالوةعلىذلك،يمكنكإيقافمهمةطباعةرسائلالفاكسبالكامل،ممايوفرالمالالمخصصللورقوالحبر،
كمايساعدعلىتقليلاستهالكالورقوكميةالورقالتالف.
لمعرفة المزيد!
للمزيدمنالمعلوماتحولإعدادواستخدامهذهالحلولالرقمية،أنظردليلالمستخدم.
)يتوفردليلالمستخدمعلىجهازالكمبيوترالخاصبكبعدماتقومبتثبيتالبرنامج.(

استخدمالطابعة 4
بيعر
مميزاتاإلنترنت
تقدمالطابعةحلواًلمبتكرةتدعمالويبيمكنهامساعدتكفيسرعةالوصوللإلنترنت،والحصولعلىالمستندات،
وطباعتهابشكلأسرعوأقلمشاكل،وبدونكمبيوترعلىاإلطالق.كذلك؛يمكناستخدامخدمةالويب
)HPbyMarketsplash(إلنشاءالموادالتسويقيةبجودةاحترافيةوطباعتها.
مالحظة:الستخدامميزاتالويبهذه؛يجبتوصيل الطابعةباإلنترنت)سواءبكابلإثرنتأواتصالالسلكي(.اليمكنكاستخدامميزاتالويبهذهفي
حالةاتصالالطابعةبواسطةكابلUSB.
مالحظة:باإلضافةلتلكالحلول؛يمكنإرسال مهامالطباعةإلىالطابعةعنبعدمنأجهزةنقالة.
معهذهالخدمة،والتيتسمىePrintHP،يمكنكالطباعةمنالهواتفالمحمولة،الكمبيوتراتالمحمولةالصغيرة،أواألجهزةالمحمولةاألخرى،
عنطريقالبريداإللكتروني.
HP Apps تطبيقات
توفرAppsHPطريقةسريعةوسهلةللوصولإلىمعلوماتالعملوتخزينهاوطباعتهادونكمبيوتر.
وباستخدامAppsHP؛يمكنالوصولإلىالمحتوىالمخزنعلىالويب؛مثلنماذجالعمل،واألخبارواألرشيفات
وغيرها،وذلكمنشاشةلوحةتحكمالطابعةمباشرة.
الستخدامAppsHP؛يجبتوصيلالطابعةباإلنترنت)سواءبكابلإثرنتأواتصالالسلكي(.اتبعاإلرشاداتفي
لوحةتحكمالطابعةلتمكينوإعدادهذهالخدمة.
يتمتلقائًياإضافةتطبيقاتAppsجديدةويمكنللمستخدميناختيارهاوتنزيلهاإلىلوحةتحكم
الطابعةلالستخدام.للمزيدمنالمعلومات،قمبزيارة.www.hp.com/go/ePrintCenter
مالحظة:للحصولعلىقائمةبمتطلباتالنظام الخاصةبموقعالويبهذا؛انظردليلالمستخدم)ذلكالمتاحعلىالكمبيوتربعدتثبيتالبرنامج(.

5استخدمالطابعة
Marketsplash by HP خدمة
زدأعمالكباستخدامأدواتHPوخدماتهاعلىاإلنترنتإلنشاءالموادالتسويقيةبجودةاحترافيةوطباعتها.
معMarketsplash؛يمكنكالقيامبمايلي:
عملمنشوراتدعائيةونشراتإعالنيةوبطاقاتأعمالمذهلةبجودةاحترافيةبسرعةوسهولة.
اخترمنآالفالنماذجالقابلةللتعديلوالتيصنعهامصممورسومياتأعمالحاصلونعلىجوائز.
يتيحتنوعخياراتالطباعةالحصولعلىماتريدبالضبطوقتماتريد.وللحصولعلىنتائجفورية
عاليةالجودة؛اطبععلىطابعتك.كماتتوفرخياراتأخرىعلىاإلنترنتلدىHPوشركائها.
حققالجودةاالحترافيةالتيتتوقعهامعتقليلتكاليفالطباعة.
HP ePrint خدمة
معePrintHP؛يمكنالطباعةمنالهواتفالنقالةالمتصلةبالبريداإللكترونيأوأجهزةالكمبيوترالمحمول،أوغيرهامناألجهزةالنقالة-فيأيزمانومكان.باستخدامخدمة
الجهازالنقالوخدماتالويبServicesWebفيالطابعة؛يمكنطباعةالمستنداتفيطابعةقدتكونبجوارك
أوعلىبعدآالفاألميال.
احتفظبكلالموادالتسويقيةمنظمةوجاهزةفيالمتناولفيحسابMarketsplash؛والمتاحمنأيكمبيوترومباشرةمنشاشةلوحةتحكمالطابعة
)فيطرزمعينةفقط(.للبدء؛اخترHPbyMarketsplashفيبرنامجطابعةHPالمرفقمعالطابعة.أولمزيدمنالمعلومات؛تفضل
.marketsplash.comبزيارة
مالحظة:للحصولعلىقائمةبمتطلباتالنظام الخاصةبموقعالويبهذا؛انظردليلالمستخدم)ذلكالمتاحعلىالكمبيوتربعدتثبيتالبرنامج(.
مالحظة:التتوفركلأدواتوخدمات Marketsplashفيكلالدولأوالمناطقأوبكل
اللغات.تفضلبزيارةmarketsplash.comللحصولعلىأحدثالمعلومات.
لالستفادةمنخدمةePrintHP؛يجبتوفرالمكوناتالتالية:
طابعةتدعمePrintHPمتصلةباإلنترنت)بواسطةكابلإثرنتأواتصالالسلكي(
جهازبهوظيفةالبريداإللكترونيعاملة
اتبعاإلرشاداتفيلوحةتحكمالطابعةلتمكينوإعدادخدماتويبServicesWebالطابعة.للمزيدمنالمعلومات؛www.hp.com/go/ePrintCenterتفضلبزيارة

إعدادواستخدامالفاكس 6
بيعر
البحث عن معلومات إعداد الفاكس
إذاكنتفيواحدمنالدول/المناطقالتالية،قمبزيارةموقعالويبالمناسبللحصولعلىالمعلوماتعنإعدادالفاكس.
www.hp.es/faxconfig إسبانياwww.hp.com/de/faxconfig ألمانياwww.hp.com/ie/faxconfig أيرلنداwww.hp.com/it/faxconfig إيطاليا
بلجيكاwww.hp.be/nl/faxconfig الفرنسيةwww.hp.be/fr/faxconfig الهولنديةwww.hp.dk/faxconfig الدانمركwww.hp.se/faxconfig السويد
سويسراwww.hp.com/ch/fr/faxconfig األلمانيةwww.hp.com/ch/de/faxconfig الفرنسية
www.hp.fi/faxconfig فرنساwww.hp.fi/faxconfig فنلنداwww.hp.pt/faxconfig لبرتغال
www.hp.com/uk/faxconfig المملكةالمتحدةwww.hp.no/faxconfig النرويج
www.hp.com/at/faxconfig النمساwww.hp.nl/faxconfig هولندا
إعدادواستخدامالفاكس2.تتيحلكهذهالطابعةإمكانيةإرسالواستقبالالفاكساتاألبيض-و-األسودو
األلوان.
إعدادالفاكس
قبلاستخدامميزةالفاكس،اتبعالخطواتالتاليةلتوصيلالطابعةبنجاح.
تلميح: يمكنكاستخدامWizardSetupFax )معالجإعدادالفاكس()نظامWindows(أو
UtilityHP)أداةHP()نظامXOSMac(إلعدادالفاكس.
للحصولعلىمزيدمنالمعلوماتحولميزاتالفاكسالمتاحةمعالطابعة،انظردليلالمستخدم)ذلكالمتاحعلى
الكمبيوتربعدتثبيتالبرنامج(.
هام: قمبفحصصندوق"setupfaxFinding information")البحثعنمعلوماتالفاكس(الخاصبالدولة/المنطقةالخاصةبك.إذالمتكن
الدولة/المنطقةالخاصةبكموجودةفيالقائمة،قمبزيارةموقعالويبللحصولعلىمعلوماتاإلعداد.إذالمتكنالدولة/المنطقةالخاصةبكموجودةفي
القائمة،اتبعالتعليماتالمزودةفيهذاالدليل.

7إعدادواستخدامالفاكس
الخطوة 1: قم بتوصيل الطابعة بخط الهاتف
قبل البدء...
قبلالبدء،تأكدمنالقيامبمايلي:
تثبيتخراطيشالحبر.
تحميلورققياسA4أوLetterفيالحاوية
قمبتجهيزسلكالهاتفوالمهايئ)إذاكانمزودامعالطابعةׂׂ(.
لمزيدمنالمعلومات،انظرملصقاإلعدادالموجودفيالصندوق.
لتوصيلالطابعةبأيمعداتتليفونيةأوأجهزةأخرى،استكملالخطواتالتالية:
باستخدامسلكالهاتفالمزودفيالعلبةمعالطابعة؛ .1قمبتوصيلأحداألطرافبمقبسالهاتفالموجود
بالحائط،ثمقمبتوصيلالطرفاآلخربالمنفذالمكتوبعليهLINE-1فيالجزءالخلفيللطابعة.
مالحظة: قدتكونبحاجةإلىتوصيلسلكالهاتف المزودبالمهايئالمتوفرلبلدك/منطقتك.
مالحظة: إذاكانطولسلكالهاتفالمزودمعالطابعة غيركاف،فيمكنكاستخداموصلةلزيادةالطول.
يمكنكشراءوصلةمنمتاجرااللكترونياتالتيتزودبملحقاتالهاتف.كماتحتاجإلىسلكهاتفآخر،
سلكهاتفعاديقديكونعندكمنقبلفيالمنزلأوفيالمكتب.للحصولعلىمزيدمنالمعلومات،انظردليلالمستخدم)ذلكالمتاحعلىالكمبيوتربعد
تثبيتبرنامجالجهاز(.
تحذير: إذاكنتتستخدمكابلغيرالمزودمعالطابعة، فقدالتتمكنمنإرسالواستقبالالفاكساتبنجاح.وألنكابالتالهاتفالتيمنالممكنأنتكونتستخدمهافيالمكتبأوالمنزليمكنهاأنتكونمختلفةعنتلكالمزودةمعالطابعة،توصيHP
باستخدامكابلالهاتفالمرفقمعالطابعة.
توصيلأيجهازتليفونيأخر.للمزيدمن .2المعلوماتحولتوصيلوإعدادأجهزةأو
خدماتإضافيةمعالطابعة،أنظرالصناديقفيهذاالقسمأوأنظردليلاإلعداد.
مالحظة: إذاواجهتمشكالتمتعلقةبإعدادالطابعة معأجهزةأوخدماتأخرى،فاتصلبالشركةالتي
زودتكبالجهازأوالخدمة.
١
٢
1مقبسالهاتفالموجودبالحائط2منفذLINE-1علىالطابعة

إعدادواستخدامالفاكس 8
بيعر
DSL/ADSL التوصيل إلى خط
إذاكنتمشتركفيخدمةDSL/ADSL،اتبعهذهالخطواتلتوصيلالفاكس.
١
٣٢
قمبتوصيلمرشحDSL/ADSLوسلكالهاتف .1المزودبواسطةمزودخدمةDSL/ADSLبين
مقبسالهاتفالموجودبالحائطومرشح.DSL/ADSL
قمبتوصيلسلكالهاتفالمزودمعالطابعةبين .2مرشحDSL/ADSLومنفذLine-1على
الطابعة.
ما هي خدمة الرنين المميز؟
توفرالعديدمنشركاتالهواتفميزةالرنينالمميزالتيتسمحلكبعدةأرقامهاتفعلىخطهاتفواحد.عندماتشتركفيهذهالخدمة،ُيخصصلكلرقمنموذجرنينمختلف.يمكنكإعدادالطابعةللردعلىالمكالماتالواردةالتي
لهانموذجرنينمحدد.
إذاقمتبتوصيلالطابعةبخطبهميزةالرنينالمميز،فاطلبمنشركةالهواتفتعييننموذجرنينواحدلكلالمكالماتالصوتيةونموذجرنينآخرلمكالماتالفاكس.ُتوصيHPلكأنتطلبرنتينأوثالثرناتلرقمالفاكس.
عندماتكتشفالطابعةنموذجالرنينالمحدد،فستردعلىالمكالمةوتستلمالفاكس.
للحصولعلىمعلوماتحولتهيئةالرنينالمميز،راجع"الخطوة3:تهيئةإعداداتالفاكس"بالصفحة10.
تلميح: إذاقمتباالشتراكبخدمةالبريدالصوتيعلىنفسخطالهاتفالذيستستخدمهلخدمةالفاكس،فلنتتمكنمناستقبالالفاكساتآلًيا.ألنهيجبعليكأنتكونجاهًزاللردشخصيًاعلىمكالماتالفاكس
الواردة،تأكدمنإغالقميزة الرد التلقائي.
إذاكنتتريدبداًلمنذلكاستقبالالفاكساتآلًيا،فاتصلبشركةالهاتفلالشتراكفيخدمةالرنينالمميزأوالحصولعلىخطهاتفيمستقلإلرسالواستقبالالفاكسات.
بعدتوصيلالطابعةبأيمعداتتليفونية، .3اذهبإلى"الخطوة2:اختبارإعدادالفاكس"
بالصفحة9.
1مقبسالهاتفالموجودبالحائط)DSL/ADSLوسلكالهاتف)مزودبواسطةمزودخدمةDSL/ADSL2مرشح3يتمتوصيلسلكالهاتفالمزودفيالعلبةمعالطابعةبمنفذLINE-1فيالطابعة

9إعدادواستخدامالفاكس
توصيل معدات إضافية
قمبإزالةالقابساألبيضمنالمنفذEXT-2 المكتوبعليهفيالجزءالخلفيمنالطابعة،ثمقمبتوصيلالهاتفبهذاالمنفذ.
فيحالةتوصيلمعداتإضافيةمثلمودمالطلبالهاتفيللكمبيوترأوهاتف،فستحتاجإلىشراءوحدةتقسيممتوازية.يتضمنالمقسمالمتوازيمنفذRJ-11واحدفيالجهةاألماميةومنفذاRJ-11فيالجهةالخلفية.التستخدموحدةالتقسيملهاتفثنائيالخطوطوالوحدةتقسيمتسلسليةوالوحدةتقسيممتوازية
بهامنفذاRJ-11فيالمقدمةومقبسفيالخلف(.
مالحظة: إذاكنتمشتركفيخدمةDSL/ADSL،قمبتوصيلمرشحDSL/ADSLإلىوحدةالتقسيمالمتوازية، ثماستخدمسلكالهاتفالمزودبواسطةHPلتوصيلالطرفاألخرمنالمرشحبمنفذLine-1فيالطابعة.قمبإزالة
القابساألبيضمنالمنفذEXT-2المكتوبعليهفيالجزءالخلفيمنالطابعة،ثمقمبتوصيلجهازالهاتفأوجهازالرداآلليإلىمنفذEXT-2.بعدذلك،قمتوصيلالمنفذالثانيمنوحدةالتقسيمالمتوازيإلىمودمDSL/ADSLوالذي
يتصلبالكمبيوتر.
١
٥
٤
٢
٧
٣
٦
1مقبسالهاتفالموجودبالحائط2وحدةالتقسيمالمتوازي
3مرشحDSL/ADSL)متوفرمنمزودخدمةDSL/ADSLالخاصبك(.4سلكالهاتفالمزودمعالطابعة
DSL/ADSL5مودم6كمبيوتر7هاتف
الخطوة 2: اختبار إعداد الفاكسقمباختبارإعدادالفاكسلفحصحالةالطابعةوللتأكدمن
صحةإعدادهمنأجلالفاكس.
يقوماختبارالفاكسبإجراءمايلي:فحصأجهزةالفاكس
التحققمنتوصيلسلكالهاتفالصحيحبالطابعة التحققمنتوصيلسلكالهاتفبالمنفذالصحيح
البحثعننغمةطلبالرقم البحثعنخطهاتفنشط
اختبارحالةتوصيلخطالهاتفالخاصبك
وبعدذلكالمس منلوحةالتحكمفيالطابعة،المس .1Setup)إعداد(.
المسTools،وبعدذلكالمسRun Fax Test. .2تقومالطابعةبعرضحالةاالختبارعلىشاشةالعرضويطبعتقريًرا.بعدانتهاءاالختبار،تقومالطابعةبطباعةتقريربنتائجاالختبار.عندفشلاالختبار،قمبمراجعةالتقريرللحصولعلىمعلوماتحولإصالحالمشكلةوإعادةتشغيلاالختبار.وللمزيدمنمعلوماتحل
المشكالت،أنظر"مشكالتإعدادالطابعة"بالصفحة22.
بعدإجراءاختباراتالفاكسبنجاح،اذهبإلى"الخطوة .33:تهيئةإعداداتالفاكس"بالصفحة10.

إعدادواستخدامالفاكس 10
بيعر
الخطوة 3: تهيئة إعدادات الفاكسقمبتغييرإعداداتالفاكسللطابعةلتطابقاحتياجاتكبعدما
تقومبتوصيلالطابعةبخطالهاتف.
مالحظة:الستخدامنفسإعداداتدقةوضوحالفاكس وإعداداتأفتح/أغمقلكافةالفاكساتالُمرسلةمن
الطابعة،قمبتهيئةاإلعداداتكماترغب،وبعدذلك.Set as New Defaultsالمس
... قم بعمل هذا:إذا أردت تهيئة هذا اإلعداد...Auto Answer )الرد التلقائي(
قمبضبطوضعالردعلىOn )تشغيل(إذاأردتأنتقومالطابعةبالردعلىالمكالماتالواردةواستقبالالفاكسات.ستقومالطابعةبالردتلقائيًاعلىالمكالماتالواردةبعدعددالرناتالتيقمتبضبطهافيإعداد
Rings to Answer )الرناتقبلالرد(.
.Setupوبعدذلكالمس المسالسهماأليمن .1المسFax Setup،وبعدذلكالمس .2
.Basic Fax Setup.ONوبعدذلكالمس،Auto Answerالمس .3
Rings to Answer )الرناتقبلالرد( )اختياري(ضبطعددالرناتقبلالرد
مالحظة: عددالرناتقبلالردبالنسبةللطابعةيجب أنيكونأكبرمنعددالرناتقبلالردبالنسبةآللة
الردعلىالمكالمات.
.Setupوبعدذلكالمس المسالسهماأليمن .1المسFax Setup،وبعدذلكالمس .2
.Basic Fax Setup.Rings to Answerالمس .3
لتغييرعددالرنات. أو المسالسهماألعلى .4المسDone،للموافقةعلىاإلعداد. .5
أين يمكنني تغيير إعدادات الفاكس؟
يمكنكتهيئةإعداداتالفاكسباستخداماألدواتالتالية:
لوحة تحكم الطابعةالمسزرSetupعلىلوحةتحكمالطابعة،
المسFax Settings،وبعدذلكالمساإلعدادالذيتريدتهيئته.
HP برامجإذاكنتقدقمتبتثبيتبرنامجHPعلىالكمبيوترالخاصبك،يمكنكتهيئةإعداداتالفاكسباستخدامالبرنامجالذيتمتثبيتهعلىالكمبيوترالخاصبك.
لمزيدمنالمعلوماتحولكيفيةاستخدامهذهاألدواتواإلعدادات،انظردليلالمستخدم.

11إعدادواستخدامالفاكس
... قم بعمل هذا:إذا أردت تهيئة هذا اإلعداد...الرنين المميز
تغييرنموذجالرنينللردإلىالرنينالمميزمالحظة: إذاكنتتستخدمخدمةالرنينالمميز،
يمكنكاستخدامأكثرمنرقمتليفونعلىنفسخطالهاتف.يمكنكتغييرهذااإلعدادلتمكينهذهالطابعةمنالتحديدالتلقائيلنمطالرنينالمستخدممعمكالمات
الفاكسفقط.
تلميح:يمكنأيًضااستخدامخاصيةكشفنمط الرنينفيلوحةتحكمالطابعةلتحديدالرنينالمميز.وبهذهالخاصية؛تتعرفالطابعةوتسجلنمطالرنينلمكالمةواردة،وبناءعلىهذهالمكالمة؛تحددتلقائًيانمطالرنينالمميزالمخصصمنشركةالهواتف
لمكالماتالفاكس.
.Setupوبعدذلكالمس المسالسهماأليمن .1المسFax Setup،وبعدذلكالمس .2
.Advanced Fax Setup.Distinctive Ringالمس .3
تظهررسالةتعلنأنهيجبعدمتغييرهذااإلعدادإال .4فيحالةحوزتكعلىأرقامعدةعلىخطالهاتفذاته.
المسYesلالستمرار.قمبعملواحدممايلي: .5
المسنمطالرنينالمخصصمنشركةالهواتفلمكالماتالفاكس.
أوالمسRing Pattern Detection،ثماتبع
اإلرشاداتفيلوحةتحكمالطابعة.
مالحظة: إذاكنتتستخدمنظامهاتفسنترالبه أنماطرنينمختلفةللمكالماتالداخليةوالخارجية؛
يجباالتصالبرقمالفاكسمنرقمخارجي.سرعة الفاكس
قمبضبطسرعةالفاكسالمستخدمةلالتصالبينالطابعةوآالتالفاكساألخرىعندإرسالالفاكساتواستقبالها.مالحظة: عندالتعرضإلىمشاكلعندإرسال
الفاكساتواستقبالها،قمبتجربةسرعةفاكسأقل.
.Setupوبعدذلكالمس المسالسهماأليمن .1المسFax Setup،وبعدذلكالمس .2
.Advanced Fax Setup،وبعدذلكالمس المسالسهماألسفل .3
.Fax Speed.Slowأو،Medium،Fastالمسالختيار .4
Fax Error Correction Mode)وضع تصحيح األخطاء للفاكس(
إذاوجدتالطابعةإشارةخطأأثناءاإلرسالوكانتوظيفةتصحيحالخطأتعمل؛فإنالطابعةقدتطلبإعادةإرسال
جزءمنالفاكس.مالحظة: إذاكنتتواجهمشكالتفيإرسالواستقبال الفاكسات،قمبإيقافتشغيلميزةتصحيحاألخطاء.وباإلضافةإلىذلك،قديكونإيقافهذهالوظيفة
مفيًداعندمحاولةإرسالفاكسإلىبلد/منطقةأخرى،أواستقبالفاكسمنبلد/منطقةأخرىأوإذاكنت
تستخدماتصالالهاتفبالقمرالصناعي.
.Setupوبعدذلكالمس المسالسهماأليمن .1المسFax Setup،وبعدذلكالمس .2
.Advanced Fax Setup،وبعدذلكالمس المسالسهماألسفل .3
.Error Correction Mode.OffأوOnاختر .4

إعدادواستخدامالفاكس 12
بيعر
إرسال فاكسيمكنكإرسالالفاكساتبطرقمختلفة.باستخداملوحةتحكمالطابعة،يمكنكإرسالفاكساتباألبيضواألسودأوفاكسات
باأللوان.يمكنكأيضًاإرسالالفاكساتيدويًامنالهاتفالملحق،ممايسمحلكبالتحدثمعالمستلمقبلإرسالالفاكس.
يمكنكأيضًاإرسالالمستنداتعلىجهازالكمبيوترالخاصبكبالفاكس،بدونطباعتهاأواًل.
استخدامالفاكس
فيهذاالقسم،سوفتتعلمكيفيةإرسالالفاكساتواستقبالها.
... قم بعمل هذا:إذا أردت تهيئة هذا اإلعداد...مستوى الصوت
قمبتغييرمستوىالصوتالخاصبأصواتالطابعة،بمافيذلكنغماتالفاكس.
.Setupوبعدذلكالمس المسالسهماأليمن .1المسFax Setup،وبعدذلكالمس .2
.Basic Fax Setup،وبعدذلكالمس المسالسهماألسفل .3
.Fax Sound Volume.Offأو،Loud،Softالمسالختيار .4
لمعرفة المزيد!
انظردليلالمستخدملمزيدمنالمعلوماتفيمايخصالمواضيعالتالية:
إرسالفاكسباستخدامالطلبالمراقب
إرسالفاكسمنالكمبيوتر
إرسالفاكسمنالذاكرة
جدولةفاكسليتمإرسالهفيوقتالحق
إرسالفاكسإلىمستلمينمتعددين
إرسالفاكسفيModeCorrectionError)وضعتصحيحاألخطاء(
دليلالمستخدممتاحعلىالكمبيوتربعدتثبيتالبرنامج.

13إعدادواستخدامالفاكس
إرسالفاكسيدوًيامنهاتفممتد
قمبتحميلالمستندالذيترغبفيإرسالهبالفاكس، .1فيالطابعة.
يمكنكإرسالالفاكسمنوحدةالتلقيماآلليللوثائقADFأومنزجاجالماسحة.
المسFax. .2
اطلبالرقمباستخداملوحةالمفاتيحالموجودة .3علىالهاتفالمتصلبالطابعة.
مالحظة: التستخدملوحةالمفاتيحالموجودةعلى لوحةالتحكمللطابعةعندإرسالفاكسيدوًيا.يجباستخداملوحةاألرقامالموجودةعلىالهاتفلطلب
رقمالمستلم.
عندمايردالمستلمعلىالمكالمة،يمكنكاالنخراط .4فيالمحادثةقبلإرسالالفاكس.عندماتكونمستعدًا
إلرسالالفاكس.
مالحظة: إذاقامجهازالفاكسبالردعلىالمكالمة، فستسمعنغماتالفاكسمنجهازاستقبالالفاكس.
تابعإلىالخطوةالتاليةإلرسالالفاكس
عندماتكونجاهًزاإلرسالالفاكس، .5المسStart BlackأوStart Color.
.Send Faxمالحظة: عندالمطالبة،اختر
إذاكنتتتحدثمعالمستلمقبلإرسالالفاكس،فاطلبمنهالضغطعلىالزر Startالموجودعلىجهازالفاكس
الخاصبهبمجردأنيسمعنغماتالفاكس.لنيصدرأيصوتعنخطالهاتفأثناءقيامالفاكسباإلرسال.فيهذا
الوقت،يمكنكإعادةوضعسماعةالهاتف.إذاأردتاالستمرارفيالحديثمعالمستلم،فانتظرعلىالخطحتى
ينتهيإرسالالفاكس.
إرسالفاكسقياسي
قمبتحميلالمستندالذيترغبفيإرسالهبالفاكس، .1فيالطابعة.
يمكنكإرسالالفاكسمنوحدةالتلقيماآلليللوثائقADFأومنزجاجالماسحة.
المسFax. .2
أدخلرقمالفاكسبواسطةلوحةالمفاتيح. .3
تلميح: إلضافةفاصلةزمنيةفيرقمالفاكسالذيتدخله،المس@*بشكلمتكرر،حتى
تظهرشرطة)-(علىالشاشة.
.Start ColorأوStart Blackالمس .4
تلميح: إذاأخبركأيمستلمبحدوثمشاكلمعجودةالفاكسالذيقمتبإرساله،فحاولتغيير
دقةالفاكسأوالتباين.

إعدادواستخدامالفاكس 14
بيعر
لمعرفة المزيد!
انظردليلالمستخدملمزيدمنالمعلوماتفيمايخصالمواضيعالتالية:
إعادةطباعةالفاكساتالمستقبلةمنالذاكرة
االستقصاءالستقبالفاكس
إعادةتوجيهالفاكساتإلىرقمآخر
قمبضبطحجمالورقللفاكساتالمستلمة.
ضبطالتصغيراآلليللفاكساتالواردة
حظرأرقامالفاكسغيرالهامةدليلالمستخدممتاحعلىالكمبيوتربعدتثبيت
البرنامج.
الفاكسات و خدمة البريد الصوتي الخاصة بك
إذاقمتباالشتراكبخدمةالبريدالصوتيعلىنفسخطالهاتفالذيستستخدمهلخدمةالفاكس،فلنتتمكنمناستقبالالفاكساتآلًيا.بداًلمنذلك،
يجبأنتتأكدمنإيقافتشغيلإعدادAnswerAuto)الردالتلقائي(حتىتستطيع
استقبالالفاكساتيدوًيا.تأكدمنأنتقومببدءالفاكسيدويًاقبلأنتلتقطخدمةالبريدالصوتيالخط.
إذاكنتتريدبداًلمنذلكاستقبالالفاكساتآلًيا،فاتصلبشركةالهاتفلالشتراكفيخدمةالرنينالمميزأوالحصولعلىخطهاتفمستقلإلرسال
واستقبالالفاكسات.
استقبالفاكستلقائيًا
إذاقمتبتشغيلخيارAuto Answer )الردالتلقائي()اإلعداداالفتراضي(منلوحةالتحكمالخاصةبالطابعة،تقومالطابعةبالردتلقائًياعلىالمكالماتالواردةواستقبالالفاكساتبعدعددالرناتالتيقمتبتحديدهافيإعداد
Rings to Answer )عددالرناتقبلالرد(.للحصولعلىمعلوماتحولتهيئةهذاالضبط،راجع
"الخطوة3:تهيئةإعداداتالفاكس"بالصفحة10.
استقبال الفاكساتتتمكنالطابعةمناستقبالالفاكساتآلًياأويدوًيا.
مالحظة: عنداستقبالفاكسبحجمLegalوعدم ضبطالطابعةحالًياإلىاستخدامورقبحجمLegal،فستقومالطابعةبتصغيرحجمالفاكسبحيثيتالءممعحجمالورقالذيتمتحميله.عندتعطيلميزةReductionAutomatic)التقليلالتلقائي(،
تقومالطابعةبطباعةالفاكسعلىصفحتين.
إذاكنتتنسخمستنًداعندوصولالفاكس،يتمحفظالفاكسفيذاكرةالطابعةإلىأنينتهيالنسخ.يؤديذلكإلىتقليل
عددصفحاتالفاكسالتييمكنحفظهافيالذاكرة.

15إعدادواستخدامالفاكس
إعادةطباعةالفاكساتالمستقبلةمنالذاكرة
إذاقمتبتشغيلBackup fax Reception،فسيتمحفظالفاكساتالمستلمةفيالذاكرة،سواءكانتالطابعة
فيحالةخطأأملمتكن.
مالحظة: يتمحذفجميعالفاكساتالمخزنةفي الذاكرةعندإيقافتشغيلالجهاز.للحصولعلىمزيدمنالمعلوماتحولهذهالميزة،انظردليلالمستخدم
)ذلكالمتاحعلىالكمبيوتربعدتثبيتالبرنامج(.
استقبالفاكسيدوًيا
عندماتكونعلىالهاتف،يمكنللشخصالذيتتحدثمعهأنيرسلفاكسلكوأنتمازلتمتصلبه)معروفبالفاكس
اليدوي(.
يمكنكاستقبالالفاكساتيدوًيامنهاتفمتصلمباشرًةبالطابعة)عبرمنفذEXT-2(أومنهاتفعلىنفسخط
الهاتف،)ولكنليسمتصاًلمباشرًةبالطابعة(.
تأكدمنتشغيلالطابعةوتحميلورقفيالدرج .1الرئيسي.
قمبإزالةأيُنسخأصليةمندرجتغذيةالمستندات .2تلقائيًا.
اضبطإعدادRings to Answerعلىعدد .3 مرتفعيسمحلكبالردعلىالمكالمةالواردةقبلأنتقومبذلكالطابعة.أو،قمبإيقافتشغيلإعدادAuto Answerبحيثالتردالطابعةعلى
المكالماتالواردةآلًيا.
إذاكنتحاليًاعلىالهاتفمعالُمرسل،فاطلبمنه .4الضغطعلىالزرStart)ابدأ(فيجهازالفاكس
الخاصبه.
بمجردسماعكلنغماتالفاكسمنجهازالفاكسالذي .5يقومباإلرسال،فقمباآلتي:
المسفاكس،ثمحددالبدء باألسودأوعلى آ.البدء باأللوان.
بعدأنتبدأالطابعةباستقبالالفاكس،يمكنك ب.وضعسماعةالهاتففيمكانهاأوالبقاءعلىالخط.يكونخطالهاتفصامًتاأثناءإرسال
الفاكس.
تأكدمنتحميلالورقفيالدرجالرئيسية. .1
.Setupوبعدذلكالمس المسالسهماأليمن .2
المسTools،وبعدذلكالمس .3Reprint Faxes in Memory.تتمطباعة
الفاكساتبعكسترتيباستقبالهابحيثتتمطباعةآخرفاكساتتماستقبالهاأواًلوهكذا.
إذاكنتتريدتوقفمهمةإعادةطباعةالفاكسات .4)إلغاء(. الموجودةفيالذاكرة،فالمس

إعدادواستخدامالفاكس 16
بيعر
التعامل مع السجالت والتقاريريمكنكطباعةأنواعمتعددةمنالفاكسات:
صفحةConfirmationFax)تأكيدالفاكس( سجلالفاكس
ReportSendFaxonImage )صورةعلىتقريرإرسالالفاكس(
تقاريرأخرى
توفرهذهالتقاريرمعلوماتمفيدةتتعلقبالنظامبالنسبةللطابعة.
مالحظة:يمكنأيًضاعرضسجلالمكالماتمن شاشةلوحةالتحكمبالطابعة.لعرضسجلالمكالمات،)سجلالمكالمات(. المسFax،وبعدذلكالمس
معذلك،اليمكنطباعةهذهالقائمة.
لمسحسجلالفاكس
مالحظة:مسحسجلالفاكسيحذفأيًضاكلالفاكسات المخزنةفيالذاكرة.
.Setupوبعدذلكالمس، المسالسهماأليمن .1
لطباعةتقرير
.Setupوبعدذلكالمس، المسالسهماأليمن .1
المسFax Setup،والمسالسهماألسفل .2.Fax Reportsوبعدذلكالمس،
.Toolsالمس .2
،وبعدذلكالمس المسالسهماألسفل .3.Clear Fax Log
اخترتقريرالفاكسالذيتريدطباعته،وبعد .3.OKذلكالمس

17إعدادواستخدامالفاكس
الفاكسوخدماتالهاتفالرقمية
كثيرمنالشركاتتمدعمالءهابخدماتالهاتفالرقمية،مثل:
DSL:خدمةالخطالمشتركالرقمي)DSL(منخاللشركةالهواتفالخاصةبك.
)قديسمىDSLبـADSLفيبلدك/منطقتك.( PBXنظامهاتفتبادلفرعيخاص:PBX ISDN:نظامشبكةالخدماتالرقميةالمتكاملة
.)ISDN( FoIP:خدمةهاتفذاتتكلفةمنخفضةتتيحلك
إرسالالفاكساتواستالمهابواسطةالطابعةالخاصةبكعنطريقاستخداماإلنترنت.تسمىهذهالطريقةبـProtocolInternetoverFax)بروتوكول
فاكسعبراإلنترنت()FoIP(.ولمزيدمنالمعلومات،انظردليلالمستخدم.
طابعاتHPمصممةخصيًصالالستخداممعخدماتالهاتفالتناظريةالتقليدية.إذاكنتفيبيئةهاتفرقمية)مثل:
DSL/ADSLأوPBXأوISDN(؛فقدتحتاجالستخداممرشحاتأومحوالترقميةإلىتناظريةأثناءإعدادالطابعة
لعملياتالفاكس.
مالحظة:التضمنHPتوافقالطابعةمعكلخطوط أومقدميالخدمةالرقمية،أوفيكلالبيئاتأومعكلالمحوالتالرقميةإلىتناظرية.منالمستحسن
دائًمامناقشةاألمرمعشركةالهاتفمباشرةلمعرفةخياراتاإلعدادالصحيحةبناءعلىخدمات
الخطالمقدمة.

إعداداتصال)802.11(الالسلكي)بعضالموديالتفقط( 18
بيعر
أثناءتركيبالبرنامج،ستتممطالبتكبإدخالاسمالشبكة)يسمىأيضًا"SSID"(ومفتاحالمروراألمني:
اسمالشبكةهواسمالشبكةالالسلكيةالخاصةبك.
مفتاحالمروراألمنييمنعاألشخاصاآلخرينمناالتصالبالشبكةالالسلكيةالخاصةبكبدونموافقتك.
استنادًاإلىمستوىاألمانالمطلوب،قدتستخدمالشبكةالخاصةبكمفتاحWPAأوكلمةمرور
.WEPإذالمتقمبتغييراسمالشبكةأوكلمةالمروراألمنيمنذ
تثبيتالشبكةالالسلكية،يمكنكفيبعضاألحيانإيجادهاعلىالجزءالخلفيمنالموجهالالسلكي.
باإلضافةإلىذلك،إذاكنتتستخدمجهازكمبيوتريعملبنظامالتشغيلWindows،توفرHPأداةتعملعبرالويباسمهاNetworkWireless
Assistantوالتيتساعدعلىاستردادهذهالمعلوماتلبعضاألنظمة.الستخدامهذهاألداة،اذهبإلى
www.hp.com/go/networksetup.)هذهاألداةمتوفرةفقطباللغةاإلنجليزية.(
إذالمتستطعإيجاداسمالشبكةأوكلمةالمروراألمنيأوالتتذكرها،أنظرالوثائقالمتاحةمعجهازالكمبيوترأوالموجهالالسلكيالخاصبك.إذاالزلتالتستطيع
الحصولعلىهذهالمعلومات؛فاتصلبمسئولالشبكةأوالشخصالذيقامبإعدادالشبكةالالسلكية.
للحصولعلىمعلوماتحولأنواعاتصاالتالشبكة،اسمالشبكة،ومفتاحWEP/عبارةمرورWPA،انظردليل
المستخدم.
ما هو اسم الشبكة الخاص بي و مفتاح المرور؟
إعداداتصال)802.11(الالسلكي3.)بعضالموديالتفقط(
إذاكانتالطابعةتدعماالتصالالالسلكي)802.11(،يمكنكتوصيلها
بشبكةاتصالالسلكيةقائمة.
لتوصيلالطابعة،استكملالخطواتالتاليةبالترتيبالمذكور.
مالحظة: قبلإعداداالتصالالالسلكي،تأكدمنإعداد جهازالطابعة.للمزيدمنالمعلومات،راجعالتعليمات
علىملصقاإلعدادالمزودمعالطابعة.

19إعداداتصال)802.11(الالسلكي)بعضالموديالتفقط(
Windowsنظام
احفظأيمستنداتمفتوحة.أغلقأيتطبيقاتجاري .1تشغيلهاعلىجهازالكمبيوتر.
أدخلقرصبرامجHPالمضغوطإلىجهاز 2.الكمبيوتر.
الخطوة 2: تثبيت برنامج الطابعة الخاصة بك اتبعاإلرشاداتالخاصةبنظامالتشغيلالمثبتلديك.
منقائمةCD،أنقر 3.Install Network/Wireless Device
ثماتبعاإلرشاداتالتيتظهرعلىالشاشة.
مالحظة: إذاعرضبرنامججدارالحمايةالموجود علىالكمبيوترأيرسائلأثناءالتركيب،فحدد
الخيار"permit/allowalways")السماحدائًما(فيالرسائل.يسمحتحديدهذاالخيارتثبيتالبرنامج
بنجاحعلىالكمبيوتر.
الخطوة 1: توصيل الطابعة بالشبكة الالسلكية الخاصة بكمنلوحةالتحكمالخاصةبالطابعة،المسالسهماأليمن، 1.
.Networkواختر
Wireless Setupوالمس،Wirelessالمس 2..OKوبعدذلكالمس،Wizard
اتبعاإلرشاداتالظاهرةعلىالشاشةإلتمام 3.عمليةاإلعداد.
مالحظة:إذاواجهتكمشاكلأثناءتشغيلمعالج WizardSetupWireless؛أنظر"مشكالت
اإلعدادالالسلكية)802.11("بالصفحة26.
التوصيل بدون موجه السلكي
إذالميكنلديكموجهالسلكي)مثلموجهLinksysالالسلكيأومحطةStationBaseAirPortApple(،فيمكنكتوصيلالطابعةمباشرةبالكمبيوترباستخداماالتصالالالسلكي)المعروفالمعروفباتصال
"computer-to-computer"أو"hocad"الالسلكي(.ولمزيدمنالمعلومات،انظردليلالمستخدم.

إعداداتصال)802.11(الالسلكي)بعضالموديالتفقط( 20
بيعر
الخطوة 3: اختبار االتصال الالسلكياطبعصفحةاالختبارالالسلكيةلمعلوماتعناتصالالطابعةالالسلكي.توفرصفحةالمعلوماتالالسلكيةمعلوماتعنحالةالطابعةوعنوانMACوعنوانالـIP.فيحالة
اتصالالطابعةبشبكة،تعرضصفحةاالختبارتفاصيلعنإعداداتالشبكة.
MacOSنظام
أدخلقرصبرامجHPالمضغوطإلىجهاز .1الكمبيوتر.
انقرنقًرامزدوًجافوقرمزأداةتثبيتHP .2بقرصCDالخاصبالبرنامجثماتبعالتعليمات
التيتظهرعلىالشاشة.
.Networkوبعدذلكالمس، المسالسهماأليمن .1
Wirelessوبعدذلكالمس،Wirelessالمس .2.Network Test

21إعداداتصال)802.11(الالسلكي)بعضالموديالتفقط(
تغيير وسيلة االتصالفيحالةتثبيتكبرامجHPوتوصيلكالطابعةمستخدًماكابل
USBأوإثرنتأواتصااًلالسلكًيا؛فيمكنكالتبديلإلىاتصالمختلفمتىماأردتذلك.
مالحظة:فيحالةالتبديلإلىاتصالالسلكي؛فتأكد منعدمتوصيلكابلإثرنتبالطابعة.يؤديتوصيلكابلEthernetإلىإيقافتشغيلالقدراتالالسلكية
للطابعة.
اتبعاإلرشاداتالخاصةبنظامالتشغيلالمثبتلديك.
Windowsنظام
منعلىسطحالمكتبللكمبيوتر؛انقرفوق 1.Start )ابدأ(،حددPrograms )البرامج(
أوAll Programs )كافةالبرامج(،أنقرفوقHP،اختراسمالطابعةثمانقر Connect a New Printerفوق
)توصيلطابعةجديدة(.
اتبعاإلرشاداتالظاهرةعلىالشاشة. 2.
MacOSXنظام
.DockفيHPUtilityانقرفوقرمز 1.
مالحظة:إذالميظهرالرمزفيDock،فانقرنقًرا مزدوًجاعلىرمزSpotlightالموجودعلىيمينشريطالقوائم،واكتبHP Utilityفيالمربع،
.HPUtilityثمانقرفوقاإلدخال
انقرفوقرمزApplicationالموجودفيشريط 2.األدوات.
أنقرنقرًامزدوجًاعلىHP Setup Assistant، 3.ثماتبعاإلرشاداتالتيتظهرعلىالشاشة.

حلمشاكلاإلعداد 22
بيعر
مشكالتتثبيتالبرنامج
قبلتثبيتالبرامج،تحققمنإغالقكافةالبرامج األخرى.
إذالميتعرفالكمبيوترعلىمسارمحركاألقراص المضغوطةالذيقمتبكتابته،فتأكدمنتحديدحرف
محركاألقراصالصحيح.
إذالميتعرفالكمبيوترعلىالقرصالمضغوط الخاصببرامجHPوالموجودفيمحرك
األقراصالمضغوطة،فتحققمنعدموجودأيعطبفيالقرصالمضغوطالخاصببرامجHP.
مشكالتإعدادالطابعة
تحققمنأنهقدتمتإزالةكافةأشرطةوموادالتعبئة منخارجالطابعةومنداخلها.
تأكدمنتحميلالطابعةبورقأبيضعاديغير مستخدمبحجمA4أوLetter)8.5x11بوصة(.
تحققمنسالمةحالةعملكافةاألسالكوالكابالت التيتستخدمها)مثلكابلUSBأوكابلالشبكة
ايثرنت(.
مصباحالطاقة)Power(مضاءوال تأكدمنأن يومض.عندتشغيلالطابعةألولمرة،فإنهاتستغرق
حوالي45ثانيةحتىيتمالتسخين.
حلمشاكلاإلعداد4.توفراألقسامالتاليةالمساعدةالخاصةبالمشكالتالتييمكنأنتواجهكأثناء
إعدادالطابعة.
إذاأردتالمزيدمنالمساعدة،انظردليلالمستخدم)ذلكالمتاحعلىالكمبيوتربعدتثبيتالبرنامج(.
تأكدمنأنالطابعةتعرضالشاشةالرئيسية،وأنهال يوجدمصابيحأخرىمضاءةأووامضةعلىلوحة
تحكمالجهاز.
تأكدمنتوصيلسلكالطاقةبإحكامبالمهايئوأن مصدرالطاقةيعملبشكلصحيح.
تأكدمنصحةتحميلالورقفيدرجالورقومنأنه غيرمنحشرفيالطابعة.
تأكدمنإغالقكافةالمقابضواألغطيةبإحكاموبشكل صحيح.
يمكنكأيضًاتنزيلبرنامجHPمنموقعويبHP.)www.hp.com/support(
إذاكنتتستخدمكمبيوتريعملبنظامالتشغيل Windowsوإذاكنتتقومبالتوصيلباستخدامكابل
USB،تأكدمنأنبرامجتعريفUSBلميتمتعطيلهافيبرنامجManagerDeviceWindows
)مديراألجهزة(.

23حلمشاكلاإلعداد
هناك مشكلة في الطابعة تتعلق بعملية إرسال واستالم الفاكسات تأكدمناستخدامسلكالهاتفأوالمهايئالمزودمع
الطابعة.)إذالمتستخدمسلكالهاتفهذاأوالمهايئ،قدتعرضالشاشةدائمًاHookOffPhone
)السماعةليستفيمكانها(.( األجهزةاألخرى،التيتستخدمنفسخطالهاتفمع
الطابعةقدتكونقيداالستخدام.تأكدمنعدماستخدامسماعاتالهواتفالفرعية)هواتفتوجدعلىنفسخطالهاتفولكنهاغيرمتصلةبالطابعة(أوأجهزة
أخرىأوليستفيمكانها.علىسبيلالمثال،
اليمكنكاستخدامالطابعةإلرسالالفاكساتواستقبالهاإذاكانتهناكسماعةهاتففرعيلميتموضعهافيمكانهاأوإذاكنتتستخدممودمكمبيوترباتصالهاتفيإلرسالالبريداإللكترونيأوللوصول
إلىاإلنترنت. إذاكنتتستخدممقسمهاتف،قديؤديهذاإلىمشاكل
فيإرسالالفاكس.حاولتوصيلالطابعةمباشرةبقابسالهاتفالمثبتبالحائط.
الخطوة 2: افحص قائمة المشكالت المحتملةإذاقمتبإجراءاختبارالفاكسولكنمازلتتواجهمشاكلفيإعدادالفاكس،افحصقائمةالمشكالتالمحتملةالتاليةو
الحلولالخاصةبها:
الخطوة 1: إجراء اختبار الفاكسقمباختبارإعدادالفاكسلفحصحالةالطابعةوللتأكدمنصحةإعدادهمنأجلالفاكس.للمزيدمنالمعلومات،
راجع"إعدادواستخدامالفاكس"بالصفحة6.
تلميح: إذاظهرلكخطأاتصالالفاكس الذييحويرمزالخطأ،يمكنكإيجادشرحلرمزالخطأعلىموقعالويبالخاصبدعم
HP)www.hp.com/support(.
مشكالتإعدادالفاكس
يتضمنهذاالقسممعلوماتحولحلالمشكالتالتيقدتواجهكعندإعدادالفاكسللطابعة.
مالحظة: إذالمتكنالطابعةمعدةبشكلصحيح إلرسالالفاكس،فقدتتعرضإلىمشاكلعندإرسال
الفاكسات،استقبالالفاكسات،أوكليهما.
عندالتعرضإلىمشاكلتتعلقبإرسالالفاكساتواستقبالها،فيمكنكطباعةتقريراختبارللفاكسلفحصحالةالطابعة.سيفشلاالختبارعندعدمإعدادالطابعةبالطريقةالصحيحةإلرسالالفاكساتواستقبالها.قمبإجراءهذااالختباربعداالنتهاءمنإعدادالطابعةإلرسالالفاكساتواستقبالها.
للحصولعلىمزيدمنالمعلومات،راجع"الخطوة2:اختبارإعدادالفاكس"بالصفحة9.
عندالمطالبة،قمباختياربلدك/منطقتك،ثماكتب"codeserrorfax")رموزالخطأالخاصة
بالفاكس(فيمربعالبحث.
إذالمتتمكنمنحلالمشكالتباستخدامالمقترحاتالمزودةفياختبارالفاكس،اذهبإلىالخطوة2.

حلمشاكلاإلعداد 24
بيعر
ال تستطيع الطابعة إرسال فاكسات ولكن تستطيع استقبالها عندعدماستخدامخدمةالرنينالمميز،تأكدمنضبط
ميزةالرنينالمميزفيالطابعةعلىRingsAll)كلالنغمات(.
فيحالةضبطAnswerAuto)الردالتلقائي(علىOff)إيقاف(،أوإذاكنتمشتركبخدمة
البريدالصوتيعلىنفسرقمالهاتفالذيتستخدمهللفاكس،يمكنكاستقبالالفكساتيدويًافقط.
إذاكانلديكمودمكمبيوترباتصالهاتفيعلىنفسخطالهاتفمعالطابعة،فتأكدمنعدمضبطالبرنامج
المزودمعالمودمإلىاستقبالالفاكساتتلقائيًا.
إذاكانلديكجهازالردعلىالمكالماتعلىنفسخطالهاتفمعالطابعة:
تأكدأنجهازالردعلىالمكالماتيعملبطريقة-صحيحة.
تأكدمنضبطالطابعةالستقبالالفاكساتتلقائًيا.-تأكدمنضبطإعدادAnswertoRings-
)عددالرناتقبلالرد(إلىعددرناتأكبرمنآلةالردعلىالمكالمات.
قمبفصلآلةالردعلىالمكالماتثمحاولاستقبال-الفاكس.
قمبتسجيلرسالةتستغرق10ثوانتقريًبا.تكلمببطء-وبمستوىصوتمنخفضعندتسجيلالرسالة.اترك
5ثوانمنالصمتعلىاألقلفينهايةالرسالةالصوتية.
تأكدأنأحدأطرافسلكالهاتفمتصلبقابسالهاتفالمثبتبالحائط،بينمايكونالطرفاآلخر
بالمنفذالمسمى"LINE-1"خلفالطابعة. حاولتوصيلهاتفيعملمباشرةبقابسالهاتف
المثبتبالحائطثمقمبفحصنغمةالطلب.إذاكنتالتسمعنغمةالطلب،قماالتصالبشركةالهاتف
ليقوموابفحصالخط. تأكدمنتوصيلالطابعةبخطهاتفتناظريأوأنك
لنتستطيعإرسالأواستقبالالفاكسات.للتأكدمنأنخطالهاتفرقمي،قمبتوصيلأيهاتفتناظريبالخطثمقمباإلصغاءإلىنغمةالطلب.إذاكنتالتسمعصوتنغمةطلبعادية،قديكونخطالهاتفمعّدللهواتفالرقمية.قمبتوصيلالطابعةبخطهاتف
تناظريثمحاولإرسالالفاكسأواستقباله.
قديكونتوصيلخطالهاتفمشوًشا.خطوطالهاتفمعصوتبجودةضعيفة)ضوضاء(
قدتسببمشكالتفيإرسالالفاكسواستقباله.قمبالتحققمنجودةالصوتبخطالهاتفمنخاللتوصيلالهاتفبمقبسالهاتف
الموجودبالحائطواالستماعإلىأيتشويشأوضوضاءأخرى.فيحالةسماعكأليتشويش،أوقفتشغيلModeCorrectionError)وضعتصحيحاألخطاء()ECM(وحاول
إرسالواستقبالالفاكسثانيًة. إذاكنتتستخدمخدماتDSL/ADSL،فتأكدمن
توصيلمرشحDSL/ADSL.بدونالمرشح،اليمكنكإرسالأواستقبالالفكساتبنجاح.
إذاكنتتستخدممحول/محولطرفيلنظامبدالةفرعيةخاصةPBX)سنترالداخلي(أوخدمةشبكة
الخدماتالرقميةالمتكاملة)ISDN(،فتأكدمنتوصيلالطابعةبالمنفذالصحيحومنضبطالمحولالطرفيعلىنوعالمحورالصحيحللبلد/المنطقة.
أنتتستخدمخدمةإرسالالفاكسعبربروتوكولاإلنترنتIP.حاولاستخدامسرعةاتصالأبطأ.إذالميتمحلالمشكلة،اتصلبقسمالدعمالمعني
.IPبخدمةالفاكسعبربروتوكولاإلنترنت

25حلمشاكلاإلعداد
ال تستطيع الطابعة إرسال فاكسات ولكن تستطيع استقبالها قدتكونالطابعةتطلبالرقمبصورةسريعةأو
مبكرةللغاية.علىسبيلالمثال،إذاأردتالوصوللخطخارجيعنطريقاالتصالبرقم"9"،
حاولوضعوقفاتكالتالي:XXX-XXXX-9)حيثXXX-XXXXهورقمالفاكسالذيترسلله(.إلدخالفاصلةالمس@*واخترشرطة)-(.إذاكنتتواجهمشكالتفيإرسالفاكسيدويًامنهاتفمتصلمباشرًةبالطابعة-وإذاكنتفيأحدالدول/المناطقالتالية-يجبعليكاستخداملوحة
المفاتيحعلىالهاتفإلرسالالفاكس:
إسبانيااألرجنتينأمريكاالالتينيةأسترالياأيرلنداإندونيسيابولنداالبرازيلتايوانتايالندسنغافورةروسياالصينشيليفنزويالالفلبينكندافيتنامكولومبياكورياماليزيالبرتغالالمملكةالعربيةالسعوديةالمكسيك
الوالياتالمتحدةاألمريكيةالهنداليوناناليابان
األجهزةاألخرى،التيتستخدمنفسخطالهاتفالذييستخدمهhgجهاز،قدتسببفشلاالختبار.يمكنكفصلجميعاألجهزةاألخرىوتشغيلاالختبارمرةأخرى.إذانجحاختبارالكشفعنرنينالطلب،
سيكونواحدأوأكثرمناألجهزةاألخرىهوسببالمشاكل.حاولإضافتهاواحدةفيالمرةوأعداختبارفيكلمرةإلىأنتحددجزءالجهازالمتسببفي
المشكلة.

حلمشاكلاإلعداد 26
بيعر
بعد حل المشكالت...
بعدحلأيمشاكلوتوصيلطابعةHPبالشبكةالالسلكية،فأكملالخطواتالتاليةلنظامالتشغيل
الخاصبك:
Windows نظامضعقرصبرنامجHPفيالكمبيوتروقم
بتشغيلبرنامجالتثبيتمرةأخرى.اخترإما Install Network/Wireless Device
)تثبيتالشبكة/الجهازالالسلكي(أوAdd a Device )إضافةجهاز(عندالمطالبة.
Mac OS نظامافتحUtilityHP،الموجودفيDock
)الحامل(.)UtilityHPموجودةأيًضافيالمجلدHewlett-PackardبالمجلدApplications)التطبيقات(الموجودعلىالكمبيوتر.(أنقرأيقونةالتطبيقApplicationفيشريطاألدوات،أنقرنقرًامزدوجًاعلىHP Setup Assistant،
ثماتبعالتعليماتالتيتظهرعلىالشاشة.
الخطوة 1: تأكد من إضاءة مصباح )802.11(إذالميكنالمصباحاألزرقالمجاورللوحةتحكمالطابعة
مضاًء،فقداليتمتشغيلالميزاتالالسلكية.
)الالسلكي(مرةواحدة لتشغيلالالسلكي،اضغطعلىزرلتشغيلالميزاتالالسلكية.
أوالمسSetupعلىلوحةتحكمالطابعة،المسWireless Menu،المسWireless ON/OFF،و
.Onبعدذلكالمس
مشكالتاإلعدادالالسلكية)802.11(
يزودكهذاالقسمبمعلوماتحولحلالمشكالتالتيقدتواجهكعندتوصيلالطابعةبالشبكةالالسلكيةالخاصةبك.
اتبعهذهالمقترحاتبالترتيبالمذكور.
مالحظة: إذاالزلتتواجهمشكالت،انظرمعلومات حلالمشكالتفيدليلالمستخدم)ذلكالمتاحعلى
الكمبيوتربعدتثبيتالبرنامج(.
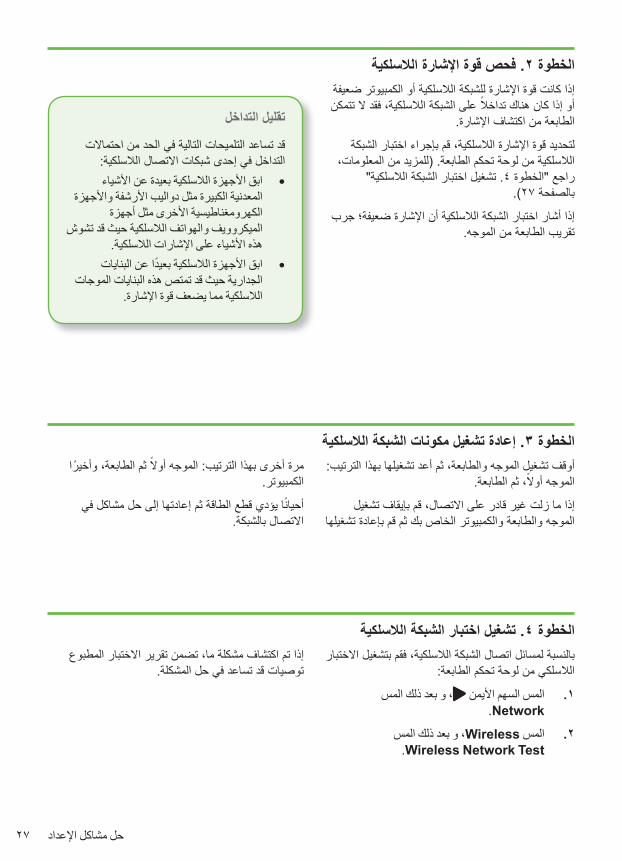
27حلمشاكلاإلعداد
تقليل التداخل
قدتساعدالتلميحاتالتاليةفيالحدمناحتماالتالتداخلفيإحدىشبكاتاالتصالالالسلكية:
ابقاألجهزةالالسلكيةبعيدةعناألشياءالمعدنيةالكبيرةمثلدواليباألرشفةواألجهزة
الكهرومغناطيسيةاألخرىمثلأجهزةالميكروويفوالهواتفالالسلكيةحيثقدتشوش
هذهاألشياءعلىاإلشاراتالالسلكية.
ابقاألجهزةالالسلكيةبعيًداعنالبناياتالجداريةحيثقدتمتصهذهالبناياتالموجات
الالسلكيةممايضعفقوةاإلشارة.
الخطوة 4. تشغيل اختبار الشبكة الالسلكيةبالنسبةلمسائلاتصالالشبكةالالسلكية،فقمبتشغيلاالختبار
الالسلكيمنلوحةتحكمالطابعة:
،وبعدذلكالمس المسالسهماأليمن .1.Network
المسWireless،وبعدذلكالمس .2.Wireless Network Test
إذاتماكتشافمشكلةما،تضمنتقريراالختبارالمطبوعتوصياتقدتساعدفيحلالمشكلة.
الخطوة 3. إعادة تشغيل مكونات الشبكة الالسلكيةأوقفتشغيلالموجهوالطابعة،ثمأعدتشغيلهابهذاالترتيب:
الموجهأواًل،ثمالطابعة.
إذامازلتغيرقادرعلىاالتصال،قمبإيقافتشغيلالموجهوالطابعةوالكمبيوترالخاصبكثمقمبإعادةتشغيلها
مرةأخرىبهذاالترتيب:الموجهأواًلثمالطابعة،وأخيًراالكمبيوتر.
أحياًنايؤديقطعالطاقةثمإعادتهاإلىحلمشاكلفياالتصالبالشبكة.
الخطوة 2. فحص قوة اإلشارة الالسلكيةإذاكانتقوةاإلشارةللشبكةالالسلكيةأوالكمبيوترضعيفةأوإذاكانهناكتداخاًلعلىالشبكةالالسلكية،فقدالتتمكن
الطابعةمناكتشافاإلشارة.
لتحديدقوةاإلشارةالالسلكية،قمبإجراءاختبارالشبكةالالسلكيةمنلوحةتحكمالطابعة.)للمزيدمنالمعلومات،
راجع"الخطوة4.تشغيلاختبارالشبكةالالسلكية"بالصفحة27(.
إذاأشاراختبارالشبكةالالسلكيةأناإلشارةضعيفة؛جربتقريبالطابعةمنالموجه.

)EWS(استخدامملقمالويبالمضمن 28
بيعر
EWSلفتح
احصلعلىعنوانIPالخاصبالطابعة.هذاالعنوان .1مدرجفيصفحةتكوينالشبكة.
قمبتحميلورقفيالدرج. آ.
،المسSetup، المسالسهماأليمن ب.المسNetwork،وبعدذلكالمس.Print Network Settings
اكتبعنوانالـIPأواسمالمضيفالذيتمتعيينه .2للجهازوذلكفيمستعرضويبمعتمدفيالكمبيوتر.
علىسبيلالمثال،إذاكانعنوانIPهو123.123.123.123،فاكتبالعنوانالتاليفيمستعرض
الويب:
http://123.123.123.123
تلميح: بعدالقيامبفتحملقمالويبالمضمن، يمكنكتسجيلإشارةمرجعيةلهبحيثيتسنىلك
الرجوعإليهبشكلسريع.
.5)EWS(استخدامملقمالويبالمضمنعندماتتصلالطابعةبإحدىشبكاتاالتصال،يمكنكاستخدام
صفحة"serverWebembedded")ملقمالويبالمضمنأو"EWS"(فيعرضمعلوماتالحالةوتهيئةإعداداتالشبكةمنالمتصفحبجهازالكمبيوترالخاص
بك.التحتاجلتثبيتأوتهيئةأيبرامجخاصةعلىجهازالكمبيوترالخاصبك.
مالحظة: ويمكنكفتحواستخدامملقمالويبالمضمن EWSواستخدامهدونوجوداتصالباإلنترنت،
ولكنلنتتوفربعضالوظائف.
للحصولعلىمزيدمنالمعلوماتحولEWS،انظردليلالمستخدم)ذلكالمتاحعلىالكمبيوتربعدتثبيتالبرنامج(.

Hewlett-Packard29بيانالضمانالمحدودلشركة
Hewlett-Packardبيانالضمانالمحدودلشركة

EN AR
www.hp.com
© 2010 Hewlett-Packard Development Company, L.P.
*C9309-90024**C9309-90024*C9309-90024