hp printer security plug-inh20195. › v2 › getpdf.aspx › 4aa7-2800enw.pdf · the installer can...
TRANSCRIPT

1
HP PRINTER SECURITY PLUG-IN For Microsoft System Center Configuration Manager (SCCM)
CONTENTS Overview ................................................................................................................................................... 2 Using with HP JetAdvantage Security Manager ............................................................................... 2 Installation ................................................................................................................................................. 3
SQL Permissions .................................................................................................................................... 4 Using a Different SQL Account ......................................................................................................... 4
WSUS .......................................................................................................................................................... 5 Solutions ................................................................................................................................................. 5
Licensing ................................................................................................................................................... 6 Launching HP Printer Security Plug-in .................................................................................................. 6 Discovery .................................................................................................................................................. 7 Groups ..................................................................................................................................................... 10 Credential Management .................................................................................................................... 11 Policies ..................................................................................................................................................... 14 Tasks ......................................................................................................................................................... 26 Reports .................................................................................................................................................... 27
Executive Summary........................................................................................................................... 27 Devices Assessed............................................................................................................................... 29 Automated Email .............................................................................................................................. 30

2
OVERVIEW HP Printer Security Plug-in is a policy based printer security compliance tool that integrates with the industry standard Microsoft System Center Configuration Manager (SCCM). While compliance settings in System Center Configuration Manager provide the tools and resources required to manage the configuration and compliance of devices such as computers, servers, and mobile devices, the HP Printer Security Plug-in allows for discovery of HP printers to ensure they remain compliant with desired security standards. Managing security is important to minimize data breaches and vulnerabilities across the print fleet. As technology improves, malicious users may target MFPs and other network peripherals to misuse resources or to gain access to networks or the internet.
USING WITH HP JETADVANTAGE SECURITY MANAGER HP JetAdvantage Security Manager is a for fee security compliance tool that includes many more security features, the ability to manage device certificates, Instant On discoveries, etc. Therefore, it may be desired to purchase Security Manager and use it instead of the HP Printer Security Plug-in because of the advanced functionality. However, because HP Printer Security Plug-in and HP JetAdvantage Security Manager have many similar core components, the two cannot co-exist on the same server. It may be desired to install HP JetAdvantage Security Manager on a separate server anyway for performance reasons.
If the HP Printer Security Plug-in is already installed on the MS SCCM server, and it is desired to upgrade to HP Security Manager on that SCCM server, the installer for Security Manager v3.2 and beyond will recognize that the plug-in is installed and will display a message indicating that the two cannot be installed on the same server simultaneously and the plug-in must be uninstalled before proceeding. The same message appears if the plug-in is attempted to be installed on the same machine where Security Manager is running, albeit an unlikely scenario.
NOTE: Previous versions of Security Manager such as v3.1.1 and prior will NOT display a warning if attempted to upgrade over top of an HP Printer Security Plug-in installation. If you attempt to install HP JetAdvantage Security Manager 3.1.1 and prior on the SCCM server where the HP Printer Security Plug-in is installed, the installation will succeed but the browser will display an HTTP 404 error when attempting to run Security Manager. If this occurs, uninstall both Security Manager and the HP Printer Security Plug-in, then reinstall Security Manager. It should now run successfully. If you only uninstall the HP Printer Security Plug-in, Security Manager still will not run. If you only uninstall Security Manager, the HP Printer Security Plug-in will not run. Both products must be uninstalled in such a scenario then install the desired product again.
Of course, nothing prevents Security Manager from running on one server and HP Printer Security Plug-in running on another server. The two tools can co-exist in an environment, but caution should be exercised to recognize that one tool can affect the other if they are both changing security settings on the printer fleet. The same concern exists if HP Web Jetadmin is running on a server in the environment as it too can change security settings on the fleet.
If Security Manager is installed on a separate server, it cannot use the same database as the HP Printer Security Plug-in. The same holds true for the HP Printer Security Plug-in, it cannot be pointed to use an existing Security Manager database. If either product attempts to use the database in use by the other product, a warning message appears indicating the instance selected contains a database that is use. Versions 3.1.1 and earlier of Security Manager will not display a warning, so care should be taken to not attempt to use the same database as the HP Printer Security Plug-in for those versions of Security Manager. If this scenario does occur, the database becomes unusable for both products. A SQL script can be provided by HP Support to put the database in a usable state for Security Manager after a service restart.

3
INSTALLATION Installation of HP Printer Security Plug-in into Microsoft System Center Configuration Manager (SCCM) is a quick and easy process. The plug-in requires a Microsoft SQL Server database on the back end. The installer can create a new MS SQL Express instance and database on the MS SCCM server, or it can be instructed to use any existing MS SQL instance (local or remote), including the same as MS SCCM is using. Requirements for HP Printer Security Plug-in are as such:
Operating system: Windows Server 2012 above
MS SCCM versions: Microsoft System Center 2012 R2 Configuration Manager SP, SP1, or SP2, with or without cumulative update 1 (CU1) or later
.Net Framework: 3.5.1 SP1 and 4.6.1
Database: MS SQL 2014 or later
Installation screens offer the option to enable the required IIS configuration options as well as the desired MS SQL server and instance.
Versions of MS SQL Server or Express that have been tested include the following:
• MS SQL Server Express 2014 (Bundled) • MS SQL Server 2016
While HP Printer Security Plug-in only tests the two most recent SQL versions at the time of release, there should be no issues using older or newer SQL versions as the plug-in uses basic calls into the SQL database and isn’t using SQL features that require later versions. Backward and forward compatibility should be present, there just isn’t capacity to test the multitude of SQL versions offered over the years.
Whether using local or remote SQL Server, Express or Full, the rules are essentially the same. In every case, HP Printer Security Plug-in needs access to a SQL server instance. It can

4
either create a new database, upgrade an existing database, or attach to an existing database, depending upon the situation and the user rights. If the plug-in is instructed to install SQL Express on the local machine, a SQL Express 2014 instance and database will be created by the installer. If HP Printer Security Plug-in is pointed to a remote SQL server and instance during installation, proper rights must be present for the user running the installation to be able to create or update a SQL database wherever SQL server may reside. Proper rights must also exist on the remote database itself for the user which the HP Printer Security Plug-in service runs under to be able to read from and write to the database.
KEY POINT: Just to reiterate, for installing and upgrading HP Printer Security Plug-in, the user who is logged into the machine and running the installer executable must have proper rights on the SQL server to either create a database or update an existing database. All the installer does is run SQL scripts to create or alter a database, and naturally any user running those commands needs to have proper SQL rights. In this case it is the Windows user who is running the installer. For normal operation of the plug-in after installation, the user running the HP Printer Security Plug-in service (default as Network Service) needs to have permissions to at least read and write to the database (explained later).
Both a named and default instance are supported when instructing the plug-in to use a remote SQL Server database.
SQL Permissions There are four scenarios where HP Printer Security Plug-in will interact with Microsoft SQL:
• Creating a database during installation of the plug-in • Upgrading a database during upgrading the plug-in from one version to another • Connect to an existing database during installation • Running the plug-in to manage security features on a fleet of devices
Each scenario requires SQL rights for potentially different users.
• Create Database – Windows user running the installer executable needs at minimum Create Database rights (sysadmin preferred).
• Upgrade Database – Windows user running the installer executable to upgrade versions needs DBO rights to perform potential commands on the database such as insert, update, alter, create table.
• Connect to an existing database - Windows user running the installer executable needs Public rights on the instance to connect to it. The HPIPSC database will have previously been created by a database administrator by using SQL scripts available from HP support. The database needs to provide DBO rights to the user running the plug-in service and application pool.
• Run HP Printer Security Plug-in – the Windows account that runs the HP Printer Security Plug-in service (default of Network Service) and the user running the HPSM application pool need DBO rights to perform operations such as reading and writing.
Using a Different SQL Account The HP Printer Security Plug-in service runs under Network Service, a limited service account that is meant to run standard privileged services. The Network Service account manifests itself remotely on the network as the machine account. If it is prohibited in the environment to allow a machine account to have DBO rights on a database, it is still possible to allow the plug-in to use a remote database by allowing a domain user account to have DBO rights to the database. Merely add a new login for the domain user account and assign it DBO rights to the HPIPSC database.

5
The IIS application pool named HPSM needs to be changed to the domain user account as well in order for the web interface to be able to access the remote database. This is done by clicking on Application Pools in the left hand pane. All application pools are displayed in the main content pane, right-click the one called HPSM and click Advanced Settings.
WSUS HP Printer Security Plug-in is a 32-bit application that runs in IIS. When the plug-in is run on MS Windows Server 2012 or above 64-bit operating oystem on which WSUS is installed, installation or login issues may occur.
Installation of WSUS (Windows Server Update Services) on 64bit Windows operating systems installs only the 64-bit version of Dynamic Compression Module dll (suscomp.dll) in System32. Hence, 32-bit version of Dynamic Compression Module dll is missing in SysWOW64 which causes any 32-bit applications running in IIS to fail.
Solutions To resolve this issue, follow below solutions:

6
1. Remove or disable the dynamic compression scheme from the IIS configuration.
To Disable ->Open IIS -> Select Site -> Open Compression Feature -> Uncheck Dynamic Compression -> Click Apply.
To Remove -> Open IIS config file “%windir%\System32\inetsrv\config\applicationHost.config” -> remove dynamic compression module, scheme & types -> Save configuration file.
Dynamic compression feature can also be removed using Configuration Editor in the IIS Manager.
2. Disable loading of the Dynamic Compression Module in IIS config file by modifying config file as:
Add an attribute of "precondition= "64bitness"to the Dynamic Compression Module in <modules> section so that it loads only in 64bit application pool. <modules>
<add name="DynamicCompressionModule" lockItem="true" preCondition="bitness64"/>
</modules>
3. Install the 32Bit version of suscomp.dll (from a 32-Bit Installation of WSUS) into “%windir%\SYSWOW64\inetsrv\”.
LICENSING Unlimited, non-expiring licenses are included by default in HP Printer Security Plug-in that allow for complete security management of the printer fleet. Three services are added when the plug-in is installed:
• Flexera Licensing Service
• HP Print License Service
• HP Printer Security Plug-in Service
All three are configured for automatic startup. If manual startup is required, start the services in the order listed above: Flexera, HP Print License, HP Printer Security Plug-in. Manual startup can also be a basic troubleshooting step for licensing issues. The HP Print License Service interacts with the Flexera Licensing Service that handles the HP Printer Security Plug-in license assignment and management task. The Flexera Licensing Service must be in a “ready” state before the HP Print License Service can interact. The Flexera service runs under the Local Service account while the HP Print License service runs under the Network Service. This might need to be changed depending upon the environment.
LAUNCHING HP PRINTER SECURITY PLUG-IN Once installed, HP Printer Security Plug-in appears in the SCCM navigation tree with several icons beneath it for:
• Discovery • Policies • Tasks • Reports • Settings
A Test Connection operation under Settings, General should be performed to ensure communication between HP Security Manager and HP Printer Security Plug-in.

7
Clicking on any of the categories the first time pops up a login screen to authenticate a user to use the plug-in. Members of the local Administrators group have automatic access to the plug-in since those members would be the ones running SCCM
DISCOVERY Discovering devices involves selecting either manual or automatic discovery.
Devices can be manually added by entering the device information into the IP Address/Hostname box and choosing Add to list for Discovery.
To discover devices automatically, select either of two discovery types:
• Number of Network Hops – this method uses a multicast UDP discovery mechanism to ask HP imaging and printing devices to identify themselves. The user may choose the number of network hops or routers to traverse in the multicast query. The default is 4 hops.
• Range – this discovery method scans the given IP address range for all devices.
Depending on the discovery type, either adjust the Number of Network Hops or type a Start IP Address and End IP Address for an IP range.

8
The group name that is viewed during the discovery of devices process is the group that populates the Group to Add field. However, another group can be substituted here by selecting it from the drop-down selection.
During discovery, IP Addresses are always resolved to hostnames, and hostnames are always resolved to IP Addresses via DNS.
Newly discovered devices appear in the device list initially with a Device Status of No Information. Use the Verify icon to verify support for a device or group of devices. Unsupported devices are indicated in the devices panel.
A verification queries additional attributes for the devices to populate the device list columns.

9
The Device Status can indicate any of several possible conditions:
• Network Connection Error - This error typically indicates an issue trying to communicate with a device over a specific protocol. Many times the plug-in is trying to securely connect to the device over SSL/TLS and cannot for some reason. Most common reasons for either of these errors include:
o No response from device on basic network communications such as ping. Device may be powered off or disconnected from network. Pings may be filtered at router or firewall.
o Device responds to pings but does not respond to Web Services (WS*) queries.
o Can’t browse to EWS page, perhaps EWS has been disabled. o SSL/TLS handshake fails so transaction cannot be encrypted. Operating
system controls the TLS versions in the handshake, not HPSM. You can select the device and click Do Not Enforce SSL/TLS.
o ACL (Access Control List) blocking. o No certificate support, already set to not enforce SSL/TLS (grayed out). o Ports blocked, perhaps by firewall o Some cases have been reported whereby DAT indicates SNMPv1/v2 passes
for Gets and Sets yet SNMPv3 cannot be enabled using SNMPv1/v2 and this error is generated. Many times a second remediation clears the error.

10
• Connection Refused / Invalid Identity Certificate - If SSL/TLS enforcement is selected, HP Printer Security Plug-in will enforce trust for future communications. This error can occur if the following is true:
o Removed, expired or revoked certificates. o Cannot connect to CRL (certificate revocation list) to check revocation.
This error can also occur if a self-signed certificate has an MD5 hash which Microsoft no longer supports, so the SSL/TLS handshake is rejected. Regenerate the self-signed certificate under EWS (might require newer Jetdirect firmware) to generate a new certificate with a supported hash.
• Credentials Failed - a mismatch occurred between what is stored in the database for the specific credential and what is on the device. HP Print Security Plug-in will always try what is stored in database first, then public/blank in case the credential was erased on the device, and finally any credential stored in the Global Credential Store. If all three attempts fail, the plug-in posts Credentials Failed as it needs proper credentials in order to communicate with the device.
o SNMP behavior is to not respond to SNMP REQ packet when community name is wrong.
o Older devices had two location under EWS for Admin Password. • Device Not Supported - device does not support enough security related items to be
deemed supported by HP Printer Security Plug-in. • Error - this is a rarely seen state that seems to occur on the devices that answer so little
to queries that the plug-in deems it not manageable. • Hostname Resolution Error - the hostname cannot be resolved, the DNS name server
does not recognize the hostname that is being presented by HP Printer Security Plug-in that once represented the device.
• License Required for Assessment - not enough licenses are available, a license has not been assigned to the device yet.
• No Information - a Verify task has not yet been performed where the plug-in gathers a dozen or so attributes about the device and populates the columns. Just adding a device will only perform a hostname lookup, but the device will remain in No Information status until a Verify is performed or an Assessment which begins with a Verify task.
The Assessment Status column is defined as such:
Assessment status has nothing to do with the state or status of the device, it merely indicates which settings were in or out of compliance during the last assessment task.
GROUPS Any discovered device will always be present in the All Devices group. Devices can be added to custom groups as desired. The primary purpose of groups is to represent a security policy. For example, if the entire fleet will receive the exact same security settings, you could merely create a remediation task that applies your one security policy to the All Devices group. If different regions will receive different security settings per region, then
- Not assessed - Assessed and all settings in compliance - Assessed with only low risk items out of
compliance - Assessed with medium risk items (and possibly
low) items out of compliance - Assessed with high risk items (and possibly
low/medium) items out of compliance

11
you could create a group for each region and schedule a remediation for each group applying its respective security policy. To create a group, select Groups from the left-hand side of the screen and choose the New icon. Groups can be nested as subgroups.
CREDENTIAL MANAGEMENT When credentials are present on a device, HP Printer Security Plugin needs to know those credentials before it can communicate with the device to read or write information. The term Credential Store refers to an area of the database where credentials are stored for each device so the plug-in knows how to communicate with it using read and write operations. All data in the Credential Store is securely encrypted in the database for protection.
If no credentials are present on a device when it is discovered, HP Printer Security Plug-in will use public or blank credentials in order to perform read and write operations on the device. Once a remediation is performed to set credentials on the device, those credentials are stored in the Credential Store for future attempts to communicate with the device for read and write operations. If credentials are already present on a device when it is discovered, credentials can be manually added to the Credential Store by selecting the device and choosing the icon for Set Credentials, Configure. This operation can be performed on a single device, multi-selected devices, or a group.

12
Credentials are tested during a Verify task, and if credentials are present on a device that HP Printer Security Plug-in does not know, a Credentials Failed status is posted.
Global Credentials are values entered into HP Printer Security Plug-in to be used in cases credentials are needed but are not available in the Credential Store. If the Global Credential value is used by the plug-in and results in success, that value is now stored for that device within the Credential Store. Global Credentials are added by clicking Settings in the navigation tree and choosing Global Credentials.

13
If the Admin (EWS) Password is claiming Credentials Failed, this means that the test HP Printer Security Plug-in performs to determine if an Admin (EWS) password is present is failing. For FutureSmart devices, the plug-in attempts to use web services to retrieve a system configuration page. Proper EWS credentials are required to retrieve such a page. If the page is not returned, it is assumed the Admin (EWS) Password that the plug-in has stored for the device in the database or in the global store is incorrect. For older non-FutureSmart devices, an attempt is made over an HTTP request to retrieve the Security Status page under EWS. Again, if the page is not returned, it is assumed the Admin (EWS) Password that Security Manager has stored for the device in the database or in the global store is incorrect.
One technique to resolve this issue is to add the Admin (EWS) Password to the database (credential store) for the device by selecting it and choosing the Set Credentials icon and clicking Configure. Another technique is to clear out the Admin (EWS) Password under EWS, then clear the credentials that are stored in the database under Set Credentials, Reset. Basically, you are just trying to make sure the plug-in and EWS match. Now perform a Verify task and see if credentials failures are cleared. If it still claims Credentials Failed, try deleting the device and rediscovering.
SNMP v1/v2 credentials are broken into two types: Read and Read/Write. These equate to the Get Community Name and Set Community Name under EWS. If there are no credentials entered for the Get Community Name under EWS, and if the Disable SNMP

14
v1/v2 default Get Community Name of “public” box is not checked, the device is wide open to read information using SNMP with just public used as the Community Name for an SNMP GET REQ packet. This isn’t uncommon as very little if any sensitive data is passed thru just Read attempts.
HP Printer Security Plug-in checks both a Set Community Name and a Get Community Name during a Verify task and will post a credential failure if either fails. If either an SNMP GET REQ or SNMP SET REQ packet receives no response, it is assumed a credential failure is present because devices will not respond if a Community Name does not match. To resolve this situation, either clear the credentials on the device under EWS, or add the SNMP v1/v2 Read/Write Community Name or the SNMP Read Community Name to the database (credential store) for the device by selecting it and choosing the Set Credentials icon and clicking Configure.
POLICIES A policy contains the security settings to be deployed across the HP imaging and printing fleet to keep them secure. A new policy is created by selecting Policies in the navigation tree and selecting the New Policy icon in the Policies window. Policies can be edited here also by checking the box next to the policy and selecting the Edit icon.
Give the policy a name, and the policy editor screen appears with all 15 offered items checked by default. Unwanted items can be unchecked and the policy saved by clicking Summary, Save.

15
Severity is customizable by the policy creator and indicates the appropriate risk level for the environment or business impact. These values of low, medium, and high will be reflected in the status of an assessment, worst case bubbles to the top and is displayed as status. The Executive Summary report will also use these values to apply a calculation against the fleet assessment and provide a score.
Remediation allows the policy creator to inform the policy to remediate (fix) the setting if it is out of compliance on the device against the value in the policy. Set remediate to enable or disable.

16
Unsupported can either be set to Ignore or Fail. If set to Ignore, a particular device that does not support the security setting will indicate Passed in the assessment report. If set to Fail, reports display the status as Not Supported by Device if a particular device does not support the setting.
Help is offered in the UI for each setting. Additional information about each setting is contained below.
Admin (EWS) Password
The Admin (EWS) Password feature helps protect the device from unauthorized access through remote applications such as Embedded Web Server (EWS) or HP Web Jetadmin. With the Admin (EWS) Password configured, the device will not allow changes to configuration settings unless the correct password is provided. The Admin (EWS) Password is also called the Administrator Password or Device Password in some applications.
Account Lockout can be enabled to define how many incorrect attempts occur before lockout (3-30), reset attempts after (0-1800 seconds), how long for lockout duration (5-1800 seconds), and minimum password length (1-16).
Password Complexity enables a password complexity check on the device to ensure the password is complex enough so it cannot be easily compromised. This feature can vary from device to device on complexity rules.
SNMP v1/v2
These settings provide support for specific tools that rely on SNMPv1/v2 for device discovery and status. If you select Read Only, enter the Read Community Name and then re-enter it to confirm. If you select Read and Write Enabled, enter the Read/Write Community Name, and then re-enter it to confirm.
According to the RFC for Community Names, a Read/Write Community Name can be used for performing SNMP Set Requests and SNMP Get Requests. Thus, Security Manager will attempt to use the Read/Write Community Name for Gets and Sets.
Enable Default SNMPv1/v2 Credential Access if it is desired to allow Public to be used for SNMP Get Requests.

17
SNMPv3
SNMPv3 employs a user-based security model (RFC 2574), and features user authentication and data privacy through encryption. To fully assess SNMPv3, you must typically create an SNMPv3 account on the device and implement the account information on the SNMPv3 management application. To create the account, provide a user name, an authentication key, a privacy key, and an encryption algorithm.
Note: If FIPS 140 is enabled, the SNMPv3 Encryption Algorithms must be set to SHA-1/AES. MD5/DES is not allowed. Best Possible can be chosen to instruct Security Manager to choose the best Encryption Algorithm in accordance to other security settings being enabled such as FIPS 140.
Many organizations opt to protect just Set operations with SNMPv3 to encrypt the data because Set operations may contain sensitive data such as passwords, but they will leave Get operations open to use SNMPv1/v2 since little to no sensitive data will be passed on Get operations. It then just becomes a matter of whether Get operations should be left open to public or protected with a Read Community Name (aka Get Community Name). Certainly it is much less work to not have to manage a Read Community Name on the fleet for data that is not seen as sensitive, but it still may be desired to control who can read any information from devices.

18
File System Password
The File System Password prevents unauthorized users from making changes to the file system configuration options and from performing a secure storage erase. File System Passwords are no longer used in FutureSmart devices and newer.
The File System Password feature helps protect the MFP data storage system options from unauthorized access. With the File System password configured, the MFP requires the password before it will allow configurations to features that affect the data storage system. Some of these features are the File Erase mode, the Secure Storage Erase feature, and the File System Access options. To configure the Files System Password, type 8 or fewer characters into the Enter Password and Confirm password fields.
PJL Password
Printer Job Language (PJL) commands provide two way communication with the printer and can be used to change control panel settings.
Note: In order for HP Printer Security Plug-in to assess the PJL Password item, the PJL Access Commands item must be set to Enable. Otherwise, assessment of the PJL Password cannot occur and the password will always be remediated, even if it matches.
The PJL password feature helps protect the MFP from unauthorized configurations through Print Job Language (PJL) commands. It does not affect ordinary print jobs. Once the PJL password is configured, the MFP requires it before it will process any of these commands. The PJL password is different from the option to disable PJL Disk Access (another setting in the EWS Security page). Configure both settings for better security. Set the PJL password

19
by typing any number between 1 and 256 into the Enter Password and Confirm password fields.
PJL Access Commands
Select the check box to assess whether access to PJL commands is restricted. If set to Disable, the HP Embedded Web Server (EWS) restricts access to PJL commands. Note: In order for the plug-in to assess the PJL Password item, the PJL Access Commands item must be set to Enable. Otherwise, assessment of the PJL password cannot occur and the password will always be remediated, even if it matches.
PJL is unique compared to all other config items. To implement the match function, HP Printer Security Plug-in uses port 9100 and the PJL access commands to change a PJL timeout value and if it changes, the password matches. Then the plug-in changes the timeout back the way it was. If the password is not set, then the process is very fast as SNMP informs if set/not set.
If P9100 is closed, or if the PJL access commands are disabled, then the match logic is skipped and the plug-in will remediate the password to insure it matches the policy.
When the PJL Device Access Commands setting is disabled on the device, the following PJL commands are no longer executed:
PJL Command Description
DEFAULT Sets default values for environment variables.
OPMSG, RDYMSG, STMSG Ready, Status and Operator messages
DMINFO, DMCMD SNMP over PJL commands
INITIALIZE Resets PJL values to factory default
SET Sets environment variable to specified value for duration of a PJL job.

20
File System Access Protocols
The File System Access Protocols settings shuts down access to the MFP file system (storage devices and configuration settings) through protocols and ports. They eliminate access from various types of management tools. HP recommends shutting down all unused access to the file system.
PML (Printer Management Language) is an HP proprietary protocol that manages HP devices. Web Jetadmin uses PML for many of its configuration settings. Disabling this PML access eliminates the PML commands that affect access to the storage devices even for Web Jetadmin. If you wish to make changes to the file system, enable PML access to make the changes, and disable it again. With this setting, MFPs will ignore PML commands that attempt to access the file system.
Network File System (NFS) is primarily used by UNIX, and Linux, and Norton systems. Disabling it disables the entire protocol for the MFPs. With this setting, MFPs will ignore all NFS requests.
PostScript enables programs such as Adobe® products to access the MFPs directly for printing and for access to fonts. Some of the commands it uses can access MFP storage devices. Disabling PostScript access to the file system disables only the commands that affect the file system.
PJL (Printer Job Language) includes capabilities to manage configurations in the form of commands inside print jobs. Some of these commands can access MFP storage devices. Disabling PJL access to the file system disables only the commands that affect the file system.

21
Standard TCP/IP Printing
Standard TCP/IP printing, also called standard network printing or AppSocket, is the most common method for printing over the network and is the standard printing protocol used by HP print devices. It is the fastest, most reliable way to print over the network. Because this is the standard network printing method, remediation is disabled by default.
TCP Port 9100 succeeded line printer remote (LPR), which had been widely adopted as the de facto standard in TCP/IP network printing for many years. Due to LPR limitations, TCP port 9100 became the fastest and most efficient way of delivering data to a printer using the TCP/IP protocol suite. Raw data delivered over TCP is sent to the printer as if it had been delivered over a parallel port, serial port, or any other port.
With Port 9100 enabled, clients are able to bypass print servers and print directly to the device. Device access control lists can limit the amount of this behavior. This could be of concern to those who track job accounting at the print server level. Upgrading firmware is accomplished through Port 9100. Extra safeguards should be established to protect against malicious firmware uploading. The most common vulnerability for TCP Port 9100 is print jobs with embedded PJL commands. These PJL commands can do a variety of things, some extremely malicious. TCP/IP headers are stripped and data is presented to the printer as if it were directly connected to a PC. Years ago, printer drivers would use the PJL command suite to control the PC attached printer in a variety of ways. In the networking world, this presents an obvious potential for misuse.
The PJL Password setting is linked as a Relative Technology to the Port 9100 setting. Since Port 9100 will remain enabled in most environments as the network printing protocol of choice, it is suggested that security be applied to the PJL settings. If Port 9100 is to be disabled in a customer environment, this usually indicates a more uncommon printing protocol such as LPD, IPP or IPPS may be in use. Make sure the policy is set accordingly or print productivity could be affected.
File Transfer Protocol (FTP)
File transfer protocol (FTP) printing sends print files from a client system to the print device using a TCP control and data connection. Although FTP provides user name and password authentication, the credentials are sent unencrypted over the network.
FTP (File Transfer Protocol) is a basic TCP/IP connectivity utility to transfer data between systems. FTP printing is a way to use FTP to send print files from a client system to an HP Jetdirect-connected printer. In an FTP printing session, the client connects and sends a print file to the HP Jetdirect FTP server which in turn passes the print file to the printer. The HP Jetdirect FTP server transfers print files to the printer but does not interpret them. For proper printing, print files must be in a language recognized by the printer (such as PostScript, PCL, or unformatted text). For formatted print jobs, you must first print to a file from your application using the driver for the selected printer, then transfer the print file to

22
the printer through an FTP session. FTP printing can be somewhat secured via a login and password, but both are sent unencrypted over the network.
FTP print and download (for firmware updates) were introduced into JetDirect products many years ago. Certain customers still require this feature in the printers and print server products they purchase. User access to the FTP server is available using the standard FTP clients that are supported on most operating systems. The FTP client is an Internet standard for file transfers. The FTP print and download features were tightly coupled in Jetdirect at one time, but are now decoupled into separate functionality packages. The “download” functionality is now referred to as “FTP Firmware Update”. Both FTP print and download use two TCP connections to transfer a file, just as in standard FTP. The “control” connection is established through the well-known TCP port (21) that passively awaits a client connection. Once connection is established, it will stay active the entire time that the client communicates with the server. The second connection, a “data” connection is created each time a file is transferred between client and server.
Security vulnerabilities related to HP Jetdirect FTP (and FTP in general), have existed for almost as long as FTP functionality itself. FTP servers are prone to remote denial-of-service (DoS) vulnerabilities that can affect device access for legitimate users. DoS attacks such as buffer overflows, rogue commands and malformed packets have been historically known to crash FTP print servers or destroy firmware. If FTP printing is not required in the environment, this protocol should be disabled. If required on legacy HP devices where FTP print and download are coupled together, only enable FTP for the firmware download, then disable when complete.
AppleTalk
AppleTalk is an obsolete protocol used by the original Apple networking. Apple no longer supports AppleTalk.
Released by Apple in 1985 with the original Macintosh, AppleTalk was a protocol suite that provided addressing, routing, data stream services, naming services and file/print sharing. AppleTalk remained available as a Macintosh communications suite until 2009 when support was dropped due to its diminishing usefulness on large enterprise networks. Using a very simplistic approach, AppleTalk connected Macs together in small local area networks and automatically managed a name based approach to host identification and network communication. Much of the AppleTalk feature set was later introduced in Bonjour and Universal Plug and Play. AppleTalk contained several primary protocols; AppleTalk Address

23
Resolution Protocol (AARP), Name Binding Protocol (NBP), Printer Access Protocol (PAP), Routing Table Maintenance Protocol (RTMP) and Zone Information Protocol (ZIP), just to name a few. AARP allowed hosts to generate their own addresses and NBP was a dynamic system for mapping network addresses to user-readable names. PAP managed printer connections and other servers, plus conveyed status and coordinate actual data transfer. RTMP managed routing information over AppleTalk networks and ZIP managed the relationship between network numbers and zones.
The AppleTalk protocol is available on many of HP’s existing installed base of legacy printing devices, but has since been eliminated on newer Future Smart devices. On HP devices that support it, AppleTalk is enabled by default. At AppleTalk startup, a socket is created and set to listen for any print requests. Printer status and the printer’s ability to accept jobs is provided to the network at this time. When a client request for print is received, a peripheral channel is locked for Printer Access Protocol (PAP) exclusive use. Data is then forwarded to the printer and the printer establishes reverse channel communication to complete the handshake. Synchronization between the client and printer continues during the forwarding of data. The client then sends a “connection close” request when data transfer is complete, signaling the peripheral to unlock the PAP channel for future use.
Security risks associated with AppleTalk are minimal, although Denial of Service (DoS) attacks over AppleTalk networks have been recorded. For devices that still support AppleTalk, disabling is recommended unless the protocol is required in the print environment. Once again, it is important to note that AppleTalk is unsupported on Mac OS X v10.6 (2009) and later operating systems. Today, it would be rare to find any AppleTalk use in most enterprise print environments.
Novell (IPX/SPX)
Internetwork packet exchange (IPX) and sequenced packet exchange (SPX) are protocols primarily used on networks that run the Novell NetWare operating system. These protocols are obsolete.
Internetwork Packet Exchange/Sequenced Packet Exchange (IPX/SPX) was a very popular protocol suite throughout the 1980’s and midway into the 1990’s. In it’s prime, the IPX/SPX protocol stack was supported by a number of network operating systems, including Windows. However, IPX/SPX was mostly thought of as the protocol for Novell Networks and specifically brought forth the practice of connecting multiple networks together, or internetworking. IPX and SPX connection services are very similar to TCP/IP and were primarily designed for local area networks. The efficiency of the IPX/SPX stack contributed to performance that typically exceeded TCP/IP on a local area network. However, TCP/IP became the industry standard due to its superior performance over wide area networks and the internet. Novell attempted to support TCP/IP with NetWare/IP by “tunneling” IPX in IP packets, but complex implementation and performance loss due to the tunneling overhead kept NetWare/IP from being widely adopted. TCP/IP is now the primary Novell NetWare internetwork protocol. Although IPX usage has declined dramatically in recent years due to TCP/IP being the pervasive internet protocol, it wouldn’t be rare to find IPX/SPX still being used in some Windows environments. In addition, some supported

24
legacy system management tools still support the stack. Many of the HP Future Smart devices do not provide support for the IPX/SPX stack.
The HP JetDirect implementation of the Novell NetWare Printing subsystem is composed of the IPX/SPX stack, IPX Direct Mode, Queue Server, Remote Printer, and NetWare Configuration modules. For many of the Future Smart devices, this capability no longer exists. When IPX/SPX is enabled on devices that support this protocol suite, the generation of Service Advertising Protocol (SAP) packets are also enabled. The JetDirect print server name and service type are broadcast via SAP packets, allowing for unique identification of the device on the IPX network. SAP packets are broadcast only after an IPX network and supported frame type are detected. Once detected, SAP packets are periodically broadcast (at some configured interval) on all sensed frame types. Jetdirect responds to service queries with a service response packet that includes the specific object type of 030c. This object type allows Netware configuration tools to identify the print server as JetDirect.
Most IPX security vulnerabilities are associated with Denial of Service (DoS) attacks. Malicious users have created malformed packets that match source and destination addresses, broadcast pings, or fill gateway buffers. HP recommends disabling IPX/SPX if not used in the print environment. If IPX/SPX is required for client printing or device management, HP then recommends disabling Novell Remote Configuration (RCFG), an IPX/SPX related technology used to remotely configure Novell queues.
Require HTTPS Redirect
When HTTPS redirect is enabled, accessing the device via a Web page is redirected through a secure port (HTTPS). HTTPS uses identity certificates in the device. Consider installing CA signed certificates before enabling.

25
Telnet
Telnet is a configuration and information protocol that allows you to configure a device from a console directly on the device.
The Telnet protocol is used as a communication facility to allow a standard method of interfacing terminal devices or processes. Its well-known port is Port 23. In the context of Jetdirect, Telnet is used for setting or displaying configuration parameters. Jetdirect products have included a Telnet configuration option for a number of years. Although the Web UI may be the configuration method of choice, some customers appreciate the availability of Telnet when browsers are unavailable or the embedded web interface is not accepting connections. Jetdirect configuration items available through Telnet range from Admin password assignment to many of the printing and discovery protocol settings. Telnet only listens for one session at a time. Other Telnet clients cannot see any Telnet menus until their sessions are accepted. The Telnet session can be terminated at any time by either side of the connection. Parameters are not saved if the Telnet session is lost before the user exits from the Telnet main menu. Telnet is sometimes used to easily test TCP/IP connections. Printing is also possible through Telnet by opening up a session using Port 9100, then entering the data to be printed.
Enabled Telnet obviously poses a serious security risk in any print environment. Although a Telnet connection may be protected by an administrator password, Telnet connections are not secure. Telnet data is transferred over the network in a clear text, unsecured fashion. Once able to establish a Telnet session, a hacker would almost have complete access to the printer’s configuration. Latest reports have shown that hackers appear to be using the telnet remote access protocol approximately 10% of the time to attack corporate servers over mobile networks. Fairly significant statistics considering Telnet is ~40 years old. Due to these Telnet related vulnerabilities, it is becoming increasingly common to see Secure Shell (SSH) replacing Telnet access methods. It is recommended to disable telnet and use a more secure method to configure HP devices. If telnet is required to transport data, it is recommended that an encrypted Telnet solution be deployed.

26
Remote Firmware Upgrade (RFU)
Allows the firmware upgrade file to be downloaded from the Internet and installed remotely.
The firmware upgrade operation updates or replaces device operating system code on HP printers and multi-function devices, and is commonly referred to as a “remote firmware update”(RFU). The Remote Firmware Upgrade setting determines if the firmware update process is allowed to be performed.
Performing a Remote Firmware Update (RFU) is typically the responsibility of an administrator within an organization. For security reasons, RFU is an option that should only be enabled when new firmware is being loaded. RFU should be disabled at all other times.
FTP Firmware Update
Select the check box to assess File Transfer Protocol (FTP) firmware update. If File Transfer Protocol (FTP) printing is allowed, you can start an FTP session and transfer the updated firmware image to the device.
TASKS The Tasks tab in the navigation tree offers the ability to perform Assess Only or Assess and Remediate tasks. An Assess Only task (assessment) reads policy security settings from devices and indicates which settings are in or out of compliance. An Assess and

27
Remediate task (remediation) fixes any settings on devices that are out of compliance by placing them back into compliance.
The result of the assessment task is indicated in the Assessment Status column in the device list. If the assessment status indicates Passed, all settings on the device matched the settings in the policy. Otherwise, assessment status will indicate any off High/Medium/Low with the most severe taking precedence for the status.
Assessment and remediation tasks on a policy for a group can be scheduled to occur at any desired frequency.
Remember, when scheduling an assessment, the Assess Only option provides a report but does not change any device settings. The Assess and Remediate option actually fixes out-of-compliance devices.
• Assessment—identifies and reports any noncompliant features during the scheduled assessment
• Remediation—applies the correct policy settings to all noncompliant features
REPORTS HP Printer Security Plug-in offers two reports to indicate which devices are in or out compliance. These reports could potentially be used to pass audits, as one example. Use the Reports tab in the navigation tree to generate or schedule the following types of reports:
• Executive Summary • Devices Assessed
Each report allows for saving the report as PDF by choosing the icon on the far right.
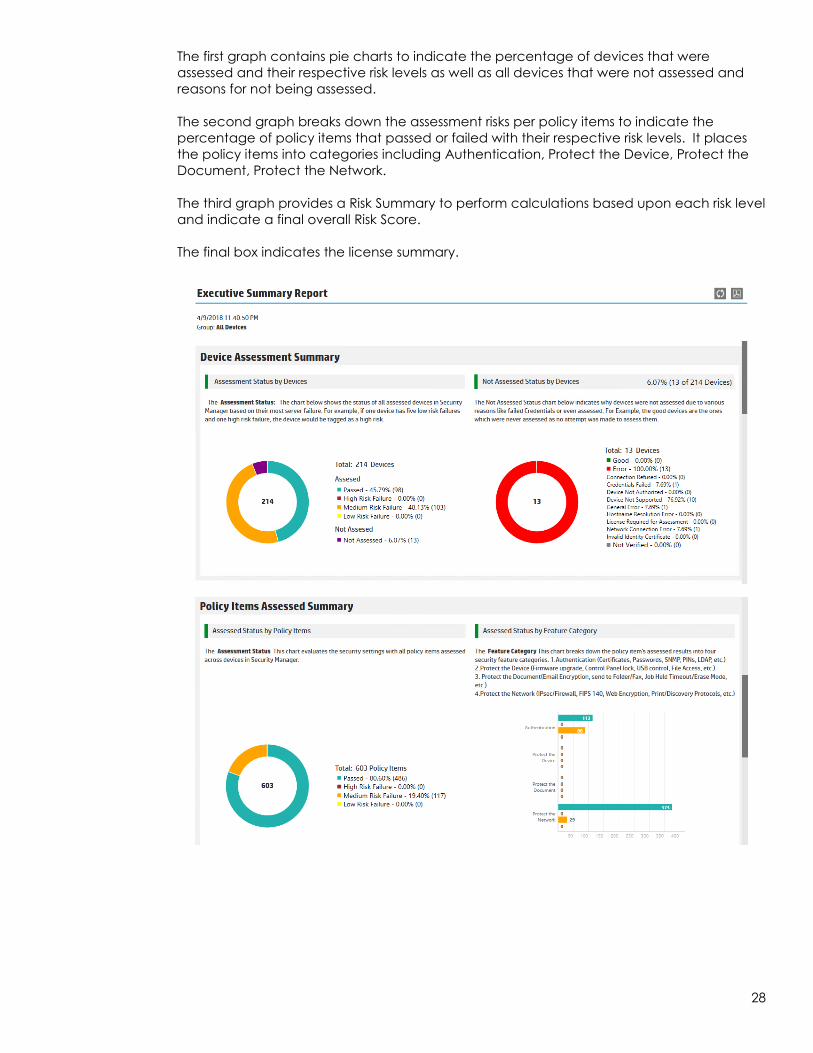
Executive Summary The Executive Summary report displays the current state of the system in a dashboard type of display. The report includes the assessment risk by device, devices not assessed, assessment risk by policy item, assessment risk by feature category, and risk summary.
28
The first graph contains pie charts to indicate the percentage of devices that were assessed and their respective risk levels as well as all devices that were not assessed and reasons for not being assessed. The second graph breaks down the assessment risks per policy items to indicate the percentage of policy items that passed or failed with their respective risk levels. It places the policy items into categories including Authentication, Protect the Device, Protect the Document, Protect the Network. The third graph provides a Risk Summary to perform calculations based upon each risk level and indicate a final overall Risk Score. The final box indicates the license summary.

29
Devices Assessed The Devices Assessed report lists all the assessed devices. To generate a more detailed report per device, select View next to each individual device. This report indicates every security setting that was assessed, whether it passed or not, and the risk level if it didn’t pass.

30
Automated Email HP Printer Security Plug-in includes an Automated Email feature that sends a preconfigured tickler email when an Assessment/Remediation task is complete. The Automated Email feature must be configured before it can be used. Configuration is performed by selecting Settings in the navigation tree and clicking Automatic Email. Configure both the email server settings used to send the email as well as some of the specifics of the email to be sent.
Settings that can be configured include the following:
• SMTP Server—The hostname or IP address of the email server. • Port—The network port used to contact the email server. • Enable SSL—Enables or disables the use of SSL when working with the email server. • Use Default Credentials—Specifies if user credentials are required. If selected, the
Username, Password, and Domain fields are disabled.

31
• Username—The username used to log in to the SMTP (email) server. • Password—The password used to log in to the SMTP server. This is a password text box,
so the characters are hidden as they are entered. • Domain—If the username is related to a domain, the domain is required to qualify the
username. This value is optional.
The settings for the email message include the following:
• Email Subject—The subject used in the email. • From Address—The email address used for the sender in the email. • Recipient(s)—One or more recipient email addresses. If more than one address is
specified, they must be separated by a space, comma, or semicolon.
Automation Output emails are supported only for Assessment/Remediation tasks. When a task is created, check the Email Results checkbox on the New Task dialog box to enable the sending of automatic email summary reports via email.
If the Email Results checkbox is selected, an email will be sent when the task completes. This checkbox is visible only if the following occur:
• A valid SMTP server name is entered in the global Settings dialog. • The task type is Assess and Remediate.
The Email Results checkbox is not visible if the task type is Assessment only.
The email message is intended to be a tickler to remind an administrator that a remediation ran. This message, like all emails, typically goes over the network in clear text, so only minimal information is included in the email. The email contains simple information, such as the task name, policy name, and device group.

32
© Copyright 2018-2019 HP Development Company, L.P. The information contained herein is subject to change without notice. The only warranties for HP products and services are set forth in the express warranty statements accompanying such products and services. Nothing herein should be construed as constituting an additional warranty. HP shall not be liable for technical or editorial errors or omissions contained herein.
Microsoft and Windows are either registered trademarks or trademarks of Microsoft Corporation in the United States and/or other countries.
4AA7-2800ENW, July 2019, Rev. 1