hp proliant essentials rapid deployment pack—windows ...h10032. · hp proliant essentials rapid...
TRANSCRIPT
HP ProLiant Essentials Rapid Deployment Pack—Windows Edition
User Guide
June 2004 (Fourth Edition) Part Number 315378-004
Product Version 1.60

© Copyright 2002, 2004 Hewlett-Packard Development Company, L.P.
Confidential computer software. Valid license from HP required for possession, use or copying. Consistent with FAR 12.211 and 12.212, Commercial Computer Software, Computer Software Documentation, and Technical Data for Commercial Items are licensed to the U.S. Government under vendor’s standard commercial license.
The information contained herein is subject to change without notice. The only warranties for HP products and services are set forth in the express warranty statements accompanying such products and services. Nothing herein should be construed as constituting an additional warranty. HP shall not be liable for technical or editorial errors or omissions contained herein.
Acrobat and Adobe are trademarks of Adobe Systems Incorporated. Linux is a U.S. registered trademark of Linus Torvalds. Microsoft and Windows are U.S. registered trademarks of Microsoft Corporation.
HP ProLiant Essentials Rapid Deployment Pack—Windows Edition User Guide
June 2004 (Fourth Edition) Part Number 315378-004 Product Version 1.60
Contents
About This Guide Audience Assumptions..................................................................................................................................v Related Documents.......................................................................................................................................vi Where to Go for Additional Help.................................................................................................................vi
Online Resources ...................................................................................................................................vi Telephone Numbers ...............................................................................................................................vi
Chapter 1 Introduction to the Rapid Deployment Pack Deployment Server Console Overview ..................................................................................................... 1-1
Deployment Server Console View...................................................................................................... 1-2 Deployment Server Console Interactions ........................................................................................... 1-3
ProLiant-Specific Features ........................................................................................................................ 1-3 Integration with Lights-Out Management........................................................................................... 1-3 Physical Devices View ....................................................................................................................... 1-6 Virtual Rack/Enclosure/Bay ............................................................................................................... 1-7 ProLiant BL Server Rip-and-Replace ............................................................................................... 1-11
Chapter 2 Using the Rapid Deployment Pack Scripted Installation Deployment for ProLiant BL Servers ...................................................................... 2-3 Image Capture for ProLiant BL Servers.................................................................................................... 2-5 Image Deployment for ProLiant BL Servers............................................................................................. 2-6 Configuration of Deployed Servers........................................................................................................... 2-8 Rip-and-Replace for ProLiant BL Servers .............................................................................................. 2-12
Chapter 3 Understanding the ProLiant Integration Module for Deployment Server Rapid Deployment Pack Jobs.................................................................................................................... 3-1
Scripted Install Jobs ............................................................................................................................ 3-2 SmartStart Toolkit and OS Imaging Jobs ........................................................................................... 3-9 SmartStart Toolkit Hardware Configuration Jobs ............................................................................ 3-10
HP ProLiant Essentials Rapid Deployment Pack—Windows Edition User Guide iii
Contents
Understanding the Deployment Server Directory Structure ....................................................................3-11 Images ...............................................................................................................................................3-11 Configurations ...................................................................................................................................3-12 Tools..................................................................................................................................................3-12 Scripts................................................................................................................................................3-13 Windows OS Files.............................................................................................................................3-13 Linux Boot Files ................................................................................................................................3-14 Documentation Files..........................................................................................................................3-14
Chapter 4 Understanding the ProLiant Integration Module for NFS Server Linux Distribution Files.............................................................................................................................4-1 Linux Installation Files ..............................................................................................................................4-1
Red Hat................................................................................................................................................4-2 UnitedLinux.........................................................................................................................................4-2
Chapter 5 Customizing the Provided Jobs, Scripts, Tools, and Configuration Files Customizing the Jobs Pane ........................................................................................................................5-1
Adding a New Job or Folder ...............................................................................................................5-2 Copying a Job or Folder ......................................................................................................................5-2 Renaming a Job or Folder....................................................................................................................5-2 Deleting a Job or Folder ......................................................................................................................5-2 Moving a Job or Folder .......................................................................................................................5-2 Exporting a Job or Folder ....................................................................................................................5-3 Importing a Job or Folder ....................................................................................................................5-3
Customizing the ProLiant Integration Module for Deployment Server.....................................................5-3 Modifying the Microsoft Windows unattend.txt File..........................................................................5-3 Customizing the Hardware Configuration Settings.............................................................................5-4 Updating the ProLiant Support Pack Files ..........................................................................................5-4 Customizing the Packaged Cluster Deployment Jobs .........................................................................5-5
Customizing the ProLiant Integration Modules for NFS Server ...............................................................5-7 Customizing the Red Hat Linux Kickstart File ...................................................................................5-7 Customizing the UnitedLinux Control File .........................................................................................5-7
Index
iv HP ProLiant Essentials Rapid Deployment Pack—Windows Edition User Guide

About This Guide
This guide provides:
• Information for using the Rapid Deployment Pack as a server deployment solution
• A description of the Deployment Server Console, its basic functionality, and ProLiant-specific features
• A description of the files and directory structure comprising the Rapid Deployment Pack components
• Server deployment usage scenarios
Audience Assumptions
To install and configure the Rapid Deployment Pack, it is assumed that you have knowledge of:
• Installing Microsoft® Windows®, either from CD or the network, using the unattend.txt mechanism
• Basic Windows management and administration, such as manipulating files and folders in Windows Explorer, creating users and groups in Computer Management, and setting share permissions
• Network infrastructure
• (Linux deployments only) Installing Linux either from CD or a network
• (Linux deployments only) Basic Linux command line interface operations (for example, mounting and unmounting floppy and CD-ROM drives, creating directories, and copying files)
To perform tasks after the installation is complete, it is assumed that you have knowledge of editing files within Windows and Linux.
HP ProLiant Essentials Rapid Deployment Pack—Windows Edition User Guide v

About This Guide
Related Documents
HP recommends reviewing the following documentation before reading this guide:
• The HP ProLiant Essentials Rapid Deployment Pack Planning Guide
• HP ProLiant Essentials Rapid Deployment Pack—Windows Edition Support Matrix
• The HP ProLiant Essentials Rapid Deployment Pack—Windows Edition Installation Guide
All of the documents can be found in PDF format at http://www.hp.com/servers/rdp, from the Rapid Deployment Pack CD autorun utility, at \pim-ds\docs on the product CD, and at .\docs on the Deployment Server.
Where to Go for Additional Help
Refer to the following sources for additional information about the Rapid Deployment Pack.
Online Resources
• HP ProLiant Essentials Rapid Deployment Pack website at http://www.hp.com/servers/rdp
• HP ProLiant Essentials Rapid Deployment Pack Knowledge Base at http://www.hp.com/servers/rdp/kb
• HP ProLiant Essentials Rapid Deployment Pack What’s New at http://www.hp.com/servers/rdp
• ITRC User Forum “ProLiant Deployment & Provisioning” at http://forums.itrc.hp.com
• Altiris website at http://www.altiris.com
Telephone Numbers
For the name of the nearest HP authorized reseller:
• In the United States, call 1-800-345-1518.
• In Canada, call 1-800-263-5868.
For HP technical support:
• In the United States and Canada, call 1-800-652-6672.
• Outside the United States and Canada, refer to http://www.hp.com
vi HP ProLiant Essentials Rapid Deployment Pack—Windows Edition User Guide
1 Introduction to the Rapid Deployment Pack
Deployment Server Console Overview
The Deployment Server Console provides the means to view and deploy servers within your network. The information in this section provides a brief description of the views and functions provided with the Deployment Server Console.
HP ProLiant Essentials Rapid Deployment Pack—Windows Edition User Guide 1-1
Introduction to the Rapid Deployment Pack
Deployment Server Console View
•
•
•
•
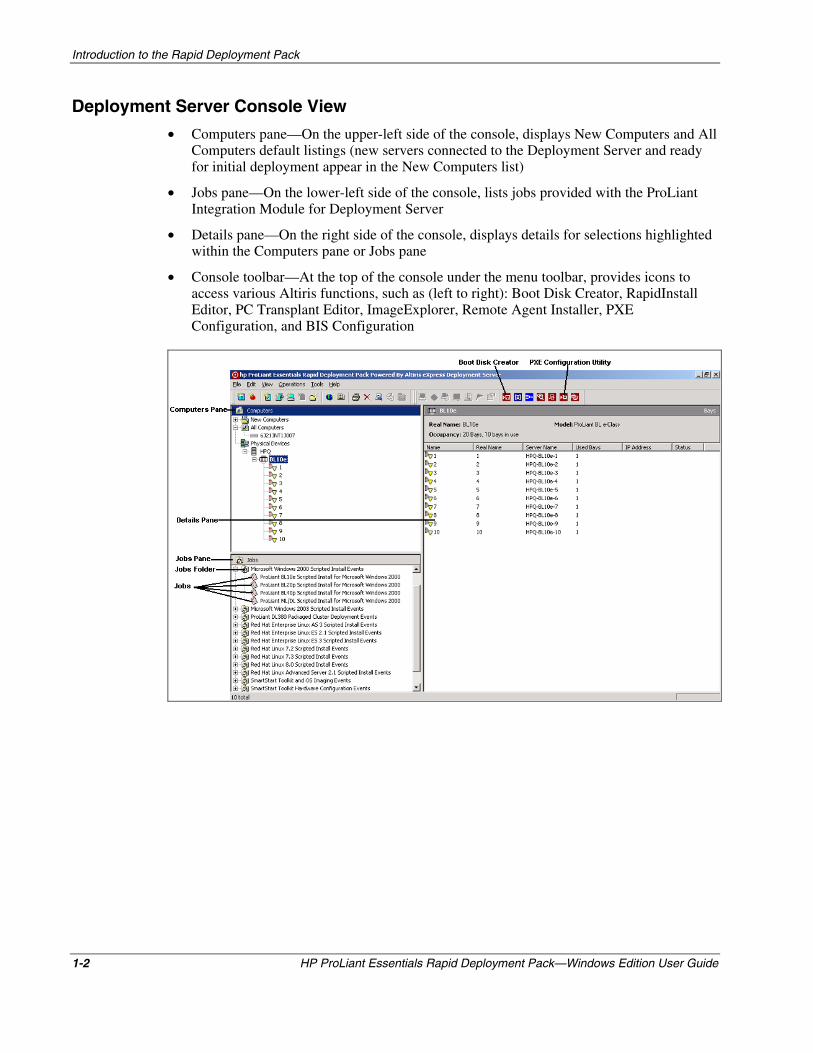
Computers pane—On the upper-left side of the console, displays New Computers and All Computers default listings (new servers connected to the Deployment Server and ready for initial deployment appear in the New Computers list)
Jobs pane—On the lower-left side of the console, lists jobs provided with the ProLiant Integration Module for Deployment Server
Details pane—On the right side of the console, displays details for selections highlighted within the Computers pane or Jobs pane
Console toolbar—At the top of the console under the menu toolbar, provides icons to access various Altiris functions, such as (left to right): Boot Disk Creator, RapidInstall Editor, PC Transplant Editor, ImageExplorer, Remote Agent Installer, PXE Configuration, and BIS Configuration
1-2 HP ProLiant Essentials Rapid Deployment Pack—Windows Edition User Guide
Introduction to the Rapid Deployment Pack
Deployment Server Console Interactions
•
•
•
•
View new computers or server status changes when they automatically appear in the Deployment Server Console view after an image deployment or scripted install.
Start a job on a server by:
— Dragging and dropping the server from the Computers pane to the job in the Jobs pane
— Dragging and dropping the job from the Jobs pane to the server in the Computers pane
In the Computers or Jobs pane, click the plus sign (+) icon before each selection name to expand the selections.
Right-click a server or job to access menu options, such as properties, job scheduling, or power management.
ProLiant-Specific Features
This section describes enhancements made to the Altiris Deployment Server Console specifically for ProLiant servers.
Integration with Lights-Out Management
Lights-Out Management enables the management of remote servers and the performance of remote console operations regardless of the state of the operating system or hardware.
The Deployment Server provides the ability to use the power management features of Integrated Lights-Out (iLO) and Remote Insight Lights-Out Edition (RILOE) to power on, power off, or cycle power on the target server. Each time a server connects to the Deployment Server, the Deployment Server determines if iLO or RILOE is installed in the server. If either is installed, the Deployment Server gathers information including the DNS name, IP address, and first user name. To perform management actions using RILOE or iLO, you must enter the password if it has not been previously saved. This password is saved in the SQL database using a standard encrypted password field. Any commands from the Deployment Server to RILOE or iLO are sent through HTTPS protocol, so the communication is secure and encrypted.
HP ProLiant Essentials Rapid Deployment Pack—Windows Edition User Guide 1-3
Introduction to the Rapid Deployment Pack
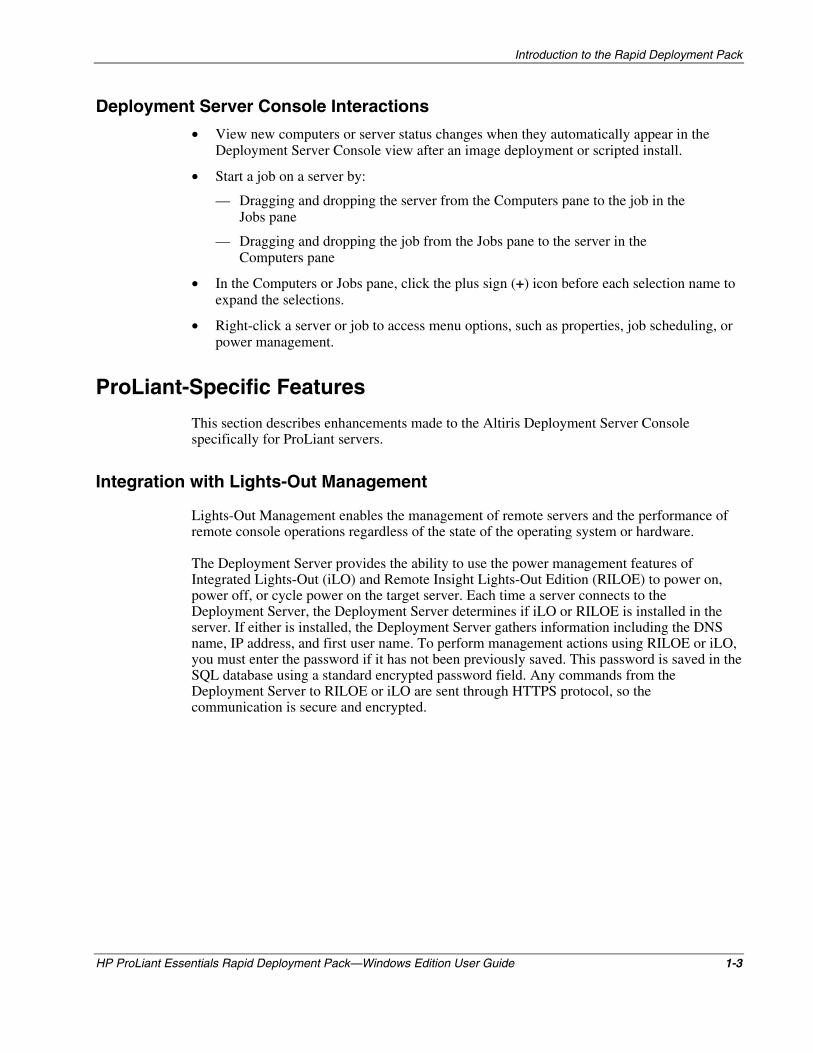
To display the stored Lights-Out information for each server:
1. Within the Computers pane, right-click the server.
2. Select Properties, and then scroll down and select the Lights-Out icon.
1-4 HP ProLiant Essentials Rapid Deployment Pack—Windows Edition User Guide
Introduction to the Rapid Deployment Pack
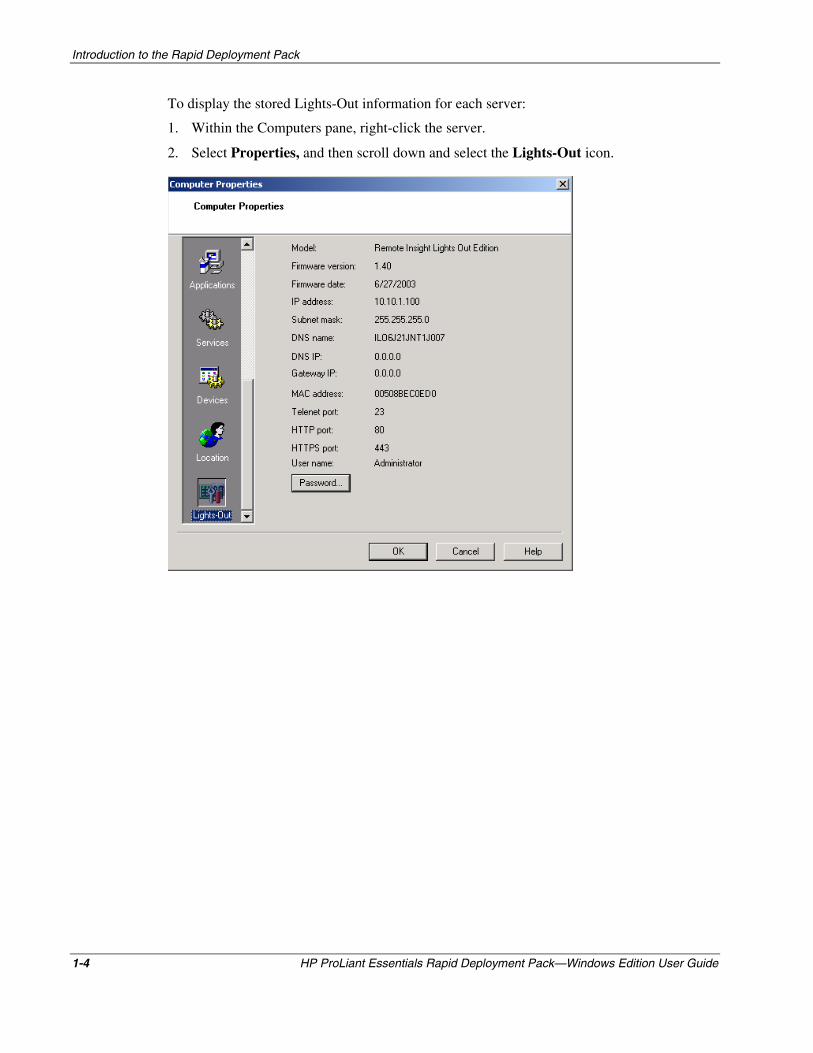
To access the iLO or RILOE interface from the Deployment Server console:
1. Within the Computers pane, right-click the server.
2. Select Power Control>RILOE/iLO – Interface.
This interface provides easy access to iLO and RILOE features, such as remote console.
HP ProLiant Essentials Rapid Deployment Pack—Windows Edition User Guide 1-5
Introduction to the Rapid Deployment Pack
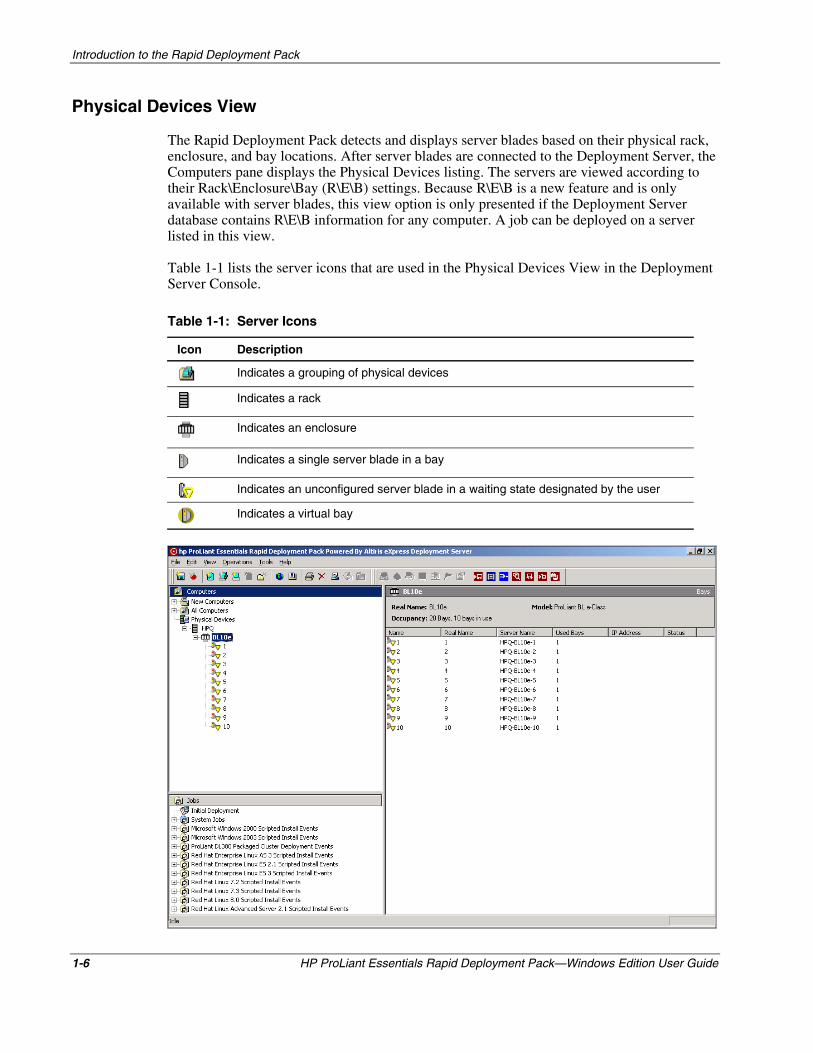
Physical Devices View
The Rapid Deployment Pack detects and displays server blades based on their physical rack, enclosure, and bay locations. After server blades are connected to the Deployment Server, the Computers pane displays the Physical Devices listing. The servers are viewed according to their Rack\Enclosure\Bay (R\E\B) settings. Because R\E\B is a new feature and is only available with server blades, this view option is only presented if the Deployment Server database contains R\E\B information for any computer. A job can be deployed on a server listed in this view.
Table 1-1 lists the server icons that are used in the Physical Devices View in the Deployment Server Console.
Table 1-1: Server Icons
Icon Description
Indicates a grouping of physical devices
Indicates a rack
Indicates an enclosure
Indicates a single server blade in a bay
Indicates an unconfigured server blade in a waiting state designated by the user
Indicates a virtual bay
1-6 HP ProLiant Essentials Rapid Deployment Pack—Windows Edition User Guide

Introduction to the Rapid Deployment Pack
Virtual Rack/Enclosure/Bay
ProLiant BL servers can be predefined with configuration settings and assigned jobs before the servers are connected to the Deployment Server. This feature is equivalent to using the Deployment Solution Virtual Computer feature. However, the Virtual Bay feature is only available with the Rapid Deployment Pack installation.
To create a virtual bay:
1. If the Physical Devices option is not already enabled, select View>Show Physical Devices.
2. In the Computers pane, right-click Physical Devices, and select New Virtual Bay.
HP ProLiant Essentials Rapid Deployment Pack—Windows Edition User Guide 1-7
Introduction to the Rapid Deployment Pack
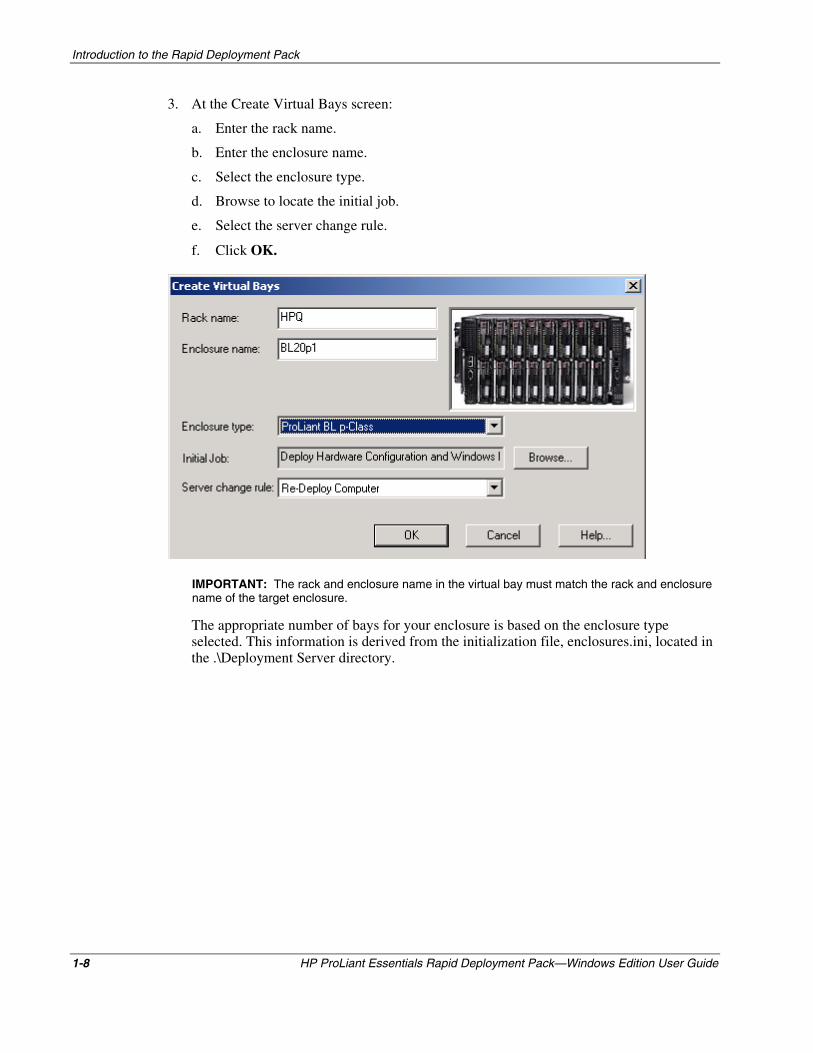
3. At the Create Virtual Bays screen:
a. Enter the rack name.
b. Enter the enclosure name.
c. Select the enclosure type.
d. Browse to locate the initial job.
e. Select the server change rule.
f. Click OK.
IMPORTANT: The rack and enclosure name in the virtual bay must match the rack and enclosure name of the target enclosure.
The appropriate number of bays for your enclosure is based on the enclosure type selected. This information is derived from the initialization file, enclosures.ini, located in the .\Deployment Server directory.
1-8 HP ProLiant Essentials Rapid Deployment Pack—Windows Edition User Guide

Introduction to the Rapid Deployment Pack
4. At the Computer Configuration Properties screen, select Microsoft Networking, and then click Define Range.
HP ProLiant Essentials Rapid Deployment Pack—Windows Edition User Guide 1-9
Introduction to the Rapid Deployment Pack
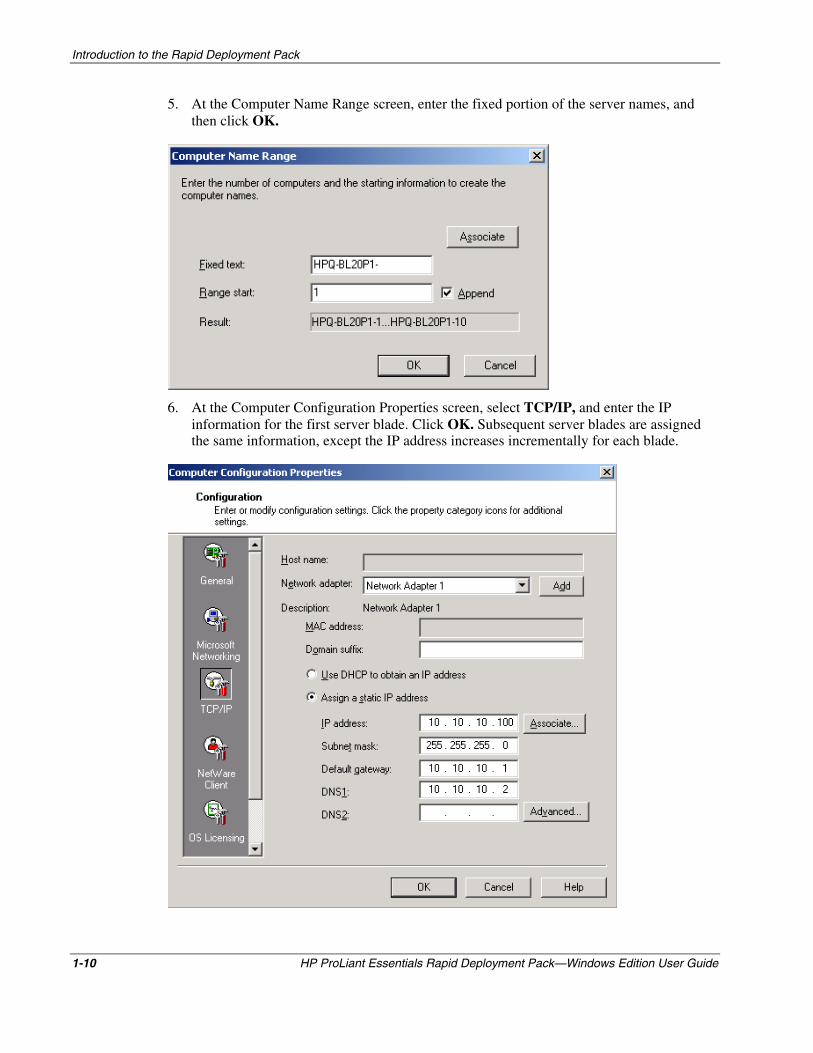
5. At the Computer Name Range screen, enter the fixed portion of the server names, and then click OK.
6. At the Computer Configuration Properties screen, select TCP/IP, and enter the IP information for the first server blade. Click OK. Subsequent server blades are assigned the same information, except the IP address increases incrementally for each blade.
1-10 HP ProLiant Essentials Rapid Deployment Pack—Windows Edition User Guide
Introduction to the Rapid Deployment Pack
The new virtual bays appear under Physical Devices with virtual bay icons when the virtual enclosure is selected. The server names and IP addresses appear in the Details pane.
The rack, enclosure, and bay numbers are listed in the Physical Devices view, with bays indicated by virtual icons. When a server blade with a matching rack, enclosure, and bay connects to the network and is identified by the Deployment Server, the awaiting configuration and jobs automatically execute. The virtual icon changes to a managed server icon in the Deployment Server Console.
ProLiant BL Server Rip-and-Replace
ProLiant BL servers include rule-based deployment based on a change in physical location. This feature enables rapid serviceability when replacing failed server blades, a procedure called “rip-and-replace.”
The Deployment Server tracks the physical location of every ProLiant BL server and detects when a new server has been placed in a particular bay. The Change Rules feature can be configured to initiate one of several different deployment actions when the Deployment Server detects a new server placed into a previously occupied bay. Rules are set for individual server blades.
NOTE: A server blade must be discovered and deployed by the Deployment Server or be located in a virtual bay to access the server change rules.
IMPORTANT: Licenses applied to a specific server cannot be removed or transferred to another server.
HP ProLiant Essentials Rapid Deployment Pack—Windows Edition User Guide 1-11
Introduction to the Rapid Deployment Pack
1-12 HP ProLiant Essentials Rapid Deployment Pack—Windows Edition User Guide
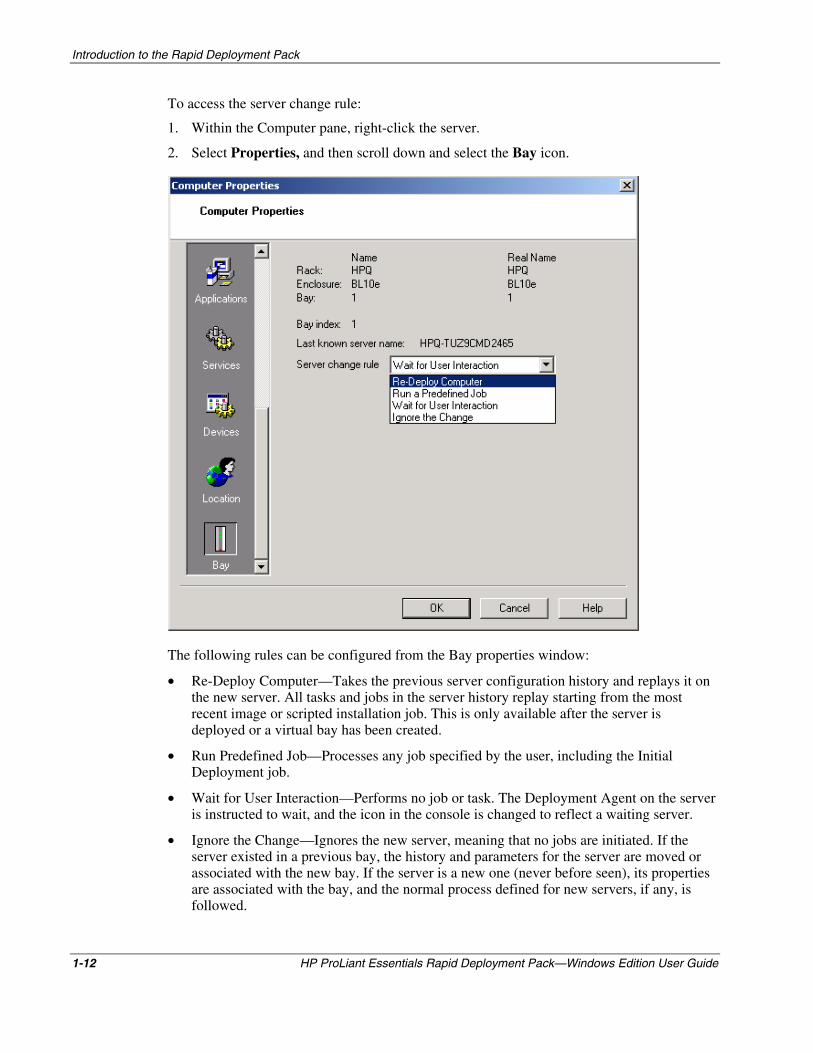
To access the server change rule:
1. Within the Computer pane, right-click the server.
2. Select Properties, and then scroll down and select the Bay icon.
The following rules can be configured from the Bay properties window:
•
•
•
•
Re-Deploy Computer—Takes the previous server configuration history and replays it on the new server. All tasks and jobs in the server history replay starting from the most recent image or scripted installation job. This is only available after the server is deployed or a virtual bay has been created.
Run Predefined Job—Processes any job specified by the user, including the Initial Deployment job.
Wait for User Interaction—Performs no job or task. The Deployment Agent on the server is instructed to wait, and the icon in the console is changed to reflect a waiting server.
Ignore the Change—Ignores the new server, meaning that no jobs are initiated. If the server existed in a previous bay, the history and parameters for the server are moved or associated with the new bay. If the server is a new one (never before seen), its properties are associated with the bay, and the normal process defined for new servers, if any, is followed.

2 Using the Rapid Deployment Pack
The usage scenario in this chapter uses server blades as an example to:
•
•
•
•
•
Deploy an operating system using scripted installation
Perform an image capture
Deploy a captured image simultaneously to other similar server blades
Perform a server configuration
Set a deployment rule to enable rip-and-replace on a deployed server blade
Although this scenario uses server blades, the process can be duplicated for other supported ProLiant servers. When performing an image capture and deployment, the hardware configuration of the target servers must be identical to the hardware configuration of the reference server.
This scenario presumes that all necessary installation and pre-deployment steps provided in the HP ProLiant Essentials Rapid Deployment Pack—Windows Edition Installation Guide have been performed.
IMPORTANT: If you plan to change the default rack and enclosure names, set these names before the first server in an enclosure connects to the Deployment Server. After the server blades are powered on for the first time and the rack and enclosure names are recorded in Deployment Server database, the server blades must be rebooted for new rack and enclosure names to be discovered. For more information, refer to “Configuring ProLiant BL Server Enclosures” in the HP ProLiant Essentials Rapid Deployment Pack—Windows Edition Installation Guide.
HP ProLiant Essentials Rapid Deployment Pack—Windows Edition User Guide 2-1
Using the Rapid Deployment Pack
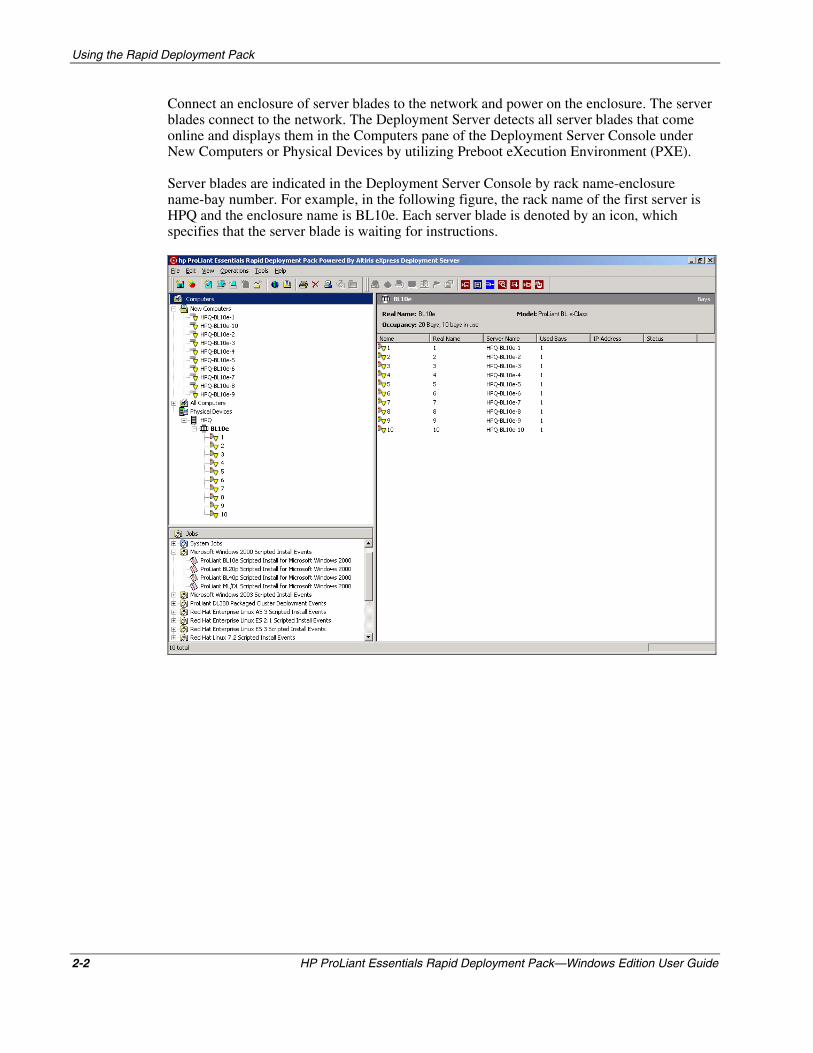
Connect an enclosure of server blades to the network and power on the enclosure. The server blades connect to the network. The Deployment Server detects all server blades that come online and displays them in the Computers pane of the Deployment Server Console under New Computers or Physical Devices by utilizing Preboot eXecution Environment (PXE).
Server blades are indicated in the Deployment Server Console by rack name-enclosure name-bay number. For example, in the following figure, the rack name of the first server is HPQ and the enclosure name is BL10e. Each server blade is denoted by an icon, which specifies that the server blade is waiting for instructions.
2-2 HP ProLiant Essentials Rapid Deployment Pack—Windows Edition User Guide

Using the Rapid Deployment Pack
Scripted Installation Deployment for ProLiant BL Servers
You can deploy all of the server blades in an enclosure by means of a scripted install job. However, it is faster to run the scripted install on the first server blade, which becomes the reference server, and then capture and deploy the reference server image to all the other server blades in the enclosure simultaneously.
From the Deployment Server Console, to deploy a single server blade:
1. In the Jobs pane, select the scripted install job to deploy, and drag this icon to the server to be deployed.
HP ProLiant Essentials Rapid Deployment Pack—Windows Edition User Guide 2-3
Using the Rapid Deployment Pack
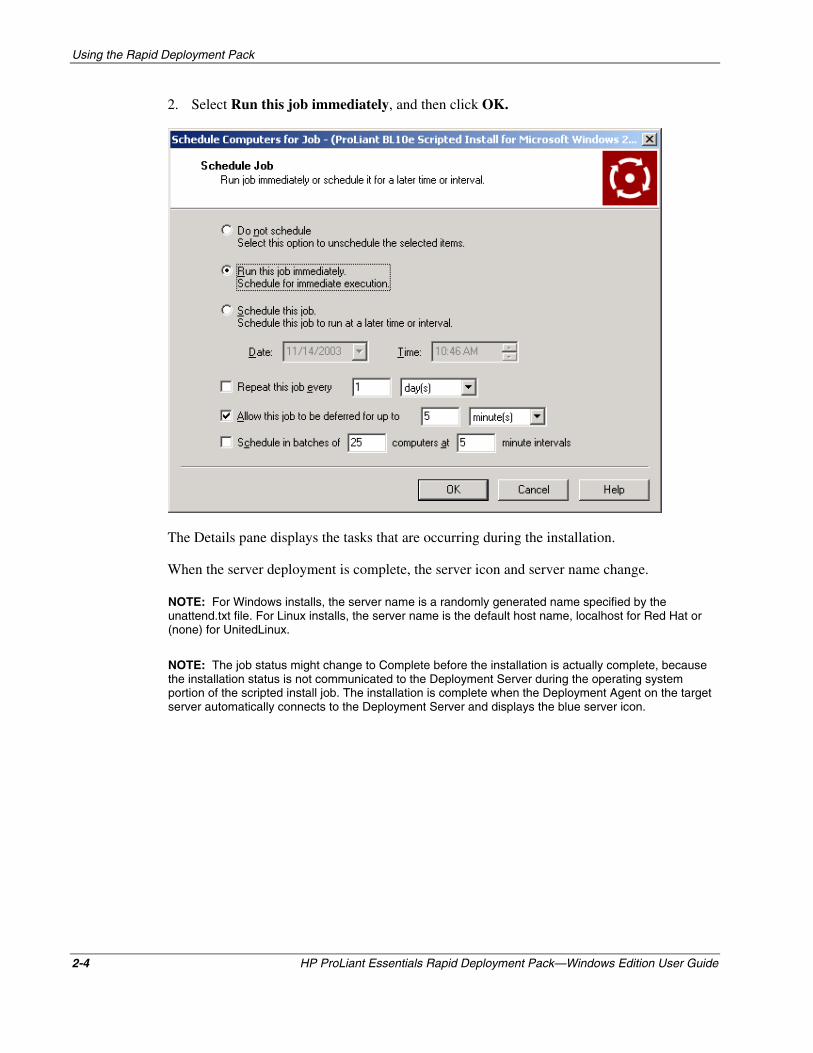
2. Select Run this job immediately, and then click OK.
The Details pane displays the tasks that are occurring during the installation.
When the server deployment is complete, the server icon and server name change.
NOTE: For Windows installs, the server name is a randomly generated name specified by the unattend.txt file. For Linux installs, the server name is the default host name, localhost for Red Hat or (none) for UnitedLinux.
NOTE: The job status might change to Complete before the installation is actually complete, because the installation status is not communicated to the Deployment Server during the operating system portion of the scripted install job. The installation is complete when the Deployment Agent on the target server automatically connects to the Deployment Server and displays the blue server icon.
2-4 HP ProLiant Essentials Rapid Deployment Pack—Windows Edition User Guide
Using the Rapid Deployment Pack
Image Capture for ProLiant BL Servers
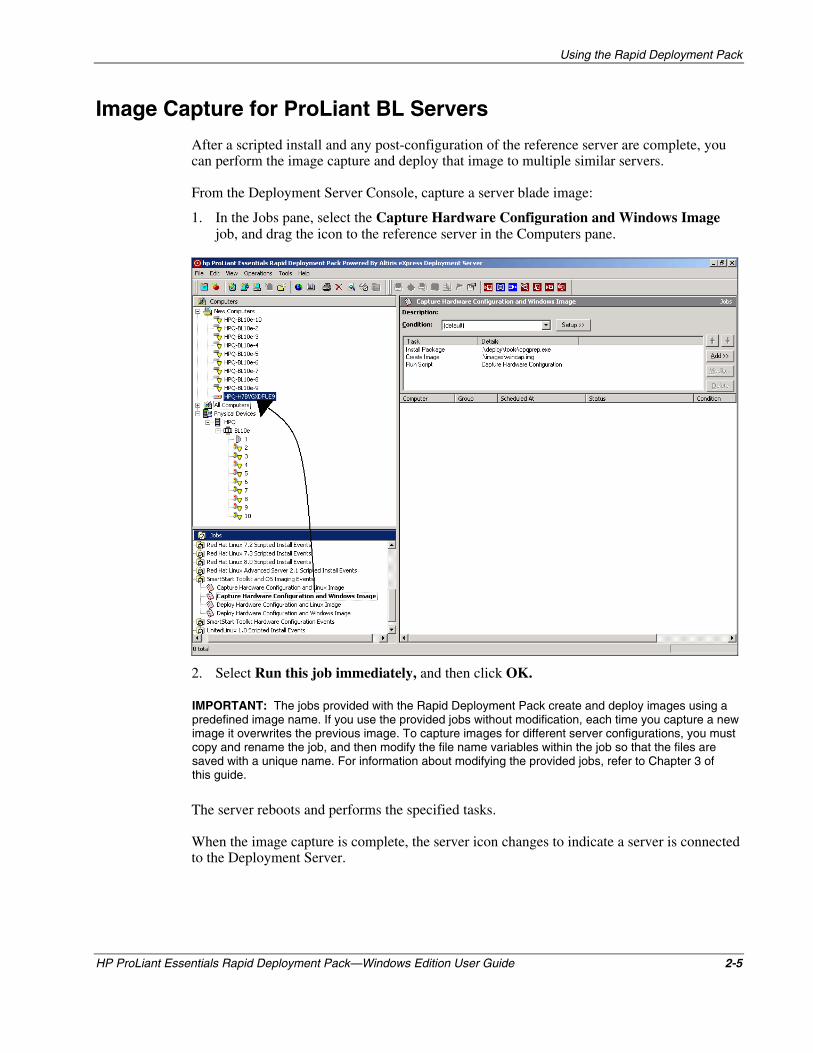
After a scripted install and any post-configuration of the reference server are complete, you can perform the image capture and deploy that image to multiple similar servers.
From the Deployment Server Console, capture a server blade image:
1. In the Jobs pane, select the Capture Hardware Configuration and Windows Image job, and drag the icon to the reference server in the Computers pane.
2. Select Run this job immediately, and then click OK.
IMPORTANT: The jobs provided with the Rapid Deployment Pack create and deploy images using a predefined image name. If you use the provided jobs without modification, each time you capture a new image it overwrites the previous image. To capture images for different server configurations, you must copy and rename the job, and then modify the file name variables within the job so that the files are saved with a unique name. For information about modifying the provided jobs, refer to Chapter 3 of this guide.
The server reboots and performs the specified tasks.
When the image capture is complete, the server icon changes to indicate a server is connected to the Deployment Server.
HP ProLiant Essentials Rapid Deployment Pack—Windows Edition User Guide 2-5
Using the Rapid Deployment Pack
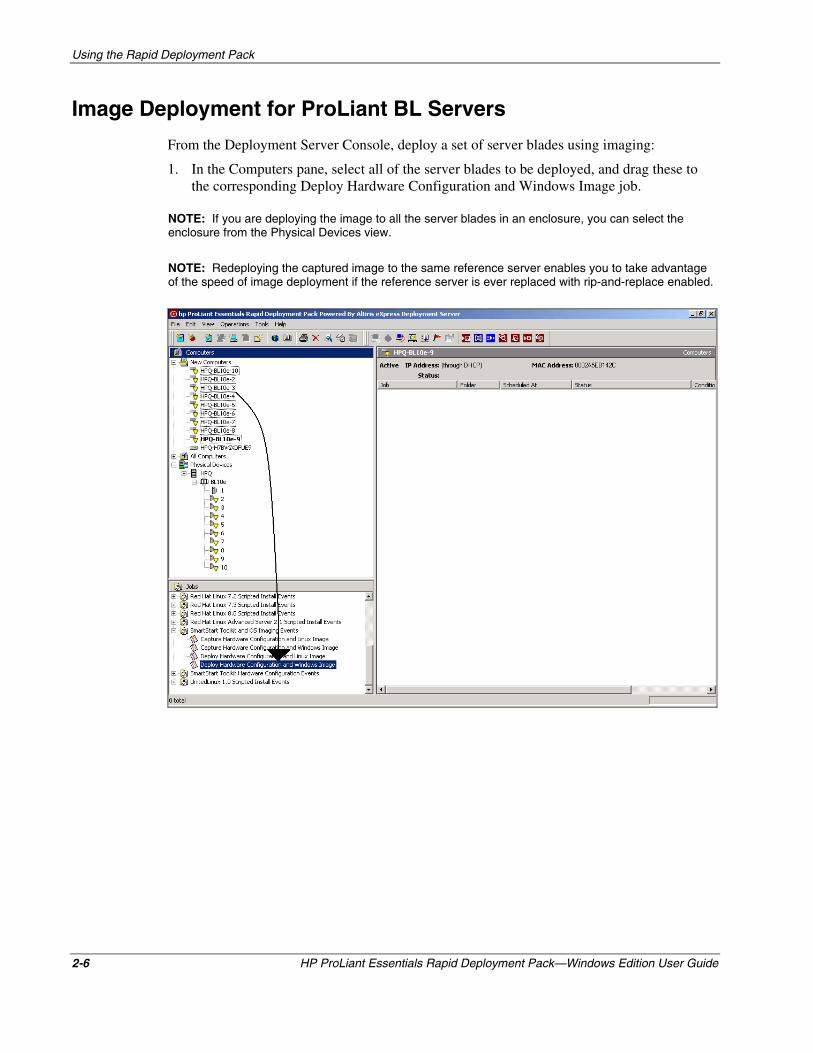
Image Deployment for ProLiant BL Servers
From the Deployment Server Console, deploy a set of server blades using imaging:
1. In the Computers pane, select all of the server blades to be deployed, and drag these to the corresponding Deploy Hardware Configuration and Windows Image job.
NOTE: If you are deploying the image to all the server blades in an enclosure, you can select the enclosure from the Physical Devices view.
NOTE: Redeploying the captured image to the same reference server enables you to take advantage of the speed of image deployment if the reference server is ever replaced with rip-and-replace enabled.
2-6 HP ProLiant Essentials Rapid Deployment Pack—Windows Edition User Guide
Using the Rapid Deployment Pack
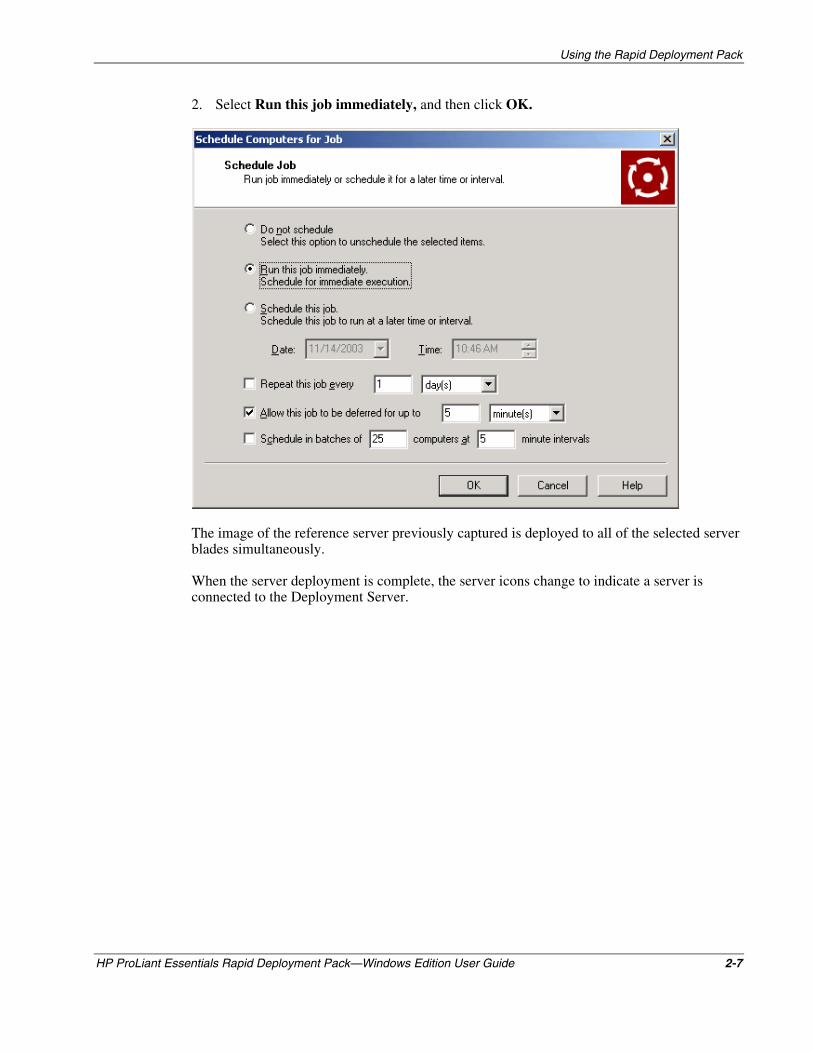
2. Select Run this job immediately, and then click OK.
The image of the reference server previously captured is deployed to all of the selected server blades simultaneously.
When the server deployment is complete, the server icons change to indicate a server is connected to the Deployment Server.
HP ProLiant Essentials Rapid Deployment Pack—Windows Edition User Guide 2-7

Using the Rapid Deployment Pack
Configuration of Deployed Servers
When deploying an image, the target server is automatically reconfigured to use the computer name and IP address information specified in the Deployment Server database. This Deployment Server feature can also be used to reconfigure existing servers or servers deployed using scripted install.
In the previous example, the reference server blade was installed using a scripted install job. This server was named HPQ-H7BVGXDFUE9, as specified in the Windows unattend text file.
To change the name of the reference server to match those deployed using imaging:
1. In the Computers pane, right-click the server to configure, and then select Configure.
2-8 HP ProLiant Essentials Rapid Deployment Pack—Windows Edition User Guide
Using the Rapid Deployment Pack
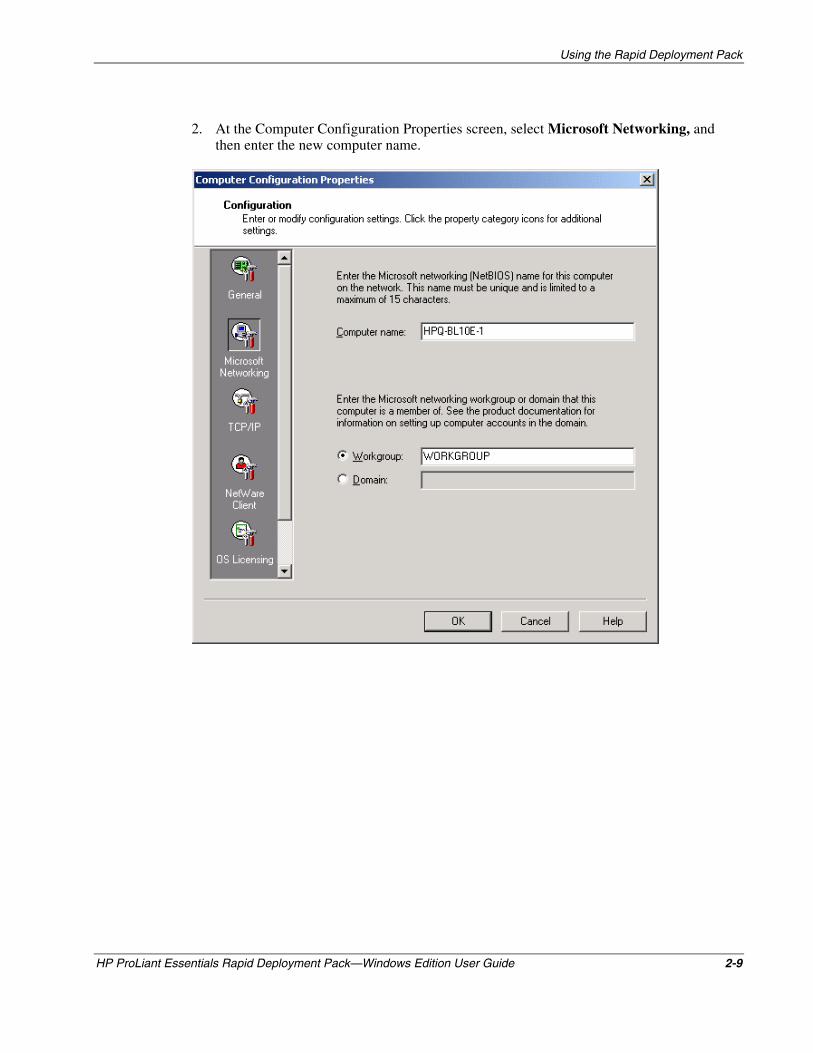
2. At the Computer Configuration Properties screen, select Microsoft Networking, and then enter the new computer name.
HP ProLiant Essentials Rapid Deployment Pack—Windows Edition User Guide 2-9
Using the Rapid Deployment Pack
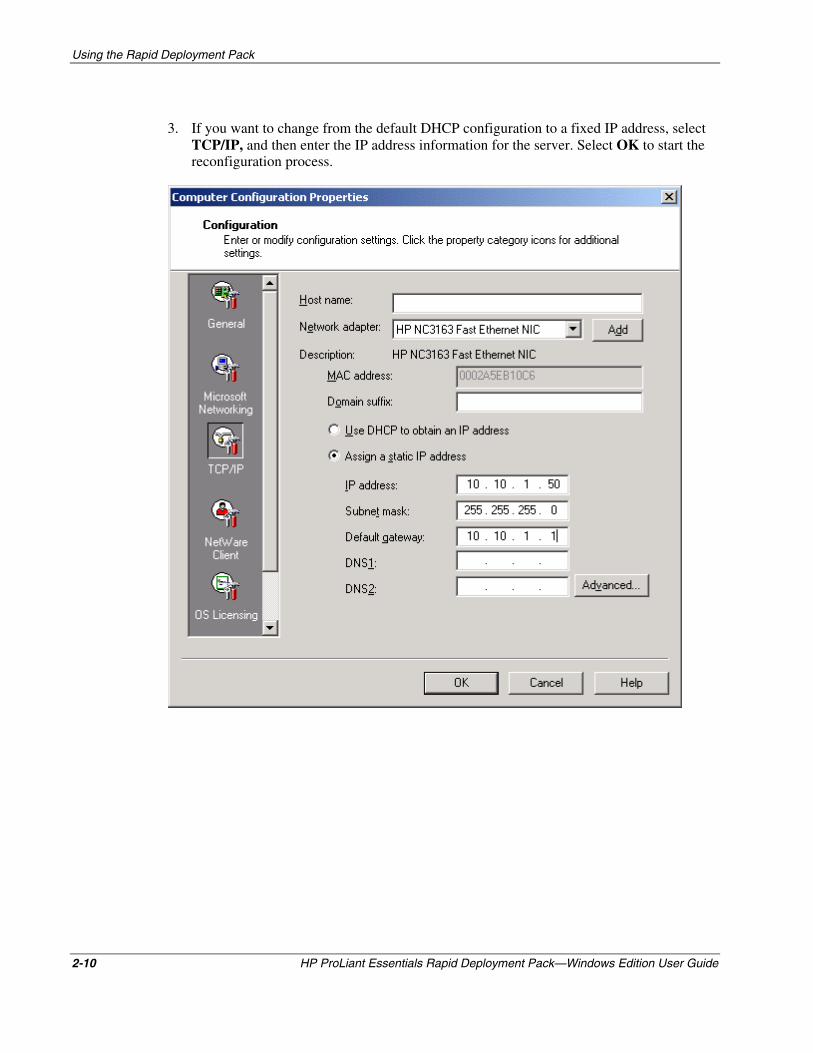
3. If you want to change from the default DHCP configuration to a fixed IP address, select TCP/IP, and then enter the IP address information for the server. Select OK to start the reconfiguration process.
2-10 HP ProLiant Essentials Rapid Deployment Pack—Windows Edition User Guide
Using the Rapid Deployment Pack
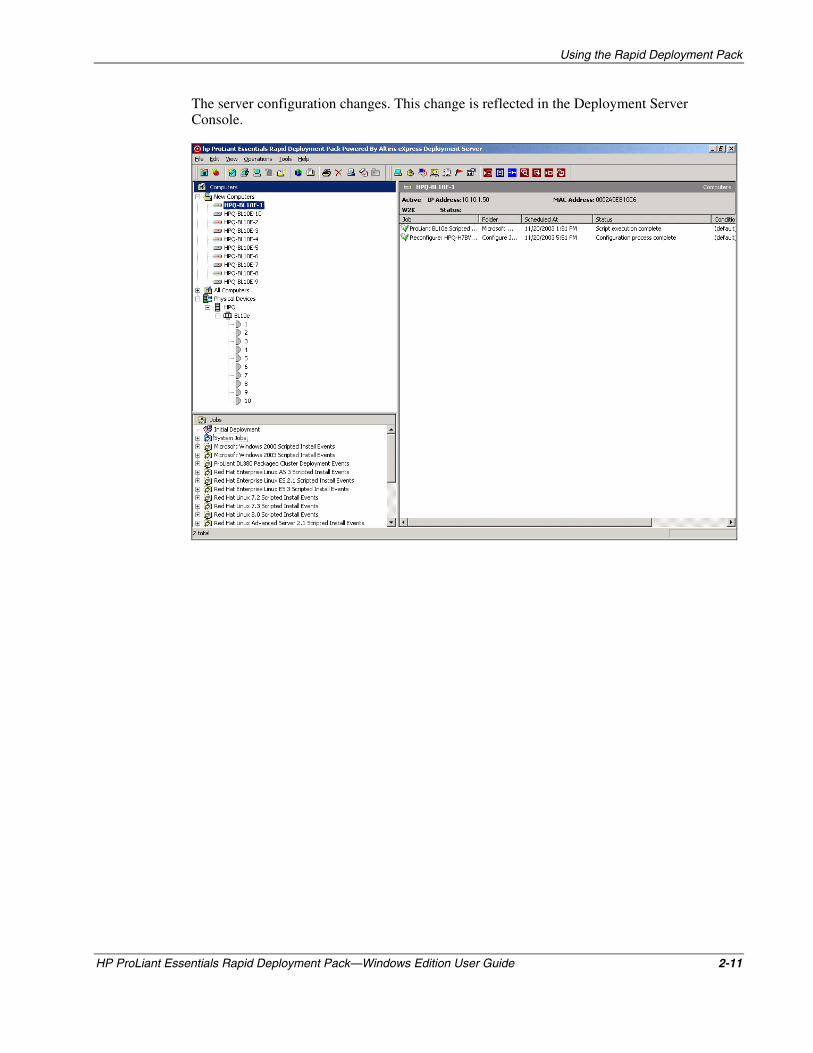
The server configuration changes. This change is reflected in the Deployment Server Console.
HP ProLiant Essentials Rapid Deployment Pack—Windows Edition User Guide 2-11
Using the Rapid Deployment Pack
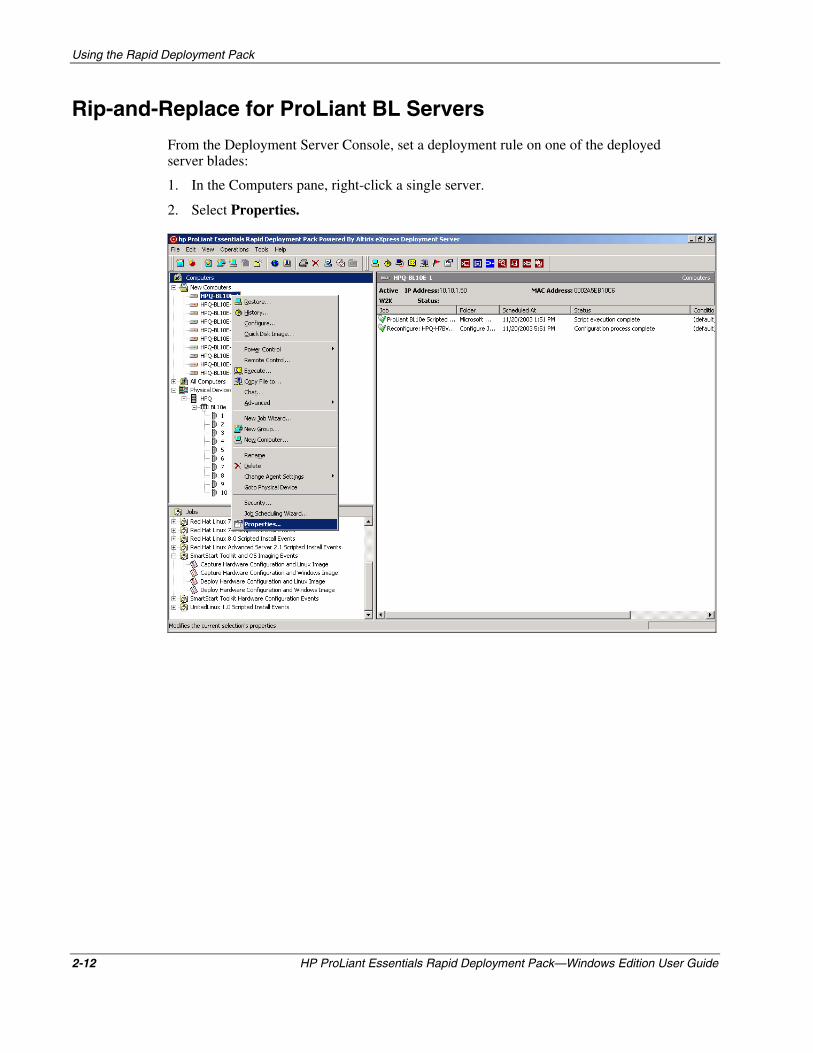
Rip-and-Replace for ProLiant BL Servers
From the Deployment Server Console, set a deployment rule on one of the deployed server blades:
1. In the Computers pane, right-click a single server.
2. Select Properties.
2-12 HP ProLiant Essentials Rapid Deployment Pack—Windows Edition User Guide

Using the Rapid Deployment Pack
HP ProLiant Essentials Rapid Deployment Pack—Windows Edition User Guide 2-13
3. Scroll down and select the Bay icon.
4. Select Re-Deploy Computer from the Server change rule list.
5. Click OK.
When this server blade is replaced, the deployment history is replayed on the new server. The tasks and jobs in the server history are run starting from the most recent image or scripted installation job, which for this example would be the image deployment.
3 Understanding the ProLiant Integration Module for
Deployment Server
Rapid Deployment Pack Jobs
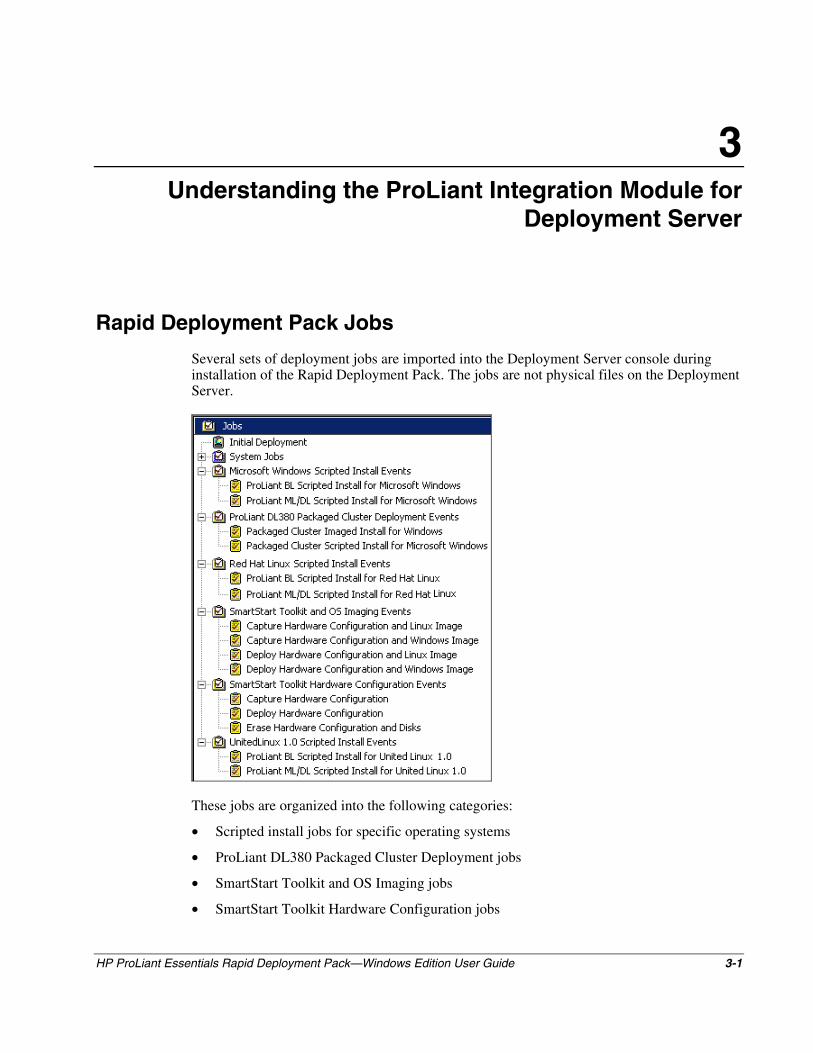
Several sets of deployment jobs are imported into the Deployment Server console during installation of the Rapid Deployment Pack. The jobs are not physical files on the Deployment Server.
These jobs are organized into the following categories:
•
•
•
•
Scripted install jobs for specific operating systems
ProLiant DL380 Packaged Cluster Deployment jobs
SmartStart Toolkit and OS Imaging jobs
SmartStart Toolkit Hardware Configuration jobs
HP ProLiant Essentials Rapid Deployment Pack—Windows Edition User Guide 3-1

Understanding the ProLiant Integration Module for Deployment Server
Scripted Install Jobs
A scripted install job enables you to perform a scripted hardware configuration and operating system installation of any supported operating system on a configured or unconfigured server.
The scripted install jobs perform the following operations consecutively:
1. Run a batch file that configures the hardware, using the CONREP and ACR utilities from the SmartStart Scripting Toolkit
2. Reboot the computer
3. Run a batch file that partitions the hard drive, using the CPQDISK utility
4. Reboot the computer
5. Run a batch file that copies support files to the hard drive of the target server and starts the operating system-specific scripted installation mechanism
3-2 HP ProLiant Essentials Rapid Deployment Pack—Windows Edition User Guide
Understanding the ProLiant Integration Module for Deployment Server
Windows Scripted Install Jobs
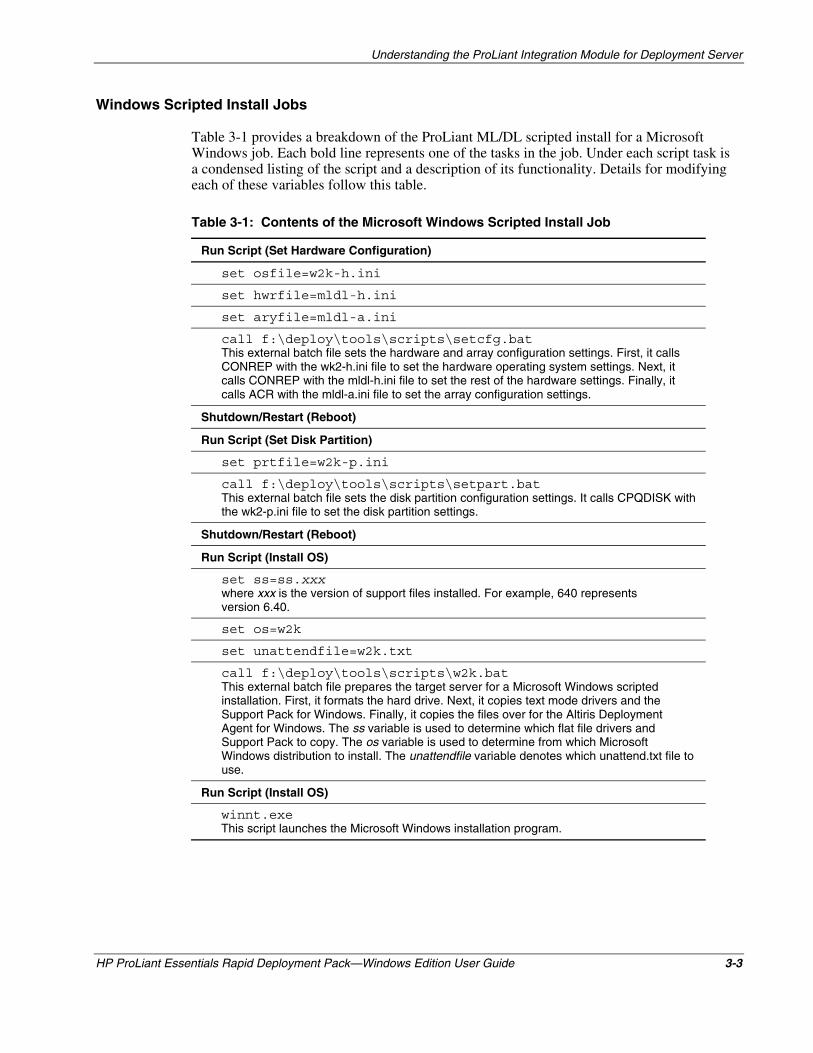
Table 3-1 provides a breakdown of the ProLiant ML/DL scripted install for a Microsoft Windows job. Each bold line represents one of the tasks in the job. Under each script task is a condensed listing of the script and a description of its functionality. Details for modifying each of these variables follow this table.
Table 3-1: Contents of the Microsoft Windows Scripted Install Job
Run Script (Set Hardware Configuration)
set osfile=w2k-h.ini
set hwrfile=mldl-h.ini
set aryfile=mldl-a.ini
call f:\deploy\tools\scripts\setcfg.bat This external batch file sets the hardware and array configuration settings. First, it calls CONREP with the wk2-h.ini file to set the hardware operating system settings. Next, it calls CONREP with the mldl-h.ini file to set the rest of the hardware settings. Finally, it calls ACR with the mldl-a.ini file to set the array configuration settings.
Shutdown/Restart (Reboot)
Run Script (Set Disk Partition)
set prtfile=w2k-p.ini
call f:\deploy\tools\scripts\setpart.bat This external batch file sets the disk partition configuration settings. It calls CPQDISK with the wk2-p.ini file to set the disk partition settings.
Shutdown/Restart (Reboot)
Run Script (Install OS)
set ss=ss.xxx where xxx is the version of support files installed. For example, 640 represents version 6.40.
set os=w2k
set unattendfile=w2k.txt
call f:\deploy\tools\scripts\w2k.bat This external batch file prepares the target server for a Microsoft Windows scripted installation. First, it formats the hard drive. Next, it copies text mode drivers and the Support Pack for Windows. Finally, it copies the files over for the Altiris Deployment Agent for Windows. The ss variable is used to determine which flat file drivers and Support Pack to copy. The os variable is used to determine from which Microsoft Windows distribution to install. The unattendfile variable denotes which unattend.txt file to use.
Run Script (Install OS)
winnt.exe This script launches the Microsoft Windows installation program.
HP ProLiant Essentials Rapid Deployment Pack—Windows Edition User Guide 3-3
Understanding the ProLiant Integration Module for Deployment Server
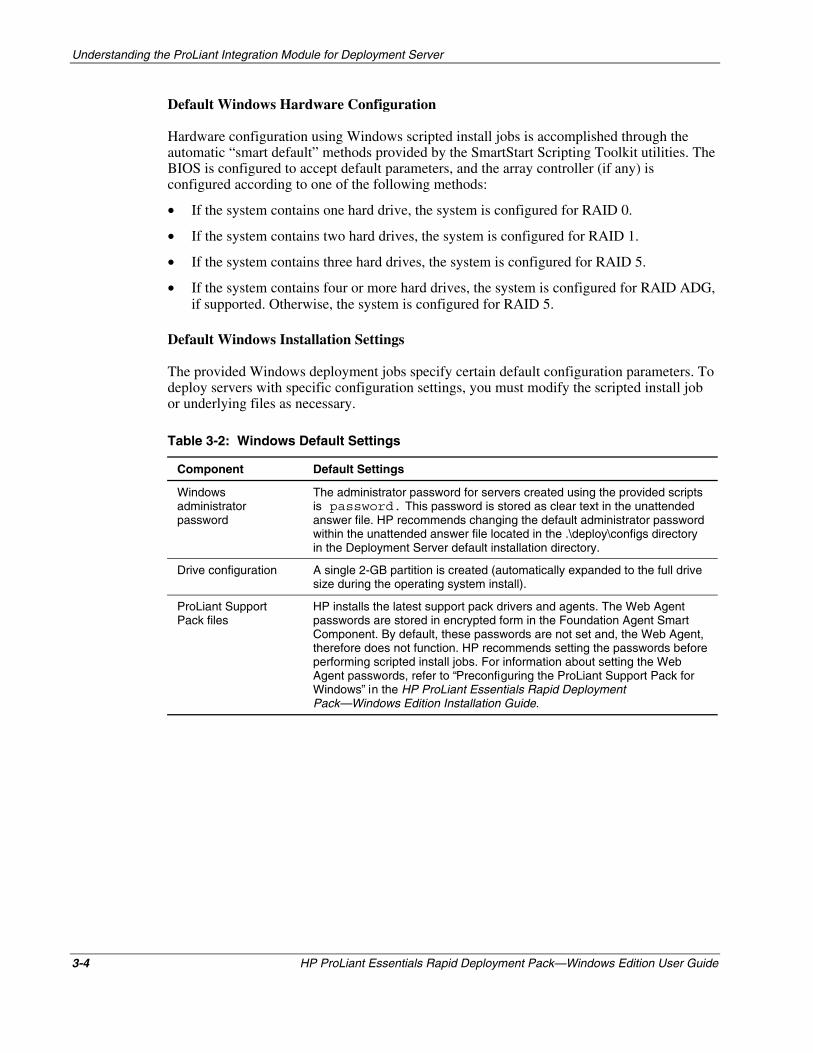
Default Windows Hardware Configuration
Hardware configuration using Windows scripted install jobs is accomplished through the automatic “smart default” methods provided by the SmartStart Scripting Toolkit utilities. The BIOS is configured to accept default parameters, and the array controller (if any) is configured according to one of the following methods:
•
•
•
•
If the system contains one hard drive, the system is configured for RAID 0.
If the system contains two hard drives, the system is configured for RAID 1.
If the system contains three hard drives, the system is configured for RAID 5.
If the system contains four or more hard drives, the system is configured for RAID ADG, if supported. Otherwise, the system is configured for RAID 5.
Default Windows Installation Settings
The provided Windows deployment jobs specify certain default configuration parameters. To deploy servers with specific configuration settings, you must modify the scripted install job or underlying files as necessary.
Table 3-2: Windows Default Settings
Component Default Settings
Windows administrator password
The administrator password for servers created using the provided scripts is password. This password is stored as clear text in the unattended answer file. HP recommends changing the default administrator password within the unattended answer file located in the .\deploy\configs directory in the Deployment Server default installation directory.
Drive configuration A single 2-GB partition is created (automatically expanded to the full drive size during the operating system install).
ProLiant Support Pack files
HP installs the latest support pack drivers and agents. The Web Agent passwords are stored in encrypted form in the Foundation Agent Smart Component. By default, these passwords are not set and, the Web Agent, therefore does not function. HP recommends setting the passwords before performing scripted install jobs. For information about setting the Web Agent passwords, refer to “Preconfiguring the ProLiant Support Pack for Windows” in the HP ProLiant Essentials Rapid Deployment Pack—Windows Edition Installation Guide.
3-4 HP ProLiant Essentials Rapid Deployment Pack—Windows Edition User Guide

Understanding the ProLiant Integration Module for Deployment Server
Red Hat Linux Scripted Install Jobs
Table 3-3 provides the breakdown for a ProLiant ML/DL scripted install for a Red Hat Linux job. Each bold line represents one of the tasks in the job. Under each script task is a condensed listing of the script and a description of its functionality.
Table 3-3: Contents of the Red Hat Linux Scripted Install Job
Run Script (Set Hardware Configuration)
set osfile=linux-h.ini
set hwrfile=mldl-h.ini
set aryfile=mldl-a.ini
call f:\deploy\tools\scripts\setcfg.bat This external batch file sets the hardware and array configuration settings. First, it calls CONREP with the linux-h.ini file to set the hardware operating system settings. Next, it calls CONREP with the mldl-h.ini file to set the rest of the hardware settings. Finally, it calls ACR with the mldl-a.ini file to set the array configuration settings.
Shutdown/Restart (Reboot)
Run Script (Set Disk Partition)
set prtfile=linux-p.ini
call f:\deploy\tools\scripts\setpart.bat This external batch file sets the disk partition configuration settings. It calls CPQDISK with the linux-p.ini file to set the disk partition settings.
Shutdown/Restart (Reboot)
Run Script (Install OS)
set nfsserver=0.0.0.0
set ss=ss.xxx where xxx is the ProLiant Support Pack version installed. For example, ss.640 represents version 6.40.
set os=rhyy where yy is the Red Hat Linux version. For example, rhas21 represents Red Hat Enterprise Linux AS 2.1.
set ksfile=ks.cfg
call f:\deploy\tools\scripts\rhyy.bat This external batch file prepares the target server for a Red Hat Linux scripted installation. First, it formats the hard drive. Next, it copies over Red Hat Linux boot files to the target server. Finally, it creates an autoexec.bat file. The autoexec.bat file contains a line that executes loadlin similar to the following: loadlin vmlinuz ks=nfs:%nfsserver%:/usr/cpqrdp/%ss%/%os%/%ksfile% initrd=initrd.img The nfsserver variable tells loadlin where to get the kickstart file. The os and ss variables are used to determine the location of the boot files to copy and determine the location of the kickstart file. The ksfile variable denotes the name of the kickstart file (.cfg) to use. Additional command line parameters may also be included to support specific console needs.
Upon rebooting, the target server boots to the C drive and runs autoexec.bat, which loads the Linux setup kernel. This reboot begins the Linux NFS-based scripted installation.
HP ProLiant Essentials Rapid Deployment Pack—Windows Edition User Guide 3-5
Understanding the ProLiant Integration Module for Deployment Server
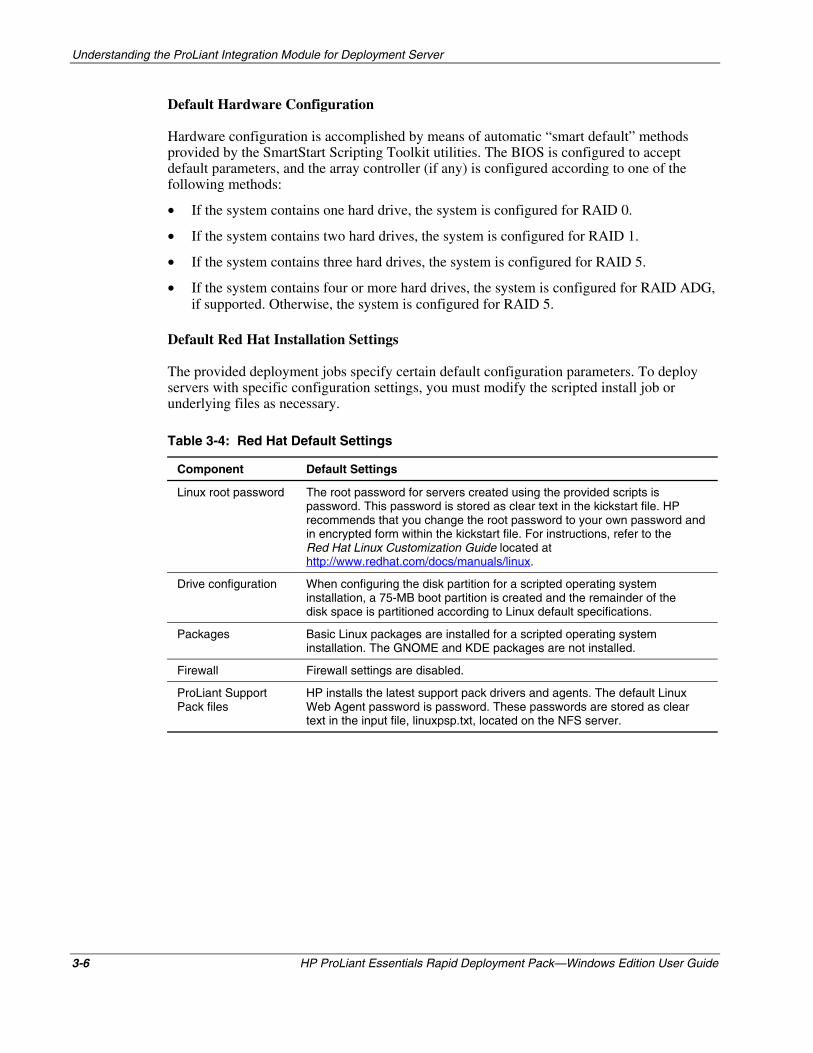
Default Hardware Configuration
Hardware configuration is accomplished by means of automatic “smart default” methods provided by the SmartStart Scripting Toolkit utilities. The BIOS is configured to accept default parameters, and the array controller (if any) is configured according to one of the following methods:
•
•
•
•
If the system contains one hard drive, the system is configured for RAID 0.
If the system contains two hard drives, the system is configured for RAID 1.
If the system contains three hard drives, the system is configured for RAID 5.
If the system contains four or more hard drives, the system is configured for RAID ADG, if supported. Otherwise, the system is configured for RAID 5.
Default Red Hat Installation Settings
The provided deployment jobs specify certain default configuration parameters. To deploy servers with specific configuration settings, you must modify the scripted install job or underlying files as necessary.
Table 3-4: Red Hat Default Settings
Component Default Settings
Linux root password The root password for servers created using the provided scripts is password. This password is stored as clear text in the kickstart file. HP recommends that you change the root password to your own password and in encrypted form within the kickstart file. For instructions, refer to the Red Hat Linux Customization Guide located at http://www.redhat.com/docs/manuals/linux.
Drive configuration When configuring the disk partition for a scripted operating system installation, a 75-MB boot partition is created and the remainder of the disk space is partitioned according to Linux default specifications.
Packages Basic Linux packages are installed for a scripted operating system installation. The GNOME and KDE packages are not installed.
Firewall Firewall settings are disabled.
ProLiant Support Pack files
HP installs the latest support pack drivers and agents. The default Linux Web Agent password is password. These passwords are stored as clear text in the input file, linuxpsp.txt, located on the NFS server.
3-6 HP ProLiant Essentials Rapid Deployment Pack—Windows Edition User Guide

Understanding the ProLiant Integration Module for Deployment Server
UnitedLinux Scripted Install Jobs
Table 3-5 provides the breakdown for a ProLiant ML/DL scripted install for a UnitedLinux job. Each bold line represents one of the tasks in the job. Under each script task is a condensed listing of the script and a description of its functionality.
Table 3-5: Contents of the UnitedLinux Scripted Install Job
Run Script (Set Hardware Configuration)
set osfile=linux-h.ini
set hwrfile=mldl-h.ini
set aryfile=mldl-a.ini
call f:\deploy\tools\scripts\setcfg.bat This external batch file sets the hardware and array configuration settings. First, it calls CONREP with the linux-h.ini file to set the hardware operating system settings. Next, it calls CONREP with the mldl-h.ini file to set the rest of the hardware settings. Finally, it calls ACR with the mldl-a.ini file to set the array configuration settings.
Shutdown/Restart (Reboot)
Run Script (Set Disk Partition)
set prtfile=linux-p.ini
call f:\deploy\tools\scripts\setpart.bat This external batch file sets the disk partition configuration settings. It calls CPQDISK with the linux-p.ini file to set the disk partition settings.
Shutdown/Restart (Reboot)
Run Script (Install OS)
set nfsserver=0.0.0.0
set ss=ss.xxx where xxx is the ProLiant Support Pack version installed. For example, ss.640 represents version 6.40.
set os=ulyy where yy is the UnitedLinux version. For example, ul10 represents UnitedLinux 1.0.
set ctlfile=mldl.xml
call f:\deploy\tools\scripts\ulyy.bat This external batch file prepares the target server for a UnitedLinux 1.0 scripted installation. First, it formats the hard drive. Next, it copies over UnitedLinux 1.0 boot files. Finally, it creates an autoexec.bat file. The autoexec.bat file contains a line that executes loadlin. The nfsserver variable tells loadlin where to get the control (.xml) and UnitedLinux yy operating system files. The os and ss variables are used to determine the location of the boot files to copy and also are combined to determine the location of the control file. The ctlfile variable denotes the name of the control (.xml) file to use. Additional command line parameters may also be included to support specific console needs.
Upon rebooting, the target server boots to the C drive and runs autoexec.bat, which loads the Linux setup kernel. This reboot begins the Linux NFS-based scripted installation.
HP ProLiant Essentials Rapid Deployment Pack—Windows Edition User Guide 3-7

Understanding the ProLiant Integration Module for Deployment Server
Default Hardware Configuration
Hardware configuration is accomplished by means of automatic “smart default” methods provided by the SmartStart Scripting Toolkit utilities. The BIOS is configured to accept default parameters, and the array controller (if any) is configured according to one of the following methods:
•
•
•
•
If the system contains one hard drive, the system is configured for RAID 0.
If the system contains two hard drives, the system is configured for RAID 1.
If the system contains three hard drives, the system is configured for RAID 5.
If the system contains four or more hard drives, the system is configured for RAID ADG, if supported. Otherwise, the system is configured for RAID 5.
Default UnitedLinux Installation Settings
The deployment jobs provided with Rapid Deployment Pack use several default configuration parameters. To deploy servers with specific configuration settings, you must modify the scripted install job or underlying files as necessary.
Table 3-6: UnitedLinux Default Settings
Component Default Settings
Linux root password The root password for servers created using the provided scripts is password. This password is stored in encrypted form in the control file. It is recommended that you change the root password in the control file. For instructions, refer to the AutoYaST2-Automatic Linux Installation and Configuration with YAST2 guide located at http://www.suse.de/~nashif/autoinstall/8.1.
Drive configuration When configuring the disk partition for a scripted operating system installation, the disk space is partitioned according to UnitedLinux default specifications.
Packages Basic Linux packages are installed for a scripted operating system installation. The GNOME and KDE packages are not installed.
Firewall Firewall settings are disabled.
ProLiant Support Pack files
HP updates and installs the latest support pack drivers and agents provided by the Rapid Deployment Pack release. The default Linux Web Agent password is password. These passwords are stored as clear text in the input file, linuxpsp.txt, located on the NFS server.
3-8 HP ProLiant Essentials Rapid Deployment Pack—Windows Edition User Guide
Understanding the ProLiant Integration Module for Deployment Server
SmartStart Toolkit and OS Imaging Jobs
SmartStart Toolkit and OS Imaging Jobs capture an exact copy of a server hardware configuration and hard drive image and deploy them to other ProLiant servers.
IMPORTANT: Server images can only be replicated when the reference server and the target server are the same ProLiant server model with the same hardware configuration.
The Capture Hardware Configuration and Image Job performs the following tasks:
1. Runs several commands to remove cached DHCP information from reference server
2. Runs the Altiris imaging tool to capture the target server hard drive image
3. Runs a batch file that captures the hardware configuration, using the CONREP and ACR utilities from the SmartStart Scripting Toolkit
The Deploy Hardware Configuration and Image Job performs the following tasks:
1. Runs a batch file that deploys the hardware configuration, using the CONREP and ACR utilities from the SmartStart Scripting Toolkit
2. Reboots the computer
3. Runs the Altiris imaging tool to deploy a hard drive image to the target server
Windows and Linux Imaging Jobs
Windows and Linux systems are imaged using the default Altiris imaging mechanism, which relies on the Altiris Deployment Agent running on the system to be imaged. The imaging task instructs the Deployment Agent to perform pre-imaging configuration tasks on the system to be imaged, then the system reboots to DOS so the imaging can be performed. After the imaging is completed, the system reboots back to Windows or Linux, where the Deployment Agent recreates the previous configuration of that system. The pre-imaging configuration is necessary to configure server specific information, such as the computer name, IP address, domain name, security ID, and so on.
HP ProLiant Essentials Rapid Deployment Pack—Windows Edition User Guide 3-9
Understanding the ProLiant Integration Module for Deployment Server
SmartStart Toolkit Hardware Configuration Jobs
The SmartStart Toolkit Hardware Configuration Jobs can quickly deploy a server hardware configuration to other ProLiant servers.
The SmartStart Toolkit Hardware Configuration Jobs:
•
•
Run a batch file that captures or deploys the hardware configuration using the CONREP and ACR utilities from the SmartStart Scripting Toolkit
Reboot the computer (a reboot is required after configuring the array controller)
The SmartStart Toolkit Hardware Configuration Jobs also include the System Erase utility. This utility can be used to erase all the data on a system, including the hardware configuration and hard drives.
CAUTION: Using the System Erase utility erases all data on the system. Be sure that all appropriate backups have been made before using the System Erase utility to prevent any data loss.
3-10 HP ProLiant Essentials Rapid Deployment Pack—Windows Edition User Guide
Understanding the ProLiant Integration Module for Deployment Server
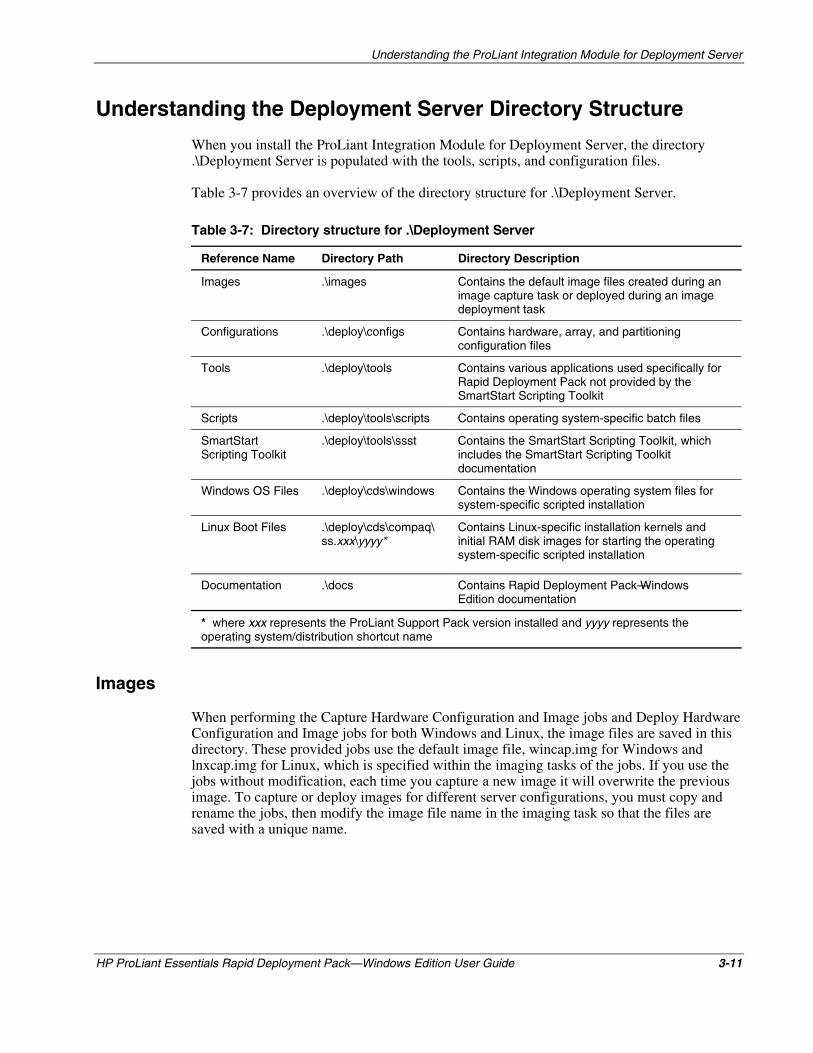
Understanding the Deployment Server Directory Structure
When you install the ProLiant Integration Module for Deployment Server, the directory .\Deployment Server is populated with the tools, scripts, and configuration files.
Table 3-7 provides an overview of the directory structure for .\Deployment Server.
Table 3-7: Directory structure for .\Deployment Server
Reference Name Directory Path Directory Description
Images .\images Contains the default image files created during an image capture task or deployed during an image deployment task
Configurations .\deploy\configs Contains hardware, array, and partitioning configuration files
Tools .\deploy\tools Contains various applications used specifically for Rapid Deployment Pack not provided by the SmartStart Scripting Toolkit
Scripts .\deploy\tools\scripts Contains operating system-specific batch files
SmartStart Scripting Toolkit
.\deploy\tools\ssst Contains the SmartStart Scripting Toolkit, which includes the SmartStart Scripting Toolkit documentation
Windows OS Files .\deploy\cds\windows Contains the Windows operating system files for system-specific scripted installation
Linux Boot Files .\deploy\cds\compaq\ss.xxx\yyyy*
Contains Linux-specific installation kernels and initial RAM disk images for starting the operating system-specific scripted installation
Documentation .\docs Contains Rapid Deployment Pack—Windows Edition documentation
* where xxx represents the ProLiant Support Pack version installed and yyyy represents the operating system/distribution shortcut name
Images
When performing the Capture Hardware Configuration and Image jobs and Deploy Hardware Configuration and Image jobs for both Windows and Linux, the image files are saved in this directory. These provided jobs use the default image file, wincap.img for Windows and lnxcap.img for Linux, which is specified within the imaging tasks of the jobs. If you use the jobs without modification, each time you capture a new image it will overwrite the previous image. To capture or deploy images for different server configurations, you must copy and rename the jobs, then modify the image file name in the imaging task so that the files are saved with a unique name.
HP ProLiant Essentials Rapid Deployment Pack—Windows Edition User Guide 3-11
Understanding the ProLiant Integration Module for Deployment Server
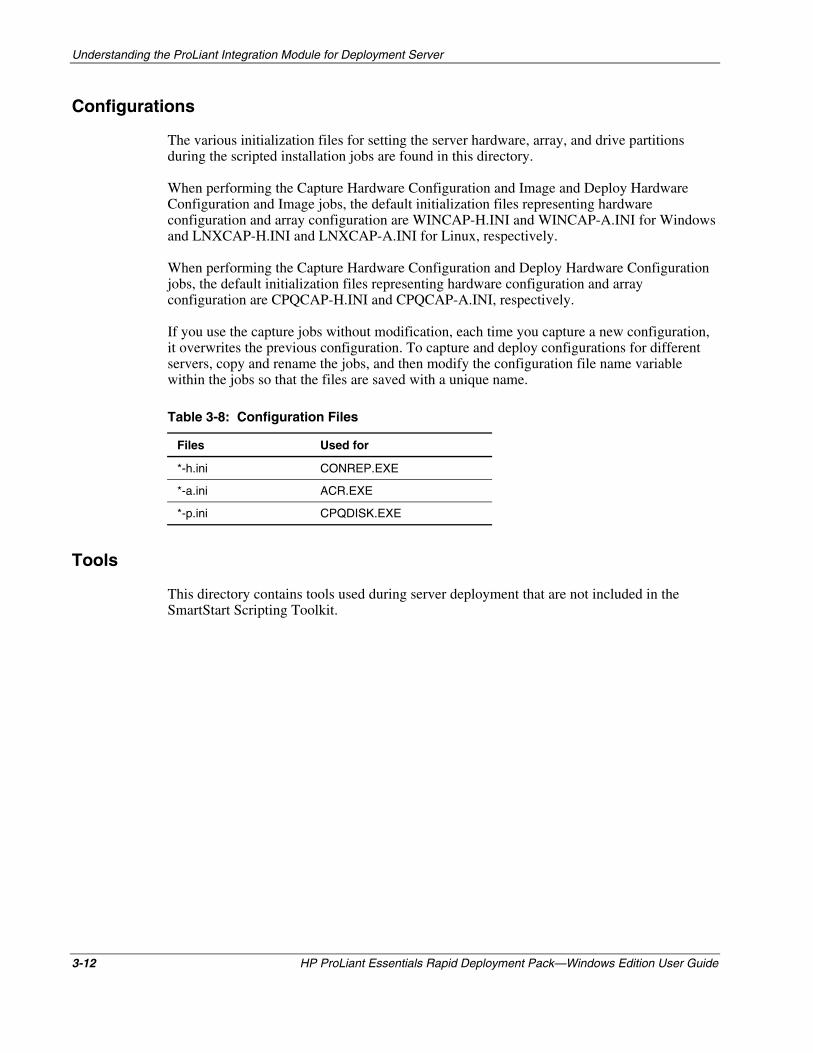
Configurations
The various initialization files for setting the server hardware, array, and drive partitions during the scripted installation jobs are found in this directory.
When performing the Capture Hardware Configuration and Image and Deploy Hardware Configuration and Image jobs, the default initialization files representing hardware configuration and array configuration are WINCAP-H.INI and WINCAP-A.INI for Windows and LNXCAP-H.INI and LNXCAP-A.INI for Linux, respectively.
When performing the Capture Hardware Configuration and Deploy Hardware Configuration jobs, the default initialization files representing hardware configuration and array configuration are CPQCAP-H.INI and CPQCAP-A.INI, respectively.
If you use the capture jobs without modification, each time you capture a new configuration, it overwrites the previous configuration. To capture and deploy configurations for different servers, copy and rename the jobs, and then modify the configuration file name variable within the jobs so that the files are saved with a unique name.
Table 3-8: Configuration Files
Files Used for
*-h.ini CONREP.EXE
*-a.ini ACR.EXE
*-p.ini CPQDISK.EXE
Tools
This directory contains tools used during server deployment that are not included in the SmartStart Scripting Toolkit.
3-12 HP ProLiant Essentials Rapid Deployment Pack—Windows Edition User Guide

Understanding the ProLiant Integration Module for Deployment Server
Scripts
The scripts contained in this directory are used for:
•
•
Wrapping utilities in the SmartStart Scripting Toolkit to detect and report errors back to the operating system
Setting up the target server to begin an operating system installation
Table 3-9: Script Files
Files Used for
acr.bat Calls ACR.EXE
conrep.bat Calls CONREP.EXE
cpqdisk.bat Calls CPQDISK.EXE
set*.bat Sets operating system, hardware, array, and partition settings
get*.bat Gets operating system, hardware, array, and partition settings
yyyy.bat Prepares hardware for operating system install
* where yyyy is the operating system/distribution shortcut name
Windows OS Files
One directory is created for each Windows operating system to store the operating system files. These files are used by the Windows scripted install jobs. The directory names are derived from the operating system name to distinguish each Windows operating system version. For example, .\deploy\cds\windows\w2k is the directory name for the Windows 2000 operating system files.
HP ProLiant Essentials Rapid Deployment Pack—Windows Edition User Guide 3-13
Understanding the ProLiant Integration Module for Deployment Server
3-14 HP ProLiant Essentials Rapid Deployment Pack—Windows Edition User Guide
•
•
•
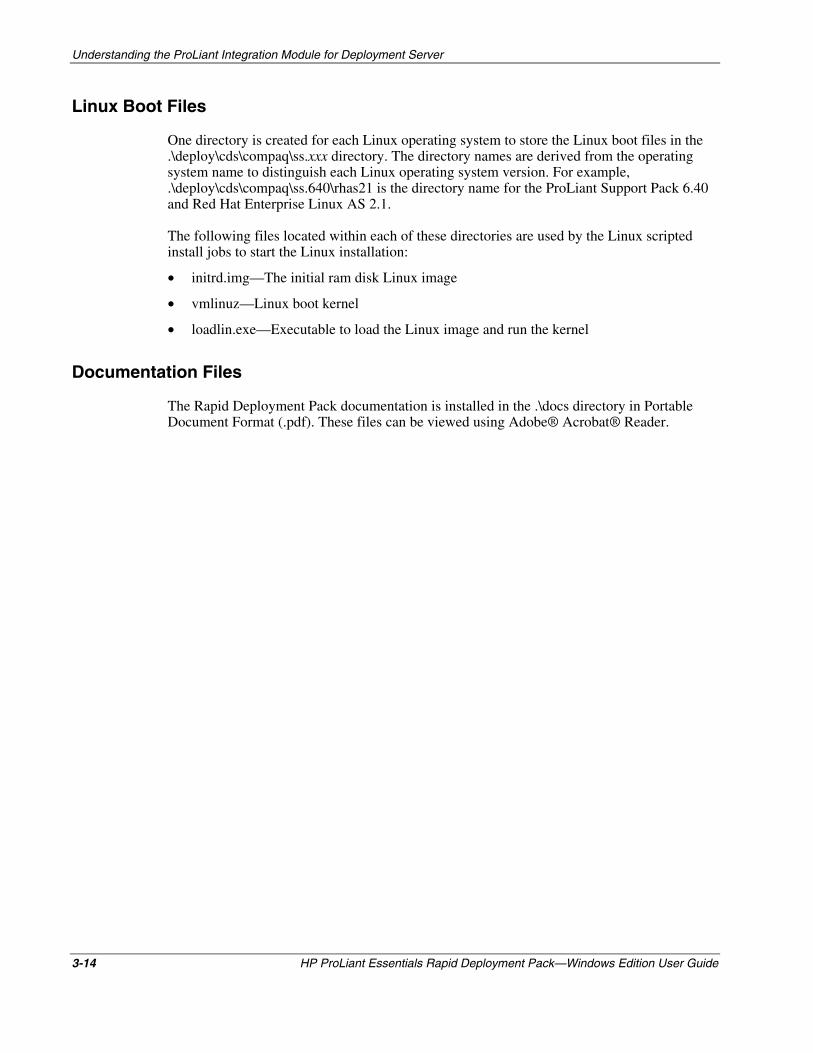
Linux Boot Files
One directory is created for each Linux operating system to store the Linux boot files in the .\deploy\cds\compaq\ss.xxx directory. The directory names are derived from the operating system name to distinguish each Linux operating system version. For example, .\deploy\cds\compaq\ss.640\rhas21 is the directory name for the ProLiant Support Pack 6.40 and Red Hat Enterprise Linux AS 2.1.
The following files located within each of these directories are used by the Linux scripted install jobs to start the Linux installation:
initrd.img—The initial ram disk Linux image
vmlinuz—Linux boot kernel
loadlin.exe—Executable to load the Linux image and run the kernel
Documentation Files
The Rapid Deployment Pack documentation is installed in the .\docs directory in Portable Document Format (.pdf). These files can be viewed using Adobe® Acrobat® Reader.

4 Understanding the ProLiant Integration Module for
NFS Server
Installing the ProLiant Integration Module for NFS populates the /usr/cpqrdp directory with the operating system distribution files, Linux installation files, and ProLiant Support Pack files according to selections made during installation. Table 4-1 provides an overview of the directory structure within /usr/cpqrdp.
Table 4-1: NFS Directory Structure
Reference Name Directory Path Directory Description
Linux distribution files /usr/cpqrdp/yyyy* Contains the operating system source files from the Linux OS distribution CDs.
Linux installation files /usr/cpqrdp/ss.xxx/yyyy* Contains the Linux installation files.
* where xxx represents the ProLiant Support Pack version installed, and yyyy represents the operating system/distribution shortcut name
Linux Distribution Files
Within the /usr/cpqrdp directory, one directory is created per operating system for storing the Linux distribution source files. The directory names are derived from the operating system name to distinguish each Linux operating system version. For example, /usr/cpqrdp/rhas21 is the directory name for the Red Hat Enterprise Linux AS 2.1 files.
NOTE: Red Hat distribution CD-ROM .iso images can be used in place of the source files at this location. For more information, refer to the Rapid Deployment Pack Knowledge Base at http://www.hp.com/servers/rdp/kb.
Linux Installation Files
In addition to the operating system directory path created in the /usr/cpqrdp directory, a path associated with the support version, ss.xxx, is also created, where xxx represents the ProLiant Support Pack version.
HP ProLiant Essentials Rapid Deployment Pack—Windows Edition User Guide 4-1
Understanding the ProLiant Integration Module for NFS Server
4-2 HP ProLiant Essentials Rapid Deployment Pack—Windows Edition User Guide
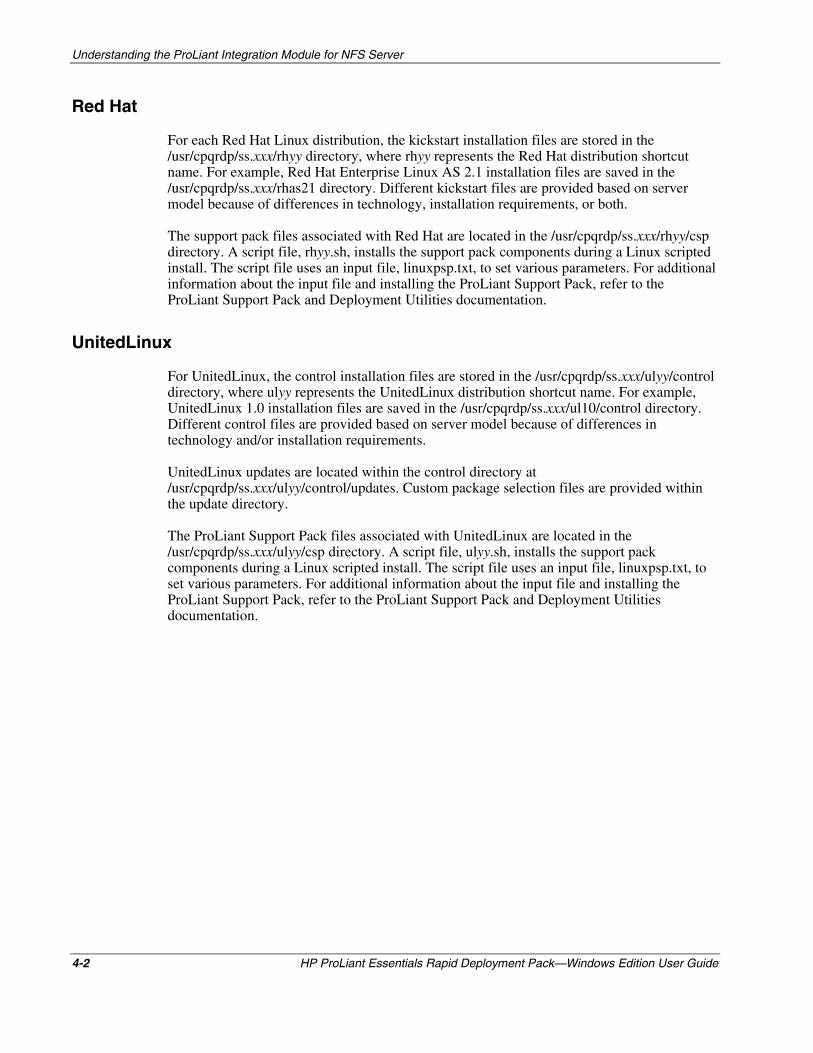
Red Hat
For each Red Hat Linux distribution, the kickstart installation files are stored in the /usr/cpqrdp/ss.xxx/rhyy directory, where rhyy represents the Red Hat distribution shortcut name. For example, Red Hat Enterprise Linux AS 2.1 installation files are saved in the /usr/cpqrdp/ss.xxx/rhas21 directory. Different kickstart files are provided based on server model because of differences in technology, installation requirements, or both.
The support pack files associated with Red Hat are located in the /usr/cpqrdp/ss.xxx/rhyy/csp directory. A script file, rhyy.sh, installs the support pack components during a Linux scripted install. The script file uses an input file, linuxpsp.txt, to set various parameters. For additional information about the input file and installing the ProLiant Support Pack, refer to the ProLiant Support Pack and Deployment Utilities documentation.
UnitedLinux
For UnitedLinux, the control installation files are stored in the /usr/cpqrdp/ss.xxx/ulyy/control directory, where ulyy represents the UnitedLinux distribution shortcut name. For example, UnitedLinux 1.0 installation files are saved in the /usr/cpqrdp/ss.xxx/ul10/control directory. Different control files are provided based on server model because of differences in technology and/or installation requirements.
UnitedLinux updates are located within the control directory at /usr/cpqrdp/ss.xxx/ulyy/control/updates. Custom package selection files are provided within the update directory.
The ProLiant Support Pack files associated with UnitedLinux are located in the /usr/cpqrdp/ss.xxx/ulyy/csp directory. A script file, ulyy.sh, installs the support pack components during a Linux scripted install. The script file uses an input file, linuxpsp.txt, to set various parameters. For additional information about the input file and installing the ProLiant Support Pack, refer to the ProLiant Support Pack and Deployment Utilities documentation.

5 Customizing the Provided Jobs, Scripts, Tools, and
Configuration Files
Customizing the Jobs Pane
The Deployment Server Console is the user interface for managing and deploying servers. Within the console, all the jobs are categorized in a folder hierarchy in the Jobs pane. You can rearrange the folders and edit the jobs.
This section explains how to add, copy, and delete job folders and jobs. For additional information about the customization features of the Web console, refer to the Altiris Deployment Solution 6.1 Product Guide at http://www.hp.com/servers/rdp.
IMPORTANT: Be sure to make copies of the provided jobs and files for backup to ensure that a working version exists in case you encounter a problem.
HP ProLiant Essentials Rapid Deployment Pack—Windows Edition User Guide 5-1
Customizing the Provided Jobs, Scripts, Tools, and Configuration Files
Adding a New Job or Folder
To add a new job or folder:
1. Right-click in the Jobs pane header, and select New Job or New Folder.
2. Enter a descriptive name for the new job or folder.
3. Press the Enter key.
Copying a Job or Folder
To copy a job or folder:
1. Right-click the job or folder, and select Copy.
2. Right-click another location in the Jobs pane, and select Paste.
IMPORTANT: The jobs in the Rapid Deployment Pack use long names to be descriptive. However, when attempting to copy these jobs, the name exceeds the 64-character limit of the Deployment Server Console and truncates because Altiris places Copy of in front of the job name.
Renaming a Job or Folder
To rename a job or folder:
1. Right-click the job or folder and select Rename, or select the job or folder and press the F2 key.
2. Enter a descriptive name for the job or folder.
3. Press the Enter key.
Deleting a Job or Folder
To delete a job or folder:
1. Right-click the job or folder, and select Delete.
2. Click Yes when prompted to confirm the action.
IMPORTANT: Deleting a folder permanently deletes all jobs within that folder.
Moving a Job or Folder
To move a job or folder:
1. Select the job or folder.
2. Drag and drop the job or folder onto another folder. To create a top-level folder, drag and drop the folder onto the Jobs pane header.
5-2 HP ProLiant Essentials Rapid Deployment Pack—Windows Edition User Guide
Customizing the Provided Jobs, Scripts, Tools, and Configuration Files
Exporting a Job or Folder
To export a job or folder:
1. Right-click the job or folder.
2. Select Export or Export Subfolders.
3. In the Export Select Job(s)/Folder(s) dialog box, click Browse to designate a directory and job file, or enter the path and file name in the Export to File name field.
NOTE: Job files are usually denoted with the .bin extension.
4. Click OK.
Importing a Job or Folder 1. Right-click within the Jobs pane.
2. Select Import.
3. In the Import Job dialog box, click Browse to locate the directory and job file, or enter the path and file name in the Job file to import field. Job files are usually denoted with the .bin extension.
4. Select the appropriate checkboxes, and then click OK.
Customizing the ProLiant Integration Module for Deployment Server
The following sections provide information about customizing the ProLiant Integration Module for Deployment Server.
Modifying the Microsoft Windows unattend.txt File
You might want to modify the provided Windows unattend.txt file to:
•
•
•
Change the default administrator password
Change the default workgroup or domain name
Select which operating system components to install, such as Internet Information Services (IIS) or Terminal Services
For information about editing a Windows scripted install unattend.txt file, refer to “Customizing the Provided Jobs, Scripts, Tools, and Configuration Files” in the HP ProLiant Essentials Rapid Deployment Pack—Windows Edition Installation Guide or the Windows 2000 online resource kit at http://www.microsoft.com./windows2000/techinfo/reskit/en-us/default.asp.
For the location of the unattend.txt files on the Deployment Server, refer to Chapter 3 of this guide.
HP ProLiant Essentials Rapid Deployment Pack—Windows Edition User Guide 5-3
Customizing the Provided Jobs, Scripts, Tools, and Configuration Files
Customizing the Hardware Configuration Settings
IMPORTANT: The hardware configuration files are not operating-system specific. The Linux scripted install jobs use these files also. Changing the supplied files might have unwanted consequences.
You might want to customize the provided configuration files to:
•
•
•
Enable or disable Advanced Server Recovery (ASR)
Change the default boot order
Set the RAID level or number of logical drives
For information about editing configuration files, refer to the SmartStart Scripting Toolkit User Guide or http://www.hp.com/servers/sstoolkit.
For the locations of the hwrfile= and the aryfile= variables within the provided scripted install jobs and file location on the Deployment Server, refer to Chapter 3 of this guide.
Updating the ProLiant Support Pack Files
You might want to update your jobs to reference new support files if you have:
•
•
•
Created your own jobs
Customized provided jobs
Chosen not to overwrite the existing provided jobs when updating the Rapid Deployment Pack
For the location of the ss= variable within the provided scripted install jobs and file location on the Deployment Server, refer to Chapter 3 of this guide.
To update Linux scripted install jobs, the installation files in the ProLiant Integration Module for NFS Server must also be modified. For information about the ProLiant Integration Module for NFS Server directory structure, refer to Chapter 4 of this guide.
5-4 HP ProLiant Essentials Rapid Deployment Pack—Windows Edition User Guide
Customizing the Provided Jobs, Scripts, Tools, and Configuration Files
Customizing the Packaged Cluster Deployment Jobs
This section provides instructions to customize the packaged cluster deployment jobs for Windows.
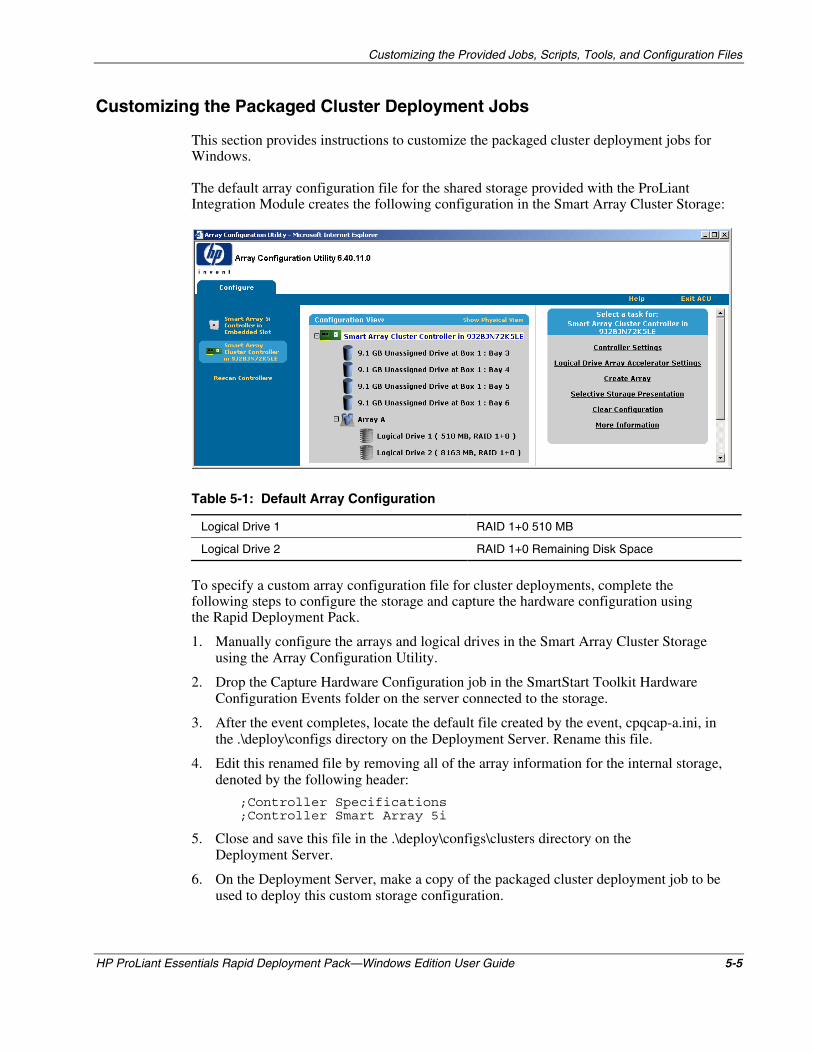
The default array configuration file for the shared storage provided with the ProLiant Integration Module creates the following configuration in the Smart Array Cluster Storage:
Table 5-1: Default Array Configuration
Logical Drive 1 RAID 1+0 510 MB
Logical Drive 2 RAID 1+0 Remaining Disk Space
To specify a custom array configuration file for cluster deployments, complete the following steps to configure the storage and capture the hardware configuration using the Rapid Deployment Pack.
1. Manually configure the arrays and logical drives in the Smart Array Cluster Storage using the Array Configuration Utility.
2. Drop the Capture Hardware Configuration job in the SmartStart Toolkit Hardware Configuration Events folder on the server connected to the storage.
3. After the event completes, locate the default file created by the event, cpqcap-a.ini, in the .\deploy\configs directory on the Deployment Server. Rename this file.
4. Edit this renamed file by removing all of the array information for the internal storage, denoted by the following header:
;Controller Specifications ;Controller Smart Array 5i
5. Close and save this file in the .\deploy\configs\clusters directory on the Deployment Server.
6. On the Deployment Server, make a copy of the packaged cluster deployment job to be used to deploy this custom storage configuration.
HP ProLiant Essentials Rapid Deployment Pack—Windows Edition User Guide 5-5

Customizing the Provided Jobs, Scripts, Tools, and Configuration Files
7. Rename this job to indicate the storage configuration being deployed.
8. In this new job, open the Run Script—Setup Deployment Environment task. Update the storagefile= variable with the name of the new array configuration file.
NOTE: If this file is located in a directory other than .\configs\cluster, specify that directory in the set statement as well. For example, if the shared storage array configuration file, exch-R5.ini, was stored in a subdirectory of the cluster directory named Chicago, the set statement would be:
set storagefile=clusters\Chicago\exch-R5.ini
5-6 HP ProLiant Essentials Rapid Deployment Pack—Windows Edition User Guide
Customizing the Provided Jobs, Scripts, Tools, and Configuration Files
HP ProLiant Essentials Rapid Deployment Pack—Windows Edition User Guide 5-7
•
•
•
•
Customizing the ProLiant Integration Modules for NFS Server
The following sections provide information about customizing the ProLiant Integration Module for NFS Server.
Customizing the Red Hat Linux Kickstart File
You might want to customize the provided kickstart files to:
Change default root or grub passwords
Change partitions, types, and sizes
Change Linux packages that are installed
Add errata kernel installation
For information about editing the kickstart files, refer to the Red Hat Linux Customization Guide located at http://www.redhat.com.
Refer to Chapter 3 of this guide for the location of the ksfile= variable within the provided scripted install jobs and Chapter 4 for the kickstart file location on the NFS server. For each Linux distribution, there are several jobs and associated kickstart files for specific ProLiant models and families. If you want to make a change to the kickstart file for a particular server or type of server, copy, rename, and edit the kickstart file and the associated job to reference the new kickstart file.
Customizing the UnitedLinux Control File
You might want to customize the provided control files to:
•
•
•
Change default root or grub passwords
Change partitions, types, and sizes
Change Linux packages that are installed
For information on editing control files, refer to the AutoYast guide at http://www.suse.de/~nashif/autoinstall/index.html.
Refer to Chapter 3 of this guide for the location of the ctlfile= variable within the provided scripted install jobs and Chapter 4 for the control file location on the NFS server. For each Linux distribution, there are several jobs and associated control files for specific ProLiant models and families. If you want to make a change to the control file for a particular server or type of server, copy, rename, and edit the control file and the associated job to reference the new control file.
Index
A H
Altiris Deployment Agent for Linux, installing 2-4 hardware configuration default 3-6, 3-8 deployment 3-10 B imaging 3-9
bay properties rule configuration 1-12 HP authorized reseller vi bay settings 1-6 BIOS settings 3-4, 3-6, 3-8 I
imaging C capture 2-5
capture, image 2-5 deployment 2-6 change rule initial deployment job 1-12
feature 1-11 installation settings setting 2-12 Red Hat default 3-6
Computer Groups pane 1-2 United Linux default 3-8 configuration Integrated Lights-Out (iLO) 1-3
deployment 2-8 settings 3-9, 3-10 J
Configuration Replication utility 3-10 job CONREP 3-10
organizing 3-1 console toolbar 1-2 pane 1-2 control file 3-7 scripted install 3-5, 3-7
job variable D ksfile 3-5, 3-7
deployment nfsserver 3-5, 3-7 configuration 2-8 os 3-3, 3-5, 3-7 imaging 2-6 ss 3-3, 3-5, 3-7 scripted installation 2-3 unattendfile 3-3 setting change rule 2-12
Deployment Agent for Linux, installing 2-4 K Deployment Server Console
kickstart file 3-5 interaction 1-3 overview 1-1 toolbar 1-2 L view 1-2
Light-Out Management 1-3 Details pane 1-2 Linux operating system disk partition, configuration 3-4, 3-6, 3-8
customizing 3-11 scripted installation 3-11 E
enclosure settings 1-6 erase utility 3-10
HP ProLiant Essentials Rapid Deployment Pack—Windows Edition User Guide Index-1
Index
M
MS DOS 3-9
P
Physical Devices View 1-6 ProLiant BL server
change rules feature 1-11 configuration 2-8 deployment 2-3 grouping 1-6 image capture 2-5 image deployment 2-6 rip-and-replace feature 1-11
ProLiant server, console enhancement 1-3
R
Rack/Enclosure/Bay settings 1-6 RAID settings 3-4, 3-6, 3-8 Red Hat Linux, scripted installation 3-5, 3-11 redeployment option 1-12 Remote Insight Lights-Out Edition (RILOE) 1-3 remote management 1-3 rip-and-replace 1-11, 2-12 run job option 1-12
S
scripted installation customization 3-11 Red Hat Linux 3-5 UnitedLinux 3-7
server blade See ProLiant BL server SmartStart Scripting Toolkit, configuring
hardware 3-4 System Erase utility 3-10
T
telephone numbers vi
U
unattend.txt 3-3 UnitedLinux, scripted installation 3-7
V
Virtual Rack/Enclosure/Bay 1-7
W
wait option 1-12
Index-2 HP ProLiant Essentials Rapid Deployment Pack—Windows Edition User Guide