hp service asset and configuration management … 48 verifyassetmanager ... l...
TRANSCRIPT
HP Service Asset and ConfigurationManagement (SACM) SolutionFor Windows Operating Sytem
SoftwareVersion: 9.40
Configuration Guide

Document Release Date: February 2015
Software Release Date: February 2015
Legal Notices
WarrantyThe only warranties for HP products and services are set forth in the express warranty statements accompanying such products and services. Nothing herein should beconstrued as constituting an additional warranty. HP shall not be liable for technical or editorial errors or omissions contained herein.
The information contained herein is subject to change without notice.
Restricted Rights LegendConfidential computer software. Valid license from HP required for possession, use or copying. Consistent with FAR 12.211 and 12.212, Commercial Computer Software,Computer Software Documentation, and Technical Data for Commercial Items are licensed to the U.S. Government under vendor's standard commercial license.
Copyright Notice© Copyright 2005 - 2015 Hewlett-Packard Development Company, L.P.
Trademark NoticesAdobe™ is a trademark of Adobe Systems Incorporated.
Microsoft® andWindows® are U.S. registered trademarks of Microsoft Corporation.
UNIX® is a registered trademark of TheOpenGroup.
This product includes an interface of the 'zlib' general purpose compression library, which is Copyright © 1995-2002 Jean-loupGailly andMark Adler.
Documentation UpdatesThe title page of this document contains the following identifying information:
l Software Version number, which indicates the software version.l Document Release Date, which changes each time the document is updated.l Software Release Date, which indicates the release date of this version of the software.
To check for recent updates or to verify that you are using themost recent edition of a document, go to: http://h20230.www2.hp.com/selfsolve/manuals
This site requires that you register for an HP Passport and sign in. To register for an HP Passport ID, go to: http://h20229.www2.hp.com/passport-registration.html
Or click theNew users - please register link on the HP Passport login page.
You will also receive updated or new editions if you subscribe to the appropriate product support service. Contact your HP sales representative for details.
SupportVisit the HP Software Support Online web site at: http://www.hp.com/go/hpsoftwaresupport
This web site provides contact information and details about the products, services, and support that HP Software offers.
HP Software online support provides customer self-solve capabilities. It provides a fast and efficient way to access interactive technical support tools needed tomanage yourbusiness. As a valued support customer, you can benefit by using the support web site to:
l Search for knowledge documents of interestl Submit and track support cases and enhancement requestsl Download software patchesl Manage support contractsl Look up HP support contactsl Review information about available servicesl Enter into discussions with other software customersl Research and register for software training
Most of the support areas require that you register as an HP Passport user and sign in. Many also require a support contract. To register for an HP Passport ID, go to:
http://h20229.www2.hp.com/passport-registration.html
To findmore information about access levels, go to:
http://h20230.www2.hp.com/new_access_levels.jsp
HP Software Solutions Now accesses the HPSW Solution and Integration Portal Web site. This site enables you to explore HP Product Solutions tomeet your businessneeds, includes a full list of Integrations between HP Products, as well as a listing of ITIL Processes. The URL for this Web site ishttp://h20230.www2.hp.com/sc/solutions/index.jsp
Configuration Guide
Page 3 of 70
Contents
Configuration Guide 1
Welcome 7
How This Guide is Organized 7
Who Should Read This Guide 8
Additional Online Resources 9
Introduction to SACM 10
Service Asset and ConfigurationManagement – Overview 10Installing SACM Products 12SACM Prerequisites 13
SACM 9.40 Solution Diagram 14
Hardware and Software Requirements 16Supported Versions 16Hardware and Software Requirements 16
HP Asset Manager Requirements 17Recommended Configuration 18
HP ServiceManager Requirements 19HP Universal CMDB Requirements 21HP Connect-It Requirements 24
SACM Project Planning 25HP Service Asset and ConfigurationManagement 25
HP Asset Manager – Overview 26
HP ServiceManager – Overview 27
HP Universal CMDB –Overview 27
HP Connect-It – Overview 28
HP Service Manager and HP Universal CMDB Integration 29
Overview 29
Set up ServiceManager for Integration with Universal CMDB 30Add the UCMDB Connection Information to the System Information Record 30Add RESTful API to Operator's Capabilities 30
Set up Universal CMDB for Integration with ServiceManager 31
Page 4 of 70

Create a New Integration Point 31
Verify ServiceManager and Universal CMDB Integration 32Run the Data Push Jobs 33Run the Population Jobs 33
HP Asset Manager and HP Universal CMDB Integration 35
Overview 35
Set up Asset Manager for Integration with Universal CMDB 35
Set up Universal CMDB for Integration with Asset Manager 36
Verify HP Asset Manager - HP Universal CMDB Integration 39Run the Data Push Jobs 39Run the Population Jobs 39
HP Asset Manager - HP Service Manager Integration 41
Overview 41
Prerequisites 41
Install and Configure Asset ManagerWeb Service 43
Install and Configure AMWeb Service Proxy 46
Install and Configure HP ServiceManagerWebsite 47Installation 47Configuration 48
Verify Asset Manager - ServiceManager Normal Integration 53
Use the Request Self-Service to Verify Asset Manager- ServiceManager Integration 54
CI's Reconciliation Priority Best Practices 57
Overview 57
Priorities Logic 57
CI Reconciliation Priority 58
Technical Reference 60
Overview 60
HP ServiceManager <-> HP Asset Manager 60Overview 60What happens when a CI does not exist in SM 61Reconciliation keys for amsm-ppt.scn 62
Companies 62
Configuration Guide
Page 5 of 70

Vendors 62Locations 63Departments 63Contacts 64Models 64Stock rooms 64
Reconciliation keys for amsm-ci-ppt-link.scn 64Links between device CIs and PPT objects 65
Reconciliation keys for smam-ppt.scn 65Locations and their link to a company and a country 66Companies 66SM Companies replicated as AM departments 66Departments 66Contacts 67Operators 67Vendors 67SM vendor sites replicated as companies in AM 68Stocks 69Models 69
Reconciliation keys for smam-wo.scn 69Changes > Workorders 70Tasks > Workorders 70For the corresponding CI 70
Configuration Guide
Page 6 of 70
WelcomeThis guide provides information for setting up and configuring the Service Asset and ConfigurationManagement (SACM) solution. This guide outlines the integration between HP Asset Manager,HP Universal CMDB, and HP ServiceManager. It explains how to install and configure thecomponents of the integration, as well as outlining how functionality of the integrated applications isenhanced.
This chapter includes:
l "How This Guide is Organized" below
l "Who Should Read This Guide" on the next page
l "Additional Online Resources" on page 9
How This Guide is OrganizedThis guide contains the following chapters:
Introduction to SACM
In addition to providing an overview of the Service Asset and ConfigurationManagement Solution,provides an introduction to SACM integrations and briefly describes how the following products workwith each other:
l HP ServiceManager (SM)
l HP Universal CMDB (UCMDB)
l HP Asset Manager (AM)
l HP Connect-It (CIT
"HP Service Manager and HP Universal CMDB Integration" on page 29
Provides the installation and configuration steps required to configure and verify the integrationbetween Service Manager and Universal CMDB .
"HP Asset Manager and HP Universal CMDB Integration" on page 35
Provides the installation and configuration steps required to configure and verify the integrationbetween Asset Manager and Universal CMDB .
"HP Asset Manager - HP ServiceManager Integration" on page 41
Provides the installation and configuration steps required to configure and verify the integrationbetween Service Manager and Asset Manager pursuant to a request from the catalog.
Page 7 of 70
"CI's Reconciliation Priority Best Practices" on page 57
Provides the Best Practices guidelines and configuration instructions for how to prioritize theinformation received from Asset Manager and ServiceManager into UCMDB in order for UCMDB tocontain themost accurate CI information.
"Technical Reference" on page 60
Describes how data objects are sourced andmapped by which scenario or adapter, as well as thereconciliation keys used, and any special requirements needed for data transfers to work properly
Who Should Read This GuideThis solution is intended for IT organizations that want to better manage all their assets fromprocurement to decommissioning, all the while supplying both operational as well as IT FinancialManagement data.
This guide is intended for:
l Customers
l Presales and sales personnel
l PSO
l Anyone whowants to learn about the solution, its flow, and its value or the value it delivers
The information in this guidemay duplicate information available in other SACM documentation, but isprovided here for convenience.
Configuration GuideWelcome
Page 8 of 70
Additional Online ResourcesTroubleshooting & Knowledge Base accesses the Troubleshooting page on the HP SoftwareSupport Web site where you can search the Self-solve knowledge base. ChooseHelp >Troubleshooting & Knowledge Base. The URL for this Web site ishttp://h20230.www2.hp.com/troubleshooting.jsp.
HP Software Support accesses the HP Software Support Web site. This site enables you to browsethe Self-solve knowledge base. You can also post to and search user discussion forums, submitsupport requests, download patches and updated documentation, andmore. ChooseHelp >HP Software Support. The URL for this Web site is www.hp.com/go/hpsoftwaresupport.
Most of the support areas require that you register as an HP Passport user and sign in. Many alsorequire a support contract.
To findmore information about access levels, go to:http://h20230.www2.hp.com/new_access_levels.jsp
To register for an HP Passport user ID, go to:http://h20229.www2.hp.com/passport-registration.html.
HP Software Web site accesses the HP SoftwareWeb site. This site provides you with themost up-to-date information on HP Software products. This includes new software releases, seminars and tradeshows, customer support, andmore. ChooseHelp > HP Software Web site. The URL for this Website is www.hp.com/go/software.
HP Software Solutions Now accesses the HPSW Solution and Integration Portal Web site. This siteenables you to explore HP Product Solutions tomeet your business needs, includes a full list ofIntegrations between HP Products, as well as a listing of ITIL Processes. The URL for this Web site ishttp://support.openview.hp.com/sc/solutions/index.jsp.
Configuration GuideWelcome
Page 9 of 70
Introduction to SACMThis chapter includes:
Service Asset and ConfigurationManagement – Overview 10
SACM 9.40 Solution Diagram 14
Hardware and Software Requirements 16
SACM Project Planning 25
HP Asset Manager – Overview 26
HP ServiceManager – Overview 27
HP Universal CMDB –Overview 27
HP Connect-It – Overview 28
Note: If you have any feedback or comments, please contact [email protected].
Service Asset and Configuration Management –OverviewSACM provides a necessary data foundation that is core to operating IT. This enables the business tofunction within its own constraints while taking into account the unique needs of the business. Manykey IT (ITIL) processes rely on SACM being in place in the organization; including all of the following:
l Service Portfolio Management (Service Strategy)
l IT Financial Management (Service Strategy)
l Service Level Management (Service Design)
l Incident Management (Service Operations)
l ProblemManagement (Service Operations)
l Request Management (Service Operations)
l ConfigurationManagement (Service Transition)
l ChangeManagement (Service Transition)
Page 10 of 70
By enabling and supporting these processes, SACM contributes to:
l Planning and proactivemanagement of IT to support the needs of the business.
l Financial traceability—the ability to understand where the IT budget is being spent and in support ofwhich business driversThis also supports better financial decisionmaking in general and specifically determining if the ITbudget is truly supporting the important business services that drive the company’s revenuestream.
l Maintaining appropriate service levels to support the business adequately IT should not over-deliver, which is expensive and wasteful, or under-deliver, which inhibits the business fromproducing better results. SACM provides the data points and transparency tomore accurately meetbusiness needs.
l Enabling services to be operated effectively and efficiently
l Populating andmanaging the ConfigurationManagement Database (CMDB)—discovering andrecording all the relevant components that comprise the IT environment
l Providing a process for on-boarding Assets and CIs—managing them throughout their respectivelife cycles and retiring them in an organizedmanner to minimize the negative impact on thebusiness
l Improving the understanding of the complex interdependencies between the various components ofIT and reducing the negative impact they may have on each other
l Standardizing IT environments, resulting in reducingmaintenance costs and improving consistencyand predictability of IT outcomes
SACM provides these values to the business throughout the entire service life cycle, from requestthrough procurement to deployment into the IT environment, management of the service in production,and ending at the retirement and disposal phases. SACM is responsible for creating andmanaging theConfigurationManagement System (CMS) and as such provides IT organizations with more controlover their IT environments, better adherence to the policies it defines, and greater accessibility to thenecessary information. SACM does so by delivering the following:
l Management and planning: Designing what level of configurationmanagement is needed and howthis level will be achieved
l Configuration identification: Establishing a system of classification of Configuration Items (CIs) intotypes, defining the relevant attributes for each CI type, determining the key attributes and therelationships between the various CI types
l Configuration Control: Governing the addition, removal and updating of each CI and ensuring thatthe appropriate process and procedures are followed for each such activity
l Status accounting and reporting: Providing an accurate account of the status of each CI/Asset
l Verification and audit: Conducting periodical audits to ensure that there are no discrepanciesbetween the documented and/or desired state of the environment and the actual state
Configuration GuideIntroduction to SACM
Page 11 of 70

Installing SACM ProductsBefore you can install and configure the integration, the SACM products must be installed andaccessible by the integration components via the network.
In-depth knowledge and administration privileges to each of the following integration products arerequired to install, configure andmanage the integration successfully.
l HP Asset Manager
l HP Universal CMDB and its probe
l HP ServiceManager
l HP Connect-It
l HP ServiceManager <-> HP Universal CMDB integration (reuse the CI Types that aremappedfrom UCMDB to SM)
Note: TheHP Universal CMDB to HP Service Manager Integration Guide to the SM <->UCMDB integration is provided with SM.
You can access the guide through the SM Help Server.
Refer to the installation guides provided with each of the products that represent the SACM solution.
Note: Although not in the scope of the SACM solution, integrating AM with IT infrastructurediscovery tools such as HP Discovery and Dependency Mapping Inventory can complement theSACM solution by providing accurate, up-to-date inventory data which serves as the foundation ofthe SACM solution. It is suggested to implement this integration before installing and configuringthe SACM solution.
Refer to the AM support matrix for the supported versions of various discovery tools. Refer to thedocumentation provided with the discovery tools for integration information.
Configuration GuideIntroduction to SACM
Page 12 of 70
SACM PrerequisitesThis guide expects that the following products are installed and fully functional:
l HP Universal CMDB (UCMDB) 10.20 or later:Server should be installed. Data flow probe shouldbe connected and running.
l HP Service Manager (SM) 9.40 or later:Server, Client, Help Server, andWeb Tier should beinstalled and running.
l HP Asset Manager (AM) 9.41 or later:Application designer, client, and AM web application.
l HP Connect-It 9.60 or later:Scenarios from SACM 9.40 kit.
Note: This guide assumes that the SACM products are installed in the following default locations:
l Universal CMDB –C:\hp\UCMDB\
l ServiceManager – C:\Program Files\HP\ServiceManager 9.40
l Asset Manager – C:\Program Files\HP\Asset Manager 9.41 en
l HP Connect-It – C:\Program Files\HP\Connect-It 9.60 en
Configuration GuideIntroduction to SACM
Page 13 of 70

SACM 9.40 Solution DiagramThe following diagram displays a typical deployment of the SACM Solution.
ID# Integration Name
#351 Employee Self-Service Catalog for Asset Manager (AM - SM)
#415 Reference Data Synchronization via Connect-It (AM <-> SM)
#816 Inventory, Software Utilization and Business Data Synch (UCMDB to AM)
Configuration GuideIntroduction to SACM
Page 14 of 70
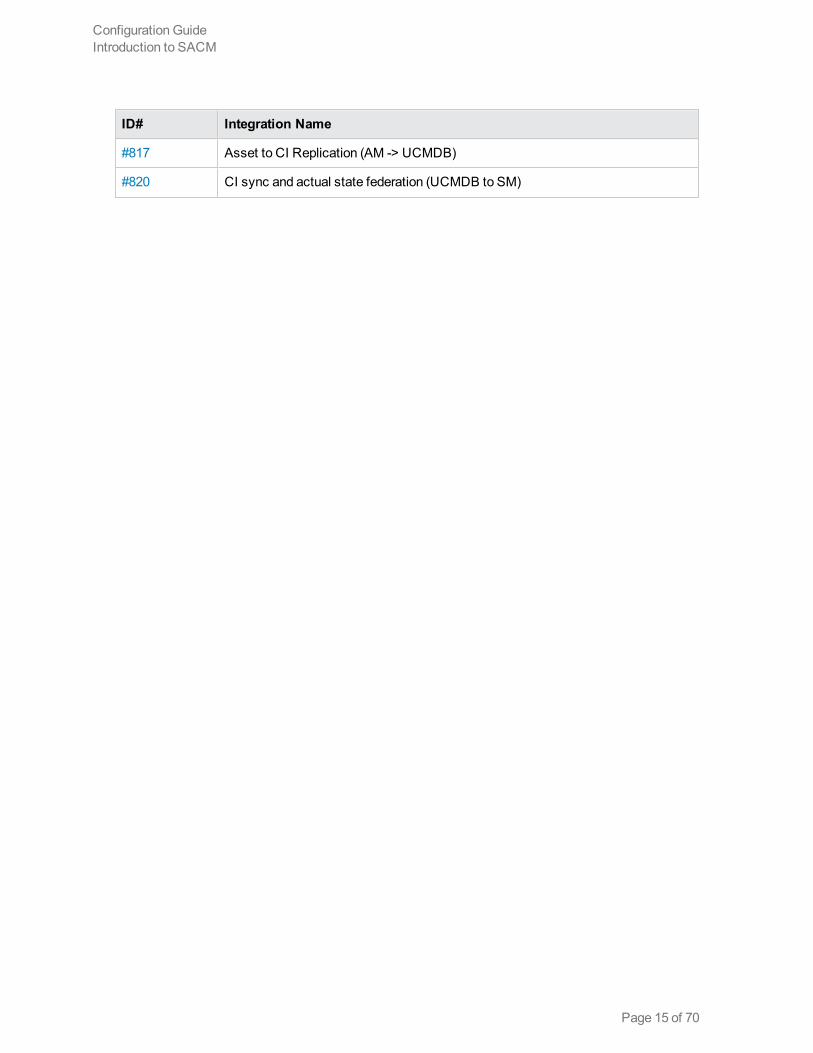
ID# Integration Name
#817 Asset to CI Replication (AM -> UCMDB)
#820 CI sync and actual state federation (UCMDB to SM)
Configuration GuideIntroduction to SACM
Page 15 of 70

Hardware and Software RequirementsThe instructions in this document assume that products are installed in the default location. If this is notthe case, you will need tomake the appropriate modifications to file paths mentioned in this document.
This section also includes:
Supported Versions 16
Hardware and Software Requirements 16
Supported VersionsThe following product versions were validated for the SACM 9.40 solution:
Product Version Instructions
UCMDB 10.20 or later
Recommended: 10.20
For installation instructions, see theHP UniversalCMDB Deployment Guide.
ServiceManager
9.40 or later
Recommended: 9.40
For installation instructions, see theHP ServiceManager Interactive UpgradeGuide
Connect-It
9.60 or later
Recommended: 9.60
For installation instructions, see theHP Connect-ITConnector Guide.
AssetManager
9.41 or later
Recommended: 9.41 with theSACM 9.40 content pack
For installation instructions, see theHP Asset Manager Installation and Upgrade.
Note: Make sure that each application you install is up and running before you perform anyconfiguration steps.
Hardware and Software RequirementsThis section includes:
HP Asset Manager Requirements 17
HP ServiceManager Requirements 19
HP Universal CMDB Requirements 21
HP Connect-It Requirements 24
Configuration GuideIntroduction to SACM
Page 16 of 70
HP Asset Manager Requirements
Supported operating systems
Asset Manager client programs
The Asset Manager client programs support:
l Windows
l Linux
To find out what operating system versions are supported, consult the Support Matrix at:www.hp.com/go/hpsoftwaresupport.
See Installation guide, chapterSupported environments, sectionSupported operatingsystems\Asset Manager client programs.
Asset Manager database server
The server may be used with all the operating systems and hardware platforms supported by yourDBMS.
To acquire the list of these supported items, refer to the documentation of your DBMS.
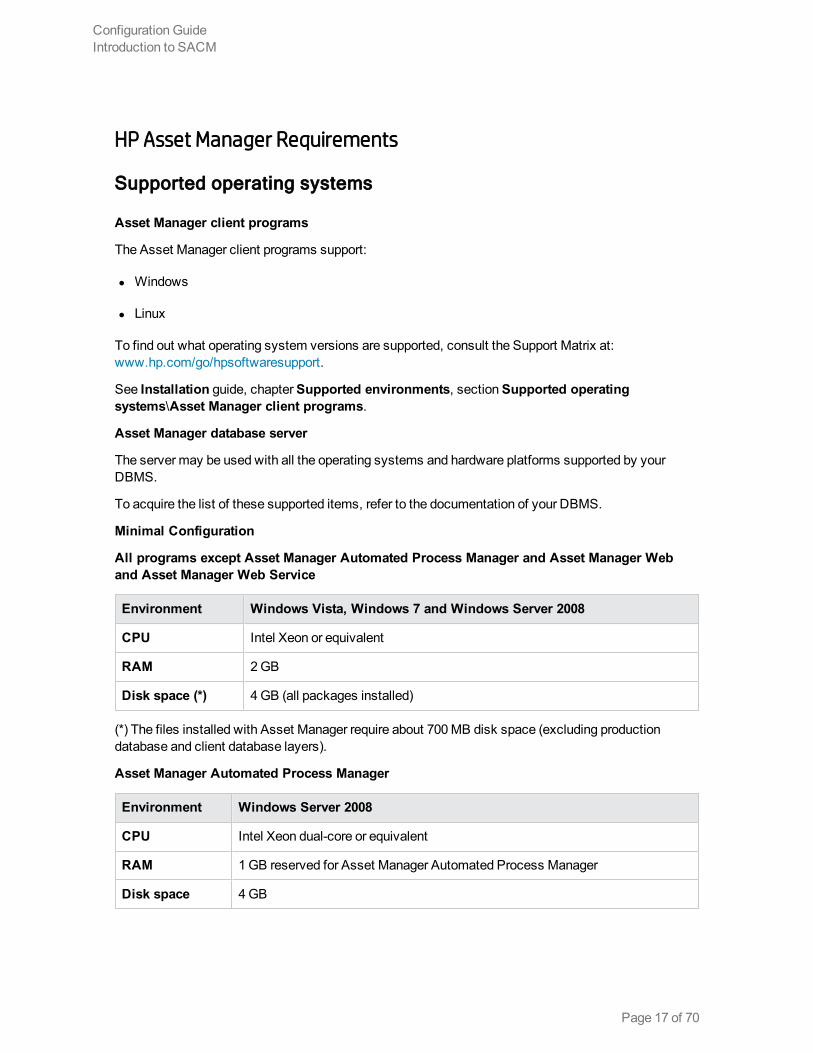
Minimal Configuration
All programs except Asset Manager Automated Process Manager and Asset Manager Weband Asset Manager Web Service
Environment Windows Vista, Windows 7 and Windows Server 2008
CPU Intel Xeon or equivalent
RAM 2GB
Disk space (*) 4GB (all packages installed)
(*) The files installed with Asset Manager require about 700MB disk space (excluding productiondatabase and client database layers).
Asset Manager Automated Process Manager
Environment Windows Server 2008
CPU Intel Xeon dual-core or equivalent
RAM 1GB reserved for Asset Manager Automated Process Manager
Disk space 4GB
Configuration GuideIntroduction to SACM
Page 17 of 70
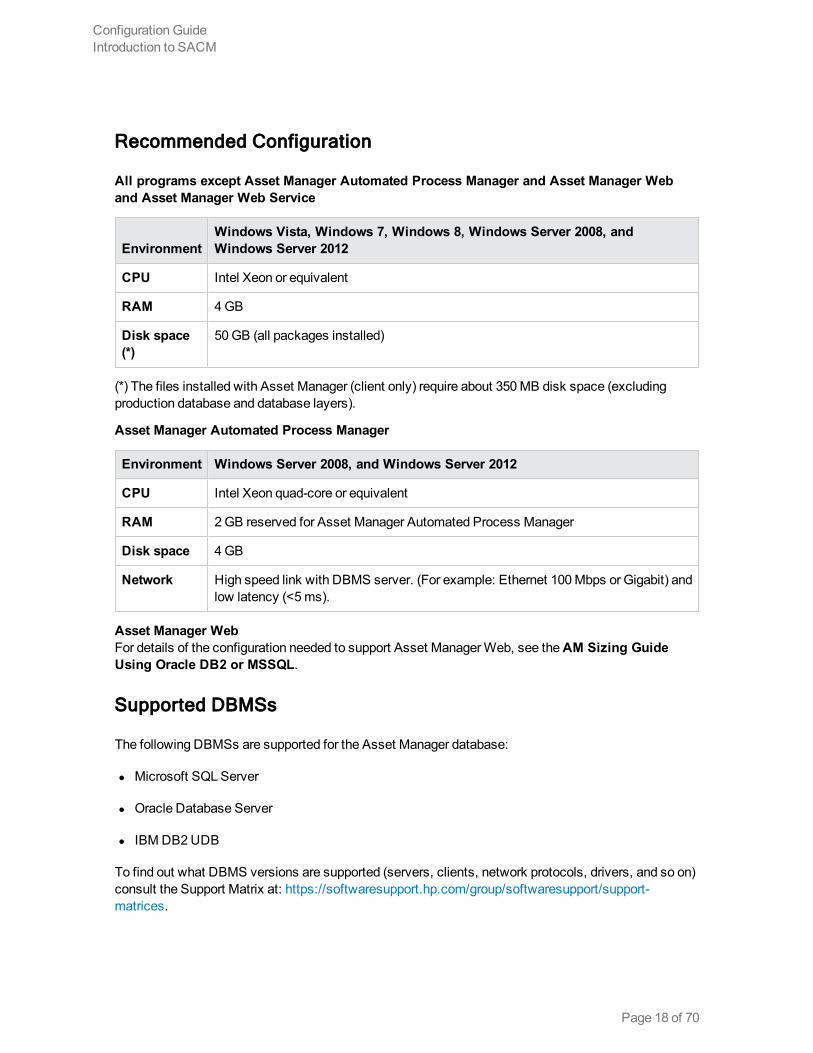
Recommended Configuration
All programs except Asset Manager Automated Process Manager and Asset Manager Weband Asset Manager Web Service
EnvironmentWindows Vista, Windows 7, Windows 8, Windows Server 2008, andWindows Server 2012
CPU Intel Xeon or equivalent
RAM 4GB
Disk space(*)
50GB (all packages installed)
(*) The files installed with Asset Manager (client only) require about 350MB disk space (excludingproduction database and database layers).
Asset Manager Automated Process Manager
Environment Windows Server 2008, and Windows Server 2012
CPU Intel Xeon quad-core or equivalent
RAM 2GB reserved for Asset Manager Automated Process Manager
Disk space 4GB
Network High speed link with DBMS server. (For example: Ethernet 100Mbps or Gigabit) andlow latency (<5ms).
Asset Manager WebFor details of the configuration needed to support Asset ManagerWeb, see theAM Sizing GuideUsing Oracle DB2 or MSSQL.
Supported DBMSs
The following DBMSs are supported for the Asset Manager database:
l Microsoft SQL Server
l Oracle Database Server
l IBM DB2UDB
To find out what DBMS versions are supported (servers, clients, network protocols, drivers, and so on)consult the Support Matrix at: https://softwaresupport.hp.com/group/softwaresupport/support-matrices.
Configuration GuideIntroduction to SACM
Page 18 of 70
HP Service Manager Requirements
Service Manager server
l Windows (64-bit):
n Windows Server 2012 R2, 2012
n Windows Server 2008 R2, 2008
l Linux (64-bit):
n RedHat Enterprise Linux 7.0, 6.x
n Oracle Enterprise Linux 7.0, 6.x
n Novell SUSE Linux Enterprise Server 11 SPx, 10 SP1
Formore supported platforms, refer to the product compatibility guide.
RDBMS
l Oracle 11.2 (11.2.0.3 or later)
l Oracle 12c
l SQLServer 2012
l SQLServer 2014
Formore details about supported RDBMS, refer to the product compatibility guide.
Service Manager Client
l Web tier
n Application server: Apache Tomcat 7.0
n WebServer: Apache HTTP Server 2.2, IIS 7.5
n Web client: Internet Explorer (IE) 11, 10, Firefox 31 or a later version (Extended SupportReleases are recommended), Google Chrome 31 or a later version
l Mobility client
Configuration GuideIntroduction to SACM
Page 19 of 70

n Application server: Apache Tomcat 7.0
n Handset:
o iOS 7.x, 8.x: Safari
o Android 4.x : Chrome, Android browser
o BlackBerry 10.0: BlackBerry browser
l Windows client
Operating Systems:
n Windows 8.1 andWindows 8 (32-bit and 64-bit)
n Windows 7 (32-bit and 64-bit)
Configuration GuideIntroduction to SACM
Page 20 of 70
HP Universal CMDB Requirements
Hardware
Computer/processor
Windows/Linux.
To fulfill the CPU requirements, youmust have one of the following:
l Intel Dual Core Xeon Processor 2.4 GHz or later
l AMD Opteron Dual Core Processor 2.4 GHz or later
In addition to the above requirements, youmust have the following number of CPU Cores, dependingon your deployment configuration:
l Small deployment: 1 CPU
l Standard deployment: 4 CPUs
l Enterprise deployment: 8 CPUs
Note: As HP Universal CMDB performance is dependent upon processor speed, to ensure properHP Universal CMDB performance, we recommend that you use the fastest possible processorspeed.
Memory
Windows/Linux.
l Small deployment: 4 GB RAM
l Standard deployment: 8 GB RAM
l Enterprise deployment:
n 16GB RAM
n 32GB RAM (for more than 40million CIs and relationships)
Memory Swap File
Windows.
l Small deployment: 6 GB (Supported)
l Standard deployment: 12 GB
Configuration GuideIntroduction to SACM
Page 21 of 70
l Enterprise deployment: 24 GB
Linux.
l Small deployment: 4 GB (Supported)
l Standard deployment: 8 GB
l Enterprise deployment: 16 GB
Note: The virtual memory forWindows should be at least 1.5 times the size of the physicalmemory.
The Linux swap file size should be equal to the size of the physical memory.
Free hard disk space
30GB at minimum (for logs, memory dumps, and so on).
Display
Windows.
Color palette setting of at least 256 colors (recommended: 32,000 colors).
Operating System
l Windows Server(64-bit):
n Windows Server 2012 andWindows Server 2012 R2
n Windows Server 2008 Enterprise SP2, R2,and R2 SP1 64-bit, Standard R2 and R2, SP1 64-bit
l RedHat Linux(64-bit)
n Enterprise/AdvancedServer 5.x
n Enterprise Server 6.2, 6.3, 6.4, and 6.5
l Oracle Linux
n Oracle Enterprise Linux Server with Red Hat Compatible Kernel v6.3
n Oracle Enterprise Linux Server with Unbreakable Enterprise Kernel v6.3
Configuration GuideIntroduction to SACM
Page 22 of 70
Database
l Oracle Server 11g or later
l Microsoft SQL Server 2008 or later
l PostgreSQL Server 9.22 or later
Application Servers
l Apache Tomcat, version 7.0.19
Web Servers
l Jetty, version 7.6.0
Web Browsers
l Windows Internet Explorer 7 or later, recommended to useWindows Internet Explorer 9
l Google Chrome on windows
l Firefox 10 and higher on windows
Plug-ins
l JAVA 7 or later
The recommended JRE version is 1.7u25.
Configuration GuideIntroduction to SACM
Page 23 of 70

HP Connect-It Requirements
Hardware
Windows
l CPU: Dual-core 2GHz or above
l RAM: 2GB or above
Linux
l CPU: Dual-core 2GHz or above
l RAM: 2GB or above
Operating System
Connect-It is a 32 bit application and only supports 32 bit interfaces.
l x86-32 / Microsoft Windows
n Windows Server 2008 SP1/SP2
n Windows Vista
n Windows 7 SP1 Enterprise
n Windows 8
l x86-64 / Microsoft Windows
n Windows Server 2008 SP1/SP2
n Windows Vista
n Windows 7 SP1 Enterprise
n Windows 8
l x86-32 / Linux
n RedHat Enterprise Linux 5 and 6 (32-bit and 64-bit)
n Oracle Linux 6
Configuration GuideIntroduction to SACM
Page 24 of 70
SACM Project Planning
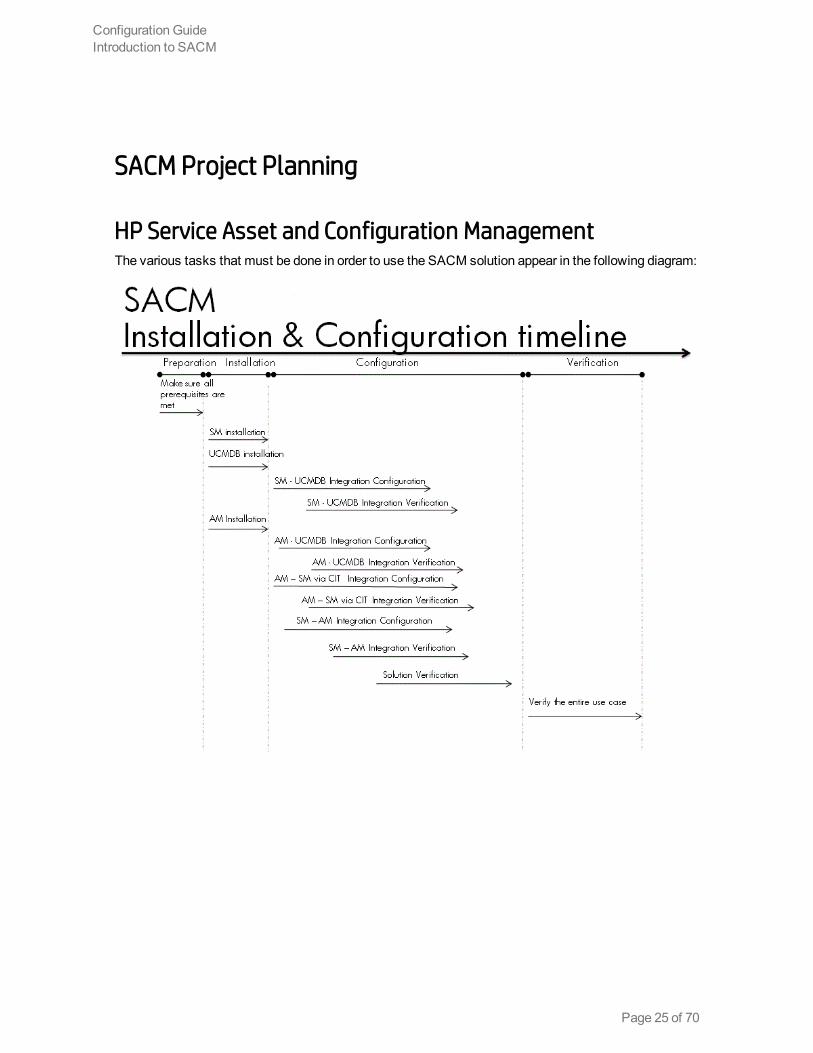
HP Service Asset and Configuration ManagementThe various tasks that must be done in order to use the SACM solution appear in the following diagram:
Configuration GuideIntroduction to SACM
Page 25 of 70

HP Asset Manager – OverviewHP Asset Manager (AM) helps IT organizations minimize their compliance risk, effectively managetheir IT services, andmaximize the utilization of IT.
AM supports the life cycle management of physical and logical assets. AM’s modules—AssetTracking, IT Procurement, Contract Management, Software Asset Management and FinancialManagement—will ensure that IT organizations get full visibility on their portfolio and can smoothly runoperations and optimize their use of IT.
AM's main benefits are described as follows:
l Asset Tracking:
n Track andmanage fiscally relevant physical and virtual assets throughout their life cycle
n Optimize IT spending
n Reduce the number of lost and unused assets
n Improve IT governance
l IT Procurement:
n Streamline IT procurement life cycle process
n Optimize purchase costs by tracking vendor prices
n Manage approvals and fulfillment of requests
n Measure contract objectives against vendor delivery metrics
l Contract Management:
n Automatically manage the operational state of contracts in use
n Track compliance with vendor terms and conditions
n Link assets to contracts (purchase, leasing, maintenance, support contracts)
n Monitor and re-evaluate contracts and suppliers
n Optimize cost of IT contracts
l Software Asset Management (SAM):
Configuration GuideIntroduction to SACM
Page 26 of 70
n Ensure vendor software license compliance using out-of-the-box SAM best practices
n Allow organizations to optimize what is already owned
n Enable activemanagement for the authoritative state of software CIs
l IT Financial Management:
n Track cost of assets and business services
n Define service offerings, manage user subscriptions
n Support showback/chargeback for use of business services
n Execute Budget Management Best Practices
HP Service Manager – OverviewHP ServiceManager stores themanaged or expected state of CIs and CI relationships as attributevalues in a CI record. To be part of the integration, a CI attribute in your UCMDB systemmust map to amanaged field in the SM CI record. You can add, remove, or update themanaged fields that are part ofthe integration by tailoring the SMWeb services that manage the integration.
SM runs according to a set of rules that define what actions you want the system to take whenever aCI’s actual state does not match the expected state as defined in the CI record. You define these rulesfrom the Discovery Event Manager (DEM) in SM where you can do the following:
l Automatically update a CI record tomatch the attribute values listed in the actual state. (This is thedefault behavior.)
l Automatically create a change record to review the differences between the actual state and themanaged state.
l Automatically create an incident record to review the differences between the actual state and themanaged state.
HP Universal CMDB – OverviewHP Universal CMDB (UCMDB) consists of a rich business-service-oriented datamodel with built-indiscovery of configuration items (CIs) and configuration item dependencies, visualization andmappingof business services, and tracking of configuration changes.
UCMDB implements datamodel, data flow management, and datamodeling capabilities, and alsoprovides impact analysis, change tracking, and reporting capabilities to transform CMDB data intocomprehensible, actionable information that helps answer critical questions and solve businessproblems.
Configuration GuideIntroduction to SACM
Page 27 of 70

HP Connect-It – OverviewConnect-It is an Enterprise Application Integration (EAI) type integration platform. An EAI solutionenables a company to integrate the different applications from which it can obtain or to which it canprovide internal data (Internal support, equipment management software, and so on) or external data(ERP, B2B, B2C). Connect-It integrates not only data, but also a company's application processes.
You can use Connect-It to:
l Transfer information from one database to another.
l Duplicate the information from one database to another in real-time.
l Import information from e-mails, delimited text files, XML files or other formats into a database.
l Export information from a database to e-mails, delimited text files, XML files or other formats.
l Import NT Security-based information into a database.
Configuration GuideIntroduction to SACM
Page 28 of 70
HP Service Manager and HP Universal CMDBIntegrationThis chapter includes:
Overview 29
Set up ServiceManager for Integration with Universal CMDB 30
Set up Universal CMDB for Integration with ServiceManager 31
Verify ServiceManager and Universal CMDB Integration 32
OverviewThis chapter describes the necessary steps to configure and verify the integration between SM andUCMDB and uses an out-of-the box configuration where a default set of configuration items (CIs) andtheir relations are synchronized between UCMDB and ServiceManager.
Page 29 of 70
Set up Service Manager for Integration with UniversalCMDBThis task includes:
Add the UCMDB Connection Information to the System Information Record 30
Add RESTful API to Operator's Capabilities 30
Add the UCMDB Connection Information to the SystemInformation Record
1. Log on to your SM system as an administrator.
2. From the System Navigator, select System Administration > Base System Configuration >Miscellaneous > System Information Record.
3. Click theActive Integrations tab.
4. Select theHP Universal CMDB option. The form displays the UCMDBWeb service field URL.
5. In the UCMDBWeb service URL field, enter the URL to the UCMDBWeb service API. The URLhas the following format:
http://<UCMDB server name>:<port>/axis2/services/ucmdbSMService.
6. In the UserId dialog box, enter your UCMDB user name and password and click Save.
Add RESTful API to Operator's Capabilities
1. In the System Navigator, go toSystem Administration > Ongoing Maintenance > Operators.
2. Enter or select your search criteria, and then click Search.
3. Select an operator from the record list to view the operator record.
4. Click theStartup tab, addRESTful API in theExecute Capabilities section, and then clickSave.
Configuration GuideHP ServiceManager and HP Universal CMDB Integration
Page 30 of 70
Set up Universal CMDB for Integration with ServiceManagerThis task includes:
Create a New Integration Point 31
Create a New Integration Point
1. Log on to UCMDB as an administrator.
2. From the left-hand navigation pane, select Data Flow Management > Integration Studio.
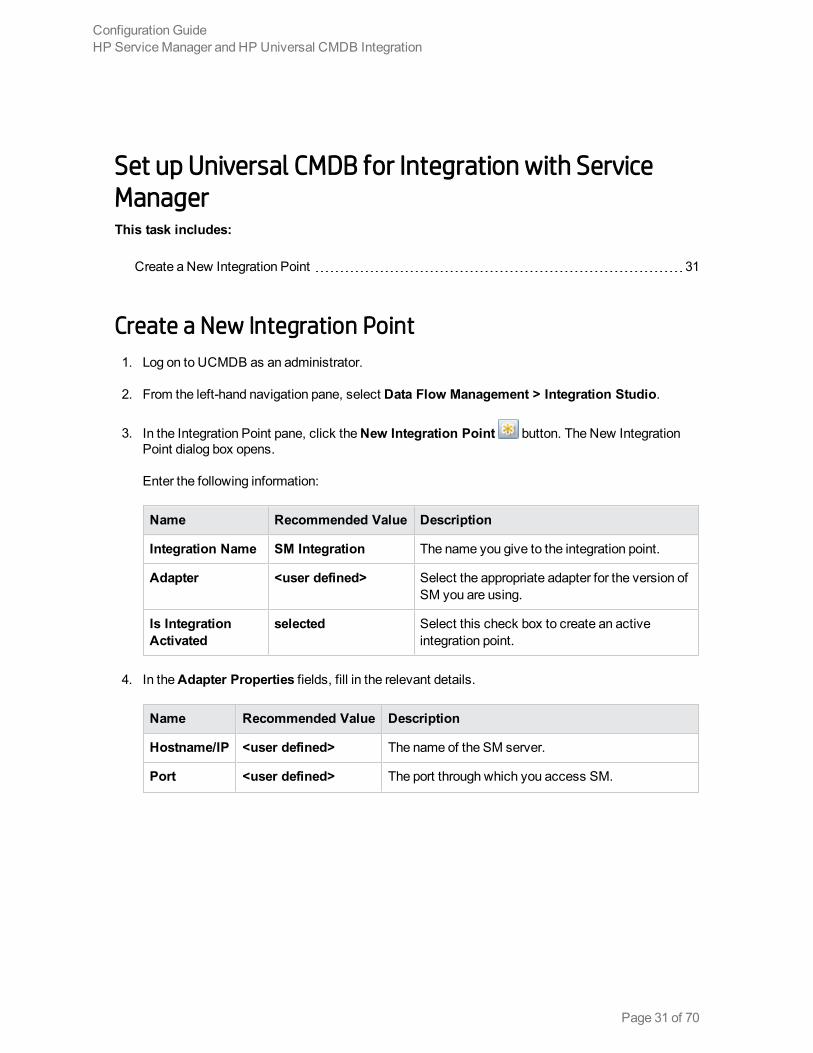
3. In the Integration Point pane, click theNew Integration Point button. The New IntegrationPoint dialog box opens.
Enter the following information:
Name Recommended Value Description
Integration Name SM Integration The name you give to the integration point.
Adapter <user defined> Select the appropriate adapter for the version ofSM you are using.
Is IntegrationActivated
selected Select this check box to create an activeintegration point.
4. In theAdapter Properties fields, fill in the relevant details.
Name Recommended Value Description
Hostname/IP <user defined> The name of the SM server.
Port <user defined> The port through which you access SM.
Configuration GuideHP ServiceManager and HP Universal CMDB Integration
Page 31 of 70

Name Recommended Value Description
Credentials <user defined> If SM credentials appear in the Credentials column,select them.
If no SM credentials appear, select GenericProtocol and click theAdd new connection details
for selected protocol type button.
Enter the following information:
n Description. EnterService Manager.
n User Name. Enter the ServiceManager username. The default value is falcon.
n User Password. Enter and confirm a password.
Probe Name <user defined> Select the name of the Data Flow Probe used to runpopulation jobs.
5. Click Test Connection.
6. After the connection success message appears, click OK.
7. On the Federation tab, select the Incident, Problem, andRequestForChangeCI types and
click theSave Integration Point button.
8. Log on to the JMX console.
9. From the UCMDB section, select UCMDB:service=Multiple CMDB Instances Services.
10. Invoke:
n setAsGlobalIdGenerator and verify it succeeded.
n getGlobalIdGeneratorScopes and verify it succeeded.
Verify Service Manager and Universal CMDBIntegrationThis task includes:
Run the Data Push Jobs 33
Run the Population Jobs 33
Configuration GuideHP ServiceManager and HP Universal CMDB Integration
Page 32 of 70
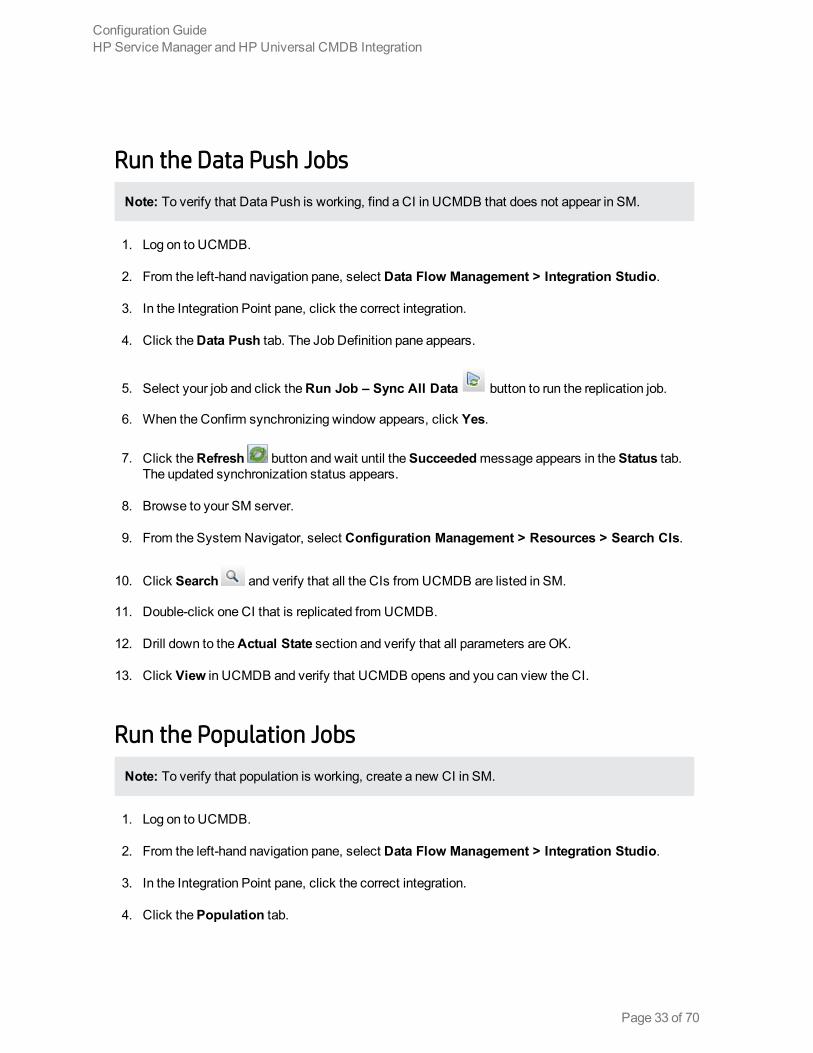
Run the Data Push Jobs
Note: To verify that Data Push is working, find a CI in UCMDB that does not appear in SM.
1. Log on to UCMDB.
2. From the left-hand navigation pane, select Data Flow Management > Integration Studio.
3. In the Integration Point pane, click the correct integration.
4. Click theData Push tab. The Job Definition pane appears.
5. Select your job and click theRun Job – Sync All Data button to run the replication job.
6. When the Confirm synchronizing window appears, click Yes.
7. Click theRefresh button and wait until theSucceededmessage appears in theStatus tab.The updated synchronization status appears.
8. Browse to your SM server.
9. From the System Navigator, select Configuration Management > Resources > Search CIs.
10. Click Search and verify that all the CIs from UCMDB are listed in SM.
11. Double-click one CI that is replicated from UCMDB.
12. Drill down to theActual State section and verify that all parameters are OK.
13. Click View in UCMDB and verify that UCMDB opens and you can view the CI.
Run the Population Jobs
Note: To verify that population is working, create a new CI in SM.
1. Log on to UCMDB.
2. From the left-hand navigation pane, select Data Flow Management > Integration Studio.
3. In the Integration Point pane, click the correct integration.
4. Click thePopulation tab.
Configuration GuideHP ServiceManager and HP Universal CMDB Integration
Page 33 of 70
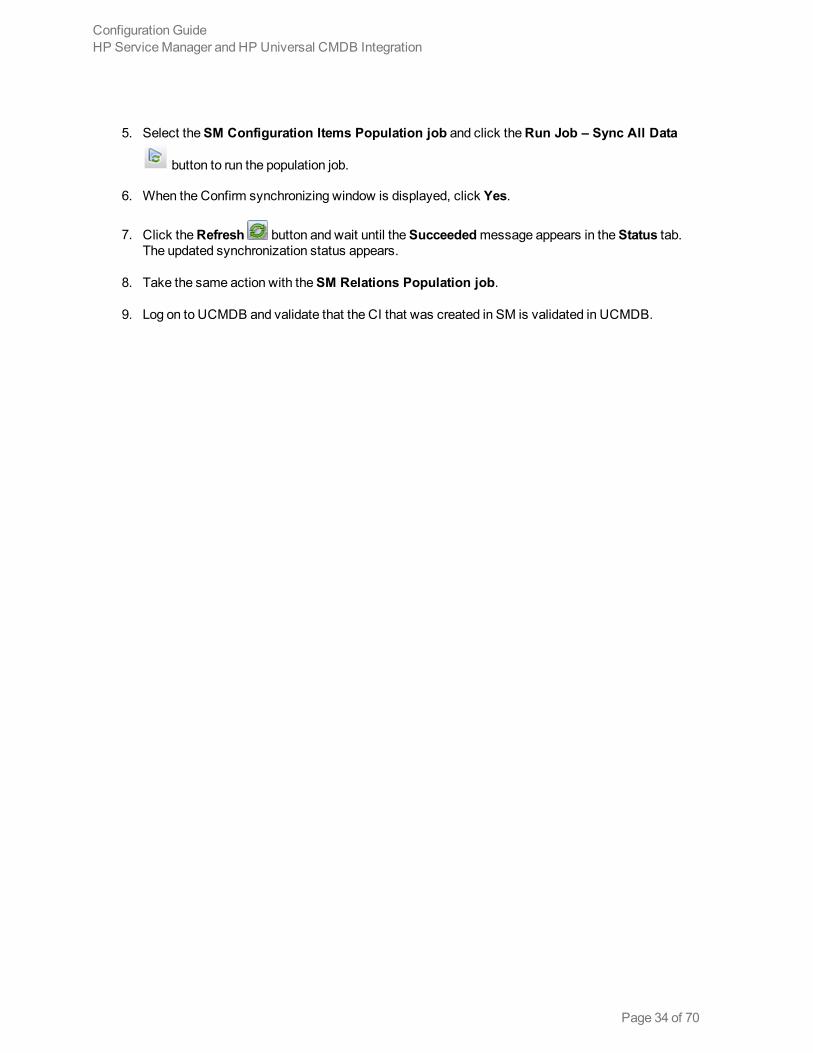
5. Select theSM Configuration Items Population job and click theRun Job – Sync All Data
button to run the population job.
6. When the Confirm synchronizing window is displayed, click Yes.
7. Click theRefresh button and wait until theSucceededmessage appears in theStatus tab.The updated synchronization status appears.
8. Take the same action with theSM Relations Population job.
9. Log on to UCMDB and validate that the CI that was created in SM is validated in UCMDB.
Configuration GuideHP ServiceManager and HP Universal CMDB Integration
Page 34 of 70
HP Asset Manager and HP Universal CMDBIntegrationThis chapter includes:
Overview 35
Set up Asset Manager for Integration with Universal CMDB 35
Set up Universal CMDB for Integration with Asset Manager 36
Verify HP Asset Manager - HP Universal CMDB Integration 39
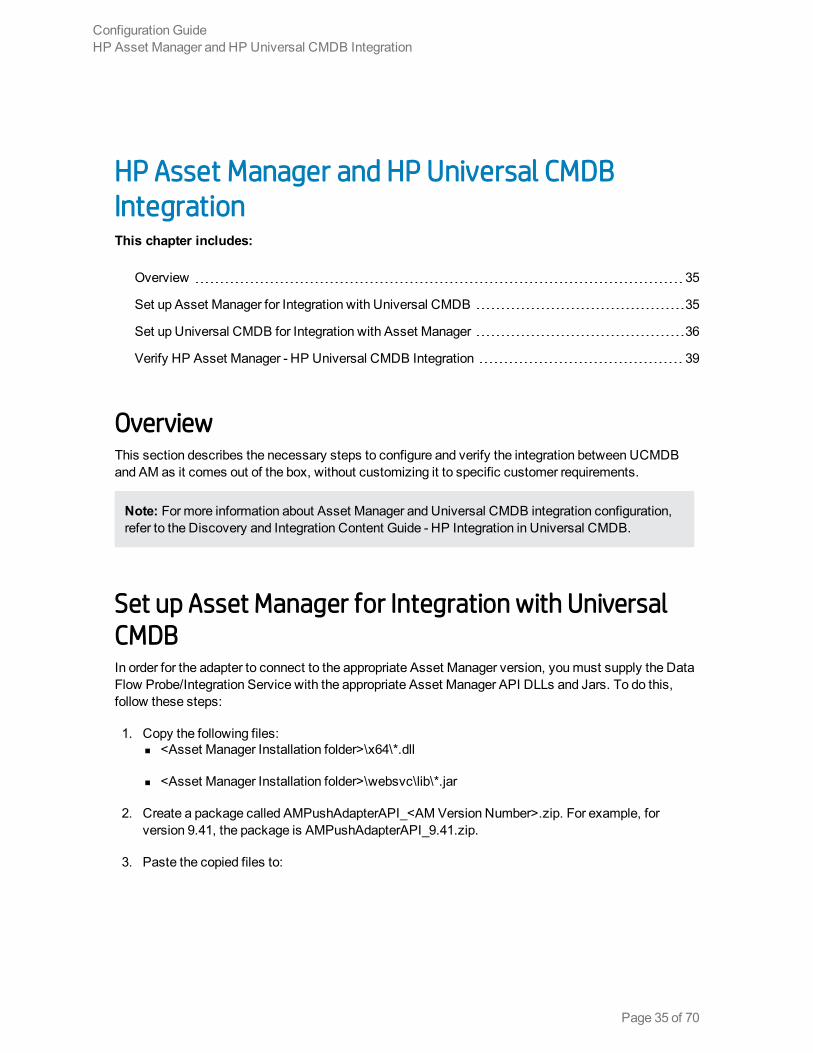
OverviewThis section describes the necessary steps to configure and verify the integration between UCMDBand AM as it comes out of the box, without customizing it to specific customer requirements.
Note: Formore information about Asset Manager and Universal CMDB integration configuration,refer to the Discovery and Integration Content Guide - HP Integration in Universal CMDB.
Set up Asset Manager for Integration with UniversalCMDBIn order for the adapter to connect to the appropriate Asset Manager version, youmust supply the DataFlow Probe/Integration Service with the appropriate Asset Manager API DLLs and Jars. To do this,follow these steps:
1. Copy the following files:n <Asset Manager Installation folder>\x64\*.dll
n <Asset Manager Installation folder>\websvc\lib\*.jar
2. Create a package called AMPushAdapterAPI_<AM Version Number>.zip. For example, forversion 9.41, the package is AMPushAdapterAPI_9.41.zip.
3. Paste the copied files to:
Configuration GuideHP Asset Manager and HP Universal CMDB Integration
Page 35 of 70
<AMPushAdapterAPI_{AM VersionNumber}.zip>\discoveryResources\AMPushAdapter\amVersion\<AM Version Number>
For example, for version 9.41, the path is:
AMPushAdapterAPI_9.41.zip\discoveryResources\AMPushAdapter\amVersion\9.41
4. Deploy the AMPushAdapterAPI_<AM Version Number>.zip package.
The workflow used by SACM should be active in Asset Manager, to do this, following theses steps:
1. Log on to Asset Manager client.
2. On the Toolsmenu, point toWorkflow, clickWorkflow schemes.
3. Locate theUpdate dtRecCreation (SQL name: sysCoreUpCrTime) workflow and theUpdate lastmodify time (SQL name: sysCoreUpMdifyTime) workflow.
4. On theGeneral tab, empty theEnd field of theValidity pane.
5. Save the changes.
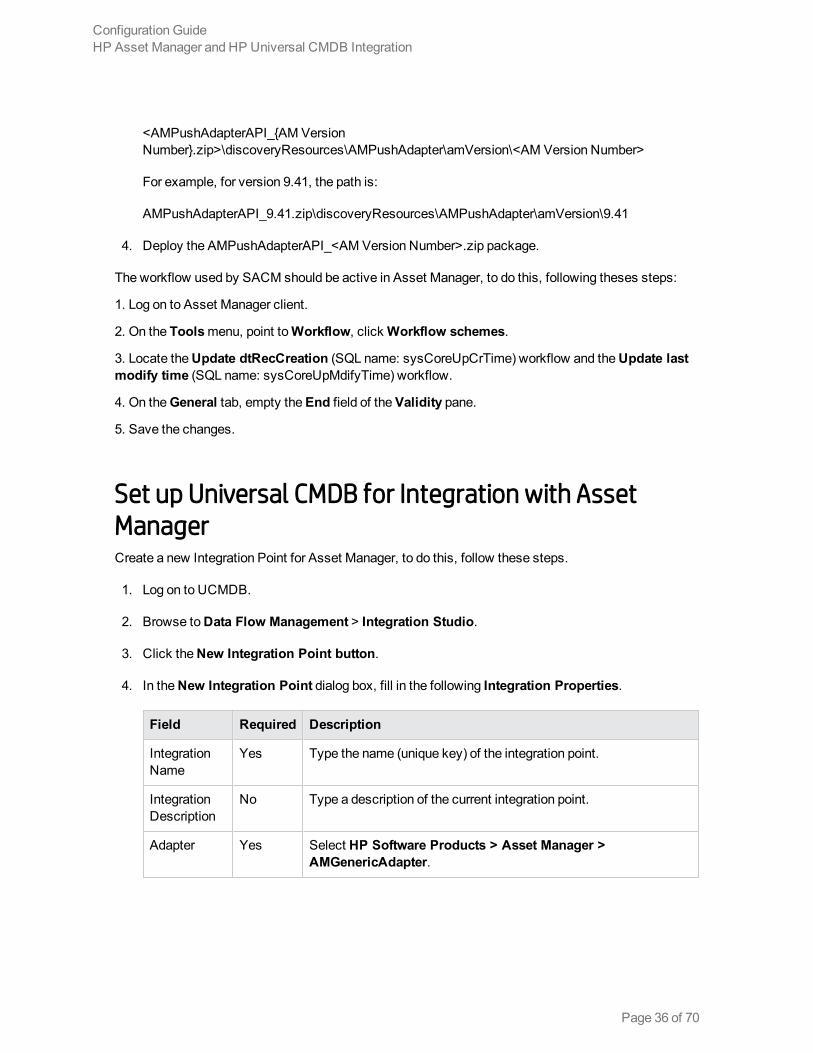
Set up Universal CMDB for Integration with AssetManagerCreate a new Integration Point for Asset Manager, to do this, follow these steps.
1. Log on to UCMDB.
2. Browse toData Flow Management > Integration Studio.
3. Click theNew Integration Point button.
4. In theNew Integration Point dialog box, fill in the following Integration Properties.
Field Required Description
IntegrationName
Yes Type the name (unique key) of the integration point.
IntegrationDescription
No Type a description of the current integration point.
Adapter Yes Select HP Software Products > Asset Manager >AMGenericAdapter.
Configuration GuideHP Asset Manager and HP Universal CMDB Integration
Page 36 of 70

Field Required Description
Is IntegrationActivated
Yes Select this option to indicate the integration point is active.
Hostname/IP Yes Type the hostname or IP Address of the Asset Manager database.
DB Type Yes Select the database type your Asset Manager schema is locatedon.
DB Port Yes Type the communication port of the Asset Manager database.
DBName/SID
Yes n DB2: type in the name of the Database Alias you defined in thedatabase connection.
n Oracle: type the service name.
n SQLServer: type the name of the schema.
DB OwnerName
No Enter the owner of the AM database schema.
CredentialsID
Yes Select Asset Manager Protocol. Create a new protocol, underAsset Manager Protocol, complete:
n Asset Manager User Name: AM administrator's user name.
n Asset Manager Password: AM administrator's password.
n DB User Name: The AM database user's name.
n DB Password: The AM database user's password.
AM Version Yes Select the version of the Asset Manager this integration pointconnects to.
AMPopulationPush BackID
No Select True to allow the adapter to push the GlobalId of UCMDB CIback to the corresponding AM entity.
AM OtherConnectionOptions
No Options can be used in the amdb.ini file. See Asset ManagerInstallation guide > Chapter 9: .ini, .cfg, and .res files > Amdb.iniFile Entries.
Configuration GuideHP Asset Manager and HP Universal CMDB Integration
Page 37 of 70
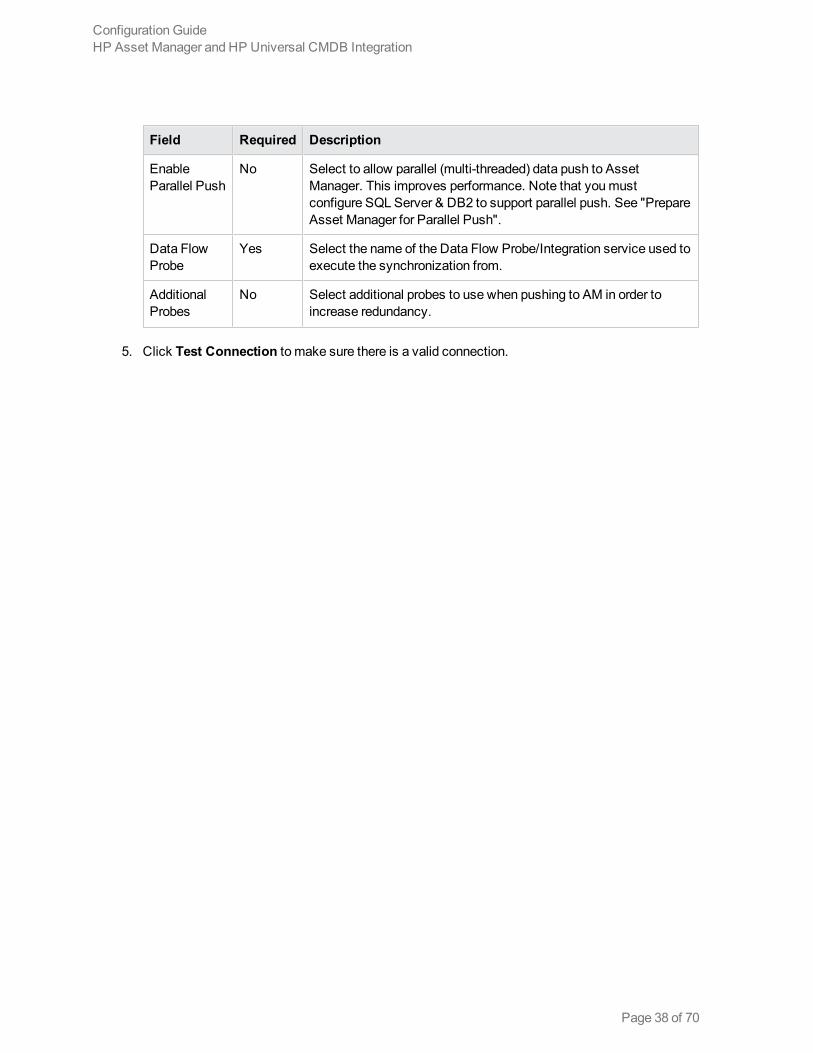
Field Required Description
EnableParallel Push
No Select to allow parallel (multi-threaded) data push to AssetManager. This improves performance. Note that youmustconfigure SQL Server & DB2 to support parallel push. See "PrepareAsset Manager for Parallel Push".
Data FlowProbe
Yes Select the name of the Data Flow Probe/Integration service used toexecute the synchronization from.
AdditionalProbes
No Select additional probes to use when pushing to AM in order toincrease redundancy.
5. Click Test Connection to make sure there is a valid connection.
Configuration GuideHP Asset Manager and HP Universal CMDB Integration
Page 38 of 70
Verify HP Asset Manager - HP Universal CMDBIntegration
Run the Data Push JobsTo verify that Data Push is working, create a Node CI in UCMDB, and then follow these steps.
1. Log on to UCMDB.
2. From the left-hand navigation pane, select Data Flow Management > Integration Studio.
3. Create a new integration point, select theAM Generic Adapter.
4. Select the Integration Pointer, click theData Push tab page on top right corner from right part.
5. Select out of box push job, then click the Full Synchronization - Runs the selected job,synchronizing all of the data button.
6. When theConfirm synchronizing window appears, click Yes.
7. Click theRefresh button and wait until theSucceededmessage appears on theStatus tab. Then,updated synchronization status appears.
8. To check push result: Go to AM web client, select IT equipment to confirm that all discoveredCIs from UCMDB appear in AM.
Run the Population JobsTo verify that population is working, create a Business Service CI whose status is notRetired/Consumed in SM, and then follow these steps.
1. Log on to UCMDB.
2. From the left-hand navigation pane, select Data Flow Management > Integration Studio.
3. In the Integration Point pane, select theAM Generic Adapter.
4. Select the Integration Pointer, click thePopulation tab page on top right corner from right part .
5. Select out of box population job, then click the Full Synchronization - Runs the selected job,synchronizing all of the data button.
6. When theConfirm synchronizing window is displayed, click Yes.
Configuration GuideHP Asset Manager and HP Universal CMDB Integration
Page 39 of 70
7. Click theRefresh button and wait until theSucceededmessage appears on theStatus tab. Then,updated synchronization status appears.
8. To check population result: From the left-hand navigation pane, selectModeling > IT UniverseManager.
9. Select theSearch CIs tab . In theCI type, select Node and click Enter. Confirm that all CIs fromAM appear in UCMDB.
Configuration GuideHP Asset Manager and HP Universal CMDB Integration
Page 40 of 70
HP Asset Manager - HP Service ManagerIntegrationThis chapter includes:
Overview 41
Prerequisites 41
Install and Configure Asset ManagerWeb Service 43
Install and Configure AMWeb Service Proxy 46
Install and Configure HP ServiceManagerWebsite 47
Verify Asset Manager - ServiceManager Normal Integration 53
Use the Request Self-Service to Verify Asset Manager- ServiceManager Integration 54
OverviewThis chapter describes the necessary steps to configure and verify the integration between SM and AMfollowing a request from the catalog. This integration enables the Employee Self Service (ESS) user ofServiceManager to create a request which will be transferred to Asset Manager and will be processedthere until completion (Service Catalog integration).
A typical request handled by this integration includes the procurement of new IT assets—such as thepurchase of a new laptop computer for an employee or a new server for a data center.
PrerequisitesBefore integrating AM and SM, there is some data that needs to be synchronized via HP Connect-It(CIT). This data includes information about People, Places, Things (PPT, not CIs), commonly referredto as PPT in the description described in this chapter. Depending on the current customerimplementation phase, themaster data source can be either ServiceManager or Asset Manager—oreach product will contain master data for specific record types.
By default, the provided HP Connect-It scenarios transfer the same PPT types from AM to SM andfrom SM to AM. You cannot implement the scenarios as they are, because data replication would circleback and forth. Therefore, youmust decide whether the AM or SM database will store the referencedata for each of the PPT types:
l Companies
l Vendors
Configuration GuideHP Asset Manager - HP ServiceManager Integration
Page 41 of 70
l Locations
l Departments
l Contacts
l Models
l Stock rooms
Run scenarios to synchronize PPT data between AM and SM:
1. Install HP Connect-It 9.60.
2. Download the SACM 9.40 content pack from HPLN(https://hpln.hp.com) and unzip it toC:\SACM940.
3. The HP Connect-It scenarios depend on the SACM IntegrationWeb Service. You need to add thisweb service to SM:
a. Log on to HP ServiceManager client with administrative rights.
b. SelectMenu Navigation > Tailoring > Database Manager in the navigation pane.
c. Right-click the screen in the right pane and select Import/Load.
d. In the File Name field, enter C:\SACM940\datakit\sc\sm94\SACMintegration.unl.
e. Click Load FG.
f. SelectMenu Navigation > Tailoring > Web Services > Web Service Configuration inthe navigation pane
g. In theService Name field, enter SACMIntegration.
h. Click Search.
Verify that you see a list of entries prefixed withSACM.
4. Open HP Connect-It , browse to C:\SACM940.
5. Select one of the following scenarios:
n If the reference database for all PPT types is AM:
o Use amsm-ppt.scn to transfer the PPTs from AM to SM.
o Do not use amsm-ci-ppt-link.scn because links between CIs and Contact, Model,Vendor,Location and Department aremanaged by the amsm-ppt.scn scenario.
Configuration GuideHP Asset Manager - HP ServiceManager Integration
Page 42 of 70
n If the reference database for all PPT types is SM:
o Use smam-ppt.scn to transfer the PPTs from AM to SM.
o Use smam-wo.scn to transfer changes and tasks.
n If the reference database for PPT types is amixed solution between AM or SM according toPPT type:
o Customize smam-ppt.scn so that PPTs referenced in SM are transferred to AM.
o Customize amsm-ppt.scn so that PPTs referenced in AM are transferred to SM.
o Do not use amsm-ci-ppt-link.scn because links between CIs and Contact, Model,Vendor,Location and Department aremanaged by the amsm-ppt.scn scenario.
o Use smam-wo.scn to transfer changes and tasks.
6. For each scenario, define the AM details and SM details.
7. After all the details are defined in the components, click Produce now to run the scenario.
Note: In an environment where an Employee Self Service (ESS) Catalog integration is planned (asdescribed in "Use the Request Self-Service to Verify Asset Manager- ServiceManagerIntegration" on page 54), it is necessary to disable Contact synchronization in order to preventpossible data duplication.
To disable the synchronization of Contact records:
1. Open the amsm-ppt.scn scenario in Connect-It.
2. In theScenario diagram pane, select theMapping box, and then select theMappings tab.
3. In the Detail of the connector 'Mapping' pane, uncheck Creation of a contact andUpdate acontact.
4. Save the changes and exit the scenario.
Install and Configure Asset Manager Web ServiceThis section shows you how to install and configure AM web service. For more information about AssetManager web configuration, refer to the Installation and upgrade guide.
1. Install JDK 7 and configure the environment variable of the JAVA_HOME to JDK folder; forexample, C:\Java\jdk1.7.0_65.
Configuration GuideHP Asset Manager - HP ServiceManager Integration
Page 43 of 70
2. Install Apache Tomcat7.0.42 to C:\Tomcat7042.
3. In order for some required libraries to be found by AMWeb, make sure <Asset ManagerInstallation folder>\bin or <Asset Manager Installation folder>\bin\x64 is in an environmentvariable of path.
4. Implementing AM Automated Process Manager inWindows:
a. Browse toStart > Run.
b. Type services.msc.
c. Select Asset Manager Automated Process Manager 9.41 and change the startup type toautomatic.
d. Click Start andOK.
e. Browse toStart > All Programs > HP > Asset Manager 9.41 en > Automated ProcessManager.
f. Click File to connect to the new database.
g. Select the relevant database and enter the credentials.
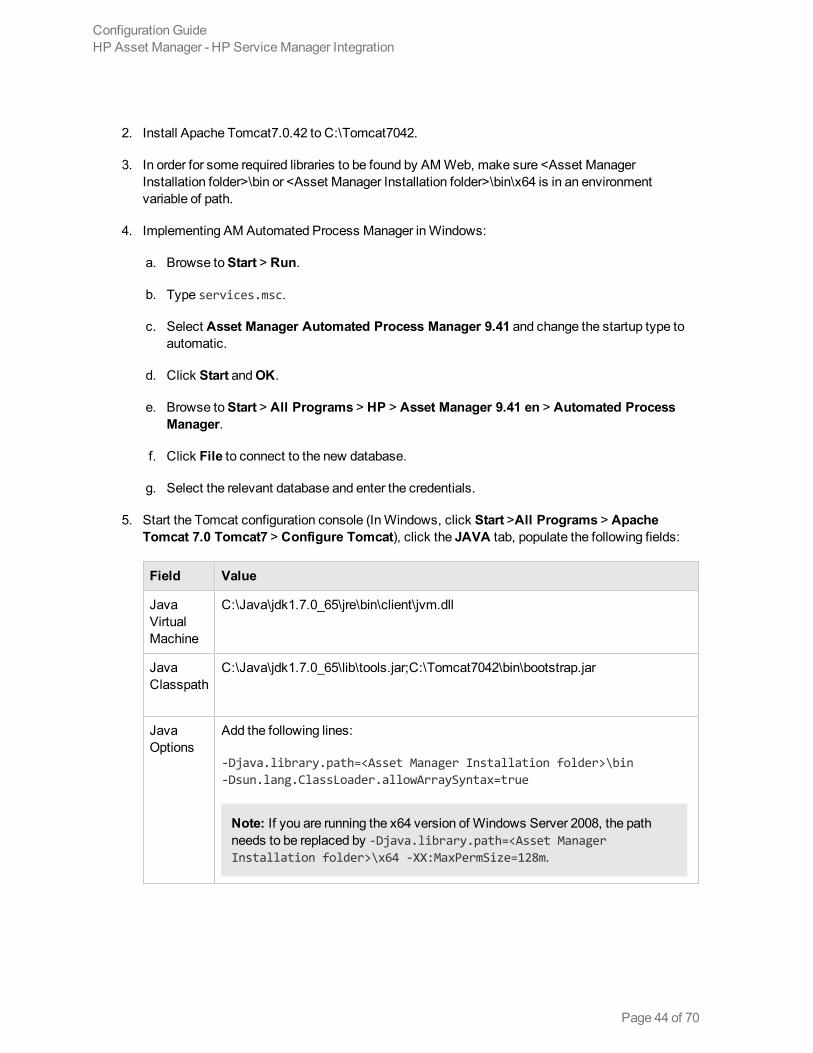
5. Start the Tomcat configuration console (InWindows, click Start >All Programs > ApacheTomcat 7.0 Tomcat7 > Configure Tomcat), click the JAVA tab, populate the following fields:
Field Value
JavaVirtualMachine
C:\Java\jdk1.7.0_65\jre\bin\client\jvm.dll
JavaClasspath
C:\Java\jdk1.7.0_65\lib\tools.jar;C:\Tomcat7042\bin\bootstrap.jar
JavaOptions
Add the following lines:
-Djava.library.path=<Asset Manager Installation folder>\bin-Dsun.lang.ClassLoader.allowArraySyntax=true
Note: If you are running the x64 version of Windows Server 2008, the pathneeds to be replaced by -Djava.library.path=<Asset ManagerInstallation folder>\x64 -XX:MaxPermSize=128m.
Configuration GuideHP Asset Manager - HP ServiceManager Integration
Page 44 of 70
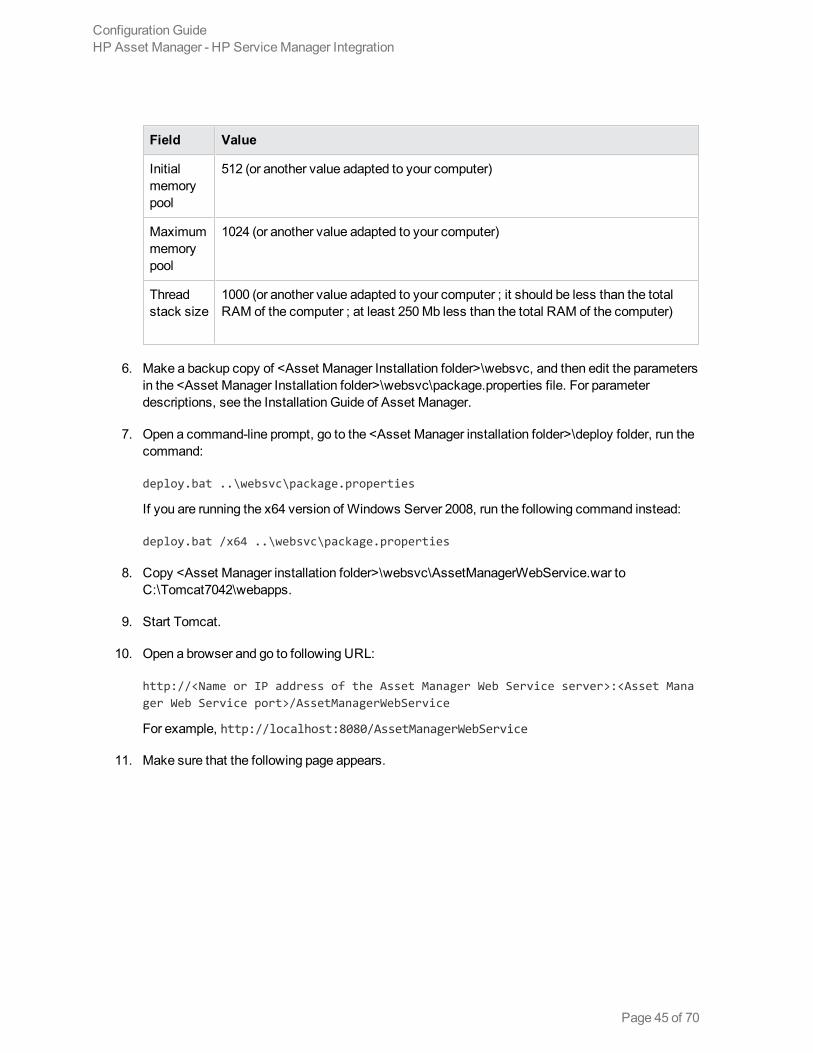
Field Value
Initialmemorypool
512 (or another value adapted to your computer)
Maximummemorypool
1024 (or another value adapted to your computer)
Threadstack size
1000 (or another value adapted to your computer ; it should be less than the totalRAM of the computer ; at least 250Mb less than the total RAM of the computer)
6. Make a backup copy of <Asset Manager Installation folder>\websvc, and then edit the parametersin the <Asset Manager Installation folder>\websvc\package.properties file. For parameterdescriptions, see the Installation Guide of Asset Manager.
7. Open a command-line prompt, go to the <Asset Manager installation folder>\deploy folder, run thecommand:
deploy.bat ..\websvc\package.properties
If you are running the x64 version of Windows Server 2008, run the following command instead:
deploy.bat /x64 ..\websvc\package.properties
8. Copy <Asset Manager installation folder>\websvc\AssetManagerWebService.war toC:\Tomcat7042\webapps.
9. Start Tomcat.
10. Open a browser and go to following URL:
http://<Name or IP address of the Asset Manager Web Service server>:<Asset Manager Web Service port>/AssetManagerWebService
For example, http://localhost:8080/AssetManagerWebService
11. Make sure that the following page appears.
Configuration GuideHP Asset Manager - HP ServiceManager Integration
Page 45 of 70

Install and Configure AM Web Service ProxyThe web service proxy is an interface that is used to convert a query to create a purchase request fromthe HP ServiceManager catalog into a series of calls to Asset Manager web service which enable thepurchase request to be created in Asset Manager.
You can install the web service proxy on any computer (for example, on the computer that runs AssetManager web service).
1. Install Apache Ant ( http://ant.apache.org) on the computer where you want to set up the webservice proxy.
2. Install Java SE.
3. Back up <Asset Manager installation folder>\esscat\build\ant.properties.defaultand rename the duplicated file to ant.properties.
4. Edit ant.properties and change thews.host, ws.port andws.service parameters to have thehttp://<ws.host>/<ws.port>/<ws.service> link point to the computer where Asset Managerweb service is installed.
5. Open a command-line prompt and go to the <Asset Manager installationfolder>\esscat\build\ folder.
Execute the following command:
ant webapp
Configuration GuideHP Asset Manager - HP ServiceManager Integration
Page 46 of 70

6. Deploy the generated ServiceCatalog.war file on your application server by following thestandard procedure.
7. Because the Java virtual machine launched by the application server uses a lot of memory, youneed to increase the available memory to at least 256MB. To do so, modify the JVM (Java VirtualMachine)MaxPermSize parameter with the following switch:
-XX:MaxPermSize=256m
If you are using the Tomcat application server, follow these steps.
a. Start the Tomcat configuration console (Start >All Programs > Apache Tomcat 7.0Tomcat7 > Configure Tomcat Windows menu).
b. Select the Java tab.
c. Add the following line to the JavaOptions section:
-XX:MaxPermSize=256m
d. Close the Tomcat configuration console.
8. Create ESS reference records in Asset Manager.
The different items that need to be created beforehand in Asset Manager are:
n Employees that can connect to the database and use the request self-service system(amEmplDept table). These employees must have a user account and password.
n Employees for whom a request is made (amEmplDept table).
n Standard request and product models (amModel table).
n Standard requests (amRequest table), products (amCatProduct table) and off-catalog products(amModel table).
Install and Configure HP Service Manager WebsiteThis section shows how to install and configure ServiceManager website.
Installation
1. Stop and copy SM web tier war file to TOMCAT_HOME\webapps\ and rename it to sm940.war.
2. Start Tomcat to deploy this war file.
Configuration GuideHP Asset Manager - HP ServiceManager Integration
Page 47 of 70
3. Search andmodify these value of parameters in web.xml underC:\Tomcat7042\webapps\sm940\WEB-INF\.
<context-param><param-name>secureLogin</param-name><param-value>false</param-value>
</context-param>
Set this value to false if ServiceManager is not configured as secure login.
<param-name>serverHost</param-name><param-value>192.168.0.1</param-value>
</init-param>
This IP address goes to the SM server. Generally, the param-value should be "localhost".
<init-param><param-name>serverPort</param-name><param-value>13080</param-value>
</init-param>
The SM service port is specified in the installation wizard. The initial value is 13080. If that isincorrect, contact the technician who installed the SM server (sm.ini).
4. Remove sm940.war, and then restart Tomcat.
5. Test SM webwith the following URL.
http://<Name or IP address of the SM Web client server>:<SM Web client serverport number>/<SM instance name>/index.do
For example:
http://localhost:8080/sm940/index.do
6. For ESS user, test http://<Name or IP address of the SM Web client server>:<SM Webclient server port number>/<SM instance name>/ess.do
For example:
http://localhost:8080/sm940/ess.do
ConfigurationIf you already have a full version of HP ServiceManager, make sure that you have installed HP ServiceManager web for an ESS (Employee Self-Service) user or consult the HP ServiceManager installationguide to install it.
Configuration GuideHP Asset Manager - HP ServiceManager Integration
Page 48 of 70
1. Disable the request validation.
a. Log on to the SM website.
b. In the browser, selectMenus Service Catalog > Administration > Approval Activities.
c. Select the first line of theGeneral Approval table.
d. Click theRemove Approval Activity link.
e. Click Finish.
2. Enable the transfer of catalog items.
a. Log on to the SM website with administrative rights.
b. SelectMenu Tailoring > Database Dictionary in the navigation pane.
c. Enter svcDisplay in the File name field, click Search.
d. Select the descriptor entry in the table (first line of the table, do not click the name column).
e. Click theNew Field/Key button.
f. Populate theName field with the optionList value, the Type field with the character value,and click Add Field.
g. Edit the optionList entry in the table to populate the SQLName field with OPTIONLIST, SQLType with IMAGE, and SQL Table with m1, then click OK.
h. Click OK, click SM Alters.
i. Enter svcDisplay in the File name field, click Search.
j. Select the descriptor entry in the table (first line of the table) again.
k. Click theNew Field/Key button.
l. Populate theName field with the optionOptions value, the Type field with the charactervalue,and click Add Field.
m. Edit the optionOptions entry in the table to populate theSQL Name field withOPTIONOPTIONS, SQL Type with IMAGE, and SQL Table with m1, and then click OK.
n. Click OK, click SM Alters.
o. Select Tailoring > Database Manager.
p. Click More > Import/Load.
Configuration GuideHP Asset Manager - HP ServiceManager Integration
Page 49 of 70
q. In the File Name field, select the <Asset Manager Installationfolder>\esscat\sc\sm71\SCR42940.unl file path, and then click the Load FG button.
r. Wait until you get amessage like "SCR42940.unl file loaded".
3. Enable the transfer of images.
a. Log on to SM website with administrative rights.
b. Select Tailoring > Database Manager.
c. Click More > Import/Load.
d. Right-click theDatabase Manager screen and select Import/Load in the contextual menu.
e. In the File Name field, select the <Asset Manager Installationfolder>\esscat\sc\sm71\QC8955.unl file, and then click the Load FG button.
f. Wait until you get amessage like "QC8955.unl file loaded".
4. Expose the detailedDescription field in the ServiceCatalog web service so that the cart statuscan be updated by the HP Connect-It scenario.
a. Log on to the SM website with administrative rights.
b. Select Tailoring- Web Services >Web Service Configuration from the navigation bar.
c. In theService Name field, enter ServiceCatalog, click Search.
d. Select theServiceCatalog entry in the list of results, uncheck theDeprecated option.
e. In the details of the ServiceCatalog web service, select the Fields tab.
At the end of the list of fields, add a new entry with the following information:
o Field: detailedDescription
o Caption: DetailedDesc
o Type: StringType
f. Click Save andOK.
5. Expose the resolution field in the ServiceDesk web service so that images can be transferred fromAsset Manager to HP ServiceManager by the HP Connect-It scenario.
a. Log on to the SM website client with administrative rights.
b. Select Tailoring >Web Services >WSDL Configuration from the navigation bar.
Configuration GuideHP Asset Manager - HP ServiceManager Integration
Page 50 of 70
c. In theService Name field, enter ServiceDesk, click Search.
d. Select theServiceDesk entry in the list of results.
In the details of theServiceDeskWeb service, select the Fields tab.
e. At the end of the list of fields, modify the resolution field with the following information:
o Caption: Resolution
o Type: StringType
f. In the same list, modify the resolution.code field with the following information:
o Caption: ResolutionCode
g. Click Save andOK.
6. As the web service proxy acts as a link between HP ServiceManager and Asset ManagerWebService, you will need to configure the links between these elements.
To configure the link between HP ServiceManager and the web service proxy, configure theCatalog connector in HP ServiceManager as follows:
a. Log on to SM website with administrative rights.
b. Select Service Catalog > Tailoring > Catalog Connectors.
c. Click Search.
d. Select the connector namedOpen a Standard Request in Asset Manager.
e. On theExpressions tab, enter the path to the web service proxy just after $L.url:
$L.url="http://<Name or IP address of the AM Web Service Proxy>:<AM Web Service Proxy port number>/ServiceCatalog/services/ServiceCatalog"
For example:
$L.url="http://ProxyServer:8080/ServiceCatalog/services/ServiceCatalog"
f. Enter user account and password value for $L.login and $L.pwd, for example:
$L.login="Admin"
$L.pwd=""
7. Update the AM web service proxy JAVA script.
Configuration GuideHP Asset Manager - HP ServiceManager Integration
Page 51 of 70
a. Log on to the SM website with administrative rights.
b. Select Tailoring >Web Services > Run WSDL to JS.
c. Enter the URL for theWSDL of Asset Manager web service proxy.
The format is:
http://<Name or IP address of the AM Web Service Proxy>:<AM Web Service Proxy port number>/ServiceCatalog/wsdl/ServiceCatalog.wsdl
For example:
http://ProxyServer:8080/ServiceCatalog/wsdl/ServiceCatalog.wsdl
d. Click Proceed.
This displays a window with the new Java script corresponding to the web service proxy.
e. Click Replace.
You should get the followingmessage:
Successful compilation of JavaScript function or expression.
f. Click Save.
g. Click Compile.
You should get the followingmessage:
Successful compilation of JavaScript function or expression.
8. Activate the linker scheduler.
a. Log on to SM website with administrative rights.
b. SelectMiscellaneous > System Status.
c. Check linker that appears in the list.
d. If the linker scheduler already appears in the list, restart it.
i. In theCommand column of the linker line, enterK.
ii. Click theExecute Commands button.
iii. Repeat this action until the linker line disappears.
Configuration GuideHP Asset Manager - HP ServiceManager Integration
Page 52 of 70
e. Click theStart Scheduler button.
f. Double-click linker-startup in the list.
9. Configure User profiles for ESS(Employ Self Service).
a. Log on to SM website with administrative rights.
b. Select System Administration > Ongoing Maintenance > Operators.
c. Enter Template_SelfService in the Login Name field, and then click Search.
d. On theSelf Service tab, check theSelf Service Access Only checkbox.
e. On theStartup tab, sectionExecute Capabilities, if svcCatEmployeeRequester is not inthe list, add svcCatEmployeeRequester to the first empty line of the table
f. Save your changes
Verify Asset Manager - Service Manager NormalIntegrationTo verify the normal integration of Asset Manager and ServiceManager, follow these steps.
1. Log on to the SM website and open a new change request.
2. Browse toChange Management > Changes > Create New Change.
3. Enter all relevant data andmandatory fields.
4. Click Save.
5. Open HP Connect-It.
6. Open the scenario smam-wo.scn.
7. Fill the relevant parameters for each product.
8. Click Produce Now .
9. Log on to HP Asset Manager.
10. Browse toAsset Lifecycle >Work Orders >Work Orders.
11. Confirm that AM receives the change request .
Note: This out-of-the-box integration synchronizes all Change and Change Tasks records from
Configuration GuideHP Asset Manager - HP ServiceManager Integration
Page 53 of 70
ServiceManager to Asset Manager. In the production environment, the user may want to limit thescope for specific Change categories. To achieve this, there is a need tomodify the smam-wo.scnscenario.
Use the Request Self-Service to Verify Asset Manager-Service Manager Integration1. Run theOOB scenarios in Connect-It to synchronize the basic data from Asset Manager to
ServiceManager.
a. Open Connect-It 9.60, click File > Open.
b. Open and run scenarios located in <HP Connect-It installationfolder>\scenario\ac\am94\esscat\am94sm933\ in the following order.
o users.scn: Synchronization of employees
o sso.scn: Synchronization of logins
o categories.scn: Synchronization of standard request and product models
o catalogitems.scn: Synchronization of standard requests, products and off-catalogproducts
o status.scn:Synchronization of request/cart statuses
c. In theScenario diagram window, modify the configuration of the SM web service connectorsand AM connectors.
d. Save your changes.
e. Run the scenarios.
2. Check the operator in ServiceManager.
a. Log on to SM website with administrative rights.
b. Select System Administration > Ongoing Maintenance > Operators.
c. Enter the logon name(amEmplDept.name in AM) in the Login Name field, for example,Shivute, who is administrator in AM.
d. On theSelf Service tab, make sure that theSelf Service Access Only option is selected.
e. On theStartup tab, the user has the following execute capabilities:
Configuration GuideHP Asset Manager - HP ServiceManager Integration
Page 54 of 70
o partial.key
o partial.key.msg.skip
o service desk
o service catalog
o change request
o svcCatEmployeeRequester
o svcCatDeptRequester
3. Create the request self-service.
a. Log on to the SM ESS website (http://<Name or IP address of the SMWeb clientserver>:<SMWeb client server port number>/<SM instance name>/ess.do) with a useraccount that has self-service right.
b. SelectMiscellaneous > Order from Catalog.
c. Select a service catalog in the right list which is from Asset Manager, for example: DeskproHP EliteDesk 800G1 (000025).
d. Select the user in the list forRequest for field, select theQuantity, add attachments ifneeded.
e. Click Add to Cart, you will get amessage like :
Deskpro HP EliteDesk 800 G1 (000025) has been added to your cart.
f. Click View Cart/Checkout.
g. Click Submit Request.
h. Enter values in thePurpose andUrgency fields.
i. Click Submit.
j. Log on to AM, frommenuAsset lifecycle > Procurement lifecycle > Purchase requests,the request created in SM should be in the list.
k. The request is then processed in Asset Manager and the standard procurement cycle istriggered.
l. The status of the cart is updated in HP ServiceManager through the status.scn scenario inHP Connect-It.
Configuration GuideHP Asset Manager - HP ServiceManager Integration
Page 55 of 70

Formore information about the HP ServiceManager Service Catalog and the request creationprocedure in HP ServiceManager, refer to the Service Catalogs section of the HP ServiceManageronline help.
Configuration GuideHP Asset Manager - HP ServiceManager Integration
Page 56 of 70

CI's Reconciliation Priority Best PracticesThis chapter includes:
Overview 57
Priorities Logic 57
CI Reconciliation Priority 58
OverviewIn the SACM Solution, as well as from the ITPS Suite perspective, UCMDB is the center CI repository.As such, it is populated with CI information from various HP and third-party products. Therefore,UCMDB must decide which source is more reliable and which source has themost accurateinformation.
UCMDB uses internal out-of-the-box reconciliation rules that make sure no duplications are createdand the CI information is accurate. In addition, it also uses the Reconciliation Priority module that givesthe ConfigurationManager the power to determine for UCMDB which integration points aremorereliable for which CI Types or Attributes (for more information, see Chapter 10 Reconciliation Priority inthe HP UCMDB Data Flow Management Guide).
In the SACM Solution, UCMDB is populated with CI information from two products – AM and SM.
This chapter details the Best Practice guidelines and configuration instructions for how to prioritize theinformation received from AM and SM into UCMDB in order for your UCMDB to contain themostaccurate CI information.
Priorities LogicConsider the following when building the priorities detailed in the following CI Reconciliation PriorityMapping table:
l UCMDB DDMA discovery reflects reality by its capability and is themost reliable source ofinformation for discoverable CITs.
l Business services and applications information is most likely to bemore accurate in SM as theowner of the Service Catalog.
l There are CITs that are coming from AM or SM—but not both. Thus, if it is a discoverable CIT,DDMA will get the highest priority, and AM or SM will get the lower priority. Otherwise, the relevantproduct will get the priority. For example, for the Asset CIT, AM gets the highest priority.
Page 57 of 70
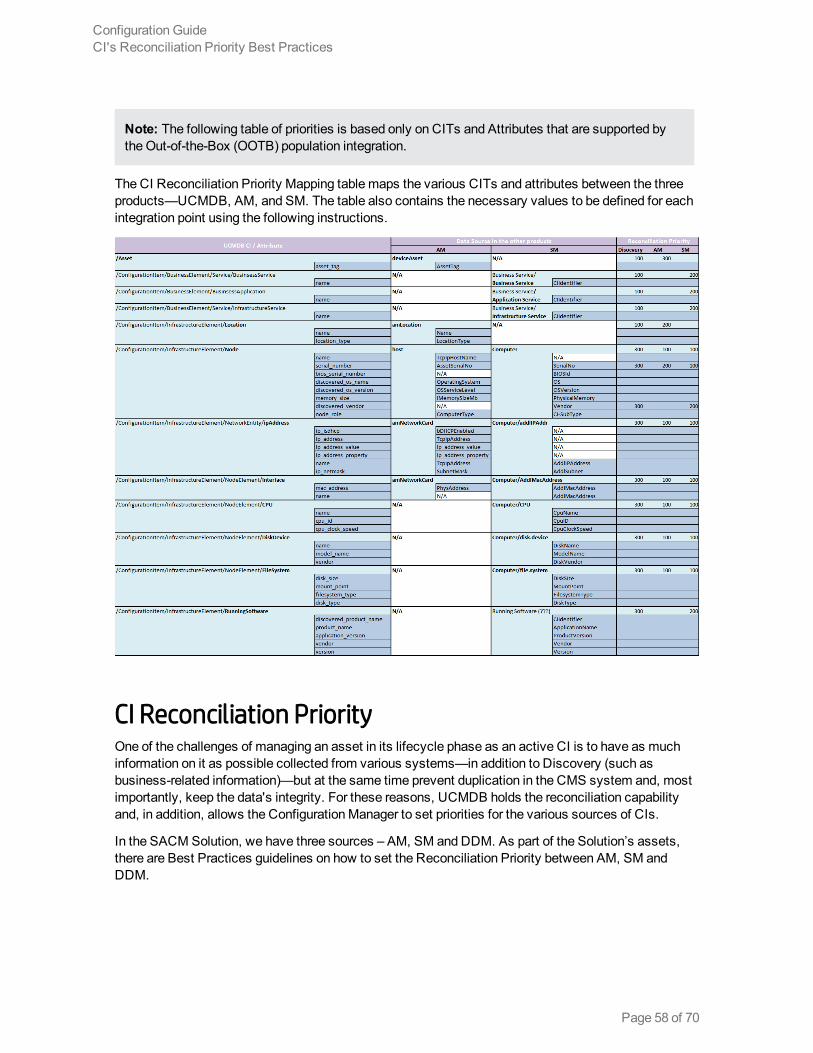
Note: The following table of priorities is based only on CITs and Attributes that are supported bythe Out-of-the-Box (OOTB) population integration.
The CI Reconciliation Priority Mapping table maps the various CITs and attributes between the threeproducts—UCMDB, AM, and SM. The table also contains the necessary values to be defined for eachintegration point using the following instructions.
CI Reconciliation PriorityOne of the challenges of managing an asset in its lifecycle phase as an active CI is to have as muchinformation on it as possible collected from various systems—in addition to Discovery (such asbusiness-related information)—but at the same time prevent duplication in the CMS system and, mostimportantly, keep the data's integrity. For these reasons, UCMDB holds the reconciliation capabilityand, in addition, allows the ConfigurationManager to set priorities for the various sources of CIs.
In the SACM Solution, we have three sources – AM, SM andDDM. As part of the Solution’s assets,there are Best Practices guidelines on how to set the Reconciliation Priority between AM, SM andDDM.
Configuration GuideCI's Reconciliation Priority Best Practices
Page 58 of 70
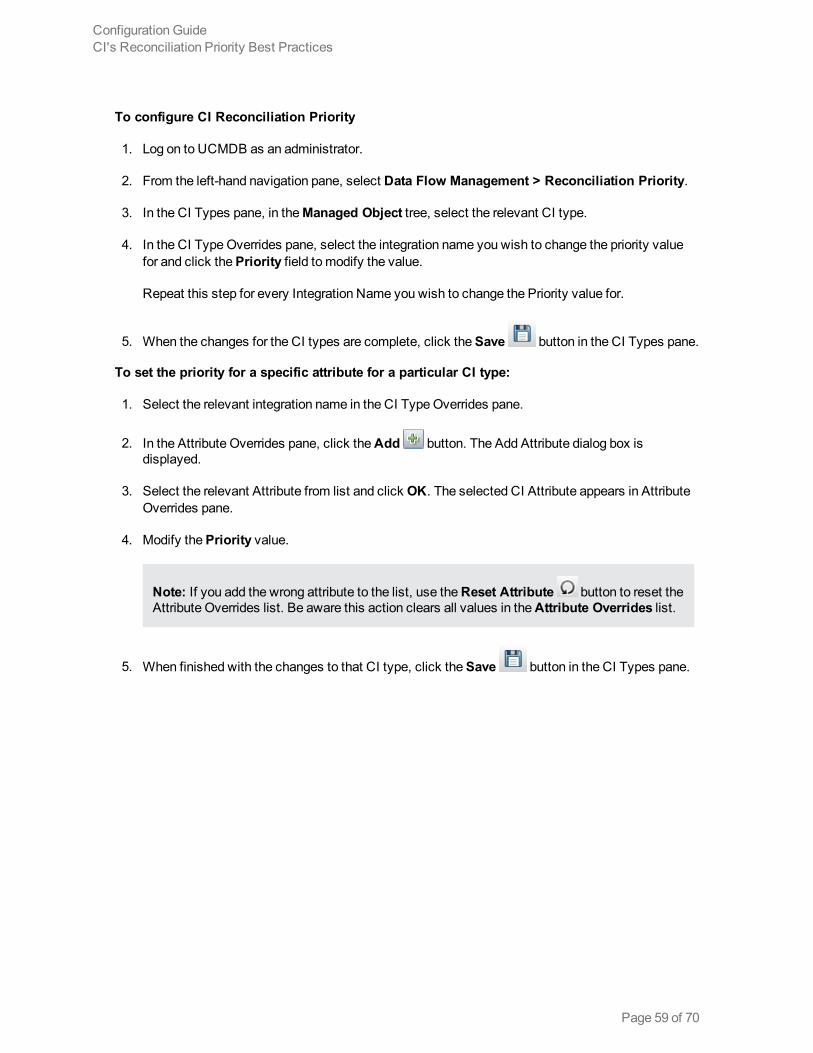
To configure CI Reconciliation Priority
1. Log on to UCMDB as an administrator.
2. From the left-hand navigation pane, select Data Flow Management > Reconciliation Priority.
3. In the CI Types pane, in theManaged Object tree, select the relevant CI type.
4. In the CI TypeOverrides pane, select the integration name you wish to change the priority valuefor and click the Priority field to modify the value.
Repeat this step for every Integration Name you wish to change the Priority value for.
5. When the changes for the CI types are complete, click theSave button in the CI Types pane.
To set the priority for a specific attribute for a particular CI type:
1. Select the relevant integration name in the CI TypeOverrides pane.
2. In the Attribute Overrides pane, click theAdd button. The Add Attribute dialog box isdisplayed.
3. Select the relevant Attribute from list and click OK. The selected CI Attribute appears in AttributeOverrides pane.
4. Modify thePriority value.
Note: If you add the wrong attribute to the list, use theReset Attribute button to reset theAttribute Overrides list. Be aware this action clears all values in theAttribute Overrides list.
5. When finished with the changes to that CI type, click theSave button in the CI Types pane.
Configuration GuideCI's Reconciliation Priority Best Practices
Page 59 of 70
Technical ReferenceThis Appendix includes:
Overview 60
HP ServiceManager <-> HP Asset Manager 60
OverviewThis appendix explains, for each database involved in the SACM integration, which data objects aresourced andmapped by which scenario or adapter, as well as the reconciliation keys used and anyspecial requirements needed for data transfers to work properly.
HP Service Manager <-> HP Asset ManagerThis section includes:
Overview 60
What happens when a CI does not exist in SM 61
Reconciliation keys for amsm-ppt.scn 62
Reconciliation keys for amsm-ci-ppt-link.scn 64
Reconciliation keys for smam-ppt.scn 65
Reconciliation keys for smam-wo.scn 69
OverviewOverview of the HP Asset Manager – HP Service Manager integration
Integrationdirection From AM to SM From SM to AM
Integrationtechnology
HP Connect-It HP Connect-It
Page 60 of 70
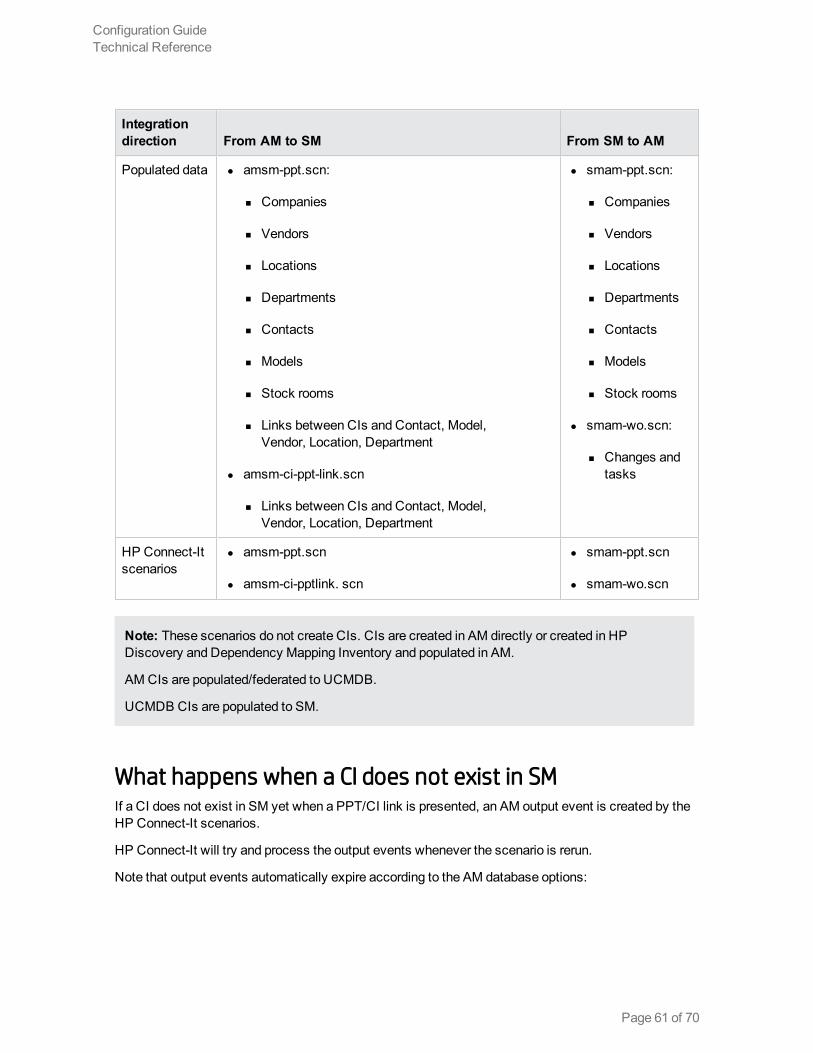
Integrationdirection From AM to SM From SM to AM
Populated data l amsm-ppt.scn:
n Companies
n Vendors
n Locations
n Departments
n Contacts
n Models
n Stock rooms
n Links between CIs and Contact, Model,Vendor, Location, Department
l amsm-ci-ppt-link.scn
n Links between CIs and Contact, Model,Vendor, Location, Department
l smam-ppt.scn:
n Companies
n Vendors
n Locations
n Departments
n Contacts
n Models
n Stock rooms
l smam-wo.scn:
n Changes andtasks
HP Connect-Itscenarios
l amsm-ppt.scn
l amsm-ci-pptlink. scn
l smam-ppt.scn
l smam-wo.scn
Note: These scenarios do not create CIs. CIs are created in AM directly or created in HPDiscovery and Dependency Mapping Inventory and populated in AM.
AM CIs are populated/federated to UCMDB.
UCMDB CIs are populated to SM.
What happens when a CI does not exist in SMIf a CI does not exist in SM yet when a PPT/CI link is presented, an AM output event is created by theHP Connect-It scenarios.
HP Connect-It will try and process the output events whenever the scenario is rerun.
Note that output events automatically expire according to the AM database options:
Configuration GuideTechnical Reference
Page 61 of 70
1. Start the AMWindows client and connect to the database.
2. Use theAdministration/ Database options...menu.
3. Configure theEvent management/ Expiration time for output events (hours) option.
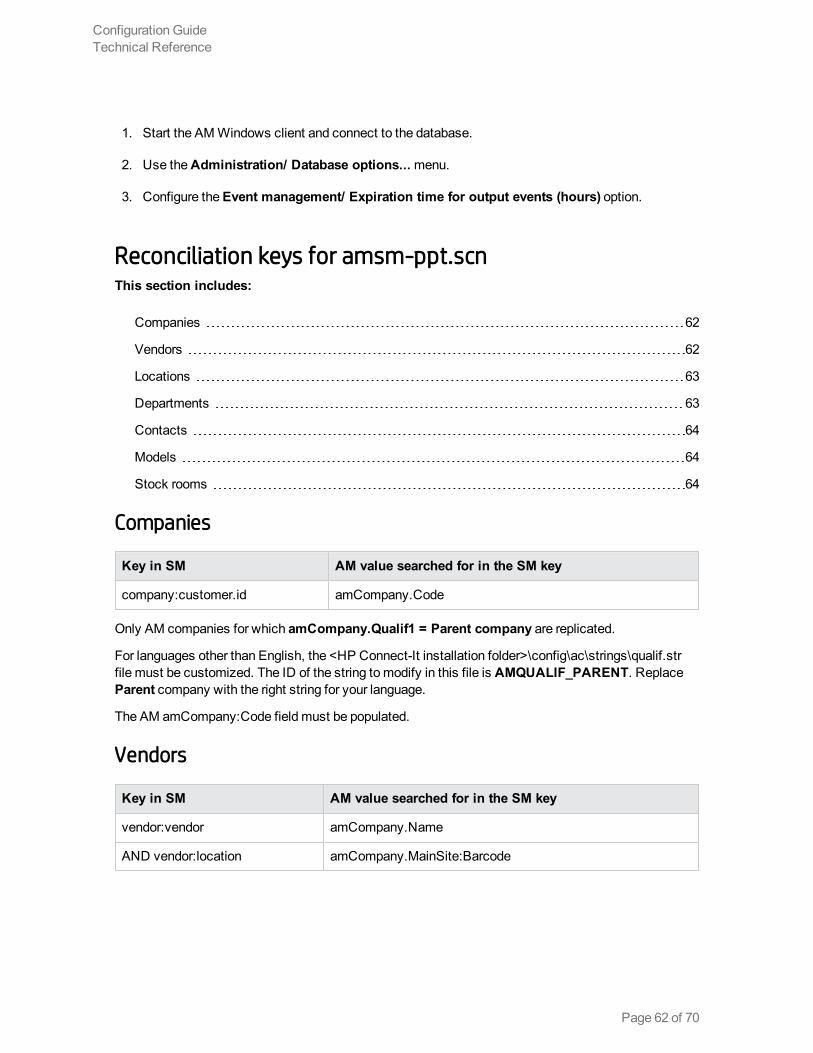
Reconciliation keys for amsm-ppt.scnThis section includes:
Companies 62
Vendors 62
Locations 63
Departments 63
Contacts 64
Models 64
Stock rooms 64
Companies
Key in SM AM value searched for in the SM key
company:customer.id amCompany.Code
Only AM companies for which amCompany.Qualif1 = Parent company are replicated.
For languages other than English, the <HP Connect-It installation folder>\config\ac\strings\qualif.strfile must be customized. The ID of the string tomodify in this file is AMQUALIF_PARENT. ReplaceParent company with the right string for your language.
The AM amCompany:Code field must be populated.
Vendors
Key in SM AM value searched for in the SM key
vendor:vendor amCompany.Name
AND vendor:location amCompany.MainSite:Barcode
Configuration GuideTechnical Reference
Page 62 of 70
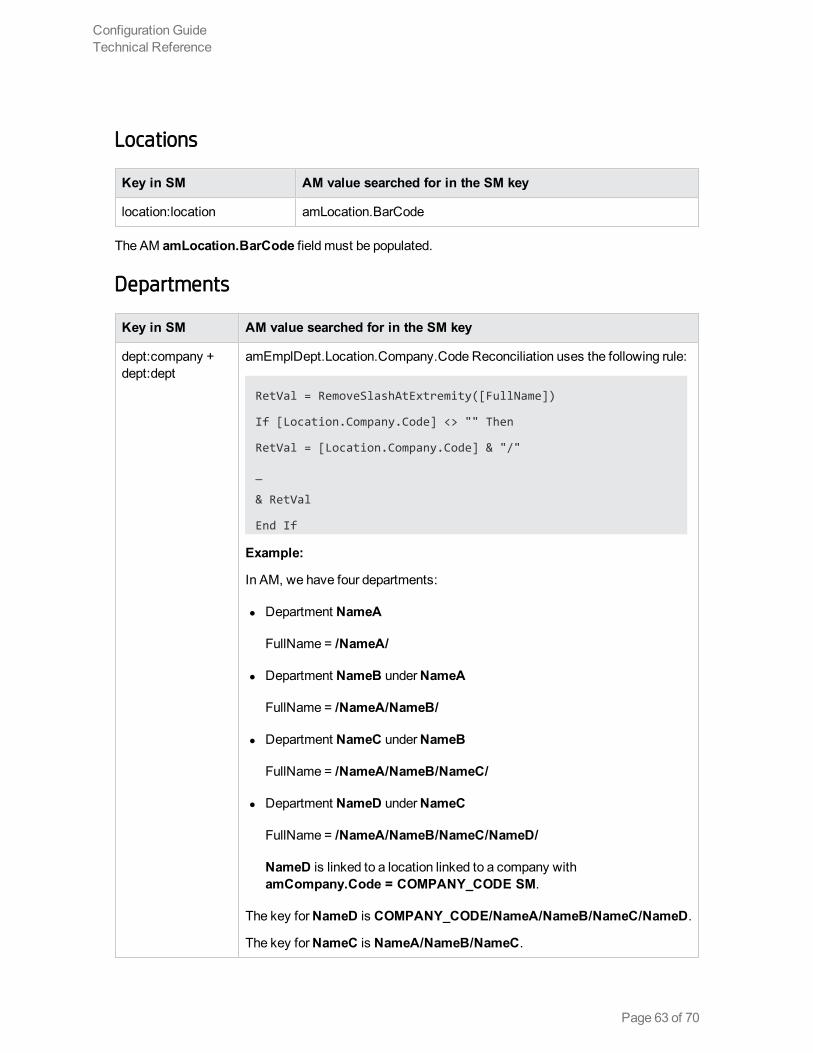
Locations
Key in SM AM value searched for in the SM key
location:location amLocation.BarCode
The AM amLocation.BarCode field must be populated.
Departments
Key in SM AM value searched for in the SM key
dept:company +dept:dept
amEmplDept.Location.Company.Code Reconciliation uses the following rule:
RetVal = RemoveSlashAtExtremity([FullName])
If [Location.Company.Code] <> "" Then
RetVal = [Location.Company.Code] & "/"
_
& RetVal
End If
Example:
In AM, we have four departments:
l Department NameA
FullName = /NameA/
l Department NameB underNameA
FullName = /NameA/NameB/
l Department NameC underNameB
FullName = /NameA/NameB/NameC/
l Department NameD underNameC
FullName = /NameA/NameB/NameC/NameD/
NameD is linked to a location linked to a company withamCompany.Code = COMPANY_CODE SM.
The key forNameD is COMPANY_CODE/NameA/NameB/NameC/NameD.
The key forNameC is NameA/NameB/NameC.
Configuration GuideTechnical Reference
Page 63 of 70

Only AM departments for which amEmplDept.bDepartment = 1 are replicated.
Contacts
Key in SM AM value searched for in the SM key
contacts:contact.name amEmplDept.Name, Name.FirstName (amEmplDept.BarCode)
Note:
l amEmplDept:Name can be up to 50 characters long, Name:FirstName up to 30 characters,and amEmplDept.BarCode up to 255 characters long.
l contacts.contact.name can only store 140 characters.
l If the amEmplDept.BarCode field does not exceed 55 characters, the reconciliation keyswork fine.
Models
Key in SM AM value searched for in the SM key
model:part.no amModels.BarCode
Note: The AM amModels.BarCode field must be populated.
Stock rooms
Key in SM AM value searched for in the SM key
stockroom:stockroom amStock.Name
Reconciliation keys for amsm-ci-ppt-link.scnThis section includes:
Links between device CIs and PPT objects 65
Configuration GuideTechnical Reference
Page 64 of 70
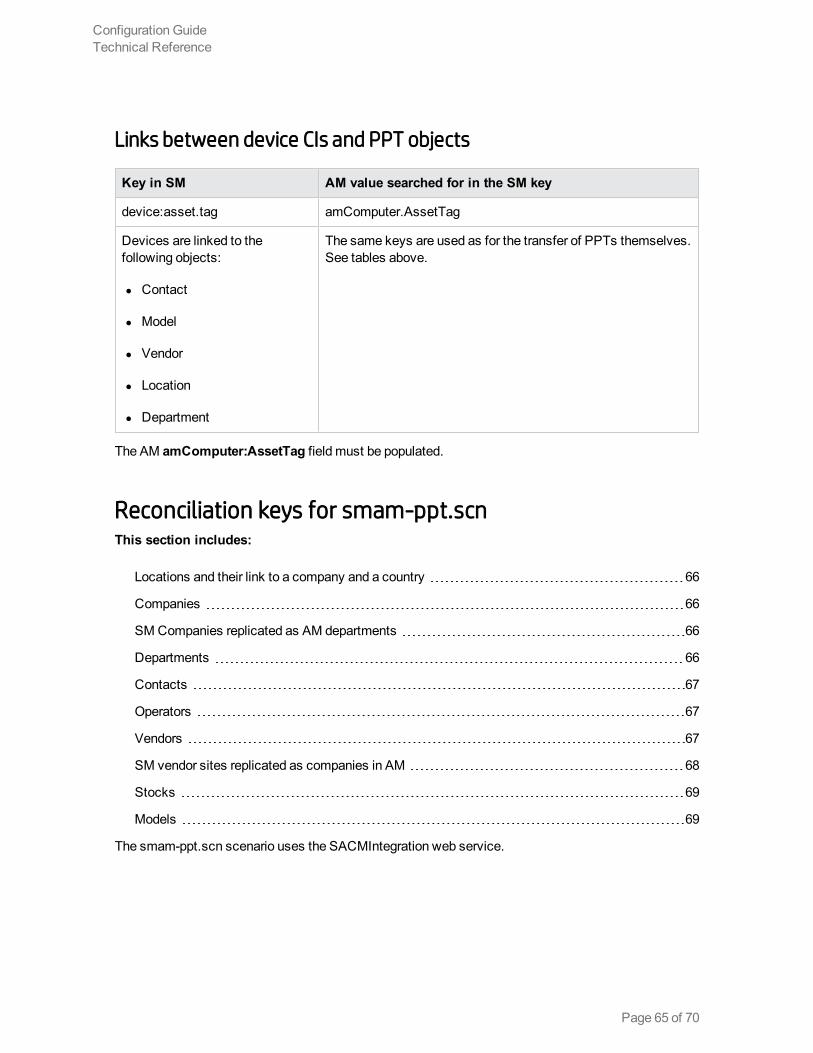
Links between device CIs and PPT objects
Key in SM AM value searched for in the SM key
device:asset.tag amComputer.AssetTag
Devices are linked to thefollowing objects:
l Contact
l Model
l Vendor
l Location
l Department
The same keys are used as for the transfer of PPTs themselves.See tables above.
The AM amComputer:AssetTag field must be populated.
Reconciliation keys for smam-ppt.scnThis section includes:
Locations and their link to a company and a country 66
Companies 66
SM Companies replicated as AM departments 66
Departments 66
Contacts 67
Operators 67
Vendors 67
SM vendor sites replicated as companies in AM 68
Stocks 69
Models 69
The smam-ppt.scn scenario uses the SACMIntegration web service.
Configuration GuideTechnical Reference
Page 65 of 70
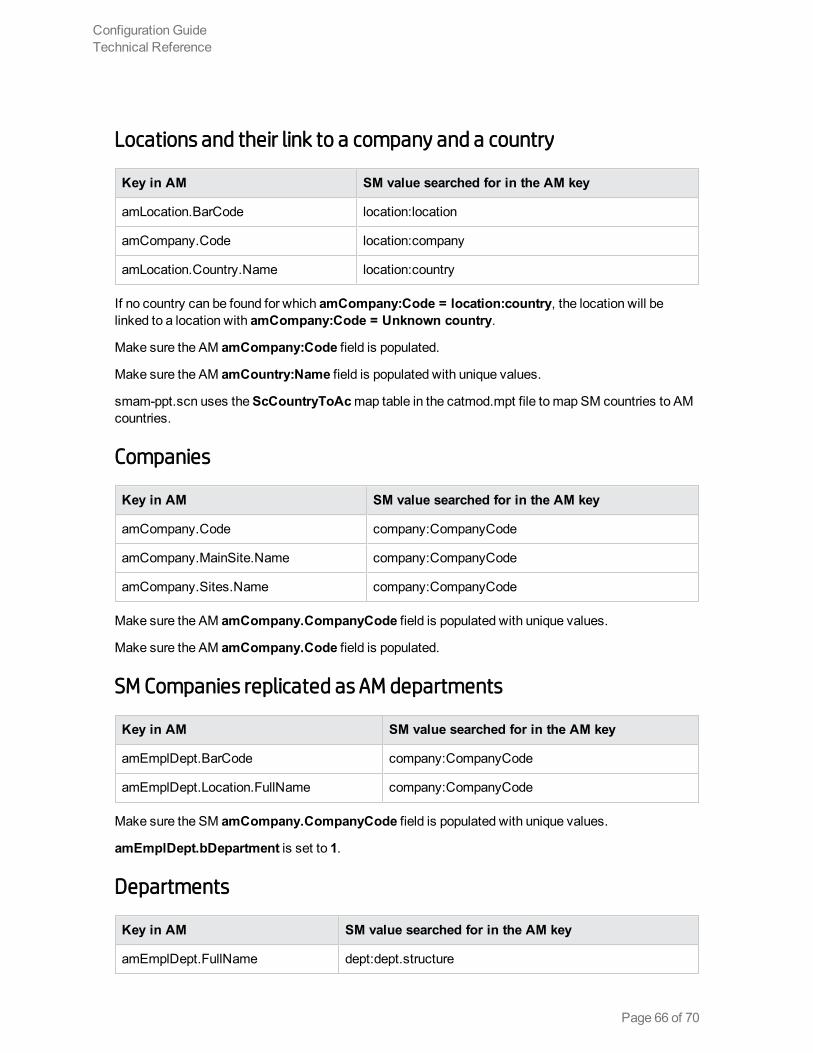
Locations and their link to a company and a country
Key in AM SM value searched for in the AM key
amLocation.BarCode location:location
amCompany.Code location:company
amLocation.Country.Name location:country
If no country can be found for which amCompany:Code = location:country, the location will belinked to a location with amCompany:Code = Unknown country.
Make sure the AM amCompany:Code field is populated.
Make sure the AM amCountry:Name field is populated with unique values.
smam-ppt.scn uses theScCountryToAcmap table in the catmod.mpt file to map SM countries to AMcountries.
Companies
Key in AM SM value searched for in the AM key
amCompany.Code company:CompanyCode
amCompany.MainSite.Name company:CompanyCode
amCompany.Sites.Name company:CompanyCode
Make sure the AM amCompany.CompanyCode field is populated with unique values.
Make sure the AM amCompany.Code field is populated.
SM Companies replicated as AM departments
Key in AM SM value searched for in the AM key
amEmplDept.BarCode company:CompanyCode
amEmplDept.Location.FullName company:CompanyCode
Make sure the SM amCompany.CompanyCode field is populated with unique values.
amEmplDept.bDepartment is set to 1.
Departments
Key in AM SM value searched for in the AM key
amEmplDept.FullName dept:dept.structure
Configuration GuideTechnical Reference
Page 66 of 70
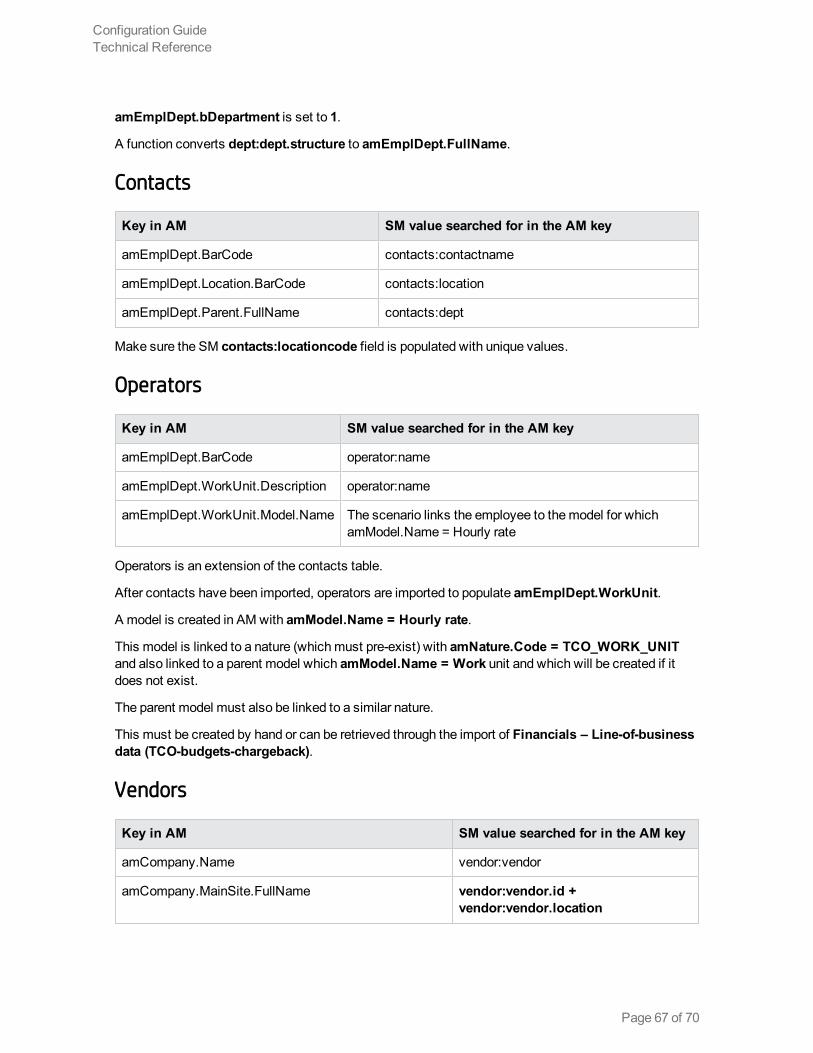
amEmplDept.bDepartment is set to 1.
A function converts dept:dept.structure to amEmplDept.FullName.
Contacts
Key in AM SM value searched for in the AM key
amEmplDept.BarCode contacts:contactname
amEmplDept.Location.BarCode contacts:location
amEmplDept.Parent.FullName contacts:dept
Make sure the SM contacts:locationcode field is populated with unique values.
Operators
Key in AM SM value searched for in the AM key
amEmplDept.BarCode operator:name
amEmplDept.WorkUnit.Description operator:name
amEmplDept.WorkUnit.Model.Name The scenario links the employee to themodel for whichamModel.Name = Hourly rate
Operators is an extension of the contacts table.
After contacts have been imported, operators are imported to populate amEmplDept.WorkUnit.
A model is created in AM with amModel.Name = Hourly rate.
This model is linked to a nature (whichmust pre-exist) with amNature.Code = TCO_WORK_UNITand also linked to a parent model which amModel.Name = Work unit and which will be created if itdoes not exist.
The parent model must also be linked to a similar nature.
This must be created by hand or can be retrieved through the import of Financials – Line-of-businessdata (TCO-budgets-chargeback).
Vendors
Key in AM SM value searched for in the AM key
amCompany.Name vendor:vendor
amCompany.MainSite.FullName vendor:vendor.id +vendor:vendor.location
Configuration GuideTechnical Reference
Page 67 of 70
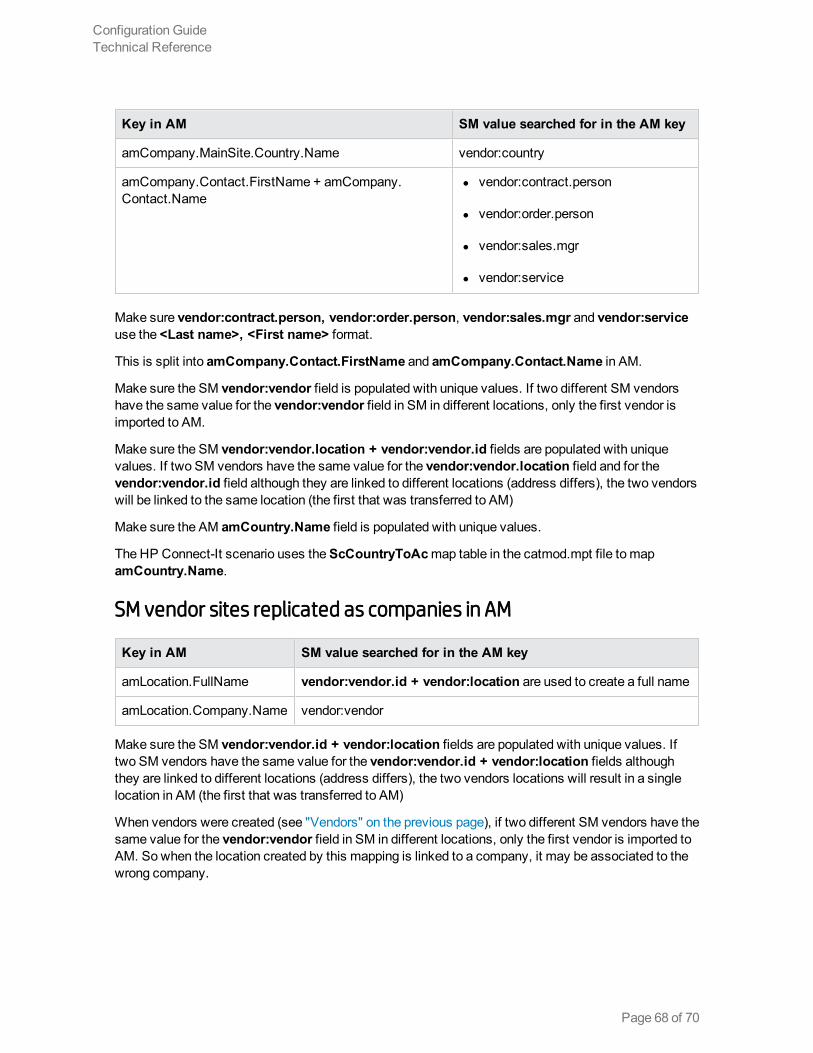
Key in AM SM value searched for in the AM key
amCompany.MainSite.Country.Name vendor:country
amCompany.Contact.FirstName + amCompany.Contact.Name
l vendor:contract.person
l vendor:order.person
l vendor:sales.mgr
l vendor:service
Make sure vendor:contract.person, vendor:order.person, vendor:sales.mgr and vendor:serviceuse the <Last name>, <First name> format.
This is split into amCompany.Contact.FirstName and amCompany.Contact.Name in AM.
Make sure the SM vendor:vendor field is populated with unique values. If two different SM vendorshave the same value for the vendor:vendor field in SM in different locations, only the first vendor isimported to AM.
Make sure the SM vendor:vendor.location + vendor:vendor.id fields are populated with uniquevalues. If two SM vendors have the same value for the vendor:vendor.location field and for thevendor:vendor.id field although they are linked to different locations (address differs), the two vendorswill be linked to the same location (the first that was transferred to AM)
Make sure the AM amCountry.Name field is populated with unique values.
The HP Connect-It scenario uses theScCountryToAcmap table in the catmod.mpt file to mapamCountry.Name.
SM vendor sites replicated as companies in AM
Key in AM SM value searched for in the AM key
amLocation.FullName vendor:vendor.id + vendor:location are used to create a full name
amLocation.Company.Name vendor:vendor
Make sure the SM vendor:vendor.id + vendor:location fields are populated with unique values. Iftwo SM vendors have the same value for the vendor:vendor.id + vendor:location fields althoughthey are linked to different locations (address differs), the two vendors locations will result in a singlelocation in AM (the first that was transferred to AM)
When vendors were created (see "Vendors" on the previous page), if two different SM vendors have thesame value for the vendor:vendor field in SM in different locations, only the first vendor is imported toAM. So when the location created by this mapping is linked to a company, it may be associated to thewrong company.
Configuration GuideTechnical Reference
Page 68 of 70
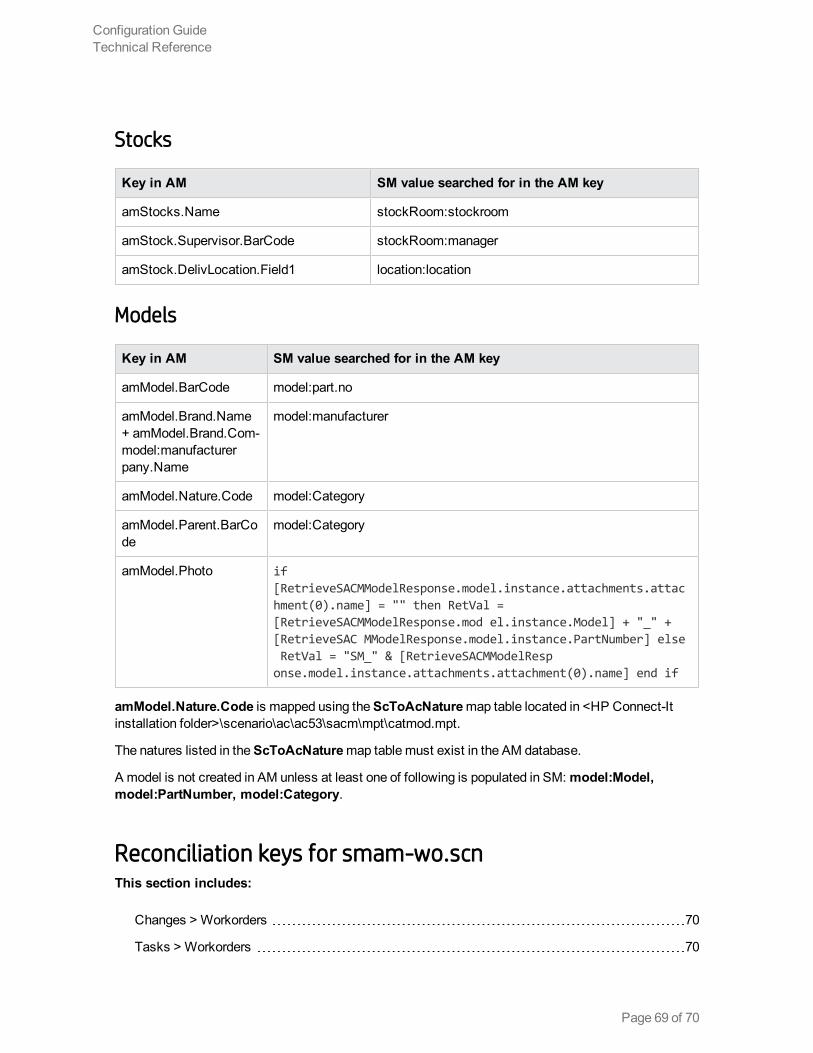
Stocks
Key in AM SM value searched for in the AM key
amStocks.Name stockRoom:stockroom
amStock.Supervisor.BarCode stockRoom:manager
amStock.DelivLocation.Field1 location:location
Models
Key in AM SM value searched for in the AM key
amModel.BarCode model:part.no
amModel.Brand.Name+ amModel.Brand.Com-model:manufacturerpany.Name
model:manufacturer
amModel.Nature.Code model:Category
amModel.Parent.BarCode
model:Category
amModel.Photo if[RetrieveSACMModelResponse.model.instance.attachments.attachment(0).name] = "" then RetVal =[RetrieveSACMModelResponse.mod el.instance.Model] + "_" +[RetrieveSAC MModelResponse.model.instance.PartNumber] elseRetVal = "SM_" & [RetrieveSACMModelResponse.model.instance.attachments.attachment(0).name] end if
amModel.Nature.Code is mapped using theScToAcNaturemap table located in <HP Connect-Itinstallation folder>\scenario\ac\ac53\sacm\mpt\catmod.mpt.
The natures listed in theScToAcNaturemap tablemust exist in the AM database.
A model is not created in AM unless at least one of following is populated in SM:model:Model,model:PartNumber, model:Category.
Reconciliation keys for smam-wo.scnThis section includes:
Changes > Workorders 70
Tasks > Workorders 70
Configuration GuideTechnical Reference
Page 69 of 70
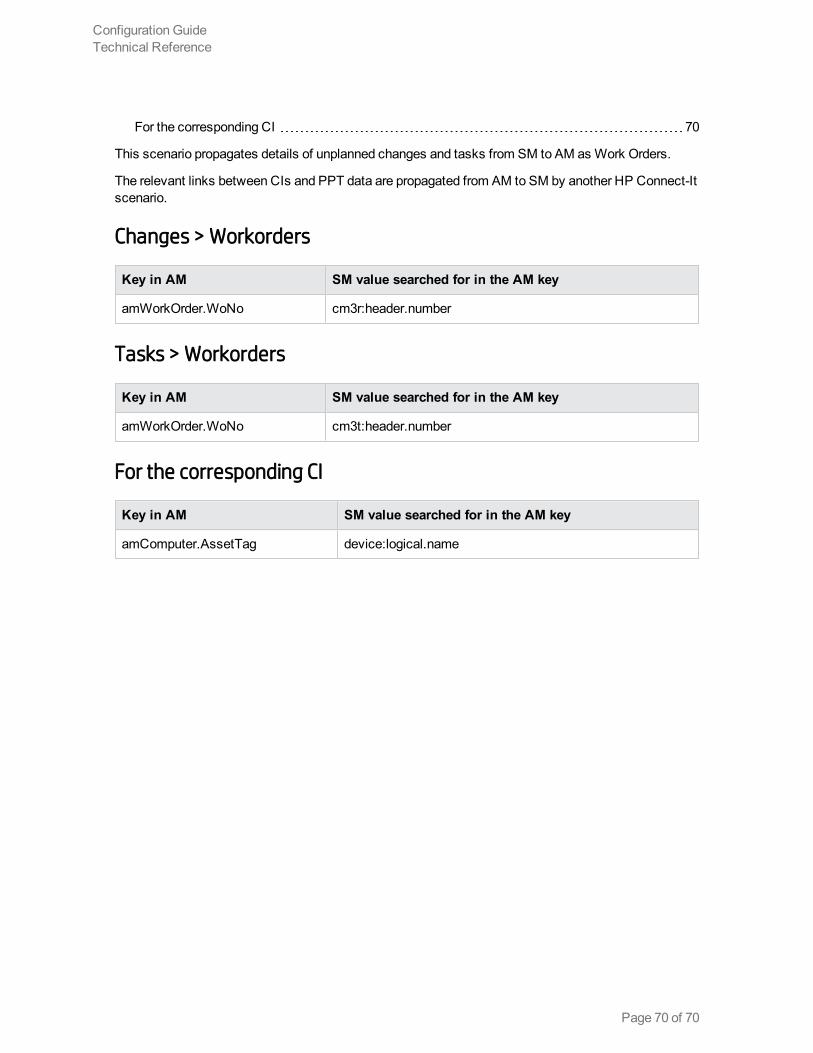
For the corresponding CI 70
This scenario propagates details of unplanned changes and tasks from SM to AM as Work Orders.
The relevant links between CIs and PPT data are propagated from AM to SM by another HP Connect-Itscenario.
Changes > Workorders
Key in AM SM value searched for in the AM key
amWorkOrder.WoNo cm3r:header.number
Tasks > Workorders
Key in AM SM value searched for in the AM key
amWorkOrder.WoNo cm3t:header.number
For the corresponding CI
Key in AM SM value searched for in the AM key
amComputer.AssetTag device:logical.name
Configuration GuideTechnical Reference
Page 70 of 70