ht pico protein express labchip labchip gxii user guide · ht pico protein express labchip kit,...
TRANSCRIPT

HT Pico Protein Express LabChip Kit LabChip GXII User Guide
Contents
I. Specifications 3 A. Sample Conditions 4
B. Kit Contents 5
C. Safety Warning & Precautions 6
D. Additional Items Required 6
II. Sample Preparation Procedures 7 A. Preparing the Dye Solution 7
B. Preparing the Diluted Stop Solution 7
C. Protein Ladder Preparation 7
D. General Sample Preparation for Reduced/Denatured Proteins 8
E. Flowchart for Reduced/Denatured Proteins 9
F. General Sample Preparation for Nonreduced Proteins 10
G. Flowchart for Nonreduced Proteins 11
III. Chip Preparation Procedure 12 A. Preparing the Buffer Tube 12
B. Preparing the Protein Chip 12
C. Inserting a Chip into the LabChip GX Instrument 13
D. Running the HT Protein Express Assay 13
E. Storing the Protein Chip 14
F. Chip Cartridge Cleaning 14
IV. Alternate Sample Preparation Procedures 15 A. Labeling Reduced Protein of unknown concentration or very low concentration 15
B. Labeling Ladder of unknown concentration or very low concentration 15 C. Labeling nonreduced samples for sensitive antibodies 16
D. Removing free dye from samples 16
E. Labeling Reduced Antibodies for HC/LC analysis 16
F. Labeling protein ladder for HC/LC analysis 17
HT Pico Protein Express LabChip Kit,
LabChip GXII User Guide
Caliper Life Sciences Page 2 of 27 Revised August 2012 68 Elm Street Hopkinton, MA 01748-1668 1-877-LABCHIP (522-2447)
V. Typical Results 18 A. Pico Protein Express Ladder 18
B. Reduced/Denatured Protein 18
C. Nonreduced Protein 19
D. High Protein 19
E. Low Protein 20
VI. Chip Related Issues 20
VII. LabChip Kit Essential Practices 22 A. General 22
B. Reverse Pipetting Technique 22
C. Reagents 23
D. Chips 23
E. Samples 24
F. Chip Well Aspiration Using a Vacuum 25
VIII. Appendix 26 A. Preparing Protein Standard Curve 26
IX. Reordering Information 27
X. Customer Technical Support 27
HT Pico Protein Express LabChip Kit,
LabChip GXII User Guide
Caliper Life Sciences Page 3 of 27 Revised August 2012 68 Elm Street Hopkinton, MA 01748-1668 1-877-LABCHIP (522-2447)
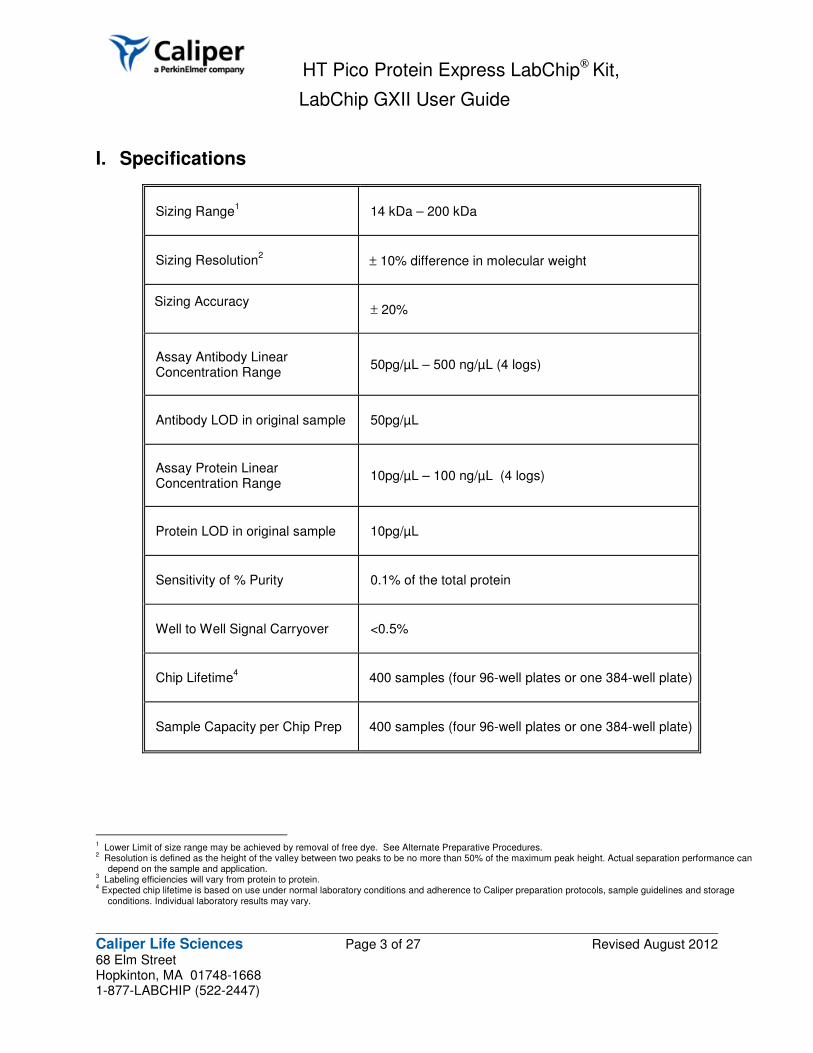
I. Specifications
Sizing Range
1
14 kDa – 200 kDa
Sizing Resolution
2
± 10% difference in molecular weight
Sizing Accuracy
± 20%
Assay Antibody Linear Concentration Range
50pg/µL – 500 ng/µL (4 logs)
Antibody LOD in original sample 50pg/µL
Assay Protein Linear Concentration Range
10pg/µL – 100 ng/µL (4 logs)
Protein LOD in original sample 10pg/µL
Sensitivity of % Purity 0.1% of the total protein
Well to Well Signal Carryover <0.5%
Chip Lifetime4
400 samples (four 96-well plates or one 384-well plate)
Sample Capacity per Chip Prep 400 samples (four 96-well plates or one 384-well plate)
1 Lower Limit of size range may be achieved by removal of free dye. See Alternate Preparative Procedures.
2 Resolution is defined as the height of the valley between two peaks to be no more than 50% of the maximum peak height. Actual separation performance can depend on the sample and application.
3 Labeling efficiencies will vary from protein to protein.
4 Expected chip lifetime is based on use under normal laboratory conditions and adherence to Caliper preparation protocols, sample guidelines and storage
conditions. Individual laboratory results may vary.
HT Pico Protein Express LabChip Kit,
LabChip GXII User Guide
Caliper Life Sciences Page 4 of 27 Revised August 2012 68 Elm Street Hopkinton, MA 01748-1668 1-877-LABCHIP (522-2447)
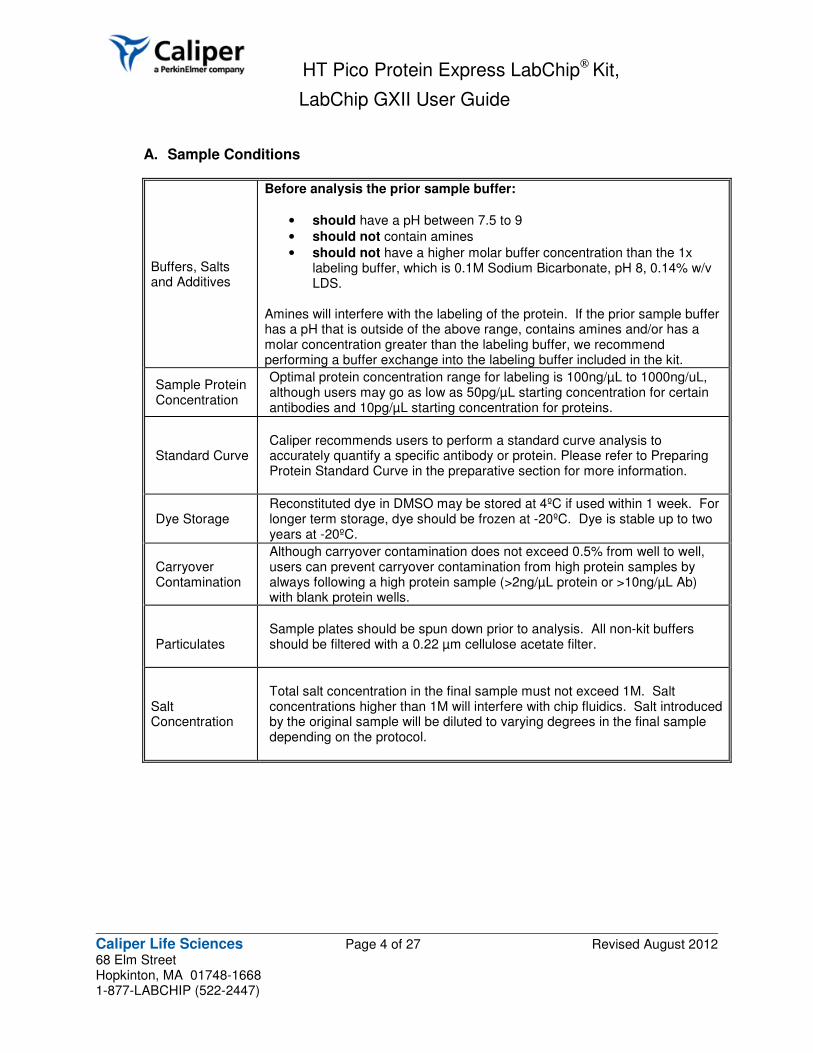
A. Sample Conditions
Buffers, Salts and Additives
Before analysis the prior sample buffer:
• should have a pH between 7.5 to 9
• should not contain amines
• should not have a higher molar buffer concentration than the 1x labeling buffer, which is 0.1M Sodium Bicarbonate, pH 8, 0.14% w/v LDS.
Amines will interfere with the labeling of the protein. If the prior sample buffer has a pH that is outside of the above range, contains amines and/or has a molar concentration greater than the labeling buffer, we recommend performing a buffer exchange into the labeling buffer included in the kit.
Sample Protein Concentration
Optimal protein concentration range for labeling is 100ng/µL to 1000ng/uL, although users may go as low as 50pg/µL starting concentration for certain antibodies and 10pg/µL starting concentration for proteins.
Standard Curve Caliper recommends users to perform a standard curve analysis to accurately quantify a specific antibody or protein. Please refer to Preparing Protein Standard Curve in the preparative section for more information.
Dye Storage Reconstituted dye in DMSO may be stored at 4ºC if used within 1 week. For longer term storage, dye should be frozen at -20ºC. Dye is stable up to two years at -20ºC.
Carryover Contamination
Although carryover contamination does not exceed 0.5% from well to well, users can prevent carryover contamination from high protein samples by always following a high protein sample (>2ng/µL protein or >10ng/µL Ab) with blank protein wells.
Particulates
Sample plates should be spun down prior to analysis. All non-kit buffers should be filtered with a 0.22 µm cellulose acetate filter.
Salt Concentration
Total salt concentration in the final sample must not exceed 1M. Salt concentrations higher than 1M will interfere with chip fluidics. Salt introduced by the original sample will be diluted to varying degrees in the final sample depending on the protocol.
HT Pico Protein Express LabChip Kit,
LabChip GXII User Guide
Caliper Life Sciences Page 5 of 27 Revised August 2012 68 Elm Street Hopkinton, MA 01748-1668 1-877-LABCHIP (522-2447)
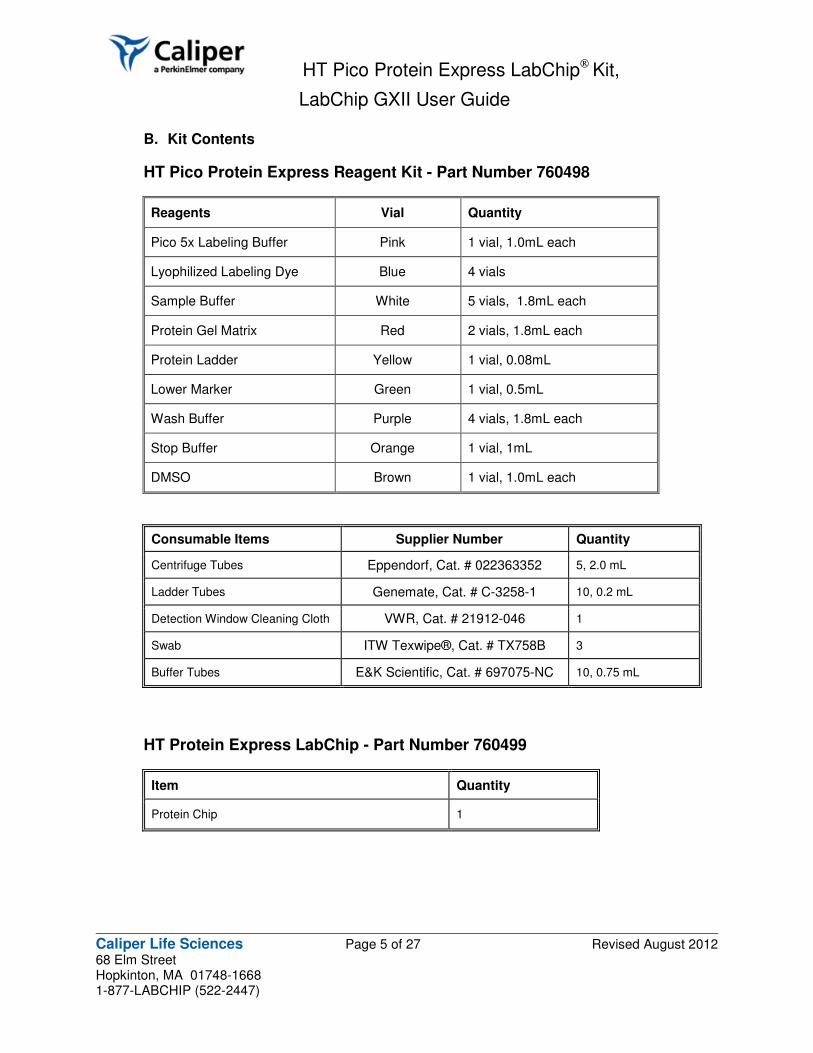
B. Kit Contents
HT Pico Protein Express Reagent Kit - Part Number 760498
Reagents Vial Quantity
Pico 5x Labeling Buffer Pink 1 vial, 1.0mL each
Lyophilized Labeling Dye Blue 4 vials
Sample Buffer White 5 vials, 1.8mL each
Protein Gel Matrix Red 2 vials, 1.8mL each
Protein Ladder Yellow 1 vial, 0.08mL
Lower Marker Green 1 vial, 0.5mL
Wash Buffer Purple 4 vials, 1.8mL each
Stop Buffer Orange 1 vial, 1mL
DMSO Brown 1 vial, 1.0mL each
Consumable Items Supplier Number Quantity
Centrifuge Tubes Eppendorf, Cat. # 022363352 5, 2.0 mL
Ladder Tubes Genemate, Cat. # C-3258-1 10, 0.2 mL
Detection Window Cleaning Cloth VWR, Cat. # 21912-046 1
Swab ITW Texwipe®, Cat. # TX758B 3
Buffer Tubes E&K Scientific, Cat. # 697075-NC 10, 0.75 mL
HT Protein Express LabChip - Part Number 760499
Item Quantity
Protein Chip 1
HT Pico Protein Express LabChip Kit,
LabChip GXII User Guide
Caliper Life Sciences Page 6 of 27 Revised August 2012 68 Elm Street Hopkinton, MA 01748-1668 1-877-LABCHIP (522-2447)
C. Safety Warnings and Precautions
! WARNING ! For Research Use Only. Not recommended or intended for diagnosis of disease
in humans or animals. Do not use internally or externally in humans or animals.
CAUTION We recommend that this product and components be handled only by those who have
been trained in laboratory techniques and that it is used in accordance with the principles of good
laboratory practice. As all chemicals should be considered as potentially hazardous, it is advisable
when handling chemical reagents to wear suitable protective clothing, such as laboratory overalls,
safety glasses, and gloves. Care should be taken to avoid contact with skin or eyes. In case of
contact with skin or eyes, wash immediately with water.
! WARNING ! Wash Buffer and Sample Buffer contain LDS. Avoid inhalation and contact with
skin and eyes.
! WARNING ! Gel Matrix contains Methylurea. Avoid contact with skin and eyes.
D. Additional Items Required 1. 0.6 mL centrifuge tubes and/or 96-well plates for denaturing protein samples
2. UltraPure Water: Molecular biology grade or better, 0.22-micron filtered. 3. 70% Isopropanol solution in DI water. 4. Reducing agent: 1M DTT (dithiothreitol) 5. Analyte Buffer (PBS, 20mM Potassium Acetate (KOAc) 6. Alkylating agent (10M N-ethylmaleimide (NEM)) dissolved in DMSO (freshly prepared each
day) for nonreduced protocols 7. Alkylating agent (0.5M Iodoacetamide (IAM)) for alternate labeling protocol for sensitive
antibodies
Note: Allow the chip and all reagents to equilibrate to room temperature before use (approximately 20 to 30 minutes).
Storage: Prior to use, store chips and reagents refrigerated at 4 °C. Reconstituted dye in DMSO, if not used within 1 week, should be stored at -20ºC. The reconstituted dye has demonstrated stability up to 2 years at -20ºC. Short term storage of dye is at 4ºC. After use, leave chips at room temperature for up to 30 days.
Note: Avoid using siliconized non-stick varieties of lab consumables. These may induce unexpected or erratic assay results caused by surface treatments leaching into components.
HT Pico Protein Express LabChip Kit,
LabChip GXII User Guide
Caliper Life Sciences Page 7 of 27 Revised August 2012 68 Elm Street Hopkinton, MA 01748-1668 1-877-LABCHIP (522-2447)
II. Sample Preparation Procedures
A. Preparing Dye Solution 1. Centrifuge lyophilized dye in microcentrifuge for 1min at maximum speed, ensuring that
pellet at bottom of tube.
2. Reconstitute dye to 200µM, by adding 120µL of 100% DMSO to one vial of dye . 3. Just before labeling, dilute 200µM dye 5x with water to 40µM. Dilute only enough volume
for immediate use. Diluted dye in water is not stable. 4. Store any unused 200µM dye at 4ºC if used within 1 week and at -20ºC for longer term
storage. 5. Dispose of any unused 40µM dye in the aqueous DMSO solution.
B. Preparing Diluted Stop Solution 1. Add 2mL Sample Buffer to 0.290mL Stop Buffer and 10mL of water. This is enough volume for one 96-well plate. 2. Label vial as “Diluted Stop Solution” and set aside until ready to use.
C. Protein Ladder Preparation
1. Add 4µL ladder to 2µL of Pico 5x Labeling Buffer and 4µL water. 2. Vortex and centrifuge. 3. Denature at 75ºC for 5min in eppendorf tube. 4. Vortex and spin down. 5. Add 5µL of 40µM reconstituted dye in water to 5µL of denatured ladder. 6. Incubate for 60min at room temperature (25ºC) in the dark. 7. Add 155µL diluted stop solution to reaction and vortex thoroughly. Spin down reaction. 8. Store in the dark until ready to read samples on GX. 9. Transfer 120µL of prepared ladder to the provided 0.2mL Ladder Tube. 10. Insert the Ladder Tube into ladder slot on the LabChip GX instrument.
Sample Preparation
It is important to confirm that Caliper’s recommended protocol is compatible with your protein or antibody of interest. Proteins may vary in their content of lysines available for labeling and their degree of sensitivity to fragmentation. Caliper recommends titrating dye and protein concentrations and optimizing labeling times and temperatures for best results.
D. General Sample Preparation for Reduced/Denatured Proteins
1. General Comments: The optimal labeling pH is 7.5 – 9. The recommended optimal protein concentration range for labeling is 0.100mg/mL to 1mg/mL. However, as an example, the general protocol uses 0.4mg/mL of protein in 1x labeling buffer as a
Note: Samples can be prepared in either a 96-well or 384-well plate or in 0.6 mL microcentrifuge tubes (and subsequently pipetted into a plate).
HT Pico Protein Express LabChip Kit,
LabChip GXII User Guide
Caliper Life Sciences Page 8 of 27 Revised August 2012 68 Elm Street Hopkinton, MA 01748-1668 1-877-LABCHIP (522-2447)
suggested starting point. Samples can be prepared in a micro-titer plate or in microcentrifuge tubes. If using a micro-titer plate, ensure that wells can fill to 110µL volume (see step 9)
2. Preparing the Pico 5x Denaturing Labeling Buffer for Reduced Proteins
a) Check to see if Pico 5x Labeling Buffer (0.5M Sodium Bicarbonate, pH 8, 0.7% w/v LDS) is cloudy. If so, dissolve precipitate by heating at 37ºC and vortexing occasionally until clear (1-2min).
b) In a eppendorf tube, add 34µL of 1M DTT (user provided) to 166µL of Pico 5x
Labeling Buffer . c) Vortex and centrifuge tube.
3. Dilute protein sample in prepared Pico 5x Labeling Buffer/DTT from step 2 down to a 1x concentration of Labeling Buffer/DTT. For example, add 4uL of sample protein at 0.4mg/mL (range: 0.100mg/mL to 1mg/mL) to 1µL of 5x Labeling Buffer/DTT. It is only necessary to perform the last dilution in 5x Labeling Buffer. Initial dilutions may be made in either PBS or 20mM KOAc.
4. Denature 5µL of 0.4mg/mL sample in 1x labeling buffer/DTT at 75°C for 5min (see chart on next page). Optimum denaturing conditions may vary by sample type.
5. Add or dispense 5µL of 40µM dye to 5µL of denatured sample.
6. Seal plate and mix for 1min with shaker and spin at 1,000xg for 1min. If labeling reaction is
in an eppendorf tube, samples can be vortexed and centrifuged.
7. Incubate at room temperature (25ºC) for 60min in the dark.
8. Shake and centrifuge plate or vortex and centrifuge sample in eppendorf tube.
9. Transfer 5µL of labeled sample to second plate which contains 105µL of diluted stop solution.
10. Seal and mix plate on shaker for 1min.
11. Centrifuge plate (1,000xg for 1min).
12. Read on GXII using HT Pico Protein Express 100 assay file.
HT Pico Protein Express LabChip Kit,
LabChip GXII User Guide
Caliper Life Sciences Page 9 of 27 Revised August 2012 68 Elm Street Hopkinton, MA 01748-1668 1-877-LABCHIP (522-2447)
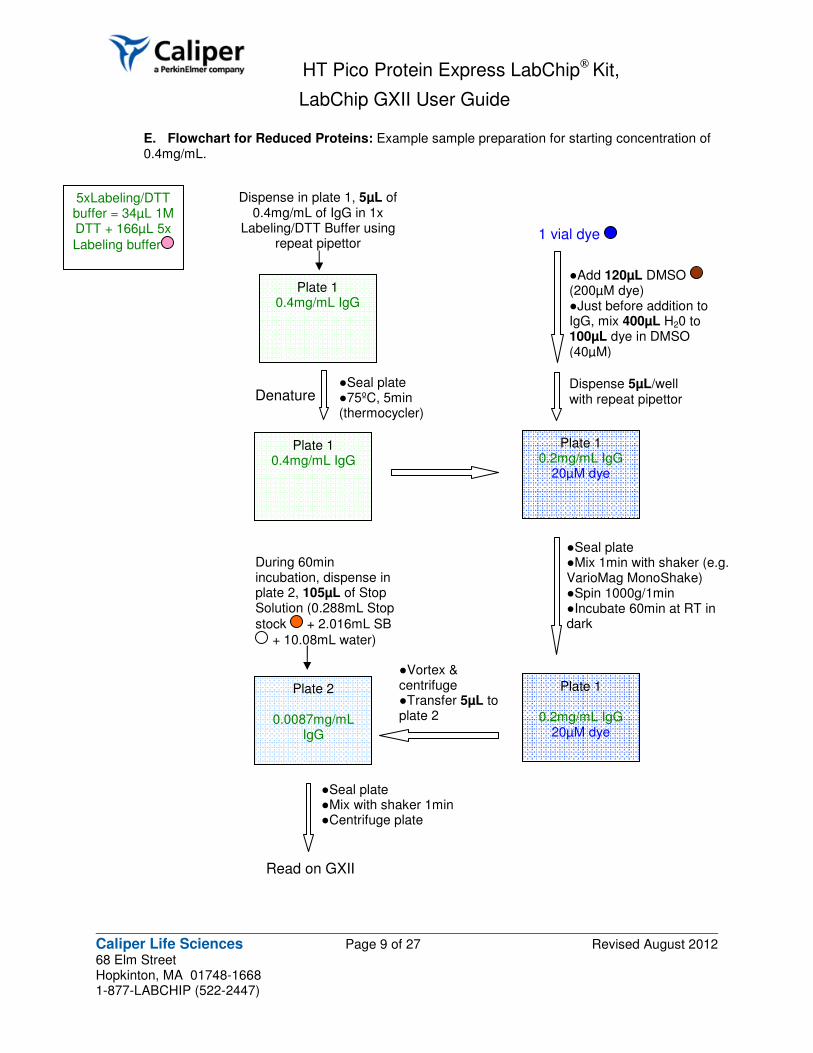
Plate 1 0.4mg/mL IgG
Plate 1 0.4mg/mL IgG
Denature
1 vial dye
Dispense 5µL/well with repeat pipettor
Read on GXII
●Seal plate ●75ºC, 5min (thermocycler)
During 60min incubation, dispense in plate 2, 105µL of Stop Solution (0.288mL Stop
stock + 2.016mL SB
+ 10.08mL water)
●Seal plate ●Mix 1min with shaker (e.g. VarioMag MonoShake) ●Spin 1000g/1min ●Incubate 60min at RT in dark
Plate 1
0.2mg/mL IgG 20µM dye
●Seal plate ●Mix with shaker 1min ●Centrifuge plate
Dispense in plate 1, 5µL of 0.4mg/mL of IgG in 1x
Labeling/DTT Buffer using repeat pipettor
●Add 120µL DMSO (200µM dye) ●Just before addition to IgG, mix 400µL H20 to 100µL dye in DMSO (40µM)
Plate 1 0.2mg/mL IgG
20µM dye
Plate 2
0.0087mg/mL IgG
●Vortex & centrifuge ●Transfer 5µL to plate 2
5xLabeling/DTT buffer = 34µL 1M DTT + 166µL 5x
Labeling buffer
E. Flowchart for Reduced Proteins: Example sample preparation for starting concentration of 0.4mg/mL.
HT Pico Protein Express LabChip Kit,
LabChip GXII User Guide
Caliper Life Sciences Page 10 of 27 Revised August 2012 68 Elm Street Hopkinton, MA 01748-1668 1-877-LABCHIP (522-2447)
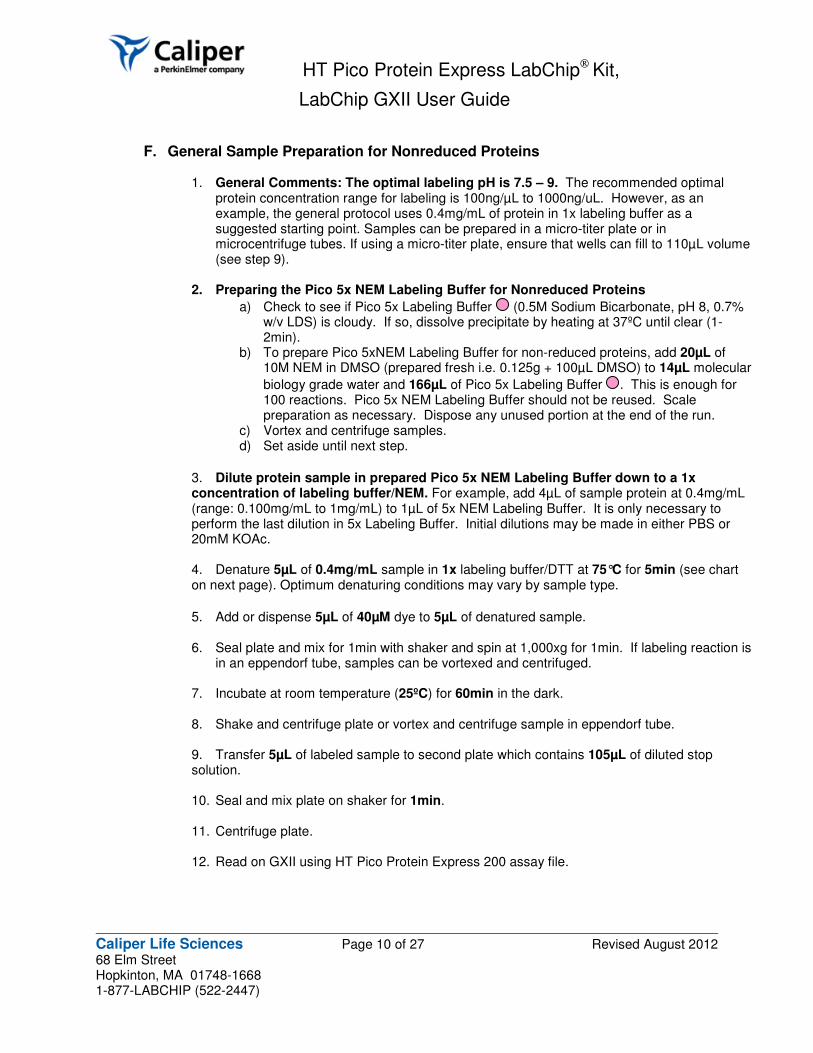
F. General Sample Preparation for Nonreduced Proteins
1. General Comments: The optimal labeling pH is 7.5 – 9. The recommended optimal protein concentration range for labeling is 100ng/µL to 1000ng/uL. However, as an example, the general protocol uses 0.4mg/mL of protein in 1x labeling buffer as a suggested starting point. Samples can be prepared in a micro-titer plate or in microcentrifuge tubes. If using a micro-titer plate, ensure that wells can fill to 110µL volume (see step 9).
2. Preparing the Pico 5x NEM Labeling Buffer for Nonreduced Proteins
a) Check to see if Pico 5x Labeling Buffer (0.5M Sodium Bicarbonate, pH 8, 0.7% w/v LDS) is cloudy. If so, dissolve precipitate by heating at 37ºC until clear (1-2min).
b) To prepare Pico 5xNEM Labeling Buffer for non-reduced proteins, add 20µL of 10M NEM in DMSO (prepared fresh i.e. 0.125g + 100µL DMSO) to 14µL molecular
biology grade water and 166µL of Pico 5x Labeling Buffer . This is enough for 100 reactions. Pico 5x NEM Labeling Buffer should not be reused. Scale preparation as necessary. Dispose any unused portion at the end of the run.
c) Vortex and centrifuge samples. d) Set aside until next step.
3. Dilute protein sample in prepared Pico 5x NEM Labeling Buffer down to a 1x concentration of labeling buffer/NEM. For example, add 4µL of sample protein at 0.4mg/mL (range: 0.100mg/mL to 1mg/mL) to 1µL of 5x NEM Labeling Buffer. It is only necessary to perform the last dilution in 5x Labeling Buffer. Initial dilutions may be made in either PBS or 20mM KOAc.
4. Denature 5µL of 0.4mg/mL sample in 1x labeling buffer/DTT at 75°C for 5min (see chart on next page). Optimum denaturing conditions may vary by sample type.
5. Add or dispense 5µL of 40µM dye to 5µL of denatured sample.
6. Seal plate and mix for 1min with shaker and spin at 1,000xg for 1min. If labeling reaction is in an eppendorf tube, samples can be vortexed and centrifuged.
7. Incubate at room temperature (25ºC) for 60min in the dark.
8. Shake and centrifuge plate or vortex and centrifuge sample in eppendorf tube.
9. Transfer 5µL of labeled sample to second plate which contains 105µL of diluted stop solution.
10. Seal and mix plate on shaker for 1min.
11. Centrifuge plate.
12. Read on GXII using HT Pico Protein Express 200 assay file.
HT Pico Protein Express LabChip Kit,
LabChip GXII User Guide
Caliper Life Sciences Page 11 of 27 Revised August 2012 68 Elm Street Hopkinton, MA 01748-1668 1-877-LABCHIP (522-2447)
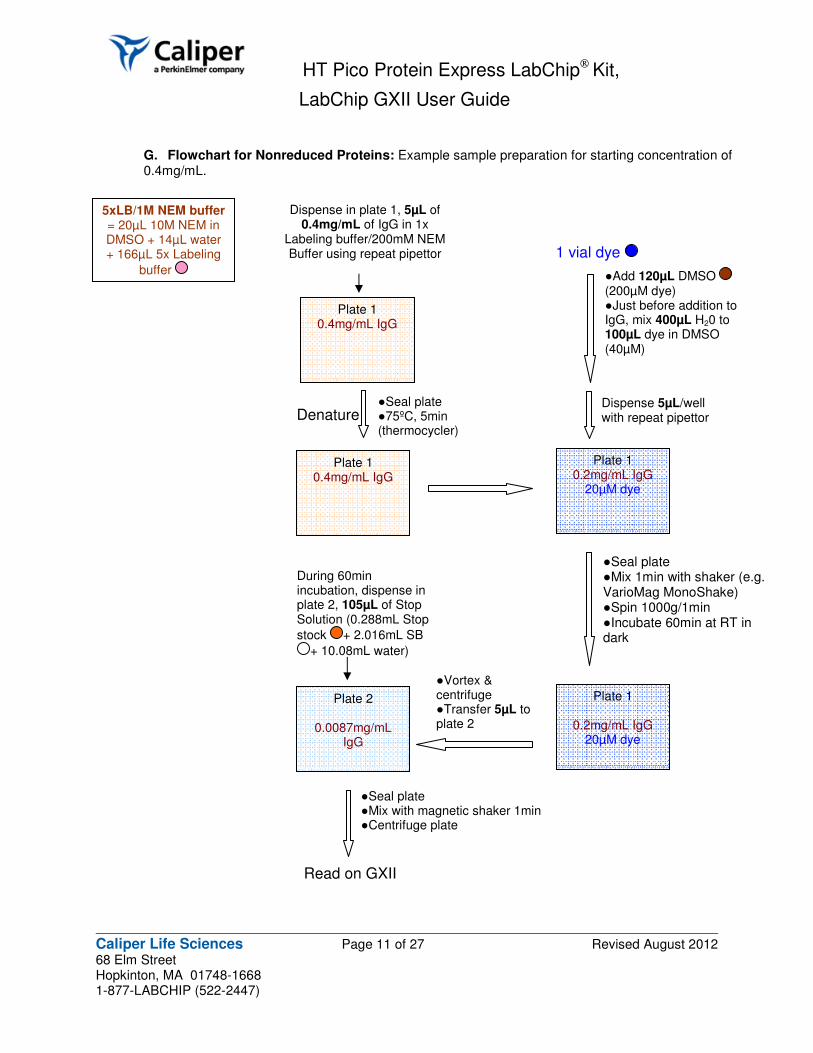
G. Flowchart for Nonreduced Proteins: Example sample preparation for starting concentration of 0.4mg/mL.
●Seal plate ●Mix 1min with shaker (e.g. VarioMag MonoShake) ●Spin 1000g/1min ●Incubate 60min at RT in dark
Dispense in plate 1, 5µL of 0.4mg/mL of IgG in 1x
Labeling buffer/200mM NEM Buffer using repeat pipettor
5xLB/1M NEM buffer = 20µL 10M NEM in DMSO + 14µL water + 166µL 5x Labeling
buffer
Plate 1 0.4mg/mL IgG
Plate 1 0.4mg/mL IgG
Denature
1 vial dye
Dispense 5µL/well with repeat pipettor
Read on GXII
●Seal plate ●75ºC, 5min (thermocycler)
During 60min incubation, dispense in plate 2, 105µL of Stop Solution (0.288mL Stop
stock + 2.016mL SB
+ 10.08mL water)
Plate 1
0.2mg/mL IgG 20µM dye
●Seal plate ●Mix with magnetic shaker 1min ●Centrifuge plate
●Add 120µL DMSO (200µM dye) ●Just before addition to IgG, mix 400µL H20 to 100µL dye in DMSO (40µM)
Plate 1 0.2mg/mL IgG
20µM dye
Plate 2
0.0087mg/mL IgG
●Vortex & centrifuge ●Transfer 5µL to plate 2
HT Pico Protein Express LabChip Kit,
LabChip GXII User Guide
Caliper Life Sciences Page 12 of 27 Revised August 2012 68 Elm Street Hopkinton, MA 01748-1668 1-877-LABCHIP (522-2447)
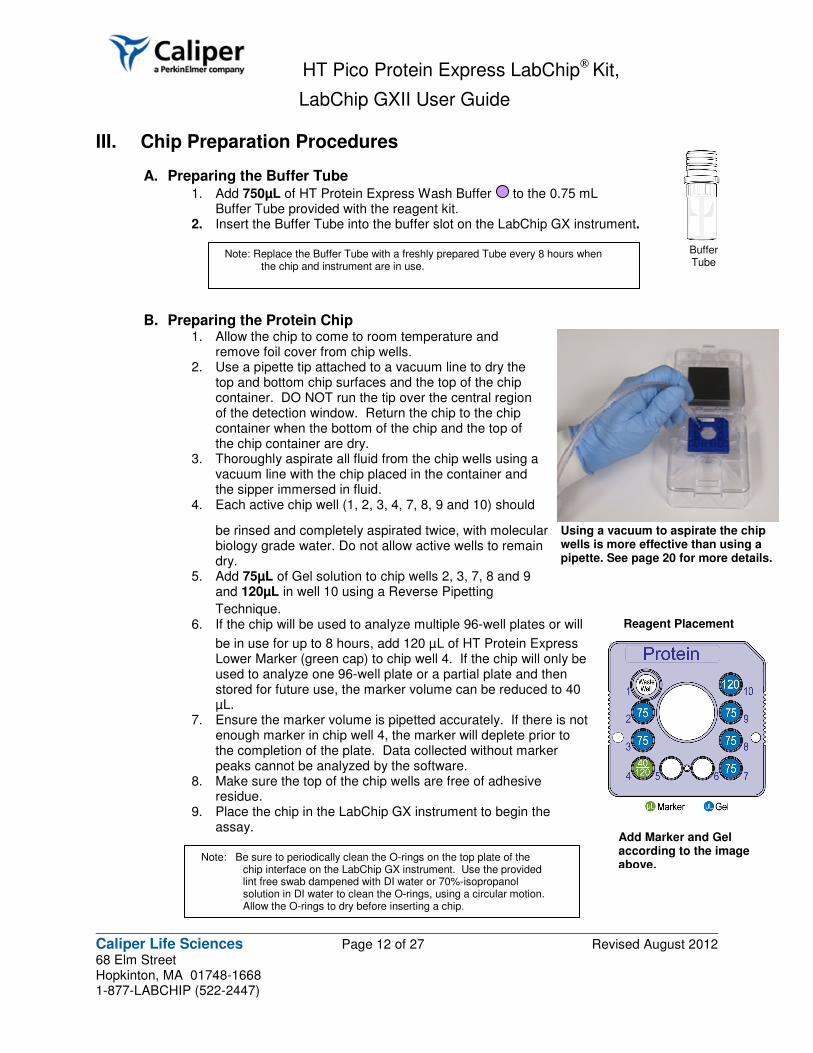
Reagent Placement
Note: Be sure to periodically clean the O-rings on the top plate of the chip interface on the LabChip GX instrument. Use the provided lint free swab dampened with DI water or 70%-isopropanol solution in DI water to clean the O-rings, using a circular motion. Allow the O-rings to dry before inserting a chip.
Using a vacuum to aspirate the chip wells is more effective than using a pipette. See page 20 for more details.
III. Chip Preparation Procedures
A. Preparing the Buffer Tube 1. Add 750µL of HT Protein Express Wash Buffer to the 0.75 mL
Buffer Tube provided with the reagent kit. 2. Insert the Buffer Tube into the buffer slot on the LabChip GX instrument.
B. Preparing the Protein Chip 1. Allow the chip to come to room temperature and
remove foil cover from chip wells. 2. Use a pipette tip attached to a vacuum line to dry the
top and bottom chip surfaces and the top of the chip container. DO NOT run the tip over the central region of the detection window. Return the chip to the chip container when the bottom of the chip and the top of the chip container are dry.
3. Thoroughly aspirate all fluid from the chip wells using a vacuum line with the chip placed in the container and the sipper immersed in fluid.
4. Each active chip well (1, 2, 3, 4, 7, 8, 9 and 10) should
be rinsed and completely aspirated twice, with molecular biology grade water. Do not allow active wells to remain dry.
5. Add 75µL of Gel solution to chip wells 2, 3, 7, 8 and 9 and 120µL in well 10 using a Reverse Pipetting
Technique. 6. If the chip will be used to analyze multiple 96-well plates or will
be in use for up to 8 hours, add 120 µL of HT Protein Express Lower Marker (green cap) to chip well 4. If the chip will only be used to analyze one 96-well plate or a partial plate and then stored for future use, the marker volume can be reduced to 40 µL.
7. Ensure the marker volume is pipetted accurately. If there is not enough marker in chip well 4, the marker will deplete prior to the completion of the plate. Data collected without marker peaks cannot be analyzed by the software.
8. Make sure the top of the chip wells are free of adhesive residue.
9. Place the chip in the LabChip GX instrument to begin the assay.
Add Marker and Gel according to the image above.
Note: Replace the Buffer Tube with a freshly prepared Tube every 8 hours when the chip and instrument are in use.
Buffer Tube
HT Pico Protein Express LabChip Kit,
LabChip GXII User Guide
Caliper Life Sciences Page 13 of 27 Revised August 2012 68 Elm Street Hopkinton, MA 01748-1668 1-877-LABCHIP (522-2447)
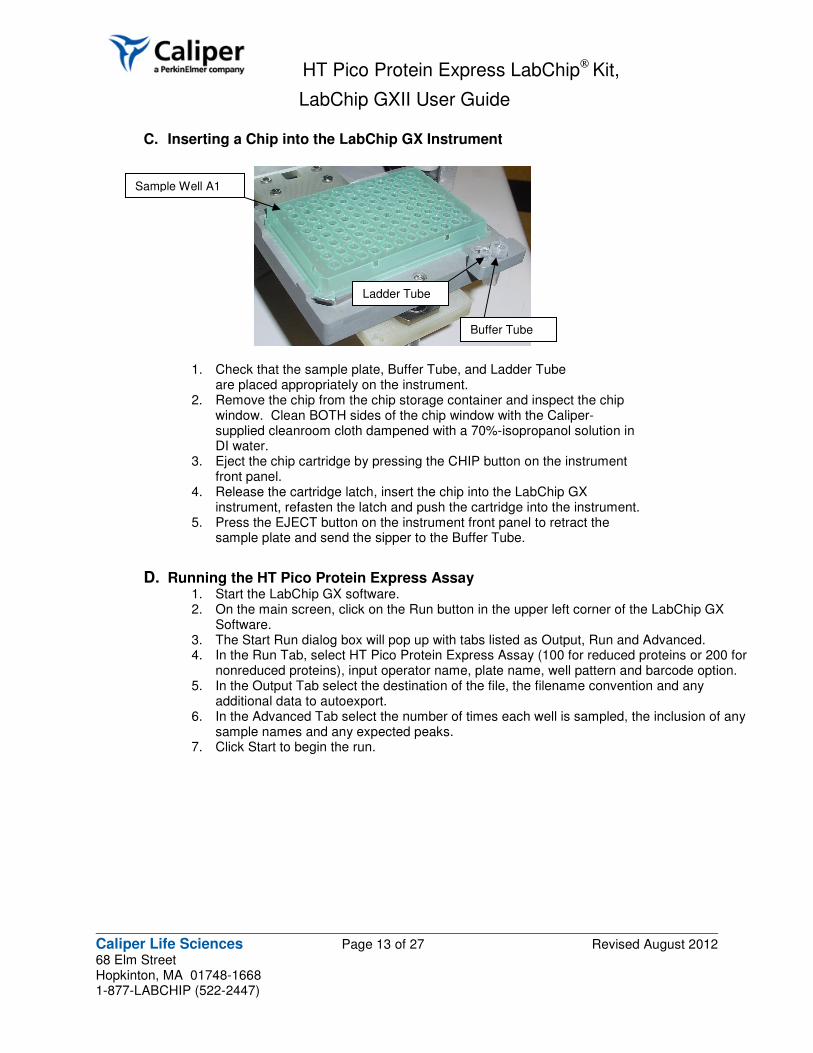
C. Inserting a Chip into the LabChip GX Instrument
1. Check that the sample plate, Buffer Tube, and Ladder Tube are placed appropriately on the instrument.
2. Remove the chip from the chip storage container and inspect the chip window. Clean BOTH sides of the chip window with the Caliper-supplied cleanroom cloth dampened with a 70%-isopropanol solution in DI water.
3. Eject the chip cartridge by pressing the CHIP button on the instrument front panel.
4. Release the cartridge latch, insert the chip into the LabChip GX instrument, refasten the latch and push the cartridge into the instrument.
5. Press the EJECT button on the instrument front panel to retract the sample plate and send the sipper to the Buffer Tube.
D. Running the HT Pico Protein Express Assay 1. Start the LabChip GX software. 2. On the main screen, click on the Run button in the upper left corner of the LabChip GX
Software. 3. The Start Run dialog box will pop up with tabs listed as Output, Run and Advanced. 4. In the Run Tab, select HT Pico Protein Express Assay (100 for reduced proteins or 200 for
nonreduced proteins), input operator name, plate name, well pattern and barcode option. 5. In the Output Tab select the destination of the file, the filename convention and any
additional data to autoexport. 6. In the Advanced Tab select the number of times each well is sampled, the inclusion of any
sample names and any expected peaks. 7. Click Start to begin the run.
Sample Well A1
Ladder Tube
Buffer Tube
HT Pico Protein Express LabChip Kit,
LabChip GXII User Guide
Caliper Life Sciences Page 14 of 27 Revised August 2012 68 Elm Street Hopkinton, MA 01748-1668 1-877-LABCHIP (522-2447)
E. Storing the Protein Chip 1. After use, the chip must be cleaned and stored in the chip container. 2. Remove the reagents from each well of the chip using vacuum. 3. Each active well (1, 2, 3, 4, 7, 8, 9 and 10) should be rinsed and aspirated twice molecular
biology grade water. 4. Add 120µL molecular biology grade water to the active wells. 5. Place the chip in the plastic storage container. The sipper should be submerged in the fluid
reservoir. Add water to the fluid reservoir as needed. 6. Cover the wells with adhesive foil to prevent buffer evaporation and store the chip at 4°C
until next use 7. The chip must be used to its lifetime (three 96-well plates) within 30 days of analyzing the
first plate of samples.
F. Chip Cartridge Cleaning 1. Daily - Inspect the inside of the chip cartridge and O-rings for debris. 2. Monthly
a) To reduce pressure leaks at the chip interface, clean the O-rings frequently. Remove the O-rings from the top plate of the chip interface on the LabChip GX instrument. Soak O-rings in DI water for a few minutes. Clean the O-ring faces by rubbing between two fingers. b) To reduce the occurrence of current leaks, clean the chip interface frequently. Clean the top plate of the chip interface using the provided lint free swab dampened with DI water. c) Allow the O-rings and chip interface to air dry. Reinsert the O-rings into the chip cartridge.
HT Pico Protein Express LabChip Kit,
LabChip GXII User Guide
Caliper Life Sciences Page 15 of 27 Revised August 2012 68 Elm Street Hopkinton, MA 01748-1668 1-877-LABCHIP (522-2447)
IV. Alternate Preparation Procedures
A. Labeling reduced protein of unknown or very low protein concentration
If the protein concentration is unknown, we recommend assuming that the concentration is low. This low throughput protocol increases the dye starting concentration to 200µM dye without further dilution in water. For very low protein concentrations, users can increase dye concentration to as much as 600µM in DMSO. However, users should keep DMSO contribution into the labeling reaction to 10%. If the peak heights are found to be saturating on the GX, further dilutions of the protein are necessary before labeling. Users should substitute the general ladder protocol with the associated ladder labeling protocol that follows in section B. Recommended Protocol:
1. Check to see if Pico 5x Labeling Buffer is cloudy. If so, dissolve precipitate by heating at 37ºC until clear (1-2min).
2. Add 17µL of 1M DTT (user provided) to 83µL of Pico 5x Labeling Buffer . 3. Vortex and centrifuge sample. 4. In an eppendorf tube, add 1µL Pico 5x Labeling Buffer/DTT (prepared in step 2) directly to
4µL protein sample. 5. Denature samples at 75°C for 5min. Optimum denaturing conditions may vary by sample
type. 6. Add 1µL of 200µM dye (or higher) to 4µL of denatured sample from step 1. 7. Incubate at room temperature (25ºC) for 60min in the dark. 8. Vortex and centrifuge sample. 9. In an eppendorf tube, add 5µL of labeled sample to 105µL of diluted stop solution. 10. Vortex and centrifuge sample. 11. Read samples on GX instrument.
B. Labeling ladder for unknown or very low protein concentration
This ladder labeling protocol should be used in association with the prior protocol for samples of unknown concentration or very low protein concentration. Recommended Protocol:
1. In an eppendorf tube, denature 4µL of protein ladder at 75°C for 5min. 2. Centrifuge tube. 3. Add 1µL of 200µM Dye to tube. 4. Incubate at room temperature (25ºC) for 60min in the dark. 5. Vortex and centrifuge sample. 6. Add 5µL of labeled sample to 325µL of diluted stop solution. 7. Vortex and centrifuge sample. 8. Transfer 120µL of prepared ladder to the provided 0.2mL Ladder Tube. 9. Insert the Ladder Tube into ladder slot on the LabChip GX instrument.
HT Pico Protein Express LabChip Kit,
LabChip GXII User Guide
Caliper Life Sciences Page 16 of 27 Revised August 2012 68 Elm Street Hopkinton, MA 01748-1668 1-877-LABCHIP (522-2447)
C. Labeling nonreduced samples for sensitive antibodies
If the recommended sample preparation protocol for nonreduced proteins results in higher than expected level of fragmentation, Caliper recommends the following substitution. Denaturing prior to labeling may induce fragmentation for certain sensitive antibodies. This protocol labels antibodies in the absence of any detergent as a first step and denatures at the end of the protocol.
Recommended Protocol:
1. Substitute 5xLabeling Buffer with 0.5M Sodium Bicarbonate, pH 8.0 2. Dilute antibody sample down to a working concentration in 0.1M Sodium Biocarbonate. 3. Dispense 5µL of 40µM dye to 5µL of antibody. 4. Incubate at room temperature (25ºC) for 60min in the dark.
5. Add 1µL of stop buffer . 6. Vortex and centrifuge sample.
7. To 5µL of labeled antibody, add 18µL of Sample Buffer/IAM (50µL Sample Buffer + 5µL 0.5M IAM)
8. Denature sample at 75ºC for 5min. 9. Add 77µL H20. 10. Vortex and centrifuge sample.
D. Removing free dye from samples
If a user is interested in removing the lower molecular weight peaks of free dye, identified by the software as system peaks, Caliper recommends the use of fluorescent dye removal columns after sample preparation is complete. The procedure below is from Thermo Scientific, catalogue number #22858. It requires at least 50uL sample volume. The user will also be required to remove low molecular weight system peaks that may be excluded in the analysis setting. Recommended Protocol:
1. The sample pH and NaCl concentrations of the sample to be processed are assumed to in the range of the kit.
2. Add 75µL of resin and centrifuge the column for 30sec at 1,000 x g to remove the storage solution.
3. Discard the used Collection Tube and place column into a new tube. 4. Add 50µL of labeled protein to the resin in the Spin Column and mix by briefly vortexing. 5. Centrifuge column for 30sec at 1,000xg to collect the purified protein. 6. Discard the used column and resin.
E. Labeling Reduced Antibodies for HC/LC analysis
If there is need to quantify HC/LC ratios for antibodies, Caliper recommends use of this protocol for accurate HC/LC analysis for obtaining best results. Labeling efficiency is maximized for both the light chain and heavy chains of typical antibodies. The protocol recommends that users increase both the protein concentration (1mg/mL) and the dye concentration (200µM). In this protocol, the dye is kept at 200µM in DMSO and water is not added for further dye dilution. Users should substitute the general ladder protocol with the associated ladder labeling protocol that follows in section F.

HT Pico Protein Express LabChip Kit,
LabChip GXII User Guide
Caliper Life Sciences Page 17 of 27 Revised August 2012 68 Elm Street Hopkinton, MA 01748-1668 1-877-LABCHIP (522-2447)
Recommended Protocol:
1. Prepare 20µL protein sample in 1x Labeling buffer at a protein concentration of 1mg/mL. 2. Denature samples at 75°C for 5min. Optimum denaturing conditions may vary by sample
type. 3. Add 1µL of 200µM Dye to 4µL of denatured protein at 1mg/mL. 4. Incubate at room temperature (25ºC) for 60min in the dark. 5. Vortex and centrifuge sample. 6. Add 435µL of diluted stop solution to the 5µL of labeled sample. 7. Vortex and centrifuge sample. 8. Transfer 45µL of labeled protein to a 96 well plate 9. Read on GX instrument
F. Labeling protein ladder for HC/LC analysis
If running the protocol for reduced antibodies, users must also run its associated protein ladder labeling procedure for obtaining best results. This ladder labeling procedure uses the same dye concentration as the reduced antibody protocol for HC/LC analysis but maintains the required ladder dilution factor for quantification.
Recommended Protocol:
1. Denature 20µL of protein ladder at 75°C for 5min.
2. Add 1µL of 200µM Dye to 4µL of protein ladder . 3. Incubate at room temperature (25ºC) for 60min in the dark. 4. Vortex and centrifuge sample. 5. Add 325µL of diluted stop solution to the 5µL labeled ladder. 6. Vortex and centrifuge sample. 7. Transfer 120µL of prepared ladder to the provided 0.2mL Ladder Tube. 8. Insert the Ladder Tube into ladder slot on the LabChip GX instrument.
HT Pico Protein Express LabChip Kit,
LabChip GXII User Guide
Caliper Life Sciences Page 18 of 27 Revised August 2012 68 Elm Street Hopkinton, MA 01748-1668 1-877-LABCHIP (522-2447)
V. Typical Results
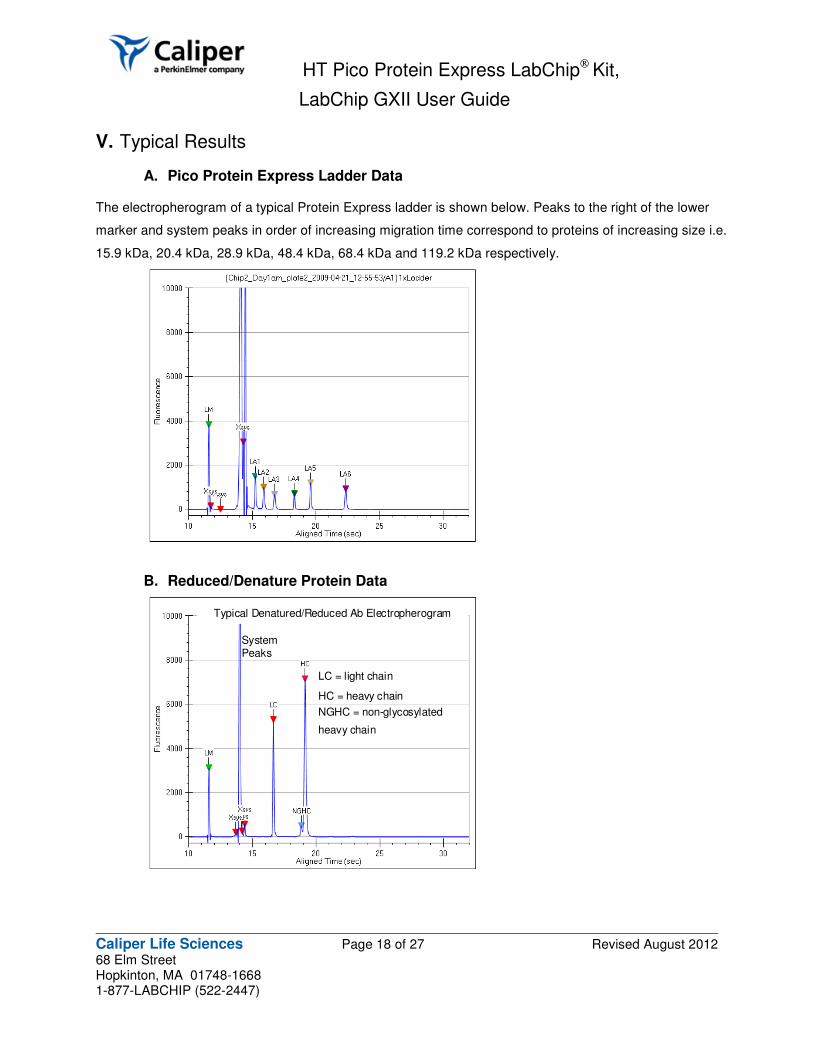
A. Pico Protein Express Ladder Data The electropherogram of a typical Protein Express ladder is shown below. Peaks to the right of the lower
marker and system peaks in order of increasing migration time correspond to proteins of increasing size i.e.
15.9 kDa, 20.4 kDa, 28.9 kDa, 48.4 kDa, 68.4 kDa and 119.2 kDa respectively.
B. Reduced/Denature Protein Data
Free Dye Peaks
Typical Ladder Electropherogram
LA = Ladder Peaks
Typical Denatured/Reduced Ab Electropherogram
System Peaks
LC = light chain
HC = heavy chain
NGHC = non-glycosylated
heavy chain
HT Pico Protein Express LabChip Kit,
LabChip GXII User Guide
Caliper Life Sciences Page 19 of 27 Revised August 2012 68 Elm Street Hopkinton, MA 01748-1668 1-877-LABCHIP (522-2447)
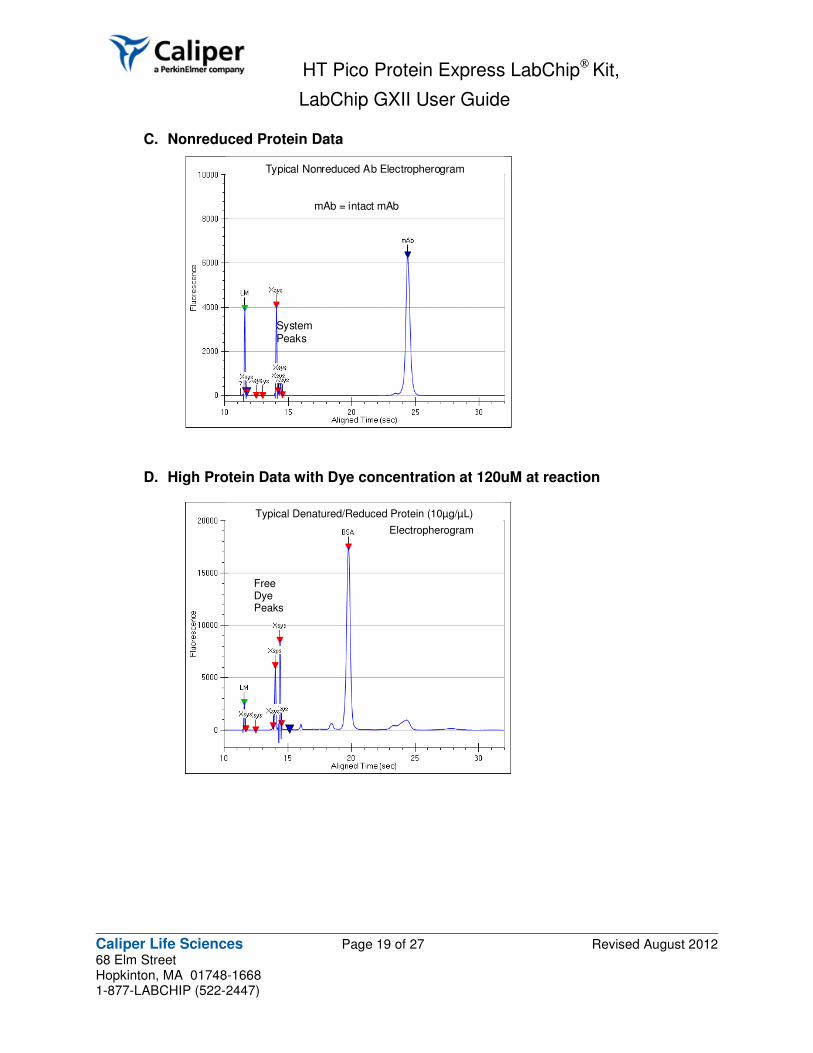
C. Nonreduced Protein Data
D. High Protein Data with Dye concentration at 120uM at reaction
Electropherogram
Typical Denatured/Reduced Protein (10µg/µL)
Free Dye Peaks
Typical Nonreduced Ab Electropherogram
System Peaks
mAb = intact mAb
HT Pico Protein Express LabChip Kit,
LabChip GXII User Guide
Caliper Life Sciences Page 20 of 27 Revised August 2012 68 Elm Street Hopkinton, MA 01748-1668 1-877-LABCHIP (522-2447)
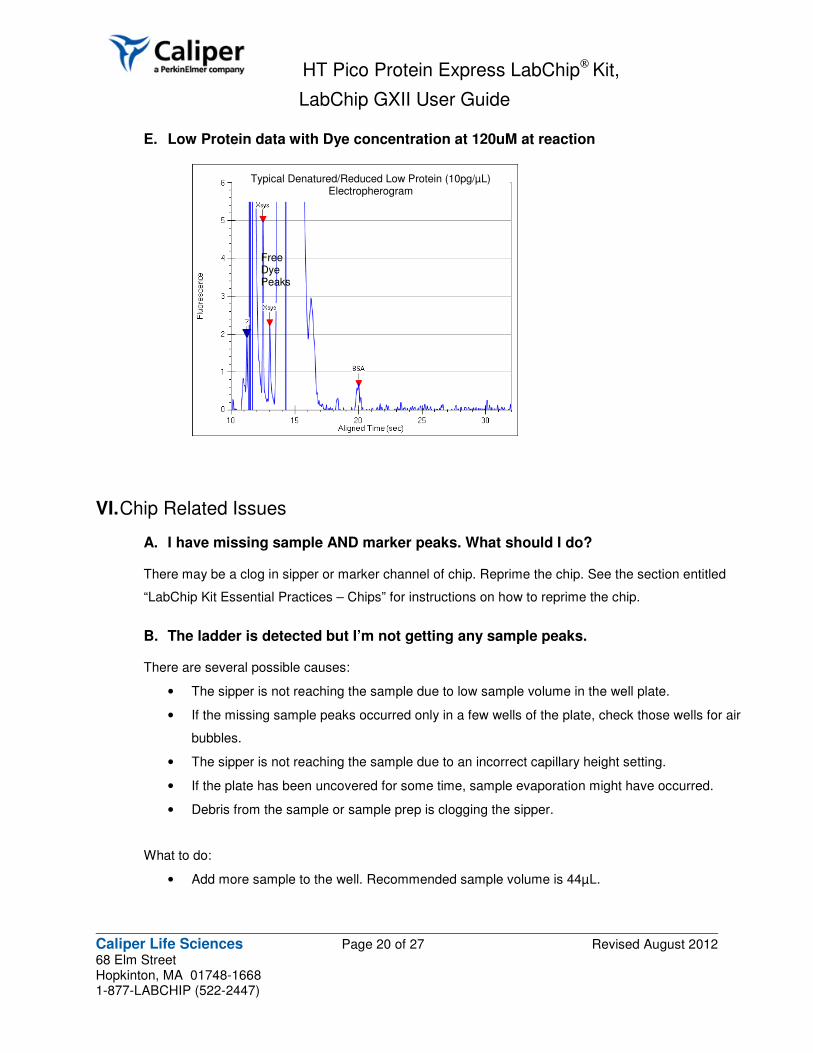
E. Low Protein data with Dye concentration at 120uM at reaction
VI. Chip Related Issues
A. I have missing sample AND marker peaks. What should I do?
There may be a clog in sipper or marker channel of chip. Reprime the chip. See the section entitled
“LabChip Kit Essential Practices – Chips” for instructions on how to reprime the chip.
B. The ladder is detected but I’m not getting any sample peaks.
There are several possible causes:
• The sipper is not reaching the sample due to low sample volume in the well plate.
• If the missing sample peaks occurred only in a few wells of the plate, check those wells for air
bubbles.
• The sipper is not reaching the sample due to an incorrect capillary height setting.
• If the plate has been uncovered for some time, sample evaporation might have occurred.
• Debris from the sample or sample prep is clogging the sipper.
What to do:
• Add more sample to the well. Recommended sample volume is 44µL.
Typical Denatured/Reduced Low Protein (10pg/µL) Electropherogram
Free Dye Peaks
HT Pico Protein Express LabChip Kit,
LabChip GXII User Guide
Caliper Life Sciences Page 21 of 27 Revised August 2012 68 Elm Street Hopkinton, MA 01748-1668 1-877-LABCHIP (522-2447)
• Manually insert a larger volume pipette tip (~100µL) into the sample well and dislodge the
bubble. Rerun these sample wells.
• Re-teach the robot positioning as described in LabChip GX Users Manual.
• Check the sample wells, especially around the edge of the plate where evaporation is fastest,
and make a fresh plate if volumes are low.
• If you suspect there may be debris in your samples, spin the sample plate down in a centrifuge.
Unclog the sipper by repriming the chip. See the section entitled “LabChip Kit Essential
Practices – Chips” for instructions on how to reprime the chip.
C. I’m not getting any ladder peaks but sample peaks and marker peaks are okay. There may be too low of a ladder volume or no ladder volume at all in the Ladder Tube. Try
adding more ladder to the Ladder Tube and restart the run. Recommended standard ladder
volume is 120µL (minimum volume no less than 100µL).
D. There are no marker peaks but sample peaks are present. Either no marker added to chip well 4 or the problem may be due to a marker channel clog.
• If you suspect that this may be due to not filling marker well or chip remaining idle on
instrument for extended period of time. Add or replenish the marker solution in the chip using
the following procedure:
• Press the CHIP button on the front instrument panel to eject the chip cartridge.
• Open the chip cartridge and return the chip to the chip container ensuring the sipper is
immersed in fluid.
• Thoroughly aspirate all fluid from chip well 4 using a vacuum line.
• Ensure that chip well 4 is rinsed and completely aspirated twice with molecular biology
grade water.
• Add HT Protein Express Lower Marker to chip well 4. If the chip will be used to analyze
multiple 96-well plates or will be in use for up to 8 hours, add 120µL of HT Protein
Express Marker (green cap) to chip well 4. If the chip will only be used to analyze one
96-well plate or a partial plate and then stored for future use, the marker volume can be
reduced to 40 µL.
• Reinsert the cartridge by engaging the latch and pushing the cartridge back into the
instrument.
• Press the Run button on the main screen of the LabChip GX software.
HT Pico Protein Express LabChip Kit,
LabChip GXII User Guide
Caliper Life Sciences Page 22 of 27 Revised August 2012 68 Elm Street Hopkinton, MA 01748-1668 1-877-LABCHIP (522-2447)
• If you suspect clogging, perform a marker channel unclogging procedure by repriming the chip.
See the section entitled “LabChip Kit Essential Practices – Chips” for instructions on how to
reprime the chip.
VII. LabChip Kit Essential Practices
To ensure proper assay performance please follow the important handling practices described below. Failure to observe these guidelines may void the LabChip Kit product warranty.
1
NOTE: It is important to keep particulates out of the chip wells, channels and capillary. Many of the following guidelines are designed to keep the chips particulate free. For assay and instrument troubleshooting, refer to the LabChip HT Software Help file or call Caliper Technical Support at 1-877-LABCHIP.
A. General 1. Allow the chip, sample plate and all reagents to equilibrate to room temperature before use
(approximately 20 to 30 minutes). 2. Clean the O-rings in the chip interface weekly and the electrodes daily. Refer to the
Instrument Users Guide Maintenance and Service section for procedures. 3. Avoid use of powdered gloves. Use only non-powdered gloves when handling chips,
reagents, sample plates, and when cleaning the instrument electrodes and electrode block. 4. Calibrate laboratory pipettes regularly to ensure proper reagent dispensing. Only the
Caliper-supplied clean room cloth can be used on the chip to clean the detection window. 5. Water used for chip preparation procedures must be 0.22-micron filtered deionized,
molecular biology grade. 6. Use of the “Reverse Pipetting Technique” (described below) will help avoid introducing
bubbles into the chip when pipetting the gel.
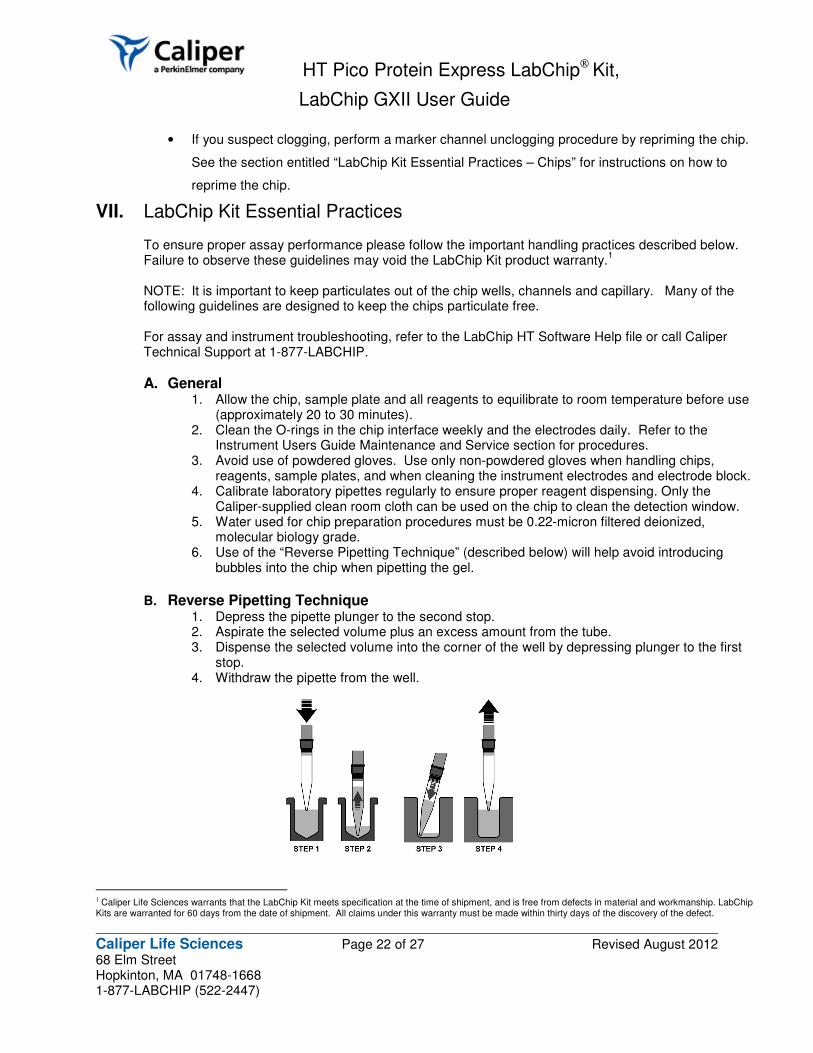
B. Reverse Pipetting Technique 1. Depress the pipette plunger to the second stop. 2. Aspirate the selected volume plus an excess amount from the tube. 3. Dispense the selected volume into the corner of the well by depressing plunger to the first
stop. 4. Withdraw the pipette from the well.
1 Caliper Life Sciences warrants that the LabChip Kit meets specification at the time of shipment, and is free from defects in material and workmanship. LabChip
Kits are warranted for 60 days from the date of shipment. All claims under this warranty must be made within thirty days of the discovery of the defect.
HT Pico Protein Express LabChip Kit,
LabChip GXII User Guide
Caliper Life Sciences Page 23 of 27 Revised August 2012 68 Elm Street Hopkinton, MA 01748-1668 1-877-LABCHIP (522-2447)
C. Reagents
1. Store reagents at 4 °C when not in use.
D. Chips 1. Repriming Chips:
a) Press the CHIP button on the front instrument panel to eject the chip cartridge. b) Reinsert the cartridge by pushing the cartridge back into the instrument. c) Press the Run button on the main screen of the LabChip GX software.
2. Washing and Repriming Chips: a) Press the CHIP button on the front instrument panel to eject the chip cartridge. b) Open the chip cartridge and return the chip to the chip container ensuring the
sipper is immersed in fluid. c) Thoroughly aspirate all fluid from the chip wells using a vacuum line. d) Each active well (1, 2, 3, 4, 7, 8, 9 and 10) should be rinsed and completely
aspirated twice with molecular biology grade water. Do not allow active wells to remain dry.
e) Add 75 µL of Wash Buffer to each active well (1, 2, 3, 4, 7, 8, 9 and 10). f) Place the chip in the LabChip GX instrument. g) Reinsert the cartridge by engaging the latch and pushing the cartridge back into the
instrument. h) Press the Wash button on the main screen of the LabChip GX software. i) After completion of the wash cycle, press the CHIP button on the front instrument
panel to eject the chip cartridge. j) Open the chip cartridge and return the chip to the chip container ensuring the
sipper is immersed in fluid. k) Thoroughly aspirate all fluid from the chip wells using a vacuum line. l) Each active well (1, 2, 3, 4, 7, 8, 9 and 10) should be rinsed and completely
aspirated twice with molecular biology grade water. Do not allow active wells to remain dry.
m) Add 75 µL of Gel solution to chip wells 2, 3, 7, 8, 9 and 120µL to chip well 10 using a Reverse Pipetting Technique.
n) If the chip will be used to analyze multiple 96-well plates or will be in use for up to 8
hours, add 120 µL of HT Protein Express Marker (green cap) to chip well 4. If the chip will only be used to analyze one 96-well plate or a partial plate and then stored
for future use, the marker volume can be reduced to 40 µL. Place the chip in the LabChip GX instrument.
o) Reinsert the cartridge by engaging the latch and pushing the cartridge back into the instrument.
p) Press the Run button on the main screen of the LabChip GX software.

HT Pico Protein Express LabChip Kit,
LabChip GXII User Guide
Caliper Life Sciences Page 24 of 27 Revised August 2012 68 Elm Street Hopkinton, MA 01748-1668 1-877-LABCHIP (522-2447)
3. Other Considerations: a) New protein chips should be stored refrigerated prior to first use. b) After running the first set of samples, protein chips must be stored at 4°C c) Do not allow the liquid in the chip container to freeze, as this may lead to poor chip
performance. Do not submerge the chip in any solution. d) The entire chip surface must be thoroughly dry before use. e) The sipper must be kept immersed in fluid at all times and should not be exposed
to an open environment for long periods of time. f) Use care in chip handling to prevent sipper damage. Damage to the sipper can
result in inconsistent sampling. g) Avoid exposing the chips to dust by keeping them in a closed environment such as
in the chip container or in the instrument before and after chip preparation. h) Chips can be prepared and left in the instrument for extended periods of time, so
that samples can be run as needed throughout the day. Caliper recommends the chip be re-prepared after it has been idle for 8 hours, but the chip can be used continually over an 8-hour work day as long as the maximum recommended idle time of 8 hours and total chip lifetime of 400 samples are not exceeded.
E. Samples
1. Prepared sample plates should be free of gas bubbles and particulate debris, both of which may inhibit sipper flow.
2. Sample plates containing gas bubbles and/or particulate debris should be spun down at 3000 rpm (1250 rcf) prior to analysis.
3. Up to four 96-well plates (400 samples) can be run with a single chip preparation.
HT Pico Protein Express LabChip Kit,
LabChip GXII User Guide
Caliper Life Sciences Page 25 of 27 Revised August 2012 68 Elm Street Hopkinton, MA 01748-1668 1-877-LABCHIP (522-2447)
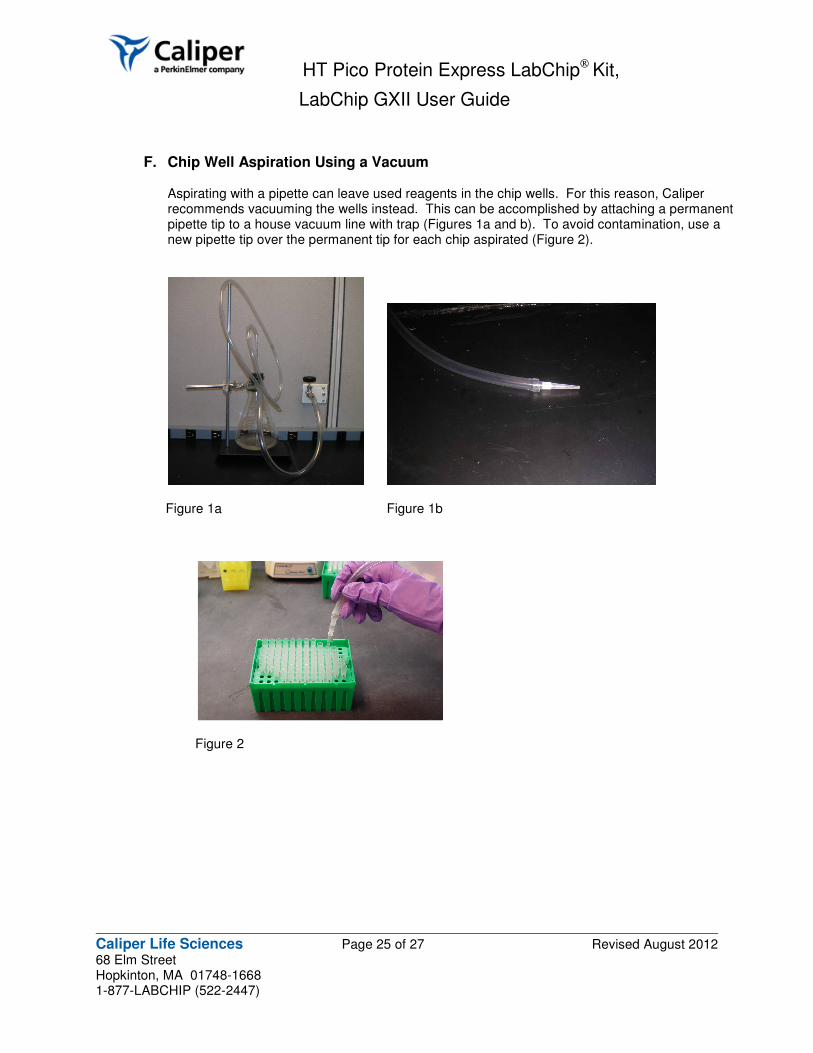
F. Chip Well Aspiration Using a Vacuum
Aspirating with a pipette can leave used reagents in the chip wells. For this reason, Caliper recommends vacuuming the wells instead. This can be accomplished by attaching a permanent pipette tip to a house vacuum line with trap (Figures 1a and b). To avoid contamination, use a new pipette tip over the permanent tip for each chip aspirated (Figure 2).
Figure 1a Figure 1b
Figure 2
HT Pico Protein Express LabChip Kit,
LabChip GXII User Guide
Caliper Life Sciences Page 26 of 27 Revised August 2012 68 Elm Street Hopkinton, MA 01748-1668 1-877-LABCHIP (522-2447)
VIII. Appendix
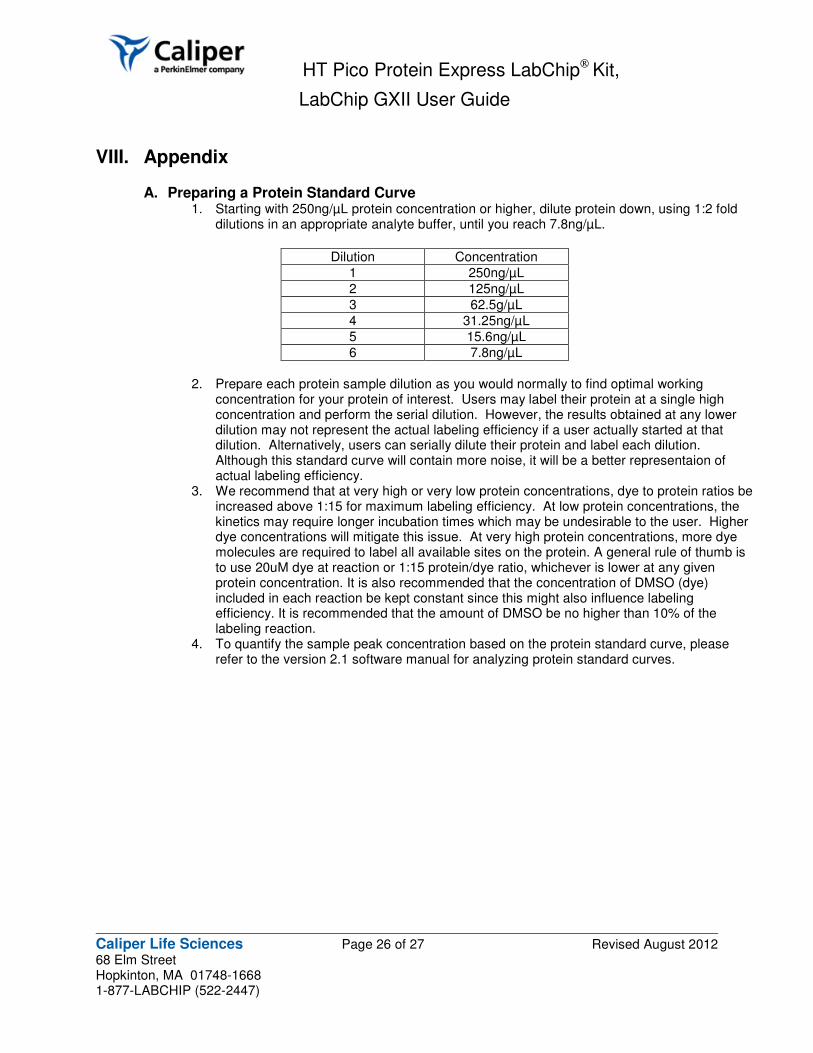
A. Preparing a Protein Standard Curve 1. Starting with 250ng/µL protein concentration or higher, dilute protein down, using 1:2 fold
dilutions in an appropriate analyte buffer, until you reach 7.8ng/µL.
Dilution Concentration
1 250ng/µL
2 125ng/µL
3 62.5g/µL
4 31.25ng/µL
5 15.6ng/µL
6 7.8ng/µL
2. Prepare each protein sample dilution as you would normally to find optimal working
concentration for your protein of interest. Users may label their protein at a single high concentration and perform the serial dilution. However, the results obtained at any lower dilution may not represent the actual labeling efficiency if a user actually started at that dilution. Alternatively, users can serially dilute their protein and label each dilution. Although this standard curve will contain more noise, it will be a better representaion of actual labeling efficiency.
3. We recommend that at very high or very low protein concentrations, dye to protein ratios be increased above 1:15 for maximum labeling efficiency. At low protein concentrations, the kinetics may require longer incubation times which may be undesirable to the user. Higher dye concentrations will mitigate this issue. At very high protein concentrations, more dye molecules are required to label all available sites on the protein. A general rule of thumb is to use 20uM dye at reaction or 1:15 protein/dye ratio, whichever is lower at any given protein concentration. It is also recommended that the concentration of DMSO (dye) included in each reaction be kept constant since this might also influence labeling efficiency. It is recommended that the amount of DMSO be no higher than 10% of the labeling reaction.
4. To quantify the sample peak concentration based on the protein standard curve, please refer to the version 2.1 software manual for analyzing protein standard curves.
HT Pico Protein Express LabChip Kit,
LabChip GXII User Guide
Caliper Life Sciences Page 27 of 27 Revised August 2012 68 Elm Street Hopkinton, MA 01748-1668 1-877-LABCHIP (522-2447)
IX. Reordering Information Product Part Number HT Pico Protein Express Reagent Kit 760498 HT Protein Express Chip Kit 760499 HT Pico Protein Sample Buffer, 3 bottles of 25mL 760414 Buffer Tube E&K Scientific 697075-MC Ladder Tube Genemate C-3258-1 2.0 mL Centrifuge Tubes Eppendorf 022363352
X. Customer Technical Support Caliper Life Sciences 68 Elm Street Hopkinton, MA 01748-1668 Phone: 1-877-LABCHIP (522-2447) Fax: 1-508-435-3439
For additional assay and instrument troubleshooting, refer to the LabChip GX Software Help file. Call Caliper Technical Support at 1-877-LABCHIP.
The chip and reagents supplied with this kit are sold with limited rights of use. The chip may only be used with the specific quantity of reagents supplied with this kit. The purchaser has no right or license to refurbish, reuse, remanufacture, or otherwise use the chip with any other reagents than those specifically supplied in this kit. For more information on the terms and conditions of use of these chips and reagents, please read your LabChip GX User Guide. Caliper, the Caliper logo, LabChip, and the LabChip logo are registered trademarks of Caliper Life Sciences. © Copyright Caliper Life Sciences 2009 http://www.caliperLS.com Doc 450697