htc artemis service manual
TRANSCRIPT
Doc. No. DOC-00021050 REV.
Issued Date 2007/1/10
. Revised Date AX03
Doc. Title Artemis Service Manual Page 1 of 66
HTC CONFIDENTIAL
宏宏宏宏達國際電子股份有限公司達國際電子股份有限公司達國際電子股份有限公司達國際電子股份有限公司
High Tech Computer, Corp.High Tech Computer, Corp.High Tech Computer, Corp.High Tech Computer, Corp.
Artemis
Service Manual
UHTC Proprietary
Confidential Treatment Requested
Rev. AX02
UOct,17,2006
HTC Corp. Engineering Mobility

Doc. No. DOC-00021050 REV.
Issued Date 2007/1/10
. Revised Date AX03
Doc. Title Artemis Service Manual Page 2 of 66
HTC CONFIDENTIAL
宏宏宏宏達國際電子股份有限公司達國際電子股份有限公司達國際電子股份有限公司達國際電子股份有限公司
High Tech Computer, Corp.High Tech Computer, Corp.High Tech Computer, Corp.High Tech Computer, Corp.
Revision Control Table
Rev Date Contents Dept Revised App Dept Stage
AX01 2006/9/15 Fist Draft PSE Henry DAL PVT AX02 2006/10/17 Add Disassembly process PSE Edwin Chen MV
AX03 2007/1/10 • Modify p.25 : Del (Stick
the Copper Foil on the Camera Module.)
PSE Edwin Chen MP
Doc. No. DOC-00021050 REV.
Issued Date 2007/1/10
. Revised Date AX03
Doc. Title Artemis Service Manual Page 3 of 66
HTC CONFIDENTIAL
宏宏宏宏達國際電子股份有限公司達國際電子股份有限公司達國際電子股份有限公司達國際電子股份有限公司
High Tech Computer, Corp.High Tech Computer, Corp.High Tech Computer, Corp.High Tech Computer, Corp.
Table of Contents
1 Introduction
2 Product Configuration
3 Labeling Plan
4 Unit Refurbishment Inspection Criteria
5 Product Overview
6 Unit Assembly/Disassembly Procedure
7 Function Test Procedure
8 OS upgrade procedure
9 Board Level 2.5 Inspection
10 Generic Troubleshooting
11 Photo for 80H & 99H Spare Part
12 RF Antenna Specification

Doc. No. DOC-00021050 REV.
Issued Date 2007/1/10
. Revised Date AX03
Doc. Title Artemis Service Manual Page 4 of 66
HTC CONFIDENTIAL
宏宏宏宏達國際電子股份有限公司達國際電子股份有限公司達國際電子股份有限公司達國際電子股份有限公司
High Tech Computer, Corp.High Tech Computer, Corp.High Tech Computer, Corp.High Tech Computer, Corp.
1. Introduction
� This manual provides the technical information to support the service activities of the pocket PC
phone - Artemis.
� This document contains highly confidential information, so any or all of this document should not be
revealed to any third party.
2. Product Features
Platform
- Slim GPS PDA Phone.
- Microsoft Windows Mobile 5 Pocket PC Phone Edition.
Processor/Chipset
- TI OMAP 850, 200 MHz.
Memory
- ROM: 128MB.
- RAM: 64MB.
LCD Module
- 2.8" 240 x 320 color TFT LCD.
- LED backlight.
- Sensitive Touch Screen.
GSM/GPRS/ EDGE Functional Block
- Internal antenna.
- GSM Quad-band: 850/900/1800/1900 MHz.
- EDGE/GPRS: class B, Multi-slot standard class 10.
GPS
- Internal GPS antenna.
- 20 parallel channel GPS receiver.
FM Radio
- Tuning range: 87.5 MHz ~ 108.5 MHz.
Wireless LAN
- WI-FI 802.11b/g.

Doc. No. DOC-00021050 REV.
Issued Date 2007/1/10
. Revised Date AX03
Doc. Title Artemis Service Manual Page 5 of 66
HTC CONFIDENTIAL
宏宏宏宏達國際電子股份有限公司達國際電子股份有限公司達國際電子股份有限公司達國際電子股份有限公司
High Tech Computer, Corp.High Tech Computer, Corp.High Tech Computer, Corp.High Tech Computer, Corp.
Device-to-Device Connectivity
- Bluetooth 2.0.
Digital Camera
- 2 mega-pixel CMOS image sensor.
Power
- Battery.
- Removable and chargeable battery, 1,250mAh.
- AC adaptor.
- AC input: 100 ~ 240V AC, 50/60 Hz.
Keyboard/Button/Switch
- Power Button.
- Volume up & down Button.
- Voice dialer /Voice recorder Button.
- Camera captures Button.
- 2 Soft-key Buttons.
- Send/Hands-free Button.
- End Button.
- Start Button.
- OK Button.
- GPS Button.
- Portal Button.
- 8-way track ball w/ action.
- Track wheel.
- Reset Switch.
Notification
- One bi-color LED for GSM network status, notification, and charging status.
- One Bi-color LEDs (Blue & Green) and One Orange-colored LED on in the second lens for WI-FI
(Green), Bluetooth (Blue), and GPS (Amble) status.
- Notification by LED, sound, message, and vibration.
Audio
- Microphone.
- Receiver.
- Loud speaker for Hands-free and GPS voice instruction support.

Doc. No. DOC-00021050 REV.
Issued Date 2007/1/10
. Revised Date AX03
Doc. Title Artemis Service Manual Page 6 of 66
HTC CONFIDENTIAL
宏宏宏宏達國際電子股份有限公司達國際電子股份有限公司達國際電子股份有限公司達國際電子股份有限公司
High Tech Computer, Corp.High Tech Computer, Corp.High Tech Computer, Corp.High Tech Computer, Corp.
Interface
- 3V SIM Card slot.
- Micro-SD Card slot.
- HTC Ext-USB (11-pin, mini-USB & audio jack in one).
- External Antenna Connector.
- External GPS Antenna Connector.
Stylus
- Lock type mechanism.
Hanger
Accessories
- Standard.
- AC adapter.
- USB Sync. Cable.
- Stereo wired headset with microphone and FM radio antenna support.
- Stylus.
- User manual, quick start guide & software CD.
- Option.
- Pouch.
- Mono Bluetooth headset.
- Stereo Bluetooth headset.
- Car adapter.
- Car holder.
Microsoft Windows Mobile 5.0 Pocket-PC Phone Applications
- Pocket Outlook.
- Calendar, Contacts, Messaging, Tasks, & Voice Notes.
- Direct-Push Mail.
- Internet Explorer Mobile.
- Office Mobile.
- Word, Excel, & PowerPoint Mobile.
- Windows Media Player 10 Mobile.
- Pictures & Videos.
- ActiveSync Client.
- Pocket MSN.

Doc. No. DOC-00021050 REV.
Issued Date 2007/1/10
. Revised Date AX03
Doc. Title Artemis Service Manual Page 7 of 66
HTC CONFIDENTIAL
宏宏宏宏達國際電子股份有限公司達國際電子股份有限公司達國際電子股份有限公司達國際電子股份有限公司
High Tech Computer, Corp.High Tech Computer, Corp.High Tech Computer, Corp.High Tech Computer, Corp.
- Modem Link.
- Device Management.
- OTA Provisioning.
- Terminal Service Client.
- Calculator.
- Games.
Value Added Applications
- Camera captures utility.
- Camcorder utility.
- H.263, MPEG4.
- WMP 10 DirectShow plug in to support playing more audio/video format.
- Audio Codec.
- MP3/ WMA / AMR/ AAC/ AAC+ (optional).
- Video Codec.
- MPEG4 / H.263 / Motion JPG.
- MMS Client.
- PDF Viewer.
- ZIP.
- SIM Manager.
- Comm. Manager.
- Voice Dial.
- Smart Dialing.
- OMA DRM v1.0.
- STK 99.
- Backup Tool.
- FM Radio Application.
- GPS navigation software [optional].

Doc. No. DOC-00021050 REV.
Issued Date 2007/1/10
. Revised Date AX03
Doc. Title Artemis Service Manual Page 8 of 66
HTC CONFIDENTIAL
宏宏宏宏達國際電子股份有限公司達國際電子股份有限公司達國際電子股份有限公司達國際電子股份有限公司
High Tech Computer, Corp.High Tech Computer, Corp.High Tech Computer, Corp.High Tech Computer, Corp.
3. Labeling Plan
3.1 Labels for device
3.1.1 Agency label-ARTE100 w/ WiFi
HTC P/N: 77H00400-00M
Size: 50.5 X 17.0 mm
HTC P/N Countries supported
Doc. No. DOC-00021050 REV.
Issued Date 2007/1/10
. Revised Date AX03
Doc. Title Artemis Service Manual Page 9 of 66
HTC CONFIDENTIAL
宏宏宏宏達國際電子股份有限公司達國際電子股份有限公司達國際電子股份有限公司達國際電子股份有限公司
High Tech Computer, Corp.High Tech Computer, Corp.High Tech Computer, Corp.High Tech Computer, Corp.
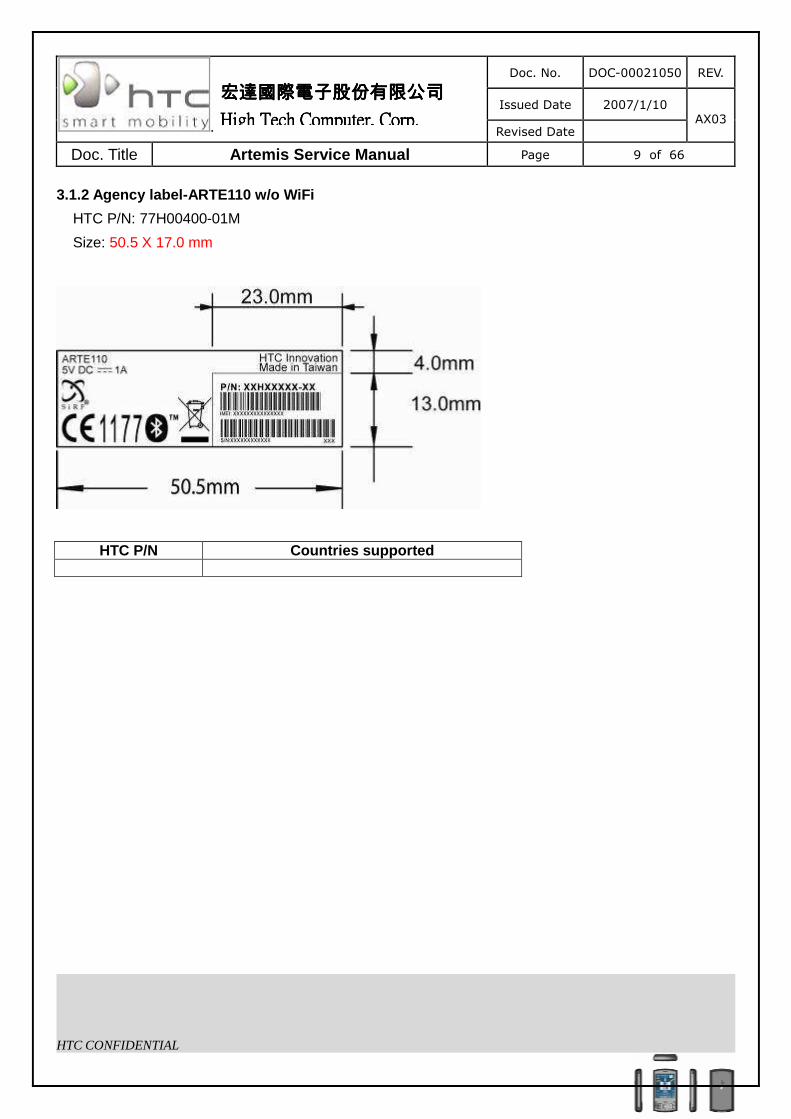
3.1.2 Agency label-ARTE110 w/o WiFi
HTC P/N: 77H00400-01M
Size: 50.5 X 17.0 mm
HTC P/N Countries supported

Doc. No. DOC-00021050 REV.
Issued Date 2007/1/10
. Revised Date AX03
Doc. Title Artemis Service Manual Page 10 of 66
HTC CONFIDENTIAL
宏宏宏宏達國際電子股份有限公司達國際電子股份有限公司達國際電子股份有限公司達國際電子股份有限公司
High Tech Computer, Corp.High Tech Computer, Corp.High Tech Computer, Corp.High Tech Computer, Corp.
3.2 main label locations Explanation
Tamper evident label
HTC PN: 77H00296-00M
Size: 5.68X6.9mm
Water sensitive label
HTC PN: 77H00203-00M
Size: 2.5X4mm

Doc. No. DOC-00021050 REV.
Issued Date 2007/1/10
. Revised Date AX03
Doc. Title Artemis Service Manual Page 11 of 66
HTC CONFIDENTIAL
宏宏宏宏達國際電子股份有限公司達國際電子股份有限公司達國際電子股份有限公司達國際電子股份有限公司
High Tech Computer, Corp.High Tech Computer, Corp.High Tech Computer, Corp.High Tech Computer, Corp.
3.3 Battery label
3.3.1 Battery label-Celxpert (WWE, CHT, Product of Taiwan)
HTC P/N: 35H00062-04M
3.3.2 Battery label-Celxpert (WWE, CHT, product of China)
HTC P/N: 35H00062-06M
3.3.3 Battery label-Celxpert (CHS, product of China)
HTC P/N: 35H00062-07M
Doc. No. DOC-00021050 REV.
Issued Date 2007/1/10
. Revised Date AX03
Doc. Title Artemis Service Manual Page 12 of 66
HTC CONFIDENTIAL
宏宏宏宏達國際電子股份有限公司達國際電子股份有限公司達國際電子股份有限公司達國際電子股份有限公司
High Tech Computer, Corp.High Tech Computer, Corp.High Tech Computer, Corp.High Tech Computer, Corp.
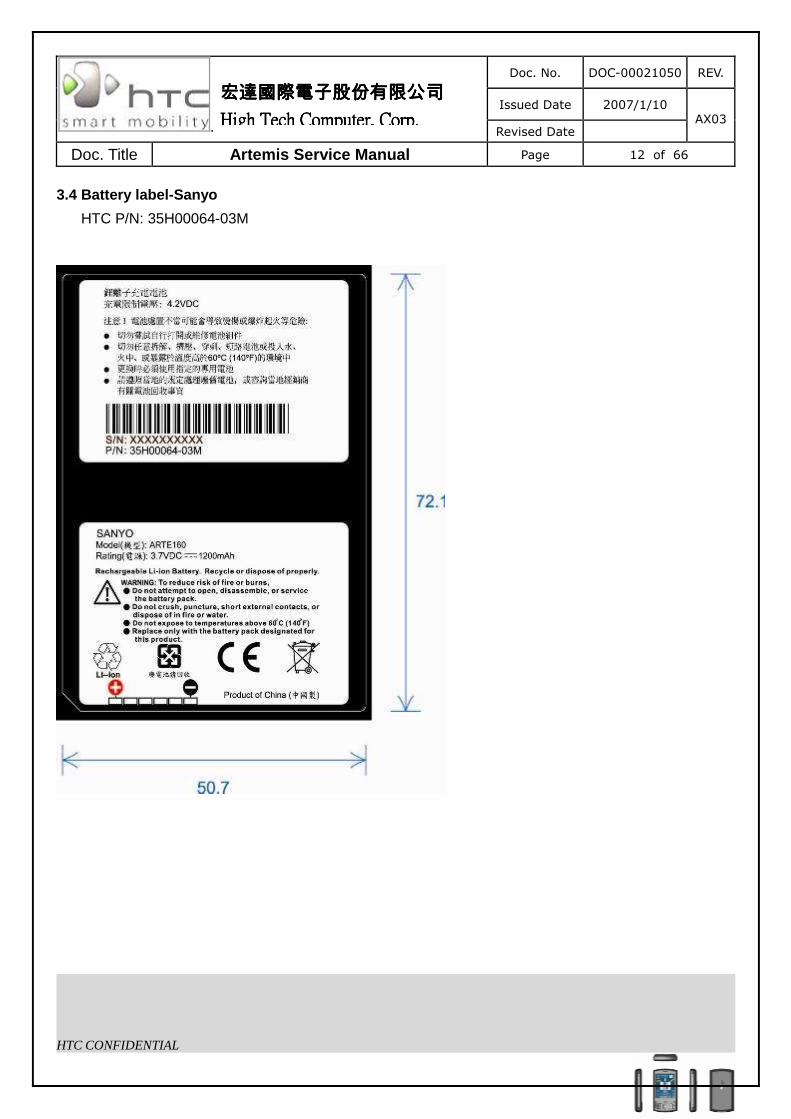
3.4 Battery label-Sanyo
HTC P/N: 35H00064-03M

Doc. No. DOC-00021050 REV.
Issued Date 2007/1/10
. Revised Date AX03
Doc. Title Artemis Service Manual Page 13 of 66
HTC CONFIDENTIAL
宏宏宏宏達國際電子股份有限公司達國際電子股份有限公司達國際電子股份有限公司達國際電子股份有限公司
High Tech Computer, Corp.High Tech Computer, Corp.High Tech Computer, Corp.High Tech Computer, Corp.
3.5 Battery label-Samsung
HTC P/N: 35H00075-01M

Doc. No. DOC-00021050 REV.
Issued Date 2007/1/10
. Revised Date AX03
Doc. Title Artemis Service Manual Page 14 of 66
HTC CONFIDENTIAL
宏宏宏宏達國際電子股份有限公司達國際電子股份有限公司達國際電子股份有限公司達國際電子股份有限公司
High Tech Computer, Corp.High Tech Computer, Corp.High Tech Computer, Corp.High Tech Computer, Corp.
4. Inspection Criteria
4.1 Definition of classes
4.1.1 Class A area => the front side of main unit involves all buttons, Wheel, Jog ball, and LED lens
except LCD.
4.1.2 Class C area => 4 sides and back views of main unit include side key *3, volume key, Camera and
stylus.
4.1.3 Class D area => Socket of battery, inner side of battery cover, Micro SD/SIM Connector and battery
connector.
Area A Area C Area D
4.2 Description
4.2.1 General inspective regulations and according SPEC refer to IS-3047 Generic Cosmetic Inspection
Criteria.
4.2.2 In the event of any inconsistencies between this document of IS-3455 and the Relationship
agreement, the parties agree that this document of IS-3455 shall prevail.
Doc. No. DOC-00021050 REV.
Issued Date 2007/1/10
. Revised Date AX03
Doc. Title Artemis Service Manual Page 15 of 66
HTC CONFIDENTIAL
宏宏宏宏達國際電子股份有限公司達國際電子股份有限公司達國際電子股份有限公司達國際電子股份有限公司
High Tech Computer, Corp.High Tech Computer, Corp.High Tech Computer, Corp.High Tech Computer, Corp.
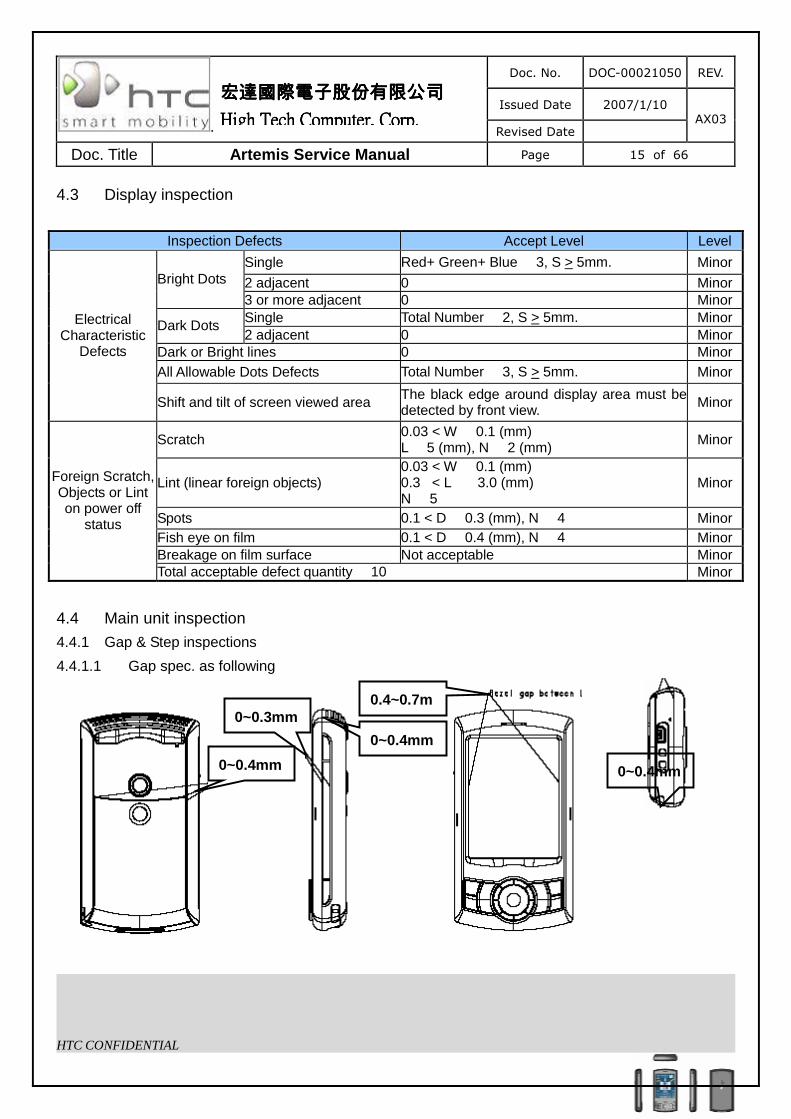
4.3 Display inspection
Inspection Defects Accept Level Level
Single Red+ Green+ Blue � 3, S > 5mm. Minor
2 adjacent 0 Minor Bright Dots
3 or more adjacent 0 Minor Single Total Number � 2, S > 5mm. Minor Dark Dots 2 adjacent 0 Minor
Dark or Bright lines 0 Minor All Allowable Dots Defects Total Number � 3, S > 5mm. Minor
Electrical Characteristic
Defects
Shift and tilt of screen viewed area The black edge around display area must be detected by front view. Minor
Scratch 0.03 < W � 0.1 (mm) L � 5 (mm), N � 2 (mm) Minor
Lint (linear foreign objects) 0.03 < W � 0.1 (mm) 0.3 < L � 3.0 (mm) N � 5
Minor
Spots 0.1 < D � 0.3 (mm), N � 4 Minor Fish eye on film 0.1 < D � 0.4 (mm), N � 4 Minor Breakage on film surface Not acceptable Minor
Foreign Scratch, Objects or Lint on power off
status
Total acceptable defect quantity � 10 Minor
4.4 Main unit inspection
4.4.1 Gap & Step inspections
4.4.1.1 Gap spec. as following
0~0.4mm
0~0.4mm
0~0.3mm 0.4~0.7m
0~0.4mm

Doc. No. DOC-00021050 REV.
Issued Date 2007/1/10
. Revised Date AX03
Doc. Title Artemis Service Manual Page 16 of 66
HTC CONFIDENTIAL
宏宏宏宏達國際電子股份有限公司達國際電子股份有限公司達國際電子股份有限公司達國際電子股份有限公司
High Tech Computer, Corp.High Tech Computer, Corp.High Tech Computer, Corp.High Tech Computer, Corp.
4.4.1.2 Step
Description Accept Criteria
1. Step between mating parts. Step < 0.3 mm
2. Others, refer to production release spec Others, refer to production release spec
4.4.2 Cosmetic inspection
4.4.2.1 Broken, come off and curved edges are unacceptable. The serious folded mark is not allowed
as photo attached, but allows two minor folded marks.
4.4.2.2 The inspective point of D area.
• Any marks generated by scratching, grinding or colliding are acceptable except base
material exposed.
• Not allow battery connector pin and SIM/Micro SD Conn. Deform. The hook of battery cover
also can’t allow broken and deform

Doc. No. DOC-00021050 REV.
Issued Date 2007/1/10
. Revised Date AX03
Doc. Title Artemis Service Manual Page 17 of 66
HTC CONFIDENTIAL
宏宏宏宏達國際電子股份有限公司達國際電子股份有限公司達國際電子股份有限公司達國際電子股份有限公司
High Tech Computer, Corp.High Tech Computer, Corp.High Tech Computer, Corp.High Tech Computer, Corp.
4.4.2.3 Others
Scratch
Description Accept Criteria
Class A Exposure of substrate do not accept
Scratch : L�4mm ,W�0.2mm ,N�2, S�10mm MI
Class B Exposure of substrate do not accept
Scratch : L�4mm ,W�0.25mm ,N�3, S�10mm MI
Class C Label area don’t care
Exposure of substrate do not accept Scratch : L�10mm ,W�0.4mm ,N�5, S�5mm
MI
Contamination dot/Granule dot/Cave granule
Description Accept Criteria
Class A D�0.5mm ,N�2,S �15 mm (Ignored if D D� 0.15mm) MI
Class B Total: D<0.6mm ,N�4,S �15 mm (Ignored if D D� 0.25mm) MI
Class C D<0.9mm ,N�4,S �10 mm MI
Burr
Description Accept Criteria
Burr. Don’t accept hand scrape MI
Imprint mark
Description Accept Criteria
Class A 0.25�diameter�0.65mm ,N�3 MI
Class B 0.65mm<Diameter�1.00mm,N�3 MI
Bright mark
Description Accept Criteria
Class A L�2.5mm,W�0.25mm,N�3 MI
Class B L�3.0mm,W�0.25mm,N�4 MI
Class C L�3.0mm,W�0.3mm,N�5 MI
Lint
Description Accept Criteria
Class A L�3mm , W�0.2mm ,N�2, S �5 mm MI
Class B L�5mm , W�0.3mm ,N�3, S �5 mm MI
Class C L�10mm , W�0.3 mm ,N�3 MI

Doc. No. DOC-00021050 REV.
Issued Date 2007/1/10
. Revised Date AX03
Doc. Title Artemis Service Manual Page 18 of 66
HTC CONFIDENTIAL
宏宏宏宏達國際電子股份有限公司達國際電子股份有限公司達國際電子股份有限公司達國際電子股份有限公司
High Tech Computer, Corp.High Tech Computer, Corp.High Tech Computer, Corp.High Tech Computer, Corp.
5. Product Overview
� Device
# Item Function
1 Voice command button Press to start Voice Speed Dial; press and hold to record a voice note.
2 Volume Slider • Slider up or down to adjust the speaker volume. • During a call, slider up or down to adjust the earpiece volume.
3 RESET button With the stylus, press RESET button to soft-reset your device.
4 Notification LED 1
The LED shows the following: • A blinking Blue light for Bluetooth system notification of powered-up and
ready to transmit radio frequency signal. • A blinking Green light for Wi-Fi status. • When both Bluetooth and Wi-Fi are enabled, their lights blink
alternately. • Amber light for GPS status.
5 Notification LED 2 The bi-color LED shows Green and Amber lights for GSM/GPRS/EDGE standby, message and network status as well as for notification and battery charging status.

Doc. No. DOC-00021050 REV.
Issued Date 2007/1/10
. Revised Date AX03
Doc. Title Artemis Service Manual Page 19 of 66
HTC CONFIDENTIAL
宏宏宏宏達國際電子股份有限公司達國際電子股份有限公司達國際電子股份有限公司達國際電子股份有限公司
High Tech Computer, Corp.High Tech Computer, Corp.High Tech Computer, Corp.High Tech Computer, Corp.
# Item Function
6 Touch Screen Tap the screen with the stylus to write, draw, or make a selection.
7 Left and Right soft keys Press to execute the command in the label above the button.
8 TALK button Press to answer an incoming call or dial a number.
9 GPS button Press to launch the GPS software.
10 START button Press to open the Start menu.
11 Track Wheel • Turn clockwise or counterclockwise to move through items on the
screen or in the menu. • When using the Camera or GPS software, using it for zooming.
12 Trackball
• Roll up, down, left, or right to move through menus and program instructions; carry out the selection by pressing the Trackball.
• When using the Camera, use it as the shutter release. • When using the GPS software, use it to move around a GPS map.
13 OK button Press to confirm your data entries, or to exit the program in use.
14 IE button Press to launch Internet Explorer Mobile.
15 END button Press to end a call or to return to the Today screen.
16 Strap Holder It lets you to attach a strap for carrying your device.
17 Microphone Speak into the microphone when receiving or making a phone call or voice recording.
18 Sync connector/ Earphone jack
• Use this connector to synchronize data by connecting the provided USB sync cable or to recharge the battery via the provided AC adapter.
• You can also connect the provided USB stereo handset for hands-free conversation or for listening FM radio and audio media. FM radio uses the stereo handset as an antenna.
19 POWER button
• Press to turn off the display temporarily. This switches your device to sleep mode. You can still receive call and message when your device is in Sleep mode.
• Press and hold (for about 5seconds) to turn off the power completely. All functions including the phone will be unavailable to use.
20 CAMERA button Press to launch the Camera; press again to take a photo or video clip, depending on the specified capture mode.
21 Stylus Use the stylus to write, draw, or select items on the touch screen.
22 Car Antenna Connector Connect your device to the car antenna while in a car to have better reception quality.
23 GPS Antenna Connector If you need better GPS signal reception, you can connect an external GPS antenna.
24 Camera Use the camera to take still photos and record video clips.
25 Self-Portrait Mirror Turn the back side of your device to face your self so that your image reflects on the mirror when taking self-portrait shots.
26 Battery Cover Slider out to access the battery compartment.

Doc. No. DOC-00021050 REV.
Issued Date 2007/1/10
. Revised Date AX03
Doc. Title Artemis Service Manual Page 20 of 66
HTC CONFIDENTIAL
宏宏宏宏達國際電子股份有限公司達國際電子股份有限公司達國際電子股份有限公司達國際電子股份有限公司
High Tech Computer, Corp.High Tech Computer, Corp.High Tech Computer, Corp.High Tech Computer, Corp.
� Accessories
# Item Function
1 AC adapter Converts AC to DC for recharging the battery.
2 USB Sync cable Connects your device to a PC and synchronize data.
3 Stereo handset
• Provide a volume control slider and a Send/End button. Press a Send/End button to pick up a call or put a call on hold; press and hold the button to end the call.
• Make sure you connect this handset when using the FM radio since its uses the handset as an antenna.
4 Car adapter Use it to charge the battery on your device while you are in traveling in a car. Plug it to the sync connector of your device and to the car’s cigarette lighter socket.
5 Car holder
Use it to mount your device in a car. Press the suction pedestal on the car’s windshield, and push the lever to securely attach the holder. The sit your device in the holder, and press both sides of the holder inward to secure the grip.

Doc. No. DOC-00021050 REV.
Issued Date 2007/1/10
. Revised Date AX03
Doc. Title Artemis Service Manual Page 21 of 66
HTC CONFIDENTIAL
宏宏宏宏達國際電子股份有限公司達國際電子股份有限公司達國際電子股份有限公司達國際電子股份有限公司
High Tech Computer, Corp.High Tech Computer, Corp.High Tech Computer, Corp.High Tech Computer, Corp.
6. Unit Assembly/Disassembly Procedure
Assembly Procedure
• Stick the EMI Gaskets on M/B. • Assemble 2 Rubbers of Microphone and
Reset button on M/B.
M/B: 51H00355-00M/Q’ty:1. [Option]. EMI Gasket: 72H01655-00M/Q’ty:1 Rubber-1 (MIC): 76H01495-00M/Q’ty:1. Rubber-2 (RST button): 76H01516-00M/Q’ty:1.
• Stick Trackball Mylar on the Rigid-Flex
Board. Rigid-Flex Board: 51H10046-00M/Q’ty:1.
Rigid-Flex Board
Trackball Mylar
EMI Gasket Rubber-2
Rubber-1

Doc. No. DOC-00021050 REV.
Issued Date 2007/1/10
. Revised Date AX03
Doc. Title Artemis Service Manual Page 22 of 66
HTC CONFIDENTIAL
宏宏宏宏達國際電子股份有限公司達國際電子股份有限公司達國際電子股份有限公司達國際電子股份有限公司
High Tech Computer, Corp.High Tech Computer, Corp.High Tech Computer, Corp.High Tech Computer, Corp.
• Stick 2 Adhesive-Double Tapes on
Rigid-Flex Board. Rigid-Flex Board: 51H10046-00M/Q’ty:1. Adhesive-Double Tape-1: 76H01520-00M/Q’ty:1. Adhesive-Double Tape-2: 76H01525-00M/Q’ty:1.
• Remove the white-film from adhesive-double
tape and stick the trackball switch board on Rigid-Flex Board.
• Assemble Jog-ball to Jog-ball holder.
Jog-ball: 36H00375-00M/Q’ty:1. Jog-ball holder: 72H01635-00M/Q’ty:1.
• Assemble the Jog-ball to Rigid-Flex Board. • Please 100% ensure that the hooks of the
Jog-ball holder are hooking the PCB’s through hold tightly.
Adhesive-Double Tape-1
Adhesive-Double Tape-2
Jog-ball holder Jog-ball
Top View
Bottom View
Trackball switch board

Doc. No. DOC-00021050 REV.
Issued Date 2007/1/10
. Revised Date AX03
Doc. Title Artemis Service Manual Page 23 of 66
HTC CONFIDENTIAL
宏宏宏宏達國際電子股份有限公司達國際電子股份有限公司達國際電子股份有限公司達國際電子股份有限公司
High Tech Computer, Corp.High Tech Computer, Corp.High Tech Computer, Corp.High Tech Computer, Corp.
• Remove the white-film from Receiver and
stick on the Chassis. Receiver: 36H00233-00M/Q’ty:1. Chassis: 74H00720-00M/Q’ty:1.
• Fix the Rigid-Flex Board on Chassis via 2
stand-off pin of the Chassis. • Screw up the Rigid-Flex Board on Chassis. • Stick the LCD Sponge on Chassis.
LCD Sponge: 76H01522-00M/Q’ty:1. Screw: 72H01671-00M/Q’ty:2.
• Insert the FPC of Rigid-Flex Board through
into another side of the Chassis. • Assemble Rigid-Flex FPC to M/B.
Receiver
Chassis
Stand-off pin
LCD sponge

Doc. No. DOC-00021050 REV.
Issued Date 2007/1/10
. Revised Date AX03
Doc. Title Artemis Service Manual Page 24 of 66
HTC CONFIDENTIAL
宏宏宏宏達國際電子股份有限公司達國際電子股份有限公司達國際電子股份有限公司達國際電子股份有限公司
High Tech Computer, Corp.High Tech Computer, Corp.High Tech Computer, Corp.High Tech Computer, Corp.
• Assemble the M/B on the Chassis. • Screw up the M/B on the Chassis. • Visual inspect the Rubbers of Reset button
and Microphone to ensure in right position.
Screw: 72H01671-00M/Q’ty:3.
• Assemble the LCD Module to the Chassis,
and insert the LCD FPC through into the Chassis and connect to M/B properly.
LCD Module: 60H00070-00M/Q’ty:1.
• Stick the Rubber on the Rigid-Flex board. • Assemble the Jog-ball support cover to
Rigid-Flex board.
Rubber: 76H01524-00M/Q’ty:1. Jog-ball support cover: 74H00715-00M/Q’ty:1.
Top View Bottom View
LCD Module
Rubber
Jog-ball support cover

Doc. No. DOC-00021050 REV.
Issued Date 2007/1/10
. Revised Date AX03
Doc. Title Artemis Service Manual Page 25 of 66
HTC CONFIDENTIAL
宏宏宏宏達國際電子股份有限公司達國際電子股份有限公司達國際電子股份有限公司達國際電子股份有限公司
High Tech Computer, Corp.High Tech Computer, Corp.High Tech Computer, Corp.High Tech Computer, Corp.
• Assemble the Keypad on the Bezel; please
100% make sure that the hooks of the Bezel are hooking the Keypad properly.
Keypad: 74H00713-00P/Q’ty:1. Bezel: 74H00719-00M/Q’ty:1 [Option].
• Assemble the M/B to the Bezel, and insert the
edge of the Receiver frame of the Chassis into the Bezel properly.
• Stick Camera spacer to M/B. Camera spacer: 76H01556-00M/Q’ty:1. Camera Module: 54H00187-00P/Q’ty:1.
Keypad
Bezel
Camera Module

Doc. No. DOC-00021050 REV.
Issued Date 2007/1/10
. Revised Date AX03
Doc. Title Artemis Service Manual Page 26 of 66
HTC CONFIDENTIAL
宏宏宏宏達國際電子股份有限公司達國際電子股份有限公司達國際電子股份有限公司達國際電子股份有限公司
High Tech Computer, Corp.High Tech Computer, Corp.High Tech Computer, Corp.High Tech Computer, Corp.
• Assemble Camera module to M/B. • Stick Camera Mylar to M/B.
Camera Mylar: 76H01559-00M/Q’ty:1.
• Stick the Mylar on M/B. Mylar: 76H01498-00M/Q’ty:1.
• Assemble the Vibrator and Speaker to the
Housing properly. Vibrator: 36H00180-00M/Q’ty:1. Speaker: 36H00420-00M/Q’ty:1. Housing: 74H00723-00M/Q’ty:1.
Mylar
Vibrator
Speaker

Doc. No. DOC-00021050 REV.
Issued Date 2007/1/10
. Revised Date AX03
Doc. Title Artemis Service Manual Page 27 of 66
HTC CONFIDENTIAL
宏宏宏宏達國際電子股份有限公司達國際電子股份有限公司達國際電子股份有限公司達國際電子股份有限公司
High Tech Computer, Corp.High Tech Computer, Corp.High Tech Computer, Corp.High Tech Computer, Corp.
• Assemble the Housing to M/B properly. • Screw up the Housing to M/B.
Screw: 72H00951-00M/Q’ty:4.
• Assemble Antenna Cover to Housing. Antenna Cover: 74H00721-00M/Q’ty:1.
• Assemble the Battery and Battery Cover. • Insert the Stylus to device properly.
Battery: 35H00062-04M/Q’ty:1. Battery Cover: 74H00722-00M/Q’ty:1 [Option]. Stylus: 74H00712-00M/Q’ty:1.
Antenna Cover
Battery Battery Cover
Stylus

Doc. No. DOC-00021050 REV.
Issued Date 2007/1/10
. Revised Date AX03
Doc. Title Artemis Service Manual Page 28 of 66
HTC CONFIDENTIAL
宏宏宏宏達國際電子股份有限公司達國際電子股份有限公司達國際電子股份有限公司達國際電子股份有限公司
High Tech Computer, Corp.High Tech Computer, Corp.High Tech Computer, Corp.High Tech Computer, Corp.
Disassembly Procedure
Open battery cover and take off the battery
Insert a plastic stick into the beside the camera lens to unlock the antenna cover
Unfasten 4 screws on the main unit
Doc. No. DOC-00021050 REV.
Issued Date 2007/1/10
. Revised Date AX03
Doc. Title Artemis Service Manual Page 29 of 66
HTC CONFIDENTIAL
宏宏宏宏達國際電子股份有限公司達國際電子股份有限公司達國際電子股份有限公司達國際電子股份有限公司
High Tech Computer, Corp.High Tech Computer, Corp.High Tech Computer, Corp.High Tech Computer, Corp.
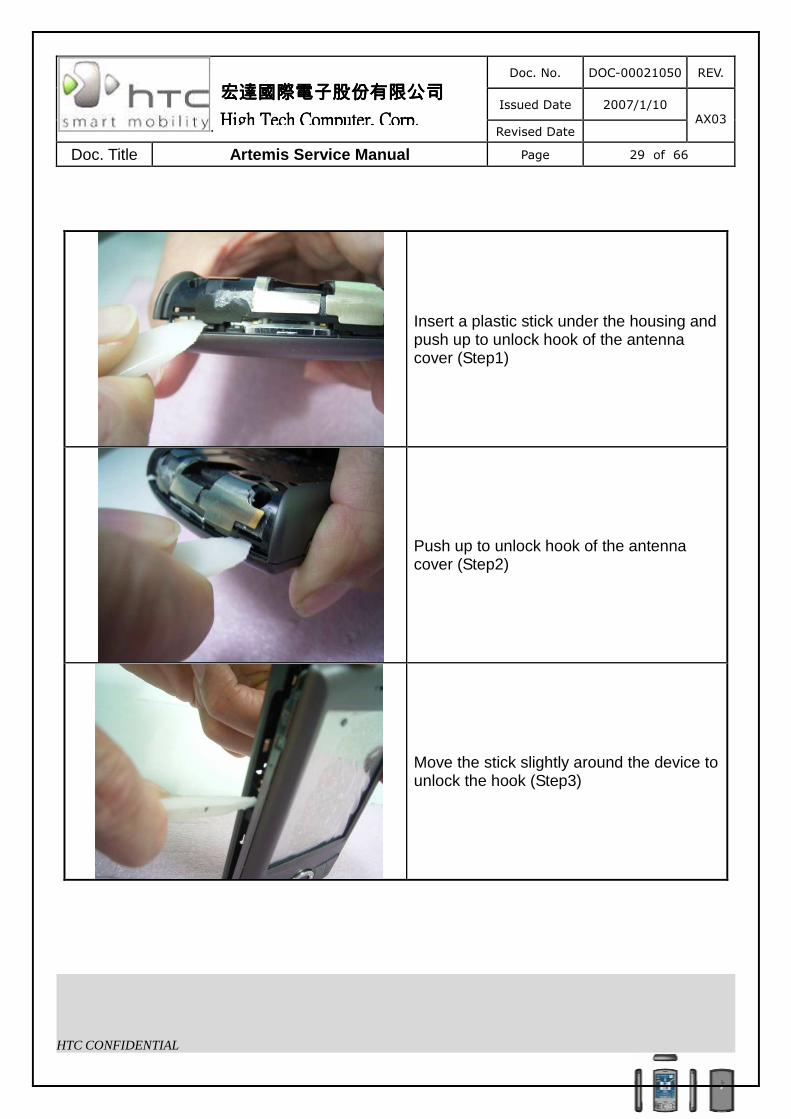
Insert a plastic stick under the housing and push up to unlock hook of the antenna cover (Step1)
Push up to unlock hook of the antenna cover (Step2)
Move the stick slightly around the device to unlock the hook (Step3)

Doc. No. DOC-00021050 REV.
Issued Date 2007/1/10
. Revised Date AX03
Doc. Title Artemis Service Manual Page 30 of 66
HTC CONFIDENTIAL
宏宏宏宏達國際電子股份有限公司達國際電子股份有限公司達國際電子股份有限公司達國際電子股份有限公司
High Tech Computer, Corp.High Tech Computer, Corp.High Tech Computer, Corp.High Tech Computer, Corp.
Move the stick slightly around the device to unlock the hook (Step4)
Move the stick slightly around the device to unlock the hook (Step5)
Separate main board and housing

Doc. No. DOC-00021050 REV.
Issued Date 2007/1/10
. Revised Date AX03
Doc. Title Artemis Service Manual Page 31 of 66
HTC CONFIDENTIAL
宏宏宏宏達國際電子股份有限公司達國際電子股份有限公司達國際電子股份有限公司達國際電子股份有限公司
High Tech Computer, Corp.High Tech Computer, Corp.High Tech Computer, Corp.High Tech Computer, Corp.
Insert a plastic stick into space between chassis and bezel to unlock chassis and bezel
Separate chassis ad bezel
Open LCM FPC gate and pull off the LCM FPC

Doc. No. DOC-00021050 REV.
Issued Date 2007/1/10
. Revised Date AX03
Doc. Title Artemis Service Manual Page 32 of 66
HTC CONFIDENTIAL
宏宏宏宏達國際電子股份有限公司達國際電子股份有限公司達國際電子股份有限公司達國際電子股份有限公司
High Tech Computer, Corp.High Tech Computer, Corp.High Tech Computer, Corp.High Tech Computer, Corp.
Peel off the LCM from the chassis
Unfasten 3 screws on the main board
Open the switch board FPC gate and pull off the switch board FPC to separate the chassis and main board
Doc. No. DOC-00021050 REV.
Issued Date 2007/1/10
. Revised Date AX03
Doc. Title Artemis Service Manual Page 33 of 66
HTC CONFIDENTIAL
宏宏宏宏達國際電子股份有限公司達國際電子股份有限公司達國際電子股份有限公司達國際電子股份有限公司
High Tech Computer, Corp.High Tech Computer, Corp.High Tech Computer, Corp.High Tech Computer, Corp.
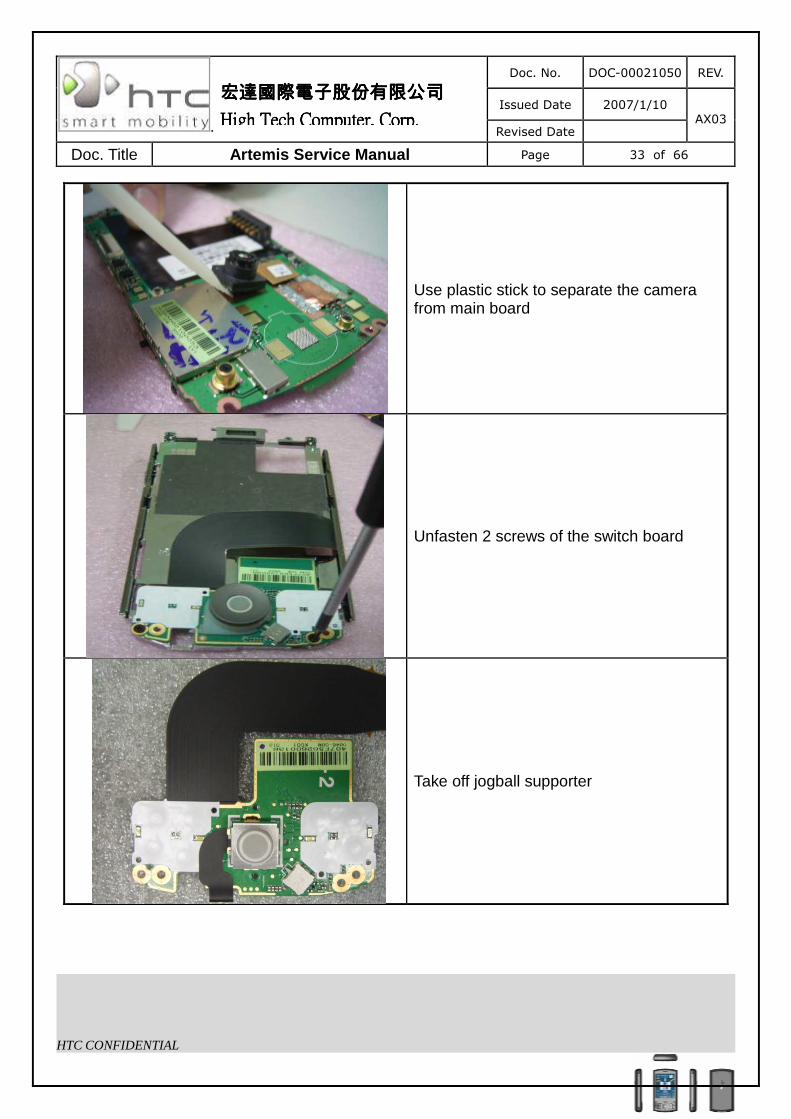
Use plastic stick to separate the camera from main board
Unfasten 2 screws of the switch board
Take off jogball supporter

Doc. No. DOC-00021050 REV.
Issued Date 2007/1/10
. Revised Date AX03
Doc. Title Artemis Service Manual Page 34 of 66
HTC CONFIDENTIAL
宏宏宏宏達國際電子股份有限公司達國際電子股份有限公司達國際電子股份有限公司達國際電子股份有限公司
High Tech Computer, Corp.High Tech Computer, Corp.High Tech Computer, Corp.High Tech Computer, Corp.
Take off jogball holder from the switch board
Use a plastic stick to push speaker out of the housing to separate
Remove vibrator from the housing

Doc. No. DOC-00021050 REV.
Issued Date 2007/1/10
. Revised Date AX03
Doc. Title Artemis Service Manual Page 35 of 66
HTC CONFIDENTIAL
宏宏宏宏達國際電子股份有限公司達國際電子股份有限公司達國際電子股份有限公司達國際電子股份有限公司
High Tech Computer, Corp.High Tech Computer, Corp.High Tech Computer, Corp.High Tech Computer, Corp.
Pull hook of the bezel and push the keypad out of the bezel
Doc. No. DOC-00021050 REV.
Issued Date 2007/1/10
. Revised Date AX03
Doc. Title Artemis Service Manual Page 36 of 66
HTC CONFIDENTIAL
宏宏宏宏達國際電子股份有限公司達國際電子股份有限公司達國際電子股份有限公司達國際電子股份有限公司
High Tech Computer, Corp.High Tech Computer, Corp.High Tech Computer, Corp.High Tech Computer, Corp.
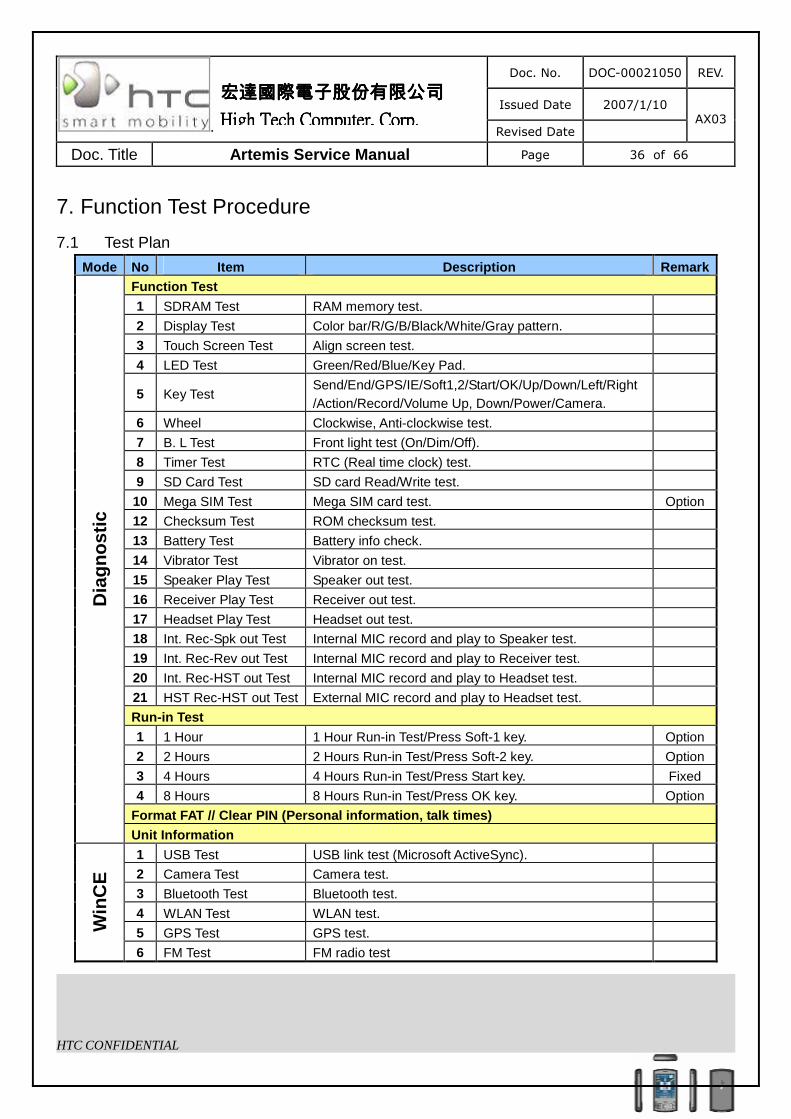
7. Function Test Procedure
7.1 Test Plan
Mode No Item Description Remark Function Test 1 SDRAM Test RAM memory test. 2 Display Test Color bar/R/G/B/Black/White/Gray pattern. 3 Touch Screen Test Align screen test.
4 LED Test Green/Red/Blue/Key Pad.
5 Key Test Send/End/GPS/IE/Soft1,2/Start/OK/Up/Down/Left/Right /Action/Record/Volume Up, Down/Power/Camera.
6 Wheel Clockwise, Anti-clockwise test. 7 B. L Test Front light test (On/Dim/Off). 8 Timer Test RTC (Real time clock) test. 9 SD Card Test SD card Read/Write test. 10 Mega SIM Test Mega SIM card test. Option
12 Checksum Test ROM checksum test. 13 Battery Test Battery info check. 14 Vibrator Test Vibrator on test. 15 Speaker Play Test Speaker out test. 16 Receiver Play Test Receiver out test. 17 Headset Play Test Headset out test. 18 Int. Rec-Spk out Test Internal MIC record and play to Speaker test. 19 Int. Rec-Rev out Test Internal MIC record and play to Receiver test. 20 Int. Rec-HST out Test Internal MIC record and play to Headset test. 21 HST Rec-HST out Test External MIC record and play to Headset test. Run-in Test 1 1 Hour 1 Hour Run-in Test/Press Soft-1 key. Option
2 2 Hours 2 Hours Run-in Test/Press Soft-2 key. Option
3 4 Hours 4 Hours Run-in Test/Press Start key. Fixed
4 8 Hours 8 Hours Run-in Test/Press OK key. Option
Format FAT // Clear PIN (Personal information, talk times)
Dia
gn
ost
ic
Unit Information 1 USB Test USB link test (Microsoft ActiveSync). 2 Camera Test Camera test. 3 Bluetooth Test Bluetooth test. 4 WLAN Test WLAN test. 5 GPS Test GPS test. W
inC
E
6 FM Test FM radio test

Doc. No. DOC-00021050 REV.
Issued Date 2007/1/10
. Revised Date AX03
Doc. Title Artemis Service Manual Page 37 of 66
HTC CONFIDENTIAL
宏宏宏宏達國際電子股份有限公司達國際電子股份有限公司達國際電子股份有限公司達國際電子股份有限公司
High Tech Computer, Corp.High Tech Computer, Corp.High Tech Computer, Corp.High Tech Computer, Corp.
7.2 Test Procedure 7.2.1 Diagnostic Test
Main Menu/Function Test Menu
I. Turn the device power off and insert
Diagnostic SD card.
II. Press and hold Power + Record
button, including Reset button, and
then enter Diagnostic mode.
III. Using Jog-ball to select the test item
and move to next page as well.
IV. Select item “Function Test” to find
the Function test menu.
SDRAM Test
I. Press Action key (Jog-ball) to select
SDRAM Test on Function test menu.
II. The program will test SDRAM block
automatically.
III. The screen will return to Function
test menu after the test is finished.
Display Test (Color bar and RED pattern)
I. Press Action key (Jog-ball) to select
Display Test on Function test menu.
II. After the test pattern is show up,
please check the pattern if any
un-uniform color or chromatist. III. Press Action key (Jog-ball) to go
next test pattern.

Doc. No. DOC-00021050 REV.
Issued Date 2007/1/10
. Revised Date AX03
Doc. Title Artemis Service Manual Page 38 of 66
HTC CONFIDENTIAL
宏宏宏宏達國際電子股份有限公司達國際電子股份有限公司達國際電子股份有限公司達國際電子股份有限公司
High Tech Computer, Corp.High Tech Computer, Corp.High Tech Computer, Corp.High Tech Computer, Corp.
Display Test (GREEN/BLUE pattern)
V. Press Action key (Jog-ball) to go
next test pattern.
Display Test (BLACK/WHITE pattern)
VI. Press Action key (Jog-ball) to go
next test pattern.
Display Test (Crabwise/Straight lines pattern)
VII. Press Action key (Jog-ball) to exit
and return to Function test menu.

Doc. No. DOC-00021050 REV.
Issued Date 2007/1/10
. Revised Date AX03
Doc. Title Artemis Service Manual Page 39 of 66
HTC CONFIDENTIAL
宏宏宏宏達國際電子股份有限公司達國際電子股份有限公司達國際電子股份有限公司達國際電子股份有限公司
High Tech Computer, Corp.High Tech Computer, Corp.High Tech Computer, Corp.High Tech Computer, Corp.
Touch Screen Test
I. Press Action key (Jog-ball) to select
Touch Screen Test on Function test
menu. II. Using Stylus to tap and follow the
symbol “+” at Center, Up-left,
Down-left, Down-right position of the
screen to perform the test. III. The screen will return to Function
test menu after the test is finished.
LED Test
I. Press Action key (Jog-ball) to select
LED Test on Function test menu. II. Press Action key (Jog-ball) and
follow the instruction on screen to
perform the LED inspection test
(Green, Red, Blue, WLAN, GPS, and
Keypad). III. Press Action key (Jog-ball) to exit
and return to Function test menu.
Key Test
I. Press Action key (Jog-ball) to select
Key Test on Function test menu. II. Follow the instruction on screen to
perform the Key/Button test (Send,
End, GPS, IE, Soft1/2, Start, OK,
Up/Down/Left/Right, Action, Record,
Volume Up/Down, Power, and
Camera). III. The screen will return to Function
test menu after the test is finished.

Doc. No. DOC-00021050 REV.
Issued Date 2007/1/10
. Revised Date AX03
Doc. Title Artemis Service Manual Page 40 of 66
HTC CONFIDENTIAL
宏宏宏宏達國際電子股份有限公司達國際電子股份有限公司達國際電子股份有限公司達國際電子股份有限公司
High Tech Computer, Corp.High Tech Computer, Corp.High Tech Computer, Corp.High Tech Computer, Corp.
Wheel Test
I. Press Action key (Jog-ball) to select
Wheel Test on Function test menu. II. Wheeled the dial scale clockwise
from scale1 to 10 to check the acting
area is functional. III. Wheeled the dial scale anti
clockwise from scale1 to 10 to check
the acting area is functional. IV. The screen will return to Function
test menu after the test is finished.
LCD Back Light Test
I. Press Action key (Jog-ball) to select
B.L Test on Function test menu. II. Press Action key (Jog-ball) to switch
the LCD backlight level from Super
(100%) -> Typical (75%) -> High
(50%) -> Low (25%) -> Off (0%). III. Press Action key (Jog-ball) to exit
and return to Function test menu.
Timer (RTC) Test
I. Press Action key (Jog-ball) to select
Timer Test on Function test menu. II. The screen will return to Function
test menu after the test is finished.

Doc. No. DOC-00021050 REV.
Issued Date 2007/1/10
. Revised Date AX03
Doc. Title Artemis Service Manual Page 41 of 66
HTC CONFIDENTIAL
宏宏宏宏達國際電子股份有限公司達國際電子股份有限公司達國際電子股份有限公司達國際電子股份有限公司
High Tech Computer, Corp.High Tech Computer, Corp.High Tech Computer, Corp.High Tech Computer, Corp.
SD Card Test
I. Press Action key (Jog-ball) to select
SD Card Test on Function test menu. II. The screen will return to Function
test menu after the test is finished.
Mega SIM Test (Option by Model)
I. Please inset Mega SIM card to the
device before test.
II. Press Action key (Jog-ball) to select
Mega SIM Test on Function test
menu.
III. The screen will return to Function
test menu after the test is finished.
ROM Checksum Inspection
I. Press Action key (Jog-ball) to select
ROM Checksum Inspection on
Function test menu. II. Press Action key (Jog-ball) to exit
and return to Function test menu.
Doc. No. DOC-00021050 REV.
Issued Date 2007/1/10
. Revised Date AX03
Doc. Title Artemis Service Manual Page 42 of 66
HTC CONFIDENTIAL
宏宏宏宏達國際電子股份有限公司達國際電子股份有限公司達國際電子股份有限公司達國際電子股份有限公司
High Tech Computer, Corp.High Tech Computer, Corp.High Tech Computer, Corp.High Tech Computer, Corp.
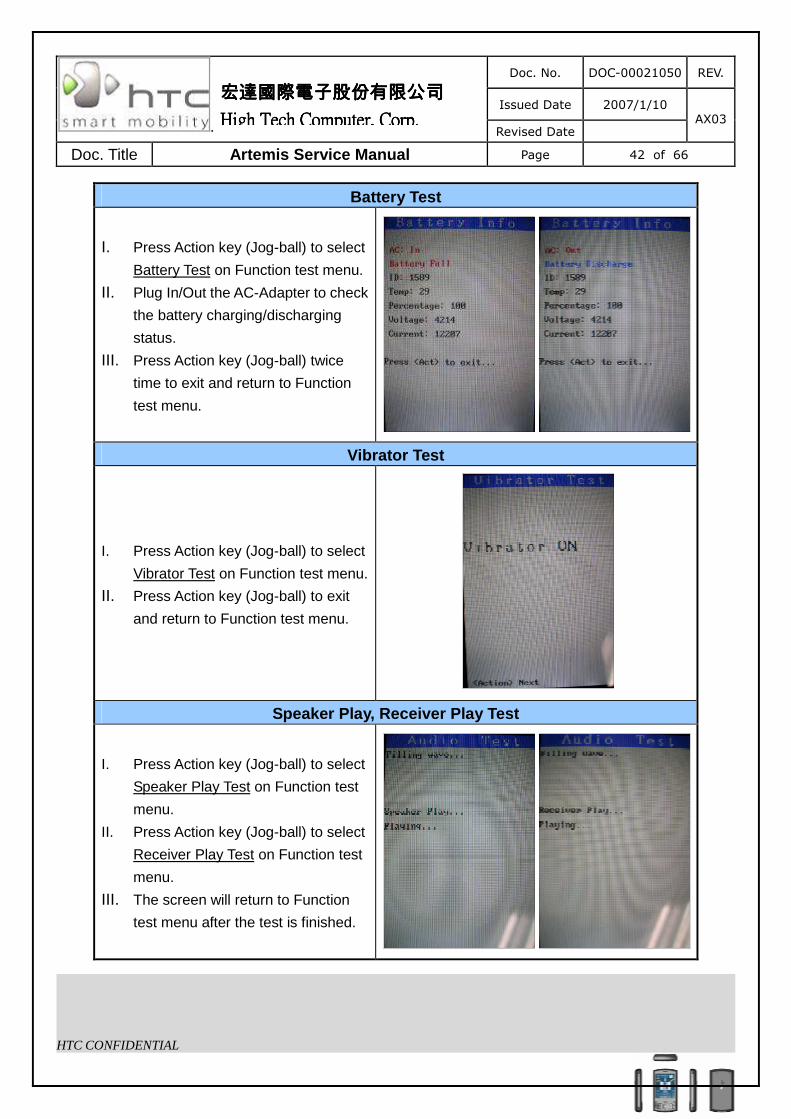
Battery Test
I. Press Action key (Jog-ball) to select
Battery Test on Function test menu. II. Plug In/Out the AC-Adapter to check
the battery charging/discharging
status. III. Press Action key (Jog-ball) twice
time to exit and return to Function
test menu.
Vibrator Test
I. Press Action key (Jog-ball) to select
Vibrator Test on Function test menu.
II. Press Action key (Jog-ball) to exit
and return to Function test menu.
Speaker Play, Receiver Play Test
I. Press Action key (Jog-ball) to select
Speaker Play Test on Function test
menu.
II. Press Action key (Jog-ball) to select
Receiver Play Test on Function test
menu.
III. The screen will return to Function
test menu after the test is finished.

Doc. No. DOC-00021050 REV.
Issued Date 2007/1/10
. Revised Date AX03
Doc. Title Artemis Service Manual Page 43 of 66
HTC CONFIDENTIAL
宏宏宏宏達國際電子股份有限公司達國際電子股份有限公司達國際電子股份有限公司達國際電子股份有限公司
High Tech Computer, Corp.High Tech Computer, Corp.High Tech Computer, Corp.High Tech Computer, Corp.
Headset Play Test
I. Press Action key (Jog-ball) to select
Headset Play Test on Function test
menu.
II. Insert Headset and hear the sound
from device.
III. The screen will return to Function
test menu after the test is finished.
Internal Record Speaker Out Test
I. Press Action key (Jog-ball) to select
Internal Record Speaker Out Test on
Function test menu.
II. Press Action key (Jog-ball) to record
the sound.
III. Check the voice quality after the
sound playback from speaker.
IV. The screen will return to Function
test menu after the test is finished.
Internal Record Receiver Out Test
I. Press Action key (Jog-ball) to select
Internal Record Receiver Out Test
on Function test menu.
II. Press Action key (Jog-ball) to record
the sound.
III. Check the voice quality after the
sound playback from receiver.
IV. The screen will return to Function
test menu after the test is finished.

Doc. No. DOC-00021050 REV.
Issued Date 2007/1/10
. Revised Date AX03
Doc. Title Artemis Service Manual Page 44 of 66
HTC CONFIDENTIAL
宏宏宏宏達國際電子股份有限公司達國際電子股份有限公司達國際電子股份有限公司達國際電子股份有限公司
High Tech Computer, Corp.High Tech Computer, Corp.High Tech Computer, Corp.High Tech Computer, Corp.
Internal Record Headset Out Test
I. Press Action key (Jog-ball) to select
Internal Record Headset Out Test on
Function test menu.
II. Press Action key (Jog-ball) to record
the sound.
III. Inset headset and check the voice
quality when the sound playback
from device.
IV. The screen will return to Function
test menu after the test is finished.
Headset Record Headset Out Test
I. Press Action key (Jog-ball) to select
Headset Record Headset Out Test
on Function test menu.
II. Insert headset and press Action key
(Jog-ball) to record the sound.
III. Check the voice quality after the
sound playback from device.
IV. The screen will return to Function
test menu after the test is finished.
Run-In Test
I. Return to Main Menu and press
Action key (Jog-ball) to select Run In
Test.
II. Insert AC-adapter and press Start
key to setup Run-In hour to 4.
III. The program will perform cycling test
(Vibrator, SDRAM, LED, Display, BL,
Timer, and Audio) within 4 hours.

Doc. No. DOC-00021050 REV.
Issued Date 2007/1/10
. Revised Date AX03
Doc. Title Artemis Service Manual Page 45 of 66
HTC CONFIDENTIAL
宏宏宏宏達國際電子股份有限公司達國際電子股份有限公司達國際電子股份有限公司達國際電子股份有限公司
High Tech Computer, Corp.High Tech Computer, Corp.High Tech Computer, Corp.High Tech Computer, Corp.
Format FAT // Clear PIN (Personal information, talk times)
I. Return to Main Menu and press
Action key (Jog-ball) to select
Format FAT.
II. The screen will return to Function
test menu after the test is finished.
Unit Information
I. Return to Main Menu and press
Action key (Jog-ball) to select Unit
Information.
II. Press Action key (Jog-ball) to exit
and return to Main menu.

Doc. No. DOC-00021050 REV.
Issued Date 2007/1/10
. Revised Date AX03
Doc. Title Artemis Service Manual Page 46 of 66
HTC CONFIDENTIAL
宏宏宏宏達國際電子股份有限公司達國際電子股份有限公司達國際電子股份有限公司達國際電子股份有限公司
High Tech Computer, Corp.High Tech Computer, Corp.High Tech Computer, Corp.High Tech Computer, Corp.
7.2.2 WinCE Test
USB Test
I. Start up the Microsoft ActiveSyncprogram in the PC.
II. Insert USB cable and connect unit to
desktop/ or laptop.
III. The USB to PC icon -> is
appears on the Today screen when
your device is connected to your
desktop/ or laptop.
Camera Test
I. Tap Start->Program->Camera or
Press Camera button to turn on the
Camera.
II. Make sure the device will present
and enter the preview display.
III. Check camera pre-view and image
quality.
Bluetooth Test - 1
I. Tap icon Comm Manager on the
Today screen and turn on Bluetooth. II. Tap the icon “Settings” down-right
the corner of the screen and select
the “Make this device….” Checkbox. III. Press Action key (Jog-ball) to go
next test pattern.

Doc. No. DOC-00021050 REV.
Issued Date 2007/1/10
. Revised Date AX03
Doc. Title Artemis Service Manual Page 47 of 66
HTC CONFIDENTIAL
宏宏宏宏達國際電子股份有限公司達國際電子股份有限公司達國際電子股份有限公司達國際電子股份有限公司
High Tech Computer, Corp.High Tech Computer, Corp.High Tech Computer, Corp.High Tech Computer, Corp.
Bluetooth Test - 2
V. Tap Start->Settings->Connections->
Beam and select “Receive all….”
Checkbox.
VI. To create a file, tap Start->Programs
->Notes->New.
VII. Tap and select the “Beam file…”
Bluetooth Test - 3
VIII. Once device is searched, tap the
device to send the file.
IX. Return to Today screen and tap
Start->Program->Comm Manager
->Bluetooth to turn off Bluetooth.
WLAN Test
I. Tap icon Comm Manager on the
Today screen and turn on WLAN.
II. Select the hot-spot/ or access point
which searchable and appears on
screen.
III. Once the hot-spot (access point) is
connected, press the IE button and
logon Internet.

Doc. No. DOC-00021050 REV.
Issued Date 2007/1/10
. Revised Date AX03
Doc. Title Artemis Service Manual Page 48 of 66
HTC CONFIDENTIAL
宏宏宏宏達國際電子股份有限公司達國際電子股份有限公司達國際電子股份有限公司達國際電子股份有限公司
High Tech Computer, Corp.High Tech Computer, Corp.High Tech Computer, Corp.High Tech Computer, Corp.
GPS Test
I. Install GPS tool to device and
execute the program.
II. Setup the COM port to COM4.
III. Place device in GPS receptor
coverage area and tap the icon
“Open GPS”.
IV. Check the GPS status as picture
shown.
[Note]: Please build up similar GPS
test station in repair center.
FM Test
I. Insert headset in device and tap
Start-> Program->FM radio.
II. Tap the search icon to search
the radio channel.
III. Once the channel is searched, tap
headset icon and switch to
speaker mode, make sure the
FM radio is functional.

Doc. No. DOC-00021050 REV.
Issued Date 2007/1/10
. Revised Date AX03
Doc. Title Artemis Service Manual Page 49 of 66
HTC CONFIDENTIAL
宏宏宏宏達國際電子股份有限公司達國際電子股份有限公司達國際電子股份有限公司達國際電子股份有限公司
High Tech Computer, Corp.High Tech Computer, Corp.High Tech Computer, Corp.High Tech Computer, Corp.
7.2.3 Leakage Current Measurement
Equipments & Fixtures
I. Micro-Current Meter.
II. Power Supply.
III. Cable.
IV. Current series jig.
V. Battery with extension cable.
Connect device to test Jig
VI. Insert battery/ with extension cable
to UUT (unit under test).
VII. Turn on the device and enter WinCE
mode.
WinCE setup
VIII. Tap the icon on the Today screen.
IX. Turn on Flight mode.
X. Turn off WLAN, BT, and FM radio.
Doc. No. DOC-00021050 REV.
Issued Date 2007/1/10
. Revised Date AX03
Doc. Title Artemis Service Manual Page 50 of 66
HTC CONFIDENTIAL
宏宏宏宏達國際電子股份有限公司達國際電子股份有限公司達國際電子股份有限公司達國際電子股份有限公司
High Tech Computer, Corp.High Tech Computer, Corp.High Tech Computer, Corp.High Tech Computer, Corp.
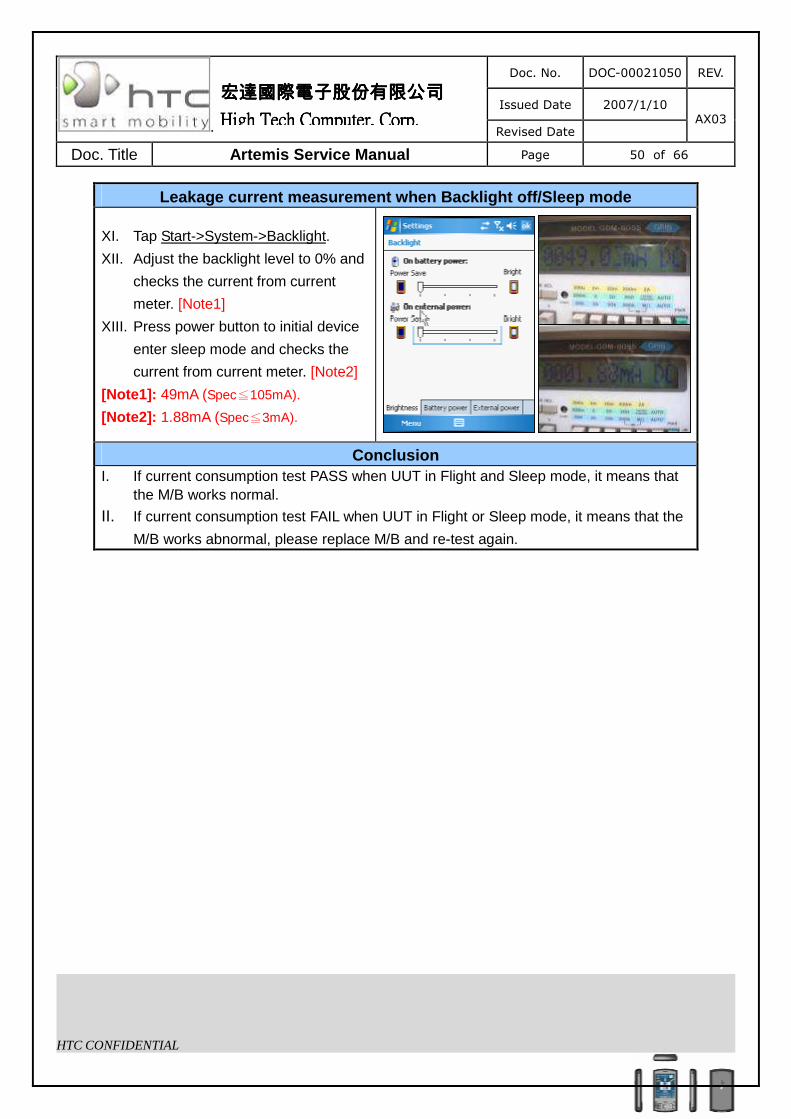
Leakage current measurement when Backlight off/Sleep mode
XI. Tap Start->System->Backlight.
XII. Adjust the backlight level to 0% and
checks the current from current
meter. [Note1]
XIII. Press power button to initial device
enter sleep mode and checks the
current from current meter. [Note2]
[Note1]: 49mA (Spec≦105mA).
[Note2]: 1.88mA (Spec≦3mA).
Conclusion I. If current consumption test PASS when UUT in Flight and Sleep mode, it means that
the M/B works normal.
II. If current consumption test FAIL when UUT in Flight or Sleep mode, it means that the
M/B works abnormal, please replace M/B and re-test again.

Doc. No. DOC-00021050 REV.
Issued Date 2007/1/10
. Revised Date AX03
Doc. Title Artemis Service Manual Page 51 of 66
HTC CONFIDENTIAL
宏宏宏宏達國際電子股份有限公司達國際電子股份有限公司達國際電子股份有限公司達國際電子股份有限公司
High Tech Computer, Corp.High Tech Computer, Corp.High Tech Computer, Corp.High Tech Computer, Corp.
8. OS upgrade procedure
8.1 RUU (Re-flash Upgrade Utility)
Connect device to PC
I. Setting and allow USB connections
in Microsoft ActiveSync.
II. Connect your device and desktop/ or
laptop via USB cable.
III. Check the pop-up message from
Microsoft ActiveSync when device is
synchronized with PC.
Download OS Image from SDO
IV. Download OS image from SDO.
http://htcscm10.htc.com.tw/SDO
V. Un-zip the file and execute RUU
program.
RUU - 1
VI. Read the pop-up message form
ROM update utility and select the “I
understand…” checkbox.
VII. Click “Next” to proceed.

Doc. No. DOC-00021050 REV.
Issued Date 2007/1/10
. Revised Date AX03
Doc. Title Artemis Service Manual Page 52 of 66
HTC CONFIDENTIAL
宏宏宏宏達國際電子股份有限公司達國際電子股份有限公司達國際電子股份有限公司達國際電子股份有限公司
High Tech Computer, Corp.High Tech Computer, Corp.High Tech Computer, Corp.High Tech Computer, Corp.
RUU - 2
VIII. Read the pop-up message form
ROM update utility to follow and
perform the instructions and select
the “I completed…” checkbox.
IX. Click “Next” to proceed.
RUU - 3
X. Current image version confirmation.
XI. Click “Update” to proceed.
RUU - 4
XII. Double verify the ROM revision
which you want to update before
re-flash procedure.
XIII. Click “Next” to proceed.

Doc. No. DOC-00021050 REV.
Issued Date 2007/1/10
. Revised Date AX03
Doc. Title Artemis Service Manual Page 53 of 66
HTC CONFIDENTIAL
宏宏宏宏達國際電子股份有限公司達國際電子股份有限公司達國際電子股份有限公司達國際電子股份有限公司
High Tech Computer, Corp.High Tech Computer, Corp.High Tech Computer, Corp.High Tech Computer, Corp.
RUU - 5
XIV. Read the information from pop-up
message and the OS update
procedure will takes 10 minutes
long.
XV. Click “Next” to proceed.
RUU - 6
XVI. You can see the update progress
from your PC and in your device.
RUU - 7
XVII. The OS upgrade is finished, click
“Finish” to close the utility.

Doc. No. DOC-00021050 REV.
Issued Date 2007/1/10
. Revised Date AX03
Doc. Title Artemis Service Manual Page 54 of 66
HTC CONFIDENTIAL
宏宏宏宏達國際電子股份有限公司達國際電子股份有限公司達國際電子股份有限公司達國際電子股份有限公司
High Tech Computer, Corp.High Tech Computer, Corp.High Tech Computer, Corp.High Tech Computer, Corp.
8.2 SD card upgrade
Download OS Image from SDO
I. Download OS image from SDO.
http://htcscm10.htc.com.tw/SDO
II. Un-zip the image file.
Format SD card and copy image file to SD card
III. Select file system and format the SD
card to FAT32 mode.
IV. Copy image file XXX.nbh to the
micro SD card and rename to
Arteimg.NBH.
SD Upgrade - 1
V. Turn the device power off and insert
Diagnostic SD card.
VI. Press and hold Power + Record
button, and Reset button to entry
Boot loader mode.
VII. Press Volume Up/Down key to start
upgrade procedure.

Doc. No. DOC-00021050 REV.
Issued Date 2007/1/10
. Revised Date AX03
Doc. Title Artemis Service Manual Page 55 of 66
HTC CONFIDENTIAL
宏宏宏宏達國際電子股份有限公司達國際電子股份有限公司達國際電子股份有限公司達國際電子股份有限公司
High Tech Computer, Corp.High Tech Computer, Corp.High Tech Computer, Corp.High Tech Computer, Corp.
SD Upgrade - 2
VIII. Format BINFS.
IX. Reading source code from SD card.
[Note]: This process will takes 5 mins,
please don’t power off the device.
SD Upgrade - 3
X. Re-flash Ext. ROM.
XI. Re-flash 1st phase OS image to flash
ROM.
SD Upgrade - 3
XII. Reading 2ND phase OS image from
SD card.
[Note]: This process will takes 6 mins,
please don’t power off the device.
XIII. Re-flash 2nd phase OS image; press
any key to exit once the process is
finished.

Doc. No. DOC-00021050 REV.
Issued Date 2007/1/10
. Revised Date AX03
Doc. Title Artemis Service Manual Page 56 of 66
HTC CONFIDENTIAL
宏宏宏宏達國際電子股份有限公司達國際電子股份有限公司達國際電子股份有限公司達國際電子股份有限公司
High Tech Computer, Corp.High Tech Computer, Corp.High Tech Computer, Corp.High Tech Computer, Corp.
9. Board Level 2.5 Inspection
9.1 Main Board

Doc. No. DOC-00021050 REV.
Issued Date 2007/1/10
. Revised Date AX03
Doc. Title Artemis Service Manual Page 57 of 66
HTC CONFIDENTIAL
宏宏宏宏達國際電子股份有限公司達國際電子股份有限公司達國際電子股份有限公司達國際電子股份有限公司
High Tech Computer, Corp.High Tech Computer, Corp.High Tech Computer, Corp.High Tech Computer, Corp.
9.2 Rigid-Flex Board

Doc. No. DOC-00021050 REV.
Issued Date 2007/1/10
. Revised Date AX03
Doc. Title Artemis Service Manual Page 58 of 66
HTC CONFIDENTIAL
宏宏宏宏達國際電子股份有限公司達國際電子股份有限公司達國際電子股份有限公司達國際電子股份有限公司
High Tech Computer, Corp.High Tech Computer, Corp.High Tech Computer, Corp.High Tech Computer, Corp.
10. Generic Troubleshooting
1....Main Unit Does Not Respond to Power Button
(1) Connect the AC adapter, maybe the battery pack is exhaust and wait for few minutes if unit boot.
(2) Check if battery installed well and switch to lock.
(3) Check key lock switch if enable
(4) Check the Power Button if any damage.
(5) Try with another battery pack.
(6) Try if unit can enter boot-loader mode. If so, try to re-flash ROM if can solve the problem.
(7) Check all connections including LCD FPC to Main Board.
(8) Replace Main Board if necessary.
(9) Once the defective part has been identified, verify it again with the defective part whether the symptom
could be duplicated.
2....Touch Panel Does Not Respond to Screen Tap
(1) Check the connection of LCM FPC cable whether is properly connected.
(2) Try to cold boot the unit then tries again.
(3) Try with another LCM.
(4) Try with another Main Board.
(5) Replace LCM if necessary
(6) Replace Main Board if necessary.
(7) Once the defective part has been identified, verify it again with the defective part whether the symptom
could be duplicated.
3....Buttons Do Not Respond
(1) Check key lock switch if enable.
(2) Try to cold boot the unit then tries again.
(3) Dismantle the unit; check the status of switches on the Main Board and the plastic parts of the Button not
responding.
(4) Try with another Main Board or Front Bezel.
(5) Replace Main Board or Front Bezel if necessary.
(6) Once the defective part has been identified, verify it again with the defective part whether the symptom
could be duplicated.

Doc. No. DOC-00021050 REV.
Issued Date 2007/1/10
. Revised Date AX03
Doc. Title Artemis Service Manual Page 59 of 66
HTC CONFIDENTIAL
宏宏宏宏達國際電子股份有限公司達國際電子股份有限公司達國際電子股份有限公司達國際電子股份有限公司
High Tech Computer, Corp.High Tech Computer, Corp.High Tech Computer, Corp.High Tech Computer, Corp.
4....Unusual Vertical / Horizontal lines or partial display
(1) Check the connection of LCM FPC whether is properly connected.
(2) Try to cold boot the unit then tries again.
(3) Try to re-flash the ROM code.
(4) Try with another LCM.
(5) Try with another Main Board.
(6) Replace LCM if necessary
(7) Replace Main Board if necessary.
(8) Once the defective part has been identified, verify it again with the defective part whether the symptom
could be duplicated.
5....Back Light Does Not Turn ON/OFF
(1) Check the connection of LCM FPC whether is properly connected.
(2) Try to re-flash the ROM code.
(3) Try with another LCM.
(4) Try with another Main Board.
(5) Replace LCM if necessary
(6) Replace Main Board if necessary.
(7) Once the defective part has been identified, verify it again with the defective part whether the symptom
could be duplicated.
6....CF/SD Card cannot be used
(1) Check whether CF/SD Card is fully inserted to the slot until you hear a click.
(2) Try to re-flash the ROM code.
(3) Try with another CF/SD Card.
(4) Try with another Main Board.
(5) Replace Main Board if necessary.
(6) Once the defective part has been identified, verify it again with the defective part whether the symptom
could be duplicated.
7....PC Connection not possible
(1) If test result is NFF, it is possible caused by user connect cradle to computer before ActiveSync is
installed.
(2) Check whether “Connection Settings” in the MS ActiveSync is properly set.

Doc. No. DOC-00021050 REV.
Issued Date 2007/1/10
. Revised Date AX03
Doc. Title Artemis Service Manual Page 60 of 66
HTC CONFIDENTIAL
宏宏宏宏達國際電子股份有限公司達國際電子股份有限公司達國際電子股份有限公司達國際電子股份有限公司
High Tech Computer, Corp.High Tech Computer, Corp.High Tech Computer, Corp.High Tech Computer, Corp.
(3) Check whether it connects with other cables or cradle, customer’s cable might be damaged.
(4) Check the external appearance of the connector on the unit whether it is physically damaged.
(5) Try to re-flash the ROM code.
(6) Replace Main Board if necessary.
(7) Once the defective part has been identified, verify it again with the defective part whether the symptom
could be duplicated.
8....Battery Pack does not start
(1) Make sure the battery cover is closed properly.
(2) Connect to the AC Adapter and see if it takes charge. Also check AC Adapter condition.
(3) Check whether AC Adapter is functioning properly.
(4) Check whether the condition of Battery Charging status is correct.
(5) Check the appearance of Battery Pack if any abnormal..
(6) Try with another Battery Pack or Replace Battery Pack if necessary
(7) Try with another Main Board or Replace Main Board if necessary.
(8) Once the defective part has been identified, verify it again with the defective part whether the symptom
could be duplicated.
9....Battery discharges quickly even after fully charged
(1) Make sure the Battery Pack takes fully charge with AC Adapter.
(2) Check whether the condition of Battery Charging status is correct.
(3) Dismantle the unit and check the appearance of Battery Pack.
(4) Try with another Battery Pack or Replace Battery Pack if necessary
(5) Try with another Main Board or Replace Main Board if necessary.
(6) Once the defective part has been identified, verify it again with the defective part whether the symptom
could be duplicated.
10....Battery Pack does not recharge
(1) Make sure the Battery Pack takes fully charge with AC Adapter.
(2) Check whether the condition of Battery Charging status is correct. Charge should be done no more than
4 hours.
(3) Dismantle the unit and check the appearance of Battery Pack.
(4) Try with another Battery Pack or Replace Battery Pack if necessary
(5) Try with another Main Board or Replace Main Board if necessary.
Doc. No. DOC-00021050 REV.
Issued Date 2007/1/10
. Revised Date AX03
Doc. Title Artemis Service Manual Page 61 of 66
HTC CONFIDENTIAL
宏宏宏宏達國際電子股份有限公司達國際電子股份有限公司達國際電子股份有限公司達國際電子股份有限公司
High Tech Computer, Corp.High Tech Computer, Corp.High Tech Computer, Corp.High Tech Computer, Corp.
(6) Once the defective part has been identified, verify it again with the defective part whether the symptom
could be duplicated.
11....No Sound from Speaker or Distorted sound
(1) Check “Sound & Notifications” Settings in the unit for Sound Enabling.
(2) Make sure it’s not MUTED.
(3) Try to re-flash the ROM code.
(4) Clean up the speaker connection side on MB if there is any contamination.
(5) Dismantle and Check whether the Speaker is properly installed (Orientation)
(6) Replace Speaker if necessary.
(7) Replace Main Board if necessary.
(8) Once the defective part has been identified, verify it again with the defective part whether the symptom
could be duplicated.
12....No Recorded Sound or Distorted sound
(1) Check “Sound & Notifications” Settings in the unit for Sound Enabling.
(2) Make sure it’s not MUTED.
(3) Try to re-flash the ROM code.
(4) Dismantle and Check whether the Microphone is properly installed.
(5) Replace Microphone if necessary.
(6) Replace Main Board if necessary.
(7) Once the defective part has been identified, verify it again with the defective part whether the symptom
could be duplicated.
13....Wireless connection (WLAN/BT) not possible
(1) Make sure the wireless environment is OK before your checking.
(2) Make sure the wireless connection setting has been properly set.
(3) Make a life connection with Internet or another device.
(4) Try to re-flash the ROM code.
(5) Try with another main board if necessary
(6) Once the defective part has been identified, verify it again with the defective part whether the symptom
could be duplicated.

Doc. No. DOC-00021050 REV.
Issued Date 2007/1/10
. Revised Date AX03
Doc. Title Artemis Service Manual Page 62 of 66
HTC CONFIDENTIAL
宏宏宏宏達國際電子股份有限公司達國際電子股份有限公司達國際電子股份有限公司達國際電子股份有限公司
High Tech Computer, Corp.High Tech Computer, Corp.High Tech Computer, Corp.High Tech Computer, Corp.
11. Photo for 80H & 99H Level

Doc. No. DOC-00021050 REV.
Issued Date 2007/1/10
. Revised Date AX03
Doc. Title Artemis Service Manual Page 63 of 66
HTC CONFIDENTIAL
宏宏宏宏達國際電子股份有限公司達國際電子股份有限公司達國際電子股份有限公司達國際電子股份有限公司
High Tech Computer, Corp.High Tech Computer, Corp.High Tech Computer, Corp.High Tech Computer, Corp.

Doc. No. DOC-00021050 REV.
Issued Date 2007/1/10
. Revised Date AX03
Doc. Title Artemis Service Manual Page 64 of 66
HTC CONFIDENTIAL
宏宏宏宏達國際電子股份有限公司達國際電子股份有限公司達國際電子股份有限公司達國際電子股份有限公司
High Tech Computer, Corp.High Tech Computer, Corp.High Tech Computer, Corp.High Tech Computer, Corp.

Doc. No. DOC-00021050 REV.
Issued Date 2007/1/10
. Revised Date AX03
Doc. Title Artemis Service Manual Page 65 of 66
HTC CONFIDENTIAL
宏宏宏宏達國際電子股份有限公司達國際電子股份有限公司達國際電子股份有限公司達國際電子股份有限公司
High Tech Computer, Corp.High Tech Computer, Corp.High Tech Computer, Corp.High Tech Computer, Corp.
12. RF Antenna Specification
Items Test Name TX Level TCH 1st Downlink Cell Power Note 1 Camp @ DCS Band 0 512 -75 BCCH=600 2 BS Originate Call 0 512 -75
E-GSM 900 Receiver Test 3 Fast Bit Error Rate 5 975 -104 4 Fast Bit Error Rate 5 42 -104 5 Fast Bit Error Rate 5 124 -104
E-GSM 900 Transmitter Test 6 TX Phase RMS Error 5 975 -104 7 TX Phase Peak Error 5 975 -104 8 TX Frequency Error 5 975 -104 9 TX Phase RMS Error 5 42 -104 10 TX Phase Peak Error 5 42 -104 11 TX Frequency Error 5 42 -104 12 TX Phase RMS Error 5 124 -104 13 TX Phase Peak Error 5 124 -104 14 TX Frequency Error 5 124 -104 15 Check TX Power 5 975 -104 16 Check TX Power 5 42 -104 17 Check TX Power 5 124 -104
DCS 1800 Receiver Test 1 Fast Bit Error Rate 0 512 -104 2 Fast Bit Error Rate 0 698 -104 3 Fast Bit Error Rate 0 885 -104
DCS 1800 Transmitter Test 4 TX Phase RMS Error 0 512 -104 5 TX Phase Peak Error 0 512 -104 6 TX Frequency Error 0 512 -104 7 TX Phase RMS Error 0 698 -104 8 TX Phase Peak Error 0 698 -104 9 TX Frequency Error 0 698 -104 10 TX Phase RMS Error 0 885 -104 11 TX Phase Peak Error 0 885 -104 12 TX Frequency Error 0 885 -104 13 Check TX Power 0 512 -104 14 Check TX Power 0 698 -104 15 Check TX Power 0 885 -104
PCS 1900 Receiver Test 1 Fast Bit Error Rate 0 512 -104 2 Fast Bit Error Rate 0 661 -104 3 Fast Bit Error Rate 0 810 -104
Doc. No. DOC-00021050 REV.
Issued Date 2007/1/10
. Revised Date AX03
Doc. Title Artemis Service Manual Page 66 of 66
HTC CONFIDENTIAL
宏宏宏宏達國際電子股份有限公司達國際電子股份有限公司達國際電子股份有限公司達國際電子股份有限公司
High Tech Computer, Corp.High Tech Computer, Corp.High Tech Computer, Corp.High Tech Computer, Corp.
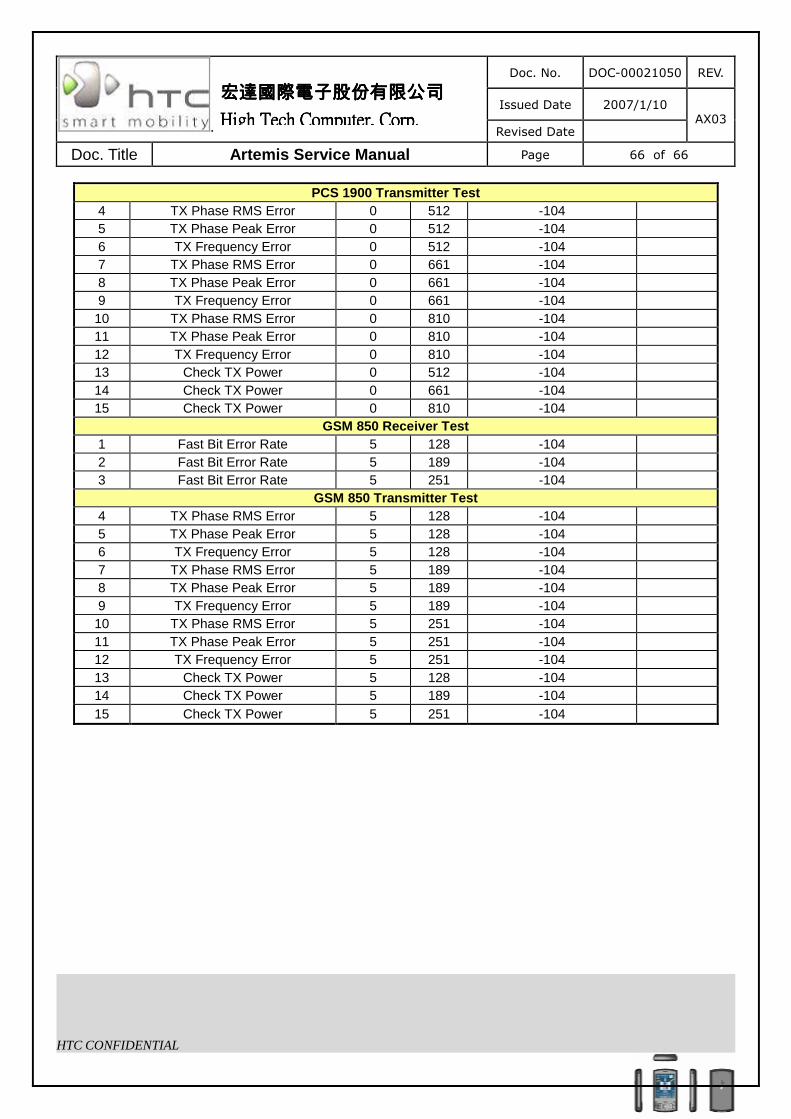
PCS 1900 Transmitter Test 4 TX Phase RMS Error 0 512 -104 5 TX Phase Peak Error 0 512 -104 6 TX Frequency Error 0 512 -104 7 TX Phase RMS Error 0 661 -104 8 TX Phase Peak Error 0 661 -104 9 TX Frequency Error 0 661 -104 10 TX Phase RMS Error 0 810 -104 11 TX Phase Peak Error 0 810 -104 12 TX Frequency Error 0 810 -104 13 Check TX Power 0 512 -104 14 Check TX Power 0 661 -104 15 Check TX Power 0 810 -104
GSM 850 Receiver Test 1 Fast Bit Error Rate 5 128 -104 2 Fast Bit Error Rate 5 189 -104 3 Fast Bit Error Rate 5 251 -104
GSM 850 Transmitter Test 4 TX Phase RMS Error 5 128 -104 5 TX Phase Peak Error 5 128 -104 6 TX Frequency Error 5 128 -104 7 TX Phase RMS Error 5 189 -104 8 TX Phase Peak Error 5 189 -104 9 TX Frequency Error 5 189 -104 10 TX Phase RMS Error 5 251 -104 11 TX Phase Peak Error 5 251 -104 12 TX Frequency Error 5 251 -104 13 Check TX Power 5 128 -104 14 Check TX Power 5 189 -104 15 Check TX Power 5 251 -104