https communities.bentley
TRANSCRIPT
Hydraulics and HydrologyThis is where you can find and contribute to discussions, ideas, and other information about Hydraulics and Hydrology.
Modeling Reference - Hydropneumatic Tanks [TN]
Applies To
Product(s): Bentley HAMMER
Version(s): V8i
Environment: N/A
Area: Modeling
Subarea: N/A
Original Author: Jesse Dringoli, Bentley Technical Support Group
OverviewThis technote explains how the Hydropneumatic Tank element works and its typical application in HAMMER V8i. It also provides an
example model file for demonstration purposes.
BackgroundThe Hydropneumatic Tank element in HAMMER represents a cylindrical or spherical pressure vessel containing fluid at the bottom and
an entrapped gas (usually air or nitrogen) overlying the liquid. It is sometimes referred to as a Gas Vessel, air chamber or pressurized
surge tank.
When the hydropneumatic tank is being filled (usually from a pump), the water volume increases and the air is compressed. When the
pump is turned off, the compressed air maintains pressure in the system until the water drains and the pressure drops. This storage of
energy as compressed air allows for a high hydraulic grade to be acheived in a relatively small tank, whereas the traditional,
unpressurized surge tank would need to be constructed as high as the hydraulic grade you need to acheive. This is because the
hydraulic grade in a hydropneumatic tank is the elevation plus the water level PLUS the pressure head of the gas above it, whereas in a
surge tank, it is the water surface elevation. Thus, a surge tank is typically not practical for a high head system.3 So, If the
hydropneumatic tank contains enough (pressurized) gas to prevent water columns from separating, it can be a very effective way to
avoid or reduce pressure surges.
The most common use of a hydropneumatic tank for surge protection is for controlling transients caused by rapid pump start up and
shut down. In a typical emergency pump shutdown scenario, the low pressure 'downsurge' can cause severe subatmospheric pressure.
Column separation can occur and severe high pressure 'upsurges' can occur upon vapor pocket collapse. So, protective equipment is
often necessary to provide water and head to the system upon downsurge and also to bleed water out of the system upon upsurge.
Most often the best protection for this situation is either a surge tank or hydropneumatic tank, since they can provide this water and
head during a transient event.
The hydraulic grade provided by a surge suppressing hydropneumatic tank must be high, and typically will operate at normal pipeline
pressure. Meaning, the normal pressure at the tank is the same pressure that would occur if the tank were not installed at all. This is
different from 'normal' hydropneumatic tanks in water distribution systems, which typically cycle quickly based on hydraulic grade
pump controls.
Note: Adding surgecontrol equipment or modifying the operating procedures may significantly change the
dynamic behavior of the water system, possibly even its characteristic time. Selecting appropriate
protection equipment requires a good understanding of its effect, for which HAMMER V8i is a great tool,
as well as the good judgment and experience you supply.
Modeling Reference - Hydropneu... Page 1
https://communities.bentley.com/... 22/02/2014 9:04:09 PM
Modeling ConsiderationsIf you have decided to model a hydropneumatic tank for surge protection, there are several considerations for its design. Each of these
can impact the effectiveness and cost of the device and must be carefully evaluated. For further guidance on sizing of the
hydropneumatic tank, we suggest the book 'Fluid Transients in Pipeline Systems' by A. Thorley.
Location
A hydropneumatic tank is typically installed just downstream of a pump station, so as to keep the water column moving upon pump
shutdown. It is typically installed inside an enclosed building and is sometimes 'twinned' (two of the same tank side by side) for
maintenance and redundancy purposes. 3
If the hydropneumatic tank location is uncertain or if more than one may be required, you can compute the transient simulation
without any protection and check your results (such as the min/max pressure envelope in the Transient Results Viewer.) By viewing
these results, you can see critical areas of the pipeline and potentially find a good location candidate for the hydropneumatic tank(s).
You can then add your hydropneumatic tank(s), re-compute the transient simulation, re-check the results and make adjustments as
necessary.
Note: Sometimes a tank may be required on the suction side of a pump station as well, to prevent
cavitation upon pump shutdown/startup. Be sure to check the minimum pressure results upstream of the pump
for your transient simulation.
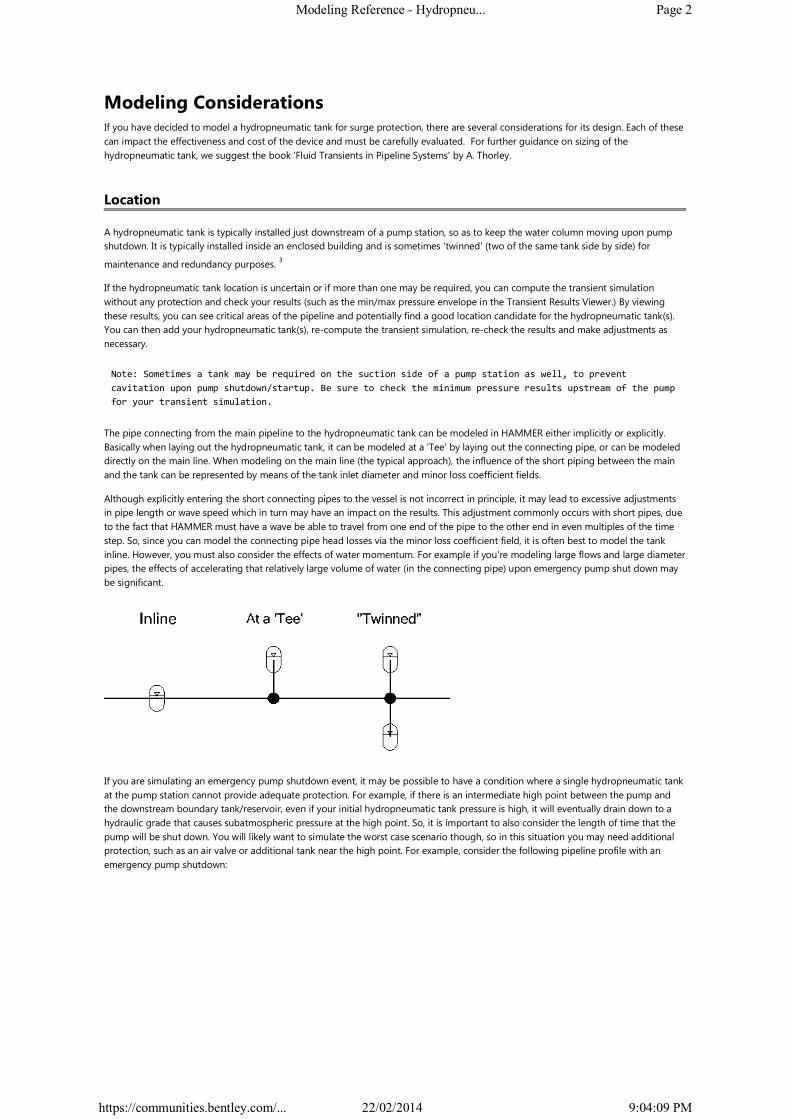
The pipe connecting from the main pipeline to the hydropneumatic tank can be modeled in HAMMER either implicitly or explicitly.
Basically when laying out the hydropneumatic tank, it can be modeled at a 'Tee' by laying out the connecting pipe, or can be modeled
directly on the main line. When modeling on the main line (the typical approach), the influence of the short piping between the main
and the tank can be represented by means of the tank inlet diameter and minor loss coefficient fields.
Although explicitly entering the short connecting pipes to the vessel is not incorrect in principle, it may lead to excessive adjustments
in pipe length or wave speed which in turn may have an impact on the results. This adjustment commonly occurs with short pipes, due
to the fact that HAMMER must have a wave be able to travel from one end of the pipe to the other end in even multiples of the time
step. So, since you can model the connecting pipe head losses via the minor loss coefficient field, it is often best to model the tank
inline. However, you must also consider the effects of water momentum. For example if you're modeling large flows and large diameter
pipes, the effects of accelerating that relatively large volume of water (in the connecting pipe) upon emergency pump shut down may
be significant.
If you are simulating an emergency pump shutdown event, it may be possible to have a condition where a single hydropneumatic tank
at the pump station cannot provide adequate protection. For example, if there is an intermediate high point between the pump and
the downstream boundary tank/reservoir, even if your initial hydropneumatic tank pressure is high, it will eventually drain down to a
hydraulic grade that causes subatmospheric pressure at the high point. So, it is important to also consider the length of time that the
pump will be shut down. You will likely want to simulate the worst case scenario though, so in this situation you may need additional
protection, such as an air valve or additional tank near the high point. For example, consider the following pipeline profile with an
emergency pump shutdown:
Modeling Reference - Hydropneu... Page 2
https://communities.bentley.com/... 22/02/2014 9:04:09 PM

Dark black line = physical elevation.
Dashed black line = steady state / initial conditions head.
As you can see, the addition of a hydropneumatic tank (gas vessel) just downstream of the pump station does not offer enough
protection. Subatmospheric pressure occurs at the downstream end of the system, due to the high point. Even with an air valve at the
high point, the longer the pump is off, the more air will be introduced into the system. The addition of a surge tank at said high point
does well at alleviating this problem.
Note: It is important to note that using air chambers and surge tanks in treated drinking water systems
can result in water quality deterioration and loss of disinfectant residual. These devices should be
equipped with a mechanism for circulating the water to keep it fresh. A further complication occurs when
the tanks are located in cold climates where the water can freeze. If freezing is an issue, smaller air
chambers that can be housed in heated buildings are preferable.1
Size
Although the total size of the hydropneumatic tank is important, it is not directly used in HAMMER unless you're using a bladder
(which is covered later in this technote). Instead, you define the initial hydraulic grade and corresponding gas volume, then view the
transient results to see how much the gas expanded.
Basically your hydropneumatic tank needs to be large enough so that it does not become empty during the transient simulation.
HAMMER assumes that the water volume in the tank is enough so that this does not happen. In the Transient Analysis Output Log
(Under Report > Transient Analysis Reports), you will see the maximum volume of gas that is needed during the transient analysis. You
will then need to provide a hydropneumatic tank that will be able to accommodate that maximum volume of gas and still not become
empty of water (assuming that you don't want it to become empty of course.)
When you're not using the bladder option, you must enter a total volume for the hydropneumatic tank (the "Volume (Tank)" field), but
this is for reference purposes during the transient simulation. If the volume of gas during the transient simulation exceeds the total
tank volume that you entered, you'll encounter a User Notification about the maximum gas volume being greater than the entered
tank volume. However, HAMMER will still compute gas volumes above the total tank volume, based on the gas law. Not only will this
indicate that there is something wrong, but it will also indicate by how much. Meaning, the user can view the maximum gas volume
required (in the text output log) with the current tank configuration, make the necessary adjustments, then re-run the simulation.
For example, a user entered 500L as the initial gas volume and 1500L as the total tank volume, but the output log shows a maximum
gas volume of 1640L. This means that during the transient simulation, the head dropped so low that the expanded gas volume
occupied more than 1500L. It tells the user that their desired tank is almost big enough, but not quite.
In case this situation occurs, it's important to realize that the total tank size is not necessarily the only factor. For example, if the initial
gas volume at the steady state hydraulic grade was smaller, the maximum gas volume during the transient may be less and within the
Modeling Reference - Hydropneu... Page 3
https://communities.bentley.com/... 22/02/2014 9:04:09 PM

desired total tank size. Other things such as a differential orifice can also influence the effectiveness of a tank that is a certain size. So,
just because the reported gas volume is higher than the tank size you'd like, it doesn't necessarily mean that you need a bigger tank.
You may be able to control the maximum gas volume by changing other parameters, therefore allowing the same tank size to be used.
Since you may be limited (due to cost, physical space or other reasons) in terms of the largest tank size you can provide, adjustment of
these other things may be necessary. With HAMMER, you can easily test different configurations of your tank to find the optimized
protection for your pipeline.
In some cases, you may have a requirement stating that a certain percentage of the tank volume must be liquid in the steady state
conditions. You may also have a limit on the total tank size, maximum pressure, bladder pre-charge pressure, etc. So, you'll need to
design around these requirements.
Differential Orifice
The piping connection between the hydropneumatic tank and the system should be sized to provide adequate hydraulic capacity when
the chamber is discharging, as well as to cause a head loss sufficient to dissipate transient energy and prevent the chamber from filling
too quickly. Both of these requirements are met through the use of a piping bypass as depicted below.1
In HAMMER, the headlosses associated with this can be modeled by using the "Minor Loss Coefficient", "Ratio Of Losses" and
"Diameter (Tank Inlet Orifice)" attributes of the hydropneumatic tank. This is referred to as the differential orifice, because the ratio of
losses allows you to have the inflow headlosses different from the outflow headlosses. In the above illustration, you can see that the
check valve causes inflows to undergo larger headlosses as water passes through the bypass. So, the ratio of losses attribute is usually
larger than 1.0 and applies to inflows.
The "minor loss coefficient" that you enter is used for tank outflows. For tank inflows, the minor loss coefficient is multiplied by the
"ratio of losses" and the resulting coefficient is used. The effect of a differential orifice can be large for some systems.
Note: you may consider adjusting the minor loss coefficient to represent multiple losses through the tank assembly. For example you may
have minor losses from bends, fittings, the tank inlet itself and the differential orifice assembly. In this case, you can set the "minor loss
coefficient" value to represent all those losses, but remember that the velocity used to calculate them is based on the area of the "diameter
(tank inlet)". Also, you'll need to set up the ratio of losses such that the losses through the entire tank assembly appropriately accounts for
the additional loss through the bypass of the differential orifice.
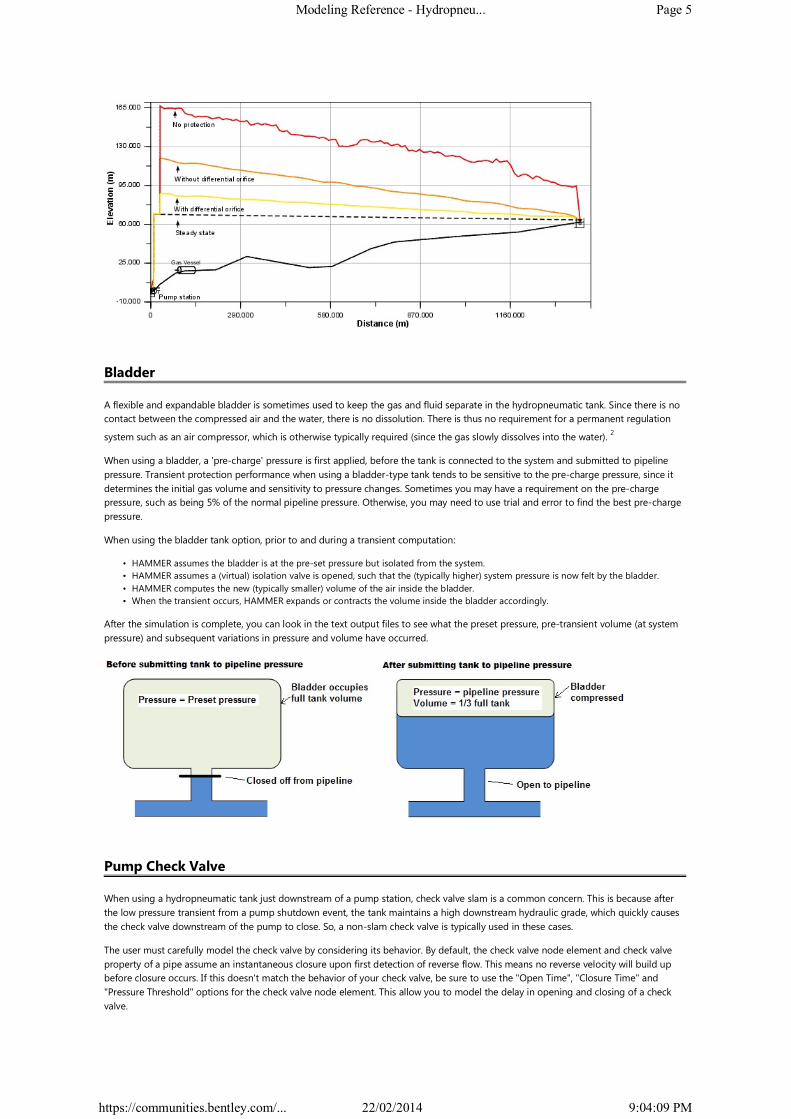
Consider the below profile, showing the maximum transient head for a pipeline during an emergency pump shutdown event. The inlet
orifice size was decreased by 75mm and a minor loss coefficient of 1.5 was used, with a ratio of 2.5. As you can see, it helps reduce the
maximum transient pressures in the system. This could also mean a possible reduction in total required tank size.
Modeling Reference - Hydropneu... Page 4
https://communities.bentley.com/... 22/02/2014 9:04:09 PM
Bladder
A flexible and expandable bladder is sometimes used to keep the gas and fluid separate in the hydropneumatic tank. Since there is no
contact between the compressed air and the water, there is no dissolution. There is thus no requirement for a permanent regulation
system such as an air compressor, which is otherwise typically required (since the gas slowly dissolves into the water). 2
When using a bladder, a 'pre-charge' pressure is first applied, before the tank is connected to the system and submitted to pipeline
pressure. Transient protection performance when using a bladder-type tank tends to be sensitive to the pre-charge pressure, since it
determines the initial gas volume and sensitivity to pressure changes. Sometimes you may have a requirement on the pre-charge
pressure, such as being 5% of the normal pipeline pressure. Otherwise, you may need to use trial and error to find the best pre-charge
pressure.
When using the bladder tank option, prior to and during a transient computation:
• HAMMER assumes the bladder is at the pre-set pressure but isolated from the system.
• HAMMER assumes a (virtual) isolation valve is opened, such that the (typically higher) system pressure is now felt by the bladder.
• HAMMER computes the new (typically smaller) volume of the air inside the bladder.
• When the transient occurs, HAMMER expands or contracts the volume inside the bladder accordingly.
After the simulation is complete, you can look in the text output files to see what the preset pressure, pre-transient volume (at system
pressure) and subsequent variations in pressure and volume have occurred.
Pump Check Valve
When using a hydropneumatic tank just downstream of a pump station, check valve slam is a common concern. This is because after
the low pressure transient from a pump shutdown event, the tank maintains a high downstream hydraulic grade, which quickly causes
the check valve downstream of the pump to close. So, a non-slam check valve is typically used in these cases.
The user must carefully model the check valve by considering its behavior. By default, the check valve node element and check valve
property of a pipe assume an instantaneous closure upon first detection of reverse flow. This means no reverse velocity will build up
before closure occurs. If this doesn't match the behavior of your check valve, be sure to use the "Open Time", "Closure Time" and
"Pressure Threshold" options for the check valve node element. This allow you to model the delay in opening and closing of a check
valve.
Modeling Reference - Hydropneu... Page 5
https://communities.bentley.com/... 22/02/2014 9:04:09 PM
Initial Conditions BehaviorAs with any transient simulation, a model with a hydropneumatic tank must begin in a steady state condition. HAMMER uses the
WaterGEMS hydraulic engine to compute the steady state initial conditions, which are used as the starting point for the transient
simulation. For a hydropneumatic tank, the initial conditions provide a hydraulic grade and inflow/outflow to the transient calculation
engine.
Steady State vs. EPS
Typically the initial conditions are computed as a steady state (by selecting "steady state" as the "time analysis type" in the steady
state/EPS solver calculation options, which is the default.) If you must compute an Extended Period Simulation (EPS), be aware that you
will need to select a timestep for the transient calculation to use as its initial conditions (Using the "initialize transient run at time"
transient calculation option). You will also likely need to use a small hydraulic timestep (selected in the steady state/EPS solver
calculation options), since a hydropneumatic tank typically cycles relatively quickly. With EPS, you will likely also need to set up controls
for your pump based on the tank hydraulic grade. Lastly, the change in HGL/volume during the EPS is calculated using either a
constant area approximation or the gas law, depending on the selection of "tank calculation model."
However, when modeling a hydropneumatic tank that is meant for transient surge protection, it typically operates under 'line' pressure,
so you usually don't need to analyze changes during EPS. The typical approach is to use a steady state simulation as the initial
conditions and select "true" for the "treat as junction" attribute (see below).
Treat as Junction?
As mentioned above, in many cases a hydropneumatic tank may be implemented only for transient protection. During a steady state
condition, the tank may simply operate under the corresponding normal / steady state head ("line pressure"). So, for simplification, it is
sometimes preferable to select "true" for the "treat as junction" attribute in the tank properties. Doing this allows the initial conditions
solver to compute a hydraulic grade at the tank location, and the user simply assumes that the tank has already responded to the
hydraulic grade and the air volume has expanded or contracted accordingly. In this case, the user only needs to enter the initial volume
of air under the "transient" section of the tank properties that corresponds to that initial conditions hydraulic grade (unless using a
bladder). It is important to remember that the tank is only treated as a junction in the initial conditions. During the transient simulation,
it is still treated as a hydropneumatic tank. Basically treating it as a junction in the initial conditions is another way of establishing the
initial hydraulic grade. The transient simulation will use that hydraulic grade along with the gas volume as the starting conditions. The
gas will then expand and contract accordingly during the transient simulation, based on the gas law.
If you already know the hydraulic grade that you'd like to use as the initial conditions, you would choose "false" for "treat as junction?"
and enter it under the "physical" section of the tank properties. The initial conditions solver will then compute the flow/head in the rest
of the system, with the hydropneumatic tank as the boundary condition. In this case, the tank will likely have either a net inflow or
outflow, to balance energy across the system. So, your transient simulation may not begin at a true "steady" condition.
Initial Conditions Attributes
The following attributes of the hydropneumatic tank influence the initial conditions calculation (steady state or EPS). You'll notice that
they are all within the "Operating Range" or "Physical" section of the hydropneumatic tank properties.
◦ Elevation (base) - The elevation of the base of the tank. It is used as a reference when entering initial hydraulic grade in terms
of "level" (i.e., if the "elevation (base)" is set to 20m and the operating range is set to "level", a "level (initial)" value of 1.0
represents an elevation of 21m).
Modeling Reference - Hydropneu... Page 6
https://communities.bentley.com/... 22/02/2014 9:04:09 PM
◦ Operating Range Type - Specify whether the initial hydraulic grade of the tank is based on levels measured from the base
elevation or as elevations measured from the global datum (zero). For example, if the base elevation is 20m, you want the initial
hydraulic grade to be 70m, and you want to use levels, then select "level" for this field and enter 50m as the initial level.
◦ HGL (Initial) or Level (Initial) - Depending on the operating range type selected, this represents the known boundary hydraulic
grade at the tank during steady state. Remember that it includes the water surface elevation plus the pressure head of the
compressed air in the hydropneumatic tank. The transient simulation will begin with this head. However, if you've selected "true"
for the "Treat as Junction" attribute, the transient simulation will ignore this value and instead use the computed steady state
hydraulic grade (seen in the "Results" section of the tank properties).
Note that said computed hydraulic grade still represents the water surface PLUS the air pressure head
it is the total head at that point in the system (see further above for more information on the "treat as
junction" attribute). So, let's say for example you ran a steady state, treating the tank as a junction
to find the 'balanced' head in the tank (as if it already responded to the system conditions) but then
wanted to change it back to being treated as a tank (for purposes of analyzing the behavior in an EPS
simulation or something else), yet still begin the simulation with the same, balanced head. To do this,
you would copy the computed hydraulic grade (from the results section of the properties) into memory, set
"treat as junction?" to "false", then paste that hydraulic grade value into the "hgl (initial)" field.
When recomputing initial conditions, the initial results will then be equivalent to the original case
where the tank was treated as a junction.
• Liquid Volume (Initial) - This represents the volume of liquid in the tank at the start of the initial conditions, corresponding to the
initial HGL. This includes the inactive volume below the affective volume, when using the "constant area approximation" tank
calculation model.
• Elevation - The elevation from which to calculate pressure in the hydropneumatic tank (typically the bottom of the tank.) It could be
set to the estimated water surface, since the air pressure (used in the gas law equation) is above that point. However, the bottom
elevation and water surface are typically very close, so this likely will not make a noticeable difference.
• Volume (tank) - This represents the total volume of the tank. This is only used in an EPS simulation (to find the gas volume so that the
gas law equation can be used) or when using the bladder option ("Has Bladder?" = "True") during a transient simulation. When using a
bladder tank, HAMMER assumes the bladder occupies this full tank volume at its "preset pressure," so this full tank volume value is
needed by the gas law equation.
• Treat as Junction? - Selects whether or not the tank is treated as a junction during the initial conditions. If "false," the "HGL (Initial)" or
"Level (Initial)" field is used for the initial head. If "true," the initial conditions solver acts as if the tank is a junction and computes
normal/'line pressure.
• Tank Calculation Model - Specifies whether to use the gas law or a constant area approximation method during EPS initial conditions.
The constant area approximation uses a linear relationship; the user must specify minimum/maximum HGL and the corresponding
volume between. The gas law model is non-linear and follows the gas law--as gas is compressed, it becomes harder to compress it
more.
• Atmospheric Pressure Head - When using the gas law tank calculation model, this field represents atmospheric pressure at the
location being modeled. This is required because the gas law equation works in absolute pressure, as opposed to gauge pressure.
Note: The "atmospheric pressure head" field is not used during the transient simulation. The
transient calculation engine assumes an atmospheric pressure head of 1 atm or 10.33 m.
• HGL on/HGL off - Exposed when using the constant area approximation method. The "HGL on" field is the lowest operational
hydraulic grade desired, and the "HGL off" is the highest operational hydraulic grade desired. Corresponding controls should be
entered to turn the pump on and off during an EPS simulation. Note that typically a transient simulation will use steady state initial
conditions, so these fields are not considered; only the steady state HGL and user-entered gas volume are used to define the initial
volume and head for the transient simulation.
• Volume (effective) - Exposed when using the constant area approximation method. Represents the volume between the HGL on and
HGL off fields.
Gas Law vs. Constant Area Approximation
For the initial conditions, the user must select either "gas law" or "constant area approximation" for the "Tank calculation model"
attribute of the hydropneumatic tank. The constant area approximation selection exposes the "Volume (effective)," "HGL on," and "HGL
off" fields. The gas law selection exposes the "Atmospheric pressure" field. These fields are primarily there to support the WaterCAD
and WaterGEMS products, which can directly open a HAMMER model. They are only used to track the change in HGL/volume for EPS
simulations, which typically aren't used in HAMMER. A transient analysis typically begins with a steady state simulation, which only
considers the "HGL (Initial)" and "volume of gas (initial)". This is because a steady state simulation is a snapshot in time, so the
head/volume are not changing. So in most cases, it does not matter which tank calculation method you choose. You will likely want to
select "gas law" for simplicity, but additional information on both approaches is provided below.
• Constant area approximation: This method approximates a hydropneumatic tank by constructing a normal tank based on hydraulic
grades. The HGL on and HGL off fields represent the liquid level plus the pressure head, and an approximated diameter is computed
Modeling Reference - Hydropneu... Page 7
https://communities.bentley.com/... 22/02/2014 9:04:09 PM

based on the effective volume. So, you essentially have a tall, skinny tank whose water surface elevation approximates the HGL in a
hydropneumatic tank.
• Gas Law: This method uses the ideal gas law, PV=nRT, to compute new hydraulic grades as liquid volume changes in the EPS
simulation (nRT is assumed to be constant). The initial liquid volume is subtracted from the total tank volume to find the gas volume.
The physical "elevation" is subtracted from the initial HGL to find the gauge pressure. The atmospheric pressure is added to the gauge
pressure to get absolute pressure, which is used in the ideal gas law equation.
Both methods typically yield similar results within the "effective" control range, but the gas law is technically more accurate.
Transient Simulation BehaviorThe following section explains how HAMMER handles hydropneumatic tanks during the transient simulation. There are two distinct
tank configurations: with a bladder and without a bladder.
Without a Bladder
The transient simulation uses the hydraulic grade from the initial conditions, along with a user-entered initial gas volume. As pressure
in the system drops due to a downsurge, this gas volume expands and water injects into the system. Pressure upsurges cause the gas
to compress as water re-enters the tank. This compression and expansion occurs in accordance with the isothermal gas law. A constant
number of moles / mass of gas in the tank and constant temperature is assumed, so the 'nRT' term in the gas law equation is replaced
by a constant, K. Thus, the equation used is PVk=K, Where P = absolute pressure (feet or meters), V = gas volume (cubic feet or cubic
meters) and k is the Gas Law Exponent specified in the tank properties. Thus, the constant K is computed from the initial gas volume
raised to the exponent, multiplied by the initial pressure. The pressure P is the initial hydraulic grade minus the tank physical elevation,
plus atmospheric pressure (1 atm or 10.33 m). This way, a new air volume can be computed based on pressure changes during the
transient simulation.
For example, consider a tank who's initial gas volume is 0.8m3 , initial hydraulic grade is 150m, physical elevation is 100m and gas law
exponent is 1.1. From this, HAMMER computes the "K" constant as: (150 - 100 + 10.33)(0.81.1
) = 47.2. Since K is known now, the change
in pressure can be computed based on changes in volume due to inflow/outflow. For example, say that the tank filled such that the gas
volume was compressed to 0.5m3. Based on the K constant of 47.2, this means that the corresponding pressure = (47.2) / (0.5
1.1) =
101.175 - 10.33 = 90.845m. (a hydraulic grade of 100 + 90.845 = 190.845m)
Note: In HAMMER 08.11.01.32+, the "Volume of gas (Initial)" field only needs to be entered if your
hydropneumatic tank is treated as a junction or if you are chosing to specify custom initial conditions
(and are not using a bladder). In other cases, the initial gas volume is derived from the total tank
volume minus the initial liquid volume.
With a Bladder
If your hydropneumatic tank has its gas contained within a bladder, then you must enter a gas preset pressure. This is the pressure
inside the bladder before the tank is submitted to pipeline pressure. Since this means that the gas takes up the entire tank volume,
the constant K in the gas law (PV = K) is computed based on this preset pressure and the full tank volume, "Volume (Tank)." The
transient simulation's initial gas volume is then computed based on the K constant and the initial conditions hydraulic grade. The initial
conditions hydraulic grade is either the user-entered value in the "HGL (Initial)" field, or the computed steady state hydraulic grade,
depending on the "treat as Junction?" selection.
For example, consider a tank that has been given a full volume of 500 L and the initial conditions pressure head is 50 m. Assume that
the pre-charge pressure is 5% of the steady state pipeline pressure. So, the gas preset pressure is set to 2.5 m. In this case, the 'K'
constant is computed as (2.5m + 10.33m)(0.5 m3) = 6.415. Since K is known now, the initial gas volume for the transient simulation
(after the bladder is submitted to pipeline pressure) is computed as V = K/P = (6.415)/(50 m+10.33 m) = 0.106 m3 = 106 L.
Note that the gas law exponent is assumed to be 1.0 in this particular calculation for finding the initial gas volume of the transient
simulation. Once the transient simulation begins, the gas law exponent entered in the tank properties (which defaults to 1.2) is used for
calculating changes in gas pressure/volume.
Intuitively, as long as the gas preset pressure is lower than the pipeline pressure in steady state, the initial volume of gas in the tank will
be less than the total volume. Typically, the preset pressure is relatively small, but that may not always be the case. Below is a
comparison of two possible bladder tank configurations (at opposite extremes of the spectrum) for a particular system, with an
emergency pump shut down event.
Modeling Reference - Hydropneu... Page 8
https://communities.bentley.com/... 22/02/2014 9:04:09 PM
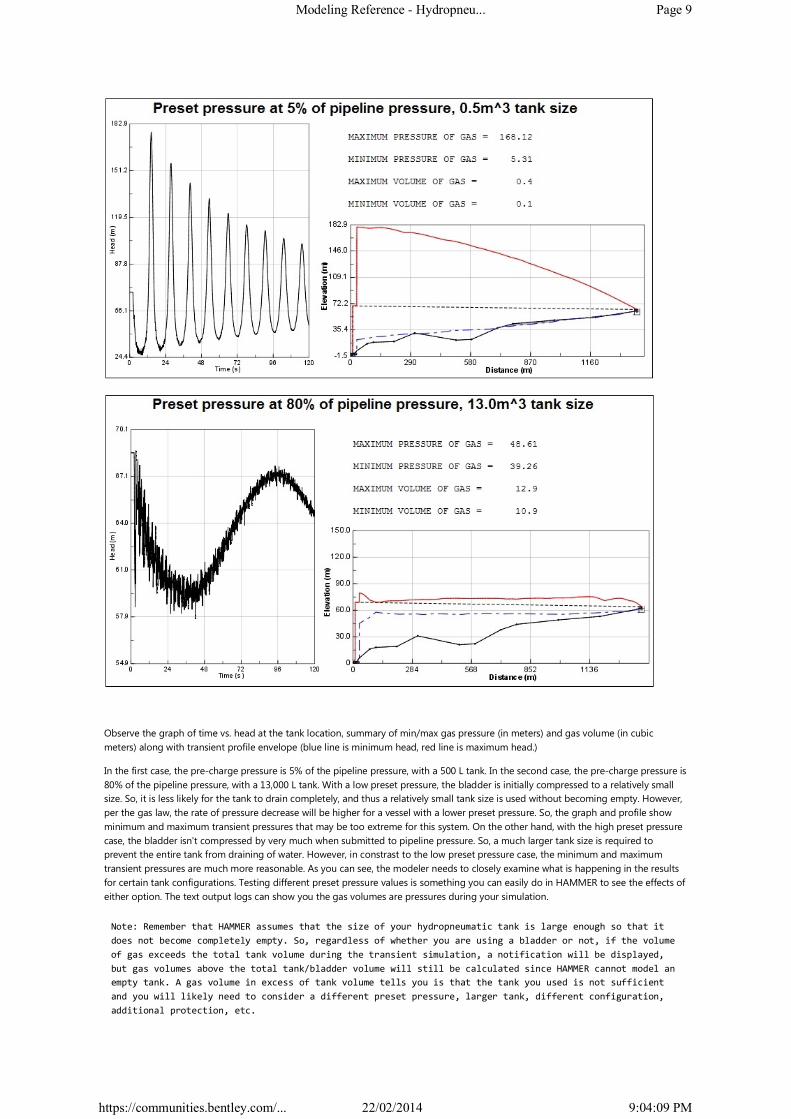
Observe the graph of time vs. head at the tank location, summary of min/max gas pressure (in meters) and gas volume (in cubic
meters) along with transient profile envelope (blue line is minimum head, red line is maximum head.)
In the first case, the pre-charge pressure is 5% of the pipeline pressure, with a 500 L tank. In the second case, the pre-charge pressure is
80% of the pipeline pressure, with a 13,000 L tank. With a low preset pressure, the bladder is initially compressed to a relatively small
size. So, it is less likely for the tank to drain completely, and thus a relatively small tank size is used without becoming empty. However,
per the gas law, the rate of pressure decrease will be higher for a vessel with a lower preset pressure. So, the graph and profile show
minimum and maximum transient pressures that may be too extreme for this system. On the other hand, with the high preset pressure
case, the bladder isn't compressed by very much when submitted to pipeline pressure. So, a much larger tank size is required to
prevent the entire tank from draining of water. However, in constrast to the low preset pressure case, the minimum and maximum
transient pressures are much more reasonable. As you can see, the modeler needs to closely examine what is happening in the results
for certain tank configurations. Testing different preset pressure values is something you can easily do in HAMMER to see the effects of
either option. The text output logs can show you the gas volumes are pressures during your simulation.
Note: Remember that HAMMER assumes that the size of your hydropneumatic tank is large enough so that it
does not become completely empty. So, regardless of whether you are using a bladder or not, if the volume
of gas exceeds the total tank volume during the transient simulation, a notification will be displayed,
but gas volumes above the total tank/bladder volume will still be calculated since HAMMER cannot model an
empty tank. A gas volume in excess of tank volume tells you is that the tank you used is not sufficient
and you will likely need to consider a different preset pressure, larger tank, different configuration,
additional protection, etc.
Modeling Reference - Hydropneu... Page 9
https://communities.bentley.com/... 22/02/2014 9:04:09 PM

Transient Simulation Attributes
The following hydropnematic tank attributes influence the transient simulation calculation:
• Diameter (Tank Inlet Orifice) - This is the size of the opening between the gas vessel and the main pipe line. It is typically smaller
than the main pipe size. It is used to compute the correct velocity through the tank, so the correct headloss is computed based on the
minor loss coefficient (the standard head loss equation is used: Hl = K*V2/2g.)
• Minor Loss Coefficient (Outflow) - This is the 'k' coefficient for computing headlosses using the standard headloss equation, H =
kV2/2g. It represents the headlosses for tank outflow. If you lump other minor losses through the tank assembly (bends, fittings,
contractions, etc) into this coefficient, keep in mind that the velocity is calculated using the area of the "diameter (tank inlet orifice)"
that you entered.
• Ratio of Losses - This is the ratio of inflow to outflow headloss. For flows into the tank (inflows), the "minor loss coefficient" is
multiplied by this value and the losses are computed using that. For flows out of the tank, HAMMER only uses the "Minor Loss
coefficient". So, if you enter a minor loss coefficient of 1.5 and a ratio of losses of 2.5, the headloss coefficient used when the tank is
filling would be 1.5 X 2.5 = 3.75.
• Gas Law Exponent - refers to the exponent to be used in the gas law equation. (the 'k' in PV^k = constant) The usual range is 1.0 to
1.4. The default is 1.2.
• Volume of Gas (Initial) - When not using a bladder, the initial volume of gas is an important attribute. This is a required input field,
representing the volume of gas inside the tank at the steady state pressure (initial conditions hydraulic grade minus tank physical
elevation). During the transient simulation, this gas volume expands or compresses, depending on the transient pressures in the
system. For example, consider a 500 L tank with base elevation of 20 m and initial hydraulic grade of 70 m. This means that the air
pressure head is ~50 m. So, the user needs to decide how much space (volume) the entrapped gas pocket would take up, at this
pressure.
Note: In version 08.11.01.XX and greater, if you are not specifying initial conditions and not treating
the tank as a junction, then the initial gas volume is not required and the field will not show up. This
is because it is either computed from the initial conditions gas volume (which is the full tank volume
minus the initial liquid volume for a steady state) or based on the preset pressure (if using the bladder
option)
Note: In some cases, you may want to analyze a range of different initial conditions, which could
potentially change the starting hydraulic grade of your hydropneumatic tank. The gas law can be employed
in this case. For example, if you know the initial gas volume is 300 L at a steady state pressure head of
50 m, you can compute the 'K' constant using the gas law, PVk=K: (50 m + 10.33 m)(0.3m3) = 18.099. (gas
law exponent assumed to be 1.0) So, if your new steady state pressure head is 30 m, the new initial gas
volume (which you must enter) is computed as V = (18.099)/(30 m+10.33 m) = 0.449 m3 = 449 L.
Note: The transient calculation engine always uses an atmospheric pressure head of 1 atm or 10.33 m when
solving the gas law equation.
◦ Has Bladder? - Denotes whether the gas is contained within a bladder. If it is set to TRUE, HAMMER automatically assumes that
the bladder occupied the full-tank volume at the preset pressure at some time and that the air volume was compressed to a
smaller size by the steady-state pressure in the system. The "Volume of gas (initial)" is not used in this case, since it is calculated
based on the full tank size, preset pressure and steady state pressure. See "with a bladder" topic for more information.
◦ Pressure (Gas-Preset) - This is the pressure (not a hydraulic grade) in the gas bladder before it is exposed to pipeline pressure;
the pressure when it fills the entire tank volume. Often called the "precharge" pressure; it is only exposed when selecting "true"
for "Has bladder?"
◦ Report Period - used to report extended results in the Transient Analysis Detailed Report. Represents a timestep increment. For
example, entering '10' would cause extended results to be reported every 10 timestep.
◦ Elevation Type - This allows you to specify the type of approach used in tracking the gas-liquid interface (a new feature as of
version 08.11.01.32). By default, the liquid surface elevation is not tracked and is essentially assumed to be fixed, at the tank
physical bottom elevation. For more information on how this option is used for tracking the liquid elevation, see "Tracking the
Liquid Level" further below.
Analyzing ResultsThere are many ways to view the results of your transient simulation. For a hydropneumatic tank, some results are available in the
powerful Transient Results Viewer tool and some are found in the text output.
Note: Do not confuse initial conditions results with transient results. The result fields in the "Results" section of the hydropneumatic
tank properties pertain to the initial conditions calculations only. For example, if you right click the tank, choose "graph" and choose
"gas volume (calculated)", this will not show you the gas volume during the transient simulation - it will be for the initial conditions
only (specifically EPS initial conditions).
Modeling Reference - Hydropneu... Page 10
https://communities.bentley.com/... 22/02/2014 9:04:09 PM

Transient Results Viewer
The primary tool for viewing results is the Transient Results Viewer. To prepare for its use, first ensure that your transient calculation
options are set up correctly (Analysis > Calculation Options). Choose some elements under "Report points", choose the desired report
times and select "true" for "generate animation data". Next, create a profile of your pipeline under View > Profiles. Next, compute your
model and go to Analysis > Transient Results Viewer.
To see the transient envelope, select your profile path and click "plot". To see how the head and vapor volume changes over time
throughout your profile, click the "animate" button and use the animation controls. This will give you a good visualization of how the
hydropneumatic tank performs. To see graphs of HGL, flow and/or vapor volume over time, select one of your report points under
"Time Histories", select the attribute to graph and click plot. For example, you may want to see the flow and head at the
hydropneumatic tank location.
Note: the "volume" reported in the transient results viewer is only air or gas introduced into the
pipeline. It does not show the volume of gas inside the hydropneumatic tank itself. The same applies to
the "air volume (maximum, transient)" field shown in the "Results (transien)" section of the
hydropneumatic tank properties.
Text Reports
HAMMER's text output results also offer important information for hydropneumatic tanks. To prepare for viewing this information, first
check your transient calculation options. "Show standard output log" and "Enable Text Reports" should be set to "true". Next, enter a
number for the "report period" field of your hydropneumatic tank. This represents how often extended text results will be reported. For
example, if your timestep is 0.01 seconds and you enter '10' for the report period, it means you'll see extended text results every 10
timesteps or every 0.1 seconds.
The first text report of importance is the Transient Analysis Output Log, under Report > Transient Analysis Reports. Scroll down to the
section starting with "THE EXTREME PRESSURES AND VOLUMES". This part of the report summarizes the maximum and minimum gas
pressure and volume for the transient simulation.
Lastly, to see a table of extended hydropneumatic tank results, open the Transient Analysis Detailed Report, under Report > Transient
Analysis Reports. Scroll down near the bottom, to the section starting with " ** Gas vessel at node" and you will find a table of gas
volume, tank hydraulic grade, pipeline hydraulic grade and tank inflow, over time. The difference between the "head-gas" and "head-
Modeling Reference - Hydropneu... Page 11
https://communities.bentley.com/... 22/02/2014 9:04:09 PM
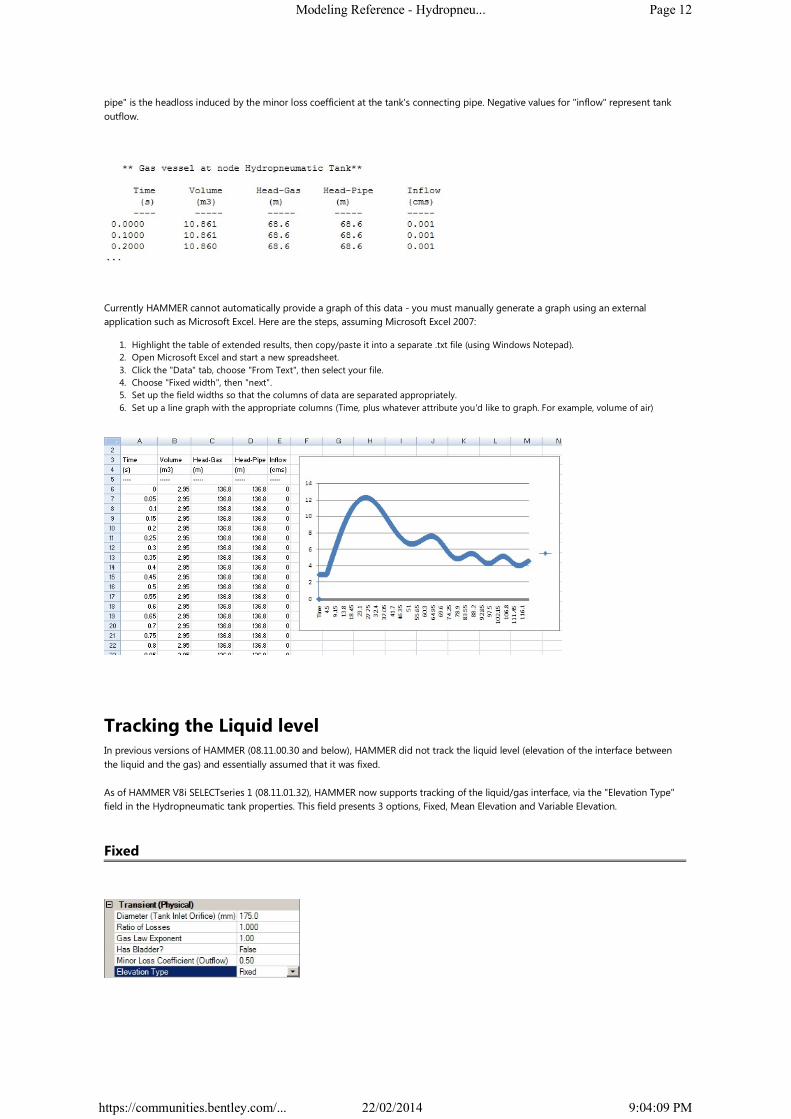
pipe" is the headloss induced by the minor loss coefficient at the tank's connecting pipe. Negative values for "inflow" represent tank
outflow.
Currently HAMMER cannot automatically provide a graph of this data - you must manually generate a graph using an external
application such as Microsoft Excel. Here are the steps, assuming Microsoft Excel 2007:
1. Highlight the table of extended results, then copy/paste it into a separate .txt file (using Windows Notepad).
2. Open Microsoft Excel and start a new spreadsheet.
3. Click the "Data" tab, choose "From Text", then select your file.
4. Choose "Fixed width", then "next".
5. Set up the field widths so that the columns of data are separated appropriately.
6. Set up a line graph with the appropriate columns (Time, plus whatever attribute you'd like to graph. For example, volume of air)
Tracking the Liquid levelIn previous versions of HAMMER (08.11.00.30 and below), HAMMER did not track the liquid level (elevation of the interface between
the liquid and the gas) and essentially assumed that it was fixed.
As of HAMMER V8i SELECTseries 1 (08.11.01.32), HAMMER now supports tracking of the liquid/gas interface, via the "Elevation Type"
field in the Hydropneumatic tank properties. This field presents 3 options, Fixed, Mean Elevation and Variable Elevation.
Fixed
Modeling Reference - Hydropneu... Page 12
https://communities.bentley.com/... 22/02/2014 9:04:09 PM

This is the default option for the "Elevation Type" field and is consistent with the behavior of previous versions. The liquid elevation is
assumed to be at a fixed location during the transient simulation, equal to the bottom of the tank. The gas pressure used in the gas law
equation is the pressure above the user-entered "elevation" field, accounting for liquid pressure plus the air pressure.
This is acceptable for most cases, mainly because the elevation difference between the range of possible liquid levels is typically quite
small. So, it does not account for much of a pressure difference. This can be observed by adjusting the "Elevation" attribute in the tank
properties.
Mean Elevation
Selecting "Mean Elevation" exposes the "Liquid Elevation (Mean)" field, which allows you to specify a custom liquid (water surface)
elevation, instead of assuming it is equal to the tank bottom (as is with the "fixed" option). It represents the average elevation of the
liquid/gas interface throughout a transient. This is useful in cases where the liquid elevation is significantly higher than the tank
bottom, but doesn't move significantly during a transient simulation. So, although no tracking of changes in liquid elevation occurs, it
allows you to get a more accurate calculation in some cases. The gas pressure used in the gas law equation during the calculations is
the pressure above the mean elevation that you enter.
Variable Elevation
Selecting "Variable Elevation" exposes the "Variable Elevation Curve" field, which allows you to enter a table of liquid elevation versus
equivalent diameter. The variable level hydropneumatic tank type is for users who have detailed information about the tank's geometry
and want to perform as accurate a simulation as possible. Typically, this type of representation would be selected in the detailed design
stage. It would also be appropriate in the case of low-pressure systems and/or relatively tall tanks with large movements of the
interface relative to the HGL of the gas. The initial liquid level is determined from the initial gas volume which is an input parameter.
The tank cross-sectional area at any elevation is interpolated from an input table of the vessel's geometry spanning the range from the
pipe connection at the bottom to the top of the tank.
After computing the transient simulation with a variable elevation hydropneumatic tank, you can view the liquid level over time by
looking at the Transient Analysis Detailed Report. This report is found under Report > Transient Analysis Reports and will show this
extended, tabular data for the tank when you've entered a value for the "report period" property of that tank (see "Text Reports"
further above).
Modeling Reference - Hydropneu... Page 13
https://communities.bentley.com/... 22/02/2014 9:04:09 PM
Note: You must be using at least version 08.11.02.31 of HAMMER in order to use the variable elevation
option with a bladder.
Other Types of Hydropneumatic Tanks There are other types of hydropneumatic tanks, which HAMMER currently cannot model. Future versions may allow users to model
these types of tanks. For example:
1. Vented Vessels - This type of hydropneumatic tank has an air valve that admits air into the system from the atmosphere, when the
tank drops below atmospheric pressure. (Walski, 2007).
2. Dipping Tube Vessel - This vessel is often used in sewer force mains and contains an air valve open to the atmosphere. A float closes
the air valve before the tank is full and the remaining air is compressed, like a normal hydropneumatic tank. More information:
http://www.charlatte.fr/2006/csae/dc/spt0140.pdf
Example ModelClick to Download
Note: the above model is for example purposes only. It can be opened in version 08.11.01.32 and above and you can find additional
information under File > Project Properties.
Reference1. Advanced Water Distribution Modeling and Management - Walski, 2007.
2. Charlatte - http://www.charlatte.fr , http://www.charlatte.fr/2006/csae/dc/spt0171.pdf
3. HAMMER V8i, Transient Analysis and Design training course manual (TRN013190-1/0001)
4. Fluid Transients in Pipeline Systems - Thorley, 2004
See AlsoProduct TechNotes and FAQs
Haestad Methods Product Tech Notes And FAQs
Protective Equipment FAQ
General HAMMER V8i FAQ
External LinksWater and Wastewater Forum
Bentley Technical Support KnowledgeBase
Bentley LEARN Server
Modeling Reference - Hydropneu... Page 14
https://communities.bentley.com/... 22/02/2014 9:04:09 PM