human resources management self service suite administrator's guide
TRANSCRIPT

Business Portal for Microsoft Dynamics® GP 2010Human Resources Management Self Service Suite
Administrator’s Guide

Copyright Copyright © 2010 Microsoft. All rights reserved.
Limitation of liability This document is provided “as-is”. Information and views expressed in this document, including URL and other Internet Web site references, may change without notice. You bear the risk of using it.
Some examples depicted herein are provided for illustration only and are fictitious. No real association or connection is intended or should be inferred.
Intellectual property This document does not provide you with any legal rights to any intellectual property in any Microsoft product.
You may copy and use this document for your internal, reference purposes.
Trademarks Microsoft, Microsoft Dynamics, Outlook, SharePoint, and Windows are trademarks of the Microsoft group of companies. FairCom and c-tree Plus are trademarks of FairCom Corporation and are registered in the United States and other countries.
All other trademarks are property of their respective owners.
Warranty disclaimer Microsoft Corporation disclaims any warranty regarding the sample code contained in this documentation, including the warranties of merchantability and fitness for a particular purpose.
License agreement Use of this product is covered by a license agreement provided with the software product. If you have any questions, please call the Microsoft Dynamics GP Customer Assistance Department at 800-456-0025 (in the U.S. or Canada) or +1-701-281-6500.
Publication date May 2010

A D M I N I S T R A T O R ’ S G U I D E i
Contents
Introduction .................................................................................................................................................2What’s in this manual...................................................................................................................................2
Symbols and conventions ............................................................................................................................3
Additional resources ....................................................................................................................................3
Technical support..........................................................................................................................................4
Documentation feedback .............................................................................................................................4
Part 1: Getting started ..................................................................................................................6
Chapter 1: Overview .......................................................................................................................... 7Applications...................................................................................................................................................7
Users, groups, and roles.............................................................................................................................10
Workflow......................................................................................................................................................10
Business Portal site structure .................................................................................................................... 11
Chapter 2: Back office integration .................................................................................... 13Integrating with Human Resources .........................................................................................................13
Integrating with Payroll .............................................................................................................................13
Integrating with Human Resources and Payroll....................................................................................14
Chapter 3: Installation .................................................................................................................. 15Install the HRM Self Service Suite ............................................................................................................15
Start the Workflow service.........................................................................................................................16
Part 2: General setup .................................................................................................................. 18
Chapter 4: SharePoint groups and MBF roles ......................................................... 19Employee......................................................................................................................................................19
Manager........................................................................................................................................................21
Human Resources administrator..............................................................................................................22
Payroll administrator .................................................................................................................................23
HRM Self Service administrator ...............................................................................................................24
Workflow administrator ............................................................................................................................25
Chapter 5: Employee Profile application ..................................................................... 27Require electronic signatures ....................................................................................................................27
The employee address displayed on the Profile page ...........................................................................29
Enter a default address ID .........................................................................................................................29
Specify how direct reports are displayed ................................................................................................30

ii A D M I N I S T R A T O R ’ S G U I D E
C O N T E N T S
Part 3: Time and Attendance setup ........................................................................34
Chapter 6: Pay schedules ........................................................................................................... 35Pay schedule overview ..............................................................................................................................35
Create a pay schedule.................................................................................................................................36
Modify a pay schedule ...............................................................................................................................37
Assign a pay schedule................................................................................................................................38
Delete a pay schedule.................................................................................................................................39
Chapter 7: Timecard restrictions ........................................................................................ 41Timecard restrictions overview.................................................................................................................41
Create or modify a timecard restriction...................................................................................................42
Assign a timecard restriction.....................................................................................................................43
Delete a timecard restriction......................................................................................................................44
Chapter 8: Batch prefixes .......................................................................................................... 47Create or modify a batch prefix ................................................................................................................47
Assign a batch prefix ..................................................................................................................................48
Delete a batch prefix ...................................................................................................................................49
Chapter 9: Assignment priority............................................................................................ 51Assignment priority overview..................................................................................................................51
Modify the assignment priority ................................................................................................................52
Chapter 10: Pay codes and time codes ......................................................................... 53Pay codes and time codes overview ........................................................................................................53
Specify which pay codes and time codes employees can enter time against ....................................54
How pay codes and time codes are displayed in the HRM Self Service Suite ..................................55
How time off information is displayed in the HRM Self Service Suite ..............................................57
Chapter 11: Departments and positions ...................................................................... 61Give employees permission to select departments and positions on their timecards......................61
Specify which departments and positions employees can enter time against ..................................61
Chapter 12: Timecard delegates.......................................................................................... 63Give an employee permission to enter timecards for another employee...........................................63
View timecard delegates ............................................................................................................................64
Chapter 13: Vacation requests and Microsoft Office Outlook .............. 65Install the Outlook add-in..........................................................................................................................65
Set up the Outlook add-in .........................................................................................................................66
Part 4: Workflow setup ............................................................................................................68
Chapter 14: Workflow overview .......................................................................................... 69Documents and workflows .......................................................................................................................69
Default workflows ......................................................................................................................................70
E-mail notifications.....................................................................................................................................70
Tasks and task transfer ...............................................................................................................................70
Workflow event log ....................................................................................................................................70

A D M I N I S T R A T O R ’ S G U I D E iii
C O N T E N T S
Chapter 15: Workflow modifications .............................................................................. 71Document types and default workflows.................................................................................................71
Set workflow options .................................................................................................................................72
Workflow steps............................................................................................................................................72
Add or modify a work item step ..............................................................................................................73
Resource queries .........................................................................................................................................75
Modify a business activity step.................................................................................................................75
Specify the starting step .............................................................................................................................76
Remove a work item step ..........................................................................................................................77
View the process log ...................................................................................................................................77
End, suspend, or resume documents .......................................................................................................78
Chapter 16: E-mail notifications.......................................................................................... 79Enter e-mail addresses ...............................................................................................................................79
Enter the name of your SMTP server.......................................................................................................79
Set up e-mail notifications .........................................................................................................................79
Message text.................................................................................................................................................80
Chapter 17: Task transfer........................................................................................................... 81When to transfer tasks................................................................................................................................81
Transfer tasks from one user or role to another......................................................................................81
Chapter 18: Workflow event log .......................................................................................... 83Select events to track in the workflow event log....................................................................................83
Set the workflow event log size and removal options...........................................................................83
View the workflow event log ....................................................................................................................84
Delete events from the workflow event log............................................................................................85
Part 5: Groups and roles reference ..........................................................................88
Chapter 19: Default group and role permissions ................................................. 89SharePoint groups.......................................................................................................................................89
MBF roles .....................................................................................................................................................90
Advanced MBF roles ..................................................................................................................................91
Index ...................................................................................................................................................................93

iv A D M I N I S T R A T O R ’ S G U I D E

INT
RO
DU
CT
ION

2 A D M I N I S T R A T O R ’ S G U I D E
IntroductionWelcome to Human Resources Management (HRM) Self Service Suite.
The HRM Self Service Suite is a collection of applications that are accessible from within Business Portal for Microsoft Dynamics® GP. Using these applications, employees can update their personal information, enter timecards, submit vacation requests, and complete other related tasks. Managers can approve timecards, modify their employees’ pay rates, and complete other administrative tasks.
Check for updated instructionsThis information was current as of March 13, 2010. The documentation may be updated as new information becomes available. Check the Microsoft Dynamics GP documentation Web site (http://go.microsoft.com/fwlink/?LinkId=185513) for the most current documentation.
This introduction is divided into the following sections:
• What’s in this manual• Symbols and conventions• Additional resources• Technical support• Documentation feedback
What’s in this manual
This manual will help you install and set up the applications in the HRM Self Service Suite.
This documentation is divided into the following parts:
• Part 1, Getting started, provides an overview of the applications included in the HRM Self Service Suite, and explains how to install them.
• Part 2, General setup, explains the setup tasks you must complete, such as assigning users to roles and setting up the Employee Profile application (which is always installed with the HRM Self Service Suite).
• Part 3, Time and Attendance setup, provides step-by-step instructions for setting up the Time and Attendance application, which employees can use to submit timecards and vacation requests.
• Part 4, Workflow setup, describes how to modify the document approval process.
• Part 5, Groups and roles reference, provides details about the SharePoint groups and MBF roles that are used with the HRM Self Service Suite.

A D M I N I S T R A T O R ’ S G U I D E 3
I N T R O D U C T I O N
Symbols and conventions
This manual uses the following symbols to make specific types of information stand out.
This manual uses the following conventions to refer to sections, navigation, and other information.
Additional resources
In addition to this manual, the following documentation is included with this release of Business Portal.
ManualsThe following PDF manuals are included in the Documentation folder on the Business Portal installation media.
Business Portal Installation Guide The Business Portal Installation Guide (BusinessPortalInstallation.pdf) provides step-by-step instructions for installing Business Portal.
Business Portal Administrator’s Guide The Business Portal Administrator’s Guide (BusinessPortalAdminGuide.pdf) explains how to set up and configure Business Portal.
Business Portal User’s Guide The Business Portal User’s Guide (BusinessPortalUsersGuide.pdf) helps users complete day-to-day tasks in Business Portal.
Application manuals User and Administrator manuals for each application installed in Business Portal are available in the Documentation folder.
HelpHelp is available by clicking the Help icon button, located in the upper-right corner of any page. The help that is displayed depends on whether you open help from a
Symbol Description
The light bulb symbol indicates helpful tips, shortcuts, and suggestions.
The warning symbol indicates situations you should be especially aware of when completing tasks. Typically, this includes cautions about performing steps in their proper order, or important reminders about how other information in Business Portal or the back office might be affected.
Convention Description
Enter a default address ID
Italic type indicates the name of a section or procedure.
File > Print The (>) symbol indicates a sequence of actions, such as clicking items on a menu or a toolbar or clicking buttons in a window. This example directs you to go to the File menu and click Print.
Bold Bold type indicates the names of fields, tabs, menus, commands, and buttons, and text you should type.

I N T R O D U C T I O N
4 A D M I N I S T R A T O R ’ S G U I D E
Business Portal page, a Microsoft® Windows® SharePoint® Services page, or a Microsoft Office SharePoint Server 2007 or Microsoft SharePoint Server 2010 page.
Business Portal help When you click the Help icon button on a Business Portal page, the relevant help topic for that page is displayed. You can use the search field on the help page to search for information. You also can click the Home icon button to browse the contents of the help.
SharePoint help Many of the features included in Business Portal—such as document libraries, lists, announcements, links, and alerts—are provided by Windows SharePoint Services. General information about these features is provided in the Administering Business Portal help. For more detailed information, refer to the Windows SharePoint Services help, which can be accessed by clicking the Help icon button in the upper-right corner of any Windows SharePoint Services page. If you’re using Office SharePoint Server 2007 or Microsoft SharePoint Server 2010, additional help related to SharePoint Server features also will be available.
Technical support
You can contact Microsoft Dynamics technical support online or by telephone. Go to www.microsoft.com/dynamics and click the CustomerSource link or call 888-477-7877 (in the U.S. and Canada) or 701-281-0555.
Documentation feedback
We welcome comments regarding the usefulness of the Microsoft Dynamics GP documentation. If you have specific suggestions or find any errors in this manual, send your comments by e-mail to the following address: [email protected].
Note: By offering any suggestions to Microsoft, you give Microsoft full permission to use them freely.

PA
RT
1: G
ET
TIN
G S
TA
RT
ED

6 A D M I N I S T R A T O R ’ S G U I D E
Part 1: Getting startedThis part of the documentation provides an overview of the HRM Self Service Suite, and explains how to install it.
The following information is included:
• Chapter 1, “Overview,” provides an overview of each application included in the HRM Self Service Suite and explains key concepts you’ll need to understand to administer these applications.
• Chapter 2, “Back office integration,” explains how the HRM Self Service Suite interacts with the Microsoft Dynamics GP Payroll and Human Resources modules.
• Chapter 3, “Installation,” provides instructions on installing and upgrading the HRM Self Service Suite.

A D M I N I S T R A T O R ’ S G U I D E 7
Chapter 1: OverviewThe following information provides an overview of each application included in the HRM Self Service Suite, and explains some key concepts you’ll need to understand to administer these applications.
This information is divided into the following sections:
• Applications• Users, groups, and roles• Workflow• Business Portal site structure
Applications
There are five applications in the HRM Self Service Suite. The following information describes each application.
Employee Profile Using the Employee Profile application, employees can manage their personal information, such as their address and emergency contacts information. Managers can use Employee Profile to review their employees’ performance and position history.
Employee Profile must be installed to use any other application in the HRM Self Service Suite.
Employee Profile helpsemployees modify their
personal information,such as their address.

P A R T 1 G E T T I N G S T A R T E D
8 A D M I N I S T R A T O R ’ S G U I D E
Employee Pay The Employee Pay application enables employees to view their pay and benefits information. Managers can use Employee Pay to review their employees’ compensation history and modify employee pay rates.
Time and Attendance Using the Time and Attendance application, employees can submit timecards, enter vacation requests, and view the amount of time off they have available.
Employee Payenables employees
to view theirpaychecks.
Employees can entervacation requests using
Time and Attendance.

A D M I N I S T R A T O R ’ S G U I D E 9
C H A P T E R 1 O V E R V I E W
Skills and Training The Skills and Training application enables employees—and their managers—to view the education, skills, and training information that has been entered for them.
Recruitment Using the Recruitment application, employees can apply for job openings in the company and view the status of their submitted applications. Managers can use the Recruitment application to post job openings, view applications, and track the cost incurred by the company to fill a position.
Employees can view theeducation, skills, and training
information on record for themusing the Skills and Training
application.
Managers can use theRecruitment application to
post job openings and viewsubmitted applications.

P A R T 1 G E T T I N G S T A R T E D
10 A D M I N I S T R A T O R ’ S G U I D E
Users, groups, and rolesTo use Business Portal, all users must be assigned to both SharePoint groups and Microsoft Business Framework (MBF) roles. SharePoint groups determine the access users have to the sites, pages, and other elements that display data, while MBF roles determine the access that users have to data.
When setting up the HRM Self Service Suite, you’ll need to work with the Business Portal administrator to assign users to SharePoint groups and MBF roles. For more information about groups and roles, see Chapter 4, “SharePoint groups and MBF roles.”
WorkflowWhen an employee completes an action in the HRM Self Service Suite, a document is created. For example, when an employee creates a timecard or modifies an emergency contact record, a document is created. The path this document must follow in order to be approved is called workflow.
A workflow defines how a document moves through the system—it lists all of the people (or roles) who must approve the document.
Each document type has its own workflowEach type of HRM document has its own workflow. For example, you may require a timecard to be approved by the employee’s manager and the Payroll administrator.
Consider another example. You may want address changes submitted by employees to be automatically approved. In this scenario, the address change is automatically saved to the back office database without approval from a manager or administrator.
Default workflowsEach type of HRM document is installed with a default workflow. You can modify each document’s workflow to fit your business needs. To view the default workflow for each document, and to modify it, see Part 4, Workflow setup.
Manager
Sam’s manager
must approve
the timecard.
1.
Sam
submits a
timecard.
Payroll
administrator
The Payroll
administrator
must approve
the timecard.
2.
Sam
submits an
address
change.
Automatic
approval
Address
changes don’t
require approval.

A D M I N I S T R A T O R ’ S G U I D E 11
C H A P T E R 1 O V E R V I E W
Business Portal site structure
Business Portal is composed of multiple web sites. The top-level site contains the main Home page and the administration pages for Business Portal and its applications. Each Business Portal center is a subsite that contains pages related to a particular department or role.
The following illustration shows the Business Portal site structure. (You may have additional center subsites in your implementation.)
You must use the top-level web site to perform administrative tasks for Business Portal and its applications, including Order Management. However, you can administer SharePoint users, groups, and content on each subsite.
For more information about site administration, refer to the Business Portal Administrator’s Guide.
Top-level
Business Portal
site
Finance Center
siteSales Center site
Purchasing
Center site
Human
Resources
Center site

12 A D M I N I S T R A T O R ’ S G U I D E

A D M I N I S T R A T O R ’ S G U I D E 13
Chapter 2: Back office integrationTo use the HRM Self Service Suite, the Human Resources or Payroll module must be installed, registered, and set up in Microsoft Dynamics GP. The modules you are using will determine which HRM Self Service Suite applications you can use, and how some of the features will work.
The following information explains which applications and features you can use, based on the back office modules you’re using.
• Integrating with Human Resources• Integrating with Payroll• Integrating with Human Resources and Payroll
Integrating with Human Resources
If the Human Resources back office module is installed and registered, but the Payroll module is not, the following features are enabled:
• You can install all HRM Self Service Suite applications.
• Employees can enter hours in Time and Attendance using time codes. Time codes based on the following time types are supported: Hourly, Overtime, Absent, and Benefit.
• Managers can create new job postings.
However, these are the limitations:
• You cannot create, modify, or delete pay schedules in Business Portal. (You must use Microsoft Dynamics GP to do this. For more information, see the documentation for the Human Resources module.)
• Employees cannot view benefit information.
Integrating with Payroll
If the Payroll back office module is installed and registered, but the Human Resources module is not, the following features are enabled:
• You can install the Employee Profile, Employee Pay, and Time and Attendance applications.
• Employees can enter hours in Time and Attendance using pay codes. Pay codes based on the following pay types are supported: Hourly, Overtime, Double Time, Vacation, Sick, and Holiday.
• You can create, modify, or delete pay schedules in Business Portal.

P A R T 1 G E T T I N G S T A R T E D
14 A D M I N I S T R A T O R ’ S G U I D E
However, these are the limitations:
• You cannot install the Recruitment application.
• You cannot install the Skills and Training application.
Integrating with Human Resources and Payroll
If both the Human Resources and Payroll back office modules are installed and registered, the following features are enabled:
• You can install all HRM Self Service Suite applications.
• Employees can enter hours in Time and Attendance using pay codes. For more information, see Chapter 10, “Pay codes and time codes.”

A D M I N I S T R A T O R ’ S G U I D E 15
Chapter 3: InstallationThe following information explains how to install the HRM Self Service Suite.
This information is divided into the following sections:
• Install the HRM Self Service Suite• Start the Workflow service
Install the HRM Self Service Suite
If you did not install the HRM Self Service Suite when running the Business Portal installation wizard, use the Setup Wizard to add it to your Business Portal installation. If you’ve installed Business Portal on multiple web servers, you must add the HRM Self Service Suite to each of the web servers.
Before installingBefore you can install the HRM Self Service Suite, you must
• Enter registration keys for it in Microsoft Dynamics GP. For more information about entering registration keys, refer to your Microsoft Dynamics GP documentation.
• Verify that you are a member of the Administrators group on the Business Portal server.
To install the HRM Self Service SuiteTo install the HRM Self Service Suite, you must run the Setup Wizard.
1. From the Business Portal installation media, double-click the CDSetup.exe file.
2. Under Install, click Business Portal for Microsoft Dynamics GP.
For detailed instructions, refer to the Business Portal Installation Guide.

P A R T 1 G E T T I N G S T A R T E D
16 A D M I N I S T R A T O R ’ S G U I D E
Start the Workflow service
The Microsoft Business Framework queued work item service (Workflow service) is installed when you install Business Portal. This service processes HRM documents.
Single Business Portal web server If you have one Business Portal server, the Workflow service will be started automatically when you install Business Portal on that server.
Multiple Business Portal web servers In a multiple Business Portal web server environment, the Workflow service must run on one of the servers. The Workflow service will be started automatically on the first server where you installed Business Portal.
If you need to manually start the Workflow service, follow the steps below.
To start the Workflow service, you must be an administrator on the Business Portal web server.
1. Open the Services window.Start > Administrative Tools > Services
2. Double-click Microsoft Business Framework queued work item service.
3. The Properties window appears. Click the General tab.
4. From the Startup type list, select Automatic.
5. Click Start.
6. Click OK to close the window.

PA
RT
2: G
EN
ER
AL S
ET
UP

18 A D M I N I S T R A T O R ’ S G U I D E
Part 2: General setupThis part of the documentation contains the setup tasks you must complete to use the HRM Self Service Suite. Specifically, you’ll need to assign users to SharePoint groups and MBF roles and set up the Employee Profile application (which is always installed with the HRM Self Service Suite).
The following information is included:
• Chapter 4, “SharePoint groups and MBF roles,” describes the HRM-specific groups and roles you’ll need to assign your users to.
• Chapter 5, “Employee Profile application,” provides setup tasks specific to the Employee Profile application.

A D M I N I S T R A T O R ’ S G U I D E 19
Chapter 4: SharePoint groups and MBF rolesTo use Business Portal, all users must be assigned to both SharePoint groups and Microsoft Business Framework (MBF) roles. SharePoint groups determine the access users have to the sites, pages, and other elements that display data, while MBF roles determine the access that users have to data.
There are six main categories of HRM users. The following information explains the SharePoint groups and MBF roles you’ll need to assign these users to.
• Employee• Manager• Human Resources administrator• Payroll administrator• HRM Self Service administrator• Workflow administrator
Employee
To give your employees access to the HRM Self Service Suite, assign them to the:
• BP Employee group• Employee advanced role
Employees must be assigned to this group and role so that they have access to the pages and data necessary to complete their tasks.
How to assign users to SharePoint groups and MBF roles You’ll need to work with the Business Portal administrator to assign users to SharePoint groups and MBF roles. Step-by-step instructions are provided in the Business Portal Administrator’s Guide.
Pages employees can useOnce you assign your employees to the BP Employee group and Employee advanced role, they can use the following HRM-specific pages.

P A R T 2 G E N E R A L S E T U P
20 A D M I N I S T R A T O R ’ S G U I D E
Site Page What can users do on this page? Which HRM application is this page installed with?
Employee Center Profile View and update their employee profile information, such as their address, emergency contacts, and dependents.
This page is installed with Business Portal. However, Employee Profile must be installed in order for users to modify the information on this page.
Pay View their paychecks, set up direct deposit information, and view and modify tax withholding information.
Employee Pay
Benefits View their payroll benefit contributions and their employer’s contributions.
Employee Pay
Skills and Training View and update information about their education and certifications they’ve received. They can also view their training history.
Skills and Training
Timecard Entry Submit timecards, view their available hours of vacation and sick time, and submit vacation requests.
Time and Attendance
HR Documents - Submitted by Me View documents they have submitted. Users can suspend or terminate documents they’ve submitted from this page.
Employee Profile
HR Documents - Assigned to Me View the documents that are currently assigned to them, and approve or reject them.
Employee Profile
Company Center Careers View job openings in the company and submit applications.
Recruitment
Training View a list of course offerings in the company. Skills and Training
Organization Structure View the company’s organizational chart. Employee Profile

A D M I N I S T R A T O R ’ S G U I D E 21
C H A P T E R 4 S H A R E P O I N T G R O U P S A N D M B F R O L E S
Manager
To give managers access to the HRM Self Service Suite, assign them to the:
• BP Manager group• Manager advanced role
Managers must be assigned to this group and role so that they have access to the pages and data necessary to complete their tasks.
How to assign users to SharePoint groups and MBF rolesYou’ll need to work with the Business Portal administrator to assign users to SharePoint groups and MBF roles. Step-by-step instructions are provided in the Business Portal Administrator’s Guide.
Pages managers can useOnce you assign managers to the BP Manager group and Manager advanced role, they can use the following HRM-specific pages.
Site Page What can users do on this page? Which HRM application is this page installed with?
Manager Center Team Profile View and update personal and work information for a selected employee.
Employee Profile
Team Job History View the job history, performance information, and compensation history for a selected employee.
Employee Profile
Team Skills and Training View and update the education, skill sets, tests, and training on record for a selected employee.
Skills and Training
Team Timecard Entry Submit timecards for their employees and view each employee’s time off information.
Time and Attendance
Timecard Status See which employees have not submitted timecards for a selected pay period.
Time and Attendance
Recruiting Submit job postings, review the job posting details (including the opening date, close date, status, and costs), and view a list of applicants for the job.
Recruitment

P A R T 2 G E N E R A L S E T U P
22 A D M I N I S T R A T O R ’ S G U I D E
Human Resources administrator
To give your Human Resources administrators access to the HRM Self Service Suite, assign them to the:
• BP HR Administrator group• Human Resources Administrator role
Human Resources administrators must be assigned to this group and role so that they have access to the pages and data necessary to complete their tasks.
How to assign users to SharePoint groups and MBF rolesYou’ll need to work with the Business Portal administrator to assign users to SharePoint groups and MBF roles. Step-by-step instructions are provided in the Business Portal Administrator’s Guide.
Pages Human Resources administrators can useOnce you assign users to the BP HR Administrator group and Human Resources Administrator role, they can use the following HRM-specific pages.
Site Page What can users do on this page? Which HRM application is this page installed with?
Human Resources Center
Timecard Status See which employees have not submitted timecards for a selected pay period.
Time and Attendance

A D M I N I S T R A T O R ’ S G U I D E 23
C H A P T E R 4 S H A R E P O I N T G R O U P S A N D M B F R O L E S
Payroll administrator
To give Payroll administrators access to the HRM Self Service Suite, assign them to the:
• BP Payroll Administrator group• Payroll Administrator role
Payroll administrators must be assigned to this group and role so that they have access to the pages and data necessary to complete their tasks.
How to assign users to SharePoint groups and MBF roles You’ll need to work with the Business Portal administrator to assign users to SharePoint groups and MBF roles. Step-by-step instructions are provided in the Business Portal Administrator’s Guide.
Pages Payroll administrators can useOnce you assign users to the BP Payroll Administrator group and Payroll Administrator role, they can use the following HRM-specific pages.
Site Page What can users do on this page? Which HRM application is this page installed with?
Payroll Timecard History View historical timecard information for employees.
Time and Attendance
Timecard Status See which employees have not submitted timecards for a selected pay period.
Time and Attendance
Top-level Business Portal site
Timecard Delegates Give an employee permission to enter timecards on behalf of another employee.
Time and Attendance

P A R T 2 G E N E R A L S E T U P
24 A D M I N I S T R A T O R ’ S G U I D E
HRM Self Service administrator
To give application administrators the ability to manage the HRM Self Service Suite, assign them to the:
• BP HRM Self Service Administrator group• HRM Self Service Administrator role
HRM Self Service Suite administrators must be assigned to this group and role so that they have access to the pages and data necessary to complete their tasks.
How to assign users to SharePoint groups and MBF rolesYou’ll need to work with the Business Portal administrator to assign users to SharePoint groups and MBF roles. Step-by-step instructions are provided in the Business Portal Administrator’s Guide.
Pages HRM Self Service administrators can useOnce you assign users to the BP HRM Self Service Administrator group and HRM Self Service Administrator role, they can use the following HRM-specific pages.
Site Page What can users do on this page? Which HRM application is this page installed with?
Top-level Business Portal site
Document Signatures Indicate whether employee signatures are required on HRM documents, such as timecards.
Employee Profile
Default Address ID Specify the address ID that will be used as the default for employees who don’t already have a default address ID in Microsoft Dynamics GP.
Employee Profile
Direct Reports View Indicate whether managers can view information about their immediate direct reports, or multiple levels of direct reports.
Employee Profile
Timecard Setup Set up pay schedules, create timecard restrictions, and create batch prefixes.
Time and Attendance
Employee Assignments Give employees permission to modify information in the Department, Position, Pay Code, and Time Code fields on their timecards.
Time and Attendance
Timecard Delegates Give an employee permission to enter timecards on behalf of another employee.
Time and Attendance

A D M I N I S T R A T O R ’ S G U I D E 25
C H A P T E R 4 S H A R E P O I N T G R O U P S A N D M B F R O L E S
Workflow administrator
Workflow is a term used to describe the document approval process. A workflow defines how a document moves through the system—that is, it lists all of the people (or roles) who must approve the document.
We recommend that you give your HRM Self Service Suite administrators the ability to manage the workflow system. Assign them to the:
• BP HR Workflow Administrator group• Workflow Administrator role
Workflow administrators must be assigned to this group and role so that they have access to the pages and data necessary to complete their tasks.
How to assign users to SharePoint groups and MBF rolesYou’ll need to work with the Business Portal administrator to assign users to SharePoint groups and MBF roles. Step-by-step instructions are provided in the Business Portal Administrator’s Guide.
Pages Workflow administrators can accessOnce you assign users to the BP HR Workflow Administrator group and Workflow Administrator role, they can use the following HRM-specific pages.
Site Page What can users do on this page? Which HRM application is this page installed with?
Top-level Business Portal site
Workflow Business Processes View and modify document workflows. Employee Profile
Workflow Process Options Manage notifications and event log settings. Employee Profile
Workflow Process Log View, end, suspend, and resume business process instances.
Employee Profile
Workflow Event Log View information about workflow events in summary or in detail.
Employee Profile
Workflow Task Transfer Assign tasks from one user or role to another. Employee Profile

26 A D M I N I S T R A T O R ’ S G U I D E

A D M I N I S T R A T O R ’ S G U I D E 27
Chapter 5: Employee Profile applicationTo set up the Employee Profile application, you must complete a few procedures, such as entering a default address ID and indicating whether employees must sign documents they submit. This information provides step-by-step instructions for each procedure.
This information is divided into the following sections:
• Require electronic signatures• The employee address displayed on the Profile page• Enter a default address ID• Specify how direct reports are displayed
Require electronic signatures
For confirmation purposes, you may want to require employees to electronically sign documents they submit, such as documents containing emergency contact information or direct deposit information. To sign documents, employees must enter their domain and logon ID in the following format: domain\logon ID.
The employee must signthe document here.
P A R T 2 G E N E R A L S E T U P
28 A D M I N I S T R A T O R ’ S G U I D E
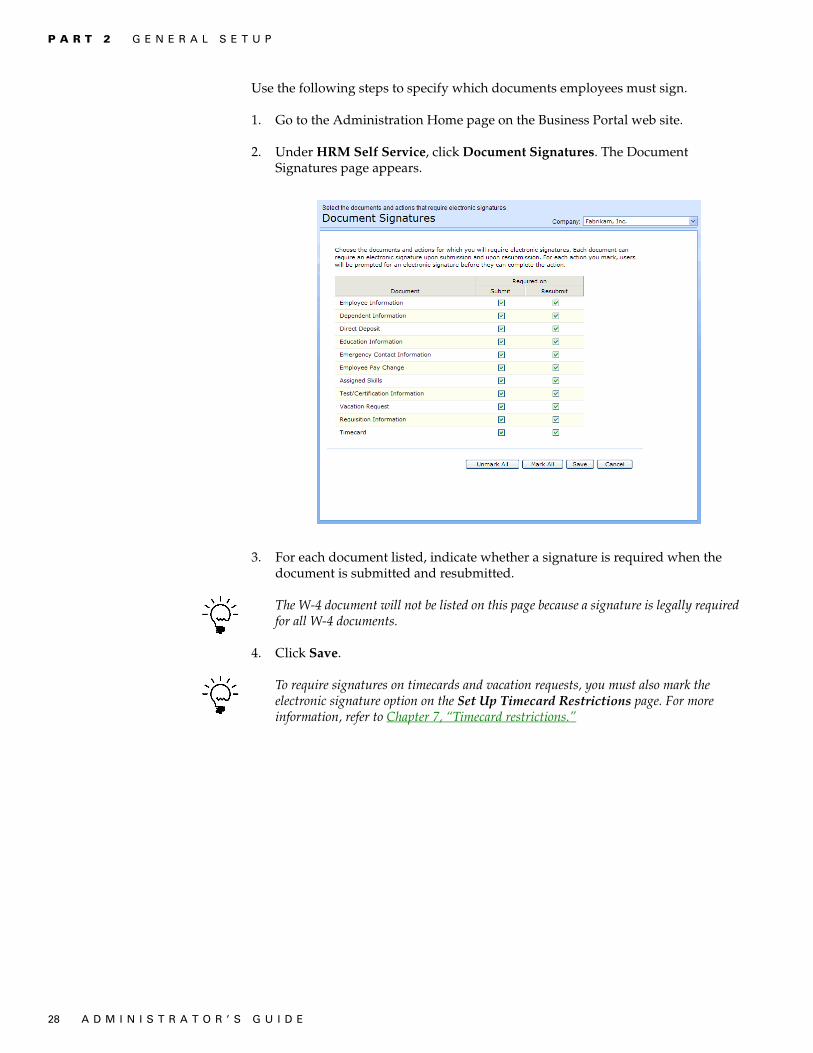
Use the following steps to specify which documents employees must sign.
1. Go to the Administration Home page on the Business Portal web site.
2. Under HRM Self Service, click Document Signatures. The Document Signatures page appears.
3. For each document listed, indicate whether a signature is required when the document is submitted and resubmitted.
The W-4 document will not be listed on this page because a signature is legally required for all W-4 documents.
4. Click Save.
To require signatures on timecards and vacation requests, you must also mark the electronic signature option on the Set Up Timecard Restrictions page. For more information, refer to Chapter 7, “Timecard restrictions.”
A D M I N I S T R A T O R ’ S G U I D E 29
C H A P T E R 5 E M P L O Y E E P R O F I L E A P P L I C A T I O N
The employee address displayed on the Profile page
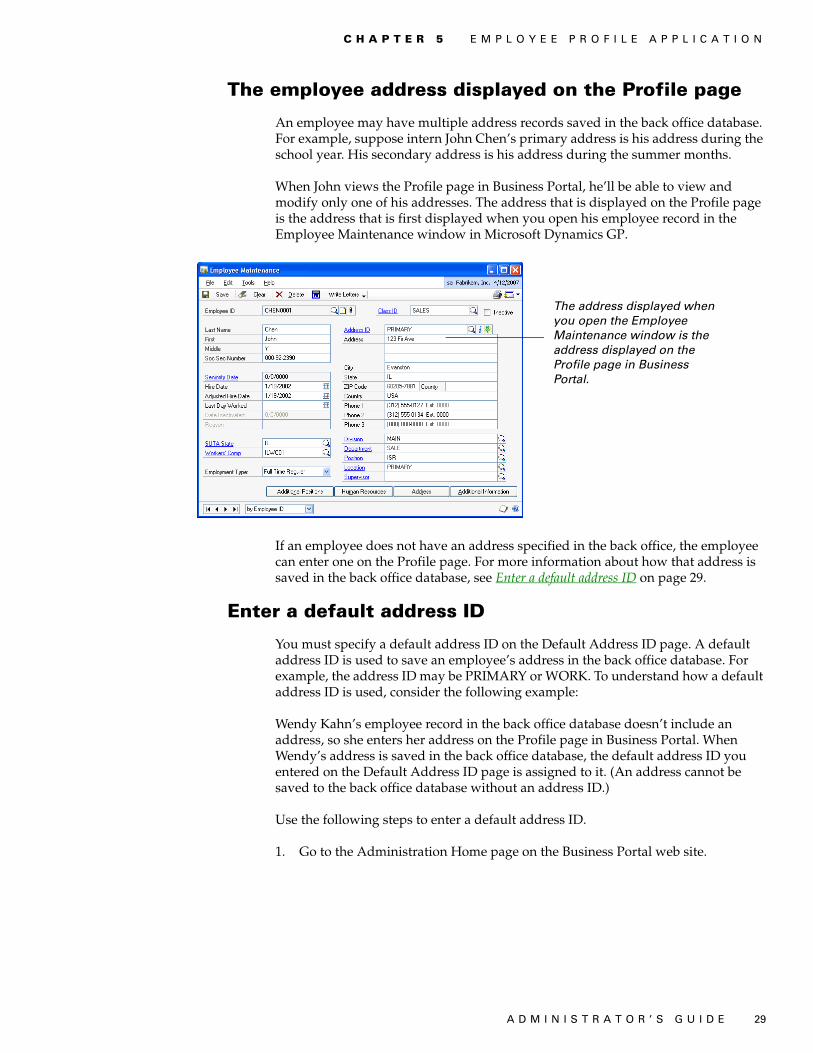
An employee may have multiple address records saved in the back office database. For example, suppose intern John Chen’s primary address is his address during the school year. His secondary address is his address during the summer months.
When John views the Profile page in Business Portal, he’ll be able to view and modify only one of his addresses. The address that is displayed on the Profile page is the address that is first displayed when you open his employee record in the Employee Maintenance window in Microsoft Dynamics GP.
If an employee does not have an address specified in the back office, the employee can enter one on the Profile page. For more information about how that address is saved in the back office database, see Enter a default address ID on page 29.
Enter a default address ID
You must specify a default address ID on the Default Address ID page. A default address ID is used to save an employee’s address in the back office database. For example, the address ID may be PRIMARY or WORK. To understand how a default address ID is used, consider the following example:
Wendy Kahn’s employee record in the back office database doesn’t include an address, so she enters her address on the Profile page in Business Portal. When Wendy’s address is saved in the back office database, the default address ID you entered on the Default Address ID page is assigned to it. (An address cannot be saved to the back office database without an address ID.)
Use the following steps to enter a default address ID.
1. Go to the Administration Home page on the Business Portal web site.
The address displayed when you open the Employee Maintenance window is the address displayed on the Profile page in Business Portal.

P A R T 2 G E N E R A L S E T U P
30 A D M I N I S T R A T O R ’ S G U I D E
2. Under HRM Self Service, click Default Address ID. The Default Address ID page appears.
3. Enter a default address ID.
4. Click Save.
Specify how direct reports are displayed
Several pages on the Manager Center site display the My Team web part. As the HRM Self Service administrator, you must specify which employees will be listed in the My Team web part. This means you must determine the following:
How many levels of direct reports should be displayed? Specify whether managers will see a single level of direct reports in the My Team web part, or all levels. If you choose to display a single level, managers will see their own direct reports. If you choose to display multiple levels, managers will see their direct reports and all organizational levels below their direct reports.
Should inactive employees be displayed? Specify whether inactive employees will be listed in the My Team web part. You can choose to display only active employees, or both active and inactive employees.
Specify which employees will belisted in the My Team web part.

A D M I N I S T R A T O R ’ S G U I D E 31
C H A P T E R 5 E M P L O Y E E P R O F I L E A P P L I C A T I O N
Use the following steps to specify which employees will be listed in the My Team web part.
1. Go to the Administration Home page on the Business Portal web site.
2. Under HRM Self Service, click Direct Reports View. The Direct Reports View page appears.
3. Indicate whether you want to display a single level of direct reports or all levels in the My Team web part.
• To display all levels of direct reports, select the View multiple levels of direct reports check box.
• To display a single level (the manager’s direct reports only), clear the View multiple levels of direct reports check box.
4. Indicate whether inactive employees will be listed in the My Team web part.
• To display only active employees, select the Include only active employees check box.
• To display active and inactive employees, clear the Include only active employees check box.
5. Click Save.

32 A D M I N I S T R A T O R ’ S G U I D E

PA
RT
3: T
IME
AN
D A
TT
EN
DA
NC
E S
ET
UP

34 A D M I N I S T R A T O R ’ S G U I D E
Part 3: Time and Attendance setupThis part of the documentation contains the setup tasks you must complete to use the HRM Self Service Suite’s Time and Attendance application.
The following information is included:
• Chapter 6, “Pay schedules,” explains how to create a pay schedule for each pay frequency your company uses, and assign your employees to it.
• Chapter 7, “Timecard restrictions,” explains how to create and assign timecard restrictions, which are groups of rules controlling timecard entry.
• Chapter 8, “Batch prefixes,” describes how to create and assign batch prefixes. Batches are used to group transactions in Microsoft Dynamics GP for posting. Batches are identified by a name or a number.
• Chapter 9, “Assignment priority,” explains how to set up the assignment priority. The assignment priority indicates which assignment type—employee, position, department, location, or division—takes precedence when an employee enters a timecard.
• Chapter 10, “Pay codes and time codes,” outlines the differences between pay codes and time codes, and explains how to specify which codes your employees can enter time against.
• Chapter 11, “Departments and positions,” provides instructions on how to specify which departments and positions your employees can enter time against.
• Chapter 12, “Timecard delegates,” describes how to give an employee permission to enter timecards on behalf of another employee.
• Chapter 13, “Vacation requests and Microsoft Office Outlook,” explains how to install the required components of the Vacation Requests for Microsoft Office Outlook® integration.

A D M I N I S T R A T O R ’ S G U I D E 35
Chapter 6: Pay schedulesA pay schedule is a record of the beginning and ending dates of each pay period, for a specific pay frequency, for a specific year. You must create a pay schedule for each pay frequency your company uses, and assign your employees to it.
The following sections are included:
• Pay schedule overview• Create a pay schedule• Modify a pay schedule• Assign a pay schedule• Delete a pay schedule
Pay schedule overview
A pay schedule is a record of the beginning and ending dates of each pay period, for a specific pay frequency, for a specific year. For example, a monthly pay schedule might look like the following.
You must create a pay schedule for each pay frequency your company uses. Where you create pay schedules depends on which Microsoft Dynamics GP modules are registered.
Human ResourcesIf Human Resources is registered, you won’t create pay schedules in Business Portal. Rather, the pay schedules that have been defined in the Human Resources back office module will automatically appear in the Pay Schedules web part on the Timecard Setup page. However, you will need to:
• Specify how many past and future pay periods will be available to employees to enter time against. See Modify a pay schedule on page 37 for more information.
• Assign the pay schedule to employees. See Assign a pay schedule on page 38 for more information.
Monthly pay schedule

P A R T 3 T I M E A N D A T T E N D A N C E S E T U P
36 A D M I N I S T R A T O R ’ S G U I D E
PayrollIf Payroll is registered, you must set up and assign pay schedules in Business Portal. For more information, see Create a pay schedule on page 36 and Assign a pay schedule on page 38.
Human Resources and PayrollIf both Human Resources and Payroll are registered, you must set up and assign pay schedules in Business Portal. For more information, see Create a pay schedule on page 36 and Assign a pay schedule on page 38.
Create a pay schedule
If the Payroll module is registered, you must create pay schedules in Business Portal. Create a pay schedule for each pay frequency your organization uses. For example, create a weekly pay schedule for employees who are paid weekly, and a monthly pay schedule for employees who are paid monthly.
Use the following steps to create a pay schedule.
1. Go to the Administration Home page on the Business Portal web site.
2. Under HRM Self Service, click Timecard Setup. The Timecard Setup page appears.
3. In the Pay Schedules web part, click Add to open the Pay Schedule Setup page.
4. In the Pay Schedule Year field, select a year.
5. In the Description field, enter a description for the pay schedule.
6. In the Frequency list, select how often employees assigned to this pay schedule will be paid.
7. If you selected Weekly or Biweekly as the frequency, you can select the Use Only Full Pay Periods check box to create pay periods that are always equal in length (7 days or 14 days). If this check box is selected, the pay schedule will be 364 days long. Day 365 is included in the first pay period for the following year.
You can clear the Use Only Full Pay Periods check box to create pay periods that can be shorter than a standard pay period. If this check box is cleared, the pay schedule will be 365 days long—or 366 days long for leap years. The last pay period for the year will be one or two days long.
8. In the Begin Date field, enter or select the starting date for this pay schedule.
9. Click Calculate Pay Periods.
The system displays names and dates for each pay period, based on the beginning date and pay frequency you selected. You can change the pay period name and dates, as needed.

A D M I N I S T R A T O R ’ S G U I D E 37
C H A P T E R 6 P A Y S C H E D U L E S
10. In the Past pay periods field, enter the number of pay periods prior to the current period that should appear on the Timecards tab of the Timecard Entry page.
Be sure enough past pay periods are displayed to employees. For example, an employee may need to view past pay periods so that she can enter vacation hours for time already taken. Or an employee may have saved—and not yet submitted—a timecard for a previous pay period. If you choose to no longer display past pay periods, the employee will not be able to submit the saved timecard.
11. In the Current and Future pay periods field, enter the number of current and future pay periods that should appear on the Timecards tab of the Timecard Entry page.
12. Click Save.
Modify a pay schedule
Use the Pay Schedules web part on the Timecard Setup page to modify pay schedules. You can modify the following settings for pay schedules:
• Description• Period names• Start and end dates• Number of pay periods displayed on the Timecards tab of the Timecard Entry
page
If the Payroll module is not registered, you won’t be able to modify the description, period names, and start and end dates.
Use the following steps to modify a pay schedule.
1. Go to the Administration Home page on the Business Portal web site.
2. Under HRM Self Service, click Timecard Setup. The Timecard Setup page appears.
3. In the Pay Schedules web part, select a pay schedule and click Modify. The Pay Schedule Setup page appears.
4. Modify the pay schedule’s description, if necessary.
Future pay period
Current pay period
Past pay period

P A R T 3 T I M E A N D A T T E N D A N C E S E T U P
38 A D M I N I S T R A T O R ’ S G U I D E
5. The pay periods for the selected pay schedule are displayed. Modify the pay period names, start dates, and end dates, as needed.
If there are active timecards using the pay schedule, you won’t be able to modify the pay period names, start dates, and end dates.
If the frequency is Weekly or Biweekly and the Use Only Full Pay Periods check box is selected, the pay periods must be equal in length. If the Use Only Full Pay Periods check box is cleared, you can enter pay periods that are shorter than a standard pay period, such as one or two days.
6. In the Past pay periods field, enter the number of pay periods prior to the current one that should appear on the Timecards tab of the Timecard Entry page.
Be sure enough past pay periods are displayed to employees. For example, an employee may need to view past pay periods so that she can enter vacation hours for time already taken. Or an employee may have saved—and not yet submitted—a timecard for a previous pay period. If you choose to no longer display past pay periods, the employee will not be able to submit the saved timecard.
7. In the Current and Future pay periods field, enter the number of current and future pay periods that should appear on the Timecards tab of the Timecard Entry page.
8. Click Save.
Assign a pay schedule
After creating pay schedules, assign them to your employees. If an employee is not assigned to a pay schedule, he or she can’t enter timecards.
You can assign pay schedules to each employee individually, or to specific groups of employees. For example, you can assign a pay schedule to all employees in a certain location or department.
Use the following steps to assign a pay schedule.
1. Go to the Administration Home page on the Business Portal web site.
2. Under HRM Self Service, click Timecard Setup. The Timecard Setup page appears.
3. In the Pay Schedules web part, select a pay schedule and click Assign. The Assign Pay Schedule page appears.
4. From the Restrict By list, select a category.
For example, if you select Employee, all employees will be listed, and you can assign the pay schedule to specific employees. If you select Department, all departments will be listed. You can then assign the pay schedule to all employees in a specific department.
If the category you selected has a large number of records, it might take a few moments to display all the records.

A D M I N I S T R A T O R ’ S G U I D E 39
C H A P T E R 6 P A Y S C H E D U L E S
5. Select the check box for each employee or group you want the pay schedule assigned to.
6. To assign the pay schedule to another category of employees, make another selection from the Restrict By list. Then select the check box for each employee or group you want the pay schedule assigned to.
When you use different categories to assign employees to pay schedules, some employees may be assigned to multiple pay schedules. For example, suppose you assigned MonthlyPaySchedule to all employees in the Sales department and BiweeklyPaySchedule to all employees who are managers. Now assume that Michael is the manager of the Sales department. This means he is assigned to both MonthlyPaySchedule and BiweeklyPaySchedule. However, only one pay schedule can be used when entering time cards. The pay schedule an employee will use when entering timecards is determined by the assignment priority. For more information, see Chapter 9, “Assignment priority.”
7. To view a list of all employees and groups currently assigned to the pay schedule, click View.
8. Click Save.
Delete a pay schedule
If the Payroll module is registered, you can delete pay schedules in Business Portal. If the Payroll module isn’t registered, you will have to delete your pay schedules in Microsoft Dynamics GP.
Before deleting a pay schedule:
• Verify that no employees are assigned to the pay schedule.
• Be sure there are no active timecards or timecard templates using the pay schedule. If you delete a pay schedule that is being used by a timecard or template, the timecard originator won’t be able to work with that timecard or template anymore.
If you delete a pay schedule that has timecards associated with it, the timecard originators won’t be able to view history information for those timecards.
Use the following steps to delete a pay schedule.
1. Go to the Administration Home page on the Business Portal web site.
2. Under HRM Self Service, click Timecard Setup. The Timecard Setup page appears.
3. In the Pay Schedules web part, select a pay schedule and click Delete. Confirm that you want to delete the pay schedule.

40 A D M I N I S T R A T O R ’ S G U I D E

A D M I N I S T R A T O R ’ S G U I D E 41
Chapter 7: Timecard restrictionsA timecard restriction is a group of rules controlling timecards. For example, a timecard restriction specifies whether employees must enter start and stop times on their timecards. A timecard restriction also specifies whether employees must electronically sign their timecards.
You must create timecard restrictions and assign them to employees. The following information explains more about timecard restrictions, including how to create them and assign them to employees.
The following sections are included:
• Timecard restrictions overview• Create or modify a timecard restriction• Assign a timecard restriction• Delete a timecard restriction
Timecard restrictions overview
A timecard restriction is a group of rules controlling timecards. You must create timecard restrictions and assign them to employees.
When you create a timecard restriction, you can:
Set hour requirements Indicate the minimum and maximum number of hours that an employee can enter on a timecard.
Indicate whether start and stop times are required Indicate whether employees must enter the time they started and stopped working each day. For example, instead of entering eight hours of work for a specific day, they’ll need to enter 8:00 A.M. as the starting time and 5:00 P.M. as the stopping time.
Indicate which fields are editable Indicate whether employees will be able to view and edit specific fields on their timecards.
• If Payroll is registered in the back office, you can select all the fields shown.
• If Payroll is not registered in the back office, you can select only the Notes field.
When an employee enters time against a pay code, the fields that you select will be available on the employee’s timecard. When an employee enters time against a time code, only the Notes field will be available (that is, if you select the Notes check box).
P A R T 3 T I M E A N D A T T E N D A N C E S E T U P
42 A D M I N I S T R A T O R ’ S G U I D E
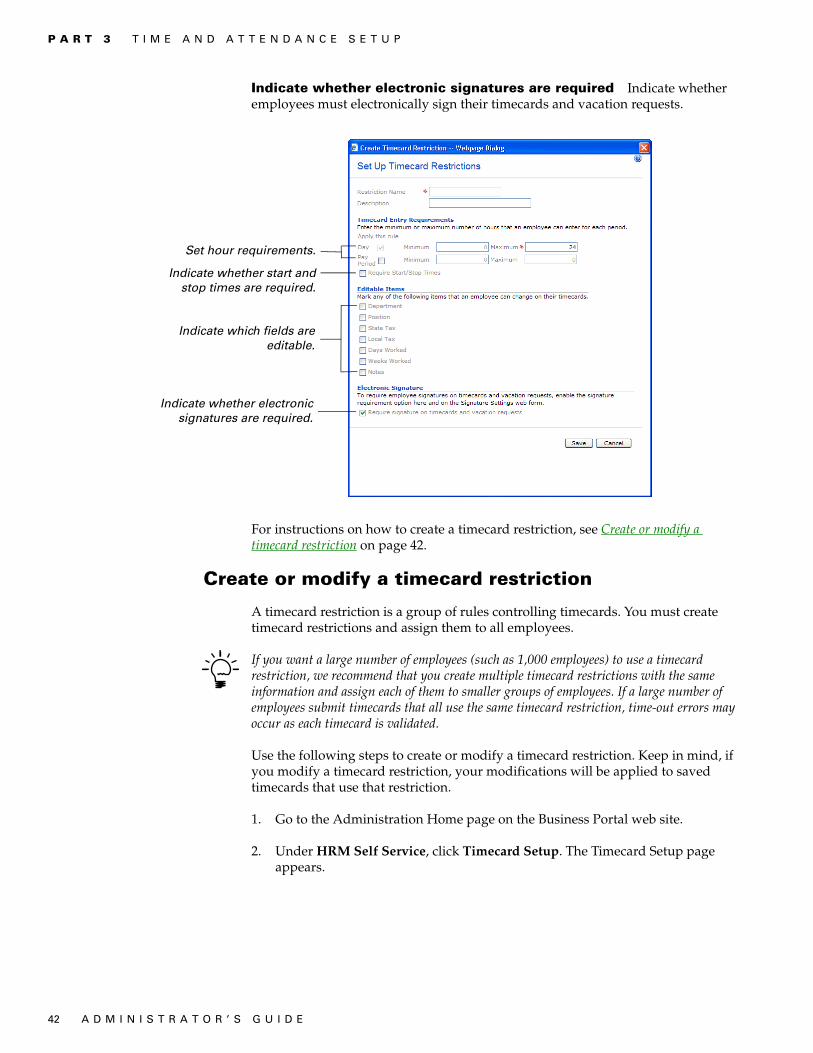
Indicate whether electronic signatures are required Indicate whether employees must electronically sign their timecards and vacation requests.
For instructions on how to create a timecard restriction, see Create or modify a timecard restriction on page 42.
Create or modify a timecard restriction
A timecard restriction is a group of rules controlling timecards. You must create timecard restrictions and assign them to all employees.
If you want a large number of employees (such as 1,000 employees) to use a timecard restriction, we recommend that you create multiple timecard restrictions with the same information and assign each of them to smaller groups of employees. If a large number of employees submit timecards that all use the same timecard restriction, time-out errors may occur as each timecard is validated.
Use the following steps to create or modify a timecard restriction. Keep in mind, if you modify a timecard restriction, your modifications will be applied to saved timecards that use that restriction.
1. Go to the Administration Home page on the Business Portal web site.
2. Under HRM Self Service, click Timecard Setup. The Timecard Setup page appears.
Indicate whether electronicsignatures are required.
Indicate which fields areeditable.
Indicate whether start andstop times are required.
Set hour requirements.

A D M I N I S T R A T O R ’ S G U I D E 43
C H A P T E R 7 T I M E C A R D R E S T R I C T I O N S
3. In the Timecard Restrictions web part, do one of the following:
• To add a new timecard restriction, click Add.
• To modify an existing timecard restriction, select the restriction and click Modify.
4. The Set Up Timecard Restrictions page appears. Enter a name for the timecard restriction.
5. Enter a description for the timecard restriction.
6. Enter the maximum number of hours an employee can enter for a day.
7. To set the minimum and maximum number of hours an employee can enter for a pay period, select the Pay Period check box, and then enter the number minimum and maximum of hours.
8. To require employees to provide start and stop times on their timecards, select the Require Start/Stop Times check box. Then select a time format:
• If you select Use AM/PM Format, employees must enter time in the following format: 8:00 AM and 5:00 PM.
• If you select Use 24-hour Format, employees must enter time in the following format: 08:00 and 16:00.
9. Select the fields you want employees to be able to view and edit on their timecards.
• If Payroll is registered in the back office, you can select all the fields shown.
• If Payroll is not registered in the back office, you can select only the Notes field.
When an employee enters time against a pay code, the fields that you select will be available on the employee’s timecard. When an employee enters time against a time code, only the Notes field will be available (that is, if you select the Notes check box).
10. Select the Require signature on timecards and vacation requests check box to require employees to electronically sign their timecards and vacation requests.
To require employees to electronically sign their timecards and vacation requests, you’ll also need to select the appropriate options on the Document Signatures page. For more information, see Require electronic signatures on page 27.
11. Click Save.
Assign a timecard restriction
After creating timecard restrictions, assign them to your employees. If an employee is not assigned to a timecard restriction, he or she can’t enter timecards.

P A R T 3 T I M E A N D A T T E N D A N C E S E T U P
44 A D M I N I S T R A T O R ’ S G U I D E
You can assign timecard restrictions to each employee individually, or to specific groups of employees. For example, you can assign a timecard restriction to all employees in a certain location or department.
Use the following steps to assign a timecard restriction.
1. Go to the Administration Home page on the Business Portal web site.
2. Under HRM Self Service, click Timecard setup. The Timecard Setup page appears.
3. In the Timecard Restrictions web part, select a timecard restriction and click Assign. The Assign Timecard Restrictions page appears.
4. From the Restrict By list, select a category.
For example, if you select Employee, all employees will be listed, and you can assign the timecard restriction to specific employees. If you select Department, all departments will be listed. You can then assign the timecard restriction to all employees in a specific department.
If the category you selected has a large number of records, it might take a few moments to display all the records.
5. Select the check box for each employee or group you want the timecard restriction assigned to.
6. To assign the timecard restriction to another category of employees, make another selection from the Restrict By list. Then select the check box for each employee or group you want the timecard restriction assigned to.
When you use different categories to assign employees to timecard restrictions, some employees may be assigned to multiple timecard restrictions. For example, let’s say you assigned TimecardRestrictionSales to all employees in the Sales department and TimecardRestrictionManagers to all employees who are managers. Now assume that Michael is the manager of the Sales department. This means he is assigned to both TimecardRestrictionSales and TimecardRestrictionManagers. However, only one timecard restriction can be used when entering time cards. The timecard restriction an employee will use when entering timecards is determined by the assignment priority. For more information, see Chapter 9, “Assignment priority.”
7. To view a list of all employees and groups currently assigned to the timecard restriction, click View.
8. Click Save.
Delete a timecard restriction
Before deleting a timecard restriction:
• Verify that no employees are assigned to the timecard restriction.
• Verify that all timecards using the timecard restriction have been processed.

A D M I N I S T R A T O R ’ S G U I D E 45
C H A P T E R 7 T I M E C A R D R E S T R I C T I O N S
Use the following steps to delete a timecard restriction.
1. Go to the Administration Home page on the Business Portal web site.
2. Under HRM Self Service, click Timecard Setup. The Timecard Setup page appears.
3. In the Timecard Restrictions web part, select a timecard restriction and click Delete. Confirm that you want to delete the timecard restriction.

46 A D M I N I S T R A T O R ’ S G U I D E

A D M I N I S T R A T O R ’ S G U I D E 47
Chapter 8: Batch prefixesWhen employee timecards are approved and transferred to Microsoft Dynamics GP, they are saved in batches. Batches are used to group transactions in Microsoft Dynamics GP for posting, and are identified by a name or a number.
If the Payroll module is registered in Microsoft Dynamics GP, you must create batch prefixes in Business Portal. The batch prefix you create will identify the Payroll batches in which timecards will be saved in the back office.
After you create a batch prefix, you’ll need to assign it to employees. For example, you can create a batch prefix named SALESTIME to identify timecards submitted by the Sales department.
The following sections are included:
• Create or modify a batch prefix• Assign a batch prefix• Delete a batch prefix
Create or modify a batch prefix
If the Payroll module is registered in Microsoft Dynamics GP, you must create batch prefixes to identify the Payroll batches in which timecards will be saved in the back office.
If the Payroll module is not registered, you will not be able to complete these steps. Batches are not used in Human Resources.
Use the following steps to create or modify a batch prefix.
1. Go to the Administration Home page on the Business Portal web site.
2. Under HRM Self Service, click Timecard Setup. The Timecard Setup page appears.
3. In the Batch Prefixes web part, do one of the following:
• To create a batch prefix, click Add. The Create Batch Prefix page appears.
• To modify a batch prefix, select a batch prefix and click Modify. The Modify Batch Prefix page appears.
4. Enter the batch prefix.
5. Enter a description for the batch prefix.
6. Click Save.

P A R T 3 T I M E A N D A T T E N D A N C E S E T U P
48 A D M I N I S T R A T O R ’ S G U I D E
Assign a batch prefix
After creating batch prefixes, assign them to your employees. If an employee is not assigned to a batch prefix, he or she can’t enter timecards.
You can assign batch prefixes to each employee individually, or to specific groups of employees. For example, you can assign a batch prefix to all employees in a certain location or department.
Use the following steps to assign a batch prefix.
1. Go to the Administration Home page on the Business Portal web site.
2. Under HRM Self Service, click Timecard setup. The Timecard Setup page appears.
3. In the Batch Prefixes web part, select a batch prefix and click Assign. The Assign Batch Prefix page appears.
4. From the Restrict By list, select a category.
For example, if you select Employee, all employees will be listed, and you can assign the batch prefix to specific employees. If you select, Department, all departments will be listed. You can then assign the batch prefix to all employees in a specific department.
If the category you selected has a large number of records, it might take a few moments to display all the records.
5. Select the check box for each employee or group you want the batch prefix assigned to.
6. To assign the batch prefix to another category of employees, make another selection from the Restrict By list. Then select the check box for each employee or group you want the batch prefix assigned to.
When you use different categories to assign employees to batch prefixes, some employees may be assigned to multiple batch prefixes. For example, let’s say you assigned SALESTIME to all employees in the Sales department and MGMNTTIME to all employees who are managers. Now assume that Michael is the manager of the Sales department. This means he is assigned to both SALESTIME and MGMNTTIME. However, only one batch prefix can be used for an employee. The batch prefix that will be used for an employee’s timecards is determined by the assignment priority. For more information, see Chapter 9, “Assignment priority.”
7. To view a list of all employees and groups currently assigned to the batch prefix, click View.
8. Click Save.

A D M I N I S T R A T O R ’ S G U I D E 49
C H A P T E R 8 B A T C H P R E F I X E S
Delete a batch prefix
Before deleting a batch prefix:
• Verify that no employees are assigned to the batch prefix.
• Verify that all timecards using the batch prefix have been processed.
Use the following steps to delete a batch prefix.
1. Go to the Administration Home page on the Business Portal web site.
2. Under HRM Self Service, click Timecard Setup. The Timecard Setup page appears.
3. In the Batch Prefixes web part, select a batch prefix and click Delete. Confirm that you want to delete the batch prefix.

50 A D M I N I S T R A T O R ’ S G U I D E
A D M I N I S T R A T O R ’ S G U I D E 51
Chapter 9: Assignment priorityAs part of Time and Attendance setup, you’ll need to specify an assignment priority. The following information explains what the assignment priority is and how to configure it.
The following sections are included:
• Assignment priority overview• Modify the assignment priority
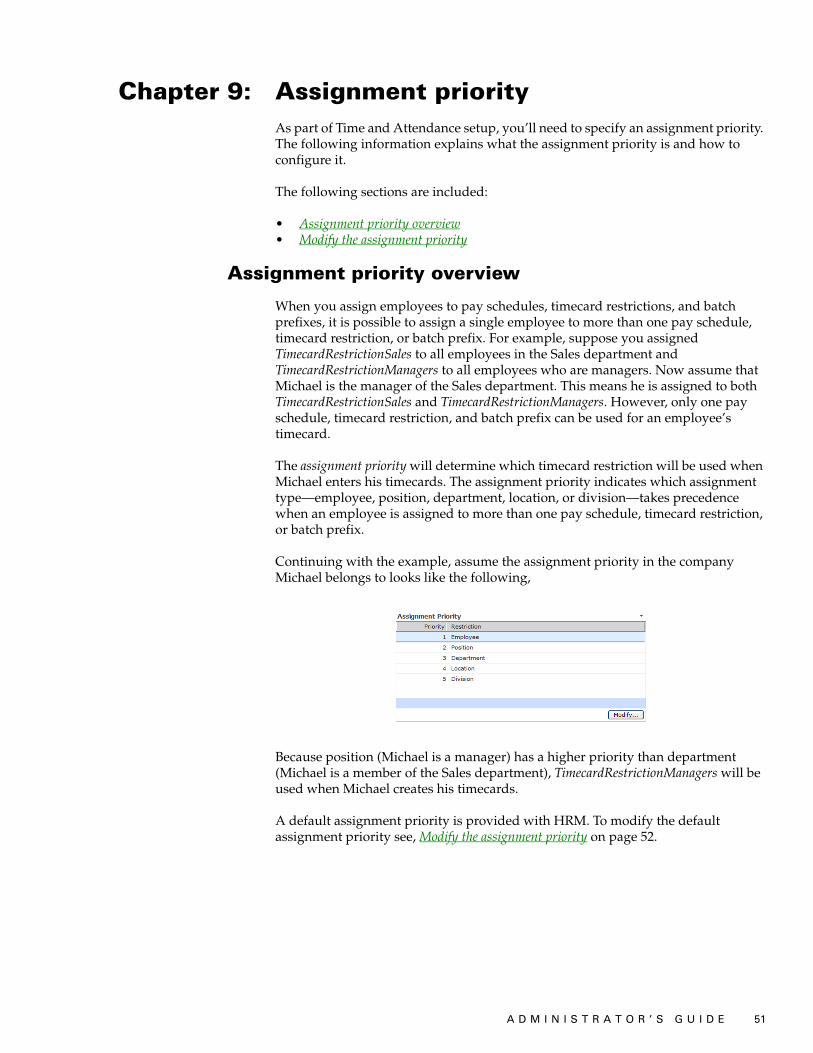
Assignment priority overview
When you assign employees to pay schedules, timecard restrictions, and batch prefixes, it is possible to assign a single employee to more than one pay schedule, timecard restriction, or batch prefix. For example, suppose you assigned TimecardRestrictionSales to all employees in the Sales department and TimecardRestrictionManagers to all employees who are managers. Now assume that Michael is the manager of the Sales department. This means he is assigned to both TimecardRestrictionSales and TimecardRestrictionManagers. However, only one pay schedule, timecard restriction, and batch prefix can be used for an employee’s timecard.
The assignment priority will determine which timecard restriction will be used when Michael enters his timecards. The assignment priority indicates which assignment type—employee, position, department, location, or division—takes precedence when an employee is assigned to more than one pay schedule, timecard restriction, or batch prefix.
Continuing with the example, assume the assignment priority in the company Michael belongs to looks like the following,
Because position (Michael is a manager) has a higher priority than department (Michael is a member of the Sales department), TimecardRestrictionManagers will be used when Michael creates his timecards.
A default assignment priority is provided with HRM. To modify the default assignment priority see, Modify the assignment priority on page 52.

P A R T 3 T I M E A N D A T T E N D A N C E S E T U P
52 A D M I N I S T R A T O R ’ S G U I D E
Modify the assignment priority
A default assignment priority is provided with HRM. You can view the default assignment priority in the Assignment Priority web part on the Timecard Setup page.
You can modify the assignment priority if you need to. Use the following steps to modify the assignment priority.
Do not modify the assignment priority when there are active timecards in the system.
1. Go to the Administration Home page on the Business Portal web site.
2. Under HRM Self Service, click Timecard Setup. The Timecard Setup page appears.
3. Review the existing priority in the Assignment Priority web part. To make changes, click Modify.
4. A dialog box appears, warning you that changes made to the assignment priority could affect timecards in the system. To continue, click Yes.
5. The Change Priority of Assignments page appears, displaying the existing priority levels. To change an item’s priority, select the item, then click Move Up or Move Down until the item is at the correct priority level.
6. Continue to select items and move them up or down, as necessary.
7. Click Save.

A D M I N I S T R A T O R ’ S G U I D E 53
Chapter 10: Pay codes and time codesWhen employees enter timecards, they’ll enter their hours against pay codes or time codes. The following information explains what pay codes and time codes are, and how to specify which ones your employees can enter time against.
The following information is included:
• Pay codes and time codes overview• Specify which pay codes and time codes employees can enter time against• How pay codes and time codes are displayed in the HRM Self Service Suite• How time off information is displayed in the HRM Self Service Suite
Pay codes and time codes overview
When employees enter timecards, they’ll enter their hours against pay codes or time codes, depending on which Microsoft Dynamics GP modules you have registered.
PayrollIf Payroll is registered, employees will enter timecards using pay codes. Pay codes are used to identify a specific type and rate of pay. For example, employees who are paid a specific hourly rate may have the pay code HOUR assigned to them.
Employees can enter time against pay codes if:
• Pay codes are assigned to them in Payroll.
• Pay codes are based on the following pay types: Hourly, Overtime, Double Time, Vacation, Sick, and Holiday. For more information about pay types, see the documentation for the Payroll module.
• Pay codes are assigned to them on the Employee Assignments page in Business Portal. See Specify which pay codes and time codes employees can enter time against on page 54 for more information.
Human ResourcesIf Human Resources is registered, but not Payroll, employees will enter timecards using time codes. Time codes are used to categorize how employees use their time. For instance, time codes can be used to track vacation time, hourly time, and sick time.
Employees can enter time against time codes if:
• Time codes are assigned to them in Human Resources.
• Time codes are based on the following time types: Hourly, Overtime, Benefit, and Absent. For more information about time types, see the documentation for the Human Resources module.
• Time codes are assigned to them on the Employee Assignments page in Business Portal. See Specify which pay codes and time codes employees can enter time against on page 54 for more information.

P A R T 3 T I M E A N D A T T E N D A N C E S E T U P
54 A D M I N I S T R A T O R ’ S G U I D E
Human Resources and PayrollIf both Human Resources and Payroll are registered, employees will enter timecards using pay codes. Pay codes are used to identify a specific type and rate of pay. For example, employees who are paid a specific hourly rate may have the pay code HOUR assigned to them.
Employees can enter time against pay codes if:
• Pay codes are assigned to them in Payroll.
• Pay codes are based on the following pay types: Hourly, Overtime, Double Time, Vacation, Sick, and Holiday. For more information about pay types, see the documentation for the Payroll module.
• Pay codes are assigned to them on the Employee Assignments page in Business Portal. See Specify which pay codes and time codes employees can enter time against on page 54 for more information.
Specify which pay codes and time codes employees can enter time against
Use the following steps to specify which pay codes and time codes your employees can enter time against.
You can also specify which departments and positions your employees can enter time against. For more information, see Chapter 11, “Departments and positions.”
1. Go to the Administration Home page on the Business Portal web site.
2. Under HRM Self Service, click Employee Assignments. The Employee Assignments page appears.
3. In the Employee List, select an employee.
4. In the Assignments web part, select the Pay Code or Time Code option. (The Time Code option won’t be available if Payroll is registered.)
All of the pay codes or time codes the employee is assigned to in Microsoft Dynamics GP will be listed, and are marked by default.

A D M I N I S T R A T O R ’ S G U I D E 55
C H A P T E R 1 0 P A Y C O D E S A N D T I M E C O D E S
5. If there are pay codes or time codes you do not want the employee to enter time against, unmark the appropriate check boxes.
The pay codes and time codes that are marked will be available in a drop-down list on the employee’s timecard. (Unmarked codes will not appear in the list.)
The pay codes and time codes listed on the Employee Assignments page are the codes assigned to the employee in Microsoft Dynamics GP. Marking or unmarking a code on this page does not affect the back office. For example, if you unmark a pay code, the employee will not be able to enter time against that pay code in Business Portal. However, the pay code will still be assigned to the employee in Microsoft Dynamics GP.
6. Click Save.
How pay codes and time codes are displayed in the HRM Self Service Suite
Pay codes and time codes are displayed in several places in the HRM Self Service Suite. The following information describes where they are displayed, and explains how your settings in the back office determine which type of code is displayed.
The pay codes or time codesthat are marked on the
Employee Assignments pagewill be displayed in this list.

P A R T 3 T I M E A N D A T T E N D A N C E S E T U P
56 A D M I N I S T R A T O R ’ S G U I D E
Timecard pageThe Timecards page displays either pay codes or time codes.
Your back office settings determine which codes are displayed.
Timecard Template pageThe Timecard Template page displays either pay codes or time codes.
Pay codes or timecodes are displayed in
this list.
If this module is registered... These codes are displayed...
Payroll Pay codes
Human Resources Time codes
Payroll and Human Resources Pay codes
Pay codes or timecodes are displayed in
this list.

A D M I N I S T R A T O R ’ S G U I D E 57
C H A P T E R 1 0 P A Y C O D E S A N D T I M E C O D E S
Your back office settings determine which codes are displayed.
Employee Pay tabThe Employee Pay tab on the Team Profile page displays pay codes only.
If Payroll is not registered, this tab is blank.
Compensation History web partThe Compensation History web part on the Team Job History page displays pay codes only.
If Payroll is not registered, this web part is blank.
How time off information is displayed in the HRM Self Service Suite
Time off information is displayed in the following places in the HRM Self Service Suite:
• Paychecks tab of the Pay page • Time Off tab of the Timecard Entry page • Time Off Summary tab of the Team Timecard Entry page
If this module is registered... These codes are displayed...
Payroll Pay codes
Human Resources Time codes
Payroll and Human Resources Pay codes
Pay codes are displayed onthe Employee Pay tab.
Pay codes are displayedin the Compensation
History web part.
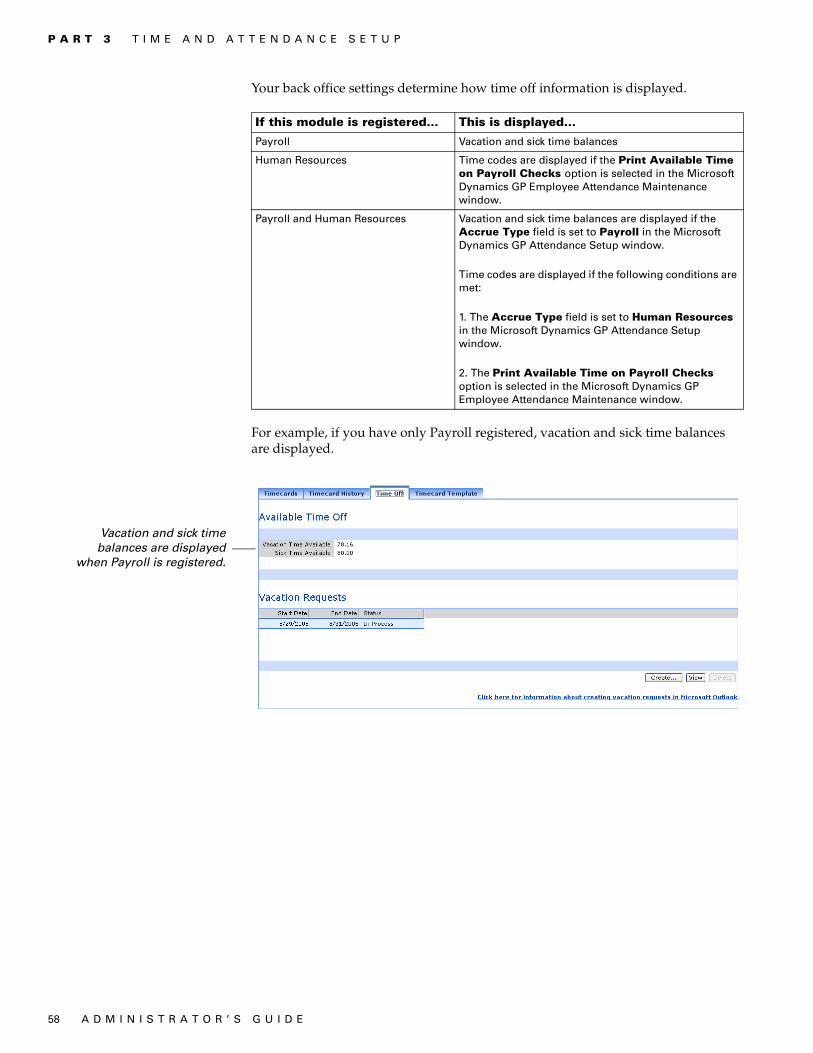
P A R T 3 T I M E A N D A T T E N D A N C E S E T U P
58 A D M I N I S T R A T O R ’ S G U I D E
Your back office settings determine how time off information is displayed.
For example, if you have only Payroll registered, vacation and sick time balances are displayed.
If this module is registered... This is displayed...
Payroll Vacation and sick time balances
Human Resources Time codes are displayed if the Print Available Time on Payroll Checks option is selected in the Microsoft Dynamics GP Employee Attendance Maintenance window.
Payroll and Human Resources Vacation and sick time balances are displayed if the Accrue Type field is set to Payroll in the Microsoft Dynamics GP Attendance Setup window.
Time codes are displayed if the following conditions are met:
1. The Accrue Type field is set to Human Resources in the Microsoft Dynamics GP Attendance Setup window.
2. The Print Available Time on Payroll Checks option is selected in the Microsoft Dynamics GP Employee Attendance Maintenance window.
Vacation and sick timebalances are displayed
when Payroll is registered.

A D M I N I S T R A T O R ’ S G U I D E 59
C H A P T E R 1 0 P A Y C O D E S A N D T I M E C O D E S
If you have only Human Resources registered, and the Print Available Time on Payroll Checks option is selected in the Employee Attendance Maintenance window, time codes are displayed.
Time codes are displayedwhen Human Resources is
registered and the PrintAvailable Time on Payroll
Checks option is selected.

60 A D M I N I S T R A T O R ’ S G U I D E

A D M I N I S T R A T O R ’ S G U I D E 61
Chapter 11: Departments and positionsSome of your employees may need to enter time against multiple departments or positions. For example, you may have an employee who needs to enter time for hours worked for both the Accounting and Purchasing/Receiving departments.
To enable employees to enter time against multiple departments and positions, you’ll need to complete two procedures. First, you’ll need to give employees permission to select departments and positions on their timecards. Second, you’ll need to specify which departments and positions each employee can enter time against.
These procedures are explained in the following sections:
• Give employees permission to select departments and positions on their timecards• Specify which departments and positions employees can enter time against
If Payroll is not registered in Microsoft Dynamics GP, there is no need to complete these procedures. Employees can specify a department and position only when entering time against a pay code. They cannot specify a department and position when entering time against a time code.
Give employees permission to select departments and positions on their timecards
To give employees permission to select the department and position that their work applied to, you must modify their timecard restriction to allow it.
1. Go to the Administration Home page on the Business Portal web site.
2. Under HRM Self Service, click Timecard Setup. The Timecard Setup page appears.
3. In the Timecard Restrictions web part, select the timecard restriction that applies to the employees who you want to be able to select their department and position when they enter timecards. Click Modify.
4. The Set Up Timecard Restrictions page appears. In the Editable Items section, select the Department and Position options.
5. Click Save.
Specify which departments and positions employees can enter time against
Use the following steps to specify which departments and positions each employee can enter time against.
You can also specify which pay codes and time codes your employees can enter time against. For more information, see Chapter 10, “Pay codes and time codes.”
1. Go to the Administration Home page on the Business Portal web site.
2. Under HRM Self Service, click Employee Assignments. The Employee Assignments page appears.

P A R T 3 T I M E A N D A T T E N D A N C E S E T U P
62 A D M I N I S T R A T O R ’ S G U I D E
3. In the Employee List, select an employee.
4. Select the Department option. All departments will be listed.
5. Select the departments you want the employee to be able to enter time against.
6. Select the Position option. All positions will be listed.
7. Select the positions you want the employee to be able to enter time against.
8. Click Save.
The departments and positions you selected will be available in drop-down lists on the employee’s timecard.
The departments and positions you select on the Employee Assignments page will be displayed in these lists.

A D M I N I S T R A T O R ’ S G U I D E 63
Chapter 12: Timecard delegatesNot all employees in your organization may have access to a computer to enter their timecards. Therefore, you may want their manager or a specific employee (such as an administrative assistant) to be their delegate—another employee who can enter timecards on their behalf. The following information explains how to give an employee the ability to enter timecards on behalf of another employee.
The following sections are included:
• Give an employee permission to enter timecards for another employee• View timecard delegates
Give an employee permission to enter timecards for another employee
To give an employee permission to enter timecards for specific employees, or for all employees in a department, complete the following steps.
1. Go to the Administration Home page on the Business Portal web site.
2. Under HRM Self Service, click Timecard Delegates. The Timecard Delegates page appears.
3. In the Employee List, select the employee who will enter timecards on behalf of another employee or employees.
4. In the Enter Time on Behalf of web part, select who the employee will enter timecards for. The employee could enter timecards for specific employees, or entire departments.
Employees Select the Employees option and select specific employees. For example, you may want to give Pilar Ackerman the ability to enter timecards for Nancy Buchanan and Aidan Delaney.
Departments Select the Departments option and select departments. For example, you may want to give administrative assistant, Diane Tibbot, the ability to enter timecards for all employees in the Shipping department.
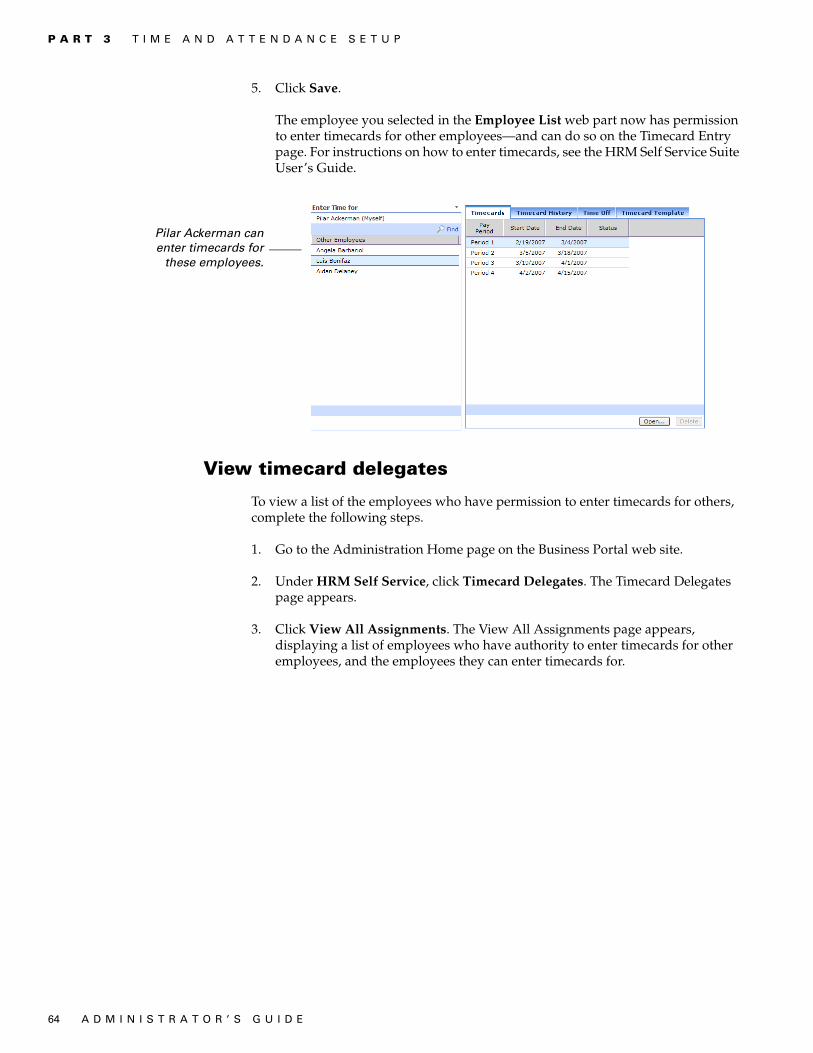
P A R T 3 T I M E A N D A T T E N D A N C E S E T U P
64 A D M I N I S T R A T O R ’ S G U I D E
5. Click Save.
The employee you selected in the Employee List web part now has permission to enter timecards for other employees—and can do so on the Timecard Entry page. For instructions on how to enter timecards, see the HRM Self Service Suite User’s Guide.
View timecard delegates
To view a list of the employees who have permission to enter timecards for others, complete the following steps.
1. Go to the Administration Home page on the Business Portal web site.
2. Under HRM Self Service, click Timecard Delegates. The Timecard Delegates page appears.
3. Click View All Assignments. The View All Assignments page appears, displaying a list of employees who have authority to enter timecards for other employees, and the employees they can enter timecards for.
Pilar Ackerman canenter timecards for
these employees.

A D M I N I S T R A T O R ’ S G U I D E 65
Chapter 13: Vacation requests and Microsoft Office Outlook Vacation Requests for Microsoft Office Outlook is a feature that integrates Time and Attendance with Microsoft Office Outlook 2007 and Outlook 2010. This integration enables employees to create and save vacation requests in Outlook. The vacation requests will then be sent automatically to Business Portal for manager approval.
The following information explains how to install the required components of the Vacation Requests for Microsoft Office Outlook integration. For information on creating and submitting vacation requests, see the HRM Self Service Suite User’s Guide.
This information is divided into the following sections:
• Install the Outlook add-in• Set up the Outlook add-in
Install the Outlook add-in
The following steps explain how to install the Vacation Requests for Microsoft Office Outlook add-in. Employees must install the Outlook add-in on the workstations where they will create and submit vacation requests.
1. Close Outlook before installing the Outlook add-in.
2. Open Business Portal and go to the Timecard Entry page.Roles > Employee > click Timecard Entry in the Quick Launch-or-Employee > click Timecard Entry in the Quick Launch
3. Click the Time Off tab and click the link to get information about creating vacation requests in Outlook.
4. The Vacation Request for Microsoft Outlook Add-in page opens. Click the link to start the installation wizard.
5. The Welcome window appears. Click Next.
6. The License Agreement window appears. Read the terms and conditions, then select I Agree, and click Next.
7. The Select Installation Folder window appears. Specify the folder where you want the Outlook add-in files installed. The default folder is C:\Documents and Settings\<user>\Application Data\Microsoft\AddIns, where <user> is the login name of the current user of the computer. Click Next.
8. The Confirm Installation window appears. Click Next to start the installation.
9. The Installation Complete window appears when the installation is complete. Click Close to close the installation wizard.
10. The Vacation Request for Microsoft Outlook Add-in page is redisplayed. Click Close.

P A R T 3 T I M E A N D A T T E N D A N C E S E T U P
66 A D M I N I S T R A T O R ’ S G U I D E
Set up the Outlook add-in
After employees install the Vacation Requests for Microsoft Office Outlook add-in, they’ll need to set up the Vacation Requests for Microsoft Office Outlook add-in. For more information, refer to the Human Resources Management Self Service Suite User’s Guide.

PA
RT
4: W
OR
KFLO
W S
ET
UP

68 A D M I N I S T R A T O R ’ S G U I D E
Part 4: Workflow setupWorkflow is the process used to route and approve documents in the HRM Self Service Suite. Workflow describes how a document “flows” through the system, starting when an employee creates a document, and ending when the document is saved in the back office database.
This part of the documentation provides an overview of the workflow system, and explains how to manage it.
The following information is provided:
• Chapter 14, “Workflow overview,” provides an overview of the workflow system and describes key concepts you’ll need to understand to administer it.
• Chapter 15, “Workflow modifications,” explains how to modify a document’s default workflow.
• Chapter 16, “E-mail notifications,” explains how to configure the workflow system so that users receive e-mail notifications when documents they’ve submitted have been approved or rejected.
• Chapter 17, “Task transfer,” describes how to reassign workflow tasks from one user or role to another user or role.
• Chapter 18, “Workflow event log,” explains how to configure and view the workflow system’s event log.
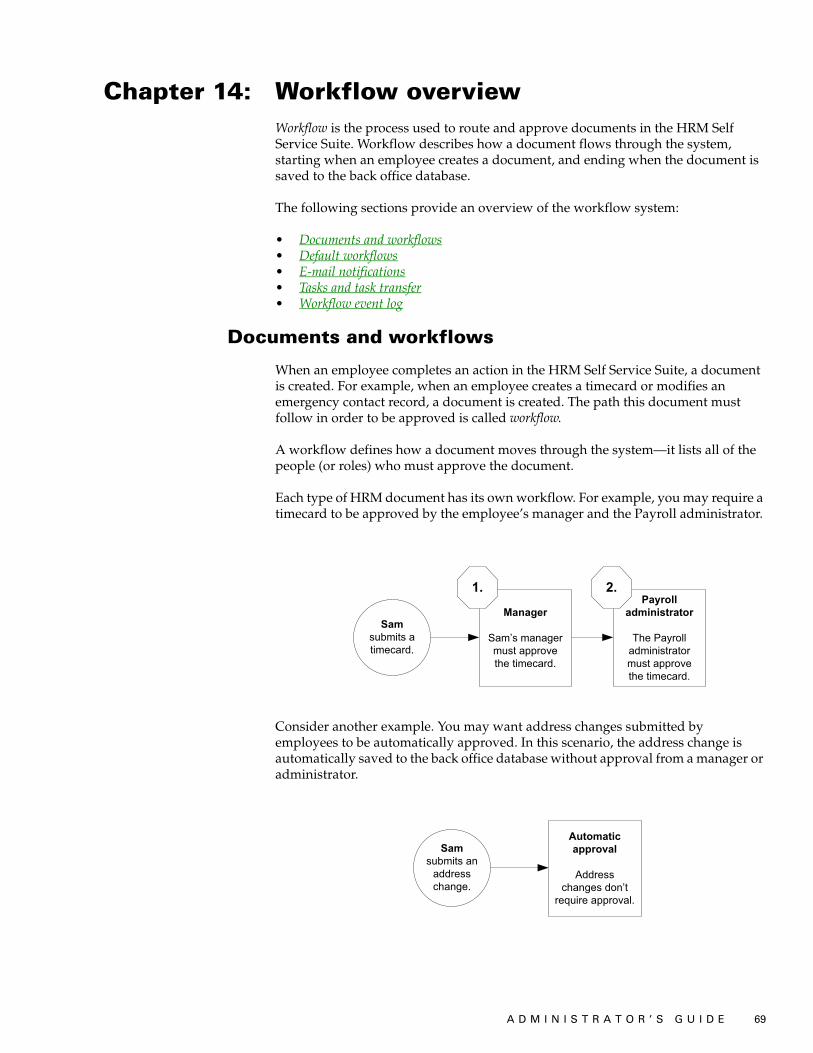
A D M I N I S T R A T O R ’ S G U I D E 69
Chapter 14: Workflow overviewWorkflow is the process used to route and approve documents in the HRM Self Service Suite. Workflow describes how a document flows through the system, starting when an employee creates a document, and ending when the document is saved to the back office database.
The following sections provide an overview of the workflow system:
• Documents and workflows• Default workflows• E-mail notifications• Tasks and task transfer• Workflow event log
Documents and workflows
When an employee completes an action in the HRM Self Service Suite, a document is created. For example, when an employee creates a timecard or modifies an emergency contact record, a document is created. The path this document must follow in order to be approved is called workflow.
A workflow defines how a document moves through the system—it lists all of the people (or roles) who must approve the document.
Each type of HRM document has its own workflow. For example, you may require a timecard to be approved by the employee’s manager and the Payroll administrator.
Consider another example. You may want address changes submitted by employees to be automatically approved. In this scenario, the address change is automatically saved to the back office database without approval from a manager or administrator.
Manager
Sam’s manager
must approve
the timecard.
1.
Sam
submits a
timecard.
Payroll
administrator
The Payroll
administrator
must approve
the timecard.
2.
Sam
submits an
address
change.
Automatic
approval
Address
changes don’t
require approval.

P A R T 4 W O R K F L O W S E T U P
70 A D M I N I S T R A T O R ’ S G U I D E
Default workflows
Each type of HRM document is installed with a default workflow. You can modify each document’s workflow to fit your business needs. To view the default workflow for each document, and to modify it, see Chapter 15, “Workflow modifications.”
E-mail notifications
E-mail notifications are e-mail messages that tell users when documents they’ve submitted have been approved or rejected, or when documents are assigned to them.
Both document originators and approvers can receive e-mail notifications. For example, a manager can receive an e-mail notification when one of his or her employees has submitted a timecard for approval. The employee can receive a notification when the manager has approved or rejected the timecard.
For information about how to set up e-mail notifications, see Chapter 16, “E-mail notifications.”
Tasks and task transfer
Once users at your company begin to submit documents, tasks will appear on each user’s HR Documents - Assigned to Me page. A task indicates that the user must approve or reject a document.
You might need to assign tasks from one user to another. For example, if a user is on vacation or leaves the company, you will need to transfer the user’s tasks to another user. You can transfer tasks using the Workflow Task Transfer page. For more information, see Chapter 17, “Task transfer.”
Workflow event log
The workflow system includes an event log, which records information about workflow events, such as when a specific document was submitted and approved.
For more information about the workflow event log, see Chapter 18, “Workflow event log.”

A D M I N I S T R A T O R ’ S G U I D E 71
Chapter 15: Workflow modificationsEach HRM document has a default workflow. You can modify each document’s workflow to fit your business needs on the Workflow Business Processes page.
The following information will help you understand and modify a document’s workflow:
• Document types and default workflows• Set workflow options• Workflow steps• Add or modify a work item step• Resource queries• Modify a business activity step• Specify the starting step• Remove a work item step• View the process log• End, suspend, or resume documents
Document types and default workflows
Each HRM document has a default workflow. The workflow defines who must approve each document. For example, the default workflow for timecards specifies that a timecard must be approved by the employee’s manager.
The following table lists each type of HRM document, and the default user or role responsible for approving it.
Document name Default approver
Dependent Information Human Resources Administrator
Emergency Contact Information Human Resources Administrator
Employee Direct Deposit Payroll Administrator
Employee Education Human Resources Administrator
Employee Information (employee profile changes) Payroll Administrator
Employee Pay Change Payroll Administrator
Employee Skills Human Resources Administrator
Employee Tax Information (W-4) Payroll Administrator
Employee Test Information Human Resources Administrator
Employee Timecard Employee’s manager (or Payroll Administrator role if employee doesn’t have a manager)
Employee Vacation Request Employee’s manager (or Payroll Administrator role if employee doesn’t have a manager)
Manager Requisition (job postings) Human Resources Administrator
Timecard on Behalf of Employee (timecards submitted by managers and delegates)
Payroll Administrator

P A R T 4 W O R K F L O W S E T U P
72 A D M I N I S T R A T O R ’ S G U I D E
Set workflow options
The Workflow Business Processes page displays each HRM document’s workflow. Each type of document is listed on the left side of the page, and setup options are listed on the right side of the page in the Options tab.
For each document type, you must specify whether:
• Users will be able to submit documents.• Users will be able to remove documents they’ve submitted from the workflow
system.
Use the following steps to set these workflow options.
1. Go to the Administration Home page on the Business Portal web site.
2. Under HRM Self Service, click Workflow Business Processes. The Workflow Business Processes page appears.
3. From the Business Process List, select a document type.
4. Select the Options tab.
5. To prevent users from submitting new documents of the selected type, select the Suspend creation of new process instances check box. For example, if you select the Employee Timecard document type and this check box, users won’t be able to submit new timecards.
You should select this check box if you’re going to modify the document’s workflow, or if you’re going to upgrade the HRM Self Service Suite.
6. To prevent users from removing documents they’ve submitted from the workflow system (and ending the approval process for them), select the Disable Terminate option for originator check box.
7. Click Save.
Workflow steps
A document’s workflow consists of steps. You can view each step in a document’s workflow on the Steps tab of the Workflow Business Processes page. Each step has a name, description, and type.
Name The purpose of the step. For example, a step might be named First Required Approver if the purpose of the step is to get initial approval of the document.
A D M I N I S T R A T O R ’ S G U I D E 73
C H A P T E R 1 5 W O R K F L O W M O D I F I C A T I O N S
Description A brief explanation of the step.
Type Indicates whether the step is a work item step or a business activity step.
• Work item steps require a user to take some action, such as approving or rejecting the document. Work item steps will appear as tasks in the appropriate user’s HR Documents - Assigned to Me page. You can add, modify, and remove work item steps from a document’s workflow. For more information, see Add or modify a work item step on page 73.
• Business activity steps are automated steps that don’t require user action. You can’t add or remove business activity steps, but you can modify them. For more information, see Modify a business activity step on page 75.
Add or modify a work item step
You can add a work item step—that is, a step that requires user interaction—to a document’s workflow, or you can modify an existing work item step.
Before adding or modifying a work item step:
• Verify that there are no active documents of the selected type in the workflow system. To determine whether there are active documents in the system—and to remove active documents if need be—see End, suspend, or resume documents on page 78.
• Prevent users from submitting new documents of the selected type. For more information, see Set workflow options on page 72.
Use the following procedure to add or modify a work item step.
1. Go to the Administration Home page on the Business Portal web site.
2. Under HRM Self Service, click Workflow Business Processes. The Workflow Business Processes page appears.
3. From the Business Process List, select a document type.
4. Select the Steps tab.
5. Do one of the following:
• To add a new work item step, click Add. The Add Step page appears.
• To modify a work item step, select the step and click Modify. The Modify Step page appears.
6. Enter a name and description for the step.
7. Select a priority level for the step. The priority level indicates the urgency of the task.
A user can change the priority level when the task appears on the HR Documents - Assigned to Me page.
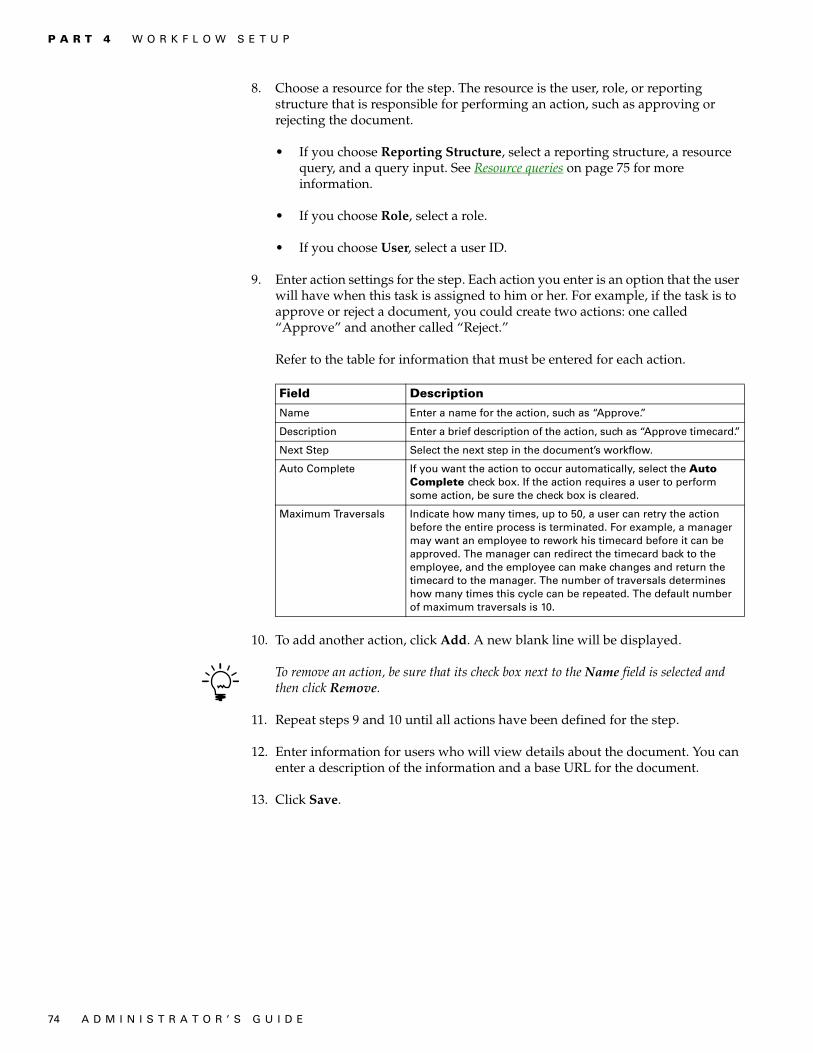
P A R T 4 W O R K F L O W S E T U P
74 A D M I N I S T R A T O R ’ S G U I D E
8. Choose a resource for the step. The resource is the user, role, or reporting structure that is responsible for performing an action, such as approving or rejecting the document.
• If you choose Reporting Structure, select a reporting structure, a resource query, and a query input. See Resource queries on page 75 for more information.
• If you choose Role, select a role.
• If you choose User, select a user ID.
9. Enter action settings for the step. Each action you enter is an option that the user will have when this task is assigned to him or her. For example, if the task is to approve or reject a document, you could create two actions: one called “Approve” and another called “Reject.”
Refer to the table for information that must be entered for each action.
10. To add another action, click Add. A new blank line will be displayed.
To remove an action, be sure that its check box next to the Name field is selected and then click Remove.
11. Repeat steps 9 and 10 until all actions have been defined for the step.
12. Enter information for users who will view details about the document. You can enter a description of the information and a base URL for the document.
13. Click Save.
Field Description
Name Enter a name for the action, such as “Approve.”
Description Enter a brief description of the action, such as “Approve timecard.”
Next Step Select the next step in the document’s workflow.
Auto Complete If you want the action to occur automatically, select the Auto Complete check box. If the action requires a user to perform some action, be sure the check box is cleared.
Maximum Traversals Indicate how many times, up to 50, a user can retry the action before the entire process is terminated. For example, a manager may want an employee to rework his timecard before it can be approved. The manager can redirect the timecard back to the employee, and the employee can make changes and return the timecard to the manager. The number of traversals determines how many times this cycle can be repeated. The default number of maximum traversals is 10.

A D M I N I S T R A T O R ’ S G U I D E 75
C H A P T E R 1 5 W O R K F L O W M O D I F I C A T I O N S
Resource queries
A resource query is a class, or division, within a reporting structure. A parent-child relationship exists between a reporting structure and its resource queries. A resource query cannot exist without its parent reporting structure.
The HRM Self Service Suite includes two resource queries. If you select the HRM Supervisor Resource reporting structure, you can select the Process Query for Payroll Supervisor resource query. If a supervisor cannot be found, the document will be assigned to the Payroll Administrator. If you select the HRM Originator Provider reporting structure, you can select the Process Query for Originator resource query.
When a workflow step uses a reporting structure as its resource, the resource query might need input to be able to locate the appropriate resource. You must point the resource query to the piece of information that will help it identify the appropriate resource.
Refer to the table for more information.
Modify a business activity step
You can modify a business activity step—that is, an automated step that requires no user interaction—in a document’s workflow.
Before modifying a business activity step:
• Verify that there are no active documents of the selected type in the workflow system. To determine whether there are active documents in the system—and to remove active documents, if need be—see End, suspend, or resume documents on page 78.
• Prevent users from submitting new documents of the selected type. For more information, see Set workflow options on page 72.
Use the following procedure to modify a business activity step.
1. Go to the Administration Home page on the Business Portal web site.
2. Under HRM Self Service, click Workflow Business Processes. The Workflow Business Processes page appears.
3. From the Business Process List, select a document type.
4. Select the Steps tab.
Query input Description
Originator A resource is identified based on information about the user or role who submitted the document.
Previous Step Assignee A resource is identified based on information about the user or role who was assigned to the previous step in the workflow.
No Input No input is required to return the appropriate resource. The same resource is always identified, no matter which user submits the document or which user or role was assigned to the previous step in the document’s workflow.

P A R T 4 W O R K F L O W S E T U P
76 A D M I N I S T R A T O R ’ S G U I D E
5. Select a step with the Business Activity type.
6. Click Modify to open the Modify Business Activity page.
7. Select the step that should follow the successful completion of the business activity step.
8. Select the step that should follow the unsuccessful completion of the business activity step.
9. Click Save.
Specify the starting step
You can specify a new starting step for a document’s workflow. Before specifying a new starting step:
• Verify that there are no active documents of the selected type in the workflow system. To determine whether there are active documents in the system—and to remove active documents, if need be—see End, suspend, or resume documents on page 78.
• Prevent users from submitting new documents of the selected type. For more information, see Set workflow options on page 72.
Use the following procedure to specify a new starting step for a document’s workflow.
1. Go to the Administration Home page on the Business Portal web site.
2. Under HRM Self Service, click Workflow Business Processes. The Workflow Business Processes page appears.
3. From the Business Process List, select a document type.
4. Select the Steps tab.
5. Select the step that you want to be the starting step.
6. Click Set Starting Step.
7. A message is displayed, asking if you’re sure you want the selected step to become the starting step. Click Yes.
The starting step will be marked with an asterisk (*).

A D M I N I S T R A T O R ’ S G U I D E 77
C H A P T E R 1 5 W O R K F L O W M O D I F I C A T I O N S
Remove a work item step
You can remove a work item step from a document’s workflow. When you remove a work item step, be sure to carefully review the remaining steps in the workflow so that no gaps are created in the document’s approval process.
Before removing a work item step:
• Verify that there are no active documents of the selected type in the workflow system. To determine whether there are active documents in the system—and to remove active documents if need be—see End, suspend, or resume documents on page 78.
• Prevent users from submitting new documents of the selected type. For more information, see Set workflow options on page 72.
• Verify that the work item step you are going to remove is not the starting step. If it is the starting step, you must select a new starting step. See Specify the starting step on page 76 for more information.
Use the following procedure to remove a work item step from a document’s workflow.
1. Go to the Administration Home page on the Business Portal web site.
2. Under HRM Self Service, click Workflow Business Processes. The Workflow Business Processes page appears.
3. From the Business Process List, select a document type.
4. Select the Steps tab.
5. Select the work item step you want to remove.
6. Click Remove.
7. A message is displayed, asking if you’re sure you want to remove the step. Click Yes.
View the process log
The process log lists all documents in the workflow system. It lists the title (or subject) of the document, the date and time the document was submitted, the user or role that is currently assigned to the document, and the current status of the document.
Use the following steps to view the process log.
1. Go to the Administration Home page on the Business Portal web site.
2. Under HRM Self Service, click Workflow Process Log. The Workflow Process Log page appears.

P A R T 4 W O R K F L O W S E T U P
78 A D M I N I S T R A T O R ’ S G U I D E
3. Select a document. Comments, action history, and details about the document are displayed on the right side of the page.
4. To filter the documents in the process log, click the arrow in the upper-left of the process log and select from the list of filter options.
End, suspend, or resume documents
You can end, suspend, or resume HRM documents using the Workflow Process Log page.
End If you click End, the selected document’s status changes to Aborted. This means the document has been permanently removed from the workflow system.
Suspend If you click Suspend, the selected document’s status changes to Suspended. This means the document’s workflow has been paused. If you later want the document’s workflow to continue, you can click Resume.
Resume If you click Resume, the suspended document’s workflow will continue. The document will be processed beginning with the workflow step from which it was suspended. You cannot resume documents that have the Aborted status.
Users can use the HR Documents - Submitted by Me page to end, suspend, or resume documents they created. Refer to the Human Resources Management Self Service Suite User’s Guide for more information.
Use the following steps to end, suspend, or resume a document.
1. Go to the Administration Home page on the Business Portal web site.
2. Under HRM Self Service, click Workflow Process Log. The Workflow Process Log page appears.
3. Select the check box next to a document.
4. Click the End, Suspend, or Resume button.
You can filter thedocuments displayed in
the process log.

A D M I N I S T R A T O R ’ S G U I D E 79
Chapter 16: E-mail notificationsE-mail notifications are e-mail messages that tell users when a workflow event has occurred, such as when documents have been assigned to them, or when documents they’ve submitted have been approved or removed from the workflow system.
Both document originators and approvers can receive e-mail notifications. For example, a manager can receive an e-mail notification when one of his or her employees has submitted a timecard for approval. The employee can receive a notification when the manager has approved or rejected the timecard.
The following information explains how to set up e-mail notifications:
• Enter e-mail addresses• Enter the name of your SMTP server• Set up e-mail notifications• Message text
Enter e-mail addresses
In order for users to receive e-mail notifications, the Business Portal administrator must enter each user’s e-mail address on the Users page.
For more information on how to enter users’ e-mail addresses, see the Business Portal Administrator’s Guide.
Enter the name of your SMTP server
In order to use e-mail notifications, the Business Portal administrator must enter the name of your Simple Mail Transfer Protocol (SMTP) server and a from e-mail address on the E-mail and Terminal Services page.
For instructions on how to enter the name of your SMTP server, see the Business Portal Administrator’s Guide.
Set up e-mail notifications
Use following steps to set up e-mail notifications.
Before you set up e-mail notifications, enter your users’ e-mail addresses and the name of the server that will manage the e-mail notifications. For more information, see Enter e-mail addresses on page 79 and Enter the name of your SMTP server on page 79.
1. Go to the Administration Home page on the Business Portal web site.
2. Under HRM Self Service, click Workflow Process Options. The Workflow Process Options page appears.
3. Click the Subscriptions tab.

P A R T 4 W O R K F L O W S E T U P
80 A D M I N I S T R A T O R ’ S G U I D E
4. Select whether to notify users when documents are assigned to them, when documents they’ve submitted have been processed, or both.
• If you select When they are assigned tasks, users will be notified when a task appears on their HR Documents - Assigned to Me page.
• If you select When a task related to a business process they started completes, users will be notified when documents they’ve submitted have been approved or rejected.
5. Indicate if users should be notified when business processes (documents) are:
• Started• Suspended• Resumed• Terminated• Completed
6. Click Save.
Message text
The text that appears in e-mail notifications indicates what action has occurred in the workflow system. For example, if you submitted a document, the e-mail notification you receive says:
Process was started successfully.
If you submit a vacation request and the Payroll Administrator approves it, the e-mail notification you receive says:
Task has been completed by Role: Payroll Administrator. The result of this task is: Approve
You cannot modify the text that appears in e-mail notifications.

A D M I N I S T R A T O R ’ S G U I D E 81
Chapter 17: Task transferOnce users at your company begin to submit documents, tasks will appear on each user’s HR Documents - Assigned to Me page. A task indicates that the user must approve or reject a document.
You might need to transfer tasks from one user to another. For example, if a user is on vacation or leaves the company, you will need to transfer the user’s tasks to another user. You can transfer tasks using the Workflow Task Transfer page.
This information is divided into the following sections:
• When to transfer tasks• Transfer tasks from one user or role to another
When to transfer tasks
Task transfer is meant to be used primarily when a user is on vacation, unexpectedly out of the office, or leaves the company.
When you transfer tasks, all of the tasks that are assigned to a user or role are moved to a new user or role; you cannot choose to reassign only some tasks, or to reassign different tasks to different users.
Transfer tasks from one user or role to another
Use the following steps to reassign tasks from one user or role to another user or role.
Be aware that tasks will continue to be assigned to a user or role until the underlying workflow, or business process, is modified. If you remove a Business Portal user before you’ve made those modifications, business processes that create tasks for the user will fail.
1. Go to the Administration Home page on the Business Portal web site.
2. Under HRM Self Service, click Workflow Task Transfer. The Workflow Task Transfer page appears.
3. Select the User or Role option above the left scrolling window to specify whether you’re transferring tasks from a user or role. If you select User, all users will be displayed in the scrolling window. If you select Role, all roles will be displayed.
Then select the specific user or role you want to remove tasks from.
4. Select the User or Role option above the right scrolling window to specify whether you’re transferring tasks to a user or role. If you select User, all users will be displayed in the scrolling window. If you select Role, all roles will be displayed.
Then select the specific user or role you want to assign tasks to.

P A R T 4 W O R K F L O W S E T U P
82 A D M I N I S T R A T O R ’ S G U I D E
5. Click Transfer.
6. A message is displayed, stating that more tasks may be assigned to the resource unless the underlying workflow, or business process, is updated. To continue transferring the tasks, click Yes.
The Workflow Task Transfer page is used to assign tasks from one user or role to another. However, in cases where a document has been resubmitted, you must reassign tasks. For example, suppose Bob’s tasks have been transferred to Juan. When Sue (Bob’s direct report) submits her timecard, it is automatically routed to Juan for approval. If Juan rejects the timecard, and Sue resubmits it, the timecard is routed to Bob for approval. In this scenario, you will need to reassign Bob’s tasks to Juan.
A D M I N I S T R A T O R ’ S G U I D E 83
Chapter 18: Workflow event logThe workflow system includes an event log that records information about workflow events, such as when a specific document was submitted and approved.
Information about the workflow event log is divided into the following sections:
• Select events to track in the workflow event log• Set the workflow event log size and removal options• View the workflow event log• Delete events from the workflow event log
Select events to track in the workflow event log
The workflow event log is the audit trail for workflow events. Use the following steps to specify which events are tracked in the workflow event log.
Workflow events are tracked in the workflow event log and the Windows event log.
1. Go to the Administration Home page on the Business Portal web site.
2. Under HRM Self Service, click Workflow Process Options. The Workflow Process Options page appears.
3. Click the Subscriptions tab.
4. In the Event Subscriptions section, select the events to track:
• If you select When tasks are created, all tasks that are created and assigned to users will be tracked in the event log.
• If you select When tasks are completed, all completed tasks will be tracked.
Be aware that workflow events are tied to the action history of a business process. If When tasks are completed is not selected, the action history will not include information about the action taken for a task.
5. Click Save.
Set the workflow event log size and removal options
The workflow event log stores information about workflow events, including the type of event, when the event was logged, and the action taken when the event occurred.
You can save an unlimited number of events in the event log, or you can set a specific number of events to save. If you choose to specify a number of events, you'll need to choose a method for removing events when the event log reaches its maximum size.
Use the following steps to set the workflow event log size and removal options.

P A R T 4 W O R K F L O W S E T U P
84 A D M I N I S T R A T O R ’ S G U I D E
1. Go to the Administration Home page on the Business Portal web site.
2. Under HRM Self Service, click Workflow Process Options. The Workflow Process Options page appears.
3. Select the General tab.
4. Select whether to save an unlimited or limited number of events in the event log. If you select Limited, enter the maximum number of events that can exist in the event log.
Action history information that is displayed on the HR Documents - Assigned to Me, HR Documents - Submitted by Me, and Workflow Process Log pages comes from the workflow event log. If you restrict the size of the workflow event log too much, you could lose action history information your users might need.
5. If you selected to limit the size of the event log, choose a method for removing events.
• If you select Based on a set number of days, enter a number of days; events older than this will be removed automatically once the event log reaches its maximum size. If the number of events logged for a period is greater than the maximum size you’ve selected for the event log, no additional events will be tracked in the event log.
• If you select As needed, the oldest events will be removed when the event log reaches the size you specified.
• If you select Manually, no additional events will be tracked in the event log when it reaches its maximum size until events are manually deleted. (The Windows event log will continue to record events when the workflow event log reaches its maximum size.) See Delete events from the workflow event log on page 85 for more information about removing events from the event log.
6. Click Save.
View the workflow event log
Use the following steps to view the workflow event log.
1. Go to the Administration Home page on the Business Portal web site.
2. Under HRM Self Service, click Workflow Event Log. The Workflow Event Log page appears.
3. Select an event in the list. The following will be displayed on the right side of the page:
Type The type of event. Information events indicate a successful action, such as the successful start of the workflow process.
Title The name of the event.
Logged The date and time when the event was logged.
Source Where the event occurred within the document’s workflow.

A D M I N I S T R A T O R ’ S G U I D E 85
C H A P T E R 1 8 W O R K F L O W E V E N T L O G
Description Indicates whether the process was successfully started or completed.
Event Category The event category that the event belongs to: system, business, or execution.
Process Instance ID The ID associated with the event’s business process instance. A process instance ID represents a separate thread of execution of a business process.
Delete events from the workflow event log
Use the following steps to delete one or more events from the event log.
If you delete events, you won’t be able to view the associated action history. For example, if you delete events that resulted from approving a document, you won’t be able to see the action history details for that document approval in other parts of Business Portal.
1. Go to the Administration Home page on the Business Portal web site.
2. Under HRM Self Service, click Workflow Event Log. The Workflow Event Log page appears.
3. Select the check box next to the event you want to delete.
4. Click Delete.

86 A D M I N I S T R A T O R ’ S G U I D E

PA
RT
5: G
RO
UP
S A
ND
RO
LES
RE
FER
EN
CE

88 A D M I N I S T R A T O R ’ S G U I D E
Part 5: Groups and roles referenceThis information provides details about the SharePoint groups and MBF roles that are used with the HRM Self Service Suite.
• Chapter 19, “Default group and role permissions,” lists the default permissions associated with the SharePoint groups and MBF roles used with the HRM Self Service Suite.

A D M I N I S T R A T O R ’ S G U I D E 89
Chapter 19: Default group and role permissionsThis information lists the default permissions associated with the SharePoint groups and MBF roles that are used with the HRM Self Service Suite.
For more information about SharePoint groups and MBF roles, see the Business Portal Administrator’s Guide.
This information is divided into the following sections:
• SharePoint groups• MBF roles• Advanced MBF roles
SharePoint groups
SharePoint groups are used to grant access to Business Portal sites and pages. The permission levels associated with each group define the level of control users have over the securable items on those pages, such as web parts.
SharePoint permission levels control whether users can modify SharePoint content, such as pages and document libraries. For example, a user who has the Read permission level for a page can’t modify the page or the web parts on it. Permission levels do not affect a user’s access to Microsoft Dynamics GP data. This means that a user with the Read permission level for a page still may be able to create transactions, modify records, or delete entries using that page.
The following table lists the SharePoint groups that are used with the HRM Self Service Suite, and includes the HRM-specific pages and permission levels associated with each group. See the Business Portal Administrator’s Guide for additional information about these SharePoint groups.
Group Site Page library HRM-specific page Permission level
BP Employee Employee Center Employee Center Pages Profile Read
HRM Employee Pay Pages Pay Read
HRM Employee Pay Pages Benefits Read
HRM Skills and Training Pages Skills and Training Read
HRM Time and Attendance Pages Timecard Entry Read
HRM Employee Profile Pages HR Documents - Submitted by Me Read
HRM Employee Profile Pages HR Documents - Assigned to Me Read
Company Center HRM Recruitment Pages Careers Read
HRM Skills and Training Pages Training Read
HRM Employee Profile Pages Organization Structure Read
BP HR Administrator Human Resources Center
HRM Time and Attendance Pages Timecard Status Read
BP HR Workflow Administrator
Top-level Business Portal site
HRM Employee Profile Pages Workflow Business Processes Read
HRM Employee Profile Pages Workflow Process Options Read
HRM Employee Profile Pages Workflow Process Log Read
HRM Employee Profile Pages Workflow Event Log Read
HRM Employee Profile Pages Workflow Task Transfer Read

P A R T 5 G R O U P S A N D R O L E S R E F E R E N C E
90 A D M I N I S T R A T O R ’ S G U I D E
MBF roles
MBF roles are used to grant access to Business Portal data. The data permissions associated with each role control access to the back office data that can be displayed in Business Portal.
The following table lists the MBF roles that are used with the HRM Self Service Suite, and includes the data permissions associated with each role. See the Business Portal Administrator’s Guide for additional information about these MBF roles.
BP HRM Self Service Administrator
Top-level Business Portal site
HRM Employee Profile Pages Document Signatures Read
HRM Employee Profile Pages Default Address ID Read
HRM Employee Profile Pages Direct Reports View Read
HRM Time and Attendance Pages Timecard Setup Read
HRM Time and Attendance Pages Employee Assignments Read
HRM Time and Attendance Pages Timecard Delegates Read
Company Center Company Center Common Pages Company Center Home Contribute
Employee Center Employee Center Common Pages Employee Center Home Contribute
Manager Center Manager Center Common Pages Manager Center Home Contribute
BP Manager Manager Center HRM Employee Profile Pages Team Profile Read
HRM Employee Profile Pages Team Job History Read
HRM Skills and Training Pages Team Skills and Training Read
HRM Time and Attendance Pages Team Timecard Entry Read
HRM Time and Attendance Pages Timecard Status Read
HRM Recruitment Pages Recruiting Read
BP Payroll Administrator
Payroll Center HRM Time and Attendance Pages Timecard History Read
HRM Time and Attendance Pages Timecard Status Read
Top-level Business Portal site
HRM Time and Attendance Pages Timecard Delegates Read
Group Site Page library HRM-specific page Permission level
Role HRM-specific data permissions
HRM Self Service Administrator
AdministrativeTimecardTemplate - AllAssignmentHeirarchy - AllBackOfficeSettings - AllBatchPrefix - AllEmployee - Restricted Directory InformationHRMSetup - AllHRPayschedule - AllHRPayscheduleYear - AllLifeEventLink - AllPRPayschedule - AllSignatureSettings - All
Human Resources Administrator
BatchPrefix - AllEmployeeTimecardTemplate - AllHRMSetup - AllHRPayschedule - ReadOnlyPayschedule - AllPayschedule - ReadOnlyPRPayschedule - ReadOnlyTimecard - All

A D M I N I S T R A T O R ’ S G U I D E 91
C H A P T E R 1 9 D E F A U L T G R O U P A N D R O L E P E R M I S S I O N S
Advanced MBF roles
Advanced MBF roles map Business Portal users to specific IDs in the back office, such as employee or salesperson IDs. This allows these users to access their personal data—for example, employee paystubs or salesperson commission information. The data permissions associated with each advanced role control access to the back office data that can be displayed in Business Portal.
The following table lists the advanced roles that are used with the HRM Self Service Suite, and includes the data permissions associated with each role. See the Business Portal Administrator’s Guide for additional information about these advanced MBF roles.
Payroll Administrator BatchPrefix - AllHRMSetup - AllHRPayschedule - ReadOnlyPayschedule - AllPayschedule - ReadOnlyPRPayschedule - ReadOnlyTimecard - All
Workflow Administrator WorkItem Reassignment
Role HRM-specific data permissions
Role HRM-specific data permissions
Employee Employee - Restricted Proxy (Timecard Entry)EmployeeTimecardTemplate - Restricted ProxyEmployeeTimecardTemplate - Restricted SelfHRMSetup - AllTimecard - Restricted ProxyTimecard - Restricted Self
Manager EmployeeTimecardTemplate - Restricted ManagerHRMSetup - AllHRPayschedule - ReadOnlyPayschedule - ReadOnlyPRPayschedule - ReadOnlyTimecard - Restricted Manager

92 A D M I N I S T R A T O R ’ S G U I D E

A D M I N I S T R A T O R ’ S G U I D E 93
IndexAaccess rights
for default advanced MBF roles 91for default MBF roles 90for default SharePoint groups 89
address IDsdescribed 29entering 29
addresses 29advanced MBF roles, default permissions
91advanced roles
Employee 19Manager 21
assignment prioritymodifying 52overview 51
Bback office integration 13batch prefixes
assigning 48creating 47deleting 49modifying 47overview 47
BP Employee groupassigning 19default permissions 89described 19
BP HR Administrator groupassigning 22default permissions 89described 22
BP HR Workflow Administrator groupassigning 25default permissions 89described 25
BP HRM Self Service Administrator groupassigning 24default permissions 89described 24
BP Manager groupassigning 21default permissions 89described 21
BP Payroll Administrator groupassigning 23default permissions 89described 23
business activity stepsdefined 72modifying 75
CChange Priority of Assignments page 52
Ddata permissions
for default advanced MBF roles 91for default MBF roles 90
Default Address ID page, using 29default address IDs
described 29entering 29
default workflowsdescribed 71modifying 71
delegatessetting up 63viewing 64
departments, specifying which ones employees can enter time against 61
direct reports, displaying in My Team web part 30
Direct Reports View page, using 30Document Signatures page, using 27documentation
additional resources 3sending feedback 4symbols and conventions 3
documentsdefault approvers 71ending 78modifying workflows 71resuming 78suspending active documents 78suspending creation of 72types 71
Eelectronic signatures, requiring 27e-mail notifications
entering e-mail addresses 79entering the SMTP server name 79overview 79setting up 79
Employee Assignments pageselecting departments and positions
61selecting pay codes and time codes 54
Employee Pay, overview 7Employee Profile
overview 7setting up 27
Employee roleassigning 19data permissions 91described 19
employees, displaying in My Team web part 30
event logoptions for removing events 83overview 83removing events from 85selecting events to track 83size limit 83viewing 84
eventsdeleting 85options for removing from event log
83selecting for event log 83
Ggroups
assigning 19BP Employee 19BP HR Administrator 22BP HR Workflow Administrator 25BP HRM Self Service Administrator
24BP Manager 21BP Payroll Administrator 23default permissions 89described 19
Hhelp, online 3HRM Self Service Administrator role
assigning 24data permissions 90described 24
HRM Self Service Suiteapplications 7installing 15overview 7
Human Resources, integration 13, 14, 53Human Resources Administrator role
assigning 22data permissions 90described 22
Iicons, used in manual 3installation
HRM Self Service Suite 15Outlook add-in 65Workflow service 16
integration with the back office 13
MManager role
assigning 21described 21, 91
manuals, included with Business Portal 3MBF roles
assigning 19default permissions 90described 19Employee 19HRM Self Service Administrator 24Human Resources Administrator 22Manager 21Payroll Administrator 23Workflow Administrator 25
Microsoft Business Framework work queued work item service, starting 16
modulesintegrating with Human Resources 13

I N D E X
94 A D M I N I S T R A T O R ’ S G U I D E
modules (continued)integrating with Human Resources
and Payroll 14integrating with Payroll 13
My Team web part, specify which employees are listed 30
Nnavigation, symbols used for 3
Oonline help, for Business Portal 3Outlook add-in, installing 65
Ppay codes
assigning to employees 54overview 53where displayed in HRM 55
Pay Schedule Setup page 36pay schedules
assigning 38creating 36deleting 39modifying 37overview 35
Payroll, integration 13, 14, 53Payroll Administrator role
assigning 23data permissions 90described 23
positions, specifying which ones employees can enter time against 61
process log, viewing 77
RRecruitment, overview 9reporting structure 75resource queries 75roles
assigning 19described 19Employee 19HRM Self Service Administrator 24Human Resources Administrator 22Manager 21Payroll Administrator 23Workflow Administrator 25
Sservices, Workflow service 16Set Up Timecard Restrictions page 42SharePoint groups
assigning 19BP Employee 19BP HR Administrator 22BP HR Workflow Administrator 25BP HRM Self Service Administrator
24BP Manager 21BP Payroll Administrator 23default permissions 89
SharePoint groups (continued)described 19
sick time, where displayed in HRM 57signatures, requiring on documents 27site structure, overview 11sites, overview 11Skills and Training, overview 8symbols, used in manual 3
Ttasks
reassigning 81transferring 81
Time and Attendance, overview 8time codes
assigning to employees 54overview 53where displayed in HRM 55, 57
time off information, where displayed in HRM 57
Timecard Delegates page, using 63Timecard Entry page 64timecard restrictions
assigning 43creating 42deleting 44modifying 42overview 41
Timecard Setup pageassigning batch prefixes 48assigning pay schedules 38assigning timecard restrictions 43creating batch prefixes 47creating pay schedules 36creating timecard restrictions 42deleting batch prefixes 49deleting pay schedules 39deleting timecard restrictions 44modifying batch prefixes 47modifying pay schedules 37modifying the assignment priority 52modifying timecard restrictions 42
timecardscreating restrictions 42setting up delegates 63viewing delegates 64
top-level Business Portal site, described 11
VVacation Requests for Microsoft Office
Outlookadd-in 65installing 65overview 65setting up 66
vacation time, where displayed in HRM 57
Wwork item steps
adding 73defined 72
work item steps (continued)modifying 73removing 77
workflowbusiness activity steps 72default approvers 71default workflows 70document types 71modifying document workflows 71overview 10, 69process log 77setup options 72specifying the starting step 76work item steps 72
Workflow Administrator roleassigning 25data permissions 90described 25
Workflow Business Processes pageadding work item steps 73modifying business activity steps 75modifying work item steps 73removing work item steps 77setting workflow options 72specifying starting steps 76
workflow event logoptions for removing events 83overview 83removing events from 85selecting events to track 83size limit 83viewing 84
Workflow Event Log pagedeleting events from the event log 85viewing the event log 84
workflow eventsdeleting 85options for removing from event log
83selecting for event log 83
Workflow Process Log pageending documents 78resuming documents 78suspending documents 78viewing the process log 77
Workflow Process Options pageselecting events to track in the event
log 83setting the event log size 83setting up e-mail notifications 79
Workflow service, starting 16Workflow Task Transfer page, using 81