hunter user manual · hunter user manual v0.1 we recommend the installation of java and eclipse via...
TRANSCRIPT

Hunter User Manual
Hunter User Manual v0.1
1. Table of contents
1. Table of contents 2. Introduction 3. Installation
3.1. Software Dependencies 3.1.1. Java 3.1.2. Eclipse Mars
3.2. Installing Hunter 3.3. Updating Hunter
4. Usage 4.1. Adding source files 4.2. Adding test files 4.3. Running the tool
5. Benchmark Examples 5.1. Steps to Run 5.2. Output
5.2.1. Bresenham 5.2.2. Bresenham_Leidos 5.2.3. LCS_String 5.2.4. LCS_Leidos 5.2.5. Matrix_Multiply_Array 5.2.6. Matrix_Multiply_Leidos
6. Hunter for General Programs 7. Support
University of Texas at Austin UToPiA 2
Hunter User Manual v0.1
2. Introduction Hunter is a code synthesis tool for Java. The input to Hunter consists of:
user query: name and signature of the method to synthesize comments describing the method functionality
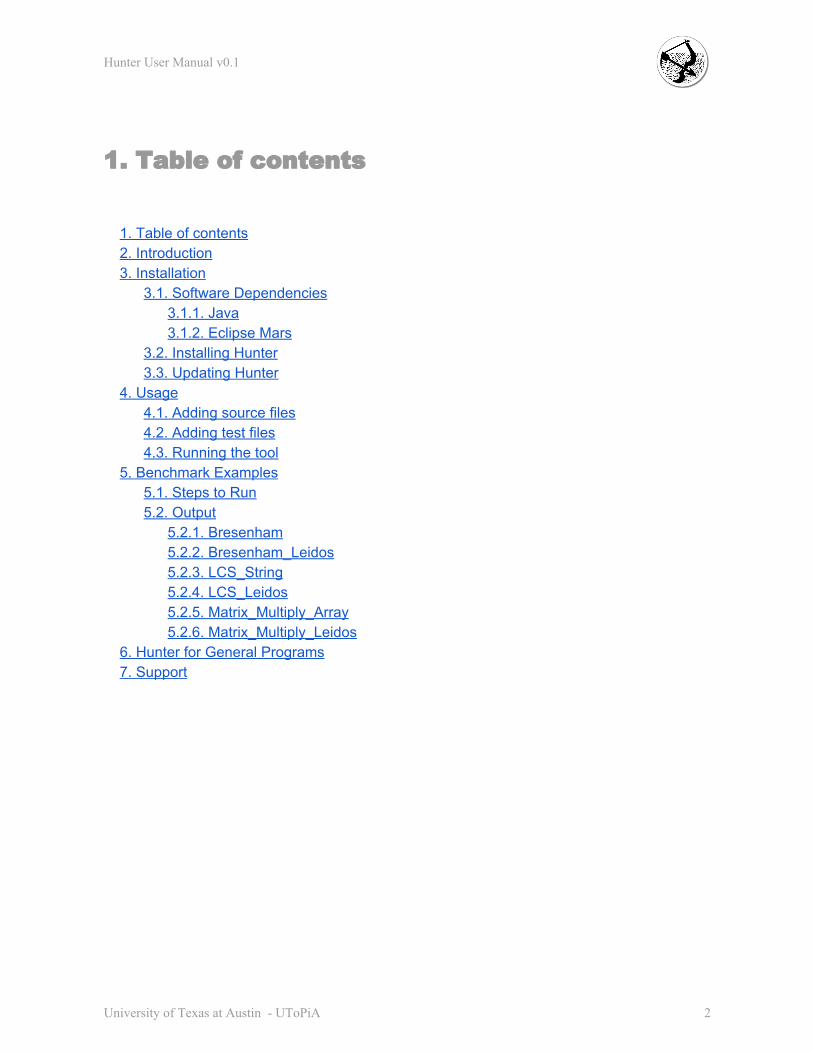
set of test cases in JUnit format Hunter is available as an Eclipse plugin and its workflow is described as follows.
Workflow of the Hunter tool
Hunter starts by performing code search over the MUSE corpus. It takes into consideration the signature of the method and the natural language comments to identify a set of candidates that most closely match the user’s query. Given a possible candidate, the interface alignment and code synthesis work together to synthesize any wrapper code needed to invoke the existing interface. While the code synthesized by our approach is always guaranteed to typecheck and satisfy certain semantic constraints, it may or may not be the program that the user intended. To increase our confidence about the correctness of the synthesized program, we run it on test cases provided by the user and backtrack if any test fails. If all tests pass, then it is guaranteed that the synthesized code corresponds to the specification provided by the user. This user manual is split into three main sections. The Installation section describes the installation and setup process and necessary prerequisites, the Usage section outlines the steps to run Hunter, and the Examples section takes the user through one of the examples provided in the package.
University of Texas at Austin UToPiA 3
Hunter User Manual v0.1
3. Installation This section describes how to download and setup Hunter.
3.1. Software Dependencies To use Hunter, the following must be present in your system:
Ubuntu 14.04 LTS 64 bits Project examples and huntersetup.sh installation script for Eclipse and Java. Can be
downloaded from here (hunter.zip). Java and JDK 1.7 or higher Eclipse Mars IDE for Java Developers
Since Hunter queries its database online, you will also need a working internet connection to run the plugin. To aid in the installation process, we provide a bash script huntersetup.sh that automatically installs Java and Eclipse. First, extract the file hunter.zip to a directory. This .zip file contains both the huntersetup.sh bash script as well as project examples to test our tool. Next, open a terminal. This can be done by clicking the Ubuntu icon in the upperleft, typing "terminal", and selecting the Terminal application from the results that appear. Go to the directory where you downloaded huntersetup.sh and execute the script by typing: $ ./hunter-setup.sh This script will check if Java needs to be installed or updated and will install both Java and Eclipse if needed. After running this script, an icon with the name EclipseHunter will appear in the desktop. Double click this icon to start Eclipse.
University of Texas at Austin UToPiA 4

Hunter User Manual v0.1
We recommend the installation of Java and Eclipse via the huntersetup.sh bash script. However, both Java and Eclipse can be installed manually by performing the following steps.
3.1.1. Java Version: Java and JDK 1.7 or higher If you have root permissions, installing Java with aptget is easy. If you do not have root permissions, then we recommend the use of the huntersetup.sh bash script to install Java locally. To install Java, first open a terminal. In the terminal, update the package index by typing: $ sudo apt-get update Then install Java with: $ sudo apt-get install default-jdk
3.1.2. Eclipse Mars Version: Eclipse Mars IDE for Java Developers Download and extract the file eclipsejavamars1linuxgtkx86_64.tar.gz to a directory. Open a terminal and go to the directory where you extracted eclipse. To run eclipse type: $ ./eclipse
University of Texas at Austin UToPiA 5
Hunter User Manual v0.1
3.2. Installing Hunter 1. Open Eclipse on your machine. If this is your first time running Eclipse, you will need to
select a workspace for your projects on startup. The default location is /home/username/workspace.
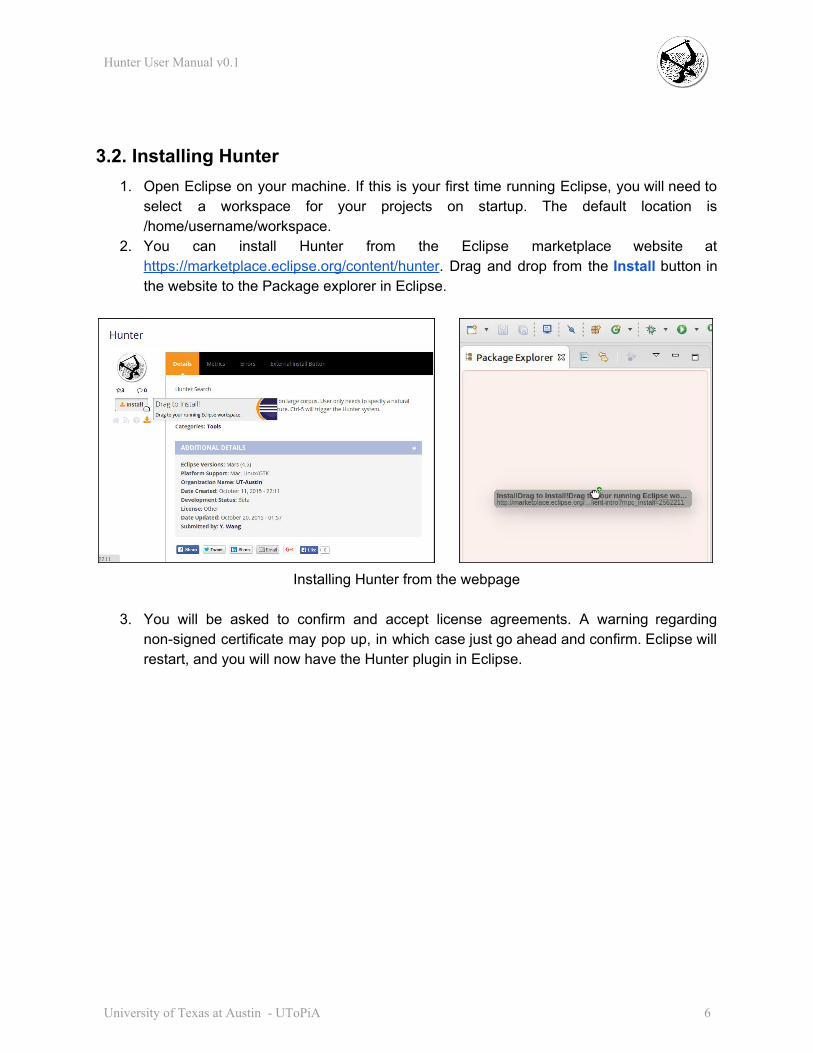
2. You can install Hunter from the Eclipse marketplace website at https://marketplace.eclipse.org/content/hunter. Drag and drop from the Install button in the website to the Package explorer in Eclipse.
Installing Hunter from the webpage
3. You will be asked to confirm and accept license agreements. A warning regarding
nonsigned certificate may pop up, in which case just go ahead and confirm. Eclipse will restart, and you will now have the Hunter plugin in Eclipse.
University of Texas at Austin UToPiA 6
Hunter User Manual v0.1
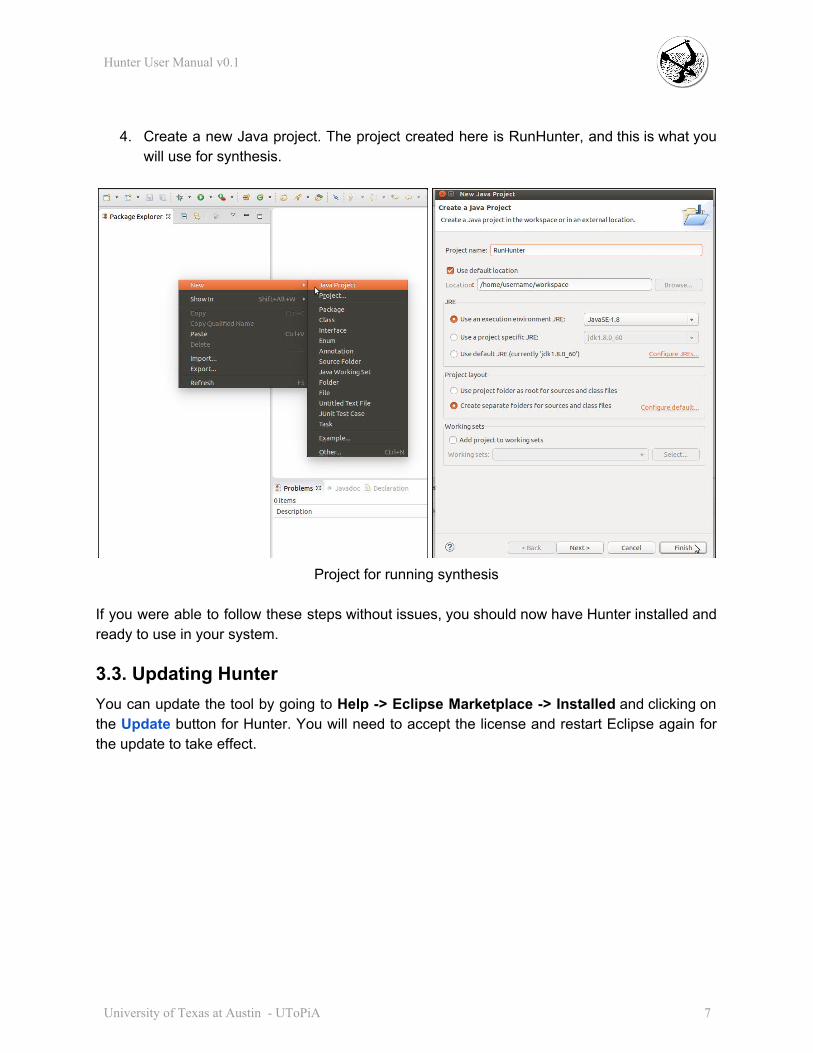
4. Create a new Java project. The project created here is RunHunter, and this is what you will use for synthesis.
Project for running synthesis
If you were able to follow these steps without issues, you should now have Hunter installed and ready to use in your system.
3.3. Updating Hunter You can update the tool by going to Help > Eclipse Marketplace > Installed and clicking on the Update button for Hunter. You will need to accept the license and restart Eclipse again for the update to take effect.
University of Texas at Austin UToPiA 7
Hunter User Manual v0.1
4. Usage Once you have Hunter installed as described in the previous section, you can use it to synthesize the java method of your preference using the steps described in this section.
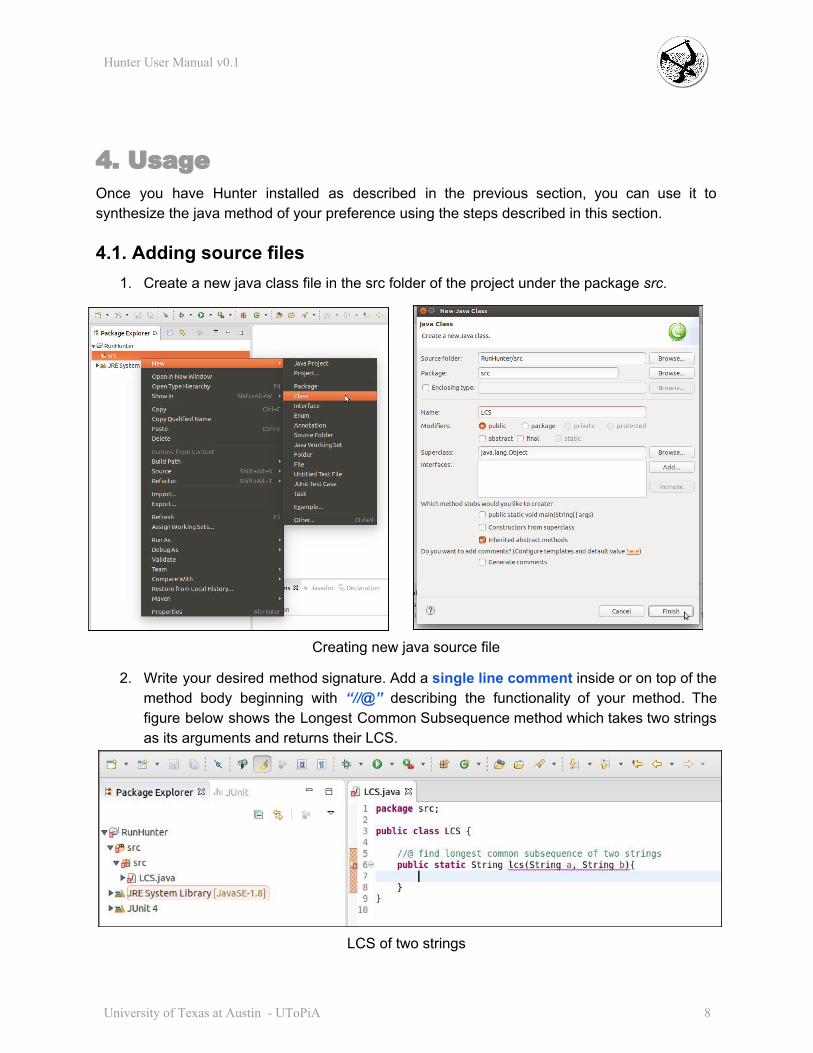
4.1. Adding source files 1. Create a new java class file in the src folder of the project under the package src.
Creating new java source file
2. Write your desired method signature. Add a single line comment inside or on top of the method body beginning with “//@” describing the functionality of your method. The figure below shows the Longest Common Subsequence method which takes two strings as its arguments and returns their LCS.
LCS of two strings
University of Texas at Austin UToPiA 8

Hunter User Manual v0.1
4.2. Adding test files Writing a JUnit test to check the correctness of your synthesized function is not mandatory, but it is recommended to allow Hunter to exclude faulty implementations.
1. Create a new JUnit test case under a new package. The pictures below show how to create a TestLCS class in the test package to test the src.LCS class.
Creating new JUnit Test case
2. Write each test case in a method preceded by “@Test”. If you need to initialize any variables before each test, you can do so by initializing them in methods preceded by
University of Texas at Austin UToPiA 9

Hunter User Manual v0.1
“@Before”, and destroy them after each test in a method preceded by “@After". Similarly, you can initialize and destroy for the entire test suite by methods preceded by “@BeforeClass” and “@AfterClass” respectively. Here, we show a simple test case for the LCS method created previously.
Sample JUnit test case for LCS method
University of Texas at Austin UToPiA 10
Hunter User Manual v0.1
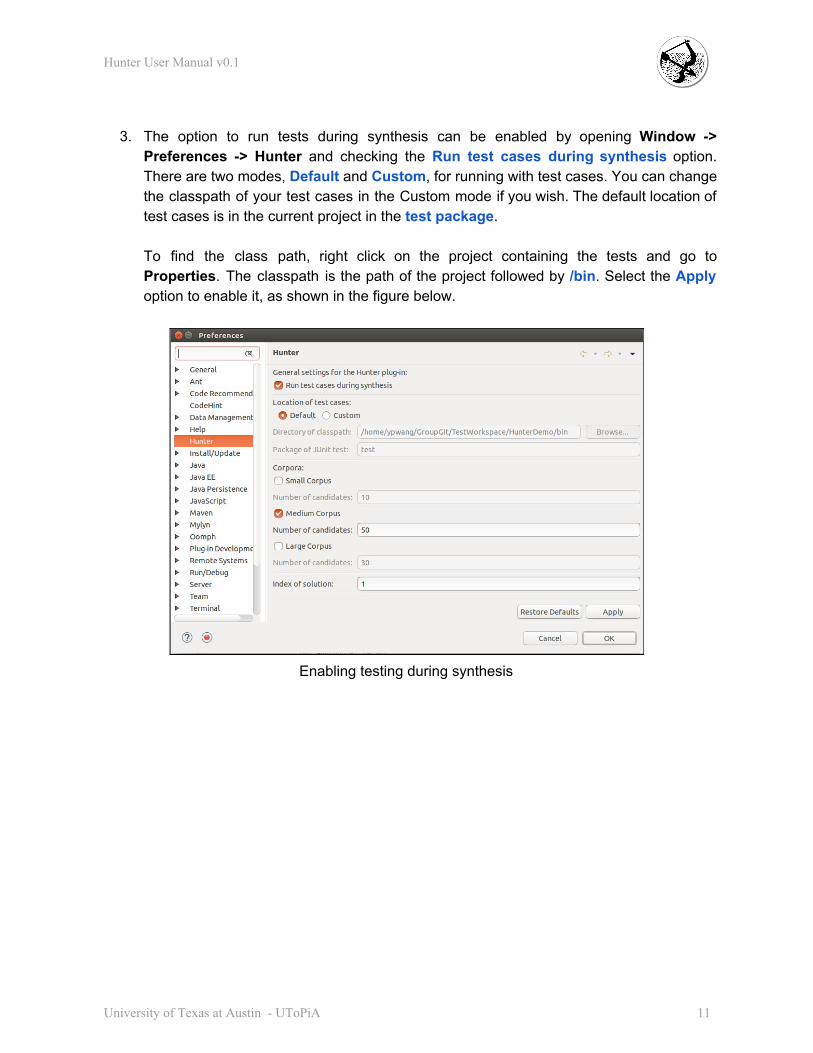
3. The option to run tests during synthesis can be enabled by opening Window > Preferences > Hunter and checking the Run test cases during synthesis option. There are two modes, Default and Custom, for running with test cases. You can change the classpath of your test cases in the Custom mode if you wish. The default location of test cases is in the current project in the test package. To find the class path, right click on the project containing the tests and go to Properties. The classpath is the path of the project followed by /bin. Select the Apply option to enable it, as shown in the figure below.
Enabling testing during synthesis
University of Texas at Austin UToPiA 11
Hunter User Manual v0.1
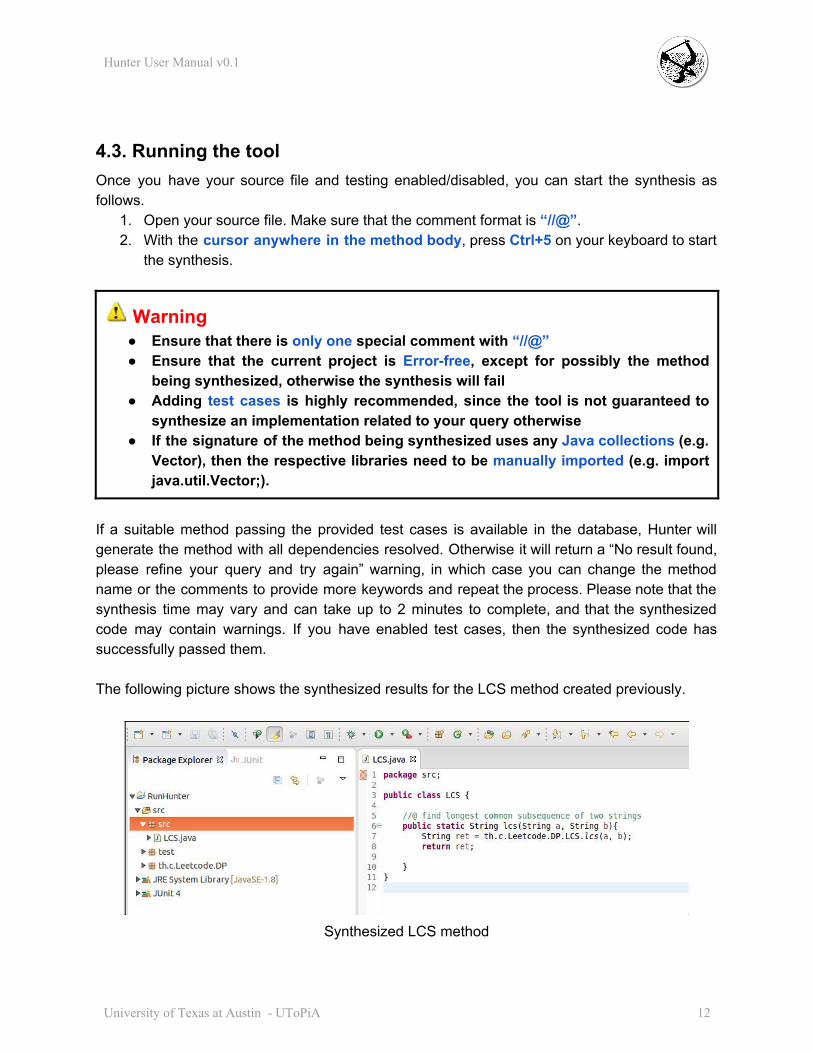
4.3. Running the tool Once you have your source file and testing enabled/disabled, you can start the synthesis as follows.
1. Open your source file. Make sure that the comment format is “//@”. 2. With the cursor anywhere in the method body, press Ctrl+5 on your keyboard to start
the synthesis.
Warning Ensure that there is only one special comment with “//@” Ensure that the current project is Errorfree, except for possibly the method
being synthesized, otherwise the synthesis will fail Adding test cases is highly recommended, since the tool is not guaranteed to
synthesize an implementation related to your query otherwise If the signature of the method being synthesized uses any Java collections (e.g.
Vector), then the respective libraries need to be manually imported (e.g. import java.util.Vector;).
If a suitable method passing the provided test cases is available in the database, Hunter will generate the method with all dependencies resolved. Otherwise it will return a “No result found, please refine your query and try again” warning, in which case you can change the method name or the comments to provide more keywords and repeat the process. Please note that the synthesis time may vary and can take up to 2 minutes to complete, and that the synthesized code may contain warnings. If you have enabled test cases, then the synthesized code has successfully passed them. The following picture shows the synthesized results for the LCS method created previously.
Synthesized LCS method
University of Texas at Austin UToPiA 12
Hunter User Manual v0.1
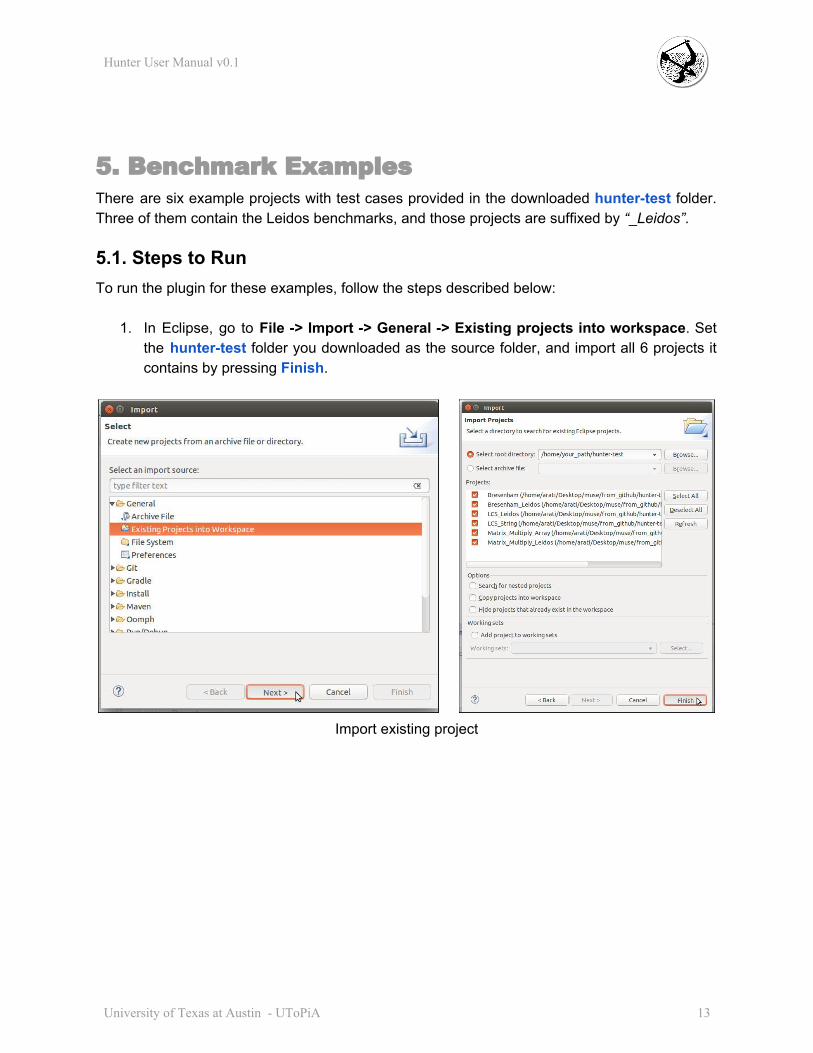
5. Benchmark Examples There are six example projects with test cases provided in the downloaded huntertest folder. Three of them contain the Leidos benchmarks, and those projects are suffixed by “_Leidos”.
5.1. Steps to Run To run the plugin for these examples, follow the steps described below:
1. In Eclipse, go to File > Import > General > Existing projects into workspace. Set the huntertest folder you downloaded as the source folder, and import all 6 projects it contains by pressing Finish.
Import existing project
University of Texas at Austin UToPiA 13

Hunter User Manual v0.1
2. Select one of the provided projects, (here we will select the LCS_Leidos project) and open the file under the src folder containing the method to be generated.
Example source file LCS_Leidos
3. Enable synthesis by opening Window > Preferences > Hunter and checking the Run
test cases during synthesis option. The provided projects have their test cases in the default location. Make sure the default option is selected for the location of test cases (see Figure “Enabling testing during synthesis” on page 11). Click Apply to save your changes.
4. With the cursor on the method body, press Ctrl+5 to run the synthesis. The following snippet shows the result generated for the LCS_Leidos example. There may be some warnings, but the synthesized code is correct and will work for the provided test cases.
Synthesized result
5. Follow the same steps for all the other projects.
University of Texas at Austin UToPiA 14
Hunter User Manual v0.1
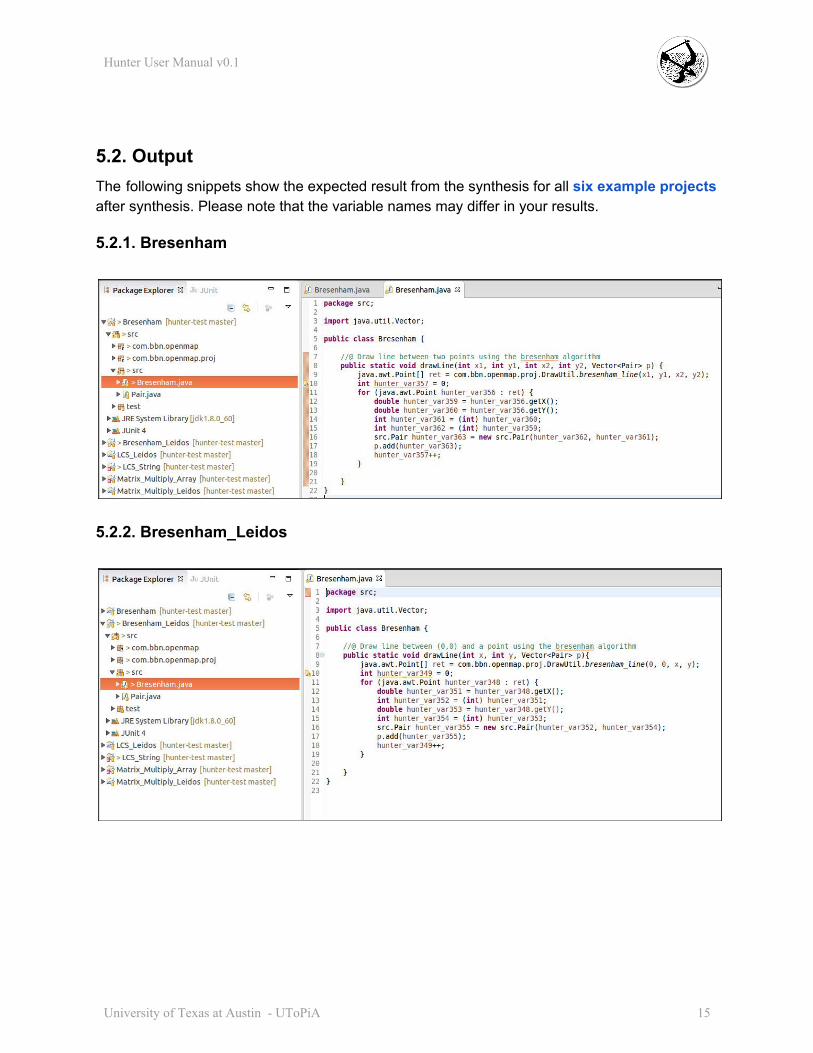
5.2. Output The following snippets show the expected result from the synthesis for all six example projects after synthesis. Please note that the variable names may differ in your results.
5.2.1. Bresenham
5.2.2. Bresenham_Leidos
University of Texas at Austin UToPiA 15

Hunter User Manual v0.1
5.2.3. LCS_String
5.2.4. LCS_Leidos
University of Texas at Austin UToPiA 16

Hunter User Manual v0.1
5.2.5. Matrix_Multiply_Array
5.2.6. Matrix_Multiply_Leidos
University of Texas at Austin UToPiA 17
Hunter User Manual v0.1
6. Hunter for General Programs Although in theory, Hunter can be queried for any function, its performance is sensitive to the function signature and the provided comments. Code quality also depends heavily on the corpus it uses. We have however found Hunter to work for a broad range of queries in practice. All these benchmarks are available here (HunterBenchmarks.tar.gz).
7. Support Hunter is a research tool developed by the UToPiA group led by Prof. Isil Dillig in the UT Austin Computer Science Department. The following members of UToPiA are involved in the development of Hunter:
Isil Dillig Ruben Martins Yu Feng Yuepeng Wang Arati Kaushik Navid Yaghmazadeh
University of Texas at Austin UToPiA 18