hyperion® dim adapter for planning
TRANSCRIPT

Hyperion® Data Integration Management Adapter for Planning
Release 11.1.1.1
Sample Readme [Skip Navigation Links]
Purpose................................................................................................................................. 1 About Data Integration Management Release 11.1.1.1 ......................................................... 1 Data Integration Management Adapters ............................................................................... 2 Setting Up the Sample Planning Application.......................................................................... 2
Dimensions Reference......................................................................................................... 3 Loading Metadata into the Sample Application.................................................................... 7 Loading Metadata into the Accounts Dimension ........................................................................ 7 Loading Metadata into the Entities Dimension .......................................................................... 9 Loading Metadata into the Segment Dimension ........................................................................ 9
Refresh Metadata for RefAp931 ........................................................................................ 10 Load Data Using Adapter for Planning............................................................................... 10 Mapping for Data Load ....................................................................................................... 11
Appendix A.......................................................................................................................... 11 Importing Account.csv as a Flat File Source...................................................................... 11 Importing the Accounts Dimension from a Planning Target .............................................. 12 Creating a Mapping Between the Account.csv Flat File Source and the Planning Accounts Dimension Target.............................................................................................................. 13
Appendix B.......................................................................................................................... 15 Import DataLoad.csv as a Flat File Source......................................................................... 15 Importing a Planning Dimension for Data Load from a Planning Target............................ 16 Creating a Mapping between the DataLoad.csv Flat File Source and the Planning DIM_PLAN:Accounts_Data_Load Target............................................................................ 16
Purpose
This document describes sample files that are provided to help you learn about this release of Oracle Hyperion® Data Integration Management Adapter for Planning. Review this information thoroughly before attempting to use the sample files.
Top of Document
About Data Integration Management Release 11.1.1.1
Data Integration Management is integrated with Informatica PowerCenter. It provides a way of uniting disparate sources of data across an enterprise. For example, it can integrate data stored in multiple

warehouses and data marts, relational database management systems (RDBMS), and on-line analytical processing (OLAP) stores.
Data Integration Management includes these components:
• PowerCenter applications:
• PowerCenter Client
• PowerCenter Server
Top of Document
Data Integration Management Adapters
When you have installed and configured Data Integration Management Release 11.1.1.1, you can install and configure adapters that enable you to retrieve and write data for these other Hyperion products:
• Oracle Hyperion® Data Integration Management Adapter for Hyperion Enterprise®
• Oracle Hyperion® Data Integration Management Adapter for Essbase®
• Oracle Hyperion® Data Integration Management Adapter for Financial Management
• Oracle Hyperion® Data Integration Management Adapter for Planning
• Oracle Hyperion® Data Integration Management Adapter for Translation Manager
• Oracle Hyperion® Data Integration Management Adapter for Planning
Top of Document
Setting Up the Sample Planning Application
The settings of mappings that are included with these samples are based on the sample application that is included with Release 11.1.1.1 of Planning. The sample mappings can also be used against an earlier release of Planning if the following conditions are met:
• The Planning sample application is installed as RefApp931 with a cube name of Consol. If you are using the Planning reference application, no changes are needed. Otherwise, update the data (.csv) files to change the cube name from Consol to a name that is appropriate for your environment.
• Smart List – Top_Segments exists within the Segments dimension and contains the members BAS, IPOD304, BB, PCD, and MP3.

Note: For a Planning release earlier than 9.3.1 you can create a sample application and create a Smart List called Top_Segments with entries as shown in the preceding figure.
• The Dimensions and members shown in the following topic, “Dimension Reference,” exist.
See the Oracle Hyperion Planning, Fusion Edition User’s Guide for help on creating the Release 11.1.1.1 Sample Planning Reference Application, associated Planning metadata, and Planning settings.
Dimensions Reference
• Accounts – Default Members
• Currency – Default Members

• Entity – Default
Note: For applications created with Planning releases earlier than 9.3.1, the sample includes a mapping to load the Entities dimension. You can execute that mapping to build your Entity hierarchy. This step is not required if you are using the Planning Release 9.3.1, 11.1.1, or 11.1.1.1 sample application.
• Period – Qtrs – Months

• Scenario – Default Members
• Segments – Default Members

Note: In the Planning 9.3.1, 11.1.1, and 11.1.1.1 sample applications, the segment hierarchy already has all the required members. If you are setting up an application with an earlier Planning release, you can use the m_FF_TO_PLAN_SEGMENTS mapping file that is included with the samples to build the Segments dimension.
• Version – Default Members
• Year – Must contain Year FY07

• Performance Settings – May be changed as needed
Loading Metadata into the Sample Application
Loading the sample application described in the preceding section involves loading metadata into the Account, Entities, and Segments dimensions, refreshing the cube, and then loading data, as described in the following topics.
Loading Metadata into the Accounts Dimension The sample includes a mapping called m_FF_TO_PLAN_ACCOUNTS, which loads metadata into the Account dimension. Import this mapping into the samples folder in your repository or into another folder.
Note: You can build this mapping and similar mapping yourself following the instructions in Appendix A.
After you import the mapping, create a workflow that uses the mapping, and execute the workflow to load the Accounts dimension:
1. Launch Workflow Manager, and create a workflow
2. Add a Session task that points to the Accounts mapping
3. From Workflow Manager, select Connections > Applications
4. Set up a connection to your Planning application
5. On the Mapping tab of the Session properties page, set the connection value for the target to the connection that you set up in the preceding step.

6. Connect the Start task to the session task
7. Save the workflow
8. Start the workflow
9. Validate the Account dimension by logging on to Hyperion Planning 9 Web and selecting Administration > Dimensions.
The following figure shows how the Account dimension should look:

Loading Metadata into the Entities Dimension The sample includes the m_FF_TO_PLAN_ENTITIES mapping file, which loads metadata into the Entities dimension. Import this mapping into the samples folder in your repository or into another folder.
Note: You need not import the mapping if you are using the reference sample application that is included with Planning Release 9.3.1, 11.1.1, or 11.1.1.1, because that sample already has the required hierarchy setup.
After you import the mapping, create a workflow that uses the mapping, and execute the workflow to load the Entities dimension. Create the workflow using the procedure described in the preceding section for loading metadata into the Accounts dimension.
The following figure shows how the Entities dimension should look when you validate it:
Loading Metadata into the Segment Dimension The sample includes the m_FF_TO_PLAN_SEGMENTS mapping file, which loads metadata into the Segments dimension. Import this mapping into the samples folder in your repository or into another folder.
After you import the mapping, create a workflow that uses the mapping, and execute the workflow to load the Segments dimension. Create the workflow using the procedure described in the section “Loading Metadata into the Accounts Dimension.”
The following figure shows how the Segments dimension should look when you validate it, with the Smart List member Top Segment displayed:

Refresh Metadata for RefAp931
To refresh metadata for RefAp931, log on to Hyperion Planning Web and select Administration > Manage Database.
The metadata is included in the Essbase application and database.
Load Data Using Adapter for Planning
You can use DIM Adapter for Planning to load data into a Planning application, but this is necessary only if you are loading data to a member that is associated with a Smart List; to load any other data into the application, use DIM Adapter for Essbase. The following procedure loads data into Planning using DIM Adapter for Planning.
To load data into a Planning application using DIM Adapter for Planning, you must set up the Data Load and Driver dimensions in Hyperion Planning Web. You may need to edit the dataload.csv file to match your environment. The unedited dataload.csv file assumes that the cube name is Consol.
To specify parameters for data to load:
1. Select Administration > Data Load Administration.
2. For Available Data Load Dimensions, select a dimension, and click Go.
3. For Available Driver Dimensions, select the dimension to which you are loading data in an Essbase database. For this example, select Accounts dimension.
4. Select Driver dimension members to which to load data values. For this example, select the members of the Segments Dimension: BAS,HTAS,IPOD304,BB,PCD,MP3,DV1000,DV2000,DV3000,DV4000,"Top Segment","Bottom Segment".
The selected members become ports in DIM Adapter for Planning.
5. Click Save.

Mapping for Data Load The sample includes the m_FF_TO_PLAN_DATA_LOAD, which loads data values. Import this mapping into the samples folder in your repository or into another folder.
Note: You can build this mapping and similar mappings yourself following the instructions in Appendix B.
After you import the mapping, create and run a workflow to load the data:
1. Launch Workflow Manager, and create a workflow.
2. Add a Session task that points to the Accounts_Data_load mapping.
3. Connect the Start task to the session task.
4. Edit the session properties to set the Planning connection and point to the DataLoad.csv file that is included with the sample.
5. Save the workflow.
6. Start the workflow.
7. Verify that the workflow was completed.
8. Use one of these methods to verify that the data was loaded:
• Create a Planning Web Form to retrieve data.
• Check Essbase Administration Services to ensure that blocks were created in the correct cube.
Top of Document
Appendix A
Importing Account.csv as a Flat File Source
1. From PowerCenter Designer – Source Analyzer, select Sources > Import from Flat File.
2. Import the Accounts.csv. For information about importing flat files, see Informatica PowerCenter online help.
3. Select Import field names from first line.
4. Set User default text Length to 80.
5. Ensure that all columns are of the text type and have the correct lengths. (You must change Account and Parent to text and their lengths to 80.)
The following figure shows how the source should look:

6. Save the repository.
7. Repeat the preceding steps to build sources for the Segments.csv file.
Note: If you are not building to the sample application, you must also import the entities.csv file.
Importing the Accounts Dimension from a Planning Target
From PowerCenter Designer – Warehouse Designer:
1. Click Sources > Import from Hyperion Planning.
2. Set up a Hyperion Planning DSN and open a connection.
3. Select the Account dimension and click OK.
The following figure shows how the target should look:

4. Save the repository.
5. Repeat the preceding steps to create a Planning target for the Segment dimension.
Note: If you are building to the Planning Release 9.3.1, 11.1.1, or 11.1.1.1 sample application, you must create the Entities dimension target.
Creating a Mapping Between the Account.csv Flat File Source and the Planning Accounts Dimension Target
1. From the sources folder in Repository Navigator, drag the Accounts source from the FlatFile folder.
This step creates a source qualifier for Accounts.
2. From the targets folder in Repository Navigator, drag the PLAN:Account target.
3. Link the source qualifier and target by dragging and dropping related ports.
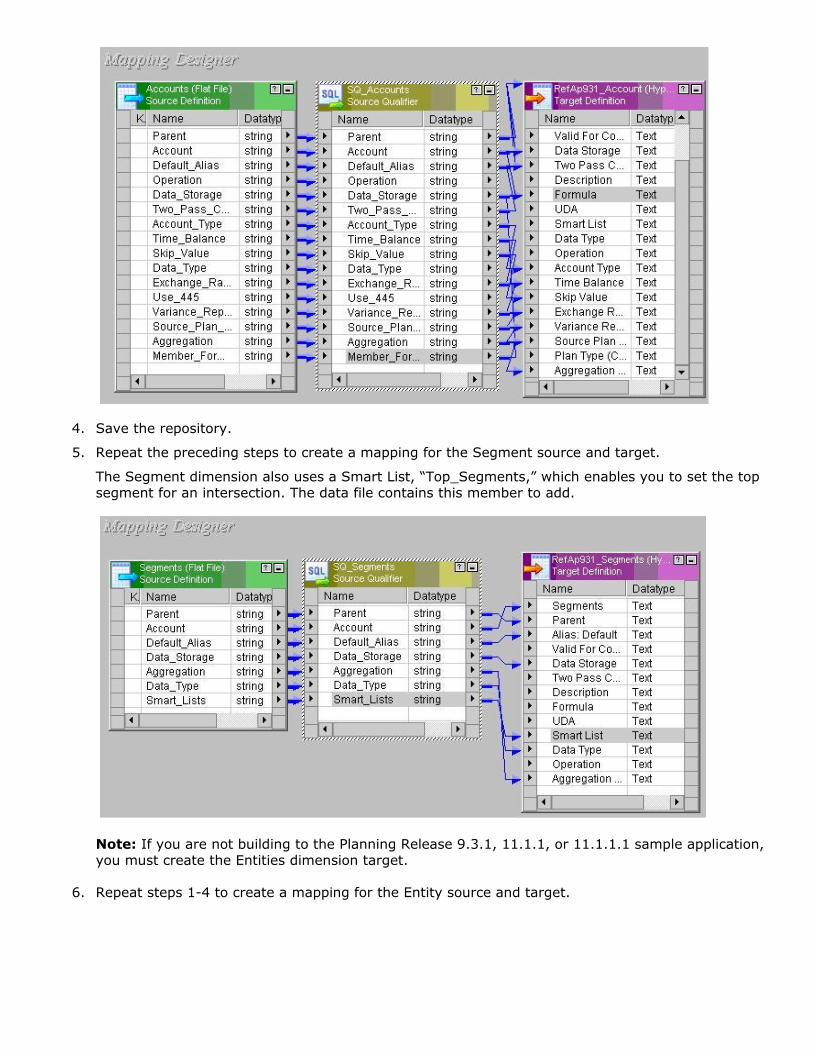
4. Save the repository.
5. Repeat the preceding steps to create a mapping for the Segment source and target.
The Segment dimension also uses a Smart List, “Top_Segments,” which enables you to set the top segment for an intersection. The data file contains this member to add.
Note: If you are not building to the Planning Release 9.3.1, 11.1.1, or 11.1.1.1 sample application, you must create the Entities dimension target.
6. Repeat steps 1-4 to create a mapping for the Entity source and target.

Top of Document
Appendix B
Import DataLoad.csv as a Flat File Source
1. From PowerCenter Designer – Source Analyzer, select Sources > Import from Flat File.
2. Import the DataLoad.csv file. For information about importing flat files, see Informatica PowerCenter online help.
3. Select Import field names from first line.
4. Set User default text Length to 80.
5. Ensure that all text columns are of the text type and have the correct length. (You must change Account and Parent to text and their lengths to 80.)
6. Ensure that all data columns are of the number type with the correct precision.
The following figure shows how the source should look:

Importing a Planning Dimension for Data Load from a Planning Target
1. From PowerCenter Designer – Source Analyzer, select Sources > Import from Hyperion Planning.
2. Set up Hyperion Planning DSN and open a connection.
3. Select the Account Dimension and Click OK.
The target will already exist as RefAp931.
4. Rename RefAp931 as Account_Data_Load.
The following figure shows how the target should look, with a port for each member set in the Driver dimension:
5. Save the repository.
Creating a Mapping between the DataLoad.csv Flat File Source and the Planning DIM_PLAN:Accounts_Data_Load Target
1. From the sources folder in Repository Navigator, drag the DataLoad source from the FlatFile folder.
This step creates a source qualifier for DataLoad.

2. From the targets folder in Repository Navigator, drag the RefAp931:Account_Data_Load target.
3. Link the source qualifier and target by dragging and dropping related ports.
The ports to connect are Account, Data Load Cube Name, POV, and Driver Dimension. POV is the combination of dimension members not used the Data Load or Driver dimension. The POV port expects a comma delimited set of values, as in the DataLoad.csv file.
Top of Document
Copyright © 2008, Oracle and / or its affiliates. All rights reserved. http://www.oracle.com