hyperion® system™ 9 financial data quality management™
TRANSCRIPT
Hyperion® System™ 9 Financial Data Quality Management™
Workbench Guide
Hyperion FDM 9.2.0

© 2000 – 2006 - Hyperion Solutions Corporation. All rights reserved. “Hyperion,” the Hyperion logo and Hyperion’s product names are trademarks of Hyperion. No portion hereof may be reproduced or distributed in any form or by any means, electronic or mechanical, including photocopying, recording, or information storage and retrieval systems, for any purpose other than the licensee’s personal use, without the express written permission of Hyperion. This software is licensed according to the conditions set forth in your Hyperion software license agreement.
Hyperion, LedgerLink, Hyperion Enterprise, and Essbase are registered trademarks of Hyperion Solutions Corporation.
Hyperion Solutions, Hyperion Planning, and Hyperion Financial Management are trademarks of Hyperion Solutions Corporation.
Citrix is a registered trademark of Citrix Systems Inc.
Microsoft and Windows are registered trademarks of Microsoft Corporation in the United States and/or other countries.
Oracle is a registered trademark of Oracle Corporation and/or its affiliates.
i
Table of ContentsInstallatIon and ConfIguratIon .............................................................................................................................v
SyStem RequiRementS ......................................................................................................................................................... v
HypeRion FDm WoRkbencH ................................................................................................................................................. v
Module 1: WorkbenCh basICs
ProduCt overvIeW ........................................................................................................................................... 1-1standard navIgatIon ......................................................................................................................................... 1-2
commanD buttonS ............................................................................................................................................................1-2WoRking WitH Data in gRiDS .............................................................................................................................................1-2ReSizing columnS ............................................................................................................................................................1-2Hot keyS .........................................................................................................................................................................1-3
PoInt of vIeW ................................................................................................................................................... 1-4WHat iS point oF vieW? ....................................................................................................................................................1-4pov moDe local vS. global ...........................................................................................................................................1-4Setting location pov .....................................................................................................................................................1-5Setting peRioD pov ........................................................................................................................................................1-6SyStem lock ....................................................................................................................................................................1-6
Module 2: hyPerIon fdM aPPlICatIon ManageMent
defInItIon of a hyPerIon fdM aPPlICatIon ........................................................................................................ 2-1settIng uP server load balanCe grouP .......................................................................................................... 2-1CreatIng a neW hyPerIon fdM aPPlICatIon ...................................................................................................... 2-3
geneRal tab ....................................................................................................................................................................2-3DatabaSe tab ...................................................................................................................................................................2-4
ManagIng a hyPerIon fdM aPPlICatIon ............................................................................................................. 2-5maintaining a HypeRion FDm application ..........................................................................................................................2-5Removing an application ..................................................................................................................................................2-5moDiFying an application ..................................................................................................................................................2-5aDDing an application ......................................................................................................................................................2-6
Module 3: Metadata
Metadata tab overvIeW ................................................................................................................................... 3-1loCatIons ......................................................................................................................................................... 3-2
WHat iS a HypeRion FDm location? .................................................................................................................................3-2HypeRion FDm location typeS ........................................................................................................................................3-2cReating a HypeRion FDm location .................................................................................................................................3-2
IMPort forMats ................................................................................................................................................ 3-7WHat aRe impoRt FoRmatS?..............................................................................................................................................3-7cReating neW impoRt gRoupS ..........................................................................................................................................3-7DeFining FielDS FoR a impoRt gRoup .................................................................................................................................3-8aSSigning impoRt FoRmatS ..............................................................................................................................................3-10aDvanceD impoRt FeatuReS .............................................................................................................................................3-10builDing impoRt ScRiptS .................................................................................................................................................3-15builDing integRation ScRiptS ..........................................................................................................................................3-17uSing aDaptoR impoRt gRoupS .......................................................................................................................................3-20expReSSion Stacking anD pRoceSSing oRDeR ..................................................................................................................3-21

ii
logIC aCCounts .............................................................................................................................................. 3-22WHat aRe logic accountS? ...........................................................................................................................................3-22cReating logic gRoupS ..................................................................................................................................................3-22cReating Simple logic accountS ....................................................................................................................................3-23cReating complex logic accountS.................................................................................................................................3-28
valIdatIon rules ............................................................................................................................................ 3-33WHat aRe valiDation Rule gRoupS .................................................................................................................................3-33Rule Data SouRceS ........................................................................................................................................................3-33valiDation RuleS ............................................................................................................................................................3-34valiDation Rule logic WizaRD ........................................................................................................................................3-38Rule logic ....................................................................................................................................................................3-41
valIdatIon entIty grouPs ............................................................................................................................... 3-44WHat aRe valiDation entity gRoupS ...............................................................................................................................3-44DeFining valiDation entitieS ...........................................................................................................................................3-44
Controls grouPs .......................................................................................................................................... 3-46contRol gRoupS oveRvieW ............................................................................................................................................3-46SectionS ........................................................................................................................................................................3-47queStionS ......................................................................................................................................................................3-48Recycle bin ...................................................................................................................................................................3-52queStion pRoFileS .........................................................................................................................................................3-54
Controls tables ............................................................................................................................................ 3-56WHat aRe contRol tableS? ...........................................................................................................................................3-56Setting up peRioDS .......................................................................................................................................................3-56Setting up categoRieS ..................................................................................................................................................3-57WoRking WitH cuRRency coDeS ......................................................................................................................................3-58
seCurIty......................................................................................................................................................... 3-59levelS oF SecuRity ........................................................................................................................................................3-59application object SecuRity ..........................................................................................................................................3-59uSeR SecuRity ...............................................................................................................................................................3-60
Module 4: systeMs
overvIeW .......................................................................................................................................................... 4-1target systeM adaPtor CoMPonents ................................................................................................................ 4-1
aDaptoR Dll/exe ...........................................................................................................................................................4-1aDaptoR xml ..................................................................................................................................................................4-1
IntegratIng WIth the target aPPlICatIon ........................................................................................................... 4-2exPortIng xMl ................................................................................................................................................ 4-2
Module 5: sCrIPts
sCrIPt edItor ................................................................................................................................................... 5-1aCCelerators ................................................................................................................................................... 5-2
Module 6: rePorts
MaIntaInIng rePorts ......................................................................................................................................... 6-1ChangIng desCrIPtIons ..................................................................................................................................... 6-1desIgnIng a rePort .......................................................................................................................................... 6-1settIng rePort grouP seCurIty ....................................................................................................................... 6-1

iii
Module 7: other tools
IMPortIng data froM MICrosoft exCel ............................................................................................................. 7-1Replacing Data ................................................................................................................................................................7-1
batCh ProCessIng ............................................................................................................................................ 7-2batcH contRolS...............................................................................................................................................................7-3batcH pRoceSSing ScReen ReSultS ..................................................................................................................................7-4batcH pRoceSSing ............................................................................................................................................................7-5
MaP Converter ................................................................................................................................................ 7-8table edItor .................................................................................................................................................. 7-11data segMents .............................................................................................................................................. 7-12
cReating neW SegmentS ................................................................................................................................................7-12Deleting, RecReating, anD ReaSSigning Data SegmentS ..................................................................................................7-12
text edItor .................................................................................................................................................... 7-13baCkuP aPPlICatIon fIles funCtIon .................................................................................................................. 7-13systeM oPtIons .............................................................................................................................................. 7-15
application SettingS ......................................................................................................................................................7-15integRation SettingS ......................................................................................................................................................7-16conFiguRation optionS ..................................................................................................................................................7-18

iv
�
Installation and ConfigurationSystem RequirementsRefer to the document titled Hardware and Software Requirements.
Hyperion FDM WorkbenchRefer to the WebLink 8.3 Installation Guide for detailed instructions to install the Workbench Client.

Hyperion FDM Workbench Guide
�i

Module 1: Workbench basics


1-1
Module 1 — Workbench Basics
Product OverviewThe Hyperion System 9 Financial Data Quality Management (Hyperion FDM) Workbench provides a windows based interface for developing, setup and modification of a Hyperion FDM application. The Workbench can be installed on a PC or Citrix/Terminal server. The Workbench provides functionality to all the application setup, integration, and development features in Hyperion FDM and should be used only by administrators.
Below is an overview of the Hyperion FDM Workbench basic functionality: MetaDataCreating and Maintaining LocationsCreating and Maintaining Import FormatsCreating and Maintaining Validation Rule GroupsCreating and Maintaining Validation Entity GroupsCreating and Maintaining Control GroupsMaintaining Control Tables (Periods, Categories & Currencies)Maintaining SecuritySystems (Integration Block setup)Script Creation/MaintenanceReport Creation/MaintenanceImporting/Exporting applications (stored in XML format)Setting Up and Monitoring Batch Processing
•••••••••••••
Hyperion FDM Workbench Guide
1-2
Standard NavigationCommand ButtonsMost forms in the Hyperion FDM Workbench contain the standard buttons listed below:
Add — Click the Add button to add a new record in the grid by moving to the last row in the grid.
Save — Click the Save button to save a record.
Cancel — Click the Cancel button to cancel an edit operation.
Close — Click the Close button to exit the form.
Excel — Click the Excel button to output the contents of a grid to an Excel spreadsheet. The Excel spreadsheet will be saved to an Excel sub-directory under the Outbox folder specified in the Connections Dialog form. The name of the file will be displayed once the export process is complete.
Print — Click the Print button to output the contents of a grid to the printer. The data to be printed will be previewed in a viewer prior to final print confirmation.
Working with Data in GridsMost forms in Hyperion FDM display data in one or more grids. Below are the basic grid operations used to manipulate data.
Edit RecordTo edit a record, select the cell you wish to edit and start typing.
Add RecordTo add a new record, click the Add button or move to the last blank row of the grid.
Delete RecordTo delete a record, click the Delete button or highlight the entire row and press the Delete key on the keyboard.
Cancel EditTo cancel all changes made to a row, click the Cancel button. To cancel changes made to an individual cell, press the Escape key.
Save Record To save a record, click on another record in the grid or click the Save button.
Resizing ColumnsTo resize a column, drag the column header’s divider to desired width.
1-3
Module 1 — Workbench Basics
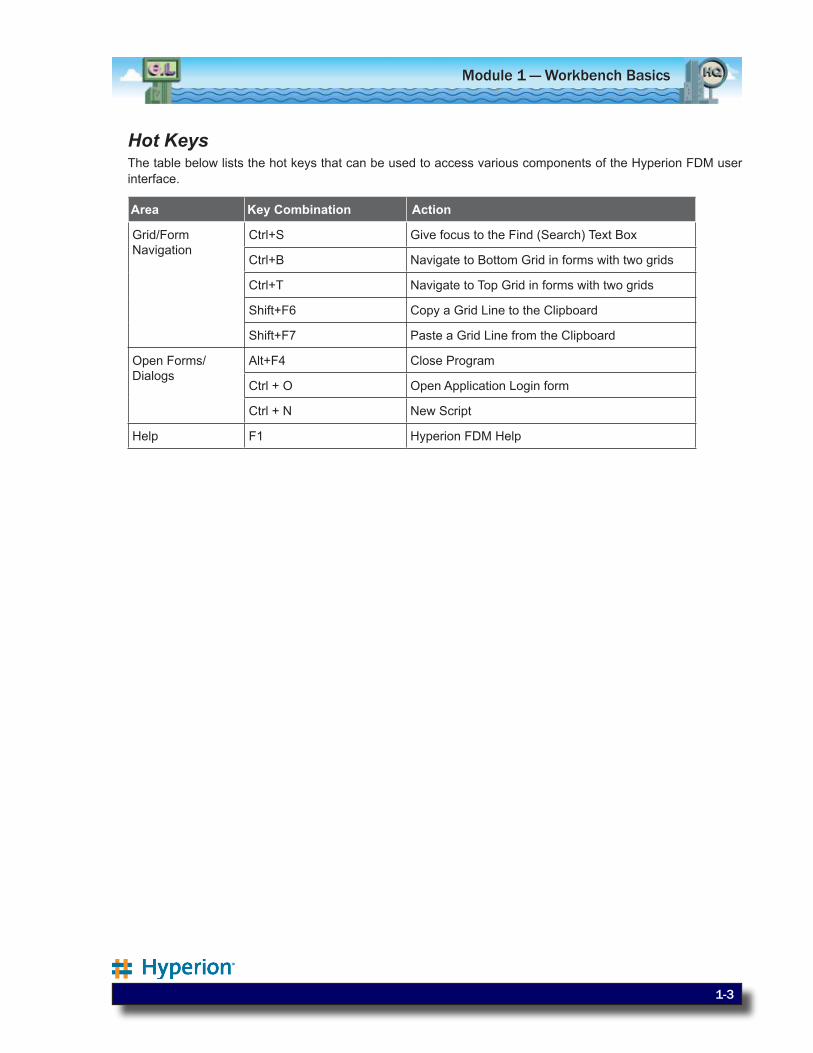
Hot KeysThe table below lists the hot keys that can be used to access various components of the Hyperion FDM user interface.
Area Key Combination Action
Grid/Form Navigation
Ctrl+S Give focus to the Find (Search) Text Box
Ctrl+B Navigate to Bottom Grid in forms with two grids
Ctrl+T Navigate to Top Grid in forms with two grids
Shift+F6 Copy a Grid Line to the Clipboard
Shift+F7 Paste a Grid Line from the Clipboard
Open Forms/Dialogs
Alt+F4 Close Program
Ctrl + O Open Application Login form
Ctrl + N New Script
Help F1 Hyperion FDM Help

Hyperion FDM Workbench Guide
1-4
Point of ViewWhat is Point of View?The Point of View is used to set Hyperion FDM’s data focus. Hyperion FDM’s Point of View is a control feature. When the POV Lock system option is active the Period and Category values are globally controlled across the system. Only the system administrator can change these values when the POV Lock is active. This ensures that end users can only load data to the proper Period and proper Category.
However, if more flexibility is desired, the POV Lock can be disabled which will allow end users to change to Local POV mode in order to perform processing for any category or period. To change the data focus, double click on the desired Category/Period on the POV bar along the bottom of the screen.
POV Mode Local vs. Global
Local POV Mode Allows any category and/or period to be selected for processing.
Global POV Mode Restricts category and period processing to a global value that is active for all users on the system.
Changing POV ModeThe POV mode can be changed by double-clicking the POV mode bar on the bottom of the screen.
Note: System administrators can always change their POV mode to the Local setting, but end users can only access this option if the POV Lock system option is disabled.
1-5
Module 1 — Workbench Basics
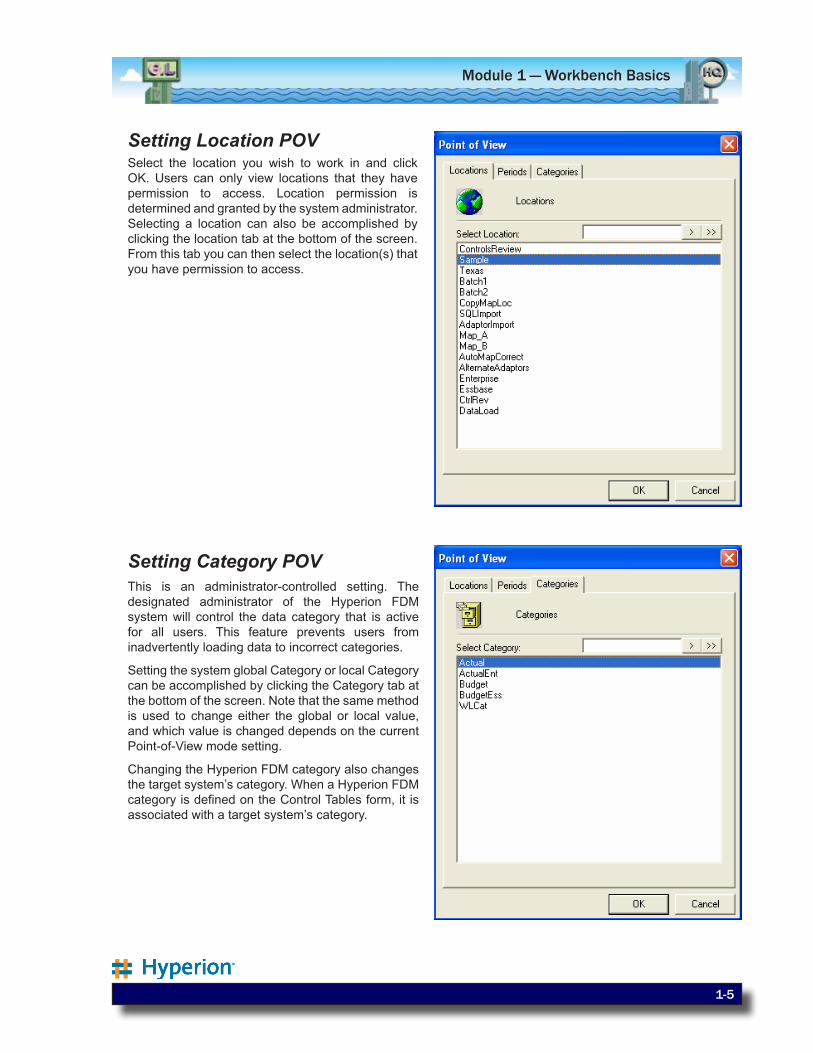
Setting Location POVSelect the location you wish to work in and click OK. Users can only view locations that they have permission to access. Location permission is determined and granted by the system administrator. Selecting a location can also be accomplished by clicking the location tab at the bottom of the screen. From this tab you can then select the location(s) that you have permission to access.
Setting Category POVThis is an administrator-controlled setting. The designated administrator of the Hyperion FDM system will control the data category that is active for all users. This feature prevents users from inadvertently loading data to incorrect categories.
Setting the system global Category or local Category can be accomplished by clicking the Category tab at the bottom of the screen. Note that the same method is used to change either the global or local value, and which value is changed depends on the current Point-of-View mode setting.
Changing the Hyperion FDM category also changes the target system’s category. When a Hyperion FDM category is defined on the Control Tables form, it is associated with a target system’s category.
Hyperion FDM Workbench Guide
1-6
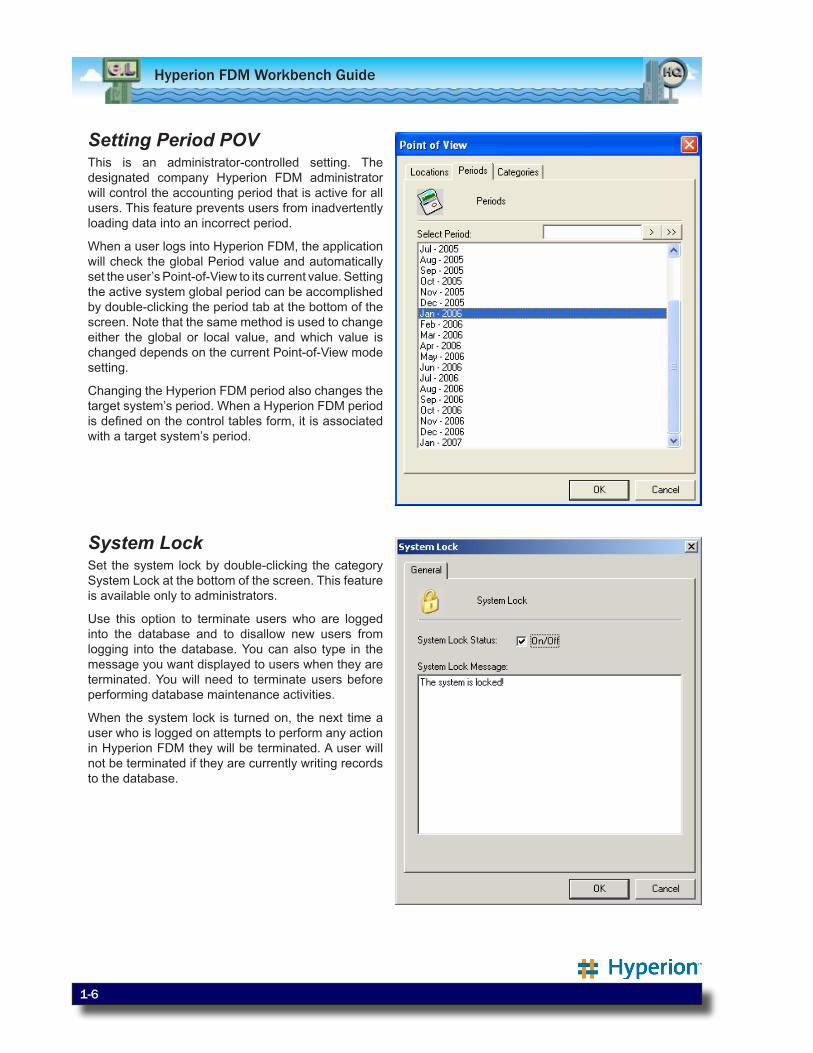
Setting Period POVThis is an administrator-controlled setting. The designated company Hyperion FDM administrator will control the accounting period that is active for all users. This feature prevents users from inadvertently loading data into an incorrect period.
When a user logs into Hyperion FDM, the application will check the global Period value and automatically set the user’s Point-of-View to its current value. Setting the active system global period can be accomplished by double-clicking the period tab at the bottom of the screen. Note that the same method is used to change either the global or local value, and which value is changed depends on the current Point-of-View mode setting.
Changing the Hyperion FDM period also changes the target system’s period. When a Hyperion FDM period is defined on the control tables form, it is associated with a target system’s period.
System LockSet the system lock by double-clicking the category System Lock at the bottom of the screen. This feature is available only to administrators.
Use this option to terminate users who are logged into the database and to disallow new users from logging into the database. You can also type in the message you want displayed to users when they are terminated. You will need to terminate users before performing database maintenance activities.
When the system lock is turned on, the next time a user who is logged on attempts to perform any action in Hyperion FDM they will be terminated. A user will not be terminated if they are currently writing records to the database.
Module 2: hyperion FdM application ManageMent

2-1
Module 2 — Hyperion FDM Application Management
Definition of a Hyperion FDM ApplicationA Hyperion FDM application consists of a RDBMS database and directories that contain all the transactional data, metadata, reports, and other files that are used when integrating with an individual target system application. A new Hyperion FDM application will need to be created for each target system application that Hyperion FDM will be loading. Valid target systems include: Hyperion Enterprise, Hyperion Financial Management, Hyperion Financial Planning, Hyperion Essbase, and all other consolidation, reporting, planning, and analytical applications. There is no limit to the number of Hyperion FDM applications that can be created. A Hyperion FDM application contains a Data, Inbox, Outbox, and Reports directories.
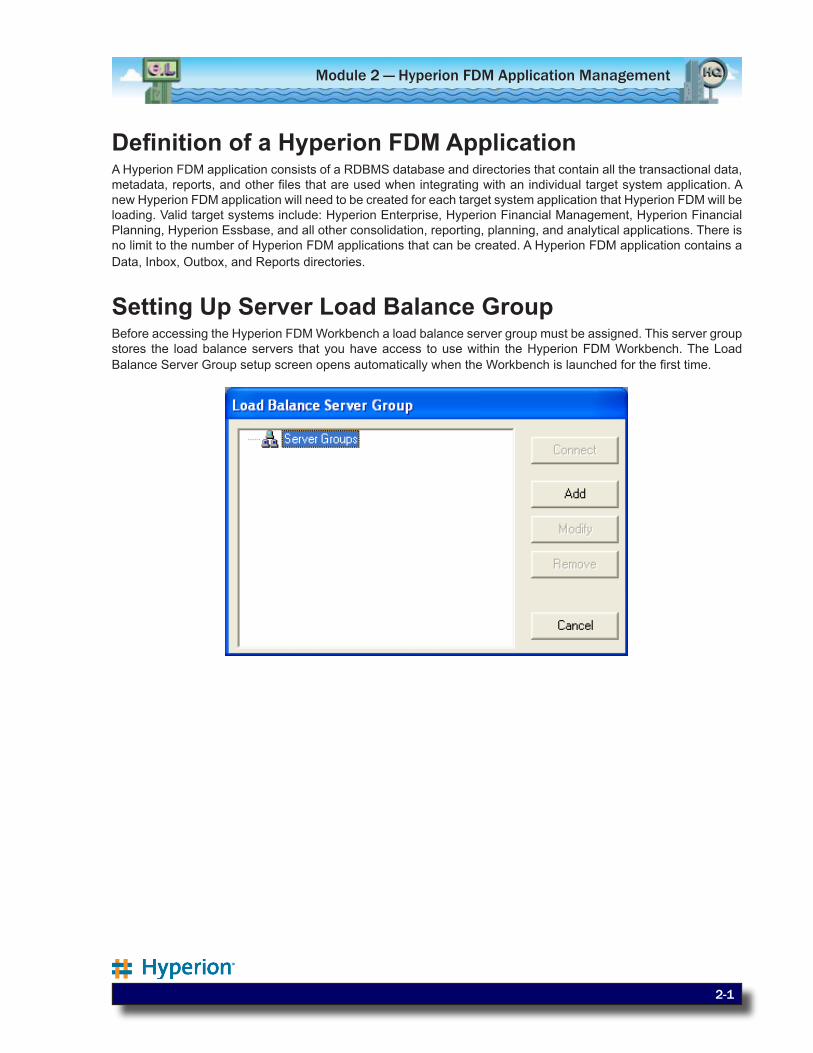
Setting Up Server Load Balance GroupBefore accessing the Hyperion FDM Workbench a load balance server group must be assigned. This server group stores the load balance servers that you have access to use within the Hyperion FDM Workbench. The Load Balance Server Group setup screen opens automatically when the Workbench is launched for the first time.
Hyperion FDM Workbench Guide
2-2
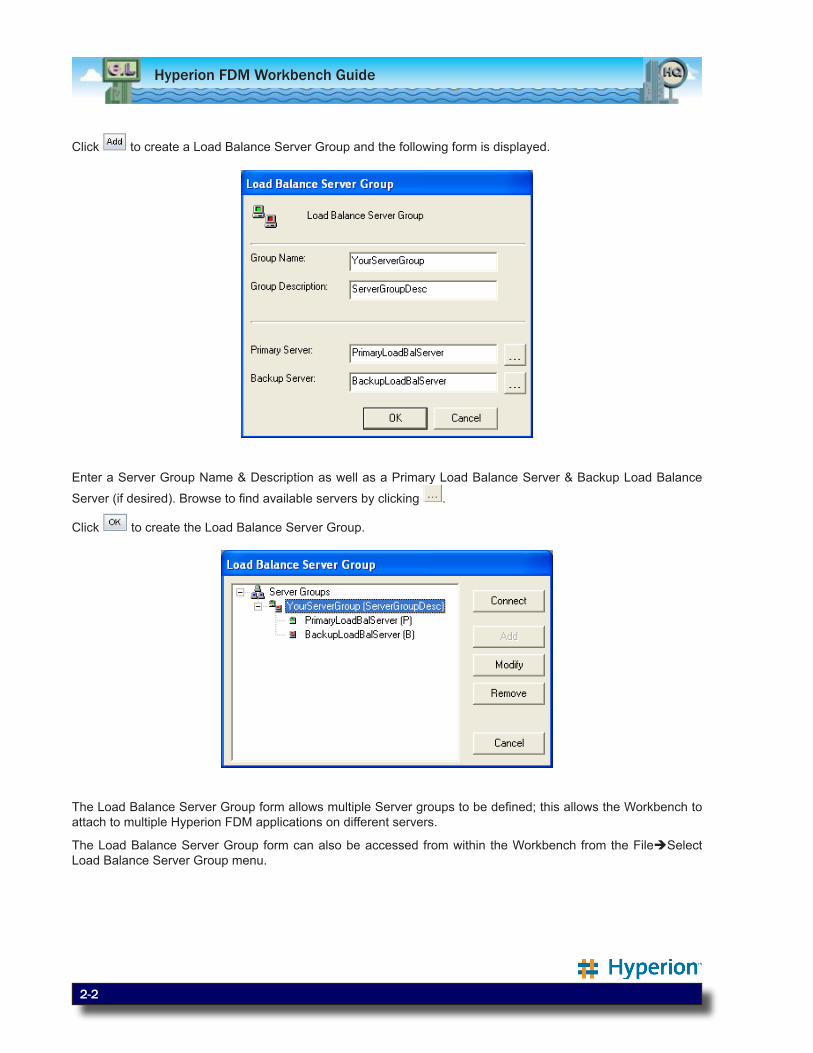
Click to create a Load Balance Server Group and the following form is displayed.
Enter a Server Group Name & Description as well as a Primary Load Balance Server & Backup Load Balance
Server (if desired). Browse to find available servers by clicking .
Click to create the Load Balance Server Group.
The Load Balance Server Group form allows multiple Server groups to be defined; this allows the Workbench to attach to multiple Hyperion FDM applications on different servers.
The Load Balance Server Group form can also be accessed from within the Workbench from the FileSelect Load Balance Server Group menu.
2-3
Module 2 — Hyperion FDM Application Management
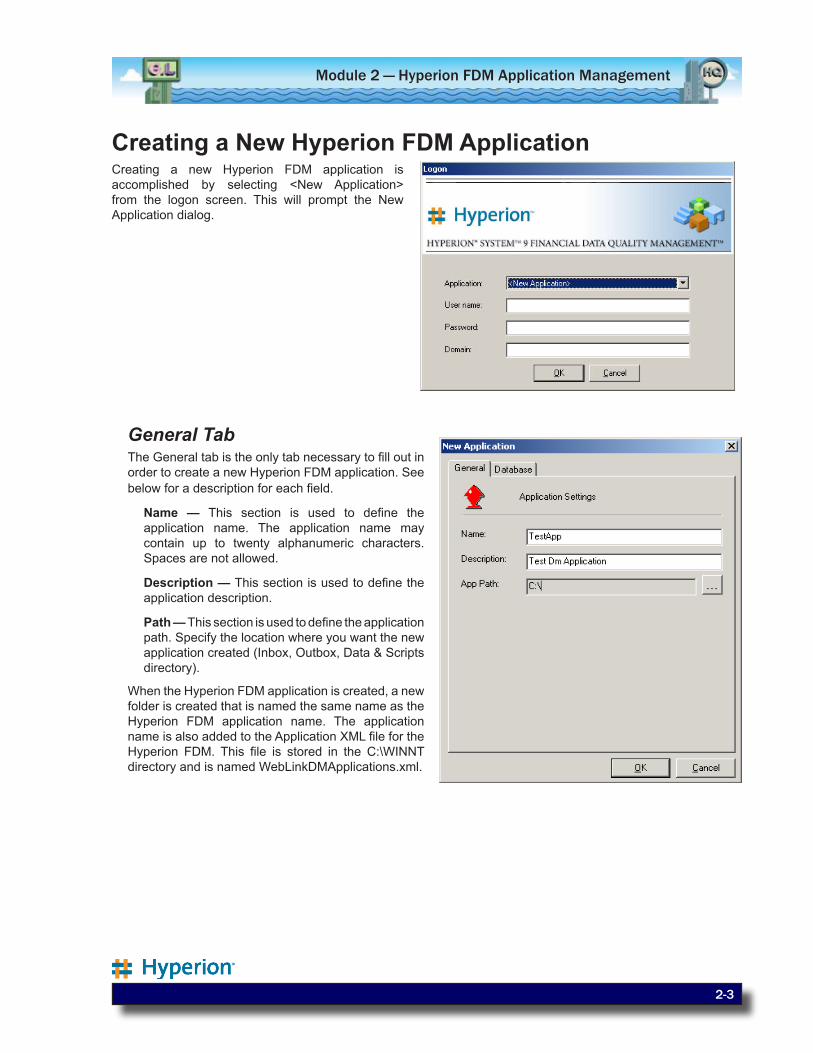
Creating a New Hyperion FDM ApplicationCreating a new Hyperion FDM application is accomplished by selecting <New Application> from the logon screen. This will prompt the New Application dialog.
General TabThe General tab is the only tab necessary to fill out in order to create a new Hyperion FDM application. See below for a description for each field.
Name — This section is used to define the application name. The application name may contain up to twenty alphanumeric characters. Spaces are not allowed.
Description — This section is used to define the application description.
Path — This section is used to define the application path. Specify the location where you want the new application created (Inbox, Outbox, Data & Scripts directory).
When the Hyperion FDM application is created, a new folder is created that is named the same name as the Hyperion FDM application name. The application name is also added to the Application XML file for the Hyperion FDM. This file is stored in the C:\WINNT directory and is named WebLinkDMApplications.xml.
Hyperion FDM Workbench Guide
2-4
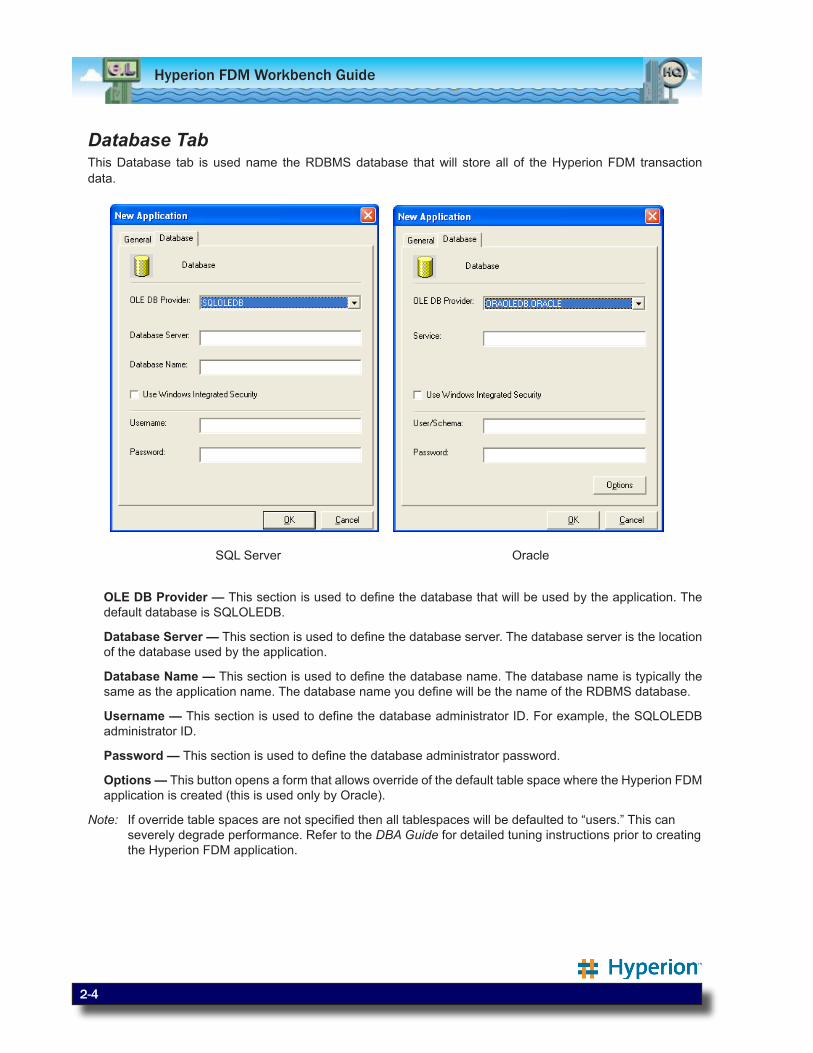
Database TabThis Database tab is used name the RDBMS database that will store all of the Hyperion FDM transaction data.
SQL Server Oracle
OLE DB Provider — This section is used to define the database that will be used by the application. The default database is SQLOLEDB.
Database Server — This section is used to define the database server. The database server is the location of the database used by the application.
Database Name — This section is used to define the database name. The database name is typically the same as the application name. The database name you define will be the name of the RDBMS database.
Username — This section is used to define the database administrator ID. For example, the SQLOLEDB administrator ID.
Password — This section is used to define the database administrator password.
Options — This button opens a form that allows override of the default table space where the Hyperion FDM application is created (this is used only by Oracle).
Note: If override table spaces are not specified then all tablespaces will be defaulted to “users.” This can severely degrade performance. Refer to the DBA Guide for detailed tuning instructions prior to creating the Hyperion FDM application.
2-5
Module 2 — Hyperion FDM Application Management
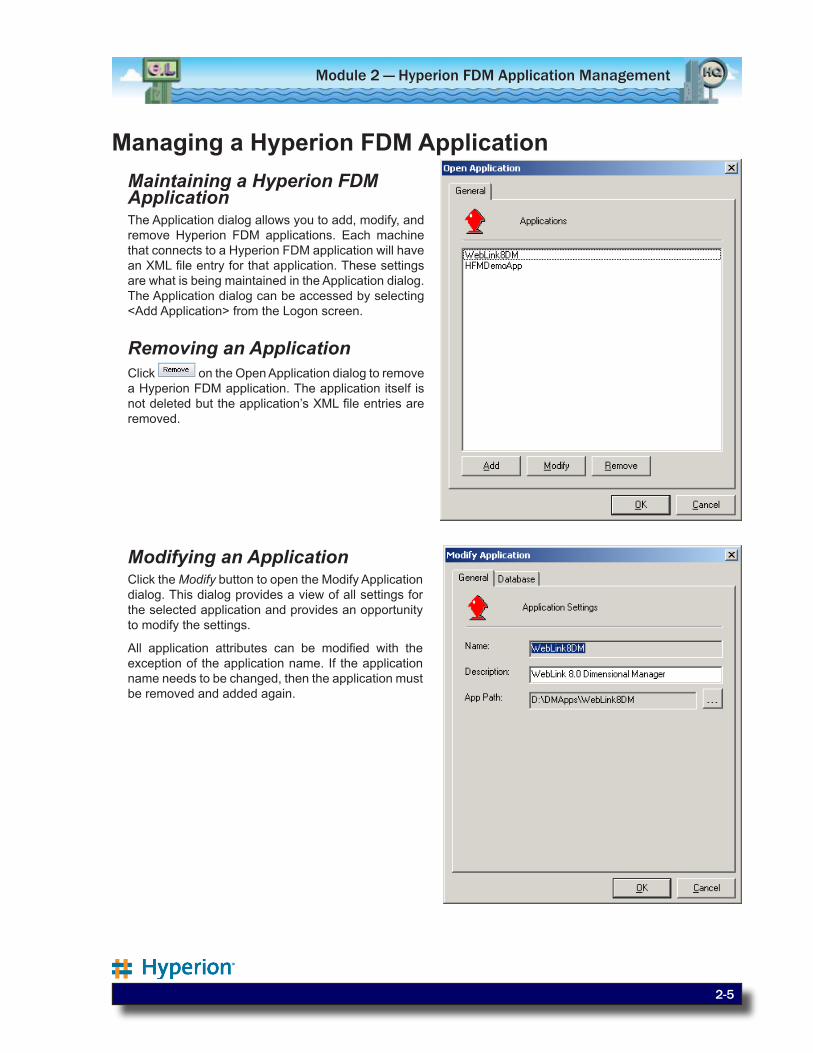
Managing a Hyperion FDM ApplicationMaintaining a Hyperion FDM ApplicationThe Application dialog allows you to add, modify, and remove Hyperion FDM applications. Each machine that connects to a Hyperion FDM application will have an XML file entry for that application. These settings are what is being maintained in the Application dialog. The Application dialog can be accessed by selecting <Add Application> from the Logon screen.
Removing an ApplicationClick on the Open Application dialog to remove a Hyperion FDM application. The application itself is not deleted but the application’s XML file entries are removed.
Modifying an ApplicationClick the Modify button to open the Modify Application dialog. This dialog provides a view of all settings for the selected application and provides an opportunity to modify the settings.
All application attributes can be modified with the exception of the application name. If the application name needs to be changed, then the application must be removed and added again.
Hyperion FDM Workbench Guide
2-6
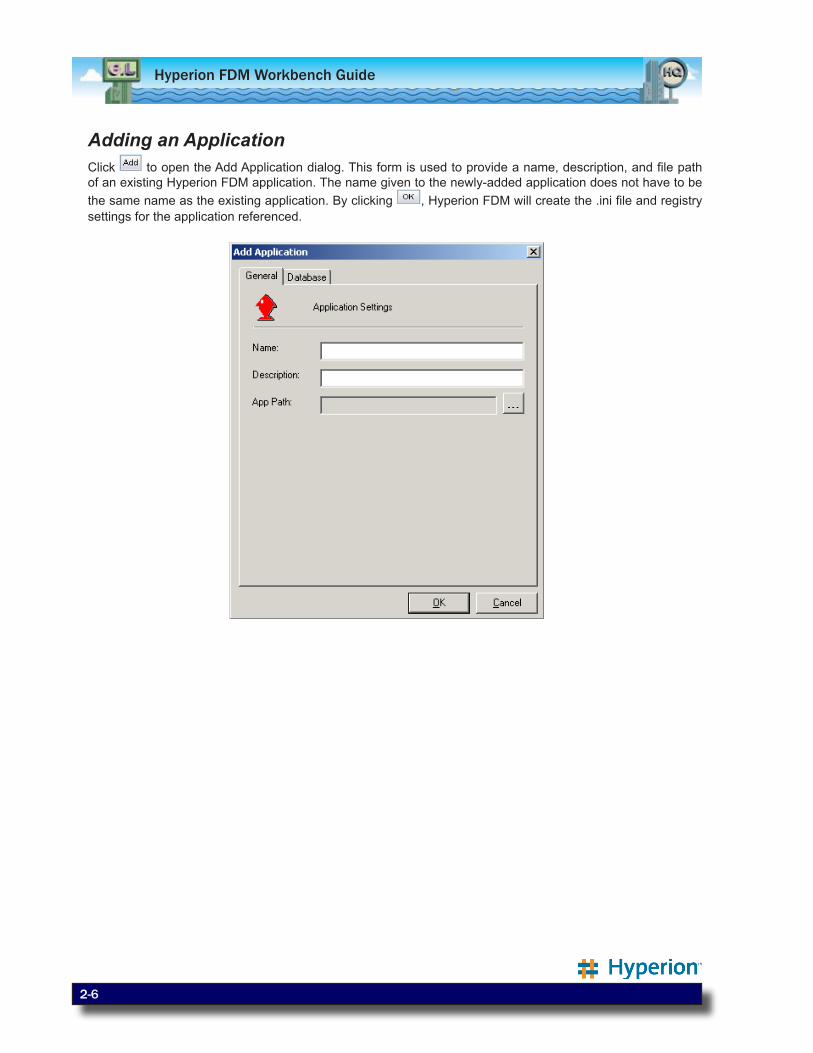
Adding an ApplicationClick to open the Add Application dialog. This form is used to provide a name, description, and file path of an existing Hyperion FDM application. The name given to the newly-added application does not have to be the same name as the existing application. By clicking , Hyperion FDM will create the .ini file and registry settings for the application referenced.

Module 3: Metadata

3-1
Module 3 — Metadata
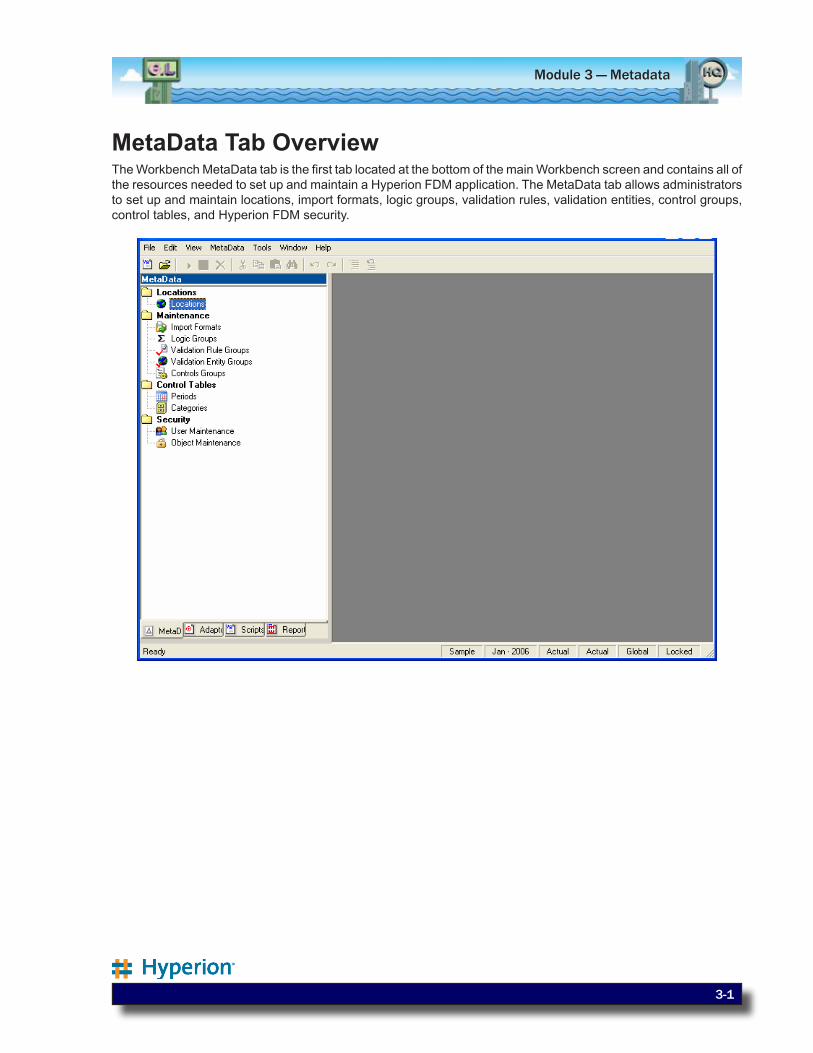
MetaData Tab OverviewThe Workbench MetaData tab is the first tab located at the bottom of the main Workbench screen and contains all of the resources needed to set up and maintain a Hyperion FDM application. The MetaData tab allows administrators to set up and maintain locations, import formats, logic groups, validation rules, validation entities, control groups, control tables, and Hyperion FDM security.

Hyperion FDM Workbench Guide
3-2
LocationsWhat is a Hyperion FDM Location?Note: This help file only details information about Hyperion FDM data load locations. Refer to the section
titled Controls Groups for information about financial controls and other information about controls review locations. Whenever a reference is made to a Hyperion FDM Location assume it is pertaining to a data load location.
A Hyperion FDM location is a reporting unit that is responsible for submitting source data into the target system. Typically, there is one Hyperion FDM location for each source file being loaded into the target system.
End users are assigned access to one or more locations by the system administrator with one location being designated as the default location for that user. When a user logs into Hyperion FDM, the user’s point of view will be set to their default location.
End users only have access to the locations they were granted access to by the administrator. The active location will be visible from the bottom Hyperion FDM toolbar. Users can switch to locations that they have access to by double-clicking on the location name in the bottom status bar and selecting the location they want to switch to.
Hyperion FDM Location TypesHyperion FDM contains two types of locations, Data Load and Controls Review locations.
Data Load — A Data Load location is a typical Hyperion FDM location where source data is imported, validated, and loaded into the target system. Although not necessary, a Data Load location can also be assigned Financial Controls to assist a company’s internal financial control policies. This help file does not cover how Financial Controls are assigned to a Data Load Location. See Controls Groups for information on assigning Financial Controls to a Data Load Location.
Controls Review Location — A Controls Review location is only assigned financial controls. No data is loaded into a Controls Review location. Controls Review locations are only necessary when using the financial controls functionality of Hyperion FDM. Refer to the section titled Control Tables for detailed information about setting up financial controls.
Creating a Hyperion FDM LocationLocations are maintained in the Locations maintenance form. The Location Maintenance form is accessed by selecting Locations from the MetaData Tab.
Refer to the section titled Control Tables for detailed information about setting up financial controls.
3-3
Module 3 — Metadata
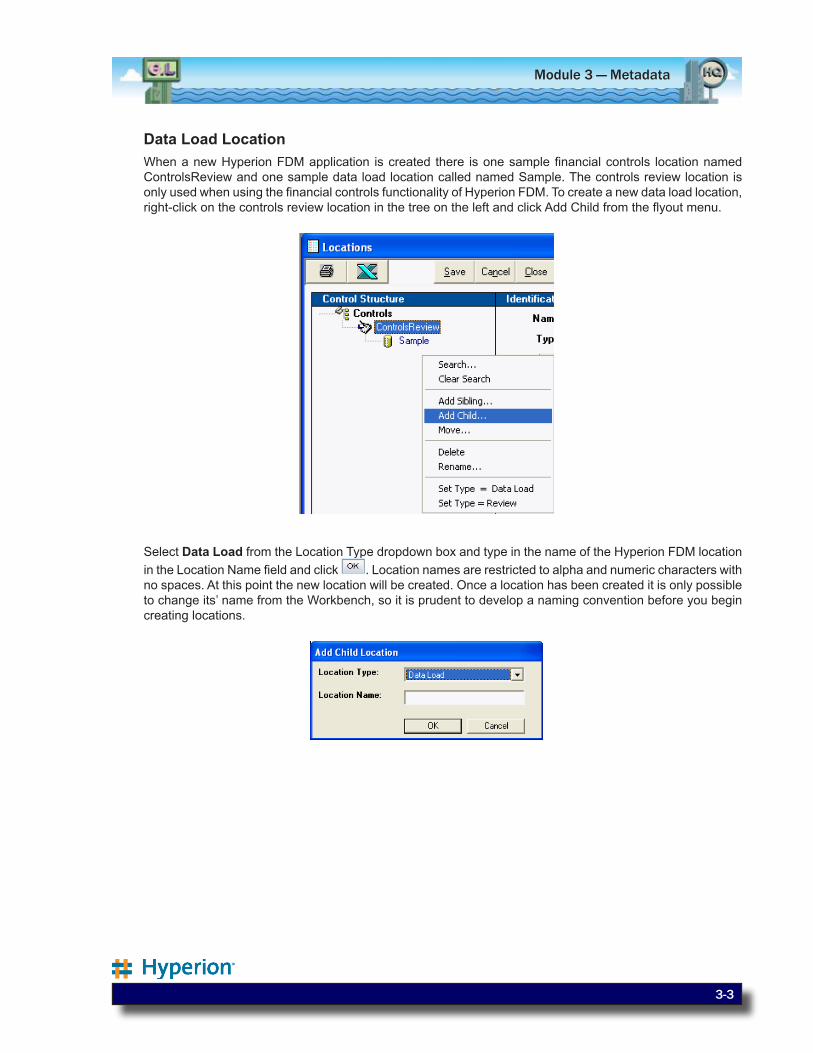
Data Load LocationWhen a new Hyperion FDM application is created there is one sample financial controls location named ControlsReview and one sample data load location called named Sample. The controls review location is only used when using the financial controls functionality of Hyperion FDM. To create a new data load location, right-click on the controls review location in the tree on the left and click Add Child from the flyout menu.
Select Data Load from the Location Type dropdown box and type in the name of the Hyperion FDM location in the Location Name field and click . Location names are restricted to alpha and numeric characters with no spaces. At this point the new location will be created. Once a location has been created it is only possible to change its’ name from the Workbench, so it is prudent to develop a naming convention before you begin creating locations.

Hyperion FDM Workbench Guide
3-4
Location Attributes
When creating a new location it is necessary to assign attributes to the location. Certain attributes are required for the location to work properly (i.e., Import Format) while other attributes are optional (i.e., Logic Group). These attributes are broken into four types that each have their own tab (General, Workflow Behaviors, Financial Controls, and Integration Options).
General Tab
Description Field — The description field is used for additional information to be kept about the location. This is useful for tracking what general ledger systems are in use or other system related information about a location. When creating a new location the name the default description is the same as the name of the location. (Required)
Currency — Choose a currency code that will identify the currency that will be loaded into the location. This currency code is only used for identification purposes in certain Hyperion FDM reports and other forms within Hyperion FDM that displays data. The currency code and does not impact any calculations as Hyperion FDM does not perform currency translation (Optional).
Parent — If a parent location is assigned to a location then the parent location and the current location with share all mapping tables. Multiple locations can have the same parent location. This is useful if multiple locations have the same chart of accounts. If a change is made to a child or parent mapping table then the change takes place for all children, parent, and sibling locations because they all share the same mapping tables (Optional).
3-5
Module 3 — Metadata
Seq Map — By default, Hyperion FDM wildcard maps (Likes, Ins, Betweens) are sorted in alphabetical order by the Rule Name field in the Maps form. Refer to the section titled Map Processing Order for additional information about the order that Hyperion FDM processes mapping rules.
Clicking on the Seq Map checkbox will display a new sequencing field in the Maps form where it is possible to assign a numeric sort order to each map. This allows for the ability to sort and process maps by a numeric value rather than relying on the alphabetical order of the Rule Name field.
This option is available for locations that have very complicated conversion rules that are predicated upon processing order (i.e., a source account is included in multiple wildcard maps so the sort order of the map would be important to determine which map the account should be processed by). This switch should be left off for locations that do not use such complicated translation rules (Optional).
Load Type — Each data load location uses one of two load types, SQL Insert or Bulk Insert. SQL Insert is the default load method and should be used for location loading smaller files (6000 records or less). The Bulk Insert load type should be selected for locations that load larger files as it is more efficient in handling larger files.
Grouping Tag — It is possible to group multiple locations together by typing in a value in the Grouping Tag field. Locations that are grouped together will be displayed in their grouping order in certain Process Monitor Reports rather than alphabetically (Optional).
Data Value — The Data Value field is an extra dimension that is only used when integrating with multi-dimension target systems. This dimension is associated with a Hyperion FDM location. When Hyperion FDM creates the load file this dimension value will be entered for every data line loaded by this location. For example, The Data Value dimension is associated with the Value dimension in HFM. By default, when integrating with HFM, the Data Value <Entity Currency> will be the default value entered in the data load file if no value is entered in this field (Optional).
Target Adaptor — When left at [None] the location will use the global adaptor. Any selection here will override the global adaptor for this location. Note: When working with Hyperion FDM MetaData screens, Hyperion FDM will use the integration options for its override adaptor.
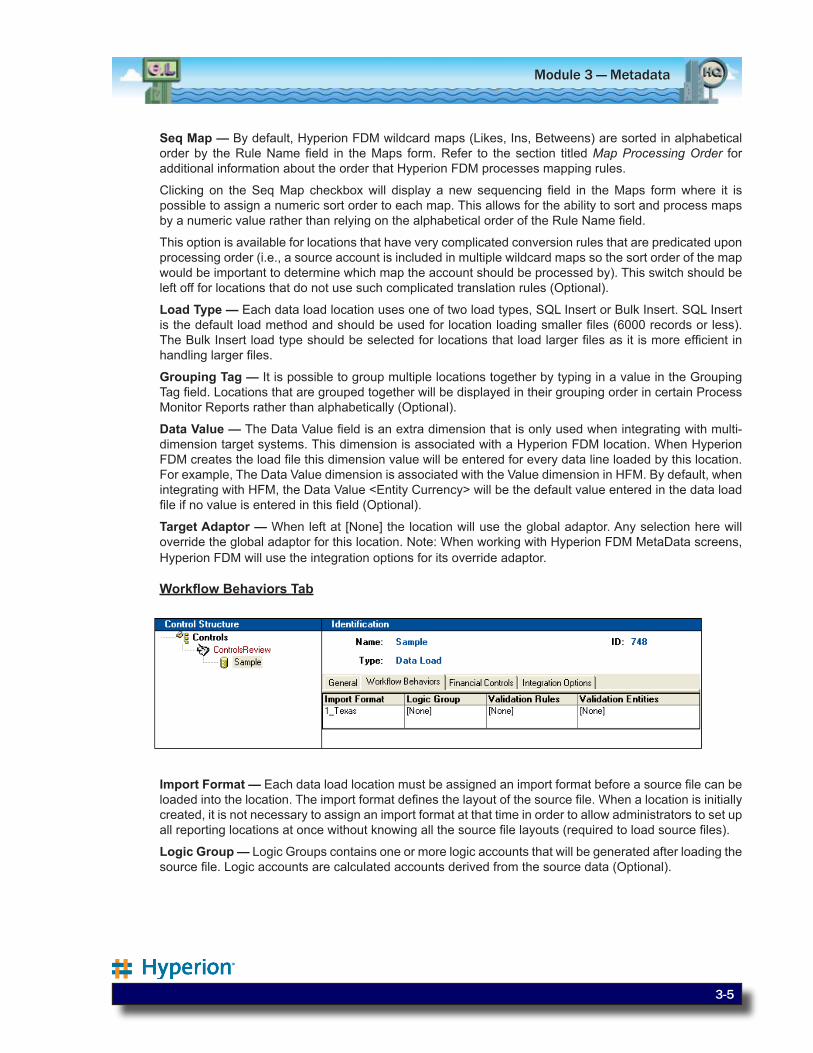
Workflow Behaviors Tab
Import Format — Each data load location must be assigned an import format before a source file can be loaded into the location. The import format defines the layout of the source file. When a location is initially created, it is not necessary to assign an import format at that time in order to allow administrators to set up all reporting locations at once without knowing all the source file layouts (required to load source files).
Logic Group — Logic Groups contains one or more logic accounts that will be generated after loading the source file. Logic accounts are calculated accounts derived from the source data (Optional).
Hyperion FDM Workbench Guide
3-6
Validation Rules — A Validation Rule Group contains a set of validation rules that will be displayed on the Hyperion FDM Validation Report. These validation rules are used by Hyperion FDM to retrieve target system data out of the target system application after completing a data load (Optional).
Validation Entities — A Validation Entity Group contains a set of target system validation entities that can be consolidated and displayed in the Hyperion FDM Validation Report (Optional).
Financial Controls Tab
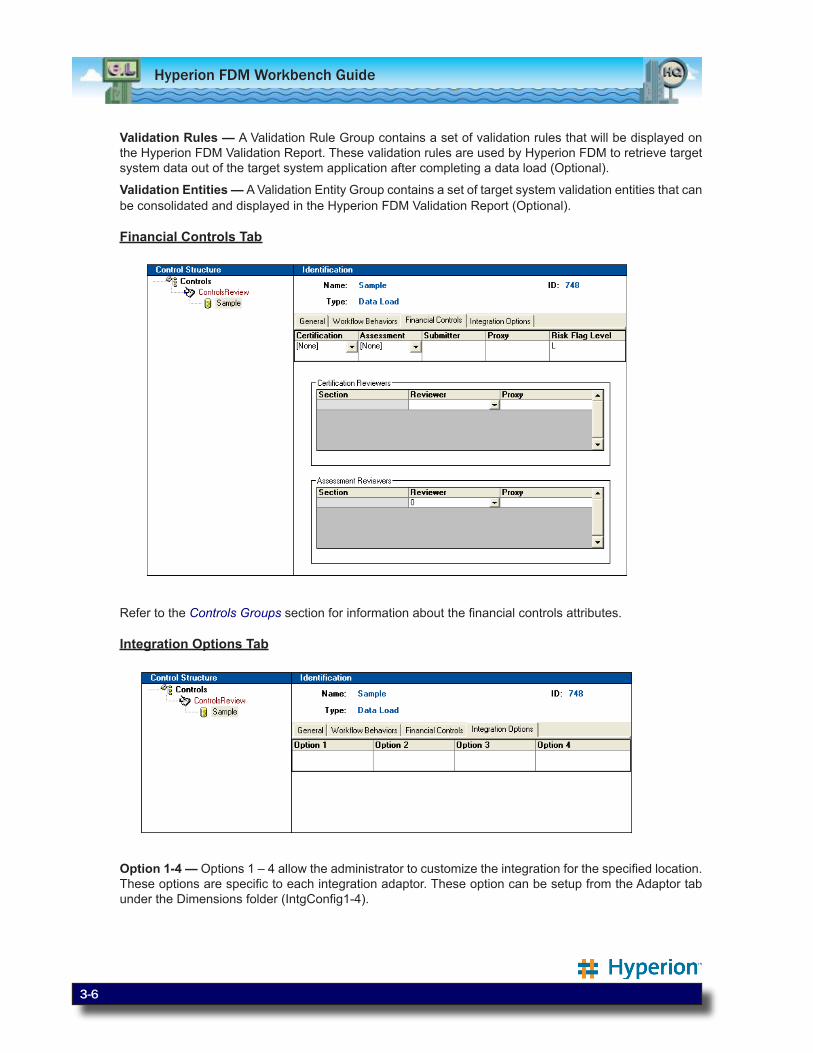
Refer to the Controls Groups section for information about the financial controls attributes.
Integration Options Tab
Option 1-4 — Options 1 – 4 allow the administrator to customize the integration for the specified location. These options are specific to each integration adaptor. These option can be setup from the Adaptor tab under the Dimensions folder (IntgConfig1-4).
3-7
Module 3 — Metadata
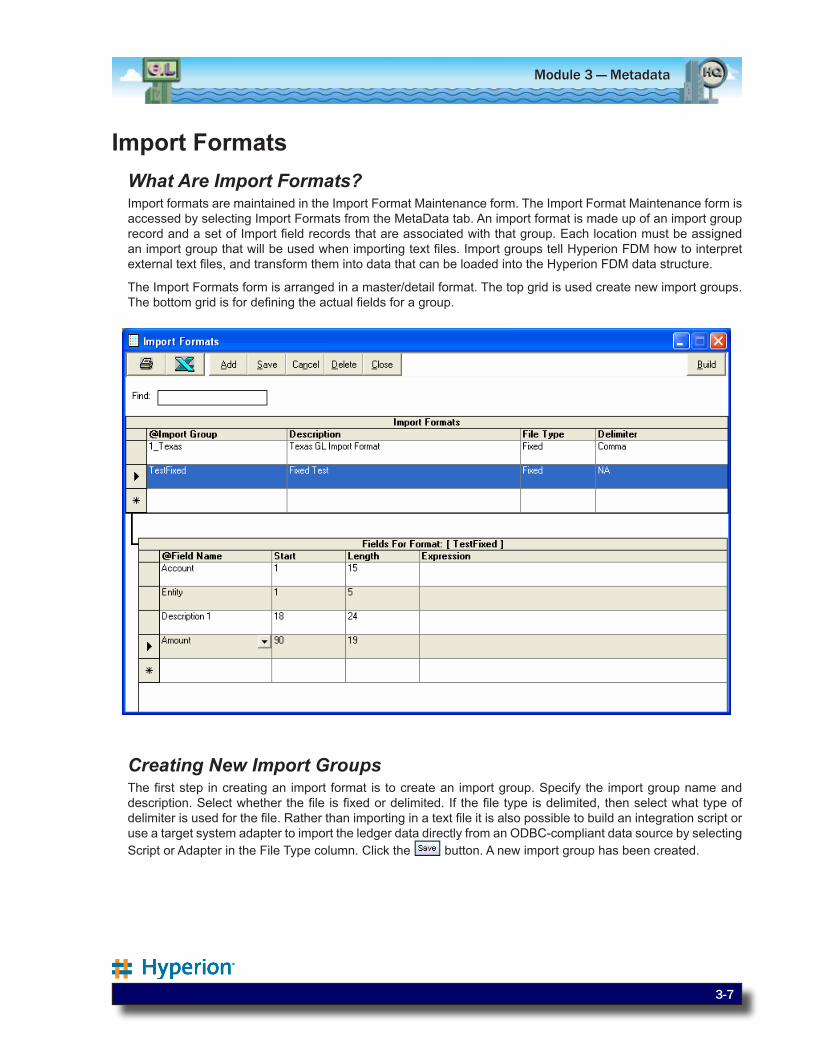
Import FormatsWhat Are Import Formats?Import formats are maintained in the Import Format Maintenance form. The Import Format Maintenance form is accessed by selecting Import Formats from the MetaData tab. An import format is made up of an import group record and a set of Import field records that are associated with that group. Each location must be assigned an import group that will be used when importing text files. Import groups tell Hyperion FDM how to interpret external text files, and transform them into data that can be loaded into the Hyperion FDM data structure.
The Import Formats form is arranged in a master/detail format. The top grid is used create new import groups. The bottom grid is for defining the actual fields for a group.
Creating New Import GroupsThe first step in creating an import format is to create an import group. Specify the import group name and description. Select whether the file is fixed or delimited. If the file type is delimited, then select what type of delimiter is used for the file. Rather than importing in a text file it is also possible to build an integration script or use a target system adapter to import the ledger data directly from an ODBC-compliant data source by selecting Script or Adapter in the File Type column. Click the button. A new import group has been created.
Hyperion FDM Workbench Guide
3-8
Defining Fields for a Import GroupEach row in the lower grid represents one import field. Multiple source fields can be assigned to the same Hyperion FDM field name, and Hyperion FDM will automatically concatenate the string values during the file load process. Enter “Skip” and enter in a text value in the Expression field to skip records containing that value within this field.
Defining Fields for a Delimited Import GroupField Name — select the field name to which to import.
Field No — type in the field number to which to import.
# of Fields — type in the total number of fields for a row in the text file.
Expression — specify an expression. This value will overwrite whatever is in that field location unless the field is defined as a “Skip” field.
Repeat the above process the for the remaining fields to import.
Defining Fields for a Fixed Import GroupField Name — select the field name in which to import.
Start — type in the start location of the field to import.
Length — type in the length of the field.Expression — specify an expression. This value will overwrite whatever is in that field location unless the field is defined as a “Skip” field.
Repeat the above process for the remainder of the fields to import.
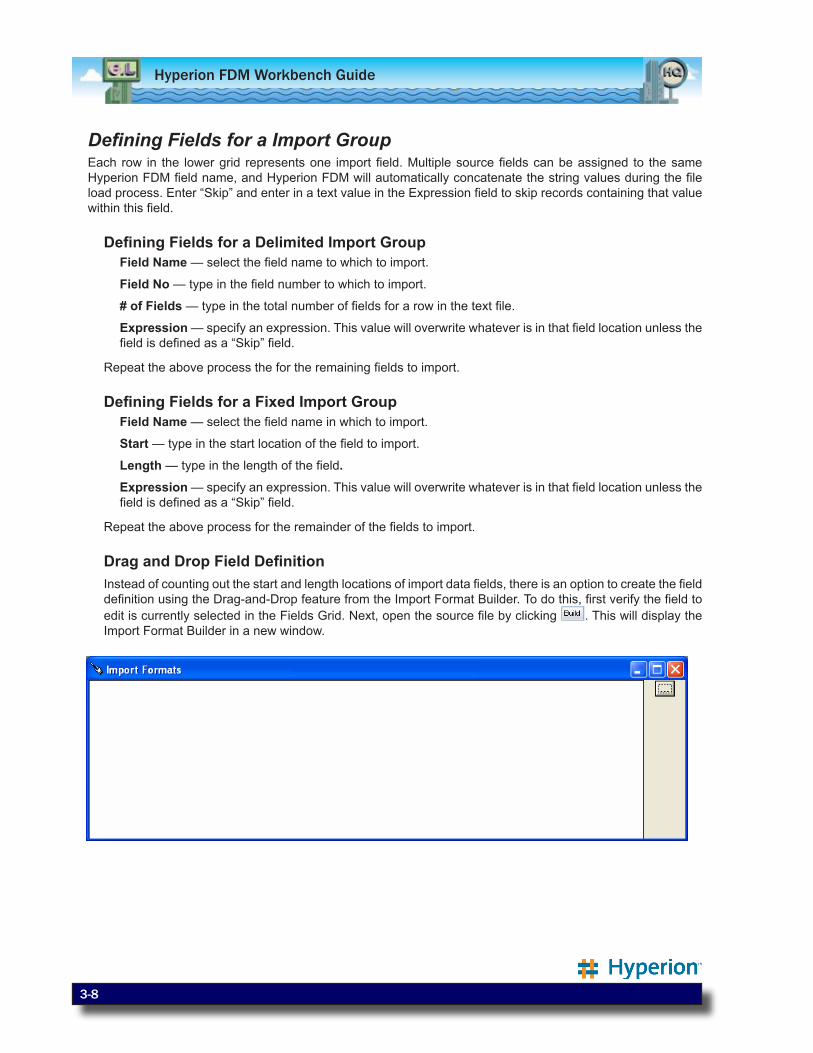
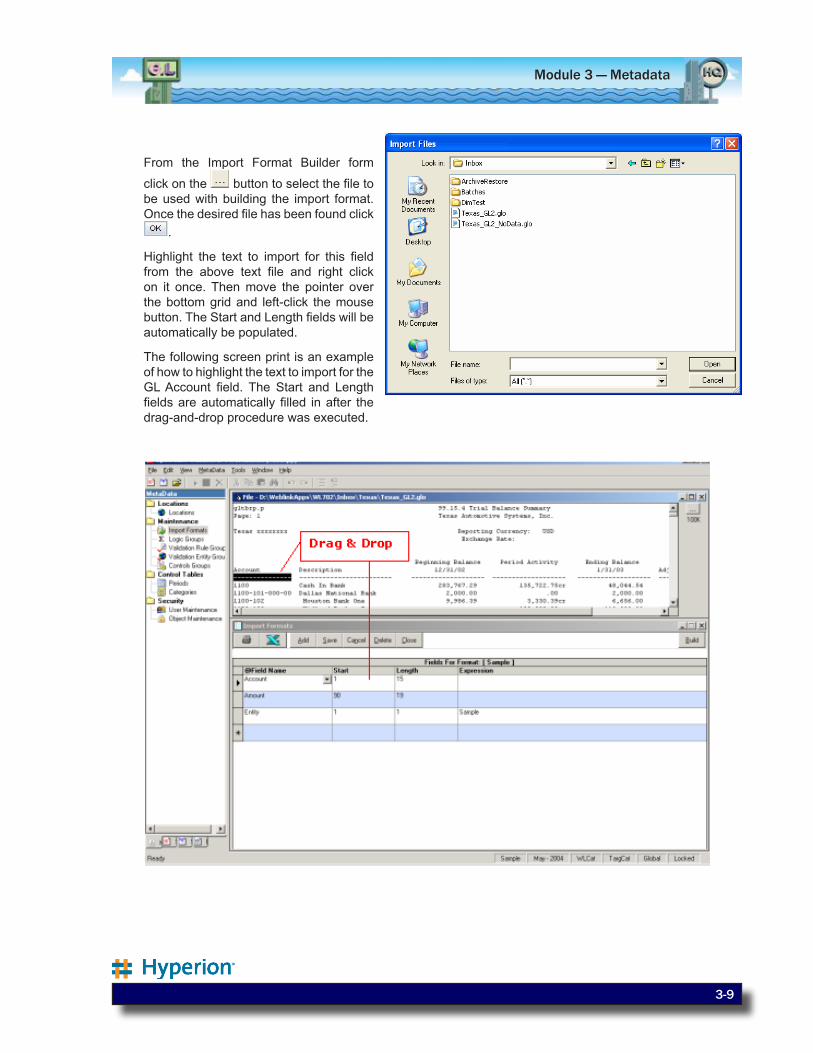
Drag and Drop Field DefinitionInstead of counting out the start and length locations of import data fields, there is an option to create the field definition using the Drag-and-Drop feature from the Import Format Builder. To do this, first verify the field to edit is currently selected in the Fields Grid. Next, open the source file by clicking . This will display the Import Format Builder in a new window.
3-9
Module 3 — Metadata
From the Import Format Builder form
click on the button to select the file to be used with building the import format. Once the desired file has been found click
.
Highlight the text to import for this field from the above text file and right click on it once. Then move the pointer over the bottom grid and left-click the mouse button. The Start and Length fields will be automatically be populated.
The following screen print is an example of how to highlight the text to import for the GL Account field. The Start and Length fields are automatically filled in after the drag-and-drop procedure was executed.
Hyperion FDM Workbench Guide
3-10
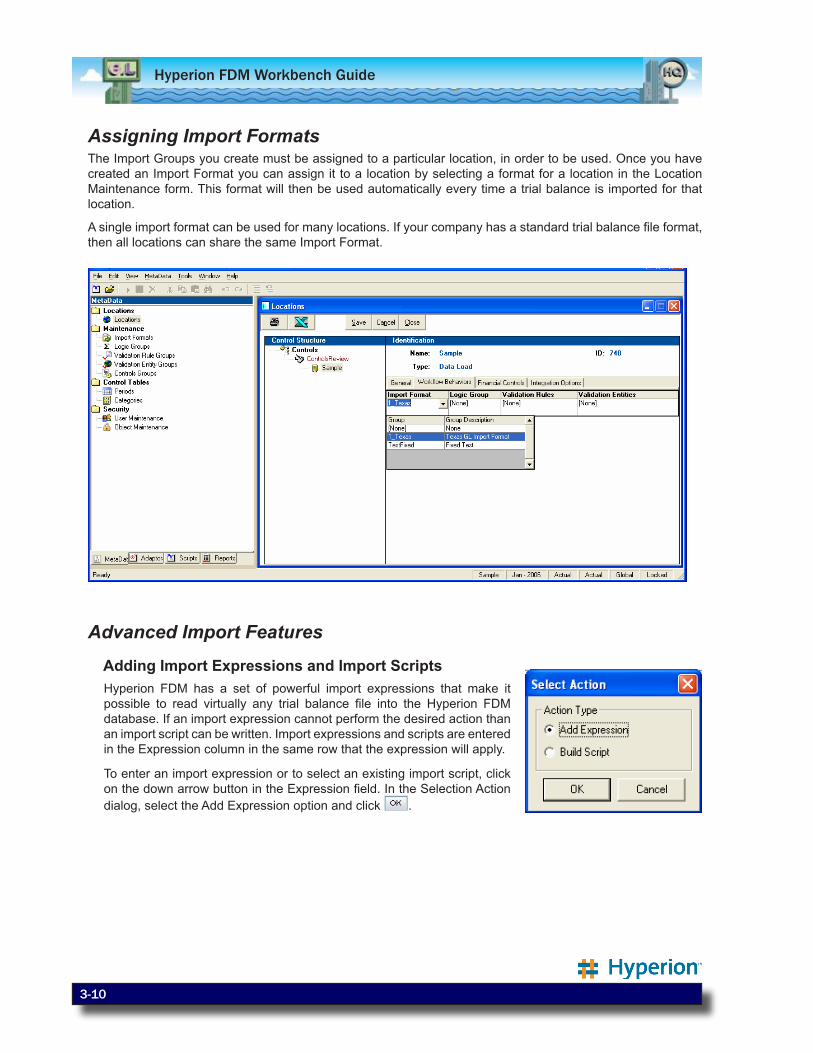
Assigning Import FormatsThe Import Groups you create must be assigned to a particular location, in order to be used. Once you have created an Import Format you can assign it to a location by selecting a format for a location in the Location Maintenance form. This format will then be used automatically every time a trial balance is imported for that location.
A single import format can be used for many locations. If your company has a standard trial balance file format, then all locations can share the same Import Format.
Advanced Import Features
Adding Import Expressions and Import ScriptsHyperion FDM has a set of powerful import expressions that make it possible to read virtually any trial balance file into the Hyperion FDM database. If an import expression cannot perform the desired action than an import script can be written. Import expressions and scripts are entered in the Expression column in the same row that the expression will apply.
To enter an import expression or to select an existing import script, click on the down arrow button in the Expression field. In the Selection Action dialog, select the Add Expression option and click .
3-11
Module 3 — Metadata
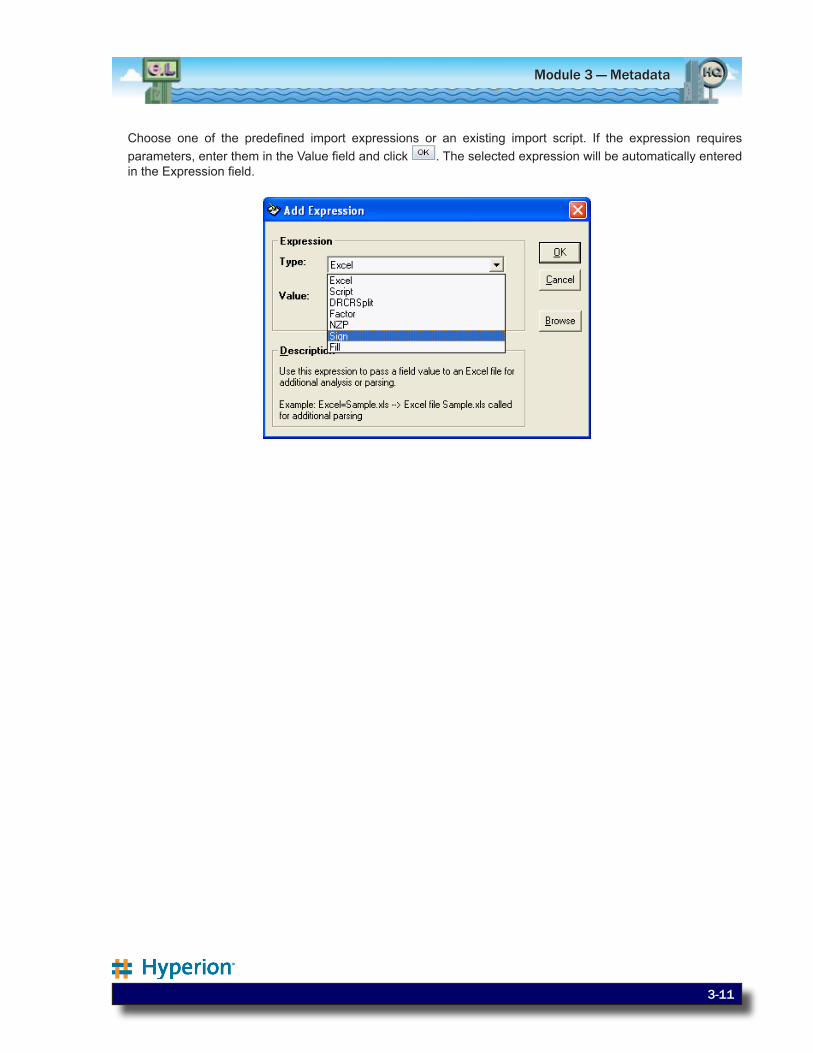
Choose one of the predefined import expressions or an existing import script. If the expression requires parameters, enter them in the Value field and click . The selected expression will be automatically entered in the Expression field.
Hyperion FDM Workbench Guide
3-12
Import expressions and scripts work by operating on the value that is read from the import file for the field that the expression is assigned. The available import expressions are listed in the following tables.
Fill = DescriptionUse this expression to fill a field with a particular character (Trailing Fill). This expression will evaluate the text value, read from the file, and if it is shorter than the fill expression the value will be padded according to the fill expression. The key word EuroToUs can be used with the amount field to trigger a number format conversion from (.,) to (,.) format.
ExampleAll fields except AmountFill=000000, File Value = 1020, Value after Fill = 102000.Amount FieldFill=EuroToUs
Applies To FieldsAll Fields, but behaves differently for Amount
FillL = DescriptionUse this expression to fill a field with a particular character (Leading Fill). This expression will evaluate the text value, read from the file, and if it is shorter than the fill expression the value will be padded according to the fill expression.
ExampleFillL=000000, File Value = 1020, Value after Fill = 001020.
Applies To FieldsAll Fields except Amount
Sign = DescriptionUse this expression to handle non-standard numeric sign conventions. By default Hyperion FDM will properly interpret leading and trailing minus signs, as well as parentheses to mean a negative number. However, some files trail numbers with other characters to indicate the numeric sign. To define a custom sign the expression should follow this form: Sign = [Positive String],[Negative String].
ExamplePositive numbers are followed by a “DR” (1,000.00DR), and negative numbers are followed by a “CR” (1,000.00CR). Expression should be: Sign=DR,CR Positive numbers are unsigned (1,000.00), and negative numbers are followed by a “CR” (1,000.00CR). Expression should be: Sign=,CR
Applies To FieldAmount
3-13
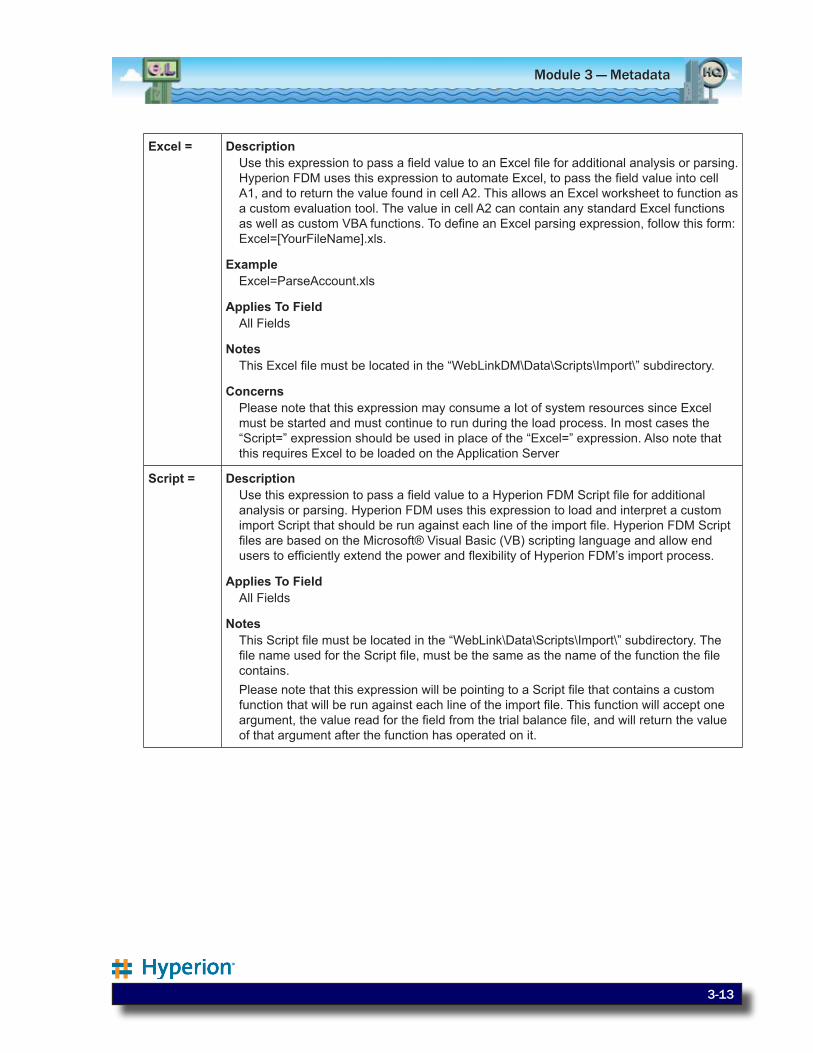
Module 3 — Metadata
Excel = DescriptionUse this expression to pass a field value to an Excel file for additional analysis or parsing. Hyperion FDM uses this expression to automate Excel, to pass the field value into cell A1, and to return the value found in cell A2. This allows an Excel worksheet to function as a custom evaluation tool. The value in cell A2 can contain any standard Excel functions as well as custom VBA functions. To define an Excel parsing expression, follow this form: Excel=[YourFileName].xls.
ExampleExcel=ParseAccount.xls
Applies To FieldAll Fields
NotesThis Excel file must be located in the “WebLinkDM\Data\Scripts\Import\” subdirectory.
ConcernsPlease note that this expression may consume a lot of system resources since Excel must be started and must continue to run during the load process. In most cases the “Script=” expression should be used in place of the “Excel=” expression. Also note that this requires Excel to be loaded on the Application Server
Script = DescriptionUse this expression to pass a field value to a Hyperion FDM Script file for additional analysis or parsing. Hyperion FDM uses this expression to load and interpret a custom import Script that should be run against each line of the import file. Hyperion FDM Script files are based on the Microsoft® Visual Basic (VB) scripting language and allow end users to efficiently extend the power and flexibility of Hyperion FDM’s import process.
Applies To FieldAll Fields
NotesThis Script file must be located in the “WebLink\Data\Scripts\Import\” subdirectory. The file name used for the Script file, must be the same as the name of the function the file contains. Please note that this expression will be pointing to a Script file that contains a custom function that will be run against each line of the import file. This function will accept one argument, the value read for the field from the trial balance file, and will return the value of that argument after the function has operated on it.
Hyperion FDM Workbench Guide
3-14
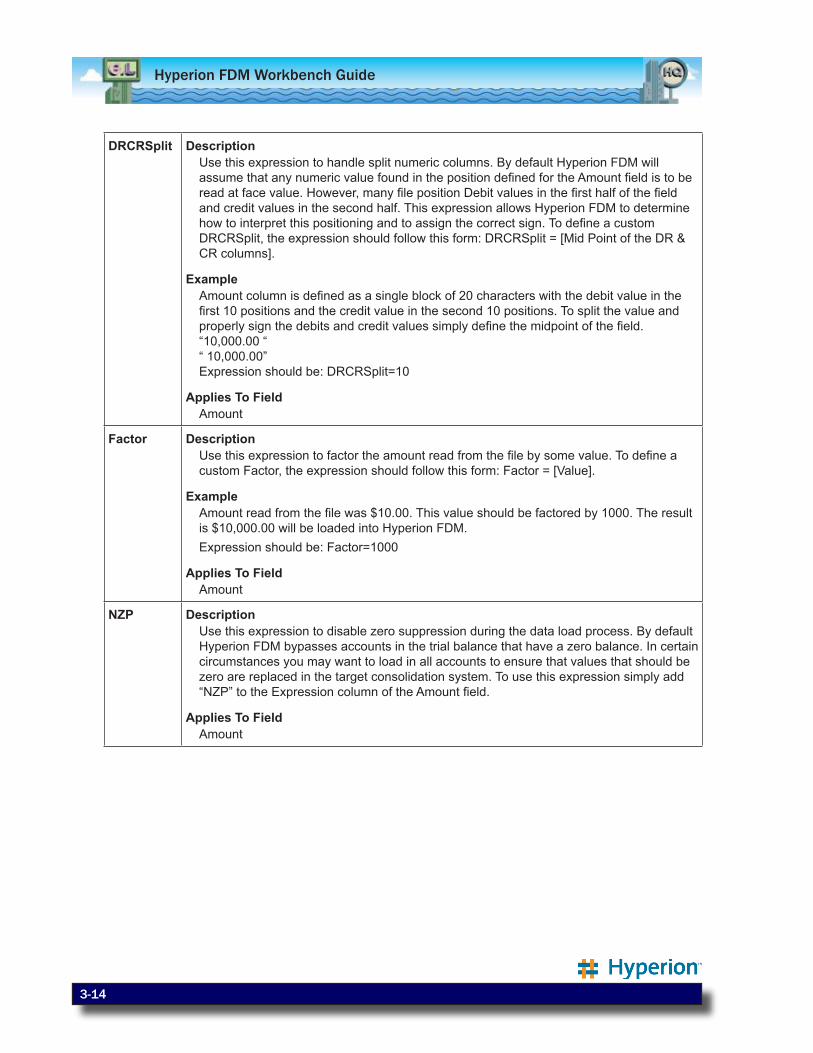
DRCRSplit DescriptionUse this expression to handle split numeric columns. By default Hyperion FDM will assume that any numeric value found in the position defined for the Amount field is to be read at face value. However, many file position Debit values in the first half of the field and credit values in the second half. This expression allows Hyperion FDM to determine how to interpret this positioning and to assign the correct sign. To define a custom DRCRSplit, the expression should follow this form: DRCRSplit = [Mid Point of the DR & CR columns].
ExampleAmount column is defined as a single block of 20 characters with the debit value in the first 10 positions and the credit value in the second 10 positions. To split the value and properly sign the debits and credit values simply define the midpoint of the field. “10,000.00 “ “ 10,000.00” Expression should be: DRCRSplit=10
Applies To FieldAmount
Factor DescriptionUse this expression to factor the amount read from the file by some value. To define a custom Factor, the expression should follow this form: Factor = [Value].
ExampleAmount read from the file was $10.00. This value should be factored by 1000. The result is $10,000.00 will be loaded into Hyperion FDM.Expression should be: Factor=1000
Applies To FieldAmount
NZP DescriptionUse this expression to disable zero suppression during the data load process. By default Hyperion FDM bypasses accounts in the trial balance that have a zero balance. In certain circumstances you may want to load in all accounts to ensure that values that should be zero are replaced in the target consolidation system. To use this expression simply add “NZP” to the Expression column of the Amount field.
Applies To FieldAmount
3-15
Module 3 — Metadata
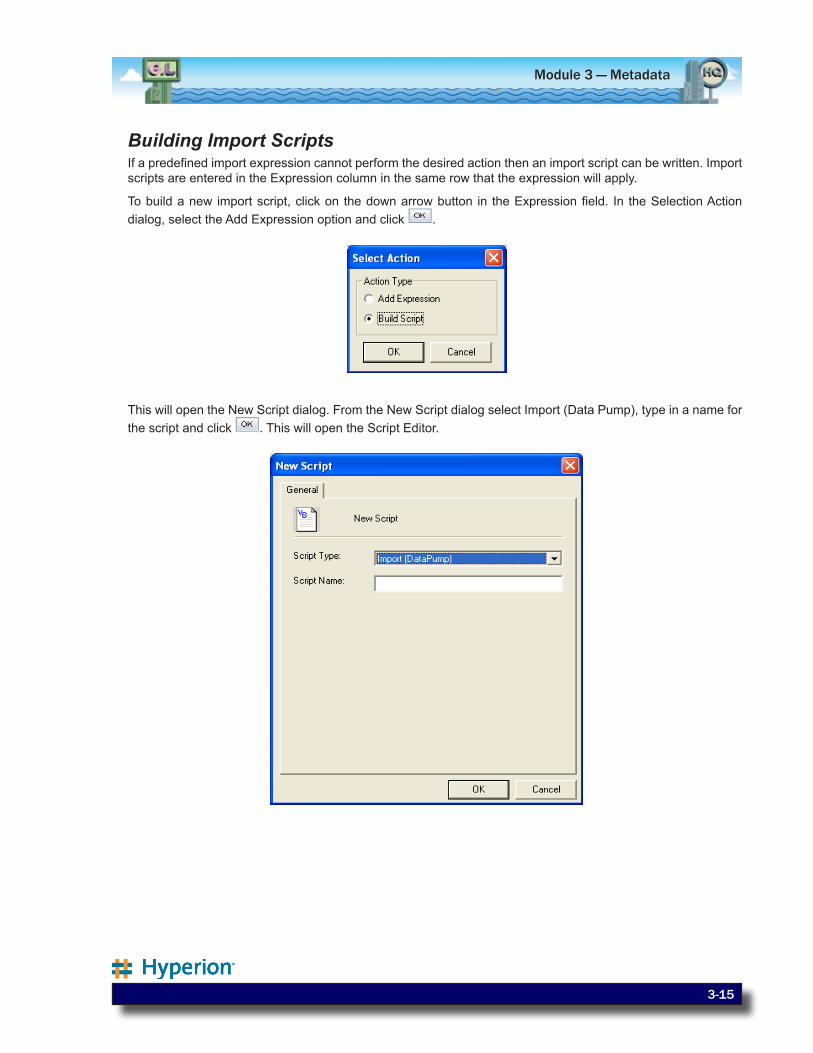
Building Import ScriptsIf a predefined import expression cannot perform the desired action then an import script can be written. Import scripts are entered in the Expression column in the same row that the expression will apply.
To build a new import script, click on the down arrow button in the Expression field. In the Selection Action dialog, select the Add Expression option and click .
This will open the New Script dialog. From the New Script dialog select Import (Data Pump), type in a name for the script and click . This will open the Script Editor.

Hyperion FDM Workbench Guide
3-16
Create the import script in the Script Editor and click .
Back in the Import Groups form follow the instructions in the topic Adding Import Expressions and Import Scripts to add the script to the Expression field.

3-17
Module 3 — Metadata
Building Integration ScriptsRather than importing in a text file it is also possible to build an integration script to import the ledger data directly from an ODBC-compliant data source. An integration script can only be run by selecting Script from the dropdown box in the File Type column in the Import Groups grid (top grid).
To select an existing integration script see the topic Adding Import Expressions and Import Scripts. To build a new Integration script, click on the down arrow button in the Expression field. In the Selection Action dialog, select the Build Script option and click .
This will open the New Script Dialog.
Hyperion FDM Workbench Guide
3-18
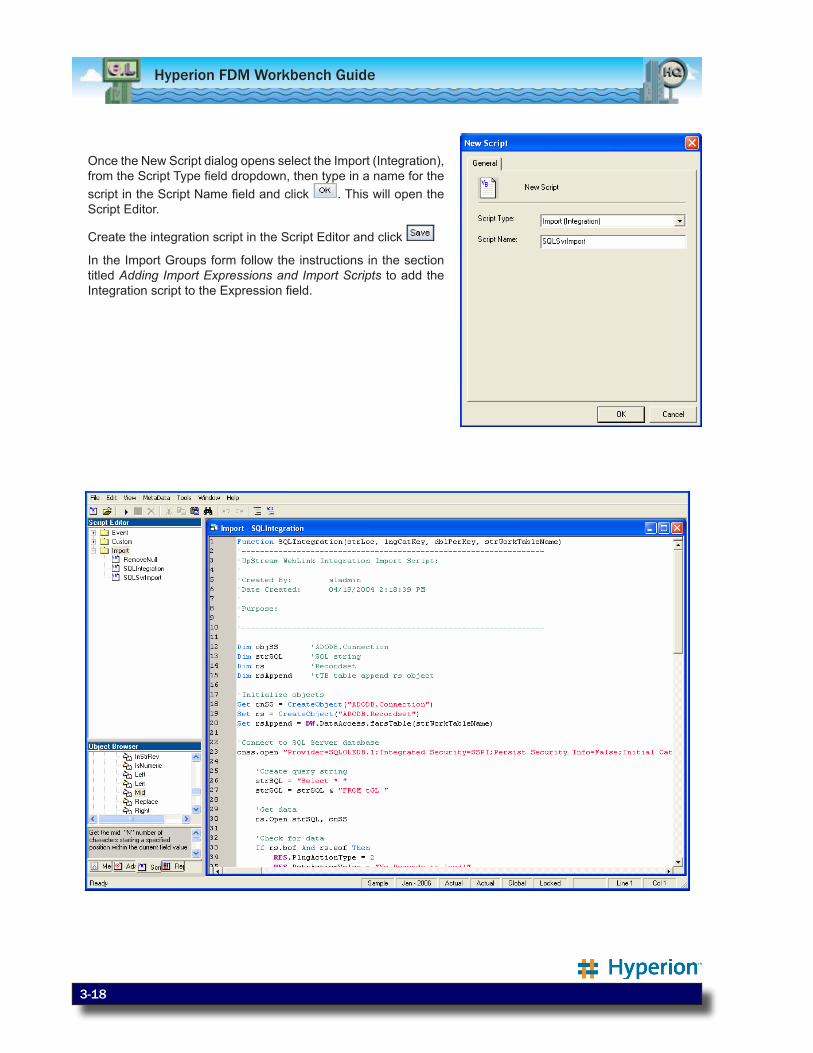
Once the New Script dialog opens select the Import (Integration), from the Script Type field dropdown, then type in a name for the script in the Script Name field and click . This will open the Script Editor.
Create the integration script in the Script Editor and click
In the Import Groups form follow the instructions in the section titled Adding Import Expressions and Import Scripts to add the Integration script to the Expression field.
3-19
Module 3 — Metadata
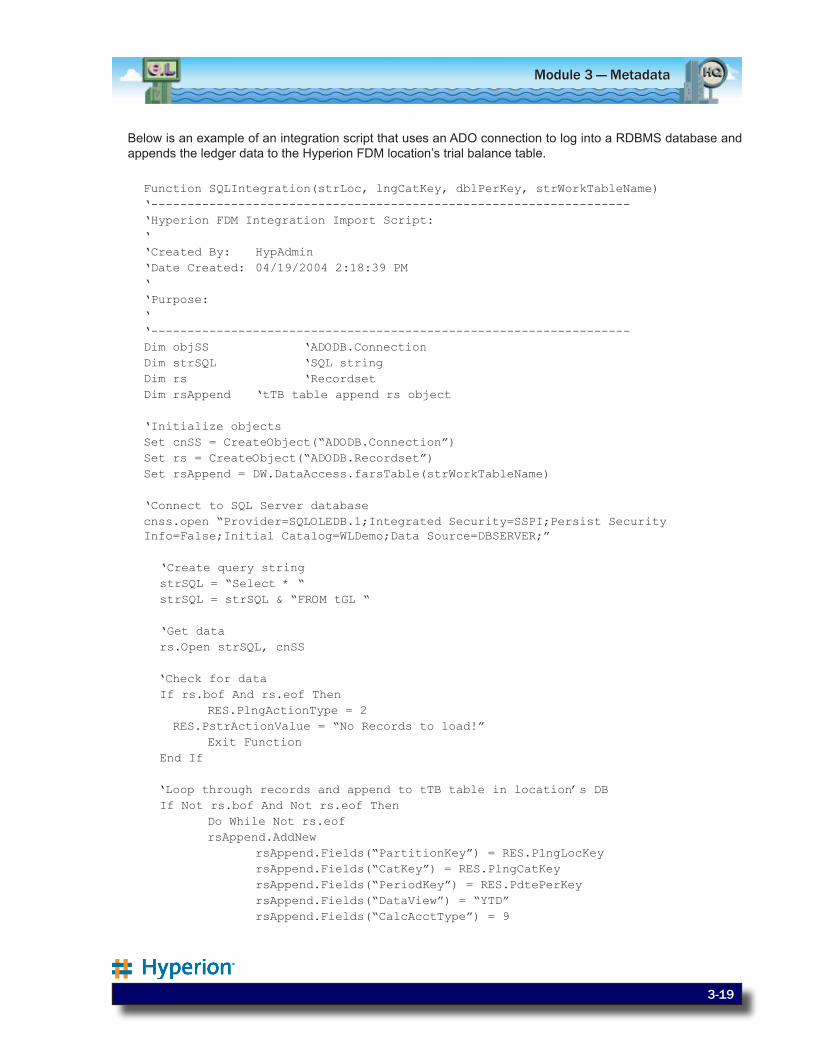
Below is an example of an integration script that uses an ADO connection to log into a RDBMS database and appends the ledger data to the Hyperion FDM location’s trial balance table.
Function SQLIntegration(strLoc, lngCatKey, dblPerKey, strWorkTableName)‘------------------------------------------------------------------‘Hyperion FDM Integration Import Script: ‘‘Created By: HypAdmin‘Date Created: 04/19/2004 2:18:39 PM‘‘Purpose: ‘ ‘------------------------------------------------------------------Dim objSS ‘ADODB.ConnectionDim strSQL ‘SQL stringDim rs ‘RecordsetDim rsAppend ‘tTB table append rs object
‘Initialize objectsSet cnSS = CreateObject(“ADODB.Connection”)Set rs = CreateObject(“ADODB.Recordset”)Set rsAppend = DW.DataAccess.farsTable(strWorkTableName)
‘Connect to SQL Server databasecnss.open “Provider=SQLOLEDB.1;Integrated Security=SSPI;Persist Security Info=False;Initial Catalog=WLDemo;Data Source=DBSERVER;”
‘Create query string strSQL = “Select * “ strSQL = strSQL & “FROM tGL “
‘Get data rs.Open strSQL, cnSS ‘Check for data If rs.bof And rs.eof Then RES.PlngActionType = 2 RES.PstrActionValue = “No Records to load!” Exit Function End If
‘Loop through records and append to tTB table in location’s DB If Not rs.bof And Not rs.eof Then Do While Not rs.eof rsAppend.AddNew rsAppend.Fields(“PartitionKey”) = RES.PlngLocKey rsAppend.Fields(“CatKey”) = RES.PlngCatKey rsAppend.Fields(“PeriodKey”) = RES.PdtePerKey rsAppend.Fields(“DataView”) = “YTD” rsAppend.Fields(“CalcAcctType”) = 9
Hyperion FDM Workbench Guide
3-20
rsAppend.Fields(“Amount”)=rs.fields(“dblAmt”).Value rsAppend.Fields(“Desc1”)=rs.fields(“txtAcctDes”).Value rsAppend.Fields(“Account”)=rs.fields(“txtAcct”).Value rsAppend.Fields(“Entity”)=rs.fields(“txtCenter”).Value rsAppend.Update
rs.movenext Loop End If
‘Records loaded RES.PlngActionType = 2 RES.PstrActionValue = “SQL Import successful!”
‘Assign Return valueSQLIntegration = True
End Function
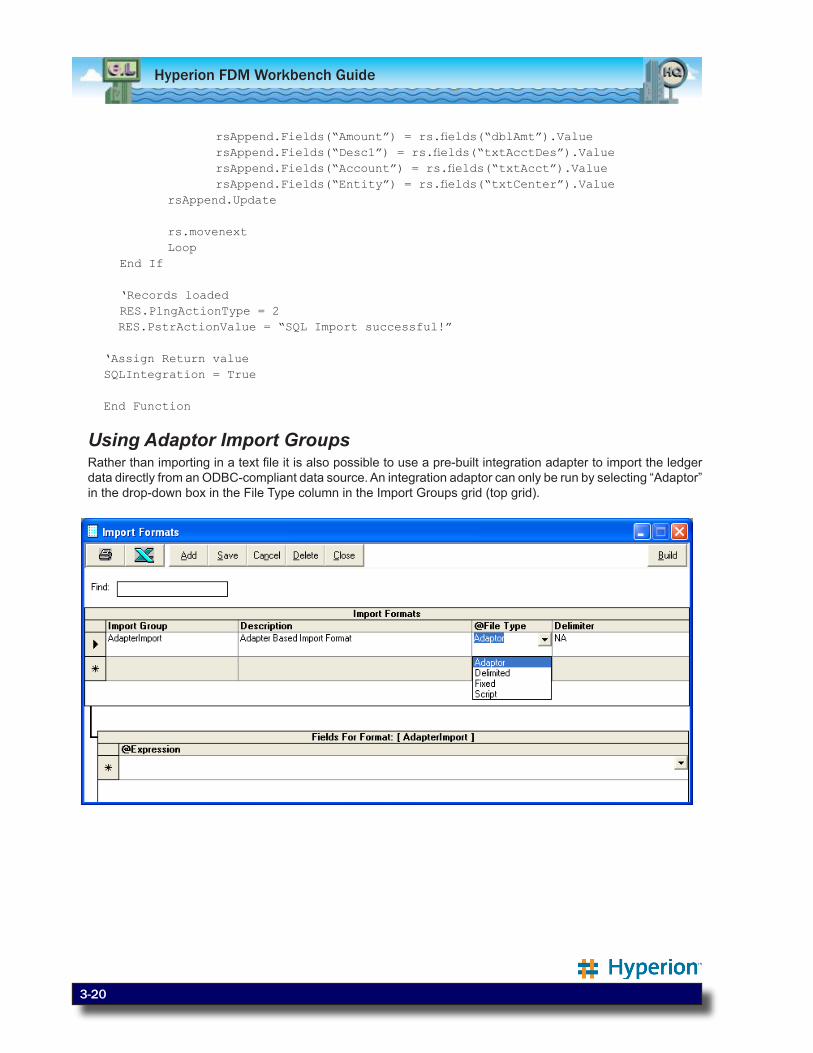
Using Adaptor Import GroupsRather than importing in a text file it is also possible to use a pre-built integration adapter to import the ledger data directly from an ODBC-compliant data source. An integration adaptor can only be run by selecting “Adaptor” in the drop-down box in the File Type column in the Import Groups grid (top grid).

3-21
Module 3 — Metadata
To select an existing integration adaptor click on the down arrow button in the Expression field. In the Selection Action dialog, select the source adaptor and click .
New source integration adaptors can be imported into the Hyperion FDM application using the Import XML function in the File menu option.
Expression Stacking and Processing OrderA single field can utilize multiple import expressions. To stack expressions simply separate the expressions with a semi-colon, but please take into consideration the order in which the layered expressions will be processed.
Expression Stacking Syntax
Field: GL Account
Expression List: Script=ParseAcct.txt;Fill=0000000
If expressions are stacked, Hyperion FDM will process the layered expressions in the order listed below. Please note that processing order is different for the Amount field.
Processing Order
All Fields Except Amount Field: Script
Excel
Fill or FillL
Amount Field: DRCRSplit
Fill (With EuroToUs Key word only)
Script
Excel
Sign
Factor
Scale
NZP
Hyperion FDM Workbench Guide
3-22
Logic AccountsWhat Are Logic Accounts?Logic accounts are dynamically generated accounts that are used to calculate supplemental values that are not provided by the source file. Logic accounts can be mapped and loaded into the target system just like any other source account. Logic accounts can be used to map a single source account to multiple target accounts or can be used to conditionally map a source account based on its value. A variety of arithmetic operations can also be performed on a logic account.
Keep in mind that the additional complexity offered by logic accounts also prevents Hyperion FDM from maintaining a detailed audit trail on how the value of the logic account was derived. In order to access the logic accounts form, click the Logic Groups menu.
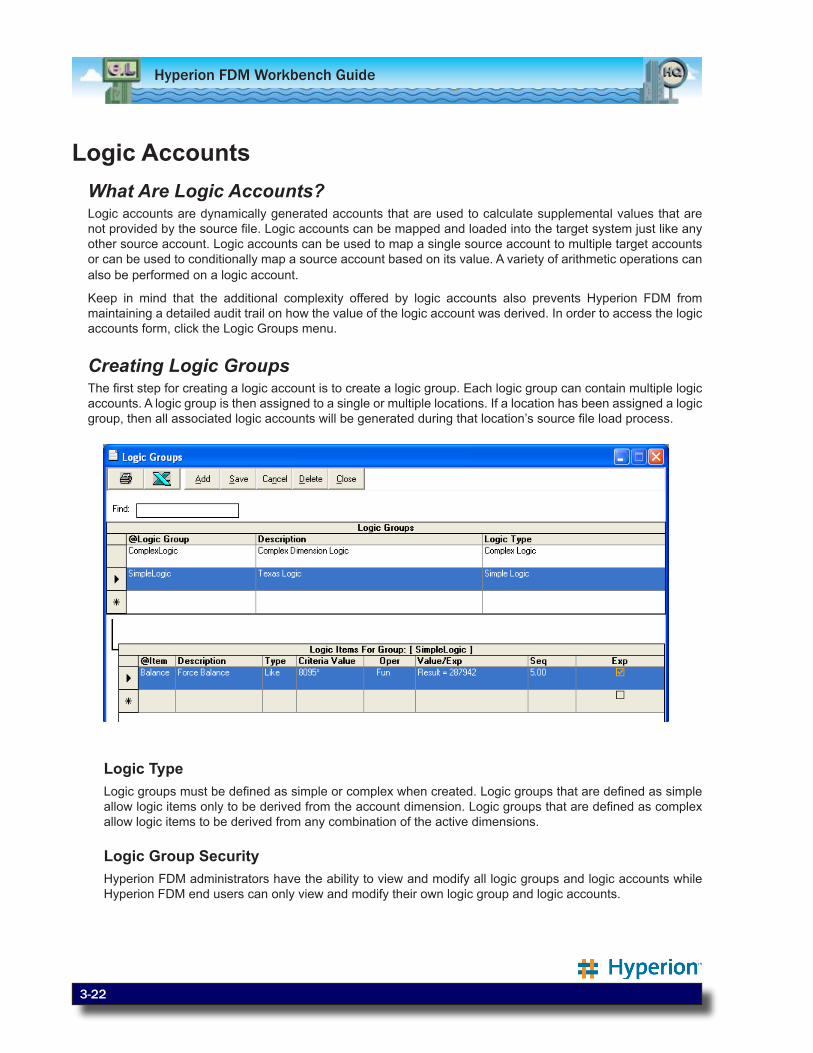
Creating Logic GroupsThe first step for creating a logic account is to create a logic group. Each logic group can contain multiple logic accounts. A logic group is then assigned to a single or multiple locations. If a location has been assigned a logic group, then all associated logic accounts will be generated during that location’s source file load process.
Logic TypeLogic groups must be defined as simple or complex when created. Logic groups that are defined as simple allow logic items only to be derived from the account dimension. Logic groups that are defined as complex allow logic items to be derived from any combination of the active dimensions.
Logic Group SecurityHyperion FDM administrators have the ability to view and modify all logic groups and logic accounts while Hyperion FDM end users can only view and modify their own logic group and logic accounts.
3-23
Module 3 — Metadata
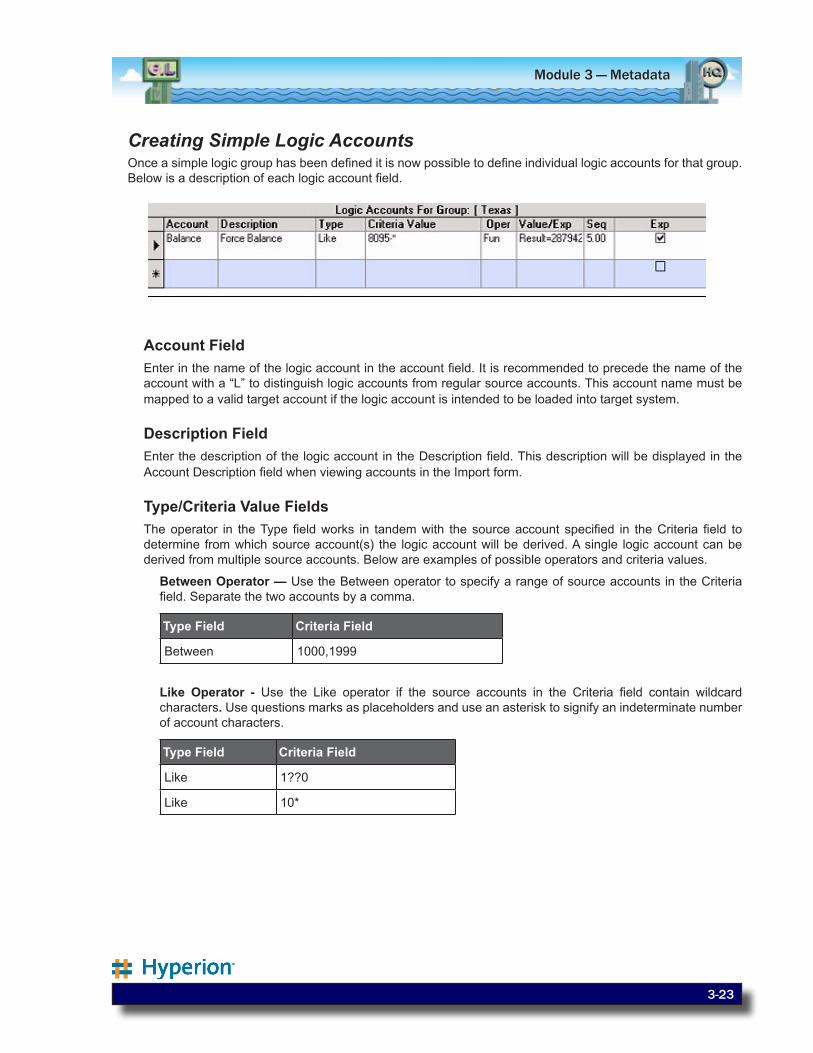
Creating Simple Logic AccountsOnce a simple logic group has been defined it is now possible to define individual logic accounts for that group. Below is a description of each logic account field.
Account FieldEnter in the name of the logic account in the account field. It is recommended to precede the name of the account with a “L” to distinguish logic accounts from regular source accounts. This account name must be mapped to a valid target account if the logic account is intended to be loaded into target system.
Description FieldEnter the description of the logic account in the Description field. This description will be displayed in the Account Description field when viewing accounts in the Import form.
Type/Criteria Value FieldsThe operator in the Type field works in tandem with the source account specified in the Criteria field to determine from which source account(s) the logic account will be derived. A single logic account can be derived from multiple source accounts. Below are examples of possible operators and criteria values.
Between Operator — Use the Between operator to specify a range of source accounts in the Criteria field. Separate the two accounts by a comma.
Type Field Criteria Field
Between 1000,1999
Like Operator - Use the Like operator if the source accounts in the Criteria field contain wildcard characters. Use questions marks as placeholders and use an asterisk to signify an indeterminate number of account characters.
Type Field Criteria Field
Like 1??0
Like 10*

Hyperion FDM Workbench Guide
3-24
In Operator — Use the In operator to include a single source account or a list of non-sequential source accounts.
Type Field Criteria Field
In 1000
In 1000,1005,2001
Grouping by CenterBy default, a separate logic account will be created for each source center found in the trial balance.
Criteria Field Result
12300 A logic account will be created for each source center that account 12300 is associated with.
It is possible to create a single logic account that summarizes multiple source centers by placing a semi-colon after the account in the Criteria field and entering a number that corresponds to the number of characters in the center you want to group by.
Criteria Field Result
12300;4 A summarized logic account will be created for account 12300 that includes all source centers that have the same first 4 characters in the source center. The center assigned to this logic account will be these 4 characters.
12300;3,4 A summarized logic account will be created for account 12300 that includes all source centers that have the same 3 characters in the source center, starting at position 4. The center assigned to this logic account will be the 3 characters starting at position 4.
It is also possible to create a logic account that summarizes all source centers by placing a semi-colon after the account in the Criteria field and entering a text value. This hard coded text value will become the new center for the summarized logic account.
Criteria Field Result
12300;Dept100 A summarized logic account will be created for account 12300 that includes all source centers. The center assigned to this logic account will be “Dept100”.
Sequence FieldThis field specifies the order that the Logic Accounts should be processed in. This allows one Logic Account to be used by another, as long as the dependant account was processed first.
3-25
Module 3 — Metadata
Export FieldThis is a Yes/No switch that determines whether or not the logic account should be considered an export account and subjected to the conversion table validation process. If the switch is set to Yes, then the logic account must be mapped in the Account Conversion table.
Operator & Value/Exp Fields
Defining Operator & Value/Exp Fields
Select an operator in the Operator field to work in tandem with the value in the Value/Expression field to perform calculations and derive values for the Logic Account.
Numeric Operators
Use a numeric operator to perform simple mathematical calculations.
+ Addition
- Subtraction
* Multiplication
/ Division
NA (No Operator)
If a numeric operator is specified in the Operator field then a numeric value must be entered in the Value/Exp field for the operator to calculate on. An exception to this rule is if the operator specified is NA. In this case no values need to be specified in the Value/Exp field. The source account(s) specified in the Criteria Value field will simply be summed up.
Function Operator — Use the Fun operator to execute a custom logic function that is defined in the Value/Exp field. Double-click in the Value/Exp field to display the Logic Function Editor in order to write a function. Logic functions are usually used for conditional mapping and other complex operations that involve multiple source accounts. Logic functions allow the use of If statements to enable conditional mapping and also allow the use of variables. The Hyperion FDM Lookup function can also be used within a logic function.
The following function parameters can be used in a function:
Curval —Value of the Logic Account’s operation
StrLocation —Active Location Name
strCenter —Logic Account’s Center
strCatKey —Active Hyperion FDM Category Key (not name)
strPerKey —Active Hyperion FDM Period
Assigning Function Return Values The result of a Logic Function must be assigned to the keyword RESULT.
RESULT = CURVAL + (|810| * .5)
If no return value is assigned to the result key word then the logic engine will automatically set the value of result to 0. This will cause the calculation to be skipped and the logic account will not be produced for the cost center that is being evaluated.
Hyperion FDM Workbench Guide
3-26
Custom Logic Function Examples
The following function assigns the result of the logic account’s calculation (using the CURVAL parameter) to the logic account (RESULT) if the logic account’s calculation returns a value greater than 0. This is an example of conditional mapping. If the source account(s) specified in the criteria column is <0 then this logic account will not be created due to the keyword “Skip.” This logic account would then need to be mapped to a particular target account in the Account Conversion form.
If CURVAL > 0 Then RESULT = CURVALElse Result=”Skip”End If
Another logic account would then be made to hold the result of the Logic Account’s calculation if the result is less than zero. This Logic Account would then be mapped to a different target account in the Account Conversion form.
If CURVAL < 0 Then RESULT = CURVAL Else Result=”Skip”End If
The function below only assigns the result of the Logic Account’s calculation to the Logic Account if “10” is the active Hyperion FDM Category Key.
If strCatKey = “10” then RESULT = CURVAL Else Result=”Skip”End If
The function below only assigns the result of the Logic Account’s calculation to the Logic Account if the Criteria Account’s center is “000”.
If strCenter = “000” then RESULT = CURVAL * 100 Else Result=”Skip”End If
The function below utilizes the Hyperion FDM Lookup Function to add a source account to the value of the Logic Account if the current Hyperion FDM Period is Dec-2003.
If strPerKey = “12/31/2003” then RESULT = CURVAL + |810| Else Result=”Skip”End If
3-27
Module 3 — Metadata
The function below utilizes the Hyperion FDM Lookup Function to add another source account from a different source center, Hyperion FDM Category and Hyperion FDM Period to the value of the Logic Account if the active location is Texas.
If strLocation = “Texas” then = RESULT = CURVAL + |000,10,09/30/01,810| Else Result=”Skip”End If
Expression Operator — Use the Exp operator to execute a custom Logic Expression that is defined in the Value/Exp field. Logic Expressions are simpler than Logic Functions and cannot use If statements or variables. Expressions also have no built in parameters except for the |CURVAL| parameter which must be enclosed in pipes. There is no need to assign the value of an Expression to the RESULT = constant like you must do in a Logic Function. Expressions are also faster to execute than Logic Functions. The Hyperion FDM Lookup Function can be used within an Expression in the same manner as it can be used within a Logic Function. Double click in the Value/Exp field to display the Expression editor in order to write a custom Expression.
Below are a few examples of custom Logic Functions:
The function below utilizes the Hyperion FDM Lookup Function to add two source accounts to the value of the Logic Account. Notice that the CURVAL parameter can be used within Expressions the same way that it is used in Logic Functions except that it must be enclosed in pipes.
|CURVAL| + |810| + |238|
The function below utilizes the Hyperion FDM Lookup Function to add another source account from a different center, Hyperion FDM category, and Hyperion FDM period to the value of the Logic Account and multiplies the entire result by 100.
(|CURVAL| + |000,10,09/30/01,810|) * 100
Hyperion FDM Lookup Function — Use the Hyperion FDM Lookup Function to return the value of any source account that resides in Hyperion FDM. The Hyperion FDM Lookup Function can be used within a Logic Function or within a Logic Expression.
To return a value of a source account for the active Logic Account’s source Center, Hyperion FDM Category, and Hyperion FDM Period simply use the following format to return the value of an account:
Syntax: |GLAcct|
Example: |810|
To return the value of a G/L account for a different G/L Center, Hyperion FDM Category key, and Hyperion FDM Period use the following format:
Syntax: |GLDept , CategoryKey , PeriodKey , GLAcct|
Example: |000, 10, 12/31/01, 810|
A combination of formats can also be used. The following example uses the default source Center and Hyperion FDM Period but specifies a particular Hyperion FDM Category Key.
|,10 , , 810|
Hyperion FDM Workbench Guide
3-28
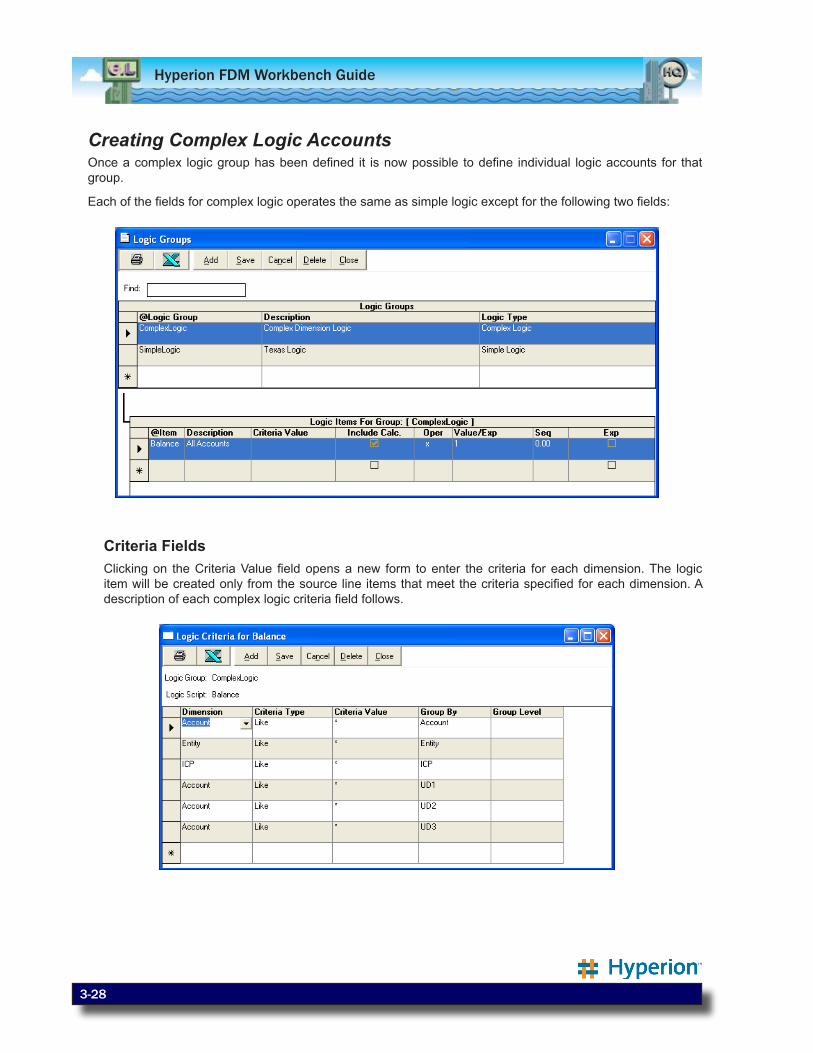
Creating Complex Logic AccountsOnce a complex logic group has been defined it is now possible to define individual logic accounts for that group.
Each of the fields for complex logic operates the same as simple logic except for the following two fields:
Criteria FieldsClicking on the Criteria Value field opens a new form to enter the criteria for each dimension. The logic item will be created only from the source line items that meet the criteria specified for each dimension. A description of each complex logic criteria field follows.

3-29
Module 3 — Metadata
DimensionThe Dimension field allows the selection of any source dimension that is enabled for loading. Each dimension can only be selected once.
Criteria TypeThe Criteria Type field works in tandem with the source Dimension & Criteria Value fields to determine which source value(s) the logic item will be derived from. Criteria types available are: In, Between, and Like. The criteria type determines how the criteria value is interpreted.
Criteria ValueThe Criteria Value field is the value that the criteria type uses to determine what members should be included in the logic calculation for any given logic Item.
Group ByThe Group By field allows the logic item to override the displayed member in the appropriate dimensions field when viewing the derived logic item in the Import form. By overriding the displayed member, this also allows the dimension to be grouped based on the value entered in the Group By field. This field can be used to “hard code” the returned member or it can append hard-coded values to the original members by putting a hard coded member & an asterisk (*) in the Group By field.
For example placing the word “Cash” in the row with Account selected for dimension, then the import form would display Cash in the Account field for the logic item. If L-* was placed in the Group By field, the import form would display L-1100 where 1100 is the original account that passed the logic criteria.
If no value is entered in the Group By field then no grouping will occur for this dimension and a separate logic item will be created for each unique dimension member.
Group LevelThe Group Level field works with the Group By field to override the displayed member in the appropriate dimensions field when viewing the logic item in the Import form. This field only accepts numeric values. Entering a value of 3 in the Group Level field then the left three characters of the Group By field will be returned. If no value is entered in the Group By field then specifying a value of 3 in the Group Level field will return the first three characters of the original source dimension member. Through use of the Group By and the Group Level fields the logic items displayed on the Import Form can be grouped to the desired level.
For example: If L-* was placed in the Group By field, the Logic Item would display in the Import form as L-1100 where 1100 is the original account that passed the logic criteria. If a Group Level of 2 was entered for the same row, then the Import form would display L-11. If a Group Level of 1 was entered for this row, then the Import form would display L-1.
Include Calc FieldThe Include Calc Field allows the logic item to include previously calculated Hyperion FDM values in its calculations if it meets the Logic Item’s criteria. Note: each Logic Item has a sequence attached and the logic items are calculated in this sequence. If the second or later logic item has this field enabled then any previously calculated logic items will be included if they meet the logic criteria.
Hyperion FDM Workbench Guide
3-30
Complex Logic Examples
Complex Logic Example 1
The first row specifies that any account that begins with “11” will be included in the calculated result for Calc Item: CashTx. The second row further qualifies the results that will be returned by specifying that the results must also have the entity equal to TX. The third line then reduces the results to only those that have an ICP value that is between 00 & 09. The last line then specifies the results must also have a Custom 1 (UD1) of either: 00, 01 or 02. Any line that is imported that does not meet all of the criteria listed will be excluded from the calculated results.
This logic example would return one record to the Import form even though the logic may result in more than one imported value being included. This can be determined by looking at the Group By fields. Each Group By field has a hard-coded value listed. This means that for every line that passes the criteria that were specified, the original imported member is replaced with the member listed in the Group By field. See the example below.
Sample Imported Values
Account Entity ICP UD1 Amount Include/Exclude1150 TX 07 01 50,401.07 Include1176 TX 04 02 10,996.00 Include1201 TX 01 00 500.00 Exclude
Logic Members Created
Account Entity ICP UD1 AmountCash Texas ICP UD1 50,401.07Cash Texas ICP UD1 10,996.00
3-31
Module 3 — Metadata
Hyperion FDM groups & summarizes each of the rows where the members are all the same, creating the following final results:
Final Logic Members Results
Account Entity ICP UD1 AmountCash Texas ICP UD1 61,397.07
Complex Logic Example 2
The first row specifies that and account that begins with 11 will be included in the calculated result for Calc Item: CashTx. The second row further qualifies the results that will be returned by specifying that the results must also have the entity equal to TX. The third line then reduces the results to only those that have an ICP value that is between 000 & 100. The last line then specifies the results must also have a Custom 1 (UD1) of either: 00, 01 or 02. Any line that is imported that does not meet all of the criteria listed will be excluded from the calculated results.
This logic example would return multiple records to the Import Form. This can be determined by looking at the Group By & group Level fields. Two of the Group By fields have a hard coded value listed and two have an asterisk. This means that for every line that passes the criteria that were specified, the original imported members for the Account & Entity dimensions are replaced with the member listed in the Group By field. The other dimensions will return all or part of the original members based on the group level entered. See the example below:
Sample Imported Values
Account Entity ICP UD1 Amount Include/Exclude1150 TX 070 01 50,401.07 Include1176 TX 040 02 10,996.00 Include1121 TX 045 02 9,050.41 Include1201 TX 100 00 500.00 Exclude
Hyperion FDM Workbench Guide
3-32
Logic Members Created
Account Entity ICP UD1 AmountCash Texas 07 UD1-01 50,401.07Cash Texas 04 UD1-02 10,996.00Cash Texas 04 UD1-02 9,050.41
Hyperion FDM groups and summarizes each of the rows where the members are all the same, creating the following final results:
Final Logic Members Results
Account Entity ICP UD1 AmountCash Texas 07 UD1-01 50,401.07Cash Texas 04 UD1-02 20,046.41

3-33
Module 3 — Metadata
Validation RulesWhat are Validation Rule GroupsValidation Rule Groups provide a way for system administrators to define a set of rules and annotations that can be used to enforce data integrity during the data collection process. Validation Rule Groups are activated by assigning them to a location. When a Validation Group is assigned to a location the Validation Report will be generated following a data load to the target system. The Validation Report will run for all entities defined in the Validation Entity Group that is also assigned to the location. If no Validation Entity Group is assigned to the location then the Validation Report will run for each target entity that was loaded to the target system.
Rule Data SourcesHyperion FDM enables data to be pulled from three sources through Validation Rules (Target System Values, Hyperion FDM Source Values, and Hyperion FDM Converted Values)
Target System — Target System retrieves pull value from the target integration system. This type of rule uses the pipe character “|” as the rule beginning/end character for the rule.
Hyperion FDM Workbench Guide
3-34
Hyperion FDM Source — Hyperion FDM Source retrieves pull value from the data that was loaded into Hyperion FDM after it has been mapped to the target members. This type of rule uses the grave accent character “`” as the rule beginning/end character for the rule.
Hyperion FDM Converted — Hyperion FDM Converted System retrieves pull value from the data that was loaded into Hyperion FDM. This type of rule uses the tilde character “~” as the rule beginning/end character for the rule.
Note: The beginning and end characters for each of the rule data sources can be set to any character desired. This can be done in the Configuration Settings menu by setting the appropriate Lookup Indicator.
Validation Rules
Defining Validation RulesEach validation group contains a set of validation rules. A validation rule consists of a target account, a title for the rule, and text describing the rule for that account and a optionally a logic statement for the rule. Each validation rule defined in the Validation Rules grid represents a line in the Validation Report. This report is run automatically following a data load.
Display Value
This column controls how Hyperion FDM will format each row of data that is being defined. This column can be used to select a valid target account, select a report format code, or create a custom expression.
3-35
Module 3 — Metadata
The contents of this column are processed under the following rules: If the field contains a report format code then no value lookup is attempted. If the column contains a valid target account, the value for that account is retrieved and presented on the report in the value column. If the column contains a custom expression, the result of the expression is displayed in the value column. This column is limited to 75 characters.
Target Account Selection
The Validation Rules grid allows for easy target account selection. This is accomplished by clicking the Browse link in the Display Value column. This will bring up a form that allows you to select accounts using the native target system’s account dialog form.
After selecting the desired account from the target system’s dialog box, the selected account will be entered into the Validation Rules grid.
Custom Expression
It is possible to create a custom expression in the Display Value field. The result of the custom expression will be displayed in the Value field in the Validation Report. All the sample expressions below use the Hyperion Enterprise Lookup Function to retrieve Hyperion Enterprise account balances. See the section entitled Hyperion Enterprise Lookup Function if the target system if Hyperion Enterprise and the section entitled Multi-Dimension Lookup Function if integrating with a system other than Hyperion Enterprise.
The expression below sums 2 Target System Accounts:
Example Expression 1: |Cash| + |TradeRec|
The expression below adds $1,000 to the Cash account and then subtracts the TradeRec account from the total.
Example Expression 2: (|Cash| + 1000) - |TradeRec|)
The expression below subtracts the Cash account from the prior period from the Cash account in the current period..
Example Expression 3: |Cash| - |,,-1,Cash|
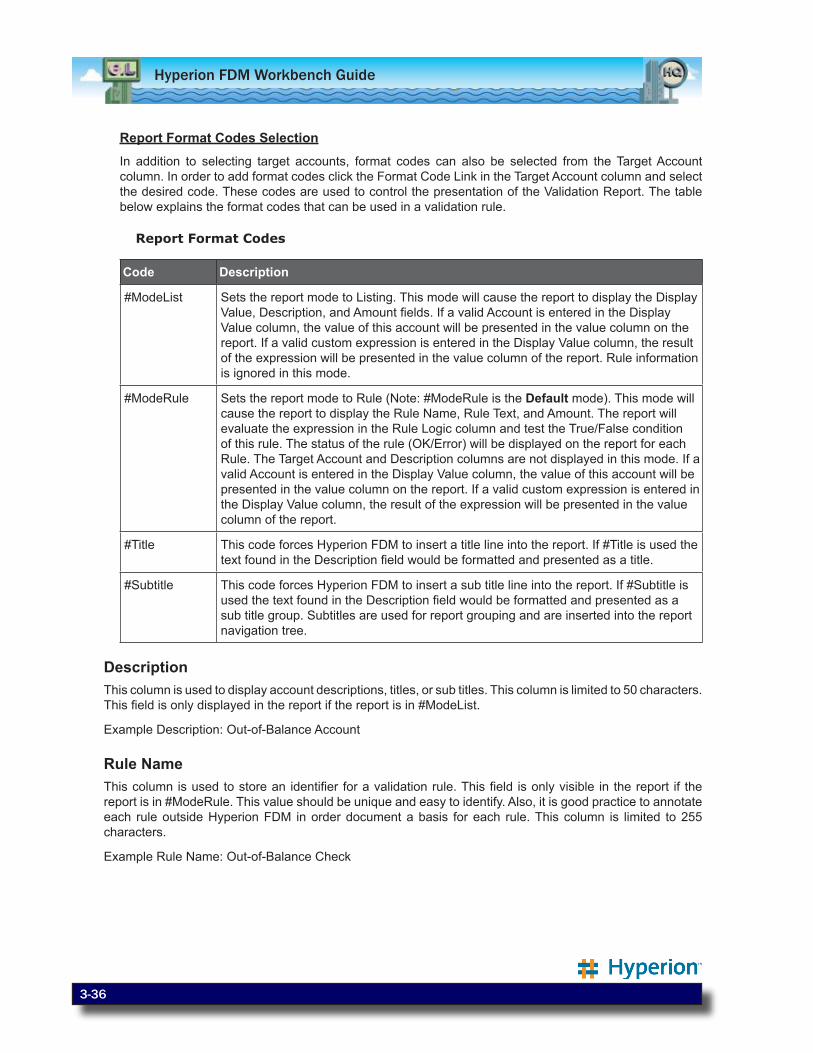
Hyperion FDM Workbench Guide
3-36
Report Format Codes Selection
In addition to selecting target accounts, format codes can also be selected from the Target Account column. In order to add format codes click the Format Code Link in the Target Account column and select the desired code. These codes are used to control the presentation of the Validation Report. The table below explains the format codes that can be used in a validation rule.
Report Format Codes
Code Description
#ModeList Sets the report mode to Listing. This mode will cause the report to display the Display Value, Description, and Amount fields. If a valid Account is entered in the Display Value column, the value of this account will be presented in the value column on the report. If a valid custom expression is entered in the Display Value column, the result of the expression will be presented in the value column of the report. Rule information is ignored in this mode.
#ModeRule Sets the report mode to Rule (Note: #ModeRule is the Default mode). This mode will cause the report to display the Rule Name, Rule Text, and Amount. The report will evaluate the expression in the Rule Logic column and test the True/False condition of this rule. The status of the rule (OK/Error) will be displayed on the report for each Rule. The Target Account and Description columns are not displayed in this mode. If a valid Account is entered in the Display Value column, the value of this account will be presented in the value column on the report. If a valid custom expression is entered in the Display Value column, the result of the expression will be presented in the value column of the report.
#Title This code forces Hyperion FDM to insert a title line into the report. If #Title is used the text found in the Description field would be formatted and presented as a title.
#Subtitle This code forces Hyperion FDM to insert a sub title line into the report. If #Subtitle is used the text found in the Description field would be formatted and presented as a sub title group. Subtitles are used for report grouping and are inserted into the report navigation tree.
DescriptionThis column is used to display account descriptions, titles, or sub titles. This column is limited to 50 characters. This field is only displayed in the report if the report is in #ModeList.
Example Description: Out-of-Balance Account
Rule NameThis column is used to store an identifier for a validation rule. This field is only visible in the report if the report is in #ModeRule. This value should be unique and easy to identify. Also, it is good practice to annotate each rule outside Hyperion FDM in order document a basis for each rule. This column is limited to 255 characters.
Example Rule Name: Out-of-Balance Check
3-37
Module 3 — Metadata
Rule TextThis field is used to define a basis or logic behind a rule. The text in this column will be the primary statement presented to the user on the Validation Report. This field is only visible in the report if the report is #ModeRule. This column is limited to 255 characters.
Example Rule Text: This Account must be between [+10 and –10]
Rule TypeThe Type field in the Validation Rules form corresponds to the Validation Entity Type field in the Validation Entity form. In the Type field select whether this rule should only be displayed on the validation report for Base entities, Parent entities or All entities. Select All (Default) if you want this rule to be displayed for all entities on the validation report. If the validation rule is designated as a Parent type then this validation rule will only be displayed in the Validation Report for entities whose Type field is set to Parent or All in the Validation Entity form. If the validation rule is designated as a Base type then this validation rule will only be displayed in the Validation Report for entities whose Type field is set to Base or All in the Validation Entity form. If a validation rule is designated as an All type then this validation rule will be displayed in the Validation Report for all entities, regardless if the entity was flagged as a Base or Parent entity in the Validation Entity form
Rule CategoryIn the Category field select a Hyperion FDM category to restrict this validation rule to a specific Hyperion FDM category. This validation rule will only be displayed on the validation report if the Hyperion FDM category selected in this field is the same as the active Hyperion FDM category set in the point of view. Select All if you want this validation rule to be displayed on the validation report regardless of the active Hyperion FDM category set in the point of view.
Rule SequenceThis column is used to control the order of rule processing. The sequence number is used to indicate the order in which the format codes and rules should be processed. It is good practice to increment the sequence number by 10 in order to provide a range for insertion of new format codes and rules.
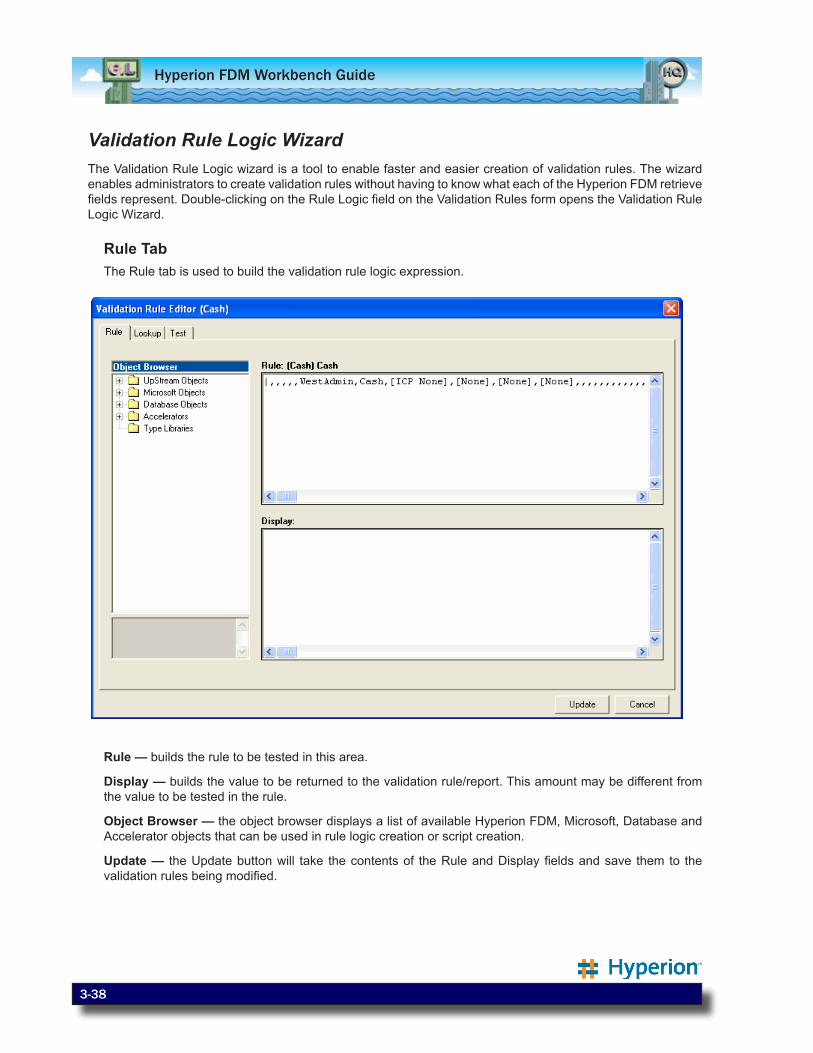
Hyperion FDM Workbench Guide
3-38
Validation Rule Logic WizardThe Validation Rule Logic wizard is a tool to enable faster and easier creation of validation rules. The wizard enables administrators to create validation rules without having to know what each of the Hyperion FDM retrieve fields represent. Double-clicking on the Rule Logic field on the Validation Rules form opens the Validation Rule Logic Wizard.
Rule TabThe Rule tab is used to build the validation rule logic expression.
Rule — builds the rule to be tested in this area.
Display — builds the value to be returned to the validation rule/report. This amount may be different from the value to be tested in the rule.
Object Browser — the object browser displays a list of available Hyperion FDM, Microsoft, Database and Accelerator objects that can be used in rule logic creation or script creation.
Update — the Update button will take the contents of the Rule and Display fields and save them to the validation rules being modified.
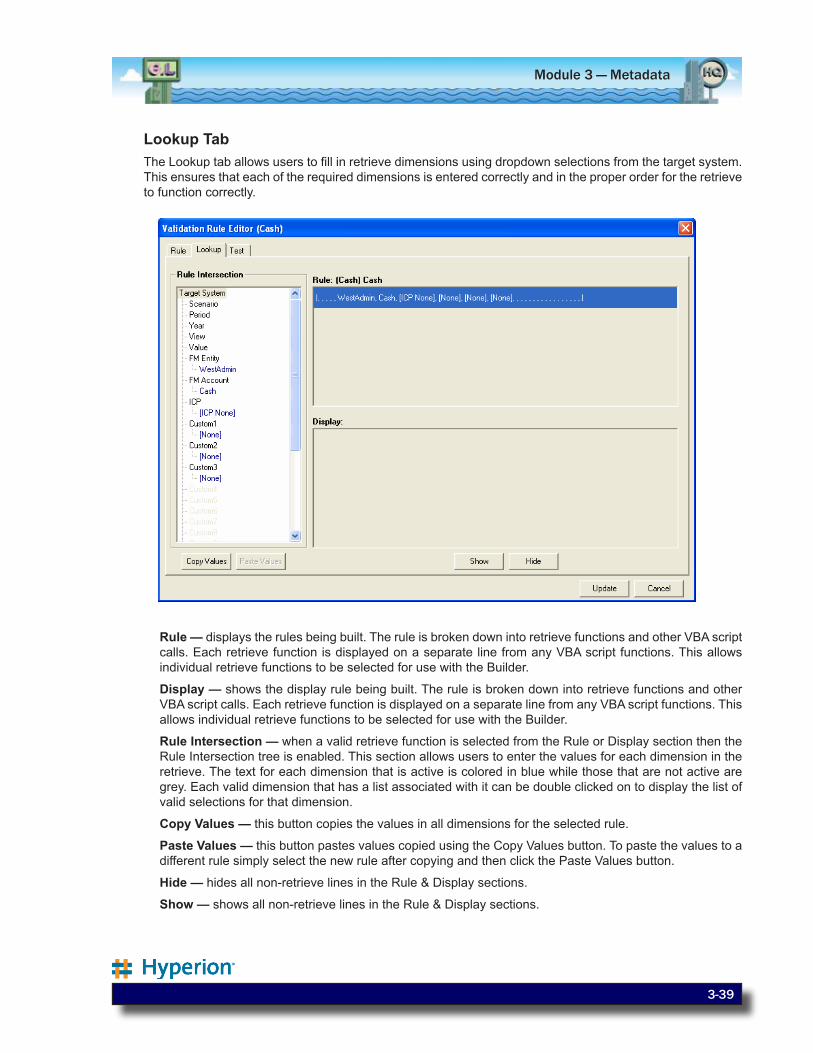
3-39
Module 3 — Metadata
Lookup TabThe Lookup tab allows users to fill in retrieve dimensions using dropdown selections from the target system. This ensures that each of the required dimensions is entered correctly and in the proper order for the retrieve to function correctly.
Rule — displays the rules being built. The rule is broken down into retrieve functions and other VBA script calls. Each retrieve function is displayed on a separate line from any VBA script functions. This allows individual retrieve functions to be selected for use with the Builder.
Display — shows the display rule being built. The rule is broken down into retrieve functions and other VBA script calls. Each retrieve function is displayed on a separate line from any VBA script functions. This allows individual retrieve functions to be selected for use with the Builder.
Rule Intersection — when a valid retrieve function is selected from the Rule or Display section then the Rule Intersection tree is enabled. This section allows users to enter the values for each dimension in the retrieve. The text for each dimension that is active is colored in blue while those that are not active are grey. Each valid dimension that has a list associated with it can be double clicked on to display the list of valid selections for that dimension.
Copy Values — this button copies the values in all dimensions for the selected rule.
Paste Values — this button pastes values copied using the Copy Values button. To paste the values to a different rule simply select the new rule after copying and then click the Paste Values button.
Hide — hides all non-retrieve lines in the Rule & Display sections.
Show — shows all non-retrieve lines in the Rule & Display sections.
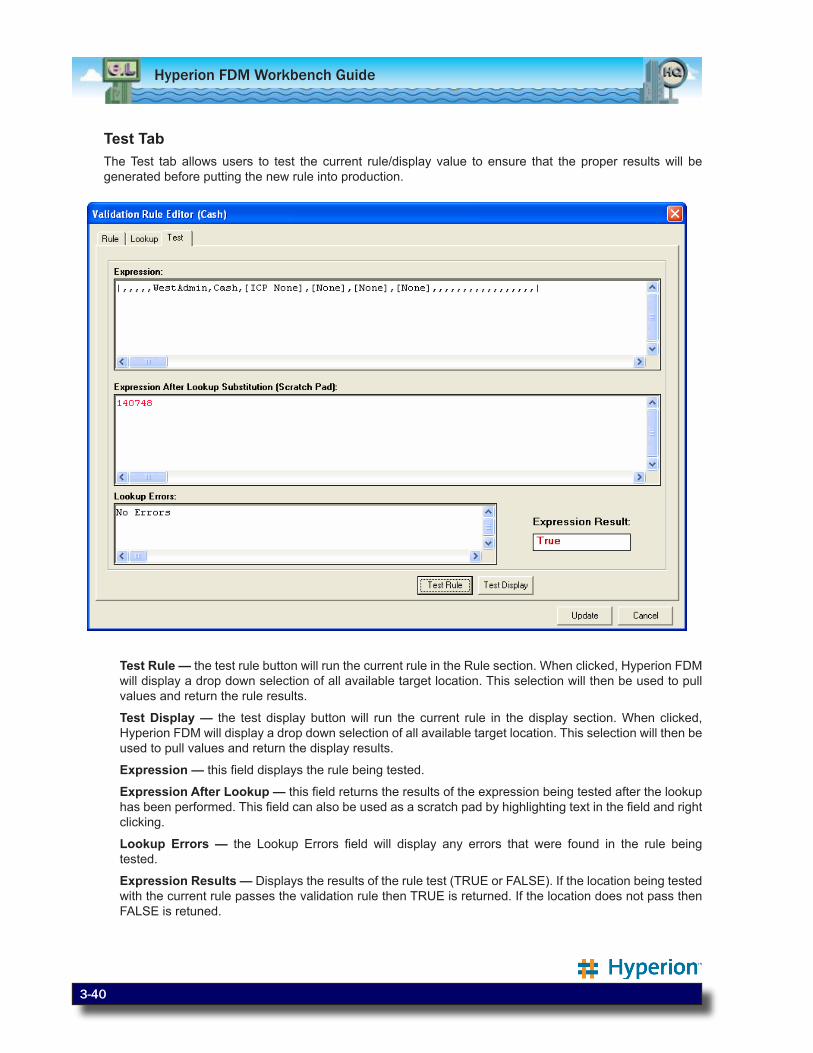
Hyperion FDM Workbench Guide
3-40
Test TabThe Test tab allows users to test the current rule/display value to ensure that the proper results will be generated before putting the new rule into production.
Test Rule — the test rule button will run the current rule in the Rule section. When clicked, Hyperion FDM will display a drop down selection of all available target location. This selection will then be used to pull values and return the rule results.
Test Display — the test display button will run the current rule in the display section. When clicked, Hyperion FDM will display a drop down selection of all available target location. This selection will then be used to pull values and return the display results.
Expression — this field displays the rule being tested.
Expression After Lookup — this field returns the results of the expression being tested after the lookup has been performed. This field can also be used as a scratch pad by highlighting text in the field and right clicking.
Lookup Errors — the Lookup Errors field will display any errors that were found in the rule being tested.
Expression Results — Displays the results of the rule test (TRUE or FALSE). If the location being tested with the current rule passes the validation rule then TRUE is returned. If the location does not pass then FALSE is retuned.
3-41
Module 3 — Metadata
Rule Logic
What is Rule Logic?The Rule Logic column is used to create a validation rule expression or a more advanced validation rule function. Validation rule expressions and functions are usually used to validate target system account balances. The Rule Logic field is only processed if the report is in ModeRule. Validation rule expressions and validation rule functions use all standard expression capabilities found in the Microsoft VB Script language. Validation rule expressions and functions must test for a True/False condition. After rule logic is processed, Hyperion FDM evaluates the result of the rule and the rule is flagged in the Validation Report as either Passing or Failing.
Validation Rule ExpressionsValidation rule expressions are usually used to validate target system account balances. Rule expressions must return a True/False result. It is possible/common to use the Hyperion Enterprise Lookup Function (when integrating with Hyperion Enterprise) or the Multi-Dimension Lookup Function (when integrating with multi-dimension target systems). For more advanced functionality use the Advanced Rule Functions.
The validation rule expression example below uses the Hyperion Enterprise Lookup Function. If the target account “Balance” is greater than $10 and less than $10 then this rule will be flagged as “OK” on the validation report. If this account balance is outside this range then this rule will be flagged as “Error” on the validation report.
Example
|Balance| >= -10.00 AND |Balance| <= 10.00
The example below is testing to see that target account “1000.100” + $100,000 is equal to target account “1000.400”.
Example
|1000.100| + 100000 = |1000.400|
Validation Rule FunctionsIn the Rule Logic Field it is possible to used advanced functions that offer additional flexibility when evaluating target system data. Hyperion FDM validation rules have been enhanced to allow the usage of full VB Script procedures. This makes it possible to set two custom string message fields and two numeric switch fields that can be evaluated by a script or custom report. Also, it is now possible to perform validations against data sources other than the target system (i.e., use a Hyperion FDM Logic Account value) in a rule.
In order to use a function in a validation rule, the rule must start with the key word “Fun:” This keyword value triggers the API to interpret the rule as a function rather than an expression. To set the return value of the function, set the keyword “Result” to True or False (i.e., Result=True). The validation rule will be flagged as “OK” on the report if the function returns a True value. The validation rule will be flagged as “Error” on the Validation Report if the function returns false.
Validation Rule Function Parameters
Validation rule functions expose the following parameters that can be evaluated in the function for use in determining if a particular validation rule should for this target system point of view:
API — Hyperion FDM’s main API programming object. Allows for the ability to utilize all of Hyperion FDM’s data values and internal API functions.
Hyperion FDM Workbench Guide
3-42
strEntity — Target Entity
strTargCat — Target Category
strTargPer — Target Period
strTargYear — Target Year
strTargFreq — Target Frequency
Optional Rule Logic PropertiesIt is also possible to set properties of the RES object which in turn will set values four custom fields that reside in the tDataCheck table. These user defined fields can be picked up on reports for warning messages and/or flags for data clearing that can be accessed in custom scripts.
Below is an example of a Rule Logic Function:Fun:If strEntity = “TEXAS.GL” Then ‘Rule not required Result = True ‘Set Messages and Switches RES.PstrCheckMessage1 = “Rule does not apply to “ & strEntity RES.PstrCheckMessage2 = “Do not fret!” RES.PblnCheckWarning = True RES.PblnCheckClearData = TrueElse ‘Check CashIF |1000| <= 0 Then Result = True ‘Set Messages and Switches RES.PstrCheckMessage1 = strEntity & “ is Good!” RES.PstrCheckMessage2 = “2”Else Result = False ‘Set Messages and Switches RES.PstrCheckMessage1 = strEntity & “ is Bad!” RES.PstrCheckMessage2 = “2” End If End If
Multi-Dimension Lookup FunctionOnly use the Multi-Dimension Lookup Function when integrating with target systems other than Hyperion Enterprise. See section entitled Hyperion Enterprise Lookup Function when integrating with Hyperion Enterprise.
The Multi-Dimension Lookup Function is used to retrieve account values from within the target system and can be used in the Rule Logic field and/or the Display field in the Validation Rules form.
Target system accounts are referenced by enclosing the account in pipes “|”. Below are the parameters that can be used when referencing a target system account.
3-43
Module 3 — Metadata
|Scenario(Optional), Period(Optional), Year(Optional), View(Optional), Entity(Optional), Account(Required), ICP(Optional), UD1(Optional), UD2(Optional), UD3(Optional), UD4(Optional), UD5(Optional), UD6(Optional), UD7(Optional), UD8(Optional), DataValue(Optional)|
Using the format above will allow Hyperion FDM to retrieve values from the target system for any dimension desired. However, it is possible to just reference the target account since the other parameters are optional.
The following examples illustrate the different ways that values can be retrieved from a target system.
Example 1 — Lookup the value of the target account “Balance” for the current target period and target scenario (category) set in the Hyperion FDM point of view, and for each entity in the Hyperion FDM Validation Entity Group that is assigned to this Hyperion FDM location. In this example, the rule will pass validation if the target account is within $10.
|,,,,,Balance,,,,,,,,,,| > -10.00 AND |,,,,,Balance,,,,,,,,,,| < 10.00
Example 2 — Lookup the value of the target account “Balance” for the supplied dimensions.|Actual,March,2002,YTD,Ohio,Balance,Michigan,Engines,Ford,Trucks,[None],,,,,USD| > 0
Example 3 — Lookup the value of the target account “Balance” for the supplied dimensions and the prior period|Actual,-1,2002,YTD,Ohio,Balance,Michigan,Engines,Ford,Trucks,[None],,,,,USD| > 0
Example 4 - Lookup the value of the target account “Balance” for the active target scenario (category) set in the Hyperion FDM point of view, the prior target period, and for each entity in the Hyperion FDM Validation Entity Group that is assigned to this Hyperion FDM location. All missing custom dimensions will be defaulted to “[None]”, the ICP dimension will default to [ICP-None], the Year dimension will default to the current year set in the active Hyperion FDM point of view, the Currency dimension defaults to “0”, and the View dimension will default to “YTD”.
|,-1,,,,Balance,,,,,,,,,,| > 0
Hyperion FDM Workbench Guide
3-44
Validation Entity GroupsWhat are Validation Entity GroupsValidation entity groups consist of one or more target system entities that you wish to consolidate and/or be displayed on the Validation Report. Validation entity groups are activated by assigning them to a location.
Defining Validation EntitiesA validation entity consists of a target entity that can be consolidated and/or be displayed on the validation report. Multiple validation entities can be assigned to one validation entity group. See topics below for descriptions of each validation entity field.
Organization/Parent EntityFor Hyperion Enterprise target systems, select the organization the entity should be consolidated in. For all other target systems, select the parent entity of the entity that will be consolidated. This field has no effect if the Consolidate field is not checked.
Entity The Entity field contains the target entity that will be consolidated and/or displayed on the Validation Report. If the Consolidate field is checked this entity will be consolidated before being displayed in the Validation Report.
ConsolidateThis switch is used to signal that a consolidation should be run for this entity prior to being displayed in the Validation Report.
Start PeriodThe start period controls how Hyperion FDM will execute the consolidation process within the target system. If the start period is set to 0, then only the current period is consolidated. If the start period is set to a value that is greater than the current period, then only the current period is consolidated. Setting the start period value to 1 will cause Hyperion FDM to consolidate for periods 1 to current period.
Entity TypeThe Type field in the Validation Entity form corresponds to the Validation Rule Type field in the Validation Rules form. In the Type field select whether the entity is a Base entity or Parent entity. Select All (Default) if you do not want to distinguish whether the entity is a Base or Parent and always want this entity displayed in the validation report for each validation rule. For example, if an entity is designated as a Parent type then this entity will only be displayed in the validation report for validation rules whose Type field is set to Parent or All. If an entity is designated as a Base type then this entity will only be displayed in the validation report for validation rules whose Type field is set to Base or All. If an entity is designated as an All type then this entity will be displayed in the validation report for all validation rules regardless of the validation rule type.
On ReportCheck this field to include this entity in the validation report. If this field is not checked and the consolidate field is checked then the entity will only be consolidated, not shown on the validation report.
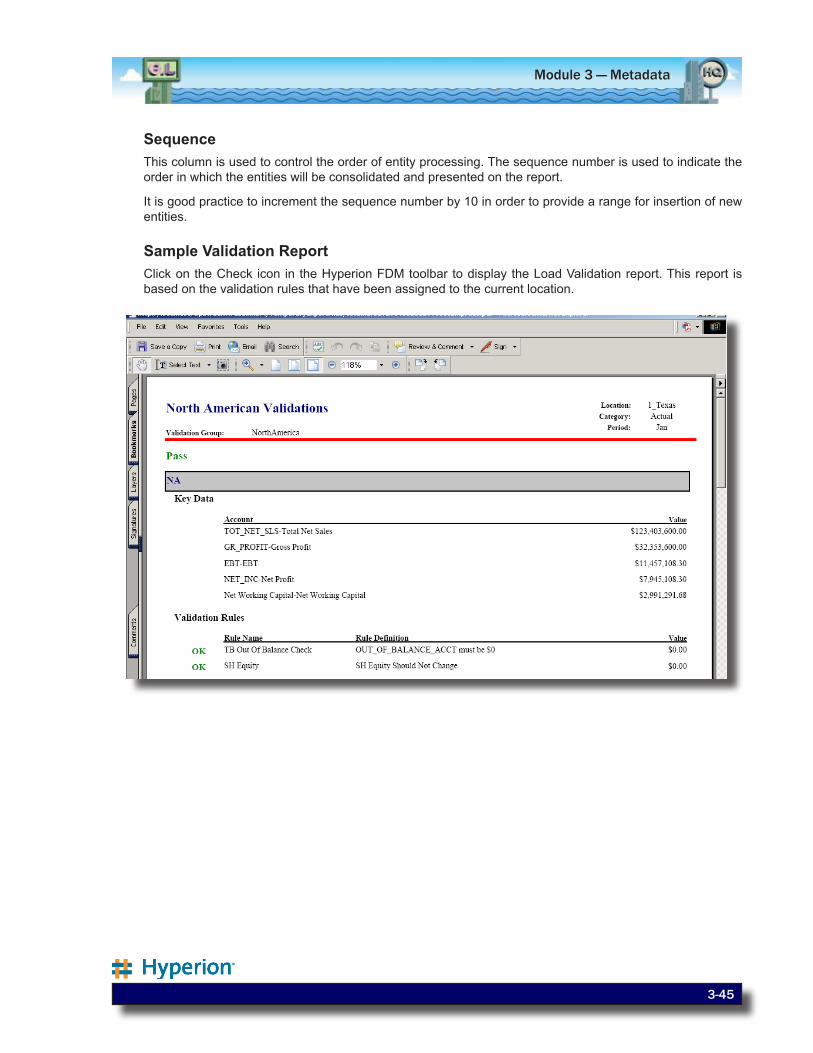
3-45
Module 3 — Metadata
SequenceThis column is used to control the order of entity processing. The sequence number is used to indicate the order in which the entities will be consolidated and presented on the report.
It is good practice to increment the sequence number by 10 in order to provide a range for insertion of new entities.
Sample Validation ReportClick on the Check icon in the Hyperion FDM toolbar to display the Load Validation report. This report is based on the validation rules that have been assigned to the current location.
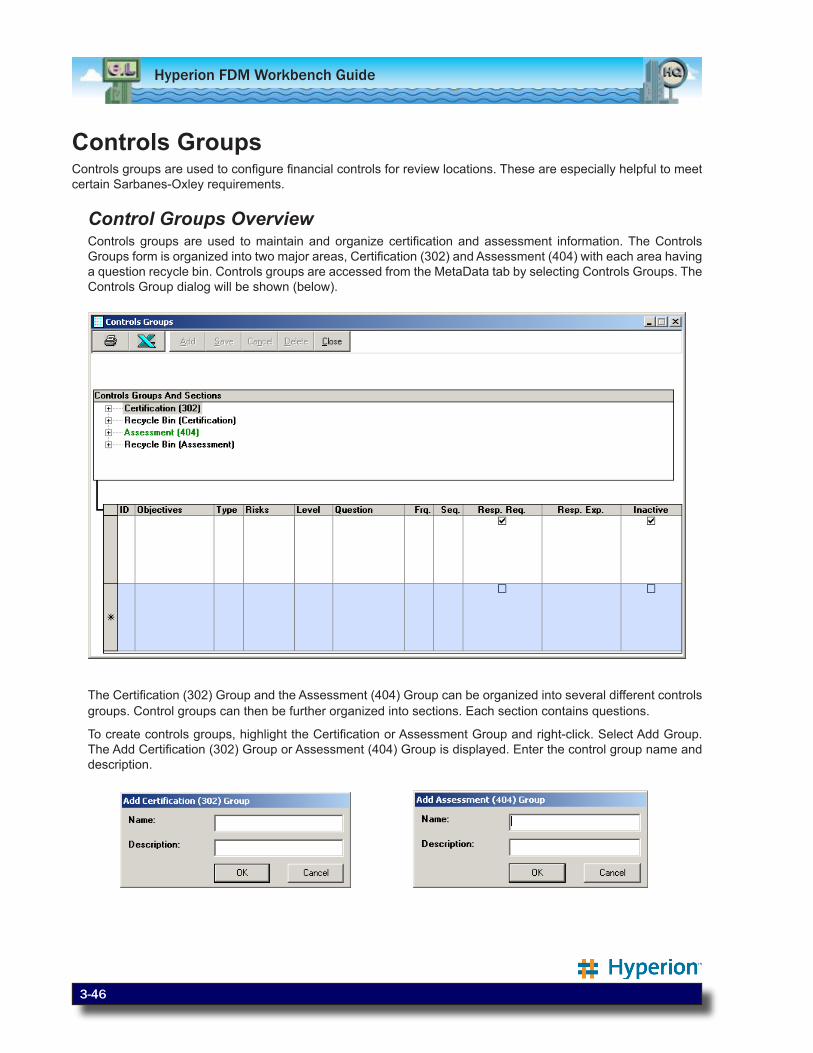
Hyperion FDM Workbench Guide
3-46
Controls GroupsControls groups are used to configure financial controls for review locations. These are especially helpful to meet certain Sarbanes-Oxley requirements.
Control Groups OverviewControls groups are used to maintain and organize certification and assessment information. The Controls Groups form is organized into two major areas, Certification (302) and Assessment (404) with each area having a question recycle bin. Controls groups are accessed from the MetaData tab by selecting Controls Groups. The Controls Group dialog will be shown (below).
The Certification (302) Group and the Assessment (404) Group can be organized into several different controls groups. Control groups can then be further organized into sections. Each section contains questions.
To create controls groups, highlight the Certification or Assessment Group and right-click. Select Add Group. The Add Certification (302) Group or Assessment (404) Group is displayed. Enter the control group name and description.
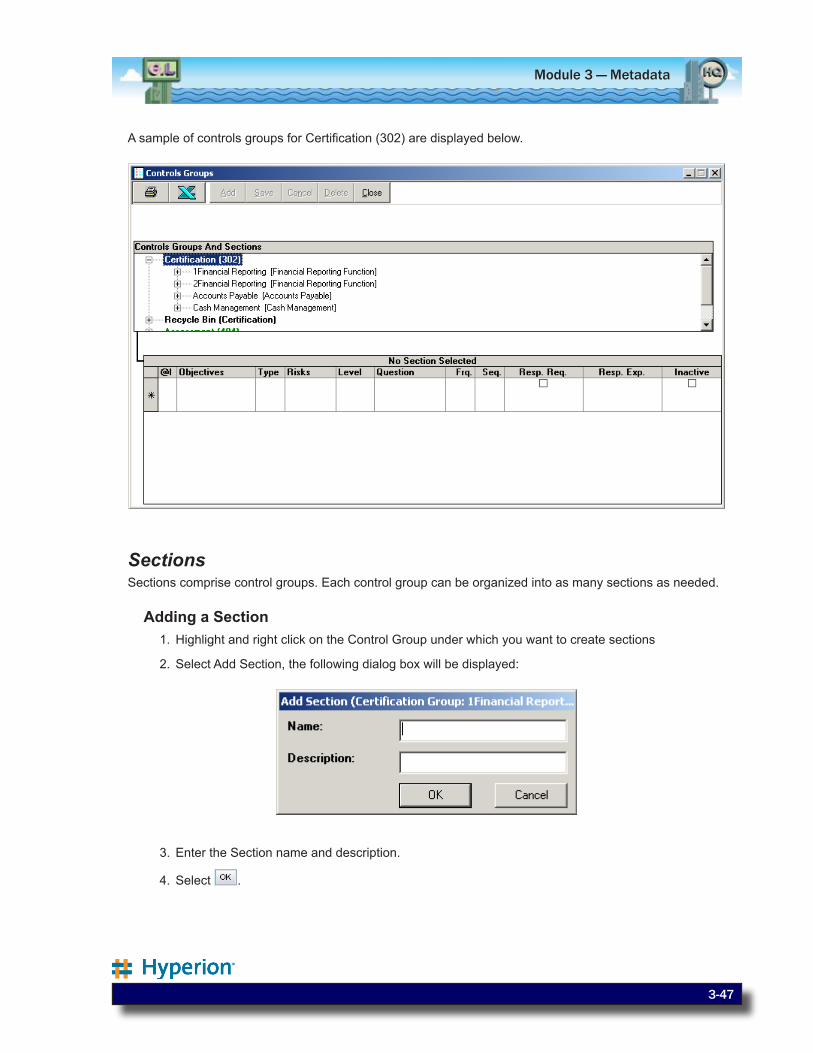
3-47
Module 3 — Metadata
A sample of controls groups for Certification (302) are displayed below.
SectionsSections comprise control groups. Each control group can be organized into as many sections as needed.
Adding a Section1. Highlight and right click on the Control Group under which you want to create sections
2. Select Add Section, the following dialog box will be displayed:
3. Enter the Section name and description.
4. Select .
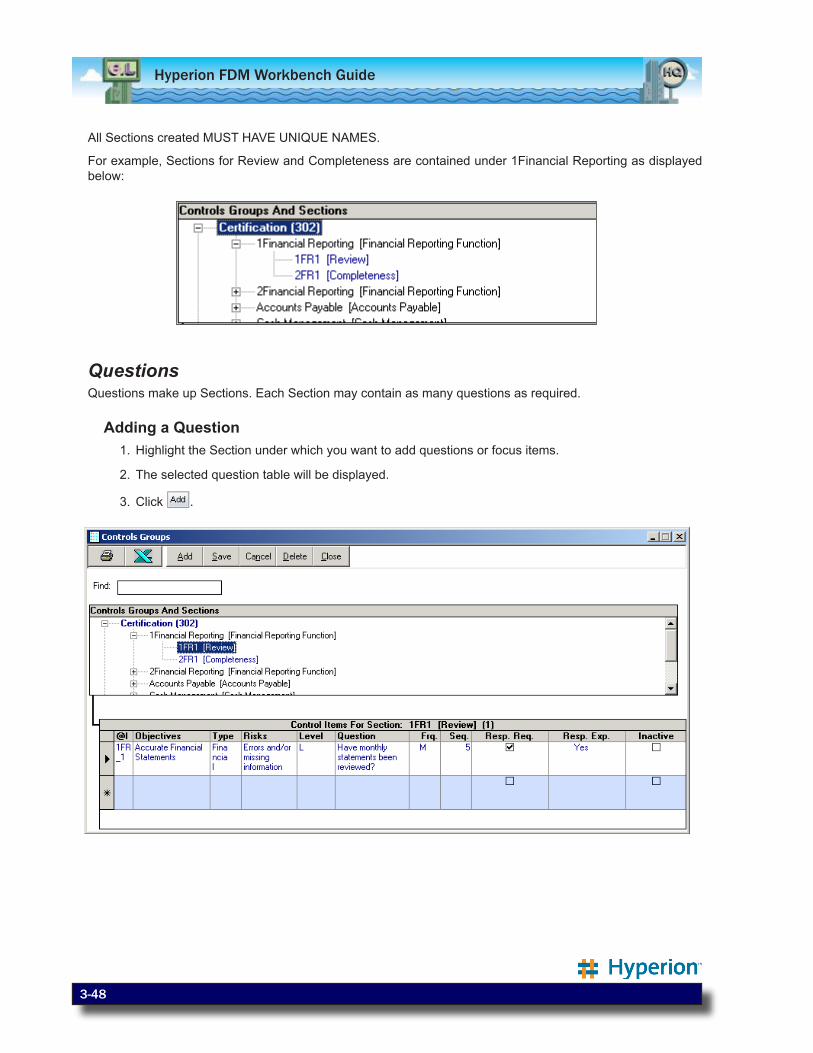
Hyperion FDM Workbench Guide
3-48
All Sections created MUST HAVE UNIQUE NAMES.
For example, Sections for Review and Completeness are contained under 1Financial Reporting as displayed below:
QuestionsQuestions make up Sections. Each Section may contain as many questions as required.
Adding a Question1. Highlight the Section under which you want to add questions or focus items.
2. The selected question table will be displayed.
3. Click .
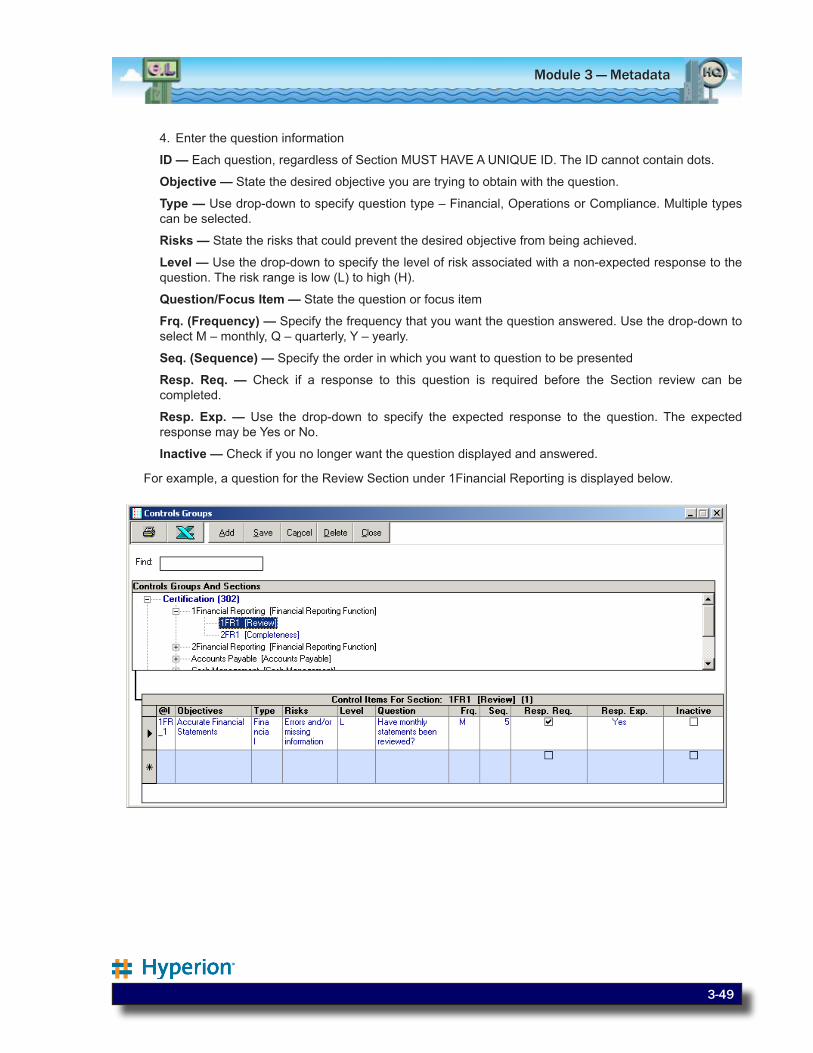
3-49
Module 3 — Metadata
4. Enter the question information
ID — Each question, regardless of Section MUST HAVE A UNIQUE ID. The ID cannot contain dots.
Objective — State the desired objective you are trying to obtain with the question.
Type — Use drop-down to specify question type – Financial, Operations or Compliance. Multiple types can be selected.
Risks — State the risks that could prevent the desired objective from being achieved.
Level — Use the drop-down to specify the level of risk associated with a non-expected response to the question. The risk range is low (L) to high (H).
Question/Focus Item — State the question or focus item
Frq. (Frequency) — Specify the frequency that you want the question answered. Use the drop-down to select M – monthly, Q – quarterly, Y – yearly.
Seq. (Sequence) — Specify the order in which you want to question to be presented
Resp. Req. — Check if a response to this question is required before the Section review can be completed.
Resp. Exp. — Use the drop-down to specify the expected response to the question. The expected response may be Yes or No.
Inactive — Check if you no longer want the question displayed and answered.
For example, a question for the Review Section under 1Financial Reporting is displayed below.
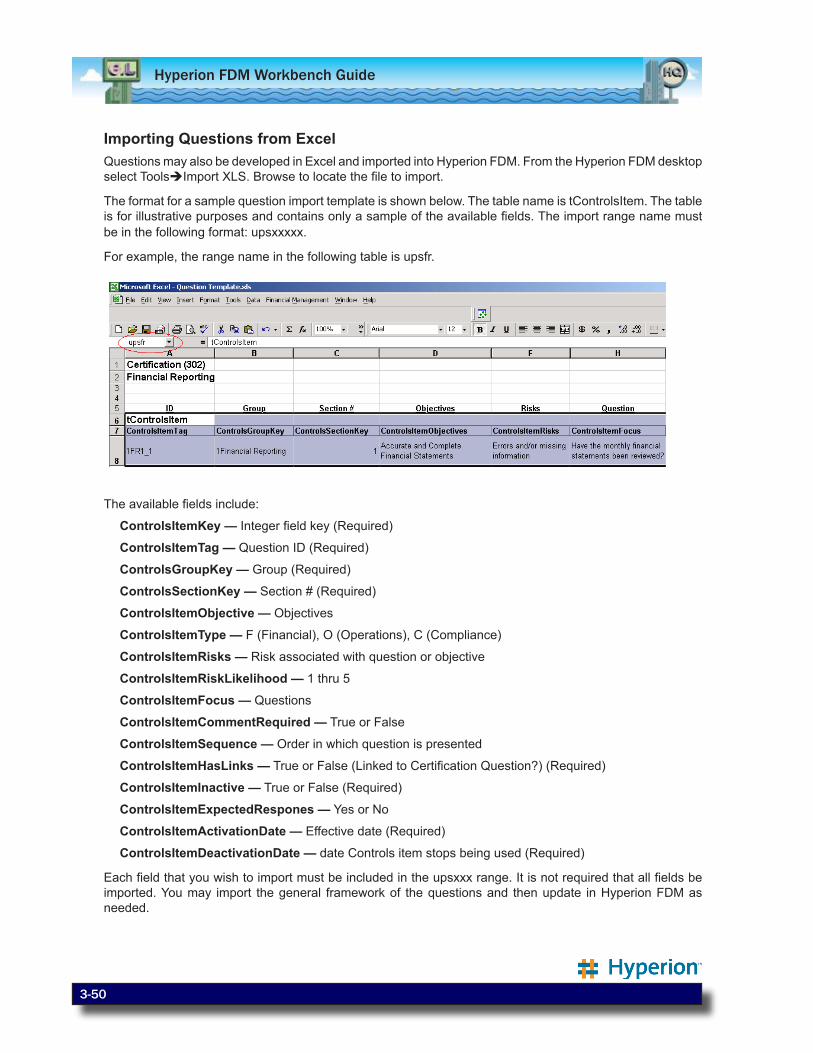
Hyperion FDM Workbench Guide
3-50
Importing Questions from ExcelQuestions may also be developed in Excel and imported into Hyperion FDM. From the Hyperion FDM desktop select ToolsImport XLS. Browse to locate the file to import.
The format for a sample question import template is shown below. The table name is tControlsItem. The table is for illustrative purposes and contains only a sample of the available fields. The import range name must be in the following format: upsxxxxx.
For example, the range name in the following table is upsfr.
The available fields include:
ControlsItemKey — Integer field key (Required)
ControlsItemTag — Question ID (Required)
ControlsGroupKey — Group (Required)
ControlsSectionKey — Section # (Required)
ControlsItemObjective — Objectives
ControlsItemType — F (Financial), O (Operations), C (Compliance)
ControlsItemRisks — Risk associated with question or objective
ControlsItemRiskLikelihood — 1 thru 5
ControlsItemFocus — Questions
ControlsItemCommentRequired — True or False
ControlsItemSequence — Order in which question is presented
ControlsItemHasLinks — True or False (Linked to Certification Question?) (Required)
ControlsItemInactive — True or False (Required)
ControlsItemExpectedRespones — Yes or No
ControlsItemActivationDate — Effective date (Required)
ControlsItemDeactivationDate — date Controls item stops being used (Required)
Each field that you wish to import must be included in the upsxxx range. It is not required that all fields be imported. You may import the general framework of the questions and then update in Hyperion FDM as needed.

3-51
Module 3 — Metadata
Note: Any dates that are imported should be formatted as text.
Effective DateEach question can be set with an effective date. The effective date determines the period in which the question is first presented. The effective date is not required if you want the question to be presented for all periods.
To set the effective date for an individual question, click the ID field link for the question you wish to set an effective date. The following dialog box will be presented:

Hyperion FDM Workbench Guide
3-52
Recycle BinThere are separate recycle bins for Certification and Assessment questions. Questions that are deleted from a Certification Section are placed in the Recycle Bin (Certification). Questions that are deleted from an Assessment Section are placed in the Recycle Bin (Assessment).
An entire Group, Section or individual question may be sent to the Recycle Bin.
Items in the Recycle Bin may be restored, if desired. Items that are deleted from the Recycle Bin are permanently deleted.
Deleting Groups, Sections or QuestionsFollow these steps to send an entire Group to the Recycle Bin:
1. Highlight the Group you wish to delete
2. Click on the Group to be deleted
3. From the top of the form click Delete
4. You will be prompted to confirm that you wish to place the Group in the Recycle Bin
5. Select Yes
6. The entire Group will be placed in the Recycle Bin
Follow these steps to send an entire Section to the Recycle Bin:
1. Highlight the Section you wish to delete
2. Click on the Section to be deleted
3. From the top of the form click Delete
4. You will be prompted to confirm that you wish to place the Section in the Recycle Bin
5. Select Yes
6. The entire Section will be placed in the Recycle Bin.
Follow these steps to send an individual Question to the Recycle Bin:
1. Highlight the Section that contains the Question you wish to delete
2. In the table select the Question you wish to delete
3. From the top of the form click Delete
4. You will be prompted to confirm that you wish to place the question in the Recycle Bin
5. Select Yes
6. The question will be placed in the Recycle Bin

3-53
Module 3 — Metadata
Restoring Groups, Sections or QuestionsFollow these steps to restore a Group from the Recycle Bin:
1. Under Recycle Bin highlight the Group you wish to restore
2. Right click on the Group
3. From the dialog box select – Restore Group
4. You will be prompted to confirm that you wish to restore the Group
5. Select Yes
6. The entire Group will be restored
Follow these steps to restore a Section from the Recycle Bin:
1. Under Recycle Bin highlight the Section you wish to restore
2. Right click on the Section
3. From the dialog box select – Restore Section
4. You will be prompted to confirm that you wish to restore the Section
5. Select Yes
6. You will then be prompted to select the Group under which you wish to restore the Section
7. From the dropdown select the desired Group
8. Select OK
9. The Section will be restored under the Group selected
Follow these steps to restore a Question from the Recycle Bin:
1. Under Recycle Bin highlight the Deleted Question Section
2. In the Deleted Questions table select the Question you wish to restore
3. Right Click on Deleted Question Section
4. Select Restore Question
5. You will be prompted to confirm that you wish to restore the Question
6. Select Yes
7. You will then be prompted to select the Section under which you wish to restore the Question
8. From the dropdown, select the desired Section
9. Select OK
10. The Question will be restored under the Section selected
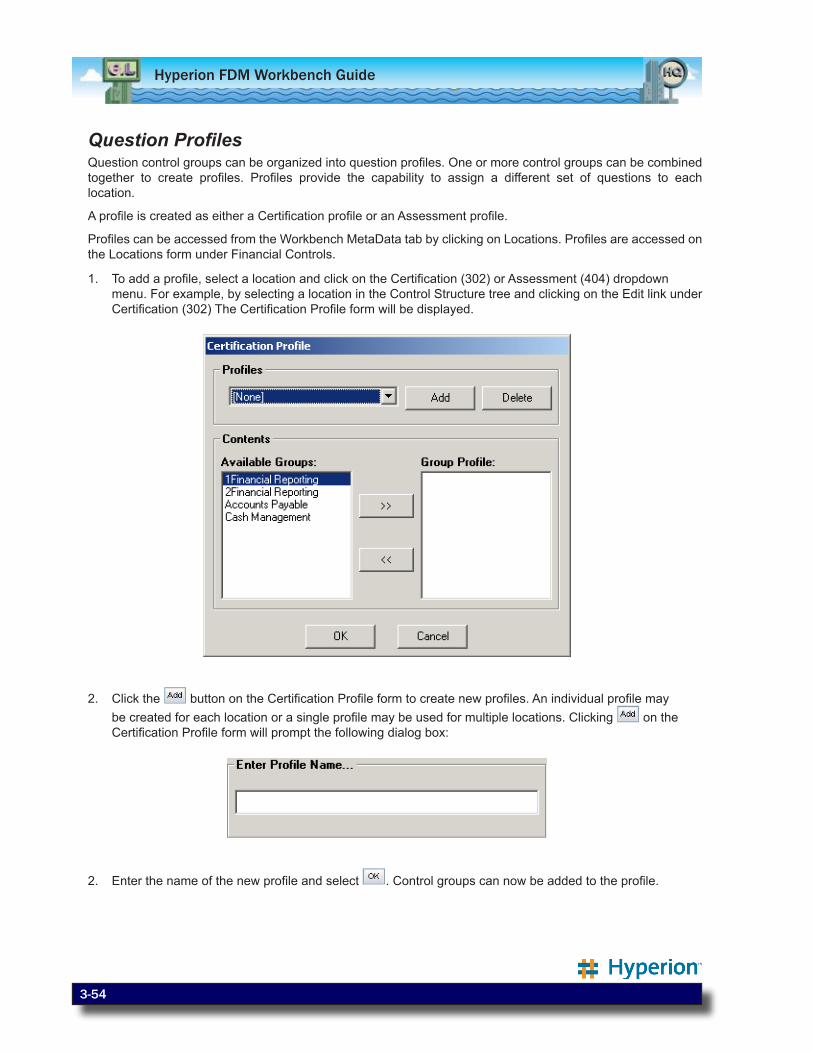
Hyperion FDM Workbench Guide
3-54
Question ProfilesQuestion control groups can be organized into question profiles. One or more control groups can be combined together to create profiles. Profiles provide the capability to assign a different set of questions to each location.
A profile is created as either a Certification profile or an Assessment profile.
Profiles can be accessed from the Workbench MetaData tab by clicking on Locations. Profiles are accessed on the Locations form under Financial Controls.
1. To add a profile, select a location and click on the Certification (302) or Assessment (404) dropdown menu. For example, by selecting a location in the Control Structure tree and clicking on the Edit link under Certification (302) The Certification Profile form will be displayed.
2. Click the button on the Certification Profile form to create new profiles. An individual profile may be created for each location or a single profile may be used for multiple locations. Clicking on the Certification Profile form will prompt the following dialog box:
2. Enter the name of the new profile and select . Control groups can now be added to the profile.

3-55
Module 3 — Metadata
Reviewers and ProxyA reviewer and a proxy (backup reviewer) are assigned to each to section. The reviewer or proxy answer the questions in the section they are assigned. There are Certification Reviewers and Assessment Reviewers.
Each section can have its own reviewer or a single reviewer can be assigned to multiple Sections.
To assign a reviewer and a proxy to a section, click on the dropdown box and select from the available users. Users are set up in Hyperion FDM security. Users that are set up in Hyperion FDM security as controls reviewers will be routed directly to the Process Explorer desktop upon sign-in.
Submitter and ProxyEach location is assigned a submitter and a proxy (backup submitter). The submitter or proxy submits the certification or assessment after all sections have been reviewed.
If the certification is contingent on data loading, a submitter will not be able to submit until data has been loaded and all sections have been reviewed.
To assign a submitter and a proxy to a location, click on the dropdown box and select from the available users. Users are set up in Hyperion FDM security. Users that are set up in Hyperion FDM security as Controls Reviewer and Submitter will be routed directly to the Process Explorer upon sign-in.
Risk Flag LevelThis field defines when red flags are displayed for questions that are answered with a non-expected response. Questions are assigned a risk level Low (L) to High (H). Set the Risk Flag Level from Low (L) to High (H), to determine when you want a non-expected response to a question to produce a red flag.
For example, a location with a Risk Flag Level set to M (Medium) will generate red flags for questions with a risk level of Medium (M) or higher that are answered with a non-expected response. Questions with a risk level of L (Low) to L-M (Low-Medium) will not generate a red flag for a non-expected response on a location with a Risk Flag Level set to M (Medium).
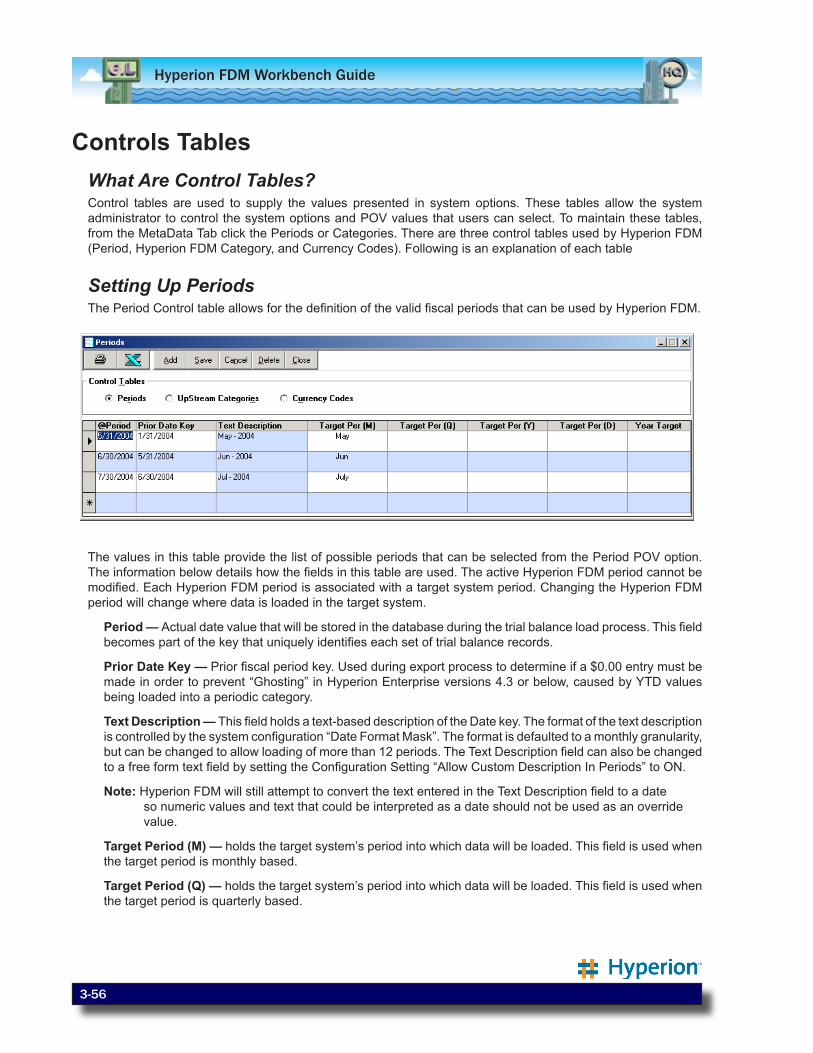
Hyperion FDM Workbench Guide
3-56
Controls TablesWhat Are Control Tables?Control tables are used to supply the values presented in system options. These tables allow the system administrator to control the system options and POV values that users can select. To maintain these tables, from the MetaData Tab click the Periods or Categories. There are three control tables used by Hyperion FDM (Period, Hyperion FDM Category, and Currency Codes). Following is an explanation of each table
Setting Up PeriodsThe Period Control table allows for the definition of the valid fiscal periods that can be used by Hyperion FDM.
The values in this table provide the list of possible periods that can be selected from the Period POV option. The information below details how the fields in this table are used. The active Hyperion FDM period cannot be modified. Each Hyperion FDM period is associated with a target system period. Changing the Hyperion FDM period will change where data is loaded in the target system.
Period — Actual date value that will be stored in the database during the trial balance load process. This field becomes part of the key that uniquely identifies each set of trial balance records.
Prior Date Key — Prior fiscal period key. Used during export process to determine if a $0.00 entry must be made in order to prevent “Ghosting” in Hyperion Enterprise versions 4.3 or below, caused by YTD values being loaded into a periodic category.
Text Description — This field holds a text-based description of the Date key. The format of the text description is controlled by the system configuration “Date Format Mask”. The format is defaulted to a monthly granularity, but can be changed to allow loading of more than 12 periods. The Text Description field can also be changed to a free form text field by setting the Configuration Setting “Allow Custom Description In Periods” to ON.
Note: Hyperion FDM will still attempt to convert the text entered in the Text Description field to a date so numeric values and text that could be interpreted as a date should not be used as an override value.
Target Period (M) — holds the target system’s period into which data will be loaded. This field is used when the target period is monthly based.
Target Period (Q) — holds the target system’s period into which data will be loaded. This field is used when the target period is quarterly based.
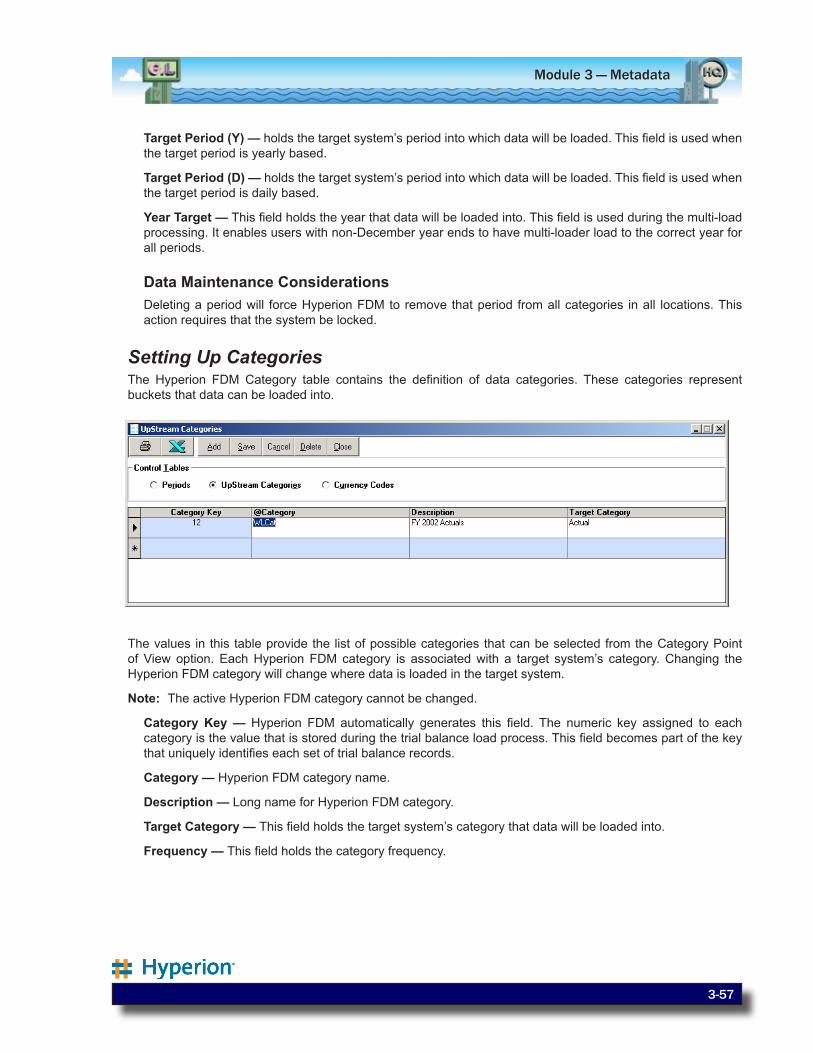
3-57
Module 3 — Metadata
Target Period (Y) — holds the target system’s period into which data will be loaded. This field is used when the target period is yearly based.
Target Period (D) — holds the target system’s period into which data will be loaded. This field is used when the target period is daily based.
Year Target — This field holds the year that data will be loaded into. This field is used during the multi-load processing. It enables users with non-December year ends to have multi-loader load to the correct year for all periods.
Data Maintenance ConsiderationsDeleting a period will force Hyperion FDM to remove that period from all categories in all locations. This action requires that the system be locked.
Setting Up CategoriesThe Hyperion FDM Category table contains the definition of data categories. These categories represent buckets that data can be loaded into.
The values in this table provide the list of possible categories that can be selected from the Category Point of View option. Each Hyperion FDM category is associated with a target system’s category. Changing the Hyperion FDM category will change where data is loaded in the target system.
Note: The active Hyperion FDM category cannot be changed.
Category Key — Hyperion FDM automatically generates this field. The numeric key assigned to each category is the value that is stored during the trial balance load process. This field becomes part of the key that uniquely identifies each set of trial balance records.
Category — Hyperion FDM category name.
Description — Long name for Hyperion FDM category.
Target Category — This field holds the target system’s category that data will be loaded into.
Frequency — This field holds the category frequency.
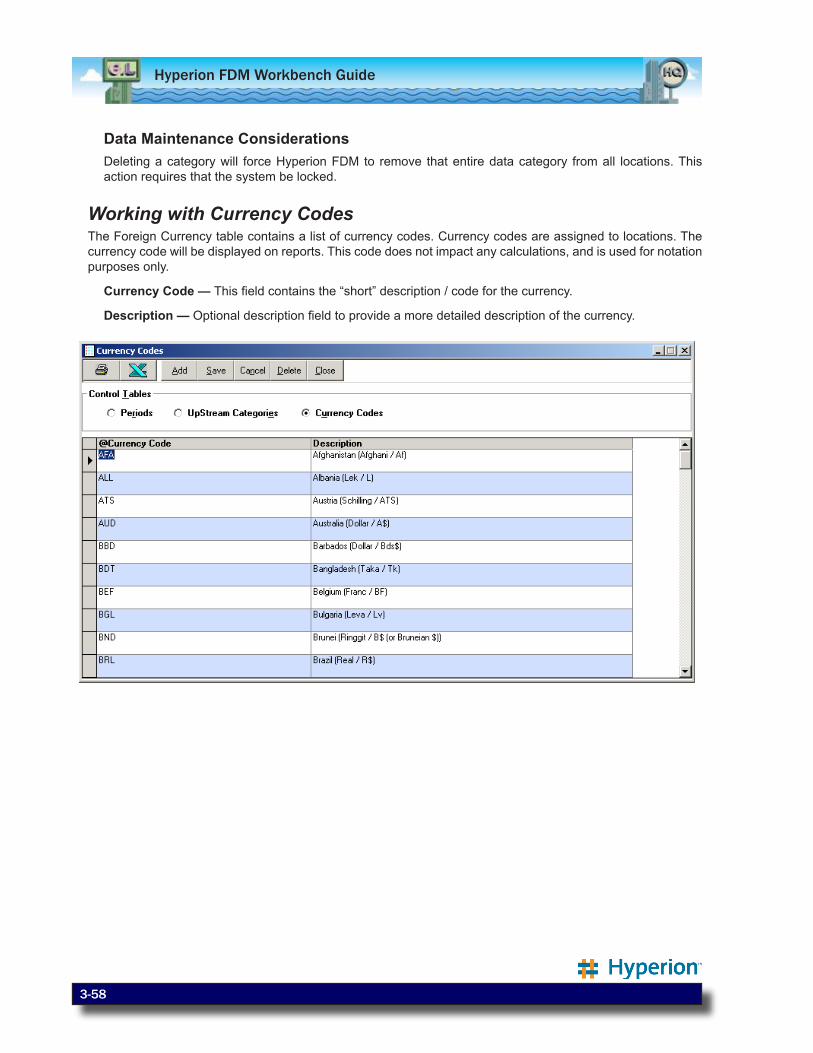
Hyperion FDM Workbench Guide
3-58
Data Maintenance ConsiderationsDeleting a category will force Hyperion FDM to remove that entire data category from all locations. This action requires that the system be locked.
Working with Currency CodesThe Foreign Currency table contains a list of currency codes. Currency codes are assigned to locations. The currency code will be displayed on reports. This code does not impact any calculations, and is used for notation purposes only.
Currency Code — This field contains the “short” description / code for the currency.
Description — Optional description field to provide a more detailed description of the currency.
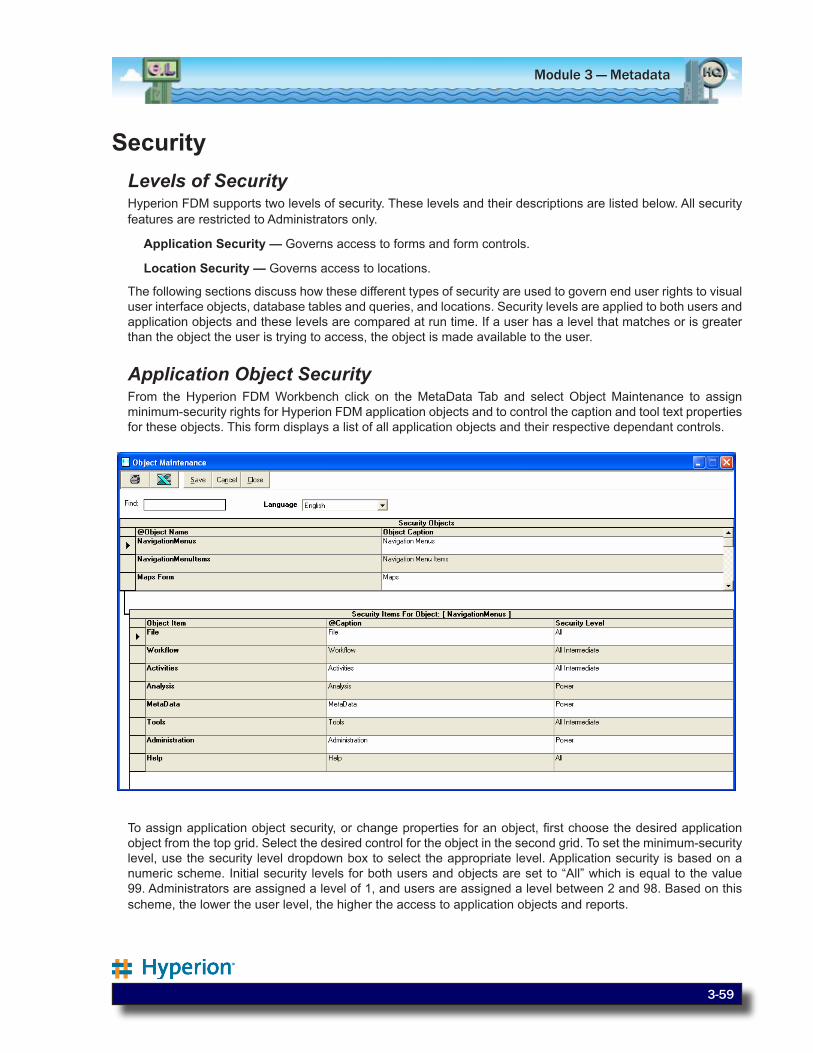
3-59
Module 3 — Metadata
SecurityLevels of SecurityHyperion FDM supports two levels of security. These levels and their descriptions are listed below. All security features are restricted to Administrators only.
Application Security — Governs access to forms and form controls.
Location Security — Governs access to locations.
The following sections discuss how these different types of security are used to govern end user rights to visual user interface objects, database tables and queries, and locations. Security levels are applied to both users and application objects and these levels are compared at run time. If a user has a level that matches or is greater than the object the user is trying to access, the object is made available to the user.
Application Object SecurityFrom the Hyperion FDM Workbench click on the MetaData Tab and select Object Maintenance to assign minimum-security rights for Hyperion FDM application objects and to control the caption and tool text properties for these objects. This form displays a list of all application objects and their respective dependant controls.
To assign application object security, or change properties for an object, first choose the desired application object from the top grid. Select the desired control for the object in the second grid. To set the minimum-security level, use the security level dropdown box to select the appropriate level. Application security is based on a numeric scheme. Initial security levels for both users and objects are set to “All” which is equal to the value 99. Administrators are assigned a level of 1, and users are assigned a level between 2 and 98. Based on this scheme, the lower the user level, the higher the access to application objects and reports.
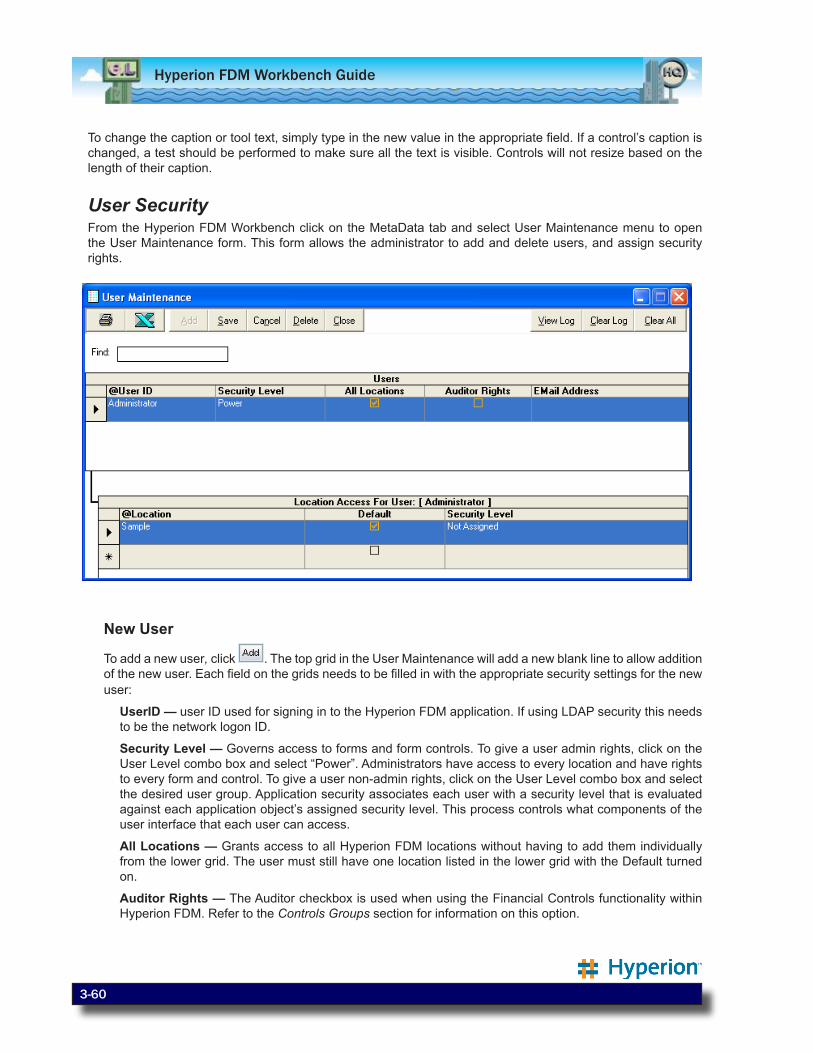
Hyperion FDM Workbench Guide
3-60
To change the caption or tool text, simply type in the new value in the appropriate field. If a control’s caption is changed, a test should be performed to make sure all the text is visible. Controls will not resize based on the length of their caption.
User SecurityFrom the Hyperion FDM Workbench click on the MetaData tab and select User Maintenance menu to open the User Maintenance form. This form allows the administrator to add and delete users, and assign security rights.
New User
To add a new user, click . The top grid in the User Maintenance will add a new blank line to allow addition of the new user. Each field on the grids needs to be filled in with the appropriate security settings for the new user:
UserID — user ID used for signing in to the Hyperion FDM application. If using LDAP security this needs to be the network logon ID.
Security Level — Governs access to forms and form controls. To give a user admin rights, click on the User Level combo box and select “Power”. Administrators have access to every location and have rights to every form and control. To give a user non-admin rights, click on the User Level combo box and select the desired user group. Application security associates each user with a security level that is evaluated against each application object’s assigned security level. This process controls what components of the user interface that each user can access.
All Locations — Grants access to all Hyperion FDM locations without having to add them individually from the lower grid. The user must still have one location listed in the lower grid with the Default turned on.
Auditor Rights — The Auditor checkbox is used when using the Financial Controls functionality within Hyperion FDM. Refer to the Controls Groups section for information on this option.

3-61
Module 3 — Metadata
Email Address — The Email Address field can be used to store the individual’s email address. A custom script can be created to notify a user via email on the loading status of a Hyperion FDM location.
Location — Hyperion FDM locations that the user has rights to access. To assign a location to a user, click on the Location column in the Location grid and select a location from the drop-down list box. Every user must be assigned at least one location.
Default — Location that will be put into the users point of view bar on starting Hyperion FDM. Every user must have one (and only one) Default location.
Security Level — The Security Level field allows users to have alternate Application Rights for any/all locations that are assigned to the user. When the Security Level field is set for a given location, that selected security level will be used in place of the user’s Application Rights (only when on the listed location). For example: If a user has default Application Rights of Intermediate-7 and has three locations assigned to him. If one of the locations has a Security Level of Intermediate-5, then when the user has that location in his POV, his Application Rights will be set to Intermediate-5.
Delete UserTo delete a user, select the user you wish to delete and click the Delete button from the User Maintenance screen.
Error LogsView Log — allows the administrator to view any existing error log for a selected user. Simply select the desired user from the user list and click the View log button.
Clear Log — clears the error log for the selected user.
Clear All — clears all error logs for all users.

Hyperion FDM Workbench Guide
3-62

Module 4: systeMs

4-1
Module 4 — Systems
OverviewThe Systems tab allows administrators to import and maintain the Adaptors that Hyperion FDM uses to connect to source and target systems. Adaptors are software codes that have been programmed to communicate with various source and target applications. Each adaptor is designed to integrate with a specific target system (Essbase, HFM, etc) or source system (SAP, SQL, etc.). These adaptors are compromised of an XML metadata component and a DLL/EXE (target adaptors only). The DLL/EXE contains the system-specific instructions for interacting with the target system. The XML contains all data relating to the Hyperion FDM application that is being integrated.
Target System Adaptor ComponentsAdaptor DLL/EXEThe target system adaptor DLL/EXE acts as a buffer between the Hyperion FDM program and the target application. The DLL contains all of the instructions for Hyperion FDM to communicate with the specified target application such as connecting to the database, loading data, extracting data, etc. Each target system adaptor DLL contains the API calls for the specific target application. This allows Hyperion FDM to be flexible to integrate with many target systems and not have to maintain large amounts of application specific calls within the program itself.
Adaptor XMLThe adaptor XML acts as a second layer between the Hyperion FDM program and the target application. The XML stores application setup parameters/options, pre-defined scripts to call API functions and return the desired data/results from the target application. The XML file also can contain all of the information needed to setup a Hyperion FDM Application (locations, security, import formats, reports, etc).
Dimensions (Target Adaptors only)The Dimensions section contains all of the available dimension lists for the target application. Each item under the main Dimension section represents one available dimension and contains a script that retrieves a list of all members in the selected dimension from the target application. These member lists are provided to Hyperion FDM. Source system adaptors do not contain the dimension section.
ActionsPre-defined scripts that interact with the target application and use the adaptor DLL’s API calls to perform such functions as: Connect, Load, ValueGet, Export, Drill Down, etc.
Machine ProfileThe machine profile contains all of the information to allow Hyperion FDM to determine on what computers/servers the source and target databases are located. The machine profile also stores global logon information for connecting to the target application. When the Global Login option is selected, Hyperion FDM will always use this username and password to log onto the HFM application server and the HFM application. This means that this user account must have access to the HFM application server and must have the appropriate security privileges in the HFM application for Hyperion FDM to load and retrieve values to and from HFM, regardless of the user who is logged into Hyperion FDM. A machine profile must be setup for every computer that has the Hyperion FDM Application Server or the Hyperion FDM Task Manager installed.
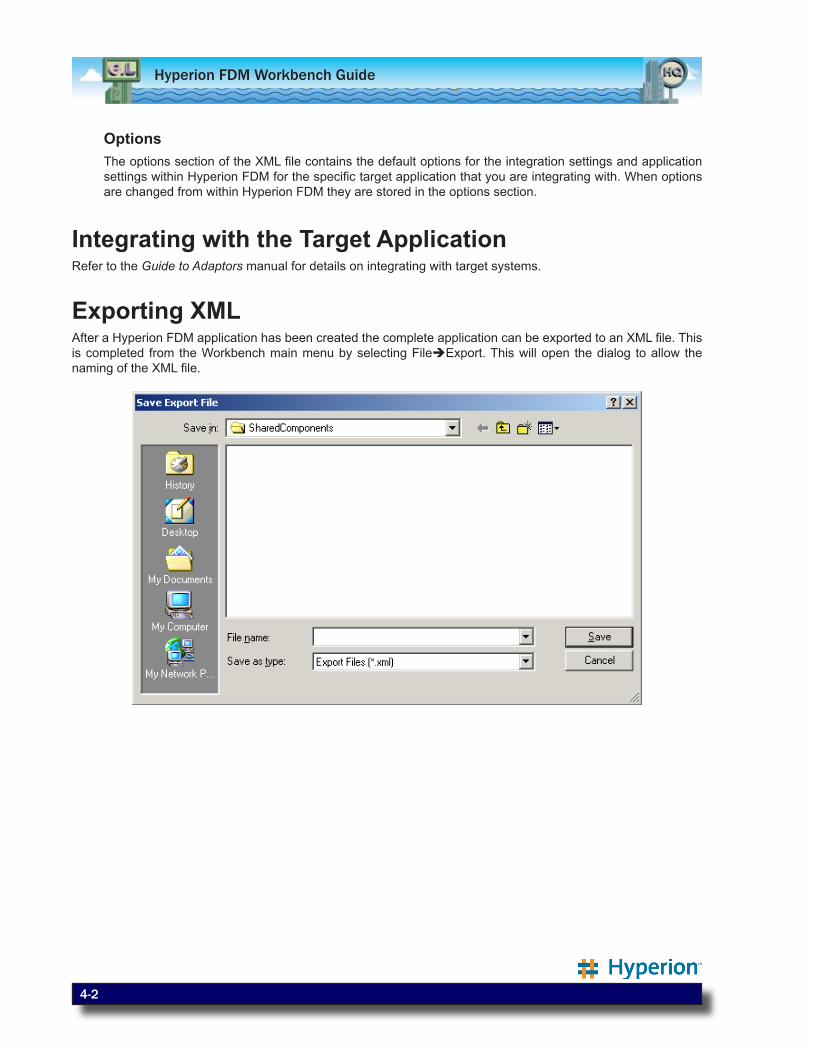
Hyperion FDM Workbench Guide
4-2
OptionsThe options section of the XML file contains the default options for the integration settings and application settings within Hyperion FDM for the specific target application that you are integrating with. When options are changed from within Hyperion FDM they are stored in the options section.
Integrating with the Target ApplicationRefer to the Guide to Adaptors manual for details on integrating with target systems.
Exporting XMLAfter a Hyperion FDM application has been created the complete application can be exported to an XML file. This is completed from the Workbench main menu by selecting FileExport. This will open the dialog to allow the naming of the XML file.
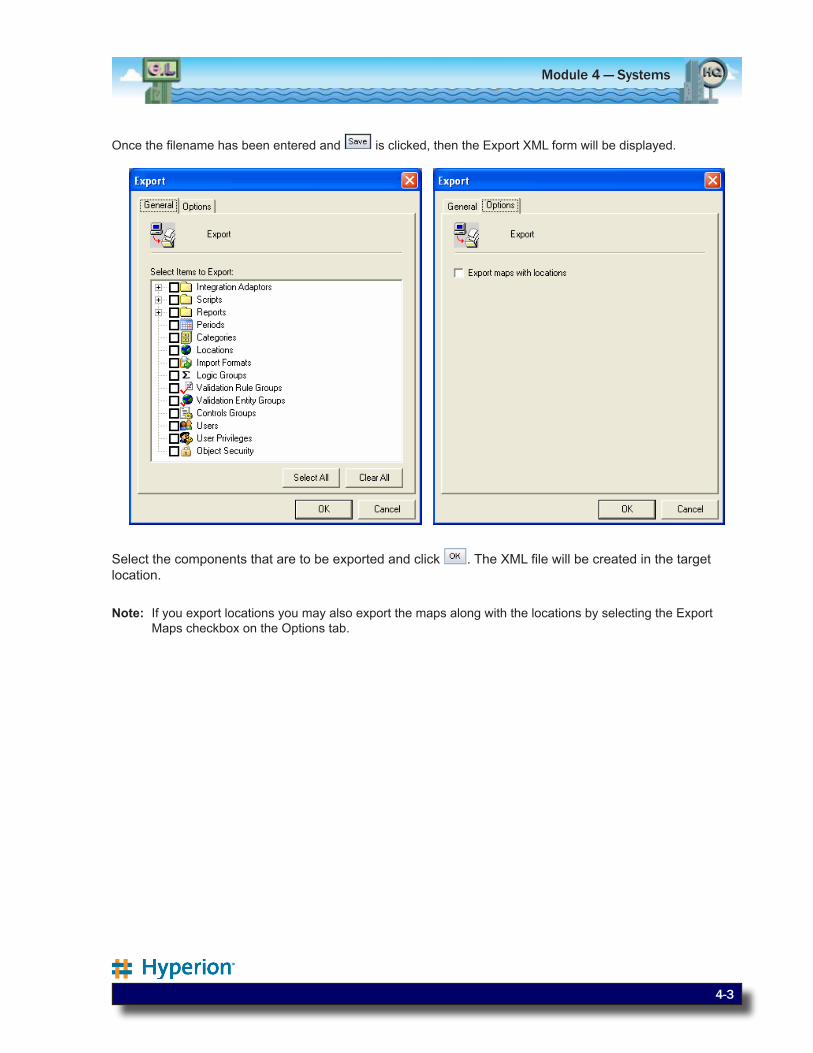
4-3
Module 4 — Systems
Once the filename has been entered and is clicked, then the Export XML form will be displayed.
Select the components that are to be exported and click . The XML file will be created in the target location.
Note: If you export locations you may also export the maps along with the locations by selecting the Export Maps checkbox on the Options tab.

Hyperion FDM Workbench Guide
4-4

Module 5: scripts

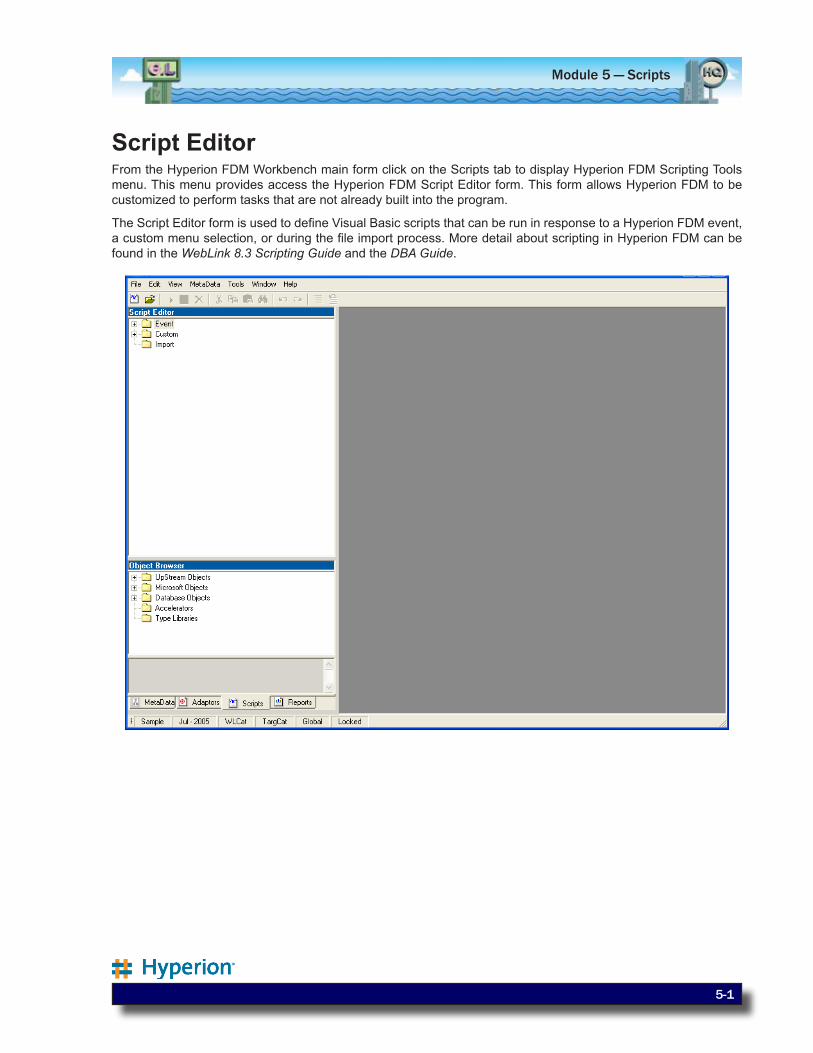
5-1
Module 5 — Scripts
Script EditorFrom the Hyperion FDM Workbench main form click on the Scripts tab to display Hyperion FDM Scripting Tools menu. This menu provides access the Hyperion FDM Script Editor form. This form allows Hyperion FDM to be customized to perform tasks that are not already built into the program.
The Script Editor form is used to define Visual Basic scripts that can be run in response to a Hyperion FDM event, a custom menu selection, or during the file import process. More detail about scripting in Hyperion FDM can be found in the WebLink 8.3 Scripting Guide and the DBA Guide.
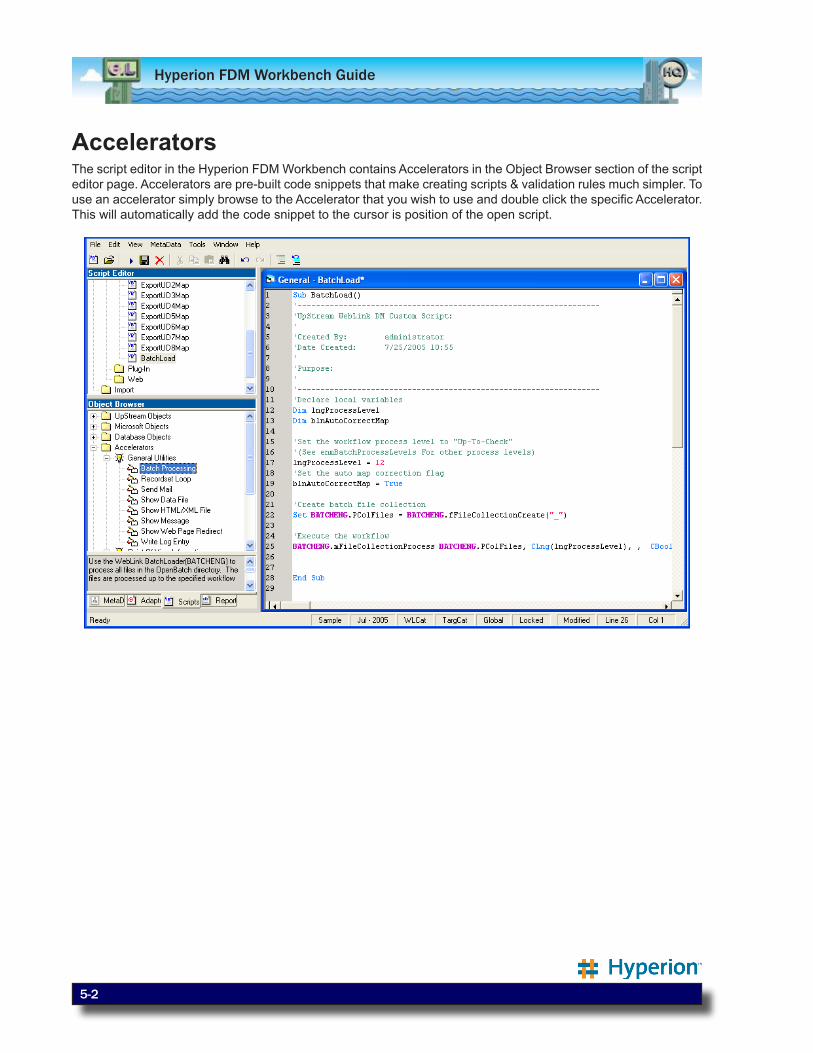
Hyperion FDM Workbench Guide
5-2
AcceleratorsThe script editor in the Hyperion FDM Workbench contains Accelerators in the Object Browser section of the script editor page. Accelerators are pre-built code snippets that make creating scripts & validation rules much simpler. To use an accelerator simply browse to the Accelerator that you wish to use and double click the specific Accelerator. This will automatically add the code snippet to the cursor is position of the open script.

Module 6: reports

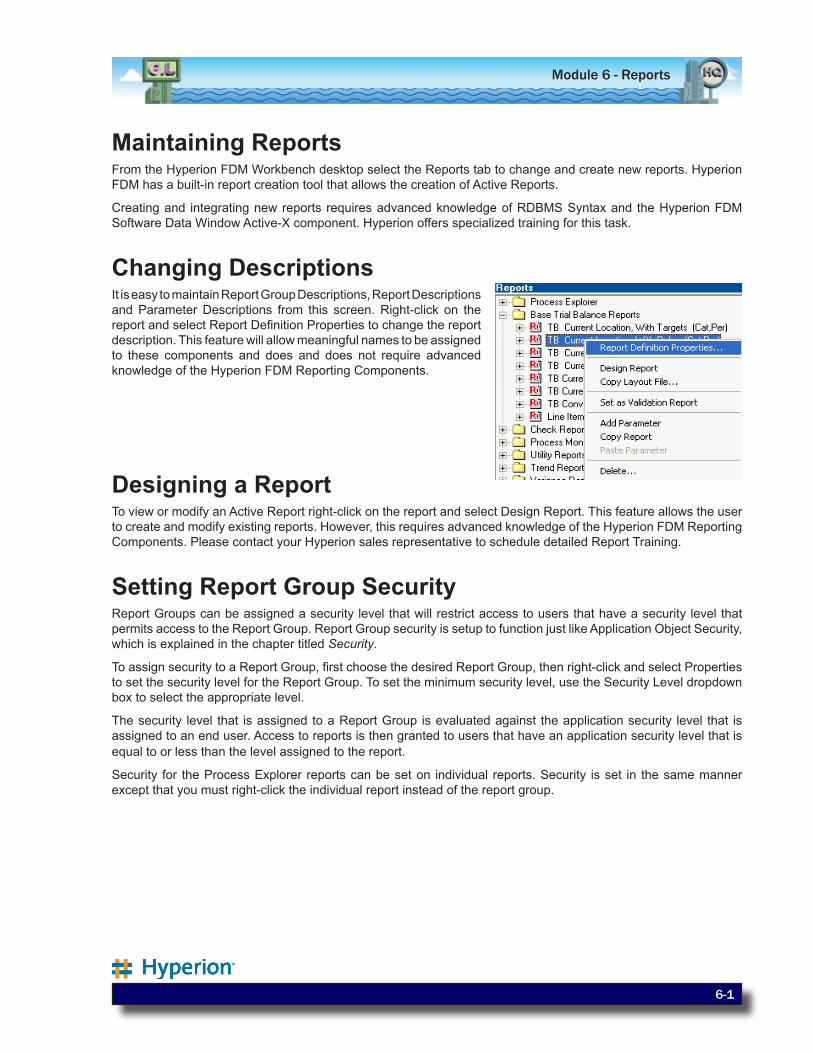
6-1
Module 6 - Reports
Maintaining ReportsFrom the Hyperion FDM Workbench desktop select the Reports tab to change and create new reports. Hyperion FDM has a built-in report creation tool that allows the creation of Active Reports.
Creating and integrating new reports requires advanced knowledge of RDBMS Syntax and the Hyperion FDM Software Data Window Active-X component. Hyperion offers specialized training for this task.
Changing DescriptionsIt is easy to maintain Report Group Descriptions, Report Descriptions and Parameter Descriptions from this screen. Right-click on the report and select Report Definition Properties to change the report description. This feature will allow meaningful names to be assigned to these components and does and does not require advanced knowledge of the Hyperion FDM Reporting Components.
Designing a ReportTo view or modify an Active Report right-click on the report and select Design Report. This feature allows the user to create and modify existing reports. However, this requires advanced knowledge of the Hyperion FDM Reporting Components. Please contact your Hyperion sales representative to schedule detailed Report Training.
Setting Report Group SecurityReport Groups can be assigned a security level that will restrict access to users that have a security level that permits access to the Report Group. Report Group security is setup to function just like Application Object Security, which is explained in the chapter titled Security.
To assign security to a Report Group, first choose the desired Report Group, then right-click and select Properties to set the security level for the Report Group. To set the minimum security level, use the Security Level dropdown box to select the appropriate level.
The security level that is assigned to a Report Group is evaluated against the application security level that is assigned to an end user. Access to reports is then granted to users that have an application security level that is equal to or less than the level assigned to the report.
Security for the Process Explorer reports can be set on individual reports. Security is set in the same manner except that you must right-click the individual report instead of the report group.

Hyperion FDM Workbench Guide
6-2

Module 7: other tools

7-1
Module 7 - Other Tools
Importing Data From Microsoft ExcelThe Import XLS tool allows Administrators to import data directly into any table in the current Hyperion FDM database. This allows users to import large amounts of application setup data without having to enter each line manually in the setup grids provided on the Workbench.
To use the Import XLS tool simply click on the Tools|Import XLS menu to import data from an Excel spreadsheet. This option will allow you to select an Excel spreadsheet file that contains a range name that has been tagged with a Hyperion FDM identifier (ups).
In order for an Excel spreadsheet to be used as an import source it must have a valid import range defined. An import range is a Microsoft® Excel range name that contains the following information.
tCurrency CurKey CurDesc USD US Dollars CDN Canadian Dollars
The grid represents a range name in Excel (upsCur). The first cell of the range must contain the Hyperion FDM table name that you wish to import to. The second row of the range must contain the field names of the table that you wish to import to. Row three and beyond are used for the data that you want to load.
Multiple ranges are allowed in one spreadsheet, however they each must begin the Hyperion FDM import identifier (ups). If the tables that you are importing to are related, the parent table must be imported prior to the child table. This can be accomplished by naming the Microsoft® Excel range names with a naming convention that is in alphabetical order. For example the range name “upsAParent” would be process before the range name “upsBChild”.
Note: When importing date fields the cells containing dates should be formatted as text
Replacing DataCreate a VB function in a module within the Excel file call UpReplace and set its return value to true. This will tell Hyperion FDM to delete all data from the table that is being loaded, prior to adding the new data.
Example:Public Function UpReplace() as Boolean‘Set value to true to force delete prior to loadUpReplace = TrueEnd Function
Hyperion FDM Workbench Guide
7-2
Batch ProcessingThe Batch Processing screen allows the administrator to execute and create batch scripts. Batches executed from the Batch Processing screen can be monitored to view the progress of the batch processing.

7-3
Module 7 - Other Tools
Batch ControlsBatch Type — determines if the batch being executed is a standard or a multiload batch. Standard batch files are a single month file that would normally be loaded through the import screen. Multiload batch files are text or Excel files that can contain multiple periods and/or locations.
Process Level — the Process Level option determines the level of processing that is to be performed. A Batch could be created to only import the files all the way to running the check report, or any step in between.
Process Method — the Process Method option determines if the batch is loaded Serial or Parallel. Serial batches will process files in order, requiring that one file complete the process prior to the next file starting. Parallel batches will process multiple files at the same time depending on the number of parallel processes specified in the No. of Parallel Process option.
No. of Parallel Processes — determines the number of processes the batch will use concurrently when the Process Method is set to parallel. Files within each process will be executed in a serial batch.
Example:If there are 20 files in the batch to be processed and the No. of Parallel Processes is set to 5 then each process will have four files in it that will be processed in a serial manner.
Note: when processing batch files in parallel Hyperion FDM will group files that are loading to the same Hyperion FDM location into the same processes this is to ensure that a location dies not have two processes attempting to load data at the same time potentially resulting in invalid results.
Load Balance Server — allows the admin to select any load balance server that has been configured in the Workbench Load Balances Server Group. This is the load balance server that will be used for processing the batch.
Auto-Map Correct — the Auto-Map Correct option allows the batch to have auto-mapping enabled or disabled for the selected batch. This will apply for all files in the batch being processed. Auto-Map Correcting is explained in detail later in this section.
File Name Delimiter — the File Name Delimiter defines what character is being used in the standard batch files names to separate the five segments of the file name. In Standard batch processing the file name must be setup in a predefined manner to allow Hyperion FDM to determine the location, category, period, load method and order of processing. By defining these parameters in the file name Hyperion FDM can process the batch file unattended. For Multi-Load batch files this option does not need to be set as the parameters for processing multi-load files are stored within the file itself.
Execute — the Execute button will initiate the batch process with the parameters selected. The Batch Monitor section will show all files being processed and will update with the results for each file.
Create Script — the Create Script button creates a batch processing script with the parameters selected. Hyperion FDM will prompt for a script name when this button is selected. This script can then be added to a scheduled task to run automatically.
Hyperion FDM Workbench Guide
7-4
Batch Processing Screen ResultsWhile processing a batch from the Batch Processing screen the Batch monitor field will display the batch results. The results are displayed in a graphical format; each load that completes has a symbol that allows the administrator to easily determine what processes failed and which ones passed.
Processing Statuses
Auto Corrected — processes with this status have had an autocorrect applied.
Successful — process with this status have completed successfully.
Failure — this status is displayed when a process has failed one of more steps.
Invalid POV — Invalid POV is displayed when the process is being loaded to an invalid period,
category or location.
7-5
Module 7 - Other Tools
Batch ProcessingThe Batch Loading process allows users to fully automate the loading of data. Hyperion FDM can even auto map any accounts that are not mapped to a pre-determined suspense account if desired. To use the batch loader all that is required is to create the batch files in the appropriate batch directory and then run the batch loader script or execute the process from the Batch Processing screen.
Note: for standard batches the files must be created with the appropriate File Name Format, for multiload batches the files must be setup as a normal multiload file with the appropriate tags at the top of the file.
File Name FormatStandard processing batch files must be in created in the standard Hyperion FDM batch file format. The file name is parsed into five different segments (File ID, Location, Category, Period, Load Method).
File ID — File ID is a free form field. This field can be used to control the order in which the batch files will load. The batch files will load in alphabetic order of the file names. To get a specific file to load first in the batch simply make the file ID a number that is lower than any other File ID (e.g. – “a_Texas_Actual04_Jan-2004_RR.txt” vs. “b_Texas_Actual04_Jan-2004_RR.txt”)
Location — the Hyperion FDM location name to be loaded
Category — the Hyperion FDM category name
Period — the Hyperion FDM period name
Load Method — a two-character switch. Character 1 = Hyperion FDM Append/Replace (Valid values A or R), Character 2 = Target Append/Replace (Valid values A or R).
Sample Formatted File Name = “a_Texas_Actual04_Jan-2004_RR.txt”
Batch File LocationAll files to be loaded through the batch loader must be placed in the appropriate folder in the application directory. Standard batch files (one month, one location) need to be placed in the OpenBatch folder. Multiload files need to be placed in the OpenBatchML folder.
After the batch has been processed a new folder will be created under the Batches folder and all files in the OpenBatch / OpenBatchML directory will be moved into the new folder. This new folder will be given a unique batch ID that is referenced in the Import log.
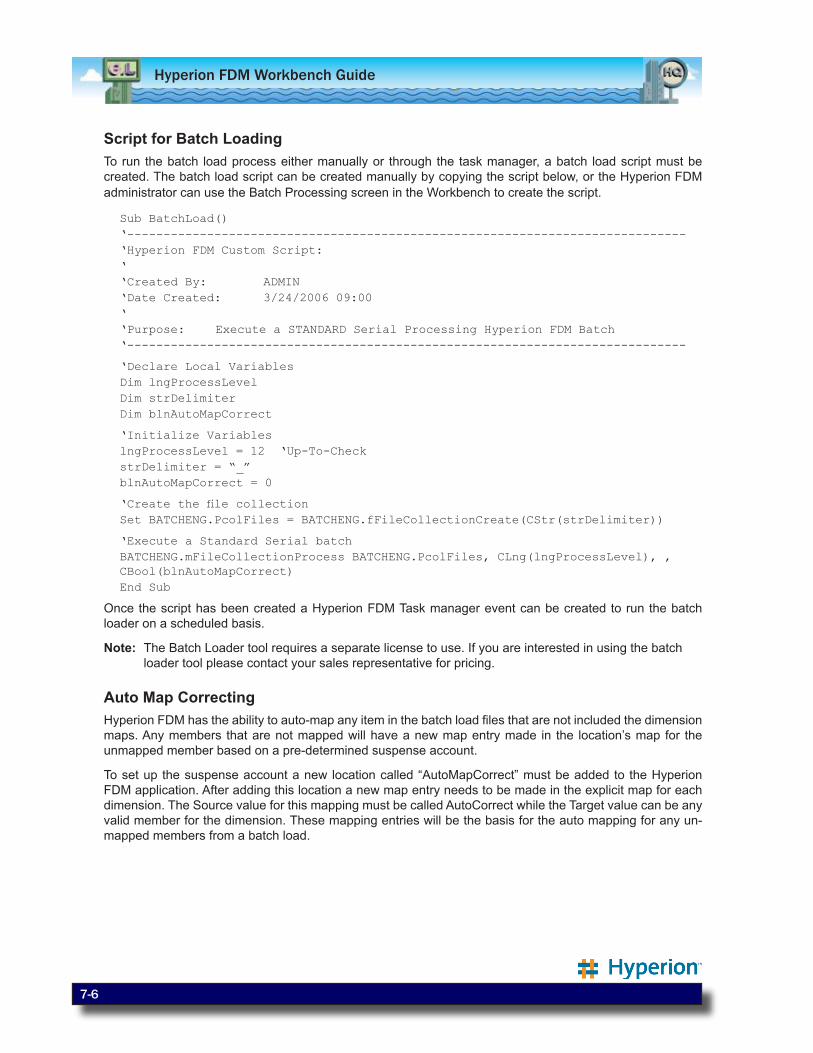
Hyperion FDM Workbench Guide
7-6
Script for Batch LoadingTo run the batch load process either manually or through the task manager, a batch load script must be created. The batch load script can be created manually by copying the script below, or the Hyperion FDM administrator can use the Batch Processing screen in the Workbench to create the script.
Sub BatchLoad()‘-----------------------------------------------------------------------------‘Hyperion FDM Custom Script: ‘‘Created By: ADMIN‘Date Created: 3/24/2006 09:00‘‘Purpose: Execute a STANDARD Serial Processing Hyperion FDM Batch ‘-----------------------------------------------------------------------------
‘Declare Local VariablesDim lngProcessLevelDim strDelimiterDim blnAutoMapCorrect
‘Initialize VariableslngProcessLevel = 12 ‘Up-To-CheckstrDelimiter = “_”blnAutoMapCorrect = 0
‘CreatethefilecollectionSet BATCHENG.PcolFiles = BATCHENG.fFileCollectionCreate(CStr(strDelimiter))
‘Execute a Standard Serial batchBATCHENG.mFileCollectionProcess BATCHENG.PcolFiles, CLng(lngProcessLevel), , CBool(blnAutoMapCorrect)End Sub
Once the script has been created a Hyperion FDM Task manager event can be created to run the batch loader on a scheduled basis.
Note: The Batch Loader tool requires a separate license to use. If you are interested in using the batch loader tool please contact your sales representative for pricing.
Auto Map CorrectingHyperion FDM has the ability to auto-map any item in the batch load files that are not included the dimension maps. Any members that are not mapped will have a new map entry made in the location’s map for the unmapped member based on a pre-determined suspense account.
To set up the suspense account a new location called “AutoMapCorrect” must be added to the Hyperion FDM application. After adding this location a new map entry needs to be made in the explicit map for each dimension. The Source value for this mapping must be called AutoCorrect while the Target value can be any valid member for the dimension. These mapping entries will be the basis for the auto mapping for any un-mapped members from a batch load.
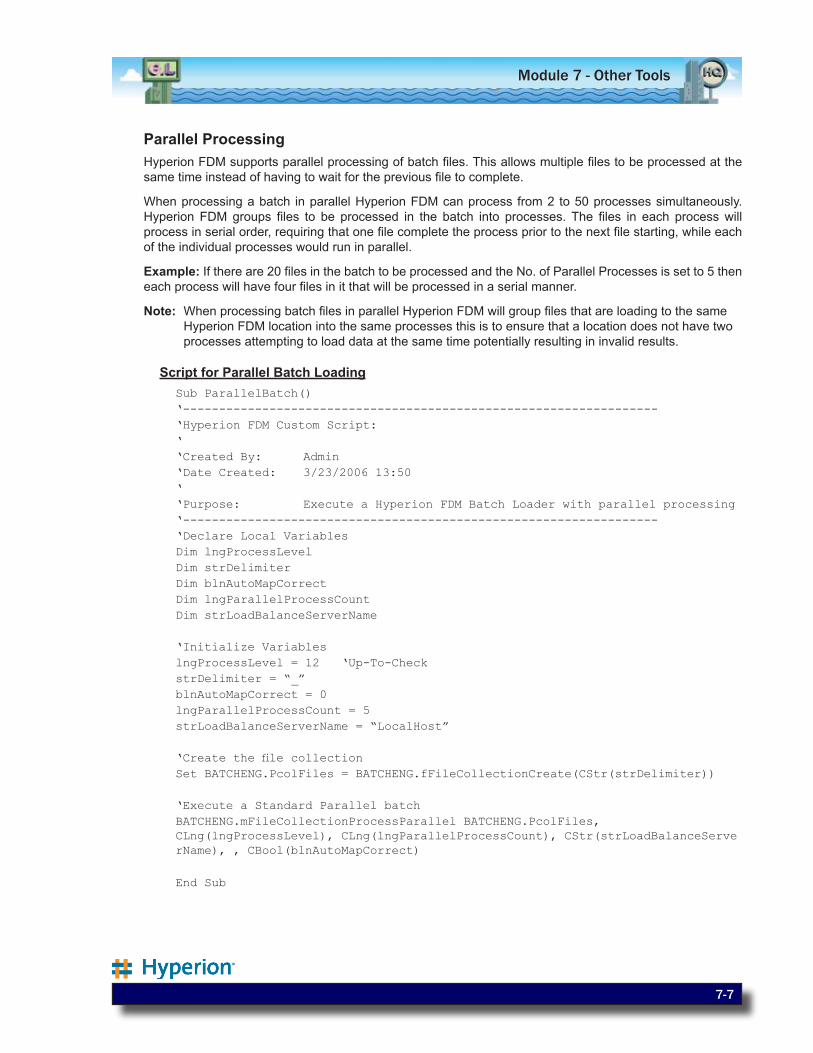
7-7
Module 7 - Other Tools
Parallel ProcessingHyperion FDM supports parallel processing of batch files. This allows multiple files to be processed at the same time instead of having to wait for the previous file to complete.
When processing a batch in parallel Hyperion FDM can process from 2 to 50 processes simultaneously. Hyperion FDM groups files to be processed in the batch into processes. The files in each process will process in serial order, requiring that one file complete the process prior to the next file starting, while each of the individual processes would run in parallel.
Example: If there are 20 files in the batch to be processed and the No. of Parallel Processes is set to 5 then each process will have four files in it that will be processed in a serial manner.
Note: When processing batch files in parallel Hyperion FDM will group files that are loading to the same Hyperion FDM location into the same processes this is to ensure that a location does not have two processes attempting to load data at the same time potentially resulting in invalid results.
Script for Parallel Batch LoadingSub ParallelBatch()‘------------------------------------------------------------------‘Hyperion FDM Custom Script: ‘‘Created By: Admin‘Date Created: 3/23/2006 13:50‘‘Purpose: Execute a Hyperion FDM Batch Loader with parallel processing‘------------------------------------------------------------------‘Declare Local VariablesDim lngProcessLevelDim strDelimiterDim blnAutoMapCorrectDim lngParallelProcessCountDim strLoadBalanceServerName
‘Initialize VariableslngProcessLevel = 12 ‘Up-To-CheckstrDelimiter = “_”blnAutoMapCorrect = 0lngParallelProcessCount = 5strLoadBalanceServerName = “LocalHost”
‘CreatethefilecollectionSet BATCHENG.PcolFiles = BATCHENG.fFileCollectionCreate(CStr(strDelimiter))
‘Execute a Standard Parallel batchBATCHENG.mFileCollectionProcessParallel BATCHENG.PcolFiles, CLng(lngProcessLevel), CLng(lngParallelProcessCount), CStr(strLoadBalanceServerName), , CBool(blnAutoMapCorrect)
End Sub
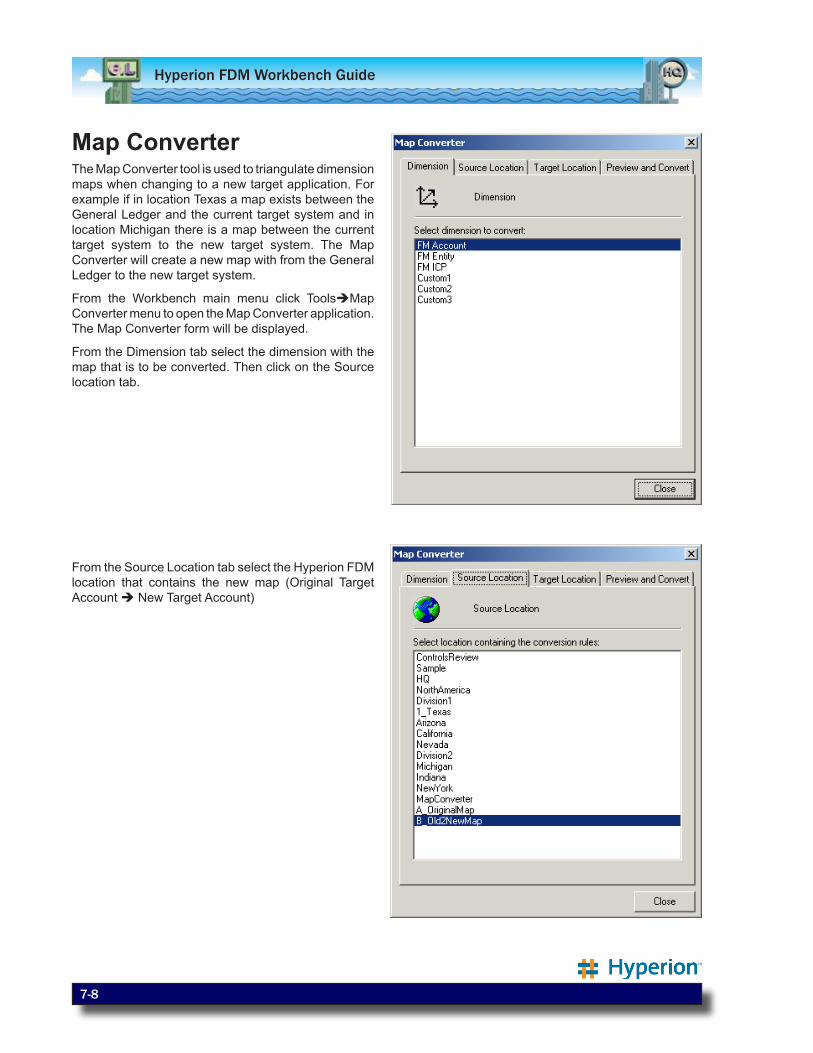
Hyperion FDM Workbench Guide
7-8
Map ConverterThe Map Converter tool is used to triangulate dimension maps when changing to a new target application. For example if in location Texas a map exists between the General Ledger and the current target system and in location Michigan there is a map between the current target system to the new target system. The Map Converter will create a new map with from the General Ledger to the new target system.
From the Workbench main menu click ToolsMap Converter menu to open the Map Converter application. The Map Converter form will be displayed.
From the Dimension tab select the dimension with the map that is to be converted. Then click on the Source location tab.
From the Source Location tab select the Hyperion FDM location that contains the new map (Original Target Account New Target Account)
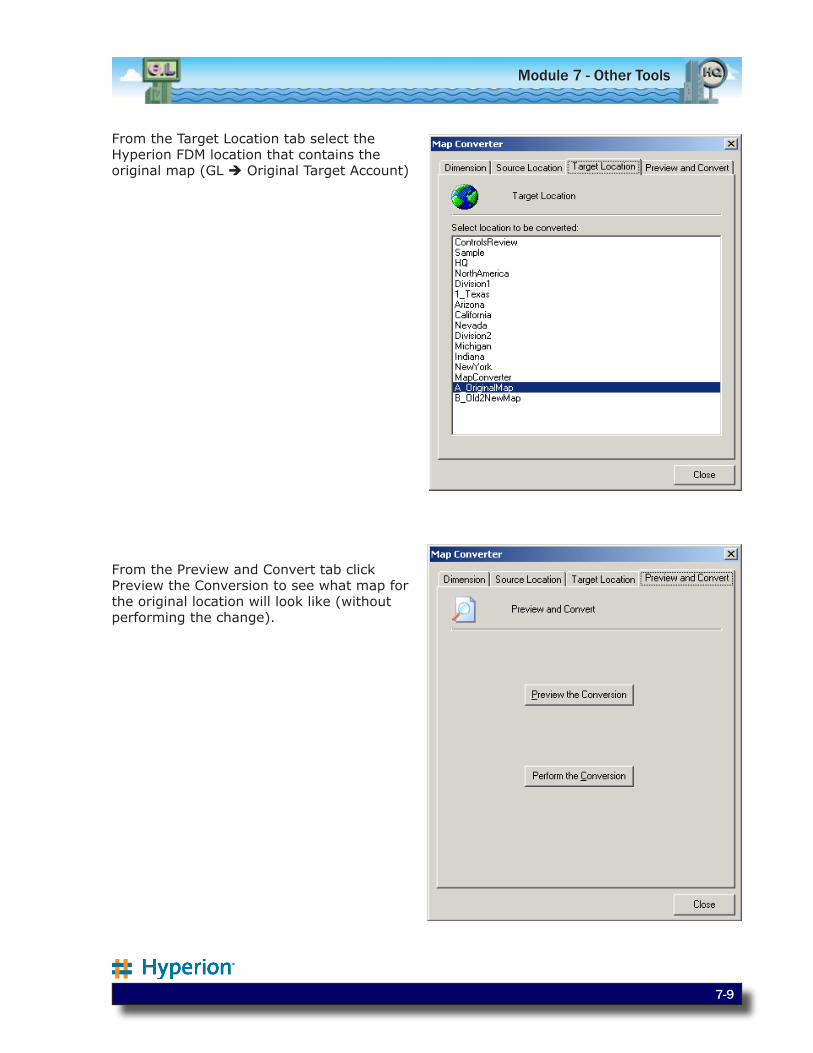
7-9
Module 7 - Other Tools
From the Target Location tab select the Hyperion FDM location that contains the original map (GL Original Target Account)
From the Preview and Convert tab click Preview the Conversion to see what map for the original location will look like (without performing the change).

Hyperion FDM Workbench Guide
7-10
To perform the final conversion, click the Perform the Conversion button.
The location that had the original map (GL Original Target Account) will be updated to hold the converted map.

7-11
Module 7 - Other Tools
Table EditorThe Table Editor tool allows administrators to open any existing table in the current Hyperion FDM database. From the Workbench main menu click ToolsTable Editor menu to open the Table Editor function. The Table Editor form will be displayed.
The administrator can select the table to be edited from the drop down at the top of the form.
This functionality is useful when there are custom tables attached to the Hyperion FDM application that need to be updated.
Warning: Use caution when using the Table Editor as changes made have the potential to cause errors in the application as well as invalidate the system audit trail.
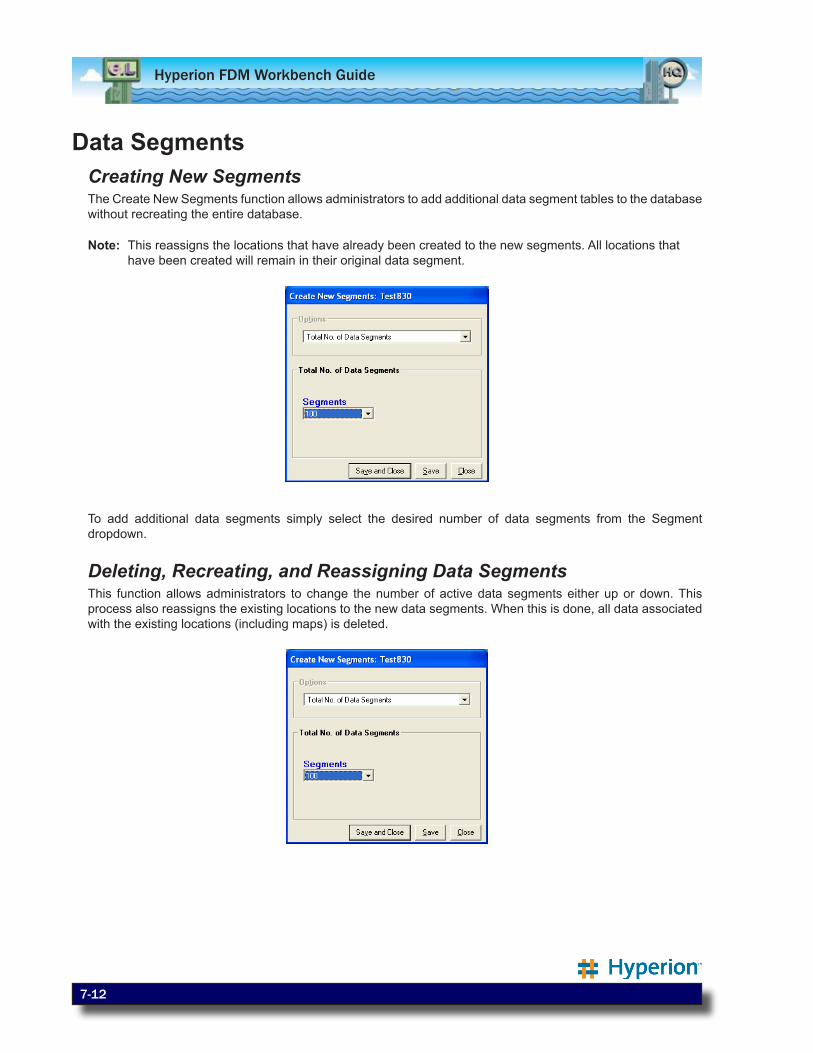
Hyperion FDM Workbench Guide
7-12
Data Segments Creating New SegmentsThe Create New Segments function allows administrators to add additional data segment tables to the database without recreating the entire database.
Note: This reassigns the locations that have already been created to the new segments. All locations that have been created will remain in their original data segment.
To add additional data segments simply select the desired number of data segments from the Segment dropdown.
Deleting, Recreating, and Reassigning Data SegmentsThis function allows administrators to change the number of active data segments either up or down. This process also reassigns the existing locations to the new data segments. When this is done, all data associated with the existing locations (including maps) is deleted.
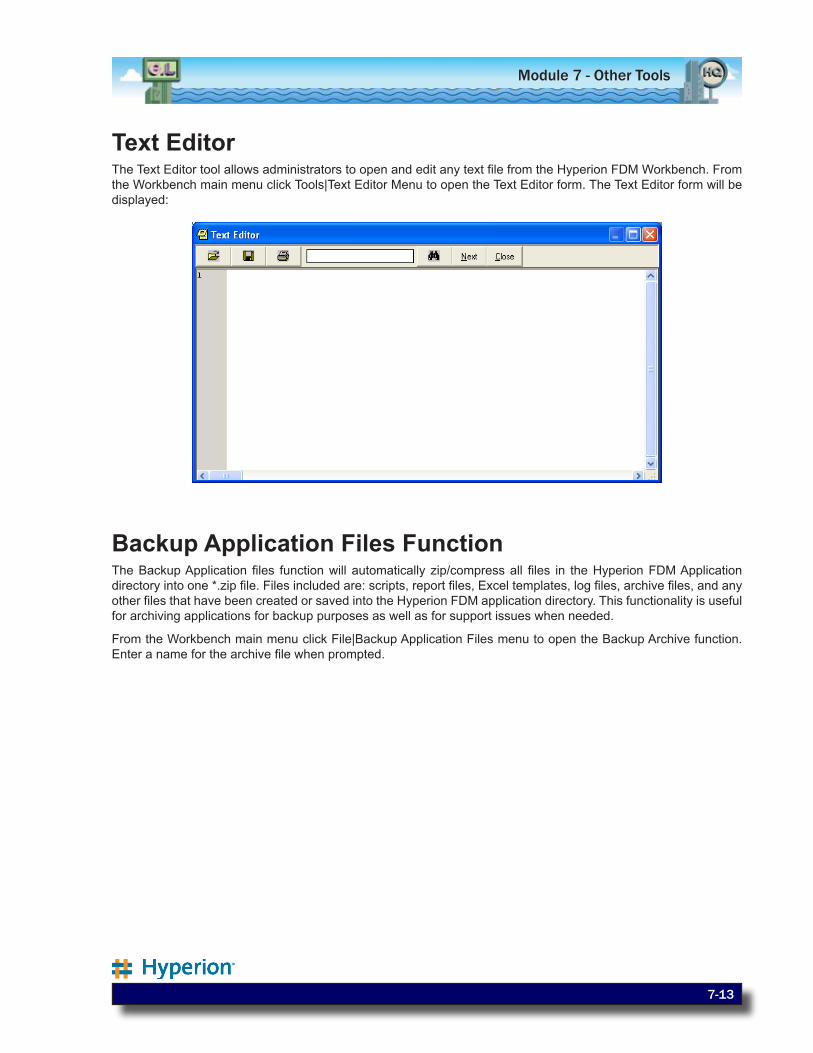
7-13
Module 7 - Other Tools
Text EditorThe Text Editor tool allows administrators to open and edit any text file from the Hyperion FDM Workbench. From the Workbench main menu click Tools|Text Editor Menu to open the Text Editor form. The Text Editor form will be displayed:
Backup Application Files FunctionThe Backup Application files function will automatically zip/compress all files in the Hyperion FDM Application directory into one *.zip file. Files included are: scripts, report files, Excel templates, log files, archive files, and any other files that have been created or saved into the Hyperion FDM application directory. This functionality is useful for archiving applications for backup purposes as well as for support issues when needed.
From the Workbench main menu click File|Backup Application Files menu to open the Backup Archive function. Enter a name for the archive file when prompted.
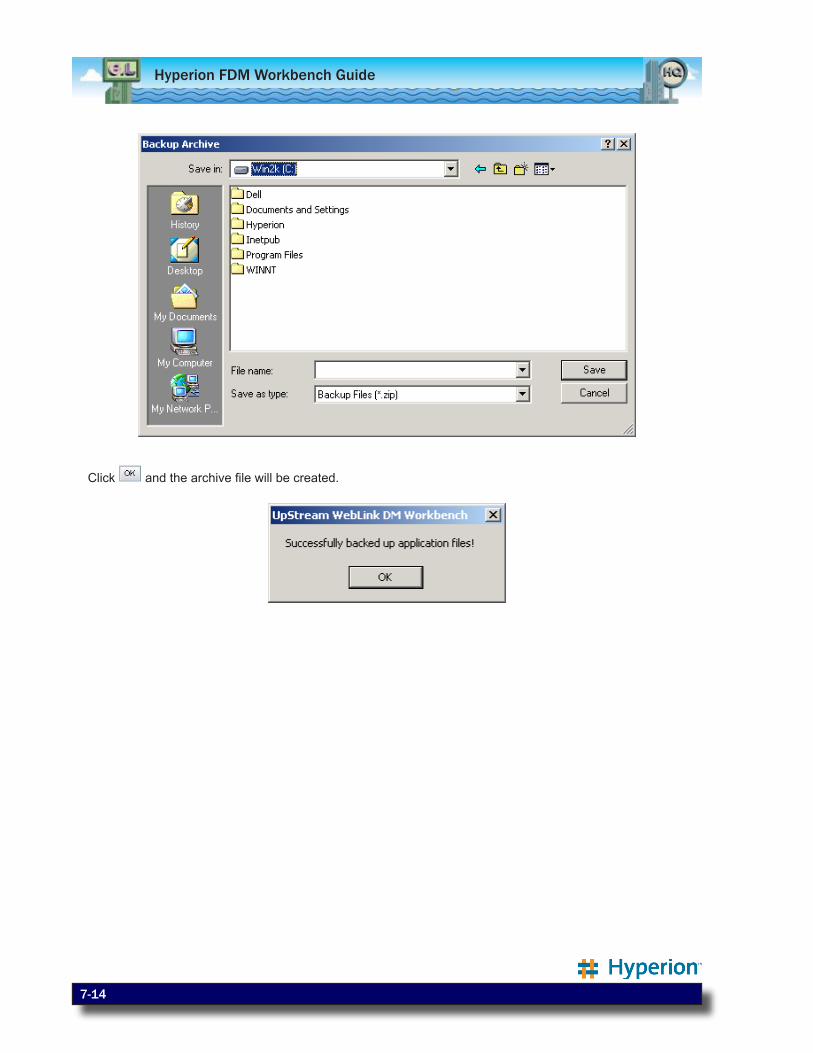
Hyperion FDM Workbench Guide
7-14
Click and the archive file will be created.
7-15
Module 7 - Other Tools
System OptionsSystem options are global values that control a Hyperion FDM application’s behavior. System options are used as both a control mechanism and performance tuning mechanism.
Application SettingsClick on the Tools|Application Settings menu to set the Application Settings. Application Settings are global system options that affect a Hyperion FDM application.
System CodeThis option is used to indicate the target system that Hyperion FDM will be integrating with. There will be a target system code for each target system integration block. Each Hyperion FDM application can only be associated with one target system.
Ignore Map ItemThis option holds a target dimension member that is identified as the dump or ignore value. Any source dimension that is mapped to this value will not be loaded into the target system. Source dimensions that are mapped to this value will be displayed in the export screen, but will be omitted from the export data file. The default value is “Ignore.”
Log Map ChangesWhen this option is enabled, all changes made to a location’s mapping table is logged in the System Log. This allows users to keep an audit trail of all mapping changes. The default value is “On.”
License Key – Hyperion FDM Power UsersThis option holds a valid Hyperion FDM Power User license key. The key is used to control the number of Hyperion FDM admin users that can be created. Your Hyperion Software implementation representative provides this key value.
License Key – Hyperion FDM UsersThis option holds a valid Hyperion FDM user license key. The key is used to control the number of Hyperion FDM users that can be created. Your Hyperion Software implementation representative provides this key value.
License Key – Batch LoaderThis option holds a valid Hyperion FDM Batch Loader license key. The key is used to control access to the Hyperion FDM Batch Loader. Your Hyperion Software implementation representative provides this key value.
Validation Report IDThis option is used to enter in the ID of the report that you wish to set as the Validation Report.
Archive MethodThis option is used to specify whether files to be archived are copied to the archive location or if they are moved to the archive location.
Hyperion FDM Workbench Guide
7-16
Controls LockThis option relates to the Financial Controls functionality of Hyperion FDM. Refer to the Financial Controls section of the WebLink 8.3 Administrator Training Guide for information on this option.
Controls w/o DataThis option relates to the Financial Controls functionality of Hyperion FDM. Refer to the Financial Controls section of the WebLink 8.3 Administrator Training Guide for information on this option.
Controls UnsubmitThis option relates to the Financial Controls functionality of Hyperion FDM. Refer to the Financial Controls section of the WebLink 8.3 Administrator Training Guide for information on this option.
Fiscal Start PeriodThis option relates to the Financial Controls functionality of Hyperion FDM. Refer to the Financial Controls section of the WebLink 8.3 Administrator Training Guide for information on this option.
Period Key Date Format MaskThis option sets the date format of the Hyperion FDM Periods description field. Once this option is set to a specific date format then all Hyperion FDM Periods that are created after that point will be created in the format specified by this option. It is not possible to have multiple period formats within the same Hyperion FDM application. The default value is “MMM-YYYY.”
Create Location FolderThis option specifies if Hyperion FDM creates a location folder in the Inbox when locations are created from the location screen. Valid settings are: only Data Load location, all location or None.
Delete Location FolderThis option specifies if Hyperion FDM should delete location folders in the Inbox when locations are deleted from the location screen. Valid settings are On and Off.
Integration SettingsClick on the Tools|Integration Settings menu to set the levels of integration between Hyperion FDM and the target system. These options will control which integration points are active, the type of integration processes to run, and default values relating to integration actions.
Connection OptionsApplication Name — This option is used to specify the application that Hyperion FDM will be integrating with.
Logon Method — This option controls the method that Hyperion FDM uses to logon to the target system whenever Hyperion FDM makes a connection. There are two Logon Methods available:
Unified — The Hyperion FDM username and password are used to logon to the target system.
Global — The username and password specified in the Global Logon Information Option is passed to the target system. Using this option, all users would connect to the target system using the same username and password.
7-17
Module 7 - Other Tools
Note: If a machine specific user name and password is specified in the Workbench then this will override the logon method specified above for this specific machine.
Global Logon Information — This option is used in conjunction with the Logon Method option. If the Logon Method option is set to “Global” then the user ID and password specified in this option will be used to logon to the target system. Separate the user ID and password with a semi-colon (i.e., UserID;Password).
Use SSO — On/Off Switch to enable Hyperion Single-Sign-On when a token is passed to Hyperion FDM.
Sticky Server — On/Off Switch to force usage of 1 server for Load, Consolidate and Check (Needed for HFM App Server cache delay).
Integration Point Options Enable Load — If this option is turned On, Hyperion FDM will automatically load the export file (*.dat file) into the target system after the Export process. If this option is turned Off, Hyperion FDM will simply create the export file but not automatically load it.
Enable Consolidation — If this option is turned On, Hyperion FDM will run a consolidation in the target system after a data load.
All Periods — On/Off Switch to controls if all periods are listed when integrating with the target system or just base periods.
Enable Validation Report — If this option is turned on, Hyperion FDM will run a Validation Report (if there is one assigned to the location) after the data load and consolidate process.
Default Load OptionsConsolidation Type — Default setting for the Consolidation Type option on the target system’s load dialog box.
Load Method — Default setting for the Load Method option on the target system’s load dialog box.
Load Operation — Default setting for the Load Process Type option on the target system’s load dialog box.
List2 — Not Used
List3 — Not Used
Calc — Default setting for the Calculate option on the target system’s load dialog box.
Accumulate in File — Default setting for the Accumulate in File option on the target system’s load dialog box.
File as Ownership Data — Default setting for the File as Ownership Data option on the target system’s load dialog box.
Status 3 — Not Used
Enable Controls Review — On/Off switch for Hyperion FDM Controls Review Action
Hyperion FDM Workbench Guide
7-18
Configuration OptionsClick on the ToolsConfiguration Options menu to set database performance and tuning options. The Hyperion FDM database is set to a standard configuration. The database tuning options listed below should be used in cases where network infrastructure may require tuning of the database engine input / output (I / O) activity.
DB VersionThis option contains the version number of the Hyperion FDM software being used.
SQL Query Date Format MaskStandard format used in SQL statements when querying dates.
Decimal ReplacementThis option allows Hyperion FDM to specify the delimiter to be used in loading BCP file format files that are loaded into RDBMS server. This option is only changed when using a system that has been setup in multiple regional settings (i.e. RDBMS server has been installed on a US–English operating system and the application server or client machine is using French regional option operating system).
Insert Batch SizeThis option allows Hyperion FDM to specify the number of rows to insert into the Hyperion FDM database at a time during the import process. This is only used for Hyperion FDM locations that have selected the SQL Insert load type.
Total No. Data SegmentsThe default number of segments created in the RDBMS database.
SQL Tuning Configuration OptionsData Seg Table File Group — allows Hyperion FDM to specify that RDBMS Server user a different Data Segment Table File Group other that the RDBMS primary group (SQL Server databases only).
Data Map Seg Table File Group — allows Hyperion FDM to specify that RDBMS Server user a different Data Map Segment Table File Group other that the RDBMS primary group (SQL Server databases only).
Work Table File Group — allows Hyperion FDM to specify that RDBMS Server user a different Work Table File Group other that the RDBMS primary group (SQL Server databases only).
Work Table Index File Group — allows Hyperion FDM to specify that RDBMS Server user a different Work Table Index File Group other that the RDBMS primary group (SQL Server databases only).
Oracle Tuning Configuration OptionsOracle Seg Insert Hint — defines how the SQL loader loads data to the tDataSeg tables. Default option setting is Append which enables Hyperion FDM to quickly append data to the seg tables without having to find available space on the table as the Insert setting requires.
Oracle Work TableSpaceName — holds the tablespace name for Hyperion FDM Work tables. Default table space - users
Oracle Work Storage Clause — used to specify storage defaults for the Work tablespace. This override the system defaults to become the defaults for objects created in that tablespace only.

7-19
Module 7 - Other Tools
Oracle Work Pct Free — used to specify the portion of the data block that is not filled by rows as they are inserted into the Work table, but are reserved for later updates made to the rows in that block. The default for PCTFREE is 10 percent. You can use any integer between 0 and 99, inclusive, as long as the sum of PCTFREE and PCTUSED does not exceed 100.
Oracle Work Init Trans — used to specify the initial number of transaction entries allocated within each data block allocated to the table. This value can range from 1 to 255. Each transaction that updates a block requires a transaction entry in the block. The size of a transaction entry depends on your operating system. This parameter ensures that a minimum number of concurrent transactions can update the block and helps avoid the overhead of dynamically allocating a transaction entry.
Oracle Work Max Trans — specifies the maximum number of concurrent transactions that can update a data block allocated to the Work table. This value can range from 1 to 255
Oracle Segment Table Logging Value — specifies if logging is on or off for the segment tables.
Oracle Work Table Index TableSpaceName — holds the tablespace name for Hyperion FDM Work Table Indexes. Default table space - users.
Oracle Data Map Seg TableSpaceName — holds the tablespace name for Hyperion FDM Data Map Seg tables. Default table space - users.
Oracle Data Map Seg Storage Clause — used to specify storage defaults for the Data Map Seg tablespace. This override the system defaults to become the defaults for objects created in that tablespace only.
Oracle Data Map Seg Pct Free — used to specify the portion of the data block that is not filled by rows as they are inserted into the Data Map Seg table, but are reserved for later updates made to the rows in that block. The default for PCTFREE is 10 percent. You can use any integer between 0 and 99, inclusive, as long as the sum of PCTFREE and PCTUSED does not exceed 100.
Oracle Data Map Seg Init Trans — used to specify the initial number of transaction entries allocated within each data block allocated to the Data Map tables. This value can range from 1 to 255. Each transaction that updates a block requires a transaction entry in the block. The size of a transaction entry depends on your operating system. This parameter ensures that a minimum number of concurrent transactions can update the block and helps avoid the overhead of dynamically allocating a transaction entry.
Oracle Data Map Seg Max Trans — specifies the maximum number of concurrent transactions that can update a data block allocated to the Data Map Seg table. This value can range from 1 to 255.
Oracle Data Seg TableSpaceName — holds the tablespace name for Hyperion FDM Data Seg tables. Default table space - users.
Oracle Data Seg Storage Clause — used to specify storage defaults for the Data Seg tablespace. This override the system defaults to become the defaults for objects created in that tablespace only.
Oracle Data Seg Pct Free — This option is used to specify the portion of the data block that is not filled by rows as they are inserted into the Data Seg table, but are reserved for later updates made to the rows in that block. The default for PCTFREE is 10 percent. You can use any integer between 0 and 99, inclusive, as long as the sum of PCTFREE and PCTUSED does not exceed 100.
Oracle Data Seg Init Trans — used to specify the initial number of transaction entries allocated within each data block allocated to the Data Seg tables. This value can range from 1 to 255. Each transaction that updates a block requires a transaction entry in the block. The size of a transaction entry depends on your operating system. This parameter ensures that a minimum number of concurrent transactions can update the block and helps avoid the overhead of dynamically allocating a transaction entry.
Oracle Data Seg Max Trans — specifies the maximum number of concurrent transactions that can update a data block allocated to the Data Seg table. This value can range from 1 to 255.

Hyperion FDM Workbench Guide
7-20
Allows custom description in period — enables the admin to create custom period descriptions instead of the default Hyperion FDM values.
Lookup Indicator: Target System Data — holds the terminating character for use by the Validation rules that pull data from the target systems. Default value is the pipe character “|”.
Lookup Indicator: Hyperion FDM Converted Data — holds the terminating character for use by the Validation rules that pull data from Hyperion FDM converted data. Default value is the grave accent character “`”.
Lookup Indicator: Hyperion FDM Source Data — holds the terminating character for use by the Validation rules that pull data from Hyperion FDM source data. Default value is the tilde character “~”.