i & estimating g - willow creek paving stones band/pallet quantities size pavers pavers sf per #...
TRANSCRIPT

Welcome to the world of Willow Creek
Paving Stones. Inside, you’ll find every-
thing you need to know to install your
Willow Creek interlocking concrete
paver surface.
Willow Creek Pavers will breathe new
life into your outdoor environment with
an exciting array of colors, textures and
patterns to complement any patio,
courtyard, walkway or drive. Whether
you choose the contemporary look of
our traditional texture or the vintage
feel of our Weathered texture, your
Willow Creek interlocking concrete
paver surface will have all the strength of
solid pavement, yet remain flexible during
the freeze-thaw cycles of the seasons.
Installed properly, Willow Creek Pavers
are designed to provide many years of
virtually maintenance-free enjoyment.
Willow Creek pavers carry a limited life-
time guarantee in residential applications.
Say goodbye to drab concrete and
asphalt, and say hello to the elegant
look and inviting warmth of Willow
Creek Pavers.
If you have further questions about the
installation of Willow Creeks Pavers,
please contact your Willow Creek supplier
or visit willowcreekpavingstones.com.
INSTALLATION & ESTIMATINGGUIDELINES
WillowCreekPavingStones.com

Page 2
BR ICKSTONE ESTIMATING GUIDE
Total Total OrderSquare Feet Brickstones Quantities
16 72 1 Band32 144 2 Bands48 216 3 Bands63 288 4 Bands79 360 5 Bands95 432 1 Pallet111 504 1 Pallet + 1 Band127 576 1 Pallet + 2 Bands143 648 1 Pallet + 3 Bands158 720 1 Pallet + 4 Bands174 792 1 Pallet + 5 Bands190 864 2 Pallets206 936 2 Pallets + 1 Band222 1008 2 Pallets + 2 Bands238 1080 2 Pallets + 3 Bands253 1152 2 Pallets + 4 Bands269 1224 2 Pallets + 5 Bands285 1296 3 Pallets301 1368 3 Pallets + 1 Band317 1440 3 Pallets + 2 Bands333 1512 3 Pallets + 3 Bands348 1584 3 Pallets + 4 Bands364 1656 3 Pallets + 5 Bands380 1728 4 Pallets
BRICKSTONE BAND/PALLET QUANTITIESSize Pavers Pavers SF Per Bands SF Per
Per SF Per Band Band Per Pallet Pallet4"x 8" 4.55 72 15.84 6 95.04
STEP 1 Calculate your project area (square feet).
STEP 2 Estimate possible waste and add to project area to determine
Total Square Feet of Brickstone needed. For patterns that require sig-
nificant cutting, consider adding up to 1/2 square foot for every lineal
foot of project perimeter.
STEP 3 Refer to the Total Square Feet column in the chart below and
read across the appropriate row to identify order quantity. Brickstone
pavers are sold by bands and pallets. Please order in whole quantities
only. The table at the bottom presents band/pallet quantities.Running Bond
Basketweave
Herringbone
Diagonal Herringbone

COBBLESTONE BAND/PALLET QUANTITIESSize Pavers Pavers SF Per # Bands SF Per
Per SF Per Band Band Per Pallet Pallet
6"x 3" 7.14 54 7.56 7 52.92
3/4 Stone 4.76 63 13.23 7 92.61
6"x 6" 3.70 45 12.15 7 85.05
6"x 9" 2.44 45 18.45 5 92.25
9"x 12" 1.22 27 22.14 4 88.56
Page 3
COBBLESTONE ESTIMATING GUIDE
BASKETWEAVE PATTERN (shading indicates laying ratio 2:4)
Total Square Feet x 25% = ___ ÷ 12.15 Sq. Ft. = Bands of 6"x 6" Pavers
Total Square Feet x 75% = ___ ÷ 18.45 Sq. Ft. = Bands of 6"x 9" Pavers
ONE-TO-ONE HERRINGBONE PATTERN (shading indicates laying ratio 2:2)
Total Square Feet x 40% = ___ ÷ 12.15 Sq. Ft. = Bands of 6"x 6" Pavers
Total Square Feet x 60% = ___ ÷ 18.45 Sq. Ft. = Bands of 6"x 9" Pavers
THREE-SIZE RANDOM PATTERN (shading indicates laying ratio 5:5:5)
Total Square Feet x 17% = ___ ÷ 7.56 = Bands of 6"x 3" Pavers
Total Square Feet x 33% = ___ ÷ 12.15 Sq. Ft. = Bands of 6"x 6" Pavers
Total Square Feet x 50% = ___ ÷ 18.45 Sq. Ft. = Bands of 6"x 9" Pavers
FOUR-SIZE RANDOM PATTERN (shading indicates laying ratio 8:8:8:2)
Total Square Feet x 14% = ___ ÷ 7.56 Sq. Ft. = Bands of 6"x 3" Pavers
Total Square Feet x 26% = ___ ÷ 12.15 Sq. Ft. = Bands of 6"x 6" Pavers
Total Square Feet x 40% = ___ ÷ 18.45 Sq. Ft. = Bands of 6"x 9" Pavers
Total Square Feet x 20% = ___ ÷ 22.14 Sq. Ft. = Bands of 9"x 12" Pavers
Basketweave Pattern25% 6'' x 6'' and 75% 6'' x 9''
Herringbone Pattern40% 6'' x 6'' and 60% 6'' x 9''
Three-Size Random17% 6'' x 3'', 33% 6'' x 6'', 50% 6'' x 9''
Four-Size Random14% 6'' x 3'', 26% 6'' x 6'', 40% 6'' x 9''
20% 9'' x 12''
STEP 1 Calculate your project area (square feet).
STEP 2 Estimate possible waste and add to project area to determine
Total Square Feet of pavers needed. For patterns that require signifi-
cant cutting, consider adding up to 1/2 square foot for every lineal
foot of project perimeter.
STEP 3 The illustrations to the right show some Cobblestone pattern
options and percentages of individual products required to create
these patterns. Use the formulas below to calculate the number of
bands of each product to order for your desired pattern. Please order
in whole band quantities only.
NOTE: Many more patterns are possible with Willow Creek Cobblestone pavers. Consultwith your Willow Creek supplier for additional patterns, use our Willow Creek EstimatingSoftware, or tap your own creativity to design a pattern suitable for your paver project.

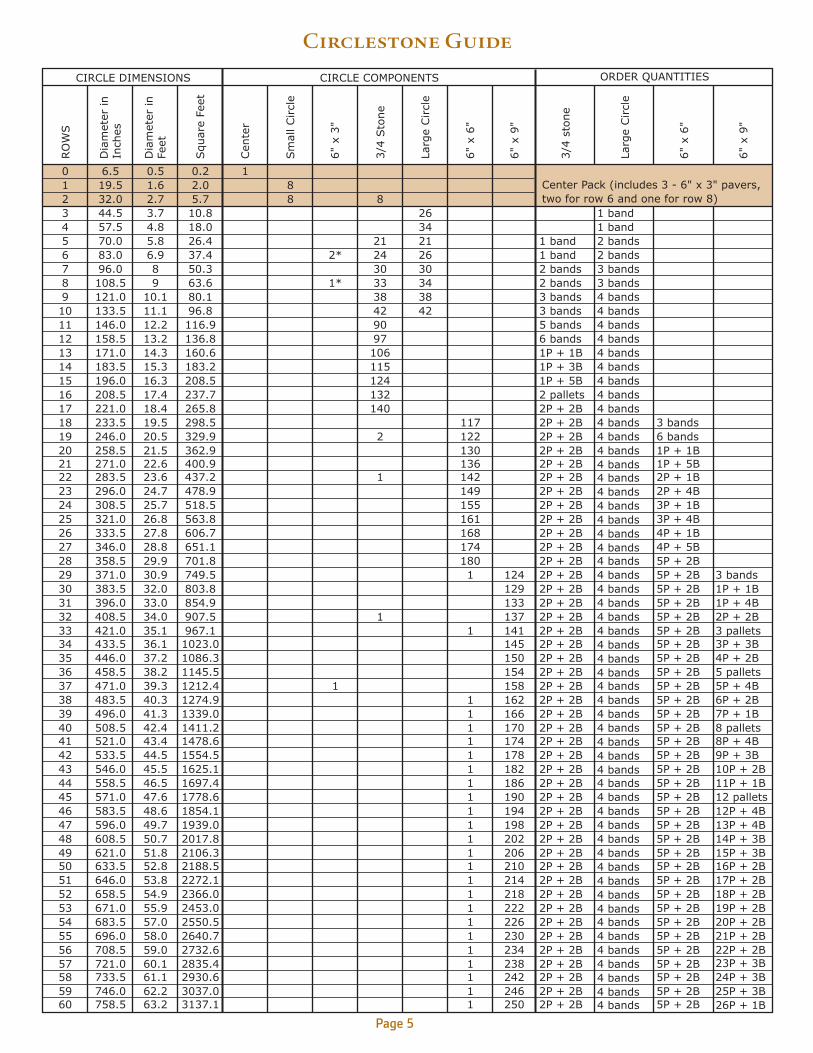
CIRCLESTONE ESTIMATING GUIDE
10 2 3 4 5 6 7 8 9 10 11 12 13 14 15
STEP 1 Determine your circle diameter.
STEP 2 Using the chart, read across the line of the appropri-
ate row/diameter to calculate product order quantities needed
in addition to the starting Center Pack. The prepackaged Center
Pack must be ordered for all circles except when installing
firepit. Shaded portions of illustrations represent materials
provided in the Center Pack.
EXAMPLE Construction of a 14-foot-diameter circle requires 1
Center Pack plus 1 Pallet and 1 Band of 3/4 Stones, and 4 Bands
of Large Circle Stones.
INSTALLATION NOTE When installing a row of Circlestone con-
taining more than one component type, alternate components
throughout row.
Page 4
SOME HELPFUL HINTSArea of circle = diameter squared ___ x 0.7854
or radius squared ___ x 3.1416
Circumference of a circle = diameter x 3.1416
EXAMPLEFor a 6-foot-diameter circle:
Calculate Area = 6' x 6' x 0.7854 = 28.3 square feet (using diameter)
or3' x 3' x 3.1416 = 28.3 square feet (using radius)
Calculate Circumference = 6' x 3.1416 = 18.8 linear feet around circle
INSTALLING A FIREPIT
When installing a circle with a firepit in the center, simply omit the
center pack. This will yield an opening of 32" diameter.
1. Depending on the depth of the base, the rim of the firepit may
be placed directly onto the compacted base.
2. Ensure that you have ample drainage inside the ring.
3. You may use the Large Circle Stone to surround the firepit to the
top edge.
4. Use concrete adhesive to secure the pavers encircling the firepit.
Please refer to the chart opposite for quantities when ordering Circlestone pavers.
5.25"
6.25"
3.75"
6.25"
7"
2.75"
6.25"
2.5"
1 band1 band2 bands2 bands3 bands3 bands5 bands6 bands1P + 1B1P + 3B1P + 5B2 pallets2P + 2B2P + 2B2P + 2B2P + 2B2P + 2B2P + 2B2P + 2B2P + 2B2P + 2B2P + 2B2P + 2B2P + 2B2P + 2B2P + 2B2P + 2B2P + 2B2P + 2B2P + 2B2P + 2B2P + 2B2P + 2B2P + 2B2P + 2B2P + 2B2P + 2B2P + 2B2P + 2B2P + 2B2P + 2B2P + 2B2P + 2B2P + 2B2P + 2B2P + 2B2P + 2B2P + 2B2P + 2B2P + 2B2P + 2B2P + 2B2P + 2B2P + 2B2P + 2B2P + 2B
1 band1 band2 bands2 bands3 bands3 bands4 bands4 bands4 bands4 bands4 bands4 bands4 bands4 bands4 bands4 bands4 bands4 bands4 bands4 bands4 bands4 bands4 bands4 bands4 bands4 bands4 bands4 bands4 bands4 bands4 bands4 bands4 bands4 bands4 bands4 bands4 bands4 bands4 bands4 bands4 bands4 bands4 bands4 bands4 bands4 bands4 bands4 bands4 bands4 bands4 bands4 bands4 bands4 bands4 bands4 bands4 bands4 bands
3 bands6 bands1P + 1B1P + 5B2P + 1B2P + 4B3P + 1B3P + 4B4P + 1B4P + 5B5P + 2B5P + 2B5P + 2B5P + 2B5P + 2B5P + 2B5P + 2B5P + 2B5P + 2B5P + 2B5P + 2B5P + 2B5P + 2B5P + 2B5P + 2B5P + 2B5P + 2B5P + 2B5P + 2B5P + 2B5P + 2B5P + 2B5P + 2B5P + 2B5P + 2B5P + 2B5P + 2B5P + 2B5P + 2B5P + 2B5P + 2B5P + 2B5P + 2B
3 bands1P + 1B1P + 4B2P + 2B3 pallets3P + 3B4P + 2B5 pallets5P + 4B6P + 2B7P + 1B8 pallets8P + 4B9P + 3B10P + 2B11P + 1B12 pallets12P + 4B13P + 4B14P + 3B15P + 3B16P + 2B17P + 2B18P + 2B19P + 2B20P + 2B21P + 2B22P + 2B23P + 3B24P + 3B25P + 3B26P + 1B
0123456789101112131415161718192021222324252627282930313233343536373839404142434445464748495051525354555657585960
6.519.532.044.557.570.083.096.0108.5121.0133.5146.0158.5171.0183.5196.0208.5221.0233.5246.0258.5271.0283.5296.0308.5321.0333.5346.0358.5371.0383.5396.0408.5421.0433.5446.0458.5471.0483.5496.0508.5521.0533.5546.0558.5571.0583.5596.0608.5621.0633.5646.0658.5671.0683.5696.0708.5721.0733.5746.0758.5
0.51.62.73.74.85.86.989
10.111.112.213.214.315.316.317.418.419.520.521.522.623.624.725.726.827.828.829.930.932.033.034.035.136.137.238.239.340.341.342.443.444.545.546.547.648.649.750.751.852.853.854.955.957.058.059.060.161.162.263.2
0.22.05.710.818.026.437.450.363.680.196.8116.9136.8160.6183.2208.5237.7265.8298.5329.9362.9400.9437.2478.9518.5563.8606.7651.1701.8749.5803.8854.9907.5967.11023.01086.31145.51212.41274.91339.01411.21478.61554.51625.11697.41778.61854.11939.02017.82106.32188.52272.12366.02453.02550.52640.72732.62835.42930.63037.03137.1
188
2*
1*
1
8
2124303338429097106115124132140
2
1
1
2634212630343842
1171221301361421491551611681741801
1
11111111111111111111111
124129133137141145150154158162166170174178182186190194198202206210214218222226230234238242246250
Center Pack (includes 3 - 6" x 3" pavers,two for row 6 and one for row 8)
RO
WS
Dia
met
er in
Inch
es
Dia
met
er in
Feet
Squar
e Fe
et
Cen
ter
Sm
all Circl
e
6"
x 3"
3/4
Sto
ne
Larg
e Circl
e
6"
x 6"
6"
x 9"
3/4
sto
ne
Larg
e Circl
e
6"
x 6"
6"
x 9"
CIRCLE DIMENSIONS CIRCLE COMPONENTS ORDER QUANTITIES
Circlestone Guide
Page 5

INSTALLATION
EXCAVATINGBefore excavating, contact your localutilities to identify any undergroundcables and pipes in and near the projectarea. Use spray paint to mark theperimeter of your project area.Excavate beyond the area to be pavedby a distance equal to the depth of baserequired (see Aggregate Base section onp.3). Excavate to a depth that allows
2-3/8 inches for pavers, 1 inchfor bedding sand and the required com-pacted aggregate base (figure 1). Finalgrade should slope away from buildingfoundations by a minimum 1/8 inch perfoot to ensure proper drainage. Allpaved surfaces should include someslope for drainage. With the aid of atransit or level, it is often helpful topound temporary guide stakes to thecorrect grade at several locations in theproject area (figure 2). Use a hand tamperor vibrating plate compactor to pack
down any loose soil remaining in theexcavated area.
Willow Creek Paving StonesUnderlayment Fabric is recommendedunder the aggregate base where cer-tain soil conditions exist—for exam-ple, in poorly drained, fine-grain soilsuch as clay or silt. By keeping the soilsub-base and aggregate base separate,this geotextile prevents the soft under-lying soil from mixing with thecrushed stone and diluting itsstrength. Place Willow Creek PavingStones Underlayment Fabric on top of the entire excavated area, includingup the sides.
COMPACTED AGGREGATE BASEPlace and compact uniform layers ofaggregate base material throughoutthe excavated area until the requireddepth and slope is achieved. Bestresults will be achieved by using avibrating plate compactor (figures 3, 4
and 5). Slightly moisten dry base mate-
rial and compact in layers of no morethan 4 inches at a time. Start at theperimeter and work your way towardthe center, overlapping each previouspass. Make at least two completepasses to create a flat, smooth base.
SETTING SCREED GUIDESPavers are laid on a 1-inch layer of bed-ding sand. Screed guides are used tolevel the bedding sand. Set screedguides parallel to each other on thecompacted aggregate base and checkgrade (figure 6). The top of the screedguides will be the top of your sand bedand will determine the pitch and flat-ness of your paver surface.
INSTALLING EDGE RESTRAINTSTo prevent lateral movement of thepavers and to ensure proper interlock-ing, edge restraints should be installedon top of the crushed-stone base on allunrestrained edges of your projectarea (figure 7). Install edging initially ononly one or two sides of the projectarea. This is where paver placementwill begin. If possible, begin at a long,
figure 2
figure 3
figure 4
figure 5
figure 6
figure 1
Page 6

straight edge. After all pavers havebeen laid, install the remainder of edg-ing. Ribs of edge restraints may beeasily cut to permit bending of therestraints for curved edges. Stake edgerestraints at all ends, leaving no morethan 12 inches between spikes. Note:
Circlestone comprises concentric rings of pavers
placed around one center paver. After all
Circlestones are installed, place edge restraints
around the perimeter of the project area.
SCREEDING SAND BEDCarefully spread bedding sand aroundand between the screed bars to form asetting bed for the pavers. Screed thesand by drawing a 2" x 4" board orother straight-edge across the top of thescreed guides (figure 8). Then remove theguides and use a trowel to fill in thevoids with sand.
LAYING PAVERSIn general, lay the first pavers againstthe longest section of edge restraint. Ifpossible, start at the low end of thegrade and work uphill to keep paversfrom shifting during construction.Select pavers at random from different
product pallets to get good color distri-bution. Work alternating from right toleft, then left to right, completing onerow at a time. Stringlines will help keeprows straight. Set the pavers carefullyinto the sand; do not press or hammerthem (figure 9). Place pavers directly nextto each other. The ribbed edges on thepavers will ensure proper spacing.Continue adding pavers until you’vecompleted your pattern. Note: When
installing Circlestone, mark the center of the
project area and begin laying pavers in concen-
tric circles from the center outward. See diagram
in the Estimating Guide for proper placement of
Circlestone components.
CUTTING PAVERSPavers may need to be cut to fitcurves, corners and angles, or to goaround objects. Mark the pavers andcut them with a diamond-blademasonry saw for the cleanest results(figure 10). A guillotine paver splitter ormallet and chisel also may be used.Cut pavers to fill any remaining gapsto maintain patterns. Gaps less than3/8 inch can be filled with sand.
COMPACTING THE PAVERSFinish installation of edge restraints.Sweep the paver surface to removedebris. Make two passes over the sur-face with the vibrating plate com-pactor to embed pavers into the bed-ding sand (figure 11). Make any finaladjustments in alignment or levelingat this time.
JOINT SANDSweep dry joint sand over the paversand work it into the joints with a pushbroom (figure 12). If using polymericsand, be sure to follow the manufac-ture’s instructions. Make at least twomore passes over the finished installa-tion with a plate compactor, the secondpass at an angle to the first to level thesurface, firmly seat pavers into beddingsand and force sand into the joints toensure they interlock properly. Finally,sweep off excess sand.
SEALANT (OPTIONAL)Willow Creek pavers will give you alifetime of beauty with no furthertreatment. However, if you decide touse a paver sealant, please consultwith your Willow Creek Paving Stonessupplier to identify suitable products.
figure 12
figure 7
figure 8
figure 9
figure 10
figure 11
Page 7

HAND TOOLS YOU’LL FIND HELPFUL• Tape measure• Spray paint to mark project area• Shovel• Wheelbarrow• Hand tamper• Wooden stakes and transit or
string level to mark grade• Mallet• Knife or heavy scissors
(for cutting underlayment fabric)• Hard-tooth rake• Hand saw (to cut edge restraint)• 4-foot hand level• Screed guides
(1-inch O.D. iron pipe)• Screed board (2" x 4" long enough
to span screed guides)• Masonry trowel• Mason’s stringline• Wide-blade mason’s chisel• Stiff-bristle push broom
WillowCreekPavingStones.com
© 2010 Willow Creek Concrete Products, Inc. • WCC-602 • 01-10
PROJECT COMPONENTS• Willow Creek Pavers• Aggregate base material
3/4-inch crushed stone (including finer particles)typically used for road base.
• Bedding sandCoarse, washed sand suitable for masonry.
• Edge restraints with 3/8” x 10”landscape spikes
• Joint sand Dry, washed sand, free of largeaggregate that would prevent it from freely flowing into joints. Polymeric joint sand may beused to prevent loss due to water or erosion.
• Willow Creek Underlayment Fabric (if necessary)
• Paver sealant (optional)
POWER TOOLS YOU MAY NEED TO RENT• Vibrating plate compactor• Masonry saw with diamond-tip blade
Available at:
IS THERE ANY ADVANTAGE TO SEALING YOUR PAVERS?Sealers offer three main advantages: stainresistance, color enhancement, and bind-ing the sand between the pavers, whichhelps to reduce weed growth. Wait at leasta year after installation to apply sealant.Sealants must be applied every two to fiveyears thereafter.
WHAT IS THE WHITISH HAZE I SOMETIMES SEE ON CONCRETEPAVERS AND WALLS?It's most likely efflorescence, a whitedeposit that sometimes appears on the sur-face of concrete, masonry or clay products.Although it can come from a number ofsources, efflorescence is often a natural by-product of cement hydration. Technicallyknown as calcium hydroxide, it appears asa white film when carried to the surface bymoisture. Efflorescence is unsightly whenit first appears but is not indicative of aflawed product. In many cases it is scouredoff during installation but it can beremoved using specialty cleaners. It willlessen and dissipate over time as the paversnaturally weather.
CALCULATIONS
Willow Creek Concrete Pavers
Filled with joint sand conformingto ASTM C144
Geosynthetic Underlayment Fabric
1” bedding sand Compacted crushed aggregatebase as speciÞed
PREPARED SUBGRADE
Plastic edge restraint
10”-12” steel spike
¾” minus (class 5)crushed compactedrock
AGGREGATE BASE Cubic yards of aggregate base: Total extended project area (s.f.) =___ x basethickness (feet) =___ ÷27 =___cubic yards.
BEDDING SANDBedding sand: Total project area (s.f.) x .08 ft (1") =___ ÷ 27 =____ cubic yards.
JOINT SANDCubic yards of joint sand: Project area (square feet) ÷ 3,600 =____ cubic yards.
EDGE RESTRAINTS Edge restraints: Project perimeter (feet) ÷ 8 ft. =____ pieces.
UNDERLAYMENT FABRICArea of underlayment fabric: Total extended project area (s.f.) + enough fabric tocover all vertical sides of the excavated area.
FAQ
INSTALLATION CHECKLIST