ibm cloud manager with openstack: administrator … orchestration service attributes. . . 282 ......
TRANSCRIPT
IBM Cloud Manager with OpenStack
Administrator Guide, version 4.2
���

IBM Cloud Manager with OpenStack
Administrator Guide, version 4.2
���

NoteBefore using this information and the product it supports, read the information in “Notices” onpage 341.
Seventh Edition (December 2014)
© Copyright IBM Corporation 2012, 2014.US Government Users Restricted Rights – Use, duplication or disclosure restricted by GSA ADP Schedule Contractwith IBM Corp.

Contents
Chapter 1. Overview of IBM CloudManager with OpenStack . . . . . . . 1IBM Cloud Manager with OpenStack technicaloverview . . . . . . . . . . . . . . . 1Self-service management portal (optional) . . . . 2
Overview of access-based roles . . . . . . . 3Terminology . . . . . . . . . . . . . 4
What's new in IBM Cloud Manager with OpenStack 5License information . . . . . . . . . . . . 6Accessibility . . . . . . . . . . . . . . 6
Chapter 2. Planning for IBM CloudManager with OpenStack . . . . . . . 7IBM Cloud Manager with OpenStack prerequisites . 7
IBM Cloud Manager with OpenStack hardwareprerequisites . . . . . . . . . . . . . 7IBM Cloud Manager with OpenStack operatingsystem and software prerequisites . . . . . . 8
IBM Cloud Manager with OpenStack virtualizationenvironment prerequisites . . . . . . . . . 10
Microsoft Hyper-V prerequisites . . . . . . 10KVM or QEMU prerequisites . . . . . . . 11PowerKVM prerequisites . . . . . . . . . 12IBM Power Virtualization Center prerequisites. . 12VMware prerequisites . . . . . . . . . . 12z/VM prerequisites . . . . . . . . . . . 14Supported IBM Cloud Manager with OpenStacksupport matrix . . . . . . . . . . . . 14
Network considerations . . . . . . . . . . 16Scalability and performance considerations . . . . 18
Server and concurrent user maximums . . . . 18Minimum requirements for large-scale PowerVCenvironment . . . . . . . . . . . . . 18
Planning worksheets: Deploying a cloud . . . . 18Worksheet: Getting started with a minimaltopology . . . . . . . . . . . . . . 19Worksheet: Controller +n compute or distributeddatabase topology . . . . . . . . . . . 19
Chapter 3. Installing and uninstallingIBM Cloud Manager with OpenStack . . 21Installing IBM Cloud Manager with OpenStack onLinux . . . . . . . . . . . . . . . . 21
Installing IBM Cloud Manager with OpenStackon Linux by using console installation . . . . 21Installing IBM Cloud Manager with OpenStackon Linux by using graphical installation . . . . 23Installing IBM Cloud Manager with OpenStackon Linux by using silent installation . . . . . 25Changing the Chef server password . . . . . 27
Deploying the z/VM appliance . . . . . . . . 27Installing and uninstalling the IBM Cloud Managerwith OpenStack Hyper-V Agent . . . . . . . 28
IBM Cloud Manager with OpenStack Hyper-VAgent Installation Prerequisites . . . . . . . 28Installing the IBM Cloud Manager withOpenStack Hyper-V Agent . . . . . . . . 29Uninstalling the IBM Cloud Manager withOpenStack Hyper-V Agent . . . . . . . . 36Uninstalling the IBM Cloud Manager withOpenStack Hyper-V Agent on Microsoft Hyper-VServer 2012 R2 . . . . . . . . . . . . 36
Configuring operating system yum repositories onthe deployment server . . . . . . . . . . . 37Applying fixes and updates . . . . . . . . . 39
Applying fixes and updates for IBM CloudManager with OpenStack . . . . . . . . . 39Applying fixes and updates for DB2 . . . . . 40Best practices for maintaining a multi-regioncloud or test cloud . . . . . . . . . . . 41
Uninstalling IBM Cloud Manager with OpenStack 42Uninstalling IBM Cloud Manager withOpenStack from deployment server . . . . . 42Uninstalling the self-service portal on Linux . . 42
Chapter 4. Upgrading IBM CloudManager with OpenStack . . . . . . . 45Upgrading the topology . . . . . . . . . . 45Upgrading a multi-region topology . . . . . . 51Upgrading the stand-alone self-service portal . . . 57
Upgrading the stand-alone self-service portaltopology when using Derby . . . . . . . . 57Upgrading the stand-alone self-service portaltopology when using DB2 . . . . . . . . 59
Upgrading a single node . . . . . . . . . . 61Upgrading the PowerVC controller and nodes. . . 64Upgrading the IBM Cloud Manager with OpenStackHyper-V Agent . . . . . . . . . . . . . 65
Graphical Upgrade . . . . . . . . . . . 65Silent upgrade . . . . . . . . . . . . 66
Chapter 5. Deploying an IBM CloudManager with OpenStack cloud . . . . 69Topology overview . . . . . . . . . . . . 69
Minimal deployment . . . . . . . . . . 70Controller +n compute deployment . . . . . 71Distributed database deployment . . . . . . 72Stand-alone self-service portal deployment . . . 73
Deploying the cloud environment . . . . . . . 74Deploying prerequisites . . . . . . . . . 74Deploying an evaluation cloud . . . . . . . 76Deploying a test or production cloud . . . . . 77Deployment customization options . . . . . 109Verifying Open vSwitch configuration . . . . 143
Using your cloud environment . . . . . . . 144Adding the self-service portal to a deployedtopology . . . . . . . . . . . . . . . 144Adding a compute node to a deployed topology 145
© Copyright IBM Corp. 2012, 2014 iii
Removing a compute node from a deployedtopology . . . . . . . . . . . . . . . 147Changing passwords and secrets . . . . . . . 147Redeploying a node cleanup . . . . . . . . 148Updating a deployed topology . . . . . . . 149Determining the fix level of deployed nodes . . . 151Adding a region to a deployed topology . . . . 152
Chapter 6. Configuring IBM CloudManager with OpenStack . . . . . . 155Configuring IBM Cloud Manager with OpenStackproperties . . . . . . . . . . . . . . 155
Changing IBM Cloud Manager with OpenStackproperties . . . . . . . . . . . . . 155Creating initial networks . . . . . . . . 155Configuring SSH and ICMP access to deployedvirtual machines . . . . . . . . . . . 157Configuring migration for a KVM node withNFS shared storage . . . . . . . . . . 158Installing a network time service . . . . . . 161Configuring multiple block storage back ends 161
Configuring IBM Cloud Manager with OpenStackself-service portal properties . . . . . . . . 163
Configuring secure shell (SSH) communication 164Configuring user registry authentication . . . 166Configuring database. . . . . . . . . . 170Configuring email notifications . . . . . . 171Configuring common cloud properties . . . . 172Configuring global image deployment . . . . 173Configuring multiple instances for a singledeployment . . . . . . . . . . . . . 193Configuring logging . . . . . . . . . . 194Configuring a network . . . . . . . . . 194Configuring billing . . . . . . . . . . 196Configuring metering . . . . . . . . . 200Configuring capacity and overcommit rates . . 201Configuring web user interface . . . . . . 202
Configuring IBM Cloud Manager with OpenStackdashboard properties . . . . . . . . . . . 204
Rebranding the dashboard . . . . . . . . 204
Chapter 7. Managing IBM CloudManager with OpenStack as anAdministrator . . . . . . . . . . . 207Configuring the license key. . . . . . . . . 207Managing IBM Cloud Manager with OpenStackservices . . . . . . . . . . . . . . . 207
Checking status of OpenStack services . . . . 207Restarting IBM Cloud Manager with OpenStackservices . . . . . . . . . . . . . . 208IBM Cloud Manager with OpenStack services 208
Managing with the IBM Cloud Manager withOpenStack self-service portal (Administratoraccess). . . . . . . . . . . . . . . . 211
Starting and stopping IBM Cloud Manager withOpenStack self-service portal . . . . . . . 211Configuring the default administrator useraccount and changing password . . . . . . 211Configuring LDAP authentication using the webinterface . . . . . . . . . . . . . . 212
Managing images . . . . . . . . . . . 214Managing projects . . . . . . . . . . . 224Managing approval policies . . . . . . . 227Managing requests . . . . . . . . . . 229Managing expiration policies . . . . . . . 230Managing flavors (OpenStack only) . . . . . 231Managing clouds . . . . . . . . . . . 234Managing network configurations . . . . . 237Managing instances . . . . . . . . . . 244Managing storage volumes . . . . . . . . 248Managing users . . . . . . . . . . . 248Managing accounts . . . . . . . . . . 251Clearing or archiving events . . . . . . . 252Viewing capacity statistics . . . . . . . . 252
Managing with OpenStack dashboard . . . . . 253Copying images from one OpenStack region toanother . . . . . . . . . . . . . . . 253
Copying a self-service portal image . . . . . 254Copying OpenStack Glance images . . . . . 254
Backing up and restoring IBM Cloud Managerwith OpenStack . . . . . . . . . . . . 256
Backing up and restoring the deployment server 256Backing up and restoring the OpenStackdatabases. . . . . . . . . . . . . . 258Backing up and restoring the self-service portal 259
Chapter 8. Security . . . . . . . . . 261Port usage . . . . . . . . . . . . . . 261User names and passwords. . . . . . . . . 263Strengthening security . . . . . . . . . . 265
Chapter 9. Reference . . . . . . . . 267Commands . . . . . . . . . . . . . . 267
Topology JSON file . . . . . . . . . . 270Cloud YAML configuration file . . . . . . 273Cloud YAML Configuration Keys. . . . . . 274Environment YAML Configuration File . . . . 276Passwords and secrets JSON file . . . . . . 277
Data bags . . . . . . . . . . . . . . 277Mapping attributes to services. . . . . . . . 279
Qpid messaging service attributes . . . . . 279OpenStack identity service attributes . . . . 279OpenStack image service attributes . . . . . 280OpenStack block storage service attributes. . . 280OpenStack orchestration service attributes . . . 282OpenStack telemetry service attributes . . . . 282OpenStack compute service attributes . . . . 282OpenStack network service attributes . . . . 283IBM OpenStack IaaS gateway attributes . . . 286IBM OpenStack PowerVC driver serviceattributes . . . . . . . . . . . . . . 286IBM OpenStack z/VM driver service attributes 286
Roles . . . . . . . . . . . . . . . . 287Best practices when using the self-service portal 288
IBM Cloud Manager with OpenStack FAQ . . 288Using the screen command . . . . . . . 290Using the nohup command . . . . . . . . 290
iv IBM Cloud Manager with OpenStack: Administrator Guide, version 4.2
Chapter 10. Troubleshooting andsupport for IBM Cloud Manager withOpenStack . . . . . . . . . . . . 291Techniques for troubleshooting problems . . . . 291Logging tasks . . . . . . . . . . . . . 293
Change logging levels from the OSGi commandprompt . . . . . . . . . . . . . . 293Retrieve log and system files . . . . . . . 294Troubleshooting using the OSGi console . . . 295
Logging chef-client output . . . . . . . . . 295Searching knowledge bases . . . . . . . . . 296Getting fixes from Fix Central . . . . . . . . 297Contacting IBM Support. . . . . . . . . . 298Exchanging information with IBM . . . . . . 299
Sending information to IBM Support . . . . 299Receiving information from IBM Support . . . 299
Subscribing to Support updates . . . . . . . 300Troubleshooting errors when deploying orupdating topologies . . . . . . . . . . . 301
Deployment hangs when running the OpenvSwitch recipe . . . . . . . . . . . . 301DB2 database requests fail with SQL1225N . . 301MySQL database requests fail with "Too manyconnections" . . . . . . . . . . . . . 302Network connectivity loss to nodes duringdeployment . . . . . . . . . . . . . 303Data bag item not found . . . . . . . . 303Deploying z/VM compute node fails . . . . 304Deployment fails with package installation error 304Node verification failed . . . . . . . . . 305Deploying a client node fails . . . . . . . 305Deploying a remote node fails . . . . . . . 306Cookbook not found . . . . . . . . . . 306Network interface not found . . . . . . . 307
Operating system repository not found . . . . 307Package failed to install or upgrade . . . . . 308PowerVC driver deploys successfully; later isdead . . . . . . . . . . . . . . . 308Compute node is deployed or updatedsuccessfully; later Open vSwitch agent is down . 308Fingerprint error during deploy . . . . . . 309Error restarting neutron when deploying atopology . . . . . . . . . . . . . . 310Cinder error occurs when you deploy acontroller node . . . . . . . . . . . . 310Internal service error occurs when you run aknife command. . . . . . . . . . . . 311Error upgrading the openstack-selinux package 311No IP addresses on virtual machines afterdeployment . . . . . . . . . . . . . 311Self-service portal displays volumes attached towrong device . . . . . . . . . . . . 312
Known problems and solutions for anAdministrator . . . . . . . . . . . . . 312
Known issues . . . . . . . . . . . . 312Limitations . . . . . . . . . . . . . 330
Known problems and solutions for a User. . . . 335Cached display . . . . . . . . . . . . 335Saving image exception . . . . . . . . . 335Error message language . . . . . . . . . 335Internet Explorer display . . . . . . . . 335Login fails . . . . . . . . . . . . . 337
Accessibility . . . . . . . . . . . . 339
Notices . . . . . . . . . . . . . . 341Trademarks . . . . . . . . . . . . . . 343Privacy policy considerations . . . . . . . . 343
Contents v

vi IBM Cloud Manager with OpenStack: Administrator Guide, version 4.2
Chapter 1. Overview of IBM Cloud Manager with OpenStack
IBM® Cloud Manager with OpenStack is an easy to deploy, simple to use cloud management softwareoffering that is based on OpenStack with IBM enhancements that feature a self-service portal forworkload provisioning, virtual image management, and monitoring. It is an innovative, cost-effectiveapproach that also includes automation, metering, and security for your virtualized environment.
IBM Cloud Manager with OpenStack technical overviewThe IBM Cloud Manager with OpenStack solution, provides the architecture, software, and mechanismsthat deliver OpenStack clouds to your environment quickly.
By installing the IBM Cloud Manager with OpenStack product, you receive the tools to easily deploy anOpenStack cloud, made up of an OpenStack controller node and one or more compute hosts. There arevarious topologies that are provided to help you deploy the nodes, which create your cloud.
The general flow for setting up your cloud includes the following steps:1. Install IBM Cloud Manager with OpenStack on the deployment server.2. Deploy the cloud topology that includes the controller node and any compute nodes that you want to
include.3. Complete additional configuration steps such as creating initial networks and defining secure access
to virtual machines.
After you install and deploy a cloud, the IBM Cloud Manager with OpenStack solution includes thefollowing management tools.v IBM Cloud Manager with OpenStack self-service portal: Optional and intended for management by
cloud users.v OpenStack dashboard: Intended for use by cloud administrators.v APIs and knife commands: Intended for cloud administrator use.
You must understand the concepts and terminology of OpenStack and Chef server technology. There issignificant documentation that is provided in the community. Review some of the key concepts likecookbooks, recipes, environments, and roles. For more information, see the following terminology resources:v All about Chef ...v Get started with OpenStack
IBM Cloud Manager with OpenStack is designed to get you started quickly, yet provide you flexibility forproduction level installations. It uses Chef server technology to provide a robust installation andconfiguration method by using cookbooks, recipes, environments, and roles. Chef provides a client thatcommunicates with the deployment server to install software on remote nodes as well.
This image shows the communication between the IBM Cloud Manager with OpenStack components inyour cloud.
© Copyright IBM Corp. 2012, 2014 1
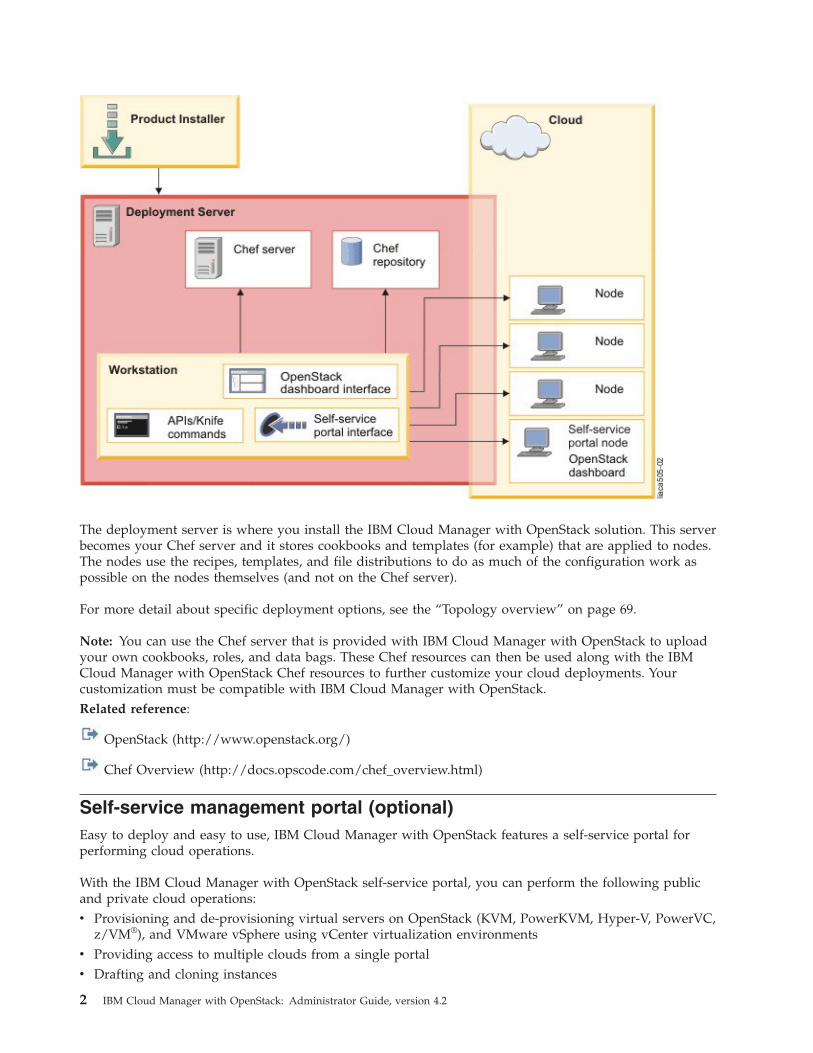
The deployment server is where you install the IBM Cloud Manager with OpenStack solution. This serverbecomes your Chef server and it stores cookbooks and templates (for example) that are applied to nodes.The nodes use the recipes, templates, and file distributions to do as much of the configuration work aspossible on the nodes themselves (and not on the Chef server).
For more detail about specific deployment options, see the “Topology overview” on page 69.
Note: You can use the Chef server that is provided with IBM Cloud Manager with OpenStack to uploadyour own cookbooks, roles, and data bags. These Chef resources can then be used along with the IBMCloud Manager with OpenStack Chef resources to further customize your cloud deployments. Yourcustomization must be compatible with IBM Cloud Manager with OpenStack.Related reference:
OpenStack (http://www.openstack.org/)
Chef Overview (http://docs.opscode.com/chef_overview.html)
Self-service management portal (optional)Easy to deploy and easy to use, IBM Cloud Manager with OpenStack features a self-service portal forperforming cloud operations.
With the IBM Cloud Manager with OpenStack self-service portal, you can perform the following publicand private cloud operations:v Provisioning and de-provisioning virtual servers on OpenStack (KVM, PowerKVM, Hyper-V, PowerVC,
z/VM®), and VMware vSphere using vCenter virtualization environmentsv Providing access to multiple clouds from a single portalv Drafting and cloning instances
2 IBM Cloud Manager with OpenStack: Administrator Guide, version 4.2
v Capturing instancesv Starting and stopping servers as part of an instancev Resizing existing virtual machinesv Creating projects to give team-specific access to instancesv Providing network configurations, which set unique network properties to different instancesv Creating expiration polices to reduce abandoned virtual machinesv Providing request and approval workflow supportv Monitoring resource allocations and billing for services
IBM Cloud Manager with OpenStack self-service portal uses the following FIPS 140-2 approvedcryptographic providers:v IBMJCEFIPS (certificate 376)v IBMJSSEFIPS (certificate 409)v IBM Crypto for C (certificate 384)
The certificates are listed on the NIST website at http://csrc.nist.gov.
Overview of access-based rolesThe IBM Cloud Manager with OpenStack self-service portal supports role-based access control.
Role-based access control is enforced by assigning one or more roles to the user, and allowing each roleto perform a given set of operations.
The self-service portal provides the following predefined roles:
User The main responsibility of an end user is to request the provisioning of deployed virtualmachines.v Deploy an image.v Manage instances.v View requests.v View projects.v View activity reports.
AdministratorUsers with this role are responsible for administering all resources in the cloud. The typical tasksof administrators are:v Configuring the cloud.v Creating a project, which manages cloud access.v Manage images.v Manage instances.v Manage requests.v View activity reports.
Content that is specific to one role or the other is designated with the following flags:
v
v
Chapter 1. Overview 3
TerminologyIBM Cloud Manager with OpenStack supports many different types of virtualization infrastructureenvironments. These environments sometimes use different terminology for the same concepts.
The terminology differences are described in the following table.
Note: IBM Cloud Manager with OpenStack is aligning more closely with OpenStack terminology. Forexample, workload and appliance are now referred to as an instance and image. OpenStack is an opensource cloud-computing platform for private and public clouds. For information about OpenStack, seehttp://www.openstack.org/
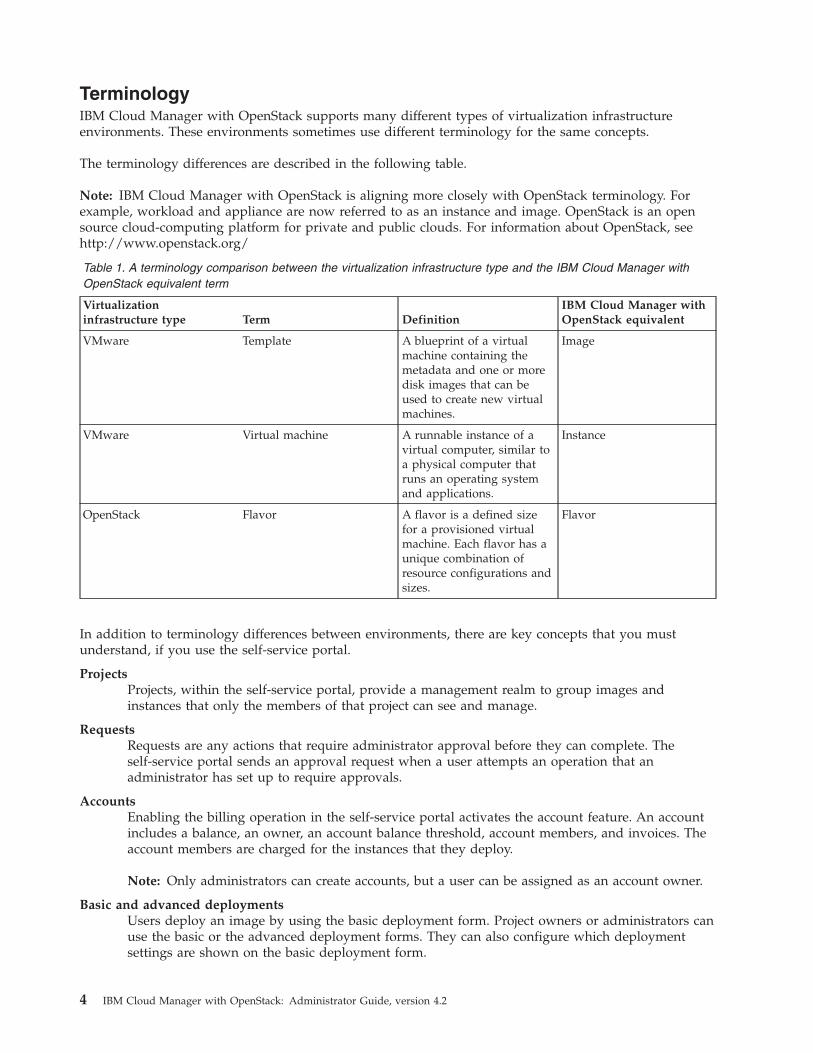
Table 1. A terminology comparison between the virtualization infrastructure type and the IBM Cloud Manager withOpenStack equivalent term
Virtualizationinfrastructure type Term Definition
IBM Cloud Manager withOpenStack equivalent
VMware Template A blueprint of a virtualmachine containing themetadata and one or moredisk images that can beused to create new virtualmachines.
Image
VMware Virtual machine A runnable instance of avirtual computer, similar toa physical computer thatruns an operating systemand applications.
Instance
OpenStack Flavor A flavor is a defined sizefor a provisioned virtualmachine. Each flavor has aunique combination ofresource configurations andsizes.
Flavor
In addition to terminology differences between environments, there are key concepts that you mustunderstand, if you use the self-service portal.
ProjectsProjects, within the self-service portal, provide a management realm to group images andinstances that only the members of that project can see and manage.
RequestsRequests are any actions that require administrator approval before they can complete. Theself-service portal sends an approval request when a user attempts an operation that anadministrator has set up to require approvals.
AccountsEnabling the billing operation in the self-service portal activates the account feature. An accountincludes a balance, an owner, an account balance threshold, account members, and invoices. Theaccount members are charged for the instances that they deploy.
Note: Only administrators can create accounts, but a user can be assigned as an account owner.
Basic and advanced deploymentsUsers deploy an image by using the basic deployment form. Project owners or administrators canuse the basic or the advanced deployment forms. They can also configure which deploymentsettings are shown on the basic deployment form.
4 IBM Cloud Manager with OpenStack: Administrator Guide, version 4.2
What's new in IBM Cloud Manager with OpenStackIBM Cloud Manager with OpenStack is a cloud solution with new features and support in this release.
The new features include the following:v A new, simplified command line method for deploying clouds in the KVM or QEMU, PowerKVM,
PowerVC environments. With this option of deploying clouds you use an example cloud file that isconfigured with typical defaults. You can customize the example cloud file as needed to meet yourneeds. For more information, see “Deploying a prescribed configuration with KVM or QEMU computenodes” on page 79, “Deploying a prescribed configuration with PowerKVM compute nodes” on page86, and “Deploying a prescribed configuration to manage to PowerVC” on page 98.
v Enhanced planning worksheets to help you get started. For more information see, “Planningworksheets: Deploying a cloud” on page 18
v IBM Cloud Manager with OpenStack features an enhanced OpenStack compute scheduler, IBMPlatform Resource Scheduler. For more information about Platform Resource Scheduler, see PlatformResource Scheduler. The Getting Started section provides more information about What's New andKnown Issues in Platform Resource Scheduler.
v Ability to upgrade the IBM Cloud Manager with OpenStack environment from version 4.1 to version4.2. For more information see, Chapter 4, “Upgrading IBM Cloud Manager with OpenStack,” on page45.
v Support for configuring your cloud topology to be compliant with the Federal Information ProcessingStandards (FIPS) for cryptography modules. For more information, see “Customizing for aFIPS-compliant topology” on page 116.
New support includes:v IBM Cloud Manager with OpenStack version 4.2 is based on the Juno OpenStack release.
– Support for APIs for the newly integrated OpenStack projects - Sahara and Trove.– Support across all OpenStack Juno APIs.– Integrated support for load balancer as a service.– RabbitMQ support for messaging queue.
v Added support for PowerVC 1.2.2, with new features that include:– Using maintenance mode to enable or disable a host system for maintenance.– Using the Attach interfaces (os-interface) Nova API service to create, list, get details for, and
delete port interfaces.– Allocating a floating IP address to an OpenStack instance. For more information, see Allocating a
floating IP address to an instance (OpenStack) and “Managing external networks and floating IPaddresses” on page 243.
v Added support for PowerKVM 2.1.1 with GRE network type support. For more information, see“Importing images (OpenStack only)” on page 214.
v Added support VXLAN network type support. For more information, see “Network considerations” onpage 16.
v Updated browser support. For more information, see “Supported IBM Cloud Manager with OpenStackweb browsers” on page 9.
For information on the latest OpenStack release, see the OpenStack (Juno) Release Notes.
Technical preview features include the following support:v IBM Cloud Manager with OpenStack version 4.2 includes a technical preview of a disaster recovery
service that enables disaster recovery for OpenStack workloads. For more information, see DisasterRecovery Technical Preview Documentation.
Chapter 1. Overview 5
License informationLearn about license information for the IBM Cloud Manager with OpenStack product.
The IBM Cloud Manager with OpenStack product includes a default trial license, with a 90-day trialperiod. You can use this license to investigate IBM Cloud Manager with OpenStack. However, to havefull use of IBM Cloud Manager with OpenStack, you need to update the trial license to a permanentlicense.
Licenses may be required for multiple systems:v If you install IBM Cloud Manager with OpenStack on an IBM Power® system or x86 system, licenses
are required for each socket on the system that is running IBM Cloud Manager with OpenStack.Licenses are also required for each socket on a system that is being managed by IBM Cloud Managerwith OpenStack.
v If you install IBM Cloud Manager with OpenStack on a System z® system, or are managing a System zsystem with IBM Cloud Manager with OpenStack, a managed engine license is required for eachSystem z engine that is running the program or being managed by the program.
For more information, see the license agreement.
To display the current license of IBM Cloud Manager with OpenStack, run the following command:/opt/ibm/cmwo/bin/cmwo_lic.sh
AccessibilityAccessibility features help users who have a disability, such as restricted mobility or limited vision, to useinformation technology products successfully.
Accessibility features
IBM® strives to provide products with usable access for everyone, regardless of age or ability. Thisproduct uses standard browser navigation keys.
The following list includes the major accessibility features in IBM Cloud Manager with OpenStack:v Keyboard-only operationv Interfaces that are commonly used by screen readersv Keys that are discernible by touch but do not activate just by touching themv Industry-standard devices for ports and connectorsv The attachment of alternative input and output devices
The IBM Cloud Manager with OpenStack Information Center, and its related publications, areaccessibility-enabled.
Keyboard navigation
The product use standard browser navigation keys.
IBM and accessibility
See the IBM Human Ability and Accessibility Center for more information about the commitment thatIBM has to accessibility.
6 IBM Cloud Manager with OpenStack: Administrator Guide, version 4.2
Chapter 2. Planning for IBM Cloud Manager with OpenStack
Review the following information for planning to install and using IBM Cloud Manager with OpenStack.The information includes hardware and software requirements for the various IBM Cloud Manager withOpenStack components.
IBM Cloud Manager with OpenStack prerequisitesReview the following information for planning to install and using IBM Cloud Manager with OpenStack.
The information includes hardware and software requirements for the various IBM Cloud Manager withOpenStack components.
IBM Cloud Manager with OpenStack hardware prerequisitesThis section describes hardware prerequisites for various platforms and components that IBM CloudManager with OpenStack supports.
The information provided is a general guideline and actual requirements can vary from installation toinstallation. Specific sizings should be done to meet your installation requirements.
The IBM Cloud Manager with OpenStack server is supported on the following platforms:v Intel x86-64 (Linux)v POWER6®, POWER7®, or POWER8™ (PowerLinux™)v z/VM systems (IBM z/Architecture®)
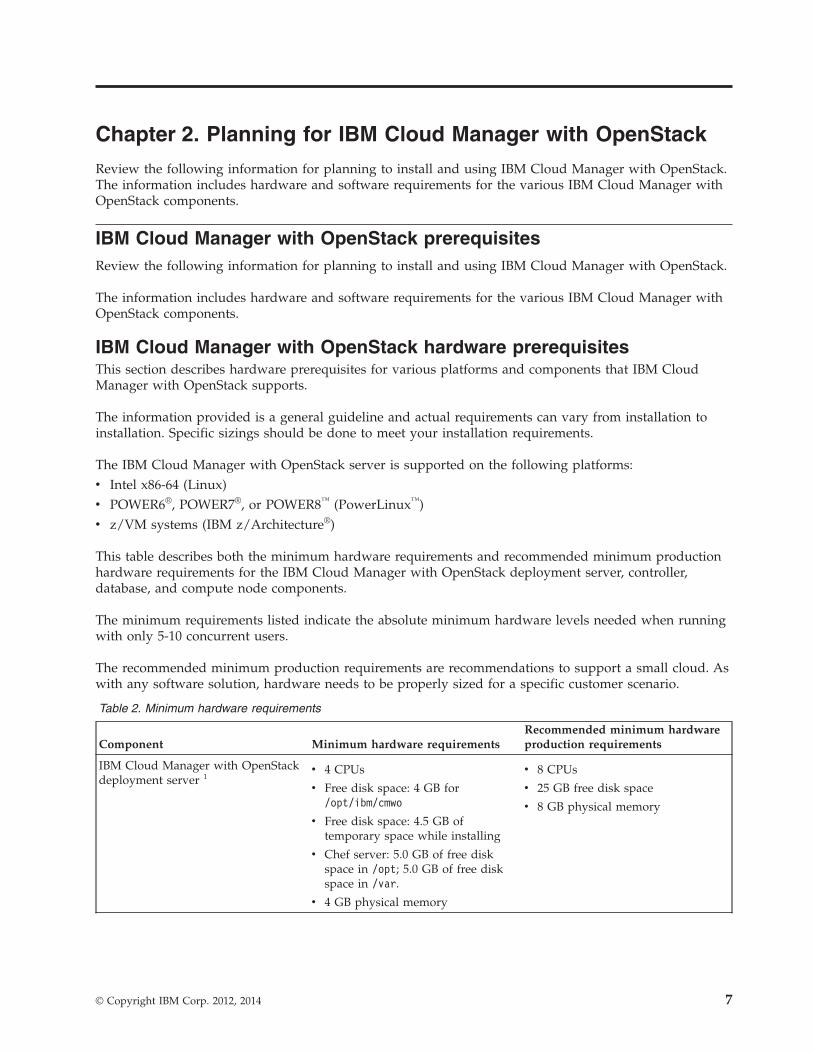
This table describes both the minimum hardware requirements and recommended minimum productionhardware requirements for the IBM Cloud Manager with OpenStack deployment server, controller,database, and compute node components.
The minimum requirements listed indicate the absolute minimum hardware levels needed when runningwith only 5-10 concurrent users.
The recommended minimum production requirements are recommendations to support a small cloud. Aswith any software solution, hardware needs to be properly sized for a specific customer scenario.
Table 2. Minimum hardware requirements
Component Minimum hardware requirementsRecommended minimum hardwareproduction requirements
IBM Cloud Manager with OpenStackdeployment server 1
v 4 CPUs
v Free disk space: 4 GB for/opt/ibm/cmwo
v Free disk space: 4.5 GB oftemporary space while installing
v Chef server: 5.0 GB of free diskspace in /opt; 5.0 GB of free diskspace in /var.
v 4 GB physical memory
v 8 CPUs
v 25 GB free disk space
v 8 GB physical memory
© Copyright IBM Corp. 2012, 2014 7
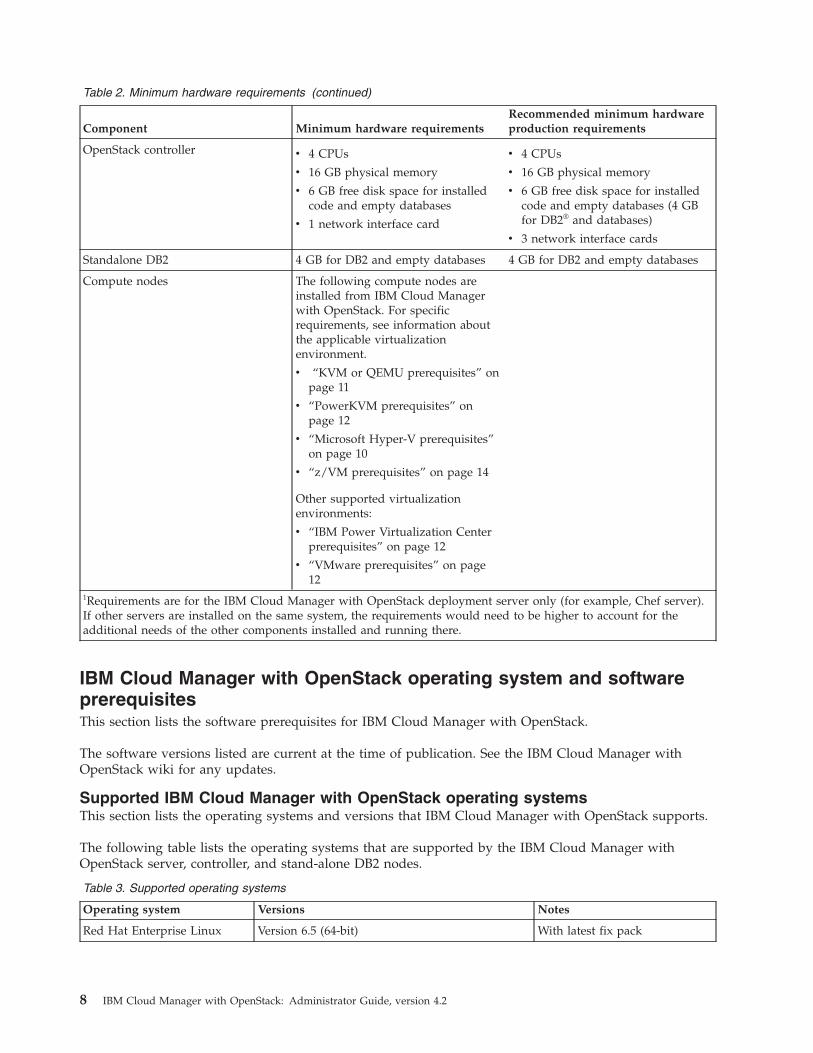
Table 2. Minimum hardware requirements (continued)
Component Minimum hardware requirementsRecommended minimum hardwareproduction requirements
OpenStack controller v 4 CPUs
v 16 GB physical memory
v 6 GB free disk space for installedcode and empty databases
v 1 network interface card
v 4 CPUs
v 16 GB physical memory
v 6 GB free disk space for installedcode and empty databases (4 GBfor DB2® and databases)
v 3 network interface cards
Standalone DB2 4 GB for DB2 and empty databases 4 GB for DB2 and empty databases
Compute nodes The following compute nodes areinstalled from IBM Cloud Managerwith OpenStack. For specificrequirements, see information aboutthe applicable virtualizationenvironment.
v “KVM or QEMU prerequisites” onpage 11
v “PowerKVM prerequisites” onpage 12
v “Microsoft Hyper-V prerequisites”on page 10
v “z/VM prerequisites” on page 14
Other supported virtualizationenvironments:
v “IBM Power Virtualization Centerprerequisites” on page 12
v “VMware prerequisites” on page12
1Requirements are for the IBM Cloud Manager with OpenStack deployment server only (for example, Chef server).If other servers are installed on the same system, the requirements would need to be higher to account for theadditional needs of the other components installed and running there.
IBM Cloud Manager with OpenStack operating system and softwareprerequisitesThis section lists the software prerequisites for IBM Cloud Manager with OpenStack.
The software versions listed are current at the time of publication. See the IBM Cloud Manager withOpenStack wiki for any updates.
Supported IBM Cloud Manager with OpenStack operating systemsThis section lists the operating systems and versions that IBM Cloud Manager with OpenStack supports.
The following table lists the operating systems that are supported by the IBM Cloud Manager withOpenStack server, controller, and stand-alone DB2 nodes.
Table 3. Supported operating systems
Operating system Versions Notes
Red Hat Enterprise Linux Version 6.5 (64-bit) With latest fix pack
8 IBM Cloud Manager with OpenStack: Administrator Guide, version 4.2
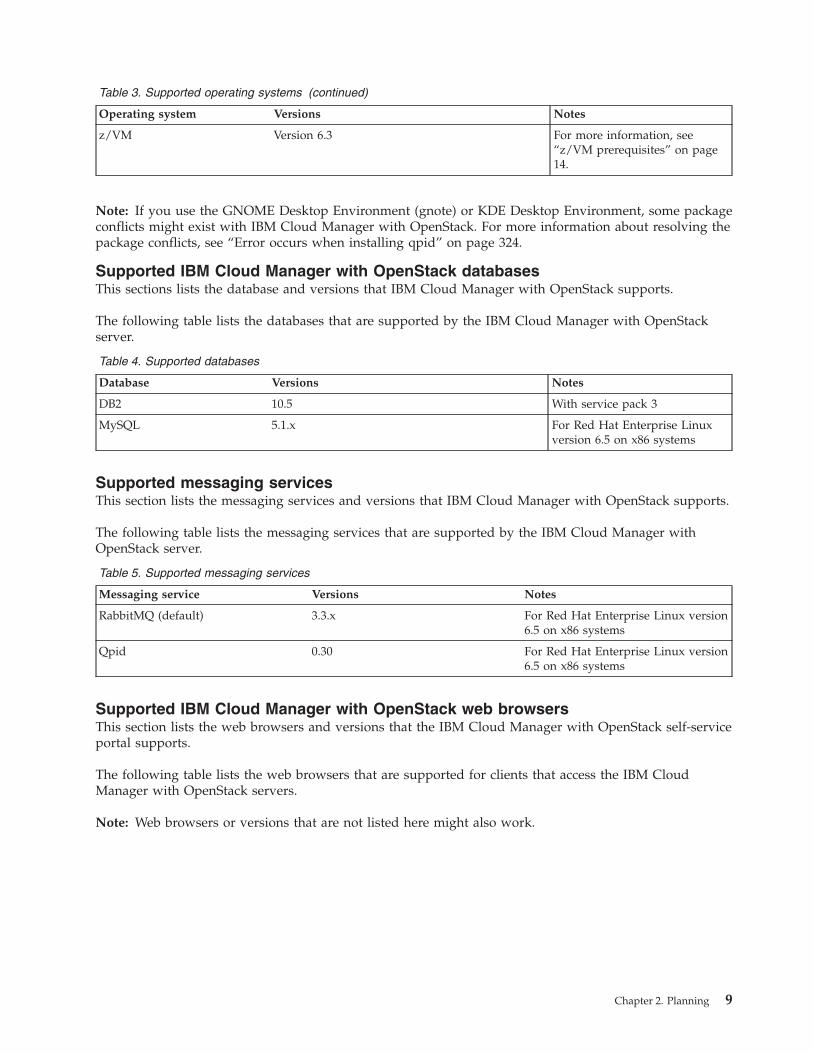
Table 3. Supported operating systems (continued)
Operating system Versions Notes
z/VM Version 6.3 For more information, see“z/VM prerequisites” on page14.
Note: If you use the GNOME Desktop Environment (gnote) or KDE Desktop Environment, some packageconflicts might exist with IBM Cloud Manager with OpenStack. For more information about resolving thepackage conflicts, see “Error occurs when installing qpid” on page 324.
Supported IBM Cloud Manager with OpenStack databasesThis sections lists the database and versions that IBM Cloud Manager with OpenStack supports.
The following table lists the databases that are supported by the IBM Cloud Manager with OpenStackserver.
Table 4. Supported databases
Database Versions Notes
DB2 10.5 With service pack 3
MySQL 5.1.x For Red Hat Enterprise Linuxversion 6.5 on x86 systems
Supported messaging servicesThis section lists the messaging services and versions that IBM Cloud Manager with OpenStack supports.
The following table lists the messaging services that are supported by the IBM Cloud Manager withOpenStack server.
Table 5. Supported messaging services
Messaging service Versions Notes
RabbitMQ (default) 3.3.x For Red Hat Enterprise Linux version6.5 on x86 systems
Qpid 0.30 For Red Hat Enterprise Linux version6.5 on x86 systems
Supported IBM Cloud Manager with OpenStack web browsersThis section lists the web browsers and versions that the IBM Cloud Manager with OpenStack self-serviceportal supports.
The following table lists the web browsers that are supported for clients that access the IBM CloudManager with OpenStack servers.
Note: Web browsers or versions that are not listed here might also work.
Chapter 2. Planning 9
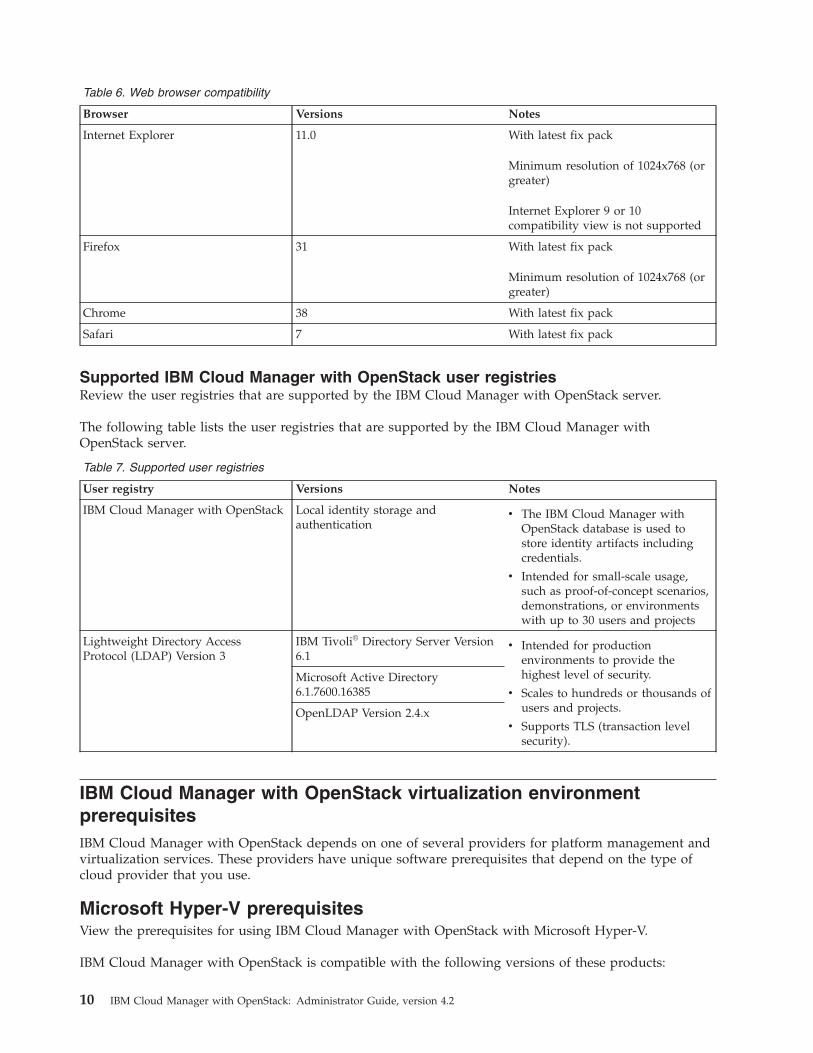
Table 6. Web browser compatibility
Browser Versions Notes
Internet Explorer 11.0 With latest fix pack
Minimum resolution of 1024x768 (orgreater)
Internet Explorer 9 or 10compatibility view is not supported
Firefox 31 With latest fix pack
Minimum resolution of 1024x768 (orgreater)
Chrome 38 With latest fix pack
Safari 7 With latest fix pack
Supported IBM Cloud Manager with OpenStack user registriesReview the user registries that are supported by the IBM Cloud Manager with OpenStack server.
The following table lists the user registries that are supported by the IBM Cloud Manager withOpenStack server.
Table 7. Supported user registries
User registry Versions Notes
IBM Cloud Manager with OpenStack Local identity storage andauthentication
v The IBM Cloud Manager withOpenStack database is used tostore identity artifacts includingcredentials.
v Intended for small-scale usage,such as proof-of-concept scenarios,demonstrations, or environmentswith up to 30 users and projects
Lightweight Directory AccessProtocol (LDAP) Version 3
IBM Tivoli® Directory Server Version6.1
v Intended for productionenvironments to provide thehighest level of security.
v Scales to hundreds or thousands ofusers and projects.
v Supports TLS (transaction levelsecurity).
Microsoft Active Directory6.1.7600.16385
OpenLDAP Version 2.4.x
IBM Cloud Manager with OpenStack virtualization environmentprerequisitesIBM Cloud Manager with OpenStack depends on one of several providers for platform management andvirtualization services. These providers have unique software prerequisites that depend on the type ofcloud provider that you use.
Microsoft Hyper-V prerequisitesView the prerequisites for using IBM Cloud Manager with OpenStack with Microsoft Hyper-V.
IBM Cloud Manager with OpenStack is compatible with the following versions of these products:
10 IBM Cloud Manager with OpenStack: Administrator Guide, version 4.2
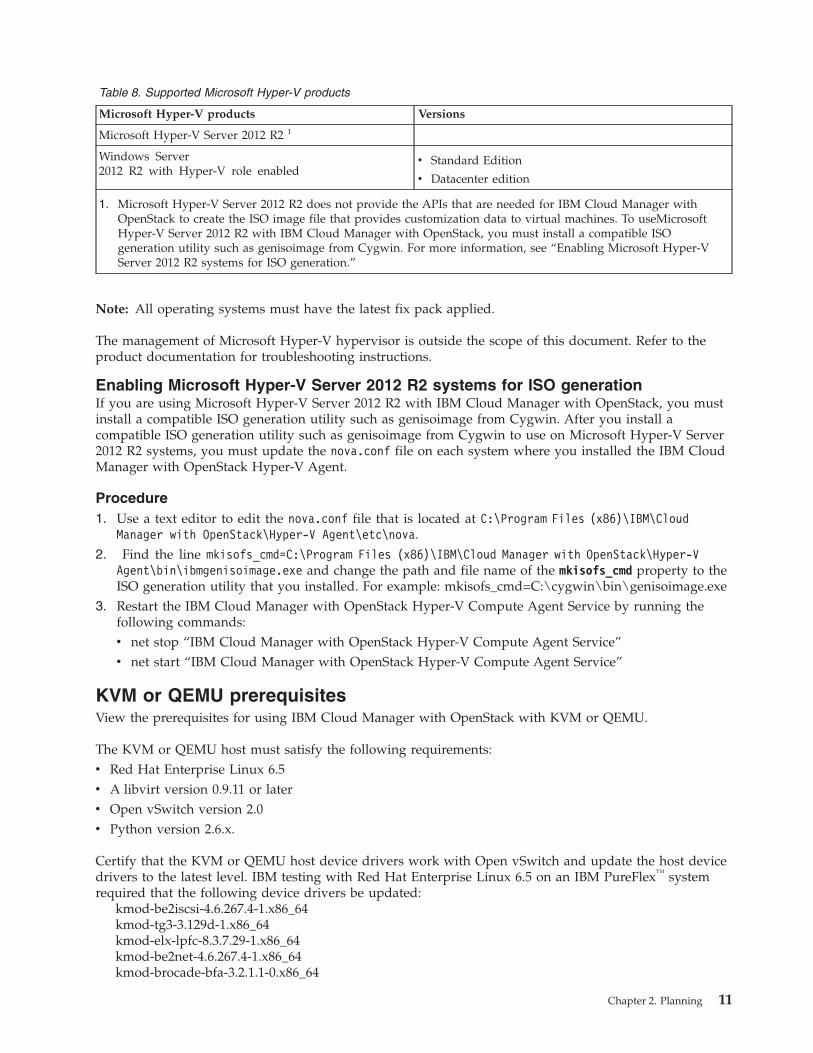
Table 8. Supported Microsoft Hyper-V products
Microsoft Hyper-V products Versions
Microsoft Hyper-V Server 2012 R2 1
Windows Server2012 R2 with Hyper-V role enabled
v Standard Edition
v Datacenter edition
1. Microsoft Hyper-V Server 2012 R2 does not provide the APIs that are needed for IBM Cloud Manager withOpenStack to create the ISO image file that provides customization data to virtual machines. To useMicrosoftHyper-V Server 2012 R2 with IBM Cloud Manager with OpenStack, you must install a compatible ISOgeneration utility such as genisoimage from Cygwin. For more information, see “Enabling Microsoft Hyper-VServer 2012 R2 systems for ISO generation.”
Note: All operating systems must have the latest fix pack applied.
The management of Microsoft Hyper-V hypervisor is outside the scope of this document. Refer to theproduct documentation for troubleshooting instructions.
Enabling Microsoft Hyper-V Server 2012 R2 systems for ISO generationIf you are using Microsoft Hyper-V Server 2012 R2 with IBM Cloud Manager with OpenStack, you mustinstall a compatible ISO generation utility such as genisoimage from Cygwin. After you install acompatible ISO generation utility such as genisoimage from Cygwin to use on Microsoft Hyper-V Server2012 R2 systems, you must update the nova.conf file on each system where you installed the IBM CloudManager with OpenStack Hyper-V Agent.
Procedure1. Use a text editor to edit the nova.conf file that is located at C:\Program Files (x86)\IBM\Cloud
Manager with OpenStack\Hyper-V Agent\etc\nova.2. Find the line mkisofs_cmd=C:\Program Files (x86)\IBM\Cloud Manager with OpenStack\Hyper-V
Agent\bin\ibmgenisoimage.exe and change the path and file name of the mkisofs_cmd property to theISO generation utility that you installed. For example: mkisofs_cmd=C:\cygwin\bin\genisoimage.exe
3. Restart the IBM Cloud Manager with OpenStack Hyper-V Compute Agent Service by running thefollowing commands:v net stop “IBM Cloud Manager with OpenStack Hyper-V Compute Agent Service”v net start “IBM Cloud Manager with OpenStack Hyper-V Compute Agent Service”
KVM or QEMU prerequisitesView the prerequisites for using IBM Cloud Manager with OpenStack with KVM or QEMU.
The KVM or QEMU host must satisfy the following requirements:v Red Hat Enterprise Linux 6.5v A libvirt version 0.9.11 or laterv Open vSwitch version 2.0v Python version 2.6.x.
Certify that the KVM or QEMU host device drivers work with Open vSwitch and update the host devicedrivers to the latest level. IBM testing with Red Hat Enterprise Linux 6.5 on an IBM PureFlex™ systemrequired that the following device drivers be updated:
kmod-be2iscsi-4.6.267.4-1.x86_64kmod-tg3-3.129d-1.x86_64kmod-elx-lpfc-8.3.7.29-1.x86_64kmod-be2net-4.6.267.4-1.x86_64kmod-brocade-bfa-3.2.1.1-0.x86_64
Chapter 2. Planning 11
kmod-qlgc-qla2xxx-8.04.00.12.06.0_k3-1.x86_64
Updated IBM device drivers are available on the following IBM Support website:
http://ibm.com/support
PowerKVM prerequisitesView the prerequisites for using IBM Cloud Manager with OpenStack with PowerKVM.
IBM Cloud Manager with OpenStack supports IBM PowerKVM compute nodes. PowerKVM computenodes must be hosts; nested virtual machines are not supported.
The PowerKVM host must satisfy the following requirements:v Operating system: IBM_PowerKVM release 2.1.0 and 2.1.1v Hardware: Power8 Server with the PowerKVM hypervisor configured.
IBM Power Virtualization Center prerequisitesView the prerequisites for using IBM Cloud Manager with OpenStack with IBM Power VirtualizationCenter.
IBM Cloud Manager with OpenStack is compatible with IBM Power Virtualization Center Standardversion 1.2.0.1, 1.2.0.2, and 1.2.x, a comprehensive virtualization management tool for the PowerVM®
platform. To take advantage of the latest features of IBM Power Virtualization Center Standard, version1.2.2 is required.
IBM Cloud Manager with OpenStack along with PowerVC provides the following capabilities:v Support for IBM Power Systems™ hosts that are managed by Hardware Management Console.v Support for storage area networks.v Support for multiple Virtual I/O Server virtual machines on each host.v Support for multiple storage connectivity groups, which enable you to deploy images so that they have
access to storage that is dedicated to a particular purpose. For more information on PowerVC andstorage connectivity groups, refer to the IBM PowerVC documentation.
Limitations for PowerVC support from IBM Cloud Manager with OpenStack:v PowerVC Express® Edition is not supported.v Image capture is not supported for any existing virtual machines that are added to PowerVC by using
the Manage Existing function.v Restarting and config drive are not supported for PowerVC 1.2.0.1 or 1.2.0.2.
For information about IBM Power Virtualization Center Standard, including hardware and softwarerequirements and supported guest operating systems, see the IBM Power Virtualization Centerinformation center at the following website.
http://www.ibm.com/support/knowledgecenter/SSXK2N/welcome
Note: IBM Cloud Manager with OpenStack supports managing a PowerVM environment only throughPowerVC. If you want to manage a PowerKVM environment, you can use IBM Cloud Manager withOpenStack to manage PowerKVM directly. For more information, see “PowerKVM prerequisites.”
VMware prerequisitesView the prerequisites for using IBM Cloud Manager with OpenStack with VMware.
IBM Cloud Manager with OpenStack is compatible with the following versions of VMware products:
12 IBM Cloud Manager with OpenStack: Administrator Guide, version 4.2
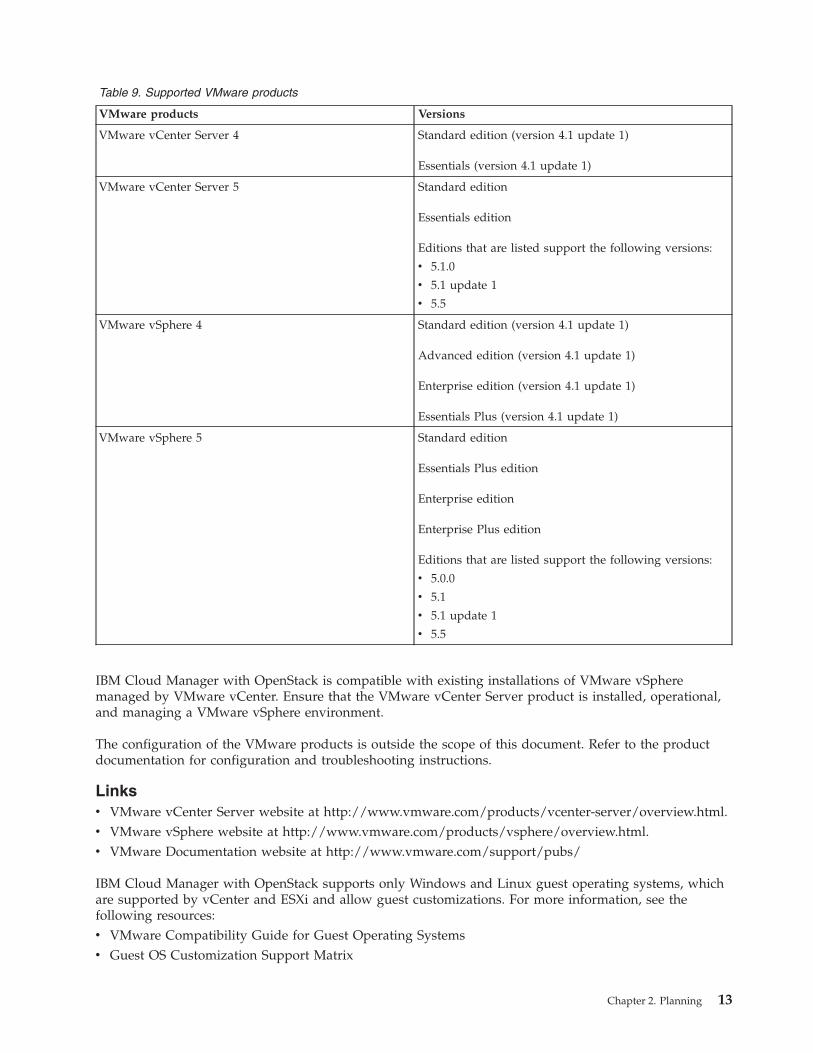
Table 9. Supported VMware products
VMware products Versions
VMware vCenter Server 4 Standard edition (version 4.1 update 1)
Essentials (version 4.1 update 1)
VMware vCenter Server 5 Standard edition
Essentials edition
Editions that are listed support the following versions:
v 5.1.0
v 5.1 update 1
v 5.5
VMware vSphere 4 Standard edition (version 4.1 update 1)
Advanced edition (version 4.1 update 1)
Enterprise edition (version 4.1 update 1)
Essentials Plus (version 4.1 update 1)
VMware vSphere 5 Standard edition
Essentials Plus edition
Enterprise edition
Enterprise Plus edition
Editions that are listed support the following versions:
v 5.0.0
v 5.1
v 5.1 update 1
v 5.5
IBM Cloud Manager with OpenStack is compatible with existing installations of VMware vSpheremanaged by VMware vCenter. Ensure that the VMware vCenter Server product is installed, operational,and managing a VMware vSphere environment.
The configuration of the VMware products is outside the scope of this document. Refer to the productdocumentation for configuration and troubleshooting instructions.
Linksv VMware vCenter Server website at http://www.vmware.com/products/vcenter-server/overview.html.v VMware vSphere website at http://www.vmware.com/products/vsphere/overview.html.v VMware Documentation website at http://www.vmware.com/support/pubs/
IBM Cloud Manager with OpenStack supports only Windows and Linux guest operating systems, whichare supported by vCenter and ESXi and allow guest customizations. For more information, see thefollowing resources:v VMware Compatibility Guide for Guest Operating Systemsv Guest OS Customization Support Matrix
Chapter 2. Planning 13
Customization of certain Microsoft Windows operating systems requires Microsoft Sysprep Tools. See theinformation for your version of vCenter for detailed instructions about obtaining the Sysprep Tools andwhere to store the tools on the vCenter Servers file systems.
Configuration considerations for VMwarev Use DRS-enabled clusters for advanced placement
Allow vCenter to place the user workload on the best host machine by using a DRS-enabled clusterwithin vCenter and setting the appliance target to use the cluster or a resource pool that is defined inthe cluster. This allows vCenter to manage the available host resources. Otherwise, the appliance targetis an individual host machine or a resource pool on a host machine.
v Place vCenter server and IBM Cloud Manager with OpenStack self-service portal on the same network.For best performance, it is recommended the vCenter server and the IBM Cloud Manager withOpenStack self-service portal are on the same network.
z/VM prerequisitesView the prerequisites for using IBM Cloud Manager with OpenStack with z/VM.
IBM Cloud Manager with OpenStack is compatible with z/VM version 6.3, which is a comprehensivevirtualization management tool for the System z platform.
IBM Cloud Manager with OpenStack with z/VM provides the following capabilities:v Support for IBM System z hosts that are managed by Extreme Cloud Administration Toolkit.v Support for storage area networks.v Support for multiple virtual machines on each host.v Support for configuring a z/VM node as a controller node or a compute node.
For more information about enabling z/VM for OpenStack and for information about deploying thez/VM appliance to manage from the z/VM environment, see Enabling z/VM for OpenStack. To deploythe z/VM appliance and manage from the z/VM environment, you must install the required prerequisitePTFs. For more information about the PTFs, see the Service Information related to IBM Cloud Managerwith OpenStack for System z.
Ensure that z/VM 6.3 and Extreme Cloud Administration Toolkit (xCAT) are configured correctly andworking well.
The configuration of z/VM and xCAT is outside the scope of this document. Refer to the followingproduct documentation for configuration and troubleshooting information:v z/VM 6.3 web site:
http://www.vm.ibm.com/zvm630/v z/VM 6.3 product information in IBM Knowledge Center:
http://www.ibm.com/support/knowledgecenter/SSB27U_6.3.0/com.ibm.zvm.v630/zvminfoc03.htm?lang=en
v z/VM Systems Management Application Programming Guide, version 6.3http://www.vm.ibm.com/library/hcsl8c20.pdf
Supported IBM Cloud Manager with OpenStack support matrixThe following information describes the OpenStack configurations that are supported through the IBMCloud Manager with OpenStack.
14 IBM Cloud Manager with OpenStack: Administrator Guide, version 4.2

Table 10. IBM Cloud Manager with OpenStack support matrixController node Compute (Nova) Scheduler Filter-scheduler
IBM Platform Resource Scheduler
Nova -network Not supported, use Neutron
quota_driver nova.quota.DbQuotaDriver (default)
nova.quota.NoopQuotaDriver
Network (Neutron) IP version IPv4
IPv4/IPv6 dual(not supported by the PowerVC driver)
Network typev Flat
v GRE (one compute hypervisor must be KVM or PowerKVM)
v VXLAN (one compute hypervisor must be KVM)
v VLAN
Virtual switch Open vSwitch 2.0
Plug-in Ml2Plugin (default)OVSNeutronPluginV2
IP addressassignmentfor deployedinstances
DHCP - provided by Neutron DHCP agent/ dnsmasq service. Not supported on PowerVC
Static - provided to instance by config_drive.Metadata service not supported.
L3 agent or floating - Enabled by default inthe example environments
Security groups Default neutron security groups do not allow ICMPor SSH into deployed instance.
Storage (Cinder) Driver cinder.volume.drivers.ibm.storwize_svc.StorwizeSVCDriverto SAN Volume Controller 6.4.1/6.4.2 for iSCSI andFibre Channel
cinder.volume.drivers.LVMVolumeDriveron Red Hat Enterprise Linux version 6.4 or 6.5for iSCSI
cinder.volume.drivers.ibm.ibmnas.IBMNAS_NFSDriverfor SONAS and IBM Storwize® V7000 Unified
cinder.volume.drivers.ibm.gpfs.GPFSDriver
powervc.volume.driver.powervc.PowerVCDriver
Authentication(Keystone)
Identity backend keystone.identity.backends.sql.Identity
keystone.identity.backends.ldap.Identity
Token format UUID
PKI
Image (Glance) Image activation config drive+cloud init(guest operating system: Linux or Windows)
config drive+VSAE(guest operating system: Linux or Windows)
config drive+sysprep(guest operating system: Windows)
ovf+VSAE(for PowerVC)
Others Operating System Red Hat Enterprise Linux version 6.5z/VM version 6.3
Database DB2 version 10.5 SP3
Queue Qpid 0.26 Transient in memoryrabbitmq-server 3.3.4 Transient in memory
Chapter 2. Planning 15
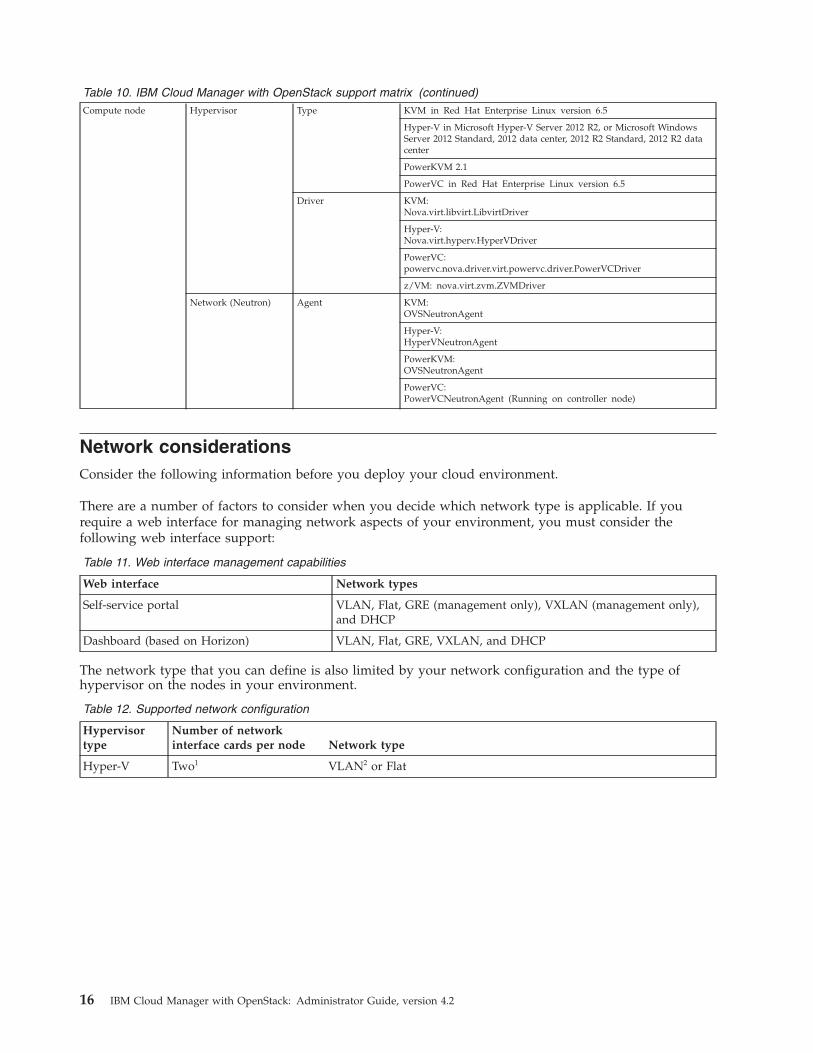
Table 10. IBM Cloud Manager with OpenStack support matrix (continued)Compute node Hypervisor Type KVM in Red Hat Enterprise Linux version 6.5
Hyper-V in Microsoft Hyper-V Server 2012 R2, or Microsoft WindowsServer 2012 Standard, 2012 data center, 2012 R2 Standard, 2012 R2 datacenter
PowerKVM 2.1
PowerVC in Red Hat Enterprise Linux version 6.5
Driver KVM:Nova.virt.libvirt.LibvirtDriver
Hyper-V:Nova.virt.hyperv.HyperVDriver
PowerVC:powervc.nova.driver.virt.powervc.driver.PowerVCDriver
z/VM: nova.virt.zvm.ZVMDriver
Network (Neutron) Agent KVM:OVSNeutronAgent
Hyper-V:HyperVNeutronAgent
PowerKVM:OVSNeutronAgent
PowerVC:PowerVCNeutronAgent (Running on controller node)
Network considerationsConsider the following information before you deploy your cloud environment.
There are a number of factors to consider when you decide which network type is applicable. If yourequire a web interface for managing network aspects of your environment, you must consider thefollowing web interface support:
Table 11. Web interface management capabilities
Web interface Network types
Self-service portal VLAN, Flat, GRE (management only), VXLAN (management only),and DHCP
Dashboard (based on Horizon) VLAN, Flat, GRE, VXLAN, and DHCP
The network type that you can define is also limited by your network configuration and the type ofhypervisor on the nodes in your environment.
Table 12. Supported network configuration
Hypervisortype
Number of networkinterface cards per node Network type
Hyper-V Two1 VLAN2 or Flat
16 IBM Cloud Manager with OpenStack: Administrator Guide, version 4.2

Table 12. Supported network configuration (continued)
Hypervisortype
Number of networkinterface cards per node Network type
KVM One v Local
v GRE3
v VXLAN
Two1v Local
v GRE3
v Flat
v VLAN2
v VXLAN
Three v Local
v GRE3
v Flat
v VLAN2
v VXLAN
PowerKVM One GRE
Two1v GRE
v VLAN2
v Flat
PowerVC Two1 VLANNote: PowerVC can be configured without a virtual machine datanetwork (only a single network card). DHCP is not supported.
z/VM Two1 VLAN2 or Flat
v1
– Management network = Defaults to eth0. It is used for OpenStack communication between nodes.
– Virtual machine data network = Defaults to eth1 (optional). It is used for virtual machine data communicationwithin the cloud environment and is only required if you are using VLAN or Flat networks. Do not use amanagement or external network as the virtual machine data network.
– External network L3 network = Defaults to eth0. It can be shared with the management network, which is thedefault configuration.Note: Using a shared network interface card might only be appropriate for testing purposes though.
The environment must have a gateway set in the public network interface configuration files or/etc/sysconfig/network. A default gateway is required.
In the example environments, the GRE and VXLAN networks are configured to use the management networketh0. The environment can be updated to allow GRE and VXLAN networks to use the virtual machine datanetwork as well.
v2 DHCP can be configured with GRE, VXLAN, and flat networks. If using a VLAN network with DHCP, ensurethat the single controller is running on dedicated physical hardware, instead of a virtual machine.
v3 If one or more of the compute hypervisors is not KVM, then GRE and VXLAN cannot be used.
Note:
v The local network type can be configured; however, the network traffic is limited to the current node.The minimum topology uses the local network option, by default.
Chapter 2. Planning 17
Scalability and performance considerationsIBM Cloud Manager with OpenStack offers considerations with regard to scalability and performancewithin the cloud environment.
Server and concurrent user maximumsIBM Cloud Manager with OpenStack allows management of a configurable number of OpenStackcompute nodes from one OpenStack controller node and self-service portal interface.
Depending on your cloud target, IBM Cloud Manager with OpenStack supports a different number ofusers and server instances in the environment. The number of concurrent servers that are supported perOpenStack compute node is highly variable based on the hardware configuration of the host and theresource consumption of the workload being deployed.
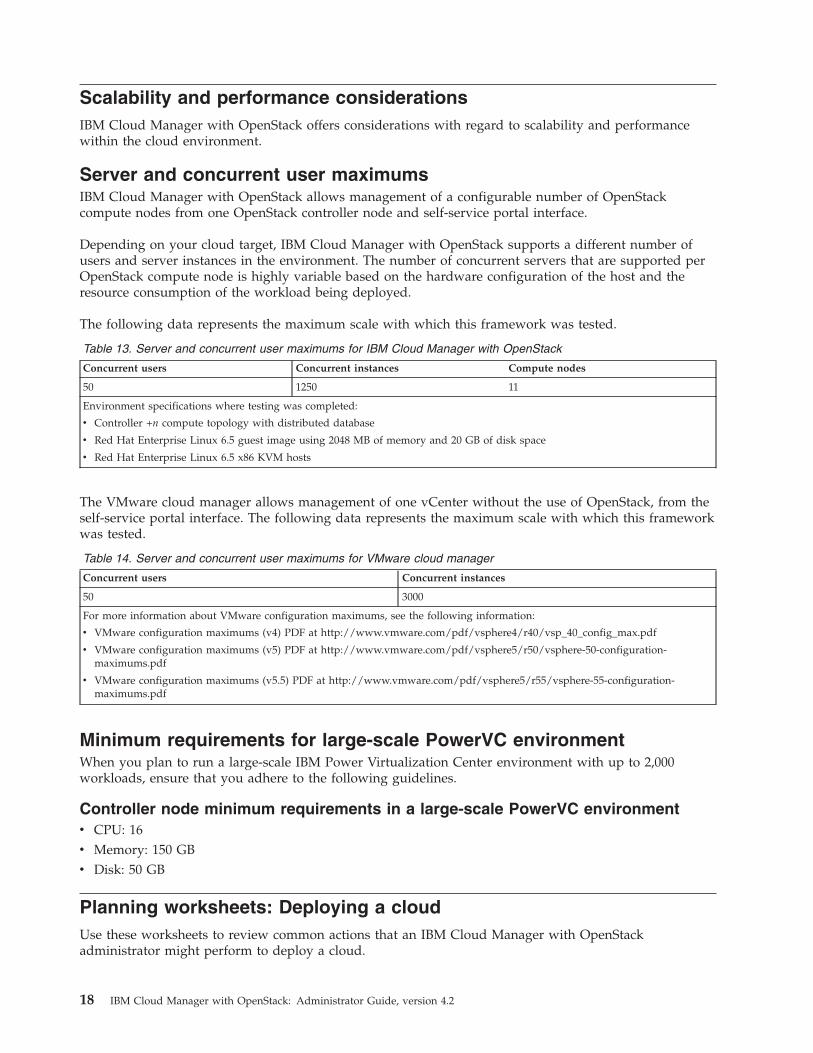
The following data represents the maximum scale with which this framework was tested.
Table 13. Server and concurrent user maximums for IBM Cloud Manager with OpenStack
Concurrent users Concurrent instances Compute nodes
50 1250 11
Environment specifications where testing was completed:
v Controller +n compute topology with distributed database
v Red Hat Enterprise Linux 6.5 guest image using 2048 MB of memory and 20 GB of disk space
v Red Hat Enterprise Linux 6.5 x86 KVM hosts
The VMware cloud manager allows management of one vCenter without the use of OpenStack, from theself-service portal interface. The following data represents the maximum scale with which this frameworkwas tested.
Table 14. Server and concurrent user maximums for VMware cloud manager
Concurrent users Concurrent instances
50 3000
For more information about VMware configuration maximums, see the following information:
v VMware configuration maximums (v4) PDF at http://www.vmware.com/pdf/vsphere4/r40/vsp_40_config_max.pdf
v VMware configuration maximums (v5) PDF at http://www.vmware.com/pdf/vsphere5/r50/vsphere-50-configuration-maximums.pdf
v VMware configuration maximums (v5.5) PDF at http://www.vmware.com/pdf/vsphere5/r55/vsphere-55-configuration-maximums.pdf
Minimum requirements for large-scale PowerVC environmentWhen you plan to run a large-scale IBM Power Virtualization Center environment with up to 2,000workloads, ensure that you adhere to the following guidelines.
Controller node minimum requirements in a large-scale PowerVC environmentv CPU: 16v Memory: 150 GBv Disk: 50 GB
Planning worksheets: Deploying a cloudUse these worksheets to review common actions that an IBM Cloud Manager with OpenStackadministrator might perform to deploy a cloud.
18 IBM Cloud Manager with OpenStack: Administrator Guide, version 4.2
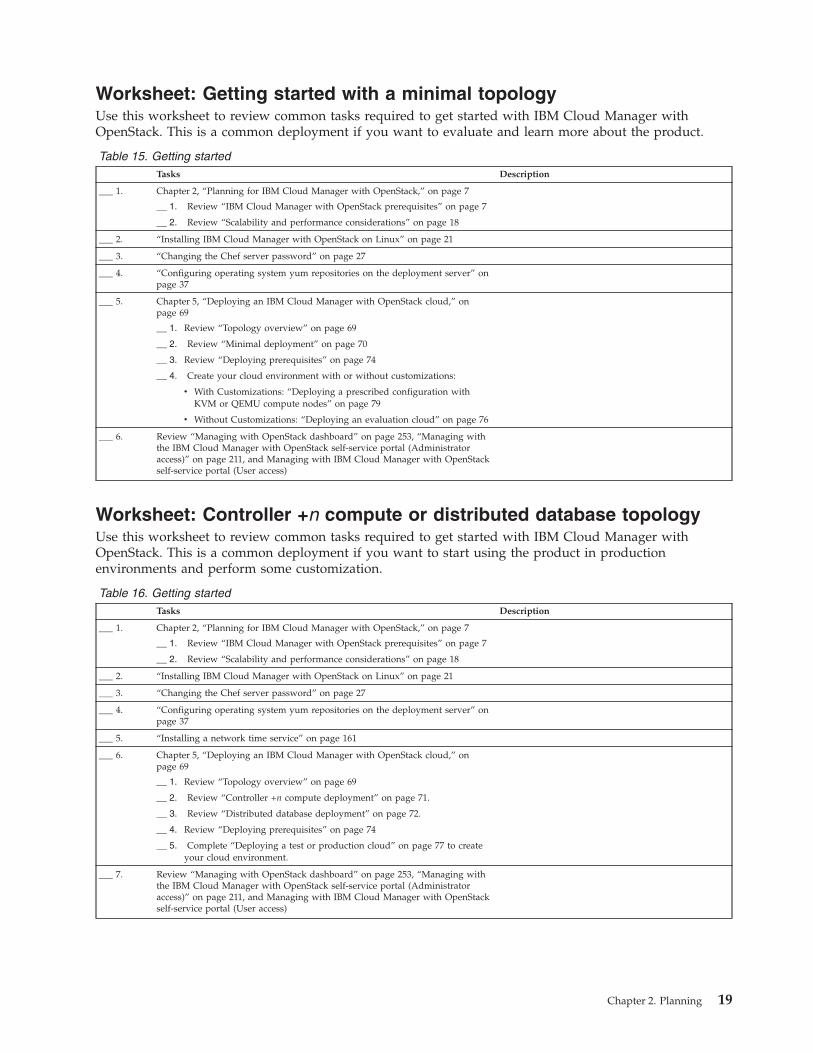
Worksheet: Getting started with a minimal topologyUse this worksheet to review common tasks required to get started with IBM Cloud Manager withOpenStack. This is a common deployment if you want to evaluate and learn more about the product.
Table 15. Getting startedTasks Description
___ 1. Chapter 2, “Planning for IBM Cloud Manager with OpenStack,” on page 7
__ 1. Review “IBM Cloud Manager with OpenStack prerequisites” on page 7
__ 2. Review “Scalability and performance considerations” on page 18
___ 2. “Installing IBM Cloud Manager with OpenStack on Linux” on page 21
___ 3. “Changing the Chef server password” on page 27
___ 4. “Configuring operating system yum repositories on the deployment server” onpage 37
___ 5. Chapter 5, “Deploying an IBM Cloud Manager with OpenStack cloud,” onpage 69
__ 1. Review “Topology overview” on page 69
__ 2. Review “Minimal deployment” on page 70
__ 3. Review “Deploying prerequisites” on page 74
__ 4. Create your cloud environment with or without customizations:
v With Customizations: “Deploying a prescribed configuration withKVM or QEMU compute nodes” on page 79
v Without Customizations: “Deploying an evaluation cloud” on page 76
___ 6. Review “Managing with OpenStack dashboard” on page 253, “Managing withthe IBM Cloud Manager with OpenStack self-service portal (Administratoraccess)” on page 211, and Managing with IBM Cloud Manager with OpenStackself-service portal (User access)
Worksheet: Controller +n compute or distributed database topologyUse this worksheet to review common tasks required to get started with IBM Cloud Manager withOpenStack. This is a common deployment if you want to start using the product in productionenvironments and perform some customization.
Table 16. Getting startedTasks Description
___ 1. Chapter 2, “Planning for IBM Cloud Manager with OpenStack,” on page 7
__ 1. Review “IBM Cloud Manager with OpenStack prerequisites” on page 7
__ 2. Review “Scalability and performance considerations” on page 18
___ 2. “Installing IBM Cloud Manager with OpenStack on Linux” on page 21
___ 3. “Changing the Chef server password” on page 27
___ 4. “Configuring operating system yum repositories on the deployment server” onpage 37
___ 5. “Installing a network time service” on page 161
___ 6. Chapter 5, “Deploying an IBM Cloud Manager with OpenStack cloud,” onpage 69
__ 1. Review “Topology overview” on page 69
__ 2. Review “Controller +n compute deployment” on page 71.
__ 3. Review “Distributed database deployment” on page 72.
__ 4. Review “Deploying prerequisites” on page 74
__ 5. Complete “Deploying a test or production cloud” on page 77 to createyour cloud environment.
___ 7. Review “Managing with OpenStack dashboard” on page 253, “Managing withthe IBM Cloud Manager with OpenStack self-service portal (Administratoraccess)” on page 211, and Managing with IBM Cloud Manager with OpenStackself-service portal (User access)
Chapter 2. Planning 19

20 IBM Cloud Manager with OpenStack: Administrator Guide, version 4.2
Chapter 3. Installing and uninstalling IBM Cloud Manager withOpenStack
Use the following topics to install and uninstall IBM Cloud Manager with OpenStack according to yourenvironment configuration.
Important: If you have a previous release that is installed on the deployment server, then IBM CloudManager with OpenStack upgrades the deployment server to version 4.2. It is recommended that youback up the deployment server before you upgrade to the current release. For more information, see“Backing up and restoring the deployment server” on page 256.
Installing IBM Cloud Manager with OpenStack on LinuxInstalling IBM Cloud Manager with OpenStack on the deployment server is the first step in the processof setting up your cloud.
When you install IBM Cloud Manager with OpenStack the installation process sets up the system as adeployment server. The installation process completes the following tasks:v Installs and configures the chef-serverv Installs the IBM OpenStack RPM files in a yum repository on the deployment serverv Uploads the OpenStack cookbooks, roles, data bags and sample environments to the chef-serverv Installs an IBM extension to the Chef knife command that enables IBM OpenStack topology
deployments
Installing IBM Cloud Manager with OpenStack on Linux by usingconsole installationYou can install IBM Cloud Manager with OpenStack on Linux by using a console.
Before you begin
The hostname for the deployment server must meet the following requirements:v The host where you install the management server must have a fully qualified domain name that
includes the domain suffix. For example, a fully qualified domain name is, mydeploymentserver.ibm.com,not mydeploymentserver. To verify that the deployment system hostname is a fully qualified domainname, run the following command:$ hostname
If the hostname is a fully qualified domain name, it will return something like:
$ mydeploymentserver.ibm.com
v The hostname must be resolvable. Add the hostname for the deployment server to the DNS system. Toverify that a hostname is resolvable, run the following command:$ hostname -f
If the hostname is resolvable it will return something like:
$ mydeploymentserver.ibm.com
© Copyright IBM Corp. 2012, 2014 21
If the hostname is not resolvable, refer to the networking documentation for the platform to get specificguidance on how to add the hostname to the DNS system.
Important: You need root authority to run the installer.
The product installer requires a functional Upstart environment. Upstart is used to manage the servicestate of the Chef server.
Note: This may not be the case in Docker containers or chroot environments that are common indeployment phases that use Anaconda/Kickstart.You can verify that Upstart is running with the following command:initctl list
About this task
To install IBM Cloud Manager with OpenStack, follow these steps:
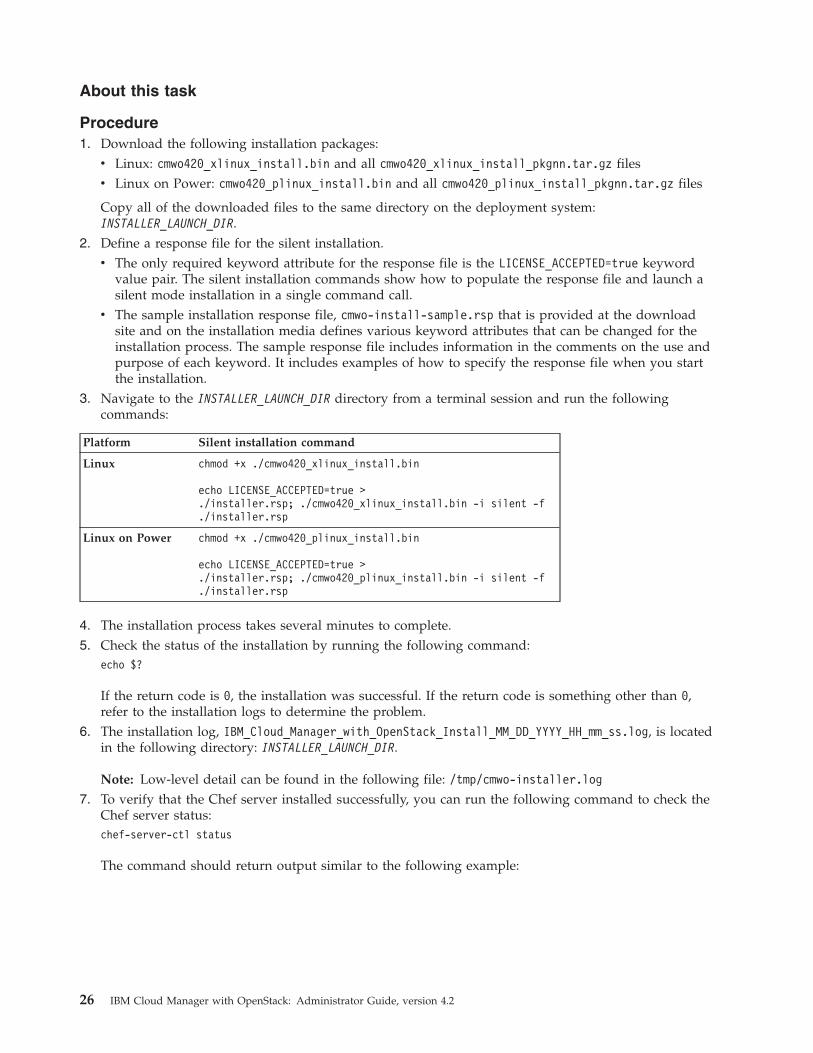
Procedure1. Download the following installation packages:
v Linux: cmwo420_xlinux_install.bin and all cmwo420_xlinux_install_pkgnn.tar.gz filesv Linux on Power: cmwo420_plinux_install.bin and all cmwo420_plinux_install_pkgnn.tar.gz files
Copy all of the downloaded files to the same directory on the deployment system:INSTALLER_LAUNCH_DIR.
2. Optional: You can define a response file for the silent installation. The sample installation responsefile, cmwo-install-sample.rsp that is provided at the download site and on the installation mediadefines various keyword attributes that can be changed for the installation process. The sampleresponse file includes information in the comments on the use and purpose of each keyword. Itincludes examples of how to specify the response file when you start the installation.
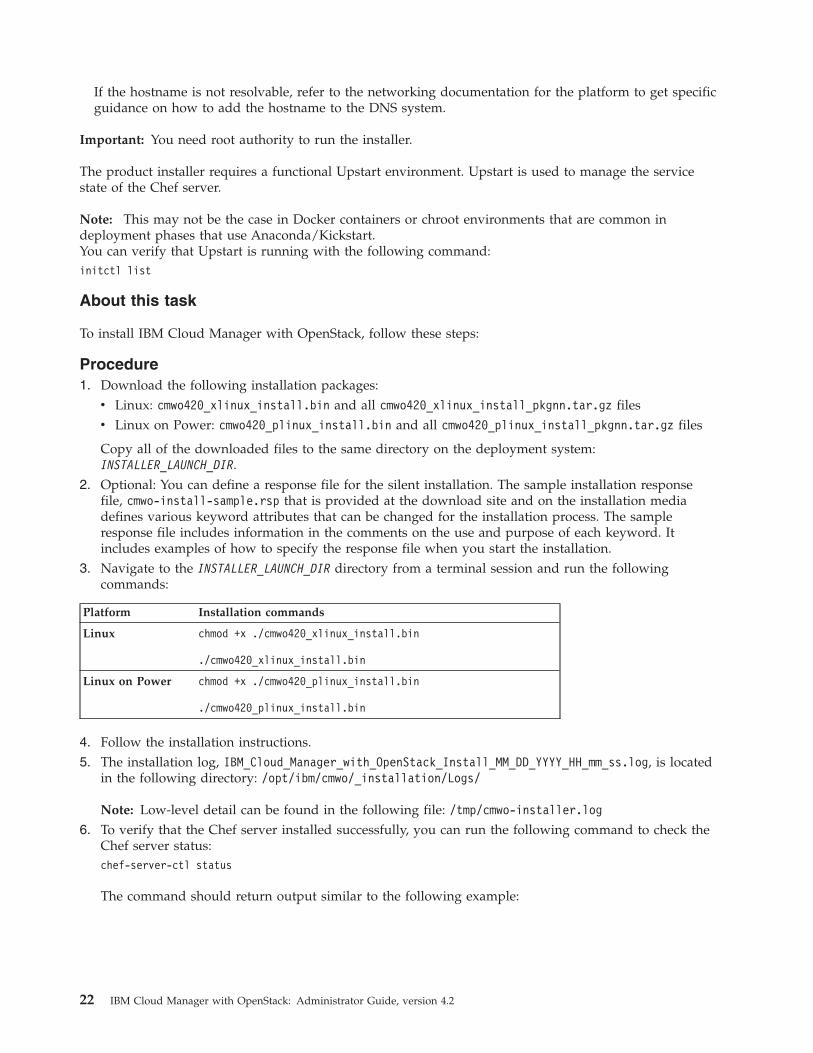
3. Navigate to the INSTALLER_LAUNCH_DIR directory from a terminal session and run the followingcommands:
Platform Installation commands
Linux chmod +x ./cmwo420_xlinux_install.bin
./cmwo420_xlinux_install.bin
Linux on Power chmod +x ./cmwo420_plinux_install.bin
./cmwo420_plinux_install.bin
4. Follow the installation instructions.5. The installation log, IBM_Cloud_Manager_with_OpenStack_Install_MM_DD_YYYY_HH_mm_ss.log, is located
in the following directory: /opt/ibm/cmwo/_installation/Logs/
Note: Low-level detail can be found in the following file: /tmp/cmwo-installer.log6. To verify that the Chef server installed successfully, you can run the following command to check the
Chef server status:chef-server-ctl status
The command should return output similar to the following example:
22 IBM Cloud Manager with OpenStack: Administrator Guide, version 4.2

[root@elvis-chef3 �]# chef-server-ctl statusrun: bookshelf: (pid 17198) 201s; run: log: (pid 17197) 201srun: chef-expander: (pid 17145) 207s; run: log: (pid 17144) 207srun: chef-server-webui: (pid 17357) 187s; run: log: (pid 17356) 187srun: chef-solr: (pid 17112) 209s; run: log: (pid 17111) 209srun: erchef: (pid 17535) 180s; run: log: (pid 17239) 199srun: nginx: (pid 17518) 181s; run: log: (pid 17517) 181srun: postgresql: (pid 17015) 220s; run: log: (pid 17014) 220srun: rabbitmq: (pid 16685) 236s; run: log: (pid 16684) 236s
What to do next
When the installation completes, the components that are necessary for creating a cloud environment areinstalled. Continue with the following steps to create your cloud.1.
Important: Download and install the latest fix pack for the IBM Cloud Manager with OpenStack fromFix Central. For more information, see “Getting fixes from Fix Central” on page 297.
2. Change the Chef server password.3. Create an operating system yum repository.4. Select and deploy a topology for your cloud configuration.
Installing IBM Cloud Manager with OpenStack on Linux by usinggraphical installationYou can install IBM Cloud Manager with OpenStack on Linux by using a graphical user interface.
Before you begin
The hostname for the deployment server must meet the following requirements:v The host where you install the management server must have a fully qualified domain name that
includes the domain suffix. For example, a fully qualified domain name is, mydeploymentserver.ibm.com,not mydeploymentserver. To verify that the deployment system hostname is a fully qualified domainname, run the following command:$ hostname
If the hostname is a fully qualified domain name, it will return something like:
$ mydeploymentserver.ibm.com
v The hostname must be resolvable. Add the hostname for the deployment server to the DNS system. Toverify that a hostname is resolvable, run the following command:$ hostname -f
If the hostname is resolvable it will return something like:
$ mydeploymentserver.ibm.com
If the hostname is not resolvable, refer to the networking documentation for the platform to get specificguidance on how to add the hostname to the DNS system.
Important: You need root authority to run the installer.
Chapter 3. Installing and uninstalling 23

The product installer requires a functional Upstart environment. Upstart is used to manage the servicestate of the Chef server.
Note: This may not be the case in Docker containers or chroot environments that are common indeployment phases that use Anaconda/Kickstart.You can verify that Upstart is running with the following command:initctl list
About this task
To install IBM Cloud Manager with OpenStack, follow these steps:
Procedure1. Download the following installation packages:
v Linux: cmwo420_xlinux_install.bin and all cmwo420_xlinux_install_pkgnn.tar.gz filesv Linux on Power: cmwo420_plinux_install.bin and all cmwo420_plinux_install_pkgnn.tar.gz files
Copy all of the downloaded files to the same directory on the deployment system:INSTALLER_LAUNCH_DIR.
2. Optional: You can define a response file for the silent installation. The sample installation responsefile, cmwo-install-sample.rsp that is provided at the download site and on the installation mediadefines various keyword attributes that can be changed for the installation process. The sampleresponse file includes information in the comments on the use and purpose of each keyword. Itincludes examples of how to specify the response file when you start the installation.
3. Navigate to the INSTALLER_LAUNCH_DIR directory from a terminal session and run the followingcommands:
Platform Installation commands
Linux chmod +x ./cmwo420_xlinux_install.bin
./cmwo420_xlinux_install.bin -i gui
Linux on Power chmod +x ./cmwo420_plinux_install.bin
./cmwo420_plinux_install.bin -i gui
4. Follow the installation instructions.5. The installation log, IBM_Cloud_Manager_with_OpenStack_Install_MM_DD_YYYY_HH_mm_ss.log, is located
in the following directory: /opt/ibm/cmwo/_installation/Logs/
Note: Low-level detail can be found in the following file: /tmp/cmwo-installer.log6. To verify that the Chef server installed successfully, you can run the following command to check the
Chef server status:chef-server-ctl status
The command should return output similar to the following example:
[root@elvis-chef3 �]# chef-server-ctl statusrun: bookshelf: (pid 17198) 201s; run: log: (pid 17197) 201srun: chef-expander: (pid 17145) 207s; run: log: (pid 17144) 207srun: chef-server-webui: (pid 17357) 187s; run: log: (pid 17356) 187srun: chef-solr: (pid 17112) 209s; run: log: (pid 17111) 209srun: erchef: (pid 17535) 180s; run: log: (pid 17239) 199srun: nginx: (pid 17518) 181s; run: log: (pid 17517) 181srun: postgresql: (pid 17015) 220s; run: log: (pid 17014) 220srun: rabbitmq: (pid 16685) 236s; run: log: (pid 16684) 236s
24 IBM Cloud Manager with OpenStack: Administrator Guide, version 4.2
What to do next
When the installation completes, the components that are necessary for creating a cloud environment areinstalled. Continue with the following steps to create your cloud.1.
Important: Download and install the latest fix pack for the IBM Cloud Manager with OpenStack fromFix Central. For more information, see “Getting fixes from Fix Central” on page 297.
2. Change the Chef server password.3. Create an operating system yum repository.4. Select and deploy a topology for your cloud configuration.
Installing IBM Cloud Manager with OpenStack on Linux by using silentinstallationYou can use a response file to install IBM Cloud Manager with OpenStack on Linux silently.
Before you begin
The hostname for the deployment server must meet the following requirements:v The host where you install the management server must have a fully qualified domain name that
includes the domain suffix. For example, a fully qualified domain name is, mydeploymentserver.ibm.com,not mydeploymentserver. To verify that the deployment system hostname is a fully qualified domainname, run the following command:$ hostname
If the hostname is a fully qualified domain name, it will return something like:
$ mydeploymentserver.ibm.com
v The hostname must be resolvable. Add the hostname for the deployment server to the DNS system. Toverify that a hostname is resolvable, run the following command:$ hostname -f
If the hostname is resolvable it will return something like:
$ mydeploymentserver.ibm.com
If the hostname is not resolvable, refer to the networking documentation for the platform to get specificguidance on how to add the hostname to the DNS system.
Important: You need root authority to run the installer.
The product installer requires a functional Upstart environment. Upstart is used to manage the servicestate of the Chef server.
Note: This may not be the case in Docker containers or chroot environments that are common indeployment phases that use Anaconda/Kickstart.You can verify that Upstart is running with the following command:initctl list
Chapter 3. Installing and uninstalling 25
About this task
Procedure1. Download the following installation packages:
v Linux: cmwo420_xlinux_install.bin and all cmwo420_xlinux_install_pkgnn.tar.gz filesv Linux on Power: cmwo420_plinux_install.bin and all cmwo420_plinux_install_pkgnn.tar.gz files
Copy all of the downloaded files to the same directory on the deployment system:INSTALLER_LAUNCH_DIR.
2. Define a response file for the silent installation.v The only required keyword attribute for the response file is the LICENSE_ACCEPTED=true keyword
value pair. The silent installation commands show how to populate the response file and launch asilent mode installation in a single command call.
v The sample installation response file, cmwo-install-sample.rsp that is provided at the downloadsite and on the installation media defines various keyword attributes that can be changed for theinstallation process. The sample response file includes information in the comments on the use andpurpose of each keyword. It includes examples of how to specify the response file when you startthe installation.
3. Navigate to the INSTALLER_LAUNCH_DIR directory from a terminal session and run the followingcommands:
Platform Silent installation command
Linux chmod +x ./cmwo420_xlinux_install.bin
echo LICENSE_ACCEPTED=true >./installer.rsp; ./cmwo420_xlinux_install.bin -i silent -f./installer.rsp
Linux on Power chmod +x ./cmwo420_plinux_install.bin
echo LICENSE_ACCEPTED=true >./installer.rsp; ./cmwo420_plinux_install.bin -i silent -f./installer.rsp
4. The installation process takes several minutes to complete.5. Check the status of the installation by running the following command:
echo $?
If the return code is 0, the installation was successful. If the return code is something other than 0,refer to the installation logs to determine the problem.
6. The installation log, IBM_Cloud_Manager_with_OpenStack_Install_MM_DD_YYYY_HH_mm_ss.log, is locatedin the following directory: INSTALLER_LAUNCH_DIR.
Note: Low-level detail can be found in the following file: /tmp/cmwo-installer.log7. To verify that the Chef server installed successfully, you can run the following command to check the
Chef server status:chef-server-ctl status
The command should return output similar to the following example:
26 IBM Cloud Manager with OpenStack: Administrator Guide, version 4.2
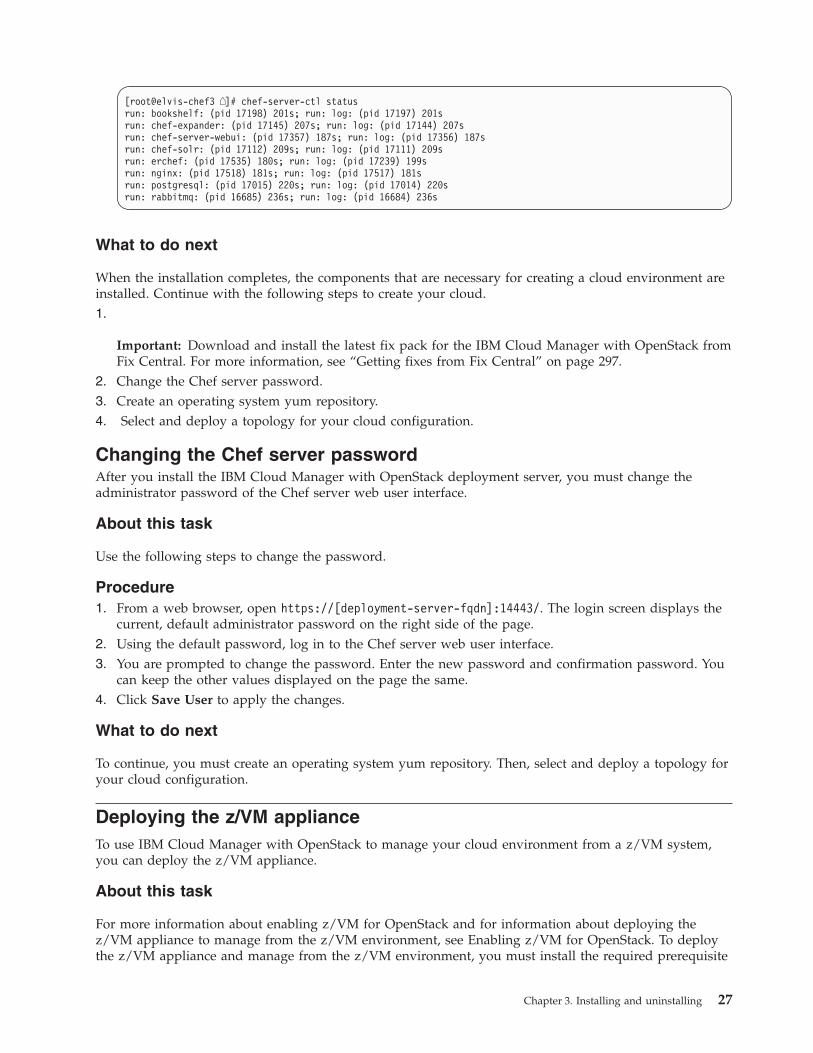
[root@elvis-chef3 �]# chef-server-ctl statusrun: bookshelf: (pid 17198) 201s; run: log: (pid 17197) 201srun: chef-expander: (pid 17145) 207s; run: log: (pid 17144) 207srun: chef-server-webui: (pid 17357) 187s; run: log: (pid 17356) 187srun: chef-solr: (pid 17112) 209s; run: log: (pid 17111) 209srun: erchef: (pid 17535) 180s; run: log: (pid 17239) 199srun: nginx: (pid 17518) 181s; run: log: (pid 17517) 181srun: postgresql: (pid 17015) 220s; run: log: (pid 17014) 220srun: rabbitmq: (pid 16685) 236s; run: log: (pid 16684) 236s
What to do next
When the installation completes, the components that are necessary for creating a cloud environment areinstalled. Continue with the following steps to create your cloud.1.
Important: Download and install the latest fix pack for the IBM Cloud Manager with OpenStack fromFix Central. For more information, see “Getting fixes from Fix Central” on page 297.
2. Change the Chef server password.3. Create an operating system yum repository.4. Select and deploy a topology for your cloud configuration.
Changing the Chef server passwordAfter you install the IBM Cloud Manager with OpenStack deployment server, you must change theadministrator password of the Chef server web user interface.
About this task
Use the following steps to change the password.
Procedure1. From a web browser, open https://[deployment-server-fqdn]:14443/. The login screen displays the
current, default administrator password on the right side of the page.2. Using the default password, log in to the Chef server web user interface.3. You are prompted to change the password. Enter the new password and confirmation password. You
can keep the other values displayed on the page the same.4. Click Save User to apply the changes.
What to do next
To continue, you must create an operating system yum repository. Then, select and deploy a topology foryour cloud configuration.
Deploying the z/VM applianceTo use IBM Cloud Manager with OpenStack to manage your cloud environment from a z/VM system,you can deploy the z/VM appliance.
About this task
For more information about enabling z/VM for OpenStack and for information about deploying thez/VM appliance to manage from the z/VM environment, see Enabling z/VM for OpenStack. To deploythe z/VM appliance and manage from the z/VM environment, you must install the required prerequisite
Chapter 3. Installing and uninstalling 27
PTFs. For more information about the PTFs, see the Service Information related to IBM Cloud Managerwith OpenStack for System z.
Installing and uninstalling the IBM Cloud Manager with OpenStackHyper-V AgentIBM Cloud Manager with OpenStack can manage Microsoft Hyper-V hypervisors from OpenStacktechnology. To manage these hypervisors, an IBM Cloud Manager with OpenStack Hyper-V Agent mustbe installed on the Hyper-V endpoint server.
This IBM Cloud Manager with OpenStack Hyper-V Agent contains packaging of the OpenStacktechnology that is required to provision to the Hyper-V server. The IBM Cloud Manager with OpenStackHyper-V Agent can be installed on a Microsoft Hyper-V Server 2012 R2 or Microsoft Windows Server2012 R2 with the Hyper-V role enabled. The IBM Cloud Manager with OpenStack Hyper-V Agent mustbe installed on all managed compute nodes. The IBM Cloud Manager with OpenStack Hyper-V Agentinstallation is packaged as a Microsoft Windows Installer that can be run as an installation wizard, or insilent mode. This installation installs the required OpenStack components on to the Hyper-V server andconfigures them to run as Microsoft Windows services.
IBM Cloud Manager with OpenStack Hyper-V Agent InstallationPrerequisitesUse the following steps to prepare your environment for installation.
Preparing Your Hyper-V Server for Installation
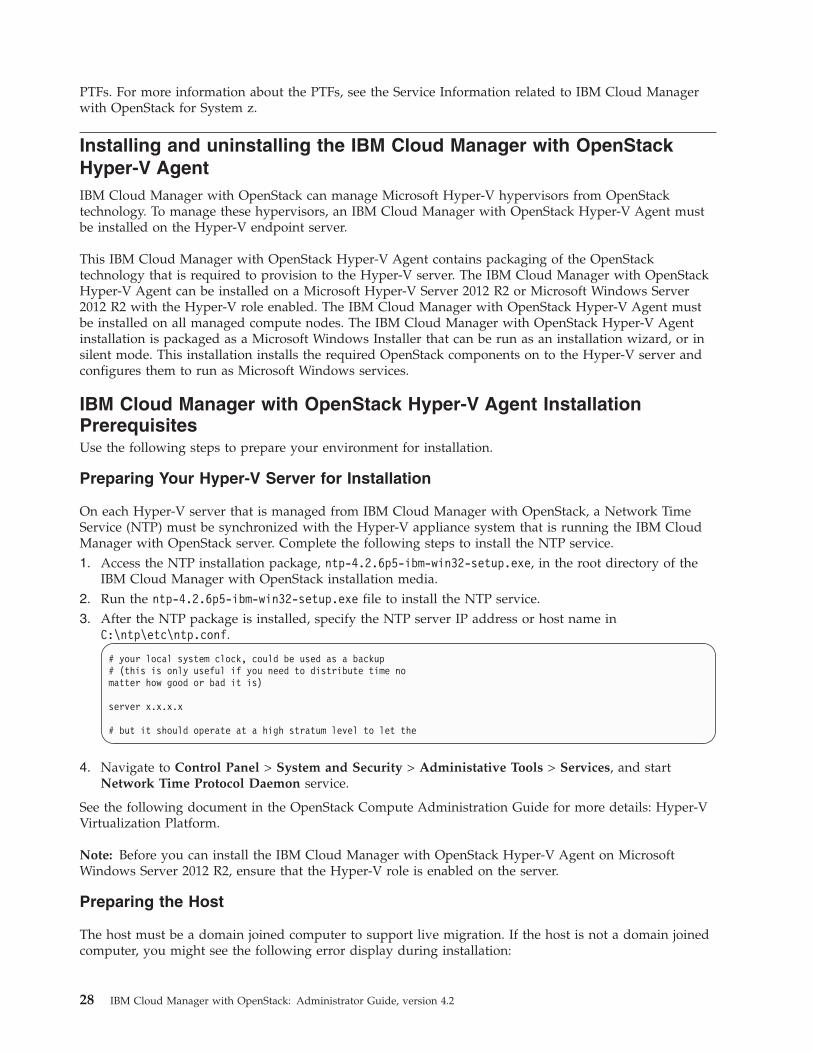
On each Hyper-V server that is managed from IBM Cloud Manager with OpenStack, a Network TimeService (NTP) must be synchronized with the Hyper-V appliance system that is running the IBM CloudManager with OpenStack server. Complete the following steps to install the NTP service.1. Access the NTP installation package, ntp-4.2.6p5-ibm-win32-setup.exe, in the root directory of the
IBM Cloud Manager with OpenStack installation media.2. Run the ntp-4.2.6p5-ibm-win32-setup.exe file to install the NTP service.3. After the NTP package is installed, specify the NTP server IP address or host name in
C:\ntp\etc\ntp.conf.
# your local system clock, could be used as a backup# (this is only useful if you need to distribute time nomatter how good or bad it is)
server x.x.x.x
# but it should operate at a high stratum level to let the
4. Navigate to Control Panel > System and Security > Administative Tools > Services, and startNetwork Time Protocol Daemon service.
See the following document in the OpenStack Compute Administration Guide for more details: Hyper-VVirtualization Platform.
Note: Before you can install the IBM Cloud Manager with OpenStack Hyper-V Agent on MicrosoftWindows Server 2012 R2, ensure that the Hyper-V role is enabled on the server.
Preparing the Host
The host must be a domain joined computer to support live migration. If the host is not a domain joinedcomputer, you might see the following error display during installation:
28 IBM Cloud Manager with OpenStack: Administrator Guide, version 4.2

Failed to modify service settings. Live migrations can be enabled only on a domain joinedcomputer.
Preparing the User
Add the user who installs the Hyper-V Agent for IBM Cloud Manager with OpenStack to the Hyper-VAdministrators group.
Note: If you are creating the user profile for the first time, the Hyper-V server must be restarted beforeyou install the IBM Cloud Manager with OpenStack Hyper-V Agent.
If the user plans to uninstall the Hyper-V Agent in the future, ensure that the user has permission to eachof the installation directories on the system.
Installing the IBM Cloud Manager with OpenStack Hyper-V AgentFollow these steps to install the IBM Cloud Manager with OpenStack Hyper-V Agent on MicrosoftWindows Server 2012 R2 or Microsoft Hyper-V Server 2012 R2.
Overview of the installation
The installation completes the following steps:v Create a product installation directoryv Create a Hyper-V external virtual switch (optional)v Configure Hyper-V Live Migration settings for this host (optional)v Install an independent Python environment to avoid conflicts with existing applications
Note: This embedded Python environment is only intended for use by the IBM Cloud Manager withOpenStack Hyper-V Agent. Do not attempt to access this environment from any other application. Thisindependent environment is designed to coexist with any preexisting Python environments that mightalready be installed on the system. Do not install new Python modules into the embedded Pythonenvironment.
v Install the required Python modules/packages required by the applicationv Install and configure the OpenStack Nova Compute servicev Install and configure the OpenStack Hyper-V Neutron agent for networkingv Register two Windows services, which are set to auto-start by default:
– IBM Cloud Manager with OpenStack Network Service
– IBM Cloud Manager with OpenStack Compute Service
Important:
v The 4.2 Hyper-V agent installer supports two message queue types, RabbitMQ and Qpid. You mustselect a message queue type that is consistent with the controller node.
v IBM Cloud Manager with OpenStack by default enables Platform Resource Scheduler in the controllernode. To complete the installation, update nova.conf file by appending ibm_notifications tonotification_topics like “notification_topics=notifications,ibm_notifications”, and then restart theIBM Cloud Manager with OpenStack compute service.
v If you migrate IBM SmartCloud® Entry 3.2 to IBM Cloud Manager with OpenStack 4.1, the neutronpassword is neutron by default. If you install a new Hyper-V Agent, you must change the defaultpassword for neutron to neutron to be consistent with the controller node.
v The 3.1 Hyper-V agent installer does not prevent users from installing a previous version over themore recent Hyper-V agent.
Chapter 3. Installing and uninstalling 29
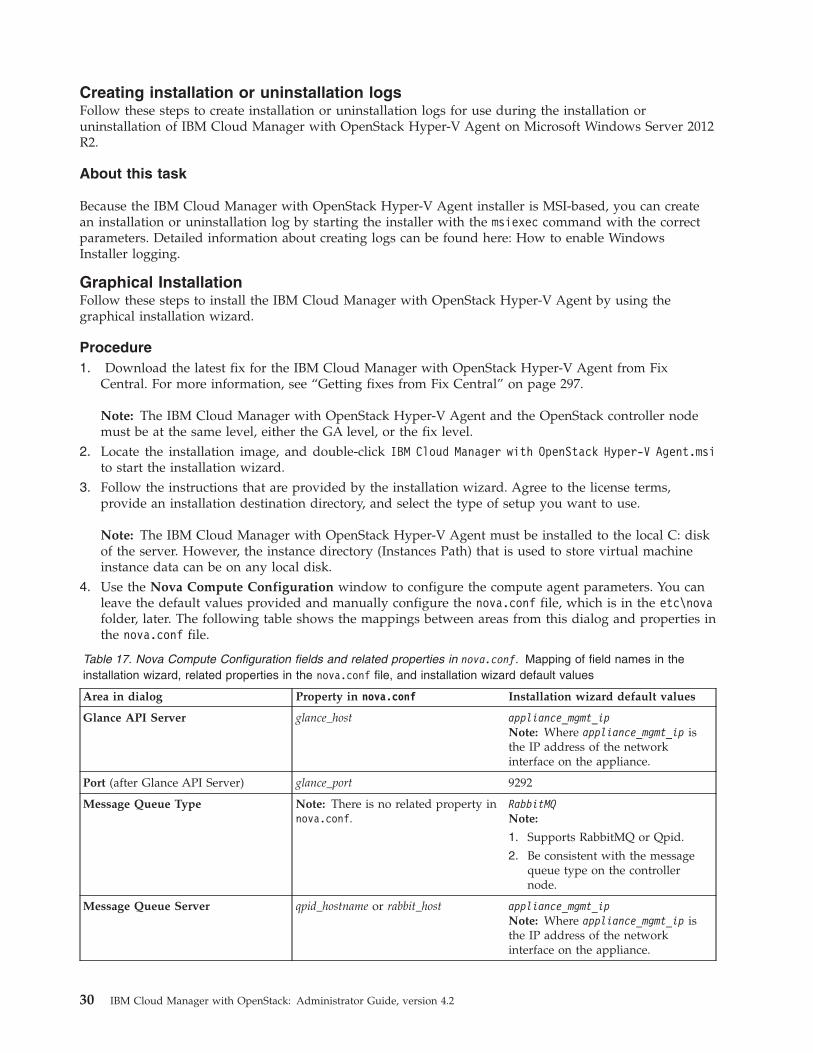
Creating installation or uninstallation logsFollow these steps to create installation or uninstallation logs for use during the installation oruninstallation of IBM Cloud Manager with OpenStack Hyper-V Agent on Microsoft Windows Server 2012R2.
About this task
Because the IBM Cloud Manager with OpenStack Hyper-V Agent installer is MSI-based, you can createan installation or uninstallation log by starting the installer with the msiexec command with the correctparameters. Detailed information about creating logs can be found here: How to enable WindowsInstaller logging.
Graphical InstallationFollow these steps to install the IBM Cloud Manager with OpenStack Hyper-V Agent by using thegraphical installation wizard.
Procedure1. Download the latest fix for the IBM Cloud Manager with OpenStack Hyper-V Agent from Fix
Central. For more information, see “Getting fixes from Fix Central” on page 297.
Note: The IBM Cloud Manager with OpenStack Hyper-V Agent and the OpenStack controller nodemust be at the same level, either the GA level, or the fix level.
2. Locate the installation image, and double-click IBM Cloud Manager with OpenStack Hyper-V Agent.msito start the installation wizard.
3. Follow the instructions that are provided by the installation wizard. Agree to the license terms,provide an installation destination directory, and select the type of setup you want to use.
Note: The IBM Cloud Manager with OpenStack Hyper-V Agent must be installed to the local C: diskof the server. However, the instance directory (Instances Path) that is used to store virtual machineinstance data can be on any local disk.
4. Use the Nova Compute Configuration window to configure the compute agent parameters. You canleave the default values provided and manually configure the nova.conf file, which is in the etc\novafolder, later. The following table shows the mappings between areas from this dialog and properties inthe nova.conf file.
Table 17. Nova Compute Configuration fields and related properties in nova.conf. Mapping of field names in theinstallation wizard, related properties in the nova.conf file, and installation wizard default values
Area in dialog Property in nova.conf Installation wizard default values
Glance API Server glance_host appliance_mgmt_ipNote: Where appliance_mgmt_ip isthe IP address of the networkinterface on the appliance.
Port (after Glance API Server) glance_port 9292
Message Queue Type Note: There is no related property innova.conf.
RabbitMQNote:
1. Supports RabbitMQ or Qpid.
2. Be consistent with the messagequeue type on the controllernode.
Message Queue Server qpid_hostname or rabbit_host appliance_mgmt_ipNote: Where appliance_mgmt_ip isthe IP address of the networkinterface on the appliance.
30 IBM Cloud Manager with OpenStack: Administrator Guide, version 4.2
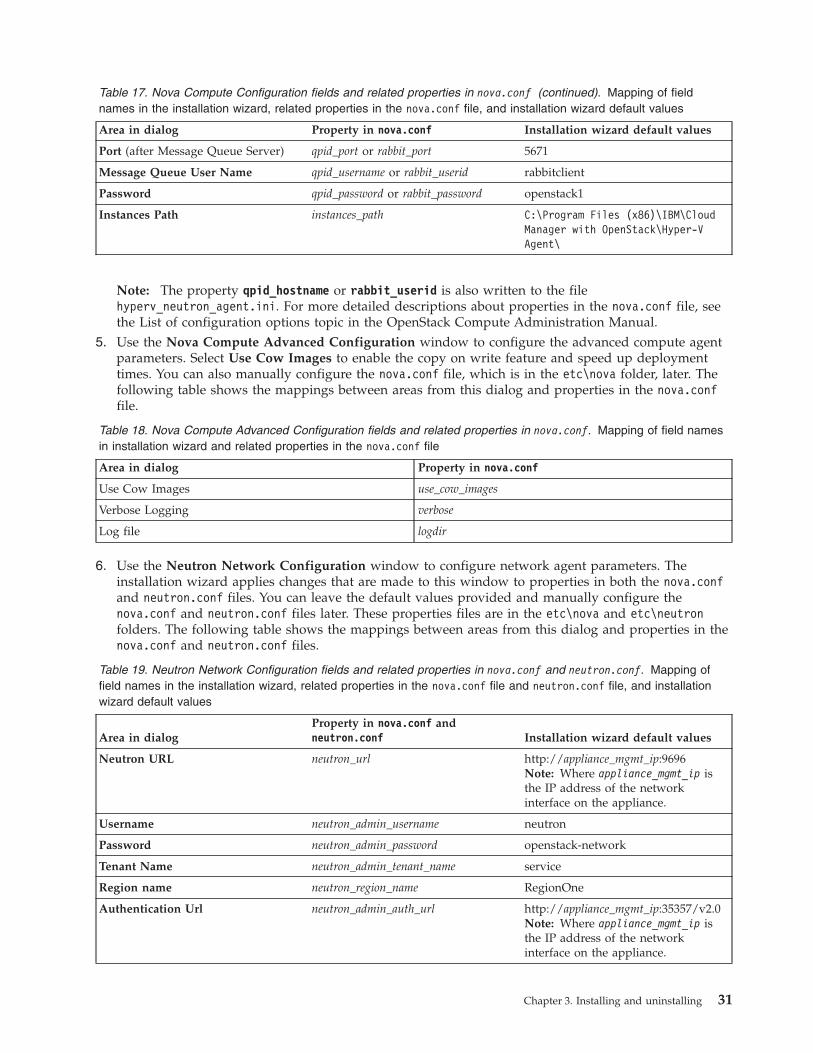
Table 17. Nova Compute Configuration fields and related properties in nova.conf (continued). Mapping of fieldnames in the installation wizard, related properties in the nova.conf file, and installation wizard default values
Area in dialog Property in nova.conf Installation wizard default values
Port (after Message Queue Server) qpid_port or rabbit_port 5671
Message Queue User Name qpid_username or rabbit_userid rabbitclient
Password qpid_password or rabbit_password openstack1
Instances Path instances_path C:\Program Files (x86)\IBM\CloudManager with OpenStack\Hyper-VAgent\
Note: The property qpid_hostname or rabbit_userid is also written to the filehyperv_neutron_agent.ini. For more detailed descriptions about properties in the nova.conf file, seethe List of configuration options topic in the OpenStack Compute Administration Manual.
5. Use the Nova Compute Advanced Configuration window to configure the advanced compute agentparameters. Select Use Cow Images to enable the copy on write feature and speed up deploymenttimes. You can also manually configure the nova.conf file, which is in the etc\nova folder, later. Thefollowing table shows the mappings between areas from this dialog and properties in the nova.conffile.
Table 18. Nova Compute Advanced Configuration fields and related properties in nova.conf. Mapping of field namesin installation wizard and related properties in the nova.conf file
Area in dialog Property in nova.conf
Use Cow Images use_cow_images
Verbose Logging verbose
Log file logdir
6. Use the Neutron Network Configuration window to configure network agent parameters. Theinstallation wizard applies changes that are made to this window to properties in both the nova.confand neutron.conf files. You can leave the default values provided and manually configure thenova.conf and neutron.conf files later. These properties files are in the etc\nova and etc\neutronfolders. The following table shows the mappings between areas from this dialog and properties in thenova.conf and neutron.conf files.
Table 19. Neutron Network Configuration fields and related properties in nova.conf and neutron.conf. Mapping offield names in the installation wizard, related properties in the nova.conf file and neutron.conf file, and installationwizard default values
Area in dialogProperty in nova.conf andneutron.conf Installation wizard default values
Neutron URL neutron_url http://appliance_mgmt_ip:9696Note: Where appliance_mgmt_ip isthe IP address of the networkinterface on the appliance.
Username neutron_admin_username neutron
Password neutron_admin_password openstack-network
Tenant Name neutron_admin_tenant_name service
Region name neutron_region_name RegionOne
Authentication Url neutron_admin_auth_url http://appliance_mgmt_ip:35357/v2.0Note: Where appliance_mgmt_ip isthe IP address of the networkinterface on the appliance.
Chapter 3. Installing and uninstalling 31
Note: The file, hyperv_neutron_agent.ini, is also updated in the background by the installer. Thefollowing properties are updated:v rpc_backend=neutron.openstack.common.rpc.impl_qpid or
neutron.openstack.common.rpc.impl_kombu, based on the message queue type that you select.v verbose=true
v debug=true
v control_exchange=neutron
v physical_network_vswitch_mappings = *:external
7. Use the Hyper-V Live Migration Settings window to configure the Live Migration settings for thehost.
Note: IBM Cloud Manager with OpenStack with Hyper-V supports a Shared nothing live migration.To use live migration, the Hyper-V server must belong a common domain. You can also skip this stepand configure the Hyper-V Live Migration setting manually later. See the following document in theOpenStack Compute Administration Guide for more details: Hyper-V Virtualization Platform
Note: When you provide a user name in the Nova compute service user field, ensure that the useryou select is a domain user.
8. Use the Virtual Switch Configuration window to configure Virtual Switch settings. For moreinformation about Hyper-V Switches, see the following topic:Hyper-V Virtual Switch Overview. If noexisting virtual switches are detected, create a new virtual switch. To add a new virtual switch, theremust be at least one physical network adapter that is not bound to any existing virtual switch. Tomanually determine whether a physical network adapter is available, you can use the PowerShellcommand get-networkadapter -physical' to see all physical network adapters. Next, you can use thePowerShell command get-vmswitch to see all network adapters that are already in use. A new virtualswitch must be exclusively associated with a physical network adapter. No two virtual switches canbe associated with the same physical network adapter on the host. See the following document in theOpenStack Compute Administration Guide for more details on using the PowerShell command:Hyper-V Virtualization Platform
Note: The Shared for management property determines whether the Hyper-V Agent can use thisphysical network adapter to manage network traffic.
9. After you complete the information in the installation wizard, the installation begins.
Silent installationBecause the IBM Cloud Manager with OpenStack Hyper-V Agent is installed by using the MicrosoftInstaller (MSI), you can start MSI directly without using the graphical installation wizard. This process iscalled silent (unattended) installation, and is useful for installing this program over a network on aremote system from a shared drive on a LAN server. Follow these steps to silently install IBM CloudManager with OpenStack Hyper-V Agent on Microsoft Windows Server 2012 R2.
Before you begin
If you choose to install silently, you must create an IBM Cloud Manager with OpenStack Hyper-V Agentsilent installation response file and use it to drive the installation. The file is addressed in the followingsections, and a sample response file is provided for reference
About this task
To install silently, you either provide installation parameters through the command line, or use an INI file(response file) to specify all the parameters in a single file. For both cases, use the msiexec command tostart the installation. For more information about this command, see Msiexec (command-line options)
32 IBM Cloud Manager with OpenStack: Administrator Guide, version 4.2
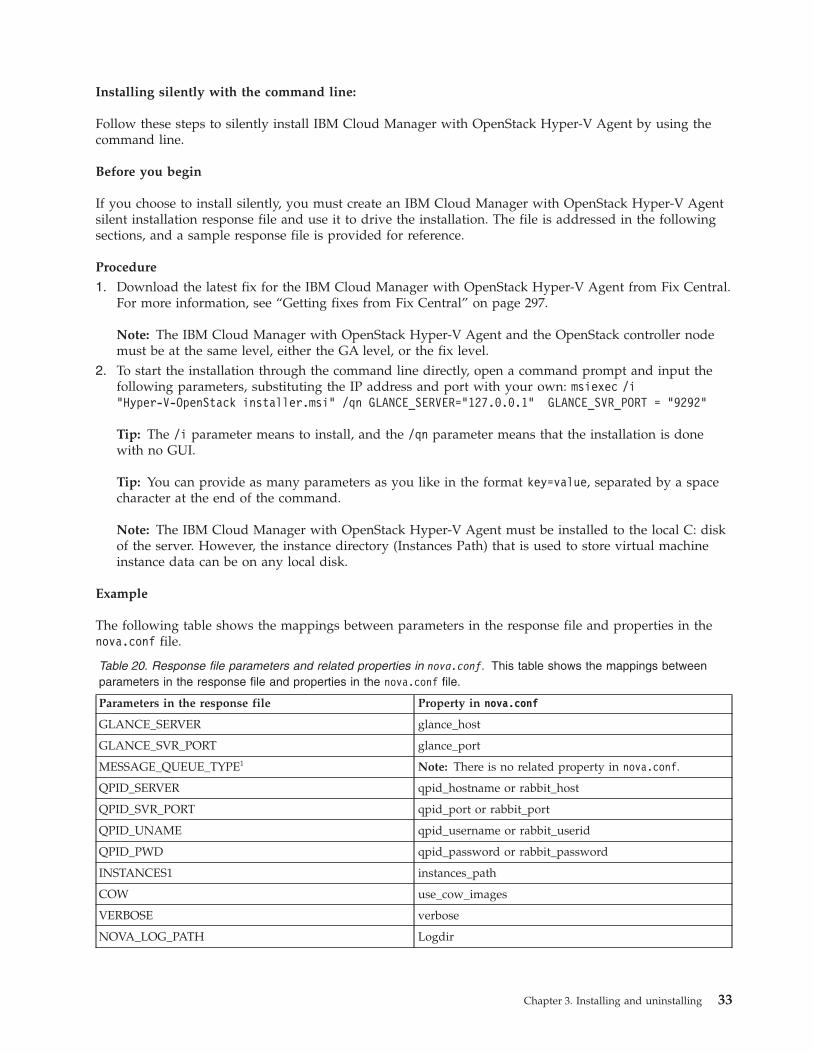
Installing silently with the command line:
Follow these steps to silently install IBM Cloud Manager with OpenStack Hyper-V Agent by using thecommand line.
Before you begin
If you choose to install silently, you must create an IBM Cloud Manager with OpenStack Hyper-V Agentsilent installation response file and use it to drive the installation. The file is addressed in the followingsections, and a sample response file is provided for reference.
Procedure
1. Download the latest fix for the IBM Cloud Manager with OpenStack Hyper-V Agent from Fix Central.For more information, see “Getting fixes from Fix Central” on page 297.
Note: The IBM Cloud Manager with OpenStack Hyper-V Agent and the OpenStack controller nodemust be at the same level, either the GA level, or the fix level.
2. To start the installation through the command line directly, open a command prompt and input thefollowing parameters, substituting the IP address and port with your own: msiexec /i"Hyper-V-OpenStack installer.msi" /qn GLANCE_SERVER="127.0.0.1" GLANCE_SVR_PORT = "9292"
Tip: The /i parameter means to install, and the /qn parameter means that the installation is donewith no GUI.
Tip: You can provide as many parameters as you like in the format key=value, separated by a spacecharacter at the end of the command.
Note: The IBM Cloud Manager with OpenStack Hyper-V Agent must be installed to the local C: diskof the server. However, the instance directory (Instances Path) that is used to store virtual machineinstance data can be on any local disk.
Example
The following table shows the mappings between parameters in the response file and properties in thenova.conf file.
Table 20. Response file parameters and related properties in nova.conf. This table shows the mappings betweenparameters in the response file and properties in the nova.conf file.
Parameters in the response file Property in nova.conf
GLANCE_SERVER glance_host
GLANCE_SVR_PORT glance_port
MESSAGE_QUEUE_TYPE1 Note: There is no related property in nova.conf.
QPID_SERVER qpid_hostname or rabbit_host
QPID_SVR_PORT qpid_port or rabbit_port
QPID_UNAME qpid_username or rabbit_userid
QPID_PWD qpid_password or rabbit_password
INSTANCES1 instances_path
COW use_cow_images
VERBOSE verbose
NOVA_LOG_PATH Logdir
Chapter 3. Installing and uninstalling 33
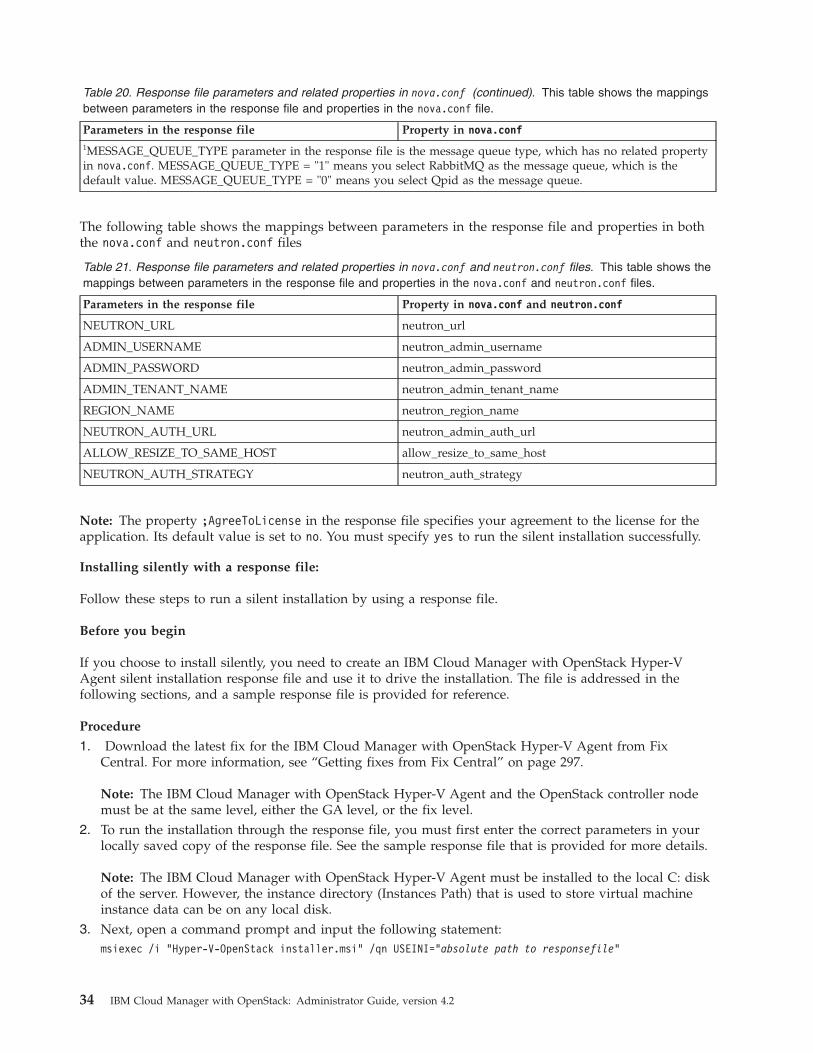
Table 20. Response file parameters and related properties in nova.conf (continued). This table shows the mappingsbetween parameters in the response file and properties in the nova.conf file.
Parameters in the response file Property in nova.conf1MESSAGE_QUEUE_TYPE parameter in the response file is the message queue type, which has no related propertyin nova.conf. MESSAGE_QUEUE_TYPE = "1" means you select RabbitMQ as the message queue, which is thedefault value. MESSAGE_QUEUE_TYPE = "0" means you select Qpid as the message queue.
The following table shows the mappings between parameters in the response file and properties in boththe nova.conf and neutron.conf files
Table 21. Response file parameters and related properties in nova.conf and neutron.conf files. This table shows themappings between parameters in the response file and properties in the nova.conf and neutron.conf files.
Parameters in the response file Property in nova.conf and neutron.conf
NEUTRON_URL neutron_url
ADMIN_USERNAME neutron_admin_username
ADMIN_PASSWORD neutron_admin_password
ADMIN_TENANT_NAME neutron_admin_tenant_name
REGION_NAME neutron_region_name
NEUTRON_AUTH_URL neutron_admin_auth_url
ALLOW_RESIZE_TO_SAME_HOST allow_resize_to_same_host
NEUTRON_AUTH_STRATEGY neutron_auth_strategy
Note: The property ;AgreeToLicense in the response file specifies your agreement to the license for theapplication. Its default value is set to no. You must specify yes to run the silent installation successfully.
Installing silently with a response file:
Follow these steps to run a silent installation by using a response file.
Before you begin
If you choose to install silently, you need to create an IBM Cloud Manager with OpenStack Hyper-VAgent silent installation response file and use it to drive the installation. The file is addressed in thefollowing sections, and a sample response file is provided for reference.
Procedure
1. Download the latest fix for the IBM Cloud Manager with OpenStack Hyper-V Agent from FixCentral. For more information, see “Getting fixes from Fix Central” on page 297.
Note: The IBM Cloud Manager with OpenStack Hyper-V Agent and the OpenStack controller nodemust be at the same level, either the GA level, or the fix level.
2. To run the installation through the response file, you must first enter the correct parameters in yourlocally saved copy of the response file. See the sample response file that is provided for more details.
Note: The IBM Cloud Manager with OpenStack Hyper-V Agent must be installed to the local C: diskof the server. However, the instance directory (Instances Path) that is used to store virtual machineinstance data can be on any local disk.
3. Next, open a command prompt and input the following statement:msiexec /i "Hyper-V-OpenStack installer.msi" /qn USEINI="absolute path to responsefile"
34 IBM Cloud Manager with OpenStack: Administrator Guide, version 4.2
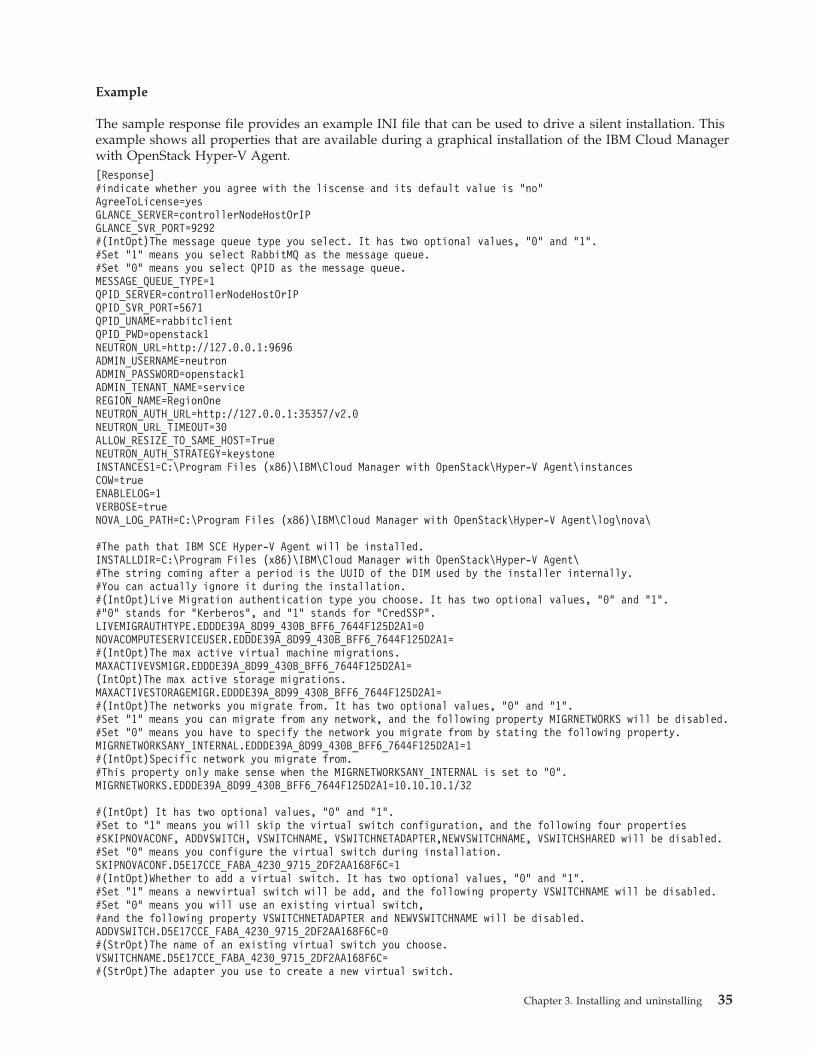
Example
The sample response file provides an example INI file that can be used to drive a silent installation. Thisexample shows all properties that are available during a graphical installation of the IBM Cloud Managerwith OpenStack Hyper-V Agent.[Response]#indicate whether you agree with the liscense and its default value is “no”AgreeToLicense=yesGLANCE_SERVER=controllerNodeHostOrIPGLANCE_SVR_PORT=9292#(IntOpt)The message queue type you select. It has two optional values, “0” and “1”.#Set “1” means you select RabbitMQ as the message queue.#Set “0” means you select QPID as the message queue.MESSAGE_QUEUE_TYPE=1QPID_SERVER=controllerNodeHostOrIPQPID_SVR_PORT=5671QPID_UNAME=rabbitclientQPID_PWD=openstack1NEUTRON_URL=http://127.0.0.1:9696ADMIN_USERNAME=neutronADMIN_PASSWORD=openstack1ADMIN_TENANT_NAME=serviceREGION_NAME=RegionOneNEUTRON_AUTH_URL=http://127.0.0.1:35357/v2.0NEUTRON_URL_TIMEOUT=30ALLOW_RESIZE_TO_SAME_HOST=TrueNEUTRON_AUTH_STRATEGY=keystoneINSTANCES1=C:\Program Files (x86)\IBM\Cloud Manager with OpenStack\Hyper-V Agent\instancesCOW=trueENABLELOG=1VERBOSE=trueNOVA_LOG_PATH=C:\Program Files (x86)\IBM\Cloud Manager with OpenStack\Hyper-V Agent\log\nova\
#The path that IBM SCE Hyper-V Agent will be installed.INSTALLDIR=C:\Program Files (x86)\IBM\Cloud Manager with OpenStack\Hyper-V Agent\#The string coming after a period is the UUID of the DIM used by the installer internally.#You can actually ignore it during the installation.#(IntOpt)Live Migration authentication type you choose. It has two optional values, “0” and “1”.#“0” stands for “Kerberos”, and “1” stands for “CredSSP”.LIVEMIGRAUTHTYPE.EDDDE39A_8D99_430B_BFF6_7644F125D2A1=0NOVACOMPUTESERVICEUSER.EDDDE39A_8D99_430B_BFF6_7644F125D2A1=#(IntOpt)The max active virtual machine migrations.MAXACTIVEVSMIGR.EDDDE39A_8D99_430B_BFF6_7644F125D2A1=(IntOpt)The max active storage migrations.MAXACTIVESTORAGEMIGR.EDDDE39A_8D99_430B_BFF6_7644F125D2A1=#(IntOpt)The networks you migrate from. It has two optional values, “0” and “1”.#Set “1” means you can migrate from any network, and the following property MIGRNETWORKS will be disabled.#Set “0” means you have to specify the network you migrate from by stating the following property.MIGRNETWORKSANY_INTERNAL.EDDDE39A_8D99_430B_BFF6_7644F125D2A1=1#(IntOpt)Specific network you migrate from.#This property only make sense when the MIGRNETWORKSANY_INTERNAL is set to “0”.MIGRNETWORKS.EDDDE39A_8D99_430B_BFF6_7644F125D2A1=10.10.10.1/32
#(IntOpt) It has two optional values, “0” and “1”.#Set to “1” means you will skip the virtual switch configuration, and the following four properties#SKIPNOVACONF, ADDVSWITCH, VSWITCHNAME, VSWITCHNETADAPTER,NEWVSWITCHNAME, VSWITCHSHARED will be disabled.#Set “0” means you configure the virtual switch during installation.SKIPNOVACONF.D5E17CCE_FABA_4230_9715_2DF2AA168F6C=1#(IntOpt)Whether to add a virtual switch. It has two optional values, “0” and “1”.#Set “1” means a newvirtual switch will be add, and the following property VSWITCHNAME will be disabled.#Set “0” means you will use an existing virtual switch,#and the following property VSWITCHNETADAPTER and NEWVSWITCHNAME will be disabled.ADDVSWITCH.D5E17CCE_FABA_4230_9715_2DF2AA168F6C=0#(StrOpt)The name of an existing virtual switch you choose.VSWITCHNAME.D5E17CCE_FABA_4230_9715_2DF2AA168F6C=#(StrOpt)The adapter you use to create a new virtual switch.
Chapter 3. Installing and uninstalling 35
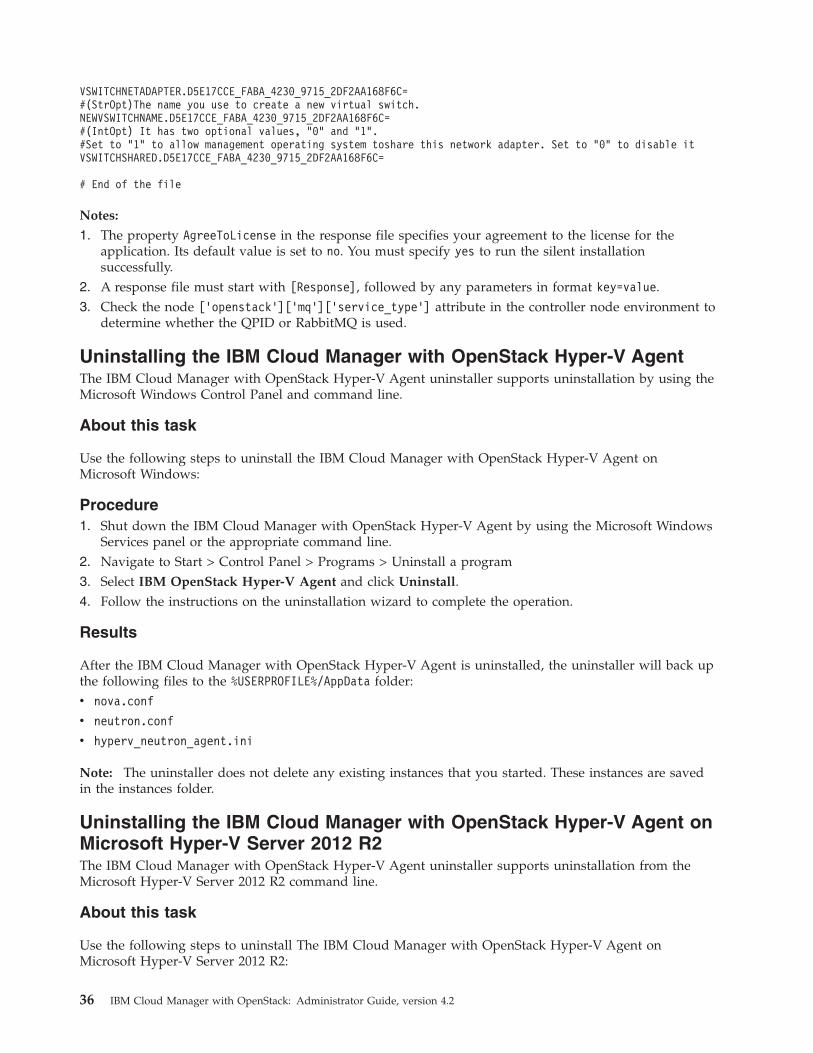
VSWITCHNETADAPTER.D5E17CCE_FABA_4230_9715_2DF2AA168F6C=#(StrOpt)The name you use to create a new virtual switch.NEWVSWITCHNAME.D5E17CCE_FABA_4230_9715_2DF2AA168F6C=#(IntOpt) It has two optional values, “0” and “1”.#Set to “1” to allow management operating system toshare this network adapter. Set to “0” to disable itVSWITCHSHARED.D5E17CCE_FABA_4230_9715_2DF2AA168F6C=
# End of the file
Notes:
1. The property AgreeToLicense in the response file specifies your agreement to the license for theapplication. Its default value is set to no. You must specify yes to run the silent installationsuccessfully.
2. A response file must start with [Response], followed by any parameters in format key=value.3. Check the node [’openstack’][’mq’][’service_type’] attribute in the controller node environment to
determine whether the QPID or RabbitMQ is used.
Uninstalling the IBM Cloud Manager with OpenStack Hyper-V AgentThe IBM Cloud Manager with OpenStack Hyper-V Agent uninstaller supports uninstallation by using theMicrosoft Windows Control Panel and command line.
About this task
Use the following steps to uninstall the IBM Cloud Manager with OpenStack Hyper-V Agent onMicrosoft Windows:
Procedure1. Shut down the IBM Cloud Manager with OpenStack Hyper-V Agent by using the Microsoft Windows
Services panel or the appropriate command line.2. Navigate to Start > Control Panel > Programs > Uninstall a program3. Select IBM OpenStack Hyper-V Agent and click Uninstall.4. Follow the instructions on the uninstallation wizard to complete the operation.
Results
After the IBM Cloud Manager with OpenStack Hyper-V Agent is uninstalled, the uninstaller will back upthe following files to the %USERPROFILE%/AppData folder:v nova.conf
v neutron.conf
v hyperv_neutron_agent.ini
Note: The uninstaller does not delete any existing instances that you started. These instances are savedin the instances folder.
Uninstalling the IBM Cloud Manager with OpenStack Hyper-V Agent onMicrosoft Hyper-V Server 2012 R2The IBM Cloud Manager with OpenStack Hyper-V Agent uninstaller supports uninstallation from theMicrosoft Hyper-V Server 2012 R2 command line.
About this task
Use the following steps to uninstall The IBM Cloud Manager with OpenStack Hyper-V Agent onMicrosoft Hyper-V Server 2012 R2:
36 IBM Cloud Manager with OpenStack: Administrator Guide, version 4.2
Procedure1. Shut down the IBM Cloud Manager with OpenStack Hyper-V Agent by using the Microsoft Windows
Services panel or the appropriate command line.2. Open a command-line window and enter the following command: WMIC.3. Enter the following command to display a list of installed products: product get name.4. Enter the command product name call uninstall, where product name is the name of the IBM Cloud
Manager with OpenStack Hyper-V Agent installed product.5. Enter Y to uninstall.
Results
After the IBM Cloud Manager with OpenStack Hyper-V Agent is uninstalled, the uninstaller will back upthe following files to the %USERPROFILE%/AppData folder:v nova.conf
v neutron.conf
v hyperv_neutron_agent.ini
Note: The uninstaller does not delete any existing instances that you started. These instances are savedin the instances folder.
Configuring operating system yum repositories on the deploymentserverAfter you install IBM Cloud Manager with OpenStack on the deployment server, you must determinehow your Linux nodes can access yum repositories that contain operating system packages that arerequired when OpenStack is deployed.
About this task
You have the following options for configuring yum repositories:v You can use your own yum repositories. If you choose this option, the yum repositories must be
configured on the nodes before deploying OpenStack. If you choose to use your own yum repositories,the following steps are unnecessary. To determine if a node has access to a yum repository, you can runthe yum list libvirt command on the node. If the command fails, a valid yum repository does notexist on the node.
v You can use the following instructions to allow the deployment server to serve as a yum repository.When the deployment server is configured as a yum repository, the yum repositories are configured onthe nodes automatically when OpenStack is deployed.
Note: RDO repositories are not supported because they contain packages that conflict with IBM CloudManager with OpenStack.
The operating system installation media for the node system contains all of the packages that arerequired to deploy OpenStack. You can access the operating system installation media by inserting theinstallation media for the node into the DVD device or by mounting the installation ISO image for thenode system.
The deployment server is configured to serve these packages from the following locations:
Packages:<installation directory>/yum-repo/operatingsystem/<platform><platform version>/<architecture>
Package updates:
Chapter 3. Installing and uninstalling 37
<installation directory>/yum-repo/operatingsystem/<platform><platform version>/<architecture>/updates
Where the variables have the following definitions:
installation directoryThe location where IBM Cloud Manager with OpenStack is installed, typically /opt/ibm/cmwo.
platformThe platform of the node system. For example, redhat or ibm_powerkvm.
platform versionThe version of the operating system on the node system. For example, 6.5 or 2.1.
architectureThe architecture for the node system. For example, x86_64 or ppc64.
An x86 64-bit Red Hat Enterprise Linux 6.5 node system requires the packages to be in the followingdirectories:/opt/ibm/cmwo/yum-repo/operatingsystem/redhat6.5/x86_64
/opt/ibm/cmwo/yum-repo/operatingsystem/redhat6.5/x86_64/updates
An IBM PowerKVM 2.1 node system requires the packages and updates to be in the followingdirectories:/opt/ibm/cmwo/yum-repo/operatingsystem/ibm_powerkvm2.1/ppc64
/opt/ibm/cmwo/yum-repo/operatingsystem/ibm_powerkvm2.1/ppc64/updates
To configure the deployment server, complete the following steps:
Note: The following steps use the Red Hat Enterprise Linux 6.5 version and x86 64-bit architecture.However, similar steps apply for other supported options.
Procedure1. Create the directories for packages and package updates on the deployment server as appropriate for
your environment.2. Copy the Packages and repodata directory from the installation media to the packages directory on
the deployment server.$ cd /opt/ibm/cmwo/yum-repo/operatingsystem/redhat6.5/x86_64$ cp -r /mnt/iso/Packages .$ cp -r /mnt/iso/repodata .
Note: Alternatively, you can create a symbolic link to the installation media. If you create thesymbolic link, you do not create the architecture directory. Instead, make a symbolic link to theinstallation media.$ cd /opt/ibm/cmwo/yum-repo/operatingsystem/redhat6.5/x86_64$ ln -s /mnt/iso/Packages$ ln -s /mnt/iso/repodata
If you use the symbolic link, you need to ensure that the mount point persists the deployment serveris restarted.
3. Optional: If you have package updates, you can create an updates repository as follows.a. On the deployment server, install the createrepo package. This package is used to create a yum
repository and is available as part of the base operating system packages.$ yum install createrepo
Note: Details about yum repositories and creating repositories is beyond the scope of thisdocument. If you need more information, see your operating system documentation.
38 IBM Cloud Manager with OpenStack: Administrator Guide, version 4.2
b. Acquire the updated package for your environment and place it in the updates directory./opt/ibm/cmwo/yum-repo/operatingsystem/redhat6.5/x86_64/updates
c. Run the createrepo command to create the updates repository:$ cd updates$ createrepo .
Results
When the deployment server is set up as a yum repository for the operating system packages andupdates, these yum repositories are automatically configured on the node systems during the deploymentprocess. You do not need to manually add these yum repositories on the node systems.Related reference:“Operating system repository not found” on page 307You might see an error in the log file that the yum repository is not available.
Applying fixes and updatesYou can apply fixes and updates for the IBM Cloud Manager with OpenStack product.Related tasks:“Updating a deployed topology” on page 149After you deploy a topology, you might need to apply fixes, either to the IBM Cloud Manager withOpenStack services themselves or to how the IBM Cloud Manager with OpenStack services are deployed.
“Getting fixes from Fix Central” on page 297You can use Fix Central to find the fixes that are recommended by IBM Support for a variety of products,including IBM Cloud Manager with OpenStack. With Fix Central, you can search, select, order, anddownload fixes for your system with a choice of delivery options. A IBM Cloud Manager with OpenStackproduct fix might be available to resolve your problem.
Applying fixes and updates for IBM Cloud Manager with OpenStackUpdates for IBM Cloud Manager with OpenStack provide fixes to the product.
About this task
There are two steps to apply updates.1. Update IBM Cloud Manager with OpenStack on the deployment server.2. Update the topology on the client nodes.
Use the following steps to install a IBM Cloud Manager with OpenStack fix pack. The fix pack updatesChef cookbooks and other resources that are stored on the deployment server. It does not apply updatesto the client nodes in your topology.
After you install the fix pack, you can deploy the fix pack to your topology.
To install a IBM Cloud Manager with OpenStack fix pack, complete the following steps:
Procedure1. Copy the IBM Cloud Manager with OpenStack fix pack files to a temporary directory, for example
/tmp/cmwo_fixpack, on the deployment server.2. Extract the fix pack files.
# cd /tmp/cmwo_fixpack# tar -zxf cmwo_fixpack_4.2.0.1.tar.gz
3. Run the fix pack installation script.
Chapter 3. Installing and uninstalling 39
# ./install_cmwo_fixpack.sh
4. The script output indicates whether the installation succeeded or failed and stores a copy of the fixpack log files in the <product_dir>/version directory, where <product_dir> is the directory whereIBM Cloud Manager with OpenStack was installed. The default path is /opt/ibm/cmwo.
What to do next
The <product_dir>/version directory keeps an overall history of fix pack installs and records the fix packlevel in the product.version file.
After you install the IBM Cloud Manager with OpenStack fix pack on the deployment server, you candeploy the fixes to your topology using the knife os manage update tool. The tool uses the chef serverand client to update the client nodes, and can be used to update single nodes or all nodes in yourtopology. Update the OpenStack controller and database nodes first, then update the compute nodes.
For more information about updating the topology on the client nodes, see “Updating a deployedtopology” on page 149.Related tasks:“Getting fixes from Fix Central” on page 297You can use Fix Central to find the fixes that are recommended by IBM Support for a variety of products,including IBM Cloud Manager with OpenStack. With Fix Central, you can search, select, order, anddownload fixes for your system with a choice of delivery options. A IBM Cloud Manager with OpenStackproduct fix might be available to resolve your problem.
Applying fixes and updates for DB2Updates for DB2 provide fixes to the DB2 database server.
About this task
These instructions assume you installed DB2 10.5, fix pack 2 and would like to install 10.5, fix pack 3.
To install a DB2 fix pack, complete the following steps:
Procedure1. Extract the DB2 fix pack.
$ tar –zxvf v10.5fp3_linuxx64_server.tar.gz
2. Shut down DB2.a. View the number of instances, using the following command:$ db2ilist.b. Run the following commands on each DB2 instance.
$ su – db2inst1
$ db2 force applications allDB20000I The FORCE APPLICATION command completed successfully.DB21024I This command is asynchronous and may not be effective immediately.
$ db2 terminateDB20000I The TERMINATE command completed successfully.
$ db2stopSQL1064N DB2STOP processing was successful.
3. Stop the DB2 administrator server (DAS).
Note: This step is not applicable if you do not have a DAS user.
40 IBM Cloud Manager with OpenStack: Administrator Guide, version 4.2
$ su – dasusr1
$ db2admin stopSQL4407W The DB2 Administration Server was stopped successfully.
4. Remove the DB2 IPC resources for the engine and clients on each instance.$ su – db2inst1
$ ipcleanApplication ipclean: Removing DB2 engine and client IPC resources for db2inst1.
5. Upgrade to DB2 10.5, fix pack 3.$ ./installFixPack -b /opt/ibm/db2/V10.5/Do you want to choose a different installation directory for the fix pack? [yes/no]------------------------------------------------------------------------------------no
6. Verify the new version of DB2.$ db2level
DB21085I This instance or install (instance name, where applicable:"db2inst1") uses "64" bits and DB2 code release "SQL10053" with levelidentifier "0604010E".Informational tokens are "DB2 v10.5.0.3", "s140203", "IP23551", and Fix Pack"3".Product is installed at "/opt/ibm/db2/V10.5".
Related tasks:“Getting fixes from Fix Central” on page 297You can use Fix Central to find the fixes that are recommended by IBM Support for a variety of products,including IBM Cloud Manager with OpenStack. With Fix Central, you can search, select, order, anddownload fixes for your system with a choice of delivery options. A IBM Cloud Manager with OpenStackproduct fix might be available to resolve your problem.
Best practices for maintaining a multi-region cloud or test cloudYou can use a single IBM Cloud Manager with OpenStack deployment server to deploy multiple cloudsor a multi-region cloud. Alternatively, you can choose to manage each cloud or region from its own IBMCloud Manager with OpenStack deployment server.
Whether you decide to maintain a single deployment server or multiple deployment servers determineshow you manage updates or upgrades.
Requirements and constraintsv A given IBM Cloud Manager with OpenStack deployment server propagates a single release and fix
level to its managed nodes. Any changes that you make to a managed server through IBM CloudManager with OpenStack will update that managed server to the current fix level of the deploymentserver.
v All servers within a single region must be managed by a single IBM Cloud Manager with OpenStackinstallation.
v Regions within a cloud are required to be at the same release, but not necessarily the same fix level.However, fixes that you make to a shared resource, such as Keystone, self-service portal, or dashboard,require an update to the region that owns that resource.
Considerationsv Consider having a test cloud that is managed from its own IBM Cloud Manager with OpenStack
deployment server. Install fix packs or new releases of IBM Cloud Manager with OpenStack on thedeployment server that is managing the test cloud. After you have tested the fixes on the test cloud,you can then install the fix pack or new release on the deployment server or servers that are managingthe production cloud.
Chapter 3. Installing and uninstalling 41
v Keep the region that owns shared resources, such as Keystone, self-service portal, and dashboard, atthe latest fix level within your cloud.
Uninstalling IBM Cloud Manager with OpenStackYou can uninstall IBM Cloud Manager with OpenStack from the deployment server. You can alsouninstall the optionally installed IBM Cloud Manager with OpenStack self-service portal.
Uninstalling IBM Cloud Manager with OpenStack from deploymentserverThe IBM Cloud Manager with OpenStack uninstaller for the deployment server, similar to the installer,supports three installation types: console, silent, and graphical installers.
About this task
The default display type is console.
Complete the following steps to uninstall IBM Cloud Manager with OpenStack from the deploymentserver:
Procedure1. Run the uninstaller with root authority by running the following command:
cmwo_uninstall
2. To uninstall IBM Cloud Manager with OpenStack using a non-default installation type, start theuninstaller from the command line and enter -i <uninstall type> where <uninstall type> is silent,or gui.
Results
IBM Cloud Manager with OpenStack is uninstalled from the deployment server. After the uninstall iscomplete, you must restart the system.
The uninstallation log, IBM_Cloud_Manager_with_OpenStack_Uninstall_MM_DD_YYYY_HH_mm_ss.log, is in theuser's home directory.
Note: The /tmp/cmwo-uninstaller.log file contains low-level detail.
Restriction: Support does not exist to uninstall a deployed topology for IBM Cloud Manager withOpenStack. The node system where a topology is deployed must be re-installed or reset back to itspre-deployment state to remove the deployed topology.
Uninstalling the self-service portal on LinuxYou can disable and uninstall the IBM Cloud Manager with OpenStack self-service portal from yourdeployed topology.
About this task1. Update the following attribute in the override_attributes section of your environment file. In a
multi-region cloud environment, this must be done for each region’s environment.ibm-sce.service.enabled: false
2. Replace the ibm-sce-node role with the ibm-sce::uninstallsce recipe in your topology file,your-topology-name.json.
42 IBM Cloud Manager with OpenStack: Administrator Guide, version 4.2

Replace role[ibm-sce-node] with recipe[ibm-sce::uninstallsce] in the run_list for the node running theself-service portal. For example, in a Minimal topology file, you would replace the ibm-sce-node role,as shown."runlist":[
"role[ibm-os-allinone-kvm]","recipe[ibm-sce::uninstallsce]"
]
3. Follow the instructions in the “Updating a deployed topology” on page 149 topic to completedisabling and uninstalling the self-service portal.
Note: For topology deployments with OpenStack, the preceding steps disable and uninstall theself-service portal only. They do not roll back the OpenStack policy files (that the self-service portalreplaced) nor do they remove the sceagent user that is registered in OpenStack.
To roll back the OpenStack policy files, complete the following steps:1. Log in to the controller node and go to the "/etc/keystone/" folder.2. Run the following commands:
$ mv policy.json.openstack policy.json$ chmod 644 policy.json$ chown root:keystone policy.json
3. Go to each of the folders below, one by one, and run the command in step 2 again from each folder,replacing keystone with the appropriate component.v /etc/glance/
v /etc/nova/
v /etc/neutron/
v /etc/cinder/
4. Run the following commands on the controller node to restart the OpenStack block storage and imageAPI services:$ service openstack-cinder-api restart$ service openstack-glance-api restart
Chapter 3. Installing and uninstalling 43

44 IBM Cloud Manager with OpenStack: Administrator Guide, version 4.2
Chapter 4. Upgrading IBM Cloud Manager with OpenStack
This section describes the in-place upgrade process to move to the latest release.
Upgrading the topologyYou can complete an in-place upgrade from IBM Cloud Manager with OpenStack, version 4.1 to IBMCloud Manager with OpenStack, version 4.2.
About this task
Upgrade support is provided for all the IBM Cloud Manager with OpenStack topologies: Minimal,controller + n compute, distributed database, and distributed using Cinder driver configuration.
Before you begin, ensure that the following assumptions are true:v The cloud environment (including PRS, PowerVC driver, z/VM driver, self-service portal, and so on) is
deployed by the IBM Cloud Manager with OpenStack 4.1 deployment server, using Chef cookbooks,with the knife os manage deploy topology xxx command.
v The Chef server that is installed by the IBM Cloud Manager with OpenStack deployer in thedeployment server must only be used to install IBM OpenStack, but cannot be used to run othercookbooks for any other purposes. You must not change the environment or runlist assigned to anynodes.
v If you deployed the controller node together with the deployment server node in IBM Cloud Managerwith OpenStack version 4.1, you must add the --use-qpid option when you run the upgradecommand. It is unsupported to switch the message queue from qpid to rabbitmq in this configuration.
v If you deployed the controller node together with the deployment server node in IBM Cloud Managerwith OpenStack version 4.1, you must check the file permission for /var/log/cinder/cinder.log on thecontroller node and cinder node. The file permission must be cinder:cinder. If the file permission isroot:root, you need to run chown cinder:cinder /var/log/cinder/cinder.log to change the filepermission.
v If you used IBM Platform Resource Scheduler in IBM Cloud Manager with OpenStack 4.1, disablenova-ibm-ego-ha-service on the controller node by running the following command:nova service-disable $controller-node nova-ibm-ego-ha-service
where $controller-node is the hostname where the nova-ibm-ego-ha-service runs. You can find thehostname by running the command, nova service-list.
v The default values for most of the OpenStack processing workers numbers are bound to CPU cores.Such behavior works well when the system has matching memory size when compared to its CPUcores. There might be memory problems on Power Systems when many CPU cores are recognized bythe operating system, and you have a relatively small amount of memory.Therefore, ensure the OpenStack services on the controller node are stopped before you run thein-place upgrade command. For multi nodes, you must run the script on each node to stop theservices. For more information about stopping these services, see Restarting IBM Cloud Manager withOpenStack services.Create cmwo_services.sh script and run sudo ./cmwo_services.sh ’CHANGEME_STOP_ORDER’ stop .
set CHANGEME_STOP_ORDER to the following services list:openstack-nova-powervcopenstack-glance-powervcopenstack-cinder-powervcopenstack-neutron-powervcopenstack-ceilometer-alarm-evaluator
© Copyright IBM Corp. 2012, 2014 45
openstack-ceilometer-agent-notificationopenstack-ceilometer-collectoropenstack-ceilometer-centralopenstack-ceilometer-apiopenstack-heat-engineopenstack-heat-api-cloudwatchopenstack-heat-api-cfnopenstack-heat-apiopenstack-cinder-scheduleropenstack-cinder-apiopenstack-cinder-volumeopenstack-nova-consoleauthopenstack-nova-novncproxyopenstack-nova-certopenstack-nova-scheduleropenstack-nova-apiopenstack-nova-conductorneutron-dhcp-agentneutron-openvswitch-agentopenstack-glance-registryopenstack-glance-apiopenstack-keystone
Complete the following steps to upgrade in-place:
Procedure1. Upgrade the deployment server from version 4.1 to version 4.2. To upgrade the deployment server,
you must install IBM Cloud Manager with OpenStack, version 4.2 on a deployment server thatalready has version 4.1 installed. As a result, the installer upgrades the deployment server to thecurrent release of the product. It is recommended that you back up the deployment server beforeyou upgrade to the current release. For more information, see “Backing up and restoring thedeployment server” on page 256.
2. Change the performance attributes in your environment file in order to customize settings for itemssuch as the message queue and workers. After you complete the configuration changes, upload theenvironment JSON file.$ # Edit the environment JSON file, your-environment-name.json.$ knife environment from file your-environment-name.json
For more information, see “Customizing performance attributes” on page 127.3. The topology files that you used to deploy the nodes in IBM Cloud Manager with OpenStack 4.1 are
required to complete the upgrade. Find them and confirm that the environment and topology inthese files were not modified. If you lost the topology files, you must create a new topology file thatdepicts your OpenStack topology. For instructions to create a topology file, see “Deploying the cloudenvironment” on page 74.
4. If you are using the self-service portal with a DB2 database, you must upload the granted userpassword of your old database to the data bag, which is used to connect to the database in theself-service portal, version 4.1.a. Run mkdir data_bags.b. Update the following JSON attributes in your environment file, your-environment-name.json.
v openstack.developer_mode: Set to False. Only use this setting for the Minimal (all-in-one)environment. The default existed in the other environment.
v openstack.secret.key_path: Set to /etc/chef/encrypted_data_bag_secret. Only use this setting forthe Minimal (all-in-one) environment. The default existed in the other environment.
c. Run cp -r /opt/ibm/cmwo/chef-repo/data_bags/inplace_upgrade_passwords data_bags/.d. Run chmod -R 600 data_bags/.e. Change the value at passwOrd to the password in the data_bags/inplace_upgrade_passwords/
self_service_db2.json file.
46 IBM Cloud Manager with OpenStack: Administrator Guide, version 4.2

{"id": "self_service_db2","self_service_db2": "passw0rd"
}
f. Upload the data bag items for the passwords, the secret file is included in your topology file.$ knife data bag from file inplace_upgrade_passwords data_bags/inplace_upgrade_passwords/self_service_db2.json --secret-file secret-file-name
g. Remove the local data bag items since they are no longer needed.$ rm -rf data_bags/
5. If you are using VMware as the hypervisor and you have virtual machine disk (VMDK) as the blockstorage backend, you must upload the vCenter host password to the data bag before you upgradethe topology.a. Run mkdir data_bags.b. Run cp -r /opt/ibm/cmwo/chef-repo/data_bags/secrets/openstack_vmware_secret_name.json.c. Run chmod -R 600 data_bags/.d. Change the value at CHANGEME to the password in the data_bags/secrets/
openstack_vmware_secret_name.json file.{
"id": "openstack_vmware_secret_name","openstack_vmware_secret_name": "CHANGEME "
}
e. Upload the data bag items for the passwords, the secret file is included in your topology file.$ knife data bag from file self_service_paswords data_bags/secrets/openstack_vmware_secret_name.json --secret-file secret-file-name
f. Remove the local data bag items since they are no longer needed.$ rm -rf data_bags/
6. If you are using the Cinder z/VM driver, you must remove the role[ibm-os-zvm-block-storage-node] that is specified in the controller node runlist (inside the topology file).
7. If you are using the z/VM compute node, you must upload thez/VM xcat mnadmin password toyour data bag.a. Run mkdir data_bags.b. Run cp /opt/ibm/cmwo/chef-repo/data_bags/user_passwords/xcatmnadmin.json data_bags/.c. Run chmod -R 600 data_bags/.d. Change the value at OPENSTACK1 to the password of the user mnadmin in the xcat server, within
the data_bags/xcatmnadmin.json file.{
"id": "xcatmnadmin","xcatmnadmin": "openstack1"
}
e. Upload the data bag item, your_env_user_passwords, which is the data bag name you created foruser_passwords, in the secret file that is included in your topology file.
Note: The following command must be entered on a single line, even though the example showsa line break for formatting purposes.$ knife data bag from file your_env_user_passwords data_bags/xcatmnadmin.json --secret-filesecret-file-name
f. Remove the local data bag items since they are no longer needed.$ rm -rf data_bags/
8. Determine whether to use the qpid or rabbitmq option during the upgrade. The in-place upgradefrom IBM Cloud Manager with OpenStack version 4.1 to 4.2 changes the message queue from qpidto rabbitmq, by default. If you do not want to change the message queue, you must use the in-placeupgrade command with the --use-qpid option.
Chapter 4. Upgrading 47

Notes:
v If you are not familiar with qpid and rabbitmq, do not use this option.v If your controller node exists on the deployment server in version 4.1, then you must use the
--use-qpid option to complete the upgrade. See the assumptions section at the beginning of thistopic.
If you use --use-qpid, the updated topology uses qpid as the message queue. Otherwise, themessage queue is replaced by rabbitmq automatically. Complete the following steps, depending onthe message queue you want to use.
rabbitmq message queue (default)To use the rabbitmq message queue, you must upload the client password for rabbitmq toyour data bag before running the in-place upgrade command.a. Run mkdir data_bags.b. Run cp /opt/ibm/cmwo/chef-repo/data_bags/user_passwords/rabbitclient.json
data_bags/.c. Run chmod -R 600 data_bags/.d. Change the value at OPENSTACK1 to the password of the user rabbitclient to
communicate to rabbitmq, within the data_bags/rabbitclient.json file.{
"id": "rabbitclient","rabbitclient": "openstack1"
}
e. Upload the data bag item, your_env_user_passwords, which is the data bag name youcreated for user_passwords, in the secret file that is included in your topology file.
Note: The following command must be entered on a single line, even though theexample shows a line break for formatting purposes.$ knife data bag from file your_env_user_passwords data_bags/rabbitclient.json--secret-file secret-file-name
f. Remove the local data bag items since they are no longer needed.$ rm -rf data_bags/
qpid message queueTo continue to use the qpid message queue, use the --use-qpid option. For example, knifeos manage in place upgrade topology topology_file.json --use-qpid.
9. If you are using the IBM Storwize Cinder driver, you must upload the SAN controller password toyour data bag before you upgrade the topology.a. If the user name of the SAN controller is admin, you must contact the SAN storage administrator
to create a new user with a different name, and set the attribute openstack.block-storage.san.san_login in your environment file to the new user name. There is a limitation thatyou cannot use admin for the authentication between Cinder service and SAN storage.$ knife environment edit your-environment-name
where your-environment-name is the environment in your topology.b. Run mkdir data_bags.c. Run cp /opt/ibm/cmwo/chef-repo/data_bags/user_passwords/admin.json data_bags/
<san_login_username>.json.where san_login_username is the user name of the SAN controller. For example, if your SAN username is update_sanuser, then you run the command cp /opt/ibm/cmwo/chef-repo/data_bags/user_passwords/admin.json data_bags/update_sanuser.json.
d. Run chmod -R 600 data_bags/.
48 IBM Cloud Manager with OpenStack: Administrator Guide, version 4.2
e. Change the value at openstack1 to the password of the SAN controller and change the value atadmin to the user name of the SAN controller within the data_bags/<san_login_username>.jsonfile. If you don't want to authenticate with the password, you can set the password to an emptyvalue "".
Note: The user name you specified here must be the same as openstack.block-storage.san.san_login in your environment.{"id": "admin","admin": "openstack1"}
For example, if your SAN user name is update_sanuser, then you change "admin" toupdate_sanuser, as follows:{"id": "update_sanuser","update_sanuser": "openstack1"}
f. Upload the data bag item, your_env_user_passwords, which is the data bag name you created foruser_passwords, the secret-file-name that is included in your topology file.$ knife data bag from file your_env_user_passwords data_bags/admin.json --secret-file secret-file-name
g. Remove the local data bag items since they are no longer needed.$ rm -rf data_bags/
10. You must upload the heat_stack_admin password to your data bag for the OpenStack heat service.a. Run mkdir data_bags.b. Run cp /opt/ibm/cmwo/chef-repo/data_bags/user_passwords/heat_stack_admin.json
data_bags/.c. Run chmod -R 600 data_bags/.d. Change the value at OPENSTACK1 to the keystone password of the user heat_stack_admin, within the
data_bags/heat_stack_admin.json file.{
"id": "heat_stack_admin","heat_stack_admin": "openstack1"
}
e. Upload the data bag item, your_env_user_passwords, which is the data bag name you created foruser_passwords, the secret file that is included in your topology file.
Note: The following command must be entered on a single line, even though the example showsa line break for formatting purposes.$ knife data bag from file your_env_user_passwords data_bags/heat_stack_admin.json--secret-file secret-file-name
f. Remove the local data bag items since they are no longer needed.$ rm -rf data_bags/
11. Ensure the configuration for global_admin in the /etc/keystone/policy.json file on each node ofyour topology is as shown:"global_admin": "rule:admin_role or is_admin:1",
If it is not, update and restart the Keystone service with the service openstack-keystone restartcommand. For more information, see “Upgrading a topology fails” on page 316.
12. Upgrade the topology deployment in-place.$ knife os manage in place upgrade topology your-topology-name.json
Note: In IBM Cloud Manager with OpenStack version 4.1, if you configured your cloud topology touse the Open vSwitch plugin for networking(neutron.plugins.openvswitch.ovs_neutron_plugin.OVSNeutronPluginV2), the upgrade process
Chapter 4. Upgrading 49
migrates the OVS plugin to the ML2 plugin automatically for IBM Cloud Manager with OpenStackversion 4.2. The Open vSwitch core plugin is not supported in the Juno release of OpenStack that isused in IBM Cloud Manager with OpenStack version 4.2. If the migration from OVS to ML2 isunexpectedly unsuccessful, the upgrade process restores the neutron database and aborts theupgrade process. For this failure, customer support is required. The migration from OVS to ML2 isonly supported when using this command to upgrade the topology. The migration from OVS to ML2is not supported when upgrading a single node.All of the nodes that are defined in the topology are upgraded. This command provides two optionsto control the upgrade process:
--no-validationThis option indicates that when the nodes list or node runlist, that is identified in thetopology file, conflicts with the list stored in the deployment Chef server, the upgradeshould continue. Without this option, you are prompted whether to continue. By default,you are prompted to confirm.
Note: To avoid breaking the cloud unintentionally, you should retain the default setting thatrequires your confirmation.
Example:$ knife os manage in place upgrade topology topology_file.json --no-validation
--use-qpidWith this option, the updated topology uses qpid as the message queue. Otherwise, themessage queue is replaced by rabbitmq.
--topology-type TYPE
TYPE is the topology type of the deployed nodes. Its value must be 1-4:
Table 22. Topology type. The table displays the option values and associated topology types.
Option Type Description
1 All-In-One topology This topology runs all IBM Cloud Manager with OpenStack services fromone system.
2 1 + N topology This topology provides a single controller node, plus any number (n) ofcompute nodes.
3 1 + N distributed DB topology This topology is similar to the controller + n compute topology; however, itallows the IBM Cloud Manager with OpenStack database service to run ona separate compute node. It also supports advanced customization.
4 1 + N distributed cindertopology
This topology provides a cloud environment with extra block storage(Cinder) nodes.
You can use the command without specifying this option. In that case, the command tries toidentify the topology by analyzing the topology file and checking the roles that are given tothe nodes automatically. If the process fails, then the command exits and requests that youexplicitly set the topology type.
Example:$ knife os manage in place upgrade topology topology_file.json --topology-type 1
It means that the topology of nodes is the Minimal topology.
Here is an example of the running result:$ knife os manage in place upgrade topology 39.jsonThe following nodes: ["dhcp-10-1-3-43.sce.cn.ibm.com"]have the same env with the topology are not in topology updated list.Do you want to continue to update all of the nodesin the topology? (y/n)[y] yBack up file ’/root/Updated-backup/env_39-env1407922391.json’ saved.Back up file ’/root/Updated-backup/
50 IBM Cloud Manager with OpenStack: Administrator Guide, version 4.2
node_dhcp-10-1-3-39.sce.cn.ibm.com1407922391.json’ succeeded.39-env: Chef environment has been updated.dhcp-10-1-3-39.sce.cn.ibm.com: Node has been updated.Update env attribute ibm-openstack.upgrade.inplace to true.Update env attribute ibm-openstack.upgrade.inplace to false.Upgrade complete!Updated attributes are:-----------------------------------Environment[’39-env’] updated attributes:Update attribute[’openstack.compute.rpc_backend’], value =’nova.openstack.common.rpc.impl_kombu’
Delete attribute[’inplace.update’]Create attribute[’openstact.test’], value = ’test’
Node[dhcp-10-1-3-39.sce.cn.ibm.com] updated attributes:Updated totally 3 attributes.
-----------------------------------
What to do next
After the upgrade is finished, review the following information.1. The environment and nodes information from the old topology is backed up. All back-up files are in
the Update-backup folder in the same folder as the topology file you specified.2. Rerunning this command is allowed. If the environment and nodes information is already backed up,
and there are no more changes, the back-up action is not completed. The command tries to update thenodes only.
3. For the self-service portal, the old home directory is backed up. The default location is/var/opt/ibm/.SCE41_no_delete/, which cannot be removed as a backup of the old data.
4. If you disabled the IBM Platform Resource Scheduler service before the upgrade, enablenova-ibm-ego-ha-service on the controller node by running the following command:nova service-enable $controller-node nova-ibm-ego-ha-service
where $controller-node is the hostname where the nova-ibm-ego-ha-service runs.
Upgrading a multi-region topologyYou can upgrade your multi-region cloud environment from IBM Cloud Manager with OpenStack,version 4.1 to IBM Cloud Manager with OpenStack, version 4.2.
About this task
Before you begin, ensure that the following assumptions are true:v The multi-region cloud environment (including PRS, PowerVC driver, z/VM driver, self-service portal,
and so on) is deployed by the IBM Cloud Manager with OpenStack 4.1 deployment server, using Chefcookbooks, with the knife os manage deploy topology xxx command.
v The Chef server that is installed by the IBM Cloud Manager with OpenStack deployer in thedeployment server must only be used to install IBM OpenStack, but cannot be used to run othercookbooks for any other purposes. You must not change the environment or runlist assigned to anynodes.
v If you deployed the controller node together with the deployment server node in IBM Cloud Managerwith OpenStack version 4.1, you must add the --use-qpid option when you run the upgradecommand. It is unsupported to switch the message queue from qpid to rabbitmq in this configuration.
v If you deployed the controller node together with the deployment server node in IBM Cloud Managerwith OpenStack version 4.1, you must check the file permission for /var/log/cinder/cinder.log on the
Chapter 4. Upgrading 51
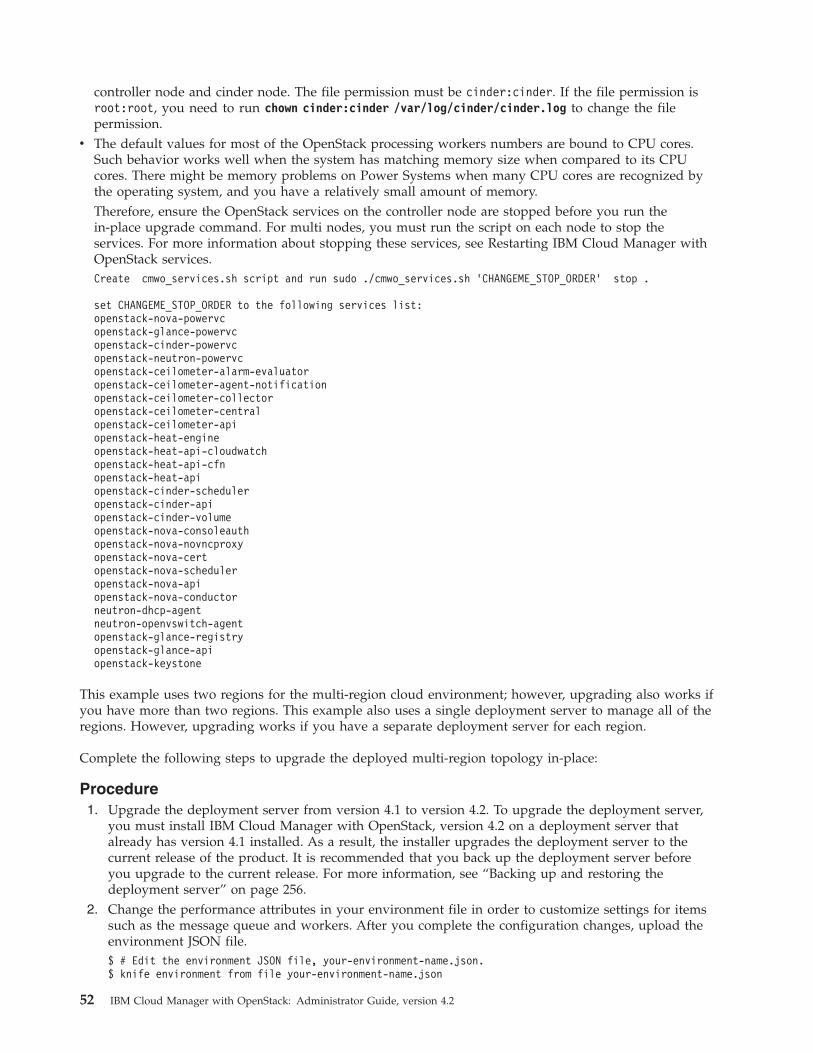
controller node and cinder node. The file permission must be cinder:cinder. If the file permission isroot:root, you need to run chown cinder:cinder /var/log/cinder/cinder.log to change the filepermission.
v The default values for most of the OpenStack processing workers numbers are bound to CPU cores.Such behavior works well when the system has matching memory size when compared to its CPUcores. There might be memory problems on Power Systems when many CPU cores are recognized bythe operating system, and you have a relatively small amount of memory.Therefore, ensure the OpenStack services on the controller node are stopped before you run thein-place upgrade command. For multi nodes, you must run the script on each node to stop theservices. For more information about stopping these services, see Restarting IBM Cloud Manager withOpenStack services.Create cmwo_services.sh script and run sudo ./cmwo_services.sh ’CHANGEME_STOP_ORDER’ stop .
set CHANGEME_STOP_ORDER to the following services list:openstack-nova-powervcopenstack-glance-powervcopenstack-cinder-powervcopenstack-neutron-powervcopenstack-ceilometer-alarm-evaluatoropenstack-ceilometer-agent-notificationopenstack-ceilometer-collectoropenstack-ceilometer-centralopenstack-ceilometer-apiopenstack-heat-engineopenstack-heat-api-cloudwatchopenstack-heat-api-cfnopenstack-heat-apiopenstack-cinder-scheduleropenstack-cinder-apiopenstack-cinder-volumeopenstack-nova-consoleauthopenstack-nova-novncproxyopenstack-nova-certopenstack-nova-scheduleropenstack-nova-apiopenstack-nova-conductorneutron-dhcp-agentneutron-openvswitch-agentopenstack-glance-registryopenstack-glance-apiopenstack-keystone
This example uses two regions for the multi-region cloud environment; however, upgrading also works ifyou have more than two regions. This example also uses a single deployment server to manage all of theregions. However, upgrading works if you have a separate deployment server for each region.
Complete the following steps to upgrade the deployed multi-region topology in-place:
Procedure1. Upgrade the deployment server from version 4.1 to version 4.2. To upgrade the deployment server,
you must install IBM Cloud Manager with OpenStack, version 4.2 on a deployment server thatalready has version 4.1 installed. As a result, the installer upgrades the deployment server to thecurrent release of the product. It is recommended that you back up the deployment server beforeyou upgrade to the current release. For more information, see “Backing up and restoring thedeployment server” on page 256.
2. Change the performance attributes in your environment file in order to customize settings for itemssuch as the message queue and workers. After you complete the configuration changes, upload theenvironment JSON file.$ # Edit the environment JSON file, your-environment-name.json.$ knife environment from file your-environment-name.json
52 IBM Cloud Manager with OpenStack: Administrator Guide, version 4.2
For more information, see “Customizing performance attributes” on page 127.3. The topology files that you used to deploy the regions in IBM Cloud Manager with OpenStack 4.1
are required to complete the upgrade. Each region should have a separate topology file. Find thefiles and confirm that the environment and topology in these files were not modified. If you lost thetopology files, you must create new topology files that depict your multi-region topology. Forinformation on creating topology files for each region, see “Deploying multi-region support” on page104.
4. Complete the subsequent steps for each region. You must complete the in-place upgrade procedurefor each region separately.
5. If you are using the self-service portal with a DB2 database, you must upload the granted userpassword of your old database to the data bag, which is used to connect to the database in theself-service portal, version 4.1.a. Run mkdir data_bags.b. Update the following JSON attributes in your environment file, your-environment-name.json.
v openstack.developer_mode: Set to False. Only use this setting for the Minimal (all-in-one)environment. The default existed in the other environment.
v openstack.secret.key_path: Set to /etc/chef/encrypted_data_bag_secret. Only use this setting forthe Minimal (all-in-one) environment. The default existed in the other environment.
c. Run cp -r /opt/ibm/cmwo/chef-repo/data_bags/inplace_upgrade_passwords data_bags/.d. Run chmod -R 600 data_bags/.e. Change the value at passwOrd to the password in the data_bags/inplace_upgrade_passwords/
self_service_db2.json file.{
"id": "self_service_db2","self_service_db2": "passw0rd"
}
f. Upload the data bag items for the passwords, the secret file is included in your topology file.$ knife data bag from file inplace_upgrade_passwords data_bags/inplace_upgrade_passwords/self_service_db2.json --secret-file secret-file-name
g. Remove the local data bag items since they are no longer needed.$ rm -rf data_bags/
6. If you are using VMware as the hypervisor and you have virtual machine disk (VMDK) as the blockstorage backend, you must upload the vCenter host password to the data bag before you upgradethe topology.a. Run mkdir data_bags.b. Run cp -r /opt/ibm/cmwo/chef-repo/data_bags/secrets/openstack_vmware_secret_name.json.c. Run chmod -R 600 data_bags/.d. Change the value at CHANGEME to the password in the data_bags/secrets/
openstack_vmware_secret_name.json file.{
"id": "openstack_vmware_secret_name","openstack_vmware_secret_name": "CHANGEME "
}
e. Upload the data bag items for the passwords, the secret file is included in your topology file.$ knife data bag from file self_service_paswords data_bags/secrets/openstack_vmware_secret_name.json --secret-file secret-file-name
f. Remove the local data bag items since they are no longer needed.$ rm -rf data_bags/
7. If you are using the Cinder z/VM driver, you must remove the role[ibm-os-zvm-block-storage-node] that is specified in the controller node runlist (inside the topology file).
Chapter 4. Upgrading 53

8. If you are using the z/VM compute node, you must upload thez/VM xcat mnadmin password toyour data bag.a. Run mkdir data_bags.b. Run cp /opt/ibm/cmwo/chef-repo/data_bags/user_passwords/xcatmnadmin.json data_bags/.c. Run chmod -R 600 data_bags/.d. Change the value at OPENSTACK1 to the password of the user mnadmin in the xcat server, within
the data_bags/xcatmnadmin.json file.{
"id": "xcatmnadmin","xcatmnadmin": "openstack1"
}
e. Upload the data bag item, your_env_user_passwords, which is the data bag name you created foruser_passwords, in the secret file that is included in your topology file.
Note: The following command must be entered on a single line, even though the example showsa line break for formatting purposes.$ knife data bag from file your_env_user_passwords data_bags/xcatmnadmin.json --secret-filesecret-file-name
f. Remove the local data bag items since they are no longer needed.$ rm -rf data_bags/
9. Determine whether to use the qpid or rabbitmq option during the upgrade. The in-place upgradefrom IBM Cloud Manager with OpenStack version 4.1 to 4.2 changes the message queue from qpidto rabbitmq, by default. If you do not want to change the message queue, you must use the in-placeupgrade command with the --use-qpid option.
Notes:
v If you are not familiar with qpid and rabbitmq, do not use this option.v If your controller node exists on the deployment server in version 4.1, then you must use the
--use-qpid option to complete the upgrade. See the assumptions section at the beginning of thistopic.
If you use --use-qpid, the updated topology uses qpid as the message queue. Otherwise, themessage queue is replaced by rabbitmq automatically. Complete the following steps, depending onthe message queue you want to use.
rabbitmq message queue (default)To use the rabbitmq message queue, you must upload the client password for rabbitmq toyour data bag before running the in-place upgrade command.a. Run mkdir data_bags.b. Run cp /opt/ibm/cmwo/chef-repo/data_bags/user_passwords/rabbitclient.json
data_bags/.c. Run chmod -R 600 data_bags/.d. Change the value at OPENSTACK1 to the password of the user rabbitclient to
communicate to rabbitmq, within the data_bags/rabbitclient.json file.{
"id": "rabbitclient","rabbitclient": "openstack1"
}
e. Upload the data bag item, your_env_user_passwords, which is the data bag name youcreated for user_passwords, in the secret file that is included in your topology file.
Note: The following command must be entered on a single line, even though theexample shows a line break for formatting purposes.
54 IBM Cloud Manager with OpenStack: Administrator Guide, version 4.2

$ knife data bag from file your_env_user_passwords data_bags/rabbitclient.json--secret-file secret-file-name
f. Remove the local data bag items since they are no longer needed.$ rm -rf data_bags/
qpid message queueTo continue to use the qpid message queue, use the --use-qpid option. For example, knifeos manage in place upgrade topology topology_file.json --use-qpid.
10. If you are using the IBM Storwize Cinder driver, you must upload the SAN controller password toyour data bag before you upgrade the topology.a. If the user name of the SAN controller is admin, you must contact the SAN storage administrator
to create a new user with a different name, and set the attribute openstack.block-storage.san.san_login in your environment file to the new user name. There is a limitation thatyou cannot use admin for the authentication between Cinder service and SAN storage.$ knife environment edit your-environment-name
where your-environment-name is the environment in your topology.b. Run mkdir data_bags.c. Run cp /opt/ibm/cmwo/chef-repo/data_bags/user_passwords/admin.json data_bags/
<san_login_username>.json.where san_login_username is the user name of the SAN controller. For example, if your SAN username is update_sanuser, then you run the command cp /opt/ibm/cmwo/chef-repo/data_bags/user_passwords/admin.json data_bags/update_sanuser.json.
d. Run chmod -R 600 data_bags/.e. Change the value at openstack1 to the password of the SAN controller and change the value at
admin to the user name of the SAN controller within the data_bags/<san_login_username>.jsonfile. If you don't want to authenticate with the password, you can set the password to an emptyvalue "".
Note: The user name you specified here must be the same as openstack.block-storage.san.san_login in your environment.{"id": "admin","admin": "openstack1"}
For example, if your SAN user name is update_sanuser, then you change "admin" toupdate_sanuser, as follows:{"id": "update_sanuser","update_sanuser": "openstack1"}
f. Upload the data bag item, your_env_user_passwords, which is the data bag name you created foruser_passwords, the secret-file-name that is included in your topology file.$ knife data bag from file your_env_user_passwords data_bags/admin.json --secret-file secret-file-name
g. Remove the local data bag items since they are no longer needed.$ rm -rf data_bags/
11. You must upload the heat_stack_admin password to your data bag for the OpenStack heat service.a. Run mkdir data_bags.b. Run cp /opt/ibm/cmwo/chef-repo/data_bags/user_passwords/heat_stack_admin.json
data_bags/.c. Run chmod -R 600 data_bags/.d. Change the value at OPENSTACK1 to the keystone password of the user heat_stack_admin, within the
data_bags/heat_stack_admin.json file.
Chapter 4. Upgrading 55
{"id": "heat_stack_admin","heat_stack_admin": "openstack1"
}
e. Upload the data bag item, your_env_user_passwords, which is the data bag name you created foruser_passwords, the secret file that is included in your topology file.
Note: The following command must be entered on a single line, even though the example showsa line break for formatting purposes.$ knife data bag from file your_env_user_passwords data_bags/heat_stack_admin.json--secret-file secret-file-name
f. Remove the local data bag items since they are no longer needed.$ rm -rf data_bags/
12. Ensure the configuration for global_admin in the /etc/keystone/policy.json file on each node ofyour topology is as shown:"global_admin": "rule:admin_role or is_admin:1",
If it is not, update and restart the Keystone service with the service openstack-keystone restartcommand. For more information, see “Upgrading a topology fails” on page 316.
13. Update your environment. Set openstack.auth.strategy to uuid.14. Upgrade the topology in place.
$ knife os manage in place upgrade topology your-topology-name.json
All of the nodes that are defined in the topology are upgraded. This command provides two optionsto control the upgrade process:
--no-validationThis option indicates that when the nodes list or node runlist, that is identified in thetopology file, conflicts with the list stored in the deployment Chef server, the upgradeshould continue. Without this option, you are prompted whether to continue. By default,you are prompted to confirm.
Note: To avoid breaking the cloud unintentionally, you should retain the default setting thatrequires your confirmation.
Example:$ knife os manage in place upgrade topology topology_file.json --no-validation
--use-qpidWith this option, the updated topology uses qpid as the message queue. Otherwise, themessage queue is replaced by rabbitmq.
--topology-type TYPE
TYPE is the topology type of the deployed nodes. Its value must be 1-4:
Table 23. Topology type. The table displays the option values and associated topology types.
Option Type Description
1 All-In-One topology This topology runs all IBM Cloud Manager with OpenStack services fromone system.
2 1 + N topology This topology provides a single controller node, plus any number (n) ofcompute nodes.
3 1 + N distributed DB topology This topology is similar to the controller + n compute topology; however, itallows the IBM Cloud Manager with OpenStack database service to run ona separate compute node. It also supports advanced customization.
4 1 + N distributed cindertopology
This topology provides a cloud environment with extra block storage(Cinder) nodes.
56 IBM Cloud Manager with OpenStack: Administrator Guide, version 4.2
You can use the command without specifying this option. In that case, the command tries toidentify the topology by analyzing the topology file and checking the roles that are given tothe nodes automatically. If the process fails, then the command exits and requests that youexplicitly set the topology type.
Example:$ knife os manage in place upgrade topology topology_file.json --topology-type 2
It means that the topology of the nodes is the 1 + N topology topology.15. If you have any regions that were upgraded without using the --use-qpid option, and you are using
the self-service portal to manage IBM Cloud Manager with OpenStack, there is an extra requirement.After you complete the preceding steps for each region, you must change the message queue fromqpid to rabbitmq on the self-service portal. For instructions on how to change the message queueoption in the self-service portal, see “Changing the message queue option” on page 236.
Note: You do not need to do anything with the region whose controller node was installed on thesame server as the self-service portal. The region is in OK state on the self-service portal because themessage queue for this region is automatically changed to rabbitmq during the in-place upgradecommand process.
What to do next
After the upgrade is finished, review the following information.1. The environment and nodes information from the old topology is backed up. All back-up files are in
the Update-backup folder in the same folder as the topology file you specified.2. Rerunning this command is allowed. If the environment and nodes information is already backed up,
and there are no more changes, the back-up action is not completed. The command tries to update thenodes only.
3. For the self-service portal, the old home directory is backed up. The default location is/var/opt/ibm/.SCE41_no_delete/, which cannot be removed as a backup of the old data.
4. If you disabled the IBM Platform Resource Scheduler service before the upgrade, enablenova-ibm-ego-ha-service on the controller node by running the following command:nova service-enable $controller-node nova-ibm-ego-ha-service
where $controller-node is the hostname where the nova-ibm-ego-ha-service runs.
Upgrading the stand-alone self-service portalYou can migrate your IBM Cloud Manager with OpenStack self-service portal configuration and datafrom IBM Cloud Manager with OpenStack, version 4.1 to IBM Cloud Manager with OpenStack, version4.2.
About this task
Use these instructions only for upgrading a stand-alone self-service portal topology. If you deploy thestand-alone self-service portal with any other IBM Cloud Manager with OpenStack topology, such asminimal, controller + n compute, distributed database, or distributed by using Cinder driverconfiguration, see “Upgrading the topology” on page 45.
Upgrading the stand-alone self-service portal topology when usingDerbyIf you are using the self-service portal with a Derby database, use these instructions to migrate your dataand configuration.
Chapter 4. Upgrading 57
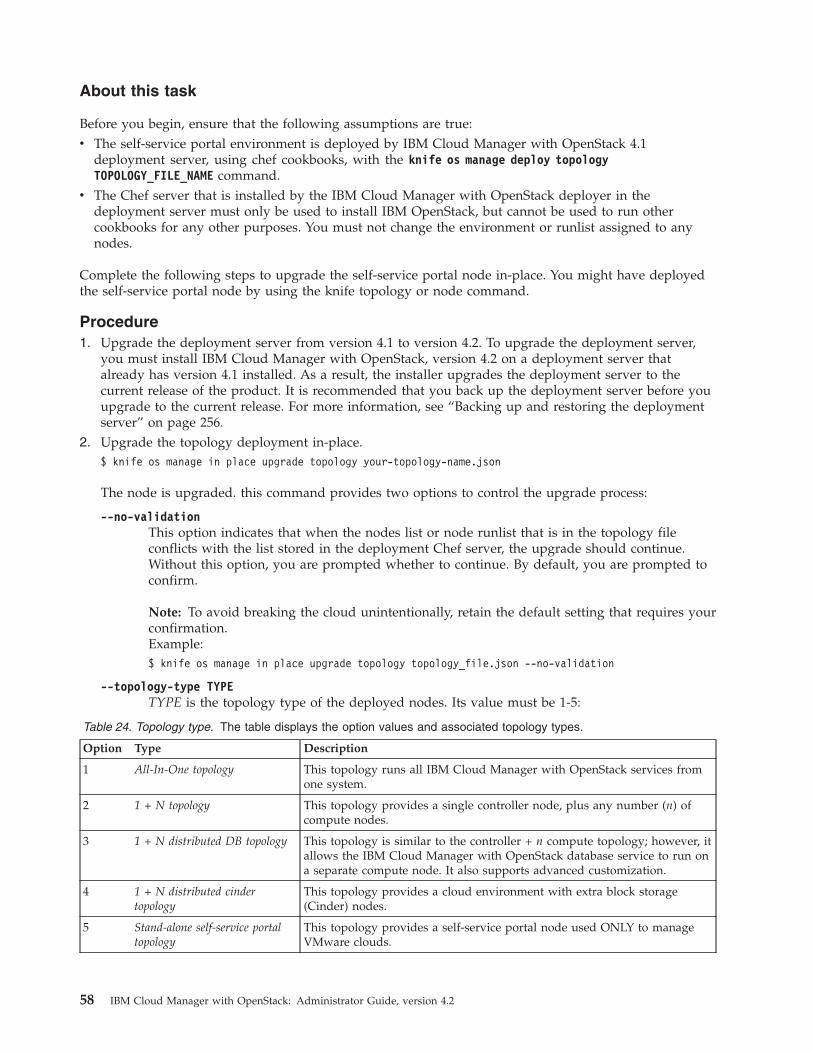
About this task
Before you begin, ensure that the following assumptions are true:v The self-service portal environment is deployed by IBM Cloud Manager with OpenStack 4.1
deployment server, using chef cookbooks, with the knife os manage deploy topologyTOPOLOGY_FILE_NAME command.
v The Chef server that is installed by the IBM Cloud Manager with OpenStack deployer in thedeployment server must only be used to install IBM OpenStack, but cannot be used to run othercookbooks for any other purposes. You must not change the environment or runlist assigned to anynodes.
Complete the following steps to upgrade the self-service portal node in-place. You might have deployedthe self-service portal node by using the knife topology or node command.
Procedure1. Upgrade the deployment server from version 4.1 to version 4.2. To upgrade the deployment server,
you must install IBM Cloud Manager with OpenStack, version 4.2 on a deployment server thatalready has version 4.1 installed. As a result, the installer upgrades the deployment server to thecurrent release of the product. It is recommended that you back up the deployment server before youupgrade to the current release. For more information, see “Backing up and restoring the deploymentserver” on page 256.
2. Upgrade the topology deployment in-place.$ knife os manage in place upgrade topology your-topology-name.json
The node is upgraded. this command provides two options to control the upgrade process:
--no-validationThis option indicates that when the nodes list or node runlist that is in the topology fileconflicts with the list stored in the deployment Chef server, the upgrade should continue.Without this option, you are prompted whether to continue. By default, you are prompted toconfirm.
Note: To avoid breaking the cloud unintentionally, retain the default setting that requires yourconfirmation.Example:$ knife os manage in place upgrade topology topology_file.json --no-validation
--topology-type TYPETYPE is the topology type of the deployed nodes. Its value must be 1-5:
Table 24. Topology type. The table displays the option values and associated topology types.
Option Type Description
1 All-In-One topology This topology runs all IBM Cloud Manager with OpenStack services fromone system.
2 1 + N topology This topology provides a single controller node, plus any number (n) ofcompute nodes.
3 1 + N distributed DB topology This topology is similar to the controller + n compute topology; however, itallows the IBM Cloud Manager with OpenStack database service to run ona separate compute node. It also supports advanced customization.
4 1 + N distributed cindertopology
This topology provides a cloud environment with extra block storage(Cinder) nodes.
5 Stand-alone self-service portaltopology
This topology provides a self-service portal node used ONLY to manageVMware clouds.
58 IBM Cloud Manager with OpenStack: Administrator Guide, version 4.2
You can use the command without specifying this option. In that case, the command tries toidentify the topology by analyzing the topology file and checking the roles that are given tothe nodes automatically. If the process fails, then the command exits and requests that youexplicitly set the topology type.
Example:$ knife os manage in place upgrade topology topology_file.json --topology-type 5
It means that the topology of nodes is the Stand-alone self-service portal topology.
What to do next
After the upgrade is finished, review the following information.1. The environment and nodes information from the old topology is backed up. All back-up files are in
the Update-backup folder in the same folder as the topology file you specified.2. Rerunning this command is allowed. If the environment and nodes information is already backed up,
and there are no more changes, the back-up action is not completed. The command tries to update thenodes only.
3. For the self-service portal, the old home directory is backed up. The default location is/var/opt/ibm/.SCE41_no_delete/, which cannot be removed as a backup of the old data.
Upgrading the stand-alone self-service portal topology when usingDB2If you are using the self-service portal with a DB2 database, use these instructions to manually migrateyour data and configuration.
Before you begin
When you migrate data in the self-service portal, you must migrate sequentially. You cannot skip aversion. For example, if you want to migrate IBM SmartCloud Entry version 3.2 to IBM Cloud Managerwith OpenStack version 4.2, you must migrate from version 3.2 to version 4.1 first.
About this task
Before you migrate to the latest version, ensure that all available fix packs are applied. Then, migratefrom IBM Cloud Manager with OpenStack self-service portal version 4.1 (with fix packs) to version 4.2.
Complete the following steps to migrate your IBM Cloud Manager with OpenStack self-service portalconfiguration and data to a new version.
Procedure1. Stop IBM Cloud Manager with OpenStack self-service portal 4.1 by running the following command:
service sce stop
2. Back up the /var/opt/ibm/.SCE41 folder on the self-service portal node as the migration source folder:# cp -rfp /var/opt/ibm/.SCE41/ /var/opt/ibm/.SCE41_no_delete/
Important: Ensure that the backup process successfully completed before you continue with the nextstep to uninstall IBM Cloud Manager with OpenStack self-service portal 4.1. If the backup is notfinished before you uninstall, then configuration and data for self-service portal 4.1 is lost.
3. Uninstall the IBM Cloud Manager with OpenStack self-service portal 4.1 by running the followingcommand:# knife os manage deploy node node.fqdn.com recipe[ibm-sce::uninstall] -P node-ssh-password -E node-environment
where
Chapter 4. Upgrading 59
v node.fqdn.com is the fully qualified domain name for the self-service portal nodev node-ssh-password is the ssh password for the self-service portal nodev node-environment is the chef environment for the self-service portal nodeExample:knife os manage deploy node hostname.my.company.com recipe[ibm-sce::uninstall] -P passw0rd -E your-environment-name
4. Install self-service portal 4.2. For more information, see “Stand-alone self-service portal for managingVMware clouds” on page 108.
5. To migrate all of your preferences from one set of configuration files to the new set, run the followingOSGi command:migrateConfig source_directory
where source_directory is the location of the previous IBM Cloud Manager with OpenStack self-serviceportal release configuration files. Ensure that the owner of the source directory is the same as theowner of the self-service portal service when you migrate the configuration.Running this command migrates the following configuration files:v cfs.keystone
v ldap.xml
v deployment.properties
v authentication.properties (admin.name is not updated by the command.)v email.properties
v messaging.properties
v metering.properties
v billing.properties
v web.properties
v *.jks
v products/*.xml
v server_rules.json
v openstack.properties
v Server.properties
6. To migrate data from your previous database, complete the following steps:a. Ensure that the target database exists.b. In your browser, log out and close all open self-service portal windows.c. Run the following OSGi command:
upgradeDatabase ’DB_Path’ ’DB2_User_Name’ ’DB2_password’
where DB_Path is the path of the database, DB2_User_Name is the name of the DB2 administrator,and DB2_password is the password for the DB2 administrator.
Note: DB2_User_Name and DB2_password are only needed when migrating data from a DB2database.For example, to migrate your data from a DB2 database, run the following command:upgradeDatabase '//localhost:50001/ssp41''db2admin' 'db2passwd'
For example, to migrate your data from a Derby database, run the following command:upgradeDatabase '/var/opt/ibm/.SCE41_no_delete/'
Considerations:v The upgradeDatabase command supports only major versions of databases.v The source database must be Derby or DB2.
60 IBM Cloud Manager with OpenStack: Administrator Guide, version 4.2
v Only approved requests can be migrated, while others such as pending requests, rejectedrequests, and withdrawn requests cannot be migrated. If the approved-requests related instancesare deleted, they cannot be migrated either.
v Before you migrate the IBM Cloud Manager with OpenStack self-service portal 4.1 data, wait 5minutes after you start IBM Cloud Manager with OpenStack self-service portal 4.2, to ensurethat the database is fully initialized.
v If any errors occur during migration, renew the target database and run the upgradeDatabasecommand again.
7. Restart the self-service portal by running the following command:service sce restart
8. You must migrate some configuration information manually. This information includes your networkconfiguration and the logging.properties file.
Note: When you migrate configuration information for a Microsoft Windows 2008 installation, youmust manually configure the cloud connection.
Upgrading a single nodeYou can complete an in-place upgrade for a single node from IBM Cloud Manager with OpenStack,version 4.1 to IBM Cloud Manager with OpenStack, version 4.2.
About this task
Upgrade support is provided for all the IBM Cloud Manager with OpenStack topologies: Minimal,controller + n compute, distributed database, and distributed using Cinder driver configuration.
Before you begin, ensure that the following assumptions are true:v The cloud environment (including PRS, PowerVC driver, z/VM driver, self-service portal, and so on) is
deployed by the IBM Cloud Manager with OpenStack 4.1 deployment server, using Chef cookbooks,with the knife os manage deploy topology xxx command.
v The Chef server that is installed by the IBM Cloud Manager with OpenStack deployer in thedeployment server must only be used to install IBM OpenStack, but cannot be used to run othercookbooks for any other purposes. You must not change the environment or runlist assigned to anynodes.
v If you deployed the controller node together with the deployment server node in IBM Cloud Managerwith OpenStack version 4.1, you must add the --use-qpid option when you run the upgradecommand. It is unsupported to switch the message queue from qpid to rabbitmq in this configuration.
v If you deployed the controller node together with the deployment server node in IBM Cloud Managerwith OpenStack version 4.1, you must check the file permission for /var/log/cinder/cinder.log on thecontroller node and cinder node. The file permission must be cinder:cinder. If the file permission isroot:root, you need to run chown cinder:cinder /var/log/cinder/cinder.log to change the filepermission.
v If you deployed the self-service portal and are using a distributed DB2 connection in IBM CloudManager with OpenStack version 4.1, you must complete the instructions in the “Upgrading thetopology” on page 45 topic instead of proceeding with the following steps.
Complete the following steps to upgrade the single node in-place. You might have deployed the singlenode using the knife topology or node command.
Procedure1. Upgrade the deployment server from version 4.1 to version 4.2. To upgrade the deployment server,
you must install IBM Cloud Manager with OpenStack, version 4.2 on a deployment server thatalready has version 4.1 installed. As a result, the installer upgrades the deployment server to the
Chapter 4. Upgrading 61

current release of the product. It is recommended that you back up the deployment server before youupgrade to the current release. For more information, see “Backing up and restoring the deploymentserver” on page 256.
2. If you are using the self-service portal with a DB2 database, you must upload the granted userpassword of your old database to the data bag, which is used to connect to the database in theself-service portal, version 4.1.a. Run mkdir data_bags.b. Update the following JSON attributes in your environment file, your-environment-name.json.
v openstack.developer_mode: Set to False. Only use this setting for the Minimal (all-in-one)environment. The default existed in the other environment.
v openstack.secret.key_path: Set to /etc/chef/encrypted_data_bag_secret. Only use this setting for theMinimal (all-in-one) environment. The default existed in the other environment.
c. Run cp -r /opt/ibm/cmwo/chef-repo/data_bags/inplace_upgrade_passwords data_bags/.d. Run chmod -R 600 data_bags/.e. Change the value at passwOrd to the password in the data_bags/inplace_upgrade_passwords/
self_service_db2.json file.{
"id": "self_service_db2","self_service_db2": "passw0rd"
}
f. Upload the data bag items for the passwords, the secret file is included in your topology file.$ knife data bag from file inplace_upgrade_passwords data_bags/inplace_upgrade_passwords/self_service_db2.json --secret-file secret-file-name
g. Remove the local data bag items since they are no longer needed.$ rm -rf data_bags/
3. If you are using VMware as the hypervisor and you have virtual machine disk (VMDK) as the blockstorage backend, you must upload the vCenter host password to the data bag before you upgrade thetopology.a. Run mkdir data_bags.b. Run cp -r /opt/ibm/cmwo/chef-repo/data_bags/secrets/openstack_vmware_secret_name.json.c. Run chmod -R 600 data_bags/.d. Change the value at CHANGEME to the password in the data_bags/secrets/
openstack_vmware_secret_name.json file.{
"id": "openstack_vmware_secret_name","openstack_vmware_secret_name": "CHANGEME "
}
e. Upload the data bag items for the passwords, the secret file is included in your topology file.$ knife data bag from file self_service_paswords data_bags/secrets/openstack_vmware_secret_name.json --secret-file secret-file-name
f. Remove the local data bag items since they are no longer needed.$ rm -rf data_bags/
4. If you are using the z/VM compute node, you must upload thez/VM xcat mnadmin password toyour data bag.a. Run mkdir data_bags.b. Run cp /opt/ibm/cmwo/chef-repo/data_bags/user_passwords/xcatmnadmin.json data_bags/.c. Run chmod -R 600 data_bags/.d. Change the value at OPENSTACK1 to the password of the user mnadmin in the xcat server, within
the data_bags/xcatmnadmin.json file.
62 IBM Cloud Manager with OpenStack: Administrator Guide, version 4.2

{"id": "xcatmnadmin","xcatmnadmin": "openstack1"
}
e. Upload the data bag item, your_env_user_passwords, which is the data bag name you created foruser_passwords, in the secret file that is included in your topology file.
Note: The following command must be entered on a single line, even though the example showsa line break for formatting purposes.$ knife data bag from file your_env_user_passwords data_bags/xcatmnadmin.json --secret-filesecret-file-name
f. Remove the local data bag items since they are no longer needed.$ rm -rf data_bags/
5. Determine whether to use the qpid or rabbitmq option during the upgrade. The in-place upgradefrom IBM Cloud Manager with OpenStack version 4.1 to 4.2 changes the message queue from qpid torabbitmq, by default. If you do not want to change the message queue, you must use the in-placeupgrade command with the --use-qpid option.
Note: If you are not familiar with qpid and rabbitmq, do not use this option.If you use --use-qpid, the updated topology uses qpid as the message queue. Otherwise, the messagequeue is replaced by rabbitmq automatically. Complete the following steps, depending on the messagequeue you want to use.
rabbitmq message queue (default)To use the rabbitmq message queue, you must upload the client password for rabbitmq toyour data bag before running the in-place upgrade command.a. Run mkdir data_bags.b. Run cp /opt/ibm/cmwo/chef-repo/data_bags/user_passwords/rabbitclient.json
data_bags/.c. Run chmod -R 600 data_bags/.d. Change the value at OPENSTACK1 to the password of the user rabbitclient to communicate
to rabbitmq, within the data_bags/rabbitclient.json file.{
"id": "rabbitclient","rabbitclient": "openstack1"
}
e. Upload the data bag item, your_env_user_passwords, which is the data bag name youcreated for user_passwords, in the secret file that is included in your topology file.
Note: The following command must be entered on a single line, even though the exampleshows a line break for formatting purposes.$ knife data bag from file your_env_user_passwords data_bags/rabbitclient.json--secret-file secret-file-name
f. Remove the local data bag items since they are no longer needed.$ rm -rf data_bags/
qpid message queueTo continue to use the qpid message queue, use the --use-qpid option. For example, knife osmanage in place upgrade node your-node-fqdn --use-qpid.
6. Upgrade the node deployment in-place.$ knife os manage in place upgrade node your-node-fqdn -x ssh-user -P ssh-password
The node is upgraded. This command provides options to control the upgrade process:
Chapter 4. Upgrading 63
--use-qpidWith this option, the updated topology uses qpid as the message queue. Otherwise, themessage queue is replaced by rabbitmq.
--topology-type TYPE
TYPE is the topology type of the deployed nodes. Its value must be 1-4:a. All-In-One topology
b. 1 + N topology
c. 1 + N distributed DB topology
d. 1 + N distributed cinder topology
You can use the command without specifying this option. In that case, the command tries toidentify the topology by analyzing the topology file and checking the roles that are given tothe nodes automatically. If the process fails, then the command exits and requests that youexplicitly set the topology type.
Example:$ knife os manage in place upgrade node your-node-fqdn -x ssh-user -P ssh-password --topology-type 1
It means that the topology of nodes is the Minimal topology.
What to do next
After the upgrade is finished, review the following information.1. The environment and nodes information from the old topology is backed up. All back-up files are in
the Update-backup folder in the same folder as the topology file you specified.2. Rerunning this command is allowed. If the environment and nodes information is already backed up,
and there are no more changes, the back-up action is not completed. The command tries to update thenodes only.
3. For the self-service portal, the old home directory is backed up. The default location is/var/opt/ibm/.SCE41_no_delete/, which cannot be removed as a backup of the old data.
4. If you disabled the IBM Platform Resource Scheduler service before the upgrade, enablenova-ibm-ego-ha-service on the controller node by running the following command:nova service-enable $controller-node nova-ibm-ego-ha-service
where $controller-node is the hostname where the nova-ibm-ego-ha-service runs.
Important: Repeat step 6 onward for each node that you must upgrade in place.
Upgrading the PowerVC controller and nodesYou can complete an in-place upgrade for IBM Cloud Manager with OpenStack, PowerVC controller andnodes from version 4.1 to version 4.2.
Before you begin
Before you begin, review the following information.v Your PowerVC nodes must remain at level 1.2.1 or lower before you upgrade the IBM Cloud Manager
with OpenStack PowerVC controller node.v You cannot upgrade PowerVC using the IBM Cloud Manager with OpenStack in place upgrade. To
upgrade PowerVC from version 1.2.1 to 1.2.2, see the PowerVC product information in IBMKnowledge Center.
64 IBM Cloud Manager with OpenStack: Administrator Guide, version 4.2
About this task
To upgrade the PowerVC controller node and PowerVC node, complete the following steps.
Procedure1. Upgrade the IBM Cloud Manager with OpenStack PowerVC controller node from version 4.1 to 4.2.
For instructions, see “Upgrading the topology” on page 45.2. Upgrade PowerVC from version 1.2.1 to version 1.2.2. For instructions, see the PowerVC product
information.3. Update the IBM Cloud Manager with OpenStack PowerVC controller node version 4.2 configuration
for PowerVC version 1.2.2.a. Export the version 4.2 environment after the IBM Cloud Manager with OpenStack upgrade to
version 4.2 is complete.knife environment show your-environment-name -d -Fjson > your-environment-name.json
b. Update the Chef environment file and data bags. Prepare PowerVC 1.2.2 rabbit client sslkey/certificates, as described in steps 4-7 and step 9 in the “Deploying an advanced configurationto manage to PowerVC” on page 101 topic.
c. Update your PowerVC controller node configuration for PowerVC version 1.2.2. For instructions,see “Updating a deployed topology” on page 149.
Upgrading the IBM Cloud Manager with OpenStack Hyper-V AgentYou can upgrade the IBM Cloud Manager with OpenStack Hyper-V Agent by using the graphicalinstallation wizard or silently.
Note: You must upgrade the Hyper-V Agent one version at a time. For example, if you have Hyper-VAgent version 3.1, FP2 installed, you must upgrade to version 3.2 and then upgrade to version 3.2, FP1.However, if you want to upgrade the Hyper-V agent to IBM Cloud Manager with OpenStack version 4.1,you must upgrade directly from IBM SmartCloud Entry version 3.2, FP2 to IBM Cloud Manager withOpenStack version 4.1, FP1. If you upgrade the Hyper-V agent from IBM SmartCloud Entry version 3.2,FP2 to IBM Cloud Manager with OpenStack version 4.1 without installing FP1 for version 4.1, you arelikely to encounter a problem.
Attention: During a graphical installation of the Hyper-V agent, if you provide a user name in the Novacompute service user field on the "Hyper-V Live Migration Settings" window, the IBM Cloud Managerwith OpenStack Compute Service runs using the domain user. In this case, after you upgrade, you mustcomplete the following steps to ensure that the instances can support live migration successfully on theHyper-V compute node.1. Open Control Panel -> Administrative Tools -> Services.2. Locate the service that is named IBM Cloud Manager with OpenStack Compute Service, right-click, and
select the properties menu.3. Switch to the Log On tab, select the second option for Log on as and provide the domain user
account and password.4. Click Apply and OK.5. Locate the service that is named IBM Cloud Manager with OpenStack Compute Service, right-click, and
select Restart to restart the service.
Graphical UpgradeTo upgrade the IBM Cloud Manager with OpenStack Hyper-V Agent by using the graphical installationwizard, follow these steps:
Chapter 4. Upgrading 65
Procedure1. Download the latest fix for the IBM Cloud Manager with OpenStack Hyper-V Agent from Fix Central.
For more information, see “Getting fixes from Fix Central” on page 297.
Note: The IBM Cloud Manager with OpenStack Hyper-V Agent and IBM Cloud Manager withOpenStack must be at the same level, either the GA level, or the fix level.
2. Locate the installation image, and double-click IBM Cloud Manager with OpenStack Hyper-VAgent.msi to start the installation wizard.
3. Follow the instructions that are provided by the installation wizard. For example, you must agree tothe license terms and specify configuration information, such as target directory, basic nova andvirtual switch configuration information, and message queue information. The IBM Cloud Managerwith OpenStack Hyper-V Agent supports two message queue types: Qpid and RabbitMQ. When youupgrade the Hyper-V Agent to 4.2, select Qpid or RabbitMQ as the message queue, depending onyour controller.
4. After you complete the information in the installation wizard, the upgrade begins.
Silent upgradeTo upgrade IBM Cloud Manager with OpenStack Hyper-V Agent silently, follow these steps:
Before you begin
Procedure1. Download the latest fix for the IBM Cloud Manager with OpenStack Hyper-V Agent from Fix Central.
For more information, see “Getting fixes from Fix Central” on page 297.
Note: The IBM Cloud Manager with OpenStack Hyper-V Agent and IBM Cloud Manager withOpenStack must be at the same level, either the GA level, or the fix level.
2. To run the installation through the response file, you must first enter the correct parameters in yourlocally saved copy of the response file. For detailed information, see the sample response files.The sample response files provide example INI files that can be used to drive a silent installation. ThisQpid Sample Response File upgrades the Hyper-V Agent using Qpid as the message queue. TheRabbitMQ Sample Response File upgrades the Hyper-V Agent using RabbitMQ as the message queue.The two examples show all properties that are available during a graphical installation of the IBMCloud Manager with OpenStack Hyper-V Agent.Qpid Sample Response File[Response]#indicate whether you agree with the license and its default value is “no”AgreeToLicense=yes#indicate using Qpid as the message queueUPGRADE_MQ_TYPE=0
RabbitMQ Sample Response File[Response]#indicate whether you agree with the license and its default value is “no”AgreeToLicense=yes#indicate using RabbitMQ as the message queueUPGRADE_MQ_TYPE=1# The RabbitMQ useridUPGRADE_MQ_UNAME=rabbitclient# The RabbitMQ passwordUPGRADE_MQ_PASSWORD=openstack1
Notes:
a. The property ;AgreeToLicense in the response file specifies your agreement to the license for theapplication. Its default value is set to no. You must specify yes to run the silent installationsuccessfully.
66 IBM Cloud Manager with OpenStack: Administrator Guide, version 4.2

b. The UPGRADE_MQ_TYPE property specifies the message queue type. Its default value is set to 1,which means you use RabbitMQ as the message queue. If the value is set to 0, it means you useQpid as the message queue.
c. The UGRADE_MQ_UNAME and UPGRADE_MQ_PASSWORD properties specify the RabbitMQ user ID andpassword. If you use Qpid as the message queue type, you do not need to set theUPGRADE_MQ_UNAME and UPGRADE_MQ_PASSWORD properties.
Note:
3. Next, open a command prompt and input the following statement:
Note: The following statement must be entered on a single line, even though the example shows aline break for formatting purposes.msiexec /i "IBM Cloud Manager with OpenStack Hyper-V Agent.msi"/qn USEINI="absolute path to responsefile"
The following properties in the nova.conf file are copied:glance_host;glance_port;qpid_hostname;qpid_port;qpid_username;qpid_password;instances_path;neutron_url;neutron_admin_username;neutron_admin_password;neutron_admin_tenant_name;neutron_region_name;neutron_admin_auth_url;auth_strategy with default value "keystone";flat_injected with default value "true";rpc_thread_pool_size with default value "128";rpc_conn_pool_size with default value "60";rpc_response_timeout with default value "600";use_cow_images=" ";vswitch_name=" ";use_ipv6 with default value "true";verbose with default value "false";log_dir=" ";
These following properties in neutron.conf file are copied:qpid_hostname;qpid_port;qpid_username;qpid_password;allow_overlapping_ips;rpc_thread_pool_size with default value "128";rpc_conn_pool_size with default value "60";rpc_response_timeout with default value "600";
The following properties in hyperv_neutron_agent.ini file are copied:qpid_hostname;qpid_username;qpid_password;physical_network_vswitch_mappings;rpc_backend;verbose;debug;control_exchange;tenant_network_type;network_vlan_ranges;
Notes:
Chapter 4. Upgrading 67

a. If you manually modified properties that are not shown, you must manually modify thoseproperties after the upgrade is complete.
b. If you use RabbitMQ as the message queue, the Qpid properties are replaced with RabbitMQproperties, including rabbit_userid, rabbit_password, rabbit_host, rabbit_port, andrabbit_use_ssl.
68 IBM Cloud Manager with OpenStack: Administrator Guide, version 4.2
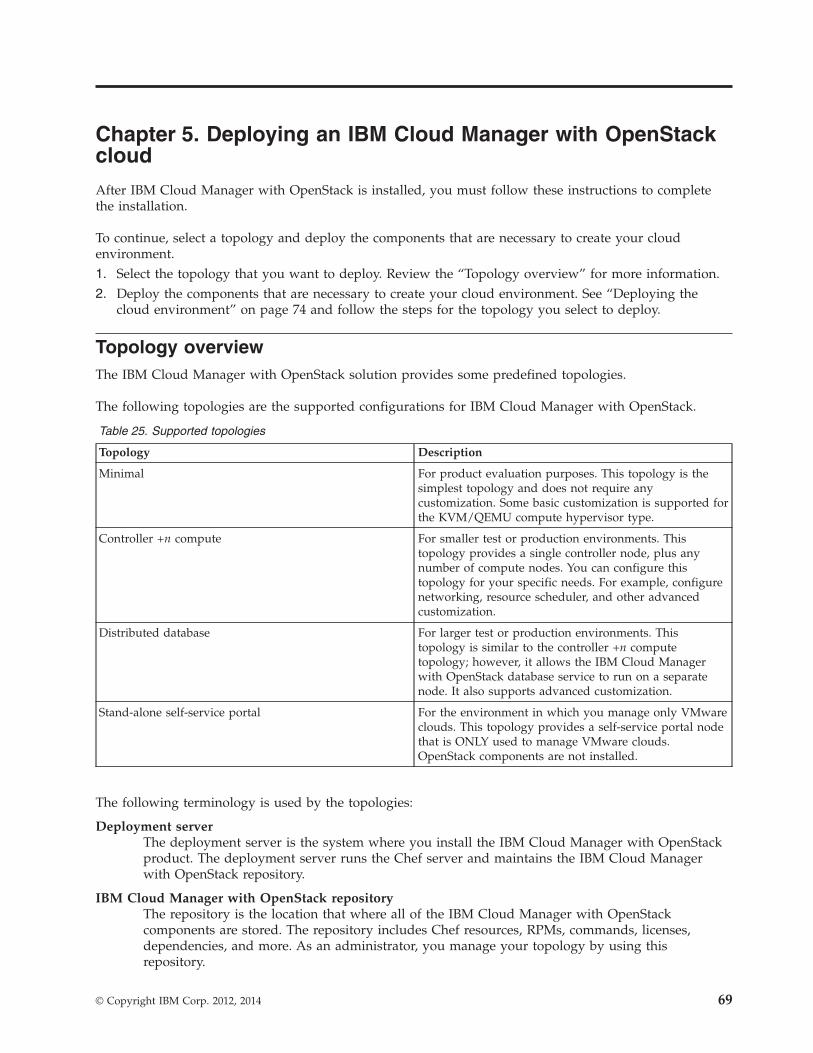
Chapter 5. Deploying an IBM Cloud Manager with OpenStackcloud
After IBM Cloud Manager with OpenStack is installed, you must follow these instructions to completethe installation.
To continue, select a topology and deploy the components that are necessary to create your cloudenvironment.1. Select the topology that you want to deploy. Review the “Topology overview” for more information.2. Deploy the components that are necessary to create your cloud environment. See “Deploying the
cloud environment” on page 74 and follow the steps for the topology you select to deploy.
Topology overviewThe IBM Cloud Manager with OpenStack solution provides some predefined topologies.
The following topologies are the supported configurations for IBM Cloud Manager with OpenStack.
Table 25. Supported topologies
Topology Description
Minimal For product evaluation purposes. This topology is thesimplest topology and does not require anycustomization. Some basic customization is supported forthe KVM/QEMU compute hypervisor type.
Controller +n compute For smaller test or production environments. Thistopology provides a single controller node, plus anynumber of compute nodes. You can configure thistopology for your specific needs. For example, configurenetworking, resource scheduler, and other advancedcustomization.
Distributed database For larger test or production environments. Thistopology is similar to the controller +n computetopology; however, it allows the IBM Cloud Managerwith OpenStack database service to run on a separatenode. It also supports advanced customization.
Stand-alone self-service portal For the environment in which you manage only VMwareclouds. This topology provides a self-service portal nodethat is ONLY used to manage VMware clouds.OpenStack components are not installed.
The following terminology is used by the topologies:
Deployment serverThe deployment server is the system where you install the IBM Cloud Manager with OpenStackproduct. The deployment server runs the Chef server and maintains the IBM Cloud Managerwith OpenStack repository.
IBM Cloud Manager with OpenStack repositoryThe repository is the location that where all of the IBM Cloud Manager with OpenStackcomponents are stored. The repository includes Chef resources, RPMs, commands, licenses,dependencies, and more. As an administrator, you manage your topology by using thisrepository.
© Copyright IBM Corp. 2012, 2014 69

Node A node is a system that is part of your topology. The applicable IBM Cloud Manager withOpenStack components are deployed to the node based on your cloud environment.
The repository, along with the associated OpenStack Chef cookbooks and dependencies provide the basicbuilding blocks that you can use to deploy IBM Cloud Manager with OpenStack.
The topologies support the following operating systems, database, message queue, and OpenStackcomponents.
Note: The following support information applies to the minimal, controller +n compute, and distributeddatabase topologies only. The stand-alone self-service portal topology includes only the self-service portal.v OpenStack Components: Identity, Image, Network, Compute, Orchestration, Block Storage, Telemetry,
and Dashboardv OpenStack Networking: Neutronv OpenStack Compute Scheduler: Compute scheduler filters, IBM Platform Resource Scheduler (PRS)v Operating System for OpenStack controller: Red Hat Enterprise Linux 6.5 or z/VM 6.3v Database: IBM DB2 (default) , MySQLv Message Queue: RabbitMQ (default), Qpidv Hypervisor types: Linux Kernel-based Virtual Machine (KVM), PowerKVM, QEMU, z/VM, and
Hyper-Vv Virtualization Manager: PowerVCv Self-service portal
You can use a single IBM Cloud Manager with OpenStack setup to manage multiple topologies andmultiple environments for those topologies. To manage, use the IBM Cloud Manager with OpenStackcommands that simplify administration.
Minimal deploymentThis topology is for product evaluation or proof of concept deployments.
With the minimal topology, all IBM Cloud Manager with OpenStack services run from one system. TheIBM Cloud Manager with OpenStack node runs basic services, including the KVM/QEMU Novacompute service.
The deployment server is the system to which you install IBM Cloud Manager with OpenStack. Thesolution delivery repository is the repository that contains all the IBM Cloud Manager with OpenStackcomponents. As an administrator, you manage the topology using this repository. The graphic belowshows some examples of deploying a minimal topology. Option 2 is the recommended example if youplan to use the deployment server to deploy additional cloud topologies.
70 IBM Cloud Manager with OpenStack: Administrator Guide, version 4.2
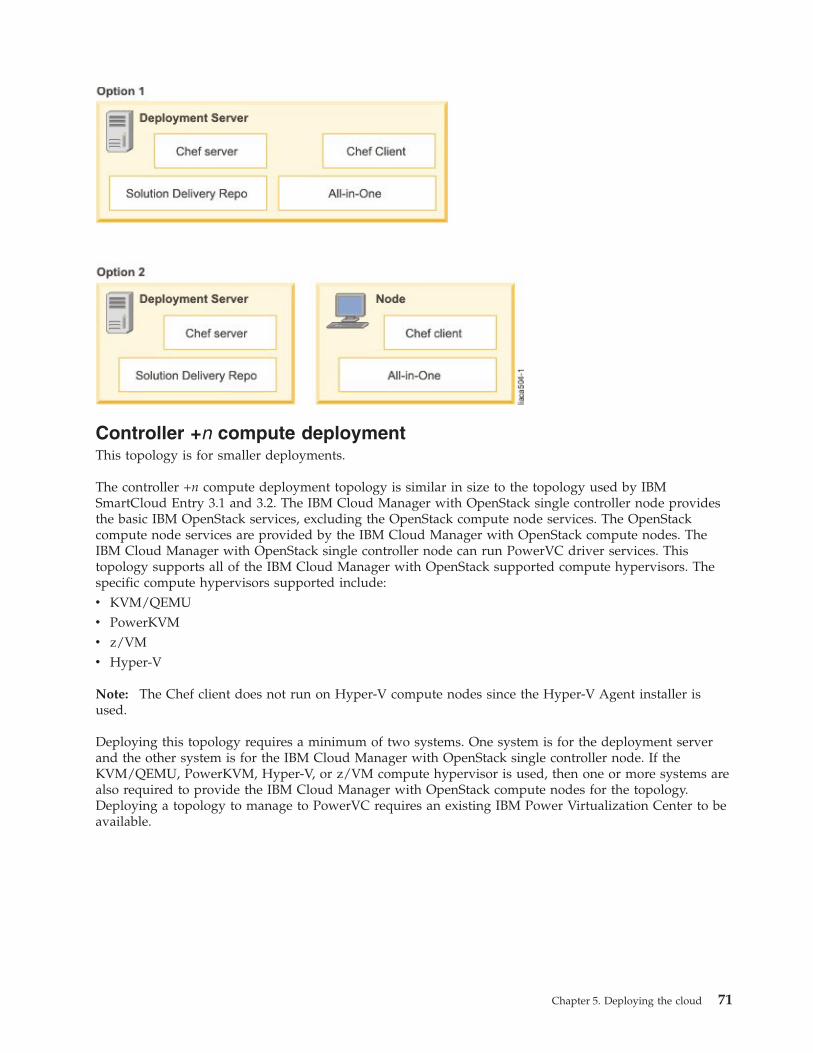
Controller +n compute deploymentThis topology is for smaller deployments.
The controller +n compute deployment topology is similar in size to the topology used by IBMSmartCloud Entry 3.1 and 3.2. The IBM Cloud Manager with OpenStack single controller node providesthe basic IBM OpenStack services, excluding the OpenStack compute node services. The OpenStackcompute node services are provided by the IBM Cloud Manager with OpenStack compute nodes. TheIBM Cloud Manager with OpenStack single controller node can run PowerVC driver services. Thistopology supports all of the IBM Cloud Manager with OpenStack supported compute hypervisors. Thespecific compute hypervisors supported include:v KVM/QEMUv PowerKVMv z/VMv Hyper-V
Note: The Chef client does not run on Hyper-V compute nodes since the Hyper-V Agent installer isused.
Deploying this topology requires a minimum of two systems. One system is for the deployment serverand the other system is for the IBM Cloud Manager with OpenStack single controller node. If theKVM/QEMU, PowerKVM, Hyper-V, or z/VM compute hypervisor is used, then one or more systems arealso required to provide the IBM Cloud Manager with OpenStack compute nodes for the topology.Deploying a topology to manage to PowerVC requires an existing IBM Power Virtualization Center to beavailable.
Chapter 5. Deploying the cloud 71
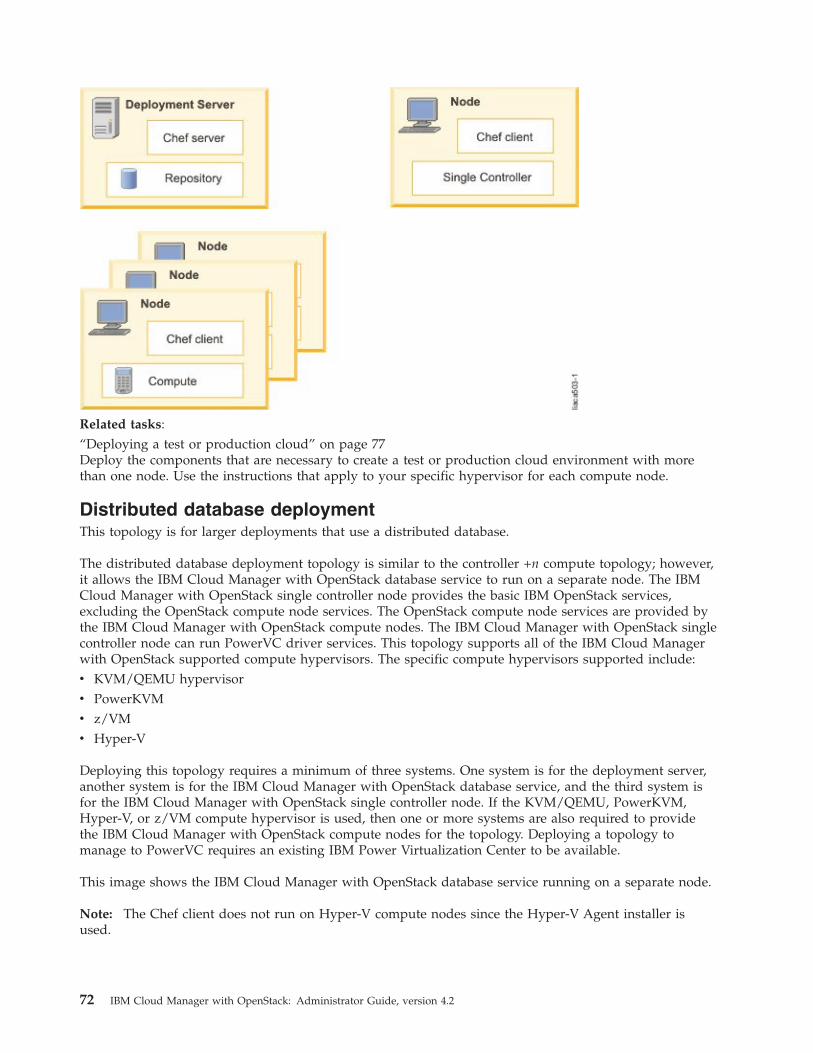
Related tasks:“Deploying a test or production cloud” on page 77Deploy the components that are necessary to create a test or production cloud environment with morethan one node. Use the instructions that apply to your specific hypervisor for each compute node.
Distributed database deploymentThis topology is for larger deployments that use a distributed database.
The distributed database deployment topology is similar to the controller +n compute topology; however,it allows the IBM Cloud Manager with OpenStack database service to run on a separate node. The IBMCloud Manager with OpenStack single controller node provides the basic IBM OpenStack services,excluding the OpenStack compute node services. The OpenStack compute node services are provided bythe IBM Cloud Manager with OpenStack compute nodes. The IBM Cloud Manager with OpenStack singlecontroller node can run PowerVC driver services. This topology supports all of the IBM Cloud Managerwith OpenStack supported compute hypervisors. The specific compute hypervisors supported include:v KVM/QEMU hypervisorv PowerKVMv z/VMv Hyper-V
Deploying this topology requires a minimum of three systems. One system is for the deployment server,another system is for the IBM Cloud Manager with OpenStack database service, and the third system isfor the IBM Cloud Manager with OpenStack single controller node. If the KVM/QEMU, PowerKVM,Hyper-V, or z/VM compute hypervisor is used, then one or more systems are also required to providethe IBM Cloud Manager with OpenStack compute nodes for the topology. Deploying a topology tomanage to PowerVC requires an existing IBM Power Virtualization Center to be available.
This image shows the IBM Cloud Manager with OpenStack database service running on a separate node.
Note: The Chef client does not run on Hyper-V compute nodes since the Hyper-V Agent installer isused.
72 IBM Cloud Manager with OpenStack: Administrator Guide, version 4.2
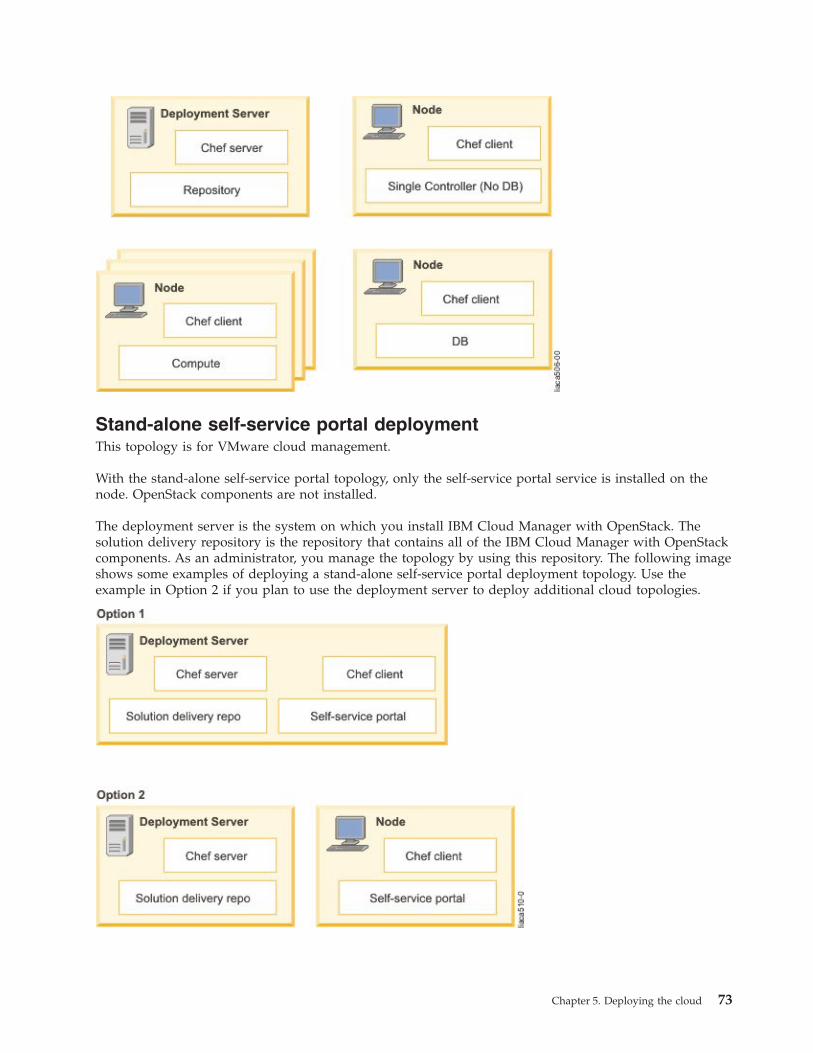
Stand-alone self-service portal deploymentThis topology is for VMware cloud management.
With the stand-alone self-service portal topology, only the self-service portal service is installed on thenode. OpenStack components are not installed.
The deployment server is the system on which you install IBM Cloud Manager with OpenStack. Thesolution delivery repository is the repository that contains all of the IBM Cloud Manager with OpenStackcomponents. As an administrator, you manage the topology by using this repository. The following imageshows some examples of deploying a stand-alone self-service portal deployment topology. Use theexample in Option 2 if you plan to use the deployment server to deploy additional cloud topologies.
Chapter 5. Deploying the cloud 73
Deploying the cloud environmentDeploy the components that are necessary to create your cloud environment.
Complete the prerequisites, then follow the steps for the topology you want to deploy.
Deploying prerequisitesBefore deploying an IBM Cloud Manager with OpenStack topology, you need to complete theprerequisites.
Procedure1. Install the latest fix packs for IBM Cloud Manager with OpenStack before you proceed. For
information about fix packs, see “Applying fixes and updates” on page 39.2. Identify the node systems for the topology. Validate and collect basic information about a node
system. Change node-fqdn to the fully qualified domain name of a node system. The deploymentsystem must be able to SSH by using the fully qualified domain name. You can also set to the publicIP address, private IP address, or host name. You are prompted for the SSH root user password forthe node. To use an SSH identity file instead of a password, use the -i node-ssh-identity option,where node-ssh-identity is the SSH identity file for the node.knife os manage validate node node-fqdn
The command performs basic validation on the node system and displays the results to the terminal.The command also stores the results in a JSON file, validate_node_node-fqdn.json, and creates acloud configuration YAML snippet file, node_node-fqdn.yml, in the current directory. The YAMLsnippet file contains network information collected for the node, including the recommendedmanagement network to use for the node. The file does not contain a recommended data networkfor the node, even if a data network exists. In addition, the file may not identify networks that haveunique configurations. The node’s network information is used when you deploy your cloudenvironment.a. Verify that the time on the node systems is within 15 minutes of the time that is shown on the
deployment server. Consider synchronizing the system clock of the deployment server and nodesystems with a network time protocol (NTP) server. For more information, see “Installing anetwork time service” on page 161.
Note: You can configure the deployment server as the network time protocol (NTP) server. Whenyou are following the deployment process, customize the topology to use the NTP server youconfigured. Look for the customization step.
b. Record the IP addresses for each node.c. Record the fully qualified domain names for each node.d. Record the root user login information (either password or SSH identity file) for each node.e. Record the number and name of each network interface card on each node.
v Management network = Defaults to eth0. It is used for OpenStack communication betweennodes.
v Virtual machine data network = Defaults to eth1 (optional). It is used for virtual machine datacommunication within the cloud environment and is only required if you are using VLAN orFlat networks. Do not use a management or external network as the virtual machine datanetwork.
v External network L3 network = Defaults to eth0. It can be shared with the managementnetwork, which is the default configuration.
If the deployment nodes do not have an eth0 or eth1 interface or if the management, externalnetwork and virtual machine data network are on different interfaces besides eth0 and eth1, thenyou must change the default environment settings when you configure the deployment.
74 IBM Cloud Manager with OpenStack: Administrator Guide, version 4.2
Note:
v The network interface cards must not connect to the same network at the same time. Forexample, eth0 and eth1 must not connect to Network A at the same time.
v The example environment assumes that the network configuration is identical across all of thedeployment nodes.
f. The network configuration and hypervisor type limit the type of networks that can be defined.For more information about network considerations, see “Network considerations” on page 16.
3. Verify the OpenStack controller node system meets the following criteria:v Operating System: Red Hat Enterprise Linux 6.5 or z/VM 6.3v Architecture: x86_64, ppc64, or 64-bit IBM z/Architecture
4. If applicable, verify that the PowerVC environment that you want to manage meets the “IBM PowerVirtualization Center prerequisites” on page 12.
5. If applicable, verify the KVM, QEMU compute node system meets the following criteria:v See “KVM or QEMU prerequisites” on page 11 for details.v To use the KVM hypervisor type on a node system, the node must support KVM acceleration. If
the node system does not support KVM acceleration, then you must use the QEMU hypervisortype. To use the QEMU hypervisor type, set the openstack.compute.libvirt.virt_type attributeto qemu in the default_attributes section of your environment when you deploy your cloudenvironment. The Minimal topology uses the QEMU hypervisor type by default. Note that theQEMU hypervisor type is not recommended for a production deployment. For details , see theOpenStack documentation.
6. If applicable, verify that the z/VM compute node system meets the following criteria:v See “z/VM prerequisites” on page 14 for details.v To use the z/VM hypervisor, one or more x86_64 Red Hat Enterprise Linux system nodes should
be used to install the compute and network driver to manage the z/VM hypervisor. One x86_64Red Hat Enterprise Linux system node is supported for each z/VM node. For more informationon configuring the z/VM hypervisor, see the Enabling z/VM for OpenStack user manual.
7. If applicable, verify the PowerKVM compute node system meets the following criteria: See“PowerKVM prerequisites” on page 12 for details.
8. If applicable, verify that the Hyper-V compute node system meets the following criteria: See“Installing and uninstalling the IBM Cloud Manager with OpenStack Hyper-V Agent” on page 28 fordetails.
9. Linux node systems must have access to a yum repository, which contains base operating systempackages for your node systems. Many of the OpenStack components depend on operating systempackages that are automatically installed on the node system during the deployment process. Todetermine if a node has access to a yum repository you can run the yum list libvirt command onthe node. If the command fails, a valid yum repository does not exist on the node. If you do nothave a yum repository configured on the node system, you can configure the Deployment Server tocreate the yum repositories on the nodes automatically when OpenStack is deployed. Forconfiguration information, see “Configuring operating system yum repositories on the deploymentserver” on page 37.
10. Consider this restriction before deploying IBM Cloud Manager with OpenStack, in case you mustundo a deployment.v Support does not exist to uninstall a deployed topology for IBM Cloud Manager with OpenStack.
You must reinstall or reset the node back to its pre-deployment state. You cannot attempt toredeploy to the same managed system without first setting the node back to its pre-deploymentstate. Back up your node system before deployment by using existing snapshot or capturecapabilities that are provided by the underlying virtualization manager or other backup methods.
v The node must also be deleted from the chef server. For more information, see “Redeploying anode cleanup” on page 148.
Chapter 5. Deploying the cloud 75
11. To ensure the IP address moves from the interface to the corresponding OVS bridge, verify that thefollowing preconditions are met.a. Each interface must have an ifcfg-ethX file in the /etc/sysconfig/network-scripts/ directory.b. If BOOTPROTO is static, the IPADDR, DEVICE attributes must be contained in the ifcfg-ethX file. In
addition, either PREFIX or NETMASK must be specified in the ifcfg-ethX file as well.c. Before you deploy, the controller node and compute node have a default gateway.
12. If the controller node has several CPUs, deploying the topology might fail because of excessivedatabase connections. The following troubleshooting topics, that are related to deploying topologies,can help you to identify and correct this problem, if relevant for your environment:v “DB2 database requests fail with SQL1225N” on page 301v “MySQL database requests fail with "Too many connections"” on page 302
A correct configuration for this problem depends on several factors, including the database engine,number of CPUs, physical memory, and swap space.
13. Consider whether to encrypt passwords during the deployment process. When you enter passwordsinto files during the deployment process (such as in the cloud YAML, passwords JSON, or topologyJSON files), you can use a command to encrypt the password. The encryption avoids having cleartext passwords in those files.knife os manage encrypt password [PASSWORD]
The command takes a clear text password and returns an encrypted password that can be used bythe other IBM Cloud Manager with OpenStack commands when processing a deployment.
Deploying an evaluation cloudUse the following procedure to deploy the components necessary to create a very basic cloudenvironment. The cloud environment is for product evaluation or a proof of concept and uses theminimal topology with KVM or QEMU compute nodes.
Procedure1. Log in to the deployment system as the root user. This is the system where IBM Cloud Manager with
OpenStack was installed.2. Deploy your topology. Change node.fqdn.com to the fully qualified domain name of the node.
$ knife os manage deploy evaluation node.fqdn.com
Note: With the evaluation deployment, you must have separate nodes for the deployment system andthe node. If that is not possible, then you must deploy using the minimal topology and customize thetopology to use the Qpid message service. See “Deploying a prescribed configuration with KVM orQEMU compute nodes” on page 79 for instructions.
3. After the deployment completes, the IBM Cloud Manager with OpenStack services are ready to use.The IBM Cloud Manager with OpenStack dashboard is available at https://node.fqdn.com/, wherenode.fqdn.com is the fully qualified domain name of the node. The web interface for IBM CloudManager with OpenStack self-service portal is available at https://node.fqdn.com:18443/cloud/web/login.html. You can log in using admin user with admin as the default password.For information about managing IBM Cloud Manager with OpenStack services, see “Managing IBMCloud Manager with OpenStack services” on page 207.Additionally, the IBM Platform Resource Scheduler (PRS) is enabled as the default OpenStackscheduling engine, for more information see “Customizing the scheduler” on page 110.
Results
You are ready to start using your cloud environment. To continue, see “Using your cloud environment”on page 144.Related reference:
76 IBM Cloud Manager with OpenStack: Administrator Guide, version 4.2
“Messaging service limitation when deployment server and IBM Cloud Manager with OpenStackcontroller are on same server” on page 331You must use the Qpid messaging service if your deployment server and the IBM Cloud Manager withOpenStack controller are on the same server.
Deploying a test or production cloudDeploy the components that are necessary to create a test or production cloud environment with morethan one node. Use the instructions that apply to your specific hypervisor for each compute node.Related concepts:“Controller +n compute deployment” on page 71This topology is for smaller deployments.
Deploying with Hyper-V compute nodesDeploy the components that are necessary to create a cloud environment with Hyper-V compute nodes.
Before you begin
Before you begin, ensure you completed the “Deploying prerequisites” on page 74 steps.
About this task
Use the following procedure to deploy the topology to your node systems.
Procedure1. Log in to the deployment system as the root user. This is the system where IBM Cloud Manager with
OpenStack was installed.2. Create a directory to store the files for the topology that you deploy. Change your-deployment-name
to the name for your deployment.$ mkdir your-deployment-name$ chmod 600 your-deployment-name$ cd your-deployment-name
3. Copy the example environment for the topology that you deploy. Change your-environment-name tothe name for your environment.
Note: The following command must be entered on a single line, even though the example shows aline break for formatting purposes.$ knife environment show example-ibm-os-single-controller-n-compute -d -Fjson> your-environment-name.json
4. Change the following JSON attributes in your environment file, your-environment-name.json:a. Name: Set to your environment name: your-environment-name.b. Description: Set to the description for your environment.c. openstack.region: (Optional) Customize the region name for your cloud. The region name must
not contain spaces or special characters.d. openstack.endpoints.host, openstack.endpoints.bind-host, and openstack.endpoints.mq.host:
Change from 127.0.0.1 to the IP address of the controller node system for the topology.e. openstack.network.ml2.mechanism_drivers: hyperv
f. openstack.network.ml2.tenant_network_types: vlan or flat, depending on your environment. Thedefault value is vlan.
g. openstack.network.ml2.flat_networks: Add your Hyper-V flat networks. For example, physnet1.h. openstack.network.ml2.network_vlan_ranges: Add your Hyper-V network VLAN range. For
example, physnet1:1000:2999.
Chapter 5. Deploying the cloud 77
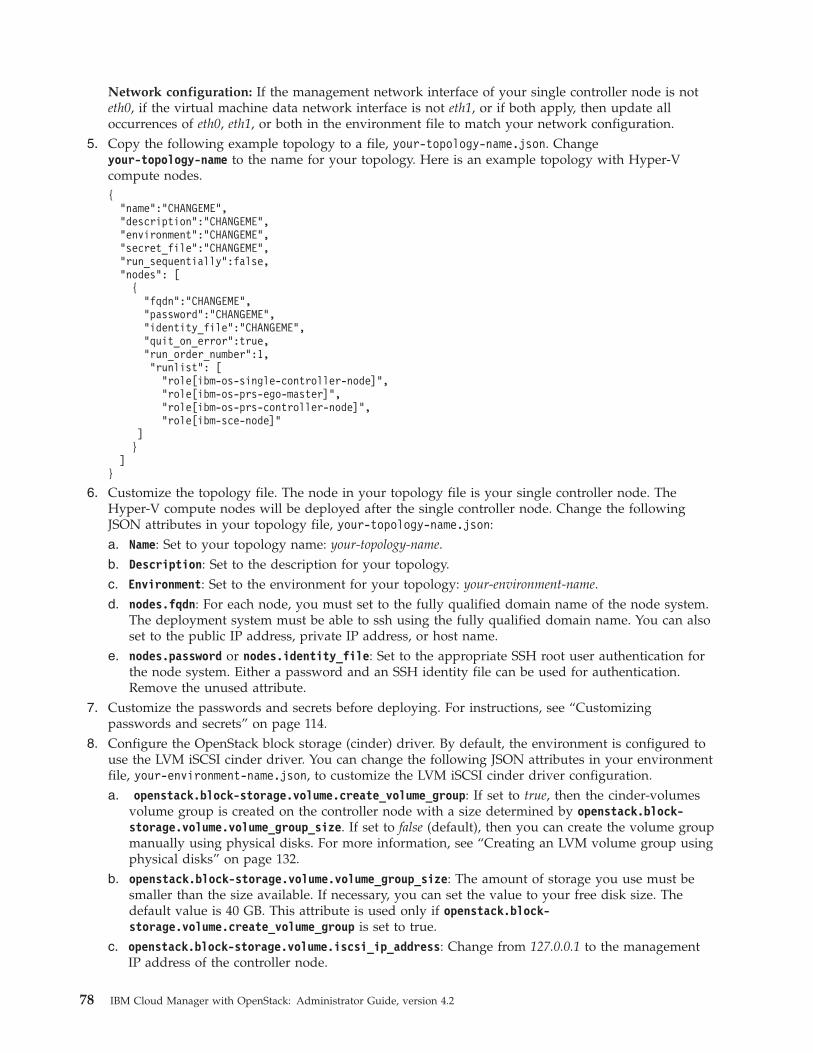
Network configuration: If the management network interface of your single controller node is noteth0, if the virtual machine data network interface is not eth1, or if both apply, then update alloccurrences of eth0, eth1, or both in the environment file to match your network configuration.
5. Copy the following example topology to a file, your-topology-name.json. Changeyour-topology-name to the name for your topology. Here is an example topology with Hyper-Vcompute nodes.{
"name":"CHANGEME","description":"CHANGEME","environment":"CHANGEME","secret_file":"CHANGEME","run_sequentially":false,"nodes": [
{"fqdn":"CHANGEME","password":"CHANGEME","identity_file":"CHANGEME","quit_on_error":true,"run_order_number":1,"runlist": [
"role[ibm-os-single-controller-node]","role[ibm-os-prs-ego-master]","role[ibm-os-prs-controller-node]","role[ibm-sce-node]"
]}
]}
6. Customize the topology file. The node in your topology file is your single controller node. TheHyper-V compute nodes will be deployed after the single controller node. Change the followingJSON attributes in your topology file, your-topology-name.json:a. Name: Set to your topology name: your-topology-name.b. Description: Set to the description for your topology.c. Environment: Set to the environment for your topology: your-environment-name.d. nodes.fqdn: For each node, you must set to the fully qualified domain name of the node system.
The deployment system must be able to ssh using the fully qualified domain name. You can alsoset to the public IP address, private IP address, or host name.
e. nodes.password or nodes.identity_file: Set to the appropriate SSH root user authentication forthe node system. Either a password and an SSH identity file can be used for authentication.Remove the unused attribute.
7. Customize the passwords and secrets before deploying. For instructions, see “Customizingpasswords and secrets” on page 114.
8. Configure the OpenStack block storage (cinder) driver. By default, the environment is configured touse the LVM iSCSI cinder driver. You can change the following JSON attributes in your environmentfile, your-environment-name.json, to customize the LVM iSCSI cinder driver configuration.a. openstack.block-storage.volume.create_volume_group: If set to true, then the cinder-volumes
volume group is created on the controller node with a size determined by openstack.block-storage.volume.volume_group_size. If set to false (default), then you can create the volume groupmanually using physical disks. For more information, see “Creating an LVM volume group usingphysical disks” on page 132.
b. openstack.block-storage.volume.volume_group_size: The amount of storage you use must besmaller than the size available. If necessary, you can set the value to your free disk size. Thedefault value is 40 GB. This attribute is used only if openstack.block-storage.volume.create_volume_group is set to true.
c. openstack.block-storage.volume.iscsi_ip_address: Change from 127.0.0.1 to the managementIP address of the controller node.
78 IBM Cloud Manager with OpenStack: Administrator Guide, version 4.2
To customize your environment for the IBM Storwize Cinder driver, see“Configuring IBM StorwizeCinder driver” on page 132.
9. (Optional) Complete any optional customizations. For options, see “Deployment customizationoptions” on page 109.
Note: Some customization options might not be supported for all hypervisor types and some cannotbe configured after you deploy your cloud environment.
10. Deploy your topology.a. Upload the environment for your deployment.
$ knife environment from file your-environment-name.json
b. Deploy the topology.$ knife os manage deploy topology your-topology-name.json
c. (Optional) Check the detailed status of the IBM Cloud Manager with OpenStack services that aredeployed.$ knife os manage services status –-topology-file your-topology-name.json
11. Install the Hyper-V agent on your Hyper-V compute nodes. For instructions, see “Installing anduninstalling the IBM Cloud Manager with OpenStack Hyper-V Agent” on page 28.
12. After the deployment is complete, the IBM Cloud Manager with OpenStack services are ready touse. The IBM Cloud Manager with OpenStack dashboard is available at https://controller.fqdn.com/, where controller.fqdn.com is the fully qualified domain name of thecontroller node in your topology. The web interface for IBM Cloud Manager with OpenStackself-service portal is available at https://controller.fqdn.com:18443/cloud/web/login.html. Youcan log into either using admin user with the password that you customized in step 7 on page 78.For more information about managing IBM Cloud Manager with OpenStack services, see “ManagingIBM Cloud Manager with OpenStack services” on page 207.
Results
You are ready to start using your cloud environment. To continue, see “Using your cloud environment”on page 144.Related reference:“Troubleshooting errors when deploying or updating topologies” on page 301If a topology deployment or update fails, review the log output from the deployment command for moreinformation.
Deploying with KVM or QEMU compute nodesDeploy the components that are necessary to create a cloud environment with KVM or QEMU computenodes. You can complete the deployment with either a prescribed or advanced configuration.
Deploying a prescribed configuration with KVM or QEMU compute nodes:
Deploy the components that are necessary to create a cloud environment with KVM or QEMU computenodes by using a prescribed cloud configuration.
Before you begin
Before you begin, ensure you completed the “Deploying prerequisites” on page 74 steps.
Chapter 5. Deploying the cloud 79
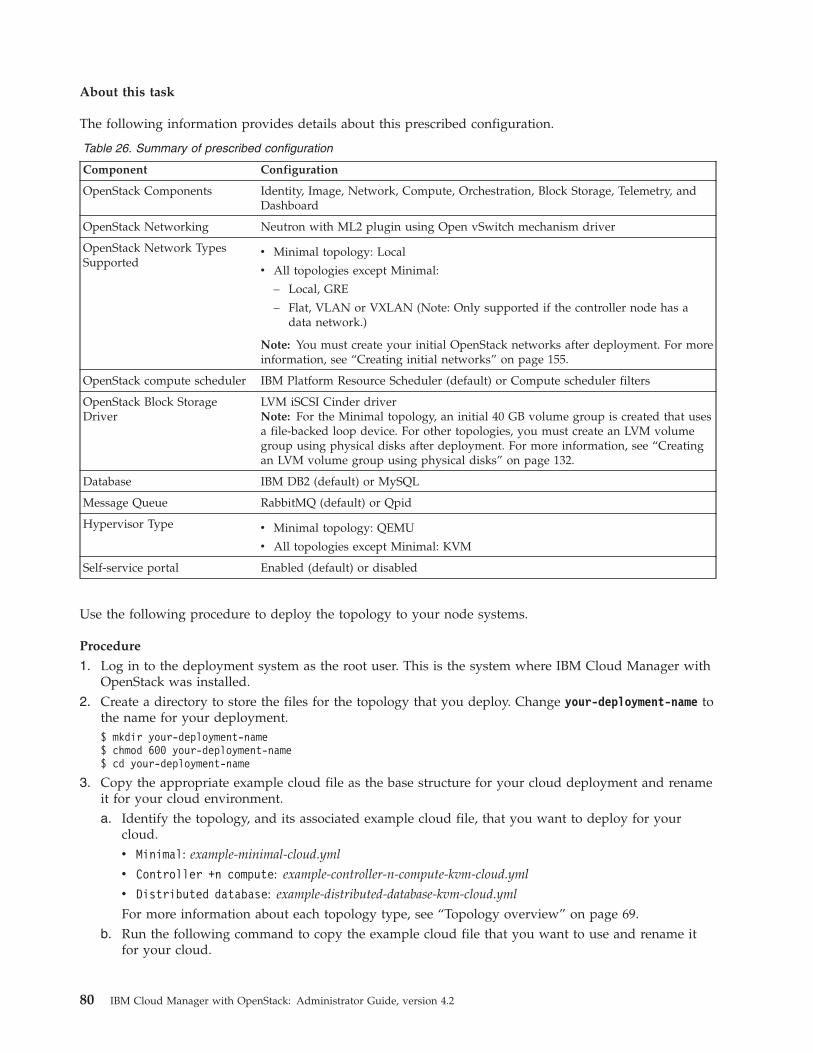
About this task
The following information provides details about this prescribed configuration.
Table 26. Summary of prescribed configuration
Component Configuration
OpenStack Components Identity, Image, Network, Compute, Orchestration, Block Storage, Telemetry, andDashboard
OpenStack Networking Neutron with ML2 plugin using Open vSwitch mechanism driver
OpenStack Network TypesSupported
v Minimal topology: Local
v All topologies except Minimal:
– Local, GRE
– Flat, VLAN or VXLAN (Note: Only supported if the controller node has adata network.)
Note: You must create your initial OpenStack networks after deployment. For moreinformation, see “Creating initial networks” on page 155.
OpenStack compute scheduler IBM Platform Resource Scheduler (default) or Compute scheduler filters
OpenStack Block StorageDriver
LVM iSCSI Cinder driverNote: For the Minimal topology, an initial 40 GB volume group is created that usesa file-backed loop device. For other topologies, you must create an LVM volumegroup using physical disks after deployment. For more information, see “Creatingan LVM volume group using physical disks” on page 132.
Database IBM DB2 (default) or MySQL
Message Queue RabbitMQ (default) or Qpid
Hypervisor Type v Minimal topology: QEMU
v All topologies except Minimal: KVM
Self-service portal Enabled (default) or disabled
Use the following procedure to deploy the topology to your node systems.
Procedure
1. Log in to the deployment system as the root user. This is the system where IBM Cloud Manager withOpenStack was installed.
2. Create a directory to store the files for the topology that you deploy. Change your-deployment-name tothe name for your deployment.$ mkdir your-deployment-name$ chmod 600 your-deployment-name$ cd your-deployment-name
3. Copy the appropriate example cloud file as the base structure for your cloud deployment and renameit for your cloud environment.a. Identify the topology, and its associated example cloud file, that you want to deploy for your
cloud.v Minimal: example-minimal-cloud.yml
v Controller +n compute: example-controller-n-compute-kvm-cloud.yml
v Distributed database: example-distributed-database-kvm-cloud.yml
For more information about each topology type, see “Topology overview” on page 69.b. Run the following command to copy the example cloud file that you want to use and rename it
for your cloud.
80 IBM Cloud Manager with OpenStack: Administrator Guide, version 4.2
Note: This step assumes the default IBM Cloud Manager with OpenStack installation path on thedeployment server (/opt/ibm/cmwo).In the following command, change example-cloud.yml to the example cloud file for the topologythat you want to deploy. Change your-cloud.yml to the name of your cloud.$ cp /opt/ibm/cmwo/cli/config/example-cloud.yml your-cloud.yml
4. Change the required YAML attributes in your cloud file, your-cloud.yml.v Cloud Information (cloud): Customize the cloud information.
a. name: Set the name for your cloud. The name cannot contain spaces or special characters. Thisname is also used as the OpenStack region name.
b. password: Set the cloud administrator (admin) user's password. This value is not required orsupported for the minimal topology. The minimal topology defaults the password to admin.
v Node Information (nodes): Customize the information for each node system in your cloud. For thecontroller +n compute or distributed database topologies, you can copy the kvm_compute nodesection to include more KVM compute nodes in your cloud.a. name and description: Leave these set to the default values provided.b. fqdn: Set to the fully qualified domain name of the node system. The deployment system must
be able to SSH by using the fully qualified domain name. You can also set to the public IPaddress, private IP address, or host name.
c. password or identity_file: Set to the appropriate SSH root user authentication for the nodesystem. You can use either a password or an SSH identity file for authentication.
d. nics.management_network: Set to the management network interface card for the node system.This network is used for IBM Cloud Manager with OpenStack communication between thenodes in the cloud. The fqdn setting for the node must resolve to the IP address of this network.The default is eth0.
e. nics.data_network: Set to the data network interface card for the node system. The default iseth1. If the node system does not have a second network interface card that can be used as adata network, then set to ~. Do not set to the same value as nics.management_network. Also, donot set to a network interface card that provides an alternative management network or anexternal network for the node, for example, a private or public IP address. A data network isrequired to use VLAN or Flat networks in your cloud.
5. Optional: Complete any optional customization by changing the appropriate YAML attributes in yourcloud file, your-cloud.yml.a. Optional: Cloud Information (cloud): Customize the cloud information.
v database_service_type: You can change the database that is used by OpenStack from DB2(default) to MySQL by setting this attribute to mysql.
v messaging_service_type: You can change the messaging queue that is used by OpenStack fromRabbitMQ (default) to Qpid by setting this attribute to qpid.
v self_service_portal and self_service_portal_node_name: IBM Cloud Manager with OpenStackfeatures an easy to use self-service portal for cloud operations. You can disable the self-serviceportal cloud feature by setting the self_service_portal attribute to disabled and theself_service_portal_node_name attribute to ~.
v platform_resource_scheduler: IBM Cloud Manager with OpenStack features an enhancedOpenStack compute scheduler, IBM Platform Resource Scheduler. You can disable PlatformResource Scheduler and use the default OpenStack compute scheduler filters by setting thisattribute to disabled. For more information about Platform Resource Scheduler, see PlatformResource Scheduler product information.
Note: If you are using the deployment server as one of the nodes in your cloud (notrecommended), then you must use the Qpid messaging service type.
b. Optional: Environment Information (environment): Customize the environment information.
Chapter 5. Deploying the cloud 81
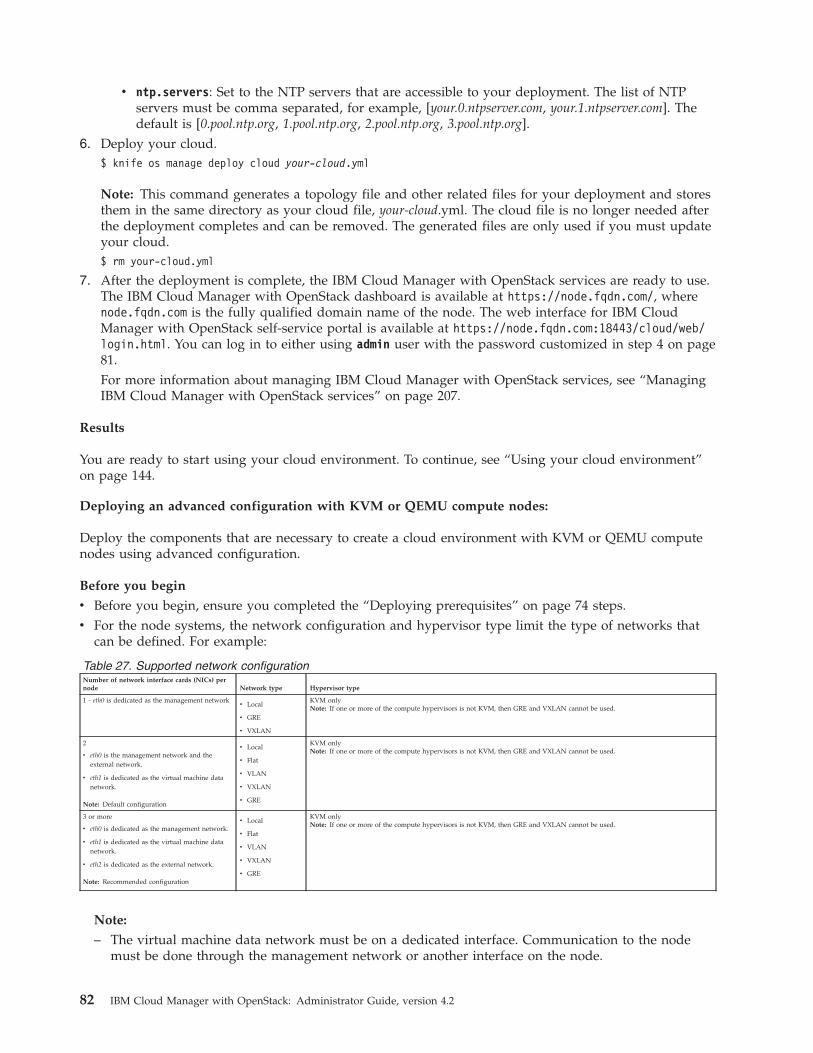
v ntp.servers: Set to the NTP servers that are accessible to your deployment. The list of NTPservers must be comma separated, for example, [your.0.ntpserver.com, your.1.ntpserver.com]. Thedefault is [0.pool.ntp.org, 1.pool.ntp.org, 2.pool.ntp.org, 3.pool.ntp.org].
6. Deploy your cloud.$ knife os manage deploy cloud your-cloud.yml
Note: This command generates a topology file and other related files for your deployment and storesthem in the same directory as your cloud file, your-cloud.yml. The cloud file is no longer needed afterthe deployment completes and can be removed. The generated files are only used if you must updateyour cloud.$ rm your-cloud.yml
7. After the deployment is complete, the IBM Cloud Manager with OpenStack services are ready to use.The IBM Cloud Manager with OpenStack dashboard is available at https://node.fqdn.com/, wherenode.fqdn.com is the fully qualified domain name of the node. The web interface for IBM CloudManager with OpenStack self-service portal is available at https://node.fqdn.com:18443/cloud/web/login.html. You can log in to either using admin user with the password customized in step 4 on page81.For more information about managing IBM Cloud Manager with OpenStack services, see “ManagingIBM Cloud Manager with OpenStack services” on page 207.
Results
You are ready to start using your cloud environment. To continue, see “Using your cloud environment”on page 144.
Deploying an advanced configuration with KVM or QEMU compute nodes:
Deploy the components that are necessary to create a cloud environment with KVM or QEMU computenodes using advanced configuration.
Before you begin
v Before you begin, ensure you completed the “Deploying prerequisites” on page 74 steps.v For the node systems, the network configuration and hypervisor type limit the type of networks that
can be defined. For example:
Table 27. Supported network configurationNumber of network interface cards (NICs) pernode Network type Hypervisor type
1 - eth0 is dedicated as the management networkv Local
v GRE
v VXLAN
KVM onlyNote: If one or more of the compute hypervisors is not KVM, then GRE and VXLAN cannot be used.
2
v eth0 is the management network and theexternal network.
v eth1 is dedicated as the virtual machine datanetwork.
Note: Default configuration
v Local
v Flat
v VLAN
v VXLAN
v GRE
KVM onlyNote: If one or more of the compute hypervisors is not KVM, then GRE and VXLAN cannot be used.
3 or more
v eth0 is dedicated as the management network.
v eth1 is dedicated as the virtual machine datanetwork.
v eth2 is dedicated as the external network.
Note: Recommended configuration
v Local
v Flat
v VLAN
v VXLAN
v GRE
KVM onlyNote: If one or more of the compute hypervisors is not KVM, then GRE and VXLAN cannot be used.
Note:
– The virtual machine data network must be on a dedicated interface. Communication to the nodemust be done through the management network or another interface on the node.
82 IBM Cloud Manager with OpenStack: Administrator Guide, version 4.2
– The local network type can be configured; however, the network traffic is limited to the currentnode. The minimum topology uses the local network option, by default.
For more information about network considerations, see “Network considerations” on page 16.
Use the following procedure to deploy the topology to your node systems.
Procedure
1. Log in to the deployment system as the root user. This is the system where IBM Cloud Managerwith OpenStack was installed.
2. Create a directory to store the files for the topology that you deploy. Change your-deployment-nameto the name for your deployment.$ mkdir your-deployment-name$ chmod 600 your-deployment-name$ cd your-deployment-name
3. Copy the example environment for the topology that you deploy. Change your-environment-name tothe name for your environment.
Note: The following command must be entered on a single line, even though the example shows aline break for formatting purposes.$ knife environment show example-ibm-os-single-controller-n-compute -d -Fjson> your-environment-name.json
4. Change the following JSON attributes in your environment file, your-environment-name.json:v Name: Set to your environment name: your-environment-name.v Description: Set to the description for your environment.v openstack.region: (Optional) Customize the region name for your cloud. The region name must
not contain spaces or special characters.v openstack.endpoints.host, openstack.endpoints.bind-host, and openstack.endpoints.mq.host:
Change from 127.0.0.1 to the IP address of the controller node system for the topology.v openstack.compute.libvirt.virt_type: Set to the hypervisor type, kvm or qemu, for the topology.v (Single network interface card or no virtual machine data network): If you are using a GRE or
VXLAN network with a single network interface card on the nodes (or no virtual machine datanetwork), you must change the following default values in the environment:openstack.network.openvswitch.tenant_network_type = "gre"openstack.network.openvswitch.bridge_mappings = ""openstack.network.openvswitch.network_vlan_ranges = ""openstack.network.openvswitch.bridge_mapping_interface = ""openstack.network.ml2.tenant_network_types = "gre"openstack.network.ml2.network_vlan_ranges = ""openstack.network.ml2.flat_networks = ""
Note: If you are using VXLAN, then replace gre in the previous example with vxlan.If the management network interface of the nodes is not eth0, then update all occurrences of eth0in the environment file to match your network configuration on the nodes.(Recommended network configuration) If the management network interface of the nodes is noteth0, if the virtual machine data network interface is not eth1, or both apply, then update alloccurrences of eth0, eth1, or both in the environment file to match your network configuration. Thefollowing list displays some of the networking properties and their default values (from theexample environment) that you might need to change. In most cases, these default values shouldbe sufficient and do not need to be changed.– openstack.network.core_plugin: neutron.plugins.ml2.plugin.Ml2Plugin.
In the example environment, the openstack.network.core_plugin property is set to"neutron.plugins.ml2.plugin.ML2Plugin" and the openstack.network.ml2.mechanism_driversproperty is set to "openvswitch". The ML2 specific properties (properties that begin with
Chapter 5. Deploying the cloud 83
openstack.network.ml2.*) must be consistent and kept in sync with the properties of themechanism driver (openstack.network.openvswitch.*). The example environment is set up withthese two sets of properties in sync.
– openstack.network.openvswitch.bridge_mapping_interface: "br-eth1:eth1". Thebridge_mapping_interface property is used to control the creation of the data network OVSbridge on the nodes. If Open vSwitch is installed and the data network bridge is alreadyconfigured on the nodes, this property is not necessary and you can set the variable to " ". If aspecific network configuration is needed for the data network (for example, bonding), you mustset this variable to "" and complete set up manually before or after the node is converged.
– openstack.network.openvswitch.bridge_mappings: "default:br-eth1".The bridge_mappings property controls which OVS bridge is used for flat and VLAN networktraffic from the node. If this OVS bridge does not exist, the Open vSwitch agent does not start.This bridge can be automatically created by setting the bridge_mapping_interface property.
– openstack.network.openvswitch.network_vlan_ranges andopenstack.network.ml2.network_vlan_ranges: These two properties define the default vlanrange used when creating a tenant network. Both of these properties default to default:1:4094.This vlan range might need to be adjusted based on the vlan configuration of the physicalswitches and hypervisors in your environment. The values of both properties must be the same.
5. Copy the following example topology to a file, your-topology-name.json. Changeyour-topology-name to the name for your topology. Here is an example topology with KVM orQEMU compute nodes.{
"name":"CHANGEME","description":"CHANGEME","environment":"CHANGEME","secret_file":"CHANGEME","run_sequentially":false,"nodes": [
{"fqdn":"CHANGEME","password":"CHANGEME","identity_file":"CHANGEME","quit_on_error":true,"run_order_number":1,"runlist": [
"role[ibm-os-single-controller-node]","role[ibm-os-prs-ego-master]","role[ibm-os-prs-controller-node]","role[ibm-sce-node]"
]},
{"fqdn":"CHANGEME","password":"CHANGEME","identity_file":"CHANGEME","quit_on_error":true,"run_order_number":2,"runlist": [
"role[ibm-os-compute-node-kvm]","role[ibm-os-prs-compute-node]"
]}
]}
6. Customize the topology file.a. The first node in your topology file is your single controller node. The second node in your
topology file is for a compute node. If your topology requires extra compute nodes, copy thecompute node section as many times as needed. Ensure that additional compute node sectionsare comma-separated.
84 IBM Cloud Manager with OpenStack: Administrator Guide, version 4.2
b. Change the following JSON attributes in your topology file, your-topology-name.json:v Name: Set to your topology name: your-topology-name.v Description: Set to the description for your topology.v Environment: Set to the environment for your topology: your-environment-name.v nodes.fqdn: For each node, you must set to the fully qualified domain name of the node
system. The deployment system must be able to ssh using the fully qualified domain name.You can also set to the public IP address, private IP address, or host name.
v nodes.password or nodes.identity_file: For each node, set to the appropriate SSH root userauthentication for the node system. Either a password and an SSH identity file can be used forauthentication. Remove the unused attribute for each node.
c. (Optional) Create node specific attribute files. This step is only required when one or more nodesin your topology require different attributes from those defined in your environment fileyour-environment-name.json.1) Create a node-specific attribute file that is similar to the following format. For example, a
node may not have an eth0 network interface, which is the default value for some attributes.Below is an example node attribute file that can be used to change the eth0 default networkon a compute node over to use eth2.{
"openstack": {"endpoints": {
"network-openvswitch": {"bind_interface": "eth2"
},"compute-vnc-bind": {
"bind_interface": "eth2"}
}}
After creating the node specific attribute files, add the nodes.attribute_file JSON attributes inyour topology file, your-topology-name.json:v nodes.attribute_file: For each node, set to the attribute JSON file which overrides the
attributes in the default_attributes section of the environment file.7. Customize the passwords and secrets before deploying. For instructions, see “Customizing
passwords and secrets” on page 114.8. Configure the OpenStack block storage (cinder) driver. By default, the environment is configured to
use the LVM iSCSI cinder driver. You can change the following JSON attributes in your environmentfile, your-environment-name.json, to customize the LVM iSCSI cinder driver configuration.a. openstack.block-storage.volume.create_volume_group: If set to true, then the cinder-volumes
volume group is created on the controller node with a size determined by openstack.block-storage.volume.volume_group_size. If set to false (default), then you can create the volume groupmanually using physical disks. For more information, see “Creating an LVM volume group usingphysical disks” on page 132.
b. openstack.block-storage.volume.volume_group_size: The amount of storage you use must besmaller than the size available. If necessary, you can set the value to your free disk size. Thedefault value is 40 GB. This attribute is used only if openstack.block-storage.volume.create_volume_group is set to true.
c. openstack.block-storage.volume.iscsi_ip_address: Change from 127.0.0.1 to the managementIP address of the controller node.
To customize your environment for a different cinder driver, see “Configuring Cinder drivers” onpage 129.
9. (Optional) Complete any optional customizations. For options, see “Deployment customizationoptions” on page 109.
Chapter 5. Deploying the cloud 85
Note: Some customization options might not be supported for all hypervisor types and some cannotbe configured after you deploy your cloud environment.
10. Deploy your topology.a. Upload the environment for your deployment.
$ knife environment from file your-environment-name.json
b. Deploy the topology.$ knife os manage deploy topology your-topology-name.json
c. (Optional) Check the detailed status of the IBM Cloud Manager with OpenStack services that aredeployed.$ knife os manage services status –-topology-file your-topology-name.json
11. After the deployment is complete, the IBM Cloud Manager with OpenStack services are ready to use.The IBM Cloud Manager with OpenStack dashboard is available at https://controller.fqdn.com/,where controller.fqdn.com is the fully qualified domain name of the controller node in yourtopology. The web interface for IBM Cloud Manager with OpenStack self-service portal is availableat https://controller.fqdn.com:18443/cloud/web/login.html. You can log into either using adminuser with the password that you customized in step 7 on page 85.For more information about managing IBM Cloud Manager with OpenStack services, see “ManagingIBM Cloud Manager with OpenStack services” on page 207.
12. (Optional) Verify the Open vSwitch (OVS) configuration for your network. See “Verifying OpenvSwitch configuration” on page 143.
What to do next
You are ready to start using your cloud environment. To continue, see “Using your cloud environment”on page 144.Related reference:“Troubleshooting errors when deploying or updating topologies” on page 301If a topology deployment or update fails, review the log output from the deployment command for moreinformation.
Platform Resource Scheduler online product documentation
Configure the Image Service“Creating initial networks” on page 155After you deploy the components for creating a cloud environment, you can create several different typesof networks.
Deploying with PowerKVM compute nodesDeploy the components that are necessary to create a cloud environment with PowerKVM computenodes. You can complete the deployment with either a prescribed or advanced configuration.
Deploying a prescribed configuration with PowerKVM compute nodes:
Deploy the components that are necessary to create a cloud environment with PowerKVM computenodes by using a prescribed cloud configuration.
Before you begin
Before you begin, ensure you completed the “Deploying prerequisites” on page 74 steps.
86 IBM Cloud Manager with OpenStack: Administrator Guide, version 4.2
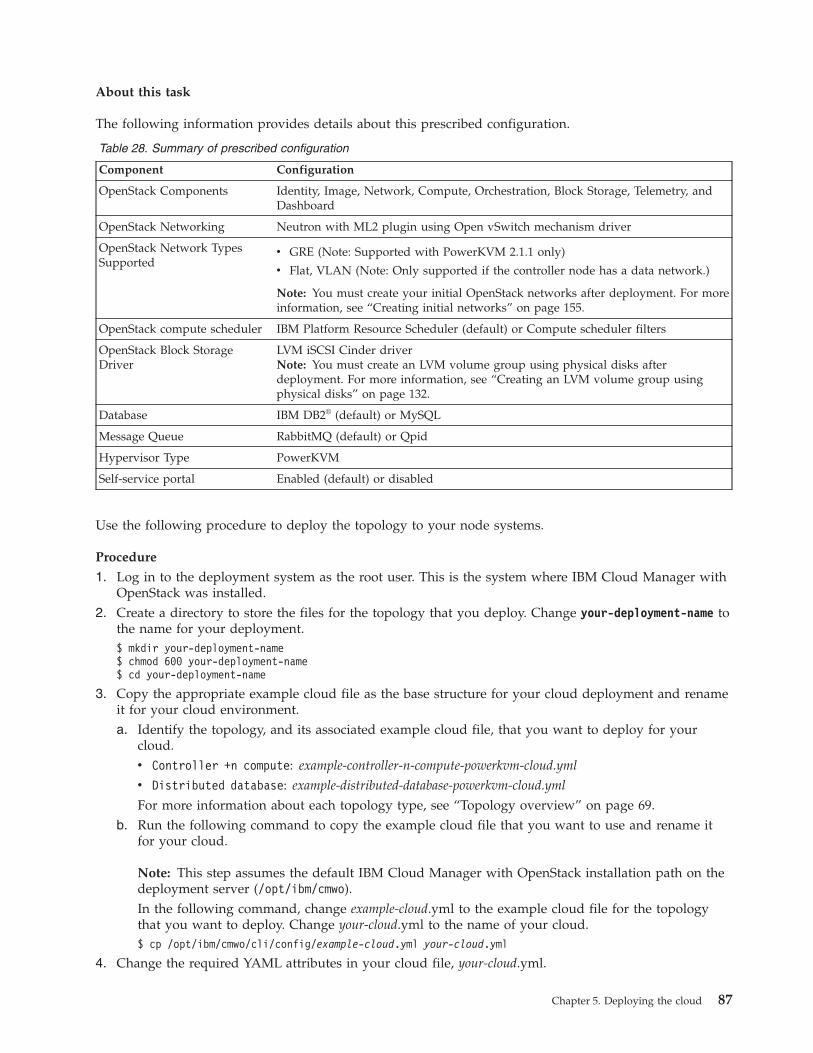
About this task
The following information provides details about this prescribed configuration.
Table 28. Summary of prescribed configuration
Component Configuration
OpenStack Components Identity, Image, Network, Compute, Orchestration, Block Storage, Telemetry, andDashboard
OpenStack Networking Neutron with ML2 plugin using Open vSwitch mechanism driver
OpenStack Network TypesSupported
v GRE (Note: Supported with PowerKVM 2.1.1 only)
v Flat, VLAN (Note: Only supported if the controller node has a data network.)
Note: You must create your initial OpenStack networks after deployment. For moreinformation, see “Creating initial networks” on page 155.
OpenStack compute scheduler IBM Platform Resource Scheduler (default) or Compute scheduler filters
OpenStack Block StorageDriver
LVM iSCSI Cinder driverNote: You must create an LVM volume group using physical disks afterdeployment. For more information, see “Creating an LVM volume group usingphysical disks” on page 132.
Database IBM DB2® (default) or MySQL
Message Queue RabbitMQ (default) or Qpid
Hypervisor Type PowerKVM
Self-service portal Enabled (default) or disabled
Use the following procedure to deploy the topology to your node systems.
Procedure
1. Log in to the deployment system as the root user. This is the system where IBM Cloud Manager withOpenStack was installed.
2. Create a directory to store the files for the topology that you deploy. Change your-deployment-name tothe name for your deployment.$ mkdir your-deployment-name$ chmod 600 your-deployment-name$ cd your-deployment-name
3. Copy the appropriate example cloud file as the base structure for your cloud deployment and renameit for your cloud environment.a. Identify the topology, and its associated example cloud file, that you want to deploy for your
cloud.v Controller +n compute: example-controller-n-compute-powerkvm-cloud.yml
v Distributed database: example-distributed-database-powerkvm-cloud.yml
For more information about each topology type, see “Topology overview” on page 69.b. Run the following command to copy the example cloud file that you want to use and rename it
for your cloud.
Note: This step assumes the default IBM Cloud Manager with OpenStack installation path on thedeployment server (/opt/ibm/cmwo).In the following command, change example-cloud.yml to the example cloud file for the topologythat you want to deploy. Change your-cloud.yml to the name of your cloud.$ cp /opt/ibm/cmwo/cli/config/example-cloud.yml your-cloud.yml
4. Change the required YAML attributes in your cloud file, your-cloud.yml.
Chapter 5. Deploying the cloud 87
v Cloud Information (cloud): Customize the cloud information.a. name: Set the name for your cloud. The name cannot contain spaces or special characters. This
name is also used as the OpenStack region name.b. password: Set the cloud administrator (admin) user's password.
v Node Information (nodes): Customize the information for each node system in your cloud. You cancopy the powerkvm_compute node section to include more PowerKVM compute nodes in your cloud.a. name and description: Leave these set to the default values provided.b. fqdn: Set to the fully qualified domain name of the node system. The deployment system must
be able to SSH by using the fully qualified domain name. You can also set to the public IPaddress, private IP address, or host name.
c. password or identity_file: Set to the appropriate SSH root user authentication for the nodesystem. You can use either a password or an SSH identity file for authentication.
d. nics.management_network: Set to the management network interface card for the node system.This network is used for IBM Cloud Manager with OpenStack communication between thenodes in the cloud. The fqdn setting for the node must resolve to the IP address of this network.The default is eth0.
e. nics.data_network: Set to the data network interface card for the node system. The default iseth1. If the node system does not have a second network interface card that can be used as adata network, then set to ~. Do not set to the same value as nics.management_network. Also, donot set to a network interface card that provides an alternative management network or anexternal network for the node, for example, a private or public IP address. A data network isrequired to use VLAN or Flat networks in your cloud.
5. Optional: Complete any optional customization by changing the appropriate YAML attributes in yourcloud file, your-cloud.yml.a. Optional: Cloud Information (cloud): Customize the cloud information.
v database_service_type: You can change the database that is used by OpenStack from DB2(default) to MySQL by setting this attribute to mysql.
v messaging_service_type: You can change the messaging queue that is used by OpenStack fromRabbitMQ (default) to Qpid by setting this attribute to qpid.
v self_service_portal and self_service_portal_node_name: IBM Cloud Manager with OpenStackfeatures an easy to use self-service portal for cloud operations. You can disable the self-serviceportal cloud feature by setting the self_service_portal attribute to disabled and theself_service_portal_node_name attribute to ~.
v platform_resource_scheduler: IBM Cloud Manager with OpenStack features an enhancedOpenStack compute scheduler, IBM Platform Resource Scheduler. You can disable PlatformResource Scheduler and use the default OpenStack compute scheduler filters by setting thisattribute to disabled. For more information about Platform Resource Scheduler, see PlatformResource Scheduler product information.
b. Optional: Environment Information (environment): Customize the environment information.v ntp.servers: Set to the NTP servers that are accessible to your deployment. The list of NTP
servers must be comma separated, for example, [your.0.ntpserver.com, your.1.ntpserver.com]. Thedefault is [0.pool.ntp.org, 1.pool.ntp.org, 2.pool.ntp.org, 3.pool.ntp.org].
6. Deploy your cloud.$ knife os manage deploy cloud your-cloud.yml
Note: This command generates a topology file and other related files for your deployment and storesthem in the same directory as your cloud file, your-cloud.yml. The cloud file is no longer needed afterthe deployment completes and can be removed. The generated files are only used if you must updateyour cloud.$ rm your-cloud.yml
88 IBM Cloud Manager with OpenStack: Administrator Guide, version 4.2
7. After the deployment is complete, the IBM Cloud Manager with OpenStack services are ready to use.The IBM Cloud Manager with OpenStack dashboard is available at https://node.fqdn.com/, wherenode.fqdn.com is the fully qualified domain name of the node. The web interface for IBM CloudManager with OpenStack self-service portal is available at https://node.fqdn.com:18443/cloud/web/login.html. You can log in to either using admin user with the password customized in step 4 on page87.For more information about managing IBM Cloud Manager with OpenStack services, see “ManagingIBM Cloud Manager with OpenStack services” on page 207.
Results
You are ready to start using your cloud environment. To continue, see “Using your cloud environment”on page 144.
Deploying an advanced configuration with PowerKVM compute nodes:
Deploy the components that are necessary to create a cloud environment with IBM PowerKVM computenodes using advanced configuration.
Before you begin
Before you begin, ensure you completed the “Deploying prerequisites” on page 74 steps.
About this task
Use the following procedure to deploy the topology to your node systems.
Procedure
1. Log in to the deployment system as the root user. This is the system where IBM Cloud Managerwith OpenStack was installed.
2. Create a directory to store the files for the topology that you deploy. Change your-deployment-nameto the name for your deployment.$ mkdir your-deployment-name$ chmod 600 your-deployment-name$ cd your-deployment-name
3. Copy the example environment for the topology that you deploy. Change your-environment-name tothe name for your environment.
Note: The following command must be entered on a single line, even though the example shows aline break for formatting purposes.$ knife environment show example-ibm-os-single-controller-n-compute -d -Fjson> your-environment-name.json
4. Change the following JSON attributes in your environment file, your-environment-name.json:v Name: Set to your environment name: your-environment-name.v Description: Set to the description for your environment.v openstack.region: (Optional) Customize the region name for your cloud. The region name must
not contain spaces or special characters.v openstack.endpoints.host, openstack.endpoints.bind-host, and openstack.endpoints.mq.host:
Change from 127.0.0.1 to the IP address of the controller node system for the topology.v (Recommended network configuration) If the management network interface of the nodes is not
eth0, if the virtual machine data network interface is not eth1, or both apply, then update alloccurrences of eth0, eth1, or both in the environment file to match your network configuration. The
Chapter 5. Deploying the cloud 89
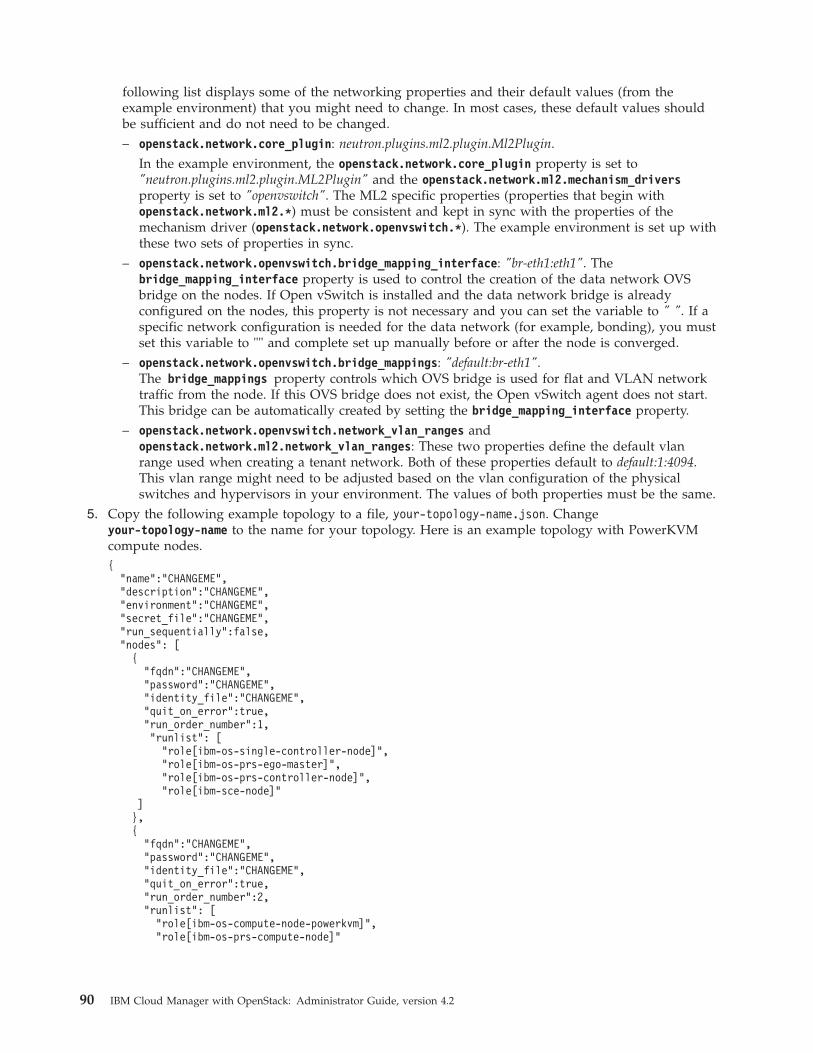
following list displays some of the networking properties and their default values (from theexample environment) that you might need to change. In most cases, these default values shouldbe sufficient and do not need to be changed.– openstack.network.core_plugin: neutron.plugins.ml2.plugin.Ml2Plugin.
In the example environment, the openstack.network.core_plugin property is set to"neutron.plugins.ml2.plugin.ML2Plugin" and the openstack.network.ml2.mechanism_driversproperty is set to "openvswitch". The ML2 specific properties (properties that begin withopenstack.network.ml2.*) must be consistent and kept in sync with the properties of themechanism driver (openstack.network.openvswitch.*). The example environment is set up withthese two sets of properties in sync.
– openstack.network.openvswitch.bridge_mapping_interface: "br-eth1:eth1". Thebridge_mapping_interface property is used to control the creation of the data network OVSbridge on the nodes. If Open vSwitch is installed and the data network bridge is alreadyconfigured on the nodes, this property is not necessary and you can set the variable to " ". If aspecific network configuration is needed for the data network (for example, bonding), you mustset this variable to "" and complete set up manually before or after the node is converged.
– openstack.network.openvswitch.bridge_mappings: "default:br-eth1".The bridge_mappings property controls which OVS bridge is used for flat and VLAN networktraffic from the node. If this OVS bridge does not exist, the Open vSwitch agent does not start.This bridge can be automatically created by setting the bridge_mapping_interface property.
– openstack.network.openvswitch.network_vlan_ranges andopenstack.network.ml2.network_vlan_ranges: These two properties define the default vlanrange used when creating a tenant network. Both of these properties default to default:1:4094.This vlan range might need to be adjusted based on the vlan configuration of the physicalswitches and hypervisors in your environment. The values of both properties must be the same.
5. Copy the following example topology to a file, your-topology-name.json. Changeyour-topology-name to the name for your topology. Here is an example topology with PowerKVMcompute nodes.{
"name":"CHANGEME","description":"CHANGEME","environment":"CHANGEME","secret_file":"CHANGEME","run_sequentially":false,"nodes": [
{"fqdn":"CHANGEME","password":"CHANGEME","identity_file":"CHANGEME","quit_on_error":true,"run_order_number":1,"runlist": [
"role[ibm-os-single-controller-node]","role[ibm-os-prs-ego-master]","role[ibm-os-prs-controller-node]","role[ibm-sce-node]"
]},{
"fqdn":"CHANGEME","password":"CHANGEME","identity_file":"CHANGEME","quit_on_error":true,"run_order_number":2,"runlist": [
"role[ibm-os-compute-node-powerkvm]","role[ibm-os-prs-compute-node]"
90 IBM Cloud Manager with OpenStack: Administrator Guide, version 4.2
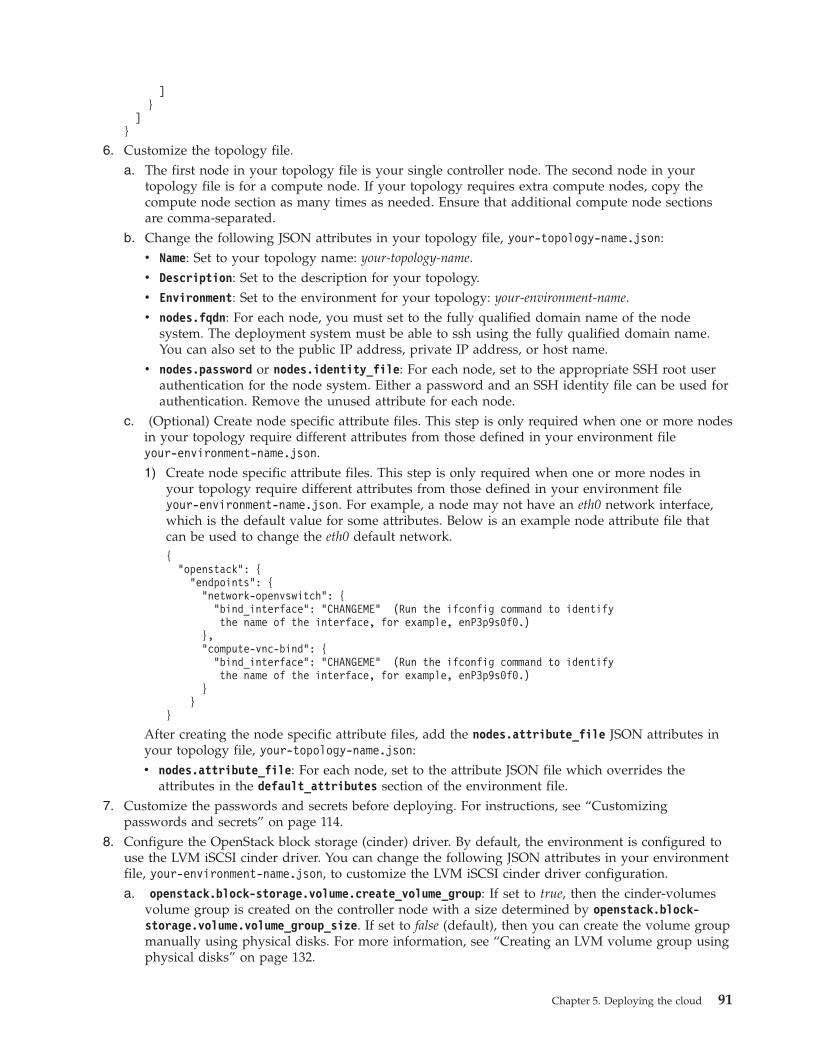
]}
]}
6. Customize the topology file.a. The first node in your topology file is your single controller node. The second node in your
topology file is for a compute node. If your topology requires extra compute nodes, copy thecompute node section as many times as needed. Ensure that additional compute node sectionsare comma-separated.
b. Change the following JSON attributes in your topology file, your-topology-name.json:v Name: Set to your topology name: your-topology-name.v Description: Set to the description for your topology.v Environment: Set to the environment for your topology: your-environment-name.v nodes.fqdn: For each node, you must set to the fully qualified domain name of the node
system. The deployment system must be able to ssh using the fully qualified domain name.You can also set to the public IP address, private IP address, or host name.
v nodes.password or nodes.identity_file: For each node, set to the appropriate SSH root userauthentication for the node system. Either a password and an SSH identity file can be used forauthentication. Remove the unused attribute for each node.
c. (Optional) Create node specific attribute files. This step is only required when one or more nodesin your topology require different attributes from those defined in your environment fileyour-environment-name.json.1) Create node specific attribute files. This step is only required when one or more nodes in
your topology require different attributes from those defined in your environment fileyour-environment-name.json. For example, a node may not have an eth0 network interface,which is the default value for some attributes. Below is an example node attribute file thatcan be used to change the eth0 default network.{
"openstack": {"endpoints": {
"network-openvswitch": {"bind_interface": "CHANGEME" (Run the ifconfig command to identifythe name of the interface, for example, enP3p9s0f0.)
},"compute-vnc-bind": {
"bind_interface": "CHANGEME" (Run the ifconfig command to identifythe name of the interface, for example, enP3p9s0f0.)
}}
}
After creating the node specific attribute files, add the nodes.attribute_file JSON attributes inyour topology file, your-topology-name.json:v nodes.attribute_file: For each node, set to the attribute JSON file which overrides the
attributes in the default_attributes section of the environment file.7. Customize the passwords and secrets before deploying. For instructions, see “Customizing
passwords and secrets” on page 114.8. Configure the OpenStack block storage (cinder) driver. By default, the environment is configured to
use the LVM iSCSI cinder driver. You can change the following JSON attributes in your environmentfile, your-environment-name.json, to customize the LVM iSCSI cinder driver configuration.a. openstack.block-storage.volume.create_volume_group: If set to true, then the cinder-volumes
volume group is created on the controller node with a size determined by openstack.block-storage.volume.volume_group_size. If set to false (default), then you can create the volume groupmanually using physical disks. For more information, see “Creating an LVM volume group usingphysical disks” on page 132.
Chapter 5. Deploying the cloud 91
b. openstack.block-storage.volume.volume_group_size: The amount of storage you use must besmaller than the size available. If necessary, you can set the value to your free disk size. Thedefault value is 40 GB. This attribute is used only if openstack.block-storage.volume.create_volume_group is set to true.
c. openstack.block-storage.volume.iscsi_ip_address: Change from 127.0.0.1 to the managementIP address of the controller node.
To customize your environment for a different cinder driver, see “Configuring Cinder drivers” onpage 129.
9. (Optional) Complete any optional customizations. For options, see “Deployment customizationoptions” on page 109.
Note: Some customization options might not be supported for all hypervisor types and some cannotbe configured after you deploy your cloud environment.
10. Deploy your topology.a. Upload the environment for your deployment.
$ knife environment from file your-environment-name.json
b. Deploy the topology.$ knife os manage deploy topology your-topology-name.json
c. (Optional) Check the detailed status of the IBM Cloud Manager with OpenStack services that aredeployed.$ knife os manage services status –-topology-file your-topology-name.json
11. After the deployment is complete, the IBM Cloud Manager with OpenStack services are ready to use.The IBM Cloud Manager with OpenStack dashboard is available at https://controller.fqdn.com/,where controller.fqdn.com is the fully qualified domain name of the controller node in yourtopology. The web interface for IBM Cloud Manager with OpenStack self-service portal is availableat https://controller.fqdn.com:18443/cloud/web/login.html. You can log into either using adminuser with the password that you customized in step 7 on page 91.For more information about managing IBM Cloud Manager with OpenStack services, see “ManagingIBM Cloud Manager with OpenStack services” on page 207.
What to do next
You are ready to start using your cloud environment. To continue, see “Using your cloud environment”on page 144.Related reference:“Troubleshooting errors when deploying or updating topologies” on page 301If a topology deployment or update fails, review the log output from the deployment command for moreinformation.
Platform Resource Scheduler online product documentation
Deploying with z/VM compute nodesDeploy the components that are necessary to create a cloud environment with z/VM compute nodes.
Before you beginv Ensure you completed the “Deploying prerequisites” on page 74 steps.v To use the z/VM hypervisor, one or more x86_64 Red Hat Enterprise Linux system nodes must be
used to install the compute and network driver to manage the z/VM hypervisor. You can run severalcompute and network agent services (for several z/VM hypervisors) on one x86_64 Red Hat EnterpriseLinux system node. For more information on configuring the z/VM hypervisor, see the z/VMOpenStack user manual.
92 IBM Cloud Manager with OpenStack: Administrator Guide, version 4.2
About this task
Use the following procedure to deploy the topology to your node systems.
Procedure1. Log in to the deployment system as the root user. This is the system where IBM Cloud Manager
with OpenStack was installed.2. Create a directory to store the files for the topology that you deploy. Change your-deployment-name
to the name for your deployment.$ mkdir your-deployment-name$ chmod 600 your-deployment-name$ cd your-deployment-name
3. Copy the example environment for the topology that you deploy. Change your-environment-name tothe name for your environment.
Note: The following command must be entered on a single line, even though the example shows aline break for formatting purposes.$ knife environment show example-ibm-os-single-controller-n-compute -d -Fjson> your-environment-name.json
4. Change the following JSON attributes in your environment file, your-environment-name.json:a.
v Name: Set to your environment name: your-environment-name.v Description: Set to the description for your environment.v openstack.region: (Optional) Customize the region name for your cloud. The region name
must not contain spaces or special characters.v openstack.endpoints.host, openstack.endpoints.bind-host, and
openstack.endpoints.mq.host: Change from 127.0.0.1 to the IP address of the controller nodesystem for the topology.
v openstack.compute.instance_name_template: Change the default value to a string of 8characters in length. For example, abc%05x.
Note: z/VM does not support more than 8 characters; therefore, this parameter does notsupport more than 8 characters.
b.
v (Recommended network configuration) If the management network interface of the nodes isnot eth0, if the virtual machine data network interface is not eth1, or both apply, then updateall occurrences of eth0, eth1, or both in the environment file to match your networkconfiguration.
v Update the following attributes for the controller node in your environment file.– openstack.network.openvswitch.bridge_mapping_interface: Set the value as nil.– openstack.network.ml2.mechanism_drivers: Add zvm, using a comma-separated list.– openstack.network.ml2.flat_networks: Add your z/VM flat networks. You must include all
flat networks of managed hosts, separated by a comma. For example,xcatvsw1flat,xcatvsw2flat.
– openstack.network.ml2.network_vlan_ranges: Add your z/VM network VLAN range. Youmust include all VLAN networks of managed hosts, separated by a comma. For example,xcatvsw1vlan:10:100,xcatvsw2vlan:10:100.
– ibm-openstack.network.l3.enable: Set the value to false. The l3-agent is not supported inz/VM.
– ibm-openstack.network.ipmovement.enable: Set the value to false. The parameter is notrequired in z/VM.
Chapter 5. Deploying the cloud 93

c. z/VM compute nodes configurations: You can update the following attributes for the z/VMcompute nodes in the environment file. Otherwise, you can specify the attributes in the attributesfile for each node, as described in step 6 which describes how to customize the attribute file.v ibm-openstack.zvm-driver.hosts: Specify all z/VM hypervisors to be managed.v ibm-openstack.zvm-driver.#host: Specify each z/VM hypervisor managed, the value should
match the values in ibm-openstack.zvm-driver.hosts. For example, if you setibm-openstack.zvm-driver.hosts as ["server1","server2"], then you have the attributesibm-openstack.zvm-driver.server1 and ibm-openstack.zvm-driver.server2. This is also the top attributefor each managed z/VM hypervisor. The sub-attributes of each ibm-openstack.zvm-driver.#host describe properties of the corresponding z/VM hypervisor.
v ibm-openstack.zvm-driver.#host.xcat.server: Specify the xCAT MN IP address or host name.v ibm-openstack.zvm-driver.#host.xcat.username: Specify the xCAT REST API user name.v ibm-openstack.zvm-driver.#host.xcat.zhcp_nodename: Specify the zHCP node name in xCAT.v ibm-openstack.zvm-driver.#host.xcat.master: Specify the xCAT master node (the node name
in the xCAT definition).v ibm-openstack.zvm-driver.#host.xcat.mnadmin: Specify the xCAT management user that can
ssh into xcat mn. If you do not set this user, the default value is mnadmin.v ibm-openstack.zvm-driver.#host.xcat.mgt_ip: Specify the first IP address of the management
network.
Note: Remember the xCAT management interface IP address. xCAT uses this IP address toconnect a newly deployed instance server.
v ibm-openstack.zvm-driver.#host.xcat.mgt_mask: Specify the network mask of the xCATmanagement network. For example: 255.255.255.0.
v ibm-openstack.zvm-driver.#host.xcat.connection_timeout: Specify the timeout value forreading the xCAT response in seconds.
v ibm-openstack.zvm-driver.#host.xcat.image_clean_period: Specify the amount of time that ifthe xCAT image is not used, it is purged after the specified time expires. The default is 30days.
v ibm-openstack.zvm-driver.#host.xcat.free_space_threshold: Specify the threshold whenxCAT MN disk space is not large enough. The default is 50G. After the disk space threshold ismet, a purge operation starts.
v ibm-openstack.zvm-driver.#host.xcat.timeout: Specify the number of seconds the agent waitsfor a xCAT MN response. The recommended value is 300.
v ibm-openstack.zvm-driver.#host.config.ram_allocation_ratio: Specify the memoryovercommit ratio for the z/VM Driver. The recommended value is 3.
v ibm-openstack.zvm-driver.#host.image.tmp_path: Specify the path that images are stored(snapshot, deploy, and so on).
v ibm-openstack.zvm-driver.#host.image.cache_manager_interval: This value is not z/VMspecific. Set it to the default 86400(s), which is 24 hours.
v ibm-openstack.zvm-driver.#host.rpc_response_timeout: Specify the timeout response time.The default is 180 seconds. If the value is reached, the live migration does not succeed.
v ibm-openstack.zvm-driver.#host.reachable_timeout: After this value, the deployment reportsan error 'Failed to power on instance'.
v ibm-openstack.zvm-driver.#host.polling_interval: The Neutron z/VM agent's pollinginterval, in seconds.
v ibm-openstack.zvm-driver.#host.config_drive.format: The config driver format. This valuemust be tgz.
94 IBM Cloud Manager with OpenStack: Administrator Guide, version 4.2
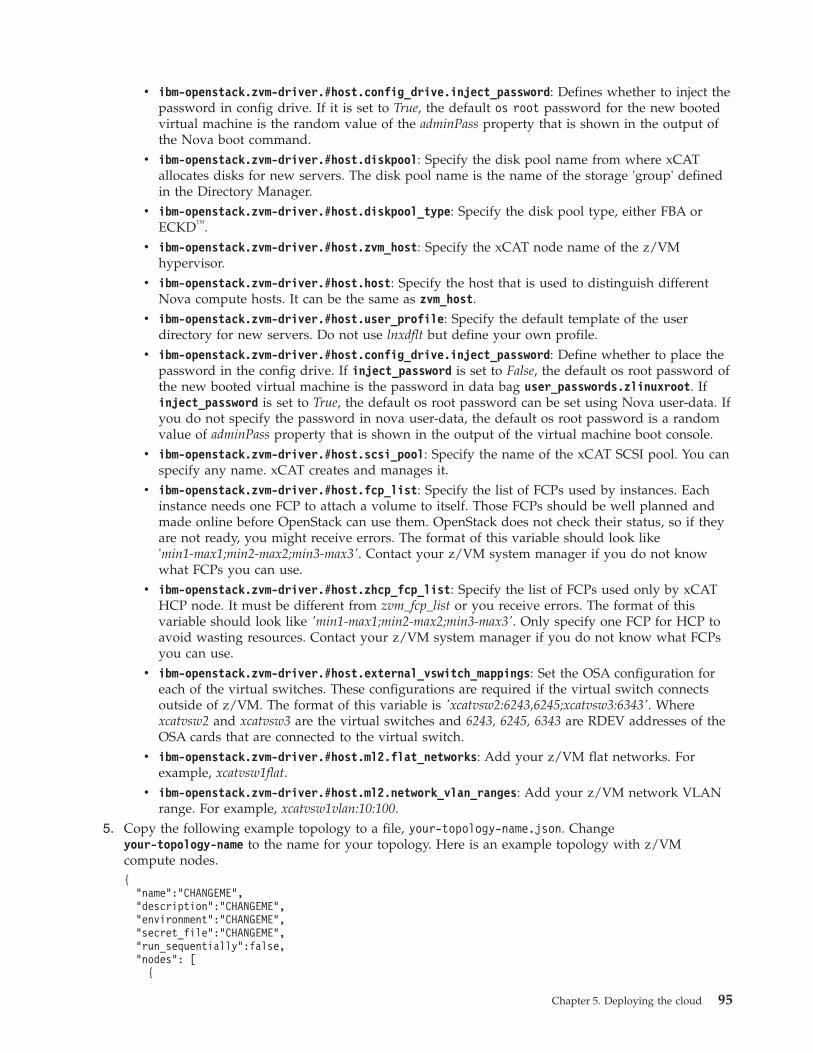
v ibm-openstack.zvm-driver.#host.config_drive.inject_password: Defines whether to inject thepassword in config drive. If it is set to True, the default os root password for the new bootedvirtual machine is the random value of the adminPass property that is shown in the output ofthe Nova boot command.
v ibm-openstack.zvm-driver.#host.diskpool: Specify the disk pool name from where xCATallocates disks for new servers. The disk pool name is the name of the storage 'group' definedin the Directory Manager.
v ibm-openstack.zvm-driver.#host.diskpool_type: Specify the disk pool type, either FBA orECKD™.
v ibm-openstack.zvm-driver.#host.zvm_host: Specify the xCAT node name of the z/VMhypervisor.
v ibm-openstack.zvm-driver.#host.host: Specify the host that is used to distinguish differentNova compute hosts. It can be the same as zvm_host.
v ibm-openstack.zvm-driver.#host.user_profile: Specify the default template of the userdirectory for new servers. Do not use lnxdflt but define your own profile.
v ibm-openstack.zvm-driver.#host.config_drive.inject_password: Define whether to place thepassword in the config drive. If inject_password is set to False, the default os root password ofthe new booted virtual machine is the password in data bag user_passwords.zlinuxroot. Ifinject_password is set to True, the default os root password can be set using Nova user-data. Ifyou do not specify the password in nova user-data, the default os root password is a randomvalue of adminPass property that is shown in the output of the virtual machine boot console.
v ibm-openstack.zvm-driver.#host.scsi_pool: Specify the name of the xCAT SCSI pool. You canspecify any name. xCAT creates and manages it.
v ibm-openstack.zvm-driver.#host.fcp_list: Specify the list of FCPs used by instances. Eachinstance needs one FCP to attach a volume to itself. Those FCPs should be well planned andmade online before OpenStack can use them. OpenStack does not check their status, so if theyare not ready, you might receive errors. The format of this variable should look like'min1-max1;min2-max2;min3-max3'. Contact your z/VM system manager if you do not knowwhat FCPs you can use.
v ibm-openstack.zvm-driver.#host.zhcp_fcp_list: Specify the list of FCPs used only by xCATHCP node. It must be different from zvm_fcp_list or you receive errors. The format of thisvariable should look like 'min1-max1;min2-max2;min3-max3'. Only specify one FCP for HCP toavoid wasting resources. Contact your z/VM system manager if you do not know what FCPsyou can use.
v ibm-openstack.zvm-driver.#host.external_vswitch_mappings: Set the OSA configuration foreach of the virtual switches. These configurations are required if the virtual switch connectsoutside of z/VM. The format of this variable is 'xcatvsw2:6243,6245;xcatvsw3:6343'. Wherexcatvsw2 and xcatvsw3 are the virtual switches and 6243, 6245, 6343 are RDEV addresses of theOSA cards that are connected to the virtual switch.
v ibm-openstack.zvm-driver.#host.ml2.flat_networks: Add your z/VM flat networks. Forexample, xcatvsw1flat.
v ibm-openstack.zvm-driver.#host.ml2.network_vlan_ranges: Add your z/VM network VLANrange. For example, xcatvsw1vlan:10:100.
5. Copy the following example topology to a file, your-topology-name.json. Changeyour-topology-name to the name for your topology. Here is an example topology with z/VMcompute nodes.{
"name":"CHANGEME","description":"CHANGEME","environment":"CHANGEME","secret_file":"CHANGEME","run_sequentially":false,"nodes": [
{
Chapter 5. Deploying the cloud 95
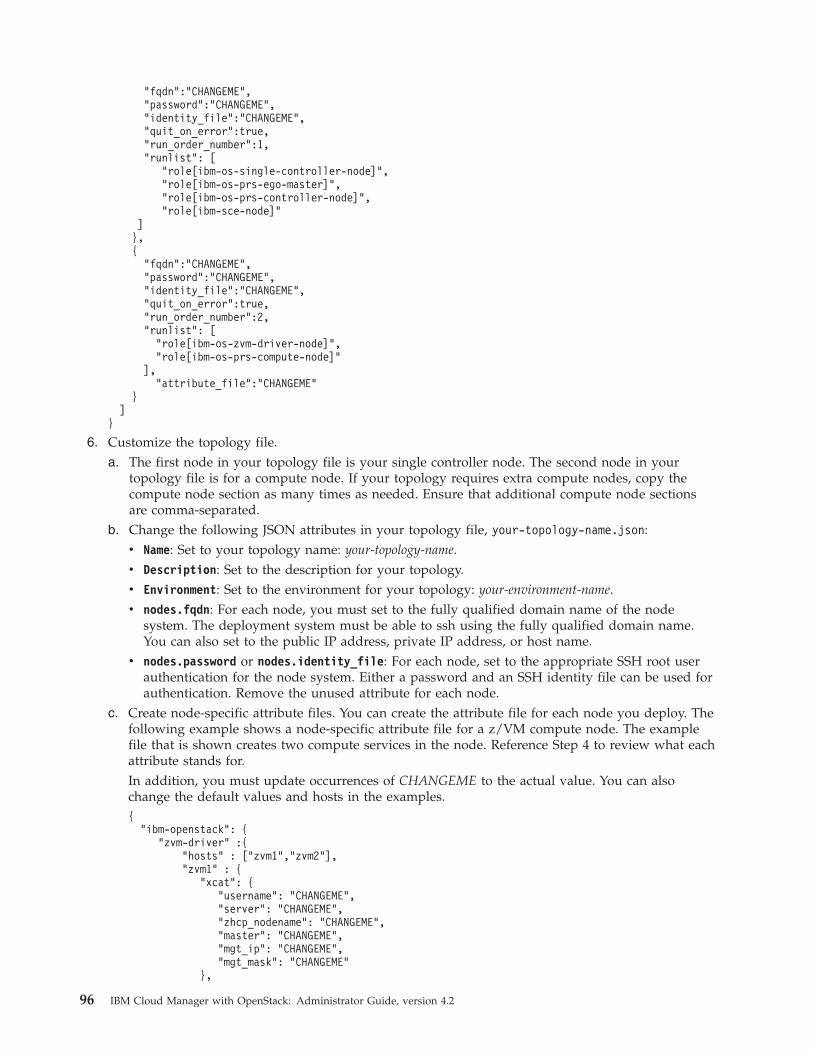
"fqdn":"CHANGEME","password":"CHANGEME","identity_file":"CHANGEME","quit_on_error":true,"run_order_number":1,"runlist": [
"role[ibm-os-single-controller-node]","role[ibm-os-prs-ego-master]","role[ibm-os-prs-controller-node]","role[ibm-sce-node]"
]},{
"fqdn":"CHANGEME","password":"CHANGEME","identity_file":"CHANGEME","quit_on_error":true,"run_order_number":2,"runlist": [
"role[ibm-os-zvm-driver-node]","role[ibm-os-prs-compute-node]"
],"attribute_file":"CHANGEME"
}]
}
6. Customize the topology file.a. The first node in your topology file is your single controller node. The second node in your
topology file is for a compute node. If your topology requires extra compute nodes, copy thecompute node section as many times as needed. Ensure that additional compute node sectionsare comma-separated.
b. Change the following JSON attributes in your topology file, your-topology-name.json:v Name: Set to your topology name: your-topology-name.v Description: Set to the description for your topology.v Environment: Set to the environment for your topology: your-environment-name.v nodes.fqdn: For each node, you must set to the fully qualified domain name of the node
system. The deployment system must be able to ssh using the fully qualified domain name.You can also set to the public IP address, private IP address, or host name.
v nodes.password or nodes.identity_file: For each node, set to the appropriate SSH root userauthentication for the node system. Either a password and an SSH identity file can be used forauthentication. Remove the unused attribute for each node.
c. Create node-specific attribute files. You can create the attribute file for each node you deploy. Thefollowing example shows a node-specific attribute file for a z/VM compute node. The examplefile that is shown creates two compute services in the node. Reference Step 4 to review what eachattribute stands for.In addition, you must update occurrences of CHANGEME to the actual value. You can alsochange the default values and hosts in the examples.{
"ibm-openstack": {"zvm-driver" :{
"hosts" : ["zvm1","zvm2"],"zvm1" : {
"xcat": {"username": "CHANGEME","server": "CHANGEME","zhcp_nodename": "CHANGEME","master": "CHANGEME","mgt_ip": "CHANGEME","mgt_mask": "CHANGEME"
},
96 IBM Cloud Manager with OpenStack: Administrator Guide, version 4.2

"ml2": {"type_drivers": "local,flat,vlan,gre","tenant_network_types": "vlan","flat_networks": "CHANGEME","network_vlan_ranges": "CHANGEME"
},"config": {
"ram_allocation_ratio": "3"},"image": {
"tmp_path": "/var/lib/nova/images","cache_manager_interval": "86400"
},"config_drive": {
"format": "tgz","inject_password": "false"
},"diskpool" : "CHANGEME","diskpool_type" : "CHANGEME","zvm_host" : "CHANGEME","host" : "CHANGEME","user_profile" : "CHANGEME","scsi_pool" : "CHANGEME","fcp_list" : "CHANGEME","zhcp_fcp_list" : "CHANGEME","external_vswitch_mappings": "CHANGEME"
},"zvm2" : {
"xcat": {"username": "CHANGEME","server": "CHANGEME","zhcp_nodename": "CHANGEME","master": "CHANGEME","mgt_ip": "CHANGEME","mgt_mask": "CHANGEME"
},"ml2": {
"type_drivers": "local,flat,vlan,gre","tenant_network_types": "vlan","flat_networks": "CHANGEME","network_vlan_ranges": "CHANGEME"
},"config": {
"ram_allocation_ratio": "3"},"image": {
"tmp_path": "/var/lib/nova/imagesCHANGEME","cache_manager_interval": "86400"
},"config_drive": {
"format": "tgz","inject_password": "false"
},"diskpool" : "CHANGEME","diskpool_type" : "CHANGEME","zvm_host" : "CHANGEME","host" : "CHANGEME","user_profile" : "CHANGEME","scsi_pool" : "CHANGEME","fcp_list" : "CHANGEME","zhcp_fcp_list" : "CHANGEME","external_vswitch_mappings": "CHANGEME"
}}
}}
Chapter 5. Deploying the cloud 97

After creating the node-specific attribute files, add the nodes.attribute_file JSON attributes inyour topology file, your-topology-name.json:v nodes.attribute_file: For each node, set to the attribute JSON file that overrides the attributes
in the default_attributes section of the environment file.7. Customize the passwords and secrets before deploying. You must change the passwords of the xCAT
administrator xcat, the xCAT mnadmin user xcatmnadmin, and any instances that are created by thez/VM root user zlinuxroot in the user_passwords data bag. For instructions, see “Customizingpasswords and secrets” on page 114.
8. (Optional) Complete any optional customizations. For options, see “Deployment customizationoptions” on page 109.
Note: Some customization options might not be supported for all hypervisor types and some cannotbe configured after you deploy your cloud environment.
9. Deploy your topology.a. Upload the environment for your deployment.
$ knife environment from file your-environment-name.json
b. Deploy the topology.$ knife os manage deploy topology your-topology-name.json
c. (Optional) Check the detailed status of the IBM Cloud Manager with OpenStack services that aredeployed.$ knife os manage services status –-topology-file your-topology-name.json
10. After the deployment is complete, the IBM Cloud Manager with OpenStack services are ready touse. The IBM Cloud Manager with OpenStack dashboard is available at https://controller.fqdn.com/, where controller.fqdn.com is the fully qualified domain name of thecontroller node in your topology. The web interface for IBM Cloud Manager with OpenStackself-service portal is available at https://controller.fqdn.com:18443/cloud/web/login.html. Youcan log into either using admin user with the password that you customized in step 7.For more information about managing IBM Cloud Manager with OpenStack services, see “ManagingIBM Cloud Manager with OpenStack services” on page 207.
What to do next
You are ready to start using your cloud environment. To continue, see “Using your cloud environment”on page 144.Related reference:“Troubleshooting errors when deploying or updating topologies” on page 301If a topology deployment or update fails, review the log output from the deployment command for moreinformation.
Configure the Image Service“Creating initial networks” on page 155After you deploy the components for creating a cloud environment, you can create several different typesof networks.
Deploying to manage to PowerVCDeploy the components that are necessary to create a test or production cloud to manage to PowerVC.You can complete the deployment with either a prescribed or advanced configuration.
Deploying a prescribed configuration to manage to PowerVC:
Deploy the components that are necessary to create a cloud environment to manage to PowerVC using aprescribed cloud configuration.
98 IBM Cloud Manager with OpenStack: Administrator Guide, version 4.2
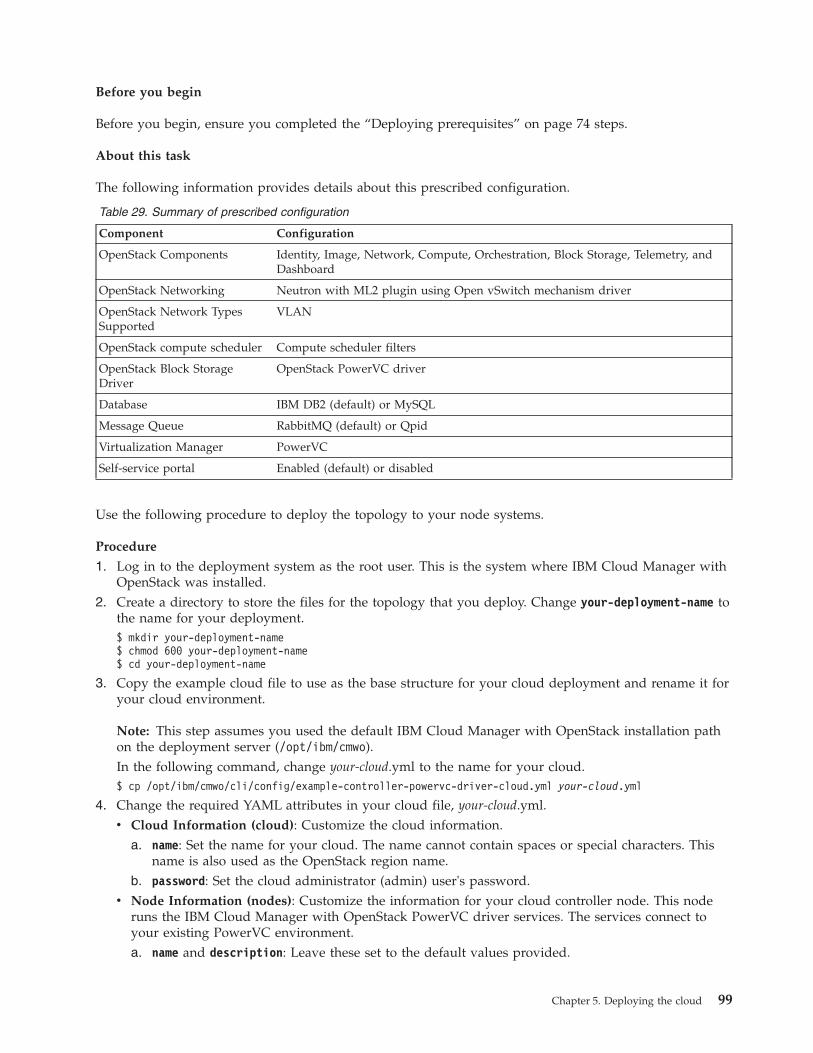
Before you begin
Before you begin, ensure you completed the “Deploying prerequisites” on page 74 steps.
About this task
The following information provides details about this prescribed configuration.
Table 29. Summary of prescribed configuration
Component Configuration
OpenStack Components Identity, Image, Network, Compute, Orchestration, Block Storage, Telemetry, andDashboard
OpenStack Networking Neutron with ML2 plugin using Open vSwitch mechanism driver
OpenStack Network TypesSupported
VLAN
OpenStack compute scheduler Compute scheduler filters
OpenStack Block StorageDriver
OpenStack PowerVC driver
Database IBM DB2 (default) or MySQL
Message Queue RabbitMQ (default) or Qpid
Virtualization Manager PowerVC
Self-service portal Enabled (default) or disabled
Use the following procedure to deploy the topology to your node systems.
Procedure
1. Log in to the deployment system as the root user. This is the system where IBM Cloud Manager withOpenStack was installed.
2. Create a directory to store the files for the topology that you deploy. Change your-deployment-name tothe name for your deployment.$ mkdir your-deployment-name$ chmod 600 your-deployment-name$ cd your-deployment-name
3. Copy the example cloud file to use as the base structure for your cloud deployment and rename it foryour cloud environment.
Note: This step assumes you used the default IBM Cloud Manager with OpenStack installation pathon the deployment server (/opt/ibm/cmwo).In the following command, change your-cloud.yml to the name for your cloud.$ cp /opt/ibm/cmwo/cli/config/example-controller-powervc-driver-cloud.yml your-cloud.yml
4. Change the required YAML attributes in your cloud file, your-cloud.yml.v Cloud Information (cloud): Customize the cloud information.
a. name: Set the name for your cloud. The name cannot contain spaces or special characters. Thisname is also used as the OpenStack region name.
b. password: Set the cloud administrator (admin) user's password.v Node Information (nodes): Customize the information for your cloud controller node. This node
runs the IBM Cloud Manager with OpenStack PowerVC driver services. The services connect toyour existing PowerVC environment.a. name and description: Leave these set to the default values provided.
Chapter 5. Deploying the cloud 99
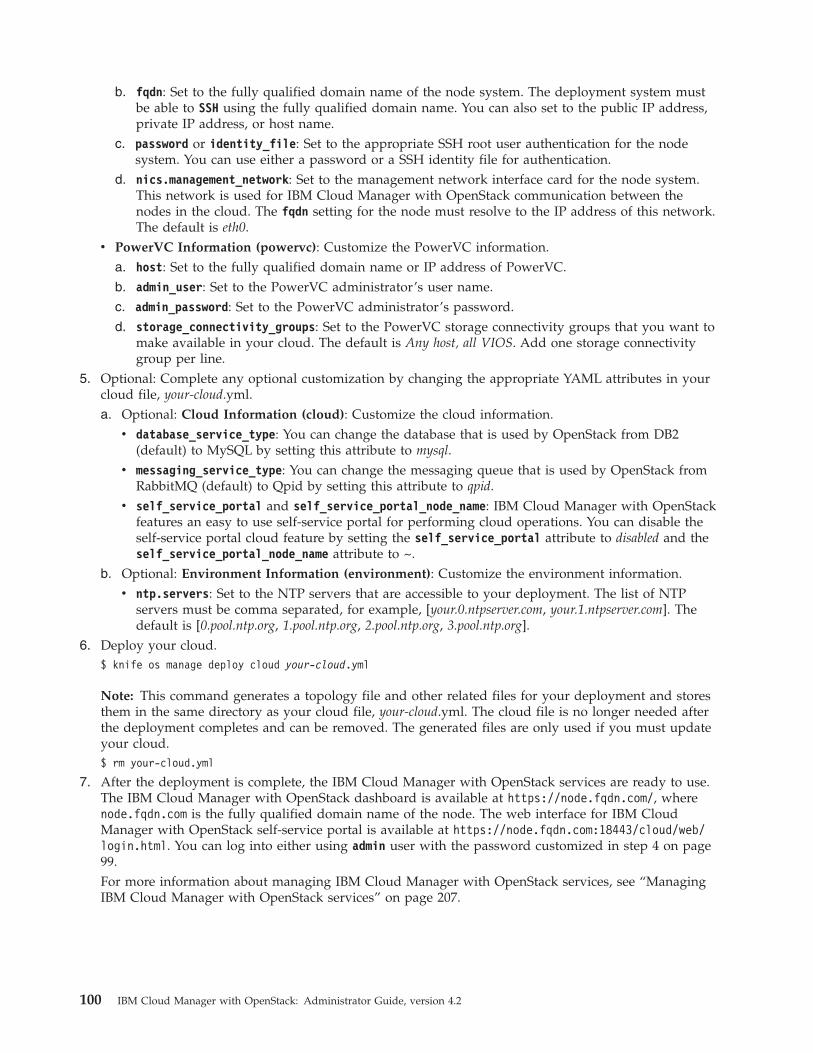
b. fqdn: Set to the fully qualified domain name of the node system. The deployment system mustbe able to SSH using the fully qualified domain name. You can also set to the public IP address,private IP address, or host name.
c. password or identity_file: Set to the appropriate SSH root user authentication for the nodesystem. You can use either a password or a SSH identity file for authentication.
d. nics.management_network: Set to the management network interface card for the node system.This network is used for IBM Cloud Manager with OpenStack communication between thenodes in the cloud. The fqdn setting for the node must resolve to the IP address of this network.The default is eth0.
v PowerVC Information (powervc): Customize the PowerVC information.a. host: Set to the fully qualified domain name or IP address of PowerVC.b. admin_user: Set to the PowerVC administrator’s user name.c. admin_password: Set to the PowerVC administrator’s password.d. storage_connectivity_groups: Set to the PowerVC storage connectivity groups that you want to
make available in your cloud. The default is Any host, all VIOS. Add one storage connectivitygroup per line.
5. Optional: Complete any optional customization by changing the appropriate YAML attributes in yourcloud file, your-cloud.yml.a. Optional: Cloud Information (cloud): Customize the cloud information.
v database_service_type: You can change the database that is used by OpenStack from DB2(default) to MySQL by setting this attribute to mysql.
v messaging_service_type: You can change the messaging queue that is used by OpenStack fromRabbitMQ (default) to Qpid by setting this attribute to qpid.
v self_service_portal and self_service_portal_node_name: IBM Cloud Manager with OpenStackfeatures an easy to use self-service portal for performing cloud operations. You can disable theself-service portal cloud feature by setting the self_service_portal attribute to disabled and theself_service_portal_node_name attribute to ~.
b. Optional: Environment Information (environment): Customize the environment information.v ntp.servers: Set to the NTP servers that are accessible to your deployment. The list of NTP
servers must be comma separated, for example, [your.0.ntpserver.com, your.1.ntpserver.com]. Thedefault is [0.pool.ntp.org, 1.pool.ntp.org, 2.pool.ntp.org, 3.pool.ntp.org].
6. Deploy your cloud.$ knife os manage deploy cloud your-cloud.yml
Note: This command generates a topology file and other related files for your deployment and storesthem in the same directory as your cloud file, your-cloud.yml. The cloud file is no longer needed afterthe deployment completes and can be removed. The generated files are only used if you must updateyour cloud.$ rm your-cloud.yml
7. After the deployment is complete, the IBM Cloud Manager with OpenStack services are ready to use.The IBM Cloud Manager with OpenStack dashboard is available at https://node.fqdn.com/, wherenode.fqdn.com is the fully qualified domain name of the node. The web interface for IBM CloudManager with OpenStack self-service portal is available at https://node.fqdn.com:18443/cloud/web/login.html. You can log into either using admin user with the password customized in step 4 on page99.For more information about managing IBM Cloud Manager with OpenStack services, see “ManagingIBM Cloud Manager with OpenStack services” on page 207.
100 IBM Cloud Manager with OpenStack: Administrator Guide, version 4.2
Results
You are ready to start using your cloud environment. To continue, see “Using your cloud environment”on page 144.
Deploying an advanced configuration to manage to PowerVC:
Deploy the components that are necessary to create a cloud environment to manage to PowerVC using anadvanced configuration.
Before you begin, ensure you completed the “Deploying prerequisites” on page 74 steps.
Use the following procedure to deploy the topology to your node systems.1. Log in to the deployment system as the root user. This is the system where IBM Cloud Manager
with OpenStack was installed.2. Create a directory to store the files for the topology that you deploy. Change your-deployment-name
to the name for your deployment.$ mkdir your-deployment-name$ chmod 600 your-deployment-name$ cd your-deployment-name
3. Copy the example environment for the topology that you deploy. Change your-environment-name tothe name for your environment.
Note: The following command must be entered on a single line, even though the example shows aline break for formatting purposes.$ knife environment show example-ibm-os-single-controller-n-compute -d -Fjson> your-environment-name.json
4. Configure the SSL client key and certificates for the PowerVC 1.2.2 message queue:a. Generate the SSL private key in the PowerVC driver controller node as follows:
openssl genrsa -out key.pem 2048
b. Generate a certificate request in the PowerVC driver controller node with the previously createdprivate key. You must enter the subject for your controller node:
Note: The following command must be entered on a single line, even though the example showsa line break for formatting purposes.openssl req -new -key key.pem -out cert.csr -subj "/CN=c582f1-n36-vm1_pok_stglabs_ibm_comMessaging Client/O=PowerVC Driver"
Note: Replace 'c582f1-n36-vm1_pok_stglabs_ibm_com' with the name of your controller node.c. Copy the certificate request generated in the previous step to your PowerVC node.d. Sign the requested certificate by the PowerVC message queue certificate authority (CA), on
thePowerVC node:
Note: The following command must be entered on a single line, even though the example showsa line break for formatting purposes.openssl ca -batch -config /etc/pki/messages/ca/openssl.conf -extensions client_ext-in cert.csr -out cert.pem -notext
e. Copy the SSL certificate 'cert.pem' and PowerVC message queue CA certificate,/etc/pki/messages/ca/cacert.pem from the PowerVC node to the PowerVC driver controllernode.
f. Set the SSL key, certificate, and PowerVC message queue CA files attributes. Below is the defaultSSL key, certificate, and CA files path (with line breaks for formatting purposes). Set theseattributes to your generated (or copied) SSL key and certificate file path:
Chapter 5. Deploying the cloud 101

[’ibm-openstack’][’powervc-driver’][’powervc’][’rabbitmq’][’ssl_keyfile_source’] =’/root/powervcmq_ssl/key.pem’
[’ibm-openstack’][’powervc-driver’][’powervc’][’rabbitmq’][’ssl_certfile_source’] =’/root/powervcmq_ssl/cert.pem’
[’ibm-openstack’][’powervc-driver’][’powervc’][’rabbitmq’][’ssl_ca_certs_source’] =’/root/powervcmq_ssl/cacert.pem’
5. Configure the PowerVC node with SSH access. If the PowerVC version is 1.2.2 or later, then SSHaccess is configured by default.v If already configured, skip to step 6.v If you do not configure the PowerVC node with SSH access, you must create the PowerVC Rabbit
client user on the PowerVC side. To do so, run the following command in the PowerVC node:su - rabbitmq -c "/usr/lib/rabbitmq/bin/rabbitmqctl add_user <username><password>su - rabbitmq -c ’/usr/lib/rabbitmq/bin/rabbitmqctl set_permissions -p / <username> ".*" ".*" ".*"’
Then, disable the SSH access and set RabbitMQ client user and password in your environmentfile, your-environment-name.json:[’ibm-openstack’][’powervc-driver’][’powervc’][’ssh’][’access’] = false[’ibm-openstack’][’powervc-driver’][’powervc’][’rabbitmq’][’username’] = ’powervcdriver_mq’
Note: The RabbitMQ client user password is set in user data bag item 'pvcrabbit' in step 7.6. Change the following JSON attributes in your environment file, your-environment-name.json:
v Name: Set to your environment name: your-environment-name.v Description: Set to the description for your environment.v openstack.region: (Optional) Customize the region name for your cloud. The region name must
not contain spaces or special characters.v openstack.endpoints.host, openstack.endpoints.bind-host, and openstack.endpoints.mq.host:
Change from 127.0.0.1 to the IP address of the controller node system for the topology.v ibm-openstack.powervc-driver.powervc.admin_user: Specify the administrator for PowerVC.v ibm-openstack.powervc-driver.db_create: Set to true for PowerVC driver.v ibm-openstack.powervc-driver.powervc.host: Specify the host name for PowerVC.v ibm-openstack.powervc-driver.powervc.mq.service_type: Specify the message queue type for
PowerVC. For PowerVC version 1.2.2 and later, set it as "rabbitmq". For PowerVC 1.2.0.X or1.2.1.X, set it as "qpid".
v ibm-openstack.powervc-driver.powervc.rabbitmq.ssl_keyfile_source: The SSL private key filepath for the PowerVC message queue.
v ibm-openstack.powervc-driver.powervc.rabbitmq.ssl_certfile_source: The SSL signed certificatefile path for the PowerVC message queue.
v ibm-openstack.powervc-driver.powervc.rabbitmq.ssl_ca_certs_source: The SSL CA file path forthe PowerVC message queue.
v ibm-openstack.powervc-driver.powervc.scg: Specify the PowerVC Storage Connectivity Group listthat will be used by the PowerVC Driver.
Note: Depending on your configuration, change the following values:v By default Neutron is set to use ML2 as the core plug-in. Set the following additional values:
– openstack.network.ml2.tenant_network_types list "vlan" in the value list.– openstack.network.ml2.network_vlan_ranges list "default:1:4094" in the value list.– openstack.network.openvswitch.tenant_network_type: "vlan"
– openstack.network.openvswitch.network_vlan_ranges list "default:1:4094" in the value list.v In a PowerVC only environment, where no other compute node is registered to a controller node
that is running the PowerVC driver, the default configuration can be simplified. You do not needto set up a dedicated virtual machine data network. In the sample environment file, the GRE
102 IBM Cloud Manager with OpenStack: Administrator Guide, version 4.2
network type is enabled by the default settings. However, since PowerVC does not support theGRE network type, set the following attributes to disable GRE and specify a valid network type.– openstack.network.openvswitch.bridge_mappings = ""
– openstack.network.openvswitch.bridge_mapping_interface = ""
– openstack.network.openvswitch.enable_tunneling ="False"
– openstack.network.openvswitch.tunnel_type = ""
– openstack.network.openvswitch.tunnel_id_ranges = ""
For simplification, you can also disable the L3 agent and IP address movement functions if youchoose. By default, they are both enabled as shown in the following default parameters.– openstack.network.l3.external_network_bridge = br-ex
– openstack.network.l3.external_network_bridge_interface = eth0
– ibm-openstack.network.ip_movement.enable = true
– ibm-openstack.network.l3.enable = true
To disable the L3 agent and IP address movement, change true to false before deploying thecontroller node.
7. Copy the following example topology to a file, your-topology-name.json. Changeyour-topology-name to the name for your topology. Here is an example topology to manage toPowerVC.{
"name":"CHANGEME","description":"CHANGEME","environment":"CHANGEME","secret_file":"CHANGEME","run_sequentially":false,"nodes": [
{"fqdn":"CHANGEME","password":"CHANGEME","identity_file":"CHANGEME","quit_on_error":true,"run_order_number":1,"runlist": ["role[ibm-os-single-controller-node]","role[ibm-os-powervc-driver-node]","role[ibm-sce-node]"]
}]
}
8. Customize the topology file. The node in your topology file is your single controller node thatincludes the PowerVC driver. Change the following JSON attributes in your topology file,your-topology-name.json:v Name: Set to your topology name: your-topology-name.v Description: Set to the description for your topology.v Environment: Set to the environment for your topology: your-environment-name.v nodes.fqdn: For each node, you must set to the fully qualified domain name of the node system.
The deployment system must be able to ssh using the fully qualified domain name. You can alsoset to the public IP address, private IP address, or host name.
v nodes.password or nodes.identity_file: Set to the appropriate SSH root user authentication forthe node system. Either a password and an SSH identity file can be used for authentication.Remove the unused attribute.
9. You must change the passwords in the user_passwords data bag to the actual password for thePowerVC administrator and PowerVC message queue client user.Enter the PowerVC admin password in the following Chef data bag:
Chapter 5. Deploying the cloud 103
`user_passwords` data bag’s `pvcadmin` data bag item
Enter the PowerVC release 1.2.1.x or 1.2.0.x message queue client user password in the followingChef data bag:`user_passwords` data bag’s `pvcqpid` data bag item
Enter the PowerVC release 1.2.2 (or later) message queue client user password in the following Chefdata bag:`user_passwords` data bag’s `pvcrabbit` data bag item
To change the passwords in pvcadmin, pvcqpid, or pvcrabbit data bags, see Customizing passwordsand secrets.
10. (Optional) Complete any optional customizations. For options, see “Deployment customizationoptions” on page 109.
Note: Some customization options might not be supported for all hypervisor types and some cannotbe configured after you deploy your cloud environment.
11. Deploy your topology.a. Upload the environment for your deployment.
$ knife environment from file your-environment-name.json
b. Deploy the topology.$ knife os manage deploy topology your-topology-name.json
c. (Optional) Check the detailed status of the IBM Cloud Manager with OpenStack services that aredeployed.$ knife os manage services status –-topology-file your-topology-name.json
12. After the deployment is complete, the IBM Cloud Manager with OpenStack services are ready touse. The IBM Cloud Manager with OpenStack dashboard is available at https://controller.fqdn.com/, where controller.fqdn.com is the fully qualified domain name of thecontroller node in your topology. The web interface for IBM Cloud Manager with OpenStackself-service portal is available at https://controller.fqdn.com:18443/cloud/web/login.html. Youcan log into either using admin user with the password that you customized in step 9.For more information about managing IBM Cloud Manager with OpenStack services, see “ManagingIBM Cloud Manager with OpenStack services” on page 207.
You are ready to start using your cloud environment. To continue, see “Using your cloud environment”on page 144.
Deploying multi-region supportIn a multi-region cloud environment, you can set up two separate deployments that use the sameOpenStack Keystone server, but use different regions and different hypervisors.
About this task
Use the following instructions to build your own multi-region cloud environment. These instructionsassume that you are familiar with the instructions for deploying a single-region cloud environment.
This example uses two regions for the multi-region cloud environment; however, you can have more thantwo regions. Also, this example uses a single deployment server to manage all of the regions. However,you can use a separate deployment server for each region. If separate deployment servers are used, theymust have the same version of IBM Cloud Manager with OpenStack installed, but are allowed to havedifferent fix pack levels. For more information about updates and release upgrades in theseconfigurations, see “Best practices for maintaining a multi-region cloud or test cloud” on page 41.
104 IBM Cloud Manager with OpenStack: Administrator Guide, version 4.2
Procedure1. Create two directories to store the files for the multi-region cloud environment. One directory is used
for region one and the second directory is used for region two.2. Create two environment files, which are copied from the example-ibm-os-single-controller-n-
compute example environment. One file is used for region one and the second file is used for regiontwo.
3. Create two topology files that are based on the hypervisor that is used in each region. One file is usedfor region one and the second file is used for region two.
4. Update the environment and topology files for each region to support the multi-region cloudenvironment.a. In each region’s environment file, update openstack.region to be the unique name for each region.
The region name must not contain spaces or special characters.
Note: For the Keystone configuration, the UUID authentication strategy is the defaultauthentication strategy. The PKI authentication strategy must not be used for a multi-regiontopology.
b. In each region’s environment file, update the openstack.endpoint.identity-api.host,openstack.endpoints.identity-admin.host, and openstack.endpoints.identity-internal.hostattributes to specify the node that contains the shared OpenStack Keystone server. The node canbe any single controller node, within the multiple region cloud environment. The followingexample JSON snippet is added to the environment file inside override_attributes > openstack >endpoints, where X.X.X.X is the management IP address for the single controller node where theshared OpenStack Keystone server is located:
"identity-api": {"host": "X.X.X.X"
},"identity-admin": {
"host": "X.X.X.X"},"identity-internal": {
"host": "X.X.X.X"}
The other endpoint host attributes (openstack.endpoints.host, openstack.endpoints.bind-host,openstack.endpoints.mq.host, openstack-endpoints.db.host, and so on) reference themanagement IP address for the single controller node of the region
c. If you want to use the self-service portal to manage your multi-region cloud environment, theneach region’s environment file must set ibm-sce.service.enabled to true. In addition, only oneregion’s topology file can contain a node with the ibm-sce-node role. That is, only one self-serviceportal is supported in a multi-region cloud environment. The self-service portal can be installed inany region. If you do not want to use the self-service portal to manage your multi-region cloudenvironment, then each region's environment file must set ibm-sce.service.enabled to false.Neither region's topology file can contain a node with the ibm-sce-node role.
d. Customize the passwords and secrets for each region. Since each region uses the same OpenStackKeystone server, the data bag items that are related to OpenStack Keystone must have the samepasswords in all regions. Other passwords and secrets can be unique for each region. For moreinformation about customizing passwords and secrets, see “Customizing passwords and secrets”on page 114.The following passwords and secrets must be the same between the regions. For more informationon the data bags that are referenced, see “Data bags” on page 277.v Shared passwords and secrets in the secrets data bag:
openstack_identity_bootstrap_tokenopenstack_simple_token
v All passwords and secrets in the service_passwords data bag are shared.
Chapter 5. Deploying the cloud 105
v Shared passwords and secrets in the user_passwords data bag:adminsceagent
Note: You can use the following command to determine the current passwords and secrets for thefirst region. The command downloads and decrypts the data bags that contain the passwords andsecrets for the first region and stores them in the data_bags directory. The directory also contains apasswords and secrets JSON file, region-one-environment-name_passwords_file.json, that can beused to set the passwords and secrets for the second region. Ensure that you remove thedata_bags directory after you are done using it.$ knife os manage get passwords --topology-file topology_region_one.json data_bags
e. The remaining environment and topology file updates are normal updates for a stand-alonedeployment. However, the same database service (DB2 or MySQL) and messaging service (Qpid)must be used for each region.
5. Deploy the topology for the region that contains the shared OpenStack Keystone server:$ knife os manage deploy topology topology_region_one.json
6. Deploy the topology for the remaining region:$ knife os manage deploy topology topology_region_two.json
7. (Optional) Check the detailed status of the IBM Cloud Manager with OpenStack services that aredeployed.$ knife os manage services status –-topology-file your-topology-name.json
8. (Self-service portal): If the self-service portal is installed, restart the IaaS gateway service on the nodewhere the shared OpenStack Keystone server is running. Run the service openstack-iaasgatewayrestart command to restart the service. Then, restart the self-service portal service on the node whereit is installed. Run the service sce restart command to restart the service. After you restart theservices, you can add an OpenStack cloud connection for the additional region. For more information,see “Adding an OpenStack cloud configuration” on page 234.
Note: Only one self-service portal must be installed to manage the multiple regions.
What to do next
For more information about managing IBM Cloud Manager with OpenStack services, see “Managing IBMCloud Manager with OpenStack services” on page 207.
Deploying multiple hypervisor typesUse this information to deploy the components that are necessary to create a cloud environment withmultiple hypervisor types.
About this task
It is possible to configure different types of hypervisors in the same OpenStack environment.
The following example shows how to build a dual hypervisor type environment using IBM CloudManager with OpenStack. The example uses the following system setup:v System 1: This is the deployment system where IBM Cloud Manager with OpenStack is installed.v System 2: The OpenStack single controller node.v System 3: The OpenStack x86 Linux Kernel-based Virtual Machine (KVM) compute node.v System 4: The OpenStack PowerKVM compute node.
Important: This procedure is for example purposes only.
106 IBM Cloud Manager with OpenStack: Administrator Guide, version 4.2
Procedure1. Install IBM Cloud Manager with OpenStack on system 1. For instructions, see “Installing IBM Cloud
Manager with OpenStack on Linux” on page 21.2. Follow the deployment prerequisites for all systems. See “Deploying prerequisites” on page 74 for
details.3. From system 1, complete the following steps.
a. Create a directory to store the files for the topology that you deploy. Change your-deployment-name to the name for your deployment.$ mkdir your-deployment-name$ chmod 600 your-deployment-name$ cd your-deployment-name
b. Copy the example environment for the topology that you deploy. Change your-environment-nameto the name for your environment.
Note: The following command must be entered on a single line, even though the example showsa line break for formatting purposes.$ knife environment show example-ibm-os-single-controller-n-compute -d -Fjson> your-environment-name.json
c. Create a topology file that is based on the following example topology file, your-topology-name.json.{
"name":"CHANGEME","description":"CHANGEME","environment":"CHANGEME","secret_file":"CHANGEME","run_sequentially":false,"nodes": [
{"fqdn":"CHANGEME_TO_SYSTEM2","password":"CHANGEME","quit_on_error":true,"run_order_number":1,"runlist": ["role[ibm-os-single-controller-node]","role[ibm-sce-node]"]},{
"fqdn":"CHANGEME_TO_SYSTEM3","password":"CHANGEME","quit_on_error":true,"run_order_number":2,"runlist": [
"role[ibm-os-compute-node-kvm]"]
},{
"fqdn":"CHANGEME_TO_SYSTEM4","password":"CHANGEME","quit_on_error":true,"run_order_number":2,"runlist": [
"role[ibm-os-compute-node-powerkvm]"]
}]
}
4. From system 1, modify the environment and topology files for the deployment. See “Deploying a testor production cloud” on page 77 for details.
5. From system 1, deploy your topology.
Chapter 5. Deploying the cloud 107
a. Upload the environment for your deployment.$ knife environment from file your-environment-name.json
b. Deploy the topology.knife os manage deploy topology your-topology-name.json
c. (Optional) Check the detailed status of the IBM Cloud Manager with OpenStack services that aredeployed.$ knife os manage services status –-topology-file your-topology-name.json
6. After the deployment is complete, the IBM Cloud Manager with OpenStack services are ready to use.The IBM Cloud Manager with OpenStack dashboard is available at https://controller.fqdn.com/,where controller.fqdn.com is the fully qualified domain name of the controller node in yourtopology. The web interface for IBM Cloud Manager with OpenStack self-service portal is available athttps://controller.fqdn.com:18443/cloud/web/login.html. You can log into either using admin userwith the password that you customized in your deployment.For more information about managing IBM Cloud Manager with OpenStack services, see “ManagingIBM Cloud Manager with OpenStack services” on page 207.
Related reference:“Troubleshooting errors when deploying or updating topologies” on page 301If a topology deployment or update fails, review the log output from the deployment command for moreinformation.“Roles” on page 287The following roles are provided in support of the reference topologies.
Stand-alone self-service portal for managing VMware cloudsDeploy the components that are necessary to use IBM Cloud Manager with OpenStack self-service portalto manage your VMware clouds.
Before you begin
Before you begin, ensure you completed the “Deploying prerequisites” on page 74 steps.
About this task
Use the following procedure to deploy the topology to your node systems.
Procedure1. Log in to the deployment system as the root user. This is the system where IBM Cloud Manager with
OpenStack was installed.2. Create a directory to store the files for the topology that you deploy. Change your-deployment-name to
the name for your deployment.$ mkdir your-deployment-name$ chmod 600 your-deployment-name$ cd your-deployment-name
3. Copy the example environment for the topology that you deploy. Change your-environment-name tothe name for your environment.
4. Change the following JSON attributes in your environment file, your-environment-name.json:v Name: Set to your environment name: your-environment-name.v Description: Set to the description for your environment.
5. Copy the following example topology to a file, your-topology-name.json. Change your-topology-nameto the name for your topology.{
"name":"CHANGEME","description":"CHANGEME","environment":"CHANGEME",
108 IBM Cloud Manager with OpenStack: Administrator Guide, version 4.2
"run_sequentially":true,"nodes": [
{"fqdn":"CHANGEME","password":"CHANGEME","identity_file":"CHANGEME","quit_on_error":true,"runlist": [
"role[ibm-sce-node]"]
}]
}
6. Change the following JSON attributes in your topology file, your-topology-name.json:a. Name: Set to your topology name: your-topology-name.b. Description: Set to the description for your topology.c. Environment: Set to the environment for your topology: your-environment-name.d. nodes.fqdn: For each node, you must set to the fully qualified domain name of the node system.
The deployment system must be able to ssh by using the fully qualified domain name. You canalso set to the public IP address, private IP address, or host name.
e. nodes.password or nodes.identity_file: Set to the appropriate SSH root user authentication forthe node system. Either a password and an SSH identity file can be used for authentication.Remove the unused attribute.
7. Customize the administrator (admin) user's password before deploying. For instructions, see“Customizing passwords and secrets” on page 114.
8. Deploy your topology.a. Upload the environment for your deployment.
$ knife environment from file your-environment-name.json
b. Deploy the topology.$ knife os manage deploy topology your-topology-name.json
c. (Optional) check the detailed status of the IBM Cloud Manager with OpenStack services that aredeployed.$ knife os manage services status --topology-file your-topology-name.json
Results
The web interface for IBM Cloud Manager with OpenStack self-service portal is available athttps://node.fqdn.com:18443/cloud/web/login.html, where node.fqdn.com is the fully qualified domainname for the node on which you deployed the self-service portal. You can log in using admin user withthe password customized in Step 7.
Deployment customization optionsConfigure these basic and advanced customization options before deploying your cloud environment.
Note:
v With some customization options, you can also configure them after you deploy your cloudenvironment.
v Some cloud environments might not support certain customization options.
Customizing for a distributed database topologyTo customize your deployment for a distributed database topology then you must update yourenvironment and topology files.
Chapter 5. Deploying the cloud 109

About this task
The following information provides details about supported options.
Table 30. Summary of support details
Support options Details
Supported hypervisor types? All
Support for post-deployment customization? No
Supported topologies? Distributed Database
Complete the following steps to update your environment and topology files.
Procedure1. Change the following JSON attributes in the override_attributes section of your environment file,
your-environment-name.json:v openstack.endpoints.db.host: Change from 127.0.0.1 to the IP address of the database node system
for the topology.v mysql.root_network_acl: If you changed the database that is used by OpenStack from DB2®
(default) to MySQL, then change this attribute to ['x.x.x.x', 'fqdn.node.com'] where x.x.x.x is the IPaddress and fqdn.node.com is the fully qualified domain name of the database node system for thetopology.
2. Add the following database node system as the first node in your topology file, your-topology-name.json.
{"fqdn":"CHANGEME","password":"CHANGEME","identity_file":"CHANGEME","quit_on_error":true,"run_order_number":0,"runlist": [
"role[ibm-os-database-server-node]"]
},
3. Modify the role for the controller node system in your topology file, your-topology-name.json.Change the "role[ibm-os-single-controller-node]" role to "role[ibm-os-single-controller-distributed-database-node]".
4. To finish the customization, return to the relevant topology deployment process and complete theremaining steps.
Related tasks:“Deploying a test or production cloud” on page 77Deploy the components that are necessary to create a test or production cloud environment with morethan one node. Use the instructions that apply to your specific hypervisor for each compute node.
Customizing the schedulerThe default scheduler for IBM Cloud Manager with OpenStack is IBM Platform Resource Scheduler. Youcan further customize your cloud deployment to use the Platform Resource Scheduler high availabilitytopology. Alternatively, you can disable Platform Resource Scheduler and use the default OpenStackcompute scheduler instead.
About this task
Platform Resource Scheduler provides additional resource optimization policies and the ability to add ahigh availability service policy. These optimization policies rely on live migration for virtual machines. Touse these features, ensure that you enable live migration for IBM Cloud Manager with OpenStack by
110 IBM Cloud Manager with OpenStack: Administrator Guide, version 4.2
following the steps in “Configuring migration for a KVM node with NFS shared storage” on page 158.For more information about using resource optimization policies and HA service policies, see thePlatform Resource Scheduler information, Resource optimization policies and HA service policy.Related tasks:“Deploying a test or production cloud” on page 77Deploy the components that are necessary to create a test or production cloud environment with morethan one node. Use the instructions that apply to your specific hypervisor for each compute node.“Updating a deployed topology” on page 149After you deploy a topology, you might need to apply fixes, either to the IBM Cloud Manager withOpenStack services themselves or to how the IBM Cloud Manager with OpenStack services are deployed.
Related reference:“Roles” on page 287The following roles are provided in support of the reference topologies.
Platform Resource Scheduler online product documentation
Customizing for Platform Resource Scheduler high availability topology:
Use these instructions if you want to customize your deployment to use the IBM Platform ResourceScheduler high availability (HA) topology.
About this task
Table 31. Summary of support details
Support options Details
Supported hypervisor types? Hyper-V, KVM or QEMU, PowerKVM, and z/VM
Support for post-deployment customization? No
Supported topologies? All, except Stand-alone self-service portal
To customize for a Platform Resource Scheduler HA deployment, complete the following steps.
Procedure
1. Append the following Platform Resource Scheduler roles to the run list for the single controller, allcompute nodes, and the Platform Resource Scheduler candidate node as follows:# PRS roles to insert in the OpenStack single controller run list before the# SCE role("role[ibm-sce-node]")
"role[ibm-os-prs-ego-master]","role[ibm-os-prs-controller-node]"
# PRS roles to append to an OpenStack compute nodes’ run list
"role[ibm-os-prs-compute-node]"
# PRS candidate role to run on prs-candidate-node# Ensure the "run_order_number" is the largest in topology file
{"fqdn": "prs-candidate-node.fqdn","identity_file": "CHANGEME","password": "CHANGEME","quit_on_error": true,"run_order_number": 999,
Chapter 5. Deploying the cloud 111
"runlist": ["role[ibm-os-prs-ego-candidate]"
]}
Note: If you use Hyper-V as the hypervisor type, to enable Platform Resource Scheduler on yourcompute nodes, complete the following steps:a. Update the nova.conf file, and append ibm_notifications to notification_topics. The following is
an example:notification_topics=notifications,ibm_notifications
b. Restart the IBM Cloud Manager with OpenStack compute service.2. Customize the following attributes in your environment file, your-environment-name.json:
v ibm-openstack.prs.ego.master_list: Set to your EGO master (OpenStack single controller) hostFQDN and EGO master candidate hosts’ FQDN.
v ibm-openstack.prs.ego.failover.enabled: Set to true to enable EGO HA topology.v ibm-openstack.prs.ego.failover.share_dir: Set to the mount point of the NFS share directory on
the EGO master and EGO master candidate hosts.v ibm-openstack.prs.ego.failover.mount_host: Set to the FQDN or IP address of your NFS server.v ibm-openstack.prs.ego.failover.mount_dir: Set to the NFS share directory exported by your NFS
server.Here is an example environment file with Platform Resource Scheduler HA topology enabled:"override_attributes": {
......"ibm-openstack": {
"prs": {"ego": {
"master_list": ["the-fqdn-of-ego-master", "the-fqdn-of-ego-candidate"],"failover": {
"enabled": true,"share_dir": "/opt/share","mount_host": "10.0.0.10","mount_dir": "/opt/nfs_dir"
}}
}},......
}
3. Customize optional Platform Resource Scheduler attributes in your environment file,your-environment-name.json, as described in “Customizing optional Platform Resource Schedulerattributes.”
4. To finish the customization, return to the relevant topology deployment process and complete theremaining steps.
Customizing optional Platform Resource Scheduler attributes:
You can customize optional attributes for Platform Resource Scheduler when deploying or updating IBMCloud Manager with OpenStack.
About this task
Table 32. Summary of support details
Support options Details
Supported hypervisor types? Hyper-V, KVM or QEMU, PowerKVM, and z/VM
Support for post-deployment customization? Yes
112 IBM Cloud Manager with OpenStack: Administrator Guide, version 4.2
Table 32. Summary of support details (continued)
Support options Details
Supported topologies? All, except Stand-alone self-service portal
Note: If you are using the prescribed configuration with KVM, QEMU, or PowerKVM, customize theoptional YAML override_attributes in your cloud file.
Procedure
1. Customize the following optional attributes in your environment file, your-environment-name.json,under the override_attributes section before deploying IBM Cloud Manager with OpenStack.v ibm-openstack.prs.ego.clusteradmin: Set to your user account for the EGO cluster administrator.
By default, this is egoadmin.v ibm-openstack.prs.ego.baseport: Set to your port range used by EGO services in the EGO master
and EGO master candidate hosts. By default, this is 7869 which means EGO services will use a portrange of 7869 to 7879.
v ibm-openstack.prs.policy_per_host_aggregate: Set to enable policy management for hostaggregate based mode policies. By default, this is false.
v ibm-openstack.prs.prs_ha_timeout_seconds: Set to the duration that a VM instance can attempt alive migration or cold migration operation before Platform Resource Scheduler times out with anerror. By default, this is 1200 seconds.
v ibm-openstack.prs.prs_mt_migration_preferred_order: Set to your preferred order when you put ahypervisor host into maintenance mode and require migrating instances away from the hypervisorhost. The available orders are memory_mb.most, memory_mb.least, vcpus.most, and vcpus.least. Bydefault, this is memory_mb.most.
v openstack.compute.scheduler.default_filters: Set to enable the scheduler feature. Refer tohttp://docs.openstack.org/juno/config-reference/content/section_compute-scheduler.html foravailable filters. By default, this is RetryFilter AvailabilityZoneFilter RamFilter ComputeFilterComputeCapabilitiesFilter and ImagePropertiesFilter.
v openstack.compute.config.cpu_allocation_ratio: Set the CPU over commit ratios for all computenodes in a cluster. By default, this is 16.0.
v openstack.compute.config.ram_allocation_ratio: Set the memory over commit ratios for allcompute nodes in a cluster. By default, this is 1.5.
v openstack.compute.config.disk_allocation_ratio: Set the disk over commit ratios for all computenodes in a cluster. By default, this is 1.0.
2. When complete, return to the relevant topology deployment or update process and complete theremaining steps.
Disabling IBM Platform Resource Scheduler:
You can disable IBM Platform Resource Scheduler and use the default OpenStack compute scheduler.
About this task
Table 33. Summary of support details
Support options Details
Supported hypervisor types? Hyper-V, KVM or QEMU, PowerKVM, and z/VM
Support for post-deployment customization? Yes
Supported topologies? All, except Stand-alone self-service portal
To disable IBM Platform Resource Scheduler, complete the following steps:
Chapter 5. Deploying the cloud 113
Procedure
1. Remove the following IBM Platform Resource Scheduler roles from the run list for the singlecontroller, and from all compute nodes as follows:# PRS roles to remove from the OpenStack single controller’s run list
"role[ibm-os-prs-ego-master]","role[ibm-os-prs-controller-node]"
# PRS roles to remove from OpenStack compute nodes' run list
"role[ibm-os-prs-compute-node]"
Note: If you use Hyper-V as the hypervisor type, to disable IBM Platform Resource Scheduler on youcompute nodes, complete the following steps:a. Update the nova.conf file, and remove ibm_notifications from notification_topics.b. Restart the IBM Cloud Manager with OpenStack compute service.
2. To finish the customization, return to the relevant topology deployment or update process andcomplete the remaining steps
Customizing passwords and secretsYou can customize the passwords and secrets that are used during the deployment process.
The following information provides details about supported options.
Table 34. Summary of support details
Support options Details
Supported hypervisor types? All
Support for post-deployment customization? No, see “Changing passwords and secrets” on page 147for customization post-deployment.
Supported topologies? All, except Minimal.
If you are deploying a Minimal topology, then all passwords and secrets are the same as their associateduser name (for example, admin/admin). Customization is not enabled for the topology.
If you are deploying any other topology, then by default, all passwords, and secrets are obtained throughencrypted data bags. An example secret key (/opt/ibm/cmwo/chef-repo/data_bags/example_data_bag_secret) and data bags (/opt/ibm/cmwo/chef-repo/data_bags/) are provided by the IBMCloud Manager with OpenStack installation. The following steps guide you through customizing theseexamples for your deployment:1. Copy and update the example passwords and secrets file. By default, this example file ensures that all
passwords and secrets are randomly generated for your deployment. To explicitly set the userpassword for the cloud administrator (admin), change the password entry for admin from RANDOMto your desired password. The same can be done for the cloud messaging service user (qpidclient orrabbitclient). If you are deploying a cloud environment with PowerVC or z/VM, you must set thepasswords for those environments as well. For more information about the passwords and secrets thatare used by a deployment, see “Data bags” on page 277.$ cp /opt/ibm/cmwo/chef-repo/data_bags/example_passwords_file.json ./your_passwords_file.json
Note: This step assumes the default IBM Cloud Manager with OpenStack installation path on thedeployment server (/opt/ibm/cmwo).
2. Set the passwords and secrets for your deployment.
Note: The following command must be entered on a single line, even though the example shows aline break for formatting purposes.
114 IBM Cloud Manager with OpenStack: Administrator Guide, version 4.2

$ knife os manage set passwords -E your-environment-name.json --secret-file your-secret-file--topology-file your-topology-name.json your_passwords_file.json
This command also creates a secret key, your-secret-file, that is used to encrypt the data bags.3. (z/VM only) Edit the following z/VM related data bag items: xcat, xcatmnadmin, and zlinuxroot.
These values set host-specific passwords for z/VM and update the data bags.a. Download and decrypt the data bags that contain the passwords and secrets for your deployment.
The information is stored in the data_bags directory. The data_bags directory contains asubdirectory for each data bag that is used by your deployment. The subdirectories contain thedata bags items for your deployment. Ensure that you remove the data_bags directory when youare done using it.$ knife os manage get passwords --topology-file your-topology-name.json data_bags
b. Edit the following data bag items: xcat, xcatmnadmin, and zlinuxroot.Here is an example using the data bag xcat, using your_env_user_passwords/xcat.json:{
"id": "xcat","xcat_server1": "CHANGEME","xcat_server2": "CHANGEME"
}
You must change the xcat_server1 (xcat_server2) to the corresponding value of the attributeibm-openstack.zvm-driver.#host.xcat.server in your attribute file, and then change the password tomatch xcatmnadmin.json.Here is an example for data bag zlinuxroot item, using your_env_user_passwords/zlinuxroot.json:{
"id": "zlinuxroot","host1": "CHANGEME","host2": "CHANGEME"
}
You must change the host1(host2) to the corresponding value of the attributeibm-openstack.zvm-driver.hosts in your attribute file, and then change the password.
c. Update the changed data bags.$ knife os manage update passwords --topology-file your-topology-name.json data_bags
d. Remove the data bag directory because it is no longer needed.$ rm -rf data_bags
4. Remove your passwords and secrets file because it is no longer needed.$ rm –f your_passwords_file.json
Note: You can use the following command to download and decrypt the data bags that contain thepasswords and secrets for your deployment. The information is stored in the data_bags directory. Thedata_bags directory contains a subdirectory for each data bag that is used by your deployment. Thesubdirectories contain the data bags items for your deployment. Ensure that you remove thedata_bags directory when you are done using it.$ knife os manage get passwords --topology-file your-topology-name.json data_bags
Related reference:“Data bag item not found” on page 303You might see an error in the log that a data bag item is missing.“Data bags” on page 277The following example data bags are provided in support of the IBM Cloud Manager with OpenStacktopologies.
Chapter 5. Deploying the cloud 115
Customizing for a FIPS-compliant topologyAdditional steps are required to configure your topology so that it is compliant with the FederalInformation Processing Standards (FIPS) for cryptography modules.
About this task
The following information provides details about supported options.
Table 35. Summary of support details
Support options Details
Supported hypervisor types? All, except Hyper-V
Support for post-deployment customization? Yes
Supported topologies? All, except Stand-alone self-service portal
To customize your deployment for a FIPS-compliant topology, you need to ensure that OpenStackcomponents are configured to communicate with HTTPs. Then, you can set the related attributes in theenvironment file and deploy the topology.
Note: Most attributes are in the override_attributes section of your environment, while some attributesmight be in the default_attributes section, depending on your topology.
Procedure1. Create or configure the certificates. For a production environment, obtain the certificates from a
trusted CA agency. You can also use the following steps to create the certificates for a non-productionenvironment.a. Run the following commands:
$ mkdir /etc/certs$ cd /etc/certs$ openssl genrsa -des3 -out server.key 2048
You are asked to enter a passphrase. You can input whatever you choose, because the password isremoved in a future step.$ openssl req -new -key server.key -out server.csr
Note: This command requests that you enter some information. When you are asked for theCommon Name, enter the public IP address of the proxy node.$ cp server.key server.key.org$ openssl rsa -in server.key.org -out server.key$ openssl x509 -req -days 9999 -in server.csr -signkey server.key -out server.crt
b. Set the following values in the environment file:v ibm-openstack.apache-proxy.certfile = /PATH/TO/server.crt
v ibm-openstack.apache-proxy.certkeyfile = /PATH/TO/server.key
c. Optional: Copy this directory and the certificates to the same directory of the compute nodes. Thisstep is not needed for the Minimal topology.
2. Complete the Apache proxy setup for each component API service. Set the following values in theenvironment file:v ibm-openstack.apache-proxy.enabled = true. This value is the switch to enable the proxy solution
for FIPS. The default value is false. By setting this value to true, the system attempts to put anApache proxy outside of each OpenStack API service.
v openstack.endpoints.host = PUBLIC_IP_ADDR of the controller node. The default value in theenvironment file is 127.0.0.1.
116 IBM Cloud Manager with OpenStack: Administrator Guide, version 4.2

v openstack.endpoints.bind-host = 127.0.0.1. This value is the IP address that the OpenStack APIservices bind to. Ensure that you set the value to 127.0.0.1, the default value.
v openstack.endpoints.SERVICE.port = PROXY_PORT_FOR_EACH_SERVICE. This value is the portthat each API service listens to, where SERVICE is the OpenStack API services such asidentity-admin/identity-api/network-api/compute-api. The default port number for each APIservice and the related proxy is the same. For example, the proxy for nova-api and the nova-apiservice itself both listen to the same port number, 8774. You can set different port numbers bychanging these attributes. An exception is that the port number for the keystone proxy must not bemodified.
3. Configure how you want the certificate to be verified. You can specify an insecure method or acertificate verification method. The insecure method explicitly allows the client to perform insecureSSL (https) requests, meaning the certificate from the server is not verified against any certificateauthorities. Alternatively, the certificate verification method requires the certificates to be verified.a. For an insecure method of verification, set the insecure values to true. For example, the following
values must be set to true:v openstack.network.api.auth.insecure = true
v openstack.network.nova.nova_api_insecure = true
v openstack.compute.network.neutron.api_insecure = true
v openstack.compute.api.auth.insecure = true
v openstack.compute.image.glance_api_insecure = true
v openstack.compute.block-storage.cinder_api_insecure = true
v openstack.block-storage.api.auth.insecure = true
v openstack.block-storage.image.glance_api_insecure = true
v openstack.orchestration.api.auth.insecure = true
v openstack.orchestration.clients.insecure = true
v openstack.telemetry.api.auth.insecure = true
v openstack.telemetry.service-credentials.insecure = true
v openstack.image.api.block-storage.cinder_api_insecure = true
v openstack.image.api.auth.insecure = true
v openstack.image.registry.auth.insecure = true
v openstack.dashboard.ssl_no_verify = "True"
v ibm-openstack.iaas-gateway.keystone_insecure - true if IaaS gateway is used.b. For the certificate verification method, set all of the CA file values to be the certificate file of the
certificate authority. See the following examples:v openstack.image.registry.auth.cafile = /PATH/TO/server.crt
v openstack.image.api.block-storage.cinder_ca_certificates_file = /PATH/TO/server.crt
v openstack.network.api.auth.cafile = /PATH/TO/server.crt
v openstack.network.nova.nova_ca_certificates_file = /PATH/TO/server.crt
v openstack.compute.network.neutron.ca_certificates_file = /PATH/TO/server.crt
v openstack.compute.api.auth.cafile = /PATH/TO/server.crt
v openstack.compute.image.ssl.ca_file = /PATH/TO/server.crt
v openstack.compute.block-storage.cinder_ca_certificates_file = /PATH/TO/server.crt
v openstack.block-storage.api.auth.cafile = /PATH/TO/server.crt
v openstack.orchestration.api.auth.cafile = /PATH/TO/server.crt
v openstack.orchestration.clients.ca_file = /PATH/TO/server.crt
v openstack.telemetry.api.auth.cafile = /PATH/TO/server.crt
v openstack.telemetry.service-credentials.cafile = /PATH/TO/server.crt
Chapter 5. Deploying the cloud 117
v openstack.image.api.auth.cafile = /PATH/TO/server.crt
v openstack.dashboard.ssl_cacert = /PATH/TO/server.crt
v openstack.dashboard.ssl_no_verify = "False"
v ibm-openstack.iaas-gateway.keystone_ca_certs = path to certificate authority if IaaS gateway isused.
v openstack.block-storage.image.glance_ca_certificates_file = /PATH/TO/server.crt
4. Set the related attributes in the environment file.a. Set all of the "hash_algorithm" or "hash_algorithms" in the environment file to sha256. The default
value for hash_algorithm is md5. For FIPS, a recommended algorithm is sha256. See the followingexamples:v openstack.identity.token.hash_algorithm = sha256
v openstack.image.api.auth.hash_algorithms = sha256
b. If auth_token is configured to use memcached (in other words, memcached_servers andmemcache_security_strategy are set) and the deployer wants to protect the data, set thememcache_secret_key to a value that is at least 112 bits. You can generate a random 112+ bit stringby reading from the following path: /dev/random: head -c 15 /dev/random | base64. Forexample, memcached_servers = localhost:11211 and memcache_security_strategy are set to eitherMAC or ENCRYPT.
5. Before you enable FIPS, stop all OpenStack services and httpd services on the IBM Cloud Managerwith OpenStack controller node.
Tip: For the FIPS environment, it is suggested to have the Chef server and controller node ondifferent nodes. Redeployment from a non-FIPS IBM Cloud Manager with OpenStack to aFIPS-compliant IBM Cloud Manager with OpenStack is supported only when the Chef-server nodeand controller node are on different nodes.
6. When complete, return to the relevant topology deployment or update process and complete theremaining steps.
What to do next
You can use the following verification examples after the installation.v Insecure method: add --insecure in the command. For example:
– nova --insecure list
– nova --insecure image-list
v Certificate verification method: the certificates need to be provided. For example:– neutron --os-cacert /var/lib/neutron/keystone-signing/cacert.pem agent-list
– heat --os-cacert /var/cache/heat/cacert.pem --ca-file /var/cache/heat/cacert.pem stack-list
Related tasks:“Deploying a test or production cloud” on page 77Deploy the components that are necessary to create a test or production cloud environment with morethan one node. Use the instructions that apply to your specific hypervisor for each compute node.“Updating a deployed topology” on page 149After you deploy a topology, you might need to apply fixes, either to the IBM Cloud Manager withOpenStack services themselves or to how the IBM Cloud Manager with OpenStack services are deployed.
Customizing basic optionsYou can update the attributes in your environment file to customize basic options for your cloudenvironment.
118 IBM Cloud Manager with OpenStack: Administrator Guide, version 4.2
Customizing NTP attributes:
You can change the NTP servers attribute in your environment file to modify the NTP servers used bythe node systems throughout your topology deployment.
About this task
The following information provides details about supported options.
Table 36. Summary of support details
Support options Details
Supported hypervisor types? All
Support for post-deployment customization? Yes
Supported topologies? All, except Stand-alone self-service portal
Complete the following steps to customize your environment.
Procedure
1. Update the following attribute in the override_attributes section of your environment file.v ntp.servers: Set to the NTP servers accessible to your deployment.
2. When complete, return to the relevant topology deployment or update process and complete theremaining steps.
Related tasks:“Deploying a test or production cloud” on page 77Deploy the components that are necessary to create a test or production cloud environment with morethan one node. Use the instructions that apply to your specific hypervisor for each compute node.“Updating a deployed topology” on page 149After you deploy a topology, you might need to apply fixes, either to the IBM Cloud Manager withOpenStack services themselves or to how the IBM Cloud Manager with OpenStack services are deployed.
Customizing OpenStack attributes:
You can change the OpenStack attributes in your environment file to control logging, quotas anduploading images.
About this task
The following information provides details about supported options.
Table 37. Summary of support details
Support options Details
Supported hypervisor types? All
Support for post-deployment customization? Yes
Supported topologies? All, except Stand-alone self-service portal
Complete the following steps to customize your environment.
Chapter 5. Deploying the cloud 119
Procedure
1. Update the following attributes in your environment file. Most attributes are in theoverride_attributes section of your environment, while some of the logging attributes might be inthe default_attributes section, depending on your topologyv openstack.compute.config.quota_*, openstack.network.quota.*, and openstack.block-
storage.quota_*: The environment file provides default quota settings for the IBM Cloud Managerwith OpenStack compute, network, and block storage components. Set the quotas as needed foryour deployment. If your deployment is part of a multi-region cloud environment, quotas settingsare unique to each region. For more information, see the OpenStack manage quotas documentation.
v openstack.image.upload_image and openstack.image.upload_images: These attributes allow animage to be uploaded to OpenStack as part of your deployment. openstack.image.upload_image isa set of key-value pairs where the key is the image name and the value is the URL location of theimage. openstack.image.upload_images is a list of keys from openstack.image.upload_image thatyou want to upload. For example:"openstack": {
"image": {"upload_image": {
"myimage": "https://myimagesource.com/myimage"},"upload_images": [
"myimage"]
}}
v openstack.identity.debug and openstack.identity.verbose: Set to true or false for the desiredlogging level for the OpenStack identity service.
v openstack.image.debug and openstack.image.verbose: Set to true or false for the desired logginglevel for the OpenStack image service.
v openstack.network.debug and openstack.network.verbose: Set to true or false for the desiredlogging level for the OpenStack network service.
v openstack.compute.debug and openstack.compute.verbose: Set to true or false for the desiredlogging level for the OpenStack compute service.
v openstack.block-storage.debug and openstack.block-storage.verbose: Set to true or false for thedesired logging level for the OpenStack block storage service.
v openstack.telemetry.debug and openstack.telemetry.verbose: Set to true or false for the desiredlogging level for the OpenStack telemetry service.
v openstack.orchestration.debug and openstack.orchestration.verbose: Set to true or false for thedesired logging level for the OpenStack orchestration service.
Note: For more information about customizing the OpenStack values, see the following configurationoptions. To map the OpenStack configuration file options to the IBM Cloud Manager with OpenStackattributes, see “Mapping attributes to services” on page 279.v cinder.conf (block-storage attributes) configuration optionsv glance-api.conf (image.api attribute) configuration optionsv glance-registry.conf (image.registry attribute) configuration optionsv keystone.conf (identity attributes) configuration optionsv nova.conf (compute attributes) configuration optionsv neutron.conf (network attributes) configuration options
2. When complete, return to the relevant topology deployment or update process and complete theremaining steps.
Related tasks:“Deploying a test or production cloud” on page 77Deploy the components that are necessary to create a test or production cloud environment with more
120 IBM Cloud Manager with OpenStack: Administrator Guide, version 4.2
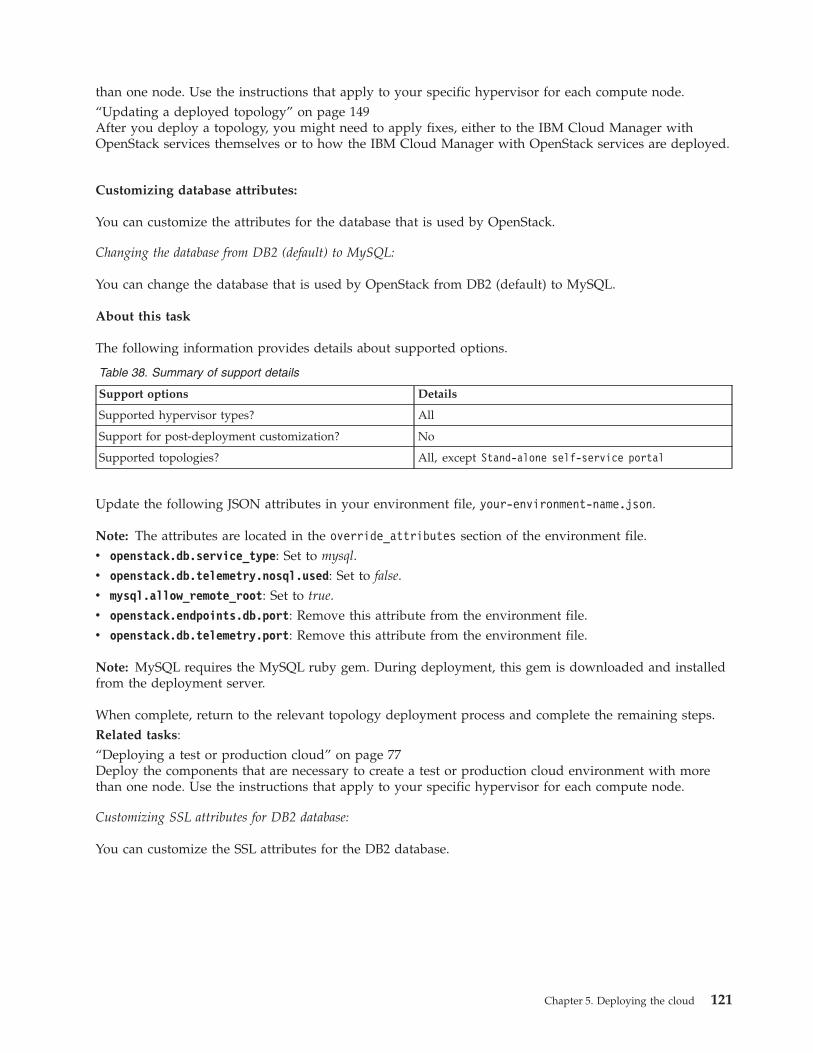
than one node. Use the instructions that apply to your specific hypervisor for each compute node.“Updating a deployed topology” on page 149After you deploy a topology, you might need to apply fixes, either to the IBM Cloud Manager withOpenStack services themselves or to how the IBM Cloud Manager with OpenStack services are deployed.
Customizing database attributes:
You can customize the attributes for the database that is used by OpenStack.
Changing the database from DB2 (default) to MySQL:
You can change the database that is used by OpenStack from DB2 (default) to MySQL.
About this task
The following information provides details about supported options.
Table 38. Summary of support details
Support options Details
Supported hypervisor types? All
Support for post-deployment customization? No
Supported topologies? All, except Stand-alone self-service portal
Update the following JSON attributes in your environment file, your-environment-name.json.
Note: The attributes are located in the override_attributes section of the environment file.v openstack.db.service_type: Set to mysql.v openstack.db.telemetry.nosql.used: Set to false.v mysql.allow_remote_root: Set to true.v openstack.endpoints.db.port: Remove this attribute from the environment file.v openstack.db.telemetry.port: Remove this attribute from the environment file.
Note: MySQL requires the MySQL ruby gem. During deployment, this gem is downloaded and installedfrom the deployment server.
When complete, return to the relevant topology deployment process and complete the remaining steps.Related tasks:“Deploying a test or production cloud” on page 77Deploy the components that are necessary to create a test or production cloud environment with morethan one node. Use the instructions that apply to your specific hypervisor for each compute node.
Customizing SSL attributes for DB2 database:
You can customize the SSL attributes for the DB2 database.
Chapter 5. Deploying the cloud 121
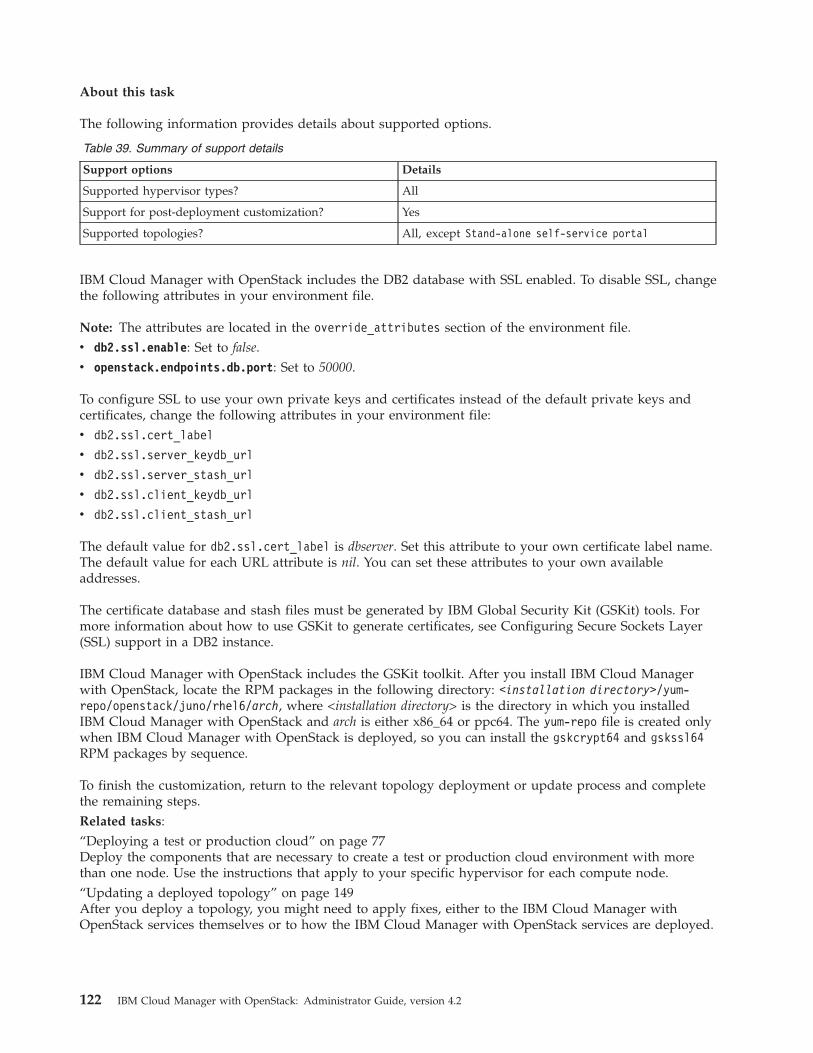
About this task
The following information provides details about supported options.
Table 39. Summary of support details
Support options Details
Supported hypervisor types? All
Support for post-deployment customization? Yes
Supported topologies? All, except Stand-alone self-service portal
IBM Cloud Manager with OpenStack includes the DB2 database with SSL enabled. To disable SSL, changethe following attributes in your environment file.
Note: The attributes are located in the override_attributes section of the environment file.v db2.ssl.enable: Set to false.v openstack.endpoints.db.port: Set to 50000.
To configure SSL to use your own private keys and certificates instead of the default private keys andcertificates, change the following attributes in your environment file:v db2.ssl.cert_label
v db2.ssl.server_keydb_url
v db2.ssl.server_stash_url
v db2.ssl.client_keydb_url
v db2.ssl.client_stash_url
The default value for db2.ssl.cert_label is dbserver. Set this attribute to your own certificate label name.The default value for each URL attribute is nil. You can set these attributes to your own availableaddresses.
The certificate database and stash files must be generated by IBM Global Security Kit (GSKit) tools. Formore information about how to use GSKit to generate certificates, see Configuring Secure Sockets Layer(SSL) support in a DB2 instance.
IBM Cloud Manager with OpenStack includes the GSKit toolkit. After you install IBM Cloud Managerwith OpenStack, locate the RPM packages in the following directory: <installation directory>/yum-repo/openstack/juno/rhel6/arch, where <installation directory> is the directory in which you installedIBM Cloud Manager with OpenStack and arch is either x86_64 or ppc64. The yum-repo file is created onlywhen IBM Cloud Manager with OpenStack is deployed, so you can install the gskcrypt64 and gskssl64RPM packages by sequence.
To finish the customization, return to the relevant topology deployment or update process and completethe remaining steps.Related tasks:“Deploying a test or production cloud” on page 77Deploy the components that are necessary to create a test or production cloud environment with morethan one node. Use the instructions that apply to your specific hypervisor for each compute node.“Updating a deployed topology” on page 149After you deploy a topology, you might need to apply fixes, either to the IBM Cloud Manager withOpenStack services themselves or to how the IBM Cloud Manager with OpenStack services are deployed.
122 IBM Cloud Manager with OpenStack: Administrator Guide, version 4.2
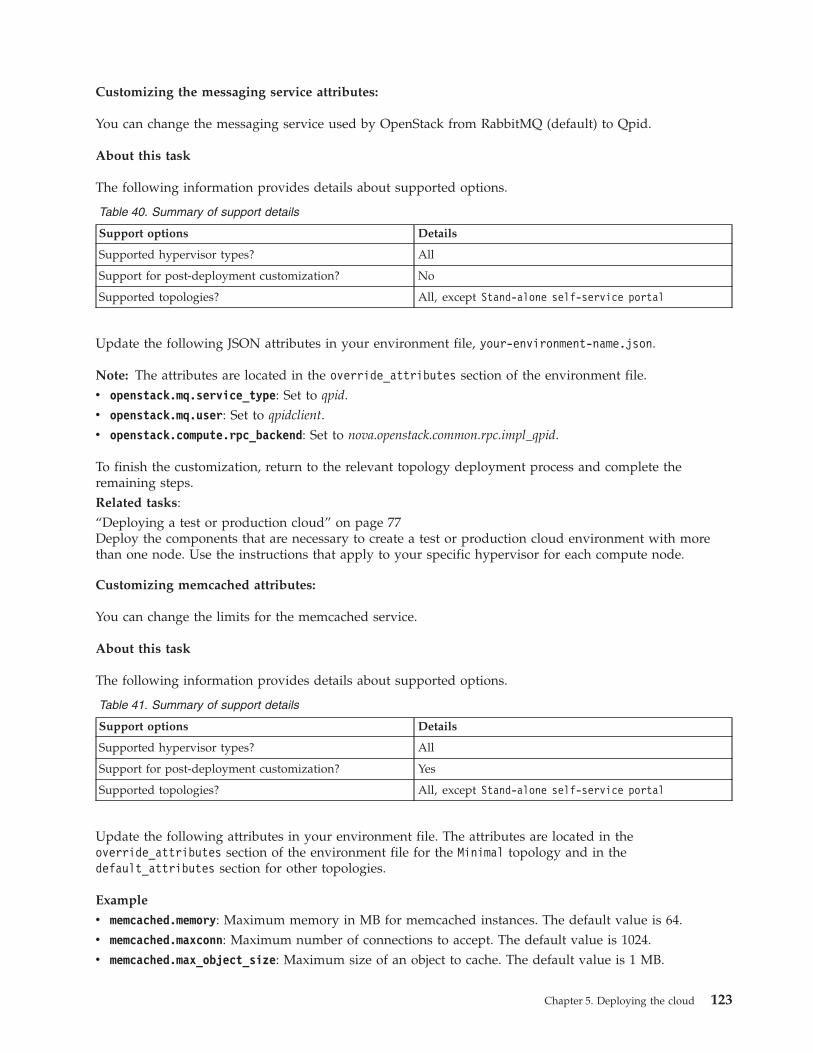
Customizing the messaging service attributes:
You can change the messaging service used by OpenStack from RabbitMQ (default) to Qpid.
About this task
The following information provides details about supported options.
Table 40. Summary of support details
Support options Details
Supported hypervisor types? All
Support for post-deployment customization? No
Supported topologies? All, except Stand-alone self-service portal
Update the following JSON attributes in your environment file, your-environment-name.json.
Note: The attributes are located in the override_attributes section of the environment file.v openstack.mq.service_type: Set to qpid.v openstack.mq.user: Set to qpidclient.v openstack.compute.rpc_backend: Set to nova.openstack.common.rpc.impl_qpid.
To finish the customization, return to the relevant topology deployment process and complete theremaining steps.Related tasks:“Deploying a test or production cloud” on page 77Deploy the components that are necessary to create a test or production cloud environment with morethan one node. Use the instructions that apply to your specific hypervisor for each compute node.
Customizing memcached attributes:
You can change the limits for the memcached service.
About this task
The following information provides details about supported options.
Table 41. Summary of support details
Support options Details
Supported hypervisor types? All
Support for post-deployment customization? Yes
Supported topologies? All, except Stand-alone self-service portal
Update the following attributes in your environment file. The attributes are located in theoverride_attributes section of the environment file for the Minimal topology and in thedefault_attributes section for other topologies.
Example
v memcached.memory: Maximum memory in MB for memcached instances. The default value is 64.v memcached.maxconn: Maximum number of connections to accept. The default value is 1024.v memcached.max_object_size: Maximum size of an object to cache. The default value is 1 MB.
Chapter 5. Deploying the cloud 123
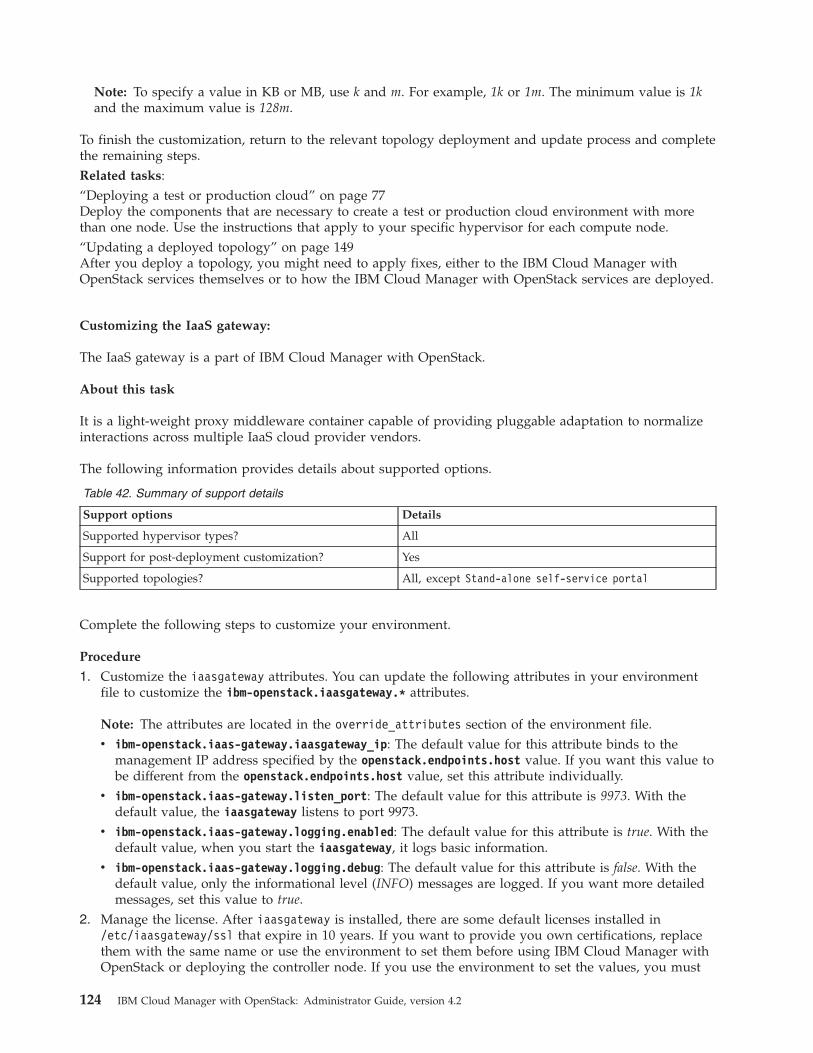
Note: To specify a value in KB or MB, use k and m. For example, 1k or 1m. The minimum value is 1kand the maximum value is 128m.
To finish the customization, return to the relevant topology deployment and update process and completethe remaining steps.Related tasks:“Deploying a test or production cloud” on page 77Deploy the components that are necessary to create a test or production cloud environment with morethan one node. Use the instructions that apply to your specific hypervisor for each compute node.“Updating a deployed topology” on page 149After you deploy a topology, you might need to apply fixes, either to the IBM Cloud Manager withOpenStack services themselves or to how the IBM Cloud Manager with OpenStack services are deployed.
Customizing the IaaS gateway:
The IaaS gateway is a part of IBM Cloud Manager with OpenStack.
About this task
It is a light-weight proxy middleware container capable of providing pluggable adaptation to normalizeinteractions across multiple IaaS cloud provider vendors.
The following information provides details about supported options.
Table 42. Summary of support details
Support options Details
Supported hypervisor types? All
Support for post-deployment customization? Yes
Supported topologies? All, except Stand-alone self-service portal
Complete the following steps to customize your environment.
Procedure
1. Customize the iaasgateway attributes. You can update the following attributes in your environmentfile to customize the ibm-openstack.iaasgateway.* attributes.
Note: The attributes are located in the override_attributes section of the environment file.v ibm-openstack.iaas-gateway.iaasgateway_ip: The default value for this attribute binds to the
management IP address specified by the openstack.endpoints.host value. If you want this value tobe different from the openstack.endpoints.host value, set this attribute individually.
v ibm-openstack.iaas-gateway.listen_port: The default value for this attribute is 9973. With thedefault value, the iaasgateway listens to port 9973.
v ibm-openstack.iaas-gateway.logging.enabled: The default value for this attribute is true. With thedefault value, when you start the iaasgateway, it logs basic information.
v ibm-openstack.iaas-gateway.logging.debug: The default value for this attribute is false. With thedefault value, only the informational level (INFO) messages are logged. If you want more detailedmessages, set this value to true.
2. Manage the license. After iaasgateway is installed, there are some default licenses installed in/etc/iaasgateway/ssl that expire in 10 years. If you want to provide you own certifications, replacethem with the same name or use the environment to set them before using IBM Cloud Manager withOpenStack or deploying the controller node. If you use the environment to set the values, you must
124 IBM Cloud Manager with OpenStack: Administrator Guide, version 4.2
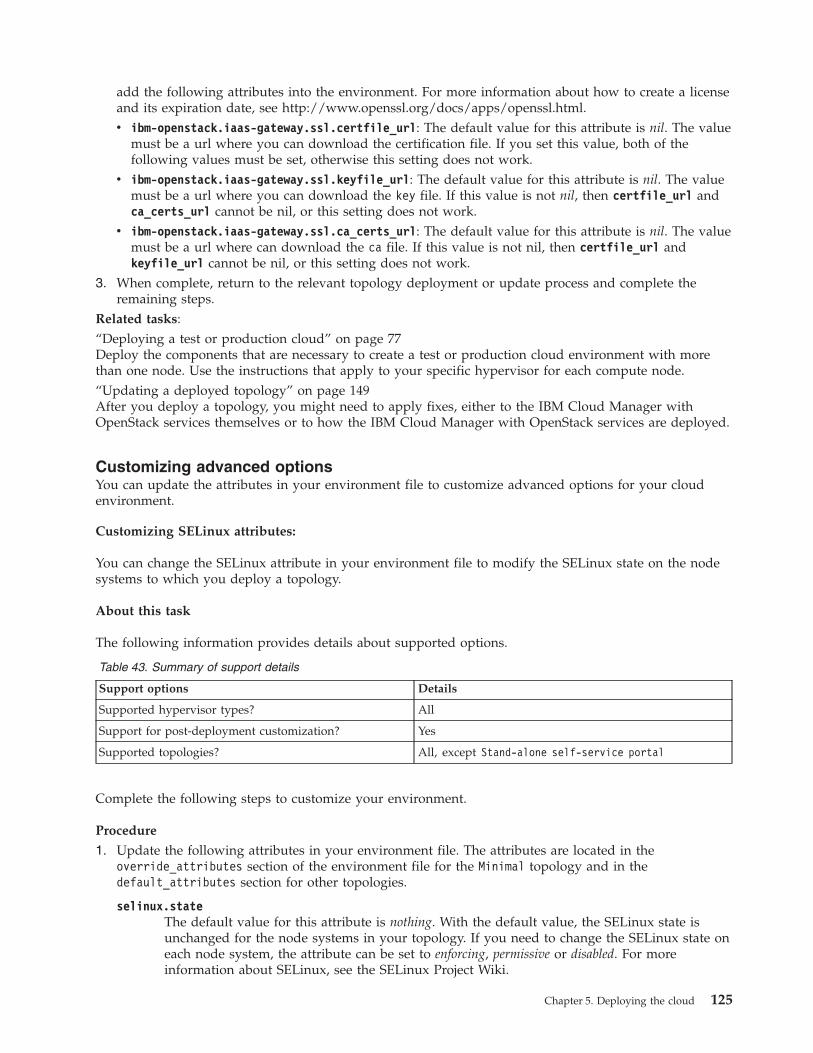
add the following attributes into the environment. For more information about how to create a licenseand its expiration date, see http://www.openssl.org/docs/apps/openssl.html.v ibm-openstack.iaas-gateway.ssl.certfile_url: The default value for this attribute is nil. The value
must be a url where you can download the certification file. If you set this value, both of thefollowing values must be set, otherwise this setting does not work.
v ibm-openstack.iaas-gateway.ssl.keyfile_url: The default value for this attribute is nil. The valuemust be a url where you can download the key file. If this value is not nil, then certfile_url andca_certs_url cannot be nil, or this setting does not work.
v ibm-openstack.iaas-gateway.ssl.ca_certs_url: The default value for this attribute is nil. The valuemust be a url where can download the ca file. If this value is not nil, then certfile_url andkeyfile_url cannot be nil, or this setting does not work.
3. When complete, return to the relevant topology deployment or update process and complete theremaining steps.
Related tasks:“Deploying a test or production cloud” on page 77Deploy the components that are necessary to create a test or production cloud environment with morethan one node. Use the instructions that apply to your specific hypervisor for each compute node.“Updating a deployed topology” on page 149After you deploy a topology, you might need to apply fixes, either to the IBM Cloud Manager withOpenStack services themselves or to how the IBM Cloud Manager with OpenStack services are deployed.
Customizing advanced optionsYou can update the attributes in your environment file to customize advanced options for your cloudenvironment.
Customizing SELinux attributes:
You can change the SELinux attribute in your environment file to modify the SELinux state on the nodesystems to which you deploy a topology.
About this task
The following information provides details about supported options.
Table 43. Summary of support details
Support options Details
Supported hypervisor types? All
Support for post-deployment customization? Yes
Supported topologies? All, except Stand-alone self-service portal
Complete the following steps to customize your environment.
Procedure
1. Update the following attributes in your environment file. The attributes are located in theoverride_attributes section of the environment file for the Minimal topology and in thedefault_attributes section for other topologies.
selinux.stateThe default value for this attribute is nothing. With the default value, the SELinux state isunchanged for the node systems in your topology. If you need to change the SELinux state oneach node system, the attribute can be set to enforcing, permissive or disabled. For moreinformation about SELinux, see the SELinux Project Wiki.
Chapter 5. Deploying the cloud 125
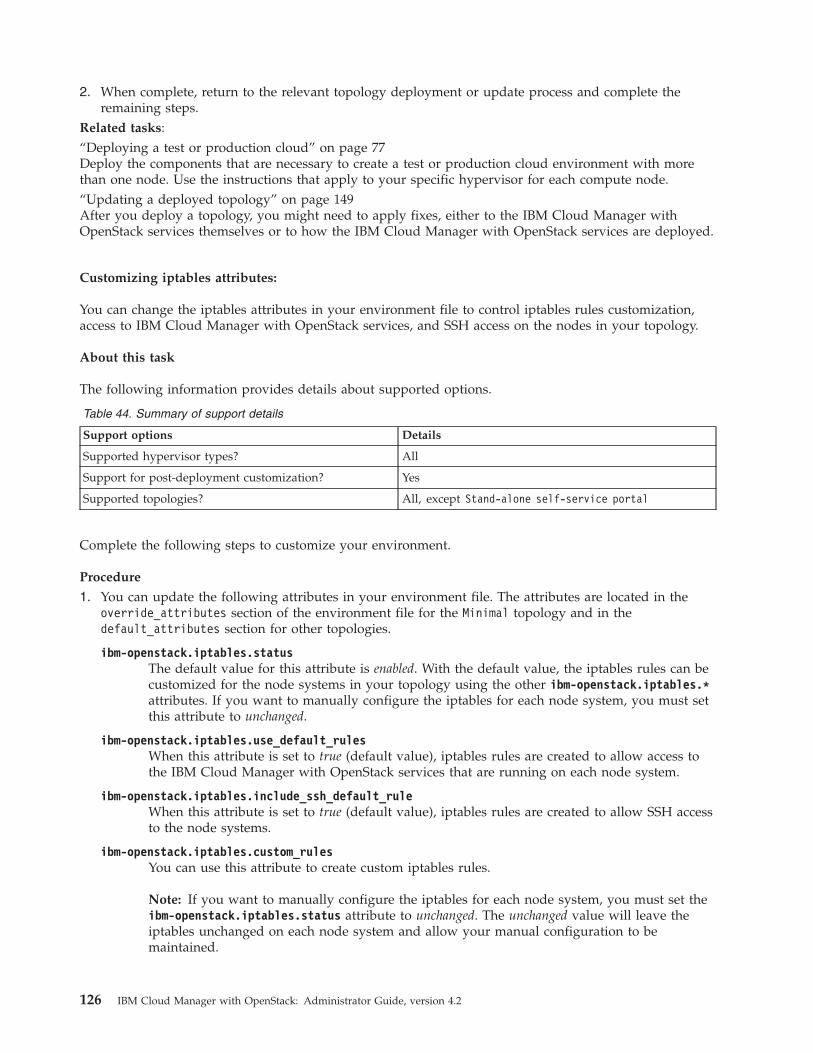
2. When complete, return to the relevant topology deployment or update process and complete theremaining steps.
Related tasks:“Deploying a test or production cloud” on page 77Deploy the components that are necessary to create a test or production cloud environment with morethan one node. Use the instructions that apply to your specific hypervisor for each compute node.“Updating a deployed topology” on page 149After you deploy a topology, you might need to apply fixes, either to the IBM Cloud Manager withOpenStack services themselves or to how the IBM Cloud Manager with OpenStack services are deployed.
Customizing iptables attributes:
You can change the iptables attributes in your environment file to control iptables rules customization,access to IBM Cloud Manager with OpenStack services, and SSH access on the nodes in your topology.
About this task
The following information provides details about supported options.
Table 44. Summary of support details
Support options Details
Supported hypervisor types? All
Support for post-deployment customization? Yes
Supported topologies? All, except Stand-alone self-service portal
Complete the following steps to customize your environment.
Procedure
1. You can update the following attributes in your environment file. The attributes are located in theoverride_attributes section of the environment file for the Minimal topology and in thedefault_attributes section for other topologies.
ibm-openstack.iptables.statusThe default value for this attribute is enabled. With the default value, the iptables rules can becustomized for the node systems in your topology using the other ibm-openstack.iptables.*attributes. If you want to manually configure the iptables for each node system, you must setthis attribute to unchanged.
ibm-openstack.iptables.use_default_rulesWhen this attribute is set to true (default value), iptables rules are created to allow access tothe IBM Cloud Manager with OpenStack services that are running on each node system.
ibm-openstack.iptables.include_ssh_default_ruleWhen this attribute is set to true (default value), iptables rules are created to allow SSH accessto the node systems.
ibm-openstack.iptables.custom_rulesYou can use this attribute to create custom iptables rules.
Note: If you want to manually configure the iptables for each node system, you must set theibm-openstack.iptables.status attribute to unchanged. The unchanged value will leave theiptables unchanged on each node system and allow your manual configuration to bemaintained.
126 IBM Cloud Manager with OpenStack: Administrator Guide, version 4.2

2. When complete, return to the relevant topology deployment or update process and complete theremaining steps.
Related tasks:“Deploying a test or production cloud” on page 77Deploy the components that are necessary to create a test or production cloud environment with morethan one node. Use the instructions that apply to your specific hypervisor for each compute node.“Updating a deployed topology” on page 149After you deploy a topology, you might need to apply fixes, either to the IBM Cloud Manager withOpenStack services themselves or to how the IBM Cloud Manager with OpenStack services are deployed.
Customizing performance attributes:
You can change the performance attributes in your environment file to customize settings for item suchas the message queue and workers.
About this task
The following information provides details about supported options.
Table 45. Summary of support details
Support options Details
Supported hypervisor types? All
Support for post-deployment customization? Yes
Supported topologies? All, except Stand-alone self-service portal
The default values for the attributes are sufficient for most topology deployments. However, you mightneed to customize the values for heavily used deployments.
You can update the following attributes in the override_attributes section of your environment file.
Procedure
1. You can update the following JSON attributes in your environment file, your-environment-name.json,to customize the Qpid performance attributes. The Rabbitmq performance attributes do not need to beupdated.
Table 46.
Attribute Description
qpid.broker.max-connectionsqpid.broker.connection-backlogqpid.broker.worker-threads
v The default value for qpid.broker.max-connections is 1000.
v The default value for qpid.broker.connection-backlog is 10.
v The default value for qpid.broker.worker-threads is 20.
For more information about customizing these values, see the Qpidbroker man page.
openstack.compute.rpc_thread_pool_sizeopenstack.compute.rpc_conn_pool_sizeopenstack.compute.rpc_response_timeout
v The default values for openstack.compute.rpc_thread_pool_size is2048.
v The default value for openstack.compute.rpc_conn_pool_size is 60.
v The default value for openstack.compute.rpc_response_timeout is60.
Chapter 5. Deploying the cloud 127

Table 46. (continued)
Attribute Description
openstack.network.rpc_thread_pool_sizeopenstack.network.rpc_conn_pool_sizeopenstack.network.rpc_response_timeout
v The default value for openstack.network.rpc_thread_pool_size is128.
v The default value for openstack.network.rpc_conn_pool_size is 60.
v The default value for openstack.network.rpc_response_timeout is300.
openstack.compute.osapi_compute_workersopenstack.identity.public_workersopenstack.identity.admin_workersopenstack.network.api_workersopenstack.network.rpc_workersopenstack.image.api.workersopenstack.image.registry.workersopenstack.block-storage.osapi_volume_workersopenstack.compute.conductor.workers
v The default value for openstack.identity.public_workers andopenstack.identity.admin_workers is the number of CPUs, with aminimum value of 2.
v The default value for openstack.network.api_workers andopenstack.network.rpc_workers is 0.
v The default values for the remaining attributes are equal to thenumber of CPUs on the node system (with a maximum value of 8).Changes to the default values should be based on the number ofCPUs that are available on the single controller node system. Someworkers are limited to a maximum value of 8.
openstack.sysctl.net.core.somaxconn You can run the sysctl net.core.somaxconn command on the nodesystems in your topology to determine the default value for each nodesystem. Heavily used deployments might require a minimum value of512.Note: The attribute name for net.core.somaxconn includes the period(.) in the name.
ibm-openstack.powervc-driver.db.max_pool_sizeibm-openstack.powervc-driver.db.max_overflow
If you plan to run a large-scale IBM Power Virtualization Centerenvironment with up to 2,000 workloads, modify the values of thefollowing attributes to enhance performance.
v ibm-openstack.powervc-driver.db.max_pool_size=50
v ibm-openstack.powervc-driver.db.max_overflow=100
You might need to increase the maximum file descriptor limit on the single controller node system inyour topology. The message queue service runs on the single controller node. You can increase themaximum file descriptor limit by adding the following lines to the /etc/security/limits.conf file.After the update, new processes will use the new limit. Existing processes continue to use theircurrent limit.* soft nofile 65536* hard nofile 65536
2. When complete, return to the relevant topology deployment or update process and complete theremaining steps.
Related tasks:“Deploying a test or production cloud” on page 77Deploy the components that are necessary to create a test or production cloud environment with morethan one node. Use the instructions that apply to your specific hypervisor for each compute node.“Updating a deployed topology” on page 149After you deploy a topology, you might need to apply fixes, either to the IBM Cloud Manager withOpenStack services themselves or to how the IBM Cloud Manager with OpenStack services are deployed.
Configuring storage (Cinder)Use this information to configure your storage environment if you want to use a storage driver that isdifferent than the default, configure multiple block storage back ends, or create a cloud environment withextra block storage (Cinder) nodes.
128 IBM Cloud Manager with OpenStack: Administrator Guide, version 4.2
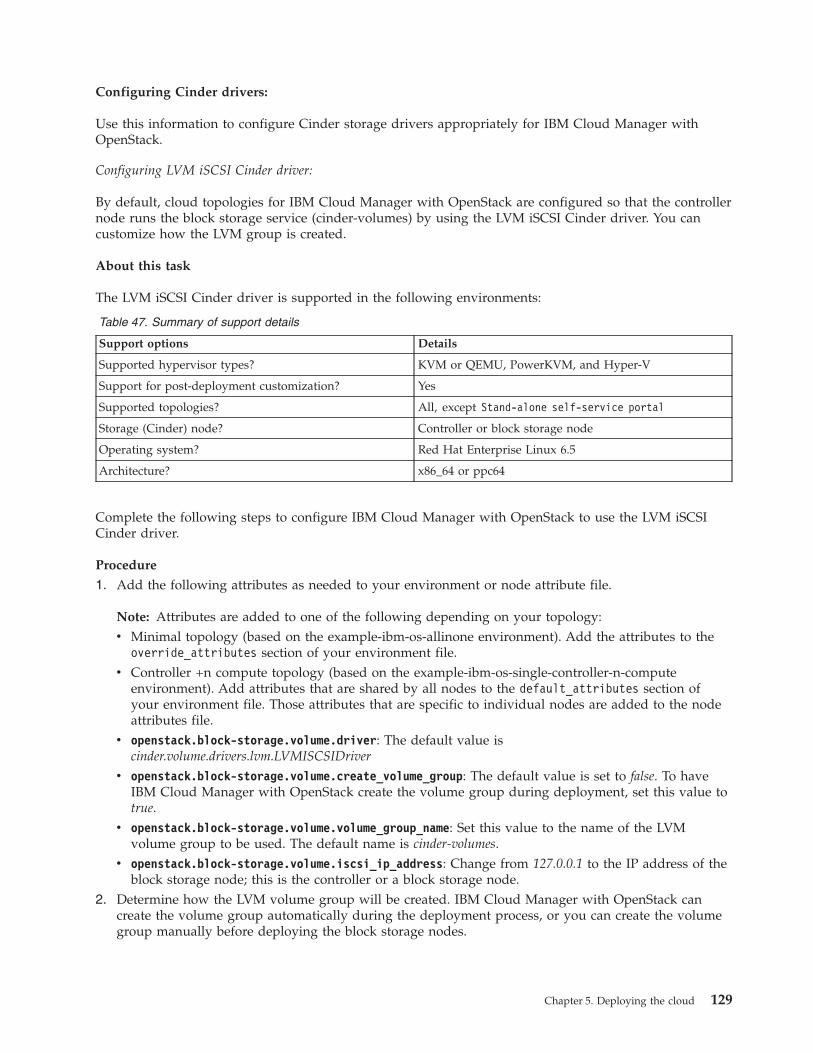
Configuring Cinder drivers:
Use this information to configure Cinder storage drivers appropriately for IBM Cloud Manager withOpenStack.
Configuring LVM iSCSI Cinder driver:
By default, cloud topologies for IBM Cloud Manager with OpenStack are configured so that the controllernode runs the block storage service (cinder-volumes) by using the LVM iSCSI Cinder driver. You cancustomize how the LVM group is created.
About this task
The LVM iSCSI Cinder driver is supported in the following environments:
Table 47. Summary of support details
Support options Details
Supported hypervisor types? KVM or QEMU, PowerKVM, and Hyper-V
Support for post-deployment customization? Yes
Supported topologies? All, except Stand-alone self-service portal
Storage (Cinder) node? Controller or block storage node
Operating system? Red Hat Enterprise Linux 6.5
Architecture? x86_64 or ppc64
Complete the following steps to configure IBM Cloud Manager with OpenStack to use the LVM iSCSICinder driver.
Procedure
1. Add the following attributes as needed to your environment or node attribute file.
Note: Attributes are added to one of the following depending on your topology:v Minimal topology (based on the example-ibm-os-allinone environment). Add the attributes to the
override_attributes section of your environment file.v Controller +n compute topology (based on the example-ibm-os-single-controller-n-compute
environment). Add attributes that are shared by all nodes to the default_attributes section ofyour environment file. Those attributes that are specific to individual nodes are added to the nodeattributes file.
v openstack.block-storage.volume.driver: The default value iscinder.volume.drivers.lvm.LVMISCSIDriver
v openstack.block-storage.volume.create_volume_group: The default value is set to false. To haveIBM Cloud Manager with OpenStack create the volume group during deployment, set this value totrue.
v openstack.block-storage.volume.volume_group_name: Set this value to the name of the LVMvolume group to be used. The default name is cinder-volumes.
v openstack.block-storage.volume.iscsi_ip_address: Change from 127.0.0.1 to the IP address of theblock storage node; this is the controller or a block storage node.
2. Determine how the LVM volume group will be created. IBM Cloud Manager with OpenStack cancreate the volume group automatically during the deployment process, or you can create the volumegroup manually before deploying the block storage nodes.
Chapter 5. Deploying the cloud 129
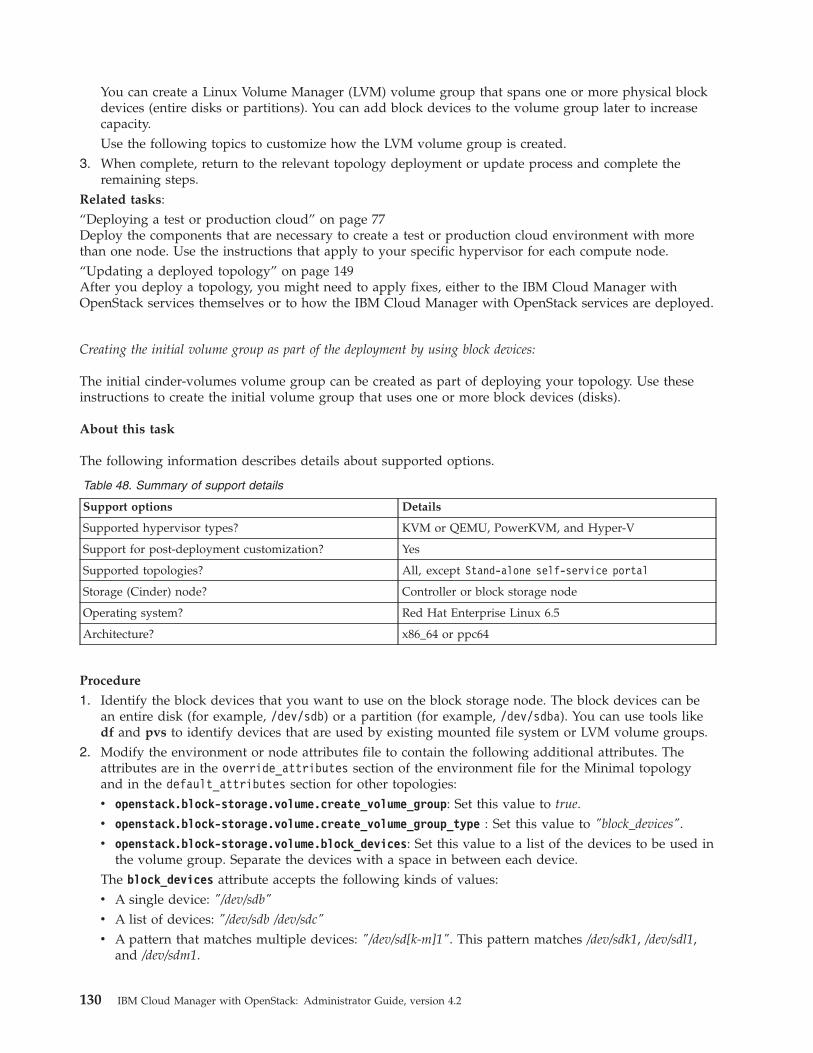
You can create a Linux Volume Manager (LVM) volume group that spans one or more physical blockdevices (entire disks or partitions). You can add block devices to the volume group later to increasecapacity.Use the following topics to customize how the LVM volume group is created.
3. When complete, return to the relevant topology deployment or update process and complete theremaining steps.
Related tasks:“Deploying a test or production cloud” on page 77Deploy the components that are necessary to create a test or production cloud environment with morethan one node. Use the instructions that apply to your specific hypervisor for each compute node.“Updating a deployed topology” on page 149After you deploy a topology, you might need to apply fixes, either to the IBM Cloud Manager withOpenStack services themselves or to how the IBM Cloud Manager with OpenStack services are deployed.
Creating the initial volume group as part of the deployment by using block devices:
The initial cinder-volumes volume group can be created as part of deploying your topology. Use theseinstructions to create the initial volume group that uses one or more block devices (disks).
About this task
The following information describes details about supported options.
Table 48. Summary of support details
Support options Details
Supported hypervisor types? KVM or QEMU, PowerKVM, and Hyper-V
Support for post-deployment customization? Yes
Supported topologies? All, except Stand-alone self-service portal
Storage (Cinder) node? Controller or block storage node
Operating system? Red Hat Enterprise Linux 6.5
Architecture? x86_64 or ppc64
Procedure
1. Identify the block devices that you want to use on the block storage node. The block devices can bean entire disk (for example, /dev/sdb) or a partition (for example, /dev/sdba). You can use tools likedf and pvs to identify devices that are used by existing mounted file system or LVM volume groups.
2. Modify the environment or node attributes file to contain the following additional attributes. Theattributes are in the override_attributes section of the environment file for the Minimal topologyand in the default_attributes section for other topologies:v openstack.block-storage.volume.create_volume_group: Set this value to true.v openstack.block-storage.volume.create_volume_group_type : Set this value to "block_devices".v openstack.block-storage.volume.block_devices: Set this value to a list of the devices to be used in
the volume group. Separate the devices with a space in between each device.The block_devices attribute accepts the following kinds of values:v A single device: "/dev/sdb"
v A list of devices: "/dev/sdb /dev/sdc"
v A pattern that matches multiple devices: "/dev/sd[k-m]1". This pattern matches /dev/sdk1, /dev/sdl1,and /dev/sdm1.
130 IBM Cloud Manager with OpenStack: Administrator Guide, version 4.2

See the following example for configuring an LVM by using a block device.{"openstack" : {"block-storage": {
"volume": {"create_volume_group": true,"create_volume_group_type": "block_devices","block_devices": "/dev/sdb",
}}
}}
3. When complete, return to the relevant topology deployment or update process and complete theremaining steps.
Related tasks:“Deploying a test or production cloud” on page 77Deploy the components that are necessary to create a test or production cloud environment with morethan one node. Use the instructions that apply to your specific hypervisor for each compute node.“Updating a deployed topology” on page 149After you deploy a topology, you might need to apply fixes, either to the IBM Cloud Manager withOpenStack services themselves or to how the IBM Cloud Manager with OpenStack services are deployed.
Creating the initial volume group as part of the deployment by using a file-backed loop device:
The initial cinder-volumes volume group can be created as part of deploying your topology. Use theseinstructions to create the initial volume group that uses a file-backed loop device.
About this task
When you create a volume group that is backed by a file on the block storage node, the deploymentprocess creates a file, /var/lib/cinder/cinder-volumes.img, and attaches a loop device, /dev/loopx, tothe file. Additionally, it creates a service, cinder-group-active, that is used to reattach the loop devicewhen the system is rebooted.
The following information describes details about supported options.
Table 49. Summary of support details
Support options Details
Supported hypervisor types? KVM or QEMU, PowerKVM, and Hyper-V
Support for post-deployment customization? Yes
Supported topologies? All, except Stand-alone self-service portal
Storage (Cinder) node? Controller or block storage node
Operating system? Red Hat Enterprise Linux 6.5
Architecture? x86_64 or ppc64
Procedure
1. 1. Modify the environment or node attributes file to contain the following additional attributes. Theseattributes are in the override_attributes section of the environment file for the Minimal topologyand in the default_attributes section for other topologies.v openstack.block-storage.volume.create_volume_group: Set this value to true.v openstack.block-storage.volume.create_volume_group_type : Set this value to "file".
Chapter 5. Deploying the cloud 131
v openstack.block-storage.volume.volume_group_size : Set this value to the size of the volumegroup in GB. There must be enough free space on the file system to create the file. The defaultvalue is 40.
2. When complete, return to the relevant topology deployment or update process and complete theremaining steps.
Related tasks:“Deploying a test or production cloud” on page 77Deploy the components that are necessary to create a test or production cloud environment with morethan one node. Use the instructions that apply to your specific hypervisor for each compute node.“Updating a deployed topology” on page 149After you deploy a topology, you might need to apply fixes, either to the IBM Cloud Manager withOpenStack services themselves or to how the IBM Cloud Manager with OpenStack services are deployed.
Creating an LVM volume group using physical disks:
Use the following instructions to create an LVM volume group on the block storage node or nodes.
About this task
The LVM iSCSI volume driver uses a volume group named "cinder-volumes" by default. Theseinstructions use that name.v Identify the block devices that you want to use on the block storage node. This can be an entire disk
(for example, /dev/sdb) or a partition (for example, /dev/sdba). You can use tools like df and pvs toidentify devices that are used by existing mounted file system or LVM volume groups.
v Create an LVM physical volume over each block device using the pvcreate command. To create anLVM physical volume for /dev/sdb, use this command:# pvcreate /dev/sdb
v Create a "cinder-volumes" LVM volume group using the physical volume or volumes you previouslycreated:# vgcreate cinder-volumes /dev/sdb [additional devices]
Adding a block device to an existing LVM volume group:
Use the following instructions to add a block device to an existing LVM volume group on a block storagenode. You can do this at any time.
About this task
v Identify the block devices that you want to use on the block storage node. This can be an entire disk(for example, /dev/sdb) or a partition (for example, /dev/sdba). You can use tools like df and pvs toidentify devices that are used by existing mounted file system or LVM volume groups.
v Create an LVM physical volume over each block device using the pvcreate command. To create anLVM physical volume for /dev/sdb, use this command:# pvcreate /dev/sdb
v Extend the LVM volume group using the physical volume or volumes you previously created:# vgextend cinder-volumes /dev/sdb [additional devices]
Configuring IBM Storwize Cinder driver:
You can configure IBM Cloud Manager with OpenStack to use the IBM Storwize Cinder driver.
132 IBM Cloud Manager with OpenStack: Administrator Guide, version 4.2
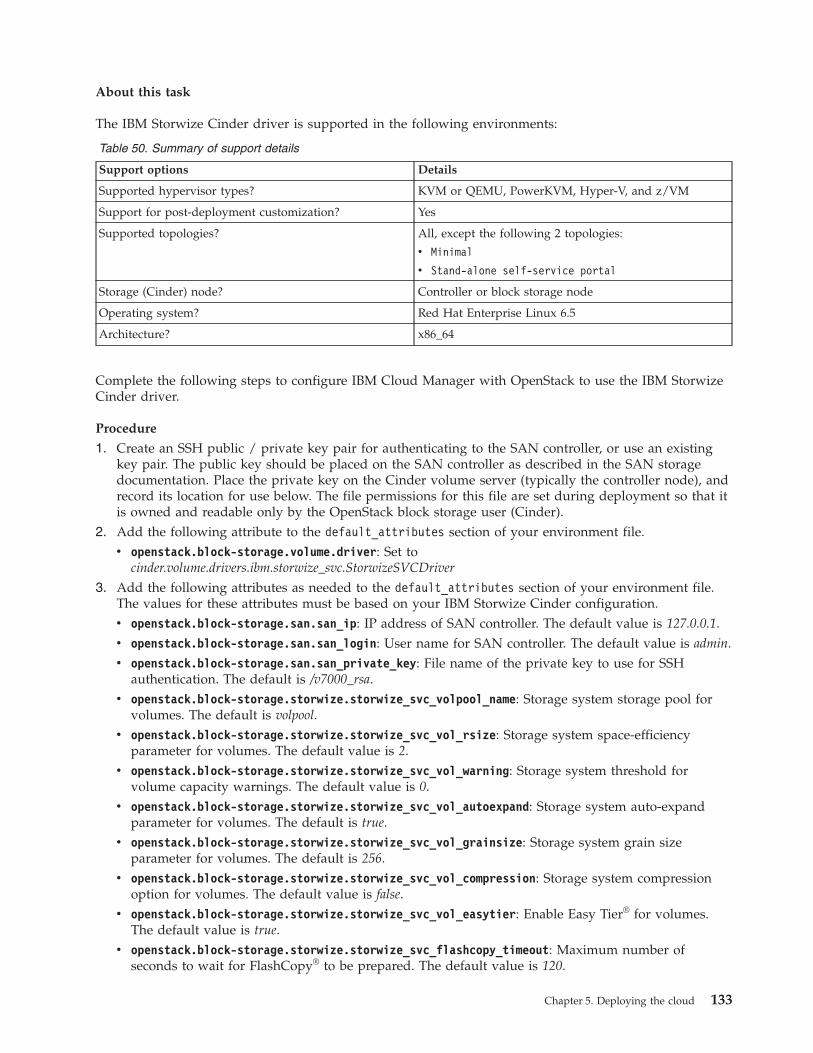
About this task
The IBM Storwize Cinder driver is supported in the following environments:
Table 50. Summary of support details
Support options Details
Supported hypervisor types? KVM or QEMU, PowerKVM, Hyper-V, and z/VM
Support for post-deployment customization? Yes
Supported topologies? All, except the following 2 topologies:
v Minimal
v Stand-alone self-service portal
Storage (Cinder) node? Controller or block storage node
Operating system? Red Hat Enterprise Linux 6.5
Architecture? x86_64
Complete the following steps to configure IBM Cloud Manager with OpenStack to use the IBM StorwizeCinder driver.
Procedure
1. Create an SSH public / private key pair for authenticating to the SAN controller, or use an existingkey pair. The public key should be placed on the SAN controller as described in the SAN storagedocumentation. Place the private key on the Cinder volume server (typically the controller node), andrecord its location for use below. The file permissions for this file are set during deployment so that itis owned and readable only by the OpenStack block storage user (Cinder).
2. Add the following attribute to the default_attributes section of your environment file.v openstack.block-storage.volume.driver: Set to
cinder.volume.drivers.ibm.storwize_svc.StorwizeSVCDriver
3. Add the following attributes as needed to the default_attributes section of your environment file.The values for these attributes must be based on your IBM Storwize Cinder configuration.v openstack.block-storage.san.san_ip: IP address of SAN controller. The default value is 127.0.0.1.v openstack.block-storage.san.san_login: User name for SAN controller. The default value is admin.v openstack.block-storage.san.san_private_key: File name of the private key to use for SSH
authentication. The default is /v7000_rsa.v openstack.block-storage.storwize.storwize_svc_volpool_name: Storage system storage pool for
volumes. The default is volpool.v openstack.block-storage.storwize.storwize_svc_vol_rsize: Storage system space-efficiency
parameter for volumes. The default value is 2.v openstack.block-storage.storwize.storwize_svc_vol_warning: Storage system threshold for
volume capacity warnings. The default value is 0.v openstack.block-storage.storwize.storwize_svc_vol_autoexpand: Storage system auto-expand
parameter for volumes. The default is true.v openstack.block-storage.storwize.storwize_svc_vol_grainsize: Storage system grain size
parameter for volumes. The default is 256.v openstack.block-storage.storwize.storwize_svc_vol_compression: Storage system compression
option for volumes. The default value is false.v openstack.block-storage.storwize.storwize_svc_vol_easytier: Enable Easy Tier® for volumes.
The default value is true.v openstack.block-storage.storwize.storwize_svc_flashcopy_timeout: Maximum number of
seconds to wait for FlashCopy® to be prepared. The default value is 120.
Chapter 5. Deploying the cloud 133
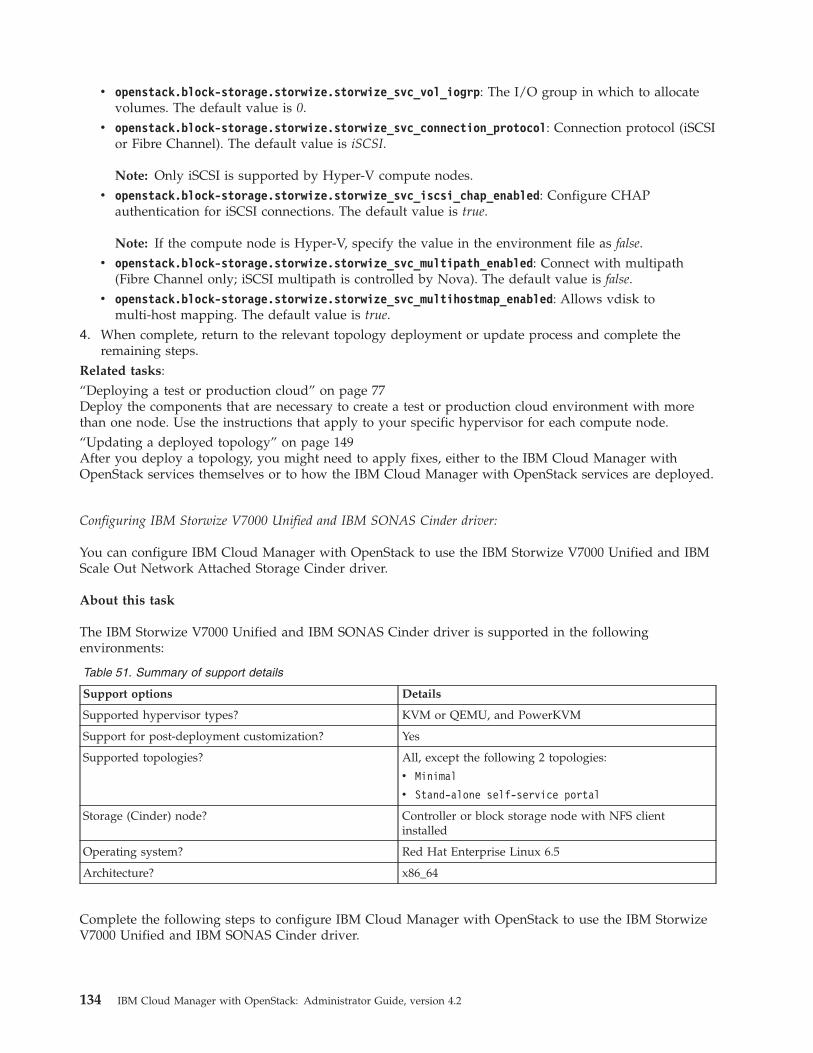
v openstack.block-storage.storwize.storwize_svc_vol_iogrp: The I/O group in which to allocatevolumes. The default value is 0.
v openstack.block-storage.storwize.storwize_svc_connection_protocol: Connection protocol (iSCSIor Fibre Channel). The default value is iSCSI.
Note: Only iSCSI is supported by Hyper-V compute nodes.v openstack.block-storage.storwize.storwize_svc_iscsi_chap_enabled: Configure CHAP
authentication for iSCSI connections. The default value is true.
Note: If the compute node is Hyper-V, specify the value in the environment file as false.v openstack.block-storage.storwize.storwize_svc_multipath_enabled: Connect with multipath
(Fibre Channel only; iSCSI multipath is controlled by Nova). The default value is false.v openstack.block-storage.storwize.storwize_svc_multihostmap_enabled: Allows vdisk to
multi-host mapping. The default value is true.4. When complete, return to the relevant topology deployment or update process and complete the
remaining steps.Related tasks:“Deploying a test or production cloud” on page 77Deploy the components that are necessary to create a test or production cloud environment with morethan one node. Use the instructions that apply to your specific hypervisor for each compute node.“Updating a deployed topology” on page 149After you deploy a topology, you might need to apply fixes, either to the IBM Cloud Manager withOpenStack services themselves or to how the IBM Cloud Manager with OpenStack services are deployed.
Configuring IBM Storwize V7000 Unified and IBM SONAS Cinder driver:
You can configure IBM Cloud Manager with OpenStack to use the IBM Storwize V7000 Unified and IBMScale Out Network Attached Storage Cinder driver.
About this task
The IBM Storwize V7000 Unified and IBM SONAS Cinder driver is supported in the followingenvironments:
Table 51. Summary of support details
Support options Details
Supported hypervisor types? KVM or QEMU, and PowerKVM
Support for post-deployment customization? Yes
Supported topologies? All, except the following 2 topologies:
v Minimal
v Stand-alone self-service portal
Storage (Cinder) node? Controller or block storage node with NFS clientinstalled
Operating system? Red Hat Enterprise Linux 6.5
Architecture? x86_64
Complete the following steps to configure IBM Cloud Manager with OpenStack to use the IBM StorwizeV7000 Unified and IBM SONAS Cinder driver.
134 IBM Cloud Manager with OpenStack: Administrator Guide, version 4.2

Procedure
1. Add the following attribute to the default_attributes section of your environment file.v openstack.block-storage.volume.driver: Set to cinder.volume.drivers.ibm.ibmnas.IBMNAS_NFSDriver.
2. Add the following attributes as needed to the default_attributes section of your environment file.The values for these attributes must be based on your IBM Storwize V7000 Unified and IBM SONASCinder driver configuration.v openstack.block-storage.ibmnas.nas_ip: Management IP address of IBM SONAS or IBM Storwize
V7000 Unified storage. The default value is 127.0.0.1.v openstack.block-storage.ibmnas.nas_login: User name to authenticate for IBM SONAS or IBM
Storwize V7000 Unified storage. The default value is admin.v openstack.block-storage.ibmnas.nas_access_ip: Host name or public IP address to access shares.
There is no default value.v openstack.block-storage.ibmnas.nas_ssh_port: SSH port to access shares. There is no default
value.v openstack.block-storage.ibmnas.shares_config: File that contains a list of IBM SONAS or IBM
Storwize V7000 Unified shares. The default value is /etc/cinder/nfs_shares.conf.v openstack.block-storage.ibmnas.mount_point_base: Storage system mount point path for volume
creation. The default value is /mnt/cinder-volumes.v openstack.block-storage.ibmnas.nfs_sparsed_volumes: Storage system volume creation method.
The default value is true.v openstack.block-storage.ibmnas.export: Storage system shares / export path parameter. There is
no default value.3. Create a data bag item in the user passwords data bag for your environment. This data bag item will
contain the password to authenticate to the storage system.a. Create a directory for the user passwords data bag. Change your_env_user_passwords to the name
of the user passwords data bag for your environment. Theopenstack.secret.user_passwords_data_bag attribute in your environment file contains the databag name to use.$ mkdir -p data_bags/your_env_user_passwords$ chmod -R 600 data_bags/
b. Create a data bag item with the following contents. The data bag item name must match the valueof the openstack.block-storage.ibmnas.nas_login attribute. The following example assumes thatthe value is your_data_bag_item_name.$ cat data_bags/your_env_user_passwords/your_data_bag_item_name.json{
"id": "your_data_bag_item_name","your_data_bag_item_name": "CHANGE_TO_PASSWORD"
}
c. Upload the data bag item that you created in the previous step. Change your-secret-key-name to thesecret key for your topology. The secret_file JSON attribute in your topology file contains thesecret file to use.$ knife data bag from file your_env_user_passwordsyour_data_bag_item_name.json --secret-file your-secret-key-name
d. Remove the local data bag item since it is no longer needed.$ rm -rf data_bags/
4. When complete, return to the relevant topology deployment or update process and complete theremaining steps.
Related tasks:“Deploying a test or production cloud” on page 77Deploy the components that are necessary to create a test or production cloud environment with morethan one node. Use the instructions that apply to your specific hypervisor for each compute node.
Chapter 5. Deploying the cloud 135
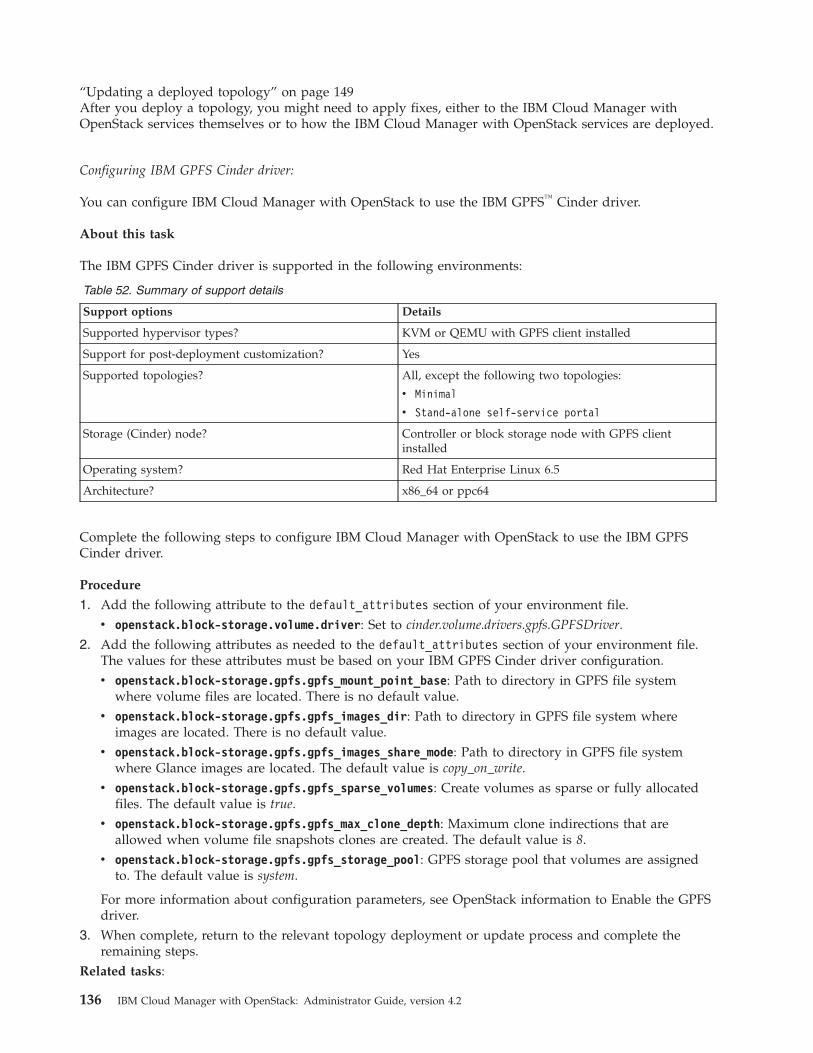
“Updating a deployed topology” on page 149After you deploy a topology, you might need to apply fixes, either to the IBM Cloud Manager withOpenStack services themselves or to how the IBM Cloud Manager with OpenStack services are deployed.
Configuring IBM GPFS Cinder driver:
You can configure IBM Cloud Manager with OpenStack to use the IBM GPFS™ Cinder driver.
About this task
The IBM GPFS Cinder driver is supported in the following environments:
Table 52. Summary of support details
Support options Details
Supported hypervisor types? KVM or QEMU with GPFS client installed
Support for post-deployment customization? Yes
Supported topologies? All, except the following two topologies:
v Minimal
v Stand-alone self-service portal
Storage (Cinder) node? Controller or block storage node with GPFS clientinstalled
Operating system? Red Hat Enterprise Linux 6.5
Architecture? x86_64 or ppc64
Complete the following steps to configure IBM Cloud Manager with OpenStack to use the IBM GPFSCinder driver.
Procedure
1. Add the following attribute to the default_attributes section of your environment file.v openstack.block-storage.volume.driver: Set to cinder.volume.drivers.gpfs.GPFSDriver.
2. Add the following attributes as needed to the default_attributes section of your environment file.The values for these attributes must be based on your IBM GPFS Cinder driver configuration.v openstack.block-storage.gpfs.gpfs_mount_point_base: Path to directory in GPFS file system
where volume files are located. There is no default value.v openstack.block-storage.gpfs.gpfs_images_dir: Path to directory in GPFS file system where
images are located. There is no default value.v openstack.block-storage.gpfs.gpfs_images_share_mode: Path to directory in GPFS file system
where Glance images are located. The default value is copy_on_write.v openstack.block-storage.gpfs.gpfs_sparse_volumes: Create volumes as sparse or fully allocated
files. The default value is true.v openstack.block-storage.gpfs.gpfs_max_clone_depth: Maximum clone indirections that are
allowed when volume file snapshots clones are created. The default value is 8.v openstack.block-storage.gpfs.gpfs_storage_pool: GPFS storage pool that volumes are assigned
to. The default value is system.
For more information about configuration parameters, see OpenStack information to Enable the GPFSdriver.
3. When complete, return to the relevant topology deployment or update process and complete theremaining steps.
Related tasks:
136 IBM Cloud Manager with OpenStack: Administrator Guide, version 4.2
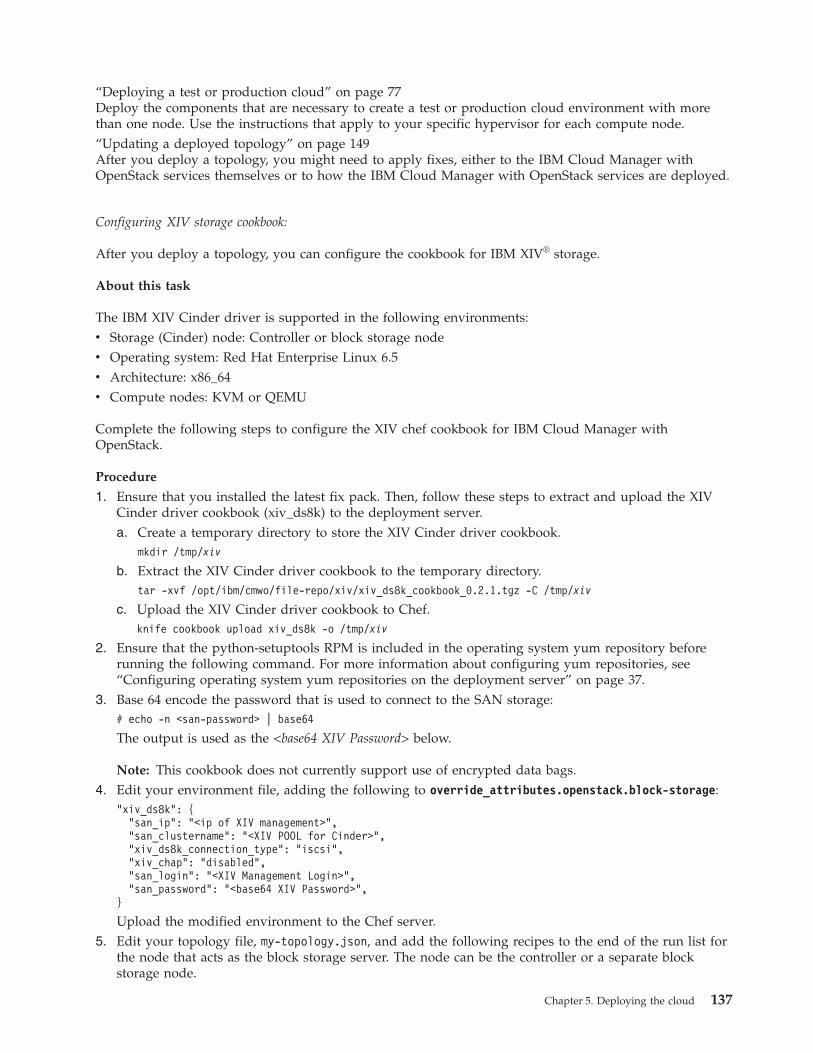
“Deploying a test or production cloud” on page 77Deploy the components that are necessary to create a test or production cloud environment with morethan one node. Use the instructions that apply to your specific hypervisor for each compute node.“Updating a deployed topology” on page 149After you deploy a topology, you might need to apply fixes, either to the IBM Cloud Manager withOpenStack services themselves or to how the IBM Cloud Manager with OpenStack services are deployed.
Configuring XIV storage cookbook:
After you deploy a topology, you can configure the cookbook for IBM XIV® storage.
About this task
The IBM XIV Cinder driver is supported in the following environments:v Storage (Cinder) node: Controller or block storage nodev Operating system: Red Hat Enterprise Linux 6.5v Architecture: x86_64v Compute nodes: KVM or QEMU
Complete the following steps to configure the XIV chef cookbook for IBM Cloud Manager withOpenStack.
Procedure
1. Ensure that you installed the latest fix pack. Then, follow these steps to extract and upload the XIVCinder driver cookbook (xiv_ds8k) to the deployment server.a. Create a temporary directory to store the XIV Cinder driver cookbook.
mkdir /tmp/xiv
b. Extract the XIV Cinder driver cookbook to the temporary directory.tar -xvf /opt/ibm/cmwo/file-repo/xiv/xiv_ds8k_cookbook_0.2.1.tgz -C /tmp/xiv
c. Upload the XIV Cinder driver cookbook to Chef.knife cookbook upload xiv_ds8k -o /tmp/xiv
2. Ensure that the python-setuptools RPM is included in the operating system yum repository beforerunning the following command. For more information about configuring yum repositories, see“Configuring operating system yum repositories on the deployment server” on page 37.
3. Base 64 encode the password that is used to connect to the SAN storage:# echo -n <san-password> | base64
The output is used as the <base64 XIV Password> below.
Note: This cookbook does not currently support use of encrypted data bags.4. Edit your environment file, adding the following to override_attributes.openstack.block-storage:
"xiv_ds8k": {"san_ip": "<ip of XIV management>","san_clustername": "<XIV POOL for Cinder>","xiv_ds8k_connection_type": "iscsi","xiv_chap": "disabled","san_login": "<XIV Management Login>","san_password": "<base64 XIV Password>",
}
Upload the modified environment to the Chef server.5. Edit your topology file, my-topology.json, and add the following recipes to the end of the run list for
the node that acts as the block storage server. The node can be the controller or a separate blockstorage node.
Chapter 5. Deploying the cloud 137

"recipe[xiv_ds8k::install]""recipe[xiv_ds8k::configure]"
The resulting run list might look like this:"runlist": [
"role[ibm-os-single-controller-node]","recipe[xiv_ds8k::install]","recipe[xiv_ds8k::configure]"
]
6. Finish deploying the topology as described in the directions for your hypervisor.
Configuring multiple block storage back ends:
When you deploy an IBM Cloud Manager with OpenStack topology, you can also configure multipleblock storage back ends on the controller or a block storage node.
Before you begin
To configure multiple block storage back ends, ensure that the latest fix pack is installed.
About this task
You can also use this multiple block storage back ends technique when you configure block storage backends on multiple servers to use a different volume_backend_name for each block storage node. To configuremultiple block storage back ends, you can define an openstack.block-storage.volume.multi_backendtable to configure each back end as part of the cloud environment or node attributes.
To configure multiple block storage back ends in the Chef environment, complete the following steps:
Procedure
1. Record the configuration for the cinder.conf properties as described in Configure multiple-storageback ends. The following example shows two storage back ends, lvm_1 and lvm_2:[DEFAULT]...enabled_backends = lvm_1, lvm_2...[lvm_1]volume_driver=cinder.volume.drivers.lvm.LVMISCSIDrivervolume_backend_name=lvm-1volume_group=cinder-volumes-1[lvm_2]volume_driver=cinder.volume.drivers.lvm.LVMISCSIDrivervolume_backend_name=lvm-2volume_group=cinder-volumes-2
2. Convert the information from the previous step to a JSON map for the openstack.block-storage.volume.multi_backend attribute that has an entry for each back end configuration file section(lvm_1, lvm_2). Each of these JSON entries is a map that contains the property name and value pairsfor each property in the section. The example from the previous step would look like the followingexample:{
"openstack" : {"block-storage" : {
"volume" : {"multi_backend" : {
"lvm_1" : {"volume_driver" : "cinder.volume.drivers.lvm.LVMISCSIDriver","volume_backend_name" : "lvm-1","volume_group" : "cinder-volumes-1"
},"lvm_2": {
138 IBM Cloud Manager with OpenStack: Administrator Guide, version 4.2

"volume_driver" : "cinder.volume.drivers.lvm.LVMISCSIDriver","volume_backend_name" : "lvm-2","volume_group" : "cinder-volumes-2"
}}
}}
}}
3. If the only block storage node in your topology is the controller, add the information from step 2 tothe Chef environment for your cloud.
4. If you have multiple block storage nodes, or the controller is not acting as the block storage node, addthe information from step 2 to the node attributes file for the block storage node.
Deploying with block storage (Cinder) nodes:
Deploy the components that are necessary to create a cloud environment with extra block storage(Cinder) nodes.
About this task
One or more nodes in your cloud topology can be configured as block storage nodes. The controller nodeis automatically configured as a block storage node. You can define more nodes by using theibm-os-block-storage-node role. A block storage node runs the Cinder volume and Ceilometer computeservices; it does not run other controller or compute node services.
A block storage node must meet the following requirements:v Operating System: Red Hat Enterprise Linux 6.4 or 6.5v Architecture: x86_64 or ppc64
For more information about storage (Cinder) drivers and the compute node hypervisors that theysupport, see “Configuring Cinder drivers” on page 129.
When you define your cloud topology, you must define attributes for each block storage node. Forexample, when you configure the block storage nodes to use the LVM iSCSI driver, you define the iSCSIIP address for each node. Depending on how you want to allocate volumes across the block storagenodes, you might want to define a unique volume backend name for each node.
The general process for including block storage nodes in your cloud topology is as follows:v Define a controller +n compute or distributed database topology. Refer to other articles in
“Deploying a test or production cloud” on page 77 for instructions to create a topology for yourhypervisor.
v Define one or more nodes in your topology as block storage nodes and define the node-specific blockstorage attributes for each block storage node.
v Deploy your topology.
Use the following instructions to define block storage nodes in your topology.
Procedure
1. Ensure that your environment overrides openstack.endpoints.db.host with the IP address of thedatabase server (your controller or distributed database server).
2. Create node attribute files for each block storage node. The files include the volume driver-specificattributes for the volume driver that is being used.Example node attributes file, storage-node-1-attributes.json. It uses the LVM volume driver withits default volume group name, cinder-volumes.
Chapter 5. Deploying the cloud 139
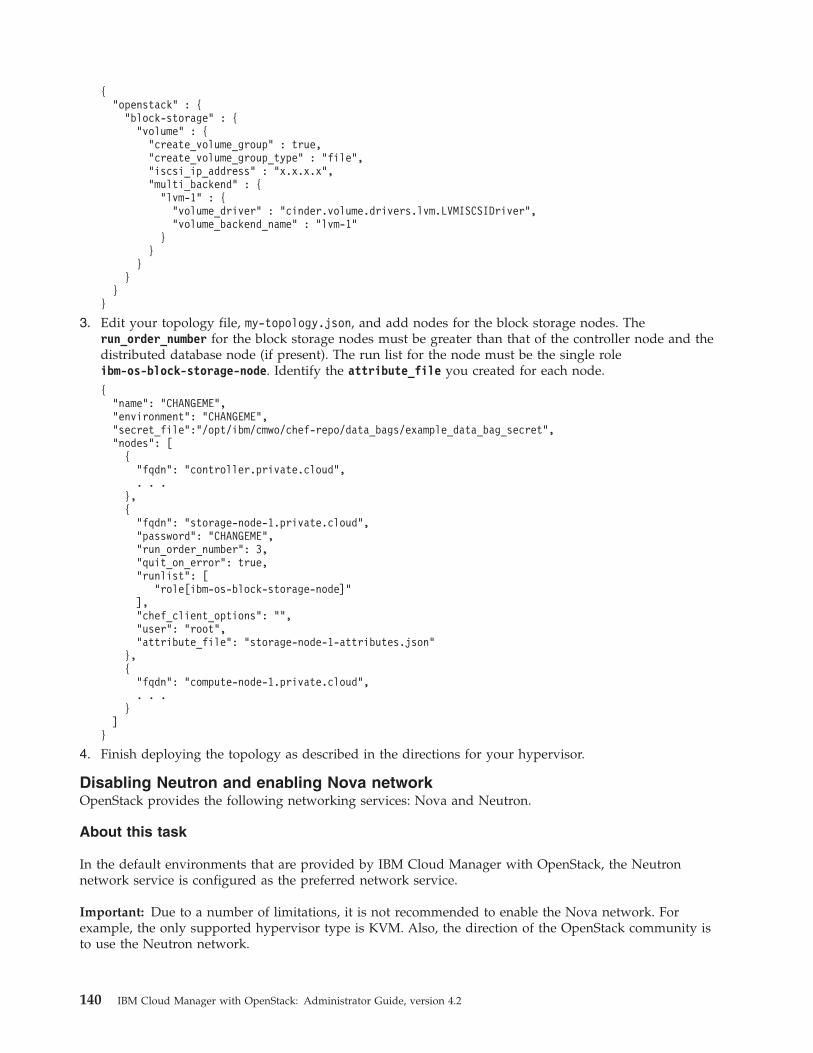
{"openstack" : {
"block-storage" : {"volume" : {
"create_volume_group" : true,"create_volume_group_type" : "file","iscsi_ip_address" : "x.x.x.x","multi_backend" : {
"lvm-1" : {"volume_driver" : "cinder.volume.drivers.lvm.LVMISCSIDriver","volume_backend_name" : "lvm-1"
}}
}}
}}
3. Edit your topology file, my-topology.json, and add nodes for the block storage nodes. Therun_order_number for the block storage nodes must be greater than that of the controller node and thedistributed database node (if present). The run list for the node must be the single roleibm-os-block-storage-node. Identify the attribute_file you created for each node.{
"name": "CHANGEME","environment": "CHANGEME","secret_file":"/opt/ibm/cmwo/chef-repo/data_bags/example_data_bag_secret","nodes": [
{"fqdn": "controller.private.cloud",. . .
},{
"fqdn": "storage-node-1.private.cloud","password": "CHANGEME","run_order_number": 3,"quit_on_error": true,"runlist": [
"role[ibm-os-block-storage-node]"],"chef_client_options": "","user": "root","attribute_file": "storage-node-1-attributes.json"
},{
"fqdn": "compute-node-1.private.cloud",. . .
}]
}
4. Finish deploying the topology as described in the directions for your hypervisor.
Disabling Neutron and enabling Nova networkOpenStack provides the following networking services: Nova and Neutron.
About this task
In the default environments that are provided by IBM Cloud Manager with OpenStack, the Neutronnetwork service is configured as the preferred network service.
Important: Due to a number of limitations, it is not recommended to enable the Nova network. Forexample, the only supported hypervisor type is KVM. Also, the direction of the OpenStack community isto use the Neutron network.
140 IBM Cloud Manager with OpenStack: Administrator Guide, version 4.2
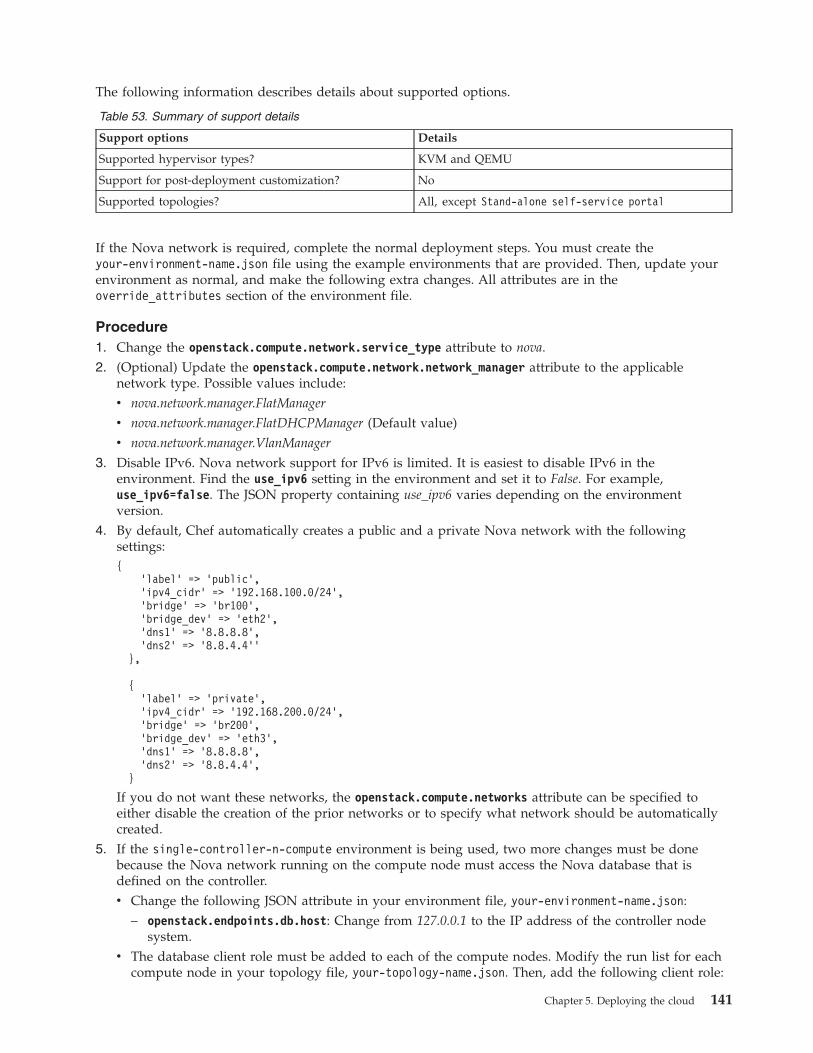
The following information describes details about supported options.
Table 53. Summary of support details
Support options Details
Supported hypervisor types? KVM and QEMU
Support for post-deployment customization? No
Supported topologies? All, except Stand-alone self-service portal
If the Nova network is required, complete the normal deployment steps. You must create theyour-environment-name.json file using the example environments that are provided. Then, update yourenvironment as normal, and make the following extra changes. All attributes are in theoverride_attributes section of the environment file.
Procedure1. Change the openstack.compute.network.service_type attribute to nova.2. (Optional) Update the openstack.compute.network.network_manager attribute to the applicable
network type. Possible values include:v nova.network.manager.FlatManager
v nova.network.manager.FlatDHCPManager (Default value)v nova.network.manager.VlanManager
3. Disable IPv6. Nova network support for IPv6 is limited. It is easiest to disable IPv6 in theenvironment. Find the use_ipv6 setting in the environment and set it to False. For example,use_ipv6=false. The JSON property containing use_ipv6 varies depending on the environmentversion.
4. By default, Chef automatically creates a public and a private Nova network with the followingsettings:{
’label’ => ’public’,’ipv4_cidr’ => ’192.168.100.0/24’,’bridge’ => ’br100’,’bridge_dev’ => ’eth2’,’dns1’ => ’8.8.8.8’,’dns2’ => ’8.8.4.4’’
},
{’label’ => ’private’,’ipv4_cidr’ => ’192.168.200.0/24’,’bridge’ => ’br200’,’bridge_dev’ => ’eth3’,’dns1’ => ’8.8.8.8’,’dns2’ => ’8.8.4.4’,
}
If you do not want these networks, the openstack.compute.networks attribute can be specified toeither disable the creation of the prior networks or to specify what network should be automaticallycreated.
5. If the single-controller-n-compute environment is being used, two more changes must be donebecause the Nova network running on the compute node must access the Nova database that isdefined on the controller.v Change the following JSON attribute in your environment file, your-environment-name.json:
– openstack.endpoints.db.host: Change from 127.0.0.1 to the IP address of the controller nodesystem.
v The database client role must be added to each of the compute nodes. Modify the run list for eachcompute node in your topology file, your-topology-name.json. Then, add the following client role:
Chapter 5. Deploying the cloud 141
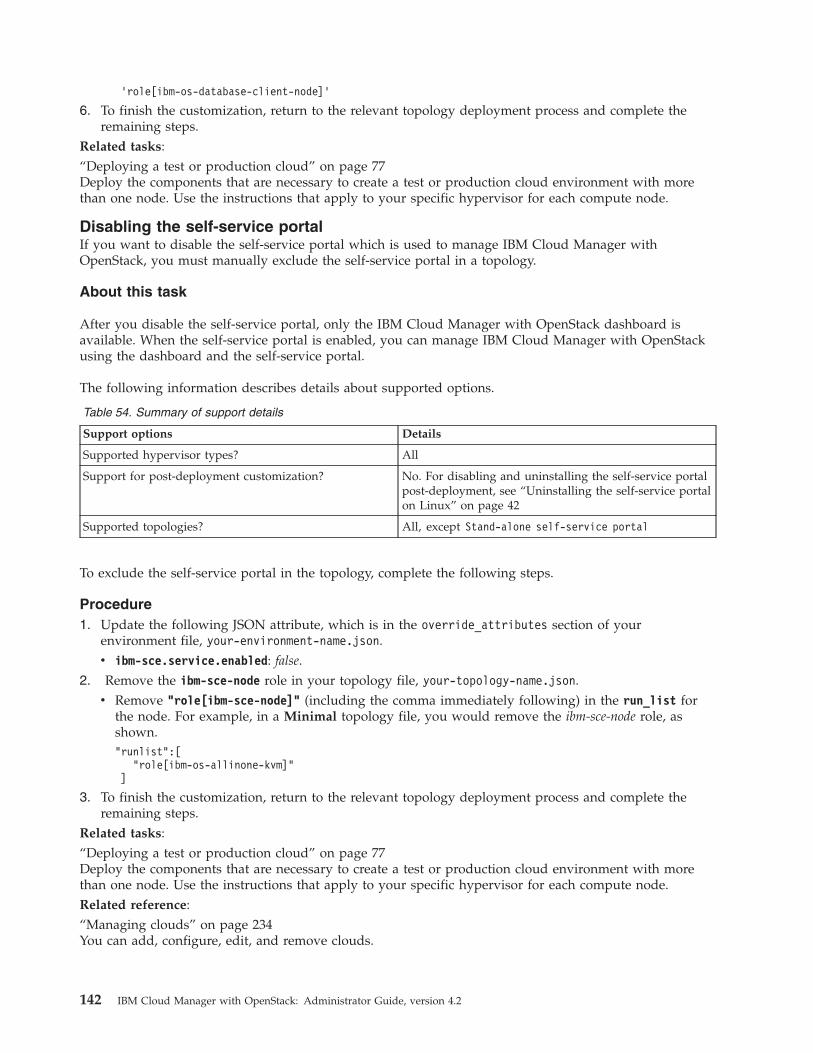
’role[ibm-os-database-client-node]’
6. To finish the customization, return to the relevant topology deployment process and complete theremaining steps.
Related tasks:“Deploying a test or production cloud” on page 77Deploy the components that are necessary to create a test or production cloud environment with morethan one node. Use the instructions that apply to your specific hypervisor for each compute node.
Disabling the self-service portalIf you want to disable the self-service portal which is used to manage IBM Cloud Manager withOpenStack, you must manually exclude the self-service portal in a topology.
About this task
After you disable the self-service portal, only the IBM Cloud Manager with OpenStack dashboard isavailable. When the self-service portal is enabled, you can manage IBM Cloud Manager with OpenStackusing the dashboard and the self-service portal.
The following information describes details about supported options.
Table 54. Summary of support details
Support options Details
Supported hypervisor types? All
Support for post-deployment customization? No. For disabling and uninstalling the self-service portalpost-deployment, see “Uninstalling the self-service portalon Linux” on page 42
Supported topologies? All, except Stand-alone self-service portal
To exclude the self-service portal in the topology, complete the following steps.
Procedure1. Update the following JSON attribute, which is in the override_attributes section of your
environment file, your-environment-name.json.v ibm-sce.service.enabled: false.
2. Remove the ibm-sce-node role in your topology file, your-topology-name.json.v Remove "role[ibm-sce-node]" (including the comma immediately following) in the run_list for
the node. For example, in a Minimal topology file, you would remove the ibm-sce-node role, asshown."runlist":[
"role[ibm-os-allinone-kvm]"]
3. To finish the customization, return to the relevant topology deployment process and complete theremaining steps.
Related tasks:“Deploying a test or production cloud” on page 77Deploy the components that are necessary to create a test or production cloud environment with morethan one node. Use the instructions that apply to your specific hypervisor for each compute node.Related reference:“Managing clouds” on page 234You can add, configure, edit, and remove clouds.
142 IBM Cloud Manager with OpenStack: Administrator Guide, version 4.2
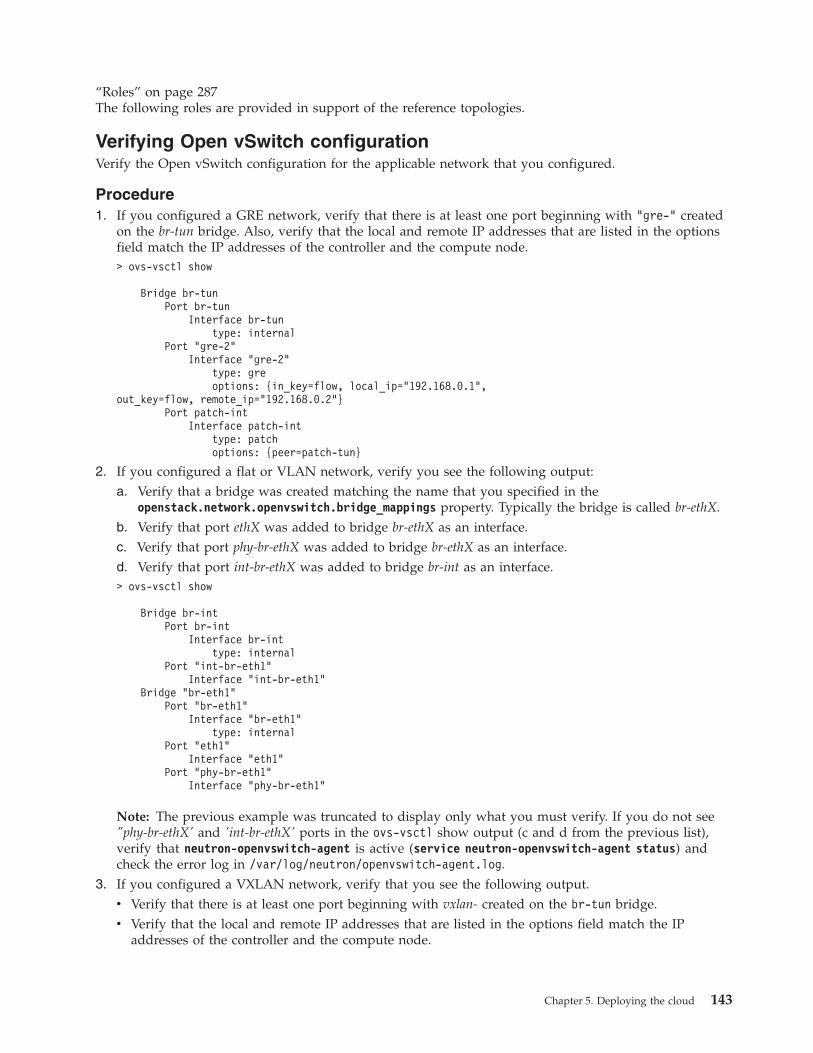
“Roles” on page 287The following roles are provided in support of the reference topologies.
Verifying Open vSwitch configurationVerify the Open vSwitch configuration for the applicable network that you configured.
Procedure1. If you configured a GRE network, verify that there is at least one port beginning with "gre-" created
on the br-tun bridge. Also, verify that the local and remote IP addresses that are listed in the optionsfield match the IP addresses of the controller and the compute node.> ovs-vsctl show
Bridge br-tunPort br-tun
Interface br-tuntype: internal
Port "gre-2"Interface "gre-2"
type: greoptions: {in_key=flow, local_ip="192.168.0.1",
out_key=flow, remote_ip="192.168.0.2"}Port patch-int
Interface patch-inttype: patchoptions: {peer=patch-tun}
2. If you configured a flat or VLAN network, verify you see the following output:a. Verify that a bridge was created matching the name that you specified in the
openstack.network.openvswitch.bridge_mappings property. Typically the bridge is called br-ethX.b. Verify that port ethX was added to bridge br-ethX as an interface.c. Verify that port phy-br-ethX was added to bridge br-ethX as an interface.d. Verify that port int-br-ethX was added to bridge br-int as an interface.> ovs-vsctl show
Bridge br-intPort br-int
Interface br-inttype: internal
Port "int-br-eth1"Interface "int-br-eth1"
Bridge "br-eth1"Port "br-eth1"
Interface "br-eth1"type: internal
Port "eth1"Interface "eth1"
Port "phy-br-eth1"Interface "phy-br-eth1"
Note: The previous example was truncated to display only what you must verify. If you do not see"phy-br-ethX' and 'int-br-ethX' ports in the ovs-vsctl show output (c and d from the previous list),verify that neutron-openvswitch-agent is active (service neutron-openvswitch-agent status) andcheck the error log in /var/log/neutron/openvswitch-agent.log.
3. If you configured a VXLAN network, verify that you see the following output.v Verify that there is at least one port beginning with vxlan- created on the br-tun bridge.v Verify that the local and remote IP addresses that are listed in the options field match the IP
addresses of the controller and the compute node.
Chapter 5. Deploying the cloud 143
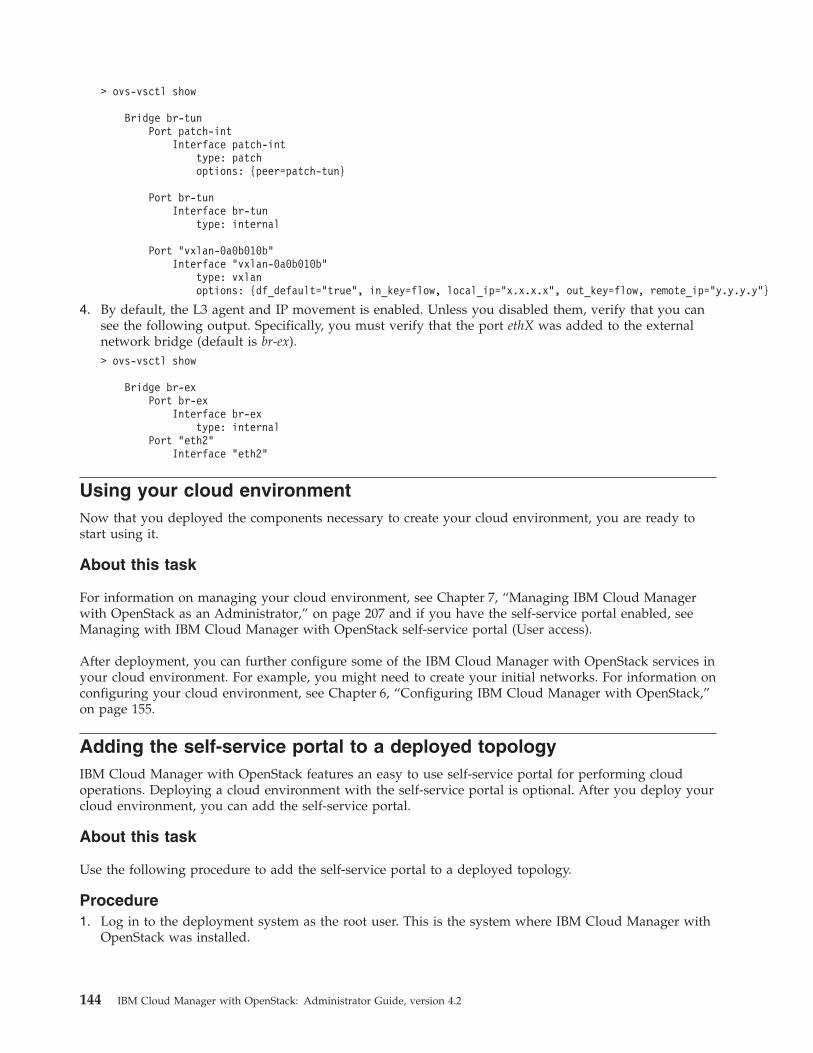
> ovs-vsctl show
Bridge br-tunPort patch-int
Interface patch-inttype: patchoptions: {peer=patch-tun}
Port br-tunInterface br-tun
type: internal
Port "vxlan-0a0b010b"Interface "vxlan-0a0b010b"
type: vxlanoptions: {df_default="true", in_key=flow, local_ip="x.x.x.x", out_key=flow, remote_ip="y.y.y.y"}
4. By default, the L3 agent and IP movement is enabled. Unless you disabled them, verify that you cansee the following output. Specifically, you must verify that the port ethX was added to the externalnetwork bridge (default is br-ex).> ovs-vsctl show
Bridge br-exPort br-ex
Interface br-extype: internal
Port "eth2"Interface "eth2"
Using your cloud environmentNow that you deployed the components necessary to create your cloud environment, you are ready tostart using it.
About this task
For information on managing your cloud environment, see Chapter 7, “Managing IBM Cloud Managerwith OpenStack as an Administrator,” on page 207 and if you have the self-service portal enabled, seeManaging with IBM Cloud Manager with OpenStack self-service portal (User access).
After deployment, you can further configure some of the IBM Cloud Manager with OpenStack services inyour cloud environment. For example, you might need to create your initial networks. For information onconfiguring your cloud environment, see Chapter 6, “Configuring IBM Cloud Manager with OpenStack,”on page 155.
Adding the self-service portal to a deployed topologyIBM Cloud Manager with OpenStack features an easy to use self-service portal for performing cloudoperations. Deploying a cloud environment with the self-service portal is optional. After you deploy yourcloud environment, you can add the self-service portal.
About this task
Use the following procedure to add the self-service portal to a deployed topology.
Procedure1. Log in to the deployment system as the root user. This is the system where IBM Cloud Manager with
OpenStack was installed.
144 IBM Cloud Manager with OpenStack: Administrator Guide, version 4.2
2. Update the following JSON attribute in your environment file your-environment-name.json. If youhave a multi-region cloud environment, then you must update the attribute in the environment filefor each region.ibm-sce.service.enabled: true
This attribute configures the self-service portal for use with OpenStack.3. Choose a node in your environment on which to deploy the self-service portal. Typically, the
self-service portal is co-located with the single controller node or is installed on a stand-alone node.Append the ibm-sce-node role to this node in your topology file your-topology-name.json. If youhave a multi-region cloud environment, only one self-service portal is installed to manage themultiple regions.For example, in a minimal topology file, you would append role[ibm-sce-node] to the run list for thenode:"runlist":[
"role[ibm-os-allinone-kvm]","role[ibm-sce-node]"
]
4. Update your cloud environment to add the self-service portal. If you have a multi-region cloudenvironment, then you must complete these steps for each region, starting with the region thatcontains the shared OpenStack Keystone server.a. Upload the updated environment file.
$ knife environment from file your-environment-name.json
b. Update the topology.$ knife os manage update topology your-topology-name.json
Note: When you enable the self-service portal for IBM Cloud Manager with OpenStack, thefollowing configuration changes are made:v Modified OpenStack policy files are installed instead of the default OpenStack policy files. The
policy files that are modified for the self-service portal ensure that the user role security modelis consistent between what the self-service portal allows and OpenStack. For more information,see Overview of project membership roles.
v Self-service portal users, roles and projects are pushed into the OpenStack Keystone identityservice. For more information, see Project management with OpenStack and “User managementwith OpenStack” on page 250.
v The OpenStack cloud connection is configured in the self-service portal.5. After the update is complete, the IBM Cloud Manager with OpenStack self-service portal is available
at https://node.fqdn.com:18443/cloud/web/login.html, where node.fqdn.com is the fully qualifieddomain name for the node on which you deployed the self-service portal. You can log in using yourcurrent cloud administrator (admin) user.
6. If you have a multi-region cloud environment, you can add an OpenStack cloud connection for theadditional regions. For more information, see “Adding an OpenStack cloud configuration” on page234.
Results
Your existing cloud resources are synchronized with the self-service portal and you can start to use theself-service portal. For more information about the self-service portal, see “Managing with the IBM CloudManager with OpenStack self-service portal (Administrator access)” on page 211.
Adding a compute node to a deployed topologyAfter deploying your topology, you can add a compute node system to your deployment. This does notapply to the Minimal topology.
Chapter 5. Deploying the cloud 145
Before you begin
Before you begin, ensure you completed the Deploying prerequisites steps based on the type of your newcompute node.
About this task
Use the following procedure to add a Linux Kernel-based Virtual Machine (KVM) or QEMU, PowerKVMor z/VM compute node to your deployment. To add another Hyper-V compute node, see “Installing anduninstalling the IBM Cloud Manager with OpenStack Hyper-V Agent” on page 28.
Note: This procedure is only applicable for adding a new node. It is not meant for deploying to anexisting node in your topology.
Procedure1. Log in to the deployment system as the root user. This is the system where IBM Cloud Manager with
OpenStack was installed.2. Create a node specific attribute file. This step is only required when the new compute node requires
different attributes from those defined in the environment for the topology. For more information onnode specific attribute files, see the applicable “Deploying a test or production cloud” on page 77section for your compute node type.
3. Deploy the new compute node. Change the following in the command below.v node-fqdn: Set to the fully qualified domain name of the node system. You can also set to the public
IP address, private IP address, or hostname.v node-run-list: Set the node run list to be the same as the run list for an existing compute node in
the topology. You can look in the topology JSON file to see the run list for an existing computenode. For example, if the run list is "runlist": ["role[ibm-os-compute-node-kvm]","role[ibm-os-prs-compute-node]"], then set node-run-list to 'role[ibm-os-compute-node-kvm],role[ibm-os-prs-compute-node]'.
v node-ssh-password: SSH root user password for the node. To use an SSH identity file instead of apassword, use the -i node-ssh-identity option, where node-ssh-identity is the SSH identity filefor the node.
v node-attribute-file: Set to the node specific attribute file created in step 2. Remove this option ifnot required.
v topology-file: Set to the fully qualified path and file name of the topology JSON file used todeploy the other nodes in the topology. The command updates the topology file with the addedcompute node information.
Note: The following command must be entered on a single line, even though the example shows aline break for formatting purposes.knife os manage deploy node node-fqdn ’node-run-list’ -P node-ssh-password --attribute-filenode-attribute-file --topology-file topology-file
For example, knife os manage deploy node hostname.my.company.com 'role[ibm-os-compute-node-kvm],role[ibm-os-prs-compute-node]' -P passw0rd --attribute-file /root/clouds/hostname_attributes.json--topology-file /root/clouds/my_topology.json
Note: For more information on the knife os manage deploy node command and the topology file, see“Commands” on page 267.
4. After the deployment completes, you can check the status of the IBM Cloud Manager with OpenStackservices, see “Checking status of OpenStack services” on page 207.
146 IBM Cloud Manager with OpenStack: Administrator Guide, version 4.2
Results
You are ready to start using IBM Cloud Manager with OpenStack services on the new compute nodesystem.Related tasks:“Deploying a remote node fails” on page 306You attempt to deploy a remote compute node but the deployment fails.
Removing a compute node from a deployed topologyAfter you deploy your topology, you can remove a compute node system from your deployment. Thisdoes not apply to the Minimal topology.
About this task
The knife os manage remove node command attempts to stop and disable any running OpenStackservices on the compute node. It then removes the compute node from the cluster on the controller node,and also removes the chef 'node' and 'client' objects for the node from the Chef server.
Use the following procedure to remove a Linux Kernel-based Virtual Machine (KVM), QEMU orPowerKVM compute node from your deployment.
Procedure1. Log in to the deployment system as the root user. This is the system where IBM Cloud Manager with
OpenStack was installed.2. Remove the compute node. Change the following command parameters.
v node-fqdn: Set to the fully qualified domain name of the node system.v node-ssh-password: SSH root user password for the node. To use an SSH identity file instead of a
password, use the -i node-ssh-identity option, where node-ssh-identity is the SSH identity file forthe node.
v topology-file: Set to the topology file used for deployment. Specifying the topology-file isoptional. If specified, the command removes the compute node information from thetopology-file.
v topology-secret-file: Set to the secret file used for deployment. If the topology-file is specified,then specifying the topology-secret-file is optional.
Note: The following command must be entered on a single line, even though the example shows aline break for formatting purposes.knife os manage remove node node-fqdn -P node-ssh-password -–topology-file topology-file--secret-file topology-secret-file
The compute node is now removed from the deployed topology environment. See “Redeploying anode cleanup” on page 148 to clean up the removed compute node.
Changing passwords and secretsYou can change the passwords and secrets that were used during the deployment process.
About this task
This task applies to the Controller +n compute or Distributed database topologies. Customizingpasswords and secrets is not done for the Minimal topology.
Note: This procedure only applies to passwords and secrets that are found in the “Data bags” on page277 topic.
Chapter 5. Deploying the cloud 147
Procedure1. Change the passwords using the appropriate management interface. From the previous list of data
bags, this step is only required for PowerVC and z/VM.v For a PowerVC instance:
– pvcadmin: Password for the PowerVC admin user. You need to use the proper PowerVCmanagement interface to change it.
– pvcqpid: Password for the PowerVC Qpid powervc_qpid user. You must not change this password.– pvcrabbit: Password for the PowerVC RabbitMQ powervcdriver_mq user. This password can be
changed with following command on a PowerVC instance.
Note: The following command must be entered on a single line, even though the example showsa line break for formatting purposes.su - rabbitmq -c ’/usr/lib/rabbitmq/bin/rabbitmqctl change_password <powervcdriver_mq user><powervcdriver_mq password>’
v For a z/VM instance:– xcat: Password for the z/VM xcat admin user.– xcatmnadmin: Password for the z/VM xcat mnadmin user.– zlinuxroot: Password for the instances that are created by z/VM root user.
2. You need to refresh your topology deployment to apply the password changes. You also change thesecrets as part of this step.a. Log in to the deployment system as the root user. This is the system where IBM Cloud Manager
with OpenStack was installed.b. Change to the directory where you stored the files for the topology that you deployed. Change
your-deployment-name to the name for your deployment.$ cd your-deployment-name
c. Download and decrypt the data bags that contain the passwords and secrets for your deploymentand store them in the data_bags directory. The data_bags directory contains a subdirectory foreach data bag that is used by your deployment. The subdirectories contain the data bag items foryour deployment.$ knife os manage get passwords --topology-file your-topology-name.json data_bags
d. Change the passwords and secrets in the data bag items for your deployment. The passwordchanges must be based on any prior changes. To change the password, you must change the valueof the data bag item name. For example, for the admin.json data bag item, change the value atCHANGEME to the password.{
"id": "admin","admin": "CHANGEME"
}
e. Upload the changed data bags for your deployment.$ knife os manage update passwords --topology-file your-topology-name.json data_bags
f. Refresh the topology deployment with the changed passwords and secrets.$ knife os manage update topology your-topology-name.json
Redeploying a node cleanupIf you need to deploy a topology to a node where a topology has previously been deployed, ensure thatthe node is in a clean state and that any corresponding node data on the deployment server has beenremoved.
148 IBM Cloud Manager with OpenStack: Administrator Guide, version 4.2
About this task
Before you redeploy a topology, complete the following steps to prepare your node and deploymentserver.
Procedure1. Revert your node system where a topology was previously deployed to a snapshot or backup version
of the node. The node must be in the state that it was in prior to when the topology was firstdeployed.
2. On the deployment server, you must delete the data that is stored about a previously deployed node.The deployment server maintains state and other data about a node system in the deployment serverdatabase. If you are redeploying, or if you replace a node with the same fully qualified domain name,run the following commands on the deployment server to remove the data that has been stored aboutthe node:$ knife node delete node.fqdn -y$ knife client delete node.fqdn -y
These commands reset the node to a clean state for the Chef server.3. Depending on how your node is configured, you might also need to delete the SSH fingerprint on
your deployment server. The deployment knife commands use SSH to communicate with the nodesystem to deploy OpenStack. Use one of the following methods to delete SSH fingerprints from the.ssh/known_hosts file on the deployment server:v Run the following command:
ssh-keygen -R node fqdn
v Edit the .ssh/known_hosts file in a text editor and delete the line that contains your node system.
Updating a deployed topologyAfter you deploy a topology, you might need to apply fixes, either to the IBM Cloud Manager withOpenStack services themselves or to how the IBM Cloud Manager with OpenStack services are deployed.
About this task
In addition, you might need to modify the IBM Cloud Manager with OpenStack configuration files orother customizations for your topology.
Note: If you have a multi-region cloud deployment, you need to update each region separately.
To update a deployed topology, complete the following steps:
Procedure1. Log in to the deployment system as the root user. This is the system where IBM Cloud Manager with
OpenStack was installed.2. Locate the directory that contains the files for the topology that you deployed. Change
your-deployment-name to the name for your deployment.$ cd your-deployment-name
3. Download the current environment for your deployment. Change your-environment-name to the namefor your deployment. The name of your environment can be found in the topology file for yourdeployment.$ knife environment show your-environment-name -d -Fjson > your-environment-name.json
Chapter 5. Deploying the cloud 149
4. (This step is only required when you apply fixes as part of the update.) The environment file for yourdeployment has constraints on the cookbook versions used. These constraints must be updated to usethe new cookbook versions. The knife os manage update environment command can be used toupdate the cookbook version constraints.v To update a JSON environment file that is named your-environment.json, run the following
command:knife os manage update environment your-environment.json
The file name must end with the .json extension. If the file refers to an existing chef environment,the file is uploaded to the chef server.
A fix pack might also require other changes to the environment. Refer to the instructions in the IBMCloud Manager with OpenStack fix pack.
5. Optional: You can change the configuration of your IBM Cloud Manager with OpenStack cloudenvironment after you deploy it. For information about the supported configuration changes, see“Deployment customization options” on page 109. Some cloud environments might not supportcertain customization options. In addition, some customization options are not supported after atopology is deployed.When you make configuration changes to your deployment environment, you can either manuallymodify the environment JSON file that you downloaded in Step 3 on page 149 or you can use theknife os manage set environment command to assist you.v Option 1: Manually edit your environment JSON file and then upload it after you complete the
configuration changes.$ # Edit the environment JSON file, your-environment-name.json.$ knife environment from file your-environment-name.json
v Option 2: Create an environment YAML configuration file that contains the configuration changes.Use the knife os manage set environment command to modify your environment. For informationabout the environment YAML configuration file that is used by the command, see “EnvironmentYAML Configuration File” on page 276.$ touch your-environment-name-changes.yml$ # Add your environment changes to the environment YAML configuration file.$ knife os manage set environment –-env-conf your-environment-name-changes.yml –y your-environment
Note: Manual modifications to IBM Cloud Manager with OpenStack configuration files that aremanaged by Chef are overwritten when you update your cloud environment. Configuration filesthat are managed by Chef have a banner similar to the following example at the beginning of thefile:# This file autogenerated by Chef# Do not edit, changes will be overwritten
If you must manually modify such configuration files, the modification must be redone after theupdate.
6. Refresh the topology deployment.$ knife os manage update topology your-topology-name.json
All of the nodes that are defined in the topology are refreshed. The following topology JSON items,which are required during a topology deployment, are optional during a topology update:
Topology Keys: environmentThe environment to use with all nodes in the topology. The environment must exist on theChef server.
Node Keys: runlistThe runlist for the node. The runlist is a list of roles and cookbook recipes to be applied to thenode. The roles and cookbook recipes must exist on the Chef server.
150 IBM Cloud Manager with OpenStack: Administrator Guide, version 4.2

If the environment, or runlist values are specified in the topology JSON, they are set again for eachnode in the topology. If the environment is not specified in the topology JSON, it is not set on allnodes. If the runlist is not specified for a particular node in the topology JSON, it is not set on thatnode.If there are nodes in the topology that you do not want to refresh, there are two options to preventthem from being updated (while still leaving them in the topology).v The knife os manage update topology command can be run in interactive mode by specifying the
--interactive command-line option:$ knife os manage update topology your-topology-name.json --interactive
When run in interactive mode, and choosing not to update all nodes, the command asks whether toupdate each node. You can then skip any nodes in the topology that you do not want to refresh.
v If you do not want to refresh a node in the topology, you can set a key in the topology JSON filethat is used to specify whether to update it.
Node Keys: allow_updateA Boolean value, which indicates whether to update the node. Set to true to update thenode. Set to false if you do not want to update the node. The default is true.
7. (This step is only required when you apply fixes as part of the update.) After you refresh the topologydeployment, restart the IBM Cloud Manager with OpenStack services. For more information, see“Managing IBM Cloud Manager with OpenStack services” on page 207.
Related concepts:“Applying fixes and updates” on page 39You can apply fixes and updates for the IBM Cloud Manager with OpenStack product.Related tasks:“Restarting IBM Cloud Manager with OpenStack services” on page 208If you need to restart services for IBM Cloud Manager with OpenStack, use the IBM Cloud Manager withOpenStack services command and specify the restart action. You can use the command to restart IBMCloud Manager with OpenStack services on a specific node or on all nodes in a topology.
Determining the fix level of deployed nodesDuring the IBM Cloud Manager with OpenStack topology update process, you might want to know thecurrent fix level of your deployed nodes.
About this task
The IBM Cloud Manager with OpenStack fix level of the nodes in a topology is available as theibm-openstack.cmwo_version node attribute. This attribute is stored in the IBM Cloud Manager withOpenStack Chef server and in a file that is located on each node. The version is updated aftersuccessfully running the knife os manage deploy node / topology or knife os manage update node /topology commands.
To query the IBM Cloud Manager with OpenStack Chef server for the ibm-openstack.cmwo_version nodeattribute, use the knife search command. If a deployed node is restored from a backup, the informationin the Chef server will be incorrect if the last deployment or update was completed after the backup.
You must use one of the following commands to show the attribute value for a single node, all nodes,and all nodes that use the same environment.
Chapter 5. Deploying the cloud 151
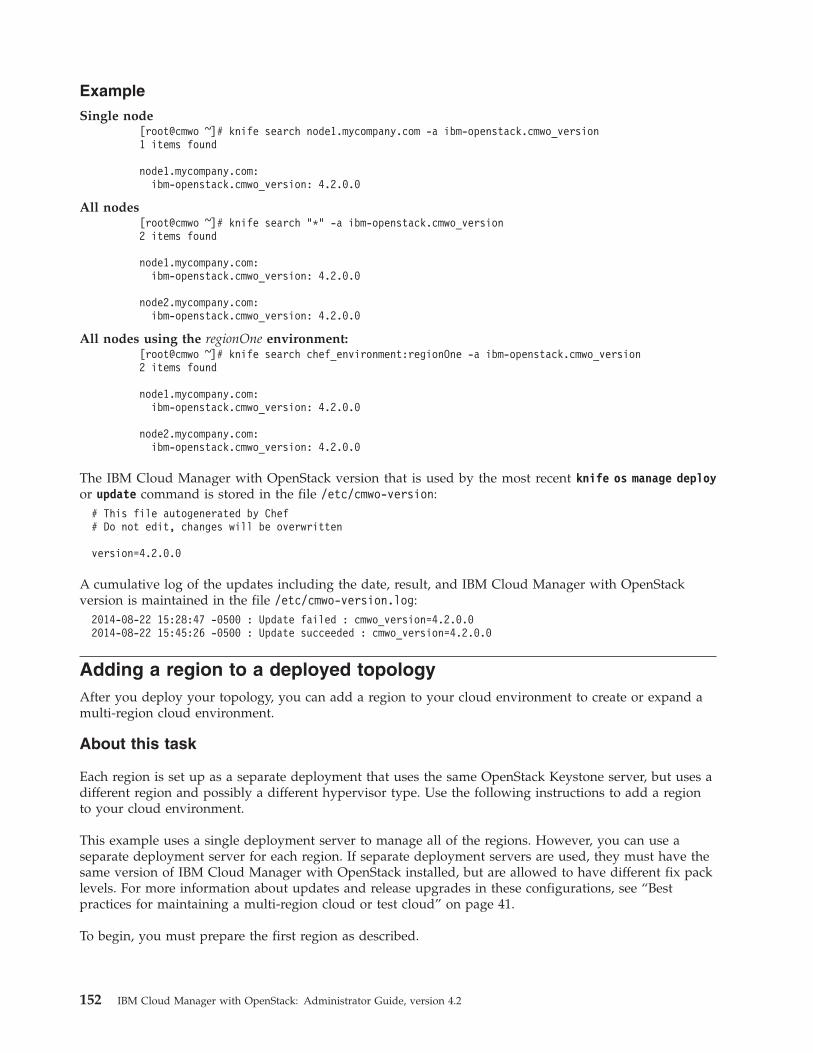
Example
Single node[root@cmwo ~]# knife search node1.mycompany.com -a ibm-openstack.cmwo_version1 items found
node1.mycompany.com:ibm-openstack.cmwo_version: 4.2.0.0
All nodes[root@cmwo ~]# knife search "*" -a ibm-openstack.cmwo_version2 items found
node1.mycompany.com:ibm-openstack.cmwo_version: 4.2.0.0
node2.mycompany.com:ibm-openstack.cmwo_version: 4.2.0.0
All nodes using the regionOne environment:[root@cmwo ~]# knife search chef_environment:regionOne -a ibm-openstack.cmwo_version2 items found
node1.mycompany.com:ibm-openstack.cmwo_version: 4.2.0.0
node2.mycompany.com:ibm-openstack.cmwo_version: 4.2.0.0
The IBM Cloud Manager with OpenStack version that is used by the most recent knife os manage deployor update command is stored in the file /etc/cmwo-version:
# This file autogenerated by Chef# Do not edit, changes will be overwritten
version=4.2.0.0
A cumulative log of the updates including the date, result, and IBM Cloud Manager with OpenStackversion is maintained in the file /etc/cmwo-version.log:
2014-08-22 15:28:47 -0500 : Update failed : cmwo_version=4.2.0.02014-08-22 15:45:26 -0500 : Update succeeded : cmwo_version=4.2.0.0
Adding a region to a deployed topologyAfter you deploy your topology, you can add a region to your cloud environment to create or expand amulti-region cloud environment.
About this task
Each region is set up as a separate deployment that uses the same OpenStack Keystone server, but uses adifferent region and possibly a different hypervisor type. Use the following instructions to add a regionto your cloud environment.
This example uses a single deployment server to manage all of the regions. However, you can use aseparate deployment server for each region. If separate deployment servers are used, they must have thesame version of IBM Cloud Manager with OpenStack installed, but are allowed to have different fix packlevels. For more information about updates and release upgrades in these configurations, see “Bestpractices for maintaining a multi-region cloud or test cloud” on page 41.
To begin, you must prepare the first region as described.
152 IBM Cloud Manager with OpenStack: Administrator Guide, version 4.2

Procedure1. Log in to the deployment system as the root user. This is the system where IBM Cloud Manager
with OpenStack was installed.2. Collect information about the first region deployed. This region contains the shared OpenStack
Keystone server.a. Record the values for the following JSON attributes in the first region’s topology file:
environment and secret_file.b. Record the values for the following JSON attributes in the first region’s environment file:
v openstack.auth.strategy
v openstack.region
v openstack.endpoints.host
v openstack.db.service_type
v openstack.mq.service_type
v openstack.secrets.* _data_bag
v ibm-sce.service.enabled
3. If the OpenStack authentication strategy for the first region (openstack.auth.strategy) is not set touuid, then you need to update the topology deployment for the first region.a. Update the environment file for the first region to set openstack.auth.strategy to uuid. Then,
upload the updated environment file.$ knife environment from file first-region-environment-name.json
b. Refresh the topology deployment for the first region.$ knife os manage update topology first-region-topology-name.json
Now you are ready to add the new region. Continue with the following steps.4. Create an environment file for the new region, which is copied from the example-ibm-os-single-
controller-n-compute example environment.5. Create a topology file for the new region that is based on the hypervisor type that is used in the
region.6. Update the environment and topology files for the new region to support the multi-region cloud
environment.a. In the new region’s environment file, set openstack.auth.strategy to uuid.b. In the new region’s environment file, update openstack.region to be a unique name for the new
region. The region name must not contain spaces or special characters.c. In the new region’s environment file, add the openstack.endpoints.identity-api.host,
openstack.endpoints.identity-admin.host, and openstack.endpoints.identity-internal.hostattributes and set them to the value of the first region’s openstack.endpoints.host attribute. Theother endpoint host attributes (openstack.endpoints.host, openstack.endpoints.bind-host,openstack.endpoints.mq.host, openstack-endpoings.db.host, and so on) reference themanagement IP address for the single controller node of the new region.
d. In the new region’s environment file, set ibm-sce.service.enabled to the value of the firstregion’s ibm-sce.service.enabled attribute.
e. Customize the passwords and secrets for the new region. Since each region uses the sameOpenStack Keystone server, the data bag items that are related to OpenStack Keystone must havethe same passwords in all regions. Other passwords and secrets can be unique for each region.For more information about customizing passwords and secrets, see “Customizing passwordsand secrets” on page 114.The following passwords and secrets must be the same between the regions. For moreinformation on the data bags that are referenced, see “Data bags” on page 277.v Shared passwords and secrets in the secrets data bag:
– openstack_identity_bootstrap_token
Chapter 5. Deploying the cloud 153
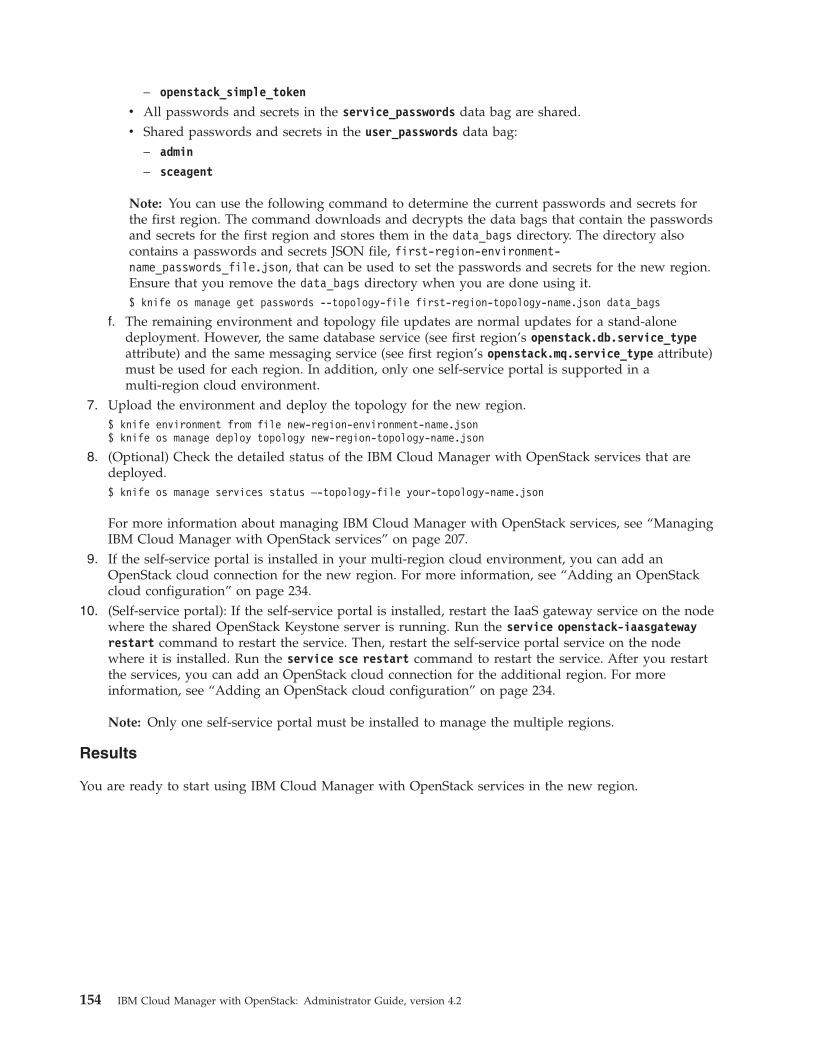
– openstack_simple_token
v All passwords and secrets in the service_passwords data bag are shared.v Shared passwords and secrets in the user_passwords data bag:
– admin
– sceagent
Note: You can use the following command to determine the current passwords and secrets forthe first region. The command downloads and decrypts the data bags that contain the passwordsand secrets for the first region and stores them in the data_bags directory. The directory alsocontains a passwords and secrets JSON file, first-region-environment-name_passwords_file.json, that can be used to set the passwords and secrets for the new region.Ensure that you remove the data_bags directory when you are done using it.$ knife os manage get passwords --topology-file first-region-topology-name.json data_bags
f. The remaining environment and topology file updates are normal updates for a stand-alonedeployment. However, the same database service (see first region’s openstack.db.service_typeattribute) and the same messaging service (see first region’s openstack.mq.service_type attribute)must be used for each region. In addition, only one self-service portal is supported in amulti-region cloud environment.
7. Upload the environment and deploy the topology for the new region.$ knife environment from file new-region-environment-name.json$ knife os manage deploy topology new-region-topology-name.json
8. (Optional) Check the detailed status of the IBM Cloud Manager with OpenStack services that aredeployed.$ knife os manage services status –-topology-file your-topology-name.json
For more information about managing IBM Cloud Manager with OpenStack services, see “ManagingIBM Cloud Manager with OpenStack services” on page 207.
9. If the self-service portal is installed in your multi-region cloud environment, you can add anOpenStack cloud connection for the new region. For more information, see “Adding an OpenStackcloud configuration” on page 234.
10. (Self-service portal): If the self-service portal is installed, restart the IaaS gateway service on the nodewhere the shared OpenStack Keystone server is running. Run the service openstack-iaasgatewayrestart command to restart the service. Then, restart the self-service portal service on the nodewhere it is installed. Run the service sce restart command to restart the service. After you restartthe services, you can add an OpenStack cloud connection for the additional region. For moreinformation, see “Adding an OpenStack cloud configuration” on page 234.
Note: Only one self-service portal must be installed to manage the multiple regions.
Results
You are ready to start using IBM Cloud Manager with OpenStack services in the new region.
154 IBM Cloud Manager with OpenStack: Administrator Guide, version 4.2
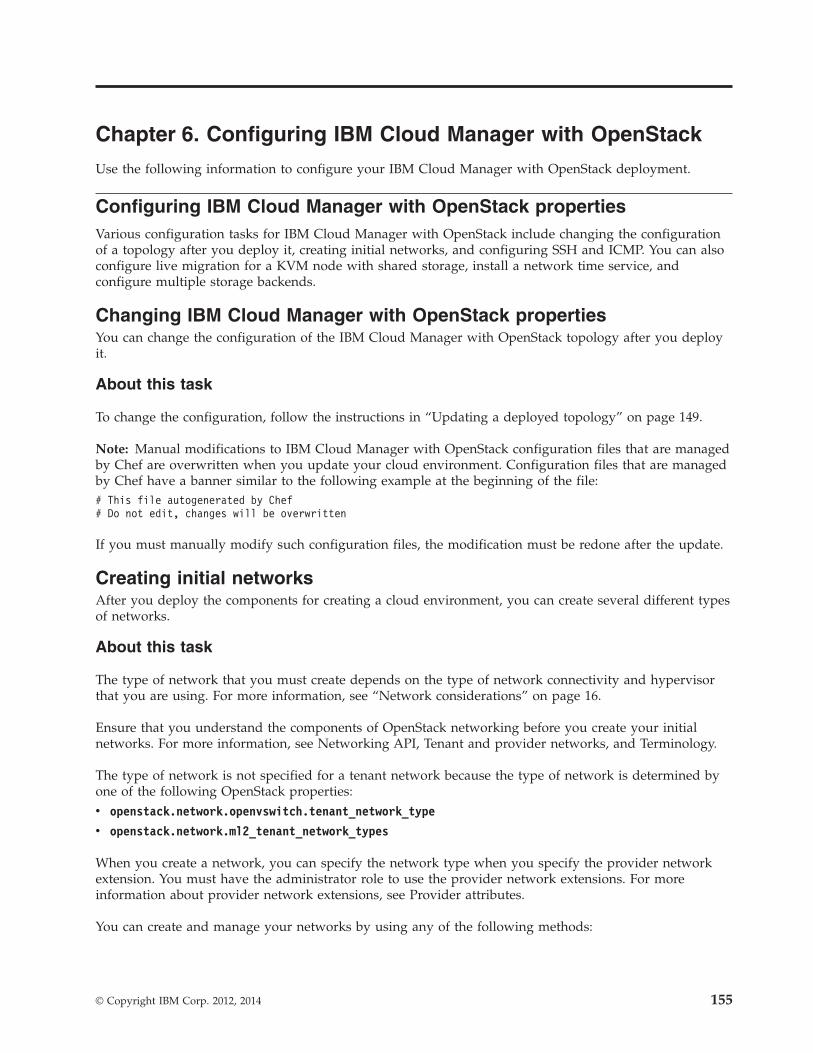
Chapter 6. Configuring IBM Cloud Manager with OpenStack
Use the following information to configure your IBM Cloud Manager with OpenStack deployment.
Configuring IBM Cloud Manager with OpenStack propertiesVarious configuration tasks for IBM Cloud Manager with OpenStack include changing the configurationof a topology after you deploy it, creating initial networks, and configuring SSH and ICMP. You can alsoconfigure live migration for a KVM node with shared storage, install a network time service, andconfigure multiple storage backends.
Changing IBM Cloud Manager with OpenStack propertiesYou can change the configuration of the IBM Cloud Manager with OpenStack topology after you deployit.
About this task
To change the configuration, follow the instructions in “Updating a deployed topology” on page 149.
Note: Manual modifications to IBM Cloud Manager with OpenStack configuration files that are managedby Chef are overwritten when you update your cloud environment. Configuration files that are managedby Chef have a banner similar to the following example at the beginning of the file:# This file autogenerated by Chef# Do not edit, changes will be overwritten
If you must manually modify such configuration files, the modification must be redone after the update.
Creating initial networksAfter you deploy the components for creating a cloud environment, you can create several different typesof networks.
About this task
The type of network that you must create depends on the type of network connectivity and hypervisorthat you are using. For more information, see “Network considerations” on page 16.
Ensure that you understand the components of OpenStack networking before you create your initialnetworks. For more information, see Networking API, Tenant and provider networks, and Terminology.
The type of network is not specified for a tenant network because the type of network is determined byone of the following OpenStack properties:v openstack.network.openvswitch.tenant_network_type
v openstack.network.ml2_tenant_network_types
When you create a network, you can specify the network type when you specify the provider networkextension. You must have the administrator role to use the provider network extensions. For moreinformation about provider network extensions, see Provider attributes.
You can create and manage your networks by using any of the following methods:
© Copyright IBM Corp. 2012, 2014 155
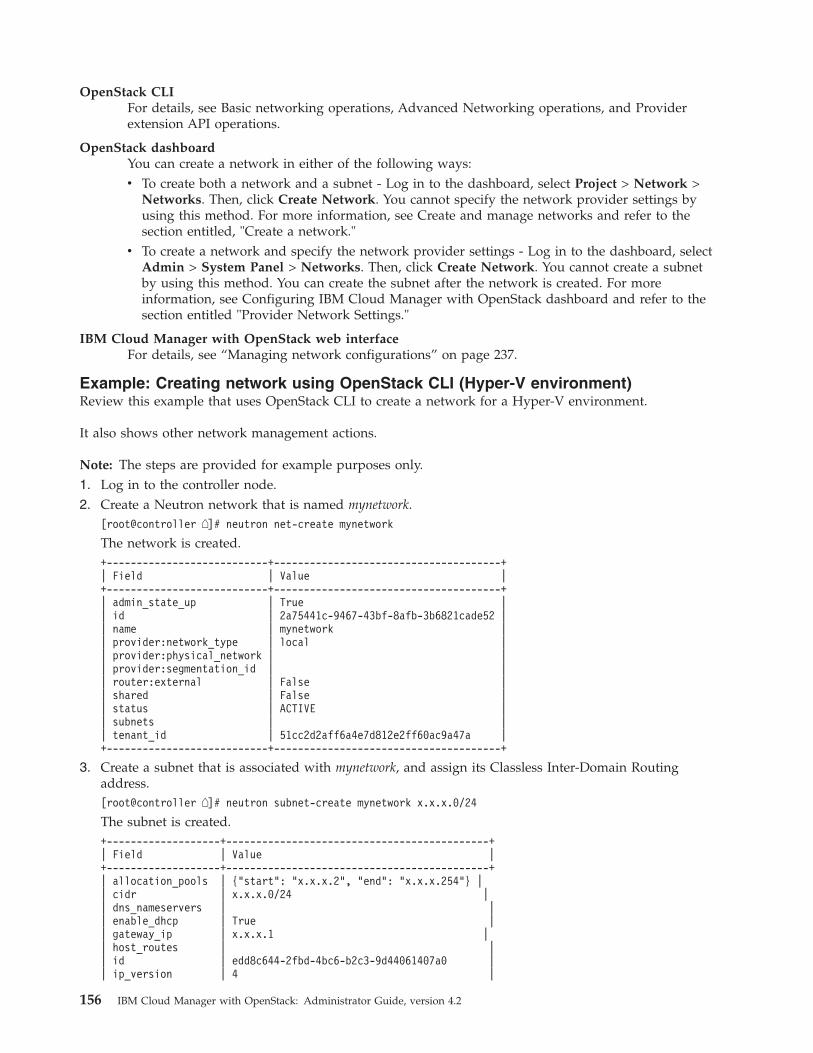
OpenStack CLIFor details, see Basic networking operations, Advanced Networking operations, and Providerextension API operations.
OpenStack dashboardYou can create a network in either of the following ways:v To create both a network and a subnet - Log in to the dashboard, select Project > Network >
Networks. Then, click Create Network. You cannot specify the network provider settings byusing this method. For more information, see Create and manage networks and refer to thesection entitled, "Create a network."
v To create a network and specify the network provider settings - Log in to the dashboard, selectAdmin > System Panel > Networks. Then, click Create Network. You cannot create a subnetby using this method. You can create the subnet after the network is created. For moreinformation, see Configuring IBM Cloud Manager with OpenStack dashboard and refer to thesection entitled "Provider Network Settings."
IBM Cloud Manager with OpenStack web interfaceFor details, see “Managing network configurations” on page 237.
Example: Creating network using OpenStack CLI (Hyper-V environment)Review this example that uses OpenStack CLI to create a network for a Hyper-V environment.
It also shows other network management actions.
Note: The steps are provided for example purposes only.1. Log in to the controller node.2. Create a Neutron network that is named mynetwork.
[root@controller �]# neutron net-create mynetwork
The network is created.+---------------------------+--------------------------------------+| Field | Value |+---------------------------+--------------------------------------+| admin_state_up | True || id | 2a75441c-9467-43bf-8afb-3b6821cade52 || name | mynetwork || provider:network_type | local || provider:physical_network | || provider:segmentation_id | || router:external | False || shared | False || status | ACTIVE || subnets | || tenant_id | 51cc2d2aff6a4e7d812e2ff60ac9a47a |+---------------------------+--------------------------------------+
3. Create a subnet that is associated with mynetwork, and assign its Classless Inter-Domain Routingaddress.[root@controller �]# neutron subnet-create mynetwork x.x.x.0/24
The subnet is created.+-------------------+--------------------------------------------+| Field | Value |+-------------------+--------------------------------------------+| allocation_pools | {"start": "x.x.x.2", "end": "x.x.x.254"} || cidr | x.x.x.0/24 || dns_nameservers | || enable_dhcp | True || gateway_ip | x.x.x.1 || host_routes | || id | edd8c644-2fbd-4bc6-b2c3-9d44061407a0 || ip_version | 4 |
156 IBM Cloud Manager with OpenStack: Administrator Guide, version 4.2

| ipv6_address_mode | || ipv6_ra_mode | || name | || network_id | 2a75441c-9467-43bf-8afb-3b6821cade52 || tenant_id | 51cc2d2aff6a4e7d812e2ff60ac9a47a |+-------------------+--------------------------------------------+
4. Update the subnet. For example, you can enable DHCP and assign a new subnet name, such asmysubnet.[root@controller �]# neutron subnet-update --enable-dhcp --name mysubnet edd8c644-2fbd-4bc6-b2c3-9d44061407a0Updated subnet: edd8c644-2fbd-4bc6-b2c3-9d44061407a0
5. Delete the subnet.[root@controller �]# neutron subnet-delete mysubnetDeleted subnet: mysubnet
6. Delete the Neutron network.[root@controller �]# neutron net-delete mynetworkDeleted network: mynetwork
Configuring SSH and ICMP access to deployed virtual machinesAfter you deploy the components for creating a cloud environment, you can configure SSH and ICMP foraccessing your virtual machines.
About this task
To configure SSH and ICMP access to your virtual machines by using the OpenStack dashboard, seeConfigure access and security for instances and refer to the section entitled, "Add a rule to the defaultsecurity group."
For information about using commands to configure SSH and ICMP to access your virtual machines, seeEnable ping and SSH on VMs (security groups). Using these commands result in the following error:Multiple security_group matches found for name ’default’, use an ID to be more specific.
Each tenant has a security group called default. To determine the security group ID, you can take one ofthe following actions:v Deploy a virtual machine and look at the Neutron port settings of the IP address that is assigned to
that virtual machine. The security group ID is a property of the Neutron port.v Use the keystone tenant-list to determine the tenant ID and then dump each Neutron security group to
determine which one has the matching tenant ID.
After you identify the security group ID, replace default with the security group ID when you run theoriginal neutron security-group-rule-create commands.
OpenStack provides the following default security rules.
Chapter 6. Configuring 157
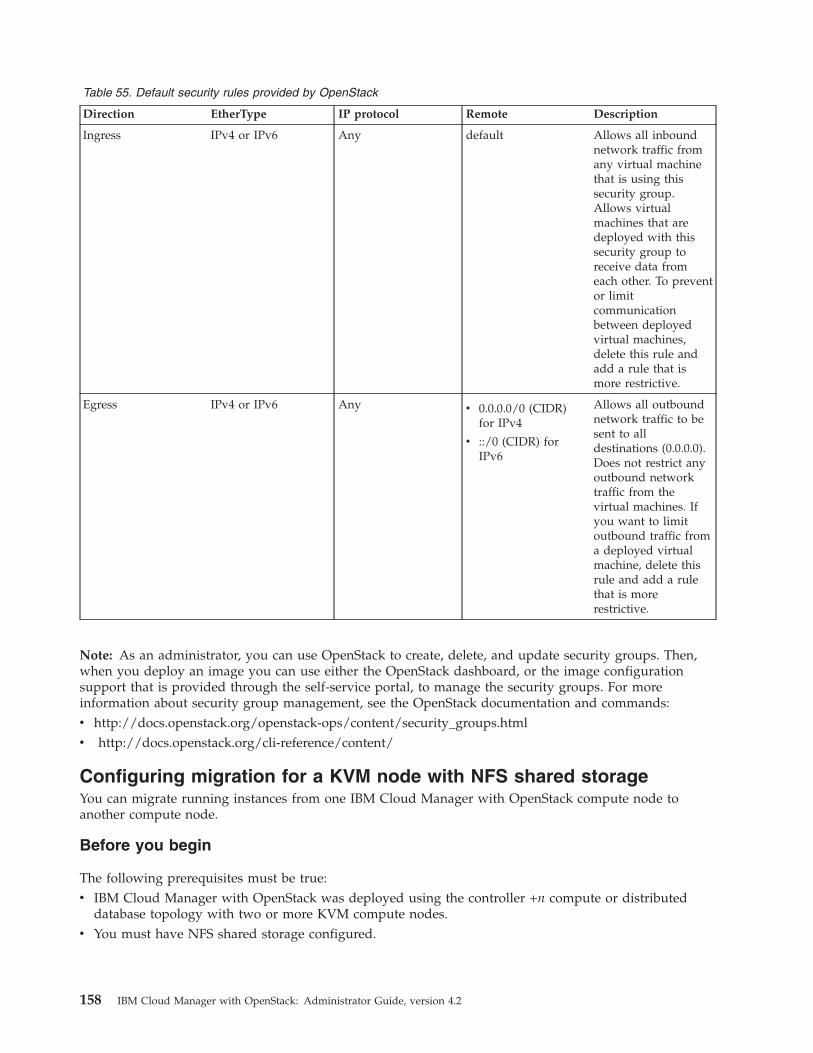
Table 55. Default security rules provided by OpenStack
Direction EtherType IP protocol Remote Description
Ingress IPv4 or IPv6 Any default Allows all inboundnetwork traffic fromany virtual machinethat is using thissecurity group.Allows virtualmachines that aredeployed with thissecurity group toreceive data fromeach other. To preventor limitcommunicationbetween deployedvirtual machines,delete this rule andadd a rule that ismore restrictive.
Egress IPv4 or IPv6 Any v 0.0.0.0/0 (CIDR)for IPv4
v ::/0 (CIDR) forIPv6
Allows all outboundnetwork traffic to besent to alldestinations (0.0.0.0).Does not restrict anyoutbound networktraffic from thevirtual machines. Ifyou want to limitoutbound traffic froma deployed virtualmachine, delete thisrule and add a rulethat is morerestrictive.
Note: As an administrator, you can use OpenStack to create, delete, and update security groups. Then,when you deploy an image you can use either the OpenStack dashboard, or the image configurationsupport that is provided through the self-service portal, to manage the security groups. For moreinformation about security group management, see the OpenStack documentation and commands:v http://docs.openstack.org/openstack-ops/content/security_groups.htmlv http://docs.openstack.org/cli-reference/content/
Configuring migration for a KVM node with NFS shared storageYou can migrate running instances from one IBM Cloud Manager with OpenStack compute node toanother compute node.
Before you begin
The following prerequisites must be true:v IBM Cloud Manager with OpenStack was deployed using the controller +n compute or distributed
database topology with two or more KVM compute nodes.v You must have NFS shared storage configured.
158 IBM Cloud Manager with OpenStack: Administrator Guide, version 4.2
About this task
Complete the following steps to enable migration capabilities with IBM Cloud Manager with OpenStackon KVM over NFS shared storage.
Procedure1. Change the following JSON attributes in your environment file:
a. Under selinux.booleans.virt_use_nfs, add the following value."selinux" : {
"booleans" : {"virt_use_nfs" : "on"
}},
b. In the default_attributes.openstack.endpoints section, add compute-vnc-proxy-bind as shown:"endpoints" : {
"compute-vnc-proxy-bind" : {"bind_interface": "eth0"
}
If the management network interface of the nodes is not eth0, change the bind_interface attributeto match your network configuration.In the override_attributes.openstack.endpoints section, add compute-vnc-bind as shown:
"compute-vnc-bind" : {"bind_interface": false,"host" : "0.0.0.0"
}
This configures the libvirt console VNC service to bind to all compute host interfaces, ratherthan to a compute host-specific IP that is not valid if the virtual machine is migrated to a differentcompute host. This could be considered a security exposure, so you might want to consideradding fire wall rules to block VNC access over other interfaces. The default configuration enablesVNC access only through the eth0 interface.
2. Change the following node-specific JSON attributes in your topology file for the controller node:"ibm-openstack": {
"iptables": {"custom_rules": "-A FWR -m state --state NEW -m tcp -p tcp --dport 2049 -j
ACCEPT -m comment --comment \"nfs\"\n-A FWR -m multiport -m state --state NEW -mudp -p udp --dports 111,875,32803,32769,892,662,2020,20049 -jACCEPT -m comment --comment \"nfs\""}
},
3. Update the topology. For instructions, see “Updating a deployed topology” on page 149.4. Verify the following after the IBM Cloud Manager with OpenStack deployment is completed. Update
as needed.a. Verify that virt_use_nfs Boolean is set to ON.
# getsebool -a|grep virt_use_nfsvirt_use_nfs --> on
Note: If needed, run the following command to set virt_use_nfs Boolean is set to ON:# setsebool -P virt_use_nfs=on
b. In the /etc/nova/nova.conf path within the controller and compute nodes, verify the followingvalues.live_migration_flag=VIR_MIGRATE_UNDEFINE_SOURCE,VIR_MIGRATE_PEER2PEER,VIR_MIGRATE_LIVE
c. Ensure that the UID and GID of user ‘nova’ are identical between each of your nodes.# id novauid=162(nova) gid=162(nova) groups=162(nova)
Chapter 6. Configuring 159

v To change a node, run the following commands:# usermod -u 103 nova (to change UID to 103)# groupmod -g 103 nova (to change GID to 103)
v Run the following commands to change file ownership:#service nova-api stop#service libvirt-bin stop#find / -uid 162 -exec chown nova {} \; (UID 162 is the old nova UID)#find / -gid 162 -exec chgrp nova {} \; (GID 162 is the old nova GID)#service nova-api restart#service libvirt-bin restart
5. Configure NFS.a. Ensure that the controller and compute nodes are configured with DNS or /etc/hosts. Make sure
that all nodes can perform name resolution with each other. You might use the ping command toping each host from one another.
b. Ensure that the UID and GID of your Compute user (Nova) are identical among all of your nodes.This ensures that the permissions on the NFS mount work correctly.
c. Export INSTANCES_PATH (that is /var/lib/nova/instances) from the controller node, and have itreadable and writable by the Compute user on compute nodes.
d. Configure the NFS server at controller node.1) Add the following line to the /etc/exports file:
INSTANCES_PATH Controller_IP/MASK(rw,sync,fsid=0,no_root_squash)
2) Set the subnet mask to the appropriate value to include the IP addresses of all compute nodes.Then, configure and start services:# exportfs –r# chkconfig nfs on# service nfs restart
e. Set the appropriate permissions on your shared directory. Run the following on all nodes.# chmod 775 INSTANCES_PATH
f. Configure NFS mounts on compute nodes.1) Add the following line to the /etc/fstab file:
Controller_IP:/ /INSTANCES_PATH nfs4 defaults 0 0
2) Ensure that you can mount the exported directory can be mounted:# mount -av
3) Verify that mount was successful:$ df -kFilesystem 1K-blocks Used Available Use% Mounted on...Controller_IP: 921515008 101921792 772783104 12%
/var/lib/nova/instances ( <-- verify this)
4) Verify that the INSTANCES_PATH directory is accessible and writable by the ‘nova’ user:# ls -ld INSTANCES_PATHdrwxrwsr-x. 5 nova nova 4096 Apr 20 18:25 /var/lib/nova/instances/
# su – nova# touch INSTANCES_PATH/test.txt (this file should be successfully created)# rm -f INSTANCES_PATH/test.txt (should be successfully removed)# exit
Note: For more information, see https://help.ubuntu.com/community/SettingUpNFSHowTo6. Use the Nova live-migration command to migrate the instances:
# nova live-migration server host_name
The server variable can be either the ID of the server or the name. The host_name variable is the newcompute host as shown in the Nova service-list.
160 IBM Cloud Manager with OpenStack: Administrator Guide, version 4.2
What to do next
After IBM Cloud Manager with OpenStack is deployed and NFS shares a mount, all instances that arecreated from this point forward can be migrated between compute nodes.
Important:
v You must configure the firewall (IP tables) to allow libvirt to communicate between nodes. Bydefault, libvirt listens on TCP port 16509, and an ephemeral TCP range 49152 - 49261 is used for theKVM communications. As a quick test, you can shut down the IPtables service to eliminate anyfirewall issues. When you change firewall rules, be careful choosing what ports you open andunderstand who has access. For information about ports that are used with libvirt, seehttp://libvirt.org/remote.html#Remote_libvirtd_configuration.
v If you change the Nova VNC console configuration and have existing virtual machines, nova updatesthe existing virtual machines the next time they are started. You must restart the existing virtualmachines before attempting live migration.
For more information about migration, seev Migrate instancesv Configure migrations
Installing a network time serviceConsider synchronizing the system clock of the deployment server and node systems with a networktime server.
Before you begin
Note: This task is for Windows NTP server setup only. For Red Hat Enterprise Linux NTP server setup,see your Red Hat Enterprise Linux documentation.
About this task
Complete the following steps to install the Network Time Protocol (NTP) service:1. Access the NTP installation package, ntp-4.2.6p5-ibm-win32-setup.exe, in the root directory of the
IBM Cloud Manager with OpenStack installation media.2. Run the ntp-4.2.6p5-ibm-win32-setup.exe file to install the NTP service.3. After the NTP package is installed, specify the NTP server IP address or host name in
C:\ntp\etc\ntp.conf.
# your local system clock, could be used as a backup# (this is only useful if you need to distribute time nomatter how good or bad it is)
server x.x.x.x
# but it should operate at a high stratum level to let the
4. Navigate to Control Panel > System and Security > Administative Tools > Services, and startNetwork Time Protocol Daemon service.
For more information about how to synchronize the system clock with an NTP server, see the NetworkTime Protocol setup documentation �for the platform.
Configuring multiple block storage back endsWhen you deploy an IBM Cloud Manager with OpenStack topology, you can also configure multipleblock storage back ends on the controller or a block storage node.
Chapter 6. Configuring 161

Before you begin
To configure multiple block storage back ends, ensure that the latest fix pack is installed.
About this task
You can also use this multiple block storage back ends technique when you configure block storage backends on multiple servers to use a different volume_backend_name for each block storage node. To configuremultiple block storage back ends, you can define an openstack.block-storage.volume.multi_backendtable to configure each back end as part of the cloud environment or node attributes.
To configure multiple block storage back ends in the Chef environment, complete the following steps:
Procedure1. Record the configuration for the cinder.conf properties as described in Configure multiple-storage
back ends. The following example shows two storage back ends, lvm_1 and lvm_2:[DEFAULT]...enabled_backends = lvm_1, lvm_2...[lvm_1]volume_driver=cinder.volume.drivers.lvm.LVMISCSIDrivervolume_backend_name=lvm-1volume_group=cinder-volumes-1[lvm_2]volume_driver=cinder.volume.drivers.lvm.LVMISCSIDrivervolume_backend_name=lvm-2volume_group=cinder-volumes-2
2. Convert the information from the previous step to a JSON map for the openstack.block-storage.volume.multi_backend attribute that has an entry for each back end configuration file section(lvm_1, lvm_2). Each of these JSON entries is a map that contains the property name and value pairsfor each property in the section. The example from the previous step would look like the followingexample:{
"openstack" : {"block-storage" : {
"volume" : {"multi_backend" : {
"lvm_1" : {"volume_driver" : "cinder.volume.drivers.lvm.LVMISCSIDriver","volume_backend_name" : "lvm-1","volume_group" : "cinder-volumes-1"
},"lvm_2": {
"volume_driver" : "cinder.volume.drivers.lvm.LVMISCSIDriver","volume_backend_name" : "lvm-2","volume_group" : "cinder-volumes-2"
}}
}}
}}
3. If the only block storage node in your topology is the controller, add the information from step 2 tothe Chef environment for your cloud.
4. If you have multiple block storage nodes, or the controller is not acting as the block storage node, addthe information from step 2 to the node attributes file for the block storage node.
162 IBM Cloud Manager with OpenStack: Administrator Guide, version 4.2
Configuring IBM Cloud Manager with OpenStack self-service portalpropertiesYou can configure many self-service portal features through a web user interface. However, you canconfigure all self-service portal features by modifying configuration property files that are in theself-service portal home directory. This section contains information about these configuration propertyfiles and the values that you can modify.
The /.SCE42 directory is the self-service portal home directory and contains all of the self-service portalconfiguration property files and log files. On Linux platforms, the default location is the /var/opt/ibmdirectory.
The authentication.properties file settings are required for the self-service portal to interface with yourcloud manager. The other features provide flexibility and convenience.
To configure basic properties and features of the self-service portal, you must modify properties that aredefined within the configuration files in the home directory. These configuration files include thefollowing properties:
authentication.propertiesSpecifies the user authentication type to use for the self-service portal.
database.propertiesSpecifies the database type and path.
email.propertiesSpecifies email notification capabilities.
cloud.propertiesSpecifies the common configuration of the self-service portal and the URL for the User Guidedocumentation.
deployment.propertiesSpecifies properties for configurations of virtual appliances to simplify deployments for cloudusers.
logging.propertiesSpecifies self-service portal log file properties.
networkConfiguration.propertiesSpecifies network configurations for deployments.
billing.propertiesEnables charging for cloud resources upon deployment.
metering.propertiesEnables metering for cloud resources upon deployment.
web.propertiesSpecifies properties for the user interface configuration.
server.propertiesSpecifies properties for enabling the optional Secure Sockets Layer (SSL) configuration.
Note: If you modify these properties while the self-service portal server is active, you must stop andrestart the self-service portal for the new property values to take effect.
Chapter 6. Configuring 163

Configuring secure shell (SSH) communicationThe IBM Cloud Manager with OpenStack self-service portal ships a self-signed certificate for SSLcommunication between a client machine, such as a web browser, and the IBM Cloud Manager withOpenStack self-service portal node. This certificate is stored in the <home directory>/.keystore file.
This self-signed certificate is shipped for testing purposes only. It is not associated with a qualified hostand domain name. Additionally, it is self-signed so a security warning is displayed when you access thehost using https. To use SSL configuration in production, create a different self-signed or CA issuedcertificate that is designated specifically for the qualified host. Additionally, the keystore password mustbe changed or another keystore must be used to contain this certificate with a secure password. The newpasswords would then be used in the following server.properties file configuration example.
To export a certificate to be used by clients, run the following command from the .SCE42 directory:"<jre path>/keytool" -export-v -alias SKC -file SKC.cer -keystore .keystore -storepass password
where password is the password you specify.
Notes:
v In order for this command to run properly, the Java/bin directory must be added to the system %PATH%variable.
v keytool is a key and certificate management utility that is included with Java™ SE 6.0.
After this certificate is imported into a client, the client can communicate with the IBM Cloud Managerwith OpenStack self-service portal by using the trusted certificate with no additional user interventionrequired. If the import is not done, the client, such as a browser, might prompt the user to verify it andconfirm that the certificate is trusted. After you confirm that you accept the risk of the certificate, you willbe able to use SSL.
Note: When you use Internet Explorer to install a self-signed certificate, ensure that the certificate issuername exactly matches the domain name of the URL that you are using it for. For example, if the URL ishttps://ip_address/cloud/web/login.html, where ip_address is your IP address, the CN setting must beCN=ip_address and the command is as follows:keytool -genkey -dname "CN=ip_address, OU=Cloud, O=IBM, L=RTP, S=NC, C=US" -alias SKC
-keystore .keystore -keyalg RSA -keysize 1024
If you still cannot install the certificate using Internet Explorer, it might be necessary to modify thesystem date time to synchronize with the IBM Cloud Manager with OpenStack self-service portal time.Also, ensure that you shut down and restart all instances of Internet Explorer after you install thecertificate.
SSL is enabled on the server by configuring the server.properties file in the self-service portal homedirectory as follows:# HTTP server portorg.osgi.service.http.port=18080
# Flag to enable/disable HTTP. If it is necessary for the protocol to be only SSL,# set this flag to false.org.eclipse.equinox.http.jetty.http.enabled=true
# Flag to enable/disable HTTPSorg.eclipse.equinox.http.jetty.https.enabled=true
# HTTPS portorg.eclipse.equinox.http.jetty.https.port=18443
164 IBM Cloud Manager with OpenStack: Administrator Guide, version 4.2
# SSL passwordorg.eclipse.equinox.http.jetty.ssl.password=password
# Keystore passwordorg.eclipse.equinox.http.jetty.ssl.keypassword=password
# The full path location of the keystoreorg.eclipse.equinox.http.jetty.ssl.keystore=home directory/.keystore
# The SSL protocolorg.eclipse.equinox.http.jetty.ssl.protocol=SSL_TLS
Note: The org.eclipse.equinox.http.jetty.ssl.protocol property is SSL_TLS if running on an IBMJRE. The property is TLS if running on a Sun or Oracle JRE.
Restart the server after you change the server.properties file. With the server running, point your clientto https://system:18443/cloud/api/users to test it. Depending on whether you imported the certificatefrom above, you might be prompted to accept the certificate.
Creating a new certificate for your host
You can use the keytool tool to create a self-signed certificate for the host you are deploying IBM CloudManager with OpenStack self-service portal on or to create a certificate signing request (CSR) to send to acertificate authority (CA) to get a CA-issued certificate that is trusted by clients automatically.
For example, to generate a new keystore with specific customer information, use the following command:keytool -genkey -dname "CN=cloud.ibm.com, OU=Cloud Services, O=IBM, L=RTP, S=NC, C=US"-alias SKC -keystore .keystore -keyalg RSA -keysize 1024
CN Specifies the customers domain.
OU Specifies the organization within the customer’s company.
O Specifies the company.
L Specifies the city of the company location.
S Specifies the state where that city resides.
CB Specifies the country.
To generate a certificate signing request from the keystore, run the following command:keytool -certreq -alias SKC -keystore .keystore -file NewCertSignRequest.csr
To import the trusted certificate (.cer) file, run this command:keytool -import -trustcacerts -alias SKC -file ./TrustedCertificate.cer -keystore .keystore
See the keytool documentation for your JRE for instructions. For the IBM JRE, the instructions areavailable at http://www.ibm.com/developerworks/java/jdk/security/60/secguides/keytoolDocs/keytool.html.
Note: When the CA is not trusted by clients automatically and you are attempting to access theself-service portal using https protocol, an exception is encountered that says the connection is untrusted.You must confirm that the risks are understood and must add an exception to continue. Even with atrusted certificate, when using Internet Explorer, you are likely to run into a similar exception.
Connecting using SSH
To further minimize security risks when connecting using OpenSSH, change the OpenSSH daemonconfiguration file so that the line containing Protocol is changed to 2. Anything less than 2 is more
Chapter 6. Configuring 165
susceptible to attack. The OpenSSH daemon implemented under the IBM Cloud Manager withOpenStack self-service portal uses port 22 as a default for communication.
Configuring user registry authenticationThe IBM Cloud Manager with OpenStack self-service portal supports both Local and LightweightDirectory Access Protocol (LDAP) user registry authentication mechanisms. Authentication is performedby using the self-service portal local user registry.
Important: If you deployed the self-service portal as part of a IBM Cloud Manager with OpenStacktopology, it is automatically configured to use the Keystone authentication mode. Therefore, thisinformation does not apply. These instructions apply to the stand-alone self-service portal topology only.
Local user registries are intended for small-scale usage, such as proof-of-concept scenarios,demonstrations, or environments with up to 30 users and projects.
LDAP user registries provide the highest level of security and scalability for production environmentsand enable the self-service portal to share a central user registry for existing users with other applicationsthat support LDAP.
For more information about user registry authentication, see “Supported IBM Cloud Manager withOpenStack user registries” on page 10.
LDAP authenticationThe IBM Cloud Manager with OpenStack includes an LDAP authenticator that is designed toauthenticate users in a wide range of environments, whether the authentication process is a simple bindor a multistage process.
LDAP authentication is performed by defining a series of steps for the authentication process, definingthe inputs and outputs of each step, and then running them in sequence. If all the steps run successfully,the user is authenticated.
Configuring LDAP authentication manuallyBeginning in IBM Cloud Manager with OpenStack 3.1 the web interface is the primary means ofconfiguring LDAP. If you have a migrated LDAP configuration from a previous release, or if you want toenable user name case sensitivity, you can edit the ldap.xml configuration file.
For more information about configuring LDAP by using the web interface, see “Configuring LDAPauthentication using the web interface” on page 212.
Properties of an LDAP authentication step
Host A string host name for the LDAP host. This property is required.
Search ContextIf an LDAP lookup is to be performed, a search context must be provided. This property isrequired only if a search filter is provided.
Search FilterIf an LDAP lookup is to be performed, a search filter format string must be provided. This stringtells the authenticator how to create a search filter that ensures that only one result is returned, asLDAP does not guarantee ordering of results if there are more than one. Additionally, the stringFILTER is a special value in the search filter. This string is replaced with the user ID enteredduring login. If you do not use the string FILTER in your configuration file, there is noreplacement during authentication. If the strings that are defined in your configuration file arestatic, and a search context is provided, the search filter property is required.
Authentication DN
166 IBM Cloud Manager with OpenStack: Administrator Guide, version 4.2
This property specifies the distinguished name (DN) used for authenticating to the LDAP server. Ifyou are using this property to perform a search, you can specify the property as:</authDN password="password">dnname</authDN>
If the property is specifying the DN to use for authentication, define the DN in one of the followingways:v The DN can be constructed from the user ID. For example, the DN for a user logging in as joe can
be constructed by using the following:<authDN>uid={FILTER},ou=people,dc=site</authDN>
This example creates the DN uid=joe,cn=users,ou=people,dc=site
v The DN of the LDAP user entry that is returned by a previous search step is represented usingthe special value {PERSON_DN}, as shown in this example:<authDN>{PERSON_DN}</authDN>
In both cases, the password that the user entered to log in is also used to authenticate to theLDAP server.
To perform an anonymous search, do not specify the authentication DN property.
Admin UsersThis attribute specifies a list of LDAP user accounts to be given administrator privileges:<adminUsers>[email protected],[email protected]</adminUsers>
User name case sensitiveThis attribute specifies whether the LDAP server defines the user name as case sensitive or not.<userNameCaseSensitive>true</userNameCaseSensitive>
Secure connection enablementThis attribute specifies whether to enable a secure connection for LDAP authentication. SomeLDAP servers enable the StartTLS operation by default, and other LDAP server do not. As anadministrator, you can turn off the secure connection, if the LDAP server does not supportStartTLS operation. The possible values for this attribute are true or false. To enable a secureconnection, specify this property in the config element:<enableSecureConn>true</enableSecureConn>
OutputsThis value indicates what information is needed during the current step for the next step andhow to pass that information along. The Outputs value is essentially a list of instructions thatgets an attribute value, for example foo, and passes it along as bar. This value is optional.v User account name: An output can be flagged as the name for a user account by adding
attribute="fullname" to the output tag. This value is retrieved and used as the user name byIBM Cloud Manager with OpenStack. If you do not specify this value, the user ID is used forthe user display name.
v User e-mail address: An output can be flagged as the email for a user account by addingattribute="email" to the output tag. This value is retrieved and used as the user emailaddress by IBM Cloud Manager with OpenStack.
Example of an ldap.xml file
In this example of an ldap.xml file, an authenticated secure search is performed to find the directoryentry where the mail attribute matches the value that is passed into the username field.<?xml version="1.0"?><config><host>ldap://ldap.company.com</host><adminUsers>[email protected],[email protected]</adminUsers><enableSecureConn>false</enableSecureConn><userNameCaseSensitive>true</userNameCaseSensitive>
Chapter 6. Configuring 167
<step><authDN password="password">cn=ldapAdmin,ou=directory,o=company.com</authDN><searchFilter>(|(mail={FILTER}))</searchFilter><searchContext>ou=directory,o=company.com</searchContext><outputs>
<output attribute="fullname"><get>cn</get>
</output></outputs>
</step><step>
<authDN>{PERSON_DN}</authDN></step>
</config>
Changing authentication modeYou can change the IBM Cloud Manager with OpenStack to LDAP authentication mode by editing theauthentication.properties file.
About this task
Note: Beginning in IBM Cloud Manager with OpenStack 3.1, the web interface is the primary means ofconfiguring LDAP. If you use the web interface to configure LDAP, the steps in this task are not required.For more information about configuring LDAP by using the web interface, see “Configuring LDAPauthentication using the web interface” on page 212.
To change IBM Cloud Manager with OpenStack to LDAP authentication mode, complete the followingsteps:
Procedure1. Open the authentication.properties file in the home directory.2. Set the authentication.type property to LDAP as shown in the following example:
authentication.type=LDAP
3. Open the ldap.xml file in the home directory.4. Configure the LDAP steps as described in the “Configuring LDAP authentication manually” on page
166.5. Restart the IBM Cloud Manager with OpenStack server.
You can change the authentication mode back to local by setting the authentication.type propertyback to LOCAL.
Configuring local authenticationBy default IBM Cloud Manager with OpenStack is set up to use local authentication mode. Localauthentication is intended for small-scale usage, such as proof-of-concept scenarios, demonstrations, orenvironments with up to 30 users and projects. For large-scale production environments, configure LDAPto ensure the highest level of security.
About this task
Validate the configuration by following these steps:
Procedure1. Open the authentication.properties file in the home directory.2. Configure the authentication.type property to use local authentication, such as:
authentication.type=Local
3. Configure the default administrator user name, name, and password, similar to the followingexample:
168 IBM Cloud Manager with OpenStack: Administrator Guide, version 4.2
admin.username=adminadmin.name=SCE Administratoradmin.password=<password>
Notes:
a. These fields might already be populated or configured during installation.b. The values of the admin.username, admin.name, and admin.password that are shown are examples.
You should update these values according to your business or security guidelines.c. To prevent too many invalid login attempts, a user can attempt to login to IBM Cloud Manager
with OpenStack three times within a 24-hour period. After three failed login attempts, both theuser and administrator roles are locked out. However, the administrator can unlock the userrecord.To configure this limitation, enable the com.ibm.cfs.failedlogincheck.enabled property asfollows:com.ibm.cfs.failedlogincheck.enabled=false
This property is disabled by default.d. The account 'Locked' field associated with the user record in IBM Cloud Manager with OpenStack,
is valid only when the account is locked in IBM Cloud Manager with OpenStack using LOCALauthentication, rather than LDAP authentication. If you are using the LDAP authentication andhave the 'account locking' feature enabled on your LDAP server, do not enable it on the IBMCloud Manager with OpenStack server. In this case, set thecom.ibm.cfs.failedlogincheck.enabled property to false in the authentication.properties fileon the IBM Cloud Manager with OpenStack server.
Configuring REST API authenticationYou can configure IBM Cloud Manager with OpenStack to require authentication when it calls to the IBMCloud Manager with OpenStack REST APIs.
About this task
IBM Cloud Manager with OpenStack supports the following authentication methods:v Basic HTTP authentication for a user login and REST API-based validationv Encrypted token-based authentication for REST API calls
The basic strategy for using encrypted tokens is as follows:v HTTP/REST agents (browser or REST client) initially use the login authentication REST API to
authenticate their user ID and password credentials.v The user ID and password are validated against the LOCAL or LDAP repository (depending if LOCAL
or LDAP is configured).v Upon successful login authentication, an encrypted token and its expiration are returned in the login
response.v The agent can use (as an HTTP header cookie) the encrypted token for subsequent REST API calls to
identity themselves until the token expires.v After the authentication token expires, the agent must use the login REST API again to validate their
user ID and password. When complete, the agent obtains a new authentication token.
Note: The system that is running the IBM Cloud Manager with OpenStack web interface or REST clientmust have the date, time, and time zone that is correctly configured for its physical location.
To require authentication when IBM Cloud Manager with OpenStack calls to the Rest APIs, complete thefollowing configuration steps:
Chapter 6. Configuring 169
Procedure1. Open the authentication.properties file in the home directory.2. Set the authentication.secure property to true as shown in the following example:
authentication.secure=true
When the property is set to true, the caller is prompted for credentials before it processes the APIrequest. The credentials are validated against the user registry that is configured, such as Local orLDAP.
3. If IBM Cloud Manager with OpenStack is configured to use Single Sign On with other SmartCloudproducts, you must set the shared secret key. Use the same shared secret key in all applications byusing Single Sign On. If IBM Cloud Manager with OpenStack is not using Single Sign On, leave theproperty unset and the application generates and save a new secret key when it first starts.com.ibm.cfs.token.key=The Secret Encryption Key
4. Optional: Set the name of the HTTP header cookie. The cookie is used to transport the encryptedauthentication token. This property specifies the name of the HTTP header cookie, which is used inHTTP REST API requests to transport the encrypted authentication token. The default value issimpletoken.com.ibm.cfs.token.header.field.name=simpletoken
5. Optional: Set the time duration for authentication tokens (in seconds). This time duration determineshow long an authentication token is valid. After a token expires, the agent must obtain a new tokenby using the login authentication REST API.com.ibm.cfs.token.duration=14400
6. Optional: Disable automatic renewal for the authentication token. When enabled, authenticationtokens renew (by using the specified duration period) each time they are successfully used on an APIcall. If this option is disabled, the only way to renew an authentication token is to obtain a new tokenby using the login authentication REST API.com.ibm.cfs.token.autorenew.enabled=false
7. Restart your IBM Cloud Manager with OpenStack server for the changes to take effect.
Configuring databaseBy default, IBM Cloud Manager with OpenStack uses an internal Derby database that is created insidethe home directory. For optimal performance in a large environment such as a production environment,consider the use of an external database. IBM Cloud Manager with OpenStack supports the use of anexternal DB2 database.
About this task
For more information about DB2 support, see “Supported IBM Cloud Manager with OpenStackdatabases” on page 9.
The self-service portal also supports initial use of a Derby database and migration to a DB2 database at afuture point.
To change the self-service portal database configuration to use DB2, complete the following steps:
Procedure1. Open the database.properties file in the home directory.2. Set the database.type property to DB2, as shown in the following example:
database.type=db2
3. Set the database.username property to the user ID defined for the database, as shown in the followingexample:database.username=<db2user>
170 IBM Cloud Manager with OpenStack: Administrator Guide, version 4.2
4. Set the database.password property to the password ID defined for the database, as shown in thefollowing example:database.password=<db2passwd>
Note: The clear text password is replaced with an encrypted password after the self-service portalstarts the first time.
5. Set the database.db2.path property to the location of the DB2 database, as shown in the followingexample:database.db2.path=//localhost:50000/cfs:
Note:
v One or more connection directives can be appended to the database path, and they must beseparated by a semicolon. For example:database.db2.path=//localhost:50000/cfs:retrieveMessagesFromServerOnGetMessage=true;
v Replace localhost with a full IP address (it can be a remote host) and verify the port number. Hereare a few links to help you find the port number:UNIX: http://publib.boulder.ibm.com/infocenter/cmgmt/v8r3m0/index.jsp?topic=%2Fcom.ibm.sysadmin.hlp%2Fcsa10010.htm or as a potential shortcut, use the grep i db2/etc/services command.Windows: http://publib.boulder.ibm.com/infocenter/cmgmt/v8r3m0/index.jsp?topic=%2Fcom.ibm.sysadmin.hlp%2Fcsa10010.htm or as a potential shortcut, look for the DB2 entries inthe services file at C:\WINDOWS\system32\drivers\etc\services.
Configuring email notificationsTo receive email notifications when various actions are taken, you must configure the notificationproperties in the home directory.
About this task
The following examples are user and administrator events that can be configured to trigger an emailnotification.v Account is created or deleted, reaches its balance threshold, is delinquent, receives a payment, has a
bill createdv Instances are deployed, fail, expire, have snapshots completev Project access is requested or grantedv User is created, requests access, has a password resetv Virtual machine is backed up, restored, has a snapshot created, or reverts to a snapshotv Volumes are created, deleted, detached and resized
To set up notification for the IBM Cloud Manager with OpenStack self-service portal, follow these steps:
Procedure1. Open the email.properties file in the home directory.2. Set the com.ibm.cfs.email.relay.host property to the host name of the relay host that the self-service
portal uses for outgoing SMTP emails.3. Optionally, you can set the email subject prefix for all self-service portal emails and the "from" name,
by setting the following properties:com.ibm.cfs.email.subject.prefixcom.ibm.cfs.email.from.namecom.ibm.cfs.email.from.address
4. Save the email.properties file and restart the self-service portal service.
Chapter 6. Configuring 171
You can globally disable email notifications in the self-service portal by setting thecom.ibm.cfs.email.default.notifications property in the email.properties file to false.Individual users can disable notifications through the self-service portal.
Note: Ensure that the self-service portal administrator has an email address that is configured toreceive notifications. The notifications email for volume operations can be sent only to the self-serviceportal Administrator.
Configuring common cloud propertiesCommon cloud properties are configured by providing information such as the refresh interval andonline help configuration in the cloud.properties file.
About this task
To configure your cloud manager, complete the following steps:
Procedure1. Open the cloud.properties file in the home directory.2. Edit the properties by providing values for each configuration property.3. Save the cloud.properties file and restart the IBM Cloud Manager with OpenStack self-service portal
server.
Cloud refresh intervalIBM Cloud Manager with OpenStack checks for new images and instances in the cloud and synchronizesthe properties for these images and instances.
By default, IBM Cloud Manager with OpenStack receives messages from the cloud to synchronize withthe cloud manager. The frequency of this synchronization is determined by thecom.ibm.cfs.cloud.refresh.interval property in the cloud.properties file. If the property is not set, adefault of 30 seconds is used.
IBM Cloud Manager with OpenStack scans the cloud for updates on instances as often as the refreshinterval property specifies. However, you can change the synchronization mode so that IBM CloudManager with OpenStack periodically checks with the cloud without waiting for messages.
For more information about setting the synchronization mode, see “Configuring cloud synchronizationmode” on page 174.
Cloud online help configurationThe IBM Cloud Manager with OpenStack has a configurable documentation property that enables IBMCloud Manager with OpenStack to open the User Guide when the Help link is selected by the user.
About this task
To configure the URL for the Help documentation, follow these steps:
Procedure1. Open the cloud.properties file in the home directory.2. Configure the property com.ibm.cfs.cloud.documentation to be set to the URL for the User Guide
location. By default, this property is set to the IBM Cloud Manager with OpenStack User Guide.Using the default property setting, the user can access the User Guide on the IBM Cloud Managerwith OpenStack wiki in any of the supported languages by selecting the link for the language ofchoice. If something other than this default behavior is wanted, the property can be changed to anyURL where the User Guide document is located.
172 IBM Cloud Manager with OpenStack: Administrator Guide, version 4.2
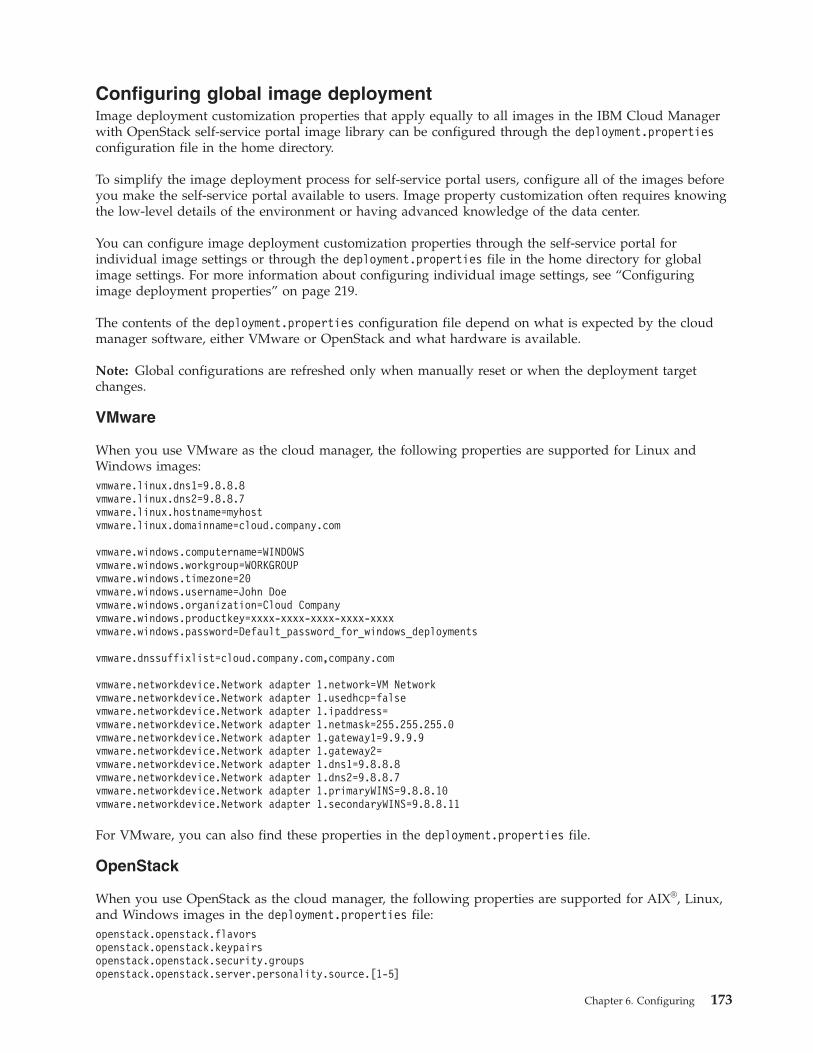
Configuring global image deploymentImage deployment customization properties that apply equally to all images in the IBM Cloud Managerwith OpenStack self-service portal image library can be configured through the deployment.propertiesconfiguration file in the home directory.
To simplify the image deployment process for self-service portal users, configure all of the images beforeyou make the self-service portal available to users. Image property customization often requires knowingthe low-level details of the environment or having advanced knowledge of the data center.
You can configure image deployment customization properties through the self-service portal forindividual image settings or through the deployment.properties file in the home directory for globalimage settings. For more information about configuring individual image settings, see “Configuringimage deployment properties” on page 219.
The contents of the deployment.properties configuration file depend on what is expected by the cloudmanager software, either VMware or OpenStack and what hardware is available.
Note: Global configurations are refreshed only when manually reset or when the deployment targetchanges.
VMware
When you use VMware as the cloud manager, the following properties are supported for Linux andWindows images:vmware.linux.dns1=9.8.8.8vmware.linux.dns2=9.8.8.7vmware.linux.hostname=myhostvmware.linux.domainname=cloud.company.com
vmware.windows.computername=WINDOWSvmware.windows.workgroup=WORKGROUPvmware.windows.timezone=20vmware.windows.username=John Doevmware.windows.organization=Cloud Companyvmware.windows.productkey=xxxx-xxxx-xxxx-xxxx-xxxxvmware.windows.password=Default_password_for_windows_deployments
vmware.dnssuffixlist=cloud.company.com,company.com
vmware.networkdevice.Network adapter 1.network=VM Networkvmware.networkdevice.Network adapter 1.usedhcp=falsevmware.networkdevice.Network adapter 1.ipaddress=vmware.networkdevice.Network adapter 1.netmask=255.255.255.0vmware.networkdevice.Network adapter 1.gateway1=9.9.9.9vmware.networkdevice.Network adapter 1.gateway2=vmware.networkdevice.Network adapter 1.dns1=9.8.8.8vmware.networkdevice.Network adapter 1.dns2=9.8.8.7vmware.networkdevice.Network adapter 1.primaryWINS=9.8.8.10vmware.networkdevice.Network adapter 1.secondaryWINS=9.8.8.11
For VMware, you can also find these properties in the deployment.properties file.
OpenStack
When you use OpenStack as the cloud manager, the following properties are supported for AIX®, Linux,and Windows images in the deployment.properties file:openstack.openstack.flavorsopenstack.openstack.keypairsopenstack.openstack.security.groupsopenstack.openstack.server.personality.source.[1-5]
Chapter 6. Configuring 173
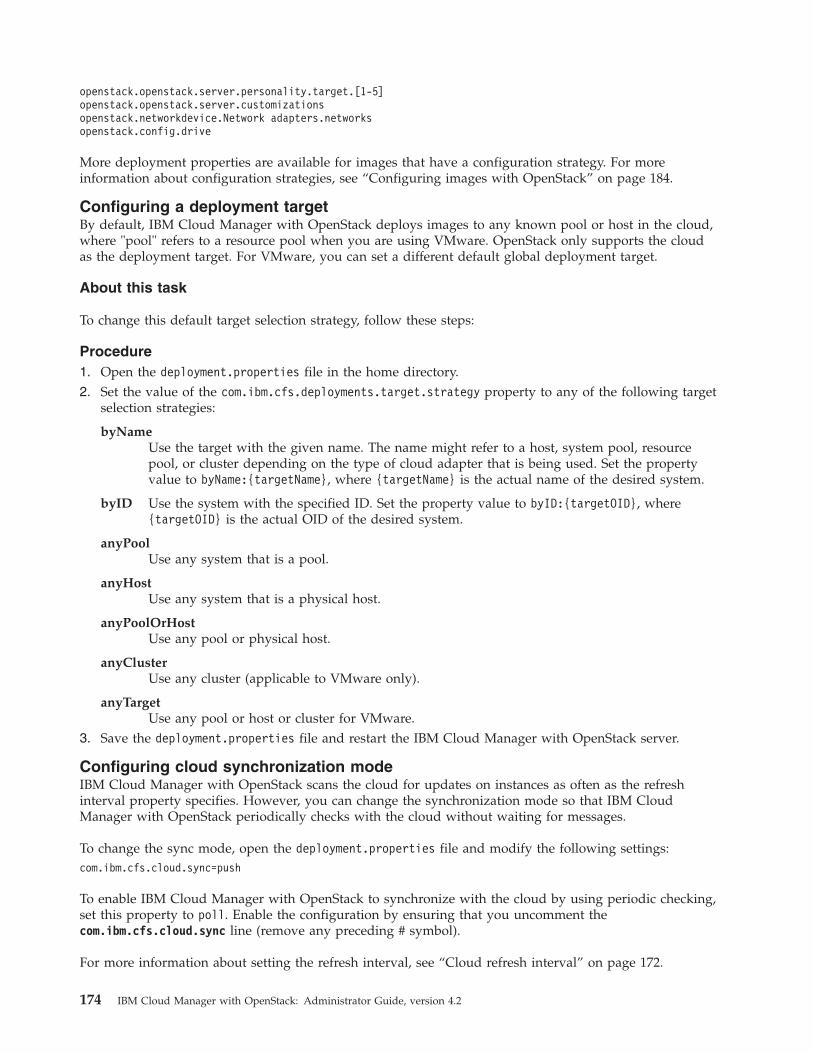
openstack.openstack.server.personality.target.[1-5]openstack.openstack.server.customizationsopenstack.networkdevice.Network adapters.networksopenstack.config.drive
More deployment properties are available for images that have a configuration strategy. For moreinformation about configuration strategies, see “Configuring images with OpenStack” on page 184.
Configuring a deployment targetBy default, IBM Cloud Manager with OpenStack deploys images to any known pool or host in the cloud,where "pool" refers to a resource pool when you are using VMware. OpenStack only supports the cloudas the deployment target. For VMware, you can set a different default global deployment target.
About this task
To change this default target selection strategy, follow these steps:
Procedure1. Open the deployment.properties file in the home directory.2. Set the value of the com.ibm.cfs.deployments.target.strategy property to any of the following target
selection strategies:
byNameUse the target with the given name. The name might refer to a host, system pool, resourcepool, or cluster depending on the type of cloud adapter that is being used. Set the propertyvalue to byName:{targetName}, where {targetName} is the actual name of the desired system.
byID Use the system with the specified ID. Set the property value to byID:{targetOID}, where{targetOID} is the actual OID of the desired system.
anyPoolUse any system that is a pool.
anyHostUse any system that is a physical host.
anyPoolOrHostUse any pool or physical host.
anyClusterUse any cluster (applicable to VMware only).
anyTargetUse any pool or host or cluster for VMware.
3. Save the deployment.properties file and restart the IBM Cloud Manager with OpenStack server.
Configuring cloud synchronization modeIBM Cloud Manager with OpenStack scans the cloud for updates on instances as often as the refreshinterval property specifies. However, you can change the synchronization mode so that IBM CloudManager with OpenStack periodically checks with the cloud without waiting for messages.
To change the sync mode, open the deployment.properties file and modify the following settings:com.ibm.cfs.cloud.sync=push
To enable IBM Cloud Manager with OpenStack to synchronize with the cloud by using periodic checking,set this property to poll. Enable the configuration by ensuring that you uncomment thecom.ibm.cfs.cloud.sync line (remove any preceding # symbol).
For more information about setting the refresh interval, see “Cloud refresh interval” on page 172.
174 IBM Cloud Manager with OpenStack: Administrator Guide, version 4.2
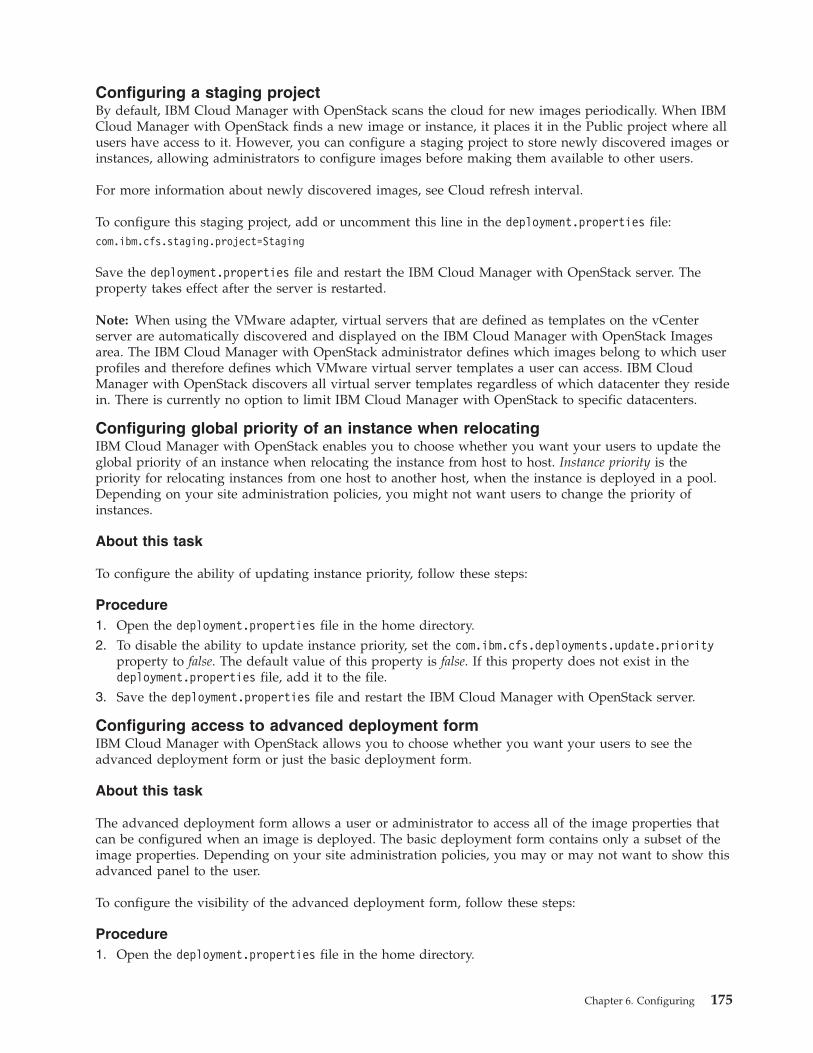
Configuring a staging projectBy default, IBM Cloud Manager with OpenStack scans the cloud for new images periodically. When IBMCloud Manager with OpenStack finds a new image or instance, it places it in the Public project where allusers have access to it. However, you can configure a staging project to store newly discovered images orinstances, allowing administrators to configure images before making them available to other users.
For more information about newly discovered images, see Cloud refresh interval.
To configure this staging project, add or uncomment this line in the deployment.properties file:com.ibm.cfs.staging.project=Staging
Save the deployment.properties file and restart the IBM Cloud Manager with OpenStack server. Theproperty takes effect after the server is restarted.
Note: When using the VMware adapter, virtual servers that are defined as templates on the vCenterserver are automatically discovered and displayed on the IBM Cloud Manager with OpenStack Imagesarea. The IBM Cloud Manager with OpenStack administrator defines which images belong to which userprofiles and therefore defines which VMware virtual server templates a user can access. IBM CloudManager with OpenStack discovers all virtual server templates regardless of which datacenter they residein. There is currently no option to limit IBM Cloud Manager with OpenStack to specific datacenters.
Configuring global priority of an instance when relocatingIBM Cloud Manager with OpenStack enables you to choose whether you want your users to update theglobal priority of an instance when relocating the instance from host to host. Instance priority is thepriority for relocating instances from one host to another host, when the instance is deployed in a pool.Depending on your site administration policies, you might not want users to change the priority ofinstances.
About this task
To configure the ability of updating instance priority, follow these steps:
Procedure1. Open the deployment.properties file in the home directory.2. To disable the ability to update instance priority, set the com.ibm.cfs.deployments.update.priority
property to false. The default value of this property is false. If this property does not exist in thedeployment.properties file, add it to the file.
3. Save the deployment.properties file and restart the IBM Cloud Manager with OpenStack server.
Configuring access to advanced deployment formIBM Cloud Manager with OpenStack allows you to choose whether you want your users to see theadvanced deployment form or just the basic deployment form.
About this task
The advanced deployment form allows a user or administrator to access all of the image properties thatcan be configured when an image is deployed. The basic deployment form contains only a subset of theimage properties. Depending on your site administration policies, you may or may not want to show thisadvanced panel to the user.
To configure the visibility of the advanced deployment form, follow these steps:
Procedure1. Open the deployment.properties file in the home directory.
Chapter 6. Configuring 175
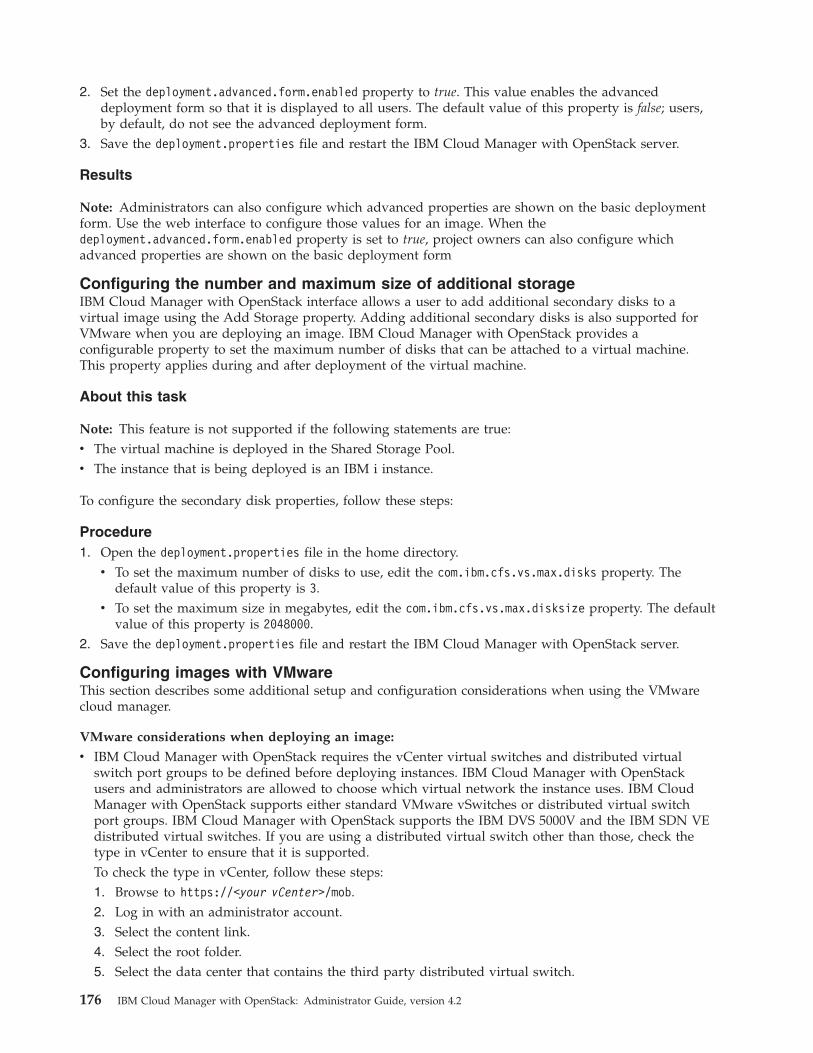
2. Set the deployment.advanced.form.enabled property to true. This value enables the advanceddeployment form so that it is displayed to all users. The default value of this property is false; users,by default, do not see the advanced deployment form.
3. Save the deployment.properties file and restart the IBM Cloud Manager with OpenStack server.
Results
Note: Administrators can also configure which advanced properties are shown on the basic deploymentform. Use the web interface to configure those values for an image. When thedeployment.advanced.form.enabled property is set to true, project owners can also configure whichadvanced properties are shown on the basic deployment form
Configuring the number and maximum size of additional storageIBM Cloud Manager with OpenStack interface allows a user to add additional secondary disks to avirtual image using the Add Storage property. Adding additional secondary disks is also supported forVMware when you are deploying an image. IBM Cloud Manager with OpenStack provides aconfigurable property to set the maximum number of disks that can be attached to a virtual machine.This property applies during and after deployment of the virtual machine.
About this task
Note: This feature is not supported if the following statements are true:v The virtual machine is deployed in the Shared Storage Pool.v The instance that is being deployed is an IBM i instance.
To configure the secondary disk properties, follow these steps:
Procedure1. Open the deployment.properties file in the home directory.
v To set the maximum number of disks to use, edit the com.ibm.cfs.vs.max.disks property. Thedefault value of this property is 3.
v To set the maximum size in megabytes, edit the com.ibm.cfs.vs.max.disksize property. The defaultvalue of this property is 2048000.
2. Save the deployment.properties file and restart the IBM Cloud Manager with OpenStack server.
Configuring images with VMwareThis section describes some additional setup and configuration considerations when using the VMwarecloud manager.
VMware considerations when deploying an image:
v IBM Cloud Manager with OpenStack requires the vCenter virtual switches and distributed virtualswitch port groups to be defined before deploying instances. IBM Cloud Manager with OpenStackusers and administrators are allowed to choose which virtual network the instance uses. IBM CloudManager with OpenStack supports either standard VMware vSwitches or distributed virtual switchport groups. IBM Cloud Manager with OpenStack supports the IBM DVS 5000V and the IBM SDN VEdistributed virtual switches. If you are using a distributed virtual switch other than those, check thetype in vCenter to ensure that it is supported.To check the type in vCenter, follow these steps:1. Browse to https://<your vCenter>/mob.2. Log in with an administrator account.3. Select the content link.4. Select the root folder.5. Select the data center that contains the third party distributed virtual switch.
176 IBM Cloud Manager with OpenStack: Administrator Guide, version 4.2
6. Select the network folder.7. Select the distributed switch that you want (the id starts with dvs-).
The top of the page shows the managed object type of the switch. If the switch type isVmwareDistributedVirtualSwitch or DistributedVirtualSwitch then it is supported. If the distributed switchtype is something other than the types listed, it is not supported; you receive an error when youdeploy to a port group that uses that distributed switch.
v IBM Cloud Manager with OpenStack connects to the vCenter server by using a single user ID andpassword. It is recommended that this user has the vCenter administrator role. If you choose to use adifferent user ID, that user must have sufficient permissions to perform the operations on the virtualmachines. The user ID must also have access to various virtual machine resources, such as networksand datastores.
v Do not change a virtual machines UUID in the vSphere Infrastructure Client. In some cases, such asmanually moving a virtual machine, the vSphere Infrastructure Client asks if you want the UUIDchanged. When an instance is deployed, IBM Cloud Manager with OpenStack keeps the UUID of thevirtual machine in its database and uses that UUID to find the virtual machine in vCenter, thereforeyou should not change the UUID.
v At some point, you might decide to migrate from IBM Cloud Manager with OpenStack to the IBMTivoli Service Automation Manager (TSAM) product or other IBM cloud product. To ease thetransition, it is highly recommended that you set up your Windows and Linux guest images asrequired by TSAM. Even if you have no plans to migrate, see Creating operating system imagetemplates for VMware in the IBM Tivoli Service Automation Manager information center athttp://pic.dhe.ibm.com/infocenter/tivihelp/v10r1/topic/com.ibm.tsam_7.2.4.1.doc/rdp/c_supported_os_vmware.html for more information about configuring your guest images.
v It is recommended that you install VMware tools on your guest operating systems before you make thevirtual machine a template.
Note: The VMware tools must be current with your version of VMware.v If you are using the VMware Converter tool to import your virtual machines into vCenter, you should
fully start the virtual server by using the VMware vSphere Client before you make it a template. Thisaction allows vCenter to discover whether VMware tools are installed into the guest.
v All virtual machines in vCenter are shown as instances in IBM Cloud Manager with OpenStack. If youconvert a virtual machine to a template, the status of that instance in IBM Cloud Manager withOpenStack changes to Unknown since the virtual machine is now a template. Do not delete thisinstance from IBM Cloud Manager with OpenStack since that deletes the underlying template onvCenter. If you want to make this instance not available for non-administrative users, use the Hideoption instead.
v IBM Cloud Manager with OpenStack does not allow you to import vApps. If you want to enable usersto deploy a single virtual server vApp, follow these steps:– Import the vApp by using vCenter– Modify the vApp properties as required by the application.– Convert the vApp to a template
v vApps with more than one virtual server are not supported.v During the deployment of an image, IBM Cloud Manager with OpenStack uses the VMware API to
apply customizations to the new virtual machine image. Therefore the VMware template image mustbe customizable by VMware. While VMware vCenter enables you to deploy a template withoutcustomizations, this option is not available in IBM Cloud Manager with OpenStack.
v When you deploy an image, IBM Cloud Manager with OpenStack instructs VMware to power on thenewly deployed virtual machine. In some cases, depending on server loads, VMware might not poweron the virtual machine. In this case, IBM Cloud Manager with OpenStack displays, by default, theinstance in STOPPED state. Since the instance has been successfully cloned and configured, IBM Cloud
Chapter 6. Configuring 177
Manager with OpenStack does not display an error and the instance can be started by the user. Youcan change this default behavior by using a deployment property that is described in the Waiting for adeployed virtual machine (VMware) topic.
v By default, IBM Cloud Manager with OpenStack reports a newly deployed instance in OK state assoon as VMware powers on the virtual machine. Depending on the guest operating system and imagedefinition, it might be a few minutes before the virtual machine is completely up and running and canbe used. In some cases, VMware might restart the virtual machine more than once during thecustomization process. You can change this default behavior by using a deployment property that isdescribed in the Waiting for a deployed virtual machine (VMware) topic.
v IBM Cloud Manager with OpenStack allows the target of a deployment to be either a specific host, ahost resource pool that is associated with a host, a cluster, or a resource pool that is associated with acluster. If the cluster is a DRS enabled cluster, VMware chooses the appropriate host and therefore youcannot choose an individual host in that cluster. By default, IBM Cloud Manager with OpenStack isconfigured to randomly choose a host that is not associated with a cluster. If no hosts are available,you get an error when you deploy. You can change the default behavior by modifying thedeployment.properties file as described in section “Configuring a deployment target” on page 174.However, it is recommended that an administrator configure each images target. For more information,see “Configuring global image deployment” on page 173.
v IPv6 is not supported when deploying to a VMware cloud. In order for deployments to not obtain anIPv6 address, the administrator needs to disable IPv6 in the VM template that is used for deploys.
Saving, restoring, and deleting virtual servers:
The IBM Cloud Manager with OpenStack allows users to save back up copies of their virtual server disksand configuration files. These copies can be restored later.
In addition, IBM Cloud Manager with OpenStack provides functions to allow users to view and deletetheir saved images. IBM Cloud Manager with OpenStack allows users to keep an administratorconfigured number of saved images. When the limit is reached, the system automatically deletes theoldest saved image. For information about how users perform save, restore, view, and delete operations,see the IBM Cloud Manager with OpenStack User Guide.
Deleting a virtual server
When a virtual server is deleted, all the saved images are deleted at the same time. There is no option tokeep images beyond the life of the virtual server.
Approvals
The save and restore functions can be configured for approval control. This requires an IBM CloudManager with OpenStack administrator to first approve any save or restore request.
Note: If the virtual server is powered on, the save function powers down the virtual server beforestarting the save operation. If the approval process is enabled, the virtual server remains powered onuntil the administrator approves the save or restore request. There is no approval process for deleting asaved virtual server image. To enable the approval process, see “Managing approval policies” on page227.
Authorization
Only the creator of an instance, an IBM Cloud Manager with OpenStack administrator, or the projectowner is allowed to save, restore, or delete a virtual server image. Users within the same project are notallowed to perform save, restore, or delete operations on other user images within a project.
178 IBM Cloud Manager with OpenStack: Administrator Guide, version 4.2

Notifications
The save, restore, and delete images functions log events to the IBM Cloud Manager with OpenStackevent log. In addition, save image and restore image operations send email notifications, if the userconfiguration is enabled to receive email notifications.
For more information about email notifications, see “Configuring email notifications” on page 171.
Setting saved image limit:
By default, IBM Cloud Manager with OpenStack allows you to keep up to three saved virtual serverimages.
About this task
To change this limit, follow these steps:
Procedure
1. Open the deployment.properties file.2. Update the com.ibm.cfs.vs.max.backups property.
For example, to keep 10 saved virtual server images, change the property to the following setting:com.ibm.cfs.vs.max.backups=10
3. Save the deployment.properties file.4. Restart the IBM Cloud Manager with OpenStack server.
VMware datastore assignment during deployment:
There is a new deployment property that you can set to select the target storage to be used when youdeploy a virtual image. You can set the Target Storage property value to datastores or datastore clustersthat are attached to the selected deployment target. If the selected deployment target is changed, thetarget storage value is updated to match what is available on the newly selected deployment target. IBMCloud Manager with OpenStack always sets the default target storage value to use the default storageselection algorithm.
The default storage selection algorithm retrieves the list of datastores and datastore clusters that areassociated with the deployment target. It then selects one of the datastores or datastore clusters that isbacked by a block device that has enough free space to contain the virtual machine disk sizes. If a blockstorage cannot be selected, then the appropriate NFS file storage, with the largest free space is chosen. Ifthere is no available storage, the deployment fails.
You can specify a set of datastores and datastore clusters for the selection algorithm to exclude or includeor both. Set the com.ibm.cfs.cloud.vmware.enable.clone.template.properties property in thevmware.properties file to true. To exclude datastores and datastore clusters from being selected, edit thecom.ibm.cfs.cloud.vmware.datastore.exclude.list property and add a comma-separated list ofdatastore and datastore cluster names. To set the datastores and datastore clusters that can be selected,edit the com.ibm.cfs.cloud.vmware.datastore.include.list property and add a comma-separated list ofdatastore and datastore cluster names.
Note: By default, the selection algorithm includes all of the datastores and datastore clusters that areassociated with the deployment target.
For example,com.ibm.cfs.cloud.vmware.enable.clone.template.properties=truecom.ibm.cfs.cloud.vmware.datastore.exclude.list=dscluster3,localdisk4com.ibm.cfs.cloud.vmware.datastore.include.list=localdisk1,dscluster2
Chapter 6. Configuring 179
To disable the algorithm, specify the datastore that you want to use in thecom.ibm.cfs.cloud.vmware.target.datastore.names property.
For example:com.ibm.cfs.cloud.vmware.enable.clone.template.properties=truecom.ibm.cfs.cloud.vmware.target.datastore.names=san,san,san
Each datastore that is listed is for a different virtual disk. The first entry is the datastore where the virtualserver configuration files are located. The subsequent datastores in the list are for the virtual system harddisk devices. For example, if your virtual server has three disks you must specify four datastores in thislist. These datastores can all be the same datastore or a combination of different datastores. If the firstentry is for a datastore cluster, then the remaining entries are ignored. The datastore cluster is used forboth the configuration files and disks. Datastore clusters are ignored when specified for subsequententries in the list.
These vmware.properties file changes apply globally to IBM Cloud Manager with OpenStack andtherefore to all deployment targets. Make sure that you specify datastores and datastore clusters that areavailable to all hosts that are the potential targets for every image. You cannot use the include list anddatastore names properties, if the following is true:v You have multiple cluster targets, each with its own set of storage, that is managed by the same
vCenter.v You want IBM Cloud Manager with OpenStack to target all the clusters.
In the datastore names property, you can specify different datastores for different disks if your virtualserver templates have more than one disk.
Note:
v Datastore clusters are only available when you are using vSphere 5 Enterprise Plus edition. For moreinformation about configuring and using datastore clusters, see the vSphere documentation.
v When you create the vmware.properties file, you must restart IBM Cloud Manager with OpenStackserver. However, changes made to the property file after you restart the server are automaticallyupdated.
Setting VMware user data during deployment:
When you deploy an image, you can set user data for the deployed virtual machine by using instancecustomization. The user data customization enables you to pass your own configuration information tothe deployed virtual machine. If this customization fails during deployment, IBM Cloud Manager withOpenStack displays the instance in FAILED state.
About this task
IBM Cloud Manager with OpenStack does not require a specific content or format for the user data.Other than base64 decoding, IBM Cloud Manager with OpenStack passes the data unchanged to theguest. It is therefore the responsibility of the guest provider to process the user data. This usually requireswriting and configuring a startup script to read this data from the CD device. IBM Cloud Manager withOpenStack does not provide nor recommend any particular script.
IBM Cloud Manager with OpenStack supports base64 encoded and plain text user data. The defaultvalue is set to base64 encoded. If decoding the user data fails, the user data is treated as plain text. IBMCloud Manager with OpenStack passes the decoded user data to the deployed virtual machine through aCD backed by an ISO file. This gives the virtual machine access to the user data through the user-datafile on one of its CD devices.
180 IBM Cloud Manager with OpenStack: Administrator Guide, version 4.2

IBM Cloud Manager with OpenStack must be configured properly to create an ISO file that contains theuser data. When IBM Cloud Manager with OpenStack is installed on Linux, the the mkisofs orgenisoimage binary must exist in the /usr/bin directory.
In addition, you can also set the following properties in the vmware.properties file to control the userdata:
com.ibm.cfs.cloud.vmware.user.data.file.nameThe name of the file on the ISO that contains the actual user data. The default value is user-data.
com.ibm.cfs.cloud.vmware.user.data.iso.temp.pathThe name of the path that is used to temporarily store ISO files on the IBM Cloud Manager withOpenStack server. The default value is the IBM Cloud Manager with OpenStack home directory.This path must end with a path separator, such as '/' on Linux.
Note:
v The ISO files that are created are managed by IBM Cloud Manager with OpenStack and not VMware.As a result, when you delete a virtual machine outside of IBM Cloud Manager with OpenStack, suchas through the vSphere client interface, the ISO file that is created for the virtual machine is notremoved.
v The ISO file of the virtual machine that contains the user data is not preserved with any saved virtualserver images or capture instances that are created from the virtual machine.
Set secure access during deployment:
When you deploy a Linux image, you can set secure access to the deployed virtual machine by usinginstance customizations.
Using these optional customizations, you can set the password or SSH public key or both for a user onthe guest operating system. If these customizations fail during deployment, IBM Cloud Manager withOpenStack displays the instance in FAILED state. You can set secure access for a root or a non-root user.
IBM Cloud Manager with OpenStack must be provided with the current root user name and passwordfor the guest operating system to set secure access during deployment. In addition, IBM Cloud Managerwith OpenStack uses VMware guest operations to complete the customizations and there are specialrequirements for performing VMware guest operations. For more information, see “Requirements forVMware guest operation” on page 183.
When you set a password for a user, access the IBM Cloud Manager with OpenStack server by using asecure connection. This ensures that the password is encrypted when sent to the IBM Cloud Managerwith OpenStack server. For more information, see “Configuring secure shell (SSH) communication” onpage 164.
When you set an SSH public key for a user, the guest operating system must have OpenSSH installedand configured to take advantage of this customization. In addition, the SSH public key must be specifiedaccording to the OpenSSH authorized_keys file format. For more information about OpenSSH, seehttp://www.openssh.org/.
Resetting secure access during capture:
When you capture a Linux instance, the SSH public keys for a user are removed from the guest operatingsystem if they were set by IBM Cloud Manager with OpenStack when the instance was deployed.
Note: For more information, see “Set secure access during deployment.”
Chapter 6. Configuring 181
Removing the SSH public keys prevents the keys from being available to instances deployed from thecaptured image. If the SSH public keys are unable to be removed during capture, IBM Cloud Managerwith OpenStack displays warning messages in the image logs. In such cases, you must manually removethe SSH public keys for the user.
IBM Cloud Manager with OpenStack needs the current root user name and password for the guestoperating system to reset secure access during capture. IBM Cloud Manager with OpenStack obtains thisinformation from the virtual server credentials, which are initially set based on the instancecustomizations. The virtual server credentials can be reset later if changed in the guest operating systemafter deployment. For more information, see the GET and PUT /instances/{id}/virtualServers/{id}/credentialsREST APIs in the IBM Cloud Manager with OpenStack Software Development Kit (SDK) Reference guide.
IBM Cloud Manager with OpenStack uses VMware guest operations to reset secure access during captureand there are special requirements for performing VMware guest operations.
Note: For more information, see “Requirements for VMware guest operation” on page 183.
Waiting for a deployed virtual machine (VMware):
IBM Cloud Manager with OpenStack provides a deployment property that enables users to specifywhether to wait for a deployed virtual machine to be started and ready for use before it reports thenewly deployed instance in OK state.
About this task
This deployment property option is labeled “Wait for the deployed virtual machine to be started andready for use.” When this option is enabled, IBM Cloud Manager with OpenStack displays the instancein a FAILED state, if the deployed virtual machine is not started and ready for use in the allotted time. Afailure can be caused by problems during the customization process (for example, specifying an incorrectWindows product key) or if the virtual machine cannot be powered on.
If VMware Tools is installed on the guest operating system, the virtual machine is considered started andready for use when the virtual machine is powered on and the necessary network customizations arecompleted for it. If VMware Tools is not installed, then only the powered on state is checked.
You can configure the amount of time to wait for a deployed virtual machine to be started and ready foruse by setting the com.ibm.cfs.cloud.vmware.deployed.vm.start.wait.time in the vmware.properties file. Thetime is in seconds and defaults to 2,700 (or 45 minutes). For example,com.ibm.cfs.cloud.vmware.deployed.vm.start.wait.time=1800
You can also configure the default value for this deployment property by settingcom.ibm.cfs.cloud.vmware.default.deployed.vm.start.wait in the vmware.properties file. The default value isfalse, which disables the option so that IBM Cloud Manager with OpenStack reports a newly deployedinstance in OK state as soon as VMware powers on the virtual machine. You can override thecom.ibm.cfs.cloud.vmware.default.deployed.vm.start.wait setting when you configure or deploy an image. Forexample, com.ibm.cfs.cloud.vmware.default.deployed.vm.start.wait=true.
Note:
v The wait time starts after IBM Cloud Manager with OpenStack attempts to power on the deployedvirtual machine.
v This deployment property applies globally to IBM Cloud Manager with OpenStack and therefore to allVMware deployments.
v When you create the vmware.properties file, you must restart IBM Cloud Manager with OpenStackserver; however changes made to the property file after that are picked up automatically.
182 IBM Cloud Manager with OpenStack: Administrator Guide, version 4.2
v During deployment, some optional instance customizations require the deployed virtual machine to bestarted and ready for use before the customizations can be completed. In such cases,IBM CloudManager with OpenStack waits for the deployed virtual machine regardless of the value that isspecified for this deployment property.
Note: For example, see “Set secure access during deployment” on page 181.
Requirements for VMware guest operation:
VMware guest operations are used to perform certain optional customizations of instances.
When you request such customizations, your request must meet the following requirements tosuccessfully perform the VMware guest operations:1. vCenter version 5.0 or later is required.2. The vSphere host machine that is used for the instance must be at version 5.0 or later and IBM Cloud
Manager with OpenStack must have network connectivity to it.3. VMware tools must be installed and current on the guest operating system for the virtual machine.4. VMware guest operations must be enabled for both the virtual machine and the host machine. They
are enabled by default, but can be disabled.
Note: If it is necessary to connect to the host machine to complete the VMware guest operations, IBMCloud Manager with OpenStack automatically accepts the security certificate for the host machine. Thesecurity certificate is stored in the <host machine>.jks file in your IBM Cloud Manager with OpenStackhome directory.
Configuring shutdown of VMware instances:
In previous versions of IBM Cloud Manager with OpenStack stopping an active instance of VMwareinstantly powered off the running instance. The virtual machine was given no delay to allow it toperform its own shutdown process. IBM Cloud Manager with OpenStack now provides a 90-second delayfor the system to complete the shutdown process. If by the end of 90 seconds the system is not shutdown, IBM Cloud Manager with OpenStack forces the VMware instance to power down immediately.
You can configure the behavior of how VMware instances are shut down by modifying the followingstatements in vmware.properties:
com.ibm.vmware.client.shutdown.delay.in.milliseconds=90000This property allows the VMware instance time to shut down before a power off is called. Thedefault is 90000 milliseconds if the property is not specified. Setting this property to 0 (zero)prevents a shutdown from being called.
com.ibm.vmware.client.disable.save.image.shutdown=falseThis property disables shutdown when save image is called. The default value is set to false,which allows shutdown to be called before save image. Specifying a value of true prevents ashutdown from being called on save image operations.
VMware limitations:
The following limitations apply to VMware and IBM Cloud Manager with OpenStack.v The saved images are managed by IBM Cloud Manager with OpenStack and not VMware. Deleting an
image outside of IBM Cloud Manager with OpenStack, such as through the vSphere client interface,does not remove the saved images.
v Properties that are defined in the deployment.properties file and the vmware.properties file are globalto all users, instances, and images. There is no option to configure these options on a more granularlevel.
Chapter 6. Configuring 183
v If you have an image that is defined in IBM Cloud Manager with OpenStack and you rename theassociated virtual machine template by using the vSphere Client, the name of the image in IBM CloudManager with OpenStack does not change. The IBM Cloud Manager with OpenStack image is stillassociated with the renamed template and can continue to be used. The image details page displaysthe renamed template name in the Original name field. You can manually change the name of theimage by clicking the name of the image on the Images details page and pressing Save.
v If you have an image that is defined in IBM Cloud Manager with OpenStack and you convert it to avirtual machine by using the vSphere Client, the image in IBM Cloud Manager with OpenStack showsa state of unknown. This state is displayed because it is no longer a template on the VMware server; theconversion made it a virtual machine, which shows up as an IBM Cloud Manager with OpenStackinstance. If the unknown IBM Cloud Manager with OpenStack image is no longer needed, it can bedeleted. A deletion of the IBM Cloud Manager with OpenStack image does not affect the IBM CloudManager with OpenStack instance or virtual machine on the VMware server.
v In some cases, when you use special characters in names of VMware objects such as port group namesand cluster names, the VMware API encodes these specials characters in a URL encoding scheme. Forexample a / character is encoded as a %2f. When the names are displayed in IBM Cloud Manager withOpenStack, the characters are not decoded. IBM Cloud Manager with OpenStack displays the encodedname. For example, if you have a cluster named DRS/Cluster it is displayed as DRS%2f%Cluster.
v IBM Cloud Manager with OpenStack creates and manages custom fields for internal use when usingVMware virtual machines. The custom fields have a "SKC_" prefix and you should not modify orremove them using the vSphere client.
Configuring images with OpenStackThe following topics cover information to configure images in an OpenStack environment.
Customizing an OpenStack instance:
When an image is deployed, you might have to customize the resulting instance on startup to applynetwork configurations, login information, application settings, and so on, before the instance is ready foruse.
About this task
IBM Cloud Manager with OpenStack provides a deployment property to enable OpenStack config drivesupport when deploying an image. This support is used to pass customizations (for example: servermetadata, user data, personality files, and SSH keys) to an instance. The config drive can be accessed byany guest operating system capable of mounting an ISO9960 file system. Images that are built with arecent version of the cloud-init software package, or similar software package such as IBM SmartCloudinit, can automatically access and apply the supported customizations that are passed to the instance bythe config drive.
Note: For more information about the cloud-init software package and the customizations that itsupports, see CloudInit.
IBM Cloud Manager with OpenStack also supports the Pluggable Configuration Strategy feature addedby IBM to OpenStack. This feature is similar to the config drive support in that it provides an instancewith the necessary customizations. Like config drive, the image must be built with the correct softwarepackage for the configuration strategy to automatically access and apply the customizations. In particular,this feature provides support for Open Virtualization Format (OVF) or Microsoft Windows SystemPreparation (Sysprep) configuration. For more information, see the following resources:v For information about OVF configuration, see Open Virtualization Format (OVF).v For information about Sysprep configuration, see Sysprep Technical Reference.
184 IBM Cloud Manager with OpenStack: Administrator Guide, version 4.2
Cloud-init software package:
IBM Cloud Manager with OpenStack supports the cloud-init software package.
When you deploy an image with config drive enabled, IBM Cloud Manager with OpenStack makes theinstance customizations available to cloud-init using the OpenStack config drive support. The cloud-initsoftware package can then access the config drive and apply the customizations to the instance. Thefollowing are some of the customizations made available through the config drive:1. User data2. Personality files3. SSH key pair4. Network adapter information (for static networks)5. Password of the default user (the password option)
Using IBM Cloud Manager with OpenStack, you can enter the contents of the user data and personalityfiles by using the deployment properties. You can enter the contents when you configure or deploy animage. The contents can be either base64 encoded or plain text. There are also deployment properties forthe SSH key pair and network adapters that are based on the SSH key pairs and networks available. Youcan set the network adapters when you configure or deploy an image. However, the SSH key pair shouldnot be set when you configure an image because OpenStack SSH key pairs are scoped to a user. Instead,the user who deploys the image should select an appropriate SSH key pair.
Note:
v Config drive is ignored when deploying PowerVC images. As a result, the instance customizations thatare passed by the config drive are also ignored.
v The cloud-init password option sets the password for the default user, which is usually not the rootuser.
v For more information about the cloud-init software package and the customizations that it supports,see CloudInit.
v For more information about the OpenStack config drive support, see Config drive.
Configuration strategies:
IBM Cloud Manager with OpenStack supports the OVF and Sysprep types of pluggable configurationstrategies.
When an image is deployed that has one of these configuration strategies, the OpenStack PluggableConfiguration Strategy feature determines the customizations made available to the instance and howthey are made available. The appropriate software package (for the configuration strategy type) on theimage is expected to access and apply the customizations. The customizations that are provided byOpenStack come from the following sources:1. Server metadata that is provided by OpenStack itself.2. Server metadata that is provided by the user deploying the image.
The following server metadata is provided by OpenStack:server.admin_password Random administrator password generated by OpenStack.server.hostname The hostname for the instance.server.domainname Domain name from the dhcp_domain configuration option.server.dns-client.pri_dns Primary DNS server IP address.server.dns-client.sec_dns Secondary DNS server IP address.server.dns-client.dns_list Space separated list of DNS server IPs.server.network.[n].mac Mac address for network interface number n.server.network.[n].mac_alt Mac address formatted with '-' rather than ':'.server.network.[n].slotnumber Slot number for network interface number n.
Defined as the decimal value of the last two digits
Chapter 6. Configuring 185
of the mac address.server.network.[n].[v4|v6].address IPv4 or IPv6 address for network interface number n.server.network.[n].[v4|v6].netmask IPv4 or IPv6 netmask for network interface number n.server.network.[n].[v4|v6].cidr IPv4 or IPv6 address and netmask in CIDR notation
for network interface number n.server.network.[n].[v4|v6].gateway IPv4 or IPv6 gateway for network interface number n.server.network.[n].v4.use_dhcp 'true' if the network uses DHCP.
Server metadata that is provided by the user during deployment are prefixed with ’server.metadata’.
Creating a configuration strategy:
A complete and accurate OVF or Sysprep configuration strategy is important to ensure that an image canbe deployed and customized properly. A poor configuration strategy can cause the deployment to fail orprevent the instance from being customized.
About this task
A configuration strategy consists of the following parts:v Typev Templatev Mappingv User metadata
For information about how to add, update or delete the configuration strategy of an image, see“Updating an image configuration strategy (OpenStack only)” on page 218.
Type The type is required and can either be ovf or sysprep.
TemplateThe template is required. When you are using an ovf configuration strategy type, this containsthe OVF descriptor for the image. When you are using a sysprep configuration strategy type, thiscontains the template unattend.xml file for the image.
MappingThe mapping is required. It defines how to map the server metadata that is provided by bothOpenStack and the user deploying the image to the appropriate elements/parts of the template.The mapping is a JavaScript Object Notation (JSON) array of objects, where each object has asource representing the server metadata to map to the target element/part in the template. Forexample:[
{"source": "server.network.1.v4.address","target": "com.ibm.vsae.2_1.network-interface.ipaddr"
},
{"source": "server.network.1.v4.netmask","target": "com.ibm.vsae.2_1.network-interface.netmask"
},
{"source": "server.network.1.v4.gateway","target": "com.ibm.vsae.2_1.network-interface.gateway"
},
{"source": "server.hostname","target": "com.ibm.vsae.2_1.system-host.hostname"
},
186 IBM Cloud Manager with OpenStack: Administrator Guide, version 4.2
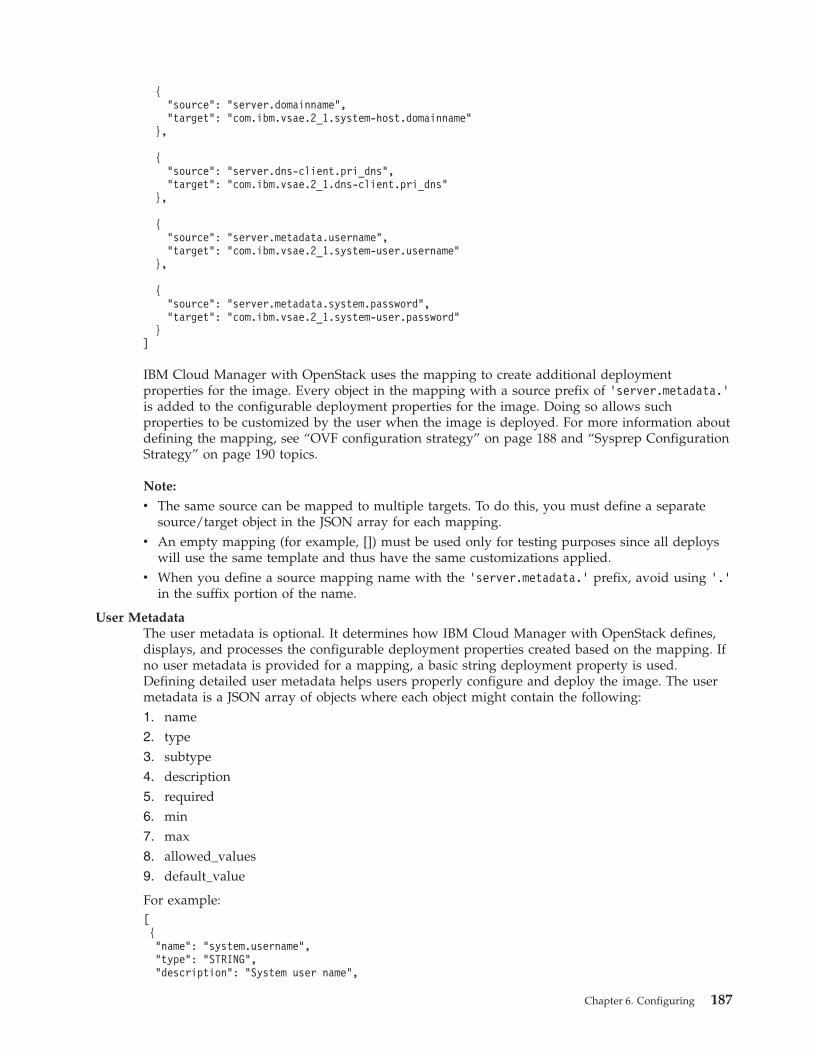
{"source": "server.domainname","target": "com.ibm.vsae.2_1.system-host.domainname"
},
{"source": "server.dns-client.pri_dns","target": "com.ibm.vsae.2_1.dns-client.pri_dns"
},
{"source": "server.metadata.username","target": "com.ibm.vsae.2_1.system-user.username"
},
{"source": "server.metadata.system.password","target": "com.ibm.vsae.2_1.system-user.password"
}]
IBM Cloud Manager with OpenStack uses the mapping to create additional deploymentproperties for the image. Every object in the mapping with a source prefix of ‘server.metadata.’is added to the configurable deployment properties for the image. Doing so allows suchproperties to be customized by the user when the image is deployed. For more information aboutdefining the mapping, see “OVF configuration strategy” on page 188 and “Sysprep ConfigurationStrategy” on page 190 topics.
Note:
v The same source can be mapped to multiple targets. To do this, you must define a separatesource/target object in the JSON array for each mapping.
v An empty mapping (for example, []) must be used only for testing purposes since all deployswill use the same template and thus have the same customizations applied.
v When you define a source mapping name with the ‘server.metadata.’ prefix, avoid using '.'in the suffix portion of the name.
User MetadataThe user metadata is optional. It determines how IBM Cloud Manager with OpenStack defines,displays, and processes the configurable deployment properties created based on the mapping. Ifno user metadata is provided for a mapping, a basic string deployment property is used.Defining detailed user metadata helps users properly configure and deploy the image. The usermetadata is a JSON array of objects where each object might contain the following:1. name2. type3. subtype4. description5. required6. min7. max8. allowed_values9. default_value
For example:[{"name": "system.username","type": "STRING","description": "System user name",
Chapter 6. Configuring 187
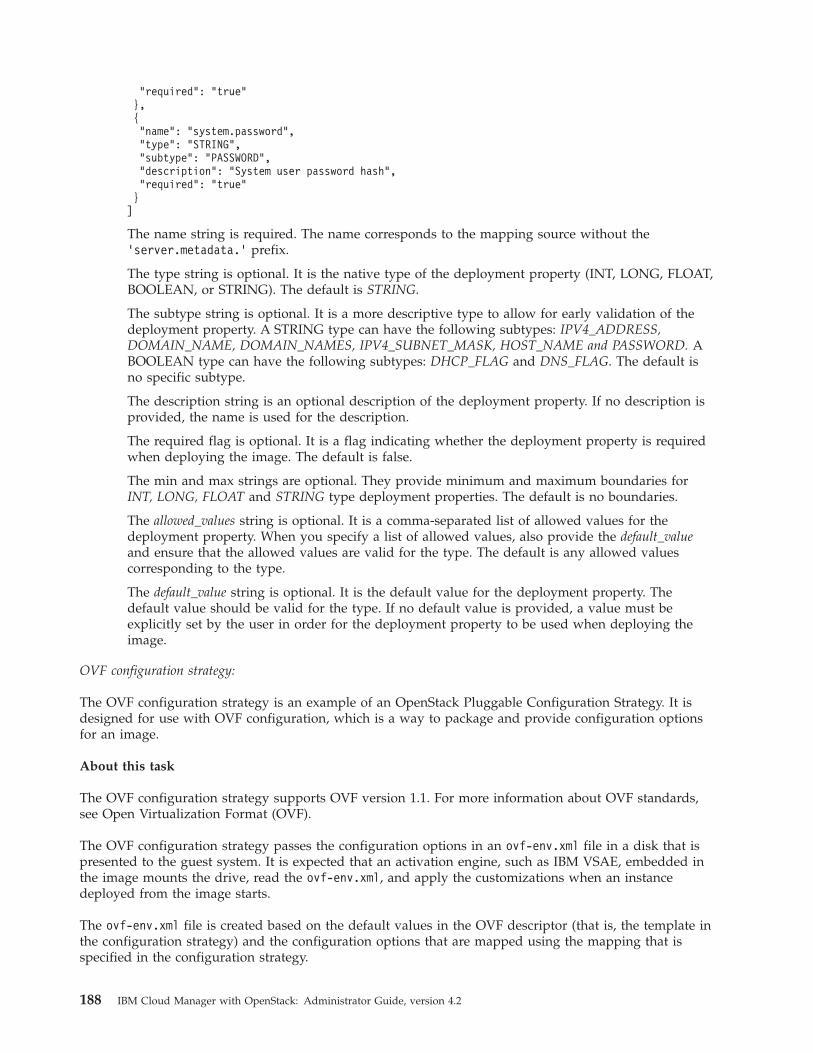
"required": "true"},{"name": "system.password","type": "STRING","subtype": "PASSWORD","description": "System user password hash","required": "true"}]
The name string is required. The name corresponds to the mapping source without the‘server.metadata.’ prefix.
The type string is optional. It is the native type of the deployment property (INT, LONG, FLOAT,BOOLEAN, or STRING). The default is STRING.
The subtype string is optional. It is a more descriptive type to allow for early validation of thedeployment property. A STRING type can have the following subtypes: IPV4_ADDRESS,DOMAIN_NAME, DOMAIN_NAMES, IPV4_SUBNET_MASK, HOST_NAME and PASSWORD. ABOOLEAN type can have the following subtypes: DHCP_FLAG and DNS_FLAG. The default isno specific subtype.
The description string is an optional description of the deployment property. If no description isprovided, the name is used for the description.
The required flag is optional. It is a flag indicating whether the deployment property is requiredwhen deploying the image. The default is false.
The min and max strings are optional. They provide minimum and maximum boundaries forINT, LONG, FLOAT and STRING type deployment properties. The default is no boundaries.
The allowed_values string is optional. It is a comma-separated list of allowed values for thedeployment property. When you specify a list of allowed values, also provide the default_valueand ensure that the allowed values are valid for the type. The default is any allowed valuescorresponding to the type.
The default_value string is optional. It is the default value for the deployment property. Thedefault value should be valid for the type. If no default value is provided, a value must beexplicitly set by the user in order for the deployment property to be used when deploying theimage.
OVF configuration strategy:
The OVF configuration strategy is an example of an OpenStack Pluggable Configuration Strategy. It isdesigned for use with OVF configuration, which is a way to package and provide configuration optionsfor an image.
About this task
The OVF configuration strategy supports OVF version 1.1. For more information about OVF standards,see Open Virtualization Format (OVF).
The OVF configuration strategy passes the configuration options in an ovf-env.xml file in a disk that ispresented to the guest system. It is expected that an activation engine, such as IBM VSAE, embedded inthe image mounts the drive, read the ovf-env.xml, and apply the customizations when an instancedeployed from the image starts.
The ovf-env.xml file is created based on the default values in the OVF descriptor (that is, the template inthe configuration strategy) and the configuration options that are mapped using the mapping that isspecified in the configuration strategy.
188 IBM Cloud Manager with OpenStack: Administrator Guide, version 4.2
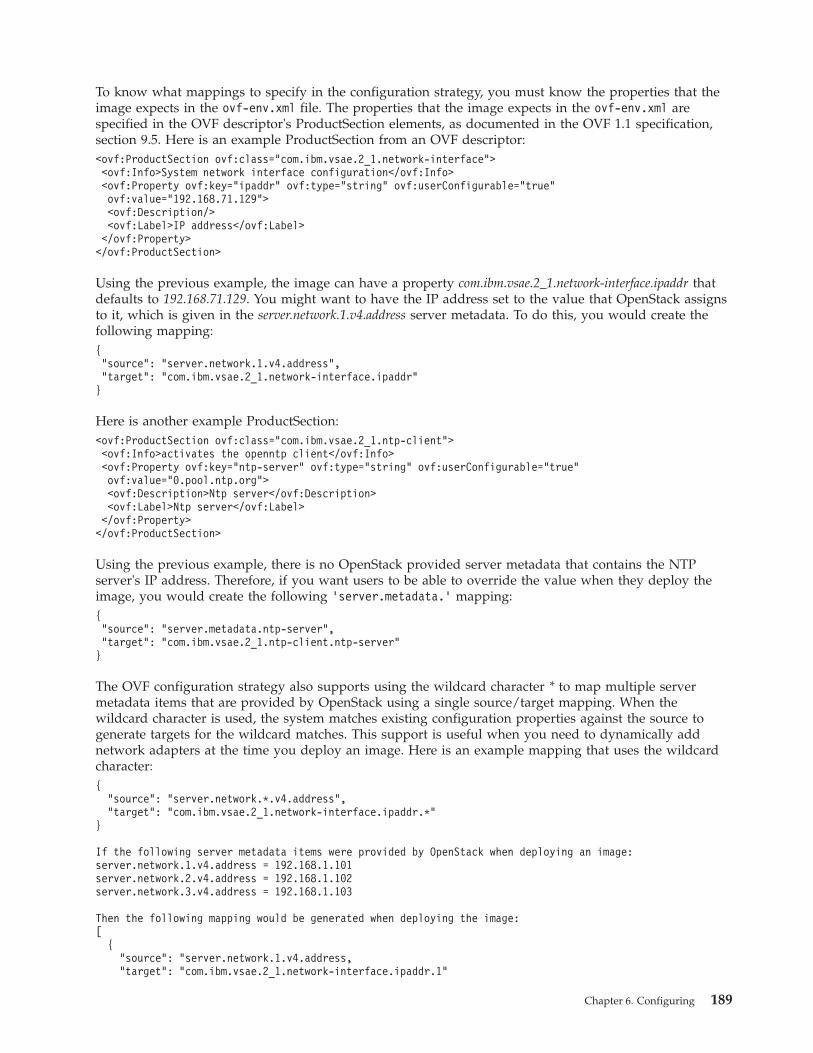
To know what mappings to specify in the configuration strategy, you must know the properties that theimage expects in the ovf-env.xml file. The properties that the image expects in the ovf-env.xml arespecified in the OVF descriptor's ProductSection elements, as documented in the OVF 1.1 specification,section 9.5. Here is an example ProductSection from an OVF descriptor:<ovf:ProductSection ovf:class="com.ibm.vsae.2_1.network-interface"><ovf:Info>System network interface configuration</ovf:Info><ovf:Property ovf:key="ipaddr" ovf:type="string" ovf:userConfigurable="true"ovf:value="192.168.71.129"><ovf:Description/><ovf:Label>IP address</ovf:Label></ovf:Property></ovf:ProductSection>
Using the previous example, the image can have a property com.ibm.vsae.2_1.network-interface.ipaddr thatdefaults to 192.168.71.129. You might want to have the IP address set to the value that OpenStack assignsto it, which is given in the server.network.1.v4.address server metadata. To do this, you would create thefollowing mapping:{"source": "server.network.1.v4.address","target": "com.ibm.vsae.2_1.network-interface.ipaddr"}
Here is another example ProductSection:<ovf:ProductSection ovf:class="com.ibm.vsae.2_1.ntp-client"><ovf:Info>activates the openntp client</ovf:Info><ovf:Property ovf:key="ntp-server" ovf:type="string" ovf:userConfigurable="true"ovf:value="0.pool.ntp.org"><ovf:Description>Ntp server</ovf:Description><ovf:Label>Ntp server</ovf:Label></ovf:Property></ovf:ProductSection>
Using the previous example, there is no OpenStack provided server metadata that contains the NTPserver's IP address. Therefore, if you want users to be able to override the value when they deploy theimage, you would create the following ‘server.metadata.’ mapping:{"source": "server.metadata.ntp-server","target": "com.ibm.vsae.2_1.ntp-client.ntp-server"}
The OVF configuration strategy also supports using the wildcard character * to map multiple servermetadata items that are provided by OpenStack using a single source/target mapping. When thewildcard character is used, the system matches existing configuration properties against the source togenerate targets for the wildcard matches. This support is useful when you need to dynamically addnetwork adapters at the time you deploy an image. Here is an example mapping that uses the wildcardcharacter:{
"source": "server.network.*.v4.address","target": "com.ibm.vsae.2_1.network-interface.ipaddr.*"
}
If the following server metadata items were provided by OpenStack when deploying an image:server.network.1.v4.address = 192.168.1.101server.network.2.v4.address = 192.168.1.102server.network.3.v4.address = 192.168.1.103
Then the following mapping would be generated when deploying the image:[
{"source": "server.network.1.v4.address,"target": "com.ibm.vsae.2_1.network-interface.ipaddr.1"
Chapter 6. Configuring 189
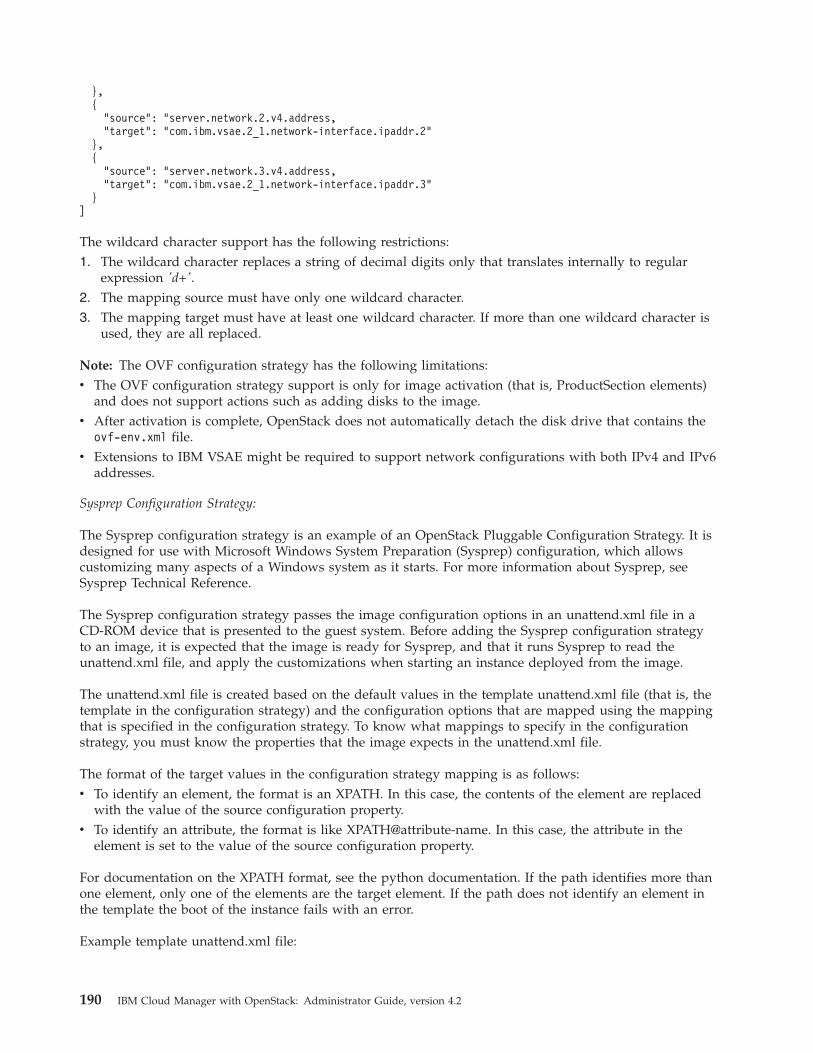
},{
"source": "server.network.2.v4.address,"target": "com.ibm.vsae.2_1.network-interface.ipaddr.2"
},{
"source": "server.network.3.v4.address,"target": "com.ibm.vsae.2_1.network-interface.ipaddr.3"
}]
The wildcard character support has the following restrictions:1. The wildcard character replaces a string of decimal digits only that translates internally to regular
expression 'd+'.2. The mapping source must have only one wildcard character.3. The mapping target must have at least one wildcard character. If more than one wildcard character is
used, they are all replaced.
Note: The OVF configuration strategy has the following limitations:v The OVF configuration strategy support is only for image activation (that is, ProductSection elements)
and does not support actions such as adding disks to the image.v After activation is complete, OpenStack does not automatically detach the disk drive that contains the
ovf-env.xml file.v Extensions to IBM VSAE might be required to support network configurations with both IPv4 and IPv6
addresses.
Sysprep Configuration Strategy:
The Sysprep configuration strategy is an example of an OpenStack Pluggable Configuration Strategy. It isdesigned for use with Microsoft Windows System Preparation (Sysprep) configuration, which allowscustomizing many aspects of a Windows system as it starts. For more information about Sysprep, seeSysprep Technical Reference.
The Sysprep configuration strategy passes the image configuration options in an unattend.xml file in aCD-ROM device that is presented to the guest system. Before adding the Sysprep configuration strategyto an image, it is expected that the image is ready for Sysprep, and that it runs Sysprep to read theunattend.xml file, and apply the customizations when starting an instance deployed from the image.
The unattend.xml file is created based on the default values in the template unattend.xml file (that is, thetemplate in the configuration strategy) and the configuration options that are mapped using the mappingthat is specified in the configuration strategy. To know what mappings to specify in the configurationstrategy, you must know the properties that the image expects in the unattend.xml file.
The format of the target values in the configuration strategy mapping is as follows:v To identify an element, the format is an XPATH. In this case, the contents of the element are replaced
with the value of the source configuration property.v To identify an attribute, the format is like XPATH@attribute-name. In this case, the attribute in the
element is set to the value of the source configuration property.
For documentation on the XPATH format, see the python documentation. If the path identifies more thanone element, only one of the elements are the target element. If the path does not identify an element inthe template the boot of the instance fails with an error.
Example template unattend.xml file:
190 IBM Cloud Manager with OpenStack: Administrator Guide, version 4.2
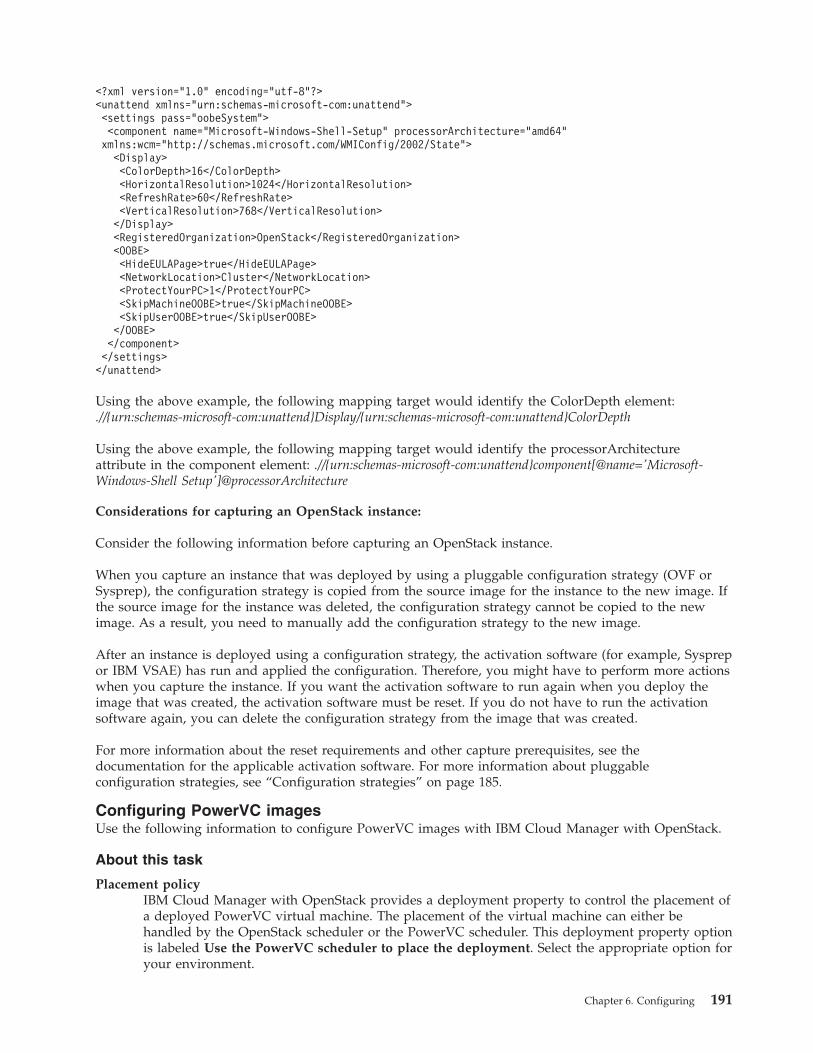
<?xml version="1.0" encoding="utf-8"?><unattend xmlns="urn:schemas-microsoft-com:unattend"><settings pass="oobeSystem"><component name="Microsoft-Windows-Shell-Setup" processorArchitecture="amd64"xmlns:wcm="http://schemas.microsoft.com/WMIConfig/2002/State">
<Display><ColorDepth>16</ColorDepth><HorizontalResolution>1024</HorizontalResolution><RefreshRate>60</RefreshRate><VerticalResolution>768</VerticalResolution></Display><RegisteredOrganization>OpenStack</RegisteredOrganization><OOBE><HideEULAPage>true</HideEULAPage><NetworkLocation>Cluster</NetworkLocation><ProtectYourPC>1</ProtectYourPC><SkipMachineOOBE>true</SkipMachineOOBE><SkipUserOOBE>true</SkipUserOOBE></OOBE></component></settings></unattend>
Using the above example, the following mapping target would identify the ColorDepth element:.//{urn:schemas-microsoft-com:unattend}Display/{urn:schemas-microsoft-com:unattend}ColorDepth
Using the above example, the following mapping target would identify the processorArchitectureattribute in the component element: .//{urn:schemas-microsoft-com:unattend}component[@name='Microsoft-Windows-Shell Setup']@processorArchitecture
Considerations for capturing an OpenStack instance:
Consider the following information before capturing an OpenStack instance.
When you capture an instance that was deployed by using a pluggable configuration strategy (OVF orSysprep), the configuration strategy is copied from the source image for the instance to the new image. Ifthe source image for the instance was deleted, the configuration strategy cannot be copied to the newimage. As a result, you need to manually add the configuration strategy to the new image.
After an instance is deployed using a configuration strategy, the activation software (for example, Sysprepor IBM VSAE) has run and applied the configuration. Therefore, you might have to perform more actionswhen you capture the instance. If you want the activation software to run again when you deploy theimage that was created, the activation software must be reset. If you do not have to run the activationsoftware again, you can delete the configuration strategy from the image that was created.
For more information about the reset requirements and other capture prerequisites, see thedocumentation for the applicable activation software. For more information about pluggableconfiguration strategies, see “Configuration strategies” on page 185.
Configuring PowerVC imagesUse the following information to configure PowerVC images with IBM Cloud Manager with OpenStack.
About this task
Placement policyIBM Cloud Manager with OpenStack provides a deployment property to control the placement ofa deployed PowerVC virtual machine. The placement of the virtual machine can either behandled by the OpenStack scheduler or the PowerVC scheduler. This deployment property optionis labeled Use the PowerVC scheduler to place the deployment. Select the appropriate option foryour environment.
Chapter 6. Configuring 191
v When this option is enabled, the PowerVC scheduler is used.v When this option is disabled, the OpenStack scheduler is used.
Note: This option is enabled by default.
Network adapter configurationOpenStack images to be deployed only to PowerVC support VLAN type networks with aphysical network name equal to "default". Such networks must also exist in the PowerVCenvironment. In addition, if the network supports both IPv4 and IPv6 addresses, only the IPv4addresses are used by PowerVC.
Flavor storage sizePowerVC does not support resizing during image deployment. However, you can resize thevirtual machine after it is successfully deployed. As a result, regardless of the OpenStack flavorthat is selected, PowerVC uses the size of the image as the storage size of the deployed PowerVCvirtual machine. For more information about PowerVC flavors, see the PowerVC InformationCenter.
Config drive and virtual machine customizationsPowerVC does not support config drive and the related virtual machine customizations duringimage deployment. If specified, these configurations are ignored. For more information about thecloud-init software package and the customizations that it supports, see “Cloud-init softwarepackage” on page 185.
Boot Volume Storage TemplateBy default, when you deploy an image, the boot volume is created using the default storagetemplate, as configured on the PowerVC server. If you would like the boot volume to use adifferent storage template, you need to add the boot volume type property to the extraspecifications of the flavor that is used to deploy the image. Edit the flavor and add the followingextra specifications.v Set the property key powervm:boot_volume_type
v Set the value of the property to the ID of the volume type you want to use.
You can find the volume type id by running the following OpenStack command: cindertype-list
Note: The volume type ID that is specified must be a PowerVC volume type. When you run acommand in the IBM Cloud Manager with OpenStack appliance, PowerVC volume type namesare prefixed with a pvc:. For more information about flavors, see Flavors.
Related reference:
PowerVC Standard Edition
Nova placement policy
Configuring instance resize timeoutIBM Cloud Manager with OpenStack allows the administrator to configure a timeout for an instanceresize action. This is optional, but can be configured in the event that the cloud manager does notrespond in a reasonable timeframe.
About this task
To configure the instance resize timeout, follow these steps:
Procedure1. Open the deployment.properties file in the home directory.
192 IBM Cloud Manager with OpenStack: Administrator Guide, version 4.2
2. Set the com.ibm.cfs.deployments.resize.timeout property to the time in minutes to wait for aninstance resize action to complete in the cloud. The default value is 10 minutes.
3. Save the deployment.properties file and restart the IBM Cloud Manager with OpenStack server.
Identifying expired instancesIBM Cloud Manager with OpenStack has a configurable task that allows administrators to identifyexpired instances and how long to keep them after they have expired.
About this task
To set how often expired instances are identified and how long they are kept, follow these steps:
Procedure1. Open the deployment.properties from your home directory.2. Configure each property in the file.
a. com.ibm.cfs.expired.deployments.finder.interval=10
When the expiration date is reached, the deployment property is put into an EXPIRED state and thevirtual machine is stopped in the deployment. Thecom.ibm.cfs.expired.deployments.finder.interval defines how often IBM Cloud Manager withOpenStack identifies expired deployments. This interval is set in seconds.
b. com.ibm.cfs.deployments.expired.delete.interval=1
This property defines the interval for deleting instances that have been identified as expired. Theunit is hour. If not set or valid, the default value is 24 hours.This property is also defined by the length of the grace period set when you create an expirationpolicy for a cloud or a project. For more information, see “Managing expiration policies” on page230.
Configuring multiple instances for a single deploymentYou can deploy multiple instances through a single deployment.
About this task
If you enable the multiple instance deployment function, a user can deploy multiple instances through asingle deployment. The deployed instances use the deployment name as the prefix of each singleinstance. The new names also use -x as the suffix, where x is the index of that instance.
Procedure1. To enable or disable this feature, set the following property value within the deployment.properties
file that is in the .SCE42 directory:v com.ibm.cfs.deployments.multi.enabled=true to enable the function.v com.ibm.cfs.deployments.multi.enabled=false to disable the function.
Note: By default, this feature is enabled.2. To control the maximum number of instances that a user is allowed to deploy at one time, set the
following property value within the deployment.properties file:com.ibm.cfs.deployments.multi.max.value=5
Note:
v The default value is 5.v If this value is set too high, it might overload the connected cloud.
Chapter 6. Configuring 193
Configuring loggingLog files are automatically saved by the IBM Cloud Manager with OpenStack self-service portal. You canconfigure the default number of log files that are saved and the types of messages that are logged.
About this task
By default, the self-service portal saves 9 log files of 50 MB each. These defaults can be modified in thelogging.properties file in the home directory.
To change the default logging options:
Procedure
Open the logging.properties file in the home directory.v To change the number of log files that are saved, set the java.util.logging.FileHandler.count
property to the number of log files that you to save. The default is 9.v To change the types of messages that are saved, set the java.util.logging.FileHandler.level
property to the level of messages that you want to receive. The default is INFO.The types of messages that are logged in the log file are informational, warning, and error messages.Use the debugging messages only for troubleshooting and debugging purposes because performancecan be impacted by excessive logging.
What to do next
Modifying the logging.properties file requires restarting the self-service portal server to pick up thechanges.
For more information about logging, see Chapter 10, “Troubleshooting and support for IBM CloudManager with OpenStack,” on page 291.
Configuring a networkThe IBM Cloud Manager with OpenStack self-service portal provides a convenient way to manage andapply network settings by using network configurations. Network configurations are a group of networksettings for a particular environment, typically a virtual network. These settings can be managed as asingle entity and applied to image configurations or instance deployment settings.
For example, suppose that a cloud environment contains two virtual networks applicable to instancedeployment: a public and a private virtual network. In this case, an administrator might create twonetwork configurations, one for the public and one for the private. In the public configuration, theadministrator would specify all the public network settings such as primary DNS, secondary DNS, andprimary gateway. The same would be done for the private network configuration. After theconfigurations are created, the administrator can configure the images to use the appropriate networkconfiguration. This action saves time by not requiring the administrator to specify each network setting ineach image. It also allows an easier way to manage the network settings on a virtual network.
While the actual settings specified in a configuration are tailored to a specific environment, the networkconfigurations themselves are a superset of all network settings regardless of image, operating system, orcloud management system. Therefore, all settings that are specified in a configuration are applicable. Forexample, the primary and secondary WINS settings of a network configuration are only applicable toWindows based images. So when you create a configuration for an image that is not using Windows,these values are not needed and can be left blank.
194 IBM Cloud Manager with OpenStack: Administrator Guide, version 4.2
Note: With the self-service portal, you can specify the network configuration for a cloud. The self-serviceportal displays only the fields that are applicable for that cloud. Before you can create an OpenStacknetwork configuration, you must select an existing OpenStack cloud.
When network configuration settings are applied to either an image configuration or during an advancedinstance deployment, their individual settings can be overridden or manually specified, if wanted.
Note: You cannot override or manually specify OpenStack network configuration settings.
You can modify your network connections through the self-service portal or though the property files inthe home directory. For more information about modifying your network connections through theself-service portal, see “Managing network configurations” on page 237.
Note: You cannot use property files to specify OpenStack network configuration settings. You must usethe self-service portal.
To modify your network connections from the home directory, create a .properties file and save it toyour home directory. The name of these files should be prefixed with networkConfiguration followed byan arbitrary suffix and the .properties file extension, similar to networkConfiguration.properties,networkConfiguration-vlan1.properties, or networkConfiguration3.properties.
Each property file contains a group of network setting. For example, assume that there is a file that isnamed networkConfiguration.properties in the home directory, which containing the following settings:name=VLAN1dns1=9.10.244.100dns2=9.10.244.200gateway1=9.5.40.1gateway2=9.5.40.2domain=mydomain.company.comsubnet=255.255.252.0networkId=[Network 1]=hostVnet:ETHERNET0/1useDHCP=falsehostnamePrefix=scecomputerNamePrefix=sceworkgroup=workgroupdescription=default network configuration9.5.42.2509.5.42.2519.5.43.23
Note: When you use a brocade switch, you must configure a host name prefix in thenetworkConfiguration.properties file: hostnamePrefix=sce.
When the self-service portal starts, the network configuration named "VLAN1" is added to the networkconfiguration list.
(VMware only) In the VWware environment, the value of the Network ID field is the name of a VMwarestandard switch network, port group name, or distributed port group. A typical VMware network ID isVM Network. This value is used to assign the virtual network adapter to the VMware network during adeployment. The rest of the values in the network configuration should be appropriate for that network.The network configuration displays all available port groups and distributed port groups. Not all portgroups or distributed port groups might be available on all target hosts. Validation of this field occursonly at deployment time when the actual deployment target is known. If the selected port group ordistributed switch is not available on the selected target host, then an error occurs and the instancedeployment fails.
Chapter 6. Configuring 195
Configuring billingThe IBM Cloud Manager with OpenStack self-service portal has a configurable billing and accountinginterface. The interface allows the self-service portal to monitor resource use and create subsequent billingto the self-service portal user accounts for the usage.
For more information about accounts, see “Managing accounts” on page 251.
Configuring billingTo enable billing, edit the billing.properties file and define what action to take when an accountbecomes delinquent. Also, set the time intervals to determine accounts that are delinquent or at theiraccount balance threshold.
About this task
Important: For billing to work, you must also enable metering. Account bills are generated based onmetering results.
To configure billing, follow these steps:
Procedure1. Open the billing.properties file in the home directory.2. Configure each property in the file.
com.ibm.cfs.billing.enabled=trueDefines whether to enable the billing and accounting functionality in IBM Cloud Managerwith OpenStack. True enables and false disables billing and accounting.
com.ibm.cfs.billing.delinquency.policy= com.ibm.cfs.services.billing.policies.shutdownDetermines the action IBM Cloud Manager with OpenStack takes against existing instancesand volumes when an account becomes delinquent. Possible values are as follows:
Table 56.
Value Description
com.ibm.cfs.services.billing.policies.destroy This value destroy all deployments and detaches allvolumes for the delinquent account.
com.ibm.cfs.services.billing.policies.shutdown This value suspends all deployments for the delinquentaccount.
com.ibm.cfs.services.billing.policies.do.nothing This value ignores delinquent accounts.
com.ibm.cfs.services.billing.policies.detach This value detaches all volumes for the delinquentaccount.
com.ibm.cfs.services.billing.policies.delete This value deletes all volumes for the delinquentaccount.
com.ibm.cfs.services.billing.policies.shutdowndetach This value suspends all deployments and detaches allvolumes for the delinquent account.
com.ibm.cfs.services.billing.policies.shutdowndelete This value suspends all deployments and deletes allvolumes for the delinquent account.
com.ibm.cfs.services.billing.policies.destroydelete This value destroy all deployments and deletes allvolumes for the delinquent account.
com.ibm.cfs.billing.delinquency.finder.interval=120This property represents the number of seconds to wait before running a job that examineseach account to determine whether the account is delinquent.
196 IBM Cloud Manager with OpenStack: Administrator Guide, version 4.2
com.ibm.cfs.billing.account.balance.threshold.interval= 24This property represents the number of hours to wait before running a job to find accountsthat are at their account balance threshold. The default value of this property is 24 hours or 1day.
Note:
v The billing.properties file is not configurable through the web user interface.v For PowerVC support, the PowerVC driver file, /etc/powervc/powervc.conf, has staging user
(staging_user) and project (staging_project_name) properties. These properties control whichOpenStack user and project owns instances that are synchronized from PowerVC. The defaultconfiguration uses the IBM Cloud Manager with OpenStack administrator and the public project.An instance must be owned by a user in OpenStack, so when you enable billing, the default owneris also billed for those instances in the PowerVC cloud.
What to do next
After you enable billing, ensure that you also enable metering. For more information, see “Configuringmetering” on page 200.
Configuring billing detailsIBM Cloud Manager with OpenStack can produce charges that are billed back to users when using aspecific cloud resource, such as an instance.
About this task
IBM Cloud Manager with OpenStack currently has the following configurable products:
Table 57. Configurable products by cloud type
OpenStack configurable products VMware configurable products
v Processor
v Memory
v Disks
v Volume
v Processor
v Memory
v Disks
A cloud product might be something similar to processor by the hour, 1 GB of RAM per day, a fixed ratecharge for a running VM, or 20 GB of active disks per day. IBM Cloud Manager with OpenStack loadsthose cloud products into a product catalog. System events, such as deploying an instance, can cause thecreation of a bill with one or more charges from one or more cloud products. IBM Cloud Manager withOpenStack automatically deducts money from the account to which the instance owner belongs.
Chapter 6. Configuring 197
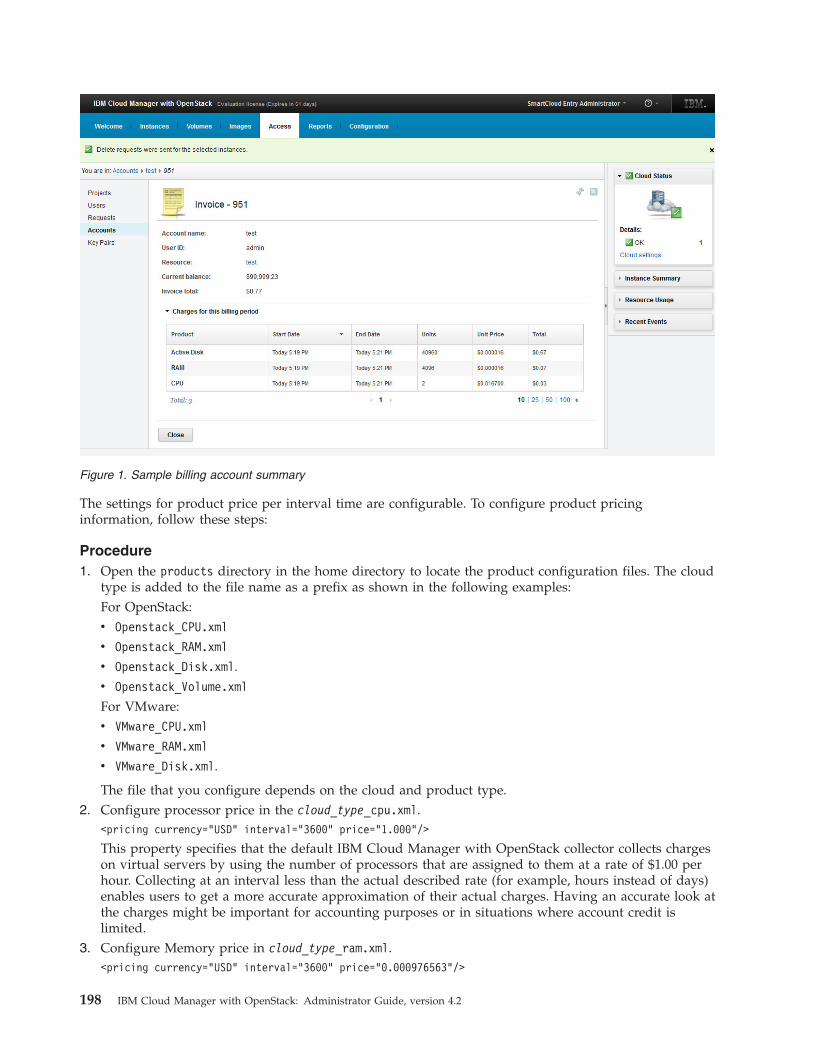
The settings for product price per interval time are configurable. To configure product pricinginformation, follow these steps:
Procedure1. Open the products directory in the home directory to locate the product configuration files. The cloud
type is added to the file name as a prefix as shown in the following examples:For OpenStack:v Openstack_CPU.xml
v Openstack_RAM.xml
v Openstack_Disk.xml.v Openstack_Volume.xml
For VMware:v VMware_CPU.xml
v VMware_RAM.xml
v VMware_Disk.xml.
The file that you configure depends on the cloud and product type.2. Configure processor price in the cloud_type_cpu.xml.
<pricing currency="USD" interval="3600" price="1.000"/>
This property specifies that the default IBM Cloud Manager with OpenStack collector collects chargeson virtual servers by using the number of processors that are assigned to them at a rate of $1.00 perhour. Collecting at an interval less than the actual described rate (for example, hours instead of days)enables users to get a more accurate approximation of their actual charges. Having an accurate look atthe charges might be important for accounting purposes or in situations where account credit islimited.
3. Configure Memory price in cloud_type_ram.xml.<pricing currency="USD" interval="3600" price="0.000976563"/>
Figure 1. Sample billing account summary
198 IBM Cloud Manager with OpenStack: Administrator Guide, version 4.2
This property specifies that the default IBM Cloud Manager with OpenStack collector collects chargeson virtual machines by using the number of bytes of RAM assigned to them at a rate of $0.000976563per MB per hour, which is about $1.00 per hour per GB.
4. Configure disks in cloud_type_disk.xml.<cloudProduct id="com.ibm.cfs.cloud.vmc.products.storage"><name>Active Disk</name><description>The amount of total disk storage in MB used in a workloadper minute.</description><!-- $1.627604167E-5 per megabyte per minute --><pricing currency="USD" interval="60" price="1.627604167E-5"/></cloudProduct>
These properties specify that the default IBM Cloud Manager with OpenStack collector collectscharges on virtual machines by using the disks that are assigned to them at a rate of $0.000976563 perMB per hour, which is about $1.00 per hour per GB.The <name> and <description> can also be overridden from the IBM Cloud Manager with OpenStackdefaults by specifying different values.
Note: The currency for all configurable products must be consistent. For example, set US dollar (USD)for both or Chinese Yuan (CNY) for both. Using inconsistent currencies causes incorrect productcharges.
5. For OpenStack clouds, configure volume price in Openstack_Volume.xml.<cloudProduct id="com.ibm.cfs.cloud.openstack.products.volume"
cloudType="Openstack" objectType="Volume"><name>Volume</name><description>The amount of a volume in MB per minute.</description><!-- $1.627604167E-5 per megabyte per minute --><pricing currency="USD" interval="60" price="1.627604167E-5"/></cloudProduct>
These properties specify that the default IBM Cloud Manager with OpenStack collector collectscharges on volumes at a rate of $1.627604167E-5 per MB per hour, which is about $1.00 per hour perGB. The <name> and <description> can also be overridden from the IBM Cloud Manager withOpenStack defaults by specifying different values.
Note: The currency for all configurable products must be consistent. For example, set US dollar (USD)for both or Chinese Yuan (CNY) for both. Using inconsistent currencies causes incorrect productcharges.
Results
After you configure account billing, you can view account billing information in the IBM Cloud Managerwith OpenStack interface.
Chapter 6. Configuring 199
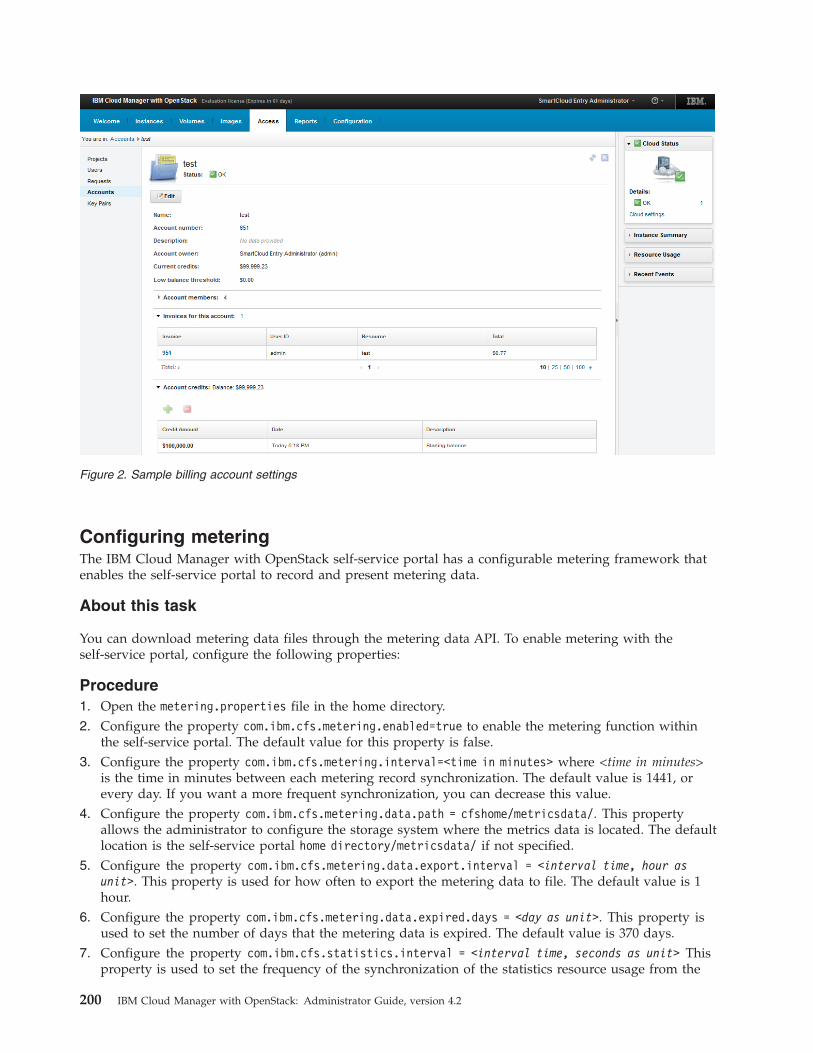
Configuring meteringThe IBM Cloud Manager with OpenStack self-service portal has a configurable metering framework thatenables the self-service portal to record and present metering data.
About this task
You can download metering data files through the metering data API. To enable metering with theself-service portal, configure the following properties:
Procedure1. Open the metering.properties file in the home directory.2. Configure the property com.ibm.cfs.metering.enabled=true to enable the metering function within
the self-service portal. The default value for this property is false.3. Configure the property com.ibm.cfs.metering.interval=<time in minutes> where <time in minutes>
is the time in minutes between each metering record synchronization. The default value is 1441, orevery day. If you want a more frequent synchronization, you can decrease this value.
4. Configure the property com.ibm.cfs.metering.data.path = cfshome/metricsdata/. This propertyallows the administrator to configure the storage system where the metrics data is located. The defaultlocation is the self-service portal home directory/metricsdata/ if not specified.
5. Configure the property com.ibm.cfs.metering.data.export.interval = <interval time, hour asunit>. This property is used for how often to export the metering data to file. The default value is 1hour.
6. Configure the property com.ibm.cfs.metering.data.expired.days = <day as unit>. This property isused to set the number of days that the metering data is expired. The default value is 370 days.
7. Configure the property com.ibm.cfs.statistics.interval = <interval time, seconds as unit> Thisproperty is used to set the frequency of the synchronization of the statistics resource usage from the
Figure 2. Sample billing account settings
200 IBM Cloud Manager with OpenStack: Administrator Guide, version 4.2
cloud. By default, the self-service portal retrieves resource usage from the cloud. These statisticsinclude processors in core, memory, and storage in megabytes. If the property is not set, a default of60 seconds is used.
Results
After you configure usage metering, you can monitor the cloud resource usage from the self-serviceportal by selecting Reports > Usage Metering. View details about a specific virtual server by selecting thevirtual server from the Usage metering grid.
For more information about using Usage Metering, see the IBM Cloud Manager with OpenStack UserGuide.
Configuring capacity and overcommit ratesThe capacity in the IBM Cloud Manager with OpenStack self-service portal indicates the total and used(or allocated) resources, including processors, memory, and storage.
The capacity view is enabled for all the supported virtualization environments. All x86 clouds supportresource overcommit by the hypervisors. Therefore, the total amount of virtual resources that can beallocated are larger than the total physical resources available. Therefore, the self-service portal supportsthe ability to set an overcommit rate to limit the resource use.
Note: Overcommit rate is not supported for PowerVC virtualization environments.
The overcommit rate is represented in the following fields:v totalCpu - Represents the physical processor cores that are multiplied by the processor overcommit ratiov totalMem - Represents the physical memory size that is multiplied by the memory overcommit ratio
Note: Overcommitted storage is not allowed.
The capacity API tells administrators the amount of physical resources, the amount of resources (afterovercommitted), and the resources that are allocated. The user interface shows the physical resource andthe overcommit rate only. It excludes the amount of resources after they are overcommitted.
To configure the overcommit rate, open the cloud.properties file and set the following properties:# The cpu overcommit rate in OpenStack cloudcom.ibm.cfs.openstack.overcommit.cpu=16# The memory overcommit rate in OpenStack cloudcom.ibm.cfs.openstack.overcommit.memory=1.5
# The cpu overcommit rate in VMware cloudcom.ibm.cfs.vmware.overcommit.cpu=10# The memory overcommit rate in VMware cloudcom.ibm.cfs.vmware.overcommit.memory=1.5
com.ibm.cfs.openstack.overcommit.memory is invalid for hyper-v hypervisor.
The self-service portal checks whether there are sufficient available resources when deploying. If theavailable resource is less than the requested resource, the self-service portal stops the deployment process.This feature can be enabled or disabled by using the following property in the deployment.propertiesfile:#Enable/Disable the capacitiy check against the selected target while deploying a workload.com.ibm.cfs.resource.check.enable=true
Chapter 6. Configuring 201
Configuring web user interface
Configuring user interface widgetsThe widgets in the web user interface of IBM Cloud Manager with OpenStack and the properties of thewidgets are configurable. Using configuration settings, you can control which widgets appear and inwhat order they appear.
About this task
To configure user interface widgets for IBM Cloud Manager with OpenStack, perform the following steps:
Procedure1. Open the web.properties file in the home directory.2. Set the com.ibm.cfs.web.pods.order property to the names of widgets that are to be shown in the
IBM Cloud Manager with OpenStack user interface, in the order you want them displayed. Thenames are not case-sensitive and must be separated by a comma. Possible names include thefollowing names:v CloudStatus
v WorkloadsStatus
v ResourceUsageStatus
v RecentEvents
3. Set the properties of each widget. The following example shows a widget property configurationexample using the CloudStatus widget.a. com.ibm.cfs.web.pods.cloudstatus.enabled=true
If the value is true, the CloudStatus widget is displayed in the IBM Cloud Manager withOpenStack web user interface. If the value is false, the property is not specified in the file, or youspecify an incorrect value (truue) then the CloudStatus widget is not displayed.
b. com.ibm.cfs.web.pods.cloudstatus.closed
If the value is true, the CloudStatus widget is initially displayed in a collapsed form. Otherwise,the CloudStatus widget is initially expanded in the IBM Cloud Manager with OpenStack web userinterface.
c. com.ibm.cfs.web.pods.cloudstatus.refresh.interval=30
The value of this property indicates how often the CloudStatus widget is refreshed. The value isspecified in seconds and must be an integer of 1 or higher.Repeat these substeps for each additional named widget to be configured, includingWorkloadsStatus, ResourceUsageStatus, and RecentEvents. The following properties can be set:
WorkloadsStatus:
v com.ibm.cfs.web.pods.workloadsstatus.enabled
v com.ibm.cfs.web.pods.workloadsstatus.closed
v com.ibm.cfs.web.pods.workloadsstatus.refresh.interval
ResourceUsageStatus
v com.ibm.cfs.web.pods.resourceusagestatus.enabled
v com.ibm.cfs.web.pods.resourceusagestatus.closed
v com.ibm.cfs.web.pods.resourceusagestatus.refresh.interval
RecentEvents
v com.ibm.cfs.web.pods.recentevents.enabled
v com.ibm.cfs.web.pods.recentevents.closed
v com.ibm.cfs.web.pods.recentevents.refresh.interval
202 IBM Cloud Manager with OpenStack: Administrator Guide, version 4.2
4. Save the web.properties file and restart the IBM Cloud Manager with OpenStack server. Theproperties of each widget take effect after the server is restarted.
Note:
v If a widget is not listed in com.ibm.cfs.web.pods.order and its propertycom.ibm.cfs.web.pods.name.enabled is set to true, it is displayed in the IBM Cloud Manager withOpenStack user interface after all the widgets specified in the com.ibm.cfs.web.pods.orderproperty.
v If the web.properties file does not exist, all user interface widgets show by default.
Configuring session timeoutYou can configure how long a web interface session for an IBM Cloud Manager with OpenStack user canremain inactive before the session times out.
About this task
To configure the timeout value, follow these steps:
Procedure1. Open the web.properties file in the home directory.2. Set the com.ibm.cfs.client.idle.timeout property to the number of minutes for which the session is
allowed to be inactive. The number must be a positive number and greater than one. After thespecified amount of time passes, the user session with IBM Cloud Manager with OpenStack expires.If the property is set to -1, the user session with IBM Cloud Manager with OpenStack never expires.
3. Save the web.properties file and restart the IBM Cloud Manager with OpenStack server. The propertytakes effect after the server is restarted.
Note: If com.ibm.cfs.client.idle.timeout property is not present or is set to an invalid value, adefault value of 30 minutes is used.
Configuring the Welcome pageYou can configure IBM Cloud Manager with OpenStack to display the welcome page for all users.
Procedure1. Open the web.properties file in the home directory.2. To display the welcome page for all users, set the com.ibm.cfs.web.welcomepage.enabled property to
true.3. Save the web.properties file and restart the IBM Cloud Manager with OpenStack server. The property
takes effect after the server is restarted.
Note: If com.ibm.cfs.web.welcomepage.enabled property is not present or is set to an invalid value,the welcome page is displayed.
Configuring the default instance nameYou can configure IBM Cloud Manager with OpenStack to use a default instance name when deployingan image. If you set this property to true, a default instance name based on the image name that is beingdeployed is generated; otherwise no default is used.
Procedure1. Open the web.properties file in the home directory.2. To set the default instance name to the image name being deployed, set the
com.ibm.cfs.web.workloadname.default.enabled property to true.
Chapter 6. Configuring 203
3. Save the web.properties file and restart the IBM Cloud Manager with OpenStack server. The propertytakes effect after the server is restarted.
Note: If com.ibm.cfs.web.workloadname.default.enabled property is not present or is set to aninvalid value, the default name is set.
Configuring IBM Cloud Manager with OpenStack dashboard propertiesYou can configure various web interface properties for the IBM Cloud Manager with OpenStackdashboard.
After you successfully install IBM Cloud Manager with OpenStack, you can customize the IBM CloudManager with OpenStack dashboard to manage your cloud. For information about customizing thedashboard settings and configuration, see Horizon Settings and Configuration Documentation.
Rebranding the dashboardIBM Cloud Manager with OpenStack provides a recipe to customize the branding that is applied to thedashboard.
The branding information must be contained in a compressed file. For example, openstack-branding.tar.gz. The compressed file content is a folder that contains up to three items:v A file that is named product_name.txt that contains the dashboard name on the first line.v A folder that is named icons that contains custom icons that override the default icons.v A folder that is named styles that contains custom style sheets to be applied to the dashboard.
Here is an example branding folder structure:branding|-- product_name.txt|-- icons| |-- favicon.png| |-- logo.png| |-- logo-splash.png|-- styles| |-- custom_1.css| |-- custom_2.scss
To create the tar file, put the branding files into a local directory structure as noted above.1. Change the active directory to the branding directory.2. Run cd branding.3. Run the tar command: tar -czf ../openstack-branding.tar.gz *.4. Make tar file available to Chef server.5. Add the ibm-os-dashboard-branding role to the end of the run list of the controller node which is
running Horizon and is to be re-branded6. Update the node. See steps in the “Updating a deployed topology” on page 149 topic.
Changing the dashboard name
You can change the dashboard name by providing a product_name.txt file. The first line of this file isused in the page title and displayed on the Login page and in the page header.
204 IBM Cloud Manager with OpenStack: Administrator Guide, version 4.2
Changing Icons
You can change the icons that are displayed in the dashboard by providing custom icons in the iconsfolder. The content of this folder is copied into the dashboard icons directory, overwriting any existingicons. To override an icon, provide an icon of the same name in the icons folder. You might change thefollowing icons for rebranding purposes:v favicon.png: The favicon image that is displayed in the browser.
Note: The favicon.ico file is not used.v logo.png: The logo that is displayed in the page header.v logo-splash.png: The logo that is displayed on the Login page
The dashboard icons are in /usr/share/openstack-dashboard/openstack_dashboard/static/dashboard/img.
Providing Custom Style sheets
You can provide custom style sheets by placing them in the styles folder. The supported style sheet typesinclude SCSS (.scss extension) and CSS (.css extension). Files of any other extension type are ignored.Multiple style sheets are applied in alphanumeric order. For example, a style sheet that is namedcustom1.css is applied before a style sheet named custom2.css.
Changing the Custom Branding
You can change or remove any custom branding that is applied to the dashboard by running thedashboard branding recipe again using different branding information. To remove a previously appliedcustomization, omit the customization information from the provided branding folder. For example, toreturn the icons back to the default, run the branding recipe using a branding folder that does notcontain an icons folder. By using an empty branding folder, all customizations are removed.
Chapter 6. Configuring 205

206 IBM Cloud Manager with OpenStack: Administrator Guide, version 4.2
Chapter 7. Managing IBM Cloud Manager with OpenStack asan Administrator
Use the following information for working with IBM Cloud Manager with OpenStack. The managementtasks vary depending on the IBM Cloud Manager with OpenStack role and access level you are using.Select the content that applies below, depending on whether you log in as an Administrator or a User.
Configuring the license keyThe IBM Cloud Manager with OpenStack product includes a default trial license, with a 90-day trialperiod. You can use this license to investigate IBM Cloud Manager with OpenStack.
About this task
To update the license, follow these steps:
Procedure1. Copy the cmwo_4.2.lic file from the IBM Cloud Manager with OpenStack installation media to the
deployment server system.2. To apply the permanent license, run the following command:
/opt/ibm/cmwo/bin/cmwo_lic.sh -a /product_dir/cmwo_4.2.lic
where product_dir is the directory to which you copied the cmwo_4.2.lic file.
Results
If the license is valid, you receive a message that states the update was successful. If it is not valid, youreceive a message that states the license is invalid.Related reference:“License information” on page 6Learn about license information for the IBM Cloud Manager with OpenStack product.
Managing IBM Cloud Manager with OpenStack servicesUse this information to see which services run in your IBM Cloud Manager with OpenStack topologydeployment. Additionally, learn to check the status of services and restart services.
Checking status of OpenStack servicesAfter an IBM Cloud Manager with OpenStack topology is deployed, you can check the status of the IBMCloud Manager with OpenStack services. You can use the OpenStack Dashboard or issue an IBM CloudManager with OpenStack command to check more detailed status.
About this task
To check the services status with OpenStack Dashboard, log in and select Admin > System Panel.
If you want a more detailed status check of the IBM Cloud Manager with OpenStack services, issue thefollowing command for each node in your topology deployment.$ knife os manage services status –-node your-node-FQDN
The status of all IBM Cloud Manager with OpenStack services on the node is displayed.
© Copyright IBM Corp. 2012, 2014 207
Alternatively, issue the following command to get detailed status for each node in a known topology byusing a topology JSON file:$ knife os manage services status –-topology-file your-topology-name.json
The status of all IBM Cloud Manager with OpenStack services on all of the nodes is displayed.
Restarting IBM Cloud Manager with OpenStack servicesIf you need to restart services for IBM Cloud Manager with OpenStack, use the IBM Cloud Manager withOpenStack services command and specify the restart action. You can use the command to restart IBMCloud Manager with OpenStack services on a specific node or on all nodes in a topology.
About this task
To restart the IBM Cloud Manager with OpenStack services, issue the following command for any nodein your topology deployment:$ knife os manage services restart –-node your-node-FQDN
All IBM Cloud Manager with OpenStack services on the node are restarted.
If you restart an OpenStack controller node, you should also restart the IBM Cloud Manager withOpenStack services on all of the OpenStack compute nodes in the topology. Issue the knife os manageservices restart command for each OpenStack compute node to restart the services on each computenode in the topology.
Alternatively, issue the following command to restart the IBM Cloud Manager with OpenStack services inthe proper order for each node in a known topology by using a topology JSON file:$ knife os manage services restart –-topology-file your-topology-name.json
All IBM Cloud Manager with OpenStack services on all nodes in the topology are restarted in the properorder.Related concepts:“Updating a deployed topology” on page 149After you deploy a topology, you might need to apply fixes, either to the IBM Cloud Manager withOpenStack services themselves or to how the IBM Cloud Manager with OpenStack services are deployed.
IBM Cloud Manager with OpenStack servicesThe IBM Cloud Manager with OpenStack services provided throughout your topology deployment aredetermined by the roles that are defined for each node.
Overview
The following lists detail the services that are provided by each role. The services are listed in their startorder. If you stop services, you must stop the services in reverse order. If you need to restart databaseservices, then all services on the OpenStack controller node must be stopped before the database servicescan be restarted. In addition, if you need to restart the Qpid (or RabbitMQ) messaging service, then theservices running on the OpenStack compute nodes must also be restarted.
Note: Nodes that have the Hyper-V agent installed are not assigned a role. For more information aboutmanaging the IBM Cloud Manager with OpenStack services that are running on Hyper-V agent nodes,see Installing and uninstalling the IBM Cloud Manager with OpenStack Hyper-V Agent.
The following roles run the same services as other roles that are described in detail below.
208 IBM Cloud Manager with OpenStack: Administrator Guide, version 4.2
ibm-os-allinone-kvmRuns the same services as the ibm-os-single-controller-node role followed by theibm-os-compute-node-kvm role.
ibm-os-single-controller-nodeRuns the same services as the ibm-os-database-server-node and ibm-os-messaging-server-noderoles followed by the ibm-os-single-controller-distributed-database-node role.
ibm-os-single-controller-powervc-driverRuns the same services as the ibm-os-single-controller-node role followed by theibm-os-powervc-driver-node role.
ibm-os-single-controller-distributed-database-nodememcachedopenstack-keystoneopenstack-iaasgatewayopenstack-glance-apiopenstack-glance-registryneutron-serverneutron-openvswitch-agentneutron-dhcp-agentneutron-lbaas-agentneutron-l3-agentneutron-vpn-agentopenstack-nova-conductoropenstack-nova-apiopenstack-nova-scheduleropenstack-nova-certopenstack-nova-novncproxyopenstack-nova-consoleauthopenstack-cinder-volumeopenstack-cinder-apiopenstack-cinder-scheduleropenstack-heat-apiopenstack-heat-api-cfnopenstack-heat-api-cloudwatchopenstack-heat-engineopenstack-ceilometer-apiopenstack-ceilometer-centralopenstack-ceilometer-collectoropenstack-ceilometer-notificationopenstack-ceilometer-alarm-evaluatoropenstack-ceilometer-alarm-notifierhttpd
Note:
v The neutron-l3-agent service is only present if the Neutron L3 agent setting is enabled with theenvironment override attribute ibm-openstack.network.l3.enable = true and the VPN setting isdisabled with the environment override attribute openstack.network.enable_vpn = false.
v The neutron-vpn-agent service is only present if the VPN setting is enabled with the environmentoverride attribute openstack.network.enable_vpn = true.
ibm-os-compute-node-kvmneutron-openvswitch-agentopenstack-nova-computeopenstack-ceilometer-compute
ibm-os-compute-node-powerkvm
Runs the same services as the ibm-os-compute-node-kvm role.
Chapter 7. Managing as an Administrator 209
ibm-os-zvm-driver-nodeneutron-zvm-agent-*openstack-nova-compute-*
Note: neutron-zvm-agent-* stands for all Neutron z/VM agent services that have the prefixneutron-zvm-agent-. Each Neutron z/VM agent service is named neutron-zvm-agent-#{host}, and each#{host} corresponds to its attribute ibm-openstack.zvm-driver.#{host} that is set by ibm-openstack.zvm-driver.hosts in Chef.
openstack-nova-compute-* stands for all Nova compute services that have the prefix openstack-nova-compute-.Each Nova compute service is named openstack-nova-compute-#{host}, and each #{host} corresponds to itsattribute ibm-openstack.zvm-driver.#{host} that is set by ibm-openstack.zvm-driver.hosts in Chef.
ibm-os-powervc-driver-nodeopenstack-glance-powervcopenstack-cinder-powervcopenstack-neutron-powervcopenstack-nova-powervc
ibm-os-database-server-node# When DB2 database is used.db2.servicedb2.nosql.service
# When MySQL database is used:mysqld
ibm-os-messaging-server-node# When Qpid messaging service is used:qpidd
# When RabbitMQ messaging service is used:rabbitmq-server
ibm-sce-nodesce
ibm-os-prs-ego-masterego
ibm-os-prs-controller-nodeopenstack-nova-ibm-notificationopenstack-nova-ibm-ego-resource-optimizationopenstack-nova-ibm-ego-ha-service
ibm-os-block-storage-nodeopenstack-ceilometer-computeopenstack-cinder-volumetgtd
Related reference:“Roles” on page 287The following roles are provided in support of the reference topologies.
210 IBM Cloud Manager with OpenStack: Administrator Guide, version 4.2
Managing with the IBM Cloud Manager with OpenStack self-serviceportal (Administrator access)With the Administrator role in the IBM Cloud Manager with OpenStack self-service portal, you performtasks such as configuring clouds, creating projects, and managing images, instances, and requests.
For information about using the self-service portal as a non-administrative user, see the Managing as aUser (self-service portal) section.
Starting and stopping IBM Cloud Manager with OpenStack self-serviceportalThe following steps are required for starting IBM Cloud Manager with OpenStack self-service portal.
Note: When you start or restart the self-service portal on a high scale cloud, the synchronization betweenthe self-service portal and the cloud might take longer than expected. This resynchronization might causeoperations such as deploying, deleting, or resizing an instance to be delayed or even fail. Wait for thesynchronization to complete before you attempt these actions.
Starting and stopping IBM Cloud Manager with OpenStack self-service portal onLinux
The IBM Cloud Manager with OpenStack self-service portal installation on Linux can be started by theroot user or by users who are members of the sce group.
After the self-service portal on Linux is installed, the self-service portal service is started. You can checkthe self-service portal status on your controller node with the service sce status command.
Use the following commands to start, stop, and restart the self-service portal service on Linux:v Start the self-service portal: service sce start
v Stop the self-service portal: service sce stop
v Restart the self-service portal: service sce restart
Access the self-service portal user interface by opening https://localhost:18443/cloud/web/index.htmlin a supported browser.
Note: The host name localhost and port 18443 are the default host and port names. Substitute theappropriate values for your environment if necessary.
Configuring the default administrator user account and changingpasswordThe default administrator account is created the first time the IBM Cloud Manager with OpenStackself-service portal is started. As administrator, configure the default administrator user account to receiveemail and notification from users.
About this task
To modify the default administrator user account, follow these steps:
Procedure1. In the self-service portal, log in as the cloud administrator.2. Select Cloud Administrator in the upper right title bar of the screen, and click Show user
preferences.
Chapter 7. Managing as an Administrator 211
3. On the User Profile dialog, enter the administrator email address.4. Check Send notifications about instances and other events.5. Verify the Timezone and Language for the administrator.6. To change the Cloud Administrator password, click Change Password.7. Click Update.
Configuring LDAP authentication using the web interfaceUse the web interface to configure IBM Cloud Manager with OpenStack self-service portal as an LDAPclient.
Procedure1. Log in to the self-service portal as an administrator.2. Click the Configuration tab and select LDAP in the navigation pane.3. Click Edit and enter the configuration settings to specify how to connect to the LDAP host.
LDAP provider hostnameThe fully qualified server host name or IP address of the LDAP host.
Port The port number of the LDAP service on the host for either transaction level security (TLS) orfor no security protocol. The default port number is 389.
Security ProtocolThe self-service portal allows transaction level security (TLS) to be used.
CertificateIf transaction level security is used, you must provide the certificate (public key) used by theLDAP server for securing the connection. For information about obtaining a certificate, seeyour LDAP server documentation.
LDAP search DNThis is the distinguished name that should be used to connect to the LDAP host to perform adirectory search, for example cn=Administrator,cn=users,dc=cfs1,dc=us
Note: This field might be required based on the configuration of the LDAP server. Forexample, if the LDAP server does not support anonymous bind, or if you specify transactionlevel security (TLS) for the Security Protocol, this field is required. If the LDAP search DN isrequired, the ID must have read authority on the LDAP server.
PasswordThis is the password that is associated with the LDAP search DN.
Note: This field is required if the LDAP search DN is required.
Search filterThis is the filter that is used to authenticate users when they log in. Include the special value{FILTER} in the filter to specify where the user ID that is provided during the login should besubstituted. For example, (|(userPrincipalName={FILTER}))
Search contextThe search context for providing the LDAP lookup.
User ID attributeThe name of the LDAP field to use as the user ID in the self-service portal.
User name attributeThe name of the LDAP field to use as the user name in the self-service portal.
Email address attributeThe name of the LDAP field to use as the email address in the self-service portal.
212 IBM Cloud Manager with OpenStack: Administrator Guide, version 4.2

4. Click Save.5. Restart the self-service portal service for the settings to take effect.
Example
The following examples show settings for different connections:v Example 1: Non secure connection (transaction level security is disabled)
LDAP provider hostnameyour.host.com.
Port 389
Security ProtocolNone
LDAP search DNcn=Manager,dc=sce,dc=com
Passwordpassword
Search filter(|(cn={FILTER}))
Search contextou=People,dc=sce-svt,dc=com
User ID attributeuid
Username attributecn
Email addressattributemail
v Example 2: Transaction level security is enabled
LDAP provider hostnameyour.host.com.
Port 389
Security ProtocolTransaction level security (TLS)
Certificatecertificate_file.cer
LDAP search DNcn=Manager,dc=sce,dc=com
Passwordpassword
Search filter(|(cn={FILTER}))
Search contextou=People,dc=sce-svt,dc=com
User ID attributeuid
Chapter 7. Managing as an Administrator 213
Username attributecn
Email addressattributemail
What to do next
Notes:
v The self-service portal cannot be returned to use local authentication (non-LDAP authentication)through the web interface. If it is necessary to restore local authentication, see Configuring localauthentication for more information. Local authentication is intended only for non-productionenvironments such as for a proof of concept or for performing a demo.
v If you want to enable user name case sensitivity, you must update the ldap.xml file after setting theinitial LDAP configuration in the web interface. For more information, see “Configuring LDAPauthentication manually” on page 166 for more information.
Managing imagesIn the Images tab, you can manage and configure the images that are available for deployment. You canview image properties and deploy images.
In IBM Cloud Manager with OpenStack, each image has a status that is associated with it. If the status isOK, then the image is ready to be deployed. Click the refresh arrow to update the status.
To view the properties of an image, click the name of the image.
If the list of images does not contain the image that you want, ensure that the current cloud, project, andarchitecture filters are set correctly.
Building imagesBuilding images manually is a complex and error-prone process. By pre-building images from specificsoftware bundles for reuse by others, administrators can streamline this process. There are severaldifferent ways of building images.
Building images with VMware StudioVMware Studio and the OVF Toolkit simplify the process of image creation. The images that arecreated in VMware Studio can be imported and deployed by using vSphere Client. For moreinformation about using VMware Studio, see VMware Studio Documentation athttp://www.vmware.com/support/developer/studio/.
Building images manuallyYou can choose to build images manually using open source tools. This method requiressignificant virtualization and image configuration (for example, OVF, Sysprep or cloud-init)experience.
For more information about creating OpenStack compatible images, see Create images manuallyin the OpenStack documentation.
Importing images (OpenStack only)Using IBM Cloud Manager with OpenStack, you can import images to an OpenStack cloud.
About this task
You can use existing OpenStack compatible images. For more information about creating OpenStackcompatible images, see Create images manually in the OpenStack documentation.
214 IBM Cloud Manager with OpenStack: Administrator Guide, version 4.2
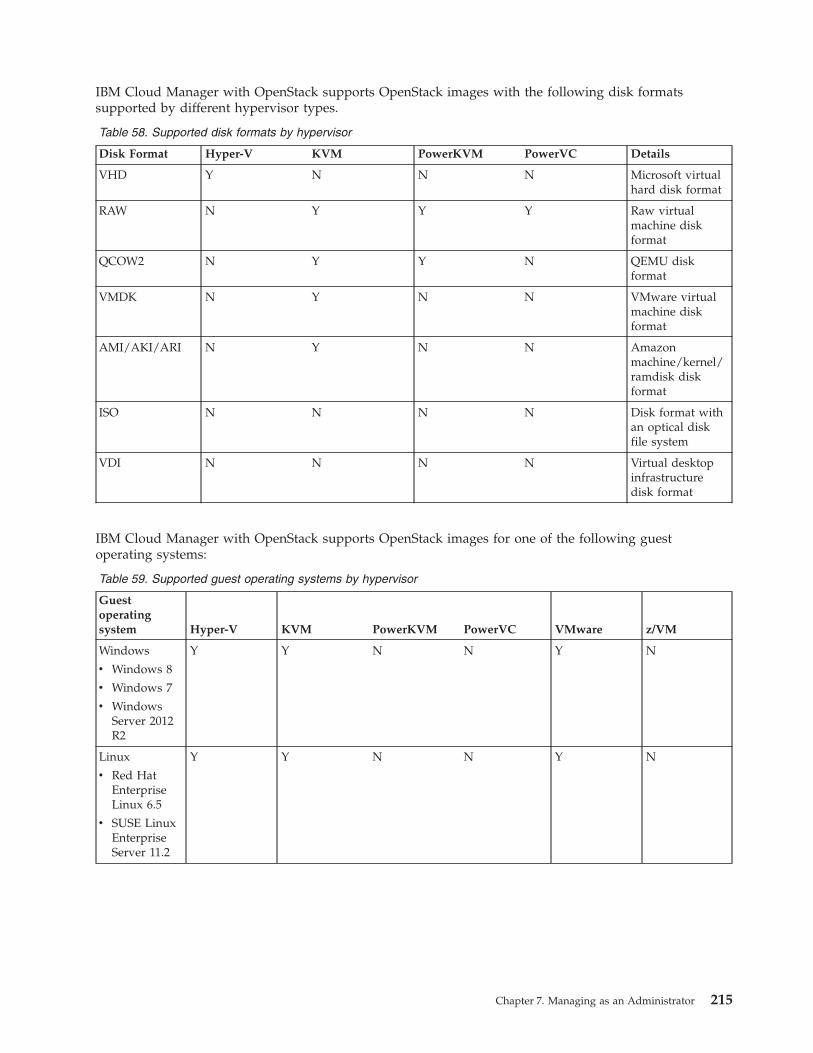
IBM Cloud Manager with OpenStack supports OpenStack images with the following disk formatssupported by different hypervisor types.
Table 58. Supported disk formats by hypervisor
Disk Format Hyper-V KVM PowerKVM PowerVC Details
VHD Y N N N Microsoft virtualhard disk format
RAW N Y Y Y Raw virtualmachine diskformat
QCOW2 N Y Y N QEMU diskformat
VMDK N Y N N VMware virtualmachine diskformat
AMI/AKI/ARI N Y N N Amazonmachine/kernel/ramdisk diskformat
ISO N N N N Disk format withan optical diskfile system
VDI N N N N Virtual desktopinfrastructuredisk format
IBM Cloud Manager with OpenStack supports OpenStack images for one of the following guestoperating systems:
Table 59. Supported guest operating systems by hypervisor
Guestoperatingsystem Hyper-V KVM PowerKVM PowerVC VMware z/VM
Windows
v Windows 8
v Windows 7
v WindowsServer 2012R2
Y Y N N Y N
Linux
v Red HatEnterpriseLinux 6.5
v SUSE LinuxEnterpriseServer 11.2
Y Y N N Y N
Chapter 7. Managing as an Administrator 215
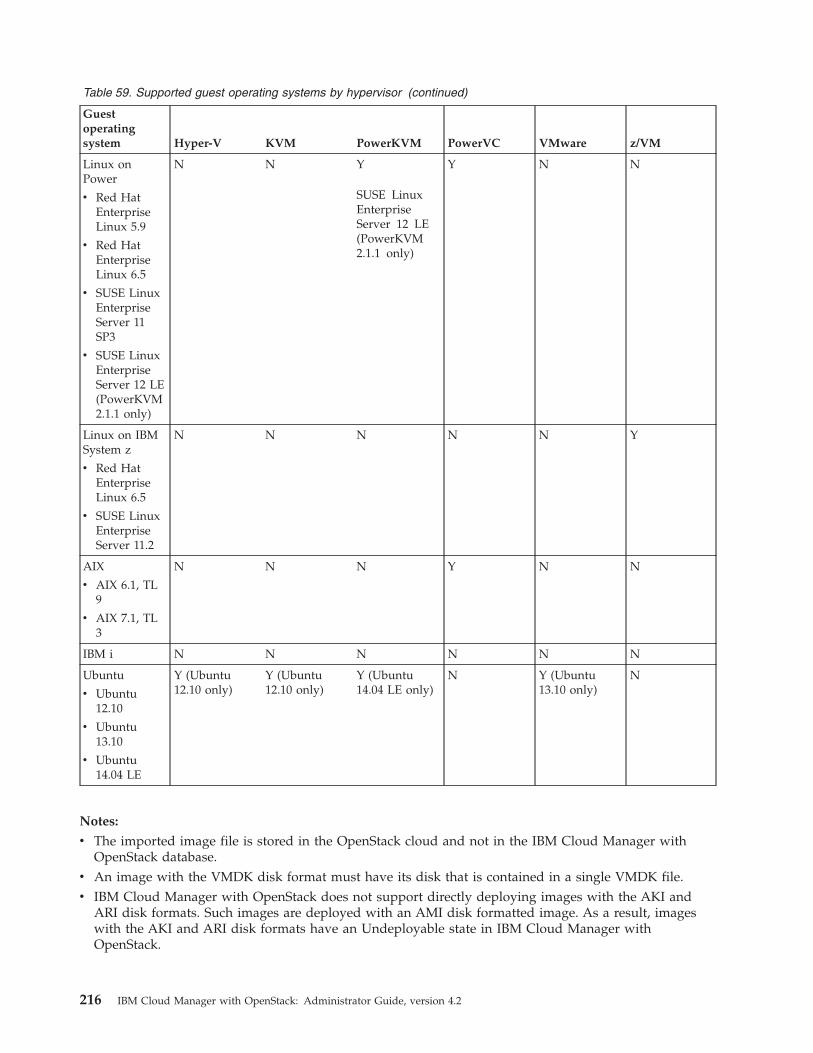
Table 59. Supported guest operating systems by hypervisor (continued)
Guestoperatingsystem Hyper-V KVM PowerKVM PowerVC VMware z/VM
Linux onPower
v Red HatEnterpriseLinux 5.9
v Red HatEnterpriseLinux 6.5
v SUSE LinuxEnterpriseServer 11SP3
v SUSE LinuxEnterpriseServer 12 LE(PowerKVM2.1.1 only)
N N Y
SUSE LinuxEnterpriseServer 12 LE(PowerKVM2.1.1 only)
Y N N
Linux on IBMSystem z
v Red HatEnterpriseLinux 6.5
v SUSE LinuxEnterpriseServer 11.2
N N N N N Y
AIX
v AIX 6.1, TL9
v AIX 7.1, TL3
N N N Y N N
IBM i N N N N N N
Ubuntu
v Ubuntu12.10
v Ubuntu13.10
v Ubuntu14.04 LE
Y (Ubuntu12.10 only)
Y (Ubuntu12.10 only)
Y (Ubuntu14.04 LE only)
N Y (Ubuntu13.10 only)
N
Notes:
v The imported image file is stored in the OpenStack cloud and not in the IBM Cloud Manager withOpenStack database.
v An image with the VMDK disk format must have its disk that is contained in a single VMDK file.v IBM Cloud Manager with OpenStack does not support directly deploying images with the AKI and
ARI disk formats. Such images are deployed with an AMI disk formatted image. As a result, imageswith the AKI and ARI disk formats have an Undeployable state in IBM Cloud Manager withOpenStack.
216 IBM Cloud Manager with OpenStack: Administrator Guide, version 4.2
v IBM Cloud Manager with OpenStack does not support importing images for deployment to PowerVC.Only the PowerVC images that were synchronized into the OpenStack cloud and made available toIBM Cloud Manager with OpenStack can be deployed to PowerVC. For information about workingwith PowerVC images, see the IBM Power Virtualization Center Standard information center:http://www.ibm.com/support/knowledgecenter/SSXK2N_1.2.1/com.ibm.powervc.standard.help.doc/powervc_images_hmc.html.
Procedure1. In the IBM Cloud Manager with OpenStack interface, click the Images tab.2. Click More and choose Import image... from the menu to open the Import Image window.3. Update the cloud, project, image name, disk format, and container format for the image being
imported.
Note: When the AMI disk format is selected, you can select the associated AKI (kernel image) andARI (ramdisk image) disk formatted images. If these images have not been imported, then you canedit these image properties later.
4. Update the hypervisor type for the image being imported. The hypervisor type might have a defaultvalue set based on the disk format selected. If the image does not have a specific hypervisor typerequirement, then select the “Not Specified” option. If a specific hypervisor type is selected and thereis no hypervisor in the OpenStack cloud that has a matching type, the image is not deployable.
5. Optional: If the image has a minimum memory or storage size requirement, update the minimummemory (MB) and minimum storage (GB) fields.
Note: By default, OpenStack uses the size of the image as the minimum storage size requirementwhen deploying the image. This default is often sufficient. However, if the image uses a compresseddisk format, such as QCOW2, then the minimum storage size requirement should be set to thedecompressed image size.
6. Optional: If the image has specific OpenStack architecture requirements, update the architecture fields.7. Click Import.
Note: When you upload an image file using some older browser versions, space for the image file isrequired in the server temp directory. This temporary file is deleted when the upload completes. If theupload does not complete successfully, it is possible that the temporary file is not deletedautomatically. If you must use an older browser, place the image file in a location where it can beimported using a URL.
Results
After the image is successfully imported, you can edit a subset of the image properties. For moreinformation on editing OpenStack image properties, see Editing image properties (OpenStack only).
If an image is not deployable after it is imported, check the log entries for the image for moreinformation. You might must modify the image properties to make the image deployable.Related reference:Building imagesThis topic contains more information about building images.Related information:Getting virtual machine imagesThis site contains example images that are compatible with OpenStack.
Editing image properties (OpenStack only)IBM Cloud Manager with OpenStack supports viewing and editing a subset of the properties that arestored with an image in the OpenStack cloud.
Chapter 7. Managing as an Administrator 217

Procedure1. In the IBM Cloud Manager with OpenStack web interface, click an image to view or edit the
properties of that image.2. The following basic OpenStack image properties can be edited: name, disk format, container format,
minimum memory (MB), and minimum storage (GB).3. Optional: You can also view, create, update, and delete additional OpenStack image properties. The
additional properties might include architecture, hypervisor_type, kernel_id, ramdisk_id, os_versionor os_distro. For more information about OpenStack image properties, see the OpenStack ComputeAdministration Guide at http://docs.openstack.org/admin-guide-cloud/content/section_image-mgmt.html.Some of the additional OpenStack image properties are specific to certain OpenStack hypervisor types.For example, the KVM hypervisor supports the hw_vif_model, hw_disk_bus and hw_cdrom_busproperties. For more information about these properties, see Libvirt Custom Hardware Configurationat https://wiki.openstack.org/wiki/LibvirtCustomHardware.
Notes:
v An image configuration strategy is part of the additional OpenStack image properties. However, theconfiguration strategy cannot be viewed or edited with this task.
v To deploy an image to an OpenStack KVM hypervisor, the qemu value is used for thehypervisor_type property of the image.
Updating an image configuration strategy (OpenStack only)IBM Cloud Manager with OpenStack supports adding, updating, and deleting the configuration strategyfor an image in an OpenStack cloud.
About this task
The configuration strategy is stored with the image in the OpenStack cloud.
Procedure1. Select the image that you want to update.2. Click More and choose Configuration Strategy... from the menu.3. Click Edit.
Note: If a configuration strategy exists, a Delete button is provided to delete the existingconfiguration strategy. The Edit button can be used to add or update the configuration strategy.
4. Update the configuration strategy type, template, user metadata, and mapping for the image.5. Click Save.
Note: After you update the configuration strategy, reset the image configuration in order for theupdated configuration strategy to be applied when you configure or deploy the image.
Related tasks:“Configuring images with OpenStack” on page 184The following topics cover information to configure images in an OpenStack environment.
Creating a VMware linked virtual machineLinked virtual machines can be created from a snapshot or from the current running point. A linkedclone is a virtual machine whose disks are linked with the template that it was cloned from. Duplicateddata is shared between the linked virtual machine and the template. Linked clones deploy much fasterbecause most of the disk data does not have to be copied.
218 IBM Cloud Manager with OpenStack: Administrator Guide, version 4.2
About this task
You can use any image (or template) to create a linked virtual clone. To create a linked virtual clone,follow these steps:
Procedure1. Open IBM Cloud Manager with OpenStack and select Images.2. Select the image that you want to clone and select Deploy > Advanced.3. On the Advanced Deployment window, select the option to Link virtual machine to image.
What to do next
Note:
v The creation of a linked clone requires the image to contain a virtual machine snapshot. If the imageused to create a linked clone does not have a virtual machine snapshot, IBM Cloud Manager withOpenStack creates a virtual machine snapshot for the image before the linked clone is created.
v If an image already has a virtual machine snapshot, IBM Cloud Manager with OpenStack does notcreate a new snapshot, but instead uses the current snapshot. Changes that are made to the templatemight not be reflected, since the clone operation is based on the snapshot and any future changes youmake are outside of the snapshot If you must change the template, create a new snapshot that includesyour changes.
v Storage DRS supports linked clones starting in VMware vSphere version 5.1. However, Storage DRS isnot always able to make a recommendation to place linked clones on a datastore. As a result, anattempt to deploy a linked clone to a storage DRS cluster results in the creation of a full clone, and awarning message in the log that a linked clone was not created.
v The disks of a linked clone cannot be resized. Any attempt to resize a linked disk at deployment timeresults in an error.
v The datastores of the image must be accessible by the deployment target or the virtual machine cannotbe linked to the image. In this case, IBM Cloud Manager with OpenStack deploys a full clone.
v You cannot unlink a linked clone from the image.
Configuring image deployment propertiesImage deployment customization properties that you want to apply to individual images must beconfigured through the IBM Cloud Manager with OpenStack web user interface. IBM Cloud Managerwith OpenStack enables you to save these properties in advance so that your users do not have to knowall the internal and advanced deployment details.
About this task
To set global image deployment properties, see “Configuring global image deployment” on page 173.
The values that are set in the global image deployment properties are used when deploying an imageunless individual deployment properties are set for an image. The values that are set for an individualimage are used unless they are explicitly overridden when deploying an image. Administrators can setwhich values are displayed in the basic deployment or even allow users to set advanced deploymentproperties. For more information about allowing users to view advanced form, see “Configuring access toadvanced deployment form” on page 175.
Note: Global configurations are refreshed only when manually reset or when the deployment targetchanges.
To configure image default deployment customization properties to be used when deploying it from IBMCloud Manager with OpenStack, complete the following steps:
Chapter 7. Managing as an Administrator 219
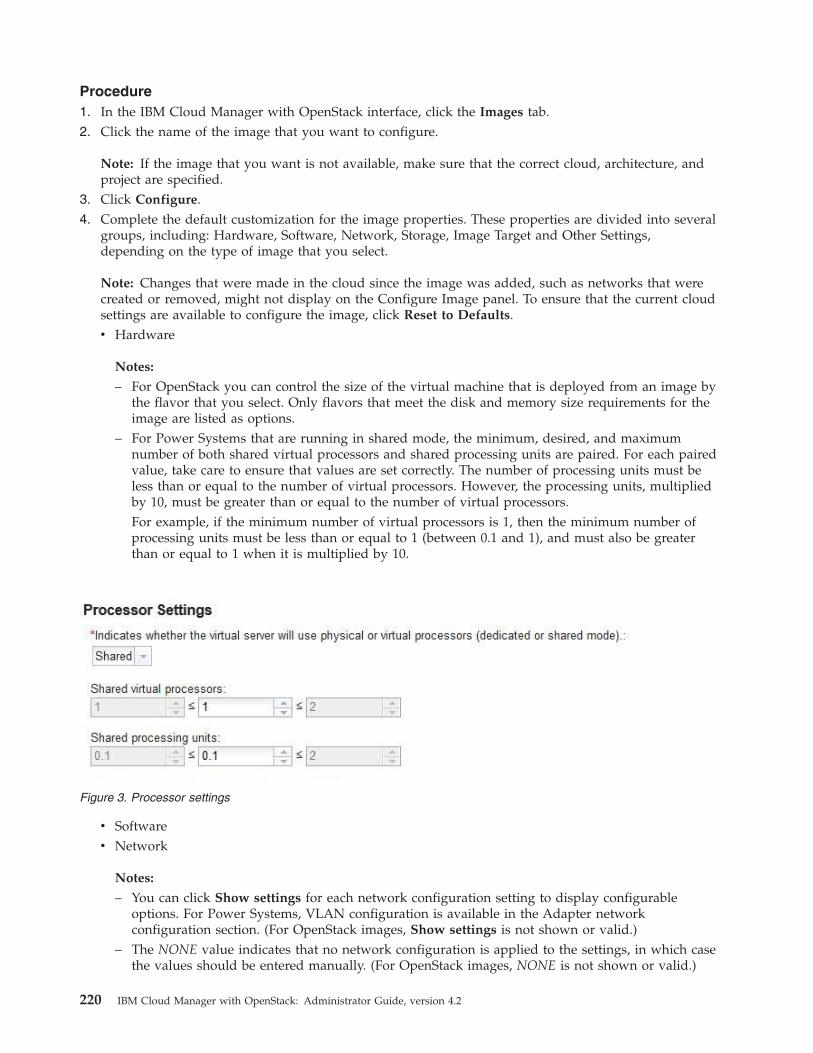
Procedure1. In the IBM Cloud Manager with OpenStack interface, click the Images tab.2. Click the name of the image that you want to configure.
Note: If the image that you want is not available, make sure that the correct cloud, architecture, andproject are specified.
3. Click Configure.4. Complete the default customization for the image properties. These properties are divided into several
groups, including: Hardware, Software, Network, Storage, Image Target and Other Settings,depending on the type of image that you select.
Note: Changes that were made in the cloud since the image was added, such as networks that werecreated or removed, might not display on the Configure Image panel. To ensure that the current cloudsettings are available to configure the image, click Reset to Defaults.v Hardware
Notes:
– For OpenStack you can control the size of the virtual machine that is deployed from an image bythe flavor that you select. Only flavors that meet the disk and memory size requirements for theimage are listed as options.
– For Power Systems that are running in shared mode, the minimum, desired, and maximumnumber of both shared virtual processors and shared processing units are paired. For each pairedvalue, take care to ensure that values are set correctly. The number of processing units must beless than or equal to the number of virtual processors. However, the processing units, multipliedby 10, must be greater than or equal to the number of virtual processors.For example, if the minimum number of virtual processors is 1, then the minimum number ofprocessing units must be less than or equal to 1 (between 0.1 and 1), and must also be greaterthan or equal to 1 when it is multiplied by 10.
v Softwarev Network
Notes:
– You can click Show settings for each network configuration setting to display configurableoptions. For Power Systems, VLAN configuration is available in the Adapter networkconfiguration section. (For OpenStack images, Show settings is not shown or valid.)
– The NONE value indicates that no network configuration is applied to the settings, in which casethe values should be entered manually. (For OpenStack images, NONE is not shown or valid.)
Figure 3. Processor settings
220 IBM Cloud Manager with OpenStack: Administrator Guide, version 4.2

– When a network configuration (including NONE) is selected for use, all settings in the subsectionare cleared, indicating they draw from the configuration specified.
– When a network configuration is applied, individual settings can be specified manually byproviding a value for the setting and therefore overriding the setting that is specified in thenetwork configuration. Any settings that are blank are taken from the configuration settings. (ForOpenStack networks, individual network settings cannot be specified.)
v Storage
Notes:
a. The Virtual disk options for an add disk request option is for adding a disk during theimage deployment and is specific to a VMware cloud. This option is an ordered andcolon-separated list of virtual disk options. The default value for an optional virtual disk optionis an empty string. The options are parsed in the following order:
Disk size in MB (Required)This option is parsed as a long.
Thin provisioned (Optional)This option is parsed as a boolean. The default value is false which specifies thickprovisioned status.
Eagerly scrub (Optional)This option is parsed as a boolean. The default value is false which specifies that theunderlying file system determines the scrub status.
Datastore (Optional)This option is parsed as a string. The default value is null which specifies that you wantto use the same datastore as the datastore that is used by the main disk of the virtualmachine. Input value sample:
The following is an example of this option:1:true:false:datastore_01
b. To configure the maximum number of disks that are allowed or the maximum size of the disks,see “Configuring the number and maximum size of additional storage” on page 176.
v Image targetv Other Settings
5. Depending on the image, you might be able to enter the root password for the server that isprovisioned by this image, such that users that deploy the image receive the root password in anemail notification.
6. Optionally, you can select specific image customization properties to display to a user on the basicdeployment form.a. Select the Show basic deploy panel settings check box at the top of the configuration panel.b. For individual customization properties, select the associated Show in basic deploy settings check
box. This option causes the property to be displayed when a user brings up the basic deploymentform for this image. Check only those properties that you want a user to customize, for example,passwords or port numbers for a specific software product included in the image.
7. Select Save.
Note: You can reset an image customization to its original configuration by clicking Reset toDefaults.
Deploying an imageYou can deploy an image with either basic configuration options or advanced configuration options.Advanced configuration options are only available if the administrator enables them for yourenvironment.
Chapter 7. Managing as an Administrator 221
Procedure1. Click the name of the image you want to deploy.2. In the Image Details properties page, click Deploy.
Note: The IBM Cloud Manager with OpenStack cloud administrator can configure IBM CloudManager with OpenStack to allow users to use the advanced deployment form when deploying animage. Click More > Advanced deploy to display the advanced deployment form.
Basic deployment
With a basic deployment, minimal configuration options, including name, description, project,flavors (if you are using OpenStack), processor information, memory, and key pairs (if you areusing OpenStack and at least one key pair is configured for the user) are displayed.
Advanced deployment
Advanced deployment makes a number of different settings available when animage is deployed. For example, with advanced deployment a user can configure setting likenetworking, storage, and software configuration values. To enable access to these functions,you can do one of the following:v Make the advanced deployment form available to all users.v Choose specific values for an image by selecting the corresponding check box and exposing
that on the basic deployment.
For more information about enabling advanced deployment options for users, see“Configuring image deployment properties” on page 219.
With advanced deployment, administrators can configure the options, so users can suspendand resume instances. The VMware and OpenStack Linux Kernel-based Virtual Machine(KVM) and Hyper-V environments support the suspend action by default.
If you enable the multiple instances on a single deployment operation, users can deploymultiple instances through a single deployment. The deployed instances use the deploymentname as the prefix of each single instance. The new names also use -x as the suffix, where x isthe index of that instance.
If the deployment approval process is enabled, you receive a single approval request. You canchange the number of deployment instances while you review the request. The metering andbilling functions remain for each of the single deployment instances. When deployingmultiple instances on a single deployment, the instances of this deployment are not displayedimmediately after you click Deploy or Approve.
You can also set fields, such as Virtual Machine Customization, Virtual Machine PersonalityFiles, and more.
Note:
v Only the members of the selected project can see the instance that is created as a result of the imagedeployment.
v If approvals are enabled, deployment does not begin until the request is approved by theadministrator.
v If billing is enabled, you must be a member of an account that is not delinquent for the deploymentto proceed.
v The expiration period and approvals policy settings for deployment depends on the policies thatare set for the cloud. If more detailed expiration and approvals are set for the project where theimage is being deployed, the policies for the project are applied.
v If you are deploying multiple instances, IBM Cloud Manager with OpenStack deploys the instancesone by one. If you restart IBM Cloud Manager with OpenStack before all the deployments arecomplete, the deployments that are not started will not be deployed. For example, if there are five
222 IBM Cloud Manager with OpenStack: Administrator Guide, version 4.2
instances to be deployed and three of them are complete and one is in progress when IBM CloudManager with OpenStack is restarted, the fourth instance will be deployed, but the fifth instancewill not be deployed.
v If you are deploying an image on z/VM through OpenStack, the instance must have at least onenetwork configuration assigned to the management network. This is because the Extreme CloudAdministration Toolkit (xCAT) is in the management network and the instance must be in the samenetwork as the xCAT, or the deployment will fail.Use the Advanced Deploy option and select the first network configuration that is displayed in theIBM Cloud Manager with OpenStack user interface for the management network.
Copying image definitionsRather than copy an entire image, you can create image copies by using just the metadata of the image.
About this task
By copying the metadata, you can make the same image available to multiple projects or providemultiple alternative configurations of the same base image. You can use the Configure Image window tomodify various configuration settings for the copies. The copy image function is enabled foradministrators and for project owners for images within their project.
When you copy an image definition, only the image metadata that is stored in the IBM Cloud Managerwith OpenStack database is copied. As a result, any metadata that is stored with the image in the cloud iscommon across the base and copied images. For example, the configuration strategy for an OpenStackimage is metadata that is stored with the image in the cloud. Therefore, the same configuration strategyis used for the base and copied images. For more information about OpenStack configuration strategies,see Configuration strategies.
Note: If you delete the base image, then all copied image configurations are also deleted.
To copy an image definition, perform the following steps:
Procedure1. On the IBM Cloud Manager with OpenStack page, click the Images tab.2. On the Images page, click the base image name that you want to copy.3. Click Copy to enter the image name and description that you want to assign to the copied image.
What to do next
Now you can configure the copied image and move it to different project if desired.
Viewing image propertiesYou can view image properties such as the image name, description, last modification date, specificationversion, revision comments, and logs. As an administrator, or if you have project owner authority, youcan also make copies of the image, view related images (images that share the same base image), andmodify the image name, description, and project.
About this task
Click the image to view or edit the details of that image. Remember that modifications that you make toan image in IBM Cloud Manager with OpenStack might not be reflected in the underlying virtualizationinfrastructure.
Deleting imagesUsing IBM Cloud Manager with OpenStack you can delete images from an OpenStack cloud and certainimages from VMware clouds.
Chapter 7. Managing as an Administrator 223
About this task
When you delete an image, it is deleted from IBM Cloud Manager with OpenStack. The image is deletedfrom the OpenStack cloud if it is a OpenStack base image.
The ability to delete an image varies by cloud type:v OpenStack images can be deleted at any time. Deleting an OpenStack base image results in all of its
related images, or copied images, being deleted as well.
Procedure1. In the IBM Cloud Manager with OpenStack interface, click Images.2. Select the image that you want to delete.3. Click the delete icon.
Managing projectsYou can create, manage, and request access to projects on the Projects page, which is available on theAccess tab.
Projects are used to define the users that have access to a set of images and instances. Only members of aproject can view images and instance within a project. In many cases, projects correspond to adepartment or other human organization.
To manage projects, go to the Access tab and click Projects to view the list of available projects.
IBM Cloud Manager with OpenStack self-service portal comes with a default project called the Publicproject, to which all users belong. All virtual images and instances created outside of the self-serviceportal are, by default, assigned to the Public project. You can also configure a staging project to storenewly discovered images or instances. The staging project allows administrators to configure imagesbefore making them available to other users. For more information, see “Configuring a staging project”on page 175.
Overview of project membership rolesWhen you are added as a member of a project, one of three membership roles are assigned to you.
OwnerA project owner has administrator authority to the project and its contents. The project ownerprimarily manages the contents of the project and who has authority to the project and itscontents.
User A project user has the authority to use the project and the objects within the project. For example,a project user can deploy a virtual image to the project. A user can also view and potentiallyrestore backup images of virtual machines that are created by other users, depending on how theproject and roles were initially set up. The project user primarily handles their own deployments.
ViewerA project viewer has authority only to view the project and the virtual images and instances thatare contained in the project.
Creating a projectIf you are given authority by your administrator, you can create projects.
Before you begin
Discuss your authority level with your administrator. The com.ibm.cfs.project.creation.by.user property inthe deployment.properties file must be set to True for you to create projects.
224 IBM Cloud Manager with OpenStack: Administrator Guide, version 4.2
Procedure1. Click New Project.2. Type a project name and description in the corresponding fields.3. Click Create.
Editing project propertiesIf you have project owner authority, you can edit the properties of an existing project, including projectroles, project name, or project membership.
Procedure1. From the list of projects, select the project you want to edit.2. To update the project name or description, click the text field and type the new values.3. To update project membership:
a. Click Project Members to open the panel.b. In the Add Project Members window, select the new members and their project roles to add them
to the project.c. Click OK.d. To modify an existing member's project role, select the users you want to modify and click Set
Role to to select the new project role.e. To remove members from the project, select the users you want to remove and then click Remove
to remove the users from the project.4. To update the expiration policies:
a. Click Expiration Policies to open the panel.b. Choose one of the following to set the expiration policy:
Use cloud defaultThe expiration of the deployment will depend on the expiration configuration of the cloudto which the image belongs.
Customize settingsThe expiration policy you set on this panel (by setting the Maximum expiration value andMaximum extension period values) overrides the expiration policy of the cloud to whichthe image belongs.
5. To update the approval policies:a. Click Approval Policies to open the panel.b. Choose one of the following to set the approval policy:
Use cloud defaultThe project uses the approval policy of cloud groups.
Customize settingsThe project uses the approval policy you set on this panel (by selecting checkboxes fromthe Require approval for the following events list) overrides the approval policy of thecloud groups.
6. Click Save.
Setting project policiesFor projects that you own, you can set expiration policies and approval policies that affect the instancesthat are deployed in that project.
Procedure1. Click the Access tab and then the Projects tab.2. Click the name of the project in the table to display the project properties.
Chapter 7. Managing as an Administrator 225
3. Click Edit.4. Expand the title of the item you want to work with: Expiration Policies or Approval Policies.5. Set your policies for your projects, or select Use cloud default to use the policies set by your
administrator.
What to do next
For more information about expiration policies and approval policies, see the IBM Cloud Manager withOpenStack Administrators Guide.
Deleting an existing projectAs a project owner, you can delete a project at any time.
About this task
When a project is deleted from IBM Cloud Manager with OpenStack, all of the virtual images andinstances contained in the project are transferred to the public project.
Procedure1. In the projects list, select the project you want to delete.
Restriction: You cannot delete the default Public project.2. Click the Delete selected projects icon.
Project management with OpenStackUnlike other cloud types, OpenStack clouds provide native support for project management through theOpenStack keystone component. Because the projects are managed in OpenStack, the projects cannot beupdated unless the OpenStack cloud is available.
Keystone is an OpenStack component that provides identity, token, catalog, and policy services to projectsin the OpenStack family. Upon first connecting to an OpenStack cloud, IBM Cloud Manager withOpenStack self-service portal imports all the projects that currently exist inOpenStack. The current projectmembership is accepted and reflected in the self-service portal.
After the initial OpenStack projects import, when connected to an OpenStack cloud, the self-service portalenters transactional mode for project management. When in transactional mode, all project managementoperations that are performed in the self-service portal are also performed in OpenStack (that is inkeystone). If a project management operation (or any of the operations described in this section) fails tocomplete successfully in the self-service portal it does not occur in OpenStack. Likewise, if it fails inOpenStack, it reverts in IBM Cloud Manager with OpenStack self-service portal.
IBM Cloud Manager with OpenStack enters transactional mode for project operations, while connected toOpenStack, in order to have the registries in both products synchronized. For this reason, whenconnected to an OpenStack cloud, IBM Cloud Manager with OpenStack cannot perform project-relatedoperations while the OpenStack cloud is down or unavailable. In addition, the projects created usingKeystone are only synchronized when the self-service portal is restarted. This cannot be done manuallyfrom the self-service portal.
The project name changes, membership changes, and project description changes made using Keystoneare also only synchronized when the self-service portal is restarted. If you cannot restart the self-serviceportal, these changes must be made manually from the self-service portal.
Restriction: If the project is deleted directly using Keystone, you also must delete this project manuallyfrom the self-service portal after the self-service portal is restarted. You are not allowed to change the
226 IBM Cloud Manager with OpenStack: Administrator Guide, version 4.2

name or delete the Public project using Keystone. Only membership changes and project descriptionchanges can be modified in the Public project directly using Keystone.
To connect to OpenStack, the IBM Cloud Manager with OpenStack self-service portal uses a service useraccount and a default service tenant. Some OpenStack installations have user accounts specific toOpenStack components (for example, nova, keystone, neutron). These and other service user accounts orservice tenants in an OpenStack server that do not represent an actual user account or tenant, can beadded to the list of service users and service tenants. By doing so, they are ignored by the self-serviceportal and those service users are not allowed to log into the self-service portal. To make this change, addthe service users and tenants to the comma-separated list of users in thecom.ibm.cfs.cloud.openstack.service.users property, or the comma-separated list of tenants in thecom.ibm.cfs.cloud.openstack.service.tenants property, in the openstack.properties file.
Managing approval policiesIBM Cloud Manager with OpenStack self-service portal administrators can enable approval policysupport by specifying the operations that require approval. If approval policies are enabled, the requestedoperation is held until the approval request is processed by the administrator.
This approval requirement ensures that self-service portal administrators control the self-service portalinstance process and provides an audit trail of the requester and approver roles.
From a user standpoint, the approval lifecycle behaves similar to the following:v Users can see only requests that they initiate.v Users are unable to view any requests against an instance in the public project that they did not
originate. Instances indicate that they are in a Pending state, but users cannot see the outstandingrequests that are initiated by other users against that instance.
Setting or modifying approval policies for a cloudFollow these steps to set or modify an approval policy for a cloud. These policies are used unless theyare overridden by an approval policy for a project.
Procedure1. In the IBM Cloud Manager with OpenStack interface, select Configuration > Clouds.2. Click the cloud name for which you want to modify approval policies.3. Select Approval Policies.4. Set the events that require administrator approval.
Deploying an imageApproval policy that is invoked when deploying an image to create an instance in the cloud.This approval policy suspends the deployment operation until the generated request isapproved or rejected.
Extending the instance expiration time frameApproval policy that is invoked when extending the expiration date of an existing instance.This approval policy suspends the expiration operation until the generated request isapproved or rejected.
Resizing an instanceApproval policy that is invoked when resizing an existing instance. This approval policysuspends the resize operation until the generated request is approved or rejected.
Capturing an instanceApproval policy that is invoked when capturing an existing instance. This approval policysuspends the capturing operation until the generated request is approved or rejected.
Chapter 7. Managing as an Administrator 227

Deleting an instanceApproval policy that is invoked when deleting an existing instance. This approval policysuspends the delete operation until the generated request is approved or rejected.
Requesting to attach storage to a virtual machineApproval policy that is invoked when attaching storage to a virtual machine. This approvalpolicy suspends the attach storage operation until the generated request is approved orrejected.
Requesting to detach storage from a virtual machineApproval policy that is invoked when detaching storage from a virtual machine. Thisapproval policy suspends the detach storage operation until the generated request is approvedor rejected.
Saving a virtual machine imageApproval policy that is invoked when saving a virtual machine image. This approval policysuspends the save image operation until the generated request is approved or rejected.
Requesting to create virtual machine snapshotApproval policy that is invoked when creating a virtual machine snapshot. This approvalpolicy suspends the virtual machine snapshot operation until the generated request isapproved or rejected.
Restoring a virtual machineApproval policy that is invoked when restoring a saved virtual machine image. This approvalpolicy suspends the restore operation until the generated request is approved or rejected.
Requesting to revert virtual machine to snapshotApproval policy that is invoked when reverting a virtual machine to snapshot version. Thisapproval policy suspends the revert to snapshot operation until the generated request isapproved or rejected.
Deleting a volumeApproval policy that is invoked when a volume is deleted. This approval policy suspends thedelete volume operation until the generated request is approved or rejected.
Creating a volumeApproval policy that is invoked when a volume is created. This approval policy suspends thecreate volume operation until the generated request is approved or rejected.
Updating a volumeApproval policy that is invoked when a volume is updated. This approval policy suspendsthe update volume operation until the generated request is approved or rejected.
Setting or modifying approval policies for a projectFollow these steps to set or modify an approval policy for a project. These policies override the approvalpolicies that are set for a cloud.
Procedure1. In the IBM Cloud Manager with OpenStack interface, select Access > Projects.2. Select the project for which you want to modify approval policies.3. Select Customize settings.4. Select Approval Policies.5. Set the events that require administrator approval. To use setting defined for a cloud, select Use cloud
default.
Deploying an imageApproval policy that is invoked when deploying an image to create an instance in the cloud.This approval policy suspends the deployment operation until the generated request isapproved or rejected.
228 IBM Cloud Manager with OpenStack: Administrator Guide, version 4.2
Extending the instance expiration time frameApproval policy that is invoked when extending the expiration date of an existing instance.This approval policy suspends the expiration operation until the generated request isapproved or rejected.
Resizing an instanceApproval policy that is invoked when resizing an existing instance. This approval policysuspends the resize operation until the generated request is approved or rejected.
Capturing an instanceApproval policy that is invoked when capturing an existing instance. This approval policysuspends the capturing operation until the generated request is approved or rejected.
Deleting an instanceApproval policy that is invoked when deleting an existing instance. This approval policysuspends the delete operation until the generated request is approved or rejected.
Requesting to attach storage to a virtual machineApproval policy that is invoked when attaching storage to a virtual machine. This approvalpolicy suspends the attach storage operation until the generated request is approved orrejected.
Requesting to detach storage from a virtual machineApproval policy that is invoked when detaching storage from a virtual machine. Thisapproval policy suspends the detach storage operation until the generated request is approvedor rejected.
Saving a virtual machine imageApproval policy that is invoked when saving a virtual machine image. This approval policysuspends the save image operation until the generated request is approved or rejected.
Requesting to create virtual machine snapshotApproval policy that is invoked when creating a virtual machine snapshot. This approvalpolicy suspends the virtual machine snapshot operation until the generated request isapproved or rejected.
Restoring a virtual machineApproval policy that is invoked when restoring a saved virtual machine image. This approvalpolicy suspends the restore operation until the generated request is approved or rejected.
Requesting to revert virtual machine to snapshotApproval policy that is invoked when reverting a virtual machine to snapshot version. Thisapproval policy suspends the revert to snapshot operation until the generated request isapproved or rejected.
Deleting a volumeApproval policy that is invoked when a volume is deleted. This approval policy suspends thedelete volume operation until the generated request is approved or rejected.
Creating a volumeApproval policy that is invoked when a volume is created. This approval policy suspends thecreate volume operation until the generated request is approved or rejected.
Updating a volumeApproval policy that is invoked when a volume is updated. This approval policy suspendsthe update volume operation until the generated request is approved or rejected.
Managing requestsWhen you deploy an image or when you initiate an action that requires approval from an administrator,a request is created and submitted to an administrator for approval. The status is set to Pending until theadministrator handles the approval request.
Chapter 7. Managing as an Administrator 229

You can set which actions require administrator approval by using the Approval policies function. Formore information, see “Managing approval policies” on page 227.
Processing instance requestsWhen an image is deployed, initiating an instance, the deployment request may require approval by anadministrator. The instance status is set to pending until the administrator handles the approval request.
About this task
You can process an instance request from the Instances tab or from the Requests tab. For moreinformation about processing an instance request from the Instances tab, see “Processing requests fromthe Instances tab” on page 245
To process a pending request, follow these steps:
Procedure1. In the IBM Cloud Manager with OpenStack interface, select Access > Requests.2. Expand the Request Details section to review or update the request before approving.3. Expand the Comments section to review comments or use the Add Comment link to provide
additional comments.v Click Approve to approve the request and allow the deployment processing to start.v Click Reject to reject the request.v Click Withdraw to withdraw a request.
Clearing or archiving requestsYou can clear or archive requests. Clearing requests deletes the requests while archiving requests savesthem to an archive folder. By clearing requests, you can free space on your system and improveperformance in the IBM Cloud Manager with OpenStack interface. Archive any requests that you maywant to reference in the future.
About this task
To clear or archive a request, follow these steps:
Procedure1. In the IBM Cloud Manager with OpenStack interface, select Access > Requests.
v To clear requests, click Clear.v To archive requests, click Archive.
2. Use the Request filter to select a subset of requests to clear or archive. Filter by status or start and enddate. If you filter by date, you must provide an end date.v To clear the selected requests, click Clear.v To archive the selected requests, click Archive. The filtered requests are saved in a file called
requests_<current time in milliseconds>.csv. This file can be found in the archives folder,located in the IBM Cloud Manager with OpenStack configuration directory.
Managing expiration policiesExpiration policies require users to set an expiration period that specifies the maximum length of theinstance lease and determine the lifecycle of expired instances.
You can set a default expiration policy for a cloud or for a project. Expiration policies set for a projectoverride the expiration policies set for a cloud. After an expiration policy is set, you must set anexpiration date whenever deploying an image from that cloud or project. However, the administrativeuser can set a date with no limitations.
230 IBM Cloud Manager with OpenStack: Administrator Guide, version 4.2
If you are deploying an image from a cloud or project that does not have an expiration policy set, youcan choose whether to set an expiration date.
The user who deployed the instance receives an email notification when the instance is about to expire.The user can extend the lease if extensions are enabled.
After the instance expires, it will be stopped. The instance can be automatically deleted after a limitedtime, which is specified by the grace period. If no grace period is specified, the instance is deletedimmediately. This setting applies regardless of whether the instance expiration maximum is set.
Updating the default expiration policy for a cloudYou can update the default expiration policy for IBM Cloud Manager with OpenStack.
About this task
To update the default expiration policy, complete the following steps:
Procedure1. In the IBM Cloud Manager with OpenStack interface, select Configuration > Clouds.2. Click the name of the cloud for which you want to update the expiration policy.3. Click Expiration Policies to open the form.4. Enter information for the default expiration policy and click Save.
Note: To delete expired instances immediately, set the Grace period to 0.
Updating the default expiration policy for a projectYou can update the default expiration policy for IBM Cloud Manager with OpenStack project.
Procedure1. In the IBM Cloud Manager with OpenStack interface, select Access > Projects.2. Select a project to open the project update page.
Note: To delete expired instances immediately, set the Grace period to 0.3. Enter information for the default expiration policy.
v If you select Use cloud default, the expiration of the deployment depends on the expirationconfiguration of the cloud to which the image belongs.
v If you select Customize settings, the expiration policy overrides the expiration policy of the cloudto which images belong.
4. Click OK.
Managing flavors (OpenStack only)A flavor is the prescribed size of a provisioned virtual machine. Each flavor has a unique combination ofresource configurations and sizes.
Updating the flavor for an OpenStack cloud configurationYou can update the flavor that is configured for the cloud.
Procedure1. In the IBM Cloud Manager with OpenStack interface, select Configuration > Clouds.2. Select the cloud for which you want to modify flavors.3. Click Edit.
Chapter 7. Managing as an Administrator 231
4. Expand the Flavors section. You can create a flavor based on an existing flavor or you can create acompletely new flavor.
5. Click the flavor name that you want to copy or click the Create a new flavor icon to create a newflavor.
6. Set the following required values:v Name
v Virtual CPUs
v Memory (MB)
v Storage (GB)
v Swap(MB) This option is only supported for KVM deployments.
Notes:
v When updating the flavor, only integers are valid for the processor, memory, storage, and swapsizes. Any fractional data is omitted.
v After a flavor is created or updated, it can be used to deploy OpenStack images. However, the newor updated flavor might not be immediately available when configuring an image. If this occurs,you can reset the image configuration to the default values in order to pick up the flavor changesmade in the cloud. For more information, see Configuring image deployment properties.
v Flavors with a storage size of 0 have special meaning in OpenStack and are not supported bynumerous hypervisors such as Hyper-V. Hypervisors that do support such flavors use the size ofthe image as the storage size when provisioning a virtual machine from the image.
7. Optional: Specify extra specifications. For information, see “Extra specifications.”
Extra specificationsA flavor might include properties that are in addition to the base flavor properties. These extraspecifications are key value pairs that can be used to provide advanced configuration that is in additionto the configuration provided by the base flavor properties. This configuration is specific to thehypervisor.
Advanced configuration provided with flavor extra specifications might include the following:v CPU sharesv CPU periodv disk read and write rates per second
In addition to enabling advanced hypervisor configuration, extra specifications are used in OpenStack asa mechanism to enable advanced placement by the scheduler with specific scheduler filters such as theComputeCapabilitiesFilter and the AggregateInstanceExtraSpecsFilter. For specific information aboutusing these filters, see the OpenStack documentation.
KVM extra specifications
Flavor extra specifications are supported as part of the KVM support with OpenStack that is providedwith IBM Cloud Manager with OpenStack.
The following extra specifications enable tuning the CPU for a virtual machine:v quota:cpu_shares
v quota:cpu_period
v quota:cpu_quota
The following extra specifications enable tuning the device I/O for a virtual machine:v quota:disk_read_bytes_sec
232 IBM Cloud Manager with OpenStack: Administrator Guide, version 4.2
v quota:disk_read_iops_sec
v quota:disk_write_bytes_sec
v quota:disk_write_iops_sec
v quota:disk_total_bytes_sec
v quota:disk_total_iops_sec
The following extra specifications enable tuning the network device interfaces for a virtual machine.However, they are not supported in IBM Cloud Manager with OpenStack since they are not used withOpenVSwitch.v quota:vif_inbound_average
v quota:vif_inbound_peak
v quota:vif_inbound_burst
v quota:vif_outbound_average
v quota:vif_outbound_peak
v quota:vif_outbound_burst
PowerVC extra specifications
Flavor extra specifications are supported as part of the PowerVC support with OpenStack that isprovided with IBM Cloud Manager with OpenStack.
The following extra specifications enable tuning the CPU for a virtual machine:v powervm:proc_units
v powervm:min_proc_units
v powervm:max_proc_units
v powervm:min_vcpu
v powervm:max_vcpu
v powervm:dedicated_proc
v powervm:share_idle
v powervm:uncapped
v powervm:shared_weight
v powervm:availability_priority
v powervm:processor_compatibility
The following extra specifications enable tuning the memory for a virtual machine:v powervm:min_mem
v powervm:max_mem
The following extra specifications enable tuning the boot volumes:v powervm:boot_volume_type
For more information, see the PowerVC Information Center.
Extra specification labels
Because it can be difficult to determine the purpose of extra specifications from their names, you canlabel extra specifications.
In the openstack.properties file any property that contains the com.ibm.cfs.openstack.flavor.extraspec.label. prefixis considered a localizable label for an OpenStack flavor extra spec. The suffix of the property must be
Chapter 7. Managing as an Administrator 233
the extra spec name, and the value of the property must be the list of localized extra spec labels.
For example, you can provide a label for the quota:cpu_shares extra specification that is similar to thefollowing:
com.ibm.cfs.openstack.flavor.extraspecs.label.quota:cpu_shares=CPU Shares, en_us=CPU Shares,es=Porción de Procesador
The first value is the label for the default locale, which is followed by a list of locale=label pairs. Eachtime the extra specification is displayed in the IBM Cloud Manager with OpenStack user interface, thecorresponding label is displayed, based on the locale of the end user.
Managing cloudsYou can add, configure, edit, and remove clouds.
In the Cloud status window, you can see the status of all of the clouds that IBM Cloud Manager withOpenStack self-service portal is connected to. To view details about a specific cloud, select Cloudsettings.
In the Clouds section of the Configuration tab, you can add, edit, and delete cloud configurations. Whenyou edit cloud configurations, you can also set or update expiration policies and approval policies.
You can customize each cloud to have its own approval and expiration policies. You can also configure anetwork for a specific cloud.
Adding a cloud configurationYou can configure a cloud in the Clouds section of the Configuration tab.
Procedure1. Open IBM Cloud Manager with OpenStack and select Configuration > Clouds.2. Click Add Cloud.3. Enter information in each of the fields that is denoted with a red asterisk (*).4. Click Add.
What to do next
After you click Add, you are prompted to trust the cloud server SSL certificate. If you do not accept thiscertificate, the cloud configuration is not added.
Note: If you do not want to accept the default Approval or expiration policies, you can edit the cloudconfiguration after adding it.
Adding an OpenStack cloud configurationWhen you deploy your cloud environment, the OpenStack cloud configuration is added automatically.However, if you added a new OpenStack region to your deployment, you must manually add theOpenStack cloud configuration for the new region.
Before you begin
Before you begin these steps, ensure that the ceilometer and heat users exist on thecom.ibm.cfs.cloud.openstack.service.users property in the /var/opt/ibm/.SCE42/openstack.propertiesfile. If the ceilometer and heat users do not exist, add them and restart the sce service before continuing.For more information, see “User management with OpenStack” on page 250.
To add an OpenStack cloud configuration, follow these steps:
234 IBM Cloud Manager with OpenStack: Administrator Guide, version 4.2
Procedure1. Log in to IBM Cloud Manager with OpenStack self-service portal as an administrator.2. Click the Configuration tab and select Clouds in the navigation pane.3. Click Create a new cloud configuration.4. Enter the cloud configuration settings for the OpenStack cloud.
Name Assign a name to the OpenStack cloud that you want to create.
DescriptionOptionally, add a description for the OpenStack cloud.
Type Select OpenStack for the cloud type.
RegionSelect the region that you want to use for this OpenStack cloud.
Message Queue Settings
Message queue typeSelect the message queue type that is used by the OpenStack cloud.
Host nameSelect the host name or the IP address of the OpenStack controller node. For moreinformation, see “Customizing the messaging service attributes” on page 123.
Port Accept the default value of 5671.
Secure the cloud connection using SSLSelect if the OpenStack cloud is configured to expose an SSL connection. By default itis selected.
User IDEnter the user ID that communicates with the messaging server. The user ID is basedon the message queue type selected. Enter rabbitclient when the message queue type isRABBIT or enter qpidclient when the type is QPID.
PasswordType the password for the user ID. For password information, see “User names andpasswords” on page 263.
5. Click Add to finish.
Results
If you receive a PKI token error when you are attempting to configure the OpenStack cloud, see “PKIerror when adding OpenStack cloud with self-service portal” on page 322 for more information.
OpenStack clouds:
When you add an OpenStack cloud, IBM Cloud Manager with OpenStack self-service portal enters atransactional mode for user and project operations. Also, OpenStack relies on Coordinated Universal Time(UTC) time.
When in transactional mode, all user and project operations fail if the OpenStack cloud is unavailable.These operations fail even if the user or project in question is not currently used in connection toOpenStack.
Additionally, IBM Cloud Manager with OpenStack self-service portal uses OpenStack efficient pollingwith the changes-since parameter support to maintain internal caches of certain OpenStack resources.The OpenStack changes-since support relies on Coordinated Universal Time (UTC) time to determine if aresource has changed. As a result, the IBM Cloud Manager with OpenStack self-service portal and
Chapter 7. Managing as an Administrator 235
OpenStack systems must maintain accurate and consistent UTC time to avoid caching and otherproblems that can occur due to incorrect system time. For more information about user and projectmanagement with OpenStack, see User management with OpenStack and Project management withOpenStack.
Multiple cloud supportIBM Cloud Manager with OpenStack allows you to manage multiple clouds from a single instance. Forexample, you can have a test cloud set up to implement your latest policies before moving those policiesto your production cloud.
This support also allows you to manage multiple types of clouds For example, you can have multipleVMware cloud instances available from a single IBM Cloud Manager with OpenStack user interface.
Updating a cloudYou can update a cloud in the Clouds section of the Configuration tab.
Procedure1. Open IBM Cloud Manager with OpenStack and select Configuration > Clouds.2. Click the name of the cloud that you want to update.3. Update the desired fields and click Save.
Tip: From this configuration panel, you can also review or change the Expiration Policies, ApprovalPolicies, and Flavors (OpenStack cloud) of the cloud. For more information, see the following topics:v “Managing expiration policies” on page 230v “Managing approval policies” on page 227v “Managing flavors (OpenStack only)” on page 231
Removing a cloudYou can remove an association with a cloud from IBM Cloud Manager with OpenStack from the Cloudssection of the Configuration tab.
Procedure1. Open IBM Cloud Manager with OpenStack and select Configuration > Clouds.2. Select the cloud that you want to remove. You can either remove just the cloud, or remove the cloud
and all instances that were deployed by IBM Cloud Manager with OpenStack.3. Click Remove.4. Click Remove Cloud Only to remove just the cloud, or click Remove cloud configuration and all
related instances to remove the cloud and all instances that were deployed by IBM Cloud Managerwith OpenStack.
5. Click Yes to confirm.
Results
Note: When removing a cloud configuration, all of the cloud resources created by IBM Cloud Managerwith OpenStack are lost. Recreating the connection to the cloud at a later time will not recover theseresources
Changing the message queue optionIf you have any regions that were upgraded without using the --use-qpid option, and you are using theself-service portal to manage IBM Cloud Manager with OpenStack, you must change the message queueoption in the self-service portal to rabbitmq for each of those regions.
236 IBM Cloud Manager with OpenStack: Administrator Guide, version 4.2
Before you begin
Without completing this task, the regions are in error state on the self-service portal after an in-placeupgrade.
About this task
To change the message queue from qpid to rabbitmq on the self-service portal manually, complete thefollowing steps for each region until all the clouds are connected properly.
Procedure1. Log in to the self-service portal web interface as an administrator.2. Click the Configuration tab and select Clouds in the navigation pane.3. Click the name of the cloud (in the table) that corresponds to the region to display the cloud
properties.4. Click Edit.5. Change the message queue to rabbitmq for the cloud. The message settings are as follows:
v User ID: rabbitclient
v Password: Enter the password of the rabbitmq message queue.v Message queue type: RABBIT
v Virtual host: Use the default value, /.6. Click Save.7. Click Refresh. The state of the cloud is updated to OK.
Managing network configurationsThe IBM Cloud Manager with OpenStack self-service portal provides a convenient way to manage andapply network settings by using network configurations. Network configurations are a group of networksettings for a particular environment, typically a virtual network. These settings can be managed as asingle entity and applied to image configurations or instance deployment settings.
For example, suppose that a cloud environment contains two virtual networks applicable to instancedeployment: a public and a private virtual network. In this case, an administrator might create twonetwork configurations, one for the public and one for the private. In the public configuration, theadministrator would specify all the public network settings such as primary DNS, secondary DNS, andprimary gateway. The same would be done for the private network configuration. After theconfigurations are created, the administrator can configure the images to use the appropriate networkconfiguration. This action saves time by not requiring the administrator to specify each network setting ineach image. It also allows an easier way to manage the network settings on a virtual network.
While the actual settings specified in a configuration are tailored to a specific environment, the networkconfigurations themselves are a superset of all network settings regardless of image, operating system, orcloud management system. Therefore, all settings that are specified in a configuration are applicable. Forexample, the primary and secondary WINS settings of a network configuration are only applicable toWindows based images. So when you create a configuration for an image that is not using Windows,these values are not needed and can be left blank.
Note: With the self-service portal, you can specify the network configuration for a cloud. The self-serviceportal displays only the fields that are applicable for that cloud. Before you can create an OpenStacknetwork configuration, you must select an existing OpenStack cloud.
When network configuration settings are applied to either an image configuration or during an advancedinstance deployment, their individual settings can be overridden or manually specified, if wanted.
Chapter 7. Managing as an Administrator 237
Note: You cannot override or manually specify OpenStack network configuration settings.
Managing network configurationsYou can create, edit, and delete, network configurations from the IBM Cloud Manager with OpenStackweb interface.
About this task
To create, edit, or delete a network configuration, follow these steps:
Procedure1. Open IBM Cloud Manager with OpenStack and select Configuration.2. Select Network.
The network configurations that are defined in the property files are displayed. The Network tabprovides a listing of all existing network configurations, and enables you to edit, create, or deletethese network configurations.v The Network Configuration column shows the name of the existing network configuration.v The Cloud column shows the name of the cloud scope that is associated with the network
configuration.v The Type column shows the IP address version that the network configuration supports. VMware
network configurations support only IPv4 addresses, but OpenStack network configurations cansupport IPv4 or both IPv4 and IPv6 addresses. OpenStack networks do not support IPv6-onlyaddresses.
v The Available Addresses column shows the number of IP addresses available in the network.v The Allocated Addresses column shows the number of IP addresses that are allocated.You can edit, create, or delete these network configurations.v To view specific network configuration properties, click the network configuration name.v To edit specific network configuration properties, click the network configuration name and then
click Edit.v To manage the IP addresses for an existing configuration, click Manage IP Addresses for the
existing configuration.
v To create a new network configuration, click the New icon.v To create a new network configuration that is based on an existing configuration, select a
configuration and click the Copy icon.
v To delete an existing configuration, select a configuration and click the Delete icon.
Adding a network configurationYou can add a network configuration from the IBM Cloud Manager with OpenStack web interface.
Before you begin
z/VM only
The /etc/neutron/plugins/openvswitch/ovs_neutron_plugin.ini file contains a network_vlan_rangesvalue similar to the following:network_vlan_ranges = xcatvsw2,xcatvsw3:2:3999
Before you can add a network configuration for an OpenStack cloud running on z/VM, follow thesesteps:
238 IBM Cloud Manager with OpenStack: Administrator Guide, version 4.2
1. Create two networks in the OpenStack environment as follows:a. First, run the following command to create the management network:
Note: The following command must be entered on a single line, even though the example showsa line break for formatting purposes.neutron net-create xcat_management --provider:network_type flat
--provider:physical_network xcatvsw2
b. Next, run the following command to create the customer network:
Note: The following command must be entered on a single line, even though the example showsa line break for formatting purposes.neutron net-create opnstk_compute --provider:network_type vlan
--provider:physical_network xcatvsw3 --provider:segmentation_id 2
2. Define a subnet for each network as follows:a. Run the following command to define the subnet for the management network:
neutron subnet-create --allocation-pool start=10.1.0.2,end=10.1.0.199 xcat_management 10.1.0.0/16
Note: You can change the IP range to any value that you want. The Extreme CloudAdministration Toolkit (xCAT) MN interface can connect this range.
b. Run the following command to change the IP range for the customer network:neutron subnet-create opnstk_compute cidr
Note: You can use any IP address that you want.
When you use IBM Cloud Manager with OpenStack to connect to z/VM, the network configuration inOpenStack is done.
About this task
To add a network configuration, follow these steps:
Procedure1. Open IBM Cloud Manager with OpenStack and select Configuration.2. Select Network.3. To create a network configuration, click New.4. Specify a cloud scope.
When you specify a cloud scope, the network configuration that you are adding is only availablewhen you deploy an image to that cloud. If you specify VMware for the cloud scope, theconfiguration is available to all VMware images. When you specify a cloud scope, this page displaysonly the fields that are applicable to the selected cloud scope.
5. Enter a name for the configuration.6. Follow the steps for the cloud scope that you selected.
v VMware
a. Optionally, enter a description.b. Select a unique Network ID.c. Select one of the following IP Settings:
– Use DHCP
– Use IP address pool
If you select Use IP address pool, follow these steps:1) Specify a Subnet mask and Gateway address. You can also provide an alternative gateway
address.
Chapter 7. Managing as an Administrator 239
2) Specify a number of IP addresses and the starting address for allocation. The endingaddress is calculated based on the number of addresses and starting address.
Note: If you specify a number of IP addresses, the number must be at least 2. To create asingle IP address, you must first create then network configuration, and then add thesingle IP address.
3) Specify DNS Settings.d. Specify System-wide settings, including Linux and AIX Network Settings and Windows
Network Settings.e. Choose to be a member of a domain or a workgroup:
– Domain
If you select Domain, specify the domain name, user, and password.– Workgroup
If you select Workgroup, specify the workgroup name.f. If you selected Use IP address pool, you can also select Obtain host name and domain name
from DNS server. If you select this option, the DNS used by the system must correlate with theDNS used by this application. If it does not, the names that are obtained might be different fromthe name that is resolved by the system DNS. The DNS server must be configured correctly forthe operating system of the IBM Cloud Manager with OpenStack server. If the names cannot beresolved, the host name prefix and domain name that are provided in this configuration areused.
Note: Only the host name and domain name are configured when you select Obtain host nameand domain name from DNS server. For other setup, such as the DNS IP address, you mustconfigure those settings manually when an image is deployed.
g. Click Save.v OpenStack
a. Select one of the following IP address versions:– IPv4 only– IPv4 and IPv6
If you select IPv4 and IPv6, you can enter separate IP address settings for IPv4 and IPv6addresses. However, the number of IPv6 addresses to allocate must be the same as thenumber of IPv4 addresses.
b. Specify a subnet mask (for IPv4) or prefix length (for IPv6) and gateway address.c. Specify a number of IP addresses and the starting address for allocation. The ending address is
calculated from the number of addresses and the starting address.
Notes:
1) There must be at least two IP addresses.d. Specify DNS settings.e. Specify provider network settings as follows:
– Specify one of the following network types:- None selected
A network is created based on the tenant_network_type property in the/etc/neutron/plugin.ini file. This value is set to vlan in the SCE image. If this option isused, the physical network name and vlan ID are automatically selected based on the"network_vlan_ranges" property in /etc/neutron/plugin.ini file. This property is set todefault:1:4094 in the SCE image.
- Flat
240 IBM Cloud Manager with OpenStack: Administrator Guide, version 4.2
A virtual network that is realized as packets on a specific physical network that containsno IEEE 802.1Q header. Each physical network can realize at most one flat network.
- Local
A virtual network that allows communication within a host, but not across the network.Local networks are intended mainly for single-node test scenarios.
- VLAN
A virtual network that is realized as packets on a specific physical network that containsIEEE 802.1Q headers with a specific VLAN id. VLAN networks that share a physicalnetwork are isolated from each other. Each distinct physical network that supports VLANnetworks is treated as a separate VLAN trunk, with a distinct space of VLAN id values.
– If you select Flat or VLAN for the network type, enter the physical network name.This physical network name must match the name that is specified in thenetwork_vlan_ranges property of the /etc/neutron/plugin.ini file.
Note: You can create only one Flat network on each physical network.– If you select VLAN, enter the VLAN ID.
Valid VLAN ID values are 1 through 4094.f. Click Save.
Editing network configurationsYou can edit a network configuration from the IBM Cloud Manager with OpenStack self-service portal.
About this task
To edit a network configuration, follow these steps:
Procedure1. Open IBM Cloud Manager with OpenStack and select Configuration.2. Click Network. The network configurations that are defined in the property files are displayed.3. Select a network configuration that you want to edit from the list of available configurations. The
current properties are displayed for the selected configuration. The properties that are displayeddepend on the cloud management system for which the network configuration was created.
4. Click Edit. You can edit only certain network configuration properties.5. Change the properties of the configuration. If you want to edit the IP addresses for this configuration,
click Manage IP Addresses. For more information about setting up an IP address pool, see“Managing IP address pools.”
6. Click Save to save your changes, or Cancel to exit the screen without saving your changes.
Managing IP address poolsIBM Cloud Manager with OpenStack can automatically select the IP address (or IP addresses) to be usedwhen provisioning a virtual machine from a list of predetermined IP addresses known as an IP addresspool. IP addresses are managed and assigned automatically to an instance so that the user requesting thedeployment does not need to specify them.
About this task
An IP address is marked as "In Use" when IBM Cloud Manager with OpenStack selects that IP addressesfrom the network configuration and uses it for the deployment of an instance. When the instance isdeleted by IBM Cloud Manager with OpenStack, the IP address "In Use" indication is cleared so that theIP address can be reused by another instance deployment. If IBM Cloud Manager with OpenStack detectsthat the instance has failed and no longer exists in the cloud, the IP address is unlocked immediately andthe "In Use" flag cleared.
Chapter 7. Managing as an Administrator 241
The administrator can also mark an IP address or a range of IP addresses as "Locked". "Locked" IPaddresses are not selected by IBM Cloud Manager with OpenStack for instance deployment. The purposeof "Locked" IP addresses is to allow the administrator to mark certain IP addresses in the network asreserved or "In Use" by other applications. If the administrator later wants to enable the IP address sothat it can be used by IBM Cloud Manager with OpenStack for instance deployment, the "Unlock" optioncan be used to remove the "Locked" indicator.
The main difference between "In Use" and "Locked" is conceptual; addresses that are "In Use" are beingused by the IBM Cloud Manager with OpenStack application, while addresses that are "Locked" are beingused by an external application or are not available as specified by an administrator.
Each network configuration contains its own IP address pool, which allows IP addresses to be managedon a per network configuration basis. If a configuration is applied to the deployment settings of aninstance (and the configuration is not set to use DHCP), the IBM Cloud Manager with OpenStackautomatically uses the pool that is associated with the configuration.
Notes:
1. Network configurations typically represent a VLAN or a virtual network. While a networkconfiguration cannot contain the same IP address more than once, different network configurationscan contain the same IP addresses. This behavior was added to allow multiple VLANs to use thesame IP address ranges. If the same IP address ranges are specified in multiple networkconfigurations, care must be taken to ensure that these network configurations are used on differentnetworks or VLANs.
2. OpenStack network configurations cannot contain the same IP addresses. Each of the IP subnets thatare defined in the OpenStack network configurations must be unique and must not overlap.
3. The IP addresses for an OpenStack network configuration are specified when the OpenStack networkconfiguration is first created. IP addresses cannot be added to or removed from an OpenStacknetwork configuration. Lock and unlock of IP addresses is supported.
The following steps describe how an administrator can manage the IP address pools that are used by theIBM Cloud Manager with OpenStack application.
Procedure1. Open IBM Cloud Manager with OpenStack and select Configuration > Network.2. From the Network page, select Edit under IP Addresses.3. The IP Addresses view is displayed. Use this view to add, remove, lock, or unlock IP addresses.4. To add IP addresses, select Add.
a. Add an individual or range of IP addresses to the pool.b. Select OK to add the IP address or range, or select Cancel to cancel the operation.
242 IBM Cloud Manager with OpenStack: Administrator Guide, version 4.2
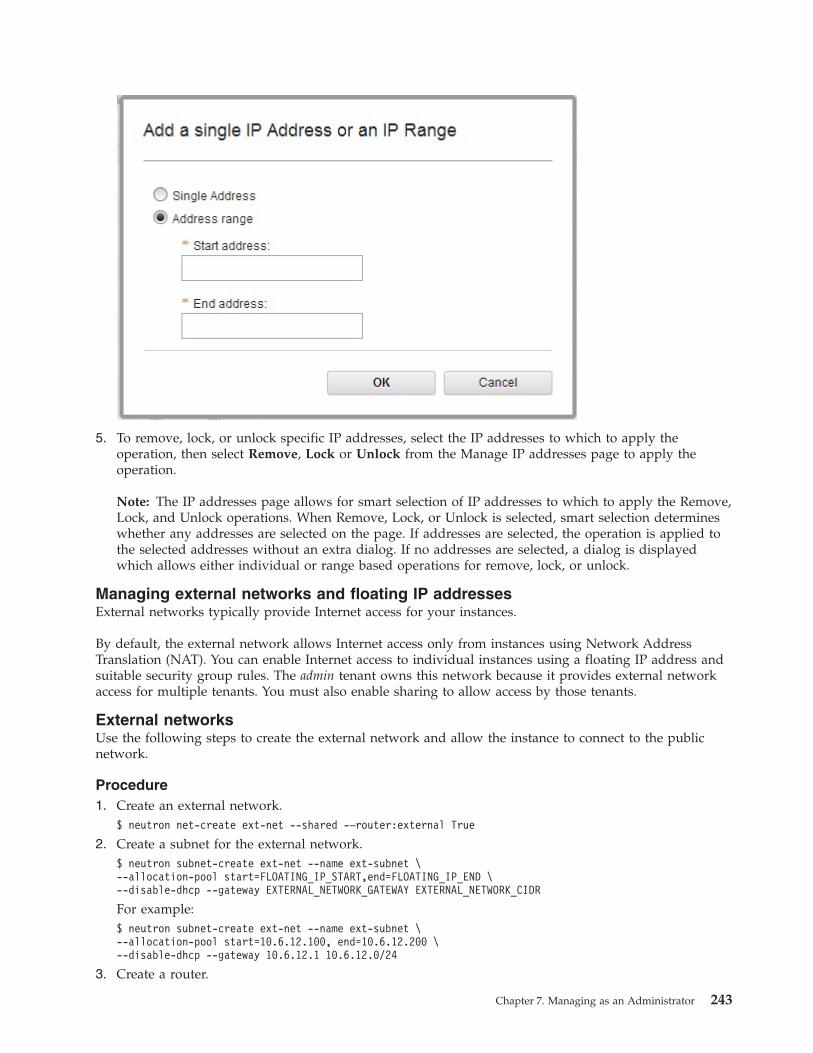
5. To remove, lock, or unlock specific IP addresses, select the IP addresses to which to apply theoperation, then select Remove, Lock or Unlock from the Manage IP addresses page to apply theoperation.
Note: The IP addresses page allows for smart selection of IP addresses to which to apply the Remove,Lock, and Unlock operations. When Remove, Lock, or Unlock is selected, smart selection determineswhether any addresses are selected on the page. If addresses are selected, the operation is applied tothe selected addresses without an extra dialog. If no addresses are selected, a dialog is displayedwhich allows either individual or range based operations for remove, lock, or unlock.
Managing external networks and floating IP addressesExternal networks typically provide Internet access for your instances.
By default, the external network allows Internet access only from instances using Network AddressTranslation (NAT). You can enable Internet access to individual instances using a floating IP address andsuitable security group rules. The admin tenant owns this network because it provides external networkaccess for multiple tenants. You must also enable sharing to allow access by those tenants.
External networksUse the following steps to create the external network and allow the instance to connect to the publicnetwork.
Procedure1. Create an external network.
$ neutron net-create ext-net --shared -–router:external True
2. Create a subnet for the external network.$ neutron subnet-create ext-net --name ext-subnet \--allocation-pool start=FLOATING_IP_START,end=FLOATING_IP_END \--disable-dhcp --gateway EXTERNAL_NETWORK_GATEWAY EXTERNAL_NETWORK_CIDR
For example:$ neutron subnet-create ext-net --name ext-subnet \--allocation-pool start=10.6.12.100, end=10.6.12.200 \--disable-dhcp --gateway 10.6.12.1 10.6.12.0/24
3. Create a router.
Chapter 7. Managing as an Administrator 243
$ neutron router-create ext-to-int
4. Connect the router to ext-net by setting the gateway for the router as ext-net.$ neturon router-gateway-set ext-to-int-id ext-net-id
5. Add the router interface to an existing private network. If you don't have one, you must create it.$ neutron router-interface-add ext-to-int-id private-subnet-id
Start an instance with the dedicated private network, and now the instance can connect to the publicnetwork.
Floating IP addressesA floating IP address is an IP address that a project can associate with a virtual machine. This associationgives the instance the same public IP address each time that it starts. You can create a pool of floating IPaddresses and assign them to instances as they are started, to maintain a consistent IP address formaintaining DNS assignment. Complete the following steps to associate a floating IP address to aninstance.
Procedurev Create a floating IP address.
$ neutron floatingip-create ext-net
v Associate the floating IP address to the port of the instance.$ neutron floatingip-associate floating_ip_id instance_port_id
Now you can connect the instance by the floating IP address in the public network.
Note: Ensure that you have added the right security group rules to the instance so you can ping or sshthe instance.
What to do next
The default security group does not allow inbound traffic from the external network to the virtualmachine instance that uses the floating IP address. To add rules that all of the external networks can useto communicate with the virtual machine instance, see “Configuring SSH and ICMP access to deployedvirtual machines” on page 157.
Managing instancesUse the Instances tab in the IBM Cloud Manager with OpenStack self-service portal to manage instancesafter they are created.
VMware: An instance in the self-service portal is equivalent to a VMware virtual machine. All of theVMware virtual machines are displayed on the self-service portal Instances tab.
You can filter the list of instances by Cloud, Projects, or Architectures.
As an administrator, you can act on pending instance requests and hide specific instances from appearingto other users.
Note: When you start or restart the self-service portal on a high scale cloud, the synchronization betweenthe self-service portal and the cloud might take longer than expected. This resynchronization might causeoperations such as deploying, deleting, or resizing an instance to be delayed or even fail. Wait for thesynchronization to complete before you attempt these actions.
Capturing an instanceYou can capture an instance or workload to create an image.
When you capture an OpenStack PowerVC instance, a message is displayed to indicate that capturingthis instance requires some manual preparation. For information about preparing an OpenStackPowerVC
244 IBM Cloud Manager with OpenStack: Administrator Guide, version 4.2
instance for capture, see Capture requirements in the PowerVC information center at the following webpage: http://www.ibm.com/support/knowledgecenter/SSXK2N_1.2.1/com.ibm.powervc.standard.help.doc/powervc_standard.html
Note: For OpenStack PowerVM, you can only capture instances that are stopped.
For information about capturing an OpenStack instance, see “Considerations for capturing an OpenStackinstance” on page 191
Pinning an instanceIn a deployed instance, you can pin a virtual machine to a specific physical host to prevent the serverfrom being relocated. However, an instance or workload that is set to be highly available cannot havepinned virtual machines.
Procedure1. In the IBM Cloud Manager with OpenStack interface, select Instances.2. Select an instance to open the properties.
v To pin an instance, select Pin.v To unpin an instance, select Unpin.
3. Click Close.
Migrating an instance (OpenStack)In a deployed instance, you can migrate a virtual machine to a specific physical host. You can alsomigrate multiple instances to a specific physical host.
Before you begin
Make sure that the instances that you want to migrate have a status of OK. If you are migrating multipleinstances, all the instances must be running on a common OpenStack cloud.
Note: If you are using a PowerVC virtualization environment, overcommitting a disk and migratingnon-shared storage are not supported for PowerVM instances. For more information about PowerVC livemigration settings and capabilities, see the PowerVC Information Center.
Procedure1. In the IBM Cloud Manager with OpenStack interface, select Instances.2. Select the instances that you want to migrate.3. Click More > Migrate to new host to open the live migration page.4. Select a destination host as follows:
v To specify that the system select a destination host, select Allow system.If the associated instance is a PowerVM instance and its Use PowerVC placement policy virtualmachine property is true, then the Allow system property indicates that the PowerVC schedulerselects a host.
v To manually select a destination host, select Manually select and then select a destination host.5. Click Migrate. The instance status changes to Migrating.6. Click the refresh arrow to update the status. When the status changes from Migrating to OK, the
migration is complete and the instance is available
Processing requests from the Instances tabWhen an image is deployed, initiating an instance, the deployment request may require approval by anadministrator. In this case, the instance status is set to pending until the administrator handles theapproval request.
Chapter 7. Managing as an Administrator 245
About this task
You can process an instance request from the Instances tab or from the Requests tab. For moreinformation about processing an instance request from the Requests tab, see “Processing instancerequests” on page 230
To process a pending request, follow these steps:
Procedure1. In the IBM Cloud Manager with OpenStack interface, select Instances.2. Select an instance name to view the instance details. Find the request list in the instance details and
select a request to display. The Request properties page appears.3. Expand the Request Details section to review or update the request before approving.4. Expand the Comments section to review comments or use the Add Comment link to provide
additional comments.v Click Approve to approve the request and allow the deployment processing to start.v Click Reject to reject the request.v Click Withdraw to withdraw a request.
Hiding or showing an instanceFollow these steps to show or hide an instance.
Procedure1. In the IBM Cloud Manager with OpenStack interface, select Instances.2. Select an instance and click Hide/Show to hide or show the instance in the instance list for all
non-administrative users.3. After an instance is hidden, a non-administrative user does not see the instance in the instance list,
but administrative users can choose to display the hidden instance. To display hidden instances in theinstance list, select Include hidden instances.
Resizing an instance (VMware)You can modify the amount of resources used by the virtual machines provisioned by your instancerunning on VMware. Depending on how your VMware virtual machines are configured, you can addmemory and virtual processors while your virtual machine is running.
About this task
Increasing the size of the virtual machine disks makes more space available on the disk, but does notchange the size of the partitions and the file systems. There are commands that must be run on the guestoperating system to increase the size of the file system. For more information about how to change thesize of the file system after storage is added, see your operating system documentation.
For more information about how a running virtual machine handles changes in memory and processor,see the VMware documentation and your operating system documentation.
Procedure1. Click the name of the instance that you want to resize.2. Click More > Resize.3. Update the number of processors and memory resources to be allocated to the virtual machine in
your instance.The settings that can be resized when a virtual machine is in the started state depend on how thevirtual machine is configured on VMware:
246 IBM Cloud Manager with OpenStack: Administrator Guide, version 4.2

Notes:
a. If the instance is started and the virtual machine is not configured to allow memory or processorchanges, those fields are not displayed. To change those values, you must first stop the instance.
b. For memory, the virtual machine must have the Memory Hot Add option enabled. Memory isonly allowed to be increased, and the maximum amount that is allowed, and the valid values, aredetermined by VMware.
c. For processors, the virtual machine must have the processor Hot Plug option enabled. To removeprocessors, the virtual machine must have the processor Hot Add and Remove option enabled.The maximum number of processors that are allowed is determined by the number of logicalprocessors on the vSphere machine that is running the virtual machine.
d. If you are changing the storage size, you can update only to a larger disk size.4. Increase the disk size.5. Click Resize.
Note:
v If approvals are enabled, then the approval must be completed before the instance is resized.v Linked clone disks or disks that are using an IDE controller cannot be resized.
Resizing an instance (OpenStack)You can modify the amount of resources that are used by the virtual machines.
About this task
Stop the instance before you continue the procedure.
Procedure1. Click the name of the instance that you want to resize.2. Click More > Resize... to open the Resizing instance page.3. Under the Hardware section, update the OpenStack Flavor to be allocated to the virtual machine in
your instance.
Notes:
v The flavor details change depending on the size flavor that you select.v When you update the flavor, the processor, memory, and storage size fields accept integers only.
Any fractional data is omitted.v (PowerVM and Hyper-V) If you are changing the storage size, you can update to a larger disk size
only.v (KVM and PowerKVM only) If you choose a flavor with a smaller storage size, KVM skips to
storage resize if it cannot be completed. The other resources are resized accordingly.v (KVM and PowerKVM only) Resizing an instance only supports local storage.v (z/VM only) You can change only the CPU and memory resources assigned to the virtual machine.
4. Click Resize.
Notes:
v If approvals are enabled, then the approval must be completed before the instance is resized. Toverify that the instance was resized, check the virtual machine flavor ID property of the instance.
v If the instance is running, OpenStack stops, resizes, and restarts the instance after the hypervisorsare resized (except PowerVM instance).
v Active resize is supported for PowerVC instances. The instances stay active during the resizingprogress. The active resize action is limited by instance resource ranges (maximum and minimumvalues of processor, memory, and processor units), and unsupported flavors are filtered. In addition,
Chapter 7. Managing as an Administrator 247

the active resize action is not allowed unless the health status of the instance is OK. For moreinformation about resource ranges, see “Extra specifications” on page 232.
v (Multiple PowerKVM hypervisors) You might encounter the following error ssh ...Permissiondenied. As a Nova user, ensure the hypervisors can ssh to each other by public key. For moreinformation, see “SSH permissions error when resizing an instance (OpenStack)” on page 318.
If you are resizing an instance on the Hyper-V hypervisor, the IBMComputeNodeService service that isdeployed with the Hyper-V agent installer must run with domain credentials and configure Kerberosconstrained delegation. You can set the service credentials by using the following command:C:\sc config "IBM SmartCloud Entry Compute Service" obj="DOMAIN\username" password="password"
.To configure the Kerberos constrained delegation setting, see step 1 in the following guide: Configureconstrained delegation.
Managing storage volumesIf you have an OpenStack cloud, you can use the Volumes tab in IBM Cloud Manager with OpenStackself-service portal to create and manage storage volumes for your virtual machines. You can manage thevolumes by sorting on the cloud and project to which the volumes and associated virtual machinesbelong.
About this task
From the Volumes tab you can create, delete, edit, and attach and detach storage volumes for virtualmachines in your OpenStack environment.
When you add a volume, you can choose the source for the new volume. You can create an emptyvolume, or you can create a volume that is sourced from an existing image or snapshot of a volume. Tocreate an image from a snapshot, you must capture an existing volume and use the captured volume asthe snapshot source.
Note: PowerVC does not support a snapshot of a volume. So while, the self-service portal does notprevent a snapshot volume in PowerVC, the snapshot volume cannot be supported by IBM CloudManager with OpenStack either.
When you delete a volume, all data is lost from the volume. Alternatively, you can detach a volume froma virtual machine to retain the content of the volume and use it in the future by attaching it to a differentinstance.
Procedure1. On the Volumes tab, use the Cloud and Project controls to sort the volumes that you want to
manage.2. Use the Add and Delete icons to add and delete volumes.3. Use the More menu to complete tasks such asAttach, Detach, and Capture on a selected volume.4. To edit an existing volume, click the volume and select Edit.
What to do next
Note: You also can manage storage volumes for a specific virtual machine from the Instances tab. Clickthe virtual machine for which you want to manage storage, and expand Storage Volumes.
Managing usersThe Users tab in the IBM Cloud Manager with OpenStack self-service portal is enabled for
administrative users and is used for creating, viewing, and managing users.
248 IBM Cloud Manager with OpenStack: Administrator Guide, version 4.2
Creating a userComplete the following steps to create a user.
Procedure1. In the IBM Cloud Manager with OpenStack self-service portal, select Access.2. Select Users.3. Click New User.4. Enter information for the new user.5. Click Create.
Notes:
v You can only create valid user accounts when using local authentication. When using LDAPauthentication, user accounts are created and managed directly through the LDAP server.
v A user can also request a new user account. To approve or reject these requests, go to Access >Requests.
Viewing or updating a userAbout this task
To view or update information about a user, follow these steps:
Procedure1. In the IBM Cloud Manager with OpenStack interface, select Access.2. Select Users.3. To view or update information about a user, select the user you want to view.
Locking a userIf you want to prevent a user from accessing the IBM Cloud Manager with OpenStack self-service portal,you can lock the user account.
About this task
To lock a user, follow these steps:
Procedure1. Open the IBM Cloud Manager with OpenStack self-service portal and select Access.2. Select Users.3. Select the user to unlock and click More > Lock.
Unlocking a userIf a user has three invalid login attempts in a 24 hour period, the user account becomes locked andrequires an administrator to unlock it.
About this task
To unlock a user, follow these steps:
Procedure1. Open the IBM Cloud Manager with OpenStack self-service portal and select Access.2. Select Users.3. Select the user to unlock and click More > Unlock.
Chapter 7. Managing as an Administrator 249
What to do next
Note: If the default administrator account becomes locked, it is unlocked when the server is restarted.
Deleting a userComplete the following steps to delete a user.
Procedure1. In the IBM Cloud Manager with OpenStack interface, select Access.2. Select Users.3. Select the user you want to delete from the list of users and click Delete.4. To confirm the user deletion, select Yes. To cancel the user deletion, select No.
Note: A user can also request to delete his user account. To approve or reject these requests, go toAccess > Requests.
User management with OpenStackUnlike other cloud types, OpenStack clouds provide native support for user management through theOpenStack keystone component.
When you first connect to an OpenStack cloud, the IBM Cloud Manager with OpenStack self-serviceportal imports all the user accounts that currently exist in OpenStack. All user roles and projectmembership are accepted and reflected in the self-service portal.
After the IBM Cloud Manager with OpenStack self-service portal imports the initial OpenStack users andconnects to an OpenStack cloud, the self-service portal enters transactional mode for user management.When in transactional mode, all operations that are performed in the self-service portal are alsoperformed in OpenStack (for example, keystone). If a user management operation (such as any of theoperations that are described in this section) fails to complete successfully in the self-service portal, itdoes not occur in OpenStack. Likewise, if it fails in OpenStack it reverts in IBM Cloud Manager withOpenStack self-service portal.
The self-service portal enters transactional mode for user operations while connected to OpenStack sothat the user registries in both products are always synchronized. For this reason, when connected to anOpenStack cloud, it is not possible to perform user-related operations while the OpenStack cloud is downor unavailable. In addition, the users created using Keystone are only synchronized when the self-serviceportal is restarted. This cannot be done manually from the self-service portal.
The user email and project membership changes made using Keystone are only synchronized when theself-service portal is restarted. If you cannot restart the self-service portal, these changes must be mademanually from the self-service portal.
Restriction: If a user is deleted directly using Keystone, you also must delete this user manually fromthe self-service portal, after the self-service portal is restarted. The user name is not allowed to changedirectly using Keystone. If the user name is changed directly using Keystone by mistake, the old name,and new name are not allowed to log in before the self-service portal is restarted, and the old name ischanged back in Keystone after the self-service portal is restarted. After that, the old name can log in. Ifyou cannot restart the self-service portal, you must change back to the old name manually from theself-service portal. You cannot change or delete the admin user directly using Keystone.
To connect to OpenStack, IBM Cloud Manager with OpenStack self-service portal uses a service useraccount and a default service tenant. Some installations of OpenStack have user accounts specific toOpenStack components (for example, Nova, Keystone, Neutron). These and other service user accounts orservice tenants in an OpenStack server that do not represent an actual user account or tenant, can beadded to the list of service users and service tenants. By doing so, they are ignored by IBM Cloud
250 IBM Cloud Manager with OpenStack: Administrator Guide, version 4.2
Manager with OpenStack and those service users are not allowed to log into the IBM Cloud Managerwith OpenStack self-service portal. To make this change, add the service users and tenants to thecomma-separated list of users in the com.ibm.cfs.cloud.openstack.service.users property, or thecomma-separated list of tenants in the com.ibm.cfs.cloud.openstack.service.tenants property, in theopenstack.properties file.
Managing accountsYou can view information for those accounts of which you are either an owner or a member.
Accounts are required when IBM Cloud Manager with OpenStack self-service portal billing is enabled.See the following guidelines for self-service portal billing:v Only self-service portal administrators can create accounts, but you can be made an account owner.v You can deploy instances only if you are an account member and the account has a positive balance
with which to pay for server use.v Only account owners and self-service portal administrators can manage accounts.v Accounts have a balance, an owner, an account balance threshold, account members, and invoices.
– The balance is a monetary balance of the account. The cost of each request and running deploymentis subtracted from the balance over time.
– The account owner is the self-service portal user profile that is accountable for crediting and payingthe account.
– The account balance threshold is a value that represents the amount at which the account balancebecomes a low balance. If the balance drops to zero, the account is delinquent.
– The account members are self-service portal users that belong to the account. When account membersdeploy instances in the self-service portal, the instances are billed to their account.
– Each instance has an invoice. An account can have many invoices, which are viewable from theAccount properties window.
Creating an accountYou can create an account at any time.
Procedure1. Click New Account.2. Enter information for the new account. Both the Account name field and the Account owner field are
required.3. Click Create.
Add members to an accountYou can add members to your account at any time, however, users can only be members of one accountat a time.
Procedure1. In the account table, select the account to which you want to add members.2. To open the account member management window, click Edit list.3. To add a member, select the member to be added from the Available users list and click Add.
Viewing or managing an accountYou can view the properties of any account, or manage the accounts that you own.
About this task
To view account properties or manage accounts that you own, select the Access tab and click Accounts.Then, you can select the account that you want to work with in the account table.
Chapter 7. Managing as an Administrator 251

Deleting an accountYou can delete an account only if you are the owner of the account, and only when the account is notassociated with any active instances.
Procedure1. In the account table, select the account you want to delete.2. Click the Delete icon and confirm the deletion.
Clearing or archiving eventsFrom the Events tab, you can see events such as instance completion, instance failure, new accountrequests, and new accounts created. You can also clear or archive events. Clearing an event deletes it.Archiving an event saves it to an archive folder. By clearing events, you can free space on your systemand improve performance in the IBM Cloud Manager with OpenStack self-service portal. Archive anyevents that you might want to reference in the future.
About this task
To clear or archive an event, follow these steps:
Procedure1. In the self-service portal, select Reports > Events.
v To clear an event, click Clear.v To archive an event, click Archive.
2. Use the Events filter to select a subset of events to clear or archive. Filter by severity or start and enddate. If you filter by date, you must provide an end date.v To clear the selected events, click Clear.v To archive the selected events, click Archive. The archived events are saved to a file called
events_<current time in milliseconds>.csv. This file is in the archives folder, which is in theself-service portal configuration directory.
Viewing capacity statisticsUsing the Capacity view, you can identify the current capacity of the resources in your virtualizationenvironment. Understanding the capacity of resources within the cloud helps you gauge the health of theentire cloud. It also helps you determine suitable targets to which you might deploy instances.
The Capacity tab shows the total, allocated available resources of a host or resource pool, including thenumber of virtual processors, memory, and storage size. The usage rate shows the real-time metrics ofhosts and virtual machines, like processor, memory, storage usage, available storage size, disk I/Orequests, network I/O packets, and more.
To access the Capacity view, click the Reports tab and then select Capacity from the left navigation.
Used This field shows a summary of all allocated resources, regardless of the state of the guestoperating system.
PhysicalThis field shows the physical capacity.
The color of the capacity indicator can be green or yellow. Green indicates that the used resources are lessthan the physical resources. Yellow indicates that the used resource is overcommitted on the availablephysical resources, but you can still deploy.
You can also access the individual instance to see the target deployment grid that displays live metricsfor the resources you want to deploy or migrate.
252 IBM Cloud Manager with OpenStack: Administrator Guide, version 4.2
Notes:
1. The allocated processors and memory that is displayed for a IBM PowerVC host might not match theactual allocation in the PowerVC environment. This is because the IBM Cloud Manager withOpenStack appliance environment with OpenStack does not support fractional processor units andmanages only resources that are owned by the Storage Connectivity Group that is defined in thePowerVC driver configuration.
2. The physical capacity for processors and memory that is displayed for a PowerVC host does notinclude resources that are reserved in the PowerVC environment.
3. The Capacity view does not display storage data for PowerVC clouds.
Managing with OpenStack dashboardUse this information if you are managing your cloud using the OpenStack dashboard, which is based onOpenStack Horizon. The IBM Cloud Manager with OpenStack dashboard is intended for administratoruse only.
If you choose, you can use the OpenStack dashboard to manage your cloud environment. After youinstall and deploy IBM Cloud Manager with OpenStack, access the dashboard. From a supportedbrowser, type https://controller.fqdn.com/, where controller.fqdn.com is the fully qualified domainname of the controller node in your topology.
You can log in using the admin user with the password that you customized for your deployment. If youdeployed the Minimal topology, then the default password is admin. For more information about usersand passwords, see the “User names and passwords” on page 263 and “Data bags” on page 277 topics.
You can configure some of the properties in the dashboard as well. For specific configuration options, see“Configuring IBM Cloud Manager with OpenStack dashboard properties” on page 204.
The OpenStack dashboard is based on OpenStack Horizon. For information about the OpenStackdashboard, see Horizon: The OpenStack Dashboard Project.
Copying images from one OpenStack region to anotherYou can copy an image that is stored in the image repository of one OpenStack region to the imagerepository in another region.
About this task
An image consists of the following information:v A disk imagev Image metadata that is stored in the OpenStack image repository (Glance)v Image configuration data that is stored in the IBM Cloud Manager with OpenStack self-service portal
database
OpenStack provides APIs and command line interfaces that can be used to copy images from one imagerepository to another.v OpenStack Image Service APIs can be used to list images, retrieve and upload images.v The openstack image command (create, list, save, set and show subcommands) and glance command
(image-create, image-download, image-list, image-show and image-update subcommands) providecommand line interfaces to the Image Service APIs.
v The OpenStack dashboard provides image management capabilities.
IBM Cloud Manager with OpenStack self-service portal provides APIs and graphical interfaces forworking with images. The self-service portal manages some properties in the OpenStack image metadata
Chapter 7. Managing as an Administrator 253
that must be kept in sync with data stored in the self-service portal database. For this reason, images thatare used with the self-service portal cannot be copied using the same technique as copying OpenStackimages.
The self-service portal does not provide features for copying images from one region to another orcopying image configuration data from one cloud image to another.
Copying a self-service portal imageUse these instructions to copy an image that is used by the IBM Cloud Manager with OpenStackself-service portal from one region to another.
About this task
To copy an image that is used by the self-service portal in region r1 to region r2, use the followingprocedure. The examples assume that the file openrc contains credentials for authenticating to region r1.This file could be the openrc file that is installed on the region r1 controller.
Procedure1. View the original image in the self-service portal and note the following properties:
v Name: myimage
v UUID: 90a8c085-5014-4a19-9001-3593f0389582
v Disk format: QCOW2
v Container Format: BARE
v Minimum memory: 0
v Minimum storage: 0
v Additional Properties:– architecture:: x86_64
– hypervisor_type: qemu
2. Extract the image file for the image. You can extract the image file by using OpenStack APIs or CLIfrom any system. For convenience, the glance image-download CLI on the region r1 controller is usedin this example.# . openrc# glance image-download --file myimage.img 90a8c085-5014-4a19-9001-3593f0389582
Note: If you already have the image file, for example, from importing the original image into theself-service portal, you do not need to extract the image.
3. If necessary, transfer the image file to the system where your web browser is running or to a systemwhere you have HTTP access to the image file.
4. From the self-service portal, go to the Image tab to import the image. Select the cloud for region r2.Then, enter the path or URL to the image file and the other information that you collected in the firststep of this process.
5. Using the self-service portal, edit the new image and set other properties to match the original image.The additional properties might include information such as the image configuration and deploymentstrategy.
Copying OpenStack Glance imagesUse these instructions to copy OpenStack Glance images from one region to another.
254 IBM Cloud Manager with OpenStack: Administrator Guide, version 4.2
About this task
If you have access to the image files and you already know information such as the container format anddisk format, you can create those images in region two. If the file is accessibly using HTTP, you can usethe OpenStack dashboard to create a new image. Otherwise, you can use the glance image-createcommand to create the image. The following example assumes that you are logged on to the region twocontroller and that you have copied the image file, test_image.img, to that system:
Note: The following command must be entered on a single line, even though the example shows a linebreak for formatting purposes.# . openrc# glance image-create --name=’test image’ --is-public=true --container-format=bare --disk-format=qcow2 <test_image.img
If the image files are stored in the region one glance repository or you are not sure of the imageproperties, use the following procedure to copy OpenStack cloud images from region r1 to region r2. Theexamples assume that the files openrc.r1 and openrc.r2 contain credentials for authenticating to regionsr1 and r2 respectively.
Procedure1. Access the environment file for the first region by using the following command.
# . openrc.r1
2. List the images in the first region and identify those that you want to copy.# openstack image list
+--------------------------------------+------------+| ID | Name |+--------------------------------------+------------+| f3b35877-f182-4cb5-a69c-bc3b40a4feb3 | test image |+--------------------------------------+------------+
3. Display the properties for the image:# openstack image show -f shell "test image"
checksum="d972013792949d0d3ba628fbe8685bce"container_format="bare"created_at="2014-12-08T20:51:26.066496"deleted="False"deleted_at="None"disk_format="qcow2"id="f3b35877-f182-4cb5-a69c-bc3b40a4feb3"is_public="True"min_disk="0"min_ram="0"name="test image"owner="e17e12ef8219460abeaf1075cbaabbd5"properties="{}"protected="False"size="13147648"status="active"updated_at="2014-12-08T20:54:24.441587"virtual_size="None"
4. Note the highlighted items in the previous step. The highlighted parameters are used in the openstackimage create command. If the properties field has a value, it must be split into sets of key valuepairs. For example:
properties="{u’key2’: u’value2’, u’key1’: u’value1’}"
The preceding values correspond to the following key value pairs:
Chapter 7. Managing as an Administrator 255
"key2" "value2""key1" "value1"
5. Save the image file on the region two controller:# openstack image save --file test_image.img "test image"
6. Access the environment file for the second region by using the following command.# . openrc.r2
7. Create the image in region r2:
Note: The following command must be entered on a single line, even though the example shows aline break for formatting purposes.# openstack image create --container-format bare --disk-format=qcow2 --public --file test_image.img"test image"
If the image has properties set, use the --property key=value option to set each option. For example:--property key1=value1 --property key2=value2
Note: You can use glance help or openstack help to get more information about OpenStack CLIcommands for working with images in the OpenStack image repository.
Results
The glance repository in region r2 should now contain copies of the images from region r1 including theirmetadata.
Backing up and restoring IBM Cloud Manager with OpenStackTo protect your IBM Cloud Manager with OpenStack data, you must back up critical files in case theserver enters an undesired state. Before you back up your data, determine the circumstances in whichyou intend to restore your data.
Backing up and restoring the deployment serverWhile there are many techniques for backing up and restoring servers, the following procedure backs upthe minimal set of data needed for a successful recovery.
How you choose to back up the deployment server data varies depending on how you deployed thedeployment server and the backup and recovery strategy and infrastructure of your organization.Regardless of the technique that is chosen, it is important to test both your backup and restore processes.
Backing up the deployment server1. Make a directory to copy the backup data. This directory can be anything that you choose, but you
must ensure that it has enough disk space to hold the backup data. The commands in this documentuse the following directory:mkdir /tmp/backup
2. If you changed the Chef server configuration files, you must back up your changes. IBM CloudManager with OpenStack sets these values during installation; therefore, no changes are typicallyrequired. If you used a response file for installation, you must backup the response file and keep itwith your backups so it can be used to reinstall IBM Cloud Manager with OpenStack.cp ~/cmwo_install.rsp /tmp/backup
3. Back up the certificates of the webserver.mkdir /tmp/backup/nginxcp -a /var/opt/chef-server/nginx/ca /tmp/backup/nginx/ca
4. Back up the bookshelf data.
256 IBM Cloud Manager with OpenStack: Administrator Guide, version 4.2
mkdir /tmp/backup/bookshelfcp -a /var/opt/chef-server/bookshelf/data /tmp/backup/bookshelf/data
5. Back up the postgres database. The pg_dump command produces a consistent backup even if theserver processes are running.mkdir /tmp/backup/database
su - opscode-pgsqlpg_dump -c opscode_chef > /tmp/chefserver.sqlexit
cp /tmp/chefserver.sql /tmp/backup/database
6. Back up your topology, node attribute, and encrypted data bag, secret key files. By default, thesefiles are in your /root/your-deployment-name directory.cp -a /root/your-deployment-name /tmp/backup/
7. Back up the /root/.chef/knife.rb file.cp /root/.chef/knife.rb /tmp/backup
8. Back up the server SSL certificate.cp /root/.chef/os-management-server.pem /tmp/backup
9. If you are using identity files rather than passwords, back up identity files of the node. The locationdepends on your configuration. When you deployed the node, you needed to specify either thenode's password or identity file in your topology files. Check your topology files to see whether youused identity files and find their locations.
10. If you customized the file-repo or the yum-repo, back up those changes.11. Compress the /tmp/backup directory and store in a safe location.
zip -r backup /tmp/backup
Restoring the deployment server
Start with a clean system and do the following:1. Retrieve your backup archive file that you want to restore and extract it to /tmp/backup.
unzip backup.zip
2. Install IBM Cloud Manager with OpenStack. Use the response file if you used one during the initialinstallation.
3. Apply any IBM Cloud Manager with OpenStack fix packs.4. Apply any file-repo or yum-repo changes that were made or restore those changes from the backup
archive file.5. Restore the postgres database.
/opt/chef-server/embedded/bin/psql -U opscode-pgsql opscode_chef< /tmp/backup/database/chefserver.sql
6. Stop the server processes.chef-server-ctl stop
7. Restore the bookshelf data.cp -a /tmp/backup/bookshelf/data/* /var/opt/chef-server/bookshelf/data/
8. Restore chef configuration data.cp -a /tmp/backup/nginx/ca /var/opt/chef-server/nginx
9. Restore the knife.rb file.cp -a /tmp/backup/knife.rb /root/.chef/
10. Restore the certificate of the webserver.cp -a /tmp/backup/os-management-server.pem /root/.chef
11. Restore your topology, node attribute, and data bag encryption, secret key files.cp -a /tmp/backup/your-deployment-name /root
Chapter 7. Managing as an Administrator 257
12. If you are using identity files rather than passwords, restore the identity files of the node. Thelocation depends on your configuration.
13. Restart the chef server.chef-server-ctl start
14. Reindex the chef server.chef-server-ctl reindex
Your deployment server restore is now complete.
Backing up and restoring the OpenStack databasesThe backup procedure is different depending on the database that is being used.
Backing up database data for recovery
All of the database data that is related to IBM Cloud Manager with OpenStack users, such as projects,networks, instances, images, are stored in the database. The backup procedure is different depending onthe database that is being used.1. Stop the IBM Cloud Manager with OpenStack services to ensure that the backup data is complete.2. Follow the instructions that pertain to your specific database.
MySQLFor more information, see Backup and Recovery in the OpenStack community documentation.
DB2 OpenStack databaseDB2 can also be used to host the OpenStack databases on the cloud controller. The followingshell script backs up a list of DB2 OpenStack databases. This shell script must be modified tomatch the environment. The variable DB is where the DB2 program is located. The variableDBLIST is a list of OpenStack databases to back up. The variable DBBACKUPDIR is adirectory to save the backups in. Since this shell script quiesces each database, while this shellscript runs, calls to these databases fail. The backup directory contains the backup files thatappear similar to the following example: NOVA.0.db2inst1.DBPART000.20140523134214.001 Thefollowing shell script is an example DB2 OpenStack database backup script:#!/bin/bash########################################################### DB2 OpenStack DB backup Linux shell script# MODIFY these variables to fit your environment# DB2 - home directory of DB2# DBLIST - list of Openstack DB to be backed up# DBBACKUPDIR - directory holding backed up copies##########################################################DB2="/opt/ibm/db2/V10.5/bin/db2"DBLIST="nova glance"DBBACKUPDIR="/tmp/DB2backupOpenstack"
mkdir -p $DBBACKUPDIRfor DB in $DBLISTdosu - db2inst1 <<EOSUecho "------DB $DB is being backed up ------"$DB2 connect to $DB$DB2 quiesce database immediate force connections$DB2 connect resetecho $DB2 backup database $DB to $DBBACKUPDIR without prompting$DB2 backup database $DB to $DBBACKUPDIR without prompting$DB2 connect to $DB$DB2 unquiesce database$DB2 connect resetEOSUdone
258 IBM Cloud Manager with OpenStack: Administrator Guide, version 4.2
For more information, see Backup and Recovery in the OpenStack community documentation.
Restoring the DB2 OpenStack databases
DB2 can also be used to host the OpenStack databases on the cloud controller. The following shell scriptcan restore a DB2 OpenStack database. This shell script must be modified to match the environment. Thevariable DB2 is where the DB2 program is located. The variable DBBACKUPDIR is a directory where thebackup files are located. The Variable DB is the OpenStack database to restore. The variableDBBACKUPTIME is the time stamp part of the backup file name, found in the backup directory. Sincethis shell script quiesces each database, while this shell script runs, calls to these databases fail. Here is anexample DB2 OpenStack database restore shell script:#!/bin/bash########################################################### DB2 OpenStack DB restore Linux shell script# MODIFY these variables to fit your environment# DB2HOME - home directory of DB2# DB - database name to be restored# DBBACKUPDIR - directory holding backed up copies# DBBACKUPTIME - timestamp part of backupname# example : 20140522162140##########################################################DB2="/opt/ibm/db2/V10.5/bin/db2"DBBACKUPDIR="/tmp/DB2backupOpenstack"DB="nova"DBBACKUPTIME="20140523135648"
su - db2inst1 <<EOSU$DB2 connect to $DB$DB2 quiesce database immediate force connections$DB2 connect resetecho $DB2 restore database $DB from $DBBACKUPDIR taken at $DBBACKUPTIME without prompting$DB2 restore database $DB from $DBBACKUPDIR taken at $DBBACKUPTIME without prompting$DB2 connect to $DB$DB2 unquiesce database$DB2 connect resetEOSU
For more information, see Backup and Recovery in the OpenStack community documentation.
Backing up and restoring the self-service portalTo protect your self-service portal data, you must back up critical files in case the server enters anundesired state. Before you back up your data, determine the circumstances in which you intend torestore your data.
Backing up self-service portal data for recovery
There are two kinds of data to back up. The first set of data is for server configuration and the second setof data is used by the database. When you consider what data to back up, review both sets of data.
Note: This procedure backs up the self-service portal only. It does not back up the underlyingvirtualization managers, such as VMware vCenter or storage devices.1. Stop the IBM Cloud Manager with OpenStack server to ensure that the backup data is complete.2. Back up the following configuration files.
v The .SCE42 folder.v In the installation folder: skc.ini
Note: If any values are changed in this file, you must back up the updated file after you changedefault values.
Chapter 7. Managing as an Administrator 259
A copy of all these files is required to ensure a complete backup.
Backing up database data for recovery
All of the database data that is related to IBM Cloud Manager with OpenStack users, such as projects,networks, instances, images, are stored in the database. The backup procedure is different depending onthe database that is being used.1. Stop the IBM Cloud Manager with OpenStack server to ensure that the backup data is complete.2. Follow the instructions that pertain to your specific database.
Derby databaseIf you are using the Derby database, backup the .SCE42/database folder that stores all thedatabase data.
DB2 databaseIf DB2 is configured, backup the database in the DB2 server. For more information about howto back up the DB2 server, see the DB2 product information.
Note: Ensure that the information referenced matches the version of DB2 that you are using.If not, reference the appropriate support documentation for similar information.
Restoring the server
To restore a backup of the server and the Derby database, copy all the saved files back to the originalserver. After the copy is complete, start the IBM Cloud Manager with OpenStack server.
If you are using the DB2 database, there are some extra steps.1. Ensure the path that is specified in the database.properties configuration file, by the property
database.db2.path, is correct.# If db2 then the path to the DB2 dtatbase needs to be provided. This will be ignored for derby.#database.db2.path=//localhost:50000/cfs:.
Essentially, creating a backup of the entire home folder and skc.ini file ensures a complete backup of theIBM Cloud Manager with OpenStack server. Copying the files back to their original location restores thedata.
Important: There is a limitation to be aware of when you use this best practice. Any incremental datathat occurs after backing up the IBM Cloud Manager with OpenStack server is lost after you restore theserver. Therefore, some functions might not work as expected. For example, consider the circumstancewhere you create an instance after you complete a capture, and then you restore the server. The IPaddress that was assigned to the instance (after the backing up) is still available in the IP address pool. Itmight be assigned to another instance.
260 IBM Cloud Manager with OpenStack: Administrator Guide, version 4.2

Chapter 8. Security
IBM Cloud Manager with OpenStack offers security options such as secure sockets layer (SSL),Lightweight Directory Access Protocol (LDAP), and user administration. This section providesinformation on managing passwords that are associated with the security options.
Passwords
IBM Cloud Manager with OpenStack uses keys to encrypt and decrypt passwords and other sensitiveinformation. If using the self-service portal, there is a protected file named cfs.keystore that stores therandomly-generated Data Encryption Standard (DES) key that IBM Cloud Manager with OpenStack uses.
The following list provides links to various sections in this document that describe default passwords andplaces where passwords are entered and stored in IBM Cloud Manager with OpenStack.v “Customizing passwords and secrets” on page 114v Chapter 3, “Installing and uninstalling IBM Cloud Manager with OpenStack,” on page 21v “Configuring secure shell (SSH) communication” on page 164v “Configuring REST API authentication” on page 169v “Configuring database” on page 170v “Configuring global image deployment” on page 173v Set secure access during deployment (Linux on VMware)v “Creating a configuration strategy” on page 186v “Configuring the default administrator user account and changing password” on page 211v “Configuring LDAP authentication using the web interface” on page 212v “Adding a network configuration” on page 238
Port usageThe number of ports that IBM Cloud Manager with OpenStack uses depends upon the variouscomponents and which network interfaces allow access to them.
The following tables list the default ports that might apply to your IBM Cloud Manager with OpenStackenvironment, depending upon your configuration. You can change these values to customize them foryour environment as well.
Table 60. Port usage for IBM Cloud Manager with OpenStack single controller
Port Service Notes
22 sshd SSH access that uses the customer network can be enabled.
67 DHCP server
68 DHCP server
80 openstack-dashboard-server
Provides access to the Horizon dashboard.
443 openstack-dashboard-server
Provides https access to the Horizon dashboard.
5000 openstack-identity-api
35357 openstack-identity-admin
© Copyright IBM Corp. 2012, 2014 261
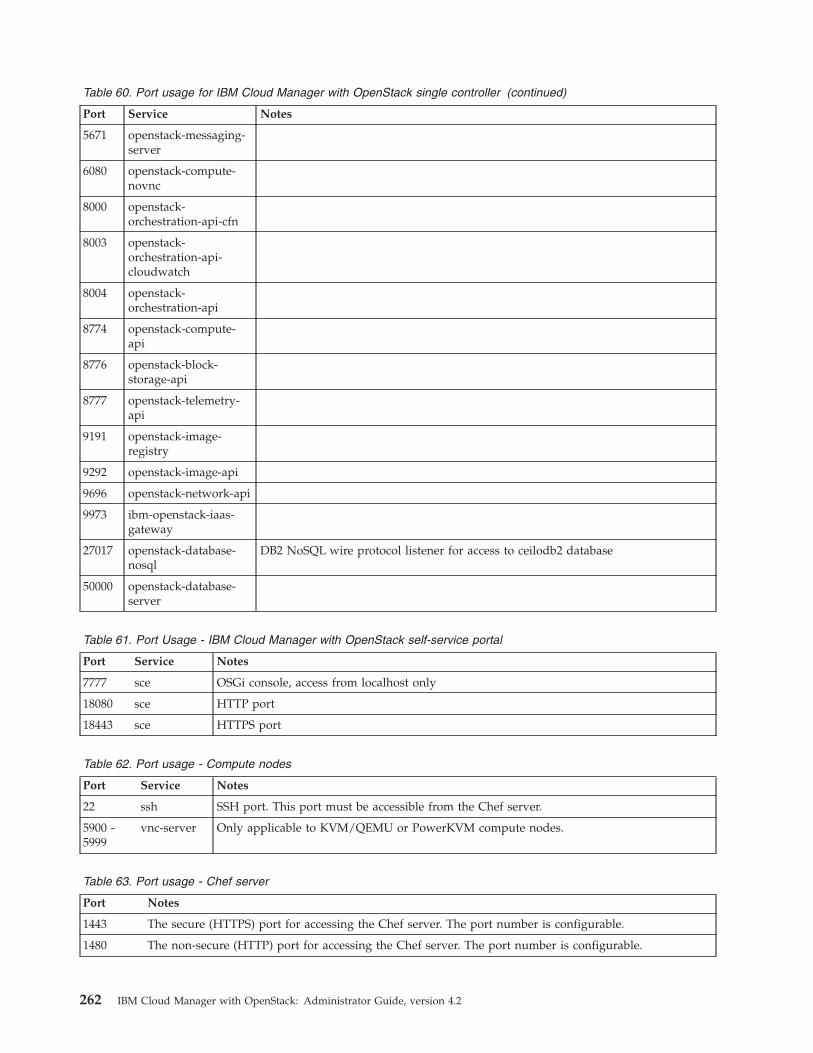
Table 60. Port usage for IBM Cloud Manager with OpenStack single controller (continued)
Port Service Notes
5671 openstack-messaging-server
6080 openstack-compute-novnc
8000 openstack-orchestration-api-cfn
8003 openstack-orchestration-api-cloudwatch
8004 openstack-orchestration-api
8774 openstack-compute-api
8776 openstack-block-storage-api
8777 openstack-telemetry-api
9191 openstack-image-registry
9292 openstack-image-api
9696 openstack-network-api
9973 ibm-openstack-iaas-gateway
27017 openstack-database-nosql
DB2 NoSQL wire protocol listener for access to ceilodb2 database
50000 openstack-database-server
Table 61. Port Usage - IBM Cloud Manager with OpenStack self-service portal
Port Service Notes
7777 sce OSGi console, access from localhost only
18080 sce HTTP port
18443 sce HTTPS port
Table 62. Port usage - Compute nodes
Port Service Notes
22 ssh SSH port. This port must be accessible from the Chef server.
5900 -5999
vnc-server Only applicable to KVM/QEMU or PowerKVM compute nodes.
Table 63. Port usage - Chef server
Port Notes
1443 The secure (HTTPS) port for accessing the Chef server. The port number is configurable.
1480 The non-secure (HTTP) port for accessing the Chef server. The port number is configurable.
262 IBM Cloud Manager with OpenStack: Administrator Guide, version 4.2
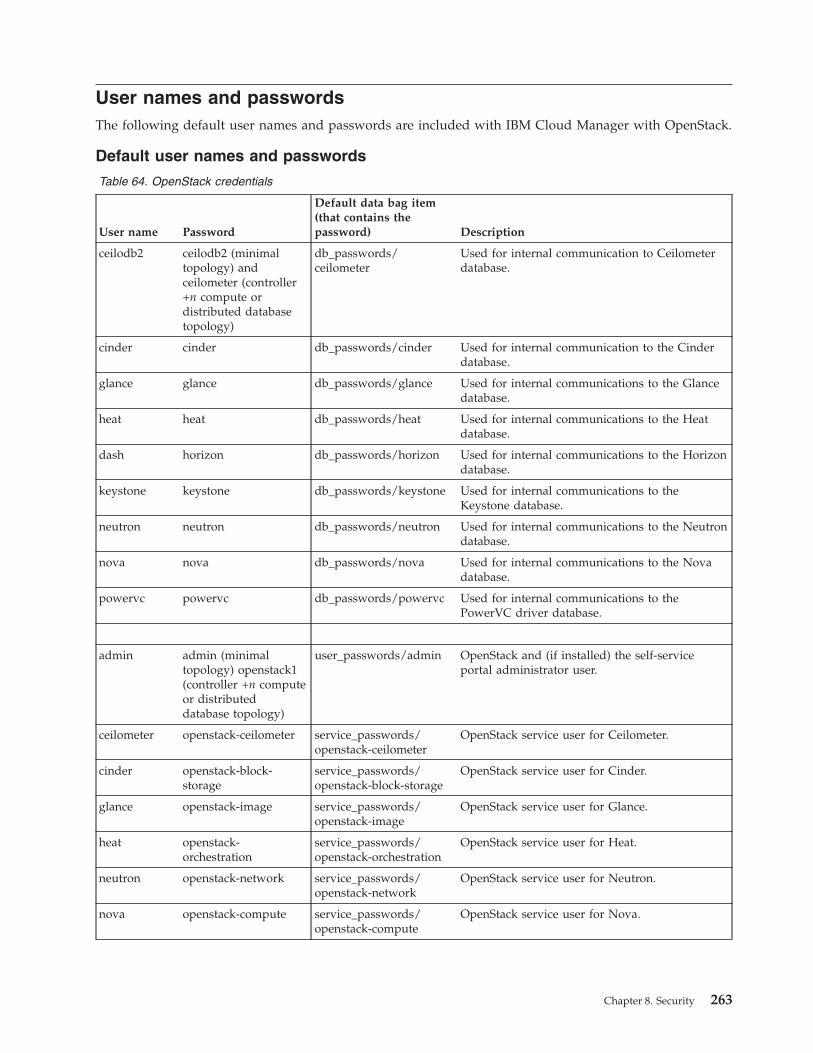
User names and passwordsThe following default user names and passwords are included with IBM Cloud Manager with OpenStack.
Default user names and passwords
Table 64. OpenStack credentials
User name Password
Default data bag item(that contains thepassword) Description
ceilodb2 ceilodb2 (minimaltopology) andceilometer (controller+n compute ordistributed databasetopology)
db_passwords/ceilometer
Used for internal communication to Ceilometerdatabase.
cinder cinder db_passwords/cinder Used for internal communication to the Cinderdatabase.
glance glance db_passwords/glance Used for internal communications to the Glancedatabase.
heat heat db_passwords/heat Used for internal communications to the Heatdatabase.
dash horizon db_passwords/horizon Used for internal communications to the Horizondatabase.
keystone keystone db_passwords/keystone Used for internal communications to theKeystone database.
neutron neutron db_passwords/neutron Used for internal communications to the Neutrondatabase.
nova nova db_passwords/nova Used for internal communications to the Novadatabase.
powervc powervc db_passwords/powervc Used for internal communications to thePowerVC driver database.
admin admin (minimaltopology) openstack1(controller +n computeor distributeddatabase topology)
user_passwords/admin OpenStack and (if installed) the self-serviceportal administrator user.
ceilometer openstack-ceilometer service_passwords/openstack-ceilometer
OpenStack service user for Ceilometer.
cinder openstack-block-storage
service_passwords/openstack-block-storage
OpenStack service user for Cinder.
glance openstack-image service_passwords/openstack-image
OpenStack service user for Glance.
heat openstack-orchestration
service_passwords/openstack-orchestration
OpenStack service user for Heat.
neutron openstack-network service_passwords/openstack-network
OpenStack service user for Neutron.
nova openstack-compute service_passwords/openstack-compute
OpenStack service user for Nova.
Chapter 8. Security 263
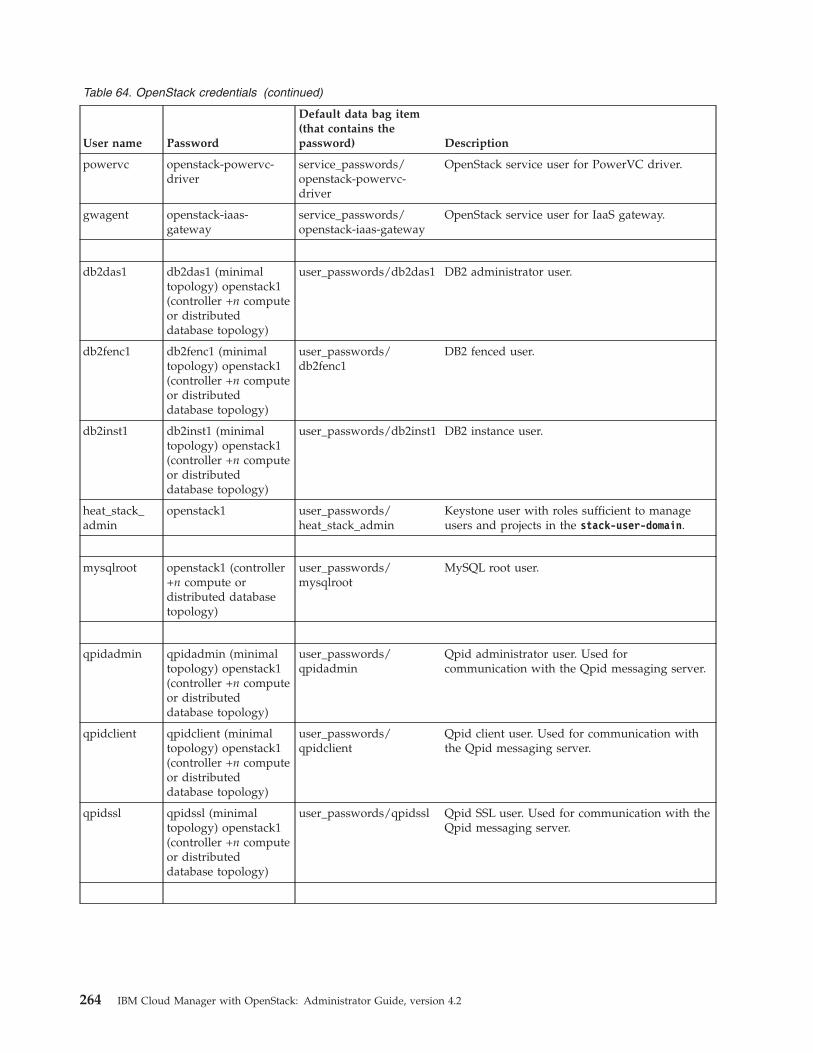
Table 64. OpenStack credentials (continued)
User name Password
Default data bag item(that contains thepassword) Description
powervc openstack-powervc-driver
service_passwords/openstack-powervc-driver
OpenStack service user for PowerVC driver.
gwagent openstack-iaas-gateway
service_passwords/openstack-iaas-gateway
OpenStack service user for IaaS gateway.
db2das1 db2das1 (minimaltopology) openstack1(controller +n computeor distributeddatabase topology)
user_passwords/db2das1 DB2 administrator user.
db2fenc1 db2fenc1 (minimaltopology) openstack1(controller +n computeor distributeddatabase topology)
user_passwords/db2fenc1
DB2 fenced user.
db2inst1 db2inst1 (minimaltopology) openstack1(controller +n computeor distributeddatabase topology)
user_passwords/db2inst1 DB2 instance user.
heat_stack_admin
openstack1 user_passwords/heat_stack_admin
Keystone user with roles sufficient to manageusers and projects in the stack-user-domain.
mysqlroot openstack1 (controller+n compute ordistributed databasetopology)
user_passwords/mysqlroot
MySQL root user.
qpidadmin qpidadmin (minimaltopology) openstack1(controller +n computeor distributeddatabase topology)
user_passwords/qpidadmin
Qpid administrator user. Used forcommunication with the Qpid messaging server.
qpidclient qpidclient (minimaltopology) openstack1(controller +n computeor distributeddatabase topology)
user_passwords/qpidclient
Qpid client user. Used for communication withthe Qpid messaging server.
qpidssl qpidssl (minimaltopology) openstack1(controller +n computeor distributeddatabase topology)
user_passwords/qpidssl Qpid SSL user. Used for communication with theQpid messaging server.
264 IBM Cloud Manager with OpenStack: Administrator Guide, version 4.2
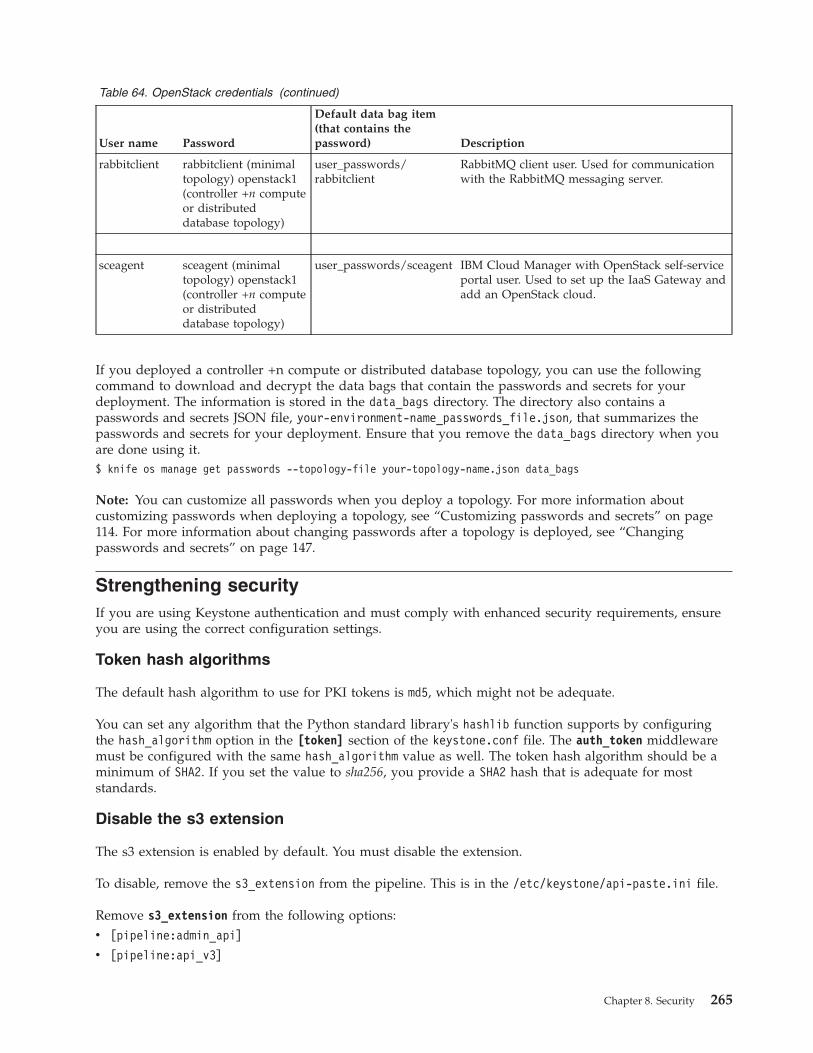
Table 64. OpenStack credentials (continued)
User name Password
Default data bag item(that contains thepassword) Description
rabbitclient rabbitclient (minimaltopology) openstack1(controller +n computeor distributeddatabase topology)
user_passwords/rabbitclient
RabbitMQ client user. Used for communicationwith the RabbitMQ messaging server.
sceagent sceagent (minimaltopology) openstack1(controller +n computeor distributeddatabase topology)
user_passwords/sceagent IBM Cloud Manager with OpenStack self-serviceportal user. Used to set up the IaaS Gateway andadd an OpenStack cloud.
If you deployed a controller +n compute or distributed database topology, you can use the followingcommand to download and decrypt the data bags that contain the passwords and secrets for yourdeployment. The information is stored in the data_bags directory. The directory also contains apasswords and secrets JSON file, your-environment-name_passwords_file.json, that summarizes thepasswords and secrets for your deployment. Ensure that you remove the data_bags directory when youare done using it.$ knife os manage get passwords --topology-file your-topology-name.json data_bags
Note: You can customize all passwords when you deploy a topology. For more information aboutcustomizing passwords when deploying a topology, see “Customizing passwords and secrets” on page114. For more information about changing passwords after a topology is deployed, see “Changingpasswords and secrets” on page 147.
Strengthening securityIf you are using Keystone authentication and must comply with enhanced security requirements, ensureyou are using the correct configuration settings.
Token hash algorithms
The default hash algorithm to use for PKI tokens is md5, which might not be adequate.
You can set any algorithm that the Python standard library's hashlib function supports by configuringthe hash_algorithm option in the [token] section of the keystone.conf file. The auth_token middlewaremust be configured with the same hash_algorithm value as well. The token hash algorithm should be aminimum of SHA2. If you set the value to sha256, you provide a SHA2 hash that is adequate for moststandards.
Disable the s3 extension
The s3 extension is enabled by default. You must disable the extension.
To disable, remove the s3_extension from the pipeline. This is in the /etc/keystone/api-paste.ini file.
Remove s3_extension from the following options:v [pipeline:admin_api]
v [pipeline:api_v3]
Chapter 8. Security 265

266 IBM Cloud Manager with OpenStack: Administrator Guide, version 4.2
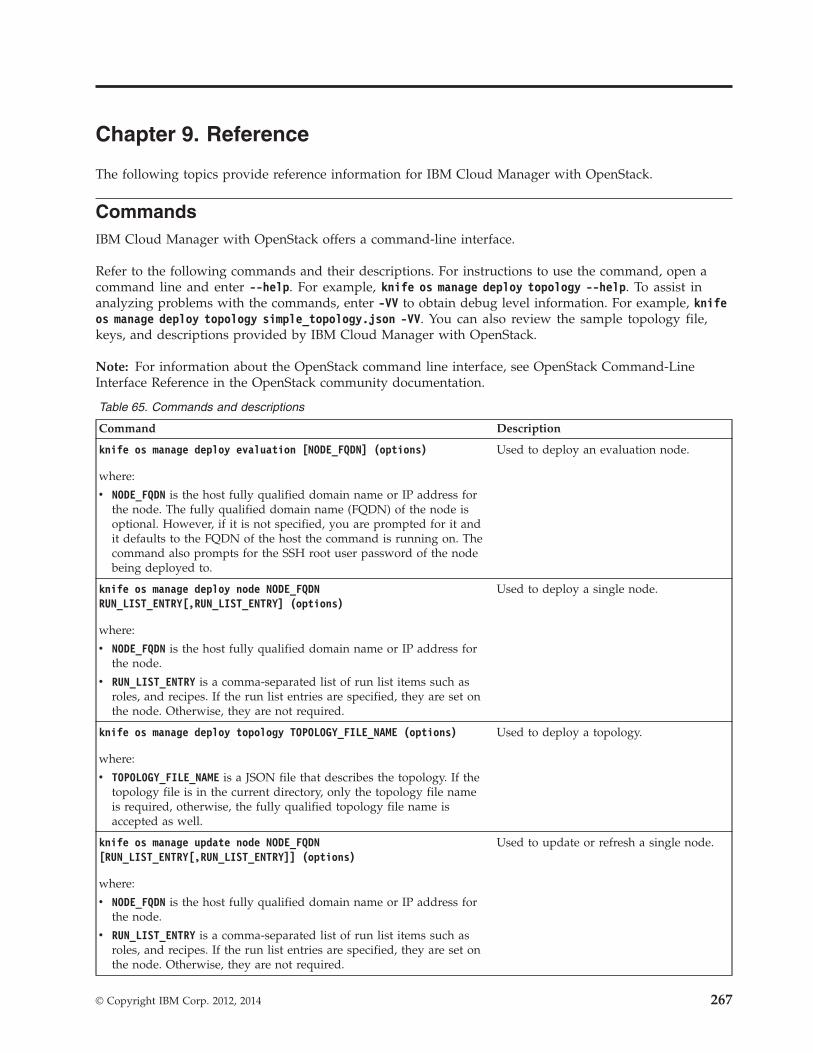
Chapter 9. Reference
The following topics provide reference information for IBM Cloud Manager with OpenStack.
CommandsIBM Cloud Manager with OpenStack offers a command-line interface.
Refer to the following commands and their descriptions. For instructions to use the command, open acommand line and enter --help. For example, knife os manage deploy topology --help. To assist inanalyzing problems with the commands, enter -VV to obtain debug level information. For example, knifeos manage deploy topology simple_topology.json -VV. You can also review the sample topology file,keys, and descriptions provided by IBM Cloud Manager with OpenStack.
Note: For information about the OpenStack command line interface, see OpenStack Command-LineInterface Reference in the OpenStack community documentation.
Table 65. Commands and descriptions
Command Description
knife os manage deploy evaluation [NODE_FQDN] (options)
where:
v NODE_FQDN is the host fully qualified domain name or IP address forthe node. The fully qualified domain name (FQDN) of the node isoptional. However, if it is not specified, you are prompted for it andit defaults to the FQDN of the host the command is running on. Thecommand also prompts for the SSH root user password of the nodebeing deployed to.
Used to deploy an evaluation node.
knife os manage deploy node NODE_FQDNRUN_LIST_ENTRY[,RUN_LIST_ENTRY] (options)
where:
v NODE_FQDN is the host fully qualified domain name or IP address forthe node.
v RUN_LIST_ENTRY is a comma-separated list of run list items such asroles, and recipes. If the run list entries are specified, they are set onthe node. Otherwise, they are not required.
Used to deploy a single node.
knife os manage deploy topology TOPOLOGY_FILE_NAME (options)
where:
v TOPOLOGY_FILE_NAME is a JSON file that describes the topology. If thetopology file is in the current directory, only the topology file nameis required, otherwise, the fully qualified topology file name isaccepted as well.
Used to deploy a topology.
knife os manage update node NODE_FQDN[RUN_LIST_ENTRY[,RUN_LIST_ENTRY]] (options)
where:
v NODE_FQDN is the host fully qualified domain name or IP address forthe node.
v RUN_LIST_ENTRY is a comma-separated list of run list items such asroles, and recipes. If the run list entries are specified, they are set onthe node. Otherwise, they are not required.
Used to update or refresh a single node.
© Copyright IBM Corp. 2012, 2014 267

Table 65. Commands and descriptions (continued)
Command Description
knife os manage remove node NODE_FQDN -–topology-fileTOPOLOGY_FILE --secret-file SECRET_FILE (options)
where:
v NODE_FQDN is the fully qualified domain name of a node that wasdeployed.
v TOPOLOGY_FILE is the name of the topology JSON file that describes atopology that was already deployed.
v SECRET-FILE is the secret file that is used to encrypt the passwordsand secrets. A secret file is required for this command. If this optionis not specified, the example data bag secret file that is found in theIBM Cloud Manager with OpenStack Chef repository is used.
Used to remove a compute node from adeployed topology.
knife os manage validate node NODE_FQDN
where:
v NODE_FQDN is the fully qualified domain name of a node system.
Used to validate a node prior todeployment.
knife os manage update topology TOPOLOGY_FILE_NAME (options)
where:
v TOPOLOGY_FILE_NAME is a JSON file that describes the topology. If thetopology file is in the current directory, only the topology file nameis required, otherwise, the fully qualified topology file name isaccepted as well.
Used to update or refresh a topology.
knife os manage set environment [ENVIRONMENT_NAME] (options)
where:
v ENVIRONMENT_NAME is the name of a new environment to create, or anexisting environment to modify. New environments are created basedon one of the existing example environments that are stored in theIBM Cloud Manager with OpenStack Chef repository. By default, thecommand prompts for several environment values, and when done,saves the environment that is created or modified on the Chef server.You can use the –env-config option in an environment YAMLconfiguration file to enter environment changes instead of using thecommand line. After the environment is updated, it can be used todeploy or update a single node or a topology. The ENVIRONMENT_NAMEfield is optional. If it is not provided, the command prompts for one.
Used to create a new, or modify anexisting Chef environment that is usedduring a topology or node deployment.
knife os manage set topology [TOPOLOGY_FILE_NAME] (options)
where:
v TOPOLOGY_FILE_NAME is the name of a new topology JSON file tocreate. The command prompts for all of the information that isrequired to deploy a topology of nodes. The resulting JSON file issaved to the current directory, and can then be used to deploy atopology using the knife os manage deploy topology command.
Used to create a new topology JSON filethat can be used during the deployment ofa topology.
One of the required topology items is theenvironment name. If you enter a newenvironment name in this command whileentering the topology information resultsin the knife os manage set environmentcommand being called automatically tocreate the new environment and upload itto the Chef server when it is complete.Thus, this command can be used to createa new environment, and upload to thechef server, as well as, create a newtopology JSON file in one step.
268 IBM Cloud Manager with OpenStack: Administrator Guide, version 4.2

Table 65. Commands and descriptions (continued)
Command Description
knife os manage appliance migrate node NODE_FQDN (options)
where:
v NODE_FQDN is the host fully qualified domain name of the controllernode.
Used to migrate the data andconfiguration from a IBM SmartCloudEntry 3.2 appliance to a IBM CloudManager with OpenStack single controlnode.
knife os manage set passwords --secret-file SECRET_FILE -EENVIRONMENT[.json] --topology-file TOPOLOGY_FILE [PASSWORDS_FILE]
where:
v SECRET_FILE is the secret file that is used to encrypt the passwordsand secrets. A secret file is required for this command. If this optionis not specified, the example data bag secret file that is found in theIBM Cloud Manager with OpenStack Chef repository is used. If thesecret file does not exist, it is created.
v ENVIRONMENT[.json] is the environment that is updated with thenew passwords and secrets. This option is required and can either bethe name of the environment on the Chef server or the environmentJSON file.
v TOPOLOGY_FILE is the topology JSON file that is updated to referencethe secret file that is used by this command.
v PASSWORDS_FILE is the passwords and secrets JSON file. If notspecified, all passwords and secrets are randomly generated. Ifspecified, the file contains the passwords and secrets that the callerwants to set for the specified data bags and data bag items. A subsetof all passwords and secrets can be set in this file. If a password orsecret is not set or its value is set to RANDOM, then a randompassword is generated. An example passwords and secrets JSON filecan be found in the IBM Cloud Manager with OpenStack Chefrepository.
Used to set passwords and secrets for anew topology deployment.
knife os manage get passwords --secret-file SECRET_FILE -EENVIRONMENT --topology-file TOPOLOGY_FILE [DATA_BAGS_DIRECTORY]
where:
v SECRET_FILE is the secret file that is used to encrypt the passwordsand secrets for the deployment. The default value is the exampledata bag secret file that is found in the IBM Cloud Manager withOpenStack Chef repository. If this option is not specified and theTOPOLOGY_FILE option is specified, the secret file that is specified bythe topology JSON file is used.
v ENVIRONMENT is the environment that is used for the deployment. Ifthis option is not specified and the TOPOLOGY_FILE option is specified,the environment that is specified by the topology JSON file is used.
v TOPOLOGY_FILE is the topology JSON file for the deployment. If theSECRET_FILE option is not specified, then the secret file that isspecified by this topology JSON file is used. If the ENVIRONMENToption is not specified, then the environment that is specified by thistopology JSON file is used.
v DATA_BAGS_DIRECTORY is the directory that is created to store the databags and data bag items that contain the passwords and secrets forthe deployment. If this option is not specified, the 'data_bags'directory is used.
Used to get passwords and secrets for atopology deployment.
Chapter 9. Reference 269

Table 65. Commands and descriptions (continued)
Command Description
knife os manage update passwords --secret-file SECRET_FILE -EENVIRONMENT --topology-file TOPOLOGY_FILE [DATA_BAGS_DIRECTORY]
where:
v SECRET_FILE is the secret file that is used to encrypt the passwordsand secrets for the deployment. The default value is the exampledata bag secret file found in the IBM Cloud Manager with OpenStackChef repository. If this option is not specified and the TOPOLOGY_FILEoption is specified, the secret file that is specified by the topologyJSON file is used.
v ENVIRONMENT is the environment that is used for the deployment. Ifthis option is not specified and the TOPOLOGY_FILE option is specified,the environment that is specified by the topology JSON file is used.
v TOPOLOGY_FILE is the topology JSON file for the deployment. If theSECRET_FILE option is not specified then the secret file that isspecified by this topology JSON file is used. If the ENVIRONMENToption is not specified then the environment specified by thistopology JSON file is used.
v DATA_BAGS_DIRECTORY is the directory containing the data bags anddata bag items with the updated passwords and secrets for thedeployment. If this option is not specified the 'data_bags' directory isused.
Used to update passwords and secrets fora topology deployment.
knife os manage encrypt password [PASSWORD]
where PASSWORD is the clear text password to encrypt. If PASSWORD is notentered, you are prompted to enter the password.
Used to encrypt a clear text password foruse in a topology JSON, passwords JSON,or cloud YAML file.
knife os manage services ACTION --node NODE_FQDN --topology-fileTOPOLOGY_FILE
where:
v ACTION is the action to perform on the OpenStack services. Validvalues are start, stop, restart, enable, disable, and status.
v NODE_FQDN is the fully qualified domain name of a node that wasdeployed.
v TOPOLOGY_FILE is the name of the topology JSON file that describes atopology that was already deployed.
Either the -node option or the –topology-file option is required, but bothcannot be specified.
Used to start, stop, restart, disable, enable,and obtain status from the OpenStackservices that are running on a particularnode or topology.
knife os manage deploy cloud CLOUD_FILE_NAME
where CLOUD_FILE_NAME is the full path and file name of the cloudYAML configuration file.
Used to deploy a cloud topology.
Topology JSON fileView a sample layout found in the topology JSON file.
A topology JSON looks similar to the following layout:{
"name":"Topology1","description":"This is a topology","environment":"os-single-controller-n-compute","secret_file":"data_bags/example_data_bag_secret","run_sequentially":false,
270 IBM Cloud Manager with OpenStack: Administrator Guide, version 4.2

"concurrency":10,"nodes": [
{"name": "controller","description": "This is the controller node","fqdn":"controllername.company.com","password":"passw0rd","run_order_number":1,"quit_on_error":true,"chef_client_options": [
"-i 3600","-s 600"
],"runlist": [
"role[ibm-os-single-controller-node]"]
},{
"name": "KVM qemu compute","description": "This is a KVM qemu compute node","fqdn":"computename.company.com","user":"admin","identity_file":"/root/identity.pem","run_order_number":2,"allow_update": false,"runlist": [
"role[ibm-os-compute-node-kvm]"],"attributes":"{\"openstack\":{\"compute\":{\"libvirt\":{\"virt_type\":\"qemu\"}}}}"
}]
}
Table 66. Topology Keys
Topology Keys Description
name A user-defined name of the topology.
description A user-defined description of the topology.
environment The environment to use with all nodes in the topology. The environment must be on thechef server.
secret_file The secret file that contains the symmetric key for encrypted data bags. This file is onlyrequired if encrypted data bags are used to store the OpenStack passwords.
run_sequentially An optional flag that is used to control how nodes in a node run_order_number run. Set totrue to run each node sequentially. Set to false to run all nodes in a run_order_number inparallel. The default value is false.
concurrency An optional integer value that is used to specify the maximum number of nodes that canrun in parallel if run_sequentially is set to false. If not set, all nodes in with arun_order_number run in parallel, without limit. The default is there is no limit on thenumber of nodes that can run in parallel.
nodes A list of nodes in the topology. At least one node is required
Table 67. Node Keys
Node Keys Description
name A user-defined name of the node.
description A user-defined description of the node.
fqdn The host fully qualified domain name or IP address of the node.
chef_node_name The optional setting for the node's name on the Chef server. This setting defaults to thefully qualified domain name value of the node if not explicitly set.
Chapter 9. Reference 271
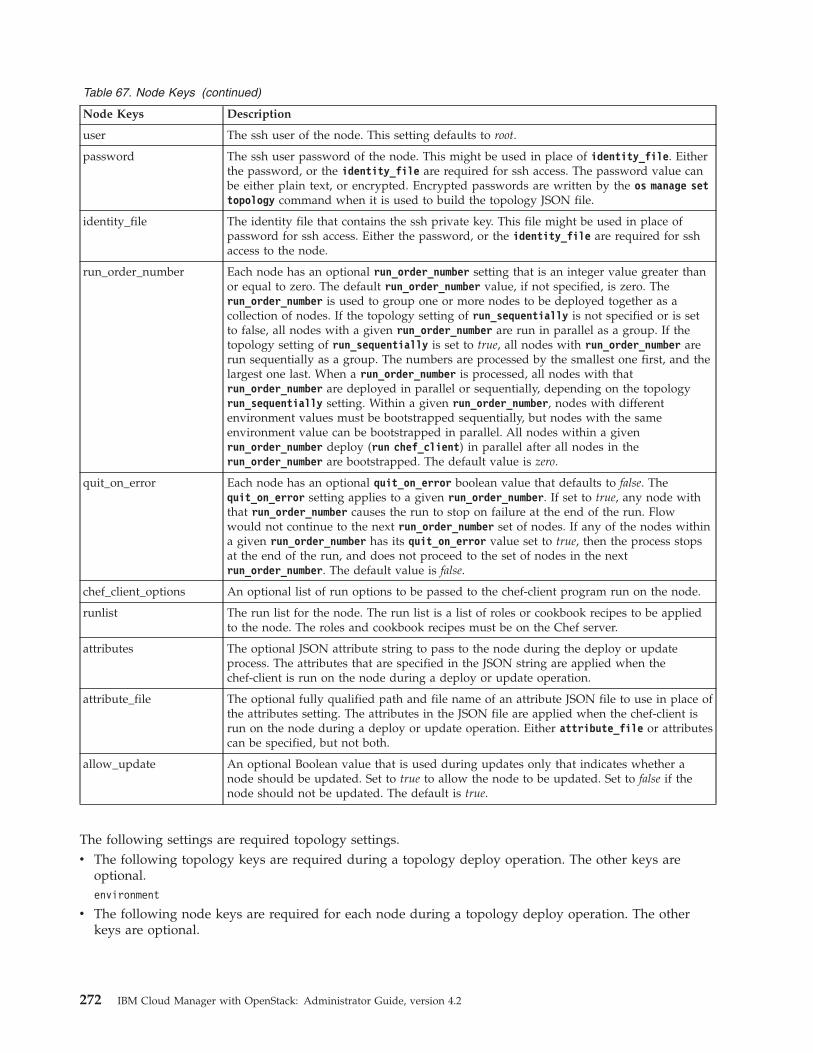
Table 67. Node Keys (continued)
Node Keys Description
user The ssh user of the node. This setting defaults to root.
password The ssh user password of the node. This might be used in place of identity_file. Eitherthe password, or the identity_file are required for ssh access. The password value canbe either plain text, or encrypted. Encrypted passwords are written by the os manage settopology command when it is used to build the topology JSON file.
identity_file The identity file that contains the ssh private key. This file might be used in place ofpassword for ssh access. Either the password, or the identity_file are required for sshaccess to the node.
run_order_number Each node has an optional run_order_number setting that is an integer value greater thanor equal to zero. The default run_order_number value, if not specified, is zero. Therun_order_number is used to group one or more nodes to be deployed together as acollection of nodes. If the topology setting of run_sequentially is not specified or is setto false, all nodes with a given run_order_number are run in parallel as a group. If thetopology setting of run_sequentially is set to true, all nodes with run_order_number arerun sequentially as a group. The numbers are processed by the smallest one first, and thelargest one last. When a run_order_number is processed, all nodes with thatrun_order_number are deployed in parallel or sequentially, depending on the topologyrun_sequentially setting. Within a given run_order_number, nodes with differentenvironment values must be bootstrapped sequentially, but nodes with the sameenvironment value can be bootstrapped in parallel. All nodes within a givenrun_order_number deploy (run chef_client) in parallel after all nodes in therun_order_number are bootstrapped. The default value is zero.
quit_on_error Each node has an optional quit_on_error boolean value that defaults to false. Thequit_on_error setting applies to a given run_order_number. If set to true, any node withthat run_order_number causes the run to stop on failure at the end of the run. Flowwould not continue to the next run_order_number set of nodes. If any of the nodes withina given run_order_number has its quit_on_error value set to true, then the process stopsat the end of the run, and does not proceed to the set of nodes in the nextrun_order_number. The default value is false.
chef_client_options An optional list of run options to be passed to the chef-client program run on the node.
runlist The run list for the node. The run list is a list of roles or cookbook recipes to be appliedto the node. The roles and cookbook recipes must be on the Chef server.
attributes The optional JSON attribute string to pass to the node during the deploy or updateprocess. The attributes that are specified in the JSON string are applied when thechef-client is run on the node during a deploy or update operation.
attribute_file The optional fully qualified path and file name of an attribute JSON file to use in place ofthe attributes setting. The attributes in the JSON file are applied when the chef-client isrun on the node during a deploy or update operation. Either attribute_file or attributescan be specified, but not both.
allow_update An optional Boolean value that is used during updates only that indicates whether anode should be updated. Set to true to allow the node to be updated. Set to false if thenode should not be updated. The default is true.
The following settings are required topology settings.v The following topology keys are required during a topology deploy operation. The other keys are
optional.environment
v The following node keys are required for each node during a topology deploy operation. The otherkeys are optional.
272 IBM Cloud Manager with OpenStack: Administrator Guide, version 4.2
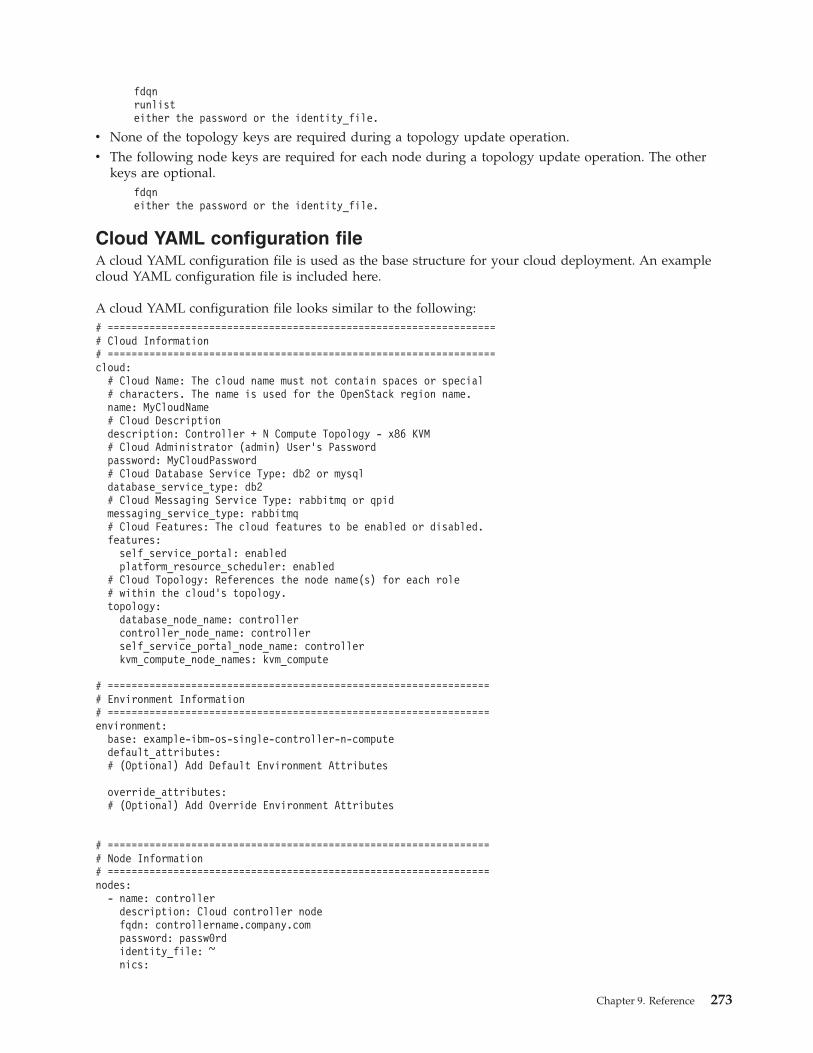
fdqnrunlisteither the password or the identity_file.
v None of the topology keys are required during a topology update operation.v The following node keys are required for each node during a topology update operation. The other
keys are optional.fdqneither the password or the identity_file.
Cloud YAML configuration fileA cloud YAML configuration file is used as the base structure for your cloud deployment. An examplecloud YAML configuration file is included here.
A cloud YAML configuration file looks similar to the following:# =================================================================# Cloud Information# =================================================================cloud:
# Cloud Name: The cloud name must not contain spaces or special# characters. The name is used for the OpenStack region name.name: MyCloudName# Cloud Descriptiondescription: Controller + N Compute Topology - x86 KVM# Cloud Administrator (admin) User’s Passwordpassword: MyCloudPassword# Cloud Database Service Type: db2 or mysqldatabase_service_type: db2# Cloud Messaging Service Type: rabbitmq or qpidmessaging_service_type: rabbitmq# Cloud Features: The cloud features to be enabled or disabled.features:
self_service_portal: enabledplatform_resource_scheduler: enabled
# Cloud Topology: References the node name(s) for each role# within the cloud’s topology.topology:
database_node_name: controllercontroller_node_name: controllerself_service_portal_node_name: controllerkvm_compute_node_names: kvm_compute
# ================================================================# Environment Information# ================================================================environment:
base: example-ibm-os-single-controller-n-computedefault_attributes:# (Optional) Add Default Environment Attributes
override_attributes:# (Optional) Add Override Environment Attributes
# ================================================================# Node Information# ================================================================nodes:
- name: controllerdescription: Cloud controller nodefqdn: controllername.company.compassword: passw0rdidentity_file: ~nics:
Chapter 9. Reference 273
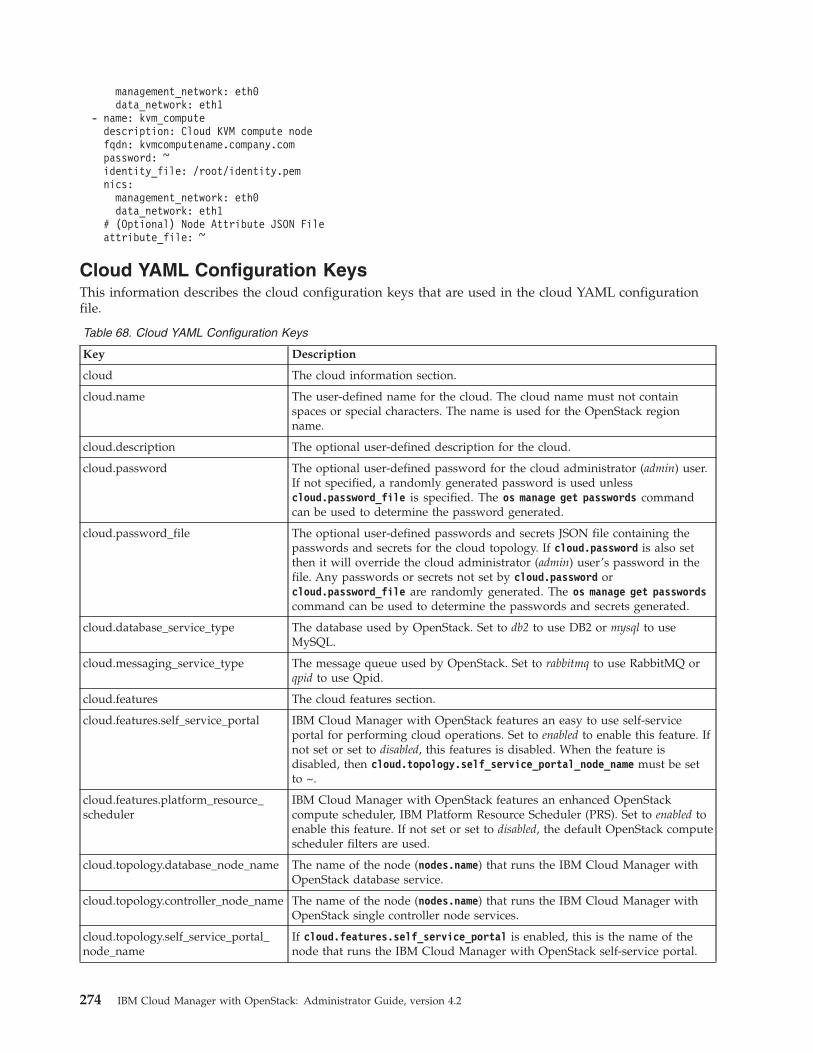
management_network: eth0data_network: eth1
- name: kvm_computedescription: Cloud KVM compute nodefqdn: kvmcomputename.company.compassword: ~identity_file: /root/identity.pemnics:
management_network: eth0data_network: eth1
# (Optional) Node Attribute JSON Fileattribute_file: ~
Cloud YAML Configuration KeysThis information describes the cloud configuration keys that are used in the cloud YAML configurationfile.
Table 68. Cloud YAML Configuration Keys
Key Description
cloud The cloud information section.
cloud.name The user-defined name for the cloud. The cloud name must not containspaces or special characters. The name is used for the OpenStack regionname.
cloud.description The optional user-defined description for the cloud.
cloud.password The optional user-defined password for the cloud administrator (admin) user.If not specified, a randomly generated password is used unlesscloud.password_file is specified. The os manage get passwords commandcan be used to determine the password generated.
cloud.password_file The optional user-defined passwords and secrets JSON file containing thepasswords and secrets for the cloud topology. If cloud.password is also setthen it will override the cloud administrator (admin) user’s password in thefile. Any passwords or secrets not set by cloud.password orcloud.password_file are randomly generated. The os manage get passwordscommand can be used to determine the passwords and secrets generated.
cloud.database_service_type The database used by OpenStack. Set to db2 to use DB2 or mysql to useMySQL.
cloud.messaging_service_type The message queue used by OpenStack. Set to rabbitmq to use RabbitMQ orqpid to use Qpid.
cloud.features The cloud features section.
cloud.features.self_service_portal IBM Cloud Manager with OpenStack features an easy to use self-serviceportal for performing cloud operations. Set to enabled to enable this feature. Ifnot set or set to disabled, this features is disabled. When the feature isdisabled, then cloud.topology.self_service_portal_node_name must be setto ~.
cloud.features.platform_resource_scheduler
IBM Cloud Manager with OpenStack features an enhanced OpenStackcompute scheduler, IBM Platform Resource Scheduler (PRS). Set to enabled toenable this feature. If not set or set to disabled, the default OpenStack computescheduler filters are used.
cloud.topology.database_node_name The name of the node (nodes.name) that runs the IBM Cloud Manager withOpenStack database service.
cloud.topology.controller_node_name The name of the node (nodes.name) that runs the IBM Cloud Manager withOpenStack single controller node services.
cloud.topology.self_service_portal_node_name
If cloud.features.self_service_portal is enabled, this is the name of thenode that runs the IBM Cloud Manager with OpenStack self-service portal.
274 IBM Cloud Manager with OpenStack: Administrator Guide, version 4.2
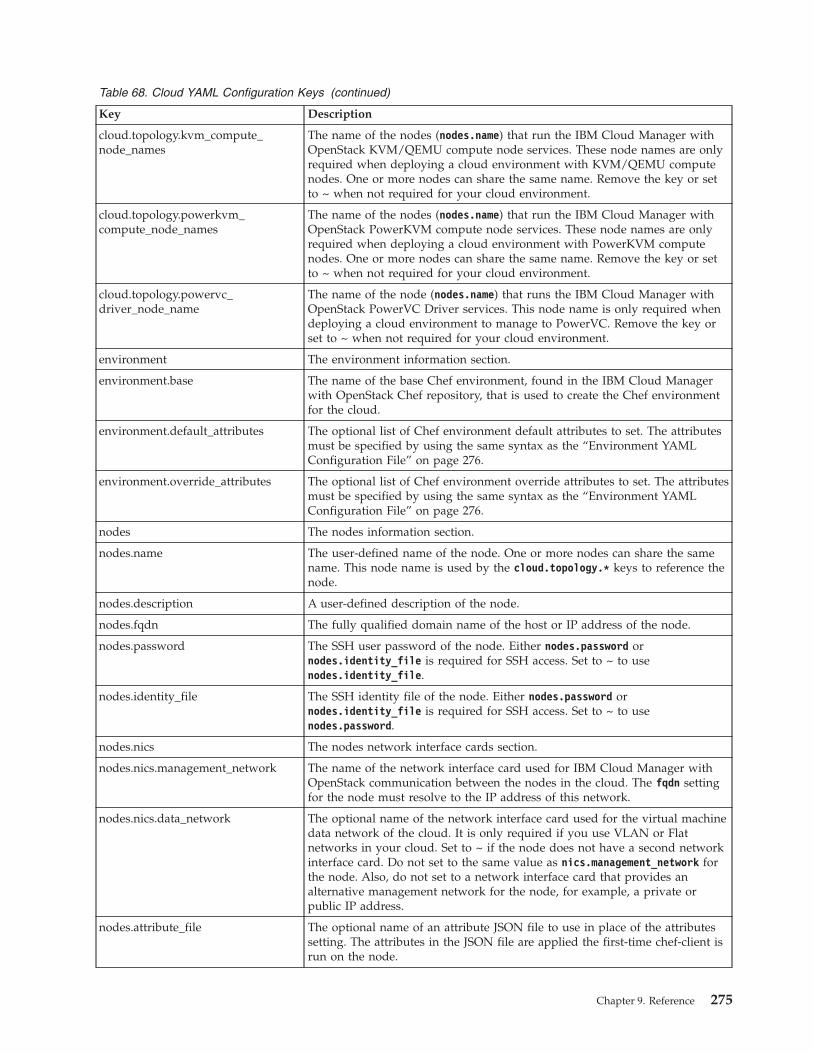
Table 68. Cloud YAML Configuration Keys (continued)
Key Description
cloud.topology.kvm_compute_node_names
The name of the nodes (nodes.name) that run the IBM Cloud Manager withOpenStack KVM/QEMU compute node services. These node names are onlyrequired when deploying a cloud environment with KVM/QEMU computenodes. One or more nodes can share the same name. Remove the key or setto ~ when not required for your cloud environment.
cloud.topology.powerkvm_compute_node_names
The name of the nodes (nodes.name) that run the IBM Cloud Manager withOpenStack PowerKVM compute node services. These node names are onlyrequired when deploying a cloud environment with PowerKVM computenodes. One or more nodes can share the same name. Remove the key or setto ~ when not required for your cloud environment.
cloud.topology.powervc_driver_node_name
The name of the node (nodes.name) that runs the IBM Cloud Manager withOpenStack PowerVC Driver services. This node name is only required whendeploying a cloud environment to manage to PowerVC. Remove the key orset to ~ when not required for your cloud environment.
environment The environment information section.
environment.base The name of the base Chef environment, found in the IBM Cloud Managerwith OpenStack Chef repository, that is used to create the Chef environmentfor the cloud.
environment.default_attributes The optional list of Chef environment default attributes to set. The attributesmust be specified by using the same syntax as the “Environment YAMLConfiguration File” on page 276.
environment.override_attributes The optional list of Chef environment override attributes to set. The attributesmust be specified by using the same syntax as the “Environment YAMLConfiguration File” on page 276.
nodes The nodes information section.
nodes.name The user-defined name of the node. One or more nodes can share the samename. This node name is used by the cloud.topology.* keys to reference thenode.
nodes.description A user-defined description of the node.
nodes.fqdn The fully qualified domain name of the host or IP address of the node.
nodes.password The SSH user password of the node. Either nodes.password ornodes.identity_file is required for SSH access. Set to ~ to usenodes.identity_file.
nodes.identity_file The SSH identity file of the node. Either nodes.password ornodes.identity_file is required for SSH access. Set to ~ to usenodes.password.
nodes.nics The nodes network interface cards section.
nodes.nics.management_network The name of the network interface card used for IBM Cloud Manager withOpenStack communication between the nodes in the cloud. The fqdn settingfor the node must resolve to the IP address of this network.
nodes.nics.data_network The optional name of the network interface card used for the virtual machinedata network of the cloud. It is only required if you use VLAN or Flatnetworks in your cloud. Set to ~ if the node does not have a second networkinterface card. Do not set to the same value as nics.management_network forthe node. Also, do not set to a network interface card that provides analternative management network for the node, for example, a private orpublic IP address.
nodes.attribute_file The optional name of an attribute JSON file to use in place of the attributessetting. The attributes in the JSON file are applied the first-time chef-client isrun on the node.
Chapter 9. Reference 275
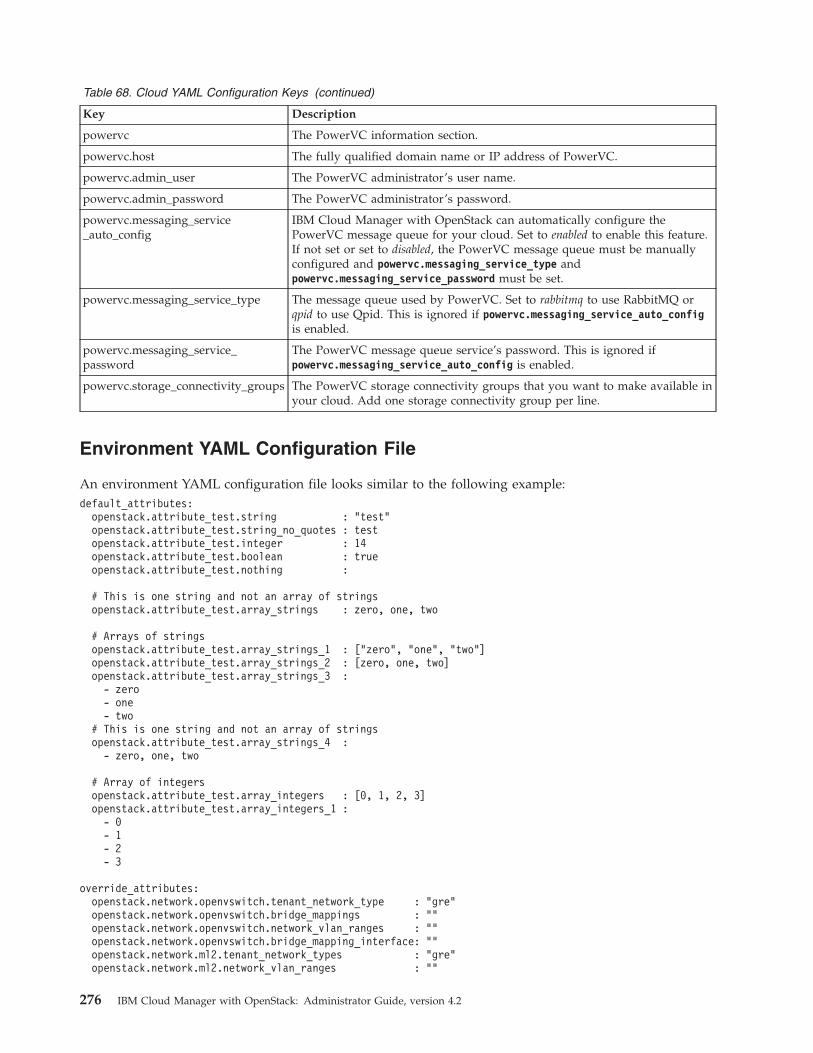
Table 68. Cloud YAML Configuration Keys (continued)
Key Description
powervc The PowerVC information section.
powervc.host The fully qualified domain name or IP address of PowerVC.
powervc.admin_user The PowerVC administrator’s user name.
powervc.admin_password The PowerVC administrator’s password.
powervc.messaging_service_auto_config
IBM Cloud Manager with OpenStack can automatically configure thePowerVC message queue for your cloud. Set to enabled to enable this feature.If not set or set to disabled, the PowerVC message queue must be manuallyconfigured and powervc.messaging_service_type andpowervc.messaging_service_password must be set.
powervc.messaging_service_type The message queue used by PowerVC. Set to rabbitmq to use RabbitMQ orqpid to use Qpid. This is ignored if powervc.messaging_service_auto_configis enabled.
powervc.messaging_service_password
The PowerVC message queue service’s password. This is ignored ifpowervc.messaging_service_auto_config is enabled.
powervc.storage_connectivity_groups The PowerVC storage connectivity groups that you want to make available inyour cloud. Add one storage connectivity group per line.
Environment YAML Configuration File
An environment YAML configuration file looks similar to the following example:default_attributes:
openstack.attribute_test.string : "test"openstack.attribute_test.string_no_quotes : testopenstack.attribute_test.integer : 14openstack.attribute_test.boolean : trueopenstack.attribute_test.nothing :
# This is one string and not an array of stringsopenstack.attribute_test.array_strings : zero, one, two
# Arrays of stringsopenstack.attribute_test.array_strings_1 : ["zero", "one", "two"]openstack.attribute_test.array_strings_2 : [zero, one, two]openstack.attribute_test.array_strings_3 :
- zero- one- two
# This is one string and not an array of stringsopenstack.attribute_test.array_strings_4 :
- zero, one, two
# Array of integersopenstack.attribute_test.array_integers : [0, 1, 2, 3]openstack.attribute_test.array_integers_1 :
- 0- 1- 2- 3
override_attributes:openstack.network.openvswitch.tenant_network_type : "gre"openstack.network.openvswitch.bridge_mappings : ""openstack.network.openvswitch.network_vlan_ranges : ""openstack.network.openvswitch.bridge_mapping_interface: ""openstack.network.ml2.tenant_network_types : "gre"openstack.network.ml2.network_vlan_ranges : ""
276 IBM Cloud Manager with OpenStack: Administrator Guide, version 4.2
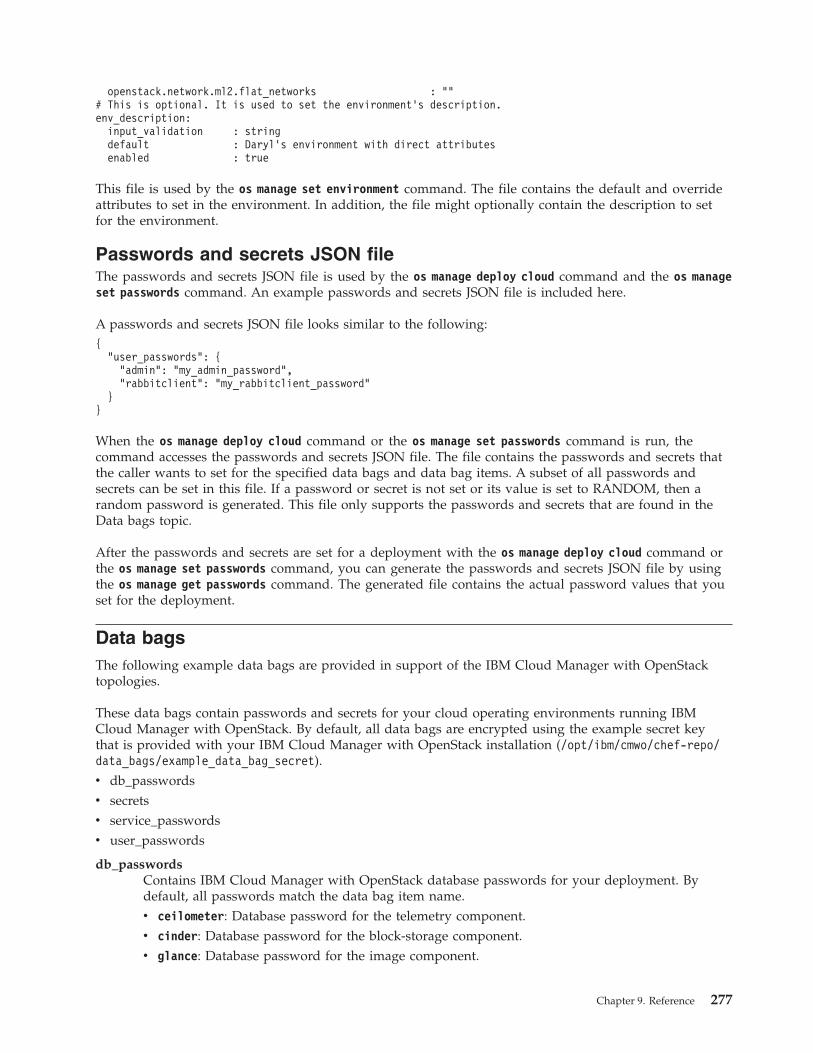
openstack.network.ml2.flat_networks : ""# This is optional. It is used to set the environment’s description.env_description:
input_validation : stringdefault : Daryl’s environment with direct attributesenabled : true
This file is used by the os manage set environment command. The file contains the default and overrideattributes to set in the environment. In addition, the file might optionally contain the description to setfor the environment.
Passwords and secrets JSON fileThe passwords and secrets JSON file is used by the os manage deploy cloud command and the os manageset passwords command. An example passwords and secrets JSON file is included here.
A passwords and secrets JSON file looks similar to the following:{
"user_passwords": {"admin": "my_admin_password","rabbitclient": "my_rabbitclient_password"
}}
When the os manage deploy cloud command or the os manage set passwords command is run, thecommand accesses the passwords and secrets JSON file. The file contains the passwords and secrets thatthe caller wants to set for the specified data bags and data bag items. A subset of all passwords andsecrets can be set in this file. If a password or secret is not set or its value is set to RANDOM, then arandom password is generated. This file only supports the passwords and secrets that are found in theData bags topic.
After the passwords and secrets are set for a deployment with the os manage deploy cloud command orthe os manage set passwords command, you can generate the passwords and secrets JSON file by usingthe os manage get passwords command. The generated file contains the actual password values that youset for the deployment.
Data bagsThe following example data bags are provided in support of the IBM Cloud Manager with OpenStacktopologies.
These data bags contain passwords and secrets for your cloud operating environments running IBMCloud Manager with OpenStack. By default, all data bags are encrypted using the example secret keythat is provided with your IBM Cloud Manager with OpenStack installation (/opt/ibm/cmwo/chef-repo/data_bags/example_data_bag_secret).v db_passwordsv secretsv service_passwordsv user_passwords
db_passwordsContains IBM Cloud Manager with OpenStack database passwords for your deployment. Bydefault, all passwords match the data bag item name.v ceilometer: Database password for the telemetry component.v cinder: Database password for the block-storage component.v glance: Database password for the image component.
Chapter 9. Reference 277
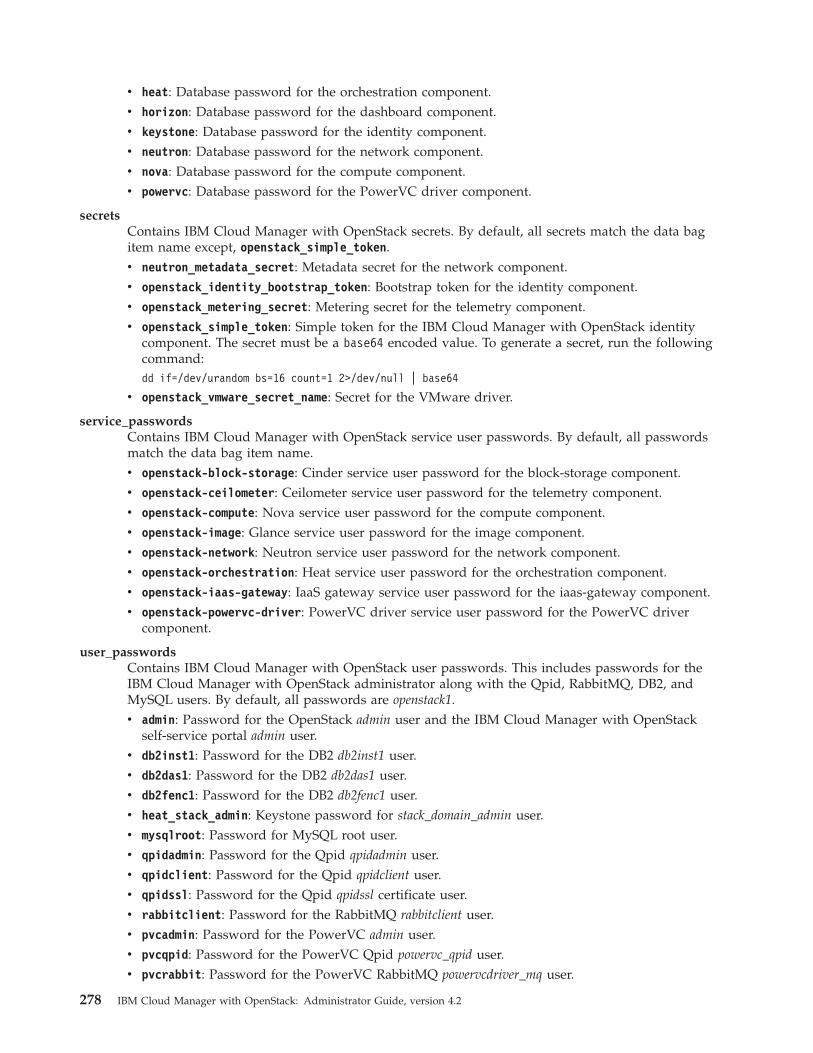
v heat: Database password for the orchestration component.v horizon: Database password for the dashboard component.v keystone: Database password for the identity component.v neutron: Database password for the network component.v nova: Database password for the compute component.v powervc: Database password for the PowerVC driver component.
secretsContains IBM Cloud Manager with OpenStack secrets. By default, all secrets match the data bagitem name except, openstack_simple_token.v neutron_metadata_secret: Metadata secret for the network component.v openstack_identity_bootstrap_token: Bootstrap token for the identity component.v openstack_metering_secret: Metering secret for the telemetry component.v openstack_simple_token: Simple token for the IBM Cloud Manager with OpenStack identity
component. The secret must be a base64 encoded value. To generate a secret, run the followingcommand:dd if=/dev/urandom bs=16 count=1 2>/dev/null | base64
v openstack_vmware_secret_name: Secret for the VMware driver.
service_passwordsContains IBM Cloud Manager with OpenStack service user passwords. By default, all passwordsmatch the data bag item name.v openstack-block-storage: Cinder service user password for the block-storage component.v openstack-ceilometer: Ceilometer service user password for the telemetry component.v openstack-compute: Nova service user password for the compute component.v openstack-image: Glance service user password for the image component.v openstack-network: Neutron service user password for the network component.v openstack-orchestration: Heat service user password for the orchestration component.v openstack-iaas-gateway: IaaS gateway service user password for the iaas-gateway component.v openstack-powervc-driver: PowerVC driver service user password for the PowerVC driver
component.
user_passwordsContains IBM Cloud Manager with OpenStack user passwords. This includes passwords for theIBM Cloud Manager with OpenStack administrator along with the Qpid, RabbitMQ, DB2, andMySQL users. By default, all passwords are openstack1.v admin: Password for the OpenStack admin user and the IBM Cloud Manager with OpenStack
self-service portal admin user.v db2inst1: Password for the DB2 db2inst1 user.v db2das1: Password for the DB2 db2das1 user.v db2fenc1: Password for the DB2 db2fenc1 user.v heat_stack_admin: Keystone password for stack_domain_admin user.v mysqlroot: Password for MySQL root user.v qpidadmin: Password for the Qpid qpidadmin user.v qpidclient: Password for the Qpid qpidclient user.v qpidssl: Password for the Qpid qpidssl certificate user.v rabbitclient: Password for the RabbitMQ rabbitclient user.v pvcadmin: Password for the PowerVC admin user.v pvcqpid: Password for the PowerVC Qpid powervc_qpid user.v pvcrabbit: Password for the PowerVC RabbitMQ powervcdriver_mq user.
278 IBM Cloud Manager with OpenStack: Administrator Guide, version 4.2
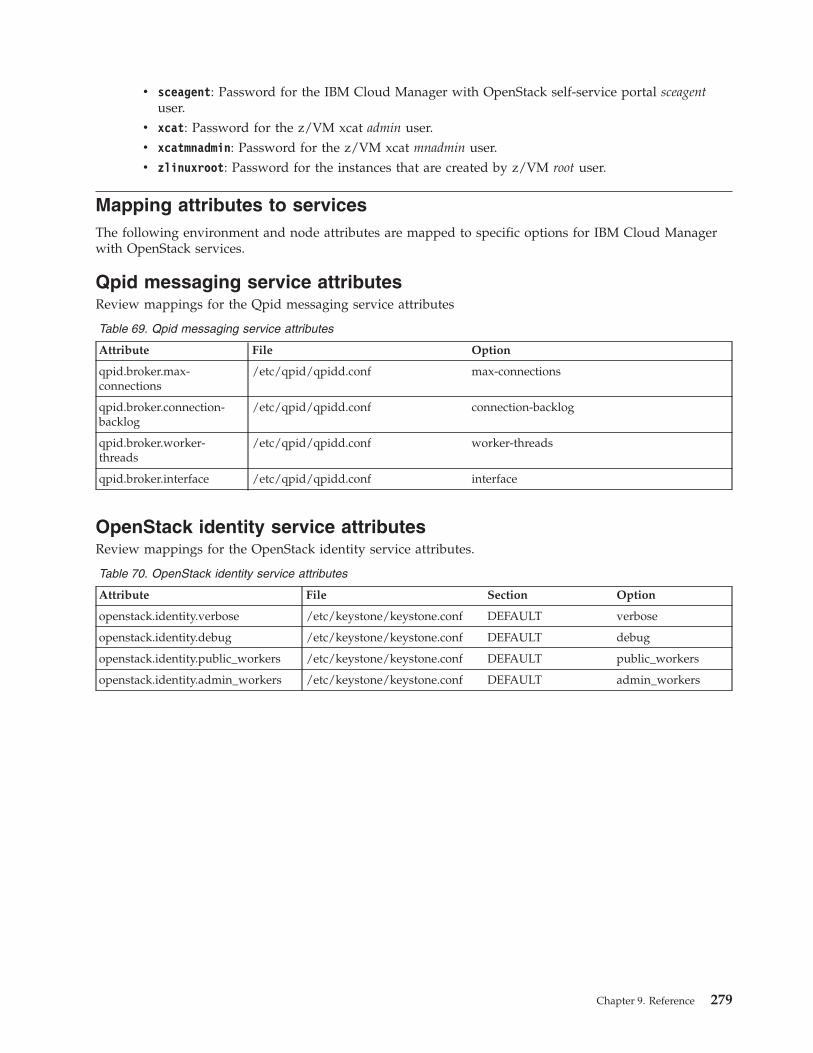
v sceagent: Password for the IBM Cloud Manager with OpenStack self-service portal sceagentuser.
v xcat: Password for the z/VM xcat admin user.v xcatmnadmin: Password for the z/VM xcat mnadmin user.v zlinuxroot: Password for the instances that are created by z/VM root user.
Mapping attributes to servicesThe following environment and node attributes are mapped to specific options for IBM Cloud Managerwith OpenStack services.
Qpid messaging service attributesReview mappings for the Qpid messaging service attributes
Table 69. Qpid messaging service attributes
Attribute File Option
qpid.broker.max-connections
/etc/qpid/qpidd.conf max-connections
qpid.broker.connection-backlog
/etc/qpid/qpidd.conf connection-backlog
qpid.broker.worker-threads
/etc/qpid/qpidd.conf worker-threads
qpid.broker.interface /etc/qpid/qpidd.conf interface
OpenStack identity service attributesReview mappings for the OpenStack identity service attributes.
Table 70. OpenStack identity service attributes
Attribute File Section Option
openstack.identity.verbose /etc/keystone/keystone.conf DEFAULT verbose
openstack.identity.debug /etc/keystone/keystone.conf DEFAULT debug
openstack.identity.public_workers /etc/keystone/keystone.conf DEFAULT public_workers
openstack.identity.admin_workers /etc/keystone/keystone.conf DEFAULT admin_workers
Chapter 9. Reference 279
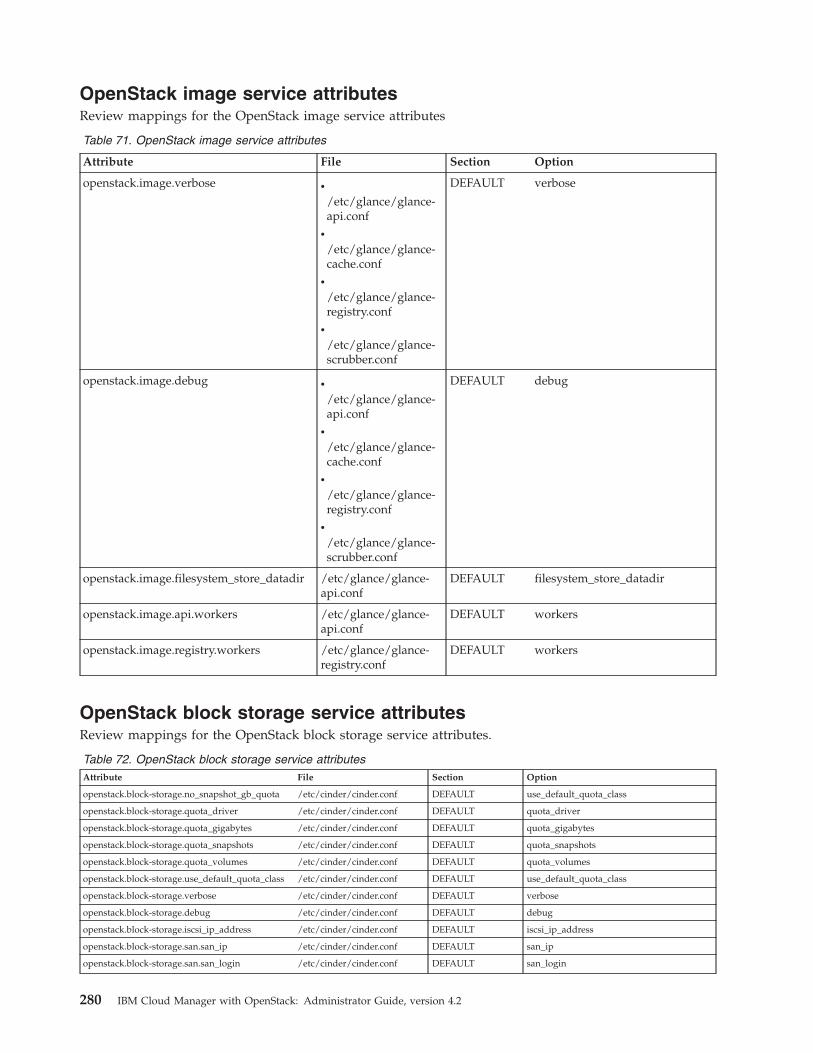
OpenStack image service attributesReview mappings for the OpenStack image service attributes
Table 71. OpenStack image service attributes
Attribute File Section Option
openstack.image.verbose v
/etc/glance/glance-api.conf
v
/etc/glance/glance-cache.conf
v
/etc/glance/glance-registry.conf
v
/etc/glance/glance-scrubber.conf
DEFAULT verbose
openstack.image.debug v
/etc/glance/glance-api.conf
v
/etc/glance/glance-cache.conf
v
/etc/glance/glance-registry.conf
v
/etc/glance/glance-scrubber.conf
DEFAULT debug
openstack.image.filesystem_store_datadir /etc/glance/glance-api.conf
DEFAULT filesystem_store_datadir
openstack.image.api.workers /etc/glance/glance-api.conf
DEFAULT workers
openstack.image.registry.workers /etc/glance/glance-registry.conf
DEFAULT workers
OpenStack block storage service attributesReview mappings for the OpenStack block storage service attributes.
Table 72. OpenStack block storage service attributesAttribute File Section Option
openstack.block-storage.no_snapshot_gb_quota /etc/cinder/cinder.conf DEFAULT use_default_quota_class
openstack.block-storage.quota_driver /etc/cinder/cinder.conf DEFAULT quota_driver
openstack.block-storage.quota_gigabytes /etc/cinder/cinder.conf DEFAULT quota_gigabytes
openstack.block-storage.quota_snapshots /etc/cinder/cinder.conf DEFAULT quota_snapshots
openstack.block-storage.quota_volumes /etc/cinder/cinder.conf DEFAULT quota_volumes
openstack.block-storage.use_default_quota_class /etc/cinder/cinder.conf DEFAULT use_default_quota_class
openstack.block-storage.verbose /etc/cinder/cinder.conf DEFAULT verbose
openstack.block-storage.debug /etc/cinder/cinder.conf DEFAULT debug
openstack.block-storage.iscsi_ip_address /etc/cinder/cinder.conf DEFAULT iscsi_ip_address
openstack.block-storage.san.san_ip /etc/cinder/cinder.conf DEFAULT san_ip
openstack.block-storage.san.san_login /etc/cinder/cinder.conf DEFAULT san_login
280 IBM Cloud Manager with OpenStack: Administrator Guide, version 4.2

Table 72. OpenStack block storage service attributes (continued)Attribute File Section Option
openstack.block-storage.san.san_private_key /etc/cinder/cinder.conf DEFAULT san_private_key
openstack.block-storage.storwize.storwize_svc_volpool_name
/etc/cinder/cinder.conf DEFAULT storwize_svc_volpool_name
openstack.block-storage.storwize.storwize_svc_vol_rsize
/etc/cinder/cinder.conf DEFAULT storwize_svc_vol_rsize
openstack.block-storage.storwize.storwize_svc_vol_warning
/etc/cinder/cinder.conf DEFAULT storwize_svc_vol_warning
openstack.block-storage.storwize.storwize_svc_vol_autoexpand
/etc/cinder/cinder.conf DEFAULT storwize_svc_vol_autoexpand
openstack.block-storage.storwize.storwize_svc_vol_grainsize
/etc/cinder/cinder.conf DEFAULT storwize_svc_vol_grainsize
openstack.block-storage.storwize.storwize_svc_vol_compression
/etc/cinder/cinder.conf DEFAULT storwize_svc_vol_compression
openstack.block-storage.storwize.storwize_svc_vol_easytier
/etc/cinder/cinder.conf DEFAULT storwize_svc_vol_easytier
openstack.block-storage.storwize.storwize_svc_flashcopy_timeout
/etc/cinder/cinder.conf DEFAULT storwize_svc_flashcopy_timeout
openstack.block-storage.storwize.storwize_svc_vol_iogrp
/etc/cinder/cinder.conf DEFAULT storwize_svc_vol_iogrp
openstack.block-storage.storwize.storwize_svc_connection_protocol
/etc/cinder/cinder.conf DEFAULT storwize_svc_connection_protocol
openstack.block-storage.storwize.storwize_svc_iscsi_chap_enabled
/etc/cinder/cinder.conf DEFAULT storwize_svc_iscsi_chap_enabled
openstack.block-storage.storwize.storwize_svc_multipath_enabled
/etc/cinder/cinder.conf DEFAULT storwize_svc_multipath_enabled
openstack.block-storage.storwize.storwize_svc_multihostmap_enabled
/etc/cinder/cinder.conf DEFAULT storwize_svc_multihostmap_enabled
openstack.block-storage.ibmnas.nas_ip /etc/cinder/cinder.conf DEFAULT nas_ip
openstack.block-storage.ibmnas.nas_login /etc/cinder/cinder.conf DEFAULT nas_login
openstack.block-storage.ibmnas.nas_ssh_port /etc/cinder/cinder.conf DEFAULT nas_ssh_port
openstack.block-storage.ibmnas.shares_config /etc/cinder/cinder.conf DEFAULT nfs_shares_config
openstack.block-storage.ibmnas.mount_point_base
/etc/cinder/cinder.conf DEFAULT nfs_mount_point_base
openstack.block-storage.ibmnas.nfs_sparsed_volumes
/etc/cinder/cinder.conf DEFAULT nfs_sparsed_volumes
openstack.block-storage.gpfs.gpfs_mount_point_base
/etc/cinder/cinder.conf DEFAULT gpfs_mount_point_base
openstack.block-storage.gpfs.gpfs_images_dir
/etc/cinder/cinder.conf DEFAULT gpfs_images_dir
openstack.block-storage.gpfs.gpfs_images_share_mode
/etc/cinder/cinder.conf DEFAULT gpfs_images_share_mode
openstack.block-storage.gpfs.gpfs_sparse_volumes
/etc/cinder/cinder.conf DEFAULT gpfs_sparse_volumes
openstack.block-storage.gpfs.gpfs_max_clone_depth
/etc/cinder/cinder.conf DEFAULT gpfs_max_clone_depth
openstack.block-storage.gpfs.gpfs_storage_pool
/etc/cinder/cinder.conf DEFAULT gpfs_storage_pool
openstack.block-storage.ibmnas.ibmnas_platform_type
/etc/cinder/cinder.conf DEFAULT ibmnas_platform_type
openstack.block-storage.osapi_volume_workers
/etc/cinder/cinder.conf DEFAULT osapi_volume_workers
Chapter 9. Reference 281
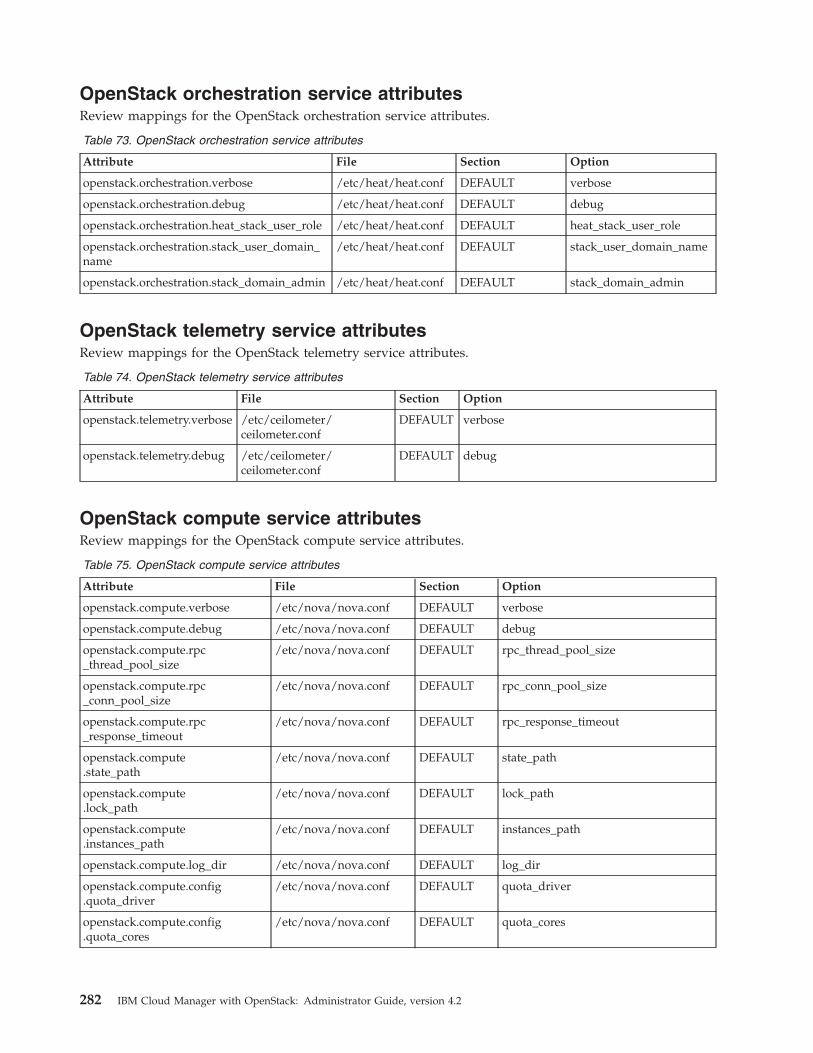
OpenStack orchestration service attributesReview mappings for the OpenStack orchestration service attributes.
Table 73. OpenStack orchestration service attributes
Attribute File Section Option
openstack.orchestration.verbose /etc/heat/heat.conf DEFAULT verbose
openstack.orchestration.debug /etc/heat/heat.conf DEFAULT debug
openstack.orchestration.heat_stack_user_role /etc/heat/heat.conf DEFAULT heat_stack_user_role
openstack.orchestration.stack_user_domain_name
/etc/heat/heat.conf DEFAULT stack_user_domain_name
openstack.orchestration.stack_domain_admin /etc/heat/heat.conf DEFAULT stack_domain_admin
OpenStack telemetry service attributesReview mappings for the OpenStack telemetry service attributes.
Table 74. OpenStack telemetry service attributes
Attribute File Section Option
openstack.telemetry.verbose /etc/ceilometer/ceilometer.conf
DEFAULT verbose
openstack.telemetry.debug /etc/ceilometer/ceilometer.conf
DEFAULT debug
OpenStack compute service attributesReview mappings for the OpenStack compute service attributes.
Table 75. OpenStack compute service attributes
Attribute File Section Option
openstack.compute.verbose /etc/nova/nova.conf DEFAULT verbose
openstack.compute.debug /etc/nova/nova.conf DEFAULT debug
openstack.compute.rpc_thread_pool_size
/etc/nova/nova.conf DEFAULT rpc_thread_pool_size
openstack.compute.rpc_conn_pool_size
/etc/nova/nova.conf DEFAULT rpc_conn_pool_size
openstack.compute.rpc_response_timeout
/etc/nova/nova.conf DEFAULT rpc_response_timeout
openstack.compute.state_path
/etc/nova/nova.conf DEFAULT state_path
openstack.compute.lock_path
/etc/nova/nova.conf DEFAULT lock_path
openstack.compute.instances_path
/etc/nova/nova.conf DEFAULT instances_path
openstack.compute.log_dir /etc/nova/nova.conf DEFAULT log_dir
openstack.compute.config.quota_driver
/etc/nova/nova.conf DEFAULT quota_driver
openstack.compute.config.quota_cores
/etc/nova/nova.conf DEFAULT quota_cores
282 IBM Cloud Manager with OpenStack: Administrator Guide, version 4.2
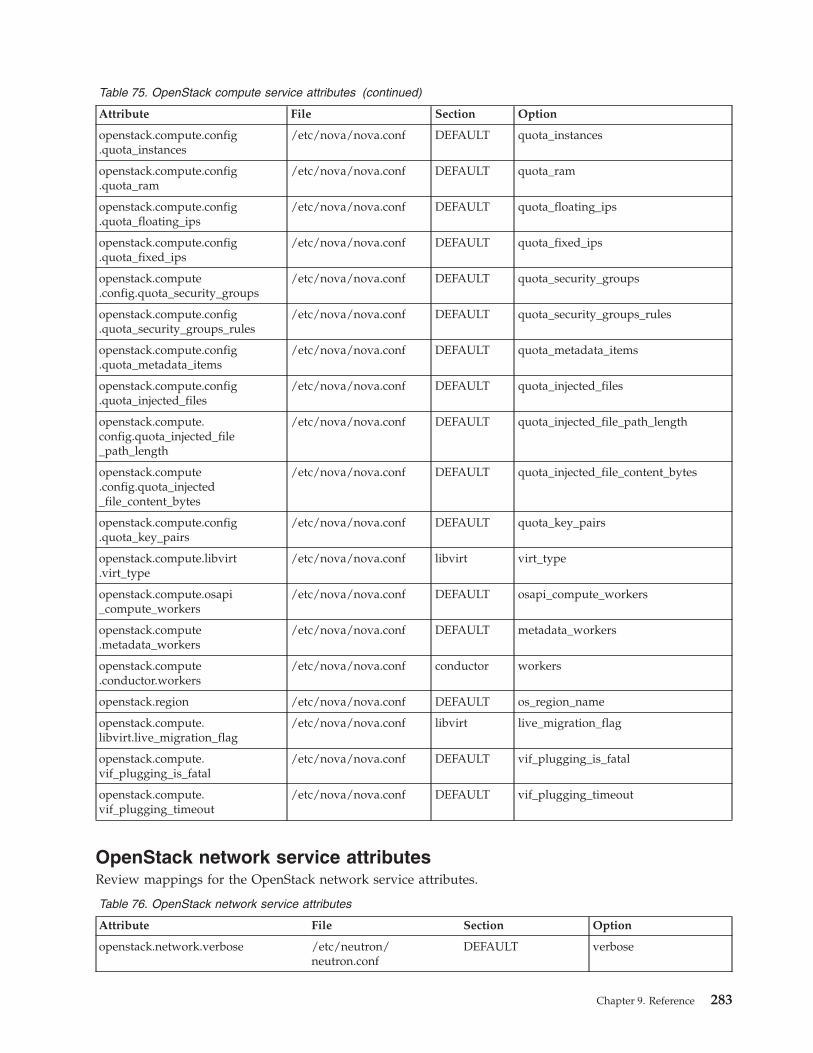
Table 75. OpenStack compute service attributes (continued)
Attribute File Section Option
openstack.compute.config.quota_instances
/etc/nova/nova.conf DEFAULT quota_instances
openstack.compute.config.quota_ram
/etc/nova/nova.conf DEFAULT quota_ram
openstack.compute.config.quota_floating_ips
/etc/nova/nova.conf DEFAULT quota_floating_ips
openstack.compute.config.quota_fixed_ips
/etc/nova/nova.conf DEFAULT quota_fixed_ips
openstack.compute.config.quota_security_groups
/etc/nova/nova.conf DEFAULT quota_security_groups
openstack.compute.config.quota_security_groups_rules
/etc/nova/nova.conf DEFAULT quota_security_groups_rules
openstack.compute.config.quota_metadata_items
/etc/nova/nova.conf DEFAULT quota_metadata_items
openstack.compute.config.quota_injected_files
/etc/nova/nova.conf DEFAULT quota_injected_files
openstack.compute.config.quota_injected_file_path_length
/etc/nova/nova.conf DEFAULT quota_injected_file_path_length
openstack.compute.config.quota_injected_file_content_bytes
/etc/nova/nova.conf DEFAULT quota_injected_file_content_bytes
openstack.compute.config.quota_key_pairs
/etc/nova/nova.conf DEFAULT quota_key_pairs
openstack.compute.libvirt.virt_type
/etc/nova/nova.conf libvirt virt_type
openstack.compute.osapi_compute_workers
/etc/nova/nova.conf DEFAULT osapi_compute_workers
openstack.compute.metadata_workers
/etc/nova/nova.conf DEFAULT metadata_workers
openstack.compute.conductor.workers
/etc/nova/nova.conf conductor workers
openstack.region /etc/nova/nova.conf DEFAULT os_region_name
openstack.compute.libvirt.live_migration_flag
/etc/nova/nova.conf libvirt live_migration_flag
openstack.compute.vif_plugging_is_fatal
/etc/nova/nova.conf DEFAULT vif_plugging_is_fatal
openstack.compute.vif_plugging_timeout
/etc/nova/nova.conf DEFAULT vif_plugging_timeout
OpenStack network service attributesReview mappings for the OpenStack network service attributes.
Table 76. OpenStack network service attributes
Attribute File Section Option
openstack.network.verbose /etc/neutron/neutron.conf
DEFAULT verbose
Chapter 9. Reference 283

Table 76. OpenStack network service attributes (continued)
Attribute File Section Option
openstack.network.debug v /etc/neutron/neutron.conf
v /etc/neutron/metadata_agent.ini
v /etc/neutron/dhcp_agent.ini
v /etc/neutron/l3_agent.ini
v /etc/neutron/lbaas_agent.ini
DEFAULT debug
openstack.network.rpc_thread_pool_size
/etc/neutron/neutron.conf
DEFAULT rpc_thread_pool_size
openstack.network.rpc_conn_pool_size
/etc/neutron/neutron.conf
DEFAULT rpc_conn_pool_size
openstack.network.rpc_response_timeout
/etc/neutron/neutron.conf
DEFAULT rpc_response_timeout
openstack.network.core_plugin
/etc/neutron/neutron.conf
DEFAULT core_plugin
openstack.network.service_plugins
/etc/neutron/neutron.conf
DEFAULT service_plugins
openstack.network.ml2.mechanism_drivers
/etc/neutron/plugins/ml2/ml2_conf.ini
ml2 mechanism_drivers
openstack.network.ml2.type_drivers
/etc/neutron/plugins/ml2/ml2_conf.ini
ml2 type_drivers
openstack.network.ml2.tenant_network_types
/etc/neutron/plugins/ml2/ml2_conf.ini
ml2 tenant_network_types
openstack.network.ml2.flat_networks
/etc/neutron/plugins/ml2/ml2_conf.ini
ml2_type_flat flat_networks
openstack.network.ml2.network_vlan_ranges
/etc/neutron/plugins/ml2/ml2_conf.ini
ml2_type_vlan network_vlan_ranges
openstack.network.ml2.tunnel_id_ranges
/etc/neutron/plugins/ml2/ml2_conf.ini
ml2_type_gre tunnel_id_ranges
openstack.network.ml2.vni_ranges
/etc/neutron/plugins/ml2/ml2_conf.ini
ml2_type_vxlan vni_ranges
openstack.network.openvswitch.network_vlan_ranges
/etc/neutron/plugins/openvswitch/ovs_neutron_plugin.ini
OVS network_vlan_ranges
openstack.network.openvswitch.enable_tunneling
/etc/neutron/plugins/openvswitch/ovs_neutron_plugin.ini
OVS enable_tunneling
openstack.network.openvswitch.tunnel_type
/etc/neutron/plugins/openvswitch/ovs_neutron_plugin.ini
OVS tunnel_type
openstack.network.openvswitch.tunnel_types
/etc/neutron/plugins/openvswitch/ovs_neutron_plugin.ini
AGENT tunnel_types
284 IBM Cloud Manager with OpenStack: Administrator Guide, version 4.2
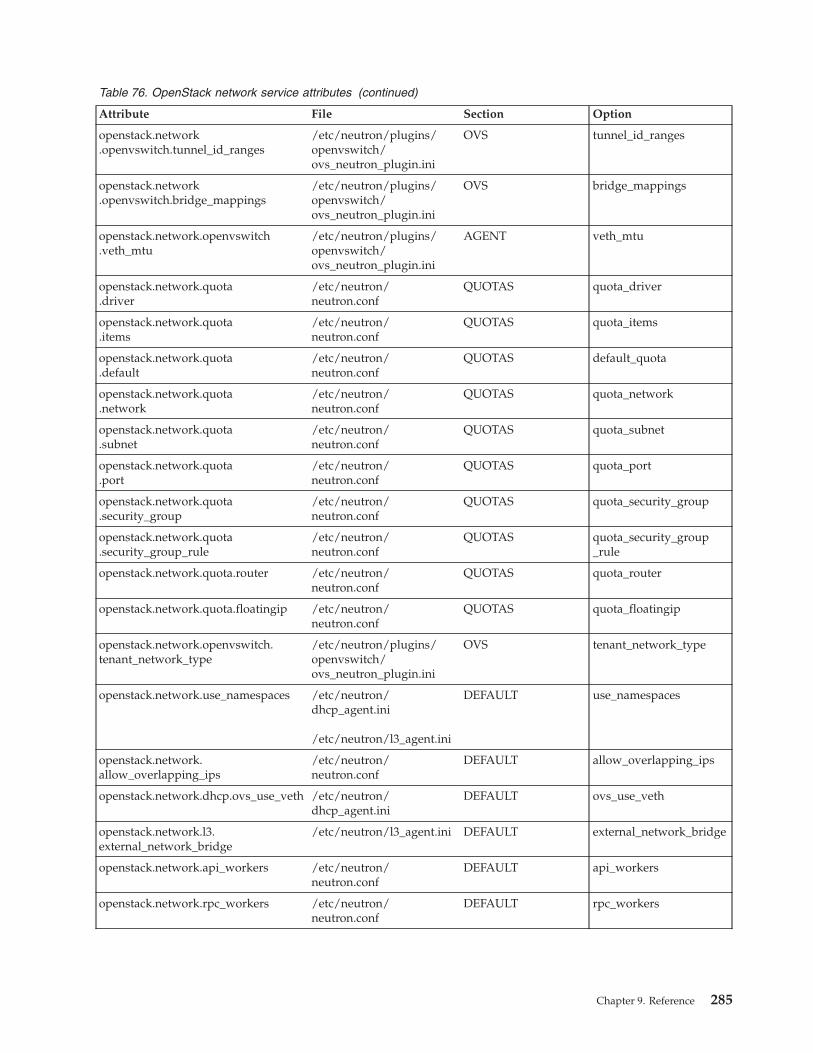
Table 76. OpenStack network service attributes (continued)
Attribute File Section Option
openstack.network.openvswitch.tunnel_id_ranges
/etc/neutron/plugins/openvswitch/ovs_neutron_plugin.ini
OVS tunnel_id_ranges
openstack.network.openvswitch.bridge_mappings
/etc/neutron/plugins/openvswitch/ovs_neutron_plugin.ini
OVS bridge_mappings
openstack.network.openvswitch.veth_mtu
/etc/neutron/plugins/openvswitch/ovs_neutron_plugin.ini
AGENT veth_mtu
openstack.network.quota.driver
/etc/neutron/neutron.conf
QUOTAS quota_driver
openstack.network.quota.items
/etc/neutron/neutron.conf
QUOTAS quota_items
openstack.network.quota.default
/etc/neutron/neutron.conf
QUOTAS default_quota
openstack.network.quota.network
/etc/neutron/neutron.conf
QUOTAS quota_network
openstack.network.quota.subnet
/etc/neutron/neutron.conf
QUOTAS quota_subnet
openstack.network.quota.port
/etc/neutron/neutron.conf
QUOTAS quota_port
openstack.network.quota.security_group
/etc/neutron/neutron.conf
QUOTAS quota_security_group
openstack.network.quota.security_group_rule
/etc/neutron/neutron.conf
QUOTAS quota_security_group_rule
openstack.network.quota.router /etc/neutron/neutron.conf
QUOTAS quota_router
openstack.network.quota.floatingip /etc/neutron/neutron.conf
QUOTAS quota_floatingip
openstack.network.openvswitch.tenant_network_type
/etc/neutron/plugins/openvswitch/ovs_neutron_plugin.ini
OVS tenant_network_type
openstack.network.use_namespaces /etc/neutron/dhcp_agent.ini
/etc/neutron/l3_agent.ini
DEFAULT use_namespaces
openstack.network.allow_overlapping_ips
/etc/neutron/neutron.conf
DEFAULT allow_overlapping_ips
openstack.network.dhcp.ovs_use_veth /etc/neutron/dhcp_agent.ini
DEFAULT ovs_use_veth
openstack.network.l3.external_network_bridge
/etc/neutron/l3_agent.ini DEFAULT external_network_bridge
openstack.network.api_workers /etc/neutron/neutron.conf
DEFAULT api_workers
openstack.network.rpc_workers /etc/neutron/neutron.conf
DEFAULT rpc_workers
Chapter 9. Reference 285
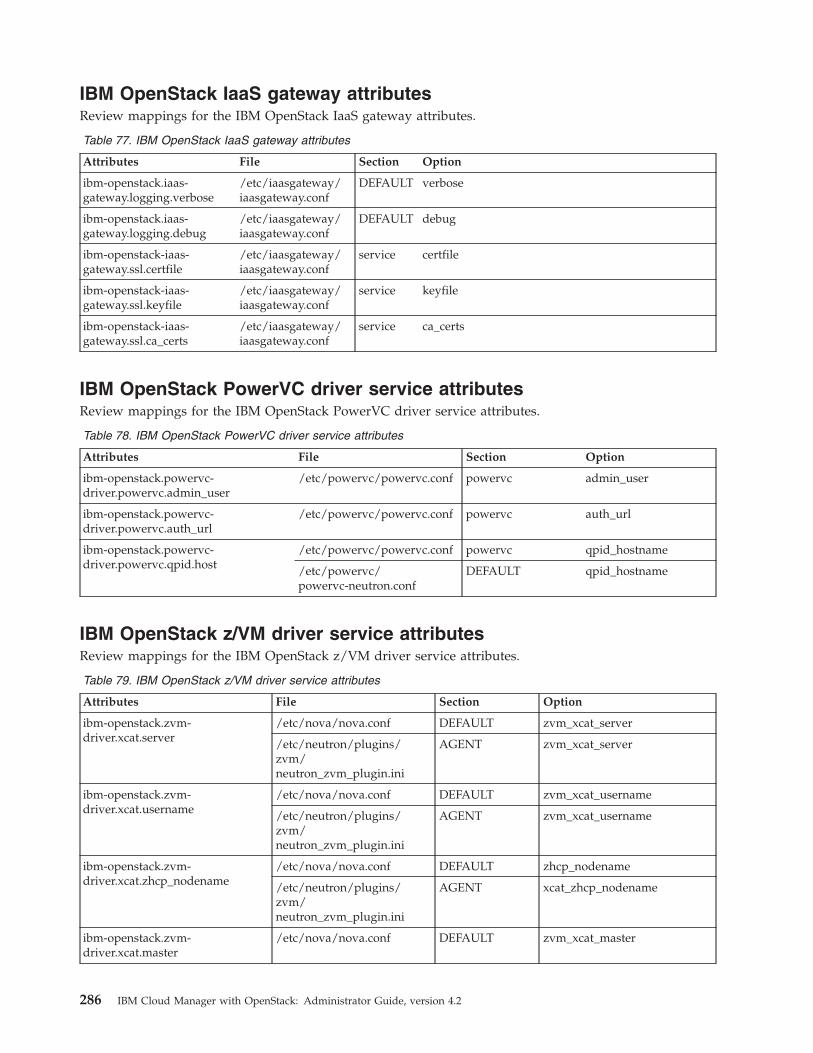
IBM OpenStack IaaS gateway attributesReview mappings for the IBM OpenStack IaaS gateway attributes.
Table 77. IBM OpenStack IaaS gateway attributes
Attributes File Section Option
ibm-openstack.iaas-gateway.logging.verbose
/etc/iaasgateway/iaasgateway.conf
DEFAULT verbose
ibm-openstack.iaas-gateway.logging.debug
/etc/iaasgateway/iaasgateway.conf
DEFAULT debug
ibm-openstack-iaas-gateway.ssl.certfile
/etc/iaasgateway/iaasgateway.conf
service certfile
ibm-openstack-iaas-gateway.ssl.keyfile
/etc/iaasgateway/iaasgateway.conf
service keyfile
ibm-openstack-iaas-gateway.ssl.ca_certs
/etc/iaasgateway/iaasgateway.conf
service ca_certs
IBM OpenStack PowerVC driver service attributesReview mappings for the IBM OpenStack PowerVC driver service attributes.
Table 78. IBM OpenStack PowerVC driver service attributes
Attributes File Section Option
ibm-openstack.powervc-driver.powervc.admin_user
/etc/powervc/powervc.conf powervc admin_user
ibm-openstack.powervc-driver.powervc.auth_url
/etc/powervc/powervc.conf powervc auth_url
ibm-openstack.powervc-driver.powervc.qpid.host
/etc/powervc/powervc.conf powervc qpid_hostname
/etc/powervc/powervc-neutron.conf
DEFAULT qpid_hostname
IBM OpenStack z/VM driver service attributesReview mappings for the IBM OpenStack z/VM driver service attributes.
Table 79. IBM OpenStack z/VM driver service attributes
Attributes File Section Option
ibm-openstack.zvm-driver.xcat.server
/etc/nova/nova.conf DEFAULT zvm_xcat_server
/etc/neutron/plugins/zvm/neutron_zvm_plugin.ini
AGENT zvm_xcat_server
ibm-openstack.zvm-driver.xcat.username
/etc/nova/nova.conf DEFAULT zvm_xcat_username
/etc/neutron/plugins/zvm/neutron_zvm_plugin.ini
AGENT zvm_xcat_username
ibm-openstack.zvm-driver.xcat.zhcp_nodename
/etc/nova/nova.conf DEFAULT zhcp_nodename
/etc/neutron/plugins/zvm/neutron_zvm_plugin.ini
AGENT xcat_zhcp_nodename
ibm-openstack.zvm-driver.xcat.master
/etc/nova/nova.conf DEFAULT zvm_xcat_master
286 IBM Cloud Manager with OpenStack: Administrator Guide, version 4.2
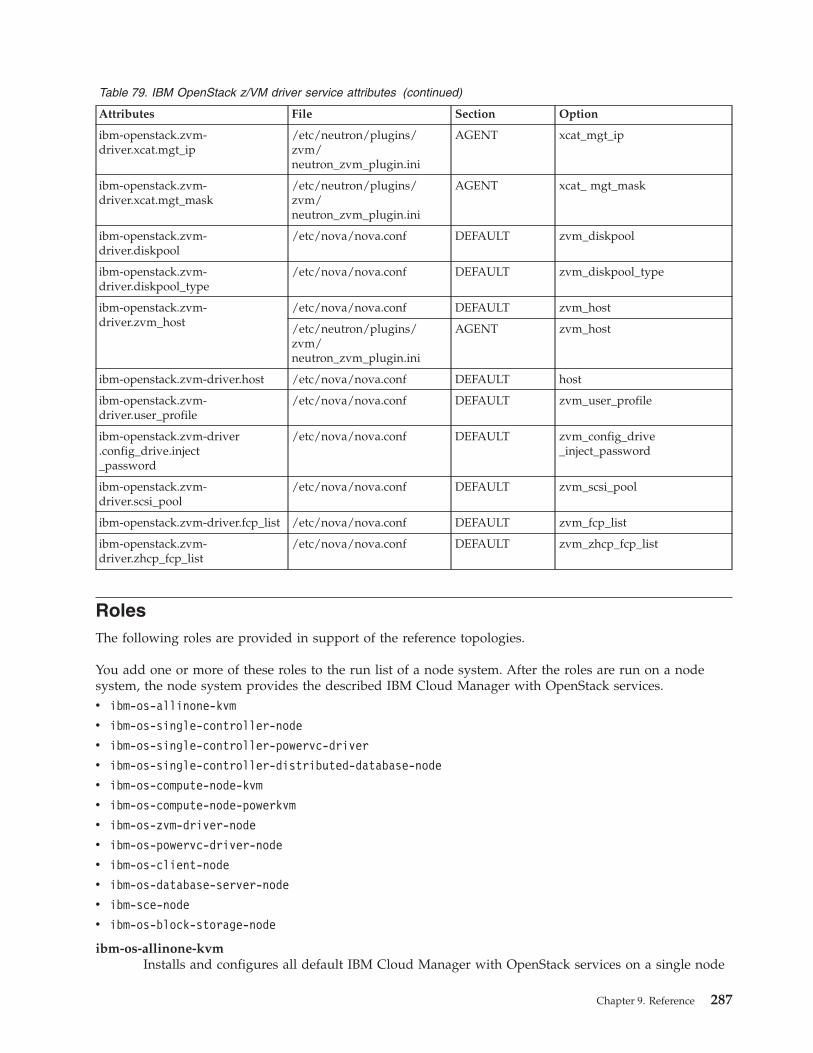
Table 79. IBM OpenStack z/VM driver service attributes (continued)
Attributes File Section Option
ibm-openstack.zvm-driver.xcat.mgt_ip
/etc/neutron/plugins/zvm/neutron_zvm_plugin.ini
AGENT xcat_mgt_ip
ibm-openstack.zvm-driver.xcat.mgt_mask
/etc/neutron/plugins/zvm/neutron_zvm_plugin.ini
AGENT xcat_ mgt_mask
ibm-openstack.zvm-driver.diskpool
/etc/nova/nova.conf DEFAULT zvm_diskpool
ibm-openstack.zvm-driver.diskpool_type
/etc/nova/nova.conf DEFAULT zvm_diskpool_type
ibm-openstack.zvm-driver.zvm_host
/etc/nova/nova.conf DEFAULT zvm_host
/etc/neutron/plugins/zvm/neutron_zvm_plugin.ini
AGENT zvm_host
ibm-openstack.zvm-driver.host /etc/nova/nova.conf DEFAULT host
ibm-openstack.zvm-driver.user_profile
/etc/nova/nova.conf DEFAULT zvm_user_profile
ibm-openstack.zvm-driver.config_drive.inject_password
/etc/nova/nova.conf DEFAULT zvm_config_drive_inject_password
ibm-openstack.zvm-driver.scsi_pool
/etc/nova/nova.conf DEFAULT zvm_scsi_pool
ibm-openstack.zvm-driver.fcp_list /etc/nova/nova.conf DEFAULT zvm_fcp_list
ibm-openstack.zvm-driver.zhcp_fcp_list
/etc/nova/nova.conf DEFAULT zvm_zhcp_fcp_list
RolesThe following roles are provided in support of the reference topologies.
You add one or more of these roles to the run list of a node system. After the roles are run on a nodesystem, the node system provides the described IBM Cloud Manager with OpenStack services.v ibm-os-allinone-kvm
v ibm-os-single-controller-node
v ibm-os-single-controller-powervc-driver
v ibm-os-single-controller-distributed-database-node
v ibm-os-compute-node-kvm
v ibm-os-compute-node-powerkvm
v ibm-os-zvm-driver-node
v ibm-os-powervc-driver-node
v ibm-os-client-node
v ibm-os-database-server-node
v ibm-sce-node
v ibm-os-block-storage-node
ibm-os-allinone-kvmInstalls and configures all default IBM Cloud Manager with OpenStack services on a single node
Chapter 9. Reference 287
system, including the compute node services for the KVM or QEMU hypervisor types. This rolecombines the ibm-os-single-controller-node and ibm-os-compute-node-kvm roles to support theminimal topology.
ibm-os-single-controller-nodeInstalls and configures all default IBM Cloud Manager with OpenStack services on a singlecontroller node system except for the compute node services. This role supports both the minimaland controller +n compute topologies.
ibm-os-single-controller-powervc-driverInstalls and configures all default IBM Cloud Manager with OpenStack services on a singlecontroller node system with IBM Cloud Manager with OpenStack PowerVC driver services toprovide manage-to PowerVC capabilities. This role combines the ibm-os-single-controller-nodeand ibm-os-powervc-driver-node roles to support the controller +n compute and distributeddatabase topology.
ibm-os-single-controller-distributed-database-nodeThis role is similar to the ibm-os-single-controller-node role. The only difference is that it doesnot run the database server service. This role supports the distributed database topology.
ibm-os-compute-node-kvmInstalls and configures the compute node services for the KVM or QEMU hypervisor types.
ibm-os-compute-node-powerkvmInstalls and configures the compute node services for the PowerKVM hypervisor type.
ibm-os-zvm-driver-nodeInstalls and configures the compute driver services for the z/VM hypervisor type.
ibm-os-powervc-driver-nodeInstalls and configures the PowerVC driver services to manage-to the PowerVC virtualizationmanager.
ibm-os-client-nodeInstalls and configures the command-line client interface. This role is included in theibm-os-single-controller-node role and needs to be used only if you would like another nodesystem to provide a command-line client interface to IBM Cloud Manager with OpenStack.
ibm-os-database-server-nodeInstalls and configures the database server service. This includes creating the required databasesfor IBM Cloud Manager with OpenStack. This role supports the distributed database topology.
ibm-sce-nodeInstalls and configures the IBM Cloud Manager with OpenStack self-service portal. This rolesupports all topologies. You can manually add this role to the run list for a node.
ibm-os-block-storage-nodeInstalls and configures a block storage (openstack-cinder-volume) node.
Best practices when using the self-service portalThis section contains some tips and techniques when using the IBM Cloud Manager with OpenStackself-service portal.
IBM Cloud Manager with OpenStack FAQThe frequently asked questions (FAQ) topic is a list of questions and answers about IBM Cloud Managerwith OpenStack.
Q: How do I find my home directory?A: For Linux, type echo $HOME in a command window.
288 IBM Cloud Manager with OpenStack: Administrator Guide, version 4.2

Q: I created a trusted certificate. Why am I still getting an exception that says the connection is untrusted?A: When the CA is not trusted by clients automatically and you are attempting to access IBM Cloud Manager
with OpenStack with the https protocol, an exception is encountered that says the connection is untrusted.You must confirm that the risks are understood and must add an exception to continue. Even with a trustedcertificate, when you are using Internet Explorer, a similar exception is likely to occur.
Q: I want to have spaces in my directory name, but it keeps failing when I try to create it. How can I havespaces?
A: If you have spaces in a directory name, then you must have double quotation marks around it as shown inthe following example: sce240_windows_installer.exe -i silent -f "c:\My Directory\installer.properties"
Q: My user ID is locked! How do I unlock it?A: If you have three invalid attempts to log in to IBM Cloud Manager with OpenStack in a 24 hour period,
your user ID is locked and must be unlocked by an administrator. If your administrator ID becomes locked,you can either wait 24 hours without logging in or restart IBM Cloud Manager with OpenStack and then trylogging in again.
Q: How does IBM Cloud Manager with OpenStack store the passwords for local users or clouds?A: The passwords are encrypted and stored in either property files or a database.
Q: IBM Cloud Manager with OpenStack GUI looks distorted. How can I fix that?A: See the information in Display issue with Internet Explorer (self-service portal).
Q: I upgraded/installed IBM Cloud Manager with OpenStack, but I’m still seeing the previous version in mybrowser. How can I fix that?
A: Clear the cache in your browser and try again. You might have to close your browser after you clear thecache and then reopen your browser and try connecting to IBM Cloud Manager with OpenStack again.
Q: My image is not visible in the window. Where is it?A: Make sure that your image is deployed and that the correct project is specified. If it still is not visible,
contact the administrator to ensure that you have access.
Q: The product charges that I set are incorrect or are not updating. What do I do?A: First of all, verify that the currencies for all configurable products are the same. You cannot mix currencies.
To change your currency for a product, see the “Configuring billing” on page 196. Make sure that you arerestarting IBM Cloud Manager with OpenStack after saving.
Q: The instances for a user were moved to a different project. Now when the user logs on, he cannot see hisinstances. How can the user access his instances?
A: The project where the instances were moved might need to be edited to grant the user access to the project.When you have ensured that the user has access to the new project, have the user check again to seewhether the instances display.
Q: When updating IBM Cloud Manager with OpenStack to a new release, can I migrate data andconfigurations from two releases previous to the current release? For example, can I migrate data in IBMCloud Manager with OpenStack from version 2.2 to version 2.4?
A: No, you must migrate sequentially. For example, migrate from IBM Cloud Manager with OpenStack version2.2 to version 2.3. Then you can migrate from IBM Cloud Manager with OpenStack version 2.3 to version2.4.
Chapter 9. Reference 289
Q: Does the IBM Cloud Manager with OpenStack infocollect command support collecting a database logsuch as DB2?
A: No, you must check with the administrator of the database and collect the log manually.
Q: Why does my login fail with the session timing out?A: If your user login fails because the session times out, there might be a problem with the timezone setting.
Verify that the IBM Cloud Manager with OpenStack server and client time and timezone match. Forexample, on the server, if the timezone is Coordinated Universal Time +08:00, the time is 11:27. For theclient, the timezone is Coordinated Universal Time +07:00, and the time should be 10:27.
Q: Why can't I access the IBM Cloud Manager with OpenStack GUI page after I start it?A: Verify that a firewall is not blocking the http or https port that you accessed. To check whether it worked in
the IBM Cloud Manager with OpenStack host, access for example, http://localhost:18080/cloud/web/login.html or use the UNIX command wget http://localhost:18080/cloud/web/login.html.
Using the screen commandThe screen command can be used to start or shut down the IBM Cloud Manager with OpenStack serveror to access the OSGI console when the server is up and running when running Linux.
For example, enter screen and then run the command to start the server. After the server is started, typectrl+a, then d to disconnect and leave the IBM Cloud Manager with OpenStack server running,
To get back to the IBM Cloud Manager with OpenStack OSGI prompt to perform other actions, such asenabling additional logging, enter screen -r.
Using the nohup commandOn AIX or Linux, if you start a process from the command line and then log off, the processes youstarted are generally terminated, even if you spawn them as background processes, because each processis sent a hang up signal (SIGHUP). The nohup command allows you to start a process with the hang upsignal disabled so that the process is not ended when you log off.
The nohup command is used frequently for starting services, such as ssh daemon or DB2 instances.
For example, to start IBM Cloud Manager with OpenStack as a background service, run the followingcommand:
nohup /opt/ibm/SCE24/skc -nosplash < /dev/null > /dev/null &
The options in this command include the following:
-nosplashPrevents the process from displaying a splash screen.
< /dev/nullDisconnects the process from terminal input. This option can prevent the process from entering astopped state as can sometimes happen when started from the command line on AIX. This optionis not needed when starting the command from a shell script.
> /dev/nullRedirects the OSGI console output. For example, you might want to redirect the output to a logfile.
& Runs the command as a background process.
290 IBM Cloud Manager with OpenStack: Administrator Guide, version 4.2
Chapter 10. Troubleshooting and support for IBM CloudManager with OpenStack
To isolate and resolve problems with your IBM products, you can use the troubleshooting and supportinformation. This information contains instructions for using the problem-determination resources that areprovided with your IBM products, including IBM Cloud Manager with OpenStack.
Techniques for troubleshooting problemsTroubleshooting is a systematic approach to solving a problem. The goal of troubleshooting is to determinewhy something does not work as expected and how to resolve the problem. Certain common techniquescan help with the task of troubleshooting.
The first step in the troubleshooting process is to describe the problem completely. Problem descriptionshelp you and the IBM technical-support representative know where to start to find the cause of theproblem. This step includes asking yourself basic questions:v What are the symptoms of the problem?v Where does the problem occur?v When does the problem occur?v Under which conditions does the problem occur?v Can the problem be reproduced?
The answers to these questions typically lead to a good description of the problem, which can then leadyou to a problem resolution.
What are the symptoms of the problem?
When starting to describe a problem, the most obvious question is “What is the problem?” This questionmight seem straightforward; however, you can break it down into several more-focused questions thatcreate a more descriptive picture of the problem. These questions can include:v Who, or what, is reporting the problem?v What are the error codes and messages?v How does the system fail? For example, is it a loop, hang, crash, performance degradation, or incorrect
result?
Where does the problem occur?
Determining where the problem originates is not always easy, but it is one of the most important steps inresolving a problem. Many layers of technology can exist between the reporting and failing components.Networks, disks, and drivers are only a few of the components to consider when you are investigatingproblems.
The following questions help you to focus on where the problem occurs to isolate the problem layer:v Is the problem specific to one platform or operating system, or is it common across multiple platforms
or operating systems?v Is the current environment and configuration supported?v Do all users have the problem?v (For multi-site installations.) Do all sites have the problem?
© Copyright IBM Corp. 2012, 2014 291
If one layer reports the problem, the problem does not necessarily originate in that layer. Part ofidentifying where a problem originates is understanding the environment in which it exists. Take sometime to completely describe the problem environment, including the operating system and version, allcorresponding software and versions, and hardware information. Confirm that you are running within anenvironment that is a supported configuration; many problems can be traced back to incompatible levelsof software that are not intended to run together or have not been fully tested together.
When does the problem occur?
Develop a detailed timeline of events leading up to a failure, especially for those cases that are one-timeoccurrences. You can most easily develop a timeline by working backward: Start at the time an error wasreported (as precisely as possible, even down to the millisecond), and work backward through theavailable logs and information. Typically, you need to look only as far as the first suspicious event thatyou find in a diagnostic log.
To develop a detailed timeline of events, answer these questions:v Does the problem happen only at a certain time of day or night?v How often does the problem happen?v What sequence of events leads up to the time that the problem is reported?v Does the problem happen after an environment change, such as upgrading or installing software or
hardware?
Responding to these types of questions can give you a frame of reference in which to investigate theproblem.
Under which conditions does the problem occur?
Knowing which systems and applications are running at the time that a problem occurs is an importantpart of troubleshooting. These questions about your environment can help you to identify the root causeof the problem:v Does the problem always occur when the same task is being performed?v Does a certain sequence of events need to happen for the problem to occur?v Do any other applications fail at the same time?
Answering these types of questions can help you explain the environment in which the problem occursand correlate any dependencies. Remember that just because multiple problems might have occurredaround the same time, the problems are not necessarily related.
Can the problem be reproduced?
From a troubleshooting standpoint, the ideal problem is one that can be reproduced. Typically, when aproblem can be reproduced you have a larger set of tools or procedures at your disposal to help youinvestigate. Consequently, problems that you can reproduce are often easier to debug and solve.
However, problems that you can reproduce can have a disadvantage: If the problem is of significantbusiness impact, you do not want it to recur. If possible, re-create the problem in a test or developmentenvironment, which typically offers you more flexibility and control during your investigation.v Can the problem be re-created on a test system?v Are multiple users or applications encountering the same type of problem?v Can the problem be re-created by running a single command, a set of commands, or a particular
application?Related tasks:
292 IBM Cloud Manager with OpenStack: Administrator Guide, version 4.2
“Searching knowledge bases” on page 296You can often find solutions to problems by searching IBM knowledge bases. You can optimize yourresults by using available resources, support tools, and search methods.
Logging tasksThe IBM Cloud Manager with OpenStack log files are a source of information for additional details aboutIBM Cloud Manager with OpenStack errors.
By default, IBM Cloud Manager with OpenStack creates a log file in the <home directory>/logs directoryand saves 9 log files of 50 MB each. The latest log file is called skc-0.log.
Change logging levels from the OSGi command promptThe logging levels can be changed dynamically while the server is running by using the log commandfrom the IBM Cloud Manager with OpenStack (OSGi) command prompt.
About this task
The logging levels can be changed dynamically while the server is running by using the log commandfrom the IBM Cloud Manager with OpenStack (OSGi) command prompt. Changes made using the logcommand are not saved and are only in effect while the server is running. If the server is restarted, thelogging levels are reset to their initial values as specified in the logging.properties file. For moreinformation about changing these values in the logging.properties file, see “Configuring logging” onpage 194.
To run the log command, follow these steps:
Procedure1. Access the IBM Cloud Manager with OpenStack OSGi console.2. At the OSGi command prompt enter log <action> <action parameters>, where the following actions
are supported:
help Displays the online help.
list Lists the available loggers and their current levels.
setlevel <logger name>=<logger level>Sets the specified logger to the specified logging levels. To set more than one logger, separatethe logger name=logger level pair with a space.
Results
See the following examples for typical log commands:log helplog listlog setlevel com.ibm.cfs.cloud=finestlog setlevel com.ibm.cfs.cloud=info default=finest
The most common log message level that an IBM Cloud Manager with OpenStack administrator mightwant to change is com.ibm.cfs.rest.client.internal=FINE. Changing the message level causes theoutput of HTTP requests and responses to be sent to and from the OpenStack REST API.
In a production environment, keep a backup of the log files for at least two weeks to help resolveproblems that are not reported immediately or that go undetected.
Note: The property file values are not case-sensitive so a property such ascom.ibm.cfs.rest.client.internal=FINE is the same as com.ibm.cfs.rest.client.internal=fine.
Chapter 10. Troubleshooting and support 293
Retrieve log and system filesIBM Cloud Manager with OpenStack provides a command-line utility that enables you to gather logs andsystem information. If IBM Cloud Manager with OpenStack self-service portal and OpenStack areinstalled in the same node, then both self-service portal and standard OpenStack logs can be collected,otherwise you can collect the former. When you use standard OpenStack logs you do not have to uselog_config to customize the configuration. This tool runs independently of IBM Cloud Manager withOpenStack and is available even when IBM Cloud Manager with OpenStack is not running.
To use the command-line utility, run the following commands:infocollect.sh
Note: These scripts can be found in the SELF_SERVICE_PORTAL_INSTALLATION_DIR/program/bin directory.
The command accepts the following options:
-c Specifies the configuration directory, for example: SELF_SERVICE_PORTAL_HOME, where all the IBMCloud Manager with OpenStack configuration and log files are saved. This argument ismandatory. You must provide an existing directory path. The command exits with an error if thespecified directory cannot be found.
-d Specifies the destination directory for the result files. If this argument is used, provide an existingdirectory path. This command exists with an error if the specified. If this argument is notprovided, the HOME directory of the caller is used. If the HOME directory is not found, for example,the corresponding environment variable is not set correctly, the system TEMP directory is used asthe default output directory. For example, in Linux /tmp is the system TEMP directory.
-h Prints usage information.
When this utility is started, the following files are created:
openStackLog.zip(Optional)Contains all of the OpenStack log files:
*.log files*.gz files
sceHome.zip
Contains all of the IBM Cloud Manager with OpenStack configurations:*.properties files*.log files*.udr filesBilling configurations: .xml files under products/
All .xml and .txt files under SELF_SERVICE_PORTAL_HOME
basicSysInfo.txt
Contains basic OS information:CPUMemoryOS name
Note: This information is retrieved by calling OS shell commands, so the results vary dependingon the concrete OS.
Example
Collect the configurations in Linux or AIX, logs, and system information, and save the result to thedirectory of /tmp/diagnostic. The SELF_SERVICE_PORTAL_HOME is /var/opt/ibm/.SCE42.
294 IBM Cloud Manager with OpenStack: Administrator Guide, version 4.2
./infocollect.sh -c /var/opt/ibm/.SCE42 -d /tmp/diagnostic
Troubleshooting using the OSGi consoleUse the Open Services Gateway initiative (OSGi) console to review information about IBM CloudManager with OpenStack.
By default, IBM Cloud Manager with OpenStack starts an OSGi command-line console when the IBMCloud Manager with OpenStack executable is run. You can access the console directly in the commandwindow started by the executable.
You can also run the console in the background and assign a specific port for telnet connections. Toassign a port, modify the skc.ini file and add an unused port number on a new line after the -consoleoption.-console<port number>
For example, to assign port 7777 for telnet connections, change the option to the following:-console7777
To connect to the OSGi console, type the following:
telnet localhost 7777
Logging chef-client outputYou can obtain chef-client logs from the nodes when you use the IBM Cloud Manager with OpenStackcommands.
The IBM Cloud Manager with OpenStack commands log chef-client console output that is captured fromeach node on the Chef server in a central location. The log file name includes the node name, as well as,an integer time stamp. Up to 9 log files are kept for each node in the /var/log/chef-server/nodes folderon the Chef server. Each IBM Cloud Manager with OpenStack deployment or update command typicallywrites 3 log files. One is for the initial ping to the node. The second is for the bootstrap, and the final isfor the actual chef-client run.
The log file generation can be controlled by two settings in the chef server /root/.chef/knife.rb file:knife[:node_log_max_files] = 9knife[:node_log_path] = ’/var/log/chef-server/nodes’
These settings default in the IBM Cloud Manager with OpenStack command-line interface code to thepreceding values shown above. The preceding values can be set in knife.rb, if the defaults are notadequate.
To turn of node logging, set knife[:node_log_max_files] = 0
Log files are created for each node to which the IBM Cloud Manager with OpenStack command connects.The log file name is <node_name>_<timestamp>.log. For example:host.my.company.com_2014-10-23_06-56-24-314222499000.log
By default, up to 9 log files are saved for each node.
Logging chef-client output to a log file on the node itself can also be accomplished by specifyingchef-client options when you issue one of the IBM Cloud Manager with OpenStack os manage deploy oros manage update commands. When chef-client writes to a log file, it does not affect its console output.
Chapter 10. Troubleshooting and support 295
To enter the chef-client options on a IBM Cloud Manager with OpenStack CLI 'node' type command, usethe -O option followed by a string that contains the chef-client options. For example:knife os manage update node host.my.company.com -P passw0rd -O ’-l info -L /var/log/chef-client.log’
The -l chef-client option is the log level (info is specified in the preceding example). The -L chef-clientoption is the log file location.
Note: The log file path must exist or an error occurs when the log file is written.
To enter the chef-client options on a IBM Cloud Manager with OpenStack CLI 'topology' type command,use the chef-client-options JSON key in the topology file that contains a list of chef-client options. Forexample, the JSON key and value for a node in the topology file might look like the following example:"chef_client_options": ["-l info", "-L /var/log/chef-client.log"],
The preceding options are passed to chef-client to cause it to perform info level logging and store the loginformation in /var/log/chef-client.log.
When forcing the chef-client to write to a log file, the output is not the same as that seen on the console.That console output is logged on the chef server as previously mentioned.
Another option to forcing chef-client to write to a log file is to set the following values in the client.rbfile on the node:log_location "/var/log/chef-client.log"verbose :infolog_level :info
That would cause info level logging to occur for all chef-client calls to the log file /var/log/chef-client.log.
Note: The chef-client log is not cleared. It is always appended to by chef-client.
Searching knowledge basesYou can often find solutions to problems by searching IBM knowledge bases. You can optimize yourresults by using available resources, support tools, and search methods.
About this task
You can find useful information by searching the knowledge center for IBM Cloud Manager withOpenStack. However, sometimes you need to look beyond the knowledge center to answer yourquestions or resolve problems.
Procedurev Find the content that you need by using the IBM Support Portal.
The IBM Support Portal is a unified, centralized view of all technical support tools and information forall IBM systems, software, and services. The IBM Support Portal lets you access the IBM electronicsupport portfolio from one place. You can tailor the pages to focus on the information and resourcesthat you need for problem prevention and faster problem resolution. Familiarize yourself with the IBMSupport Portal by viewing the demo videos (https://www.ibm.com/blogs/SPNA/entry/the_ibm_support_portal_videos) about this tool. These videos introduce you to the IBM Support Portal,explore troubleshooting and other resources, and demonstrate how you can tailor the page by moving,adding, and deleting portlets.
v The Techdocs Web site at www.ibm.com/support/techdocs/ provides white papers, technotes, tips,and other documents related to IBM Cloud Manager with OpenStack.
296 IBM Cloud Manager with OpenStack: Administrator Guide, version 4.2
Tip: To locate the information that you need, either select the categories that you want to search orselect All of the Techdocs library to search all categories. Then enter IBM SmartCloud Entry in the for:field and click Search.
v Search for content on the forum: Forumv Search for content by using the IBM masthead search. You can use the IBM masthead search by typing
your search string into the Search field at the top of any ibm.com® page.v Search for content by using any external search engine, such as Google, Yahoo, or Bing. If you use an
external search engine, your results are more likely to include information that is outside the ibm.comdomain. However, sometimes you can find useful problem-solving information about IBM products innewsgroups, forums, and blogs that are not on ibm.com.
Tip: Include “IBM” and the name of the product in your search if you are looking for informationabout an IBM product.
Related concepts:“Techniques for troubleshooting problems” on page 291Troubleshooting is a systematic approach to solving a problem. The goal of troubleshooting is to determinewhy something does not work as expected and how to resolve the problem. Certain common techniquescan help with the task of troubleshooting.Related reference:“Known problems and solutions for an Administrator” on page 312If you are using IBM Cloud Manager with OpenStack with the Administrator role, review theses knownproblems and solutions that you might encounter.“Known problems and solutions for a User” on page 335If you are using IBM Cloud Manager with OpenStack with the User role, review theses known problemsand solutions that you might encounter.
Getting fixes from Fix CentralYou can use Fix Central to find the fixes that are recommended by IBM Support for a variety of products,including IBM Cloud Manager with OpenStack. With Fix Central, you can search, select, order, anddownload fixes for your system with a choice of delivery options. A IBM Cloud Manager with OpenStackproduct fix might be available to resolve your problem.
Procedure
To find and install fixes:1. Obtain the tools that are required to get the fix. If it is not installed, obtain your product update
installer. You can download the installer from Fix Central. This site provides download, installation,and configuration instructions for the update installer.
2. Click Find Product.3. Begin typing IBM Cloud Manager with OpenStack in the Product Selector field.4. Select IBM Cloud Manager with OpenStack from the list. For Installed version, select All.5. Identify and select the fix that is required.6. Download the fix.
a. Open the download document and follow the link in the “Download Package” section.b. When downloading the file, ensure that the name of the maintenance file is not changed. This
change might be intentional, or it might be an inadvertent change that is caused by certain webbrowsers or download utilities.
7. Apply the fix using the instructions in the readme.txt file that comes with the fix package.Related concepts:
Chapter 10. Troubleshooting and support 297
“Applying fixes and updates for IBM Cloud Manager with OpenStack” on page 39Updates for IBM Cloud Manager with OpenStack provide fixes to the product.“Applying fixes and updates for DB2” on page 40Updates for DB2 provide fixes to the DB2 database server.“Applying fixes and updates” on page 39You can apply fixes and updates for the IBM Cloud Manager with OpenStack product.
Contacting IBM SupportIBM Support provides assistance with product defects, answers FAQs, and helps users resolve problemswith the product.
Before you begin
After trying to find your answer or solution by using other self-help options such as technotes, you cancontact IBM Support. Before contacting IBM Support, your company or organization must have an activeIBM software maintenance agreement (SWMA), and you must be authorized to submit problems to IBM.For information about the types of available support, see the Support portfolio topic in the “SoftwareSupport Handbook”: http://www14.software.ibm.com/webapp/set2/sas/f/handbook/offerings.html.
Procedure
To contact IBM Support about a problem:1. Define the problem, gather background information, and determine the severity of the problem. For
more information, see the Getting IBM support topic in the Software Support Handbookhttp://www14.software.ibm.com/webapp/set2/sas/f/handbook/getsupport.html.
2. Gather diagnostic information.3. Submit the problem to IBM Support in one of the following ways:
v Online through the IBM Support Portal ( http://www.ibm.com/software/support/): You can open,update, and view all of your service requests from the Service Request portlet on the ServiceRequest page.
v By phone: For the phone number to call in your region, see the Directory of worldwide contacts(http://www.ibm.com/planetwide/) web page.
Results
If the problem that you submit is for a software defect or for missing or inaccurate documentation, IBMSupport creates an Authorized Program Analysis Report (APAR). The APAR describes the problem indetail. Whenever possible, IBM Support provides a workaround that you can implement until the APARis resolved and a fix is delivered. IBM publishes resolved APARs on the IBM Support website daily, sothat other users who experience the same problem can benefit from the same resolution.
What to do next
Be prepared to work with the IBM technical-support representative by using IBM Assist On-site, which isa remote-assistance plug-in that you can download to your computer. The IBM technical-supportrepresentative can use IBM Assist On-site to view your desktop and share control of your mouse andkeyboard. This tool can shorten the time that it takes to identify the problem, collect the necessary data,and solve the problem. For more information, see IBM Assist On-site: http://www.ibm.com/support/assistonsite/.
298 IBM Cloud Manager with OpenStack: Administrator Guide, version 4.2
Exchanging information with IBMTo diagnose or identify a problem, you might need to provide IBM Support with data and informationfrom your system. In other cases, IBM Support might provide you with tools or utilities to use forproblem determination.
Sending information to IBM SupportTo reduce the time that is required to resolve your problem, you can send trace and diagnosticinformation to IBM Support.
Procedure
To submit diagnostic information to IBM Support:1. Open a problem management record (PMR). You can use the Service Request Tool to create a PMR:
http://www.ibm.com/support/servicerequest2. Collect the diagnostic data that you need. Diagnostic data helps reduce the time that it takes to
resolve your PMR. Manually collect and compress the required diagnostic information by followingthe directions that you receive from IBM Support.
Note: See “Retrieve log and system files” on page 294 for directions on collecting logs and systeminformation for IBM Cloud Manager with OpenStack.
3. Transfer the files to IBM. Use the information on the IBM Enhanced Customer Data Repository(ECuRep) website: http://www.ibm.com/software/support/exchangeinfo.html. While ECuRep is theprimary method for uploading data, you can also use one of the following methods to transfer thefiles to IBM. All of these data exchange methods are described on the ECuRep website as well.v The Service Request toolv Standard data uploads methods: FTP, HTTPv Secure data upload methods: FTPS, SFTP, HTTPSv Email
Receiving information from IBM SupportECuRep is the primary method for exchanging data. However, on occasion, an IBM technical-supportrepresentative might ask you to download diagnostic tools or other files. You can use FTP to downloadthese files.
Before you begin
Ensure that your IBM technical-support representative provided you with the preferred server to use fordownloading the files and the exact directory and file names to access.
Procedure
To download files from IBM Support:1. Use FTP to connect to the site that your IBM technical-support representative provided and log in as
anonymous. Use your email address as the password.2. Change to the appropriate directory:
a. Change to the /fromibm directory.cd fromibm
b. Change to the directory that your IBM technical-support representative provided.cd nameofdirectory
3. Enable binary mode for your session.
Chapter 10. Troubleshooting and support 299
binary
4. Use the get command to download the file that your IBM technical-support representative specified.get filename.extension
5. End your FTP session.quit
Subscribing to Support updatesTo stay informed of important information about the IBM products that you use, you can subscribe toupdates.
About this task
By subscribing to receive updates about IBM Cloud Manager with OpenStack, you can receive importanttechnical information and updates for specific IBM Support tools and resources. You can subscribe toupdates by using My Notifications:
My NotificationsWith My Notifications, you can subscribe to Support updates for any IBM product. (MyNotifications replaces My Support, which is a similar tool that you might have used in the past.)With My Notifications, you can specify that you want to receive daily or weekly emailannouncements. You can specify what type of information you want to receive (such aspublications, hints and tips, product flashes (also known as alerts), downloads, and drivers). MyNotifications enables you to customize and categorize the products about which you want to beinformed and the delivery methods that best suit your needs.
Procedure
To subscribe to My Notifications, complete the following steps:1. Go to the IBM Support Portal (http://www.ibm.com/software/support/) and sign in by using your
IBM ID and password.2. In the Notifications portlet, click Manage all my subscriptions, then click the Subscribe tab.3. Click Other Software.4. Select IBM Cloud Manager with OpenStack, then click Continue.
a. Select your preferences for how to receive updates, whether by email, online in a designatedfolder, or as an RSS or Atom feed.
b. Select the types of documentation updates that you want to receive, for example, new informationabout product downloads and discussion group comments.
c. Click Submit.
Results
Until you modify your My Notifications preferences, you receive notifications of updates that you haverequested. You can modify your preferences when needed.Related reference:
Subscribe to My Notifications support content updates
My Notifications for IBM technical support
My Notifications for IBM technical support overview
300 IBM Cloud Manager with OpenStack: Administrator Guide, version 4.2

Troubleshooting errors when deploying or updating topologiesIf a topology deployment or update fails, review the log output from the deployment command for moreinformation.
Identify errors, starting at the beginning of the log output. The first error found is typically the mostuseful. Errors found at the end of the log output might be the result of earlier errors. The following topicsmight provide additional information to solve the problem. After completing the recommended resolutionto the problem, retry the topology deployment or update.
Deployment hangs when running the Open vSwitch recipeYou might encounter a hang during the deployment process if you specified an incorrect value for yourcontroller node’s data network.
Symptoms
Your deployment hangs at the following step and you cannot log in to the controller node using the fullyqualified domain name that you specified when you deployed the node:Running Recipe openstack-network::openvswitch
Resolving the problem
To resolve the problem, complete the following steps.1. Access the console for your controller node or, if available, log in to the controller node using an
alternative management or external network.2. Delete the Open vSwitch data network bridge that was created during deployment. To do so, run
ovs-vsctl del-br br-eth0, where br-eth0 is the bridge and eth0 is the incorrect value that isspecified for your controller node’s data network. After the bridge is deleted, log in to the controllernode using the fully qualified domain name that you specified when you deployed the node.
3. Update you deployment files with the correct management and data networks. For more informationabout determining the management and data networks for a node, see the Deploying prerequisitestopic.
4. Cancel the hung deployment and then try again.
DB2 database requests fail with SQL1225NWhen you deploy a topology with DB2 databases and cloud nodes that have several CPUs, databaserequests might fail with a SQL1225N message.
Symptoms
During deployment, the Chef logs show a failure with a SQL1225N message:Error executing action `run` on resource ’execute[grant privilegeto user(dash) on database(horizon)]’================================================================================
Mixlib::ShellOut::ShellCommandFailed------------------------------------Expected process to exit with [0], but received ’4’---- Begin output of su - db2inst1 -c "(db2 ’connect to horizon’) &&(db2 ’grant dbadm on database to user dash’) && (db2 ’connect reset’)" ----STDOUT: SQL1225N The request failed because an operating system process, thread, orswap space limit was reached. SQLSTATE=57049STDERR:---- End output of su - db2inst1 -c "(db2 ’connect to horizon’) &&(db2 ’grant dbadm on database to user dash’) && (db2 ’connect reset’)" ----
Chapter 10. Troubleshooting and support 301
Causes
Some OpenStack components start multiple worker processes based on the number of CPUs. Each ofthese processes has its own database connections. When the number of CPUs is large (for example, 32),the database connections might require more memory than is available.
Resolution
The following attributes can be set in the environment to control the number of worker processes.openstack.block-storage.osapi_volume_workersopenstack.compute.conductor.workersopenstack.compute.osapi_compute_workersopenstack.identity.admin_workersopenstack.identity.public_workersopenstack.image.api.workersopenstack.image.registry.workers
The default values for these attributes, particularly the compute and identity workers, is based on thenumber of CPUs and might need to be set to a smaller value. For more information about how to changethese attributes, see “Customizing performance attributes” on page 127.
Alternately, you can add physical memory or increase the swap space on the node.
MySQL database requests fail with "Too many connections"When deploying a topology with MySQL database and cloud nodes that have several CPUs, databaserequests might fail with a "Too many connections" error.
Symptoms
The chef logs from deploy shows a failure like the following:ERROR: database_user[neutron] (openstack-ops-database::openstack-db line 99)had an error: Mysql::Error: Too many connections
Causes
Some OpenStack components start multiple worker processes based on the number of CPUs. Each ofthese processes has its own database connections. When the number of CPUs is large (for example, 32),the number of database connections might exceed the MySQL maximum connection limit, which is set to151 connections.
Resolution
The following attributes can be set in the environment to control the number of worker processes.openstack.block-storage.osapi_volume_workersopenstack.compute.conductor.workersopenstack.compute.osapi_compute_workersopenstack.identity.admin_workersopenstack.identity.public_workersopenstack.image.api.workersopenstack.image.registry.workers
The default values for these attributes, particularly the compute and identity workers, is based on thenumber of CPUs and might need to be set to a smaller value. For more information about how to changethese attributes, see “Customizing performance attributes” on page 127.
302 IBM Cloud Manager with OpenStack: Administrator Guide, version 4.2
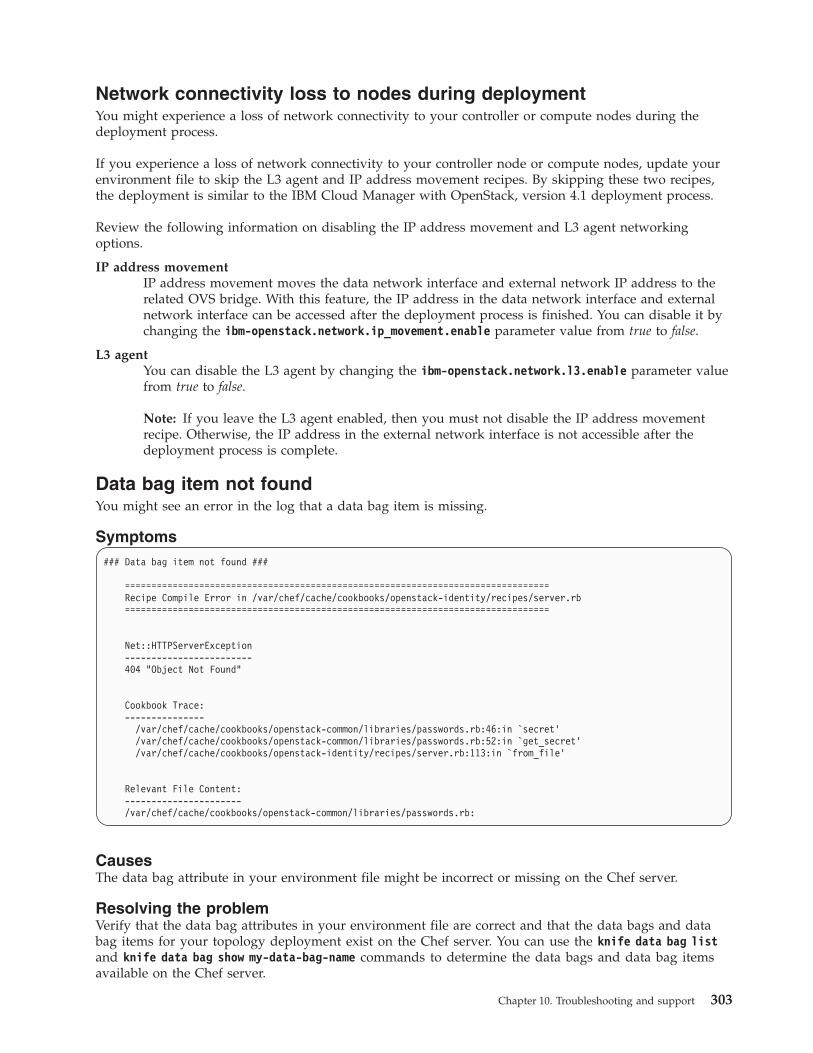
Network connectivity loss to nodes during deploymentYou might experience a loss of network connectivity to your controller or compute nodes during thedeployment process.
If you experience a loss of network connectivity to your controller node or compute nodes, update yourenvironment file to skip the L3 agent and IP address movement recipes. By skipping these two recipes,the deployment is similar to the IBM Cloud Manager with OpenStack, version 4.1 deployment process.
Review the following information on disabling the IP address movement and L3 agent networkingoptions.
IP address movementIP address movement moves the data network interface and external network IP address to therelated OVS bridge. With this feature, the IP address in the data network interface and externalnetwork interface can be accessed after the deployment process is finished. You can disable it bychanging the ibm-openstack.network.ip_movement.enable parameter value from true to false.
L3 agentYou can disable the L3 agent by changing the ibm-openstack.network.l3.enable parameter valuefrom true to false.
Note: If you leave the L3 agent enabled, then you must not disable the IP address movementrecipe. Otherwise, the IP address in the external network interface is not accessible after thedeployment process is complete.
Data bag item not foundYou might see an error in the log that a data bag item is missing.
Symptoms### Data bag item not found ###
================================================================================Recipe Compile Error in /var/chef/cache/cookbooks/openstack-identity/recipes/server.rb================================================================================
Net::HTTPServerException------------------------404 "Object Not Found"
Cookbook Trace:---------------
/var/chef/cache/cookbooks/openstack-common/libraries/passwords.rb:46:in `secret’/var/chef/cache/cookbooks/openstack-common/libraries/passwords.rb:52:in `get_secret’/var/chef/cache/cookbooks/openstack-identity/recipes/server.rb:113:in `from_file’
Relevant File Content:----------------------/var/chef/cache/cookbooks/openstack-common/libraries/passwords.rb:
CausesThe data bag attribute in your environment file might be incorrect or missing on the Chef server.
Resolving the problemVerify that the data bag attributes in your environment file are correct and that the data bags and databag items for your topology deployment exist on the Chef server. You can use the knife data bag listand knife data bag show my-data-bag-name commands to determine the data bags and data bag itemsavailable on the Chef server.
Chapter 10. Troubleshooting and support 303

Deploying z/VM compute node failsYou attempt to deploy z/VM compute nodes but the deployment fails.
About this task
If you encounter problems when you deploy your z/VM compute nodes, verify that you updated all therequired attributes in your environment file, your-environment-name.json prior to deployment. Forexample, verify that you add and update the following attribute:v ibm-openstack.zvm-driver.xcat.mnadmin: Specify the xCAT management user that can ssh into xcat
mn. If you do not set this user, the default value is mnadmin.
To view the necessary attributes, review all the steps in the “Deploying with z/VM compute nodes” onpage 92 topic.
Deployment fails with package installation errorDuring deployment, a package might fail to install successfully and you receive a deployment error.
If you receive the following error during the deployment process, follow these steps to troubleshoot. Theerror message states:========================================================================Error executing action `upgrade` on resource ’package[openstack-nova-common]’================================================================================
First, use one the following options to determine what caused the `package` to fail to install.v SSH to the node where the `upgrade` failed, and attempt to 'yum install' the `package` to see the
detailed failure. For example, run # yum install openstack-nova-common. You receive a messagesimilar to the one shown here....Error unpacking rpm package python-ecdsa-0.11-1.ibm.el6.noarcherror: unpacking of archive failed on file /usr/lib/python2.6/site-packages/ecdsa-0.11-py2.6.egg-info: cpio: renameVerifying : python-ecdsa-0.11-1.ibm.el6.noarch 1/1
Failed:python-ecdsa.noarch 0:0.11-1.ibm.el6
Complete!
v Otherwise, SSH to the node where the `upgrade` failed, and view the yum log in /var/log/yum.log andidentify the package that failed. For example:# cat /var/log/yum.log | grep ecdsaSep 29 03:07:44 python-ecdsa-0.11-1.ibm.el6.noarch: 100
The installation of a package might fail if you use PIP to install python packages, prior to installing theRPMs. This combination is error prone.
Use the following steps to resolve the issue:1. Uninstall the package that failed and deploy the topology again. For example:
# pip uninstall ecdsaUninstalling ecdsa:
/usr/lib/python2.6/site-packages/ecdsa-0.11-py2.6.egg-info/usr/lib/python2.6/site-packages/ecdsa/__init__.py/usr/lib/python2.6/site-packages/ecdsa/__init__.pyc/usr/lib/python2.6/site-packages/ecdsa/_version.py/usr/lib/python2.6/site-packages/ecdsa/_version.pyc/usr/lib/python2.6/site-packages/ecdsa/curves.py/usr/lib/python2.6/site-packages/ecdsa/curves.pyc/usr/lib/python2.6/site-packages/ecdsa/der.py/usr/lib/python2.6/site-packages/ecdsa/der.pyc/usr/lib/python2.6/site-packages/ecdsa/ecdsa.py
304 IBM Cloud Manager with OpenStack: Administrator Guide, version 4.2
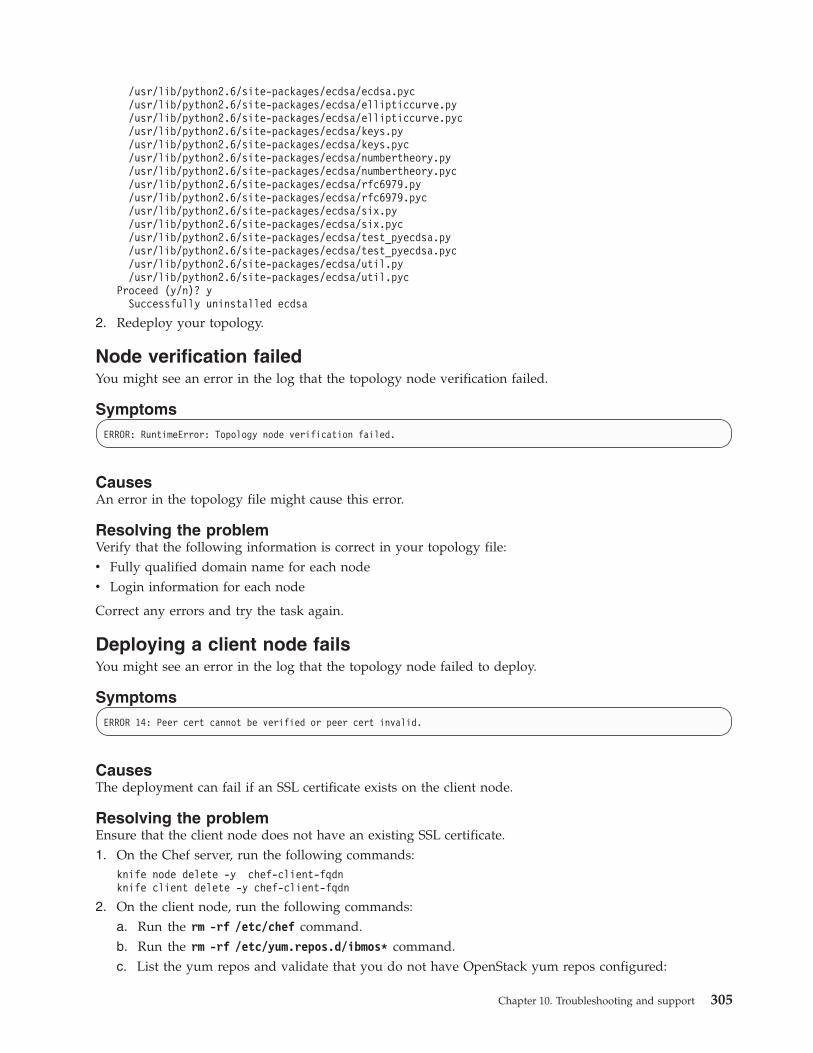
/usr/lib/python2.6/site-packages/ecdsa/ecdsa.pyc/usr/lib/python2.6/site-packages/ecdsa/ellipticcurve.py/usr/lib/python2.6/site-packages/ecdsa/ellipticcurve.pyc/usr/lib/python2.6/site-packages/ecdsa/keys.py/usr/lib/python2.6/site-packages/ecdsa/keys.pyc/usr/lib/python2.6/site-packages/ecdsa/numbertheory.py/usr/lib/python2.6/site-packages/ecdsa/numbertheory.pyc/usr/lib/python2.6/site-packages/ecdsa/rfc6979.py/usr/lib/python2.6/site-packages/ecdsa/rfc6979.pyc/usr/lib/python2.6/site-packages/ecdsa/six.py/usr/lib/python2.6/site-packages/ecdsa/six.pyc/usr/lib/python2.6/site-packages/ecdsa/test_pyecdsa.py/usr/lib/python2.6/site-packages/ecdsa/test_pyecdsa.pyc/usr/lib/python2.6/site-packages/ecdsa/util.py/usr/lib/python2.6/site-packages/ecdsa/util.pyc
Proceed (y/n)? ySuccessfully uninstalled ecdsa
2. Redeploy your topology.
Node verification failedYou might see an error in the log that the topology node verification failed.
SymptomsERROR: RuntimeError: Topology node verification failed.
CausesAn error in the topology file might cause this error.
Resolving the problemVerify that the following information is correct in your topology file:v Fully qualified domain name for each nodev Login information for each node
Correct any errors and try the task again.
Deploying a client node failsYou might see an error in the log that the topology node failed to deploy.
SymptomsERROR 14: Peer cert cannot be verified or peer cert invalid.
CausesThe deployment can fail if an SSL certificate exists on the client node.
Resolving the problemEnsure that the client node does not have an existing SSL certificate.1. On the Chef server, run the following commands:
knife node delete -y chef-client-fqdnknife client delete -y chef-client-fqdn
2. On the client node, run the following commands:a. Run the rm -rf /etc/chef command.b. Run the rm -rf /etc/yum.repos.d/ibmos* command.c. List the yum repos and validate that you do not have OpenStack yum repos configured:
Chapter 10. Troubleshooting and support 305
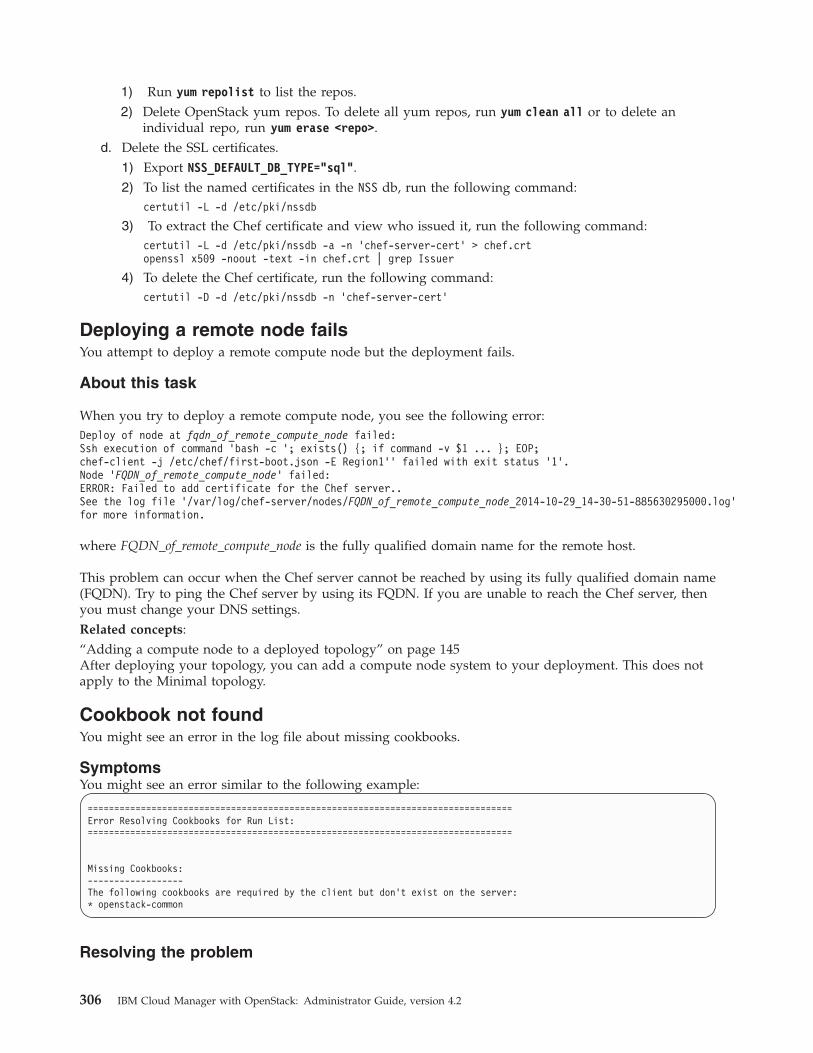
1) Run yum repolist to list the repos.2) Delete OpenStack yum repos. To delete all yum repos, run yum clean all or to delete an
individual repo, run yum erase <repo>.d. Delete the SSL certificates.
1) Export NSS_DEFAULT_DB_TYPE="sql".2) To list the named certificates in the NSS db, run the following command:
certutil -L -d /etc/pki/nssdb
3) To extract the Chef certificate and view who issued it, run the following command:certutil -L -d /etc/pki/nssdb -a -n ’chef-server-cert’ > chef.crtopenssl x509 -noout -text -in chef.crt | grep Issuer
4) To delete the Chef certificate, run the following command:certutil -D -d /etc/pki/nssdb -n ’chef-server-cert’
Deploying a remote node failsYou attempt to deploy a remote compute node but the deployment fails.
About this task
When you try to deploy a remote compute node, you see the following error:Deploy of node at fqdn_of_remote_compute_node failed:Ssh execution of command ’bash -c ’; exists() {; if command -v $1 ... }; EOP;chef-client -j /etc/chef/first-boot.json -E Region1’’ failed with exit status ’1’.Node ’FQDN_of_remote_compute_node’ failed:ERROR: Failed to add certificate for the Chef server..See the log file ’/var/log/chef-server/nodes/FQDN_of_remote_compute_node_2014-10-29_14-30-51-885630295000.log’for more information.
where FQDN_of_remote_compute_node is the fully qualified domain name for the remote host.
This problem can occur when the Chef server cannot be reached by using its fully qualified domain name(FQDN). Try to ping the Chef server by using its FQDN. If you are unable to reach the Chef server, thenyou must change your DNS settings.Related concepts:“Adding a compute node to a deployed topology” on page 145After deploying your topology, you can add a compute node system to your deployment. This does notapply to the Minimal topology.
Cookbook not foundYou might see an error in the log file about missing cookbooks.
SymptomsYou might see an error similar to the following example:
================================================================================Error Resolving Cookbooks for Run List:================================================================================
Missing Cookbooks:------------------The following cookbooks are required by the client but don’t exist on the server:* openstack-common
Resolving the problem
306 IBM Cloud Manager with OpenStack: Administrator Guide, version 4.2
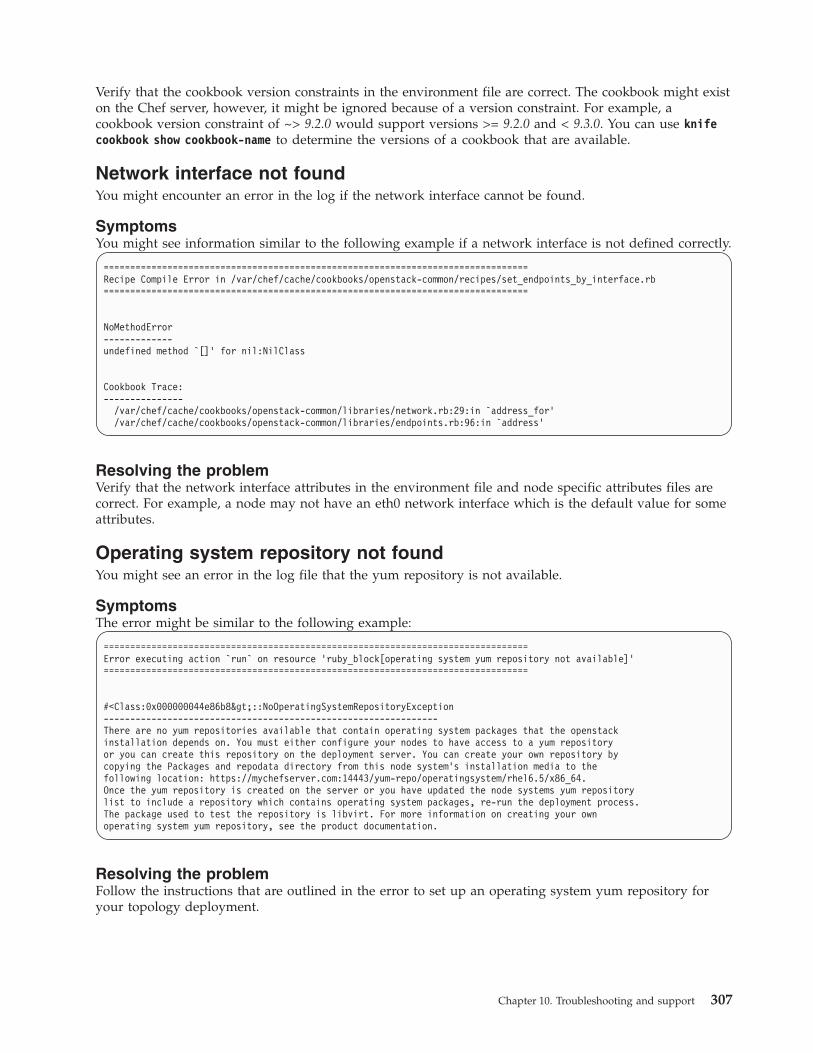
Verify that the cookbook version constraints in the environment file are correct. The cookbook might existon the Chef server, however, it might be ignored because of a version constraint. For example, acookbook version constraint of ~> 9.2.0 would support versions >= 9.2.0 and < 9.3.0. You can use knifecookbook show cookbook-name to determine the versions of a cookbook that are available.
Network interface not foundYou might encounter an error in the log if the network interface cannot be found.
SymptomsYou might see information similar to the following example if a network interface is not defined correctly.
================================================================================Recipe Compile Error in /var/chef/cache/cookbooks/openstack-common/recipes/set_endpoints_by_interface.rb================================================================================
NoMethodError-------------undefined method `[]’ for nil:NilClass
Cookbook Trace:---------------
/var/chef/cache/cookbooks/openstack-common/libraries/network.rb:29:in `address_for’/var/chef/cache/cookbooks/openstack-common/libraries/endpoints.rb:96:in `address’
Resolving the problemVerify that the network interface attributes in the environment file and node specific attributes files arecorrect. For example, a node may not have an eth0 network interface which is the default value for someattributes.
Operating system repository not foundYou might see an error in the log file that the yum repository is not available.
SymptomsThe error might be similar to the following example:
================================================================================Error executing action `run` on resource ’ruby_block[operating system yum repository not available]’================================================================================
#<Class:0x000000044e86b8>::NoOperatingSystemRepositoryException---------------------------------------------------------------There are no yum repositories available that contain operating system packages that the openstackinstallation depends on. You must either configure your nodes to have access to a yum repositoryor you can create this repository on the deployment server. You can create your own repository bycopying the Packages and repodata directory from this node system’s installation media to thefollowing location: https://mychefserver.com:14443/yum-repo/operatingsystem/rhel6.5/x86_64.Once the yum repository is created on the server or you have updated the node systems yum repositorylist to include a repository which contains operating system packages, re-run the deployment process.The package used to test the repository is libvirt. For more information on creating your ownoperating system yum repository, see the product documentation.
Resolving the problemFollow the instructions that are outlined in the error to set up an operating system yum repository foryour topology deployment.
Chapter 10. Troubleshooting and support 307
Package failed to install or upgradeYou might see an error in the log file about being unable to upgrade a resource.
SymptomsThe error might be similar to the following example:
================================================================================Error executing action `upgrade` on resource ’package[python-openstackclient]’================================================================================
Resolving the problemThe node might be unable to connect to or use the Chef server or the operating system or IBM CloudManager with OpenStack package repositories. Log in to the node and attempt to install or upgrade thepackage manually. Start by clearing the expired package cache by running yum clean expire-cache, thenattempt to install the failed package (for example, yum install python-openstackclient). If the packageinstalls successfully, try the topology deployment or update again. If the package installation fails, thecommand output provides more information about why the error occurred and how to resolve it.
PowerVC driver deploys successfully; later is deadIt appears that you successfully deployed a controller node that includes the PowerVC driver, but laterthe PowerVC driver service is dead.
SymptomsAfter successfully deploying a controller node you might subsequently notice that PowerVC services aredead and the system is unusable.
CausesA configuration error such as a mistake for the IP address of the PowerVC host system can cause thePowerVC driver services to eventually fail.
Diagnosing the problemYou can use the following command to check the status of the PowerVC driver service.service openstack-nova-powervc status
Resolving the problemIf PowerVC services are dead, ensure that the settings in the environment file are correct. Then try thedeployment task again.
Compute node is deployed or updated successfully; later OpenvSwitch agent is downYou successfully deploy, update, or apply a fix pack to a compute node, but later the Open vSwitch agenton the compute node is down.
SymptomsAfter you successfully deploy, update, or apply a fix pack to a compute node, you are unable to start anew virtual machine.
You check the status of the Open vSwitch agent by running the following command on your controllernode:neutron agent-list
The Open vSwitch agent is down.
Causes
308 IBM Cloud Manager with OpenStack: Administrator Guide, version 4.2

This problem can occur for various reasons, one of which is that there is an error in the/etc/neutron/plugins/openvswitch/ovs_neutron_plugin.ini file on the compute node.
Resolving the problemTo resolve the problem, try to restart the Open vSwitch agent by running the following command on thecompute node:service neutron-openvswitch-agent restart
Take one of the following actions:v If the agent status on the controller is active, try to start the virtual machine.v If the agent status is not active, see the /var/log/neutron/openvswitch-agent.log file on the compute
node.
If you applied a fix pack to multiple PowerKVM compute nodes, it is likely that the agent is down on allof them. You can resolve the problem similarly for each compute node.
Fingerprint error during deployWhen redeploying to a node where a topology has previously been deployed, you receive an SSHfingerprint error.
SymptomsWhen updating the environment during the deployment process, you receive an error similar to thefollowing:ERROR: fingerprint 1d:51:e2:2d:79:85:9c:c0:7c:9d:82:c7:3f:94:ad:b4 does notmatch for "your_system.domain.com,x.x.x.x"ERROR: /opt/chef/embedded/lib/ruby/gems/1.9.1/gems/net-ssh-2.9.0/lib/net/ssh/verifiers/secure.rb:50:in `process_cache_miss’/opt/chef/embedded/lib/ruby/gems/1.9.1/gems/net-ssh-2.9.0/lib/net/ssh/verifiers/secure.rb:35:in `verify’/opt/chef/embedded/lib/ruby/gems/1.9.1/gems/net-ssh-2.9.0/lib/net/ssh/verifiers/strict.rb:16:in `verify’/opt/chef/embedded/lib/ruby/gems/1.9.1/gems/net-ssh-2.9.0/lib/net/ssh/verifiers/lenient.rb:15:in `verify’/opt/chef/embedded/lib/ruby/gems/1.9.1/gems/net-ssh-2.9.0/lib/net/ssh/transport/kex/diffie_hellman_group1_sha1.rb:173:in `verify_server_key’/opt/chef/embedded/lib/ruby/gems/1.9.1/gems/net-ssh-2.9.0/lib/net/ssh/transport/kex/diffie_hellman_group1_sha1.rb:68:in `exchange_keys’/opt/chef/embedded/lib/ruby/gems/1.9.1/gems/net-ssh-2.9.0/lib/net/ssh/transport/algorithms.rb:364:in `exchange_keys’/opt/chef/embedded/lib/ruby/gems/1.9.1/gems/net-ssh-2.9.0/lib/net/ssh/transport/algorithms.rb:205:in `proceed!’/opt/chef/embedded/lib/ruby/gems/1.9.1/gems/net-ssh-2.9.0/lib/net/ssh/transport/algorithms.rb:196:in `send_kexinit’/opt/chef/embedded/lib/ruby/gems/1.9.1/gems/net-ssh-2.9.0/lib/net/ssh/transport/algorithms.rb:151:in `accept_kexinit’/opt/chef/embedded/lib/ruby/gems/1.9.1/gems/net-ssh-2.9.0/lib/net/ssh/transport/session.rb:195:in `block in poll_message’/opt/chef/embedded/lib/ruby/gems/1.9.1/gems/net-ssh-2.9.0/lib/net/ssh/transport/session.rb:173:in `loop’/opt/chef/embedded/lib/ruby/gems/1.9.1/gems/net-ssh-2.9.0/lib/net/ssh/transport/session.rb:173:in `poll_message’/opt/chef/embedded/lib/ruby/gems/1.9.1/gems/net-ssh-2.9.0/lib/net/ssh/transport/session.rb:210:in `block in wait’/opt/chef/embedded/lib/ruby/gems/1.9.1/gems/net-ssh-2.9.0/lib/net/ssh/transport/session.rb:208:in `loop’/opt/chef/embedded/lib/ruby/gems/1.9.1/gems/net-ssh-2.9.0/lib/net/ssh/transport/session.rb:208:in `wait’/opt/chef/embedded/lib/ruby/gems/1.9.1/gems/net-ssh-2.9.0/lib/net/ssh/transport/session.rb:87:in `initialize’/opt/chef/embedded/lib/ruby/gems/1.9.1/gems/net-ssh-2.9.0/lib/net/ssh.rb:202:in `new’
Chapter 10. Troubleshooting and support 309
/opt/chef/embedded/lib/ruby/gems/1.9.1/gems/net-ssh-2.9.0/lib/net/ssh.rb:202:in `start’/opt/chef/embedded/lib/ruby/gems/1.9.1/gems/net-ssh-multi-1.2.0/lib/net/ssh/multi/server.rb:185:in `new_session’/opt/chef/embedded/lib/ruby/gems/1.9.1/gems/chef-11.12.4/lib/chef/monkey_patches/net-ssh-multi.rb:79:in `next_session’/opt/chef/embedded/lib/ruby/gems/1.9.1/gems/net-ssh-multi-1.2.0/lib/net/ssh/multi/server.rb:138:in `session’/opt/chef/embedded/lib/ruby/gems/1.9.1/gems/net-ssh-multi-1.2.0/lib/net/ssh/multi/session_actions.rb:36:in `block (2 levels) in sessions’ERROR: Node ’powervc-rhel64’ at your_system.domain.com verification error:Could not connect to your_system.domain.comas user ’root’ with the specified password : Ssh execution of command’2>/dev/null 1>&2 echo hello’ failed:fingerprint 1d:51:e2:2d:79:85:9c:c0:7c:9d:82:c7:3f:94:ad:b4 does not matchfor "your_system.domain.com,x.x.x.x"ERROR: RuntimeError: Topology node verification failed.
Resolving the problemYou might need to delete the SSH fingerprint on your deployment server. The deployment knifecommands use SSH to communicate with the node system to deploy OpenStack. Use one of the followingmethods to delete SSH fingerprints from the .ssh/known_hosts file on the deployment server:v Run the following command:
ssh-keygen -R node fqdn
v Edit the .ssh/known_hosts file in a text editor and delete the line that contains your node system.
Error restarting neutron when deploying a topologyWhen you attempt to deploy a topology, you receive an error about restarting the neutron-plugin-openvswitch-agent service.
SymptomsYou see something similar to the following error:ESC[31mError executing action `restart` on resource ’service[neutron-plugin-openvswitch-agent]’ESC
CausesYou might not have the right version of a package, such as OpenSSL.
Resolving the problemEnsure that the yum repositories are configured correctly so that package updates are accessible. Formore information, see “Configuring operating system yum repositories on the deployment server” onpage 37.
Then, try the deployment task again.
Cinder error occurs when you deploy a controller nodeYou see a cinder error in the log after you try to deploy a controller node.
SymptomsYou try to deploy a controller node and it fails. You check the log and see the following error message:Error executing action `run` on resource ’execute[cinder-manage db sync]’IOError: [Errno 13] Permission denied: ’/var/log/cinder/cinder.log’
CausesThis error can occur if Service Pack 1 is not installed before you deploy a controller node with storagesupport.
Resolving the problem
310 IBM Cloud Manager with OpenStack: Administrator Guide, version 4.2
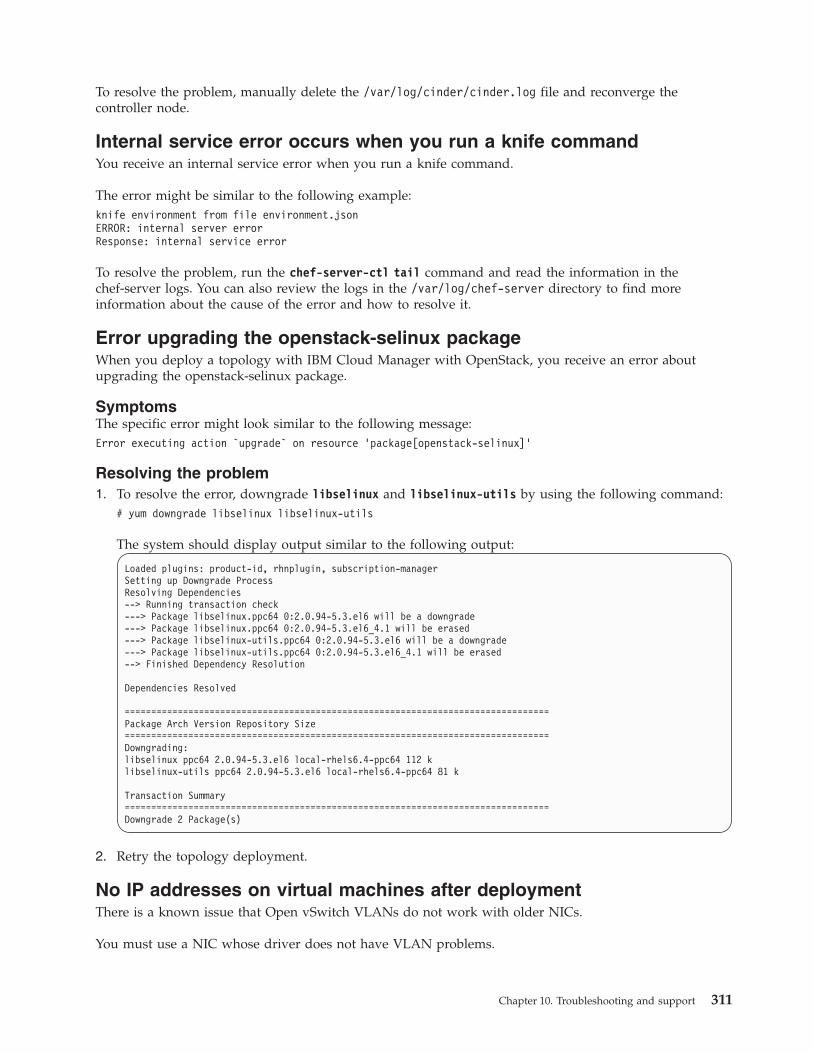
To resolve the problem, manually delete the /var/log/cinder/cinder.log file and reconverge thecontroller node.
Internal service error occurs when you run a knife commandYou receive an internal service error when you run a knife command.
The error might be similar to the following example:knife environment from file environment.jsonERROR: internal server errorResponse: internal service error
To resolve the problem, run the chef-server-ctl tail command and read the information in thechef-server logs. You can also review the logs in the /var/log/chef-server directory to find moreinformation about the cause of the error and how to resolve it.
Error upgrading the openstack-selinux packageWhen you deploy a topology with IBM Cloud Manager with OpenStack, you receive an error aboutupgrading the openstack-selinux package.
SymptomsThe specific error might look similar to the following message:Error executing action `upgrade` on resource ’package[openstack-selinux]’
Resolving the problem1. To resolve the error, downgrade libselinux and libselinux-utils by using the following command:
# yum downgrade libselinux libselinux-utils
The system should display output similar to the following output:
Loaded plugins: product-id, rhnplugin, subscription-managerSetting up Downgrade ProcessResolving Dependencies--> Running transaction check---> Package libselinux.ppc64 0:2.0.94-5.3.el6 will be a downgrade---> Package libselinux.ppc64 0:2.0.94-5.3.el6_4.1 will be erased---> Package libselinux-utils.ppc64 0:2.0.94-5.3.el6 will be a downgrade---> Package libselinux-utils.ppc64 0:2.0.94-5.3.el6_4.1 will be erased--> Finished Dependency Resolution
Dependencies Resolved
================================================================================Package Arch Version Repository Size================================================================================Downgrading:libselinux ppc64 2.0.94-5.3.el6 local-rhels6.4-ppc64 112 klibselinux-utils ppc64 2.0.94-5.3.el6 local-rhels6.4-ppc64 81 k
Transaction Summary================================================================================Downgrade 2 Package(s)
2. Retry the topology deployment.
No IP addresses on virtual machines after deploymentThere is a known issue that Open vSwitch VLANs do not work with older NICs.
You must use a NIC whose driver does not have VLAN problems.
Chapter 10. Troubleshooting and support 311
For more information about an Open vSwitch workaround, see ovs−vlan−bug−workaround. There isadditional information on the following Open vSwitch Frequently Asked Questions page as well.
Self-service portal displays volumes attached to wrong deviceFor a PowerVM environment, when you investigate volumes that are attached to a device, the name thatis displayed by the self-service portal user interface is not meaningful.
The Attached VM or Attached to fields in the user interface display a device name (or mount point). Forexample, Attached to icm42ui on /dev/sdb. For PowerVM, this device name is meaningless and doesnot reflect the actual device name in the guest operating system.
The following example shows the device details that display from the Cinder show command, which arealso meaningless for PowerVM.------------------------------------------------------------------------+| attachments | [{u’device’: u’/dev/sdd’, u’server_id’:u’bddd1457-507f-42a5-9d56-a2a6c79f1e6c’, u’id’: u’c21a8b02-7454-4018-9539-9c1fa4b60a71’,u’host_name’: None, u’volume_id’: u’c21a8b02-7454-4018-9539-9c1fa4b60a71’}]
Note: This behavior applies only to PowerVM environments.
Known problems and solutions for an AdministratorIf you are using IBM Cloud Manager with OpenStack with the Administrator role, review theses knownproblems and solutions that you might encounter.
If your particular problem is not represented, see “Searching knowledge bases” on page 296 for a list ofother references, particularly the Techdocs Web site, where more recent solutions or workarounds mightinstead reside.
Known issuesThere are several known issues with the current release of IBM Cloud Manager with OpenStack.
If your particular problem is not represented, see “Searching knowledge bases” on page 296 for a list ofother references, particularly the Techdocs Web site, where more recent solutions or workarounds mightinstead reside.
DBDuplicateEntry error in Neutron server logAfter you finish the deploying, if you use DB2 as the OpenStack database, you might see theDBDuplicateEntry error in the Neutron server log. This error message does not impact any OpenStackfunction. The error appears in the error log of the Neutron server and openvswitch-agent.
Symptoms
In the /var/log/neutron/server.log and /var/log/neutron/openvswitch-agent.log, you might see thefollowing errors, which are a result of the DBDuplicateEntry error:
Note: The output has been formatted for display purposes.2014-11-10 23:14:36.050 31989 ERROR oslo.messaging.rpc.dispatcher [req-e07a7ed7-d22f-40e9-b299-aba6e06f9470 ]Exception during message handling: (IntegrityError) ibm_db_dbi::IntegrityError: Statement Execute Failed:[IBM][CLI Driver][DB2/LINUXX8664] SQL0803N One or more values in the INSERT statement, UPDATE statement,or foreign key update caused by a DELETE statement are not valid because the primary key, unique constraintor unique index identified by "2" constrains table "NEUTRON.AGENTS" from having duplicate values forthe index key.SQLSTATE=23505 SQLCODE=-803 ’INSERT INTO agents (id, agent_type, "binary", topic, host, admin_state_up,created_at,started_at, heartbeat_timestamp, description, configurations) VALUES (?, ?, ?, ?, ?, ?, ?, ?, ?, ?, ?)’
312 IBM Cloud Manager with OpenStack: Administrator Guide, version 4.2

(’5028b520-1a90-46c2-9e97-b1cb80d6ebe0’, ’Open vSwitch agent’, ’neutron-openvswitch-agent’, ’N/A’,’testhl12.sce.ibm.com’, ’1’, datetime.datetime(2014, 11, 11, 4, 14, 35, 580590),datetime.datetime(2014, 11, 11, 4, 14, 35, 580590), datetime.datetime(2014, 11, 11, 4, 14, 35, 580590),None, ’{"arp_responder_enabled": false, "tunneling_ip": "10.11.1.12", "devices": 0, "l2_population":false,"tunnel_types": ["gre", "vxlan"], "enable_distributed_routing": false, "bridge_mappings": {"default":"br-eth1"}}’)2014-11-10 23:14:36.050 31989 TRACE oslo.messaging.rpc.dispatcher Traceback (most recent call last):2014-11-10 23:14:36.050 31989 TRACE oslo.messaging.rpc.dispatcherFile "/usr/lib/python2.6/site-packages/oslo/messaging/rpc/dispatcher.py", line 134, in _dispatch_and_reply2014-11-10 23:14:36.050 31989 TRACE oslo.messaging.rpc.dispatcher incoming.message))2014-11-10 23:14:36.050 31989 TRACE oslo.messaging.rpc.dispatcherFile "/usr/lib/python2.6/site-packages/oslo/messaging/rpc/dispatcher.py", line 177, in _dispatch2014-11-10 23:14:36.050 31989 TRACE oslo.messaging.rpc.dispatcher return self._do_dispatch(endpoint,method, ctxt, args)2014-11-10 23:14:36.050 31989 TRACE oslo.messaging.rpc.dispatcherFile "/usr/lib/python2.6/site-packages/oslo/messaging/rpc/dispatcher.py", line 123, in _do_dispatch2014-11-10 23:14:36.050 31989 TRACE oslo.messaging.rpc.dispatcherresult = getattr(endpoint, method)(ctxt, **new_args)2014-11-10 23:14:36.050 31989 TRACE oslo.messaging.rpc.dispatcherFile "/usr/lib/python2.6/site-packages/neutron/db/agents_db.py", line 237, in report_state2014-11-10 23:14:36.050 31989 TRACE oslo.messaging.rpc.dispatcherself.plugin.create_or_update_agent(context, agent_state)2014-11-10 23:14:36.050 31989 TRACE oslo.messaging.rpc.dispatcherFile "/usr/lib/python2.6/site-packages/neutron/db/agents_db.py", line 214, in create_or_update_agent2014-11-10 23:14:36.050 31989 TRACE oslo.messaging.rpc.dispatcherreturn self._create_or_update_agent(context, agent)2014-11-10 23:14:36.050 31989 TRACE oslo.messaging.rpc.dispatcherFile "/usr/lib/python2.6/site-packages/neutron/openstack/common/excutils.py", line 82, in __exit__2014-11-10 23:14:36.050 31989 TRACE oslo.messaging.rpc.dispatchersix.reraise(self.type_, self.value, self.tb)2014-11-10 23:14:36.050 31989 TRACE oslo.messaging.rpc.dispatcherFile "/usr/lib/python2.6/site-packages/neutron/db/agents_db.py", line 197, in create_or_update_agent2014-11-10 23:14:36.050 31989 TRACE oslo.messaging.rpc.dispatcherreturn self._create_or_update_agent(context, agent)2014-11-10 23:14:36.050 31989 TRACE oslo.messaging.rpc.dispatcherFile "/usr/lib/python2.6/site-packages/neutron/db/agents_db.py", line 191, in _create_or_update_agent2014-11-10 23:14:36.050 31989 TRACE oslo.messaging.rpc.dispatchergreenthread.sleep(0)2014-11-10 23:14:36.050 31989 TRACE oslo.messaging.rpc.dispatcherFile "/usr/lib64/python2.6/site-packages/sqlalchemy/orm/session.py", line 447, in __exit__2014-11-10 23:14:36.050 31989 TRACE oslo.messaging.rpc.dispatcherself.rollback()2014-11-10 23:14:36.050 31989 TRACE oslo.messaging.rpc.dispatcherFile "/usr/lib64/python2.6/site-packages/sqlalchemy/util/langhelpers.py", line 58, in __exit__2014-11-10 23:14:36.050 31989 TRACE oslo.messaging.rpc.dispatchercompat.reraise(exc_type, exc_value, exc_tb)2014-11-10 23:14:36.050 31989 TRACE oslo.messaging.rpc.dispatcherFile "/usr/lib64/python2.6/site-packages/sqlalchemy/orm/session.py", line 444, in __exit__2014-11-10 23:14:36.050 31989 TRACE oslo.messaging.rpc.dispatcherself.commit()2014-11-10 23:14:36.050 31989 TRACE oslo.messaging.rpc.dispatcherFile "/usr/lib64/python2.6/site-packages/sqlalchemy/orm/session.py",line 354, in commit2014-11-10 23:14:36.050 31989 TRACE oslo.messaging.rpc.dispatcherself._prepare_impl()2014-11-10 23:14:36.050 31989 TRACE oslo.messaging.rpc.dispatcherFile "/usr/lib64/python2.6/site-packages/sqlalchemy/orm/session.py", line 334, in _prepare_impl2014-11-10 23:14:36.050 31989 TRACE oslo.messaging.rpc.dispatcherself.session.flush()2014-11-10 23:14:36.050 31989 TRACE oslo.messaging.rpc.dispatcherFile "/usr/lib64/python2.6/site-packages/sqlalchemy/orm/session.py", line 1818, in flush2014-11-10 23:14:36.050 31989 TRACE oslo.messaging.rpc.dispatcherself._flush(objects)2014-11-10 23:14:36.050 31989 TRACE oslo.messaging.rpc.dispatcherFile "/usr/lib64/python2.6/site-packages/sqlalchemy/orm/session.py", line 1936, in _flush2014-11-10 23:14:36.050 31989 TRACE oslo.messaging.rpc.dispatcher
Chapter 10. Troubleshooting and support 313

transaction.rollback(_capture_exception=True)2014-11-10 23:14:36.050 31989 TRACE oslo.messaging.rpc.dispatcherFile "/usr/lib64/python2.6/site-packages/sqlalchemy/util/langhelpers.py", line 58, in __exit__2014-11-10 23:14:36.050 31989 TRACE oslo.messaging.rpc.dispatchercompat.reraise(exc_type, exc_value, exc_tb)2014-11-10 23:14:36.050 31989 TRACE oslo.messaging.rpc.dispatcherFile "/usr/lib64/python2.6/site-packages/sqlalchemy/orm/session.py", line 1900, in _flush2014-11-10 23:14:36.050 31989 TRACE oslo.messaging.rpc.dispatcherflush_context.execute()2014-11-10 23:14:36.050 31989 TRACE oslo.messaging.rpc.dispatcherFile "/usr/lib64/python2.6/site-packages/sqlalchemy/orm/unitofwork.py", line 372, in execute2014-11-10 23:14:36.050 31989 TRACE oslo.messaging.rpc.dispatcherrec.execute(self)2014-11-10 23:14:36.050 31989 TRACE oslo.messaging.rpc.dispatcherFile "/usr/lib64/python2.6/site-packages/sqlalchemy/orm/unitofwork.py", line 525, in execute2014-11-10 23:14:36.050 31989 TRACE oslo.messaging.rpc.dispatcheruow2014-11-10 23:14:36.050 31989 TRACE oslo.messaging.rpc.dispatcherFile "/usr/lib64/python2.6/site-packages/sqlalchemy/orm/persistence.py", line 64, in save_obj2014-11-10 23:14:36.050 31989 TRACE oslo.messaging.rpc.dispatchertable, insert)2014-11-10 23:14:36.050 31989 TRACE oslo.messaging.rpc.dispatcherFile "/usr/lib64/python2.6/site-packages/sqlalchemy/orm/persistence.py", line 569, in _emit_insert_statements2014-11-10 23:14:36.050 31989 TRACE oslo.messaging.rpc.dispatcherexecute(statement, params)2014-11-10 23:14:36.050 31989 TRACE oslo.messaging.rpc.dispatcherFile "/usr/lib64/python2.6/site-packages/sqlalchemy/engine/base.py", line 662, in execute2014-11-10 23:14:36.050 31989 TRACE oslo.messaging.rpc.dispatcherparams)2014-11-10 23:14:36.050 31989 TRACE oslo.messaging.rpc.dispatcherFile "/usr/lib64/python2.6/site-packages/sqlalchemy/engine/base.py", line 761, in _execute_clauseelement2014-11-10 23:14:36.050 31989 TRACE oslo.messaging.rpc.dispatchercompiled_sql, distilled_params2014-11-10 23:14:36.050 31989 TRACE oslo.messaging.rpc.dispatcherFile "/usr/lib64/python2.6/site-packages/sqlalchemy/engine/base.py", line 874, in _execute_context2014-11-10 23:14:36.050 31989 TRACE oslo.messaging.rpc.dispatchercontext)2014-11-10 23:14:36.050 31989 TRACE oslo.messaging.rpc.dispatcherFile "/usr/lib/python2.6/site-packages/oslo/db/sqlalchemy/compat/handle_error.py", line 125, in _handle_dbapi_exception2014-11-10 23:14:36.050 31989 TRACE oslo.messaging.rpc.dispatchersix.reraise(type(newraise), newraise, sys.exc_info()[2])2014-11-10 23:14:36.050 31989 TRACE oslo.messaging.rpc.dispatcherFile "/usr/lib/python2.6/site-packages/oslo/db/sqlalchemy/compat/handle_error.py", line 102, in _handle_dbapi_exception2014-11-10 23:14:36.050 31989 TRACE oslo.messaging.rpc.dispatcherper_fn = fn(ctx)2014-11-10 23:14:36.050 31989 TRACE oslo.messaging.rpc.dispatcherFile "/usr/lib/python2.6/site-packages/oslo/db/sqlalchemy/exc_filters.py", line 323, in handler2014-11-10 23:14:36.050 31989 TRACE oslo.messaging.rpc.dispatchercontext.is_disconnect)2014-11-10 23:14:36.050 31989 TRACE oslo.messaging.rpc.dispatcherFile "/usr/lib/python2.6/site-packages/oslo/db/sqlalchemy/exc_filters.py", line 223, in _db2_dupe_key_error2014-11-10 23:14:36.050 31989 TRACE oslo.messaging.rpc.dispatcher raise exception.DBDuplicateEntry([], integrity_error)2014-11-10 23:14:36.050 31989 TRACE oslo.messaging.rpc.dispatcherDBDuplicateEntry: (IntegrityError) ibm_db_dbi::IntegrityError:Statement Execute Failed: [IBM][CLI Driver][DB2/LINUXX8664] SQL0803NOne or more values in the INSERT statement, UPDATE statement, orforeign key update caused by a DELETE statement are not valid becausethe primary key, unique constraint or unique index identified by "2"constrains table "NEUTRON.AGENTS" from having duplicate values for the index key.SQLSTATE=23505 SQLCODE=-803 ’INSERT INTO agents (id, agent_type, "binary",topic, host, admin_state_up, created_at, started_at, heartbeat_timestamp,description, configurations) VALUES (?, ?, ?, ?, ?, ?, ?, ?, ?, ?, ?)’
314 IBM Cloud Manager with OpenStack: Administrator Guide, version 4.2
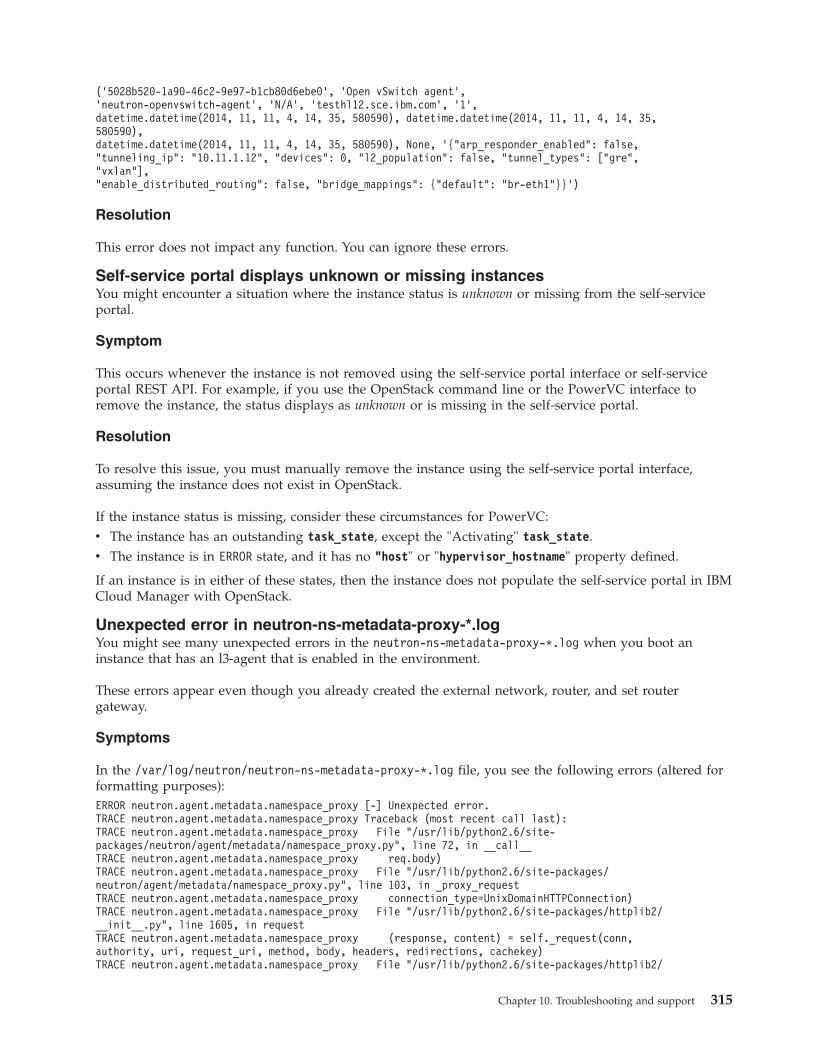
(’5028b520-1a90-46c2-9e97-b1cb80d6ebe0’, ’Open vSwitch agent’,’neutron-openvswitch-agent’, ’N/A’, ’testhl12.sce.ibm.com’, ’1’,datetime.datetime(2014, 11, 11, 4, 14, 35, 580590), datetime.datetime(2014, 11, 11, 4, 14, 35,580590),datetime.datetime(2014, 11, 11, 4, 14, 35, 580590), None, ’{"arp_responder_enabled": false,"tunneling_ip": "10.11.1.12", "devices": 0, "l2_population": false, "tunnel_types": ["gre","vxlan"],"enable_distributed_routing": false, "bridge_mappings": {"default": "br-eth1"}}’)
Resolution
This error does not impact any function. You can ignore these errors.
Self-service portal displays unknown or missing instancesYou might encounter a situation where the instance status is unknown or missing from the self-serviceportal.
Symptom
This occurs whenever the instance is not removed using the self-service portal interface or self-serviceportal REST API. For example, if you use the OpenStack command line or the PowerVC interface toremove the instance, the status displays as unknown or is missing in the self-service portal.
Resolution
To resolve this issue, you must manually remove the instance using the self-service portal interface,assuming the instance does not exist in OpenStack.
If the instance status is missing, consider these circumstances for PowerVC:v The instance has an outstanding task_state, except the "Activating" task_state.v The instance is in ERROR state, and it has no "host" or "hypervisor_hostname" property defined.
If an instance is in either of these states, then the instance does not populate the self-service portal in IBMCloud Manager with OpenStack.
Unexpected error in neutron-ns-metadata-proxy-*.logYou might see many unexpected errors in the neutron-ns-metadata-proxy-*.log when you boot aninstance that has an l3-agent that is enabled in the environment.
These errors appear even though you already created the external network, router, and set routergateway.
Symptoms
In the /var/log/neutron/neutron-ns-metadata-proxy-*.log file, you see the following errors (altered forformatting purposes):ERROR neutron.agent.metadata.namespace_proxy [-] Unexpected error.TRACE neutron.agent.metadata.namespace_proxy Traceback (most recent call last):TRACE neutron.agent.metadata.namespace_proxy File "/usr/lib/python2.6/site-packages/neutron/agent/metadata/namespace_proxy.py", line 72, in __call__TRACE neutron.agent.metadata.namespace_proxy req.body)TRACE neutron.agent.metadata.namespace_proxy File "/usr/lib/python2.6/site-packages/neutron/agent/metadata/namespace_proxy.py", line 103, in _proxy_requestTRACE neutron.agent.metadata.namespace_proxy connection_type=UnixDomainHTTPConnection)TRACE neutron.agent.metadata.namespace_proxy File "/usr/lib/python2.6/site-packages/httplib2/__init__.py", line 1605, in requestTRACE neutron.agent.metadata.namespace_proxy (response, content) = self._request(conn,authority, uri, request_uri, method, body, headers, redirections, cachekey)TRACE neutron.agent.metadata.namespace_proxy File "/usr/lib/python2.6/site-packages/httplib2/
Chapter 10. Troubleshooting and support 315
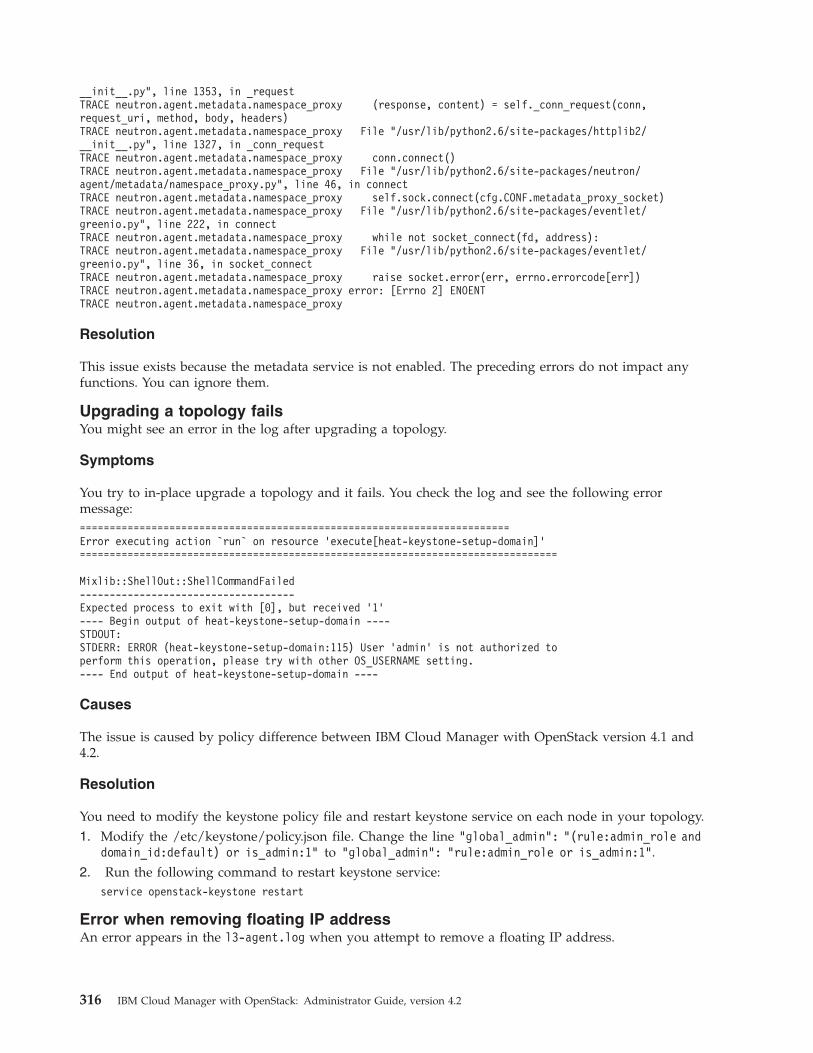
__init__.py", line 1353, in _requestTRACE neutron.agent.metadata.namespace_proxy (response, content) = self._conn_request(conn,request_uri, method, body, headers)TRACE neutron.agent.metadata.namespace_proxy File "/usr/lib/python2.6/site-packages/httplib2/__init__.py", line 1327, in _conn_requestTRACE neutron.agent.metadata.namespace_proxy conn.connect()TRACE neutron.agent.metadata.namespace_proxy File "/usr/lib/python2.6/site-packages/neutron/agent/metadata/namespace_proxy.py", line 46, in connectTRACE neutron.agent.metadata.namespace_proxy self.sock.connect(cfg.CONF.metadata_proxy_socket)TRACE neutron.agent.metadata.namespace_proxy File "/usr/lib/python2.6/site-packages/eventlet/greenio.py", line 222, in connectTRACE neutron.agent.metadata.namespace_proxy while not socket_connect(fd, address):TRACE neutron.agent.metadata.namespace_proxy File "/usr/lib/python2.6/site-packages/eventlet/greenio.py", line 36, in socket_connectTRACE neutron.agent.metadata.namespace_proxy raise socket.error(err, errno.errorcode[err])TRACE neutron.agent.metadata.namespace_proxy error: [Errno 2] ENOENTTRACE neutron.agent.metadata.namespace_proxy
Resolution
This issue exists because the metadata service is not enabled. The preceding errors do not impact anyfunctions. You can ignore them.
Upgrading a topology failsYou might see an error in the log after upgrading a topology.
Symptoms
You try to in-place upgrade a topology and it fails. You check the log and see the following errormessage:========================================================================Error executing action `run` on resource ’execute[heat-keystone-setup-domain]’================================================================================
Mixlib::ShellOut::ShellCommandFailed------------------------------------Expected process to exit with [0], but received ’1’---- Begin output of heat-keystone-setup-domain ----STDOUT:STDERR: ERROR (heat-keystone-setup-domain:115) User ’admin’ is not authorized toperform this operation, please try with other OS_USERNAME setting.---- End output of heat-keystone-setup-domain ----
Causes
The issue is caused by policy difference between IBM Cloud Manager with OpenStack version 4.1 and4.2.
Resolution
You need to modify the keystone policy file and restart keystone service on each node in your topology.1. Modify the /etc/keystone/policy.json file. Change the line "global_admin": "(rule:admin_role and
domain_id:default) or is_admin:1" to "global_admin": "rule:admin_role or is_admin:1".2. Run the following command to restart keystone service:
service openstack-keystone restart
Error when removing floating IP addressAn error appears in the l3-agent.log when you attempt to remove a floating IP address.
316 IBM Cloud Manager with OpenStack: Administrator Guide, version 4.2
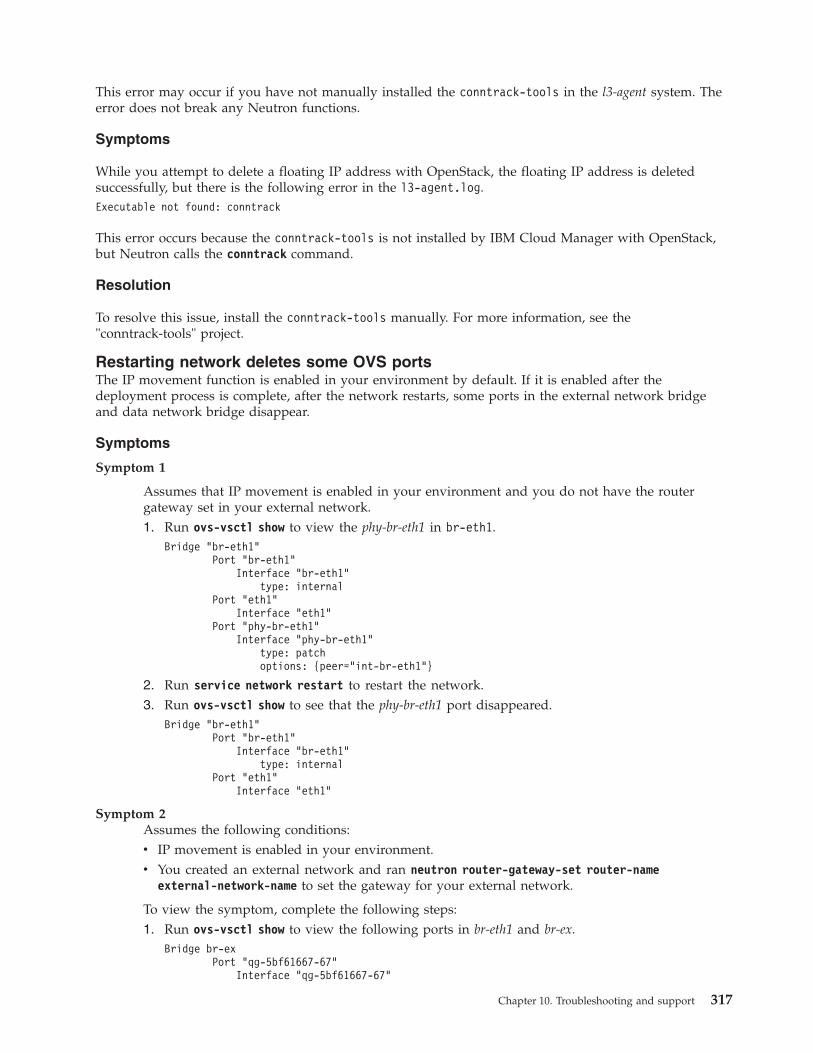
This error may occur if you have not manually installed the conntrack-tools in the l3-agent system. Theerror does not break any Neutron functions.
Symptoms
While you attempt to delete a floating IP address with OpenStack, the floating IP address is deletedsuccessfully, but there is the following error in the l3-agent.log.Executable not found: conntrack
This error occurs because the conntrack-tools is not installed by IBM Cloud Manager with OpenStack,but Neutron calls the conntrack command.
Resolution
To resolve this issue, install the conntrack-tools manually. For more information, see the"conntrack-tools" project.
Restarting network deletes some OVS portsThe IP movement function is enabled in your environment by default. If it is enabled after thedeployment process is complete, after the network restarts, some ports in the external network bridgeand data network bridge disappear.
Symptoms
Symptom 1
Assumes that IP movement is enabled in your environment and you do not have the routergateway set in your external network.1. Run ovs-vsctl show to view the phy-br-eth1 in br-eth1.
Bridge "br-eth1"Port "br-eth1"
Interface "br-eth1"type: internal
Port "eth1"Interface "eth1"
Port "phy-br-eth1"Interface "phy-br-eth1"
type: patchoptions: {peer="int-br-eth1"}
2. Run service network restart to restart the network.3. Run ovs-vsctl show to see that the phy-br-eth1 port disappeared.
Bridge "br-eth1"Port "br-eth1"
Interface "br-eth1"type: internal
Port "eth1"Interface "eth1"
Symptom 2Assumes the following conditions:v IP movement is enabled in your environment.v You created an external network and ran neutron router-gateway-set router-name
external-network-name to set the gateway for your external network.
To view the symptom, complete the following steps:1. Run ovs-vsctl show to view the following ports in br-eth1 and br-ex.
Bridge br-exPort "qg-5bf61667-67"
Interface "qg-5bf61667-67"
Chapter 10. Troubleshooting and support 317
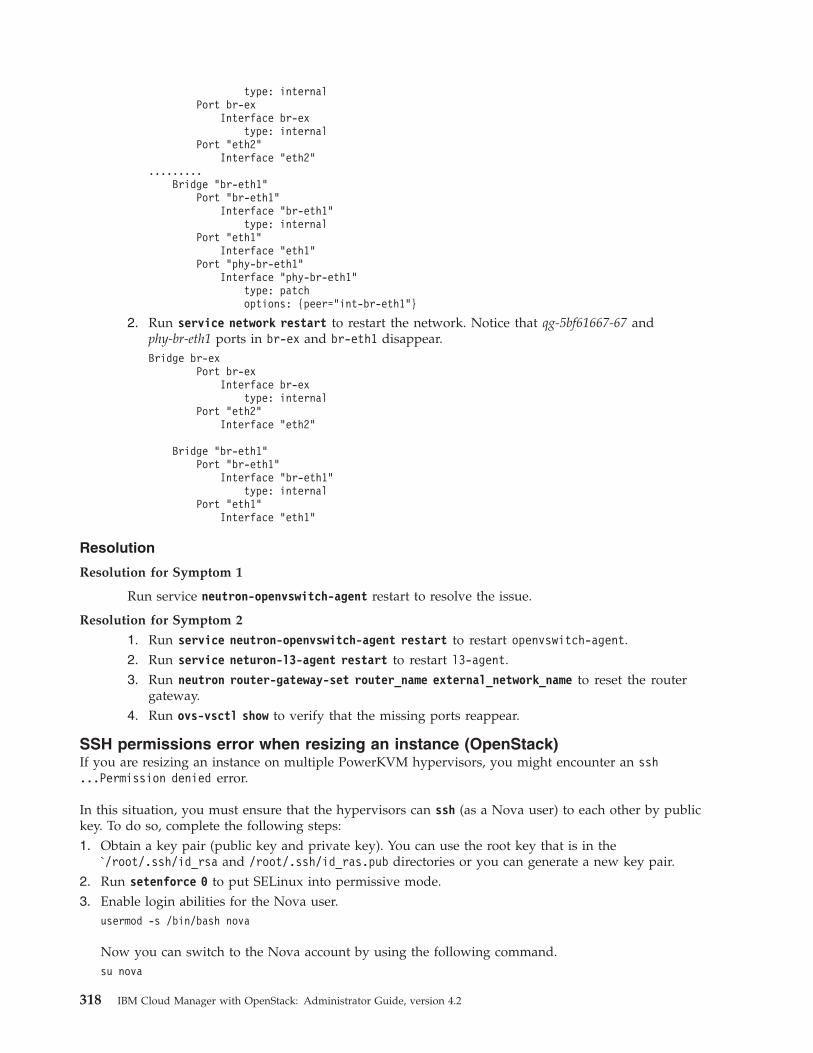
type: internalPort br-ex
Interface br-extype: internal
Port "eth2"Interface "eth2"
.........Bridge "br-eth1"
Port "br-eth1"Interface "br-eth1"
type: internalPort "eth1"
Interface "eth1"Port "phy-br-eth1"
Interface "phy-br-eth1"type: patchoptions: {peer="int-br-eth1"}
2. Run service network restart to restart the network. Notice that qg-5bf61667-67 andphy-br-eth1 ports in br-ex and br-eth1 disappear.Bridge br-ex
Port br-exInterface br-ex
type: internalPort "eth2"
Interface "eth2"
Bridge "br-eth1"Port "br-eth1"
Interface "br-eth1"type: internal
Port "eth1"Interface "eth1"
Resolution
Resolution for Symptom 1
Run service neutron-openvswitch-agent restart to resolve the issue.
Resolution for Symptom 2
1. Run service neutron-openvswitch-agent restart to restart openvswitch-agent.2. Run service neturon-l3-agent restart to restart l3-agent.3. Run neutron router-gateway-set router_name external_network_name to reset the router
gateway.4. Run ovs-vsctl show to verify that the missing ports reappear.
SSH permissions error when resizing an instance (OpenStack)If you are resizing an instance on multiple PowerKVM hypervisors, you might encounter an ssh...Permission denied error.
In this situation, you must ensure that the hypervisors can ssh (as a Nova user) to each other by publickey. To do so, complete the following steps:1. Obtain a key pair (public key and private key). You can use the root key that is in the
`/root/.ssh/id_rsa and /root/.ssh/id_ras.pub directories or you can generate a new key pair.2. Run setenforce 0 to put SELinux into permissive mode.3. Enable login abilities for the Nova user.
usermod -s /bin/bash nova
Now you can switch to the Nova account by using the following command.su nova
318 IBM Cloud Manager with OpenStack: Administrator Guide, version 4.2

4. Create the folder that is needed by ssh and place the private key that you obtained in step 1 into thisfolder.mkdir -p /var/lib/nova/.sshcp <private key> /var/lib/nova/.ssh/id_rsacat<pub key> >> /var/lib/nova/.ssh/authorized_keysecho ’StrictHostKeyChecking no’ >> /var/lib/nova/.ssh/configchmod 600 /var/lib/nova/.ssh/id_rsa /var/lib/nova/.ssh/authorized_keys
5. Repeat steps 2-4 on each node.
Important: All the nodes share a key pair and you must not generate a new key pair for the secondnode.
6. Ensure that the key is working properly.# su - nova# ssh node-another
Note:
a. You log in to the node-another node without a password.b. If your server is configured with both the IP address and the hostname, you must run this
command twice. For example:1) su nova ssh nova@host-name
2) su nova ssh [email protected]
where x.x.x.x is the server IP address.
Ceilometer collector not working after message queue is restartedYou might experience problems if you restart the message queue service on its own.
Symptom
The Ceilometer collector is not working and the message queue service was restarted recently.
Explanation
If the message queue is restarted, it is possible that the Ceilometer collector cannot collect metrics.
Resolution
Restart the Ceilometer collector service.1. Log in to the controller node.2. Run the following command:
service openstack-ceilometer-collector restart
PowerVC quota exceededWhen you deploy an instance on PowerVC, you might see an error that the instance quota was exceeded.
SymptomsYou receive the following error when you deploy an instance on PowerVC.
NV-02B1F9F Quota exceeded for instances
Resolving the problemCheck the user's tenant and run the following command nova quota-update --instances <number><tenant of the user>
Chapter 10. Troubleshooting and support 319
where <number> is a larger number than the current value and <tenant of the user> is the tenant orproject ID to which the user belongs.
Installation fails after uninstallWhen you attempt to install IBM Cloud Manager with OpenStack on the deployment server, afterperforming an uninstall, the installation fails with a NONFATAL_ERROR during console and graphical userinterface mode installs or with a nonzero return code during silent mode installs.
SymptomsThe installation fails with a NONFATAL_ERROR during console and graphical user interface mode installs orwith a nonzero return code during silent mode installs after performing an uninstall.
CausesOccasionally, the IBM Cloud Manager with OpenStack uninstall process does not remove theopenstack-utils RPM. This symptom appears when the installation process attempts to install thispackage again. To verify this is the case, review the /tmp/cmwo-installer.log to determine whether theopenstack-utils was already installed. If a line similar to the following is found in the/tmp/cmwo-installer.log then this is the cause of the symptom:package openstack-utils-2014.1.1-201405072052.ibm.el6.15.noarch is already installed
If the symptom was caused for other reasons, contact your support representative.
Resolving the problemTo resolve the problem, complete the following steps.v Uninstall IBM Cloud Manager with OpenStack by running, cmwo_uninstall.v Uninstall the openstack-utils RPM by running, yum erase openstack-utils -y.v Install IBM Cloud Manager with OpenStack.
Cannot resize z/VM instance (self-service portal)You cannot resize a z/VM instance through IBM Cloud Manager with OpenStack.
SymptomsWhile you attempt to resize a z/VM instance through IBM Cloud Manager with OpenStack, it might takea long time and appear to fail.
CausesThe virtual machine status in the OpenStack command line displays the following message:VERIFY_RESIZE
However, you can access the virtual machine, and the virtual machine resize is successful. The resizeoperation can take a long time (for example, 2 hours or more), depending on the size of the virtualmachine. IBM Cloud Manager with OpenStack times out while waiting for the resize operation to finish.
Resolving the problemYou can extend the timeout value for this operation in the openstack.properties file. Modify thecom.ibm.cfs.cloud.openstack.client.wait.for.server.resize.timeout.in.seconds value.
Cannot resize PowerVC instanceYou cannot resize a PowerVC instance through IBM Cloud Manager with OpenStack.
SymptomsWhile you attempt to resize a PowerVC instance through IBM Cloud Manager with OpenStack, youmight receive an error similar to the following message.
320 IBM Cloud Manager with OpenStack: Administrator Guide, version 4.2
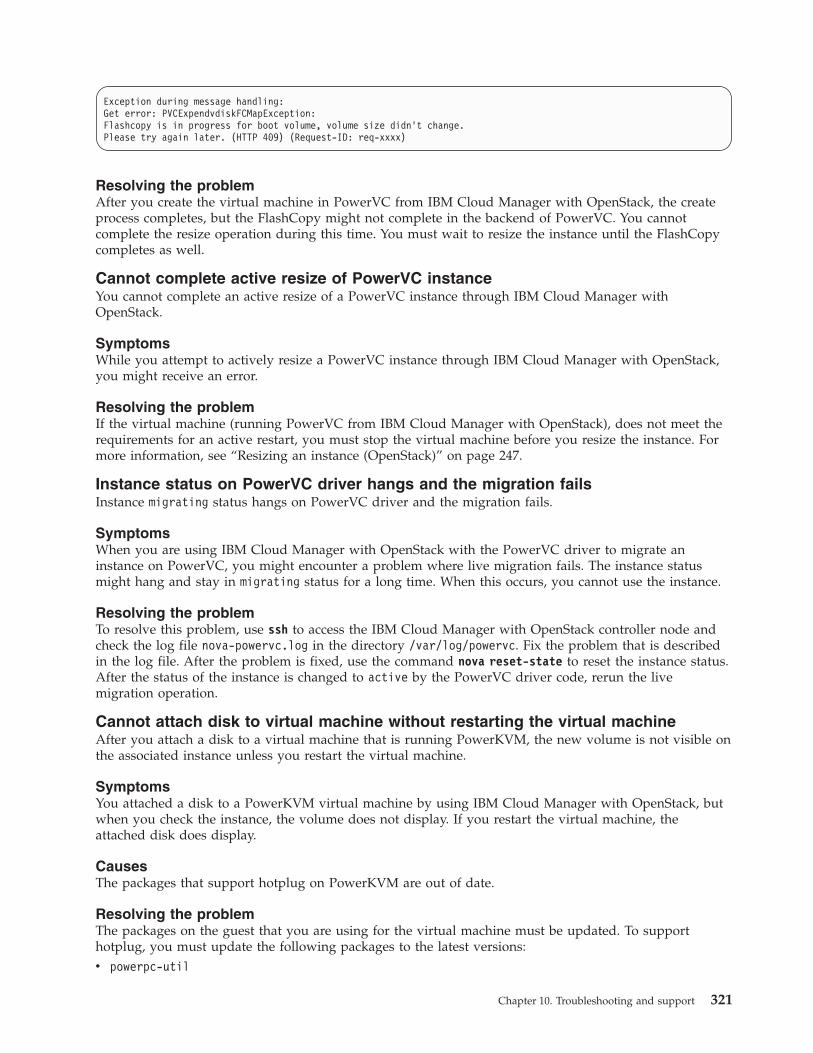
Exception during message handling:Get error: PVCExpendvdiskFCMapException:Flashcopy is in progress for boot volume, volume size didn’t change.Please try again later. (HTTP 409) (Request-ID: req-xxxx)
Resolving the problemAfter you create the virtual machine in PowerVC from IBM Cloud Manager with OpenStack, the createprocess completes, but the FlashCopy might not complete in the backend of PowerVC. You cannotcomplete the resize operation during this time. You must wait to resize the instance until the FlashCopycompletes as well.
Cannot complete active resize of PowerVC instanceYou cannot complete an active resize of a PowerVC instance through IBM Cloud Manager withOpenStack.
SymptomsWhile you attempt to actively resize a PowerVC instance through IBM Cloud Manager with OpenStack,you might receive an error.
Resolving the problemIf the virtual machine (running PowerVC from IBM Cloud Manager with OpenStack), does not meet therequirements for an active restart, you must stop the virtual machine before you resize the instance. Formore information, see “Resizing an instance (OpenStack)” on page 247.
Instance status on PowerVC driver hangs and the migration failsInstance migrating status hangs on PowerVC driver and the migration fails.
SymptomsWhen you are using IBM Cloud Manager with OpenStack with the PowerVC driver to migrate aninstance on PowerVC, you might encounter a problem where live migration fails. The instance statusmight hang and stay in migrating status for a long time. When this occurs, you cannot use the instance.
Resolving the problemTo resolve this problem, use ssh to access the IBM Cloud Manager with OpenStack controller node andcheck the log file nova-powervc.log in the directory /var/log/powervc. Fix the problem that is describedin the log file. After the problem is fixed, use the command nova reset-state to reset the instance status.After the status of the instance is changed to active by the PowerVC driver code, rerun the livemigration operation.
Cannot attach disk to virtual machine without restarting the virtual machineAfter you attach a disk to a virtual machine that is running PowerKVM, the new volume is not visible onthe associated instance unless you restart the virtual machine.
SymptomsYou attached a disk to a PowerKVM virtual machine by using IBM Cloud Manager with OpenStack, butwhen you check the instance, the volume does not display. If you restart the virtual machine, theattached disk does display.
CausesThe packages that support hotplug on PowerKVM are out of date.
Resolving the problemThe packages on the guest that you are using for the virtual machine must be updated. To supporthotplug, you must update the following packages to the latest versions:v powerpc-util
Chapter 10. Troubleshooting and support 321
v librtas
v ppc64-diag
To download the latest versions of the PowerKVM packages for your Linux distribution, see Index of/software/server/POWER/Linux/yum/IBM.
Two users within the same browserLogging in as two different users within the same browser shows only the most recent user.
Details
Different tabs or windows of the same browser instance share the same session and browser cookies sothe user does not really have two independent sessions. If a user logs in with two different user IDs atthe same time, the browser will use information based on that most recent login, and there is no clearindication that one just superseded the other. For example, if a user logs in as UserA in one browserwindow and UserB in another browser window, both windows are UserB, and all content and settingsdisplayed belong to UserB.
Solution
To log in as a different user with a browser, log out and close all browser instances before logging in asthe alternate user. To log in as two different users at the same time, two different browsers are needed,for example, Internet Explorer and Mozilla Firefox.
Delete of an instance while a storage flashcopy is running against the instancewill cause the delete to failAn IBM Cloud Manager with OpenStack instance cannot be deleted immediately after the same instancehas been deployed or captured.
Details
A recently deployed or captured IBM Cloud Manager with OpenStack instance has a status of "OK" andthe cloud manager instance status also shows "OK", but the storage flashcopy may still be in progress,and an attempt to delete the instance while the flashcopy is running will cause the delete to fail.
Solution
To prevent an error from happening on a delete soon after a deploy or capture, you must either monitorthe flashcopy until it ends, or wait for some conservative period of time, for example, 20 minutes, beforeattempting the delete.
The best way to tell if the flashcopy has finished is by accessing the storage subsystem user interface (UI).Here is how to use the Storwize storage subsystem UI to determine when the flashcopy is finished:1. Access Storwize UI.2. From IBM Cloud Manager with OpenStack, perform the deploy or capture.3. From the Storwize UI left navigation pane, select: Copy Services, then Flashcopy Mappings.
A flash copy should be in progress. If a flash copy is not in progress, wait for it to be displayed; inour testing the flashcopy usually appeared about 30-60 seconds after the IBM Cloud Manager withOpenStack deploy or capture was started.
4. Wait until the flash copy completes. Once the flash copy has completed, the IBM Cloud Manager withOpenStack instance can be deleted.
PKI error when adding OpenStack cloud with self-service portalYou encounter an error message when you attempt to add an OpenStack cloud to IBM Cloud Managerwith OpenStack using the self-service portal.
322 IBM Cloud Manager with OpenStack: Administrator Guide, version 4.2
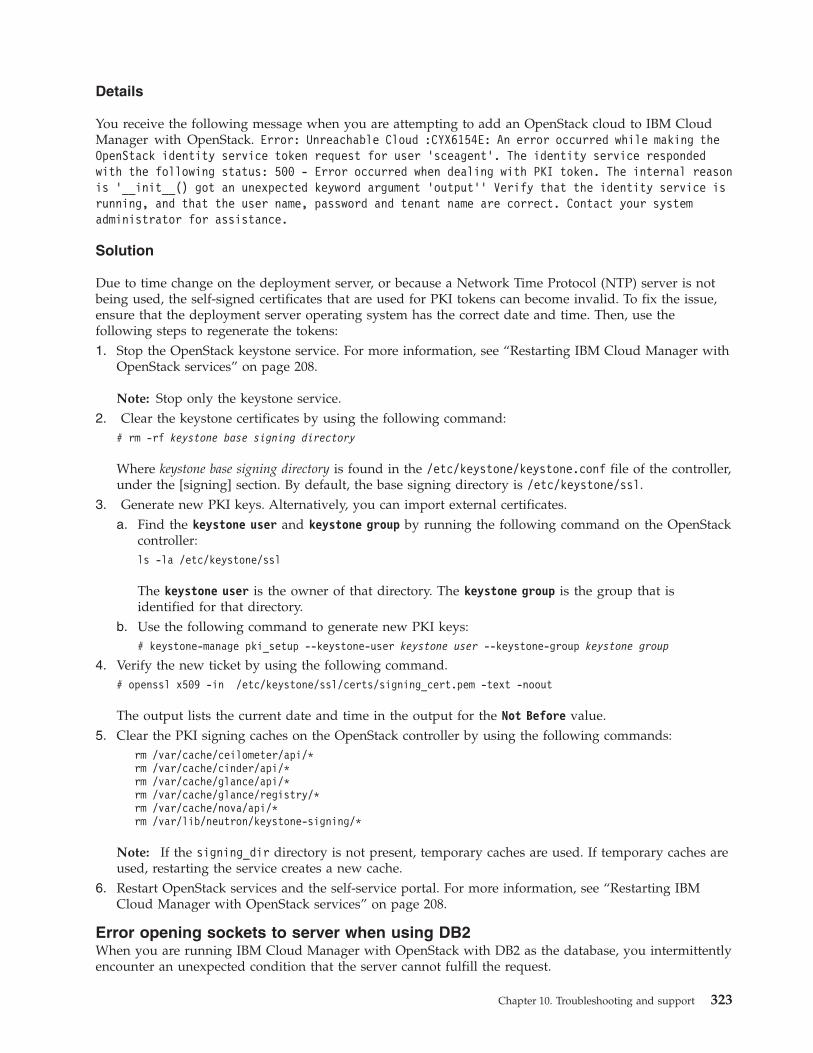
Details
You receive the following message when you are attempting to add an OpenStack cloud to IBM CloudManager with OpenStack. Error: Unreachable Cloud :CYX6154E: An error occurred while making theOpenStack identity service token request for user 'sceagent'. The identity service respondedwith the following status: 500 - Error occurred when dealing with PKI token. The internal reasonis '__init__() got an unexpected keyword argument 'output'' Verify that the identity service isrunning, and that the user name, password and tenant name are correct. Contact your systemadministrator for assistance.
Solution
Due to time change on the deployment server, or because a Network Time Protocol (NTP) server is notbeing used, the self-signed certificates that are used for PKI tokens can become invalid. To fix the issue,ensure that the deployment server operating system has the correct date and time. Then, use thefollowing steps to regenerate the tokens:1. Stop the OpenStack keystone service. For more information, see “Restarting IBM Cloud Manager with
OpenStack services” on page 208.
Note: Stop only the keystone service.2. Clear the keystone certificates by using the following command:
# rm -rf keystone base signing directory
Where keystone base signing directory is found in the /etc/keystone/keystone.conf file of the controller,under the [signing] section. By default, the base signing directory is /etc/keystone/ssl.
3. Generate new PKI keys. Alternatively, you can import external certificates.a. Find the keystone user and keystone group by running the following command on the OpenStack
controller:ls -la /etc/keystone/ssl
The keystone user is the owner of that directory. The keystone group is the group that isidentified for that directory.
b. Use the following command to generate new PKI keys:# keystone-manage pki_setup --keystone-user keystone user --keystone-group keystone group
4. Verify the new ticket by using the following command.# openssl x509 -in /etc/keystone/ssl/certs/signing_cert.pem -text -noout
The output lists the current date and time in the output for the Not Before value.5. Clear the PKI signing caches on the OpenStack controller by using the following commands:
rm /var/cache/ceilometer/api/*rm /var/cache/cinder/api/*rm /var/cache/glance/api/*rm /var/cache/glance/registry/*rm /var/cache/nova/api/*rm /var/lib/neutron/keystone-signing/*
Note: If the signing_dir directory is not present, temporary caches are used. If temporary caches areused, restarting the service creates a new cache.
6. Restart OpenStack services and the self-service portal. For more information, see “Restarting IBMCloud Manager with OpenStack services” on page 208.
Error opening sockets to server when using DB2When you are running IBM Cloud Manager with OpenStack with DB2 as the database, you intermittentlyencounter an unexpected condition that the server cannot fulfill the request.
Chapter 10. Troubleshooting and support 323
Details
The following specific error is displayed:The server encountered an unexpected condition which prevented it from fulfilling the request
If you check the IBM Cloud Manager with OpenStack log you might see an exception similar to thefollowing:[05/16/13 04:38:17:009] 33904 SEVERE: CYX1846E: Internal database error.<openjpa-2.1.0-r422266:1071316 fatal general error> org.apache.openjpa.persistence.PersistenceException: [jcc][t4][2043][11550][4.8.87] Exception java.net.NoRouteToHostException:Error opening socket to server localhost/127.0.0.1 on port 50,000 with message: Cannot assignrequested address. ERRORCODE=-4499, SQLSTATE=08001. Stack Trace: <openjpa-2.1.0-r422266:1071316fatal general error> org.apache.openjpa.persistence.PersistenceException:[jcc][t4][2043][11550][4.8.87] Exception java.net.NoRouteToHostException: Error opening socket toserver localhost/127.0.0.1 on port 50,000 with message: Cannot assign requested address.ERRORCODE=-4499, SQLSTATE=08001
DB2 socket connections in TIMED_WAIT state are exhausting the available ports for DB2 connections.Normally, the system releases sockets in TIMED_WAIT state after 2 minutes. However, in some cases, thiswait is too long and there are no more available sockets to use. You can reduce the amount of wait timeby adjusting the TIMED_WAIT reuse and recycle values on the IBM Cloud Manager with OpenStackserver.
Solution
To adjust the TIMED_WAIT reuse and recycle values on the controller node for the deployed topology,add the following to the /etc/sysctl.conf file:net.ipv4.tcp_tw_reuse = 1net.ipv4.tcp_tw_recycle = 1
Make the TIMED_WAIT reuse and recycle values effective by using the following command:/sbin/sysctl -p
Error occurs when installing qpidDuring the installation of IBM Cloud Manager with OpenStack or when deploying a cloud topology, youmight encounter an error that the Qpid package did not install correctly.
SymptomsDuring installation or when deploying a topology you might see an error similar to the following:
[2014-02-12T10:43:31-06:00] DEBUG: Chef::Exceptions::Exec: package[qpid-cpp-server](/var/chef/cache/cookbooks/qpid/providers/setup.rb line 15) had an error:Chef::Exceptions::Exec: returned 1, expected 0
CausesA conflict might exist with Red Hat Enterprise Linux GNOME Desktop Environment (gnote), KDEDesktop Environment (Akonadi - the PIM Storage Service), or another external package that depends onversion 1.41.0 of Boost C++ libraries.
Resolving the problemTo remove the conflict, identify and remove the conflicting package. Run the following command toidentify any conflicting packages:rpm -qa | grep -e "boost-.*-1\.41\.0.*" | xargs rpm --test -e
Then run the following command to remove any conflicting packages:yum remove "package_name"
324 IBM Cloud Manager with OpenStack: Administrator Guide, version 4.2
where package_name is the name of the conflicting package.
After any conflicting packages are removed, try the installation or deployment task again.
Installation fails when SSH is interruptedWhen attempting to install IBM Cloud Manager with OpenStack on the deployment server, theinstallation fails and you are unable to uninstall the product.
SymptomsYou might see an error similar to the following message: This Application has Unexpectedly Quit.
CausesInstallAnywhere cannot tolerate a Secure Shell (SSH) interruption. The results of the attemptedinstallation are unpredictable. The installation is incomplete and the uninstall utility is unusable.
Resolving the problemYou must manually clean up the system.1. Uninstall the Chef and Chef server RPMs if they were installed.2. Delete the /etc/chef and /etc/chef-server directories if they exist.3. Delete the /root/.chef directory if it exists.4. Delete the /opt/ibm/cmwo directory.5. Delete the /var/..com.zerog.registry.xml file if it exists. This file is the InstallAnywhere registry.6. Trying running the installation again
SSL connection error occurs when certificate expiresAn SSL connection error occurs due to an expired certificate.
SymptomsYou receive an SSL connection error.
CausesThe error can occur when your SSL certificate is expired.
Resolving the problemDetermine whether the certificate is expired. If it expired, you must delete the certificate and create a newcertificate with a specific expiration date. To resolve the problem, complete the following steps:1. Determine the name of your certificate by going to the following directory:
/etc/pki/
Run the following command:# certutil -L -d qpid/
Check the output for the name of the certificate, for example, qpidssl or openssl.2. Determine whether the certificate is expired by running the following command:
# certutil -V -n certificate_name -u C -d qpid/
where certificate_name is the name of your certificate.3. Determine the expiration date of the certificate by running the following command:
# certutil -L -d qpid/ -n certificate_name
4. Delete the expired certificate by running the following command:# certutil -D -d qpid/ qpid/cert.password -n certificate_name
5. Create a certificate by running the following command:
Chapter 10. Troubleshooting and support 325
# certutil -S -d ./qpid/ -n certificate_name -s ’CN=certificate_name’ -t ’CT,,’ -x -v 10-f ./qpid/cert.password -z /usr/bin/certutil
IBM Knowledge Center seems to cut off bottom of pageWhile you are browsing content about IBM Cloud Manager with OpenStack in IBM Knowledge Center,you encounter a page that seems to cut off part of the information at the bottom of the page.
SymptomsYou might see extra white space at the bottom of an IBM Knowledge Center topic that contains a table.The link to a parent topic might be missing.
CausesThe framework has a known issue.
Resolving the problemTry displaying the content in a different web browser.
Using IPv6 and Python version 2.6If you want to use the IPv6 management network and you are also using Python, version 2.6, you mightneed to patch Python with an update to version 2.6.
SymptomsFor example, you attempt to configure glance_api_servers in nova.conf to [2001:db8::22]:9696. You receiveen error similar to the following output:Traceback (most recent call last):
File "<stdin>", line 1, in <module>File "urlparse.py", line 105, in port
return int(port, 10)ValueError: invalid literal for int() with base 10: ’db8::22]:9696’
CausesThe root cause of this problem is that the urlparse lib in Python 2.6 does not parse IPv6 URLs correctly.
Resolving the problemTo resolve this issue, you must patch the Python 2.6 code to successfully parse the IPv6 managementnetwork URL. Use the following instructions to patch Python.1. For more information about the IPv6 URL parsing problem, see http://bugs.python.org/issue2987.2. For more information about the fix patch for the bug, see http://bugs.python.org/file10451/python-
urlparse-rfc2732-fix.patch.3. Find the following code in /usr/lib64/python2.6/urlparse.py:
@propertydef hostname(self):
netloc = self.netlocif "@" in netloc:
netloc = netloc.rsplit("@", 1)[1]if ":" in netloc:
netloc = netloc.split(":", 1)[0]return netloc.lower() or None
@propertydef port(self):
netloc = self.netlocif "@" in netloc:
netloc = netloc.rsplit("@", 1)[1]if ":" in netloc:
port = netloc.split(":", 1)[1]return int(port, 10)
return None
4. Change the bold lines in step 3 into:
326 IBM Cloud Manager with OpenStack: Administrator Guide, version 4.2
@propertydef hostname(self):
netloc = self.netlocif "@" in netloc:
netloc = netloc.rsplit("@", 1)[1]if netloc and netloc[-1] != ’]’ and ":" in netloc:
netloc = netloc.rsplit(":", 1)[0]return netloc.lower() or None
@propertydef port(self):
netloc = self.netlocif "@" in netloc:
netloc = netloc.rsplit("@", 1)[1]if netloc and netloc[-1] != ’]’ and ":" in netloc:
port = netloc.rsplit(":", 1)[1]return int(port, 10)
return None
5. If you need to apply the fix to more than one system, you can generate a patch by completing thefollowing steps:a. cp /usr/lib64/python2.6/urlparse.py /usr/lib64/python2.6/urlparse.py.ori
b. Update /usr/lib64/python2.6/urlparse.py according to the previous steps.c. Generate the patch by using the following command: diff /usr/lib64/python2.6/
urlparse.py.ori /usr/lib64/python2.6/urlparse.py > urlparse.patch
d. Apply the patch on other system by using the following command: patch /usr/lib64/python2.6/urlparse.py urlparse.patch
6. After the code is changed or the patch is applied, clean up the pyc and pyo files for urlparse.py:rm /usr/lib64/python2.6/urlparse.pycrm /usr/lib64/python2.6/urlparse.pyo
7. Restart the OpenStack services that are configured with IPv6 management network URLs.
Error viewing OpenStack resources with multiple regions (self-service portal)After you deploy a topology that uses multiple regions with the IBM Cloud Manager with OpenStackself-service portal enabled, you see errors when you attempt to list OpenStack resources.
SymptomsWhen you view OpenStack resources from the self-service portal, you encounter errors such as thefollowing:Failed to get the endpoint url of the volumes.
CausesPKI tokens are being used for the authentication strategy and the tokens have become too large.
Resolving the problemSwitch the authentication strategy to uuid by setting this value in your chef environment file:[’openstack’][’auth’][’strategy’] = ’uuid’
Then redeploy the topology.
Error logs about failure to connect to messaging queue serviceYou might briefly see error logs about a failure to connect to the messaging queue service whenOpenStack services start for the first time.
Chapter 10. Troubleshooting and support 327
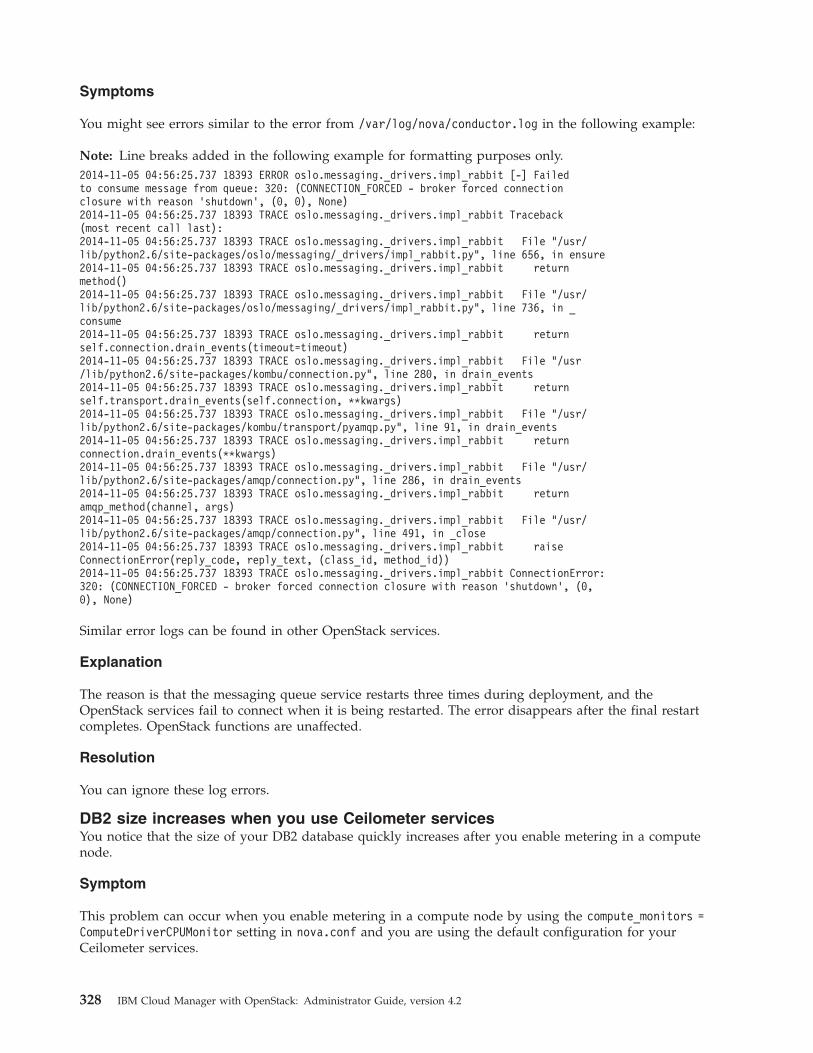
Symptoms
You might see errors similar to the error from /var/log/nova/conductor.log in the following example:
Note: Line breaks added in the following example for formatting purposes only.2014-11-05 04:56:25.737 18393 ERROR oslo.messaging._drivers.impl_rabbit [-] Failedto consume message from queue: 320: (CONNECTION_FORCED - broker forced connectionclosure with reason ’shutdown’, (0, 0), None)2014-11-05 04:56:25.737 18393 TRACE oslo.messaging._drivers.impl_rabbit Traceback(most recent call last):2014-11-05 04:56:25.737 18393 TRACE oslo.messaging._drivers.impl_rabbit File "/usr/lib/python2.6/site-packages/oslo/messaging/_drivers/impl_rabbit.py", line 656, in ensure2014-11-05 04:56:25.737 18393 TRACE oslo.messaging._drivers.impl_rabbit returnmethod()2014-11-05 04:56:25.737 18393 TRACE oslo.messaging._drivers.impl_rabbit File "/usr/lib/python2.6/site-packages/oslo/messaging/_drivers/impl_rabbit.py", line 736, in _consume2014-11-05 04:56:25.737 18393 TRACE oslo.messaging._drivers.impl_rabbit returnself.connection.drain_events(timeout=timeout)2014-11-05 04:56:25.737 18393 TRACE oslo.messaging._drivers.impl_rabbit File "/usr/lib/python2.6/site-packages/kombu/connection.py", line 280, in drain_events2014-11-05 04:56:25.737 18393 TRACE oslo.messaging._drivers.impl_rabbit returnself.transport.drain_events(self.connection, **kwargs)2014-11-05 04:56:25.737 18393 TRACE oslo.messaging._drivers.impl_rabbit File "/usr/lib/python2.6/site-packages/kombu/transport/pyamqp.py", line 91, in drain_events2014-11-05 04:56:25.737 18393 TRACE oslo.messaging._drivers.impl_rabbit returnconnection.drain_events(**kwargs)2014-11-05 04:56:25.737 18393 TRACE oslo.messaging._drivers.impl_rabbit File "/usr/lib/python2.6/site-packages/amqp/connection.py", line 286, in drain_events2014-11-05 04:56:25.737 18393 TRACE oslo.messaging._drivers.impl_rabbit returnamqp_method(channel, args)2014-11-05 04:56:25.737 18393 TRACE oslo.messaging._drivers.impl_rabbit File "/usr/lib/python2.6/site-packages/amqp/connection.py", line 491, in _close2014-11-05 04:56:25.737 18393 TRACE oslo.messaging._drivers.impl_rabbit raiseConnectionError(reply_code, reply_text, (class_id, method_id))2014-11-05 04:56:25.737 18393 TRACE oslo.messaging._drivers.impl_rabbit ConnectionError:320: (CONNECTION_FORCED - broker forced connection closure with reason ’shutdown’, (0,0), None)
Similar error logs can be found in other OpenStack services.
Explanation
The reason is that the messaging queue service restarts three times during deployment, and theOpenStack services fail to connect when it is being restarted. The error disappears after the final restartcompletes. OpenStack functions are unaffected.
Resolution
You can ignore these log errors.
DB2 size increases when you use Ceilometer servicesYou notice that the size of your DB2 database quickly increases after you enable metering in a computenode.
Symptom
This problem can occur when you enable metering in a compute node by using the compute_monitors =ComputeDriverCPUMonitor setting in nova.conf and you are using the default configuration for yourCeilometer services.
328 IBM Cloud Manager with OpenStack: Administrator Guide, version 4.2
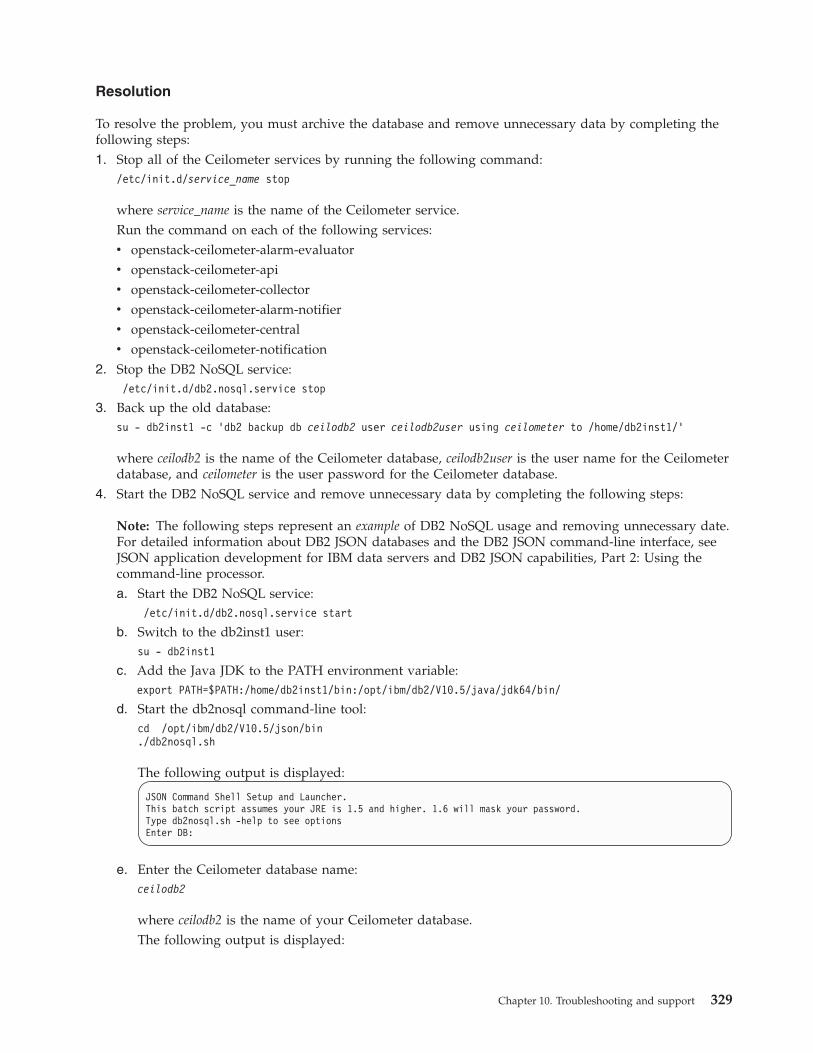
Resolution
To resolve the problem, you must archive the database and remove unnecessary data by completing thefollowing steps:1. Stop all of the Ceilometer services by running the following command:
/etc/init.d/service_name stop
where service_name is the name of the Ceilometer service.Run the command on each of the following services:v openstack-ceilometer-alarm-evaluatorv openstack-ceilometer-apiv openstack-ceilometer-collectorv openstack-ceilometer-alarm-notifierv openstack-ceilometer-centralv openstack-ceilometer-notification
2. Stop the DB2 NoSQL service:/etc/init.d/db2.nosql.service stop
3. Back up the old database:su - db2inst1 -c ’db2 backup db ceilodb2 user ceilodb2user using ceilometer to /home/db2inst1/’
where ceilodb2 is the name of the Ceilometer database, ceilodb2user is the user name for the Ceilometerdatabase, and ceilometer is the user password for the Ceilometer database.
4. Start the DB2 NoSQL service and remove unnecessary data by completing the following steps:
Note: The following steps represent an example of DB2 NoSQL usage and removing unnecessary date.For detailed information about DB2 JSON databases and the DB2 JSON command-line interface, seeJSON application development for IBM data servers and DB2 JSON capabilities, Part 2: Using thecommand-line processor.a. Start the DB2 NoSQL service:
/etc/init.d/db2.nosql.service start
b. Switch to the db2inst1 user:su - db2inst1
c. Add the Java JDK to the PATH environment variable:export PATH=$PATH:/home/db2inst1/bin:/opt/ibm/db2/V10.5/java/jdk64/bin/
d. Start the db2nosql command-line tool:cd /opt/ibm/db2/V10.5/json/bin./db2nosql.sh
The following output is displayed:
JSON Command Shell Setup and Launcher.This batch script assumes your JRE is 1.5 and higher. 1.6 will mask your password.Type db2nosql.sh -help to see optionsEnter DB:
e. Enter the Ceilometer database name:ceilodb2
where ceilodb2 is the name of your Ceilometer database.The following output is displayed:
Chapter 10. Troubleshooting and support 329
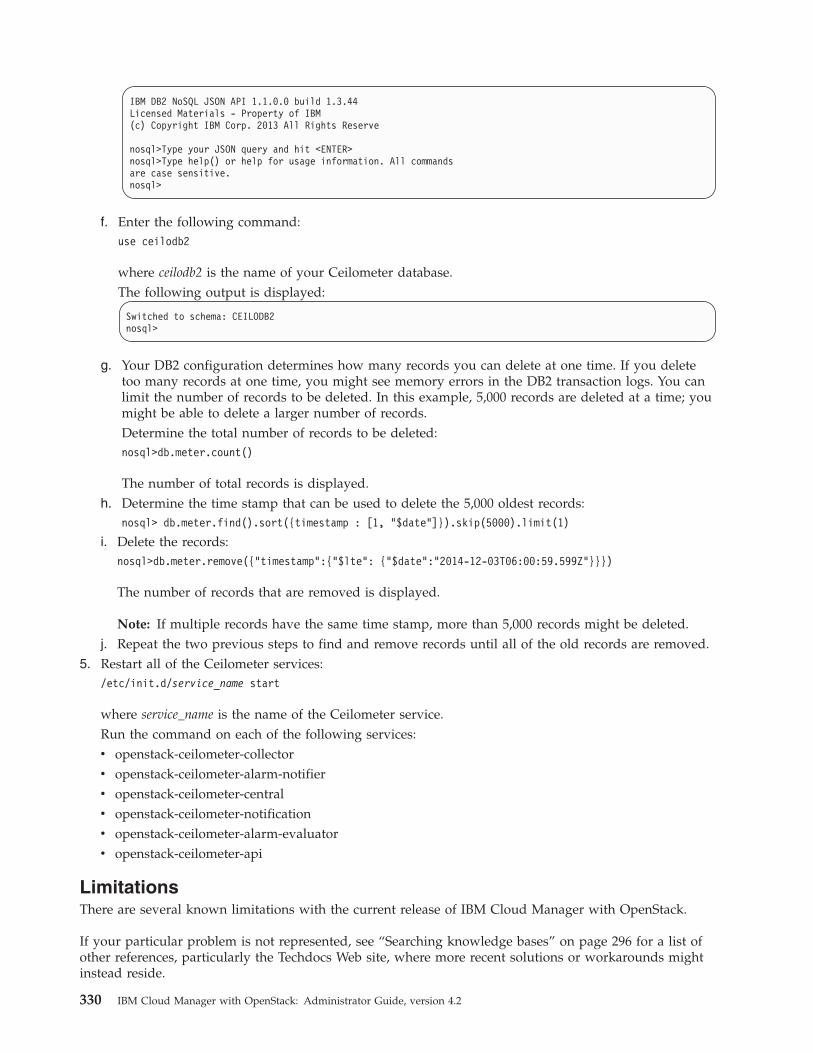
IBM DB2 NoSQL JSON API 1.1.0.0 build 1.3.44Licensed Materials - Property of IBM(c) Copyright IBM Corp. 2013 All Rights Reserve
nosql>Type your JSON query and hit <ENTER>nosql>Type help() or help for usage information. All commandsare case sensitive.nosql>
f. Enter the following command:use ceilodb2
where ceilodb2 is the name of your Ceilometer database.The following output is displayed:
Switched to schema: CEILODB2nosql>
g. Your DB2 configuration determines how many records you can delete at one time. If you deletetoo many records at one time, you might see memory errors in the DB2 transaction logs. You canlimit the number of records to be deleted. In this example, 5,000 records are deleted at a time; youmight be able to delete a larger number of records.Determine the total number of records to be deleted:nosql>db.meter.count()
The number of total records is displayed.h. Determine the time stamp that can be used to delete the 5,000 oldest records:
nosql> db.meter.find().sort({timestamp : [1, "$date"]}).skip(5000).limit(1)
i. Delete the records:nosql>db.meter.remove({"timestamp":{"$lte": {"$date":"2014-12-03T06:00:59.599Z"}}})
The number of records that are removed is displayed.
Note: If multiple records have the same time stamp, more than 5,000 records might be deleted.j. Repeat the two previous steps to find and remove records until all of the old records are removed.
5. Restart all of the Ceilometer services:/etc/init.d/service_name start
where service_name is the name of the Ceilometer service.Run the command on each of the following services:v openstack-ceilometer-collectorv openstack-ceilometer-alarm-notifierv openstack-ceilometer-centralv openstack-ceilometer-notificationv openstack-ceilometer-alarm-evaluatorv openstack-ceilometer-api
LimitationsThere are several known limitations with the current release of IBM Cloud Manager with OpenStack.
If your particular problem is not represented, see “Searching knowledge bases” on page 296 for a list ofother references, particularly the Techdocs Web site, where more recent solutions or workarounds mightinstead reside.
330 IBM Cloud Manager with OpenStack: Administrator Guide, version 4.2
IPv6 limitation with deploymentYou can deploy the OpenStack components in an IPv6-supported environment and then, configure IPv6on the OpenStack components.
However, due to limitations with InstallAnywhere and Chef, you cannot deploy an IPv6-configuredOpenStack environment directly through the IBM Cloud Manager with OpenStack deployment process.Using the deployment process, you can install an IPv4 environment only.
Commands fail after DB2 restartedYou might experience problems when you run commands after the database is restarted.
Symptom
If the database (whether DB2 or mysql) is restarted, it is possible that the OpenStack command lines failto return results, even after several attempts.
Resolution
Run the command again and it works after several attempts.
Cannot create images (Glance) with Unicode valuesIf you encounter issues when you create an image, ensure that you are not using Unicode propertyvalues.
There cannot be any Unicode property values within uploaded Glance images. The limitation also appliesto any headers for an image request.
Messaging service limitation when deployment server and IBM Cloud Managerwith OpenStack controller are on same serverYou must use the Qpid messaging service if your deployment server and the IBM Cloud Manager withOpenStack controller are on the same server.
When the deployment server is on the same server as the IBM Cloud Manager with OpenStack controller,the controller cannot be restarted due to a port conflict after the operating system is restarted. Thislimitation occurs because the configuration file used by the rabbitmq-server in the deployment serverand the configuration file that is deployed by IBM Cloud Manager with OpenStack are in the samelocation.
In this configuration, you must use the qpid messaging service.
Note: In addition, this configuration must be used for evaluation purposes only.
In IBM Cloud Manager with OpenStack version 4.2, the rabbitmq messaging service is the default.Therefore, you must switch from the RabbitMQ messaging service to the Qpid messaging service beforeyou deploy IBM Cloud Manager with OpenStack. For instructions, see “Customizing the messagingservice attributes” on page 123.
VLAN networks must have unique IDsIBM Cloud Manager with OpenStack only supports VLAN networks that have different IDs.
With PowerVC, you can create different VLAN networks with the same VLAN ID. However, IBM CloudManager with OpenStack does not support this configuration. In this situation, IBM Cloud Manager withOpenStack only creates one VLAN.
Chapter 10. Troubleshooting and support 331
Billing limitation with OpenStack Cinder serviceIn the IBM Cloud Manager with OpenStack self-service portal, there is a limitation when you use theCinder service with the billing function.
SymptomsBilling does not work with the volume configurable product if you use the Cinder service API, version 1.
Resolving the problemIf you want to use the billing function for volumes, you must use the Cinder service API, version 2.
Starting IBM Cloud Manager with OpenStack on a high scale cloudWhen starting or restarting IBM Cloud Manager with OpenStack on a high scale cloud, thesynchronization between IBM Cloud Manager with OpenStack and the cloud may take longer thanexpected. This resynchronization may cause operations such as deploying, deleting, or resizing aninstance to be delayed or even fail. Wait for the synchronization to complete before attempting theseactions.
Limitations when using VMware within the self-service portalv The vCenter linked mode is not supported due to limited testing. You are responsible for any errors
while you are using linked vCenters mode.v The size of a virtual disk can be increased either at deployment time or through the IBM Cloud
Manager with OpenStack self-service portal resize function. This increases the size of the disk,however, the guest file system is not changed and does not automatically use the increased size. Toincrease the guest file system to use the larger disk size, see the VMware documentation and guestoperating system documentation.
v If your virtual system disks contain a Logical Volume Manager, then you must install VMware Toolsinside the guest so that vCenter can customize the image during the deploy operation. For moreinformation about LVM support, see the VMware documentation.
v All snapshots must be integrated before you create a template.v Preferably, use shared storage for the hosts that are part of a cluster deployment target. If this is not
possible, then remove hosts from the cluster while they are in maintenance mode. This prevents thedefault storage selection algorithm from selecting a data store that is only available from the host inmaintenance mode. Selecting such a data store would cause a deployment to fail. For more informationabout the default storage selection algorithm, see “VMware datastore assignment during deployment”on page 179.
VMware capture instance:
The capture instance function is implemented using the VMware clone to template feature. The IBMCloud Manager with OpenStack allows you to configure the optional properties in vmware.properties forcontrolling where the new template is created when a capture request is initiated:
com.ibm.cfs.cloud.vmware.capture.image.datastore.namesDatastore(s) used when capturing the image of an instance, for example when creating atemplate. This list is a series of datastore names separated by commas.
com.ibm.cfs.cloud.vmware.capture.image.destination.nameThe destination host or cluster for where the new template will be placed.
com.ibm.cfs.cloud.vmware.capture.image.destination.typeThe type of the destination for the new template, either HOST or CLUSTER.
com.ibm.cfs.cloud.vmware.capture.image.folderThe folder path for where to place the new template, for example, . /DatacenterName/vm/FolderName.
332 IBM Cloud Manager with OpenStack: Administrator Guide, version 4.2

If these properties are not specified, the default behavior is to create the new template in the samelocation as the existing virtual machine.
VMware storage:
v When attaching a new storage volume in a cloud using VMware vCenter Server cloud, the space inassigned storage name will be ignored in the attached storage volume.
Include only ASCII characters in configuration filesWhen editing self-service portal configuration files, only use ASCII characters. If non-ASCII characters areused, the original characters are not preserved and display as garbled text in the IBM Cloud Managerwith OpenStack self-service portal user interface. The configuration files include all the .properties files inthe home directory.
Disk resize supportIn a Shared Storage Pool environment, changing the disk size when deploying is not supported. Inaddition, when deploying an IBM i workload, disk resize is not available. In these cases, the disk sizeproperty is not displayed in the output of POST /cloud/api/workload and the disk resize field is notdisplayed on the Advanced deployment window.
Limitation when you use characters other than printable ASCII charactersLimitations apply when you use characters that are not printable ASCII characters for IBM CloudManager with OpenStack operations. You must use only printable ASCII characters because Python 2.Xsupports only printable ASCII characters.
Examples:v You use Chinese characters to try to create, edit, or update a volume. You receive a warning that
indicates that there are too many characters, or you receive an error that states that the operationcannot complete. Try the operation again, but ensure that you use printable ASCII characters instead ofChinese characters.
v You might encounter a problem when you run the following command:cinder list --display-name display-name
when display-name is composed of characters that are not printable ASCII characters. Ensure that youuse printable ASCII characters for display-name.
v When you install IBM Cloud Manager with OpenStack, the path to the installer must contain onlyprintable ASCII characters.
Unable to restore a virtual server with fixed VHD typeWhen a virtual server is deployed by using an image with a fixed VHD type on Hyper-V, that virtualserver cannot be successfully restored after a backup.
The limitation is due to the following error condition:CYX6161E: An error occurred at ’2013-05-06T21:05:04Z’ for virtual machine with identifier’fd319c6e-91e9-4350-b896-9fdcd3236282’. The error code is ’500’. The detailed error is:ImageTooLarge - Image is larger than instance type allowsFile "C:\Program Files (x86)\IBM\SmartCloud Entry\Hyper-V Agent\Python27\lib\site-packages\nova\compute\manager.py", line 230, in decorated_functionreturn function(self, context, *args, **kwargs)File "C:\Program Files (x86)\IBM\SmartCloud Entry\Hyper-V Agent\Python27\lib\site-packages\nova\compute\manager.py", line 1230, in run_instancedo_run_instance()File "C:\Program Files (x86)\IBM\SmartCloud Entry\Hyper-V Agent\Python27\lib\site-packages\nova\openstack\common\lockutils.py", line 242, in innerretval = f(*args, **kwargs)File "C:\Program Files (x86)\IBM\SmartCloud Entry\Hyper-V Agent\Python27\lib\site-packages\nova\compute\manager.py", line 1229, in do_run_instanceadmin_password, is_first_time, node, instance)File "C:\Program Files (x86)\IBM\SmartCloud Entry\Hyper-V Agent\Python27\lib\site-packages\
Chapter 10. Troubleshooting and support 333
nova\compute\manager.py", line 877, in _run_instanceself._set_instance_error_state(context,instance[’uuid’])File "C:\Program Files (x86)\IBM\SmartCloud Entry\Hyper-V Agent\Python27\lib\contextlib.py",line 24, in __exit__self.gen.next()File "C:\Program Files (x86)\IBM\SmartCloud Entry\Hyper-V Agent\Python27\lib\site-packages\nova\compute\manager.py",line 798, in _run_instanceimage_meta = self._check_image_size(context, instance)File "C:\Program Files (x86)\IBM\SmartCloud Entry\Hyper-V Agent\Python27\lib\site-packages\nova\compute\manager.py", line 1040, in _check_image_sizeraise exception.ImageTooLarge()Instance could no longer be found in the Cloud.It could have been purposely deleted from the Cloud.
This issue is tracked at https://bugs.launchpad.net/nova/+bug/1177927.
Validation errors when updating a configuration strategyWhen you update the configuration strategy for an image, all fields on the page are validated after youselect a local file for the template, user metadata, or mapping. If any of the fields are not valid, an errormessage displays. Error messages display even if you have not yet provided a value for a required field,such as the mapping field. Proceed by specifying the required fields.
Problem choosing correct datastore during concurrent deployments (VMwarevCenter)The IBM Cloud Manager with OpenStack self-service portal is unable to choose the correct targetdatastore if VMware vCenter does not provide real-time datastore usage information.
VMware vCenter does not refresh the data of datastore usage before cloning is completed. When you runconcurrent deployments, if VMware vCenter cannot provide real-time datastore usage, IBM CloudManager with OpenStack self-service portal cannot decide the correct target datastore under concurrentdeployment scenario. As a result, the datastore is not enough when the concurrent deployments need atotal datastore resource that is bigger than the datastore nodes left. With insufficient resources,deployments fail as the resources do not meet the minimum amounts. The self-service portal tries tosuggest other datastore nodes. It attempts three times, by default. If you want to configure a valuegreater than three, open the vmware.properties file and add the following line:"com.ibm.vmware.client.clone.retry.attempts=5", for example.
The failed virtual machine sends a log to the self-service portal interface, as follows:The following instance logs were found in the Cloud. CYX0886E: Unable to determine if the deployedvirtual machine ’*’ is started and ready for use in the allotted time of 2,700 seconds.The deployed virtual machine may still be starting or may have had customization problems.Check the log and the virtual machine for more information.If the virtual machine was started and is ready for use,increase the wait time in the vmware.properties file."
XFS dependency packages required for SwiftIf you want to use Swift on an IBM Power system or System z system that is running IBM CloudManager with OpenStack, you must first manually install several XFS file system packages.
SymptomsBefore you can use Swift with IBM Cloud Manager with OpenStack on an IBM Power system or Systemz system, you must locate and install several XFS file system packages.
Resolving the problemThe XFS packages that are required to run Swift on an IBM Power system or System z system with IBMCloud Manager with OpenStack are included in the following list:v xfsdumpv xfsprogs-devel
334 IBM Cloud Manager with OpenStack: Administrator Guide, version 4.2
v xfsprogs
Locate and install these XFS file system packages before attempting to run Swift on an IBM Power systemor System z system with IBM Cloud Manager with OpenStack.
Migration information not availableYou cannot find instructions for migrating from IBM SmartCloud Entry, version 3.2 to IBM CloudManager with OpenStack, version 4.2.
SymptomsYou are not able to locate instructions for migrating from IBM SmartCloud Entry, version 3.2 to IBMCloud Manager with OpenStack, version 4.2.
CausesInstructions for migrating from IBM SmartCloud Entry, version 3.2 to IBM Cloud Manager withOpenStack, version 4.2 are not available at this time.
Known problems and solutions for a UserIf you are using IBM Cloud Manager with OpenStack with the User role, review theses known problemsand solutions that you might encounter.
Cached displayWhen you install or upgrade to IBM Cloud Manager with OpenStack, your browser might not update theimages from a previous version of the software.
Be sure to clear your browser’s cache after you upgrade to, or install, IBM Cloud Manager withOpenStack.
Saving image exceptionIf the virtual machine is not created by the current IBM Cloud Manager with OpenStack, you receive anerror message when you save an image backup of the virtual machine.
IBM Cloud Manager with OpenStack requires the details of the virtual machine to create an imagebackup. If this error occurs, you receive the following message:CYX4755E: Instance "instance name" does not have a customization and its virtual machine cannot be saved.
Note: Instance name is the name of the instance that contains the virtual machine.
Error message languageSome error messages appear in a language other than the language that you set for the IBM CloudManager with OpenStack user interface.
These error messages appear in the language set in your operating system. If the error message does notappear in the language that you want, verify your settings in both the IBM Cloud Manager withOpenStack user interface and the operating system.
Internet Explorer displayWhen you are using IBM Cloud Manager with OpenStack in Internet Explorer 9, 10, or Internet Explorer11, you might see that layout and formatting makes the screen difficult to navigate.
When you are accessing IBM Cloud Manager with OpenStack with Internet Explorer 9, 10, or InternetExplorer 11, the browser might render the web user interface in Compatibility View mode by default.
Chapter 10. Troubleshooting and support 335
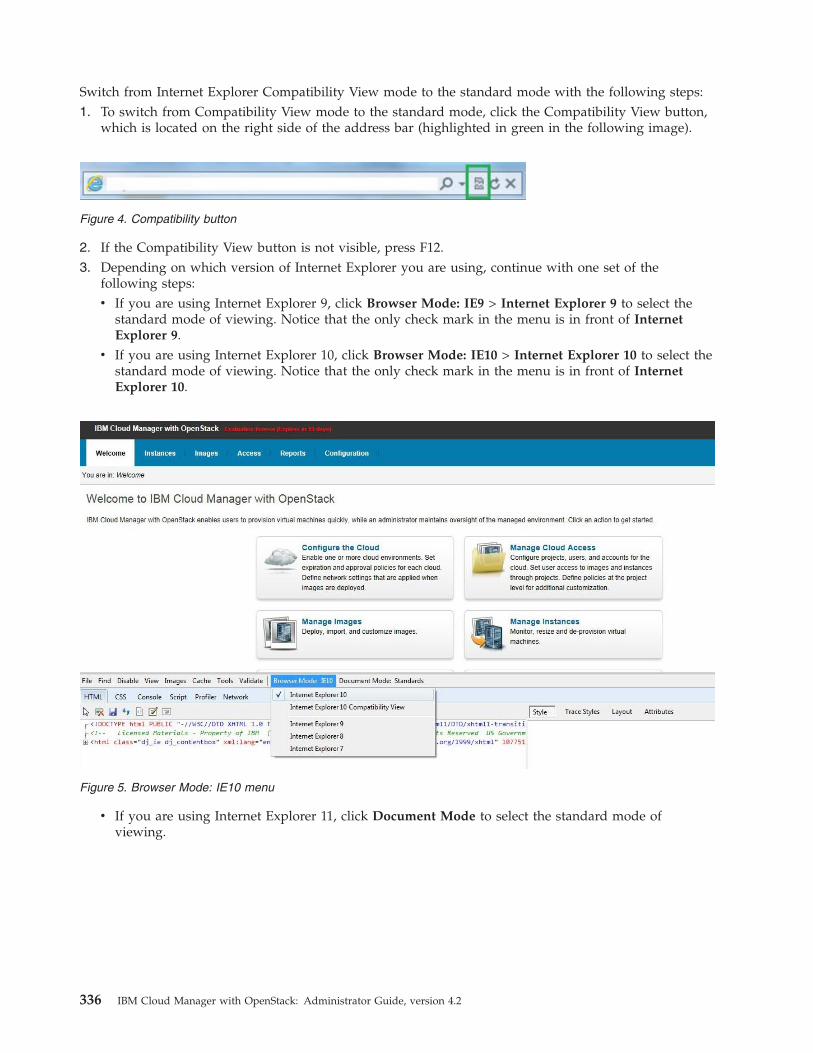
Switch from Internet Explorer Compatibility View mode to the standard mode with the following steps:1. To switch from Compatibility View mode to the standard mode, click the Compatibility View button,
which is located on the right side of the address bar (highlighted in green in the following image).
2. If the Compatibility View button is not visible, press F12.3. Depending on which version of Internet Explorer you are using, continue with one set of the
following steps:v If you are using Internet Explorer 9, click Browser Mode: IE9 > Internet Explorer 9 to select the
standard mode of viewing. Notice that the only check mark in the menu is in front of InternetExplorer 9.
v If you are using Internet Explorer 10, click Browser Mode: IE10 > Internet Explorer 10 to select thestandard mode of viewing. Notice that the only check mark in the menu is in front of InternetExplorer 10.
v If you are using Internet Explorer 11, click Document Mode to select the standard mode ofviewing.
Figure 4. Compatibility button
Figure 5. Browser Mode: IE10 menu
336 IBM Cloud Manager with OpenStack: Administrator Guide, version 4.2
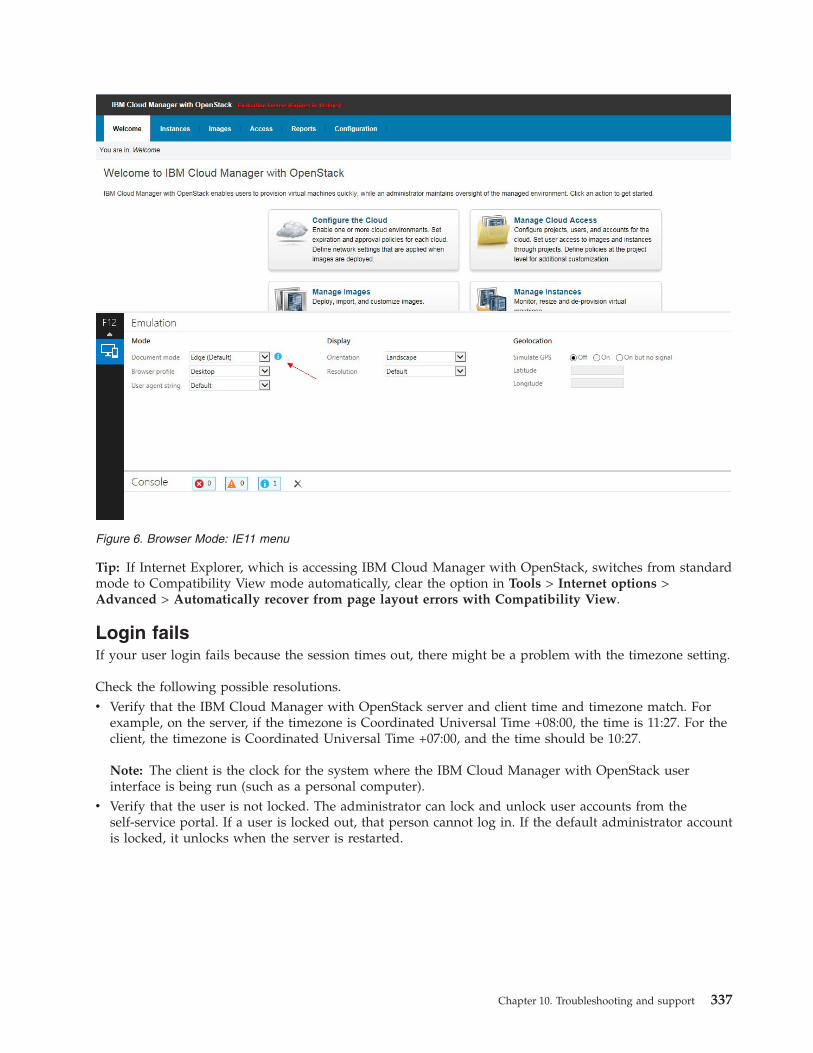
Tip: If Internet Explorer, which is accessing IBM Cloud Manager with OpenStack, switches from standardmode to Compatibility View mode automatically, clear the option in Tools > Internet options >Advanced > Automatically recover from page layout errors with Compatibility View.
Login failsIf your user login fails because the session times out, there might be a problem with the timezone setting.
Check the following possible resolutions.v Verify that the IBM Cloud Manager with OpenStack server and client time and timezone match. For
example, on the server, if the timezone is Coordinated Universal Time +08:00, the time is 11:27. For theclient, the timezone is Coordinated Universal Time +07:00, and the time should be 10:27.
Note: The client is the clock for the system where the IBM Cloud Manager with OpenStack userinterface is being run (such as a personal computer).
v Verify that the user is not locked. The administrator can lock and unlock user accounts from theself-service portal. If a user is locked out, that person cannot log in. If the default administrator accountis locked, it unlocks when the server is restarted.
Figure 6. Browser Mode: IE11 menu
Chapter 10. Troubleshooting and support 337

338 IBM Cloud Manager with OpenStack: Administrator Guide, version 4.2
Accessibility
IBM Cloud Manager with OpenStack does not interfere with the accessibility features for supportedbrowsers. For a comprehensive list of accessibility features please visit the accessibility support page forthe supported browser that you are using. For a list of supported browsers, see Supported web browsers.
No hardcopy publications are shipped with this program. The IBM Knowledge Center is a worldwidecentral repository of IBM technical publications hosted in a single application, located at a single URL:
http://www-01.ibm.com/support/knowledgecenter/
Find and navigate technical content more efficiently and easily with improved search, filtering and userexperience. Create your own collections of IBM documents with PDF output on-demand.
Note: You can find the IBM Cloud OpenStack Platform product collection here:
http://www-01.ibm.com/support/knowledgecenter/SSUTA8/welcome
When you send information to IBM, you grant IBM a nonexclusive right to use or distribute theinformation in any way it believes appropriate without incurring any obligation to you.
© Copyright IBM Corp. 2012, 2014 339

340 IBM Cloud Manager with OpenStack: Administrator Guide, version 4.2
Notices
This information was developed for products and services offered in the U.S.A. This material may beavailable from IBM in other languages. However, you may be required to own a copy of the product orproduct version in that language in order to access it.
IBM may not offer the products, services, or features discussed in this document in other countries.Consult your local IBM representative for information on the products and services currently available inyour area. Any reference to an IBM product, program, or service is not intended to state or imply thatonly that IBM product, program, or service may be used. Any functionally equivalent product, program,or service that does not infringe any IBM intellectual property right may be used instead. However, it isthe user's responsibility to evaluate and verify the operation of any non-IBM product, program, orservice.
IBM may have patents or pending patent applications covering subject matter described in thisdocument. The furnishing of this document does not grant you any license to these patents. You can sendlicense inquiries, in writing, to:
IBM Director of LicensingIBM CorporationNorth Castle DriveArmonk, NY 10504-1785U.S.A.
For license inquiries regarding double-byte character set (DBCS) information, contact the IBM IntellectualProperty Department in your country or send inquiries, in writing, to:
Intellectual Property LicensingLegal and Intellectual Property LawIBM Japan Ltd.1623-14, Shimotsuruma, Yamato-shiKanagawa 242-8502 Japan
The following paragraph does not apply to the United Kingdom or any other country where suchprovisions are inconsistent with local law: INTERNATIONAL BUSINESS MACHINES CORPORATIONPROVIDES THIS PUBLICATION "AS IS" WITHOUT WARRANTY OF ANY KIND, EITHER EXPRESS ORIMPLIED, INCLUDING, BUT NOT LIMITED TO, THE IMPLIED WARRANTIES OFNON-INFRINGEMENT, MERCHANTABILITY OR FITNESS FOR A PARTICULAR PURPOSE. Somestates do not allow disclaimer of express or implied warranties in certain transactions, therefore, thisstatement may not apply to you.
This information could include technical inaccuracies or typographical errors. Changes are periodicallymade to the information herein; these changes will be incorporated in new editions of the publication.IBM may make improvements and/or changes in the product(s) and/or the program(s) described in thispublication at any time without notice.
Any references in this information to non-IBM Web sites are provided for convenience only and do not inany manner serve as an endorsement of those Web sites. The materials at those Web sites are not part ofthe materials for this IBM product and use of those Web sites is at your own risk.
IBM may use or distribute any of the information you supply in any way it believes appropriate withoutincurring any obligation to you.
© Copyright IBM Corp. 2012, 2014 341
Licensees of this program who wish to have information about it for the purpose of enabling: (i) theexchange of information between independently created programs and other programs (including thisone) and (ii) the mutual use of the information which has been exchanged, should contact:
IBM CorporationDept. LRAS/Bldg. 90311501 Burnet RoadAustin, TX 78758-3400U.S.A.
Such information may be available, subject to appropriate terms and conditions, including in some cases,payment of a fee.
The licensed program described in this document and all licensed material available for it are providedby IBM under terms of the IBM Customer Agreement, IBM International Program License Agreement,IBM License Agreement for Machine Code, or any equivalent agreement between us.
Any performance data contained herein was determined in a controlled environment. Therefore, theresults obtained in other operating environments may vary significantly. Some measurements may havebeen made on development-level systems and there is no guarantee that these measurements will be thesame on generally available systems. Furthermore, some measurements may have been estimated throughextrapolation. Actual results may vary. Users of this document should verify the applicable data for theirspecific environment.
Information concerning non-IBM products was obtained from the suppliers of those products, theirpublished announcements or other publicly available sources. IBM has not tested those products andcannot confirm the accuracy of performance, compatibility or any other claims related to non-IBMproducts. Questions on the capabilities of non-IBM products should be addressed to the suppliers ofthose products.
All statements regarding IBM's future direction or intent are subject to change or withdrawal withoutnotice, and represent goals and objectives only.
All IBM prices shown are IBM's suggested retail prices, are current and are subject to change withoutnotice. Dealer prices may vary.
This information is for planning purposes only. The information herein is subject to change before theproducts described become available.
This information contains examples of data and reports used in daily business operations. To illustratethem as completely as possible, the examples include the names of individuals, companies, brands, andproducts. All of these names are fictitious and any similarity to the names and addresses used by anactual business enterprise is entirely coincidental.
COPYRIGHT LICENSE:
This information contains sample application programs in source language, which illustrate programmingtechniques on various operating platforms. You may copy, modify, and distribute these sample programsin any form without payment to IBM, for the purposes of developing, using, marketing or distributingapplication programs conforming to the application programming interface for the operating platform forwhich the sample programs are written. These examples have not been thoroughly tested under allconditions. IBM, therefore, cannot guarantee or imply reliability, serviceability, or function of theseprograms. The sample programs are provided "AS IS", without warranty of any kind. IBM shall not beliable for any damages arising out of your use of the sample programs.
342 IBM Cloud Manager with OpenStack: Administrator Guide, version 4.2

Each copy or any portion of these sample programs or any derivative work, must include a copyrightnotice as follows:
© IBM Corp. 2014. Portions of this code are derived from IBM Corp. Sample Programs. © Copyright IBMCorp. 2012, 2014.
If you are viewing this information in softcopy, the photographs and color illustrations may not appear.
TrademarksIBM, the IBM logo, and ibm.com are trademarks or registered trademarks of International BusinessMachines Corporation in the United States, other countries, or both. If these and other IBM trademarkedterms are marked on their first occurrence in this information with a trademark symbol (® and ™), thesesymbols indicate U.S. registered or common law trademarks owned by IBM at the time this informationwas published. Such trademarks may also be registered or common law trademarks in other countries. Acurrent list of IBM trademarks is available on the Web at Copyright and trademark information atwww.ibm.com/legal/copytrade.shtml
Adobe, the Adobe logo, PostScript, and the PostScript logo are either registered trademarks or trademarksof Adobe Systems Incorporated in the United States, and/or other countries.
Intel, Intel logo, Intel Inside, Intel Inside logo, Intel Centrino, Intel Centrino logo, Celeron, Intel Xeon,Intel SpeedStep, Itanium, and Pentium are trademarks or registered trademarks of Intel Corporation or itssubsidiaries in the United States and other countries.
Java and all Java-based trademarks and logos are trademarks or registered trademarks of Oracleand/or its affiliates.
Linux is a trademark of Linus Torvalds in the United States, other countries, or both.
Microsoft, Windows, Windows NT, and the Windows logo are trademarks of Microsoft Corporation in theUnited States, other countries, or both.
UNIX is a registered trademark of The Open Group in the United States and other countries.
Other company, product, or service names may be trademarks or service marks of others.
Privacy policy considerationsIBM Software products, including software as a service solutions, (“Software Offerings”) may use cookiesor other technologies to collect product usage information, to help improve the end user experience, totailor interactions with the end user or for other purposes. In many cases no personally identifiableinformation is collected by the Software Offerings. Some of our Software Offerings can help enable you tocollect personally identifiable information. If this Software Offering uses cookies to collect personallyidentifiable information, specific information about this offering’s use of cookies is set forth below.
Depending upon the configurations deployed, this Software Offering may use session and persistentcookies that collect each user’s user name and password for purposes of session management,authentication, and enhanced user usability. These cookies cannot be disabled.
Notices 343

If the configurations deployed for this Software Offering provide you as customer the ability to collectpersonally identifiable information from end users via cookies and other technologies, you should seekyour own legal advice about any laws applicable to such data collection, including any requirements fornotice and consent.
For more information about the use of various technologies, including cookies, for these purposes, SeeIBM’s Privacy Policy at http://www.ibm.com/privacy and IBM’s Online Privacy Statement athttp://www.ibm.com/privacy/details the section entitled “Cookies, Web Beacons and OtherTechnologies” and the “IBM Software Products and Software-as-a-Service Privacy Statement” athttp://www.ibm.com/software/info/product-privacy.
344 IBM Cloud Manager with OpenStack: Administrator Guide, version 4.2


����
Printed in USA