ibm endpoint manager: console operator™s guide
TRANSCRIPT

IBM Endpoint ManagerVersion 9.0
Console Operator’s Guide
���


IBM Endpoint ManagerVersion 9.0
Console Operator’s Guide
���

NoteBefore using this information and the product it supports, read the information in “Notices” on page 251.
This edition applies to version 9, release 0, modification level 0 of IBM Endpoint Manager and to all subsequentreleases and modifications until otherwise indicated in new editions.
© Copyright IBM Corporation 2013.US Government Users Restricted Rights – Use, duplication or disclosure restricted by GSA ADP Schedule Contractwith IBM Corp.

Contents
Chapter 1. IBM Endpoint ManagerConsole Operator's Guide . . . . . . . 1Accessing the console . . . . . . . . . . . 1
Console authentication using Windows sessioncredentials . . . . . . . . . . . . . . 2
Introducing the IBM Endpoint Manager console userinterface . . . . . . . . . . . . . . . . 2A sample console operator's workflow. . . . . . 5
Chapter 2. Fixlets and Tasks . . . . . . 9Introducing Fixlets and Tasks . . . . . . . . . 9Differences between Fixlets and tasks. . . . . . 10Viewing Fixlets and Tasks . . . . . . . . . 10Monitoring Fixlets and Tasks . . . . . . . . 11Commenting on Fixlets and Tasks . . . . . . . 13Creating or Customizing Fixlets and Tasks . . . . 13Hiding Fixlets and Tasks . . . . . . . . . . 16Viewing Relevance Expressions . . . . . . . . 18Introducing Relevance . . . . . . . . . . . 19
Chapter 3. Actions. . . . . . . . . . 21Taking actions . . . . . . . . . . . . . 22
Taking a default action as part of the deploymentof a Fixlet or a task . . . . . . . . . . . 23Taking multiple actions . . . . . . . . . 24Taking a custom action . . . . . . . . . 26
Monitoring an action taken . . . . . . . . . 26Viewing the details of an action run . . . . . . 28Running commands on actions . . . . . . . . 30Adding a comment . . . . . . . . . . . . 31Making an offer using a custom action . . . . . 32
Chapter 4. Sites . . . . . . . . . . . 35Introducing Sites . . . . . . . . . . . . 35Selecting Sites . . . . . . . . . . . . . 35
Subscribing with a Masthead . . . . . . . 36Subscribing with the Licensing Dashboard . . . 36
Viewing Site Properties . . . . . . . . . . 36Restricting Computers . . . . . . . . . . . 38Restricting Readers . . . . . . . . . . . . 39Creating Custom Sites . . . . . . . . . . . 39Canceling a Subscription . . . . . . . . . . 41Adding Files to Sites . . . . . . . . . . . 41Viewing and Deleting Site Files. . . . . . . . 43
Chapter 5. Domains . . . . . . . . . 45Introducing Domains . . . . . . . . . . . 45Domain Sites . . . . . . . . . . . . . . 48Selecting Domains . . . . . . . . . . . . 50Navigating Domains . . . . . . . . . . . 50Minimizing the Domain Panel . . . . . . . . 55Deleting Domains . . . . . . . . . . . . 56
Chapter 6. Operators. . . . . . . . . 59Introducing Operators . . . . . . . . . . . 59Adding Console Operators . . . . . . . . . 59Adding Local Operators . . . . . . . . . . 59Monitoring Operators . . . . . . . . . . . 61
Chapter 7. Roles . . . . . . . . . . 63Introducing Roles . . . . . . . . . . . . 63Creating Roles . . . . . . . . . . . . . 63Assigning Roles . . . . . . . . . . . . . 64
Chapter 8. LDAP Directories . . . . . 67Adding LDAP Servers . . . . . . . . . . . 67Adding Active Directory . . . . . . . . . . 68Adding LDAP Operators . . . . . . . . . . 71Associating an LDAP group . . . . . . . . . 72
Chapter 9. Client Computers . . . . . 75Introducing Client Computers . . . . . . . . 75Monitoring Computer Status . . . . . . . . 75Grouping Computers . . . . . . . . . . . 77Commenting on Computers . . . . . . . . . 77Creating Retrieved Properties . . . . . . . . 78Creating Client Dashboards . . . . . . . . . 79Locking Computers. . . . . . . . . . . . 81Removing Computers . . . . . . . . . . . 82
Chapter 10. Computer Groups. . . . . 83Introducing Computer Groups . . . . . . . . 83Creating Manual Computer Groups . . . . . . 83Creating Automatic Computer Groups . . . . . 84Commenting on Computer Groups . . . . . . 85Removing Computer Groups . . . . . . . . 85
Chapter 11. Analyses . . . . . . . . 87Introducing Analyses . . . . . . . . . . . 87Viewing Analyses . . . . . . . . . . . . 87Monitoring Analyses . . . . . . . . . . . 88Commenting on Analyses . . . . . . . . . 89Creating Analyses . . . . . . . . . . . . 89Editing Analyses . . . . . . . . . . . . 90Hiding Analyses. . . . . . . . . . . . . 91
Chapter 12. Baselines . . . . . . . . 93Introducing Baselines . . . . . . . . . . . 93Viewing Baselines . . . . . . . . . . . . 93Monitoring Baselines . . . . . . . . . . . 94Commenting on Baselines . . . . . . . . . 94Creating or Customizing Baselines. . . . . . . 95Hiding Baselines. . . . . . . . . . . . . 96
Chapter 13. Relays and Servers . . . . 97Understanding Relays . . . . . . . . . . . 97Relay requirements . . . . . . . . . . . . 97
© Copyright IBM Corp. 2013 iii

Setting Up Relays . . . . . . . . . . . . 98Using Relays . . . . . . . . . . . . . . 98Automatic Relays . . . . . . . . . . . . 99Manually Assigning Multiple Clients . . . . . . 99Manually Assigning Single Clients. . . . . . . 99Adjusting the IBM Endpoint Manager Server andRelays . . . . . . . . . . . . . . . . 100Dynamic Bandwidth Throttling . . . . . . . 100
Chapter 14. Client-Relay-ServerAuthentication . . . . . . . . . . . 103Client Authentication . . . . . . . . . . . 103Authenticating relays . . . . . . . . . . . 103Handling the key exchange. . . . . . . . . 104Manual key exchange . . . . . . . . . . 104Revoking Client Certificates . . . . . . . . 104Re-registering a revoked client . . . . . . . 105Mailboxing . . . . . . . . . . . . . . 105
Chapter 15. Displays and Reports . . 107Web Reports. . . . . . . . . . . . . . 107Viewing Dashboards . . . . . . . . . . . 109
Baseline Synchronization Dashboard. . . . . 109Deployment Health Checks Dashboard andDeployment Overview Dashboard . . . . . 111License Overview Dashboard . . . . . . . 113Maintenance Windows Dashboard . . . . . 114
Visualizing Data . . . . . . . . . . . . 116
Chapter 16. Menus . . . . . . . . . 119File Menu . . . . . . . . . . . . . . 119Edit Menu . . . . . . . . . . . . . . 119View Menu . . . . . . . . . . . . . . 121Go Menu . . . . . . . . . . . . . . . 122Tools Menu . . . . . . . . . . . . . . 122Help Menu . . . . . . . . . . . . . . 124
Chapter 17. The Dialogs . . . . . . . 125About the IBM Endpoint Manager Console . . . 125Action: Computers . . . . . . . . . . . 126Action History Tab . . . . . . . . . . . 128Action List and Document . . . . . . . . . 129Action Parameter . . . . . . . . . . . . 130Action Progress Report . . . . . . . . . . 130Action Script Tab . . . . . . . . . . . . 131Action Settings . . . . . . . . . . . . . 133Action Site Signing Key . . . . . . . . . . 134Action: Summary . . . . . . . . . . . . 135Action: Target . . . . . . . . . . . . . 137Add Comment . . . . . . . . . . . . . 138Add Custom Setting . . . . . . . . . . . 139Add Files to Site . . . . . . . . . . . . 140Add LDAP Server . . . . . . . . . . . . 141Add LDAP User . . . . . . . . . . . . 141Add User. . . . . . . . . . . . . . . 141Analysis List and Document . . . . . . . . 142Applicable Computers Tab . . . . . . . . . 143Applicability tab . . . . . . . . . . . . 144Assign User Management Rights . . . . . . . 145Baseline Component Applicability Tab . . . . . 146
Baseline List and Document . . . . . . . . 146Change Database Password . . . . . . . . 148Change Private Key Password. . . . . . . . 148Comments . . . . . . . . . . . . . . 148Component Applicability Tab . . . . . . . . 150Components Tab . . . . . . . . . . . . 151Computer: Action History . . . . . . . . . 152Computer: Applicable Tasks . . . . . . . . 152Computer Group: Action History. . . . . . . 153Computer Group: Applicable Analyses . . . . . 154Computer Group: Relevant Baselines . . . . . 154Computer Group: Computers . . . . . . . . 155Computer Group: Description . . . . . . . . 156Computer Group: Relevant Fixlet Messages . . . 157Computer Group List and Document . . . . . 157Computer Group: Reporting Computers . . . . 159Computer Group: Applicable Tasks . . . . . . 160Computer List and Document . . . . . . . . 160Computer: Management Rights . . . . . . . 162Computer: Relevant Baselines . . . . . . . . 162Computer: Relevant Fixlet Messages. . . . . . 163Computer Subscriptions Tab . . . . . . . . 164Computer: Summary . . . . . . . . . . . 166Connect to Database . . . . . . . . . . . 168Console Operator: Assigned Roles Tab . . . . . 169Console Operator: Details Tab . . . . . . . . 170Create Role . . . . . . . . . . . . . . 171Help for the IBM Endpoint Manager Console . . 172Console Operator: Administered Computers . . . 172Console Operator: Issued Actions. . . . . . . 173Console Operator List and Document . . . . . 173Create Analysis. . . . . . . . . . . . . 175Create Analysis Description Tab . . . . . . . 176Create Analysis Properties Tab . . . . . . . 177Create Analysis Relevance Tab. . . . . . . . 178Create Automatic Computer Group . . . . . . 179Create Custom Site . . . . . . . . . . . 180Create Fixlet or Task . . . . . . . . . . . 181Description Tab. . . . . . . . . . . . . 182Details Tab . . . . . . . . . . . . . . 183Edit Actions Tab . . . . . . . . . . . . 186Edit Baseline . . . . . . . . . . . . . 188Edit Components Tab . . . . . . . . . . 189Edit Computer Settings . . . . . . . . . . 190Edit Description Tab . . . . . . . . . . . 191Edit Fixlet Message . . . . . . . . . . . 191Edit Processing Instruction . . . . . . . . . 192Edit Properties Tab . . . . . . . . . . . 193Edit Relevance Tab . . . . . . . . . . . 194Edit Script Element . . . . . . . . . . . 196Edit Settings for Computer . . . . . . . . . 197Edit Task . . . . . . . . . . . . . . . 198Enter Private Key . . . . . . . . . . . . 199Execution Tab . . . . . . . . . . . . . 199Find . . . . . . . . . . . . . . . . 201Fixlet and Task: List and Document . . . . . . 203Fixlet List and Document . . . . . . . . . 205Import Content . . . . . . . . . . . . . 206Launch Web Reports . . . . . . . . . . . 206Main Console Window . . . . . . . . . . 207Manage Properties. . . . . . . . . . . . 209
iv IBM Endpoint Manager: Console Operator’s Guide

Manual Computer Groups . . . . . . . . . 210Messages tab . . . . . . . . . . . . . 211Modify Custom Site Subscriptions . . . . . . 212Offer tab . . . . . . . . . . . . . . . 213Operator Permissions Tab . . . . . . . . . 214Post-Action tab . . . . . . . . . . . . . 216Post-Execution Action Script Tab . . . . . . . 217Pre-Execution Action Script tab . . . . . . . 218Preferences . . . . . . . . . . . . . . 219Recent Comments . . . . . . . . . . . . 221Results Tab . . . . . . . . . . . . . . 221Role Computer Assignments Tab . . . . . . . 222Role Details Tab . . . . . . . . . . . . 223Role LDAP Groups Tab . . . . . . . . . . 224Role Operators Tab . . . . . . . . . . . 225Role Sites Tab . . . . . . . . . . . . . 225Security Warning . . . . . . . . . . . . 226Settings Tab . . . . . . . . . . . . . . 227Site Details Tab . . . . . . . . . . . . . 228
Site List and Document . . . . . . . . . . 229Site Properties . . . . . . . . . . . . . 231Success Criteria tab . . . . . . . . . . . 232Take action . . . . . . . . . . . . . . 233Take multiple actions . . . . . . . . . . . 235Target Tab . . . . . . . . . . . . . . 236Task List and Document. . . . . . . . . . 237Users Tab. . . . . . . . . . . . . . . 239View action info . . . . . . . . . . . . 240Visualization Parameters: Colorization . . . . . 242Visualization Parameters: Computers . . . . . 243Visualization Parameters: General . . . . . . 244Visualization Tool . . . . . . . . . . . . 245
Appendix. Support . . . . . . . . . 249
Notices . . . . . . . . . . . . . . 251
Contents v

vi IBM Endpoint Manager: Console Operator’s Guide

Chapter 1. IBM Endpoint Manager Console Operator's Guide
IBM Endpoint Manager solves the increasingly complex problem of keeping yourcritical systems updated, compatible, and free of security problems.
The IBM Endpoint Manager console uses patented Fixlet technology to identifyvulnerable or aberrant computers on your network and then allows authorizedpersonnel to correct these issues across any subset of the network with a fewsimple mouse-clicks.
Rolling out a security patch or a software update can be accomplished in minutes,allowing you to keep a step ahead of potential network problems whilemaintaining a standardized operating environment. You can track the progress ofeach computer as updates are applied, making it easy to gauge the level ofcompliance across your entire enterprise.
IBM Endpoint Manager allows you to create and print an audit trail of each issueand its resolution to meet regulatory or policy guidelines. At any time and fromany browser, you can view or print graphs and reports summarizing conditionsacross hundreds of thousands of networked computers.
For an overview about the IBM Endpoint Manager functionality and architecture,see the IBM Endpoint Manager Getting Started Guide.
The following topics explain how to access the console and give you an overviewof the console design and usage:v “Accessing the console”v “Introducing the IBM Endpoint Manager console user interface” on page 2v “A sample console operator's workflow” on page 5
Accessing the console
The console is the visible face of IBM Endpoint Manager, used by the operator tomonitor and repair networked computers running the IBM Endpoint Managerclient. To begin using the console, you must be authorized. There are two kinds ofconsole user:v Operators, who manage the day-to-day operation of the program, including
Fixlet management and action deployment, subject to the management rightsassigned by a site administrator or master operator.
v Master Operators, who are operators with the added authority to assignmanagement rights to other console operators. Master operators can also:– Create new computer settings, which allow clients to be labeled for various
groupings.– Create or edit retrieved properties, which are used to filter and sort
computers.– Change the IBM Endpoint Manager client heartbeat, to optimize the
program's performance.– Subscribe or unsubscribe from sites.– Create custom actions (if that option was selected for this deployment).
© Copyright IBM Corp. 2013 1
When you have your credentials, you are ready to operate the console:1. Start the console by double-clicking its desktop icon or select it from the
Programs menu: Start / Programs / IBM Endpoint Manager / IBM EndpointManager Console.
2. Log in to the console using one of the following notations for the username:
usernameusername@domaindomain\user
3. After you initialize the action site, the console opens and begins to importFixlet. After it finishes, it forwards the Fixlets to the installed clients, whichevaluate them and return the results. This process can take a few minutes.
Console authentication using Windows session credentials
Windows authentication allows LDAP users to log in to the console using theirWindows session credentials. It takes advantage of Window's Security SupportProvider Interface (SSPI) - Microsoft Kerberos.
The server must be joined to a domain (Active Directory only) and have validatedwrite to service principal name (SPN) for SELF set to Allow. If other users will berunning the service, the server must also have write permissions for them. Theservice must be run as the Local System or domain user that has Administrativerights on the computer.
If the server’s domain has a domain trust, other domain users may also log inusing Windows session credentials.
To visualize the domains in the console, you must add the server’s domain in yourLDAP directories and add your LDAP users.
Note: To ensure that an operator is prompted for a password when he runs anaction, you must ensure that:v The operator logs in using the username/password notation.v The loginTimeoutSeconds is set to 0 in the Advanced option tab of the
Administration Tool.
Introducing the IBM Endpoint Manager console user interface
The Main Console window for IBM Endpoint Manager has a panel on the leftcontaining buttons and navigation trees called the Domain Panel. It is designed togroup content into collections pertaining to specific operator domains, such assoftware patching, malware protection, power management, and so on. After adomain has been chosen and topics are selected from the navigation tree, a list ofrelated content is shown on the right. From this list, specific items can be selectedfor a more detailed view in the Work Area beneath the list. Here is a simplifiedbreakdown of some of the features you might encounter in a typical session:
Domain PanelThis vertical panel on the left provides a high-level view of the extensivecontent, allowing you to quickly subdivide the information by major ITfunctions. Within each domain, this panel presents navigation trees thatmake it easy to zoom in on Fixlet, reports, analyses, and other content.
2 IBM Endpoint Manager: Console Operator’s Guide
This panel might be subdivided into sections, depending on the style ofthe domain. Some of these sections might include:
Content FiltersIf it exists, this section is at the top and provides various contentfilters and reports that are a part of the selected domain. Click thedisclosure icon to the left (either a triangle or a plus sign) toproduce a navigation tree to refine your choices.
General ContentThis section lets you navigate all the content in the domain. Thecontent might include Fixlet, tasks, actions, analyses, andcomputers, all collected from various sites. Click the disclosureicon to the left (either a triangle or a plus sign) to open up the tree.
Domain ButtonsAt the bottom of the Domain Panel, these buttons represent the set ofdomains that are currently available to you. When you subscribe to a site,it is automatically entered into the correct domain. If a new domain isrequired, a button for it is added to this group. At the bottom of thebuttons is a control that allows you to adjust the number of buttons todisplay.
Console ToolbarThis toolbar allows you to navigate back and forth through the items youhave selected from the Domain navigation tree. These Back and Forwardbuttons act like their counterparts in a browser, and are an importantmethod for navigating through your content. In addition there are buttonsthat allow you to display items you might have hidden and items that arenot currently relevant to any of your clients (this allows you to view all theavailable content for research or cloning purposes). There is also a refreshbutton that reloads content from the database for the console display.
List PanelThis is a listing of the items specified by the content filters and thenavigation trees in the Domain Panel. You can sort this list by clicking thecolumn headers and you can rearrange the headers by dragging them leftor right. In addition, you can right-click the headers to see a pop-up menucontaining a list of all the possible fields. Check those you want to use asheaders.
Context MenuThis is the menu that opens when you right-click any item in a list.Different lists have different context menus.
Work Area ToolbarThis bar contains context-sensitive buttons that can run various actionsbased on the content of the current work area. It also contains two icons,upper right, that let you maximize or detach a specific document.Detaching allows you to examine more than one document at a time.
Work AreaBelow the List Panel and the Work Area Toolbar is the Work Area. Whenyou click an item from the List Panel, the console opens a detaileddocument in this window. The following list describes, for example, theelements of a Fixlet:
Document tabsEach type of document has a unique set of tabs to go along with it.
Chapter 1. Console Operator's Guide 3

For a Fixlet, the tabs include items such as Description, Details,Applicable Computers, and Action History.
Fixlet When a Fixlet is opened from the list, the default Description tab isselected and the Fixlet document explains the issue in plainEnglish.
Action ButtonA Fixlet document typically contains at least one Action,represented by a link in the Work Area (also available from theTake Action button in the Work Area Toolbar). Click it to deploythe Action across your network.
Below is a screen shot from a typical session. A subset of Fixlets and Tasks havebeen selected from the Domain navigation tree, and the user is viewing thedescription of a Task opened from the list panel:
Domain Panel Console Toolbar List Panel Context Menu
Domain Buttons Work Area Toolbar Work Area
In general, your workflow proceeds first from the Domain Panel to the List Panel.After selecting an item from that list, you follow the instructions in the Work Areato complete the task.
How you proceed depends on the content type. Fixlet describe problems that havebeen discovered on one or more clients. Analyses present you with informationcollected from the clients on your network. The computer branch of the tree allowsyou to examine specific clients under your control.
4 IBM Endpoint Manager: Console Operator’s Guide

For example, if you select Fixlets from the Domain Panel, a list of the relevantFixlets is shown in the List Panel. Select one from the list and it is shown in theWork Area below. The Fixlet document presents you with a short, clear explanationof a problem that is currently affecting your clients. If you want, you can inspectthe underlying code used in the relevance expression and the proposed actions byclicking the Details tab. When you have decided to deploy the action to theaffected computers, click the action (represented by a button in the Work AreaToolbar or a hyperlink in the Work Area) and follow the prompts. After deployingthe action, the affected clients are remediated and no longer report the problem. Atthat point, the Fixlet is removed from the relevant Fixlet list.
You can set preferences that govern how responsive and secure you want yournetwork to be. To adjust the default values, select Preferences from the File menu.
A sample console operator's workflow
IBM Endpoint Manager is a powerful and feature-packed program that might seemoverwhelming to a new user. However, when you understand the typicalworkflow, the operation becomes straightforward and intuitive. Let's run through asample session:1. Start up the IBM Endpoint Manager Console.2. From the Domain Panel on the left, click the button labeled All Content, which
lets us view all subscribed sites. Then click the Fixlets and Tasks item at thetop of the Domain panel. This then displays a list of the Fixlet and Tasks thatare currently applicable to your network in the List Panel to the right.
3. From the List Panel, click a Fixlet of interest. The corresponding documentopens in the Work Area below the list. This is the text of the Fixlet, which givesyou the information you need to decide on deployment, along with the specificactions to take.
Chapter 1. Console Operator's Guide 5
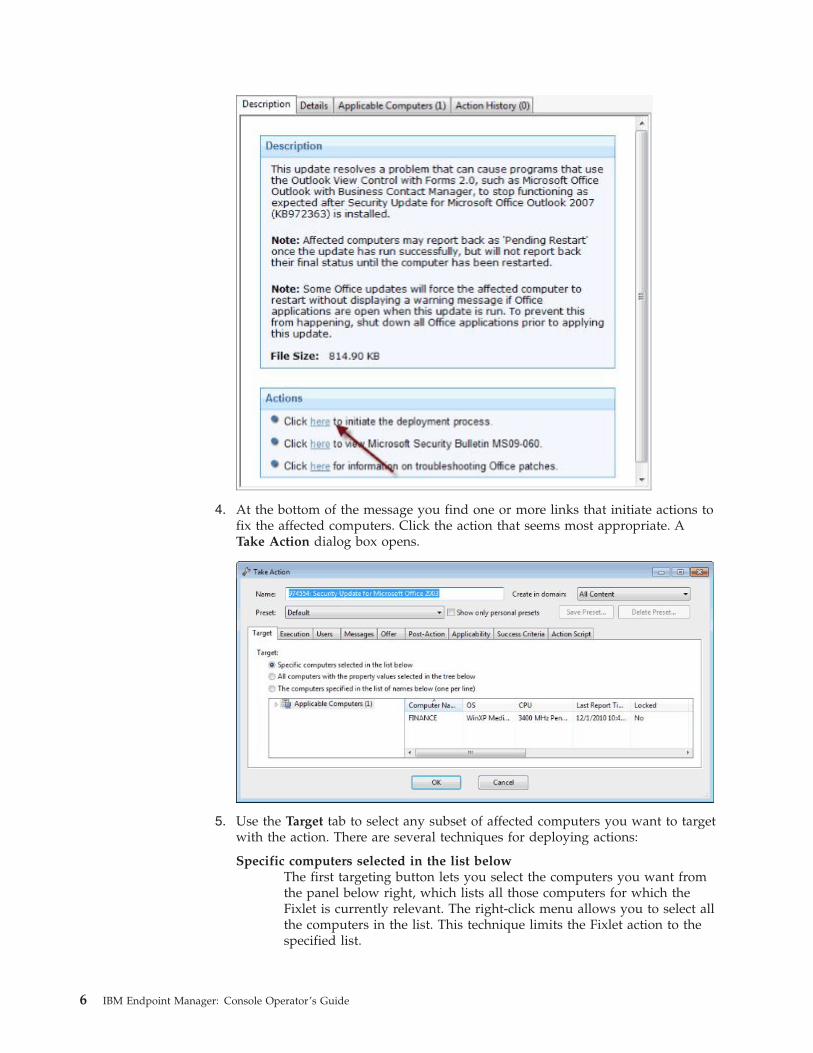
4. At the bottom of the message you find one or more links that initiate actions tofix the affected computers. Click the action that seems most appropriate. ATake Action dialog box opens.
5. Use the Target tab to select any subset of affected computers you want to targetwith the action. There are several techniques for deploying actions:
Specific computers selected in the list belowThe first targeting button lets you select the computers you want fromthe panel below right, which lists all those computers for which theFixlet is currently relevant. The right-click menu allows you to select allthe computers in the list. This technique limits the Fixlet action to thespecified list.
6 IBM Endpoint Manager: Console Operator’s Guide

All computers with the property values selected in the tree belowChoose the second button to take actions on computers with a set ofspecified properties. Until the expiration of the action period, whenevera computer satisfies the given properties it is targeted. As with allactions, only the affected computers actually receive the action.
The computers specified in the list of names belowChoose the third button to specify a list of computers.
6. Use the rest of the tabs to prepare your action, including execution schedules,client messages, extra scripting and more, then click the OK button. For moreinformation, see the article on the Take Action dialog.
7. When you supply your password, the Fixlet action is deployed throughoutyour network, and is applied specifically to each computer that needs it, subjectto any filters you put in place.
This is the process that you use for typical computer maintenance and remediation.As you explore the interface, you will discover that it can also help you remediatesecurity issues, inventory your computers, manage your users, and maintain adetailed audit trail of every patch and upgrade. As varied as these tasks are, theyare all accomplished with a similar workflow. You should experiment to learnmore about the power of this interface.
Chapter 1. Console Operator's Guide 7

8 IBM Endpoint Manager: Console Operator’s Guide
Chapter 2. Fixlets and Tasks
Introducing Fixlets and Tasks
Fixlets and Tasks are central to IBM Endpoint Manager. Using Relevancestatements, they target specific computers, remediating only those IBM EndpointManager Clients affected by an issue. They are both packaged with an Actionscript that can resolve the issue with a simple mouse-click.
Fixlets and Tasks differ mainly in how they get resolved.v A Fixlet is triggered by a Relevance clause that detects a vulnerability. When an
Action is invoked to remediate the vulnerability, the Fixlet automatically losesrelevance and is thus no longer applicable on that specific IBM EndpointManager Client. As a Fixlet Action propagates through your network, you cantrack its progress with the Console, Web Reports, and the Visualization Tool.When every IBM Endpoint Manager Client in your network has beenremediated, the Fixlet is no longer relevant and it is removed from the list. If theissue returns, the Fixlet is shown again in the list, ready to address the issueagain.
v A Task comes with one or more Action scripts that help you adjust settings orrun maintenance tasks. It generally stays relevant after its Action script has beenrun. Tasks are designed for reapplication and as a consequence, they are oftenpersistent.
Both Fixlets and Tasks might have a Default Action, allowing you to simply clickfrom the list to deploy it. They can both be grouped into Baselines, allowing higherlevels of automation. If you create a Baseline of Fixlets or Tasks which all containdefault Actions, you can turn the tedious chores of maintaining a corporate policyor common operating environment into a single-click operation. In typicaloperation, Fixlet relevance contributes to the overall baseline relevance; Taskrelevance does not. Similarly, Actions created from a Baseline can be composed ofboth Fixlet and Task Actions, and typically only the relevance of the Fixlet Actionscontributes to the decision to run the group. These are defining features of Fixletsand Tasks. The following table summarizes the differences:
Fixlet message Task
Relevance interpretation: Machine is in remediablestate
Action is available to run inthis context
To establish success ofremediation:
Relevance becomes false Action runs to completion
Contributes to BaselineRelevance?
Yes No
Contributes to Group Actionexecution?
Yes No
At any time, you can open a Fixlet or Task to inspect the underlying Relevanceexpressions that are used to target the Clients, as well as the Action scripts that aredesigned to address the issue. The language is human-readable to give you a highdegree of confidence in both the applicability of the trigger and efficacy of theremedial Action. You can also see exactly which computers in your network are
© Copyright IBM Corp. 2013 9

affected by each Fixlet or Task. When propagated, you can then view the progressand ultimate history of each Action taken on a Client-by-Client basis.
Differences between Fixlets and tasksIf you look at the details in the Fixlet and task definition on the IBM EndpointManager console, you see the same entries. What makes the difference between thetwo are the scope and the default behavior.
For what concerns the scope:v Fixlets are used for fixing lack of compliance to enforced rules, in a few words, a
Fixlet takes a known "broken" condition and fixes it.v Tasks are configuration items to run, in other words, a task takes a
"not-necessarily broken condition" and changes it to something else that is"not-necessarily fixed".
For example:v A Fixlet would be Update AntiVirus definition.v A task would be Run Antivirus scan.
For what concerns the default behaviour:v When a Fixlet finishes it's action script, it checks the relevance to make sure it
has gone from true, the Fixlet is relevant, to false, whatever was broken is nowfixed, and reports back Fixed when it is done.
v When a task finishes its action script, it does not check the relevance again. If allthe lines in the action script completed then the client considers that actionsuccessful and reports back Complete. For this reason, as a best practice, you aresuggested to set success criteria for the action run by the task to ensure that thetask run and that it was successful.
Viewing Fixlets and Tasks
To display a Fixlet or Task,1. From the navigation tree in the Domain Panel, click the icon labeled Fixlets and
Tasks.2. From the resulting List Panel on the right, click an item to open it.
The body of the Fixlet message is shown in the Work Area (click the Descriptiontab if not already selected).
10 IBM Endpoint Manager: Console Operator’s Guide

When selected, each Fixlet or Task has a window of its own.
Each Fixlet or Task comes with four tabs in the Work Area:v Description: This is a page providing a descriptive explanation of the problem
and one or more Actions to fix it. The Actions are represented by links at thebottom of the description page. Click an Action to open the Take Action dialog,which allows you to further target or schedule the Action. If you accidentallyclick an Action hyperlink, before the actual deployment, you always get achance to modify (or cancel) the Action.
v Details: This dialog contains the Fixlet/Task properties such as category, securityID, download size, source, severity, and date. It also lists the code behind theRelevance expressions and the Actions. At the bottom of this dialog there is atext box for you to enter a comment that remains attached to this item.
v Applicable Computers: This is a filter/list of all the computers targeted by theselected Fixlet or Task. You can filter the list by selecting items from the folderson the left, and sort the list by clicking the column headers.
v Action History: This is a filter/list of any Actions that have been deployed fromthis Fixlet or Task. If the item is new, there are no Actions in the list. Like theother filter/lists in the Console, you can filter the Actions using the left panel,and sort them by clicking the column headers above the right-hand list.
Monitoring Fixlets and Tasks
When a Fixlet or Task becomes relevant somewhere in your network, IBMEndpoint Manager adds it to the list available under the Fixlets and Tasks icon inthe Domain Panel navigation tree. You can filter this list by opening the icon andclicking the subcategories underneath. Each icon represents data groupings that
Chapter 2. Fixlets and Tasks 11

you can use to narrow down the items in the List Panel on the right. Then, in thelisting area itself, you can sort the items by clicking a column heading.
The list headers include the following information:v Name: The name assigned to the Fixlet message by the author.v ID: A numerical ID assigned to the Fixlet message by the author.v Source Severity: A measure of how serious a Fixlet message is, assigned by the
Fixlet author. Typical values are Critical, Important, Moderate, or Low.v Site: The name of the site that is generating the relevant Fixlet message.v Applicable Computer Count: The number of IBM Endpoint Manager Clients in
the network currently affected by the Fixlet message.v Open Action Count: Number of distinct actions open for the given Fixlet
message.v Category: The type of Fixlet message, such as a security patch or update.v Unlocked Computer Count: The number of unlocked computers affected by the
Fixlet.v Download Size: The size of the remedial file or patch that the action downloads.v Source: The name of the source company that provided the Fixlet information.v Source ID: An identification number assigned to the Fixlet to relate it back to its
source.v Source Release Date: The date this Fixlet message was released.
For example, you might filter the Fixlet list by opening the Source Severity folderand selecting Important to filter out less urgent Fixlet messages.
Then you could sort the Fixlet messages by Applicable Computer Count (whichshows the number of affected computers) to find which Fixlet messages are
12 IBM Endpoint Manager: Console Operator’s Guide

relevant to the greatest number of computers. If you do not see one of the columnslisted above, right-click in the Fixlet header and select it from the pop-up menu.
Commenting on Fixlets and Tasks
You can attach a comment to a Fixlet or Task that other operators can read.1. From the Domain Panel, select Fixlets and Tasks from the navigation tree.2. Select a Fixlet or Task from the List Panel on the right by clicking it.3. From the document panel below, select the Details tab and scroll to the bottom.
4. Type your comment into the text box and click the Add Comment Button.
Your comment is name- and time-stamped for other operators to view it. Inaddition to Fixlets and Tasks, you can attach comments to Actions, Computers, andAnalyses.
Creating or Customizing Fixlets and Tasks
To create your own custom Fixlet or Task message from scratch,
Chapter 2. Fixlets and Tasks 13

1. Select Tools > Create New Fixlet or Task. This opens a creation dialog withblank fields for you to fill in.
You might also want to customize a Fixlet or Task. You can do this by cloningand modifying an existing one. To do this, first select the desired Fixlet or Taskfrom the List Panel, then select Edit > Create Custom Copy (or right-click theitem and select Create Custom Copy from the context menu). The appropriatecreation dialog opens, but this time it is filled with the original content.
Either way, the Create dialog provides the same options. Enter the name ofyour customized message in the top left text box. This serves as the title whenthe Fixlet or Task is displayed. You can use the name for sorting and filtering,so create a consistent naming convention to make your content moremanageable.
2. Choose the Site and Domain to host it from the drop-down menus, upperright.Next, click through each of the tabs to further define your Fixlet or Task.
14 IBM Endpoint Manager: Console Operator’s Guide
3. Description: Enter your descriptive text in this box. You can use the textmanipulation toolbar at the top of the dialog to enhance the formatting.
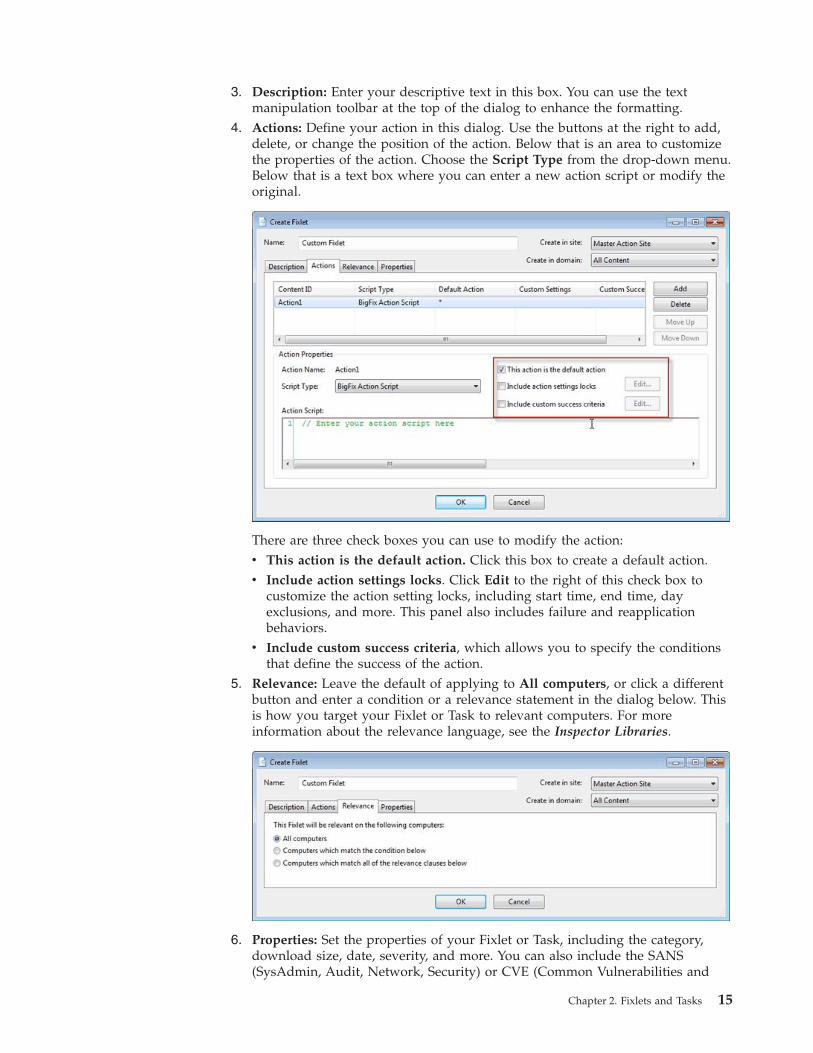
4. Actions: Define your action in this dialog. Use the buttons at the right to add,delete, or change the position of the action. Below that is an area to customizethe properties of the action. Choose the Script Type from the drop-down menu.Below that is a text box where you can enter a new action script or modify theoriginal.
There are three check boxes you can use to modify the action:v This action is the default action. Click this box to create a default action.v Include action settings locks. Click Edit to the right of this check box to
customize the action setting locks, including start time, end time, dayexclusions, and more. This panel also includes failure and reapplicationbehaviors.
v Include custom success criteria, which allows you to specify the conditionsthat define the success of the action.
5. Relevance: Leave the default of applying to All computers, or click a differentbutton and enter a condition or a relevance statement in the dialog below. Thisis how you target your Fixlet or Task to relevant computers. For moreinformation about the relevance language, see the Inspector Libraries.
6. Properties: Set the properties of your Fixlet or Task, including the category,download size, date, severity, and more. You can also include the SANS(SysAdmin, Audit, Network, Security) or CVE (Common Vulnerabilities and
Chapter 2. Fixlets and Tasks 15

Exposures) ID numbers.
7. When you are satisfied with your definitions, click OK. Because your Fixlet orTask must be propagated, you are prompted for your private key password.When you enter it and click OK, it is sent to all the Clients, which evaluate itfor relevance and report back their status. You can then follow the deploymentof your new content in real-time from the Console.
Hiding Fixlets and Tasks
You can hide a Fixlet or Task with the following procedure:1. From any Fixlet or Task List Panel, select the messages you want to hide.2. Right-click the desired item and select Globally or Locally Hide from the
pop-up menu (or select Edit > Hiding > Globally/Locally Hide).
16 IBM Endpoint Manager: Console Operator’s Guide

The selected Fixlet or Task is no longer displayed in the list. If you chose to hidethe item locally, it is still visible to other Console users. If you are a masteroperator, you can hide a Fixlet or Task globally to hide it also from all non-masterusers.
Fixlet or Tasks that are hidden are still available and you can restore or "unhide"them at any time. Here is how:1. Click the Show Hidden Content button in the Console Toolbar. All content,
including hidden content, is listed if this button is selected.
2. A single Fixlet or Task can be unhidden by clicking it from a list. In theresultant Work Area you see an Unhide button. Click it to return the item to itsnormal state.
3. Multiple Fixlets or Tasks can be unhidden by selecting them, right-clicking thegroup, and choosing Unhide from the context menu, or select multiple itemsand select Edit > Hiding > Globally/Locally Unhide.
Chapter 2. Fixlets and Tasks 17

Generally speaking, it is not necessary to hide Fixlets or Tasks, because you cansimply ignore them. One important reason to hide them is if you have your ownpolicy that must take precedence. For example, a Fixlet message might suggest thatit is a good idea to install a particular security update, but you might be aware ofreasons why it must not be applied to your network. In this case, hiding the Fixletremoves it from the user interface, so you can focus on other content. A masteroperator can also hide Fixlets and Tasks that must not be applied by ordinaryoperators.
Viewing Relevance Expressions
When a Fixlet message becomes relevant to some computer in your network, youmight want to know exactly what triggered it, and what action is suggested. Thisis easy to investigate, because these items are written in the Relevance Language,which is a human-readable language for probing and acting on computers.
To view Relevance Expressions:1. Click a Fixlet message from any Fixlet List Panel to open a detailed Fixlet
document in the Work Area below.2. Select the Details tab.
This opens a page listing various Properties and below that, the Relevance clausesand Action scripts:
18 IBM Endpoint Manager: Console Operator’s Guide

This window shows you how the computer is interrogated and why it has beentriggered as relevant. Typically there are multiple Relevance clauses that are allANDed together to determine if a given IBM Endpoint Manager Client is affected.
Scroll down to view the Action script.
Introducing Relevance
To quickly and non-invasively inspect various aspects of a computer, theRelevance Language was created. This human-readable language is at the heart ofthe program and allows Fixlet authors to target actions to just those computers thatneed the fix -- and no others. You can be confident that only broken machines arebeing fixed.
The Relevance Language can query an exhaustive set of computer properties, anddo it quickly. Most Console operators rely on other users to write Fixlet messages,and so their exposure to the Relevance Language is not critical to operating theConsole. However, as a power user, you can customize the Console with shortlines of code from the Relevance Language (called Relevance Expressions) whichgrant you an unprecedented amount of control over the IBM Endpoint ManagerClient computers on the network.
A typical Relevance Expression might be:
vendor name of processor
This expression returns the name of the manufacturer of the CPU (Intel or AMD,for example), which can then be used to determine relevance.
Chapter 2. Fixlets and Tasks 19

You can use Relevance Expressions to create retrieved properties, which you canthen use to organize and filter the Clients in the network. For example, here aresome possible properties that might be useful to know about your IBM EndpointManager Client computers:
Table 1. Properties of the IBM Endpoint Manager Client computers
Property name Relevance Expression Result
Pentium family name of mainprocessor contains "Pentium"
True if the processor is aPentium.
Small drive Total space of drive "c:" <2000000000
True if the drive is smallerthan 2GB.
Bad clock absolute value (now -apparent registration servertime) > 1 hour
True if the clock is off bymore than one hour.
IE Version file version of application"iexplore.exe" of the registry
Version number of InternetExplorer on a Windowscomputer.
Mailto App application of key"HKEY_CLASSES_ROOT\mailto" of the registry
On a Windows computer, thename of the app that handlesmailto requests from abrowser.
Running Word exists running applicationwhose (name of it aslowercase is "winword.exe")
True if Word is running on aWindows IBM EndpointManager Client computer.
Bios date date of Bios BIOS date on a Windowscomputer, if it exists.
Processors number of processors The total number ofprocessors in the IBMEndpoint Manager Clientcomputer.
Use the Manage Properties dialog to see how these custom properties work. Clickthe Add New button, supply the property name, and type in the RelevanceExpression in the text box.
There are thousands of useful Retrieved Properties — far too many to list here. Fora more extensive list of retrieved properties, check the Support Website. For anin-depth discussion of Relevance, see the Relevance Language Reference.
20 IBM Endpoint Manager: Console Operator’s Guide

Chapter 3. Actions
Actions are scripts that run on selected targets. They are used to fix policyviolation and security exposures and to run configuration steps. Fixlet, tasks, andbaselines depend on actions to run their remediation mission.
Actions are triggered by a console operator using a take action command. They canbe run independently or as part of Fixlets, tasks, or baselines.
An action is described using a proprietary language, the action language. For moreinformation about the action language, see Introducing the action language theIBM Endpoint Manager: Action Guide.
Actions can be used in synergy with relevance expressions to customize a specificsolution for specific IBM Endpoint Manager Clients. You must take into accountthe restrictions imposed by relevance expressions, action scripts and theauthorizations assigned to the console operator to understand how targetingoccurs. The following picture shows how the applicable targets are selected.
All clientsClients specifiedin the ApplicableComputers tab
Relevantclients
A console operator can be authorized to manage only a subset of all availableclients. These are the targets that operator is allowed to submit the content to.When he runs the take action command, that subset of clients is reduced to the listof targets specified in the Targets tab of the action definition. As soon as theconsole operator clicks OK to take the action, the console sends the request to theserver. The server then propagates the action to the computers selected in theTargets tab of the action. On the computers the applicability of the action isevaluated. The action is applicable to a computer if the relevance expression set inthe Applicability tab is evaluated True for that computer. If so the action is run.
There are two types of actions:
Default actionsThey are optionally included in Fixlet and tasks at authoring stage. Theyrun automatically on relevant targets when the Fixlet or the task isdeployed.
You can view the information about the default action, if any defined, inthe Details tab of the Fixlet message or task.
© Copyright IBM Corp. 2013 21

You must run the Take Action command to deploy the related Fixlet ortask. You can still customize on the fly the action when you run the TakeAction command. Depending on the number of Fixlets or tasks that youwant to submit concurrently, one or more than one, you can:v “Taking a default action as part of the deployment of a Fixlet or a task”
on page 23v “Taking multiple actions” on page 24
Custom actionsThey are used to fix problems or to address issues that are not covered bythe default action or to customize the action for your specific environment.Custom actions override default actions. To create and submit a customaction you must run the “Taking a custom action” on page 26 command.
Note: Actions cannot be automatically undone. If you need this capability youmust code it in the action itself.
These are the activities that you can run against actions from the IBM EndpointManager console:v “Taking actions”v “Monitoring an action taken” on page 26v “Viewing the details of an action run” on page 28v “Running commands on actions” on page 30v “Adding a comment” on page 31v “Making an offer using a custom action” on page 32
Taking actionsAt the heart of the IBM Endpoint Manager is the ability to take actions to applypolicy or fix one or many computers. This topic describes how to do it.
These are the different ways to deploy an action:
22 IBM Endpoint Manager: Console Operator’s Guide

v “Taking a default action as part of the deployment of a Fixlet or a task”v “Take multiple actions” on page 235v “Taking a custom action” on page 26
Whatever type of take action you choose, this is what happens after you clickedOK to take the action:1. The console sends the request to the server.2. The server stores the action to the op site folder associated with the console
operator who issued it, or the actionsite folder, if the action was issued by themaster operator.
3. The server propagates the action to the computers selected in the Target tab ofthe action or to all computers managed by the operator who issued the action.
4. On the computers the applicability of the action is evaluated. If the relevanceexpression described in the action is evaluated true then the action isapplicable.
5. If the action is applicable to that computer, the action is pulled from the serverfolder down to the computer and it is run.The computer is added to the Computers tab and the status of the actionrunning on the computer is updated up to completion.
Taking a default action as part of the deployment of a Fixlet ora task
You deploy a Fixlet or a task by taking the action that it contains. Follow theinstructions provided in this topic to see how to do it.1. Click on a relevant Fixlet or task, the content of the selected object is displayed
in the Work area below.
Chapter 3. Actions 23

2. You can run the action associated to the Fixlet or to the task in one of theseways:v Right-click a relevant Fixlet or a task and choose Take Default Action from
the pop-up menu.v Click a relevant Fixlet or task and select Take Default Action in the Work
Area toolbar.v Click a relevant Fixlet or task and select the Description tab. Scroll down to
see the suggested actions. Click the link related to the action that you wantto run.
Note: These options are available only if the selected Fixlet or task contains adefault action.The Take action dialog opens.
3. In that dialog you can review and, if needed, update the action values. Formore information about the values that you can set in its input fields and tabs,see “Take action” on page 233.
4. When you finish editing, click OK to deploy the action.5. Enter your authentication password and click OK.
Taking multiple actionsThis topic describes how to deploy a set of Fixlets or tasks in a single groupingusing the Take multiple actions command.
As a requirement, each Fixlet or task involved in the group must have associated adefault action.
These is how you can accomplish this task:
24 IBM Endpoint Manager: Console Operator’s Guide

1. Right-click a selected group of tasks or Fixlets containing default actions.2. Select Take Default Action. The Take Multiple Actions dialog opens.
3. In this dialog, specify how the selected actions must be deployed to thecomputers in your network. The input fields contained in the dialog are thesame as those contained in the “Take action” on page 233 display with theexception of the following additional fields:
Run all members actions of action group regardless of errorsThis field belongs to the Execution tab and specifies whether the actionrun should stop if an error occurs for one or more object of the groupor not.
Pre-Execution Action Script tabLets you specify an Action Script to run before the group of Actions isdeployed.
Post-Execution Action ScriptLets you specify an Action Script to run after the group of Actions isdeployed.
4. When you finish editing, click OK to deploy the action.5. Enter your authentication password and click OK. A progress dialog opens to
keep you informed about the stage of the deployment.
Note: The difference between grouping Fixlets or tasks and creating a baselinecontaining the same set of object is that the objects contained in the baseline arebound in sequence.
Chapter 3. Actions 25

Taking a custom actionThis topic describes how to create and take a custom action in one shot using theTake custom action command.
These is how you can accomplish this task:1. Log on to the Console as an Operator with Custom Content permissions.2. Either select Tools in the main toolbar and then choose Take Custom Action or
right-click with the mouse on an item in the action List panel and select TakeCustom Action. The Take Action dialog opens.
3. Fill in the input fields as it is described in “Take action” on page 233.4. When you finish editing, click OK to deploy the action.5. Enter your authentication password and click OK.
Monitoring an action takenThis topic explains how you can keep track of the progression of the deploymentof an action taken.
After actions have been scheduled, the IBM Endpoint Manager server attempts tosignal individual computers that there are actions waiting for them. Ideally, theIBM Endpoint Manager client gathers the action information from the action siteand runs it immediately. More typically however, some computers are powered offand others are mobile and undocked at the time of the deployment. As soon asthese computers are powered on or docked to the network, the remedial actionsare applied to them as well.
26 IBM Endpoint Manager: Console Operator’s Guide

At any time you can see the status of the actions taken from the IBM EndpointManager console. You can:
Monitor the overall state of the actionYou can see it in the State column of the Actions List panel.
The state can be:
Open The action is active on one or more computers. It remains openuntil its expiration date elapses, or an operator stops it.
StoppedThe action was stopped by an operator. It remains stopped until itsexpiration date elapses or it is removed.
ExpiredThe expiration date for the action expired. An action expiredcannot be removed.
Monitor the status of the action on selected computersYou can see it in the Computers tab of the selected action .
To access this dialog:1. Click the Action icon in the navigation tree.2. Select an action in the Actions List Panel. Information about the action
is displayed in the Work Area.3. Select the Computers tab in the Work Area.
For information about the different statuses, see “Action: Computers” onpage 126.
Monitor the action progression on a computerYou can see the result of each step of the action run on a specific computer.This is shown in the View Action Info dialog.
Chapter 3. Actions 27
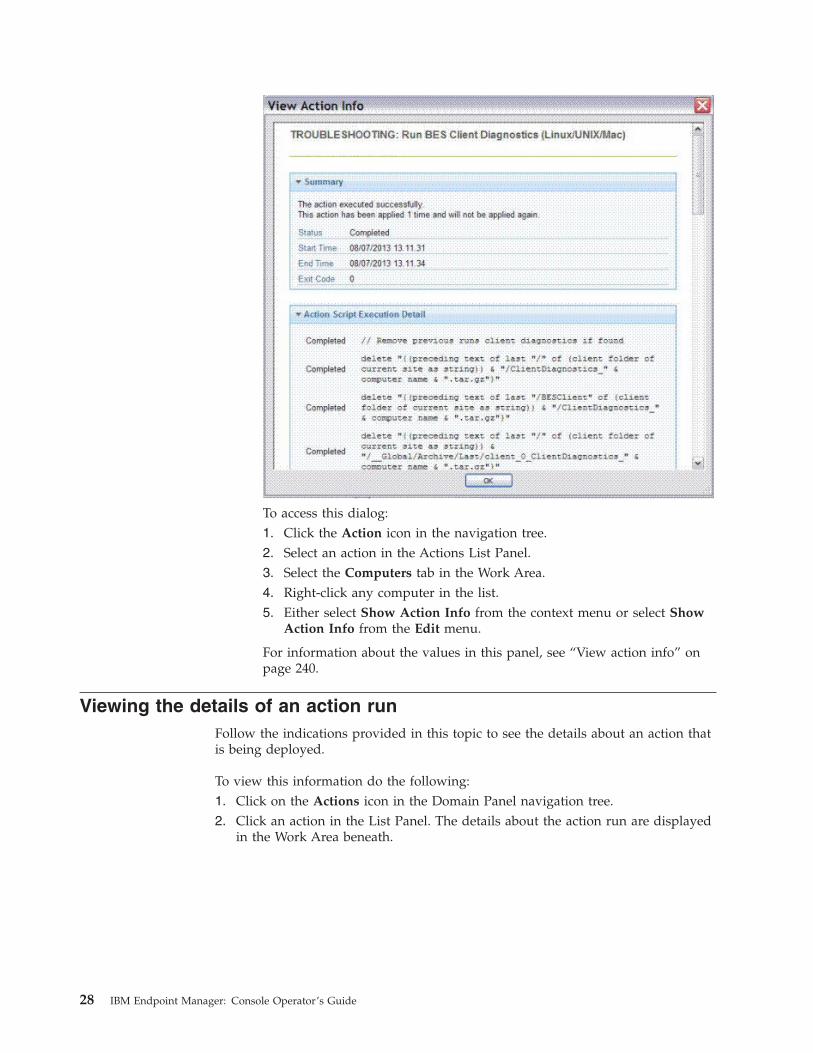
To access this dialog:1. Click the Action icon in the navigation tree.2. Select an action in the Actions List Panel.3. Select the Computers tab in the Work Area.4. Right-click any computer in the list.5. Either select Show Action Info from the context menu or select Show
Action Info from the Edit menu.
For information about the values in this panel, see “View action info” onpage 240.
Viewing the details of an action runFollow the indications provided in this topic to see the details about an action thatis being deployed.
To view this information do the following:1. Click on the Actions icon in the Domain Panel navigation tree.2. Click an action in the List Panel. The details about the action run are displayed
in the Work Area beneath.
28 IBM Endpoint Manager: Console Operator’s Guide

There are three tabs in an action document. They are:
SummaryThis tab summarizes the action, with sections on the status of the actionand the progress of the download. It displays information about thebehavior of the Action, including:v Progress of the downloadv Action IDv Usersv Run optionsv Post actionsv Relevance clausev Text of the action scriptv Success criteria
At the bottom of this dialog there is a text box where you can insert acomment that can be viewed by other operators accessing the samecontent site.
For more information about the content of this tab see “Action:Summary” on page 135.
Computers
It shows the computers affected by the specified action and the states ofthe action on each of them.The deployed action progresses through aseries of well-defined stages on a given computer.
For information about the values displayed in this tab and the status ofthe action on a computer across the different stages, see “Action:Computers” on page 126.
Chapter 3. Actions 29

Target It shows the targeting method and the subset of computers that wasoriginally targeted by the action. The content of this tab is read-onlyand it can be static or dynamic depending on the targeting methodspecified when the action was taken, explicitly from a list or indirectlyby retrieved property.
For more information about targeting methods and their results, see“Action: Target” on page 137.
Running commands on actionsThis topic explains how and which commands you can run on actions.
Do the following to get to the available commands:1. Click the Actions icon in the Domain Panel navigation tree.2. Click the action in the List Panel. At the top of the Work Area there is a toolbar
with four icons:
Stop Click this button to halt the deployment of an action that has alreadybeen triggered but has not expired yet.
This command completes the run on the computers where the actionhas already started and prevents the action from running on thecomputers where the action has not yet started to run, for examplebecause of computer unavailability, lack of network connectivity orgather frequency.As an alternative, you can stop an action byright-clicking the action and choosing Stop Action from the pull-downmenu or by selecting Stop Action from the Edit menu.
Note: You must enter your password to confirm the action halt.
30 IBM Endpoint Manager: Console Operator’s Guide

Copy Click this button to create on the fly a copy of the action to deploy. ATake Action panel is opened to allow you to customize the copy andtrigger it.
Note: There is no way to modify the targeting or scheduling of anaction after the deployment is initiated. If you want to modify an actionthat has been deployed but has not finished running, you must firststop the action as it is described here and then start a new action withthe desired characteristics.
Export Click this button to save a copy of this action. Later on you can importthe edited action as a custom action and run it.
RemoveClick this button to delete this action from the database. You canremove an action only when it is stopped.
The commands that cannot be run on an action in its current state are greyedout
Adding a commentIBM Endpoint Manager Console operators can make comments on most of the IBMEndpoint Manager objects. This topic describes how to add a comment to anaction.
Run these steps to create a comment for an action:1. Click the Actions icon in the Domain Panel navigation tree.2. Right-click an action and select Add Comment.3. Type your comment into the dialog box that opens.
Similarly, you can attach comments to tasks, Fixlet, computers, and analyses. Thesecomments can include keywords or operating notes. This is a freeform field, soyou can make up your own rules for commenting.
To view an aggregated list of all comments, select View Recent Comments fromthe Tools menu.
This dialog lists all the comments created to date, sorted by timestamp, with themost recent comments at the top. The name of the console operator responsible forthe comment is listed next to the description. Each comment contains a link thatopens the original object in the main window, allowing you to view the descriptionand other aspects of the object.
Chapter 3. Actions 31

Making an offer using a custom actionFollow the instructions provided in this topic if you want to offer to users a set ofdownloads that they can select at their own discretion. This capability is alsoreferred to as self-provisioning.
These offerings are delivered as a type of custom action, so they include all thetargeting and scheduling capabilities that you would expect from a typical action.
Important: These actions run with elevated permissions, so this can be used toallow non-privileged users the ability to trigger specifically-approved actions thatrun with higher permissions.
To advertise such an offer, follow these steps:1. In the main toolbar select Tools.2. Select Take Custom Action. The Take Action dialog opens.3. Click the Offer tab.
For more information about the values that you can set in its input fields andtabs, see “Offer tab” on page 213.
4. Click the other tabs in the Take Action dialog to further customize the actionthat will advertise your offering.
5. When you are ready to deploy your offering, click OK.6. Your action offer is distributed to all the computers that have been specifically
targeted. This select group of users is then presented with your offer andprompted to accept it on their own schedule.
32 IBM Endpoint Manager: Console Operator’s Guide

Note: This tab is available also when taking a default action as it is described in“Taking a default action as part of the deployment of a Fixlet or a task” on page23.
Chapter 3. Actions 33

34 IBM Endpoint Manager: Console Operator’s Guide

Chapter 4. Sites
Introducing Sites
Sites are collections of Fixlet messages that are created internally by you, by IBM,or by other vendors. You subscribe to a Site and agree on a schedule fordownloading the latest batch of Fixlet messages.
You can view and manage your collection of Sites by navigating to them andopening them in the Domain Panel. You can add a new Site subscription byacquiring a Masthead file from a vendor or from IBM. Sites are generally devotedto a single topic, such as security or the maintenance of a particular piece ofsoftware or hardware. However, several sites might share characteristics and arethen grouped into Domains, which are designed to be in accordance with thetypical job duties of your various Console managers. For example, the person incharge of patching and maintaining a common operating environment findsSupport sites and Patching sites for various operating systems all bundled in thePatch Management Domain.
You can set up your own custom Site and populate it with Fixlets that you havedeveloped specifically for your own network. You and other operators can thensend and receive the latest in-house patches and quickly deploy them to theappropriate locations and departments.
Selecting Sites
Upon installation, the program is automatically set up to subscribe to certainmanagement and maintenance sites. Depending on the terms of your license, youmight have subscriptions to other sites as well. This means that content from thoseSites automatically flows into your enterprise and is evaluated for relevance on allcomputers running the IBM Endpoint Manager Client. These sites, in turn areautomatically registered with an appropriate Domain, providing a simple way todivide the content into functional sections.
Subscribing to Sites from the License Overview dialog
1. Select the License Overview node from the BigFix Management domain. TheLicense Overview dialog appears, listing available sites.
2. Click the enable button associated with the site to which you want to subscribe.3. Enter your password to subscribe to the site. The new site will now be listed in
the Manage Sites node of the domain panel.4. Open the Manage Sites node and select your newly subscribed site.5. From the site dialog, click the Computer Subscriptions tab to assign the site to
the appropriate computers.6. From the Operator Permissions tab, select the operators you want to associate
with this site and their level of permission.7. Click Save Changes when you are done.
Note: If you change your license, you will need to resubscribe to your Fixlet sites.Although your new license is associated with your old one, only the Support sitewill be automatically renewed.
© Copyright IBM Corp. 2013 35

Subscribing with a Masthead
To subscribe to a site using a masthead file, follow these steps:1. First, find an appropriate Site masthead file, which has an extension of .efxm.
There are several ways to do this:v Fixlet Sites: IBM might post links list to new Sites as they become available.v Fixlet Subscriptions: Sometimes a Fixlet message might offer a subscription.
Just click the Fixlet action to initiate the subscription.v Download Mastheads: You can also subscribe to a Site by downloading a
masthead file from a vendor's website.2. When the masthead is saved to your computer, you can activate it in one of
two ways.v Double-click the masthead, orv Select Add External Site Masthead from the Tools menu, browse to the
folder containing the masthead, and click Open.3. You are prompted for your private key password. Type it in and click OK.
The masthead is propagated to all Clients, which immediately begin to evaluatethe Fixlet messages from the new site.
Subscribing with the Licensing Dashboard
You can also subscribe to a Fixlet Site by using the Licensing Dashboard in BigFixManagement, found in the Domain Panel:1. Open the BigFix Management domain and scroll to the top to view the
associated dashboards.2. From the Licensing Dashboard, select the sites you want to subscribe to.
Viewing Site Properties
After initiating a subscription, you can inspect its properties and signingauthorities. This can be useful when tracking down the origin of a particular Fixletmessage or action. Here is how:v Click the site from the Domain Panel on the left.
The Site Properties are shown in the Work Area, detailing information about thesite publisher and the URL from which the content has been gathered.
36 IBM Endpoint Manager: Console Operator’s Guide

Depending on its type, a site might have other properties as well. You can assign asite to a specific set of computers. A custom site allows you to assign operatorpermissions for owning, writing, and reading a Site. External sites (except essentialsupport sites) can have restrictions placed on both computers and operators,allowing a Master Operator to fine-tune the domain of a Site.
You can also assign roles to any site, allowing you to select pre-created directoryaccess roles and grant them read privileges to the site. To access these extraproperties, click the Role Permissions tab.
Click a role from the list, and use the buttons to assign or deny reader permissions.
Chapter 4. Sites 37

Restricting Computers
There might be occasions where a IBM Endpoint Manager Client or a group ofClients is storing redundant Fixlet messages, typically due to an overlap in sitecontent. In addition, some IBM Endpoint Manager Clients might collectsuperfluous Fixlet messages, as when a Linux machine retrieves Windows Fixlets.This poses no problem to the operation of the program, which knows to ignoreirrelevant or redundant Fixlet messages, but it might consume Client disk space.The Site Subscription dialog lets you narrow down the number of clientssubscribed to the selected external Site. Here is how:1. Select the desired site from the Domain Panel.
2. Select the Computer Subscriptions tab. You have several choices for selectingcomputers.v All computers. Click this button to automatically subscribe all Clients to this
site. This is the default action.v No computers. Click here to unsubscribe all Clients.v Computers subscribed via ad-hoc custom site subscription actions. If you
choose a custom site, this option is also available to flexibly assign computerson ad-hoc basis by creating an Action to subscribe relevant computers to thesite.
v Computers which match the condition below. Click here and then create acondition that must evaluate to TRUE for the IBM Endpoint Manager Clientto be subscribed to the site. The default is to parse computer names, but thepull-down list contains several properties that you can use as usefulsubscription criteria. Press the plus sign to add more criteria. You cancombine conditions by ANDing or ORing them.
3. When you are satisfied with how your computers subscribe to this site, clickSave Changes from the Work Area Toolbar. Enter your private password topropagate the subscription request to your network.
38 IBM Endpoint Manager: Console Operator’s Guide

Restricting Readers
Restrictions can be placed on Sites to limit access. As with operator permissions onCustom Sites, you can restrict both the operators and computers of most externalSites.
Not all operators need to know about all sites, and some sites might be most easilymanaged by a single operator, such as an appointed Anti-Virus Czar or the FinanceIT Manager. If you have Master Operator privileges, you can limit how manyNon-Master Operators are able to view any specified Site. Here is how:1. Select the desired site from the Domain Panel.
2. The site properties are shown in the Work Area. Click Operator Permissions.3. You can click the box to Grant read permission globally. Otherwise, clear the
box and set permissions on a user-by-user basis.4. When you are satisfied with your selections, click OK.
Creating Custom Sites
You can create a Custom Site to host your own Fixlet messages that are pertinentto your network. Here is how:1. Select Tools > Create Custom Site.2. You are prompted for a name for your custom site. Enter a name and click OK.3. From the Domain panel, find your site under Sites > Custom and click it to
describe your site.
Chapter 4. Sites 39

From the Details tab, enter a description of your site. From the Domainpull-down menu, select a Domain to house your site.
4. From the Computer Subscriptions tab, indicate which subset of your IBMEndpoint Manager Client computers you want to subscribe to this site.
There are several choices:v All Computers. Click this button to automatically subscribe all Clients to this
site.v No Computers. Click this button if you are not yet ready to subscribe any
computers.v Computers subscribed via ad-hoc custom site subscription actions. This
choice requires you to create an Action to subscribe relevant computers tothe site.
40 IBM Endpoint Manager: Console Operator’s Guide

v Computers which match the condition below. This choice allows you todescribe a set of criteria that must all evaluate to TRUE before a IBMEndpoint Manager Client is subscribed. From the pull-down menu, you canselect from dozens of properties to test for inclusion.
5. From the Operator Permissions tab, you can grant specific access permissionsto specific operators.
There are several options:v Grant read permission globally. Click this button to provide read
permission to all operators.v Or click specific Operators from the list and assign them specific rights, such
as Owner, Writer, Reader, or None.6. Click the Save Changes button above the work area to complete the
description of your site. You must enter your password to propagate your newcustom site.
Canceling a Subscription
You can try out different Site subscriptions for your organization, because noactions are ever taken without your approval. Nevertheless, if you find that asubscription is not useful, you can cancel it by removing the site from the domainin which it is located, as follows:1. In the Domain Panel, expand the icon containing Sites. From the External or
Custom icon, select the site you want to delete.2. Open the site and from the Work Area Tool bar, click the Remove button.3. Click Yes on the confirmation dialog, and enter your password to complete the
site removal.
Note: You cannot unsubscribe from the IBM Endpoint Manager Support sitebecause it is needed to upgrade and manage licensing issues in the Consoleprogram.
Adding Files to Sites
Starting with version 8.1, you can add files to a Site. These can be as simple as textand utility files or as powerful as Dashboards and Domains (described at the endof this section). Files can be added to the master action site, custom sites, andoperator sites, but you must have write permissions for the site. This means that
Chapter 4. Sites 41
only master operators can add files to the master action site, custom-site writerscan only add files to custom sites and non-master operators can only add files totheir own operator site. There are several useful things you can accomplish usingthis feature:v Place utility files on all clients subscribed to a sitev Share custom dashboards with multiple console usersv Share custom domains with multiple console users
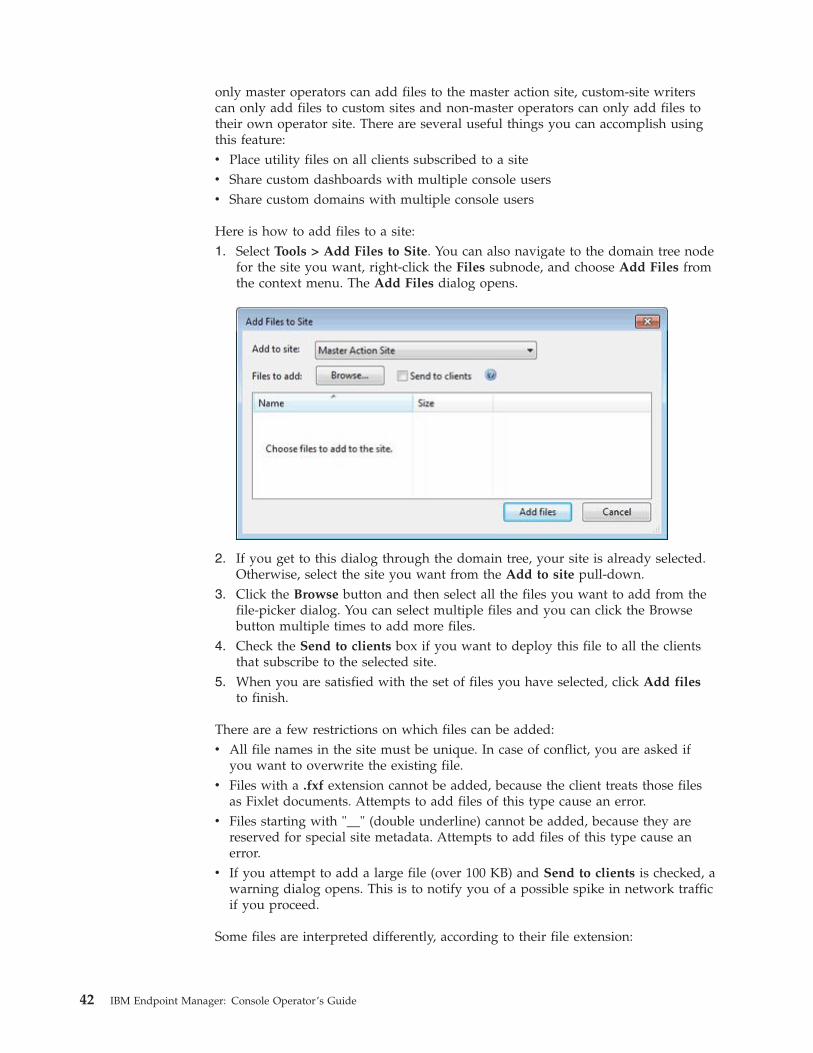
Here is how to add files to a site:1. Select Tools > Add Files to Site. You can also navigate to the domain tree node
for the site you want, right-click the Files subnode, and choose Add Files fromthe context menu. The Add Files dialog opens.
2. If you get to this dialog through the domain tree, your site is already selected.Otherwise, select the site you want from the Add to site pull-down.
3. Click the Browse button and then select all the files you want to add from thefile-picker dialog. You can select multiple files and you can click the Browsebutton multiple times to add more files.
4. Check the Send to clients box if you want to deploy this file to all the clientsthat subscribe to the selected site.
5. When you are satisfied with the set of files you have selected, click Add filesto finish.
There are a few restrictions on which files can be added:v All file names in the site must be unique. In case of conflict, you are asked if
you want to overwrite the existing file.v Files with a .fxf extension cannot be added, because the client treats those files
as Fixlet documents. Attempts to add files of this type cause an error.v Files starting with "__" (double underline) cannot be added, because they are
reserved for special site metadata. Attempts to add files of this type cause anerror.
v If you attempt to add a large file (over 100 KB) and Send to clients is checked, awarning dialog opens. This is to notify you of a possible spike in network trafficif you proceed.
Some files are interpreted differently, according to their file extension:
42 IBM Endpoint Manager: Console Operator’s Guide
v ojo: A site file with the extension .ojo is loaded as a dashboard and is visible toall readers of the site. The dashboard is also visible in the Dashboards subnodeof the site node in the domain tree.
v BESDomain: A site file with the extension .BESDomain is loaded as a domainvisible to all readers of the site and is shown in the list of domains in thedomain bar.
v bfa: A site file with the extension .bfa is treated as a BigFix archive file createdby the bfarchive tool. The archive is unpacked, and all files are added.
Viewing and Deleting Site Files
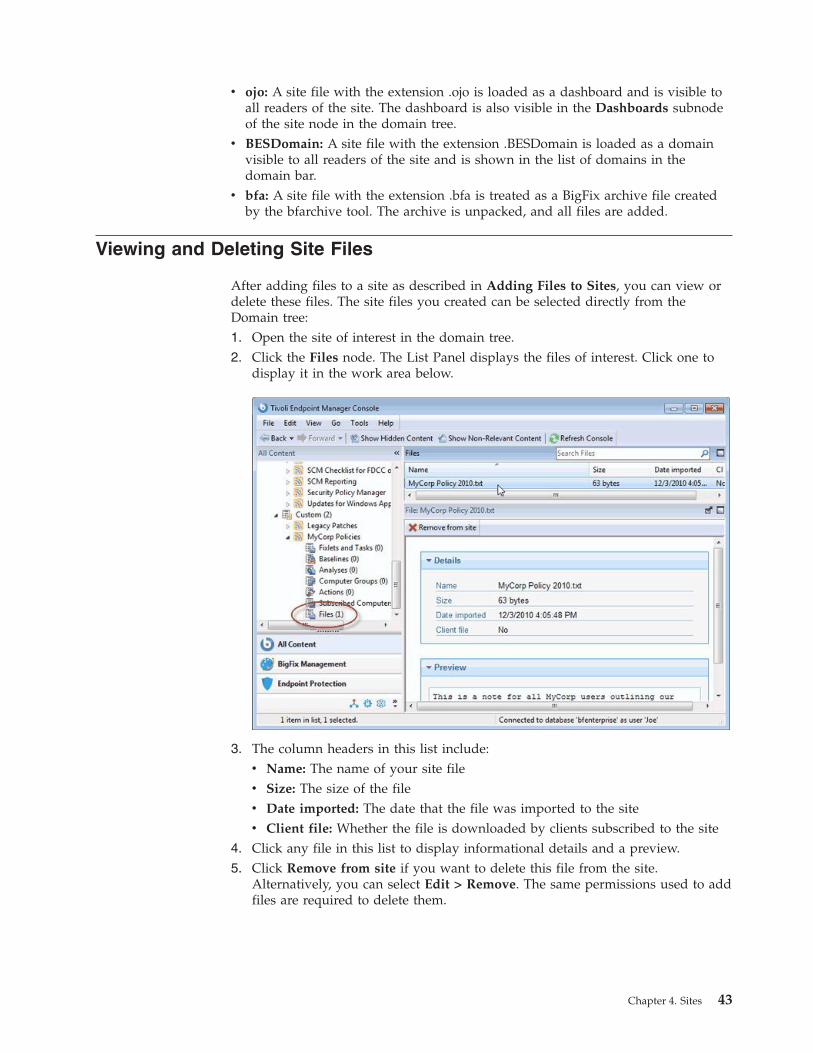
After adding files to a site as described in Adding Files to Sites, you can view ordelete these files. The site files you created can be selected directly from theDomain tree:1. Open the site of interest in the domain tree.2. Click the Files node. The List Panel displays the files of interest. Click one to
display it in the work area below.
3. The column headers in this list include:v Name: The name of your site filev Size: The size of the filev Date imported: The date that the file was imported to the sitev Client file: Whether the file is downloaded by clients subscribed to the site
4. Click any file in this list to display informational details and a preview.5. Click Remove from site if you want to delete this file from the site.
Alternatively, you can select Edit > Remove. The same permissions used to addfiles are required to delete them.
Chapter 4. Sites 43

44 IBM Endpoint Manager: Console Operator’s Guide

Chapter 5. Domains
Introducing Domains
Domains represent the major organizing principle in the IBM Endpoint ManagerConsole. Domains contain a set of related sites, such as Patch Management forvarious operating systems. Domains are reflect the tasks of specific ConsoleOperators, such as Patch Management, AntiVirus Management, PowerManagement, and so on.
Domains are located on the leftmost panel of the Console.
Select the Domain you want from the buttons at the bottom of the panel. Thecontents of the domain are then displayed. Some Domains have extra structure,such as Content Filters that allow you to narrow down the viewable content byVendor.
Generally there is a Domain Overview, to help you understand the extent of thecontent.
© Copyright IBM Corp. 2013 45

This particular overview shows you at a glance what new Fixlets, Analyses, Tasks,and so on. have recently been added to the Domain.
In the General Content section, the information available can be further brokendown by opening the various topics, content types and folders. For most topicshere, a single click causes the contents to be shown in the List Panel, top right. Onitems with a disclosure icon (plus/minus or triangle icon), you can click it to openup filtering options. Drill down through any folders to reach a leaf node thatrepresents a subset of the original topic. Now, in the List Panel, only the specifiedsubset is displayed.
46 IBM Endpoint Manager: Console Operator’s Guide

Here the Fixlets and Tasks have been opened to disclose the Source Severityfolder. Within that folder, only the Critical Fixlets have been selected, making theresulting List Panel shorter and easier to deal with.
In general, there is a Sites section that you can open to examine the sitesindividually should you need. Different domains have different structures, soexplore them.
Chapter 5. Domains 47
Domain Sites
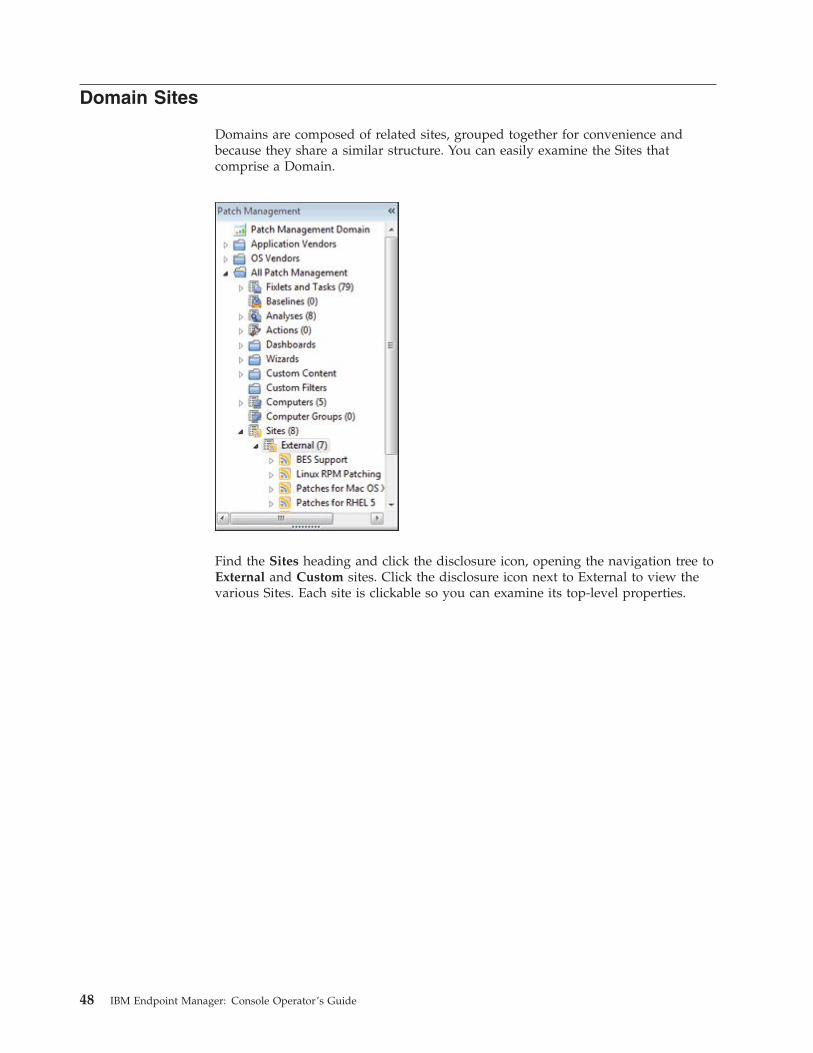
Domains are composed of related sites, grouped together for convenience andbecause they share a similar structure. You can easily examine the Sites thatcomprise a Domain.
Find the Sites heading and click the disclosure icon, opening the navigation tree toExternal and Custom sites. Click the disclosure icon next to External to view thevarious Sites. Each site is clickable so you can examine its top-level properties.
48 IBM Endpoint Manager: Console Operator’s Guide
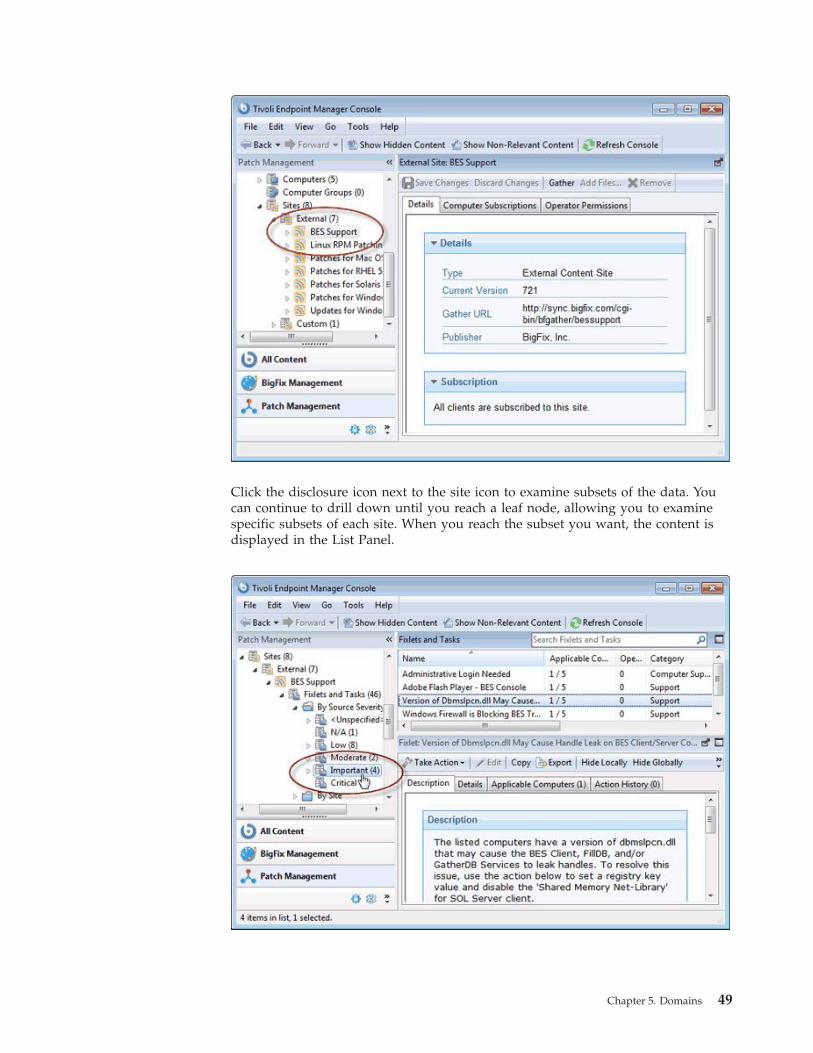
Click the disclosure icon next to the site icon to examine subsets of the data. Youcan continue to drill down until you reach a leaf node, allowing you to examinespecific subsets of each site. When you reach the subset you want, the content isdisplayed in the List Panel.
Chapter 5. Domains 49

Selecting Domains
You typically have several Domains available to you, each covering a group ofrelated tasks that fall into the purview of a specified Console Operator. As you addsites to your Console, they find their way into the appropriate Domains, and createnew Domains when needed. The Domain Panel is on the left side of the Console,and buttons corresponding to the Domains are shown at the bottom of that panel.
Depending on the Domain you click, an overview is typically displayed in theWork Area. It shows a list of the most recent additions to the content for a quickappraisal.
At the bottom of the button list is a pull-out menu that lets you adjust the numberof buttons you want to display.
Navigating Domains
Domains are a logical collection of sites that all have similar purposes andstructure. As a consequence, each Domain reflects a unique structure and displaysits contents appropriately. Nevertheless, all sites have certain similarities in howthey manage content, and a simple domain is sufficient to explore most of theiroptions and how to navigate amongst them. The example used here is PatchManagement.
50 IBM Endpoint Manager: Console Operator’s Guide

Click the Domain button to view it in the Domain Panel. For this example, thereare two folders, Application Vendors and OS Vendors that act as domain contentfilters. Not all domains have such filters, but they are fairly common when there isa benefit to grouping the information into logical partitions. Here, there is a way togroup the content based either on the software vendor (such as Adobe, Mozilla,and so on.) or the OS vendor (Mac, Windows, Linux, and so on.). You can click thedisclosure icon (either a plus-minus icon or a rotating triangle icon, depending onyour operating system) or double-click the tree node itself to open it up andexplore its subheaders.
Chapter 5. Domains 51

Below any domain filters, you find a more generic presentation of the domaincontent.
Notice the icon labeled All Patch Management. This icon represents the maincontent of this domain, and is composed of a union of Fixlets and Tasks combinedfrom all the sites that make up this domain. You can open this category and drilldown by sources or severity. Under the Source Severity folder is a breakdown ofthe content that allows you to select only critical, important, or other categories ofFixlet severity to concentrate on. Click these icons once to view all the content thatfits this criteria in the List Panel to the right.
52 IBM Endpoint Manager: Console Operator’s Guide

Double-click to open the icon for further filtering of the content. For example,under Source Severity > Critical you can filter the resulting set of critical Fixletsby Site. Finally, at the leaf node, you can click an icon to produce a list of theseverity- and site-filtered content in the List Panel. As you drill down, you areANDing the various filters, producing a smaller and more targeted set at eachlevel.
All of these navigation icons work in the sameway. A single click highlights theparticular category and a double click opens it for further refinement. In general,each icon can be a destination or the head of a new tree to examine. When youclick it, the particular subset of data implied by that icon opens in the List Panel tothe right. The drill-down ends at an ultimate leaf node, where all the possiblefields have been exhaustively ANDed together. Note that there are many ways toachieve the same subset of leaf items. because the field criteria are simply ANDedtogether, it does not matter which order you choose.
Chapter 5. Domains 53

Note that Fixlets, Tasks, Analyses, Actions, Baselines, Computers, and ComputerGroups are almost always represented in the main navigation tree of any givenDomain. Other content, such as filters, custom content, and custom sites are oftenrepresented as well. As the Operator responsible for a Domain, you should find iteasy to see the overall structure at a glance. You soon become familiar with drillingdown to filter and narrow your selections.
54 IBM Endpoint Manager: Console Operator’s Guide

Minimizing the Domain Panel
If you need more panel space, you can minimize the Domain Panel by clicking theminimize icon at the upper right of the panel.
This reduces the panel to a small stub at the left of the Console window. To restorethe Domain Panel, click the stub.
Chapter 5. Domains 55
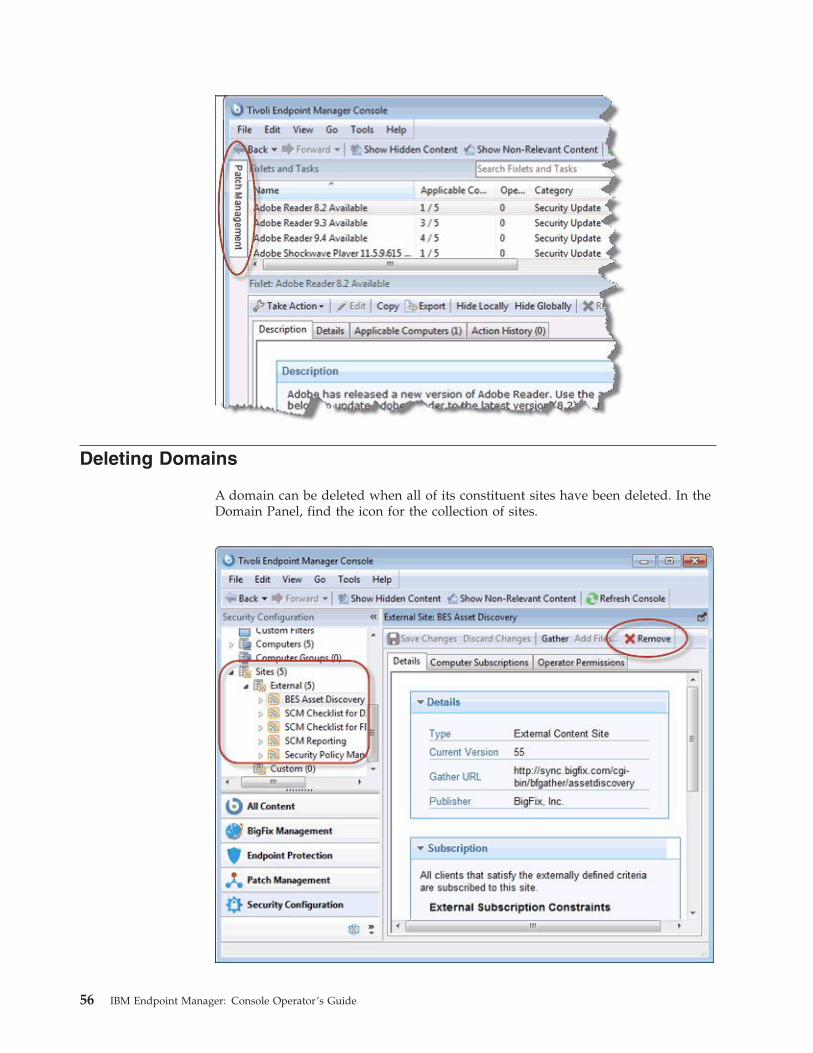
Deleting Domains
A domain can be deleted when all of its constituent sites have been deleted. In theDomain Panel, find the icon for the collection of sites.
56 IBM Endpoint Manager: Console Operator’s Guide

Open the site icon, and navigate to External sites. Double-click each site in turnand use the Remove button at the top of the Work Area to delete all of the sitesthat exist there. Do the same for any Internal sites. The domain is no longer visible.
Chapter 5. Domains 57

58 IBM Endpoint Manager: Console Operator’s Guide

Chapter 6. Operators
Introducing Operators
When you install IBM Endpoint Manager, you also set up specific personnel to actas Operators. There are three classes of operator:v The Site Administrator is responsible for installing and maintaining the IBM
Endpoint Manager components, as well as managing the certificates and keys.Only the Administrator can create new users.
v The Console Master Operators can assign management rights to otheroperators.
v The Console Operators are the day-to-day managers of their own domains, butthey cannot assign management rights.
Often these administrative roles overlap and one person might be assignedmultiple duties.
Adding Console Operators
You can create accounts for new Console operators, assigning them roles orgranting them permissions to view or manage specific computers and sites. Youcan create local operators or select predefined operators from LDAP or ActiveDirectory servers.
You can add single operators at any time by selecting Tools > Create Operator.
If you are using Active Directory or some kind of LDAP, you can add previouslydefined users by selecting Tools > Add LDAP Operator. Once created, they areadded to the Operators node in the Domain Panel.
Using Active Directory or LDAP allows you to take advantage of previouslydefined permissions for users and managers in your enterprise.
You can also add an LDAP group to a role, which can add many users at once.
Note: For LDAP operator and LDAP Group an Active Directory or LDAPdirectory must first be added to IBM Endpoint Manager.
Adding Local Operators
You can create accounts for operators that access the Console using the local IBMEndpoint Manager account. For security purposes, a password-protectedpublic/private key is also generated so the new operator can properly create andsign actions.
To add a local operator perform the following steps:1. Click the Tools > Create Operator menu item or use the context menu in an
operator list. The Add User dialog appears.
© Copyright IBM Corp. 2013 59

2. Enter the Username of the person you want to designate as a publisher oroperator.
3. Create a Password and retype it for confirmation. When you give the keys toyour operators, they can change their passwords if they want.
4. Click OK. The Console Operator window appears.
5. From the Details tab, assign operator permissions.6. From the Administered Computers tab, assign the desired computers to this
operator.7. From the Assigned Role tab, select the roles to apply to this operator.8. From the Sites tab, assign the sites you want this operator to have access to.9. From the Computer Assignments tab, add the computers you want to assign
to this operator.10. To save the changes click Save Changes.
At any time, you can also convert a local operator to an LDAP operator. To do so,follow these steps:
60 IBM Endpoint Manager: Console Operator’s Guide

1. From any list of local operators, right click on the operator you want toconvert.
2. From the context menu, select Convert to LDAP Operator.
Monitoring Operators
If you are a Master Operator (you must have a correctly authorized user namecreated with the IBM Endpoint Manager Administration Tool), you can monitorwhat other operators are doing and what computers they are authorized toadminister.
Each operator is represented by, among other attributes, a Name, User Type andLogin type. To view the list of Console Operators, select the All Content Domainand then click the node labeled Operators from the Domain Panel. In the ListPanel on the right, all the current Operators are listed.
Click any operator from the List Panel to open the Operator work area.
There are several tabs to choose from:v Details: Describes the operator by name and type and lets you select a login
type. This is also where you can view and alter operator permissions.v Administered Computers: Presents a list of computers that are currently
assigned to the selected Console operator.v Issued Actions: Presents a list of actions that have been issued by the selected
Console operator.
Chapter 6. Operators 61

v Assigned Roles: Displays the currently assigned roles, and lets you reassignthem.
v Sites: Displays the sites currently assigned to this operator, and lets you reassignthem. If the site is a custom site, you can also set Read/Write/Ownerpermissions.
62 IBM Endpoint Manager: Console Operator’s Guide
Chapter 7. Roles
Introducing Roles
Roles provide a powerful tool to help you organize and grant complexpermissions. Like groups, roles can have various members defined, but each roleincludes implicit permissions. Roles contain distinguished names, but you shouldbe careful to understand that if a DN is described as a sys-admin, you are nottalking about the sys-admin group, but rather the rights you want to associate withsys-admins.
Roles are built into LDAP so when you include an LDAP server or LDAP group,you will have any associated roles available for assignment as well.
You may have already assigned permissions to your console operators, so whenyou also assign a role to that user you will effectively expand their permissions.When permissions conflict, the highest level will be selected.
To view the available roles, select All Content from the domain panel and selectthe node labeled Roles. From the list that appears, select the role you want toassociate with various computers, operators, groups and sites.
Creating Roles
You can create roles to define a set of permissions that can be shared by variousoperators. Roles allow you to create a generic category of permissions that you canthen associate with individual operators, computers, groups and sites.
To create a role, perform the following steps:1. Click Tools > Create Role. The Create Role dialog appears and prompts you
for a name.2. Enter a descriptive name for your role. The role panel appears.
© Copyright IBM Corp. 2013 63

3. Enter a short description of the role and then set the permission levelsassociated with this role.
4. Set the computer assignments, operators, LDAP groups and sites by clickingthe various tabs.
5. Make sure to click Save Changes when you're done.
Assigning Roles
Once you have created a role and set its permissions, you can assign that role toconsole operators, client computers, LDAP groups and Fixlet sites.
To assign roles, perform the following steps:1. Click All Content in the domain panel and then select the node labelled Roles.
The list of currently defined roles is displayed.2. Click on the role you want to assign. The Role dialog opens.
64 IBM Endpoint Manager: Console Operator’s Guide

3. Click on the tabs to assign roles. Each tab contains a button to add or assign arole.
4. Click the Add or Assign button to bring up a dialog that lets you select one ormore items to associate with the specified role. In the case where permissionsconflict, the least restrictive permissions have priority.
5. Make sure to click Save Changes when you're done.
Chapter 7. Roles 65

66 IBM Endpoint Manager: Console Operator’s Guide

Chapter 8. LDAP Directories
Adding LDAP Servers
You can add Lightweight Directory Access Protocol (LDAP) associations to IBMEndpoint Manager. That allows you and other users to log in using thosecredentials, piggybacking on your existing authentication scheme.
To add an existing LDAP domain to the Console, follow these steps:1. From the Tool menu, select Add LDAP Directory. The Add LDAP Server
dialog appears.
2. Provide a name and from the Type pull-down, make sure Generic LDAPServer is selected.
3. Fill in the information pertaining to your LDAP installation. Under Server,enter the host name or IP Address of the server.
4. Enter the port number, typically 636 if you are using Secure Sockets Layer(SSL).
5. Enter the base distinguished name (Base DN), of the form dc=example,dc=com.6. Click the button to connect anonymously or to use credentials. If you choose
to connect using credentials, enter your User DN and password.
© Copyright IBM Corp. 2013 67

7. Click Test to ensure you have entered your information correctly and aconnection can be made to your LDAP.
8. If you want to include user or group filters, click the Show advanced settingslink. After specified, all further LDAP searches will be subject to theappropriate filter.
9. Click Add to complete the LDAP setup.
Your LDAP Server is now configured and available for use in the Console.
Adding Active Directory
You can use Microsoft Active Directory (AD) to handle authentication on IBMEndpoint Manager. That allows you and other users to log in to the Console usingyour Active Directory credentials, taking advantage of your existing authenticationpolicies.
To add an existing Active Directory to the Console, follow these steps:1. From the Tool menu, select Add LDAP Directory. The Add LDAP Directory
dialog appears.
2. Provide a name for the Active Directory and from the Type pull-down, makesure Microsoft Active Directory is selected.
3. Under Server, enter the host name, IP Address or fully qualified domain nameof the server.
4. To access an entire AD forest, click the checkbox labeled This is a globalcatalog server.
68 IBM Endpoint Manager: Console Operator’s Guide
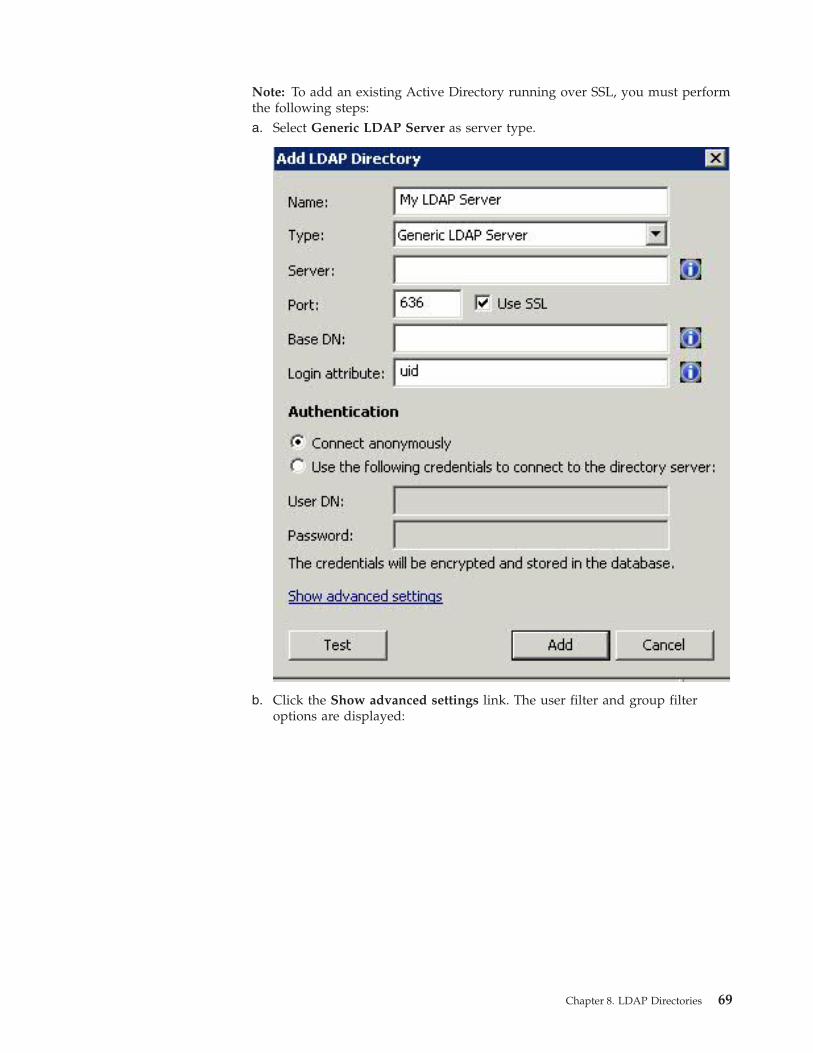
Note: To add an existing Active Directory running over SSL, you must performthe following steps:a. Select Generic LDAP Server as server type.
b. Click the Show advanced settings link. The user filter and group filteroptions are displayed:
Chapter 8. LDAP Directories 69

c. Enter UserPrincipalName in Login attribute.d. Enter (objectCategory=user) in User filter
e. Enter(&(objectCategory=group)(groupType:1.2.840.113556.1.4.803:=2147483648))
in Group filter.5. Click the button to connect as the root server service user or to use
credentials. If you choose to connect using credentials, enter your ADUsername and Password.
6. Click the Test button to make sure you have entered your information correctlyand a connection can be made to your Active Directory server.
70 IBM Endpoint Manager: Console Operator’s Guide

7. Click the Add button to complete the Active Directory setup.
Your Active Directory Server is now configured and available for use in theConsole.
Adding LDAP Operators
You can create accounts for operators to access the Console using an existingActive Directory or LDAP account. This allows you to add operators withpredefined permissions from your current directory access tools. Those operatorscan then log in as usual, using one of the following notations:
usernameusername@domaindomain\username
To add an LDAP operator, perform the following steps:1. Click the Tools > Add LDAP Operator menu item. The Add LDAP User dialog
appears.
2. You can query and filter the users defined on the specified LDAP server usingthe Search field and the two radio buttons.
3. When you find the user to add as LDAP operator select it and click Add. TheConsole Operator panel appears.
Chapter 8. LDAP Directories 71

4. From the Details tab assign operator permissions.5. From the Administered Computers tab, assign the desired computers to this
operator.6. From the Assigned Role tab, select the roles to apply to this operator.7. From the Sites tab, assign the sites you want this operator to have access to.8. From the Computer Assignments tab, add the computers that you want to
assign to this operator.9. To save the changes click Save Changes.
At any time, you can also convert a local operator to an LDAP operator. To do so,follow these steps:1. From any list of local operators, right click on the operator you want to
convert.2. From the context menu, select Convert to LDAP Operator.
Associating an LDAP group
You can import entire groups of operators that have been defined in an existingActive Directory or LDAP dierctory.
To add such a group perform the following steps:1. Create a role to accept your new group by selecting Tools > Create Role.
72 IBM Endpoint Manager: Console Operator’s Guide

Enter a name for your group and click OK.2. The Role panel appears.
In Click the LDAP Groups tab.3. Select the LDAP group that you want to associate with this role and click
Assign LDAP Group.4. To save the changes click Save Changes.
When you associate an LDAP group with a role, any user from that group canthen log in to the console. Only those users who actually log in will be provisionedwith accounts and thus end up in the list of Operators. This avoids the creation ofunnecessary accounts. Operators are granted the highest privileges resulting fromthe sum of all their roles and permissions. For instance, if a user has access tocomputer set A and sites X from role 1, and computer set B and sites Y from role 2,they will have permissions for Sites X and Y across both computer sets A and B.
Chapter 8. LDAP Directories 73

74 IBM Endpoint Manager: Console Operator’s Guide

Chapter 9. Client Computers
Introducing Client Computers
Client Computers represent those computers in your network running the IBMEndpoint Manager Client. When the client software is installed, you have a highlevel of control over these machines, allowing you to maintain common operatingenvironments, roll out the latest patches, detect spyware, view and summarizeproperties, create reports, and much more.
Client computers can have settings applied to handle a multiplicity of features,including the ability to define and organize corporate departments. Clientcomputers can be automatically grouped according to these settings or othercomputer properties, allowing you to target specialized remediation to distinctdomains. Settings are used to define Relays, bandwidth, idle time, buffers, andmuch more.
The Computers icon in the Domain Panel navigation tree in the main interface letsyou quickly see your network, with the ability to filter and sort large numbers ofcomputers by dozens of properties.
The Visualization Tool allows you to quickly monitor large, globally distributednetworks, and follow remediation deployments and compliance, corporate-wide.Web Reports allow operators with access to a browser to view audit trails andgenerate listings and graphical reports with just a few mouse-clicks.
Monitoring Computer Status
IBM Endpoint Manager can be used to analyze the computers in your network.Using the Relevance Language, you can query any IBM Endpoint Manager Clientand get a real-time response. This can be invaluable for analyzing trends andpotential problem areas on your network. To view the computers in your network,sorted and filtered by various properties, follow these steps:1. Select the Computers icon in the Domain Panel navigation tree. Your
networked Client computers are shown in the List Panel, ready to be sortedand filtered by various properties.
2. Click By Retrieved Properties (in the navigation tree under the Computersicon) and open folders to filter the list.
© Copyright IBM Corp. 2013 75

Click the desired column headers in the resulting List Panel to sort the list.Click again to reverse the sort order.
The folder names and column headers represent important, continuously updatedproperties of your networked computers, called retrieved properties. To view theRelevance Expressions that define the column headers:1. Select Manage Properties from the Tools menu. A dialog opens, initially listing
the default properties that come predefined by IBM Endpoint Manager, such asOS, CPU, Computer Name, and so on.
2. Click a retrieved property. In the text box underneath, you can view theRelevance Expressions that are used to define this column.
76 IBM Endpoint Manager: Console Operator’s Guide

For example, the column heading CPU is generated by the following RelevanceExpression:(significant digits 2 of (speed of main processor / mhz)) as string & "Mhz" &family name of main processor...
That is, CPU is a concatenation of relevance expressions and strings thatproduces an output like:2800 Mhz Pentium 4
3. Each property has an evaluation period. The shorter the period, the more oftenthe client evaluates it. This makes the Console more up-to-date, but it mightimpact client performance. Make sure long periods are allocated totime-consuming or slowly changing Relevance evaluations.
You can quickly select which properties to display by right-clicking the columnheaders of any Computer List Panel. A pop-up menu is displayed that allows youto check or uncheck the properties you want to display. Notice that when youdelete a property from the headers, it is also removed from the navigation treeunder the Computers tab.
Grouping Computers
The IBM Endpoint Manager Console allows you to group your computers to targetthem more efficiently. You might want to group your development computers, forexample, to make sure you do not interfere with certain legacy software projects.There are several ways to group computers, but the two most common techniquesare Manual Grouping and Automatic Grouping. Manual groups are static, butautomatic groups can change dynamically, depending on the current values of theinclusion properties.
When grouped, you have provided yourself with a simple way to filter andseparate your networked computers. Open the Computers icon in the DomainPanel navigation tree and select the folder named By Group. Then you can selectthe group or groups you want to list. Alternatively, you can click the ComputerGroups icon and select groups under that icon as well.
Whenever a list of computers is presented, you should find the By Group folder.For example, when you click an Action button in a Fixlet or Task, you see theRelevant Computers icon, listing just those computers that are affected by theselected Fixlet. Open the By Group folder to narrow down the list of computers tojust the selected groups.
Note: A computer can belong to more than one group.
Commenting on Computers
You can attach a comment to a IBM Endpoint Manager Client Computer, whichother operators can read.1. Select the Computers icon in the Domain Panel navigation tree and open it if
you want to choose one of the Computer subcategories to narrow down yourlist.
2. Select a computer from the List Panel on the right by clicking it.3. From the document panel below, select the Summary tab.4. Scroll to the bottom of the page, type your comment into the text box, and click
the Add Comment Button.
Chapter 9. Client Computers 77

Your comment is name- and time-stamped for other operators to view it. As wellas Computers, you can attach comments to Fixlets, Tasks, Actions, and Analyses.
Creating Retrieved Properties
You can collect information from IBM Endpoint Manager Clients by definingvarious retrieved properties. A large range of computer attributes can bemonitored as retrieved properties. There are several reasons why you might wantto create some custom retrieved properties of your own:v When you create a retrieved property it can be used as a filter in all subsequent
computer listings, allowing you to control data sets that might otherwise bedifficult to visualize.
v Your newly-created properties are added to the column headers of computerlistings, allowing you to sort on their values.
v Retrieved properties can be used to fine-tune the targeting of Fixlet actions.v Retrieved properties can also be used and charted in Web Reports.
IBM Endpoint Manager includes a predefined set of retrieved properties, which aresufficient to group computers by many frequently requested criteria. There aretimes, however, when you might want even more control over how your Clientsare grouped and sorted.
To create a custom retrieved property, follow these steps:1. Choose Tools > Manage Properties. The Manage Properties dialog is displayed.
You can filter the properties by using the left filter panel to select a subset ofthe properties to view on the right.
2. If you cannot find what you want in this list, create a new property: click AddNew, type in the name of your new retrieved property and create a RelevanceExpression to evaluate. This can access hardware characteristics, registryentries, and even data in specific files on the client computers. After you definethe new property, the Clients automatically compute the value of thecorresponding relevance expression and return it to the Database.
78 IBM Endpoint Manager: Console Operator’s Guide

3. Click the OK button.
Note: Some of these properties are aimed at specific operating systems and returna blank string for other operating systems. If more than one result is retrieved for aproperty, the entire list is retrieved.
Creating Client Dashboards
You can create custom IBM Endpoint Manager Client Dashboards, similar to thosein the Console. Dashboards are HTML files with embedded Relevance clauses thatcan analyze the local computer and print out the current results. Clients with adashboard have an extra tab to display the resulting report.
To create a Client Dashboard, you must create a new folder named __UISupport(note the two leading underscores) in the __BESData folder. This is a subfolder ofthe BES Client folder, so the final pathname looks like:
Program Files/BigFix Enterprise/BES Client/__BESData/__UISupport
Place the Dashboard file (named _dashboard.html) and any accompanyinggraphics files into this folder. The next time the Client starts up, it incorporatesthese files into its interface, adding a tab labeled Dashboard. When the user clicksthis tab, the Dashboard calculates the latest values of each Relevance clause anddisplays them.
The Relevance statements are embedded in the HTML inside special tags with theform:<?relevance statement ?>
For example, to find and print the time, use the following:<?relevance now ?>
When the Client displays the page containing this statement, it evaluates theRelevance clause “now” and substitutes the value for the tag. The followingsample HTML prints out the word “Date:” and then the current date and time:<html><body>Date: <?relevance now ?></body></html>
To allow the user to refresh the Relevance evaluation, add this line to the file:<html><body>Date: <?relevance now ?><A href="cid:load?page=_dashboard.html">Refresh</A></body></html>
This link, labeled Refresh, causes the page to reload. When it does, it reevaluatesthe relevance clauses. It is easy to see how you would add other Relevanceexpressions to this page. For example, to print out the OS and the computer name,add these two lines:<html><body>Date: <?relevance now ?>
Chapter 9. Client Computers 79

Operating System: <?relevance name of operating system ?>Computer Name:<?relevance computer name ?><A href="cid:load?page=_dashboard.html"> Refresh </A></body></html>
You can use style sheets to format the output. You can even use the defaultstyle-sheet, offer.css for some preset formatting. Here is an example of aDashboard with a title, a header, a refresh link, and a section of retrieved propertyvalues:<html>
<head><link type="text/css" rel="stylesheet" ref="offer.css"></link><title> Dashboard Example</title></head>
<body><div class="header"><div class="headerTitle"><font size="6"><?relevance computer name ?></font></div>
<div class="headerCategory"><font size="1">(Last updated: <?relevance now ?>)</font><BR><div><font size="1"><a href="cid:load?page=_dashboard.html">Refresh</a></font></div>
</div></div><div class="section"><div class="sectionHeader">Computer Information</div><div class="subsection"><table><tr><td valign="top"> OS: </td>
<td><?relevance operating system ?></td></tr><tr><td valign="top"> RAM: </td>
<td><?relevance (size of ram)/1048576 ?> MB</td></tr><tr><td valign="top"> DNS Name: </td>
<td><?relevance dns name ?></td></tr></table></div></div></body></html>
This dashboard file produces an output like the following:
80 IBM Endpoint Manager: Console Operator’s Guide

To learn more about Relevance expressions, see the Relevance Language Reference.
Locking Computers
You can change the locked status of any IBM Endpoint Manager Client in thenetwork. This lets you exclude specific computers or groups of computers from theeffects of Fixlet actions. This could be useful, for example, if you want to excludecertain development computers from any changes or updates. It also provides apowerful technique for testing new Fixlet actions on a limited set of unlockedcomputers, while keeping the rest of the network locked down. Client computerscan be locked forever (until explicitly unlocked) or for a defined period of time.
Changes are made to the locked status of a Client by sending an action. As aconsequence, the Console operator must supply correct authentication to lock orunlock any computer. Even though a Client is locked, there is still a subset ofactions that can be accepted by the client. These include clock changes and unlockactions as well as actions from the BES Support site.
To lock or unlock a computer, follow these steps:1. Click the Computers icon in the Domain Panel navigation tree to open the List
Panel of networked IBM Endpoint Manager Client computers.2. Select the computers that you want to lock.3. Right-click and select Edit Computer Settings from the pop-up menu, or select
Edit Computer Settings from the Edit menu. The Edit Settings dialog opens.
Chapter 9. Client Computers 81
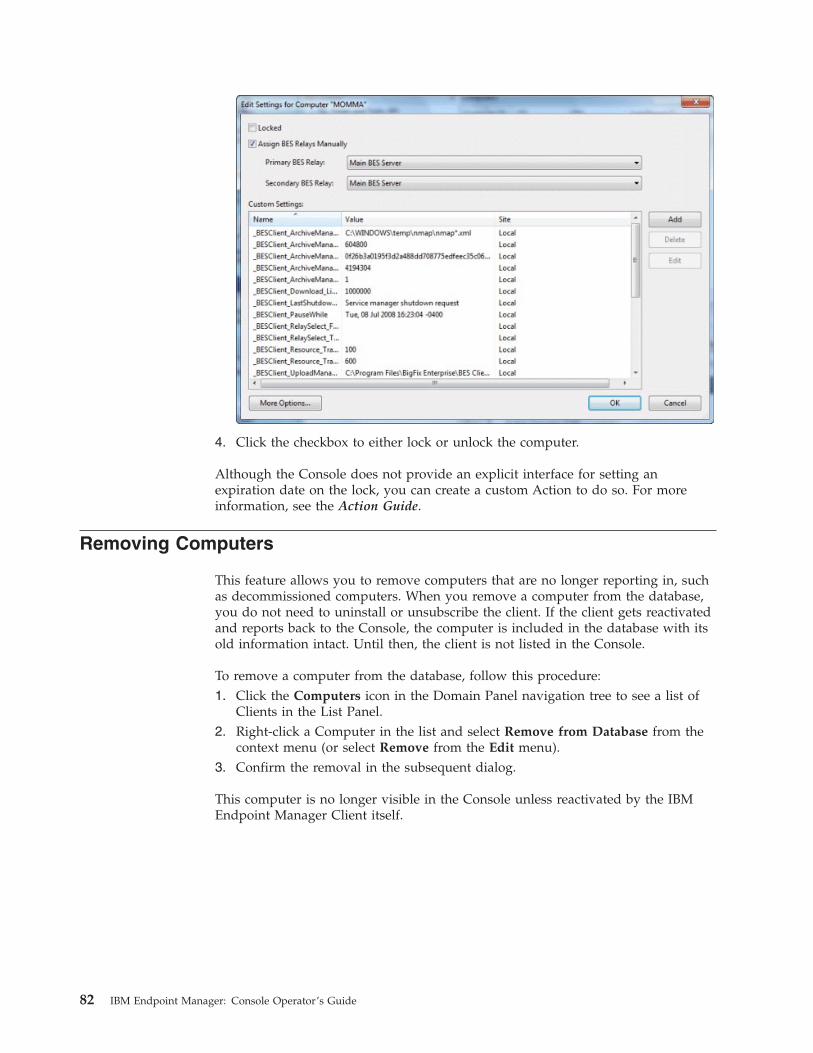
4. Click the checkbox to either lock or unlock the computer.
Although the Console does not provide an explicit interface for setting anexpiration date on the lock, you can create a custom Action to do so. For moreinformation, see the Action Guide.
Removing Computers
This feature allows you to remove computers that are no longer reporting in, suchas decommissioned computers. When you remove a computer from the database,you do not need to uninstall or unsubscribe the client. If the client gets reactivatedand reports back to the Console, the computer is included in the database with itsold information intact. Until then, the client is not listed in the Console.
To remove a computer from the database, follow this procedure:1. Click the Computers icon in the Domain Panel navigation tree to see a list of
Clients in the List Panel.2. Right-click a Computer in the list and select Remove from Database from the
context menu (or select Remove from the Edit menu).3. Confirm the removal in the subsequent dialog.
This computer is no longer visible in the Console unless reactivated by the IBMEndpoint Manager Client itself.
82 IBM Endpoint Manager: Console Operator’s Guide
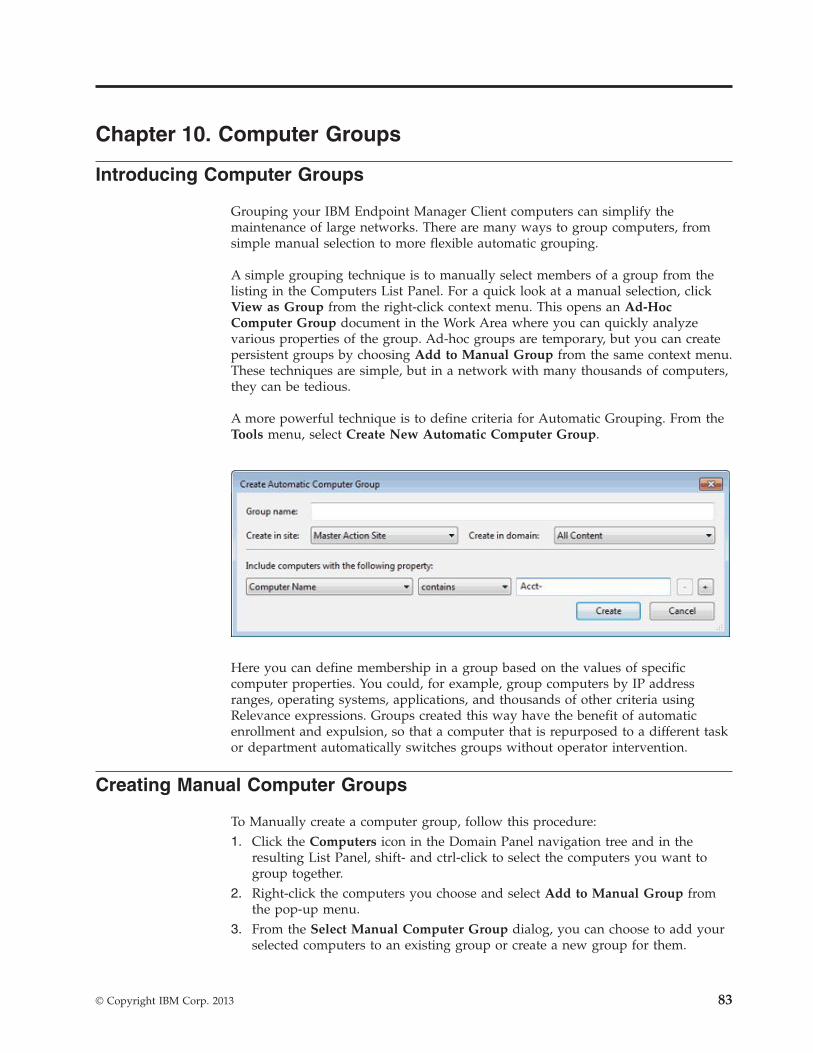
Chapter 10. Computer Groups
Introducing Computer Groups
Grouping your IBM Endpoint Manager Client computers can simplify themaintenance of large networks. There are many ways to group computers, fromsimple manual selection to more flexible automatic grouping.
A simple grouping technique is to manually select members of a group from thelisting in the Computers List Panel. For a quick look at a manual selection, clickView as Group from the right-click context menu. This opens an Ad-HocComputer Group document in the Work Area where you can quickly analyzevarious properties of the group. Ad-hoc groups are temporary, but you can createpersistent groups by choosing Add to Manual Group from the same context menu.These techniques are simple, but in a network with many thousands of computers,they can be tedious.
A more powerful technique is to define criteria for Automatic Grouping. From theTools menu, select Create New Automatic Computer Group.
Here you can define membership in a group based on the values of specificcomputer properties. You could, for example, group computers by IP addressranges, operating systems, applications, and thousands of other criteria usingRelevance expressions. Groups created this way have the benefit of automaticenrollment and expulsion, so that a computer that is repurposed to a different taskor department automatically switches groups without operator intervention.
Creating Manual Computer Groups
To Manually create a computer group, follow this procedure:1. Click the Computers icon in the Domain Panel navigation tree and in the
resulting List Panel, shift- and ctrl-click to select the computers you want togroup together.
2. Right-click the computers you choose and select Add to Manual Group fromthe pop-up menu.
3. From the Select Manual Computer Group dialog, you can choose to add yourselected computers to an existing group or create a new group for them.
© Copyright IBM Corp. 2013 83

Select an existing group or name a new one and click OK.4. Enter your password to propagate the new manual group.
This computer group is added under the Computer Group icon in the DomainPanel navigation tree and helps you to subdivide your networked computers downinto more reasonably sized chunks.
Groups use a global scope grouping mechanism that allows any operator withmanagement rights on the device to edit membership. While manual groups areshared by operators with rights over the machine, dynamic groups have their ownscope.
Creating Automatic Computer Groups
To create a group that automatically enlists computers, follow this procedure:1. Click Tools > Create New Automatic Group.2. From the Create New Automatic Computer Group dialog, enter the name of
your group and select the site and domain you want it to be located in.
3. Enter a property, a relation, and a value into the three boxes at the bottom ofthe dialog. For example, to create a group that automatically enlists Windowscomputers, select OS contains Win. Click the + button to add new propertiesthat you can AND (include all properties) or OR (include any properties)together to identify group membership.
4. When you are finished, click OK and enter your password to propagate thegroup settings.
84 IBM Endpoint Manager: Console Operator’s Guide

You now have a new Automatic Computer Group that is listed under theComputer Groups icon in the Domain Panel navigation tree and can be used tosubdivide your network into more workable chunks. Unlike Manual Groups,which are statically defined, Automatic Groups change their population dependingon the evaluation of the group properties.
Commenting on Computer Groups
You can attach a comment to a Computer Group, which other operators can read.1. Open the Computer Groups icon in the Domain Panel navigation tree and
choose one of the categories under the icon to narrow down your list.2. Select a computer group from the resulting List Panel on the right by clicking
it.3. From the document panel below, select the Description tab.4. Scroll to the bottom of the page, type your comment into the text box and click
the Add Comment Button.
Your comment is name- and time-stamped for other operators to view it. As wellas Computer Groups, you can attach comments to Fixlets, Tasks, Actions, andAnalyses.
Removing Computer Groups
To remove a computer from IBM Endpoint Manager administration, follow thisprocedure:1. Click the Computer Groups icon in the Domain Panel navigation tree.2. Right-click a Computer Group from the resultant List Panel and select Remove
from the context menu (or select Remove Computer Group from the Editmenu).
3. Provide your password to confirm the deletion.
This computer group is deleted from the list.
Chapter 10. Computer Groups 85

86 IBM Endpoint Manager: Console Operator’s Guide

Chapter 11. Analyses
Introducing Analyses
An Analysis is a collection of property expressions that allow an Operator to viewand summarize various properties of IBM Endpoint Manager Client computersacross a network. The collection is grouped together to be labeled, edited, andactivated against groups of computers to allow the results to be displayed together.For example, suppose you have a custom application deployed in your network,and you want to create an analysis to give you important information about thestate of your machines relative to that custom application. You might build ananalysis with several properties, such as:v Is the custom application installed?v What is the version of the custom application?v Is the application currently running?
With an analysis composed of these properties, operators can activate the analysisagainst groups of machines to get visibility into the state of the network as itpertains to the custom application.
There are several pre-made Analyses that examine important aspects of yournetworked computers, including their hardware, applications, andServer/Relay/Client relationships.
Studying these default Analyses can be instructive when you want to make yourown or customize existing ones. Custom Analyses can help you monitor aspects ofyour network that are vital to your company's operation.
The Retrieved Properties that underlie each Analysis are created using Relevanceexpressions. For example, to make sure you have fully deployed the most recentIBM Endpoint Manager Client software, you might use an expression such asversion of client. This simple expression is evaluated on every computer wherethe analysis is targeted, allowing you to see explicitly which version of the IBMEndpoint Manager Client is running on each computer, or to view a summary ofhow many machines are running each version.
Analyses are targeted with yet another Relevance statement, which might be assimple as TRUE, which would include all connected Clients. Generally, you wantto narrow the scope with a Relevance statement such as name of operating systemas lowercase starts with "win", which would limit the Analysis to Windowscomputers only.
Viewing Analyses
To display an Analysis,1. Click the Analyses icon in the Domain Panel navigation tree.2. Click an entry in the resulting Analysis List Panel.
The body of the Analysis is shown in the Work Area below the list (click theDescription tab if not already selected).
© Copyright IBM Corp. 2013 87

The Analysis display region has several tabs:v Description: This is an HTML page providing a description of the analysis.v Details: This panel provides a property-by-property listing of the chosen
analysis, as well as the Relevance statement that is being used to target thechosen computers. At the bottom is a text box for entering a comment that to beattached to this analysis.
v Results: This dialog lists the actual results of the analysis, which can be filteredand sorted by the pre-assigned properties (this tab is only available if theAnalysis is activated).
v Applicable Computers: This is a filter/list of all the computers where theselected analysis is applicable. You can filter the list by selecting items from thefolders on the left, and sort the list by clicking the column headers.
Monitoring Analyses
When an analysis is activated, IBM Endpoint Manager adds it to the list displayedby the Analyses icon in the Domain Panel navigation tree. The Analysis List Panelcontains entries that can be sorted by the following column headers:v Name: The name assigned to the Analysis by the author.v Status: The activation state of the Analysis.v Site: The name of the site that is generating the relevant Analysis.v Applicable Computer Count: The number of IBM Endpoint Manager Clients in
the network currently being analyzed.v Activated By: The name of the Console operator who activated this analysis.v Time Activated: The date and time the analysis was activated.
88 IBM Endpoint Manager: Console Operator’s Guide

As with all the icons in the Domain Panel navigation tree, you can filter this list byopening the Analyses icon and selecting any of the icons beneath it. Each icon youclick narrows down the list of Analyses on the right. Then, in the listing area itself,you can sort the Analyses by clicking a column heading.
For example, you might filter the list by opening the Activated Analyses sub-icon,then opening the Activated By folder and selecting a specific Operator to see thesubset of analyses that have been activated by that Operator.
Commenting on Analyses
You can attach a comment to an Analysis that other operators can read:1. Select the Analyses icon in the Domain Panel navigation tree and choose one of
the subcategories underneath it to narrow down your list.2. Select an Analysis from the resultant List Panel on the right by clicking it.3. In the Work Area below, select the Details tab. Scroll to the bottom of this
dialog to the comments text box.4. Type your comment into the text box and click the Add Comment button.
Your comment is name- and time-stamped for other operators to view it. As wellas Analyses, you can attach comments to Fixlets, Tasks, Actions, and Computers.
Creating Analyses
Analyses allow you to create and track specified properties of your managed IBMEndpoint Manager Clients. These properties can be extracted from any subset ofyour network, which simplifies the process of managing inventory, licensing,security, and policies. Using Web Reports, you can view a history of each analysis.
Analyses are also the only way for Non-Master Operators to create retrievedproperties, because they do not have access to the Manage Properties Dialog.
To create your own custom Analysis, follow these steps:1. Select Tools > Create New Analysis
2. This opens the Create Analysis dialog with a text box for entering the name ofyour new Analysis.
Chapter 11. Analyses 89

Because you can use the name for sorting and filtering, create a consistentnaming convention to make your Analyses more accessible. Enter the name andthen select the host site and domain for the Analysis from the drop-downmenus at the right. The dialog contains three tabs. Click through each tab todefine your Analysis:v Description: In this dialog, you can enter the text that describes your
Analysis. You can choose from the text editing tools at the top of the text boxto create your custom content.
v Properties: Add the retrieved properties that form the core of your Analysisby clicking the Add Property button, then providing a name and a Relevanceexpression that is evaluated to create the returned property value.
v Relevance: Enter another Relevance expression that determines whichcomputers are selected for this Analysis.
3. Check the box at the bottom of the dialog if you want to automatically activatethe Analysis. When you are satisfied with your Analysis definitions, click OK.
4. Your Analysis must be propagated, so you are prompted for your private keypassword. When you enter it and click OK, your Analysis is sent to all theClients, which evaluate it for relevance and report back their status. You cannow monitor specific properties of your networked Clients from the Console.
Editing Analyses
To edit an Analysis, follow these steps:1. Open the Analyses icon in the Domain Panel navigation tree, and select My
Analyses as a filter. In the resultant List Panel, select the Analysis you want toedit. Note that not all Analyses are editable.
2. Select Edit > Edit Custom Analysis (or right-click the Analysis and select Editfrom the pop-up menu).
3. This opens the Edit Analysis dialog.
Edit the Name of the Analysis and then select the hosting site and domainfrom the pull-down menus. Below this, there are three tabs. Click through eachtab to customize your Analysis:v Description: Edit the description of the Analysis, explaining the properties
that are being analyzed.v Properties: This is the core part of the Analysis.
90 IBM Endpoint Manager: Console Operator’s Guide

Click Add Property or choose an existing property and the relevance boxbecomes editable. If you are adding a new property, enter its name andrelevance to define it. Otherwise, edit the existing text. The Relevance clauseis evaluated to provide the retrieved property value. You can add moreproperties, or click the Remove Property button to delete the highlightedone.
v Relevance: Here is where you define a Relevance statement to target specificcomputers for your Analysis.
Select All computers or enter an expression that targets a subset of yournetworked Clients. Otherwise, you can set specific conditions or relevanceclauses to limit the application of the Analysis.
4. When you are satisfied with your edits, click OK.5. Your Analysis must be propagated, so you are prompted for your private key
password. When you enter it and click OK, your edited Analysis is sent to allthe Clients.
Hiding Analyses
You can hide an Analysis with the following procedure:1. From any Analysis List Panel, select the Analysis you want to hide.
Chapter 11. Analyses 91

2. Right-click the Analysis and select either Globally Hide Analysis or LocallyHide Analysis from the context menu (or select these same choices from theEdit menu).
The selected Analysis is no longer displayed in the Analysis list. If you chose tohide the Analysis locally, it is still visible to other Console users. If you are amaster operator, you can hide an Analysis globally, to have it also hidden from allnon-master users.
Items that are hidden are still available and you can restore or unhide them at anytime. Here is how:1. Click the Show Hidden Content icon in the Console toolbar.2. Right-click the Analysis you want to restore and select the appropriate action
from the pop-up menu. You can unhide or switch the hiding scope betweenglobal and local.
92 IBM Endpoint Manager: Console Operator’s Guide

Chapter 12. Baselines
Introducing Baselines
Baselines are collections of Fixlet messages and Tasks. They provide a powerfulway to deploy a group of Actions across an entire network with a singlecommand.
Baselines provide a way to maintain a common operating environment, makingsure that all users in any given domain have the same software, patches, anddrivers. Baselines are easy to set up, by selecting the Fixlet messages, Tasks, andother Baselines that you want to be a part of the group. To limit the scope of aBaseline, a Relevance expression can be used to target any subset of your network,using IP addresses, computer names, operating systems, and many other qualifiers.
For example, you might make a Baseline named "All critical hotfixes," andpopulate it with all the current critical hotfixes available in the Fixlet list. Or youmight create one named "Finance department baseline," to keep that particulargroup of computers updated with the latest financial programs, financial tables,updates, and patches.
Viewing Baselines
Baselines allow you to group Fixlet messages and Tasks into a group for simple,one-click deployment. To display an existing Baseline, click the Baselines icon inthe Domain Panel navigation tree. From the resulting List Panel, click an item. Thebody of the Baseline is shown in the Work Area below.
© Copyright IBM Corp. 2013 93

The Baseline display region has several tabs:v Description: This is typically an HTML page providing a descriptive explanation
of the problem and an action to fix it.v Details: This tab lists the Baseline Properties, a section detailing the code behind
the Relevance expressions and the Baseline actions, along with other Baselineproperties. Scroll to the bottom to enter a comment as a note for yourself orother Console operators.
v Components: This tab lists the components, namely the Fixlet messages, Tasks,and other Baselines that are grouped into this Baseline. Because Baselines makea copy of the components, it is possible for one of these copies to get out of syncwith the underlying Fixlet or Task that spawned it. If this happens, a message isdisplayed saying that the source differs from the copy and allowing you tosynchronize with the current source.
v Applicable Computers: This is a filter/list of all the computers targeted by theselected Baseline. You can filter the list by selecting items from the folders on theleft, and sort the list by clicking the column headers.
v Component Applicability: This is a filter/list of the various components of theBaseline. It displays the number of computers where the Baseline is currentlyapplicable and, after a slash, the number where it is not. Double-click an item inthe list to display it for inspection.
v Action History: This is a filter/list of any Actions that have been deployed fromthis Baseline. If the Baseline is new, there are no Actions in the list. Like theother filter/lists in the Console, you can filter the actions using the left panel,and sort them by clicking the column headers.
Monitoring Baselines
When Baselines become relevant somewhere in your network, the IBM EndpointManager Console adds them to the list of Baselines to be displayed under theBaselines icon in the Domain Panel navigation tree. You can filter this list byopening the icon and selecting one of the subsets. In the resulting List Panel on theright, you can sort the Baselines by clicking one of the column headings, whichmight include the following fields:v Name: The name assigned to the Baseline by the author.v ID: A numerical ID assigned to the Baseline by the author.v Site: The name of the site that is generating the relevant Baseline.v Applicable Computer Count: The number of IBM Endpoint Manager Clients in
the network currently targeted by the Baseline.v Open Action Count: The number of actions open for the given Baseline.
If you do not see one of the columns listed above, right-click in the Baseline headerand select it from the pop-up menu.
Commenting on Baselines
You can attach a comment to a Baseline, which other operators can read.1. Select the Baselines icon in the Domain Panel navigation tree and open it if
you want to choose one of the Baseline subcategories to narrow down your list.2. Select a Baseline from the List Panel on the right by clicking it.3. From the document panel below, select the Details tab and scroll to the bottom
of the page.
94 IBM Endpoint Manager: Console Operator’s Guide

4. Type your comment into the text box and click the Add Comment Button.
Your comment is name- and time-stamped for other operators to view it. As wellas Baselines, you can attach comments to Fixlets, Actions, Computers, andAnalyses.
Creating or Customizing Baselines
Baselines allow you to gather multiple Fixlets and Tasks into groups that can beapplied immediately to any set of target computers. The name Baseline was chosento suggest a minimal set of conditions that could be applied across your networkto ensure compliance with corporate guidelines. To create your own customBaseline from scratch, follow these steps:v In a Fixlet or Task list, highlight one or more items and select Add To New
Baseline from the context menu. You can also select Create New Baseline fromthe Tools menu.
To clone off a Baseline and customize it, first select the Baseline in any list, then:v Select Edit > Create Custom Baseline Copy (or right-click the Baseline and
select Create Custom Copy from the pop-up menu).
Either way, this opens a dialog with four tabs.
At the top of the dialog, you can specify the name of your custom Baseline as wellas the Site and Domain that will host the Baseline. Click through each of the tabsbelow to define your Baseline:v Description: This dialog lets you describe your custom Baseline as an HTML
page. Edit the text, using the text toolbar at the top of the window.v Components: You can add or customize the components of a Baseline. To add a
new component, click the add components to group link. From the resultingdialog, you can select new Fixlet messages, Tasks, and other Baselines to add tothe existing Baseline group.
v Relevance: Enter your relevance statement here, or modify the existing relevancestatement. This allows you to further constrain your Baseline to specific
Chapter 12. Baselines 95

computers. By default, this Relevance statement is TRUE, which leaves the job oftargeting to the individual Fixlets and Tasks that make up the Baseline. For moreinformation about the relevance language, see the Inspector Libraries.
v Properties: Customize the properties of your Baseline, or accept the originalproperties. Because you have customized the Baseline, update the source fieldsto reflect the new authorship. There are fields here that specify the category,download size, source information, and the CVE/SANS ID codes.
When you are satisfied with your Baseline modifications, click OK. Because yourcustomized Baseline must be propagated, you are prompted for your private keypassword. When you enter it and click OK, your Baseline is sent to all networkedClients, which evaluate it for relevance and report back their status. You can nowfollow the deployment of your own custom Baselines from the Console.
Hiding Baselines
You can hide a Baseline with the following procedure:1. From any Baseline List Panel, select the Baseline you want to hide.2. Right-click the Baseline and select Globally or Locally Hide Baseline from the
pop-up menu (or from the Edit menu).
The selected Baselines are no longer displayed in the Baseline list. If you chose tohide the Baseline locally, it is still visible to other Console users. If you are aMaster Operator, you can hide a Baseline globally, to hide it also from allnon-master users.
Items that are hidden are still available and you can restore or unhide them at anytime. Here is how:1. Click the Show Hidden Content button in the Console toolbar.2. Click the Baselines icon in the Domain Panel navigation tree, which now
shows all the hidden content.3. From the List Panel, choose a Baseline and choose Edit > Hiding >
Locally/Globally Unhide or right-click and choose the same option from thecontext menu. You can also open the hidden Baseline and click the Unhidebutton in the Work Area below.
Generally it is not necessary to hide Baselines, because you can simply ignorethem. The main reason for hiding a Baseline is if you think that the message is notrelevant to your network and you want to avoid viewing the Baseline every timeyou launch the Console.
96 IBM Endpoint Manager: Console Operator’s Guide

Chapter 13. Relays and Servers
Understanding Relays
Relays are optional network components that can significantly improve theperformance of your installation. Downloads and patches, which are often largefiles, represent by far the greatest fraction of the program's bandwidth. Relays aredesigned to take over the bulk of the download burden from the IBM EndpointManager Server. Rather than downloading patches directly from a Server, Clientscan instead be instructed to download from designated Relays, significantlyreducing both server load and client/server network traffic. Relays help in theupstream direction as well, compiling and compressing data received from theClients before passing it on to the Server. Any Windows 200x, Windows 7, Vista, orXP-based client can serve as a Relay. Several other operating systems can supportrelays as well, such as Solaris, and some variants of Linux. See the support site forthe latest information.
A Relay simultaneously resolves two bottlenecks:v Relieves the Load on IBM Endpoint Manager Servers. This Server has many
duties, among them the difficult job of distributing patches and other files. ARelay can be set up to ease this burden, so that the Server does not need todistribute the same files to every Client. Instead, the file is sent once to theRelay, which in turn distributes it to several Clients. The overhead on the Serveris reduced, on average, by the ratio of relays to clients.
v Reduces Congestion on Low-Bandwidth Connections. If you have a IBMEndpoint Manager Server communicating with a dozen computers in a remoteoffice over a slow VPN, designate one of those computers as a Relay. Then,instead of sending patches over the VPN to every IBM Endpoint Manager Clientindependently, the IBM Endpoint Manager Server only sends a single copy tothe Relay. That Relay, in turn, distributes the file to the other computers in theremote office over its own fast LAN. This effectively removes the VPNbottleneck for remote groups on your network.
Note: Relays also work well to reduce total network usage when used onsubnets connected through switches on your LAN. Ask IBM Software Supportfor more details.
Assigning Relays is simple, and Clients can be configured to automaticallydiscover and link to them. The program enables the Clients to discover theirnearest relays, or they can be configured manually.
Relay requirements
A Relay takes over most of the download tasks of the IBM Endpoint ManagerServer. If several Clients simultaneously request files from a Relay, a significantamount of the computer's resources might be used to serve those files. Other thanthat, the duties of the Relay are not too demanding. The requirements for a Relaycomputer vary widely depending on three main factors:v The number of connected Clients that are downloading files.v The size of each download.v The period of time allotted for the downloads.
© Copyright IBM Corp. 2013 97

The Relay system requirements are similar to those for a workgroup file server. Acomputer with 1 GHZ CPU, 256 MB RAM, and 5 GB of free space on the harddrive can act as a Relay for as many as one thousand computers, if the Consoleoperator distributes the file downloads over an appropriate length of time. Hereare some further requirements and recommendations:v The Relay can only be installed on computers running under Windows 200x, 7,
Vista, or XP as well as Red Hat Enterprise Linux 4/5/6, and Solaris 10.v The Relay can be installed on an ordinary workstation, but if several Clients
simultaneously download files, it might slow the computer down.v Workgroup file servers and other server-quality computers that are always
turned on are good candidates for installing a Relay.
Setting Up Relays
To set up a Relay, you must designate a Windows 200x, Windows 7, Vista, or XPclient computer to take over some server duties. When a Relay has been set up,computers in the network can automatically find them and connect to them (oryou can manually assign IBM Endpoint Manager Clients to point to specifiedrelays).
IBM Endpoint ManagerThis significantly reduces the client/server communicationnecessary for patch application and management. Clients start to download fromthese designated relays, minimizing the load on thin connections to the IBMEndpoint Manager Server. The Clients also upload their status information to theRelay, which compiles and compresses it before passing it on up to the server.
To configure a client computer as a Relay, follow these steps:1. Open Fixlets and Tasks from the Domain Panel and select Tasks Only.2. Double-click the task labeled Install IBM Endpoint Manager Relay. A task
window opens below. Make sure the Description tab is selected. There are threechoices for where to place the Relay installation folder:v Install to a given path. This option allows you to specify a path for the Relay
installation folder.v Install on the drive with most free space. This action lets you automatically
choose the most capacious drive for the installation folder.v Install to the default location. This is the recommend action. It automatically
finds the optimal location for the installation folder.
After the relays have been created, Clients can be made to automatically discoverand connect to them, always seeking the Relay that is the fewest hops away.
If you need to manually configure your Clients, you must notify each computer touse a specific relay to point to, as described in Using Relays.
Using Relays
When you have set up a Relay you must direct IBM Endpoint Manager Clients onyour network to gather from that relay, instead of from your Server. IBM EndpointManager can automatically assign your relays for you. This is not without risks(see the Administrator's Guide or visit the support site for more information), butit can be a good idea for two reasons:
98 IBM Endpoint Manager: Console Operator’s Guide
v Clients can determine which relays are the fewest number of hops away, so yourtopology is optimized.
v Your network configuration is constantly shifting as laptops dock and undock,as computers start up or shut down, or as new hardware is added or removed.Clients can dynamically assess your configuration to maintain the most efficientconnections as your network changes.
Automatic Relays
Here is how you can ensure that your IBM Endpoint Manager Client computersare automatically signing up to the nearest relays:1. Click the Computers icon in the Domain Panel to display a filter/list of IBM
Endpoint Manager Client computers.2. Select the set of computers that you want to automatically connect to the
optimal Relay.3. Right-click the highlighted computers and select Edit Computer Settings from
the pop-up menu.4. Check the box labeled Relay Selection Method.5. Select the button labeled Automatically Locate Best Relay.6. Click the OK button.
Manually Assigning Multiple Clients
You can select all the computers (or any given subset) of the local network togather from a specified relay. The procedure is different for setting a singlecomputer or multiple computers. Here is how to set multiple computers to point toa relay:1. Click the Computers icon in the Domain Panel to display a list of IBM
Endpoint Manager Client computers.2. Select the set of computers that you want to connect to the IBM Endpoint
Manager Relay. You can use the filter panel on the left to narrow down thecomputer list.
3. Right-click the highlighted computers and select Edit Computer Settings fromthe pop-up menu.
4. Check the box labeled Primary Relay.5. Select the name of a Relay from the pull-down menu.6. Click the OK button.
Manually Assigning Single Clients
Here is how to set a single computer to point to a relay:1. Click the Computers icon in the Domain Panel to display a filter/list of IBM
Endpoint Manager Client computers.2. Right-click the single computer that you want to connect to the IBM Endpoint
Manager Relay.3. Select Edit Computer Settings from the pop-up menu.4. Check the box labeled Assign Relays Manually.5. From the Primary Relay pull-down menu, select a Relay.6. Click the OK button.
Chapter 13. Relays and Servers 99

Adjusting the IBM Endpoint Manager Server and Relays
To get the best performance from IBM Endpoint Manager, you might need toadjust the server and the relays. There are two important ways of adjusting theflow of data throughout your network, throttling and caching:
Throttling Outgoing Download Traffic: Throttling allows you to set the maximumdata rate for the IBM Endpoint Manager Server. Here is how to change the datarate:1. Open Fixlets and Tasks icon in the Domain Panel navigation tree and then
click Tasks Only.2. In the find window above the Tasks List, type "throttle" to search for the
appropriate Task.3. From the resulting list, click the task labeled Server Setting: Throttle Outgoing
Download Traffic. A task window opens below. Make sure the Description tabis selected. There are three choices:v Set the limit on total outgoing download traffic. This choice allows you to
directly set the maximum number of kilobytes per second you want to grantto the server.
v Disable the setting. This option lets you open the download traffic on theIBM Endpoint Manager Server to full throttle.
v Get more information. This option opens a browser window with moredetailed information about bandwidth throttling.
4. If you select a throttle limit, then from the subsequent Take Action dialog youcan select a set of computers to throttle. Click OK to propagate the task.
Download Cache Size: IBM Endpoint Manager Servers and Relays maintain acache of the downloads most recently requested by Clients, helping to minimizebandwidth requirements.1. Open Fixlets and Tasks icon in the Domain Panel navigation tree and then
click Tasks Only.2. In the find window above the Tasks List, type "cache" to search for the
appropriate Task.3. From the resulting list, click the task labeled Relay / Server Setting: Download
Cache Size. A task window opens below. Make sure the Description tab isselected. Select the link to change the download cache size on the listedcomputers. This list might include Relays as well as the IBM Endpoint ManagerServer.
4. Enter the number of megabytes to cache. The default is 1024 MB, or onegigabyte.
5. From the subsequent Take Action dialog, select a set of computers and clickOK.
Dynamic Bandwidth Throttling
When a large download becomes available, each link in your deployment mighthave unique bandwidth issues. There are server-to-client, server-to-relay, andrelay-to-client links to consider, and each might require individual adjustment. Asexplained elsewhere, it is possible to simply set a maximum value (throttle) for thedata rates, and for this there are broad-based policies you can follow. You might,for example, throttle a IBM Endpoint Manager Client to 2Kb/s if it is more than
100 IBM Endpoint Manager: Console Operator’s Guide

three hops from a Relay. However, the optimal data rates can vary significantly,depending on the current hierarchy and the network environment.
A better technique is to use dynamic bandwidth throttling, which monitors andanalyzes overall network capacity. Whereas normal throttling simply specifies amaximum data rate, dynamic throttling adds a “busy time” percentage. This is thefraction of the bandwidth that you want to allocate when the network is busy. Forexample, you could specify that downloads do not use any more than 10% of theavailable bandwidth whenever the program detects existing network traffic.Dynamic throttling also provides for a minimum data rate, in the case the busypercentage is too low to be practical.
When you enable dynamic throttling for any given link, the program monitors andanalyzes the existing data throughput to establish an appropriate data rate. If thereis no competing traffic, the throughput is set to the maximum rate. In the case ofexisting traffic, the program throttles the data rate to the specified percentage orthe minimum rate, whichever is higher. You must enable dynamic throttling onboth the server and the client side to have it work correctly.
You control dynamic bandwidth throttling with computer settings. There are fourbasic settings for each link:v DynamicThrottleEnabled: This setting defaults to zero (disabled). Any other
value enables dynamic throttling for the given link.v DynamicThrottleMax: This setting usually defaults to the maximum unsigned
integer value, which indicates full throttle. Depending on the link, this value setsthe maximum data rate in bits or kilobits per second.
v DynamicThrottleMin: This setting defaults to zero. Depending on the link, thisvalue sets the minimum data rate in bits or kilobits per second. This valueplaces a lower limit on the percentage rate given below.
v DynamicThrottlePercentage: This setting defaults to 100%, which has the sameeffect as normal (non-dynamic) throttling.. It represents the fraction of themaximum bandwidth you want to use when the network is busy. It typically hasa value between five and ten percent, to prevent it from dominating existingnetwork traffic. (A zero for this setting is the same as 100%.)
As with any other setting, you can create or edit the dynamic bandwidth settingsby right-clicking an item (or group of items) in any computer list and choosingEdit Computer Settings from the context menu.
The specific variable names include the IBM Endpoint Manager Server/Relaysettings:
_BESRelay_HTTPServer_DynamicThrottleEnabled
_BESRelay_HTTPServer_DynamicThrottleMaxKBPS
_BESRelay_HTTPServer_DynamicThrottleMinKBPS
_BESRelay_HTTPServer_DynamicThrottlePercentage
The IBM Endpoint Manager Client settings:
_BESClient_Download_DynamicThrottleEnabled
_BESClient_Download_DynamicThrottleMaxBytesPerSecond
Chapter 13. Relays and Servers 101
_BESClient_Download_DynamicThrottleMinBytesPerSecond
_BESClient_Download_DynamicThrottlePercentage
The Gathering settings:
_BESGather_Download_DynamicThrottleEnabled
_BESGather_Download_DynamicThrottleMaxBytesPerSecond
_BESGather_Download_DynamicThrottleMinBytesPerSecond
_BESGather_Download_DynamicThrottlePercentage
Note: For any of these settings to take effect, you must restart the affected services(Server, Relay, or Client).
If you set a Server and its connected Client to differing maximums or minimums,the connection choosees the smaller value of the two.
102 IBM Endpoint Manager: Console Operator’s Guide

Chapter 14. Client-Relay-Server Authentication
Client Authentication
Client Authentication (introduced in version 9) extends the security model used byIBM Endpoint Manager to encompass trusted client reports and private messages.This feature is not backward-compatible, and clients prior to version 9.0 will not beable to communicate with an authenticating relay or server.
The original security model has two central capabilities:v Clients trust content from server. All commands and questions that clients
receive are signed by a key that is verified against a public key installed on theclient.
v Clients can submit private reports to server. The client can choose to encryptreports that it sends up to the server, so that no attacker can interpret what iscontained in the report. This feature is disabled by default, and is switched onwith a setting.
Client Authentication extends the security model to provide the mirror image ofthese two capabilities:v Server can trust reports from clients (non-repudiation). Clients sign every
report that they submit to the server, which is able to verify that the report doesnot come from an attacker.
v Server can send private data to clients (mailboxing). The server can encryptdata that it sends to an individual client, so that no attacker can interpret thedata.
Communication using an authenticated relay is a two-way trusted and privatecommunication channel that uses SSL to encrypt all communications. However,communication between a non-authenticating relay and its children is notencrypted unless it is an encrypted report or a mailboxed action or file.
This level of security is useful for many purposes. Your company may havesecurity policies that require authenticating relays on your internet-facing nodes, inyour DMZ, or any network connection that you don’t totally trust. Withauthentication, you can prevent clients that haven’t yet joined your deploymentfrom getting any information about the deployment.
Authenticating relays
Relays can be configured as authenticating relays to authenticate agents. This way,only trusted agents can gather site content or post reports. Use authenticating relayconfiguration for an internet-facing relay in the DMZ.
A relay configured to authenticate agents only performs SSL communication withchild agents or relays that present an SSL certificate issued and are signed by theserver during a key exchange.
To configure an authenticating relay, set the client setting_BESRelay_Comm_Authenticating to 1 or use the related task in the BES Support
© Copyright IBM Corp. 2013 103
site. To configure an open relay again, set _BESRelay_Comm_Authenticating to 0 oruse the related task in the BES Support site. The default value is (0), open relay.
Handling the key exchange
When an agent tries to register and does not have a key and certificate, itautomatically tries to perform a key exchange with its selected relay. If the relay isa non-authenticating relay, it forwards the request up the relay chain to the server,which signs a certificate for the agent. This certificate can later be used by theagent when connecting to an authenticating relay.
Authenticating relays deny these automatic key exchange operations. Thefollowing is a typical scenario:
When you deploy a new Endpoint Manager 9.0 environment or upgrade anexisting Endpoint Manager environment to 9.0 all agents automatically perform thekey exchange with their relays. If the administrator configures the internet facingrelay as an authenticating relay, the existing agents already have the certificate andwork correctly. No further action is required. When you connect new agents to theauthenticating relay they do not work, until the manual key exchange procedure isrun on them.
Manual key exchange
If an agent does not have a certificate and can only reach an authenticating relayon the network, connected through the internet, you can manually run thefollowing command on the agent so it can perform the key exchange with anauthenticating relay:BESClient -register <password> [http://<relay>:52311]
The client includes the password in its key exchange with the authenticating relay,which verifies it before forwarding the key exchange to its parent.
You can configure the password as:v A single password in the client setting _BESRelay_Comm_KeyExchangePassword on
the relay.v A newline-delimited list of one-time passwords stored in a file named
KeyExchangePasswords in the relay storage directory (value StoragePath ofHKLM\SOFTWARE\BigFix\Enterprise Server\GlobalOptions).
Revoking Client CertificatesAfter a client authenticates, you can revoke its certificate if you have any reason todoubt its validity. When you do, that client is no longer authenticated for trustedcommunication. It is removed from the console and a revocation list is updatedand collected by all relays, so that the client’s key can no longer be used tocommunicate with authenticating relays.
To revoke a computer:1. Right-click a computer in any list of computers.
104 IBM Endpoint Manager: Console Operator’s Guide

2. From the pop-up menu, click Revoke Certificate.3. From the confirmation dialog click OK if you are sure you want to remove the
computer's certificate.
This sends revocations down to the relays. Once revoked, that client can no longeruse its private key to gather content from the authenticating relays. The revokedclient disappears from the computer list in the console.
Re-registering a revoked client
When a certificate is revoked, the compromised key is discarded. However, theclient can rejoin the network in two ways.v In an authenticating environment, if the client can access a non-authenticating
relay or server, the client can exchange keys and re-register automaticallyv In an authenticating environment, if the client can only access authenticating
relays, the client is required to use the manual exchange method if automatickey exchange did not previously take place.
v In an open (non-authenticating) environment, the client can re-register itself witha non-authenticating relay.
In all cases, the computer gets a fresh certificate and a new computer id.
Mailboxing
With Client Mailboxing (introduced in version 9.0) you can send an encryptedaction to any given client, instead of broadcasting it to all clients. This improvesefficiency, since the client doesn’t need to qualify every action, and it minimizesnetwork traffic. As a consequence,v Clients are only interrupted when they are targeted.
Chapter 14. Client-Relay-Server Authentication 105

v Clients don't have to process actions that are not relevant to them for reporting,evaluating, gathering, and action processing.
Privacy is assured because the message is encrypted specifically for each recipient;only the targeted client can decrypt it.
A client's mailbox is implemented as a specialized action site, and each client isautomatically subscribed to it. The client knows to scan for actions in this site aswell as the master site and operator sites.
To send an encrypted action directly to a client mailbox, follow these steps:1. Open the Take Action dialog (available from the Tools menu and various other
dialogs).
2. Click the Target tab.3. Click Select devices or Enter device names. Mail-boxing is only available when
you specify a static list of clients. Dynamically targeted computers will not beencrypted and will instead be sent in the open to the master site or a specificoperator site. If you target clients with versions prior to 9.0, the action will alsogo into the master or operator site.
4. Click OK. Actions targeted by computer ID or name will now be encryptedand sent to the client mailbox.
The identifier of the operator who deploys the action is included with the action.Before a client takes the action, it first determines if it is currently administered bythat operator. If not, it refuses to run the action.
106 IBM Endpoint Manager: Console Operator’s Guide
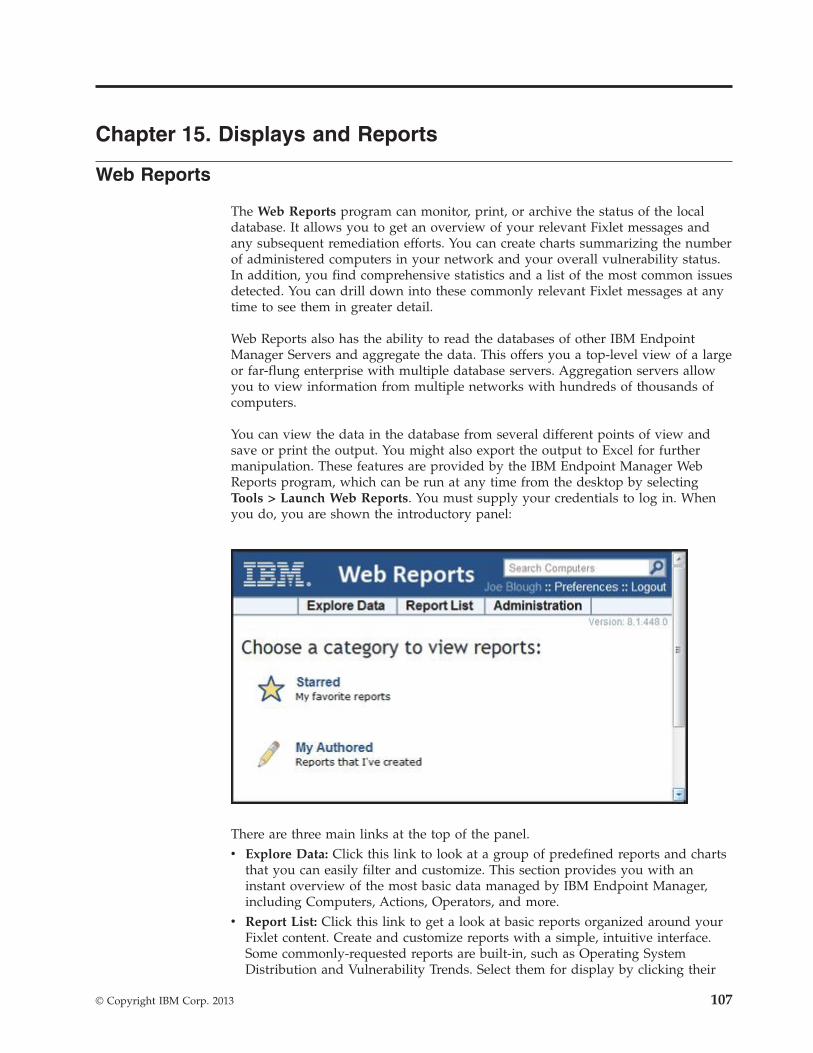
Chapter 15. Displays and Reports
Web Reports
The Web Reports program can monitor, print, or archive the status of the localdatabase. It allows you to get an overview of your relevant Fixlet messages andany subsequent remediation efforts. You can create charts summarizing the numberof administered computers in your network and your overall vulnerability status.In addition, you find comprehensive statistics and a list of the most common issuesdetected. You can drill down into these commonly relevant Fixlet messages at anytime to see them in greater detail.
Web Reports also has the ability to read the databases of other IBM EndpointManager Servers and aggregate the data. This offers you a top-level view of a largeor far-flung enterprise with multiple database servers. Aggregation servers allowyou to view information from multiple networks with hundreds of thousands ofcomputers.
You can view the data in the database from several different points of view andsave or print the output. You might also export the output to Excel for furthermanipulation. These features are provided by the IBM Endpoint Manager WebReports program, which can be run at any time from the desktop by selectingTools > Launch Web Reports. You must supply your credentials to log in. Whenyou do, you are shown the introductory panel:
There are three main links at the top of the panel.v Explore Data: Click this link to look at a group of predefined reports and charts
that you can easily filter and customize. This section provides you with aninstant overview of the most basic data managed by IBM Endpoint Manager,including Computers, Actions, Operators, and more.
v Report List: Click this link to get a look at basic reports organized around yourFixlet content. Create and customize reports with a simple, intuitive interface.Some commonly-requested reports are built-in, such as Operating SystemDistribution and Vulnerability Trends. Select them for display by clicking their
© Copyright IBM Corp. 2013 107

titles in the list. You can create your own custom reports and save them as eitherpublic or private (viewable only by you). Your public reports are added to thereports list; your private reports are only available when you log in with acorrect password.
v Administration: Click this link to gain access to various administrativefunctions, including scheduling activities, managing filters, operators, databasesettings, and users.
In addition, there are two report categories to get you started.v Starred: This link takes you directly to favorite reports that you have flagged as
starred.v My Authored: This link takes you to a list of those reports you personally
created.
Depending on your configuration, there might be more categories available fromthis startup panel.
Here is a snippet of a typical report, summarizing the computers in your networkby their properties. To produce this report, simply click Report List then selectComputer Properties List.
Web Reports can be viewed at any time from the Console under Tools > LaunchWeb Reports.
Any Web Report server can be set up to aggregate data from the other IBMEndpoint Manager Servers. Talk to your Site Administrator about setting up anaggregation server. Refer them to the Administrator's Guide for furtherinformation.
The Web Reports interface is very rich and its complete documentation is beyondthe scope of this guide. For more in-depth information, see the Web Reports Guide.
108 IBM Endpoint Manager: Console Operator’s Guide

Viewing DashboardsDashboards are list of reports that update in real time and provide you withhigh-level views of your IBM Endpoint Manager network.
Click the All Content domain to see all dashboards that are available in yourenvironment in the Domain Panel navigation tree under Dashboards. If you selecta specific content site, you see only the dashboards available with that content site.These reports access the database to provide you with timely and compact viewsof your network.
To run a dashboard, select it from the Dashboards icon in the Domain Panelnavigation tree. The dashboard is shown in the Work Area on the right.
When you install the IBM Endpoint Manager Console, you get the following set ofdashboards:v “Baseline Synchronization Dashboard”v “Deployment Health Checks Dashboard and Deployment Overview Dashboard”
on page 111v “License Overview Dashboard” on page 113v “Maintenance Windows Dashboard” on page 114
Baseline Synchronization DashboardUse the Baseline Synchronization dashboard to make sure that your baselines,source Fixlets, and actions are in sync. Ensuring that your baseline components arein sync with the source Fixlets prevents issues when you deploy actions across anentire network.
This sample scenario shows how strategic the use of this dashboard can be.Assume, for example, that you created and tested a new set of baselines when avendor reports that there was an error with some of their patches. For this reasonnew Fixlets, replacing those containing the patches in error, are released by IBMEndpoint Manager. It can be time consuming to check which of your baselineswere affected. By using the Baseline Synchronization Dashboard, you can, with justa few clicks, view which of your baselines are out-of-sync and automaticallyupdate their content if necessary.
Note: This dashboard also displays all the actions that are from an out-of-syncbaseline, giving you the option to close them and issue them again.
Run the following steps to access the Baseline Synchronization Dashboard:1. Click the All Content domain in the Domain Panel.2. Select the Dashboards icon in the Domain Panel navigation tree.3. Select BES Support.4. Click Baseline Synchronization Dashboard. The dashboard opens.
Chapter 15. Displays and Reports 109
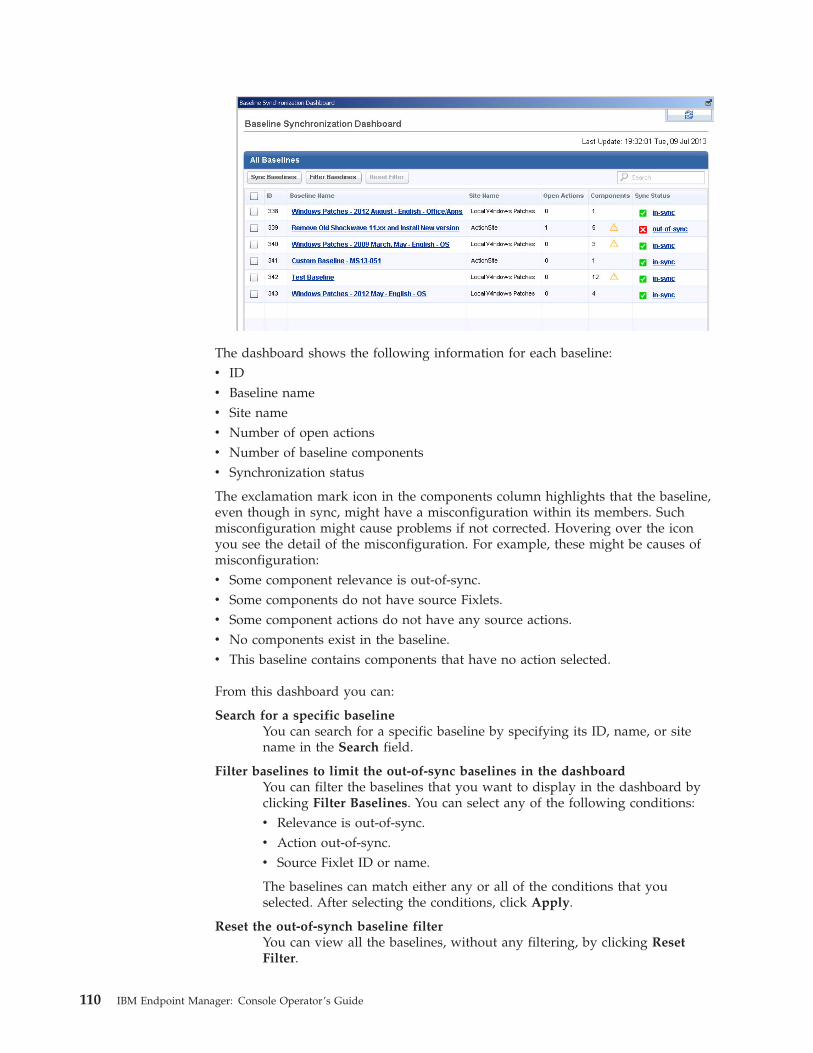
The dashboard shows the following information for each baseline:v IDv Baseline namev Site namev Number of open actionsv Number of baseline componentsv Synchronization status
The exclamation mark icon in the components column highlights that the baseline,even though in sync, might have a misconfiguration within its members. Suchmisconfiguration might cause problems if not corrected. Hovering over the iconyou see the detail of the misconfiguration. For example, these might be causes ofmisconfiguration:v Some component relevance is out-of-sync.v Some components do not have source Fixlets.v Some component actions do not have any source actions.v No components exist in the baseline.v This baseline contains components that have no action selected.
From this dashboard you can:
Search for a specific baselineYou can search for a specific baseline by specifying its ID, name, or sitename in the Search field.
Filter baselines to limit the out-of-sync baselines in the dashboardYou can filter the baselines that you want to display in the dashboard byclicking Filter Baselines. You can select any of the following conditions:v Relevance is out-of-sync.v Action out-of-sync.v Source Fixlet ID or name.
The baselines can match either any or all of the conditions that youselected. After selecting the conditions, click Apply.
Reset the out-of-synch baseline filterYou can view all the baselines, without any filtering, by clicking ResetFilter.
110 IBM Endpoint Manager: Console Operator’s Guide

View the synchronization status of the baseline componentsTo know which Fixlets have parts that are out-of-sync with respect to thesource Fixlet, click Sync Status beside each out-of-sync baseline.
The Baseline Components List dialog displays the sync status of eachcomponent in detail.
Synchronize baselinesA baseline is out-of-sync when the baseline component's relevance oraction is different from that of the source Fixlet. To synchronize a baselinemeans to update the baseline components to match the source Fixlets’relevance.
In the Baseline Synchronization Dashboard, select the out-of-sync baselinesand click Sync Baselines.
Deployment Health Checks Dashboard and DeploymentOverview Dashboard
Use the Deployment Health Checks Dashboard and the Deployment OverviewDashboard to manage and monitor the health of your IBM Endpoint Managerenvironment.
The dashboards track important health indicators for Relay Health, ConsoleHealth, Server Health, Client Health, and Deployment Optimization. For each ofthese checks you see:v A descriptionv Specific deployment detailsv Severity of High, Medium, or Low
v Status of Passed, Warning, or Failed
v Remediation steps
IBM Endpoint Manager Console administrators should regularly review thisdashboard and remediate any failure as described in the check.
Run the following steps to access the Deployment Health Checks Dashboard:1. Click the All Content domain in the Domain Panel.2. Select the Dashboards icon in the Domain Panel navigation tree.3. Select BES Support.
Chapter 15. Displays and Reports 111

4. Click Deployment Health Checks Dashboard. The dashboard opens.
Run the following steps to access the Deployment Overview Dashboard:1. Click the All Content domain in the Domain Panel.2. Select the Dashboards icon in the Domain Panel navigation tree.3. Select BES Support.4. Click Deployment Overview Dashboard. The dashboard opens.
112 IBM Endpoint Manager: Console Operator’s Guide

License Overview DashboardUse the License Overview dashboard to subscribe to content sites.
When you add subscriptions to content sites, content automatically flows fromthese sites into your environment and is evaluated for relevance on all computersrunning the IBM Endpoint Manager Client.
The list of available content sites that you see in this dashboard is strictly related tothe license of IBM Endpoint Manager that you purchased. When you buy IBMEndpoint Manager, you receive a license number that defines which products inthe IBM Endpoint Manager suite you purchased. This information is used by theproduct to populate, at installation time, the License Overview Dashboard with thesubscriptions to only the products in the suite that you purchased.
With the exception of the content related to the IBM Endpoint Manager platform,for which you are automatically subscribed at installation time, you must manuallyadd subscriptions from the License Overview Dashboard to the other content sitescovered by your license. This means that even though your license includes, forexample, the IBM Endpoint Manager for Patch Management product, you still
Chapter 15. Displays and Reports 113
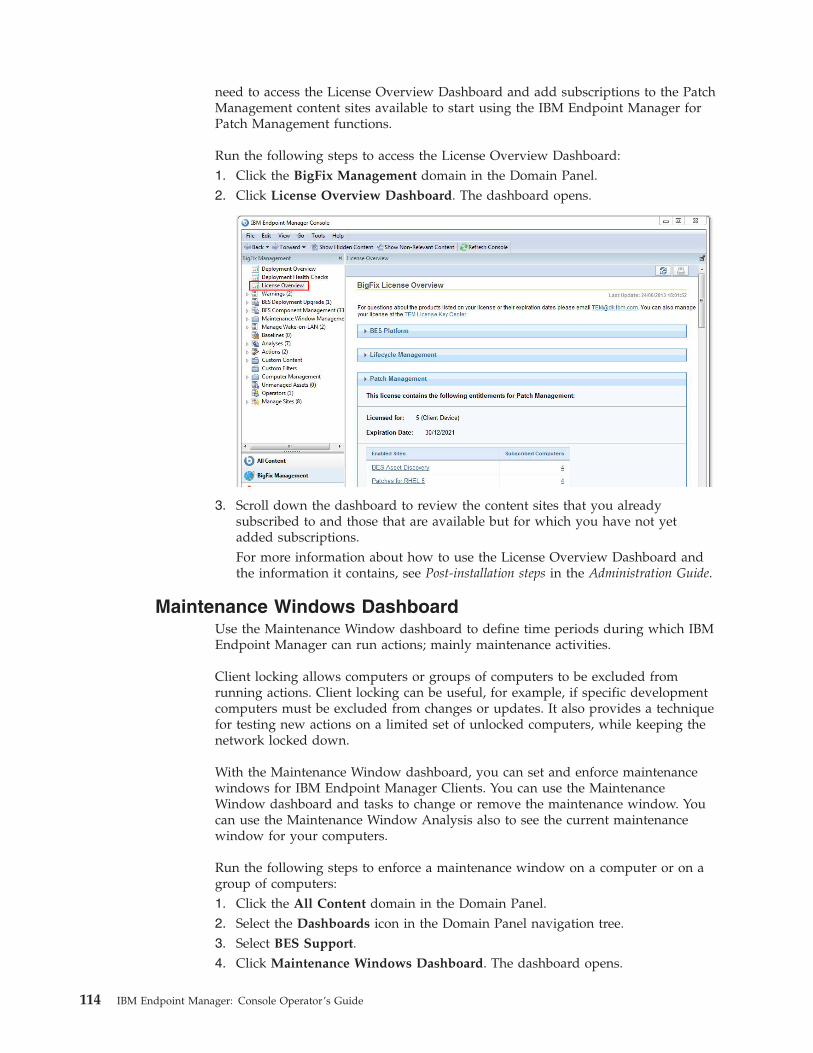
need to access the License Overview Dashboard and add subscriptions to the PatchManagement content sites available to start using the IBM Endpoint Manager forPatch Management functions.
Run the following steps to access the License Overview Dashboard:1. Click the BigFix Management domain in the Domain Panel.2. Click License Overview Dashboard. The dashboard opens.
3. Scroll down the dashboard to review the content sites that you alreadysubscribed to and those that are available but for which you have not yetadded subscriptions.For more information about how to use the License Overview Dashboard andthe information it contains, see Post-installation steps in the Administration Guide.
Maintenance Windows DashboardUse the Maintenance Window dashboard to define time periods during which IBMEndpoint Manager can run actions; mainly maintenance activities.
Client locking allows computers or groups of computers to be excluded fromrunning actions. Client locking can be useful, for example, if specific developmentcomputers must be excluded from changes or updates. It also provides a techniquefor testing new actions on a limited set of unlocked computers, while keeping thenetwork locked down.
With the Maintenance Window dashboard, you can set and enforce maintenancewindows for IBM Endpoint Manager Clients. You can use the MaintenanceWindow dashboard and tasks to change or remove the maintenance window. Youcan use the Maintenance Window Analysis also to see the current maintenancewindow for your computers.
Run the following steps to enforce a maintenance window on a computer or on agroup of computers:1. Click the All Content domain in the Domain Panel.2. Select the Dashboards icon in the Domain Panel navigation tree.3. Select BES Support.4. Click Maintenance Windows Dashboard. The dashboard opens.
114 IBM Endpoint Manager: Console Operator’s Guide

5. Click Create New Maintenance Window to set a new Maintenance Window.After you create a maintenance window, you can see it under MaintenanceTasks.
6. Use the "Enforce Maintenance Window with Client Locking" task to set amaintenance window on a computer. The computer is unlocked when it is inthe maintenance window and locked for the remainder of the time. Eachcomputer can have only one active maintenance window at any time. The"Enforce Maintenance Window with Client Locking" task overrides a previouslocking or unlocking action for the selected computers. Similarly, any locking orunlocking action that is taken on the selected computers later overrides theeffects of a previous "Enforce Maintenance Window with Client Locking" taskrun.
Chapter 15. Displays and Reports 115

Note: Alternatively you can lock or unlock a computer, by running thefollowing steps:a. Right-clicking on the computer.b. Selecting Edit Computer Settings
c. Clicking the check mark to lock or unlock the computer.7. Click the maintenance tasks to apply the maintenance window to computers.8. After a maintenance window is set on a computer, it returns true or false in the
"Maintenance Window" property.
Visualizing Data
The Visualization Tool allows you to view and manipulate data across your entiremanaged network. It lets you visualize various hierarchical relationships in yournetwork, using an interactive 3D sphere to map the data.
The Visualization Tool makes it possible to view a real-time graphical networkmap showing Fixlet relevance, Action status, and Retrieved Properties.
As an example, you could view all computers that are currently unpatched forMS04-011 across an enterprise network, displayed as an Active Directory hierarchy.Then you could watch the clients change from red to green as they get patched inreal-time across your network. As another example, you could view all Clients thatare currently using Microsoft Office, colored according to version.
Or you can create your own hierarchy. You could assign settings on all yourmachines named 'city', 'building', and 'floor'. You could then create a dynamicsetting called 'location' that concatenates these properties:
116 IBM Endpoint Manager: Console Operator’s Guide
set setting location = (value of setting 'city' & ';' & value of setting 'building' & ';' &value of setting 'floor')
Specify a semi-colon as the delimiter of this setting to visualize your computers asa location-based hierarchy, from each networked city down to the floor of everybuilding.
To create your own custom view of the data, follow these steps:1. Select Tools > Launch Visualization Tool...
2. There are three tabs in the Visualization Parameters dialog:v General: Specify the desired display hierarchy from among Relays, Active
Directory, IP Address, or Retrieved Property.v Colorization: Indicate how you want to color-code the client nodes. You can
base your color scheme on Fixlet Relevance, Baseline Relevance, RetrievedProperties, Action Status, or a custom Relevance clause.
v Computers: Limit the computers you want to display, using Active Directoryand Retrieved Properties as filters. To show all the computers under IBMEndpoint management, click Show all computers.
3. Click OK to generate your customized visualization of your network.4. A graph of your network, mapped onto a 3D sphere, is displayed. You can now
use the Controls listed in the upper right corner to change your view of thedata.
5. Double-click a computer node to bring it to the forefront. Drag the elements inthe graph to tweak the viewpoint.
6. You can continuously rotate the model by selecting View > Spin Mode.
7. Use the Navigation menu to move through the hierarchy, from each selectedcomputer to its sibling, parent or child.
Chapter 15. Displays and Reports 117

118 IBM Endpoint Manager: Console Operator’s Guide

Chapter 16. Menus
File Menu
The File Menu offers the following commands:
Import Import .bes files, which can be default Tasks,Actions, Baselines, or other content that youmight have created or customized.
Export Export a Task, Action, Fixlet, Baseline, andso on. that you or another Console user cansubsequently import. Exporting provides auseful mechanism for creating customizedcontent. Simply export the content, edit itwith any text editor, and then import thecustomized version.
Preferences... Set refresh, IBM Endpoint Manager Clientheartbeat, colorizing, caching, and otherpersistent Console preferences.
Change Database Password... Change the sign-in password for thecurrently connected user.
Exit Quit the program.
Edit Menu
The Edit Menu offers the following commands:
Table 2. Edit menu
Command Description
Cut Cut text and put in clipboard. Thiscommand is for use in the various textboxes that the Console uses for data input.
Copy Text Copy text and put it in the clipboard.
Copy Text with Headers Copy text, including any associated headers,and put it in the clipboard.
Paste Insert the contents of the clipboard. Thisoption is only activated when there is aneditable text box on the panel.
Select All Select all items in the current window.Depending on the window, this can be textfrom the Work Area or items in the ListPanel.
© Copyright IBM Corp. 2013 119

Table 2. Edit menu (continued)
Command Description
Hiding > Remove the selected objects, Fixlets, Tasks,Baselines, or Analyses, from the List Panel.The object itself is not actually deleted, andcan be retrieved by clicking Show HiddenContent in the Console Toolbar. Theseoptions only become available when youclick objects in the List Panel. Alternatively,you can right-click the objects and selecthiding options from the context menu.There are four options
Globally Hide: This hides the object acrossall Consoles.
Globally Unhide: Relist the selected objects(either Fixlets, Tasks, Baselines, orAnalyses). To find the object, click the ShowHidden Content button.
Locally Hide: Hide the object on the currentConsole only; other Consoles still displaythe object. The object itself is not actuallydeleted, and can be retrieved by clicking theShow Hidden Content button and selectingit from the navigation tree.
Locally Unhide: After clicking the ShowHidden Content button, you can choose tounhide locally hidden content with thiscommand.
Create Custom Object Copy... Create a customized clone of the currentlyselected object (Fixlet, Task, Baseline,Computer Group, or Analysis). For eachcopy, you can create a header name andcompose a message to describe theassociated actions. You can also customizeor add relevance expressions to refine thetargeting of the Fixlet or Task.
Remove... Remove a customized object (including aFixlet, Task, Baseline, Computer Group,Analysis or Site File) from its list.Confirming this choice permanentlyremoves the customized object from the list.
Edit Custom Object... Edit the Message, Action, Relevance, andProperties of a customized object (Fixlet,Task, Baseline, Computer Group, orAnalysis).
120 IBM Endpoint Manager: Console Operator’s Guide

Table 2. Edit menu (continued)
Command Description
Groups > Manage groups of computers. This itemexpands to include:
View as Group: Create an ad-hoc groupfrom a selected set of computers. You canthen view the Fixlets, Tasks, Baselines,Actions, and Analyses that pertain to thisparticular group.
Add to Manual Group...: Add the selectedcomputers to a named group. You can eitherattach the computer to an existing group orcreate a new named group. You mustsupply a password to propagate the newgroup name to the selected clients.
Remove From Manual Group: Remove acomputer from the specified group. First,select the group from the navigation tree onthe left, then select a computer from the list.You must supply a password to propagatethe change.
Stop Action Stop the selected actions.
Assign User Management Rights... Opens a display that lets you grant andrevoke management rights on acomputer-by-computer basis.
Find... Opens a dialog that prompts you for asearch field and search string. You cansearch for fields that either contain or donot contain the search string. In addition,for objects that can be hidden, such asFixlets, Tasks, Baselines, or Analyses, youcan search based on visibility.
View Menu
The View Menu offers the following commands:
Show Hidden Content Allow hidden content, including Fixletmessages, Tasks, Analyses, and so on. to beviewed. Content can be hidden locally (onthis Console only) or globally (on allConsoles). To view this content, select thisitem or click the button in the ConsoleToolbar with the same name. From thenavigation tree, all content becomes visibleand you can select hidden items to unhidethem if you choose.
Chapter 16. Menus 121

Show Non-Relevant Content Allow non-relevant content, such as Fixletmessages and Tasks, to be viewed. Typicallythe IBM Endpoint Manager operates bydisplaying only those items that are relevantto your network. Thus, out of the thousandsof available Fixlets, for example, only a feware brought to your attention forremediation. When an item has beenremediated across your entire network, it isno longer relevant and is no longer shown.This menu item allows you to examine theseitems, which can be useful if you want toclone or repurpose one for your own uses.
Show Status Bar Display the number of relevant messagesand the connected database in the status barat the bottom of the Console window. Selectthis menu item to toggle its state.
Refresh Fetch the latest information from the IBMEndpoint Manager database. Typically, yourinformation is updated automatically basedon a schedule determined by youradministrator (and by your choice in thePreferences dialog). Because refreshingcauses a database access, use it withrestraint.
Go Menu
The Go Menu allows you to quickly select Domains and to change the focus areaof the Console. It offers the following commands:
All Content Open the top-level Domain that contains acombination of all Domains.
Other Domain Names Open the specified Domain. The next fewentries in this menu include the variousDomains you created, depending on thespecific Fixlet sites you are subscribed to.
Current List Move the focus of the Console to the ListPanel at the top right of the Console.
Current Document Move the focus of the Console to the currentdocument in the Work Area at the bottomright of the Console.
Tools Menu
The Tools Menu offers the following commands:
Take Custom Action... Run a custom command, targeted to anysubset of IBM Endpoint Manager Clientcomputers.
Create New Fixlet... Create a custom Fixlet message, completewith targeting and actions.
122 IBM Endpoint Manager: Console Operator’s Guide
Create New Task... Create a custom Task, similar to a Fixletmessage, but used by the Console operatorto install software, update settings, orestablish other local policies.
Create New Baseline... Create a custom Baseline, allowing you toestablish a grouping of Tasks, Fixletmessages, and other Baselines that can beapplied with a single click to any groupingof computers.
Create New Analysis... Create a custom analysis, based on thespecified properties of the IBM EndpointManager Client computers.
Create New Automatic Computer Group... Create an automatically defined grouping ofcomputers, based on various clientproperties, such as name, CPU, IP Address,and so on.
Create New Manual Computer Group... Manually create a computer group whichyou can populate from any computer list.
Add External Site Masthead... Start a new Subscription to a Fixlet site. Thiscommand opens a browser window for youto select a masthead file, typically with anextension of .efxm.
Add Files to Site... Add text, utility, domain, or dashboard filesto the sites you author.
Add LDAP Directory... Add an existing Lightweight DirectoryAccess Protocol (LDAP) or Active Directory(AD) domain to the Console.
Create Custom Site... Create a custom site containing your owncontent. You can create custom Fixlets,Tasks, Analyses, and so on.
Create Operator... Create a local operator with passwordprotection.
Add LDAP Operator... Add a Console operator from the list ofusers on your existing LDAP Server.
Create Role... Create a Role with associated permissionsover computers and sites. Roles can alsoinclude LDAP Groups, allowing you to addmultiple potential users at once.
Create Custom Filter... Create a named filter that allows you to findspecific custom content, based on variousproperties. The objects available to filterinclude Fixlet messages, Tasks, Analyses,Computers, and more.
Manage Properties... Create and manage properties to retrievefrom your Clients, using Relevance clauses.These properties are included in the columnheaders on client listings. There is a defaultset of properties, but you can add or deletethem. Properties are used to filter or selectsubsets of Clients for Fixlet actiondeployment.
Chapter 16. Menus 123

View Recent Comments View the list of comments made by theConsole operators, sorted from most recentto oldest. This list includes all comments,regardless of the underlying object.
Launch Web Reports... Provide access to data reports, which arecollected from various IBM EndpointManager Servers and aggregated into a setof HTML reports summarizing the historyand status of Fixlet messages and actionsacross extended networks of computers.
Launch Visualization Tool... Run a tool to visualize the hierarchy of yourinstallation, from the servers down throughthe relays to the client computers.
Help Menu
The Help Menu offers the following commands:
Contents Provide integrated help.
Visit support.bigfix.com Launch a browser to view the support site.
Customer Feedback Options Allow us to learn from your experience.Click the button to participate in ananonymous survey to help us learn moreabout how people use the program. Thisinformation is used to improve yourexperience.
About IBM Endpoint Manager Console... Display the version number of the program,along with a URL for support.
124 IBM Endpoint Manager: Console Operator’s Guide

Chapter 17. The Dialogs
About the IBM Endpoint Manager Console
The About dialog displays the version of the IBM Endpoint Manager Console. Italso includes a URL for technical support.
This dialog is available by selecting:v Help > About IBM Endpoint Manager Console
© Copyright IBM Corp. 2013 125

Action: ComputersThe Computers tab of the Action document shows the number of computersaffected by the specified action along with the current status of each.
To view this information for a specific action:1. Click the Action icon in the navigation tree.2. Select that specific action in the List Panel. Information about the action is
displayed in the Work Area.3. Select the Computers tab in the Work Area.
In the Computers tab there is a navigation tree on the left where you see thenumber of computers affected by the specified action and you can filter list bynarrowing down for easier analysis. A filtered list shows the computers targeted bythe action, along with the current status of each. The list can be sorted by clickingthe appropriate header. You can view more detailed information about a targetedcomputer by double-clicking the computer in the list.
The Targets tab shows the set of computers that was originally targeted by theaction, the Computers tab, instead, shows:v The status of the action on each of the selected targets, regardless of whether
they responded or not, if the action was originally targeted to specificcomputers.
v The status of the action on the target that actually responded, if the action wasoriginally targeted by properties.
Note: The Computers tab is renamed Reported Computers tab if the targetingmethod selected in the Target tab of the Take Action dialog was set toDynamically targeted by properties.
The deployed action progresses through a series of well-defined stages on a givencomputer. These are the statuses of the action on a computers across the variousstages:
CancelledThe user has canceled the action.
126 IBM Endpoint Manager: Console Operator’s Guide

ConstrainedThe action has been constrained by a Relevance statement set in theExecution tab of the Take Action dialog.
Download FailedThe action failed to complete the download.
Error The action has resulted in an error.
EvaluatingThe action is still evaluating its relevance.
ExpiredThe action has passed its expiration date.
Failed The action has failed to run correctly.
Fixed The action has completed, resolving the issue.
Invalid SignatureThe action cannot run due to an invalid signature.
LockedThe computer is locked and cannot run the action.
Not RelevantThe action is not relevant on this client.
Not ReportedThe action has not reported its success or failure.
Offers DisabledOffers cannot be presented on the specified client, so the action will neverrun.
Pending DownloadsThe action is waiting for downloads.
Pending LoginThe action is waiting for the user to log in for a user-assisted action.
Pending MessageThe action is waiting for the user to accept the action message.
Pending Offer AcceptanceThe action is waiting for the user to accept the offer.
Pending RestartThe action is waiting for a client computer restart.
PostponedThe action has been postponed by the client.
RunningThe action is currently running.
WaitingThe action is waiting for a user response.
Chapter 17. The Dialogs 127

Action History Tab
The Action History tab lists the deployment history of the actions associated withthe selected Fixlet, Task, or Baseline document.
To see something in this dialog, you must have issued an Action. The ActionHistory list can be sorted by clicking the headers, which include the ID, TimeIssued, State, % Complete (based on the number of Clients reporting success),Name, Site, Issued By, and Type.
This dialog is available by selecting a Fixlet, Task, or Baseline icon from theDomain Panel navigation tree, clicking an item from the List Panel, and clickingthe Action History tab in the Work Area below the list.
128 IBM Endpoint Manager: Console Operator’s Guide
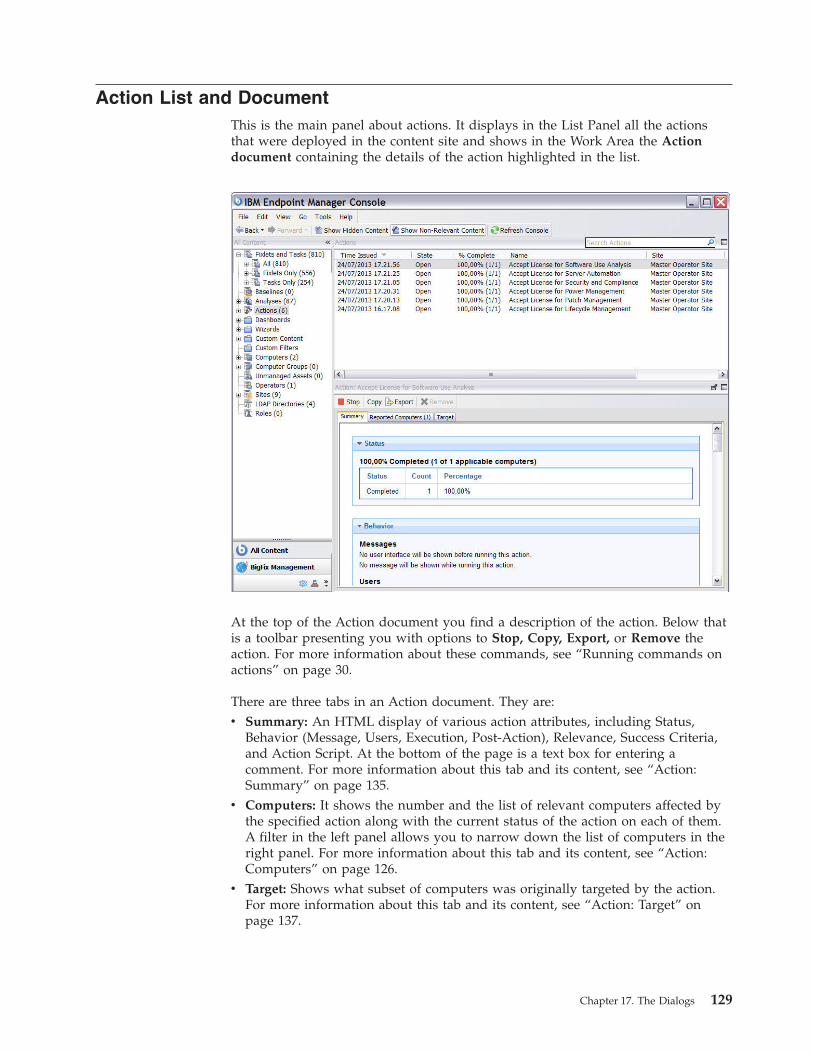
Action List and DocumentThis is the main panel about actions. It displays in the List Panel all the actionsthat were deployed in the content site and shows in the Work Area the Actiondocument containing the details of the action highlighted in the list.
At the top of the Action document you find a description of the action. Below thatis a toolbar presenting you with options to Stop, Copy, Export, or Remove theaction. For more information about these commands, see “Running commands onactions” on page 30.
There are three tabs in an Action document. They are:v Summary: An HTML display of various action attributes, including Status,
Behavior (Message, Users, Execution, Post-Action), Relevance, Success Criteria,and Action Script. At the bottom of the page is a text box for entering acomment. For more information about this tab and its content, see “Action:Summary” on page 135.
v Computers: It shows the number and the list of relevant computers affected bythe specified action along with the current status of the action on each of them.A filter in the left panel allows you to narrow down the list of computers in theright panel. For more information about this tab and its content, see “Action:Computers” on page 126.
v Target: Shows what subset of computers was originally targeted by the action.For more information about this tab and its content, see “Action: Target” onpage 137.
Chapter 17. The Dialogs 129

Action Parameter
This dialog box makes a request for extra information required by certain Actionsor group of Actions before execution. Typically there is a prompt with a text boxfor you to supply a parameter.
Click OK to continue the Action deployment. This typically opens the Take Actiondialog, where you can further specify deployment options.
An Action Parameter dialog is opened only when you click an Action link in aFixlet that requires extra information before final targeting.
Action Progress Report
This dialog box shows the progress of an action as it is applied across the Fixletnetwork.
First, it shows the progress of any downloads (patches, updates, and so on.). Ifthere are files to download, it displays the name of the downloaded file, the totalnumber of bytes, the current amount downloaded, the transfer rate, and theestimated time to completion.
130 IBM Endpoint Manager: Console Operator’s Guide

The Actions can go through several states as they are collected, evaluated, and runby the clients. These states include:v Running: The Action is currently running.v Evaluating: The Action is still evaluating its relevance.v Failed: The Action has failed to run correctly.v Cancelled: The user has canceled the Action.v Download Failed: The Action failed to complete the download.v Locked: The computer is locked and cannot run the action.v Offers Disabled: Offers cannot be presented on the specified client, so the
Action will never run.v Waiting: The Action is waiting for a user response.v Pending Downloads: The Action is waiting for downloads.v Pending Restart: The Action is waiting for a restart from the Client computer.v Pending Message: The Action is waiting for the user to accept the Action
message.v Pending Login: The Action is waiting for the user to log in for a user-assisted
Action.v Pending Offer Acceptance: The Action is waiting for the user to accept the offer.v Constrained: The Action has been constrained by a Relevance statement set in
the Execution tab of the Take Action Dialog.v Expired: The Action has passed its expiration date.v Postponed: The Action has been postponed by the Client.v Invalid Signature: The Action cannot run due to an invalid signature.v Not Relevant: The Action is not relevant on this Client.v Not Reported: The Action has not reported its success or failure.v Error: The Action has resulted in an error.v Fixed: The Action has completed, resolving the issue.
Action Script TabIn general you are recommended to use the action script provided with the Fixletor task, however, sometime it might be useful to align the action script to yourenvironment and business needs. The Action Script tab of the Take Action dialogallows you to modify the action script.
Chapter 17. The Dialogs 131

To access this tab:1. Select a Fixlet message or a task from any list.2. Click an action button.3. In the Take Action dialog, select the Action Script tab.
There are two buttons in this dialog:
Use the action script from the original Fixlet or task messageThis is the default for most Fixlet actions, and is the recommended option.
Use the following action scriptYou can select one of the following options and either modify the existingscript or enter a new script in the text area. Select the type of action scriptthat you want to use for this script:
BigFix Action ScriptThis is the IBM Endpoint Manager standard scripting language foractions. For more information about the action language, seeIntroducing the action language.
AppleScriptThis is Apple's scripting language for controlling computerresources.
sh The action is a shell script to be run by a Linux or a UNIX or a bsdshell.
Note: By default, actions cannot be undone. Make sure to test your action on asmall scale before you deploy it in your entire network.
132 IBM Endpoint Manager: Console Operator’s Guide

Action Settings
The Action Settings dialog lets you apply lockable Action Settings to a new orcustomized Fixlet message, Task, or Baseline.
Using the lock icons to the right of the screen, you can lock the individual itemsunder each of the tabs of this dialog to force the action to be run with the selectedconstraints.v At the top of this dialog is the Name of the Action. Depending on the context it
might be editable, if you want to rename it or add extra information to it.
Below the Name box are some buttons that allow you to save or re-use yourAction values:v Preset: This is a pull-down menu with the names of your existing presets, if any.
Click one to automatically fill out your Action settings.v Show only personal presets: Check this box to limit the presets to your own
personal presets.v Save Preset: After creating custom settings for an Action, you can save them for
later re-use.v Delete Preset: Select a preset and then click this button to delete it.
This body of the dialog contains several tabs, including:v Execution: This tab allows you to set constraints on the Action, including
starting and ending dates and run windows. You can also set up retry counts (in
Chapter 17. The Dialogs 133

case the Action fails or reverts) and allow the deployment to be distributed overa period of time to minimize the network load.
v Users: Allows you to specify whether or not you require a logged-on user (orspecified group of users) to be present before running the Action.
v Messages: Specify informative messages to be displayed on the targeted Clients,along with options for user interaction.
v Offer: This tab allows you to convert this Action into an Offer, which triggersthe display of an HTML user interface on select Clients. The user has the optionto select these Offers from a list.
v Post-Action: Specify a follow-up behavior for the Action, such as a restart orshutdown, including appropriate warning messages.
To lock or unlock any of the items under these tabs, simply click the lock icons tothe right.
When you have finished specifying your Action settings, click OK. Before theConsole can issue the Action, you must enter your password . When you do, aprogress dialog opens to keep you informed about the deployment.
This dialog is available when you create or customize a Fixlet message, Task, orBaseline. For Tasks and Fixlet messages, select the Actions tab, check the box nextto Include action settings locks, and click the Edit button to see this dialog. Whencreating or customizing a Baseline, click the Components tab, check the box nextto Use custom action settings, and click the set action settings link.
Action Site Signing Key
This dialog allows you to manage the location of your private key (.pvk), or tochange the password for your Action signing key.
The Console operator must obtain a private key (publisher.pvk or license.pvk) fromthe Site Administrator, who must first create it using the IBM Endpoint ManagerAdministrator Tool. When these keys have been created, the Site Administratorgives them to authorized personnel, who can then propagate Actions. To sign anaction, the authorized Console operator must browse to the appropriate privatekey (typically stored on a removable disk or memory stick) and provide apassword.
You can see this dialog by selecting Tools > Manage Signing Key.
134 IBM Endpoint Manager: Console Operator’s Guide

Action: SummaryThe Summary tab of the Action document shows various attributes of the selectedaction. These settings were created when the action was initially specified.
To view this information for a specific action:1. Click the Action icon in the navigation tree.2. Select that specific action from the List Panel. Information about the action is
displayed in the Work Area.3. In the Work Area, click the Summary tab.
In the Summary tab you see the following information:
Status It shows the number of applicable targets grouped by completion status ofthe action. This status can be not reported, or are Waiting, or Running, orCompleted.
SourceIf this action was originated by a Fixlet, this section contains a link to theFixlet and the name of the content site involved.
BehaviorIt displays action settings including:
MessagesDescribes any messages to be displayed either before or during theexecution of the specified action.
Chapter 17. The Dialogs 135

Users Lists the requirements for user intervention in the action. Allows auser interface to be presented to select user groups.
ExecutionContains information about the execution of the action, includingending time, reapplication, and what happens if the action fails.
Post-ActionProvides information about what happens, including restarting orshutting down after the application of the action.
DetailsThis section displays information about the action run and the relevanceexpressions and the action scripts it used:
ID The ID of the action. This is the unique identifier for that actionrun.
DomainThe name of the domain hosting this action.
Type Either single or multiple action, depending on how the action wasissued. For more details, see “Taking actions” on page 22.
State The overall state of the action as it deploys. These are the possiblestates:
open The action is active on one or more computers. It remainsopen until its expiration date elapses, or an operator stopsit.
stoppedThe action was stopped by an operator. It remains stoppeduntil its expiration date elapses or it is removed.
expiredThe expiration date for the action expired. An actionexpired cannot be removed.
Issued The date of issuance and the operator who issued the action.
RelevanceThis is a full listing of the relevance statement that determines thetargeting of this action. For information about the Relevancelanguage, see Introducing the Relevance languagethe IBM EndpointManager: Relevance Language Guide.
Action ScriptThis is a listing of the script that is run if this action is relevant tothe client computer. For information about the action language, seeIntroducing the action languagethe IBM Endpoint Manager: ActionGuide.
Success CriteriaThe criteria used to determine the successful conclusion of theaction.
CommentsThis is a text box that allows you to view or attach a comment to theaction. This messages can be seen by all operators having access to thecontent site that the action belongs to.
136 IBM Endpoint Manager: Console Operator’s Guide

Action: TargetThe Target tab of the Action document presents a read-only display of thecomputers targeted by the specified action.
To view this information for a specific action:1. Click the Action icon in the navigation tree.2. Select that specific action in the List Panel. Information about the action is
displayed in the Work Area.3. Select the Targets tab in the Work Area.
The dialog shows which computers are currently targeted by the Action. Theoriginal targeting was set when the action was deployed in the Target tab of the“Take action” on page 233 dialog. Depending on the targeting method, indicatedby three read-only radio buttons at the top of this dialog, the this list of computerscan be static or dynamic.
Selected devicesIf this option was specified, the computers in the list are those relevant tothe action, those that satisfied the relevance expression set in theApplicability tab of the “Take action” on page 233 dialog. This is thedefault behavior.
Dynamically targeted by propertiesIf this option was specified, the action selects any IBM Endpoint ManagerClient computer with the retrieved property specified, for example anycomputer with Linux Red Hat Enterprise Server 6.1 installed.
Chapter 17. The Dialogs 137

This search runs when the Take action is triggered, then it is evaluatedagain on timely basis until the action expires. The action expiration timewas set in the Execution tab when the Take action was triggered. If newcomputers satisfying the property are found, they are added to the list oftargets and the action is run on them too. when this targeting method isselected, The Computers tab is renamed Reported Computers.
Enter device namesIf this option was specified, you see a list of computers that were manuallyselected for this action when the Take action was triggered.
Add Comment
The Add Comment dialog lets you attach an explanatory comment to Fixletmessages, Tasks, Baselines, Actions, Computers, Computer Groups, and Analyses.
138 IBM Endpoint Manager: Console Operator’s Guide

The comment you enter here is displayed in the Description or Summary tab whenyou open one of the associated items in the workspace.
This dialog is available by right-clicking an item from the List Panel and selectingAdd Comment from the context menu.
Add Custom Setting
This dialog box lets you create a custom Name/Value setting that applies to theselected computer.
Type a name for the variable in the first input box, and type the value of thevariable in the second box. This can be useful for naming or otherwise attachingtext or numeric values to a computer or set of computers.
This dialog is available from the Edit Computer Settings dialog. Right-click acomputer from any listing, select Edit Computer Settings from the pop-up menu,and then click the Add button.
Chapter 17. The Dialogs 139

Add Files to Site
This dialog lets you add files to any site that you can author. These can beanything from simple text files to functional dashboards.
Select a site from the Add to site pulldown, Browse for the files to add, and thenclick Add files.
To distribute the files to every client, click the Send to clients box.
For more information, see Adding Files to Sites.
This dialog is available by selecting Tools > Add Files to Site...
140 IBM Endpoint Manager: Console Operator’s Guide

Add LDAP Server
Add LDAP User
LDAP users can be added through the Console.
Select or search for the user's name. Click Add.
This dialog is presented when you select Tools > Add LDAP Operator.
Add User
Local users can be added through the Console with password protection.
Enter the user's name and password plus verification. Click OK.
This dialog is presented when you select Tools > Create Operator.
Chapter 17. The Dialogs 141

Analysis List and Document
A list of Analyses is displayed when you click Analyses, or any of its child nodes,from the Domain Panel navigation tree.
An Analysis document is displayed in the Work Area of the Console when youclick an item from this list.
At the top of the Analysis document is the name of the analysis. There is a toolbarat the top of the window, with the following choices:v Activate: Start the specified Analysis. This option is only available if the
Analysis is currently deactivated.v Deactivate: Stop the specified Analysis. This option is only available if the
Analysis is currently activated.
142 IBM Endpoint Manager: Console Operator’s Guide

v Edit: Make changes to this Analysis. This option is only available if this is acustom Analysis.
v Export: Save a copy of this Analysis to import it into a different Console ordeployment or to edit it in an external editor.
v Hide Globally: Hide this Analysis from all Consoles.v Hide Locally: Hide this Analysis from the local Console only.v Remove: Delete the Analysis. This option is only available for custom Analyses.
There are several tabs in an Analysis document. They include:v Description: An HTML page describing the Analysis, along with a link to
activate or deactivate the Analysis.v Details: An HTML page listing the various Analysis attributes, including
Properties and Relevance. At the bottom of the page is a text box for entering aComment attached to the Analysis.
v Results: A dialog displaying the results of the Analysis. This tab is only visiblefor an activated Analysis.
v Applicable Computers: A list of the Clients where this Analysis is applicable.This is a typical filter/list panel for computers; click a filter in the left panel tonarrow down the list of computers in the right panel.
To display an Analysis list, click the Analyses icon (or any of its child nodes) inthe Domain Panel navigation tree.
An Analysis document is opened whenever you open an item in an Analysis list.
Applicable Computers Tab
The Applicable Computers tab displays all the networked computers that areaffected by the currently selected Fixlet, Task, Analysis, or Baseline object.
This is a /list view with a filter panel on the left, allowing you to narrow downthe displayed list of computers. To do this, open a retrieved property or groupfrom the left panel and select a value to filter the list.
Chapter 17. The Dialogs 143

Like other lists in the Console, you can sort it by clicking the column headers. Youcan add or remove header properties by right-clicking in the header row.
This dialog is available by opening a Fixlet, Task, Analysis, or Baseline from theList Panel and clicking the Applicable Computers tab in the Work Area below.
Applicability tabIn the Applicability tab you can specify the criteria to use to judge the relevanceof a Fixlet action.
This tab is available from several different dialogs:v “Take action” on page 233v “Take multiple actions” on page 235v “Edit Computer Settings” on page 190
It is strongly recommended that you use the original Relevance expression, butyou might want to customize it to better suit your needs. Select:
...the relevance clause from the original Fixlet or Task Message evaluates to true.To confirm the relevance expression set in the default action.
...the following relevance clause evaluates to true.To modify the existing relevance expression or to specify a new relevanceexpression to suite your needs. For more information about the Relevancelanguage, see Introducing the Relevance language.
144 IBM Endpoint Manager: Console Operator’s Guide

Assign User Management Rights
The Assign User Management Rights dialog lets you choose which computers anoperator can manage.
This dialog displays the current set of computers that can be managed by theselected Console operator and lets you add or delete computers from that set.There are two buttons in this dialog:v Add: Add new computers to the set of computers that the operator can manage.
This opens a standard filter/list box of the computers on your network. Use thevalues of the retrieved properties to filter down the group of computers for thisoperator. The use of retrieved properties, including custom properties, makes itsimple to group computers. For example, you might want to group computersby their operating system or cpu type. Or you might create a special computersetting, like department or location, and use that to group management rights tothe selected operator. Or there might be computers using particular applicationsthat you want to assign to specialists in your organization.
v Delete: This button lets you remove computers from the set of computers thatthe operator can manage. It opens a dialog that lets you choose which retrievedproperty filters you want to delete. (If a single filter was defining the rights,when you select Delete, it does so without opening this dialog.)
This dialog is available by selecting Operators from the Domain Panel navigationtree, right-clicking any operator in the List Panel, and choosing Assign UserManagement Rights from the context menu (or choose Assign User ManagementRights from the Edit menu). You must have logged in with Administrator rights toview this tab.
Chapter 17. The Dialogs 145

Baseline Component Applicability Tab
The Baseline Component Applicability tab of the Computer document displays alist of Baseline Components that are applicable to the selected computer.
The components are listed by their number as defined in the Baseline, the name ofthe component, the group it is associated with, and whether or not it is relevant tothe specified computer. Right-click the header to see what fields are available todisplay and sort by.
This dialog is available by selecting Computers from the Domain Panel navigationtree, clicking a computer from the List Panel, and clicking the BaselineComponent Applicability tab.
Baseline List and Document
A list of Baselines is displayed when you click Baselines, or any of its child nodes,from the Domain Panel navigation tree.
A Baseline document is displayed in the Work Area of the Console when you clickan item from this list.
146 IBM Endpoint Manager: Console Operator’s Guide
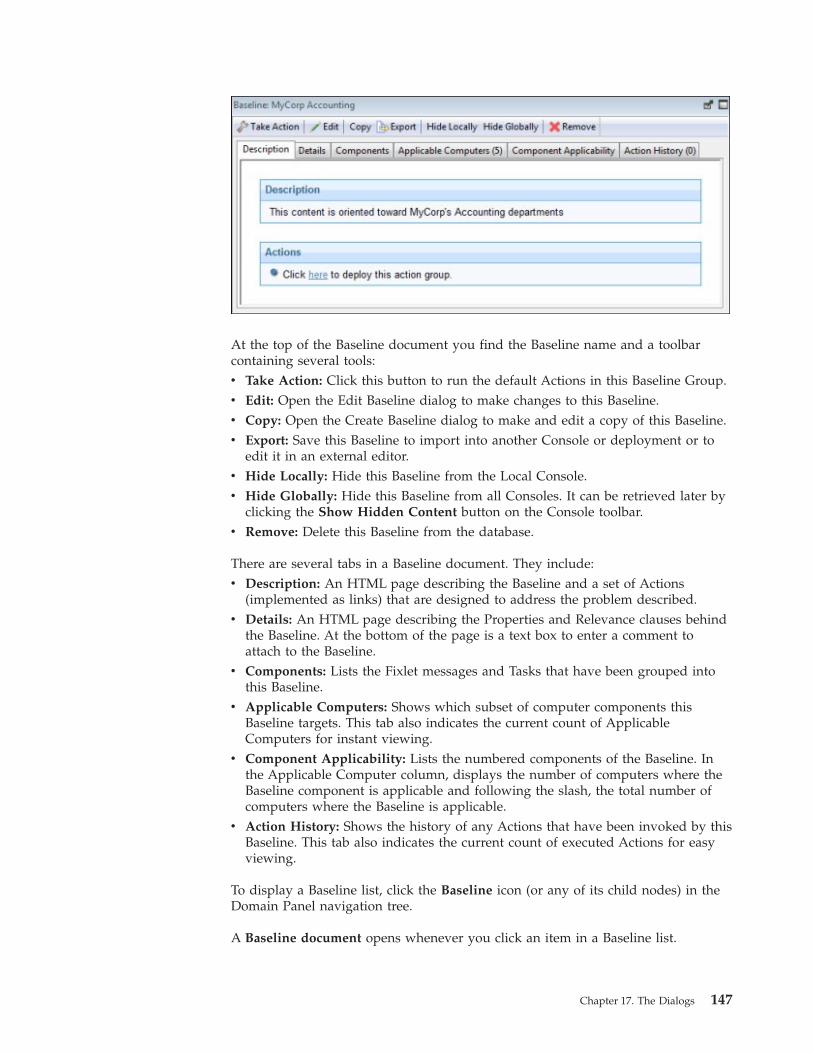
At the top of the Baseline document you find the Baseline name and a toolbarcontaining several tools:v Take Action: Click this button to run the default Actions in this Baseline Group.v Edit: Open the Edit Baseline dialog to make changes to this Baseline.v Copy: Open the Create Baseline dialog to make and edit a copy of this Baseline.v Export: Save this Baseline to import into another Console or deployment or to
edit it in an external editor.v Hide Locally: Hide this Baseline from the Local Console.v Hide Globally: Hide this Baseline from all Consoles. It can be retrieved later by
clicking the Show Hidden Content button on the Console toolbar.v Remove: Delete this Baseline from the database.
There are several tabs in a Baseline document. They include:v Description: An HTML page describing the Baseline and a set of Actions
(implemented as links) that are designed to address the problem described.v Details: An HTML page describing the Properties and Relevance clauses behind
the Baseline. At the bottom of the page is a text box to enter a comment toattach to the Baseline.
v Components: Lists the Fixlet messages and Tasks that have been grouped intothis Baseline.
v Applicable Computers: Shows which subset of computer components thisBaseline targets. This tab also indicates the current count of ApplicableComputers for instant viewing.
v Component Applicability: Lists the numbered components of the Baseline. Inthe Applicable Computer column, displays the number of computers where theBaseline component is applicable and following the slash, the total number ofcomputers where the Baseline is applicable.
v Action History: Shows the history of any Actions that have been invoked by thisBaseline. This tab also indicates the current count of executed Actions for easyviewing.
To display a Baseline list, click the Baseline icon (or any of its child nodes) in theDomain Panel navigation tree.
A Baseline document opens whenever you click an item in a Baseline list.
Chapter 17. The Dialogs 147

Change Database Password
The IBM Endpoint Manager Console allows you to change the database passwordif you have the correct authorization. Enter the current password, then enter andvalidate the new password.
Note: This dialog is not available if you are using NT Authentication and thus arenot using a password to connect to the database.
This dialog is available when you select File > Change Database Password.
Change Private Key Password
The IBM Endpoint Manager Console allows you to change your private keypassword.
Enter your current password, then enter and validate the new password.
This dialog is available when you select Tools > Manage Signing Key > ChangePassword.
Comments
IBM Endpoint Manager Console Operators can make comments on most of theIBM Endpoint Manager objects, including Fixlets, Tasks, Actions, Computers, andso on. These comments can be created whenever an object like a Fixlet is selectedand displayed in the main window. Here is how to create a comment for a Fixletmessage:1. Click the Fixlets and Tasks icon in the Domain Panel navigation tree.2. Right-click a Fixlet and select Add Comment.
148 IBM Endpoint Manager: Console Operator’s Guide

3. Type your comment into the dialog box that opens.
4. Alternatively, you can double-click a Fixlet message, select the Details tab, andenter your comment at the bottom of the page.
Similarly, you can attach comments to Tasks, Actions, Computers, and Analyses.These comments can include keywords or operating notes. You might want to havespecial information about certain computers, or usage pointers for special Tasks.This is a free-form field, so you can make up your own rules for commenting.
To view an aggregated list of all comments, select View Recent Comments fromthe Tools menu.
Chapter 17. The Dialogs 149

This dialog lists all the comments created to date, sorted by time-stamp, with themost recent comments at the top. The name of the Console Operator responsiblefor the comment is listed next to the description. Each comment contains a linkthat opens the original object in the main window, allowing you to view thedescription and other aspects of the object.
Component Applicability Tab
The Component Applicability tab of the Baseline document displays a list of howmany computers have been targeted by the specific component.
The components are numbered, corresponding to their order under theComponents tab.
Following the number is the name of the component and then the ApplicableComputer Count. This column is composed of multiple numbers in a form like'35/50 (4 unknown)'. The first number is the count of computers where thecomponent is applicable, the second is the total number of computers targeted bythe Baseline.
This dialog is available by choosing the Baseline icon in the Domain Panelnavigation tree, opening an item from the resulting List Panel, and clicking theComponent Applicability tab.
150 IBM Endpoint Manager: Console Operator’s Guide

Components Tab
The Components tab of the Baseline document displays a list of all the componentFixlet messages and Tasks that have been grouped into this particular Baseline.
Click the links beneath each component to view the source Fixlet or Task, or to seethe actual code behind the Relevance statements and Action scripts.
The components of a Baseline are copies of the original Fixlet or Task, not pointers.As such, if the underlying Fixlet or Task changes, the Baseline might become out ofsync with the original. If this happens, the message Source Fixlet differs is shownin the component listing.
This dialog is available by choosing the Baseline icon in the Domain Panelnavigation tree, opening an item from the resulting List Panel, and clicking theComponents tab.
Chapter 17. The Dialogs 151

Computer: Action History
The Action History tab provides a listing of all the actions that have beendeployed on the specified computer.
Note that unlike the general action list for all computers available from the mainActions Tab, this list contains only actions targeted to the selected computer.
The Action History list has options similar to any Action List Panel.
To view more information about a particular action, double-click it. This opens thecorresponding Action document in the Work Area.
This dialog is available by choosing the Computers icon from the Domain Panelnavigation tree and then clicking a computer from the list. Then click the ActionHistory tab in the Computer document window.
Computer: Applicable Tasks
The Applicable Tasks tab of the Computer document lists all the Tasks that arerelevant to the selected computer.
This filter list is updated in real-time, refreshing its display as Tasks arereevaluated. You can filter the list by clicking items in the left pane, and sort thetasks by clicking the appropriate headers.
152 IBM Endpoint Manager: Console Operator’s Guide

This dialog has the same options as any Task List Panel.
This dialog is available by clicking the Computers icon in the Domain Panelnavigation tree and then clicking a computer from the resulting List Panel. Thenclick the Applicable Tasks tab in the Computer document window.
Computer Group: Action History
The Action History tab of the Computer Group document provides a historicallisting of all the actions that target any member of the specified computer group.
This dialog has the same options as any Action History List Panel, but containsonly those Actions that are targeted to the selected Computer Group.
To view more information about a particular Action, double-click it. This opens thecorresponding Action document in the bottom panel.
This dialog is available by clicking the Computer Groups icon in the DomainPanel navigation tree and clicking a Computer Group from the resulting List Panel.Then click the Action History tab in the Computer Group Work Area.
Chapter 17. The Dialogs 153

Computer Group: Applicable Analyses
The Applicable Analyses tab of the Computer Group document provides a listingof all the Analyses applicable to this group and allows you to filter them.
This dialog has the same options as any Analyses List Panel.
To view more information about a particular Analysis, click it. This opens thecorresponding Applicable Analyses document in the bottom panel.
This dialog is available by clicking the Computer Groups icon in the DomainPanel navigation tree and clicking a Computer Group from the resulting List Panel.Then click the Applicable Analyses tab in the Computer Group documentwindow.
Computer Group: Relevant Baselines
The Relevant Baselines tab of the Computer Group document provides a listingof all the Baselines that have been deployed on the specified Computer Group.
This dialog has the same options as any Baseline List Panel, but contains onlyBaselines targeted to the selected Computer Group.
To view more information about a particular Baseline, double-click it. This opensthe corresponding Relevant Baseline document in the Work Area.
154 IBM Endpoint Manager: Console Operator’s Guide

This dialog is available by clicking the Computer Groups icon in the DomainPanel navigation tree and clicking a Computer Group from the List Panel. Thenclick the Relevant Baselines tab in the Computer Group Work Area.
Computer Group: Computers
The Computers tab of the Computer Group document provides a listing of all thecomputers that have been manually selected to be a part of the specified ComputerGroup.
This dialog is displayed only for Manual Computer Groups. It has options similar toother Computer lists, but contains only computers belonging to the selectedManual Computer Group. Note that the number of reporting computers isavailable in the tab itself, for viewing at a glance.
To view more information about a particular Computer, double-click it. This opensthe corresponding Computer document in the bottom panel.
This dialog is available by clicking the Computer Groups icon in the DomainPanel navigation tree and clicking a Manual Computer Group from the List Panel.Then click the Computers tab in the Computer Group Work Area.
Chapter 17. The Dialogs 155

Computer Group: Description
The Description tab of the Computer Group document provides informationabout a selected Computer Group. Below is the dialog for an Automatic ComputerGroup.
It contains different information depending on whether the group is Automatic orManual:
Automatic Computer Groups contain several sections:v Group Definition: This is a listing of the properties that specify the inclusion of
a computer into the group. Each is a clause of the form <property><relationship> <value>. For example, OS contains "win", creates an AutomaticComputer Group consisting of Windows machines.
v Targeting Relevance: This is the full Relevance expression that implements theproperty evaluation described above. Click show indented relevance to see aformatted version of the expression.
v Comments: This is a text box to enter a comment that is attached to theComputer Group for other operators to view.
Manual Computer Groups only contain a Comment box. The information youenter here is attached to this Computer Group and become available to otherConsole operators.
This dialog is available by clicking the Computer Groups icon in the DomainPanel navigation tree and clicking a Computer Group from the List Panel. Thenclick the Description tab in the Computer Group document window.
156 IBM Endpoint Manager: Console Operator’s Guide

Computer Group: Relevant Fixlet Messages
The Relevant Fixlets tab of the Computer Group document provides a listing ofall the Fixlet messages that have been targeted to the specified Computer Group.
This dialog has the same options as any Fixlet List Panel, but contains only thoseFixlet messages targeted to the selected Computer Group.
To view more information about a particular Fixlet message, double-click it. Thisopens the corresponding Relevant Fixlet message document in the Work Area.
This dialog is available by clicking the Computer Groups icon in the DomainPanel navigation tree and clicking a Computer Group from the List Panel. Thenclick the Relevant Fixlets tab in the Computer Group Work Area.
Computer Group List and Document
A list of Computer Groups is displayed when you click Computer Groups, or anyof its child nodes, from the Domain Panel navigation tree.
A Computer Group document is displayed in the Work Area of the Console whenyou click any item from this list.
Chapter 17. The Dialogs 157

At the top of the Computer Group document is the name of the group. Under thatis the Computer Group toolbar. It includes:v Edit: Open up a dialog that allows you to edit the criteria for this group.v Copy: Create a copy of this group and edit it.v Export: Save this group for editing by an external editor.v Remove: Delete this group from the list.
There are several tabs in a Computer Group document, and they might differaccording to the group type. They include:v Description: For an Automatic group, this tab displays the Group Definition (as
a list of property-associated Relevance expressions), the Targeting Relevanceclause that implements the group definition, and a comment box. For a Manualgroup, this tab displays a comment box only.
v Reporting Computers: Only displayed for Automatic groups, this tab is a list ofthe computers that are currently considered members of the group, based onproperties and Relevance. This is a filter/list panel, allowing you to narrowdown the list by selecting from the filtering folders on the left side.
v Computers: Only displayed for Manual groups, this tab is a list of thecomputers that have been manually selected to be members of the group. This isa filter/list panel, allowing you to narrow down the list by selecting from thefiltering folders on the left side.
v Relevant Fixlet Messages: Lists all the Fixlet messages that apply to thisComputer Group.
v Applicable Tasks: Lists all the Tasks that apply to this Computer Group.v Relevant Baselines: Lists all the Baselines that apply to this Computer Group.v Action History: Lists all the Actions that target any member of this computer
group.v Applicable Analyses: Lists all the Analyses and allows you to filter them by
Computer Group.
158 IBM Endpoint Manager: Console Operator’s Guide

To display a Computer Group list, click the Computer Groups icon (or any of itschild nodes) in the Domain Panel navigation tree.
A Computer Group document is opened whenever you click an item in aComputer Group list.
Computer Group: Reporting Computers
The Reporting Computers tab of the Computer Group document provides alisting of all the computers that have been automatically chosen to be a part of thespecified Computer Group because of their property values.
This dialog is displayed only for Automatic Computer Groups. It has the sameoptions as any Computer List Panel, but contains only computers reporting to theselected Computer Group.
To view more information about a particular Reporting Computer, double-click it.This opens the corresponding Computer document in the Work Area.
This dialog is available by clicking the Computer Groups icon in the DomainPanel navigation tree and clicking an Automatic Computer Group from the ListPanel. Then click the Reporting Computers tab in the Computer Group WorkArea.
Chapter 17. The Dialogs 159

Computer Group: Applicable Tasks
The Applicable Tasks tab of the Computer Group document provides a listing ofall the Tasks that are applicable to one or more computers in the specifiedComputer Group.
This dialog has the same options as any Task list. Click any header to sort the list.
To view more information about a particular Task, double-click it. This opens thecorresponding Task document in the Work Area.
This dialog is available by clicking the Computer Groups icon in the DomainPanel navigation tree and clicking a Computer Group from the List Panel. Thenclick the Applicable Tasks tab in the Computer Group Work Area.
Computer List and Document
A list of Computers is displayed when you click Computers, or any of its childnodes, from the Domain Panel navigation tree.
A Computer document is displayed in the bottom window of the Console whenyou click any item from this list. Click the Summary tab to see essentialinformation about this computer.
160 IBM Endpoint Manager: Console Operator’s Guide

Here you find the name, information about the processor, and operating system.Scroll down to see more information, including how many Fixlet messages arerelevant to this computer and how many actions are open.
There are several tabs in a Computer document. They include:v Summary: Displays a list of properties that are being retrieved from this
computer, as well as the Client Relay Status, Group Memberships, Custom Sites,Settings, and Comments.
v Relevant Fixlet Messages: A list of the Fixlet messages that are currentlyrelevant on this computer. These can be narrowed down using the filter tree inthe left panel, then sorted by clicking the column headers. The current numberof relevant messages is indicated in the tab itself, so you can see it at a glance.
v Applicable Tasks: Lists the Tasks that apply to this computer. The currentnumber of tasks is indicated in the tab.
v Relevant Baselines: Lists the Baseline items (Fixlets and Tasks) that have beenassigned to this computer. The current number of baselines is indicated in thetab.
v Baseline Component Applicability: Shows which components of specifiedBaselines are applicable to this computer.
v Action History: Shows which Actions have been applied to this computer. Thecurrent number of Actions is indicated in the tab.
v Management Rights: Displays the names of the authorized operators for thiscomputer. The current number of operators is indicated in the tab.
A computer list is displayed when you click the Computers icon (or any of itschild nodes) in the Domain Panel navigation tree.
Chapter 17. The Dialogs 161

A Computer document is opened whenever you click an item in any list ofComputers.
Computer: Management Rights
The Management Rights tab of the Computer dialog lists the operators who arecurrently granted management rights to apply actions to the specified computer.
You can filter this list by using the filter tree in the left panel. The list has threeheaders that you can use to sort the list:v Name: The name of the Console operator who has been granted rights.v Master Operator: A Yes or No flag that indicates if the rights manager is also a
Master Operator.v Last Login Time: The last time this operator logged in to the IBM Endpoint
Manager System
This dialog is available by clicking the Computers icon in the Domain Panelnavigation tree and then clicking a computer in the resulting List Panel. Then clickthe Management Rights tab in the Work Area below.
Computer: Relevant Baselines
The Relevant Baselines tab of the Computer document lists all the Baselines thatare applicable to the selected computer.
162 IBM Endpoint Manager: Console Operator’s Guide

This filter/list is updated in real-time, refreshing its display as Baselines arereevaluated. The number of Baselines that are currently relevant is listed in the tabitself for easy viewing. Because Baselines contain content such as Fixlets that aretargeted to computers based on relevance, different Baselines might apply todifferent computers, depending on current applicability.
This dialog has the same options as any Baseline List Panel, and can be sorted bythe same headers. You can open and view individual Baselines by double-clickingthem from this list.
This dialog is available by clicking an item in any Computer list. Then click theRelevant Baselines tab in the Computer Work Area.
Computer: Relevant Fixlet Messages
The Relevant Fixlet Messages tab of the Computer document lists all the Fixletmessages that are relevant to the selected computer.
This filter list is updated in real-time, refreshing its display as Fixlet messages arereevaluated. The number of Baselines that are currently relevant is listed in the tabitself for easy viewing.
This dialog has the same options as any Fixlet List Panel and can be sorted by thesame headers.
This dialog is available by clicking the Computers icon in the Domain Panelnavigation tree and clicking a computer from the List Panel. Then click theRelevant Fixlet Messages tab in the Computer Work Area.
Chapter 17. The Dialogs 163

Computer Subscriptions Tab
The Computer Subscriptions tab of the Sites document lets you establish criteriafor subscribing Clients to the specified site.
There are three buttons available for external sites.v All computers. Subscribe all available clients to the specified site.v No computers. Do not subscribe any clients to the site.v Computers which match... Set criteria for subscription based on client
properties. This is a flexible technique to subscribe only those computers thatsatisfy the properties you specify in a property / operator / value trio. You canselect any or all from the pull-down menu to OR or AND the criteria together.Use the plus button to add another criterion and the minus button to delete one.
For custom sites, there is another button.v Computers subscribed via ad-hoc custom site subscription actions. With this
option all computers start out unsubscribed. To subsequently subscribe acomputer, you must display the list of computers (click Computers from theDomain Panel navigation tree) and then right-click the set of computers youwant. From the context menu, select Modify Custom Site Subscriptions.
164 IBM Endpoint Manager: Console Operator’s Guide

From the resulting dialog, select sites to subscribe or unsubscribe.
Only those sites where the ad-hoc option has been set are available forsubscription in the pull-down menu. Note that this dialog also allows you tounsubscribe computers from an ad-hoc grouping.
This dialog is available by clicking the Sites icon in the Domain Panel navigationtree, clicking an item from the resulting List Panel, and then clicking the ComputerSubscriptions tab.
Chapter 17. The Dialogs 165

Computer: Summary
The Computer Summary tab lists several items of interest, including Properties,Relay status, Grouping, Custom Sites, Settings, and more.
The Properties section of the Summary lists various properties of the givencomputer, derived from Relevance Expressions. These properties help you definesubsets, sorting fields, reports, and grouping criteria for the various clientcomputers under your administration.
The default properties include, but are not limited to:
Core Properties
v Active Directory Path: The position of the IBM Endpoint Manager Client withinthe Active Directory hierarchy.
v OS: The operating system of the given computer.v CPU: The speed and type of CPU.
166 IBM Endpoint Manager: Console Operator’s Guide

v DNS Name: The name of the computer.v IP Address: The current IP Address of the computer.v IPv6 Address: The version 6 IP Addresses of the computerv Last Reported: The time that the computer last reported.v Locked: The locked status (Yes or No) of each computer.
Custom Properties
v BIOS: The version and date of the Basic Input/Output System.v Free Space on System Drive: How much space is available on drive C of the
given computer.v RAM: The amount of RAM in the given computer.v Subnet Address: The subnet IP Address of the given computer.v Total Size of System Drive: The total size of the drive containing the operating
system on the given computer.v User Name: The name of the IBM Endpoint Manager Client user.
You can find out more about these predefined properties in the sections oncomputer properties and Relevance Expressions.
Scroll down to see the other sections of the Computer Summary.
v Client Relay Status identifies the status of the chosen computer as a Server,Relay, or Client.
v Computer Group Membership lists any groups, automatic or manual, that thiscomputer is a member of.
v Subscribed Sites lists any Sites that this computer is subscribed to, includingexternal sites, operator sites, and custom sites.
Chapter 17. The Dialogs 167

The following sections contain a list of Settings for this computer, including Client,Relay, Server, Gather, and WebReport settings and the versions of the IBMEndpoint Manager software running on this computer.
At the bottom of the page is a text box where you can enter comments that to beattached to this computer for future reference.
This dialog is available by clicking the Computers icon in the Domain Panelnavigation tree and clicking a computer from the right-hand List Panel. Then clickthe Summary tab in the Computer Work Area.
Connect to Database
The Connect to Database dialog opens when you start the IBM Endpoint ManagerConsole.
It lets you select which Database you want to manage.
Database: Select a database from the pull-down menu.
168 IBM Endpoint Manager: Console Operator’s Guide

Username: Enter the user name that allows you to access the database. The set ofallowed users is maintained by the IBM Endpoint Manager Site Administratorusing the IBM Endpoint Manager Administration Tool.
Password: Enter the password that corresponds to the user name above. In somecases, NT will authenticate for the user. If this is the case, the password box isgrayed out.
This dialog is available when launching the IBM Endpoint Manager Console.
Console Operator: Assigned Roles Tab
The Assigned Roles tab of the Operators window allows you to associate roleswith the specified Console operator.
Click Assign Role to bring up a dialog with your currently unassigned roles listedfor selection. You can also delete roles from this operator by selecting them fromthe list and clicking Remove Role.
Make sure to click Save Changes before you dismiss this window.
This dialog is presented when you select someone from the Operator list or whenyou create an operator from scratch with one of the Operator creation commandsavailable in the Tools menu.
Chapter 17. The Dialogs 169
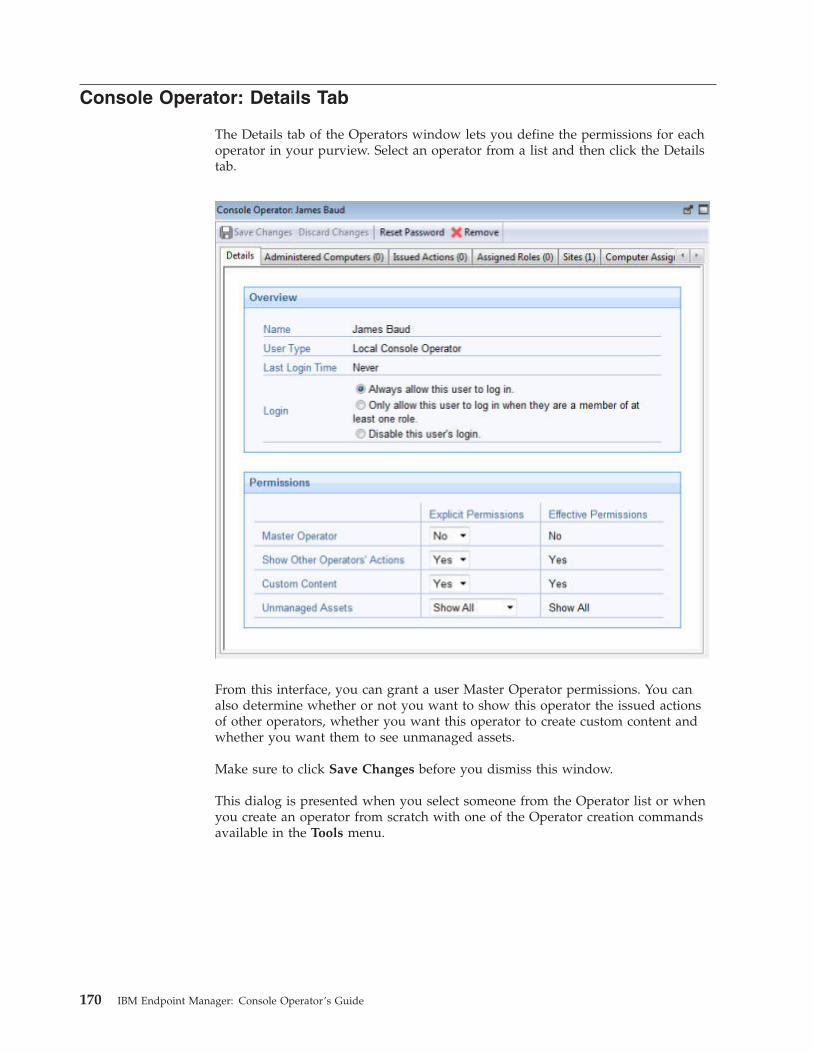
Console Operator: Details Tab
The Details tab of the Operators window lets you define the permissions for eachoperator in your purview. Select an operator from a list and then click the Detailstab.
From this interface, you can grant a user Master Operator permissions. You canalso determine whether or not you want to show this operator the issued actionsof other operators, whether you want this operator to create custom content andwhether you want them to see unmanaged assets.
Make sure to click Save Changes before you dismiss this window.
This dialog is presented when you select someone from the Operator list or whenyou create an operator from scratch with one of the Operator creation commandsavailable in the Tools menu.
170 IBM Endpoint Manager: Console Operator’s Guide
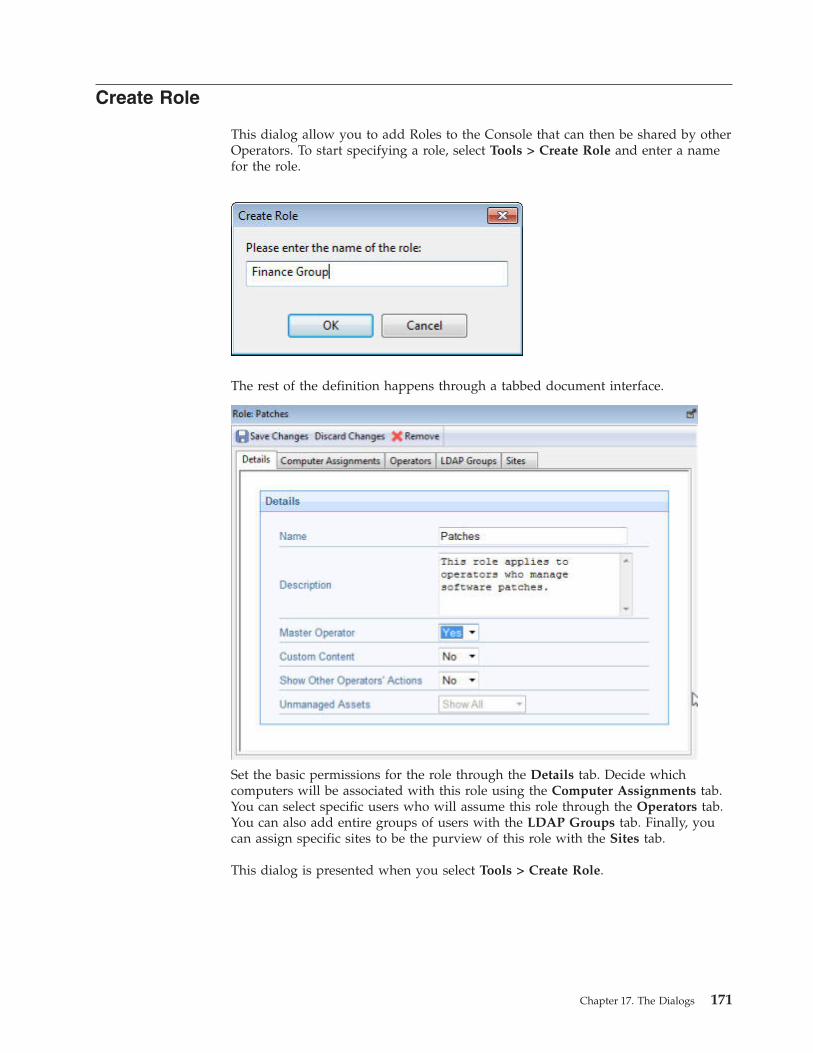
Create Role
This dialog allow you to add Roles to the Console that can then be shared by otherOperators. To start specifying a role, select Tools > Create Role and enter a namefor the role.
The rest of the definition happens through a tabbed document interface.
Set the basic permissions for the role through the Details tab. Decide whichcomputers will be associated with this role using the Computer Assignments tab.You can select specific users who will assume this role through the Operators tab.You can also add entire groups of users with the LDAP Groups tab. Finally, youcan assign specific sites to be the purview of this role with the Sites tab.
This dialog is presented when you select Tools > Create Role.
Chapter 17. The Dialogs 171

Help for the IBM Endpoint Manager Console
Show the help files for the IBM Endpoint Manager Console. These online filesprovide a tutorial, a description of the program, and a full-text search capacity. Toget started, click here.
This dialog is available by selecting:v Help > Contents
Console Operator: Administered Computers
The Administered Computers tab of the Console Operator document displays afilter/list of all the computers administered by the selected operator.
Note that the number of computers is displayed in the tab itself for viewing at aglance. As with any Computer List Panel, you can filter and sort it by retrievedproperties and groups. This means you can use your own custom-createdproperties or groupings to parcel out administrative rights. You might use aretrieved property, for example, to match up specific applications to experts inyour organization. Or you could connect departmental IT managers to their owndomains, automatically.
This list is similar to other computer lists in the Console, but it is specific to theselected operator, letting you focus on one person at a time.
This dialog is available by clicking an operator from any Console Operator list andselecting the Administered Computers tab.
172 IBM Endpoint Manager: Console Operator’s Guide

Console Operator: Issued Actions
The Issued Actions tab of the Console Operator document displays a filter/list ofall the Actions that have been deployed by the selected operator.
At the top of the dialog is the name of the operator. As with any Action list, youcan filter and sort it by various properties, including State (open, expired) and Site.The current number of issued actions for this operator is displayed in the tab itselffor easy viewing.
This list is similar to other Action lists in the Console, but it is specific to theselected operator, letting you focus on one person at a time. This interface alsoallows you to stop an action if it hasn't completed. Right-click the action you wantto stop and select Stop Action from the pop-up menu.
This dialog is available by clicking an operator from any Console Operator list andselecting the Issued Actions tab.
Console Operator List and Document
A list of Operators is displayed when you click Console Operators, or any of itschild nodes, from the Domain Panel navigation tree.
A Console Operator document is displayed in the Work Area of the Console whenyou click any item from this list.
Chapter 17. The Dialogs 173

At the top of the Console Operator document is the name of the operator. The tabsunderneath display at a glance how many computers are being administered bythis operator and how many actions this operator has issued.
The tabs in a Console Operator document include:v Details: A window outlining the permissions for this operator, including master
operator, Showing other operator actions, custom content and unmanaged assets.v Administered Computers: A typical filter/list window containing all the
computers under this operator's administration.v Issued Actions: Shows what Fixlet actions have been applied by this Console
Operator.v Assigned Roles: Lists those roles associated with this operator.v Sites: Lists those sites that can be administered by this operator.
To display this Console Operator list, click the Console Operators icon (or any ofits child nodes) in the Domain Panel navigation tree, then select an operator toview. After making any changes, make sure to click the Save Changes button.
174 IBM Endpoint Manager: Console Operator’s Guide

Create Analysis
The Create Analysis dialog lets you deploy your own custom Analyses to monitorand audit properties across your managed network. You can create an Analysisfrom scratch or you can edit an existing custom Analysis by selecting it from thelist and choosing Edit > Edit Custom Analysis.
To create an original Analysis, choose Tools > Create New Analysis. The CreateAnalysis dialog opens.
There are three items at the top to help you identify your Analysis:v Name: Enter the name of your custom Analysis.v Create in site: From the pull-down menu, select a site (typically the Master
Action Site) to host the Analysis.v Create in domain: From the pull-down menu, select the Domain you want to
house the Analysis.
Beneath these data fields, there are three tabs:v Description: Create a user-readable title and message to accompany the Analysis
you want to run. This is an HTML page, and you can use the text editing toolsat the top to adjust the look of your Analysis.
v Properties: Specify retrieved client properties for your Analysis. Click the AddProperty button, enter a name and a relevance clause. You can also specify anevaluation period for this property.
v Relevance: Specify the target client computers for your custom Analysis using aRelevance clause. The Analysis is applied to all computers where the Relevanceclause evaluates to TRUE.
At the bottom of this dialog is a check box:v Automatically activate this analysis after it is created: Check this box if you
want to immediately propagate this Analysis when clicking the OK button.Leaving this blank lets you describe your Analysis without actually activating it.
Chapter 17. The Dialogs 175

You can create a new Analysis by selecting Tools > Create New Analysis, or byright-clicking in the Analysis window and selecting Create New Analysis from thecontext menu.
You can edit your existing custom Analyses by right-clicking on them and selectingEdit from the pop-up menu.
Create Analysis Description Tab
The Description tab of the Create Analysis dialog lets you define the html pagefor your custom Analysis.
Enter the description of your custom Analysis in the first box. You can customizethe second box as well, but the existing text is quite standard.
You can create a new Analysis by selecting Tools > Create New Analysis, or youcan edit a custom Analysis by right-clicking it and selecting Edit Custom Analysisfrom the context menu. To clone and edit an existing Analysis, first right-click it,select Export from the context menu to save it, then select File > Import to bring itback in for editing.
176 IBM Endpoint Manager: Console Operator’s Guide

Create Analysis Properties Tab
The Properties tab of the Create Analysis dialog lets you define the properties youwant to analyze.
This is the customized heart of the Analysis, and is not the same as the Propertiestab of the Fixlet, Task, or Baseline dialogs.
There are two buttons in the Property tab:v Add Property. Click this button to add a new property to the Analysis. When
you do, the text areas below becomes editable and you can define the property.v Remove Property. Highlight a retrieved property from this list to the left and
click Remove Property to delete this item from the Analysis.
After clicking the Add Property button, you must enter a Name for the propertyand a Relevance statement to retrieve the information. For example, you mightwant to retrieve the names of the administrators for each client. You might namethe property "Client Admins" and use a Relevance expression like "names ofadministrators of client".
You can also set the schedule for the analysis from the Evaluate every pull-downmenu. The default is to update the property value whenever a report is requested.But you can also set it to any regular period between 5 minutes and 30 days.
You can create a new Analysis by selecting Tools > Create New Analysis, or youcan edit a custom Analysis by right-clicking it and selecting Edit Custom Analysisfrom the pop-up menu or from the Edit menu.
Chapter 17. The Dialogs 177

Create Analysis Relevance Tab
The Relevance tab of the Create Analysis dialog lets you define a relevance clauseto determine the applicability of your custom Analysis to specific computers.
You can choose from three relevance options:v All computers: This is the default choice and analyzes the properties you specify
on all of the IBM Endpoint Manager Clients in your network.v Computers which match the condition below: When you select this choice, you
can select from several pre-defined properties to identify a subset of Clients foranalysis.
v Computers with match all of the relevance clauses below: This choice lets youspecify a computer with a custom relevance statement. This is the most powerfulof the available choices, and lets you easily narrow down the computers toanalyze.
You can create a new Analysis by selecting Tools > Create New Analysis, or youcan edit a custom Analysis by right-clicking it and selecting Edit Custom Analysisfrom the context menu. To clone and edit an existing Analysis, first right-click it,select Export from the context menu to save it, then select File > Import to bring itback in for editing.
178 IBM Endpoint Manager: Console Operator’s Guide

Create Automatic Computer Group
This dialog allows you to create rules that automatically enlist specific computersin a group.
It has the following parts:v Computer Group Name: This is a text box to enter the name of your group.
This is listed in the name column of any computer group listing.v Create in site: This is a pull-down menu listing the site you want to host the
computer group.v Create in domain: This is a pull-down menu listing the domain you want to
host the computer group.v Include computers with [any/all of] the following property: This option lets
you specify a condition that must evaluate to true before the computer becomesa member of the group. If there is more than one condition, this option includesa pull-down menu allowing you to use any or all of the conditions listed. Threefields are used to define a condition:– The retrieved property: select a property from the pull-down list containing
dozens of pre-defined retrieved properties. Note that there are two otheroptions at the top of this list.- Select Relevance Expression from the top of the list, select is true or is
false from the relationship pulldown and then click the Edit Relevancebutton to define a custom relevance expression to base your group on.
- Select Group Membership from the property list, select the desiredmembership option, and then select a manual group from the pull-downlist to the right.
– The relationship: Select from the four available comparison operators:contains, equals, does not contain, and does not equal. Depending on theparticular retrieved property, there might be other relationships available.
– The value: Enter a value to be compared to the value of the retrievedproperty. If the comparison is true, the Baseline becomes relevant on thespecified computer. For example, to create a group that automatically enlistsWindows computers, enter OS contains Win.There are two buttons used to edit the list of conditions:
– Plus (+): Click this button to add a new condition to the list. When there aretwo or more conditions, notice that the radio button above includes apull-down menu allowing you to trigger on any or all of the conditions in thelist.
Chapter 17. The Dialogs 179
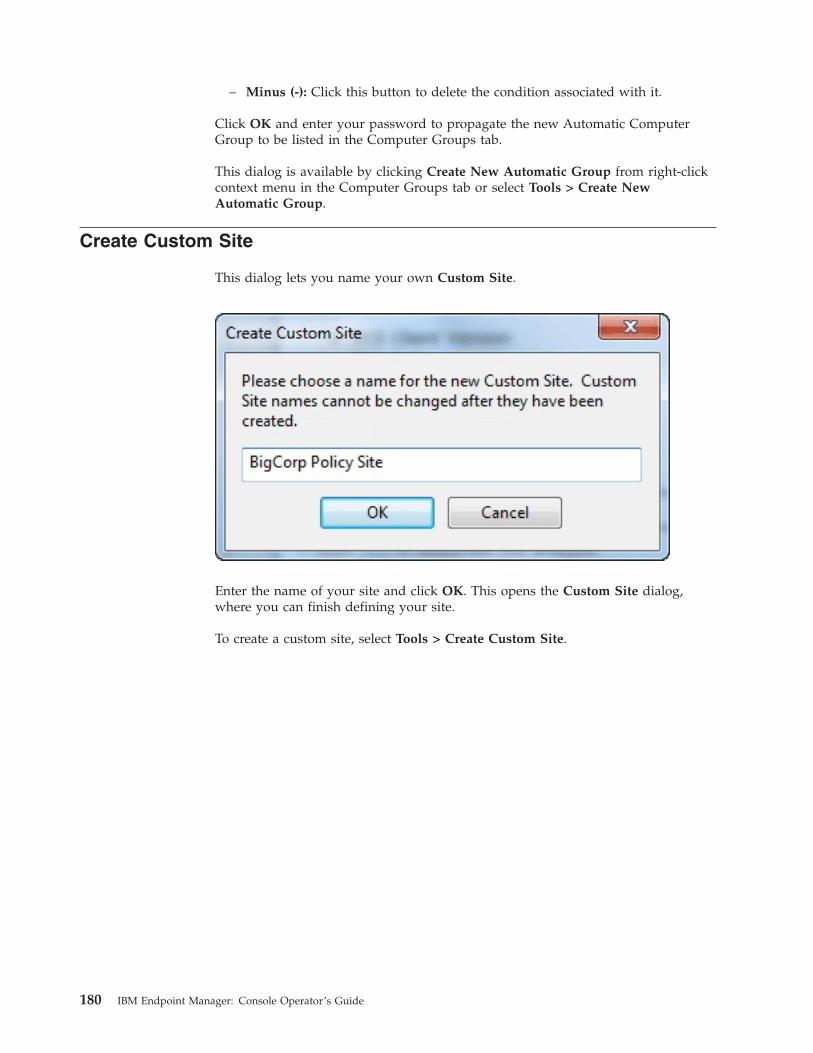
– Minus (-): Click this button to delete the condition associated with it.
Click OK and enter your password to propagate the new Automatic ComputerGroup to be listed in the Computer Groups tab.
This dialog is available by clicking Create New Automatic Group from right-clickcontext menu in the Computer Groups tab or select Tools > Create NewAutomatic Group.
Create Custom Site
This dialog lets you name your own Custom Site.
Enter the name of your site and click OK. This opens the Custom Site dialog,where you can finish defining your site.
To create a custom site, select Tools > Create Custom Site.
180 IBM Endpoint Manager: Console Operator’s Guide

Create Fixlet or Task
The Create Fixlet and Create Task dialogs are similar and allow you to create orcustomize a Fixlet or Task.
There are several tabs to help you define or edit your Fixlet or Task.v Description: Enter your descriptive text in this box. You can use the text
manipulation toolbar at the top of the dialog to enhance the formatting.v Actions: Define your action in this dialog. Use the buttons at the right to add,
delete, or change the position of the action. Below that is an area to customizethe properties of the action. Choose the Script Type from the drop-down menu.Below that is a text box where you can enter a new action script or modify theoriginal. There are three check boxes you can use to modify the action:– This action is the default action. Click this box to create a default action.– Include action settings locks. Click the Edit box to the right of this check box
to customize the action setting locks, including start time, end time, dayexclusions, and more. This panel also includes failure and reapplicationbehaviors.
– Include custom success criteria, which allows you to specify the conditionsthat define the success of the action.
v Relevance: Leave the default of applying to All computers, or click a differentbutton and enter a condition or a relevance statement in the dialog below. Thisis how you target your Fixlet or Task to relevant computers. For moreinformation about the relevance language, see the Inspector Libraries.
v Properties: Set the properties of your Fixlet or Task, including the category,download size, date, severity, and more. You can also include the SANS(SysAdmin, Audit, Network, Security) or CVE (Common Vulnerabilities andExposures) ID numbers.
You can create a custom Fixlet or Task by selecting Tools > Create New Fixlet orTask, or you can edit an existing Fixlet or Task by right-clicking it from the ListPanel and then selecting Create Custom Copy from the context menu.
Chapter 17. The Dialogs 181

Description Tab
The Description tab provides an English-language description of the selectedFixlet, Task, Analysis, or Baseline.
It typically provides one or more actions (in the form of links) that can be run toinstall a patch, change a registry, update an application, run an analysis, and so on.
Click the link to deploy the action or analysis across your network. For Fixletmessages, when an Action completes, the initiating Fixlet usually disappearsbecause the problem no longer pertains. Tasks, Baselines, and Analyses, on theother hand, continue to stay activated until you terminate them.
This dialog is available by clicking a Fixlet, Task, Analysis, or Baseline icon in theDomain Panel navigation tree, selecting an item from the List Panel, and clickingthe Description tab.
182 IBM Endpoint Manager: Console Operator’s Guide

Details Tab
The Details tab shows you the mechanics behind the selected Fixlet, Task,Analysis, or Baseline object.
It includes several sections describing various aspects of the Fixlet message:v Properties: As seen above, this section lists various properties of the Fixlet, Task,
or Baseline, including Category, Download Size, Severity, and more. Theseproperties are defined manually when the object is created.
v Relevance: This section displays the Relevance expressions that are used todetermine the relevance of an individual Fixlet message or Task.
Chapter 17. The Dialogs 183

This example has multiple statements that must all be true for the item to beconsidered Relevant to any particular IBM Endpoint Manager Client. For aBaseline, this is an 'envelope' expression that determines the overall relevance ofthe group. Only if the group is applicable is the relevance of the constituentTasks and Fixlets analyzed. This is the core information for an Analysis, whichevaluates the Relevance expression and retrieves that value.
v Actions: This section displays the code to be run if an action is deployed fromeither a Fixlet or a Task.
184 IBM Endpoint Manager: Console Operator’s Guide
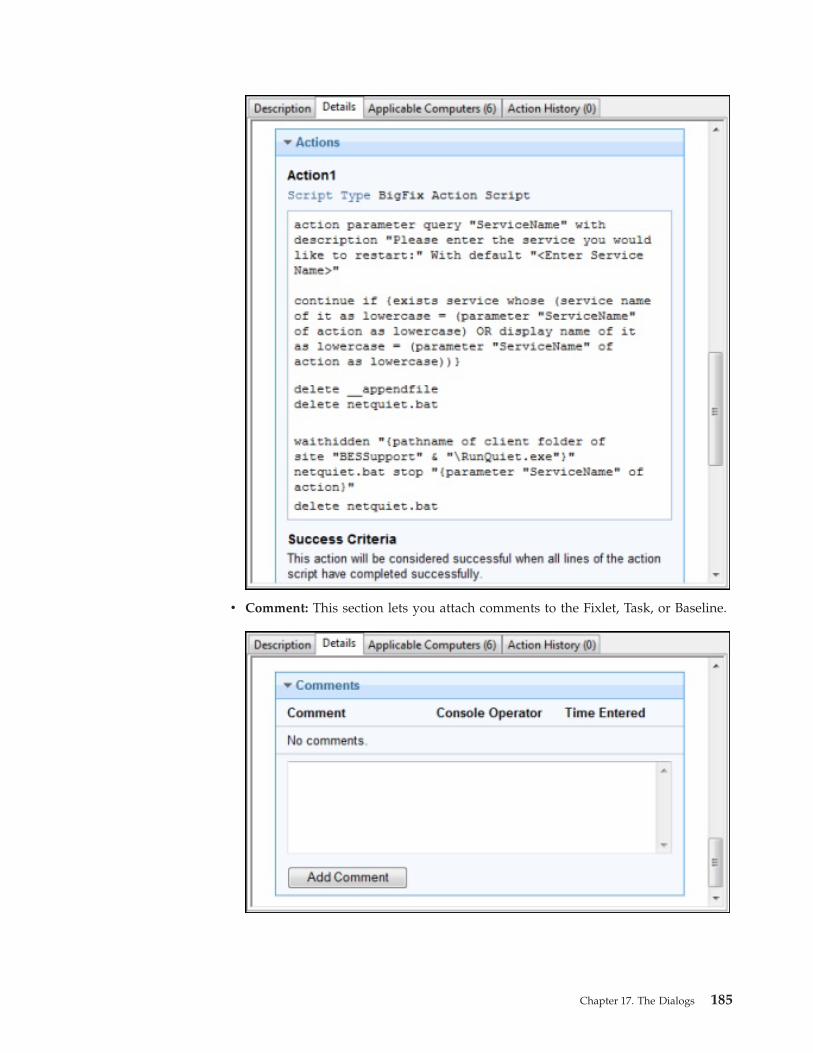
v Comment: This section lets you attach comments to the Fixlet, Task, or Baseline.
Chapter 17. The Dialogs 185
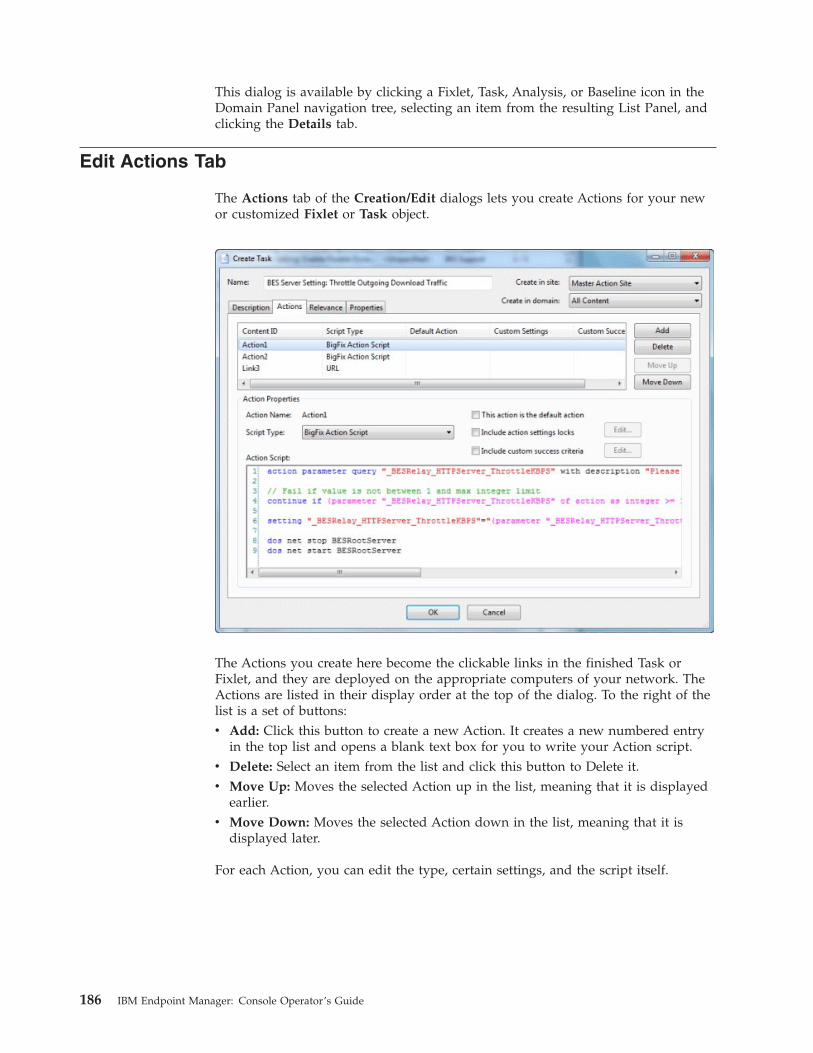
This dialog is available by clicking a Fixlet, Task, Analysis, or Baseline icon in theDomain Panel navigation tree, selecting an item from the resulting List Panel, andclicking the Details tab.
Edit Actions Tab
The Actions tab of the Creation/Edit dialogs lets you create Actions for your newor customized Fixlet or Task object.
The Actions you create here become the clickable links in the finished Task orFixlet, and they are deployed on the appropriate computers of your network. TheActions are listed in their display order at the top of the dialog. To the right of thelist is a set of buttons:v Add: Click this button to create a new Action. It creates a new numbered entry
in the top list and opens a blank text box for you to write your Action script.v Delete: Select an item from the list and click this button to Delete it.v Move Up: Moves the selected Action up in the list, meaning that it is displayed
earlier.v Move Down: Moves the selected Action down in the list, meaning that it is
displayed later.
For each Action, you can edit the type, certain settings, and the script itself.
186 IBM Endpoint Manager: Console Operator’s Guide

Select an Action Script Type from the pull-down menu. Among the choices are:v BigFix Action Script: This is a cross-platform scripting language, and is the
default scripting type.v AppleScript: This is the scripting language of choice for managing Macintosh
computers.v sh: This is shell script as used by a UNIX system.v URL: This is a URL pointing to an appropriate script or informational web page.
When an Action is created as a URL, it is listed as a numbered Link.
There are some more properties you can use to modify any Action.
Check one or more of the following boxes to customize each action:v This Action is the default Action: Check this box to make the selected Action
the default for this group of Actions. Default Actions must be failsafe andsimple, making it reasonable to launch them unattended or to group them forsimultaneous deployment.
v Include Action Settings Locks: Check this box to use custom settings and locks,including display messages, users, execution behavior, and post-actions. Clickthe Edit button to open the Action Settings dialog with a lock next to each item.Click the locks to keep these values from being changed.
v Include Custom Success Criteria: Typically a Fixlet is designed so thatcompleting an Action makes it fail the initial Relevance test. Because this test istypically triggered by a vulnerability, its failure indicates successful remediation,therefore causing the Fixlet to disappear from the Console. However, you canselect other criteria to establish success by checking this box. Click the Editbutton to open the Action Success Criteria dialog and key in your alternativecriteria.
In the bottom text box, enter the actual text of the Action Script. The style variesdepending on the script type you chose in the previous section. Because they canbe potentially distributed to hundreds of thousands of computers, it is alwaysadvisable to test and test again.
Chapter 17. The Dialogs 187

This dialog is available by clicking the Fixlet, Task, or Baseline icon in the DomainPanel navigation tree. Right-click an item in the resulting List Panel and selectCreate Custom Copy from the context menu.
Alternatively, select the Create item you want from the Tools menu.
Edit Baseline
The Edit Baseline dialog. Baselines are groups of Fixlet messages, Tasks, and otherBaselines that you want to run with a single mouse-click.
For example, a Baseline might be created to group all your application patches orsecurity issues together to ensure a common operating environment. You can createa Baseline from scratch, or clone or edit an existing Baseline.
When you select this interface, you are presented with a dialog with three inputitems at the top:v Name: Enter the name of your Baseline.v Create in site: From the pull-down menu, select a host site.v Create in domain: From the pull-down menu, select a host domain.
Beneath these data fields, there are four tabs:v Description: Create a user-readable title and description for the Baseline you
want to deploy.v Components: Specify the components, namely the Fixlet messages, Tasks, and
other Baselines, that you want to group into this Baseline.v Relevance: Create a relevance clause to target this Baseline to just the subset of
computers you want. Because each component of your Baseline has its ownRelevance clause, the default Relevance is set to TRUE.
v Properties: Specify certain properties for your Baseline, including category,source, severity, and date.
To create a new Baseline from scratch, select the following:
188 IBM Endpoint Manager: Console Operator’s Guide

v Tools > Create New Baseline
You can also customize an existing Baseline by selecting it from any Baseline listand then choosing:v Edit > Create Custom Copy
Alternatively, right-click in a Baseline list and select Create Custom Copy orCreate New Baseline from the context menu. Similarly, you can edit an existingcustom Baseline by selecting Edit Custom Baseline from the right-click contextmenu.
Edit Components Tab
The Components tab of the Edit Baseline dialog lets you specify a group of Fixletmessages and Tasks that you want to add to your Baseline.
Click the link to add components to group and then select Fixlets, Tasks, and otherBaselines to place into your group. Use the edit name link to name the group. Youcan place all your components into a single group or click the add new componentgroup link to add structure to your Baseline. Click the red X to delete theassociated component, and use the up (^) and down (v) arrows to change theorder of the components in the list.
Check the box next to Use custom action settings if you want to modify theBaseline Action settings. Click the set action settings link to open the ActionSettings dialog.
The components of a Baseline are copies of the original Fixlet or Task, not pointers.As such, if the underlying Fixlet or Task changes, the Baseline might become out ofsync with the original. If this happens, the message Source Fixlet differs is shownin the component listing.
At the bottom of this dialog, there is a Find command that opens a dialog for youto enter a search string and options such as match whole word, match case, andsearch direction. It allows you to easily search through the components of yourBaseline.
Chapter 17. The Dialogs 189

There is also a Sync All Components button. This forces all of your Baselinecomponents to sync up with the latest versions of their sources, in case they havechanged.
To create a new Baseline from scratch, select the following:v Tools > Create New Baseline
You can also customize an existing Baseline by selecting it from any Baseline listand then selecting:v Edit > Create Custom Copy
Alternatively, right-click in a Baseline list and select Create Custom Copy orCreate New Baseline from the context menu.
Edit Computer Settings
The Edit Computer Settings dialog allows IBM Endpoint Manager Consoleoperators to change certain computer attributes on a single or specified set ofcomputers, including locking, making the client a Relay, pointing to Relays, andcreating custom settings.
There are five tabbed dialogs on this panel to target and customize the settings fora selected group of Clients:v Settings: Displays a group of controls to edit computer settings, such as the
locked status, relays, and custom variables.v Target: Displays a filter/list of computers that can be edited, filtered, sorted, and
grouped for specifically targeted settings.v Execution: As with other Actions, you can limit the activation of the settings to
any schedule, keeping in mind that the Action might take some time to deploy.When applied, the settings remain until removed. You can also specify certainuser interactions and add extra targeting based on the contents of retrievedproperties.
190 IBM Endpoint Manager: Console Operator’s Guide

v Users: Allows you to specify whether or not you want a user to be logged onbefore activating the settings.
v Messages: Allows you to issue a message to the IBM Endpoint Manager Clientbefore activating the settings.
When multiple computers are selected, this dialog is available by right-clicking andselecting Edit Computer Settings from the context menu (or select Edit ComputerSettings from the Edit menu).
Edit Description Tab
The Description tab of the Creation/Edit dialogs lets you describe your new orcustomized Fixlet, Task, Analysis, or Baseline object.v Enter a custom Description for the body of your descriptive message. Click the
description in the HTML page to modify it.v Below the Description box is the text describing the Actions you can attach to
this Fixlet, Task, or Baseline. The Action is a clickable link in the Descriptionpage. Click the text to modify it, although the default text is usually sufficient.
Note: For an Analysis, this link activates the retrieval of the specifiedProperties. Activation involves the running of an Action, but in the case of anAnalysis, it is a benign Action that creates a property that can be read by theConsole.
This dialog is available by clicking the Fixlet, Task, or Baseline icon in the DomainPanel navigation tree. Right-click an item in the resulting List Panel and select theappropriate Create option from the context menu.
Alternatively, select the Create item from the Tools menu.
Edit Fixlet Message
The Edit Fixlet Message dialog allows you to create your own custom Fixletmessages. You can create a Fixlet message from scratch or clone an existing oneand customize it. To create an original Fixlet, choose Tools > Create New Fixlet.You are presented with a dialog with three text boxes at the top:v Name: Enter the name of your custom Fixlet message.v Create in site: From the pull-down menu, select the IBM Endpoint Manager site
you want to host it.v Create in domain: From the pull-down menu, select the Domain you want to
host this Task.
Beneath these data fields, there are four tabs:v Description: Create a user-readable title and description for the Fixlet you want
to deploy. If you are cloning an existing Fixlet, the original title and descriptionis the default. This is an HTML page, and you can use the toolbar at the top toalter fonts and formatting.
v Actions: Specify the actions for your custom Fixlet to run.v Relevance: Create a relevance clause to target this Fixlet to a subset of
computers you choose. For a cloned Fixlet, the original relevance clause is thedefault. You can replace or modify the relevance clause to suit your networkneeds.
Chapter 17. The Dialogs 191
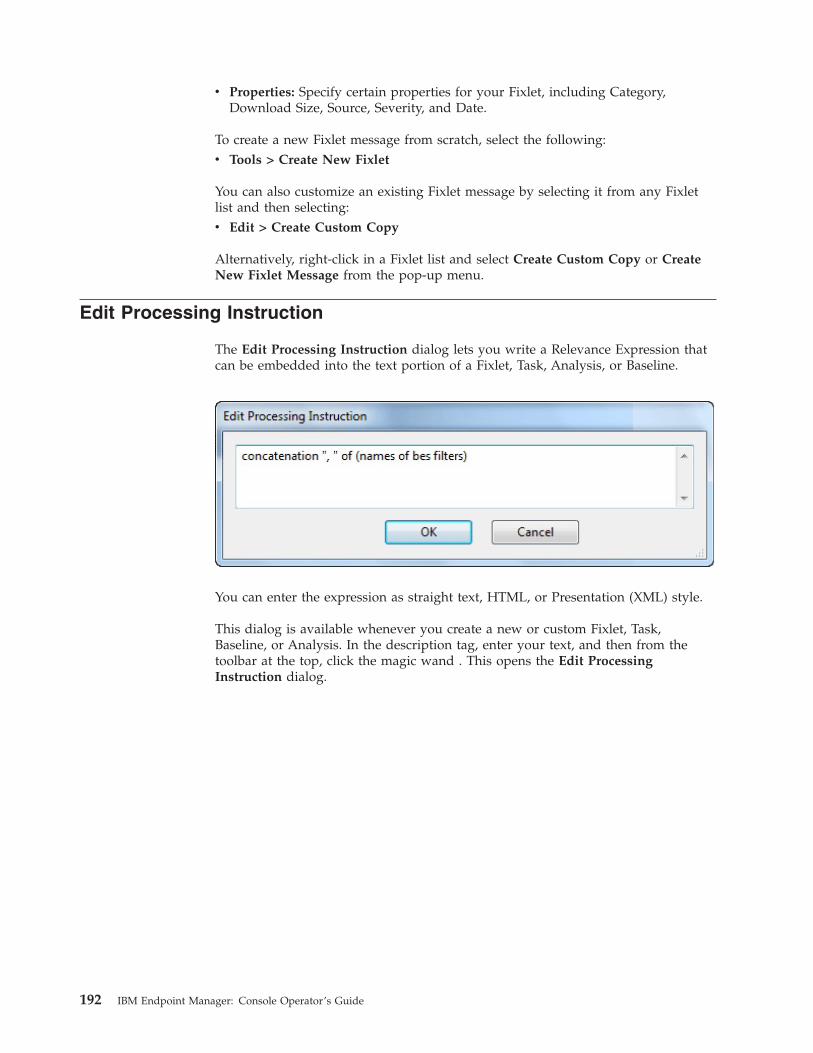
v Properties: Specify certain properties for your Fixlet, including Category,Download Size, Source, Severity, and Date.
To create a new Fixlet message from scratch, select the following:v Tools > Create New Fixlet
You can also customize an existing Fixlet message by selecting it from any Fixletlist and then selecting:v Edit > Create Custom Copy
Alternatively, right-click in a Fixlet list and select Create Custom Copy or CreateNew Fixlet Message from the pop-up menu.
Edit Processing Instruction
The Edit Processing Instruction dialog lets you write a Relevance Expression thatcan be embedded into the text portion of a Fixlet, Task, Analysis, or Baseline.
You can enter the expression as straight text, HTML, or Presentation (XML) style.
This dialog is available whenever you create a new or custom Fixlet, Task,Baseline, or Analysis. In the description tag, enter your text, and then from thetoolbar at the top, click the magic wand . This opens the Edit ProcessingInstruction dialog.
192 IBM Endpoint Manager: Console Operator’s Guide

Edit Properties Tab
The Properties tab of the Creation/Edit dialogs lets you assign certain importantproperties to your new or customized Fixlet, Task, or Baseline object.
There are a series of text fields that you can use to describe the various possibleproperties:v Category: There are many categories you can file your Fixlet, Task, or Baseline
objects under, including the standard ones such as Setting, Update, Support, andmore. If you want, you can create new settings also for your particularinstallation.
v Download Size: If a download is associated with your Fixlet, Task, or Baseline,you can enter the size here. This allows you to sort, filter, and keep track of thebandwidth requirements of your various custom-designed objects.
v Source: This is the source of the Fixlet, Task, or Baseline. For a custom object,this is typically a name chosen by the IBM Endpoint Manager Administrator,usually Internal.
v Source ID: This is an ID associated with the source described above. For anInternal source, the ID is typically blank.
v Source Release Date: Enter the release date of this Fixlet, Task, or Baseline tomanage these objects by age.
v Source Severity: Enter the severity of the Fixlet, Task, or Baseline, typically froma list including Low, Moderate, Important, and Critical.
v CVE ID: Enter the ID for the Common Vulnerabilities and Exposures standard,if any.
v SANS ID: Enter the ID for the System Administration, Networking, andSecurity standard, if any.
This dialog is available by clicking the Fixlet, Task, or Baseline icon in the DomainPanel navigation tree. Right-click an item in the resulting List Panel and selectCreate Custom Copy from the context menu.
Alternatively, select the Create item from the Tools menu.
Chapter 17. The Dialogs 193

Edit Relevance Tab
The Relevance tab of the Creation/Edit dialogs lets you create a relevanceexpression to fine-tune the deployment of your custom Fixlet, Task, Analysis, orBaseline object.
There are several ways to specify a set of computers:v All computers: The default is to include all the networked IBM Endpoint
Manager Clients for this particular Fixlet, Task, Analysis, or Baseline --regardless of relevance.
v Computers that match [any/all of] the conditions below: This option lets youspecify a condition that must evaluate to true before the computer triggers theFixlet, Task, Analysis, or Baseline.
If there is more than one condition, this option includes a pull-down menuallowing you to select any (ORing the conditions) or all (ANDing theconditions). Three fields are used to define each condition:– The retrieved property: select a property from the pull-down list containing
the pre-defined retrieved properties. Note that there are two other options atthe top of this list.- Select Relevance Expression from the top of the list, select is true or is
false from the relationship pull-down list and then click the Edit Relevancebutton to define a custom relevance expression to base your group on.
194 IBM Endpoint Manager: Console Operator’s Guide

- Select Group Membership from the property list, select a membershipoption and then select a manual group from the pull-down list to the right.
– The relationship: select from the four available comparison operators:contains, equals, does not contain, and does not equal. Depending on theparticular retrieved property, there might be other relationships available.
– The value: Enter a value to be compared to the value of the retrievedproperty. If the comparison is true, the Baseline becomes relevant on thespecified computer. For example, to create a group that automatically enlistsWindows computers, enter OS contains Win.There are two buttons used to edit the list of conditions:
– Plus (+): Click this button to add a new condition to the list. When there aretwo or more conditions, notice that the radio button above includes apull-down menu allowing you to trigger on any or all of the conditions in thelist.
– Minus (-): Click this button to delete the condition associated with it.v Computers on which the relevance clause below is true: Click this button to
enter a custom Relevance expression to be evaluated on each IBM EndpointManager Client.
If the relevance expression evaluates to true, the Fixlet, Task, or Baselinebecomes relevant to that particular client and the Console reflects that status. Inthe case of multiple relevance statements, they must all be TRUE (they areANDed together) for the Task or Fixlet to become relevant.A complete discussion of relevance expressions is beyond the scope of thisdocumentation. For more information, see the Relevance Language Reference andthe various Inspector Guides. For some instructive examples, make customcopies of available Support Fixlets and examine their relevance statements.
This dialog is available by clicking the Fixlet, Task, Analysis, or Baseline icon in theDomain Panel navigation tree. Right-click the item in the resulting List Panel andselect Create Custom Copy from the context menu.
Alternatively, select the Create item from the Tools menu.
Chapter 17. The Dialogs 195

Edit Script Element
The Edit Script Element dialog lets you create a small script to accompany a newor custom Fixlet, Task, Baseline, or Analysis.
Enter the text of your action, and click OK. For more information about Actionscripts see the Action Language Reference.
This dialog is available whenever you create a new or custom Fixlet, Task,Baseline, or Analysis. In the description tag, enter your text, and then from the
toolbar at the top, insert the Script icon . This opens the Edit Script Elementdialog.
196 IBM Endpoint Manager: Console Operator’s Guide

Edit Settings for Computer
The Edit Settings for Computer dialog allows the IBM Endpoint Manager Consoleoperator to alter the settings for a selected computer. (For more settings, or toapply settings to multiple computers, see Edit Computer Settings).
There are several ways you can customize the settings of a computer:v Locked. Check this box to lock the computer.v Assign Relays Manually. Relays can be automatically assigned. Clear this box to
select automatic discovery (the recommended setting). If you want to manuallyspecify a particular relay for this IBM Endpoint Manager Client, check this boxand select the relays you want from the pull-down menus below.– Primary Relay Server: Select the name of the primary Relay from the
pull-down menu. The selected computer now points to this relay for Fixletdownloads instead of connecting directly to the IBM Endpoint ManagerServer.
– Secondary Relay Server: Select the name of the secondary Relay from thepull-down menu. If the primary relay is unavailable, then this secondaryrelay takes over the job of providing Fixlet downloads.
Custom Settings: This list box contains custom named variables that can beassigned to each computer. This is a valuable technique for organizing a networkof computers, and can help to identify individual computers as well as groups. Thelist of settings in this box can be sorted by clicking the appropriate header:v Name: This column contains the assigned custom variable names, for example,
"depts."v Value: This column lists the values of the named variables, for example, "human
resources."v Site: As applied by the Console Operator, these named variables are a part of
the "local" site. These variables can also be set by other Fixlet sites, in which casetheir site name is shown here.
There are three buttons to the right of the list:
Chapter 17. The Dialogs 197
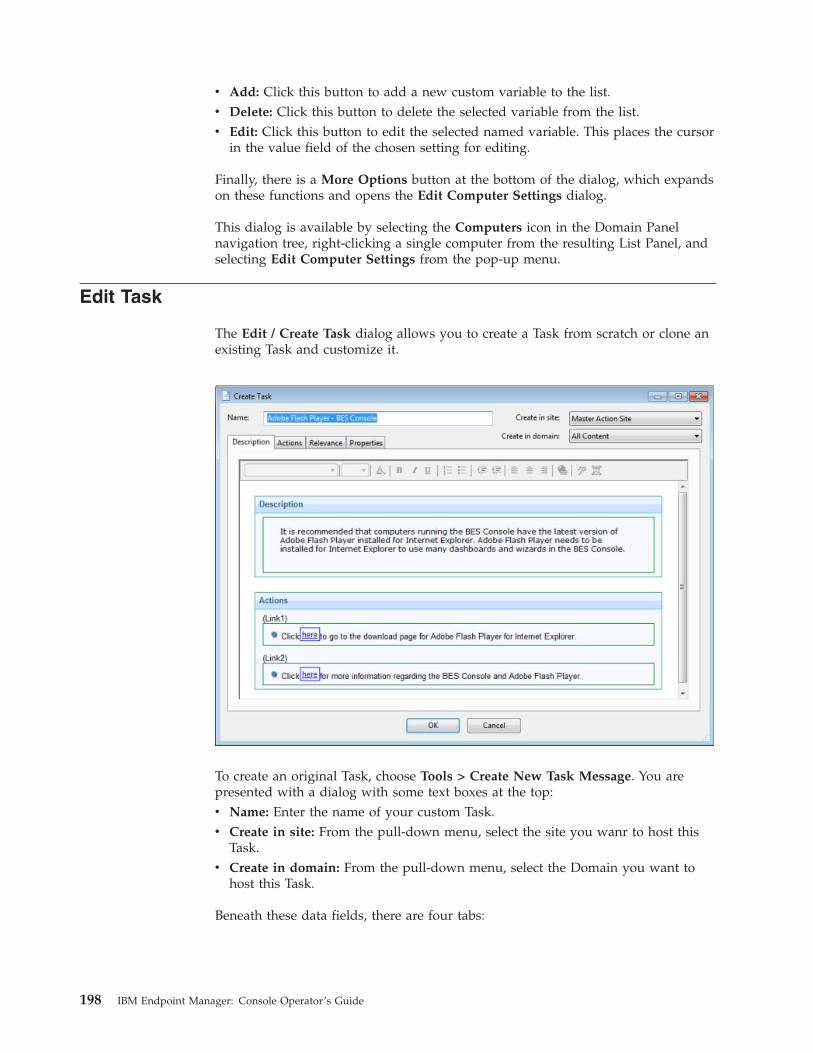
v Add: Click this button to add a new custom variable to the list.v Delete: Click this button to delete the selected variable from the list.v Edit: Click this button to edit the selected named variable. This places the cursor
in the value field of the chosen setting for editing.
Finally, there is a More Options button at the bottom of the dialog, which expandson these functions and opens the Edit Computer Settings dialog.
This dialog is available by selecting the Computers icon in the Domain Panelnavigation tree, right-clicking a single computer from the resulting List Panel, andselecting Edit Computer Settings from the pop-up menu.
Edit Task
The Edit / Create Task dialog allows you to create a Task from scratch or clone anexisting Task and customize it.
To create an original Task, choose Tools > Create New Task Message. You arepresented with a dialog with some text boxes at the top:v Name: Enter the name of your custom Task.v Create in site: From the pull-down menu, select the site you wanr to host this
Task.v Create in domain: From the pull-down menu, select the Domain you want to
host this Task.
Beneath these data fields, there are four tabs:
198 IBM Endpoint Manager: Console Operator’s Guide

v Description: Create a user-readable title and description for the Task you wantto deploy. If you are cloning an existing Task, the original title and description isthe default. This is an HTML page, and you can use the toolbar at the top toalter fonts and formatting.
v Actions: Specify the actions for your custom Task to run.v Relevance: Create a relevance clause to target this Task to a subset of computers.
For a cloned Task, the original relevance clause is the default. You can replace ormodify the relevance clause to suit your network needs.
v Properties: Specify certain properties for your Task, including Category,Download Size, Source, Severity, and Date.
To create a new Task from scratch, select the following:v Tools > Create New Task
You can also customize an existing Task by selecting it from any Task list and thenchoosing:v Edit > Create Custom Copy
Alternatively, right-click in a Task list and select Create Custom Copy or CreateNew Task from the pop-up menu.
Enter Private Key
The Enter Private Key dialog requests a password.
Type in the publisher password that you were given by your Site Administrator.This dialog is displayed whenever an action is deployed, to ensure that onlyauthorized personnel are allowed to update computers in the network.
Execution TabThe Execution tab can be found in various action dialogs. In this tab you can setthe schedule, time interval, and the recovery options that must be satisfied whendeploying the action.
Use the settings in this tab to ease the traffic load in your network.
Chapter 17. The Dialogs 199

This tab is available from several different dialogs:v “Take action” on page 233v “Take multiple actions” on page 235v “Action Settings” on page 133v “Edit Computer Settings” on page 190
In the Constraints section of this dialog you can schedule actions and restrict thetarget computers, in particular:
Ends on [date] [time]It defines the action’s expiration date and time.
Run only when [Property] [Operator] [Value]It filters clients by their retrieved properties. Select a Property and anOperator from the pull-down menus, then select a value for comparison.The value entered must form a valid relevance expression.
In the Behavior section of this dialog you can manage failed actions and recurrentrelevance. The IBM Endpoint Manager Client can retry any action that isunsuccessful and reapply any action that succeeds and then subsequently fails.This capability allows you to automatically implement continuing policiesminimizing the network load and the operator intervention. You can set thefollowing behaviour:
200 IBM Endpoint Manager: Console Operator’s Guide

On failure, retry XX timesIt sets the maximum number of retries upon action failure. The defaultvalue is 3 retries. After selecting this checkbox, choose one conditionamong the following:
Wait XX between attemptsThe Client waits a time interval of XX before retrying the action.The default time interval is 1 hour.
Wait until computer has rebootedThe Client waits to reboot before rerunning the action.
Reapply this actionIt applies again the action if the target is no more compliant to the policyset by the relevance expression. After selecting this checkbox, choose onecondition among the following:
Whenever it becomes relevant againIt reapplies the action as soon as the relevance expression evaluatesagain to true
While relevant, waiting XX between reapplicationsInstead of immediately reapplying the action upon relevance, itspecifies a period of time to wait between attemptedreapplications.
Limit to XX reapplicationsIt continues to apply the action the given maximum number oftimes, while it remains relevant. The default values is 3 times. Itcounts the number of attempts after the original, so a limit of 3actually involves 4 attempts.
Start client downloads before constraints are satisfiedThe software downloads starts before the Client has satisfied the executionconstraints. Select this option if you want to ensure that the download isavailable for execution as soon as the desired time frame begins.
Stagger action start times over MM minutes to reduce network loadIt forces the program to space out the running of actions. This option canreduce the load on the network, in the case of bandwidth-intensive actions,and is useful to help relays in effectively servicing hundreds of attachedClients.
Find
You can find information in any of the lists (Fixlets, Tasks, Actions, and so on.)whenever the focus is on that list. To do this, you create a Find Filter. For example,to find a particular word in the Fixlet list, click anywhere in the Fixlet List Paneland press Ctrl-F (or select Find from the Edit menu).
Chapter 17. The Dialogs 201

There are several sections in the Filter dialog:
Name: Provide a name for your Find Filter in the Name box.
Visibility: This box lets you keep the Filter to yourself or share it with other users.
Include: This section lets you define the scope of the Find. Choose from Fixlets,Actions, Tasks, or any of the other main categories of content. You can choose toinclude all (AND the properties) or any (OR the properties) of the following items.
Two properties have been pre-arranged for you, but you can add or delete fromthese default choices. As with other property choices using IBM Endpoint Manager,there is a {field} {operator} {search string} triad to define. Here the defaults allowyou to select a Name containing a value and a Visibility. Because Fixlets, Tasks,and Analyses can be hidden, the visibility field allows you to search through theseitems depending on whether they are Visible, Locally Hidden, or GloballyHidden.
When you have finished defining your Find Filter, click the Create button. Yourcustom filter is placed in the All Content Domain, under the Custom Filters folder.To make changes, right-click it and select Edit from the context menu.
This dialog is available by selecting one of the main content categories (FixletMessages, Tasks, Actions, and so on.) the icon in the Domain Panel navigation treeto establish the focus, then pressing Ctrl-F or selecting Find from the Edit menu.
202 IBM Endpoint Manager: Console Operator’s Guide

Fixlet and Task: List and Document
A list is created whenever you click Fixlets and Tasks from the Domain Panelnavigation tree.
This list incorporates both Fixlets and Tasks, which you can filter by opening theicon and clicking any of the child nodes beneath it. The List Panel on the rightnow contains all the currently relevant Fixlets and Tasks, narrowed down by thefilters. A Fixlet or Task document is displayed in the Work Area of the Consolewhen you click any item in the list. It displays a description and typically a set oflinks to deploy Actions.
Chapter 17. The Dialogs 203

Fixlet and Tasks have the same basic tools and tabs available because they aresimilar objects. The main difference between the two is that a Fixlet is triggered bya vulnerability, whereas a Task is designed for ongoing maintenance. Both of themuse Relevance clauses to target client computers and both use Action scripts toaccomplish their goals. You can get a separate listing of each by clicking the AllTasks or All Fixlets node in the navigation tree.
At the top of each document you find the name of the Fixlet or Task. Beneath thatis a toolbar containing the following tools:v Take Action: This tool provides a pull-down menu of Actions. Select an action
from the menu to deploy it to your network.v Edit: Lets you edit the Fixlet or Task. This tool is only available for custom
Fixlets or Tasks.v Copy: Lets you copy or clone the Fixlet or Task to customize what it does.v Export: Allows you to export the Fixlet or Task for editing in an external editor,
or for copying to another Console or deployment.v Hide Locally: Hides the Fixlet or Task on this version of the Console.v Hide Globally: Hides the Fixlet or Task on all networked Consoles.v Remove: Deletes this Fixlet or Task (only available for Custom Fixlets or Tasks).
There are several tabs for this document. They include:v Description: An HTML page describing the Fixlet or Task and a set of Actions
(implemented as links) that address the problem described. You can search anyof the HTML interfaces in the Console by pressing Ctrl-F and then entering yoursearch string.
v Details: An HTML page describing the Properties, Relevance clauses, and Actionscripts associated with the Fixlet or Task. At the bottom of the page is a text boxto enter a comment to be attached to the message.
v Applicable Computers: Shows which subset of computers is targeted by theAction.
v Action History: Shows the history of any Actions that were invoked by thisFixlet or Task.
To display a Fixlet or Task list, click the Fixlets and Tasks icon in the DomainPanel navigation tree.
A Fixlet or Task document is opened whenever you open an item in the resultinglist.
204 IBM Endpoint Manager: Console Operator’s Guide

Fixlet List and Document
A list is created whenever you click Fixlets and Tasks from the Domain Panelnavigation tree. This list incorporates both Fixlets and Tasks, which you can filterby opening the Fixlet and Tasks icon and clicking All Fixlet Messages beneath it.
The List Panel on the right now contains all the currently relevant Fixlets. A Fixletdocument is displayed in the Work Area of the Console when you click anymessage in the list. As well as a description, it includes clickable links calledActions.
Chapter 17. The Dialogs 205

At the top of the Fixlet document you find the Fixlet name. Beneath that is atoolbar containing the following tools:v Take Action: This tool runs the default action of the Fixlet.v Edit: This option lets you edit the Fixlet. This tool is only available for custom
Fixlets that you created yourself.v Copy: This option lets you copy or clone the Fixlet to customize what it does.v Export: This tool allows you to export the Fixlet for editing in an external editor.v Hide Locally: Hides the Fixlet on this version of the Console.v Hide Globally: Hides the Fixlet on all Consoles.v Remove: Deletes this Fixlet (only available for Custom Fixlets).
There are several tabs in a Fixlet document. They include:v Description: An HTML page describing the Fixlet and a set of Actions
(implemented as links) that address the problem described. You can search anyof the HTML interfaces in the Console by pressing Ctrl-F and then entering yoursearch string.
v Details: An HTML page describing the Properties, Relevance clauses and Actionscripts associated with the Fixlet. At the bottom of the page is a text box to entera comment to be attached to the Fixlet message.
v Applicable Computers: Shows which subset of computers is targeted by theaction.
v Action History: Shows the history of any actions that were invoked by thisFixlet message.
To display a Fixlet list, click the Fixlets icon under the Fixlets and Tasks icon inthe Domain Panel navigation tree.
A Fixlet document is opened whenever you open an item in a Fixlet list.
Import Content
The Import dialog allows you to import .bes files that you exported or that weresent to you by another operator.
IBM Endpoint Manager files might contain groups of Fixlet messages, Tasks,Actions, or Baselines. When you open them, a Create dialog is displayed, togetherwith the expected features for each content type. For more information, see theassociated creation dialogs for the selected content.
This dialog is available by selecting Import from the File menu.
Launch Web Reports
The Web Reports dialog provides access to network information, which is collectedfrom the IBM Endpoint Manager Servers and aggregated into a set of HTMLreports. These include summaries of the history and status of Fixlet messages andActions across extended networks of computers. These reports can be used to tracksoftware deployments and compliance across a global network of independentLANs. To start, select Tools > Launch Web Reports.
Web Reports is a stand-alone program that is not described in this Guide. For moreinformation, see the Web Reports Guide.
206 IBM Endpoint Manager: Console Operator’s Guide

This dialog is available by selecting:v Tools > Launch Web Reports.
Main Console Window
The Main Console Window has a panel on the left containing buttons andnavigation trees called the Domain Panel. Choose an item from the Domain Panelto open the related List Panel on the right. From this list, specific items can beopened in the Work Area below. Here are the main parts:v Domain Panel: This panel provides a high-level view of the IBM Endpoint
Manager content, allowing you to quickly subdivide the information by major ITfunctions. Within each domain, this panel presents navigation trees that make iteasy to zoom in on Fixlet Messages, Reports, Analyses, and other content.
v Domain Buttons: At the bottom of the Domain Panel, these buttons representthe set of Domains that are currently available to you. When you subscribe to asite, it is automatically entered into the correct domain. If a new domain isrequired, a button for it is added to this group. At the bottom of the buttons is acontrol that allows you to adjust the number of buttons to display.
v Console Toolbar: This toolbar allows you to navigate back and forth through theitems you have selected from the Domain navigation tree. In addition, there arebuttons that allow you to display items you might have hidden and items thatare not currently relevant to any of your Clients (this allows you to view all theavailable content for research or cloning purposes). There is also a refresh buttonthat re-evaluates content for the Console display.
v List Panel: This is a listing of the items specified by the content filters and thenavigation trees in the Domain Panel. You can sort this list by clicking thecolumn headers and you can rearrange the headers by dragging them left orright. In addition, you can right-click the headers to see a pop-up menucontaining a list of all the possible fields. Check those you want to use asheaders.
v Context Menu: This is the menu that opens when you right-click any item in alist. Different lists have different context menus.
v Work Area Toolbar: This bar contains context-sensitive buttons that can runvarious actions based on the content of the current work area.
v Work Area: Below the List Panel and the Work Area Toolbar is the Work Area.When you double-click an item from the List Panel, the Console opens adetailed document in this window.
Domain Panel Console Toolbar List Panel Context Menu
Chapter 17. The Dialogs 207

Domain Buttons Work Area Toolbar Work Area
208 IBM Endpoint Manager: Console Operator’s Guide

Manage Properties
The Manage Properties dialog contains a list of computer properties that areretrieved on a regular schedule from each IBM Endpoint Manager Client.
This allows the Console operator to monitor specific aspects of all managed clients.These properties can also form the basis of the client filters (and column headers)in the Console whenever client computers are listed. In addition, these propertiescan be used to target computers for Fixlet messages or actions.
There are several properties listed as defaults in the top panel, but if you are aMaster Operator, you can add to these (and delete others) by using the buttons onthe right:v Add New: To add a property, click this button, and the bottom part of the dialog
becomes editable. Supply a name (that to be used for filtering and sorting) andthen fill in a Relevance Expression in the text box below.
v Delete: To delete a property, highlight it in the list and then click this button.v Make Custom Copy: You can clone and customize any property by selecting it
in the list and then clicking this button.v Export: To export a property as an XML (.bes) file for sharing with other users,
click the button and then specify a filename for export.
Below this panel are two text fields. They display the existing property name andrelevance expression. For reserved properties, these fields are display-only. Manyof the properties, however, are available for editing.v Name: Displays the existing name of a property, or allows you to enter a name
for a new Property. If you make this name available, it is integrated into theinterface for filtering, sorting, and targeting. This field also allows you to renamea property.
Chapter 17. The Dialogs 209

v Relevance: This text box displays the relevance expression that is evaluated toproduce the retrieved property.
For each of these properties, there is an optional evaluation period:v Evaluate Every: Choose a time period, from 5 minutes to one month, which
controls how often the Property is evaluated. You might want to set a longperiod for time-consuming property evaluations or a short period for moreurgent properties. The default is Every Report, which revaluates the propertieswith each report.
NOTE: Some of the properties (such as the IP Address and the relay status) areessential to the correct functioning of the Console. They are marked as Reserved,and cannot be renamed or deleted.
This dialog is available by selecting Tools > Manage Properties...
Manual Computer Groups
This dialog allows you to manually group your computers to target themsimultaneously.
To choose the computers you want to group, select them from the Computers ListPanel. Right-click and select Add to Manual Group from the context menu. In thedialog that opens, you can add these computers to a pre-existing group, or define anew group. There are two buttons for these choices:v Add the selected computers to the manual group selected below: Click a group
and click OK.v Add the selected computers to a new manual group named: Type in a new
group name and click OK.
NOTE: A computer can belong to more than one group. You can also definegroups automatically, by using properties or Relevance statements to indicate theirgroup status.
This dialog is available by clicking the Computers icon in the Domain Panelnavigation tree, selecting computers from the Computer List Panel, and thenright-clicking and selecting Add to Manual Group from the context menu.
210 IBM Endpoint Manager: Console Operator’s Guide

Messages tabOrdinarily, the system applies actions in the background, without involving anyusers. In the Messages tab you can select to alert the user with a specific message,and to offer certain interactive features on the message display, including theability to see more information about the proposed action and to cancel theproposed action.
This tab is available from several different dialogs:v “Take action” on page 233v “Take multiple actions” on page 235v “Action Settings” on page 133v “Edit Computer Settings” on page 190
You can select to display a message to the users before running the action or whilethe action runs or both. The default is to show no message. If you click on Displaymessage before running action, in addition to the title and the text of the message,you can specify the following behaviors:
Ask user to save workIncludes a prompt asking users to save their work before the action isinvoked.
Allow user to view action scriptAllows the user to look over the script before accepting the action.
Note: This option is disabled in the Take Multiple Action dialog.
Chapter 17. The Dialogs 211
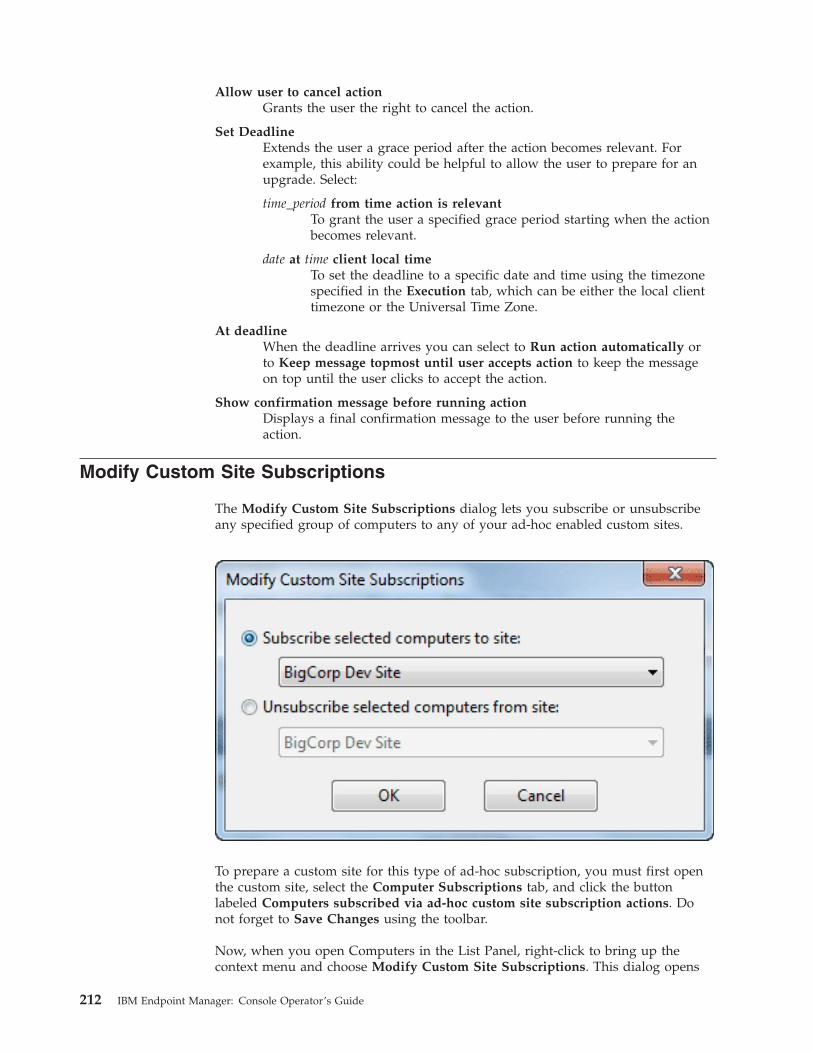
Allow user to cancel actionGrants the user the right to cancel the action.
Set DeadlineExtends the user a grace period after the action becomes relevant. Forexample, this ability could be helpful to allow the user to prepare for anupgrade. Select:
time_period from time action is relevantTo grant the user a specified grace period starting when the actionbecomes relevant.
date at time client local timeTo set the deadline to a specific date and time using the timezonespecified in the Execution tab, which can be either the local clienttimezone or the Universal Time Zone.
At deadlineWhen the deadline arrives you can select to Run action automatically orto Keep message topmost until user accepts action to keep the messageon top until the user clicks to accept the action.
Show confirmation message before running actionDisplays a final confirmation message to the user before running theaction.
Modify Custom Site Subscriptions
The Modify Custom Site Subscriptions dialog lets you subscribe or unsubscribeany specified group of computers to any of your ad-hoc enabled custom sites.
To prepare a custom site for this type of ad-hoc subscription, you must first openthe custom site, select the Computer Subscriptions tab, and click the buttonlabeled Computers subscribed via ad-hoc custom site subscription actions. Donot forget to Save Changes using the toolbar.
Now, when you open Computers in the List Panel, right-click to bring up thecontext menu and choose Modify Custom Site Subscriptions. This dialog opens
212 IBM Endpoint Manager: Console Operator’s Guide

and those custom sites that have been enabled for ad-hoc subscriptions areavailable for subscription from the pull-down menu. If the site is alreadysubscribed to a custom site, this dialog also lets you unsubscribe it.
This dialog is available by right-clicking an item from any Computer list andselecting Modify Custom Site Subscriptions from the context menu. For thismenu choice to be available, you must have first set up a Custom Site withsubscribers.
Offer tabIn the Offer tab you can advertise a list of actions (typically optional patches orupdates) to the IBM Endpoint Manager Client user.
This tab is available from several different dialogs:v “Take action” on page 233v “Take multiple actions” on page 235v “Action Settings” on page 133v
Use the information in this tab to let an operator, which is allowed to manage thetargeted Clients, choose the actions from the offering list. Offers are limited toversion 7.0 Clients or later.
In this tab you see the following options:
Chapter 17. The Dialogs 213
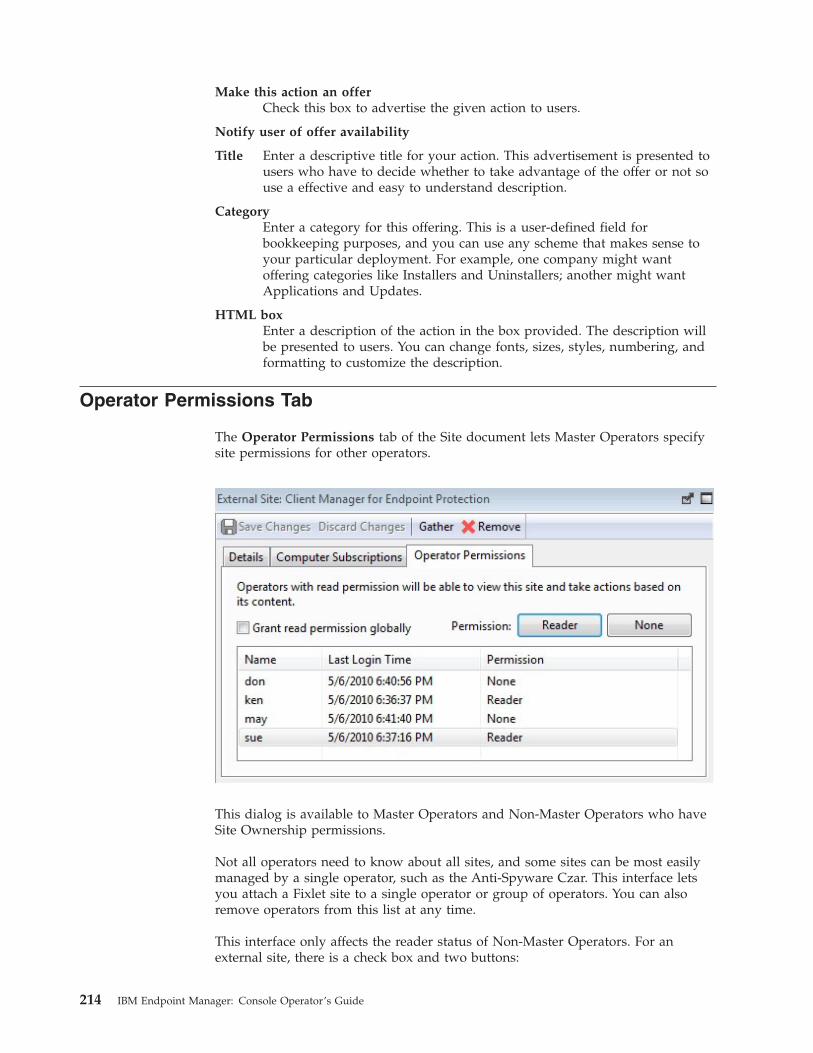
Make this action an offerCheck this box to advertise the given action to users.
Notify user of offer availability
Title Enter a descriptive title for your action. This advertisement is presented tousers who have to decide whether to take advantage of the offer or not souse a effective and easy to understand description.
CategoryEnter a category for this offering. This is a user-defined field forbookkeeping purposes, and you can use any scheme that makes sense toyour particular deployment. For example, one company might wantoffering categories like Installers and Uninstallers; another might wantApplications and Updates.
HTML boxEnter a description of the action in the box provided. The description willbe presented to users. You can change fonts, sizes, styles, numbering, andformatting to customize the description.
Operator Permissions Tab
The Operator Permissions tab of the Site document lets Master Operators specifysite permissions for other operators.
This dialog is available to Master Operators and Non-Master Operators who haveSite Ownership permissions.
Not all operators need to know about all sites, and some sites can be most easilymanaged by a single operator, such as the Anti-Spyware Czar. This interface letsyou attach a Fixlet site to a single operator or group of operators. You can alsoremove operators from this list at any time.
This interface only affects the reader status of Non-Master Operators. For anexternal site, there is a check box and two buttons:
214 IBM Endpoint Manager: Console Operator’s Guide

v Grant read permission globally: Check this box to allow read access to alloperators.
v Reader: Select an operator from the list and then click this button to grant readpermission to that operator.
v None: Select an operator from the list and click this button to deny readpermission to the specified operator.
For a custom site, which can be owned and edited, there are two extra permissionbuttons.
As before, you select an operator from the list and then click buttons to grantpermissions. The two extra buttons are:v Owner: This grants the greatest permission to the operator who can then assign
reader and writer permissions.v Writer: This button allows an operator to edit the site.
This dialog is available by clicking the Sites icon in the Domain Panel navigationtree, selecting a Site from the resulting List Panel, and then clicking the OperatorPermissions tab.
Chapter 17. The Dialogs 215

Post-Action tabIn the Post-Action tab you can set to restart or shut down the client computer afterthe action has completed
This tab is available from several different dialogs:v “Take action” on page 233v “Take multiple actions” on page 235v “Action Settings” on page 133
Among the various settings that you can specify in this tab you find:
Allow user to cancel restartThis gives the user a dialog box where they can cancel the proposedrestart.
Set deadlineThis gives the user the option to delay the restart/shutdown for thespecified time frame after the action completed. Typically, restarts areneeded to complete an installation, so they should not be postponed fortoo long a time.
At deadlineClick one of these buttons to specify what the deadline action is. You canchoose to automatically restart, or to keep a dialog box on the screen untilthe user is ready.
216 IBM Endpoint Manager: Console Operator’s Guide

Post-Execution Action Script TabIn the Pre-Execution Action Script tab of the Take Multiple Actions dialog youcan create an action script that runs after the chosen set of actions is run.
This tab is available from several different dialogs:v “Take action” on page 233 when deploying a baselinev “Take multiple actions” on page 235
There are two buttons in this dialog:
Do not run a custom action script after executing this multiple action groupThis is the default for most Fixlet actions, and is the recommended option.
Run the following action script after executing this multiple action groupYou can select one of the following options and either modify the existingscript or enter a new script in the text area. Select the type of action scriptthat you want to use for this script:
BigFix Action ScriptThis is the IBM Endpoint Manager standard scripting language foractions. For more information about the action language, seeIntroducing the action language.
AppleScriptThis is Apple's scripting language for controlling computerresources.
Chapter 17. The Dialogs 217

sh The action is a shell script to be run by a Linux or a UNIX or a bsdshell.
Note: By default, actions cannot be undone. Make sure to test your action on asmall scale before you deploy it in your entire network.
Pre-Execution Action Script tabIn the Pre-Execution Action Script tab of the Take Multiple Actions dialog youcan create an action script that runs before the chosen set of actions is run.
This tab is available from several different dialogs:v “Take action” on page 233 when deploying a baselinev “Take multiple actions” on page 235
There are two buttons in this dialog:
Do not run a custom action script before executing this multiple action groupThis is the default for most Fixlet actions, and is the recommended option.
Run the following action script before executing this multiple action groupYou can select one of the following options and either modify the existingscript or enter a new script in the text area. Select the type of action scriptthat you want to use for this script:
218 IBM Endpoint Manager: Console Operator’s Guide

BigFix Action ScriptThis is the IBM Endpoint Manager standard scripting language foractions. For more information about the action language, seeIntroducing the action language.
AppleScriptThis is Apple's scripting language for controlling computerresources.
sh The action is a shell script to be run by a Linux or a UNIX or a bsdshell.
Note: By default, actions cannot be undone. Make sure to test your action on asmall scale before you deploy it in your entire network.
Preferences
The Preferences dialog lets you adjust certain system-wide parameters.
There are several sections in the Preferences dialog:
Fixlet List
v Refresh list every XX seconds: Controls how often the Fixlet display is updated.The default setting causes the IBM Endpoint Manager Database to be queriedevery 15 seconds. More frequent updates cause more network traffic, but lessfrequent updates increase the response time. As the IBM Endpoint Manager
Chapter 17. The Dialogs 219

Database increases in size, a longer refresh rate might be desirable. 15 secondsprovides a good balance between latency and bandwidth concerns.
Client Computers
v Send heartbeat every XX minutes: Controls how often the IBM EndpointManager Client computers check in with the IBM Endpoint Manager Server toupdate their status. Each time a IBM Endpoint Manager Client sends aheartbeat, it includes any retrieved property values that have changed. 15minutes is the default value.
v Mark as offline after XX minutes: Controls how long to wait after the lastheartbeat before a computer is declared to be offline. The default is 50 minutes.
Relevance Colorization
v Modify the colors used to display relevance: Whenever Relevance expressionsare viewed, the text can be colored for easier reading. Click the Set Colorsbutton to open an interface allowing you to customize your personal colorscheme.
Console Close
v Prompt for confirmation before closing the console: This preference provides ayes/no prompt every time you exit the Console.
Language
v Console Language: If you want to change the Console language, select thelanguage and then restart the Console.
Cache options
v Always load data from database: If you do not want to leave informationcached on your Console computer, click this option. This causes all data to beloaded freshly from the database each time you open the Console.
v Keep partial cache on disk: This option caches everything except retrievedproperty results. The Console still caches Fixlet and Action results, which arethen written out upon exiting.
v Keep full cache on disk: With this option, retrieved properties can be storedlocally along with Fixlet and Action results. The more properties you keep in thecache, the more expensive it is to maintain, so the caching policy determineshow long the Console runs before it clears items out of its cache.
Expiration policy. If you have selected the full caching option above, you mustalso set an expiration policy to periodically purge the cache:v Aggressive: This policy purges unused data rapidly, purging any items that
were not accessed in the previous Console session.v Moderate: This policy is intermediate between aggressive and conservative.v Conservative: This policy allows data to remain for a long time between purges,
whether or not is has been recently accessed.v Clear Cache: Click this button to clear the current cache when the Console is
next run.
This dialog is available by selecting:v File > Preferences
220 IBM Endpoint Manager: Console Operator’s Guide

Recent Comments
This dialog presents a list of comments that have been attached to Fixlet messages,Tasks, Baselines, Actions, and Computers.
It compiles all the Comments from each of these interfaces for viewing in oneplace.
You can view the current comments by selecting Tools > View Recent Comments.
Results Tab
The Results tab of the Analysis document displays a list of targeted computersand the results of the analysis for each one.
The format of this display depends on the selected View, either list or summary.The list view is shown above.
When viewed as a list, each specified retrieved property has a correspondingheader and the value of each property is displayed beneath it. If there is more thanone value for a property, then <multiple results> is displayed. You can sort this listby the headers or use the folders in the left-hand panel to filter the results. Thisallows you to manage large sets of computers by their retrieved properties.
Chapter 17. The Dialogs 221

When viewed as a summary, each property has its own section, with responsecounts and percentages for each value of the property.
This dialog is available whenever you select an activated Analysis from anappropriate list.
Role Computer Assignments Tab
The Computer Assignments tab of the Roles window allows you to add a set ofcomputers to a role.
Click the Add button to include computers, defined by properties or groups, as apart of this role's definition. Make sure to click Save Changes before you dismissthis window.
222 IBM Endpoint Manager: Console Operator’s Guide

This dialog is presented when you select a role from the Roles list or when youcreate a role from scratch with Tools > Create Role.
Role Details Tab
Roles can be created and defined through the Console. You can create a role byselecting Tools > Create Role. You can modify an existing role by clicking on anitem in a Roles List, which is available when you select Roles from the Domainpanel.
The Roles Detail tab lets you describe the role and set permissions. In particular,you can give this role Master Operator permissions with the appropriatepull-down menu. If you want this role to be able to create and edit custom sites,use the Custom Content pull-down. If you want this role to be able to follow theactions of other operators, select Yes from Show Other Operator's Actions. Finally,if you want to allow this role to view Unmanaged Assets, select that option fromthe appropriate pull-down.
This dialog is presented when you select a role from any list of roles.
Chapter 17. The Dialogs 223

Role LDAP Groups Tab
The LDAP Group tab of the Roles window allows you to associate an LDAPGroup to the Role definition.
Click Assign LDAP Group to bring up a dialog with your currently unassignedLDAP Groups listed for selection. You can also delete groups by selecting theirname and clicking Remove LDAP Group.
Make sure to click Save Changes before you dismiss this window.
This dialog is presented when you select a role from the Roles list or when youcreate a role from scratch with Tools > Create Role.
224 IBM Endpoint Manager: Console Operator’s Guide

Role Operators Tab
The Operators tab of the Roles window allows you to associate specific local orLDAP-defined users with the given role.
Click the Assign User button to bring up the list of currently unassigned users.You can delete users from this role by selecting their names and clicking RemoveUser.
Make sure to click Save Changes before you dismiss this window.
This dialog is presented when you select a role from the Roles list or when youcreate a role from scratch with Tools > Create Role.
Role Sites Tab
The Sites tab of the Roles window allows you to associate content sites with agiven role.
Chapter 17. The Dialogs 225

You can add various sites by clicking the Assign Site button. Then, for a customsite, you can assign owners and writers to this role.
Make sure to click Save Changes before you dismiss this window.
This dialog is presented when you select a role from the Roles list or when youcreate a role from scratch with Tools > Create Role.
Security Warning
The Security Warning dialog alerts you about scripting or relevance statementsembedded in text.
Whenever the Console detects that an embedded Relevance clause or a script isabout to be displayed, this warning pops up. Unlike Action scripts, which requirea password before they can be run, embedded scripts are run automatically andthus require scrutiny. In general, if you created these scripts from a custom site,you can click the checkbox to allow dynamic scripting to always be enabled.
If you are uncertain about the source of the embedded script, click Disable.
This dialog is displayed whenever content containing a Relevance statement or ascript is about to be displayed.
226 IBM Endpoint Manager: Console Operator’s Guide
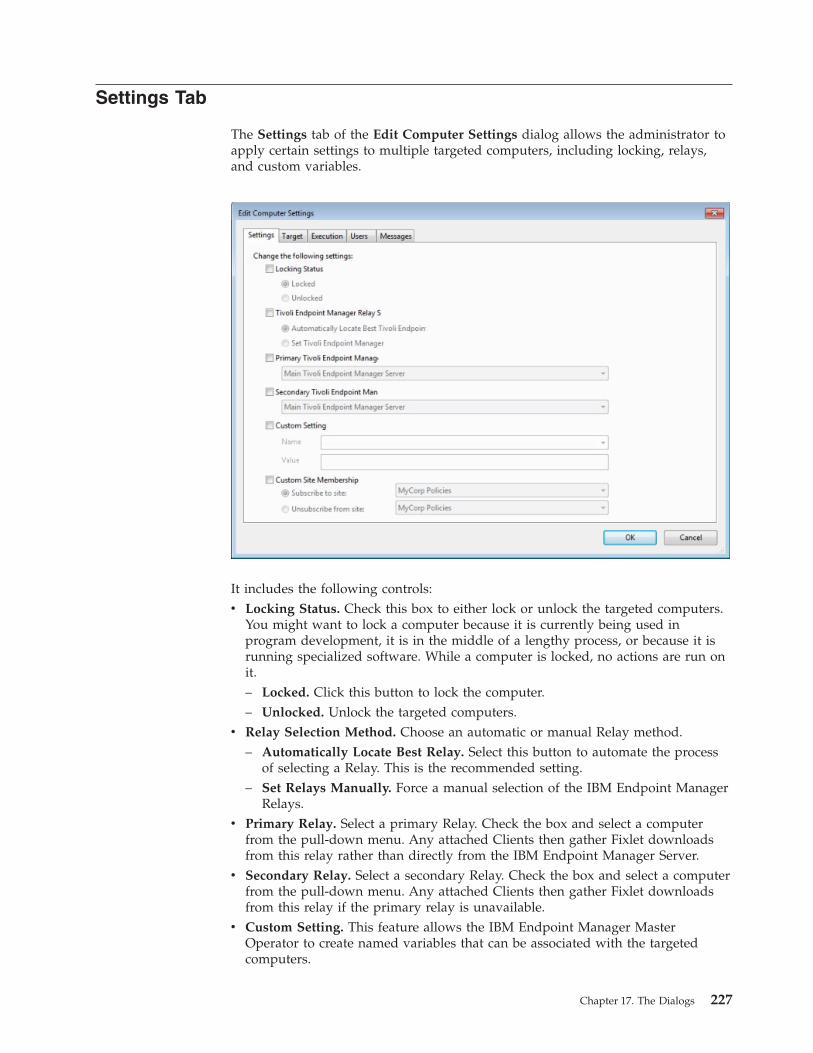
Settings Tab
The Settings tab of the Edit Computer Settings dialog allows the administrator toapply certain settings to multiple targeted computers, including locking, relays,and custom variables.
It includes the following controls:v Locking Status. Check this box to either lock or unlock the targeted computers.
You might want to lock a computer because it is currently being used inprogram development, it is in the middle of a lengthy process, or because it isrunning specialized software. While a computer is locked, no actions are run onit.– Locked. Click this button to lock the computer.– Unlocked. Unlock the targeted computers.
v Relay Selection Method. Choose an automatic or manual Relay method.– Automatically Locate Best Relay. Select this button to automate the process
of selecting a Relay. This is the recommended setting.– Set Relays Manually. Force a manual selection of the IBM Endpoint Manager
Relays.v Primary Relay. Select a primary Relay. Check the box and select a computer
from the pull-down menu. Any attached Clients then gather Fixlet downloadsfrom this relay rather than directly from the IBM Endpoint Manager Server.
v Secondary Relay. Select a secondary Relay. Check the box and select a computerfrom the pull-down menu. Any attached Clients then gather Fixlet downloadsfrom this relay if the primary relay is unavailable.
v Custom Setting. This feature allows the IBM Endpoint Manager MasterOperator to create named variables that can be associated with the targetedcomputers.
Chapter 17. The Dialogs 227

– Name. Type the name of a variable to be associated with all targetedcomputers, for example, "department."
– Value. Enter the value of the above-named variable, for example, "payroll."
When multiple computers are selected, this dialog is available by right-clicking andselecting Edit Computer Settings from the context menu.
Site Details Tab
The Details tab of the Site document provides you with information about the siteand the subscription criteria.
The Details group provides information about the version, publisher, and URL ofthe site.
The Subscription group provides information about how the criteria are used toselect clients for subscription to the site.
This dialog is available by clicking the Site icon in the Domain Panel navigationtree, selecting a Site from the resulting List Panel, and clicking the Details tab fromthe document in the Work Area below.
228 IBM Endpoint Manager: Console Operator’s Guide

Site List and Document
A list of Sites is displayed when you click Sites, or any of its child nodes, from theDomain Panel navigation tree.
A Site document is displayed in the Work Area of the Console when you click anyitem from this list. If you open the Sites icon, you can filter the sites to eitherCustom or External types. Click an external site from the list to open it in the WorkArea below.
At the top is a toolbar with four buttons:v Save Changes: This button is grayed out for an external site.v Discard Changes: This button is grayed out for an external site.
Chapter 17. The Dialogs 229

v Gather: This button gathers the contents of the site.v Remove: This button allows you to remove the site from the Console.
Beneath the toolbar are three tabs:v Details: This read-only tab displays the version, URL, and publisher of the site.v Computer Subscriptions: This tab lets you specify which Clients are subscribed
to this site.v Operator Permissions: This tab lets you attach Operators to the site as owners,
writers, or readers.
You can also create and edit your own Custom sites. If you have any custom sites,click one from the list to view or edit it.
The document for a Custom Site is similar to that for an External site, with addedabilities to edit the site. The toolbar has the same four buttons:v Save Changes: After making edits to your Custom Site, click this button to
record your changes.v Discard Changes: This button clears all the changes you made.v Gather: Because the contents of a custom site are typically stored locally, this
tool might be grayed-out.v Remove: This button allows you to entirely remove the site from the Console.
Beneath the toolbar are the same three tabs:v Details: This tab allows you to view or edit the description of your custom site
and to select the Domain you want to host the site.
230 IBM Endpoint Manager: Console Operator’s Guide

v Computer Subscriptions: This tab lets you specify which Clients are subscribedto this site.
v Operator Permissions: This tab lets you attach Operators to the site as owners,writers, or readers.
To view the Site list, click the Sites Icon (or any of its child nodes) in the DomainPanel navigation tree. Open the icon to narrow down the list to either Custom orExternal sites.
To view a Site Document, click any item in a site list.
To create a custom site, select Tools > Create Custom Site.
Site Properties
The Site Properties dialog displays information about the selected Fixlet site,including the name of the Site publisher and the URL from which the content isgathered.
The tabs in this dialog include:v Details: This tab displays the Site type (internal, external), the version, and
information about the publisher and subscriptions.v Computer Subscriptions: This dialog allows you to narrow down the list of
computers that subscribe to the chosen site. By eliminating superfluous orirrelevant Fixlet subscriptions, you can reduce the disk-storage requirements ofyour client computers.
Chapter 17. The Dialogs 231

v Operator Permissions: This is a list of the operators and their permission levels.For an external site, you can typically only grant read access, but for a customsite you can grant ownership, write or read permission.
This dialog is available by clicking the Sites icon in the Domain Panel navigationtree and then clicking an item from the resulting List Panel. The Site informationopens in the Work Area below.
Success Criteria tabIn the Success Criteria tab you can define the conditions under which the action isconsidered to be successful.
This dialog is available by selecting a Fixlet message or task from any list, thenclicking an action button. From the “Take action” on page 233 dialog, select theSuccess Criteria tab.
Select one of the following options:
The applicability relevance evaluates to falseThis is the default success criteria, requiring that the Relevance statementthat made the action applicable is no longer TRUE. Because the Relevancestatement notices a problem and the action fixes it, this is generallysufficient to establish success.
All lines of the action script have completed successfullyYou can make success dependent on completing all steps of the actionscript.
232 IBM Endpoint Manager: Console Operator’s Guide

The following relevance clause evaluates to falseYou can use a special Relevance clause to ensure that the action hasaccomplished it goals. In this case a text box below becomes editable andyou can create or revise an existing Relevance clause.
Take actionUse the Take Action dialog to run deploy a Fixlet, a task or a baseline.
The Take Action dialog is similar to the Take Multiple Actions dialog, but issuesonly a single action.
You can access this dialog in one of these ways:v Right-click a relevant Fixlet message or a task and choose Take Default Action
from the pop-up menu.v Click a relevant Fixlet message or task and select Take Default Action in the
Work Area toolbar.v Click a relevant Fixlet message or task and select the Description tab. Scroll
down to see the suggested actions. Click the link related to the action that youwant to run.
Using the input fields and tabs contained in the dialog you can specify exactlyhow the selected action is to be deployed to the computers in your network. Theseare the fields and the tabs contained in the dialog:
Name Is the name of the action.
Chapter 17. The Dialogs 233

Create in domainRepresents the domain where you want to store your custom action. AllContent is the top-level domain, and it includes objects from all domains.
Preset Specifies a preset customized action. There are two built-in presetsavailable, Default and Policy. Select Policy if you want to set no expirationdate for the action. You can also save your current input as a preset,private or public, for later use.
Target tabContains the list of targets for the action. You can select the targets of theaction from the provided list, or use properties to filter a list or specify alist of target computers. If you click Select devices you must select thespecific targets in the list. For more information about this tab, see “Action:Target” on page 137.
Execution tabContains the time constraints and retry behavior for the action run andfailure. For more information about this tab, see “Execution Tab” on page199.
Users tabContains the settings to run the action based on which and if specific usersare logged on the computer. For more information about this tab, see“Users Tab” on page 239.
Messages tabContains messages to display before or while the action runs. For moreinformation about this tab, see “Messages tab” on page 211.
Offer tabSpecifies whether or not to advertise the existence of programs or patchesthat your networked Clients can choose to use. This grants extra control toyour users to customize their setup. For more information about this tab,see “Offer tab” on page 213.
Post-action tabLists the activities that must be done to complete the action, includingrestart or shutdown. For more information about this tab, see “Post-Actiontab” on page 216.
Applicability tabContains the relevance clause that determines the applicability of theaction. For more information about the Relevance language, seeIntroducing the Relevance language. For more information about this tab,see “Applicability tab” on page 144.
Success criteria tabSpecifies what is intended as successful outcome for the action. This tablets you use different criteria to determine when a problem has been fixed.For more information about this tab, see “Success Criteria tab” on page232.
Action script tabContains a script describing the action to run. The script is written usingthe action language. An operator needs Custom Authoring permissions toedit the action script. For more information about the action language, seeIntroducing the action language. For more information about this tab, see“Action Script Tab” on page 131
234 IBM Endpoint Manager: Console Operator’s Guide

When you decide to run the action, click OK and enter your password. A progressdialog is displayed to keep you informed about the deployment of the action. Youcan also monitor how the action is being processed following the instructionsprovided in “Monitoring an action taken” on page 26.
Take multiple actionsIn the Take multiple actions dialog you specify the settings for deploying a set ofFixlets or tasks in a single grouping.
As a requirement, each Fixlet or task involved in the group must have associated adefault action.
These is how you can accomplish this task:1. Right-click a selected group of tasks or Fixlets containing default actions.2. Select Take Default Action. The Take Multiple Actions dialog opens.
3. In this dialog, specify how the selected actions must be deployed to thecomputers in your network. The input fields contained in the dialog are thesame as those contained in the “Take action” on page 233 display with theexception of the following additional fields:
Run all members actions of action group regardless of errorsThis field belongs to the Execution tab and specifies whether the actionrun should stop if an error occurs for one or more object of the groupor not.
Pre-Execution Action Script tabLets you specify an Action Script to run before the group of Actions isdeployed.
Chapter 17. The Dialogs 235

Post-Execution Action ScriptLets you specify an Action Script to run after the group of Actions isdeployed.
4. When you finish editing, click OK to deploy the action.5. Enter your authentication password and click OK. A progress dialog opens to
keep you informed about the stage of the deployment.
Target Tab
The Target tab can be found in various Action dialogs.
When an Action becomes relevant, the Console operator can target a subset ofusers to receive the action.
There are three radio buttons at the top of this dialog:v Specific Computers selected in the list below. When you select this button,
only those Clients highlighted in the computer list receive the actions. This is thedefault behavior. Note that you can filter this computer list by selecting itemsfrom the tree view in the left panel. When you click OK, the selection ofcomputers in this list is frozen, the retrieved values are not reevaluated beforethe action is deployed. Thus, if a computer is affected by this problem in thefuture, it is not covered by this option. It trigger sthe same Fixlet, but requiresyou to target it again.
v All Computers with the Retrieved Properties values selected in the tree below.This button causes continued evaluation of IBM Endpoint Manager Clientcomputers for relevance if they match the selected properties. Unlike thescenario described above, if a new computer is affected by this problem in thefuture, it is automatically updated. You can also filter this set of relevantcomputers using the retrieved property panel on the left. Because of theopen-ended nature of this function, you might want to use the Execution tab todefine an expiration date.
v The computers specified in the list of names below. This button allows you toenter (or paste) a list of specific computers. Format the list with computer names(as displayed in the Console), separated by newlines.
These options grant you great power over the deployment of Fixlet actions. Thinkcarefully about your choices here. The first button is the safest, because it describesa static set of computers that you want to target. The second choice is morepowerful, because it continues to evaluate and automatically deploy relevant
236 IBM Endpoint Manager: Console Operator’s Guide

actions, but it could also have long-term consequences that you should consider.The third choice allows you to deploy to a specific list of computers, for fine-graincontrol over your deployment.
This tab is available from several different dialogs:
Take Action, Take Multiple Actions and Edit Computer Settings.
Task List and Document
A list is created whenever you click Fixlets and Tasks from the Domain Panelnavigation tree. This list incorporates both Fixlets and Tasks, which you can filterby opening the Fixlet and Tasks icon and clicking All Tasks beneath it.
The List Panel on the right now contains all the currently relevant Tasks. The Taskdocument is displayed in the Work Area of the Console when you click any itemin the list.
Chapter 17. The Dialogs 237

At the top of the Task document is the name. Beneath that is a toolbar with thefollowing tools:v Take Action: This tool runs the default action of the Fixlet.v Edit: This option lets you edit the Fixlet. This tool is only available for custom
Fixlets that you created yourself.v Copy: This option lets you copy or clone the Fixlet to customize what it does.v Export: This tool allows you to export the Fixlet for editing in an external editor.v Hide Locally: Hides the Fixlet on this version of the Console.v Hide Globally: Hides the Fixlet on all Consoles.v Remove: Deletes this Fixlet (only available for Custom Fixlets).
There are several tabs in a Task document. They include:v Description: A text version of the Task, describing the problem and offering one
or more Action buttons or links to resolve the issue. You can search any of theHTML interfaces in the Console by pressing Ctrl-F and then entering yoursearch string.
v Details: A list of the properties, Relevance statements, and Actions thatconstitute the Task.
v Applicable Computers: Lists the subset of computers that are targeted by theTask.
v Action History: Shows the history of the Action deployment. This list is emptyunless the Action associated with the Task has already been triggered.
To display a Task list, click the Tasks icon under the Fixlets and Tasks icon in theDomain Panel navigation tree.
A Task document is opened whenever you open an item in a Task list.
238 IBM Endpoint Manager: Console Operator’s Guide

Users TabThe Users tab can be found in various action dialogs. In this tab you can fine tunethe delivery of actions based on the presence of users.
For example, you can target long installations to just those computers where theusers have logged off, ensuring that no downtime is incurred by the installation.
This tab is available from several different dialogs:v “Take action” on page 233v “Take multiple actions” on page 235v “Action Settings” on page 133v “Edit Computer Settings” on page 190
You can select one of the following options:
Run only when there is no user logged onChoose this option for long installations that might happen overnight, butonly on logged-off clients.
Run independently of user presence, and display the user interface to thespecified users
This can be useful for critical patches or small, silent updates. You canspecify a set of users that are allowed to view the IBM Endpoint ManagerClient interface.
Chapter 17. The Dialogs 239

Run when at least one of the specified users is logged on, and only display theuser interface to those users
Choose this option when the action requires feedback or intervention fromspecific groups of users.
You can also select users and user’s group to interact with the user interface. Selectone of the following values:
All usersClick this button to select all users.
Local usersSelect only local NT-Vista users .
Users in the following groupsSelect users from the group below:
Add Domain GroupAdd an Windows NT Domain group of users.
Add Local GroupAdd a local Windows NT or Vista group to the set of users.
Add All Win9x Users GroupAdd users who are logged in to Windows 9x Clients.
Add All WinNT Users GroupAdd users who are logged in as Windows NT users.
RemoveRemove the selected user group from the list.
View action info
This dialog is available from any open Action document. Select the Computers tabin the Work Area, right-click any computer in the list, and either select ShowAction Info from the context menu or select Show Action Info from the Editmenu.
The View Action Info dialog displays information about a specific action for agiven computer.
240 IBM Endpoint Manager: Console Operator’s Guide

Title Shows the title of the Fixlet or task that initiated the action.
SummaryA summation of the action deployment for this computer. It includes thecurrent Status, the Start and End Time for the run of the action, and anyExit Code that might be returned by the action.
Action Script Execution DetailThe result of each step included in the triggered action.
Chapter 17. The Dialogs 241

Visualization Parameters: Colorization
The Colorization tab of the Visualization Parameters dialog lets you customize thecolors for a graphical representation of your network.
This tab offers four different ways to color the data, available from the mainpull-down menu:v No colorization: Select this option to have every computer displayed as white.v Fixlet Message Relevance: Color each computer based on the Relevance
(applicable or non-applicable) of specific Fixlet messages. Specify the Fixletmessage in the filter/list box below.
v Baseline Relevance: Color each computer based on the Relevance (applicable ornon-applicable) of specific Baseline groups. Specify the Baselines in the filter/listbox below.
v Retrieved Property: Select the colors of the IBM Endpoint Manager Clientcomputers based on the specified retrieved property.
v Action Status: Base the colors of the computers on the current status (completed,open, expired) of a specified action. Specify the Action in the filter/list boxbelow.
v Relevance Clause: Color each computer based on a Relevance Clause, asspecified in the text box below.
This dialog is available by selecting Tools > Launch Visualization Tool >Colorization.
242 IBM Endpoint Manager: Console Operator’s Guide

Visualization Parameters: Computers
The Computers tab of the Visualization Parameters dialog lets you limit thenumber of computers to be graphed.
This tab has two buttons to make your selection easy.v Show all computers in visualization: This is the default option, allowing all
Clients to be displayedv Show only selected computers in visualization: This option opens a computer
filter/list allowing you to specify any subset of computers in your network byretrieved properties or groupings.
This dialog is available by selecting Tools > Launch Visualization Tool >Computers.
Chapter 17. The Dialogs 243

Visualization Parameters: General
The General tab of the Visualization Parameters dialog helps you to customize agraphical representation of your network.
There are several ways to represent the data:v Use Relay structure: Display the network tree from the IBM Endpoint Manager
Relay point of view. This is the default view.v Use Active Directory Structure: Use the Active Directory to map out the
network tree for visualization.v Use IP Address Structure: Use the IP architecture to map out the network tree.v Use Retrieved Property Path Structure: Use standard or custom properties of
the client computers to map out a custom network tree. If you select this option,you must specify the path-style property that you want from the section below:– Path Retrieved Property: This pull-down menu lists the available IBM
Endpoint Manager Client properties. Select one of these to define the networkgraph. A path-style property has a separator string to delimit the parts of thepath. For example, if you use an IP address as a path, you would select aperiod as a separator. Another example is an actual directory path, where thedelimiter is a backslash. You can also create your own custom paths byconcatenating fields with your own chosen separator.
– Path Separator String: Enter the delimiter you want to use to parse the pathspecified above. For example, to create a hierarchy from a directory path, use'\' as a separator string..
– Reverse Path Hierarchy: Check this box if your chosen path-style propertyhas the most significant part on the right instead of the left.
– Use first result if the computer has more than one result for this retrievedproperty: Many properties return a list, rather than a single item. Thesevalues can be ignored, or you can check this box to have the first element inthe list used for the network map.
244 IBM Endpoint Manager: Console Operator’s Guide

– Group computers with the same retrieved property value: This optioncreates easy-to-visualize groups from computers sharing the same property.
v Show labels on leaf nodes: Check this box if you want to display labels next tothe computers at the leaf nodes of the network tree.
This dialog is available by selecting Tools > Launch Visualization Tool...
Visualization Tool
The Visualization tool allows administrators to view and manipulate data fromtheir network. To start this tool, Select Launch Visualization Tool from the Toolsmenu. A dialog opens allowing you to set certain parameters:
This dialog allows you to load and save your preset preferences to customizeindividual views of your network. The presets are managed with a simpleinterface:v Preset: Select a named set of options from this pull-down menu of
previously-defined preferences.v Show only personal presets: Check this box to filter down the list of presets to
just those you personally created.v Save Preset: Click this button to save the current set of preferences as a named
preset.
Chapter 17. The Dialogs 245

You can choose to make your presets private, or you can share them with otherOperators. Later, if you want to change the parameters of this preset, open it,make the changes, and save it with the same name. You are asked to confirm theupdate.
v Delete Preset: Deletes the currently selected preset.
Below the Preset interface, there are three tabbed areas:v General: Describe the network hierarchy according to the specified structure.v Colorization: Set up a coloring scheme for the display.v Computers: Select all computers or a specified subset.
Before running the tool, your options are checked for completeness. If they pass,the Visualization tool runs with these values.
With this panel, you can display network locations, relay hierarchies, ActiveDirectory domains, and other administrator-defined hierarchies. The tool is3-dimensional and you can rotate the graph to better visualize the network.
246 IBM Endpoint Manager: Console Operator’s Guide

The tool makes it possible to view a real-time graphical network map showingFixlet message status, Action status, Retrieved Property information, and muchmore. For example, you could view all computers that are currently unpatched fora specific Fixlet across your enterprise, and watch the clients change from red togreen as the patch is propagated.
This dialog is available by selecting Tools > Launch Visualization Tool. You mustenable hardware acceleration and OWC, if you have not done so already.
Chapter 17. The Dialogs 247

248 IBM Endpoint Manager: Console Operator’s Guide

Appendix. Support
For more information about this product, see the following resources:v IBM Endpoint Manager Support sitev IBM Endpoint Manager wikiv Knowledge Basev Forums and Communities
© Copyright IBM Corp. 2013 249

250 IBM Endpoint Manager: Console Operator’s Guide

Notices
This information was developed for products and services offered in the U.S.A.
IBM® may not offer the products, services, or features discussed in this documentin other countries. Consult your local IBM representative for information on theproducts and services currently available in your area. Any reference to an IBMproduct, program, or service is not intended to state or imply that only that IBMproduct, program, or service may be used. Any functionally equivalent product,program, or service that does not infringe any IBM intellectual property right maybe used instead. However, it is the user's responsibility to evaluate and verify theoperation of any non-IBM product, program, or service.
IBM may have patents or pending patent applications covering subject matterdescribed in this document. The furnishing of this document does not grant youany license to these patents. You can send license inquiries, in writing, to:
IBM Director of LicensingIBM CorporationNorth Castle DriveArmonk, NY 10504-1785U.S.A.
For license inquiries regarding double-byte character set (DBCS) information,contact the IBM Intellectual Property Department in your country or sendinquiries, in writing, to:
Intellectual Property LicensingLegal and Intellectual Property LawIBM Japan Ltd.19-21, Nihonbashi-Hakozakicho, Chuo-kuTokyo 103-8510, Japan
The following paragraph does not apply to the United Kingdom or any othercountry where such provisions are inconsistent with local law:
INTERNATIONAL BUSINESS MACHINES CORPORATION PROVIDES THISPUBLICATION "AS IS" WITHOUT WARRANTY OF ANY KIND, EITHEREXPRESS OR IMPLIED, INCLUDING, BUT NOT LIMITED TO, THE IMPLIEDWARRANTIES OF NON-INFRINGEMENT, MERCHANTABILITY OR FITNESSFOR A PARTICULAR PURPOSE.
Some states do not allow disclaimer of express or implied warranties in certaintransactions, therefore, this statement may not apply to you.
This information could include technical inaccuracies or typographical errors.Changes are periodically made to the information herein; these changes will beincorporated in new editions of the publication. IBM may make improvementsand/or changes in the product(s) and/or the program(s) described in thispublication at any time without notice.
Any references in this information to non-IBM Web sites are provided forconvenience only and do not in any manner serve as an endorsement of those Web
© Copyright IBM Corp. 2013 251

sites. The materials at those Web sites are not part of the materials for this IBMproduct and use of those Web sites is at your own risk.
IBM may use or distribute any of the information you supply in any way itbelieves appropriate without incurring any obligation to you.
Licensees of this program who wish to have information about it for the purposeof enabling: (i) the exchange of information between independently createdprograms and other programs (including this one) and (ii) the mutual use of theinformation which has been exchanged, should contact:
IBM Corporation2Z4A/10111400 Burnet RoadAustin, TX 78758 U.S.A.
Such information may be available, subject to appropriate terms and conditions,including in some cases, payment of a fee.
The licensed program described in this document and all licensed materialavailable for it are provided by IBM under terms of the IBM Customer Agreement,IBM International Program License Agreement or any equivalent agreementbetween us.
Any performance data contained herein was determined in a controlledenvironment. Therefore, the results obtained in other operating environments mayvary significantly. Some measurements may have been made on development-levelsystems and there is no guarantee that these measurements will be the same ongenerally available systems. Furthermore, some measurements may have beenestimated through extrapolation. Actual results may vary. Users of this documentshould verify the applicable data for their specific environment.
Information concerning non-IBM products was obtained from the suppliers ofthose products, their published announcements or other publicly available sources.IBM has not tested those products and cannot confirm the accuracy ofperformance, compatibility or any other claims related to non-IBM products.Questions on the capabilities of non-IBM products should be addressed to thesuppliers of those products.
All statements regarding IBM's future direction or intent are subject to change orwithdrawal without notice, and represent goals and objectives only.
All IBM prices shown are IBM's suggested retail prices, are current and are subjectto change without notice. Dealer prices may vary.
This information is for planning purposes only. The information herein is subject tochange before the products described become available.
This information contains examples of data and reports used in daily businessoperations. To illustrate them as completely as possible, the examples include thenames of individuals, companies, brands, and products. All of these names arefictitious and any similarity to the names and addresses used by an actual businessenterprise is entirely coincidental.
COPYRIGHT LICENSE:
252 IBM Endpoint Manager: Console Operator’s Guide

This information contains sample application programs in source language, whichillustrate programming techniques on various operating platforms. You may copy,modify, and distribute these sample programs in any form without payment toIBM, for the purposes of developing, using, marketing or distributing applicationprograms conforming to the application programming interface for the operatingplatform for which the sample programs are written. These examples have notbeen thoroughly tested under all conditions. IBM, therefore, cannot guarantee orimply reliability, serviceability, or function of these programs. The sampleprograms are provided "AS IS", without warranty of any kind. IBM shall not beliable for any damages arising out of your use of the sample programs.
If you are viewing this information softcopy, the photographs and colorillustrations may not appear.
Trademarks
IBM, the IBM logo, and ibm.com are trademarks or registered trademarks ofInternational Business Machines Corp., registered in many jurisdictions worldwide.Other product and service names might be trademarks of IBM or other companies.A current list of IBM trademarks is available on the “Web at Copyright andtrademark information” at www.ibm.com/legal/copytrade.shtml.
Adobe, Acrobat, PostScript and all Adobe-based trademarks are either registeredtrademarks or trademarks of Adobe Systems Incorporated in the United States,other countries, or both.
IT Infrastructure Library is a registered trademark of the Central Computer andTelecommunications Agency which is now part of the Office of GovernmentCommerce.
Intel, Intel logo, Intel Inside, Intel Inside logo, Intel Centrino, Intel Centrino logo,Celeron, Intel Xeon, Intel SpeedStep, Itanium, and Pentium are trademarks orregistered trademarks of Intel Corporation or its subsidiaries in the United Statesand other countries.
Linux is a trademark of Linus Torvalds in the United States, other countries, orboth.
Microsoft, Windows, Windows NT, and the Windows logo are trademarks ofMicrosoft Corporation in the United States, other countries, or both.
ITIL is a registered trademark, and a registered community trademark of the Officeof Government Commerce, and is registered in the U.S. Patent and TrademarkOffice.
UNIX is a registered trademark of The Open Group in the United States and othercountries.
Java™ and all Java-based trademarks and logos are trademarks or registeredtrademarks of Oracle and/or its affiliates.
Cell Broadband Engine is a trademark of Sony Computer Entertainment, Inc. in theUnited States, other countries, or both and is used under license therefrom.
Linear Tape-Open, LTO, the LTO Logo, Ultrium, and the Ultrium logo aretrademarks of HP, IBM Corp. and Quantum in the U.S. and other countries.
Notices 253

254 IBM Endpoint Manager: Console Operator’s Guide


����
Printed in USA