ibm tivoli storage manager for virtual environments: data ... · w indows server 2012 or 2012 r2...
TRANSCRIPT

IBM Tivoli Storage Manager for Virtual EnvironmentsVersion 7.1.3
Data Protection for Microsoft Hyper-VInstallation and User's Guide
IBM


IBM Tivoli Storage Manager for Virtual EnvironmentsVersion 7.1.3
Data Protection for Microsoft Hyper-VInstallation and User's Guide
IBM

Note:Before you use this information and the product it supports, read the information in “Notices” on page 77.
Second edition (September 2015)
This edition applies to version 7, release 1, modification 3 of Tivoli Storage Manager for Virtual Environments: DataProtection for Microsoft Hyper-V (product number 5725-A44) and to all subsequent releases and modifications untilotherwise indicated in new editions.
© Copyright IBM Corporation 2011, 2015.US Government Users Restricted Rights – Use, duplication or disclosure restricted by GSA ADP Schedule Contractwith IBM Corp.

Contents
About this publication . . . . . . .. vWho should read this publication . . . . . .. vPublications . . . . . . . . . . . . .. vNew for Data Protection for Microsoft Hyper-VVersion 7.1.3 . . . . . . . . . . . . .. v
Chapter 1. Protection for MicrosoftHyper-V virtual machines . . . . . .. 1Incremental forever backup strategy . . . . .. 3
Snapshot management with Windows PowerShell 4Documentation resources . . . . . . . . .. 4Hyper-V backup support limitations . . . . .. 6
Chapter 2. Installing Data Protection forMicrosoft Hyper-V . . . . . . . . .. 7Determine system requirements . . . . . . .. 7Determine which features to install . . . . . .. 7
Install Data Protection for Microsoft Hyper-Vfeatures with default settings . . . . . . .. 8Install the backup-archive client (data mover) .. 8Install the Tivoli Storage Manager recovery agent 10
Installing in silent mode . . . . . . . . .. 12Uninstalling Data Protection for Microsoft Hyper-V 12Uninstalling Data Protection for Microsoft Hyper-Vwith the Microsoft Windows Installer Tool . . .. 13
Chapter 3. Configuring Data Protectionfor Microsoft Hyper-V . . . . . . .. 15Creating and modifying the client options file . .. 15Configuring Data Protection for Microsoft Hyper-Vin a cluster environment . . . . . . . . .. 17Configuring the Tivoli Storage Manager recoveryagent GUI . . . . . . . . . . . . . .. 19Manually configuring an iSCSI device . . . .. 23
Chapter 4. Command reference . . .. 25Reading syntax diagrams . . . . . . . . .. 25Backup VM . . . . . . . . . . . . . .. 27Expire . . . . . . . . . . . . . . .. 32Query VM . . . . . . . . . . . . . .. 33Restore VM . . . . . . . . . . . . .. 36
Chapter 5. Options reference . . . .. 39Dateformat . . . . . . . . . . . . .. 39Detail . . . . . . . . . . . . . . .. 41
Domain.vmfull . . . . . . . . . . . .. 41Filelist . . . . . . . . . . . . . .. 43Inactive . . . . . . . . . . . . . .. 44Include.vm . . . . . . . . . . . . .. 45Mode . . . . . . . . . . . . . . . .. 46Mbobjrefreshthresh . . . . . . . . . .. 47Mbpctrefreshthresh . . . . . . . . . .. 48Noprompt . . . . . . . . . . . . . .. 49Numberformat . . . . . . . . . . . . .. 49Pick . . . . . . . . . . . . . . . .. 50Pitdate . . . . . . . . . . . . . . .. 51Pittime . . . . . . . . . . . . . . .. 51Timeformat . . . . . . . . . . . . .. 52Vmbackdir . . . . . . . . . . . . . .. 53Vmbackuptype . . . . . . . . . . . . .. 54Vmctlmc . . . . . . . . . . . . . . .. 54Vmmaxparallel . . . . . . . . . . . .. 55Vmmc . . . . . . . . . . . . . . . .. 57
Chapter 6. Mount and file restore . .. 59Tivoli Storage Manager recovery agentconfigurations . . . . . . . . . . . .. 59Snapshot mount overview . . . . . . . .. 60
Mount guidelines . . . . . . . . . .. 61File restore overview . . . . . . . . . .. 61
File restore guidelines . . . . . . . . .. 63Restoring one or more files . . . . . . . .. 63
Chapter 7. Tivoli Storage Managerrecovery agent commands . . . . .. 67Mount . . . . . . . . . . . . . . .. 67Set_connection . . . . . . . . . . . .. 70Help . . . . . . . . . . . . . . . .. 71Recovery Agent command-line interface returncodes . . . . . . . . . . . . . . .. 72
Appendix. Accessibility features for theTivoli Storage Manager product family . 75
Notices . . . . . . . . . . . . .. 77
Glossary . . . . . . . . . . . . .. 81
Index . . . . . . . . . . . . . .. 83
© Copyright IBM Corp. 2011, 2015 iii

iv IBM Tivoli Storage Manager for Virtual Environments: Data Protection for Microsoft Hyper-V Installation and User's Guide
About this publication
This publication provides overview, planning, and user instructions for IBM®
Tivoli® Storage Manager for Virtual Environments: Data Protection for MicrosoftHyper-V.
Who should read this publicationThis publication is intended for administrators and users who are responsible forimplementing a backup solution with Tivoli Storage Manager for VirtualEnvironments: Data Protection for Microsoft Hyper-V in one of the supportedenvironments.
In this publication, it is assumed that you have an understanding of the followingapplications:v Microsoft Hyper-V Server 2012 or Microsoft Hyper-V Server 2012 R2v Tivoli Storage Manager backup-archive clientv Tivoli Storage Manager server
PublicationsThe Tivoli Storage Manager product family includes IBM Tivoli StorageFlashCopy® Manager, IBM Tivoli Storage Manager for Space Management, IBMTivoli Storage Manager for Databases, and several other storage managementproducts from IBM.
To view IBM product documentation, see http://www.ibm.com/support/knowledgecenter.
New for Data Protection for Microsoft Hyper-V Version 7.1.3IBM Tivoli Storage Manager for Virtual Environments: Data Protection forMicrosoft Hyper-V Version 7.1.3 contains updates, which includemaintenance-related changes.
New and changed information in this product documentation is indicated by avertical bar (|) to the left of the change.
The language packages are now merged into the base package. Because the filemerge is handled programmatically, no action is required on your part.
From the Tivoli Storage Manager Operations Center, you can view front-end andback-end capacity usage to estimate compliance with license entitlements.
Important: Data Protection for Microsoft Hyper-V must be at the latest level forthe Operations Center to present complete data.
© Copyright IBM Corp. 2011, 2015 v

vi IBM Tivoli Storage Manager for Virtual Environments: Data Protection for Microsoft Hyper-V Installation and User's Guide

Chapter 1. Protection for Microsoft Hyper-V virtual machines
IBM Tivoli Storage Manager for Virtual Environments: Data Protection forMicrosoft Hyper-V is a licensed product that provides storage managementservices for virtual machines in a Microsoft Hyper-V environment. IBM TivoliStorage Manager for Virtual Environments: Data Protection for Microsoft Hyper-Vis referred to as Data Protection for Microsoft Hyper-V throughout this document.
Data Protection for Microsoft Hyper-V integrates Tivoli Storage Manager forVirtual Environments virtualization protection with the Tivoli Storage ManagerBackup-Archive Client to protect Microsoft Hyper-V virtual machines on MicrosoftWindows Server 2012 or 2012 R2 systems.
Back up Hyper-V virtual machines
Data Protection for Microsoft Hyper-V creates an incremental forever full orincremental forever incremental backup of Hyper-V virtual machines in VHDXdisk format. The virtual machine is backed up to the Tivoli Storage Managerserver. Microsoft Volume Shadow Copy Service (VSS) is used to take a consistentsnapshot of the virtual machine.
You can back up Hyper-V virtual machines that exist on a local disk, aSAN-attached disk, or cluster shared volume. For example, you can back upvirtual machines that are stored on Cluster Shared Volumes (CSV) in a Hyper-Vcluster environment or on Server Message Block (SMB) file shares that are on aremote system. You can back up any guest operating systems that are hosted bythe Hyper-V server on remote shares, regardless of whether the guest operatingsystem is supported by Tivoli Storage Manager.
The following backup types are supported for Microsoft Hyper-V virtual machinesin VHDX disk format:
Incremental forever full backupCreates a backup of snapshot disk data to the Tivoli Storage Managerserver.
Incremental forever incremental backupCreates a snapshot of the blocks that changed since the last incrementalforever full backup.
For more information, see “Hyper-V backup support limitations” on page 6.
Restore an entire Hyper-V virtual machine
Each Hyper-V virtual machine backup is restored from the Tivoli Storage Managerserver as a single entity. You can restore any guest operating systems that arehosted by the Hyper-V server regardless of whether the guest operating system issupported by Tivoli Storage Manager.
A Data Protection for Microsoft Hyper-V restore operation ensures that the sameblock on the production disk is only restored once. Older backup versions expireaccording to the Tivoli Storage Manager server management class policy that isassociated with the virtual machine.
© Copyright IBM Corp. 2011, 2015 1
|
|||||
|||||||
||
|||
|||
|

Restore an entire Hyper-V virtual machine to an alternativelocation
You can restore a Hyper-V virtual machine to an alternate virtual machine name,to an alternate location on the Hyper-V host, or both. You can also restore aHyper-V virtual machine to a different Hyper-V host. However, to restore thevirtual machine to a different host, you must run the restore operation from theHyper-V host where the virtual machine is being restored to.
Restore a file from a Hyper-V virtual machine
Use this restore method when only one or more files must be restored. The filesare manually copied from a mounted virtual machine disk that is accessed throughan iSCSI target or partition. This method requires the Tivoli Storage Managerrecovery agent to be installed.
Policy management at the virtual machine level
Storage requirements for Hyper-V virtual machine backups are determined byTivoli Storage Manager server management classes. You can set different policiesfor different virtual machines. Although the default management class determinesstorage characteristics for all Hyper-V backups, you can override the defaultmanagement class or specify a management class to use for the Hyper-V controlfiles.
User interfaces
Complete all Data Protection for Microsoft Hyper-V backup, restore, and querytasks with the backup-archive client Java GUI or backup-archive command-lineclient. To restore one or more files from a Hyper-V virtual machine, use the TivoliStorage Manager Recovery Agent GUI.
2 IBM Tivoli Storage Manager for Virtual Environments: Data Protection for Microsoft Hyper-V Installation and User's Guide
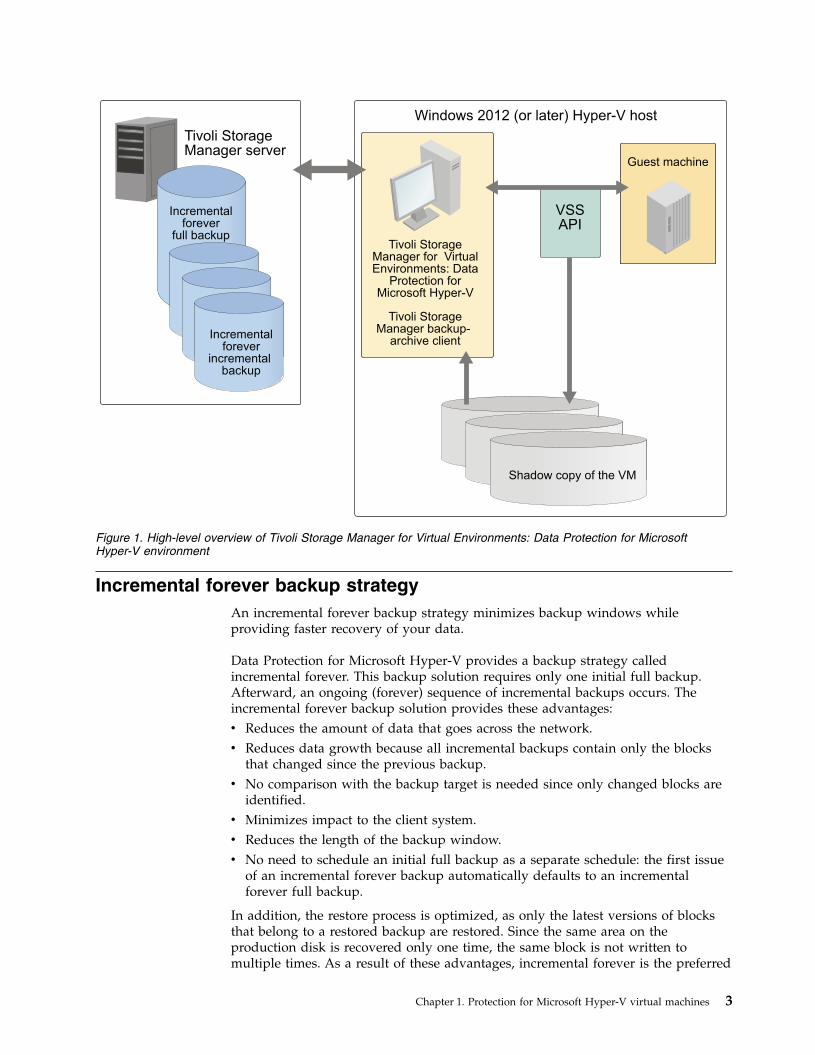
Incremental forever backup strategyAn incremental forever backup strategy minimizes backup windows whileproviding faster recovery of your data.
Data Protection for Microsoft Hyper-V provides a backup strategy calledincremental forever. This backup solution requires only one initial full backup.Afterward, an ongoing (forever) sequence of incremental backups occurs. Theincremental forever backup solution provides these advantages:v Reduces the amount of data that goes across the network.v Reduces data growth because all incremental backups contain only the blocks
that changed since the previous backup.v No comparison with the backup target is needed since only changed blocks are
identified.v Minimizes impact to the client system.v Reduces the length of the backup window.v No need to schedule an initial full backup as a separate schedule: the first issue
of an incremental forever backup automatically defaults to an incrementalforever full backup.
In addition, the restore process is optimized, as only the latest versions of blocksthat belong to a restored backup are restored. Since the same area on theproduction disk is recovered only one time, the same block is not written tomultiple times. As a result of these advantages, incremental forever is the preferred
Windows 2012 (or later) Hyper-V host
Incrementalforever
full backup
Tivoli StorageManager server
Incrementalforever
incremental backup
Tivoli Storage Manager for Virtual Environments: Data
Protection for Microsoft Hyper-V
Tivoli Storage Manager backup-
archive client
VSSAPI
Shadow copy of the VM
Guest machine
Figure 1. High-level overview of Tivoli Storage Manager for Virtual Environments: Data Protection for MicrosoftHyper-V environment
Chapter 1. Protection for Microsoft Hyper-V virtual machines 3
backup strategy.
Snapshot management with Windows PowerShellOn a Microsoft Hyper-V system, you can use Windows PowerShell “cmdlets” toremove (undo) snapshots that were created by Tivoli Storage Manager for aHyper-V virtual machine.
You can use these cmdlets only on the Hyper-V system; you cannot removesnapshots from the Microsoft System Center Virtual Machine Manager.
Hyper-V systems issue cautionary messages to discourage you from editing virtualhard disks that contain snapshots, or virtual hard disks that are associated with achain of differencing (incremental-forever) snapshots. Instead, use the cmdlets tomanage snapshots to minimize the risk of data loss.
For a list of cmdlets that are available for Hyper-V, go to http://technet.microsoft.com/en-us/library/hh848559.aspx and read the information forthe available cmdlets. Use the Get-VMSnapshot cmdlet with the -SnapshotTypeRecovery parameter to retrieve snapshots for a virtual machine. Use theRemove-VMSnapshot cmdlet to remove a snapshot. Removing a snapshot merges theinformation that the snapshot wrote to the snapshot differences file (the AVHDXfile) back to the virtual machine hard disk (the VHDX file).
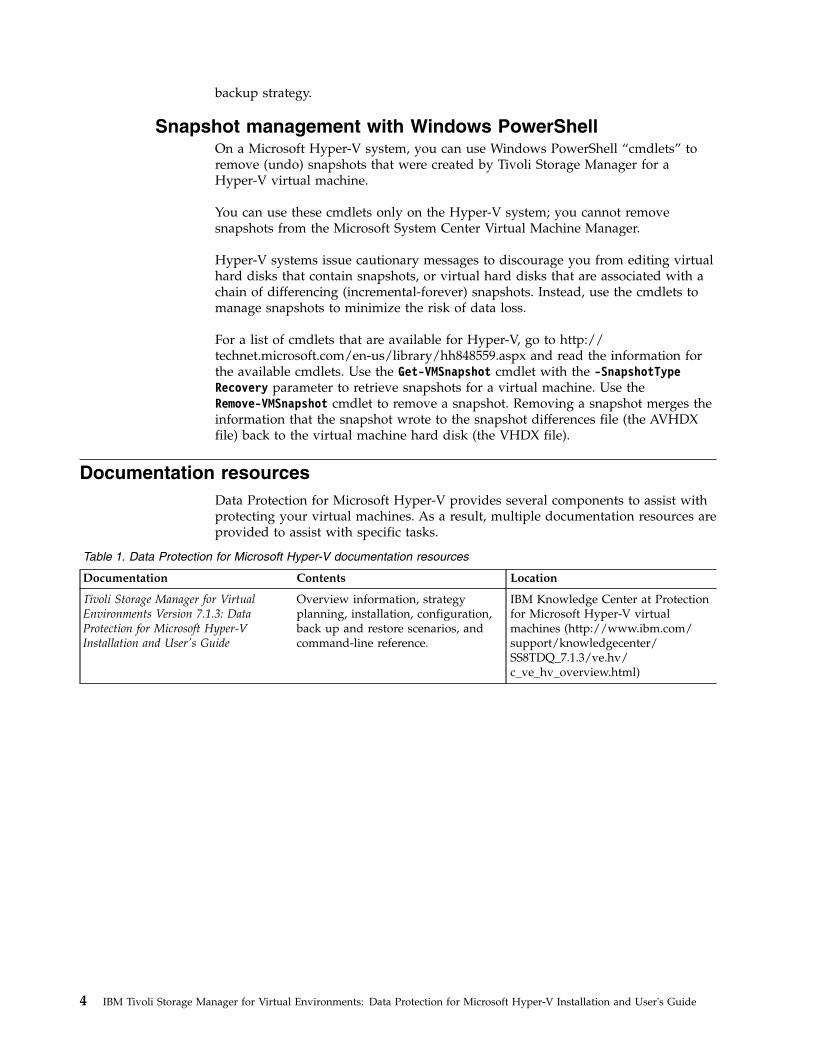
Documentation resourcesData Protection for Microsoft Hyper-V provides several components to assist withprotecting your virtual machines. As a result, multiple documentation resources areprovided to assist with specific tasks.
Table 1. Data Protection for Microsoft Hyper-V documentation resources
Documentation Contents Location
Tivoli Storage Manager for VirtualEnvironments Version 7.1.3: DataProtection for Microsoft Hyper-VInstallation and User's Guide
Overview information, strategyplanning, installation, configuration,back up and restore scenarios, andcommand-line reference.
IBM Knowledge Center at Protectionfor Microsoft Hyper-V virtualmachines (http://www.ibm.com/support/knowledgecenter/SS8TDQ_7.1.3/ve.hv/c_ve_hv_overview.html)
4 IBM Tivoli Storage Manager for Virtual Environments: Data Protection for Microsoft Hyper-V Installation and User's Guide
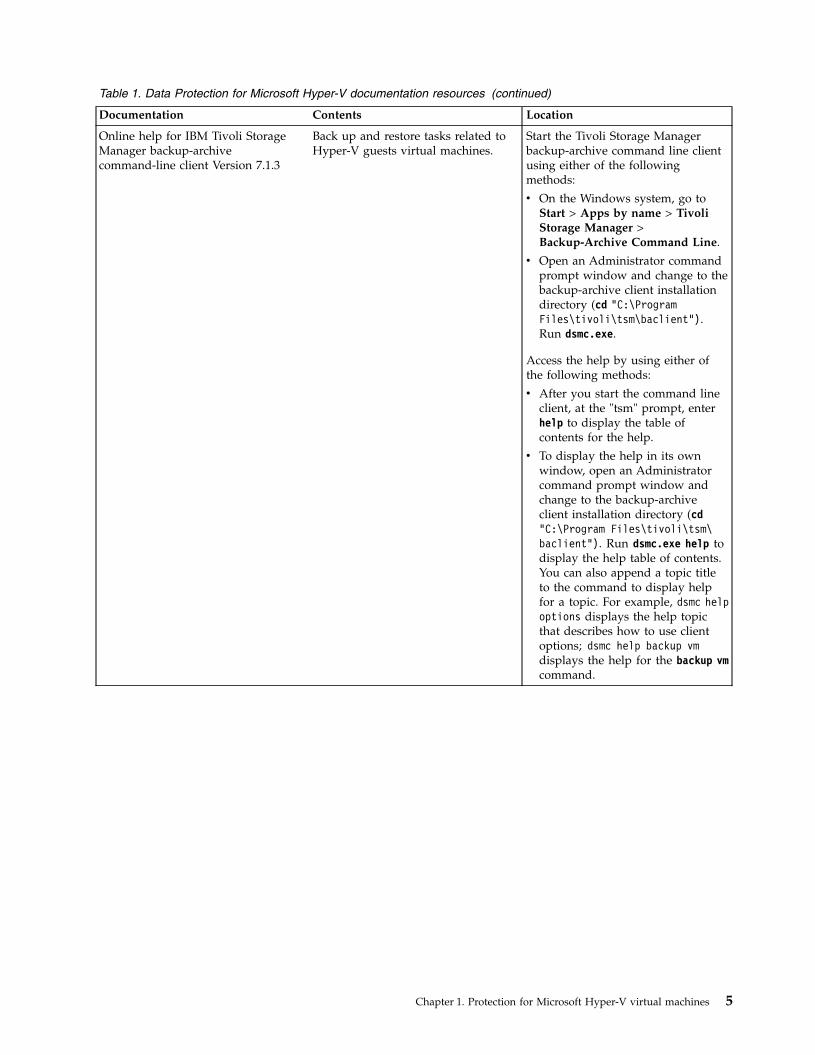
Table 1. Data Protection for Microsoft Hyper-V documentation resources (continued)
Documentation Contents Location
Online help for IBM Tivoli StorageManager backup-archivecommand-line client Version 7.1.3
Back up and restore tasks related toHyper-V guests virtual machines.
Start the Tivoli Storage Managerbackup-archive command line clientusing either of the followingmethods:
v On the Windows system, go toStart > Apps by name > TivoliStorage Manager >Backup-Archive Command Line.
v Open an Administrator commandprompt window and change to thebackup-archive client installationdirectory (cd "C:\ProgramFiles\tivoli\tsm\baclient").Run dsmc.exe.
Access the help by using either ofthe following methods:
v After you start the command lineclient, at the "tsm" prompt, enterhelp to display the table ofcontents for the help.
v To display the help in its ownwindow, open an Administratorcommand prompt window andchange to the backup-archiveclient installation directory (cd"C:\Program Files\tivoli\tsm\baclient"). Run dsmc.exe help todisplay the help table of contents.You can also append a topic titleto the command to display helpfor a topic. For example, dsmc helpoptions displays the help topicthat describes how to use clientoptions; dsmc help backup vmdisplays the help for the backup vmcommand.
Chapter 1. Protection for Microsoft Hyper-V virtual machines 5

Table 1. Data Protection for Microsoft Hyper-V documentation resources (continued)
Documentation Contents Location
Online help for IBM Tivoli StorageManager backup-archive GUI Version7.1.3
Back up and restore tasks related toHyper-V guests virtual machines.
Start the Tivoli Storage Managerbackup-archive GUI client usingeither of the following methods:
v On the Windows system, go toStart > Apps by name > TivoliStorage Manager >Backup-Archive GUI.
v Open an Administrator commandprompt window and change to thebackup-archive client installationdirectory (cd "C:\ProgramFiles\tivoli\tsm\baclient").Run dsm.exe.
Access the help using either of thefollowing methods:
v Select the help icon and click HelpTopics or Getting started.
v You can also press the F1 key toopen the Help Topics help.
Hyper-V backup support limitationsBefore you attempt a backup operation, be aware that certain limitations apply.
Data Protection for Microsoft Hyper-V does not back up a Hyper-V virtualmachine that uses physical disks. The entire virtual machine (including virtualdisks) is skipped and the backup operation fails.
Data Protection for Microsoft Hyper-V supports incremental forever full backupand incremental forever incremental backup of Microsoft Hyper-V virtual machinesin VHDX disk format only. To create an image backup of the full virtual machinein VHD or VHDX disk format, use the Tivoli Storage Manager backup-archiveclient without Tivoli Storage Manager - Data Protection for Microsoft Hyper-Vinstalled on the system. Issue the backup-archive client dsmc backup vm vmname-vmbackuptype=hypervfull -mode=full command to create an image backup of allobjects on a Microsoft Hyper-V virtual machine VHD or VHDX disk. Optionally,convert .vhd files to .vhdx format according to instructions available in Microsoftdocumentation.
The Microsoft Windows Management Instrumentation (WMI) Service (winmgmt)must be running on the systems where Data Protection for Microsoft Hyper-V,Tivoli Storage Manager backup-archive client, and Tivoli Storage Manager recoveryagent are installed. Operations fail if the WMI Service is not running. Therefore, donot turn off the WMI Service.
Hyper-V configurations from Windows Server 2012 R2 are not compatible withWindows Server 2012. As a result, a restore operation from Windows Server 2012R2 to Windows Server 2012 fails. However, a restore operation from WindowsServer 2012 to Windows Server 2012 R2 succeeds. For more information, see thefollowing Microsoft Knowledge Base article: http://support.microsoft.com/kb/2868279.
6 IBM Tivoli Storage Manager for Virtual Environments: Data Protection for Microsoft Hyper-V Installation and User's Guide
||||||||||

Chapter 2. Installing Data Protection for Microsoft Hyper-V
Determine system requirementsData Protection for Microsoft Hyper-V requires 500 MB of disk space forinstallation and a supported operating system.
Data Protection for Microsoft Hyper-V requires the Hyper-V role to be installed onthe Microsoft Windows Server 2012 or 2012 R2 system.
For detailed Data Protection for Microsoft Hyper-V software and hardwarerequirements, see Data Protection for Microsoft Hyper-V Requirements athttp://www.ibm.com/support/docview.wss?uid=swg21679294.
Determine which features to installReview the features that are available to install.
The following features are available to install with the Tivoli Storage Manager forVirtual Environments: Data Protection for Microsoft Hyper-V product DVD ordownload image:v Data Protection for Microsoft Hyper-V product code
Provides virtualization protection for Microsoft Hyper-V virtual machines.
Tip: The Data Protection for Microsoft Hyper-V product code is installed withevery feature.To install the Data Protection for Microsoft Hyper-V product code, follow thesteps in “Install Data Protection for Microsoft Hyper-V features with defaultsettings” on page 8.
v Tivoli Storage Manager backup-archive clientWhen you offload backup workloads, the backup-archive client runs theoperation on the backup server and "moves" the data to the Tivoli StorageManager server. This client is referred to as the data mover.To install the backup-archive client, follow the steps in “Install thebackup-archive client (data mover)” on page 8.
v Tivoli Storage Manager recovery agentProvides virtual mount and file restore capability.To install the Tivoli Storage Manager recovery agent, follow the steps in “Installthe Tivoli Storage Manager recovery agent” on page 10.
© Copyright IBM Corp. 2011, 2015 7

Install Data Protection for Microsoft Hyper-V features withdefault settings
Install Data Protection for Microsoft Hyper-V and the backup-archive client (datamover) without modifying features or installation directories.
About this task
To install Data Protection for Microsoft Hyper-V with default settings, complete thefollowing steps:
Procedure1. Either insert the Tivoli Storage Manager for Virtual Environments: Data
Protection for Microsoft Hyper-V product DVD into the DVD drive ordownload the image from IBM Passport Advantage®.
2. To start the installation program, double-click the DVD\x64\Setup.exe file.Choose the language for the installation process, then click Next.
3. On the Welcome to the InstallShield Wizard for Tivoli Storage Manager forVirtual Environments: Data Protection for Hyper-V suite page, click Next.
4. On the License Agreement page, read the terms of the license agreement. ClickI accept the terms in the license agreement. If you do not accept the terms ofthe license agreement, the installation ends. Click Next
5. On the Installation Type page, the installation process begins immediately afteryou click Typical Installation. You cannot change your selection once theinstallation process begins. If you are sure that you want to install DataProtection for Microsoft Hyper-V and the backup-archive client (data mover)without modifying features or installation directories, click Typical Installation.
Tip: The installation process might take several minutes to complete.6. On the Install Wizard Completed page, click Finish to exit the wizard.
Results
Data Protection for Microsoft Hyper-V and the Tivoli Storage Managerbackup-archive client (data mover) are now installed.
What to do next
Before you attempt a backup or restore operation, complete the tasks described in“Creating and modifying the client options file” on page 15.
Install the backup-archive client (data mover)Install the backup-archive client and modify features or installation directories.
Before you beginv The backup-archive client runs the operation on the backup server and "moves"
the data to the Tivoli Storage Manager server. This client is referred to as thedata mover.
v The Data Protection for Microsoft Hyper-V product code is also installed withthis feature.
About this task
To install the backup-archive client (data mover), complete the following steps:
8 IBM Tivoli Storage Manager for Virtual Environments: Data Protection for Microsoft Hyper-V Installation and User's Guide

Procedure1. Either insert the Tivoli Storage Manager for Virtual Environments: Data
Protection for Microsoft Hyper-V product DVD into the DVD drive ordownload the image from IBM Passport Advantage.
2. To start the installation program, double-click the DVD\x64\Setup.exe file.Choose the language for the installation process, then click Next.
3. On the Welcome to the InstallShield Wizard for Tivoli Storage Manager forVirtual Environments: Data Protection for Hyper-V suite page, click Next.
4. On the License Agreement page, read the terms of the license agreement.Click I accept the terms in the license agreement. If you do not accept theterms of the license agreement, the installation ends. Click Next
5. On the Installation Type page, click Advanced Installation.6. On the Advanced Installation page, the installation process begins
immediately after you click Install the Tivoli Storage Managerbackup-archive client (data mover). You cannot change your selection afterthe installation process begins. If you are sure that you want to install thebackup-archive client (data mover), click Install the Tivoli Storage Managerbackup-archive client (data mover).
7. On the Welcome to the InstallShield Wizard for Tivoli Storage Manager forVirtual Environments: Data Protection for Microsoft Hyper-V page, click Next.
8. On the Destination Folder page, specify where to install the software (DataProtection for Microsoft Hyper-V). You can accept the default location that isshown in the Destination Folder field or click Change to specify anotherlocation. Click Next after you make your selection.
9. On the Ready to Install the Program page, click Install to begin installingyour selected components (Data Protection for Microsoft Hyper-V).
10. On the Install Wizard Completed page, click Finish to exit the wizard. DataProtection for Microsoft Hyper-V is installed. The InstallShield Wizard beginsinstalling the data mover.
11. On the Location to Save Files page, specify where to save the data mover files.You can accept the default location that is shown in the Save files in folderfield or click Change to specify another location. Click Next after you makeyour selection.
12. On the Welcome to the InstallShield Wizard for Tivoli Storage Manager Clientpage, click Next.
13. On the Destination Folder page, specify where to install the software. You canaccept the default location that is shown in the Install IBM Tivoli StorageManager Client to field or click Change to specify another location. ClickNext after you make your selection.
14. On the Setup Type page, select one of the following the types: Typical orCustom.v Typical
A typical installation installs the following features:– The backup-archive client GUI files (needed to use the Java™ GUI)– The backup-archive client web files (needed to use the web client)– The client API files (as needed by your client and operating system)
v Custom
A custom installation selects the same files as a typical installation.However, you can accept the default location that is shown in the Install tofield or click Change to specify another location. Click Space to viewrequired disk space.
Chapter 2. Installing Data Protection for Microsoft Hyper-V 9
Click Next after you make your selection.15. On the Ready to Install the Program page, click Install to begin installing
your selected backup-archive client (data mover) features.
Tip: After you click Install, the installation process might take severalminutes to complete.
16. On the Install Wizard Completed page, click Finish to exit the wizard.
Results
The Tivoli Storage Manager backup-archive client (and Data Protection forMicrosoft Hyper-V) are now installed.
What to do next
Before you attempt to back up a Hyper-V virtual machine, complete the tasksdescribed in “Creating and modifying the client options file” on page 15.
Install the Tivoli Storage Manager recovery agentInstall the Tivoli Storage Manager recovery agent for virtual mount and file restoreoperations.
Before you beginv The Tivoli Storage Manager recovery agent installation requires the system to be
restarted. Therefore, to avoid possible issues that are related to restarting theHyper-V host system, do not install the Tivoli Storage Manager recovery agenton the Hyper-V host system.
v TCP ports 22 (SSH default port) and 3260 (iSCSI default port) must be open andavailable before you install the Tivoli Storage Manager recovery agent. To checkthe port status, opening a command prompt and issue the following commands:netstat -np TCP | find "22"
netstat -np TCP | find "3260"
v The Data Protection for Microsoft Hyper-V product code is also installed withthis feature.
About this task
To install the Tivoli Storage Manager recovery agent, complete the following stepson a virtual machine or other system that is not the Hyper-V host system:
Procedure1. Either insert the Tivoli Storage Manager for Virtual Environments: Data
Protection for Microsoft Hyper-V product DVD into the DVD drive ordownload the image from IBM Passport Advantage.
2. To start the installation program, double-click the DVD\x64\Setup.exe file.Choose the language for the installation process, then click Next.If you already completed a Typical Installation, the Program Maintenancepage displays after you double-click the DVD\x64\Setup.exe file:a. On the Program Maintenance page, click Modify.b. On the Custom Setup page, click Tivoli Storage Manager recovery agent,
then click Install.c. Go to Step 11 on page 11 and follow the remaining installation steps.
10 IBM Tivoli Storage Manager for Virtual Environments: Data Protection for Microsoft Hyper-V Installation and User's Guide
3. On the Welcome to the InstallShield Wizard for Tivoli Storage Manager forVirtual Environments: Data Protection for Hyper-V suite page, click Next.
4. On the License Agreement page, read the terms of the license agreement.Click I accept the terms in the license agreement. If you do not accept theterms of the license agreement, the installation ends. Click Next.
5. On the Installation Type page, click Advanced Installation.6. On the Advanced Installation page, the installation process begins
immediately after you click Install the Tivoli Storage Manager recoveryagent. You cannot change your selection once the installation process begins.If you are sure that you want to install the recovery agent, click Install theTivoli Storage Manager recovery agent.
Tip: The installation process might take several minutes to complete.7. On the Welcome to the InstallShield Wizard for Tivoli Storage Manager for
Virtual Environments: Data Protection for Microsoft Hyper-V page, click Next.8. On the Destination Folder page, specify where to install the software. You can
accept the default location that is shown in the Destination Folder field orclick Change to specify another location. Click Next after you make yourselection.
9. On the Ready to Install the Program page, click Install to begin installingyour selected components
10. On the Install Wizard Completed page, click Finish to exit the wizard.11. On the Welcome to the InstallShield Wizard for Tivoli Storage Manager for
Virtual Environments page, click Next.12. On the Software License Agreement page, read the terms of the license
agreement. Click I accept the terms in the license agreement. If you do notaccept the terms of the license agreement, the installation ends. Click Next.
13. On the Custom Setup page, you can click Space to view required disk space.Click Change to specify where to install this feature. The following userinterfaces install:v Tivoli Storage Manager recovery agent GUIv Tivoli Storage Manager recovery agent command-line interface
(RecoveryAgentShell.exe )
Click Next after you make your selection.14. On the Ready to Install the Program page, click Install to begin installing
your selected components.v You are prompted to install the IBM Virtual Volume driver. This driver is
used for mount operations. Click Install to install the driver. If you do notinstall the driver now, you are prompted again to install it when youattempt to mount a volume.
v TCP ports 22 (SSH default port) and 3260 (iSCSI default port) must be openand available to complete the installation process. Click OK.
15. On the Tivoli Storage Manager for Virtual Environments InstallShield WizardCompleted page, click Finish to exit the wizard. You must restart your systemafter installation completes.
Results
The Tivoli Storage Manager recovery agent (and Data Protection for MicrosoftHyper-V) are now installed.
Chapter 2. Installing Data Protection for Microsoft Hyper-V 11
What to do next
Before you attempt to mount a backed up Hyper-V virtual machine disk to restorea file, complete the tasks described in “Configuring the Tivoli Storage Managerrecovery agent GUI” on page 19.
Installing in silent modeInstall all Tivoli Storage Manager for Virtual Environments and data moverfeatures silently on a single system from the product DVD, or other installationmedia.
About this task
Restriction: All features are installed to their default location. You cannot silentlyinstall Tivoli Storage Manager for Virtual Environments and data mover features toa non-default location.
Procedure1. Either insert the Tivoli Storage Manager for Virtual Environments product DVD
into the DVD drive or download the image from IBM Passport Advantage.2. From a command prompt window, use the cd command to change to one of
the following folders:v If you downloaded the product image from Passport Advantage, go to
<extract folder>TSM4VE_WIN.v If you inserted the product DVD into the DVD drive, go to <DVD>\.
3. Enter one of the following command:
setup.exe /silent
4. Restart the system after installation completes.
Note: The following message displays the first time that you mount a volume:
The Virtual Volume Driver is not yet registered. Recovery Agent can registerthe driver now. During registration, a Microsoft Windows Logo warning may be displayed.Accept this warning to allow the registration to complete.Do you want to register the Virtual Volume Driver now?
You must register the Virtual Volume Driver to proceed with Tivoli StorageManager recovery agent operations.
Uninstalling Data Protection for Microsoft Hyper-VThe process for uninstalling Data Protection for Microsoft Hyper-V is the same fora new installation and for an upgraded version.
Before you begin
Restriction: You must unmount all virtual volumes before uninstalling TivoliStorage Manager recovery agent. Otherwise, these mounted virtual volumes cannotbe unmounted after Tivoli Storage Manager recovery agent is reinstalled.
Procedure1. Go to Start > Control Panel > Programs - Uninstall a program.
12 IBM Tivoli Storage Manager for Virtual Environments: Data Protection for Microsoft Hyper-V Installation and User's Guide

2. On the Uninstall or change a program page, select IBM Tivoli Storage Managerfor Virtual Environments: Data Protection for Microsoft Hyper-V and clickUninstall.
3. On the Uninstall or change a program page, select IBM Tivoli Storage ManagerClient and click Uninstall.
4. On the Uninstall or change a program page, select IBM Tivoli Storage ManagerRecovery Agent and click Uninstall.
Uninstalling Data Protection for Microsoft Hyper-V with the MicrosoftWindows Installer Tool
Uninstall Data Protection for Microsoft Hyper-V from a Microsoft Windows ServerCore with the Microsoft Windows Installer Tool.
Procedure1. Locate the Data Protection for Microsoft Hyper-V UninstallString in the
Wow6432Node registry path. For example:[HKEY_LOCAL_MACHINE\SOFTWARE\Wow6432Node\Microsoft\Windows\CurrentVersion\Uninstall\{060612C6-E661-4502-ADD0-AF912CDB02C9}]
2. Run the following command:C:\"C:\Program Files (x86)\InstallShield Installation Information\{060612C6-E661-4502-ADD0-AF912CDB02C9}\Setup.exe" -remove -runfromtemp
Chapter 2. Installing Data Protection for Microsoft Hyper-V 13

14 IBM Tivoli Storage Manager for Virtual Environments: Data Protection for Microsoft Hyper-V Installation and User's Guide

Chapter 3. Configuring Data Protection for Microsoft Hyper-V
After successfully installing Data Protection for Microsoft Hyper-V, you mustconfigure the client before performing any backup and restore operations. Youmust also configure the Tivoli Storage Manager recovery agent to restoreindividual files.
Creating and modifying the client options fileThe client options file is an editable text file that contains configurationinformation for the backup-archive client options that are used for Data Protectionfor Microsoft Hyper-V operations.
About this task
The first time that you start the Windows Backup-Archive Client GUI, theinstallation program searches for an existing client options file, called dsm.opt. Ifthis file is not detected, a client options file configuration wizard starts andprompts you to specify initial client configuration settings. When the wizardcompletes, it saves the information that you specified in the dsm.opt file. Bydefault, the dsm.opt file is saved to C:\Program Files\Tivoli\TSM\baclient.
The options file must contain the following information to communicate with theserver:v The VMBACKUPType HYPERVFULL option must be specified.v The host name or IP address of the Tivoli Storage Manager server.v The port number that the server listens on for client communications. A default
port number is configured by the client options file configuration wizard. Youdo not need to override this default port number unless your server isconfigured to listen on a different port.
v Your client node name. The node name is a name that uniquely identifies yourclient node. The node name defaults to the short host name of the computer thatthe client is installed on.
Additional client options can be specified, as needed.
Note: Client options can also be set on the server in a client option set. Clientoptions that are defined on the server in a client option set override client optionsthat are set in the client options file.
A sample options file is copied to your disk when you install the backup-archiveclient. The file is called dsm.smp. By default, the dsm.smp file is copied toC:\Program Files\Tivoli\TSM\config\. You can view the contents of this file to seeexamples of different options and how they are specified. The file also containscomments that explain syntax conventions for include lists, exclude lists, andwildcard use. You can also use this file as a template for your client options file byediting it and saving it as dsm.opt in the C:\Program Files\Tivoli\TSM\baclientdirectory.
After the initial client options file is created, you can modify the client options byadding or changing the options as needed. You can modify the dsm.opt file in anyof the following ways:
© Copyright IBM Corp. 2011, 2015 15
v By running the client options file configuration setup wizardv By using the client preferences editorv By editing the dsm.opt file with a text editor program, such as Notepad
Perform the following steps to modify the client options:
Procedure1. Select a method to modify the file.
Method Steps
Setup wizard The configure wizard opens automaticallywhen the backup-archive client is installedfor the first time. If the wizard does notopen automatically, complete the followingsteps:
1. Click Start > All Programs > TivoliStorage Manager > Backup-ArchiveGUI.
2. Select Utilities > Setup Wizard > Helpme configure the TSM Client OptionsFile. On-screen text and online help isavailable to provide guidance as younavigate through the wizard panels. Thisclient options file configuration wizardoffers limited choices and configuresonly the most basic options.
Preferences editor 1. Click Start > All Programs > TivoliStorage Manager > Backup-ArchiveGUI.
2. Select Edit > Client Preferences. Selectthe tabs in the preferences editor to setclient options. Specify the options in thedialog boxes, drop down lists, and othercontrols. Online help is provided. Clickthe question mark (?) icon to display thehelp topics for the online help for the tabthat you are editing. You can set moreoptions in the preferences editor thanyou can set in the setup wizard.
Edit the dsm.opt file 1. Edit the dsm.opt file by using a plain texteditor. Each of the options is described indetail in the documentation in Chapter 5,“Options reference,” on page 39. Thismethod is the most versatile way to setclient options because not all options canbe set in the client options fileconfiguration wizard or in thepreferences editor.
2. To comment out a setting, insert anasterisk (*) as the first character on theline that you want to comment out.Remove the asterisk to make thecommented option active.
2. Save the changes.
16 IBM Tivoli Storage Manager for Virtual Environments: Data Protection for Microsoft Hyper-V Installation and User's Guide

a. Changes made in the client options file configuration wizard and in thepreferences editor are saved and recognized by the client when the wizardcompletes, or when you exit the preferences editor.
b. If you edit the client options file with a text editor while the client isrunning, you must save the file and restart the client so the changes aredetected.
3. Verify that your configuration is complete by making sure that you can viewthe virtual machines in your environment:v To verify your configuration with the Tivoli Storage Manager backup-archive
command line client, issue the dsmc show vm command. A list of virtualmachines that are available for backup displays.
v To verify your configuration with the Tivoli Storage Manager backup-archiveGUI, click Actions > Backup VM. In the Backup Virtual Machine window,expand the Hyper-V VMs node to show the virtual machines that areavailable for backup.
If you can view the virtual machines in your environment, you are ready toback up your virtual machines as described in “Backup VM” on page 27.
What to do next
If you plan to run backup and restore operations in a cluster, complete the tasksdescribed in “Configuring Data Protection for Microsoft Hyper-V in a clusterenvironment” before you attempt a backup or restore operation.
Configuring Data Protection for Microsoft Hyper-V in a clusterenvironment
Configuration consists of updating the dsm.opt files and registering the nodes foreach physical server in the cluster.
Before you begin
You can use the Hyper-V failover clustering feature to allow Hyper-V virtualmachines to fail over from one cluster node to another cluster node when anoutage occurs. For information about installing this feature, and for informationthat describes how to set up a cluster configuration for Hyper-V virtual machines,see the Microsoft documentation for Hyper-V and your operating system.
In a failover cluster configuration, you can ensure that the Hyper-V virtualmachines are backed up to (and restorable from) a single Tivoli Storage Managerserver container, regardless of which cluster node is backing them up. Youimplement this configuration by creating a proxy relationship, on the Tivoli StorageManager server, to allow each physical server node (NODENAME option) to performoperations on behalf of a node that serves as a container on the Tivoli StorageManager server (ASNODENAME option). You can move virtual machines within thecluster and still back up data to the same container.
About this task
Before you begin, assign a unique node name for each physical server in thecluster (for example, Host1, Host2). Next, assign a node name that is the TivoliStorage Manager server container for all the virtual machine backups in the cluster(for example, clusternode).
Chapter 3. Configuring Data Protection for Microsoft Hyper-V 17
Procedure
Complete Step 1 through Step 3 on the Tivoli Storage Manager server:1. Log on to the Tivoli Storage Manager server and start an administrative client
session in command line mode:dsmadmc -id=admin -password=admin
2. Issue the REGISTER NODE command to register each physical server node in thecluster, and the cluster node, to the Tivoli Storage Manager server.For this example, you register the following nodes:REGISTER NODE HOST1 <password for HOST1>
REGISTER NODE HOST2 <password for HOST2>
REGISTER NODE CLUSTERNODE <password for CLUSTERNODE>
The ASNODENAME value (CLUSTERNODE) identifies a container on the Tivoli StorageManager server where files are stored that were backed up by the physicalserver nodes in the cluster.
3. Issue the GRANT PROXYNODE command to grant proxy authority to each physicalserver node in the cluster. This proxy authority allows each physical servernode in the cluster to back up files to the CLUSTERNODE.For this example, you register the following proxy authority:a. This command allows HOST1 to perform operations on behalf of
CLUSTERNODE:GRANT PROXYNODE TARGET=CLUSTERNODE AGENT=HOST1
b. This command allows HOST2 to perform operations on behalf ofCLUSTERNODE:GRANT PROXYNODE TARGET=CLUSTERNODE AGENT=HOST2
Complete Step 4 through Step 6 on each physical server node in the cluster:4. Install and configure the Tivoli Storage Manager backup-archive client on each
physical server node in the cluster.For detailed instructions, see the following contents:v “Install the backup-archive client (data mover)” on page 8v “Creating and modifying the client options file” on page 15
5. Identify each physical server node with a unique nodename, and set theNODENAME option in the dsm.opt file on each physical server node in the cluster.For this example, assume that you specified the following values for theNODENAME option:v In the dsm.opt file on Host1, you specified NODENAME HOST1v In the dsm.opt file on Host2, you specified NODENAME HOST2
6. Set the ASNODENAME option in the dsm.opt file on each physical server node inthe cluster.v The ASNODENAME value must be the same in all dsm.opt files in the cluster.v The ASNODENAME value must not match any NODENAME value in any dsm.opt
files in the cluster.
For this example, assume that you specified the following values for theASNODENAME option:v In the dsm.opt file on Host1, you specified ASNODENAME CLUSTERNODEv In the dsm.opt file on Host2, you specified ASNODENAME CLUSTERNODE
18 IBM Tivoli Storage Manager for Virtual Environments: Data Protection for Microsoft Hyper-V Installation and User's Guide

Results
When either of the nodes (HOST1, HOST2) backs up data to the Tivoli StorageManager server, the backups are stored in the container named CLUSTERNODE. Bothnodes (HOST1, HOST2) can back up or restore data from that Tivoli StorageManager server container.
Example
For example, when this command is issued on HOST2, it performs an incrementalforever full backup of virtual machine VM1 (owned by HOST2) to a Tivoli StorageManager server container identified by CLUSTERNODE:dsmc backup vm VM1 -vmbackuptype=hypervfull -mode=iffull -asnode=clusternode
Configuring the Tivoli Storage Manager recovery agent GUIInstructions about how to set up the Tivoli Storage Manager recovery agent GUIfor mount and file restore operations is provided.
Before you begin
These configuration tasks must be completed before you attempt an operation inthe Tivoli Storage Manager recovery agent GUI.
Procedure1. Log on to the system where you want to restore files. Tivoli Storage Manager
recovery agent must be installed on the system.2. Click Select TSM server in the Tivoli Storage Manager recovery agent GUI to
connect to a Tivoli Storage Manager server.Specify the following options:
Server addressEnter the IP address or host name of the Tivoli Storage Manager.
Server portEnter the port number that is used for TCP/IP communication with theserver. The default port number is 1500.
Node access method:
AsnodenameSelect this option to use a proxy node to access the virtual machinebackups that are in the target node. The proxy node is a node that isgranted "proxy" authority to perform operations on behalf of the targetnode.
Typically, the Tivoli Storage Manager administrator uses the grantproxynode command to create the proxy relationship between twoexisting nodes.
If you select this option, complete the following steps:a. Enter the name of the target node (the node where the virtual
machine backups are located) in the Target Node field.b. Enter the name of the proxy node in the Authentication node field.c. Enter the password for the proxy node in the Password field.d. Click OK to save these settings and exit the Tivoli Storage Manager
information dialog.
Chapter 3. Configuring Data Protection for Microsoft Hyper-V 19
When you use this method, the Tivoli Storage Manager recovery agentuser knows only the proxy node password, and the target nodepassword is protected.
FromnodeSelect this option to use a node with access limited only to the snapshotdata of specific virtual machines in the target node.
Typically, this node is given access from the target node that owns thevirtual machine backups by using the set access command:set access backup -TYPE=VM vmdisplayname mountnodename
For example, this command gives the node named myMountNode theauthority to restore files from the virtual machine named myTestVM:set access backup -TYPE=VM myTestVM myMountNode
If you select this option, complete the following steps:a. Enter the name of the target node (the node where the virtual
machine backups are located) in the Target Node field.b. Enter the name of the node that is given limited access in the
Authentication node field.c. Enter the password for the node that is given limited access in the
Password field.d. Click OK to save these settings and exit the Tivoli Storage Manager
information dialog.
When you use this method, you can see a complete list of backed-upvirtual machines. However, you can restore only those virtual machinebackups to which the node was granted access. In addition, thesnapshot data is not protected from expiration on the server.
Direct Select this option to authenticate directly to the target node (the nodewhere the virtual machine backups are located).
If you select this option, complete the following steps:a. Enter the name of the target node (the node where the virtual
machine backups are located) in the Authentication node field.b. Enter the password for the target node in the Password field.c. Click OK to save these settings and exit the Tivoli Storage Manager
information dialog.
Use Password access generateWhen this option is selected and the password field is empty, the TivoliStorage Manager recovery agent authenticates with an existingpassword that is stored in the registry. If not selected, you mustmanually enter the password.
To use this option, you must first manually set an initial password forthe node to which the option applies. You must specify the initialpassword when you connect to the Tivoli Storage Manager node for thefirst time by entering the password in the Password field and selectingthe Use Password access generate check box.
However, when you use the local data mover node as theAuthentication node, the password might already be stored in theregistry. As a result, select the Use Password access generate check boxand do not enter a password.
20 IBM Tivoli Storage Manager for Virtual Environments: Data Protection for Microsoft Hyper-V Installation and User's Guide
Tivoli Storage Manager recovery agent queries the specified server for a list ofprotected virtual machines, and shows the list.
3. Set the following mount, backup, and restore options by clicking Settings:
Virtual Volume write cacheThe Tivoli Storage Manager recovery agent that is running on thebackup proxy host saves data changes on a virtual volume in the writecache. By default, the write cache is enabled and the maximum cachesize is 90% of the available space for the selected folder. To prevent thesystem volume from becoming full, change the write cache to a path ona volume other than the system volume.
Folder for temporary filesSpecify the path where data changes are saved. The write cachemust be on a local drive and cannot be set to a path on ashared folder.
Cache sizeSpecify the size of the write cache. The maximum allowedcache size is 90% of the available space for the selected folder.
Restriction: To prevent any interruption during restore processing,exclude the write cache path from all antivirus software protectionsettings.
Data AccessSpecify the type of data to be accessed. If you are using an offlinedevice (such as tape or virtual tape library), you must specify theapplicable data type.
Storage typeSpecify one of the following storage devices from which tomount the snapshot:
Disk/FileThe snapshot is mounted from a disk or file. Thisdevice is the default.
Tape The snapshot is mounted from a tape storage pool.When this option is selected, it is not possible to mountmultiple snapshots.
VTL The snapshot is mounted from an offline virtual tapelibrary. Concurrent mount sessions on the same virtualtape library are supported.
Note: When the storage type is changed, you must restart theservice for the changes to take effect.
Disable expiration protectionDuring a mount operation, the snapshot on the Tivoli StorageManager server is locked to prevent it from expiring during theoperation. Expiration might occur because another snapshot isadded to the mounted snapshot sequence. This value specifieswhether to disable expiration protection during the mountoperation.v To protect the snapshot from expiration, do not select this
option. This option is cleared by default. The snapshot on theTivoli Storage Manager server is locked and the snapshot isprotected from expiration during the mount operation.
Chapter 3. Configuring Data Protection for Microsoft Hyper-V 21

v To disable expiration protection, select this option. Thesnapshot on the Tivoli Storage Manager server is not lockedand the snapshot is not protected from expiration during themount operation. As a result, the snapshot might expireduring the mount operation. This expiration can produceunexpected results and negatively impact the mount point.For example, the mount point can become unusable orcontain errors. However, expiration does not affect thecurrent active copy. The active copy cannot expire during anoperation.When the snapshot is on a target replication server, thesnapshot cannot be locked because it is in read-only mode. Alock attempt by the server causes the mount operation to fail.To avoid the lock attempt and prevent such a failure, disableexpiration protection by selecting this option.
Read Ahead size (in 16-KB blocks)Specify the number of extra data blocks that are retrieved fromthe storage device after a read request is sent to a single block.The default values are as follows:v Disk or file: 64v Tape: 1024v VTL: 64
The maximum value for any device is 1024.
Read Ahead cache size (in blocks)Specify the size of the cache where the extra data blocks arestored. The default values are as follows:v Disk or file: 10000v Tape: 75000v VTL: 10000
Since each snapshot has its own cache, make sure to plan howmany snapshots are mounted or restored simultaneously. Thecumulative cache size cannot exceed 75000 blocks.
Driver timeout (seconds)This value specifies the amount of time to process data requestsfrom the file system driver. If processing is not completed intime, the request is canceled and an error is returned to the filesystem driver. Consider increasing this value when youexperience timeouts. For example, timeouts might occur whenthe network is slow, the storage device is busy, or multiplemount sessions are being processed. The default values are asfollows:v Disk or file: 60v Tape: 180v VTL: 60
Click OK to save your changes and exit the Settings.4. Verify that each Tivoli Storage Manager server node (that was specified with
the Asnodename and Fromnode options) allows backups to be deleted. The TivoliStorage Manager recovery agent creates unused temporary objects duringoperations. The BACKDELete=Yes server option allows these objects to beremoved so that they do not accumulate in the node.
22 IBM Tivoli Storage Manager for Virtual Environments: Data Protection for Microsoft Hyper-V Installation and User's Guide
a. Log on to the Tivoli Storage Manager server and start an administrativeclient session in command-line mode:dsmadmc -id=admin -password=admin -dataonly=yes
b. Enter this command:Query Node <nodename> Format=Detailed
Make sure the command output for each node includes the followingstatement:
Backup Delete Allowed?: Yes
If this statement is not included, update each node with this command:UPDate Node <nodename> BACKDELete=Yes
Run the Query Node command again for each node to verify that each nodeallows backups to be deleted.
Manually configuring an iSCSI deviceThis procedure describes how to configure a Windows system that is used duringan iSCSI mount operation. The snapshot is mounted from Tivoli Storage Managerserver storage.
Before you begin
Review the following iSCSI requirements before you proceed with this task:v During an iSCSI mount, an iSCSI target is created on the Tivoli Storage Manager
recovery agent system. You can connect to the iSCSI target from any system tocreate a volume that contains the backup data. Also, you can then mount thisvolume from another system.
v iSCSI initiator is required on any system that must connect to the iSCSI target.v Make sure that an iSCSI initiator is installed on the system where the data is to
be restored.v Microsoft iSCSI Initiator is not required on the Tivoli Storage Manager recovery
agent system.
Review the following disk and volume requirements before you proceed with thistask:v If a volume spans several disks, you must mount all the required disks. When
mirrored volumes are used, mount only one of the mirrored disks. Mountingone disk prevents a time-consuming synchronization operation.
v If multiple dynamic disks were used on the backup system, these disks areassigned to the same group. As a result, Windows Disk Manager might considersome disks as missing and issue an error message when you mount only onedisk. Ignore this message. The data on the backed up disk is still accessible,unless some of the data is on the other disk. This issue can be solved bymounting all the dynamic disks.
About this task
Complete these tasks to configure the Windows system that is used during aniSCSI mount operation:
Chapter 3. Configuring Data Protection for Microsoft Hyper-V 23

Procedure1. On the Tivoli Storage Manager recovery agent system, open port 3260 in the
LAN firewall and the Windows client firewall. Record the iSCSI initiator nameon the system where data is to be restored.The iSCSI initiator name is shown in the iSCSI initiator configuration windowof the Control Panel. For example:iqn.1991-05.com.microsoft:hostname
2. Complete these tasks on the system where the Tivoli Storage Manager recoveryagent (or iSCSI target) is installed:a. Start the Tivoli Storage Manager recovery agent GUI. Complete the Select
TSM server and Select snapshot dialogs and click Mount.b. In the Choose mount destination dialog, select Mount an iSCSI target.c. Create a target name. Make sure that it is unique and that you can identify
it from the system that runs the iSCSI initiator. For example:iscsi-mount-tsm4ve
d. Enter the iSCSI Initiator name that was recorded in Step 1 and click OK.e. Verify that the volume you just mounted is displayed in the Mounted
Volumes field.3. Locate and start the iSCSI Initiator program on the initiator system that was
selected in Step 1:a. Connect to the iSCSI target:
1) In the Targets tab, enter the TCP/IP address of the Tivoli StorageManager recovery agent (iSCSI target) used in Step 2 in the Target:dialog. Click Quick Connect.
2) The Quick Connect dialog shows a target that matches the target namethat was specified in Step 2c. If it is not already connected, select thistarget and click Connect.
b. On the initiator system, go to Control Panel > Administrative Tools >Computer Management > Storage > Disk Management.1) If the mounted iSCSI target is listed as Type=Foreign, right-click Foreign
Disk and select Import Foreign Disks. The Foreign Disk Group isselected. Click OK.
2) The next screen shows the type, condition, and size of the Foreign Disk.Click OK and wait for the disk to be imported.
3) When the disk import completes, press F5 (refresh). The mounted iSCSIsnapshot is visible and contains an assigned drive letter. If drive lettersare not automatically assigned, right-click the required partition andselect Change Drive Letters or Paths. Click Add and select a driveletter.
4. Open Windows Explorer (or other utility) and browse the mounted snapshotfor a file restore operation.
5. After the file is restored, complete these tasks:a. Disconnect each iSCSI target by using the iSCSI Initiator Properties dialog.b. Dismount the volume from Step 2 by selecting the volume in the Tivoli
Storage Manager recovery agent GUI and clicking Dismount.
24 IBM Tivoli Storage Manager for Virtual Environments: Data Protection for Microsoft Hyper-V Installation and User's Guide

Chapter 4. Command reference
The following sections contain detailed information about each of the clientcommands that are used for Data Protection for Microsoft Hyper-V operations.
Issue these commands from the Tivoli Storage Manager backup-archive commandline client. Start the command line client using either of the following methods onthe Windows system:v Go to Start > Apps by name > Tivoli Storage Manager > Backup-Archive
Command Line.v Open an Administrator command prompt window and change to the
backup-archive client installation directory (cd "C:\Program Files\tivoli\tsm\baclient"). Run dsmc.exe.
To complete these tasks from the Tivoli Storage Manager backup-archive GUI, startthe backup-archive GUI client using either of the following methods on theWindows system:v Go to Start > Apps by name > Tivoli Storage Manager > Backup-Archive GUI.v Open an Administrator command prompt window and change to the
backup-archive client installation directory (cd "C:\Program Files\tivoli\tsm\baclient"). Run dsm.exe.
Access related GUI task help using either of the following methods:v Select the help icon and click Help Topics or Getting started.v You can also press the F1 key to open the Help Topics help.
Reading syntax diagramsTo read a syntax diagram for entering a command, follow the path of the line.Read from left to right and from top to bottom.v The ►►─── symbol indicates the beginning of a syntax diagram.v The ───► symbol at the end of a line indicates that the syntax diagram continues
on the next line.v The ►─── symbol at the beginning of a line indicates that a syntax diagram
continues from the previous line.v The ───►◄ symbol indicates the end of a syntax diagram.
Syntax items, such as a keyword or a variable, can be:v On the line (required element)v Above the line (default element)v Below the line (optional element)
Symbols
Enter these symbols exactly as they appear in the syntax diagram.v * Asteriskv { } Bracesv : Colonv , Comma
© Copyright IBM Corp. 2011, 2015 25

v = Equal Signv - Hyphenv () Parenthesesv . Periodv Spacev " quotation markv 'single quotation mark
Variables
Italicized lowercase items such as <var_name> indicate variables. In this example,you can specify a <var_name> when you enter the cmd_name command.
►► cmd_name <var_name> ►◄
Repetition
An arrow returning to the left means that the item can be repeated. A characterwithin the arrow means that you must separate repeated items with that character.
►► ▼
,
repeat ►◄
A footnote (1) by the arrow refers to a limit that tells how many times the item canbe repeated.
►► ▼
,(1)
repeat ►◄
Notes:
1 Specify repeat up to 5 times.
Required choices
When two or more items are in a stack and one of them is on the line, you mustspecify one item.
In this example, you must choose A, B, or C.
►► cmd_name ABC
►◄
Optional choices
When an item is below the line, that item is optional. In the first example, you canselect A or nothing at all.
26 IBM Tivoli Storage Manager for Virtual Environments: Data Protection for Microsoft Hyper-V Installation and User's Guide
►► cmd_nameA
►◄
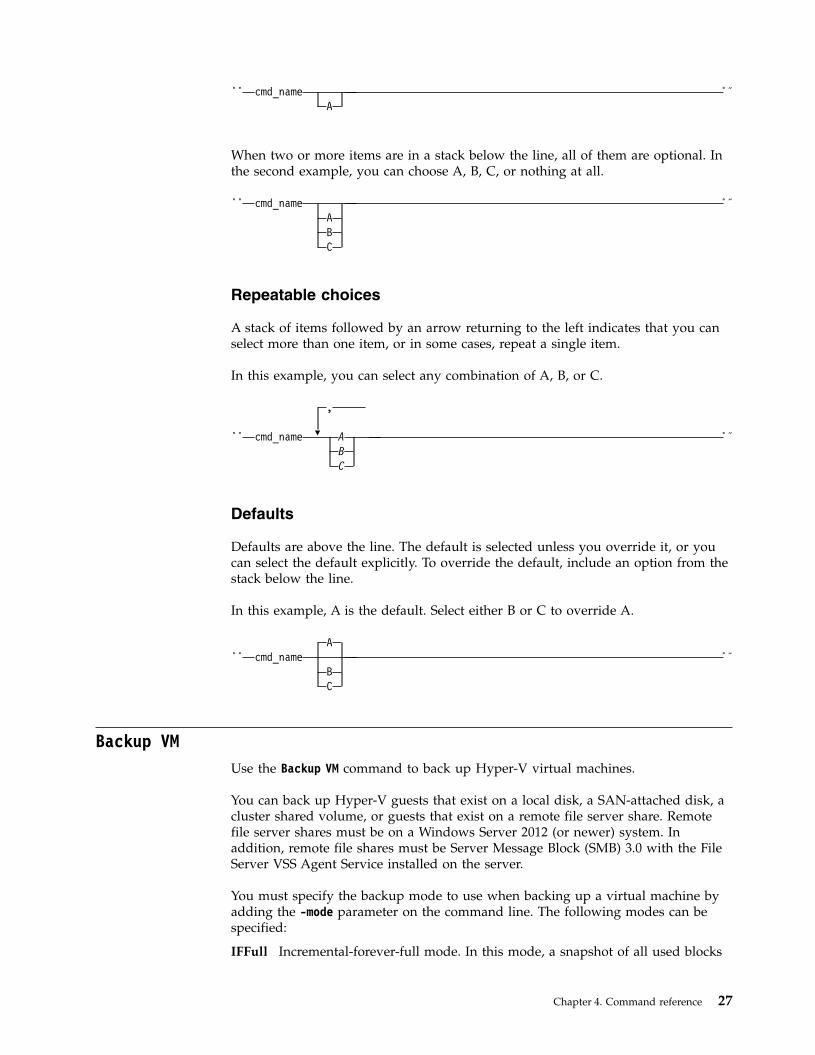
When two or more items are in a stack below the line, all of them are optional. Inthe second example, you can choose A, B, C, or nothing at all.
►► cmd_nameABC
►◄
Repeatable choices
A stack of items followed by an arrow returning to the left indicates that you canselect more than one item, or in some cases, repeat a single item.
In this example, you can select any combination of A, B, or C.
►► ▼
,
cmd_name ABC
►◄
Defaults
Defaults are above the line. The default is selected unless you override it, or youcan select the default explicitly. To override the default, include an option from thestack below the line.
In this example, A is the default. Select either B or C to override A.
►►A
cmd_nameBC
►◄
Backup VMUse the Backup VM command to back up Hyper-V virtual machines.
You can back up Hyper-V guests that exist on a local disk, a SAN-attached disk, acluster shared volume, or guests that exist on a remote file server share. Remotefile server shares must be on a Windows Server 2012 (or newer) system. Inaddition, remote file shares must be Server Message Block (SMB) 3.0 with the FileServer VSS Agent Service installed on the server.
You must specify the backup mode to use when backing up a virtual machine byadding the -mode parameter on the command line. The following modes can bespecified:
IFFull Incremental-forever-full mode. In this mode, a snapshot of all used blocks
Chapter 4. Command reference 27
on a virtual machine’s disks are backed up to the server. The backupincludes configuration information, and all of the disks.
IFIncrementalIncremental-forever-incremental. In this mode, a snapshot is created of theblocks that have changed since the last incremental forever backup,whether full or incremental. The backup includes configurationinformation, and all of the disks.
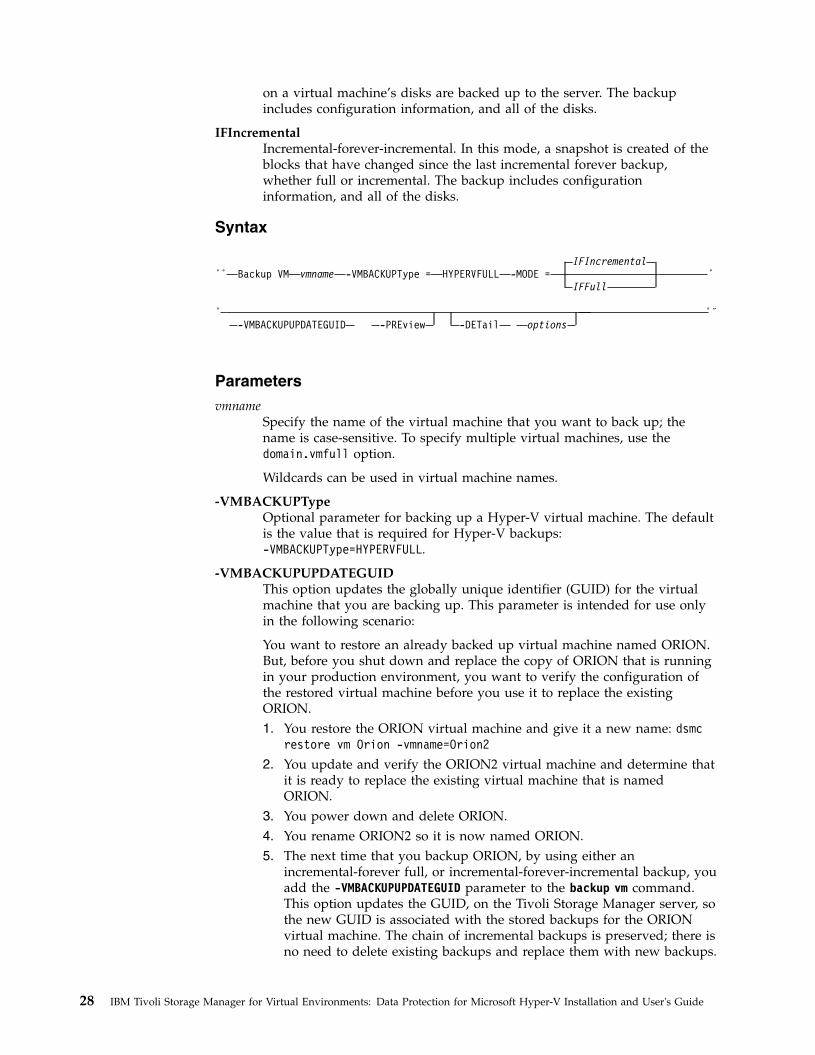
Syntax
►►IFIncremental
Backup VM vmname -VMBACKUPType = HYPERVFULL -MODE =IFFull
►
►-VMBACKUPUPDATEGUID -PREview -DETail options
►◄
Parameters
vmnameSpecify the name of the virtual machine that you want to back up; thename is case-sensitive. To specify multiple virtual machines, use thedomain.vmfull option.
Wildcards can be used in virtual machine names.
-VMBACKUPTypeOptional parameter for backing up a Hyper-V virtual machine. The defaultis the value that is required for Hyper-V backups:-VMBACKUPType=HYPERVFULL.
-VMBACKUPUPDATEGUIDThis option updates the globally unique identifier (GUID) for the virtualmachine that you are backing up. This parameter is intended for use onlyin the following scenario:
You want to restore an already backed up virtual machine named ORION.But, before you shut down and replace the copy of ORION that is runningin your production environment, you want to verify the configuration ofthe restored virtual machine before you use it to replace the existingORION.1. You restore the ORION virtual machine and give it a new name: dsmc
restore vm Orion -vmname=Orion2
2. You update and verify the ORION2 virtual machine and determine thatit is ready to replace the existing virtual machine that is namedORION.
3. You power down and delete ORION.4. You rename ORION2 so it is now named ORION.5. The next time that you backup ORION, by using either an
incremental-forever full, or incremental-forever-incremental backup, youadd the -VMBACKUPUPDATEGUID parameter to the backup vm command.This option updates the GUID, on the Tivoli Storage Manager server, sothe new GUID is associated with the stored backups for the ORIONvirtual machine. The chain of incremental backups is preserved; there isno need to delete existing backups and replace them with new backups.
28 IBM Tivoli Storage Manager for Virtual Environments: Data Protection for Microsoft Hyper-V Installation and User's Guide

-PREViewThis parameter displays additional information about a virtual machine,including the labels of the Hyper-V virtual hard disks (VHDX) that are inthe virtual machine.
When you issue the -preview option, the backup operation does not start.You must issue the backup command without the -preview option to startthe backup operation.
-DETailThis parameter displays detailed information about a virtual machine. Usethis option with -preview to view more details about the disks that areinvolved in the backup operation.
When you issue the -detail option, the backup operation does not start.You must issue the backup command without the -detail option to startthe backup operation.
Example commands
This command starts an incremental-forever-incremental backup of a Hyper-Vvirtual machine that is named "VM1":dsmc backup vm VM1 -vmbackuptype=hypervfull -mode=ifincremental
This command starts an incremental-forever-incremental backup of a Hyper-Vvirtual machine that is named "VM3":dsmc backup vm VM3 -vmbackuptype=hypervfull -mode=ifincremental -preview
In the command output, the -preview parameter displays the VHDX labels in thevirtual machine:
VM Name: VM3
Domain Keyword: all-vmMode: Incremental Forever - IncrementalTarget Node Name: NODE1Data Mover Node Name: NODE1Cluster Resource: Yes
Disk[1]Name: c:\ClusterStorage\Volume1\Hyper-V\VM3\VM3.VHDXCapacity: 40.00 GBSize: 9.09 GBFull Backup: includedIncremental Backup: excludedDisk Type: VHDXNumber of Subdisk: 1
Disk[2]Name: c:\ClusterStorage\Volume3\Hyper-V\VM3\VM3-DISK2.VHDXCapacity: 127.00 GBSize: 4.00 MBFull Backup: includedIncremental Backup: excludedDisk Type: VHDXNumber of Subdisk: 1
When the -detail parameter is specified with the -preview parameter, the VHDXlabels and their subdisks are shown:
Chapter 4. Command reference 29

VM Name: VM3
Domain Keyword: all-vmMode: Incremental Forever - IncrementalTarget Node Name: NODE1Data Mover Node Name: NODE1Cluster Resource: Yes
Disk[1]Name: c:\ClusterStorage\Volume1\Hyper-V\VM3\VM3.VHDXCapacity: 40.00 GBSize: 9.09 GBFull Backup: includedIncremental Backup: excludedDisk Type: VHDXNumber of Subdisk: 1
Subdisk[1]Name: c:\ClusterStorage\Volume1\Hyper-V\VM3\VM3_9B26166-9C3E.avhdxCapacity: 40.00 GBSize: 1.25 GBFull Backup: includedIncremental Backup: includedDisk Type: AVHDX
Disk[2]Name: c:\ClusterStorage\Volume3\Hyper-V\VM3\VM3-DISK2.VHDXCapacity: 127.00 GBSize: 4.00 MBFull Backup: includedIncremental Backup: excludedDisk Type: VHDXNumber of Subdisk: 1
Subdisk[1]Name: c:\ClusterStorage\Volume3\Hyper-V\VM3\VM3-Disk2_243D063-9CD9.avhdxCapacity: 127.00 GBSize: 4.00 MBFull Backup: includedIncremental Backup: includedDisk Type: AVHDX
Options file examples
In this example, the domain.vmfull option specifies these virtual machines:domain.vmfull BigVM,myGentoox64,HPV2VM3-OLD,Local10
This command starts an incremental-forever-incremental backup of all Hyper-Vvirtual machines specified in the domain.vmfull option. It also displays previewinformation about each virtual machine:dsmc backup vm -vmbackuptype=hypervfull -mode=iffull -preview
The following output is shown:
30 IBM Tivoli Storage Manager for Virtual Environments: Data Protection for Microsoft Hyper-V Installation and User's Guide

1. VM Name: BigVM
Domain Keyword: all-vmMode: Incremental Forever - FullTarget Node Name: MSFData Mover Node Name: MSFCluster Resource: No
Disk[1]Name: \\lingonberry\c$\Users\michael\Documents\Storage\BigVM.vhdxCapacity: 5.85 TBSize: 5.00 MBFull Backup: includedIncremental Backup: excludedDisk Type: VHDXNumber of Subdisk: 0
2. VM Name: Gentoox64
Domain Keyword: all-vmMode: Incremental Forever - FullTarget Node Name: MSFData Mover Node Name: MSFCluster Resource: No
3. VM Name: HPV2VM3-OLD
Domain Keyword: all-vmMode: Incremental Forever - FullTarget Node Name: MSFData Mover Node Name: MSFCluster Resource: No
4. VM Name: Local10
Domain Keyword: all-vmMode: Incremental Forever - FullTarget Node Name: MSFData Mover Node Name: MSFCluster Resource: No
Disk[1]Name: \\lingonberry\c$\Users\michael\Documents\Storage\Local10.vhdxCapacity: 127.00 GBSize: 4.00 MBFull Backup: includedIncremental Backup: excludedDisk Type: VHDXNumber of Subdisk: 0
Total number of virtual machines processed: 4ANS1900I Return code is 0.ANS1901I Highest return code was 0.
Related links for backing up Hyper-V virtual machines
v “Detail” on page 41v “Domain.vmfull” on page 41v “Mbobjrefreshthresh” on page 47v “Mbpctrefreshthresh” on page 48v “Mode” on page 46v “Query VM” on page 33v “Restore VM” on page 36v “Vmbackuptype” on page 54
Chapter 4. Command reference 31

ExpireThe expire command deactivates the backup objects that you specify in the filespecification or with the filelist option. You can specify an individual file toexpire, or a file that contains a list of files to expire. If OBJTYPE=VM, this commanddeactivates the current backup for a virtual machine.
When you are working in interactive mode, a prompt notifies you before files areexpired.
The expire command does not remove workstation files. If you expire a file ordirectory that still exists on your workstation, the file or directory is backed upagain during the next incremental backup, unless you exclude the object frombackup processing.
If you expire a directory that contains active files, those files are not displayed in asubsequent query from the GUI. However, these files are displayed on thecommand line, if you specify the correct query with a wildcard character for thedirectory.
Note: Because the expire command changes the server picture of the client filesystem without changing the client file system, the expire command is not allowedon files that are on a file system that is monitored by the Tivoli Storage Managerjournal service.
Syntax
►►OBJTYPE=FILE filespec
EXPireOBJTYPE=VM vmname
►
►options
►◄
Parameters
OBJTYPE=FILE filespecSpecifies a path and a file name that you want to expire. You can enter onlyone file specification on this command. However, you can use wildcards toselect a group of files or all the files in a directory. If you specify the filelistoption, the filespec designation is ignored.
OBJTYPE=VM vmnamevmname specifies the name of a virtual machine. The active backup for thespecified virtual machine is expired. The virtual machine name cannot containwildcard characters.
When objtype=VM is specified, the expire command expires only full virtualmachine backups (MODE=FULL or MODE=IFFULL) for the virtual machine that isspecified on the vmname parameter.
Table 2. Expire command: Related options
Option Where to use
dateformat “Dateformat”on page 39
Client options file (dsm.opt) or command line.
32 IBM Tivoli Storage Manager for Virtual Environments: Data Protection for Microsoft Hyper-V Installation and User's Guide

Table 2. Expire command: Related options (continued)
Option Where to use
filelist “Filelist” onpage 43
Command line only.
noprompt “Noprompt” onpage 49
Command line only.
numberformat“Numberformat” on page49
Client options file (dsm.opt) or command line.
pick “Pick” on page 50 Command line only.
timeformat “Timeformat”on page 52
Client user-options file (dsm.opt) or command line.
Examples
Task Deactivate the letter1.txt file in the home directory.
Command: dsmc expire c:\home\letter1.txt
Task Deactivate all files in the admin\mydir directory.
Command: dsmc expire c:\admin\mydir\*
Task Deactivate all files that are named in the c:\avi\filelist.txt file.
Command: dsmc expire -filelist=c:\avi\filelist.txt
Task Deactivate the current backup of the virtual machine that is namedvm_test.
Command: dsmc expire –objtype=VM vm_test
Query VMUse the query vm command to determine which Hyper-V virtual machines werebacked up.
Syntax
►► Query VM vmnameoptions
►◄
Parameters
vmnameSpecifies the virtual machine host name that you want to query. The virtualmachine name is case-sensitive. If you specify a virtual machine name on thecommand, the name cannot contain wildcard characters.
If you omit the virtual machine name, the command displays all virtualmachine backups on the Tivoli Storage Manager server.
Chapter 4. Command reference 33
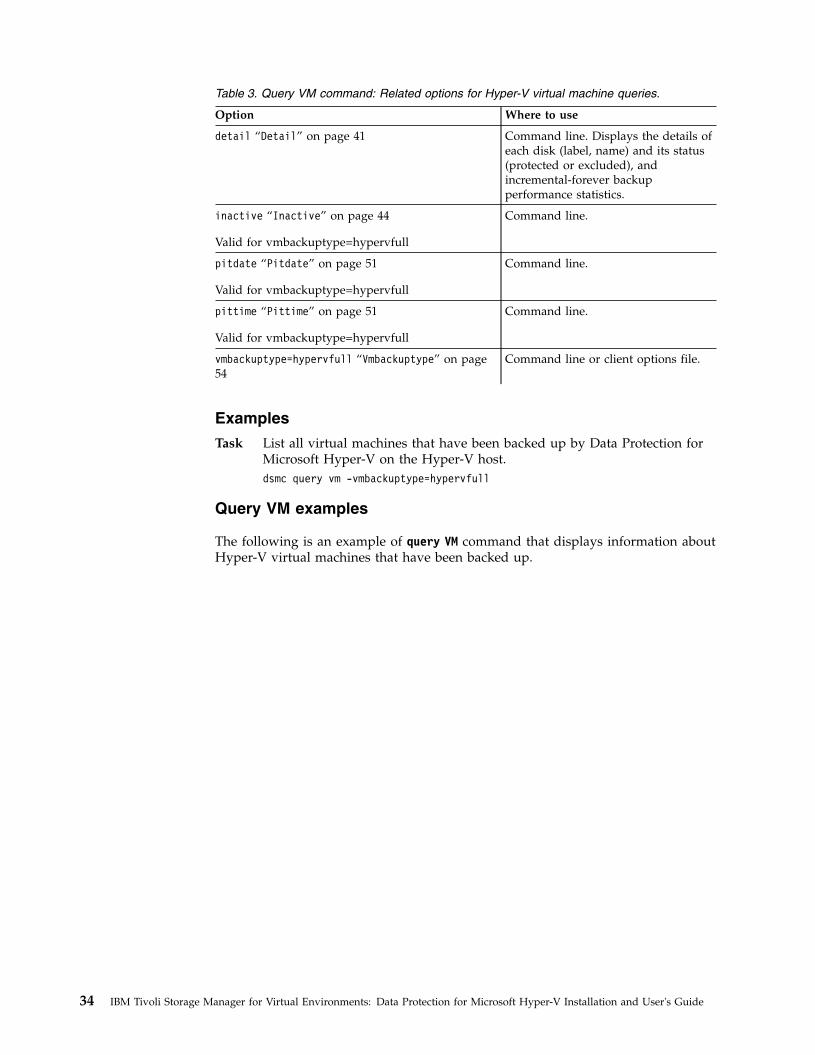
Table 3. Query VM command: Related options for Hyper-V virtual machine queries.
Option Where to use
detail “Detail” on page 41 Command line. Displays the details ofeach disk (label, name) and its status(protected or excluded), andincremental-forever backupperformance statistics.
inactive “Inactive” on page 44
Valid for vmbackuptype=hypervfull
Command line.
pitdate “Pitdate” on page 51
Valid for vmbackuptype=hypervfull
Command line.
pittime “Pittime” on page 51
Valid for vmbackuptype=hypervfull
Command line.
vmbackuptype=hypervfull “Vmbackuptype” on page54
Command line or client options file.
Examples
Task List all virtual machines that have been backed up by Data Protection forMicrosoft Hyper-V on the Hyper-V host.dsmc query vm -vmbackuptype=hypervfull
Query VM examples
The following is an example of query VM command that displays information aboutHyper-V virtual machines that have been backed up.
34 IBM Tivoli Storage Manager for Virtual Environments: Data Protection for Microsoft Hyper-V Installation and User's Guide

dsmc query vm -vmbackuptype=hypervfull -detail
# Backup Date Mgmt Class Size Type A/I Virtual Machine--- ------------------- ---------- ----------- ------ --- ---------------
1 04/03/2014 15:07:16 STANDARD 127.00 GB IFINCR A Win8.1The size of this incremental backup: 3.06 GBThe number of incremental backups since last full: 2The amount of extra data: 1The TSM objects fragmentation: 2Backup is represented by: 173 TSM objectsApplication protection type: n/aDisk[1]Label: Hard Disk 1Disk[1]Name: naDisk[1]Status: Protected2 04/08/2014 11:21:45 STANDARD 1.15 TB IFFULL A Local4The size of this incremental backup: n/aThe number of incremental backups since last full: 0The amount of extra data: 0The TSM objects fragmentation: 0Backup is represented by: 0 TSM objectsApplication protection type: n/aDisk[1]Label: Hard Disk 1Disk[1]Name: naDisk[1]Status: Protected
-----------------------------------------------------------------------------All averages are calculated only for incremental forever backups displayed above.The average size of incremental backup: 3.06 GBThe average number of incremental backups since last full: 1The average overhead of extra data: 0The average TSM objects fragmentation: 1The average number of TSM objects per backup: 86
ANS1900I Return code is 0.ANS1901I Highest return code was 0.
The next example shows output from a query VM that includes the -detail option.This command includes a virtual machine name so the output is only displayed forthe specified virtual machine. The detailed output includes the type of backup thatwas performed, the size of the virtual machine, information about its disks, andstatistics.
dsmc query vm HPV2VM1 -detail
Periodic Full - Full
Query Virtual Machine for Full VM backup
# Backup Date Mgmt Class Size Type A/I Virtual Machine--- ------------------- ---------- ----------- ------ --- ---------------
1 03/14/2014 09:58:44 STANDARD 60.00 GB IFINCR A HPV2VM1The size of this incremental backup: 8832 KBThe number of incremental backups since last full: 4The amount of extra data: 0The TSM objects fragmentation: 3Backup is represented by: 174 TSM objectsApplication protection type: n/aDisk[1]Label: Hard Disk 1Disk[1]Name: naDisk[1]Status: Protected
-----------------------------------------------------------------------------All averages are calculated only for incremental forever backups displayed above.The average size of incremental backup: 8832 KBThe average number of incremental backups since last full: 4The average overhead of extra data: 0The average TSM objects fragmentation: 3The average number of TSM objects per backup: 174
The following example shows the syntax to use to list all Hyper-V virtualmachines that have been backed up by this node:
Chapter 4. Command reference 35
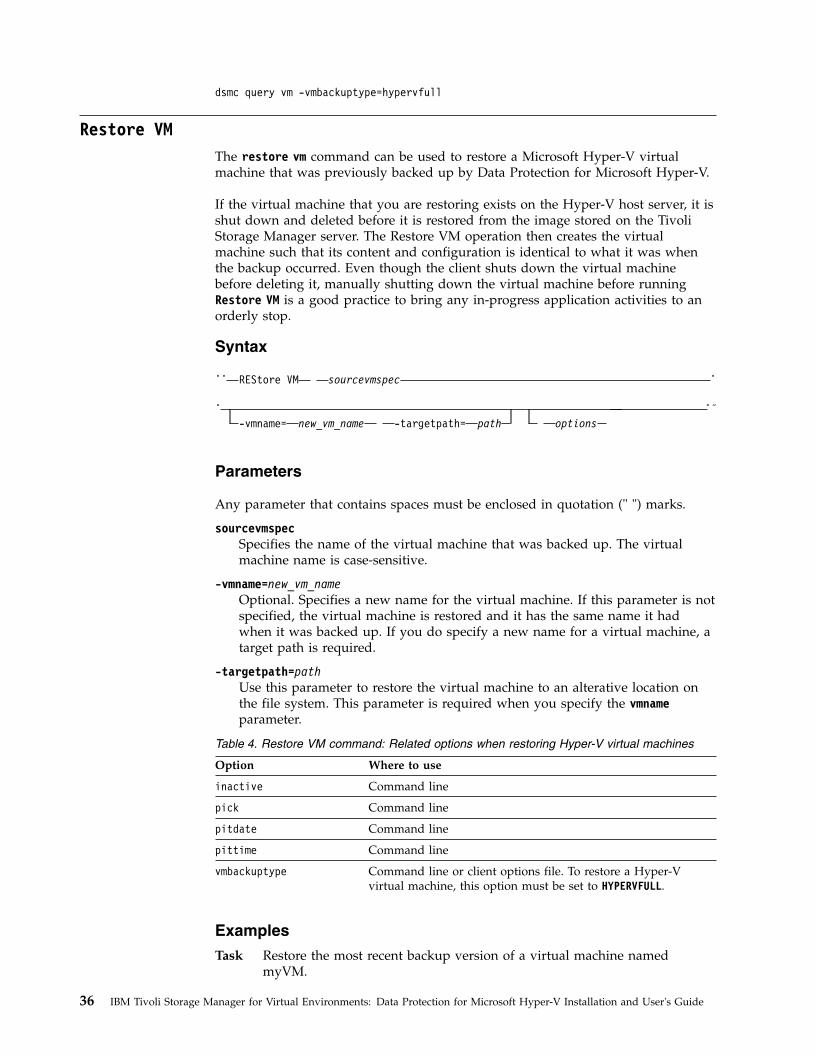
dsmc query vm -vmbackuptype=hypervfull
Restore VMThe restore vm command can be used to restore a Microsoft Hyper-V virtualmachine that was previously backed up by Data Protection for Microsoft Hyper-V.
If the virtual machine that you are restoring exists on the Hyper-V host server, it isshut down and deleted before it is restored from the image stored on the TivoliStorage Manager server. The Restore VM operation then creates the virtualmachine such that its content and configuration is identical to what it was whenthe backup occurred. Even though the client shuts down the virtual machinebefore deleting it, manually shutting down the virtual machine before runningRestore VM is a good practice to bring any in-progress application activities to anorderly stop.
Syntax
►► REStore VM sourcevmspec ►
►-vmname= new_vm_name -targetpath= path options
►◄
Parameters
Any parameter that contains spaces must be enclosed in quotation (" ") marks.
sourcevmspecSpecifies the name of the virtual machine that was backed up. The virtualmachine name is case-sensitive.
-vmname=new_vm_nameOptional. Specifies a new name for the virtual machine. If this parameter is notspecified, the virtual machine is restored and it has the same name it hadwhen it was backed up. If you do specify a new name for a virtual machine, atarget path is required.
-targetpath=pathUse this parameter to restore the virtual machine to an alterative location onthe file system. This parameter is required when you specify the vmnameparameter.
Table 4. Restore VM command: Related options when restoring Hyper-V virtual machines
Option Where to use
inactive Command line
pick Command line
pitdate Command line
pittime Command line
vmbackuptype Command line or client options file. To restore a Hyper-Vvirtual machine, this option must be set to HYPERVFULL.
Examples
Task Restore the most recent backup version of a virtual machine namedmyVM.
36 IBM Tivoli Storage Manager for Virtual Environments: Data Protection for Microsoft Hyper-V Installation and User's Guide

dsmc restore vm myvm
Chapter 4. Command reference 37

38 IBM Tivoli Storage Manager for Virtual Environments: Data Protection for Microsoft Hyper-V Installation and User's Guide

Chapter 5. Options reference
The following sections contain detailed information about each of the client optionsthat are used for Data Protection for Microsoft Hyper-V operations.
Information for each option includes the following information:v a descriptionv a syntax diagramv detailed descriptions of the parametersv examples of using the option in the client options file (if applicable)v examples of using the option on the command line (if applicable)
Options with a command-line example of Does not apply cannot be used withcommand line or scheduled commands.
DateformatThe dateformat option specifies the format you want to use to display or enterdates.
Use this option if you want to change the default date format for the language ofthe message repository you are using.
By default, the backup-archive and administrative clients obtain formatinformation from the locale definition in effect at the time you start the client.Consult the documentation on your local system for details about setting up yourlocale definition.
You can use the dateformat option with the expire command.
When you include the dateformat option with a command, it must precede thefromdate and pitdate options.
Options File
Place this option in the client options file (dsm.opt). You can set this option on theRegional Settings tab, Date Format drop-down list of the Preferences editor.
Syntax
►► DATEformat format_number ►◄
Parameters
format_numberDisplays the date using one of the following formats. Select the number thatcorresponds to the date format you want to use:1 MM/DD/YYYY
This is the default for the following available translations:v US English
© Copyright IBM Corp. 2011, 2015 39

v Chinese (Traditional)v Korean
2 DD-MM-YYYY
This is the default for the following available translations:v Brazilian Portuguesev Italian
3 YYYY-MM-DD
This is the default for the following available translations:v Japanesev Chinese (Simplified)v Polish
4 DD.MM.YYYY
This is the default for the following available translations:v Germanv Frenchv Spanishv Czechv Russian
5 YYYY.MM.DD
This is the default for the following available translations:v Hungarian
6 YYYY/MM/DD7 DD/MM/YYYY
Examples
Options file:dateformat 3
Command line:-date=3
This option is valid on the initial command line and in interactive mode. If youuse this option in interactive mode, it affects only the command with which it isspecified. When that command completes, the value reverts to the value at thebeginning of the interactive session. This is the value from the dsm.opt file unlessoverridden by the initial command line or by an option forced by the server.
Additional considerations for specifying time and date formats
The date or time format you specify with this option must be used when usingoptions that take date and time as input. Examples are: totime, fromtime, todate,fromdate, and pittime.
For example, if you specify the timeformat option as TIMEFORMAT 4, the value thatyou provide on the fromtime or totime option must be specified as a time such as12:24:00pm. Specifying 13:24:00 would not be valid because TIMEFORMAT 4 requiresan hour integer that is 12 or less. If you want to specify up to 24 hour values on anoption, and if you want to use commas as separators, you must specify TIMEFORMAT2.
40 IBM Tivoli Storage Manager for Virtual Environments: Data Protection for Microsoft Hyper-V Installation and User's Guide

DetailUse the detail option to display management class, file space, and backupinformation.
Use the detail with the query vm command to display the following statistics:v The average number of Tivoli Storage Manager objects that are needed to
describe a single megablock, across all megablocks in a backup.v The average number of Tivoli Storage Manager objects that are needed to
describe a single megablock, for all megablocks in a filespace.v The number of backups that were created since the last full backup was created
from the production disks.
The values returned on query vm can help you fine tune the heuristics (see theMbobjrefreshthresh and Mbpctrefreshthresh options) to fine tune the valuestrigger for megablock refreshes.
Syntax
►► DETail ►◄
Parameters
There are no parameters for this option.
Examples
Command line:
dsmc query vm -detail
Domain.vmfullThe domain.vmfull option specifies the virtual machines to include in your backupoperations.
Use this option to specify which Hyper-V virtual machines are processed whenyou run a backup vm -vmbackuptype=hypervfull command, without specifying anyHyper-V virtual machine names.
You can specify which virtual machines are to be processed by using any of thefollowing techniques:v Use the VM= option and specify the name of a virtual machine.v Provide a comma-separated list of virtual machine names.v Use wildcard syntax to process virtual machines that match the name pattern.v Use the all-vm domain-level parameter. You can also include one or more
virtual machines by using the VM= keyword, or exclude virtual machines byusing the -VM= syntax.
The virtual machines that are specified on the domain.vmfull option are processedonly when the backup vm command is entered without specifying a virtual machineor a list of virtual machines on the command line.
Chapter 5. Options reference 41
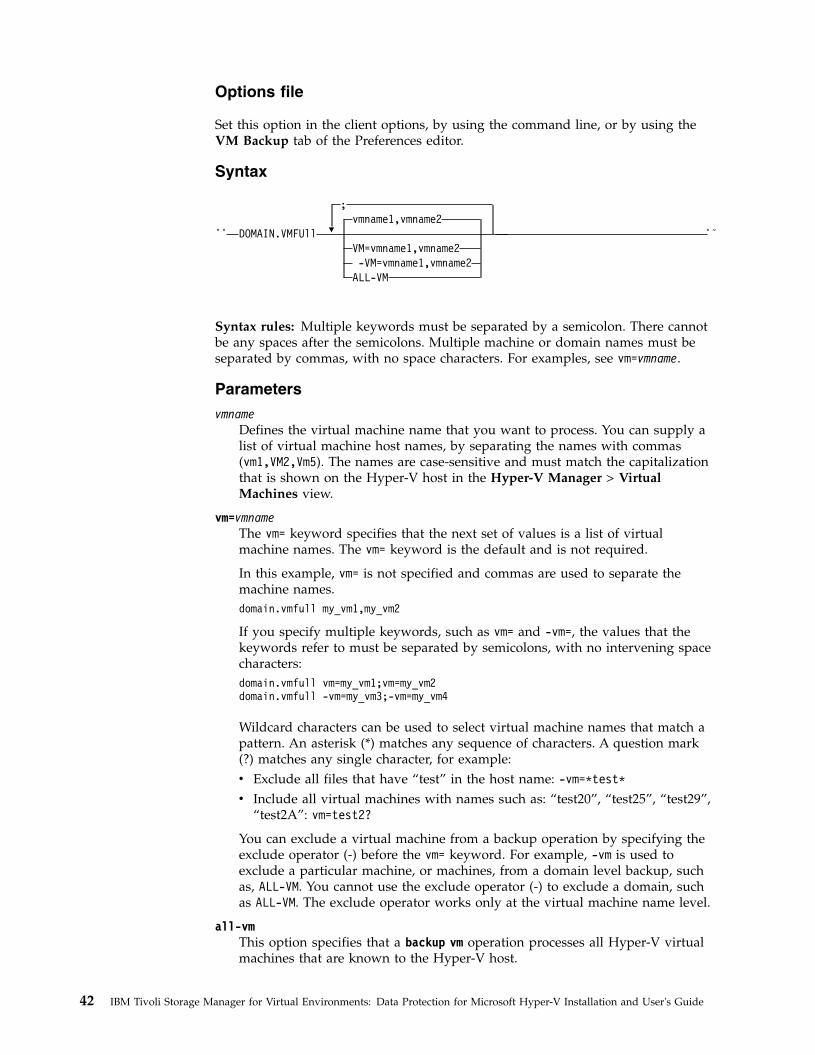
Options file
Set this option in the client options, by using the command line, or by using theVM Backup tab of the Preferences editor.
Syntax
►► ▼
;vmname1,vmname2
DOMAIN.VMFUllVM=vmname1,vmname2-VM=vmname1,vmname2
ALL-VM
►◄
Syntax rules: Multiple keywords must be separated by a semicolon. There cannotbe any spaces after the semicolons. Multiple machine or domain names must beseparated by commas, with no space characters. For examples, see vm=vmname.
Parameters
vmnameDefines the virtual machine name that you want to process. You can supply alist of virtual machine host names, by separating the names with commas(vm1,VM2,Vm5). The names are case-sensitive and must match the capitalizationthat is shown on the Hyper-V host in the Hyper-V Manager > VirtualMachines view.
vm=vmnameThe vm= keyword specifies that the next set of values is a list of virtualmachine names. The vm= keyword is the default and is not required.
In this example, vm= is not specified and commas are used to separate themachine names.domain.vmfull my_vm1,my_vm2
If you specify multiple keywords, such as vm= and -vm=, the values that thekeywords refer to must be separated by semicolons, with no intervening spacecharacters:domain.vmfull vm=my_vm1;vm=my_vm2domain.vmfull -vm=my_vm3;-vm=my_vm4
Wildcard characters can be used to select virtual machine names that match apattern. An asterisk (*) matches any sequence of characters. A question mark(?) matches any single character, for example:v Exclude all files that have “test” in the host name: -vm=*test*v Include all virtual machines with names such as: “test20”, “test25”, “test29”,
“test2A”: vm=test2?
You can exclude a virtual machine from a backup operation by specifying theexclude operator (-) before the vm= keyword. For example, -vm is used toexclude a particular machine, or machines, from a domain level backup, suchas, ALL-VM. You cannot use the exclude operator (-) to exclude a domain, suchas ALL-VM. The exclude operator works only at the virtual machine name level.
all-vmThis option specifies that a backup vm operation processes all Hyper-V virtualmachines that are known to the Hyper-V host.
42 IBM Tivoli Storage Manager for Virtual Environments: Data Protection for Microsoft Hyper-V Installation and User's Guide

Examples
Options file:Include all virtual machines in full VM backup operations.domain.vmfull all-vm
Include all virtual machines in full VM backup operations, except for theones that have a name suffix of _test.domain.vmfull all-vm;-vm=*_test
Include all virtual machines in full VM backup operations, but excludevirtual machines testvm1 and testmvm2.domain.vmfull all-vm;-VM=testvm1,testvm2
FilelistUse the filelist option to process a list of files.
You can use the filelist option with the expire command.
The Tivoli Storage Manager client opens the file you specify with this option andprocesses the list of files within according to the specific command. When you usethe filelist option, Tivoli Storage Manager ignores all other file specifications onthe command line.
The files (entries) listed in the filelist must adhere to the following rules:v Each entry must be a fully-qualified or a relative path to a file or directory. Note
that if you include a directory in a filelist entry, the directory is backed up, butthe contents of the directory are not.
v Each path must be specified on a single line. A line can contain only one path.v Paths must not contain control characters, such as 0x18 (CTRL-X), 0x19 (CTRL-Y)
and 0x0A (newline).v The filelist can be an MBCS file or a Unicode file with all Unicode entries.v Any Tivoli Storage Manager filelist entry that does not comply with these rules
is ignored.
The following are examples of valid paths in a filelist:c:\myfiles\directory\file1c:\tivoli\mydir\yourfile.doc..\notes\avi\dir1..\fs1\dir2\file3"d:\fs2\Ha Ha Ha\file.txt""d:\fs3\file.txt"
You can use the filelist option during an open file support operation. In thiscase, Tivoli Storage Manager processes the entries in the filelist from the virtualvolume instead of the real volume.
If an entry in the filelist indicates a directory, only that directory is processed andnot the files within the directory.
If the file name (the filelistspec) you specify with the filelist option does notexist, the command fails. Tivoli Storage Manager skips any entries in the filelistthat are not valid files or directories. Tivoli Storage Manager logs errors andprocessing continues to the next entry.
Chapter 5. Options reference 43
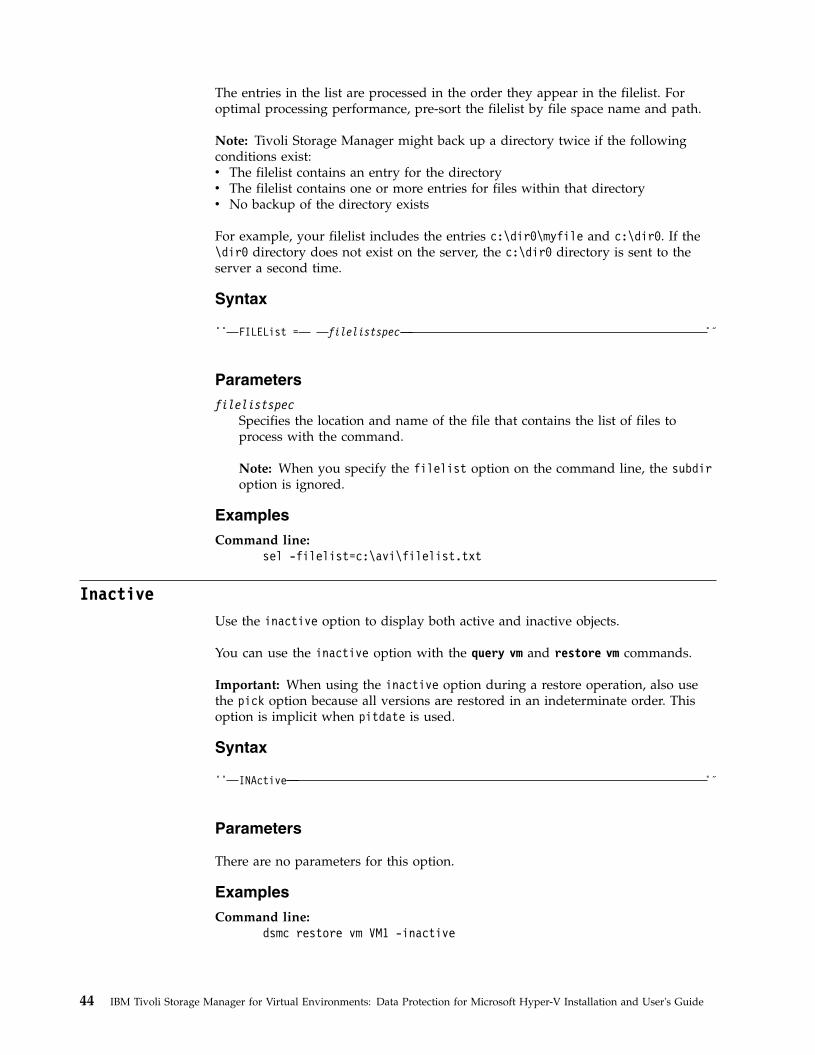
The entries in the list are processed in the order they appear in the filelist. Foroptimal processing performance, pre-sort the filelist by file space name and path.
Note: Tivoli Storage Manager might back up a directory twice if the followingconditions exist:v The filelist contains an entry for the directoryv The filelist contains one or more entries for files within that directoryv No backup of the directory exists
For example, your filelist includes the entries c:\dir0\myfile and c:\dir0. If the\dir0 directory does not exist on the server, the c:\dir0 directory is sent to theserver a second time.
Syntax
►► FILEList = filelistspec ►◄
Parameters
filelistspecSpecifies the location and name of the file that contains the list of files toprocess with the command.
Note: When you specify the filelist option on the command line, the subdiroption is ignored.
Examples
Command line:sel -filelist=c:\avi\filelist.txt
InactiveUse the inactive option to display both active and inactive objects.
You can use the inactive option with the query vm and restore vm commands.
Important: When using the inactive option during a restore operation, also usethe pick option because all versions are restored in an indeterminate order. Thisoption is implicit when pitdate is used.
Syntax
►► INActive ►◄
Parameters
There are no parameters for this option.
Examples
Command line:dsmc restore vm VM1 -inactive
44 IBM Tivoli Storage Manager for Virtual Environments: Data Protection for Microsoft Hyper-V Installation and User's Guide

Include.vmThis option overrides the management class that is specified on the vmmc option.
The management class specified on the vmmc option applies to all backups. You canuse the include.vm option to override that management class, for one or morevirtual machines. The include.vm option does not override or affect themanagement class that is specified by the vmctlmc option. The vmctlmc optionbinds backed-up virtual machine control files to a specific management class.
Options File
Set this option in the client options file.
Syntax
►► INCLUDE.VM vmnamemgmtclassname
►◄
Parameters
vmnameRequired parameter. Specifies the name of a virtual machine that you want tobind to the specified management class. Only one virtual machine can bespecified on each include.vm statement. However, you can specify as manyinclude.vm statements as needed to bind each virtual machine to a specificmanagement class.
You can include wildcards in the virtual machine name. An asterisk (*)matches any character string. A question mark (?) matches a single character. Ifthe virtual machine name contains a space character, enclose the name indouble quotation marks (").
Tip: If the virtual machine name contains special characters, type the questionmark wildcard in place of the special characters when you specify the virtualmachine name.
mgmtclassnameOptional parameter. Specifies the management class to use when the specifiedvirtual machine is backed up. If this parameter is not specified, themanagement class defaults to the global virtual machine management classthat is specified by the vmmc option.
Examples
Assume that the following management classes exist and are active on the TivoliStorage Manager server:v MCFORTESTVMSv MCFORPRODVMSv MCUNIQUEVM
Example 1The following include.vm statement in the client options file binds allvirtual machines that have names that begin with VMTEST to themanagement class called MCFORTESTVMS:include.vm vmtest* MCFORTESTVMS
Chapter 5. Options reference 45

Example 2The following include.vm statement in the client options file binds avirtual machine that is named WHOPPER VM1 [PRODUCTION] to themanagement class called MCFORPRODVMS:include.vm "WHOPPER VM1 ?PRODUCTION?" MCFORPRODVMS
The virtual machine name must be enclosed in quotation marks because itcontains space characters. Also, the question mark wildcard is used tomatch the special characters in the virtual machine name.
Example 3The following include.vm statement in the client options file binds avirtual machine that is named VM1 to a management class that is namedMCUNIQUEVM:include.vm VM1 MCUNIQUEVM
Related information
“Vmmc” on page 57
ModeUse the mode option to specify the backup mode to use when performing specificbackup operations.
You can use the mode option with the backup vm command. this parameter specifieswhether to perform a full image backup, an incremental-forever full backup, or anincremental-forever-incremental backup of Hyper-V virtual machines.
The mode option has no effect on a when backing up a raw logical device.
Syntax
►►IFIncremental
MODE =IFFull
►◄
Parameters
IFIncrementalSpecifies that you want to perform an incremental-forever-incremental backupof a Hyper-V virtual machine. An incremental-forever-incremental backupbacks up only the disk blocks that have changed since the last backup. This isthe default backup mode.
You cannot use this backup mode to back up a virtual machine if the client isconfigured to encrypt the backup data.
IFFullSpecifies that you want to perform an incremental-forever-full backup of aHyper-V virtual machine. An incremental-forever-full backup backs up all usedblocks on a virtual machine's disks. By default, the first backup of a Hyper-Vvirtual machine is an incremental-forever-full (mode=iffull) backup, even ifyou specify mode=ifincremental (or let the mode option default). Subsequentbackups default to mode=ifincremental.
46 IBM Tivoli Storage Manager for Virtual Environments: Data Protection for Microsoft Hyper-V Installation and User's Guide

You cannot use this backup mode to back up a virtual machine if the client isconfigured to encrypt the backup data.
Examples
Task Perform an incremental-forever-full VM backup of a Windows Hyper-VVM named msvm1dsmc backup vm msvm1 -mode=iffull-vmbackuptype=hypervfull
Task Perform an incremental-forever-incremental backup of a Windows Hyper-VVM named msvm1dsmc backup vm msvm1 -mode=ifincremental-vmbackuptype=hypervfull
Related reference:“Backup VM” on page 27
MbobjrefreshthreshThe mbobjrefreshthresh (megablock object refresh threshold) option is a numberdefining a threshold. When the number of Tivoli Storage Manager objects that areneeded to describe any 128 MB megablock exceeds this value, the entire megablockis refreshed and the objects that were used to represent this area, in previousbackups, are expired.
When you backup a virtual machine, the data is stored on the Tivoli StorageManager server in 128 MB units, called megablocks. If an area on the productiondisk changes and a new incremental backup is performed, a new megablock iscreated to represent the changes that were made to the previously backed up data.Because a new megablock can be created with each incremental backup, eventuallythe megablocks can adversely affect the performance of the Tivoli Storage Managerdatabase, and therefore, adversely affect the performance of most Tivoli StorageManager operations.
Use this option when estimating Tivoli Storage Manager objects that representproduction data for each virtual machine backup. For example, when the numberof Tivoli Storage Manager objects exceed this value, the megablock is refreshed.This action means that the entire 128-MB block is copied to the Tivoli StorageManager server and is represented as a single Tivoli Storage Manager object. Theminimum value is 2 and the maximum value is 8192. The default value is 50.
Options file
Specify this option in the client options file.
Syntax
►►50
MBOBJREFRESHTHRESHinteger
►◄
Parameters
The minimum value you can specify is 2 megablocks, the largest value is 8192megablocks; the default is 50 megablocks.
Chapter 5. Options reference 47
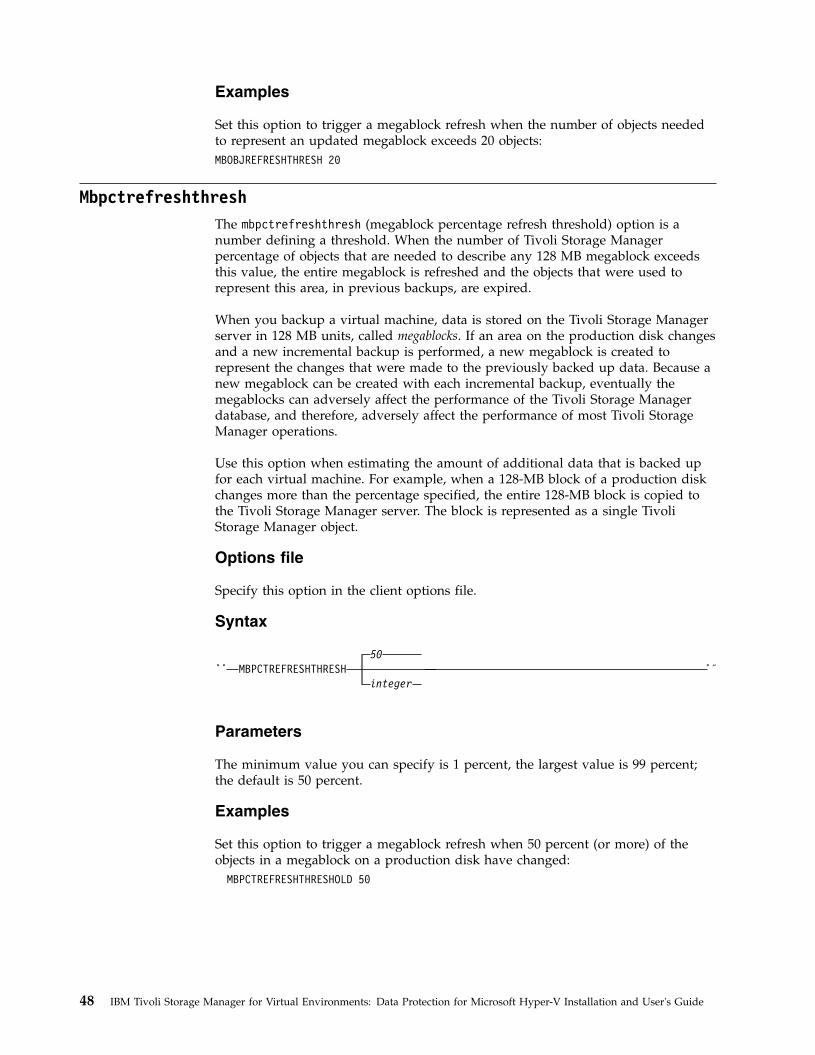
Examples
Set this option to trigger a megablock refresh when the number of objects neededto represent an updated megablock exceeds 20 objects:MBOBJREFRESHTHRESH 20
MbpctrefreshthreshThe mbpctrefreshthresh (megablock percentage refresh threshold) option is anumber defining a threshold. When the number of Tivoli Storage Managerpercentage of objects that are needed to describe any 128 MB megablock exceedsthis value, the entire megablock is refreshed and the objects that were used torepresent this area, in previous backups, are expired.
When you backup a virtual machine, data is stored on the Tivoli Storage Managerserver in 128 MB units, called megablocks. If an area on the production disk changesand a new incremental backup is performed, a new megablock is created torepresent the changes that were made to the previously backed up data. Because anew megablock can be created with each incremental backup, eventually themegablocks can adversely affect the performance of the Tivoli Storage Managerdatabase, and therefore, adversely affect the performance of most Tivoli StorageManager operations.
Use this option when estimating the amount of additional data that is backed upfor each virtual machine. For example, when a 128-MB block of a production diskchanges more than the percentage specified, the entire 128-MB block is copied tothe Tivoli Storage Manager server. The block is represented as a single TivoliStorage Manager object.
Options file
Specify this option in the client options file.
Syntax
►►50
MBPCTREFRESHTHRESHinteger
►◄
Parameters
The minimum value you can specify is 1 percent, the largest value is 99 percent;the default is 50 percent.
Examples
Set this option to trigger a megablock refresh when 50 percent (or more) of theobjects in a megablock on a production disk have changed:
MBPCTREFRESHTHRESHOLD 50
48 IBM Tivoli Storage Manager for Virtual Environments: Data Protection for Microsoft Hyper-V Installation and User's Guide

NopromptThe noprompt option suppresses the confirmation prompt that is presented by theexpire command.
Use the noprompt option with the expire command.
Syntax
►► NOPrompt ►◄
Parameters
There are no parameters for this option.
Examples
Command line:dsmc expire -noprompt c:\home\project\*
NumberformatThe numberformat option specifies the format you want to use to display numbers.
Use this option if you want to change the default number format for the languageof the message repository you are using.
By default, format information is obtained from the locale definition in effect at thetime the client is called. Consult the documentation on your local system fordetails about setting up your locale definition.
You can only use the numberformat option with the expire command.
Options File
Place this option in the client user-options file (dsm.opt). You can set this option onthe Regional Settings tab, Number Format field of the Preferences editor.
Syntax
►► NUMberformat number ►◄
Parameters
numberDisplays numbers using any one of the following formats. Specify the number(0–6) that corresponds to the number format you want to use.
0 Use the locale-specified date format. This is the default (does not apply toMac OS X).
1 1,000.00
This is the default for the following available translations:v US Englishv Japanese
Chapter 5. Options reference 49
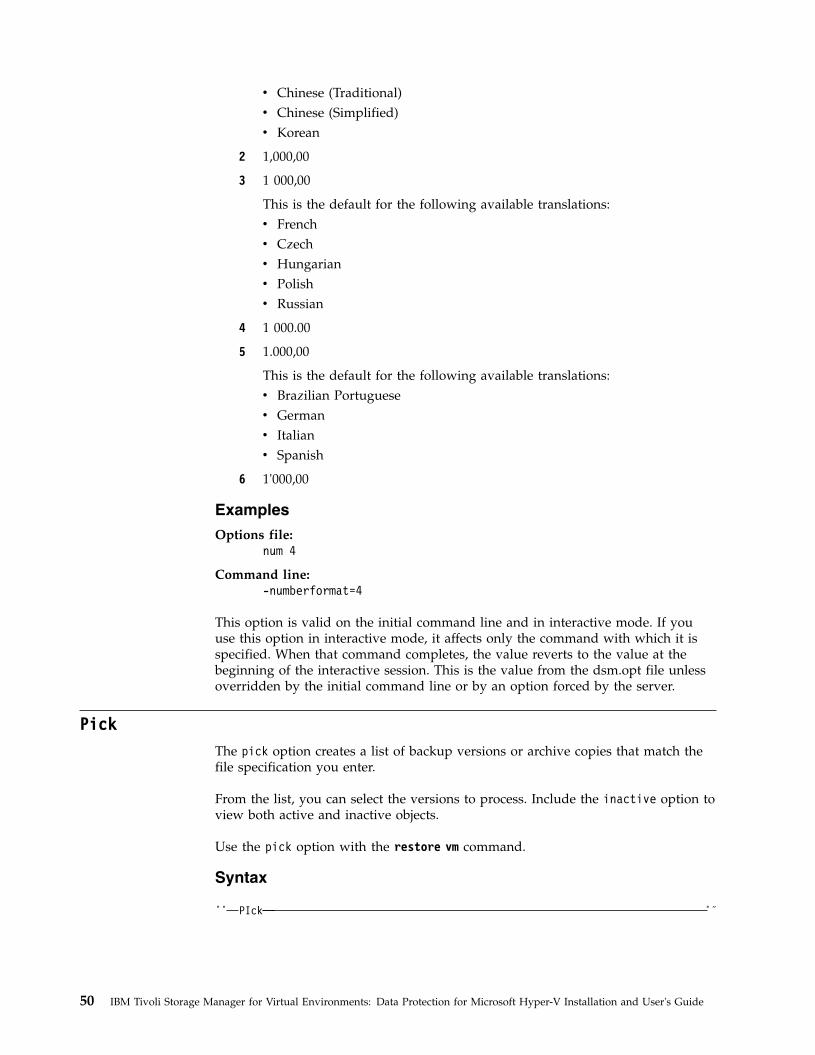
v Chinese (Traditional)v Chinese (Simplified)v Korean
2 1,000,00
3 1 000,00
This is the default for the following available translations:v Frenchv Czechv Hungarianv Polishv Russian
4 1 000.00
5 1.000,00
This is the default for the following available translations:v Brazilian Portuguesev Germanv Italianv Spanish
6 1'000,00
Examples
Options file:num 4
Command line:-numberformat=4
This option is valid on the initial command line and in interactive mode. If youuse this option in interactive mode, it affects only the command with which it isspecified. When that command completes, the value reverts to the value at thebeginning of the interactive session. This is the value from the dsm.opt file unlessoverridden by the initial command line or by an option forced by the server.
PickThe pick option creates a list of backup versions or archive copies that match thefile specification you enter.
From the list, you can select the versions to process. Include the inactive option toview both active and inactive objects.
Use the pick option with the restore vm command.
Syntax
►► PIck ►◄
50 IBM Tivoli Storage Manager for Virtual Environments: Data Protection for Microsoft Hyper-V Installation and User's Guide
Parameters
There are no parameters for this option.
Examples
Command line:dsmc restore vm vmfin* -pick -inactive
PitdateUse the pitdate option with the pittime option to establish a point in time todisplay or restore the latest version of your backups.
Files that were backed up on or before the date and time you specify, and whichwere not deleted before the date and time you specify, are processed. Backupversions that you create after this date and time are ignored.
Use the pitdate option with the query vm and restore vm commands.
When pitdate is used, the inactive and latest options are implicit.
Syntax
►► PITDate = date ►◄
Parameters
dateSpecifies the appropriate date.
Examples
Command line:dsmc restore vm vmfin3 -pitdate=02/21/2014
PittimeUse the pittime option with the pitdate option to establish a point in time todisplay or restore the latest version of your backups.
Files that were backed up on or before the date and time you specify, and whichwere not deleted before the date and time you specify, are processed. Backupversions that you create after this date and time are ignored. This option is ignoredif you do not specify pitdate option.
Use the pittime option with the query vm and restore vm commands.
Syntax
►► PITTime = time ►◄
Chapter 5. Options reference 51

Parameters
timeSpecifies a time on a specified date. If you do not specify a time, the timedefaults to 23:59:59.
Examples
Command line:dsmc query vm vmfin1 -pitt=06:00:00 -pitd=02/03/2014
TimeformatThe timeformat option specifies the format in which you want to display and entersystem time.
Use this option if you want to change the default time format for the language ofthe message repository you are using.
By default, format information is obtained from the locale definition in effect at thetime the client is called. Consult the documentation on your local system fordetails about setting up your locale definition.
You can only use the timeformat option with the expire command.
When you include the timeformat option with a command, it must precede thefromtime, pittime, and totime options.
Options File
Place this option in the client options file (dsm.opt). You can set this option on theRegional Settings tab, Time Format field of the Preferences editor.
Syntax
►► TIMEformat format_number ►◄
Parameters
format_numberDisplays time in one of the formats listed here. Select the format number thatcorresponds to the format you want to use. When you include the timeformatoption in a command, it must precede the pittime option.1 23:00:002 23,00,003 23.00.004 12:00:00 A/P5 A/P 12:00:00
Examples
Options file:timeformat 4
Command line:-time=3
52 IBM Tivoli Storage Manager for Virtual Environments: Data Protection for Microsoft Hyper-V Installation and User's Guide
This option is valid on the initial command line and in interactive mode. If youuse this option in interactive mode, it affects only the command with which it isspecified. When that command completes, the value reverts to the value at thebeginning of the interactive session. This is the value from the dsm.opt file unlessoverridden by the initial command line or by an option forced by the server.
Additional considerations for specifying time and date formats
The date or time format you specify with this option must be used when usingoptions that take date and time as input. Examples are: totime, fromtime, todate,fromdate, and pittime.
For example, if you specify the timeformat option as TIMEFORMAT 4, the value thatyou provide on the fromtime or totime option must be specified as a time such as12:24:00pm. Specifying 13:24:00 would not be valid because TIMEFORMAT 4 requiresan hour integer that is 12 or less. If you want to specify up to 24 hour values on anoption, and if you want to use commas as separators, you must specify TIMEFORMAT2.
VmbackdirThe vmbackdir option specifies the temporary disk location where the client savescontrol files that are created during full VM backup and restore operations ofMicrosoft Hyper-V virtual machines.
When a client on a data mover node starts a full VM backup of a virtual machine,the client creates metadata in files that are associated with the backed up virtualmachine and its data. The files that contain the metadata are referred to as controlfiles.
During full VM backup operations, the metadata is saved on a disk in the datamover node until the backup completes and both the virtual machine data and thecontrol files are saved to server storage. During a full VM restore operation, thecontrol files are copied from the server and are temporarily stored on the datamover disk, where they are used to restore the virtual machine and its data. Aftera backup or a restore operation completes, the control files are no longer neededand the client deletes them from their temporary disk location.
The directory that is specified by this option must be on a drive that containssufficient free space to contain the control information from a full VM backup.
Options File
Set this option in the client options file, or specify it on the command line as anoption for the backup vm or restore vm commands.
Syntax
►► VMBACKDir directory ►◄
Parameters
directorySpecifies the path where the control files are stored on the backup server.
The default is c:\mnt\tsmvmbackup\fullvm\
Chapter 5. Options reference 53

Examples
Options file:VMBACKD c:\mnt\tsmvmbackup\
Command line:dsmc backup vm -VMBACKUPT=fullvm -VMBACKD=G:\virtual_machine\control_files\
dsmc restore vm -VMBACKUPT=fullvm -VMBACKD=G:\san_temp\
VmbackuptypeUse the vmbackuptype option with the backup VM or restore VM command tospecify a Hyper-V full VM backup.
Options File
Place this option in the client options file (dsm.opt), or on the command line.
Syntax
►► VMBACKUPType HYPERVFULL ►◄
Parameters
HYPERVFULLSpecify this value when you perform a full VM backup of one or moreHyper-V virtual machines.
Examples
Options file:VMBACKUPT hypervfull
Command line:dsmc backup vm VM2 -VMBACKUPT=hypervfull -MODE=IFFULL
Performs a full virtual-machine backup of Hyper-V virtual machine named"VM2", to the Tivoli Storage Manager server.
VmctlmcThis option specifies the management class to use when backing up virtualmachine control files.
By default, virtual machine control files are bound to the default managementclass. The vmmc option can be used to specify a different management class towhich virtual machine data and virtual machine control files are bound. Thevmctlmc option overrides the default management class and the vmmc option for thevirtual machine control files.
Under certain conditions, it might be desirable or necessary to bind the controlfiles to a different management class than the data files.
The vmctlmc option is required if virtual machine data files are backed up to tape.Virtual machine control files must be backed up to a disk-based storage pool thatdoes not migrate to tape. The storage pool can be composed of random access
54 IBM Tivoli Storage Manager for Virtual Environments: Data Protection for Microsoft Hyper-V Installation and User's Guide

volumes and sequential file volumes; the storage pool can also be a deduplicatedpool. Use the vmctlmc option to specify a management class that stores data insuch a storage pool.
Restriction: The management class that is specified by the vmctlmc optiondetermines only the destination storage pool for virtual machine control files.Retention of the control files is determined by the vmmc option, if specified, or bythe default management class. The retention for the virtual machine control filesalways matches the retention of the virtual machine data files.
Options File
Place this option in the client options file dsm.opt.
Syntax
►► VMCTLmc class_name ►◄
Parameters
class_nameSpecifies a management class that applies to backing up virtual machinecontrol files. If you do not set this option, the management class that isspecified on the vmmc option is used. If you do not set this option and the vmmcoption is not set, the default management class of the node is used.
Examples
Options file:vmctlmc diskonlymc
Command line:Does not apply.
VmmaxparallelThis option is used to configure parallel backups of several virtual machines, usinga single instance of the backup-archive client. The vmmaxparallel option specifiesthe maximum number of virtual machines that can be backed up to the server, atany one time.
Options file
This option is valid in the client options file (dsm.opt) or on the command line forBackup VM. It can also be included on the server in a client options set. It cannot beset in the Preferences Editor.
Syntax
►►1
VMMAXParallelinteger
►◄
Chapter 5. Options reference 55

Parameters
integerSpecifies the maximum number of virtual machines that can be backed up, atany one time, during a parallel backup operation. The default is 1. Themaximum is 50.
Note: When using client side deduplication, a deduplication session is startedfor each VM. This deduplication session is not counted as one of thevmmaxparallel sessions.The MAXNUMMP server parameter specifies the maximum number of mountpoints a node is allowed to use on the server when the copy destination of thestorage pool is FILE or TAPE. MAXNUMMP must be equal to or greater than theVMMAXPARALLELsetting. When multiple instances of the client are backing upfiles, or when a single client performs parallel backups, additional mountpoints might be needed. If the number of mount points requested exceeds theMAXNUMMP value, the server issues an error (ANS0266I). In response to the error,the client reduces VMMAXPARALLEL to match the number specified by MAXNUMMPand continues the backup with the reduced number of sessions. If additionalANS0266I errors are detected, the client reduces VMMAXPARALLEL by 1 andattempts to continue the backup. If VMMAXPARALLEL is decremented to 1 and theclient receives more ANS0266I errors, the client ends the backup and issues thefollowing error:ANS5228E A backup VM operation failed because VMMAXPARALLEL wasreduced to 1 and the client still cannot obtain a server mount point.Contact your server administrator if you need the value that is currently set forMAXNUMMP increased, so your node can support additional parallel backupsessions.During Hyper-V virtual machine backups, Tivoli Storage Manager creates VSSsnapshots of all volumes that contain virtual machine data. Backup data isread from the VSS snapshots, and not from data that is on the live file system.In many cases, when Tivoli Storage Manager attempts to create severalsnapshots concurrently, the VSS software provider might fail to satisfy asnapshot request for several virtual machines. The failures occur because theVSS software snapshot provider can not handle the load that is created byseveral backups that are attempted in parallel. To avoid this issue, use a VSShardware snapshot provider instead of a VSS software provider.
Examples
Options fileVMMAXP 10
Related reference:“Backup VM” on page 27“Domain.vmfull” on page 41
56 IBM Tivoli Storage Manager for Virtual Environments: Data Protection for Microsoft Hyper-V Installation and User's Guide

VmmcUse the vmmc option to store virtual machine backups by using a management classother than the default management class. The vmmc option is only valid whenvmbackuptype=hypervfull option is set.
Options File
Place this option in the client options file (dsm.opt), or on the command line.
Syntax
►► VMMC management_class_name ►◄
Parameters
management_class_nameSpecifies a management class that applies to the backed up virtual machinedata. If you do not set this option, the default management class of the node isused.
Examples
Task: Run a backup of the virtual machine that is named myVirtualMachine andsave the backup according to the management class that is namedmyManagmentClass.
dsmc backup vm "myVirtualMachine" -vmmc=myManagmentClass
Chapter 5. Options reference 57

58 IBM Tivoli Storage Manager for Virtual Environments: Data Protection for Microsoft Hyper-V Installation and User's Guide

Chapter 6. Mount and file restore
Tivoli Storage Manager recovery agent configurationsThe Tivoli Storage Manager recovery agent provides a variety of configurations forperforming file restore and disk / block device exposure.
Off-host file restore
These configurations do not require Tivoli Storage Manager recovery agent to beinstalled in each virtual machine guest. Instead, an off-host instance is responsiblefor file restore of multiple virtual machines. With this configuration, the mountprocess exposes a virtual volume from a selected disk partition. For GPT disks, thewhole disk must be exposed to make the partitions available, and the disk must beiSCSI connected. Use the recovery agent GUI to accomplish this task.
The Tivoli Storage Manager administrator must register a node that is associatedwith the recovery agent. The recovery agent node must be granted proxy authorityto access the data node (or nodes) where the snapshots are stored. When asnapshot is mounted to the off-host server, the virtual volume can benetwork-shared to make it accessible to the virtual machine guest. Or, you cancopy the files from the mounted volume to the virtual machine guest by anyfile-sharing method.v For step by step restore instructions, see “Restoring one or more files” on page
63
In-guest file restore
These configurations require Tivoli Storage Manager recovery agent to be installedin each virtual machine guest. The mount and restore process is performed for asingle partition from the backed up disk.
The Tivoli Storage Manager recovery agent node name is typically granted accessonly to the virtual machine where it is running with the Tivoli Storage Managerbackup-archive client dsmc set access command. The restore process is typicallybegun by a user who logs in to the guest machine of the virtual machine.
For these configurations, be sure to compare the specific virtual machine guestoperating system requirements with the supported levels of Tivoli Storage Managerrecovery agent. If a specific operating system is not supported, determine if theoff-host disk / block device exposure configuration can also be used for filerestore. Use the Tivoli Storage Manager recovery agent GUI to accomplish thistask.v For planning information and operating system-based guidelines, see Chapter 6,
“Mount and file restore.”v For step-by-step restore instructions, see “Restoring one or more files” on page
63.
Off-host iSCSI target
This configuration exposes an iSCSI target from the instance of the off-host TivoliStorage Manager recovery agent and manually uses an in-guest iSCSI initiator to
© Copyright IBM Corp. 2011, 2015 59
access the disk snapshot. This configuration requires an iSCSI initiator to beinstalled within the virtual machine guest. This approach exposes an iSCSI LUN,rather than the off-host file restore, which exposes an individual disk partition. Usethe Tivoli Storage Manager recovery agent GUI to accomplish this task.
In this configuration, the user specifies the virtual machine guest iSCSI initiatorname for the system where the iSCSI device is accessed. After a disk snapshot ismounted, it can be discovered and logged in to by using the iSCSI initiator in thevirtual machine guest.
If you back up a virtual machine that contains GUID Partition Table (GPT) disksand want to mount the volume in the GPT disk, follow this procedure:1. Mount the GPT disk as an iSCSI target.2. Use the Microsoft iSCSI Initiator to log onto the target.3. Open the Windows Disk Management to find the disk and bring it online. You
can then view the volume in the GPT disk.v For planning information and operating system-based guidelines, see Chapter 6,
“Mount and file restore,” on page 59.v For step by step restore instructions, see “Restoring one or more files” on page
63.
Snapshot mount overviewYou can use Tivoli Storage Manager recovery agent to mount a snapshot and usethe snapshot to complete data recovery.
Mount snapshots with the Tivoli Storage Manager recovery agent GUI. Install andrun the recovery agent on a system that is connected to the Tivoli Storage Managerserver through a LAN. You cannot use the recovery agent component operations ina LAN-free path.
Be aware of these three situations when running mount operations:v When the Tivoli Storage Manager recovery agent is installed on a guest machine,
you cannot start a mount operation for any file system or disk while the guestmachine is being backed up. You must either wait for the backup to complete, oryou must cancel the backup before running a mount operation. These operationsare not allowed because the locking mechanism is for a full virtual machine.
v When you browse the snapshot backup inventory, the operating system versionof the virtual machine is the version that was specified when the virtualmachine was originally created. As a result, recovery agent might not reflect thecurrent operating system.
v A volume becomes unstable when a network failure interrupts a mountoperation. A message is issued to the event log. When the network connection isreestablished, another message is issued to the event log. These messages are notissued to the recovery agent GUI.
A maximum of 20 iSCSI sessions is supported. The same snapshot can be mountedmore than one time. If you mount a snapshot from the same tape storage pool byusing multiple instances of the recovery agent, one of the following actions occurs:v The second recovery agent instance is blocked until the first instance is
complete.v The second recovery agent instance might interrupt the activity of the first
instance. For example, it might interrupt a file copy process on the first instance.
60 IBM Tivoli Storage Manager for Virtual Environments: Data Protection for Microsoft Hyper-V Installation and User's Guide
v The recovery agent cannot connect to multiple servers or nodes simultaneously.
As a result, avoid concurrent recovery agent sessions on the same tape volume.
Mount guidelinesSnapshots can be mounted in either read-only or read/write mode. In read/writemode, recovery agent saves changes to data in memory. If the service is restarted,the changes are lost.
The recovery agent operates in either of the following two modes:
No user is logged inRecovery agent runs as a service.
User is logged inRecovery agent continues to run as a service until you start the recoveryagent and use the GUI. When you close the recovery agent and GUI, theservice restarts. You can use only the recovery agent application and GUIwhen running with administrator login credentials. Only one copy of therecovery agent application can be active at any time.
When mounted volumes exist and you start Mount from the Start menu, thismessage is displayed:
Some snapshots are currently mounted. If you choose to continue, these snapshots will bedismounted. Note that if a mounted volume is currently being used by an application, theapplication may become unstable. Continue?
When Yes is clicked, the mounted volumes are unmounted, even when they are inuse.
Restriction: When exposing snapshots as iSCSI targets, and a snapshot of adynamic disk is displayed to its original system, the UUIDs become duplicated.Likewise when a snapshot of a GPT disk is displayed to its original system, theGUIDs become duplicated. To avoid this duplication, expose dynamic disks andGPT disks to a system other than the original system. For example, expose thesedisk types to a proxy system, unless the original disks no longer exist.
File restore overviewUse the Tivoli Storage Manager recovery agent for efficient file restores and tominimize downtime by mounting snapshots to virtual volumes.
Tivoli Storage Manager recovery agent can be used for the following tasks:v Recovering lost or damaged files from a backupv Mounting a virtual machine guest volume and creating an archive of the virtual
machine guest filesv Mounting database applications for batch reports
The virtual volume can be viewed by using any file manager, for exampleWindows Explorer. The directories and files in the snapshot can be viewed andmanaged like any other file. If you edit the files and save your changes, after youunmount the volume, your changes are lost because the changed data is held inmemory and never saved to disk. Because the changes are written to memory,Tivoli Storage Manager recovery agent can use a large amount of RAM when it isworking in read/write mode.
Chapter 6. Mount and file restore 61

You can copy the changed files to another volume before you unmount thevolume.
The default read only mount option is the preferred method, unless a mountedvolume must be writeable. For example, an archive application might require writeaccess to the archived volume.
The Tivoli Storage Manager recovery agent mounts snapshots from the TivoliStorage Manager server. In the Tivoli Storage Manager recovery agent GUI, clickRemove to close an existing connection to a Tivoli Storage Manager server. Youmust remove any existing connection before you can establish a new connection toa different server or different node. Dismount all volumes before you clickRemove. The remove operation fails if there are active mount and restore sessionsin the mount machines. You cannot remove the connection to a server when youare running a file restore from that server. You must first dismount all virtualdevices and stop all restore sessions before you disconnect from a server. If you donot do so, the connection is not removed.
You must unmount all virtual volumes before uninstalling Tivoli Storage Managerrecovery agent. Otherwise, these mounted virtual volumes cannot be unmountedafter Tivoli Storage Manager recovery agent is reinstalled.
Restoring file information for a block-level snapshot is a random-access process. Asa result, processing might be slow when a sequential-access device (such as a tape)is used. To run a file restore of data that is stored on tape, consider moving thedata to disk or file storage first. From a Tivoli Storage Manager serveradministrative command-line client (dsmadmc), issue the QUERY OCCUPANCY commandto see where the data is stored. Then, issue the MOVE NODEDATA command to movethe data back to disk or file storage.
Mounting a snapshot from the same tape storage pool by two instances of Mountcan cause one of these results:v The second Mount instance is blocked until the first instance is complete.v Both mounts succeed, but the performance is poor.
When restoring data from a mirrored volume, mount only one of the disks thatcontains the mirrored volume. Mounting both disks causes Windows to attempt aresynchronization of the disks. However, both disks contain a different time stampif mounted. As a result, all data is copied from one disk to the other disk. Thisamount of data cannot be accommodated by the virtual volume. When you mustrecover data from a volume that spans two disks, and those disks contain amirrored volume, complete these steps:1. Mount the two disks.2. Use the iSCSI initiator to connect to the first disk.3. Use Windows Disk Manager to import this disk. Ignore any message regarding
synchronization.4. Delete the mirrored partition from the first (or imported) disk.5. Use the iSCSI initiator to connect to the second disk.6. Use Windows Disk Manager to import the second disk.
Both volumes are now available.
Restriction: Do not change a Tivoli Storage Manager node password whilerunning a file restore from snapshots stored in that node.
62 IBM Tivoli Storage Manager for Virtual Environments: Data Protection for Microsoft Hyper-V Installation and User's Guide

File restore guidelinesYou can use Tivoli Storage Manager recovery agent for efficient file restore and tominimize downtime by mounting snapshots to virtual volumes. File restore issupported from snapshots of NTFS, FAT, or FAT32 volumes.
The mount function cannot be used to mount a snapshot of partitions from adynamic or GPT-based disk as a virtual volume. Only partitions from anMBR-based, basic disk can be mounted as virtual volumes. File restore from GPT,dynamic, or any other non-MBR or non-basic disk is possible by creating a virtualiSCSI target and using an iSCSI initiator to connect it to your system.
If you are running a file restore of data on dynamic disks, the snapshot must bemounted to a server that has the same version of Windows, or a newer version ofWindows, as the node that created the snapshot. Files on the dynamic disk can beaccessed indirectly by nodes that have older versions of Windows, by mapping adrive on the older nodes to a CIFS share where the snapshot is mounted.
Important: The ACL values associated with the folders and files that are restoredin a file restore operation are not transferred to the restored files. In order tomaintain ACL values, use the XCOPY command when copying files from thetarget.
Restoring one or more filesYou can restore one (or more) files from a virtual machine that was backed up toTivoli Storage Manager server storage.
Before you begin
If your restore operation accesses the virtual machine disk snapshot with anin-guest iSCSI initiator, make sure the following conditions exist before proceeding:v The iSCSI device is configured and the iSCSI Initiator program is running.v Port 3260 is open in the LAN firewall between the system where the Tivoli
Storage Manager recovery agent GUI is installed and the initiator system.
About this task
To mount a backed up virtual machine disk and export the mounted volume for afile restore operation, complete the following steps:
Procedure1. Start the Tivoli Storage Manager recovery agent GUI.
On the Windows system, go to Start > Apps by name > Tivoli StorageManager > Tivoli Storage Manager Recovery Agent.The Tivoli Storage Manager recovery agent GUI can either be installed on thevirtual machine guest or installed on a separate host.
2. Connect to a Tivoli Storage Manager server by clicking Select TSM server.The target node is where the backups are located. You can manage the level ofaccess to the target node data by specifying a different node name in the Nodeaccess method section.
3. Select a virtual machine from the list.
Chapter 6. Mount and file restore 63
Tip: You can find your virtual machine quickly by typing the first few lettersof the machine name in the edit portion of the list box. The list shows onlythose machines that match the letters you entered. Machine names arecase-sensitive.A virtual machine might display in the list, but if you select it, the snapshotslist might be empty. This situation occurs because of one of the followingreasons:v No snapshots completed successfully for that virtual machine.v The Fromnode option was used and the specified node is not authorized to
restore the selected virtual machine.4. Mount the snapshot through an iSCSI connection:
a. Click Mount in the Tivoli Storage Manager recovery agent GUI.b. In the Select mount destination dialog, click Mount as an iSCSI target.c. Enter the name of the target. This name must be unique for each mount.d. Enter the iSCSI initiator name.
The iSCSI initiator name is shown in the Configuration tab in the iSCSIInitiator Properties dialog. For example:iqn.1991-05.com.microsoft:hostname
5. Complete these steps on the target system where the iSCSI initiator isinstalled:a. Click the Targets tab.b. In the Quick Connect section, enter the IP address or host name of the
system where the Tivoli Storage Manager recovery agent GUI is installed.c. Click Quick Connect.d. In the Quick Connect dialog, select the IP address or host name in the
Discovered targets field and click Connect.e. After Status - Connected is shown, click Done.f. Go to Control Panel > Administrative Tools > Computer Management >
Storage > Disk Management.1) If the mounted iSCSI target is listed as Type=Foreign, right-click
Foreign Disk and select Import Foreign Disks. The Foreign DiskGroup is selected. Click OK.
2) The next screen shows the type, condition, and size of the Foreign Disk.Click OK and wait for the disk to be imported.
3) When the disk import completes, press F5 (refresh). The mounted iSCSIsnapshot is visible and contains an assigned drive letter. If drive lettersare not automatically assigned, right-click the required partition andselect Change Drive Letters or Paths. Click Add and select a driveletter.
6. Select the preferred snapshot date. A list of virtual machine disks that arebacked up in the selected snapshot displays. Select a disk and click Mount.
7. In the Select Mount Destination dialog, check Create virtual volume fromselected partition. A list of partitions available on the selected disk is shown.For each partition, its size, label, and file system type are displayed.v If the disk is not MBR-based, an error message is displayed.v By default, only partitions that can be used for file restore are displayed.v To display all partitions that existed on the original disk, clear the Show
only mountable partitions check box.8. Select the required partition. Partitions formatted using unsupported file
systems cannot be selected.
64 IBM Tivoli Storage Manager for Virtual Environments: Data Protection for Microsoft Hyper-V Installation and User's Guide

9. Specify a drive letter or an empty folder as a mount point for the virtualvolume.
10. Click OK to create a Virtual Volume that can be used to recover the files.11. When the Virtual Volume is created, use Windows Explorer to copy the files to
your preferred location.
Important: The ACL values associated with the folders and files that arerestored in a file restore operation are not transferred to the restored files. Inorder to maintain ACL values, use the XCOPY command when copying filesfrom the target.
Related tasks:“Configuring the Tivoli Storage Manager recovery agent GUI” on page 19“Manually configuring an iSCSI device” on page 23
Chapter 6. Mount and file restore 65

66 IBM Tivoli Storage Manager for Virtual Environments: Data Protection for Microsoft Hyper-V Installation and User's Guide
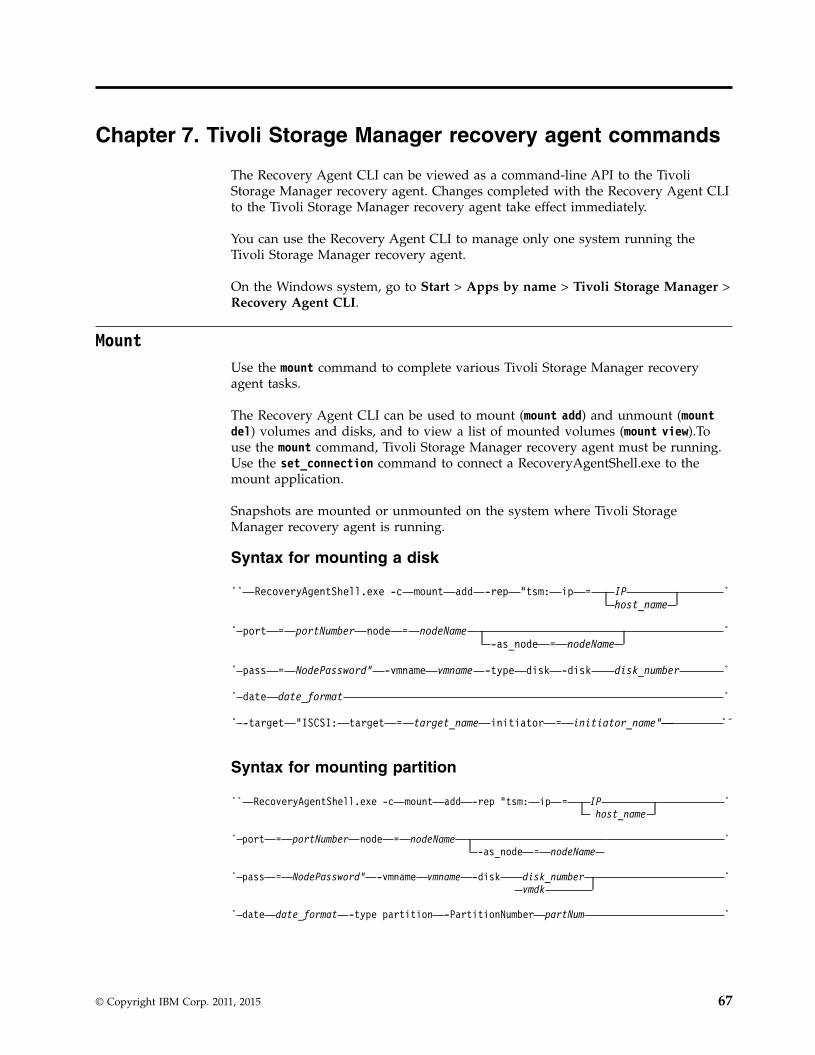
Chapter 7. Tivoli Storage Manager recovery agent commands
The Recovery Agent CLI can be viewed as a command-line API to the TivoliStorage Manager recovery agent. Changes completed with the Recovery Agent CLIto the Tivoli Storage Manager recovery agent take effect immediately.
You can use the Recovery Agent CLI to manage only one system running theTivoli Storage Manager recovery agent.
On the Windows system, go to Start > Apps by name > Tivoli Storage Manager >Recovery Agent CLI.
MountUse the mount command to complete various Tivoli Storage Manager recoveryagent tasks.
The Recovery Agent CLI can be used to mount (mount add) and unmount (mountdel) volumes and disks, and to view a list of mounted volumes (mount view).Touse the mount command, Tivoli Storage Manager recovery agent must be running.Use the set_connection command to connect a RecoveryAgentShell.exe to themount application.
Snapshots are mounted or unmounted on the system where Tivoli StorageManager recovery agent is running.
Syntax for mounting a disk
►► RecoveryAgentShell.exe -c mount add -rep "tsm: ip = IPhost_name
►
► port = portNumber node = nodeName-as_node = nodeName
►
► pass = NodePassword" -vmname vmname -type disk -disk disk_number ►
► date date_format ►
► -target "ISCSI: target = target_name initiator = initiator_name" ►◄
Syntax for mounting partition
►► RecoveryAgentShell.exe -c mount add -rep "tsm: ip = IPhost_name
►
► port = portNumber node = nodeName-as_node = nodeName
►
► pass = NodePassword" -vmname vmname -disk disk_numbervmdk
►
► date date_format -type partition -PartitionNumber partNum ►
© Copyright IBM Corp. 2011, 2015 67

► -target volume_letter"ISCSI: target = target_name initiator = initiator_name"
►◄
Command types
add Use this command type to mount a disk or volume of a snapshot to thesystem where Tivoli Storage Manager recovery agent is running.
The following list identifies the tags and parameters for the add commandtype:
-targetThis tag is required. Use this tag to specify the following targets:v Virtual volume - only for a partition mountv Reparse point - only for a partition mountv iSCSI target
-rep This tag is required. Use it to specify the Tivoli Storage Managerserver that is storing the snapshots, and the Tivoli Storage Managernode that has access to the backups. For example:tsm: ip=<ip/host_name> port=<port_number>node=<node_name> pass=<node_password>
You can also specify the as_node and from_node options. If thepassword field is empty, the Tivoli Storage Manager recovery agentattempts to use the password for the stored node.
-type This tag is required. Use it to specify that you want to mount adisk or a partition. The options are:
-type disk-type partition
-VMnameThis tag is required. Use it to specify the machine name that issource of the snapshot. The specified value is case-sensitive.
-disk This tag is required. Use it to specify the disk number of the sourcebacked up machine to be mounted.
-date This tag is required. Use it to specify the date of the snapshot thatyou want to mount. The date format is yyyy-Mmm-dd hh:mm:ss. Forexample:-date "2013-Apr-12 22:42:52 AM"
To view the active (or latest) snapshot, specify last snapshot.
-PartitionNumberThis tag is optional. If the -type is partition, enter the partitionnumber to mount.
-ro|-fwUse this tag to specify whether the mounted volume is read-only(-ro) or fake-write (-fw).
-disk This tag is required. Use it to specify the disk number of the sourcebacked up machine to be mounted.
-ExpireProtectThis tag is optional. During a mount operation, the snapshot onthe Tivoli Storage Manager server is locked to prevent it from
68 IBM Tivoli Storage Manager for Virtual Environments: Data Protection for Microsoft Hyper-V Installation and User's Guide

expiring during the operation. Expiration might occur becauseanother snapshot is added to the mounted snapshot sequence. Thisvalue specifies whether to disable expiration protection during themount operation. You can specify one of the following values:
Yes Specify Yes to protect the snapshot from expiration. Thisvalue is the default. The snapshot on the Tivoli StorageManager server is locked and the snapshot is protectedfrom expiration during the mount operation.
No Specify No to disable expiration protection. The snapshot onthe Tivoli Storage Manager server is not locked and thesnapshot is not protected from expiration during themount operation. As a result, the snapshot might expireduring the mount operation. This expiration can produceunexpected results and negatively impact the mount point.For example, the mount point can become unusable orcontain errors. However, expiration does not affect thecurrent active copy. The active copy cannot expire duringan operation.
When the snapshot is on a target replication server, thesnapshot cannot be locked because it is in read-only mode.A lock attempt by the server causes the mount operation tofail. To avoid the lock attempt and prevent such a failure,disable expiration protection by specifying No.
dump Use this command type to get a list of all the available backups to mount.
The following list identifies the tags and parameters for the dump commandtype:
-rep This tag is required. Use this tag to specify the Tivoli StorageManager server storing the snapshots, and to specify the TivoliStorage Manager node that has access to the backups. For example:tsm: ip=<IP/host name> port=<PortNumber>node=<NodeName> pass=<NodePassword>
-file This tag is optional. Use this tag to identify a file name to store thedump text. If this tag is not specified, the dump text is printedonly to stdout.
removeUse this type to remove the connection to a Tivoli Storage Manager server.A connection cannot be removed when it is in use, such as when mountedvolumes exist.
The following list identifies the tag for the remove command type:-rep - This tag is required. Use this tag to specify the Tivoli StorageManager server connection to be removed.
view Use this type to view a list of all mounted snapshots. This type has notags.
Example commands
The following examples use the -target tag:v In the following example V: is the virtual volume mount target:
-target "V:"
v In the following example a reparse point volume mount target is specified:
Chapter 7. Tivoli Storage Manager recovery agent commands 69

-target "C:\SNOWBIRD@FASTBACK\SnowbirtK\Snowbird\K\\"
v In the following example an iSCSI target is specified:-target "ISCSI: target=<target_name> initiator=<initiator_name>"
In this example, a snapshot of virtual machine named VM-03ent is located on aTivoli Storage Manager server with IP 10.10.10.01. Disk number 1 of this snapshotis mounted to the system where Tivoli Storage Manager recovery agent is running.The following command shows how to specify the add type to mount a disk:mount add -rep "tsm: ip=10.10.10.01 port=1500 node=tsm-ba pass=password"-target "iscsi: target=test1 initiator=initiator_name" -type disk-vmname VM-03ENT -disk 1 -date "2014-Jan-21 10:46:57 AM -ExpireProtect=Yes"
The following examples show how to specify the dump type:v List all the available backed up VMs.
mount dump –type TSM –for TSMVE -rep P -requestListVM [–file <FileNameAndPath>]
v List all the available disk snapshots of a virtual machine.mount dump –type TSM –for TSMVE -rep P -requestListSnapshots -VMName P [-file <FileNameAndPath>]
v List all the available partitions of a disk snapshot.mount dump –type TSM –for TSMVE -rep P -requestListPartitions -VMName P -disk P -date P [-file <FileNameAndPath>]
In the following example, remove the connection to a Tivoli Storage Managerserver (10.10.10.01) using node NodeName:mount remove -rep "tsm: NodeName@ip"
The following example uses the view type:mount view
Related links for mounting a Hyper-V snapshot
v “Set_connection”v “Help” on page 71
Set_connectionThe set_connection command sets the Recovery Agent CLI to work with aspecified Tivoli Storage Manager recovery agent.
Syntax
►► RecoveryAgentShell.exe -c set_connection ►
► mount_computer IP address or host_name ►◄
Command type
mount_computerUse this command type to set the connection from the Recovery Agent CLIto the system where the Tivoli Storage Manager recovery agent is installed.
The following list identifies the parameters for the mount_computercommand type:
70 IBM Tivoli Storage Manager for Virtual Environments: Data Protection for Microsoft Hyper-V Installation and User's Guide

IP address or host_nameThis variable is required. Specify the IP address or hostname of thesystem where the Tivoli Storage Manager recovery agent isinstalled.
Example commands
In the following example, the Recovery Agent CLI is set to work with TivoliStorage Manager recovery agent on the ComputerName host.set_connection mount_computer ComputerName
Related links for setting a connection
v “Mount” on page 67v “Help”
HelpThe help command displays the help for all of the supported Recovery Agent CLIcommands.
Syntax
►► RecoveryAgentShell.exe -c -h command ►◄
Command tag
-h Use this command tag to show help information.
The following list identifies the parameter for the mount_computercommand type:
commandThis variable is required. Specify the Recovery Agent command forwhich you want help information.
Example commands
In the following example, the Recovery Agent CLI is set to work with TivoliStorage Manager recovery agent on the ComputerName host.set_connection mount_computer ComputerName
Related links for setting a connection
v “Mount” on page 67v “Set_connection” on page 70
Chapter 7. Tivoli Storage Manager recovery agent commands 71

Recovery Agent command-line interface return codesReturn codes help identify the results of Recovery Agent CLI operations.
Use these return codes to check the status of your Recovery Agent CLI operations.
Table 5. Recovery Agent CLI return codes
ReturnCode Value Description
0 FBC_MSG_MOUNT_SUCCESS Command submitted successfully toData Protection for MicrosoftHyper-V mount.
0 FBC_MSG_DISMOUNT_SUCCESS Successfully dismounted a snapshot.
0 FBC_MSG_VIEW_SUCCESS View operation successful.
0 FBC_MSG_DUMP_SUCCESS Dump operation successful.
0 FBC_MSG_REMOVE_SUCCESS Remove operation successful.
1 FBC_MSG_MOUNT_FAIL Mount failed (See the mount logs fordetails).
2 FBC_MSG_MOUNT_DRIVER_ERROR Mount driver error.
3 FBC_MSG_VOLUME_LETTER_BUSY Volume letter or reparse point is inuse.
4 FBC_MSG_MOUNT_WRONG_PARAMETERS
Incorrect parameters assigned to themount command (See the mount logsfor details).
5 FBC_MSG_MOUNT_ALREADY_MOUNTED
Job is already mounted on therequested target.
6 FBC_MSG_MOUNT_WRONG_PERMISSIONS
Insufficient permissions.
7 FBC_MSG_MOUNT_NETWORK_DRIVE
Cannot mount on network mappedvolume.
8 FBC_MSG_MOUNT_LOCKED_BY_SERVER
Snapshot locked by the server.
9 FBC_MSG_CAN_NOT_CHANGE_REPOSITORY
Cannot change repository.
11 FBC_MSG_DISMOUNT_FAIL Failed to dismount a mountedsnapshot.
13 FBC_MSG_VIEW_FAIL Retrieving list of virtual volumesfailed.
15 FBC_MSG_DUMP_FAIL Dump command list creation failed.
16 FBC_MSG_CONNECTION_FAILED Disconnected from Data Protectionfor Microsoft Hyper-V mount.
17 FBC_MSG_CONNECTION_TIMEOUT Operation timed out.
18 FBC_MSG_MOUNT_FAILED_TO_FIND_REPOSITORY
Failed to find a valid repository withsnapshots.
19 FBC_MSG_MOUNT_JOB_NOT_FOUND
Failed to find the requested snapshot.
20 FBC_MSG_MOUNT_JOB_FOLDER_NOT_FOUND
Failed to find the requested snapshotdata.
72 IBM Tivoli Storage Manager for Virtual Environments: Data Protection for Microsoft Hyper-V Installation and User's Guide

Table 5. Recovery Agent CLI return codes (continued)
ReturnCode Value Description
22 FBC_MSG_CAN_NOT_REMOVE_REPOSITORY
Cannot remove selected repository.
23 FBC_MSG_REPOSITORY_GOT_MOUNTS
Repository has mounted snapshots.
38 FBC_MSG_MOUNT_NOT_WRITABLE_VOLUME
The mount volume is not writable
39 FBC_MSG_NO_TSM_REPOSITORY No Tivoli Storage Manager repositorywas located.
40 FBC_MSG_MOUNT_NOT_ALLOWED_AS_READONLY
Mounting the iSCSI target as readonly is not allowed.
41 FBC_MSG_RESOURCE_BUSY_IN_TAPE_MODE
Data Protection for MicrosoftHyper-V is running in tape mode -media is busy.
42 FBC_MSG_DISK_TYPE_NOT_SUPPORTED
Partition operation not supported forthis type of disk.
43 FBC_MSG_MOUNT_INITIALIZING The operation failed, Data Protectionfor Microsoft Hyper-V mount iscurrently initializing. Try again later.
44 FBC_MSG_CANNOT_LOCK_SNAPSHOT
The snapshot cannot be protectedagainst expiration during thisoperation. Refer to documentation formore details.
Chapter 7. Tivoli Storage Manager recovery agent commands 73

74 IBM Tivoli Storage Manager for Virtual Environments: Data Protection for Microsoft Hyper-V Installation and User's Guide

Appendix. Accessibility features for the Tivoli StorageManager product family
Accessibility features help users who have a disability, such as restricted mobilityor limited vision to use information technology products successfully.
Accessibility features
The IBM Tivoli Storage Manager family of products includes the followingaccessibility features:v Keyboard-only operation using standard operating-system conventionsv Interfaces that support assistive technology such as screen readers
The command-line interfaces of all products in the product family are accessible.
Tivoli Storage Manager Operations Center provides the following additionalaccessibility features when you use it with a Mozilla Firefox browser on aMicrosoft Windows system:v Screen magnifiers and content zoomingv High contrast mode
The Operations Center and the Tivoli Storage Manager server can be installed inconsole mode, which is accessible.
The Operations Center help system is enabled for accessibility. For moreinformation, click the question mark icon on the help system menu bar.
Vendor software
The Tivoli Storage Manager product family includes certain vendor software that isnot covered under the IBM license agreement. IBM makes no representation aboutthe accessibility features of these products. Contact the vendor for the accessibilityinformation about its products.
IBM and accessibility
See the IBM Human Ability and Accessibility Center (http://www.ibm.com/able)for information about the commitment that IBM has to accessibility.
© Copyright IBM Corp. 2011, 2015 75

76 IBM Tivoli Storage Manager for Virtual Environments: Data Protection for Microsoft Hyper-V Installation and User's Guide

Notices
This information was developed for products and services offered in the U.S.A.
IBM may not offer the products, services, or features discussed in this document inother countries. Consult your local IBM representative for information on theproducts and services currently available in your area. Any reference to an IBMproduct, program, or service is not intended to state or imply that only that IBMproduct, program, or service may be used. Any functionally equivalent product,program, or service that does not infringe any IBM intellectual property right maybe used instead. However, it is the user's responsibility to evaluate and verify theoperation of any non-IBM product, program, or service.
IBM may have patents or pending patent applications covering subject matterdescribed in this document. The furnishing of this document does not grant youany license to these patents. You can send license inquiries, in writing, to:
IBM Director of LicensingIBM CorporationNorth Castle Drive, MD-NC119Armonk, NY 10504-1785United States of America
For license inquiries regarding double-byte character set (DBCS) information,contact the IBM Intellectual Property Department in your country or sendinquiries, in writing, to:
Intellectual Property LicensingLegal and Intellectual Property LawIBM Japan Ltd.19-21, Nihonbashi-Hakozakicho, Chuo-kuTokyo 103-8510, Japan
The following paragraph does not apply to the United Kingdom or any othercountry where such provisions are inconsistent with local law:INTERNATIONAL BUSINESS MACHINES CORPORATION PROVIDES THISPUBLICATION "AS IS" WITHOUT WARRANTY OF ANY KIND, EITHEREXPRESS OR IMPLIED, INCLUDING, BUT NOT LIMITED TO, THE IMPLIEDWARRANTIES OF NON-INFRINGEMENT, MERCHANTABILITY OR FITNESSFOR A PARTICULAR PURPOSE. Some states do not allow disclaimer of express orimplied warranties in certain transactions, therefore, this statement may not applyto you.
This information could include technical inaccuracies or typographical errors.Changes are periodically made to the information herein; these changes will beincorporated in new editions of the publication. IBM may make improvementsand/or changes in the product(s) and/or the program(s) described in thispublication at any time without notice.
Any references in this information to non-IBM websites are provided forconvenience only and do not in any manner serve as an endorsement of thosewebsites. The materials at those websites are not part of the materials for this IBMproduct and use of those websites is at your own risk.
© Copyright IBM Corp. 2011, 2015 77

IBM may use or distribute any of the information you supply in any way itbelieves appropriate without incurring any obligation to you.
Licensees of this program who want to have information about it for the purposeof enabling: (i) the exchange of information between independently createdprograms and other programs (including this one) and (ii) the mutual use of theinformation which has been exchanged, should contact:
IBM Corporation2Z4A/10111400 Burnet RoadAustin, TX 78758US
Such information may be available, subject to appropriate terms and conditions,including in some cases, payment of a fee.
The licensed program described in this document and all licensed materialavailable for it are provided by IBM under terms of the IBM Customer Agreement,IBM International Program License Agreement or any equivalent agreementbetween us.
Any performance data contained herein was determined in a controlledenvironment. Therefore, the results obtained in other operating environments mayvary significantly. Some measurements may have been made on development-levelsystems and there is no guarantee that these measurements will be the same ongenerally available systems. Furthermore, some measurements may have beenestimated through extrapolation. Actual results may vary. Users of this documentshould verify the applicable data for their specific environment.
Information concerning non-IBM products was obtained from the suppliers ofthose products, their published announcements or other publicly available sources.IBM has not tested those products and cannot confirm the accuracy ofperformance, compatibility or any other claims related to non-IBM products.Questions on the capabilities of non-IBM products should be addressed to thesuppliers of those products.
This information contains examples of data and reports used in daily businessoperations. To illustrate them as completely as possible, the examples include thenames of individuals, companies, brands, and products. All of these names arefictitious and any similarity to the names and addresses used by an actual businessenterprise is entirely coincidental.
COPYRIGHT LICENSE:
This information contains sample application programs in source language, whichillustrate programming techniques on various operating platforms. You may copy,modify, and distribute these sample programs in any form without payment toIBM, for the purposes of developing, using, marketing or distributing applicationprograms conforming to the application programming interface for the operatingplatform for which the sample programs are written. These examples have notbeen thoroughly tested under all conditions. IBM, therefore, cannot guarantee orimply reliability, serviceability, or function of these programs. The sampleprograms are provided "AS IS", without warranty of any kind. IBM shall not beliable for any damages arising out of your use of the sample programs.
78 IBM Tivoli Storage Manager for Virtual Environments: Data Protection for Microsoft Hyper-V Installation and User's Guide
Each copy or any portion of these sample programs or any derivative work, mustinclude a copyright notice as follows:Portions of this code are derived from IBM® Corp. Sample Programs.
© Copyright IBM® Corp. _enter the year or years_. All rights reserved.
Trademarks
IBM, the IBM logo, and ibm.com® are trademarks or registered trademarks ofInternational Business Machines Corp., registered in many jurisdictions worldwide.Other product and service names might be trademarks of IBM or other companies.A current list of IBM trademarks is available on the Web at "Copyright andtrademark information" at www.ibm.com/legal/copytrade.shtml.
Adobe is a registered trademark of Adobe Systems Incorporated in the UnitedStates, and/or other countries.
Linear Tape-Open, LTO, and Ultrium are trademarks of HP, IBM Corp. andQuantum in the U.S. and other countries.
Intel and Itanium are trademarks or registered trademarks of Intel Corporation orits subsidiaries in the United States and other countries.
Linux is a registered trademark of Linus Torvalds in the United States, othercountries, or both.
Microsoft, Windows, and Windows NT are trademarks of Microsoft Corporation inthe United States, other countries, or both.
Java and all Java-based trademarks and logos are trademarks or registeredtrademarks of Oracle and/or its affiliates.
UNIX is a registered trademark of The Open Group in the United States and othercountries.
Terms and conditions for product documentation
Permissions for the use of these publications are granted subject to the followingterms and conditions.
ApplicabilityThese terms and conditions are in addition to any terms of use for the IBMwebsite.
Personal useYou may reproduce these publications for your personal, noncommercialuse provided that all proprietary notices are preserved. You may notdistribute, display or make derivative work of these publications, or anyportion thereof, without the express consent of IBM.
Commercial useYou may reproduce, distribute and display these publications solely withinyour enterprise provided that all proprietary notices are preserved. Youmay not make derivative works of these publications, or reproduce,distribute or display these publications or any portion thereof outside yourenterprise, without the express consent of IBM.
Rights Except as expressly granted in this permission, no other permissions,
Notices 79

licenses or rights are granted, either express or implied, to the publicationsor any information, data, software or other intellectual property containedtherein.
IBM reserves the right to withdraw the permissions granted hereinwhenever, in its discretion, the use of the publications is detrimental to itsinterest or, as determined by IBM, the above instructions are not beingproperly followed.
You may not download, export or re-export this information except in fullcompliance with all applicable laws and regulations, including all UnitedStates export laws and regulations.
IBM MAKES NO GUARANTEE ABOUT THE CONTENT OF THESEPUBLICATIONS. THE PUBLICATIONS ARE PROVIDED "AS-IS" ANDWITHOUT WARRANTY OF ANY KIND, EITHER EXPRESSED ORIMPLIED, INCLUDING BUT NOT LIMITED TO IMPLIED WARRANTIESOF MERCHANTABILITY, NON-INFRINGEMENT, AND FITNESS FOR APARTICULAR PURPOSE.
Privacy policy considerations
IBM Software products, including software as a service solutions, (“SoftwareOfferings”) may use cookies or other technologies to collect product usageinformation, to help improve the end user experience, to tailor interactions withthe end user, or for other purposes. In many cases no personally identifiableinformation is collected by the Software Offerings. Some of our Software Offeringscan help enable you to collect personally identifiable information. If this SoftwareOffering uses cookies to collect personally identifiable information, specificinformation about this offering’s use of cookies is set forth below.
This Software Offering does not use cookies or other technologies to collectpersonally identifiable information.
If the configurations deployed for this Software Offering provide you as customerthe ability to collect personally identifiable information from end users via cookiesand other technologies, you should seek your own legal advice about any lawsapplicable to such data collection, including any requirements for notice andconsent.
For more information about the use of various technologies, including cookies, forthese purposes, see IBM’s Privacy Policy at http://www.ibm.com/privacy andIBM’s Online Privacy Statement at http://www.ibm.com/privacy/details in thesection entitled “Cookies, Web Beacons and Other Technologies,” and the “IBMSoftware Products and Software-as-a-Service Privacy Statement” athttp://www.ibm.com/software/info/product-privacy.
80 IBM Tivoli Storage Manager for Virtual Environments: Data Protection for Microsoft Hyper-V Installation and User's Guide

Glossary
A glossary is available with terms and definitions for the IBM Tivoli Storage Manager family of products.
See Tivoli Storage Manager glossary (http://www.ibm.com/support/knowledgecenter/SSGSG7_7.1.3/tsm/glossary.html).
To view glossaries for other IBM products, see http://www.ibm.com/software/globalization/terminology/.
© Copyright IBM Corp. 2011, 2015 81

82 IBM Tivoli Storage Manager for Virtual Environments: Data Protection for Microsoft Hyper-V Installation and User's Guide
Index
Aaccessibility features 75archive
list of files 43
Bback up
parallel 55backup
incremental foreverdescription 3
backup vm command 27
Cclient features
Windows client 7commands
backup vm 27expire 32mount 67query VM 33restore vm 36set_connection 70
configuringiSCSI mount 23overview 15Tivoli Storage Manager recovery agent GUI 19
control files 53
Ddate format
specifying 39dateformat option 39detail option 41disability 75disk space requirements
Windows client 7documentation 4domain
include for full vm backups 41domain.vmfull option 41
Eexpire command 32
Ffile space 41filelist option 43files
archive a list of 43restore overview 61restore task (Windows) 63
Ggroup backup
display active and inactive objects 44
Hhardware requirements
Windows client 7Hyper-V cmdlets 4Hyper-V snapshots
deleting 4rolling back 4
IIBM Knowledge Center vinactive option 44include.vm option 45incremental backup
process a list of files 43incremental forever
description 3installation procedure 8, 10
silent 12iSCSI mount
configuring 23
Kkeyboard 75Knowledge Center v
LLAN environment 60
Mmanaging snapshots 4Mbobjrefreshthresh 47Mbpctrefreshthresh 48memory requirements
Windows client 7mode option 46mount command 67mounting snapshots 60
NNew in Data Protection for Microsoft Hyper-V Version
7.1.3 vnoprompt option 49numberformat
specifying 49numberformat option 49
© Copyright IBM Corp. 2011, 2015 83
Ooptions
dateformat 39detail 41domain.vmfull 41filelist 43inactive 44include.vm 45mbobjrefreshthresh 47mbpctrefreshthresh 48mode 46noprompt 49numberformat 49pick 50pitdate 51pittime 51timeformat 52vmbackdir 53vmbackuptype 54vmbackupupdateguid 28vmmaxparallel 55vmmc 57
options file 15options reference 39
Pparallel backups 55pick option 50pitdate 51pittime option 51publications v
Qquery
backups, establish point-in-time 51display active and inactive objects 44
query VM command 33
Rrestore
backups, establish point-in-time 51create list of backup versions to 50display active and inactive objects 44list of files 43
restore vm command 36retrieve
list of files 43
Sset_connection command 70silent install 12snapshot management 4snapshots
mounting 60syntax diagram
reading 25repeating values 25required choices 25
system statedisplay active and inactive objects 44
Ttime format
specifying 52timeformat option 52Tivoli Storage Manager recovery agent GUI
configuring 19options 19
Uuninstalling 12
server core 13
Vvmbackdir option 53vmbackuptype option 54, 57vmbackupupdateguid option 28vmctlmc option
optionsvmctlmc 54
vmmaxparallel option 55volumes
restore overview 61restore task (Windows) 63
WWindows client
client features 7disk space requirements 7hardware requirements 7memory requirements 7
Windows featuresinstallable 7
84 IBM Tivoli Storage Manager for Virtual Environments: Data Protection for Microsoft Hyper-V Installation and User's Guide


IBM®
Product Number: 5725-A44
Printed in USA