icbm integrated controlled bass manager - outlaw...
TRANSCRIPT

Owner’s Manual
ICBMIntegrated ControlledBass Manager

2 Outlaw Audio
Owner’s Manual
The lightning flash with arrowhead, within an equilateraltriangle, is intended to alert the user to the presence ofuninsulated “dangerous voltage” within the product’senclosure that may be of sufficient magnitude to constitutea risk of electrical shock to persons.
The exclamation point within an equilateral triangle isintended to alert the user to the presence of importantoperating maintenance (servicing) instructions in theliterature accompanying the appliance.
Please Read FirstCAUTION: To reduce the risk of electric shock, do not remove the cover(or back). No user serviceable parts inside. Refer to qualified personnel.
WARNING: To reduce the risk of fire or electric shock, do not exposethis appliance to rain or moisture.
Warnings
IMPORTANT SAFETY NOTEBefore connecting a new component such as the ICBM toyour audio or home theater system it is always goodpractice to make certain that all components are turnedoff, and preferably unplugged from their AC powersource. Many modern electronics products feature
Outlaw Model ICBM-1 Limited WarrantyThis warranty protects the owner of the Outlaw ICBM-1 (the PRODUCT) for five (5)
years from the date of purchase.This warranty covers all defects in material and workmanship with the following spe-cific exceptions. These are:• Damage caused by improper installation or adjustment• Damage caused by accident, unreasonable use or neglect• Damage from failure to follow instructions contained in this Owner’s Manual• Damage from the performance of repairs by someone not authorized by
Outlaw Audio• Any unit on which the serial number has been effaced, modified, or removed• Damage occurring during shipment• Units which have been altered or modified in design, appearance or construction
This warranty covers only the actual defects within the PRODUCT itself. IT DOESNOT cover costs of installation in (or removal from) a fixed installation, or normal set-up, claims based on any misrepresentation by the seller, or performance variations re-sulting from installation related circumstances such as signal quality, AC power or in-compatibilities with speakers and/or other system components.
During the warranty period, Outlaw Audio will, at its option, either repair the defect,or replace the defective product, or the defective parts, or components thereof at nocharge to the owner for parts and labor covered by this warranty. If necessary repairs arenot covered by this warranty, or if a unit is examined which is not in need of repair, youwill be charged for the repairs and/or the examination. If non-warranted repairs areneeded, we will notify you of the estimated cost and ask for your authorization to per-form said repairs.
You must pay shipping charges incurred in getting your product to the factory. Wewill pay the return shipping charges if the repairs are covered by the warranty. Pleasesave the original shipping cartons as the unit MUST be returned in the original cartonand packing. (Replacement cartons are available at a modest charge.)If your product needs service, please notify us at:
Outlaw Audio
Sales (866) OUTLAWS Service (866) OUTLAWAYou will need to present the original bill of sale to establish the date of purchase.
In the event that the proof of purchase cannot be established with the original receipt,the warranty period shall be determined by the earliest date of manufacture shown onthe unit, provided that the serial number label has not been altered in any manner, orby our records relating that serial number.
In the event that you wish to return your Outlaw ICBM-1 back to us, for anyreason, please call to arrange for a Return Authorization Number. This will insure thatyour problem is discussed with a service technician who will determine if there is aquick solution to your problem.
Outlaw Audio shall not be liable for, in any way responsible for, any incidental orconsequential damages of any kind. Some states do not allow limitations on how longan implied warranty lasts and/or do not allow the exclusion of incidental or conse-quential damages, therefore, the limitations and exclusions stated herein may notapply to you. This warranty gives you specific legal rights; and you may also haveother rights which vary from state to state.
THERE ARE NO WARRANTIES GIVEN BY OUTLAW AUDIO WHICH EXTEND BE-YOND THE DESCRIPTION GIVEN HEREIN. ANY IMPLIED WARRANTIES OF FITNESSFOR PURPOSE SOLD, MERCHANTIABILITY, DESCRIPTION, QUALITY OR ANY OTHERMATTERS ARE TO THE TERMS OF THE EXPRESSED LIMITED WARRANTY STATEDHEREIN.
Products are sold on the basis of specifications applicable at the time of sales.Outlaw Audio shall have no obligation to modify products once they have been sold.
This warranty is applicable only in the United States. For applicability in othercountries, please call Outlaw Audio.
automatic turn-on circuits that may be activated during aninstallation, causing the potential for damage toelectronic components and/or speakers. Such damage isnot covered by product warranties and Outlaw Audiospecifically disclaims responsibility for any such damage.

3Integrated Controlled Bass Manager
Owner’s Manual
Outlaw AudioIntegrated Controlled Bass Manager ICBMThank you for buying an Outlaw Audio Integrated Controlled Bass Manager. The ICBM provides themost flexible bass management capability available, while providing a high-quality signal path thatpreserves the fidelity of the original audio signal. It’s the perfect match for:
■ DVD-Audio or SACD players that do not have internal bass management capability■ Preamp/processors with limited bass management that does not properly match your speakers■ Two-channel stereo systems that do not have a dedicated subwoofer output■ 5.1-channel mixing studios that use –10 dB V unbalanced feeds to the monitors
Setup GuideGetting the best performance out of the ICBM requires an understanding of the concepts behind bassmanagement. For those who are not familiar with the intricacies of bass management and crossovers,there’s a comprehensive tutorial later in this manual. However, we suspect that you are anxious to getyour system hooked up. Depending on the equipment in your system, follow one of the following threeset up configurations:
■ Using the ICBM with a DVD-Audio or Multi-channel SACD Player: Page 3■ Using the ICBM between a multi-channel processor or receiver and an amplifier: Page 5■ Using the ICBM in a stereo system with a subwoofer: Page 9
Due to issues relating to copy protection systems, virtually every high resolution, multi-channel opticalplayback device on the market uses a built-in decoder that delivers the output of the DVD-Audio or SACDdisc as separate analog outputs. In virtually all cases, these are full range signals, but most DVD-A andSACD players provide little or no control for bass management. At the same time, since the analog “6Channel Direct” inputs on most processors and receivers are “straight through” audio paths, they, too,lack any bass management.
This presents a problem for systems using satellite/subwoofer style speaker systems, as the lack of bassmanagement and redirection on both the source device and the control unit means that full rangesignals will be passed on to bandwidth-limited speakers unable to handle the full spectrum outputs.Even where there is bass management in the analog path, it is typically limited, and unable toaccommodate the wide range of crossover points required by different speakers. The ICBM wasspecifically designed to solve the problem caused by this lack of internal bass management, and is tailormade for this application.
Using the ICBM with a DVD-Audio or Multi-channel SACD Player
For this installation, you will need 12 audio interconnect cables to connect the ICBM into your system.We recommend that Outlaw Audio PDA cables be used, but any high quality, shielded cables will do. It isalways a good idea to keep cable runs as short as possible to minimize the potential for inducing noise
Setup Guide

4 Outlaw Audio
Owner’s ManualSetup Guide
RLOWPASSMODEAC 15V L IN OUT(SR6)
CENTER SURR.SUB/LFE OUTPUTOUTLAW AUDIO CORPORATIONDURHAM, N.H.-USA
IN OUTRIGHT SURR.LFE
IN OUTLEFT SURR.
IN OUTCENTER
IN OUTRIGHT L/R
RECOMBINEIN OUTON
OFF
SPECIAL
NORMAL
MONO
STEREO
LEFTIN
STEREO OUT
6 CHANNEL OUT
L
LEFT RIGHT CENTERDIGITAL OUT LEFTSURR
RIGHTSURR
LFE6 CHANNEL IN
LEFT RIGHT CENTER LEFTSURR
RIGHTSURR
LFE
R
Outlaw ICBM
DVD-A or SACD Player A/V Processor or Receiver
and RFI/EMI. Always keep audio interconnects separate from AC power cords, as well as from RF, videoand data cables, if possible.
Step 1 Turn off and unplug all system components.
Step 2 Look at your player’s rear panel.
You will see a set of six RCA output jacks grouped together.
Many DVD-Audio players also offer an extra set of left/right stereo outputs, which aregrouped separately from the six RCA output jacks. Don’t use these! They contain a down-mixed stereo signal that you don’t want in this instance.
If you can’t find six RCAs grouped together on the back, you probably have a conventional DVD-Video player or a stereo-only SACD player. In the former case, the ICBM should be connectedbetween your pre/pro or receiver and your amplifiers, as explained later in this manual. In thelatter, skip forward to the section that shows how to connect the ICBM into a stereo system.
Step 3 Connect your player to the ICBM.
Connect cables from the six RCA jacks on your player to the corresponding inputs on the ICBM–left to left, right surround to right surround, and so on.
Note that the LFE output on your player may also be labeled “SUB” or “Subwoofer”. Connectthat output to the LFE input on the ICBM.
Step 4 Now locate the six-channel direct (sometimes labeled 5.1-channel direct) input on yourprocessor or receiver.
This input will also have six RCA jacks grouped together, similar to your player. If your processoror receiver doesn’t have this kind of input, you won’t be able to hear DVD-Audio or multi-channel
Figure 1Using the ICBMwith a DVD-Audioor multi-channelSACD player

5Integrated Controlled Bass Manager
Owner’s ManualSetup Guide
SACD, but you may be able to use the ICBM between your processor or receiver and youramplifiers, as explained in the next section.
Step 5 Connect the ICBM to your processor or receiver.
Connect the ICBM’s outputs to the corresponding inputs on the processor or receiver againmaking careful to connect right to right, left to left, and so on.
If there are any settings for bass management on the player or in the analog “direct” channels ofyour processor or receiver, set them to “LARGE” or “OFF” so that a full range signal is passedthrough to the ICBM . However, do not make any adjustments to the bass management or“speaker configuration” settings in the processor or receiver that work with the conventionaldigital or two-channel analog inputs. You can leave these set as they were—they will not affectthe six-channel input that the ICBM is connected to. Make sure you’re using your subwoofer’s“bypass” input or control setting if it has one. If it doesn’t, use the highest crossover frequencysetting your sub provides.
Step 6 Plug in the ICBM’s AC adapter.
Connect the small plug at the end of the cord from the ICBM’s external transformer/powersupply into the matching jack on the ICBM’s rear panel. Plug the transformer/power supply intoan AC power source. (Due to the low current draw of the ICBM you may safely connect it to therear panel outlets on a processor or receiver so that it turns on automatically with your system.
Step 7 Reconnect your system components to their AC power sources.
Step 8 Check your connections.
Turn your system components on. To make certain that all connections have been made to theproper channels, activate the processor or receiver’s speaker balancing “test tone.” As the tonecirculates among the speakers, check the front panel readout or on-screen display to verify thatthe sound comes from the channel shown in the indicators. If the sound is comes from the wrongchannel at any time, turn off all equipment and re-check the connections between the ICBM andyour processor or receiver to make certain that the channels are properly matched.
Once all channel connections have been verified your ICBM is properly connected and ready foroperation. Turn to page 13 to learn how to operate the ICBM’s controls.
Using the ICBM between a multi-channel processor or receiver and an amplifier
Depending on your system, for this installation you will need between 12 and 16 audio interconnectcables to connect the ICBM into your system. For 7.1 channel systems, you will also need 2 sets of “Y”adapters. As always, it is a good idea to keep cable runs as short as possible to minimize the potential forinducing noise and RFI/EMI. Always keep audio interconnects separate from AC power cords, as well asfrom RF, video and data cables, if possible.

6 Outlaw Audio
Owner’s ManualSetup Guide
Figure 2Using the ICBMbetween a 5.1 channelprocessor or receiverand 5 channelamplifier RLOWPASSMODEAC 15V L IN OUT
(SR6)CENTER SURR.SUB/LFE OUTPUT
OUTLAW AUDIO CORPORATIONDURHAM, N.H.-USA
IN OUTRIGHT SURR.LFE
IN OUTLEFT SURR.
IN OUTCENTER
IN OUTRIGHT L/R
RECOMBINEIN OUTON
OFF
SPECIAL
NORMAL
MONO
STEREO
LEFTIN
OUTPUTLEFT RIGHT CENTER LEFT
SURRRIGHTSURR
SUB CHANNEL1
CHANNEL2
CHANNEL3
CHANNEL4
CHANNEL5
Outlaw ICBM
5.1 ChannelProcessor or Receiver 5-Channel AmpSubwoofer
Step 1 Turn off and unplug all system components.
Step 2 Locate the appropriate outputs on your processor or receiver.
Before you make any connections, find the “six channel output,” “eight channel output” or“preamp output” jacks on your receiver or processor’s rear panel. They are typically a set of six,seven or eight RCA jacks grouped together. If your receiver or processor does not have these jacksfor ALL channels we recommend that you use the configuration for a two-channel stereo system,as shown on page 9.
Step 3 Connect your processor or receiver to the ICBM.
For systems with 5.1 (“six channel”) outputs Connect cables from the five main channel outputs(left/center/right/left surround/right surround) on your receiver or processor to thecorresponding inputs on the ICBM—left to left, right surround to right surround, and so on (seeFigure 2). Do not connect the subwoofer output of your receiver or processor at this time.
For systems with 6.1 outputs Connect the cables from the six main channel outputs (left/center/right/left surround/right surround/center surround) on your receiver or processor to thecorresponding inputs on the ICBM – left to left, right surround to right surround, and so on. Donot connect the subwoofer output of your receiver or processor at this time.
For systems with 7.1 outputs Connect the cables from the five main channel outputs (left/center/right/left surround/right surround) on your receiver or processor to the correspondinginputs on the ICBM – left to left, right surround to right surround, and so on (see Figure 3). Asthe output for the “surround back left” and “surround back right” channels is actually amonaural signal, use a short “Y” adaptor to combine the two outputs to a single feed, and then

7Integrated Controlled Bass Manager
Owner’s Manual
connect the cable to the Center Surround input on the rear of the ICBM. Do not connect thesubwoofer output of your receiver or processor at this time.
Step 4 Connect the ICBM to your amplifier.
Next, connect the output jacks on the ICBM to the corresponding input jacks on youramplifier(s). Most amplifiers don’t have input labels for all the channels in a 5.1-channel or 6.1-channel system; the channels are often just numbered. So be extra careful to connect each of theICBM’s outputs to the proper amplifier channels.
Note that for 7.1 systems you will need to connect a “Y” adaptor cable or connector to theCenter Surround output jack on the ICBM. This is a monaural signal that should beconnected to the amplifier channels that feed the Surround Back Left and Surround BackRight channels for your system.
Step 5 Connect the ICBM to your subwoofer.
If you have a powered subwoofer, connect either of the ICBM’s subwoofer output to thesubwoofer’s line-level (RCA) input. If your subwoofer has a “bypass” input make the connectionthere. If not, set the crossover frequency control on the subwoofer to the highest possible setting.If you have two subwoofers and wish to run them in stereo, connect the ICBM’s left subwooferoutput to the left subwoofer, and the right subwoofer output to the right subwoofer and set thecrossover on the subwoofers as noted above.
If you use tower speakers that contain an internal powered woofer section and an LFE input, andyou do not use a separate subwoofer, you may wish to connect the ICBM’s subwoofer outputs tothe speakers’ LFE inputs. This will give you additional fine-tuning capabilities as compared to
Setup Guide
Figure 3Using the ICBMbetween a 7.1 channelprocessor or receiverand 7 channelamplifier
RLOWPASSMODEAC 15V L IN OUT(SR6)
CENTER SURR.SUB/LFE OUTPUTOUTLAW AUDIO CORPORATIONDURHAM, N.H.-USA
IN OUTRIGHT SURR.LFE
IN OUTLEFT SURR.
IN OUTCENTER
IN OUTRIGHT L/R
RECOMBINEIN OUTON
OFF
SPECIAL
NORMAL
MONO
STEREO
LEFTIN
CENTER LEFTSURR
RIGHTSURR
LEFTBACKSURR
RIGHTBACKSURR
OUTPUTLEFT RIGHT SUB CHANNEL
1CHANNEL
2CHANNEL
3CHANNEL
4CHANNEL
5CHANNEL
6CHANNEL
7
Outlaw ICBM
7.1 ChannelProcessor or
Receiver 7-Channel AmpSubwoofer
Y-AdaptorY-Adaptor

8 Outlaw Audio
Owner’s Manual
using the ICBM’s Left/Right Recombine switch to route the subwoofer signal into the main left/right speakers. However, using the speakers’ LFE inputs requires a more complex connection, andmore care in system fine-tuning. Most users will probably prefer to use the ICBM’s Left/RightRecombine switch and ignore the speakers’ LFE inputs.
Step 6 Plug in the ICBM’s AC adapter.
Connect the small plug at the end of the cord from the ICBM’s external transformer/powersupply into the matching jack on the ICBM’s rear panel. Plug the transformer/power supply intoan AC power source. (Due to the low current draw of the ICBM you may safely connect it to therear panel outlets on a processor or receiver so that it turns on automatically with your system.
Step 7 Reconnect your system components to their AC power sources.
Step 8 Check your connections.
Turn your system components on. To make certain that all connections have been made to theproper channels, activate the processor or receiver’s speaker balancing “test tone.” As the tonecirculates among the speakers, check the front panel readout or on-screen display to verify thatthe sound comes from the channel shown in the indicators. If the sound is comes from the wrongchannel at any time, turn off all equipment and re-check the connections between the ICBM andyour processor or receiver to make certain that the channels are properly matched.
Although the ICBM has minimal insertion loss, as it is connected between the output of yourreceiver or processor and your amplifier, it is a good idea to take this opportunity to use the testtone to re-check the output levels for all channels so that they are equal.
Step 9 Reset the speaker configuration of your processor or receiver.
Go to the “setup” mode and set all speakers to “large” and subwoofer to “on.” This effectivelydeactivates the bass management in the receiver or processor and passes that task on to theICBM. Some receivers do not offer an “all speakers large/subwoofer on” setting. In this case, setas many speakers as possible to “large” while maintaining the “subwoofer on” setting. A fewinexpensive receivers offer only two bass management modes: “all speakers small/subwoofer on”and “large left/right, small center/surrounds/no subwoofer.” If you have one of these, use thelatter setting—the ICBM will let you use a subwoofer and large front speakers together, anoption your receiver doesn’t offer!
Step 10 Set the delay for the surround channels.
The ICBM works best in this application if you set the delay for the surround channels to 0milliseconds. If your processor or receiver lets you set delays by specifying a certain distance fromyour listening position to each speaker, set all of the speaker distances the same. (The distancedoesn’t matter; the usual default of 10 feet will work fine.)
Setup Guide
9Integrated Controlled Bass Manager
Owner’s Manual
For optimum sound quality, if you set your delay to 0 ms, you should position all of your speakersat the same distance from your listening position. Of course, in some listening rooms, this isn’tpossible. You can choose one of two options here. In most rooms the best option is set up thedelays as you normally would, remembering that it’s impossible to set the delays perfectly formore than one listener, anyway! In addition, as both DVD-Audio and multi-channel SACD playersdo not currently offer delay settings; the delay is only effective in Dolby Digital, Pro Logic (or ProLogic II), and DTS modes. Even if you use delay for Dolby Digital or DTS, you won’t get it forDVD-Audio or SACD. Thus, deactivating delay will probably have a very small effect on the soundquality of your system.
The second option is appropriate if your surround speakers are eight or more feet closer to theprimary listening position than the front speakers. In that case you should use the delay settingsprovided in the receiver or processor. Delaying signals before they reach the bass managementcircuitry could cause some cancellation effects in the bass, but bass response in a room istypically very uneven, anyway, so it’s unlikely you’ll notice this effect.
You have now completed the installation of your new ICBM. Turn to page 13 for the operatinginstructions.
Using the ICBM in a stereo system with a subwoofer
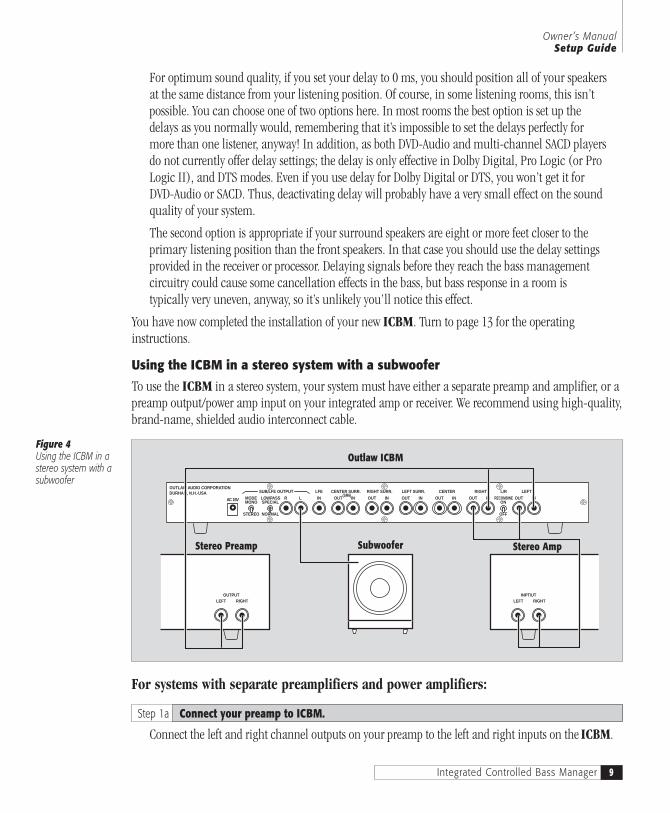
To use the ICBM in a stereo system, your system must have either a separate preamp and amplifier, or apreamp output/power amp input on your integrated amp or receiver. We recommend using high-quality,brand-name, shielded audio interconnect cable.
Setup Guide
Figure 4Using the ICBM in astereo system with asubwoofer
RLOWPASSMODEAC 15V L IN OUT(SR6)
CENTER SURR.SUB/LFE OUTPUTOUTLAW AUDIO CORPORATIONDURHAM, N.H.-USA
IN OUTRIGHT SURR.LFE
IN OUTLEFT SURR.
IN OUTCENTER
IN OUTRIGHT L/R
RECOMBINEIN OUTON
OFF
SPECIAL
NORMAL
MONO
STEREO
LEFTIN
OUTPUTLEFT RIGHT
INPT\UTLEFT RIGHT
Outlaw ICBM
Stereo Preamp Stereo AmpSubwoofer
For systems with separate preamplifiers and power amplifiers:
Step 1a Connect your preamp to ICBM.
Connect the left and right channel outputs on your preamp to the left and right inputs on the ICBM.

10 Outlaw Audio
Owner’s ManualPrinciples of Bass Management
Step 2a Connect the ICBM to your amplifier.
Connect the ICBM’s left and right outputs to the left and right inputs of your amplifier.
For receivers with preamp outputs and main inputs:
Step 1b Connect your receiver to ICBM.
First, remove the jumpers that connect these jacks and save them for future use should you usethe receiver at a later date without the ICBM. Then, connect thhe left and right preamp outputsto the left and right inputs on the ICBM.
Step 2b Connect the ICBM to your receiver.
Connect the left and right outputs of the ICBM to the “main in” jacks on the receiver.
For both options:
Step 3 Connect your subwoofer(s).
If you’re using a single subwoofer, connect either of the ICBM’s subwoofer outputs to thesubwoofer’s line-level input. Use the subwoofer’s “bypass” input or control setting if it has one; ifnot, use the highest crossover frequency setting your sub provides. If you’re using two subwoofers,connect the left subwoofer to the ICBM’s left subwoofer output, and the right subwoofer to theICBM’s right subwoofer output.
Step 4 Plug in the ICBM’s AC adapter.
Connect the small plug at the end of the cord from the ICBM’s external transformer/powersupply into the matching jack on the ICBM’s rear panel. Plug the transformer/power supply intoan AC power source. (Due to the low current draw of the ICBM you may safely connect it to therear panel outlets on a processor or receiver so that it turns on automatically with your system.
That’s all there is to the stereo connection. Now we’ll explain how to set the ICBM’s controls.
The Basic Principles of Bass ManagementIf you were to run your entire system “full range” (i.e. every speaker set to “large,” so they all geteverything from 20Hz to 20kHz), the smallest speakers in your system would receive deep bass signals. Asa result, you wouldn’t hear much of the bass, because small woofers and cabinets can’t reproduce it. Anydeep bass you did hear from a small speaker would likely sound distorted. Worst of all, extremely lowfrequencies can damage small speakers.
Bass management is the circuitry you use to direct low frequencies to the speakers best able to handlethem. For example, a bass management system can extract low frequencies out of small surroundspeakers (that aren’t designed for deep bass), and either re-direct the bass to a large pair of towerspeakers in the front—or send it to a subwoofer.

11Integrated Controlled Bass Manager
Owner’s Manual
Bass management circuitry is sometimes called a “crossover,” and the point at which it divides the bassfrom the other frequencies is called the “crossover point.” You’ll find bass management circuitry builtinto all Dolby Digital receivers and pre-amp/processors, and into all DVD players which contain on-board internal 5.1-channel Dolby Digital decoders.
Bass management circuitry not only gathers in the low frequencies from all channels and redirects themto where they can be easily reproduced, It also handles the .1 channel. The .1 channel (in a 5.1-channelsoundtrack ) is actually a special, additional bass track on Dolby Digital, DTS, DVD-Audio, and multi-channel SACD discs. In many cases, extra deep bass is recorded onto this .1 track, which is normallyrouted to a subwoofer. But in systems that do not have a subwoofer, you will not hear the .1 bass unlessyou use bass management circuitry to re-route the bass into the other speakers in the system.
So why do you need an ICBM?
Most of today’s DVD-Audio players, and some of today’s multi-channel SACD players, do not have bassmanagement when you’re playing DVD-Audio or SACD discs. (The players themselves may contain bassmanagement menus, but this built in circuitry is probably effective only when you’re listening to DolbyDigital and DTS soundtracks.)
As a result, when you’re listening to DVD-Audio or SACD discs, all of the speakers get a full-range signal,(with deep bass being sent to all speakers), and the separate “.1” bass track goes only to the subwoofer.Thus, the main speakers in the system may get more bass than they can handle. And in systems withouta subwoofer, most of the bass will be thrown away, because it cannot be routed to the other speakers.
The ICBM can fix these problems entirely. Connect it between your DVD-Audio or SACD player and yourreceiver or preamp/processor, and the ICBM will put all the bass in the right place. If you have smallsatellite speakers and a subwoofer, it will keep the bass out of the small speakers and send it all to thesubwoofer. If you have large tower speakers and no subwoofer, the ICBM will route the “.1” bass fromthe subwoofer track over to the tower speakers.
Even if your DVD-Audio or SACD player does have bass management, it will be much less versatile thanthe ICBM’s circuitry, and thus won’t let you fine-tune your system as the ICBM will.
The ICBM works not only with 5.1-channel systems, but also with 6.1-channel systems like LucasfilmTHX Surround EX and DTS ES-Matrix and ES-Discrete. We have included an extra channel of bassmanagement to accommodate these systems. That extra channel also lets the ICBM work with the 6.0-channel systems now being championed by Chesky Records and others. These systems repurpose two ofthe channels in DVD-Audio or multi-channel SACD, using the center channel as a left front/side“height” channel, and the LFE channel as a right front/side “height” channel.
Do you still need an ICBM if you don’t have DVD-Audio or SACD?
You might. Unless your receiver or preamp/processor has sophisticated bass management controls,there’s a good chance your bass management isn’t optimized for your speakers. Most receivers and pre/pros have a fixed crossover point at 80 or 100 Hertz, which lies in the upper bass region. That’s fine ifyou have mid-sized satellite or surround speakers with, say, 6- or 7-inch woofers. But if you’re using
Principles of Bass Management

12 Outlaw Audio
Owner’s Manual
speakers with smaller woofers measuring 4 inches or so, you may find that you lose the bass from 80 Hzto about 120 Hz, because the smaller woofer can’t reproduce it. In this case, you’d want a highercrossover point (around 120 Hz).
Alternatively, if you’re using smaller tower speakers and a subwoofer, the small tower speakers will pro-bably distort when you feed them a signal with deep bass–yet using an 80 or 100 Hz crossover point withthese speakers wastes the bass capability that they do have. You may also find that these speakers do abetter job of reproducing upper bass, in the 50 to 100 Hz range, than a large subwoofer will. In this case,you’d want a lower crossover point–around 40 or 60 Hz depending on the size of the tower speakers.
The ICBM offers crossover points at 40, 60, 80, 100, and 120 Hz, so you can perfectly optimize your bassmanagement to get the best performance from your speakers. In this case, you wire the ICBM betweenyour pre/pro and your amplifiers. Using the ICBM with a receiver in this fashion requires use ofseparate amplifiers, or that the receiver include a full set of “preamp out/power amp in” connections.Consult your receiver manual for more information.
Do you still need an ICBM if you only have a stereo system?
If you’re using a subwoofer, then yes, you do! The ICBM gives you far more adjustability than thecrossovers built into subwoofers do, so you can fine-tune your bass response to perfection. You can setthe crossover point where it’s perfect for your speakers, and you can even drive two subwoofers in stereo.
The ICBM’s Controls
Figure 5ICBM front panel
The ICBM’s Controls
LEFT/RIGHT
40 BYPASS
6080 100
120
40 BYPASS
6080 100
120
40 BYPASS
6080 100
120
40 BYPASS
6080 100
120
CENTER LEFT/RIGHTSURROUND
CENTER SURROUND LFE MIX
-10dB LFE CAL MIN +9dB
SUBWOOFER LEVEL ICBM-1INTEGRATEDCONTROLLEDBASS MANAGER
A B C D E F
A Left/Right Front Channels Crossover Frequency Control – sets frequency at which bass will befiltered out of left/right front channels and redirected into subwoofer
B Center Front Channel Crossover Frequency Control – sets frequency at which bass will be filteredout of center front channels and redirected into subwoofer or front left/right channels
C Left/Right Surround Channels Crossover Frequency Control – sets frequency at which bass will befiltered out of left/right surround channels and redirected into subwoofer or front left/rightchannels
D Center Surround/SR6 Crossover Frequency Control– sets frequency at which bass will be filteredout of center surround channel and redirected into subwoofer or front left/right channels
E LFE Mix Control – sets level of LFE signal relative to other signals
F Subwoofer Level Control – sets level of subwoofer output

13Integrated Controlled Bass Manager
Owner’s ManualSetting the ICBM’s Controls
Figure 6ICBM rear panel
G Subwoofer Mode Mono/Stereo Switch – selects mono feed to all subwoofers, or provides stereo feedfor separate left and right subwoofers
H Lowpass Special/Normal Switch – selects normal (12 dB/octave), or special 36 dB/octave lowpasscrossover for subwoofers requiring a steeper filter curve
I L/R Recombine On/Off Switch – redirects bass out of all channels not set to bypass, and into frontleft/right channels. Does not deactivate subwoofer.
Note: Operation of this switch is somewhat counter-intuitive. Please read “Setting the Left/Right Recombine switch” on page 14 before using this option.
Setting the ICBM’s ControlsIt’s easy to adjust the ICBM for your system. You just set the proper crossover point for each of yourspeakers, set a couple of configuration switches, and then fine-tune the bass performance with the LFEMix and Subwoofer Level controls. Here’s how to do it….
Setting the crossover points
First, you will need to determine the best crossover point for each of your speakers. If you know eachspeaker’s rated +/-3 dB frequency response, you can use that. Whatever the speaker’s rated bassextension is, add about 10 Hz to that number, then set the ICBM’s crossover for that channel at the nexthighest number. For example, given a speaker rated at 55 Hz – 20 kHz, +/-3 dB, take the 55 Hz numberand add 10 Hz to get 65 Hz. The next highest setting on the ICBM is 80 Hz, so that’s the setting youshould start with. Listen carefully to the bass at that setting, then try the next lowest setting (in this case,60 Hz) and give another listen to the same material. You may notice better bass definition. Or you maynotice more distortion. Use whichever setting yields the best overall bass fidelity.
If you don’t know your speakers’ rated frequency responses, here’s a guide to typical bass managementsettings for several common speaker types:
Speaker Type ICBM SettingLarge tower speaker with one 12- or 15-inch woofer, or two 10-inch woofers Bypass or 40 HzSmall tower speaker with one 10-inch woofer or two 8-inch woofers 40 HzSmall tower or large bookshelf speaker with one 8-inch woofer or two 6-inch woofers 60 HzBookshelf speaker with one 6-inch woofer or two 5-inch woofers 80 HzBookshelf speaker with one 5-inch woofer or two 4-inch woofers 100 HzSatellite speaker with one 4-inch woofer or one or two 3.5-inch woofers 120 Hz
RLOWPASSMODEAC 15V L IN OUT(SR6)
CENTER SURR.SUB/LFE OUTPUTOUTLAW AUDIO CORPORATIONDURHAM, N.H.-USA
IN OUTRIGHT SURR.LFE
IN OUTLEFT SURR.
IN OUTCENTER
IN OUTRIGHT L/R
RECOMBINEIN OUTON
OFF
SPECIAL
NORMAL
MONO
STEREO
LEFTIN
G H I
14 Outlaw Audio
Owner’s Manual
Cabinet size and tuning also affects bass response, so you should experiment with the settings to makesure they sound best for your system. If you hear too much bass distortion, listen closely to the differentspeakers in your system to see which ones are distorting, then try raising the crossover point for thosespeakers by one or two notches. If the bass sounds poorly defined, try lowering the crossovers for thelarger speakers in your system by one notch.
Setting the Left/Right Recombine switch
Note: In order to make the ICBM as versatile as possible, we had to make the operation of thisswitch somewhat counter-intuitive. Please read over the following carefully before using the Left/RightRecombine switch.
The Left/Right Recombine switch redirects the bass into the front left and right speakers. You shoulddefinitely set this switch to “on” if you do not use a subwoofer.
However, we have designed the ICBM’s circuits so that you can still use a subwoofer with the Left/RightRecombine switch activated. The reason we did this is that even if you have fairly large front left andright speakers, you may want to route some of the front left/right signal to the subwoofer to reinforce thebass output from those channels.
If you connect a subwoofer with the Left/Right Recombine switch on, and, if you want bass also goingto the subwoofer, you must set the Left/Right Front Crossover Frequency control to anysetting other than “bypass.” For example, if you have large front speakers, and set the crossoverpoint for them to 80 Hz (or any other frequency other than “bypass”), the front speakers will actuallycontinue to get a full range signal. (The bass is first removed from the front speakers and then sent rightback to them.) What the crossover control is actually doing is setting what frequencies will also travelon to the subwoofer. As a rule of thumb, setting this control at 80 Hz is a safe bet. If you are using a verylarge (15 or 18-inch) subwoofer, you may find that setting this control at 60 or 40 Hz gives yousomewhat better bass definition.
We know this concept is a bit tricky to comprehend, but it is the simplest explanation we can give to avery sophisticated electrical manipulation.
Setting the Subwoofer Mode Mono/Stereo switch
The Subwoofer Mode Mono/Stereo switch lets you use two subwoofers for a stereo effect. Although bass isgenerally non-directional, some critical listeners feel that having two subwoofers set up in stereo yieldsbetter sound than setting up multiple subwoofers and feeding them the same signal.
When the stereo switch is activated, the ICBM gathers all low bass from the right front, right surround,and one-half of the bass from the center channel and center surround channel and places it with theright subwoofer output. Conversely, everything from the left front, left surround, and one-half of thecenter and center surround are channeled to the left subwoofer output.
From a technical standpoint, both mono and stereo approaches have their pluses and minuses. If youuse the ICBM with two subwoofers, you should experiment setting this switch both ways to see which
Setting the ICBM’s Controls

15Integrated Controlled Bass Manager
Owner’s Manual
sounds the best to you. (As a side note, we fully expect the advantages of mono versus stereo subswith the ICBM to be a lively topic of debate on Internet chat rooms. After all, the Outlaws arealready arguing among themselves as to which way sounds better.)
Setting the Low pass Special/Normal switch
The Low pass Special/Normal switch lets you change the slope of the subwoofer crossover from the“normal” 2nd order (12 dB/octave) response to the “special” 6th order (36 dB/octave) response. Withmost powered subwoofers, the “normal” setting will work best. However, some subwoofers–particularlyTHX®-certified models – are designed to be used with high-order crossovers. If you have a THX-certifiedsubwoofer, use the “special” setting. If you use a subwoofer that is not THX-certified, try flipping theswitch both ways to see which sounds best.
Setting the LFE Mix control
The LFE Mix control lets you lower the level of the “.1” LFE signal by up to 10 dB. Normally, you shouldleave this control set full up, at the 0 dB setting. But many 5.1-channel programs have LFE tracks thatsome listeners find overwhelming. If your system sounds good with most discs, but certain discs soundtoo bassy, try lowering the LFE level for those discs.
This control does not affect the bass content of the other channels, so it will not affect the fundamentalbalance and tonal quality of your system.
Setting the Subwoofer Level control
This control lets you fine-tune the balance of your subwoofer with your other speakers. You can boostthe subwoofer by up to 9 dB, or completely turn it down. You may find that with certain programmaterial, kicking the subwoofer up a couple of decibels (or pulling it down a few dB) gives a moresatisfying effect. This control works like the level control on a powered subwoofer, except that it offers amore limited range of adjustment for greater precision.
When you calibrate your system using the internal test tones in your receiver or preamp/processor, setthe ICBM’s Subwoofer Level control to 0 dB and use the level control in the receiver or pre/pro, or thecontrol on the subwoofer, to set the level so it’s equal to that of the other channels. Now you can use theSubwoofer Level control on the ICBM for fine-tuning. You’ll find it easier to access than the controls onthe subwoofer or in the pre/pro or receiver. Whenever you want to return to a “by the book,” referencesetting for your subwoofer level, just set the ICBM’s Subwoofer Level control back to 0 dB.
If you’re using the ICBM in a stereo system, you can set the Subwoofer Level control by ear, using musicor movies, or you can use a CD with test tones, such as Stereophile Test CD 1, along with an SPL meter.Play a test tone at about 500 Hz, and observe the reading on your SPL meter. Now play a test tone belowthe lowest crossover frequency you’re using on the ICBM. (For example, if your lowest crossover settingon the ICBM is 60 Hz, use a test tone in the 40 to 50 Hz range.) Adjust the ICBM’s Subwoofer Levelcontrol so that the level is the same on the bass tone as it was on the 500 Hz tone.
Setting the ICBM’s Controls
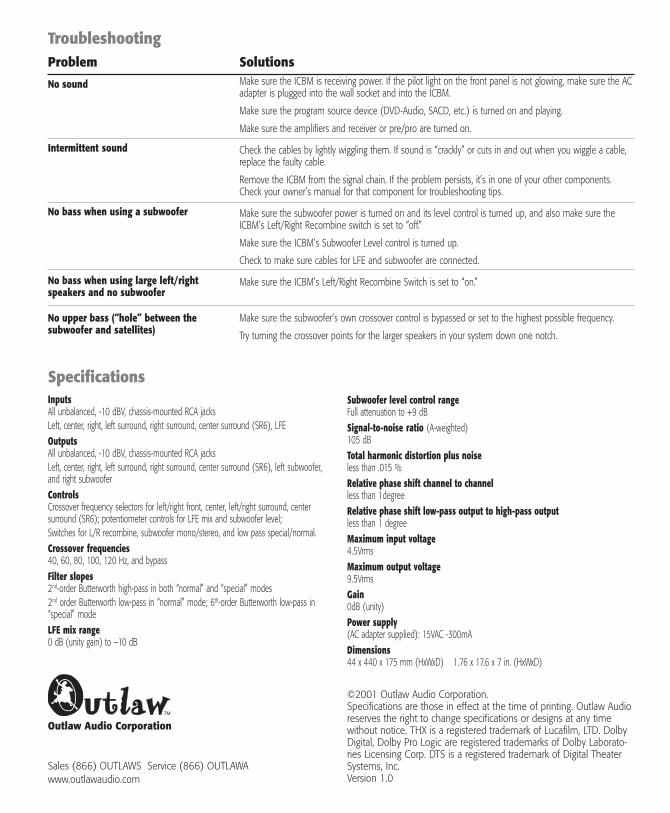
SolutionsMake sure the ICBM is receiving power. If the pilot light on the front panel is not glowing, make sure the ACadapter is plugged into the wall socket and into the ICBM.
Make sure the program source device (DVD-Audio, SACD, etc.) is turned on and playing.
Make sure the amplifiers and receiver or pre/pro are turned on.
Check the cables by lightly wiggling them. If sound is “crackly” or cuts in and out when you wiggle a cable,replace the faulty cable.
Remove the ICBM from the signal chain. If the problem persists, it’s in one of your other components.Check your owner’s manual for that component for troubleshooting tips.
Make sure the subwoofer power is turned on and its level control is turned up, and also make sure theICBM’s Left/Right Recombine switch is set to “off.”
Make sure the ICBM’s Subwoofer Level control is turned up.
Check to make sure cables for LFE and subwoofer are connected.
Make sure the ICBM’s Left/Right Recombine Switch is set to “on.”
Make sure the subwoofer’s own crossover control is bypassed or set to the highest possible frequency.
Try turning the crossover points for the larger speakers in your system down one notch.
Outlaw Audio Corporation
Sales (866) OUTLAWS Service (866) OUTLAWAwww.outlawaudio.com
©2001 Outlaw Audio Corporation.Specifications are those in effect at the time of printing. Outlaw Audioreserves the right to change specifications or designs at any timewithout notice. THX is a registered trademark of Lucafilm, LTD. DolbyDigital, Dolby Pro Logic are registered trademarks of Dolby Laborato-ries Licensing Corp. DTS is a registered trademark of Digital TheaterSystems, Inc.Version 1.0
Troubleshooting
SpecificationsInputsAll unbalanced, -10 dBV, chassis-mounted RCA jacksLeft, center, right, left surround, right surround, center surround (SR6), LFE
OutputsAll unbalanced, -10 dBV, chassis-mounted RCA jacksLeft, center, right, left surround, right surround, center surround (SR6), left subwoofer,and right subwoofer
ControlsCrossover frequency selectors for left/right front, center, left/right surround, centersurround (SR6); potentiometer controls for LFE mix and subwoofer level;Switches for L/R recombine, subwoofer mono/stereo, and low pass special/normal.
Crossover frequencies40, 60, 80, 100, 120 Hz, and bypass
Filter slopes2nd-order Butterworth high-pass in both “normal” and “special” modes2nd order Butterworth low-pass in “normal” mode; 6th-order Butterworth low-pass in“special” mode
LFE mix range0 dB (unity gain) to –10 dB
Subwoofer level control rangeFull attenuation to +9 dB
Signal-to-noise ratio (A-weighted)105 dB
Total harmonic distortion plus noiseless than .015 %
Relative phase shift channel to channelless than 1degree
Relative phase shift low-pass output to high-pass outputless than 1 degree
Maximum input voltage4.5Vrms
Maximum output voltage9.5Vrms
Gain0dB (unity)
Power supply(AC adapter supplied): 15VAC -300mA
Dimensions44 x 440 x 175 mm (HxWxD) 1.76 x 17.6 x 7 in. (HxWxD)
Problem
No sound
Intermittent sound
No bass when using a subwoofer
No bass when using large left/rightspeakers and no subwoofer
No upper bass (“hole” between thesubwoofer and satellites)