iceni -...
TRANSCRIPT

I C E N II C E N I
R E D U X
S P I T F I R E

Welcome.
Thanks for purchasing Albion III Iceni - Redux, an exciting array of orchestral and cinematic tools made “the Spitfire way”.
Reading manuals is a bore, so stick this next to your loo and give a read whenever you can, you may find a host of good tips and ideas on how to get the best out of your purchase.
About Spitfire:
Spitfire was formed in 2008 by a group of successful British composers as a means of producing the tools they needed for their busy work schedules. Sick of dry, humourless, ugly, unrealistic enormously untamable sounding libraries, Spitfire set about redefining the way samples were created.
Our aim is to reproduce the conditions of top movie recording sessions and approach sampling as if we were recording a film score one note at a time; To record performances, and parts thereof, not scientifically created samples;To capture, not only the timbre of a world class set of players, but also to record the room in which they played..
If you are wanting perfectly tuned, normalised or “dry” samples you have probably come to the wrong place. For here you may find the odd string squeak, a “fruity” trumpet note, and lots and lots of “room” but put the whole package together, write some beautiful music and suddenly this library and our approach will make perfect sense.
About Albion:
Albion I was the first comprehensive set of Orchestral tools produced by Spitfire for the world at large. Having spent 4 years sweating blood and tears over what is arguably one of the world’s best set of bespoke and exclusive orchestral librar-ies. Spitfire rolled it’s sleeves up to “have some fun”.
Albion was designed as a work-horse cinematic orchestral palette designed to be used as the “daddy” of your main rig, or simply a sketch pad on your laptop. And so it proved, many thousands of you adopted and approved of our approach. So much so we were glad to introduce a whole raft of new features and content into our latest free update. Some thing we always plan to do with all our libraries.
Where Albion I was designed to provide that enormous, epic cinematic sound. Albion II - Loegria was designed to fill your 5.1 space with beautiful cinematic detail and beauty, esoteric instruments and approaches and eccentric ideas. All with an essential selection of additional orchestral voices not found in Albion I. It is a delicate library full of pretty loveli-ness
About “Iceni”
Albion III is none of those things. It is a never-before-assembled lo-end insult to the senses. Featuring a selection of the most colon-bothering, disturbed bass frequencies yet to grace your lower intestine.
The orchestral content of this library is a staggering array of bottom disturbance, a 32 piece string band comprising of 24 celli and 8 basses. Extraordinary brass and woodwind sections bringing the total head-count for this band to 45..... all low, all recorded in the hall at Air studios, through fine ribbon and valves onto tape.
...That is until you include members of the Olympic opening ceremony drum corps playing the lowest and largest drums available to hire in London.
This is our greatest train set today and in addition to this rare selection of orchestral material we have had an absolute scream really utilising the talents of our team to take this orchestral material and... urm..... mate the bejesus out of it cre-ating mind warping bass synths and some of the most unpleasant creatively diverse loops on the market today. With this library you’re not going to be able to compare it. This is a new start to your arsenal of compositional tools and one that will stand you out from the rest. Congratulations on your purchase.

ABOUT THIS “REDUX” EDITION OF ALBION VOLUME 3.
EXCLUSIVE NEW SAMPLE CONTENT (often several gigabytes per product), NEW PRESETS, RE-BUILT FROM CODE-BASS UP, WITH A HOST OF NEW FEATURES, IMPROVEMENTS AND AD-VANCEMENTS.
We love Albion, and it seems that a lot of you do too. Having worked with it on numerous films, tv se-ries and computer games for a couple of years now; having gained new ground in developing our BML range; and having received numerous ideas and comments from our extensive and passionate user base; the Spitfire team has set about revising the entire range to keep Albion feeling fresh, new and as cutting edge as if you had bought it yesterday.
EXTRA CONTENT:
• Freshly mixed Albion Orchestra “Hyped Ensembles”. Iceni is remarkably tight and agile considering the numbers of players. The “Hyped Ensembles” offer a slightly less articulate produced take on these recordings which give more of a “what you’d expect” from a band of this size.• Stephenson’s “Underbass” - A selection of vintage synths sampled for their sub bass qualities and designed to sit an octave below your basses for that modern Hollywood sound... well we say sound, it’s more a feeling!• Additional Stephenson’s Material including “Henson’s Underbelly” and “Warped Pads”.• Darwin’s Wipes - We’ve taken the orginal Darwin sessions and have morphed them into extraordi-nary wipes and transitions.• Over 100 useful and inspiring hand crafted Ostinatum Presets designed by an Award Winning com-poser.
EXTRA FUNCTIONALITY INCLUDES:
• ADDED: New unified UI to match the latest Spitfire releases.• ADDED: ‘Persistent releases’. Release triggers no longer fade out when moving the mod wheel.• ADDED: ‘fp Hall trigger’. When moving from fp to lower dynamics (in select articulations) the hall reverb is retained.• ADDED: Round Robin layering to thicken the texture.• ADDED: Marcatos (and leisurely staccatos) can now be released early with an RT.• ADDED: Stereo Collapse for the close mic functionality.• ADDED: Per articulation mixing ability.• UPDATED: Moves the Albion series to the ‘BML’ codebase with all its latest features and functional-ity.• UPDATED: Latest version of the FX sequencer and Ostinatum machine.• UPDATED: Latest UACC specification implemented.

PA G E 4
CONTENTS
SPECIFICATIONS 5
LETS GET STARTED 6
ALBION CONTENT 7
THE FRONT PANEL 10
THE ARTICULATIONS 11
GENERAL & EXPRESSION 13
MICS & MIXES 14
ADVANCED 15
OSTINATUM 16
THE FX SEQUENCER 19
STEPHENSON STEAM SYNTH 21
BRUNEL LOOP BROWSER 23
THE PUNCH COG 25
UACC 26
TROUBLESHOOTING 28

PA G E 5
SPECIFICATIONSKONTAKT
PLEASE MAKE SURE YOU HAVE THE LATEST VERSION OF KONTAKT OR HAVE KONTAKT PLAYER 4.2.4 OR 5 INSTALLED.
RECOMMENDED SPEC:The better your computer, the better the performance of any Spitfire module. But not to worry if you’re not spec’d up to the hilt. All programs are provided with a set of parameters that enable you to tone back the CPU demands of any given patch. But moving forward, we’re confident this module will keep your computer busy for many years to come! We recommend a combination of high processor speeds, a good chunk of memory and a devoted 7200rpm eSata, USBII, Thunderbolt, or Firewire audio drive. The more memory you have, the less demand placed on your drive, and having a totally devoted drive gives you the chance to load less into memory and reduce load times. The higher the speed of your CPU, the more capable your computer will be to deal with some of the amazing, but complicated scripts we’ve written.
PCs:We recommend Windows 7 (latest Service Pack, 32/64 Bit), Intel Core Duo or AMD Athlon 64 X2, 2 GB RAM (4 GB recommended).
MACs:We recommend Mac OS X 10.6, 10.7 or 10.8 (latest update), Intel Core 2 Duo, 2 GB RAM (4 GB rec-ommended).
DRIVES:Firewire, USBII, or eSata, 7200rpm. Ask your dealer for drives that are suitable for “AV use”. We always recommend as small a drive as possible unless you are using SSD, as the platter will be smaller and the seek time less. The library will take up around 24 Gig on your hard drive. If using several large libraries, or a number of Spitfire modules from the same machine, we really recommend having your samples distributed over a number of drives. Lacie eSata or Quadras 7200rpm we highly recommend. Moreo-ver, an exciting development lies in the recent arrival of some amazing solid state (SSD) drives. With seek times reduced to a fraction (0.1ms vs 6-9ms) of what standard drives can offer, we are certain you will be able to reduce your sampler’s “pre-load” (page 15.) buffer tenfold meaning you’ll be able to load enormous orchestral palettes into a single machine.
HOST:The Kontakt 4 & 5 platforms should work comfortably on most commonly found platforms and DAWs. As always make sure you’re as up-to-date as you can afford! If you’re planning on building or adding Spitfire to an already large orchestral palette, we recommend running your library independently of your DAW, either on your host computer (e.g. via Re-Wire) or on a slave device (e.g.. via Midi or MOL). This will assist your loading times, and will allow your DAW to do what it does best and sort out all your note ons and note offs! We heartily endorse Plogue Bidule (www.plogue.com) as a virtual rack/ routing system. For more advice and information about setting up please check our website.

PA G E 6
INSTALLATION1. Download the free Kontakt Player application from here and install it.
http://www.native-instruments.com/#/en/products/producer/kontakt-player/
2. Open the Player (or Kontakt 4 full version if you have that) and click ‘Add Library’ in the library browser window:
3. Navigate to the library folder. For example: the ‘Spitfire Albion Library’ folder that contains your library’s Instruments and Samples folders, and also has the ‘info.nkx’ file.
4. Now you have added the library to the Service Centre, and you will be prompted to open the application to enter your Serial Number.
5. Open the service centre application, and enter the Serial Number in this format:
XXXXX-XXXXX-XXXXX-XXXXX-XXXXX
(This is the same number you used to download your library.)
6. Restart Kontakt and your library is authorised.
7. Blow the dust off your ModWheel and enjoy!
NB. TO ENJOY THE OSTINATUM FACTORY PRESET PATTERNS YOU WILL NEED TO MOVE THIS FOLDER. SEE PAGE 19 FOR MORE DETAILS.

ALBION III CONTENTTHE ALBION ICENI ORCHESTRA
STRINGS:
If this is your first foray into orchestral music, please don’t be afraid. We’re about to make it very very easy and a whole lot of fun. There is a great number of ways a stringed instrument can be played from bowing the string, to plucking it. These are called articulations. Iceni is very limited in this respect and by-design. The production costs on this library are focused on getting the biggest band possible to play the most useful selection of articulations. This library is not a stan-dalone orchestra. But a low one. If all you want to do is low, this is all you’ll need! But, having been recorded in the same room as Albion 1 & 2, is designed to sonically and perfectly integrate with those more detailed libraries. All three will provide you with a seriously expressive, dynamic and detailed set of tools, with this latest incarnation seriously sorting out your bottom!
Instead of being recorded in situ (ie fanning out to the right of the conductor cellos then basses) this string band has been recorded with the cellos forming a horse shoe around the conductor with the basses in a line behind. The cellos are organised into two sections, A being to the left of the conductor, B to the right. We have given you a degree of control over the arrangement possibilities of this extraordinary section by giving you tutti (all together) and A & B cello sections where A is mapped to the left hand of your keyboard, B to the right. These are all totally different recordings so please don’t hesitate to overdub the tutti low strings with A&B cellos.... Suddenly you’ll have 48 cellos and 8 basses!!! We have also given you greater control with cello and bass close mics separated off on the mic controllers, but more of that in “Front Panel” page **.
BRASS & WIND
OK so the strings are good. But we really think these sections are going to feel your love. We recommend you really look into these bad boys as there really is nothing, bar none, NOTHING that sounds like this. Two reasons. 1. No one has sampled bands of this make-up for commercial release. 2. Certainly where the brass is concerned, it is our opinion that Brits make this kind of noise the best. I won’t try and justify this comment but if you were to ask any A list film composer about the capabilities of our A-list brass players and they will give you the same answer. We’ve even heard of clandestine brass sessions taking place for scores that are advertised as US - union only scores. For big pictures. It is simply a tradition that the UK has, and delivers on. It’s why JW wrote the theme tune for Star Wars with Maurice Murphy in mind. It’s why HZ did what he did on Inception. It’s not that we do it better. It’s just something about a combination of aching beauty bursting into something wholly unwholesome, unruly, it cuts through, shocks and jolts.
So our winds:
WIND:
2 contra bassoons, 2 contrabass clarinets, heckelphone, 2 bassoons, 2 bass clarinets, 1 bass saxophone.
There is nothing in the orchestral choral range that transmits low sub harmonics more than the Contrabassoon. It’s just a big oboe isn’t it...... No, no it’s not. When you have nightmares tonight it’s this that will come rasping at you not a tuba. This section will make you think differently about woodwinds. The heckelphone.... well that IS just a big oboe (bass oboe) a really big one.
We’ve concentrated on articulations that we think are useful for these types of ensemble. So have gone a little further than the strings. There are plenty of fantastic FX for strings in Albion I, but as these brass and wind libraries are so unique we felt that we wouldn’t be cluttering you hard drive with a duplication of efforts.
In addition to the longs, shorts and legatos found in the strings we have:
Ripps - A quick flurry of notes up or down to a short note. Great for punctuation and accents.
Staccato - A shorter short, good for lines of notes.
FX - Orchestrated by the warped mind of Ben Foskett these speak for themselves and we look forward to hearing them on a multitude of projects coming to a multiplex near you soon!
BRASS:
2 tubas, 2 cimbassi, 2 contra bass bones, 3 bass bones
Tubas, like you’ve never heard, the rare and ancient Cimbasso, the rasp of which you’ll be blown away by. Contra Bass Bones of which in one famous orchestration book recommends you don’t write for as they’re “too difficult to play” and some good old bass trombones. We’ve sampled these at dynamics that sound closed and not too brassy and very brassy so if you don’t move that mod-wheel on the longs/ legatos or play louder on the shorts you’re not at the party. One ar-ticulation we haven’t mentioned is “Longs Nasty” the instruction given was blunt: “play at lip bleed levels, it doesn’t have to sound nice”.
PA G E 7

PA G E 8
DARWIN PERCUSSION IIIDarwin III continues it’s brand as a thunderous aneurysm of cinematic drumming. There is no reason for this other than we just wanted more! So we got out players to play for longer, looser, tighter and for more dynamic layers. To make the success of our first two outings even more comprehensive.
Where Darwin’s first two creations were made from more traditional orchestral batterie; bass drums and toms etc, this selection is a wholly more calamitous and (are you getting bored yet?) LOW selection wide screen percussion. Played by the leader and members of the Olympic opening ceremony drum corps, a selection of some of the largest, deepest. (and in one case rarest) drums available to hire in London. Including: A selection of Taikos and Daikos (big Japanese drums), Bass drums, British Marching Toms, and Bass Drums. Available with 3 controllable mic positions, recorded with numerous (up to 6) dynamic layers (there’s lots of quiet stuff in there too) and 5 round robins to give you fantastic realism.
BRUNEL LOOPS IIIWe’re so excited to present you with an exhaustive year-long project. Combining the talents of 3 sets of programmer/ producer/ composers to being some very very different patterns to the loop landscape. These loops are designed predominantly to be part of a composition, not ones in their own right. Largely constructed from difficult to place sounds, these loops will fit beautifully [sic] into orchestral arrange-ments or indeed become thudding centrepieces to pop and dance tracks.
We’ve reinvented the way to browse these loops so go to page 27 to find out how to get the best out of these, unlock greater selections of loops, portions of and sync them to your host tempo.
THE PRODUCERS:
The Flight are an exciting up-and-coming London-based production team who have worked for and with the likes of Lana Del Ray, Rufus Wainwright, Skye, Jess Mills, Bjork, there loops are very organic in nature, sub-zero cool and very simple.
Stanley Gabriel is an exciting young programmer producer who have worked for and with the likes of Kate Bush, Ladyhawke, Little Boots. Stanley really has his finger on the dance-pop scene in London, his loops are fuller more electronic sounding.
Christian Henson is from a dance background, having engineered and produced for acts such as LTJ Bukem and The Freestylers, he broke into film composition by programming for the likes of Anne Dud-ley, Dario Marieanelli, Patrick Doyle and HGW. Other than the 35+ film scores and numerous top-end TV shows as composer in his own right Christian’s bleeps and beats can be found anywhere from Spy Game to Narnia.

PA G E 9
STEPHENSON’S STEAM BANDWe have strayed slightly from the previous incarnations of Stephenson’s band where these would be derived totally from these new “Iceni” recording with our recordings are processed our precious players through an awesome array of effects, both virtual and outboard. To create an “alternative band” at the very least, at best, an “alternative universe”. There’s a bit of that here, but we didn’t want to retread too much of a well trodden path in Albion I & II. If you don’t plan on using A1 & 2 you’ll still have a good taster within:
Steam Synth:
Blake Robinson has delivered us an amazing synth UI here that has helped us to take raw orchestral material and batter it beyond all recognition into the speaker-flexing tones you hear here. Essentially a bass synth we are staggered at how you can take orchestral material and turn it into marauding dubstep, crunk sounds and ef-fects. The sub harmonics that you get with the woodwinds for example can lend to a filthy sine like sub tone so even with the simplest of instruments nothing stays still. A lot of the filters are sync’d to the tempo of your host.
Steam Pads:
These are the most musical of the Steam Band section. We have taken each individual choir across the pitch register and have given you an alternate take, a very alternate take, like an alternative universe. We have made the Mod wheel do very different things for these sounds, so to get the best.... go on, give it a wiggle.
Steam Octavium and Gabriel’s Auditorium:
This huge selection of fantastic arpeggiatted and step sequenced sounds exhaustively designed by programmer/ producer supremo Stanley Gabriel. These will automatically sync to your host and will provide you with arcing ribbons of inspiration out of the box.
Stephenson’s Underbass
We took a selection of the greatest classic analogie synths including a Roland Juno 6, SH101, TB303, Roland JX3P, MiniMoog, SE1X, and a classic Wurlitzer, via neve line amps and a Cranesong AD converter. To create pure and round but eminently mixable sub bass patches designed to sit under you celli and contrabasses (rec-ommended you copy MIDI data and transpose down an octave) for that ultra modern movie theatre shudder-ing sound.
IN ADDITION TO THE ABOVE, THE NEW REDUX VERSION OF ICENI HAS A HOST OF NEW SYNTH PATCHES WHICH FURTHER MUTATES, MORPHS AND WARPS THE ICENI CONTENT.

PA G E 1 0
THE FRONT PANEL
MIC/ MIX POSITIONSGENERAL CONTROLS
EXPRESSION CONTROLS
ARTICULATIONS
DEFAULT CCsCC1 - DynamicsCC11 - Expression (0-100% fade)CC16 - SpeedCC21 - VibratoCC22 - Close Mic sliderCC23 - Tree Mic sliderCC24 - Amb Mic sliderCC25 - Outrigger Mic sliderCC32 - Articulation control
PA G E 1 1
ARTICULATIONS (BRUSH SETS)
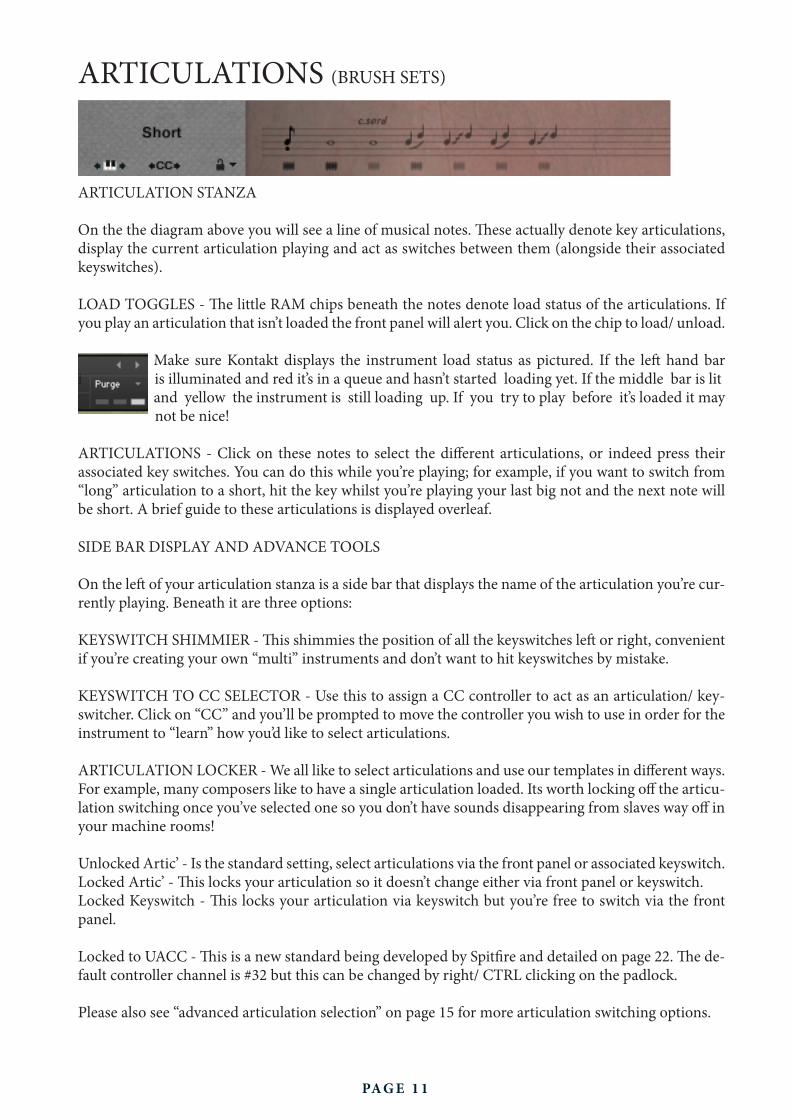
ARTICULATION STANZA
On the the diagram above you will see a line of musical notes. These actually denote key articulations, display the current articulation playing and act as switches between them (alongside their associated keyswitches).
LOAD TOGGLES - The little RAM chips beneath the notes denote load status of the articulations. If you play an articulation that isn’t loaded the front panel will alert you. Click on the chip to load/ unload.
Make sure Kontakt displays the instrument load status as pictured. If the left hand bar i is illuminated and red it’s in a queue and hasn’t started loading yet. If the middle bar is lit and yellow the instrument is still loading up. If you try to play before it’s loaded it may not be nice!
ARTICULATIONS - Click on these notes to select the different articulations, or indeed press their associated key switches. You can do this while you’re playing; for example, if you want to switch from “long” articulation to a short, hit the key whilst you’re playing your last big not and the next note will be short. A brief guide to these articulations is displayed overleaf.
SIDE BAR DISPLAY AND ADVANCE TOOLS
On the left of your articulation stanza is a side bar that displays the name of the articulation you’re cur-rently playing. Beneath it are three options:
KEYSWITCH SHIMMIER - This shimmies the position of all the keyswitches left or right, convenient if you’re creating your own “multi” instruments and don’t want to hit keyswitches by mistake.
KEYSWITCH TO CC SELECTOR - Use this to assign a CC controller to act as an articulation/ key-switcher. Click on “CC” and you’ll be prompted to move the controller you wish to use in order for the instrument to “learn” how you’d like to select articulations.
ARTICULATION LOCKER - We all like to select articulations and use our templates in different ways. For example, many composers like to have a single articulation loaded. Its worth locking off the articu-lation switching once you’ve selected one so you don’t have sounds disappearing from slaves way off in your machine rooms!
Unlocked Artic’ - Is the standard setting, select articulations via the front panel or associated keyswitch.Locked Artic’ - This locks your articulation so it doesn’t change either via front panel or keyswitch.Locked Keyswitch - This locks your articulation via keyswitch but you’re free to switch via the front panel.
Locked to UACC - This is a new standard being developed by Spitfire and detailed on page 22. The de-fault controller channel is #32 but this can be changed by right/ CTRL clicking on the padlock.
Please also see “advanced articulation selection” on page 15 for more articulation switching options.

PA G E 1 2
A BRIEF GUIDEWELCOME TO THE SPITFIRE ORCHESTRAL EXPERIENCE!
When you start playing these patches you will be triggering some of the greatest players, playing the greatest - some priceless - instruments, in one of the greatest recording studios in the world. Produced by successful film composers and orchestra-tors, through a selection of unique vintage mics, onto a meticulously serviced Studer 2” tape machine via world class Neve mic pres and analogue Neve desk and finally via head-of-the-class prism AD converters into the digital format you are now enjoying.
It’s about to get very, very fun.
**** THE MOD WHEEL ****
Without this you will be under-using the entire Albion library by about 75%.
Go on, give it a wiggle.
All long patches use the mod wheel to dial in different dynamic layers. Used in conjunction with a volume or expression fader you will get an extraordinary sense of dynamic headroom and timbral control.
SAMPLE STARTS
To maintain reality we cut our samples earlier than others. The start of a note often gives a sample its character. By cutting its front off too much we feel you take away its personality. If things are playing back a bit behind the beat, even after quantizing don’t be afraid of pulling that sequencer track pre-delay down a few dozen milli seconds.
SHORTS/ STACCATO - These are short, stabby articulations, they are velocity sensitive so the harder you play them the samples triggered will be played at a louder dynamic not only in volume but intensity of sound. We have also recorded “round robins” ie a number of different performances of the note so that if you repeat the same note it doesn’t produce a “machine gun” effect that gives the game away. For the “tutti” (together) Low Strings all of these are situated on the lower register of the keyboard as you would expect. FOR THE CELLOS SECTION A (LEFT) IS SITUATED ON THE LOWER REGISTER, SECTION B (RIGHT) ARE SITUATED ON THE UPPER. So to get both sections to play, perform with both hands or over dub/ copy and transpose you MIDI up to these registers.
SHORTS EXTRAS - We recorded the lower range of the tutti with a slightly shorter attack as the lower end had an enormous “bloom” that we feel may be difficult to control for more detailed work.
LONGS - As the name suggests, these are polyphonic so you can play more than one at a time. The dynamics of these are modulation wheel controlled. We’ve done this so you can swell up or down during a sustained note without having to re-trigger by hitting harder. You’ll not be getting the best out of the library if you don’t use this function! By hitting the notes harder you’ll also be able to change the speed of attack of the note. So try playing soft for those marauding dark pads and chords, harder for more insistent and urgent phrases. But for single lines we suggest you use:
LONGS CS - Stands for “Con Sordino” this is essentially a practice mute that is moved up the string beneath the bridge to quieten the instrument. For film music it was popularised by Bernard Herrmann and for smaller ensembles gives a thinner brighter more timid sound even uncomfortable. But for these large sections it becomes a thing of sheer beauty, like a large lake of custard (Bird’s of course) sprinkled with icing sugar.
FINGERED LEGATO - This is the big headache for us. We exhaustively record every possible interval between notes, chop these “transitions” and put them between the notes you play! All you have to do is make sure you either play “joined up” where one note overlaps the other (you can’t play more than one note, it won’t let you!). Or simply go into your editor on your DAW after playing, lasso all the notes and drag there ends so they overlap. If you want the band to sound like they’re re-bowing at the head of a note, just put a small gap between the notes. For the celli, remember you have two sections on the left and right of the keyboard so these two legato engines will work simultaneously and independently of each other. You can also have polyphonic legato control, this is not really a live feature but more of a post production, editing tool. You can have up to 4 voices which are selected by velocity. If you wish to use the polyphonic legato function, we would suggest you play in with one of the “longs” articulations. Then activate a legato artic’ and it’s polyphonic legato switch. Go into your event editor and make all notes the same vel. Then in a matrix or piano roll editor select each voice group by lassoing notes events and shift all the velocities to 0 - 31 for the 1st group, 32 - 63 for the second, 62 - 95 for the third and 96 - 127 for the 4th.
PORTAMENTO LEGATO - Is a transition where the note is changed without re bowing and by sliding the finger up or down on the same string to the note. This articulation works just as above.

PA G E 1 3
GENERAL CONTROLS
OPTIONS
PRESETS - This allows you to load predetermined sets of articulations affectionately called “Brush Sets” quickly and easily to optimise your system quickly, for essential articulations or to start building templates using empty “shells”.
PURGE UNUSED - This control keeps unloading any samples you are not using to keep your memory usage as low as pos-sible.
TRANSPOSE - Toggle this on and tweak the number to the right to transpose your instrument. Note: this is not the same as tuning, the instrument will actually offset the samples to the selected pitch. This is a great way of making Albion sound bigger. Pull two of the same patches into the same Kontakt multi, leave one as is, then with the second transpose up 3 on the UI and then, of course, tune down by 3. Play together and hey presto double the players!
CC1 MAPPED VEL(OCITY) - Click this to have velocity controlled dynamics (for the shorts for instance) mapped to CC1 as it is with the longs.
ROUND ROBINS & LEGATO
ROUND ROBINS - This refers to the number of round robins (multiple recordings of the same notes that cycle around as you repeatedly play a note) your instrument uses, the number can be dragged up and down (1-8) to save you memory.
RESET FROM F0 - This enables you to control the round robin cycle so it sounds identical every time you play. Toggle on & play the key selected (default F0) to reset.
RESET ON TRANSPORT - As above but resets every time you press play! Genius!
NO EXTRA FUNCTIONALITY (NEIGHBOURING ZONES)- Next to this lies a drop-down menu with some amazing new functions:
• “No extra Functionality” - Is the standard default where round robins are used as they were intended.• “Neighbouring Zones” - pulls from neighbouring zones, so for an ‘8RR’ instrument, you effectively cycle through up to 24 different sounding notes when pressing a key. It’s still just playing the one RR at a time, though giving you more of them. In legato mode this also alternates between 3 legato intervals to give a fake round robin.• “2x Round Robin With Skip” - plays two RR simultaneously, so you get a thicker sound, it’s the equivalent of plopping two notes on top of each other in your DAW (and it drops the overall volume ~6db so that the levels remain the same but it just sounds thicker). NB THIS IS NOT AVAILABLE TO LEGATO TRANSITIONS. This plays the pairs and moves ahead by 2 RR. In this mode RR is effectively halved. E.g: if you press a note it would play RR1/RR2 then RR3/RR4 ,etc.• “Layer 2x Round Robins With No Skip” - As above but this plays a pair but doesn’t move ahead by 2 so that RR isn’t halved. So if you press a note it would play RR1/RR2, then RR2/RR3, then RR3/RR4.
EXPRESSION CONTROLSVisual representation of the various expression controllers available to you.Right/ ctrl click to reassign/ learn different controller assignments.
DYNAMICS - (DEFAULT CC1 MOD WHEEL) Controls and xFades the different dynamic layers recorded.
VIBRATO - (DEFAULT CC 21) Controls and xFades level of vibrato.
SPEED - (DEFAULT CC 16) Controls the speed of legato transitions. Reduce when playing in, expand when playing back for ease of use.
EXPRESSION - (DEFAULT CC11) Controls the volume of the articulation.

PA G E 1 4
MICROPHONE/ MIX SETTINGSWelcome to the wonderful world of Air Studios and the mixes of our chiefengineer Jake Jackson.
Use the chips beneath the faders to load/ unload different microphones and the faders above to tweak the balance of them. Turning a fader all the way down will also unload the mics, conversely turning the fader back up will reload. Right/ CTRL click on the faders to assign CC controllers so you can mix these live for fantastic shifts in the spacial nature of the samples.
MICROPHONES / MIXES
Right/ CTRL click on the mic letters to change Kontakt channel/output assignment. STANDARD ARRAY:
C - Close mics, a selection of valve mics placed for optimum focus close to the instruments. This mic control is great to add in for added definition and at times a bit of “rounding of sound”, in isolation it can be a way of achieving a more intimate or pop-music style sound.
T - Tree. This refers to the “Decca” tree of three mics placed above the conductors podium. In the case of Albion priceless vintage Neumann M50s. These are placed to give the ultimate sound of the bandand the hall. There are the default mic position that loads in with each patch.
A - Ambient. A set of condenser mics placed high up in the gallery, away from the band. This mic position gives a massive amount of stereo spread and room sound over the band. Great mixed with the other mics, but also ideal when fed to your Ls & Rs speakers as it sends for true surround informa-tion.
O - Outriggers, a set of vintage mics placed wide apart to the left and right of the tree. These give a similar balance of room and band but with a broader stereo spread. The effect of this mic is some-where between the tree and ambient mics.

PA G E 1 5
ADVANCED STUFF.
MICROPHONE MIX TO ARTICULATION LINKER
The small notation symbol locks the microphone mix or tweak you’ve made to the articulation selected. This means if you want to boost any perceived inconsistencies in volume between say pizzicato and col legno you can. Or indeed if you want to roll off some of the hall ambience for a short versus the long articulations, this is how to fine tune.
CLOSE MIC PAN COLLAPSER
To the right of the above is a selector that opens the mic collapser: The close mics are a stereo mix and this collapser allows you to refine how the stereo image is handled. All our musicians are recorded in-situ, I.e. where they would be seated on a standard scoring session. Giving you a fantastic spectral spread when putting all the elements together, which helps define the detail. This panning tool helps you to manage and tweak to your own tastes/ needs.
STEREO WIDTH - Allows you to control how far the stereo image reaches. All the way to the right would be like having your two pan pots panned hard. All the way to the left would be like having both pots centre.
STEREO PAN - This allows you to control where in the pan field the centre of this image is placed.
ADVANCED ARTICULATION SELECTION.
For those of you who want to tweak your articulation selection further. If you want to create setups that closely integrate with notation software, or performance patches that react to the way you play, then this deep editor may be for you. It’s accessed by holding CMD (or CTRL on PC) and clicking the articulation icon. Can be closed by clicking the X to the bottom right of the UI.
LATCH TOGGLE - Switches this way of selecting the articulation on.
“WITH” SELECTOR - Selects how you would like to select.
PARAMETERS - Edit these to select a range in which this articulation would be selected.

PA G E 1 6
THE OSTINATUM(Access via the icon beneath the spanner)
SETTINGS
TRANSPORT
RHYTHM COMPUTER

PA G E 1 7
OSTINATUM FRONT PANELBest used with short articulations, this ever evolving device can offer instant chaotic inspiration. It can be used to create scientifically designe rhythms, from ostinati and arpeggiated sequences, to shimmering tremolando effects.
SETTINGS:
LOAD/ SAVE - Allows you to store your preciously made Ostinati. (see overleaf for information about “Ostinatum Factory Presets”).
MODE - Selects how the Ostinatum will interpret your playing. Ostinatum will sequence a maximum of 10 notes (one for each of your fingers). It needs to arrange them into a note order “1-10” and this determines how it does that.
OFF - The default postion Ostinatum remains dormant. ORDER PRESSED - This will organise the notes in the order you pressed them. ASCENDING - From bottom to top. DESCENDING - From top to bottom.
CONTROL KEYSWITCHES - Allows you to set up a section of the keyboard that controls the state of the ostinatum. These keyswitches let you turn it off, or set the Mode. SOLO KEYSWITCHES - Allows you to dedicate a section of the keyboard to keyswitches that solo each ostinatum track. The first KS turns all tracks on, the following KS solos each individual track.
CHORD MODE - This ignores any note order and simply plays everything polyphonically. Great for measured trem style effects.
TRANSPORT:
This is a real time “note order” display. So with “Ascending” mode activated a C major triad played from middle C up will show up 1=C4, 2 = E4, 3 =G4. These note numbered assignments are processed in...
THE RHYTHM COMPUTER
NOTE MENU - Click these to place a note into the computer at the length you desire. Trash removes and scroll down different pre-designed sequences to the right of this. The cog allows you further fine tuning and configuration tools.
LENGTH - This displays the note lengths in the sequence that you have selected from the Note Menu. Drag down here to create rest versions of the note length.
KEY - Under each note you can select which key (displayed in real time in the Transport) note is attached to. Scroll up and down to select. So in the sequence pictured a C triad will sound C,E,C,C,C,C.
OFFSET - Adjust these bars up and down to adjust the velocity levels of each note, this will bring your rhythm sequence to life and provide you with all sorts of surprising syncopated accents.
NOW HIT PLAY ON YOUR DAW AND ENJOY!

OSTINATUM FACTORY PRESET PATTERNSOur team of award winning composers and programmers have enjoyed making you over 100 pre-made Osti-natum patterns to give you a rich selection of different start points from which to tailor your sequences.
First we need to make sure you’ve tramsferred the file into the correct location so the Ostinatum can find it quick and easily.
Locate “Ostinatum Presets” in your Albion Redux folder and move them to:
MAC: Documents>Albion>Data.
PC: My Documents>Albion/Data
If you have existing patterns saved in there you may want to move them into “Users”, so it’s nice and clean.
To browse and load click on the little floppy disk icon. We’ve tried to make some kind of sense in our titling and have cre-ated a selection that are better suited to Ascending, Descending or “Chord Mode”. So if you fancy an ascending pattern look out fr this in the suffix of the name. We’ve also created a selection of different meters and speeds so if you load up something suffixed with “8s” this will get you a quaver or 8th pattern. If this feels too slow you may want to go up to 16s to give you a semiquver pattern. Most are designed for 2 to 5 finger patterns with the “two hands” signifying that they have been designed for both hands to be on the keyboard!
PA G E 1 8
THE ALBION FX SEQUENCER1.
3.
5. 2. 6.
4.8.
9.
7.
PAGE 19

THE ALBION FX SEQUENCER KEY
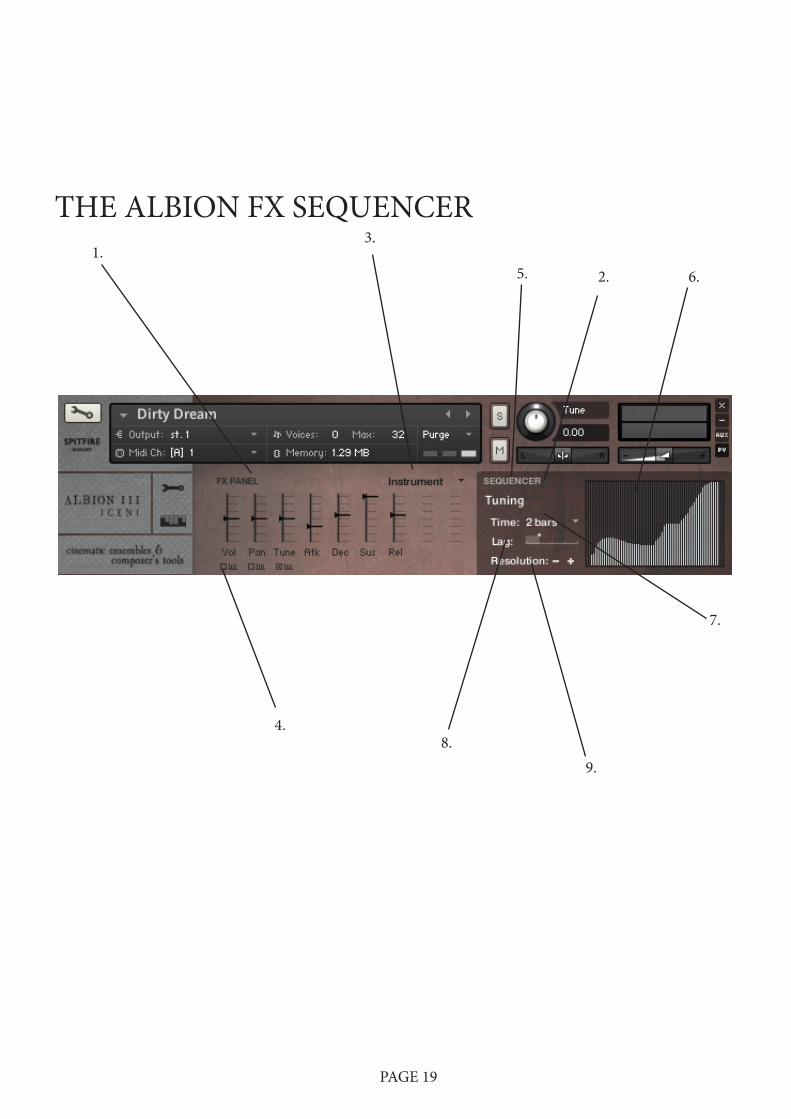
We’ve designed this tool so you can punk things further to your heart’s content, either in a quick brash way by pinging FX in or by carefully designing amazing FX sequences with this highly intuitive tool.
1. FX Panel Here lies all your hands-on, non sequenced parameters. The top layer provides some basic patch tweaks you can make, overall volume, pan, tuning, and a simple ADSR envelope. This is so that you don’t have to press the scary spanner button if you don’t want to and our Kontakt Player users also have a wide range of editable tools.
2. Sequencer Panel Strap on your jewellers loop and go in for some meticulous FX sequencing. All your sequencing and automation will happen in this panel.
3. Effects Selector Pick the FX you’d like to dial in here from the drop down menu: Instrument (the top layer of basic patch parameters as pictured above), EQ, LoFi, LPF, Chorus, Reverb, Delay, Distortion, Phaser.
4. Sequencer Launch Buttons This launches the sequencer for the selected FX parameter. This will then be clearly displayed in...
5. Loaded FX Parameter Display Identifies which FX parameter you’re editing/ sequencing.
6. Sequencer Matrix Here is where the fun happens, drag up the columns from 0% to 100% to shape your FX sequence.
7. Time Determines what the Matrix represents. Click on the drop down and select one of these options: 4,3,2 & 1 bar, 2 beats and 1 beat.
8. Lag Introduces a lag into the movement of the control you are automating. The effect will be that the con-trols respond more slowly and give you a smoother interpretation of the FX sequence you have made or, in the other direction, become much crunchier and brutal.
9. Resolution Determines the resolution of the sample steps within the time frame that you have selected. From lumpy crotchet steps suitable for gated phrases to finer, smoother more detailed steps suitable for sweeps.
PAGE 20

STEPHENSON’S STEAM SYNTH
5.
2. 3.
8. 9.
10.
4.
7.6.
1.
7.
21.

THE STEPHENSON STEAM SYNTH
Although these sound excellent out of the box we’ve also given you an easy to use and ingenious front panel.
1. Lo & Hi Pass Filters LPF = Low, HPF = Hi. For some, a counter intuitive industry standard in titling. Adjust the graph on the LPF to chop off the top end, HPF to chop off the bottom. So if you want to reduce your fizzing synth sound to a muted sub tone drag the LPF graph from right to left.
2. Wobble Amount Three modulator windows that give you wobble, or sometimes, WAB WAB WAB! Adjust the AMT to effect the amount of WAB WAB.
3. Wobble Frequency Adjust the graph to change the frequency or speed of your wobbles. For tempo sync’d modulators this will tune coarsely to provide you with 8th triplet 16th, etc etc.
4. A.D.S.R. Attack, Decay, Sustain Release envelope. These knobs will adjust the shape of the sound from a volume point of view. Adjust attack to make the sound come thudding in or gradually fade in. Adjust release to make the sound go from a sharp end or off to a gradual decay. For an 808 style bass pull up one of the subbier sounds and pull the attack all the way to the right. The release to about mid way (to taste) and play some short notes.
5. FX Parameter Display We’ve pre-loaded a selection of FX. Activate by clicking the FX icons along this bar.
6. Portamento Glide On/ Off Toggle Click this to make the sound monophonic (so you only can play one note at a time) and to activate the portamento glide function.
7. Portamento Glide Amount Now that your Glide toggle is on hold one key down and whilst holding press another. Because you’re in monophonic mode the sound will transition from the first pitch you depressed to the second, this fader controls the time this transition takes.
8. Yoke X&Y FX Selector The yoke (10.) is a dual FX controller that adjusts your FX parameters in real time for fantastic sequenc-ing options. Y = vertical controller, X = horizontal. Scroll down to select which FX you wish to control.
9. Yoke X&Y FX Parameter Selector Determines which parameter from your selected FX you wish to map to the X or Y yoke controller.
You can also alter the FX parameters further and map them direct to the Yoke controller (right/ ctrl click) by accessing the additional FX parameter Bar; Command/ Right Click on the FX Icon you’d like to acces addi-tional parameters for.
22.

BRUNEL LOOP BROWSER
2.4.
3.
1.
7.
23.
THE BRUNEL LOOP BROWSER
An ingenious way of browsing through loop content:
1. Menu/ Loop Title Window This window will display the loop name once you’ve selected it.
2. Menu Icon Click this icon to return to the menu, this will automatically unload the loop you have selected and load up all the menu versions of the loops available in he patch you have loaded.
3. Loop Lamps In menu mode play the different loops distributed along the keyboard. A lamp will illuminate for each key/ loop played. These loops will play at the tempo they were recorded. Once you’ve found a loop you like and click on the illuminated lamp. This will unload the menu of loops and load up your desired loop (mapped to C1) with alternative patterns, mixes and single hits all sync’d to your host tempo.
4. LP Filter We’ve mapped a low pass filter to your modulation wheel (CC1). As these are predominantly bass end loops this will provide you with the opportunity of fading your loops down to marauding thumping pulses.
24.
PA G E 2 5 .
THE PUNCH COG(Available on Instruments saved in the “Punch Cog” or “Tweakable” folder)
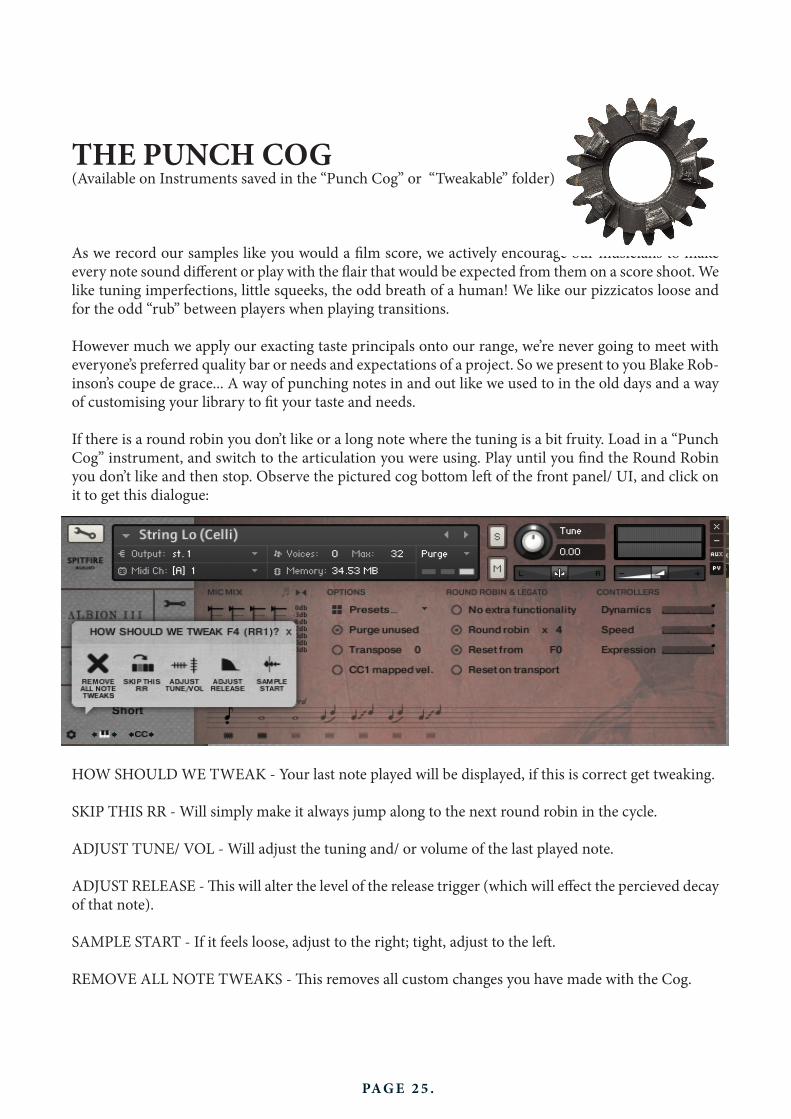
As we record our samples like you would a film score, we actively encourage our musicians to make every note sound different or play with the flair that would be expected from them on a score shoot. We like tuning imperfections, little squeeks, the odd breath of a human! We like our pizzicatos loose and for the odd “rub” between players when playing transitions.
However much we apply our exacting taste principals onto our range, we’re never going to meet with everyone’s preferred quality bar or needs and expectations of a project. So we present to you Blake Rob-inson’s coupe de grace... A way of punching notes in and out like we used to in the old days and a way of customising your library to fit your taste and needs.
If there is a round robin you don’t like or a long note where the tuning is a bit fruity. Load in a “Punch Cog” instrument, and switch to the articulation you were using. Play until you find the Round Robin you don’t like and then stop. Observe the pictured cog bottom left of the front panel/ UI, and click on it to get this dialogue:
HOW SHOULD WE TWEAK - Your last note played will be displayed, if this is correct get tweaking.
SKIP THIS RR - Will simply make it always jump along to the next round robin in the cycle.
ADJUST TUNE/ VOL - Will adjust the tuning and/ or volume of the last played note.
ADJUST RELEASE - This will alter the level of the release trigger (which will effect the percieved decay of that note).
SAMPLE START - If it feels loose, adjust to the right; tight, adjust to the left.
REMOVE ALL NOTE TWEAKS - This removes all custom changes you have made with the Cog.

We finally admit that things have got out of hand here in the world of Virtual instruments. Every sin-gle one works differently, responds differently to different key switches and controllers, and thats just within our own library! The UACC (pron’ you-ack) project is our attempt to unify articulation switch-ing across our entire range and it’s one we hope other developers will also adopt. It will mean greater integration between your VI set templates; greater encouragement to venture into the darker, less vis-ited corners of your collection; and a smoother workflow.
When selecting “Articulation Locked To UACC” you disable what we believe to be the soon-outdated keyswitch method of articulation selection in favour of UACC which defaults to channel #32 (change this by right-clicking the CC slider next to the padlock). This then gives you the option of using a MIDI controller to select articulations based on the list below. We recommend a switch based controller or an iPad app. Alternatively simply dial-in event or automation data on your DAW. The latter will give you the ability of always being on the correct articulation, even if you haven’t rolled your sequence back before the MIDI event.
This list is a work in progress and we look to users and other developers to finalise it.
1 Longs (vib xFade CC21)2 Longs con sord3 Longs alternate mute4 Longs sul pont5 Longs con sord sul pont6 Longs sul tasto7 Longs flautando8 Longs (artificial) harmonics9 Longs SUL lowest string10 Longs sul pont heavy distorted11 Longs Cuivre (brass only)12 Longs vib13 Longs flutter14 Longs hollow (flutes only)15 Longs overblow (flutes only)16 Longs overblow flutter (flutes only)17 Longs Mariachi (if separated off)
21 Legato22 Legato con sord23 Legato SUL lowest string24 Legato half section25 Legato half section con sord26 Legato sul pont27 Legato fast run (if separate patch)28 Legato flautando29 Legato harmonics
- CONTINUED:
UNIVERSAL ARTICULATION CONTROLLER CHANNELUACC
PA G E 2 6 .

- CONTINUED:
41 Spiccato (strings only)42 Shorts spiccato43 Staccato44 Staccato dig45 Spiccato con sord46 Feathered spiccato47 Staccatissimo48 Tenuto shorts49 Marcato shorts50 Combined shorts via velocity, with dyn on MW51 Staccatissimo con sord52 Tenuto shorts con sord53 Marcato shorts con sord54 Combined shorts via velocity, with dyn on MW con sord55 Staccatissimo con sord ALT56 Tenuto shorts con sord ALT57 Marcato shorts con sord ALT58 Combined shorts via velocity, with dyn on MW con sord ALT
61 Pizzicato62 Pizz Bartok63 Col legno battuto
71 Trills min 2nd72 Trills maj 2nd73 Trills min 3rd74 Trills maj 3rd75 Trills perf 4th
81 Trems - unmeasured82 Trems - unmeasured con sord83 Trems - unmeasured sul pont84 Trems - unmeasured con sord sul pont85 Trems - measured 180 bpm86 Trems - measured 150 bpm87 Trems - measured 120 bpm88 Trems - measured TM 180 bpm (time machine)89 Trems - measured TM 150 bpm (time machine)90 Trems - measured TM 120 bpm (time machine)91 Double tonguing92 Triple tonguing93 Quad tonguing94 Double tonguing con sord95 Triple tonguing con sord96 Quad tonguing con sord
111 FX 1112 FX 2113 FX 3114 FX 4115 FX 5116 FX 6117 FX 7118 FX 8119 FX 9120 FX 10121 Disco falls122 Rips123 Falls124 Rips con sord125 Falls con sord
PA G E 2 7 .
PA G E 2 8 .
TROUBLESHOOTING
This is a manual to accompany v4.0 of a favourite line for Spitfire with a totally new set of scripts, and UI. We have used our experience as busy film composers to deliver something that we’d like.
It is our hope that you keep in touch with us to let us know how you’re getting on, how you’re using Albion, how you’re finding it and, if we were to consider looking at areas in the future, what you’d like us to look at. From this we’ll form a consensus and wholeheartedly pledge that we will act upon it wherever possible or practical.
But here’s a couple of commonly asked questions...
• This library really isn’t behaving how I’d expect. - OK, so we’re now officially blue in the face. But before you go ANY further please check you are using the ABSOLUTE latest version of Kontakt. Visit your trusty service centre and we hope this page remains relatively under-thumbed.
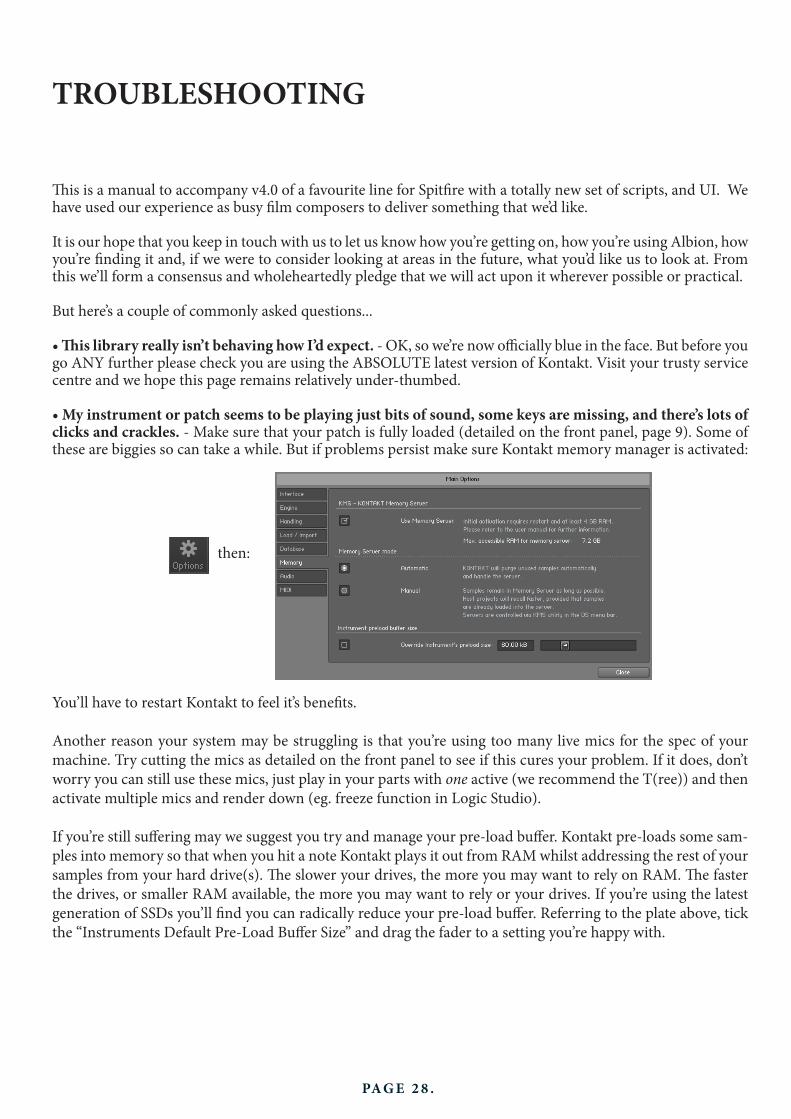
• My instrument or patch seems to be playing just bits of sound, some keys are missing, and there’s lots of clicks and crackles. - Make sure that your patch is fully loaded (detailed on the front panel, page 9). Some of these are biggies so can take a while. But if problems persist make sure Kontakt memory manager is activated:
then:
You’ll have to restart Kontakt to feel it’s benefits.
Another reason your system may be struggling is that you’re using too many live mics for the spec of your machine. Try cutting the mics as detailed on the front panel to see if this cures your problem. If it does, don’t worry you can still use these mics, just play in your parts with one active (we recommend the T(ree)) and then activate multiple mics and render down (eg. freeze function in Logic Studio).
If you’re still suffering may we suggest you try and manage your pre-load buffer. Kontakt pre-loads some sam-ples into memory so that when you hit a note Kontakt plays it out from RAM whilst addressing the rest of your samples from your hard drive(s). The slower your drives, the more you may want to rely on RAM. The faster the drives, or smaller RAM available, the more you may want to rely or your drives. If you’re using the latest generation of SSDs you’ll find you can radically reduce your pre-load buffer. Referring to the plate above, tick the “Instruments Default Pre-Load Buffer Size” and drag the fader to a setting you’re happy with.

PA G E 2 9 .
A QUICK THANKSChristian & Paul would like to thank Dominic Kelly of the English Session Orchestra, Ali-son Burton and the whole of the Air Studios team. Jake Jackson for making everything sound so marvellous, and the remarkable talents, immense intellect and invention of James Bellamy, Stanley Gabriel, Andrew Blaney, Blake Robinson and Stu Kennedy. We’d also like to welcome Jess to the team. You may have notice the grammer is much improved in this manual. This is thanks to her!
Most of all we would like to thank the amazing support and loyalty of our user base, our Face-book and Twitter friends and everyone at VI Control.
We are in the same boat as all of you. We’re not software developers by trade, so we appreciate your honesty in paying your way to be a part of our family and not distributing this illegally. But more importantly, if you have any ideas or criticism please let us know directly and in a con-secutive manner, via our help desk. You never know, you just may have thought of something that we hadn’t considered. We want to make our entire range the best there is, and we rely on you to help us achieve that.....
With thanks.
Christian & Paul.