idoc signer for apple ipad - esign emceeesignemcee.net/emceedocs/idocsigner.pdfidoc signer® for...
TRANSCRIPT
www.topazsystems.com
User Guide
iDoc Signer® for Apple iPad
Copyright © 2014 Topaz Systems, Inc. All rights reserved.
iDoc Signer and Topaz trademarks, logos, and service marks (collectively the "Trademarks"), including but not limited to iDoc
Signer® and Topaz
®, are trademarks of Topaz Systems Inc. in the U.S. and/or other countries.
2 www.topazsystems.com Back to Top
iDoc Signer User Guide
Table of Contents
1 – Introduction ........................................................................................................................ 4
1.1 - Features .......................................................................................................................................................4
2 – Getting Started ................................................................................................................... 5
2.1 – Supported Devices and OS Versions ........................................................................................................5
2.2 – Installing the iDoc Signer App ...................................................................................................................5
2.3 – Signature Capture and Embedding ...........................................................................................................5
2.4 – Doc Signer Demo Site .................................................................................................................................5
2.5 – Menu Toolbar ...............................................................................................................................................6
2.6 – Quick Steps for Signing Existing Digital Signature Fields in PDF Documents ....................................7
2.7 – Quick Steps for Creating, Placing, and Signing New Digital Signature Fields in PDF Documents ....8
3 – PDF Documents ................................................................................................................. 9
3.1 – Opening PDF Documents ...........................................................................................................................9
3.2 – Reading PDF Documents ......................................................................................................................... 10
4 – Capturing the Signature .................................................................................................. 13
4.1 – Creating a Signature Object .................................................................................................................... 13
4.2 – The Signature Capture Window .............................................................................................................. 13
5 – Placing the Signature ...................................................................................................... 14
5.1 – Editing and Deleting the Signature ......................................................................................................... 15
5.1.1 – Signature Information ............................................................................................................... 16
5.2 – Resizing the Signature ............................................................................................................................. 17
5.2.1 – Resizing Proportionally .............................................................................................................. 17
5.2.2 – Resizing Anamorphically ............................................................................................................ 18
5.3 – Moving the Signature ............................................................................................................................... 18
5.4 – Locking the Signature .............................................................................................................................. 19
5.5 – Signing Existing PDF Signature Fields .................................................................................................. 20
5.6 – Creating Empty Signature Fields ............................................................................................................ 21
6 – Signature Location Information...................................................................................... 22
6.1 – Checking Location Information ............................................................................................................... 22
7 – Fillable Forms (PDF Acroforms) ..................................................................................... 22
7.1 – Text Fields ................................................................................................................................................. 23
7.2 – Check Boxes ............................................................................................................................................. 23
7.3 – Radio Buttons ........................................................................................................................................... 24
7.4 – List Boxes .................................................................................................................................................. 24
7.5 – Combo Boxes............................................................................................................................................ 25
3 www.topazsystems.com Back to Top
iDoc Signer User Guide
8 – Embedding Signature & Form Data into PDF Documents for Distribution ................ 25
8.1 – Document Sharing and Distribution ....................................................................................................... 25
8.2 – Signature Embedding .............................................................................................................................. 26
8.3 – Form Data Embedding ............................................................................................................................. 27
8.4 – Document Locking and Deleting............................................................................................................. 27
9 – iDoc Signer Settings ........................................................................................................ 28
9.1 – Default Signature Details ......................................................................................................................... 29
9.2 – Doc Signer Server .................................................................................................................................... 29
9.3 – Form Field Read-Only Rules ................................................................................................................... 29
10 – External Bluetooth Signature Capture Pad ................................................................. 29
10.1 – How to Pair with the Topaz SigLite BTA 1x5 Bluetooth Pad .............................................................. 30
10.2 – How to Check Bluetooth Status ............................................................................................................ 30
10.3 – Unpairing the Topaz SigLite BTA 1x5 Bluetooth Pad ......................................................................... 30
4 www.topazsystems.com Back to Top
iDoc Signer User Guide
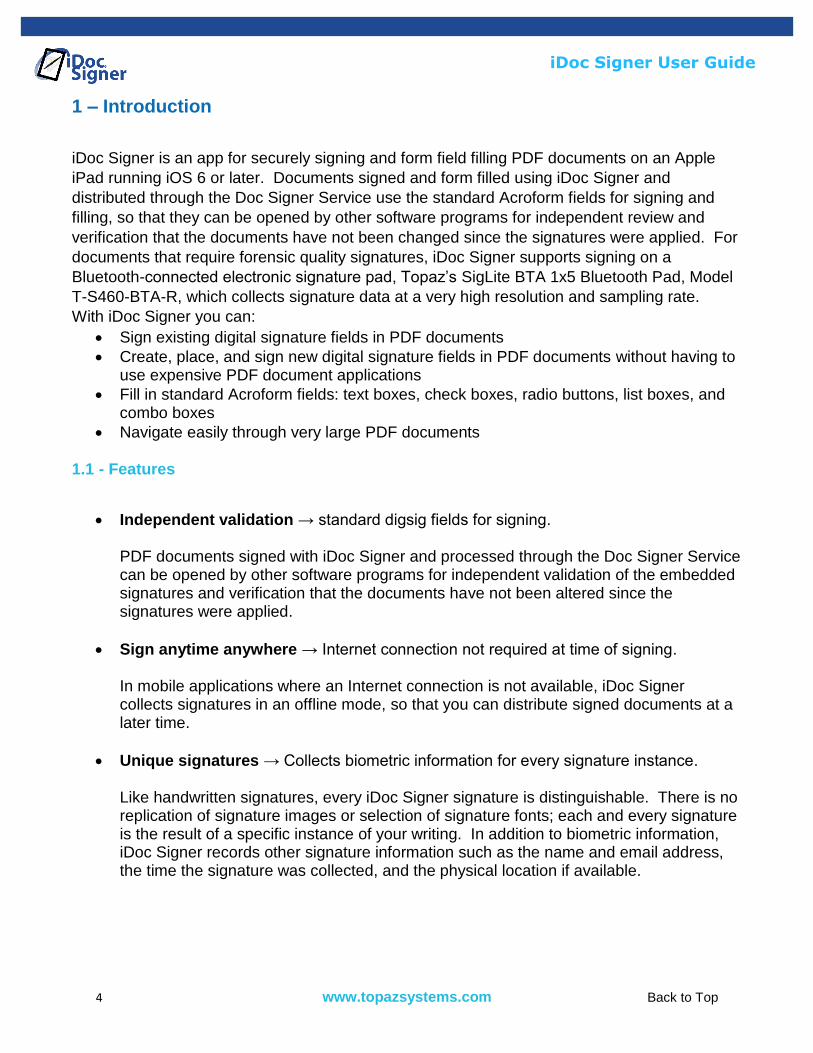
1 – Introduction
iDoc Signer is an app for securely signing and form field filling PDF documents on an Apple
iPad running iOS 6 or later. Documents signed and form filled using iDoc Signer and
distributed through the Doc Signer Service use the standard Acroform fields for signing and
filling, so that they can be opened by other software programs for independent review and
verification that the documents have not been changed since the signatures were applied. For
documents that require forensic quality signatures, iDoc Signer supports signing on a
Bluetooth-connected electronic signature pad, Topaz’s SigLite BTA 1x5 Bluetooth Pad, Model
T-S460-BTA-R, which collects signature data at a very high resolution and sampling rate.
With iDoc Signer you can:
Sign existing digital signature fields in PDF documents
Create, place, and sign new digital signature fields in PDF documents without having to use expensive PDF document applications
Fill in standard Acroform fields: text boxes, check boxes, radio buttons, list boxes, and combo boxes
Navigate easily through very large PDF documents
1.1 - Features
Independent validation → standard digsig fields for signing. PDF documents signed with iDoc Signer and processed through the Doc Signer Service can be opened by other software programs for independent validation of the embedded signatures and verification that the documents have not been altered since the signatures were applied.
Sign anytime anywhere → Internet connection not required at time of signing. In mobile applications where an Internet connection is not available, iDoc Signer collects signatures in an offline mode, so that you can distribute signed documents at a later time.
Unique signatures → Collects biometric information for every signature instance. Like handwritten signatures, every iDoc Signer signature is distinguishable. There is no replication of signature images or selection of signature fonts; each and every signature is the result of a specific instance of your writing. In addition to biometric information, iDoc Signer records other signature information such as the name and email address, the time the signature was collected, and the physical location if available.
5 www.topazsystems.com Back to Top
iDoc Signer User Guide
Signature creation → Signature fields you create can be resized, reshaped, and relocated. The flexibility to manipulate new digital signature fields provides an easy method for fitting signatures into existing forms.
Optional Bluetooth Signature Pad → Supports signature collection from the Topaz SigLite BTA 1x5 Bluetooth Signature Pad. For documents that require forensic quality signatures, iDoc Signer supports signing on a Bluetooth connected electronic signature pad, the Topaz SigLite BTA 1x5 Bluetooth Pad, Model T-S460-BTA-R, which collects signature data at a very high resolution and sampling rate.
2 – Getting Started
2.1 – Supported Devices and OS Versions
iPad & iPad Mini – iOS 6.0 and higher
2.2 – Installing the iDoc Signer App
To use the Apple iPad for signing documents, you must download the iDoc Signer App on your iPad device. The iDoc Signer app is available for free from the Apple App store. 2.3 – Signature Capture and Embedding
The iDoc Signer App is designed to enable PDF documents to be electronically signed locally on an iPad in three easy steps (see sections 2.5 and 2.6). 2.4 – Doc Signer Demo Site
The iDoc Signer App is pre-configured to work with the Doc Signer Service hosted on the Topaz demo site. Upon installation of the iDoc Signer App, you can immediately use the sample document installed with the app to learn how to sign and fill form fields. You can also load local PDF documents from other apps on your iPad into iDoc Signer, sign and fill fields in those documents, and then distribute them by email or by opening the documents in other apps.
6 www.topazsystems.com Back to Top
iDoc Signer User Guide
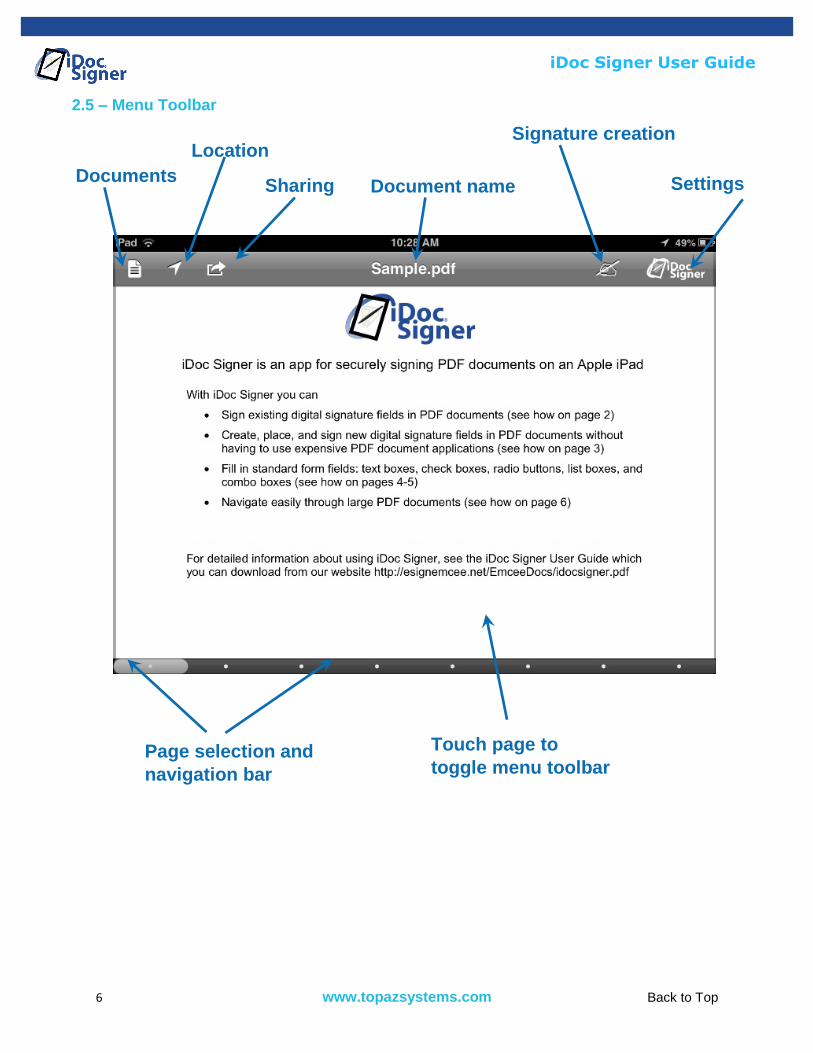
2.5 – Menu Toolbar
Documents Document name
Signature creation Location
Sharing Settings
Page selection and
navigation bar
Touch page to
toggle menu toolbar
7 www.topazsystems.com Back to Top
iDoc Signer User Guide
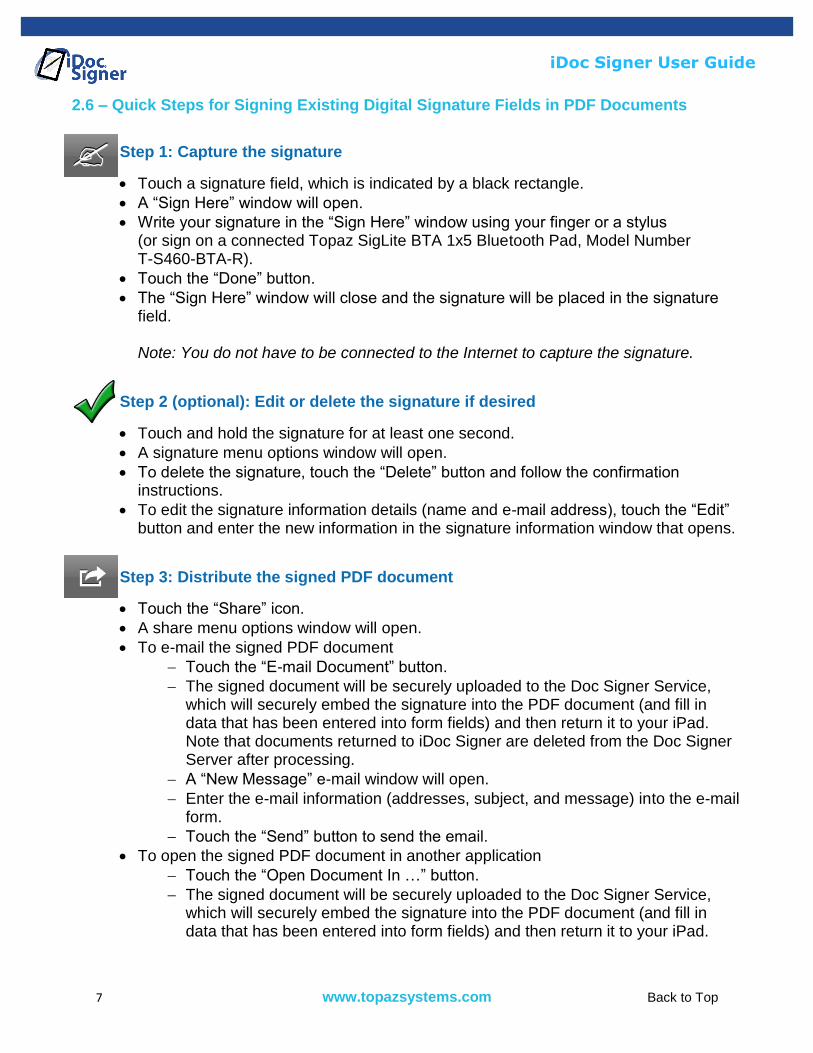
2.6 – Quick Steps for Signing Existing Digital Signature Fields in PDF Documents
Step 1: Capture the signature
Touch a signature field, which is indicated by a black rectangle.
A “Sign Here” window will open.
Write your signature in the “Sign Here” window using your finger or a stylus (or sign on a connected Topaz SigLite BTA 1x5 Bluetooth Pad, Model Number T-S460-BTA-R).
Touch the “Done” button.
The “Sign Here” window will close and the signature will be placed in the signature field. Note: You do not have to be connected to the Internet to capture the signature.
Step 2 (optional): Edit or delete the signature if desired
Touch and hold the signature for at least one second.
A signature menu options window will open.
To delete the signature, touch the “Delete” button and follow the confirmation instructions.
To edit the signature information details (name and e-mail address), touch the “Edit” button and enter the new information in the signature information window that opens.
Step 3: Distribute the signed PDF document
Touch the “Share” icon.
A share menu options window will open.
To e-mail the signed PDF document
Touch the “E-mail Document” button.
The signed document will be securely uploaded to the Doc Signer Service, which will securely embed the signature into the PDF document (and fill in data that has been entered into form fields) and then return it to your iPad. Note that documents returned to iDoc Signer are deleted from the Doc Signer Server after processing.
A “New Message” e-mail window will open.
Enter the e-mail information (addresses, subject, and message) into the e-mail form.
Touch the “Send” button to send the email.
To open the signed PDF document in another application
Touch the “Open Document In …” button.
The signed document will be securely uploaded to the Doc Signer Service, which will securely embed the signature into the PDF document (and fill in data that has been entered into form fields) and then return it to your iPad.

8 www.topazsystems.com Back to Top
iDoc Signer User Guide
Note that documents returned to iDoc Signer are deleted from the Doc Signer Server after processing.
A window will open that displays program icons on your iPad that can open a PDF document.
Touch the icon of the desired program, and it will open the signed PDF document.
To lock the signed PDF document
Touch the “Lock Document” button.
A “Warning” window will open that describes the effect of locking the document. Note that a locked document cannot be unlocked before distributing.
Touch the “Lock” button to lock the signed PDF document, or touch the “Cancel” button to cancel the operation.
2.7 – Quick Steps for Creating, Placing, and Signing New Digital Signature Fields in PDF
Documents
Step 1: Create the new signature field and capture the signature
Touch the “Sign” icon (the hand holding a pen) on the menu bar at the top right of the screen. Note: If your screen doesn’t display the “Sign” icon, email us at [email protected] or call us at (805) 520-8292 to enable this feature.
A “Sign Here” window will open.
If you want to sign the document immediately, write your signature in the “Sign Here” window using your finger or a stylus (or sign on a connected Topaz SigLite BTA 1x5 Bluetooth Pad, Model T-S460-BTA-R). Note: You do not have to be connected to the Internet to capture the signature. Note: If you want to create a new empty (unsigned) signature field, simply proceed without signing or touching the “Cancel” button. In this case, a new empty signature object will appear with an icon showing a hand holding a pen, until the document is distributed through the Doc Signer Service, which will embed the empty signature field in the document to make it ready for signing.
Touch the “Done” button.
The “Sign Here” window will close and the signature field will be placed in the middle of the portion of the document page visible on the screen.
Step 2 (optional): Fit and place the signature field in the document
To move the signature field on the page, simply drag it to the desired location with your finger.
To resize the signature field proportionally, use the standard Apple pinch-zoom gestures.
To resize the signature field anamorphically, use the grip at the lower right corner of the signature field; note that the shape of the signature is not changed.
9 www.topazsystems.com Back to Top
iDoc Signer User Guide
To “lock” the signature in place, simply tap on the signature; you can toggle the locked/unlocked state by tapping on a signature at any time. An unlocked signature is denoted by a surrounding purple rectangle; for a locked signature the rectangle is removed.
To delete a signature field or edit signature details, see Step 2 in Signing Existing Digital Signature Fields.
Step 3: Embed signatures permanently for distribution
Touch the “Share” Icon and select an option, either e-mail the signed document or send the signed document to another local app that supports PDF documents.
If there are new signatures present within the document, the document will be securely uploaded to the Doc Signer service, which will securely embed the signatures into the document and then return it to your iPad. Note that documents returned to iDoc Signer are deleted from the Doc Signer server after processing.
The distribution ready document can then be sent by e-mail or opened in another app.
To distribute the signed PDF document, see Step 3 in Signing Existing Digital Signature Fields.
3 – PDF Documents
iDoc Signer includes a powerful PDF document reader that can load very large documents for
review before signing. Documents with hundreds of pages can be easily navigated in
sequence or you can skip forward or backwards to direct pages using the page navigation
scrollbar at the bottom of the page.
3.1 – Opening PDF Documents
The iDoc Signer App is designed to enable PDF documents to be electronically signed locally on an iPad in three easy steps (see sections 2.5 and 2.6).
PDF Documents can be sent to iDoc Signer using the standard Apple file share interface
between apps. For example, a PDF file received as an e-mail attachment can be sent to iDoc
Signer by touching the attachment itself in the e-mail client to open the file in the Apple file
preview app. From there it can be sent to iDoc Signer by selecting “iDoc Signer” from the app’s
Share icon “Open in …” menu option.
Note: PDF documents may be password protected. If a password protected document is
selected to be opened by iDoc Signer, you will be prompted to enter the password protecting
the document. Without the valid password the document cannot be opened.

10 www.topazsystems.com Back to Top
iDoc Signer User Guide
Once the PDF document is opened in iDoc Signer, a copy of the original document will also be
available from iDoc Signer’s “Document” icon under the “Inbox” folder, as shown in the
following figure
The iDoc Signer Inbox
Note: A sample PDF document is included with the iDoc Signer app and can be loaded for
demo purposes anytime by selecting the “Reset Demo” menu option in the Documents menu.
3.2 – Reading PDF Documents
The iDoc Signer App is designed to enable PDF documents to be electronically signed locally on an iPad in three easy steps (see sections 2.5 and 2.6).
For document navigation, note that there is a page selection display at the bottom of the page -
a series of dots in which the highlighted dot represents the page currently displayed. If the
document has a very large number of pages, there is a black scroll bar with a white vertical line
representing the page currently displayed. There are three ways to navigate among pages in
a document:
Original documents
are stored in the
“Inbox” folder
Documents
Menu Icon Current document
name
11 www.topazsystems.com Back to Top
iDoc Signer User Guide
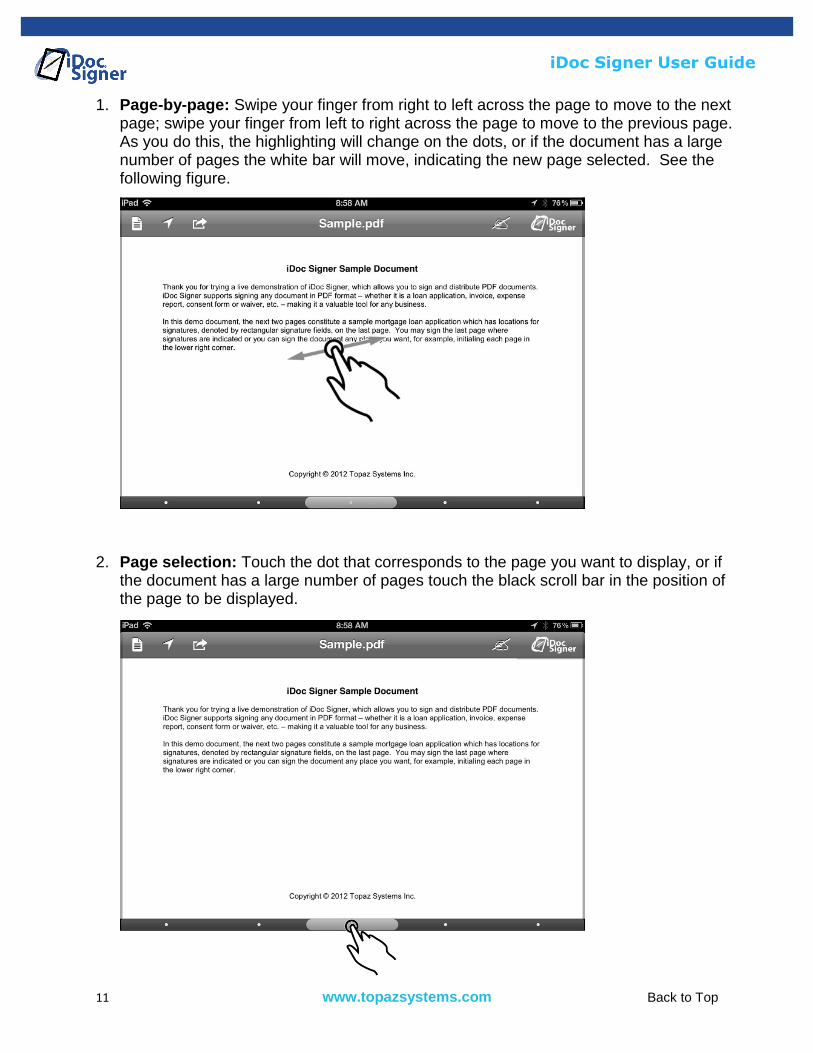
1. Page-by-page: Swipe your finger from right to left across the page to move to the next page; swipe your finger from left to right across the page to move to the previous page. As you do this, the highlighting will change on the dots, or if the document has a large number of pages the white bar will move, indicating the new page selected. See the following figure.
2. Page selection: Touch the dot that corresponds to the page you want to display, or if the document has a large number of pages touch the black scroll bar in the position of the page to be displayed.
12 www.topazsystems.com Back to Top
iDoc Signer User Guide
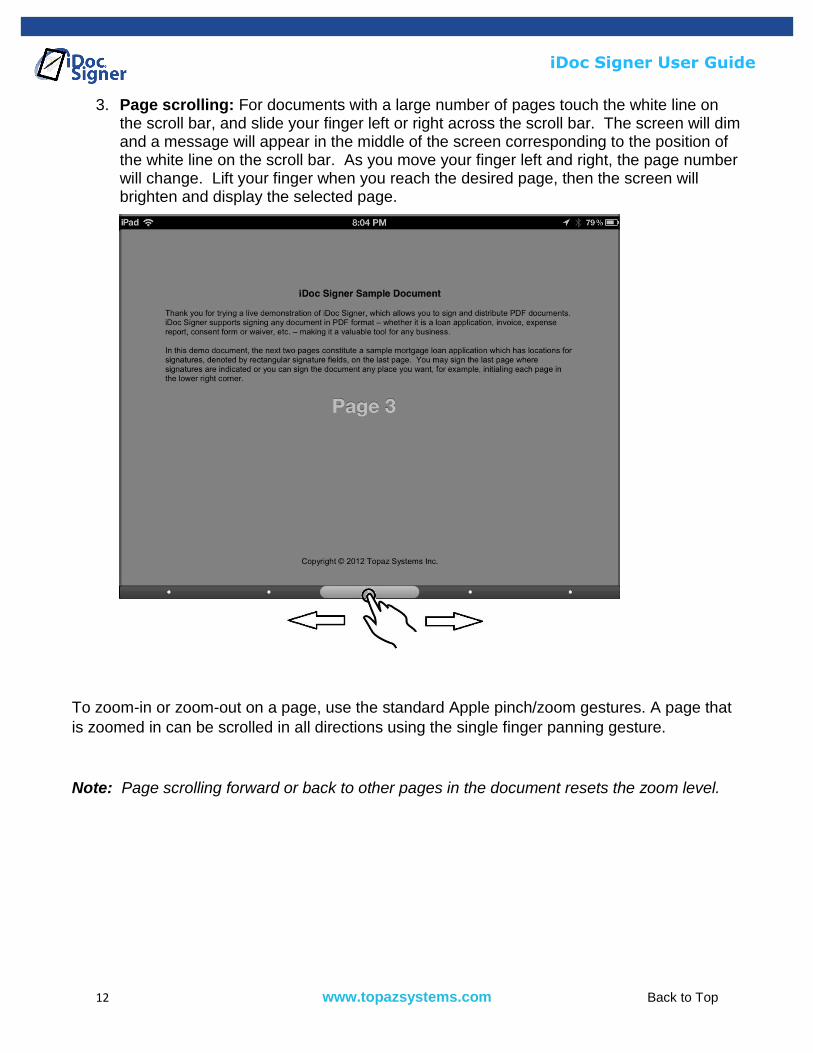
3. Page scrolling: For documents with a large number of pages touch the white line on the scroll bar, and slide your finger left or right across the scroll bar. The screen will dim and a message will appear in the middle of the screen corresponding to the position of the white line on the scroll bar. As you move your finger left and right, the page number will change. Lift your finger when you reach the desired page, then the screen will brighten and display the selected page.
To zoom-in or zoom-out on a page, use the standard Apple pinch/zoom gestures. A page that
is zoomed in can be scrolled in all directions using the single finger panning gesture.
Note: Page scrolling forward or back to other pages in the document resets the zoom level.

13 www.topazsystems.com Back to Top
iDoc Signer User Guide
4 – Capturing the Signature
iDoc Signer introduces a new way of electronically signing PDF documents. Unlike other
document signature products that annotate documents with images of signatures, iDoc Signer
captures signatures in real time at the biometric data level. This enables iDoc Signer to
represent signatures on document pages as independent objects that can be resized and
repositioned at will while maintaining at all times the true representation of the signer’s
signature. This novel approach allows signers full control over the appearance and placement
of their signatures in documents.
4.1 – Creating a Signature Object
To sign a document, first navigate to the desired page within the document that you want to
sign and touch the “Sign” button. This will open the signature capture window.
4.2 – The Signature Capture Window
Sign Button
Clears the signature
Changes the signature line size
Changes the signature line color
14 www.topazsystems.com Back to Top
iDoc Signer User Guide
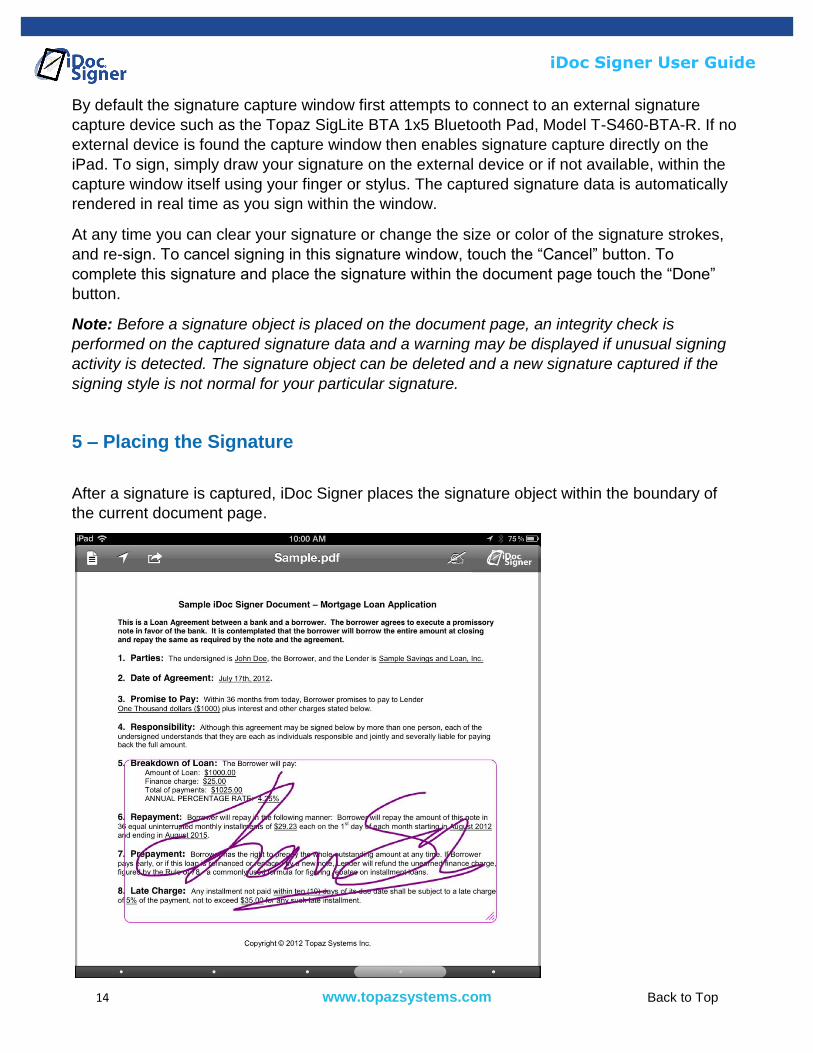
By default the signature capture window first attempts to connect to an external signature
capture device such as the Topaz SigLite BTA 1x5 Bluetooth Pad, Model T-S460-BTA-R. If no
external device is found the capture window then enables signature capture directly on the
iPad. To sign, simply draw your signature on the external device or if not available, within the
capture window itself using your finger or stylus. The captured signature data is automatically
rendered in real time as you sign within the window.
At any time you can clear your signature or change the size or color of the signature strokes,
and re-sign. To cancel signing in this signature window, touch the “Cancel” button. To
complete this signature and place the signature within the document page touch the “Done”
button.
Note: Before a signature object is placed on the document page, an integrity check is
performed on the captured signature data and a warning may be displayed if unusual signing
activity is detected. The signature object can be deleted and a new signature captured if the
signing style is not normal for your particular signature.
5 – Placing the Signature
After a signature is captured, iDoc Signer places the signature object within the boundary of
the current document page.

15 www.topazsystems.com Back to Top
iDoc Signer User Guide
5.1 – Editing and Deleting the Signature
Every signature object contains the raw signature capture data as well as extra metadata that
will be included in the embedded Adobe digital signature field. The following signature
information is included:
Name and e-mail o This information is editable in each signature and defaults can be defined in the
app (See Settings section).
Current location o This is the GPS location at the time of signature capture (see Location section).
Date and Time stamp o This is the local date/time of the signature capture.
Device ID of the capturing signature o This is a unique identifier that defines the device that captured the signature.
Some of the information such as name and e-mail can be edited by accessing the signature
details window. To edit the signature, touch and hold the signature until the signature menu
appears and select “Edit”.
Note: The same signature menu can be used to delete a signature object.
16 www.topazsystems.com Back to Top
iDoc Signer User Guide
5.1.1 – Signature Information
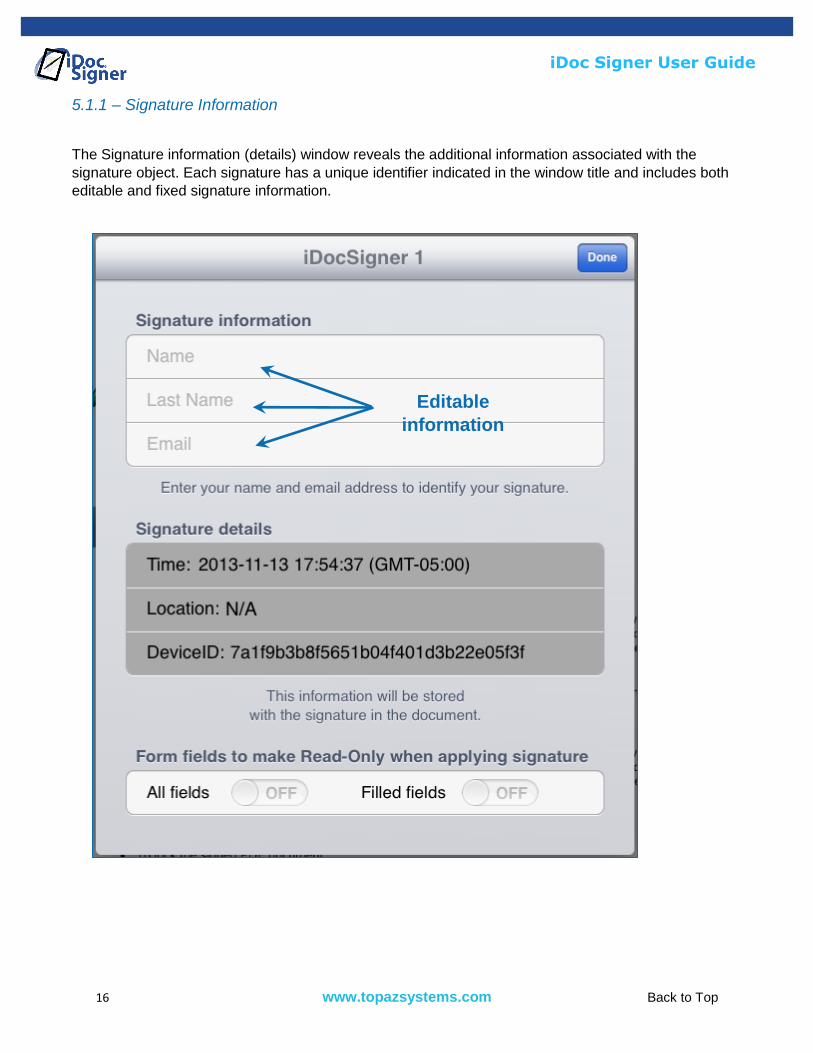
The Signature information (details) window reveals the additional information associated with the
signature object. Each signature has a unique identifier indicated in the window title and includes both
editable and fixed signature information.
Editable
information
17 www.topazsystems.com Back to Top
iDoc Signer User Guide
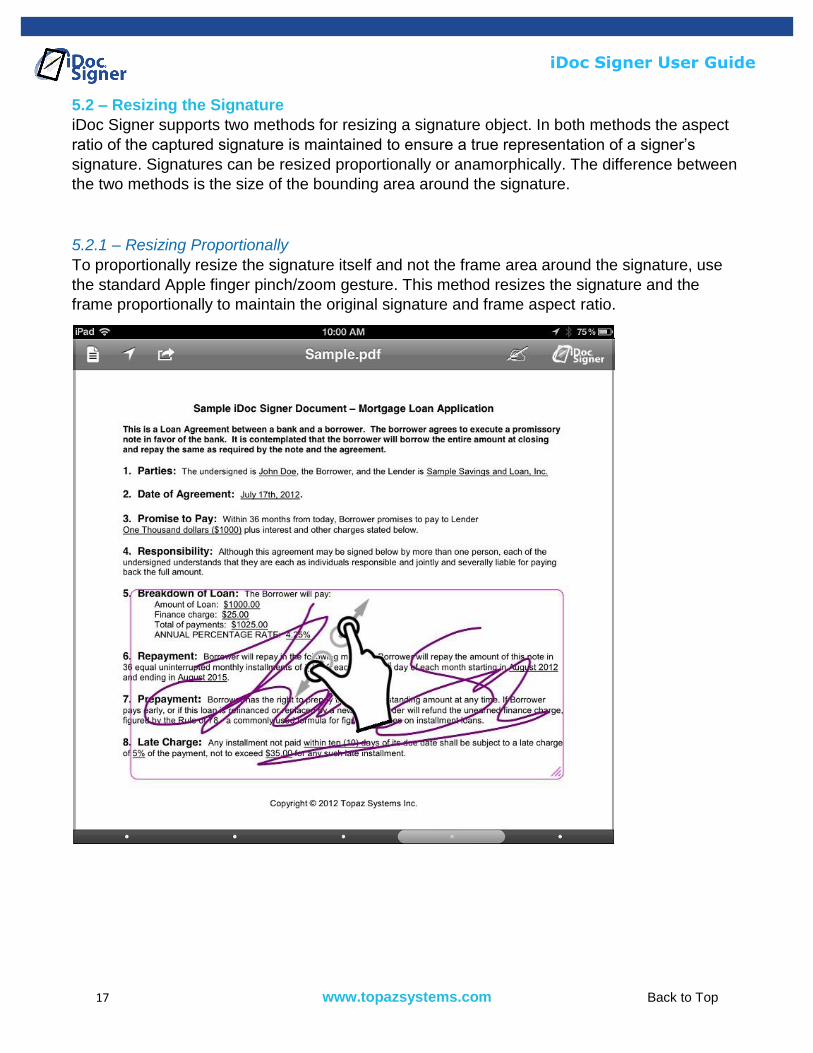
5.2 – Resizing the Signature
iDoc Signer supports two methods for resizing a signature object. In both methods the aspect
ratio of the captured signature is maintained to ensure a true representation of a signer’s
signature. Signatures can be resized proportionally or anamorphically. The difference between
the two methods is the size of the bounding area around the signature.
5.2.1 – Resizing Proportionally
To proportionally resize the signature itself and not the frame area around the signature, use
the standard Apple finger pinch/zoom gesture. This method resizes the signature and the
frame proportionally to maintain the original signature and frame aspect ratio.
18 www.topazsystems.com Back to Top
iDoc Signer User Guide
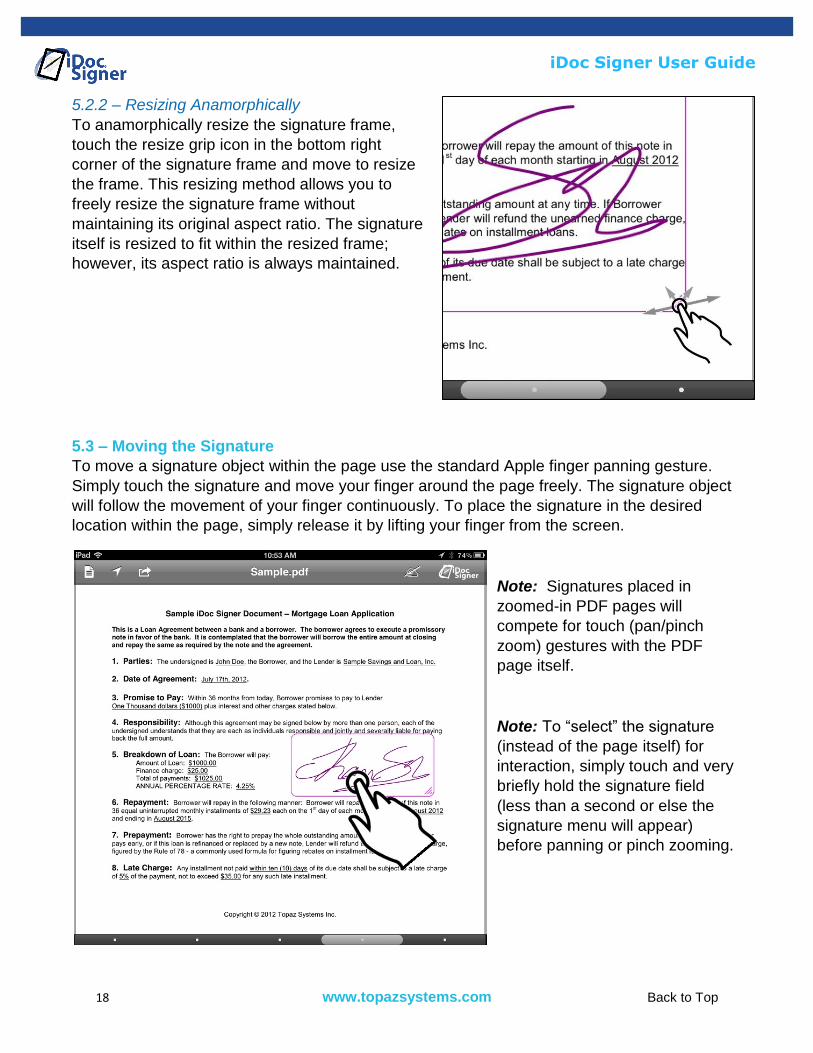
5.2.2 – Resizing Anamorphically
To anamorphically resize the signature frame,
touch the resize grip icon in the bottom right
corner of the signature frame and move to resize
the frame. This resizing method allows you to
freely resize the signature frame without
maintaining its original aspect ratio. The signature
itself is resized to fit within the resized frame;
however, its aspect ratio is always maintained.
5.3 – Moving the Signature
To move a signature object within the page use the standard Apple finger panning gesture.
Simply touch the signature and move your finger around the page freely. The signature object
will follow the movement of your finger continuously. To place the signature in the desired
location within the page, simply release it by lifting your finger from the screen.
Note: Signatures placed in
zoomed-in PDF pages will
compete for touch (pan/pinch
zoom) gestures with the PDF
page itself.
Note: To “select” the signature
(instead of the page itself) for
interaction, simply touch and very
briefly hold the signature field
(less than a second or else the
signature menu will appear)
before panning or pinch zooming.
19 www.topazsystems.com Back to Top
iDoc Signer User Guide
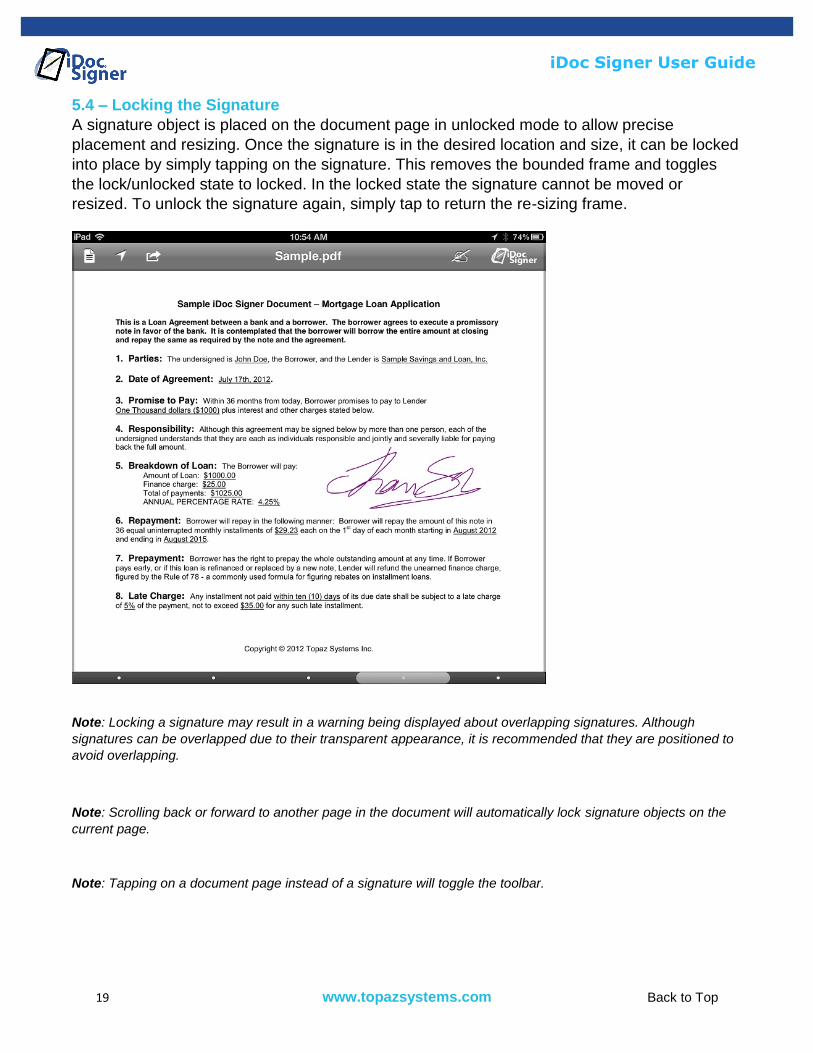
5.4 – Locking the Signature
A signature object is placed on the document page in unlocked mode to allow precise
placement and resizing. Once the signature is in the desired location and size, it can be locked
into place by simply tapping on the signature. This removes the bounded frame and toggles
the lock/unlocked state to locked. In the locked state the signature cannot be moved or
resized. To unlock the signature again, simply tap to return the re-sizing frame.
Note: Locking a signature may result in a warning being displayed about overlapping signatures. Although
signatures can be overlapped due to their transparent appearance, it is recommended that they are positioned to
avoid overlapping.
Note: Scrolling back or forward to another page in the document will automatically lock signature objects on the
current page.
Note: Tapping on a document page instead of a signature will toggle the toolbar.
20 www.topazsystems.com Back to Top
iDoc Signer User Guide
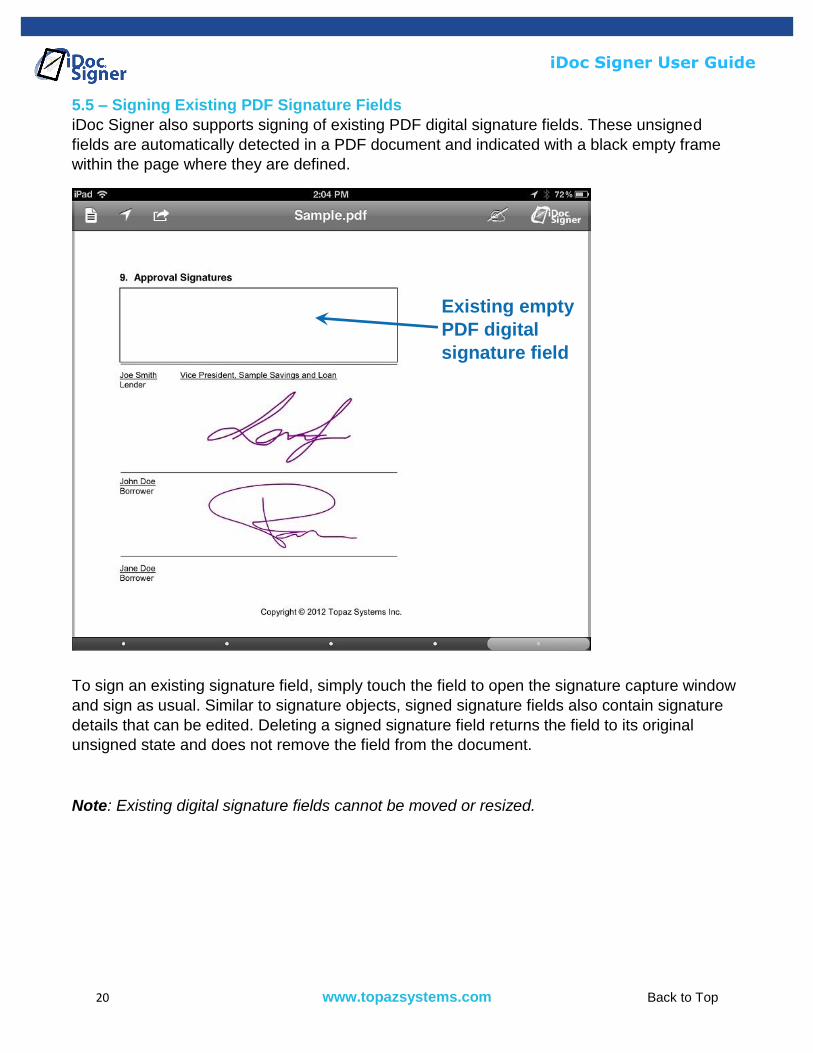
5.5 – Signing Existing PDF Signature Fields
iDoc Signer also supports signing of existing PDF digital signature fields. These unsigned
fields are automatically detected in a PDF document and indicated with a black empty frame
within the page where they are defined.
To sign an existing signature field, simply touch the field to open the signature capture window
and sign as usual. Similar to signature objects, signed signature fields also contain signature
details that can be edited. Deleting a signed signature field returns the field to its original
unsigned state and does not remove the field from the document.
Note: Existing digital signature fields cannot be moved or resized.
Existing empty
PDF digital
signature field

21 www.topazsystems.com Back to Top
iDoc Signer User Guide
5.6 – Creating Empty Signature Fields iDoc Signer also supports the creation of new
signature fields to remain empty for future use.
To create an empty signature object, touch the
“Sign” button to open the signature capture
window and then the “Done” button without
signing. This action will prompt you to create an
empty signature object.
Choosing “Yes” will create an
empty signature object. As
illustrated in the diagram on the
left, a new empty signature object
will appear with an icon showing
a hand holding a pen.
Newly created empty signature
objects can be resized,
reshaped, or deleted. To sign an
empty signature object it must
first be converted into a PDF
signature field and embedded in
the document by the Doc Signer
service.

22 www.topazsystems.com Back to Top
iDoc Signer User Guide
6 – Signature Location Information
iDoc Signer supports Apple Location services to add the current GPS location into the
signature object details. In order for location information to be included, the service must be
enabled for the iDoc Signer app in the iPad settings. iDoc Signer automatically reads location
information for inclusion in signature objects. This information can be checked anytime and
prior to signing a document. The iDoc Signer tool bar contains a Location icon that can be
either disabled or enabled.
6.1 – Checking Location Information
If enabled, this means that iDoc Signer has acquired GPS location information and
will be included in all signatures. If the icon is disabled, no information is available.
This condition can be due to disabled Location services in general on the iPad or for
the iDoc Signer app specifically. A disabled icon can also mean that accurate location
information has not been acquired yet.
To check the current location, simply touch the icon to open the location in Google Maps or
Apple Maps. Signature location can also be checked by touching on the GPS coordinates in a
signature object’s details.
7 – Fillable Forms (PDF Acroforms)
iDoc Signer supports PDF form fillable fields allowing for documents to be filled and signed in
one signing session. As with signature objects, form data objects can be modified using iDoc
Signer and then these changes made permanent and embedded into the PDF document by
the Doc Signer service along with signature objects.
The following form fields are supported:
Single line and Multiline text fields
Check boxes
Radio boxes
List boxes (single or multiselect)
Combo boxes (both editable and non-editable)

23 www.topazsystems.com Back to Top
iDoc Signer User Guide
.
7.1 – Text Fields
A text field is a box or space in which the user can enter text from the keyboard. iDoc Signer
supports both single line and multiline text fields.
Here is a single line text field example:
What’s your favorite color?
Here is a multiline text field:
Describe the effect of the Hundred Years War:
iDoc Signer also supports clone text fields, so that when you enter text into one field, and then
move control to another part of the document, the text will be replicated in the clone field.
7.2 – Check Boxes
Check boxes toggle between two states, on and off. A check box field is a group of one or
more check boxes, each of which can be independently toggled, simply by touching a box.
Here is a field of check boxes:
What veggies do you like?
(Check all that apply)
iDoc Signer supports clone check boxes, so that when you toggle one check box, its clone
check box toggles the same way.
Here’s an example in which the first and last check boxes are clones:
24 www.topazsystems.com Back to Top
iDoc Signer User Guide
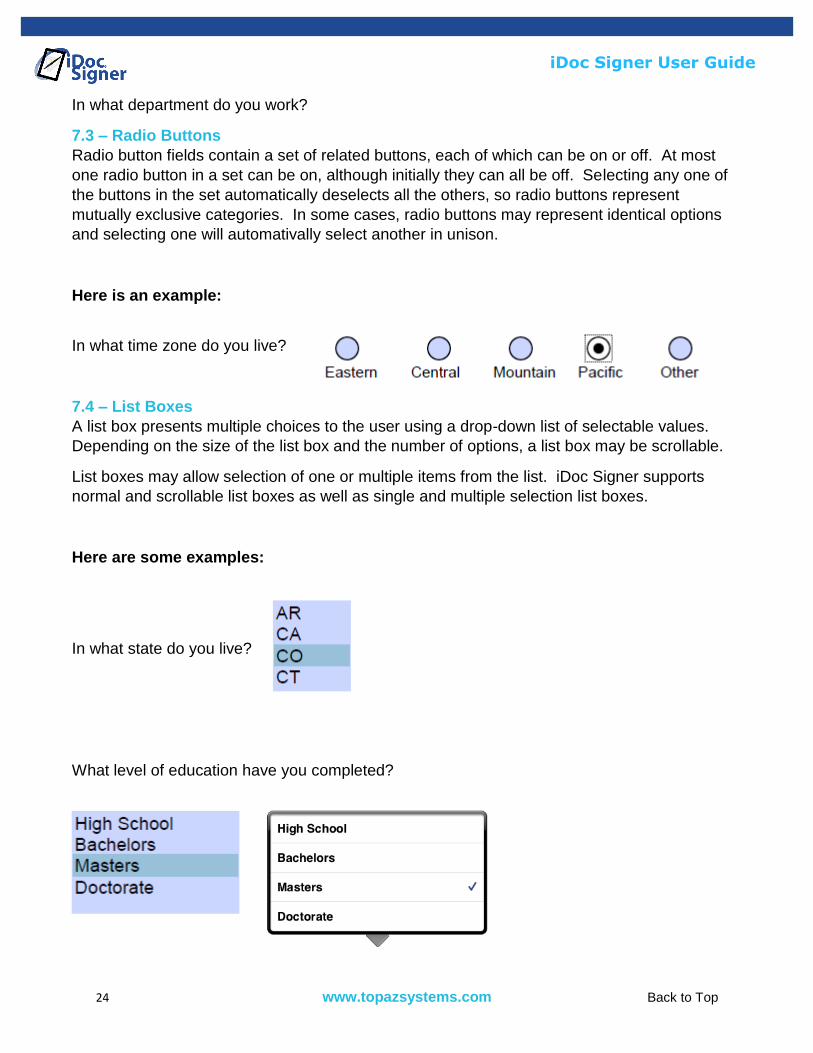
In what department do you work?
7.3 – Radio Buttons
Radio button fields contain a set of related buttons, each of which can be on or off. At most
one radio button in a set can be on, although initially they can all be off. Selecting any one of
the buttons in the set automatically deselects all the others, so radio buttons represent
mutually exclusive categories. In some cases, radio buttons may represent identical options
and selecting one will automativally select another in unison.
Here is an example:
In what time zone do you live?
7.4 – List Boxes
A list box presents multiple choices to the user using a drop-down list of selectable values.
Depending on the size of the list box and the number of options, a list box may be scrollable.
List boxes may allow selection of one or multiple items from the list. iDoc Signer supports
normal and scrollable list boxes as well as single and multiple selection list boxes.
Here are some examples:
In what state do you live?
What level of education have you completed?
25 www.topazsystems.com Back to Top
iDoc Signer User Guide
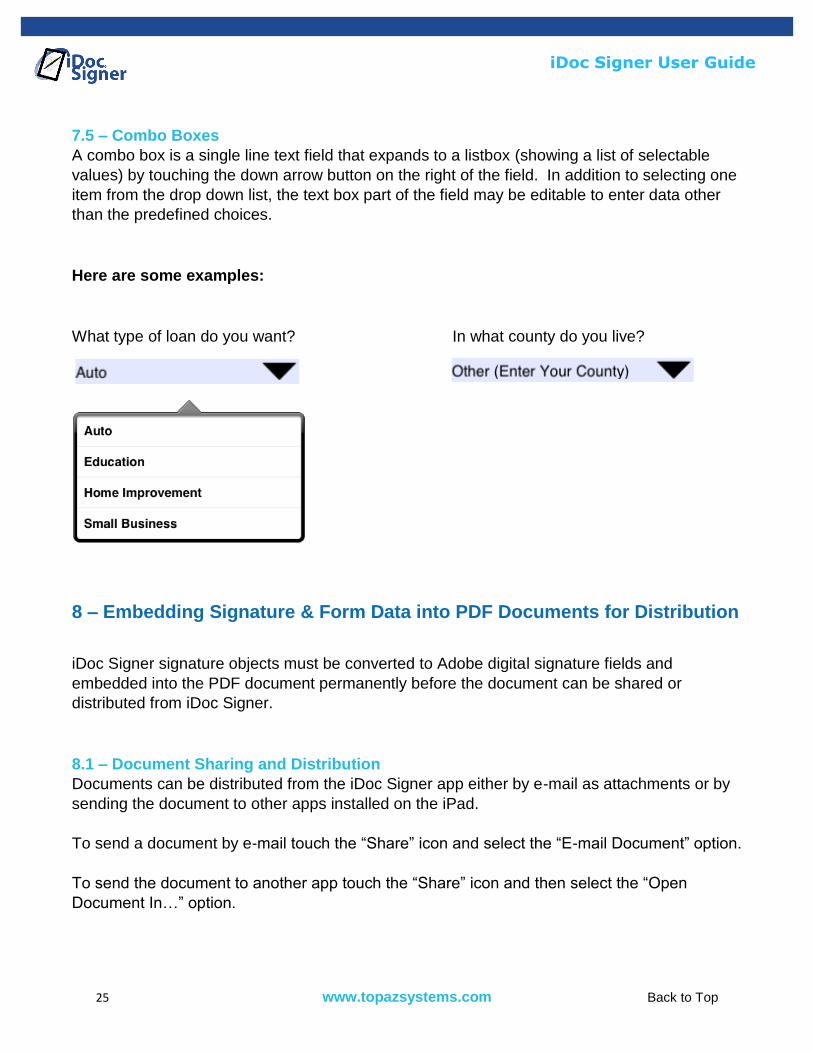
7.5 – Combo Boxes
A combo box is a single line text field that expands to a listbox (showing a list of selectable
values) by touching the down arrow button on the right of the field. In addition to selecting one
item from the drop down list, the text box part of the field may be editable to enter data other
than the predefined choices.
Here are some examples:
What type of loan do you want? In what county do you live?
8 – Embedding Signature & Form Data into PDF Documents for Distribution
iDoc Signer signature objects must be converted to Adobe digital signature fields and
embedded into the PDF document permanently before the document can be shared or
distributed from iDoc Signer.
8.1 – Document Sharing and Distribution
Documents can be distributed from the iDoc Signer app either by e-mail as attachments or by
sending the document to other apps installed on the iPad.
To send a document by e-mail touch the “Share” icon and select the “E-mail Document” option.
To send the document to another app touch the “Share” icon and then select the “Open
Document In…” option.

26 www.topazsystems.com Back to Top
iDoc Signer User Guide
Note: Only apps supporting the PDF document format will be listed in the apps to choose from,
when selecting the “Open Document In” option. Only a limited number of app entries are
supported by Apple. If your desired app is not listed, try removing other PDF supported apps.
8.2 – Signature Embedding
If newly signed signature fields, newly created signature objects, or newly filled fields are
detected when the document is to be e-mailed or shared with another app, the document is
first sent securely to an online Doc Signer service for processing. This is performed
automatically prior to executing an e-mail or share request. The returned document contains
only Adobe digital signature fields in place of the iDoc Signer signature objects, securely
containing all the signature details. If iDoc Signer does not detect any new signatures, any new
signature objects, or any new data in form fields, it immediately processes the document for e-
mailing or sharing with another app.
Signed documents returned to iDoc Signer are always stored in the document list separate
from the original unsigned version in the “Inbox” folder. In addition, signed documents have the
term “~signed” appended to their filenames.
Note: Documents sent to the Doc Signer service are always returned to the iDoc Signer app
and are not stored permanently online.
Note: Re-signing a signed document before distributing it will result in the signed version of the
file being overwritten when the re-signed version is returned from the Doc Signer service.

27 www.topazsystems.com Back to Top
iDoc Signer User Guide
8.3 – Form Data Embedding
If original PDF document form data is changed or new data is added, iDoc Signer will detect
the changes and, as with applied signatures, securely send the document to the Doc Signer
service before you can share the document by e-mail or send it to another app. If form data is
changed and one or more signature fields are signed at the same time, the data is first
embedded and the signatures are always applied last. Documents with form data changes but
no new signatures have the term “~filled” appended to their filenames.
8.4 – Document Locking and Deleting Since signature objects must be converted into permanent signature fields before they can be
distributed, it may be necessary to lock the document until online connectivity is available. Locking the
document ensures that signature objects and form data cannot be modified or new signatures added.
Once locked, the document remains protected until it is processed by the Doc Signer service. A locked
document is indicated by a red toolbar and locked share menu icon.
A document can be deleted anytime even if it is locked. To delete a document open the Documents
menu and swipe across the name of the document to reveal a deletion button.
Note: Currently loaded documents cannot be deleted from the document menu.
Locked document
indicators
28 www.topazsystems.com Back to Top
iDoc Signer User Guide
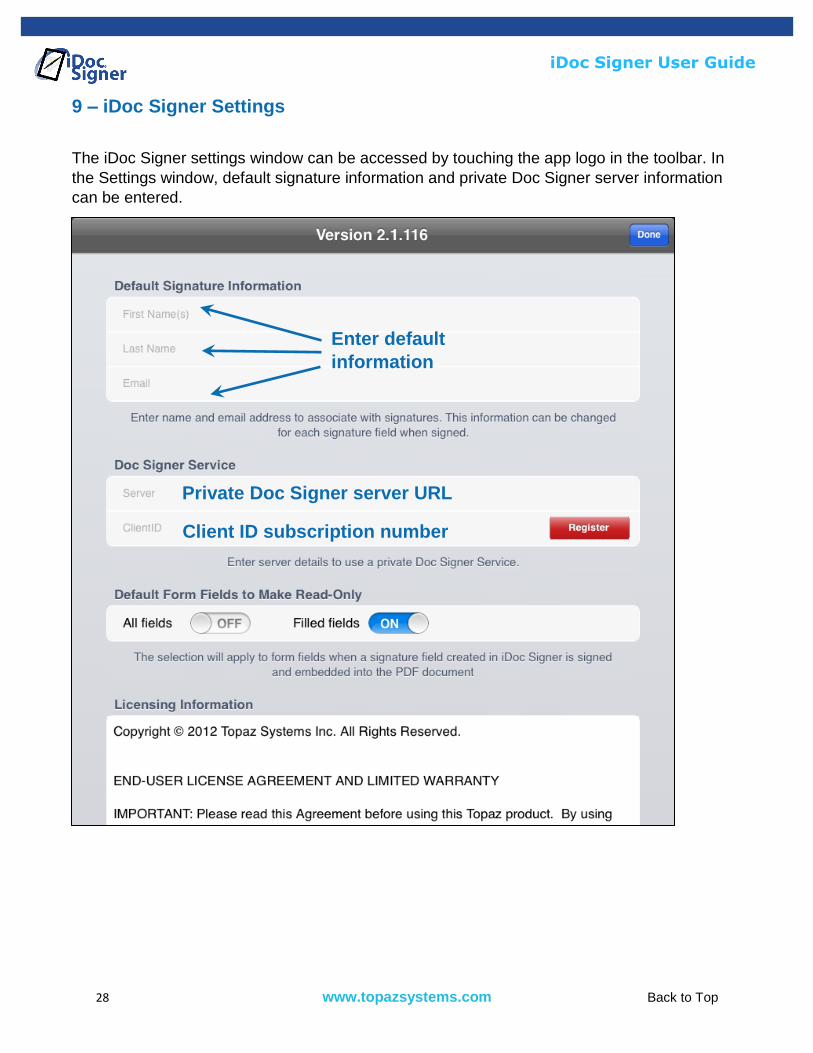
9 – iDoc Signer Settings
The iDoc Signer settings window can be accessed by touching the app logo in the toolbar. In
the Settings window, default signature information and private Doc Signer server information
can be entered.
Enter default
information
Private Doc Signer server URL
Client ID subscription number
29 www.topazsystems.com Back to Top
iDoc Signer User Guide
9.1 – Default Signature Details
In the Settings window a default name and e-mail can be entered for inclusion in every
signature created in iDoc Signer.
Note: Default signature information can be edited and changed in individual signature objects
after signing.
9.2 – Doc Signer Server
By default the iDoc Signer app uses the Doc Signer demo site for Doc Signer services. This is
for demo purposes only. For production use, the Doc Signer server URL should be entered in
the Settings window along with your individual Client ID subscription number.
Depending on the Client ID supplied by your service provider, you may also need to manually
register your device before using the service. In all cases, follow the instructions supplied by
your service provider for private Doc Signer service configuration and use.
9.3 – Form Field Read-Only Rules
When a signature field created in iDoc Signer is signed, it will make filled form fields read-only.
Optionally, you can select a read-only rule to apply with each signature. Turning on the “All
fields” option will make all form fillable fields-read only when the document is signed. The
option “Filled fields” will only make read-only fields with changed content at the time of signing.
These rules are applicable only for new signature fields added to the document by the iDoc
Signer application. These settings will not affect preexisting signature fields.
The default form field read-only rule is copied into each signature field. However, each
signature object’s read-only rule can be modified by editing the signature object properties. As
such, different rules can be applied to the documents form fields by different signature fields.
10 – External Bluetooth Signature Capture Pad
For documents that require forensic quality signatures, iDoc Signer supports signing on a
Bluetooth connected electronic signature pad, the Topaz SigLite BTA 1x5 Bluetooth Pad,
Model T-S460-BTA-R, which collects signature data at a very high resolution and sampling
rate. iDoc Signer will automatically recognize the external pad once it is successfully paired
and connected with the iPad. If available, signature capture is performed on the external pad
but rendered in real time on the iPad.
30 www.topazsystems.com Back to Top
iDoc Signer User Guide
10.1 – How to Pair with the Topaz SigLite BTA 1x5 Bluetooth Pad
1. From the iPad’s Home screen, choose Settings > Bluetooth, ensure that Bluetooth is set
to ON, and the iPad searches for nearby Bluetooth devices. 2. From the list of detected devices, choose the T-S460-BTA-R device. 3. When pairing is complete, the iPad will show the status as Connected and iDoc Signer
will recognize and use the external device for signature capture automatically if available.
Note: While your iOS device can maintain multiple pairing records, it can only connect to one
Topaz SigLite BTA 1x5 Bluetooth Pad at a time. The Topaz device will automatically re-
connect to the last iPad it connected with. As such, in order to pair with a new iPad, first turn
off the old iPad’s Bluetooth setting to make the Topaz device available to other iPads.
Note: For successful pairing and connection between the iPad and Topaz SigLite BTA 1x5
Bluetooth Pad, a fully charged Topaz device is highly recommended.
10.2 – How to Check Bluetooth Status
You can see whether SigLite BTA 1x5 Bluetooth Pad is connected to the iPad, by looking at
the Bluetooth icon in the status bar at the top of the screen:
or (white): Bluetooth is on and a device is connected to the iPad.
(gray): Bluetooth is on but no device is connected. If you've paired the Topaz device
with the iPad, it may be out of range or turned off.
No Bluetooth icon in status bar: the iPad has not been paired with any devices.
10.3 – Unpairing the Topaz SigLite BTA 1x5 Bluetooth Pad
If you've paired your iPad with the Topaz Bluetooth pad and no longer wish to use that device,
you may temporarily disable it or permanently unpair it. If you wish to leave the device paired,
but capture signatures on the iPad itself, simply turn off the Topaz pad first. To unpair the
device, follow the steps below:
1. From the iPad’s Home screen choose Settings > Bluetooth. If Bluetooth isn't on, turn it
on.
2. Choose the T-S460-BTA-R device from the paired device list
3. Tap Unpair.