if you're like most musicians i know, the first thing you...
TRANSCRIPT


If you're like most musicians I know, the first thing you want to do is plug-in your new amp and start playing - the last thing you want to do is read an owner's manual. Go ahead and play the amp and see what it can do for you. Once you've completed the "breaking in" experience, please read through this manual. The Convertible" amp was designed to give you any sound that's in your head. To provide that versatility, many unique and exclusive features are built-in. This manual will show you the easy way of getting a wide variety of great sounds just by properly setting up the amp. Enjoy it. If you have any comments about the design of your amp, I'd like to hear from you. If you have any ideas for modules or other related products, please write me at the address below. Thank you,
P.S. If you haven't mailed in your warranty card, please do it now. It may seem like a hassle, but it's the only way we have to verify warranty status of your amp.

Unpacking Inspect your ConvertibleT M amp for hidden damage that may have occurred in transit. Your amp was inspected and sound tested before shipment from the factory. All claims for shipping damage must be made by the receiver. Save your box and packing material for evidence of damage if it has occurred. Packing Materials The original box and packing materials are specially designed to protect your amp during shipment. SAVE ALL PACKING MATERIALS. In the unlikely event that your amp needs to be returned to the factory, the original box and packing material will be necessary for shipment. These are carrier approved packing materials and they will insure safe transit back to the factory.
Specifications for 100 watt Convertible Amps
Combo Head Weight: 57 lbs 42 lbs Cabinet Dimensions: 19 3/4" h 10 15/16" h 18 25/32" w 21 25/32" w 11 3/8" d 11 1/16" d Power Requirements: 120 volts a.c. (U.S. models) Power Consumption: 480 watts at full rated output.
Power Circuit: All tube, EL-34 tubes 100 watt rms @ 8 ohms from 8 ohm output @ 120 v.a.c. @ 5% @ 1 khz.
Damping Factor: From damping output: - Low 0.1 into 4 ohms', - High 4.0 into 8 ohms
Input Impedance: 4.7 meg-ohms adjustable to zero via load resistor plugs.
Input Sensitivity: (With Normal, Normal, Normal modules): 1.2 millivolts. Dynamic Headroom: 4-5 db

Table of Contents Front Panel Controls……………………………………………………………………Page 4-5 Rear Panel Controls..……………………………………………………………….....Page 6-7 Module Arrangements………………………………………………………….………Page 8-9 Preamp Modules………………………………………………………………….…Page 10-11 Changing Modules……………………………………………………………………....Page 12 Tubes Preamp………………………………………………………………….…..……Page 13 Power………..……………………………………………………………………………Page 14 Load Resistor Plugs……………………………………………………………………..Page 15 Trouble Shooting…………………………………………………………………….Page 16-18 Blank Module Arrangements……………………………………………………….Page 19-20

1) LOAD RESISTOR INPUT (Combo only) Guitar pickups have different output voltages. Using the load resistor plugs supplied with your combo amp, you can match your pickups to the amp's input. STANDARD ELECTROMAGNETIC PICKUPS Convertible amps have 4.7 meg-ohm input jacks. Some players prefer using no load resistor plug because they want the brightest sound possible and 4.7 is a good match with their pickups. You should experiment with the two load plugs provided to find your favorite setup. It is recommended that the input impedance of the amp be 10 to 20 times higher than the pick-up output impedance to avoid excessive "loading". UNIOUE DESIGN PICKUPS LOW IMPEDANCE PICKUPS: To optimize signal to noise ratio, input impedance should be fairly low - typically 100 to 10k ohms. Try the lOk330pf load resistor plug for great tone and low noise. PIEZO TRANDUCERS (built in to acoustic guitars): To avoid loading down Piezo pickups, the input impedance should be high. Most players like the sound with these pickups using no load resistor plug. ELECTROMAGNETIC ACOUSTIC GUITAR PICKUP: To get a warm, round sound, many players like using the 1 meg load resistor plug, It gives a smooth high end and quiets the signal. 2) MAIN GUITAR INPUT: When using only one instrument, this is the only jack that is live.

3) AUXILIARY GUITAR INPUT: Use this input for a second guitar or other instrument. This is a parallel input to the Main Guitar Input so they will both play through the "on" channel. If you use the Auxiliary Input for a second instrument, the output volume from both instruments will be reduced. You will have to increase the Master Volume control to compensate. Also, the instrument that is plugged into the Auxiliary Input will have less volume than the instrument plugged into the Main Input. If you need both instruments playing at their loudest volume, you can plug them into a "Y" cord and run them both through the Main Guitar Input. If you want to use one guitar playing through two amps, plug your guitar into the Main Guitar Input and run a normal guitar cable from the Convertible's Auxiliary Guitar Input to the main input on your second amp. 4) OVERDRIVE: This control dictates the amount of preamp distortion and influences the volume you want to add to your signal. The lowest setting gives the cleanest signal and lowest volume. The highest setting gives the most distortion and highest volume. Technically it controls the gain level applied from Stage 2 to Stage 3 of the preamp, Although the intensity of overdrive varies with the modules YOU use, the relative effect is the same: clockwise increases distortion: counterclockwise decreases distortion. Like all of the preamp controls on this amp, each channel is independent. You can have a clean setting on one channel and a distorted setting on the other channel. 5) MASTER VOLUME: This control sends the signal volume from the preamp to the power amplifier. For the cleanest signal, turn the Master Volume up high and keep the Overdrive low (but not off). For the dirtiest signal turn the Master Volume down (but not off) and the Overdrive up high. 6) CHANNEL 1 INDICATOR (Red): When your amp is in Channel 1 and the power is on, this L.E.D. will glow. It's indicating that only the controls on this row will affect your sound. 7) CHANNEL 2 INDICATOR (Green): When your amp is in Channel 2 and the power is on, this L.E.D. will glow. It's indicating that only the controls on this row will affect your sound. Your Convertible amp uses L.E.D.'s instead of bulbs because L.E.D.'s will last up to 10 times longer than regular bulbs. Under normal usage, your L.E.D.'s should last 10 years. 8) TONE CONTROLS: The two sets of tone controls allow you to get the tone coloration you want from each channel without affecting the tone of the other channel. The three tone controls - treble, mid, bass - are a standard interdependent circuit. As you increase the mid control, the treble and bass will yield less range. Experiment with these controls to find where they work best with your guitar and the room you're playing in. Note: If you turn all tone controls "Off" (farthest to the left), no sound will come out of your amp.
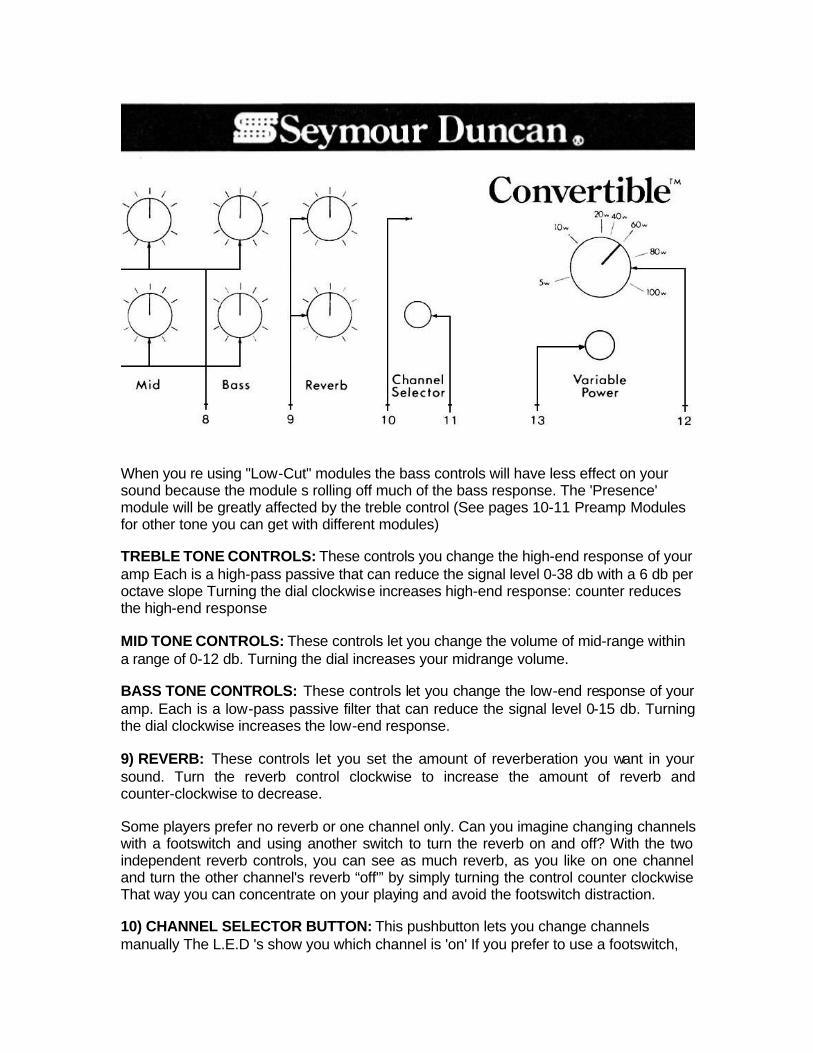
When you re using "Low-Cut" modules the bass controls will have less effect on your sound because the module s rolling off much of the bass response. The 'Presence' module will be greatly affected by the treble control (See pages 10-11 Preamp Modules for other tone you can get with different modules) TREBLE TONE CONTROLS: These controls you change the high-end response of your amp Each is a high-pass passive that can reduce the signal level 0-38 db with a 6 db per octave slope Turning the dial clockwise increases high-end response: counter reduces the high-end response MID TONE CONTROLS: These controls let you change the volume of mid-range within a range of 0-12 db. Turning the dial increases your midrange volume. BASS TONE CONTROLS: These controls let you change the low-end response of your amp. Each is a low-pass passive filter that can reduce the signal level 0-15 db. Turning the dial clockwise increases the low-end response. 9) REVERB: These controls let you set the amount of reverberation you want in your sound. Turn the reverb control clockwise to increase the amount of reverb and counter-clockwise to decrease. Some players prefer no reverb or one channel only. Can you imagine changing channels with a footswitch and using another switch to turn the reverb on and off? With the two independent reverb controls, you can see as much reverb, as you like on one channel and turn the other channel's reverb “off'” by simply turning the control counter clockwise That way you can concentrate on your playing and avoid the footswitch distraction. 10) CHANNEL SELECTOR BUTTON: This pushbutton lets you change channels manually The L.E.D 's show you which channel is 'on' If you prefer to use a footswitch,

use the channel selector button to put the amp in the green L.E.D channel first, then the footswitch will operate 11) CHANNEL SELECTOR JACK: This jack accepts a standard '4 guitar cord (not supplied) for connection to the footswitch. When hooked up, the footswitch allows you to change channels arid take advantage of the independent volume, overdrive, tone, and reverb controls The Seymour Duncan footswitch L.E D will glow only when you're playing through the top channel. Some amps produce a loud 'pop" through their speakers when channel switching The Convertible amp uses a channel switching circuit built into the preamp that is isolated from other electronics No annoying pops will occur when changing channels 12) VARIABLE POWER CONTROL: This control changes the power amplifier current to reduce or increase power amplifier wattage 100 watt tube amps are great for playing in large clubs where you need lots of power, but for smaller places, a low powered amp might be more useful To get amplifier distortion you need to work the power amp section hard - pushing it beyond its limits With the Convertible amp, you dial in the amount of power you need from 100 watts down to 5 watts For the cleanest signal, use all 100 watts and turn the Master Volume control to adjust loudness. For a distorted sound, turn the Master Volume control pas! 1 o'clock and use less power. You will get a warm, round distortion that is heard only on small amplifiers Variable Power is not like typical preamp overdrives. The. Variable Power circuit actually controls the cutout stage of the amp. When the Master Volume control is set low you will notice little or no change from the Variable Power control because you are asking the amp to give you very, little wattage. The higher you set the Master Volume control, the more you will notice the effect of Variable Power. Experiment to find where you like it best, Note: The full Power range (5 to 100 watts) is available when running the amp in the Pentode mode (See page 7 for Pentode/Triode switch). Variable Power will control 3 to 60 watts in the Triode mode. 13) VARIABLE POWER JACK: Use this lack with a PASSIVE volume pedal (100-500k ohm range) to remotely change Variable Power. CAUTION: An active volume pedal (the type that uses batteries or a c. power) will not work in the circuit. When you turn up the Variable Power, you not only get the most power available, but also less distortion from the amp. If you want to change Variable Power while you're playing, a volume pedal lets you do it easily. Many players like to use all 100 watts while playing clean rhythm and then use the Variable Power with a volume pedal to reduce the power and get amplifier distortion for lead work Variable Power can also be changed with a footswitch. When the footswitch is "off", you will get all 100 watts. When the footswitch is "on", you will get only 5 watts. When using the footswitch, the Variable Power Control knob will have no effect. Your only choices are 100 watts or 5 watts.

1) FUSE HOLDER: The fuse is located in the cap of the fuse holder. If the fuse fails, it must be replaced with one that provides proper current protection or you will void the warranty. The proper fuse rating for the 110-120 v.a.c. Convertible amp is 5A 250V slo blow. Before removing the fuse cap, UNPLUG THE POWER CORD FROM THE WALL A.C. OUTLET. After checking the fuse and replacing the fuse cap, you can plug the amp back into the wall. To remove the fuse cap, simply grasp the cap with your fingers, push in, and turn counter-clockwise. To replace the cap, grasp the cap with your fingers, push in, and turn clockwise. Fuses do not wear out; they do not deteriorate with age. Fuses are protection devices that prevent the electronics from damage if there is a serious electrical problem. If your amp repeatedly has fuse failures, check page under "Fuse Failure" for troubleshooting tips. 2) ON/OFF/ON POWER SWITCH: This switch is designed to turn your amp on and to allow you reverse the a.c. polarity. If you're picking up 60 hz hum from the wall current, put the "ON" switch in the other "ON" position. If you're using other equipment like a P.A. and you get a shock when touching the microphone, place the "ON" switch in the other "ON" position to eliminate the shock. The middle position is "OFF". 3) STANDBY: Use this switch when you will not use the amp for a short time period (like in-between sets). This switch turns off the sound output but keeps the tubes warm and ready to play. Standby switches are important on tube amps because the tubes wear out quickest from temperature change. When the amp is off, the tubes will cool, when they're on, they get hot. Standby keeps them in operation so they stay warm and give you long life. Because of the high gain circuitry in your amp, it is normal to hear some residual noise through your speaker for one minute after switching into "Standby".

With the Standby switch in the up position, your amp will be on With the Standby switch in the down position, Standby will be in operation and no sound will come from the amp. 4) A.C. CONVENIENCE OUTLETS: These outlets let you plug in other equipment for a.c. power. They can supply a total of 700 watts. To find out how much wattage your equipment uses, look on the back of the unit where the power cord is located. Most companies will list the wattage demand there. For example, your Convertible amp uses 480 watts. NEVER PLUG IN UNITS THAT DRAW MORE THAN A TOTAL OF 700 WATTS, OR YOU WILL RISK THE POSSIBILITY OF AN ELECTRICAL FIRE. 5) EFFECTS LOOP: Use this circuit with your effects for the least amount of hiss, In older design amps, players had to plug their guitars directly into effects and plug the effects into the guitar input jacks on their amps. With the Convertible amp, you can plug your guitar into the guitar input jack and run your effects through the Effects Loop. The "Send Level" control lets you match the Effects Loop output to the input of your effects. When the level is set too low, too much hiss will come through the speaker and the volume will be low. When the level is set too high, you will overload the effect input and cause too much distortion Experiment with the setting to find the best match for your effects ''Effects Send" should be connected to the input of your effect using a normal guitar cable. "Effects Return" should be connected to the output of your effect using a normal guitar cable. You want the signal to come OUT of your amp INTO the effect and OUT of the effect INTO your amp. 6) REVERB: This is where your reverb connects. The return jack accepts the reverb cable with a red dot on the plug.

Convertible amps are designed with Accutronics 2-spring reverbs. These are the most natural sounding reverb units available and they provide a wide range of reverb for your playing styles. 7) PENTODE/TRIODE SWITCH: This switch changes the operation of the EL-34 output tubes, which use five components inside each tube. With this switch in the up position, the tubes run in the Pentode mode and all five components operate for full 100-watt power. The sound is brighter and crisper. With the switch in the down position the tubes run in the Triode mode and three components operate for 60-watt maximum power. The sound is smoother with a little less edge. Experiment with this switch to find where you like it for your musical style. Some amps have 60/100-watt switches. What they do is turn off the voltage to two tubes. That causes the power to drop but also places stress and wear on the two tubes that are on. The Pentode/Triode switch allows all tubes to run stress-free and provides longer life to all the tubes. 8) VARIABLE DAMPING: This circuit is included with Convertible amps to give you more control over your sound. Damping is the amount of control the amplifier has on the speaker. High damping (turning the control to the right) increases the control of the speaker - the sound is crisper and tighter. Low damping (turning the control to the left) decreases the control of the speaker - the sound is looser and fatter sounding with slightly more presence. There is no recommended setting because only you can tell what's best for the sound YOU want to produce. This control is effective ONLY when the speaker is connected to the "Variable Damping Out" speaker jack. 9) 4 OHM, 8 OHM SPEAKER JACKS: You can use these jacks to match the amp impedance to the input of the speakers you use. Proper connection to these jacks will give you maximum power and maximum damping. If you choose to run an 8 ohm speaker in the 4 ohm jack, no damage will result in the amp or with the speaker, it will just sound different from being played through the 8 ohm jack. The same situation is possible with a 4 ohm speaker in the 8 ohm jack. You can also use all three-speaker jacks at the same time with different speakers. The Convertible amp's strong transformer can handle almost any load with no damage. 10) SLAVE OUT: Use this jack for patching the output signal of the amp directly into a mixer, tape recorder, or another amp. Just use a regular guitar cord from Slave Out to the guitar input of the other unit. The circuit is wired after the output stage so all tone, volume, damping control, effects loop, etc. controls will affect the outgoing signal. Output is one volt at full power.

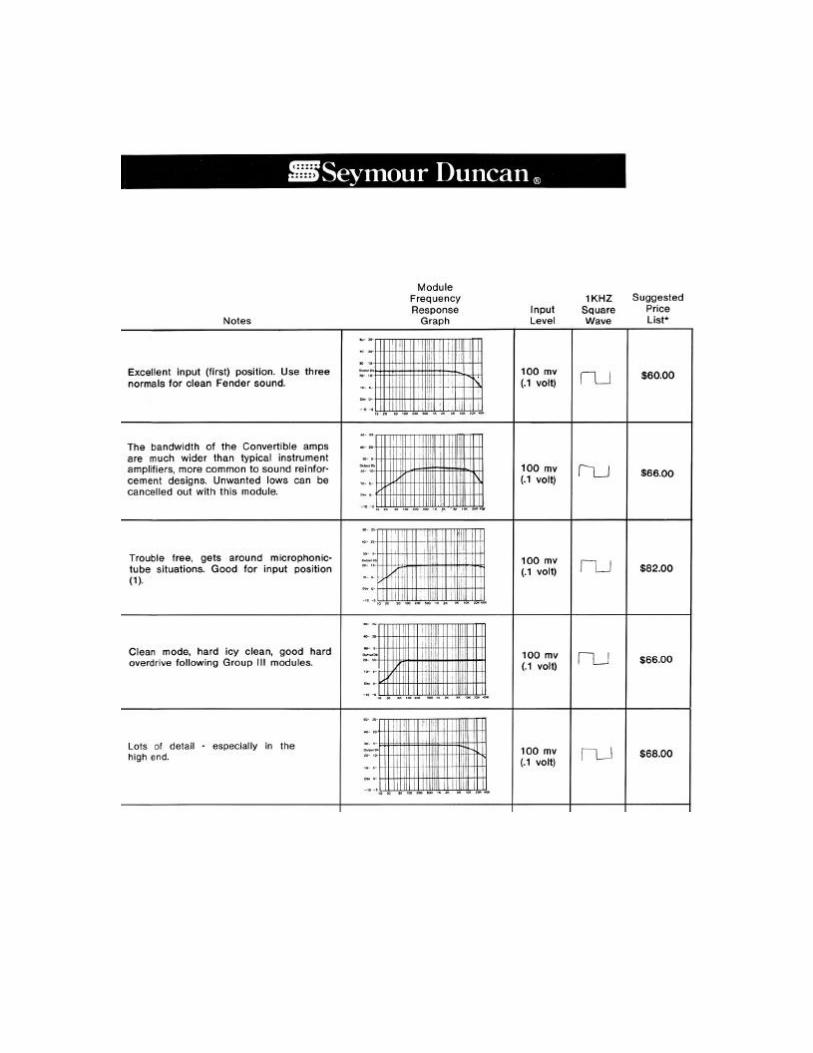
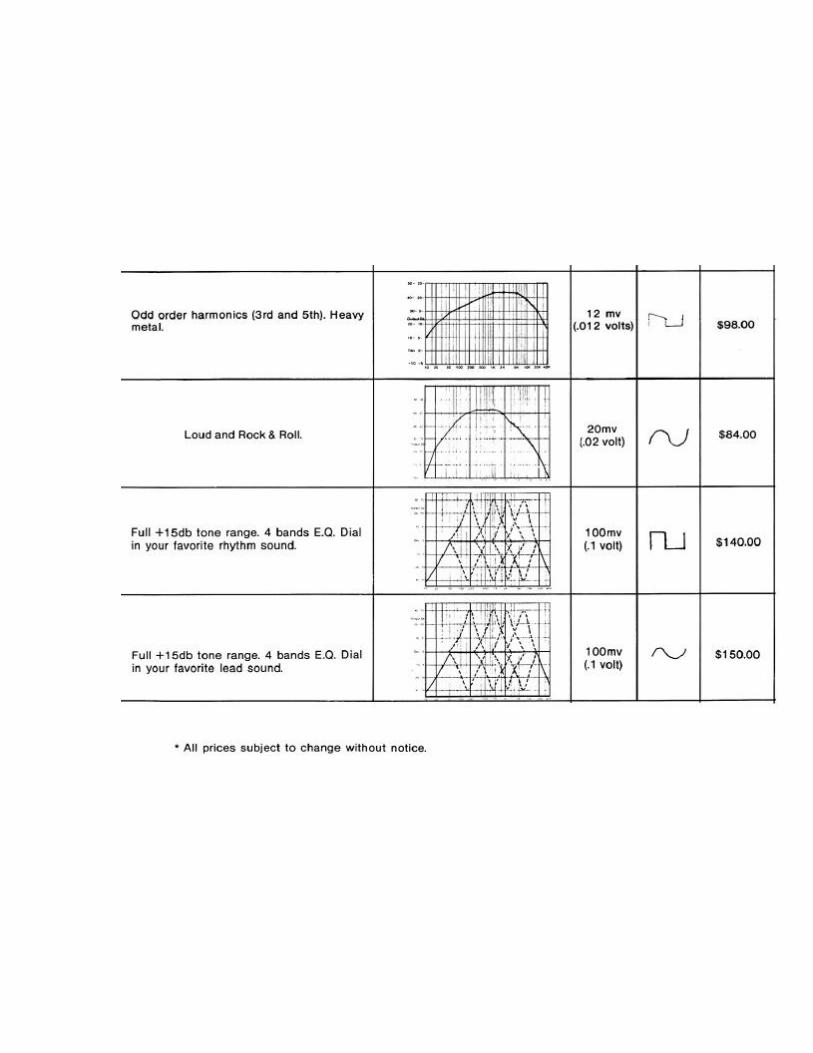
MODULE ARRANGEMENTS Your amp was shipped with the modules arranged in the configuration drawn below. Remember your guitar signal runs in series through three modules per channel before reaching the amplifier. The modules for the red channel are in positions #1, 2, and 4. The modules for the green channel are in positions #1, 3, and 5. In this section you will find a number of different module arrangements and the sound produced from each. To replace or rearrange modules, follow the steps under "Changing Modules". Here is the way modules are arranged when Convertible amps are shipped
Below are just some of the module arrangements you can try for different sounds. Your dealer has a wide selection of modules for you to choose from that you can use to customize your sound even more. And each year, new modules will be introduced.


CHANGING MODULES The five factory installed preamp modules are located directly under the Quick AccessTM module system plate on the top of the amp. Changing modules is quick and easy. Dramatic tone changes are possible just by rearranging your present module configuration. To replace or rearrange the modules, just follow these easy steps. TO REMOVE: 1. UNPLUG YOUR AMPLIFIER from the power outlet.
2. Turn the Quick Access plate screws counter-clockwise - they will POP UP
3. Remove the plate. 4. Looking down inside the amplifier, firmly grasp the module you
want to replace by its handle and lift slowly. When the module is free from its receptacle, continue to lift upward. You may have to turn the module sideways to clear the module opening.
TO REPLACE: 1. MAKE SURE THE AMPLIFIER IS STILL UNPLUGGED. 2. Choose the module you want to install and grasp by its handle.
3. Insert the module to be installed through the Quick Access module system opening. It may be necessary to turn the module sideways before it will fit through the module opening.
4. Align the module plug to be installed over the receptacle in the module position you have chosen.
5. Slowly insert the module into the receptacle. Apply moderate pressure until you feel the module is seated snugly.
6. Repeat steps 2 thru 5 for each module you want to replace/ rearrange. When you have finished changing modules, double-check all modules to ensure they are still snug in their re-ceptacles.
7. Align the module system plate with the holes in the top of the amplifier cabinet and then secure.
8. Make sure that the Volume and Variable Power controls are at a low setting and Standby switch is place in the ON position.
9. Plug the power cord from the amplifier into the 110-120Vac wall outlet and place the Amp Power switch in the ON position.
10. After a one-minute warm-up, flip Standby switch on the rear panel to the "ON" position and you're ready to play.

TUBES Just like all other parts in the Convertible amps, the tubes were selected for providing the most musical tones. Tubes can be temperamental, but there are things that can be done to avoid problems. Module Preamp Tubes The 1 2AX7 Tungsram tubes will give you the least amount of noise and the sweetest tone. However, they develop a microphonic ringing when subjected to a lot of bumps from traveling. Typically, microphonics are most sensitive from the input module (the module that's shared by both channels). Here are some ways to eliminate microphonics. 1. You can swap the tube from another preamp module with the input module. 2. If you are using two identical modules and one of them is the input module, just
switch the position of the two modules. Classic ----- Hi Gain For example: Classic Normal ----- Presence Just take the two "Classic" modules and switch their positions. If the second "Classic" module's tube does not have microphonics you've solved the problem.
3. Polish 1 2AX7 tubes are constructed differently than the Tungsrams. Although Polish tubes are noisier and harder sounding, they are less subject to microphonics. Radio Shack and other companies offer Polish tubes. "Made in Poland" is stamped directly on those tubes so you can be sure where they come from.
4. Try using an FET or IC module in the input. Because neither of these are tube
designs, you'll get no microphonics. For a warmer tube sound, use an FET module in the input stage. If you're after a harder solid-state sound, use an IC module in the input stage.
If you're involved in a touring schedule and you want to avoid tube related problems, bring some extra tubes with you for all YOUR equipment.

SPARE TUBE There is a spare 12AU7 tube mounted inside your Convertible amp. This is a stock replacement tube for the Cascode module. We also discovered an interesting sound when replacing the standard 12AX7 tube in the Classic module with a 12AU7 tube. If you use a Classic module in the input stage (first position), try using the 1 2AU7 tube there. You'll notice a little less output volume, but it will also allow you to get a louder, clearer rhythm. Try this setup: Classic with 12AU71 Classic Normal Hi-Gain Presence If you play a guitar with a high output humbucker pickup and you're having problems with a loud, clean rhythm, this could easily provide the sound you're after. POWER AMP TUBES Convertible amps are designed for use with EL-34 power tubes. These tubes will give you the sweetest tone and are generally more "musical". The EL-34 tubes installed in your amp are specially matched for cathode current. This reduces hum and noice -especially noticeable when playing quiet passages and in the recording studio. You'll notice a little label attached to the base of each tube that shows current draw. When you replace your output tubes, make sure to ask for matched sets to keep your amp sounding like new. If you're transporting your amp often and subjecting it to rough handling, there are other power tubes that will better withstand the abuse. The 6CA7 is an industrial version of the EL-34. While the tone is not as sweet as EL-34's, it is better suited to handle bumps and bangs. You can plug 6CA7 tubes directly into the power tube sockets because the pin matchups are identical and the amp bias will not have to be changed. The 6L6 and 6550 tubes will also stand up to road knocks. Like the 6CA7 tubes, they are not as musical as EL34's. You'll notice a harder sound. Although the pin matchups allow you to directly plug 6L6 and 6550 tubes into the power tube sockets, you'll need to have a service technician replace a bias resistor with one that's value matches the 6L6's or 6550's. See your authorized service center for cost
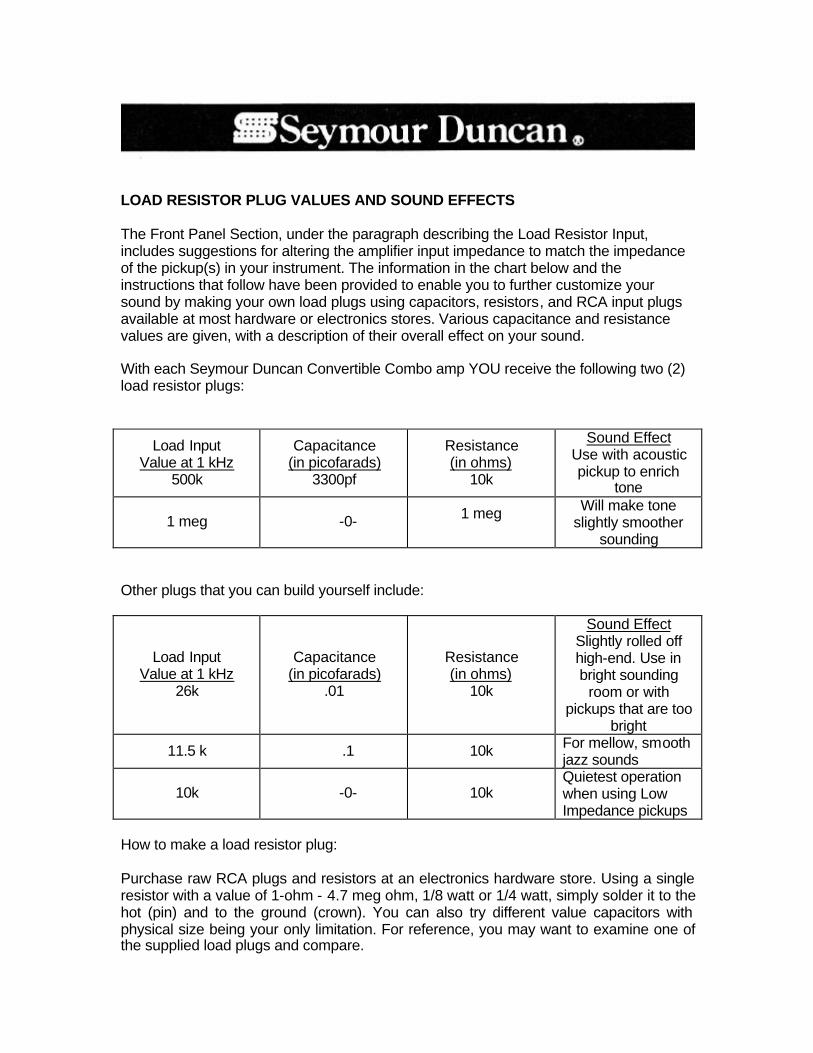
LOAD RESISTOR PLUG VALUES AND SOUND EFFECTS The Front Panel Section, under the paragraph describing the Load Resistor Input, includes suggestions for altering the amplifier input impedance to match the impedance of the pickup(s) in your instrument. The information in the chart below and the instructions that follow have been provided to enable you to further customize your sound by making your own load plugs using capacitors, resistors, and RCA input plugs available at most hardware or electronics stores. Various capacitance and resistance values are given, with a description of their overall effect on your sound. With each Seymour Duncan Convertible Combo amp YOU receive the following two (2) load resistor plugs:
Load Input Value at 1 kHz
500k
Capacitance (in picofarads)
3300pf
Resistance (in ohms)
10k
Sound Effect Use with acoustic pickup to enrich
tone
1 meg -0- 1 meg
Will make tone slightly smoother
sounding Other plugs that you can build yourself include:
Load Input Value at 1 kHz
26k
Capacitance (in picofarads)
.01
Resistance (in ohms)
10k
Sound Effect Slightly rolled off high-end. Use in bright sounding
room or with pickups that are too
bright
11.5 k .1 10k For mellow, smooth jazz sounds
10k -0- 10k Quietest operation when using Low Impedance pickups
How to make a load resistor plug: Purchase raw RCA plugs and resistors at an electronics hardware store. Using a single resistor with a value of 1-ohm - 4.7 meg ohm, 1/8 watt or 1/4 watt, simply solder it to the hot (pin) and to the ground (crown). You can also try different value capacitors with physical size being your only limitation. For reference, you may want to examine one of the supplied load plugs and compare.

TROUBLESHOOTING The following table should enable you, with little or no knowledge of electronics, to isolate the cause of some problems you may experience with your amplifier and the steps required for repair. Most causes of impaired amplifier performance are due to minor problems or irregularities, which can be easily corrected by you. However, if you cannot identify the cause of the problem using the table below, or if it indicates your amplifier to be defective and in need of repair, return the unit to an authorized Seymour Duncan Service Center or call (805) 964-9610 for a Return Authorization number. Symptom Probable Cause Remedy Amplifier does not come on when power switch is "ON". 1) Power not connected 1) Ensure power cord is
plugged into power outlet
2) Blown amp fuse 2) Check amp fuse; replace if blown with 250VAC 5Amp SLO-BLOW
3) No source voltage 3) Verify power source with something you know works
4) Defective ON/OFF power switch
4) Return unit to dealer or factory for repair
No sound coming from speaker(s), (No audible amplifier hum).
1) Amplifier in standby 1) Place standby switch in ON (up) position
2) Master Volume and/or Overdrive control levels set too low.
2) Increase control level setting(s) to "2" and listen
3) Speaker output plug disconnected or output wires shorted.
3) Connect output plug to 4 ohm, 8 ohm, or Variable Damping input
4) Instrument pickup/electronics may be defective.
4) Unplug cable from instrument and touch tip of plug; if hum is heard, replace instrument with one known to operate properly
5) Defective speaker(s) 5) Verify speakers operate properly using another amp
61) Volume controls on your instrument are down
6) Increase settings and listen
7) Defective center driver tube 12AX7 7) Replace 12AX7
8) Defective 5U4GB rectifier power tube 8) Replace tube
Loud amplifier hum 1) Amplifier A.C. polarity 1) Reverse position of power ON switch
2) Instrument connecting 2) See that connecting

cable not properly grounded
cable is plugged into instrument
3) EL-34 power tube shorted 3) Replace EL-34
Amp blows a fuse after several minutes of operation
1) Wires from speaker to amplifier shorted 1) Replace speaker cord
2) EL-34 or 5U4GB power tube defective 2) Replace tube
3) Problem persists 3) Return amp for repair to dealer or factory
Amp blows a fuse immediately after it is switched ON
1) Defective 5U4GB power tube 1) Replace tube
2) Internal short circuit 2) Return amp to dealer orfactory for repair
Distorted sound coming from only one channel
1) Overdrive control level set too high
1) Reduce control level setting
2) Defective preamp module
2) Replace module with one known to operate properly
Distorted sound coming from both channels
1) Overdrive control level set too high
1) Reduce control level setting
2) Defective first stage preamp module
2) Replace module with one known to operate properly
3) Speaker output wires to amplifier shorted 3) Replace speaker cord
4) Pickup, instrument, or connecting cable may be defective
4) Substitute cable and instrument with one you know operates properly
5) Defective speaker(s)
5) Verify speakers operate properly by connecting speaker plug to speaker output jack on another amp. If speaker is detective return unit to dealer or factory for repair
6) Defective Variable Power tube (12AU7 near power transformer)
6) Remove 12AU7 variable power tube to check and replace if necessary
No reverb coming from amplifier
1) Reverb control level(s) set too low 1) Increase control level(s)
2) Reverb output wires not connected to Send/Return inputs
2) Ensure output wires properly connected to rear panel jacks. Cable with red dot should be connected to Return Jack
3) Defective internal spring reverb unit 3) Replace
4) Defective reverb Send or 4) Return to dealer or
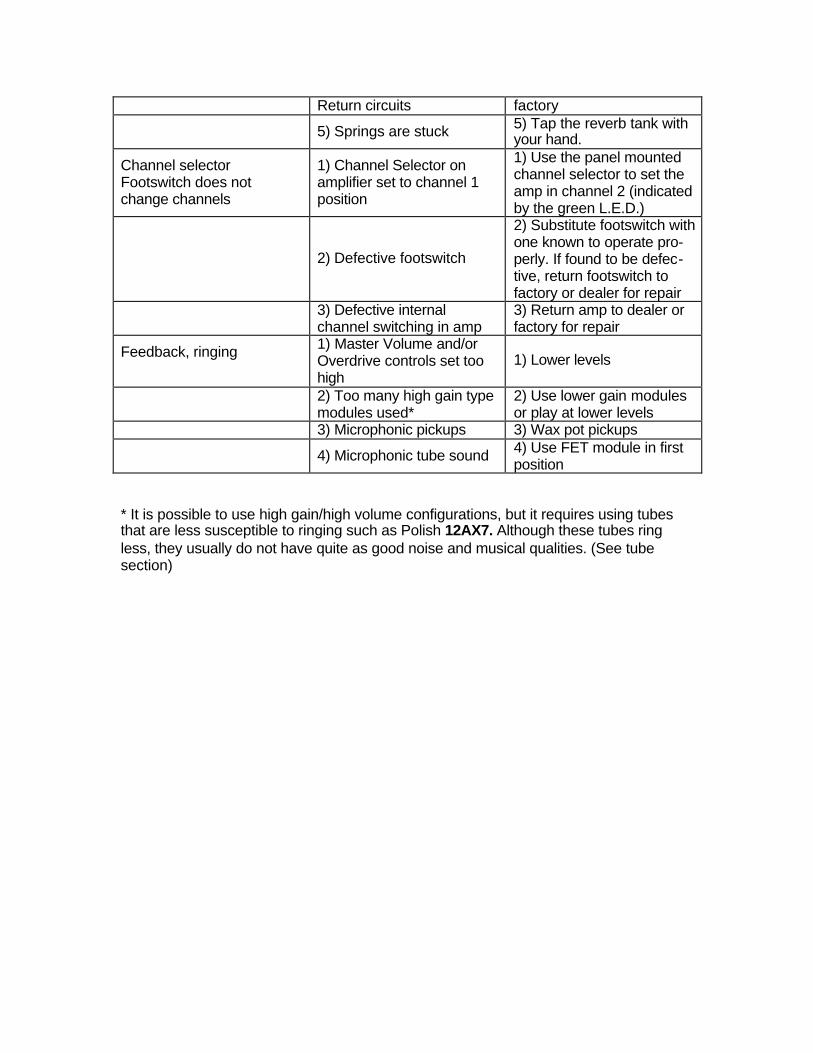
Return circuits factory
5) Springs are stuck 5) Tap the reverb tank with your hand.
Channel selector Footswitch does not change channels
1) Channel Selector on amplifier set to channel 1 position
1) Use the panel mounted channel selector to set the amp in channel 2 (indicated by the green L.E.D.)
2) Defective footswitch
2) Substitute footswitch with one known to operate pro-perly. If found to be defec-tive, return footswitch to factory or dealer for repair
3) Defective internal channel switching in amp
3) Return amp to dealer or factory for repair
Feedback, ringing
1) Master Volume and/or Overdrive controls set too high
1) Lower levels
2) Too many high gain type modules used*
2) Use lower gain modules or play at lower levels
3) Microphonic pickups 3) Wax pot pickups
4) Microphonic tube sound 4) Use FET module in first position
* It is possible to use high gain/high volume configurations, but it requires using tubes that are less susceptible to ringing such as Polish 12AX7. Although these tubes ring less, they usually do not have quite as good noise and musical qualities. (See tube section)