igneous rock textures - webs new folder... · igneous rock textures ... water bath) magnifying...
TRANSCRIPT

IGNEOUS ROCK TEXTURES Teacher Information: Be sure to explain and use all standard laboratory safety practices and procedures. Be sure your students understand how to safely handle the chemicals and materials that are used. Materials needed:Salol (phenyl salicylate) Plastic wrap Small paper cups Ice cubes Small test tubes Hot water
A jar or beaker of hot water that will hold test tubes (makes hot water bath) magnifying glasses igneous rocks from Frizzle kit appropriate safety equipment
Salol technically known as phenyl salicylate can be purchased from science supply companies. Salol is an organic compound that is synthetically produced so it is not a mineral –however, just like mineral crystals, it has a regular geometric form and structure. So your students will be able to observe the formation of crystals in different “environments”. It is an excellent choice for this experiment because it has a low melting point (1080F) and is generally safe to use. Have one small test tube for each student group. Put a small amount –1 to 2 teaspoons of salol in each test tube. Put the test tubes in a hot water bath. The temperature of the water needs to be around 1080F—just hot enough to melt the salol. You do not want to get it too hot or it will melt the plastic wrap! Using the plastic wrap allows you to reuse the salol again and again. Please be aware that you will not be able to clean all of the salol out of the test tubes—so they should be saved for this experiment. After the students have created their “environments” give each student group a test tube of salol to use—or pour it out for them. They will need to allow the salol to crystallize, which should happen right away on the ice cube, take longer on the plastic wrap on the table, and longest in the sand. If the salol does not crystallize, it is sometimes necessary to add a seed crystal—a few grains of salol. Ask the students to look carefully at the crystals created in each environment. They should be able to see interlocking flat crystal faces, with the biggest crystals forming in the sand where they had the greatest amount of time to form. After you are finished, you can collect the salol, which should come off the plastic wrap easily. It can then be melted again and reused. Please note—Granite is an intrusive (large crystals) igneous rock. It crystallizes inside the Earth. Basalt, pumice and obsidian are all extrusive—crystallizing on the surface. Their crystals are too small to be seen with the naked eye. Obsidian cools quickly—but also forms a glass (no crystals) because the lava flow is “very dry” (does not contain any water) unlike pumice and scoria that have all those gas bubbles.
J.Ruddock 23
IGNEOUS ROCKS Igneous Rock Textures
Question: What does the size of the crystals of an igneous rock tell you about where the rock was formed? IGNEOUS ROCKS are formed from the cooling of molten magma that comes from inside the Earth. To be able to understand how an igneous rock forms from this molten rock. We will simulate the process on a small scale using salol. PROCEDURE: 1. Get 3 square pieces of plastic wrap. Put one on the table and put the second one on an ice cube. For the third one, put it on the end of your finger and make a “well” it in the cup of sand. 2. Using the scoop, fill the test tube halfway with salol. Stand the test tubes in the beaker of water. Heat the water until all of the salol melts. 3. Pour one-third of the melted salol from test tube on to the plastic wrap on the table and let it cool. You may need to add a couple of grains of salol to start crystals forming. 4. Pour another third of the salol on the plastic wrap that is on the ice cube and the rest into the plastic in the well in the sand. 5. Observe carefully. Where do the crystals form first? After the salol has formed crystals, examine the crystals. Compare the size of the crystals
Describe and Draw what you observe about the crystal size. Crystals in sand Crystals at the surface Crystals on ice cube
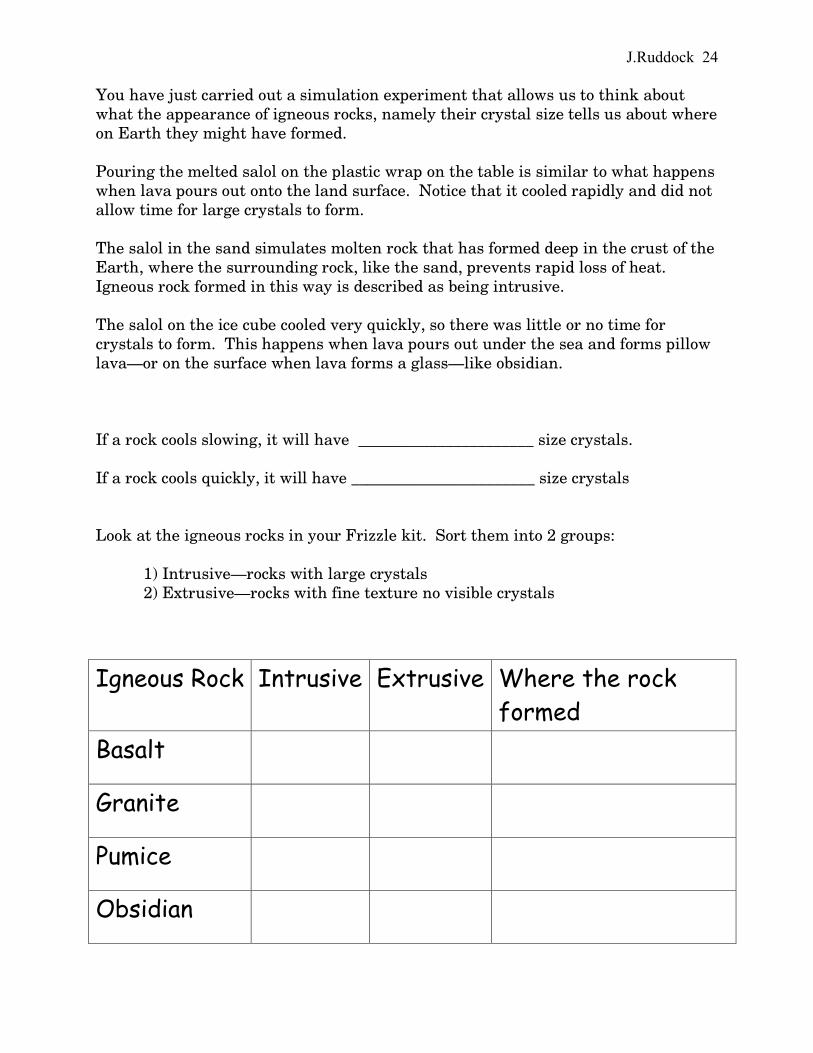
J.Ruddock 24 You have just carried out a simulation experiment that allows us to think about what the appearance of igneous rocks, namely their crystal size tells us about where on Earth they might have formed. Pouring the melted salol on the plastic wrap on the table is similar to what happens when lava pours out onto the land surface. Notice that it cooled rapidly and did not allow time for large crystals to form. The salol in the sand simulates molten rock that has formed deep in the crust of the Earth, where the surrounding rock, like the sand, prevents rapid loss of heat. Igneous rock formed in this way is described as being intrusive. The salol on the ice cube cooled very quickly, so there was little or no time for crystals to form. This happens when lava pours out under the sea and forms pillow lava—or on the surface when lava forms a glass—like obsidian. If a rock cools slowing, it will have ______________________ size crystals. If a rock cools quickly, it will have _______________________ size crystals Look at the igneous rocks in your Frizzle kit. Sort them into 2 groups: 1) Intrusive—rocks with large crystals 2) Extrusive—rocks with fine texture no visible crystals
Igneous Rock Intrusive Extrusive Where the rock formed
Basalt
Granite
Pumice
Obsidian
J.Ruddock 25
Cooling Crystals Can we REALLY see what is happening inside the Earth? Well maybe not, but this demonstration will help your students better understand how large crystals form inside the Earth, creating intrusive igneous rocks like the granite in your kit. Prepare the following solution. 1. Put 1 cup of water in a saucepan. 2. Sprinkle one package of unflavored gelatin on the water. Let it set for 5 minutes to soften the gelatin. 3. Then heat the water, stirring until the gelatin is dissolved. 4. When the gelatin is dissolved, heat the water to boiling and add 2 to 3 cups of sugar. Add one cup at a time, stirring until all the sugar dissolves. After adding the second cup, continue adding sugar until the solution becomes saturated—and not more sugar will dissolve. The amount of sugar will determine how long it takes before crystals appear in your finished solution. 5. Bring the mixture to a boil, and continue boiling for 5 minutes. 6. Next, remove the pan from the heat and allow any undissolved sugar to settle to the bottom of the pan. 7. Pour the clear, top liquid into a clean glass or plastic pint jar. Make sure the liquid is cool enough to not break or melt your jar. Wrap the jar in a towel to keep it warm. 8. The next day remove the towel and observe the jars over several days. You should notice crystals forming in the gelatin matrix. As time goes on the crystals will grow in size and begin to interfere with each other and become interlocking—similar to the way crystals form in granite. 9. Have your students observe and record the crystal formation. You can double this recipe to prepare more solution at one time. When you are finished with the observations, you can save the solutions and re-melt them for another crystal growing demonstration. Adapted from: Sweet Crystals by Plunkette and Uslabar Earth at Hand: A Collection of Articles from NSTA’s Journals National Science Teachers Association Washington, D.C.
J.Ruddock 26 Earth Model II
Kids Inside the Earth Your students can learn about the structure of the Earth by building a human model. Draw a model of the inside of the Earth on the board. If you need background information, this USGS (United States Geological Survey) web site--http://pubs.usgs.gov/gip/dynamic/inside.html will help. Explain this model to your students. Tell them the Earth has three main layers: crust, mantle and core. Explain that the mantle and core can be divided into sub layers. Explain each layer and the sub layers. Materials: Copy these words on separate slips of paper. Put them in a hat. Adjust the numbers to the size of your class. inner core (1) outer core (3) deep mantle (6) asthenosphere (8) lithosphere (12) Take your students to a large open area to “build” the Earth. Have students draw slips to see what part they will play. Explain the parts to the students and have them practice their part. Then build the model from the inside out.
1. Inner core -- flex muscles and lift weights (very dense solid metal) 2. Outer core -- form circle around inner core, face in toward inner core, while
waving arms up and down to represent the liquid (moving) outer core. 3. Deep mantle -- join hands and form a circle around outer core. Chant, “hot
rock, hot rock, hot rock”. 4. Asthenosphere--surround deep mantle, slowly sway bodies back and forth to
represent the movement that occurs in this layer. 5. Lithosphere-- form a circle facing outward and slowly walk around the rest of
the Earth chanting, “moving plates, moving plates”.
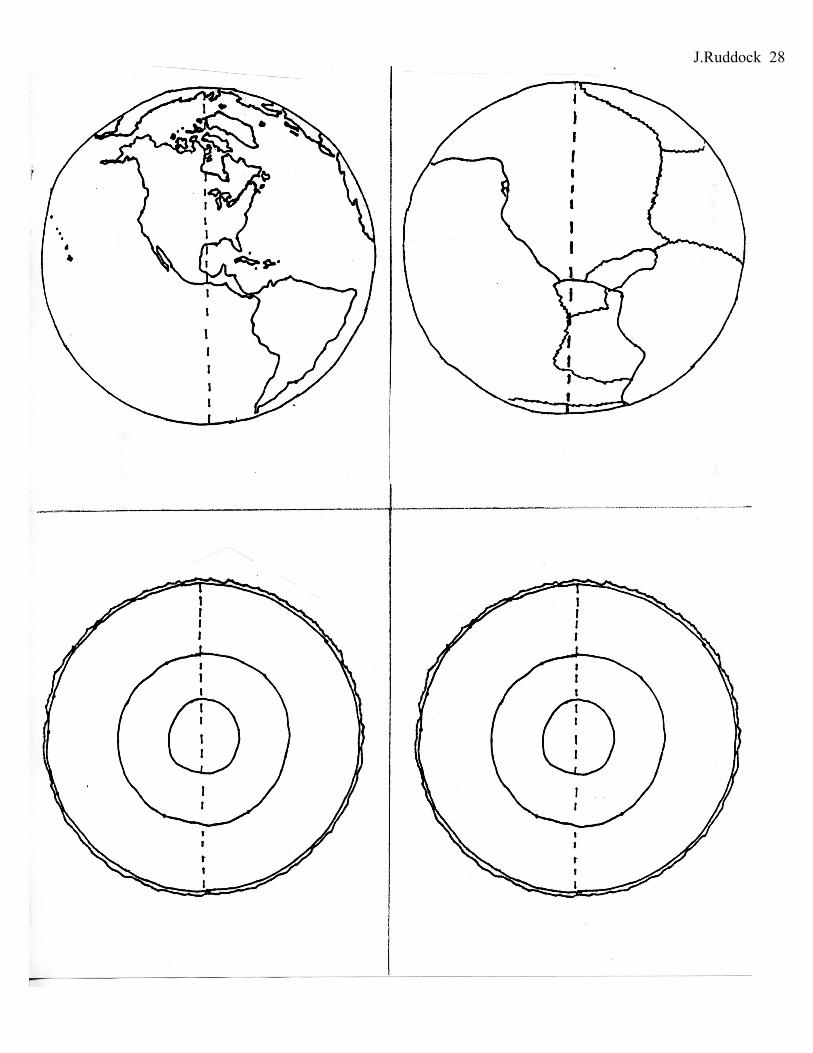
J.Ruddock 27 Earth Model III Making a Paper Model of the Earth Materials: copies of Earth Model pages for each student team scissors glue or tape crayons 1. Cut out the four circles that represent the Earth layers. Fold each circle in half on the dashed line with the printed side facing in. 2. Place the circle with the map of North and South America face down on the table. Dot glue on the left side of the circle. 3. Place the folded circle labeled crust face up on top of the map circle so that the edges match exactly. Fold the crust circle closed, and put a piece of tape down the center fold line, attaching it to the map circle. 4. Repeat step 3 with the mantle circle and the inner/outer core circle. 5. Tape or glue the blank sides together. You should now have a 3-D model of the inside of the Earth. 6. Color your model and add any additional information that you have learned about the inside of the Earth to your model
J.Ruddock 28
J.Ruddock 29
The Rock Cycle How do rocks form? Are new rocks forming right now? To help understand this process, we are going to do a rock cycle simulation using crayons for rocks. Be sure to use all standard laboratory safety practices and procedures. Be sure you understand how to safely handle the materials that are used. Materials: Wax crayons: red, green, blue, yellow (4 of same color per team) Wax paper Pencil sharpener 3x3 inch paper (1 per team) Heavy duty Aluminum foil small pieces of board
C-clamps small metal pie pan—lined with foil heat source—electric fry pan, hot plate etc. hot pads or tongs newspaper appropriate safety equipment
Part 1: Weathering 1. Get a piece of wax paper, 4 crayons of the same color and a pencil sharpener. 2. Remove the paper from the crayons and shave them making a pile of fragments on your wax paper. Think of your crayons as rocks and describe what you did to them. Where and how do you think this happens on the earth? Part 2: Erosion and Deposition 1. Work in groups of four, each with different color “rock fragments” 2. Get a piece of aluminum foil. Put the 3 in x 3 in piece of paper in the center of the foil. 3. Put all of one color of the rock fragments on the square of paper. Gently covering the piece of paper. Carefully place another layer of a different color of fragments on top of the first layer. Continue until each color layer of fragments has been placed on the pile. What did you do that was like erosion?
J.Ruddock 30 Where did you deposit your rock fragments? What are some of the ways that rock fragments are moved on the earth? Where do you think they get deposited? Part 3: Sedimentary Rocks 1. Carefully fold up your foil around the “rock fragments” to make a square package. 2. Place the foil packet between two boards. Apply light pressure to the sandwich using C-camps so that the fragments are compressed. 3. Remove the package from the C-clamps. Carefully open it and observe what has happened. Look specifically at the center region and the outer edges. 4. Carefully pick up the center section and break the “sedimentary rock” into two parts. Look at the broken edges. Describe your “sedimentary rock”. How did your rock form? Where do you think sedimentary rocks are forming on the earth now? Part 4: Metamorphic Rocks 1. Put the rock fragments that are left on the foil in the metal pan. Set one piece of your rock aside for later. Put the other piece back in the aluminum foil. Refold the foil around the rock. Put the packet back between the boards and clamp it again. This time apply as much pressure as it possible. 2. Remove the package. Open it, and look at the newly formed “rock”. Compare this “rock” to your “sedimentary rock”. How has the sedimentary rock changed? Describe the new “rock”.
J.Ruddock 31 Where on the earth do you think great pressure is being applied to rocks? Part 5: Igneous Rocks 1. Set your metamorphic rock aside with your sedimentary rock piece. Get the metal pan that has all the left over rock fragments. 2. Cover the surface of a hot plate with aluminum foil. Put the pan of “rock fragments” on the hot plate. Turn it on low. WATCH IT CAREFULLY and FOLLOW ALL SAFETY RULES! 3. When most of the “rock” has melted, turn the hot plate off. 4. When it has completely melted use tongs to carefully lift the pan off the hot plate. 5. Half of the groups should place the tray on several thicknesses of newspaper. Let it cool and solidify. The other half of the groups should put their tray on ice to cool it quickly. How did the igneous rock form? Describe the “igneous rock”. Compare the igneous rock that cooled on the newspaper to the one that cooled on ice. Is there a difference in the crystal size? How would igneous rocks that cooled on the surface of the earth look different from those that cooled inside the earth? Where do you think igneous rocks are forming on the earth? Look at the “rock pieces” that you saved. Think about the processes that formed each one. Use this information to draw a diagram of a rock cycle on the back of this paper.
Adapted from: Color Me Metamorphic by D. Birdd Earth at Hand: A Collection of Articles from NSTA’s Journals National Science Teachers Association Washington, D.C.