im118896 inventor basics series – taking control of your ... · page 1 . im118896 . inventor...
TRANSCRIPT

Page 1
IM118896 Inventor Basics Series – Taking Control of Your Styles & Standards Chris Benner - Powell Fabrication & Manufacturing, Inc. Mark Lancaster - Synergis Engineering Design Solutions
Description This class will be a beginner's guide to using the Autodesk Inventor Styles Editor. Styles Editor is like your one stop shop for controlling how things appear in your Inventor Parts, Assemblies, and Drawings. From text styles and dimensions, to lighting and scenes, and everything in between. The Styles Editor gives you great "out of the box" functionality and the ability to create your own unique styles. Having a basic understanding of this tool can greatly improve productivity in your modeling and drawing. Speaker(s) Chris Benner CAD Manager/Designer Powell Fabrication & Manufacturing, Inc. I have been working as a mechanical designer and drafter for more than 20 years, using Autodesk, Inc., products for most of that time. I was inducted in the first class of Autodesk Expert Elites for my activity on the Autodesk discussion forums and social media, and for my CAD Tips, Tricks & Workarounds blog. I've spoken at Autodesk University 4 times, including a trip to Moscow in 2014 to speak at AU Russia. My specialties are Inventor Tube & Pipe and Frame Generator, Content Center, and Vault Professional. Mark Lancaster Product Support Specialist/Help Desk Tech Synergis Engineering Design Solution Since 2013, Mark Lancaster has been the Product Support Specialist for Synergis Engineering Design Solution (an Autodesk Platinum Partner located in Quakertown PA). Besides the focus on the Autodesk manufacturing & data management solutions along with Autodesk licensing, Mark is also a regular contributor to the Synergis CAD Blog web site. Mark is an Autodesk Certified Inventor Professional for the past 3 years and his expertise is centered on frame generator, routed system, content center and iLogic. Besides assisting Synergis customers with product support issues, Mark also spends his time on the Autodesk Licensing/Installation & Inventor forums assisting other user like yourself. Mark has been an Autodesk Expert Elite close to 2 years now, but is no stranger to the CAD world. He started his career out (late 80s) by performing drafting/design duties using a (drafting) board and CAD software. Mark has over 20 years of experience in the manufacturing world, 15+ years in the 3D modeling world, and is a self-taught AutoCAD user since Release 9. However most of that time has been around CAD and document management administration. His motto for many years has been “I’m here to assist you in getting your job done” and is always looking for better ways of doing things due to his “Lean Manufacturing” background.
Learning Objectives • Learn how to find and understand the styles in your Inventor files • Learn to edit existing styles and create new ones • Learn about styles libraries • Learn about style conflicts and how to avoid them

Page 2
What are Styles & Standards in Inventor Styles in Inventor can best be thought of as your library for enforcing drafting standards in your design documents. There are many styles that can be modified easily to control the appearance of things such as dimensions, arrows and leaders, layers, linetypes, revision tables etc., in your drawing files. In your part and assembly environments, styles also control your lighting and background appearances. These styles and standards come out of the box stored in your Design Data folder as .XML files. They should, however, always be managed from within the Inventor environment itself. There are several ways to create, edit and manage these styles and, without repeating everything that is in the product documentation, we will cover some of the most common do’s and don’ts of managing your styles. Viewing Inventor Styles – Drawing Files Before we dive into creating and editing styles in Inventor, let’s look at where they are found in the Inventor ribbon structure, and what they look like. From the Inventor Ribbon, the styles editor is found on the Manage tab.
The “out of the box” styles editor for drawing files (.idw & .dwg) will look like the following image. At this point no custom styles have been added or edited. The top category are your Standards. Standards are a collection of various styles.
For example, let’s expand the dimension styles and see what one of those looks like.

Page 3
You can see that within this category, there are already several defined styles. Within this one individual style, there are several tabs of settings. Your styles can be made unique in this way, based on your needs and your company standards. They can be customized to meet international standards as well. In the upper right corner is a pull down that allows you to show local styles, as well as only those that are active, or all styles. The Back button returns you to the previous style that you were viewing or editing. The New button is used to create a new custom style based on the style you are currently viewing or editing. The Save and Reset buttons will become active as soon as you begin to edit a style. Save will preserve the changes you have made to a new or existing style, and Reset will discard any changes made since the last save. Right clicking on any style in the menu gives you several options as shown below. In this example, the right click was performed on a new style recently created.

Page 4
These options allow you to create a new style from this one, rename the current style, replace the current style with another style or purge the style from the document. You can also choose to purge any sub-styles that may be nested into the current style. Use caution in this, as it will purge the sub-style anywhere it is used. Export allows you to save the style as a .styxml file. This may be a good way of sharing a specific style across a network, or simply backing up a style you have modified, for later use. Helpful Tip: Before you start adding, modifying, and/or purging styles, you should back up your Inventor out of the box “Design Data” folder for safe keeping. Purging an unused and unwanted style can be done one of two ways. Purge Styles will remove the top level style, for example a dimension style that is not in use, but will retain any other styles referenced by it. An example of this is a dimension style which references a text style. The dimension style will be purged, and the text style retained. Purge Styles and Substyles will remove the top level style as well as any referenced substyles, such as the text style in the previous example. The “greyed out” options are only available if you are using style libraries. Finally, on the bottom left of the editor is a product help button, which takes you online to the product documentation, and an Import button, which allows you to import a .styxml file that you have previously exported. Viewing Inventor Styles – Parts & Assemblies Model files for parts and assemblies contain styles as well. These control things like the text styles used in sketching, and on model based definition, as well as backgrounds and lighting. The styles editor for these file types is located in the same place on the ribbon, and will look like the image below.

Page 5
As with drawing styles, these styles can be manipulated to create a unique look and feel to your modeling environment. Managing Styles There are several ways of managing and sharing your styles with other users. It is important to note that changes made to the styles in a single document will affect only that document. To share one of these edited styles with a team, the style needs to be exported to a shared location, and then imported by these users. Creating and editing styles in your document templates will make those changes available to anyone with access to the templates, on documents created after the changes were made. Documents created prior to the template style change will still carry the old version of the styles. Style libraries can be created and set as active in your Inventor projects, and to anyone who uses that project. This ensures that all users have access to the most current styles. If, however, an older document is opened that contains a different version of a style saved in a style library, the style in the document will take precedence over the style library version. Mark will be covering more about this and what can go right or wrong with this.

Page 6
If your Inventor Project has the setting Use Style library set to Read/Write, then users will be able to save styles that they have created or modified to the style library. Saving to the style library pushes the style out to the Design Data folder, or whatever folder you have designated for the active project. This then becomes the new "global" style for that project. The Update command, shown greyed out in the image on Page 4, is activated if using a style library. Selecting this will update the local style by pulling from the Design Data folder, or the style folder specified in your project.
Style Settings in Application Options In the Inventor Application Options, there are two settings that are also related to style, that we wanted to put in here just so you are aware of them. On the Drawing tab, you have the option of setting Default Object Style and Default Layer Style to either “By Standard” or “Last Used”.

Page 7
Creating and Editing Styles Creating a new style in Inventor is very simple. The process begins by opening the styles editor in your document. Locate the style category you want to add a style to, and expand it. Then look at the existing styles to see which style, if any, is closest to the settings you would like to use. Select that style to make it current, and then select the New button in the right pane. You can also right click on the style name in the left pane, and select New from the options menu. The Style name, by default will be Copy of and then the name of the current style. Change this name to something more descriptive so it will be recognized easily. The new style will be created and added to the list of available styles for editing. Proceed by changing any of the variables available in that style to make it unique. There are also Parent Standards at the top of the editor. Within these Standards you can then “mix and match” the styles to create very unique combinations.

Page 8
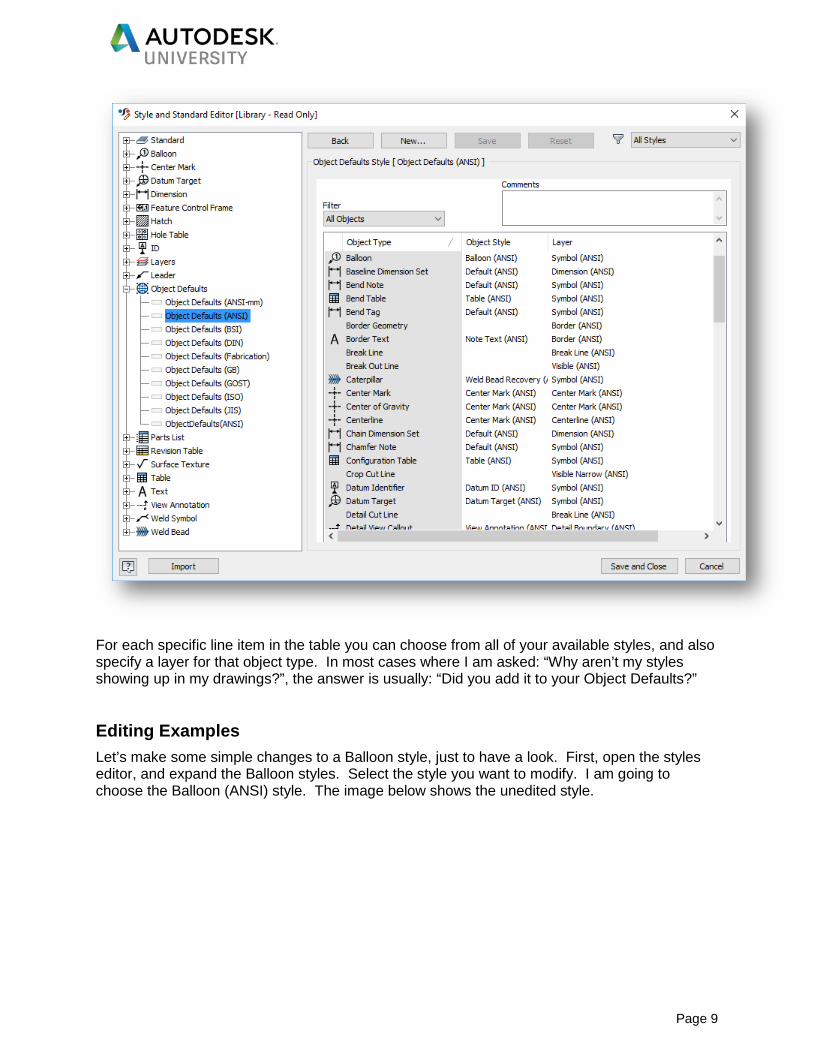
Object Defaults This is probably the most important, and one of the more over looked features of the styles manager. Once you have created your top level standards, and added or edited the individual style categories the way you want them, you still need to tell Inventor which individual style goes with which standard.
In my example above, under Object Defaults, you see all of the standards which are defined at the top of the page. Select which parent you want to set the defaults for and a table opens which allows you to specify a style for each of several categories. This is how you directly control the appearances of your documents.
Page 9
For each specific line item in the table you can choose from all of your available styles, and also specify a layer for that object type. In most cases where I am asked: “Why aren’t my styles showing up in my drawings?”, the answer is usually: “Did you add it to your Object Defaults?” Editing Examples Let’s make some simple changes to a Balloon style, just to have a look. First, open the styles editor, and expand the Balloon styles. Select the style you want to modify. I am going to choose the Balloon (ANSI) style. The image below shows the unedited style.

Page 10
Notice that this style contains several sub-styles. Each of these could be edited in their own rite, or can also be edited from this screen by selecting the pencil icon to the right of the sub-style. In this example, I will edit the Leader Style. First I will select a different one form the pull down list.

Page 11
Next, I will select the pencil, to make changes to the leader style I just selected.
This opens that style, as if you had selected it from the main menu on the left. Once you have made your changes, simply use the Back button at the top to return to the Balloon style.
A few more tweaks, and I have customized that style. Save and Close, and this new style is ready to use once it has been assigned to a Standard using Object Defaults. Mark?......

Page 12
Inventor Drawing Style Conflict
Have you ever seen the above message when you start an Inventor drawing? Does this message only appear for certain users in your organization? Have you struggled in solving the message? Perhaps you have ended up suppressing the prompt altogether. Before we get into solving it, let’s take a moment and discuss what lead us to this moment. When Inventor is installed, standard drawing styles are stored by default in the C:\Users\Public\Documents\Autodesk\Inventor <version>\Design Data folder. In this location, you will find numerous XML files (which Chris has already mentioned) related to the styles listed in your drawing styles editor. This information (XLM/styles/Design Data folder) is considered the “Style Library Definitions”, or the master style library (your global drawing styles). For example:
Page 13
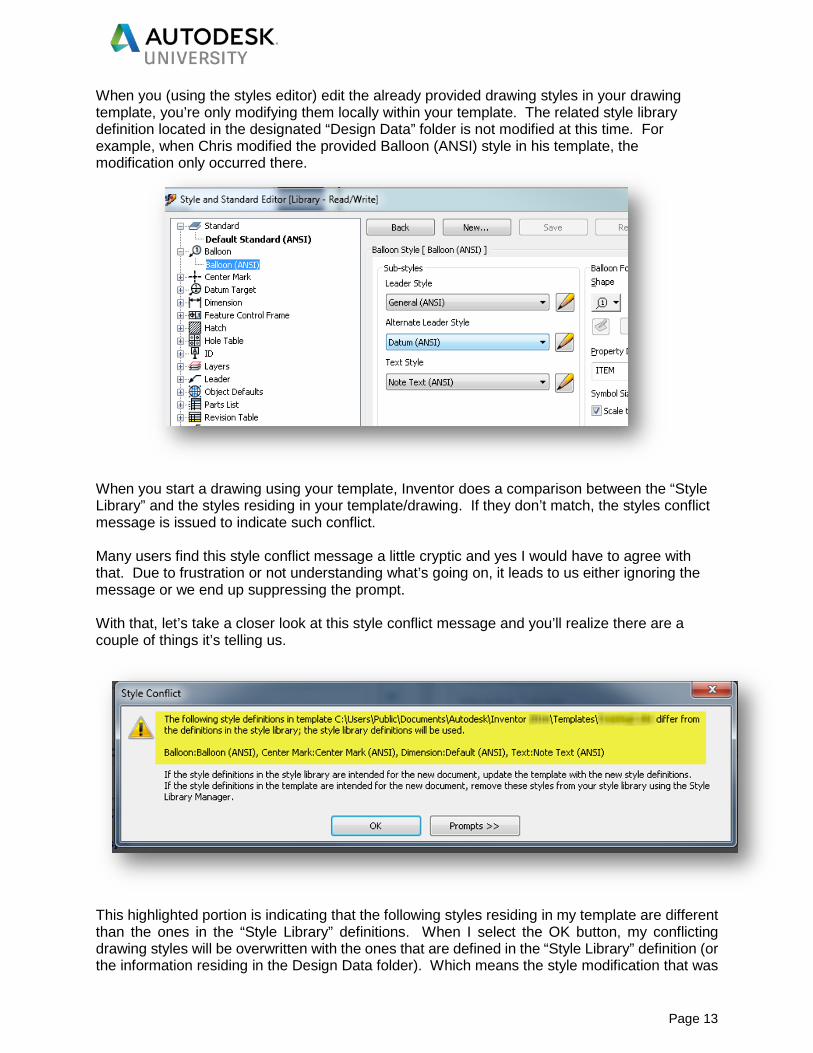
When you (using the styles editor) edit the already provided drawing styles in your drawing template, you’re only modifying them locally within your template. The related style library definition located in the designated “Design Data” folder is not modified at this time. For example, when Chris modified the provided Balloon (ANSI) style in his template, the modification only occurred there.
When you start a drawing using your template, Inventor does a comparison between the “Style Library” and the styles residing in your template/drawing. If they don’t match, the styles conflict message is issued to indicate such conflict. Many users find this style conflict message a little cryptic and yes I would have to agree with that. Due to frustration or not understanding what’s going on, it leads to us either ignoring the message or we end up suppressing the prompt. With that, let’s take a closer look at this style conflict message and you’ll realize there are a couple of things it’s telling us.
This highlighted portion is indicating that the following styles residing in my template are different than the ones in the “Style Library” definitions. When I select the OK button, my conflicting drawing styles will be overwritten with the ones that are defined in the “Style Library” definition (or the information residing in the Design Data folder). Which means the style modification that was

Page 14
done locally in my template no longer exist for this new drawing. However, many users get confused when they go back to edit their template and find their style modifications are still there. Which leads to the question: “Why are my modified styles not appearing in the drawing I just started”? The key to this style conflict is based on the comparison that Inventor performs when a drawing is first started using the Inventor NEW command. When you directly open your template (or an existing drawing) there’s no comparison being performed between the styles located in your drawing and the ones stored in the design data folder.
Now that you understand why the message is appearing, let’s start discussing how to resolve it. First of all, Inventor is always assuming the “Style Library” definitions located in the design data folder is the controlling factor for your drawing. Although I’m not a fan of this assumption, there are things that we can do to overcome this. Let’s examine the 2nd part of the message…
For this highlighted portion, Inventor is informing us how to resolve the style conflict in our template.
As indicated by the underlined portion, if the actual “Styles Library” definitions are supposed to be used, then we need to “UPDATE” the styles in our template. To update, simply open your template, select the Manage ribbon tab and the Update styles function.

Page 15
From the template modification Chris performed, you can see the styles listed here are the same ones that appeared in the styles conflict message we received. In addition, you can also see in the “Location” column, the style exist in both location (i.e. design data folder & template) but the “Changes” column indicates the change is locally or within the template. When you update, you are overwriting the selected local styles (Update column = Yes) with the information residing in your design data folder. Once the update is performed, the styles now match and the conflict no longer exists. However, when using this workflow, you will lose any template modification you made to these styles and in certain cases you probably don’t want this to occur. So, ask yourself do I really want to update my styles or do something else?
This underlined portion of the message tells us that if we want to maintain our modified styles (per the template), we need to use the “Style Library Manager” and remove those conflicting styles from the “Style Library” definitions.
The first question you may be asking, where is the Style Library Manager located? This utility is located outside of Inventor under the Windows start menu/Autodesk/Inventor version section.

Page 16
The “Style Library Manager” performs two functions, one as a migration tool to move styles from one Inventor version to the next (discussed later on) and the second is to control/manage your current global styles and resolve those conflict messages. Before using this utility… If you have multiple versions of Inventor installed on your machine, you must always use the same Style Library Manager version as the Inventor version being used. I strongly suggest that you always backup your design data folder just in case you make a mistake and want to restore your original out of the box (OOTB) information • STEP #1: Ensure the “Style Library 1” field is pointing to the correct folder location where
your Inventor Design Data folder resides. • STEP #2: Select “Show All Styles” (filter) button. • STEP #3: Select the overall conflicting style type from the list. Since we have a conflict
with the Balloon (ANSI) style, we will select the Balloon style type. • STEP #4: Right mouse click on the style causing the conflict and select “Delete
Styles”. In our case it will be the Balloon (ANSI) style.

Page 17
However, this is the main reason I am not a big fan of using this solution. The Balloon (ANSI) style has a parent/child relationship with other styles defined within your design data folder.
Which would require me to first remove it from the other styles that are listed in the resulting window. If this is something you want to do, locate the styles in the order they’re listed and perform the delete style workflow as already mentioned. Before deleting, check to ensure have you backed up your Design Data folder. There is no undo operation and that’s why it is important to have a backup before continuing. Existing files using these “deleted” styles will lose their global reference and will become a locally stored style. In this case, I don’t really want to do this because I truly don’t want to destroy this relationships that was initially created. So, the question remains: how do I resolve this? Although the style conflict message doesn’t allude to it, there are 3 other options you can use to resolve the conflict.

Page 18
Option #1:
By using your template, you can save the styles back to the design data folder and define what the new “Style Library” definitions will be.
For certain Inventor users, the “SAVE” option may be disabled/greyed out just as the image above represents. The reason is based on the setting within your active project file.
Remember, changes to the project file can only occur in a non-read only state. When the “Use Style Library” option is set to read-only, the user is unable to save back to the designated Inventor Design Data folder. This option is just another security measure put in place to protect your controlling (master) styles. When it’s set to read-write then the user is allowed to save back to this location and update the controlling styles. Helpful tip: I recommend that all users not have the ability to read-write to your designated styles library. If you’re planning to use this option to resolve the conflict, I strongly suggest that you first back-up the design data folder just in case you make a mistake and want to restore your OOTB information. Upgrading Inventor Version: Requires a migration of the styles

Page 19
Option #2:
This option, which is my preferred method, is to create new styles (drawing template) using the existing ones and leave the provided ones unchanged. This way when the style comparison is performed, these local styles only appear in the drawing template and there is no related style to compare in the Inventor Design Data folder. Let’s look at this option. At this point I’ve already opened my drawing template and brought up the “Styles Editor”. Although Chris has already covered how to create and modify your drawing styles, I wanted to demonstrate how I personally approach setting up my styles based on using option #2. Please note there’s no established rules stating you must accomplish it this way!!!
Many times, I’ve heard from users about the layout of the style editor and how it’s a little clunky. I would have to agree since I originally struggled with this interface many year ago. But once you understand its layout, I believe it is much easier to work with. For me I’ve always viewed the “Styles Editor” interface as being divided up into three parts.
• Main Standard Style (Yellow highlight) Basically, these styles are defined as the parent to your object defaults and drawing styles. In addition, a template can have many standard styles but only one can be active at a given time.
• Object Default Style (Green highlight) As Chris has already pointed out, the object default styles instruct Inventor what style to use based on the drawing annotation you’re placing onto your drawing. However, the user still has the ability to manually override it if they choose to.
• Drawing Styles (Red highlight) These are the actual style definitions for the drawing annotations you apply to your drawing.

Page 20
Although I like to start out by defining all of my necessary drawing styles, you may want to take a different approach in setting up your own styles. 1st Step: Determine which drawing styles you will use and change. For example, I came from a filtration company where datum targets, feature control frames, hole tables, and a few other annotations/styles never really appeared on our drawings. Which means I left these styles as is or basically keep the out of box configuration for them. In your organization, I would also assume there are a few drawing styles that you don’t use as well. For my example, I will need to create styles for balloons, center marks, dimensions, leaders, parts list, tables, text, and view annotations to meet my needs. All the other styles are not necessary and I can leave them as is. 2nd Step: The first style I’m going to address is the text style, followed by the leader. Why modify the text style first and not the balloon you ask? There are no set rules but, in my opinion, the text style is a commonly used definition or it’s used in numerous drawings styles/annotation. With that, I just find it much easier to create that first and continue. Same as the leader, in my opinion, it’s the next commonly shared style. As Chris has already demonstrated, I’m just going to clone (copy) the existing/selected Note Text (ANSI) using the “New” button. Followed by defining a name for the new text style. As an alternative method, you can also right mouse click on the style and select “New Style”.

Page 21
Helpful Tip: I would recommend coming up with a naming convention for your styles. The option “Add to standard” can be checked or unchecked at this point. When checked, the new style will be available to any style that is current available under the Standard section of the Style Editor. However, making the style available or not, can be changed later on if needed. In my case or the way I work, I always uncheck this option to ensure I’m not impacting any existing standard when I save using the Style Editor. Next, I will define what the new text style settings will be. Since Chris has already demonstrated this process, I will bypass showing these steps. Now I need to save my style and move onto creating the next one which, in my case, would be cloning the Label Text (ANSI) style. From there I will create styles for my leader annotations and the other styles that I listed earlier. As a reminder, make sure to uncheck the option “Add to standard” each time. At some point, you may realize that one or more of the out of box styles will actually work for you and you will not need to do anything else for them. In my example, the Center Mark (ANSI) settings meets my requirements so I will leave it as is. Also, when I got to my parts list and table style I realized I need additional text styles for it. So, I’ll switch back over to the text style section and create those additional text styles. After a while my individual drawing styles are taking shape.

Page 22
3rd Step: Now that I’ve finished creating my individual drawing styles, the next step for me is to only define the “Object Default” style (using an existing one). From there, I’ll go back later on to modify its requirements. Remember there are no set rules in setting up your styles and I’m only demonstrating how I would accomplish this.
4th Step: I will create my “Standard” style based on the ANSI standard. In your case, select the standard that you require.

Page 23
In my standard, I will start out by assigning the requirements located under the “General” and “View Preferences” tab. For the “Available Styles” tab, I will start selecting the styles that will be available (per this standard) to the user. Followed by selecting the “Object Defaults” tab and defining the “Object Default” style that I created earlier.
5th Step: After saving/apply my changes, I will go back and finish setting up my “Object Defaults” style. Helpful Tip: To make things easier for yourself, change the filter to shorten the list of objects you’re working on.
Page 24
Now I will save my “Object Defaults” and at this point I could create addition standards if I needed to. For our example, we are done and now I will activate the “STD DWG (ANSI) style either by doubling clicking on it or by right mouse click/Activate. 6th Step: I will now save me template and verify the styles are working the way I wanted them to. When I implement my template for use, there will never be a style conflict since all my styles are contained within my template. Although there are numerous steps you must take to accomplish this, I prefer this method over any other solutions regarding avoiding and/or resolving the styles conflict. You may be asking yourself, yes, I can see how this method avoids further style conflicts but are there any advantage and/or disadvantage by using this method.
ADVANTAGE One of the main reasons why I prefer this method is when it comes time to upgrade to the next version of Inventor. Since my styles are local or only contained with the template, when I upgrade, I only need to open my template and save it to the next version. No migration of the drawing styles located in the design folder is necessary. Although I recommend everybody in your organization to be using the same design data location, having your styles just in your template allows user to have different design data location based on their needs or project requirements. Meaning there’s no need to worry about if I have the latest drawing styles in my design data folder. When updates are made to the local styles/template, everybody will have them the next time they start a drawing. If they were global we would have to ensure everybody’s design data folder was updated (unless it was in shared location). DISADVANTAGE Styles created by this workflow are local and if you needed to create additional templates for your organization you would also need to recreate these styles in those templates as well. When working with legacy drawings and/or templates, these styles would not exist and you would also have to recreate them. Too many style definitions within your template could lead to Inventor performance issues. See the purging section for additional information. Beside the performance issue, the disadvantages listed above can still be addressed by opening your template and exporting the “Standard” style (or an individual style) to an external XML file (by right mouse clicking on it). From there, you can import the external styles into your other templates or legacy drawings. See the “Managing your Styles” section for additional information.

Page 25
Upgrading Inventor Version: Open drawing template and migrate/save template. Option #3:
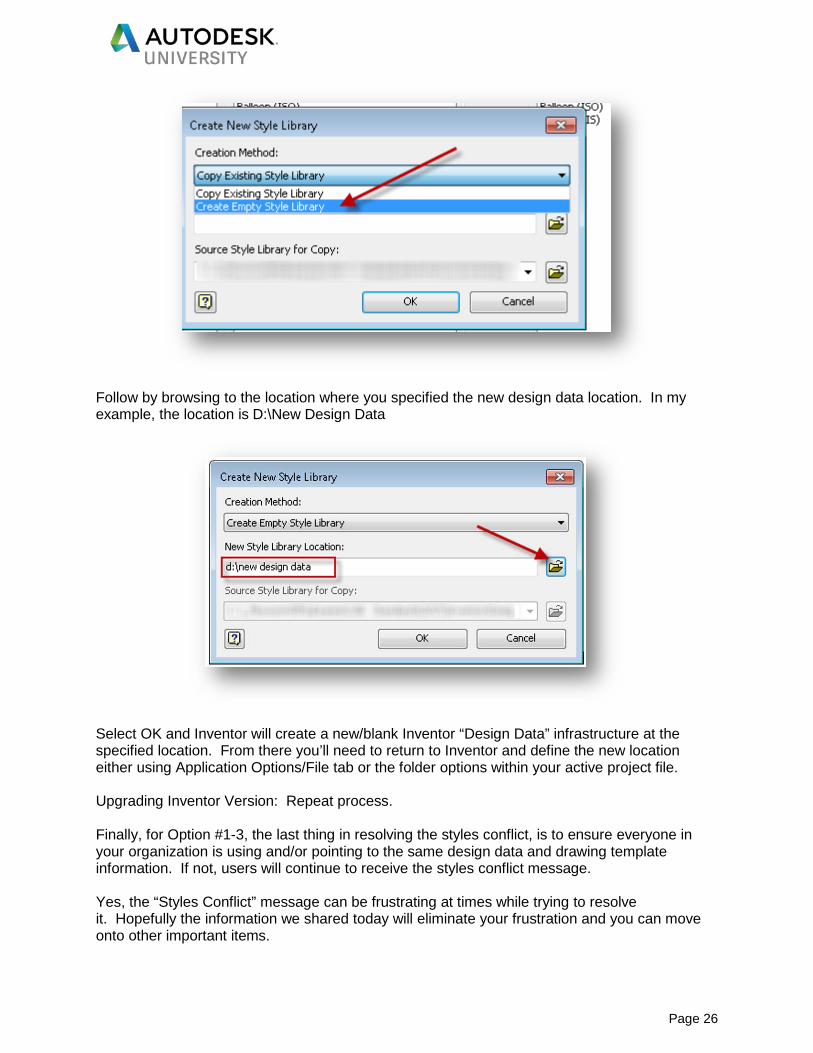
The final option, will allow you to create a new Inventor Design Data folder location containing blank XML/style files. When the comparison takes place, there are no “Master” styles to compare and thus no conflicts will ever exist. Although I could create this new blank “Design Data” folder location on the fly, I prefer creating it ahead of time using Windows Explorer. For our example, I’ve created a folder called “New Design Data” on my “D” partition. Next, launch the “Styles Library Manager” and select “Create New Styles Library” icon button.
From there, change the creation method to “Create Empty Style Library”.
Page 26
Follow by browsing to the location where you specified the new design data location. In my example, the location is D:\New Design Data
Select OK and Inventor will create a new/blank Inventor “Design Data” infrastructure at the specified location. From there you’ll need to return to Inventor and define the new location either using Application Options/File tab or the folder options within your active project file. Upgrading Inventor Version: Repeat process. Finally, for Option #1-3, the last thing in resolving the styles conflict, is to ensure everyone in your organization is using and/or pointing to the same design data and drawing template information. If not, users will continue to receive the styles conflict message. Yes, the “Styles Conflict” message can be frustrating at times while trying to resolve it. Hopefully the information we shared today will eliminate your frustration and you can move onto other important items.

Page 27
Managing your Styles Copying/Updating styles over to existing files
Over time we most likely will create or modify existing styles in our Inventor templates. For our existing files, we need to determine if these styles will be necessary or not. If you do require a new or modified style to exist in a legacy file (or files) please use the following to accomplish this.
Method #1: Local Styles (stored only in template/file)
These styles are defined only in the template and do not exist in the list if the “Styles Update” function is used. Since these styles do not exist outside of the template/file, you’ll have to manually export and import these styles between your files.
Method #2: Global Styles (stored in Design Data/Master location)
1. Manually Update: By using the “Update” function on the Manage tab/Style section, you can push those selected global styles into your template/file.
2. Batch Update: By adding the SDK User Tool add-in, you can use the Batch Update Styles tool to accomplish this. However, this tool will only update those styles that are named the same and can be found in both location (global and local).
Purging styles is important
Style definitions play important role in our templates/files and purging unused styles is also beneficial to your files. Unused styles, most likely start to appear in our files as modifications occur over time. Leaving them or letting them build up will lead to disorganization and Inventor performance issue. Matter of fact, left over styles is one of the Inventor Performance items that’s being covered in the MFG118915 Boosting Inventor Performance class. Basically, that class states: It’s recommended that you purge these unused styles from your files on a regularly basis.

Page 28
Helpful Tip: Depending on the style, its relationship and/or its status, certain styles may not be able to be purged. In addition, individual styles may also be purged via the “Style Editor” using the right mouse click on style/Purge selection (context menu) option. As an alternative method you can use the “Inventor Task scheduler” to batch purge these unused styles via the “Purge” task function.
However, when it comes to purging, especially via the task scheduler method, I always recommend that you fully understand what the purging operating will be accomplishing and make sure you don’t purge styles that you may end up needing down the road.

Page 29
Copy Styles from one Library to another Library In certain design requirements, you may need to create a special styles library to support a given design or model structure without impacting existing styles. In most cases you wouldn’t have an existing styles library already defined for this new style library, but you could still start with an existing one and copy to it. For our example, we are going to assume we need to create this new (special) styles library from scratch. As stated earlier when we discussed how to create a blank “Design Data” folder, I mentioned that I could create the folder structure on the fly but I elected to do it ahead of time using Windows Explorer. Since we are kind of repeating that same workflow, I’ve created a special styles library location in D:\Inventor New\Resource. STEP #1: Ensure the “Style Library 1” field is pointing to the correct folder location where your current Inventor Design Data folder resides. Although the information here is not going to be used to copy from, we will be using the information later in the steps. STEP #2: Select “Show All Styles” (filter) button. STEP #3: Select the “Create New Style Library” button.
STEP #4: Select if you want to copy from an existing style that closely represents your new special library or create an empty/blank configuration to have a clean slate to start from.

Page 30
For our example, we will be using the clean slate method
STEP #5: Select the location where the special styles library will be located and the OK button to create. For our example, this will be located at D:\Inventor New\Resource.
As you can see the “Balloon” styles in my current “Design Data” folder are shown as blue to indicate they only reside in that given style libraries or “Style Library #1”. You can also see in the same dialog, “Style Library #2”, now points to the location that I specified on my “D” partition. However, its column is empty since we created a blank environment and there’s no actual style information residing there. For our example let’s say we want to copy the “Balloon (ANSI)” over to my special style’s library. I click on that style (or select many styles) in the column for Styles Library #1 and select add >> (button).

Page 31
Once the selected style (or styles) is added, you can now see their coloring changes to black in both columns to indicate the styles are now the same between the two (2) libraries.
Although we just copied the “Balloon (ANSI)” style, other styles that support it are also copied at the same time. For example, when I change the “Style Type” to “Leaders” you can see the additional leader styles that were also copied to support the “Balloon (ANSI)” style.

Page 32
Continue to select and copy all of the styles that are required in this special styles library. However I do recommend that styles related to “Object Defaults” and “Standard” be the last two (2) styles that you select and copy over. If they are selected too early, it may take some time to process because it must first copy over all of the related child styles. Once you’re completed, select the “Exit” button and return to Inventor to define the special style library in your project file and start defining (using the Style Editor) what the special standards will be.
There could come a time when you need to go back and add more styles to your special styles library. Repeat the steps as indicated above except for STEP #3, this time select to open your special styles library or pick it from the list if it exists.
From here I can now add (copy) other styles from Library #1 to Library #2 (our special styles library). In addition, you may have also noticed the “Balloon (ANSI)” style in the image above is now in red. The red indicates this given style between the two (2) libraries is now different. Although I didn’t cover that step, I had modified it (using the style editor) in our special styles library (or Library #2). At this point I could select the original style in Library #1 and copy it to Library #2 or reverse the steps and replace the information in Library #1 using the updated Library #2 information. Either method would turn the style back to a color black to indicate they are now the same definition. Finish the process of adding using the existing steps.

Page 33
Renaming Global Styles Within the Inventor “Style Editor”, you can right mouse click on a given style and select to rename (if possible). When this rename occurs, the change only happens within this file and there’s no impact to any other files using the same style name or the related global/master style. To rename a global style (design data folder) you must use the “Styles Library Manager”. First make sure the information in Library # 1 or 2 is pointing to the correct location. Next select the style type and then right mouse click on the style you need to rename. Select “Rename Styles” and accept (or not) the warning about breaking the link. When you rename a global style, all existing files referencing the originally named style is no longer associated to the “global” style and that style will become a locally stored.
Migrating Custom Global Styles Each year when Autodesk releases a new version of Inventor, one of the update/migration steps that you may have to perform is migrating your custom global/master styles. Design data in most cases is reformatted for each yearly release. Here are some guidelines about this migration process:
• If you have never modified the global styles residing in the designated “Design Data” folder, there’s no need to migrate the existing information to the new version of Inventor.
• Custom styles that are migrated can no longer be used in legacy versions. When migrating, it’s important to migrate the information to a separate style library and not over-write the legacy information.
• Although I’m not a fan of this but you can continue to use the legacy “Design Data” information but you will lose any updates/modifications per the new release. In addition if the formatting has changed between Inventor versions, you could receive errors regarding this. I believe you should always migrate your custom global styles when a new version of Inventor is released.
Now there’s a couple of ways that we can accomplish the migration process but I find it’s much easier to do this. Before any migration occurs, it’s important to have a backup for the legacy and newer version of your design data. STEP #1: Create a migration folder somewhere on your PC or network. For example let’s say I was going to migrate my custom global styles from Inventor 2016 to Inventor 2018. I would create a folder somewhere and perhaps call it “Inv16_to_Inv 18_Style”. STEP #2: Copy my current legacy (in my case Inventor 2016) “Design Data” folder to the folder location that I just created in STEP #1. STEP #3: Launch Inventor 2018 (upgrading to this version per example) and exit the program. This will ensure the last registered version of Inventor is the correct version being used in the migration process. STEP #4: Launch the “Styles Library Manager”. STEP #5: In Library #1 field, select to open the location as defined per STEP #1. STEP #6: Select the “Migrate” button. If the migration button is disable, it indicates the information is already in the correct version format.

Page 34
STEP #7: Depending on what needs to be migrated, a prompt will be issued denoting what styles are part of the migration process. In addition, this migration process can’t be undo and that’s why it’s important to create a separate migration area as outlined in STEP #1.
STEP #8: If you elected to continue with the migration process it should finish after some time (be patience) and present you with the following message of what was completed.

Page 35
STEP #9: Copy the migrated information over to the “Design Data” folder of the new release of Inventor. WARNING: When migrating custom styles to the latest release, one of items you have to consider, did Autodesk add new “styles” in the latest release? For example, in Inventor 2018 and the 2018.1 release, styles related to MBD (model based definitions) were added to parts (2018) and assembly (2018.1) files. When you migrate your existing custom styles to 2018, these MBD styles will not existing in the migrated information and errors will be reported when you try to place MBD into your model. To resolve, you’ll need to go back to the Style Library Manager and copy them from the original 2018 Design Data over into your migrated location. See this forum posting for additional information.
Inventor Materials and Appearances Styles Ever since Autodesk released Inventor 2013 and changed how Inventor materials & appearance are handled, I don’t really consider the material and appearance information as styles anymore but in fact they are. Although we are not going into a depth discussion about materials and appearances, I do want to pass along a couple of related topics based on my history of supporting end users. Issue #1: Material and/or appearance not correct in a given file/model/part/assembly but in other files and the assigned library, the definition it’s correct. What’s wrong?

Page 36
Solution: Although there could be a few reasons why this is occurring. The solution I want to share is based on updating the document information for materials and/or appearances. When a material and/or appearance is used, the information is “copied” to the document itself. Meaning the information is now locally and such information might’ve been changed within the file itself. Just like drawing styles, if the style is changed, it’s only locally and that holds true when you make changes to the material and/or appearance assigned to your document/part/model/assembly. What end user may forget over time, they still do have the ability to update their material and/or appearance to the standard using the “Update” function in the Manage ribbon tab/Styles section. For example, I changed the material and appearance definition within my part file. When I select to update, you can see the style information resides in both location (globally/local) but the modification occurred locally.
Issue #2: Must update numerous files to the latest material and/or appearance information. How can I do this besides opening each file and manually doing an update? Solution: To automate this process use the Inventor Task Scheduler by selecting one of the following task.
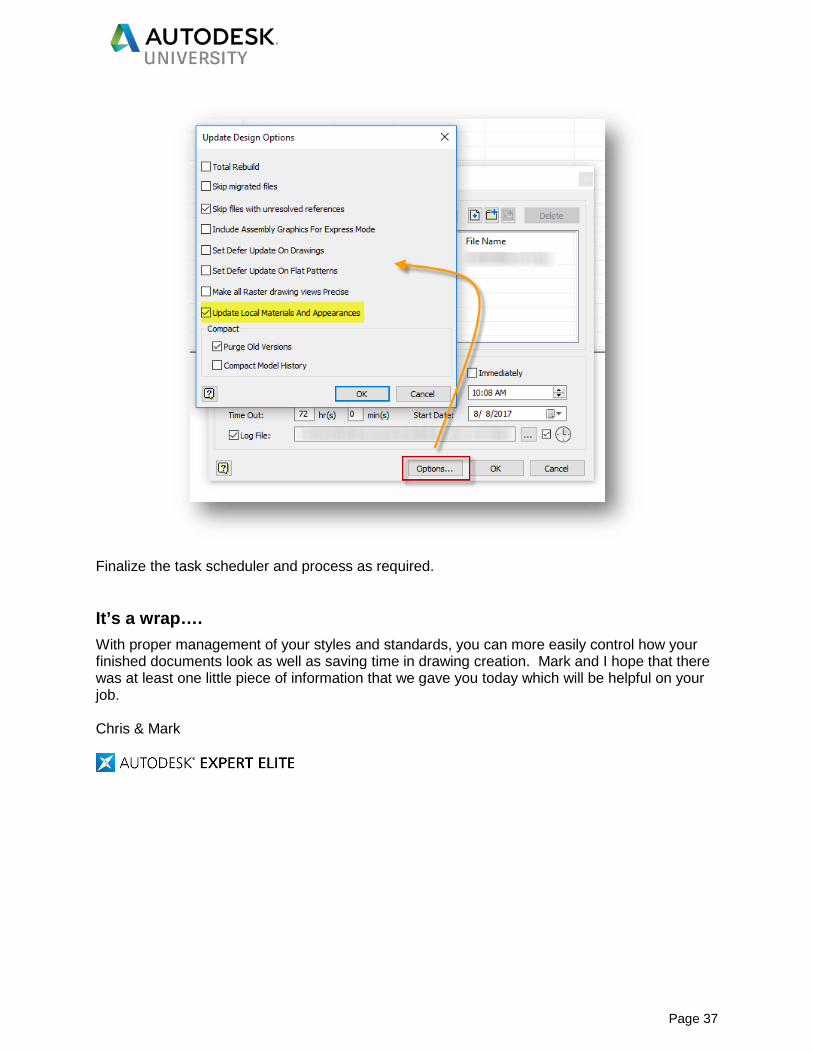
Prior to running any task, I strongly recommend that you create a backup copy of the data that you’ll being processing just in case the end results are not what you expected. Select the files needing updating, the options button and check the option to update the local material and appearance.
Page 37
Finalize the task scheduler and process as required. It’s a wrap…. With proper management of your styles and standards, you can more easily control how your finished documents look as well as saving time in drawing creation. Mark and I hope that there was at least one little piece of information that we gave you today which will be helpful on your job. Chris & Mark