immersion day - s3. · pdf filecreating an elastic load balancer . immersion day creating an...
TRANSCRIPT

Rev 2015-01
Immersion Day
Creating an Elastic Load Balancer

Immersion Day
Creating an Elastic Load Balancer
Copyright 2015, Amazon Web Services, All Rights Reserved Page 2
Table of Contents Overview .....................................................................................................................................................................3
Launch a Second Web Server ....................................................................................................................................4
Create an ELB ............................................................................................................................................................6
Immersion Day
Creating an Elastic Load Balancer
Copyright 2015, Amazon Web Services, All Rights Reserved Page 3
Overview This lab will walk the user through creating an ELB to load balance traffic across several EC2 nodes in a single
Availability Zone.
This lab has a prerequisite of Immersion Day – Getting Started with EC2 and assumes that you
have already launched your first web server. This lab will demonstrate configuring a farm of web
servers from the Immersion Day – Getting Started with EC2 lab to use ELB for its load balancing
needs.

Immersion Day
Creating an Elastic Load Balancer
Copyright 2015, Amazon Web Services, All Rights Reserved Page 4
Launch a Second Web Server
Let’s launch another web server, similar to our existing web server instance.
1. Right click your web server and choose Launch More Like This. As it implies, this feature will launch
another web server similar to the existing web server.
2. On the next screen, scroll down to the Tags section and click Edit Tags.

Immersion Day
Creating an Elastic Load Balancer
Copyright 2015, Amazon Web Services, All Rights Reserved Page 5
3. Change the Value of the Name tag to something different than the first instance, like [Your Initials] –
Immersion Day Webserver 2.
4. Click the Review and Launch button and then on the next screen click the blue Launch button near the
bottom right corner.
5. On the next screen, ensure you have a keypair selected, checkmark the acknowledgement and click on
the Launch Instances button. Like your first instance, this newly launched instance will take a few
minutes to boot and configure itself.
6. Once the second web server has passed its status checks, confirm the web server is operational by
browsing to its web site using its public DNS.
Immersion Day
Creating an Elastic Load Balancer
Copyright 2015, Amazon Web Services, All Rights Reserved Page 6
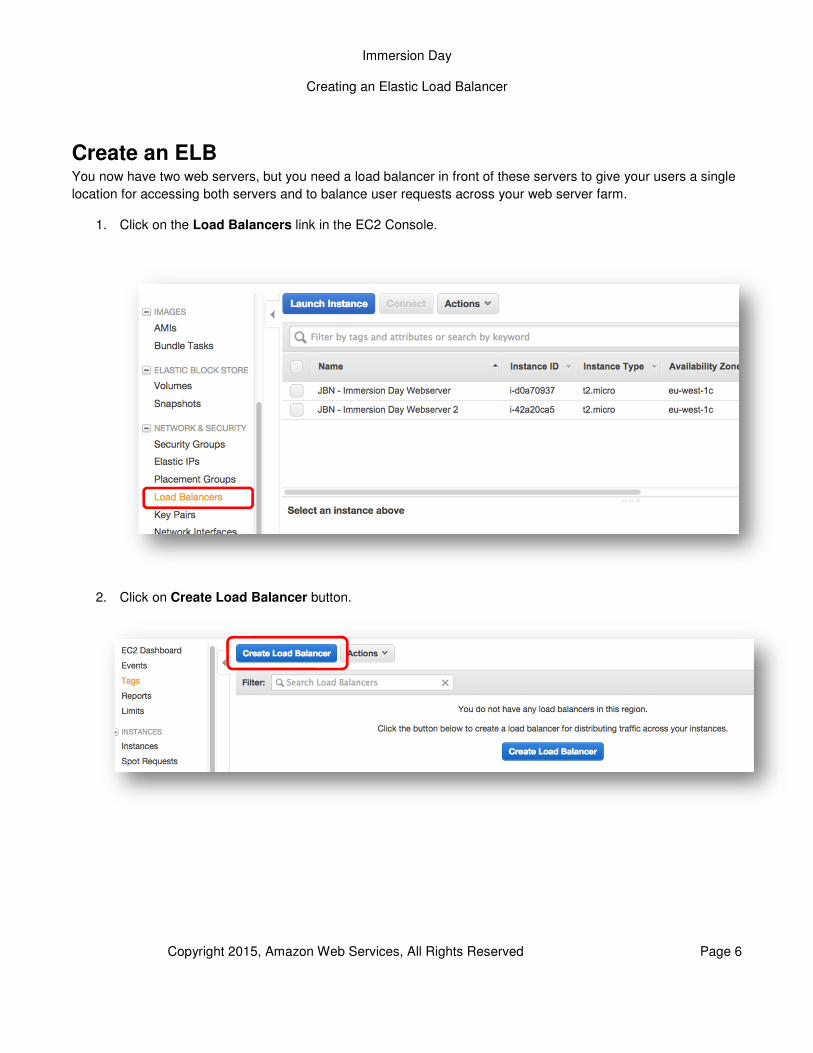
Create an ELB You now have two web servers, but you need a load balancer in front of these servers to give your users a single
location for accessing both servers and to balance user requests across your web server farm.
1. Click on the Load Balancers link in the EC2 Console.
2. Click on Create Load Balancer button.

Immersion Day
Creating an Elastic Load Balancer
Copyright 2015, Amazon Web Services, All Rights Reserved Page 7
3. We will just be creating a HTTP load balancer, so give your ELB a new name like [Your Initials]–
ImmersionDay-ELB, accept the default listener configuration, and click Continue.
4. On the next screen change Ping Path to / (delete index.html), Healthy Threshold to 2 and accept the
rest of the default options by clicking Continue.

Immersion Day
Creating an Elastic Load Balancer
Copyright 2015, Amazon Web Services, All Rights Reserved Page 8
5. On the next screen we’ll create a new security group for our ELB. Name your security group something
like [Your Initials] – Immersion Day ELB SG, and allow HTTP traffic to be passed to your instances by
creating a rule of type HTTP for port 80, then click Continue.

Immersion Day
Creating an Elastic Load Balancer
Copyright 2015, Amazon Web Services, All Rights Reserved Page 9
6. Select your Web Servers to add them to your ELB and click Continue.
7. Tag your ELB with a Key of Name and a Value of [Your Initials] – Immersion Day ELB and click
Continue.

Immersion Day
Creating an Elastic Load Balancer
Copyright 2015, Amazon Web Services, All Rights Reserved Page 10
8. Review your ELB settings and click Create (followed by Close).
9. AWS is now creating your ELB. It will take a couple of minutes to establish your load balancers, attach
your web servers, and pass a couple of health checks. Click on your load balancer, select the Instances
tab, and wait until the instances status changes from Out of Service to In Service. Also note that the
overall “Healthy?” column turns from No to Yes.

Immersion Day
Creating an Elastic Load Balancer
Copyright 2015, Amazon Web Services, All Rights Reserved Page 11
10. Once your ELB is healthy, click on the Description tab, select and copy the ELB’s DNS name.

Immersion Day
Creating an Elastic Load Balancer
Copyright 2015, Amazon Web Services, All Rights Reserved Page 12
11. Open the ELB URL in a new browser tab. Hit the browser refresh button and you should cycle through your
web servers (you may need to do a “Shift-F5” or “Shift-Refresh” as some browsers like Chrome are pretty
aggressive in locally caching web pages).

Immersion Day
Creating an Elastic Load Balancer
Copyright 2015, Amazon Web Services, All Rights Reserved Page 13
12. Congratulations, you’ve created a load balanced website.