impact contactrpt manual - ohio state university word... · manuals\impact_contactrpt_manual ......
TRANSCRIPT

UNIVERSITY DEVELOPMENT
Impact Contact Report
I m p a c t C o n t a c t _R p t U s e r M a n u a l
H:\ISAdmin\IMPACT Core Team\Release 4 Impact Contact Report\Training\Final
Manuals\Impact_ContactRpt_Manual.doc
Created August 2006
Last saved 10/26/2006 5:06 PM
UN IVERS I TY DEVELOPMENT
Impact Contact Report User Manual
2222
Table of Contents
WHAT IS IMPACT CONTACT REPORT..........................................3
CONTACT REPORT SUBMISSION GUIDELINES..........................3
IMPACT CONTACT REPORT TERMINOLOGY ..............................6
ACCESSING IMPACT CONTACT REPORT ...................................8
ADDING A NEW CONTACT ..........................................................10
ADDING A NEXT STEP WHEN FILING A CONTACT REPORT...19
EDITING AN EXISTING CONTACT REPORT...............................20
CONTACT REPORT SECURITY & DATA ACCESS RIGHTS ......24
APPENDIX A..................................................................................25
APPENDIX B..................................................................................26
APPENDIX C..................................................................................27
APPENDIX D..................................................................................28

3333
What is Impact Contact Report
mpact Contact Report is a web accessible tool for entering contact information into The Ohio State University’s Alumni/Development system. Accessible from within Impact, Impact Contact Report allows you to enter, view and edit information about the contacts
you make with your prospects. This replaces entirely the former online contact report tool.
Contact Report Submission Guidelines
The guidelines below were developed by the senior managers and AVP’s of University Development. Please direct any questions to the senior manager/AVP for your area.
Four primary reasons to enter contact reports: 1. To provide a historical record of a prospect’s
involvement/engagement. 2. To record information that helps assess a prospect’s capacity,
interests, and philanthropic motivations; or to record significant stewardship or cultivation activity that moves a prospect toward a gift, demonstrates impact of a past gift, or resolves complex donor issues.
3. To facilitate effective internal communication with colleagues by keeping them informed of our activities and contacts with prospects.
4. To quantify and qualify our work as Development Officers. What should be recorded through contact reports:
• Contacts made with a specific individual prospect in mind, such as:
o Face-to-face visits intended to deepen the university-prospect relationship by evaluating interests or capacity, strengthening personal connectivity, and advancing the prospect toward a gift.
o Sending of formal proposals related to ongoing gift discussions.
o Documentation of in-depth phone conversations or e-mail exchanges that result in discovery of new or clarified information about a prospect and her/his relationship with Ohio State or other philanthropic causes.
o Correspondence used to distribute targeted information to a unique prospect.
I

4444
What should not be recorded through contact reports:
• Contacts made or targeted at a “group” of people, such as: o Distribution of print or electronic newsletters o Distribution of holiday cards
• Routine contacts that are related to, or part of a series of contacts related to other events, occurrences, or activities, such as:
o Phone calls to schedule appointments o Batch distributions of gift acknowledgement letters o Routine “thank you” notes following personal visits
• Coincidental contact, such as a casual encounter at the store
• Automatically uploaded contact report summaries in electronic batch format
Use of contact reports for Events:
• Invitation lists do not need to be recorded through contact reports. However, a final attendance roster should be recorded by the office/unit hosting the event. These contacts should be recorded as “Event” contacts.
• If a Development Officer engages in significant dialogue with an individual prospect during an event, she/he may wish to record a separate report as a “Face-to-Face” contact to document that dialogue.
• Eventually, a new Events Module should be developed in IMPACT to facilitate recording of invitation and attendance lists.
Use of contact reports for Board and Council Meetings:
• A final attendance roster should be recorded by the office/unit hosting the advisory board or council meeting. These contacts should be recorded as “Event” contacts.
• If a Development Officer engages a board member in significant dialogue or activity around a board/council meeting, she/he may wish to record a separate report as a “Face-to-Face” contact to document that activity.
Use of contact reports to document meetings with Deans/Directors: If you coordinate contact of a prospect by a Dean/Director without your presence, include your name as a participant in the appointment when filing the contact report, but reflect the specifics of what happened and who was involved in the detail of your report. This will enable us to appropriately “link” all contacts orchestrated by a Development Officer back to the Development Officer.
Contact report etiquette:
• A contact report should be concise and contain relevant information about the Participants, Purpose, and Results.
5555
• If appropriate, the prospect strategy may be updated and next steps scheduled.
• If multiple development staff participate in a single contact, staff should discuss and coordinate filing of the report.
Confidentiality: Contact reports will often include information of a confidential and sensitive nature. Use discretion and common sense when entering information about sensitive subject matters such as family issues, illness, personality traits, substance abuse, or suspicious behavior. A good rule of thumb is to not include anything you would not want the prospect to see. Monthly Deadline:
To facilitate distribution of monthly activity reports to supervisors, all contact reports for one month should be filed electronically by the close of business on the 10
th day of the
following month. Continued use of Central Files Imaging System (CFIS) for archival purposes: Development Officers may continue to send relevant documents to ADIS for storage in Central Files. Examples of materials that we should consider storing include: gift proposals, stewardship reports, media articles, research, and even some routine correspondence and gift acknowledgement letters, such as those sent by the President and Vice President. With the exception of final attendance rosters for events and board/council meetings, all contact reports should be filed electronically. However, storing of these documents still has value for archival purposes.
6666
Hard copy submissions to ADIS
• Documents and Lists sent to ADIS clearly labeled as Event attendees will be entered as such in IMPACT contact reports. These documents should have the following information. If not all information is present the documents may be returned:
o IMPACT ID (If no IMPACT ID put “NO ID”)
o First and Last name
o Date of Event
o 90 Character Brief Description
o Person(s) making contact
• Documents and Lists not clearly labeled as Event attendees will be imaged without being entered in IMPACT contact reports. The following information is required:
o IMPACT ID for each name (If no IMPACT ID put “NO ID”)
o First and Last name
Impact Contact Report Terminology
CR Number This is a unique identifier for the contact that is generated by the system. This number is used as a link on various screens to take you to the contact detail information. If the persons being contacted include multiple constituents who each have a record in Impact, the contact will display on each record, but the contact number will be the same for each. If you make a change on the contact, the change is reflected for all of the persons contacted and all of the persons making contact. Primary ID When adding a new contact, this is the ID number of the record that you are on when you click the Add Contact button. This allows the system to pull the spouse record and/or employer record for the constituent if they have one so that you do not have to look up the spouse or employer ID if you want to include them as part of the contact. Once a contact is added, the Primary ID indicator no longer displays.
� Note
CR Number allows for entering a single contact that includes multiple people being contacted as well a multiple people making contact. You do not have to re-enter the data on each record.

7777
Contact Method How did the contact occur? Current contact method option categories are: Face to Face, Electronic, Letter, Event or Letter. Contact Reason Why did the contact occur? What was being accomplished? Current contact reason options categories are: Cold Call, Cultivation, Solicitation, Discovery and Stewardship.

8888
Accessing Impact Contact Report
Step 1: Locate the record In Impact search for the individual or organization record for which you want to file or view a contact report. Use the ID number or the name of the record you're trying to locate. Click the Search button (or press enter) to perform the search. When Impact successfully locates a record using the ID number, the default starting screen will display in the data frame. For an individual, this starting point is initially set to be the General Overview Screen. You can use the default options screen to choose a different screen to display first when reviewing an individual's record. (see "Customizing Impact VIEW," in the Impact VIEW manual for additional information and instructions.)
Step 2: Locate the Contact Report Data Select “Contact Overview” from the left menu frame.
� Note
The link to Contact Overview is found on the left menu frame in Impact
� Note
When searching for ID, leading zeros may be dropped. For example, typing 564863 will work as well as 00564863.
Use this link to view the full details of all contacts, one
at a time.
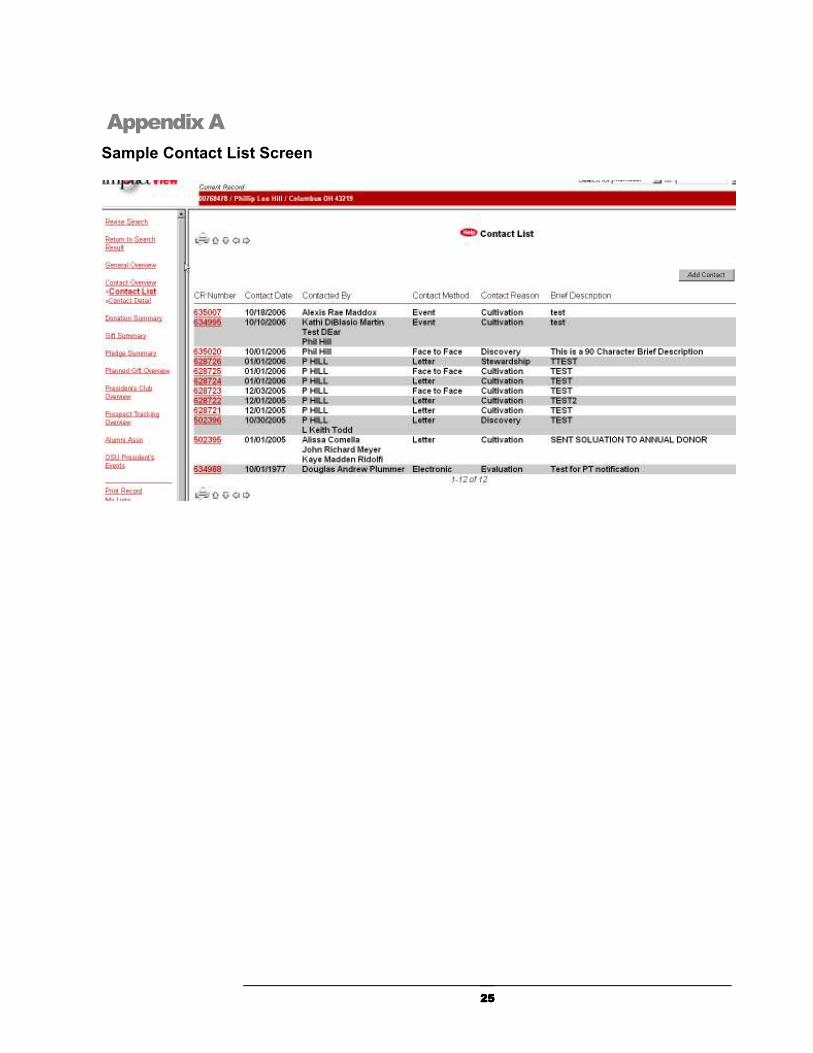
Use this link to view a list of all contact reports and see summary information about each one. See Appendix A for a sample Contact List
screen.
Use this link to view stats on all contacts filed and summary information about the newest and oldest contacts on this record.

9999
Step 3: View the Contact Overview Screen After selecting Contact Overview, the following data frame will appear.
The Contact Overview screen displays the Number of Contacts on Record, the Newest Contact Information, the Oldest Contact Information, a list of who has contacted the constituent and the number of times contacted by each individual. From this screen you can click on links (shown in red and underlined on the screen) to see more detail. The CR Number link will take you to the detail for that contact, the Number of Contacts on Record will take you the contact list, and the Number of Times contacted link next to a “Contacted By” name will take you to a contact list showing only those contacts. From the Contact Overview screen you can also add a new contact by clicking on the Add Contact button.
� Note
The number of Contacts on Record (listed near the top of the screen) can differ from the sum of the number of times contacted by individual people (listed in the lower part of the screen) if more than one person was involved in any of the contacts.

10101010
Adding a New Contact
1. Select the Add contact button.
This will take you to the Contact Edit screen.
� Note
An Add Contact button can also be found on the Contact List screen.
11111111
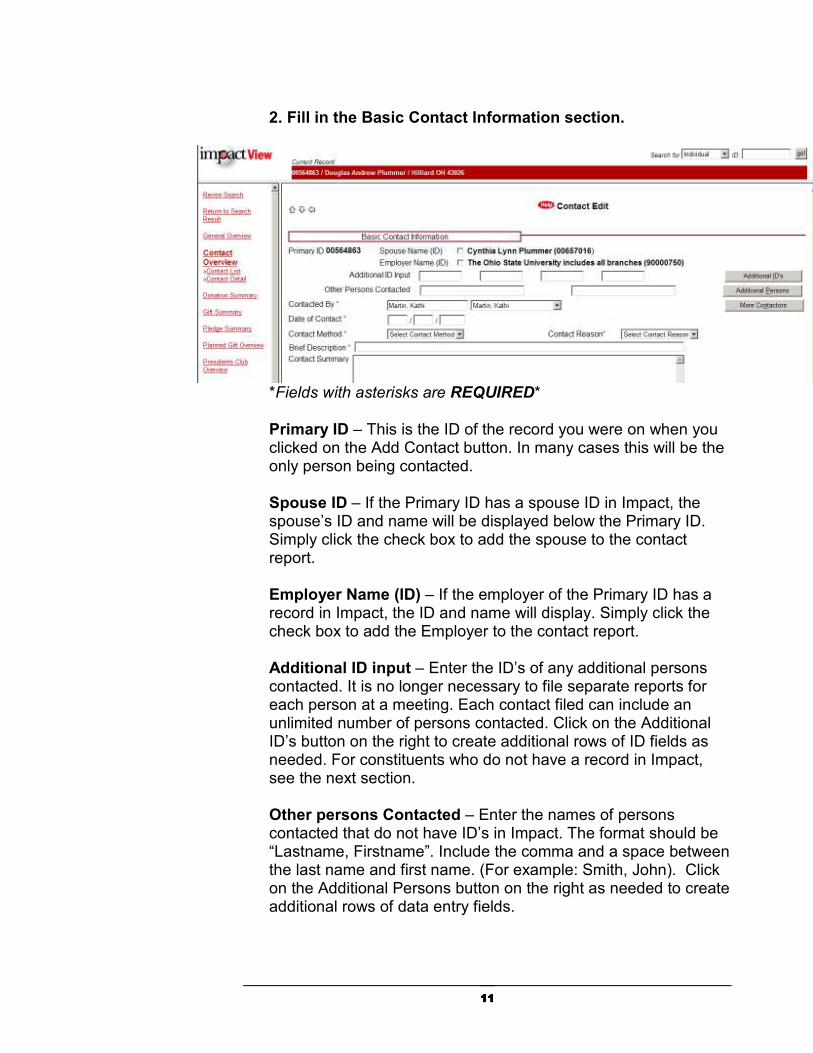
2. Fill in the Basic Contact Information section.
*Fields with asterisks are REQUIRED* Primary ID – This is the ID of the record you were on when you clicked on the Add Contact button. In many cases this will be the only person being contacted. Spouse ID – If the Primary ID has a spouse ID in Impact, the spouse’s ID and name will be displayed below the Primary ID. Simply click the check box to add the spouse to the contact report. Employer Name (ID) – If the employer of the Primary ID has a record in Impact, the ID and name will display. Simply click the check box to add the Employer to the contact report. Additional ID input – Enter the ID’s of any additional persons contacted. It is no longer necessary to file separate reports for each person at a meeting. Each contact filed can include an unlimited number of persons contacted. Click on the Additional ID’s button on the right to create additional rows of ID fields as needed. For constituents who do not have a record in Impact, see the next section. Other persons Contacted – Enter the names of persons contacted that do not have ID’s in Impact. The format should be “Lastname, Firstname”. Include the comma and a space between the last name and first name. (For example: Smith, John). Click on the Additional Persons button on the right as needed to create additional rows of data entry fields.
12121212
*Contacted By – Enter the person(s) making contact. You can enter the name using several different methods. In the first box you can use the type down function by starting to type the last name of the person you wish to enter. When the correct name appears simply tab to the next field. For example, entering “hil” will return Hill, Phil. Or you can click on the drop down menu to the right and scroll to the correct name. The drop down menu contains a list of Impact users. If the person is not listed (for example a volunteer) you can still enter the name by typing in Last Name, First Name. Use the More Contactors button on the right to create additional data entry fields. *Date of Contact – Enter the date the contact occurred. *Contact Method – Select from one of the following contact methods from the drop down menu.
Electronic – Use for personal (one-on-one) email correspondence.
• Event – Use when the constituent attended a function or a meeting with a group of volunteers.
• Letter – Use when sending personalized (one-on-one) correspondence.
• Face to Face – Use when a significant personal meeting takes place with the constituent.
• Telephone – Use for a significant phone conversation with a constituent.
*Contact Reason – Select from one of the following contact reasons from the drop down menu.
• Cultivation – Use this when the contact was to further the overall relationship with the constituent.
• Cold Call – Use this for an initial unsolicited contact.
• Evaluation – Use this when evaluating a constituent’s potential.
• Solicitation – Use this when directly addressing a specific ask.
• Stewardship – Use this when the primary purpose is to thank the constituent for past activities.
*Brief Description – Enter a summary of this contact (up to 90 characters). This is the description that will appear on the Contact List and Contact Overview screens as well as on reports.

13131313
Summary – Enter a detailed description of what occurred during this contact (up to 8,000 characters). Do NOT include requests for biographic data changes or Prospect Tracking additions or changes as this will not be reviewed. 3. Fill in the Additional contact information section.
Note: If you do not have Prospect Tracking rights, you will not see this Contact report section. Prospect Tracking Project – If this contact relates to an existing project, select the project here. All active projects for the primary ID will appear in the drop down menu. Place Where Contacted – Enter the place where the contact happened. (For example, Donor’s Home, Morton’s, Wexner Center, etc) Hard copy sent to Imaging – Check this box if a copy of the letter or other documentation is being sent to Central Files to be imaged.
14141414
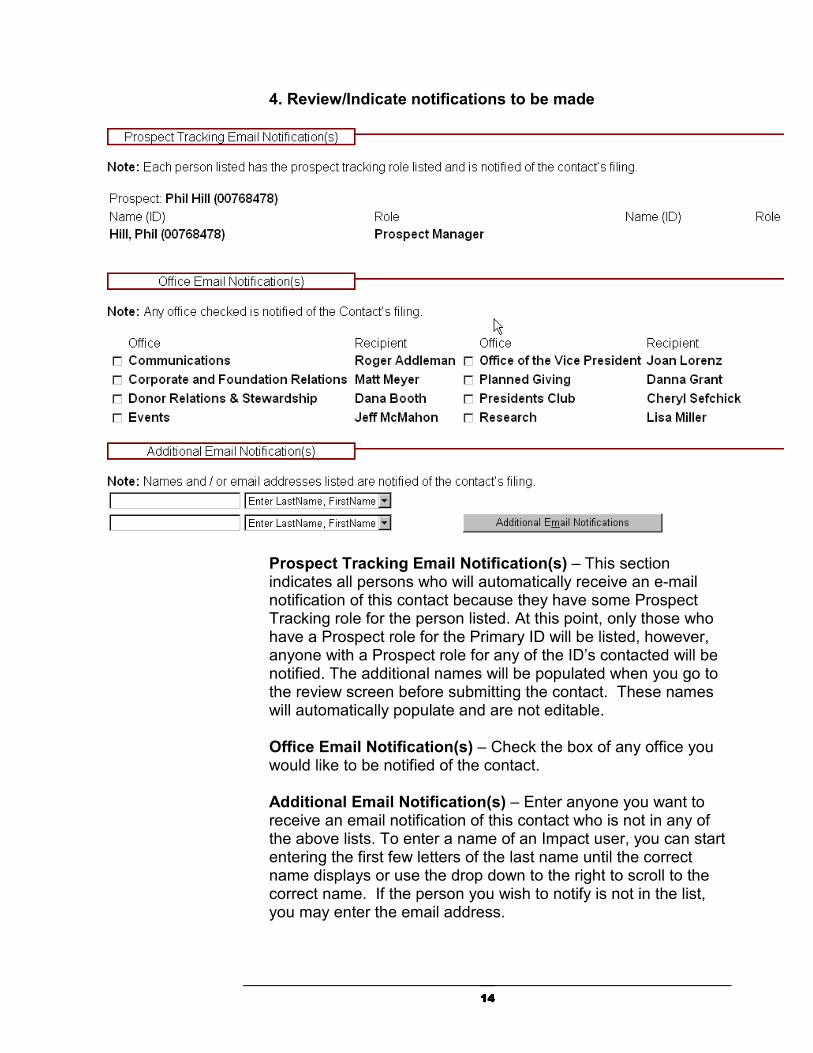
4. Review/Indicate notifications to be made
Prospect Tracking Email Notification(s) – This section indicates all persons who will automatically receive an e-mail notification of this contact because they have some Prospect Tracking role for the person listed. At this point, only those who have a Prospect role for the Primary ID will be listed, however, anyone with a Prospect role for any of the ID’s contacted will be notified. The additional names will be populated when you go to the review screen before submitting the contact. These names will automatically populate and are not editable. Office Email Notification(s) – Check the box of any office you would like to be notified of the contact. Additional Email Notification(s) – Enter anyone you want to receive an email notification of this contact who is not in any of the above lists. To enter a name of an Impact user, you can start entering the first few letters of the last name until the correct name displays or use the drop down to the right to scroll to the correct name. If the person you wish to notify is not in the list, you may enter the email address.

15151515
5. Indicate any paper copies of the contact that have been distributed.
Paper Copies – Record where you or your office have sent paper copies of this contact. DO NOT use this to request paper copies be sent, as this will not be done. Step 6: Click on the Review Contact Button. This will take you to the Contact Edit Review screen.

16161616
Contact Constituents – This section shows the name and home address of each ID entered for the contact. It also shows the name and home address linked to that ID for verification purposes. Deceased persons will have **DECEASED** above their name. Any person who did not have an ID will show up as **NO ID** and the name as entered on the previous screen. Contacted by – The name(s) of all persons making contact will display in this area Contact Information – The details about the contact will display here.
Prospect Tracking Email Notification(s) – This area will display the names of all persons being notified of this contact because of their Prospect Tracking role for the linked constituent. Note that on this screen you will see the Prospect Tracking notifications for each ID contacted.

17171717
Office Email Notification(s) – Has a check box for the offices selected to receive notification of this contact. Additional Email Notification(s) – shows the name or email address of any additional persons selected to receive a notification of this contact. Please see Appendix C for a sample email notification. Paper Copies – Shows the entry of all places paper copies sent. If any information is found to be incorrect or missing, click on the Back button to make corrections.
If all of the information is correct, click on the Commit Contact button. You should see the following screen with the message “Update Successful Contact Report - ######“ where ###### is the CR Number of the contact you have filed. CR number is a unique identifier for the contact that is generated by the system.
You are done filing your contact!
� Note
If you would like to be taken directly to the Impact Next Step screen when you commit the contact, you can click on the Commit Contact and Add Next Steps Button.
See “Adding a Next Step…” in the next section for more information.

18181818
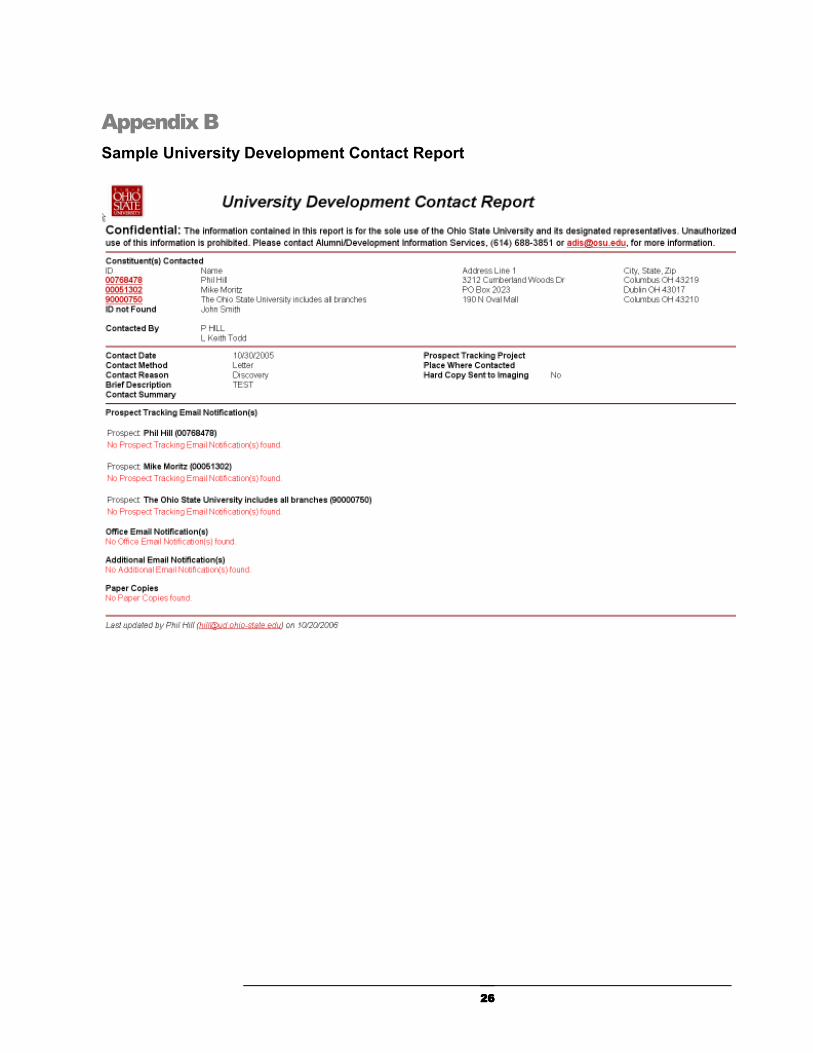
Print a paper copy To Print a paper copy of the contact report select the “Print UD contact Report” button at the bottom of the page. See Appendix B for an Example.
See the next page for a brief overview of adding next steps associated with a contact. For information on editing an existing contact, go to page 20. You can view the detail of a contact by clicking on the CR number link from the Contact List or Contact Overview screens. See Appendix A for a sample Contact List screen.

19191919
Adding a Next Step when filing a contact report
From the review screen, if you click on the Commit Contact and Add a Next Step button, you will be taken to directly to a Next Step Update screen. Next steps allow you assign tasks to yourself and others as reminders as well as to track your cultivation and/or solicitation progress. When you click on the Commit Contact and Add a Next Step button, you will be taken to the Next Step Update screen. You will also see a note indicating that the Contact Report was successfully added. Note: You must have the appropriate Prospect Tracking rights to enter a next step.
Fill in the required data. When complete, click on the Submit/Done button to save the Next Step and go to the Contact Overview screen. If you have additional Next Steps to add, click on the Submit/More button to take you to a new Next Step Update screen to enter another Next Step. The Reset button will clear all of the information you have entered in any field on the Next Step Update screen. If you are done adding Next Steps and would like to add another contact, click on the Submit/Add Contact button to be taken to a blank Contact Edit screen where you can enter a new contact.
20202020
Editing an existing Contact Report
A contact can be edited by the person filing the contact, by any person who is listed under “Contacted by” for that contact, or by a person with biographic data entry rights (ADIS staff). A contact can also be edited by anyone who has been given “inherited” rights as a Designee/Assistant of any person who is listed under “Contacted by.”
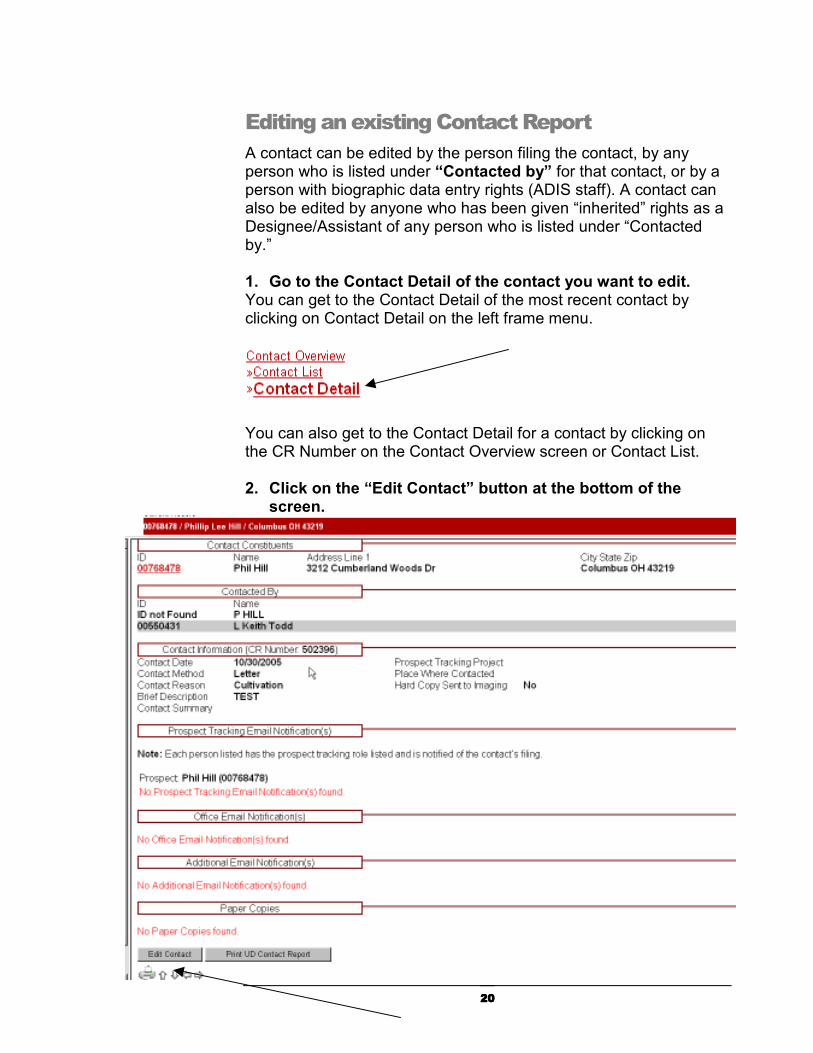
1. Go to the Contact Detail of the contact you want to edit. You can get to the Contact Detail of the most recent contact by clicking on Contact Detail on the left frame menu.
You can also get to the Contact Detail for a contact by clicking on the CR Number on the Contact Overview screen or Contact List. 2. Click on the “Edit Contact” button at the bottom of the
screen.

21212121
3. Make edits to the appropriate information. You can add, delete or change most information on this screen. You cannot change or add email notification information. If you need to notify anyone of changes to the contact or want to notify additional people, you will need to do that manually. When you edit a contact, remember that the changes will appear on every record for which this contact was filed.

22222222
4. Click on the review contact button at the bottom of the page
5. Review the contact information
� Note
Clicking on the reset button from this screen will restore the data to what it was before you clicked on Edit Contact.

23232323
6. Commit the contact.
This will take you to the contact Detail screen where you will see the message “Update Successful Contact Report – ######” where ###### is the CR Number of the contact you have filed.
You are done editing your contact and your changes have been saved!

24242424
Contact Report Security & Data Access Rights
A contact can be edited by any person who is listed under “Contacted by” for that contact, by the person filing the contact, or by a person with biographic data entry rights (ADIS staff). Keep in mind that any change made to a contact will be reflected on all records associated with that contact. In other words, if the contact lists multiple ID’s contacted, you edit the contact only once and the changes will be reflected on all of the ID’s listed for that CR number. A contact can only be deleted by a person with biographic data entry rights. If you need to have a contact deleted, email [email protected] and refer to the CR number in your request. Keep in mind that requesting a contact deletion means that the contact will no longer display on any record for which that contact was filed. If you just need to remove the contact from a particular ID number or remove a particular contactor from the contact, you can do that by editing the contact. Assistant/Designee Security Rights An assistant or designee may be assigned rights to perform data entry as if that individual was you. To have such an arrangement put into place, please email [email protected] For example: “Please make (Insert Designee Name) the assistant on my account for IMPACT PT". Be sure to indicate your name or include your email signature. It will take approximately 3 business days to complete your request. Once this security arrangement is completed, your assistant will be able to act as if they were you on all records. The sole exception to that is for general comments where ownership rights continue to sit with the individual who did the data entry.
25252525
Appendix A
Sample Contact List Screen
26262626
Appendix B
Sample University Development Contact Report

27272727
Appendix C
Sample Email notification
From: UD Contact Reports
Sent: 08/14/2006
To: Douglas Andrew Plummer
Subject: Online Contact Reports for 08/13/2006
Below is a list of contact reports that were filed in the last 24 hours.
To go to the "University Development Contact Report" screen, click on the CR # link.
If you have questions about the content of a report, please contact the person or persons who
made the contact. If you have questions about accessing the report on the Web, please contact
Alumni/Development Information Services, (614) 688-3851 or [email protected]
state.edu, for more information.
Confidential:
The information contained in this email is for the sole use of the Ohio State University and its
designated representatives. Unauthorized use of this information is prohibited.
The CR Number in the email is a link to a printer friendly University Development Contact Report screen that shows the details of the contact (Appendix B). Any recipient who has a university name.n account can view this report. Recipients outside the university will not have a link. From report screen, anyone with the appropriate Impact security rights can click on the ID number link to go to the Contact Detail screen in Impact.

28282828
Appendix D
IMPACT Q&R Contact Report
The instructions below will show you how to use IMPACT Q&R to set up a Query and run a year-to-date Contact Report list for your contacts. Log in to IMPACT Q&R and choose Run Query and Report.
At the Q&R screen under Query choose Create New to set up a query that will pull your contact reports.
29292929
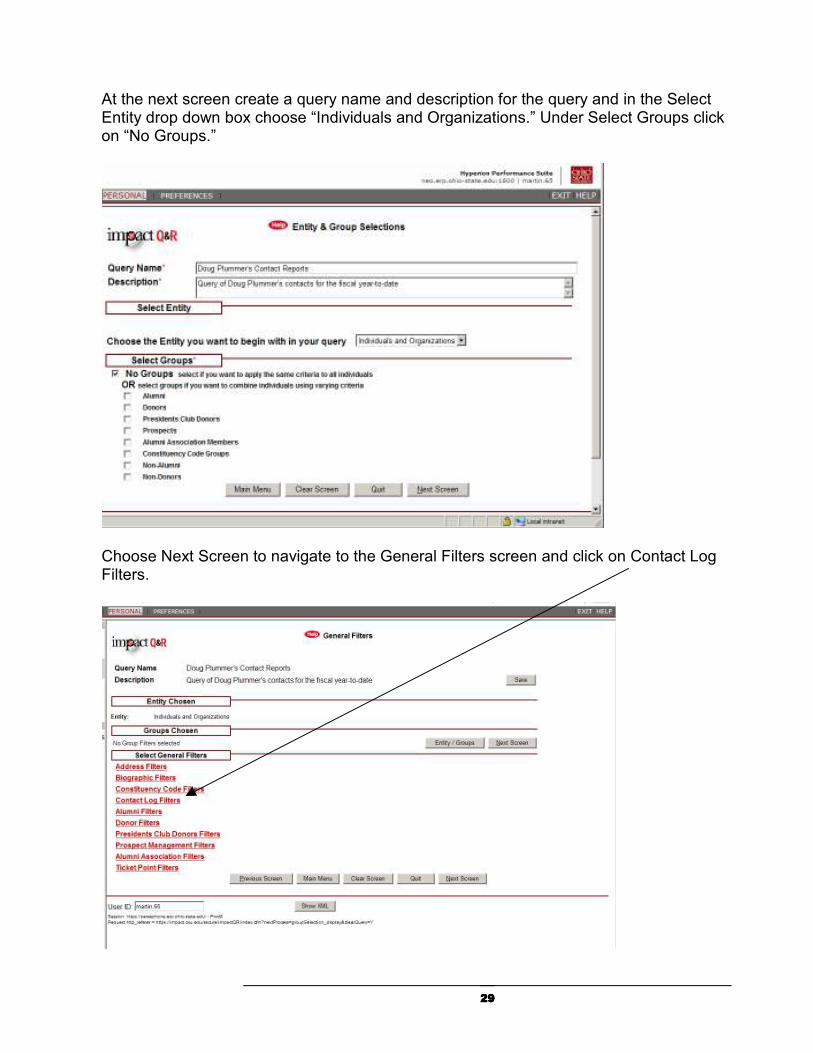
At the next screen create a query name and description for the query and in the Select Entity drop down box choose “Individuals and Organizations.” Under Select Groups click on “No Groups.”
Choose Next Screen to navigate to the General Filters screen and click on Contact Log Filters.
30303030
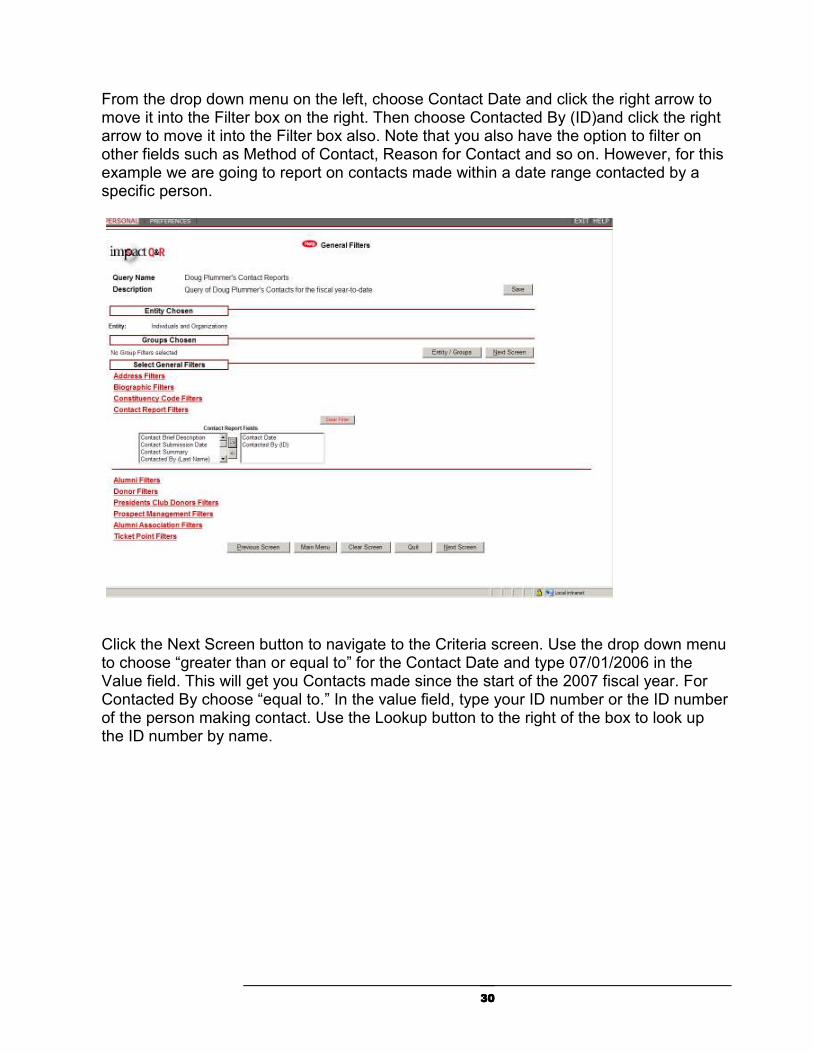
From the drop down menu on the left, choose Contact Date and click the right arrow to move it into the Filter box on the right. Then choose Contacted By (ID)and click the right arrow to move it into the Filter box also. Note that you also have the option to filter on other fields such as Method of Contact, Reason for Contact and so on. However, for this example we are going to report on contacts made within a date range contacted by a specific person.
Click the Next Screen button to navigate to the Criteria screen. Use the drop down menu to choose “greater than or equal to” for the Contact Date and type 07/01/2006 in the Value field. This will get you Contacts made since the start of the 2007 fiscal year. For Contacted By choose “equal to.” In the value field, type your ID number or the ID number of the person making contact. Use the Lookup button to the right of the box to look up the ID number by name.

31313131
Click on the Next Screen button to navigate to the Excludes screen. On this screen, the Deceased, No Contact from OSU and Invalid Addresses boxes will be checked as the default. However, for a Contact Log Report you will likely want to uncheck those boxes so that you get all contacts made within the time frame by the person making contact.

32323232
Click on the Next Screen button to go to the Query Review screen. Check to make sure you chose the correct date range and correct Contacted By ID. Then click on the Save button. You may change the query name or description if you wish and then click the Save button to save the query.
This will return you to the Query Review screen and the words “Query Successfully Saved.” will appear in red.
33333333
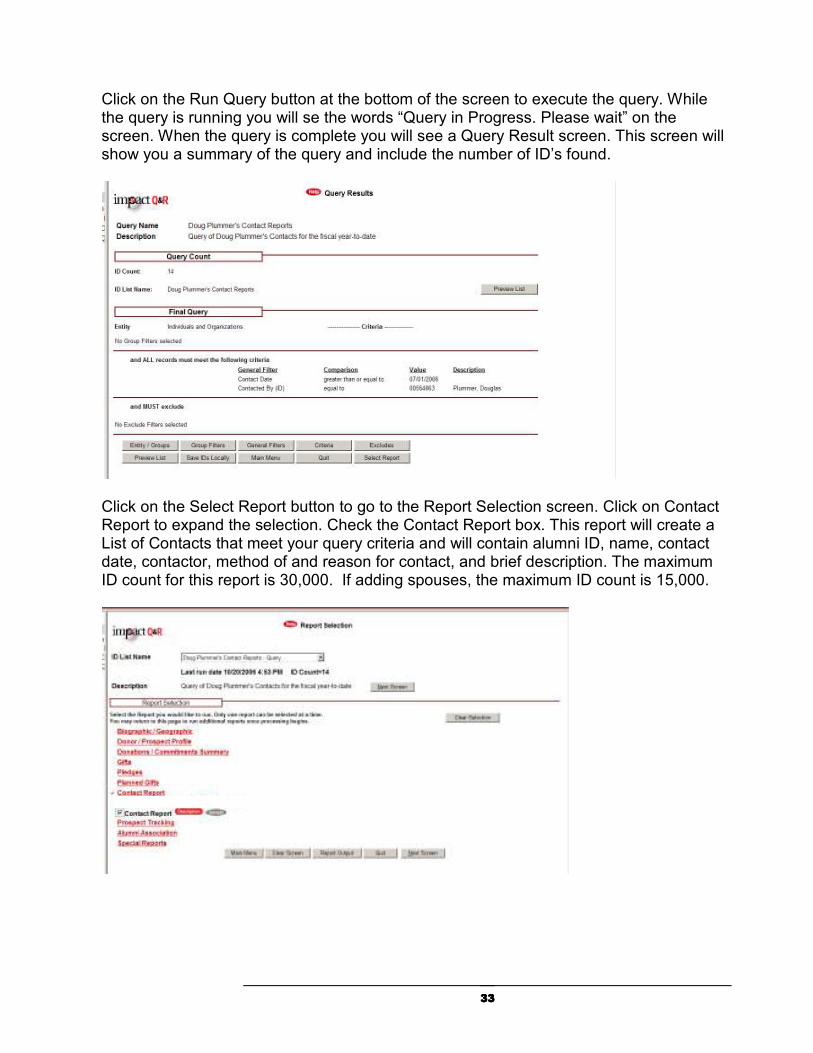
Click on the Run Query button at the bottom of the screen to execute the query. While the query is running you will se the words “Query in Progress. Please wait” on the screen. When the query is complete you will see a Query Result screen. This screen will show you a summary of the query and include the number of ID’s found.
Click on the Select Report button to go to the Report Selection screen. Click on Contact Report to expand the selection. Check the Contact Report box. This report will create a List of Contacts that meet your query criteria and will contain alumni ID, name, contact date, contactor, method of and reason for contact, and brief description. The maximum ID count for this report is 30,000. If adding spouses, the maximum ID count is 15,000.

34343434
Click on the Next Screen button to navigate to the Report Parameters screen.
Fill in the required fields (marked by an asterisk). You can choose to break and/or sort the report on Name, Contact Date, Contact Method or Contact Reason if you wish. If you choose the option to show all contact entries for the ID’s in the list you will get all contacts for all prospects that met your query criteria, and not just your contacts. Choose Run Report. The following confirmation box will appear. You may close this box by click on the “X” in the top right corner. Do not click on the Cancel Job button unless you want to stop running the report.

35353535
Click on the Report Output button or navigate to the Report Output folder to view the report.
The report will be named WR163CR01 – Contact Report.
Click on the htm or pdf icon to view the report. See a sample page of the report on the next page.

36363636
Sample page of IMPACT Q&R CR01 Report