implant scanning step-by-step - · pdf fileimplant scanning with trios trios implants implant...
TRANSCRIPT

Implant Scanning Step-by-Step

Implant Scanning with TRIOSTRIOS Implants
Implant Scanning Step-by-Step
Scanning an Implant Case can be done in multiple ways:
1. Implant Case incl Emergence Profile scan (Slide 9 to 20)2. Standard Implant Case without Emergence Profile (Slide 21 to 26)3. Implant Case incl Pre-Preparation scan (Slide 27 to 32)4. Implant Case incl Pre-Preparation and Emergence Profile scans (Slide 33 to 39)
For all four scenarios, selecting the right items on the order page is key. The first slides from 3 to 8 will help you to select everything for the right order.
Please read the document “Implants with TRIOS® - Quick Guide 2014”before scanning your first implant case.
The Scenarios in this guide are created on Dental Demo Model manufactured by Frasaco.

Create a patient with a new sessionTRIOS Implants
Implant Scanning Step-by-Step
1. Click “Add patient” 2. Fill out patient info3. Select “New session” to create a new case

Choose LabTRIOS Implants
Implant Scanning Step-by-Step
1. Click ”Change lab” to choose a lab from your list of laboratories
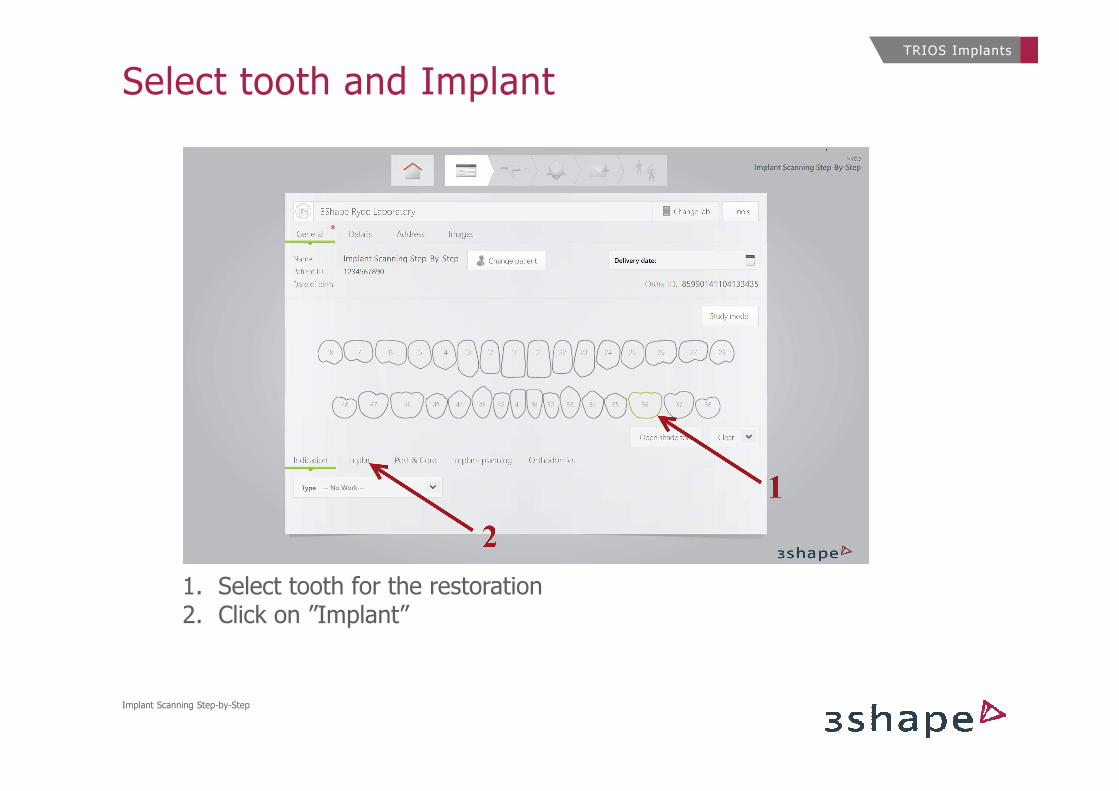
Select tooth and ImplantTRIOS Implants
Implant Scanning Step-by-Step
1. Select tooth for the restoration2. Click on ”Implant”
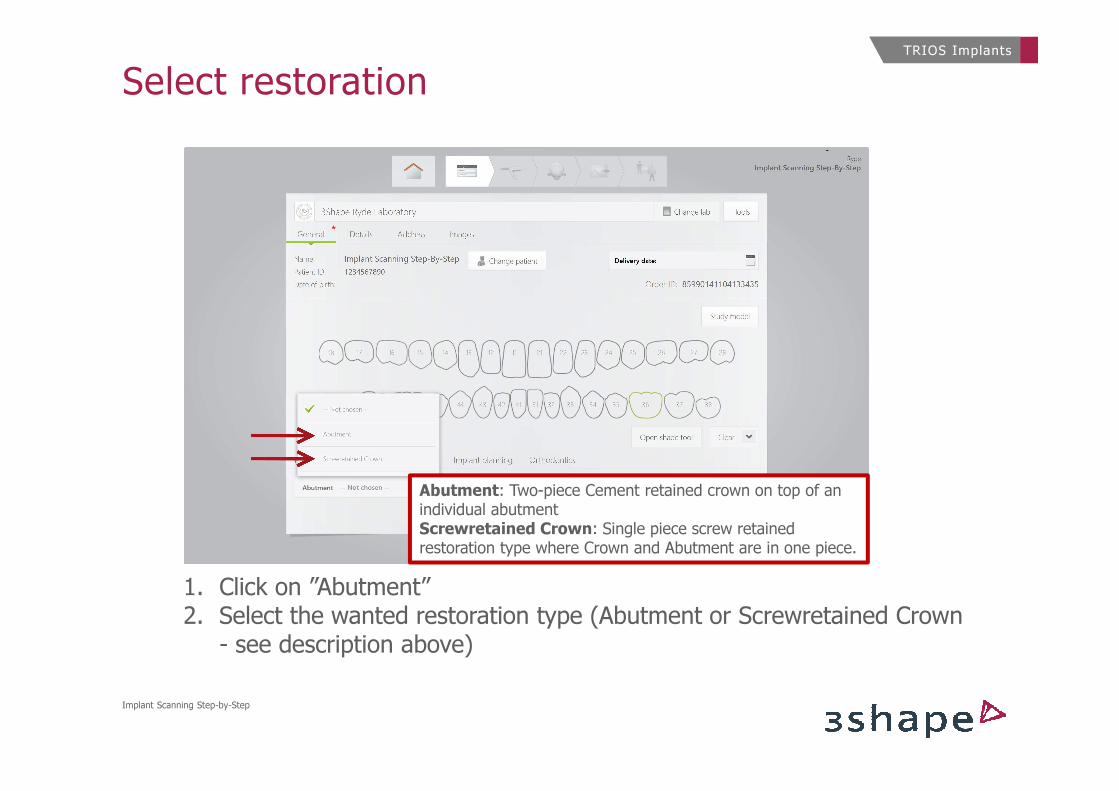
Select restorationTRIOS Implants
Implant Scanning Step-by-Step
1. Click on ”Abutment”2. Select the wanted restoration type (Abutment or Screwretained Crown - see description above)
Abutment: Two-piece Cement retained crown on top of an individual abutmentScrewretained Crown: Single piece screw retained restoration type where Crown and Abutment are in one piece.

Select manufacturerTRIOS Implants
Implant Scanning Step-by-Step
1. Select your ”Manufacturer” of choice2. Use scroll to see options
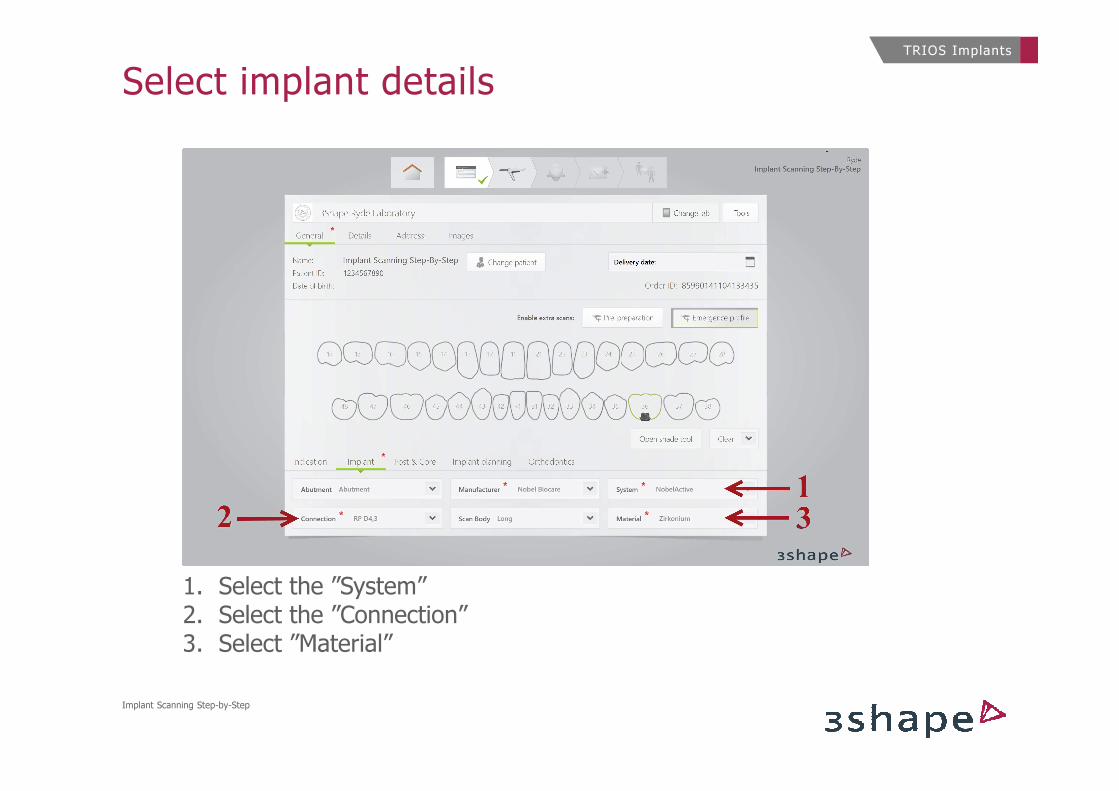
Select implant detailsTRIOS Implants
Implant Scanning Step-by-Step
1. Select the ”System”2. Select the ”Connection”3. Select ”Material”

Scenario 1:
Implant Case incl Emergence Profile scan
TRIOS Implants
Implant Scanning Step-by-Step
Scenario 1: Implant Case with Emergence Profile Scan
When using the surrounding soft tissue (gingiva) for optimized fit and esthetic qualities of the customized abutment and final restoration[1]
[1] “The creation of a proper contoured restoration with a natural emergence profile and gingival architecture that harmonizes with the adjacent teeth is very important for aesthetic
and functional implant therapy” Wöhrle PS. Nobel perfect esthetic scalloped implant: rationale for a new design. Clin Implant Dent Relat Res. 2003;5(Suppl 1):64–73. [PubMed]

Enable emergence profile scanTRIOS Implants
Implant Scanning Step-by-Step
Scenario 1: Implant Case with Emergence Profile Scan
1. Click the ”Emergence Profile” button2. Go to ”Scan Page”

Emergence profile scan enabled TRIOS Implants
Implant Scanning Step-by-Step
Scenario 1: Implant Case with Emergence Profile Scan
This selcection will activate an extra scan-field:

Scan emergence profileTRIOS Implants
Implant Scanning Step-by-Step
Scenario 1: Implant Case with Emergence Profile Scan
1. Scan emergence profile immidiately after removal of healing cap/abutment 2. Stop scanning as soon as the emergence profile is covered3. Mark the tooth as close to the screwhole as possible!

Lock surface - optionalTRIOS Implants
Implant Scanning Step-by-Step
Scenario 1: Implant Case with Emergence Profile Scan
1. Open ”Tools”2. Select ”Lock Surface”

Benefits of locked surfaceTRIOS Implants
Implant Scanning Step-by-Step
Scenario 1: Implant Case with Emergence Profile Scan
By locking the Emergence Profile, additional scanning after collaps of Emergence Profile will not impact the final 3D structure
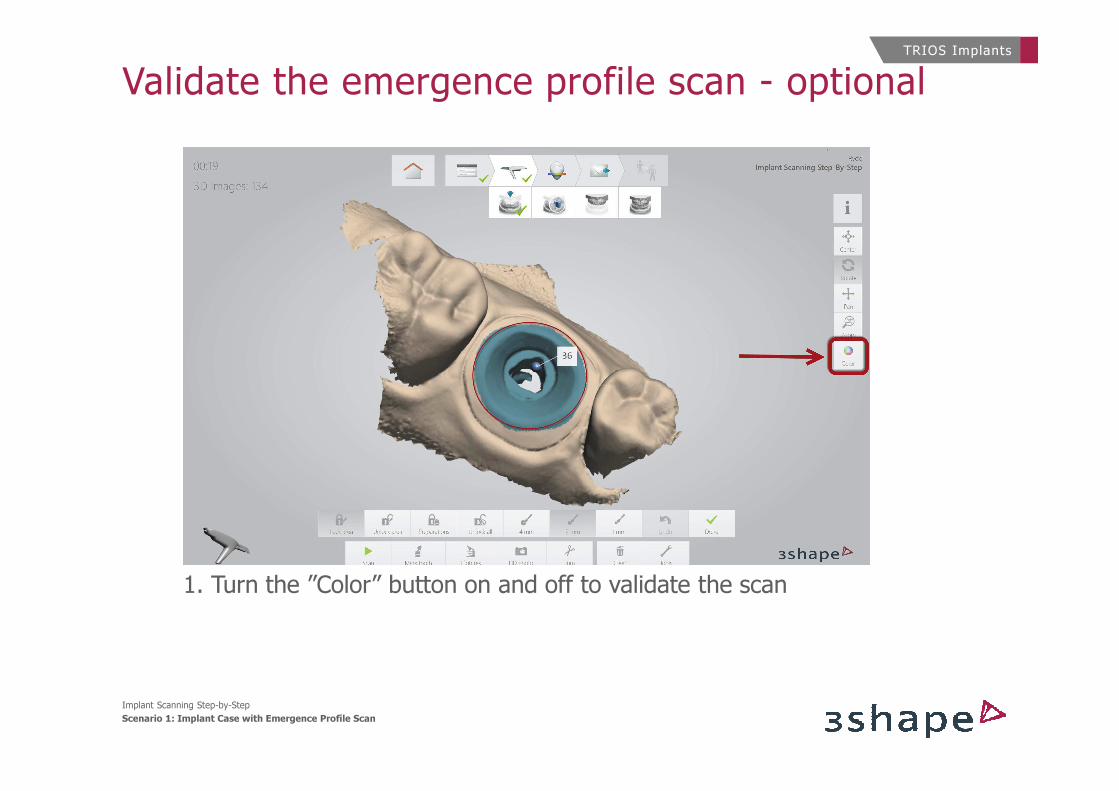
Validate the emergence profile scan - optionalTRIOS Implants
Implant Scanning Step-by-Step
Scenario 1: Implant Case with Emergence Profile Scan
1. Turn the ”Color” button on and off to validate the scan
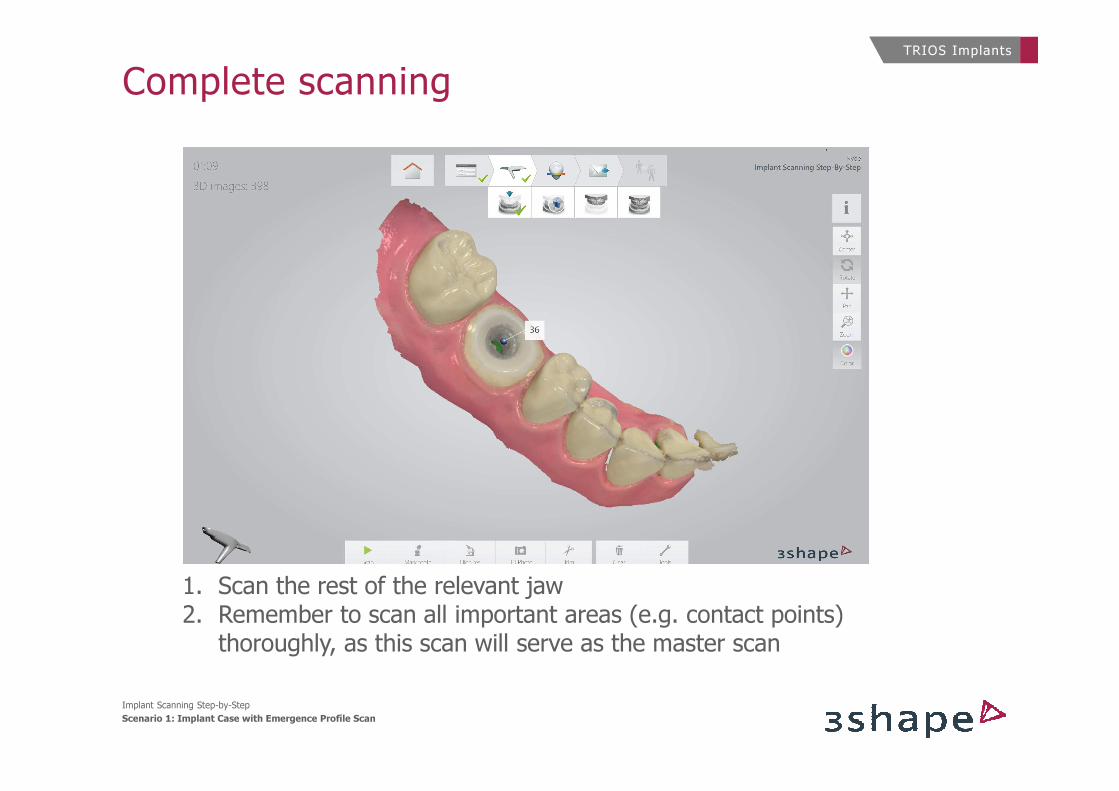
Complete scanningTRIOS Implants
Implant Scanning Step-by-Step
Scenario 1: Implant Case with Emergence Profile Scan
1. Scan the rest of the relevant jaw2. Remember to scan all important areas (e.g. contact points) thoroughly, as this scan will serve as the master scan

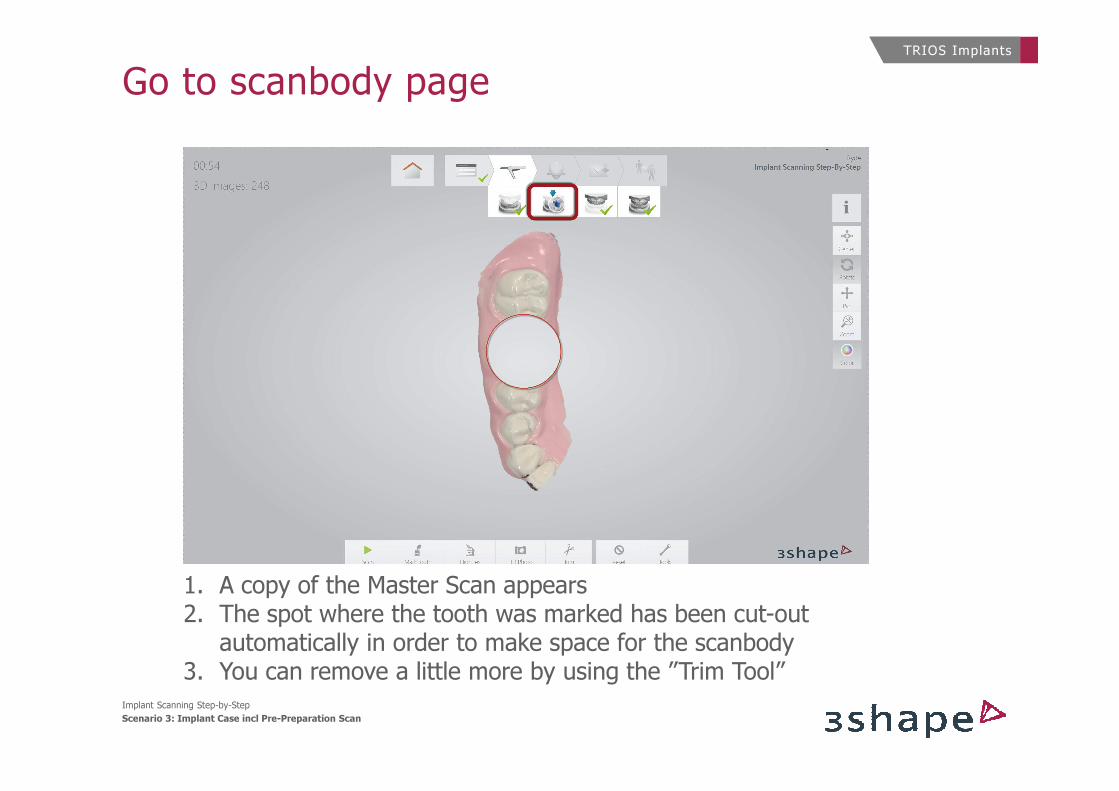
Go to scanbody pageTRIOS Implants
Implant Scanning Step-by-Step
Scenario 1: Implant Case with Emergence Profile Scan
1. A copy of the Master Scan appears2. The spot where the tooth was marked has been cut-out automatically in order to make space for the scanbody
3. You can remove a little more by using the ”Trim Tool”

ScanbodiesTRIOS Implants
Implant Scanning Step-by-Step
Scenario 1: Implant Case with Emergence Profile Scan
• Scanbodies have many different designs • Please position the scanbody with the flat side easily visible• Scan the top of the scanbody thoroughly - see marked areas below• An incomplete scan of the scanbody, may result in a bad restoration!

Insert the Scanbody and scan it according to the instructions on slide 18
Insert scanbodyTRIOS Implants
Implant Scanning Step-by-Step
Scenario 1: Implant Case with Emergence Profile Scan

Finalize scansTRIOS Implants
Implant Scanning Step-by-Step
Scenario 1: Implant Case with Emergence Profile Scan
1. Scan ”Antagonist” 2. Scan ”Bite” for occlussion
End of Scan Scenario 1

Scenario 2:
Standard Implant Case without Emergence profile
TRIOS Implants
Implant Scanning Step-by-Step
Scenario 2: Standard Implant Case
When Emergence profile is not required for esthetics and design

Disable extra scansTRIOS Implants
Implant Scanning Step-by-Step
Scenario 2: Standard Implant Case
1. Leave both boxes unmarked2. Go to ”Scan Page”
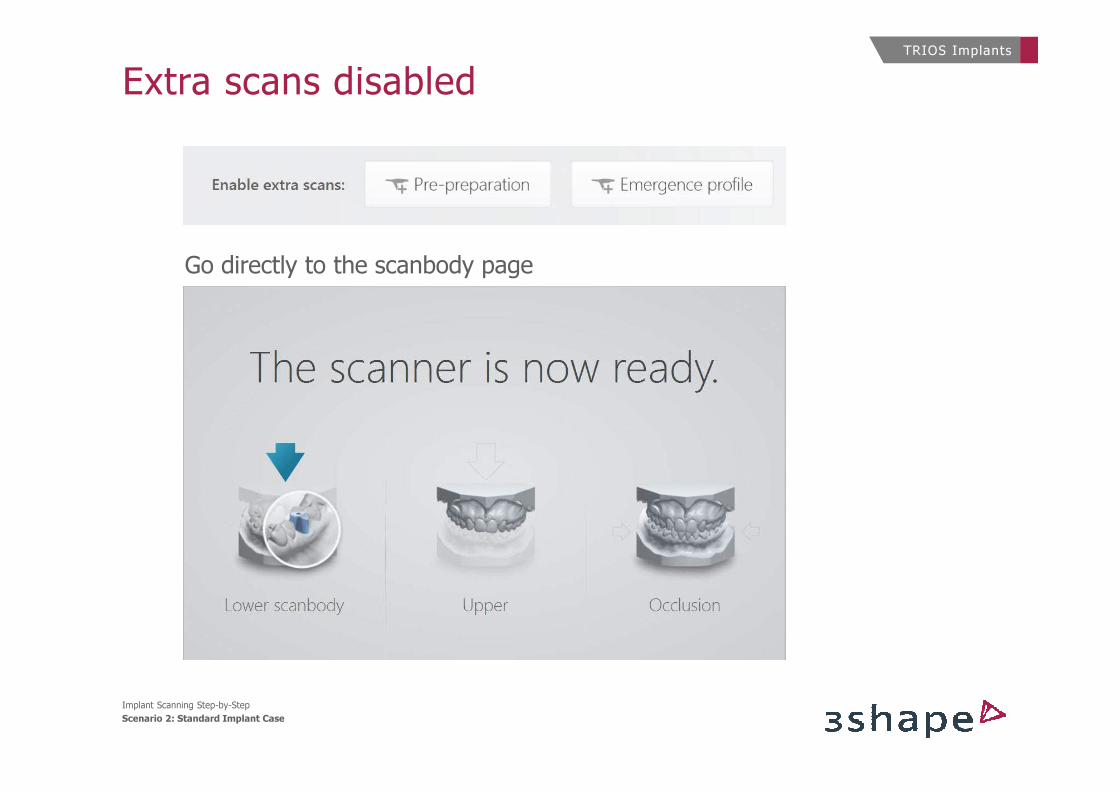
Extra scans disabled TRIOS Implants
Implant Scanning Step-by-Step
Scenario 2: Standard Implant Case
Go directly to the scanbody page

Insert scanbodyTRIOS Implants
Implant Scanning Step-by-Step
Scenario 2: Standard Implant Case
Insert the Scanbody and scan it according to the instructions on slide 18

Mark the toothTRIOS Implants
Implant Scanning Step-by-Step
Scenario 2: Standard Implant Case
1. Mark the tooth by selecting the center on the top of the scanbody

1. Scan ”Antagonist” 2. Scan ”Bite” for occlussion
Finalize scansTRIOS Implants
Implant Scanning Step-by-Step
Scenario 2: Standard Implant Case
End of Scan Scenario 2

Scenario 3:
Implant Case incl Pre-Preparation Scan
TRIOS Implants
Implant Scanning Step-by-Step
Scenario 3: Implant Case incl Pre-Preparation Scan
When the morphology of the damaged tooth (prior to extraction), or the temporary can be used for designing the final restoration

Enable Pre-preparation scanTRIOS Implants
Implant Scanning Step-by-Step
Scenario 3: Implant Case incl Pre-Preparation Scan
1. Click the ”Pre-preparation” button2. Go to ”Scan Page”
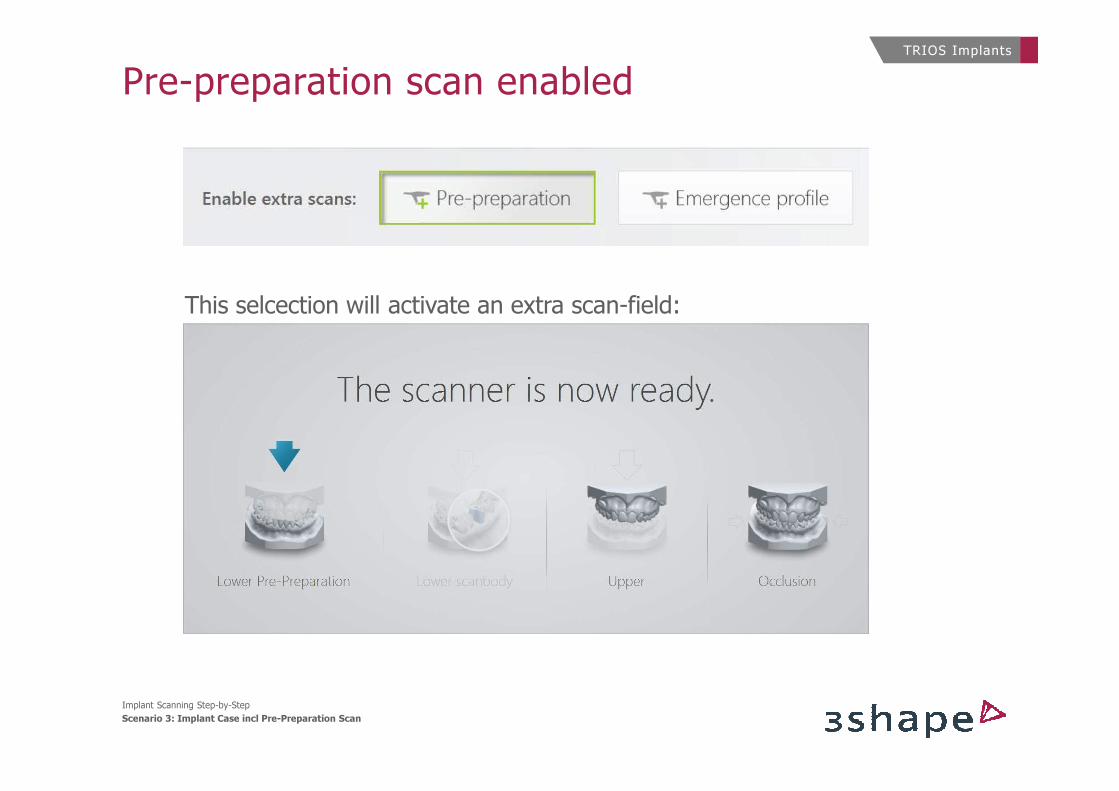
Pre-preparation scan enabledTRIOS Implants
Implant Scanning Step-by-Step
Scenario 3: Implant Case incl Pre-Preparation Scan
This selcection will activate an extra scan-field:

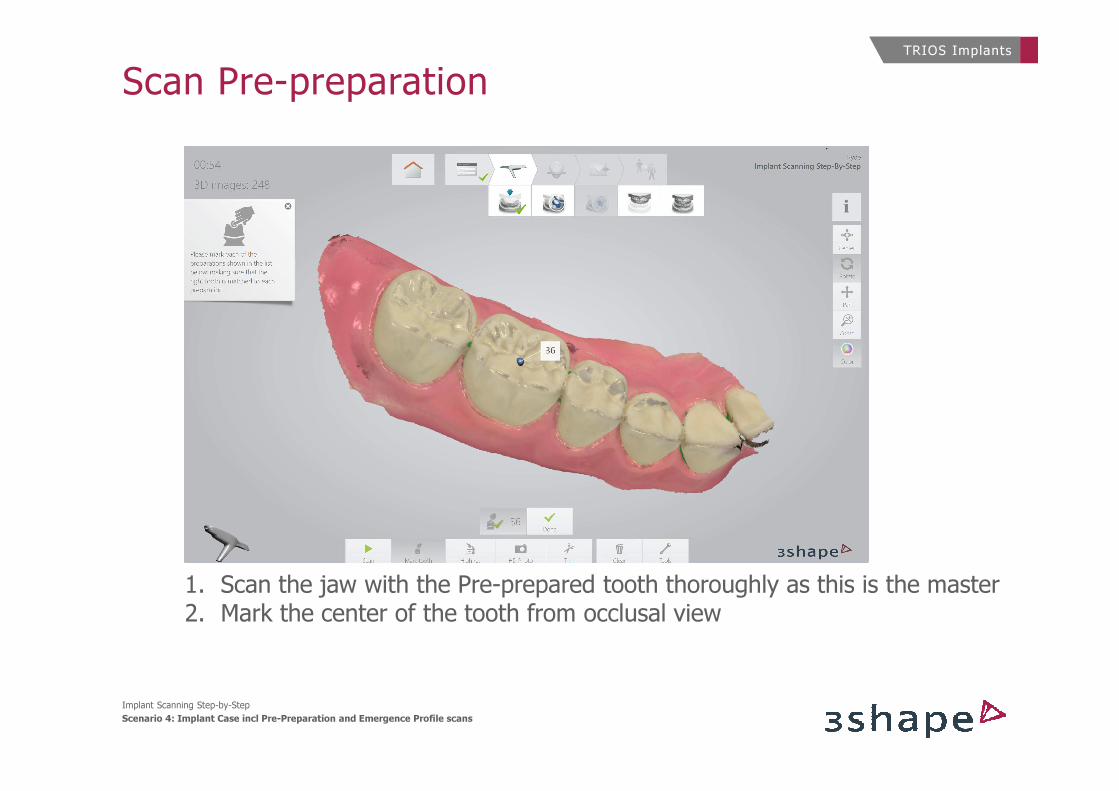
Scan Pre-preparationTRIOS Implants
Implant Scanning Step-by-Step
Scenario 3: Implant Case incl Pre-Preparation Scan
1. Scan the jaw with the Pre-prepared tooth thoroughly as this is the master2. Mark the center of the tooth from occlusal view
Go to scanbody pageTRIOS Implants
Implant Scanning Step-by-Step
Scenario 3: Implant Case incl Pre-Preparation Scan
1. A copy of the Master Scan appears2. The spot where the tooth was marked has been cut-out automatically in order to make space for the scanbody
3. You can remove a little more by using the ”Trim Tool”
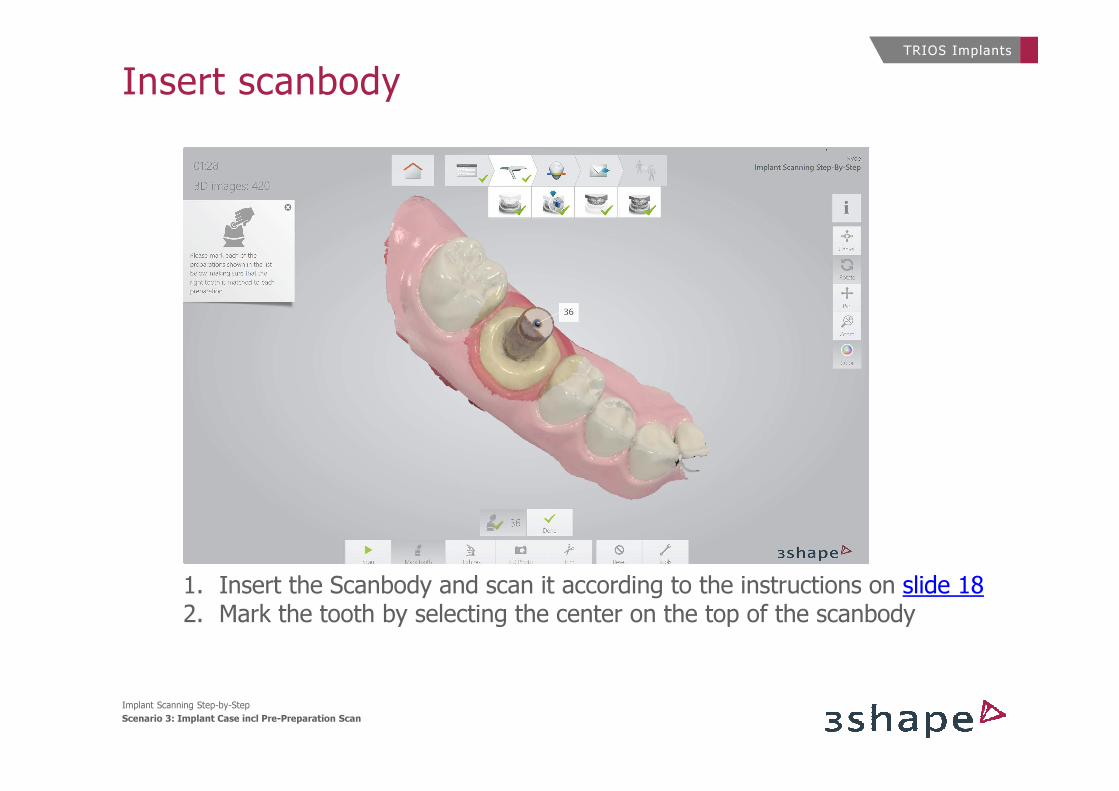
Insert scanbodyTRIOS Implants
Implant Scanning Step-by-Step
Scenario 3: Implant Case incl Pre-Preparation Scan
1. Insert the Scanbody and scan it according to the instructions on slide 182. Mark the tooth by selecting the center on the top of the scanbody

Finalize scansTRIOS Implants
Implant Scanning Step-by-Step
Scenario 3: Implant Case incl Pre-Preparation Scan
1. Scan ”Antagonist” 2. Scan ”Bite” for occlussion
End of Scan Scenario 3

TRIOS Implants
Implant Scanning Step-by-Step
Scenario 4: Implant Case incl Pre-Preparation and Emergence Profile scans
Scenario 4:
Implant Case incl Pre-Preparation and Emergence Profile ScansWhen using the surrounding soft tissue (gingiva) for optimized fit and esthetic qualities of the customized abutment and final restoration AND the morphology of the damaged tooth (prior to extraction), or the temporary can be used for designing the final restoration

Enable Pre-preparation + Emergence profile scansTRIOS Implants
Implant Scanning Step-by-Step
Scenario 4: Implant Case incl Pre-Preparation and Emergence Profile scans
1. Click the ”Pre-preparation” and the ”Emergence profile” buttons2. Go to ”Scan Page”

Pre-preparation and Emergence Profile scans enabled
TRIOS Implants
Implant Scanning Step-by-Step
Scenario 4: Implant Case incl Pre-Preparation and Emergence Profile scans
This selcection will activate two extra scan-fields:
Scan Pre-preparationTRIOS Implants
Implant Scanning Step-by-Step
Scenario 4: Implant Case incl Pre-Preparation and Emergence Profile scans
1. Scan the jaw with the Pre-prepared tooth thoroughly as this is the master2. Mark the center of the tooth from occlusal view

Go to Lower scan pageTRIOS Implants
Implant Scanning Step-by-Step
Scenario 4: Implant Case incl Pre-Preparation and Emergence Profile scans
1. A copy of the Master Scan appears2. The spot where the tooth was marked has been cut-out automatically in order to make space for the Emergence profile
3. You can remove a little more by using the ”Trim Tool”
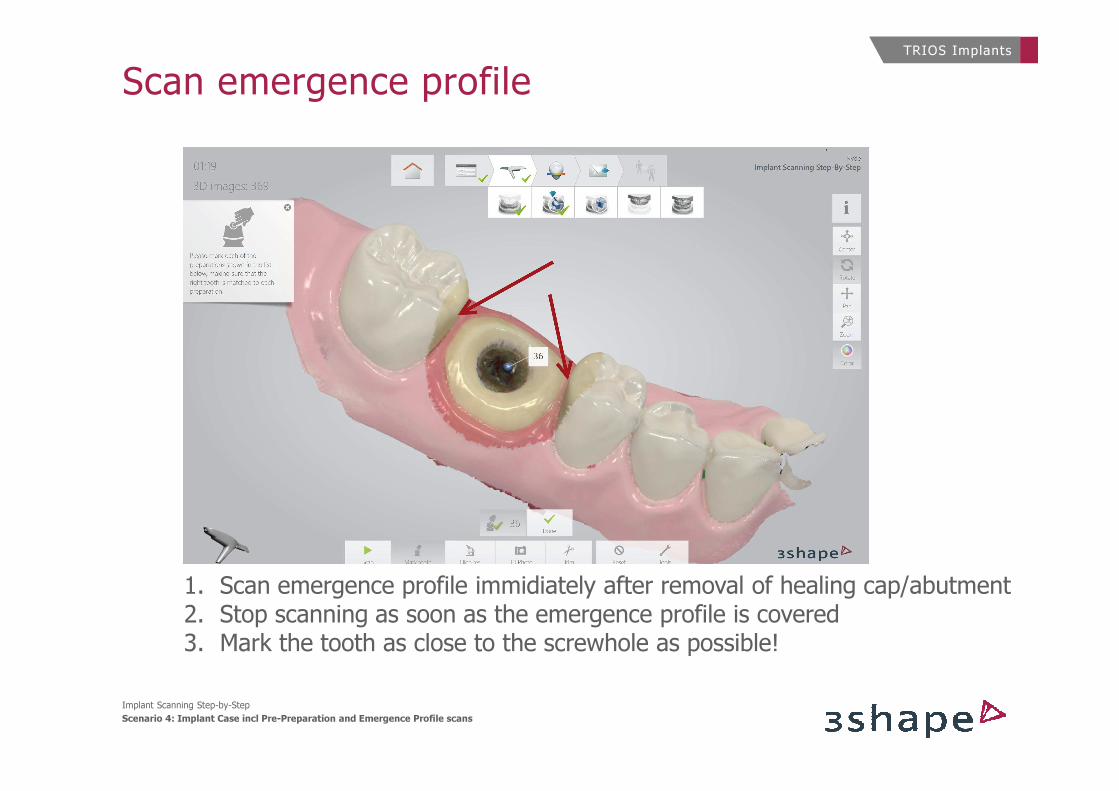
Scan emergence profileTRIOS Implants
Implant Scanning Step-by-Step
Scenario 4: Implant Case incl Pre-Preparation and Emergence Profile scans
1. Scan emergence profile immidiately after removal of healing cap/abutment 2. Stop scanning as soon as the emergence profile is covered3. Mark the tooth as close to the screwhole as possible!

Go to lower scanbody pageTRIOS Implants
Implant Scanning Step-by-Step
Scenario 3: Implant Case incl Pre-Preparation Scan
1. A copy of the Master Scan incl Emergence profile appears2. The spot where the tooth was marked has been cut-out automatically in order to make space for the scanbody
3. You can remove a little more by using the ”Trim Tool”
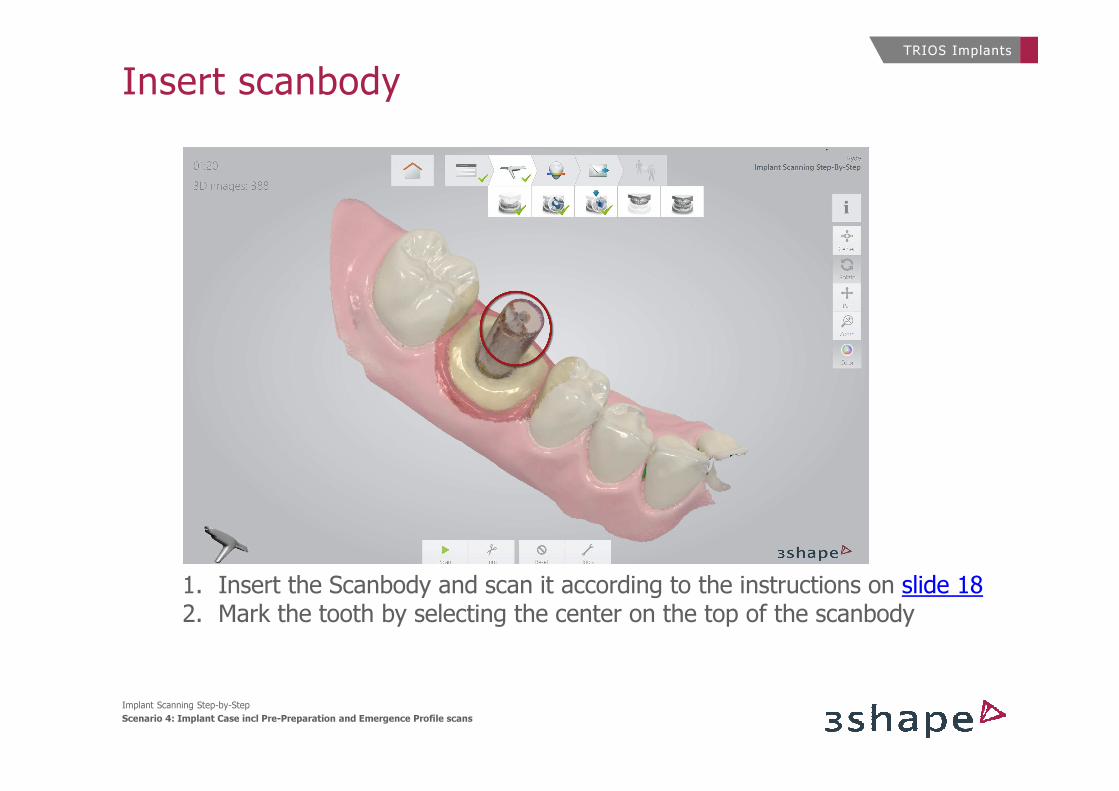
Insert scanbodyTRIOS Implants
Implant Scanning Step-by-Step
Scenario 4: Implant Case incl Pre-Preparation and Emergence Profile scans
1. Insert the Scanbody and scan it according to the instructions on slide 182. Mark the tooth by selecting the center on the top of the scanbody
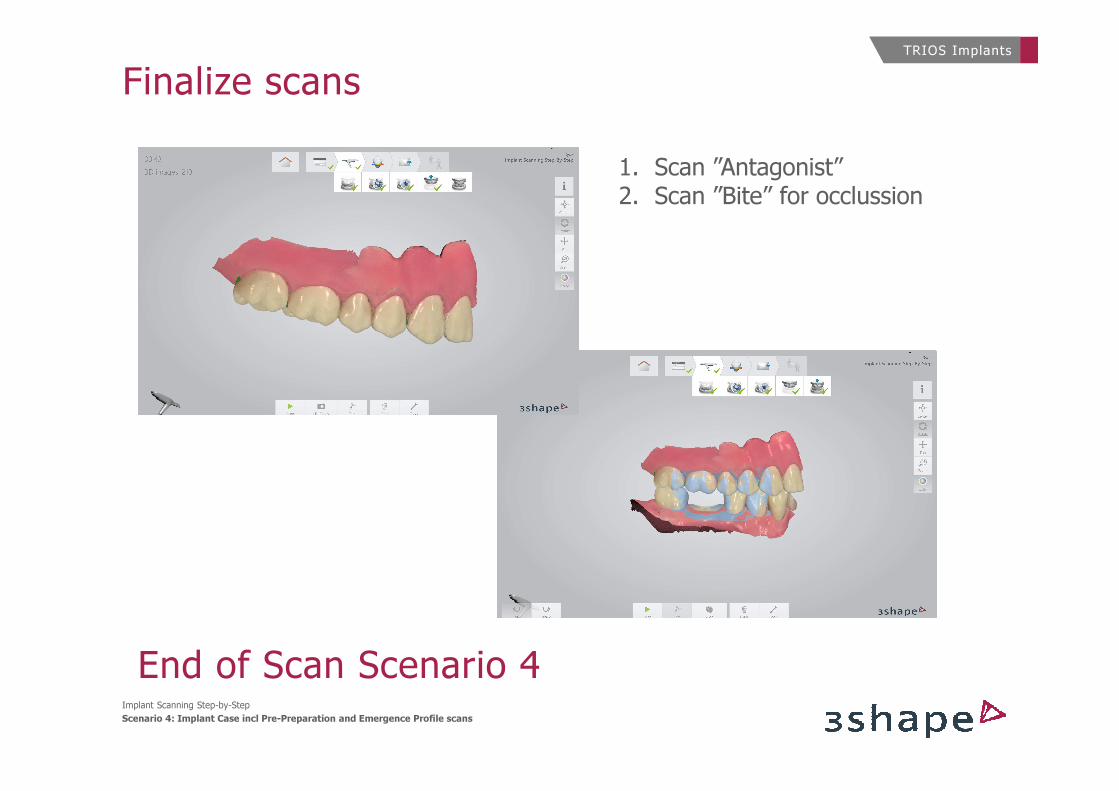
Finalize scansTRIOS Implants
Implant Scanning Step-by-Step
Scenario 4: Implant Case incl Pre-Preparation and Emergence Profile scans
1. Scan ”Antagonist” 2. Scan ”Bite” for occlussion
End of Scan Scenario 4

Technology designed the way you work