implementing 360 reviews
TRANSCRIPT

PUBLICDocument Version: 2H 2021 – 2022-03-17
Implementing 360 Reviews
© 2
022
SAP
SE o
r an
SAP affi
liate
com
pany
. All r
ight
s re
serv
ed.
THE BEST RUN

Content
1 Overview of SAP SuccessFactors 360 Reviews. . . . . . . . . . . . . . . . . . . . . . . . . . . . . . . . . . . . . . . . . 8
2 360 Reviews - SAP Fiori Version. . . . . . . . . . . . . . . . . . . . . . . . . . . . . . . . . . . . . . . . . . . . . . . . . . . 102.1 Feature Comparison Between 360 Reviews - SAP Fiori Version and 360 Reviews v11 Version. . . . . . . . . . .112.2 Features Only Available in 360 Reviews - SAP Fiori Version. . . . . . . . . . . . . . . . . . . . . . . . . . . . . . . . . . 142.3 Changes in Form Template of 360 Reviews - SAP Fiori Version. . . . . . . . . . . . . . . . . . . . . . . . . . . . . . . . 15
3 Configuring 360 Templates. . . . . . . . . . . . . . . . . . . . . . . . . . . . . . . . . . . . . . . . . . . . . . . . . . . . . . . 173.1 Configuring 360 Templates Using XML. . . . . . . . . . . . . . . . . . . . . . . . . . . . . . . . . . . . . . . . . . . . . . . . 17
Introduction Section. . . . . . . . . . . . . . . . . . . . . . . . . . . . . . . . . . . . . . . . . . . . . . . . . . . . . . . . . . .18User Info Section. . . . . . . . . . . . . . . . . . . . . . . . . . . . . . . . . . . . . . . . . . . . . . . . . . . . . . . . . . . . . 21Review Info Section. . . . . . . . . . . . . . . . . . . . . . . . . . . . . . . . . . . . . . . . . . . . . . . . . . . . . . . . . . . 23Reviewer Section. . . . . . . . . . . . . . . . . . . . . . . . . . . . . . . . . . . . . . . . . . . . . . . . . . . . . . . . . . . . . 24Rater List Section. . . . . . . . . . . . . . . . . . . . . . . . . . . . . . . . . . . . . . . . . . . . . . . . . . . . . . . . . . . . 26Competency Section. . . . . . . . . . . . . . . . . . . . . . . . . . . . . . . . . . . . . . . . . . . . . . . . . . . . . . . . . . 27Goal Section. . . . . . . . . . . . . . . . . . . . . . . . . . . . . . . . . . . . . . . . . . . . . . . . . . . . . . . . . . . . . . . . 36Summary Section. . . . . . . . . . . . . . . . . . . . . . . . . . . . . . . . . . . . . . . . . . . . . . . . . . . . . . . . . . . . 39Custom Section. . . . . . . . . . . . . . . . . . . . . . . . . . . . . . . . . . . . . . . . . . . . . . . . . . . . . . . . . . . . . 43Post Review Phase. . . . . . . . . . . . . . . . . . . . . . . . . . . . . . . . . . . . . . . . . . . . . . . . . . . . . . . . . . . .44Configuring Rating Scale Type. . . . . . . . . . . . . . . . . . . . . . . . . . . . . . . . . . . . . . . . . . . . . . . . . . . 46
3.2 Configuring 360 Templates Using Admin Center. . . . . . . . . . . . . . . . . . . . . . . . . . . . . . . . . . . . . . . . . 48Manage Templates Tool. . . . . . . . . . . . . . . . . . . . . . . . . . . . . . . . . . . . . . . . . . . . . . . . . . . . . . . . 48General Settings. . . . . . . . . . . . . . . . . . . . . . . . . . . . . . . . . . . . . . . . . . . . . . . . . . . . . . . . . . . . . 49360 Form Template Settings. . . . . . . . . . . . . . . . . . . . . . . . . . . . . . . . . . . . . . . . . . . . . . . . . . . . .50
3.3 Permissions. . . . . . . . . . . . . . . . . . . . . . . . . . . . . . . . . . . . . . . . . . . . . . . . . . . . . . . . . . . . . . . . . . . 62Section Permissions. . . . . . . . . . . . . . . . . . . . . . . . . . . . . . . . . . . . . . . . . . . . . . . . . . . . . . . . . . 63Field Permissions. . . . . . . . . . . . . . . . . . . . . . . . . . . . . . . . . . . . . . . . . . . . . . . . . . . . . . . . . . . . 64Drilldown Permissions. . . . . . . . . . . . . . . . . . . . . . . . . . . . . . . . . . . . . . . . . . . . . . . . . . . . . . . . . 65Rater ID Permissions. . . . . . . . . . . . . . . . . . . . . . . . . . . . . . . . . . . . . . . . . . . . . . . . . . . . . . . . . . 66
3.4 Rater Category Rollup. . . . . . . . . . . . . . . . . . . . . . . . . . . . . . . . . . . . . . . . . . . . . . . . . . . . . . . . . . . . 69Configuring Rollup for a 360 Reviews Form. . . . . . . . . . . . . . . . . . . . . . . . . . . . . . . . . . . . . . . . . . . 71
3.5 Calibration Mode. . . . . . . . . . . . . . . . . . . . . . . . . . . . . . . . . . . . . . . . . . . . . . . . . . . . . . . . . . . . . . . 72Configuring Calibration. . . . . . . . . . . . . . . . . . . . . . . . . . . . . . . . . . . . . . . . . . . . . . . . . . . . . . . . 73Sample Multi-Rater Form. . . . . . . . . . . . . . . . . . . . . . . . . . . . . . . . . . . . . . . . . . . . . . . . . . . . . . . 73
3.6 Anonymous View for Named 360s. . . . . . . . . . . . . . . . . . . . . . . . . . . . . . . . . . . . . . . . . . . . . . . . . . . 74
4 Main Routing Actions. . . . . . . . . . . . . . . . . . . . . . . . . . . . . . . . . . . . . . . . . . . . . . . . . . . . . . . . . . . 754.1 Raters in 360 Reviews Forms. . . . . . . . . . . . . . . . . . . . . . . . . . . . . . . . . . . . . . . . . . . . . . . . . . . . . . . 75
2 PUBLICImplementing 360 Reviews
Content
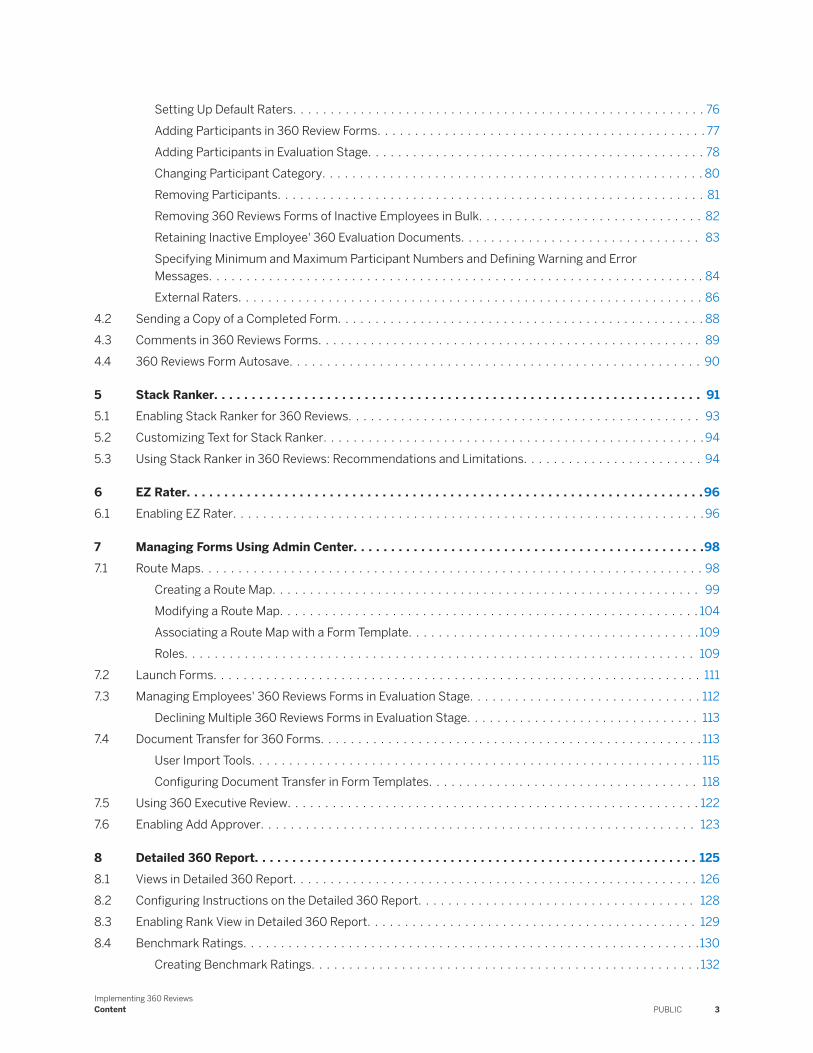
Setting Up Default Raters. . . . . . . . . . . . . . . . . . . . . . . . . . . . . . . . . . . . . . . . . . . . . . . . . . . . . . . 76Adding Participants in 360 Review Forms. . . . . . . . . . . . . . . . . . . . . . . . . . . . . . . . . . . . . . . . . . . . 77Adding Participants in Evaluation Stage. . . . . . . . . . . . . . . . . . . . . . . . . . . . . . . . . . . . . . . . . . . . . 78Changing Participant Category. . . . . . . . . . . . . . . . . . . . . . . . . . . . . . . . . . . . . . . . . . . . . . . . . . . 80Removing Participants. . . . . . . . . . . . . . . . . . . . . . . . . . . . . . . . . . . . . . . . . . . . . . . . . . . . . . . . . 81Removing 360 Reviews Forms of Inactive Employees in Bulk. . . . . . . . . . . . . . . . . . . . . . . . . . . . . . 82Retaining Inactive Employee' 360 Evaluation Documents. . . . . . . . . . . . . . . . . . . . . . . . . . . . . . . . 83Specifying Minimum and Maximum Participant Numbers and Defining Warning and Error Messages. . . . . . . . . . . . . . . . . . . . . . . . . . . . . . . . . . . . . . . . . . . . . . . . . . . . . . . . . . . . . . . . . . 84External Raters. . . . . . . . . . . . . . . . . . . . . . . . . . . . . . . . . . . . . . . . . . . . . . . . . . . . . . . . . . . . . . 86
4.2 Sending a Copy of a Completed Form. . . . . . . . . . . . . . . . . . . . . . . . . . . . . . . . . . . . . . . . . . . . . . . . . 884.3 Comments in 360 Reviews Forms. . . . . . . . . . . . . . . . . . . . . . . . . . . . . . . . . . . . . . . . . . . . . . . . . . . 894.4 360 Reviews Form Autosave. . . . . . . . . . . . . . . . . . . . . . . . . . . . . . . . . . . . . . . . . . . . . . . . . . . . . . . 90
5 Stack Ranker. . . . . . . . . . . . . . . . . . . . . . . . . . . . . . . . . . . . . . . . . . . . . . . . . . . . . . . . . . . . . . . . . 915.1 Enabling Stack Ranker for 360 Reviews. . . . . . . . . . . . . . . . . . . . . . . . . . . . . . . . . . . . . . . . . . . . . . . 935.2 Customizing Text for Stack Ranker. . . . . . . . . . . . . . . . . . . . . . . . . . . . . . . . . . . . . . . . . . . . . . . . . . . 945.3 Using Stack Ranker in 360 Reviews: Recommendations and Limitations. . . . . . . . . . . . . . . . . . . . . . . . 94
6 EZ Rater. . . . . . . . . . . . . . . . . . . . . . . . . . . . . . . . . . . . . . . . . . . . . . . . . . . . . . . . . . . . . . . . . . . . .966.1 Enabling EZ Rater. . . . . . . . . . . . . . . . . . . . . . . . . . . . . . . . . . . . . . . . . . . . . . . . . . . . . . . . . . . . . . . 96
7 Managing Forms Using Admin Center. . . . . . . . . . . . . . . . . . . . . . . . . . . . . . . . . . . . . . . . . . . . . . .987.1 Route Maps. . . . . . . . . . . . . . . . . . . . . . . . . . . . . . . . . . . . . . . . . . . . . . . . . . . . . . . . . . . . . . . . . . . 98
Creating a Route Map. . . . . . . . . . . . . . . . . . . . . . . . . . . . . . . . . . . . . . . . . . . . . . . . . . . . . . . . . 99Modifying a Route Map. . . . . . . . . . . . . . . . . . . . . . . . . . . . . . . . . . . . . . . . . . . . . . . . . . . . . . . . 104Associating a Route Map with a Form Template. . . . . . . . . . . . . . . . . . . . . . . . . . . . . . . . . . . . . . . 109Roles. . . . . . . . . . . . . . . . . . . . . . . . . . . . . . . . . . . . . . . . . . . . . . . . . . . . . . . . . . . . . . . . . . . . 109
7.2 Launch Forms. . . . . . . . . . . . . . . . . . . . . . . . . . . . . . . . . . . . . . . . . . . . . . . . . . . . . . . . . . . . . . . . . 1117.3 Managing Employees' 360 Reviews Forms in Evaluation Stage. . . . . . . . . . . . . . . . . . . . . . . . . . . . . . . 112
Declining Multiple 360 Reviews Forms in Evaluation Stage. . . . . . . . . . . . . . . . . . . . . . . . . . . . . . . 1137.4 Document Transfer for 360 Forms. . . . . . . . . . . . . . . . . . . . . . . . . . . . . . . . . . . . . . . . . . . . . . . . . . . 113
User Import Tools. . . . . . . . . . . . . . . . . . . . . . . . . . . . . . . . . . . . . . . . . . . . . . . . . . . . . . . . . . . . 115Configuring Document Transfer in Form Templates. . . . . . . . . . . . . . . . . . . . . . . . . . . . . . . . . . . . 118
7.5 Using 360 Executive Review. . . . . . . . . . . . . . . . . . . . . . . . . . . . . . . . . . . . . . . . . . . . . . . . . . . . . . . 1227.6 Enabling Add Approver. . . . . . . . . . . . . . . . . . . . . . . . . . . . . . . . . . . . . . . . . . . . . . . . . . . . . . . . . . 123
8 Detailed 360 Report. . . . . . . . . . . . . . . . . . . . . . . . . . . . . . . . . . . . . . . . . . . . . . . . . . . . . . . . . . . 1258.1 Views in Detailed 360 Report. . . . . . . . . . . . . . . . . . . . . . . . . . . . . . . . . . . . . . . . . . . . . . . . . . . . . . 1268.2 Configuring Instructions on the Detailed 360 Report. . . . . . . . . . . . . . . . . . . . . . . . . . . . . . . . . . . . . 1288.3 Enabling Rank View in Detailed 360 Report. . . . . . . . . . . . . . . . . . . . . . . . . . . . . . . . . . . . . . . . . . . . 1298.4 Benchmark Ratings. . . . . . . . . . . . . . . . . . . . . . . . . . . . . . . . . . . . . . . . . . . . . . . . . . . . . . . . . . . . .130
Creating Benchmark Ratings. . . . . . . . . . . . . . . . . . . . . . . . . . . . . . . . . . . . . . . . . . . . . . . . . . . . 132
Implementing 360 ReviewsContent PUBLIC 3

Applying Benchmark Ratings to Forms. . . . . . . . . . . . . . . . . . . . . . . . . . . . . . . . . . . . . . . . . . . . . 133
9 E-mail Notifications for 360 Reviews. . . . . . . . . . . . . . . . . . . . . . . . . . . . . . . . . . . . . . . . . . . . . . .135
10 Ad Hoc Reporting for 360 Multi-Rater Subjects. . . . . . . . . . . . . . . . . . . . . . . . . . . . . . . . . . . . . . 13810.1 Creating 360 Multi-Rater Ad Hoc Report. . . . . . . . . . . . . . . . . . . . . . . . . . . . . . . . . . . . . . . . . . . . . . 139
11 Integration of 360 Reviews with Career Development Planning. . . . . . . . . . . . . . . . . . . . . . . . . . .141
12 Mobile 360 Reviews. . . . . . . . . . . . . . . . . . . . . . . . . . . . . . . . . . . . . . . . . . . . . . . . . . . . . . . . . . . 14312.1 Enabing Mobile 360 Reviews. . . . . . . . . . . . . . . . . . . . . . . . . . . . . . . . . . . . . . . . . . . . . . . . . . . . . . 14312.2 Mobile 360 Reviews Feature Support. . . . . . . . . . . . . . . . . . . . . . . . . . . . . . . . . . . . . . . . . . . . . . . . 143
13 Data Protection and Privacy. . . . . . . . . . . . . . . . . . . . . . . . . . . . . . . . . . . . . . . . . . . . . . . . . . . . . 14913.1 Centralized Data Protection and Privacy. . . . . . . . . . . . . . . . . . . . . . . . . . . . . . . . . . . . . . . . . . . . . . 14913.2 Data Retention Management. . . . . . . . . . . . . . . . . . . . . . . . . . . . . . . . . . . . . . . . . . . . . . . . . . . . . . 149
14 Using the Check Tool. . . . . . . . . . . . . . . . . . . . . . . . . . . . . . . . . . . . . . . . . . . . . . . . . . . . . . . . . . . 15114.1 Benefits of the Check Tool. . . . . . . . . . . . . . . . . . . . . . . . . . . . . . . . . . . . . . . . . . . . . . . . . . . . . . . . 15214.2 Check Results. . . . . . . . . . . . . . . . . . . . . . . . . . . . . . . . . . . . . . . . . . . . . . . . . . . . . . . . . . . . . . . . . 15314.3 Creating Product Support Tickets from the Check Tool. . . . . . . . . . . . . . . . . . . . . . . . . . . . . . . . . . . . 15314.4 Using the Quick Fix Feature. . . . . . . . . . . . . . . . . . . . . . . . . . . . . . . . . . . . . . . . . . . . . . . . . . . . . . . 154
4 PUBLICImplementing 360 Reviews
Content

Change History
Learn about changes to the documentation for 360 Reviews in recent releases.
2H 2021
Type of Change Description More Info
Changed The setting Hide the Export and Export(Compact) buttons for documents in the Completed Folder is removed from the form template of 360 Reviews - SAP Fiori Version.
● Feature Comparison Between 360 Reviews - SAP Fiori Version and 360 Reviews v11 Version [page 11]
● Changes in Form Template of 360 Reviews - SAP Fiori Version [page 15]
Changed We added a paragraph to say that users can specify minimum and maximum numbers of participants, both for the participant list and by individual categories, and can define prompt messages.
Launch Forms [page 111]
Changed We revised the topic to explain how to specify the minimum and maximum numbers.
Specifying Minimum and Maximum Participant Numbers and Defining Warning and Error Messages [page 84]
1H 2021
Type of Change Description More Info
Added Stack Ranker is an important feature in 360 Reviews. We add a section about this feature to help customers to better understand and use it.
● Stack Ranker [page 91]● Enabling Stack Ranker for 360 Re
views [page 93]● Customizing Text for Stack Ranker
[page 94]● Using Stack Ranker in 360 Reviews:
Recommendations and Limitations [page 94]
Added The attribute pdf-page-break-opt is supported on 360 Reviews forms of Fiori version.
Features Only Available in 360 Reviews - SAP Fiori Version [page 14]
Implementing 360 ReviewsChange History PUBLIC 5
Type of Change Description More Info
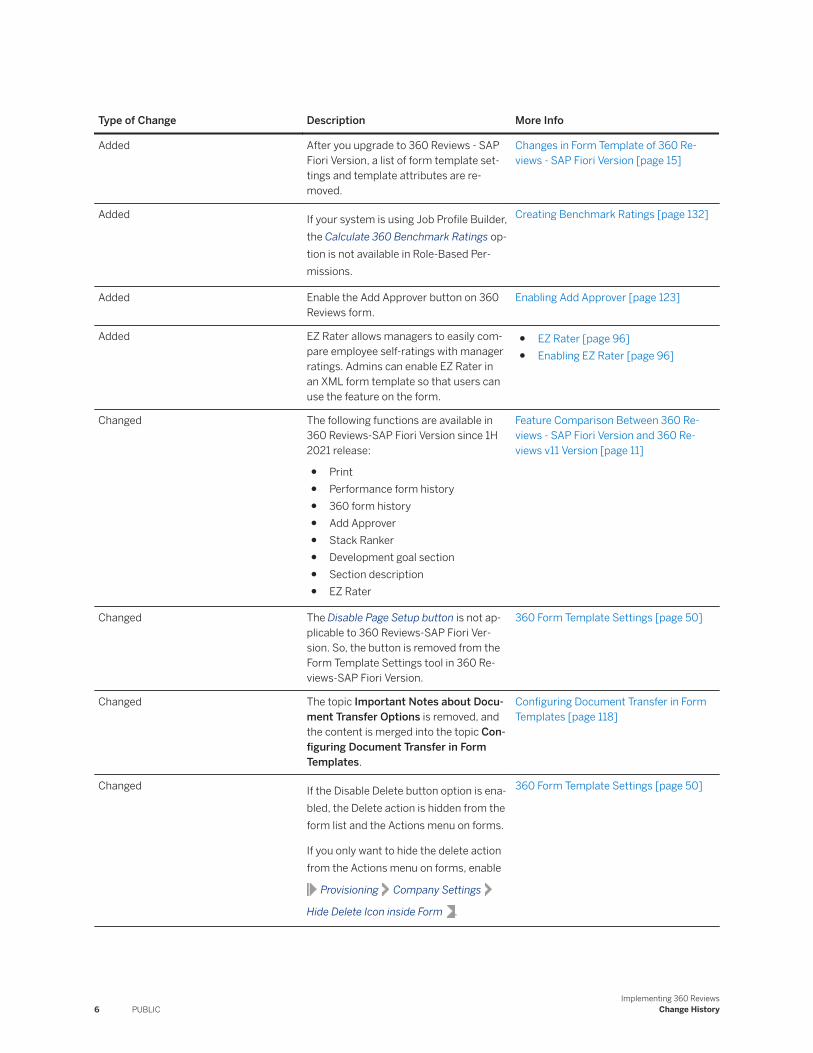
Added After you upgrade to 360 Reviews - SAP Fiori Version, a list of form template settings and template attributes are removed.
Changes in Form Template of 360 Reviews - SAP Fiori Version [page 15]
Added If your system is using Job Profile Builder, the Calculate 360 Benchmark Ratings option is not available in Role-Based Permissions.
Creating Benchmark Ratings [page 132]
Added Enable the Add Approver button on 360 Reviews form.
Enabling Add Approver [page 123]
Added EZ Rater allows managers to easily compare employee self-ratings with manager ratings. Admins can enable EZ Rater in an XML form template so that users can use the feature on the form.
● EZ Rater [page 96]● Enabling EZ Rater [page 96]
Changed The following functions are available in 360 Reviews-SAP Fiori Version since 1H 2021 release:
● Print● Performance form history● 360 form history● Add Approver● Stack Ranker● Development goal section● Section description● EZ Rater
Feature Comparison Between 360 Reviews - SAP Fiori Version and 360 Reviews v11 Version [page 11]
Changed The Disable Page Setup button is not applicable to 360 Reviews-SAP Fiori Version. So, the button is removed from the Form Template Settings tool in 360 Reviews-SAP Fiori Version.
360 Form Template Settings [page 50]
Changed The topic Important Notes about Document Transfer Options is removed, and the content is merged into the topic Configuring Document Transfer in Form Templates.
Configuring Document Transfer in Form Templates [page 118]
Changed If the Disable Delete button option is enabled, the Delete action is hidden from the form list and the Actions menu on forms.
If you only want to hide the delete action from the Actions menu on forms, enable
Provisioning Company Settings
Hide Delete Icon inside Form .
360 Form Template Settings [page 50]
6 PUBLICImplementing 360 Reviews
Change History
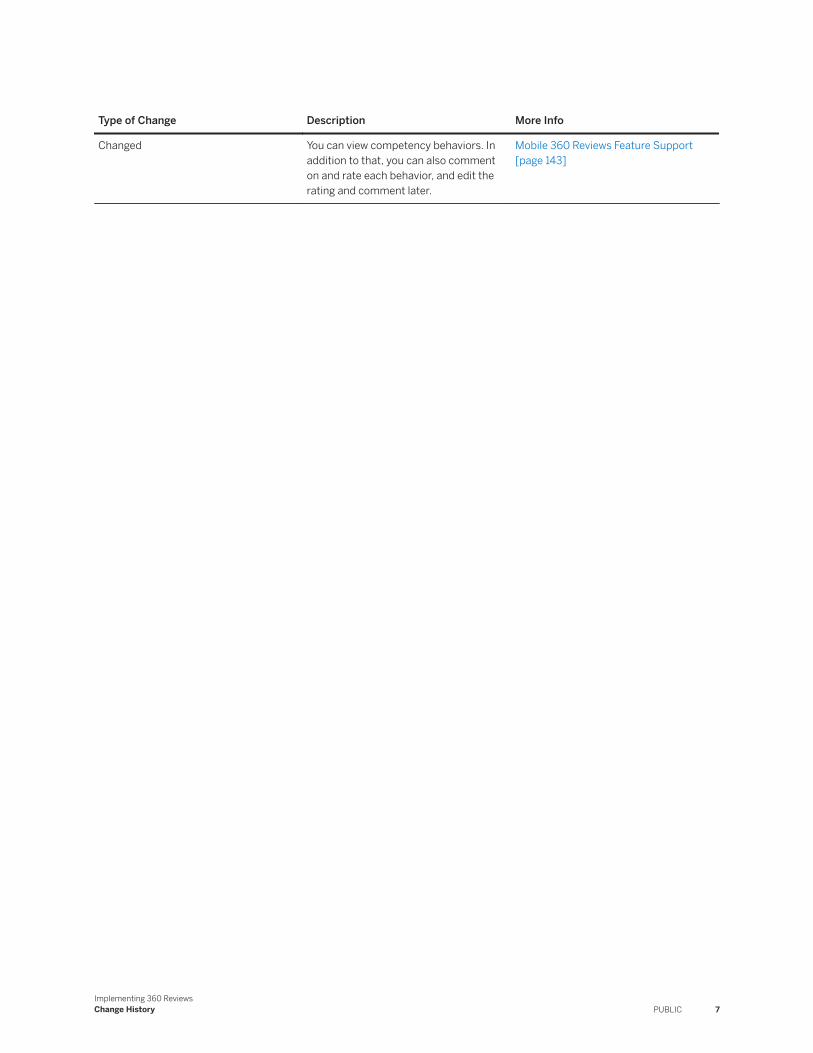
Type of Change Description More Info
Changed You can view competency behaviors. In addition to that, you can also comment on and rate each behavior, and edit the rating and comment later.
Mobile 360 Reviews Feature Support [page 143]
Implementing 360 ReviewsChange History PUBLIC 7

1 Overview of SAP SuccessFactors 360 Reviews
SAP SuccessFactors 360 Reviews enables you to combine self-feedback with anonymous input from colleagues and external sources to have the most comprehensive view of the performance of employees in your organization.
If your review process relies only the feedback of managers, you risk missing out on valuable information. Bringing in feedback from everyone connected to your employees - including clients - gives a much more balanced, comprehensive, and informative picture of your employees.
With 360 Reviews, you have an independent development tool that isn’t directly tied to compensation or promotion decisions and is geared toward personal development. You can offer your managers and employees clear insights into their strengths and weakness. The 360 Reviews offer a full-circle view of performance that provides a better insight for coaching and development, and ensures more accurate, effective, and fair assessments.
The 360 Reviews help you:
● Develop comprehensive feedback: Incorporate self-ratings, peer review, and upward assessments for feedback at all levels.
● Gain a holistic performance perspective: Get feedback from outside employees’ hierarchies or departments and gain a broader view.
● Automate workflows: Stay ahead of deadlines with integrated e-mail reminders and requests, plus automatic routing of forms among managers, employees, and peers.
● Identify hidden strengths and weakness: Pinpoint skills, competency gaps, reward drivers, and other performance trends.
● Use limited compensation budgets effectively: Make pay decisions with valid, objective, and anonymous feedback to gain a candid perspective.
RememberThe route map used in a 360 Reviews must not have a Collaborative step (C-step), as the 360 workflow does not support the C-step. In the 360 reviews, the process owner is an important role responsible for the last modify step and this "Process Owner" role can only be one user per design. If a C-step is added in the modify stage, multiple users become process owners, and that breaks the rules defined for the 360 process.
The features listed under 360 Reviews in Admin Center
You can also create content, configure settings and form templates and launch forms by using the features listed under 360 Reviews in the Admin Center.
Use this feature: To do this:
Change 360 Process Owner Change the process owner of a 360 document.
Change Participant Category Change the participant categories for a 360 document.
8 PUBLICImplementing 360 Reviews
Overview of SAP SuccessFactors 360 Reviews

Use this feature: To do this:
Complete/Decline 360 Complete or decline a 360 document
Change 360 Process Owner Form Create 360 Review forms for a user or selected users.
E-Mail Notification Template Settings Edit the email notification settings to enable, disable, or configure the content of email templates
Form Template Settings Modify settings, upload, or download a form template.
Launch 360 Reviews Create and launch the form for a 360 Review process
Manage Route Maps Define the recipients of a route map and the order in which he or she receives the map.
Manage Scheduled Reviews Cancel or modify the launch of a form
Manage Templates Create and update a form template
Rating Scales Create, copy, or modify a rating scale
Restore Completed 360 Restore a completed 360 back to evaluation for a participant
Implementing 360 ReviewsOverview of SAP SuccessFactors 360 Reviews PUBLIC 9

2 360 Reviews - SAP Fiori Version
360 Reviews - SAP Fiori Version is Generally Available (GA).
While the majority of features are supported, it does not yet support all features from the 360 Reviews v11 Version. To see a list of remaining feature gaps, please go to Feature Comparison Between 360 Reviews - SAP Fiori Version and 360 Reviews v11 Version [page 11].
360 Reviews - SAP Fiori Version is supported by SAPUI5 technology, offering you an intuitive and modern user experience. The application gives you a 360-degree view of employee’s performance that provides a better insight for coaching and development, and ensures accurate, effective, and fair evaluations. By upgrading to 360 Reviews - SAP Fiori Version, you can take advantage of the intuitive SAP Fiori UI design to boost employee engagement and accelerate talent development across your organization.
How to Upgrade to 360 Reviews - SAP Fiori Version
Before upgrading to 360 Reviews - SAP Fiori Version, make sure that you have 360 Reviews enabled in your system. Then go to Admin Center Upgrade Center Recommended Upgrades .
After upgrade, if you want to use the existing templates, you must update them in Manage Templates so that they can be compatible with 360 Reviews - SAP Fiori Version. The completed or in-process forms that were created before the upgrade aren’t affected.
NoteIf you haven’t used any OData API-related features since upgrade, and now encounter some problems when opening the 360 Reviews - SAP Fiori Version form, you’re recommended to refresh OData API Metadata via
Admin Center Odata API Metadata Refresh And Export .
How to Revert to the Old 360 Reviews Solution
You’re allowed to revert to the old solution by either turning off 360 Reviews - SAP Fiori Version in Upgrade Center within 30 days after upgrade, or contacting your implementation partner or Product Support.
Please note the following before you undo the upgrade:
● After reverting back to the old solution, you can continue using the forms created using 360 Reviews - SAP Fiori Version, but these forms won’t be changed back to the old UI. In addition, the new templates created in 360 Reviews - SAP Fiori Version are locked by the system and can’t be used anymore.
● The forms and templates that are created before the upgrade can still be used.
Feature Comparison Between 360 Reviews - SAP Fiori Version and 360 Reviews v11 Version [page 11]This topic mainly compares the feature gap between 360 Reviews - SAP Fiori Version and 360 Reviews v11 Version.
10 PUBLICImplementing 360 Reviews
360 Reviews - SAP Fiori Version

Features Only Available in 360 Reviews - SAP Fiori Version [page 14]The table lists the features that are available exclusively to 360 Reviews - SAP Fiori Version.
Changes in Form Template of 360 Reviews - SAP Fiori Version [page 15]After you upgrade to 360 Reviews - SAP Fiori Version, a list of form template settings and template attributes are removed.
2.1 Feature Comparison Between 360 Reviews - SAP Fiori Version and 360 Reviews v11 Version
This topic mainly compares the feature gap between 360 Reviews - SAP Fiori Version and 360 Reviews v11 Version.
In 360 Reviews - SAP Fiori Version, some of the form template settings and form template elements aren't supported. Thus, when you validate and update the existing 360 Reviews templates for compatibility with 360 Reviews - SAP Fiori Version, you might get a validation message that says certain elements will be removed from the template.
Feature Comparison Between 360 Reviews - SAP Fiori Version and 360 Reviews v11 Version
Features 360 Reviews - SAP Fiori Version 360 Reviews v11 Version
Form
Sections that can be configured on a form:
● Introduction section● Job Description section● Review Info section● Reviewer Info section● User Info section● Summary section● Signature section● Participant List section● Competencies section● Goals section● Custom section
Available Available
Development goal section Available Available
Learning activity in development goal section
In Plan Available
Section description Available Available
Permissions
For details, refer to Permissions [page 62].
Available Available
Stack Ranker
For details, refer to Stack Ranker [page 91].
Available Available
Implementing 360 Reviews360 Reviews - SAP Fiori Version PUBLIC 11

Features 360 Reviews - SAP Fiori Version 360 Reviews v11 Version
Print Available Available
EZ Rater
For details, refer to EZ Rater [page 96].
Available Available
The form info icon Available Available
Add Approver Available Available
Add external user as participant
For details, refer to Adding External Raters [page 87].
Available Available
Advanced Search Available Available
Detailed 360 Report Available Available
Summary View Available Available
Autosave Available Unavailable
Objective and competency weight for each item and section
Available Available
Rating scale description Available Available
Circle or star rating Available Unavailable
Required fields Available Available
Show Assignment Available Available
Competency behavior Available Available
Add to Outlook In Plan Available
Performance form history Available Available
360 form history Available Available
Spellcheck Available Available
Legal Scan Available Available
Writing Assistant on the Competency section
Available Available
Rich Text Editor (RTE) for comments and custom element
Available Available
Plain text for comments and custom element
Unavailable Available
Drill down function Available Available
Send Reminder Available Available
Workflow
12 PUBLICImplementing 360 Reviews
360 Reviews - SAP Fiori Version

Features 360 Reviews - SAP Fiori Version 360 Reviews v11 Version
Main routing actions:
● Launch● Send to Next Step● Complete● Decline● Reject● Send back● Sign● Send Copy
Available Available
Admin Tools
Modify Form Route Map
For details, refer to Modifying a Route Map [page 104].
Available Available
Delete Form Available Available
Restore Deleted Forms Available Available
Route Signature Stage Form Available Available
Route Completed Forms Available Available
Manage Document Visibility Available Available
Change Form Date Available Available
Objective Number Prefix Unavailable Available
Edit competency comments on the Signature Stage
Unavailable Available
Email Notification Available Available
Report and Review
360 Executive Review Available Available
Ad-hoc Report Available Available
Report - Story Available Available
Template
Min and max participants for category, form. and person
Available Available
Hide the Export button on the completed forms
Unavailable Available
Parent topic: 360 Reviews - SAP Fiori Version [page 10]
Related Information
Features Only Available in 360 Reviews - SAP Fiori Version [page 14]
Implementing 360 Reviews360 Reviews - SAP Fiori Version PUBLIC 13

Changes in Form Template of 360 Reviews - SAP Fiori Version [page 15]
2.2 Features Only Available in 360 Reviews - SAP Fiori Version
The table lists the features that are available exclusively to 360 Reviews - SAP Fiori Version.
Features Only Available to 360 Reviews - SAP Fiori Version
Features Description
Form autosave When you're editing a 360 Reviews form in 360 Reviews - SAP Fiori Version, the system saves the form automatically after 5 seconds of inactivity.
For details, see 360 Reviews Form Autosave [page 90].
Functions in detailed 360 report When you open a detailed 360 report of SAP Fiori version, you can find the following functions that exist only in 360 Reviews - SAP Fiori Version:
● Radar chart for competencies● The Print Setup dialog
For details, see Detailed 360 Report [page 125].
Page breaks for PDF file of forms The attribute pdf-page-break-opt is supported on 360 Reviews forms of Fiori version. Admins can add the attribute to form template XML file by using the following values:
● 0 (default): The PDF version may have page breaks.● 1: The PDF version will avoid page breaks at the section
level.● 2: The PDF version will avoid page breaks at both the sec
tion level and item level.
Parent topic: 360 Reviews - SAP Fiori Version [page 10]
Related Information
Feature Comparison Between 360 Reviews - SAP Fiori Version and 360 Reviews v11 Version [page 11]Changes in Form Template of 360 Reviews - SAP Fiori Version [page 15]
14 PUBLICImplementing 360 Reviews
360 Reviews - SAP Fiori Version

2.3 Changes in Form Template of 360 Reviews - SAP Fiori Version
After you upgrade to 360 Reviews - SAP Fiori Version, a list of form template settings and template attributes are removed.
Removed Form Template Settings
The following settings are removed from the Form Template Settings tool.
● Enable Progress Meter● Enable Calibration Mode● Enable Rich Text Editing of Comment Fields● Enable Auto Logout at Session Timeout● Bypass Draft Routing● Disable Detailed 360 Report button in routing bar● Show on-form workflow options as a pull-down list● Display Step Start Date● Enable form title editability in Form info page● Enable form title editability in the Form (V10)● Hide manager's own documents in Manager Dashboard● Hide the Export and Export(Compact) buttons for documents in the Completed Folder
Attributes Removed from Templates During Template Conversion
When you validate and update the existing 360 Reviews templates for compatibility with 360 Reviews - SAP Fiori Version, you might get a validation message that the following attributes will be removed from the template:
● Calibration-mode
NoteCalibration Mode is removed after upgrade. If you want to provide or review the different ratings for employees, you can use Stack Ranker.
● section-color● sect-level-elements● allow-to-add-development-goal● Rater Section: project-template-id● rating-bar-color● show-points● section-comments-blank-indicator● comments-blank-indicator
Implementing 360 Reviews360 Reviews - SAP Fiori Version PUBLIC 15

● publish (a field publishing configuration that controls publishing in a given route step.)● editable-in-signature-step● show-group-matrix● show-gap-competencies-in-summary● show-gap-behaviors-in-summary● allow-close-individual-gap-in-summary● show-behaviors-in-summary● show-cdp-wizard-button
Parent topic: 360 Reviews - SAP Fiori Version [page 10]
Related Information
Feature Comparison Between 360 Reviews - SAP Fiori Version and 360 Reviews v11 Version [page 11]Features Only Available in 360 Reviews - SAP Fiori Version [page 14]
16 PUBLICImplementing 360 Reviews
360 Reviews - SAP Fiori Version

3 Configuring 360 Templates
3.1 Configuring 360 Templates Using XML
This chapter provides information on how to configure 360 templates using XML.
RememberAs a customer, you don't have access to Provisioning. To complete tasks in Provisioning, contact your implementation partner. If you're no longer working with an implementation partner, contact Product Support.
Introduction Section [page 18]This element is used to display introductory information. The introduction-sect element supports html.
User Info Section [page 21]The User Information section displays the basic data of the subject being reviewed in the form. You can configure the 360 User Information section in the same way as a Performance Management form.
Review Info Section [page 23]You can use this section to display the review period covered by the form and the name of the person who created the form.
Reviewer Section [page 24]You can use this section to display the detailed information about reviewers.
Rater List Section [page 26]You can manage raters for a 360 form in the Rater List section, and define those who will be automatically pulled into the 360 review process.
Competency Section [page 27]You can use this section to specify the competencies that are evaluated in a form.
Goal Section [page 36]You can use this section to define all the objectives or goals that will be evaluated during a review event.
Summary Section [page 39]The Summary section displays summarized information about all the evaluation sections on the form in one central area.
Custom Section [page 43]You can use custom sections to gather information that is not objective or competency based.
Post Review Phase [page 44]The Post Review Phase can be used after the Evaluation Phase but before the Completion or Signature Phases.
Configuring Rating Scale Type [page 46]You can associate different rating scale types with goal sections and competency sections.
Implementing 360 ReviewsConfiguring 360 Templates PUBLIC 17

3.1.1 Introduction Section
This element is used to display introductory information. The introduction-sect element supports html.
Supported HTML tags
HTML tags Description Example
<p> Defines a paragraph <p> Paragraph</p>
<a> Defines a hyperlink <a href="http://www.successfactors.com">hyperlink</a>
<strong> Defines important text <strong>bold text</strong>
<em> Defines emphasized text <em>emphasis</em>
<u> Defines underlined text <u>underlined text</u>
<ol> Defines an ordered list <ol><li>This is an example of a numbered list</li></ol>
<ul> Defines an unordered list <ul><li>This is an example of a bulleted list</li></ul>
<li> Defines a list <li>This is an example of a list</li>
<font> Defines font, color, and size for text <font color="#0000ff">colored text</font>
<font size="4">larger text</font>
<img> Defines an image <img alt="" src="http://www.successfactors.com/etc/designs/successfactors/images/logo_successfactors.png" style="width: 216px; height: 42px;" />
<span> Defines a section in a document <span>Section of a document</span>
<blockquote> Defines a section that is quoted from another source
<blockquote cite="http://www.successfactors.com"> </blockquote>
Note<span> and <img> are the only HTML tags that supports the "style" attribute
ExampleXML Example:
18 PUBLICImplementing 360 Reviews
Configuring 360 Templates

This is an example of an introduction section. The fmsectconfig sub-element is required but in this case does not affect the configuration.
<introduction-sect> <fm-sect index="0" mgt-only="false" split-cmt="false" cmt-opt="1"> <fm-sect-name><![CDATA[Introduction]]></fm-sect-name> <fm-sect-intro><![CDATA[]]></fm-sect-intro> <fm-sect-config> <rating-label><![CDATA[Rating]]></rating-label> <rating-label-others><![CDATA[Rating]]></rating-label-others> <default-rating><![CDATA[unrated]]></default-rating> <hidden-strength-threshold>0.0</hidden-strength-threshold> <blind-spot-threshold>0.0</blind-spot-threshold> <num-decimal-places>2</num-decimal-places> <publish-button-label><![CDATA[Publish Content]]></publish-button-label> </fm-sect-config></fm-sect> </introduction-sect>
Attributes
Attributes Valid values Description
index Numeric The order in which sections are displayed in the form is controlled by section index number starting with index="0". As a result, the form XML can list sections in any order. When you move sections using Provisioning the index number assigned to a section will be updated automatically to reflect how you have rearranged the sections in the form.
mgt-only True or False True if only Manager or HR can see this section
split-cmt True or False True if displaying Subject and Manager's comments side by side
cmt-opt Numeric Show both item and section comments
Elements
Elements DescriptionCan be configured from Manage Template Settings in Admin Center
<introduction-sect> 360 Reviews introduction section
<fm-sect> Generic section for all SFV4 forms.
<fm-sect-name> The name of the section. Yes
Implementing 360 ReviewsConfiguring 360 Templates PUBLIC 19

Elements DescriptionCan be configured from Manage Template Settings in Admin Center
<fm-sect-intro> Introductory text that can be used to provide the user with the information needed to complete the section. This can also be instruction text that describes the business processes, corporate values and goals, or that references other documents.
Yes
<fmsectconfig> This element contains configurable options for any form sections.
● rating-label: Label that corresponds to the Rating of Record field
● rating-label-others: Label that corresponds to the Subject Rating or the Personal Rating, ratings other than the Rating of Record
● default-rating: The default rating value when no value is selected
● unrated-rating: The rating value that can be selected by the user. This value is not included in the calculation.
● hidden-strength-threshold: The minimum value of the difference between employee's self rating and others' rating. If an employee rates lower than others on a goal or competency, and the difference is higher than the value you set here, the goal or competency is considered a hidden strength.
● blind-spot-threshold: The minimum value of the difference between employee's self rating and others' rating. If an employee rates higher than others on a goal or competency, and the difference is higher than the value you set here, the goal or competency is considered a blind spot.
● num-decimal-places: Number of decimals places to use when calculating the rating for this section
Parent topic: Configuring 360 Templates Using XML [page 17]
20 PUBLICImplementing 360 Reviews
Configuring 360 Templates

Related Information
User Info Section [page 21]Review Info Section [page 23]Reviewer Section [page 24]Rater List Section [page 26]Competency Section [page 27]Goal Section [page 36]Summary Section [page 39]Custom Section [page 43]Post Review Phase [page 44]Configuring Rating Scale Type [page 46]
3.1.2 User Info Section
The User Information section displays the basic data of the subject being reviewed in the form. You can configure the 360 User Information section in the same way as a Performance Management form.
You can rename the section, and include or exclude various fields to display information about the employee. Data in this section is non-editable and read-only.
By default, each data element reflects the user information that is current at the time the form is opened. The sync-until-completion is used to sync an employee info element with values in the database in Employee section until document completion. To preserve the information it used to be at the time the form was created, even if the user's information changes after that, you can set the sync-until-completion ="false".
You can use fm-element to define what information fields will be displayed about the subject being reviewed in the form. The accepted employee information fields include:
● USERNAME● FIRSTNAME● LASTNAME● MI● GENDER● EMAIL● MANAGER● HR● DEPARTMENT● JOBCODE● DIVISION● LOCATION● TIMEZONE● HIREDATE● EMPID● TITLE
Implementing 360 ReviewsConfiguring 360 Templates PUBLIC 21

● FAX● ADDR1● ADDR2● STATE● ZIP● COUNTRY● LAST_REVIEW_DATE● CUSTOM01● CUSTOM02● CUSTOM03● MATRIX_MANAGER
XML Example
<userinfo-sect> <fm-sect index="1" mgt-only="false" split-cmt="false" cmt-opt="1"> <fm-sect-name><![CDATA[User Information]]></fm-sect-name> <fm-sect-intro><![CDATA[]]></fm-sect-intro> <fm-sect-config> <rating-label><![CDATA[Rating]]></rating-label> <rating-label-others><![CDATA[Rating]]></rating-label-others> <default-rating><![CDATA[unrated]]></default-rating> <hidden-strength-threshold>0.0</hidden-strength-threshold> <blind-spot-threshold>0.0</blind-spot-threshold> <num-decimal-places>2</num-decimal-places> <publish-button-label><![CDATA[Publish Content]]></publish-button-label> </fm-sect-config> <fm-element index="0" type="3"> <ekey><![CDATA[FIRSTNAME]]></ekey> <ename><![CDATA[]]></ename> <evalue><![CDATA[]]></evalue> </fm-element> <fm-element index="1" type="3"> <ekey><![CDATA[LASTNAME]]></ekey> <ename><![CDATA[]]></ename> <evalue><![CDATA[]]></evalue> </fm-element> <fm-element index="2" type="3"> <ekey><![CDATA[TITLE]]></ekey> <ename><![CDATA[]]></ename> <evalue><![CDATA[]]></evalue> </fm-element> </fm-sect> </userinfo-sect>
RememberThis code snippet is a sample configuration. The exact configuration depends on your system settings.
Parent topic: Configuring 360 Templates Using XML [page 17]
22 PUBLICImplementing 360 Reviews
Configuring 360 Templates

Related Information
Introduction Section [page 18]Review Info Section [page 23]Reviewer Section [page 24]Rater List Section [page 26]Competency Section [page 27]Goal Section [page 36]Summary Section [page 39]Custom Section [page 43]Post Review Phase [page 44]Configuring Rating Scale Type [page 46]
3.1.3 Review Info Section
You can use this section to display the review period covered by the form and the name of the person who created the form.
The Review Info section is sometimes labeled Review Information or Review Period. The originator field cannot be changed, and no additional fields can be added to this section. The default validation for review dates will include start date, end date and due date, but the validation of due date with the option “Disable Due Date Validation” can be disabled in Form Template Setting. XML customization of this section is limited to changing the section name, section name color bar, and section intro text.
RememberAs a customer, you don't have access to Provisioning. To complete tasks in Provisioning, contact your implementation partner. If you're no longer working with an implementation partner, contact Product Support.
XML Example
<reviewinfo-sectindex="2"> <reviewinfo-sect-name><![CDATA[Review Information]]></reviewinfo-sect-name> <reviewinfo-sect-intro><![CDATA[<b>This review covers the dates listed below.</b>]]></reviewinfo-sect-intro> <fm-sect-config> <rating-label><![CDATA[Rating]]></rating-label> <rating-label-others><![CDATA[Rating]]></rating-label-others> <default-rating><![CDATA[unrated]]></default-rating> <hidden-strength-threshold>0.0</hidden-strength-threshold> <blind-spot-threshold>0.0</blind-spot-threshold> </fm-sect-config></reviewinfo-sect>
RememberThis code snippet is a sample configuration. The exact configuration depends on your system settings.
Implementing 360 ReviewsConfiguring 360 Templates PUBLIC 23
Parent topic: Configuring 360 Templates Using XML [page 17]
Related Information
Introduction Section [page 18]User Info Section [page 21]Reviewer Section [page 24]Rater List Section [page 26]Competency Section [page 27]Goal Section [page 36]Summary Section [page 39]Custom Section [page 43]Post Review Phase [page 44]Configuring Rating Scale Type [page 46]
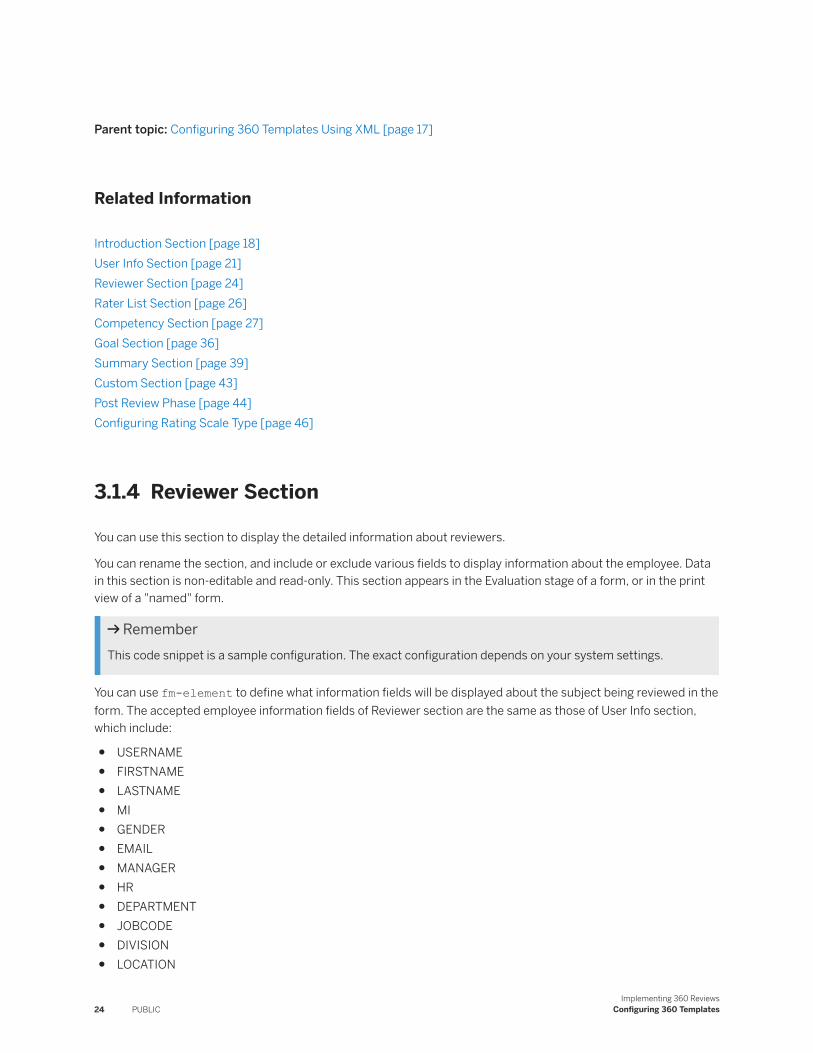
3.1.4 Reviewer Section
You can use this section to display the detailed information about reviewers.
You can rename the section, and include or exclude various fields to display information about the employee. Data in this section is non-editable and read-only. This section appears in the Evaluation stage of a form, or in the print view of a "named" form.
RememberThis code snippet is a sample configuration. The exact configuration depends on your system settings.
You can use fm-element to define what information fields will be displayed about the subject being reviewed in the form. The accepted employee information fields of Reviewer section are the same as those of User Info section, which include:
● USERNAME● FIRSTNAME● LASTNAME● MI● GENDER● EMAIL● MANAGER● HR● DEPARTMENT● JOBCODE● DIVISION● LOCATION
24 PUBLICImplementing 360 Reviews
Configuring 360 Templates

● TIMEZONE● HIREDATE● EMPID● TITLE● FAX● ADDR1● ADDR2● STATE● ZIP● COUNTRY● LAST_REVIEW_DATE● CUSTOM01● CUSTOM02● CUSTOM03● MATRIX_MANAGER
XML Example
<reviewer-sect> <fm-sect index="3" mgt-only="false" split-cmt="false" cmt-opt="1"> <fm-sect-name><![CDATA[Reviewer Info]]></fm-sect-name> <fm-sect-intro><![CDATA[]]></fm-sect-intro> <fm-sect-config> <rating-label><![CDATA[Rating]]></rating-label> <rating-label-others><![CDATA[Rating]]></rating-label-others> <default-rating><![CDATA[unrated]]></default-rating> <hidden-strength-threshold>0.0</hidden-strength-threshold> <blind-spot-threshold>0.0</blind-spot-threshold> <num-decimal-places>2</num-decimal-places> <publish-button-label><![CDATA[Publish Content]]></publish-button-label> </fm-sect-config> <fm-element index="0" type="3"> <ekey><![CDATA[FIRSTNAME]]></ekey> <ename><![CDATA[]]></ename> <evalue><![CDATA[]]></evalue> </fm-element> <fm-element index="1" type="3"> <ekey><![CDATA[LASTNAME]]></ekey> <ename><![CDATA[]]></ename> <evalue><![CDATA[]]></evalue> </fm-element> <fm-element index="2" type="3"> <ekey><![CDATA[TITLE]]></ekey> <ename><![CDATA[]]></ename> <evalue><![CDATA[]]></evalue> </fm-element> </fm-sect> </reviewer-sect>
RememberThis code snippet is a sample configuration. The exact configuration depends on your system settings.
Implementing 360 ReviewsConfiguring 360 Templates PUBLIC 25

Parent topic: Configuring 360 Templates Using XML [page 17]
Related Information
Introduction Section [page 18]User Info Section [page 21]Review Info Section [page 23]Rater List Section [page 26]Competency Section [page 27]Goal Section [page 36]Summary Section [page 39]Custom Section [page 43]Post Review Phase [page 44]Configuring Rating Scale Type [page 46]
3.1.5 Rater List Section
You can manage raters for a 360 form in the Rater List section, and define those who will be automatically pulled into the 360 review process.
The Rater List section lists raters for a 360 form, and is available only in the Modify stage. It can be made available to managers only by configuring mgt-only="true".
By default, data of department, division, location, email, and manager has already been configured in the Rater List section. You can also control which data is displayed in this section by adding the corresponding code as follows, between <date-column-format> and <min-rater-count>. For example, if you add <rater-column key="DIVISION"></rater-column>, then only information about Division displays.
<rater-column key="DIVISION"></rater-column> <rater-column key="LOCATION"></rater-column> <rater-column key="DEPARTMENT"></rater-column><rater-column key="MANAGER"></rater-column><rater-column key="EMAIL"></rater-column>
The default-rater defines the roles that will be auto-populated in the rater list upon document creation.
XML Example
<rater-sect index="2" mgt-only="false"> <rater-sect-name><![CDATA[Rater List]]></rater-sect-name> <fm-sect-config> <rating-label><![CDATA[Rating]]></rating-label> <rating-label-others><![CDATA[Rating]]></rating-label-others>
26 PUBLICImplementing 360 Reviews
Configuring 360 Templates

<default-rating><![CDATA[unrated]]></default-rating> <hidden-strength-threshold>0.0</hidden-strength-threshold> <blind-spot-threshold>0.0</blind-spot-threshold> </fm-sect-config> <rater-config> <date-column-format>MM/dd/yyyy</date-column-format> <min-rater-count>0</min-rater-count> <max-rater-count>50</max-rater-count> <min-rater-complete-count>0</min-rater-complete-count> <default-rater category="Direct Report"><![CDATA[ED]]></default-rater> <default-rater category="Manager"><![CDATA[EM]]></default-rater> <default-rater category="Self"><![CDATA[E]]></default-rater> </rater-config> </rater-sect>
RememberThis code snippet is a sample configuration. The exact configuration depends on your system settings.
Parent topic: Configuring 360 Templates Using XML [page 17]
Related Information
Introduction Section [page 18]User Info Section [page 21]Review Info Section [page 23]Reviewer Section [page 24]Competency Section [page 27]Goal Section [page 36]Summary Section [page 39]Custom Section [page 43]Post Review Phase [page 44]Configuring Rating Scale Type [page 46]
3.1.6 Competency Section
You can use this section to specify the competencies that are evaluated in a form.
The Competency section lists the competencies or competency behaviors that a manager and others evaluate during a review. A form can have several Competency sections, which work in the same way. In each section, competencies can be added as Core Competencies, Custom Competencies (also known as Hardcoded Competencies) and Job Role Competencies. Those competencies can be prepopulated or added manually. Each competency ID can appear only once in a form.
Parent topic: Configuring 360 Templates Using XML [page 17]
Implementing 360 ReviewsConfiguring 360 Templates PUBLIC 27

Related Information
Introduction Section [page 18]User Info Section [page 21]Review Info Section [page 23]Reviewer Section [page 24]Rater List Section [page 26]Goal Section [page 36]Summary Section [page 39]Custom Section [page 43]Post Review Phase [page 44]Configuring Rating Scale Type [page 46]
3.1.6.1 Custom Competencies
You can enable custom competencies by configuring your template using XML.
Custom competencies are supported in both 360 Reviews v11 and 360 Reviews - SAP Fiori Version. You can only add custom competencies via XML configuration of your template. This functionality isn’t currently available using Manage Templates in Admin Center. After you add custom competencies, the Custom checkbox, which is grayed out in your template, will be checked automatically.
RememberAs a customer, you don't have access to Provisioning. To complete tasks in Provisioning, contact your implementation partner. If you're no longer working with an implementation partner, contact Product Support.
Hard Code Example
<fm-competency index="0" removable="false"> <fm-comp-id>19819</fm-comp-id> <fm-comp-name><![CDATA[]]></fm-comp-name> <fm-comp-desc><![CDATA[]]></fm-comp-desc> </fm-competency>
In Context
<?xml version="1.0" encoding="UTF-8"?> <!DOCTYPE competency-sect SYSTEM "sf-form.dtd"><competency-sect index="4" configurable="true" mgt-only="false" use-jobcode="true" use-core-comp="true" category-filter-opt="no-filter" no-rate="false" no-weight="true" summ-opt="999" split-cmt="false" rating-opt="0" cmt-opt="2" suppress-item-comments="0" behavior-rating-opt="0" behavior-cmt-opt="1" behavior-mode-opt="0" in-summ-display="true" in-overall-rating="true" no-group="true" use-behavior="false" if-no-ratings-then-ignore-section="true" lock-item-weights="false" in-objcomp-summ-display="false" in-objcomp-summ-overall-rating="false" show-comp-expected-rating="false" show-comp-proficiency-level="false" comp-expected-rating-format="0" show-behavior-expected-rating="false" behavior-expected-rating-format="0" behavior-weighted="false" min-competencies-required="-2147483648" max-competencies-allowed="2147483647" sect-mode="normal" ez-rater-expand-all="false" show-calculated-section-rating="true" lock-behavior-content="false" hide-waca="false">
28 PUBLICImplementing 360 Reviews
Configuring 360 Templates

<comp-sect-name msgKey="3d6e257db20b4884bf6b67cea8c7dd3f_1573629499874"><![CDATA[Competency Feedback]]></comp-sect-name> <comp-sect-intro msgKey="5bdedcff1d8949edb66793ff048b68b8_1573629499874"><![CDATA[<b>INSTRUCTIONS</b>: Please respond to the following statements as they relate to the person whose name appears on this form. Please select the rating that best describes the individual.]]></comp-sect-intro> <fm-sect-config> <rating-label msgKey="PM_RatingLabel_Rating"><![CDATA[Rating]]></rating-label> <rating-label-others msgKey="PM_RatingLabelOthers"><![CDATA[Rating]]></rating-label-others> <default-rating><![CDATA[Select one...]]></default-rating> <unrated-rating><![CDATA[Unable to Rate]]></unrated-rating> <hidden-strength-threshold>1.0</hidden-strength-threshold> <blind-spot-threshold>1.5</blind-spot-threshold> <required-fields> <role-name>*</role-name> <field refid="item-rating" min-value="-1.0" max-value="-1.0"/> <route-step stepid="*"/> <send-action sendid="complete_360"/> </required-fields> <default-item-comments-label><![CDATA[Comments]]></default-item-comments-label> <num-decimal-places>2</num-decimal-places> <publish-button-label><![CDATA[null]]></publish-button-label> </fm-sect-config> <action-permission type="none"> <role-name>*</role-name> <action refid="add-item"/> <action refid="remove-item"/> <route-step stepid="*"/> </action-permission> <action-permission type="enabled"> <role-name>EM</role-name> <action refid="add-item"/> <action refid="remove-item"/> <route-step stepid="*"/> </action-permission> <action-permission type="enabled"> <role-name>*</role-name> <action refid="my-team-rater"/> <route-step stepid="*"/> </action-permission> <action-permission type="none"> <role-name>E</role-name> <action refid="my-team-rater"/> <route-step stepid="*"/> </action-permission> <sect-weight>100.0</sect-weight> <fm-sect-scale show-value="true"> <scale-source>1</scale-source> <scale-id><![CDATA[Performance Rating Scale]]></scale-id> <scale-type><![CDATA[null]]></scale-type> </fm-sect-scale> <fm-competency index="0" removable="false"> <fm-comp-id>19819</fm-comp-id> <fm-comp-name><![CDATA[]]></fm-comp-name> <fm-comp-desc><![CDATA[]]></fm-comp-desc> </fm-competency> <meta-grp-label><![CDATA[Group]]></meta-grp-label> </competency-sect>
Implementing 360 ReviewsConfiguring 360 Templates PUBLIC 29
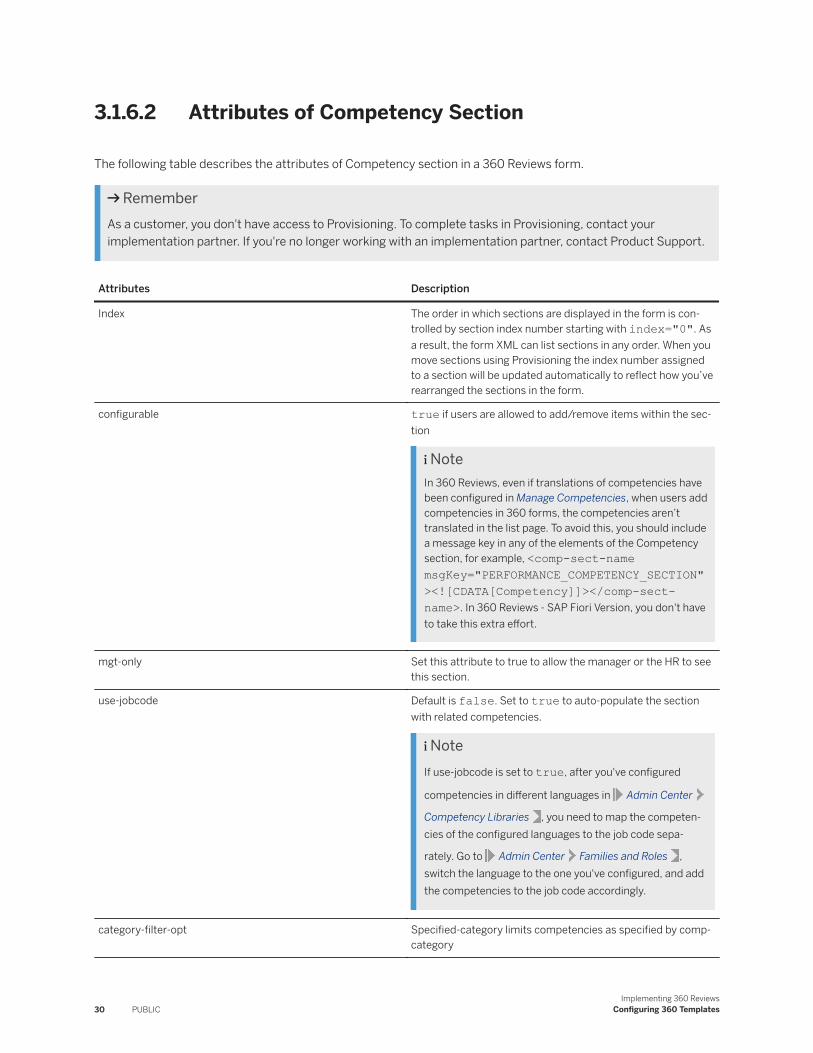
3.1.6.2 Attributes of Competency Section
The following table describes the attributes of Competency section in a 360 Reviews form.
RememberAs a customer, you don't have access to Provisioning. To complete tasks in Provisioning, contact your implementation partner. If you're no longer working with an implementation partner, contact Product Support.
Attributes Description
Index The order in which sections are displayed in the form is controlled by section index number starting with index="0". As a result, the form XML can list sections in any order. When you move sections using Provisioning the index number assigned to a section will be updated automatically to reflect how you’ve rearranged the sections in the form.
configurable true if users are allowed to add/remove items within the section
NoteIn 360 Reviews, even if translations of competencies have been configured in Manage Competencies, when users add competencies in 360 forms, the competencies aren’t translated in the list page. To avoid this, you should include a message key in any of the elements of the Competency section, for example, <comp-sect-name msgKey="PERFORMANCE_COMPETENCY_SECTION"><![CDATA[Competency]]></comp-sect-name>. In 360 Reviews - SAP Fiori Version, you don't have to take this extra effort.
mgt-only Set this attribute to true to allow the manager or the HR to see this section.
use-jobcode Default is false. Set to true to auto-populate the section with related competencies.
NoteIf use-jobcode is set to true, after you've configured
competencies in different languages in Admin Center
Competency Libraries , you need to map the competencies of the configured languages to the job code sepa
rately. Go to Admin Center Families and Roles , switch the language to the one you've configured, and add the competencies to the job code accordingly.
categoryfilteropt Specifiedcategory limits competencies as specified by comp-category
30 PUBLICImplementing 360 Reviews
Configuring 360 Templates
Attributes Description
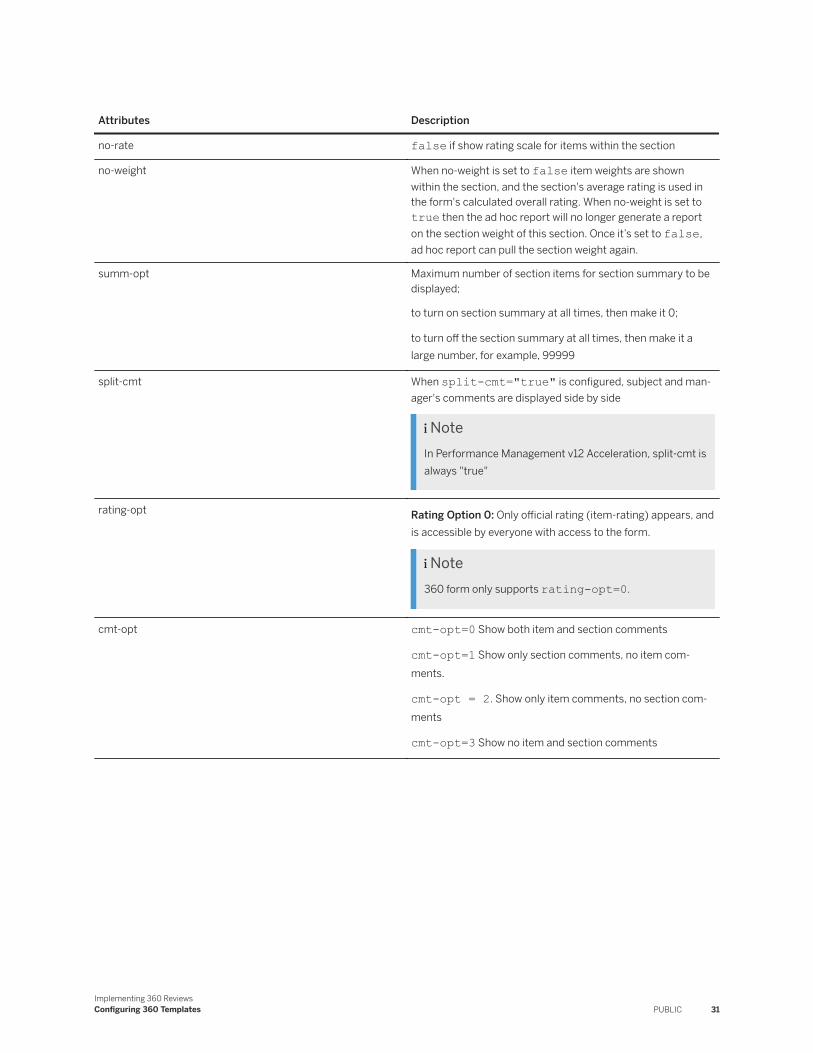
no-rate false if show rating scale for items within the section
no-weight When no-weight is set to false item weights are shown within the section, and the section's average rating is used in the form's calculated overall rating. When no-weight is set to true then the ad hoc report will no longer generate a report on the section weight of this section. Once it’s set to false, ad hoc report can pull the section weight again.
summ-opt Maximum number of section items for section summary to be displayed;
to turn on section summary at all times, then make it 0;
to turn off the section summary at all times, then make it a large number, for example, 99999
split-cmt When split-cmt="true" is configured, subject and manager's comments are displayed side by side
NoteIn Performance Management v12 Acceleration, split-cmt is always "true"
rating-opt Rating Option 0: Only official rating (item-rating) appears, and is accessible by everyone with access to the form.
Note360 form only supports rating-opt=0.
cmt-opt cmt-opt=0 Show both item and section comments
cmt-opt=1 Show only section comments, no item comments.
cmt-opt = 2. Show only item comments, no section comments
cmt-opt=3 Show no item and section comments
Implementing 360 ReviewsConfiguring 360 Templates PUBLIC 31

Attributes Description
suppress-item-comments 0: do NOT hide item comments (DEFAULT)
1: suppress behavior comments but allow competency comments
2: suppress competency comments but allow behavior comments
3: suppress item comments
Notesuppress-item-comments=1,2,3 isn’t supported in Performance Management v12 Acceleration.
behavior-cmt-opt 0: Show behavior item comments (and if applicable, the evaluator* rating)
1(default value): Don’t Show any behavior item comments or evaluator* ratings behavior-rating-opt
32 PUBLICImplementing 360 Reviews
Configuring 360 Templates

Attributes Description
behavior-mode-opt 0: This is the Default mode. In this mode, the competency behaviors don’t get displayed above or below the competency description. Behavior mode '0' supports the existing configuration, where a user manually rates on the behavior items and those ratings are used to generate a "Calculated Competency Rating" (if the Calculation on form is enabled in the form template XML). This mode is also used for backwards compatibility for existing forms.
1: When the behavior-mode-opt is set to '1', the Behavior items are displayed below the competency rating. Only the behaviors mapped to the job code are displayed. Therefore, this feature will only work when the user has a valid jobcode. If the competency doesn’t have any behaviors, then none are displayed.
2: When the behavior-mode-opt is set to '2', the Behavior items are displayed above the competency rating. Only the behaviors mapped to the job code are displayed. Therefore, this feature will only work when the subject has a valid jobcode and use-jobcode is set to true. If the competency doesn’t have any behaviors, then none are displayed.
4:When the behavior-mode-opt is set to '4', Competencies must be manually added to the form, and all behaviors for competencies added will be displayed on the form below the competency rating, regardless of the jobcode-behavior mapping.
5: When the behavior-mode-opt is set to '5', Competencies must be manually added to the form, and all behaviors for competencies added will be displayed on the form above the competency rating, regardless of the jobcode-behavior mapping.
NoteFor option 4 and 5: This feature will only work when use-jobcode is set to false.
in-summ-display true ratings and weightings from this section will be displayed in the Summary Sect; default is true;
in-summ-display="true"
in-overall-rating True ratings from this section are used in calculating the Calculated Form rating; default is true; the "bk" value is for backward compatibility.
no-group True is default False = group selection is displayed if groups have been defined in the Meta section
use-subtopic Don’t use this attribute. Replaced by use-behavior
Implementing 360 ReviewsConfiguring 360 Templates PUBLIC 33

Attributes Description
use-behavior If you want to rate by behaviors, set use-behavior=true and behavior-mode-opt=0.
If you want to show behaviors but not rate them, set use-behavior=false and behavior-mode-opt to nonzero. How the behaviors are displayed is determined by the specific value you set for behavior-mode-opt. For detailed information, see the part of behavior-mode-opt in this table.
if-no-ratings-then-ignore-section True is default; don’t include this section in the Calculated Form rating if no competencies are rated
False = use zero for this section in calculating the Calculated Form Rating
lock-item-weights 0: Show behavior item comments (and if applicable, the evaluator*lock-item-weights=false. Allow the weight of each competency to be edited.
lock-item-weights=true. Doesn’t allow the weight of competency to be edited.
show-comp-expected-rating true if showing the competency's expected rating for the job role, required for showing the gap between expected and actual competency rating; default is false
comp-expected-rating-format 0: Default. Showing the expected rating in %
1: Converting the % to a score normalized to the section scale
show-behavior-expected-rating False: Default. Not showing behavior's expected rating for the job role
behavior-expected-rating-format 0: Default. Showing the expected rating in %
1: Converting the % to a score normalized to the section scale
behavior-weighted True: Behavior is weightedFalse: If equally weighted and no weight fields will be displayed for Behaviors
sect-mode normal or EZ-Rater.
When it’s set to EZ-Rater mode, EZ-Rater UI is shown while section summary and other item fields are ignored. Behavior will only show on the form when use-behavior is set to true.
ez-rater-expand-all true or false, if the section is in EZ-Rater mode, and this is true, then expand all objective details
show-calculated-section-rating true or false. True if showing the section calculated rating.
hide-waca Determines whether or not to hide the Writing Assistant. This is only applicable when the company or form template has been configured to display the Writing Assistant. True: hide writing assistant False: exposeWriting Assistant
34 PUBLICImplementing 360 Reviews
Configuring 360 Templates

Attributes Description
min-competencies-required
max-competencies-allowed
There’s optional minimum/maximum threshold for the number of competencies that must/can be included on 360 forms. If specified, the validation will occur when a 360 form is about to be sent to the Evaluation stage. If validation fails, the user will see a warning message, and won’t be able to route or complete the form.
NoteIn 360 Reviews, if there are many steps in Modify stage, then only the step before the Evaluation stage does the validation.
*min-competencies-required: this represents the minimum number of competencies that must be in this section to allow the form to be routed.
*max-competencies-allowed: this represents the maximum number of competencies that are allowed to be in this section, else the form cannot be routed.
You can set just a min, or just a max, or both.
lock-behavior-content If behavior-mode-opt is set to 0, this attribute is assumed to be false (default).
behavior-mode-opt is nonzero and lock-behavior-content is set to false: Behavior list isn’t hardcoded to the form during form creation and form modification and the behavior list is linked to the corresponding competency.
In this case, when jobcode changes or the behavior name or the description is updated, the behavior for the existing form instances reflect the changes.
behavior-mode-opt is nonzero and lock-behavior-content is set to true: Behavior list is hardcoded to the form during form creation and form modification, rather than being linked to the corresponding competency.
In this case, when jobcode changes or the behavior name or the description is updated, the behavior for the existing form instances don’t reflect the changes.
num-decimal-places This attribute configures the number of decimal places for calculated ratings in the competency section. The default value is 2.
Implementing 360 ReviewsConfiguring 360 Templates PUBLIC 35

3.1.7 Goal Section
You can use this section to define all the objectives or goals that will be evaluated during a review event.
Goals sections can either start out blank where you manually add the goals you want to review, or they can start out with the relevant goals already identified and listed in the form. In either case, once you have goals in the section, you can review them. Goals can be rated by manager only or by both the manager and employee or even by a third party.
When you print a 360 Reviews form (V11) with goal sections, the goal names show on gray bar with auto-numbering if obj-plan-number-format is configured in the goal template. Otherwise, the goal names show beneath the gray bar.
You can configure the 360 Goal section in the same way as a Performance Management form.
XML Example
<!DOCTYPE objective-sect SYSTEM "sf-form.dtd"> <objective-sect index="5" configurable="true" mgt-only="false" use-jobcode="false" no-rate="true" develop-goal="false" show-learning-activity-competency="false" no-weight="true" summ-opt="0" split-cmt="false" rating-opt="0" cmt-opt="3" in-summ-display="true" in-overall-rating="true" no-group="true" use-milestone="false" if-no-ratings-then-ignore-section="true" lock-item-weights="false" in-objcomp-summ-display="false" in-objcomp-summ-overall-rating="false" auto-pop-weights="false" show-obj-expected-rating="false" min-goals-required="-2147483648" max-goals-allowed="2147483647" allow-draft-tgm-goals="false" hide-addexistinggoals-btn="true" sect-mode="normal" ez-rater-expand-all="false" obj-edit="form" show-calculated-section-rating="true" avoid-obj-plan-state-change-by-multiple-forms="false"> <obj-sect-name><![CDATA[Objective]]></obj-sect-name> <obj-sect-intro><![CDATA[<p>Enter your objectives here </p>]]></obj-sect-intro> <fm-sect-config> <rating-label><![CDATA[Rating]]></rating-label> <rating-label-others><![CDATA[Rating]]></rating-label-others> <default-rating><![CDATA[unrated]]></default-rating> <unrated-rating><![CDATA[]]></unrated-rating> <hidden-strength-threshold>0.0</hidden-strength-threshold> <blind-spot-threshold>0.0</blind-spot-threshold> <num-decimal-places>2</num-decimal-places> <publish-button-label><![CDATA[Publish Content]]></publish-button-label> </fm-sect-config> <sect-weight>0.0</sect-weight> <sect-weight-4-objcomp-summary></sect-weight-4-objcomp-summary> <fm-sect-scale show-value="true"> <scale-source>1</scale-source> <scale-id><![CDATA[Default Scale]]></scale-id> <scale-type><![CDATA[DROPDOWN]]></scale-type> </fm-sect-scale> <obj-sect-type autosync="false"><![CDATA[plan]]></obj-sect-type> <obj-sect-plan-id>5</obj-sect-plan-id> <meta-grp-label><![CDATA[Group]]></meta-grp-label> </objective-sect>
RememberThis code snippet is a sample configuration. The exact configuration depends on your system settings.
36 PUBLICImplementing 360 Reviews
Configuring 360 Templates

Parent topic: Configuring 360 Templates Using XML [page 17]
Related Information
Introduction Section [page 18]User Info Section [page 21]Review Info Section [page 23]Reviewer Section [page 24]Rater List Section [page 26]Competency Section [page 27]Summary Section [page 39]Custom Section [page 43]Post Review Phase [page 44]Configuring Rating Scale Type [page 46]
3.1.7.1 Attributes of the Goal Section
The table below describes the attributes of the Goal Section.
Attribute Description
Index The order in which sections are displayed in the form is controlled by section index number starting with index="0". As a result, the form XML can list sections in any order. When you move sections using Provisioning the index number assigned to a section will be updated automatically to reflect how you have re-arranged the sections in the form.
configurable 'True' if users are allowed to add/remove items within the section
mgt-only Control if only manager or HR can see this section
use-jobcode Not Supported
no-rate 'False' if rating scale for items appears within the section. 'True' if rating scale does not appear within the section.
no-weight When no-weight is set to 'false', item weights are shown within the section, and the section's average rating is used in the form's calculated overall rating. When no-weight is set to 'true', then item weights do not appear within this section.
develop-goal Set to 'False' if the you are configuring this section for performance goals.
Set to 'True' if the you are configuring this section for development goals.
summ-opt Not supported.
split-cmt When split-cmt="true",subject and manager's comments are displayed side by side.
Implementing 360 ReviewsConfiguring 360 Templates PUBLIC 37

Attribute Description
rating-opt Rating Option 0: Only one rating appears, and is accessible by everyone with access to the form.
Rating Option 1: The employee additionally has a rating that only they can access. The top rating is still accessible by everyone, and is the rating of recored and the item-rating.
Rating Option 2: Everyone who has access to the form in edit mode has their own rating box. The top rating box still appears, and is the rating of record and the item-rating, but is normally accessible only to the manager.
Rating Option 3: The manager rating is the rating of record and the item-rating. The manager rating does not need to be permissioned because only the manager can edit the manage rating, and only the employee can edit the employee rating. This is the recommended configuration.
Note360 form only supports rating-opt=0.
cmt-opt cmt-opt=0 Show both item and section comments
cmt-opt=1 Show only section comments, no item comments.
cmt-opt = 2. Show only item comments, no section comments
cmt-opt=3 Show no item and section comments;
in-summ-display 'True' if ratings and weightings from this section will be displayed in the Summary section.The default value is true;
in-overall-rating Set to 'True' if the section is to be included in the document overall rating calculation if applicable; default is true; the "bk" value is for backward compatibility. Set to 'False' if you do not wish to include this section in the document overall rating calculation.
no-group Not supported.
use-milestone Not supported
lock-item-weights lock-item-weights=false: Allow the weight of each competency to be edited.
lock-item-weights=true: Does not allow the weight of competency to be edited.
auto-pop-weights Set to 'True' if you want to auto populate the goal weights with their weights in the goal plan.
Set to 'False' if you do not want to auto populate the goal weights with their weights in the goal plan.
show-obj-expected-rating 'True' if showing the objective's expected rating next to each goal
sect-mode Normal or EZ-Rater. EZ-Rater mode shows EZ-Rater rater ui, section summary and other item fields are ignored.
ez-rater-expand-all Only valid if the section is in EZ-Rater mode, and if this is 'true', then expand all objective details
show-calculated-section-rating
'True' if showing the section calculated rating.
obj-edit Form edit goal in place.
38 PUBLICImplementing 360 Reviews
Configuring 360 Templates
Attribute Description
min-goals-required
max-goals-allowed
There is optional minimum/maximum threshold for the number of goals that must/can be included on 360 forms. If specified, the validation will occur when a 360 form is about to be sent to the Evaluation stage. If validation fails, the user will see a warning message, and will not be able to route or complete the form.
NoteIn 360 Reviews, if there are many steps in Modify stage, then only the step before the Evaluation stage does the validation.
min-goals-required: this represents the minimum number of goals that must be in this section to allow the form to be routed.
max-goals-allowed: this represents the maximum number of goals that are allowed to be in this section, else the form can not be routed.
You can set just a min, or just a max, or both.
num-decimal-places This attribute configures the number of decimal places for calculated ratings in the goal section. The default value is 2.
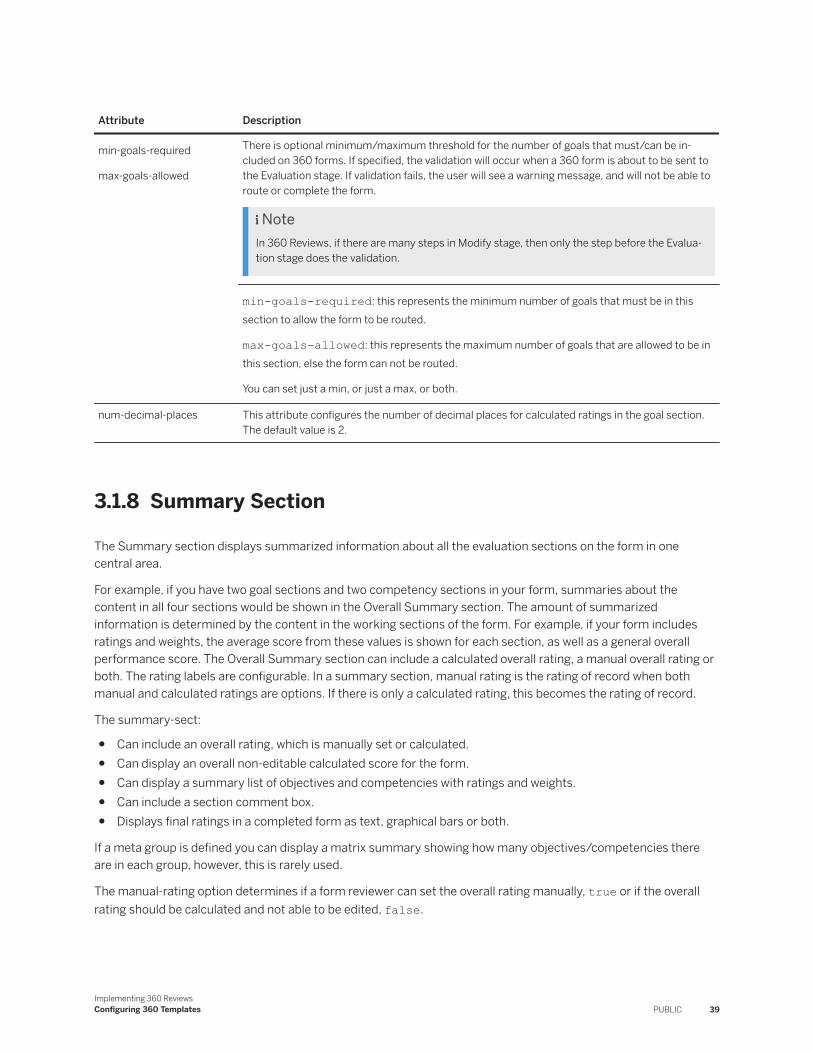
3.1.8 Summary Section
The Summary section displays summarized information about all the evaluation sections on the form in one central area.
For example, if you have two goal sections and two competency sections in your form, summaries about the content in all four sections would be shown in the Overall Summary section. The amount of summarized information is determined by the content in the working sections of the form. For example, if your form includes ratings and weights, the average score from these values is shown for each section, as well as a general overall performance score. The Overall Summary section can include a calculated overall rating, a manual overall rating or both. The rating labels are configurable. In a summary section, manual rating is the rating of record when both manual and calculated ratings are options. If there is only a calculated rating, this becomes the rating of record.
The summary-sect:
● Can include an overall rating, which is manually set or calculated.● Can display an overall non-editable calculated score for the form.● Can display a summary list of objectives and competencies with ratings and weights.● Can include a section comment box.● Displays final ratings in a completed form as text, graphical bars or both.
If a meta group is defined you can display a matrix summary showing how many objectives/competencies there are in each group, however, this is rarely used.
The manual-rating option determines if a form reviewer can set the overall rating manually, true or if the overall rating should be calculated and not able to be edited, false.
Implementing 360 ReviewsConfiguring 360 Templates PUBLIC 39
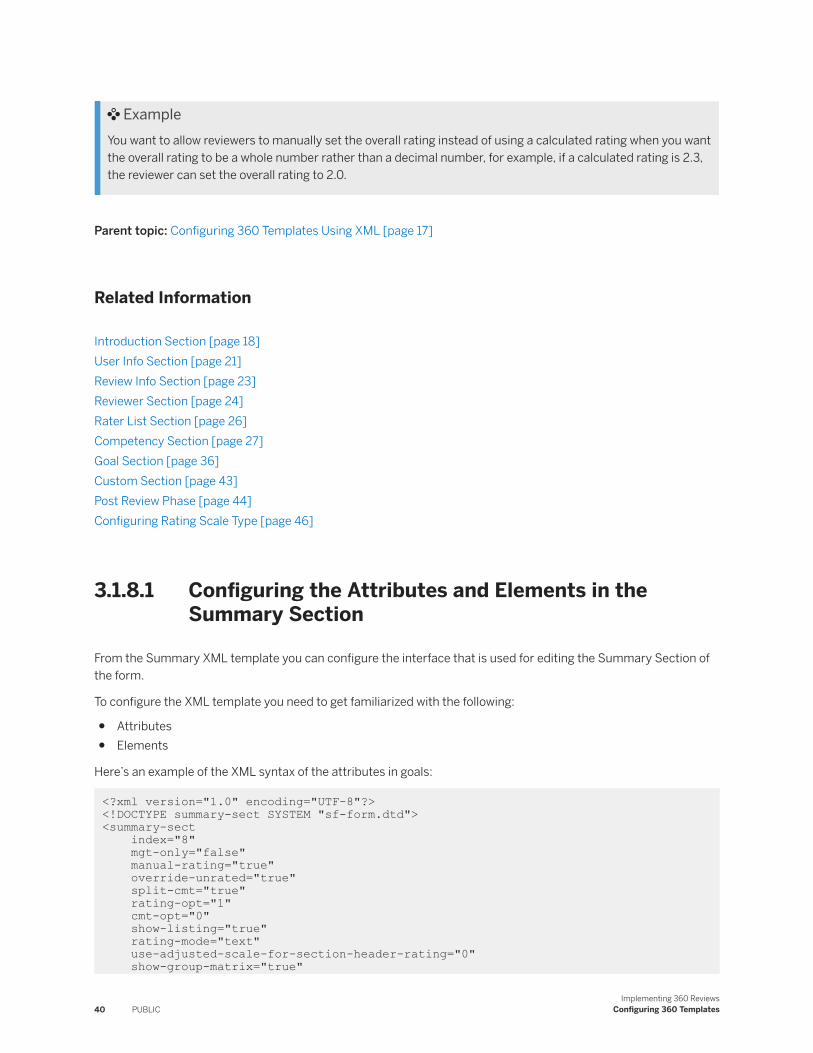
ExampleYou want to allow reviewers to manually set the overall rating instead of using a calculated rating when you want the overall rating to be a whole number rather than a decimal number, for example, if a calculated rating is 2.3, the reviewer can set the overall rating to 2.0.
Parent topic: Configuring 360 Templates Using XML [page 17]
Related Information
Introduction Section [page 18]User Info Section [page 21]Review Info Section [page 23]Reviewer Section [page 24]Rater List Section [page 26]Competency Section [page 27]Goal Section [page 36]Custom Section [page 43]Post Review Phase [page 44]Configuring Rating Scale Type [page 46]
3.1.8.1 Configuring the Attributes and Elements in the Summary Section
From the Summary XML template you can configure the interface that is used for editing the Summary Section of the form.
To configure the XML template you need to get familiarized with the following:
● Attributes● Elements
Here’s an example of the XML syntax of the attributes in goals:
<?xml version="1.0" encoding="UTF-8"?> <!DOCTYPE summary-sect SYSTEM "sf-form.dtd"><summary-sect index="8" mgt-only="false" manual-rating="true" override-unrated="true" split-cmt="true" rating-opt="1" cmt-opt="0" show-listing="true" rating-mode="text" use-adjusted-scale-for-section-header-rating="0" show-group-matrix="true"
40 PUBLICImplementing 360 Reviews
Configuring 360 Templates

overall-rating-display-order="manual-calc"> <summary-sect-name><![CDATA[Summary]]></summary-sect-name> <summary-sect-intro><![CDATA[]]></summary-sect-intro> <fm-sect-config> <rating-label><![CDATA[Rating]]></rating-label> <rating-label-others><![CDATA[Rating]]></rating-label-others> <default-rating><![CDATA[unrated]]></default-rating> <unrated-rating><![CDATA[Too new to rate]]></unrated-rating> <hidden-strength-threshold>0.0</hidden-strength-threshold> <blind-spot-threshold>0.0</blind-spot-threshold> <num-decimal-places>2</num-decimal-places> <publish-button-label><![CDATA[Publish Content]]></publish-button-label> </fm-sect-config> <show-gap-competencies-in-summary/> <allow-close-individual-gap-in-summary/> <show-gap-behaviors-in-summary/> <show-behaviors-in-summary/> </summary-sect>
Attributes
Attributes are a list of options that affect the behavior of the element. For example, the attribute index controls the order in which the sections are displayed in the form.
Attribute Description
Index The order in which sections are displayed in the form is controlled by section index number starting with index="0". As a result, the form XML can list sections in any order. When you move sections using Provisioning the index number assigned to a section will be updated automatically to reflect how you have re-arranged the sections in the form.
mgt-only obsolete
ask-4-comment obsolete; set to "false" always
manual-rating true to allow a user to put an overall rating that is different from the calculated one (if any);
if set to false, the summary-rating is the same as the calculated rating and fm-sect-scale is ignored if any, and users are not allowed to override it.
override-unrated This is applicable only if manual-rating is true.
● If manual rating is false, override-unrated is ignored.● If manual-rating is true and override-unrated is false, then the overall rating is always the manual rat
ing.● If manual-rating is true and override-unrated is true, then the overall rating will be the manual rating
unless the manual rating is unrated.● If the manual rating is unrated when the form is at the current step, then the overall rating won't be
overriden by the calculated rating.● If the manual rating is unrated when the form is routed, then the overall rating will default back to the
calculated rating.
split-cmt true if displaying subject and manager's comments side by side
rating-opt 0: default, no ratings next to each user's comment
Implementing 360 ReviewsConfiguring 360 Templates PUBLIC 41

Attribute Description
cmt-opt 0: Show section comments; default
1: No section comments;
show-listing true if allow listing; false if not; default is true
rating-mode "text" - default; display ratings in text
"graph" - display ratings in graphical form;
"mixed" - display ratings in both text and graphical forms.
If you use "graph" or "mixed" for rating-mode the graphical rating bars only appear in a completed document.
use-adjusted-scale-for-section-header-rating
Controls how the overall section rating is displayed in the summary section. If using text-based ratings, you have the option of having subtotals to use the same adjusted scale values from the meta section.
0 - DEFAULT: display the manual/calculated rating. For calculated, there is no rating label but just rating value.
1 -Text only --take the calculated/manual section rating and use the adjusted scale (defined in the meta section) to display the adjusted rating label and/or the adjusted rating value.
2 - a combination of 0 and 1. display the original rating but use the label from the adjusted scale.
show-group-matrix: true if allow group matrix display in the section; default is true
num-decimal-places
This attribute configures the number of decimal places for calculated ratings in the summary section. The default value is 2.
Elements
This table describes the Elements for Goals:
Element Description
summary-sect-name The name of the section. See fm-sect-name for details.
summary-sect-intro Introductory text that appears in the section. See fm-sect-intro for details.
fmsectconfig Controls the color of the section. See fmsectconfig for details.
fmsectconfig See fmsectconfig for details.
fieldpermission See fieldpermission for details.
fm-sect-scale Obsolete. It is replaced by fm-sect-scale in fm-meta if any.
summary-rating Overall rating of the 360 form if any. This defaults to the calculated average of all sections included in overall calculation.
calc-summary-rating Calculated Overall rating of the 360 form if any.
unadjusted-overall-summary-rating
the actual calculated overall form rating (ie, before any adjustments based on the adjusted-scale.
42 PUBLICImplementing 360 Reviews
Configuring 360 Templates

Element Description
overall-rating-label A non-zero-length string (including whitespace) will over-ride the default "Overall Form Rating" label. For example:
<overall-rating-label><![CDATA[Overall Ranking:]]></overall-rating-label>
calc-rating-label A non-zero-length string (including whitespace) will over-ride the default "Calculated Form Rating" label. For example:
<calc-rating-label><![CDATA[Computed Ranking (4 = 100%):]]></calc-rating-label>
group-matrix-other-label A non-zero-length string (including whitespace) will over-ride the default "Other" label.
show-gap-behaviors-in-summary The behaviors for each competency, if rated by behavior, is shown in the summary section of the form along with the gap analysis.
show-behaviors-in-summary The behaviors for each competency, if rated by behavior, is shown in the summary section of the form.
show-gap-competencies-in-summary
The gap analysis scale for competencies will appear in the Summary section of the form.
allow-close-individual-gap-in-summary
If this element is added to the Summary section of the form a clickable link will be available in the form for each competency item to add related development goal.
3.1.9 Custom Section
You can use custom sections to gather information that is not objective or competency based.
Custom section is a customized section to collect feedbacks from raters. It is not visible in the detailed 360 report. You can configure the 360 Custom Section in the same way as a Performance Management form.
Fields contained within a custom section consists of "custom fields" that are rendered "top-down" in a single column. The fields can be pre-populated with defaults that are editable to form reviewers. Custom fields are defined using fm-element.
NoteIf you use a checkbox type you must specify the value such as True, Y, or Yes. This is the value that is stored when user checks the box. If you do not specify a value, then no value is stored in the database.
XML Example
\\ <fm-sect index="8" mgt-only= " false " split-cmt= " false " cmt-opt= "1"> <fm-sect-name><![CDATA[Additional Comments]]></fm-sect-name>
Implementing 360 ReviewsConfiguring 360 Templates PUBLIC 43

<fm-sect-intro><![CDATA[Please use the spaces below to document areas of strength and areas for improvement.]]></fm-sect-intro> <fm-sect-config> <rating-label><![CDATA[Rating]]></rating-label> <rating-label-others><![CDATA[Rating]]></rating-label-others> < default-rating><![CDATA[unrated]]></ default-rating> <hidden-strength-threshold>0.0</hidden-strength-threshold> <blind-spot-threshold>0.0</blind-spot-threshold> </fm-sect-config> <fm-element index= "0" type= "9"> <ekey><![CDATA[TeamPlayerCheckBox]]></ekey> <ename><![CDATA[<b>Check here to indicate that if the Employee is a team player</b>]]></ename> <evalue><![CDATA[Y]]></evalue> </fm-element> <fm-element index= "1" type= "3"> <ekey><![CDATA[Date]]></ekey> <ename><![CDATA[How does the employee contribute to helping the team reach their overall objectives?]]></ename> <evalue><![CDATA[]]></evalue> </fm-element> </fm-sect> \\
RememberThis code snippet is a sample configuration. The exact configuration depends on your system settings.
Parent topic: Configuring 360 Templates Using XML [page 17]
Related Information
Introduction Section [page 18]User Info Section [page 21]Review Info Section [page 23]Reviewer Section [page 24]Rater List Section [page 26]Competency Section [page 27]Goal Section [page 36]Summary Section [page 39]Post Review Phase [page 44]Configuring Rating Scale Type [page 46]
3.1.10 Post Review Phase
The Post Review Phase can be used after the Evaluation Phase but before the Completion or Signature Phases.
In this phase, you can:
● Add more participants, for example, in the case where several of the originally-invited participants declined.
44 PUBLICImplementing 360 Reviews
Configuring 360 Templates

● Send forms back to participants to ask them to modify their feedback, for example, where the original feedback includes too much information to ensure anonymity or includes offensive or overly sensitive information.
● Insert summarizing comments that let you present comments or analysis on the overall feedback.
What you can do Comments
Allow a manager to review 360 participant feedback before sending it to the employee
This is a signature step added to the route map
Let the manager see the Detailed 360 Report before anyone else
You can control the timing and access to the Detailed 360 Report using the button permission for detailed-360-report in the form template XML and then setting, under form template administration, the Detailed 360 Report permission control to Use Form XML.
Let the manager see participant feedback Permission drill-down access to the manager
Allow manager to add additional participant or send forms back to participants for changes
You can create a competency section and make it editable during a 360 signature step. This is done by adding a sub-element <editable-in-signature-step> to a competency section. This is only valid for competency sections and 360 form templates.
To show this section only in during a signature step, use the section permissions to hide it at all other times. The primary use case is to employ the section comments, or repurpose competencies and use item comments. These comments appear in the Detailed 360 Report. Ratings entered into this section do not effect the overall 360 score and do not appear in the Detailed 360 Report.
Sample code for post review
<!DOCTYPE competency-sect SYSTEM "sf-form.dtd"> <competency-sect index= "7" configurable= "false " mgt-only= "false " use-jobcode= "false " category-filter-opt= "no-filter" no-rate= "true " no-weight= "true " summ-opt= "99" split-cmt= "true " rating-opt= "0" cmt-opt= "1" suppress-item-comments= "0" behavior-rating-opt= "0" behavior-cmt-opt= "0" behavior-mode-opt= "0" in-summ-display= "false " in-overall-rating= "false " no-group= "false " use-behavior= "false " if-no-ratings-then-ignore-section= "false " lock-item-weights= "false " in-objcomp-summ-display= "false " in-objcomp-summ-overall-rating= "false " show-comp-expected-rating= "false " show-comp-proficiency-level= "false " comp-expected-rating-format= "0" show-behavior-expected-rating= "false " behavior-expected-rating-format= "0" behavior-weighted= "false " sect-mode= "normal" ez-rater-expand-all= "false " show-calculated-section-rating= "true " lock-behavior-content= "false " hide-waca= "false "> <comp-sect-name><![CDATA[Overall 360 Comments]]></comp-sect-name> <fm-sect-config> <rating-label><![CDATA[Rating]]></rating-label> <rating-label-others><![CDATA[Rating]]></rating-label-others> < default-rating><![CDATA[unrated]]></ default-rating> <hidden-strength-threshold>0.0</hidden-strength-threshold> <blind-spot-threshold>0.0</blind-spot-threshold> <section-manager-comments-label><![CDATA[{0}'''s Comments]]></section-manager-comments-label>
Implementing 360 ReviewsConfiguring 360 Templates PUBLIC 45

<section-subject-comments-label><![CDATA[{0}'''s Comments]]></section-subject-comments-label> <manager-comments-label><![CDATA[{0}'''s Comments]]></manager-comments-label> <subject-comments-label><![CDATA[{0}'''s Comments]]></subject-comments-label> <section-permission type= "hidden"> <role-name>*</role-name> <route-step stepid= "EmpNom"/> <route-step stepid= "MgrNom"/> <route-step stepid= "HRNom"/> <route-step stepid= "EmpLaunch"/> <route-step stepid= "Eval"/> </section-permission> <num-decimal-places>2</num-decimal-places> <publish-button-label><![CDATA[Publish Content]]></publish-button-label> </fm-sect-config> <editable-in-signature-step/> <sect-weight>0.0</sect-weight> <fm-sect-scale show-value= "true "> <scale-source>1</scale-source> <scale-id><![CDATA[360 Scale]]></scale-id> <scale-type><![CDATA[DROPDOWN]]></scale-type> </fm-sect-scale> <meta-grp-label><![CDATA[Group]]></meta-grp-label> </competency-sect>
RememberThis code snippet is a sample configuration. The exact configuration depends on your system settings.
Parent topic: Configuring 360 Templates Using XML [page 17]
Related Information
Introduction Section [page 18]User Info Section [page 21]Review Info Section [page 23]Reviewer Section [page 24]Rater List Section [page 26]Competency Section [page 27]Goal Section [page 36]Summary Section [page 39]Custom Section [page 43]Configuring Rating Scale Type [page 46]
3.1.11 Configuring Rating Scale Type
You can associate different rating scale types with goal sections and competency sections.
The rating scale type is configured in form template XML file by using the fm-sect-scale element. For example:
<fm-sect-scale show-value="true"> <scale-source>1</scale-source> <scale-id><![CDATA[2005b]]></scale-id> <scale-type><![CDATA[DROPDOWN]]></scale-type> </fm-sect-scale>
46 PUBLICImplementing 360 Reviews
Configuring 360 Templates

In 360 Reviews forms of SAP Fiori version, the scale type is displayed as dropdown list in related section for the following configurations:
● When you select the Hide numeric rating values (only show text labels) option through Manage TemplatesGeneral Settings .
NoteThis option applies to all sections in a form.
● When the show-value attribute is set to false.● When the maximum rating value is larger than 5. For example, you set up a 6-point rating scale.● When the reverse-scale attribute is set to true.
The 360 Reviews v11 Version and 360 Reviews - SAP Fiori Version support different rating scale types. For details, check the following table.
Comparison of Supported Ratings Scale Type Between 360 Reviews v11 Version and 360 Reviews - SAP Fiori Version
Scale Type 360 Reviews v11 Version 360 Reviews - SAP Fiori Version
Dropdown list Support Support
Radio Not support
NoteIf you set the rating scale type to radio, horizontal radio, or free text for a 360 Reviews form of SAP Fiori version, it’s automatically converted into star.
Horizontal radio
Free text
Star Not support Support
Circle
Parent topic: Configuring 360 Templates Using XML [page 17]
Related Information
Introduction Section [page 18]User Info Section [page 21]Review Info Section [page 23]Reviewer Section [page 24]Rater List Section [page 26]Competency Section [page 27]Goal Section [page 36]Summary Section [page 39]Custom Section [page 43]Post Review Phase [page 44]
Implementing 360 ReviewsConfiguring 360 Templates PUBLIC 47
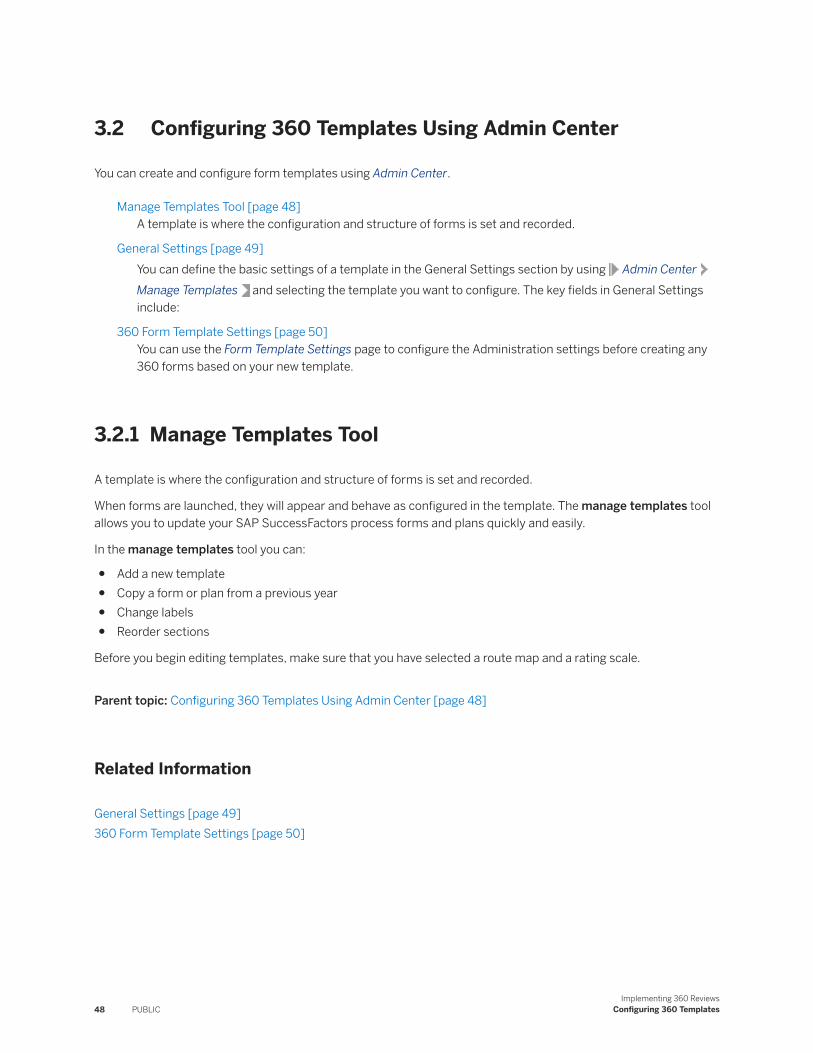
3.2 Configuring 360 Templates Using Admin Center
You can create and configure form templates using Admin Center.
Manage Templates Tool [page 48]A template is where the configuration and structure of forms is set and recorded.
General Settings [page 49]You can define the basic settings of a template in the General Settings section by using Admin CenterManage Templates and selecting the template you want to configure. The key fields in General Settings include:
360 Form Template Settings [page 50]You can use the Form Template Settings page to configure the Administration settings before creating any 360 forms based on your new template.
3.2.1 Manage Templates Tool
A template is where the configuration and structure of forms is set and recorded.
When forms are launched, they will appear and behave as configured in the template. The manage templates tool allows you to update your SAP SuccessFactors process forms and plans quickly and easily.
In the manage templates tool you can:
● Add a new template● Copy a form or plan from a previous year● Change labels● Reorder sections
Before you begin editing templates, make sure that you have selected a route map and a rating scale.
Parent topic: Configuring 360 Templates Using Admin Center [page 48]
Related Information
General Settings [page 49]360 Form Template Settings [page 50]
48 PUBLICImplementing 360 Reviews
Configuring 360 Templates

3.2.1.1 Creating a Form Template
Create a form template so that you can configure the form template for performance reviews.
Procedure
1. In Admin Center, go to Manage Templates.The Manage Template page opens.
2. Choose Performance Review tab.3. Choose Add a New Template.
The SuccessStore dialog box opens to display prebuilt templates.4. Choose the template that you want to use.5. Choose Add to My Instance.6. In the Save as New Template dialog box, enter a name for your template.7. Choose Save.
A form template is created.
Next Steps
Configure the general settings and edit fields and sections of the form template.
3.2.2 General Settings
You can define the basic settings of a template in the General Settings section by using Admin Center Manage Templates and selecting the template you want to configure. The key fields in General Settings include:
Field Description
Name Title of the template that will be visible to end users. Currently you can't add translations in the Manage Templates tool, but you can configure message keys in 360 form template XML to support translations.
Description Short description of the form that is only visible in the “Manage Templates” area to administrators.
Route Map Directs the workflow of the form during the review cycle and is required before saving the form template.
Implementing 360 ReviewsConfiguring 360 Templates PUBLIC 49

Field Description
Rating Scale The default scale for all sections of the performance form. If you choose to have a different scale for another ratable section (that is, Competencies, Goals, Summary), you may associate a scale to each of those sections individually.
Hide numeric rating values The rating scale is a simple dropdown list with only the text of each scale anchor (that is, Exceeds Expectations) visible. If you’re using 360 Reviews - SAP Fiori Version, when the field is enabled, the “star” or “circle” rating bubbles are no longer visible.
Unable to rate Allows an additional selection added to the rating scale that is the equivalent of a “Not Applicable” score where there’s no positive or negative impact to the subject of the form. This field overrides all other sections of the form that are ratable, so if only specific sections should have this option, configure in those respective sections, not General Settings.
Enabled anonymity in the 360 reporting functions Select if you want to protect the anonymity of participants in the 360 detailed report. Only the aggregate scores are available.
Advanced Settings Links to “Form Template Settings”.
Parent topic: Configuring 360 Templates Using Admin Center [page 48]
Related Information
Manage Templates Tool [page 48]360 Form Template Settings [page 50]
3.2.3 360 Form Template Settings
You can use the Form Template Settings page to configure the Administration settings before creating any 360 forms based on your new template.
You can use Categories, Roll-up, and Thresholds to help keep responses anonymous. You can also control who has access to the Detailed 360 report using Admin Tools Form Template Administration settings.
The Process Owner, Employee, Manager/HR, Approvers, and Users with Detailed Reporting Privileges can selectively be granted access to view the Detailed 360 Report. The Process Owner for a 360 for is the person who sends the 360 out for feedback. So, in other words, the last person to touch the form before it is sent out to the participants.
50 PUBLICImplementing 360 Reviews
Configuring 360 Templates

Setting Description
Template Name ● the external name of your template● upon creation, forms will also include this name in the form title● template name can be changed at any time although not recommended● you can configure the template name in different languages
NoteIf the form setting in Company System and Logo Settings is All documents will display their form template name at the time the document was created. This option does not support translations of the document name,○ when the template name is changed after the form is launched, users can't see
the changed form title in the form.○ the form title isn't adapted to logged-in users' language settings, but is displayed
in the default language.
If the form setting is All documents will display their current form template name as configured in the Form Template Administration settings. This option supports translations of the document name,○ when the template name is changed after the form is launched, users can see
the changed form title in the form.○ once the template name is configured in logged-in users' language, the form title
is displayed in logged-in users' language.
● form data reporting is driven off external name not internal id
Template Type ● not editable, read only● type is set when form template is uploaded● form XML syntax identifies template type
Last Modified ● not editable, read only● identifies when the template was uploaded or last modified in Provisioning
Routing Map ● determines the workflow/routing and stages of a form● route map must already be defined before it can be associated with a template that is,
available for selection in the drop down list
Default Dates for Form Creation
Set the Default Start, End, and Due dates either Fixed or Relative to the:
● Form Creation Date● Default Start Date● Default Due Date
Default Due Notification Date (in days)
Specifies the timeframe in which an email notice is sent to a user informing them that the form is due. The timeframe is a number of days in relation to the form's due date. For example, if you specify 7, the notice is sent 7 before the form is due.
Regardless of this setting, the Document Due Notification will not be sent in the following circumstances:
● If you select the Disable Due Notification option
Implementing 360 ReviewsConfiguring 360 Templates PUBLIC 51

Setting Description
● If the user's email notifications are turned off (Turning Email Notifications On or Off for Users)
● If the Document Due Notification email notification is turned off (Defining Your Company Email Notifications)
This change applies to existing forms as well as newly created forms.
Default Late Notification Date (in days):
Specifies the timeframe in which an email notice is sent to a user informing them that the form is late.
The timeframe is determined in relation to the form's due date. For example, you can specify that a notice is sent 7 after the form was due.
Enter a number in this field. For example, enter 7 if you want the email notice sent 7 days after the form was due.
Default Due Notification Date (in days)
● used to set the default date upon which an email notification is sent to the user who has the form in his/her Inbox that the form due date is approaching
● calculated based on form due date- number of days specified● emails are sent during off business hours, after midnight EST
Default Late Notification Date (in days)
● used to set the default date upon which an email notification is sent to the user who has the form in his/her Inbox that the form is past due
● calculated based on form due date + number of days specified● emails are sent during off business hours, after midnight EST
Template Status ● choices are Enable or Disable● Enable – enables the form to be created by users assigned permission to create the form● Disable – prevents the form from being created; does not revoke the permission to create
the form from users who were granted permission
Template Flag ● choices are Public or Private● applicable to forms only, not notes● Public – forms are transferable whenever a manager-transfer process is started. For
example, all public forms under the old manager are transferred to the new manager. Most forms are Public.
● Private – forms are not transferred during the manager-transfer process. A Private form remains with the original manager, that is,. it will not be transferred with any public forms that are transferred to the new manager.
● This flag has no impact on the route map and if there are any EM steps in the route map that have not yet been completed, these EM steps will reference and route the form to the new manager at that time.
Do Not Transfer Documents If enabled, forms cannot be transferred.
Setting this option disables all the options nested under this option. It means forms will not get transferred when the manager changes regardless of any other settings you have elsewhere.
NoteThis is for current step only. Future steps will still show the new manager
52 PUBLICImplementing 360 Reviews
Configuring 360 Templates

Setting Description
Automatic Manager Transfer Select...
● Automatic insertion of new manager as next document recipient if not already: This will automatically select the new manager as the recipient of the form if not already selected.
● Automatic Inbox Document Transfer To New Manager: This will automatically transfer the form to the new manager's inbox
● Automatic En Route Document Transfer To New Manager: This form will get automatically forwarded to the new manager's for further action.
● Automatic Completed Document Copy to New Manager: This will automatically copy the completed form to the new manager.
● Hide Visibility After Document Transfer: After the form gets transferred the visibility of the form will be hidden from the old manager.
● Automatic Process Owner Change To New Manager For In-Progress Documents When Old Manager is Process Owner (Only for 360)
● Automatic Process Owner Change To New Manager For Completed Documents When Old Manager is Process Owner (Only for 360)
When transferring 360 documents from old manager`s inbox folder to new manager, do not auto decline old manager`s participant forms in evaluation.
Select this option when transferring 360 documents from old manager`s inbox folder to new manager, do not auto decline old manager`s participant forms in evaluation.
When transferring 360 documents which are in evaluation stage, add new manager as a participant. (If new manager is a removed participant, he/she will be re-added.)
Select this option when transferring 360 documents which are in evaluation stage, add new manager as a participant. (If new manager is a removed participant, he/she will be re-added.)
When the system is configured to remove documents for inactive employees, apply these overrides so the system does not remove documents for this form template
● When an employee is set to inactive, this setting overrides the global setting that may remove inactive employee's documents. This setting may be useful when an employee is terminated yet still has an active form that entitles eligibility for incentive pay.○ Do Not Remove Inactive Employee's In-Progress Documents.○ Do Not Remove Inactive Employee's Completed Documents.○ Do Not Remove Inactive Employees' 360 Evaluation Documents
Default Targets ● choices are Self and Direct Reports, Self Only, or Direct Reports Only● Self and Direct Reports – enables a user to create a form for which he/she or one of
his/her direct reports is the subject● Self Only – enables a user to create a form for which he/she is the subject● Direct Reports Only – enables a user to create a form for which one of his/her direct
report is the subject● HR Reports Only- enables a user to create a form for which HR report is the subject
Implementing 360 ReviewsConfiguring 360 Templates PUBLIC 53

Setting Description
● Self and Matrix Reports- enables a user to create a form for which he/she or one of his/her matrix reports is the subject
● Matrix Reports Only- enables a user to create a form for which one of his/her matrix reports is the subject
● the user creating the form is called the form originator● see also setting for Allow form creator to select anyone as a subject
Keep last touched version upon Document completion
If enabled, the version of the form on which the last action was performed is saved.
Enable Auto Logout at Session Timeout
If enabled, you will be automatically logged out of the system when the session gets timed out.
Enable Auto Restore Deleted Form When Importing User
● In the case of employees who've been deactivated and are reactivated, restores the most recent deleted for that employee when they are imported into the system.
● Only forms that were in an in-progress state when deleted will be restored. Completed forms will not be restored.
● If document transfer option is disabled, and the manager info has changed, the managers associated with the form at the time it was deleted will remain the same when the form is restored for the user
● If the manager associated with the user has changed since the user was reactivated, the manager in the form will still remain the same as it was at the time the form was deleted.
● If document transfer option is enabled, and the manager info has changed, the managers associated with the form at the time it was deleted In this case, we will first restore the In-Progress documents and then follow the rest of the document transfer rules.
● If form was out for feedback when deleted, form will be restored to individual who the form was with
Enable Spell Check ● Enables spell checking for each form comment box● A Spell Check button will be available with each item● Company must be provisioned with the spell checking feature.
RememberAs a customer, you don't have access to Provisioning. To complete tasks in Provisioning, contact your implementation partner. If you're no longer working with an implementation partner, contact Product Support.
Enable Legal Scan If enabled, the form is scanned for potentially improper or discriminatory language in comment sections of form.
Disable Spell Check on Route If you have enabled spell check in Provisioning, the spell check on route is enabled. With this feature, a spell check is run each time the form routes to the next step. To disable it, choose Disable Spell Check on Route.
RememberAs a customer, you don't have access to Provisioning. To complete tasks in Provisioning, contact your implementation partner. If you're no longer working with an implementation partner, contact Product Support.
54 PUBLICImplementing 360 Reviews
Configuring 360 Templates

Setting Description
Disable Legal Scan on Route If you have enabled legal scan in Provisioning, the legal scan on route is enabled. With this feature, a legal scan is run each time the form routes to the next step. To disable it, choose Disable Legal Scan on Route.
RememberAs a customer, you don't have access to Provisioning. To complete tasks in Provisioning, contact your implementation partner. If you're no longer working with an implementation partner, contact Product Support.
Enable Writing Assistant Displays a writing assistant hyperlink for each form comment box that provides context sensitive assistance to the form's content. Company must be provisioned with the writing assistant feature.
RememberAs a customer, you don't have access to Provisioning. To complete tasks in Provisioning, contact your implementation partner. If you're no longer working with an implementation partner, contact Product Support.
Disable Ask for Edit Routing Disables the edit functionality when using Get Feedback
Bypass Draft Routing No longer allows users to create a new form as a draft version (Draft Mode). When you select this option, users won't be able to edit the form before routing it to others for evaluation. This change applies to newly created forms only, it doesn't affect existing forms.
Disable All Toolbar Buttons (overrides all button selections below)
If enabled, disables all the Toolbar Buttons
Disable All Toolbar Buttons (overrides all button selections below)
If enabled, hides all of the icons, and actions and history drop-downs at the top of the page.
Disable Print Button If enabled, it hides the Print button.
Disable Send and Open Next Form Button
If enabled, it hides Send and Open Next Form button at the bottom of the Performance Form.
Disable Page Setup button ● Not applicable to Performance Management v12Acceleration● Not applicable to 360 Reviews- SAP Fiori Version
Disable Delete button If enabled, hides the delete action from the form list and the Actions menu on forms.
NoteThe ability to delete forms is available to only form originators and the manager of the form subject.
Implementing 360 ReviewsConfiguring 360 Templates PUBLIC 55

Setting Description
If you only want to hide the delete action from the Actions menu on forms, enable
Provisioning Company Settings Hide Delete Icon inside Form , and make sure Disable Delete button unchecked.
RememberAs a customer, you don't have access to Provisioning. To complete tasks in Provisioning, contact your implementation partner. If you're no longer working with an implementation partner, contact Product Support.
Disable Note button ● If enabled, hides Notes information from the Supporting Information pod.
Disable Form button If enabled, hides the Performance Forms selection from the History drop-down.
Disable 360 button If enabled, hides the 360 Forms selection from the History drop-down.
Disable Info button If enabled, it hides the document information that would otherwise be viewable in a pop-up window.
NoteThe document info button displays info about the routing – who has handled the document in the past (and when they sent it to the next person), where it will go in the future.
Disable Download button● Note
This option is available only for PM v11 forms, not for PM v12 Acceleration forms.
Disable Send button ● prevents users from being able to send a form● disabling the Send button will keep the form in the Inbox unless the form can be deleted
or until the Send button is enabled to send the form onto Completion
Disable Send button for completed documents
If enabled, Send button for completed forms is disabled.
Disable Late Notification ● suppresses email notifications informing users when a form is late● turns off the notification for the form only and not for other forms that are enabled in the
instance
Disable Due Notification ● suppresses email notifications informing users when a form is due● turns off the notification for the form only and not for other forms that are enabled in the
instance
Disable Step Exit Notification ● suppresses email notifications informing users when a routing step has been completed, that is, when a form moves from one workflow stage to another
● turns off the notification for the form only and not for other forms that are enabled in the instance
56 PUBLICImplementing 360 Reviews
Configuring 360 Templates

Setting Description
Allow form creator to select anyone as a subject
● allows users to select a form subject outside of self or direct reports● a "Find User" search box will appear in the New Document wizard
Allow Matrix Manager to Delete document if Delete button is available
If enabled, the matrix manager is allowed to delete the form if the Delete button is available.
Show Signoff routing step names in Signoff Stage
If enabled, the Signoff routing step names are displayed in Signoff Stage.
Show Participants in Status Summary (Applicable to Anonymous 360's only)
Applicable only for Anonymous 360s. Displays the names of the participants (in random order) in the Participant List summary during the evaluation phase of an Anonymous 360. This option is only applicable to Anonymous 360s. You can't use this option with Named 360 evaluations. By default, no participant names are listed for Anonymous 360s.
When you select this option, you're allowing participant names to be displayed on the Participant List during the evaluation phase. Names are displayed in random order, with no way to correlate the names with actual reviews, so anonymity isn't jeopardized.
You might want to use this feature if you're also using the Enable Add New Participants after 360 Evaluation starts option, because your users can see who they've already chosen to participate, and if they need to add more users, they can ensure that they aren't selecting the same users.
Allow Re-Selection of Removed Participants to Feedback Team after 360 Evaluation starts
Allows employees to add back Participants they’ve deleted from the form. Now, when employees want to add back a deleted Participant, they can find the form in their En Route folder (My Forms page) and use the Add New Participants page to add the deleted Participant again. The deleted Participant will be shown with their original category settings.
Don't display the subject's Manager and HR Rep. by default as potential participants
If enabled, the subject's Manager and HR Rep. is not displayed by default as potential participants
Hide dropped users records in 360 Ad Hoc report (Important Note: Report synchronization is required after this configuration to ensure that dropped users in existing forms will not be displayed in 360 ad-hoc report .Please go to Company Settings and run "Sync" in 360 Multi-Rater Subject.)
Category Weight Setting Enabled any of the following:
● Enable category weight normalization
Implementing 360 ReviewsConfiguring 360 Templates PUBLIC 57

Setting Description
● Hide category weight tips in Summary View● Hide category weight legend in Detail Report
Participants Threshold Control
Apply Threshold On..
Refers to the minimum number of participants required before the ratings and comments from peers will be displayed. The level can be set to:
● Participant Level - Recommended● Item Level
The better choice is almost ALWAYS "Participant Level". The reason we recommend using Participant Level is because let's say 3 people have been asked to rate an employee. Each of those raters skip a question. The threshold is set = 3. That means none of the raters responses would show up (unless you have roll-up turned on). The user could end up missing valuable information that is included in those reviews
Enable 360 Drilldown Permission for...
Specifies which 360 Participants can view the individual evaluation results. You can choose more than one type of Participant. Your selections apply only to this type of form, and they override any default company settings.
NoteThese Participant options work in conjunction with each other, meaning users who fit in more than one category will get included. For example, if you select Manager/HR and Approvers because you want to exclude the subject of the evaluation (Employee), then make sure that the subject is not also one of the Approvers. Otherwise, the subject will be included, even though you didn't specifically choose the option.
The participant choices are:
● Process Owner - The last person to modify the form before it's distributed to others for evaluation.
● Employee The person who is the subject of the 360 evaluation.● Users With Detailed Reports Privilege Any person who also belongs to a user group that
has the Detailed Reports Privilege associated with it.● Manager/HR The manager or the HR representative of the subject of the form.● Approvers Everyone who contributed to, or modified, the content of the form before it
was distributed for evaluation.
This change applies to existing forms as well as newly created forms.
Detailed 360 Report Permission Control
● Use Form XML● Enable 360 Detailed Report Permission for:
○ Process Owner:○ Employee:○ Users With Detailed Reports Privilege:○ Manager of Employee's Manager:○ Manager:○ HR Rep. :
58 PUBLICImplementing 360 Reviews
Configuring 360 Templates

Setting Description
○ Approvers:Refers to who will have the Detailed 360 Report link on the 360 form. If someone with permission to access the report link sends you the completed 360, you "inherit" that person's permission to access the report link.
Hide Detailed 360 Report link unless participants complete their forms.
Disable Detailed 360 Report button in routing bar
Hide the 'decline to participate' button on the 360 form for...
Hides the Decline to Participate button from the specified role.
The participant choices are:
● Process Owner - The last person to modify the form before it's distributed to others for evaluation.
● Manager/HR The manager or the HR representative of the subject of the form.● Employee The person who is the subject of the 360 evaluation.● Approvers Everyone who contributed to, or modified, the content of the form before it
was distributed for evaluation.● All raters - Tip Use this option if you want to let users choose whether they want to
Enable Add New Participants after 360 Evaluation starts for:
You can decide which roles are allowed to add more participants during the evaluation phase. This feature gives you the ability to add new participants to a 360 after the evaluation has started. It does not enable you to add participants to a 360 that has been completed by all participants.
The available roles that can be granted permission are:
Process Owner, Manager/HR, Employee, Approvers
Enable Send Back for When enabled any of the selected roles can send the form back.
Enable Send Reminder Email for:
When enabled the selected roles can send the reminder emails to participants.
Enable Remove Participants after 360 Evaluation starts for:
Defines who will have permission to remove participants from the form.
Enable Gap Analysis View from Detailed 360 Report
Allows users to see the Gap Analysis view of the Detailed 360 report. If you select this option, users will see a Gap Analysis View button in the Detailed 360 report.
Enable Rank View from Detailed 360 Report
Allows users to see the Rank view of the Detailed 360 report. If you select this option, users will see a Rank View button in the Detailed 360 report.
Show Display Options in Graphical Summary View
Specifies which sections users see by default in the Graphical Summary view of the Detailed 360 report. If this option is selected, users will only see the selected sections by default, but
Implementing 360 ReviewsConfiguring 360 Templates PUBLIC 59
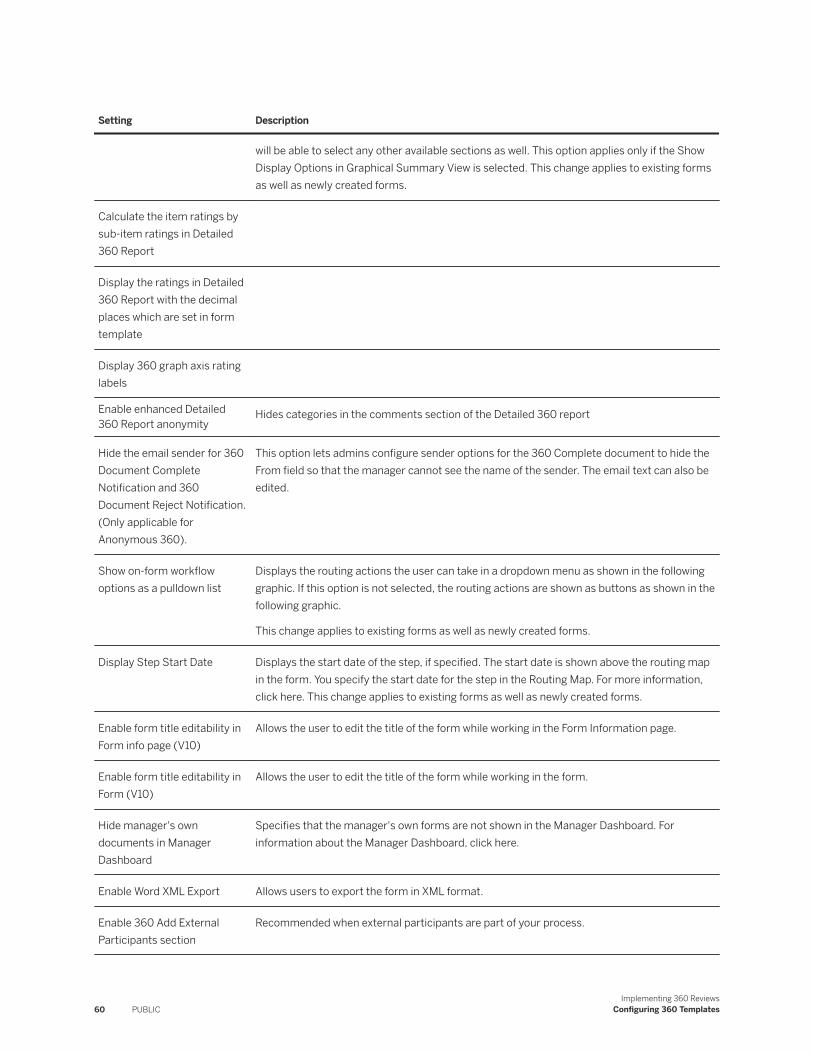
Setting Description
will be able to select any other available sections as well. This option applies only if the Show Display Options in Graphical Summary View is selected. This change applies to existing forms as well as newly created forms.
Calculate the item ratings by sub-item ratings in Detailed 360 Report
Display the ratings in Detailed 360 Report with the decimal places which are set in form template
Display 360 graph axis rating labels
Enable enhanced Detailed 360 Report anonymity
Hides categories in the comments section of the Detailed 360 report
Hide the email sender for 360 Document Complete Notification and 360 Document Reject Notification. (Only applicable for Anonymous 360).
This option lets admins configure sender options for the 360 Complete document to hide the From field so that the manager cannot see the name of the sender. The email text can also be edited.
Show on-form workflow options as a pulldown list
Displays the routing actions the user can take in a dropdown menu as shown in the following graphic. If this option is not selected, the routing actions are shown as buttons as shown in the following graphic.
This change applies to existing forms as well as newly created forms.
Display Step Start Date Displays the start date of the step, if specified. The start date is shown above the routing map in the form. You specify the start date for the step in the Routing Map. For more information, click here. This change applies to existing forms as well as newly created forms.
Enable form title editability in Form info page (V10)
Allows the user to edit the title of the form while working in the Form Information page.
Enable form title editability in Form (V10)
Allows the user to edit the title of the form while working in the form.
Hide manager's own documents in Manager Dashboard
Specifies that the manager's own forms are not shown in the Manager Dashboard. For information about the Manager Dashboard, click here.
Enable Word XML Export Allows users to export the form in XML format.
Enable 360 Add External Participants section
Recommended when external participants are part of your process.
60 PUBLICImplementing 360 Reviews
Configuring 360 Templates

Setting Description
Disallow further invitations when a user has already been invited to rate forms. (The option will be regarded as disabled if the maximum number is set zero.)
Hide the Show Assignment button.
No longer allows the form's originator to select sections that participants can rate. If you select this option, all participants will have to provide ratings for all sections.
Only create for users who don't have an existing form with an End Date between...and...
Allows you to create the form only for employees who haven't received this form already, for example newly hired employees or employees who are new to the system. If you select this option, specify the timeframe in the mm/dd/yyyy format. For example, if you specify 01/31/2015 and 2/28/2015, the users who received this form with the End Date between 1/31/2015 and 02/28/2015 will not receive the form.
Show digital signatures in Document Print Preview
Specifies that the signer's name is shown on the printed copy of the form as well as their role and the date when the user signed the form. If you don't select this option, only the signer's role and date when the user signed the form is shown.
Hide the link to the detailed 360 report in the En Route and Completed folders until all users have completed the 360
Prevents users from viewing the Detailed 360 report until all participants have completed the form. Note We recommend selecting this option. Otherwise, users will be able to view the Detailed 360 report at any time, even before all participants have provided their ratings. In this case, the report might show inaccurate results. This change applies to existing forms as well as newly created forms.
Disable Due Date Validation Specifies that SAP SuccessFactors doesn't check whether the Due Date of the form is valid. For example, to be valid, the form's Due Date must be later then its End Date and Start Date.
Disallow users from changing the Start Date
Prevents employees who can create forms from changing the start date, end date, or due date of the form. If this option is selected, the Start Date specified in the form template will always be used, users won't be able to change this date when creating the form.
This change applies to existing forms as well as newly created forms. Displays the start date of the step, if specified. The start date is shown above the routing map in the form. You specify the start date for the step in the Routing Map.
Disallow users from changing the End Date
Prevents employees who can create forms from changing the start date, end date, or due date of the form. If this option is selected, the Start Date specified in the form template will always be used, users won't be able to change this date when creating the form. This change applies to existing forms as well as newly created forms.
Disallow users from changing the Due Date
Disallow users from changing the Due Date Prevents employees who can create forms from changing the due date of the form. If this option is selected, the Due Date specified in the form template will always be used, users won't be able to change this date when creating the form. This change applies to existing forms as well as newly created forms.
Enable form routing to previous step
Recommended. Greatly improves workflow options allowing a person to send the form back when data is missing or extra information is desired.
Implementing 360 ReviewsConfiguring 360 Templates PUBLIC 61
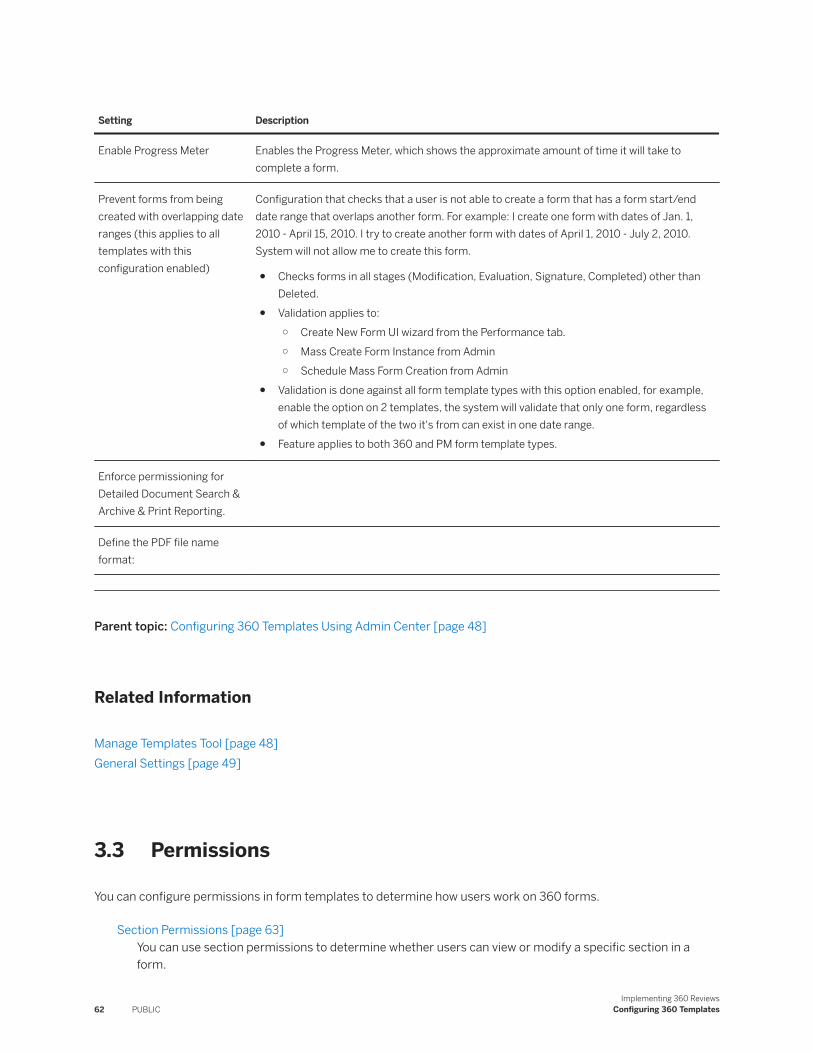
Setting Description
Enable Progress Meter Enables the Progress Meter, which shows the approximate amount of time it will take to complete a form.
Prevent forms from being created with overlapping date ranges (this applies to all templates with this configuration enabled)
Configuration that checks that a user is not able to create a form that has a form start/end date range that overlaps another form. For example: I create one form with dates of Jan. 1, 2010 - April 15, 2010. I try to create another form with dates of April 1, 2010 - July 2, 2010. System will not allow me to create this form.
● Checks forms in all stages (Modification, Evaluation, Signature, Completed) other than Deleted.
● Validation applies to:○ Create New Form UI wizard from the Performance tab.○ Mass Create Form Instance from Admin○ Schedule Mass Form Creation from Admin
● Validation is done against all form template types with this option enabled, for example, enable the option on 2 templates, the system will validate that only one form, regardless of which template of the two it's from can exist in one date range.
● Feature applies to both 360 and PM form template types.
Enforce permissioning for Detailed Document Search & Archive & Print Reporting.
Define the PDF file name format:
Parent topic: Configuring 360 Templates Using Admin Center [page 48]
Related Information
Manage Templates Tool [page 48]General Settings [page 49]
3.3 Permissions
You can configure permissions in form templates to determine how users work on 360 forms.
Section Permissions [page 63]You can use section permissions to determine whether users can view or modify a specific section in a form.
62 PUBLICImplementing 360 Reviews
Configuring 360 Templates

Field Permissions [page 64]You can use field permissions to control whether users can view or modify a specific field of a 360 form.
Drilldown Permissions [page 65]You can use drilldown permission to determine who can view the evaluation details from raters in the Summary View.
Rater ID Permissions [page 66]You can work with implementation partners to define who can see the rater identities along with the routing step using rater-id-permission in Provisioning.
3.3.1 Section Permissions
You can use section permissions to determine whether users can view or modify a specific section in a form.
By default, section permissions are "enabled" for all users and all sections. You can configure section permissions in Provisioning.
RememberAs a customer, you don't have access to Provisioning. To complete tasks in Provisioning, contact your implementation partner. If you're no longer working with an implementation partner, contact Product Support.
Type of Access
● enabled: users can see the section● disabled: user can see the section with read only on fields● hidden: user can't see the section.
XML Example: Making a section "enabled" only for HR and Manager
In the example below, only the HR and manager can access and modify the section.
<section-permission type="hidden"> <role-name>*</role-name> <route-step stepid="*"/> </section-permission> <section-permission type="enabled"> <role-name>EM</role-name> <role-name>EH</role-name> <route-step stepid="*"/> </section-permission>
NoteNo role-name (*) means all roles, and no route-step (stepid = "*") means all steps.
Implementing 360 ReviewsConfiguring 360 Templates PUBLIC 63
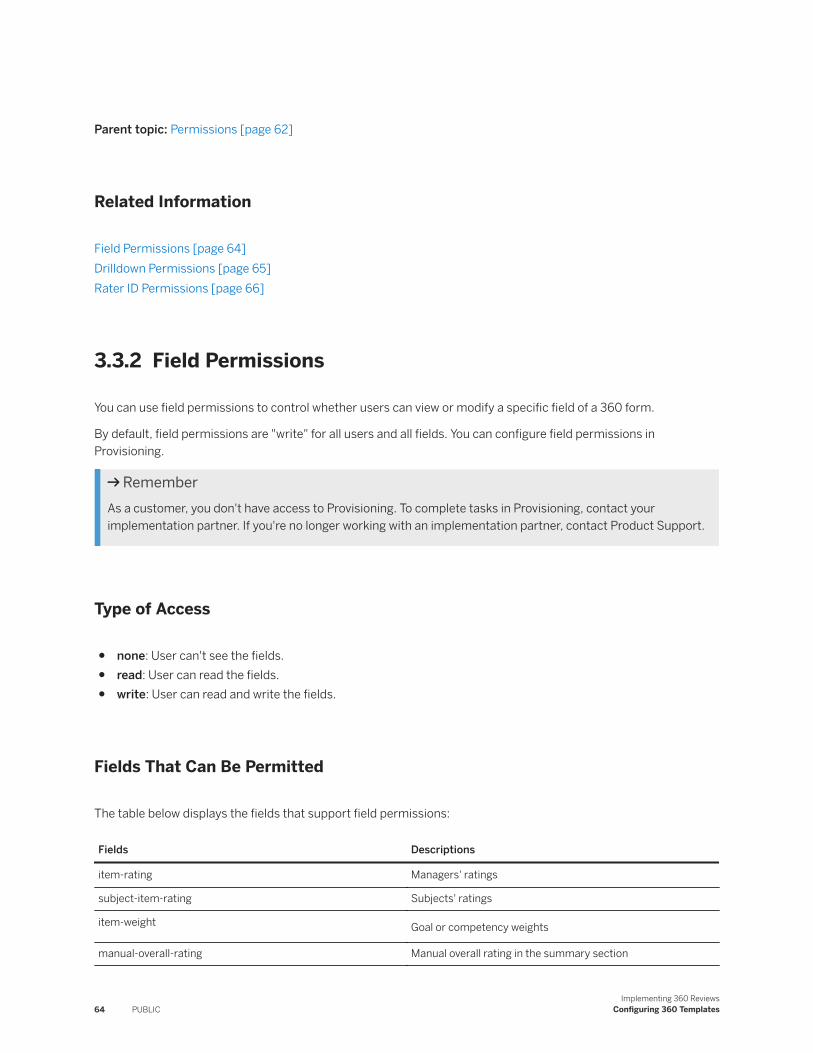
Parent topic: Permissions [page 62]
Related Information
Field Permissions [page 64]Drilldown Permissions [page 65]Rater ID Permissions [page 66]
3.3.2 Field Permissions
You can use field permissions to control whether users can view or modify a specific field of a 360 form.
By default, field permissions are "write" for all users and all fields. You can configure field permissions in Provisioning.
RememberAs a customer, you don't have access to Provisioning. To complete tasks in Provisioning, contact your implementation partner. If you're no longer working with an implementation partner, contact Product Support.
Type of Access
● none: User can't see the fields.● read: User can read the fields.● write: User can read and write the fields.
Fields That Can Be Permitted
The table below displays the fields that support field permissions:
Fields Descriptions
item-rating Managers' ratings
subject-item-rating Subjects' ratings
item-weight Goal or competency weights
manual-overall-rating Manual overall rating in the summary section
64 PUBLICImplementing 360 Reviews
Configuring 360 Templates

Fields Descriptions
calculated-overall-rating Calculated overall rating in the summary section
NoteThis field isn’t editable. If you set the field permission as Write, it’s interpreted as Read.
review-period The start, end, and due dates in the review information section
tgmfields It affects goal category, goal weight link, goal state, goal metric, goal details, and other details
XML Examples: Making the Review Period Read-Only
The following example shows how to make the review dates read-only to all users.
<field-permission type="read"> <field refid="review-period"/> </field-permission>
Parent topic: Permissions [page 62]
Related Information
Section Permissions [page 63]Drilldown Permissions [page 65]Rater ID Permissions [page 66]
3.3.3 Drilldown Permissions
You can use drilldown permission to determine who can view the evaluation details from raters in the Summary View.
To grant drilldown permission, go to Admin Center Form Template Settings and choose a template. Then select Enable 360 Drilldown Permission for: for the following available roles:
● Process Owner: the last Modify step user● Employee: the form subject● Users With Detailed Reports Privilege: any user who belongs to a user group that is granted with the Detailed
Reports Privilege● Manager: the manager of the form subject
Implementing 360 ReviewsConfiguring 360 Templates PUBLIC 65

● HR: the HR representative of the form subject● Approvers:: any user who modified the form before it is sent for evaluation
Once the selected users are granted the drilldown permission, they can navigate to Summary View Evaluation Summary on a 360 form, and click a rater's name to view the form that the rater completed.
NoteThe drilldown permission only allows users to view the form completed by raters, and what users can see on the form is determined by form specific permissions such as section permissions and field permissions.
Parent topic: Permissions [page 62]
Related Information
Section Permissions [page 63]Field Permissions [page 64]Rater ID Permissions [page 66]
3.3.4 Rater ID Permissions
You can work with implementation partners to define who can see the rater identities along with the routing step using rater-id-permission in Provisioning.
NotePlease remember that <rater-id-permission> is only applicable to Open 360s. Do not try it with Anonymous 360s.
The <rater-id-permission> provides a great deal of flexibility to set anonymity based on who (User Roles - <role-name>) is viewing the 360, in which stage of the 360 (Routing Step - <route-step>), and to what target group(s) of raters (Rater Category - <rater-category>) the anonymity is to be applied.
This only makes sense in an *Open* 360 in which a customer can choose to hide rater identities in certain 360 routing steps, including 360 Evaluation Stage and Completed Stage.
For 360 Evaluation Stage, use 360EvaluationStage stepid and for Completed Stage, use CompletedStage stepid.
Type of access
● none: users cannot see the rater identities.● enabled: users can see the rater identities.
66 PUBLICImplementing 360 Reviews
Configuring 360 Templates

Parent topic: Permissions [page 62]
Related Information
Section Permissions [page 63]Field Permissions [page 64]Drilldown Permissions [page 65]
3.3.4.1 Example: Making a 360 Anonymous for Some and Named for Others
You can configure a 360 to have varying levels of anonymity. For example, a manager sees the 360 as named and the employee sees the 360 as anonymous. It is also possible for the employee to see responses from their manager or peers as named, but can only see responses from their direct reports as anonymous.
As of now, it is not possible to grant someone with the ability to remove participants comments. Even if you can see who said what, you cannot remove the comments. Also, configuration of levels of anonymity must be done at the time the form is created. This means, before the 360 review process, you need to know who you want to grant access to see named participants. Once the form is created and the process is started, you cannot change that.
In provisioning, access your 360 form template and ensure that Participant names on 360 option is selected.
RememberAs a customer, you don't have access to Provisioning. To complete tasks in Provisioning, contact your implementation partner. If you're no longer working with an implementation partner, contact Product Support.
Add the following XML example in the meta section after
<meta-cat hidden-threshold="0" min-count="0" max-count="2147483647" ><![CDATA[Self]]></meta-cat>
ExampleThe following example hides all rater identities for all users in all stages, that is, every rater is shown as Anonymous and in effect it turns an Open 360 to an Anonymous 360:
<rater-id-permission type="none"> <rater-category>*</rater-category><role-name>*</role-name><route-step stepid="*"/> </rater-id-permission>
OR
<rater-id-permission type="none"> <role-name>*</role-name><route-step stepid="*"/> </rater-id-permission>
Implementing 360 ReviewsConfiguring 360 Templates PUBLIC 67

ExampleTo hide all rater identities for Employee in all stages, that is, to the Employee, all raters will be shown as Anonymous:
<rater-id-permission type="none"> <rater-category>*</rater-category><role-name>E</role-name><route-step stepid="*"/> </rater-id-permission>
OR
<rater-id-permission type="none"> <role-name>E</role-name><route-step stepid="*"/> </rater-id-permission>
ExampleTo hide all rater identities for all users in 360 Evaluation Stage:
<rater-id-permission type="none"> <rater-category>*</rater-category><role-name>*</role-name><route-step stepid="360EvaluationStage"/> </rater-id-permission>
OR
<rater-id-permission type="none"> <role-name>*</role-name><route-step stepid="360EvaluationStage"/> </rater-id-permission>
ExampleTo hide all rater identities for all users in 360 Evaluation Stage, except the Manager, that is, when the Manager opens the 360, all the names of the raters are visible, while everyone else sees as Anonymous:
<rater-id-permission type="none"> <rater-category>*</rater-category><role-name>*</role-name><route-step stepid="360EvaluationStage"/></rater-id-permission><rater-id-permission type="enabled"><rater-category>*</rater-category><role-name>EM</role-name><route-step stepid="360EvaluationStage"/> </rater-id-permission>
Specific Example
Add the following snippet in meta section of 360.
<meta-cat hidden-threshold="0" min-count="0" max-count="2147483647" ><![CDATA[Self]]></meta-cat> <rater-id-permission type="none">
68 PUBLICImplementing 360 Reviews
Configuring 360 Templates

<rater-category>*</rater-category><role-name>*</role-name><route-step stepid="*"/></rater-id-permission><rater-id-permission type="enabled"><rater-category>*</rater-category><role-name>EM</role-name><route-step stepid="360EvaluationStage"/><route-step stepid="CompletedStage"/></rater-id-permission> <meta-360-rollup-category-name><![CDATA[Upward]]></meta-360-rollup-category-name>
As a result of this, when the 360 is in the evaluation and completion stage, the manager sees participant names in the evaluation summary.
When the 360 is in the evaluation or completion stage, the employee (other than the employee with a completed copy) cannot see participant names in the evaluation summary.
3.4 Rater Category Rollup
If you have set a threshold number of raters in some categories, but that threshold is not met, you can configure rater categories to rollup via Provisioning. Therefore, the rater responses from these categories can be combined with those from other categories, and show up in the Detailed 360 Report.
RememberAs a customer, you don't have access to Provisioning. To complete tasks in Provisioning, contact your implementation partner. If you're no longer working with an implementation partner, contact Product Support.
Some definitions and values about rollup are described on this page.
Rollup and drop
The two options can be selected from the Unmet threshold action dropdown.
● Rollup: combine categories if the minimum threshold is not met.● Drop: drop or do not report the data if the minimum threshold is not met.
NoteThe system only supports one of them. You cannot select rollup, and then expect categories to drop if minimum thresholds are not met.
Rollup type
There are two types of rollup.
Implementing 360 ReviewsConfiguring 360 Templates PUBLIC 69

● [Recommended] Circular: the data rolls to the next category group that is listed in meta-360-rollup-category-name.
● Uturn: the data rolls to the next category group that is listed in the meta-360-rollup-category-name, and if the threshold is not met, it rolls back-up the list.
CautionThis feature will probably only be used by one client for which it was implemented.
Attributes of rater categories
The example code is used to explain the attributes of rater categories in xml.
<fm-meta> <meta-form-id>-1</meta-form-id> <meta-rated>true</meta-rated> <meta-rating>0.0</meta-rating> <meta-scale>0.0</meta-scale> <meta-grp-label><![CDATA[Group]]></meta-grp-label> <meta-cat hidden-threshold="2" min-count="0" max-count="50" cat-weight="20.0"><![CDATA[Direct Report]]></meta-cat> <meta-cat hidden-threshold="2" min-count="0" max-count="50" cat-weight="20.0"><![CDATA[Peer]]></meta-cat> <meta-cat hidden-threshold="1" min-count="1" max-count="50" cat-weight="30.0"><![CDATA[Manager]]></meta-cat> <meta-cat hidden-threshold="1" min-count="1" max-count="50" cat-weight="15.0"><![CDATA[Self]]></meta-cat> <meta-cat hidden-threshold="2" min-count="1" max-count="50" cat-weight="15.0"><![CDATA[External]]></meta-cat> <meta-360-rollup-category-name><![CDATA[Direct Report]]></meta-360-rollup-category-name> <meta-360-rollup-category-name><![CDATA[Peer]]></meta-360-rollup-category-name> <meta-360-rollup-category-name><![CDATA[External]]></meta-360-rollup-category-name> <fm-sect-scale show-value="true"> <scale-source>1</scale-source> <scale-id><![CDATA[Review Scale]]></scale-id> <scale-type><![CDATA[DROPDOWN]]></scale-type> </fm-sect-scale> <meta-item-weight-floor-ceiling-option>warning</meta-item-weight-floor-ceiling-option> </fm-meta>
● hidden-threshold: used to hide raters if the total number of raters in the form is less than the threshold defined in the hidden-threshold attribute. If the hidden threshold is not met, the data for that category will not be reported. You can specify rollup to have the aggregate combine with another category.
NoteIf category thresholds are set but not met, and no rollup is specified, then the data for each of the categories will be dropped and cannot be viewed in the detailed 360 report.
70 PUBLICImplementing 360 Reviews
Configuring 360 Templates

● min-count and max-count: used to limit the number of raters per category.● cat-weight: used to define weights to rater categories, so that ratings from different rater categories can be
weighted in calculation.● meta-360-rollup-category-name: defines order of roll up when the hidden threshold is not met.
For example, the hidden threshold for direct report is 2, and if only one direct report completes the 360 form, the responses from that rater will be rolled up together with the responses from the raters in the Peer category..
Configuring Rollup for a 360 Reviews Form [page 71]This example will show you how to configure rollup for a 360 form.
3.4.1 Configuring Rollup for a 360 Reviews Form
This example will show you how to configure rollup for a 360 form.
Context
The following categories have been set for a given customer in a 360 form:
● Self● Manager● Direct Report● Peers● External
The customer has set a threshold number of raters from the above categories. If no threshold is met, and no rollup is specified, the data for the categories will be dropped, and cannot be viewed in the detailed 360 report. Rollup can be configured in Provisioning.
RememberAs a customer, you don't have access to Provisioning. To complete tasks in Provisioning, contact your implementation partner. If you're no longer working with an implementation partner, contact Product Support.
Procedure
1. Open a form template in Provisioning.2. Select Rollup from the Unmet threshold actiondropdown.3. [Recommended] Select Circular from the Rating rollup type (only applied to Rollup Action) dropdown.4. Enable Participant names on 360, and then save.5. Add the following code example to the <fm-meta> section of the form template.
<fm-meta> <meta-form-id>-1</meta-form-id>
Implementing 360 ReviewsConfiguring 360 Templates PUBLIC 71

<meta-rated>true</meta-rated> <meta-rating>0.0</meta-rating> <meta-scale>0.0</meta-scale> <meta-grp-label><![CDATA[Group]]></meta-grp-label> <meta-cat hidden-threshold="2" min-count="0" max-count="50" ><![CDATA[Direct Report]]></meta-cat> <meta-cat hidden-threshold="2" min-count="0" max-count="50" ><![CDATA[Peer]]></meta-cat> <meta-cat hidden-threshold="1" min-count="1" max-count="50" ><![CDATA[Manager]]></meta-cat> <meta-cat hidden-threshold="1" min-count="1" max-count="50" ><![CDATA[Self]]></meta-cat> <meta-cat hidden-threshold="2" min-count="1" max-count="50" ><![CDATA[External]]></meta-cat> <meta-360-rollup-category-name><![CDATA[Direct Report]]></meta-360-rollup-category-name> <meta-360-rollup-category-name><![CDATA[Peer]]></meta-360-rollup-category-name> <meta-360-rollup-category-name><![CDATA[External]]></meta-360-rollup-category-name> <fm-sect-scale show-value="true"> <scale-source>1</scale-source> <scale-id><![CDATA[Review Scale]]></scale-id> <scale-type><![CDATA[DROPDOWN]]></scale-type> </fm-sect-scale> <meta-item-weight-floor-ceiling-option>warning</meta-item-weight-floor-ceiling-option> </fm-meta>
In the code, the meta-360-rollup-category-name attribute defines the order of rollup, when the hidden threshold 2 for Direct Report, Peer and External is not met. Below are some examples of rollup order.○ If only one Direct Report completes the 360 form, his or her responses will be combined with the
responses in the Peer category.○ If only one Peer completes the 360 form, his or her responses will be combined with the responses in the
External category.○ If only one External completes the 360 form, his or her responses will be combined with the responses in
the Direct Report category.○ If one Direct Report, one External and two Peers complete the 360 form, then according to the order of
rollup in the meta-360-rollup-category-name, all the three categories will be combined into one category in the detailed 360 report.
6. Log in to the application, and then navigate to Admin Center Form Template Settings , and select the 360 form that you have configured in Provisioning.
7. Enable Apply Threshold On: Participant Level, and save.
Result: You have successfully configured rollup for the 360 form.
Parent topic: Rater Category Rollup [page 69]
3.5 Calibration Mode
Calibration mode for a 360 allows the rater to rate multiple subjects at the same time in a single assessment.
NoteThe competencies that are rated should be the same for all subjects.
72 PUBLICImplementing 360 Reviews
Configuring 360 Templates

Need to Know
● Competency Section is the only section that displays in calibration mode (form intro section disappears - does not display)
● Open ended questions are not supported.● Drop down rating scales are only supported.● Item level comments are hardwired and cannot be altered regardless of the cmt-opt indicated in the form xml.● Calibration Mode only works if there is one competency section in the form. If there is more than one
competency section, sections are not displayed to the raters.
3.5.1 Configuring Calibration
In provisioning for your form template, add the following code (code in blue) to the competency section of the 360:
<blind-spot-threshold>0.5</blind-spot-threshold> <required-fields> <role-name>*</role-name> <field refid="item-rating" min-value="-1.0" max-value="-1.0"/> <route-step stepid="*"/> <send-action sendid="complete_360"/> </required-fields><calibration-mode/>
RememberAs a customer, you don't have access to Provisioning. To complete tasks in Provisioning, contact your implementation partner. If you're no longer working with an implementation partner, contact Product Support.
In Admin Center, go to the Form Template and ensure Enable Calibration Mode is enabled.
3.5.2 Sample Multi-Rater Form
This is a sample Multi-Rater form with the<calibration-mode/>code and 3 hard coded competencies from the SAP SuccessFactors Competency library:
How does it work
1. Create 360's for multiple subjects and be sure that you add the same demo user as a participant in all 360's (in other words, if you are creating 360's as cgrant for all team members, be sure to include cgrant as one of the participants for all subjects).
2. Send the 360's to evaluation mode.3. As the rater, you will receive each 360 in your inbox.4. Click on any one of the 360's in your inbox.
You can select the subjects you want to rate and then click the Rate button in the lower right. You will then be brought into a view like below where you can rate each of the subjects and provide comments all on a single screen.
Once you complete the rating for all subjects, all of the forms will be completed and moved out of your inbox.
Implementing 360 ReviewsConfiguring 360 Templates PUBLIC 73
3.6 Anonymous View for Named 360s
Anonymous View allows users to select if they want to display the Detailed 360 Report with names or without names.
The primary use of this feature is when the report is enabled for Managers, who then print the reports to give to employees and want to print an anonymous view.
NoteThis feature is only applicable to named 360s. The 360 must be named, but you can hide the information from displaying.
To enable the anonymous view:
1. Create a Named 360.
2. Check the access permissions for the Detailed 360 Report. Go to Admin Form Templates and select the correct 360 form template and check Enable 360 Detailed Report Permission for.
3. Check Enable Anonymous 360 Detailed Report View.4. Open the Detailed 360 report from the Summary view after the 360 report is completed.5. When viewing the report, you can select if you want the named view or the anonymous view.
74 PUBLICImplementing 360 Reviews
Configuring 360 Templates

4 Main Routing Actions
Main routing actions involved in the workflow for a 360 Reviews form that is determined by the route map associated.
When a 360 Reviews form is being routed, it can be routed through four stages: Modify stage, Evaluation stage, Signature stage, and Completed stage. In each phase, there are main routing actions guiding users through the whole process. In the Modify stage, roles defined in the route map can nominate raters, and send the form to next step. In the Evaluation stage, raters evaluate the subjects, while roles with proper permission can continue to add extra raters. In the Signature stage, participants can sign the form, while permitted roles can reject it or send it back to a specific role for additional changes. In the Completed stage, participants can complete or decline the form.
4.1 Raters in 360 Reviews Forms
You can determine and modify internal and external raters on 360 Review forms, and send the forms for ratings.
Setting Up Default Raters [page 76]
Adding Participants in 360 Review Forms [page 77]Once you've launched the forms, you can add or remove raters from the Rater List section.
Adding Participants in Evaluation Stage [page 78]Process owners and permitted roles can add participants when a 360 Reviews form is in Evaluation stage.
Changing Participant Category [page 80]You can change the participant category for a 360 form using Admin Center Change Participant Category .
Removing Participants [page 81]You can remove participants using Modify Participants. Once the participants are removed from the participant list, they won’t receive notifications to approve the 360 Review forms.
Removing 360 Reviews Forms of Inactive Employees in Bulk [page 82]You can bulk remove the 360 Reviews forms that are in the Evaluation stage from the inboxes of inactive employees.
Retaining Inactive Employee' 360 Evaluation Documents [page 83]In the Form Template level, you can enable the option to avoid inactive users been removed for a particular template.
Specifying Minimum and Maximum Participant Numbers and Defining Warning and Error Messages [page 84]
External Raters [page 86]In the Modify and the Evaluation stages, roles defined in a route map can add external raters in the system with Single Sign-On (SSO) enabled.
Implementing 360 ReviewsMain Routing Actions PUBLIC 75

4.1.1 Setting Up Default Raters
What roles are supported currently for the default rater population:
The only roles supported currently in the system for the default rater population field are the following:
E, EM, EX, EMM, EH, ED, EMD
How to set a default rater so that it appears automatically in a form:
This code needs to be added for each category that you want to automatically populate in the Participant List when the form is created:
<default-rater category="Direct Report"><![CDATA[ED]]></default-rater>
How to set a default rater so they appear automatically in a form AND can't be removed:
<default-rater removable="false" category="Self"><![CDATA[E]]></default-rater> </rater-config>
Here is an example of how both options look in the section:
</fm-sect-config> <rater-config><date-column-format>MM/dd/yyyy</date-column-format><min-rater-count>0</min-rater-count><max-rater-count>2147483647</max-rater-count><rater-cat-min-err-msg><![CDATA["The number of participants in the [[CATEGORY]] category does not meet the minimum of [[EXPECTED_COUNT]]. Please correct it before moving the document forward."]]></rater-cat-min-err-msg><rater-cat-max-err-msg><![CDATA["The number of participants in the [[CATEGORY]] category exceeds the maximum of [[EXPECTED_COUNT]]. Please correct it before moving the document forward."]]></rater-cat-max-err-msg> <default-rater category="Direct Report"><![CDATA[ED]]></default-rater><default-rater removable="false" category="Direct Manager"><![CDATA[EM]]></default-rater><default-rater removable="false" category="Self"><![CDATA[E]]></default-rater></rater-config> </rater-sect>
Parent topic: Raters in 360 Reviews Forms [page 75]
Related Information
Adding Participants in 360 Review Forms [page 77]Adding Participants in Evaluation Stage [page 78]Changing Participant Category [page 80]Removing Participants [page 81]Removing 360 Reviews Forms of Inactive Employees in Bulk [page 82]Retaining Inactive Employee' 360 Evaluation Documents [page 83]Specifying Minimum and Maximum Participant Numbers and Defining Warning and Error Messages [page 84]External Raters [page 86]
76 PUBLICImplementing 360 Reviews
Main Routing Actions

4.1.2 Adding Participants in 360 Review Forms
Once you've launched the forms, you can add or remove raters from the Rater List section.
Context
You can also add permanent raters to the list.
Procedure
1. Go to Performance .2. Choose a launched form.3. On the Participant List Section page, click Modify Participants.
You can filter your search based on divisions, departments, location, or user's name.
NoteThe corresponding button is Add Participants in 360 Reviews - SAP Fiori Version.
4. Click Search Users.
NoteWhile searching for a user, if the search results return numerous users with similar names and you’re unable to find the particular user you're looking for, use the advanced search link to find the user.
5. To choose all users as participants, click Select All. To verify all the newly added participants, scroll down to Selected Participant.
Once the list is complete with all users' details, click OK to return to the form.
6. Click Add to List. This brings up the Participant List Section page.7. On the Participant List Section, from the Category dropdown box to select the label such as Upward,
Downward/Colleague, or Self for the new participants.
Task overview: Raters in 360 Reviews Forms [page 75]
Related Information
Setting Up Default Raters [page 76]Adding Participants in Evaluation Stage [page 78]Changing Participant Category [page 80]
Implementing 360 ReviewsMain Routing Actions PUBLIC 77

Removing Participants [page 81]Removing 360 Reviews Forms of Inactive Employees in Bulk [page 82]Retaining Inactive Employee' 360 Evaluation Documents [page 83]Specifying Minimum and Maximum Participant Numbers and Defining Warning and Error Messages [page 84]External Raters [page 86]
4.1.3 Adding Participants in Evaluation Stage
Process owners and permitted roles can add participants when a 360 Reviews form is in Evaluation stage.
Prerequisites
You are among the roles who are granted with the permission Enable Add New Participants after 360 Evaluation starts for: in the Form Template Settings tool.
Context
There are different types of roles under the Enable Add New Participants after 360 Evaluation starts for: option. To understand the roles, see Definitions of Participants in Form Template Settings [page 79].
Procedure
1. Open a 360 Reviews form that is in Evaluation stage.2. There're two ways to perform the current step:
○ If you're the process owner, go to the Summary View page.○ If you're the other permitted role, submit the form first and go to the Evaluation Summary section in your
completed form.
3. Choose Add New Participants.
You can also remove existing participants from the list.4. Save you changes.
Results
You've added new participants to the form.
78 PUBLICImplementing 360 Reviews
Main Routing Actions
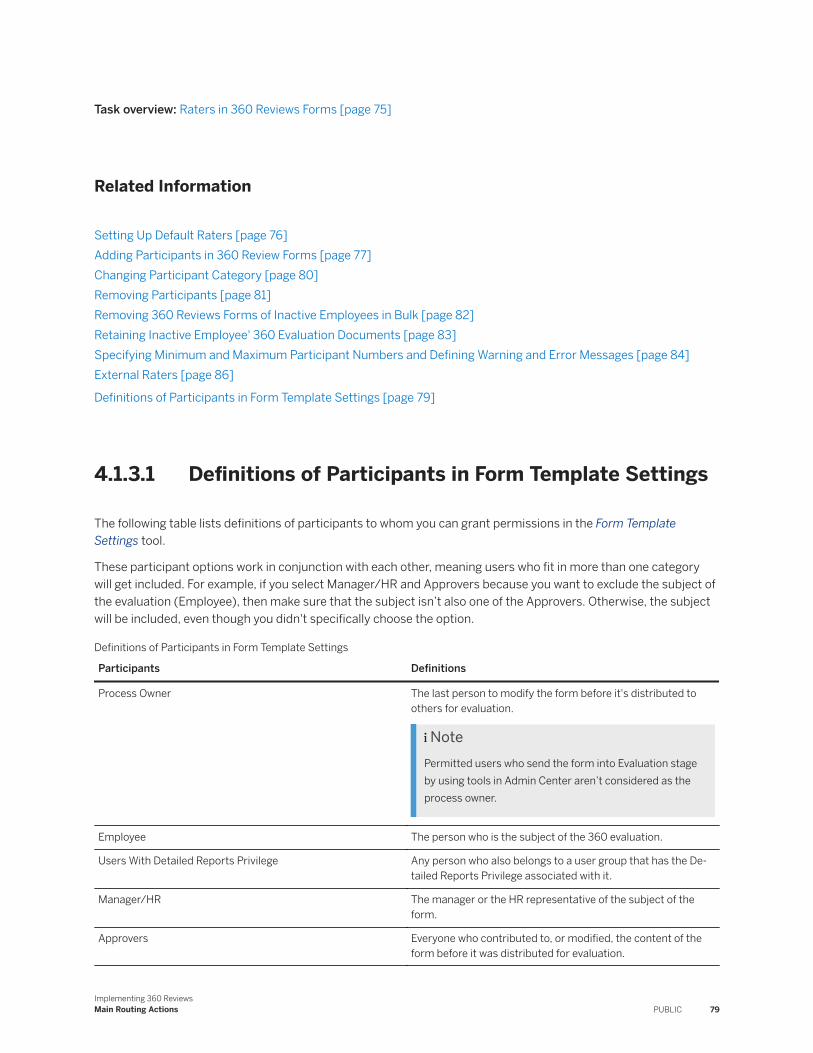
Task overview: Raters in 360 Reviews Forms [page 75]
Related Information
Setting Up Default Raters [page 76]Adding Participants in 360 Review Forms [page 77]Changing Participant Category [page 80]Removing Participants [page 81]Removing 360 Reviews Forms of Inactive Employees in Bulk [page 82]Retaining Inactive Employee' 360 Evaluation Documents [page 83]Specifying Minimum and Maximum Participant Numbers and Defining Warning and Error Messages [page 84]External Raters [page 86]
Definitions of Participants in Form Template Settings [page 79]
4.1.3.1 Definitions of Participants in Form Template Settings
The following table lists definitions of participants to whom you can grant permissions in the Form Template Settings tool.
These participant options work in conjunction with each other, meaning users who fit in more than one category will get included. For example, if you select Manager/HR and Approvers because you want to exclude the subject of the evaluation (Employee), then make sure that the subject isn’t also one of the Approvers. Otherwise, the subject will be included, even though you didn't specifically choose the option.
Definitions of Participants in Form Template Settings
Participants Definitions
Process Owner The last person to modify the form before it's distributed to others for evaluation.
NotePermitted users who send the form into Evaluation stage by using tools in Admin Center aren’t considered as the process owner.
Employee The person who is the subject of the 360 evaluation.
Users With Detailed Reports Privilege Any person who also belongs to a user group that has the Detailed Reports Privilege associated with it.
Manager/HR The manager or the HR representative of the subject of the form.
Approvers Everyone who contributed to, or modified, the content of the form before it was distributed for evaluation.
Implementing 360 ReviewsMain Routing Actions PUBLIC 79

Participants Definitions
All raters All the raters who are involved in the form.
TipUse this option if you want to let users choose whether they want to.
4.1.4 Changing Participant Category
You can change the participant category for a 360 form using Admin Center Change Participant Category .
Prerequisites
● Ensure that the Change Participant Category permision is enabled in Admin Center Manage Permission Roles Administrator Permission Manage Documents .
● Ensure that the 360 form for which you want to change the participant category is launched, and not in Modify Stage.
Procedure
1. Go to Admin Center Change Participant Category .2. Type the Document Id of a 360 form, and click Find Document.
NoteTo determine a Document Id, navigate to Performance and hover over the "Information" icon in the "Action" column of any 360 form. This icon will show the document ID.
3. Change the participant category using Change Categories dropdown list.
Results
You have successfully changed the category of a participant.
Task overview: Raters in 360 Reviews Forms [page 75]
80 PUBLICImplementing 360 Reviews
Main Routing Actions

Related Information
Setting Up Default Raters [page 76]Adding Participants in 360 Review Forms [page 77]Adding Participants in Evaluation Stage [page 78]Removing Participants [page 81]Removing 360 Reviews Forms of Inactive Employees in Bulk [page 82]Retaining Inactive Employee' 360 Evaluation Documents [page 83]Specifying Minimum and Maximum Participant Numbers and Defining Warning and Error Messages [page 84]External Raters [page 86]
4.1.5 Removing Participants
You can remove participants using Modify Participants. Once the participants are removed from the participant list, they won’t receive notifications to approve the 360 Review forms.
Procedure
1. Go to Home Performance .2. Choose a launched form.3. On the Participant List Section page, click Modify Participants.
Click any column header to sort the list, either ascending or descending
NoteFor a 360 Reviews form of SAP Fiori version, you can click Delete to remove the participants.
4. Under Actions, click the X icon to remove the participants from the list.5. To remove all participants, click Clear List.
Note that you cannot remove the required names. Once the users are removed from the list, you can add them to the list again.
If you don't want specific roles to modify participants. You can disable the Rater List section for the role by using the following XML code to make it read-only, so the Modify Participants button does not display.
<section-permission type="disabled"> <role-name>*</role-name> <route-step stepid="*"/> </section-permission>
Task overview: Raters in 360 Reviews Forms [page 75]
Implementing 360 ReviewsMain Routing Actions PUBLIC 81

Related Information
Setting Up Default Raters [page 76]Adding Participants in 360 Review Forms [page 77]Adding Participants in Evaluation Stage [page 78]Changing Participant Category [page 80]Removing 360 Reviews Forms of Inactive Employees in Bulk [page 82]Retaining Inactive Employee' 360 Evaluation Documents [page 83]Specifying Minimum and Maximum Participant Numbers and Defining Warning and Error Messages [page 84]External Raters [page 86]
4.1.6 Removing 360 Reviews Forms of Inactive Employees in Bulk
You can bulk remove the 360 Reviews forms that are in the Evaluation stage from the inboxes of inactive employees.
Context
In the meantime, the inactive employees' statuses are marked as Removed(Incomplete) in the Evaluation Summary to indicate that they’re no longer participants in the forms.
NoteIf the employees have submitted ratings before being set inactive, the ratings given by them are still valid in the forms, and their statuses are shown as Completed.
You can also bulk remove the 360 Reviews forms of inactive employees by using the Employee Import tool in Admin Center, or Manage Scheduled Jobs in Provisioning.
RememberAs a customer, you don't have access to Provisioning. To complete tasks in Provisioning, contact your implementation partner. If you're no longer working with an implementation partner, contact Product Support.
Procedure
1. Go to Admin Center Employee Import .2. Choose Remove Inactive Employees' 360 Evaluation Documents in the Specify Form routing options section.3. Validate and import your user file.
82 PUBLICImplementing 360 Reviews
Main Routing Actions

Results
The 360 Reviews forms that are in the Evaluation stage are removed from inactive employees' inboxes. Meanwhile, the employees' statuses are marked as Removed(Incomplete) in the Evaluation Summary. But you can still restore the forms that are deleted by using the Restore Deleted Forms tool.
Task overview: Raters in 360 Reviews Forms [page 75]
Related Information
Setting Up Default Raters [page 76]Adding Participants in 360 Review Forms [page 77]Adding Participants in Evaluation Stage [page 78]Changing Participant Category [page 80]Removing Participants [page 81]Retaining Inactive Employee' 360 Evaluation Documents [page 83]Specifying Minimum and Maximum Participant Numbers and Defining Warning and Error Messages [page 84]External Raters [page 86]
4.1.7 Retaining Inactive Employee' 360 Evaluation Documents
In the Form Template level, you can enable the option to avoid inactive users been removed for a particular template.
Context
It is possible to override this setting at the form template level, so that for a particular template inactive users forms are not removed even if the Do Not Remove Inactive Employee' 360 Evaluation Documents option is checked when setting user status.
Procedure
Go to Admin Tools Form Templates Select a template , check Do Not Remove Inactive Employees' 360 Evaluation Documents option, and save.
Task overview: Raters in 360 Reviews Forms [page 75]
Implementing 360 ReviewsMain Routing Actions PUBLIC 83

Related Information
Setting Up Default Raters [page 76]Adding Participants in 360 Review Forms [page 77]Adding Participants in Evaluation Stage [page 78]Changing Participant Category [page 80]Removing Participants [page 81]Removing 360 Reviews Forms of Inactive Employees in Bulk [page 82]Specifying Minimum and Maximum Participant Numbers and Defining Warning and Error Messages [page 84]External Raters [page 86]
4.1.8 Specifying Minimum and Maximum Participant Numbers and Defining Warning and Error Messages
You can specify minimum and maximum numbers of participants and define warning or error messages that show when participants added do not meet a specified limit.
When a warning message shows up, users are alerted to the fact that they're below the minimum or above the maximum limit, but they still can forward the form to the next step; when an error message shows up, users cannot forward the form onto the next step.
Specify Minimum and Maximum Numbers for the Participant List and Define Messages
Use the elements min-rater-count and max-rater-count to specify minimum and maximum numbers of participants for the participant list. You can go on to define warning or error messages using these elements: min-warning-msg, min-error-msg, max-warning-msg, and max-error-msg.
The following example demonstrates how to specify the minimum number of participants and define a warning message that shows up if participants added don't meet the minimum limit.
<rater-sect> ...<min-rater-count>0</min-rater-count><min-warning-msg><![CDATA[WARNING: Number of participants selected - [[ACTUAL_COUNT]] - less than the minimum number of [[EXPECTED_COUNT]]. Please select more than 1 participants.]]></min-warning-msg>... </rater-sect>
The following example demonstrates how to specify the maximum number of participants and define an error message that shows up if participants added exceed the specified maximum limit.
<rater-sect> ...<max-rater-count>5</max-rater-count><max-error-msg><![CDATA[ERROR: Number of participants selected - [[ACTUAL_COUNT]] - exceeds the maximum number of [[EXPECTED_COUNT]].
84 PUBLICImplementing 360 Reviews
Main Routing Actions

Please select no more than 5 participants.]]></max-error-msg>... </rater-sect>
Specify Minimum and Maximum Numbers by Categories and Define Messages
Additionally, you can use the attributes min-count and max-count in a meta-cat element to specify minimum and maximum numbers of participants for a particular category. You can go on to define warning or error messages using these elements: rater-cat-min-warn-msg, rater-cat-min-err-msg, rater-cat-max-warn-msg, and rater-cat-max-err-msg.
The following example demonstrates how to specify the minimum and maximum numbers of participants for a particular category and define an error message that shows up if participants added for that category exceed the specified maximum limit.
<fm-meta> ...<meta-cat hidden-threshold="1" min-count="0" max-count="5" cat-weight="10.0" ><![CDATA[Peer]]></meta-cat>...</fm-meta><rater-sect>...<rater-cat-max-err-msg><![CDATA[ ERROR: Number of participants selected for the Category "[[CATEGORY]]" is [[ACTUAL_COUNT]], which exceeds the expected number of participants permitted - [[EXPECTED_COUNT]]. Please remove some of the participants until the expected number is met.]]></rater-cat-max-err-msg>... </rater-sect>
The following example demonstrates how to specify the minimum and maximum numbers of participants for a particular category and define a warning message that shows up if participants added for that category don't meet the specified minimum limit.
<fm-meta> ...<meta-cat hidden-threshold="1" min-count="0" max-count="5" cat-weight="10.0" ><![CDATA[Peer]]></meta-cat>...</fm-meta><rater-sect>...<rater-cat-min-warn-msg><![CDATA[ WARNING: Number of participants selected for the Category "[[CATEGORY]]" is [[ACTUAL_COUNT]], which is less than the minimum number of participants permitted - [[EXPECTED_COUNT]]. Please select more than 1 participants.]]></rater-cat-min-warn-msg>... </rater-sect>
Parent topic: Raters in 360 Reviews Forms [page 75]
Implementing 360 ReviewsMain Routing Actions PUBLIC 85

Related Information
Setting Up Default Raters [page 76]Adding Participants in 360 Review Forms [page 77]Adding Participants in Evaluation Stage [page 78]Changing Participant Category [page 80]Removing Participants [page 81]Removing 360 Reviews Forms of Inactive Employees in Bulk [page 82]Retaining Inactive Employee' 360 Evaluation Documents [page 83]External Raters [page 86]
4.1.9 External Raters
In the Modify and the Evaluation stages, roles defined in a route map can add external raters in the system with Single Sign-On (SSO) enabled.
Before external users are added, admins turn on the 360 External Participant email notifications, among which the 360 Document Evaluation Notification for External Participant notification is a must. When external users are added to the Rater List, e-mails are sent automatically to seek their consent on participation and evaluation. If they accept the invitation, they’re taken to an external authorization screen on which they enter a verification code that is sent by e-mail.
The external raters have limited permissions. They can’t see or access anything in the system beyond the 360 form that they’ve been asked to complete. Likewise, they can't see or access anything on the form beyond the permissions granted to the form. When they start the evaluation, they can give ratings and comments. Once they complete the forms, they can’t edit or recall the completed forms.
Parent topic: Raters in 360 Reviews Forms [page 75]
Related Information
Setting Up Default Raters [page 76]Adding Participants in 360 Review Forms [page 77]Adding Participants in Evaluation Stage [page 78]Changing Participant Category [page 80]Removing Participants [page 81]Removing 360 Reviews Forms of Inactive Employees in Bulk [page 82]Retaining Inactive Employee' 360 Evaluation Documents [page 83]Specifying Minimum and Maximum Participant Numbers and Defining Warning and Error Messages [page 84]
86 PUBLICImplementing 360 Reviews
Main Routing Actions
4.1.9.1 Adding External Raters
When a 360 form is in the Modify and the Evaluation stage, roles defined in the route map template can add external users, existing or new, to collect their ratings and comments.
Prerequisites
● Enable Use of External Users (V10 & V11 ONLY) is checked in Provisioning.
RememberAs a customer, you don't have access to Provisioning. To complete tasks in Provisioning, contact your implementation partner. If you're no longer working with an implementation partner, contact Product Support.
● Enable 360 Add External Participants section is checked in Admin Center Form Template Settings for the target form template.
● The 360 Document Evaluation Notification for External Participant is turned on.
Context
When you enable Hide External Users from search results in Admin Center Company System and Log Settings , the external users are hidden from search result throughout SAP SuccessFactors applications. But in 360 Reviews - SAP Fiori Version, users can still find external users in the Add Participants dialog window even though the setting is enabled. This is because we decouple that the setting from the search function in 360 Reviews - SAP Fiori Version.
Procedure
1. Go to Add Participant page.
A dialogue pops up in which you can search for external users as well as internal users.2. Enter an external user’s first name, last name, username, or e-mail address.
NoteFinding users by their usernames requires that the Hide (user name) in the UI is deselected in Provisioning.
○ For an existing external user, enter the user's name, username, or e-mail address.○ For a new external user, click Add a new external participant. in the dropdown list of search box to create a
new account and the system will add it to the list simultaneously.
Implementing 360 ReviewsMain Routing Actions PUBLIC 87

Note
If the entered e-mail address already exists, you can complete the user information in Admin CenterManage Users , and then go back to search for and add this user.
3. Click Add to List to finish.
Results
External raters receive e-mails asking their consent on the participation and evaluation.
4.2 Sending a Copy of a Completed Form
When a form is completed, you can send a copy of it to 10 internal users at most in one go.
Procedure
1. Go to Performance and choose a completed 360 Reviews form.2. Click Send Copy.
You can disable the Send Copy button through Admin Center Form Template Settings Disable Send button for completed documents .
3. Find and select the users to whom you want to send the copy.4. Click Send.5. Click Send to finish.
If Document Forward Notification is enabled, you can also add comments to the copy before sending it.
Results
You've sent the copy of a completed form to target users. The receivers can find the read-only copy in the Completed folders.
88 PUBLICImplementing 360 Reviews
Main Routing Actions

4.3 Comments in 360 Reviews Forms
The comment function in a 360 Reviews form enables participants to give feedback on the employee.
Use
Participants can add an overall comment to a section and a comment to a rating in a 360 Reviews form.
CautionAfter participants have submitted the form with comments, they cannot edit or delete the comments anymore.
Features
The comment function in a 360 Reviews form includes the following key features:
● Edits don't get lost: The comments can be saved automatically by the system when participants stop typing and go inactive for over five seconds.
NoteThe autosave function also applies to the custom text boxes.
● Flexible text length: The text length of a comment can be customized to ensure that participants enter effective content.
● Custom comment labels: The comment labels can be customized to distinguish the managers' comments from employees' comments.
● Spell Check and Legal Scan: The comment box supports the Spell Check and the Legal Scan functions to ensure the text quality.
Scope
You can add comments in the following areas of a 360 Reviews form:
● The Competency section● The Goal section● The Summary section● The Signature section● The Rating item
Implementing 360 ReviewsMain Routing Actions PUBLIC 89

Visibility
The added comments have different levels of visibility during the whole process:
● In the Evaluation stage, the comments added by participants are invisible to other participants.● In the Signature stage, the comments given by the employee and the manager are visible to each other.● In the Completed stage, all the comments along with the commenters' names can be found in the Detailed 360
Report, which is available for the permitted participants.To include the comments in the report, you can enable the Show comments for the report. If you want to hide the commenters' names, you can choose the Anonymous View of the report. For details, see Anonymous View for Named 360s [page 74].
4.4 360 Reviews Form Autosave
When users are editing a 360 Reviews form using 360 Reviews - SAP Fiori Version, the system saves the form automatically after 5 seconds of inactivity.
This autosave feature works in all stages, views, and sections on a form, except in the following scenarios where your changes are immediately saved:
● When you open the links under the Actions menu, including Open Detailed 360 Report, Spell check entire form and Legal scan entire form
● When you print a form or save a form as PDF
If you leave a form page before the changes are saved automatically, a message pops up reminding you that you might lose the changes after leaving the form. At this moment, if you wait for another 5 seconds before clicking Leave to exit, your changes can still be saved automatically. Otherwise, you might lose the changes that you made.
90 PUBLICImplementing 360 Reviews
Main Routing Actions

5 Stack Ranker
Stack Ranker allows managers to quickly review the competency ratings for their direct reports and to visualize how the employees compare with, or stack up against, one another.
If direct reports have in-progress forms based on the same form template, managers can review their competency ratings at one time and quickly identify top and low performers.
Accessing Stack Ranker
For Performance Management forms, managers can access Stack Ranker in Team Overview, as shown below.
For 360 Reviews forms, managers can access Stack Ranker in the Competency section, as shown below.
Implementing 360 ReviewsStack Ranker PUBLIC 91

Features
In Stack Ranker, a list of employees and their competency ratings are displayed. You can use the features highlighted in the screenshot below.
● Select a value on the rating scale to give or change a rating.
92 PUBLICImplementing 360 Reviews
Stack Ranker

● Choose (comment) to add comments on reasons for the change. You can enter up to 4,000 characters in a comment field.
● View employees' ranking in the right panel of the page. The ranking is updated simultaneously with the ratings you give. You can use the dropdown list to view the ranking of the overall competency rating or a specific competency rating.
Rating Fields in Stack Ranker
Stack Ranker supports three types of rating fields: horizontal boxes with rating values, horizontal boxes without rating values, and dropdown list. For the horizontal boxes, rating descriptions are shown on mouseover.
The type of rating fields used in Stack Ranker depends on the rating scale and form template configurations.
● If a rating scale has more than seven rating levels, the dropdown list is used.● If rating values are not integers from 0 to 9, the dropdown list is used.
5.1 Enabling Stack Ranker for 360 Reviews
Stack Ranker for 360 Reviews can only be enabled in Provisioning.
Context
After you enable this feature, managers use the feature, in which mode employees stack up against one another, to easily review and change the competency ratings and comment on the competencies.
Procedure
1. Go to Provisioning Company Settings Team Rater for 360 .
RememberAs a customer, you don't have access to Provisioning. To complete tasks in Provisioning, contact your implementation partner. If you're no longer working with an implementation partner, contact Product Support.
2. Go to Provisioning Form Template Administration .3. Choose the target 360 Reviews form template.4. Add <my-team-rater/> to the <fm-meta> section.
5. Make sure use-behavior="false".
6. Save your changes.
Implementing 360 ReviewsStack Ranker PUBLIC 93

Results
The Stack Ranker button appears in the Competency section on the configured 360 Reviews forms.
5.2 Customizing Text for Stack Ranker
You can replace the Stack Ranker label with a customized text in English, Spanish, and Canadian French.
Procedure
1. In Admin Center, go to Text Replacement.2. Search for Stack Ranker in the Default Text column.3. In the Replace With Text field, enter the text with which you want to replace Stack Ranker.4. Choose Save.
Stack Ranker in the system is replaced with your customized text.
5.3 Using Stack Ranker in 360 Reviews: Recommendations and Limitations
Learn about the recommendations for and limitations of using Stack Ranker in 360 Reviews.
Recommendations
Competency TypeThough Stack Ranker supports jobspecific competencies and custom competencies, we recommend that you use custom competencies, so that all direct reports have the same number of competencies to be reviewed.
Competency WeightThough competency weights can be included in the rating calculation, the weights are not shown in Stack Ranker and managers may find it difficult to understand how the ratings are added up. Therefore, we do not recommend that you use the weight function in Stack Ranker.
Rich Text Editor (RTE)Plain texts may not work properly for comments, so we recommend that you enable using RTE.
94 PUBLICImplementing 360 Reviews
Stack Ranker

Overall Competency RatingUnless you want the overall competency rating to appear in People Profile, do not include a summary section.
Limitations
There are a few limitations in Stack Ranker.
● If managers are involved in performance reviews with different route maps, or there is a manger change, they may see people who are not their direct reports in Stack Ranker.
● Forms can't be mass routed to the next step.● Rating behaviors is not supported.● Comments for competency items or sections can't be printed out.
Implementing 360 ReviewsStack Ranker PUBLIC 95

6 EZ Rater
EZ Rater allows managers to easily compare employee self-ratings with manager ratings.
You can set up EZ Rater for goal sections and competency sections. In the EZ Rater mode, competency and goal items are displayed in a compact list view, so users can easily rate them at one time. It shows employee self-ratings and manager ratings in parallel and provides a gap analysis chart. If an employee self-rating is higher than a manager rating, the gap is highlighted in red in the chart; and if a manager rating is higher than an employee self-rating, the gap is highlighted in green in the chart.
6.1 Enabling EZ Rater
Enable EZ Rater in an XML form template so users can easily rate items at one time.
Procedure
1. In a goal section or competency section, set the sect-mode attribute of to EZ-Rater.
2. Set the ez-rater-expand-all accordingly. true or false.
○ If it's set to true, all goal details or competency details are expanded by default.○ If it's set to false, all details are collapsed by default.
NoteIn 360 Reviews - SAP Fiori Version, the ez-rater-expand-all attribute is only applicable to the goal section.
This example shows how EZ Rater is used in a competency section.
<competency-sect mgt-only="false" index="7" cmt-opt="0" split-cmt="false" show-calculated-section-rating="true" ez-rater-expand-all="false" sect-mode="EZ-Rater" in-objcomp-summ-overall-rating="false" in-objcomp-summ-display="false" lock-item-weights="false" if-no-ratings-then-ignore-section="true" no-group="true" in-overall-rating="true" in-summ-display="true" rating-opt="0" summ-opt="0" no-weight="true" no-rate="false" use-jobcode="true" configurable="true" hide-waca="false" lock-behavior-content="false" max-competencies-allowed="2147483647" min-competencies-required="-2147483648" behavior-weighted="false" behavior-expected-rating-format="0" show-behavior-expected-rating="false" comp-expected-rating-format="0" show-comp-proficiency-level="false" show-comp-expected-rating="false" use-behavior="false" behavior-mode-opt="0" behavior-cmt-opt="1" behavior-rating-opt="0" suppress-item-comments="0" category-filter-opt="no-filter" use-core-comp="false"> <comp-sect-name>
3. Save your changes.
96 PUBLICImplementing 360 Reviews
EZ Rater
Results
For the form that is configured with the EZ Rater feature, competency or goal items are displayed in a compact list view.
Implementing 360 ReviewsEZ Rater PUBLIC 97

7 Managing Forms Using Admin Center
You can manage the 360 form from Admin Center
Route Maps [page 98]Route maps define how 360 forms are routed during the 360 review process. They include four stages, the Modify, Evaluation, Signature, and Completion Stage.
Launch Forms [page 111]You can launch 360 Reviews forms from Admin Center Launch Forms .
Managing Employees' 360 Reviews Forms in Evaluation Stage [page 112]You can complete or delete 360 forms from Admin Center Complete/Decline 360 documents .
Document Transfer for 360 Forms [page 113]Document transfer is used to transfer employee's documents from old manager to new manager when the employee's manager is changed.
Using 360 Executive Review [page 122]360 Executive Review allows super HR roles or other users to monitor form status and access 360 forms even if they are not on the route map.
Enabling Add Approver [page 123]Enable the Add Approver feature on 360 Reviews form so that users can add approvers to form route map.
7.1 Route Maps
Route maps define how 360 forms are routed during the 360 review process. They include four stages, the Modify, Evaluation, Signature, and Completion Stage.
A route map defines a robust workflow process that ensures 360 forms are securely routed to all the right people during the 360 review process. There are four stages of a 360 Reviews route map:
● Modify Stage: During the 360 review process, employees and managers nominate raters such as peers, managers, direct reports, and even external parties in this stage.
● Evaluation Stage: During the 360 review process, raters evaluate the subject of the form in this stage.● Signature Stage: During the 360 review process, roles defined in route map steps can sign the form in this
stage.Permissioned roles can reject the form, which removes all signatures and reverts it back to the Evaluation stage. The rejected form goes back to the Process Owner’s inbox for re-evaluation before due date, and to other participants’ Completed folder.Meanwhile, permissioned roles can send the form back to a specific role for additional changes, which also removes all signatures and reverts it back to the Evaluation stage.
● Completion Stage: During the 360 review process, the form is officially completed, and review reports are available in this stage.
Parent topic: Managing Forms Using Admin Center [page 98]
98 PUBLICImplementing 360 Reviews
Managing Forms Using Admin Center

Related Information
Launch Forms [page 111]Managing Employees' 360 Reviews Forms in Evaluation Stage [page 112]Document Transfer for 360 Forms [page 113]Using 360 Executive Review [page 122]Enabling Add Approver [page 123]
7.1.1 Creating a Route Map
To define how 360 forms are routed during the 360 review process, create route maps using Manage Route Maps.
Prerequisites
1. Workflow has been enabled in Provisioning.
RememberAs a customer, you don't have access to Provisioning. To complete tasks in Provisioning, contact your implementation partner. If you're no longer working with an implementation partner, contact Product Support.
2. The permission of Routing Maps under Manage Form Templates has been granted.
Context
You can create route maps at any time. After you’ve created a route map, associate the route map to a specific form template before the route map can be used.
Procedure
1. Go to Admin Center 360 Reviews , select Manage Route Maps.
2. Choose Add New Route Map Build Your Own .3. Select I want to personalize the evaluation stage in a 360 review route map.
An evaluation step is added to the Evaluation Stage.4. Click the add button in the Modify Stage or Signature Stage to add a step.
Implementing 360 ReviewsManaging Forms Using Admin Center PUBLIC 99
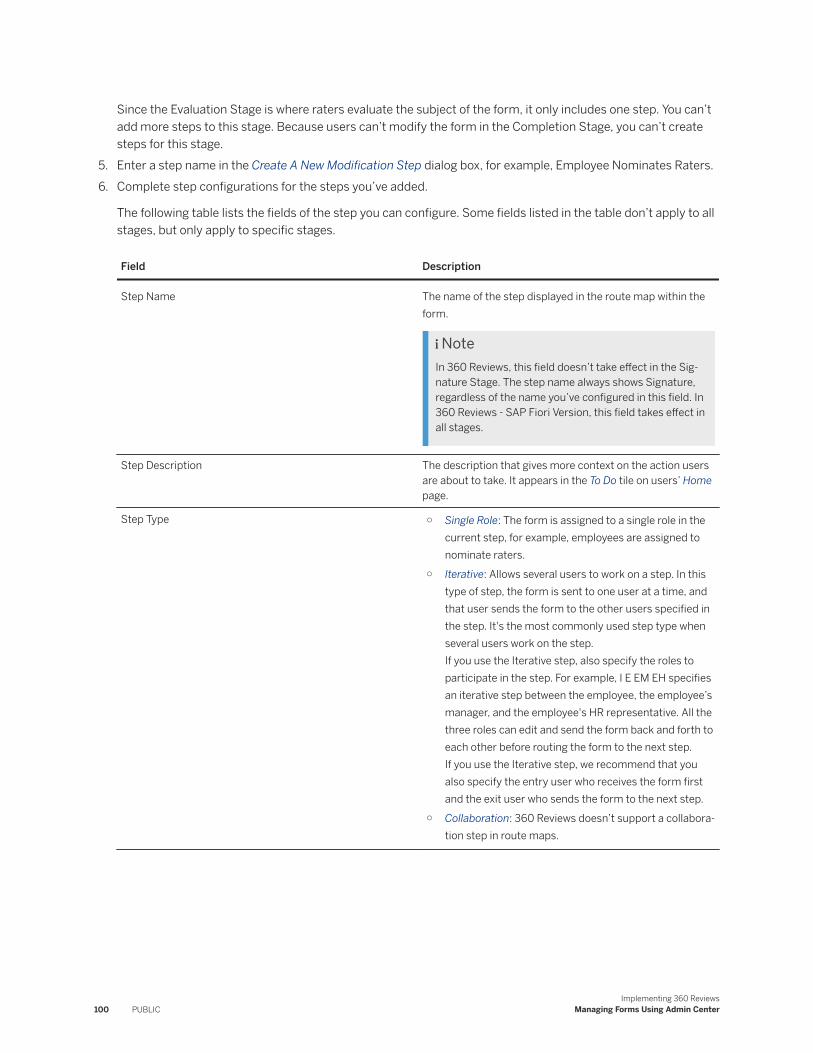
Since the Evaluation Stage is where raters evaluate the subject of the form, it only includes one step. You can’t add more steps to this stage. Because users can’t modify the form in the Completion Stage, you can’t create steps for this stage.
5. Enter a step name in the Create A New Modification Step dialog box, for example, Employee Nominates Raters.6. Complete step configurations for the steps you’ve added.
The following table lists the fields of the step you can configure. Some fields listed in the table don’t apply to all stages, but only apply to specific stages.
Field Description
Step Name The name of the step displayed in the route map within the form.
NoteIn 360 Reviews, this field doesn’t take effect in the Signature Stage. The step name always shows Signature, regardless of the name you’ve configured in this field. In 360 Reviews - SAP Fiori Version, this field takes effect in all stages.
Step Description The description that gives more context on the action users are about to take. It appears in the To Do tile on users’ Home page.
Step Type ○ Single Role: The form is assigned to a single role in the current step, for example, employees are assigned to nominate raters.
○ Iterative: Allows several users to work on a step. In this type of step, the form is sent to one user at a time, and that user sends the form to the other users specified in the step. It's the most commonly used step type when several users work on the step.If you use the Iterative step, also specify the roles to participate in the step. For example, I E EM EH specifies an iterative step between the employee, the employee’s manager, and the employee's HR representative. All the three roles can edit and send the form back and forth to each other before routing the form to the next step.If you use the Iterative step, we recommend that you also specify the entry user who receives the form first and the exit user who sends the form to the next step.
○ Collaboration: 360 Reviews doesn’t support a collaboration step in route maps.
100 PUBLICImplementing 360 Reviews
Managing Forms Using Admin Center

Field Description
Roles Choose from the dropdown list the role you want the form to send to in this step.
SAP SuccessFactors uses job roles instead of employee names to specify who receives a form. This is because the same form template is typically distributed to multiple users, and it's easier for you to designate a role rather than a specific person. For example, if you're launching a 360 review cycle for the entire company, you can specify that the form is sent to the subject of the review first. However, you can designate a specific person if it better meets your business requirements.
A custom option is available in the dropdown list if your needs are more advanced. Examples of custom codes include:○ R - Recruiter in Recruiting○ W - Second recruiter in Recruiting○ Q - VP of staffing in Recruiting○ T - Primary coordinator in Recruiting○ G - Hiring manager in Recruiting○ EMMM - Employee's 3rd level manager○ S - Sourcer in Recruiting○ I F - Family expert (only valid in the signature stage)
Start Date The date when you want users to start working on this step. This means that forms can be moved into this step early, but users shouldn't start working on this step until this date has passed. However, setting a start date doesn't automatically lock the form. Users can work on the step any time, even before the start date.
If you want to enforce the start date, select Enforce Start Date. This option locks the form in read-only mode until the enforced start date is reached. Therefore, users won't be able to work on the step until the specified start date.
Exit Date Enter the earliest date when employees can move the form to the next step. Use this date only if you want to prevent employees from sending the form to the next step at any time.
NoteIf you’re using the Automatic send on due date option in the Due Date field, the exit date must be earlier than the due date.
Implementing 360 ReviewsManaging Forms Using Admin Center PUBLIC 101

Field Description
Due Date The date when the step should be completed. If you want to have the form automatically forward to the next step on the due date, select Automatic send on due date.
NoteThe form is sent to the next step on the next day of the due date.
Additionally, if you want to only send forms that pass the form validation check, select Only send forms that pass validation. Forms that fail to pass validation aren’t automatically moved to the next step. To send all forms regardless of whether they pass validation, select Always send regardless of validation.
Carbon Copy These User Roles Upon Document Completion Specify roles to receive a copy of the form after it’s completed.
Advanced options
Step Introduction & Mouseover text The text users see when they point the mouse at the step. The text appears only before the step is completed.
TipUse this field to provide a brief description of what users are expected to do during this step.
Step Name After Completion The names of the users see after the step is completed. If you leave this field blank, the step name remains the name specified in Step Name.
Reject Button Mouseover Text The text shown to users when they point the mouse at the reject button. The reject button is used to send the form back one step in the route map. This button only appears in signature steps. It’s helpful to use this text to provide a brief description of the reject action.
Step Mode Specifies the extent to which users can modify the content of the form in this step.
○ Full Edit: Allows users to change any content in text areas.
○ Comment Only: Only allows users to add evaluation comments to the form.
○ Signature: Allows users to electronically sign the form, but not to modify the content. Only applies to steps in the Signature Stage and is the only option available in that stage.
102 PUBLICImplementing 360 Reviews
Managing Forms Using Admin Center

Field Description
Exit Button Text The text for sending the form to the next step. This text appears on the Routing options button or the dropdown menu for the step. This text also appears on the button on the confirmation page.
Step Exit Text The text that appears on the confirmation page before the form routes to the next step.
TipUse this field to let users know what they need to do and what their action means.
Previous Step Exit Button Text The text for sending the form to the previous step. This text appears on the Routing options button or the dropdown menu for the step.
This text also appears on the button on the confirmation page.
Previous Step Exit Text The text that appears on the confirmation page before the form is sent back to the previous step.
TipUse this field to let users know what they need to do and what their action means.
Step Id The ID that the system uses to identify the step internally. It’s not the order of the step in the route map.
NoteStep Id shouldn’t contain spaces or accented characters.
7. Click Save at the left top of the page.
A new route map is created successfully.
Next Steps
After you’ve created a route map, you can modify the route map as needed. See Modifying a Route Map [page 104].
To use the newly created route map, associate the route map with a form template. See Associating a Route Map with a Form Template [page 109].
Implementing 360 ReviewsManaging Forms Using Admin Center PUBLIC 103

7.1.2 Modifying a Route Map
You can modify route maps anytime as needed using Managing Route Maps.
Prerequisites
1. Workflow has been enabled in Provisioning.
RememberAs a customer, you don't have access to Provisioning. To complete tasks in Provisioning, contact your implementation partner. If you're no longer working with an implementation partner, contact Product Support.
2. The permission of Routing Maps under Manage Form Templates has been granted.
Context
After you modify a route map, the modified route map only applies to the new forms launched after the modification. All existing forms use the original route map.
Procedure
1. Go to Admin Center 360 Reviews , select Manage Route Maps.2. Choose the route map you want to modify.3. Make any of the following changes:
○ Click the add button in the Modify or Signature Stage to add a step.Since the Evaluation Stage is where raters evaluate the subject of the form, it only includes one step. You can’t add more steps to this stage. Because users can’t modify the form in the Completion Stage, you can’t create steps for this stage.
○ Remove the existing steps in the Modify or Signature Stage.○ Modify step configurations for the existing steps. The following table lists the fields of the step you can
configure. Some fields listed in the table don’t apply to all stages, but only apply to specific stages.
104 PUBLICImplementing 360 Reviews
Managing Forms Using Admin Center

Field Description
Step Name The name of the step displayed in the route map within the form.
NoteIn 360 Reviews, this field doesn’t take effect in the Signature Stage. The step name always shows Signature, regardless of the name you’ve configured in this field. In 360 Reviews - SAP Fiori Version, this field takes effect in all stages.
Step Description The description that gives more context on the action users are about to take. It appears in the To Do tile on users’ Home page.
Step Type ○ Single Role: The form is assigned to a single role in the current step, for example, employees are assigned to nominate raters.
○ Iterative: Allows several users to work on a step. In this type of step, the form is sent to one user at a time, and that user sends the form to the other users specified in the step. It's the most commonly used step type when several users work on the step.If you use the Iterative step, also specify the roles to participate in the step. For example, I E EM EH specifies an iterative step between the employee, the employee’s manager, and the employee's HR representative. All the three roles can edit and send the form back and forth to each other before routing the form to the next step.If you use the Iterative step, we recommend that you also specify the entry user who receives the form first and the exit user who sends the form to the next step.
○ Collaboration: 360 Reviews doesn’t support a collaboration step in route maps.
Implementing 360 ReviewsManaging Forms Using Admin Center PUBLIC 105

Field Description
Roles Choose from the dropdown list the role you want the form to send to in this step.
SAP SuccessFactors uses job roles instead of employee names to specify who receives a form. This is because the same form template is typically distributed to multiple users, and it's easier for you to designate a role rather than a specific person. For example, if you're launching a 360 review cycle for the entire company, you can specify that the form is sent to the subject of the review first. However, you can designate a specific person if it better meets your business requirements.
A custom option is available in the dropdown list if your needs are more advanced. Examples of custom codes include:○ R - Recruiter in Recruiting○ W - Second recruiter in Recruiting○ Q - VP of staffing in Recruiting○ T - Primary coordinator in Recruiting○ G - Hiring manager in Recruiting○ EMMM - Employee's 3rd level manager○ S - Sourcer in Recruiting○ I F - Family expert (only valid in the signature stage)
Start Date The date when you want users to start working on this step. This means that forms can be moved into this step early, but users shouldn't start working on this step until this date has passed. However, setting a start date doesn't automatically lock the form. Users can work on the step any time, even before the start date.
If you want to enforce the start date, select Enforce Start Date. This option locks the form in read-only mode until the enforced start date is reached. Therefore, users won't be able to work on the step until the specified start date.
Exit Date Enter the earliest date when employees can move the form to the next step. Use this date only if you want to prevent employees from sending the form to the next step at any time.
NoteIf you’re using the Automatic send on due date option in the Due Date field, the exit date must be earlier than the due date.
106 PUBLICImplementing 360 Reviews
Managing Forms Using Admin Center

Field Description
Due Date The date when the step should be completed. If you want to have the form automatically forward to the next step on the due date, select Automatic send on due date.
NoteThe form is sent to the next step on the next day of the due date.
Additionally, if you want to only send forms that pass the form validation check, select Only send forms that pass validation. Forms that fail to pass validation aren’t automatically moved to the next step. To send all forms regardless of whether they pass validation, select Always send regardless of validation.
Carbon Copy These User Roles Upon Document Completion
Specify roles to receive a copy of the form after it’s completed.
Advanced options
Step Introduction & Mouseover text The text users see when they point the mouse at the step. The text appears only before the step is completed.
TipUse this field to provide a brief description of what users are expected to do during this step.
Step Name After Completion The names of the users see after the step is completed. If you leave this field blank, the step name remains the name specified in Step Name.
Reject Button Mouseover Text The text shown to users when they point the mouse at the reject button. The reject button is used to send the form back one step in the route map. This button only appears in signature steps. It’s helpful to use this text to provide a brief description of the reject action.
Step Mode Specifies the extent to which users can modify the content of the form in this step.
○ Full Edit: Allows users to change any content in text areas.
○ Comment Only: Only allows users to add evaluation comments to the form.
○ Signature: Allows users to electronically sign the form, but not to modify the content. Only applies to steps in the Signature Stage and is the only option available in that stage.
Implementing 360 ReviewsManaging Forms Using Admin Center PUBLIC 107

Field Description
Exit Button Text The text for sending the form to the next step. This text appears on the Routing options button or the dropdown menu for the step. This text also appears on the button on the confirmation page.
Step Exit Text The text that appears on the confirmation page before the form routes to the next step.
TipUse this field to let users know what they need to do and what their action means.
Previous Step Exit Button Text The text for sending the form to the previous step. This text appears on the Routing options button or the dropdown menu for the step.
This text also appears on the button on the confirmation page.
Previous Step Exit Text The text that appears on the confirmation page before the form is sent back to the previous step.
TipUse this field to let users know what they need to do and what their action means.
Step Id The ID that the system uses to identify the step internally. It’s not the order of the step in the route map.
NoteStep Id shouldn’t contain spaces or accented characters.
4. Click Save at the left top of the page.
A route map is modified successfully.
108 PUBLICImplementing 360 Reviews
Managing Forms Using Admin Center

7.1.3 Associating a Route Map with a Form Template
Associate route maps with the 360 form templates you're using in Form Template Settings. You can also associate a different route map with the form template that has had one.
Prerequisites
You’ve created a 360 review form template and the route map you want to use. Also, make sure that you have the required permission. In Admin Center Manage Permission Roles [Permission Role] Permission…Administrator Permissions Manage Form Templates , select Form Templates.
Context
Each form template has a route map associated with it. You can associate one route map with several form templates. You can also change the route map associated with a form template.
If you change a route map after you associate it with a form template or associate a different route map with a form template, the change is reflected only on new forms launched from the form template. All existing forms use the original route map.
Procedure
1. Go to Admin Center 360 Reviews , select Form Template Settings.2. Choose a form template.3. Choose the route map you want to associate with this form template from the Routing Map dropdown list.4. Click Update Form Template at the left bottom of the page.
The form template is successfully associated with the route map.
7.1.4 Roles
Learn about the standard and custom roles that are used in Performance Management.
Role Value Role Name Role Description
E Employee Employee
EM Manager Employee's direct manager
Implementing 360 ReviewsManaging Forms Using Admin Center PUBLIC 109

Role Value Role Name Role Description
EMM 2nd Level Manager Employee's second-level manager
EX First Matrix Manager Matrix managers are the "dotted-line" managers of employees. EX is the primary matrix manager defined in the instance.
EP All Matrix Managers EP is all the matrix managers of employees defined in the instance. For iterative and collaboration steps only.
EH HR Rep. Employee's HR representative
EHM HR Rep.'s Manager Direct manager of employees' HR representative
U User A specific user. For single-role steps and signature steps only.
O Originator User who creates the form
OM Originator's Manager Direct manager of the user who creates the form
EA Employee's second manager Custom role. It is used for Compensation processes where the compensation hierarchy and workflow may be different from the organization hierarchy. It can also be used in the same way as the EM role in Performance Management.
EMMM Employee's 3rd level manager Custom role
R Recruiter in Recruiting Custom role
W Second recruiter in Recruiting Custom role
Q VP of staffing in Recruiting Custom role
T Primary Coordinator in Recruiting Custom role
G Hiring Manager in Recruiting Custom role
S Sourcer in Recruiting Custom role
110 PUBLICImplementing 360 Reviews
Managing Forms Using Admin Center
7.2 Launch Forms
You can launch 360 Reviews forms from Admin Center Launch Forms .
If you want to launch forms for multiple employees, you can upload a .csv file with user IDs of employees you create forms for.
On the Select Employees tab, there is a Upload Participant List feature that allows you to create forms with predefined raters. It is only applicable for 360 Reviews forms, and will be disabled if any recurring schedule option is selected on the Launch Date tab. In the upload file, the header row should include the following fields:
● SUBJECT_ID: User ID of form subject● RATER_ID: User ID of rater who provides ratings on the form● RATER_CATEGORY: Rater's category, such as peer and other.
NoteTo ensure that 360 forms are launched successfully, please do not include inactive users in the upload participant list.
Using proper elements or attributes in the form template file, you can specify the maximum and minimum numbers of participants for the whole participant list or by individual categories. It's recommended that you also define out-of-range warning or error messages if you choose to specify the maximum and minimum numbers. See "Specifying Maximum and Minimum Participant Numbers and Defining Warning and Error Messages" in the Related Information section for details.
Parent topic: Managing Forms Using Admin Center [page 98]
Related Information
Route Maps [page 98]Managing Employees' 360 Reviews Forms in Evaluation Stage [page 112]Document Transfer for 360 Forms [page 113]Using 360 Executive Review [page 122]Enabling Add Approver [page 123]Specifying Minimum and Maximum Participant Numbers and Defining Warning and Error Messages [page 84]
Implementing 360 ReviewsManaging Forms Using Admin Center PUBLIC 111

7.3 Managing Employees' 360 Reviews Forms in Evaluation Stage
You can complete or delete 360 forms from Admin Center Complete/Decline 360 documents .
Context
NoteComplete/Decline 360 documents only works for 360 forms in Evaluation stage.
Procedure
1. Go to Admin Center Complete/Decline 360 documents .2. Type the employee username, and click Find Document.3. Select the 360 form that you want to complete or delete, and then choose Complete document or Decline
document.
Task overview: Managing Forms Using Admin Center [page 98]
Related Information
Route Maps [page 98]Launch Forms [page 111]Document Transfer for 360 Forms [page 113]Using 360 Executive Review [page 122]Enabling Add Approver [page 123]
112 PUBLICImplementing 360 Reviews
Managing Forms Using Admin Center

7.3.1 Declining Multiple 360 Reviews Forms in Evaluation Stage
Use the mass decline option to decline multiple incomplete forms by uploading a CSV file with the affected document ID's.
Context
You can mass decline all incomplete 360 evaluation forms by uploading a CSV file with the affected document IDs.
Note
If you use the Admin Center Route Document tool to batch route forms, it can auto-decline the forms that are in Evaluation stage.
Procedure
1. Go to Admin Center Complete/Decline 360 Documents and click the Mass Decline-Complete 360 Documents link.
2. In the Select Action dropdown, select Mass Decline 360 Evaluation Documents to decline 360 forms in Evaluation stage.
NoteYou can select Mass Complete 360 Documents to push the forms to completion.
3. Click Browse to upload a csv file with document IDs. The file should just contain one column with document IDs, and should not have any column title.
4. Click Process and wait for the results of the import. If anything fails, the affected document IDs will appear.
7.4 Document Transfer for 360 Forms
Document transfer is used to transfer employee's documents from old manager to new manager when the employee's manager is changed.
There are some business events that require employee's performance related documents to be transferred between managers, for example, when the manager of a department is changed. Document transfer and related features can be used to facilitate manual or automatic movement of documents between users.
To enable document transfer feature, the first step is to make sure that the document transfer options have been checked on the Form Template Settings page. Then you need to configure document transfer in different tools, for example, user import tool. Document transfer options should be configured at both the form template level and user data level, but the form template level settings will override the settings on the user data level.
Implementing 360 ReviewsManaging Forms Using Admin Center PUBLIC 113

NoteIf you trigger 360 document transfer via People Profile, the following two options on Form Template Settings are not supported:
● When transferring 360 documents from old manager's inbox folder to new manager, do not auto decline old manager's participant forms in evaluation.
● When transferring 360 documents which are in evaluation stage, add new manager as a participant. (If new manager is a removed participant, he/she will be re-added.)
Parent topic: Managing Forms Using Admin Center [page 98]
Related Information
Route Maps [page 98]Launch Forms [page 111]Managing Employees' 360 Reviews Forms in Evaluation Stage [page 112]Using 360 Executive Review [page 122]Enabling Add Approver [page 123]
114 PUBLICImplementing 360 Reviews
Managing Forms Using Admin Center
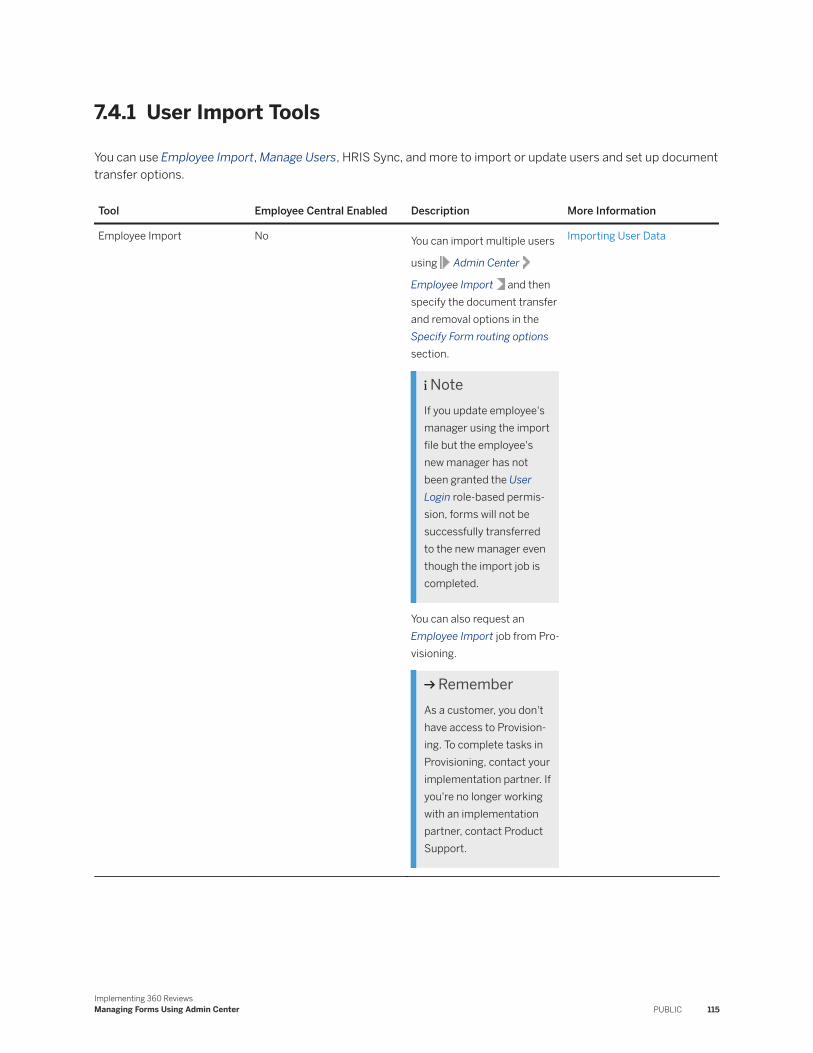
7.4.1 User Import Tools
You can use Employee Import, Manage Users, HRIS Sync, and more to import or update users and set up document transfer options.
Tool Employee Central Enabled Description More Information
Employee Import No You can import multiple users
using Admin Center
Employee Import and then specify the document transfer and removal options in the Specify Form routing options section.
NoteIf you update employee's manager using the import file but the employee's new manager has not been granted the User Login role-based permission, forms will not be successfully transferred to the new manager even though the import job is completed.
You can also request an Employee Import job from Provisioning.
RememberAs a customer, you don't have access to Provisioning. To complete tasks in Provisioning, contact your implementation partner. If you're no longer working with an implementation partner, contact Product Support.
Importing User Data
Implementing 360 ReviewsManaging Forms Using Admin Center PUBLIC 115

Tool Employee Central Enabled Description More Information
Manage User No You can update users using
Admin Center Manage
Users .
When you change the employee's manager in the Manager field and then save the change, a window pops up asking if you want to route the form to the new manager. Choose OK if you want to trigger document transfer.
Updating Users
116 PUBLICImplementing 360 Reviews
Managing Forms Using Admin Center

Tool Employee Central Enabled Description More Information
HRIS Sync Yes When an employee's Job Information data is updated with a new manager, on the Effective Date of the Job Info record where the manager change is made, the system will synchronize the manager change to basic user data and will then transfer forms based on the options you have enabled in the HRIS Sync job.
HRIS Sync can be triggered in any of the following ways: real-time sync integration by UI operation, scheduled HRIS Sync jobs, and Employee Central data import. To create a scheduled HRIS Sync job, go
to Provisioning Manage
Scheduled Jobs Create New
Job HRIS sync , and configure document transfer settings in Job Parameters.
RememberAs a customer, you don't have access to Provisioning. To complete tasks in Provisioning, contact your implementation partner. If you're no longer working with an implementation partner, contact Product Support.
Human Resource Information System (HRIS) Synchronization
Syncing HRIS Data
Basic Import Yes You can trigger document transfer at the time of importing employee data. Go to
Admin Center Import
Employee Data Basic
Import to submit a job.
Importing Employee Data
Configuring Basic User Options While Uploading the Basic Import Template
Implementing 360 ReviewsManaging Forms Using Admin Center PUBLIC 117
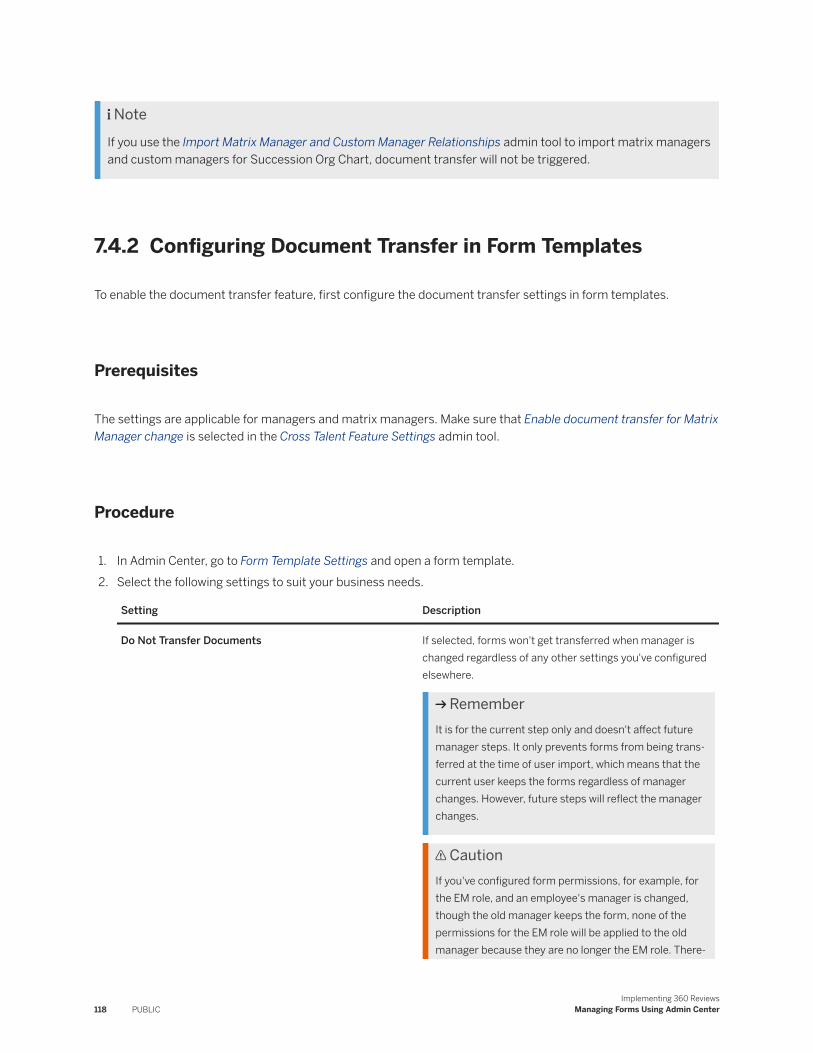
NoteIf you use the Import Matrix Manager and Custom Manager Relationships admin tool to import matrix managers and custom managers for Succession Org Chart, document transfer will not be triggered.
7.4.2 Configuring Document Transfer in Form Templates
To enable the document transfer feature, first configure the document transfer settings in form templates.
Prerequisites
The settings are applicable for managers and matrix managers. Make sure that Enable document transfer for Matrix Manager change is selected in the Cross Talent Feature Settings admin tool.
Procedure
1. In Admin Center, go to Form Template Settings and open a form template.2. Select the following settings to suit your business needs.
Setting Description
Do Not Transfer Documents If selected, forms won't get transferred when manager is changed regardless of any other settings you've configured elsewhere.
RememberIt is for the current step only and doesn't affect future manager steps. It only prevents forms from being transferred at the time of user import, which means that the current user keeps the forms regardless of manager changes. However, future steps will reflect the manager changes.
CautionIf you've configured form permissions, for example, for the EM role, and an employee's manager is changed, though the old manager keeps the form, none of the permissions for the EM role will be applied to the old manager because they are no longer the EM role. There
118 PUBLICImplementing 360 Reviews
Managing Forms Using Admin Center

Setting Description
fore, you'd better configure this setting only when there are no more manager actions to complete the form.
With this setting enabled, when the EP role (all matrix managers) is changed during the iterative step for the EP role, the matrix manager who currently reviews forms keeps the forms. Meanwhile, the matrix manager reviewer list for the future steps within the iterative step is updated according to the latest changes.
ExampleThe EP role, EX1, EX2, and EX3 participate in an iterative step of a performance review. Currently, EX2 is reviewing the form. See the following table for the use cases of EP role changes:
EP Role ChangeMatrix Manager Reviewer List
Add EX4 EX1 > EX2 > EX3 > EX4
Remove EX1 EX2 > EX3
Remove EX2 EX1 > EX2 > EX3
NoteEX2 remains on the reviewer list when reviewing the form. After the form is sent to another user, EX2 will be removed from the list.
Remove EX1, EX2, and EX3
EX2
NoteEX2 remains on the reviewer list when reviewing the form. After the form is sent to another user, EX2 will be removed from the list.
Adjust the order of EX1 and EX2
EX2 > EX1 > EX3
Implementing 360 ReviewsManaging Forms Using Admin Center PUBLIC 119

Setting Description
EP Role ChangeMatrix Manager Reviewer List
Update EX2 to EX4 EX1 > EX4 > EX3 > EX2
NoteEX2 remains on the reviewer list when reviewing the form. After the form is sent to another user, EX2 will be removed from the list.
Automatic Manager Transfer > Automatic insertion of new manager as next document recipient if not already
If selected, the new manager will become a part of the review process and the old manager will be removed from accountability going forward.○ If the current step is a single manager step, a new step
with the same step name as the current one will be added as the next step for the new manager.
○ If the current step is a single step not for managers, a new step named Document Transfer will be added as the next step for the new manager.
○ If the current step is an iterative or collaboration step, no new step will be added.
○ If the next step is already for managers, no new step will be added.However, if the next step is the first step in the Signature stage for managers, a new step named Document Transfer will be added to the Modify stage for the new manager.
The old manager will retain a copy of the form when the form is moved to the new manager, but the copy will not get updated with any new information.
NoteDo not enable this setting unless you want the new manager to be the next reviewer in any cases. Consider our tip and warning below:○ This setting may not make sense for the last few
steps of performance reviews. For example, when the form is about to be moved to a signature step, inserting the new manager in this step may not be
120 PUBLICImplementing 360 Reviews
Managing Forms Using Admin Center

Setting Description
desirable because the new manager has had no insight into the history of the form.
○ With this setting enabled, a new step, an alternate route user step, will be added to the route map, which may introduce a security hole by exposing certain data.
Automatic Manager Transfer > Automatic Inbox Document Transfer To New Manager
If selected, forms will be transferred from the old manager's Inbox to the new manager's Inbox.
The old manager will retain a copy of the form when the form is moved to the new manager, but the copy will not get updated with any new information.
Automatic Manager Transfer > Automatic En Route Document Transfer To New Manager
If selected, forms will be transferred from the old manager's En Route folder to the new manager's En Route folder.
The old manager will retain a copy of the form when the form is moved to the new manager, but the copy will not get updated with any new information.
Automatic Manager Transfer > Automatic Completed Document Copy to New Manager
If selected, all completed forms of the employee will be transferred from the old manager's Completed folder to the new manager's Completed folder. The copy of the forms will be sent to the new manager, and the old manager will retain the original forms.
Automatic Manager Transfer > Hide Visibility After Document Transfer
If selected, after forms are transferred to the new manager, the forms will be hidden from the old manager.
NoteThis setting is not supported for 360 Reviews forms.
Automatic Manager Transfer > Automatic Process Owner Change To New Manager For In-Progress Documents When Old Manager is Process Owner (Only for 360)
If selected, and the old manager is the process owner, also known as the last Modify step user, of in-progress 360 Reviews forms, the process owner will be changed to the new manager.
If the new manager is a rater, they can access the forms in Inbox. If the new manager is not a rater, they can access the forms in the En Route folder. The old manager will retain access to the forms.
Automatic Manager Transfer > Automatic Process Owner Change To New Manager For Completed Documents When Old Manager is Process Owner (Only for 360)
If selected, and the old manager is the process owner, also known as the last Modify step user, of completed 360 Reviews forms, the process owner will be changed to the new manager.
Implementing 360 ReviewsManaging Forms Using Admin Center PUBLIC 121

Setting Description
The new manager can access the forms in the Completed folder, and the old manager will retain access to the forms.
3. Choose Update Form Template to save changes.
7.5 Using 360 Executive Review
360 Executive Review allows super HR roles or other users to monitor form status and access 360 forms even if they are not on the route map.
Prerequisites
Before using 360 Executive Review, enable the following in Provisioning:
● 360 Multi-Rater● Role-based Permissions (RBP)● Enable 360 Executive Review Page - requires 360 Multi-Rater and Role Based Permission
RememberAs a customer, you don't have access to Provisioning. To complete tasks in Provisioning, contact your implementation partner. If you're no longer working with an implementation partner, contact Product Support.
To grant users the permission for 360 Executive Review, go to Admin Center Manage Permission RolesPermission Administrator Permissions and select 360 Executive Review under Manage Documents.
Context
NoteIf the logged-in user is on the form route map or is the manager of form subject, he or she cannot access the form using 360 Executive Review.
Procedure
1. Go to Admin Center Performance and click the 360 Executive Review tab.2. On the 360 Executive Review page, apply filters, for example Template Name and Form Status, to filter the
forms.
122 PUBLICImplementing 360 Reviews
Managing Forms Using Admin Center

3. Expand Forms Summary for two pie charts indicating the number and percentage of forms in the filtered form status and due date status.
4. In the fom list, you can view the form status and current step, and do the following:○ Mass route forms forward or backward using the Send to Previous Step or Send to Next Step button.
NoteMass routing will be synchronous when the number of forms being routed is no greater than 20. If you select more than 20 forms to be mass routed, a job will then be triggered in Provisioning.
○ Click and open a form to modify it based on the current route step. For example, you can add or remove raters when the form is in the Modify stage.
An email will be sent to the current step owner once the form has been modified in the following scenarios:○ Delete an already launched form○ Add or remove participants.○ Add or remove competencies○ Send Back the form○ Mass route forms
Task overview: Managing Forms Using Admin Center [page 98]
Related Information
Route Maps [page 98]Launch Forms [page 111]Managing Employees' 360 Reviews Forms in Evaluation Stage [page 112]Document Transfer for 360 Forms [page 113]Enabling Add Approver [page 123]
7.6 Enabling Add Approver
Enable the Add Approver feature on 360 Reviews form so that users can add approvers to form route map.
Context
After you enable this feature, managers can nominate approvers in a form that is in the Modify stage. The approvers can modify the content of the form before it’s distributed for evaluation.
Implementing 360 ReviewsManaging Forms Using Admin Center PUBLIC 123

Procedure
1. Go to Admin Center Form Template Settings .2. Enable Allow Add Approver/Evaluator.3. Save your changes.
Results
Permitted users can find the Add Approver button on the lower right corner of a form that is in the Modify stage.
Task overview: Managing Forms Using Admin Center [page 98]
Related Information
Route Maps [page 98]Launch Forms [page 111]Managing Employees' 360 Reviews Forms in Evaluation Stage [page 112]Document Transfer for 360 Forms [page 113]Using 360 Executive Review [page 122]
124 PUBLICImplementing 360 Reviews
Managing Forms Using Admin Center

8 Detailed 360 Report
After a 360 Reviews form is completed, you can view its detailed 360 report, which provides both an overview and an in-depth look at employees' ratings.
Features
● Four report views:○ Graphical Summary○ Gap Analysis○ Hidden Strengths and Blind Spots○ Rank
To understand these four views, see Views in Detailed 360 Report [page 126].● Customized print view (Only available in 360 Reviews - SAP Fiori Version): Instead of printing the report in all
available views, you can customize specific views to print.
Limitation
For both the 360 v11 and 360 Fiori versions, if more than 100 participants are added to a 360 Reviews form to provide feedback, only 100 pieces of the participants’ feedback can be included in the Detailed 360 Report. The included feedback is selected by the system randomly. But for the 360 Fiori version, the subject's feedback will always be included in the Detailed 360 Report.
Views in Detailed 360 Report [page 126]After a 360 reviews form is fully completed, you can review a detailed 360 report that contains four views. They're Graphical Summary, Gap Analysis, Hidden Strengths and Blind Spots, and Rank.
Configuring Instructions on the Detailed 360 Report [page 128]You can allow admins to create instructional text for the Detailed 360 Report.
Enabling Rank View in Detailed 360 Report [page 129]On the Rank view, managers can see employee’s competency ratings from highest first or lowest first to identify employees' strengths and development areas.
Benchmark Ratings [page 130]A benchmark rating is an average rating of a competency of a job code. Companies can use the benchmark rating to compare an employee's rating against the average rating.
Implementing 360 ReviewsDetailed 360 Report PUBLIC 125

8.1 Views in Detailed 360 Report
After a 360 reviews form is fully completed, you can review a detailed 360 report that contains four views. They're Graphical Summary, Gap Analysis, Hidden Strengths and Blind Spots, and Rank.
Graphical Summary
The Graphical Summary view is the default opening view of a detailed 360 report. It provides an overview of ratings broken down by individual raters and categories of raters along with comments given on the ratings.
NoteIn 360 Reviews - SAP Fiori Version, a radar chart is used to display item ratings for competencies under the Graphical Summary tab. The chart only shows competency that has at least three rated items.
This view includes the following areas:
● The Overall Rating section (The counterpart in 360 Reviews - SAP Fiori Version is the Overview section.) displays an average rating by each category of raters and all raters. With specific configurations, the section can also display weighted sum rating of all raters, or of all raters except the employee. Minimum and maximum ratings are also available.
NoteMinimum and maximum ratings aren’t available in 360 Reviews - SAP Fiori Version.
● In the Competency and the Goal sections, average ratings of all raters and comments are displayed by sections and items.
Gap Analysis
The Gap Analysis view allows you to know if there's a significance difference in the ratings between the two categories of raters.
You can show the Gap Analysis view by going through the following steps:
1. Go to Admin Center 360 Reviews Form Template Settings .2. Select or clear Enable Gap Analysis View from Detailed 360 Report.3. Click Update Form Template.
Details about the different colors shown in the Gap Analysis view:
There are five possible colors on the gap analysis chart, that is, on the first two columns where you select the two columns to compare. For the actual gap, it’s only red or green depending on the direction of the gap. So, for the first two columns the change in color depends on the percentage of the rating in the scale. For example, a rating of 3.45 on a 1–5 scale equals 61.25%, and not directly mapped to ratings (so we can support different rating scales with the same five colors).
126 PUBLICImplementing 360 Reviews
Detailed 360 Report

Here’s the breakdown of what percentage the rating represents and what color is displayed:
● 25% and under = red● More than 25% up to and including 41% = orange● More than 41% up to and including 59% = yellow● More than 59% up to and including 75% = light green● Everything else (more than 75% and up) = green
NoteIn 360 Reviews - SAP Fiori Version, there're only two colors shown in the Gap Analysis view. One is green, which represents positive value; The other is red, which represents negative value.
Hidden Strength and Blind Spot
The Hidden Strengths and Blind Spots view allows you to see whether there’s a significant difference between how employees rate themselves compared with how others rate them. The view includes two sections:
● The Hidden Strength section displays the competency or the goal on which employees rate themselves lower than others rate them by a defined amount.
● The Blind Spot section displays the competency or the goal on which employees rate themselves higher than others rate them by a defined amount.
You can show this view by configuring it in XML form template. Below is a sample configuration.
Sample Code
<hidden-strength-threshold>0.0</hidden-strength-threshold> <blind-spot-threshold>0.0</blind-spot-threshold>
Rank
The Rank view allows you to see all competencies or behaviors across all sections.
You can show the Rank view on the report by going through the following steps:
1. Go to Admin Center 360 Reviews Form Template Settings .2. Select Enable Rank View from Detailed 360 Report.3. Click Update Form Template.
Parent topic: Detailed 360 Report [page 125]
Implementing 360 ReviewsDetailed 360 Report PUBLIC 127

Related Information
Configuring Instructions on the Detailed 360 Report [page 128]Enabling Rank View in Detailed 360 Report [page 129]Benchmark Ratings [page 130]
8.2 Configuring Instructions on the Detailed 360 Report
You can allow admins to create instructional text for the Detailed 360 Report.
Context
Note● Instructions are only shown on the Graphical Summary View and do not appear on any other view.● Instructions are set at the Form Template. This means that admins need to determine how they want to use
the report and compose their instructional text before the actual forms are created for their users. We recommend that Professional Services demonstrate this to admins.
● If instructional text is used, then it will be displayed by default on the Detailed 360 Report. A display option will be available to hide the instructional text if desired by the user.
● If instructional text is not used, then the instruction section will be invisible, and no option to show/hide will be available. This allows for backwards compatibility for existing customers who do not use this feature.
● HTML rendering is not supported by the instructional field.
.
Procedure
1. While creating the 360 form template, enter the instructional text in the form xml editor in Provisioning. This text is stored in the <instruction-sect> tag in the form xml.
RememberAs a customer, you don't have access to Provisioning. To complete tasks in Provisioning, contact your implementation partner. If you're no longer working with an implementation partner, contact Product Support.
2. Use the template to create a test form and verify that the instructions appear correctly before you create live forms.
128 PUBLICImplementing 360 Reviews
Detailed 360 Report

Results
The Instructions section shows up on the Detailed 360 Report.
Task overview: Detailed 360 Report [page 125]
Related Information
Views in Detailed 360 Report [page 126]Enabling Rank View in Detailed 360 Report [page 129]Benchmark Ratings [page 130]
8.3 Enabling Rank View in Detailed 360 Report
On the Rank view, managers can see employee’s competency ratings from highest first or lowest first to identify employees' strengths and development areas.
Context
You can rank competencies or behaviors across sections. The related ratings can be ranked by available rating sources. Ensure that the ranking is numbered to identify the top 5, or top 10 ratings or so on. The report doesn’t include the comments in Rank view. Only ratings are displayed on the report.
Procedure
1. Go to the Admin Center Form Template Settings .2. Choose a 360 Reviews form template.3. Select Enable Rank View from Detailed 360 Report.4. Save your changes.
Results
You can find the Rank view in detailed 360 reports.
Implementing 360 ReviewsDetailed 360 Report PUBLIC 129

Task overview: Detailed 360 Report [page 125]
Related Information
Views in Detailed 360 Report [page 126]Configuring Instructions on the Detailed 360 Report [page 128]Benchmark Ratings [page 130]
8.4 Benchmark Ratings
A benchmark rating is an average rating of a competency of a job code. Companies can use the benchmark rating to compare an employee's rating against the average rating.
There's only one benchmark rating per competency per job code. When you apply benchmark ratings to forms, for completed forms, a benchmark rating bar appears in each competency's bar charts in the Graphical Summary and Rank View report.
The benchmark ratings shown in the report are taken from the last benchmark ID that was applied to the form. The benchmark ID is created when a benchmark calculation is completed. It represents the group of each competency's average rating in one benchmark calculation.
How Benchmark Ratings Are Calculated
A benchmark rating is calculated by averaging all ratings for a competency of a job code, including the self-rating. All individual ratings are equally weighted. You can't apply weights to make any individual raters or groups' ratings worth more.
NoteOnly completed 360 forms are included for the calculation of benchmark ratings. If there are incomplete 360 forms that fall within the filter criteria, no participant ratings from those reviews are included in the calculation.
The calculation of benchmark ratings is based on job code assignment. So, all individuals within the company who have the same job code (defined in User Directory and set for each employee) have their ratings averaged together. The only way to exclude specific people's ratings from this benchmark is to exclude them from the job code, or not create a form instance for them.
ExampleJohn Doe has a 360 form created for him. Jane Smith also has a 360 form created for her. Both John and Jane have the same job code and are rated on the same five competencies, plus one specific to each of them. The ratings for these forms are as follows:
130 PUBLICImplementing 360 Reviews
Detailed 360 Report

John Doe's 360 Reviews Self-Rating
Manager Rating Rater 1 Rater 2 Rater 3 Rater 4
Competency 1 4 3 4 2 2 1
Competency 2 5 5 4 2 3 3
Competency 3 3 3 3 3 3 3
Competency 4 3 2 4 2 2 1
Competency 5 4 2 3 1 1 1
Competency A 2 2 1 / / 3
Jane Smith's 360 Reviews Self-Rating
Manager Rating Rater 1 Rater 2 Rater 3 Rater 4
Competency 1 4 3 4 2 2 1
Competency 2 5 5 4 2 3 3
Competency 3 3 3 3 3 3 3
Competency 4 3 2 4 2 2 1
Competency 5 4 2 3 1 1 1
Competency B 4 4 5 5 3 3
Competency Benchmark Rating
Competency 1 2.667
Competency 2 3.667
Competency 3 3
Competency 4 2.333
Competency 5 2
Competency A 2
Competency B 4
NoteCompetencies 1–5 are averaged over 12 distinct ratings, Competency A four distinct ratings, and Competency B six distinct ratings.
Creating Benchmark Ratings [page 132]To use benchmark ratings in Detailed 360 Report, create benchmark ratings first.
Applying Benchmark Ratings to Forms [page 133]To use benchmark ratings in Detailed 360 Report, apply the benchmark ratings that you've created to forms.
Parent topic: Detailed 360 Report [page 125]
Implementing 360 ReviewsDetailed 360 Report PUBLIC 131
Related Information
Views in Detailed 360 Report [page 126]Configuring Instructions on the Detailed 360 Report [page 128]Enabling Rank View in Detailed 360 Report [page 129]
8.4.1 Creating Benchmark Ratings
To use benchmark ratings in Detailed 360 Report, create benchmark ratings first.
Prerequisites
You're granted the Calculate 360 Benchmark Ratings permission.
NoteIf your system is using Job Profile Builder, the Calculate 360 Benchmark Ratings option isn’t available in Role-Based Permissions and Admin Center.
Procedure
1. Go to Admin Center, choose 360 Reviews Calculate 360 Benchmark Ratings .2. Select the 360 forms for which you want to create benchmark ratings. You can select multiple form templates.3. (Optional) Select a date range for the start date, due date, and end date of the forms. Use these filters to
exclude the forms you don't want to calculate.4. Choose Create New Benchmark Ratings.
A batch process starts to generate the average ratings for each competency of a job code. You receive an email when the process is complete.
Results
When the benchmark ratings are created, they're given a benchmark ID. The benchmark ratings are stored but aren’t automatically applied to the forms.
Task overview: Benchmark Ratings [page 130]
132 PUBLICImplementing 360 Reviews
Detailed 360 Report

Related Information
Applying Benchmark Ratings to Forms [page 133]
8.4.2 Applying Benchmark Ratings to Forms
To use benchmark ratings in Detailed 360 Report, apply the benchmark ratings that you've created to forms.
Prerequisites
You've created benchmark ratings for the forms that you want to display benchmark ratings. You can only apply the benchmark ratings to the forms that were used to create the benchmark ratings.
Context
A form can support only one benchmark ID at a time to determine the benchmark ratings for comparison. If the form has been used in multiple benchmark calculations, the benchmark ratings from the last benchmark ID are applied to the form.
Procedure
1. Go to Admin Center, choose 360 Reviews Calculate 360 Benchmark Ratings .2. In the benchmark ID section, choose Apply Benchmark To Forms.
"Benchmark has been applied to forms" is reminded under the benchmark calculation information.
Next Steps
If you want to know which forms were included in a benchmark calculation, choose Download Benchmark Data to get the benchmark calculation information, including form ID and benchmark ID.
If needed, you can delete an existing benchmark ID by choosing Delete Benchmark. If you delete the benchmark ID that is in use, those forms that are using the benchmark ID no longer display benchmark ratings in Detailed 360 Report.
Task overview: Benchmark Ratings [page 130]
Implementing 360 ReviewsDetailed 360 Report PUBLIC 133

Related Information
Creating Benchmark Ratings [page 132]
134 PUBLICImplementing 360 Reviews
Detailed 360 Report
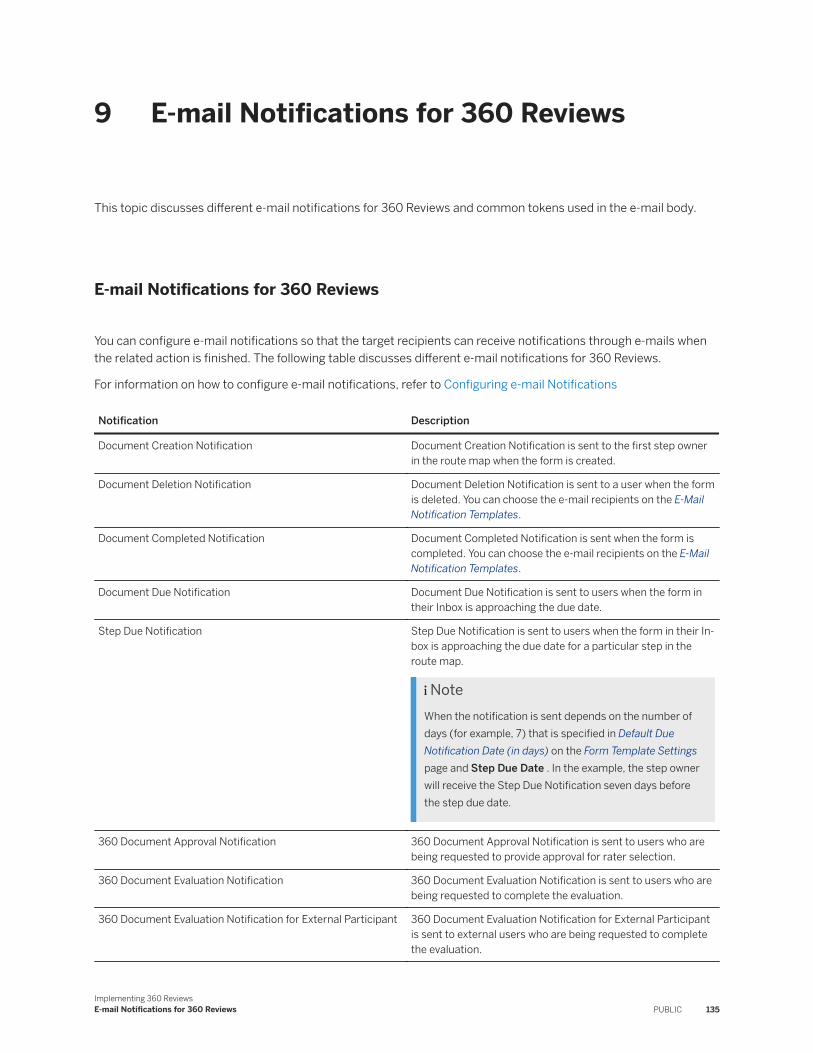
9 E-mail Notifications for 360 Reviews
This topic discusses different e-mail notifications for 360 Reviews and common tokens used in the e-mail body.
E-mail Notifications for 360 Reviews
You can configure e-mail notifications so that the target recipients can receive notifications through e-mails when the related action is finished. The following table discusses different e-mail notifications for 360 Reviews.
For information on how to configure e-mail notifications, refer to Configuring e-mail Notifications
Notification Description
Document Creation Notification Document Creation Notification is sent to the first step owner in the route map when the form is created.
Document Deletion Notification Document Deletion Notification is sent to a user when the form is deleted. You can choose the e-mail recipients on the E-Mail Notification Templates.
Document Completed Notification Document Completed Notification is sent when the form is completed. You can choose the e-mail recipients on the E-Mail Notification Templates.
Document Due Notification Document Due Notification is sent to users when the form in their Inbox is approaching the due date.
Step Due Notification Step Due Notification is sent to users when the form in their Inbox is approaching the due date for a particular step in the route map.
NoteWhen the notification is sent depends on the number of days (for example, 7) that is specified in Default Due Notification Date (in days) on the Form Template Settings page and Step Due Date . In the example, the step owner will receive the Step Due Notification seven days before the step due date.
360 Document Approval Notification 360 Document Approval Notification is sent to users who are being requested to provide approval for rater selection.
360 Document Evaluation Notification 360 Document Evaluation Notification is sent to users who are being requested to complete the evaluation.
360 Document Evaluation Notification for External Participant 360 Document Evaluation Notification for External Participant is sent to external users who are being requested to complete the evaluation.
Implementing 360 ReviewsE-mail Notifications for 360 Reviews PUBLIC 135

Notification Description
360 Document Kickoff Notification 360 Document Kickoff Notification is sent to a 360 form subject, informing him or her of the final approved selection of feedback team members, when a 360 form is sent to the Evaluation Stage.
360 Document Complete Notification 360 Document Completed Notification is sent to a 360 process owner, informing him or her that a 360 participant has completed the form.
360 Document Reject Notification 360 Document Reject Notification is sent to a 360 process owner, informing him or her a 360 participant has rejected the form.
360 Document Send Back Notification 360 Document Send Back Notification is sent to a 360 rater, informing him or her that a form is sent back to their Inbox for re-evaluation.
Tokens used in e-mail notification
In the E-mail Body, you might see the following tokens which are used to populate data from the document into the text of 360 Reviews e-mail notification.
Token Definition
[[SIGNATURE]] Signature
[[DOC_TITLE]] Title of document
[[SENDER]] Sender of document
[[DOC_DUE_DATE]] Due date of this document
[[REVIEW_END_ON]] End date of this review
[[IS_WAS_DUE_ON]] Due date of this document
[[IS_WAS_DUE_ON_LONG]] Due date of this document
The example of date format is November 20, 2018
[[DOC_COMMENT]] Comment from sender to be included in e-mail
In e-mail notifications such as Document Routing Notification and 360 Document Reject Notification, this token is configured by default. After users enable these notifications, they can enter comments in the Email Notification Comments box when routing forms.
NoteIf [[DOC_COMMENT]] is removed from the E-mail Body, users cannot see the Email Notification Comments box when sending the form to next step.
136 PUBLICImplementing 360 Reviews
E-mail Notifications for 360 Reviews
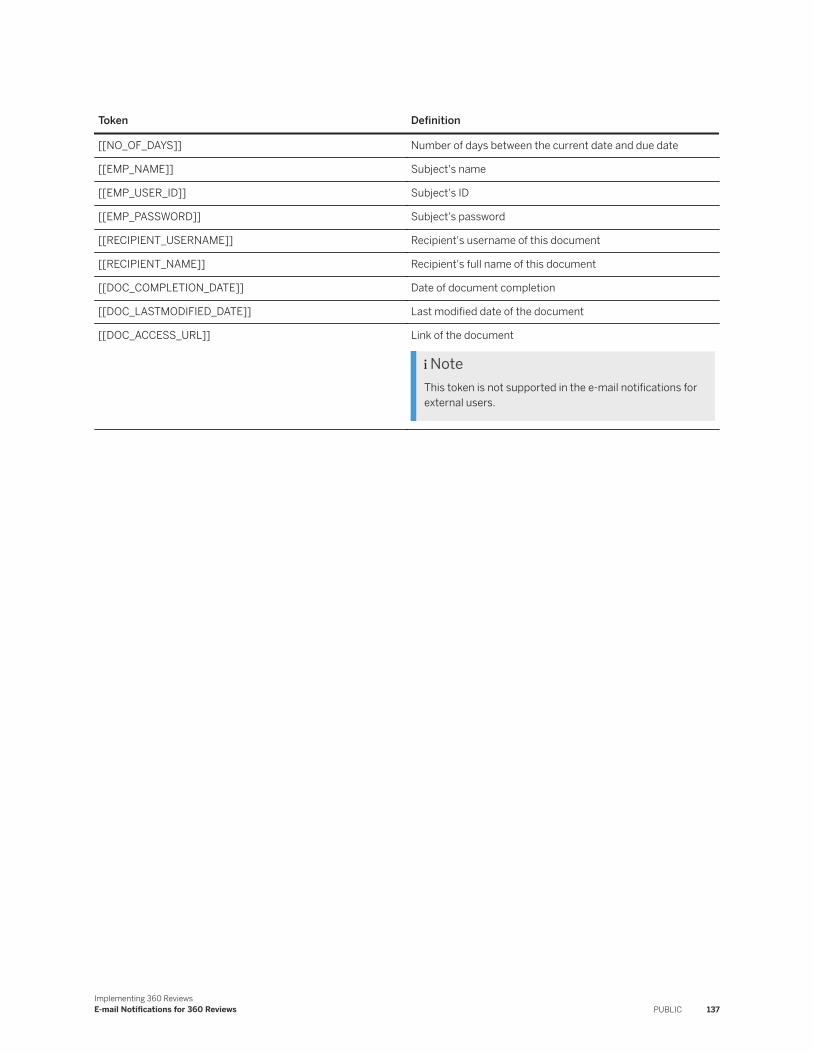
Token Definition
[[NO_OF_DAYS]] Number of days between the current date and due date
[[EMP_NAME]] Subject's name
[[EMP_USER_ID]] Subject's ID
[[EMP_PASSWORD]] Subject's password
[[RECIPIENT_USERNAME]] Recipient's username of this document
[[RECIPIENT_NAME]] Recipient's full name of this document
[[DOC_COMPLETION_DATE]] Date of document completion
[[DOC_LASTMODIFIED_DATE]] Last modified date of the document
[[DOC_ACCESS_URL]] Link of the document
NoteThis token is not supported in the e-mail notifications for external users.
Implementing 360 ReviewsE-mail Notifications for 360 Reviews PUBLIC 137

10 Ad Hoc Reporting for 360 Multi-Rater Subjects
You can create 360 Multi-Rater Subject domain ad-hoc reports to track the 360 review feedback for employees. The Ad Hoc Reports can provide you details about the employees (subjects), their reviewers (participants), and the feedback the employees receive on competencies, behaviors, goals, and performance, and so on.
For more information on setting up ad hoc reporting, refer to the Implementing Ad Hoc Reporting guide.
For more information on using the ad hoc reports, refer to the Ad Hoc Report Builder guide.
Reporting Participant Names When Form is Anonymous:
Ad Hoc Reporting does not display participant names when the 360 form is anonymous. If you want to report the participant names for anonymous forms, you can create a Anonymous 360 Status spreadsheet report which helps you find out how many 360 forms are still in progress, which participants have not completed their reivews yet and how many forms they still need to complete.
How to create Anonymous 360 Status spreadsheet report1. Enable the Anonymous 360 Status Report in your system
Go to Provisioning Company Settings and select Import all Standard RDFs . Then save the change and log out from Provisioning. Next, go back to Provisioning, choose Import/Update/Export RDFs Anonymous 360 Status Report and click Save Changes.
RememberAs a customer, you don't have access to Provisioning. To complete tasks in Provisioning, contact your implementation partner. If you're no longer working with an implementation partner, contact Product Support.
2. Obtain the Anonymous 360 Status Report role-based permissionAdmins go to Admin Center Manage Permission Roles User Permissions Reports PermissionSpreadsheet Report Privilege Other and grant users the Anonymous 360 Status Report permission.
3. Run the Anonymous 360 Status ReportNavigate to Admin Center Reporting Switch to Classic Reporting Spreadsheet Reports and choose Anonymous 360 Status Report .
138 PUBLICImplementing 360 Reviews
Ad Hoc Reporting for 360 Multi-Rater Subjects

10.1 Creating 360 Multi-Rater Ad Hoc Report
You can generate ad hoc reports on 360 Reviews.
Procedure
1. Launch the application, and go to the Reporting module.2. Click the Analytics tab, and under Reports, click Ad Hoc Reports.3. Click Create New Report.
4. For the Report Type field, select Single Domain Report.5. From the Report Definition Type dropdown, select 360 Multi-Rater 360.6. Click Create.7. Under the General Info tab, enter Report Name, Description, and set the Report Priority.8. To include the employees to be considered while generating the report, click the People tab, and under Define
Report Scope, click Refine Criteria.9. In the Define Team dialog box, select Team Manager, select Team Reporting Type and click OK.10. Go to the Data Sets tab, click Select Template, select the 360 template, and click OK.11. Then, to configure the fields that you need in your ad hoc report, click the Columns tab.12. In the Edit Columns section, click Select Columns. The Select Columns dialog box appears.
NoteTo improve performance, a Participant Feedback Status (New) column is introduced. The difference between the Participant Feedback Status (New) column and the existing Participant Feedback Status column is as follows:○ The Participant Feedback Status column contains different feedback statuses including Declined and
Passive Declined. Declined means that participants decline to modify the form, while Passive Declined means that the form is declined by the Auto Route Job in the system.
○ In the Participant Feedback Status (New) column, however, there is no Passive Declined status, and the Declined status contains the data of both active decline by participants and passive decline by the Auto Route Job.
13. Select the columns you need in your report.14. Under the Filter tab, click Refine Criteria, select filters as follows:
a. Select a filter. The filter definition dialog appears.b. Use either the By My Selection tab or the By Rule tab, and complete the definition.c. Click Done.
15. Click Save.16. Click Preview to check whether the report generates all the information you need.
Implementing 360 ReviewsAd Hoc Reporting for 360 Multi-Rater Subjects PUBLIC 139

Results
You have successfully created your ad hoc report.
NoteWhen creating rating scales for 360 Reviews forms, you can configure rating descriptions in your own language. However, in ad hoc reports, the system doesn't support localizing rating descriptions in the language you've configured before, but showing the default language of rating scales.
Overall ratings may be displayed differently in 360 Reviews forms, Detailed 360 reports, and ad hoc reports. This is because the number of decimal places are configured differently in forms, detailed reports, and ad hoc reports. Also, in detailed reports, the "All" rating is the average rating of all raters except the employee self.
140 PUBLICImplementing 360 Reviews
Ad Hoc Reporting for 360 Multi-Rater Subjects

11 Integration of 360 Reviews with Career Development Planning
You can integrate the development goal plan with 360 Reviews and view the development goals in the detailed 360 report. You can similarly integrate Learning with 360 Reviews too.
Note the following:
● Allow users to access the subject's CDP plan to view or add development goals for the subject.● There is no permissioning on this feature. If enabled, it will allow anyone who has access to the Detailed 360
Report to modify CDP goals for the subject.● When the feature is enabled, the link will always use the default CDP plan● You cannot specify which plan to use if there is more than one CDP plan in the company instance, other than by
setting the default plan● CDP Links will only be available for the Graphical Summary View and the Rank View. Gap Analysis, Hidden
Strengths and Blind Spots Views do not offer this functionality.
NoteTo use this feature you need to have created a valid CDP template created for the company instance, and set it as the default CDP plan. The plan must contain goals.
1. In the 360 form template, enable the option "embed-cdp-goals=true".
NoteIf forms have already been created, you will need to change this setting in the xml for each form.
2. Navigate to the summary view for the desired 360, then open the Detailed 360 Report. The Development Goals link is available from the Graphical Summary View and the Rank View
3. Click the Development Goals link. The Development Goals dialog box displays the development goals that currently exist for this person and this competency.
4. Click Add Development Goal, then, in the next dialog box, add or edit the goals.5. Finally, click Save and then Finish to return to the 360 report.
NoteTo integrate with Learning, both the logged-in user and the form subject must have learning access permission.
To enable this option, in Provisioning, select Form Template Administration <the specific template> then select Enable Learning Integration.
RememberAs a customer, you don't have access to Provisioning. To complete tasks in Provisioning, contact your implementation partner. If you're no longer working with an implementation partner, contact Product Support.
Implementing 360 ReviewsIntegration of 360 Reviews with Career Development Planning PUBLIC 141

When this option has been enabled, Assign Learning appears below each competency description on the form.
142 PUBLICImplementing 360 Reviews
Integration of 360 Reviews with Career Development Planning
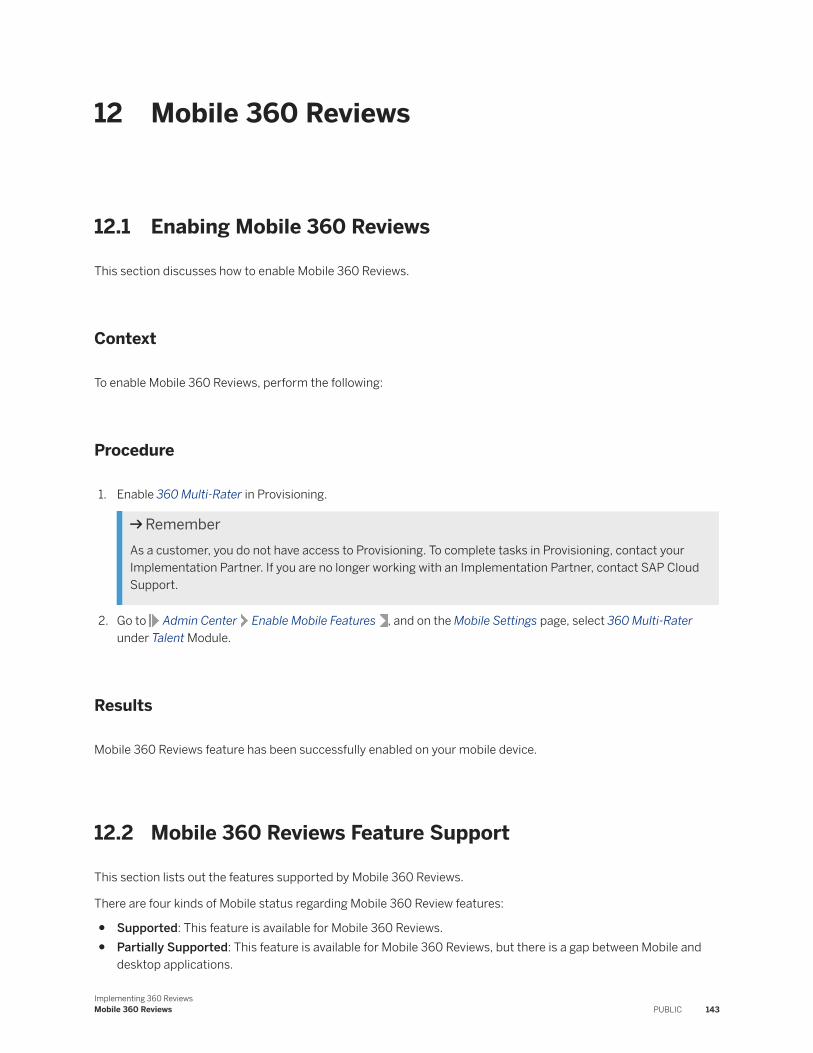
12 Mobile 360 Reviews
12.1 Enabing Mobile 360 Reviews
This section discusses how to enable Mobile 360 Reviews.
Context
To enable Mobile 360 Reviews, perform the following:
Procedure
1. Enable 360 Multi-Rater in Provisioning.
RememberAs a customer, you do not have access to Provisioning. To complete tasks in Provisioning, contact your Implementation Partner. If you are no longer working with an Implementation Partner, contact SAP Cloud Support.
2. Go to Admin Center Enable Mobile Features , and on the Mobile Settings page, select 360 Multi-Rater under Talent Module.
Results
Mobile 360 Reviews feature has been successfully enabled on your mobile device.
12.2 Mobile 360 Reviews Feature Support
This section lists out the features supported by Mobile 360 Reviews.
There are four kinds of Mobile status regarding Mobile 360 Review features:
● Supported: This feature is available for Mobile 360 Reviews.● Partially Supported: This feature is available for Mobile 360 Reviews, but there is a gap between Mobile and
desktop applications.
Implementing 360 ReviewsMobile 360 Reviews PUBLIC 143

● Not Supported: This feature is not available for Mobile 360 Reviews, and not included in the roadmap plan either.
● Planned: This feature is not currently available for Mobile 360 Reviews, but has been included in the road map plan.
Supported Operating Systems
SAP SuccessFactors Mobile APP Mobile Status
iOS (iPhone and iPad) Supported
Android Supported
Use Case
360 Use Case Mobile Status
Raters provide feedback for an employee Supported
360 Evaluation Form is created by choosing Raters, Competencies/Objectives etc.
Planned
Summary of the Evaluations Planned
360 Form Sections
360 Form Sections Mobile Status Notes
Performance Goal/Objective Partially Supported See Performance Goal/Objective Section below for details
Competency Partially Supported See Competency Section below for details
Development Goal/Objective Partially Supported See Development Goal/Objective Section below for details
Summary Partially Supported See Summary Section below for details
Rater Section Planned
Custom Supported
Signature Not Supported
Introduction Not Supported
Review Information Not Supported
144 PUBLICImplementing 360 Reviews
Mobile 360 Reviews

360 Form Sections Mobile Status Notes
User Information Not Supported
Job Description Not Supported
Route Map Stages
Route Map Stage Mobile Status Notes
Modify Planned
Evaluation Supported
Signature Not Supported
Completion Not Supported
Roles
All Roles are supported.
Rating Option
Only Rating Option= 0 is supported.
Rating Scale
Rating Scale Mobile Status Notes
Circle icon scale Supported ● Only circle icon is supported on mobile
● If the value of the scale is more than 5, all scales are displayed in a dropdown
● 1-3● 1-5● 1-7● Build your own
Supported Without numeric rating values, all scales are displayed in a dropdown
Implementing 360 ReviewsMobile 360 Reviews PUBLIC 145

Required Fields
Required Fields Mobile Status Notes
Required Fields Partially Supported Required field validation on submission is supported, but currently it is not possible to show the user if the Overall Manual Rating in the Summary section is required.
Character Limits
Character Limits Mobile Status Notes
Comments Fields Partially Supported Character limit validation on submission is supported but it is not currently possible to show the user if they are under or over the character limit settings in real-time.
Performance Goal/Objective Section
Performance Goal Section Mobile Status Notes
View Performance Goal Partially Supported View name and metric field only
Performance Goal Rating Supported View and Edit
Performance Goal Rating Scale Description
Supported
Performance Goal Comments Partially Supported ● View & edit● Plain text only. See Rich Text Editor
section below for RTE expected behaviors.
Section Introduction Partially Supported Plain text only. See Rich Text Editor section below for RTE expected behaviors.
Performance Goal section comment Partially Supported Plain text only. See Rich Text Editor section below for RTE expected behaviors.
Add Performance Goal Supported
Edit Performance Goal Supported
Delete Performance Goal Supported
Custom Elements Not Supported
146 PUBLICImplementing 360 Reviews
Mobile 360 Reviews

Development Goal/Objective Section
Performance Goal Section Mobile Status Notes
View Development Goal Partially Supported View name and metric field only
Development Goal Rating Supported View and Edit
Development Goal Rating Scale Description
Supported
Development Goal Comments Partially Supported ● View & edit● Plain text only. See Rich Text Editor
section below for RTE expected behaviors.
Section Introduction Partially Supported Plain text only. See Rich Text Editor section below for RTE expected behaviors.
Development Goal section comment Partially Supported Plain text only. See Rich Text Editor section below for RTE expected behaviors.
Add Development Goal Supported
Edit Development Goal Supported
Delete Development Goal Supported
Custom Elements Not Supported
Competency Section
Competency Section Mobile Status Notes
View Competency Partially Supported View name, weight, and description only
Competency Rating Supported View and Edit
Competency Rating Scale Description Supported
Competency Comments Partially Supported ● View and edit● Plain text only. See Rich Text Editor
section below for RTE expected behaviors.
Section Introduction Partially Supported Plain text only. See Rich Text Editor section below for RTE expected behaviors.
Competency section comment Partially Supported Plain text only. See Rich Text Editor section below for RTE expected behaviors
Competency Behaviors Partially Supported You can view competency behaviors. In addition to that, you can also comment on and rate each behavior, and edit the rating and comment later.
Add Competency Planned
Implementing 360 ReviewsMobile 360 Reviews PUBLIC 147

Competency Section Mobile Status Notes
Delete Competency Planned
Custom Elements Not Supported
Summary Section
Summary Section Mobile Status Notes
Calculated Rating Supported
Adjusted Calculated Rating Supported
Overall Manual Rating Partially Supported Required field validation on submission is supported, but currently it is not possible to show the user if this field is required
Introduction Partially Supported Plain text only. See Rich Text Editor section below for RTE expected behaviors
Comment Supported Plain text only. See Rich Text Editor section below for RTE expected behaviors
Summary section table Not Supported
Other Features
Other Features Mobile Status Notes
EZ-Rater Not Supported
Rich Text Editor (Not supported)
Rich Text Editor (RTE) or text formatted with an RTE is not currently supported in Mobile 360 Reviews
If you are using RTE for comment fields, please be aware of the following impacts:
● If text is formatted using RTE on the web, and then edited in the Mobile application, the formatting will be lost in both the web and Mobile applications. Only HTML tags will be visible.
● If text if formatted using RTE on the web , and then viewed in the Mobile application, the text will be displayed without any formatting.
148 PUBLICImplementing 360 Reviews
Mobile 360 Reviews

13 Data Protection and Privacy
13.1 Centralized Data Protection and Privacy
Data protection and privacy features work best when implemented suite-wide, and not product-by-product. For this reason, they are documented centrally.
The Setting Up and Using Data Protection and Privacy guide provides instructions for setting up and using data protection and privacy features throughout the SAP SuccessFactors HXM Suite. Please refer to the central guide for details.
NoteSAP SuccessFactors values data protection as essential and is fully committed to help customers complying with applicable regulations – including the requirements imposed by the General Data Protection Regulation (GDPR).
By delivering features and functionalities that are designed to strengthen data protection and security customers get valuable support in their compliance efforts. However it remains customer’s responsibility to evaluate legal requirements and implement, configure and use the features provided by SAP SuccessFactors in compliance with all applicable regulations.
Related Information
Setting Up and Using Data Protection and Privacy
13.2 Data Retention Management
Identify which data purge function in the Data Retention Management tool meets your data protection and privacy requirements.
The Data Retention Management tool supports two different data purge functions: the newer data retention time management (DRTM) function and legacy non-DRTM function.
RememberWe encourage all customers to stop using the legacy purge function and start using data retention time management (DRTM) instead. To get started using this and other data protection and privacy features, refer to the Data Protection and Privacy guide.
Implementing 360 ReviewsData Protection and Privacy PUBLIC 149
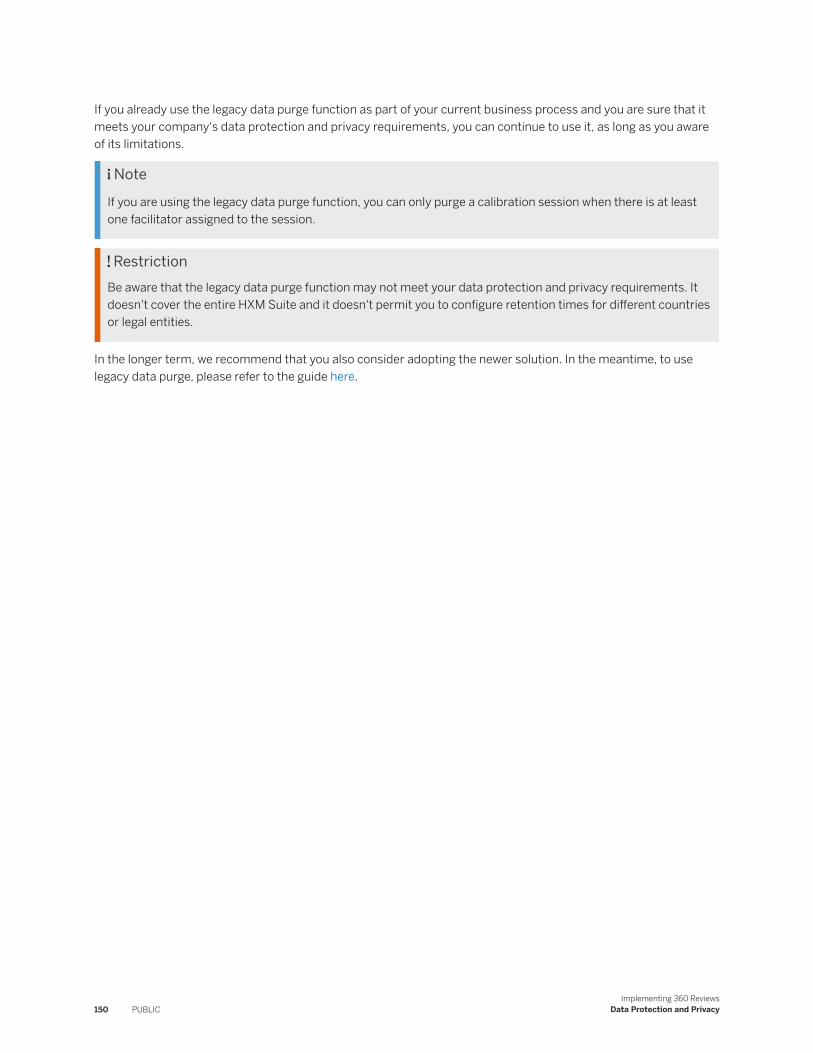
If you already use the legacy data purge function as part of your current business process and you are sure that it meets your company's data protection and privacy requirements, you can continue to use it, as long as you aware of its limitations.
NoteIf you are using the legacy data purge function, you can only purge a calibration session when there is at least one facilitator assigned to the session.
RestrictionBe aware that the legacy data purge function may not meet your data protection and privacy requirements. It doesn't cover the entire HXM Suite and it doesn't permit you to configure retention times for different countries or legal entities.
In the longer term, we recommend that you also consider adopting the newer solution. In the meantime, to use legacy data purge, please refer to the guide here.
150 PUBLICImplementing 360 Reviews
Data Protection and Privacy

14 Using the Check Tool
Use the check tool to find potential problems and errors in your configuration before you contact Product Support about an issue.
Prerequisites
Enable Metadata Framework. Most customers already use Metadata Framework.
Assign Access Check Tool and Allow Configuration Export to your role in Role-Based Permissions (RBP). If you want to use the Quick Fix feature for the checks that have it, assign the Allow Check Tool Quick Fix permission too,
● Access Check Tool authorizes users to access the tool.● Allow Configuration Export authorizes users to attach configuration information to a ticket.● Some checks have a quick fix, which can be used to immediately correct any issues found by that check.
Assign the Allow Check Tool Quick Fix permission to authorize users to run these quick fixes.
Tip
Refer to Guided Answers for the Check Tool for a guided navigation through the available check tool checks and more information on each check.
Procedure
1. Go to Admin Center.2. In the tools search field, type Check Tool.3. In Application, select the application you want to check.
TipAll Applications runs checks in all your applications.
For example, to run checks for Time Off, select Time Off.
You see the checks for the application you selected. The description for each check describes the situation you hope to find in running the check. For example, in running the check Accrual lookup by seniority is consistent, you hope to find that the lookup is indeed consistent.
4. Click the check the box at top left in the table to run all checks.5. If you want to run only some checks, select them individually.
TipTo understand what a check does, right click the Check ID. The system then displays some information on the check.
Implementing 360 ReviewsUsing the Check Tool PUBLIC 151

6. Click Run Checks to check your applications for the checks you selected.
Next Steps
Evaluate the results and resolve the issues. If you encounter an error you cannot resolve, contact Product Support by creating a ticket.
Benefits of the Check Tool [page 152]The SAP SuccessFactors check tool helps you identify and resolve issues when your system doesn’t work as you expect.
Check Results [page 153]After you run checks in the check tool, it returns the results of the check so that you can resolve issues that it found.
Creating Product Support Tickets from the Check Tool [page 153]When the check tool reports a serious issue, you might need to contact Product Support. You can create a support ticket from within the check tool.
Using the Quick Fix Feature [page 154]The Check Tool includes a Quick Fix feature that you can use to immediately correct issues found during a check run.
14.1 Benefits of the Check Tool
The SAP SuccessFactors check tool helps you identify and resolve issues when your system doesn’t work as you expect.
If your SAP SuccessFactors applications are behaving in unexpected ways, it is likely that it has a configuration or data conflict: you have some data that is inconsistent or a configuration error. The check tool quickly identifies these types of problems so that you can avoid support tickets. You might still need to create a support ticket if the problem is severe, but even in severe cases, the check tool can save you time because it can export the results of the check and your configuration for Product Support. The support engineer, therefore, can identify the issue more quickly.
When you run the check tool, you see:
● A list of issues in your configuration or data and the severity of each issue.● A solution or recommendation to address the issue.
152 PUBLICImplementing 360 Reviews
Using the Check Tool

14.2 Check Results
After you run checks in the check tool, it returns the results of the check so that you can resolve issues that it found.
To see the results of the checks, look in the Result column. If you run the checks multiple times to see how you are resolving issues, look in the Previous Result column to compare the current results to previous results.
Possible Results of Check Tool
Result Action
No issues found If the tool cannot find issues, you see a green check mark in the Result column.
Issues found If the tool finds issues, it reports the number of issues and a yellow warning icon or a red alarm icon.
● The yellow icon indicates a low severity issue. The system proposes a solution.● The red icon indicates a high severity issue. You must take action, which could include creat
ing a support ticket.
Note● The maximum text size of a cell is limited, which can result in the text being truncated in the Result or
Details column. Select the Export Results button to download the check results and view the complete text.● The downloaded check result table can display a maximum number of 10,000 rows.
Related Information
Creating Product Support Tickets from the Check Tool [page 153]
14.3 Creating Product Support Tickets from the Check Tool
When the check tool reports a serious issue, you might need to contact Product Support. You can create a support ticket from within the check tool.
Prerequisites
Run the check tool. You can find the check tool by going to Admin Center Check Tool . You create the ticket from the results page of the tool.
Implementing 360 ReviewsUsing the Check Tool PUBLIC 153

Procedure
1. On the results page, look in the Result column for the errors you want to report on.
You usually contact Product Support for high severity issues not low severity issues.2. Click the error in the result to open the Detailed Result.
NoteIf you cannot click the error, expand the list of checks from the Description column, and then click the error from the Result column.
3. In Detailed Result Need Assistance? , copy the component ID.
For example, LOD-SF-EC is the component ID for Employee Central.4. Create a customer incident in the relevant category.5. When you create the ticket, paste the component ID into the ticket.
14.4 Using the Quick Fix Feature
The Check Tool includes a Quick Fix feature that you can use to immediately correct issues found during a check run.
Procedure
1. Run checks as described in Using the Check Tool for one or more components. The tool generates check results, some of which might be warnings or errors.
2. Select the result of one of the checks where issues were identified. If the check includes a quick fix, you see the four-step process at the top of the resulting window. You are in step 1, called Found Issues.
3. Choose Step 2 to proceed to Select Correction.4. The resulting window shows one or more corrections for the issue. Select the one you want and choose Step 3
to proceed to Final Approval.5. In the Final Approval step, you can opt to change your mind and not carry out the fix. If you want to proceed,
choose Step 4.6. The system confirms that the fix is now running. Choose Close to complete the procedure. The system verifies
that the fix has run correctly after a short time by running the check again.
154 PUBLICImplementing 360 Reviews
Using the Check Tool
Important Disclaimers and Legal Information
HyperlinksSome links are classified by an icon and/or a mouseover text. These links provide additional information.About the icons:
● Links with the icon : You are entering a Web site that is not hosted by SAP. By using such links, you agree (unless expressly stated otherwise in your agreements with SAP) to this:
● The content of the linked-to site is not SAP documentation. You may not infer any product claims against SAP based on this information.● SAP does not agree or disagree with the content on the linked-to site, nor does SAP warrant the availability and correctness. SAP shall not be liable for any
damages caused by the use of such content unless damages have been caused by SAP's gross negligence or willful misconduct.
● Links with the icon : You are leaving the documentation for that particular SAP product or service and are entering a SAP-hosted Web site. By using such links, you agree that (unless expressly stated otherwise in your agreements with SAP) you may not infer any product claims against SAP based on this information.
Videos Hosted on External PlatformsSome videos may point to third-party video hosting platforms. SAP cannot guarantee the future availability of videos stored on these platforms. Furthermore, any advertisements or other content hosted on these platforms (for example, suggested videos or by navigating to other videos hosted on the same site), are not within the control or responsibility of SAP.
Beta and Other Experimental FeaturesExperimental features are not part of the officially delivered scope that SAP guarantees for future releases. This means that experimental features may be changed by SAP at any time for any reason without notice. Experimental features are not for productive use. You may not demonstrate, test, examine, evaluate or otherwise use the experimental features in a live operating environment or with data that has not been sufficiently backed up.The purpose of experimental features is to get feedback early on, allowing customers and partners to influence the future product accordingly. By providing your feedback (e.g. in the SAP Community), you accept that intellectual property rights of the contributions or derivative works shall remain the exclusive property of SAP.
Example CodeAny software coding and/or code snippets are examples. They are not for productive use. The example code is only intended to better explain and visualize the syntax and phrasing rules. SAP does not warrant the correctness and completeness of the example code. SAP shall not be liable for errors or damages caused by the use of example code unless damages have been caused by SAP's gross negligence or willful misconduct.
Bias-Free LanguageSAP supports a culture of diversity and inclusion. Whenever possible, we use unbiased language in our documentation to refer to people of all cultures, ethnicities, genders, and abilities.
Implementing 360 ReviewsImportant Disclaimers and Legal Information PUBLIC 155

www.sap.com/contactsap
© 2022 SAP SE or an SAP affiliate company. All rights reserved.
No part of this publication may be reproduced or transmitted in any form or for any purpose without the express permission of SAP SE or an SAP affiliate company. The information contained herein may be changed without prior notice.
Some software products marketed by SAP SE and its distributors contain proprietary software components of other software vendors. National product specifications may vary.
These materials are provided by SAP SE or an SAP affiliate company for informational purposes only, without representation or warranty of any kind, and SAP or its affiliated companies shall not be liable for errors or omissions with respect to the materials. The only warranties for SAP or SAP affiliate company products and services are those that are set forth in the express warranty statements accompanying such products and services, if any. Nothing herein should be construed as constituting an additional warranty.
SAP and other SAP products and services mentioned herein as well as their respective logos are trademarks or registered trademarks of SAP SE (or an SAP affiliate company) in Germany and other countries. All other product and service names mentioned are the trademarks of their respective companies.
Please see https://www.sap.com/about/legal/trademark.html for additional trademark information and notices.
THE BEST RUN