important warranty & installation … warranty & installation instructions attached please...
TRANSCRIPT

IMPORTANT WARRANTY & INSTALLATION INSTRUCTIONS ATTACHED
Please Forward All Attached Information to Consumer Warranty Not Valid Unless Returned to CORSA Performance
We ask that you take a few moments to compete our warranty registration form:
TO ACTIVATE YOUR LIMITED LIFETIME WARRANTY GO TO:
CORSAPERFORMANCE.COM/WARRANTY
For Full-Color Installation Instructions, Please Visit: CORSAPERFORMANCE.COM and Search by Part Number
Please be sure to review the enclosed instructions prior to beginning the installation process. If you
have any questions about the enclosed parts, instructions or encounter a problem during installation: CALL CORSA PERFORMANCE TECHNICAL ASSISTANCE AT 800.486.0999
CORSA PERFORMANCE l 140 BLAZE INDUSTRIAL PKWY, BEREA, OHIO 44017
STOP
02/10/16
INS5315
CORSA Performance · 140 Blaze Industrial Pkwy · Berea, OH 44017 · P: (440) 891.0999 · F: (440) 891-1868 2
E - M a i l : s a l e s @ c o r s a p e r f o r m a n c e . c o m · w w w . c o r s a p e r f o r m a n c e . c o m
Cat-Back Exhaust System
2011-16 Jeep Grand Cherokee 5.7L
Single 4.5” Pro-Series® Tips PN: 14991
Twin 4.0” Pro-Series® Tips PN: 14992 (Summit Edition)
*For Black PVD Tips (PN 14991BLK & 14992BLK)
Please take time to read and understand these installation instructions. CORSA recommends that the installation of this system be performed by a qualified service center or professional
muffler installer who has the necessary equipment, tools and experienced personnel. However, if you decide to
perform this install, the use of a lift and an additional person will be required.
CAUTION: Never work on a hot exhaust system. Allow time for the vehicle to cool. Always wear eye protection when
working under a vehicle.
Recommended Tools:
3/8” drive ratchet
3/8” drive 13mm deep socket
3/8” drive 14mm deep socket
3/8” drive 15mm deep socket
14mm wrench
Rubber mallet and/or hammer
Grommet pullers
Soap and water solution
Torque Wrench
Safety glasses
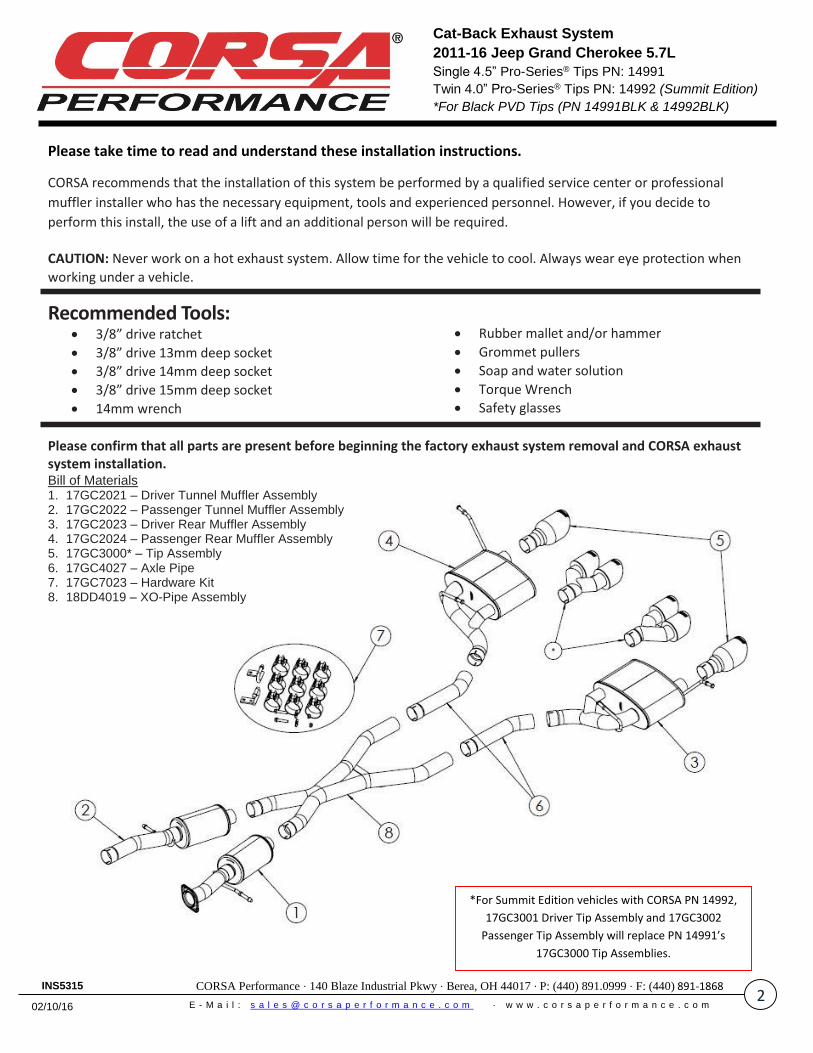
Please confirm that all parts are present before beginning the factory exhaust system removal and CORSA exhaust system installation. Bill of Materials 1. 17GC2021 – Driver Tunnel Muffler Assembly 2. 17GC2022 – Passenger Tunnel Muffler Assembly 3. 17GC2023 – Driver Rear Muffler Assembly 4. 17GC2024 – Passenger Rear Muffler Assembly 5. 17GC3000* – Tip Assembly 6. 17GC4027 – Axle Pipe 7. 17GC7023 – Hardware Kit 8. 18DD4019 – XO-Pipe Assembly
*For Summit Edition vehicles with CORSA PN 14992,
17GC3001 Driver Tip Assembly and 17GC3002
Passenger Tip Assembly will replace PN 14991’s
17GC3000 Tip Assemblies.
02/10/16
INS5315
CORSA Performance · 140 Blaze Industrial Pkwy · Berea, OH 44017 · P: (440) 891.0999 · F: (440) 891-1868 3
E - M a i l : s a l e s @ c o r s a p e r f o r m a n c e . c o m · w w w . c o r s a p e r f o r m a n c e . c o m
Cat-Back Exhaust System
2011-16 Jeep Grand Cherokee 5.7L
Single 4.5” Pro-Series® Tips PN: 14991
Twin 4.0” Pro-Series® Tips PN: 14992 (Summit Edition)
*For Black PVD Tips (PN 14991BLK & 14992BLK)
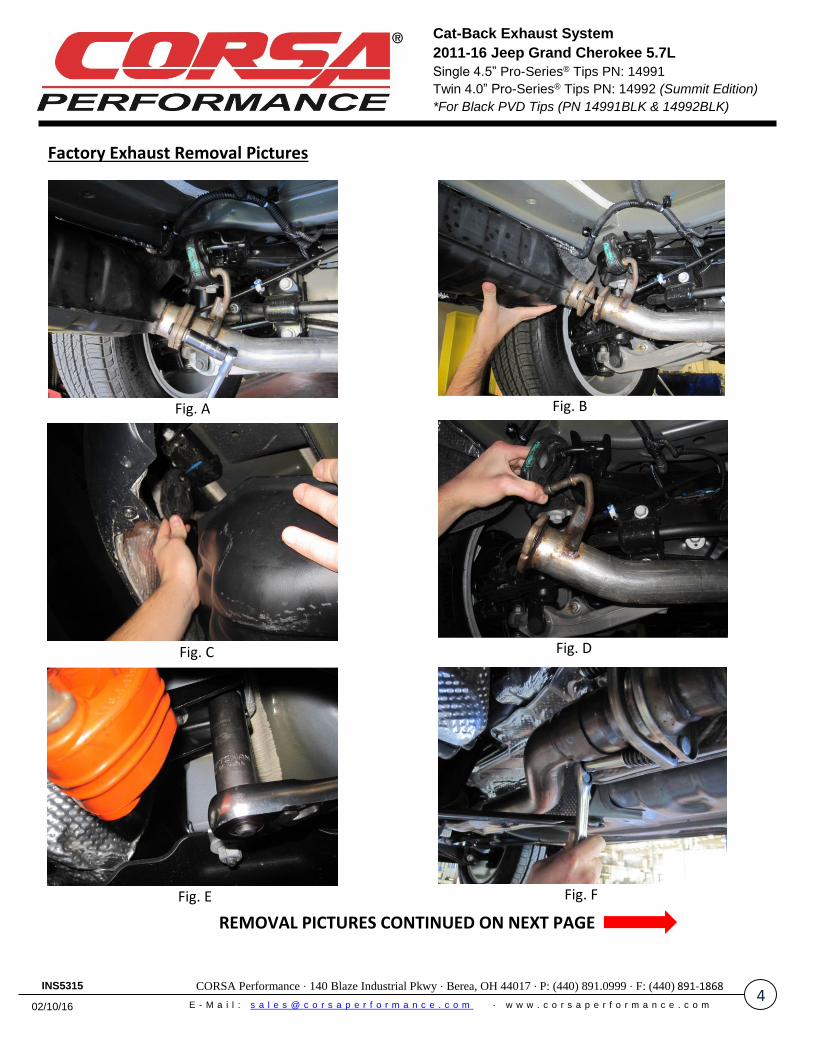
Factory Exhaust System Removal: 1. Beginning at the rear of the vehicle on the driver’s side, use the 15mm socket and ratchet to loosen and remove
the hardware securing the muffler. (Fig. A) By pulling up and rearward, separate the rear muffler from the axle pipe. (Fig. B)
2. At this point, remove the rear muffler from the factory rubber grommet. This rubber grommet is above the muffler towards the outside of the car vehicle, making access with grommet pullers difficult. It is possible to remove the muffler from the grommet by hand if grommet pullers will not fit into the cavity. (Fig. C) After removal, set the muffler aside. Note: A soap and water solution will aid in removing hangers from rubber grommets.
3. Remove the driver’s side axle pipe hanger from the factory grommet (Fig. D) Repeat on the passenger’s side of the vehicle.
4. At the front of the vehicle, use the 13mm socket and ratchet to remove the two bolts securing the front driver’s side hanger bracket to the chassis. Save the bolts for later use when installing the Corsa exhaust system. (Fig. E) Repeat on the passenger’s side of the vehicle.
5. Using the 14mm socket and ratchet, remove the spring nuts from the factory studs on both the driver’s and passenger’s side of the vehicle. (Fig. F)
6. Carefully remove the factory exhaust system from the vehicle by first pushing the system towards the rear of the vehicle. Once the studs are free of the flanges at the front, slightly lower the front. At this point, remove the passenger’s side rear hanger from the grommet above the muffler. Note: There may be a ground strap between the vehicle frame and the muffler hanger. This strap clips in place and can be easily removed from the muffler.
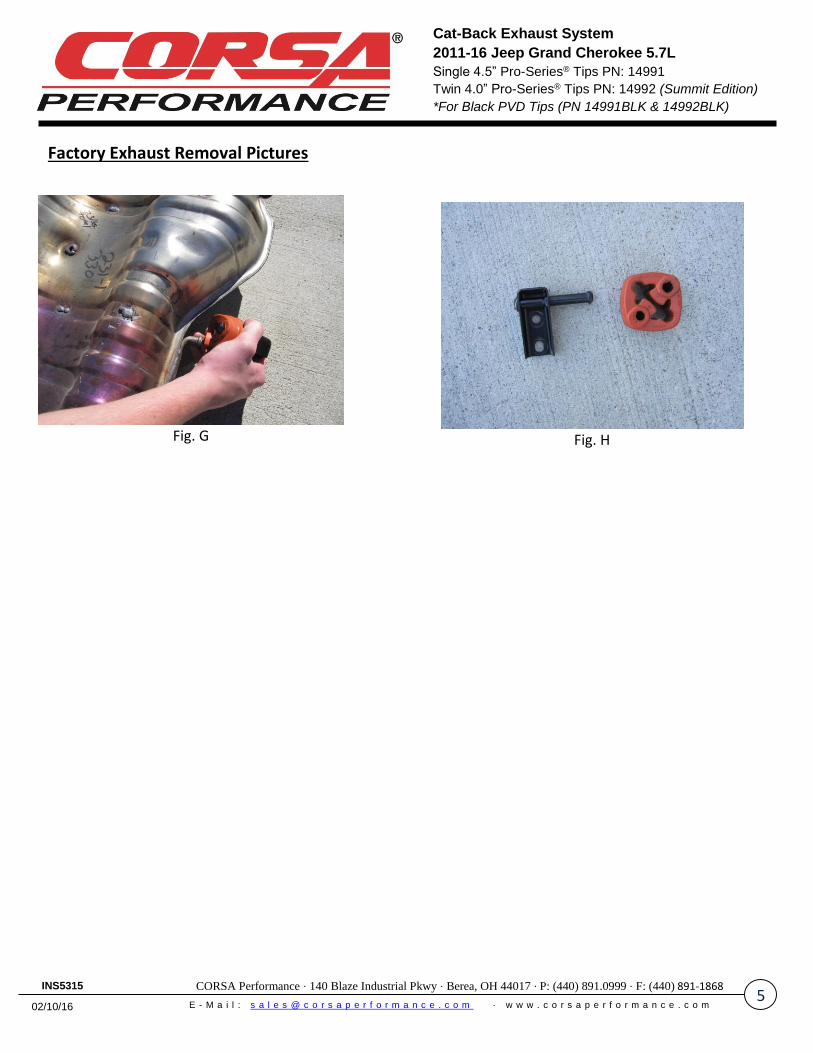
7. Set the factory exhaust system to the side. Remove the rubber grommets from the sides of the factory tunnel muffler using the grommet pullers. Save the rubber grommets for later use when installing the Corsa exhaust system. (Fig. G & H) Note: A second person helping is necessary during this step due to the size and weight of the factory exhaust.
8. Using the 15mm socket and ratchet, loosen the clamp on the passenger’s side of the vehicle near the flange connection. Remove this short connector piece from the vehicle, leaving only a flange on the driver’s side. Note: A penetrating lubricant spray used at this expansion joint may make separating these pipes easier. The use of a rubber mallet or hammer to gently tap the flange rearward may also aid in removal.
This concludes the factory exhaust system removal process.
REMOVAL PICTURES ON NEXT PAGE
02/10/16
INS5315
CORSA Performance · 140 Blaze Industrial Pkwy · Berea, OH 44017 · P: (440) 891.0999 · F: (440) 891-1868 4
E - M a i l : s a l e s @ c o r s a p e r f o r m a n c e . c o m · w w w . c o r s a p e r f o r m a n c e . c o m
Cat-Back Exhaust System
2011-16 Jeep Grand Cherokee 5.7L
Single 4.5” Pro-Series® Tips PN: 14991
Twin 4.0” Pro-Series® Tips PN: 14992 (Summit Edition)
*For Black PVD Tips (PN 14991BLK & 14992BLK)
Factory Exhaust Removal Pictures
REMOVAL PICTURES CONTINUED ON NEXT PAGE
Fig. A Fig. B
Fig. C Fig. D
Fig. E Fig. F
02/10/16
INS5315
CORSA Performance · 140 Blaze Industrial Pkwy · Berea, OH 44017 · P: (440) 891.0999 · F: (440) 891-1868 5
E - M a i l : s a l e s @ c o r s a p e r f o r m a n c e . c o m · w w w . c o r s a p e r f o r m a n c e . c o m
Cat-Back Exhaust System
2011-16 Jeep Grand Cherokee 5.7L
Single 4.5” Pro-Series® Tips PN: 14991
Twin 4.0” Pro-Series® Tips PN: 14992 (Summit Edition)
*For Black PVD Tips (PN 14991BLK & 14992BLK)
Factory Exhaust Removal Pictures
Fig. G Fig. H

02/10/16
INS5315
CORSA Performance · 140 Blaze Industrial Pkwy · Berea, OH 44017 · P: (440) 891.0999 · F: (440) 891-1868 6
E - M a i l : s a l e s @ c o r s a p e r f o r m a n c e . c o m · w w w . c o r s a p e r f o r m a n c e . c o m
Cat-Back Exhaust System
2011-16 Jeep Grand Cherokee 5.7L
Single 4.5” Pro-Series® Tips PN: 14991
Twin 4.0” Pro-Series® Tips PN: 14992 (Summit Edition)
*For Black PVD Tips (PN 14991BLK & 14992BLK)
Installation of CORSA Exhaust System:
NOTE: Apply the anti-seize lubricant (supplied) to the threads ONLY of all the clamps and flange bolts. Failure to follow this
procedure can cause nuts to seize on clamps and potentially destroy threads. After applying anti-seize lubricant, be sure to
thoroughly clean your hands, as lubricant will tarnish stainless steel. All clamps should be tightened using a properly calibrated
Torque Wrench. Using an air impact gun will damage the clamp and reduce its ability to
effectively seal the joint. It may also cause the joint to separate, thereby causing damage
to your exhaust system and to your vehicle.
NOTE: Align all clamps so that the center of the clamp bolt is 90 degrees from the notch in
the pipe. (See Fig. CLAMP)
1. Begin by removing all exhaust components from the shipping container including the clamps.
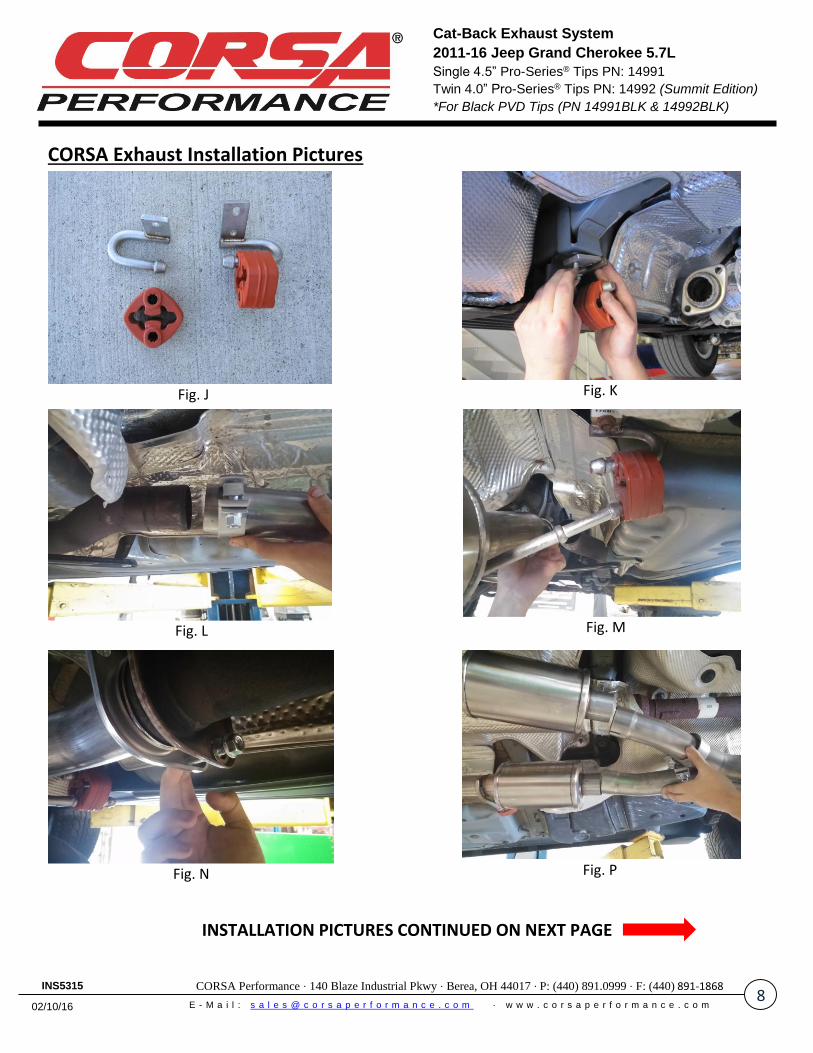
2. Locate the two hanger brackets in the hardware kit. Install the rubber grommets saved from Step #7 of the removal process (Fig. J) and mount the brackets on the vehicle using the bolts saved from Step #3. (Fig. K) Note: Ensure the U bent hanger is towards the front of the vehicle when mounting!
3. Locate the passenger side tunnel muffler and one of the supplied 2.5” clamps. Slide a clamp over the expanded end of the muffler with the bolt opposite the hanger. Slide the expanded end of the muffler over the passenger side front exhaust pipe. (Fig. L) Insert the muffler hanger into the grommet. (Fig. M). Note: The use of a soap and water solution may aid in working with the rubber grommets.
4. Locate the two bolts, two nuts, and two washers from the hardware kit along with the driver’s side tunnel muffler. Begin by inserting the hanger into the rubber grommet. Slide the bolts into the holes of the flange on the tunnel muffler such that the bolt head is towards the rear of the vehicle, followed by a washer, then the nut on the front side of the factory flange. (Fig. N) Hand tighten both nuts and bolts.
5. Locate the XO pipe assembly and two more of the supplied clamps. Slide the clamps over the expanded end of the XO pipe such that the bolts are towards the inside and then slide the expanded ends of the XO pipe over the outlets of the tunnel mufflers. (Fig. P) Ensure the flat bracket on the XO pipe is towards the ground. Snugly tighten the clamp on the passenger tunnel muffler and the two clamps on the XO pipe using the 15mm socket and ratchet. Note: At this point, the XO pipe assembly needs supported using a suitable device.
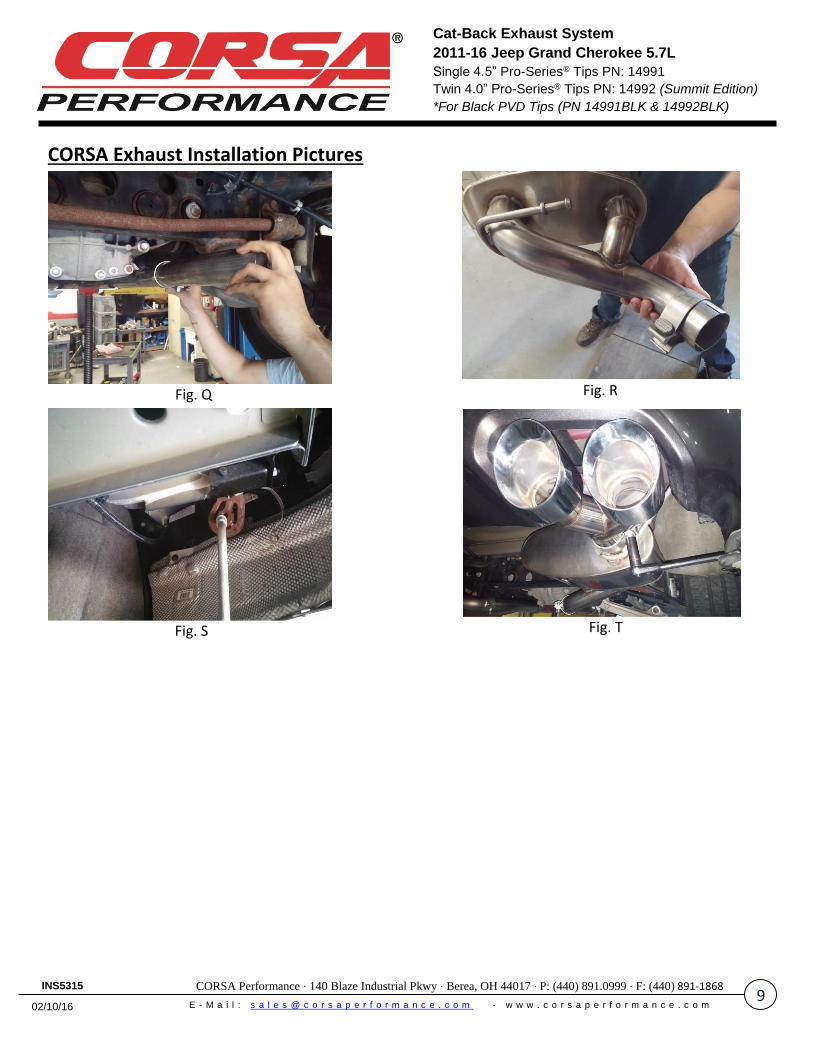
6. Locate the two axle pipes and two more of the supplied clamps. Slide the clamps over the expanded ends of the axle pipes and slide them over the outlet ends of the XO pipe. (Fig. Q) The plane of the bend on the axle pipe should be roughly parallel to the ground. Once the axle pipes are rotated correctly, snugly tighten them using the 15mm socket and ratchet.
INSTALLATION INSTRUCTION CONTINUED ON NEXT PAGE
02/10/16
INS5315
CORSA Performance · 140 Blaze Industrial Pkwy · Berea, OH 44017 · P: (440) 891.0999 · F: (440) 891-1868 7
E - M a i l : s a l e s @ c o r s a p e r f o r m a n c e . c o m · w w w . c o r s a p e r f o r m a n c e . c o m
Cat-Back Exhaust System
2011-16 Jeep Grand Cherokee 5.7L
Single 4.5” Pro-Series® Tips PN: 14991
Twin 4.0” Pro-Series® Tips PN: 14992 (Summit Edition)
*For Black PVD Tips (PN 14991BLK & 14992BLK)
Installation of CORSA Exhaust System:
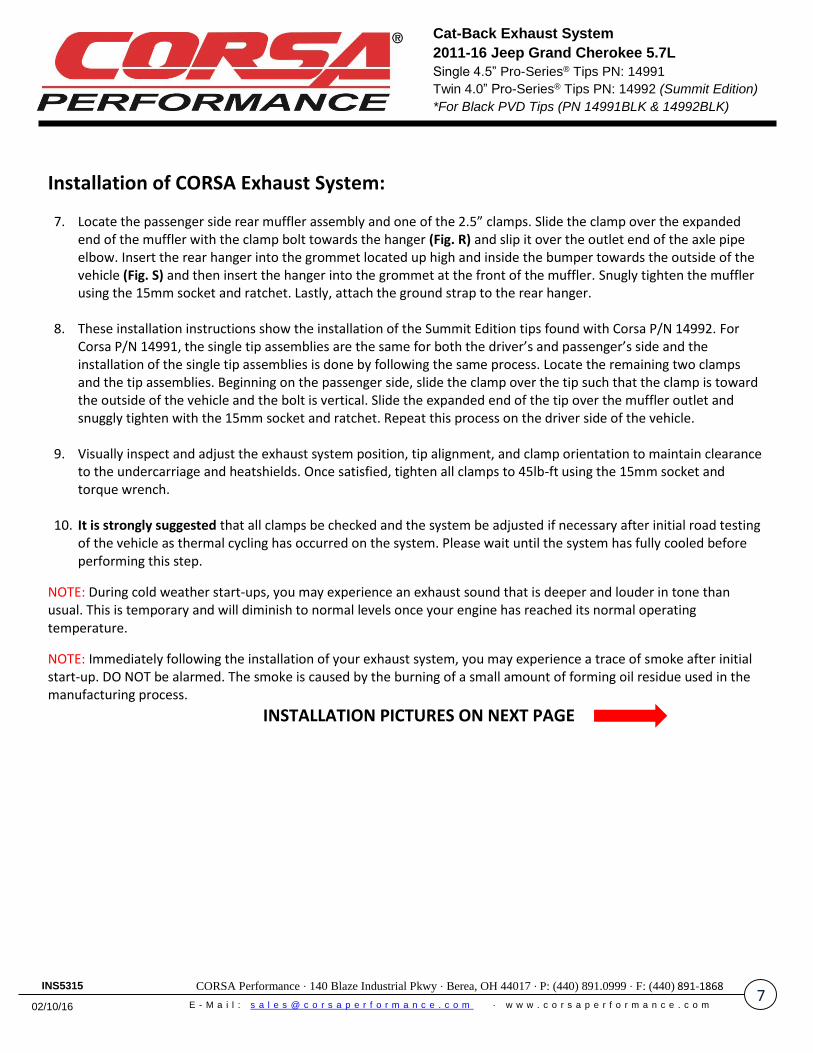
7. Locate the passenger side rear muffler assembly and one of the 2.5” clamps. Slide the clamp over the expanded end of the muffler with the clamp bolt towards the hanger (Fig. R) and slip it over the outlet end of the axle pipe elbow. Insert the rear hanger into the grommet located up high and inside the bumper towards the outside of the vehicle (Fig. S) and then insert the hanger into the grommet at the front of the muffler. Snugly tighten the muffler using the 15mm socket and ratchet. Lastly, attach the ground strap to the rear hanger.
8. These installation instructions show the installation of the Summit Edition tips found with Corsa P/N 14992. For Corsa P/N 14991, the single tip assemblies are the same for both the driver’s and passenger’s side and the installation of the single tip assemblies is done by following the same process. Locate the remaining two clamps and the tip assemblies. Beginning on the passenger side, slide the clamp over the tip such that the clamp is toward the outside of the vehicle and the bolt is vertical. Slide the expanded end of the tip over the muffler outlet and snuggly tighten with the 15mm socket and ratchet. Repeat this process on the driver side of the vehicle.
9. Visually inspect and adjust the exhaust system position, tip alignment, and clamp orientation to maintain clearance to the undercarriage and heatshields. Once satisfied, tighten all clamps to 45lb-ft using the 15mm socket and torque wrench.
10. It is strongly suggested that all clamps be checked and the system be adjusted if necessary after initial road testing of the vehicle as thermal cycling has occurred on the system. Please wait until the system has fully cooled before performing this step.
NOTE: During cold weather start-ups, you may experience an exhaust sound that is deeper and louder in tone than usual. This is temporary and will diminish to normal levels once your engine has reached its normal operating temperature.
NOTE: Immediately following the installation of your exhaust system, you may experience a trace of smoke after initial start-up. DO NOT be alarmed. The smoke is caused by the burning of a small amount of forming oil residue used in the manufacturing process.
INSTALLATION PICTURES ON NEXT PAGE
02/10/16
INS5315
CORSA Performance · 140 Blaze Industrial Pkwy · Berea, OH 44017 · P: (440) 891.0999 · F: (440) 891-1868 8
E - M a i l : s a l e s @ c o r s a p e r f o r m a n c e . c o m · w w w . c o r s a p e r f o r m a n c e . c o m
Cat-Back Exhaust System
2011-16 Jeep Grand Cherokee 5.7L
Single 4.5” Pro-Series® Tips PN: 14991
Twin 4.0” Pro-Series® Tips PN: 14992 (Summit Edition)
*For Black PVD Tips (PN 14991BLK & 14992BLK)
CORSA Exhaust Installation Pictures
INSTALLATION PICTURES CONTINUED ON NEXT PAGE
Fig. J Fig. K
Fig. L Fig. M
Fig. N Fig. P
02/10/16
INS5315
CORSA Performance · 140 Blaze Industrial Pkwy · Berea, OH 44017 · P: (440) 891.0999 · F: (440) 891-1868 9
E - M a i l : s a l e s @ c o r s a p e r f o r m a n c e . c o m · w w w . c o r s a p e r f o r m a n c e . c o m
Cat-Back Exhaust System
2011-16 Jeep Grand Cherokee 5.7L
Single 4.5” Pro-Series® Tips PN: 14991
Twin 4.0” Pro-Series® Tips PN: 14992 (Summit Edition)
*For Black PVD Tips (PN 14991BLK & 14992BLK)
CORSA Exhaust Installation Pictures
Fig. Q Fig. R
Fig. S Fig. T