importing intellipics activities tutorial · viewing ladybugs song in explore mode 1. after the...
TRANSCRIPT

Importing IntelliPics Activities
Tutorial
Copyright 2002, IntelliTools, Inc.
Note: This tutorial requires that you have installed IntelliPics Studio. Authoring featuresnecessary to complete this tutorial are not available when using IntelliPics Studio Player.

Copyright Notice
© 2002 IntelliTools, Inc. All rights reserved. The distribution and sale of this software and manual are authorized forthe original purchaser only. Unauthorized duplication is a violation of federal copyright law.
Images that appear in IntelliPics Studio may not be used in any commercial application without the prior consent ofIntelliTools, Inc.
Trademarks and Acknowledgments
IntelliTools, IntelliPics, IntelliKeys, IntelliTalk II, and Overlay Maker, and their respective logos are registeredtrademarks of IntelliTools, Inc. IntelliMathics, IntelliCritters, IntelliMation, IntelliQuiz, Overlay Printer, and OverlaySender are trademarks of IntelliTools, Inc.
Adobe and Acrobat Reader are registered trademarks or trademarks of Adobe Systems Incorporated, registered inthe United States and/or other countries. Macintosh, QuickTime, and QuickTime logo are registered trademarks ortrademarks of Apple Computer, Inc., registered in the U.S.A. and other countries. Windows 95, Windows 98,Windows 2000, and Windows ME are registered trademarks or trademarks of Microsoft Corporation, registered inthe U.S.A. and other countries. Other brand and product names mentioned herein are trademarks, registeredtrademarks, or trade names of their respective holders and are hereby acknowledged.
Some photographic images included with this program are from the CD-ROM, “Picture This... Professional Edition”and are the copyright of Silver Lining Multimedia, Inc. If you would like to obtain more images that can be importedinto IntelliTools products, please visit the Silver Lining Multimedia Web site: http://www.silverliningmm.com.
Over 90 of the images supplied with IntelliPics Studio are Picture Communication Symbols from the Boardmakersoftware, ©1981–2001 Mayer-Johnson, Inc. and are used with permission. Boardmaker has 3,000+ additional imagesthat can be imported into IntelliTools products. For additional information about Boardmaker images, please visitthe Mayer-Johnson Web site: http://www.mayer-johnson.com.
Credits
IntelliPics Studio was produced through the collaborative efforts of many staff members at IntelliTools. Design:Arjan Khalsa, Scott Schafer; Project Management: David Robertshaw; Content Development: Suzanne Feit, ArjanKhalsa, Lucinda Ray, Patty Kilroy; Software Engineering: Scott Schafer, Paul Archibald, Fred Ross-Perry; User’sGuide: Alan Rhody; Teacher’s Guide: Lucinda Ray; Tutorial: Suzanne Feit; Additional Development: PhilipNittenberg, Jeremy Bolan, Linda Finley, Meida Pang, Steve Gensler; Testing: Dale Goetsch, Lisa Carr, Mike Burns,Meida Pang, Chris Finley; Artwork: Patty Kilroy, Chris Santeramo, Michelle Graham, Mary Ann Zapalac, JeremyBolan; Support Services: Linda Finley; Packaging: Patty Kilroy.
Technical SupportHours: 8 a.m.– 5 p.m. Pacific Time, Monday through FridayPhone: (800) 899-6687 (U.S. and Canada)
(707) 773-2000 (local and international)Fax: (707) 773-2001Email: [email protected] (for technical information)
[email protected] (for general information)World Wide Web: http://www.intellitools.com
Important note: To insure that returns are handled correctly and without delays, please call us for a ReturnMerchandise Authorization (RMA) before returning any item.
MNL-IPS-T&T Importing Printed in U.S.A. 10/02

Importing IntelliPics Activities 1
Table of Contents
Introduction...........................................................................................................................2
Universal Design.......................................................................................................................2
About this Tutorial ....................................................................................................................2
Part 1: Viewing Imported and Enhanced IntelliPics Activities
Getting Started ..........................................................................................................................3
From the Fun, Two, Three! CD...........................................................................................3
From IntelliPics Studio.........................................................................................................3
Viewing Ladybugs Song in Explore Mode .............................................................................4
Viewing Ladybugs Song in Design Mode ..............................................................................4
Viewing Who is in the Shed? in Explore Mode .....................................................................5
Viewing Who is in the Shed? in Design and Paint Modes....................................................5
Viewing Animated Animals in Explore Mode........................................................................6
Viewing Animated Animals in Design Mode: ........................................................................6
Comparing Size ....................................................................................................................6
Using Color and Backgrounds ...........................................................................................7
Part 2: Importing IntelliPics Activities
Importing IntelliPics Activities into IntelliPics Studio’s Explore Mode ...............................8
Part 3: Importing into Explore, Paint, and Design Template
Modifying the Snowman Activity for Explore Mode...........................................................10
Part 4: Using the the Explore, Paint, and Design Template
Modifying the Snowman Activity in Design Mode..............................................................10
Modifying Page 1 ...............................................................................................................12
Modifying Page 2 ...............................................................................................................13
Modifying Remaining Pages .............................................................................................13
Adding Page Sound.................................................................................................................14
Adding Finishing Touches .....................................................................................................14
Saving as a Template...............................................................................................................15
Part 5: Creating the Overlay
Making the Overlay ................................................................................................................16
Modifying the Overlay............................................................................................................16

IntelliPics Studio Tutorial2
Introduction
IntelliPics® has been a very successful multimediaauthoring tool for almost a decade. Created withuniversal design principles, it enables students,teachers, therapists, and parents to customizecurriculum and create activities that are engaging,interactive, and accessible to all students. Manywonderful IntelliPics activities can be found on theIntelliTools Activity Exchange and in classrooms acrossthe nation. These activities range from simple causeand effect to sequencing and electronic storybooks.
IntelliPics® Studio is IntelliTools’ new and improvedmultimedia authoring tool. This program contains theelements of IntelliPics, plus more! Activities created inIntelliPics can be used in the Explore mode ofIntelliPics Studio. Two additional modes of IntelliPicsStudio, Design and Paint, allow teachers to createactivities that move beyond cause and effect and enablestudents to write, color, design, paint, and even createtheir own activities. Activities can be saved into studentportfolios, and access can be provided at a variety oflevels.
A new template, called Explore, Paint, and Design, hasbeen added to IntelliPics Studio. This template can beused to import activities created in IntelliPics intoIntelliPics Studio. It can also be used to create newactivities.
Your time is valuable. When you use the new Explore,Paint, and Design template, you will see that an activitythat engages a student in cause and effect usingExplore mode can use the same palettes andcurriculum content in Design and/or Paint mode.These added modes and program enhancementsprovide students with a greater degree of interaction,promoting their growing comprehension andindependence.
This tutorial will show you how to import existingIntelliPics activities into IntelliPics Studio and to extendthem beyond simple cause and effect activities. Thetutorial will guide you through the sample activities onthe IntelliPics Studio Fun, Two, Three! CD and inspireyou to move ahead and enjoy the powerful newprogram IntelliPics Studio.
The illustrations in this tutorial areintended to be similar to what you seeon-screen. Some may differ dependingon the computer system you are using.
Note
Universal DesignThe activities you create using the Explore, Paint, andDesign template and IntelliPics Studio are designed forall students, including those with physical or cognitivedisabilities. These activities are ideal for inclusionclassrooms, because all students can use them: with amouse, an IntelliKeys® keyboard, or a switch. Theactivities refered to in this tutorial include customoverlays .
Important NoteThis tutorial requires that you have installed IntelliPicsStudio. Authoring features necessary to complete thistutorial are not available when using the IntelliPicsStudio Player.
About This TutorialYou will start this tutorial by by looking at some of themost popular IntelliTools IntelliPics activities. Theseactivities have been imported into IntelliPics Studio todemonstrate the benefits of using this versatile multi-media program with your students.
When an IntelliPics activity is imported into IntelliPicsStudio, it can be imported in two ways:
1. Into an Explore template – this displays the activityas it originally appeared. In IntelliPics Studio, thisview is called “Explore” mode.
2. Into an Explore, Paint, and Design Template – thisdisplays the activity in a document that has manyadditional program features. In IntelliPics Studio,“Paint” and “Design” are the two modes a teacheruses to author or modify an activity. It is easy toswitch between modes using menu options or byclicking a palette item.
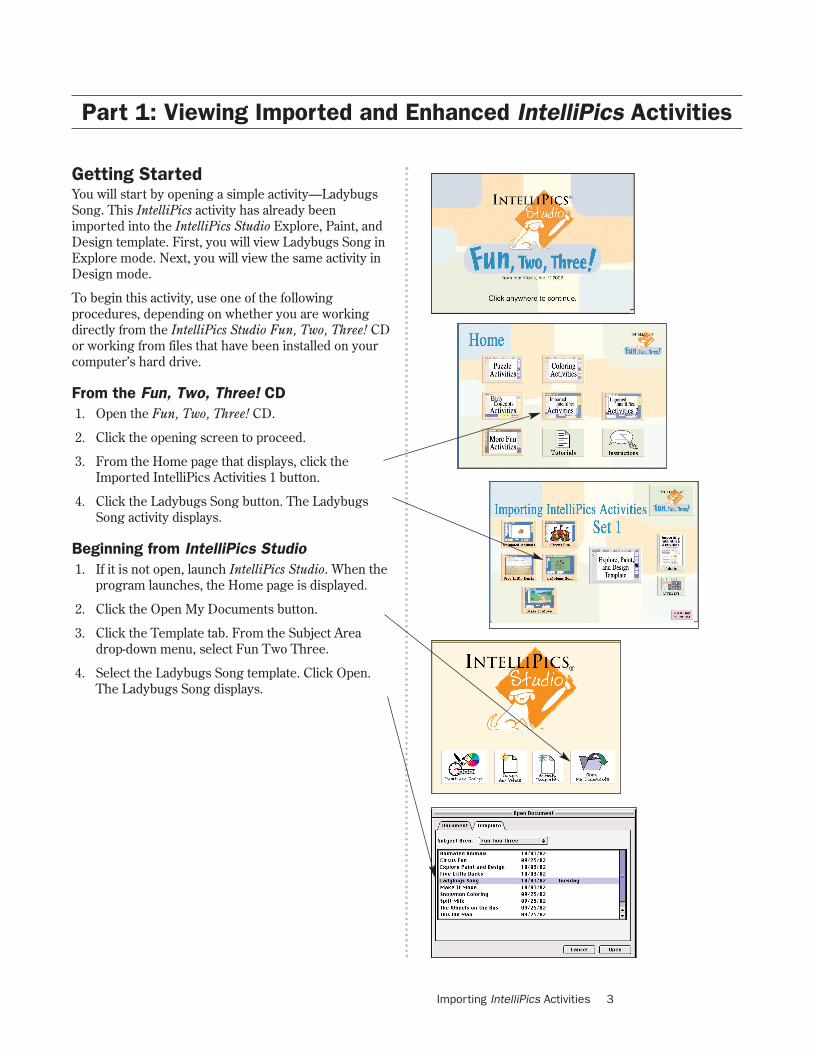
Getting StartedYou will start by opening a simple activity—LadybugsSong. This IntelliPics activity has already beenimported into the IntelliPics Studio Explore, Paint, andDesign template. First, you will view Ladybugs Song inExplore mode. Next, you will view the same activity inDesign mode.
To begin this activity, use one of the followingprocedures, depending on whether you are workingdirectly from the IntelliPics Studio Fun, Two, Three! CDor working from files that have been installed on yourcomputer’s hard drive.
From the Fun, Two, Three! CD1. Open the Fun, Two, Three! CD.
2. Click the opening screen to proceed.
3. From the Home page that displays, click theImported IntelliPics Activities 1 button.
4. Click the Ladybugs Song button. The LadybugsSong activity displays.
Beginning from IntelliPics Studio 1. If it is not open, launch IntelliPics Studio. When the
program launches, the Home page is displayed.
2. Click the Open My Documents button.
3. Click the Template tab. From the Subject Areadrop-down menu, select Fun Two Three.
4. Select the Ladybugs Song template. Click Open.The Ladybugs Song displays.
Importing IntelliPics Activities 3
Part 1: Viewing Imported and Enhanced IntelliPics Activities

Viewing Ladybugs Song in ExploreMode 1. After the title page reads aloud, click the first
screen to hear the song and see the animatedeffects.
2. Click the screen again to proceed.
Because students only need to respond with a singleclick of a mouse, switch, or touch on an IntelliKeyskeyboard, this is a simple cause and effect activity.
Viewing Ladybugs Song in DesignModeNext, you will view this popular activity in IntelliPicsStudio’s Design mode.
As you view the Ladybugs Song activity in Designmode, notice that the content of this IntelliPics Studioactivity is the same as it was in IntelliPics, but thepresentation has been enhanced—the activity occurson several pages of a document, and read-aloud textboxes have been added. The ability to createmultipage documents and read aloud text boxes aretwo useful IntelliPics Studio authoring features.
1. Click the Design item (above the page) to viewthe document in Design mode. Notice theLadybug’s Song palette at the left of the page.
2. Click the Hide Palettes item (above page) to hidethe Ladybugs Song palette, as it is unnecessaryfor students to use and may be distracting.
3. Click the Next Page item. The Ladybug’s Songactivity begins.
4. Click the text box to hear the text read aloud asecond time. Each time you click a read aloud textbox, the message will be repeated.
5. Click the Next Page item to view the followingpage (it includes the text: “1 flew away and thenthere were 4.”) Click the door and play theanimation again. Click the Play IntelliMation itemto play the animation a third time.
Displaying palette items for students to use isanother useful feature of IntelliPics Studio.
Design mode enables students to extend theirlearning by allowing them to hear the text repeat,highlighting as it reads. They can also repeat theanimation on the page, encouraging more interaction.
IntelliPics Studio Tutorial4
Part 1: Viewing Imported and Enhanced IntelliPics Activities

Viewing Who is in the Shed? inExplore ModeYou might want to have an activity that includes bothExplore and Paint. You will view Who is in the Shed?to see an example of how Paint mode might enhancethe original IntelliPics version of the activity.
1. Open Who is in the Shed? in Activity Set 2 on theFun, Two, Three! CD, using the steps on page 3.This activity will open in Explore mode.
2. Click the screen to experience the activity as itoriginally played in IntelliPics. Each click providesmore information about, and a more completepicture of, a series of farm animals in the shed.
Viewing Who is in the Shed? inDesign and Paint Modes1. Click the shed item to display Design mode. (To
make this activity more intuitive for use bychildren, the icon on the Design item has beenchanged to the image of the shed.)
2. Click an animal or animals from the palette on theleft of the page.
3. Move the animal on top of the shed (you maywant to leave part of the animal in the doorway).Notice that the animals speak and make a noisewhen they are clicked on the page.
4. Click the Eraser in the upper right corner. Theanimal will “disappear” inside the shed. (To makethis activity more intuitive for use by children,clicking on the Eraser automatically displays theactivity in Paint mode.)
5. Use the cursor, which now looks like an eraser, toerase the picture of the shed until the animal isvisible.
6. Click the Design item (with the picture of theshed on it) to play the activity again. (You can usethe delete key on the computer to remove theanimals from the screen.)
7. Save this activity under a unique name, such asFind the Animal in the Shed.
This activity gives students practice in problemsolving. You can create versions of the activity withpart or none of the animal showing in the shed door,or with one or several animals inside the shed.Students can play this game with each other.
Importing IntelliPics Activities 5
Part 1: Viewing Imported and Enhanced IntelliPics Activities

IntelliPics Studio Tutorial6
Viewing Animated Animals in ExploreModeOne of the most popular IntelliPics activities isAnimals. You will examine a variation of this activitytitled Animated Animals to see the similarity betweenIntelliPics and IntelliPics Studio.
1. Open Animated Animals in Activity Set 1 on theFun, Two, Three! CD, using the steps on page 3.Notice that in Explore mode this screen looksvery similar to the original IntelliPics activity.
2. Click any animal to place it on the page. Theanimal will animate and make a sound. Use theNumber, Size, and Color items to vary thenumber of the animal on the page, to make theanimal larger or smaller, or to change its color.
Viewing Animated Animals in DesignModeNow you will use Design mode to compare the sizesof animals, relative to one another.
Comparing Size1. Click the Design item at the top left of the page.
2. Click the bear, at the left of the page, three timesto place three bears on the page.
3. Click the Make Bigger tool at the bottom of thepage to make one of the bears very large.
4. Select a second bear on the page. Use the MakeBigger tool to make this bear medium sized.
5. Arrange the bears on the page to match thepicture on the right.
6. Now you will create directions for the studentswho will use this activity. Select the Text tool.
7. Click and drag the cursor across the screen tocreate a text box. Type the text: ‘Put the bears inorder, from the smallest to the largest.
8. The next step is to make the text box read aloud.Hold down the [Ctrl] key and click the text box.
9. Click to place checks in the boxes in front of Lockand Read Only Text. Click OK.
10. Use the mouse to click the text box. It will readyour directions aloud.
11. Save your activity as Animated Animals Modified.
Part 1: Viewing Imported and Enhanced IntelliPics Activities
Importing IntelliPics Activities 7
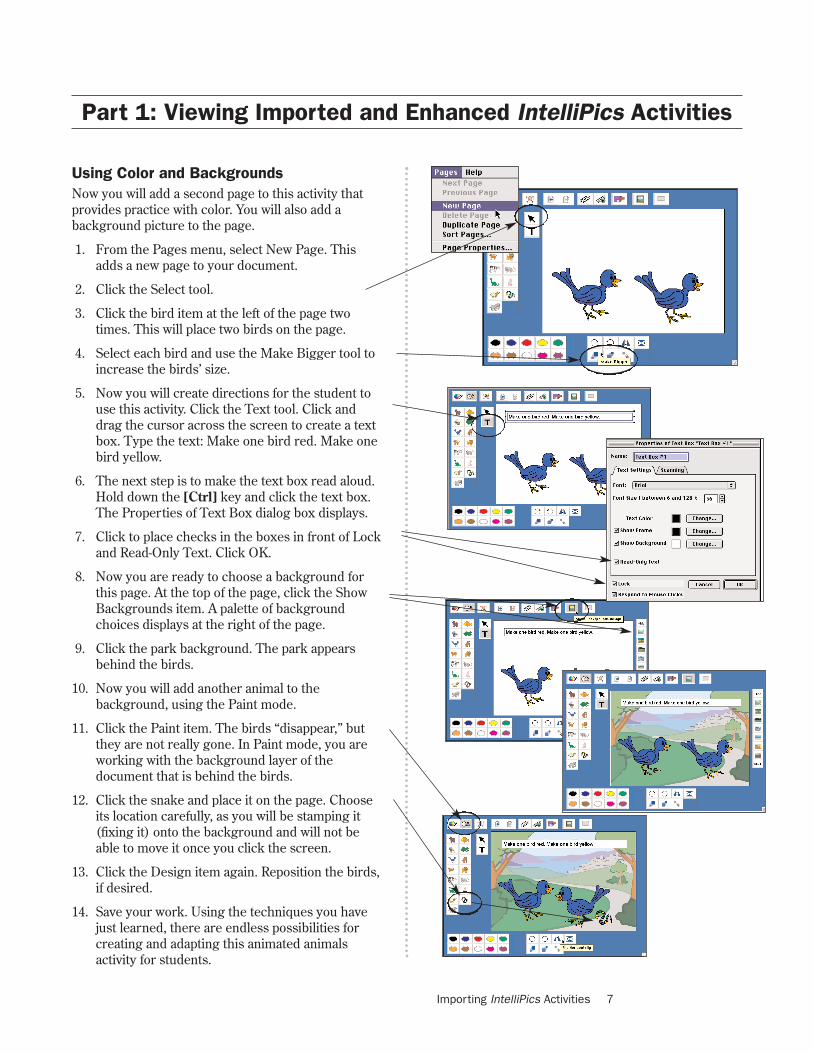
Using Color and BackgroundsNow you will add a second page to this activity thatprovides practice with color. You will also add abackground picture to the page.
1. From the Pages menu, select New Page. Thisadds a new page to your document.
2. Click the Select tool.
3. Click the bird item at the left of the page twotimes. This will place two birds on the page.
4. Select each bird and use the Make Bigger tool toincrease the birds’ size.
5. Now you will create directions for the student touse this activity. Click the Text tool. Click anddrag the cursor across the screen to create a textbox. Type the text: Make one bird red. Make onebird yellow.
6. The next step is to make the text box read aloud.Hold down the [Ctrl] key and click the text box.The Properties of Text Box dialog box displays.
7. Click to place checks in the boxes in front of Lockand Read-Only Text. Click OK.
8. Now you are ready to choose a background forthis page. At the top of the page, click the ShowBackgrounds item. A palette of backgroundchoices displays at the right of the page.
9. Click the park background. The park appearsbehind the birds.
10. Now you will add another animal to thebackground, using the Paint mode.
11. Click the Paint item. The birds “disappear,” butthey are not really gone. In Paint mode, you areworking with the background layer of thedocument that is behind the birds.
12. Click the snake and place it on the page. Chooseits location carefully, as you will be stamping it(fixing it) onto the background and will not beable to move it once you click the screen.
13. Click the Design item again. Reposition the birds,if desired.
14. Save your work. Using the techniques you havejust learned, there are endless possibilities forcreating and adapting this animated animalsactivity for students.
Part 1: Viewing Imported and Enhanced IntelliPics Activities

IntelliPics Studio Tutorial8
Now that you have seen how IntelliPics activities canbe viewed and also enhanced in IntelliPics Studio, thenext section of the tutorial will show you how toimport an IntelliPics activity into IntelliPics Studio.
On the Fun, Two, Three! CD you will find the originalIntelliPics activity titled Snowman Coloring Book. Youwill import the activity into IntelliPics Studio using twodifferent strategies.
• The first strategy will give you the same access toExplore mode that was available in IntelliPics.
• The second strategy will use the new Explore,Paint, and Design template, which allows you toexpand the interaction available to the user.
An additional feature of IntelliPics Studio is that itallows you to save student work into individualportfolios.
Importing IntelliPics Activities intoIntelliPics Studio’s Explore Mode1. Close all previously opened IntelliPics Studio files.
2. From the File menu, select Import IntelliPics File.
3. Navigate to and open the Snowman for Tutorialfolder. (Windows users: Files of type – All Files.)
• If you installed this set of activities, the folderis on your desktop.
• If you did not install the activities, the folderis on the CD, inside the Activities folder,inside the Imported IntelliPics Activitiesfolder.
4. Select the Snowman Coloring Book file. ClickOpen.
5. The Import IntelliPics Activity dialog boxdisplays. In the Choose a Document Style area,make sure that IntelliPics is selected (this is thedefault selection). Click Import.
6. The Save As dialog box displays. Name the fileSnowman Coloring Explore. Click Save. Theactivity displays on the page and reads thedirections aloud.
7. Click each succeeding screen to play this activity.On many screens you can color the snowman tomatch the color of the juice the snowman drank.The recorded voice reads the caption again.
Part 2: Importing IntelliPics Activities

Importing IntelliPics Activities 9
Note: to stop the speech at any time press the[Esc] key on the computer keyboard.
7. Notice that when you click a color, you also hearsynthesized speech reading a page number. Youcan turn off this speech feature:
a. From the Options menu, select SnowmanColoring Explore settings. The SnowmanColoring Explore Settings dialog boxdisplays.
b. Click the Caption tab.
c. Deselect Speak Caption. Click OK to closethis dialog box.
8. Click to move to a new screen. Now only whenyou the text will be read in the recorded voice.
As you have seen, importing an existing IntelliPicsactivity into the Explore mode of IntelliPics Studioenables students to use the activity in a familiar way.However, it does not provide any of the enhanced,interactive features available in IntelliPics Studio.
Part 2: Importing IntelliPics Activities

IntelliPics Studio Tutorial10
In the next part of this tutorial, you will import theSnowman activity into the IntelliPics Studio Explore,Paint, and Design template. This template includes allthe features of Explore mode but also enables you toexpand a students’ ability to interact with the activity.
1. From the File menu, select Import IntelliPics File.
2. Navigate to and open the Snowman for Tutorialfolder (Windows users: Files of type – All Files).
• If you installed this set of activities, the folderis on your desktop.
• If you did not install the activities, the folder ison the CD, inside the Imported IntelliPicsActivities folder, which is inside the Activitiesfolder.
3. Select the Snowman Coloring Book file. ClickOpen.
4. The Import IntelliPics Activity dialog box displays.In the Choose a Document Style area, click theradio button in front of Explore, Paint, and Designto select it. Click Import.
5. The Save As dialog box displays. Name the fileSnowman Coloring Fun. Click Save.
Modifying the Snowman Activity forExplore Mode1. The document will open in Explore mode.
2. There are several palettes on the screen that arenot necessary for this activity. The only palettesyou need on the screen are the Mode and Colorspalettes. You can remove extra palettes to simplifythe screen for students.
3. Hold down the [Ctrl] key and click the Explorepalette item. The Edit Item dialog box displays.
4. Select the Actions icon at the left.
5. The actions associated with this item are listed inthe Item Actions list box at the bottom of thisdialog box. You will remove palettes listed here, sothese palettes will not show on screen when theactivity is in Explore mode.
6. Click Show Palette “Quiz” and click the Removebutton.
7. Repeat the step above and remove each paletteexcept for Mode and Colors. You should end up
Part 3: Importing into the Explore, Paint and Design Template
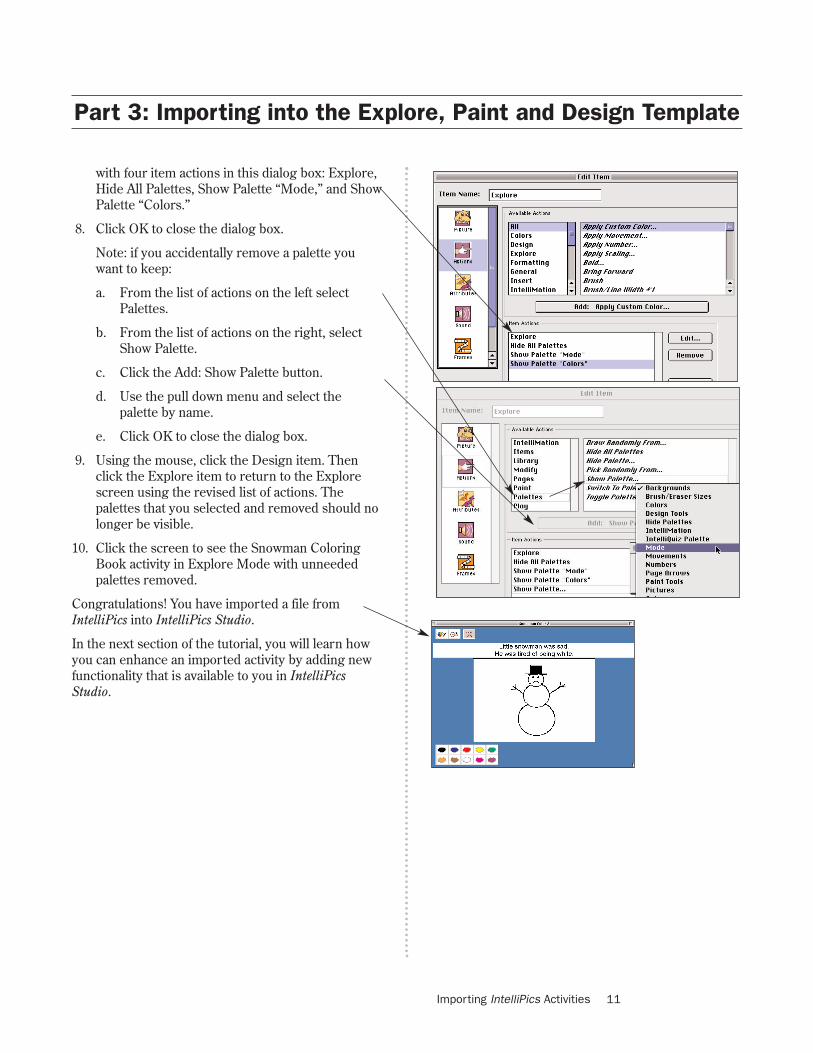
Importing IntelliPics Activities 11
with four item actions in this dialog box: Explore,Hide All Palettes, Show Palette “Mode,” and ShowPalette “Colors.”
8. Click OK to close the dialog box.
Note: if you accidentally remove a palette youwant to keep:
a. From the list of actions on the left selectPalettes.
b. From the list of actions on the right, selectShow Palette.
c. Click the Add: Show Palette button.
d. Use the pull down menu and select thepalette by name.
e. Click OK to close the dialog box.
9. Using the mouse, click the Design item. Thenclick the Explore item to return to the Explorescreen using the revised list of actions. Thepalettes that you selected and removed should nolonger be visible.
10. Click the screen to see the Snowman ColoringBook activity in Explore Mode with unneededpalettes removed.
Congratulations! You have imported a file fromIntelliPics into IntelliPics Studio.
In the next section of the tutorial, you will learn howyou can enhance an imported activity by adding newfunctionality that is available to you in IntelliPicsStudio.
Part 3: Importing into the Explore, Paint and Design Template

IntelliPics Studio Tutorial12
Modifying the Snowman Activity inDesign ModeIn Design mode, you can add new functionality to theSnowman activity you have imported. In this sectionof the tutorial, you will create a multi-page activitywith text boxes that read aloud. Since you can saveand print a student’s responses in this multipageversion of the activity, you have a record of a student’sability to select appropriate colors.
To help you keep track of page numbers and itemnames, you will make some other slight modificationsto this activity.
1. Click the Design item.
2. To view the names of the items in the Picturepalette, hold down the [Ctrl] key and click the topsnowman. The Edit Item dialog displays. ClickOK.
3. The Edit Palette Contents dialog displays. Clickthe Palette Appearance button.
4. Click the Display tab.
5. Click Picture and Item Name. Click OK to closeall dialog boxes. Now you can see that the itemsin the picture palette at the left were named aspages in the original IntelliPics document.
6. IntelliPics Studio will display screens fromIntelliPics documents as pages. To view the pagenumbers in IntelliPics Studio, from the Viewmenu select Show Status Bar. The status barbelow the page shows Page 1 is displayed.
Modifying Page 11. Click the first picture item, titled Pg1.
2. Notice that the snowman is placed on the screen.Click the snowman and move it to the center ofthe screen.
3. Use the Make Bigger item, at the bottom of thepage, to enlarge the snowman.
4. Click the Text tool at the left of the page. Clickand drag across the screen to create a text boxabove the snowman.
5. Type the text that appears at the top of the pageinto the text box you just created. (This text is acaption in Explore mode. It will not stay on the
Part 4: Using the Explore, Paint and Design Template

Importing IntelliPics Activities 13
Part 4: Using the Explore, Paint and Design Template
screen when you add a different item. Thereforethe text box you create will allow students to seeand reread the text.
6. After you type the text, click the Select tool, whichlooks like an arrow. You can now move thesnowman again, or resize the text box.
7. When you are satisfied with the layout, hold downthe [Ctrl] key and click the text box. TheProperties of Text Box displays. Select Read-OnlyText and Lock. Click OK to close this dialog box.
8. Hold down the [Ctrl] key and click the snowman.Click Lock. Click OK to close this dialog box.
The text is now locked on the screen and thesnowman is fixed to a location.
10. Using the mouse, click the text box. It will readout loud. Click the snowman. You will hear thedigitized speech.
Modifying Page 21. From Pages menu, select New Page.
2. A new blank page displays. Click Pg2, the seconditem in the Pictures menu at the left of the page.The picture placed on the page shows coloredjuice jugs.
3. Repeat steps 2–10 above to resize the picture andcreate text for this page.
Note: On this page, the juice jugs are differentcolors, and it would be preferable if the studentcould not change the colors. Hold down the [Ctrl]key while you click one of the jugs to display aProperties dialog box. Select Lock and deselectRespond to Mouse Clicks. Close the dialog box.
Modifying Remaining Pages 1. From Pages menu, select New Page.
2. A new blank page displays. Click Pg3, the thirditem in the Pictures menu at the left of the page.The picture shows a red snowman.
3. Repeat steps 2–10 above to create this next page.
4. Repeat these steps to create each of the otherpages, using the picture items that came from theIntelliPics activity.
5. Select Save frequently as you work.

IntelliPics Studio Tutorial14
Adding Page SoundOne of the powerful features available in IntelliPicsStudio is the many ways students can interact with anactivity. Students can click a text box to hear the textrepeated. They can also click the snowman on eachpage to hear the digitized speech again. Sounds canalso play automatically when students turn to a newpage.
1. Use the blue Previous Page arrow to go to Page 1.
2. Hold down the [Ctrl] key and click the page. ThePage Properties dialog box displays.
3. Click Page Sounds tab.
4. In the Recorded Sound list box, highlight thesound named pg1. (This is the sound that wasautomatically imported from the originalIntelliPics activity.)
5. Click the Play button to verify that this is thesound you want students to hear on Page 1.(Press the [Esc] key to stop playing the sound.)
6. Click OK. This will attach the sound to Page 1,and it will automatically play when the pageopens.
7. Use the Next Page arrow to go to Page 2. Repeatsteps 2–6 above to add the pg2 sounds to thispage.
8. Continue to add the page sounds to eachadditional page of the activity.
9. Save your work.
Adding Finishing TouchesAfter you design your activity, there is no need to haveextra palettes on the screen that students will not use.(Students only need page arrows and colors.) A HidePalettes item is located at the top of the page. You willmake a small modification to the item so that whenthe user selects the Hide Palettes item, the activitywill go to Page 1 and hide all unnecessary palettes.
1. Hold down the Ctrl key and click the HidePalettes item. The Edit Item dialog box displays.
2. Click the Actions icon at the left.
3. In the Available Actions, in the left column selectPalettes. In the right column, select Show Palette.
4. Click the button Add: Show Palette.
Part 4: Using the Explore, Paint and Design Template

15
5. Using the pull down menu that lists all thepalettes included in this activity, select Colors.The action Show Palette “Colors” will appear inthe Actions box at the bottom of the dialog.
6. In the Available Actions list box, in the column onthe left, select Pages. In the column on the right,highlight the action Go to Page.
7. Click the button Add: Go to Page.
8. From the pull down menu, select Page 1. When-ever the user clicks the Hide Palettes item, thedocument returns to Page 1, all unnecessarypalettes are hidden, and the Colors palette shows.
9. Click OK to close all dialog boxes.
0. Click the Hide Palettes item. The activity willreturn to Page 1, and unnecessary palettes willdisappear.
11. Save your work.
Practice using the activity with the Next Page andPrevious page arrows. Listen to the sounds byclicking the text box and the snowman. Check tomake sure that all the snowmen are white before youproceed to the next step, which is saving the finalversion of your document as a template.
Saving as a TemplateOnce you have finished the activity you can choose tosave the document as a template. Each time a studentopens a template, it opens as an untitled documentthat the student can save into his or her own portfolio.
1. From the File menu, select Save As. The Save Asdialog box displays.
2. Click the Template tab.
3. To create a new subject area, click the EditSubject Areas button. Type in the name ImportedFiles. Click OK.
4. Name the file: Snowman Color Fun.
5. Click OK to close the dialog.
Congratulations! You have imported a file fromIntelliPics and modified it using IntelliPics Studio. Youhave expanded and enhanced the ways students canuse this classic activity. In the last section of thistutorial, you will learn to create an overlay for this fileif your students will be using it with an IntelliKeyskeyboard.
Importing IntelliPics Activities
Part 4: Using the Explore, Paint and Design Template

IntelliPics Studio Tutorial16
You may be working with students who need to usethe IntelliKeys keyboard to access the activities youcreate. If so, in this section of the tutorial, you willlearn to create an overlay that students can use inboth the Design and Explore modes of the SnowmanColoring activity.
You will need to have Overlay Maker installed on thecomputer in order to create an overlay for anIntelliKeys keyboard. IntelliPics Studio has beendesigned to help you create overlays from activitiesquickly and easily.
You will open the file, create the overlay, and thensave the file with a new name. The overlay willautomatically be placed inside the IntelliPics StudioOverlays Folder. It will be attached to the file and beavailable when the file opens. The overlay you willcreate is used in both Design and Explore modes.
Making the Overlay1. If it is not already open, open the template
Snowman Color Fun.
2. From the File menu, save this document asSnowman Color 2.
3. From the View menu, select Explore. It will beeasier to create the overlay from the Exploremode version of the document.
4. From the IntelliKeys menu, select Make OverlayThe Make Overlay dialog box displays..
5. In the Select Palettes menu, only three palettesshould be selected. The Colors and Mode palettesshould already be checked. Scroll down the list ofpalettes and click the box in front of the TopPalette item to select it. Click OK.
6. The Save As dialog will display. The name foryour overlay is automatically listed as SnowmanColor 2 Overlay. Click Save.
7. Overlay Maker will automatically launch,provided it is installed on your computer.
8. An overlay will open, with the items in the threepalettes you selected automatically placed on theoverlay. The appropriate key content is alsoalready created for each key.
Part 5: Creating the Overlay

Importing IntelliPics Activities 17
Modifying the OverlayThis overlay will work better for your students if youmake a few modifications. You will delete two keysthat are not needed, move the position of several keys,and add two new keys.
1. Click the Paint key to select it. Press delete onyour keyboard to remove the Paint key.
2. Click and drag the Save key to the place wherethe Paint key used to be located.
3. Click the Create IntelliMation key. Press delete.
4. Move the Play IntelliMation key to the right.
To enable the user to select items (such as the textboxes and the snowman) on the Design mode screen,you will now add two new keys. One key will have thekey content ‘tab’. The other key will have the keycontent ‘enter’. You can either create these keys orcopy them from another overlay. For this tutorial youwill copy the keys from another overlay.
6. From the File menu, select Open.
7. Navigate to the IntelliPics Studio folder (probablylocated inside the IntelliTools folder on yourcomputer’s hard drive).
8. Once you have located the IntelliPics Studiofolder, open it and locate the Overlays folder.Select the overlay A Day at the Beach, and clickOpen.
9. You should now have two overlays open. Move orresize them, so that you can see both overlays atthe same time.
10. On the A Day at the Beach Overlay, select the keythat looks like a finger pointing. From the Editmenu, select Copy.
11. Now select the Snowman Overlay. From the Editmenu, select Paste. The key will appear on theSnowman Overlay, including the needed keycontent. (The key content for this key is alreadyset as ‘tab’.)
12. Repeat the steps 10 and 11 above, copying andpasting the key with the Thumbs Up picture. (Thekey content for this key is already set as ‘enter’.)
13. Resize the keys to fit the space in the lower row ofthe Snowman Overlay.
Part 5: Creating the Overlay

IntelliPics Studio Tutorial18
14. The overlay is now complete. From the Filemenu, select Save.
15. The overlay is now attached to your document,Snowman Color 2. You can now save thisdocument as a Template, so that it can be usedover and over without changing the template.
16. From the File Menu, select Save As.
17. Click the Template tab.
18. Name the document Snowman Color 2.
CongratulationsCongratulations! You have learned to import existingIntelliPics documents into IntelliPics Studio, toenhance them, and to create overlays to accompanyyour enhanced activities.
Be sure to check the IntelliTools Web site,www.intellitools.com, for more ideas and activitiesrelated to using IntelliPics Studio.
Part 5: Creating the Overlay