importing transaction files to the general ledger - … · importing transaction files to the...
TRANSCRIPT

Revision date: May 4, 2018
For an updated copy of this booklet, check out the Reference Materials page of our website: http://www.cuanswers.com/resources/doc/cubase-reference
CU*BASE® is a registered trademark of CU*Answers, Inc.
Importing Transaction Files to the General Ledger
INTRODUCTION
Do you have an Excel spreadsheet with a batch of debit and credit entries
you want to post? Have you ever wanted to be able to receive a list of journal
entries from a third-party vendor and post them to your G/L? Now you
can. The CU*BASE Create/Post Journal Entries feature lets you pull data
from a batch of journal entries directly from an external source.
In a nutshell, there are two main tasks in the process: Upload the data (from
Excel, a CSV file, etc.) to the i5 system so CU*BASE can access the
data. Then start a new journal entry and use the Import Entries feature to
pull that data in and create the batch of entries to be posted. The system will automatically verify and highlight all entries to check that valid G/L
account numbers and other fields are filled in properly. From there the
batch becomes a normal J/E batch you can post right away or suspend and
post later.
This booklet describes the steps needed to upload the file and import the
entries into the J/E tool, ready for final review and posting. For complete details on using the Create/Post Journal Entries feature to create and post
batches to your General Ledger, refer to CU*BASE GOLD Online Help.
CONTENTS
SECURITY REQUIREMENTS 2
SUPPORTED FILE TYPES 3
(STEP 1): UPLOAD THE FILE TO CU*BASE 5
(STEP 2): IMPORTING THE FILE 9

2 Importing Transactions Files and Posting Them to the General Ledger
SECURITY REQUIREMENTS
Special authority is required to upload files from a PC onto the CU*BASE
system. Start by completing the iShield Security Access Request for
CU*BASE Uploads form, available at the website shown below, to request
access privileges (select the “GLIMPORT” table):
https://www.cuanswers.com/wp-content/uploads/iShieldRequestForm_Upload.pdf

Importing Transactions Files and Posting Them to the General Ledger 3
SUPPORTED FILE TYPES
Supported File Types include the following:
• Flat file format – Not common, but might be an option available
from your third-party vendor.
• User-defined fixed file – Instead of a delimiter (separator between
fields), the fields are padded to a fixed width.
• User-defined comma-delimited format (also referred to as CSV or comma-separated values) – The most commonly used, this is the
format typically created by spreadsheet program such as Microsoft©
Excel.
All three formats must follow these rules for field type and length:
Field Name Type Total Length Decimals
Branch Numeric 2 0
G/L Acct # Numeric 5 0
Debit Transaction Amount
Numeric 12 2
Credit Transaction Amount
Numeric 12 2
Source Numeric 9 0
Description Alphanumeric 25
Other requirements for each file type:
Type Field order Extra fields allowed? Notes
Flat File Format
Must be in the exact order as shown above
No
User-defined Fixed File Format
Same fields as above but can be in any order in the file
No ▪ Field length must be exact and consistent from one record to the next
User-defined Comma-Delimited Format
Same fields as above but can be in any order in the file
Yes, but must be to the right (after) the required fields, not between
them
▪ Field lengths cannot be greater than the sizes shown above
▪ Currency amounts cannot contain commas but must include decimals
Otherwise the amounts
will pull in as whole dollars in CU*BASE. If you create a file in Excel this will happen auto-matically, but be sure to alert your vendor so that this is applied correctly.

4 Importing Transactions Files and Posting Them to the General Ledger
As a rule, worksheets you intend to convert and upload should not include
other extraneous information such as column headings, blank rows, titles,
graphics, or other special layout formatting. In other words,
This: ...not this:

Importing Transactions Files and Posting Them to the General Ledger 5
(STEP 1): UPLOAD THE FILE TO
CU*BASE
Prepare Your File for Upload
In this step you will upload your file from your PC to the IBM i so that it can
be imported by the budget tool.
Once you have created your file, save it to your C:\ drive or a network
location. (Either location works fine for the file upload process.)
Because of how a System i works, you will actually be pulling data into an
existing file on CU*BASE (basically a big, empty file that is large enough to
contain the data you’re uploading).
BE CAREFUL: The file into which you will be pulling your
budget data is the same file as used by the import
feature available in Tool #61 Create/Post Journal
Entries. So if you or someone else routinely pulls data into that file for posting to your G/L, this import will overwrite
whatever is already in that file. So be sure to coordinate the timing with anyone else at your credit union who is authorized to upload data into your G/L.

6 Importing Transactions Files and Posting Them to the General Ledger
Upload Your File
1. To upload your G/L file, use Tool #374 File Upload (PC to System i)
2. The upload screen will appear:
3. Fill in as shown in the above sample, using these rules:
Field Name Description
PC These settings refer to where the data is coming from.
File name Enter the path (the storage location, both drive and folder) and file name where the file is stored on your PC. Use backslashes between the folder name and the file name, as in the sample above (or better yet, use the Browse button to locate the file).
IBM i These settings refer to where the data will be going.
IBM i This designates the iSeries system to which the files will be uploaded. For online credit unions, this will read PROD.CUANSWERS.COM and should not be changed.
(If this defaults to something else, leave it as the default.)
Library/File
(Member)
Enter your credit union’s Query library name, a forward slash, then the name of the file that holds records to be imported into the G/L:
QUERYxx/GLIMPORT
(For the xx, fill in your credit union’s two-character credit union ID)
4. Click the Details button
Enter the path and exact name of your file in this field
along with the correct file extension (such as .XLS or
.CSV.) You can also use the Browse button to the right to search for the file on your
computer.
Remember to enter your CUID here in place of
the XX.
This should default to your
system name.

Importing Transactions Files and Posting Them to the General Ledger 7
5. Enter C:\CUBASE\CUBASE\RESOURCES\GLIMPORT.FDF in the
screen as shown below (casing doesn’t matter):
6. Click OK to save and return to the Data Transfer window
7. From the screen shown above, select the File menu and choose
Properties

8 Importing Transactions Files and Posting Them to the General Ledger
8. Check Convert CCSID 65535 as shown above
9. Click OK
10. To begin the transfer process, click the Transfer data to IBM i button.
A series of messages will appear to report on the progress of the transfer.
If you experience problems uploading, it may be because you have not been authorized to upload data. If you receive the error: “Data in this field is incorrect or does not match the PC data type,” make sure to set the properties as shown in #8 above.
11. When the transfer is complete, the following message will appear: Click
OK and the Data Transfer dialog box will reappear. Click Close [] to
exit.
12. The file is now uploaded to the GLIMPORT file definition and is ready for
import into Tool #61 Create/Post Journal Entries.
This option must be selected for the upload
to work properly.
This number should match the number of individual figures in your original
source file.

Importing Transactions Files and Posting Them to the General Ledger 9
(STEP 2): IMPORTING THE FILE
Once you have uploaded the file to CU*BASE (see previous section), you will
now be ready to import the data into the General Ledger.
1. Select Tool #61 Create/Post Journal Entries.
2. Select to create a General Ledger entry.
• Select Create.
• Then enter a Corp ID, Effective Posting date, JE ID and JE ID
#.
3. Press Enter.
10 Importing Transactions Files and Posting Them to the General Ledger
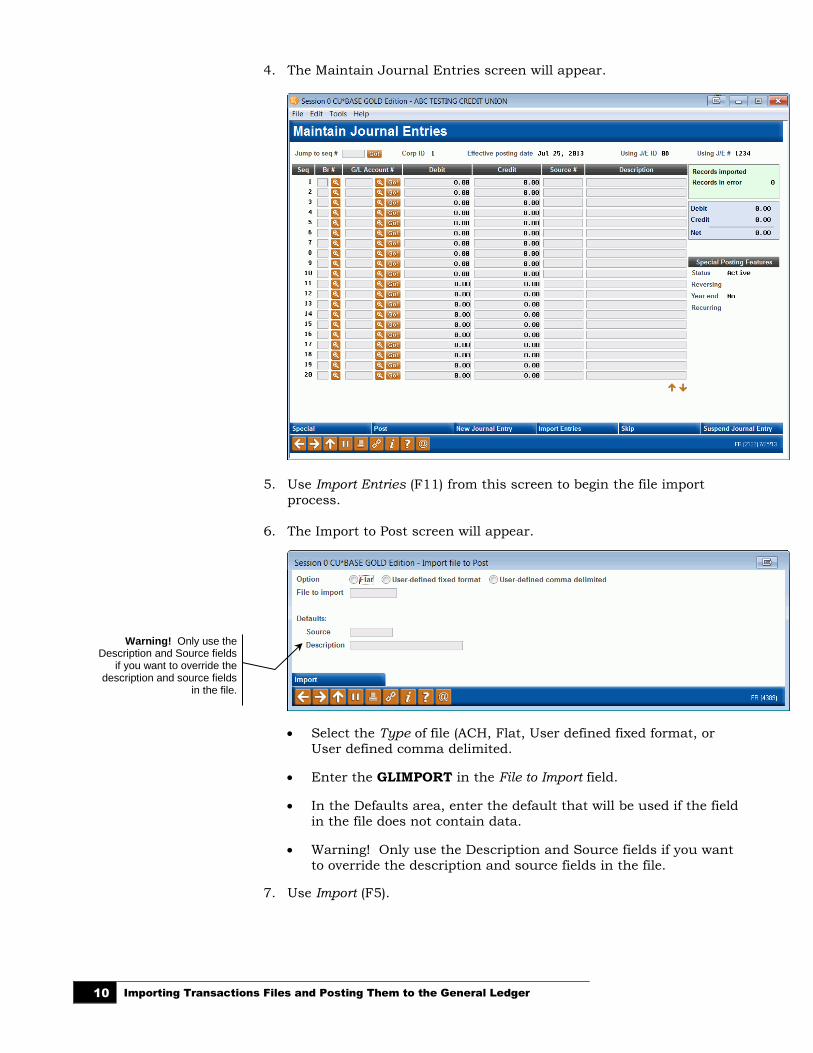
4. The Maintain Journal Entries screen will appear.
5. Use Import Entries (F11) from this screen to begin the file import
process.
6. The Import to Post screen will appear.
• Select the Type of file (ACH, Flat, User defined fixed format, or
User defined comma delimited.
• Enter the GLIMPORT in the File to Import field.
• In the Defaults area, enter the default that will be used if the field
in the file does not contain data.
• Warning! Only use the Description and Source fields if you want
to override the description and source fields in the file.
7. Use Import (F5).
Warning! Only use the Description and Source fields
if you want to override the description and source fields
in the file.

Importing Transactions Files and Posting Them to the General Ledger 11
• With User Defined files, you will be required to define the
beginning and end position of the required fields. Use Import (F5) from this screen.
User Defined Fixed Format
• With Comma Delimited files you will be required to order the
fields. Use Import (F5) from this screen.
Comma Delimited File
7. The file values will be uploaded to the Maintain Journal Entries
screen.

12 Importing Transactions Files and Posting Them to the General Ledger
File Uploaded
You can at this time make any needed changes to the transactions
that have been imported.
• The file shown above has exceptions, colored in blue.
8. Use Post (F2) to post the entries.