improved movement principles of pid
TRANSCRIPT

ROBOTC
Movement
Improved Movement • 1© Carnegie Mellon Robotics Academy / For use with LEGO® MINDSTORMS® Education NXT software and base set 9797
The NXT is capable of automatically adjusting power levels so that its wheels move at the specified SPEED rather than just being driven with the same power. This is very important if you want your robot to drive straight! This ability, known as PID speed control, is enabled by default in ROBOTC 2.0 and higher.
Improved Movement Principles of PID
In this lesson, you will learn how the PID speed control algorithm works.
Using the rotation sensors built into the NXT motors, the robot can be aware of how far each wheel has moved. By comparing the motor’s current position to its position a split second ago, the robot can calculate how fast the wheel is moving.
A short time later... (t=0.1s)1/10th of a second later, the wheel has turned slightly. Since both the change in position and the change in time are known, the robot can calculate the rate of turn.
Starting position (t=0)The initial position of the wheel as it starts turning.
Speed = ∆angle ∆time
Suppose the wheel turned 30 degrees in the 0.1 seconds shown above. The robot would automatically calculate the speed as:
Speed = ∆angle ∆time
Speed = 30º 0.1sec
Speed = 300º/sec
This speed is translated into a “speed rating” in the NXT firmware so that a speed rating of 100 would correspond to an “ideal motor” running at 100% power.
Since the robot can now tell how fast the wheel is actualy turning, it can use PID to tune the motor power levels to make sure it is running at the correct speed. If the motor’s actual speed is lower than it should be, the PID algorithm will increase its power level. If the motor is ahead, PID will slow it down. On the following page, we’ll find out how it works.
ROBOTC
Movement
Improved Movement • 2© Carnegie Mellon Robotics Academy / For use with LEGO® MINDSTORMS® Education NXT software and base set 9797
Improved Movement Principles of PID (cont.)
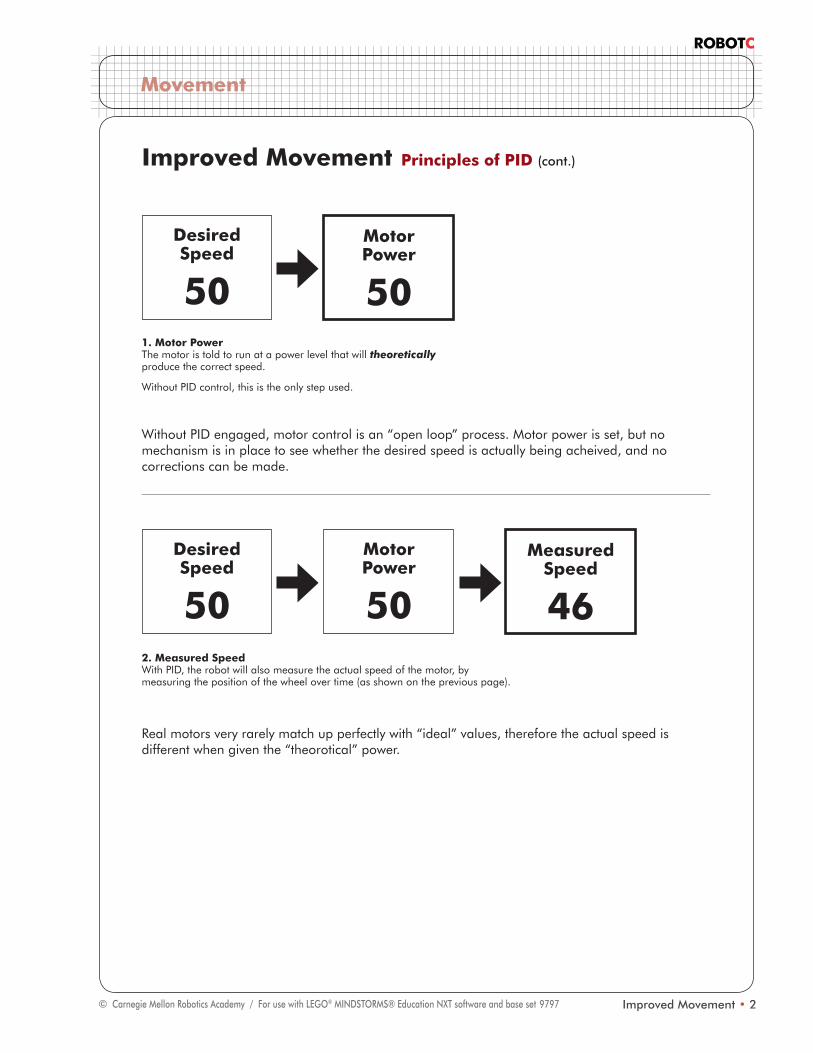
Without PID engaged, motor control is an “open loop” process. Motor power is set, but no mechanism is in place to see whether the desired speed is actually being acheived, and no corrections can be made.
Desired Speed
50
Motor Power
50
Desired Speed
50
Motor Power
50
Measured Speed
46
1. Motor PowerThe motor is told to run at a power level that will theoretically produce the correct speed.
Without PID control, this is the only step used.
2. Measured SpeedWith PID, the robot will also measure the actual speed of the motor, by measuring the position of the wheel over time (as shown on the previous page).
Real motors very rarely match up perfectly with “ideal” values, therefore the actual speed is different when given the “theorotical” power.

ROBOTC
Movement
Improved Movement • 3© Carnegie Mellon Robotics Academy / For use with LEGO® MINDSTORMS® Education NXT software and base set 9797
Improved Movement Principles of PID (cont.)
Desired Speed
50
Motor Power
50
Measured Speed
46
Error
4
Desired Speed
50
Motor Power
50
Measured Speed
46
PID Adjustment
+5
Error
4
4. PID AdjustmentBased on the size of the error, the PID algorithm proposes an adjustment to the motor power that should get the motor’s actual speed closer to the desired speed.
3. ErrorThe difference between the desired speed and the actual speed is calculated. This difference is called the “error”. A large error indicates that the motor’s actual speed is significantly different from the speed it should be maintaining.
How far off is the speed? The “error” term is simply the difference between the measured speed and the desired speed.
Based on the size of the error term, and how the error has been changing over time (has it been getting bigger or smaller?), the PID algorithm calculates an adjustment to the motor power that should help the motor’s actual speed to get closer to the desired speed.

ROBOTC
Movement
Improved Movement • 4© Carnegie Mellon Robotics Academy / For use with LEGO® MINDSTORMS® Education NXT software and base set 9797
Improved Movement Principles of PID (cont.)
6. Repeat CycleThe motor runs with the new power, and the cycle repeats. The robot measures the new speed, calculates a new error, and a new adjustment. This process of self-adjustment continues as long as the program keeps running.
The new motor power is calculated by adding the PID adjustment factor to the original power.
The adjustment is applied to the motor power. The speed is measured again. The error is recalculated (hopefully it is now smaller!). A new adjustment factor is determined. The cycle continues forever, always ready to catch and compensate for any factor that may make the robot go at the wrong speed.
5. Apply AdjustmentThe PID Adjustement factor is applied to the robot’s motor power (50 + 5 = 55).
Desired Speed
50
Motor Power
55
Measured Speed
46
PID Adjustment
+5
Error
4
Desired Speed
50
Motor Power
55
Measured Speed
53
PID Adjustment
+2
Error
-3

ROBOTC
Movement
Improved Movement • 5© Carnegie Mellon Robotics Academy / For use with LEGO® MINDSTORMS® Education NXT software and base set 9797
Improved Movement Principles of PID (cont.)
End of Section This setup, where the robot monitors and adjusts its speed based on measurements it takes itself, is called “closed loop” control. The term refers to the “loop” relationship formed by output (motor power) and feedback (speed measurement, error, and PID adjustment factor).
PID gives your robot the ability to intelligently self-adjust its motor power levels to the correct values to maintain a desired speed. The closed-loop system monitors the “error” difference between how fast the robot is going and how fast it should be, and makes adjustments to the motor’s power level accordingly.

ROBOTC
Movement
Improved Movement • 6© Carnegie Mellon Robotics Academy / For use with LEGO® MINDSTORMS® Education NXT software and base set 9797
ROBOTC 2.0 and higher includes a PID algorithm already built into the firmware that is enabled by default for each NXT motor on the robot.
Improved Movement PID Programming
In this lesson, you will observe the PID speed control in action.
1. Start with your moving-and-turning Labyrinth program. Save your program with a new name: “LabyrinthPID”.
1a. Save program As...Select File > Save As... to save your program under a new name.
1b. Browse to an appropriate folderBrowse to or create an appropriately named folder within your program folder to save your program.
1d. Save Click Save.
1c. Rename programGive this program the new name “LabyrinthPID”.
Note To verify that the PID algorithm is enabled by default for each NXT motor on the robot, go to the Robot menu and select Motors and Sensors Setup. Under the Motors tab, you can see that the PID Control box is checked for motors A, B and C. If for some reason you want to turn off PID control, you can do so by un-checking these boxes.

ROBOTC
Movement
Improved Movement • 7© Carnegie Mellon Robotics Academy / For use with LEGO® MINDSTORMS® Education NXT software and base set 9797
Improved Movement PID Programming (cont.)
2. Lower the power levels. PID control can’t apply more than 100% power to correct motors set for full speed.
task main(){ motor[motorC] = 50; motor[motorB] = 50; wait1Msec(30000);
motor[motorC] = -50; motor[motorB] = 50; wait1Msec(800);
}
123456789
101112
2a. Modify this codeRestore the motor command settings to 50%.
3. Download and run. Keep your robot plugged in.
3b. Download and CompileClick Robot > Download Program.
3c. Run the programClick “Start” on the onscreen Program Debug window.
3a. Block up the robotPlace an object under the robot so that its wheels can’t reach the table. This lets you run the robot without having to chase it around.
2b. Modify this codeWe want enough time to see and test the effects of PID control. Change this value to 30 seconds (30000 ms).

ROBOTC
Movement
Improved Movement • 8© Carnegie Mellon Robotics Academy / For use with LEGO® MINDSTORMS® Education NXT software and base set 9797
Improved Movement PID Programming (cont.)
4. A window should appear called the “NXT Device Control Display”. If it doesn’t appear...
4. NXT Device Control DisplayMake sure this window is showing. If not, open it through Robot > Debug Windows > NXT Devices.
Checkpoint This debugger window is a troubleshooting tool that can help you see what your robot is doing, and what it thinks it’s doing. The lines we’re interested in are highlighted above: “Speed” and “PID” for Motors C and B.
The Speed column shows the desired speed for the motor, which we set to be 50%. The PID column shows the actual amount of power that the robot is giving the motor to make it move at that speed.
Adjusted motor powerThe PID algorithm is having to give this motor 64% power to achieve 50% speed. This is typical, because the motor needs additional power to overcome friction.

ROBOTC
Movement
Improved Movement • 9© Carnegie Mellon Robotics Academy / For use with LEGO® MINDSTORMS® Education NXT software and base set 9797
5. Hold one wheel in place and watch the power values on its corresponding motor.
5b. Observe motor powerThe PID algorithm will notice that the motor’s measured speed is falling behind where it should be, and will increase the motor’s power level to try to bring the speed up.
6. Release the wheel and observe its reaction.
6a. Release the wheelLet go of the wheel so it can turn freely again.
5a. Hold wheelGrab one of the wheels on the robot and hold it so it stops. In the picture, motor C’s wheel is being held.
Improved Movement PID Programming (cont.)
6b. Observe motor powerNow that the wheel is going too fast, the motor will decrease its power until it reaches the correct speed.

ROBOTC
Movement
Improved Movement • 10© Carnegie Mellon Robotics Academy / For use with LEGO® MINDSTORMS® Education NXT software and base set 9797
7. End the program and return the timing to what it was before.
7. Modify this codeChange the timing back to 4000ms (still at 50% speed).
End of Section PID control is a great way to make your robot’s movement more consistent. The algorithm monitors how fast the motors are turning versus how far they should be, and adjusts the motors’ power levels to keep them on track. This allows the robot to automatically adjust for minor variations both in the environment and in the motors themselves.
Improved Movement PID Programming (cont.)
task main(){
motor[motorC] = 50; motor[motorB] = 50; wait1Msec(4000);
motor[motorC] = -50; motor[motorB] = 50; wait1Msec(800);
}
123456789
101112

ROBOTC
Movement
Improved Movement • 11© Carnegie Mellon Robotics Academy / For use with LEGO® MINDSTORMS® Education NXT software and base set 9797
Improved Movement Synchronized Motors
When we started, we said that we wanted the robot to go straight. Its motors should move at the same speed. PID control gave us that in a roundabout way: by asking both motors to maintain a target speed, and giving them both the same target, they moved the same speed. Sort of.
If we run into a tough spot like this, how should the robot react?
Using PID, the other motor will keep running at the speed it was set to, and the robot will begin to spin in a circle as if ordered to turn.
However, if going straight is the priority, then we need to change our perspective slightly. We’ll need to enforce identical speeds on the two motors as our first priority, not just tell both motors to seek the same target independently. The sameness of the values is more important than the exact speed.
ROBOTC includes a feature called Motor Synchronization, which allows you to pair two motors together, and define their speeds relative to each other. If you tell them that their goal is to stay exactly together with one another as they move, then they will, even if it means the faster one has to stop and wait. The goal of keeping both motors together takes precedence over reaching the “ideal” speed.
StuckThe wheel is being held firmly in place... what should the other wheel do?

ROBOTC
Movement
Improved Movement • 12© Carnegie Mellon Robotics Academy / For use with LEGO® MINDSTORMS® Education NXT software and base set 9797
In this lesson, you will learn how to use Motor Synchronization to ensure that both motors run at the same speed, even if something unexpected happens to one of them.
1. Open ROBOTC and start a new program.
1. Create new programSelect File > New to create a blank new program.
2. Add the basic framework for a program.
Improved Movement Synchronized Motors (cont.)
task main(){
}
2. Add this codeAdd a task main() {}.
12345
3. Engage Motor Synchronization on the robot, with the sync mode set to “synchBC”. The special term synchBC defines B and C as the motors to be synchronized.
task main(){
nSyncedMotors = synchBC;
}
3. Add this codeEngage Motor Synchronization for Motors B and C, with B set as the master.
123456
ROBOTC
Movement
Improved Movement • 13© Carnegie Mellon Robotics Academy / For use with LEGO® MINDSTORMS® Education NXT software and base set 9797
Improved Movement Synchronized Motors (cont.)
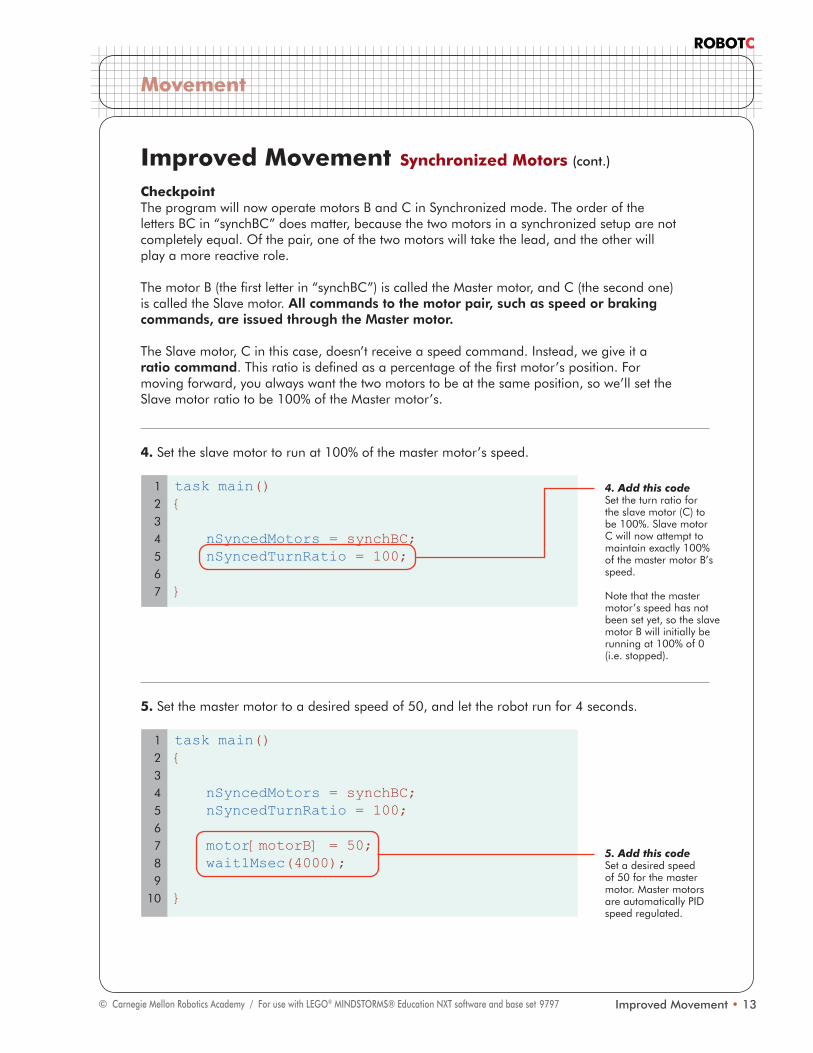
Checkpoint The program will now operate motors B and C in Synchronized mode. The order of the letters BC in “synchBC” does matter, because the two motors in a synchronized setup are not completely equal. Of the pair, one of the two motors will take the lead, and the other will play a more reactive role.
The motor B (the first letter in “synchBC”) is called the Master motor, and C (the second one) is called the Slave motor. All commands to the motor pair, such as speed or braking commands, are issued through the Master motor.
The Slave motor, C in this case, doesn’t receive a speed command. Instead, we give it a ratio command. This ratio is defined as a percentage of the first motor’s position. For moving forward, you always want the two motors to be at the same position, so we’ll set the Slave motor ratio to be 100% of the Master motor’s.
4. Set the slave motor to run at 100% of the master motor’s speed.
task main(){
nSyncedMotors = synchBC; nSyncedTurnRatio = 100;
}
4. Add this codeSet the turn ratio for the slave motor (C) to be 100%. Slave motor C will now attempt to maintain exactly 100% of the master motor B’s speed.
Note that the master motor’s speed has not been set yet, so the slave motor B will initially be running at 100% of 0 (i.e. stopped).
1234567
5. Set the master motor to a desired speed of 50, and let the robot run for 4 seconds.
task main(){
nSyncedMotors = synchBC; nSyncedTurnRatio = 100;
motor[motorB] = 50; wait1Msec(4000);
}
5. Add this codeSet a desired speed of 50 for the master motor. Master motors are automatically PID speed regulated.
123456789
10

ROBOTC
Movement
Improved Movement • 14© Carnegie Mellon Robotics Academy / For use with LEGO® MINDSTORMS® Education NXT software and base set 9797
Improved Movement Synchronized Motors (cont.)
6. Save your program as “LabyrinthSynch”.
6a. Save program As...Select File > Save As... to save your program under a new name.
6b. Browse to an appropriate folderBrowse to or create an appropriately named folder within your program folder to save your program.
6d. Save Click Save.
6c. Rename programGive this program the new name “LabyrinthSynch”.
7a. Compile and DownloadClick Robot > Compile and Download Program.
7b. Run the programClick “Start” on the onscreen Program Debug window.
5. Download and Run.

ROBOTC
Movement
Improved Movement • 15© Carnegie Mellon Robotics Academy / For use with LEGO® MINDSTORMS® Education NXT software and base set 9797
task main(){
nSyncedMotors = synchBC; nSyncedTurnRatio = -100;
motor[motorB] = 50; wait1Msec(4000);
}
123456789
10
Improved Movement Synchronized Motors (cont.)
Checkpoint The motors are now constantly updating themselves to maintain identical positions as they move. If one motor happens to stop, the other motor will adjust, and maintain 100% of the new position!
Finally, motor synchronization is useful for far more than just going straight. Cleaning up turning is also quite easy. As you saw when you first encountered turns, all you need to do is set the motors to move at different speeds. To turn in place, the motors should go different speeds. For a point turn, they should be completely opposite. The Slave motor should go -100% of the Master motor’s speed.
8. Change the sync ratio to -100% to make the robot turn instead of moving straight.
8. Modify this codeChange the sync ratio 100% to -100% to make the motors turn in exactly opposite directions.
9a. Compile and DownloadClick Robot > Compile and Download Program.
9b. Run the programClick “Start” on the onscreen Program Debug window.
9. Download and Run.

ROBOTC
Movement
Improved Movement • 16© Carnegie Mellon Robotics Academy / For use with LEGO® MINDSTORMS® Education NXT software and base set 9797
Improved Movement Synchronized Motors (cont.)
End of Section Motor synchronization allows you to control your robot in a way that prioritizes motor alignment over motor speed. This is a trade-off, but one that may be favorable when the most important thing is getting your robot to go straight.