improvised munitions handbook
TRANSCRIPT

8/2/2019 Improvised Munitions Handbook
http://slidepdf.com/reader/full/improvised-munitions-handbook 1/336

8/2/2019 Improvised Munitions Handbook
http://slidepdf.com/reader/full/improvised-munitions-handbook 2/336

8/2/2019 Improvised Munitions Handbook
http://slidepdf.com/reader/full/improvised-munitions-handbook 3/336
Introduction, Purpose and Scope, Safety and Reliability
INTRODUCTION
1. Purpose and Scope
In Unconventional Warfare operations it may be impossible or unwise to useconventional military munitions as tools in the conduct of certain missions. It may benecessary instead to fabricate the required munitions from locally available orunassuming materials. The purpose of this Manual is to increase the potential of SpecialForces and guerrilla troops by describing in detail the manufacture of munitions fromseemingly innocuous locally available materials.
Manufactured, precision devices almost always will be more effective, more reliable, andeasier to use than improvised ones, but shelf items will just not be available for certainoperations for security or logistical reasons. Therefore the operator will have to rely onmaterials he can buy in a drug or paint store, find in a junk pile, or scrounge from militarystocks. Also, many of the ingredients and materials used in fabricating homemade itemsare so commonplace or innocuous they can be carried without arousing suspicion. Thecompleted item itself often is more easily concealed or camouflaged. In addition, the fieldexpedient item can be tailored for the intended target, thereby providing an advantageover the standard item in flexibility and versatility.
The Manual contains simple explanations and illustrations to permit construction of theitems by personnel not normally familiar with making and handling munitions. Theseitems were conceived in-house or, obtained from other publications or persoimel engagedin munitions or special warfare work. This Manual includes methods for fabricatingexplosives, detonators, propellants, shaped charges, small arms, mortars, incendiaries,delays, switches, and similar items from indigenous materials.
1. Safety and Reliability
Each item was evaluated both theoretically and experimentally to assure safety andreliability. A large number of items were discarded because of inherent hazards orunreliable performance. Safety warnings are prominently inserted in the procedureswhere they apply but it is emphasized that safety is a matter of attitude. It is a proven factthat men who are alert, who think out a situation, and who take correct precautions havefewer accidents than the careless and indifferent. It is important that work be planned andthat instructions be followed to the letter; all work should be done in a neat and orderlymanner. In the manufacture explosives, detonators, propellants and incendiaries,equipment must be kept clean and such energy concentrations as sparks,
friction, impact, hot objects, flame, chemical reactions, and excessive pressure should beavoided.

8/2/2019 Improvised Munitions Handbook
http://slidepdf.com/reader/full/improvised-munitions-handbook 4/336
These items were found to be effective in most environments; however, samples should be made and tested remotely prior to actual use of assure proper performance. Chemicalitems should be used as soon as possible after preparation and kept free of moisture, dirt,and the above energy concentrations. Special care should be taken in any attempt atsubstitution or use of items for purposes other than that specified or intended.
3. User Comments
It is anticipated that this manual will be revised or changed from time to time. In this wayit will be possible to update present material and add new items as they become available.Users are encouraged to submit recommended changes or comments to improve thismanual. Comments should be keyed to the specific page, paragraph, and line of the textin which changes are recommended. Reasons should be provided for each comment toinsure understanding and complete evaluation. Comments should be forwarded directly
to Commandant, United States Army, Special Warfare School, Fort Bragg, NorthCarolina 28307 and Commanding Officer, United States Army, Frankford Arsenal,SMUFA-J8000, Philadelphia, Pennsylvania 19137.

8/2/2019 Improvised Munitions Handbook
http://slidepdf.com/reader/full/improvised-munitions-handbook 5/336
Plastic Explosive Filler
A plastic explosive filler can be made from potassium chlorate and petroleum jelly. Theexplosive can be detonated with commercial #8 or any military blasting cap.
HOW USED
Medicine
Manufacture of matches
Medicine Lubricant
MATERIAL REQUIRED
Potassium chlorate
Petroleum jelly (Vaseline)
Piece of round stick
Wide bowl or other container for mixing ingredients.
PROCEDURE
1. Spread potassium chlorate crystals thinly on a hard surface. Roll the round stick overcrystals to crush into a very fine powder until it looks like face powder or wheat flour.
2. Place 9 parts powdered potassium chlorate and 1 part petroleum jelly in a wide bowl orsimilar container. Mix ingredients with hands (knead) until a uniform paste is obtained.

8/2/2019 Improvised Munitions Handbook
http://slidepdf.com/reader/full/improvised-munitions-handbook 6/336
NOTE: Store explosive in a waterproof container until ready to use.

8/2/2019 Improvised Munitions Handbook
http://slidepdf.com/reader/full/improvised-munitions-handbook 7/336
Potassium Nitrate
Potassium nitrate (saltpeter) can be extracted from many natural sources and can be usedto make nitric acid, black powder and many pyrotechnics. The yield ranges from . 1 to10% by weight, depending on the fertility of the soil.
MATERIALS
Nitrate bearing earth or other material, about 3-1/2 gallons (13-1/2 liters) Fine wood ashes, about 1/2 cup (1/8 liter) Bucket or similar container, about 5 gallons (19 liters) in volume (Plastic, metal,
or wood) 2 pieces of finely woven cloth, each slightly larger than bottom of bucket
Shallow pan or dish, at least as large as bottom of bucket Shallow heat resistant container(ceramic, metal, etc.) Water – 1-3/4 gallons (6-3/4 liters) Awl, knife, screwdriver, or other hole producing instrument Alcohol about 1 gallon (4 liters) (whiskey, rubbing alcohol, etc.) Heat source (fire, electric heater, etc.) Paper Tape
SOURCE
Soil containing old decayed vegetable or animal matter Old cellars and/or farm dirt floors Earth from old burial grounds Decayed stone or mortar building foundations Totally burned whitish wood ash powder Totally burned paper (black)
NOTE: Only the ratios of the amounts of ingredients are important. Thus, for twice asmuch potassium nitrate, double quantities used.
PROCEDURE:
1. Punch holes in bottom of bucket. Spread one piece of cloth over holes inside of bucket.

8/2/2019 Improvised Munitions Handbook
http://slidepdf.com/reader/full/improvised-munitions-handbook 8/336
2. Place wood ashes on cloth and spread to make a layer about the thickness of the cloth.Place second piece of cloth on top of ashes.
3. Place dirt in bucket.

8/2/2019 Improvised Munitions Handbook
http://slidepdf.com/reader/full/improvised-munitions-handbook 9/336
4. Place bucket over shallow container. Bucket may be supported on sticks if necessary.
5. Boil water and pour It over earth in bucket a little at a time. Allow water to run through
holes in bucket into shallow container. Be sure water goes through all of the earth. Allowdrained liquid to cool and settle for I to 2 hours.
NOTE: Do not pour all of the water at once, since this may cause stoppage.
6. Carefully drain off liquid into heat resistant container. Discard any sludge remaining in bottom of the shallow container.
7. Boil mixture over hot fire for at least 2 hours. Small grains of salt will begin to appearin the solution. Scoop these out as they form, using any type of improvised strainer(paper, etc.).

8/2/2019 Improvised Munitions Handbook
http://slidepdf.com/reader/full/improvised-munitions-handbook 10/336
8. When liquid has boiled down to approximately half its original volume, remove fromfire and let sit. After half an hour add an equal volume of alcohol. When mixture is poured through paper, small white crystals will collect on top of it.
9. To purify the potassium nitrate, redesolve the dry crystals in the smallest possibleamount of boiled water. Remove any gait crystals that appear (Step 7); pour through animprovised filter made of several pieces of paper and evaporate or gently heat theconcentrated solution to dryness.
10. Spread crystals on flat surface and allow to dry. The potassium nitrate crystals arenow ready for use.

8/2/2019 Improvised Munitions Handbook
http://slidepdf.com/reader/full/improvised-munitions-handbook 11/336
Improvised Black Powder
Black powder can be prepared in a simple, safe manner. It may be used as blasting or gun powder.
MATERIAL REQUIRED:
Potassium nitrate, granulated, 3 cups (3/4 liter) (see Sect. I, No. 2) Wood charcoal, powdered, 2 cups (1/2 liter) Sulfur, powdered, 1/2 cup (1/8 liter) Alcohol, 5 pints (2-1/2 liters) (whiskey, rubbing alcohol, etc.) Water, 3 cups (3/4 liter) Heat source
2 Buckets – each 2 gallon (7-1/2 liters) capacity, at least one of which is heatresistant (metai, ceramic, etc.) Flat window screening, at least 1 foot (30 cm) square Large wooden stick Cloth, at least 2 feet (60 cm) square
NOTE: The above amounts will yield two pounds (900 grams) of black powder.However, only the ratios of the amounts of ingredients are important. Thus, for twice asmuch black powder, double all quantities used.
PROCEDURE:
1. Place alcohol in one of the buckets.
2. Place potassium nitrate, charcoal, and sulfur in the heat resistant bucket. Add 1 cupwater and mix thoroughly with wooden stick until all ingredients are dissolved.
3. Add remaining water (2 cups) to mixture. Place bucket on heat source and stir untilsmall bubbles begin to form.
CAUTION: Do not boil mixture. Be sure all mixture stays wet. If any is dry, as on sidesof pan, it may ignite.
4. Remove bucket from heat and pour mixture into alcohol while stirring vigorously.

8/2/2019 Improvised Munitions Handbook
http://slidepdf.com/reader/full/improvised-munitions-handbook 12/336
5. Let alcohol mixture stand about 5 minutes. Strain mixture through cloth to obtain black powder. Discard liquid. Wrap cloth around black powder and squeexe to remove allexcess liquid.
6. Place screening over dry bucket. Place workable amount of damp powder on screenand granulate by rubbing solid through screen.

8/2/2019 Improvised Munitions Handbook
http://slidepdf.com/reader/full/improvised-munitions-handbook 13/336
7. Spread granulated black powder on flat dry surface so that layer about 1/2 inch (1-1/4cm) is formed. Allow to dry. Use radiator, or direct sunlight. This should be dried as soonas possible, preferably in one hour. The longer the drying period, the less effective the black powder.
CAUTION: Remove from heat as soon as granules are dry. Black powder is now readyfor use.

8/2/2019 Improvised Munitions Handbook
http://slidepdf.com/reader/full/improvised-munitions-handbook 14/336
Nitric Acid
Nitric acid is used in the preparation of many explosives, incendiary mixtures, and aciddelay timers. It may be prepared by distilling a mixture of potassium nitrate andconcentrated sulfuric acid.
MATERIAL REQUIRED:
Potassium nitrate (2 parts by volume) Concentrated sulfuric acid (1 part by volume) 2 bottles or ceramic jugs (narrow necks are preferable) Pot or frying pan Heat source (wood, coal, or charcoal)
Tape (paper, electrical, masking, etc. but not cellophane) Paper or raga
SOURCES:
Drug Store Improvised (Section I, No. 2) Motor vehicle batteries Industrial plants
IMPORTANT: If sulfuric acid is obtained from a motor vehicle batten*. concentrate it by boiling It until white fumes appear. DO NOT INHALE FUMES.
NOTE: The amount of nitric acid produced is the same as the amount of potassiumnitrate. Thus, for 2 tablespoonfuls of nitric acid, use 2 tablespoonful of potassium nitrateand 1 tablespoonful of concentrated sulfuric acid.
PROCEDURE:
1. Place dry potassium nitrate in bottle or jug. Add sulfuric acid. Do not fill bottle morethan 1/4 full. Mix until paste is formed.

8/2/2019 Improvised Munitions Handbook
http://slidepdf.com/reader/full/improvised-munitions-handbook 15/336
CAUTION: Sulfuric acid will burn skin and destroy clothing. If any is spilled, wash itaway with a large quantity of water. Fumes are also dangerous and should not be inhaled.
2. Wrap paper or rags around necks of 2 bottles. Securely tape necks of bottles together.Be sure bottles are flush against each other and that there are no air spaces.
3. Support bottles on rocks or cans so thit
empty bottle Is slightly lower than bottle containing paste so that nitric acid that isformed in receiving bottle will not run into other bottle.
4. Build fire in pot or frying pan.
5. Gently heat bottle containing mixture by moving fire in and out. As red fumes begin toappear periodically pour cool water over empty receiving bottle. Nitric acid will begin toform In the receiving bottle.
CAUTION: Do not overheat or wet bottlecontaining mixture or it may shatter. As an added precaution, place bottle to be heated inheat resistant container filled with sand or gravel. Heat this outer container to producenitric acid.

8/2/2019 Improvised Munitions Handbook
http://slidepdf.com/reader/full/improvised-munitions-handbook 16/336
6. Continue the above process until no more red fumes are formed. If the nitric acidformed in the receiving bottle is not clear (cloudy) pour it into cleaned bottle and repeatSteps 2-6.
CAUTION: Nitric acid will burn skin and destroy clothing. If any is spilled, wash itaway with a large quantity of water. Fumes are also dangerous and should not be inhaled.
Nitric acid should be kept away from all combustibles and should be kept in a sealedceramic or glass container.

8/2/2019 Improvised Munitions Handbook
http://slidepdf.com/reader/full/improvised-munitions-handbook 17/336
Initiator for Dust Explosions
An initiator which will initiate common material to produce dust explosions can berapidly and easily constructed. This type of charge is ideal for the destruction of enclosedareas such as rooms or buildings.
MATERIAL REQUIRED:
A flat can, 3 in. (8 cm) diameter and 1-1/2 in. (3-3/4 cm) high. A 6-1/2 ounceTuna can serves the purpose quite well.
Blasting cap Explosive Aluminum (may be wire, cut sheet, flattened can or powder
Large nail, 4 in. (10 cm) long Wooden rod – 1/4 in. (6 mm) diameter Flour, gasoline and powder or chipped aluminum
NOTE: Plastic explosives (Comp. C-4, etc.) produce better explosions than castexplosives (Comp. B, etc.).
PROCEDURE:
1. Using the nail, press a hole through the side of the Tuna can 3/8 to 1/2 inch (1 to 1-1/2cm) from the bottom. Using a rotating and lever action, enlarge the hole until it willaccommodate the blasting cap.
2. Place the wooden rod in the hole and position the end of the rod at the center of thecan.
3. Press explosive into the can, being sure to surround the rod, until it is 3/4 inch (2 cm)from top of the can. Carefully remove the wooden rod.

8/2/2019 Improvised Munitions Handbook
http://slidepdf.com/reader/full/improvised-munitions-handbook 18/336
4. Place the aluminum metal on top of theexplosive.
5. Just before use, insert the blasting cap into the cavity made by the rod. The initiator isnow ready for use.
NOTE: If it is desired to carry the initiator some distance, card¬board may be pressed ontop of the aluminum to insure against loss of material.
HOW TO USE:

8/2/2019 Improvised Munitions Handbook
http://slidepdf.com/reader/full/improvised-munitions-handbook 19/336
This particular unit works quite well to initiate charges of five pounds of flour, 1/2 gallon(1-2/3 liters) of gasoline or two pounds of flake painters aluminum. The solid materialsmay merely be contained in sacks or cardboard cartons. The gasoline may be placed in plastic- coated paper milk cartons, plastic or glass bottles. The charges are placed directlyon top of the initiator and the blasting cap is actuated electrically or by fuse depending onthe type of cap employed. This will destroy a 2,000 cubic feet enclosure (building 10 x 20x 10 feet).
NOTE: For larger enclosures, use proportionately larger initiators and charges.

8/2/2019 Improvised Munitions Handbook
http://slidepdf.com/reader/full/improvised-munitions-handbook 20/336
Fertilizer Explosive
An explosive munition can be made from fertilizer grade ammonium nitrate and eitherfuel oil or a mixture of equal parts of motor oil and gasoline. When properly prepared,this explosive munition can be detonated with a blasting cap.
MATERIAL REQUIRED:
Ammonium nitrate (not less than 32% nitrogen) Fuel oil or gasoline ar.d motor oil (1:1 ratio) Two flat boards. (At least one of these should be comfortably held in the hand, i.e.
2 x 4 and 35 x 36.) Bucket or other container for mixing ingredients Iron or steel pipe or bottle, sin
can or heavy-walled cardboard tube Blasting cap Wooden rod – 1/4 in. diameter Spoon or similar measuring container
PROCEDURE:
1. Spread a handful of the ammonium nitrate on the large flat board and rub vigorouslywith the other board until the large particles are crushed into a very fine powder thatlooks like flour (approx. 10 min).
NOTE: Proceed with Step 2 as soon as possible since the powder may take moisturefrom the air and become spoiled.
2. Mix one measure icup, tablespoon, etc.) of fuel oil with16 measures of the finely ground ammonium nitrate In a dry bucket or other suitablecontainer and stir with the wooden rod. If fuel oil is not available, use one half measureof gasoline and one half measure of motor oil. Store in a waterproof container until readyto use.

8/2/2019 Improvised Munitions Handbook
http://slidepdf.com/reader/full/improvised-munitions-handbook 21/336
3. Spoon this mixture into an iron or steel pipe which hasan end cap threaded on one end. If a pipe is not available, you may use a dry tin can, aglass jar or a heavy-walled cardboard tube.
NOTE: Confining the open end of the container will add to the effectiveness of theexplosive.
4. Insert blasting cap just beneath the surface of the explosive mix.

8/2/2019 Improvised Munitions Handbook
http://slidepdf.com/reader/full/improvised-munitions-handbook 22/336
NOTE: Take care not to tamp or shake the mixture in the pipe. If mixture becomestightly packed, one cap will not be sufficient to initiate the explosive.

8/2/2019 Improvised Munitions Handbook
http://slidepdf.com/reader/full/improvised-munitions-handbook 23/336
Carbon Tet Explosive
A moist explosive mixture can be made from fine aluminum powder combined withcarbon tetrachloride or tetrachloroethylene. This explosive can be detonated with a blasting cap.
SOURCE:
Paint Store Pharmacy, or fire extinguisher fluid Dry cleaners Pharmacy
MATERIAL REQUIRED:
Fine aluminum bronzing powder Carbon tetrachloride or tetrachloroethylene Stirring rod (wood) Mixing container (bowl, bucket, etc.) Measuring container (cup, tablespoon, etc.) Storage container (jar, can, etc.) Blasting cap Pipe, can or jar
PROCEDURE:
1. Measure out two parts aluminum powder to one part carbon tetrachloride ortetrachloroethylene liquid into mixing container, adding liquid to powder while stirringwith the wooden rod.

8/2/2019 Improvised Munitions Handbook
http://slidepdf.com/reader/full/improvised-munitions-handbook 24/336
2. Stir until the mixture becomes the consistency of honey syrup.
NOTE: Fumes from the liquid are dangerous and should not be inhaled.
3. Store explosive in a jar or similar water proof container until ready to use. The liquidin the mixture evaporates quickly when not confined.
NOTE: Mixture will detonate in this manner for a period of 72 hours.
HOW TO USE:
1. Pour this mixture into an iron or steel pipe which has an end cap threaded on one end.If a pipe is not available, you may use a dry tin can or a glass jar.

8/2/2019 Improvised Munitions Handbook
http://slidepdf.com/reader/full/improvised-munitions-handbook 25/336
2. Insert blasting cap just beneath the surface of the explosive mix.
NOTE: Confining the open end of the container will add to the effectiveness of theexplosive.

8/2/2019 Improvised Munitions Handbook
http://slidepdf.com/reader/full/improvised-munitions-handbook 26/336
Fertilizer AN-AL Explosive
A dry explosive mixture can be made from ammonium nitrate fertilizer combined withfine aluminum powder. This explosive can be detonated with a blasting cap.
MATERIAL REQUIRED:
Ammonium nitrate fertilizer (not less than 32% nitrogen) Fine aluminum bronzing powder Measuring container (cup, tablespoon, etc.) Mixing container (wide bowl, can, etc.) Two flat boards (one should be comfortably held in hand and one very large, i.e. 2
x 4 and 36 x 36 in.)
Storage container (jar, can, etc.) Blasting cap Wooden rod – 1/4 inch diameter Pipe, can or jar
SOURCE:
Farm or Feed Store Paint Store
PROCEDURE:
1. Method I – To obtain a low velocity explosive.
a. Use measuring container to measure four parts fertilizer to one part aluminum powderand pour into the mixing container. (Example: 4 cups of fertilizer to 1 cup aluminum powder.)
b. Mix ingredients well with the wooden rod.
2. Method II – To obtain a much higher velocity explosive.
a. Spread a handful at a time of the fertilizer on the large flat board and rub vigorouslywith the other board until the Large particles are crushed into a very fine powder thatlooks like flour (approx. 10 min per handful).
NOTE: Proceed with step b below as soon as possible since the powder may takemoisture from the air and become spoiled.
b. Follow steps a and b of Method I.

8/2/2019 Improvised Munitions Handbook
http://slidepdf.com/reader/full/improvised-munitions-handbook 27/336
3. Store the explosive mixture in a waterproofcontainer, such as glass jar, steel pipe, etc., until ready to use.
HOW TO USE:
Follow steps 1 and 2 of “How To Use” in Section I, No. 7.

8/2/2019 Improvised Munitions Handbook
http://slidepdf.com/reader/full/improvised-munitions-handbook 28/336
Red or White Powder Propellant
“Red or White Powder” Propellant may be prepared In a simple, safe manner. Theformulation described below will result In approximately 2-1/2 pounds of powder. This isa small arms propellant and should only be used in weapons with 1/2 in. inside diameteror less, such as the Match Gun or the 7.62 Carbine, but not pistols.
MATERIAL REQUIRED:
Heat source (Kitchen stove or open fire) 2 gallon metal bucket Measuring cup (8 ounces) Wooden spoon or rubber spatula
Metal sheet or aluminum foil (at least 18 in. sq.) Flat window screen (at least 1 ft. sq.) Potassium nitrate (granulated) 2-1/3 cups White sugar (granulated) 2 cups Powdered ferric oxide (rust) 1/8 cup (if available) Clear water, 3-1/2 cups
PROCEDURE:
1. Place the sugar, potassium nitrate, and water in the bucket. Heat with a low flame,stirring occasionally until the sugar and potassium nitrate dissolve.
2. If available, add the ferric oxide (rust) to the solution. Increase the tame under themixture until it boils gently.
NOTE: The mixture will retain the rust coloration.

8/2/2019 Improvised Munitions Handbook
http://slidepdf.com/reader/full/improvised-munitions-handbook 29/336
3. Stir and scrape the bucket sides occasionally until the mixture is reduced to one quarterof its original volume, then stir continuously.
4. As the water evaporates, the mixture will become thicker until it reaches theconsistency of cooked breakfast cereal or homemade fudge. At this stage of thickness,remove the bucket from the heat source, and spread the mass on the metal sheet.
5. While the materialcools, score it with the spoon or spatula in crisscrossed furrows about 1 inch apart.

8/2/2019 Improvised Munitions Handbook
http://slidepdf.com/reader/full/improvised-munitions-handbook 30/336
6. Allow the material to air dry, preferably in the sun. As it dries, rescore it occasionally(about every 20 minutes) to aid drying.
7. When the material has dried to a point where it is moist and soft but not sticky to thetouch, place a small spoonful on the screen. Rub the material back and forth against thescreen meBh with spoon or other flat object until the material is granulated into smallworm-like particles.
8. After granulation, return the material tothe sun to dry completely.

8/2/2019 Improvised Munitions Handbook
http://slidepdf.com/reader/full/improvised-munitions-handbook 31/336
Nitric Acid / Nitrobenzene (“Hellhoffite”)
SOURCE:
Field grade or 90% concentrated (specific gravity of 1.48) Drug store (oil of mirbane) Chemical supply house Industries (used as solvent) Glass, clay, etc.
An explosive munitions can be made from rnononitrobenezene and nitric acid. It is asimple explosive to prepare. Just pour the mono- nitrobenzene into the acid and stir.
MATERIAL REQUIRED:
Nitric acid Mononitrobenzene (also known as nitrobenzene) Acid resistant measuring containers Acid resistant mixing rod Blasting cap Wax Steel pipe, end cap and tape Bottle or jar
NOTE: Prepare mixture just before use.
PROCEDURE:
1. Add 1 volume (cup, quart, etc.) mononitrobenzene to 2 volumes nitric acid in bottle or jar.
2. Mix ingredients well by stirring with acidresistant rod.

8/2/2019 Improvised Munitions Handbook
http://slidepdf.com/reader/full/improvised-munitions-handbook 32/336
CAUTION: Nitric acid will burn skin and destroy clothing. If any is spilled, wash off
immediately with large amount of water. Nitrobenzene is toxic; do not inhale fumes.
HOW TO USE:
1. Wax blasting cap, pipe and end cap,
2. Thread end cap onto pipe.
3. Pour mixture into pipe.
4. Insert and tape blasting cap just beneath surface of mixture.

8/2/2019 Improvised Munitions Handbook
http://slidepdf.com/reader/full/improvised-munitions-handbook 33/336
NOTE: Combining the open end of the pipe will
add to the effectiveness of the explosive.

8/2/2019 Improvised Munitions Handbook
http://slidepdf.com/reader/full/improvised-munitions-handbook 34/336
Optimized Process for Cellulose /Acid Explosives
An acid type explosive can be made from nitric acid and white paper or cotton cloth..This explosive can be detonated with a commercial #8 or any military blasting cap.
MATERIAL REQUIRED:
Nitric Acid White imprinted, unsized paper Clean white cotton cloth Acid resistant container Aluminum foil or acid resistant material Protective gloves
Blasting cap Wax
SOURCE:
Industrial metal processors, 90% concentrated (specific gravity of 1.48) Field grade (See Section I. No. 4) Paper towels, napkins Clothing, sheets, etc. Wax coated pipe or can, ceramic pipe, glass jar, etc. Heavy-walled glass containers Food stores
PROCEDURE:
1. Put on gloves.
2. Spread out a layer of paper or cloth on aluminum foil and sprinkle with nitric acid untilthoroughly soaked. If aluminum foil is unavailable, use an acid resistant material (glass,ceramic or wood).

8/2/2019 Improvised Munitions Handbook
http://slidepdf.com/reader/full/improvised-munitions-handbook 35/336
CAUTION: Acid will burn skin and destroy clothing. If any is spilled, wash it away witha large quantity of water. Do not inhale fumes.
3. Place another layer of paper or cloth on top of the acid-soaked sheet and repeat step 2above. Repeat as often as necessary.
4. Roll up the aluminum foil containing the acid-soaked sheets and insert the roll into theacid resistant container.
NOTE: If glass, ceramic or wooden tray is used, pick up sheets with two wooden sticksand load into container.
5. Wax blasting cap.
6. Insert the blasting cap in the center of the rolled sheets. Allow 5 minute8 beforedetonating the explosive.

8/2/2019 Improvised Munitions Handbook
http://slidepdf.com/reader/full/improvised-munitions-handbook 36/336

8/2/2019 Improvised Munitions Handbook
http://slidepdf.com/reader/full/improvised-munitions-handbook 37/336
Methyl Nitrate Dynamite
A moist explosive mixture can be made from sulfuric acid, nitric acid and methyl alcohol.This explosive can be detonated with a blasting cap.
MATERIAL REQUIRED:
Sulfuric acid Methyl alcohol Eyedropper or syringe with glass tube Large diameter glass (2 qt.) jar Narrow glass jars (1 qt.) Absorbent (fine sawdust, shredded paper, shredded cloth)
Cup Pan (3 to 5 gallon) Teaspoon Wooden stick Steel pipe with end cap Blasting cap Water Tray
SOURCES:
Clear battery acid boiled until white fumes appear Field grade nitric acid (Section I, No. 4) or 90% conc. (sp. gr. of 1.48) Methanol Wood alcohol (not denatured alcohol) Anti-freeze (non-permanent)
PROCEDURE:
1. Add 24 teaspoons of sulfuric acid to 16-1/2 teaspoona of nitric acid in the 2 quart jar.

8/2/2019 Improvised Munitions Handbook
http://slidepdf.com/reader/full/improvised-munitions-handbook 38/336
CAUTION: Acid will burn skin and destroy
clothing. If any is spilled, wash it away with a large quantity of water. Do not inhalefumes.
3. Rapidly swirl the jar to create a whirlpool m the liquid (without splashing) whilekeeping the bottom portion of the jar in the water.
4. While continually swirling, add to mixture, 1/2 teaspoon at a time, 13-1/2 teaspoons ofmethyl alcohol, allowing mixture to cool at least one minute between additions.
CAUTION: If there is a sudden increase in the amount of fumes produced or if thesolution suddenly turns much darker or begins to froth, dump solution in the water within10 seconds. This will halt the reaction and prevent an accident.
5. After the final addition of methyl alcohol, swirl for another 30 to 45 seconds.

8/2/2019 Improvised Munitions Handbook
http://slidepdf.com/reader/full/improvised-munitions-handbook 39/336
6. Carefully pour the solution into one of the narrow glass jars. Allow jar to stand inwater for approximately 5 minutes until two layers separate.
7. With an eyedropper or syringe, remove top layer and carefully put into another narrowglass jar. This liquid is the explosive.
CAUTION: Explosive is shock sensitive.
8. Add an equal quantity of water to the explosive and swirl. Allow mixture to separateagain as in step 6. The explosive is now the bottom layer.
9. Carefully remove the top layer with the eyedropper or syringe and discard.
10. Place one firmly packed cup of absorbent in the tray.
11. While stirring with the wooden stick, slowly add explosive until the mass is verydamp but not wet enough to drip. Explosive is ready to use.
8/2/2019 Improvised Munitions Handbook
http://slidepdf.com/reader/full/improvised-munitions-handbook 40/336
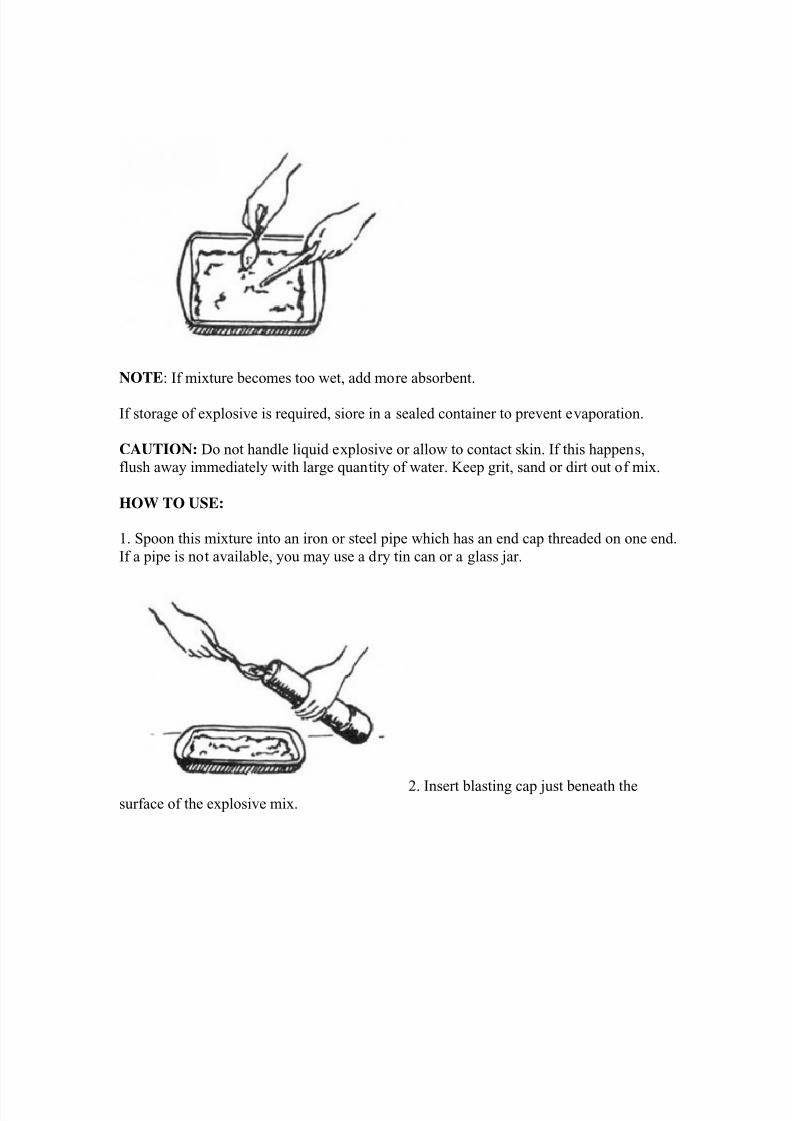
NOTE: If mixture becomes too wet, add more absorbent.
If storage of explosive is required, siore in a sealed container to prevent evaporation.
CAUTION: Do not handle liquid explosive or allow to contact skin. If this happens,flush away immediately with large quantity of water. Keep grit, sand or dirt out of mix.
HOW TO USE:
1. Spoon this mixture into an iron or steel pipe which has an end cap threaded on one end.If a pipe is not available, you may use a dry tin can or a glass jar.
2. Insert blasting cap just beneath thesurface of the explosive mix.

8/2/2019 Improvised Munitions Handbook
http://slidepdf.com/reader/full/improvised-munitions-handbook 41/336
NOTE: Confining the open end of the container will add to the effective ness of theexplosive.

8/2/2019 Improvised Munitions Handbook
http://slidepdf.com/reader/full/improvised-munitions-handbook 42/336
Urea Nitrate Explosive
Urea nitrate can be used as an explosive munition. It is easy to prepare from nitric acidand urine. It can be detonated with a blasting cap.
MATERIAL REQUIRED:
Nitric acid, 90% conc. (1.48 sp. gr.) Urine 2 one gallon heat and acid-resistant containers (glass, clay, etc.) Filtering material Aluminum powder (optional or if available) Heat source
Measuring containers (cup and spoon) Water Tape Blasting cap Steel pipe and end cap (s)
SOURCE:
Field grade (Section I, No. 4) or industrial metal processors Animals (including humans ) Paper towel or finely textured cotton cloth (shirt, sheet, etc.) Paint stores
NOTE: Prepare mixture just before use.
PROCEDURE:
1. Boil a large quantity of urine (10 cups) to approximately 1/10 its volume (1 cup) in oneof the containers over the heat source.

8/2/2019 Improvised Munitions Handbook
http://slidepdf.com/reader/full/improvised-munitions-handbook 43/336
2. Filter the urine into the other container through the filtering material to removeimpurities.
3. Slowly add 1/3 cup of nitric acid to the filtered urine, and let mixture stand for 1 hour.

8/2/2019 Improvised Munitions Handbook
http://slidepdf.com/reader/full/improvised-munitions-handbook 44/336
CAUTION: Acid will burn skin and destroy clothing. If any is spilled wash it away witha large quantity of water. Do not inhale fumes.
4. Filter mixture as in step 2. Urea nitrate crystals will collect on the paper.
5. Wash the urea nitrate by pouring water over it.
6. Remove urea nitrate crystals from the filtering material and allow to dry thoroughly(approximately 16 hours).
NOTE: The drying time can be reduced to two hours if a hot (not boiling) water bath isused. See Step 5 o: Section I, No. 15.

8/2/2019 Improvised Munitions Handbook
http://slidepdf.com/reader/full/improvised-munitions-handbook 45/336
HOW TO USE:
1. Spoon the urea nitrate crystals into an iron or steel pipe which has an end cap threadedon one end.
2. Insert blasting cap just beneath the surface of the urea nitrate crystals.
NOTES: This explosive can be made more effective by mixing with aluminum powder
(can be obtained in paint stores) in the ratio of 4 to 1. For example, mix 1 cup ofaluminum powder with 4 cups of urea nitrate.
Confining the open end of the container will add to the effectiveness of the explosive.

8/2/2019 Improvised Munitions Handbook
http://slidepdf.com/reader/full/improvised-munitions-handbook 46/336
Preparation of Copper Sulfate (Pentahydrate)
Copper sulfate ia a required material for the preparation of TACC (Section I, No. 16).
MATERIAL REQUIRED:
Pieces of copper or copper wire Dilute sulfuric acid (battery acid) Potassium Nitrate (Section I, No. 2) or Nitric Acid, 90%conc. (1.48 sp. gr.) (Section I, No. 4) Alcohol Water Two 1 pint jars or glasses, heat resistant Paper towels
Pan Wooden rod or stick Improvised Scale (Section VII, No. Cup Container Heat source Teaspoon
PROCEDURE:
1. Place 10 grams of copper pieces Lnto one of the pint jars. Add 1 cup (240 milliliters)of dilute sulfuric acid to the copper.
2. Add 12 grams of potassium nitrate or 1-1/2 teaspoons of nitric acid to the mixture.

8/2/2019 Improvised Munitions Handbook
http://slidepdf.com/reader/full/improvised-munitions-handbook 47/336
NOTE: Nitric acid gives a product of greater purity.
3. Heat the mixture in a pan of simmering hot water bath until the bubbling has ceased(approximately 2 hours). The mixture will turn to a blue color.
CAUTION: The above procedure will cause strong toxic fumes. Perform Step 3 in anopen, well ventilated area.
4. Pour the hot blue solution, but not the copper, into the other pint Jar. Allow solution to
cool at room temperature. Crystals will form at the bottom of the Jar. Discard theunreacted copper pieces in the first Jar.
5. Carefully pour away the liquid from the crystals. Crush crystals Into a powder withwooden rod or stick.

8/2/2019 Improvised Munitions Handbook
http://slidepdf.com/reader/full/improvised-munitions-handbook 48/336
6. Add 1/2 cup (120 milliliters) of alcohol to the powder while stirring.
7. Filter the solution through a paper towel into a container to collect the crystals. Wash
the crystals left on the paper towel three times, using 1/2 cup (120 milliliters) por-tions ofalcohol each time.

8/2/2019 Improvised Munitions Handbook
http://slidepdf.com/reader/full/improvised-munitions-handbook 49/336
9. Air dry the copper sulfate crystals for 2 hours.
NOTE: Drying time can be reduced to 1/2 hour by use of hot, not boiling, water bath (seeStep 3).

8/2/2019 Improvised Munitions Handbook
http://slidepdf.com/reader/full/improvised-munitions-handbook 50/336
Reclamation of RDX from C-4
RDX can be obtained from C-4 explosive with the use of gasoline. It can be used as a booster explosive for detonators (Section VI, No. 13) or as a high explcsive charge.
MATERIAL REQUIRED:
Gasoline C-4 explosive 2 pint glass jars, wide mouth Paper towels Stirring rod (glass or wc-od) Water Ceramic or glass dish
Pan Optional (RDX can be air dried instead) Heat Source Teaspoon Cup Tape
PROCEDURE:
1. Place 1-1/2 teaspoons (15 grams) of C-4 explosive in one of the pint jars. Add 1 cup(240 milliliters) of gasoline.
NOTE: These quantities can be increased to obtain more RDX. For example, use 2gallons of gasoline per 1 cup of C-4.

8/2/2019 Improvised Munitions Handbook
http://slidepdf.com/reader/full/improvised-munitions-handbook 51/336
2. Knead and stir the C-4 with the rod until the C-4 has broken down into small particles.Allow mixture to stand for 1/2 hour.
3. Stir the mixture again until a fine white powder remains on the bottom of the jar.
4. Filter the mixture through a paper towel into the other glass jar. Wash the particlescollected on the paper towel with 1/2 cup (120 milliliters) of gasoline. Discard the waste
liquid.

8/2/2019 Improvised Munitions Handbook
http://slidepdf.com/reader/full/improvised-munitions-handbook 52/336
5. Place the RDX particles in a glass or ceramic dish. Set the dish in a pan of hot water,not boiling, and dry for a period of 1 hour.
NOTE: The RDX particles may be air dried for a period of 2 to 3 hours.

8/2/2019 Improvised Munitions Handbook
http://slidepdf.com/reader/full/improvised-munitions-handbook 53/336
TACC (Tetramminecopper (II) Chlorate)
Tetramminecopper (II) chlorate is a primary explosive that can be made from sodiumchlorate, copper sulfate and ammonia. This explosive is to be used with a boosterexplosive such as picric acid (Section I, No. 21) or RDX (Section I, No. 15) in thefabrication of detonators (Section 6, No. 13)
MATERIAL REQUIRED:
Sodium chlorate Copper sulfate Ammonia hydroxide Alcohol, 95% pure
Wax, clay, pitch, etc. Water Bottle, narrow mouth (wine or coke) Bottles, wide mouth (mason jars) Tubing (rubber, copper, steel) to fit narrow mcuth bottle Teaspoon Improvised scale Heat source Paper towel Pan Tape Cup
SOURCES:
Section I, No. 23 Medicine
Weed killer, hardware store Section I, No. 14 Insecticide, hardware store Water purifying agent Household ammonia Smelling salts
PROCEDURE:
1. Measure 1/3 teaspoon (2-1/2 grams) of sodium chlorate into a wide mouth bottle. Add10 teaspoons of alcohol.

8/2/2019 Improvised Munitions Handbook
http://slidepdf.com/reader/full/improvised-munitions-handbook 54/336
2. Place the wide mouth bottle in a pan of hot water. Add 1 teaspoon (4 grams) of coppersulfate to the mixture. Heat for a period of 30 minutes just under the boiling point and stiroccasionally.
CAUTION: Keep solution away from flame.
NOTE: Keep volume of solution constant by adding additional alcohol approximatelyevery 10 minutes.

8/2/2019 Improvised Munitions Handbook
http://slidepdf.com/reader/full/improvised-munitions-handbook 55/336
3. Remove solution from pan and allow to cool. Color of solution will change from blueto light green. Filter solution through a paper towel into another wide mouth bottle. Storesolution until ready for step 6.
4. Add 1 cup (250 milliliters) of ammonia to the narrow mouth bottle.
5. Place tubing into the neck of bottle so that it extends about 1-1/2 inches (4 cm) inside bottle. Seal tubing to bottle with wax, clay, pitch, etc.
6. Place free end of tubing into the chlorate-alcohol-sulfate solution (Step 3). Heat bottlecontaining ammonia in a pan of hot water, but not boiling, for approximately 10 minutes.

8/2/2019 Improvised Munitions Handbook
http://slidepdf.com/reader/full/improvised-munitions-handbook 56/336
7. Bubble ammonia gas through the chlorate-alcohol-sulfate solution, approximately 10minutes, until the color changes from light green to
dark blue, Continue bubbling for another 10 minutes.
CAUTION: At this point the solution is a primary explosive. Keep away from flame.
8. Remove the solution from the pan and reduce the volume to about 1/3 of its originalvolume by evaporating in the open air or in a stream of air.
NOTE: Pour solution into a flat container for faster evaporation.
9. Filter the solution through a paper towel into a wide mouth bottle to collect crystals.Wash crystals with 1 teaspoon of alcohol and set aside to dry (approx. 16 hours).
CAUTION: Explosive is shock and flame sensitive. Store in a capped container.
NOTE: The drying time can be reduced to 2 hours if a hot (not boiling ) water bath isused.

8/2/2019 Improvised Munitions Handbook
http://slidepdf.com/reader/full/improvised-munitions-handbook 57/336
HMTD
HMTD is a primary explosive that can be made from hexamethy- lenetetramine,hydrogen peroxide and citric acid. This explosive is to be used with a booster explosivesuch as picric acid (Section I, No. 21) or RDX Section I, No. 15) in the fabrication ofdetonators (Section 6, No. 13).
MATERIAL REQUIRED:
Hexamethylenetetramine Hydrogen peroxide Citric acid Containers, bottles or glasses
Paper towels Teaspoon Pan Water Tape
SOURCES:
Drugstores under names of urotropine, hexamin, methenamine, etc. Army heat tablets. 6% hair bleach (or stronger if possible) Drug stores or food stores (“Sour Salt”)
PROCEDURE:
1. Measure 9 teaspoons of hydrogen peroxide into a container.
2. In 3 portions, dissolve 2-1/2 teaspoons of crushed hexamethy- lenetetramine in the peroxide.

8/2/2019 Improvised Munitions Handbook
http://slidepdf.com/reader/full/improvised-munitions-handbook 58/336
3. Keep the solution cool for 30 minutes by placing container in a pan of cold water.
4 . In 5 portions, dissolve 4-1/2 teaspoons of crushed citric acid in thehexamethylenetetramine-peroxide solution.
5. Permit solution to stand at room temperature until solid par tides form fit the bottonr.of container.
NOTE: Complete precipitation will take place in 8 to 24 hours.
CAUTION: At this point the mixture is a primary explosive. Keep away from flame.
6. Filter the mixture through a paper towel into a container to collect the solid particles.

8/2/2019 Improvised Munitions Handbook
http://slidepdf.com/reader/full/improvised-munitions-handbook 59/336
7. Wash the solid particles collected in the paper towel with 6 teaspoons of water by pouring the water over them. Discard the liquid in the container.
8. Place these explosive particles in a container and allow to dry.
CAUTION: Handle dry explosive with great care. Do not scrape or handle it roughly.Keep away from sparks or open flames. Store in cool, dry place.

8/2/2019 Improvised Munitions Handbook
http://slidepdf.com/reader/full/improvised-munitions-handbook 60/336
Potassium or Sodium Nitrate and Litharge (Lead Monoxide)
Potassium or sodium nitrite is needed to prepare DDNP (Section I, No. 19), and lithargeis required for the preparation of lead picrate (Section I, No. 20).
MATERIAL REQUIRED:
Lead metal (small pieces or chips) Potassium (or sodium) nitrate Methyl (wood) alcohol Iron pipe with end cap Iron rod or screwdriver Paper towels
2 glass jars, wide mouth Metal pan Heat source (hot coals or blow torch) Improvised scale (Section VII, No.) Cup Water Pan
SOURCE:
Plumbing supply store Field grade (Section I, No. 2) or Drug Store
PROCEDURE:
1. Mix 12 grams of lead and 4 grams of potassium or sodium nitrate in a jar. Place themixture in the iron pipe.

8/2/2019 Improvised Munitions Handbook
http://slidepdf.com/reader/full/improvised-munitions-handbook 61/336
2. Heat iron pipe in a bed of hot coals or with blow torch for 30 minutes to 1 hour.(Mixture will change to a yellow color.)
3. Remove the iron pipe from the heat source and allow to cool. Chip out the yellowmaterial formed in the Iron pipe and place the chips in the glass jar.

8/2/2019 Improvised Munitions Handbook
http://slidepdf.com/reader/full/improvised-munitions-handbook 62/336
4. Add 1/2 cup (120 milliliters) of methyl alcohol to the chips.
5. Heat the glass jar containing the mixture in a hot water bath for approximately 2minutes (heat until there is a noticeable reaction between chips and alcohol; solution will
turn darker).

8/2/2019 Improvised Munitions Handbook
http://slidepdf.com/reader/full/improvised-munitions-handbook 63/336
6. Filter the mixture through a paper towel into the other glass jar. The material left onthe paper towel is lead monoxide.
7. Remove the lead monoxide and wash it twice through a paper towel using 1/2 cup (120milliliters) of hot water each time. Air dry before using.
8. Place the Jar with the liquid (from Step 5) in a hot water bath (as in Step 5) and heatuntil the alcohol has evaporated. The powder remaining in the Jar after evaporation is potassium or sodium nitrite.
NOTE: Nitrite has a strong tendency to absorb water from the atmosphere and should bestored in a closed container.

8/2/2019 Improvised Munitions Handbook
http://slidepdf.com/reader/full/improvised-munitions-handbook 64/336
DDNP
DDNP is a primary explosive used in the fabrication of detonators (Section VI, No. 13).It is to be used with a booster explosive such as picric acid (Section I, No. 21) or RDX(Section I, No. 15).
MATERIAL REQUIRED:
Picric acid Flowers of sulfur Lye (sodium hydroxide) Sulfuric acid, diluted Potassium or sodium nitrite
Water 2 glass cups, heat resistant, (Pyrex) Stirring rod (glass or wood) Improvised scale Paper towels Teaspoon Tablespoon Eyedropper Heat source Containers Tape
SOURCES:
Section I, No. 21 Motor vehicle batteries Section I, No. 18 Section VII, No. 8
PROCEDURE:
1. In one of the glass cups, mix 1/2 gram of lye with 2 tablespoons (30 milliliters) ofwarm water.

8/2/2019 Improvised Munitions Handbook
http://slidepdf.com/reader/full/improvised-munitions-handbook 65/336
2. Dissolve 1 teaspoon (3 grams) of picric acid in the water-lye solution. Store until readyfor step 5.
3. Place 1/4 teaspoon (1 milliliter) of water in the other glass cup, Add 1/2 teaspoon (2-1/2 grams) of sulfur and 1/3 teaspoon (2-1/2 grams) of lye to the water.
4. Boil solution over heat source until color turns dark red. Remove and allow solution tocool.

8/2/2019 Improvised Munitions Handbook
http://slidepdf.com/reader/full/improvised-munitions-handbook 66/336
5. In three portions, add this sulfur-lye solution to the picric acid-lye solution (Step 2);stir while pouring. Allow mixture to cool.
6. Filter the mixture through a paper towel into a container. Small red particles willcollect on the paper. Discard the liquid in the container.
7. Dissolve the red particles in 1/4 cup (60 milliliters) of boiling water.

8/2/2019 Improvised Munitions Handbook
http://slidepdf.com/reader/full/improvised-munitions-handbook 67/336
8. Remove and filter the mixture through a paper towel as in step 6. Discard the particlesleft on the paper.
9. Using an eyedropper, slowly add the sulfuric acid to the filtered solution until it turnsorange-brown.
10. Add 1/2 teaspoon (2-1/2 grams) more of sulfuric acid to the solution. Allow thesolution to cool to room temperature.
11. In a separate container, dissolve 1/4 teaspoon (1.8 grams) of potassium or sodiumnitrite in 1/3 cup (80 milliliters) of water.
12. Add this solution in one portion, while stirring, to the orange-brown solution. Allowthe mixture to stand for 10 minutes. The mixture will turn light brown.
CAUTION: At this point the mixture is a primary explosive. Keep away from flame.

8/2/2019 Improvised Munitions Handbook
http://slidepdf.com/reader/full/improvised-munitions-handbook 68/336
13. Filter the mixture through a paper towel. Wash the particles left on the paper with 4teaspoons (20 milliliters) of water.
14. Allow the particles to dry (approx. 16 hours).
CAUTION: Explosive is shock and flame sensitive. Store explosive in a cappedcontainer.

8/2/2019 Improvised Munitions Handbook
http://slidepdf.com/reader/full/improvised-munitions-handbook 69/336
Preparation of Lead Picrate
Lead picrate is used as a primary explosive in the fabrication of detonators (Section VI, No. 13). It is to be used with a booster explosive such as picric acid (Section I, No. 21) orRDX (Section I, No. 15).
MATERIAL REQUIRED:
Litharge (lead monoxide) Picric Acid Wood alcohol (methanol) Wooden or plastic rod Dish or saucer (china or glass)
Teaspoon Improvised Scale Containers Flat pan
SOURCE:
Section I, No. 18 or plumbing supplies Section I, No. 21 Paint removers; some antifreezes Section VII, No. 8
PROCEDURE:
1. Weigh 2 grams each of picric acid and lead monoxide. Place each in a separatecontainer.
2. Place 2 teaspoons (10 milliliters) of the alcohol in a dish. Add the picric acid to thealcohol and stir with the wooden or plastic rod.

8/2/2019 Improvised Munitions Handbook
http://slidepdf.com/reader/full/improvised-munitions-handbook 70/336
3. Add the lead monoxide to the mixture while stirring.
CAUTION: At this point the solution is a primary explosive. Keep away from flame.
4. Continue stirring the mixture until the alcohol has evaporated. The mixture willsuddenly thicken.
5. Stir mixture occasionally (to stop lumps from forming) until a powder is formed. Afew lumps will remain.
CAUTION: Be very careful of dry material forming on the inside of the container.
6.Spread this powdered mixture, lead the picrate, in a flat pan to air dry.

8/2/2019 Improvised Munitions Handbook
http://slidepdf.com/reader/full/improvised-munitions-handbook 71/336
NOTE: If possible, dry the mixture in a hot, not boiling, water bath for a period of 2hours.

8/2/2019 Improvised Munitions Handbook
http://slidepdf.com/reader/full/improvised-munitions-handbook 72/336
Preparation of Picric Acid from Aspirin
Section I
No. 21
Picric acid can be used as a booster explosive in detonators (Section VI, No. 13), a highexplosive charge, or as an intermediate to preparing lead picrate (Section I, No. 20) orDDNP (Section I, No. 19).
MATERIAL REQUIRED:
Aspirin tablets (5 grams per tablet)
Alcohol, 95% pure Sulfuric acid, concentrated, (battery acid – boil until white fumes appear) Potassium Nitrate (Section I, No. 2) Water Paper towels Canning jar, 1 pint Rod (glass or wood) Glass containers Ceramic or glass dish Cup Teaspoon Tablespoon Pan Heat Source Tape
PROCEDURE:
1. Crush 20 aspirin tablets in a glass container. Add 1 teaspoon of water and work into a paste.

8/2/2019 Improvised Munitions Handbook
http://slidepdf.com/reader/full/improvised-munitions-handbook 73/336
2. Add approximately 1/3 to 1/2 cup of alcohol (100 mililiters) to the aspirin paste; stirwhile pouring.
3. Filter the alcohol-aspirin solution through a paper towel into another glass container. Discard the solid left on the paper towel.

8/2/2019 Improvised Munitions Handbook
http://slidepdf.com/reader/full/improvised-munitions-handbook 74/336
4. Pour the filtered solution into a ceramic or glass dish.
5. Evaporate the alcohol and water from the solution by placing the dish into a pan of hotwater. White powder will remain in the dish after evaporation.
NOTE: Water in pan should be at hot bath temperature, not boiling, approximately 160°to 180°F. It should not bum the hands.
6. Pour 1/3 cup (80 milliliters) of concentrated sulfuric acid into a canning jar. Add thewhite powder to the sulfuric acid.

8/2/2019 Improvised Munitions Handbook
http://slidepdf.com/reader/full/improvised-munitions-handbook 75/336
7. Heat canning jar of sulfuric acid in a pan of simmering hot water bath for 15 minutes;then remove jar from the bath. Solution will turn to a yellow-orange color.
8. Add 3 level teaspoons (15 grams) of potassium nitrate in three portions to the yellow-orange solution; stir vigorously during additions. Solution will turn red, and then back toa yellow-orange color.

8/2/2019 Improvised Munitions Handbook
http://slidepdf.com/reader/full/improvised-munitions-handbook 76/336
9. Allow the solution to cool to ambient or room temperature while stirring occasionally.
10. Slowly pour the solution, while stirring, into 1-1/4 cup (300 milliliters) of cold waterand allow to cool.
11. Filter the solution through a paper towel into a glass container. Light yellow particleswill collect on the paper towel.
12. Wash the light yellow particles with 2 tablespoons (25 milliliters) of water. Discardthe waste liquid in the container.

8/2/2019 Improvised Munitions Handbook
http://slidepdf.com/reader/full/improvised-munitions-handbook 77/336
13. Place particles in ceramic dish and set in a hot water bath, as in step 5, for 2 hours.

8/2/2019 Improvised Munitions Handbook
http://slidepdf.com/reader/full/improvised-munitions-handbook 78/336
Double Salts
Double Salts is used as a primary explosive in the fabrication of detonators (Section VI, No. 13). It can be made in the field from silver (coins), nitric acid, calcium carbide, andwater.
MATERIALS REQUIRED:
Nitric acid (90% conc.) (Section I, No. 4) Silver metal (silver coin, about 5/8 in diameter) Calcium carbide (acetylene or calcium carbide lamps) Rubber and glass tubing (approx. 1/4 in. inside diameter) Paper towels
Heat-resistant bottles or ceramic jugs, 1 to 2 quart capacity, and one cork to fit.(Punch hole in cork to fit tubing.) Teaspoon (aluminum, stainless steel or wax-coated) or equivalent measure Glass container Heat source Long narrow jar (olive jar) Tape Water Alcohol
PROCEDURE:
1. Dilute 2-1/4 teaspoons of nitric acid with 1-1/2 teaspoons of water in a glass container by adding the acid to the water.
2. Dissolve a silver coin (a silver dime) in the diluted nitric acid. The solution will turn toa green color.

8/2/2019 Improvised Munitions Handbook
http://slidepdf.com/reader/full/improvised-munitions-handbook 79/336
NOTE: It may be necessary to warm the container to completely dissolve the silver coin.
CAUTION: Acid will burn skin and destroy clothing. If any is spilled, wash it away witha large quantity of water. Do not inhale fumes.
3. Pour solution into a long narrow (olive) jar and place it in a bottle of hot water.Crystals will form in the solution; heat until crystals dissolve.
4. While still heating and after crystals have dissolved, place 10 teaspoons of calciumcarbide in another glass bottle and add 1 teaspoon of water. After the reaction has startedadd another teaspoon of water. Then set up as shown.
5. Bubble acetylene through the solution for 5 to 8 minutes. A brown vapor will be givenoff and white flakes will appear in the silver solution.
6. Remove the silver solution from the heat source and allow it to cool. Filter the solutionthrough a paper towel into a glass container. Green crystals will collect on the paper.

8/2/2019 Improvised Munitions Handbook
http://slidepdf.com/reader/full/improvised-munitions-handbook 80/336
7. Wash the solids collected on the paper towel with 12 teaspoons of alcohol. The solidmaterial will turn white while the solvent in the container will have a green color.
8. Place the white solid material on a clean paper towel to air dry.
CAUTION: Handle dry explosive with great care. Do not scrape or handle it roughly.Keep away from sparks or open flames. Store in cool, dry place.
8/2/2019 Improvised Munitions Handbook
http://slidepdf.com/reader/full/improvised-munitions-handbook 81/336
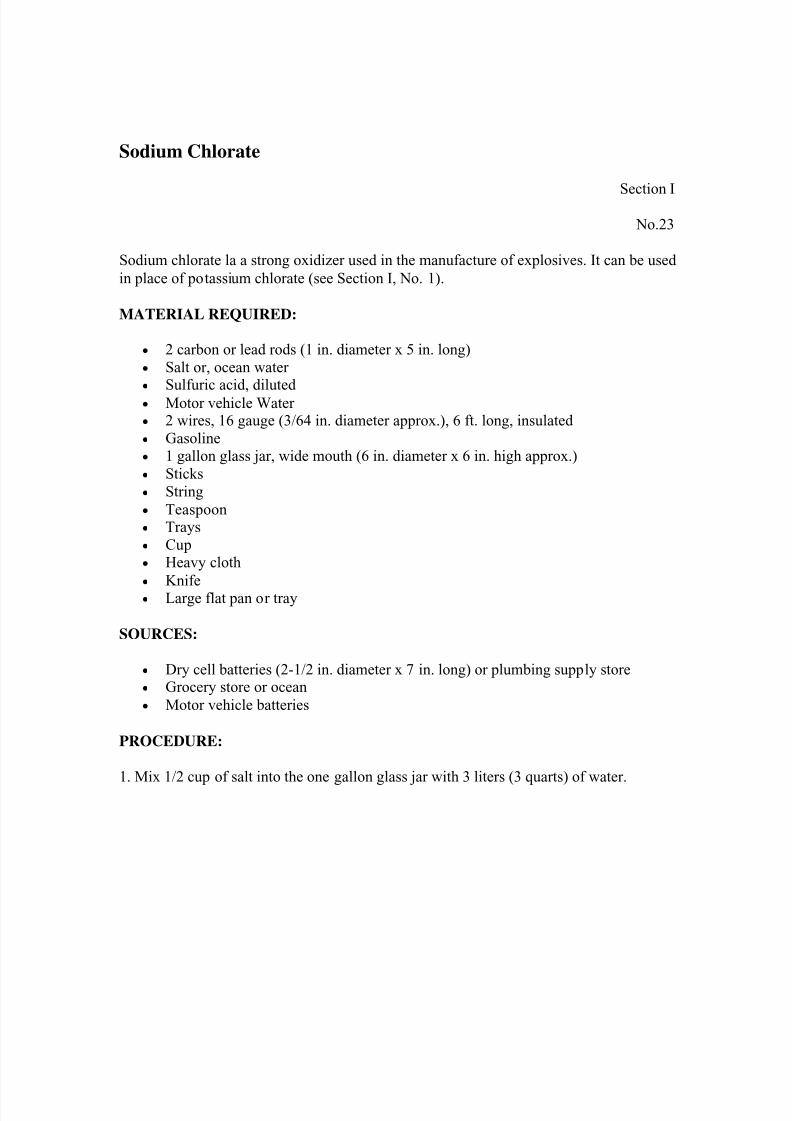
Sodium Chlorate
Section I
No.23
Sodium chlorate la a strong oxidizer used in the manufacture of explosives. It can be usedin place of potassium chlorate (see Section I, No. 1).
MATERIAL REQUIRED:
2 carbon or lead rods (1 in. diameter x 5 in. long) Salt or, ocean water
Sulfuric acid, diluted Motor vehicle Water 2 wires, 16 gauge (3/64 in. diameter approx.), 6 ft. long, insulated Gasoline 1 gallon glass jar, wide mouth (6 in. diameter x 6 in. high approx.) Sticks String Teaspoon Trays Cup Heavy cloth Knife Large flat pan or tray
SOURCES:
Dry cell batteries (2-1/2 in. diameter x 7 in. long) or plumbing supply store Grocery store or ocean Motor vehicle batteries
PROCEDURE:
1. Mix 1/2 cup of salt into the one gallon glass jar with 3 liters (3 quarts) of water.

8/2/2019 Improvised Munitions Handbook
http://slidepdf.com/reader/full/improvised-munitions-handbook 82/336
2. Add 2 teaspoons of battery acid to the solution and stir vigorously for 5 minutes.
3. Strip about 4 inches of insulation from both ends of the 2 wires.
8/2/2019 Improvised Munitions Handbook
http://slidepdf.com/reader/full/improvised-munitions-handbook 83/336
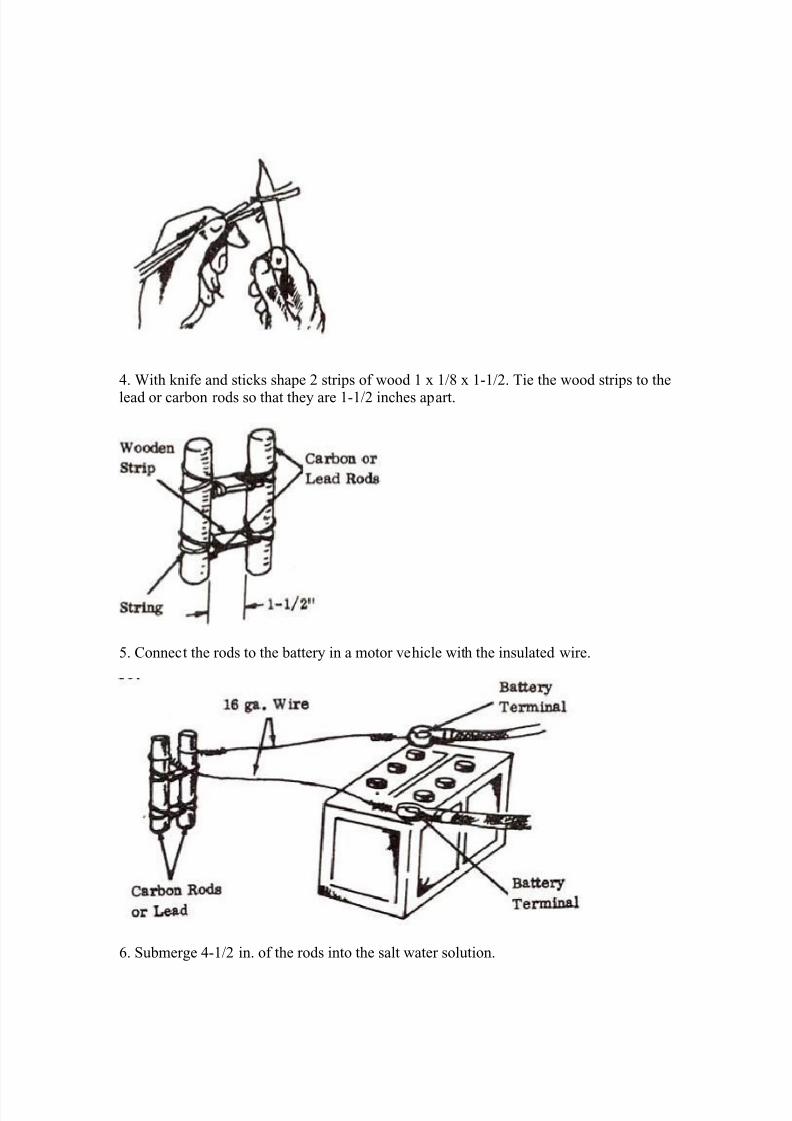
4. With knife and sticks shape 2 strips of wood 1 x 1/8 x 1-1/2. Tie the wood strips to the
lead or carbon rods so that they are 1-1/2 inches apart.
5. Connect the rods to the battery in a motor vehicle with the insulated wire.
6. Submerge 4-1/2 in. of the rods into the salt water solution.

8/2/2019 Improvised Munitions Handbook
http://slidepdf.com/reader/full/improvised-munitions-handbook 84/336
7. With gear in neutral position, start the vehicle engine. Depress the acceleratorapproximately 1/5 of its full travel.
8. Run the engine with the accelerator in this position for 2 hours ; then, shut it down 2hours.
9. Repeat this cycle for a total of 64 hours while maintaining the level of the acid-saltwater solution in the glass jar.
CAUTION: This arrangement employs voltages which may be dangerous to personnel.
Do not touch bare wire leads while engine is running.
10. Shut off the engine. Remove the rods from the glass jar and disconnect wire leadsfrom the battery.
11. Filter the solution through the heavy cloth into a flat pan or tray, leaving the sedimentat the bottom of the glass jar.

8/2/2019 Improvised Munitions Handbook
http://slidepdf.com/reader/full/improvised-munitions-handbook 85/336
12. Allow the water in the filtered solution to evaporate at room temperature (approx. 16hours). The residue is approximately 60% or more sodium chlorate which is pure enoughto be used as an explosive ingredient.

8/2/2019 Improvised Munitions Handbook
http://slidepdf.com/reader/full/improvised-munitions-handbook 86/336
Mercury Fulminate
Section I
No. 24
Mercury Fulminate is used as a primary explosive in the fabrication of detonators(Section VI, No. 13). It is to be used with a booster explosive such as picric acid (SectionI, No. 21) or RDX (Section I, No. 15).
MATERIAL REQUIRED:
Nitric Acid, 90% conc. (1.48 sp. gr.)
Mercury Ethyl (grain) alcohol (90%) Filtering material Teaspoon measure (1/4, 1/2, and 1 teaspoon capacity) – aluminum, stainless steel
or wax-coated Heat source Clean wooden stick Clean water Glass containers Tape Syringe
SOURCE:
Field grade (Section I, No. 4) or industrial metal processors Thermometers, mercury switches, old radio tubes Paper towels
PROCEDURE:
1. Dilute 5 teaspoons of nitric acid with 2-1/2 teaspoons of clean water in a glasscontainer by adding the acid to the water.
2. Dissolve 1/8 teaspoon of mercury in the diluted nitric acid. This will yield dark redfumes.

8/2/2019 Improvised Munitions Handbook
http://slidepdf.com/reader/full/improvised-munitions-handbook 87/336
NOTE: It may be necessary to add water, one drop at a time, to the mercury-acidsolution in order to start reaction.
CAUTION: Acid will burn skin and destroy clothing. If any is spilled, wash it away witha large quantity of water. Do not inhale fumes.
3. Warm 10 teaspoons of the alcohol in a container until the alcohol feels warm to theinside of the wrist.
4. Pour the metal-acid solution into the warmalcohol. Reaction should start In less than 5 minutes. Dense white fumes will be given offduring reaction. As time lapses, the fumes will become less dense. Allow 10 to 15minutes to complete reaction. Fulminate will settle to bottom.

8/2/2019 Improvised Munitions Handbook
http://slidepdf.com/reader/full/improvised-munitions-handbook 88/336
CAUTION: This reaction generates large quantities of toxic, flammable fumes. The process must be conducted outdoors or in a well ventilated area, away from sparks oropen flames. Do not inhale fumes.
5. Filter the solution through a paper towel into a container. Crystals may stick to the sideof the container. If so, tilt and squirt water down the sides of the container until all thematerial collects on the filter paper.
6. Wash the crystals with 6 teaspoons of ethyl alcohol.

8/2/2019 Improvised Munitions Handbook
http://slidepdf.com/reader/full/improvised-munitions-handbook 89/336
7. Allow these mercury fulminate crystals to air dry.
CAUTION: Handle dry explosive with great care. Do not scrape or handle it roughly.Keep away from sparks or open flames. Store in cool, dry place.

8/2/2019 Improvised Munitions Handbook
http://slidepdf.com/reader/full/improvised-munitions-handbook 90/336
Sodium Chlorate and Sugar or Aluminum Explosive
Section I
No. 25
An explosive munition can be made from sodium chlorate combined with granular sugar,or aluminum powder. This explosive can be detonated with a No. 8 commercial or aMilitary J-2 blasting cap.
MATERIAL REQUIRED:
Sodium chlorate
Granular sugar Aluminum powder Wooden rod or stick Bottle or jar Blasting cap Steel pipe (threaded at one end), end cap and tape Wax Measuring container (cup, quart, etc.)
SOURCE:
Section I, No. 23 Food store Paint store
PROCEDURE:
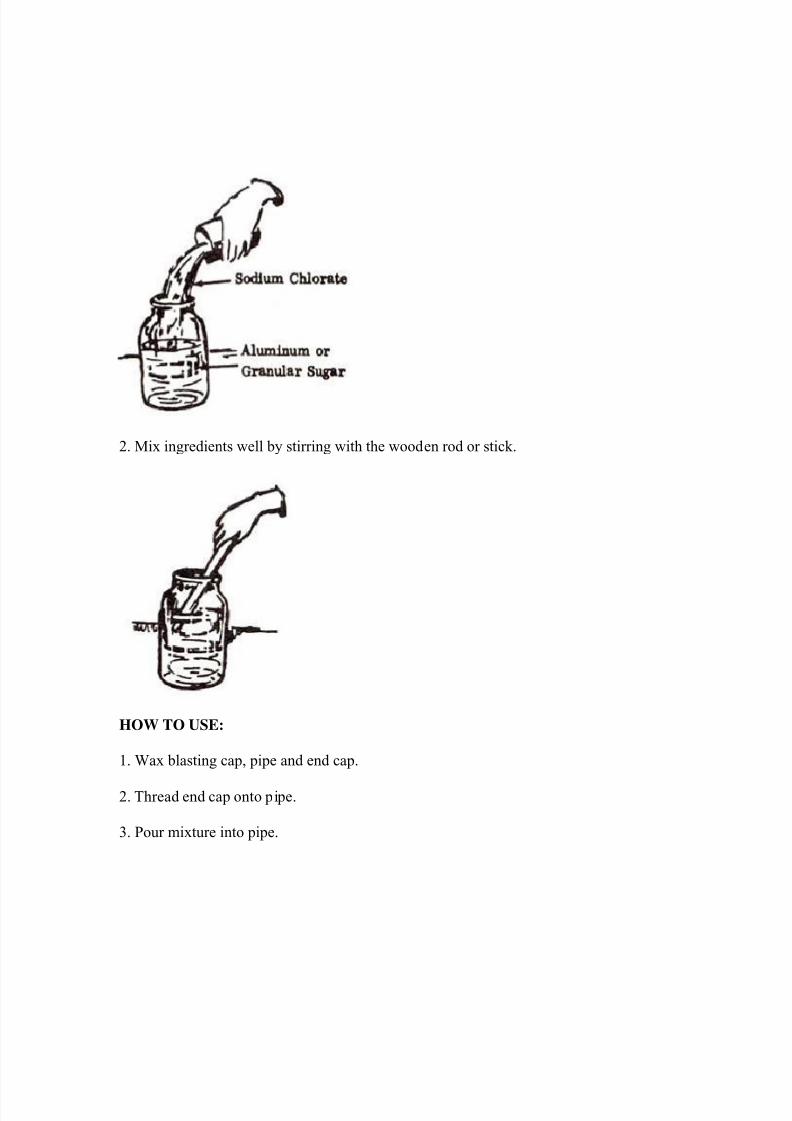
1. Add three volumes (cups, quarts, etc.) sodium chlorate to one volume aluminum, ortwo granular sugar, in bottle or jar.
8/2/2019 Improvised Munitions Handbook
http://slidepdf.com/reader/full/improvised-munitions-handbook 91/336
2. Mix ingredients well by stirring with the wooden rod or stick.
HOW TO USE:
1. Wax blasting cap, pipe and end cap.
2. Thread end cap onto pipe.
3. Pour mixture into pipe.

8/2/2019 Improvised Munitions Handbook
http://slidepdf.com/reader/full/improvised-munitions-handbook 92/336
4. Insert end tape blasting cap just beneath surface of mixture
NOTE: Confining the open end of the pipe will add to the effectiveness of the explosive.

8/2/2019 Improvised Munitions Handbook
http://slidepdf.com/reader/full/improvised-munitions-handbook 93/336
Mines and Grenades

8/2/2019 Improvised Munitions Handbook
http://slidepdf.com/reader/full/improvised-munitions-handbook 94/336

8/2/2019 Improvised Munitions Handbook
http://slidepdf.com/reader/full/improvised-munitions-handbook 95/336
NOTE: If plastic explosive Is to be used, fill pipe before Inserting blasting cap. Push around stick into the center of the explosive to make a hole and then insert the blastingcap.
3. Pour explosive or propellant into pipe a little bit at a time. Tap the base of the pipefrequently to settle filler.
4. Drill a hole in the center of the unassembled pipe cap large enough for the fuse cord to pan through.

8/2/2019 Improvised Munitions Handbook
http://slidepdf.com/reader/full/improvised-munitions-handbook 96/336
5. Wipe pipe threads to remove any filler material.
Slide the drilled pipe cap over the fuse end screw handtight onto the pipe.

8/2/2019 Improvised Munitions Handbook
http://slidepdf.com/reader/full/improvised-munitions-handbook 97/336

8/2/2019 Improvised Munitions Handbook
http://slidepdf.com/reader/full/improvised-munitions-handbook 98/336
3. Place blasting cap on one end of the fuse cord and crimp with pliers.
NOTE: To find out how long the fuse cord should be, check the time it takes a knownlength to burn. If 12 inches (30 cm) burns for 30 seconds, a 10 second delay will require a4 inch (10 cm) fuse.
4. Insert the blasting cap in the hole in the block of explosive. Tape or tie fuse cordsecurely in place so that it will not fall out when the grenade is thrown.
ALTERNATE USE:
An effective directional anti-personnel mint can be made by placing mils on only oneside of the explosive block. For this case, an electric blasting cap can be used.

8/2/2019 Improvised Munitions Handbook
http://slidepdf.com/reader/full/improvised-munitions-handbook 99/336

8/2/2019 Improvised Munitions Handbook
http://slidepdf.com/reader/full/improvised-munitions-handbook 100/336
Wine Bottle Cone Charge
Section II
No. 3
This cone charge will penetrate 3 to 4 inches of armor. Placed on an engine or enginecompartment it will disable a tank or other vehicle.
MATERIAL REQUIRED:
Glass wine bottle with false bottom (cone shaped) Plastic or castable explosive
Blasting cap Gasoline or Kerosene (small amount) String Adhesive tape
PROCEDURE:
1. Soak a piece of string in gasoline or keroaene. Double wrap thia string around the wine bottle String approximately 3 in. (7 1/2 cm) above the top of the cone.
NOTE: A small amount of motor oil added to the gasoline or kerosene will improveresults.

8/2/2019 Improvised Munitions Handbook
http://slidepdf.com/reader/full/improvised-munitions-handbook 101/336
2. Ignite the string and allow to burn for 1 to 2 minutes. Then plunge the bottle into coldwater to crack the bottle. The top half can now be easily removed and discarded.
3. If plastic explosive is used: (a) pack explosive into the bottle a little at a timecompressing with a wooden rod. Fill the bottle to the top.
(b) press a 1/4 in. wooden dowel Bottom Half 1/2 in. (12mm) into the middle of 0f Bottlethe top of the explosive charge to form a hole for the blasting cap.
4. If TNT or other castable explosive is used:

8/2/2019 Improvised Munitions Handbook
http://slidepdf.com/reader/full/improvised-munitions-handbook 102/336
(a) break explosive into small pieces using a wooden mallet or non-sparking metal tools.Place pieces in a tin can.
(b) Suspend this can in a larger container which is partly filled with water. A stiff wire orstick pushed through the smaller can will accomplish this.
CAUTION: The inner can must not rest on the bottom of the outer container.
(c) Heat the container on an electric hot plate or other heat source. Stir the explosivefrequently with a wooden stick while it is melting.
CAUTION: Keep area well ventilated while melting explosive. Fumes may be poisonous.
(d) When all the explosive has melted, remove the inner container and stir the moltenexplosive until it begins to thicken. During this time the bottom half of the wine bottleshould be placed in the container of hot water. This will preheat the bottle so that it willnot crack when the explosive is poured.
(e) Remove the bottle from hot water and dry thoroughly. Pour molten explosive into the bottle and allow to cool. The crust which forms on top of the charge during coolingshould be broken with a wooden stick and more explosive added. Do this as often asnecessary until the bottle is filled to the top.
(f) When explosive has completely hardened, bore a hole for the blasting cap in the
middle of the top of the charge about 1/2 in. (12mm) deep.
HOW TO USE:
1. Place blasting cap in the hole in the top of the charge. If nonelectric cap is used be surecap is crimped around fuze and fuze is long enough to provide safe delay.

8/2/2019 Improvised Munitions Handbook
http://slidepdf.com/reader/full/improvised-munitions-handbook 103/336
2. Place the charge so that the bottom is 3 to 4 in. (7 1/2 to 10 cm) from the target. Thiscan be done by taping legs to the charge or any other convenient means as long at there isnothing between the bass of the charge and the target.
3. If electric cap is used, connect blasting cap wires to firing circuit.
NOTE: The effectiveness of this charge can be increased by placing it inside a can, box,or similar contains r and packing sand or dirt between the charge and the container .

8/2/2019 Improvised Munitions Handbook
http://slidepdf.com/reader/full/improvised-munitions-handbook 104/336
Grenade – Tin Can Land Mine
Section II
No. 4
This device can be used as a land mine that will explode when the trip wire is pulled.
MATERIAL REQUIRED:
Hand grenade having side safety lever
Sturdy container, open at one end, that is just large enough to fit over grenade and
its safety lever (tin can of proper size is suitable). Strong string or wire
NOTE: The container must be of such a size that, when the grenade is placed in It andthe safety pin removed, its sides will prevent the safety lever from springing open. Oneend must be completely open.
PROCEDURE:
1. Fasten one piece of string to the closed end of container, making a strong connection.This can be done by punching 2 holes in the can, looping the string through them, and
tying a knot.
2. Tie free end of this string to bush, stake, fencepost, etc.
3. Fasten another length of string to the grenade such that it cannot interfere with thefunctioning of the ignition mechanism of the grenade.

8/2/2019 Improvised Munitions Handbook
http://slidepdf.com/reader/full/improvised-munitions-handbook 105/336
4. Insert grenade into container.
5. Lay free length of string across path and fasten to stake, bush. etc. The string shouldremain taut.
HOW TO USE:
1. Carefully withdraw safety pin by pulling on ring. Be sure safety lever is restrainedduring this operation. Grenade will function in normal manner when trip wire is pulled.
NOTE: In areas where concealment is possible, a greater effect may be obtained bysuspending the grenade several feet above ground, as illustrated below.
8/2/2019 Improvised Munitions Handbook
http://slidepdf.com/reader/full/improvised-munitions-handbook 106/336
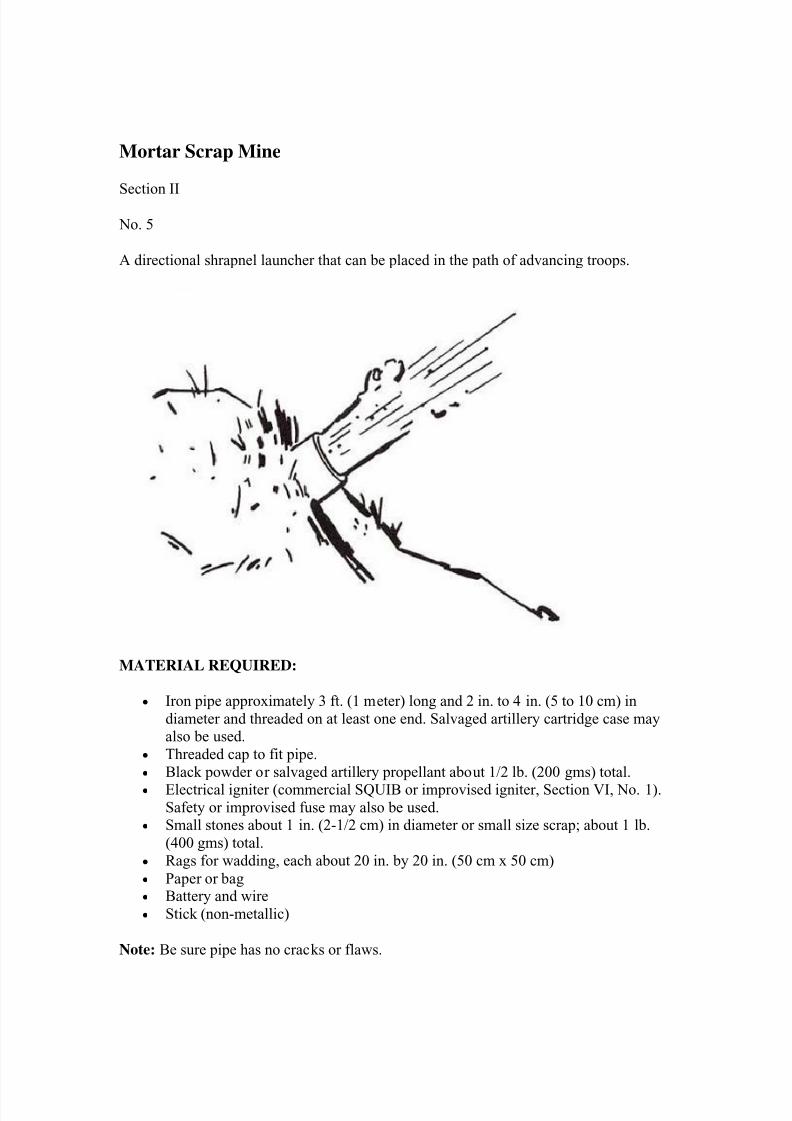
Mortar Scrap Mine
Section II
No. 5
A directional shrapnel launcher that can be placed in the path of advancing troops.
MATERIAL REQUIRED:
Iron pipe approximately 3 ft. (1 meter) long and 2 in. to 4 in. (5 to 10 cm) indiameter and threaded on at least one end. Salvaged artillery cartridge case mayalso be used.
Threaded cap to fit pipe. Black powder or salvaged artillery propellant about 1/2 lb. (200 gms) total.
Electrical igniter (commercial SQUIB or improvised igniter, Section VI, No. 1).Safety or improvised fuse may also be used.
Small stones about 1 in. (2-1/2 cm) in diameter or small size scrap; about 1 lb.(400 gms) total.
Rags for wadding, each about 20 in. by 20 in. (50 cm x 50 cm) Paper or bag Battery and wire Stick (non-metallic)
Note: Be sure pipe has no cracks or flaws.

8/2/2019 Improvised Munitions Handbook
http://slidepdf.com/reader/full/improvised-munitions-handbook 107/336
PROCEDURE:
1. Screw threaded cap onto pipe.
2. Place propellant and igniter in paper or rag and tie package with string so contents willnot fall out.
3. Insert packaged propellant and igniter into pipe until package rests against threadedcap leaving firing leads extending from open end of pipe.
4. Roll rag till it is about 6 in. (15-1/2 cm) long and the same diameter as pipe. Insert ragwadding against packaged propellant igniter. With caution, pack tightly using stick.
5. Insert stones and/or scrap metal into pipe.
6. Insert second piece of rag wadding against stones and/or metal scrap. Pack tightly as before.
HOW TO USE:
1. Bury pipe in ground with open end facing the expected path of the enemy. The openend may be covered with cardboard and a thin layer of dirt or leaves as camouflage.

8/2/2019 Improvised Munitions Handbook
http://slidepdf.com/reader/full/improvised-munitions-handbook 108/336
2. Connect firing leads to battery and switch. Mine can be remotely fired when needed orattached to trip device placed in path of advancing troops.
NOTE: A NON-ELECTRICAL ignition system can be substituted for the electricalignition system as follows.
1. Follow above procedure, substituting safety fuse for igniter.
2. Light safety fuse when ready to fire.

8/2/2019 Improvised Munitions Handbook
http://slidepdf.com/reader/full/improvised-munitions-handbook 109/336
Coke Bottle Shaped Charge
Section II
No. 6
This shaped charge will penetrate 3 in. (7-1/2 cm) ot armor. (It will disable a vehicle if placed on the engine or engine compartment).
MATERIAL REQUIRED:
Glass Coke bottle, 6-1/2 oz. size Plastic or castable explosive, about 1 lb. (454 gm)
Blasting cap Metal cylinder, open at both ends, about 6 in. (15 cm) long and 2 in. (5 cm) inside
diameter. Cylinder should be heavy walled for best results. Plug to fit mouth of coke bottle (rags, metal, wood, paper, etc.) Non-metal rod about 1/4 in. (6 mm) in diameter and 8 in. (20 cm) or more In
length. Tape or string 2 tin cans if castable explosive is used (See Section II, No. 3)
NOTE: Cylinder may be cardboard, plastic, etc. if castable explosive is used.
PROCEDURE:
1. Place plug in mouth of bottle.

8/2/2019 Improvised Munitions Handbook
http://slidepdf.com/reader/full/improvised-munitions-handbook 110/336
2. Place cylinder over top of bottle until bottom of cylinder rests on widest part of bottle.Tape cylinder to bottle. Container should be straight on top of bottle.
3. If plastic explosive is used:
a. Place explosive in cylinder a little at a time tamping with rod until cylinder is full.
b. Press the rod about 1/2 In. (1 cm) into the middle of the top of the explosive charge toform a hole for the blasting cap.

8/2/2019 Improvised Munitions Handbook
http://slidepdf.com/reader/full/improvised-munitions-handbook 111/336
4. If castable explosive is used, follow procedure of Wine Bottle Cone Charge, Section II, No. 3, Step 4, a through f.
HOW TO USE:
Method 1. If electrical blasting cap is used:
1. Place blasting
CAUTION: Do not insert blasting cap until charge is ready to be detonated.
2. Place bottom of Coke Bottle flush against the target. If target is not flat and horizontal,fasten bottle to target by any convenient means, such as by placing tape or string aroundtarget and top of bottle. Bottom of bottle acts as stand-off.

8/2/2019 Improvised Munitions Handbook
http://slidepdf.com/reader/full/improvised-munitions-handbook 112/336
CAUTION: Be sure that base of bottle is flush against target and that there Is nothing between the target and the base of the bottle.
3. Connect leads from blasting cap to firing circuit.
Method II: If non-electrical blasting cap Is used:
1. Crimp cap
CAUTION: Be sure fuse Is long enough to provide a safe delay.
2. Follow steps 1, 2, and CAUTIONS of Method I.
3. Light fuse when reacts to fire.

8/2/2019 Improvised Munitions Handbook
http://slidepdf.com/reader/full/improvised-munitions-handbook 113/336
Cylindrical Cavity Shaped Charge
Section II
No. 7
A shaped charge can be made from common pipe. It will penetrate 1-1 2 in. (3-1 “2 cm)of steel, producing a hole 1-1/2 in. (3-1/2 cm) in diameter.
MATERIAL REQUIRED:
Iron or steel pipe. 2 to 2-1/2 in. (3 to 6-1/2 cm) in diameter and 3 to 4 in. (7-1. 2 to10 cm) long
Metal pipe, 1/2 to 3’4 in. (1-1/2 to 2 cm) in diameter and 1-1/2 in. (3-1 2 cm)long, open at both ends. (The wall of the pipe should be as thin as possible.) Blasting cap Non-metallic rod, 1/4 in. (6 mm) in diameter Plastic or castable explosive 2 metal cans of different sizes Stick or wire Heat source
PROCEDURE:
1. If plastic explosive is used
a.Place larger pipe on flat surface. Hand pack and tamp explosive into pipe. Leaveapproximately 1/4 in. (G mm) space at top.
b. Push rod into center of explosive. Enlarge hole in explosive to diameter and length ofsmall pipe.
c. Insert small pipe into hole.

8/2/2019 Improvised Munitions Handbook
http://slidepdf.com/reader/full/improvised-munitions-handbook 114/336
IMPORTANT: Be sure direct contact is made between explosive and small pipe. Tampexplosive around pipe by hand if necessary.
d. Make sure that there it 1/4 in. (6 mm) empty space above smell pipe. Removeexplosive If necessary.
e. Turn pipe upside down and push rod 1/2 In. (1-1/4 cm) into center of opposite end ofexplosive to form a hole for the blasting cap.
CAUTION: Do not insert blasting cap in hole until ready to fire shaped charge.
2. If TNT or other castable explosive is used:
a. Follow procedure, Section U, No. 3, Step 4, Parts a, b, c, including CAUTIONS.
b. When all the explosive has melted, remove the inner container and stir the moltenexplosive until it begins to thicken.
c. Place large pipe on flat surface. Pour explosive into pipe until it is 1-3/4 In. (4 cm)from the top.

8/2/2019 Improvised Munitions Handbook
http://slidepdf.com/reader/full/improvised-munitions-handbook 115/336
d. Place small pipe in center of large pipe so that it rests on top of explosive. Holdingsmall pipe in place, pour explosive around small pipe until explosive is 1/4 In. (6 mm)
from top of large pipe.
e. Allow explosive to cool. Break crust that forms on top of the charge during coolingwith a wooden stick and add more explosive. Do this as often as necessary until explosiveIs 1/4 In. (6 mm) from top.
f. When explosive hat completely hardened, turn pipe upside down and bore a hole (orthe blasting cap In the middle of the top of the charge about 1/2 In. (1-1/4 cm) deep.

8/2/2019 Improvised Munitions Handbook
http://slidepdf.com/reader/full/improvised-munitions-handbook 116/336
HOW TO USE:
Method I – If electrical blasting cap is used:
1. Place blasting cap in hole made for it.
CAUTION: Do not insert blasting cap until charge Is ready to fire.
2. Place other end of pipe flush against the target. Fasten pipe to target by any convenientmeans, such as by placing tape or string around target and top of pipe, if target is not flatand horizontal.
CAUTION: Be sure that base of pipe is flush against target and there is nothing betweenthe target and the base of the pipe.
3. Connect leads from blasting cap to firing circuit.
Method II : If non-electrical blasting cap is used:

8/2/2019 Improvised Munitions Handbook
http://slidepdf.com/reader/full/improvised-munitions-handbook 117/336
1. Crimp cap around fuse.
CAUTION: Be sure fuse Is long enough to provide s safe delay.
2. Follow Steps 1, 2. and CAUTION of Method 1.
3. Light fuse when ready-to fire.

8/2/2019 Improvised Munitions Handbook
http://slidepdf.com/reader/full/improvised-munitions-handbook 118/336
Funnel Shaped Charge
Section II
No. 9
An effective shaped charge can be made using various types of commercial funnels. Seetable for penetration capabilities.
MATERIAL REQUIRED:
Container (soda or beer can, etc.), approximately 2-1/2 in. diameter x 5 in. long(6-1/4 cm x 12-1/2 cm)
Funnel(s) (glass, steel, or aluminum) 2-1/2 in. (6-1/2cm) in diameter Wooden rod or stick, 1/4 in. (6 mm) in diameter Tape Blasting cap (electrical or non-electrical) Sharp cutting edge Explosive
PROCEDURE:
1. Remove the top and bottom from can and discard.
2. Cut off and throw away the spout of the funnel(s).
NOTE: When using 3 funnels (see table), place the modified funnels together as tightand as straight as possible. Tape the funnels together at the outer ridges.

8/2/2019 Improvised Munitions Handbook
http://slidepdf.com/reader/full/improvised-munitions-handbook 119/336
3. Place the funnel(s) in the modified can. Tape on outer ridges to hold funnel(s) to can.
4. If plastic explosive is used, fill the can with the explosive using small quantities, andtamp with wooden rod or stick.
NOTE: If castable explosive is used, refer to step 4 of Section n, No. 3.

8/2/2019 Improvised Munitions Handbook
http://slidepdf.com/reader/full/improvised-munitions-handbook 120/336
5. Cut wooden rod to lengths 3 inches longer than the standoff length. (See table.)Position three of these rods around the explosive filled can
and hold in place with tape.
NOTE: The position of the rods on the container must conform to standoff dimensions toobtain the penetrations given in the table.
6. Make a holefor blasting cap in the center of the explosive with rod or stick.

8/2/2019 Improvised Munitions Handbook
http://slidepdf.com/reader/full/improvised-munitions-handbook 121/336
CAUTION: Do not place blasting cap in place until the Funnel Shaped Charge is readyfor use.
HOW TO USE:
1. Place blasting cap in the hole in top of the charge. If non-electric cap is used, be surecap is crimped around fuse and fuse is long enough to provide safe delay.
2. Place (tape if necessary) the Funnel Shaped Charge on the target so so that nothing is between the base of charge and target.
3. If electric cap is used, connect blasting cap wires to firing circuit.

8/2/2019 Improvised Munitions Handbook
http://slidepdf.com/reader/full/improvised-munitions-handbook 122/336
Linear Shaped Charge
Section II
No. 10
This shaped charge made from construction materials will cut through up to nearly 3inches of armor depending upon the liner used (see table).
MATERIAL REQUIRED:
Standard structural angle or pipe (see table) Wood or cardboard container
Hacksaw Wooden rod, 1/4 in. (6 mm) diameter Explosive Blasting cap Tape
NOTE: These were the only linear shaped charges of this type that were found to bemore efficient than the Ribbon Charge.
Ribbon Charge: No standoff is required; just place on target.

8/2/2019 Improvised Munitions Handbook
http://slidepdf.com/reader/full/improvised-munitions-handbook 123/336
PROCEDURE:
1. If pipe is used:
a. Place the pipe in the vise and cut pipe in half lengthwise. Remove the pipe halfsections from vise.
b. Discard one of the pipe half sections, or save for another charge.
2. Place angle or pipe half section with open end face down on a flat surface.
3. Make container from any material available. The container must be as wide as theangle or pipe half section, twice as high, and as long as the desired cut to be made withthe charge.
4. Place container over the liner (angle or pipe half section) and tape liner to container.

8/2/2019 Improvised Munitions Handbook
http://slidepdf.com/reader/full/improvised-munitions-handbook 124/336
5. If plastic explosive is used, fill the container with the explosive using small quantities,and tamp with wooden rod or stick.
NOTE: If castable explosive is used, refer to step 4 of Section n, No. 3.
6. Cut wooden rod to lengths 2 inches longer than the standoff length (see table). Positionthe rods at the corners of the explosive filled container and hold in place with tape.
NOTE: The position of the rods on the container must conform to standoff and penetration dimensions given in the table.

8/2/2019 Improvised Munitions Handbook
http://slidepdf.com/reader/full/improvised-munitions-handbook 125/336
7. Make a hole for blasting cap in the side of the container 1/2 in. above the liner and
centered with the wooden rod.
CAUTION: Do not place blasting cap in place until the Linear Shaped Charge is readyfor use.
HOW TO USE:
1. Place blasting cap into hole on the side of the container. If nonelectric cap is used, besure cap is crimped around fuse and fuse is long enough to provide safe delay.

8/2/2019 Improvised Munitions Handbook
http://slidepdf.com/reader/full/improvised-munitions-handbook 126/336
2. Place (tape if necessary) the Linear Shaped Charge on the target so that nothing is between base of charge and target.
3. If electric cap is used, connect blasting cap wires to firing circuit.

8/2/2019 Improvised Munitions Handbook
http://slidepdf.com/reader/full/improvised-munitions-handbook 127/336

8/2/2019 Improvised Munitions Handbook
http://slidepdf.com/reader/full/improvised-munitions-handbook 128/336
Pipe Pistol for 9mm Ammunition
Section III
No. 1
A 9 mm pistol can be made from 1/4″ steel gas or water pipe and fittings.
MATERIAL REQUIRED
1/4M nominal size steel pipe 4 to 6 inches long with threaded ends. 1/4″ Solid pipe plug Two (2) steel pipe couplings Metal strap – roughly 1/8″ x 1/4″ x
5″
Two (2) elastic bands Flat head nail – 6D or 8D (approx 1/16″ diameter) Two (2) wood screws #8 Wood 8″ x 5″ x 1″
Drill 1/4″ wood or metal rod, (approx 8″ long)
PROCEDURE
1. Carefully inspect pipe and fittings.
b. Make sure that there are NO cracks or other flaws in the pipe or fittings.
c. Check inside diameter of pipe using a 9 mm cartridge as a gauge. The bullet shouldclosely fit into the pipe without forcing but the cartridge case SHOULD NOT fit into pipe.
d. Outside diameter of pipe MUST NOT BE less than 1 1/2 times bullet diameter (. 536inches; 1. 37 cm)

8/2/2019 Improvised Munitions Handbook
http://slidepdf.com/reader/full/improvised-munitions-handbook 129/336
2. Drill a 9/16″ (1.43 cm) diameter hole 3/8″ (approximately 1 cm) into one coupling toremove the thread.
Drilled section should fit tightly over smooth section of pipe.
3. Drill a 25/64″ (1 cm) diameter hole 3/4″ (1. 9 cm) into pips. Use cartridge as a gauge;when a cartridge is inserted into the pipe, the base of the case should be even cm) withthe end of the pipe. Thread coupling tightly onto pips, drilled and first.
4. Drill a hole in the center of the pipe plug just urge enough for the nail to fit through.
HOLE MUST BE CENTERED IN PLUG.
5. Push nail through plug until head of nail is flush with square end. Cut nail off at otherend 1/16″ (. 158 cm) away from plug. Round off end of nail with file.

8/2/2019 Improvised Munitions Handbook
http://slidepdf.com/reader/full/improvised-munitions-handbook 130/336
6. Bend metal strap to “U” shape and drill holes for wood screws. File two small notchesat top.
7. Saw or otherwise shape 1″ (2. 54 cm) thick hard wood into stock.
8. Drill a 9/16″ diameter (1.43 cm) hole through the stock. The center of the hole should
be approximately 1/2″ (1. 27 cm) from the top.

8/2/2019 Improvised Munitions Handbook
http://slidepdf.com/reader/full/improvised-munitions-handbook 131/336
9. Slide the pipe through this hole and attach front coupling. Screw drilled plug into rearcoupling.
NOTE: If 9/16″ drill is not available cut a “V” groove in the top of the stock and tape pipe securely in place.
10. Position metal strap on stock so that top will hit the head of the nail. Attach to stockwith wood screw on each side.

8/2/2019 Improvised Munitions Handbook
http://slidepdf.com/reader/full/improvised-munitions-handbook 132/336
11. String elastic bands from coupling to notch on each side the strap.
SAFETY CHECK – TEST FIRE PISTOL BEFORE HAND FIRING
1. Locate a barrier such as a stone wall or large tree which you can stand behind in casethe pistol ruptures when fired.
2. Mount pistol solidly to a table or other rigid support at least ten feet in front of the barrier.
3. Attach a cord to the firing strap on the pistol.
4. .Holding the other end of the cord, go behind the barrier.
5. Pull the cord so that the firing strap is held back.
6. Release the cord to fire the pistol. (If pistol does not fire, shorten the elastic bands orincrease their number. )
IMPORTANT: Fire at least five rounds from behind the barrier and then re-inspect the pistol before you attempt to hand fire it.
HOW TO OPERATE PISTOL
1. To Load
a. Remove plug from rear coupling.

8/2/2019 Improvised Munitions Handbook
http://slidepdf.com/reader/full/improvised-munitions-handbook 133/336
b. Place cartridge into pipe.
c. Replace plug
2. To Fire
a. Pull strap back and hold with thumb until ready.
b. Release strap.

8/2/2019 Improvised Munitions Handbook
http://slidepdf.com/reader/full/improvised-munitions-handbook 134/336
3. To Remove Shell Case
a. Remove plug from rear coupling.
b. Insert 1/4″ diameter steel or wooden rod into front of pistol and push she case out.

8/2/2019 Improvised Munitions Handbook
http://slidepdf.com/reader/full/improvised-munitions-handbook 135/336
Shotgun (12 Gauge)
Section III
No. 2
A 12-gauge shotgun can be made from 3/4″ water or gat pipe and fittings.
MATERIALS REQUIRED
Wood 2″ x 4″ x 32″
3/4″ nominal size water or gas pipe 20″ to 30″ long threaded on one end. 3/4″ steel coupling
Solid 3/4″ pipe plug
Metal strap (1/4″ x 1/16″ x 4″)
Twine, heavy (100 yards approximately) 3 wood screws and screwdriver Flat head nail 6D or 8D Hand drill Saw or knife File Shellac or lacouer Elastic Bands
PROCEDURE
1. Carefully inspect pipe and fittings,
a. Make sure that there are no cracks or other flaws.
b. Check inside diameter of pipe. A 12-gauge shot shell should fit into the pipe but the brass rim should not fit.
c. Outside diameter of pipe must be at least 1 in. (2. 54 cm).
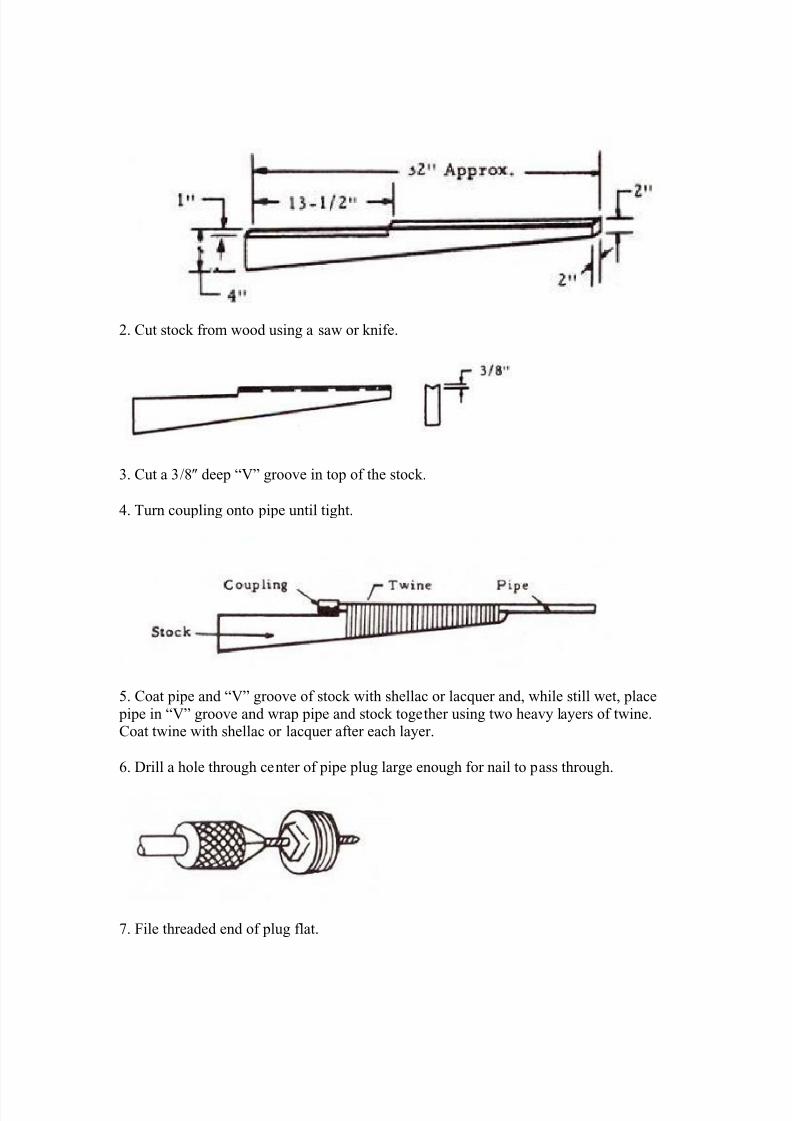
8/2/2019 Improvised Munitions Handbook
http://slidepdf.com/reader/full/improvised-munitions-handbook 136/336
2. Cut stock from wood using a saw or knife.
3. Cut a 3/8″ deep “V” groove in top of the stock.
4. Turn coupling onto pipe until tight.
5. Coat pipe and “V” groove of stock with shellac or lacquer and, while still wet, place pipe in “V” groove and wrap pipe and stock together using two heavy layers of twine.Coat twine with shellac or lacquer after each layer.
6. Drill a hole through center of pipe plug large enough for nail to pass through.
7. File threaded end of plug flat.

8/2/2019 Improvised Munitions Handbook
http://slidepdf.com/reader/full/improvised-munitions-handbook 137/336

8/2/2019 Improvised Munitions Handbook
http://slidepdf.com/reader/full/improvised-munitions-handbook 138/336
11. Position metal strap on stock so that top will hit the head of the nail. Attach to stockwith wood screw.
12. Place screw in each side of stock about 4″ in front of metal strap. Pass elastic bands
through notch in metal strap and attach to screw on each side of the stock.
SAFETY CHECK – TEST FIRE SHOTGUN BEFORE HAND FIRING
Locate a barrier such as a stone wall or large tree which you can stand behind in case theweapon explodes when fired.

8/2/2019 Improvised Munitions Handbook
http://slidepdf.com/reader/full/improvised-munitions-handbook 139/336
Mount shotgun solidly to a table or other rigid support at least ten feet in front of the barrier.
Attach a long cord to the firing strap on the shotgun.
Holding the other end of the cord, go behind the barrier.
Pull the cord so that the firing strap is held back.
Release the cord to fire the shotgun. (If shotgun does not fire, shorten the elastic bands orIncrease their number. )
IMPORTANT: Fire at least five rounds from behind the barrier and then re-inspect theshotgun before you attempt to shoulder fire it.
HOW TO OPERATE SHOTGUN
1. To Load
a. Take plug out of coupling.
b. Put shotgun shell into pipe.
c. Screw plug hand-tight into coupling.
2. To Fire

8/2/2019 Improvised Munitions Handbook
http://slidepdf.com/reader/full/improvised-munitions-handbook 140/336
a. Pull strap back and hold with thumb.
b. Release strap.
3. To Unload Gun
a. Take plug out of coupling.
b. Shake out used cartridge.

8/2/2019 Improvised Munitions Handbook
http://slidepdf.com/reader/full/improvised-munitions-handbook 141/336
Shotshell Dispersion Control
Section III
No. 3
When desired, shotshell can be modified to reduce shot dispersion.
MATERIAL REQUIRED:
Shotshell Screwdriver or knife Any of the following filler materials: Crushed Rice, Rice, Flour, Dry Bread
Crumbs, Fine Dry Sawdust
PROCEDURE:
1. Carefully remove crimp from shotshell using a screw driver or knife.
NOTE: If cartridge is of roll crimp type, remove top wad.
2. Pour shot from shell.

8/2/2019 Improvised Munitions Handbook
http://slidepdf.com/reader/full/improvised-munitions-handbook 142/336
3. Replace one layer of shot in the cartridge. Pour in filler material to fill the spaces between the shot.
4. Repeat Step 3 until, all shot has been replaced.
5. Replace top wad (if applicable) and re-fold crimp.
6. Roll shell on flat surface to smooth out crimp and restore roundness.

8/2/2019 Improvised Munitions Handbook
http://slidepdf.com/reader/full/improvised-munitions-handbook 143/336
7. Seal end of case with wax.
HOW TO USE:
This round is loaded and fired in the same manner as standard shotshell. The shot spreadwill be about 2/3 that of a standard round.

8/2/2019 Improvised Munitions Handbook
http://slidepdf.com/reader/full/improvised-munitions-handbook 144/336
Carbine (7.62mm Standard Rifle Ammunition)
Section III
No. 4
A rifle can be made from water or gas pipe and fittings. Standard cartridges are used forammunition.
MATERIAL REQUIRED:
Wood approximately 2 in. x 4 in. x 30 in. 1/4 in. nominal size iron water or gas pipe 20 In. long threaded at one end. 3/8 In. to 1/4 in. reducer 3/8 In. x 1-1/2 in. threaded pipe 3/8 in. pipe coupling Metal strap approximately 1/2 in. x 1/16 in. x 4 In.
Twine, heavy (100 yards approx.) 3 wood screws and screwdriver Flat head nail about 1 in. long Hand drill Saw or knife File Pipe wrench Shellac or lacquer Elastic bands Solid 3/8 In. pipe plug
PROCEDURE:
1. Inspect pipe and fittings carefully.
a. Be sure that there are no cracks or flaws.
b. Check Inside diameter of pipe. A 7. 62 mm projectile should fit into 3/8 in. pipe.
2. Cut stock from wood using saw or knife.

8/2/2019 Improvised Munitions Handbook
http://slidepdf.com/reader/full/improvised-munitions-handbook 145/336
3. Cut a 1/4 In. deep “V” groove in top of the stock.
4. Fabricate rifle barrel from pipe,
a. File or drill inside diameter of threaded end of 20 in. pipe for about 1/4 in. so neck ofcartridge case will fit in.
b. Screw reducer onto threaded pipe using pipe wrench.
c. Screw short threaded pipe into reducer.
d. Turn 3/8 pipe coupling onto threaded pipe using pipe wrench. All fittings should be astight as possible. Do not split fittings.
5. Coat pipe and “V” groove of stock with shellac or lacquer. While still wet, place pipein “V” groove and wrap pipe and stock together using two layers of twine. Coat twinewith shellac or lacquer after each layer.
6. Drill a hole through center of pipe plug large enough for nail to pass through.

8/2/2019 Improvised Munitions Handbook
http://slidepdf.com/reader/full/improvised-munitions-handbook 146/336
7. File threaded end of plug flat.
8. Push nail through plug and out off rounded 1/32 In. (2 mm) past the plug.
9. Screw plug Into coupling.
10. Bend 4 In. metal strap into “L” shape and drill hole for wood screw. Notch metal
strap on the long side 1/2 in. from bend.

8/2/2019 Improvised Munitions Handbook
http://slidepdf.com/reader/full/improvised-munitions-handbook 147/336
11. Position metal strap on stock so that top will hit the head of the nail. Attach to stockwith wood screw.
12. Place screw in each side of stock about 4 in. in front of metal strap. Pass elastic bandsthrough notch in metal strap and attach to screw on each side of the stock.
CHECK – TEST FIRE RIFLE BEFORE HAND FIRING
1. Locate a barrier such as a stone wall or large tree which you can stand behind to testfire weapon.
2. Mount rifle solidly to a table or other rigid support at least ten feet in front of the barrier.
3. Attach a long cord to the firing strap on the rifle.
4. Holding the other end of the cord, go behind the barrier.
5. Pull the cord so that the firing strap is held back.
6. Release the cord to fire the rifle. (If the rifle does not fire, shorten the elastic bands orincrease their number.)
IMPORTANT: Fire at least five rounds from behind a barrier and then re inspect therifle before you attempt to shoulder fire it.

8/2/2019 Improvised Munitions Handbook
http://slidepdf.com/reader/full/improvised-munitions-handbook 148/336
HOW TO OPERATE RIFLE:
1. To Load
a. Remove plug from coupling.
b. Put cartridge into pipe.
c. Screw plug hand-tight Into coupling.
2. To Fire
a. Pull strap back and hold with thumb.
b. Release strap.

8/2/2019 Improvised Munitions Handbook
http://slidepdf.com/reader/full/improvised-munitions-handbook 149/336
3. To Unload Gun
a. Take plug out of coupling.
b. Drive out used case using stick or twig.

8/2/2019 Improvised Munitions Handbook
http://slidepdf.com/reader/full/improvised-munitions-handbook 150/336
Reusable Primer
Section III
No. 5
A method of making a previously fired primer reusable.
MATERIAL REQUIRED:
Used cartridge case 2 long nails having approximately the same diameter as the inside of the primer
“Strike-anywhere” matches – 2 or 3 are needed for each primer Vise Hammer Knife or other sharp edged instrument
PROCEDURE:
1. File one nail to a needle point so that it is small enough to fit through hole in primer pocket.
2. Place cartridge case and nail between Jaws ofvise. Force out fired primer with nail as shown:

8/2/2019 Improvised Munitions Handbook
http://slidepdf.com/reader/full/improvised-munitions-handbook 151/336
3. Remove anvil from primer cup.
4. File down point of second nail until tip is flat.
5. Remove indentations from face of primer cup with hammer and flattened nail.
6. Cut off tips of the heads of “strike-anywhere” matches using knife. Carefully crush thematch tips on dry surface with wooden match stick until the mixture is the consistency ofsugar.

8/2/2019 Improvised Munitions Handbook
http://slidepdf.com/reader/full/improvised-munitions-handbook 152/336
CAUTION: Do not crush more than 3 match tips at one time or the mixture mayexplode.
7. Pour mixture into primer cup. Compress mixture with wooden match stick until primercup is fully packed.
8. Place anvil in primer pocket with legs down.
9. Place cup in pocket with mixture facing downward.
10. Place cartridge case and primer cup between vise jaws, and press slowly until primeris seated into bottom of pocket. The primer is now ready to use.

8/2/2019 Improvised Munitions Handbook
http://slidepdf.com/reader/full/improvised-munitions-handbook 153/336

8/2/2019 Improvised Munitions Handbook
http://slidepdf.com/reader/full/improvised-munitions-handbook 154/336
Pipe Pistol for .45 Caliber Ammunition
Section III
No. 6
A .45 caliber pistol can be made from 3/8 in. nominal diameter steel gas or water pipeand fittings. Lethal range is about 15 yards (13-1/2 meters).
MATERIAL REQUIRED:
Steel pipe. 3/8 in. (1 cm) nominal diameter and 6 in. (15 cm) long with threadedends. 2 threaded couplings to fit pipe
Solid pipe plug to fit pipe coupling Hard wood. 8-1/2 in. x 6-1/2 in. x 1 in. (21 cm x 16-1/2 cm x 2-1/2 cm) Tape or string Flat head nail, approximately 1/16 in. (1-1/2 mm) in diameter 2 wood screws,
approximately 1/16 in. (1-1/2 mm) in diameter Metal strap, 5 in. x 1/4 in. x 1/8 in. (12-1/2 cm x 6 mm x I mm) Bolt, 4 in. (10 cm) long, with nut (optional). Elastic bands Drills, one 1/16 in. (1-1/2 mm) in diameter, and one having same diameter as bolt
(optional). Rod, 1/4 in. (6mm) in diameter and 8 in. (20 cm) long Saw or knife
PROCEDURE:
1. Carefully inspect pipe and fittings.
a. Make sure that there are no cracks or other flaws in the pipe and fittings.
b. Check inside diameter of pipe using a .45 caliber cartridge as a gauge. The cartridgecase should fit into the pipe snugly but without forcing.
c. Outside diameter of pipe MUST NOT BE less than 1-1/2 times the bullet diameter.
2. Follow procedure of Section III, No. 1, steps 4, 5, and 6.
3. Cut stock from wood using saw or knife.

8/2/2019 Improvised Munitions Handbook
http://slidepdf.com/reader/full/improvised-munitions-handbook 155/336
4. Cut a 3/8 in. (9-1/2 mm) deep groove in top of stock.
5. Screw couplings onto pipe. Screw plug into one coupling.
6. Securely attach pipe to stock using string or tape.
7. Follow procedures of Section III, No. 1, steps 10 and 11

8/2/2019 Improvised Munitions Handbook
http://slidepdf.com/reader/full/improvised-munitions-handbook 156/336
8. (Optional) Bend bolt for trigger. Drill hole in stock and place bolt in hole so strap will be anchored by bolt when pulled back. If bolt is not available, use strap as trigger by pulling back and releasing.
9. Follow SAFETY CHECK, Section III, No. 1
HOW TO USE:
1. To load:
a. Remove plug from rear coupling,
b. Wrap string or elastic band around extractor groove so case will seat into barrelsecurely.
c. Place cartridge in pipe.
d. Replace plug.

8/2/2019 Improvised Munitions Handbook
http://slidepdf.com/reader/full/improvised-munitions-handbook 157/336
2. To Fire:
a. Pull metal strap back and anchor in trigger.
b. Pull trigger when ready to fire.
NOTE: If bolt is not used, pull strap back and release.
3. To remove cartridge case:
a. Remove plug from rear coupling.
b. Insert rod into front of pistol and push cartridge case out.

8/2/2019 Improvised Munitions Handbook
http://slidepdf.com/reader/full/improvised-munitions-handbook 158/336
Match Gun
Section III
No. 7
An improvised weapon using safety match heads as the propellant and a metal object asthe projectile. Lethal range is about 40 yards (36 meters).
MATERIAL REQUIRED:
Metal pipe 24 in. (61 cm) long and 3/8 in. (1 cm) in diameter (nominal size) or itsequivalent, threaded on one end.
End cap to fit pipe Safety matches – 3 books of 20 matches each. Wood – 28 in. x 4 in. x 1 in. (70 cm x 10 cm x 2.5 cm) Toy caps OR safety fuse
OR “Strike-anywhere matches” (2) Electrical tape or string Metal strap, about 4 in. x 1/4 in. x 3/16 in. (10 cm x 6 mm x 4.5 mm) 2 rags,
about 1 in x 12 in. and 1 in. x 3 in. (2-1/2 cm x 30 cm and 2-1/2 cm x 8 cm) Wood screws Elastic bands Metal object (steel rod, bolt with head cut off, etc.), approximately 7/16 in. (11
mm) in diameter, and 7/16 in. (11 mm) long if iron or steel, 1-1/4 in. (31 mm)long if aluminum, 5/16 in. (8mm) long if lead.
Metal disk 1 in. (2-1/2 cm) in diameter and 1/16 in. (1-1/2 mm) thick Bolt, 3/32in. (2-1/2 mm) or smaller in diameter and nut to fit
Saw or knife
PROCEDURE:
1. Carefully inspect pipe and fittings. Be sure that there are no cracks or other flaws.
2. Drill small hole in center of end cap. If safety fuse is used, be sure it will pass throughthis hole.

8/2/2019 Improvised Munitions Handbook
http://slidepdf.com/reader/full/improvised-munitions-handbook 159/336
3. Cut stock from wood using saw or knife.
4. Cut 3/8 in. (9-1/2 mm) deep “V” groove in top of stock.
5. Screw end cap onto pipe until finger tight.
6. Attach pipe to stock with string or tape.

8/2/2019 Improvised Munitions Handbook
http://slidepdf.com/reader/full/improvised-munitions-handbook 160/336
7. Bend metal strap into “L” shape and drill holes for wood screw. Notch metal strap onlong side 1/2 in. (1 cm) from bend.
8. Position metal strap on stock so that the top will hit the center of hole drilled in endcap.
9. Attach metal disk to strap with nut and bolt. This will deflect blast from hole in endcap when gun is fired. Be sure that head of bolt is centered on hole in end cap.
10. Attach strap to stock with wood screws.

8/2/2019 Improvised Munitions Handbook
http://slidepdf.com/reader/full/improvised-munitions-handbook 161/336
11. Place screw on each side of stock about 4 in. (10 cm) in front of metal strap. Passelastic bands through notch in metal strap and attach to screw on each side of stock.
HOW TO USE:
A. When Toy Caps Are Available:
1. Cut off match heads from 3 books of matches with knife. Pour match heads into pipe.
2. Fold one end of 1 in. x 12 in. rag 3 times so that it becomes a one inch square of 3thicknesses. Place rag into pipe to cover match heads, folded end first. Tamp firmlyWITH CAUTION.

8/2/2019 Improvised Munitions Handbook
http://slidepdf.com/reader/full/improvised-munitions-handbook 162/336
3. Place metal object into pipe. Place 1 in. x 3 in. rag into pipe to cover projectile. Tampfirmly WITH CAUTION.
4. Place 2 toy caps over small hole in end cap. Be sure metal strap will hit caps when it isreleased.
NOTE: It may be necessary to tape toy caps to end cap.
5. When ready to fire, pull metal strap back and release.
B. When “Strike-Anywhere” Matches Are Available:
1. Follow steps 1 through 3 in A.
2. Carefully cut off tips of heads of 2 “strike-anywhere” matches with knife.

8/2/2019 Improvised Munitions Handbook
http://slidepdf.com/reader/full/improvised-munitions-handbook 163/336
3. Place one tip in hole in end cap. Push in with wooden end of match stick.
4. Place second match tip on a piece of tape. Place tape so match tip is directly over holein end cap.
5. When ready to fire, pull metal strap back and release.
C. When Safety Fuse Is Available: (Recommended for Booby Traps)
1. Remove end cap from pipe. Knot one end of safety fuse. Thread safety fuse throughhole in end cap so that knot
is on inside of end cap.
2. Follow steps 1 through 3 in A.
3. Tie several matches to safety fuse near outside of end cap.

8/2/2019 Improvised Munitions Handbook
http://slidepdf.com/reader/full/improvised-munitions-handbook 164/336
NOTE: Bare end of safety fuse should be inside match head cluster.
4. Wrap match covers around matches and tie. Striker should be in contact with match bands.
5. Replace end cap on pipe.
6. When ready to fire, pull match cover off with strong, firm, quick motion.
SAFETY CHECK – TEST FIRE GUN BEFORE HAND FIRING
1. Locate a barrier such as a stone wall or large tree which you can stand behind in casethe weapon explodes when fired.
2. Mount gun solidly to a table or other rigid support at least ten feet in front of the barrier.
3. Attach a long cord to the firing strap on the gun.
4. Holding the other end of the cord, go behind the barrier.

8/2/2019 Improvised Munitions Handbook
http://slidepdf.com/reader/full/improvised-munitions-handbook 165/336
5. Pull the cord so that the firing strap is held back.
6. Release the cord to fire the gun. (If gun does not fire, shorten the elastic bands orincrease their number.)
IMPORTANT: Fire at least five rounds from behind the barrier and then re-inspect thegun before you attempt to shoulder fire it.

8/2/2019 Improvised Munitions Handbook
http://slidepdf.com/reader/full/improvised-munitions-handbook 166/336
Rifle Cartridge
Section III
No. 8
NOTE: See Section III, No. 5 for reusable primer.
A method of making a previously fired rifle cartridge reusable.
MATERIAL REQUIRED:
Empty rifle cartridge, be sure that it still fits inside gun.
Threaded bolt that fits into neck of cartridge at least 1-1/4 in. (3 cm) long. Safety or “strike-anywhere” matches (about 58 matches are needed for 7.62 mm
cartridge) Rag wad (about 3/4 in. (1-1/2 cm) square for 7.62 mm cartridge) Knife Saw
NOTE: Number of matches and size of rag wad depend on particular cartridge used.
PROCEDURE:
1. Remove coating on heads of matches by scraping match sticks with sharp edge.
CAUTION: If wooden “strike-any¬where” matches are used, cut off tips first. Discardtips or use for
Reusable Primer, Section III, No. 5.

8/2/2019 Improvised Munitions Handbook
http://slidepdf.com/reader/full/improvised-munitions-handbook 167/336
2. Fill previously primed cartridge case with match head coatings up to its neck. Packevenly and tightly with match stick.
CAUTION: Remove head of match stick before packing. In all packing operations, stand
off to the side and pack gently. Do not hammer.
3. Place rag wad in neck of case. Pack with match stick from which head was removed.
4. Saw off head end of bolt so remainder is approximately the length of the standard bullet.

8/2/2019 Improvised Munitions Handbook
http://slidepdf.com/reader/full/improvised-munitions-handbook 168/336
5. Place bolt in cartridge case so that it sticks out about the same length as the original bullet.
NOTE: If bolt does not fit snugly, force paper or match sticks between bolt and case, orwrap tape around bolt before inserting in case.

8/2/2019 Improvised Munitions Handbook
http://slidepdf.com/reader/full/improvised-munitions-handbook 169/336
Pipe Pistol for .38 Caliber Ammunition
Section III
No. 9
A .38 caliber pistol can be made from 1/4 in. nominal diameter steel gas or water pipeand fittings. Lethal range is approximately 33 yards (30 meters).
MATERIAL REQUIRED:
Steel pipe, 1/4 in. (6 mm) nominal diameter and 6 in. (15 cm) long with threadedends (nipple)
Solid pipe plug, 1/4 in. (6 mm) nominal diameter 2 steel pipe couplings, 1/4 in. (6mm) nominal diameter Metal strap, approximately 1/8 in. x 1/4 in. x 5 in. (3 mm x 6 mm x 125 mm or
12-1/2 cm) Elastic bands Flat head nail – 6D or 8D, approximately 1/16 in. diameter (1-1/2 mm) 2 wood screws, #8 Hard wood, 8 in. x 5 in. x 1 in. (20 cm x 12-1/2 cm x 2-1/2 cm) Drill Wood or metal rod, 1/4 in. (6 mm) diameter and 8 in. (20 cm) long Saw or knife
PROCEDURE:
1. Carefully inspect pipe and fittings.
a. Make sure that there are NO cracks or other flaws in the pipe or fittings
b. Check inside diameter of pipe using a .38 caliber cartridge as a gauge. The bulletshould fit closely into the pipe without forcing, but the cartridge case SHOULD NOT fitinto the pipe.

8/2/2019 Improvised Munitions Handbook
http://slidepdf.com/reader/full/improvised-munitions-handbook 170/336
c. Outside diameter of pipe MUST NOT BE less than 1-1/2 times the bullet diameter.
2. Drill a 35/64 in. (14 mm) diameter hole 3/4 in. (2 cm) into one coupling to remove thethread. Drilled section should fit tightly over smooth section of pipe.
3. Drill a 25/64 in. (1 cm) diameter hole 1-1/8 in. (2.86 cm) into pipe. Use cartridge as agauge, when a cartridge is inserted into the pipe, the shoulder of the case should buttagainst the end of the pipe. Thread coupling tightly onto pipe, drilled end first.
4. Follow procedures of Section III, No. 1, steps 4 through 11.
5. Follow SAFETY CHECK, Section nI, No. 1. HOW TO OPERATE PISTOL:
Follow procedures of HOW TO OPERATE PISTOL, Section in, No. 1, steps 1, 2, and 3.

8/2/2019 Improvised Munitions Handbook
http://slidepdf.com/reader/full/improvised-munitions-handbook 171/336
Pipe Pistol for .22 Caliber Ammunition
Section III
No. 10
A .22 Caliber pistol can be made from 1/8 in. nominal diameter extra heavy, steel gas orwater pipe and fittings. Lethal range is approximately 33 yards (30 meters).
MATERIAL REQUIRED:
Steel pipe, extra heavy, 1/8 in. (3 mm) nominal diameter and 6 in. (15 cm) longwith threaded ends (nipple)
Solid pipe plug, 1/8 in. (3 mm) nominal diameter 2 steel pipe couplings, 1/8 in. (3mm) nominal diameter Metal strap, approximately 1/8 in. x 1/4 in. x 5 in. (3 mm x 6 mm x 125 mm or
12-1/2 cm) Elastic bands Flat head nail – 6D or 8D (approximately 1/16 in. (1-1/2 mm) diameter 2 wood
screws, #8 Hard wood, 8 in. x 5 in. x 1 in. (20 cm x 12-1/2 cm x 2-1/2 cm) Drill Wood or metal rod, 1/8 in. (3 mm) diameter and 8 in. (20 cm) long Saw or knife
PROCEDURE:
1. Carefully inspect pipe and fittings.
a. Make sure that there are NO cracks or other flaws in the pipe or fittings.

8/2/2019 Improvised Munitions Handbook
http://slidepdf.com/reader/full/improvised-munitions-handbook 172/336
b. Check inside diameter of pipe using a . 22 caliber cartridge, long or short, as a gauge.The bullet should fit closely into the pipe without forcing, but the cartridge caseSHOULD NOT fit into the pipe.
c. Outside diameter of pipe MUST NOT BE less than 1-1/2 times the bullet diameter.
2. Drill a 15/64 in. (1/2 cm) diameter hole 9/16 in. (1-1/2 cm) deep in pipe for longcartridge. (If a short cartridge is used, drill hole 3/8 in. (1 cm) deep). When a cartridge isinserted into the pipe, the shoulder of the case should butt against the end of the pipe.
3. Screw the coupling onto the pipe. Cut coupling length to allow pipe plug to thread in pipe flush against the cartridge case.
4. Drill a hole off center of the pipe plug just large enough for the nail to fit through.
NOTE: Drilled hole MUST BE OFF CENTER in plug.

8/2/2019 Improvised Munitions Handbook
http://slidepdf.com/reader/full/improvised-munitions-handbook 173/336
5. Push nail through pipe plug until head of nail is flush with square end. Cut nail off atother end 1/16 in. (1-1/2 mm) away from plug. Round off end with file.
6. Follow procedures of Section HI, No. 1, steps 6 through 11.
7. Follow SAFETY CHECK, Section III, No. 1.
HOW TO OPERATE:
Follow procedures of HOW TO OPERATE PISTOL, Section III, No. 1, steps 1, 2, and 3.

8/2/2019 Improvised Munitions Handbook
http://slidepdf.com/reader/full/improvised-munitions-handbook 174/336
Low Signature System
Section III
No. 11
Low signature systems (silencers) for improvised small arms weapons (Section III) can be made from steel gas or water pipe and fittings.
MATERIAL REQUIRED:
Grenade container Steel pipe nipple, 6 in. (15 cm) long – See Table I for diameter
2 steel pipe couplings – See Table II for dimensions Cotton cloth – See Table II for dimensions Drill Absorbent cotton
PROCEDURE:
1. Drill hole in grenade container at both ends to fit outside diameter of pipe nipple. (SeeTable I.)
2. Drill four (4) rows of holes in pipe nipple. Use Table I for diameter and location of
holes.

8/2/2019 Improvised Munitions Handbook
http://slidepdf.com/reader/full/improvised-munitions-handbook 175/336
3.Thread one of the pipe couplings on the drilled pipe nipple.

8/2/2019 Improvised Munitions Handbook
http://slidepdf.com/reader/full/improvised-munitions-handbook 176/336
4. Cut coupling length to allow barrel of weapon to thread fully into low signaturesystem. Barrel should butt against end of the drilled pipe nipple.
5. Separate the top half of the grenade container from the bottom half.
6. Insert the pipe nipple in the drilled hole at the base of the bottom half of container.
Pack the absorbent cotton inside the container and around the pipe nipple.
7. Pack the absorbent cotton in top half of grenade container leaving hole in center.Assemble container to the bottom half.

8/2/2019 Improvised Munitions Handbook
http://slidepdf.com/reader/full/improvised-munitions-handbook 177/336
8. Thread the other coupling onto the pipe nipple.
NOTE: A longer container and pipe nipple, with same “A” and “B” dimensions as thosegiven, will further reduce the signature of the system.
HOW TO USE:
1. Thread the low signature system on the selected weapon securely.
2. Place the proper cotton wad size into the muzzle end of the system.
3. Load Weapon
4. Weapon is now ready for use.

8/2/2019 Improvised Munitions Handbook
http://slidepdf.com/reader/full/improvised-munitions-handbook 178/336
Mortars and Rockets

8/2/2019 Improvised Munitions Handbook
http://slidepdf.com/reader/full/improvised-munitions-handbook 179/336
Recoilless Launcher
Section: IV
No.1
A dual directional scrap fragment launcher which can be placed to cover the path ofadvancing troops.
MATERIAL REQUIRED:
Iron water pipe approximately 4 ft. (1 meter) long and 2 to 4 in. (5 to 10 cm) indiameter
Black powder (commercial) or salvaged artillery propellant about 1/2 lb. (200
gms) Safety or improvised fuse (Section VI, No. 7) or improvised electrical igniter
(Section VI, No. 2) Stones and/or metal scrap chunks approximately 1/2 in. (1 cm) in diameter –
about 1 lb. (400 gms) total 4 rags for wadding, each about 20 in. by 20 in. (50 cm by 50 cm) Wire Paper or rag
NOTE: Be sure that the water pipe has no cracks or flaws.

8/2/2019 Improvised Munitions Handbook
http://slidepdf.com/reader/full/improvised-munitions-handbook 180/336
PROCEDURE:
1. Place propellant and igniter in paper or rag and tie with string so contents cannot fallout.
2. Insert packaged propellant and igniter in center of pipe. Pull firing leads out one end of pipe.
3. Stuff a rag wad into each end of pipe and lightly tamp using a flat end stick.
4. Insert stones and/or scrap metal into each end of pipe. Be sure the same weight ofmaterial is used In each side.
5. Insert a rag wad into each end of the pipe and pack tightly as before.
HOW TO USE:
1. Place scrap mine in a tree or pointed in the path of the enemy. Attach Igniter lead tothe firing circuit. The recoilless launcher is now ready to fire.

8/2/2019 Improvised Munitions Handbook
http://slidepdf.com/reader/full/improvised-munitions-handbook 181/336
2. If safety or Improvised fuse is used instead of the detonator, place the fuse into the packaged propellant through a hole drilled in the center of the pipe. Light free end of fusewhen ready to fire. Allow for normal delay time.
CAUTION: Scrap will be ejected from both ends of the launcher.

8/2/2019 Improvised Munitions Handbook
http://slidepdf.com/reader/full/improvised-munitions-handbook 182/336

8/2/2019 Improvised Munitions Handbook
http://slidepdf.com/reader/full/improvised-munitions-handbook 183/336
3. Drill a hole through the center of one wooden block of such size that the push-rod willfit tightly. Whittle a depression around the hole on one side approximately 1/8 in. (3 mm)and large enough for the grenade to rest in.
4. Place the base of the grenade in the depression in the wooden block. Securely fastengrenade to block by wrapping tape (or wire) around entire grenade and block.
NOTE: Be sure that the tape (or wire) does not cover hole in block or interfere with theoperation of the grenade safety lever.
5. Drill hole through the center of the second wooden block, so that it will Just slide over
the outside of the gun barrel.
6. Drill a hole in the center of the bottom of the tin can the same size as the hole in the block.
7. Attach can to block as shown.

8/2/2019 Improvised Munitions Handbook
http://slidepdf.com/reader/full/improvised-munitions-handbook 184/336
8. Slide the can and block ontothe barrel until muzzle passes can open end. Wrap a small piece of tape around the barrelan inch or two from the end. Tightly wrapped string may be used instead of tape. Forcethe can and wooden block forward against the tape so that they are securely held in place.Wrap tape around the barrel behind the can.
CAUTION: Be sure that the can is securely fastened to the gun barrel. If the can should become loose and slip down the barrel after the launcher is assembled, the grenade willexplode after the regular delay time.
9. Remove crimp from a 12 gauge shotgun cartridge with pen knife. Open cartridge. Pourshot from shell. Remove wads and plastic liner if present.

8/2/2019 Improvised Munitions Handbook
http://slidepdf.com/reader/full/improvised-munitions-handbook 185/336
10. Empty the propellant onto a piece of paper. Using a knife, divide the propellant inhalf. Replace half of the propellant into the cartridge case.
11. Replace the 12 gauge cardboard wads into cartridge case.
NOTE: If wads are not available, stuff tissue paper or cotton into the cartridge case. Packtightly.
HOW TO USE:
Method I – When ordinary grenade is used:
1. Load cartridge in gun.
2. Push end of push-rod without the rubber disk into hole in wooden block fastened togrenade.

8/2/2019 Improvised Munitions Handbook
http://slidepdf.com/reader/full/improvised-munitions-handbook 186/336
3. Slowly push rod into barrel until it rests against the cartridge case and grenade is incan. If the grenade is not in the can. remove rod and cut to proper size. Push rod back into barrel.
4. With can holding safety lever of grenade in place, carefully remove safety pin.
CAUTION: Be sure that the sides of the can restrain the grenade safety lever. If thesafety lever should be released for any reason, grenade will explode after regular grenadedelay time.
5. To fire grenade launcher, rest gun in ground at angle determined by range desired. A45 degree angle should give about 150 meters (160 yds.)
Method II – When improvised pipe grenade is used:
An improvised pipe grenade (Section 11. No. 1) may be launched in a similar manner. Notin can is needed.
1. Fasten the grenade to the block as shown above with the fuse hole at the end oppositethe block.
2. Push end of push-rod into hole in wooden block fastened to grenade.

8/2/2019 Improvised Munitions Handbook
http://slidepdf.com/reader/full/improvised-munitions-handbook 187/336
3. Push rod into barrel until it rests against cartridge case.
4. Load cartridge In gun.
5. Follow step 5 of Method 1.
6. Using a fuse with at least a 10 second delay, light the fuse before fixing.
7. Fire when the fuss burns to 1/2 its original length.

8/2/2019 Improvised Munitions Handbook
http://slidepdf.com/reader/full/improvised-munitions-handbook 188/336
Fire Bottle Launcher
Section IV
No. 4
A device using 2 items (shotgun and chemical fire bottle) that can be used to start or place a fire 80 yards (72 meters) from launcher.
MATERIAL REQUIRED:
Standard 12 gauge or improvised shotgun (Section in, No. 2) Improvised fire bottle (Section V, No. 1)
Tin can, about 4 in. (10 cm) in diameter and 5-1/2 In. (14 cm) high Wood, about 3 in. x 3 in. x 2 in. (7-1/2 cm x 7-1/2 cm x 5 cm) Nail, at least 3 in. (7-1/2 cm) long Nuts and bolts or nails, at least 2-1/2 in. (6-1/2 cm) long Rag Paper Drill
If Standard Shotgun is Used:
Hard wood stick, about the same length as shotgun barrel and about 5/8 In. (1-1/2
cm) In diameter. Stick need not be round. 2 washers (brass, steel, iron, etc.)having outside diameter of 5/8 in. (1-1/2 cm) One wood screw about 1 in. (2-1/2 cm) long Rubber disk, 3/4 in. (2 cm) in diameter and 1/4 in. (6 mm) thick, leather,
cardboard, etc. can be used. 12 gauge shotgun ammunition
If Improvised Shotgun is Used:
Fuse, safety or Improvised fast burning (Section VI, No. 7) Hard wood stick, about the same length as shotgun barrel and 3/4 in. (2 cm) in
diameter Black powder – 9 grams (135 grains). See Section VII, No. 8.
PROCEDURE:
METHOD I – If Improvised Shotgun is Used:
1. Drill bole In center of wood block approximately 1 In. (2-1/2 cm) deep. Hole shouldhave approximately the same diameter as the wooden a tick.
2. Drill 2 small boles on opposite sides of the wooden block. Hole should be large enoughfor bolts to pea a through.

8/2/2019 Improvised Munitions Handbook
http://slidepdf.com/reader/full/improvised-munitions-handbook 189/336
3. Fasten can to block with nuts and bolts.
NOTE: Can may also be securely fastened to block by hammering several nails throughcan and block. Do dot drill boles, and be careful not to split wood.
4. Place wooden stick Into hole In wooden block. Drill small hole (same diameter as that
of 3 In. nail) through wooden block and through wooden stick. Insert nail in hole.

8/2/2019 Improvised Munitions Handbook
http://slidepdf.com/reader/full/improvised-munitions-handbook 190/336

8/2/2019 Improvised Munitions Handbook
http://slidepdf.com/reader/full/improvised-munitions-handbook 191/336
NOTE: Hole in plug may have to be enlarged for fuse.
8. Insert rag Into front of shotgun. Pack rag against powder package with stick. USECAUTION.
METHOD II – If Standard Shotgun is Used:
1. Follow Steps 1 and 2, Shotgun Grenade Launcher, Section IV, No. 2.
2. Follow procedure of Method I, Steps 1 – S.
3. Follow Steps 9, 10, 11, Shotgun Grenade Launcher, Section IV, No. 2, using 1/3 of
total propellant instead of 1/2.
4. Load cartridge in gun.
HOW TO USE:
1. Insert stick and holder containing chemical fire bottle.
CAUTION: Do not tilt muzzle downward.
2. Hold gun against ground at 45′ angle and light fuse.

8/2/2019 Improvised Munitions Handbook
http://slidepdf.com/reader/full/improvised-munitions-handbook 192/336
CAUTION: Severe burns may result if bottle shatters when fired. If possible, obtain s bottle Identical to that being used as the fire bottle. Fill about 2/3 full of water and fire asabove. If bottle shatters when fired Instead of being launched intact, use a different typeof bottle.

8/2/2019 Improvised Munitions Handbook
http://slidepdf.com/reader/full/improvised-munitions-handbook 193/336
Grenade Launchers
Section IV
No. 5
A variety of grenade launchers can be fabricated from metal pipes and fittings. Ranges upto 600 meters (660 yards) can be obtained depending on length of tube, charge, numberof grenades, and angle of firing.
MATERIAL REQUIRED:
Metal pipe, threaded on one end and approximately 2-1/2 in. (6-1/4 cm) in
diameter and 14 in. to 4 ft. (35 cm to 119 cm) long depending on range desiredand number of grenades used. End cap to fit pipe Black powder, 15 to 50 gm, approximately 1-1/4 to 4-1/4 tablespoons (Section I,
No. 3) Safety fuse, fast burning improvised fuse (Section VI, No. 7) or improvised
electric bulb Initiator (Section VI, No. 1 Automobile light bulb is needed) Grenade(a) – 1 to 6 Rag(s) – about 30 in. x 30 in. (75 cm x 75 cm) and 20 in. x 20 in. (55 cm x 55 cm) Drill String
NOTE: Examine pipe carefully to be sure there are no cracks or other flaws.
PROCEDURE:
METHOD 1 – If Fuse Is Used: End Cap
1. Drill small hole through center of end cap.
2. Make small knot near one end of fuse. Place black powder and knotted end of fuse in paper and tie with string.

8/2/2019 Improvised Munitions Handbook
http://slidepdf.com/reader/full/improvised-munitions-handbook 194/336
3. Thread fuse through hole in end cap and place package in end cap. Screw end cap onto pipe, being careful that black powder package is not caught between the threads.
4. Roll rag wad so that it is about 6 in. (15 cm) long and has approximately the samediameter as the pipe. Push rolled rag into open- end of pipe until it rests against black powder package.

8/2/2019 Improvised Munitions Handbook
http://slidepdf.com/reader/full/improvised-munitions-handbook 195/336
5. Hold grenade safety lever in place and carefully withdraw safety pin.
CAUTION: If grenade safety lever is released for any reason, grenade will explode afterregular time. (4-5 sec.)
6. Holding safety lever in place, carefully push grenade into pipe, lever end first, until itrests against rag wad.
7. The following table lists various types of grenade launchers and their performancecharacteristics.

8/2/2019 Improvised Munitions Handbook
http://slidepdf.com/reader/full/improvised-munitions-handbook 196/336
(a) For this range, an additional delay is required. See Section VI, No. 11 and 12.
(b) For multiple grenade launcher, load as shown.
NOTE: Since performance of different black powder varies, fire several test rounds todetermine the exact amount of powder necessary to achieve the desired range.
HOW TO USE:
1. Bury at least 1/2 of the launcher pipe in the ground at desired angle. Open end should
face the expected path of the enemy. Muzzle may be covered with cardboard and a thinlayer of dirt and/or leaves as camouflage. Be sure cardboard prevents dirt from entering pipe.

8/2/2019 Improvised Munitions Handbook
http://slidepdf.com/reader/full/improvised-munitions-handbook 197/336
NOTE: The 14 In. launcher may be hand held against the ground instead of being buried.
2. Light fuse when ready to fire.
METHOD II – If Electrical igniter is used:
NOTE: Be sure that bulb is in good operating condition.
1. Prepare electric bulb initiator as described in Section VI
2. Place electric initiator and black powder charge in paper. Tie ends of paper with string

8/2/2019 Improvised Munitions Handbook
http://slidepdf.com/reader/full/improvised-munitions-handbook 198/336
3. Follow above Procedure, Steps 3 to end.
HOW TO USE:
1. Follow above How to Use, Step 1.
2. Connect leads to firing circuit. Close circuit when ready to fire.

8/2/2019 Improvised Munitions Handbook
http://slidepdf.com/reader/full/improvised-munitions-handbook 199/336
60mm Mortar Projectile Launcher
Section IV
No. 6
A device to launch 60 mm mortar rounds using a metal pipe 2-1/2 In. (6 cm) In diameterand 4 ft. (120 cm) long as the launching tube.
MATERIAL REQUIRED:
Mortar, projectile (60 mm) and charge increments Metal pipe 2-1/2 In. (6 cm) in diameter and 4 ft. (120 cm) long, threaded on one
end Threaded end cap to fit pipe Bolt, 1/8 in. (3 mm) in diameter and at least 1 In. (2-1/2 cm) long Two (2) nuts to fit bolt File Drill
PROCEDURE:
1. Drill hole 1/8 In. (3 mm) in diameter through center of end cap.
2. Round off end of bolt with file.

8/2/2019 Improvised Munitions Handbook
http://slidepdf.com/reader/full/improvised-munitions-handbook 200/336
3. Place bolt through hole in end cap. Secure in place with nuts as illustrated.
4. Screw end cap onto pipe tightly. Tube is now ready for use.
HOW TO USE:
1. Bury launching tube in ground at desired angle so that bottom of tube is at least 2 ft.(60 cm) underground. Adjust the number of increments In rear finned end of mortar projectile. See following table for launching angle and number of increments used.

8/2/2019 Improvised Munitions Handbook
http://slidepdf.com/reader/full/improvised-munitions-handbook 201/336
2. When ready to fire, withdraw safety wire from mortar projectile. Drop projectile Into
launching tube, FINNED END FIRST.
CAUTION: Be sure bore riding pin is in place in fuse when mortar projectile Is droppedinto tube. A live mortar round could explode in the tube if the fit is loose enough to permit the bore riding pin to come out partway.

8/2/2019 Improvised Munitions Handbook
http://slidepdf.com/reader/full/improvised-munitions-handbook 202/336
CAUTION: The round will fire as soon as the projectile is dropped into tube. Keep all parts of body behind the open end of the tube.
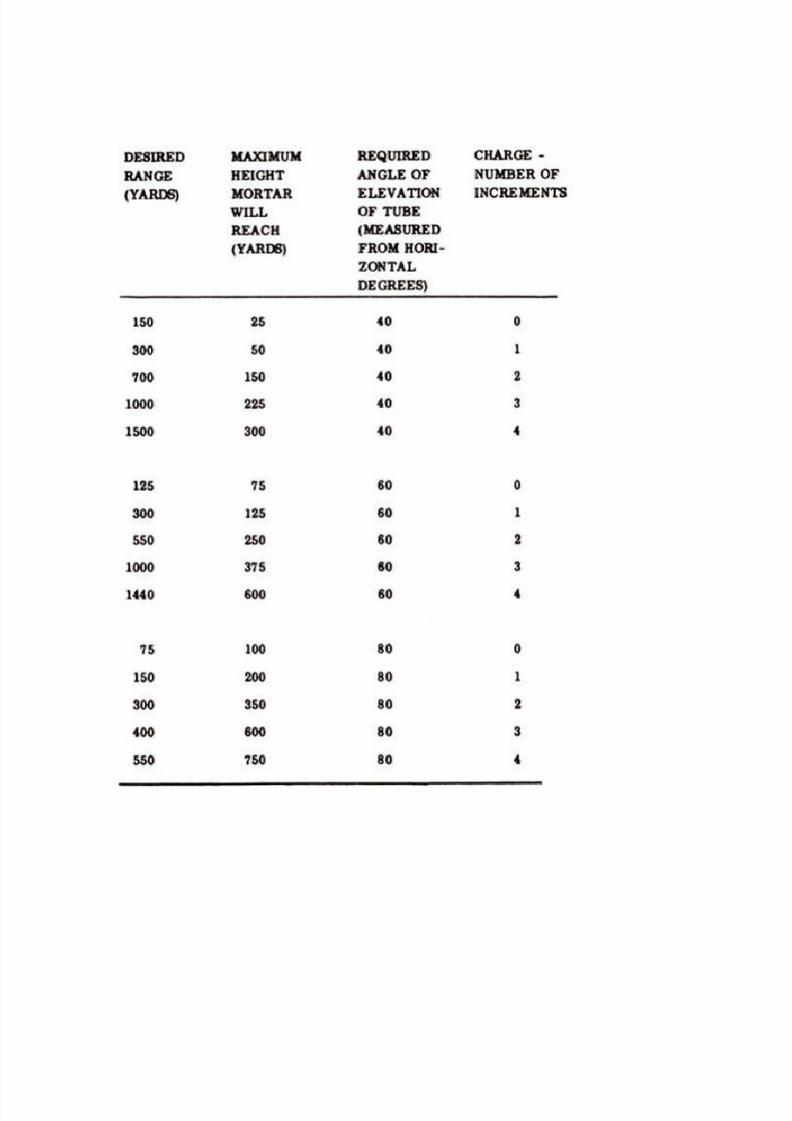
8/2/2019 Improvised Munitions Handbook
http://slidepdf.com/reader/full/improvised-munitions-handbook 203/336

8/2/2019 Improvised Munitions Handbook
http://slidepdf.com/reader/full/improvised-munitions-handbook 204/336
Incendiary Devices

8/2/2019 Improvised Munitions Handbook
http://slidepdf.com/reader/full/improvised-munitions-handbook 205/336
Chemical Fire Bottle
Section V
No.1
This incendiary bottle is self-igniting on target impact.
MATERIALS REQUIRED: How Used Common Source
Sulphuric Acid StorageBatteries Motor Vehicles
Material Processing Industrial Plants
Gasoline MotorFuel Gas Station or Motor Vehicles
Potassium ChlorateMedicine Drug Store
Sugar SweeteningFoods Food Store
Glass bottle with stopper (roughly 1 quart size).
Small Bottle or jar with lid.
Rag or absorbent paper (paper towels, newspaper).
String or rubber bands.

8/2/2019 Improvised Munitions Handbook
http://slidepdf.com/reader/full/improvised-munitions-handbook 206/336
PROCEDURE
1. Sulphuric Acid Must be Concentrated. If battery acid or other dilute acid is used,concentrate it by boiling until dense white fumes are given off. Container used should beof enamel- ware or oven glass.
CAUTION
Sulphuric acid will burn skin and destroy clothing. If any is spilled, wash it away with alarge quantity of water. Fumes are also dangerous and should not be inhaled.
2. Remove the acid from heat and allow to cool to room temperature.
3. Pour gasoline into the Urge (1 quart) bottle until it ii approximately 2/3 full.
4. Add concentrated sulphuric acid to gasoline slowly until the bottle is filled to within 1″to 2″ from top. Place the stopper on the bottle.
5. Wash the outside of the bottle thoroughly with clear water.
CAUTION: If this is not done, the fire bottle may be dangerous to handle during use.
6. Wrap a clean cloth or several sheets of absorbent paper around the outside of the bottle. Tie with string or fasten with rubber bands.
7. Dissolve 1/2 cup (100 gm) of potassium chlorate and 1/2 cup (100 gm) of sugar in onecup (250 cc) of boiling water.
8. Allow the solution to cool, pour into the small bottle and cap tightly. The cooledsolution should be approx. 2/3 crystals and 1/3 liquid. If there is more liquid than this, pour off excess before using.
CAUTION:Store this bottle separately from the other bottle.

8/2/2019 Improvised Munitions Handbook
http://slidepdf.com/reader/full/improvised-munitions-handbook 207/336
HOW TO USE
1. Shake the small bottle to mix contents and pour onto the cloth or paper around thelarge bottle.
Bottle can be used wet or after solution has dried. However, when dry, the sugar –Potaesium chlorate mixture is very sensitive to spark or flame and should be handledaccordingly.
2. Throw or launch the bottle. When the bottle breaks against a hard surface (target) thefuel will ignite.

8/2/2019 Improvised Munitions Handbook
http://slidepdf.com/reader/full/improvised-munitions-handbook 208/336
Igniter from Book Matches
Section V
No. 2
This is a hot igniter made from paper book matches for use with molotov cocktail andother incendiaries.
Material Required
Paper book matches. Adhesive or friction tape.
Procedure
1. Remove the staple(s) from match book and separate matches from cover.
2. Fold and tape one row of matches.
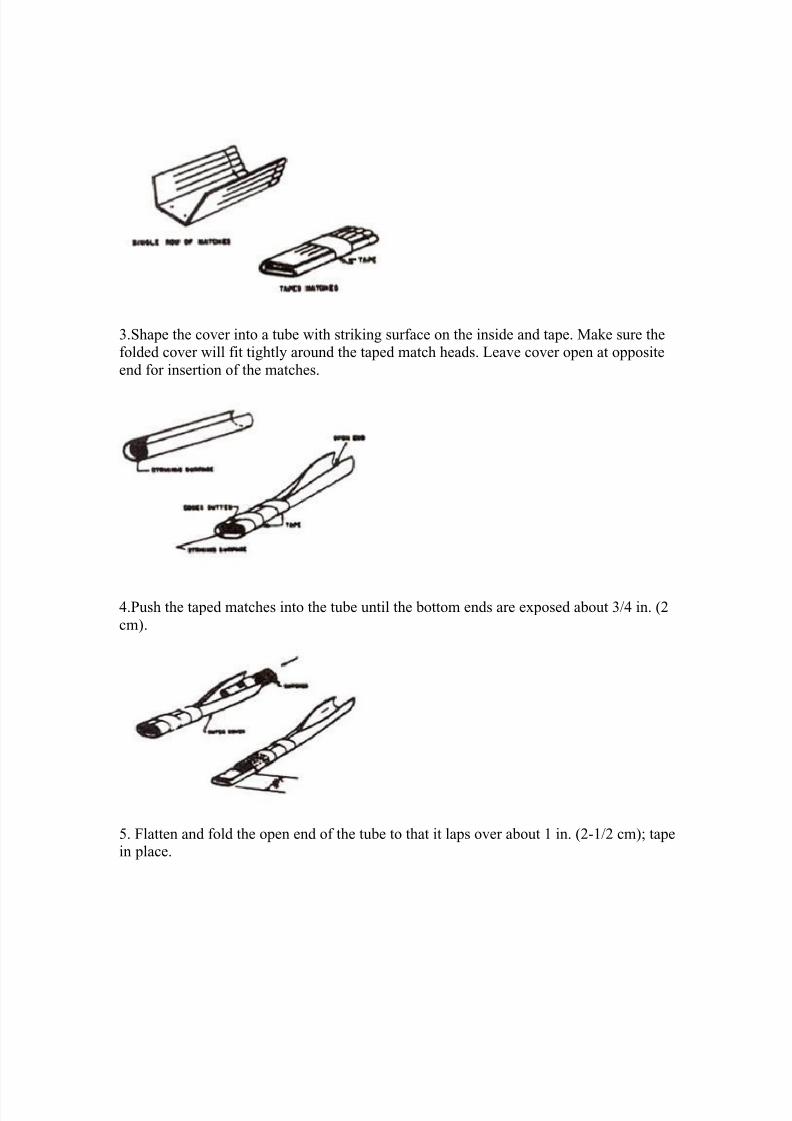
8/2/2019 Improvised Munitions Handbook
http://slidepdf.com/reader/full/improvised-munitions-handbook 209/336
3.Shape the cover into a tube with striking surface on the inside and tape. Make sure thefolded cover will fit tightly around the taped match heads. Leave cover open at oppositeend for insertion of the matches.
4.Push the taped matches into the tube until the bottom ends are exposed about 3/4 in. (2cm).
5. Flatten and fold the open end of the tube to that it laps over about 1 in. (2-1/2 cm); tapein place.

8/2/2019 Improvised Munitions Handbook
http://slidepdf.com/reader/full/improvised-munitions-handbook 210/336
Use With Molotov Cocktail
Tape the “match end tab” of the igniter to the neck of the molotov cocktail.
Grasp the “cover end tab” and pull sharply or quickly to ignite.
General Use

8/2/2019 Improvised Munitions Handbook
http://slidepdf.com/reader/full/improvised-munitions-handbook 211/336
The book match igniter can be used by itself to ignite flammable liquids, fuse cords andsimilar items requiring hot ignition.
CAUTION
Store matches and completed igniters in mois- tureproof containers such as rubber or plastic bags until ready for use. Damp or wet paper book matches will not ignite.

8/2/2019 Improvised Munitions Handbook
http://slidepdf.com/reader/full/improvised-munitions-handbook 212/336
Mechanically Initiated Fire Bottle
Section V
No. 3
The mechanically initiated Fire Bottle it an incendiary device which ignites when thrownagainst a hard surface.
MATERIALS REQUIRED
Glass jar or short neck bottle with a leakproof lid or stopper. “Tin” can or similar container just large enough to fit over the lid of the jar.
Coil spring (compression) approximately 1/2 the diameter of the can and 1 1/2times as long. Gasoline Four (4) “blue tip” matches Flat stick or piece of metal (roughly 1/2″ x 1/16″ x 4″)
Wire or heavy twine Adhesive tape
PROCEDURE
1. Draw or scratch two lines around the can – one 3/4″ (19 mm) and the other 1 1/4″ (30
mm) from the open end.

8/2/2019 Improvised Munitions Handbook
http://slidepdf.com/reader/full/improvised-munitions-handbook 213/336
2. Cut 2 slots on opposite sides of the tin can at
the line farthest from the open end. Make slots large enough for the flat stick or piece ofmetal to pass through.
3. Punch 2 small holes just below the rim of the open end of the can.

8/2/2019 Improvised Munitions Handbook
http://slidepdf.com/reader/full/improvised-munitions-handbook 214/336
4. Tape blue tip matches together in pairs. The distance between the match heads shouldequal the inside diameter of the can. Two pairs are sufficient.
5. Attach paired matches to second and third coils of the spring, using thin wire.
6. Insert the end of the spring opposite the matches into the tin can.
7. Compress the spring until the end with thematches pastes the slot in the can. Pass the flat stick or piece of metal through slots in canto hold spring in place. This acts as a safety device.

8/2/2019 Improvised Munitions Handbook
http://slidepdf.com/reader/full/improvised-munitions-handbook 215/336
8. Punch many closely spaced small holes between the lines marked on the can to form astriking surface for the matches. Be careful not to seriously deform can.
9. Fill the jar with gasoline and cap tightly.
10. Turn can over and place over the jar so that the safety stick rests on the lid of the jar.

8/2/2019 Improvised Munitions Handbook
http://slidepdf.com/reader/full/improvised-munitions-handbook 216/336

8/2/2019 Improvised Munitions Handbook
http://slidepdf.com/reader/full/improvised-munitions-handbook 217/336
HOW TO USE
1. Carefully withdraw flat safety stick.
2. Throw jar at hard surface.
CAUTION:
DO NOT REMOVE SAFETY STICK UNTIL READY TO THROW FIRE BOTTLE.
The safety stick, when in place, prevents ignition of the fire bottle if it shouldaccidentally be broken.

8/2/2019 Improvised Munitions Handbook
http://slidepdf.com/reader/full/improvised-munitions-handbook 218/336
Gelled Flame Fuels
Section V
No. 4
Gelled or paste type fuels are often preferable to raw gasoline for use in incendiarydevices such as fire bottles. This type fuel adheres more readily to the target and producesgreater heat concentration.
Several methods are shown for gelling gasoline using commonly available materials. The
methods are divided into the following categories based on the major ingredient:
4 .1 Lye Systems
4.2 Lye-Alcohol Systems
4.3 Soap-Alcohol Systems
4.4 Egg White Systems
4.5 Latex Systems
4.6 Wax Systems
4.7 Animal Blood Systems

8/2/2019 Improvised Munitions Handbook
http://slidepdf.com/reader/full/improvised-munitions-handbook 219/336
Lye Systems
Section V
No. 4.
Lye (also known as caustic soda or Sodium Hydroxide) can be used in combination with powdered rosin or castor oil to gel gasoline for use as a flame fuel which will adhere totarget surfaces.
NOTE: This fuel is not suitable for use in the chemical (Sulphuric Acid) type of fire bottle (Section V. No.l). The acid will react with the lye and break down the gel.
MATERIALS REQUIRED:
PROCEDURE:
CAUTION: Make sure that there are no open flames in the area when mixing the flamefuel. NO SMOKING!
1. Pour gasoline into jar, bottle or other container. (DO NOT USE AN ALUMINUMCONTAINER.)
2. If rosin is in cake form, crush into small pieces.
3. Add rosin or castor oil to the gasoline and stir for about five (5) minutes to mixthoroughly.

8/2/2019 Improvised Munitions Handbook
http://slidepdf.com/reader/full/improvised-munitions-handbook 220/336
4. In a second container (NOT ALUMINUM) add lye to an equal volume of water slowlywith stirring.
CAUTION: Lye solution can burn skin and destroy clothing. If any is spilled, wash awayimmediately with large quantities of water.
5. Add lye solution to the gasoline mix and stir until mixture thickens (about one minute).
NOTE: The sample will eventually thicken to a very firm paste. This can be thinned, ifdesired, by stirring in additional gasoline.

8/2/2019 Improvised Munitions Handbook
http://slidepdf.com/reader/full/improvised-munitions-handbook 221/336
Lye Alcohol Systems
Section V
No. 4.2
Lye (also known as caustic soda or Sodium Hydroxide) can be used in combination withalcohol and any of several fats to gel gasoline for use as a flame fuel.
NOTE: This fuel is not suitable for use in the chemical (Sulphuric Acid) type of fire bottle (Section V, No. 1). The acid will react with the lye and break down the gel.
MATERIALS REQUIRED
NOTE: The following can be substituted for the tallow:
(a) Wool grease (Lanolin) (very good) — Fat extracted from sheep wool.
(b) Castor oil (good).
(c) Any vegetable oil (com, cottonseed, peanut, linseed, etc.)
(d) Any fish oil
(e) Butter or oleomargarine

8/2/2019 Improvised Munitions Handbook
http://slidepdf.com/reader/full/improvised-munitions-handbook 222/336
It is necessary when using substitutes (c) to (e) to double the given amount of fat and oflye for satisfactory bodying.
PROCEDURE:
CAUTION: Make sure that there are no open flames in the area when mixing flamefuels. NO SMOKING!
1. Pour gasoline into bottle, jar or other container. (DO NOT USE AN ALUMINUMCONTAINER).
2. Add Tallow (or substitute) to the gasoline and stir for about 1/2 minute to dissolve fat.
3. Add alcohol to the gasoline mixture.
4. In a separate container (NOT ALUMINUM) slowly add lye to an equal amount ofwater. Mixture should be stirred constantly while adding lye.
CAUTION: Lye solution can burn skin and destroy clothing. If any is spilled, wash awayimmediately with large quantities of water.
5. Add lye solution to the gasoline mixture and stir occasionally until thickened (about1/2 hour).
NOTE: The mixture will eventually (1 to 2 days) thicken to a very firm paste. This can be thinned, if desired, by stirring in additional gasoline.

8/2/2019 Improvised Munitions Handbook
http://slidepdf.com/reader/full/improvised-munitions-handbook 223/336
Soap Alcohol Systems
Section V
No. 4.3
Common household soap can be used in combination with alcohol to gel gasoline for useas a flame fuel which will adhere to target surfaces.
MATERIAL REQUIRED:
NOTE: Unless the word “soap” actually appears somewhere on the container or wrapper,a washing compound is probably a detergent. These Can Not Be Used.
PROCEDURE:
CAUTION: Make sure that there are no open flames in the area when mixing flamefuels. NO SMOKING!
1. If bar soap is used, carve into thin flakes using a knife.
2. Pour alcohol and gasoline into a Jar, bottle or other container and mix thoroughly.
3. Add soap powder or flakes to gasoline-alcohol mix and stir occasionally untilthickened (about IS minutes).

8/2/2019 Improvised Munitions Handbook
http://slidepdf.com/reader/full/improvised-munitions-handbook 224/336
Egg Systems
Section V
No.4.4.
The white of any bird egg can be used to gel gasoline for use as a flame fuel which willadhere to target surfaces.
MATERIALS REQUIRED:

8/2/2019 Improvised Munitions Handbook
http://slidepdf.com/reader/full/improvised-munitions-handbook 225/336
PROCEDURE:
CAUTION: Make sure that there are no open flames in the area !when mixing flamefuels. NO SMOKING!
1. Separate egg white from yolk. This can be done by breaking the egg into a dish andcarefully removing the yolk with a spoon.
NOTE: DO NOT GET THE YELLOW EGG YOLK MIXED INTO THE EGG WHITE.If egg yolk gets into the egg white, discard the egg
2. Pour egg white into a jar, bottle, or other container and add gasoline.
3. Add the salt (or other additive) to the mixture and stir occasionally until gel forms(about 5 to 10 minutes).
NOTE: A thicker gelled flame fuel can be obtained by putting the capped jar in hot(65°C) water for about 1/2 hour and then letting them cool to room temperature. (DO NOT HEAT THE GELLED FUEL CONTAINING COFFEE).

8/2/2019 Improvised Munitions Handbook
http://slidepdf.com/reader/full/improvised-munitions-handbook 226/336
Latex Systems
Section V
No. 4. 5
Any milky white plant fluid it a potential source of latex which can be used to gelgasoline
MATERIALS REQUIRED:
NOTE: If acids are not available, use acid salt (alum, sulfates and chlorides other thansodium or potassium). The formic acid from crushed red ants can also be used.
PROCEDURE:
CAUTION: Make sure that there are no open flames in the area
when mixing flame fuels. NO SMOKING!
1. With Commercial Rubber Latex:
a. Place 7 parts by volume of latex and 92 parts by volume of gasoline in bottle. Cap bottle and shake to mix well.
b. Add 1 part by volume vinegar (or other acid) and shake until gel forms.
[CAUTION: Concentrated acids will burn skin and destroy clothing. If any is spilled,wash away immediately with large quantities of water.

8/2/2019 Improvised Munitions Handbook
http://slidepdf.com/reader/full/improvised-munitions-handbook 227/336
2. With Natural Latex:
a. Natural latex should form lumps as it comes from the plant. If lumps do not form, adda small amount of acid to the latex.
b. Strain off the la£ex lumps and allow to dry in air,
c. Place 20 parts by volume of latex in bottle and add 80 parts by volume of gasoline.Cover bottle and allow to stand until a swollen gel mass is obtained (2 to 3 days).

8/2/2019 Improvised Munitions Handbook
http://slidepdf.com/reader/full/improvised-munitions-handbook 228/336
Wax Systems
Section V
No. 4.6
Any of several common waxes can be used to gel gasoline for use as a flame fuel whichwill adhere to target surfaces.
MATERIALS REQUIRED:
PROCEDURE:
1. Obtaining wax from Natural Sources: Plants and berries are potential sources of naturalwaxes. Place the plants and/or berries in boiling water. The natural waxes will melt. Letthe water cool. The natural waxes will form a solid layer on the water surface. Skim offthe solid wax and let it dry. With natural waxes which have suspended matter whenmelted, screen the wax through a cloth.
2. Melt the wax and pour into jar or bottle which has been placed in a hot water bath.
3. Add gasoline to the bottle.
4. When wax has completely dissolved in the gasoline, allow the water bath to coolslowly to room temperature.

8/2/2019 Improvised Munitions Handbook
http://slidepdf.com/reader/full/improvised-munitions-handbook 229/336
NOTE: If a gel does not form, add additional wax (up to 40% by volume) and repeat theabove steps. If no gel forms with 40% wax, make a Lye solution by dissolving a smallamount of Lye (Sodium Hydroxide) in an equal amount of water. Add this solution (1/2% by volume) to the gasoline wax mix and shake bottle until a gel forms

8/2/2019 Improvised Munitions Handbook
http://slidepdf.com/reader/full/improvised-munitions-handbook 230/336
Animal Blood Systems
Section V
No. 4. 7
Animal blood can be used to gel gasoline for use as a flame fuel which will adhere totarget surfaces.
MATERIAL REQUIRED:
PROCEDURE:

8/2/2019 Improvised Munitions Handbook
http://slidepdf.com/reader/full/improvised-munitions-handbook 231/336
Preparation of animal blood strum:
a. Slit animal’s throat by jugular vein. Hang-up-side down to drain.
b. Place coagulated (lumpy) blood in a cloth or on a screen and catch the red fluid(serum) which drains through,
c. Store in cool place if possible.
CAUTION: Do not get aged animal blood or the serum into an open cut. This can causeinfections.
2. Pour blood serum into jar, bottle, or other container and add gasoline.
3. Add the salt (or other additive) to the mixture and stir until a gel forms.

8/2/2019 Improvised Munitions Handbook
http://slidepdf.com/reader/full/improvised-munitions-handbook 232/336
Acid Delay Incendiary
Section V
No. 5
This device will ignite automatically after a given time delay.
MATERIAL REQUIRED:
Small jar with cap Cardboard Adhesive tape
Potassium Chlorate Sugar Sulphuric Acid (Battery Acid) Rubber sheeting (automotive inner tube)
PROCEDURE:
1. Sulphuric acid must be concentrated. If battery acid or other dilute acid is used,concentrate it by boiling. Container used should be of enamelware or oven glass. Whendense white fumes begin to appear, immediately remove the acid from heat and allow tocool to room temperature.
CAUTION: Sulphuric acid will burn skin and destroy clothing. If any is spilled, wash it
away with a large quantity of water. Fumes are also dangerous and should not be inhaled.
2. Dissolve one part by volume of Potassium Chlorate and one part by volume of sugar intwo parts by volume of boiling water.
3. Allow the solution to cool. When crystals settle, pour off and discard the liquid.
4. Form a tube from cardboard just large enough to fit around the outside of the jar and 2to 3 times the height of the jar. Tape one end of the tube closed.

8/2/2019 Improvised Munitions Handbook
http://slidepdf.com/reader/full/improvised-munitions-handbook 233/336
5. Pour wet Potassium Chlorate- sugar crystals into the tube until it is about 2/3 full.Stand the tube aside to dry.
6. Drill a hole through the cap of the jar about 1/2 inch (1 1/4 cm) in diameter.
7. Cut 4 disc from rubber sheet so that it just fits snugly inside the lid of the jar.

8/2/2019 Improvised Munitions Handbook
http://slidepdf.com/reader/full/improvised-munitions-handbook 234/336
8. Partly fill jar with water, cover with rubber disc and cap tightly with the drilled lid.Invert bottle and allow to stand for a few minutes to make sure that there are no leaks.THIS IS EXTREMELY IMPORTANT.
9. Pour water from jar and fill about 1/3 full with concentrated sulphuric acid. Replacethe rubber disc and cap tightly.
IMPORTANT: Wash outside of jar thoroughly with clear water. II this it not done, the jar may be dangerous to handle during use
HOW TO USE:
1. Place the tube containing the Sugar Chlorate crystals on an incendiary or flammablematerial taped end down.
2. Turn the jar of sulphuric acid cap open end down and slide it into of the tube.
After a time delay, the acid will eat through the rubber disc and ignite the sugar chloratemix. The delay time depends upon the thickness and type of rubber used for the disc.Before using thit device, tests should be conducted to determine the delay time that can be expected.
NOTE: A piece of standard automobile inner tube (about 1/32” thick) will provide adelay time of approximately 45 minutes.

8/2/2019 Improvised Munitions Handbook
http://slidepdf.com/reader/full/improvised-munitions-handbook 235/336
Improvised White Flare
Section V
No. 6
An improvised white flare can be made from potassium nitrate, aluminum powder andshellac. It has a time duration of approximately 2 minutes.
MATERIALS REQUIRED:
Potassium nitrate Aluminum powder (bronzing)
Shellac Quart jar with lid Fuse, 15 in. long Wooden rod, 1/4 in. diameter Tin can, 2-1/2 in. diameter x 5 in, long Flat window screen Wooden block
SOURCE:
Field grade (Section I, No. 2)
Drug Store Hardware or paint store Hardware or paint store
NOTE: All of the above dimensions are approximate
PROCEDURE:
1. Place the potassium nitrate crystals on the screen. Rub the material back and forthagainst the screen mesh with the wooden block until the nitrate is granulated into a powder.

8/2/2019 Improvised Munitions Handbook
http://slidepdf.com/reader/full/improvised-munitions-handbook 236/336
2. Measure 21 tablespoons of the powdered nitrate into a quart jar. Add 21 tablespoons ofthe aluminum powder to the nitrate.
3. Place lid 011 the jar and shake ingredients vigorously until well mixed.
4. Add 12 tablespoons of shellac to the mixture and stir with the wooden rod. Storemixture until ready for Step 7.
5. Knot one end of the fuse.

8/2/2019 Improvised Munitions Handbook
http://slidepdf.com/reader/full/improvised-munitions-handbook 237/336
6. Wrap the knotted end of the fuse once around the inside bottom of the can with theknot at the center. Then, run the rest of the fuse out the center top of the can.
7. Pour the mixture in the can and around the fuse.
8. Store flare mixture away from heat and flame until ready for use, but no longer than 3weeks.

8/2/2019 Improvised Munitions Handbook
http://slidepdf.com/reader/full/improvised-munitions-handbook 238/336
Improvised Iron Oxide
Section V
No. 7
Iron Oxide can be made from steel wool. It is used in the preparation of ImprovisedYellow Flare (Section V, No. 8), Improvised White Smoke Munition (Section V, No. 9)and Improvised Black Smoke Munition (Section V, No. 10).
MATERIAL REQUIRED:
Steel wool (without soap), approx. 16 large pads
Smoke pipe, approximately 4 feet long x 12 inches in diameter, 1/16 inches thick Vacuum cleaner Electrical source (110 v., A. C.) Window screen Newspaper 2 containers Wooden blocks, if necessary Flame source (matches, lighter, etc.)
SOURCE:
Hardware or general store Hardware store Hardware store Modern commercial and domestic buildings
PROCEDURE:
1. Separate a handful of steel wool into a fluffy ball approximately 12 inches in diameterand place into one end of the smoke pipe.
2. Place the pipe on a level, nonflammable surface. Steady the pipe, using wooden blocksif necessary.
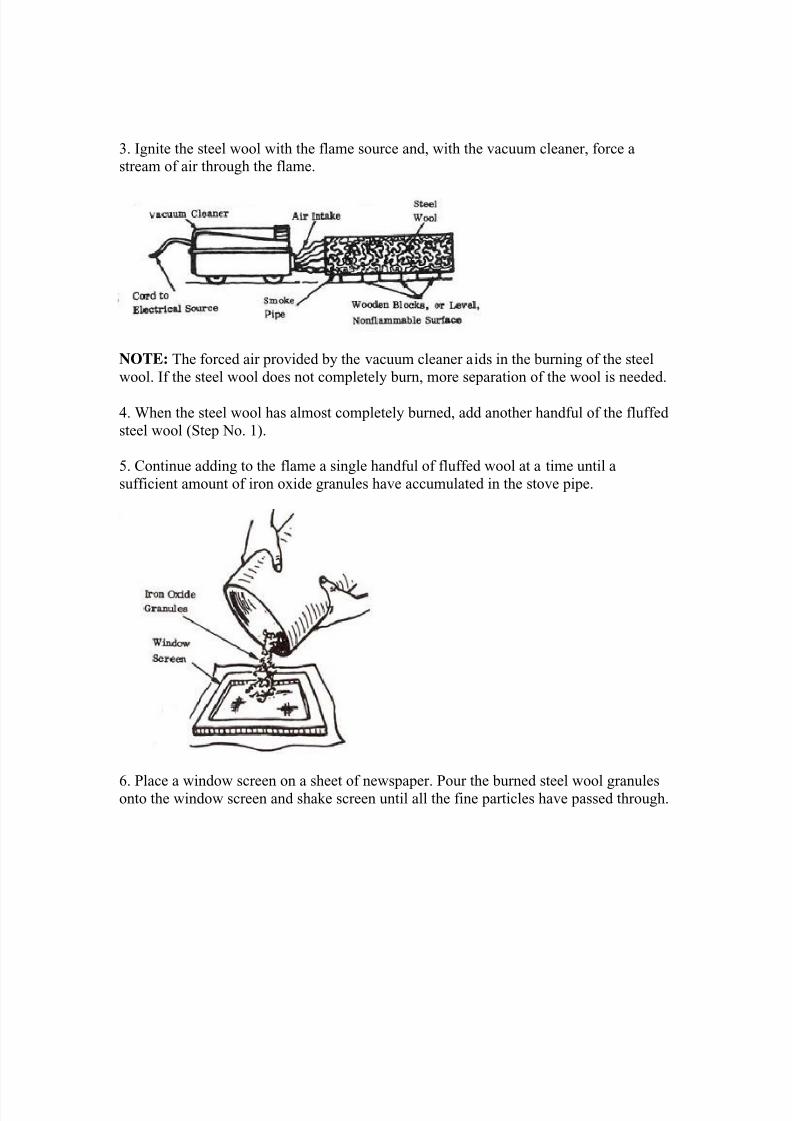
8/2/2019 Improvised Munitions Handbook
http://slidepdf.com/reader/full/improvised-munitions-handbook 239/336
3. Ignite the steel wool with the flame source and, with the vacuum cleaner, force astream of air through the flame.
NOTE: The forced air provided by the vacuum cleaner aids in the burning of the steelwool. If the steel wool does not completely burn, more separation of the wool is needed.
4. When the steel wool has almost completely burned, add another handful of the fluffedsteel wool (Step No. 1).
5. Continue adding to the flame a single handful of fluffed wool at a time until asufficient amount of iron oxide granules have accumulated in the stove pipe.
6. Place a window screen on a sheet of newspaper. Pour the burned steel wool granulesonto the window screen and shake screen until all the fine particles have passed through.

8/2/2019 Improvised Munitions Handbook
http://slidepdf.com/reader/full/improvised-munitions-handbook 240/336
7. Discard those particles on the newspaper which are fibrous and unburned.
8. Save the particles which were too large to pass through the screen in one of thecontainers for future burning.
9. Store particles of iron oxide (left on newspaper) in another container until reacts foruse.

8/2/2019 Improvised Munitions Handbook
http://slidepdf.com/reader/full/improvised-munitions-handbook 241/336
Improvised Yellow Flare
Section V
No. 8
A yellow flare can be made from shellac, sulfur, aluminum powder, iron oxide and baking soda. It can be used either for signaling or lighting up a dark area.
MATERIALS REQUIRED:
Shellac Sulfur
Aluminum powder (bronzing) Black iron oxide Sodium bicarbonate (baking soda) Improvised white flare mix Window Screen Wooden rod or stick Tablespoon Quart Jar with lid Newspaper Wooden block Fuse, 15 Inches long Tin can, 2-1/2 inches diameter x 5 inches long Aluminum foil Flame source (matches, lighter, etc.)
SOURCES:
Hardware or paint store
Drug or agricultural supply store
Hardware or paint store
Section V, No. 7
Food store
Section V, No. 6
PROCEDURE:
1. Measure 6 firm level tablespoons of sulfur into a quart jar.

8/2/2019 Improvised Munitions Handbook
http://slidepdf.com/reader/full/improvised-munitions-handbook 242/336
2. Add 7 firm level tablespoons of sodium bicarbonate to the sulfur.
3. Add 2 heaping tablespoons of black iron oxide.
4. Place the lid on the quart jar and shake ingredients 10 times.
5. Place the mixed ingredients on the window screen.

8/2/2019 Improvised Munitions Handbook
http://slidepdf.com/reader/full/improvised-munitions-handbook 243/336
6. Mix ingredients thoroughly by forcing material through screen mesh onto thenewspaper, using a wooden rod or stick. Repeat screening 2 times to insure thoroughmixing.
7. Pour mixed ingredients back into the Jar.
8. Add 20 heaping tablespoons of aluminum powder to the ingredients.

8/2/2019 Improvised Munitions Handbook
http://slidepdf.com/reader/full/improvised-munitions-handbook 244/336
9. Add while stirring the least amount of shellac needed to moisten mixture.
10. Force moistened mix through screen mesh onto the newspaper as in Step 6. Storemixture until ready for Step 14.
11. Measure one heaping teaspoon of white flare mix onto a 4 inch square piece ofaluminum foil.
12. Knot one end of the fuse and place the knot onto the mix.
13. Fold the corners of the foil tightly around the fuse.
14. Now place the yellow flare mix into the can.

8/2/2019 Improvised Munitions Handbook
http://slidepdf.com/reader/full/improvised-munitions-handbook 245/336
15. Place the fused white flare mix In the foil below the surface of the yellow flare mix inthe can.
16. Light the fuse with the flame source when ready.

8/2/2019 Improvised Munitions Handbook
http://slidepdf.com/reader/full/improvised-munitions-handbook 246/336
Improvised White Smoke Munition
Section V
No. 9
A white smoke munition can be made from sulfur, potassium nitrate, black powder,aluminum powder, iron oxide and carbon tetra chloride. It can be used either for signalingor screening.
MATERIAL REQUIRED:
Sulfur
Potassium nitrate (Saltpeter) Improvised black powder Aluminum powder (bronzing) Black iron oxide Carbon tetrachloride Improvised white flare mix Tablespoon Wooden rod or stick Newspaper Quart Jar with lid Window screen Fuse, 15 inches long Tin can, 2-1/2 inches diameter x 5 inches long Flame source (matches, lighter, etc.)
SOURCE:
Drug or agricultural supply store Drug store or Section I, No. 2 Section I, No. 3 Hardware or paint store Section V, No. 7 Hardware or paint store
Section V, No. 6
PROCEDURE:
1. Measure 3 level tablespoons of powdered dry sulfur into the quart jar.

8/2/2019 Improvised Munitions Handbook
http://slidepdf.com/reader/full/improvised-munitions-handbook 247/336
2. Add 4 level tablespoons of powdered dry potassium nitrate to the sulfur.
NOTE: It may be necessary to crush the potassium nitrate crystals and sulfur to obtain anaccurate measure in tablespoon.
3. Add 2 heaping tablespoons of black iron oxide.
4. Place all ingredients on the window screen.
5. Mix ingredients thoroughly by sieving them onto the newspaper. Repeat screening 3times to insure thorough mixing.
6. Pour mixed ingredients back into the Jar.

8/2/2019 Improvised Munitions Handbook
http://slidepdf.com/reader/full/improvised-munitions-handbook 248/336
7. Screw lid onto the quart Jar and shake vigorously until the ingredients are evenlymixed.
8. Remove lid from quart jar and add 15 heaping tablespoons of aluminum powder(bronzing) to the ingredients. Mix thoroughly with wooden rod or stick.
NOTE: If the white smoke mixture is not for immediate use, screw the lid back onto the jar tightly and store until ready for use. If mixture is for immediate use, continue with thefollowing steps.
9. Wet mix the ingredients to a paste consistency with carbon tetrachloride.

8/2/2019 Improvised Munitions Handbook
http://slidepdf.com/reader/full/improvised-munitions-handbook 249/336
CAUTION: Fumes of Carbon Tetra¬chloride are hazardous. Perform Step 10 in a wellventilated area.
10. Add 1/2 cup of black powder to the ingredients and carefully mix with wooden rod orstick.
HOW TO USE:
1. Measure one heaping teaspoon of white flare mix onto a 4 inch square piece ofaluminum foil.
2. Knot one end of the fuse and place the knot into the mix.
3. Fold the corners of the foil tightly around the fuse.

8/2/2019 Improvised Munitions Handbook
http://slidepdf.com/reader/full/improvised-munitions-handbook 250/336
4. Now place the white smoke mix into the can.
5. Place the fused white flare mix in the foil below the surface of the white 8moke mix in
the can.
6. Light the fuse with the flame source when ready.

8/2/2019 Improvised Munitions Handbook
http://slidepdf.com/reader/full/improvised-munitions-handbook 251/336
Improvised Black Smoke
Section V
No. 10
A black smoke munition can be made from sulfur, aluminum powder, iron oxide, mothcrystals and carbon tetrachloride. It can be used either for signaling or screening.
MATERIAL REQUIRED:
Sulfur Aluminum powder (bronzing)
Improvised black iron oxide Moth crystals (paradichlorobenzene) Carbon tetrachloride Improvised white flare mix Table salt Teaspoon Tablespoon Quart jar or container Wooden rod or stick Wooden block Window screen Newspaper Fuse, 15 in. long Tin can, 2-1/2 in. diameter x 5 in. long Aluminum foil Flame source (matches, lighter, etc.)
SOURCES:
Drug store Paint or hardware store Section V, No. 7 Hardware store Paint or hardware store Section V, No. 6
Food store
PROCEDURE:
1. Measure 3 level teaspoons of sulfur into a quart jar.

8/2/2019 Improvised Munitions Handbook
http://slidepdf.com/reader/full/improvised-munitions-handbook 252/336
2. Add 1 heaping tablespoon of improvised iron oxide to the sulfur.
3. Add 2 level teaspoons of table salt.
4. Crush 5 heaping tablespoons of moth crystal into a fine powder using a wooden block.
5. Add 4 heaping tablespoons of powdered moth crystals to the other Ingredients in Jar.
6. Place all ingredients on the window screen.
7. Mix ingredients thoroughly by sieving them onto the newspaper. Repeat screening 3times to insure thorough mixing.

8/2/2019 Improvised Munitions Handbook
http://slidepdf.com/reader/full/improvised-munitions-handbook 253/336
8. Pour mixed ingredients back into the jar.
9. Add 12 heaping tablespoons of aluminum powder to the ingredients and mix bystirring with wooden rod or stick.

8/2/2019 Improvised Munitions Handbook
http://slidepdf.com/reader/full/improvised-munitions-handbook 254/336
10. Just before use as a black smoke, wet mix the above ingredients to a paste consistencywith carbon tetrachloride.
CAUTION: Fumes of Carbon Tetrachloride are hazardous. Perform Step 10 in a wellventilated area.
HOW TO USE:
1. Measure one heaping teaspoon of white flare mix onto a 4 inch square piece ofaluminum foil.
2. Knot one end of the fuse and place the knot into the mix.
3. Fold the corners of the foil tightly around the fuse.
4. Now place the black smoke mix into the can.

8/2/2019 Improvised Munitions Handbook
http://slidepdf.com/reader/full/improvised-munitions-handbook 255/336
5. Place the fused white flare mix in the foil below the surface of the black smoke mix inthe can.
6. Light the fuse with the flame source when ready.

8/2/2019 Improvised Munitions Handbook
http://slidepdf.com/reader/full/improvised-munitions-handbook 256/336

8/2/2019 Improvised Munitions Handbook
http://slidepdf.com/reader/full/improvised-munitions-handbook 257/336
Electric Bulb Initiator
Section VI
No. 1
Mortars, mines and similar weapons often make use of electric initiators. An electricinitiator can be made using a flashlight or automobile electric light bulb.
MATERIAL REQUIRED
Electric light bulb and mating socket Cardboard or heavy paper B
lack Powder Adhesive tape
PROCEDURE
Method I
1. Break the glass of the electric light bulb. Take care not to damage the filament. Theinitiator will NOT work if the filament is broken. Remove all glass above the base of the bulb.

8/2/2019 Improvised Munitions Handbook
http://slidepdf.com/reader/full/improvised-munitions-handbook 258/336
2. Form a tube 3 to 4 inches long from cardboard or heavy paper to fit around the base ofthe bulb. Join the tube with adhesive tape.
3. Fit the tube to the bulb base and tape in place.
Make sure that the tube does not cover that portion of the bulb base that fits into thesocket.
4. If no socket is available for connecting the initiator to the firing circuit, solder theconnecting wires to the bulb base.
CAUTION: Do NOT use a hot soldering iron on the completed igniter since it mayignite the Black Powder.
5. Fill the tube with Black Powder and tape the open end of the tube closed.

8/2/2019 Improvised Munitions Handbook
http://slidepdf.com/reader/full/improvised-munitions-handbook 259/336
Method II
If the glass bulb (electric light) is large enough to hold the Black Powder, it can be usedas the container.
PROCEDURE
1. File a small hole in the top of the bulb.
2. Fill the bulb with Black Powder and tape the hole closed.

8/2/2019 Improvised Munitions Handbook
http://slidepdf.com/reader/full/improvised-munitions-handbook 260/336
Fuse Igniter from Book Matches
Section VI
No. 2
A simple, reliable fuse igniter can be made from paper book matches.
Material Required
Paper book matches. Adhesive or friction tape. Fuse cord (improvised or commercial).
Pin or small nail.
Procedure
1. Remove the staple(s) from match book and separate matches from cover.
2. Cut fuse cord so that inner core is exposed.

8/2/2019 Improvised Munitions Handbook
http://slidepdf.com/reader/full/improvised-munitions-handbook 261/336
3. Tape exposed end of fuse cord in center of one row of matches.
4. Fold matches over fuse and tape.
5. Shape the cover into a tube with the striking surface on the inside and tape. Make surethe edges of the cover at the striking end are butted. Leave cover open at opposite end forinsertion of the matches.
6. Push the taped matches with fuse cord into the tube until the bottom ends of thematches are exposed about 3/4 inch (2 cm).

8/2/2019 Improvised Munitions Handbook
http://slidepdf.com/reader/full/improvised-munitions-handbook 262/336
7. Flatten and fold the open end of the tube so that it laps over about 1 inch (2-1/2 cm);tape in place.
8. Push pin or small nail through matches and fuse cord. Bend end of pin or nail.
Method of Use
To light the fuse cord, the Igniter is held by both hands and pulled sharply or quickly.
CAUTION
Store matches and completed fuse igniters in moisture proof containers such as plastic orrubber type bags until ready for use. Damp or wet paper book matches will not ignite.Fuse lengths should not exceed 12 in. (30 cm) for easy storage. These can be spliced tomain fuses when needed.
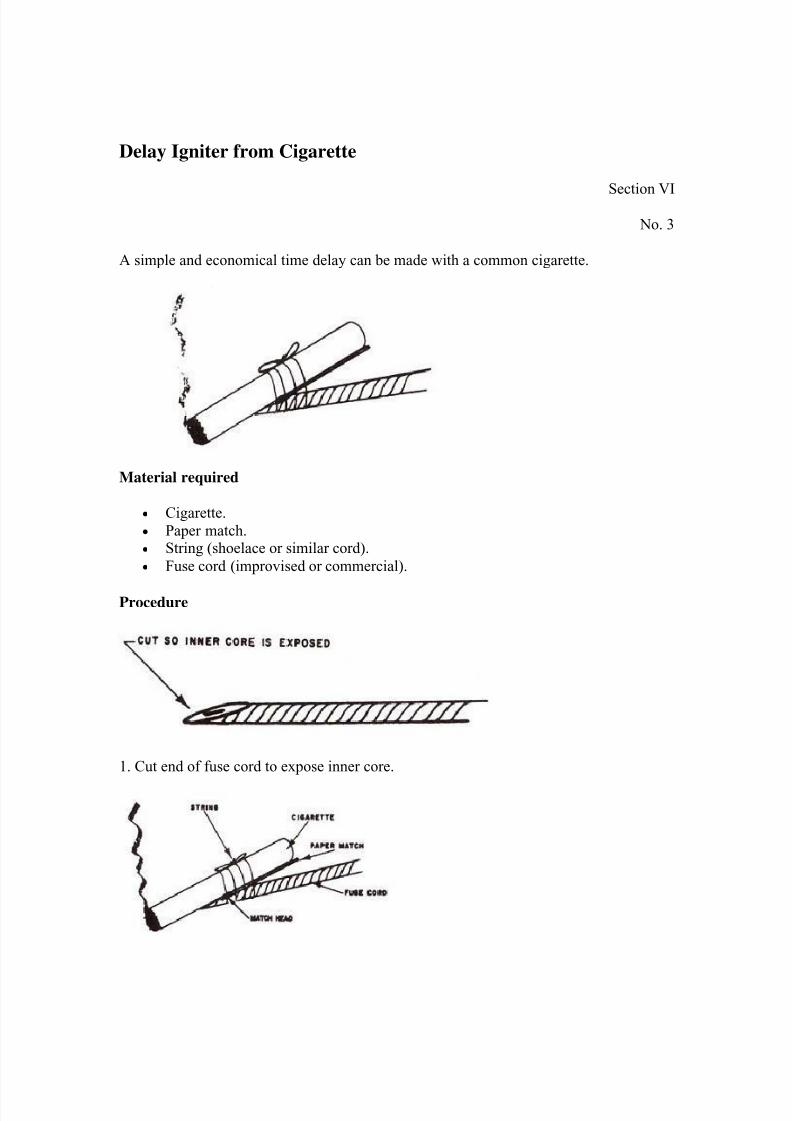
8/2/2019 Improvised Munitions Handbook
http://slidepdf.com/reader/full/improvised-munitions-handbook 263/336
Delay Igniter from Cigarette
Section VI
No. 3
A simple and economical time delay can be made with a common cigarette.
Material required
Cigarette. Paper match. String (shoelace or similar cord). Fuse cord (improvised or commercial).
Procedure
1. Cut end of fuse cord to expose inner core.

8/2/2019 Improvised Munitions Handbook
http://slidepdf.com/reader/full/improvised-munitions-handbook 264/336
2. Light cigarette in normal fashion. Place a paper match so that the head is over exposedend of fuse cord and tie both to the side of the burning cigarette with string.
3. Position the burning cigarette with fuse so that it burnt freely. A suggested method is tohang the delay on a twig.
NOTE
Common dry cigarettes burn about 1 inch every 7 or 8 minutes in still air. If the fuse cordis placed 1 inch from the burning end of a cigarette a time delay of 7 or 8 minutes willresult.
Delay time will vary depending upon type of cigarette, wind, moisture, and otheratmospheric conditions.
To obtain accurate delay time, a test run should be made under “use” conditions.

8/2/2019 Improvised Munitions Handbook
http://slidepdf.com/reader/full/improvised-munitions-handbook 265/336
Watch Delay Timer
Section VI
No. 4
A time delay device for use with electrical firing circuits can be made by using a watchwith a plastic crystal.
Material and Equipment Required
Watch with plastic crystal. Small clean metal screw. Battery. Connecting wires.
Drill or nail.
Procedure
1. If watch has a sweep or large second hand, remove it. If delay time of more than onehour is required, also remove the minute hand. If hands are painted, carefully scrape paintfrom contact edge with knife.
2.Drill a hole through the crystal of the watch or pierce the crystal with a heated nail. Thehole must be small enough that the screw can be tightly threaded into it.

8/2/2019 Improvised Munitions Handbook
http://slidepdf.com/reader/full/improvised-munitions-handbook 266/336
3. Place the screw in the hole and turn down as far as possible without making contactwith the face of the watch. If screw has a pointed tip, it may be necessary to grind the tipflat.
If no screw is available, pass a bent stiff wire through the hole and tape to the crystal.
IMPORTANT: Check to make sure hand of watch cannot pass screw or wire withoutcontacting it.
How to Use
1. Set the watch so that a hand will reach the screw or wire at the time you want the firingcircuit completed.
2. Wind the watch.
3. Attach a wire from the case of the watch to one terminal of the battery.
4. Attach one wire from an electric initiator (blasting cap, squib, or alarm device) to thescrew or wire on the face pf the watch.
5. After thorough inspection is made to assure that the screw or the wire connected to it isnot touching the face or case of the watch, attach the other wire from the initiator to thesecond terminal of the battery.
CAUTION
Follow step 5 carefully to prevent premature initiation.

8/2/2019 Improvised Munitions Handbook
http://slidepdf.com/reader/full/improvised-munitions-handbook 267/336
No-flash Fuse Igniter
Section VI
No. 5
A simple no-flash fuse igniter can be made from common pips fittings.
MATERIAL REQUIRED:
1/4 in. (6mm) Pips Cap Solid 1/4 in. (6mm) Pipe Plug Flat head nail about 1/16in. (1 1/2 mm) in diameter
Hand Drill
Common “Strike Anywhere” Matches Adhesive Tape
PROCEDURE:
1. Screw the pipe plug tightly into the pipe cap.
2. Drill hole completely through the center of the plug and cap large enough that the nailfits loosely.

8/2/2019 Improvised Munitions Handbook
http://slidepdf.com/reader/full/improvised-munitions-handbook 268/336
3. Enlarge the hole in the plug except for the last 1/8 in. (3 mm) so that the fuse cord will just fit.
4. Remove the plug from the cap and push the flat head nail through the hole in the capfrom the inside.
5. Cut the striking tips from approximately 10 strike-anywhere matches. Place match tipsinside pipe cap and screw plug in finger tight.
HOW TO USE:
1. Slide the fuse cord into the hole in the pipe plug.
2. Tape igniter to fuse cord.

8/2/2019 Improvised Munitions Handbook
http://slidepdf.com/reader/full/improvised-munitions-handbook 269/336
3. Tap point of nail on a hard surface to ignite the fuse.

8/2/2019 Improvised Munitions Handbook
http://slidepdf.com/reader/full/improvised-munitions-handbook 270/336
Dried Seed Timer
Section VI
No. 6
A time delay device for electrical firing circuits can be made using the principle ofexpansion of dried seeds.
MATERIEL REQUIRED:
Dried peas, beans or other dehydrated seeds Wide mouth glass jar with non- metal cap
Two screws or bolts Thin metal plate Hand drill Screwdriver
PROCEDURE:
1. Determine the rate of rise of the dried seeds selected. This is necessary to determinedelay time of the timer.
a. Place a sample of the dried seeds in the jar and cover with water.
b. Measure the time it takes for the seeds to rise a given height. Most dried seeds increase50% in one to two hours.
2. Cut a disc from thin metal plate. Disc should fit loosely inside the jar.
NOTE: If metal is painted, rusty or otherwise coated, it must be scraped or sanded toobtain a clean metal surface.

8/2/2019 Improvised Munitions Handbook
http://slidepdf.com/reader/full/improvised-munitions-handbook 271/336
3. Drill two holes in the cap of the jar about 2 inches apart. Diameter of holes should besuch that screws or bolts will thread tightly into them. If the jar has a metal cap or no cap,
a piece of wood or plastic (NOT METAL) can be used as a cover.
4. Turn the two screws or bolts through the holes in the cap. Bolts should extend aboutone in. (2 1/2 cm) into the jar.
IMPORTANT: Both bolts must extend the same distance below the container cover.
5. Pour dried seeds into the container. The level will depend upon the previouslymeasured rise time and the desired delay.
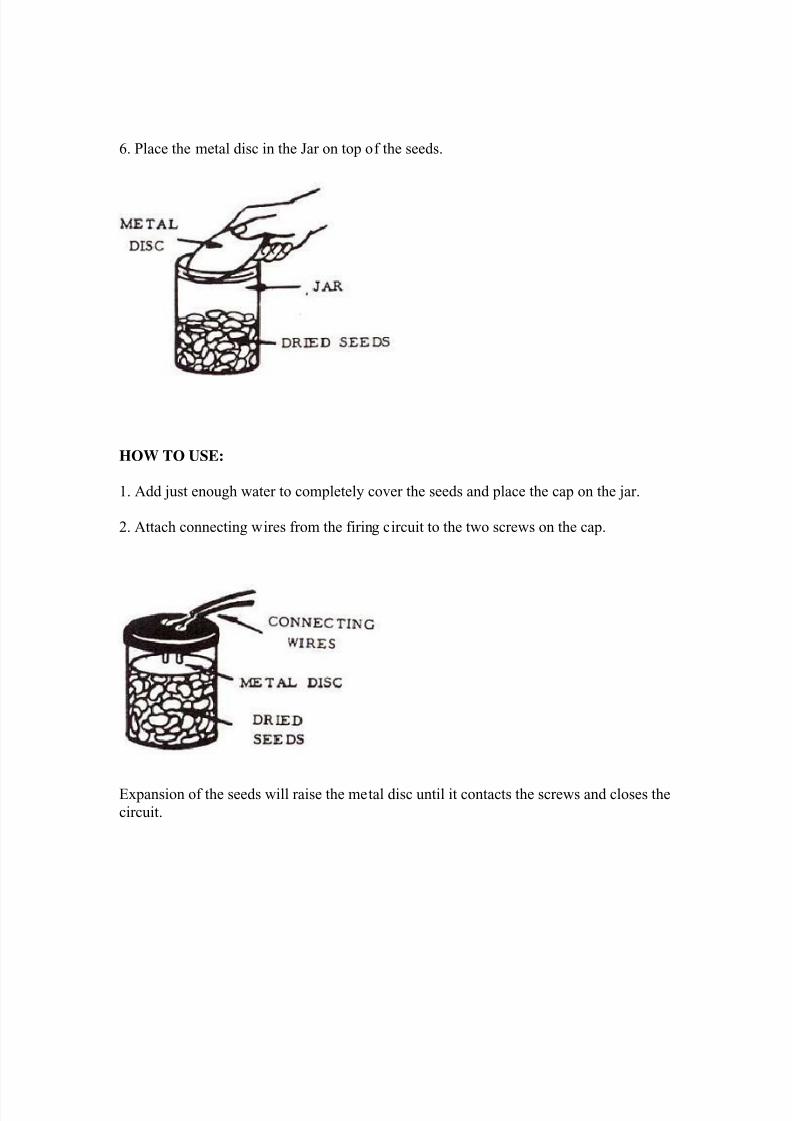
8/2/2019 Improvised Munitions Handbook
http://slidepdf.com/reader/full/improvised-munitions-handbook 272/336
6. Place the metal disc in the Jar on top of the seeds.
HOW TO USE:
1. Add just enough water to completely cover the seeds and place the cap on the jar.
2. Attach connecting wires from the firing circuit to the two screws on the cap.
Expansion of the seeds will raise the metal disc until it contacts the screws and closes thecircuit.

8/2/2019 Improvised Munitions Handbook
http://slidepdf.com/reader/full/improvised-munitions-handbook 273/336

8/2/2019 Improvised Munitions Handbook
http://slidepdf.com/reader/full/improvised-munitions-handbook 274/336
Fuse Cords
Section VI
No. 7
These fuse cords are used for igniting propellants and incendiaries or, with a non-electric blasting cap, to detonate explosives.
FAST BURNING FUSE
The burning rate of this fuse is approximately 40 in. (100 cm) per minute.
MATERIAL REQUIRED:
Soft Cotton String…………………………………Potassium Nitrate (Saltpeter)25 parts
Fine Black Powder or ……………………………Charcoal 3 parts Piece of round stick…………………………….. Sulphur 2 parts Two pans or dishes
PROCEDURE:
1. Moisten fine Black Powder to form a paste or prepare a substitute as follows:
a. Dissolve Potassium Nitrate in an equal amount of water.
b. Pulverize charcoal by spreading thinly on a hard surface and rolling the round stickover it to crush to a fine powder.
c. Pulverize sulphur in the same manner.
d. Dry mix sulphur and charcoal.
e. Add Potassium Nitrate solution to the dry n.ix to obtain a thoroughly wet paste.
2. Twist or braid three strands of cotton string together.

8/2/2019 Improvised Munitions Handbook
http://slidepdf.com/reader/full/improvised-munitions-handbook 275/336
3. Rub paste mixture into twisted string with fingers and allow to dry.
4. Check actual burning rate of fuse by measuring the time it takes for a known length to burn. This is used to determine the length needed for a desired delay time. If 5 in. (12 1/2cm) burns for 6 seconds, 50 in. (125 cm) of fuse cord will be needed to obtain a oneminute (60 second) delay time.
SLOW BURNING FUSE
The burning rate of this fuse is approximately 2 in. (5 cm) per minute.
MATERIAL REQUIRED:
Cotton String or 3 Shoelaces Potassium Nitrate or Potassium Chlorate Granulated Sugar
PROCEDURE:
1. Wash cotton string or shoelaces in hot soapy water; rinse in fresh water.
2. Dissolve 1 part Potassium Nitrate or Potassium Chlorate and 1 part granulated sugar in2 parts hot water.

8/2/2019 Improvised Munitions Handbook
http://slidepdf.com/reader/full/improvised-munitions-handbook 276/336
3. Soak string or shoelaces in solution.
4. Twist or braid three strands of string together and allow to dry.
5. Check actual burning rate of the fuse by measuring the time it takes for a known lengthto burn. This is used to determine the Length needed for the desired delay time. If 2 in. (5cm) burns for 1 minute, 10 in. (25 cm) will be needed to obtain a 5 minute delay.
NOTE: The last few inches of this cord (the end inserted in the material to be ignited)should be coated with the fast burning Black Powder paste if possible. This must be donewhen the fuse is used to ignite a blasting cap.
REMEMBER: The burning rate of either of these fuses can vary| greatly. Do Not Usefor ignition until you have checked their burning rate.

8/2/2019 Improvised Munitions Handbook
http://slidepdf.com/reader/full/improvised-munitions-handbook 277/336
Time Delay Grenade
SECTION VI
No. 9
This delay mechanism makes it possible to use an ordinary grenade as a time bomb.
MATERIAL REQUIRED:
Grenade Fuse Cord
IMPORTANT: Fuse cord must be the type that burns completely. Slow burningimprovised fuse cord (Section VI, No. 7) is suitable. Safety fuse is not satisfactory, sinceits outer covering does not burn.
PROCEDURE:
1. Bend end of safety lever upward to form a hook. Make a single loop of fuse cordaround the center of the grenade body and safety lever. Tie a knot of the non-slip varietyat the safety lever.
NOTE: The loop must be tight enough to hold the safety lever In position when the pin isremoved.
2. Measuring from the knot along the free length of the fuse cord, measure off a length offuse cord that will give the desired delay time. Cut off the excess fuse cord.
HOW TO USE:
1. Place hand around grenade and safety lever so safety lever Is held in place. Carefullyremove pin.

8/2/2019 Improvised Munitions Handbook
http://slidepdf.com/reader/full/improvised-munitions-handbook 278/336
2. Emplace grenade In desired location while holding grenade and safety lever.
3. Very carefully remove hand from grenade and safety lever, making sure that the fusecord holds the safety lever in place.
CAUTION: If loop and knot of fuse cord do not hold for any reason and the safety leverIs released, the grenade will explode after the regular delay time.
4.Light free end of fuse cord.

8/2/2019 Improvised Munitions Handbook
http://slidepdf.com/reader/full/improvised-munitions-handbook 279/336
Can – Liquid Time Delay
Section VI
No. 10
A time delay device for electrical firing circuits can be made using a can and liquid.
MATERIAL REQUIRED:
Can Liquid (water, gasoline, etc.) Small block of wood or any material that will float on the liquid used
Knife 2 pieces of solid wire, each piece 1 foot (30 cm) or longer
PROCEDURE:
1. Make 2 small holes at opposite sides of the can very close to the top.
2. Remove Insulation from a long piece of wire for a distance a little greater than thediameter of the can
3. Secure the wire in place across the top of the can by threading it through the holes andtwisting in place, leaving some slack. Make loop in center or wire. Be sure a long pieceof wire extends from one end of the can.

8/2/2019 Improvised Munitions Handbook
http://slidepdf.com/reader/full/improvised-munitions-handbook 280/336
4. Wrap a piece of insulated wire around the block of wood. Scrape insulation from asmall section of this wire and bend as shown so that wire contacts loop before woodtouches bottom of container. Thread this wire through the loop of bare wire.
5. Make a very small hole (pinhole) in the side of the container. Fill container with aquantity of liquid corresponding to the desired delay time. Since the rate at which liquidleaves the can depends upon weather conditions, liquid used, size of hole, amount ofliquid in the container, etc.. determine the delay time for each individual case. Delaysfrom a few minutes to many hours are possible. Vary time by adjusting liquid level, typeof liquid (water, oil) and hole size.
HOW TO USE:
1. Fill can with liquid to the same level as during experimental run (step 5 above). Besure that wooden block floats on liquid and that wire Is free to move down as liquidleaves container.
2. Connect wires to firing circuit.
NOTE: A long term delay can be obtained by placing a volatile liquid (gasoline, ether,etc.) in the can Instead of water and relying on evaporation to lower the level. Be sure

8/2/2019 Improvised Munitions Handbook
http://slidepdf.com/reader/full/improvised-munitions-handbook 281/336
that the wood will float on the liquid used. DO NOT MAKE PINHOLE IN SIDE OFCAN!

8/2/2019 Improvised Munitions Handbook
http://slidepdf.com/reader/full/improvised-munitions-handbook 282/336
Short Term Time Delay for Grenade
Section VI
No. 11
A simple modification can produce delays of approximately 12 seconds for grenadeswhen fired from Grenade Launchers (Section IV, No. 5).
MATERIAL REQUIRED:
Grenade Nail
Knife Pliers Safety fuse
NOTE: Any safety or improvised fuse may be used. However, since different timedelays will result, determine the burning rate of the fuse first.
PROCEDURE
1. Unscrew fuse mechanism from body of grenade and remove. Pliers may have to beused.
2. Carefully cut with knife or break off detonator at crimp and save for later use.

8/2/2019 Improvised Munitions Handbook
http://slidepdf.com/reader/full/improvised-munitions-handbook 283/336
CAUTION: If detonator is cut or broken below the crimp, detonation may occur andsevere injuries could result.
3. Remove safety pin pull ring and lever, letting striker hit the primer. Place fusemechanism aside until delay fuse powder mix in mechanism is completely burned.
4. Remove pin, spring, and striker.
5. Remove primer from fuse mechanism by pushing nail through bottom end of primerhole and tapping with hammer.

8/2/2019 Improvised Munitions Handbook
http://slidepdf.com/reader/full/improvised-munitions-handbook 284/336
6. Insert safety fuse through top of primer hole. Enlarge hole If necessary. The fuseshould go completely through the hole.
7. Insert fuse into detonator and tape it securely to modified fuse mechanism.
NOTE: Be sure that fuse rests firmly against detonator at all times.
8. Screw modified fuse mechanism back into grenade. Grenade is now reactor for use.

8/2/2019 Improvised Munitions Handbook
http://slidepdf.com/reader/full/improvised-munitions-handbook 285/336
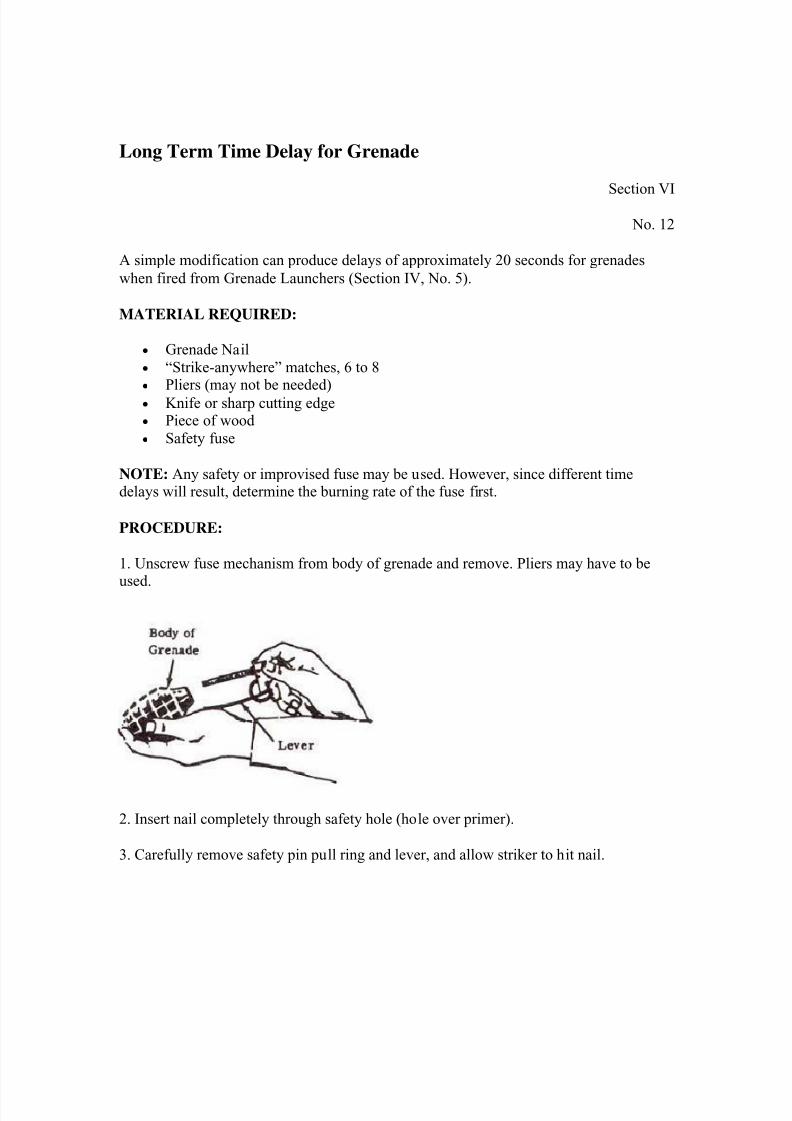
8/2/2019 Improvised Munitions Handbook
http://slidepdf.com/reader/full/improvised-munitions-handbook 286/336
Long Term Time Delay for Grenade
Section VI
No. 12
A simple modification can produce delays of approximately 20 seconds for grenadeswhen fired from Grenade Launchers (Section IV, No. 5).
MATERIAL REQUIRED:
Grenade Nail “Strike-anywhere” matches, 6 to 8
Pliers (may not be needed) Knife or sharp cutting edge Piece of wood Safety fuse
NOTE: Any safety or improvised fuse may be used. However, since different timedelays will result, determine the burning rate of the fuse first.
PROCEDURE:
1. Unscrew fuse mechanism from body of grenade and remove. Pliers may have to be
used.
2. Insert nail completely through safety hole (hole over primer).
3. Carefully remove safety pin pull ring and lever, and allow striker to hit nail.

8/2/2019 Improvised Munitions Handbook
http://slidepdf.com/reader/full/improvised-munitions-handbook 287/336
CAUTION: If for any reason, striker should hit primer Instead of nail, [detonator willexplode after (4-5 sec.) delay time.
4. Push pin out and remove spring and striker. Remove nail.
5. Carefully remove top section of fuse mechanism from bottom section by unscrewing.Pliers may have to be used.
CAUTION: Use extreme care – sudden shock may set off detonator.

8/2/2019 Improvised Munitions Handbook
http://slidepdf.com/reader/full/improvised-munitions-handbook 288/336
6. Fire primer by hitting nail placed against top of it. Remove fired primer (same as procedure 5 of Section VI, No. 11).
CAUTION: Do not hold assembly in your hand during above operation, as serious burns
may result.
7. Scrape delay fuse powder with a sharpened stick. Loosen about 1/4 in. (8 mm) of powder in cavity.

8/2/2019 Improvised Munitions Handbook
http://slidepdf.com/reader/full/improvised-munitions-handbook 289/336
8. Cut off tips (not whole head) of 8 “strike-anywhere” matches with sharp cutting edge.Drop them into delay fuse hole.
9. Place safety fuse In delay fuse hole so that it is flush against the match tips.
IMPORTANT: Be sure fuse remains flush against the match tips at all times.
10. Thread fuse through primer hole. Enlarge hole if necessary. Screw modified fusemechanism back together. Screw combination back into grenade. Grenade modification is
now ready for use. Light fuse when ready to use.
NOTE: If time delay is used for Improvised Grenade Launchers (Section IV, No. 5) .

8/2/2019 Improvised Munitions Handbook
http://slidepdf.com/reader/full/improvised-munitions-handbook 290/336
1. Wrap tape around safety fuse.
2. Securely tape fuse to grenade
3. Load grenade in launcher. Grenade will explode in approximately 20 seconds aftersafety fuse burns up to bottom of grenade.

8/2/2019 Improvised Munitions Handbook
http://slidepdf.com/reader/full/improvised-munitions-handbook 291/336
Detonator
Section VI
No. 13
Detonators (blasting caps) can be made from a used small arms cartridge case and fieldmanufactured explosives. Detonators are used to initiate secondary high explosives (C-4,TNT, etc.).
MATERIAL REQUIRED:
Primary explosive
Booster explosive Improvised scale Used cartridge case Fuse, 12 in. long Round wooden stick (small enough just to fit in the neck of the cartridge case) Drill or knife Long nail with sharpened end Vise Improvised loading fixture
SOURCE:
See table RDX (Section I, No. 15) or Picric Acid (Section I, No. 21) Section VII, No. 8 . 22 caliber or larger
PROCEDURE:
1. Remove fired primer from a used cartridge case using a sharpened nail. (See SectionIII, No. 5.)
2. If necessary, open out flash hole in the primer pocket using a drill or knife. Make itlarge enough to receive fuse.

8/2/2019 Improvised Munitions Handbook
http://slidepdf.com/reader/full/improvised-munitions-handbook 292/336
3. Place one end of fuse in the flash hole and extend it through the case until It becomesexposed at the open end. Knot this end and then pull fuse in cartridge case thus preventing fuse from falling out.
4. Load the primary explosive in the cartridge case, using the following table for the proper amount.

8/2/2019 Improvised Munitions Handbook
http://slidepdf.com/reader/full/improvised-munitions-handbook 293/336
5. Compress the primary explosive into the cartridge case with the wooden stick and thefollowing improvised loading fixture.

8/2/2019 Improvised Munitions Handbook
http://slidepdf.com/reader/full/improvised-munitions-handbook 294/336
CAUTION: The primary explosive is shock and flame sensitive.
NOTE: Tamping is not needed when TACC is used.

8/2/2019 Improvised Munitions Handbook
http://slidepdf.com/reader/full/improvised-munitions-handbook 295/336
6. Add one gram of booster explosive. The booster can be RDX (Section I, No. 15), orPicric Acid (Section I, No. 21).
7. Compress the booster explosive into the cartridge case with wood¬en stick and theloading fixture.
8. If the case is not full, fill the remainder with the secondary explosive to be detonated.
CAUTION: Detonator has considerably more power than a military blasting cap andshould be handled carefully.

8/2/2019 Improvised Munitions Handbook
http://slidepdf.com/reader/full/improvised-munitions-handbook 296/336
Miscellaneous
Clothespin Switch
Section VII
No. I
A spring type clothespin is used to make a circuit clos¬ing switch to actuate explosive
charges, mines, booby traps and alarm systems.
Material Required
Spring type clothespin. Solid copper wire — 1/16 in. (2 mm) in diameter. Strong string on wire. Flat piece of wood (roughly 1/8 x 1″ x 2″). Knife.
Procedure
1. Strip four in. (10 cm) of insulation from the ends of 2 solid copper wires. Scrape
copper wires with pocket knife until metal is shiny.
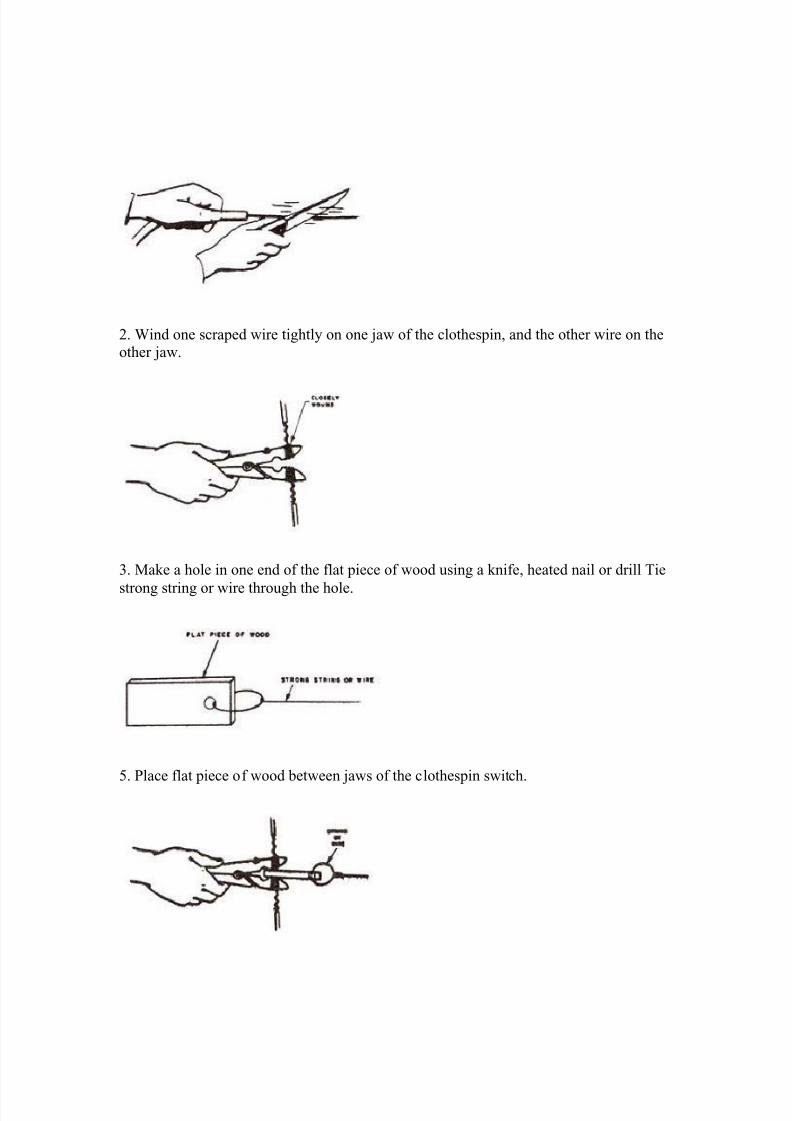
8/2/2019 Improvised Munitions Handbook
http://slidepdf.com/reader/full/improvised-munitions-handbook 297/336
2. Wind one scraped wire tightly on one jaw of the clothespin, and the other wire on theother jaw.
3. Make a hole in one end of the flat piece of wood using a knife, heated nail or drill Tie
strong string or wire through the hole.
5. Place flat piece of wood between jaws of the clothespin switch.

8/2/2019 Improvised Munitions Handbook
http://slidepdf.com/reader/full/improvised-munitions-handbook 298/336
Basic Firing Circuit
When the flat piece of wood is removed by pulling the string, the jaws of the clothespinwill close completing the circuit.
CAUTION
Do not attach the battery until the switch and trip wire have been emplaced andexamined. Be sure the flat piece of wood is separating the jaws
of the switch.
A Method of Use

8/2/2019 Improvised Munitions Handbook
http://slidepdf.com/reader/full/improvised-munitions-handbook 299/336
Mousetrap Switch
Section VII
No. II
A common mousetrap can be used to make a circuit closing switch for electricallyinitiated explosives, mines and booby traps.
MATERIEL REQUIRED:
Mousetrap Hacksaw or File
Connecting wires
PROCEDURE:
1. Remove the trip lever from the mousetrap using a hacksaw or file. Also remove thestaple and holding wire.
2. Retract the striker of the mousetrap and attach the trip lever across the end of the wood base using the staple with which the holding wire was attached.
NOTE: If the trip lever is not made of metal, a piece of metal of approximately the samesize should be used.

8/2/2019 Improvised Munitions Handbook
http://slidepdf.com/reader/full/improvised-munitions-handbook 300/336
3. Strip one in. (2 1/2 cm) of insulation from the ends of 2 connecting wires.
4. Wrap one wire tightly around the spring loaded striker of the mousetrap.
5. Wrap the second wire around some part of the trip lever or piece of metal.
NOTE: If a soldering iron is available, solder both of the above wire a in place.
HOW TO USE:
This switch can be used in a number of ways — one typical method is presented here.
The switch is placed inside a box which also contains the explosive and batteries. Thespring loaded striker is held back by the lid of the box and when the box is opened thecircuit is closed.

8/2/2019 Improvised Munitions Handbook
http://slidepdf.com/reader/full/improvised-munitions-handbook 301/336

8/2/2019 Improvised Munitions Handbook
http://slidepdf.com/reader/full/improvised-munitions-handbook 302/336
Flexible Plate Switch
Section VII
No. 3
This pressure sensitive switch if used for initiating emplaced mines and explosives.
MATERIAL REQUIRED:
Two flexible metal sheets one approximately 10 in. (25 cm) square oneapproximately 10 in. x 8 in.(20 cm)
Piece of wood 10 in. square by 1 in. thick
Four soft wood blocks 1 in.x 1 in.x 1/4 in. Eight flat head nails, 1 in. long Connecting wires Adhesive tape
PROCEDURE:
1. Nail 10 in. x 8 in. metal sheet to 10 in. square piece of wood so that 1 in. of woodshows on each side of metal. Leave one of the nails sticking up about 1/4 in.

8/2/2019 Improvised Munitions Handbook
http://slidepdf.com/reader/full/improvised-munitions-handbook 303/336
2. Strip insulation from the end of one connecting wire. Wrap this end around the nail anddrive the nail all the way in.
3. Place the four wood blocks on the corners of the wood base.
4. Place the 10 in. square flexible metal sheet so that it rests on the blocks in line with thewood base.
5. Drive four nails through the metal sheet and the blocks to fasten to the wood base. Asecond connecting wire is attached to one of the nails as in Step 2.

8/2/2019 Improvised Munitions Handbook
http://slidepdf.com/reader/full/improvised-munitions-handbook 304/336
6. Wrap adhesive tape around the edges of the plate and wood base. This will assure that
no dirt or other foreign matter will get between the plates and prevent the switch fromoperating.
HOW TO USE:
The switch is placed in a hole in the path of expected traffic and covered with a thin layerof dirt or other camouflaging material. The mine or other explosive device connected tothe switch can be buried with the switch or emplaced elsewhere as desired.

8/2/2019 Improvised Munitions Handbook
http://slidepdf.com/reader/full/improvised-munitions-handbook 305/336
When a vehicle passes over the switch, the two metal plates make contact closing thefiring circuit.

8/2/2019 Improvised Munitions Handbook
http://slidepdf.com/reader/full/improvised-munitions-handbook 306/336
Metal Ball Switch
Section VII
No. 4
This switch will close an electric circuit when it is tipped in any direction. It can be usedalone for booby traps or in combination with another switch or timer as an anti-disturbance switch.
MATERIAL REQUIRED:
Metal Ball 1/2″ ( 1 1/4 cm) diameter (see Note)
Solid copper wire 1/16″ (1/4 cm) diameter Wood block 1″ ( 2 1/2 cm) square by 1/4″ thick Hand drill Connecting wires Soldering iron & solder
NOTE: If other than a 1/2″ diameter ball is used, other dimensions must be changed so
that the ball will rest in the center hole of the block without touching either of the wires.
PROCEDURE:
1. Drill four 1/16″ holes and one 1/8″ hole through the wood block as shown.

8/2/2019 Improvised Munitions Handbook
http://slidepdf.com/reader/full/improvised-munitions-handbook 307/336
2. Form two “U” shaped pieces from 1/16″ copper wire to the dimensions shown.
3. Wrap a connecting wire around one leg of each “U” at least 1/4″ from the end and
solder in place.
4. Place metal ball on block so that It rests in the center hole.

8/2/2019 Improvised Munitions Handbook
http://slidepdf.com/reader/full/improvised-munitions-handbook 308/336
5. Insert the ends of the small “U” into two holes in the block. Insert large “U” into theremaining two holes.
CAUTION: Make sure that the metal ball does not touch either “U” shaped wire whenthe switch is standing on its base. If the ball does touch, bend wires outward slightly.
HOW TO USE:
Mount switch vertically and connect in electrical firing circuit as with any other switch.When tipped in any direction it will close the circuit.
CAUTION: Switch must be mounted vertically and not disturbed while completingconnections.

8/2/2019 Improvised Munitions Handbook
http://slidepdf.com/reader/full/improvised-munitions-handbook 309/336
Altimeter Switch
Section VII
No. 5
This twitch it designed for use with explosives placed on aircraft. It will close anelectrical firing circuit when an altitude of approximately 5000 ft (1-1/2 KM) it reached.
MATERIAL REQUIRED:
Jar or tin can Thin sheet of flexible plastic or waxed paper
Thin metal sheet (cut from tin can) Adhesive Tape Connecting Wires
PROCEDURE:
1. Place sheet of plastic or waxed paper over the top of tie can or jar and tape tightly totides of container.
NOTE: Plastic sheet should not be stretched tight. A small depression should be left inthe top.

8/2/2019 Improvised Munitions Handbook
http://slidepdf.com/reader/full/improvised-munitions-handbook 310/336
2. Cut two contact strips from thin metal and bend to the shapes shown.
3. Strip insulation from the ends of two connecting wires. Attach one wire to each contactstrip.
NOTE: If a soldering iron it available solder wires in place.
4. Place contact strips over container so that the larger contact is above the smaller with avery small clearance between the two.
5. Securely tape contact strips to sides of container.

8/2/2019 Improvised Munitions Handbook
http://slidepdf.com/reader/full/improvised-munitions-handbook 311/336
HOW TO USE:
1. Connect the altimeter switch in an explosive circuit the same as any switch.
2. Place the explosive package on airplane. As the plane rises the air inside the containerwill expand. This forces the plastic sheet against the contacts closing the firing circuit.
NOTE: The switch will not function in a pressurized cabin. It must be placed in some part of the plane which will not be pressurized.
Pull-Loop SwitchSection VII
No. 6
This switch will initiate explosive charges, mines, and booby traps when the trip wire is pulled.
MATERIAL REQUIRED:
2 lengths of insulated wire Knife Strong string or cord Fine thread that will break easily
PROCEDURE:
1. Remove about 2 Inches of insulation from one end of each length of wire. Scrape barewire with knife until metal is shiny.

8/2/2019 Improvised Munitions Handbook
http://slidepdf.com/reader/full/improvised-munitions-handbook 312/336
2. Make a loop out of each piece of bare wire.
3. Thread each wire through the loop of the other wire so the wires can slide along eachother.
NOTE: The loops should contact each other when the two wires are pulled taut.
HOW TO USE:
1. Separate loops by about 2 inches. Tie piece of fine thread around wires near each loopThread should be taut enough to support loops and wire, yet fine enough that it will breakunder a very slight pull.

8/2/2019 Improvised Munitions Handbook
http://slidepdf.com/reader/full/improvised-munitions-handbook 313/336
2. Fasten one wire to tree or stake and connect end to firing circuit.
3. Tie a piece of cord or string around the other piece of wire a few Inches from the loop.Tie free end of cord around tree, bush, or stake. Connect the free end of the wire to thefiring circuit. Initiation will occur when the tripcord is pulled.
CAUTION: Be sure that the loops do not contact each other when the wires areconnected to the firing circuit.
OTHER USES: The switch minus the fine thread may be used to activate a booby trap by such means as attaching it between the lid and a rigid portion of a box, between a doorand a door Jamb, and In similar manners.
Knife Switch
Section VII
No. 7
This device will close the firing circuit charges, mines, and booby traps when the tripwire is pulled or cut.
MATERIAL REQUIRED:
Knife or hack saw blade 6 nails Strong string or light rope Sturdy wooden board

8/2/2019 Improvised Munitions Handbook
http://slidepdf.com/reader/full/improvised-munitions-handbook 314/336
Wire
PROCEDURE:
1. Place knife on board. Drive 2 nails into board on each side of knife handle so knife isheld in place.
2. Drive one nail into board so that it touches blade of knife near the point.
3. Attach rope to knife. Place rope across path. Apply tension to rope, pulling knife bladeaway from nail slightly. Tie rope to tree, bush, or stake.
4. Drive another nail into board near the tip of the knife blade as shown below. Connectthe two nails with a piece of conducting wire. Nail should be positioned so that it willcontact the second nail when blade is pulled about 1 inch (2-1/2 cm) to the side.
NOTE: Check position of nails to knife blade. The nails should be placed so that theknife blade will contact either one when the rope is pulled or released.
HOW TO USE:
Attach one wire from firing circuit to one of the nails and the other to the knife blade.The circuit will be completed when the tripcord is pulled or released.
Improvised Scale
Section VII
No. 8

8/2/2019 Improvised Munitions Handbook
http://slidepdf.com/reader/full/improvised-munitions-handbook 315/336
This scale provides a means of weighing propellant and other items when conventionalscales or balances are not available.
MATERIAL REQUIRED:
Pages from Improvised Munitions Handbook Straight sticks about 1 foot (30 cm) long and 1/4 in. (5 mm) in diameter Thread or fine string
PROCEDURE:
1. Make a notch about 1/2 in. (1 cm) from each end of stick. Be sure that the two notchesare the same distance from the end of the stick.
2. Find the exact center of the stick by folding in half a piece of thread the same length asthe stick and placing it alongside the stick as a ruler. Make a small notch at the center of
the stick.
3. Tie a piece of thread around the notch. Suspend stick from branch, an¬other stickwedged between rocks, or by any other means. Be sure stick is balanced and free tomove.
NOTE: If stick is not balanced, shave or scrape a little off the heavy end until it does balance. Be sure the lengths of the arms are the same.

8/2/2019 Improvised Munitions Handbook
http://slidepdf.com/reader/full/improvised-munitions-handbook 316/336
4. Make a container out of one piece of paper. This can be done by rolling the paper intoa cylinder and folding up the bottom a few times.
5. Punch 2 holes at opposite sides of paper container. Suspend container from one side ofstick.
6. Count out the number of hand¬book pages equal In weight to that of the quantity ofmaterial to be weighed. Each sheet of paper weighs about 1.3 grams (20 grains or .04ounce). Suspend these sheets, plus one, to balance container on the other side of the scale.
7. Slowly add the material to be weighed to the container. When the stick is balanced, thedesired amount of material is in the container.

8/2/2019 Improvised Munitions Handbook
http://slidepdf.com/reader/full/improvised-munitions-handbook 317/336
8. If it is desired to weigh $ quantity of material larger than that which would fit in theabove container, make a container out of a larger paper or paper bag, and suspend fromone side of the stick. Suspend hand¬book pages from the other side until the stick is balanced. Now place
a number of sheets of handbook pages equal in weight to that of the desired amount ofmaterial to be weighed on one side, and fill the container with the material until the stickis balanced.
9. A similar method may be used to measure parts or percentage by weight. The weightunits are unimportant. Suspend equal weight containers from each side of the stick. Bags,tin cans, etc. can be used. Place one material in one of the containers. Fill the othercontainer with the other material until they balance. Empty and refill the number of timesnecessary to get the required parts by weight (e.g., 5 to 1 parts by weight would require 5
fillings of one can for one filling of the other).
Rope Grenade Launching Technique
Section VII
No. 9
A method of increasing the distance a grenade may be thrown. Safety fuse is used toincrease the delay time.
MATERIAL REQUIRED:
Hand grenade (Improvised pipe hand grenade, Section II, No. 1 may be used) Safety fuse or fast burning Improvised Fuse, (Section VI, No. 7) Light rope, cord, or string
PROCEDURE:
1. Tie a 4 to 6 foot (a meter) length of cord to the grenade. Be sure that the rope will not prevent the grenade handle from coming off.

8/2/2019 Improvised Munitions Handbook
http://slidepdf.com/reader/full/improvised-munitions-handbook 318/336
Note: If improvised grenade is used, tie cord around grenade near the end cap. Tape in place if necessary.
2. Tie a large knot in the other end of the cord for use as a handle.
3. Carefully remove safety pin from grenade, holding safety lever in place. Enlarge safety pin hole with point of knife, awl, or drill so that safety fuse will pass through hole.
4. Insert safety fuse in hole. Be sure that safety fuse is long enough to provide a 10second or more time delay. Slowly release safety lever in place.
CAUTION: If safety lever should be released for any reason, grenade will explode afterregular delay time (4-5 sec.).
NOTE: If diameter of safety fuse is too large to fit in hole (Step 4), follow procedure andHow to Use of Time Delay Grenade, Section VI, No. 9, instead of Steps 3 and 4 above.

8/2/2019 Improvised Munitions Handbook
http://slidepdf.com/reader/full/improvised-munitions-handbook 319/336
HOW TO USE:
1. Light fuse.
2. Whirl grenade overhead, holding knot at end of rope, until grenade picks up speed (3or 4 turns).
3. Release when sighted on target.
CAUTION: Be sure to release grenade within 10 seconds after fuse is lit.
NOTE: It is helpful to practice first with a dummy grenade or a rock to improveaccuracy. With practice, accurate launching up to 100 meters (300 feet) can be obtained.
Bicycle Generator Power Source
Section VII
No. 10
A 6 volt, 3 watt bicycle generator will set off one or two blasting caps (connected in
series) or an igniter.
MATERIAL REQUIRED:
Bicycle generator (6 volts, 3 watt) Copper wire Knife
PROCEDURE:
1. Strip about 4 in. (10 cm) of coating from both ends of 2 copper wires. Scrape ends with
knife until metal is shiny.

8/2/2019 Improvised Munitions Handbook
http://slidepdf.com/reader/full/improvised-munitions-handbook 320/336
2. Connect the end of one wire to the generator terminal.

8/2/2019 Improvised Munitions Handbook
http://slidepdf.com/reader/full/improvised-munitions-handbook 321/336
3. Attach the end of the second wire to generator case. This wire may be wrapped arounda convenient projection, taped, or simply held against the case with the hand.
HOW TO USE:
1. Connect free ends of wires to blasting cap or squib leads.
CAUTION: If drive wheel is rotated, explosive may be set off.
2. Run the drive wheel firmly and rapidly across the palm of the hand to activategenerator.
Automobile Generator Power Source
Section VII
No. 11
An automobile generator can be used as a means of fixing one blasting cap or igniter.(Improvised Igniter, Section V, No. 2, may be used.)

8/2/2019 Improvised Munitions Handbook
http://slidepdf.com/reader/full/improvised-munitions-handbook 322/336
MATERIAL REQUIRED:
Automobile generator (6, 12, or 28 volts). (An alternator will not work.)
Copper Wire Strong string or wire, about 5 ft. (150 cm) long and 1/16 in. (1-1/2 mm) in
diameter Knife Small light bulb requiring same voltage as generator, (for example, bulb from
same vehicle as generator).
PROCEDURE:
1. Strip about 1 in. (2-1/2 cm) of coating from both ends of 3 copper wires. Scrape endswith knife until metal is shiny.
2. Connect the A and F terminals with one piece of wire.
3. Connect a wire to the A terminal. Connect another to the G terminal.

8/2/2019 Improvised Munitions Handbook
http://slidepdf.com/reader/full/improvised-munitions-handbook 323/336
NOTE: The F and G or C terminals may not be labeled; in this case, connect wires as
shown. The F terminal is usually smaller in sire than the C or G terminal.
4. Wrap several turns of string or wire clockwise around the drive pulley.
HOW TO USE:
1. Connect the free ends of the wires to the light bulb.
2. Place one foot on the generator to secure it in place. Give the string or wire a very hard pull to light the bulb.

8/2/2019 Improvised Munitions Handbook
http://slidepdf.com/reader/full/improvised-munitions-handbook 324/336
NOTE: If not successful at first, rewind string and try again several times. Afterrepeating this operation and the bulb still does not light, follow Step 4, “How to Use.”
3. If light bulb lights, follow Steps 1 and 2 of above, “How to Use,” connecting free endsof wires to blasting cap or igniter instead of to light bulb.
4. If light bulb does not light after several pulls, switch leads connected to F and Gterminals. Repeat above “How to Use,” Steps 1 to 3.
Improvised Battery (Short Lasting)
Section VII
No. 12
IMPROVISED BATTERY (SHORT LASTING)

8/2/2019 Improvised Munitions Handbook
http://slidepdf.com/reader/full/improvised-munitions-handbook 325/336
This battery is powerful but must be used within 15 minutes after fabrication. One cell ofthis battery will detonate one blasting cap or one igniter. Two cells, connected in series,will detonate two of these devices and so on. Larger cells have a longer life as well asgreater power.
MATERIALS
Water Sodium hydroxide (lye, solid or concentrated solution) Copper or brass plate about 4 in. (10 cm) square and 1/16 in. (2 mm) thick Aluminum plate or sheet, same size as copper plate Charcoal powder Container for mixing Knife
One of the following:
Potassium permanganate, solid Calcium hypochlorite, solid Manganese dioxide (pyrolucite)
COMMON SOURCE
Soap manufacturing Disinfectants
Sewer cleaner Disinfectants Deodorants Disinfectants Water treating chemicals Chlorine bleaches Dead dry-cell batteries
NOTE: Be sure sodium hydroxide solution is at least a 45% solution by weight. If not, boil off some of the water. If solid sodium hydroxide is available, dissolve some sodiumhydroxide In about twice as much water (by volume).
PROCEDURE:
1. Scrape coating off both ends of wires with knife until metal is shiny.

8/2/2019 Improvised Munitions Handbook
http://slidepdf.com/reader/full/improvised-munitions-handbook 326/336
2. Mix thoroughly (do not grind) approximately equal volumes of powdered charcoal and
one of the following: potassium permangenate, calcium hypochlorite, or manganesedioxide. Add water until a very thick paste is formed.
3. Spread a layer of this mixture about 1/8 in. (2 mm) thick on the copper or brass plate.Be sure mixture is thick enough so that when mixture is sandwiched be¬tween two metal plates, the plates will not touch each other at any point.
NOTE: If more power is required, prepare several plates as above.
HOW TO USE:
1. Just prior to use (no more than 15 minutes), carefully pour a small quantity of sodiumhydroxide solution over the mixture on each plate used.

8/2/2019 Improvised Munitions Handbook
http://slidepdf.com/reader/full/improvised-munitions-handbook 327/336
CAUTION: If solution gets on skin, wash off immediately with water.
2. Place an aluminum plate on top of the mixture on each copper plate. Press firmly.Remove any excess that oozes out between the plates.
CAUTION: Be sure plates are not touching each other at any point.
3. If more than one cell is used, place the cells on top of each other so that unlike metal plates are touching.

8/2/2019 Improvised Munitions Handbook
http://slidepdf.com/reader/full/improvised-munitions-handbook 328/336
4. When ready to fire, clean plates with knife where connections are to be made. Connectone wire to the outer aluminum plate. This maybe done by holding the wires against the
plates or by hooking them through holes punched through plates. If wires are hookedthrough plates, be sure they do not ouch mixture between plates.

8/2/2019 Improvised Munitions Handbook
http://slidepdf.com/reader/full/improvised-munitions-handbook 329/336
Improvised Battery (2 Hour Duration)
Section VII
No. 13
This battery should be used within 2 hours and should be securely wrapped. Three cellswill detonate one blasting cap or one igniter. Five cells, connected in series, will detonatetwo of these devices and so on. Larger cells have a longer life and will yield more power.
If depolarizing materials such as potassium permanganate or manganese dioxide cannot be obtained, ten cells without depolarizer, arranged as described below, (Step 4) willdetonate one blasting cap.
MATERIALS
Water Ammonium chloride (sal ammoniac) (solid or concentrated solution) Charcoal powder Copper or brass plate about 4 in. (10 cm) square and 1/16 in. (2 mm) thick Aluminum plate same size as copper or brass plate Wax and paper (or waxed paper) Wire, string or tape Container for mixing Knife
One of the following:
Potassium permanganate, solid Manganese dioxide
COMMON SOURCE
Medicines Soldering fluxes Fertilizers Ice melting chemicals for roads Candles Disinfectants Deodorants Dead dry batteries
NOTE: If ammonium chloride solution la not concentrated (at least 45% by weight) boiloff some of the water.
PROCEDURE:

8/2/2019 Improvised Munitions Handbook
http://slidepdf.com/reader/full/improvised-munitions-handbook 330/336
1. Mix thoroughly (do not grind) approximately equal volumes of powdered charcoal,ammonium chloride and one of the following: potassium permanganate or manganesedioxide. Add water until a very thick paste is formed. If ammonium chloride is insolution form, it may not be necessary to add water.
2. Spread a layer of this mixture, about 1/8 in. (3 mm) thick, on a clean copper or brass plate. The layer must be thick enough to prevent a second plate from touching the copper plate when it is pressed on top.
3. Press an aluminum plate very firmly upon the mixture on the copper plate. Removecompletely any of the mixture that squeezes out between the plates. The plates must nottouch.
4. If more than one cell is desired:
a. Place one cell on top of the other so that unlike metal plates are touching

8/2/2019 Improvised Munitions Handbook
http://slidepdf.com/reader/full/improvised-munitions-handbook 331/336
b. Wrap the combined cells in heavy waxed paper. The waxed paper can be made by
rubbing candle wax over one side of a piece of paper. Secure the paper around the batterywith string, wire or tape. Expose the top and bottom metal plates at one corner.
HOW TO USE:
1. Scrape a few inches off each end of two wires with knife till metal is shiny.
2. Clean plates with knife until metal is shiny where connections are to be made.
3. Connect one wire from the explosive to a copper or brass plate and the other wire to analuminum plate. The connection can be made by holding the wire against the plate. A permanent connection can be made by hooking the wire through holes in the exposedcorners of the plates. The battery is now ready for use.
NOTE: If battery begins to fail after a few firings, scrape the plates and wires whereconnections are made until metal is shiny.
Armor Materials

8/2/2019 Improvised Munitions Handbook
http://slidepdf.com/reader/full/improvised-munitions-handbook 332/336
Section VII
No. 14
The following table shows the amount of indigenous materials needed to 8top ball type projectiles of the 5.56 mm, .30 caliber, and .50 caliber ammunition fired from theirrespective weapons at a distance of 10 feet (3 m).
NOTE: After many projectiles are fired into the armor, the armor will break down. Morematerial must be added.

8/2/2019 Improvised Munitions Handbook
http://slidepdf.com/reader/full/improvised-munitions-handbook 333/336
Primary High Explosives
13-1
Section 13. PRIMARY HIGH EXPLOSIVES
MERCURY FULMINATE
Description: Mercury fulminate is an initiating explosive, commonly appearing as whiteor gray crystals. It is extremely sensitive to initiation by heat, friction, spark or flame, andimpact. It detonates when initiated by any of these means. It is pressed into containers,usually at 3000 psi, for use in detonators and blasting caps. However, when compressedat greater and greater pressure (up to 30,000 psi), it becomes “dead pressed.” In this
condition, it can only be exploded by another initial detonating agent. Mercury fulminategradually becomes inert when stored continuously above 100° F. A dark-colored productof deterioration gives evidence of this effect. Mercury fulminate is stored underwaterexcept when there is danger of freezing. Then it is stored under a mixture of water andalcohol. Comments: This material was tested. It is effective.
References: TM 9-1900, Ammunition, General, page 59.
TM 9-1910, Military Explosives, page 98.
LEAD STYPHNATE
Description: Lead styphnate is an initiating explosive, commonly appearing in the formof orange or brown crystals. It is easily ignited by heat and static discharge but cannot beused to initiate secondary high explosives reliably. Lead styphnate is used as an ignitingcharge for lead azide and as an ingredient in priming mixtures for small armsammuni¬tion. In these applications, it is usually mixed with other materials first and then pressed into a metallic container (detonators and primers). Lead styphnate is stored underwater except when there is clanger of freezing. Then it is stored under a mixture of waterand alcohol.
Comments: This item was tested. It is effective.
References: TM 9-1900, Ammunition, General, page 59.
TM 9-1910, Military Explosives, page 107.
LEAD AZIDE
Description: Lead azide is an initiating explosive and is produced as a white to buffcrystalline substance. It is a more efficient detonating agent than mercury fulminate and itdoes not decompose on long con¬tinued storage at moderately elevated temperatures. Itis sensitive to both flame and impact but requires a layer of lead styphnate priming

8/2/2019 Improvised Munitions Handbook
http://slidepdf.com/reader/full/improvised-munitions-handbook 334/336
mixture to produce reliable initiation when it is used in detonators that are initiated by afiring pin or electrical energy. It is generally loaded into aluminum detonator housingsand must not be loaded into housing of copper or brass because extremely sensitivecopper azide can be formed in the presence of moisture.
Section 14. SECONDARY HIGH EXPLOSIVES
TNT 14-1
Description: TNT (Trinitrotoluene) is produced from toluene, sulfuric acid, and nitricacid. It is a powerful high explosive. It is well suited for steel cutting, concrete breaching,general demolition, and for under¬water demolition. It is a stable explosive and isrelatively insensitive to shock. It may be detonated with a blasting cap or by primacord.
TNT is issued in 1-pound and Vj-pound containers and 50-pounds to a wooden box.
Comments: This material was tested. It is effective. TNT is toxic and its dust should not be inhaled or allowed to contact the skin.
References: TM 9-1900, Ammunition, General, page 263.
FM 5-25, Explosives and Demolitions, page 3.
NITROSTARCH 14-2
Description: Nitrostarch is composed of starch nitrate, barium nitrate, and sodiumnitrate. It is more sensitive to flame, friction, and impact than TNT but is less powerful. Itis initiated by detonating cord. Nitrostarcn is issued in 1-pound and Impound blocks. The1-pound packages can be broken into Vi-pound blocks. Fifty 1-pound packages and onehundred Impound packages are packed in boxes.
Comments: This material was tested. It is effective.
Reference: TM 9-1900, Ammunition, General, page 263.
TETRYL 14-3
Description: Tetryl is a fine, yellow, crystalline material and exhibits a very highshattering power. It is commonly used as a booster in explosive.
Comments: This material was tested. It is effective.
References: TM 9-1900, Ammunition, General, page 265.
FM 5-25, Explosives and Demolitions, page 8.

8/2/2019 Improvised Munitions Handbook
http://slidepdf.com/reader/full/improvised-munitions-handbook 335/336
Secondary High Explosives
Section 14. SECONDARY HIGH EXPLOSIVES
TNT 14-1
Description: TNT (Trinitrotoluene) is produced from toluene, sulfuric acid, and nitricacid. It is a powerful high explosive. It is well suited for steel cutting, concrete breaching,general demolition, and for under¬water demolition. It is a stable explosive and isrelatively insensitive to shock. It may be detonated with a blasting cap or by primacord.TNT is issued in 1-pound and Vj-pound containers and 50-pounds to a wooden box.
Comments: This material was tested. It is effective. TNT is toxic and its dust should not
be inhaled or allowed to contact the skin.
References: TM 9-1900, Ammunition, General, page 263.
FM 5-25, Explosives and Demolitions, page 3.
NITROSTARCH 14-2
Description: Nitrostarch is composed of starch nitrate, barium nitrate, and sodium nitrate.It is more sensitive to flame, friction, and impact than TNT but is less powerful. It isinitiated by detonating cord. Nitrostarcn is issued in 1-pound and Impound blocks. The 1-
pound packages can be broken into Vi-pound blocks. Fifty 1-pound packages and onehundred Impound packages are packed in boxes.
Conwients: This material was tested. It is effective.
Reference: TM 9-1900, Ammunition, General, page 263.
TETRYL 14-3
Description: Tetryl is a fine, yellow, crystalline material and exhibits a very highshattering power. It is commonly used as a booster in ex-
Comments: This material was tested. It is effective.
References: TM 9-1900, Ammunition, General, page 265.
FM 5-25, Explosives and Demolitions, page 8.
MILITARY DYNAMITE 14-7
Description: Military (construction) dynamite, unlike commercial dynamite, does notabsorb or retain moisture, contains no nitroglycerine, and is much safer to store, handle,

8/2/2019 Improvised Munitions Handbook
http://slidepdf.com/reader/full/improvised-munitions-handbook 336/336
and transport. It comes in standard sticks inches in diameter by 8 inches long, weighingapproximately % pound. It detonates at a velocity of about 20,000 feet per second and isvery satisfactory for military construction, quarrying, and demo-lition work. It may bedetonated with an electric or nonelectric mili¬tary blasting cap or detonating cord.
Comments: This material was tested. It is effective.
References: FM 5-25, Explosives and Demolitions, page 7. TM 9-1910, MilitaryExplosives, page 204.
AMATOL 14-8
Description: Amatol is a high explosive, white to buff in color. It is a mixture ofammonium nitrate and TNT, with a relative effectiveness slightly higher than that of TNTalone. Common compositions vary from 80% ammonium nitrate and 20% TNT to 40 %ammonium nitrate and 60% TNT. Amatol is used as the main bursting charge in artilleryshell and bombs. Amatol absorbs moisture and can form dangerous compounds withcopper and brass. Therefore it should not be housed in containers of such metals.
Comments: This material was tested. It is effective. References: FM 5-25, Explosives andDemolitions, page 7. TM 9-1910, Military Explosives, page 182.
PETN 14-9
Description: PETN (pentaerythrite tetranitrate), the high explosive used in detonating
cord, is one of the most powerful of military explosives, almost equal in force tonitroglycerine and RDX. When used in detonating cord, it has a detonation velocity of21,000 feet per second and is relatively insensitive to friction and shock from handlingand transportation.
Comments: This material was tested. It is effective.
References: FM 5-25, Explosives and Demolitions, page 7. TM 9-1910, MilitaryExplosives, page 135. TM 31-201-1, Unconventional Warfare Devices and Techniques, para 1508.
BLASTING GELATIN 14-10
Description: Blasting gelatin is a translucent material of an elastic, jellylike texture and ismanufactured in a number of different colors. It is considered to be the most powerfulindustrial explosive. Its characteristics are similar to those of gelatin dynamite except that blasting gelatin is more water resistant. Comments: This material was tested. It iseffective. Reference: TM 9-1910, Military Explosives, page 204.
COMPOSITION B 14-11