ims online max - ims payroll€¦ · ims online max screens ... • generally this function isn’t...
TRANSCRIPT

IMS Online Max
Manager user guide

IMS Online Max: manager user guide
December 2015 © Enfinit Software Ltd 2010. All rights reserved. Page 2 of 32
Table of Contents Logging into IMS Online Max ..................................................................................................................... 3
Web address .......................................................................................................................................... 3Login details ........................................................................................................................................... 3
Changing your password .................................................................................................................... 3IMS Online Max screens ............................................................................................................................ 4Timesheets ................................................................................................................................................. 5
Create a Timesheet ................................................................................................................................ 6Navigating the Timesheet ....................................................................................................................... 8
Action Buttons .................................................................................................................................... 8Field Definitions .................................................................................................................................. 9
Entering Timesheets on behalf of employees ...................................................................................... 12Time Entries ..................................................................................................................................... 12Leave Taken ..................................................................................................................................... 13
Approving Employees’ Timesheets ...................................................................................................... 15Un-submitting Employees’ Timesheets ................................................................................................ 17Viewing Historical Timesheets ............................................................................................................. 18Print Timesheets .................................................................................................................................. 19
Timesheet Summary ................................................................................................................................ 20Reports ..................................................................................................................................................... 22
Report Output Options ......................................................................................................................... 22Viewing reports on-screen ................................................................................................................ 22Saving reports .................................................................................................................................. 22
Timesheet Reports ............................................................................................................................... 24Timesheet Notes .............................................................................................................................. 24Timesheet Status ............................................................................................................................. 25
Payment Reports .................................................................................................................................. 27Payment Summary – fortnight .......................................................................................................... 27
Variable rosters ........................................................................................................................................ 28Roster tab page .................................................................................................................................... 28Editing variable rosters ......................................................................................................................... 28Enter a one-off roster change ............................................................................................................... 30
General Information .................................................................................................................................. 31Alerts & warnings ................................................................................................................................. 31
Warnings Definitions ........................................................................................................................ 31Logging out of IMS Online Max ............................................................................................................ 32

IMS Online Max: manager user guide
December 2015 © Enfinit Software Ltd 2010. All rights reserved. Page 3 of 32
Logging into IMS Online Max
Web address Your Payroll Administrator will advise the web address for logging into IMS Online Max.
You can log into IMS Online Max from anywhere where there is an internet connection.
Login details Your login name is your IMS Payroll employee number. The first time you log into IMS Online Max, your password is your IRD Number (e.g. 012-345-678 is entered as 012345678). If you don’t know your IRD Number, please contact your Payroll department. After you have successfully logged in for the first time, you will be prompted to change your password. Make sure the password is secure, and remember, it is case-sensitive.
If you forget your password, please contact your Payroll department so that it can be reset. You have nine opportunities to enter a password before you will be locked out of the system.
Changing your password
You can change your password at any time when logged into IMS Online Max. Click on the ‘My Password’ tab page, and enter new password details:
Field Explanation
Current password • Enter current password (case-sensitive)
New password • Enter a new password that will apply from next login into IMS Online Max. • Ensure it is secure.
Confirm password • Re-enter your new password.
Click Save.

IMS Online Max: manager user guide
December 2015 © Enfinit Software Ltd 2010. All rights reserved. Page 4 of 32
IMS Online Max screens
The following tab pages are available in IMS Online Max:
• My time • Enter, approve and un-submit timesheets for your employees • View potential timesheet payments • Check the status of Timesheets (submitted, not submitted, approved,
unsubmitted) • View historical timesheets • Run reports
• My leave • Enter leave on behalf of your employees • Approve or decline employees’ leave requests • View past, current and future Leave Requests for your team • Check the status of Leave Requests (submitted, not submitted, approved, not
approved) • View scheduled days of work • View actual leave history payments
• My roster
• View your employees’ rosters
• My payslips • View your own payslips online
• My documents • View documents online (for example, company policies, newsletters etc)
• My details • Review your personal payroll details • Notify Payroll department if changes are required
• My password • Change password details
Please refer to Manager Guide (IMS Online Express) for instructions on how to navigate My leave / My payslips / My documents / My details / My password.
Please refer to INSERT LINK TO MAX EMPLOYEE GUIDE for instructions on how to enter and submit your own timesheets to your manager.
IMS Online Max: manager user guide
December 2015 © Enfinit Software Ltd 2010. All rights reserved. Page 5 of 32
Timesheets The following functionality is available for managers on the My Time tab page:
• Create a timesheet • generally this function isn’t necessary as most organisations have their
payroll department create all employees’ timesheets at the beginning of each pay period
• Enter timesheets on behalf of your employees
• Approve employees’ timesheets
• Un-submit employees’ timesheets
• Check the status of timesheets (submitted, unsubmitted, approved)
• View your employees’ historical timesheets
• Run various timesheet and payments reports

IMS Online Max: manager user guide
December 2015 © Enfinit Software Ltd 2010. All rights reserved. Page 6 of 32
Create a Timesheet In most organisations, timesheets are created by the Payroll department. If they are not, managers are able to create timesheets for their employees. On the My time tab page, select the applicable employee from the drop down box. Click Create.
You will only be able to create timesheets for pay periods that are open. Pay periods are opened by your Payroll Administrator. If this message appears you need to wait until the pay period is opened.
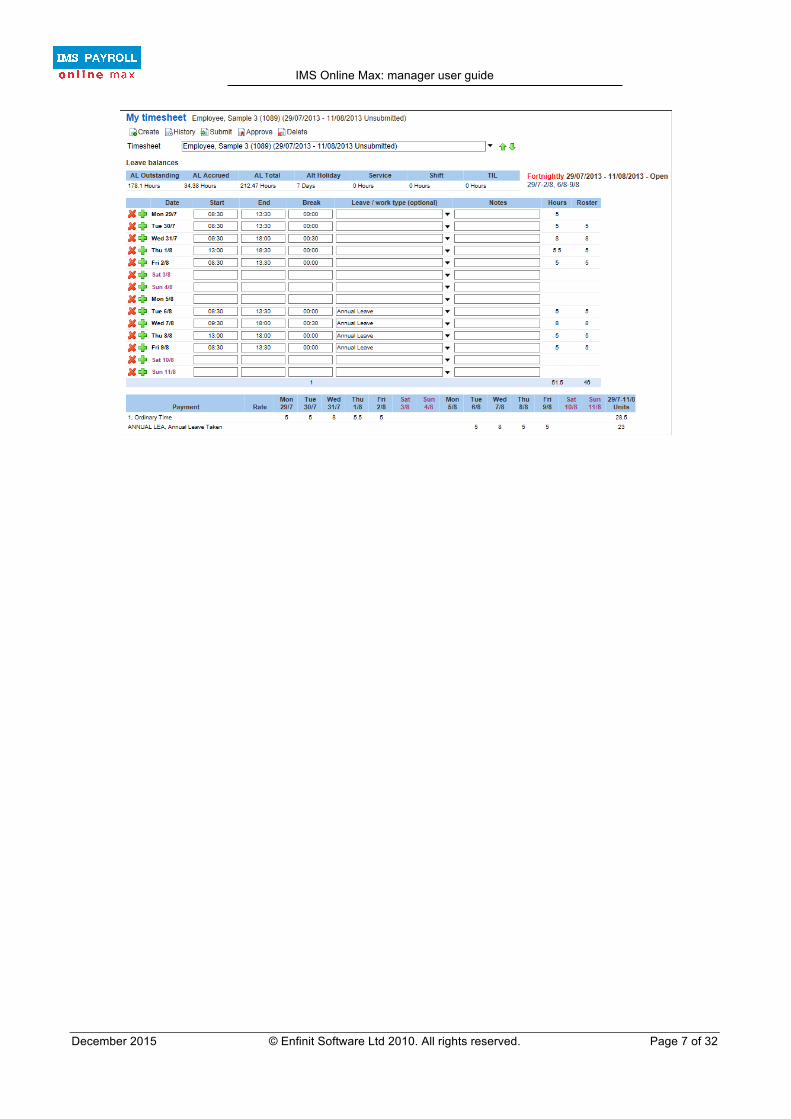
A new editable timesheet for the current pay period will display on-screen. Each day will be populated with the employee’s rostered hours. Any leave that has been previously entered into the Leave Planner will be automatically populated against the appropriate day.
IMS Online Max: manager user guide
December 2015 © Enfinit Software Ltd 2010. All rights reserved. Page 7 of 32

IMS Online Max: manager user guide
December 2015 © Enfinit Software Ltd 2010. All rights reserved. Page 8 of 32
Navigating the Timesheet This section explains the different areas on the timesheet and tips for entering information.
Action Buttons
You will have some or all of the following actions on the My time page:
Action Explanation
Save • This Action appears when you start entering information into the timesheet • After entering data you should click ‘Save’ to ensure the information is
saved
Revert • This Action appears when you start entering information into the timesheet • If you have entered information and wish to remove it, by clicking on
Revert it will take the timesheet back to the last time it was saved
Create • Creates a new timesheet for the first available pay period • Will not create a new timesheet for a period which has already had a
timesheet created i.e. cannot duplicate timesheets • The message “No further periods have been opened so cannot create a
new timesheet at this stage” indicates the current pay period is not open therefore is not available for entering timesheets
History • Shows historical timesheets
Submit • Submits the timesheet ready for approval • Submitted timesheets cannot be modified unless it is first Unsubmitted.
Unsubmit • Shown only when the timesheet has been Submitted • Changes the timesheet back to an editable state • Managers use this to re-open the timesheet so the employee can make
changes and re-submit, for example if manager doesn’t agree with some entries
Approve
• Only available to Managers/Administrators • Marks the timesheet as Approved • Unapproved timesheets will still be exported to payroll • Timesheets can be Approved regardless of whether they have been
submitted or not
Delete • Deletes the current timesheet. Not reversible. Once a timesheet is deleted a new one will need to be created by clicking Create

IMS Online Max: manager user guide
December 2015 © Enfinit Software Ltd 2010. All rights reserved. Page 9 of 32
Field Definitions
Timesheet Period: This box shows the pay period that the timesheet is for:
You are able to move backwards and forwards through employees’ timesheets by using the green buttons at the right. Leave Balances: This area on the timesheet displays leave balances. They are balances as at the last closed pay. Balances update after each payrun is closed. Balances do not update as leave is entered into the Leave Planner or Timesheet, balances are controlled by the actual payroll system.
Timesheet Body: The below table explains the fields within the body of the timesheet. Every organisation is unique so timesheet layouts will differ between companies (e.g. some companies may show which cost centre payments will be charged to). This table contains generic fields generally used by all organisations:
Column Explanation
• Clicking this button will remove everything that has been entered on this day. It will also remove any additional lines that may have been created on a day
• Clicking this button will create a new line. For example if you wanted to enter two time-bands on one day, two leave types taken on one day or a partial day’s leave
• Week days are displayed in black font colour • Weekend days are displayed in purple font colour • Public holidays are displayed in green font colour
IMS Online Max: manager user guide
December 2015 © Enfinit Software Ltd 2010. All rights reserved. Page 10 of 32
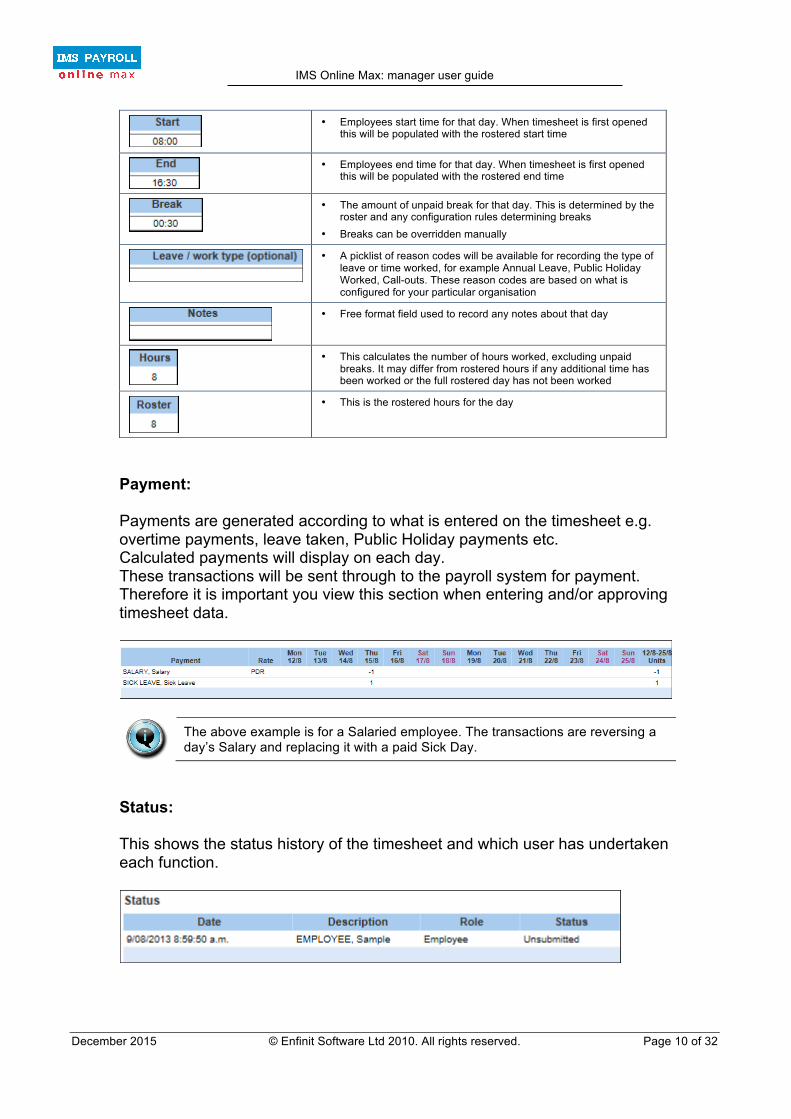
• Employees start time for that day. When timesheet is first opened
this will be populated with the rostered start time
• Employees end time for that day. When timesheet is first opened
this will be populated with the rostered end time
• The amount of unpaid break for that day. This is determined by the
roster and any configuration rules determining breaks • Breaks can be overridden manually
• A picklist of reason codes will be available for recording the type of
leave or time worked, for example Annual Leave, Public Holiday Worked, Call-outs. These reason codes are based on what is configured for your particular organisation
• Free format field used to record any notes about that day
• This calculates the number of hours worked, excluding unpaid
breaks. It may differ from rostered hours if any additional time has been worked or the full rostered day has not been worked
• This is the rostered hours for the day
Payment: Payments are generated according to what is entered on the timesheet e.g. overtime payments, leave taken, Public Holiday payments etc. Calculated payments will display on each day. These transactions will be sent through to the payroll system for payment. Therefore it is important you view this section when entering and/or approving timesheet data.
The above example is for a Salaried employee. The transactions are reversing a day’s Salary and replacing it with a paid Sick Day.
Status: This shows the status history of the timesheet and which user has undertaken each function.
IMS Online Max: manager user guide
December 2015 © Enfinit Software Ltd 2010. All rights reserved. Page 11 of 32
The above example shows the timesheet is currently Unsubmitted. Once it is submitted for approval another line will display showing the date and time the timesheet was submitted and by whom.
IMS Online Max: manager user guide
December 2015 © Enfinit Software Ltd 2010. All rights reserved. Page 12 of 32
Entering Timesheets on behalf of employees This section assists you in entering timesheet information on behalf of your employees. After entering timesheet data, you should click Save.
Time Entries
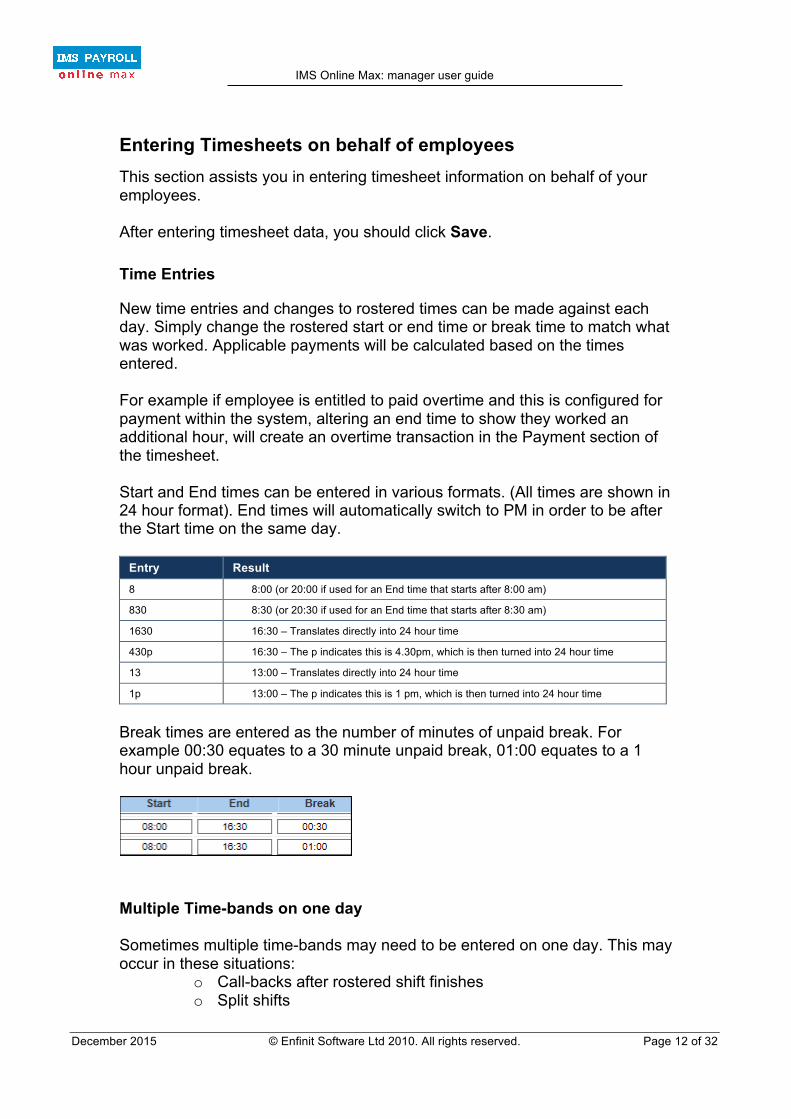
New time entries and changes to rostered times can be made against each day. Simply change the rostered start or end time or break time to match what was worked. Applicable payments will be calculated based on the times entered. For example if employee is entitled to paid overtime and this is configured for payment within the system, altering an end time to show they worked an additional hour, will create an overtime transaction in the Payment section of the timesheet. Start and End times can be entered in various formats. (All times are shown in 24 hour format). End times will automatically switch to PM in order to be after the Start time on the same day.
Entry Result
8 8:00 (or 20:00 if used for an End time that starts after 8:00 am)
830 8:30 (or 20:30 if used for an End time that starts after 8:30 am)
1630 16:30 – Translates directly into 24 hour time
430p 16:30 – The p indicates this is 4.30pm, which is then turned into 24 hour time
13 13:00 – Translates directly into 24 hour time
1p 13:00 – The p indicates this is 1 pm, which is then turned into 24 hour time
Break times are entered as the number of minutes of unpaid break. For example 00:30 equates to a 30 minute unpaid break, 01:00 equates to a 1 hour unpaid break.
Multiple Time-bands on one day Sometimes multiple time-bands may need to be entered on one day. This may occur in these situations:
o Call-backs after rostered shift finishes o Split shifts

IMS Online Max: manager user guide
December 2015 © Enfinit Software Ltd 2010. All rights reserved. Page 13 of 32
o Charging time to different cost centre o Different jobs worked on the one day that are paid differently
To create more than one row on one day, click the button. This will open up an additional row.
Click the button if you wish to remove a row.
To remove data within a single field, you can click on the ‘x’ at the end of the box. For example, clicking on the ‘x’ in this box will remove the Sick Leave reason code from that box. This is quicker than manually back-spacing out the data.
Leave Taken
If you wish to enter some leave taken, click on the black drop-down arrow next to the Leave / Work type box.
A pick-list of reason codes relative to your organisation will appear. Select the appropriate one by clicking on it. Alternatively, if you know the reason type, you can start typing it in the box and it will take you to that reason code.

IMS Online Max: manager user guide
December 2015 © Enfinit Software Ltd 2010. All rights reserved. Page 14 of 32
Partial Days Leave For partial days leave, you should create an additional line for the applicable day. To create an additional row, click the button. On the applicable row, select the appropriate leave reason.
The above example shows the employee has taken three hours sick leave from 13:30 to 16:30.

IMS Online Max: manager user guide
December 2015 © Enfinit Software Ltd 2010. All rights reserved. Page 15 of 32
Approving Employees’ Timesheets Employees will submit their timesheets for their manager’s approval. Alternatively, if the manager has entered a timesheet on behalf of an employee, the manager can approve the timesheet straight away. In this instance, the timesheet does not have to be submitted first. To approve a timesheet, on the My time page select the appropriate employees’ timesheet from the drop down box by clicking on it.
Important: You should check the timesheet entries and the Payments at the bottom of the screen before approving. To approve the timesheet, click Approve.
After approving, the Action buttons are reduced to Create / History / Unsubmit.
The Status section will be updated to show the date and time the timesheet was approved.
At the top of the timesheet it will also show Approved

IMS Online Max: manager user guide
December 2015 © Enfinit Software Ltd 2010. All rights reserved. Page 16 of 32
IMS Online Max: manager user guide
December 2015 © Enfinit Software Ltd 2010. All rights reserved. Page 17 of 32
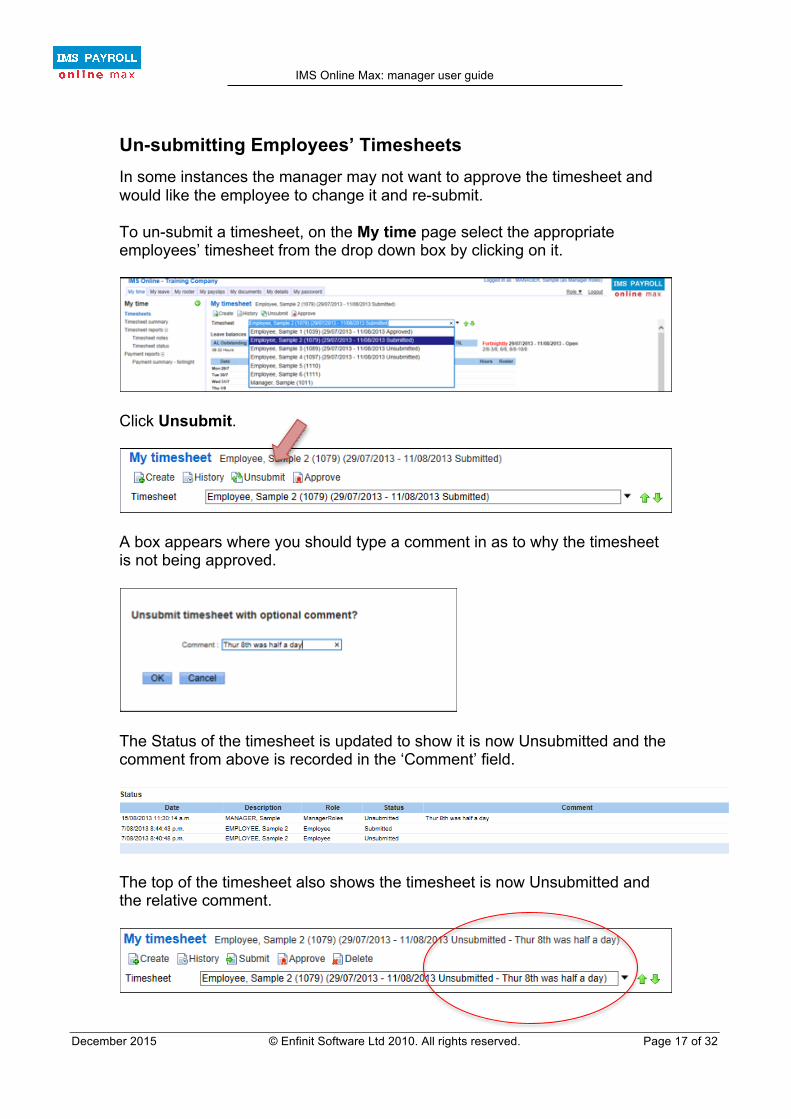
Un-submitting Employees’ Timesheets In some instances the manager may not want to approve the timesheet and would like the employee to change it and re-submit. To un-submit a timesheet, on the My time page select the appropriate employees’ timesheet from the drop down box by clicking on it.
Click Unsubmit.
A box appears where you should type a comment in as to why the timesheet is not being approved.
The Status of the timesheet is updated to show it is now Unsubmitted and the comment from above is recorded in the ‘Comment’ field.
The top of the timesheet also shows the timesheet is now Unsubmitted and the relative comment.

IMS Online Max: manager user guide
December 2015 © Enfinit Software Ltd 2010. All rights reserved. Page 18 of 32
Viewing Historical Timesheets You can view historical timesheets from the My time page. Click on the History button
The drop down box is where individual timesheets are selected, and can be opened by clicking on the black drop-down arrow on the right. Timesheets will be displayed in employee order, then date order, oldest to newest.
Select the employees’ timesheet you wish to view by clicking on it. After selecting a timesheet, you can move backwards and forwards between
other timesheets by using the green arrows.

IMS Online Max: manager user guide
December 2015 © Enfinit Software Ltd 2010. All rights reserved. Page 19 of 32
Print Timesheets If you wish to print a timesheet, on the My time screen click on Timesheets on the left hand side of the screen. Right click and select Print.

IMS Online Max: manager user guide
December 2015 © Enfinit Software Ltd 2010. All rights reserved. Page 20 of 32
Timesheet Summary The Timesheet summary is a high-level weekly view of their employees’ timesheets. It shows the hours worked or leave entered on each day.
A coloured border is added for warnings (yellow) or critical alerts (red) on any day. Using your mouse you can hover over the coloured warning and a pop-up message appears advising what the warning is.
The above Timesheet Summary shows five employees’ timesheet have been approved (highlighted in green). One employee has a warning message against the Sick leave on Thursday 27/6.
Navigation tips The following buttons allow you to easily navigate within the timesheet summary:
Button Tips
• View timesheet data from the previous week
• View timesheet data from the previous day
• View timesheet data from the next day
• View timesheet data from the next week
• Updates timesheet data, coloured approvals etc
• Enter a date to jump to (for example, if you want to look at data from three
years previous, use Show Me to enter a date belonging to that year, rather than clicking Previous Year three times)
• Provides you with the colours guide to assist you to better understand the screen

IMS Online Max: manager user guide
December 2015 © Enfinit Software Ltd 2010. All rights reserved. Page 21 of 32

IMS Online Max: manager user guide
December 2015 © Enfinit Software Ltd 2010. All rights reserved. Page 22 of 32
Reports There are various reports available on the My time tab to assist with managing timesheets. Reports can either be viewed on-screen or saved.
Report Output Options
Viewing reports on-screen
After the report has run, left click on the paper symbol to view the report on-screen:
Saving reports
After the report has been run, right click on the paper symbol, click ‘Save target as…’ and select where you wish to save the report to:

IMS Online Max: manager user guide
December 2015 © Enfinit Software Ltd 2010. All rights reserved. Page 23 of 32
The following screen will appear once the report has been exported to your destination. Click Close.

IMS Online Max: manager user guide
December 2015 © Enfinit Software Ltd 2010. All rights reserved. Page 24 of 32
Timesheet Reports The timesheet reports are listed at the left of the My time tab page:
Timesheet Notes
This produces a report of any timesheets that have a comment added against an employee’s shift To run this report, select the applicable pay period and click Start:
The report displays any Comments attached to shifts for the manager’s review.
IMS Online Max: manager user guide
December 2015 © Enfinit Software Ltd 2010. All rights reserved. Page 25 of 32
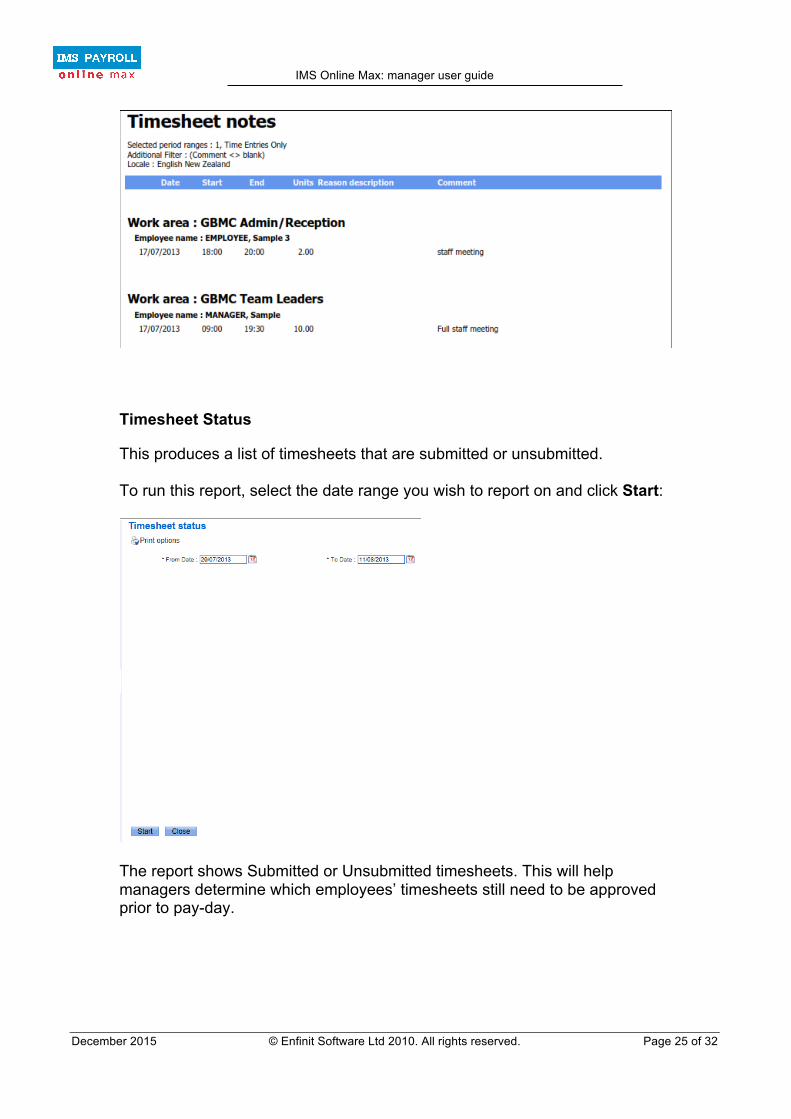
Timesheet Status
This produces a list of timesheets that are submitted or unsubmitted. To run this report, select the date range you wish to report on and click Start:
The report shows Submitted or Unsubmitted timesheets. This will help managers determine which employees’ timesheets still need to be approved prior to pay-day.

IMS Online Max: manager user guide
December 2015 © Enfinit Software Ltd 2010. All rights reserved. Page 26 of 32

IMS Online Max: manager user guide
December 2015 © Enfinit Software Ltd 2010. All rights reserved. Page 27 of 32
Payment Reports
Payment Summary – fortnight
This shows each days’ payments applied to each employee for the pay period. To run this report, select the pay period you wish to report on and click Start:
The report details the types of payments or leave, and the applicable hours/units, assigned to each day of the pay period.

IMS Online Max: manager user guide
December 2015 © Enfinit Software Ltd 2010. All rights reserved. Page 28 of 32
Variable rosters Some organisations have variable rosters. This allows managers to ‘tweak’ employees’ permanent rosters for particular periods. Variable rosters are typically used in organisations who have very fluid rosters, such as health and retail.
Roster tab page Roster summary information is displayed on the My Roster tab page:
The roster summary is usually a week, fortnight or a month in length.
• This page, by default, displays the employees’ permanent roster, along with any one-off changes that have been made to the roster via this tab page.
• If there is no permanent (default) roster set up for employees then this page will be blank until a one-off roster has been added.
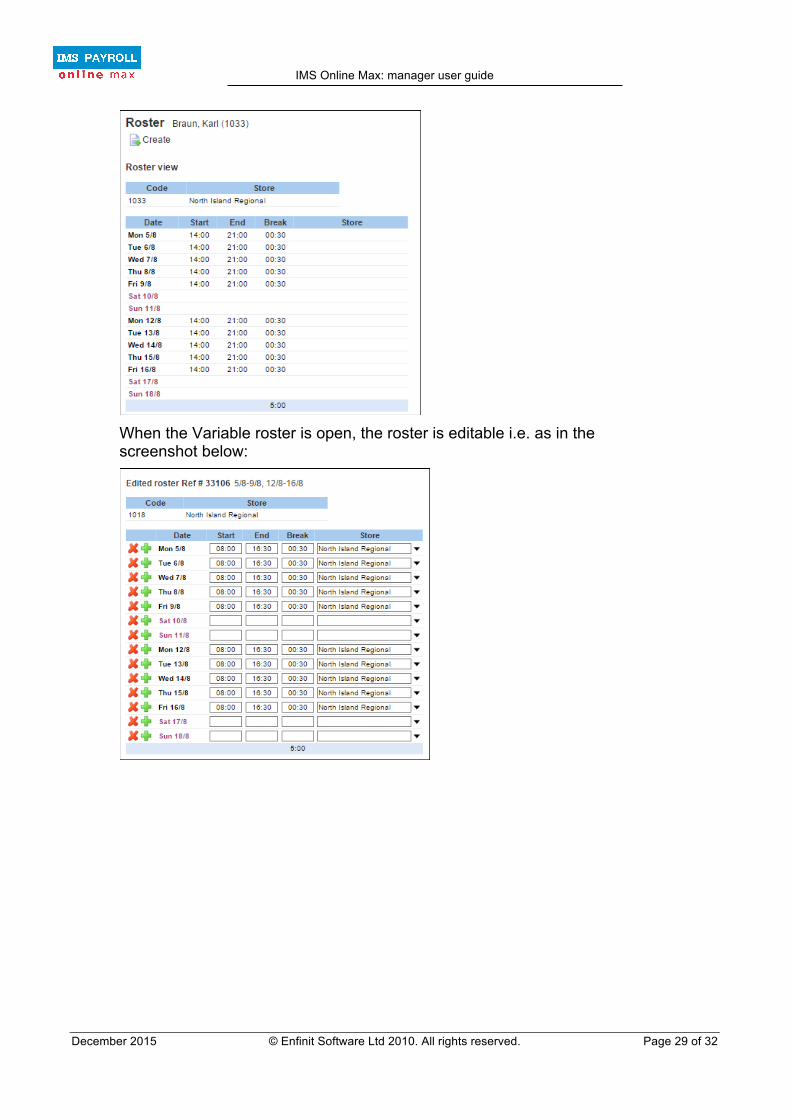
Editing variable rosters Variable rosters are opened in line with pay periods i.e. if a pay period is fortnightly, then a variable roster will be opened for the same fortnightly period. Administrators are typically responsible for opening up variable rosters in advance, to allow managers to ‘tweak’ rosters for employees in their Work areas. Managers are able to view employees’ rosters on the My Roster tab page. If the Variable roster isn’t open yet, then the roster won’t be editable i.e. as in the screenshot below:
IMS Online Max: manager user guide
December 2015 © Enfinit Software Ltd 2010. All rights reserved. Page 29 of 32
When the Variable roster is open, the roster is editable i.e. as in the screenshot below:
IMS Online Max: manager user guide
December 2015 © Enfinit Software Ltd 2010. All rights reserved. Page 30 of 32
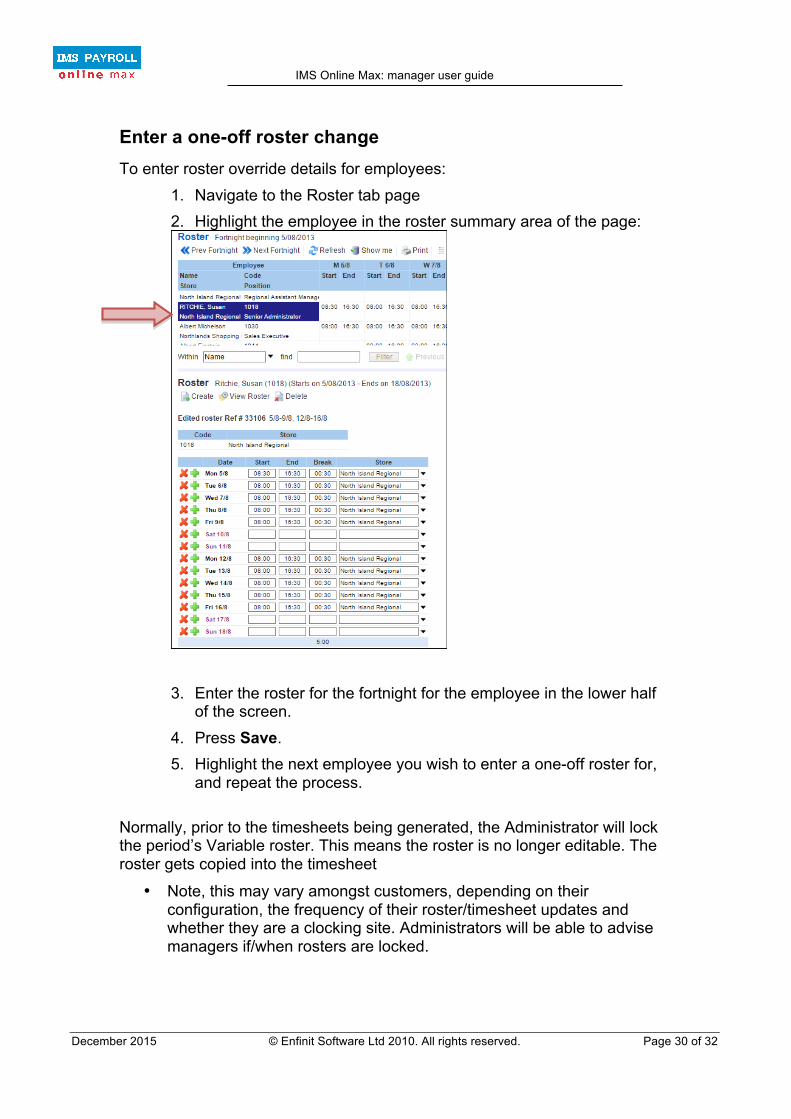
Enter a one-off roster change To enter roster override details for employees:
1. Navigate to the Roster tab page 2. Highlight the employee in the roster summary area of the page:
3. Enter the roster for the fortnight for the employee in the lower half
of the screen. 4. Press Save. 5. Highlight the next employee you wish to enter a one-off roster for,
and repeat the process. Normally, prior to the timesheets being generated, the Administrator will lock the period’s Variable roster. This means the roster is no longer editable. The roster gets copied into the timesheet
• Note, this may vary amongst customers, depending on their configuration, the frequency of their roster/timesheet updates and whether they are a clocking site. Administrators will be able to advise managers if/when rosters are locked.

IMS Online Max: manager user guide
December 2015 © Enfinit Software Ltd 2010. All rights reserved. Page 31 of 32
General Information
Alerts & warnings As timesheets are updated, coloured warnings may display. There are two types of warnings:
• Critical (red) warning – this warning must be addressed; you will not be able to Save or Approve the Timesheet until it has been resolved.
• Information (yellow) warning – this warning is for information purposes only; you should read the warning, take action if necessary, otherwise Save or Approve the timesheet as normal.
When a coloured warning is displayed, using your mouse, hover over the coloured alert and a message will appear advising you what the warning or message is.
Warnings Definitions
Each organisation will have their own set of messages relative to them. The below table provides some generic warning messages that may appear.
Warning Solution
Leave will be capped at Rostered/Standard Daily Hours
Warns that the leave hours will be capped at Rostered or Standard hours for that day. Would generally appear if entering more leave hours than has been rostered for that day, unless your organisation allows employees to take more leave than they are rostered for
Leave will not be deducted, Stat Holiday is payable instead
Advises that if a leave reason has been entered on a Public Holiday, no leave will be deducted, the day will be paid as a Public Holiday
No entitlement to Alt Day accrual Advises there is no entitlement to an Alternative Holiday for this particular Public Holiday shift
Overlaps with another entry on this day. Please edit or delete this entry
The start time on this time-band is before the end time on the previous time-band. Time-bands cannot overlap
Partial day hours may not be higher than Rostered/Standard Daily Hours
Reduce the number of hours for the partial day to be equal to or less than the Rostered or Standard Daily hours
Please enter a Start/End Time ending in 00, 15, 30, 45 min
The time has not been entered as a quarter hour unit
IMS Online Max: manager user guide
December 2015 © Enfinit Software Ltd 2010. All rights reserved. Page 32 of 32
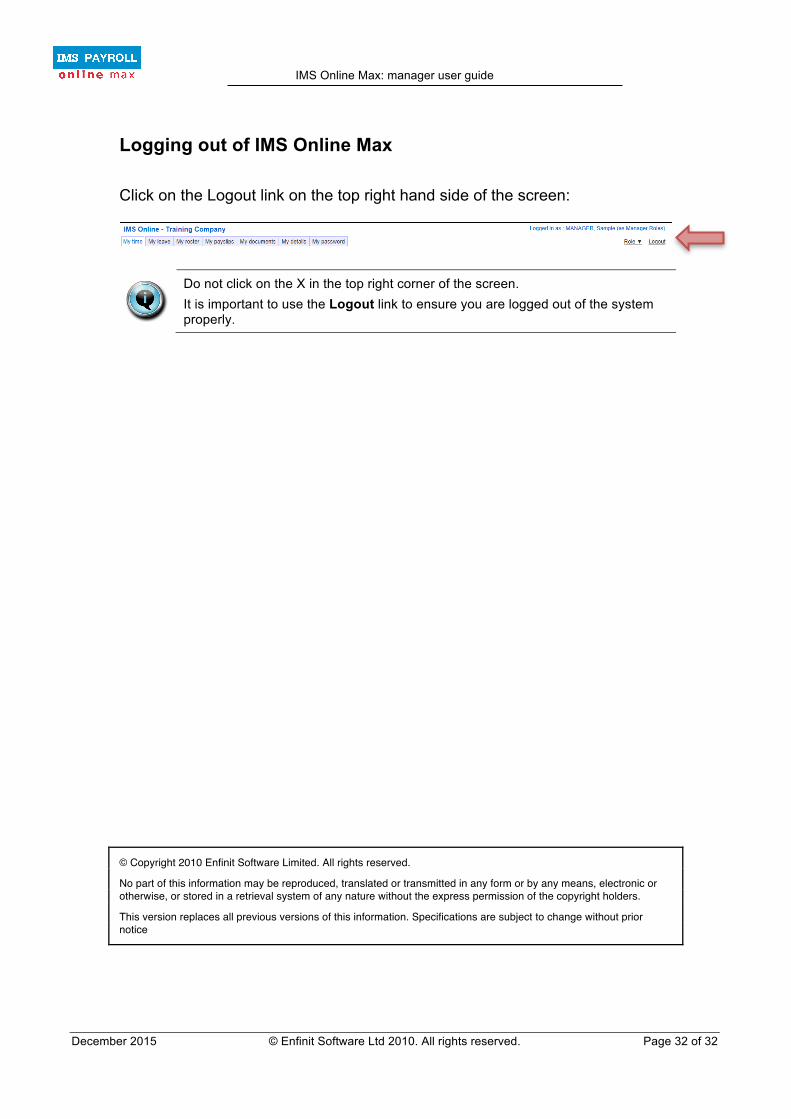
Logging out of IMS Online Max Click on the Logout link on the top right hand side of the screen:
Do not click on the X in the top right corner of the screen. It is important to use the Logout link to ensure you are logged out of the system properly.
© Copyright 2010 Enfinit Software Limited. All rights reserved.
No part of this information may be reproduced, translated or transmitted in any form or by any means, electronic or otherwise, or stored in a retrieval system of any nature without the express permission of the copyright holders.
This version replaces all previous versions of this information. Specifications are subject to change without prior notice