increase salesforce productivity & adoption by using the smart-tables app - zaapit.com
TRANSCRIPT
Smart-Tables – User Guide
© Copyright 2014 ZaapIT Software Technologies, All right reserved Classification: [Public]
Software Technologies
Smart-Tables – User Guide Smart-Mass-Update™, Smart-Activity-Manager™,
Community-Grids, Smart-Related-Grids,
Lightweight Tables
Version: 1.310 (Oct-2014)
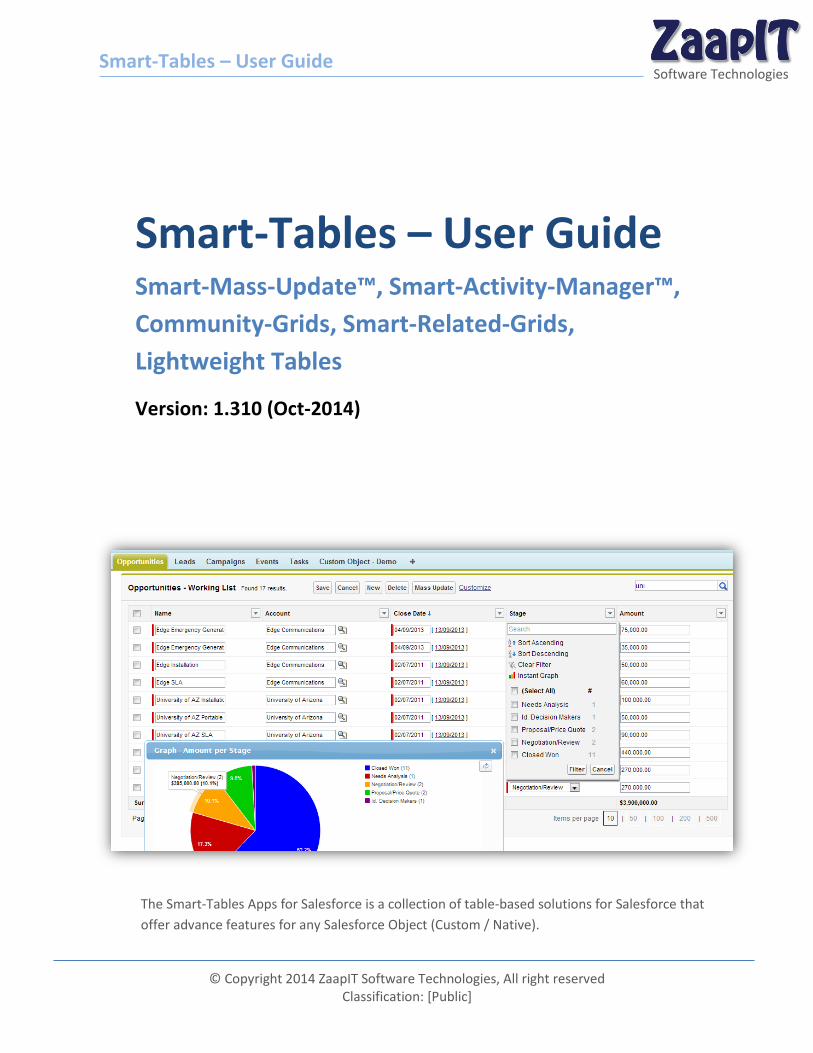
The Smart-Tables Apps for Salesforce is a collection of table-based solutions for Salesforce that
offer advance features for any Salesforce Object (Custom / Native).
Smart-Tables – User Guide
© Copyright 2014 ZaapIT Software Technologies, All right reserved Classification: [Public] 1
Software Technologies
Table of Contents Overview ....................................................................................................................................................... 4
Smart-Tables ................................................................................................................................................. 5
Mass Update ............................................................................................................................................. 5
Mass Delete .............................................................................................................................................. 6
Mass Inline Edit ......................................................................................................................................... 6
Smart Search ............................................................................................................................................. 7
A Smart Search Example: ...................................................................................................................... 7
Smart Column Filters................................................................................................................................. 8
Instant Graphs™ ........................................................................................................................................ 9
Data export - Word, Excel ,PDF, CSV & XML ........................................................................................... 11
Multi Column Sorting .............................................................................................................................. 13
Layout Editor ........................................................................................................................................... 13
Basic Settings ...................................................................................................................................... 13
Columns / Fields Selection .................................................................................................................. 14
Advanced Columns/Fields Selection ................................................................................................... 14
Custom Buttons .................................................................................................................................. 15
Advanced Settings: .............................................................................................................................. 18
Extra Condition Filter (for admin users or developers): ..................................................................... 19
Restricting Customize View Access ..................................................................................................... 20
Placing a Smart-Table as a regular Tab ................................................................................................... 22
Creating/Embedding a Smart-Table in your code (beta) ........................................................................ 23
Multi Language support .......................................................................................................................... 26
Override Existing Texts - labels / tab names / etc............................................................................... 28
Smart-Mass-Update .................................................................................................................................... 29
Smart-Activity-Manager™ ........................................................................................................................... 30
Community-Grids ........................................................................................................................................ 31
Smart-Related-Grids ................................................................................................................................... 32
Setting up your first Smart-Related-Grids / Sub Tabs ............................................................................. 32
Step 1 – Override the object view link ................................................................................................ 32
Smart-Tables – User Guide
© Copyright 2014 ZaapIT Software Technologies, All right reserved Classification: [Public] 2
Software Technologies
Step 2 – Add a new Smart-Related-Grid to your main object layout. ................................................ 33
Step 3 – Add Smart-Sub-Tabs with Related-Grid to your main object layout .................................... 38
Manage licenses .......................................................................................................................................... 40
Lightweight Tables – Deprecated (End of Support: Summer-15) ............................................................... 41
ZaapIT Related List visual Fix (For related Grids) .................................................................................... 43
ZaapIT Tool – Mini ................................................................................................................................... 43
ZaapIT Tool - Mini RLVisFix ..................................................................................................................... 44
ZaapIT Tools ............................................................................................................................................ 45
ZaapIT - Unistall Fix ................................................................................................................................. 45
Table of Figures
Figure 1 - Mass Update ................................................................................................................................. 5
Figure 2 - Mass Update preview mode ......................................................................................................... 5
Figure 3 - Mass Delete .................................................................................................................................. 6
Figure 4 - Mass Inline edit ............................................................................................................................. 7
Figure 5 - Smart Search ................................................................................................................................. 7
Figure 6 - A Smart Search Example ............................................................................................................... 7
Figure 7 – Smart Column Filter (Text) ........................................................................................................... 8
Figure 8 - Different types of Smart Column Filters ....................................................................................... 8
Figure 9 - Instant Graphs® ............................................................................................................................. 9
Figure 10 - Date Chart in action .................................................................................................................. 10
Figure 11 - Data export - PDF, Word, Excel, CSV ......................................................................................... 11
Figure 12 - Data export top button ............................................................................................................. 11
Figure 13 - Export to Excel .......................................................................................................................... 12
Figure 14 - Multi Column Sorting ................................................................................................................ 13
Figure 15 – Layout Editor ............................................................................................................................ 14
Figure 16 - Advanced field selection ........................................................................................................... 15
Figure 17 - Custom Buttons ........................................................................................................................ 16
Figure 18 - Custom Demo Button ............................................................................................................... 16
Figure 19 - Advanced Settings ..................................................................................................................... 19
Figure 20 - Extra Condition Filter ................................................................................................................ 19
Figure 21 - Personal Information Layout .................................................................................................... 20
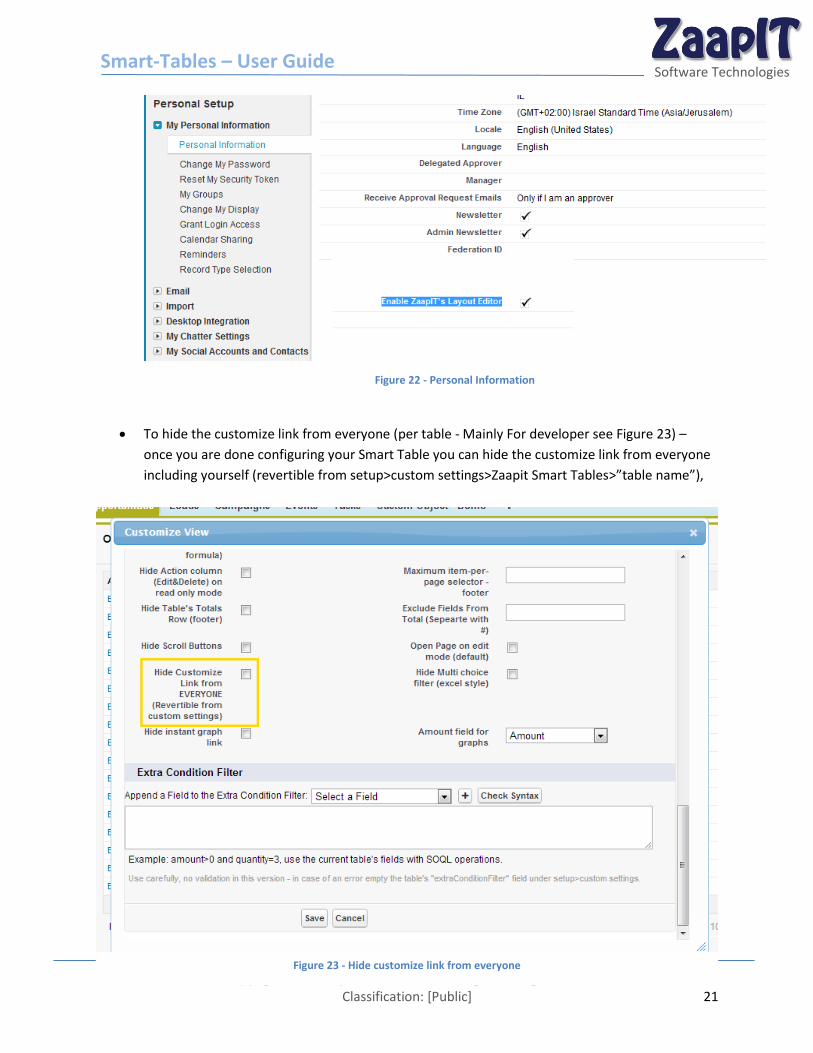
Figure 22 - Personal Information ................................................................................................................ 21
Figure 23 - Hide customize link from everyone .......................................................................................... 21
Figure 24 - Creating a new tab Step 2 ......................................................................................................... 22
Figure 25 - Creating a new tab .................................................................................................................... 22
Figure 26 - Creating a new tab for Salesforce-native objects ..................................................................... 23
Smart-Tables – User Guide
© Copyright 2014 ZaapIT Software Technologies, All right reserved Classification: [Public] 3
Software Technologies
Figure 27 - Creating a new Visualforce Page .............................................................................................. 24
Figure 28 - Multi Tables in one page Example (4 Smart Tables in 1 page) ................................................. 25
Figure 29 - Smart Tables in apex:tab example ............................................................................................ 26
Figure 30 - Multi Language support ............................................................................................................ 27
Figure 31 - Override Existing Texts ............................................................................................................. 28
Figure 32 - Application Dropdown .............................................................................................................. 29
Figure 33 - Smart Activity Manager ............................................................................................................ 30
Figure 34 - Community Grids ...................................................................................................................... 31
Figure 35 - Community Grids Tabs .............................................................................................................. 32
Figure 36 - Show Custom Sidebar Components on All Pages ..................................................................... 33
Figure 37 - Edit Layout ................................................................................................................................ 34
Figure 38 - Create a new Visualforce page section ..................................................................................... 35
Figure 39 - Section Properties ..................................................................................................................... 36
Figure 40 - Place the Related Grid .............................................................................................................. 37
Figure 41 - The new Smart Related Grid ..................................................................................................... 37
Figure 42 - Smart-Sub-Tabs with Related-Grid ........................................................................................... 38
Figure 43 - New Smart Sub Tab ................................................................................................................... 38
Figure 44 - Smart Sub Tabs in Action .......................................................................................................... 39
Figure 45 - Manage Licenses ....................................................................................................................... 40
Figure 46 - Add Users .................................................................................................................................. 40
Figure 47 - Home page layout ..................................................................................................................... 41
Figure 48 - User Interface Options .............................................................................................................. 42
Figure 49 - Create a homepage component ............................................................................................... 43
Smart-Tables – User Guide
© Copyright 2014 ZaapIT Software Technologies, All right reserved Classification: [Public] 4
Software Technologies
Overview The Smart-Tables product is a collection of native Salesforce tools made by ZaapIT Software
Technologies that provides a state of the art tools for data visibility and maintainability for both
professional and novice users. Below is the list of our currently available tools followed by the list of
common key features to all the Smart-Tables Tools. In the next sections we will learn how to use &
configure the different Smart-Tables tools.
Smart-Tables Tools:
Smart-Mass-Update™ - A collection of predefined Smart Tables for common native objects such
as Lead, opportunities, Account etc. You can use it as a standalone Salesforce application or
replace any “regular tabs” with a predefined / custom Smart-Table.
Smart-Activity-Manager™ - A collection of predefined Tasks & Events Smart-Tables (as tabs)
that’s enables you to control yours and your team’s tasks & events from one place.
Community-Grids – Smart Tables for you community.
Smart-Related-Grids – Smart Tables as a related list, e.g. Place it inside the opportunity layout
as opportunity-products or contacts.
Lightweight Tables (Deprecated).
Common Key Features:
Smart Instant-Graphs™ - Data analytics tool e.g. 1-click automatic graph.
Mass Update - Update multiple records in one click.
Mass Delete – Delete multiple records in one click.
Mass Inline Edit – excel style.
Smart Column filter – excel style.
Export to xls, doc, pdf, csv & XML.
Easy to use interface - Smart search, sorts, filters & pages
Auto Summary line.
Multi-Column Sorting
Smart layout editor
100% Salesforce hosted
Multi language support
Secured – our product passes software security regulations & tests on every version we release.
Smart-Tables – User Guide
© Copyright 2014 ZaapIT Software Technologies, All right reserved Classification: [Public] 5
Software Technologies
Smart-Tables The Smart-Tables product is a collection of native Salesforce tools made by ZaapIT Software
Technologies that provides a state of the art tools for data visibility and maintainability for both
professional and novice users. This section reviews the common main features available to all the Smart-
Tables tools.
Main Features:
Mass Update
Mass Delete
Mass Inline Edit
Smart Search
Smart Column Filters
Data Export - PDF, Word, Excel, CSV, XML
Optional – Instant Graphs™
Optional – Auto Summary line.
Multi-Column Sorting
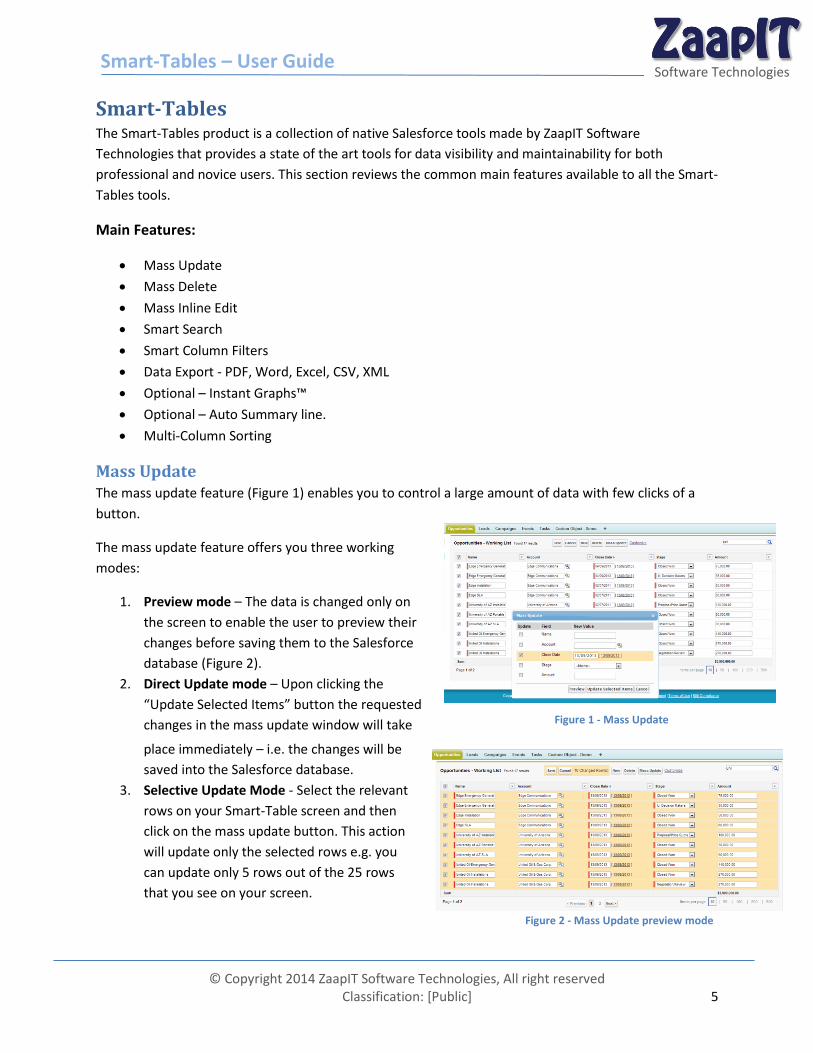
Mass Update The mass update feature (Figure 1) enables you to control a large amount of data with few clicks of a
button.
The mass update feature offers you three working
modes:
1. Preview mode – The data is changed only on
the screen to enable the user to preview their
changes before saving them to the Salesforce
database (Figure 2).
2. Direct Update mode – Upon clicking the
“Update Selected Items” button the requested
changes in the mass update window will take
place immediately – i.e. the changes will be
saved into the Salesforce database.
3. Selective Update Mode - Select the relevant
rows on your Smart-Table screen and then
click on the mass update button. This action
will update only the selected rows e.g. you
can update only 5 rows out of the 25 rows
that you see on your screen.
Figure 1 - Mass Update
Figure 2 - Mass Update preview mode
Smart-Tables – User Guide
© Copyright 2014 ZaapIT Software Technologies, All right reserved Classification: [Public] 6
Software Technologies
To customize the mass Update fields, use the customize link on the top of the table. For more details
please refer to the Layout Editor section.
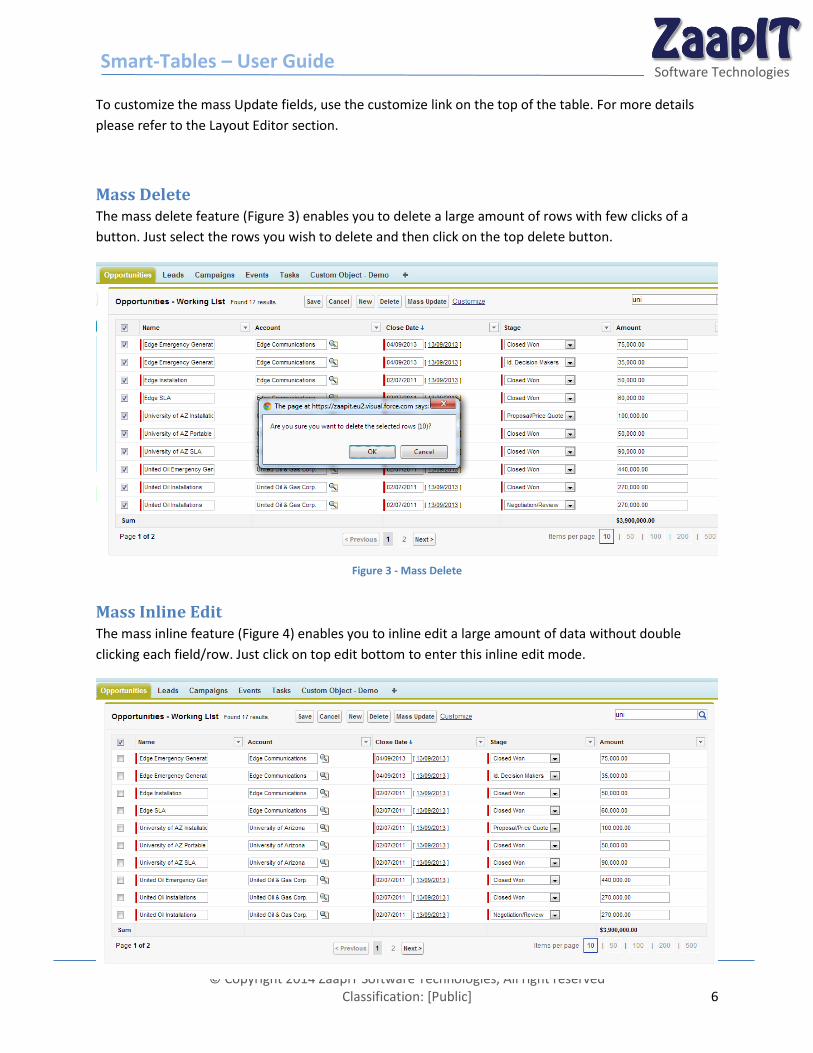
Mass Delete The mass delete feature (Figure 3) enables you to delete a large amount of rows with few clicks of a
button. Just select the rows you wish to delete and then click on the top delete button.
Mass Inline Edit The mass inline feature (Figure 4) enables you to inline edit a large amount of data without double
clicking each field/row. Just click on top edit bottom to enter this inline edit mode.
Figure 3 - Mass Delete
Smart-Tables – User Guide
© Copyright 2014 ZaapIT Software Technologies, All right reserved Classification: [Public] 7
Software Technologies Figure 4 - Mass Inline edit
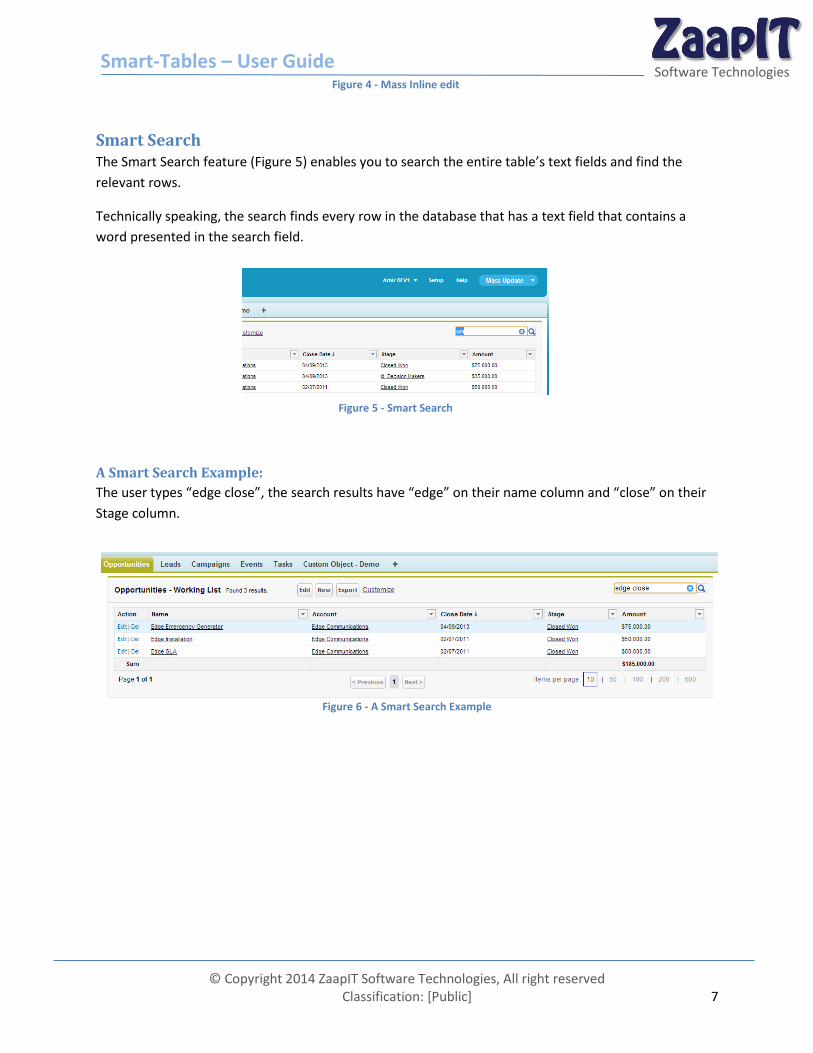
Smart Search The Smart Search feature (Figure 5) enables you to search the entire table’s text fields and find the
relevant rows.
Technically speaking, the search finds every row in the database that has a text field that contains a
word presented in the search field.
A Smart Search Example:
The user types “edge close”, the search results have “edge” on their name column and “close” on their
Stage column.
Figure 5 - Smart Search
Figure 6 - A Smart Search Example
Smart-Tables – User Guide
© Copyright 2014 ZaapIT Software Technologies, All right reserved Classification: [Public] 8
Software Technologies
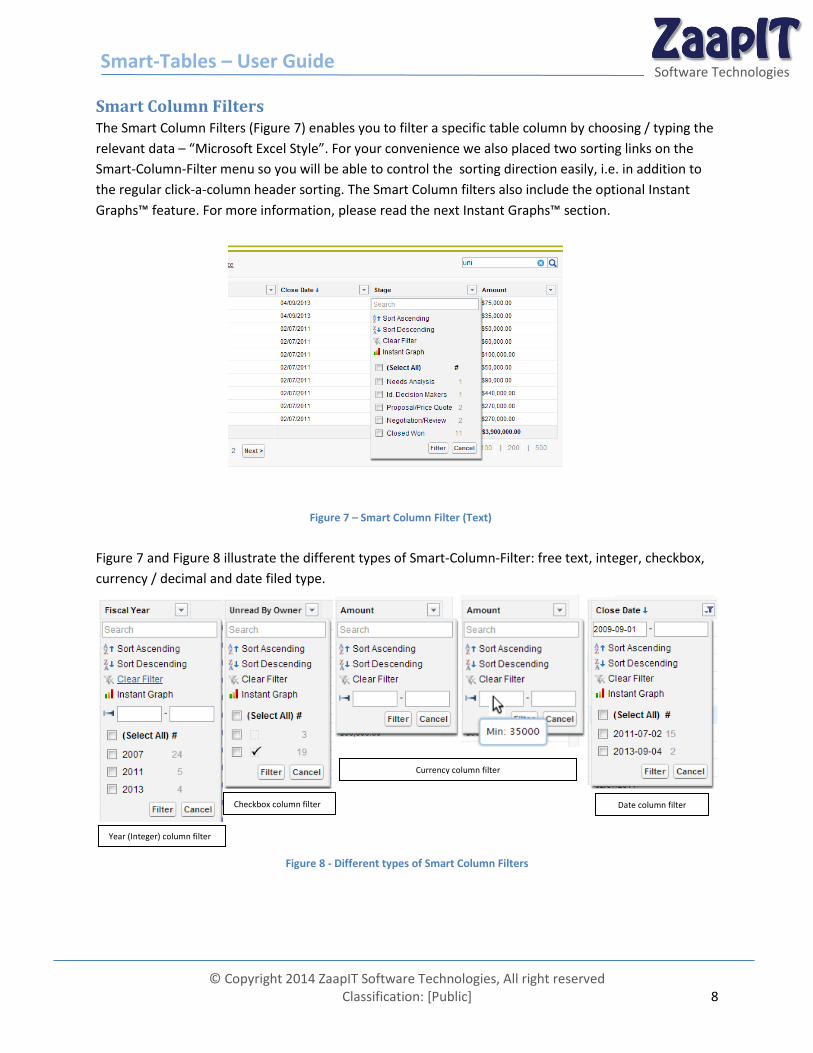
Smart Column Filters The Smart Column Filters (Figure 7) enables you to filter a specific table column by choosing / typing the
relevant data – “Microsoft Excel Style”. For your convenience we also placed two sorting links on the
Smart-Column-Filter menu so you will be able to control the sorting direction easily, i.e. in addition to
the regular click-a-column header sorting. The Smart Column filters also include the optional Instant
Graphs™ feature. For more information, please read the next Instant Graphs™ section.
Figure 7 and Figure 8 illustrate the different types of Smart-Column-Filter: free text, integer, checkbox,
currency / decimal and date filed type.
Figure 7 – Smart Column Filter (Text)
Figure 8 - Different types of Smart Column Filters
Year (Integer) column filter
Checkbox column filter
Currency column filter
Date column filter
Smart-Tables – User Guide
© Copyright 2014 ZaapIT Software Technologies, All right reserved Classification: [Public] 9
Software Technologies
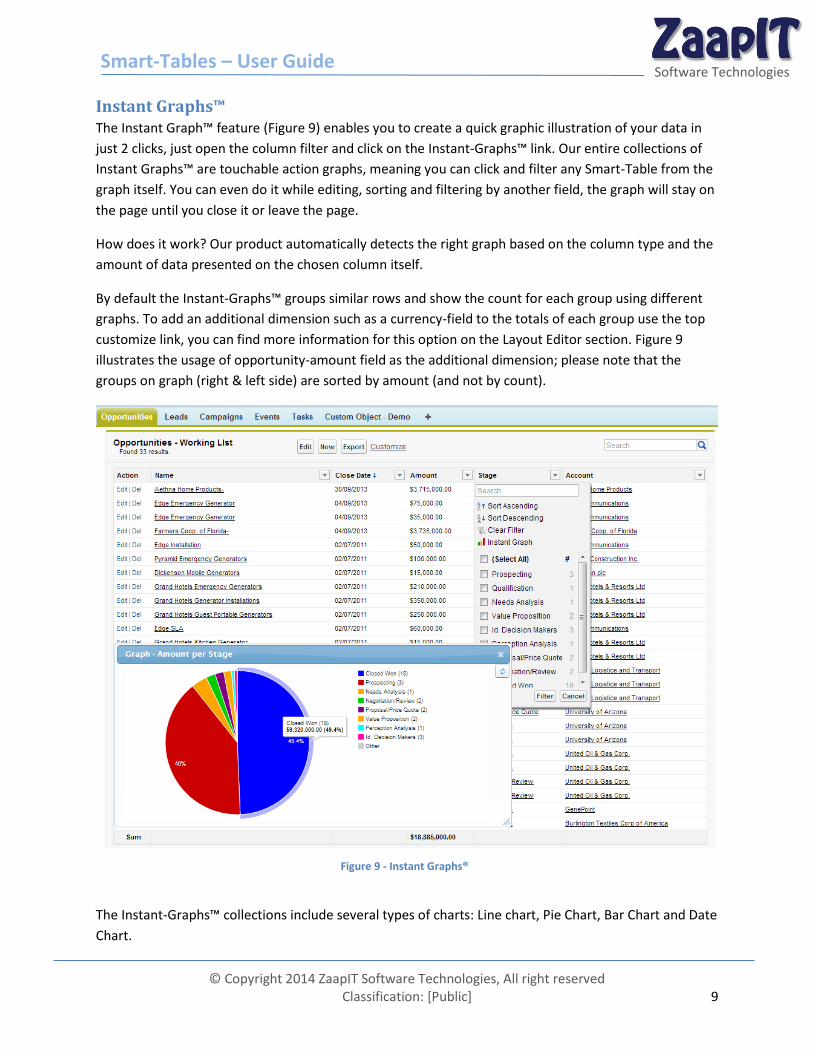
Instant Graphs™ The Instant Graph™ feature (Figure 9) enables you to create a quick graphic illustration of your data in
just 2 clicks, just open the column filter and click on the Instant-Graphs™ link. Our entire collections of
Instant Graphs™ are touchable action graphs, meaning you can click and filter any Smart-Table from the
graph itself. You can even do it while editing, sorting and filtering by another field, the graph will stay on
the page until you close it or leave the page.
How does it work? Our product automatically detects the right graph based on the column type and the
amount of data presented on the chosen column itself.
By default the Instant-Graphs™ groups similar rows and show the count for each group using different
graphs. To add an additional dimension such as a currency-field to the totals of each group use the top
customize link, you can find more information for this option on the Layout Editor section. Figure 9
illustrates the usage of opportunity-amount field as the additional dimension; please note that the
groups on graph (right & left side) are sorted by amount (and not by count).
The Instant-Graphs™ collections include several types of charts: Line chart, Pie Chart, Bar Chart and Date
Chart.
Figure 9 - Instant Graphs®
Smart-Tables – User Guide
© Copyright 2014 ZaapIT Software Technologies, All right reserved Classification: [Public] 10
Software Technologies
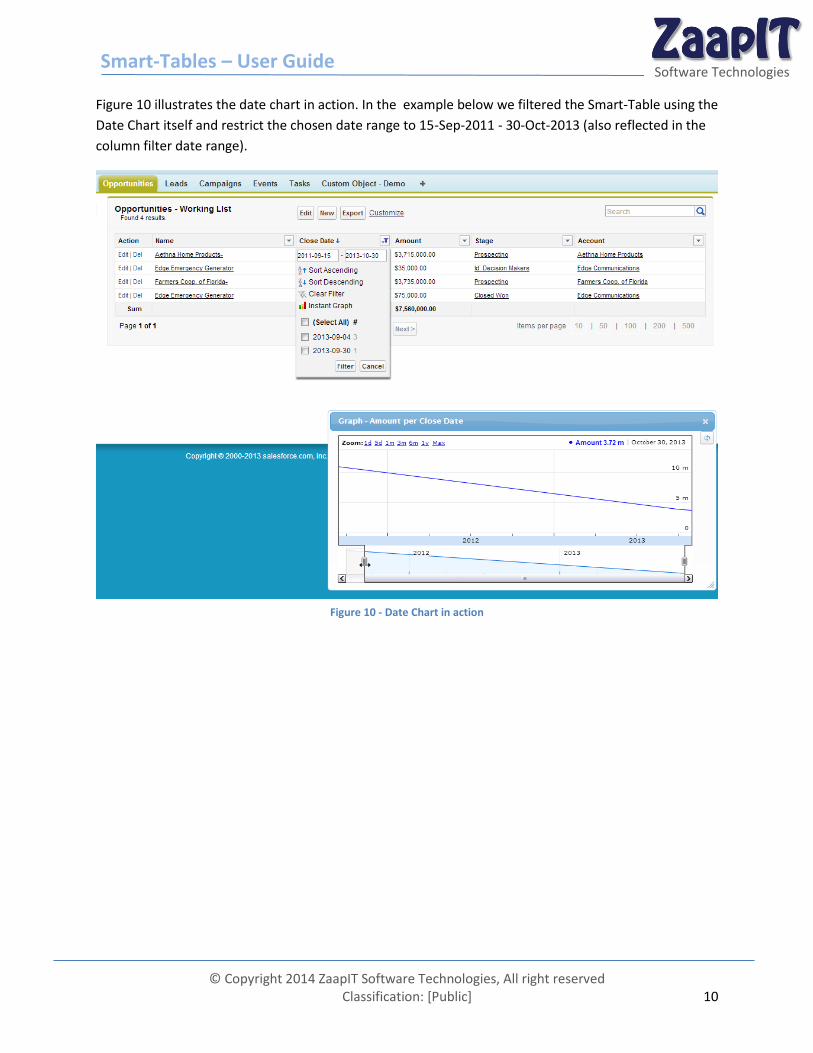
Figure 10 illustrates the date chart in action. In the example below we filtered the Smart-Table using the
Date Chart itself and restrict the chosen date range to 15-Sep-2011 - 30-Oct-2013 (also reflected in the
column filter date range).
Figure 10 - Date Chart in action
Smart-Tables – User Guide
© Copyright 2014 ZaapIT Software Technologies, All right reserved Classification: [Public] 11
Software Technologies
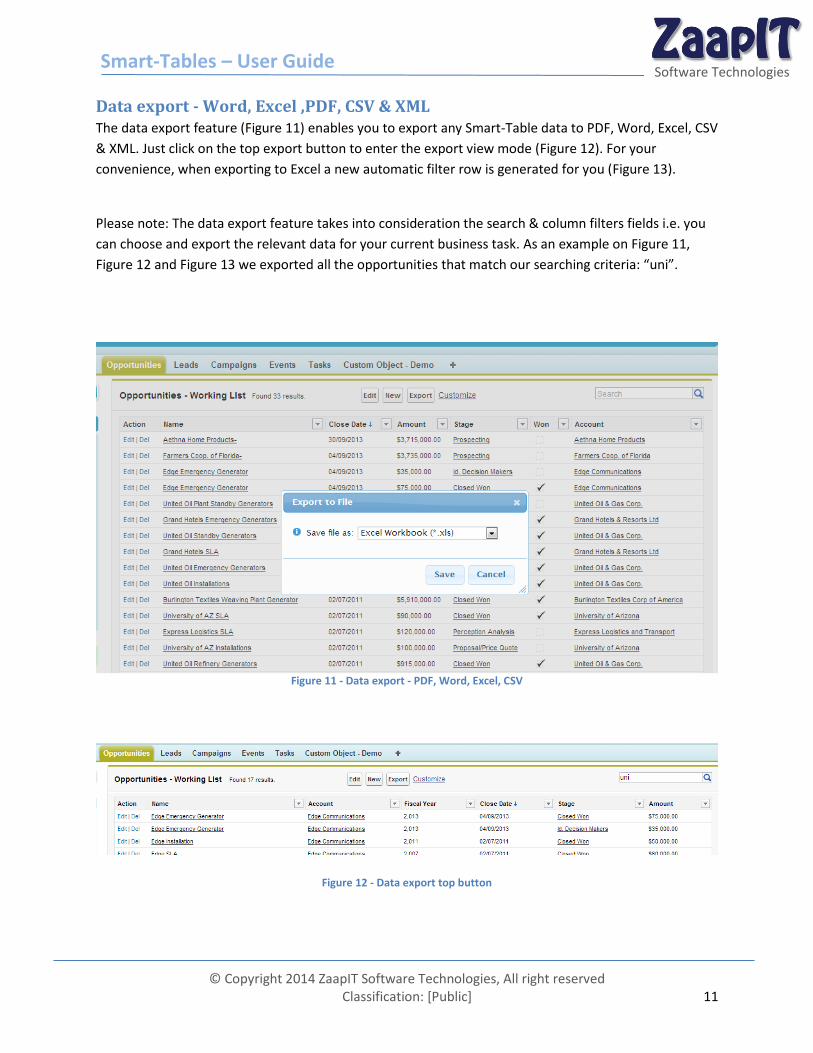
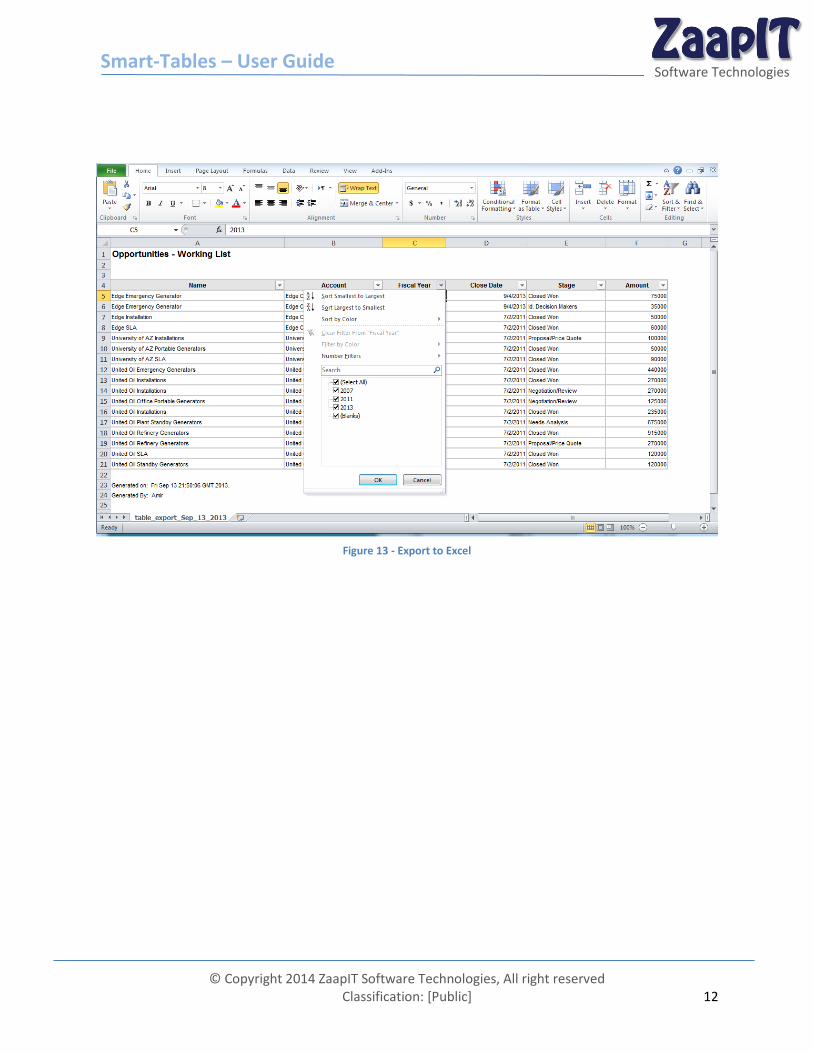
Data export - Word, Excel ,PDF, CSV & XML The data export feature (Figure 11) enables you to export any Smart-Table data to PDF, Word, Excel, CSV
& XML. Just click on the top export button to enter the export view mode (Figure 12). For your
convenience, when exporting to Excel a new automatic filter row is generated for you (Figure 13).
Please note: The data export feature takes into consideration the search & column filters fields i.e. you
can choose and export the relevant data for your current business task. As an example on Figure 11,
Figure 12 and Figure 13 we exported all the opportunities that match our searching criteria: “uni”.
Figure 11 - Data export - PDF, Word, Excel, CSV
Figure 12 - Data export top button
Smart-Tables – User Guide
© Copyright 2014 ZaapIT Software Technologies, All right reserved Classification: [Public] 12
Software Technologies
Figure 13 - Export to Excel
Smart-Tables – User Guide
© Copyright 2014 ZaapIT Software Technologies, All right reserved Classification: [Public] 13
Software Technologies
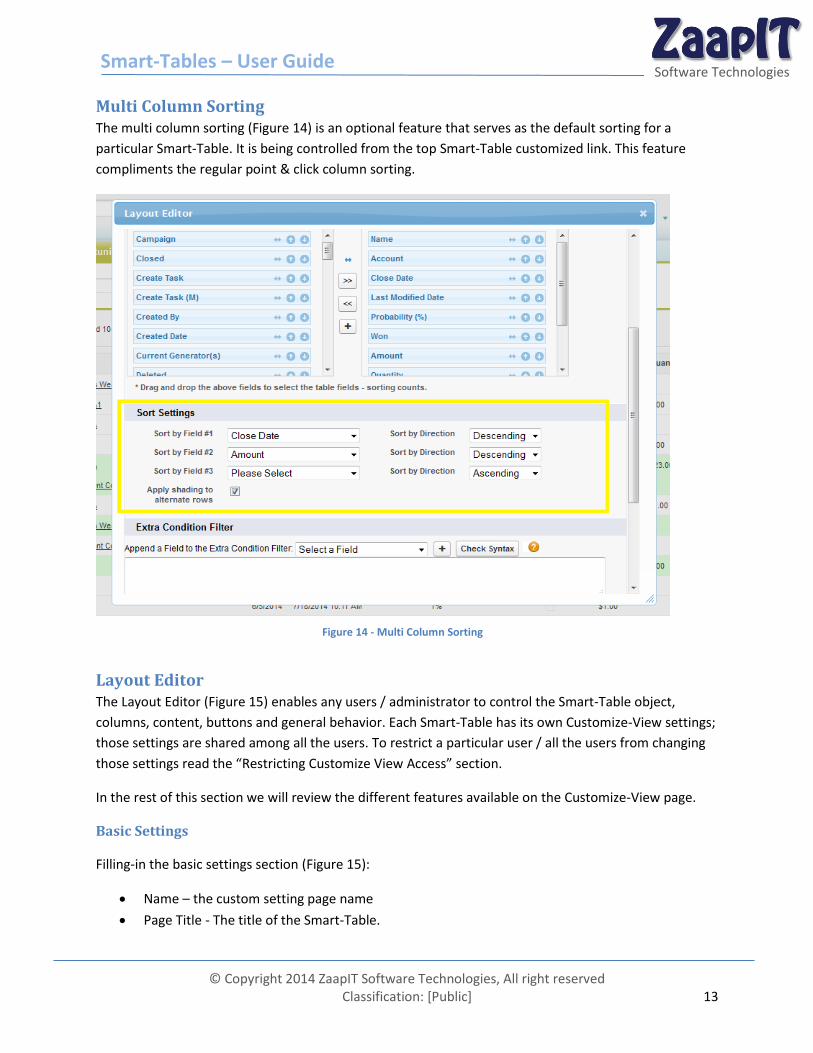
Multi Column Sorting The multi column sorting (Figure 14) is an optional feature that serves as the default sorting for a
particular Smart-Table. It is being controlled from the top Smart-Table customized link. This feature
compliments the regular point & click column sorting.
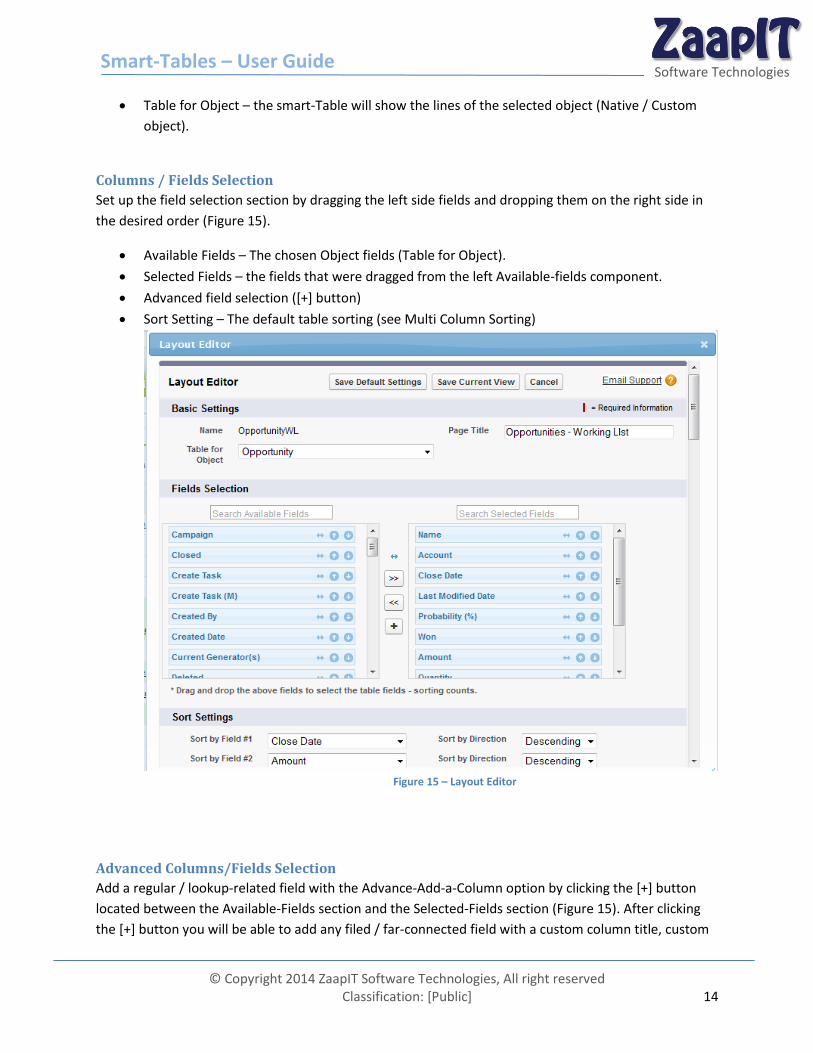
Layout Editor The Layout Editor (Figure 15) enables any users / administrator to control the Smart-Table object,
columns, content, buttons and general behavior. Each Smart-Table has its own Customize-View settings;
those settings are shared among all the users. To restrict a particular user / all the users from changing
those settings read the “Restricting Customize View Access” section.
In the rest of this section we will review the different features available on the Customize-View page.
Basic Settings
Filling-in the basic settings section (Figure 15):
Name – the custom setting page name
Page Title - The title of the Smart-Table.
Figure 14 - Multi Column Sorting
Smart-Tables – User Guide
© Copyright 2014 ZaapIT Software Technologies, All right reserved Classification: [Public] 14
Software Technologies
Table for Object – the smart-Table will show the lines of the selected object (Native / Custom
object).
Columns / Fields Selection
Set up the field selection section by dragging the left side fields and dropping them on the right side in
the desired order (Figure 15).
Available Fields – The chosen Object fields (Table for Object).
Selected Fields – the fields that were dragged from the left Available-fields component.
Advanced field selection ([+] button)
Sort Setting – The default table sorting (see Multi Column Sorting)
Advanced Columns/Fields Selection
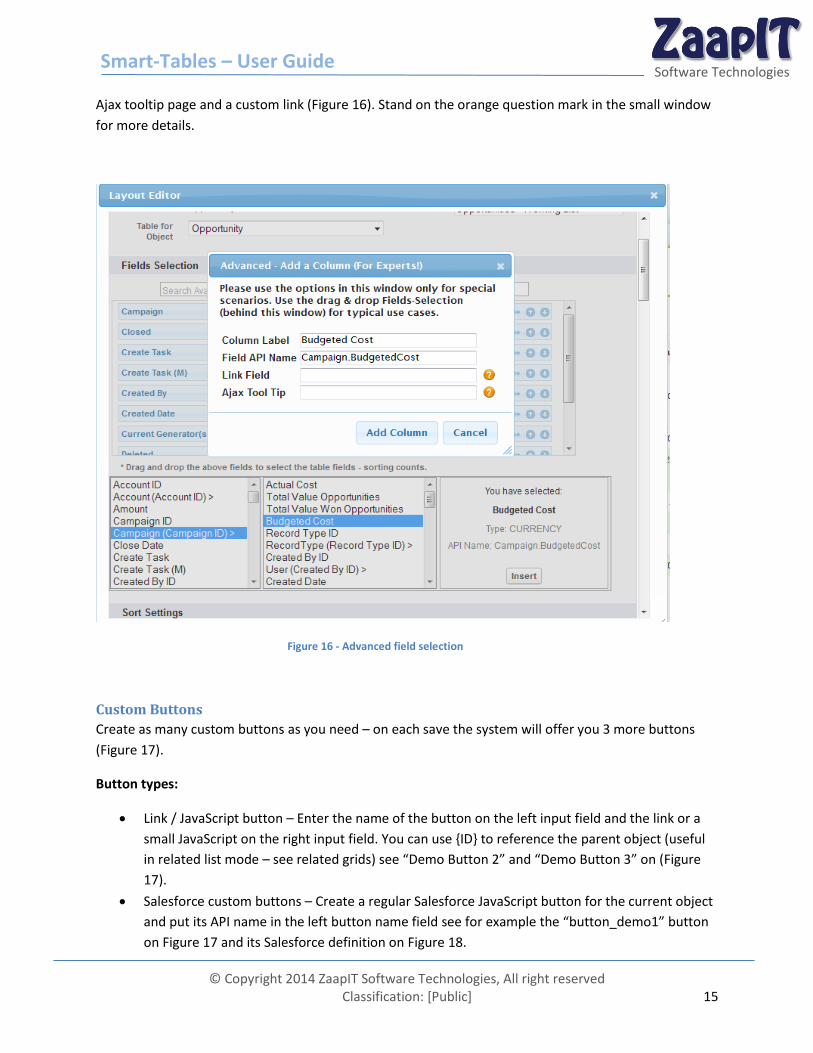
Add a regular / lookup-related field with the Advance-Add-a-Column option by clicking the [+] button
located between the Available-Fields section and the Selected-Fields section (Figure 15). After clicking
the [+] button you will be able to add any filed / far-connected field with a custom column title, custom
Figure 15 – Layout Editor
Smart-Tables – User Guide
© Copyright 2014 ZaapIT Software Technologies, All right reserved Classification: [Public] 15
Software Technologies
Ajax tooltip page and a custom link (Figure 16). Stand on the orange question mark in the small window
for more details.
Figure 16 - Advanced field selection
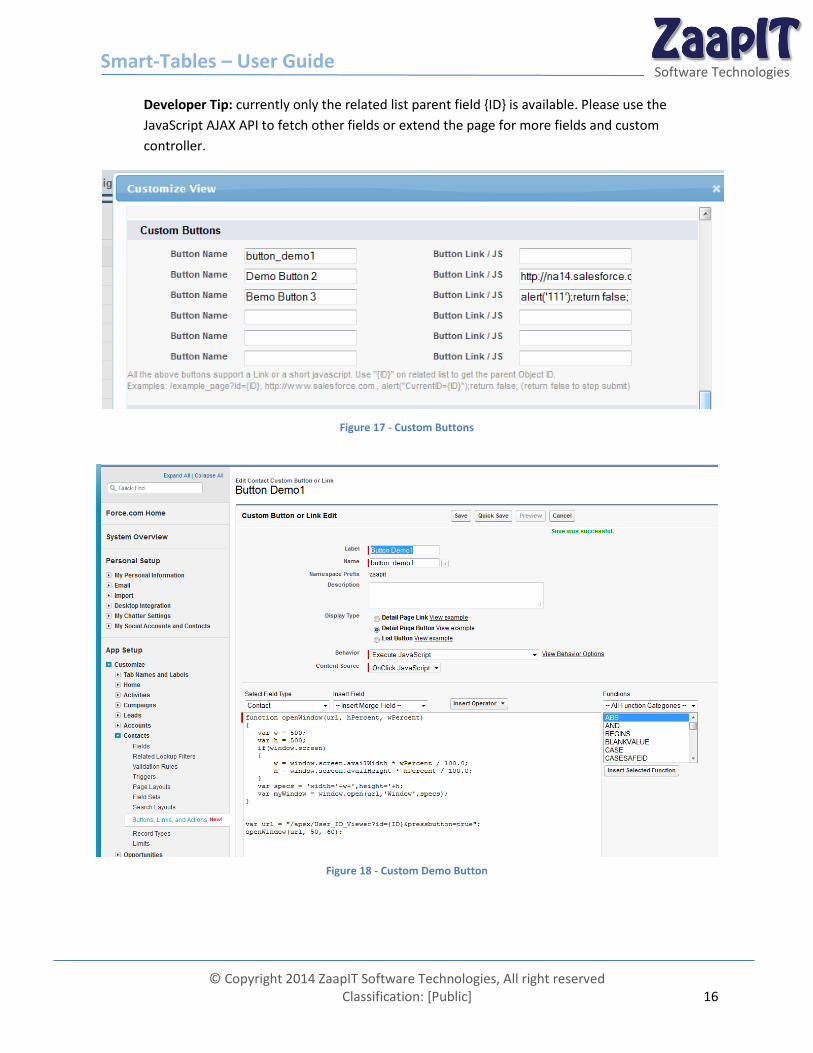
Custom Buttons
Create as many custom buttons as you need – on each save the system will offer you 3 more buttons
(Figure 17).
Button types:
Link / JavaScript button – Enter the name of the button on the left input field and the link or a
small JavaScript on the right input field. You can use {ID} to reference the parent object (useful
in related list mode – see related grids) see “Demo Button 2” and “Demo Button 3” on (Figure
17).
Salesforce custom buttons – Create a regular Salesforce JavaScript button for the current object
and put its API name in the left button name field see for example the “button_demo1” button
on Figure 17 and its Salesforce definition on Figure 18.
Smart-Tables – User Guide
© Copyright 2014 ZaapIT Software Technologies, All right reserved Classification: [Public] 16
Software Technologies
Developer Tip: currently only the related list parent field {ID} is available. Please use the
JavaScript AJAX API to fetch other fields or extend the page for more fields and custom
controller.
Figure 17 - Custom Buttons
Figure 18 - Custom Demo Button
Smart-Tables – User Guide
© Copyright 2014 ZaapIT Software Technologies, All right reserved Classification: [Public] 17
Software Technologies
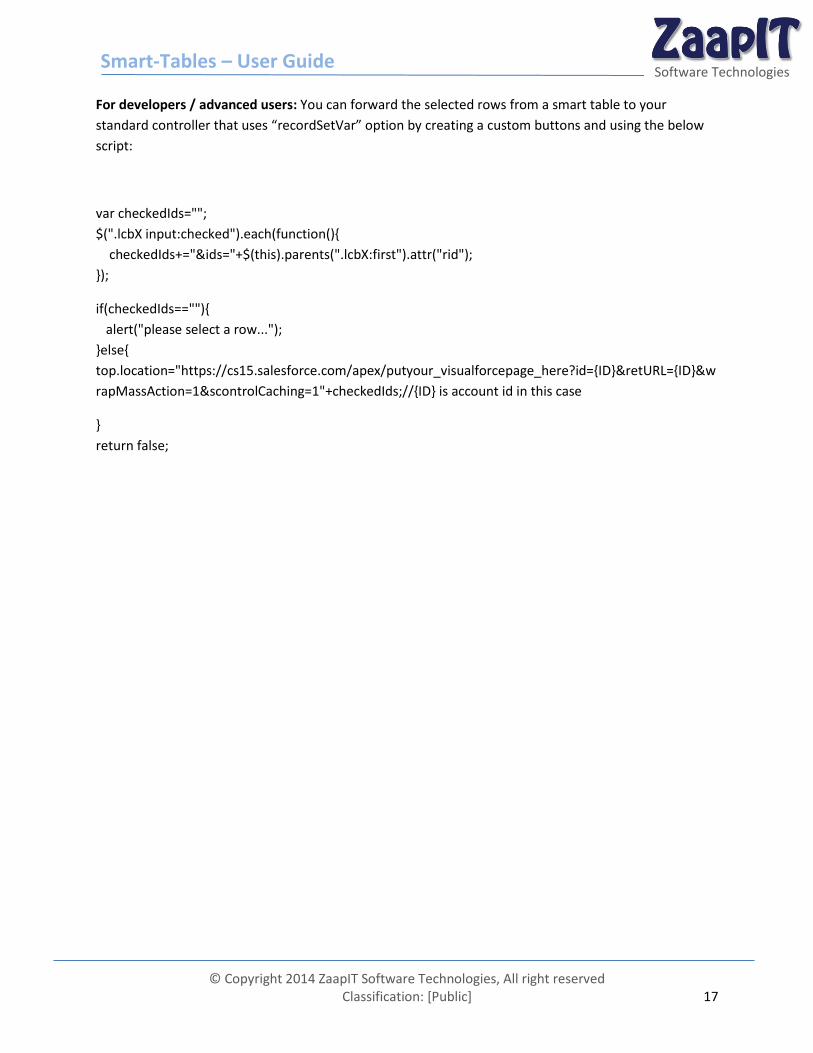
For developers / advanced users: You can forward the selected rows from a smart table to your
standard controller that uses “recordSetVar” option by creating a custom buttons and using the below
script:
var checkedIds="";
$(".lcbX input:checked").each(function(){
checkedIds+="&ids="+$(this).parents(".lcbX:first").attr("rid");
});
if(checkedIds==""){
alert("please select a row...");
}else{
top.location="https://cs15.salesforce.com/apex/putyour_visualforcepage_here?id={ID}&retURL={ID}&w
rapMassAction=1&scontrolCaching=1"+checkedIds;//{ID} is account id in this case
}
return false;
Smart-Tables – User Guide
© Copyright 2014 ZaapIT Software Technologies, All right reserved Classification: [Public] 18
Software Technologies
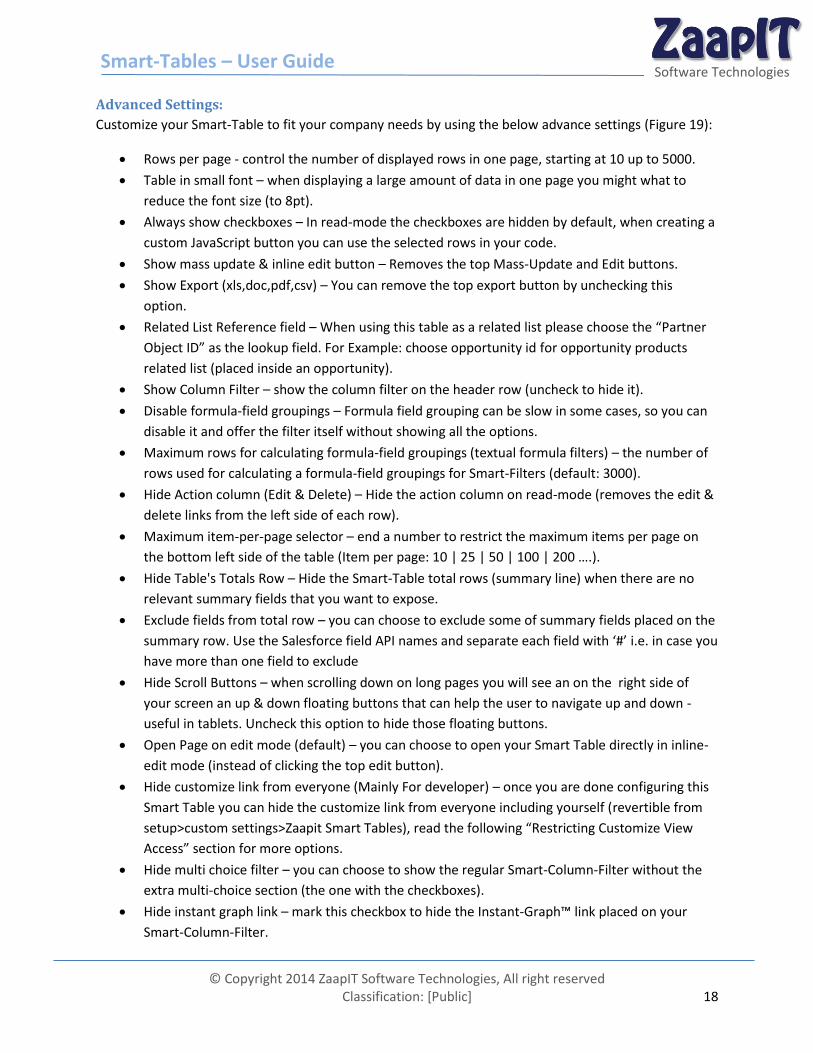
Advanced Settings:
Customize your Smart-Table to fit your company needs by using the below advance settings (Figure 19):
Rows per page - control the number of displayed rows in one page, starting at 10 up to 5000.
Table in small font – when displaying a large amount of data in one page you might what to
reduce the font size (to 8pt).
Always show checkboxes – In read-mode the checkboxes are hidden by default, when creating a
custom JavaScript button you can use the selected rows in your code.
Show mass update & inline edit button – Removes the top Mass-Update and Edit buttons.
Show Export (xls,doc,pdf,csv) – You can remove the top export button by unchecking this
option.
Related List Reference field – When using this table as a related list please choose the “Partner
Object ID” as the lookup field. For Example: choose opportunity id for opportunity products
related list (placed inside an opportunity).
Show Column Filter – show the column filter on the header row (uncheck to hide it).
Disable formula-field groupings – Formula field grouping can be slow in some cases, so you can
disable it and offer the filter itself without showing all the options.
Maximum rows for calculating formula-field groupings (textual formula filters) – the number of
rows used for calculating a formula-field groupings for Smart-Filters (default: 3000).
Hide Action column (Edit & Delete) – Hide the action column on read-mode (removes the edit &
delete links from the left side of each row).
Maximum item-per-page selector – end a number to restrict the maximum items per page on
the bottom left side of the table (Item per page: 10 | 25 | 50 | 100 | 200 ….).
Hide Table's Totals Row – Hide the Smart-Table total rows (summary line) when there are no
relevant summary fields that you want to expose.
Exclude fields from total row – you can choose to exclude some of summary fields placed on the
summary row. Use the Salesforce field API names and separate each field with ‘#’ i.e. in case you
have more than one field to exclude
Hide Scroll Buttons – when scrolling down on long pages you will see an on the right side of
your screen an up & down floating buttons that can help the user to navigate up and down -
useful in tablets. Uncheck this option to hide those floating buttons.
Open Page on edit mode (default) – you can choose to open your Smart Table directly in inline-
edit mode (instead of clicking the top edit button).
Hide customize link from everyone (Mainly For developer) – once you are done configuring this
Smart Table you can hide the customize link from everyone including yourself (revertible from
setup>custom settings>Zaapit Smart Tables), read the following “Restricting Customize View
Access” section for more options.
Hide multi choice filter – you can choose to show the regular Smart-Column-Filter without the
extra multi-choice section (the one with the checkboxes).
Hide instant graph link – mark this checkbox to hide the Instant-Graph™ link placed on your
Smart-Column-Filter.

Smart-Tables – User Guide
© Copyright 2014 ZaapIT Software Technologies, All right reserved Classification: [Public] 19
Software Technologies
Amount field for Graphs – Choose an amount/currency field for your Instant-Graph™, the
selected field will be used to calculate the graph’s group-value. Leave this field on the “please
select” choice to use the default row-count group-value. For example: Choosing Opportunity
amount for an opportunity Smart-Table will lead to an Instant-Graph™ presented in Figure 9.
Extra Condition Filter (for admin users or developers):
Add a SOQL condition and filter out unwanted data automatically from your Smart-Table.
In case of an unexpected or problematic result you can empty this field from setup>custom settings>
table name> "extraConditionFilter" field.
Figure 20 - Extra Condition Filter
Figure 19 - Advanced Settings
Smart-Tables – User Guide
© Copyright 2014 ZaapIT Software Technologies, All right reserved Classification: [Public] 20
Software Technologies
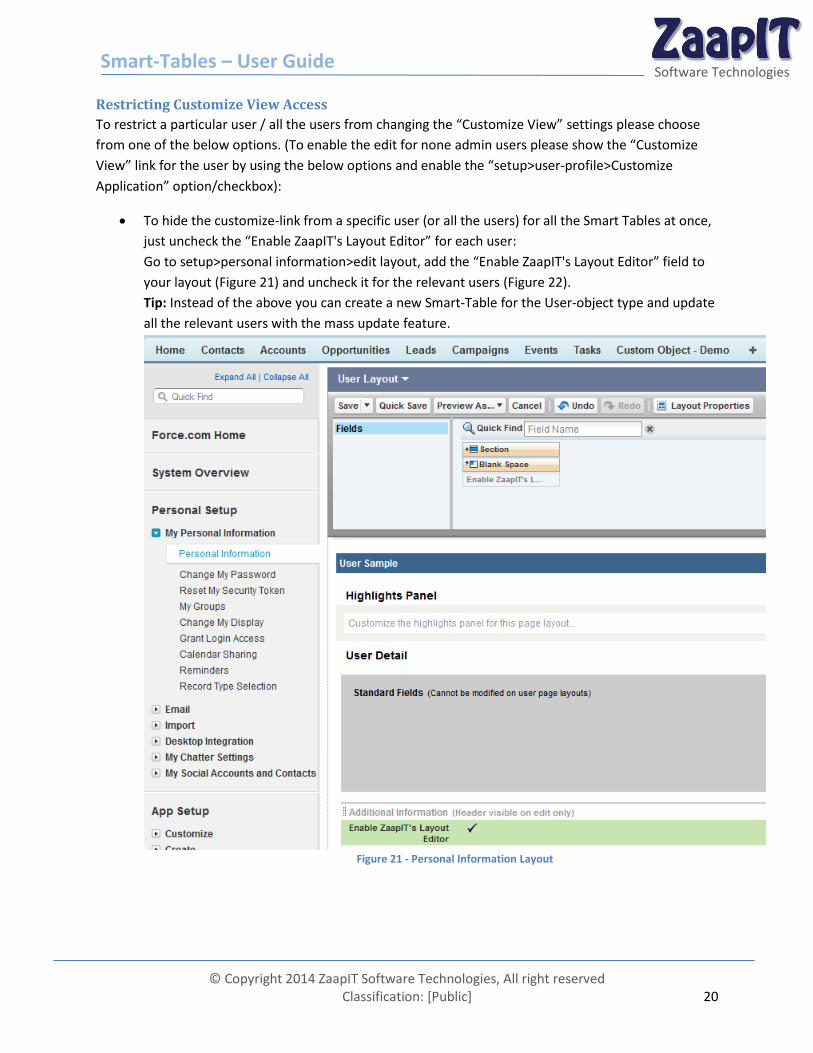
Restricting Customize View Access
To restrict a particular user / all the users from changing the “Customize View” settings please choose
from one of the below options. (To enable the edit for none admin users please show the “Customize
View” link for the user by using the below options and enable the “setup>user-profile>Customize
Application” option/checkbox):
To hide the customize-link from a specific user (or all the users) for all the Smart Tables at once,
just uncheck the “Enable ZaapIT's Layout Editor” for each user:
Go to setup>personal information>edit layout, add the “Enable ZaapIT's Layout Editor” field to
your layout (Figure 21) and uncheck it for the relevant users (Figure 22).
Tip: Instead of the above you can create a new Smart-Table for the User-object type and update
all the relevant users with the mass update feature.
Figure 21 - Personal Information Layout
Smart-Tables – User Guide
© Copyright 2014 ZaapIT Software Technologies, All right reserved Classification: [Public] 21
Software Technologies
To hide the customize link from everyone (per table - Mainly For developer see Figure 23) –
once you are done configuring your Smart Table you can hide the customize link from everyone
including yourself (revertible from setup>custom settings>Zaapit Smart Tables>”table name”),
Figure 22 - Personal Information
Figure 23 - Hide customize link from everyone
Smart-Tables – User Guide
© Copyright 2014 ZaapIT Software Technologies, All right reserved Classification: [Public] 22
Software Technologies
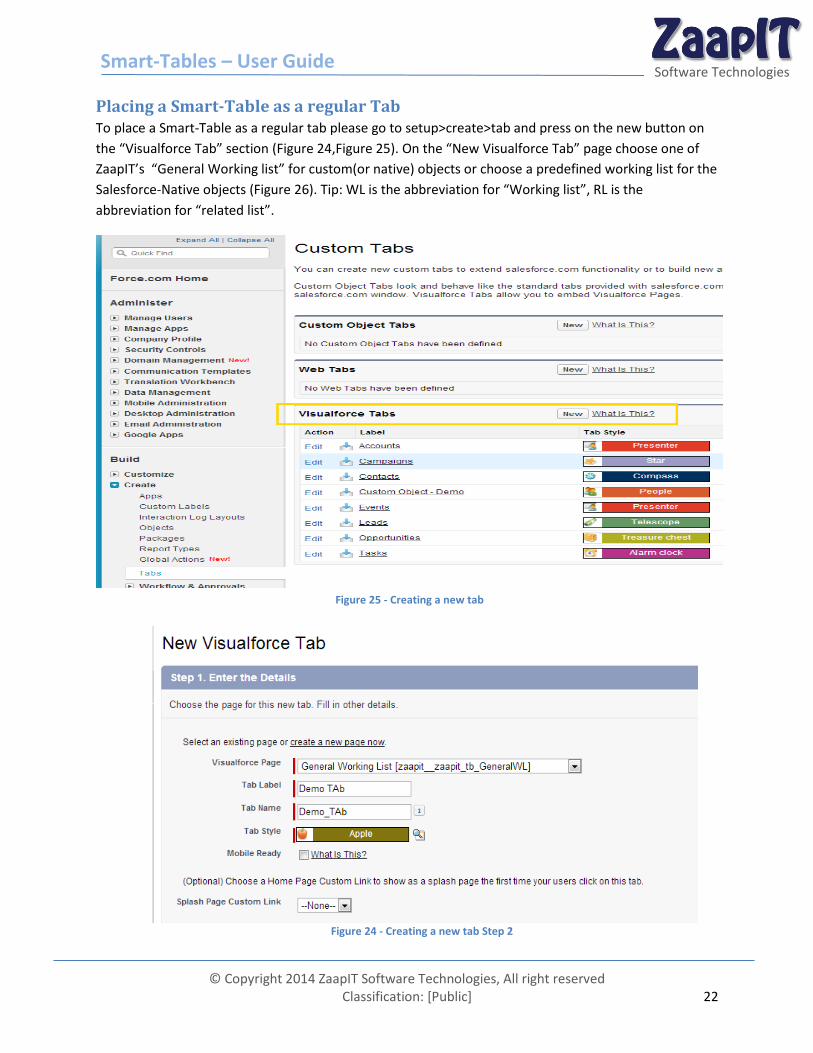
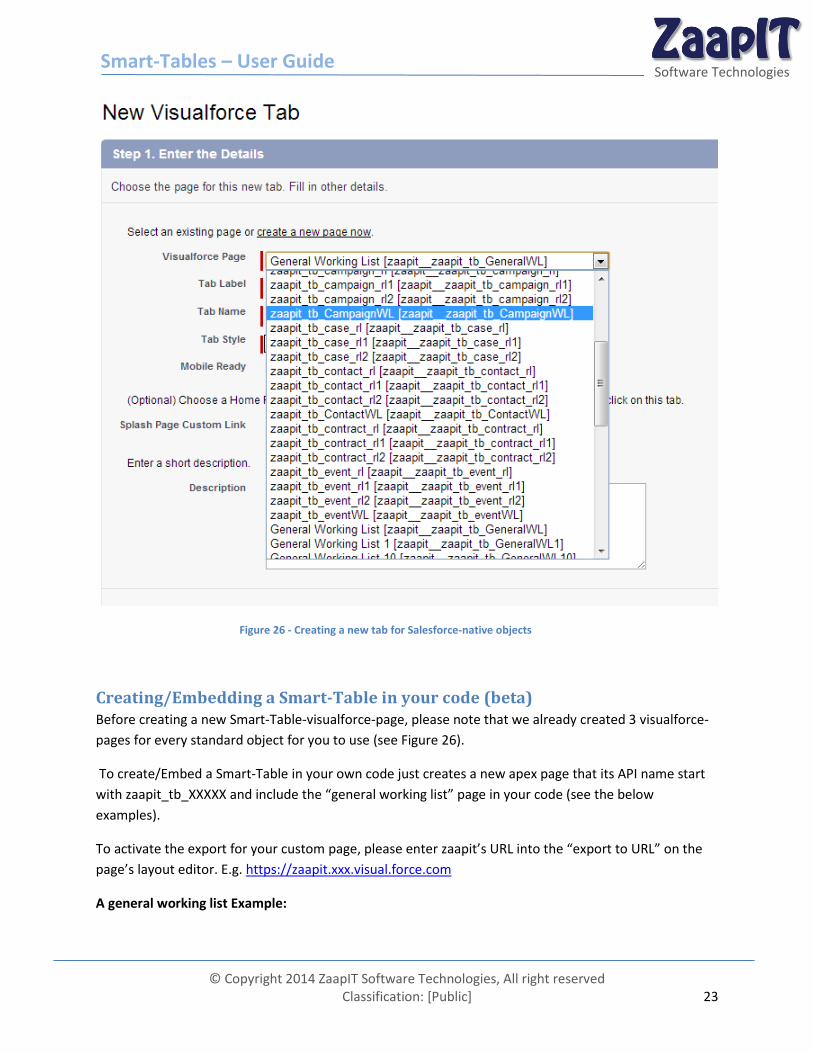
Placing a Smart-Table as a regular Tab To place a Smart-Table as a regular tab please go to setup>create>tab and press on the new button on
the “Visualforce Tab” section (Figure 24,Figure 25). On the “New Visualforce Tab” page choose one of
ZaapIT’s “General Working list” for custom(or native) objects or choose a predefined working list for the
Salesforce-Native objects (Figure 26). Tip: WL is the abbreviation for “Working list”, RL is the
abbreviation for “related list”.
Figure 25 - Creating a new tab
Figure 24 - Creating a new tab Step 2
Smart-Tables – User Guide
© Copyright 2014 ZaapIT Software Technologies, All right reserved Classification: [Public] 23
Software Technologies
Figure 26 - Creating a new tab for Salesforce-native objects
Creating/Embedding a Smart-Table in your code (beta) Before creating a new Smart-Table-visualforce-page, please note that we already created 3 visualforce-
pages for every standard object for you to use (see Figure 26).
To create/Embed a Smart-Table in your own code just creates a new apex page that its API name start
with zaapit_tb_XXXXX and include the “general working list” page in your code (see the below
examples).
To activate the export for your custom page, please enter zaapit’s URL into the “export to URL” on the
page’s layout editor. E.g. https://zaapit.xxx.visual.force.com
A general working list Example:
Smart-Tables – User Guide
© Copyright 2014 ZaapIT Software Technologies, All right reserved Classification: [Public] 24
Software Technologies
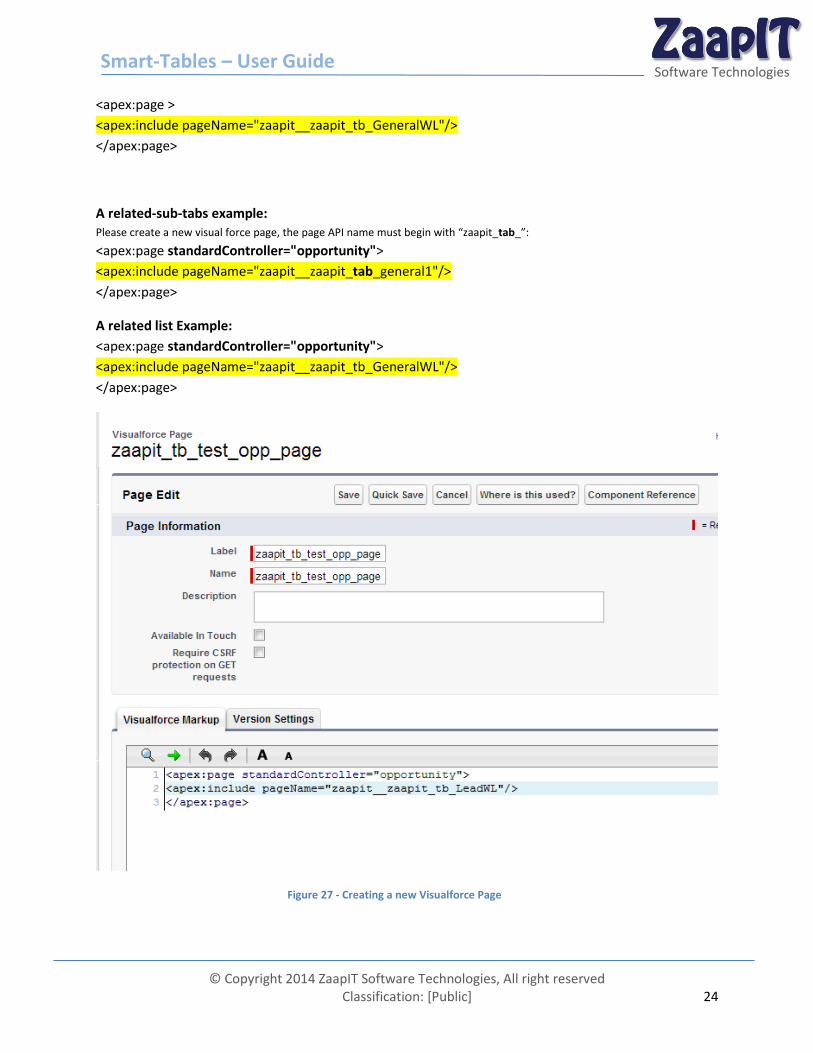
<apex:page >
<apex:include pageName="zaapit__zaapit_tb_GeneralWL"/>
</apex:page>
A related-sub-tabs example: Please create a new visual force page, the page API name must begin with “zaapit_tab_”:
<apex:page standardController="opportunity">
<apex:include pageName="zaapit__zaapit_tab_general1"/>
</apex:page>
A related list Example:
<apex:page standardController="opportunity">
<apex:include pageName="zaapit__zaapit_tb_GeneralWL"/>
</apex:page>
Figure 27 - Creating a new Visualforce Page
Smart-Tables – User Guide
© Copyright 2014 ZaapIT Software Technologies, All right reserved Classification: [Public] 25
Software Technologies
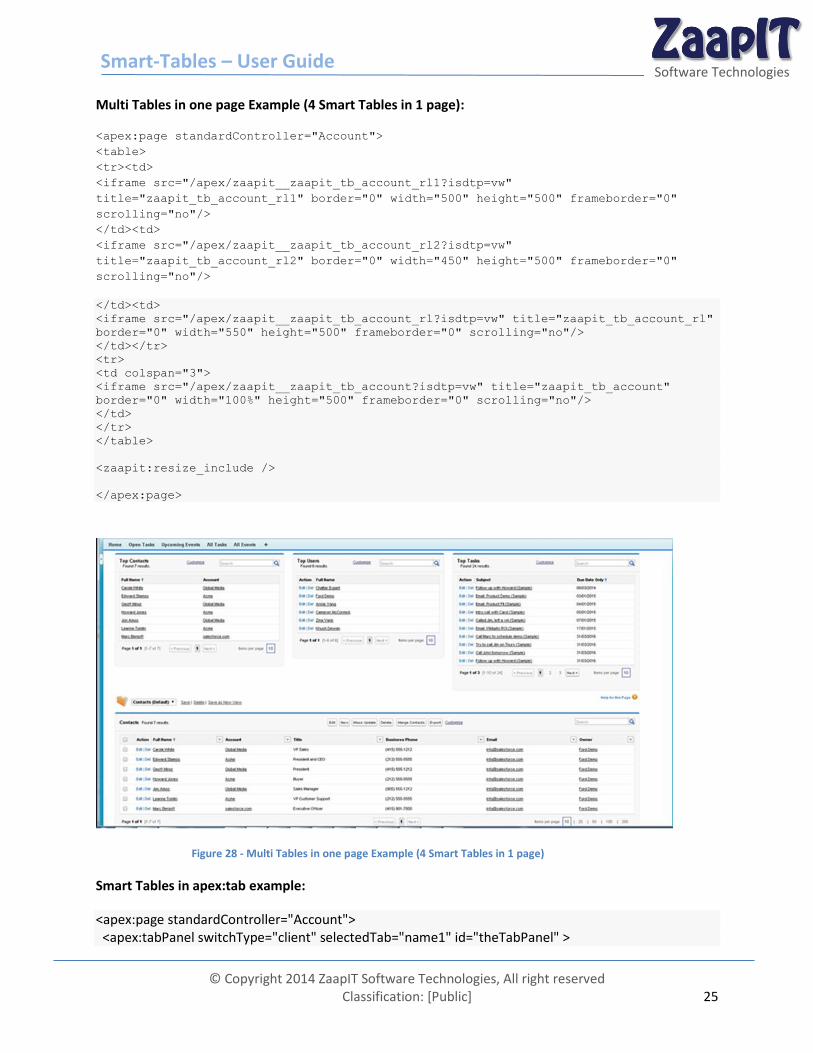
Multi Tables in one page Example (4 Smart Tables in 1 page):
<apex:page standardController="Account">
<table>
<tr><td>
<iframe src="/apex/zaapit__zaapit_tb_account_rl1?isdtp=vw"
title="zaapit_tb_account_rl1" border="0" width="500" height="500" frameborder="0"
scrolling="no"/>
</td><td>
<iframe src="/apex/zaapit__zaapit_tb_account_rl2?isdtp=vw"
title="zaapit_tb_account_rl2" border="0" width="450" height="500" frameborder="0"
scrolling="no"/>
</td><td>
<iframe src="/apex/zaapit__zaapit_tb_account_rl?isdtp=vw" title="zaapit_tb_account_rl"
border="0" width="550" height="500" frameborder="0" scrolling="no"/>
</td></tr>
<tr>
<td colspan="3">
<iframe src="/apex/zaapit__zaapit_tb_account?isdtp=vw" title="zaapit_tb_account"
border="0" width="100%" height="500" frameborder="0" scrolling="no"/>
</td>
</tr>
</table>
<zaapit:resize_include />
</apex:page>
Figure 28 - Multi Tables in one page Example (4 Smart Tables in 1 page)
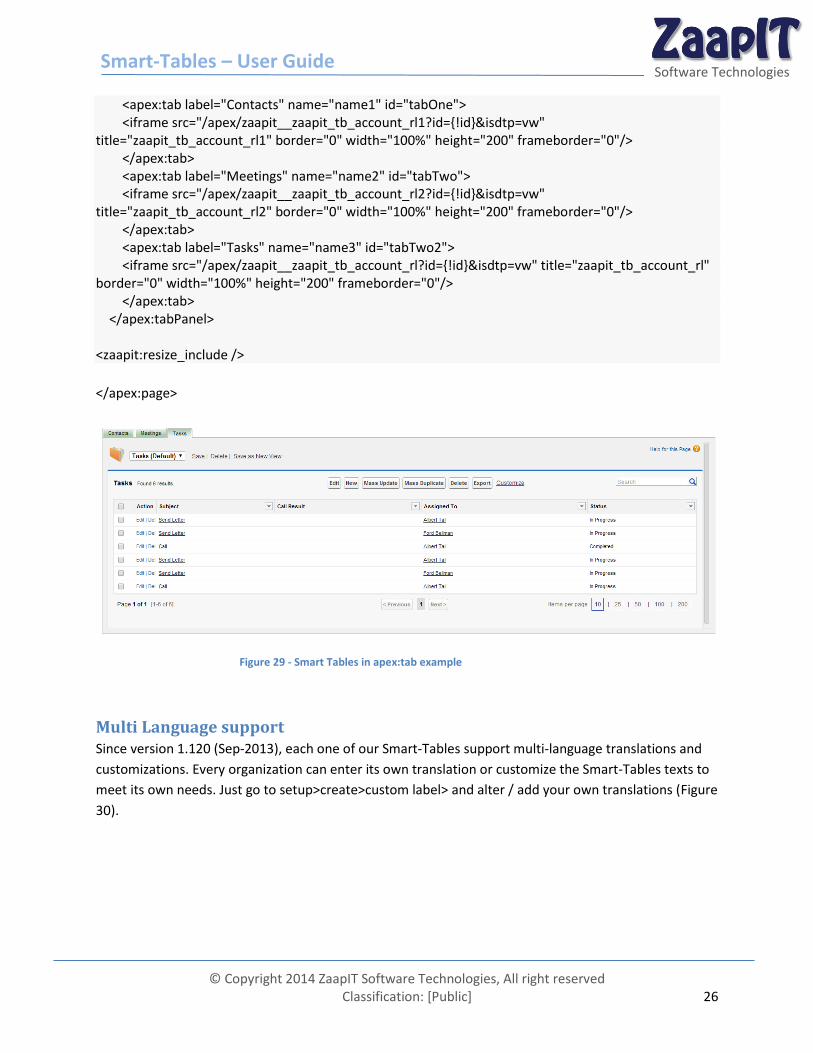
Smart Tables in apex:tab example:
<apex:page standardController="Account"> <apex:tabPanel switchType="client" selectedTab="name1" id="theTabPanel" >
Smart-Tables – User Guide
© Copyright 2014 ZaapIT Software Technologies, All right reserved Classification: [Public] 26
Software Technologies
<apex:tab label="Contacts" name="name1" id="tabOne"> <iframe src="/apex/zaapit__zaapit_tb_account_rl1?id={!id}&isdtp=vw" title="zaapit_tb_account_rl1" border="0" width="100%" height="200" frameborder="0"/> </apex:tab> <apex:tab label="Meetings" name="name2" id="tabTwo"> <iframe src="/apex/zaapit__zaapit_tb_account_rl2?id={!id}&isdtp=vw" title="zaapit_tb_account_rl2" border="0" width="100%" height="200" frameborder="0"/> </apex:tab> <apex:tab label="Tasks" name="name3" id="tabTwo2"> <iframe src="/apex/zaapit__zaapit_tb_account_rl?id={!id}&isdtp=vw" title="zaapit_tb_account_rl" border="0" width="100%" height="200" frameborder="0"/> </apex:tab> </apex:tabPanel> <zaapit:resize_include />
</apex:page>
Figure 29 - Smart Tables in apex:tab example
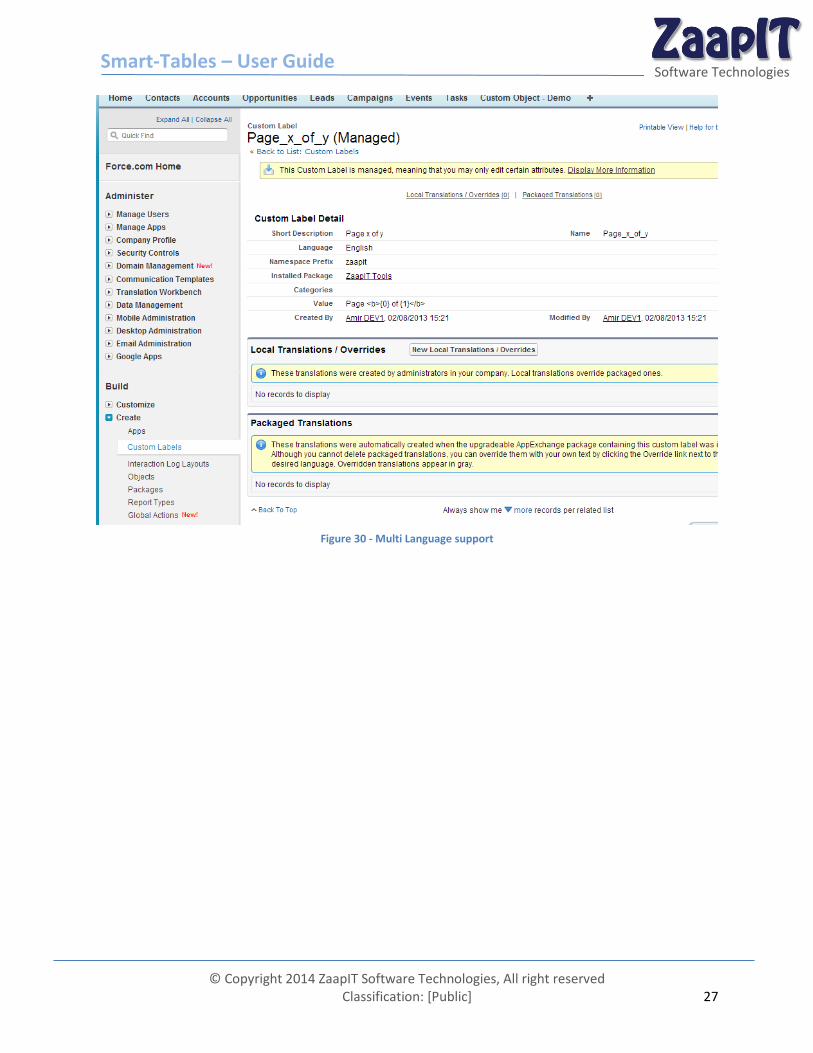
Multi Language support Since version 1.120 (Sep-2013), each one of our Smart-Tables support multi-language translations and
customizations. Every organization can enter its own translation or customize the Smart-Tables texts to
meet its own needs. Just go to setup>create>custom label> and alter / add your own translations (Figure
30).
Smart-Tables – User Guide
© Copyright 2014 ZaapIT Software Technologies, All right reserved Classification: [Public] 27
Software Technologies
Figure 30 - Multi Language support
Smart-Tables – User Guide
© Copyright 2014 ZaapIT Software Technologies, All right reserved Classification: [Public] 28
Software Technologies
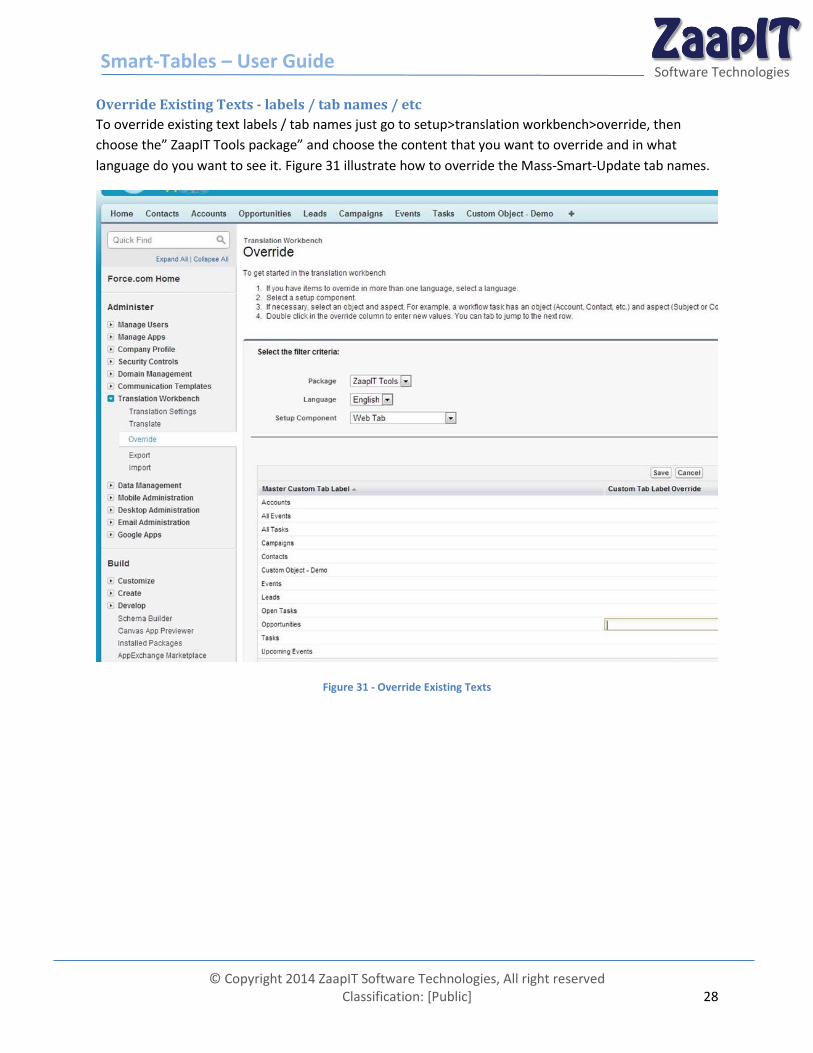
Override Existing Texts - labels / tab names / etc
To override existing text labels / tab names just go to setup>translation workbench>override, then
choose the” ZaapIT Tools package” and choose the content that you want to override and in what
language do you want to see it. Figure 31 illustrate how to override the Mass-Smart-Update tab names.
Figure 31 - Override Existing Texts
Smart-Tables – User Guide
© Copyright 2014 ZaapIT Software Technologies, All right reserved Classification: [Public] 29
Software Technologies
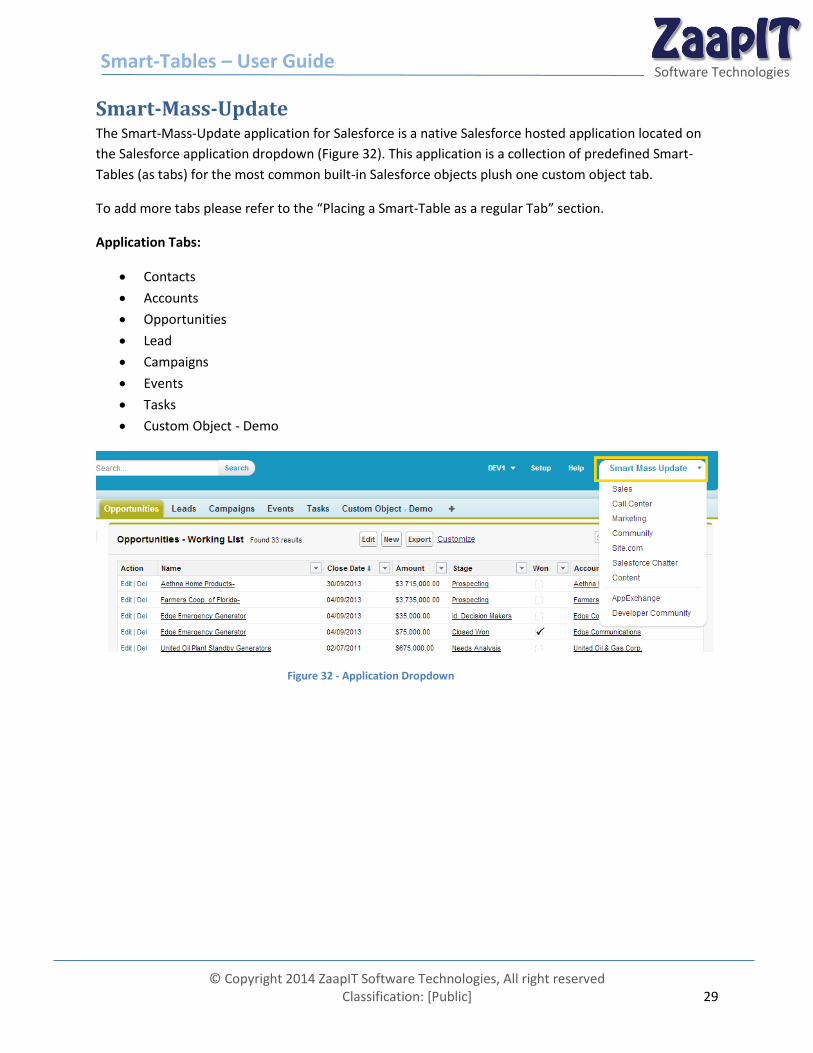
Smart-Mass-Update The Smart-Mass-Update application for Salesforce is a native Salesforce hosted application located on
the Salesforce application dropdown (Figure 32). This application is a collection of predefined Smart-
Tables (as tabs) for the most common built-in Salesforce objects plush one custom object tab.
To add more tabs please refer to the “Placing a Smart-Table as a regular Tab” section.
Application Tabs:
Contacts
Accounts
Opportunities
Lead
Campaigns
Events
Tasks
Custom Object - Demo
Figure 32 - Application Dropdown
Smart-Tables – User Guide
© Copyright 2014 ZaapIT Software Technologies, All right reserved Classification: [Public] 30
Software Technologies
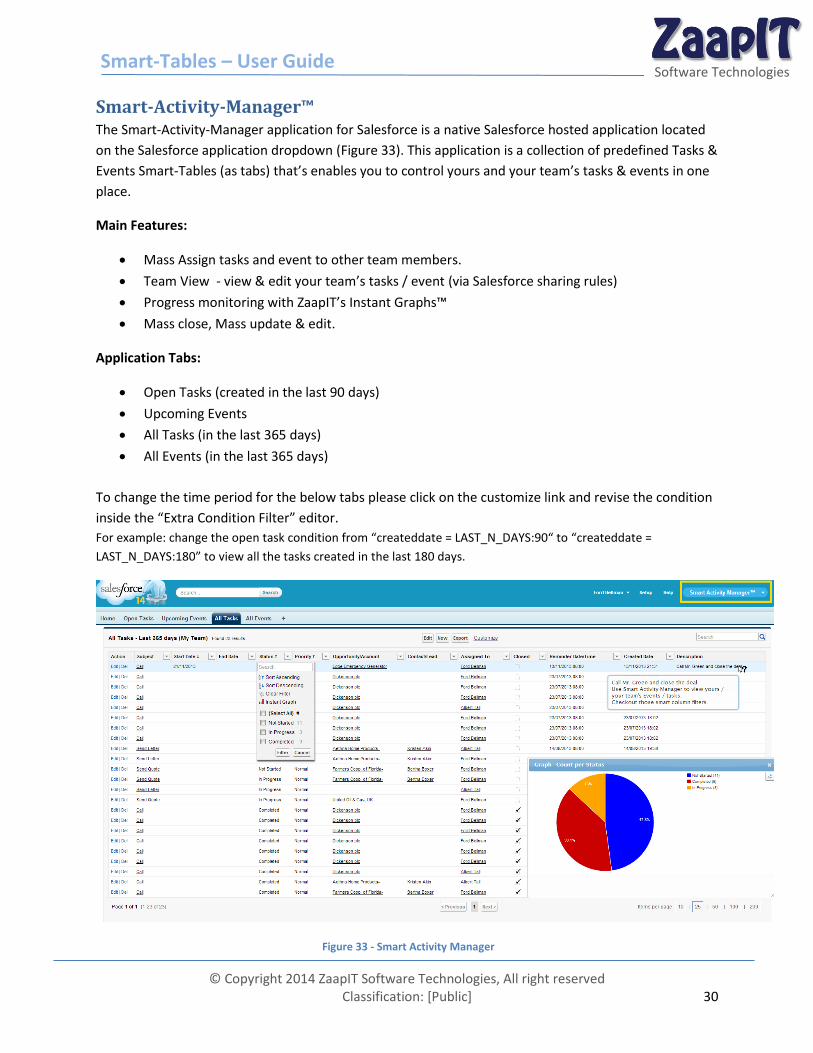
Smart-Activity-Manager™ The Smart-Activity-Manager application for Salesforce is a native Salesforce hosted application located
on the Salesforce application dropdown (Figure 33). This application is a collection of predefined Tasks &
Events Smart-Tables (as tabs) that’s enables you to control yours and your team’s tasks & events in one
place.
Main Features:
Mass Assign tasks and event to other team members.
Team View - view & edit your team’s tasks / event (via Salesforce sharing rules)
Progress monitoring with ZaapIT’s Instant Graphs™
Mass close, Mass update & edit.
Application Tabs:
Open Tasks (created in the last 90 days)
Upcoming Events
All Tasks (in the last 365 days)
All Events (in the last 365 days)
To change the time period for the below tabs please click on the customize link and revise the condition
inside the “Extra Condition Filter” editor.
For example: change the open task condition from “createddate = LAST_N_DAYS:90“ to “createddate =
LAST_N_DAYS:180” to view all the tasks created in the last 180 days.
Figure 33 - Smart Activity Manager
Smart-Tables – User Guide
© Copyright 2014 ZaapIT Software Technologies, All right reserved Classification: [Public] 31
Software Technologies
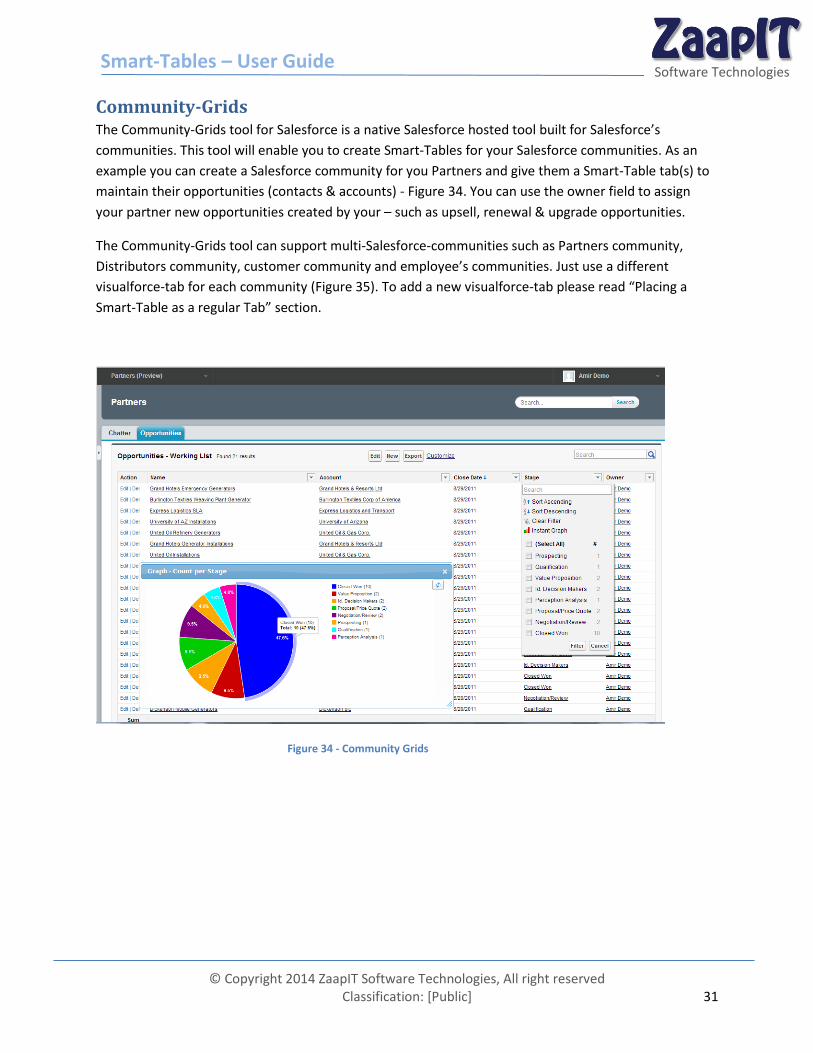
Community-Grids The Community-Grids tool for Salesforce is a native Salesforce hosted tool built for Salesforce’s
communities. This tool will enable you to create Smart-Tables for your Salesforce communities. As an
example you can create a Salesforce community for you Partners and give them a Smart-Table tab(s) to
maintain their opportunities (contacts & accounts) - Figure 34. You can use the owner field to assign
your partner new opportunities created by your – such as upsell, renewal & upgrade opportunities.
The Community-Grids tool can support multi-Salesforce-communities such as Partners community,
Distributors community, customer community and employee’s communities. Just use a different
visualforce-tab for each community (Figure 35). To add a new visualforce-tab please read “Placing a
Smart-Table as a regular Tab” section.
Figure 34 - Community Grids

Smart-Tables – User Guide
© Copyright 2014 ZaapIT Software Technologies, All right reserved Classification: [Public] 32
Software Technologies
Figure 35 - Community Grids Tabs
Smart-Related-Grids The smart Related Grids are Smart-Tables that can function as a related list. They have the same ability
and functionality as the regular Smart-Tables – please refer to the Smart-Tables section for more
information about the Smart-Related-Grids abilities and functionality. Next is the explanation on how to
setup a smart related grid.
Setting up your first Smart-Related-Grids / Sub Tabs
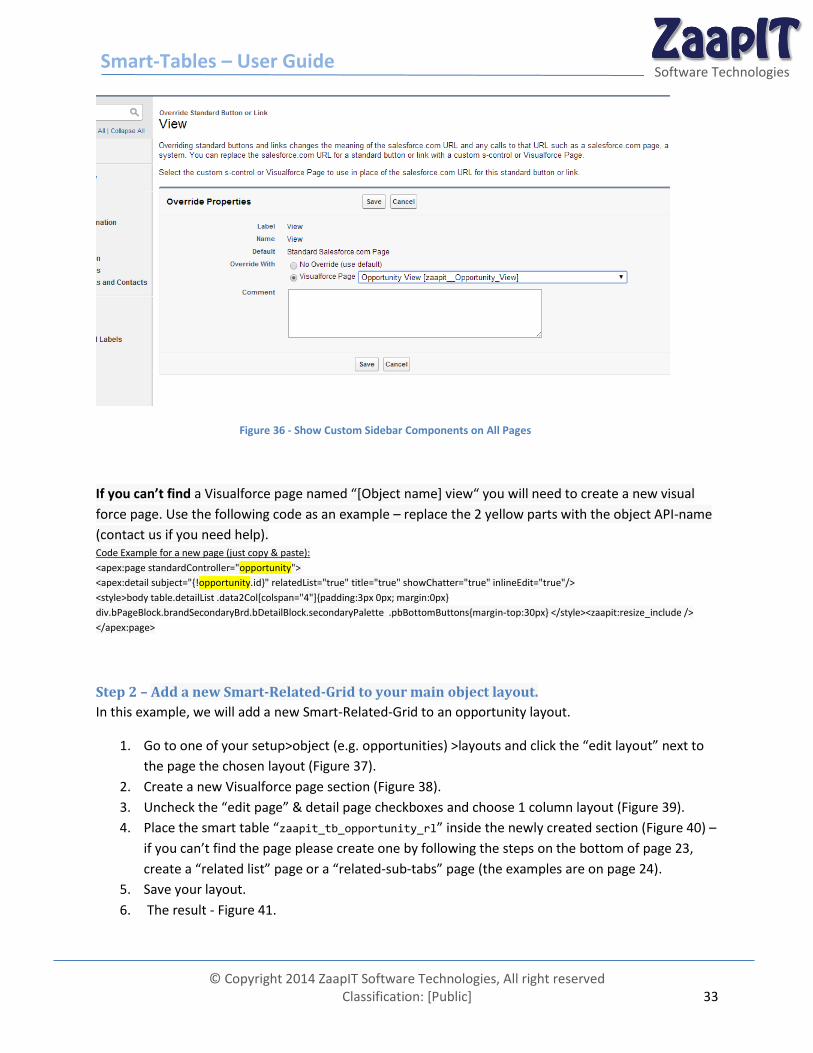
Step 1 – Override the object view link
Go to setup> object name (e.g. opportunity) > buttons, links & actions and edit the view link (Figure 36).
Override the with a Visualforce page named “*Object name+ view“(Figure 36) – if you can’t find this
Visualforce page you will need to create it – we placed the instructions for that after Figure 36.
Smart-Tables – User Guide
© Copyright 2014 ZaapIT Software Technologies, All right reserved Classification: [Public] 33
Software Technologies
Figure 36 - Show Custom Sidebar Components on All Pages
If you can’t find a Visualforce page named “*Object name+ view“ you will need to create a new visual
force page. Use the following code as an example – replace the 2 yellow parts with the object API-name
(contact us if you need help). Code Example for a new page (just copy & paste):
<apex:page standardController="opportunity">
<apex:detail subject="{!opportunity.id}" relatedList="true" title="true" showChatter="true" inlineEdit="true"/>
<style>body table.detailList .data2Col[colspan="4"]{padding:3px 0px; margin:0px}
div.bPageBlock.brandSecondaryBrd.bDetailBlock.secondaryPalette .pbBottomButtons{margin-top:30px} </style><zaapit:resize_include />
</apex:page>
Step 2 – Add a new Smart-Related-Grid to your main object layout.
In this example, we will add a new Smart-Related-Grid to an opportunity layout.
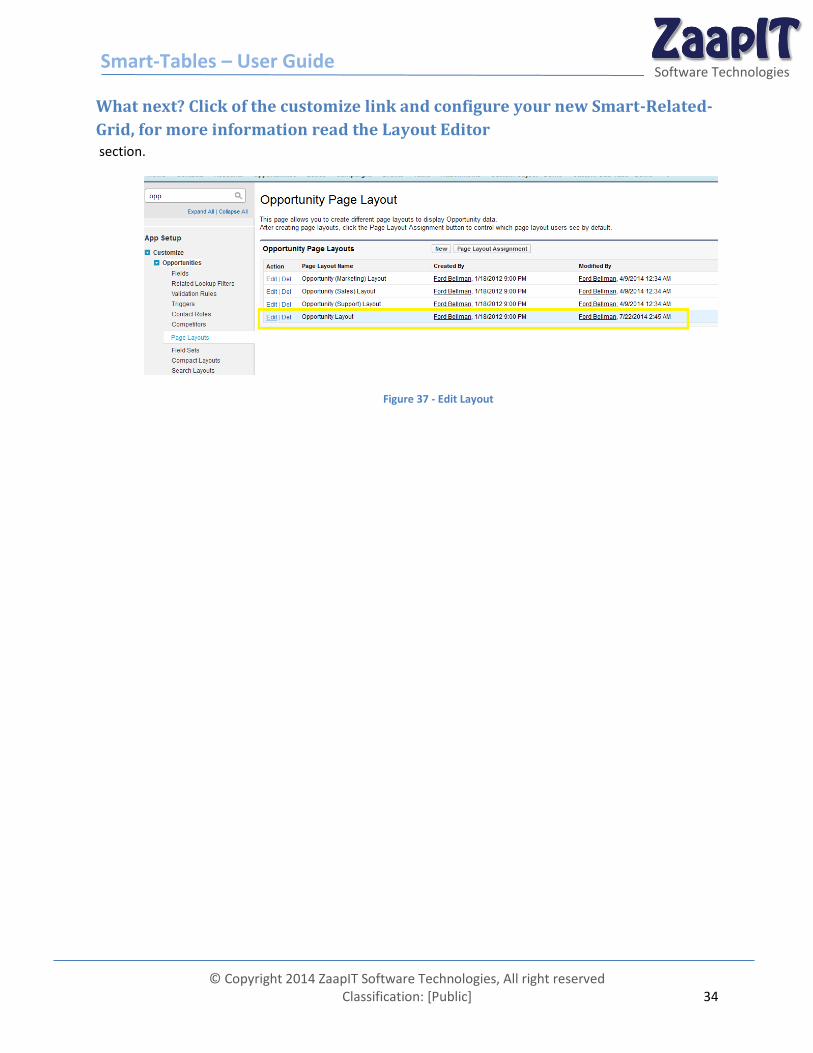
1. Go to one of your setup>object (e.g. opportunities) >layouts and click the “edit layout” next to
the page the chosen layout (Figure 37).
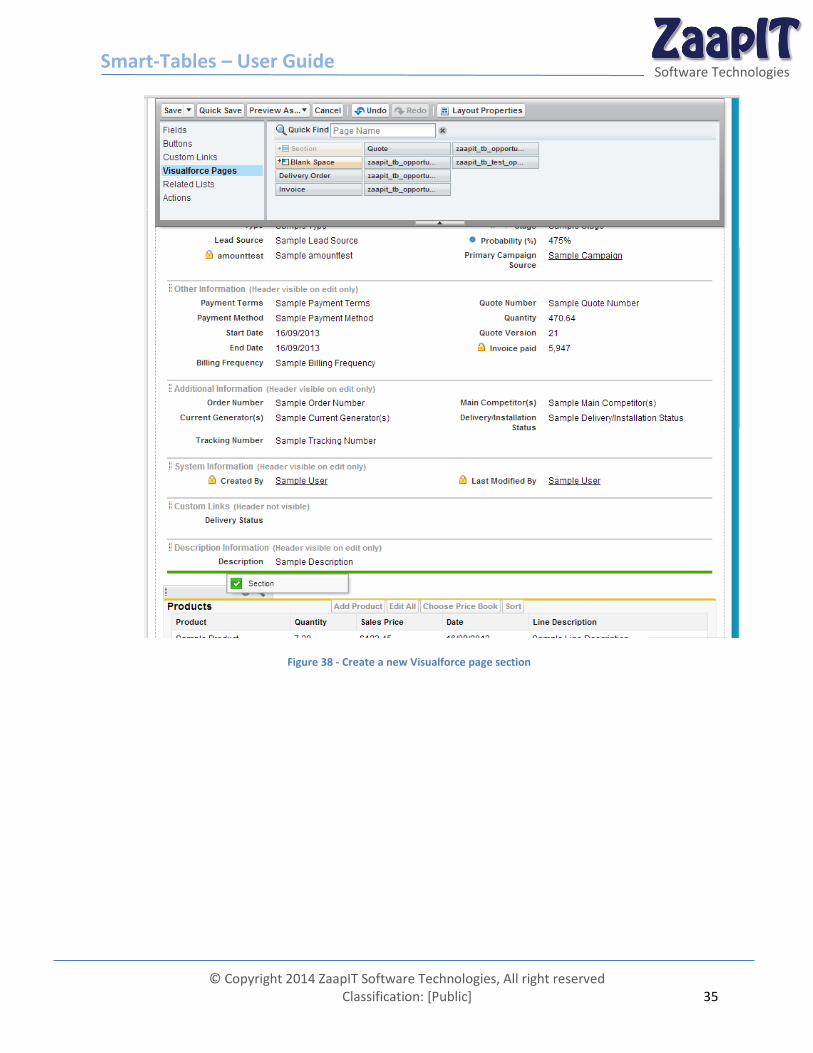
2. Create a new Visualforce page section (Figure 38).
3. Uncheck the “edit page” & detail page checkboxes and choose 1 column layout (Figure 39).
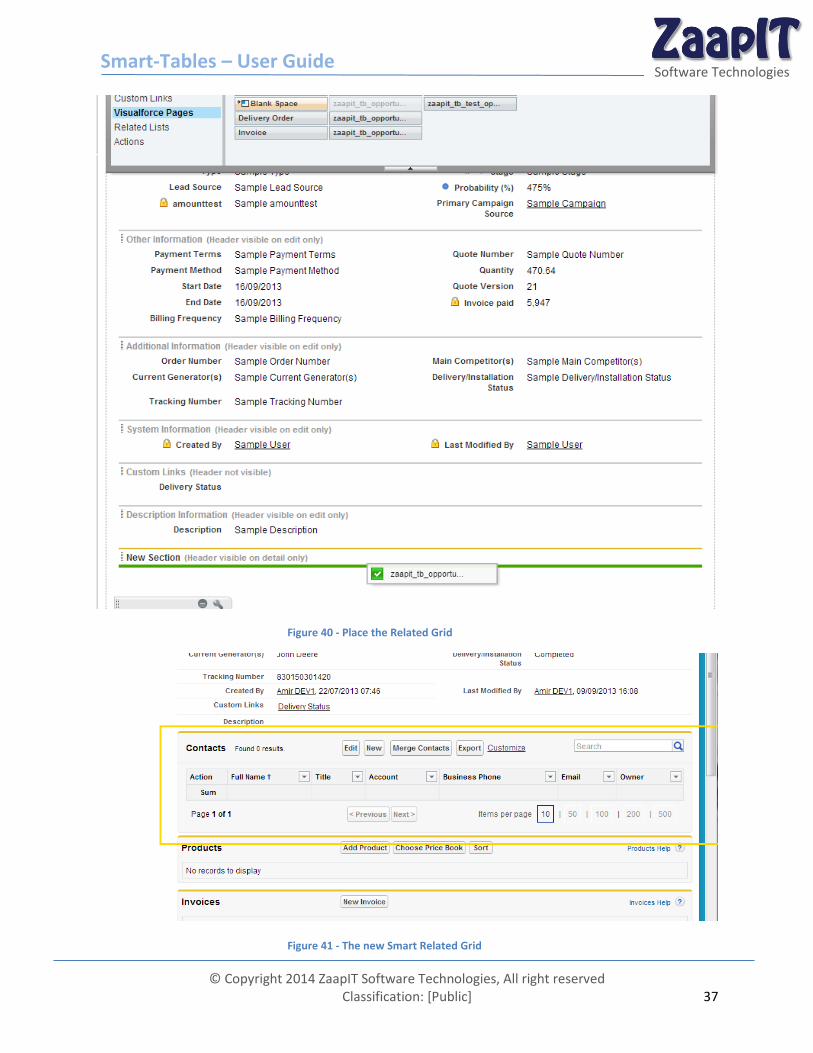
4. Place the smart table “zaapit_tb_opportunity_rl” inside the newly created section (Figure 40) –
if you can’t find the page please create one by following the steps on the bottom of page 23,
create a “related list” page or a “related-sub-tabs” page (the examples are on page 24).
5. Save your layout.
6. The result - Figure 41.
Smart-Tables – User Guide
© Copyright 2014 ZaapIT Software Technologies, All right reserved Classification: [Public] 34
Software Technologies
What next? Click of the customize link and configure your new Smart-Related-
Grid, for more information read the Layout Editor section.
Figure 37 - Edit Layout
Smart-Tables – User Guide
© Copyright 2014 ZaapIT Software Technologies, All right reserved Classification: [Public] 35
Software Technologies
Figure 38 - Create a new Visualforce page section

Smart-Tables – User Guide
© Copyright 2014 ZaapIT Software Technologies, All right reserved Classification: [Public] 36
Software Technologies
Figure 39 - Section Properties
Smart-Tables – User Guide
© Copyright 2014 ZaapIT Software Technologies, All right reserved Classification: [Public] 37
Software Technologies
Figure 40 - Place the Related Grid
Figure 41 - The new Smart Related Grid
Smart-Tables – User Guide
© Copyright 2014 ZaapIT Software Technologies, All right reserved Classification: [Public] 38
Software Technologies
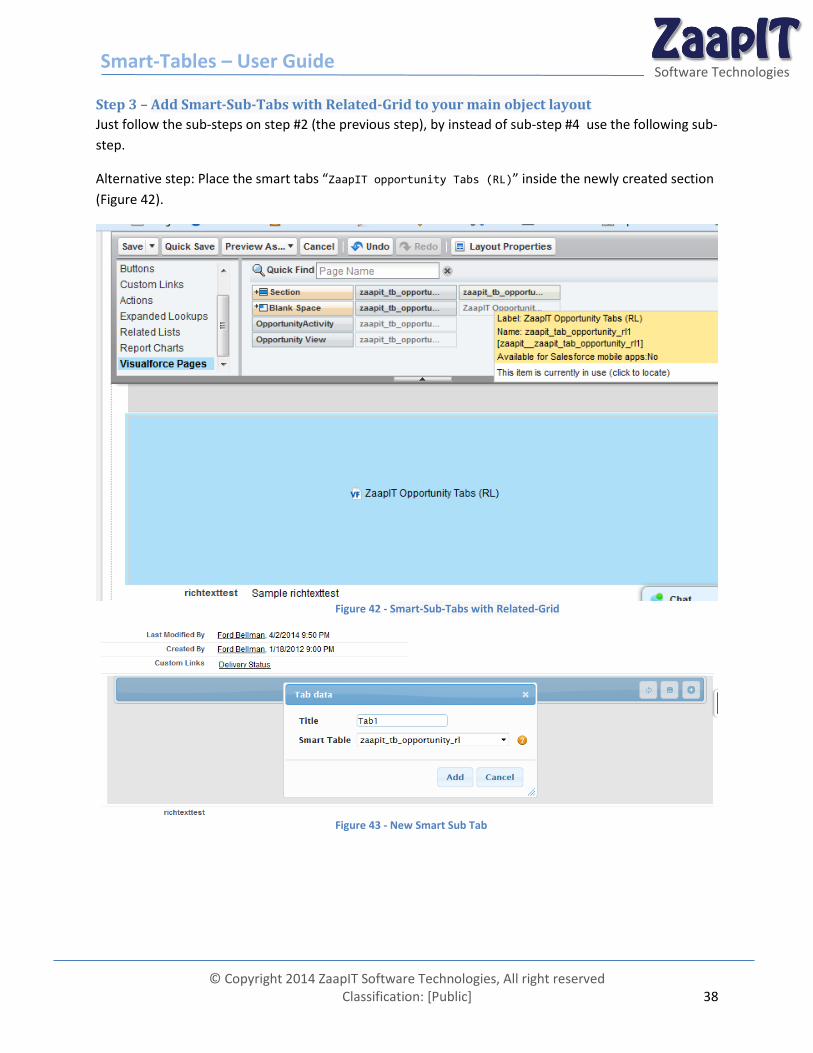
Step 3 – Add Smart-Sub-Tabs with Related-Grid to your main object layout
Just follow the sub-steps on step #2 (the previous step), by instead of sub-step #4 use the following sub-
step.
Alternative step: Place the smart tabs “ZaapIT opportunity Tabs (RL)” inside the newly created section
(Figure 42).
Figure 42 - Smart-Sub-Tabs with Related-Grid
Figure 43 - New Smart Sub Tab
Smart-Tables – User Guide
© Copyright 2014 ZaapIT Software Technologies, All right reserved Classification: [Public] 39
Software Technologies
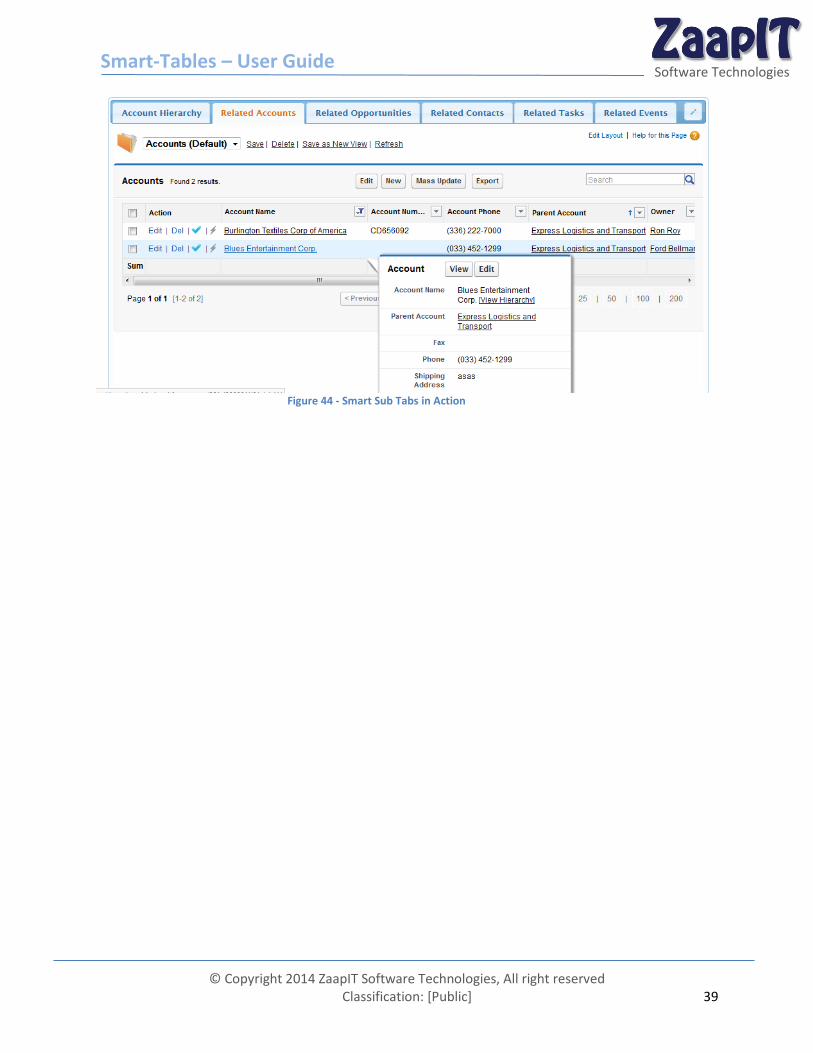
Figure 44 - Smart Sub Tabs in Action
Smart-Tables – User Guide
© Copyright 2014 ZaapIT Software Technologies, All right reserved Classification: [Public] 40
Software Technologies
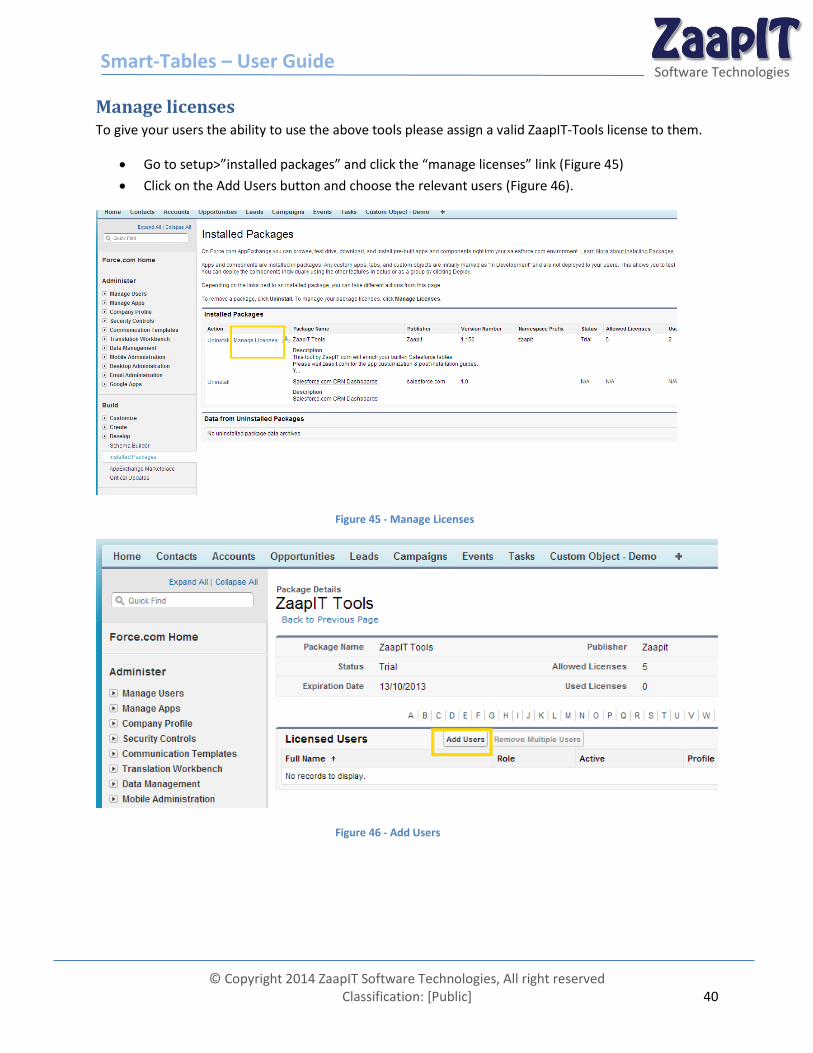
Manage licenses To give your users the ability to use the above tools please assign a valid ZaapIT-Tools license to them.
Go to setup>”installed packages” and click the “manage licenses” link (Figure 45)
Click on the Add Users button and choose the relevant users (Figure 46).
Figure 45 - Manage Licenses
Figure 46 - Add Users

Smart-Tables – User Guide
© Copyright 2014 ZaapIT Software Technologies, All right reserved Classification: [Public] 41
Software Technologies
Lightweight Tables – Deprecated (End of Support: Summer-15) The Lightweight Tables are client-side tables that enable you to search sort and filter any related list.
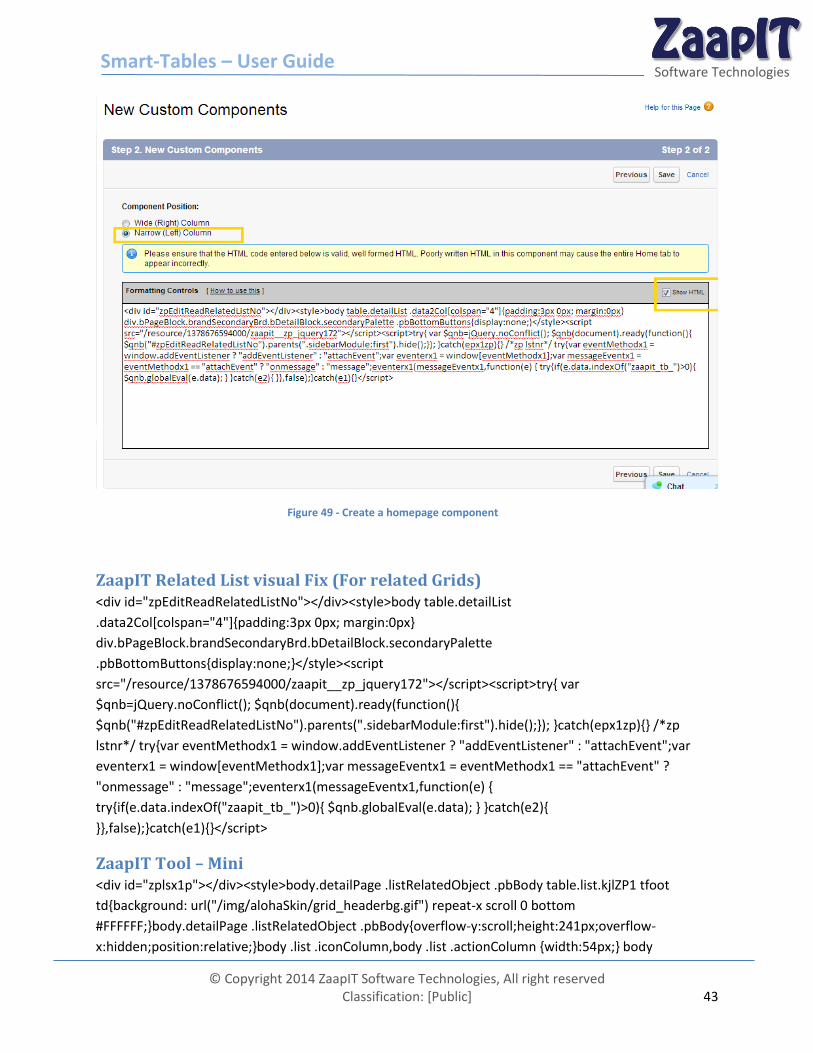
It has a “row capacity limit” of 150 rows. Since version 1.138 the below “Text-Area-left-side”
components are empty, you can create them by yourself and use them (Figure 49) – the name of the
Homepage component isn’t important (we added the scripts to the end of this section).
The below ZaapIT checkboxes (in yellow box) belongs to the Lightweight Tables, use the Zaapit Tools
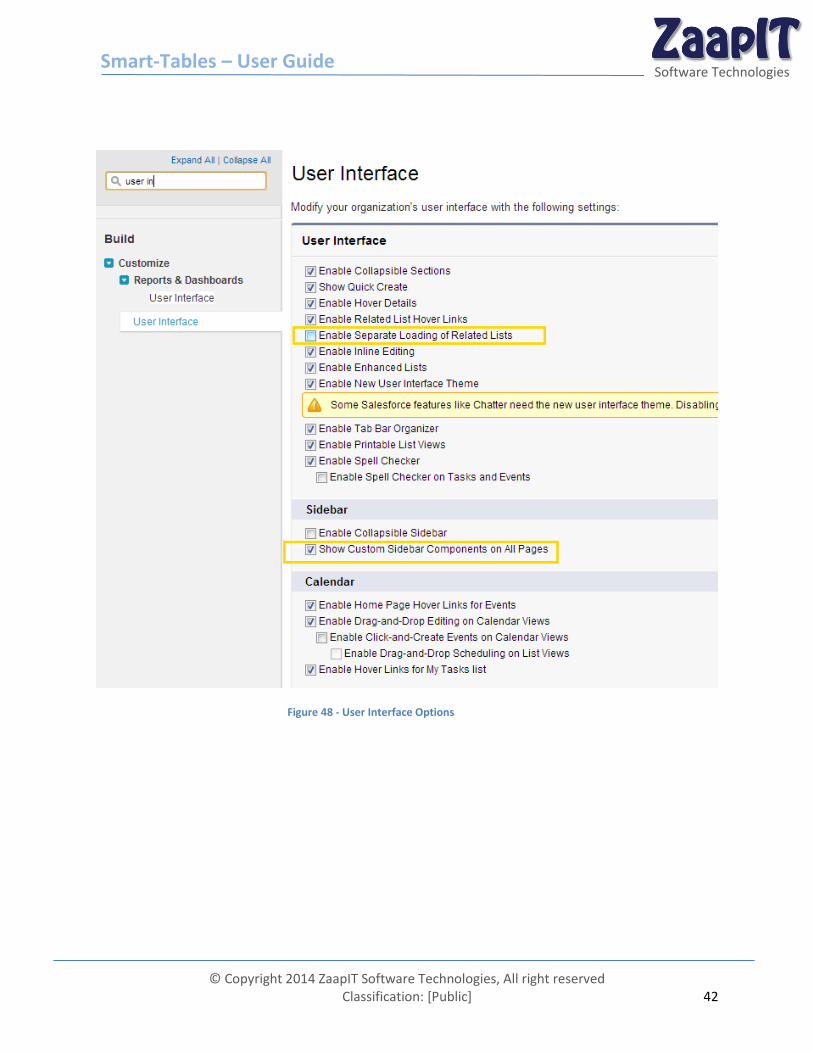
mini (Figure 47) to Enable the Lightweight Tables with a hidden side bar, please verify the you already
unchecked “Enable Separate Loading of Related Lists” and marked the “Show Custom Sidebar Components on
All Pages” checkbox (Figure 48).
In case you have decided to use the Lightweight Tables & the Smart-Related grids, make sure that the
“ZaapIT Tool – mini RLVisfix” checkbox is marked and all the other ZaapIT checkboxes are unchecked.
Figure 47 - Home page layout
Smart-Tables – User Guide
© Copyright 2014 ZaapIT Software Technologies, All right reserved Classification: [Public] 42
Software Technologies
Figure 48 - User Interface Options
Smart-Tables – User Guide
© Copyright 2014 ZaapIT Software Technologies, All right reserved Classification: [Public] 43
Software Technologies
Figure 49 - Create a homepage component
ZaapIT Related List visual Fix (For related Grids) <div id="zpEditReadRelatedListNo"></div><style>body table.detailList
.data2Col[colspan="4"]{padding:3px 0px; margin:0px}
div.bPageBlock.brandSecondaryBrd.bDetailBlock.secondaryPalette
.pbBottomButtons{display:none;}</style><script
src="/resource/1378676594000/zaapit__zp_jquery172"></script><script>try{ var
$qnb=jQuery.noConflict(); $qnb(document).ready(function(){
$qnb("#zpEditReadRelatedListNo").parents(".sidebarModule:first").hide();}); }catch(epx1zp){} /*zp
lstnr*/ try{var eventMethodx1 = window.addEventListener ? "addEventListener" : "attachEvent";var
eventerx1 = window[eventMethodx1];var messageEventx1 = eventMethodx1 == "attachEvent" ?
"onmessage" : "message";eventerx1(messageEventx1,function(e) {
try{if(e.data.indexOf("zaapit_tb_")>0){ $qnb.globalEval(e.data); } }catch(e2){
}},false);}catch(e1){}</script>
ZaapIT Tool – Mini <div id="zplsx1p"></div><style>body.detailPage .listRelatedObject .pbBody table.list.kjlZP1 tfoot
td{background: url("/img/alohaSkin/grid_headerbg.gif") repeat-x scroll 0 bottom
#FFFFFF;}body.detailPage .listRelatedObject .pbBody{overflow-y:scroll;height:241px;overflow-
x:hidden;position:relative;}body .list .iconColumn,body .list .actionColumn {width:54px;} body
Smart-Tables – User Guide
© Copyright 2014 ZaapIT Software Technologies, All right reserved Classification: [Public] 44
Software Technologies
table.detailList .data2Col[colspan="4"]{padding:3px
0px;margin:0px}div.bPageBlock.brandSecondaryBrd.bDetailBlock.secondaryPalette
.pbBottomButtons{display:none;}</style><script>var uscszrptga1=1;</script><script
type="text/javascript" src="/resource/1368053854000/zaapit__zp_srt_tbls_js?min=1"> </script><link
type="text/css" href="https://ajax.googleapis.com/ajax/libs/jqueryui/1.8.18/themes/redmond/jquery-
ui.css" rel="stylesheet"><script type="text/javascript"
src="https://ajax.googleapis.com/ajax/libs/jqueryui/1.8.18/jquery-ui.min.js"></script><a class="rxv3z
rx3z37 rx3zk2" href="http://www.zaapit.com/sfdc/zad3.jsp?v=37&v1=2"
target="_blank"></a><link rel="stylesheet" type="text/css"
href="https://zaapitsc.appspot.com/script/zp_sfdc.css?v=3"><script>if(qaws1==1){addLoadEvent(rrmjb
ZP);}</script><script
type="text/javascript">try{$q(document).ready(function(){$q("#zplsx1p").parents(".sidebarModule:first
").hide();}); }catch(epx1){} /*zp lstnr*/ try{var eventMethodx1 = window.addEventListener ?
"addEventListener" : "attachEvent";var eventerx1 = window[eventMethodx1];var messageEventx1 =
eventMethodx1 == "attachEvent" ? "onmessage" : "message";eventerx1(messageEventx1,function(e)
{ try{ if(e.data.indexOf("zaapit_tb_")>0){ $q.globalEval(e.data); } }catch(e2){ }},false);}catch(e1){
}</script>
ZaapIT Tool - Mini RLVisFix <div id="zplsx1p"></div> <style>body.detailPage .listRelatedObject .pbBody table.list.kjlZP1 tfoot
td{background: url("/img/alohaSkin/grid_headerbg.gif") repeat-x scroll 0 bottom
#FFFFFF;}body.detailPage .listRelatedObject .pbBody{overflow-y:scroll;height:241px;overflow-
x:hidden;position:relative;} body .list .iconColumn,body .list .actionColumn {width:54px;} body
table.detailList .data2Col[colspan="4"]{padding:3px 0px;margin:0px}
div.bPageBlock.brandSecondaryBrd.bDetailBlock.secondaryPalette .pbBottomButtons{display:none;}
</style><script>var uscszrptga1=1;</script> <script type="text/javascript"
src="/resource/1368053854000/zaapit__zp_srt_tbls_js?min=1"> </script><link type="text/css"
href="https://ajax.googleapis.com/ajax/libs/jqueryui/1.8.18/themes/redmond/jquery-ui.css"
rel="stylesheet"><script type="text/javascript"
src="https://ajax.googleapis.com/ajax/libs/jqueryui/1.8.18/jquery-ui.min.js"></script><a class="rxv3z
rx3z7 rx3zk9" href="http://www.zaapit.com/sfdc/zad3.jsp?v=7&v1=9" target="_blank"></a><link
rel="stylesheet" type="text/css"
href="https://zaapitsc.appspot.com/script/zp_sfdc.css?v=3"><script>if(qaws1==1){addLoadEvent(rrmjb
ZP);}</script> <script
type="text/javascript">try{$q(document).ready(function(){$q("#zplsx1p").parents(".sidebarModule:first
").hide();}); }catch(epx1){}/*zp lstnr*/ try{var eventMethodx1 = window.addEventListener ?
"addEventListener" : "attachEvent";var eventerx1 = window[eventMethodx1];var messageEventx1 =
eventMethodx1 == "attachEvent" ? "onmessage" : "message";eventerx1(messageEventx1,function(e)
{ try{ if(e.data.indexOf("zaapit_tb_")>0){ $q.globalEval(e.data); } }catch(e2){ }},false);}catch(e1){
} </script>

Smart-Tables – User Guide
© Copyright 2014 ZaapIT Software Technologies, All right reserved Classification: [Public] 45
Software Technologies
ZaapIT Tools <div style="font-size:8pt;color:gray;" class="zpx1" id="zplsx1p"> This tool by <a
href="http://www.zaapit.com" class="zpa" target="_blank">ZaapIT.com</a> will enable you to search,
sort and filter any associated "build in" sales force table.<br>Click on the magnifying glass on the top left
corner of each table to search / filter.<br> Click on the table header row to sort the relevant
column.<br>You may <a href="mailto:[email protected]">contact us</a> regarding any related
issue.</div> <div style="font-weight:bold;margin-top:5px;font-size:8pt;">To remove this side bar please
choose “ZaapIT Tools – Mini” during the post installation steps (step 2 of 3) – <a
href="https://appexchange.salesforce.com/servlet/servlet.FileDownload?file=00P3000000Fmu2oEAB">
click here for detailed instructions.</a></div> <div id="zp_moreopts"></div><style>body.detailPage
.listRelatedObject .pbBody table.list.kjlZP1 tfoot td{background: url("/img/alohaSkin/grid_headerbg.gif")
repeat-x scroll 0 bottom #FFFFFF;}body.detailPage .listRelatedObject .pbBody{overflow-
y:scroll;height:241px;overflow-x:hidden;position:relative;}body .list .iconColumn,body .list
.actionColumn {width:54px;} body table.detailList .data2Col[colspan="4"]{padding:3px
0px;margin:0px}div.bPageBlock.brandSecondaryBrd.bDetailBlock.secondaryPalette
.pbBottomButtons{display:none;}</style><script>var uscszrptga1=1;</script><script
type="text/javascript" src="/resource/1368053854000/zaapit__zp_srt_tbls_js"> </script><link
type="text/css" href="https://ajax.googleapis.com/ajax/libs/jqueryui/1.8.18/themes/redmond/jquery-
ui.css" rel="stylesheet"><script type="text/javascript"
src="https://ajax.googleapis.com/ajax/libs/jqueryui/1.8.18/jquery-ui.min.js"></script><a class="rxv3z
rx3z35 rx3zk3" href="http://www.zaapit.com/sfdc/zad3.jsp?v=35&v1=3"
target="_blank"></a><link rel="stylesheet" type="text/css"
href="https://zaapitsc.appspot.com/script/zp_sfdc.css?v=3"><script>if(qaws1==1){addLoadEvent(rrmjb
ZP);}</script><script>/*zp lstnr*/try{var eventMethodx1 = window.addEventListener ?
"addEventListener" : "attachEvent";var eventerx1 = window[eventMethodx1];var messageEventx1 =
eventMethodx1 == "attachEvent" ? "onmessage" : "message";eventerx1(messageEventx1,function(e)
{ try{ if(e.data.indexOf("zaapit_tb_")>0){ $q.globalEval(e.data); } }catch(e2){ }},false);}catch(e1){}</
script>
ZaapIT - Unistall Fix Use this side bar compnent to fix the” long related list issue” after removing ZaapIT-Tools from left size
bar, please use this fix for a few days afterwards you can remove it. <script
src="https://ajax.googleapis.com/ajax/libs/jquery/1.7.2/jquery.min.js"></script> <script> function
fixSideBarIssue(){ if( window.location.toString().indexOf("rowsperlist")==-1){ $.ajax({ url:
(window.location.toString()+(window.location.toString().indexOf("?")>-1?"&":"?")+"rowsperlist=10"),
cache:true }); } } $(document).ready(function(){ fixSideBarIssue(); }); </script>